

Page 1
DE
PL
EN
IT
ES
FR
SE
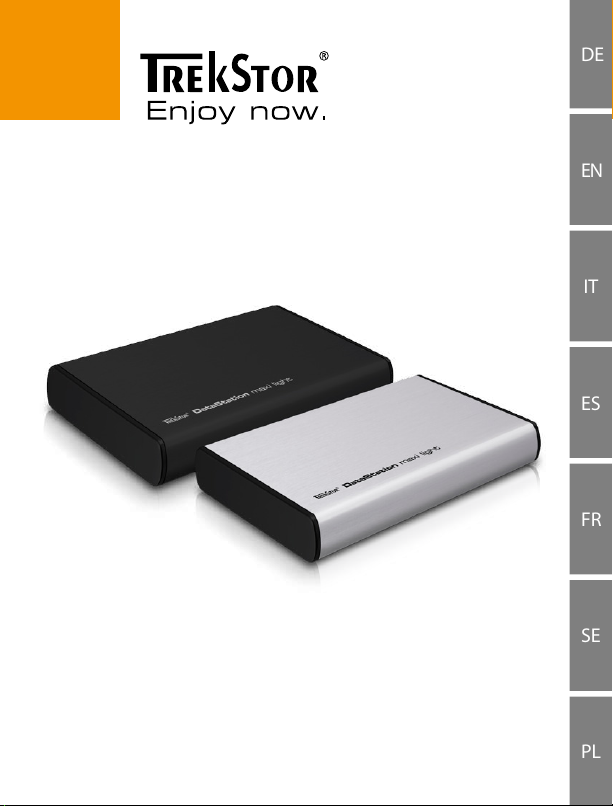
DataStation
®
maxi light
Page 2
BEDIENUNGSANLEITUNG
b
Wir gratulieren Ihnen zum Kauf der TrekStor DataStation und sind sicher, dass Sie viel Freude
mit diesem Produkt haben werden. Bitte lesen Sie die folgenden Abschnitte aufmerksam
durch, damit Sie die Funktionen dieses Produkts und seine Bedienung kennenlernen.
Aktuelle Produktinformationen können Sie der TrekStor Website www.trekstor.de entnehmen.
Haben Sie Fragen zur Bedienung oder den Funktionen von diesem Produkt? Auf der
TrekStor Website unter "Service" + "FAQ" finden Sie Antworten auf die häufigsten Fragen.
Selbstverständlich steht Ihnen auch unser Support bei allen Fragen rund um dieses
i
Gerät gerne zur Verfügung. Am besten ist es, wenn Sie uns über das Support-Formular
auf unserer Website www.trekstor.de unter "Service" + "Support" kontaktieren oder
unseren Support anrufen. Je ausführlicher die Beschreibung Ihres Anliegens ist, desto
schneller und zielgerichteter können wir Ihnen helfen!
Systemanforderungen
Windows® 7/Vista™/XP/2000, Mac® OS X:
Für diese Betriebssysteme werden keine weiteren Treiber benötigt. Bitte beachten Sie,
dass für Windows® 2000 mindestens Service-Pack 4 und für Windows® XP mindestens
Service-Pack 2 installiert sein muss.
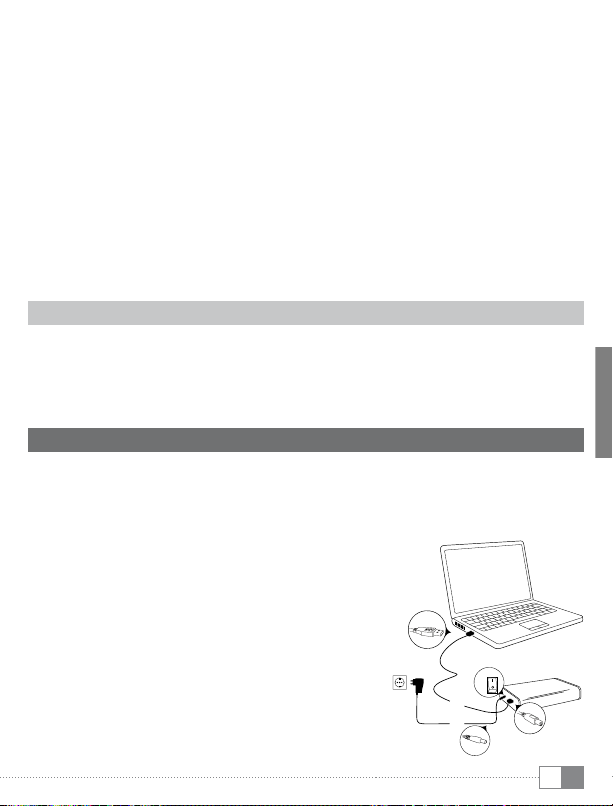
1) Inbetriebnahme
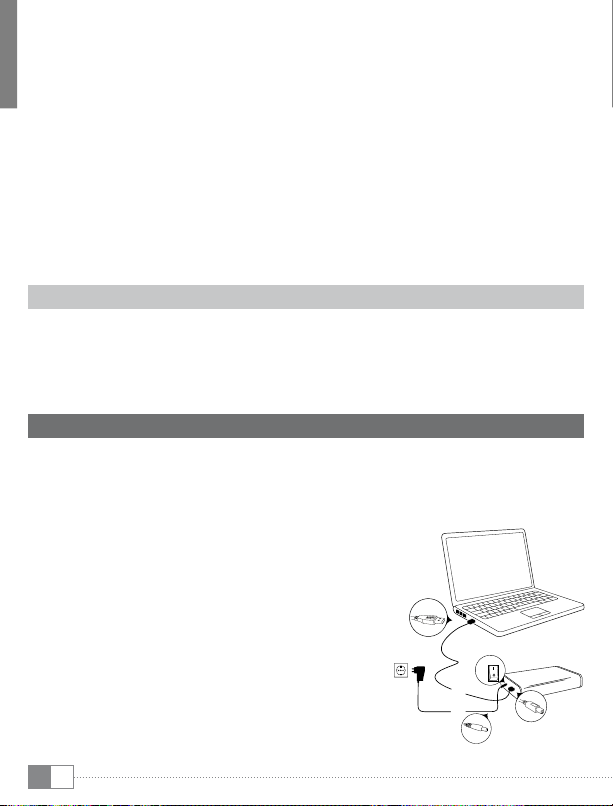
1) Schließen Sie das mitgelieferte Netzkabel, sofern vorhanden, am Netzteil an und
stecken Sie das Netzteil in eine Steckdose. Verbinden Sie das Netzteil mit dem
"Power"-Anschluss der DataStation.
2) Verwenden Sie bitte ausschließlich das mitgelieferte USB-Anschlusskabel, um das
Gerät mit einem USB-Anschluss Ihres PCs zu verbinden.
3) Schalten Sie die DataStation durch kurzes Drücken
der Ein-/Ausschalttaste
Ein-/Ausschalters ) ein. Ihr Betriebssystem erkennt
automatisch die DataStation und fügt auf dem
"ArbeitSPlAtz"/"comPuter" (Microsoft® Windows) bzw. auf
dem "DeSktoP" (Mac® OS X und Linux®) die DataStation
als "lokAler DAtenträger" (bzw. "lokAleS lAuFwerk") hinzu.
Halten Sie die Ein-/Ausschalttaste
gedrückt bzw. betätigen Sie den Ein-/Ausschalter
), um die DataStation auszuschalten.
) bzw. durch Betätigen des
) länger
3
2
1
DE
2
Page 3

2) Datenaustausch
Nach erfolgreicher Inbetriebnahme des Geräts erscheint im "ArbeitSPlAtz"/"comPuter"
(Windows®) bzw. auf Ihrem "DeSktoP" (Mac® OS X) ein lokaler Datenträger "trekStor".
Windows® 7/Vista™/XP
• Markieren Sie die gewünschten Dateien bzw. Ordner mit der Maus.
• Positionieren Sie den Mauszeiger über den markierten Dateien bzw. Ordnern
und drücken Sie dann die rechte Maustaste. Wählen Sie aus dem erscheinenden
Kontextmenü den Punkt "
• Wählen Sie im "
Laufwerk "trekStor") aus.
• Drücken Sie die rechte Maustaste und wählen Sie die Option "
Kopiervorgang zu starten. Nach Abschluss des Kopiervorgangs sind die Daten auf
dem Ziellaufwerk vorhanden.
ArbeitSPlAtz"/"comPuter"/"DeSktoP" das gewünschte Ziel (z. B. das
koPieren" aus.
einFügen", um den
Mac® OS X ab 10.3
Markieren Sie die gewünschten Dateien mit der Maus. Ziehen Sie per Drag and Drop
die Dateien im "FinDer" auf das Laufwerkssymbol Ihrer DataStation.
3) Abmelden und Trennen der TrekStor DataStation vom Computer
Windows® 7/Vista™/XP
Klicken Sie mit der linken Maustaste unten rechts in der Taskleiste auf das Symbol
"HArDwAre entFernen oDer AuSwerFen". Wählen Sie aus dem erscheinenden Kontextmenü
den Punkt "uSb-mASSenSPeicHer - lAuFwerk entFernen" durch Klicken mit der linken
Maustaste aus. Dadurch wird die DataStation aus dem Betriebssystem Ihres Rechners
entfernt. Jetzt können Sie die DataStation von Ihrem Computer trennen.
Mac® OS X ab 10.3
Sie müssen das Laufwerk vom Desktop entfernen, bevor Sie es trennen oder
abschalten. Dazu klicken Sie auf das betreffende Laufwerk-Symbol und ziehen es auf
das Papierkorb-Symbol.
Achtung: Befolgen Sie bitte den empfohlenen Abmeldevorgang, um Schäden am Gerät
a
oder Datenverlust zu vermeiden!
3
DE
Page 4

4) Formatieren der Festplatte
Wichtig: Sichern Sie alle Daten Ihrer Festplatte, bevor Sie Ihre Festplatte formatieren.
a
Achtung: Beim Formatieren werden ALLE Daten auf dem Datenträger gelöscht.
a
Bitte beachten Sie, dass bei einer FAT32 formatierten Festplatte nur Dateien mit einer
i
Dateigröße bis maximal 4 GB unterstützt werden. Wenn Sie größere Dateien speichern
wollen, empfiehlt sich die Verwendung der Dateisysteme NTFS (Windows®) oder HFS+
(Mac® OS X).
Windows® 7/Vista™/XP
Die DataStation kann wie jede andere Festplatte in Windows® formatiert werden.
• Klicken Sie im "
Datenträger "trekStor".
• Wählen Sie aus dem erscheinenden Kontextmenü den Punkt "
• Klicken Sie mit der linken Maustaste auf die Schaltfläche "
Sie das Formatieren durch Drücken der Schaltfläche "ok".
ArbeitSPlAtz"/"comPuter" mit der rechten Maustaste auf den lokalen
FormAtieren…" aus.
StArten" und bestätigen
Mac® OS X ab 10.4
Um die DataStation unter Mac® OS X zu formatieren, gehen Sie bitte wie folgt vor:
• Öffnen Sie über "
• Klicken Sie auf die DataStation, um diese für das Formatieren auszuwählen. Diese
ist mit ihrer Modellnummer aufgeführt.
• Wählen Sie im rechten Teil des Fensters "
• Wählen Sie mithilfe der Drop-Down-Liste unter "
erstellenden Partitionen aus.
Formatierung mit dem Dateisystem HFS+
Um die DataStation unter Mac® OS X mit dem Dateisystem "HFS+" ("
zu formatieren, gehen Sie bitte wie folgt vor:
• Klicken Sie auf die Schaltfläche "
"guiD-PArtitionStAbelle" oder "APPle-PArtitionStAbelle" aus und bestätigen Sie die Wahl
mit "ok".
• Bestimmen Sie mithilfe der Drop-Down-Liste das Dateisystem für die zu
formatierende Festplatte/Partition und tragen Sie einen Namen in das dafür
vorgesehene Feld ein.
4
DE
FinDer" + "ProgrAmme" + "DienStProgrAmme" das "FeStPlAtten-DienStProgrAmm".
PArtitionieren" aus.
ScHemA" die Anzahl der zu
mAc oS extenDeD")
oPtionen" und wählen Sie hier als Partitionsschema
Page 5

Hinweis für Mac® OS X Leopard: Mit dem Dateisystem "HFS+" ("Mac oS extended")
i
steht Ihnen die Funktion der "tiMe MacHine" zur Verfügung.
• Klicken Sie nun auf die Schaltfläche "
Sicherheitsabfrage mit einem Klick auf "PArtitionieren", um die Formatierung
zu starten.
Formatierung mit dem Dateisystem FAT32
Das Dateisystem "FAt32" bietet die maximale Kompatibilität mit unterschiedlichen
Betriebssystemen, hat jedoch eine Größenbeschränkung für Dateien (max. 4 GB). Um
die DataStation unter Mac® OS X mit dem Dateiformat "FAt32" zu formatieren, gehen
Sie bitte wie folgt vor:
• Klicken Sie auf die Schaltfläche "
"mASter boot recorD" aus und bestätigen Sie die Wahl mit "ok".
• Bestimmen Sie mithilfe der Drop-Down-Liste das Dateisystem "mS-DoS"/"mS-DoS
(FAt)" für die zu formatierende Festplatte/Partition und tragen Sie einen Namen in
das dafür vorgesehene Feld ein.
Bitte warten Sie, bis die Formatierung Ihrer DataStation vollständig abgeschlossen
i
ist. Bitte beachten Sie, dass die Formatierung unter Mac® OS X 10.4.x einige Zeit
beansprucht.
• Klicken Sie nun auf die Schaltfläche "
Sicherheitsabfrage mit einem Klick auf "PArtitionieren", um die Formatierung
zu starten.
Anwen Den" und bestätigen Sie die
oPtionen" und wählen Sie hier als Partitionsschema
AnwenDen" und bestätigen Sie die
5
DE
Page 6

Sicherheits- und Verwendungshinweise:
Technische Arbeiten an dem Produkt dürfen nur von entsprechend qualifizierten Personen
durchgeführt werden. Das Produkt darf weder geöffnet werden noch dürfen Änderungen daran
d
vorgenommen werden. Die Komponenten können nicht vom Nutzer gewartet werden.
Setzen Sie das Gerät niemals Feuchtigkeit, Kondenswasser und Nässe aus.
e
Schützen Sie das Gerät vor extrem hohen und niedrigen Temperaturen und
Temperaturschwankungen. Betreiben Sie es nur bei einer Umgebungstemperatur innerhalb des
j
Bereichs von 10º C und 40º C.
Stellen Sie das Gerät nicht in der Nähe einer Wärmequelle auf und schützen Sie es vor direkter
Sonneneinstrahlung.
m
Achten Sie bei der Verwendung und Lagerung des Geräts auf eine möglichst staubfreie Umgebung.
h
Die Reinigung der Oberfläche des Geräts darf niemals mit Lösungsmitteln, Farbverdünnern,
Reinigungsmitteln oder anderen chemischen Produkten erfolgen, nutzen Sie stattdessen ein weiches,
g
trockenes Tuch bzw. einen weichen Pinsel.
Von der Nutzung von USB-Kabeln mit Leitungslängen von mehr als 3 m sollte abgesehen werden.
o
Sollten Sie das Gerät einer elektrostatischen Entladung aussetzen, kann es u. U. zu einer
Unterbrechung des Datentransfers zwischen dem Gerät und dem Computer kommen bzw.
p
Funktionen des Gerätes können gestört werden. In diesem Fall sollte das Gerät vom USB-Port
abgezogen und erneut eingesteckt werden.
Die Ihnen vom Betriebssystem angezeigte Speicherkapazität Ihrer externen Festplatte kann von der
eigentlichen Kapazität abweichen. TrekStor verwendet, wie auch die meisten Hardwarehersteller, zur
Angabe der Speicherkapazität die vom Internationalen Einheitensystem (SI) vorgegeben Präfixe für
Einheiten (z. B. 1 GB = 1.000.000.000 Byte). Viele Betriebssysteme halten sich allerdings nicht an diese
q
Vorgabe und zeigen eine geringere Speicherkapazität an, da sie ihren Berechnungen 1 GB = 2 Byte =
1.073.741.824 Byte zugrunde legen.
Der Hersteller behält sich das Recht vor, das Produkt ständig weiter zu entwickeln. Diese Änderungen
können ohne direkte Beschreibung in dieser Bedienungsanleitung vorgenommen werden. Informationen
in dieser Bedienungsanleitung müssen somit nicht den Stand der technischen Ausführung widerspiegeln.
Der Hersteller garantiert nur die Eignung für die eigentliche Bestimmung dieses Produktes. Weiter ist der
Hersteller nicht für Beschädigungen oder Verlust von Daten und deren Folgeschäden verantwor tlich.
Copyright © 2010 TrekStor GmbH. Alle Rechte vorbehalten. Bei weiteren erwähnten Produkt- oder
Firmenbezeichnungen handelt es sich möglicherweise um Warenzeichen oder Markennamen der
jeweiligen Inhaber.
6
DE
Page 7
OPERATING INSTRUCTIONS
b
Thank you for buying the TrekStor DataStation. We are confident that this product will
be the source of much enjoyment. Please read the following instructions carefully so
that you can become acquainted with the functions of this product and its use.
Current product information can be found at the TrekStor Website (www.trekstor.de).
Have you got questions about the operation or the functions of this product? On the
TrekStor website you can find answers to the most frequently asked questions under
Service" + "FAQ".
"
You can also get quick assistance by contacting our support. If you want to contact our
i
support, it is best to visit our website, www.trekstor.de, and fill out the support form that
can be found under "Service" + "Support". You can of course also contact us directly by
e-mail or telephone (see the back of these instructions). The more detailed your support
request is, the quicker and better we will be able to help you!
System requirements
Windows® 7/Vista™/XP/2000, Mac® OS X:
No additional drivers are necessary for these operating systems. If you use Windows®
2000, make sure that you have installed at least service pack 4; Windows® XP requires
service pack 2 or above.
1) Startup
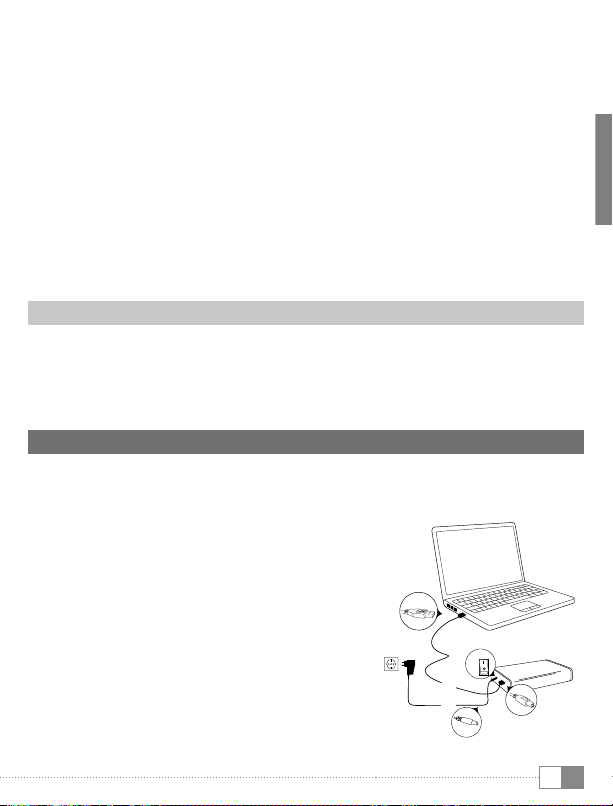
1) Connect the provided power cable (if available) to the power supply, and
plug the power supply into a socket. Connect the power supply to the "Power"
connection of the DataStation.
2) Only use the provided USB connection cable to
connect the device to a USB port in your PC.
3) Turn on the DataStation by briefly pressing the on/off
Hold down the on/off button
) or by actuating the on/off switch ).
button
Your operating system will automatically recognize
the DataStation, and add the DataStation as a
"locA l DiSk" (or "lo cAl Dri ve") to "my comP uter"/
"comPuter" (Microsoft® Windows) or the "DeSktoP"
(Mac® OS X and Linux®).
on/off switch ) to turn off the DataStation.
) or actuate the
3
2
1
7
EN
Page 8

2) Data exchange
After a successful startup of the device, a local disk "trekStor" appears under
"my comPuter"/"comPuter" (Windows®) or on your "DeSktoP" (Mac® OS X).
Windows® 7/Vista™/XP
• Select the desired files or folders with your mouse.
• Position the mouse pointer over the selected files or folders, and press the right
mouse button. Select "
• Under "
• Click it with your right mouse button, and select "
my co mPuter"/"co mPuter", select the desired target (such as the "trekStor "
drive).
copying is completed, the data will be available on the target drive.
coPy" from the context menu that appears.
PASte" to start copying. After
Mac® OS X from 10.3
Select the desired files with your mouse. Drag and drop the files in the "FinDer" to the
drive symbol of your DataStation.
3) Logging off and disconnecting the TrekStor DataStation from the
computer
Windows® 7/Vista™/XP
At the bottom right on the task bar, left-click on the icon "SAFely remove HArDwAre". In
the context menu that appears, left-click on "SAFely remove mASS StorAge Device - Drive" to
select it. This removes the DataStation from the operating system of your computer.
You can now disconnect the DataStation from your computer.
Mac® OS X from 10.3
You need to remove the drive from the Desktop before you disconnect it or turn it off.
Click on the relevant drive icon, and drag it to the trash icon.
Note: Please follow the recommended logoff procedure to prevent damage to the
a
device or data loss.
EN
8
Page 9

4) Formatting the hard disk
Important: Back up all the data on your hard disk before formatting it.
a
Note: ALL the data on the disk will be deleted when you format it.
a
Please note that only files with a maximum file size of 4 GB are supported for a hard disk
i
formated with FAT32. If you want to store larger files, we recommend the use of the file
systems NTFS (Windows®) or HFS+ (Mac® OS X).
Windows® 7/Vista™/XP
The DataStation can be formatted like any other hard disk in Windows®.
• Under "
• Select "
• Left-click on the "
my comPuter"/"comPuter", right-click on the local disk "trekStor".
FormAt…" from the context menu that appears.
StArt" button, and confirm that you want to format by clicking
the "ok" button.
Mac® OS X from 10.4
To format the DataStation in Mac® OS X, please proceed as follows:
• Select "
• Click on the DataStation to select it. It is listed under its model number.
• In the right side of the window, select "
• Use the drop-down list under "
Formatting with the file system HFS+
To format the DataStation in Mac® OS X with the file format "HFS+" ("
please proceed as follows:
• Click on the button "
• Use the drop-down list to determine the file system for the hard disk/partition to
FinDer" + "ProgrAmS" + "utilitieS" and open "DiSk utility".
PArtition".
you want to create.
PArtition tAble" as the partition scheme and confirm the choice by klicking on "ok".
be formatted, and enter the name in the provided field.
Instructions for the Mac® OS X Leopard: The file system "HFS+" ("Mac oS extended")
i
allows you to use the "tiMe MacHine".
oPtionS" and choose either "guiD PArtition tAble" or "APPle
volume ScHeme" to select the number of partitions
mAc oS extenDeD")
9
EN
Page 10

• To start the formatting of the DataStation, click on the "APPly" button and confirm
this by clicking on "PArtition", in the window that appears.
Formatting with the file system FAT32
The file system "FAt32" offers the maximum compatibility with different operating
systems. Unfortunately, it is limited with respect to the maximum possible size of a file
(max. 4 GB). To format the DataStation using Mac® OS X with the file system "FAt32"
please proceed as follows:
• Click on the button "
scheme and confirm the selection by klicking on "ok".
oPtionS" and choose "mASter boot recorD" as the partition
• Use the drop-down list to select the file system "mS-DoS"/"mS-DoS (FAt)" for the
hard disk/partition to be formatted, and enter the name in the provided field.
Please wait until the formatting of your DataStation has been completed. Please
i
note that formatting under Mac® OS X 10.4.x takes a long time.
• To start the formatting of the DataStation, click on the "
this by clicking on "PArtition", in the window that appears.
APPly" button and confirm
EN
10
Page 11

Instructions for safety and use:
Only qualified persons may perform technical work on the product. The product may not be opened
or changed. The components cannot be serviced by the user.
d
Never expose the device to moisture, condensation and liquids.
e
Protect the device from extremely high and low temperatures and temperature fluctuations. Use the
device within an ambient temperature of 10ºC to 40ºC.
j
Never place the device close to a source of heat, and protect it from direct sunlight.
m
Make sure that the surroundings are as dust-free as possible when you use and store the device.
h
Never clean the surface of the device with solvents, paint thinners, cleansers or other chemical
products. Instead, use a soft, dry cloth or soft brush.
g
Do not use USB cables longer than 3 meters.
o
In certain circumstances, exposing the device to an electrostatic discharge may interrupt the data
transfer between the device and the computer and impair the functions of the device. If this occurs,
p
the device should be unplugged from the USB port and then plugged in again.
The capacity indicated by your operating system can be different than the actual capacity of your
external hard drive. Like most manufacturers of computer hardware, TrekStor uses the prefixes for units
(e.g. 1 GB = 1.000.000.000 bytes) as prescribed by the International System of Units (SI). Unfortunately,
q
many operating systems do not comply with this norm and display a lower capacity because they
base their calculations on the assumption that 1 GB = 2 bytes = 1.073.741.824 bytes.
The manufacturer retains the right to continually improve the product. These changes may be made
without being directly described in these operating instructions. For this reason, the information provided
in these operating instructions may not reflect the current state of the art.
The manufacturer only guarantees suitability for the product's intended purpose. In addition, the
manufacturer is not responsible for damages or loss of data and subsequent consequences.
Copyright © 2010 TrekStor GmbH. All rights reserved. Other cited product or company names may be
trademarks or brand names of the respective owner.
11
EN
Page 12
ISTRUZIONI PER L'USO
b
Congratulazioni per l'acquisto del TrekStor DataStation: siamo sicuri che vi divertirete a
usare questo prodotto. Si prega di leggere attentamente le seguenti sezioni in modo
da conoscere le funzioni di questo prodotto ed il suo uso.
Per informazioni aggiornate sul prodotto, fare riferimento al sito web TrekStor www.trekstor.de.
Avete domande sull'uso o le funzioni di questo prodotto? Nel sito web TrekStor in
ASSiStenzA" + "FAQ" trovate le risposte alle domande più frequenti.
"
Naturalmente anche il nostro supporto è a vostra disposizione per tutte le domande
i
relative a questo dispositivo. È meglio se ci contattate tramite il modulo di supporto
sul nostro sito www.trekstor.de nella sezione "Servizio" + "Supporto" o chiamate il nostro
supporto. Più dettagliata è la descrizione della vostra richiesta, più veloce e più mirato
può essere il nostro aiuto!
Requisiti di sistema
Windows® 7/Vista™/XP/2000, Mac® OS X:
per questi sistemi operativi non sono necessari driver aggiuntivi. Attenzione: per
Windows® 2000 deve essere installato almeno il Service Pack 4, mentre per Windows®
XP almeno il Service Pack 2.
1) Attivazione
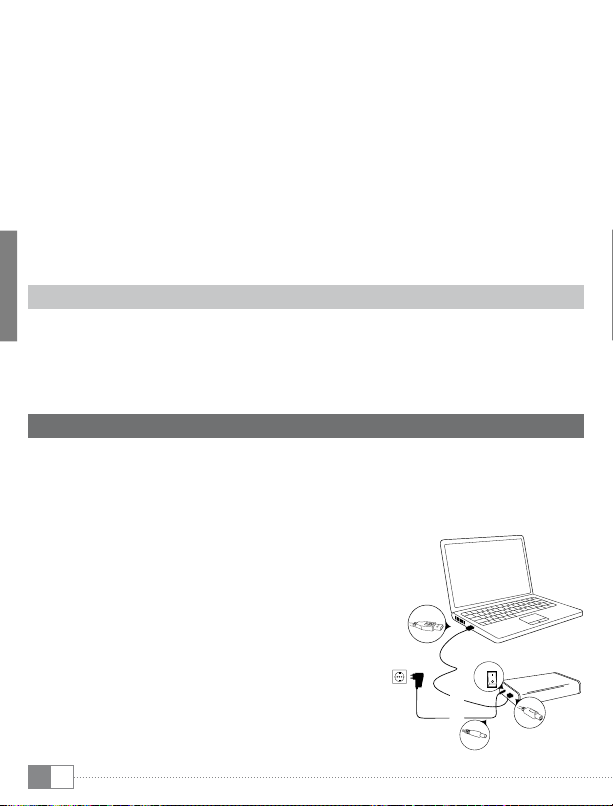
1) Collegare il cavo di alimentazione in dotazione, se disponibile, al trasformatore
e inserire il trasformatore in una presa di corrente. Collegare il trasformatore alla
presa "Power" della DataStation.
2) Utilizzare esclusivamente il cavo di collegamento USB in dotazione per collegare
l'apparecchio a una presa USB del proprio PC.
3) Accendere la DataStation premendo brevemente
il pulsante d'accensione/spegnimento
l'interruttore di accensione/spegnimento ). Il
sistema operativo rileva automaticamente la
DataStation e aggiunge a "riSorSe Del comPuter"/
"comPuter" (Microsoft® Windows) o al "DeSktoP"
(Mac® OS X e Linux®) la DataStation come
"SuPP orto DAti lo cAle" (o "DiSc o locAle").
Tenere premuto il tasto di accensione/
spegnimento
l'interruttore di accensione/spegnimento
) per spegnere la DataStation.
12
IT
) più a lungo o premere
) oppure
3
2
1
Page 13

2) Scambio di dati
Dopo aver attivato l'apparecchio, in "riSorSe Del comPuter"/"comPuter" (Windows®) o sulla
"DeSktoP" (Mac® OS X) viene visualizzato un supporto dati locale "trekStor".
Windows® 7/Vista™/XP
• Evidenziare i file o le cartelle desiderati con il mouse.
• Posizionare il mouse sui file o sulle cartelle selezionate e fare clic con il pulsante
destro del mouse. Selezionare l'opzione "
visualizzato sullo schermo.
riSorSe Del comPuter"/"comPuter"/"DeSktoP", selezionare il percorso desiderato
• In "
(ad es. l'unità "trekStor").
• Premere il pulsante destro del mouse e selezionare l'opzione "
il processo di copia. Una volta completato il processo di copia, i dati saranno
disponibili sull'unità di destinazione.
coPiA" dal menu contestuale che viene
incollA" per avviare
Mac® OS X versione 10.3 o superiore
Evidenziare i file desiderati con il mouse. Trascinare i dati con la funzione Drag and Drop
in "FinDer" sul simbolo della periferica della propria DataStation.
3) Disattivazione e disconnessione di TrekStor DataStation
dal computer
Windows® 7/Vista™/XP
In basso a destra sulla barra delle applicazioni, fare clic con il pulsante sinistro del mouse
sull'icona "rimozione o eliminAzione Dell'HArDwAre". Dal menu contestuale visualizzato
selezionare la voce "rimozione P eriFericA Di Ar cHiviAzione Di mASSA uSb" facendo clic con il
pulsante sinistro del mouse. In tal modo, DataStation viene rimosso dal sistema operativo
del computer. A questo punto è possibile scollegare la DataStation dal PC.
Mac® OS X
È necessario rimuovere la periferica dal Desktop prima di scollegarla o disattivarla. Per
eseguire questa operazione, fare clic sull'icona della periferica e spostarla sull'icona del
cestino.
Nota: per evitare danni alla periferica o eventuali perdite di dati, attenersi al processo di
a
rimozione suggerito!
13
IT
Page 14

4) Formattazione del disco rigido
Importante: Salvare tutti i dati del disco rigido, prima di formattarlo.
a
Attenzione: Con la formattazione TUT TI i dati saranno cancellati dall'unità.
a
Si prega di notare che in caso di disco rigido formattato con FAT32 sono supportati
i
solo i file con una dimensione massima di 4 GB. Se si vogliono salvare file di
dimensioni maggiori, suggeriamo di usare il sistema di file NTFS (Windows®) oppure
HFS+ (Mac® OS X).
Windows® 7/Vista™/XP
La DataStation può essere formattata in Windows® come qualsiasi altro disco rigido.
• Cliccare su "
locale trekStor".
• Selezionare dal meno di contesto che appare la voce "
• Cliccare col tasto sinistro del mouse sul pulsante "
formattazione premendo il pulsante "ok".
workStAtion"/"riSorSe Del comPuter" col tasto destro del mouse sull'unità
FormAttA..."
Avvio"e confermare la
Mac® OS X da 10.4
Per formattare la DataStation sotto Mac® OS X, fare quanto segue:
trovA" + "ProgrAmmi" + "ProgrAmmi Di utilità" aprire il "ProgrAmmA Di utilità Del DiSco rigiDo".
• In "
• Cliccare sulla DataStation, per selezionarla per la formattazione. Questa è elencata
con il suo numero di modello.
• Selezionare nella parte destra della finestra "
• Selezionare dal menù a discesa sotto "
stanno creando.
Formattazione con il sistema di file HFS+
Per formattare la DataStation su Mac® OS X con il sistema di file "HFS+" ("
si prega di seguire quanto riportato sotto:
• Cliccare sul pulsante "
Di PArtizione guiD" oppure "tAbellA Di PArtizione APPle" e confermare la scelta con "ok".
• Determinare con l'aiuto del menù a discesa il sistema di file per il disco rigido/la
partizione che si sta formattando ed inserire un nome nel campo ad esso riferito.
oPzioni" e selezionare qui come schema di partizione "tAbellA
creAre unA PArtizione".
ScHemA" il numero delle partizioni che si
mAc oS extenDeD"),
14
IT
Page 15

Suggerimento per Mac® OS X Leopard: Con il sistema di file "HFS+" ("Mac oS
i
extended") viene fornita la funzione della "tiMe MacHine".
• Cliccare ora sul pulsante "
su "FormAttA", per iniziare la formattazione.
Formattazione con il sistema di file FAT32
Il sistema di file "FAt32" fornisce la massima compatibilità con diversi sistemi operativi,
ha però un limite di dimensione per i file (max. 4 GB). Per formattare la DataStation
sotto Mac® OS X con il formato di file "FAt32", fare quanto segue:
• Cliccare sul pulsante "
boot recorD" e confermare la scelta con "ok".
• Determinare con l'aiuto del menù a discesa il sistema di file "mS-DoS"/"mS-DoS
(FAt)" per il disco rigido/la partizione che si sta formattando ed inserire un nome
nel campo ad esso riferito.
Si prega di attendere fino al completamento della formattazione della
i
DataStation. Si prega di notare che la formattazione su Mac® OS X 10.4.x richiede
un po' di tempo.
• Cliccare ora sul pulsante "
su "FormAttA", per iniziare la formattazione.
APPlicA" e confermare nella richiesta di sicurezza cliccando
oPzioni" e selezionare qui come schema di partizione "mASter
APPlicA" e confermare nella richiesta di sicurezza cliccando
15
IT
Page 16

Indicazioni di sicurezza ed istruzioni per l'uso:
Le eventuali operazioni sul presente prodotto possono essere eseguite solamente da personale
qualificato. Il prodotto non deve essere aperto né modificato. I componenti non possono essere
d
riparati da parte dell'utente.
Non esporre mai l'apparecchio a umidità, condensa e liquidi.
e
Proteggere l'apparecchio da temperature particolarmente elevate o basse e dalle variazioni di
temperatura. Utilizzare l'apparecchio solo a una temperatura ambiente compresa tra 10º C e 40º C.
j
Non posizionare l'apparecchio in prossimità di fonti di calore e proteggerlo dalla luce diretta del sole.
m
Utilizzare e conservare l'apparecchio in un ambiente il più possibile libero da polveri.
h
Per la pulizia della superficie dell'apparecchio non utilizzare mai solventi, diluenti, detergenti o altri
prodotti chimici, bensì un panno morbido e asciutto o un pennello morbido.
g
Si consiglia di evitare l'impiego di cavi USB con una lunghezza superiore ai 3 m.
o
Nel caso in cui l'apparecchio venga esposto a una scarica elettrostatica, il trasferimento di dati tra
l'apparecchio e il computer potrebbe venire interrotto e/o le funzioni dell'apparecchio potrebbero
p
essere disturbate. In questo caso, scollegare l'apparecchio dalla porta USB e ricollegarlo.
La capacità di memoria dell'hard disk esterno indicata dal sistema operativo può differire dalla
capacità effettiva. Come la maggioranza dei produttori di hardware, per indicare la capacità
di memoria TrekStor utilizza i prefissi per le unità stabiliti dal Sistema internazionale di unità di
misura (SI) (ad es. 1 GB = 1.000.000.000 byte). Tuttavia, numerosi sistemi operativi non rispettano
q
queste indicazioni e mostrano una capacità di memoria inferiore, dato che alla base dei loro
calcoli 1 GB = 2 byte = 1.073.741.824 byte.
Il produttore si riserva il diritto di effettuare ulteriori operazioni di miglioramento del prodotto in modo
costante. Tali modifiche possono essere apportate senza fornirne una descrizione diretta all'interno delle
presenti istruzioni per l'uso. Le informazioni contenute nelle presenti istruzioni per l'uso non corrispondono
necessariamente allo stato della versione tecnica.
Il produttore garantisce esclusivamente l'idoneità all'uso previsto. Il produttore non è tenuto a rispondere di
eventuali danni o perdite di dati, né di danni secondari da essi derivanti.
Copyright © 2010 TrekStor GmbH. Tutti i diritti riservati. Per quanto riguarda eventuali riferimenti a prodotti
o aziende, si tratta di marchi di fabbrica o di nomi dei marchi dei rispettivi proprietari.
16
IT
Page 17
MANUAL DE USUARIO
b
Le felicitamos por la compra del TrekStor DataStation maxi Xpress y estamos convencidos
de que estará contento con este producto. Por favor, lea detenidamente los siguientes
capítulos para que se familiarizarse con las funciones del producto y su manejo.
Encontrará la información actual sobre el TrekStor DataStation maxi Xpress en la página
web www.trekstor.es.
En caso de que tenga preguntas sobre el producto o su funcionamiento, encontrará
respuestas a las preguntas más frecuentes en la página web de TrekStor en el apartado
Servicio"+"FAQ".
"
Lo mejor sería ponerse en contacto con nosotros a través de una llamada telefónica
i
o formulario de soporte en nuestro sitio web www.trekstor.es en "Service"+"Support".
¡Cuanto más detallada sea la descripción de su solicitud, más rápida y precisa será la
forma en que le podremos ayudar!
Requisitos del sistema
Windows® 7/Vista™/XP/2000, Mac® OS X:
Estos sistemas operativos no necesitan drivers adicionales. Tenga en cuenta que
con Windows® 2000 es necesario haber instalado el Service Pack 4 o superior, y con
Windows® XP, el Service Pack 2 o superior.
1) Puesta en funcionamiento
1) Si dispone de este, conecte el cable suministrado a la fuente de alimentación y
enchufe la fuente. Conecte la fuente de alimentación a la conexión "Power" de la
DataStation.
2) Para conectar el aparato a un puerto USB del PC, utilice únicamente el cable de
conexión USB suministrado.
3) Encienda la DataStation pulsando brevemente la
tecla de encendido/apagado ) o mediante el
botón de encendido/apagado ). El sistema
operativo reconoce automáticamente la
DataStation y añade en "mi Pc"/"eQui Po"
(Microsoft® Windows) o bien en el "eScritorio"
(Mac® OS X y Linux®) la DataStation como
"DiSco ex trAíble" (o bien "uniDAD locAl").
Para apagar la DataStation, mantenga pulsada
más tiempo la tecla de encendido/apagado
o utilice el botón de encendido/apagado ).
)
3
2
1
17
ES
Page 18

2) Intercambio de datos
Tras la correcta puesta en funcionamiento del aparato, el DataStation aparecerá
en "mi Pc"/"eQuiPo" (Windows®) o en el "eScritorio" (Mac® OS X) como la unidad de
almacenamiento local "trekStor".
Windows® 7/Vista™/XP
• Marque los archivos o carpetas deseados con el ratón.
• Posicione el puntero del ratón sobre los archivos o carpetas marcados y, a
continuación, haga clic con el botón derecho del ratón. En el menú contextual
que aparece, seleccione la opción "
mi Pc"/"eQuiPo"/"eScritorio", seleccione la unidad deseada (por ejemplo, la
• En "
unidad "trekStor").
• Haga clic con el botón derecho del ratón y seleccione la opción "
el proceso de copia. Una vez finalizada la copia, los archivos estarán disponibles en
la unidad seleccionada.
coPiAr".
PegAr" para iniciar
Mac® OS X a partir de 10.3
Marque los archivos deseados con el ratón. Arrastre los archivos desde el "FinDer" hasta
el símbolo de unidad de disco de DataStation.
3) Desconexión y retirada de DataStation TrekStor del ordenador
Windows® 7/Vista™/XP
Haga clic con el botón izquierdo del ratón en el símbolo "QuitAr HArDwAre con SeguriDAD"
situado abajo a la derecha en la barra de tareas. En el menú contextual que aparece,
seleccione "DiSPo Sitivo De A lmAcenAmi ento mASi vo uSb" y haga clic en "De tener" con el
botón izquierdo del ratón. De esta forma, el DataStation se desconectará del sistema
operativo del ordenador. Ahora puede retirar el DataStation del PC.
Mac® OS X
Debe eliminar del escritorio el icono de unidad antes de desconectarla o retirarla. Para
ello, arrastre el icono de unidad a la papelera de reciclaje.
Precaución: ¡siga el proceso de desconexión recomendado para evitar daños en el
a
equipo o pérdida de datos!
18
ES
Page 19

4) Formatear el disco duro
Importante: haga copia de seguridad de sus datos importantes de su disco duro antes
a
de formatearlo.
Precaución: al formatear se borrarán TODOS los datos del disco extraíble.
a
Por favor, tenga en cuenta que en un disco duro formateado en FAT32 el tamaño
i
máximo posible de los archivos es de 4GB. Si desea guardar archivos de mayor
tamaño, se recomienda el uso de los sistemas de archivos NTFS (Windows®) o
HFS+ (Mac® OS X).
Windows® 7/Vista™/XP
El DataStation puede ser formateado en Windows® como cualquier otro disco duro.
mi Pc"/"eQuiPo" haga clic con el botón derecho del ratón sobre el disco
• En "
extraíble "trekStor".
• Seleccione la opción "
• Haga clic con el botón izquierdo del ratón sobre el botón "
pulsando el botón "AcePtAr".
FormAteAr…" en el menú contextual que aparece.
inicio" y confirme
Mac® OS X a partir de 10.4
Para formatear el DataStation bajo Mac® OS X, proceda como se indica a continuación:
• Mediante "
• Haga clic sobre lel DataStation para seleccionarlo para el formateo. Éste aparece
por debajo de su número del modelo.
• En la parte derecha de la ventana seleccione la opción "
• En el menú desplegable, seleccione en "
particiones a crear.
Formateo con el sistema de archivos HFS+
Para formatear el DataStation en Mac® OS X con el sistema de archivos "HFS+"
mAc oS extenDeD"), proceda como se describe a continuación:
("
• Haga clic sobre el botón
PArticioneS guiD" o "mAPA De PArticioneS APPle" y confirme la selección con "AcePtAr".
• Con ayuda de la lista desplegable defina el sistema de archivos para la partición/
disco duro por formatear e introduzca un nombre en el campo previsto para ello.
FinDer"+"APlicAcioneS"+"utiliDADeS" abra la "utiliDAD De DiScoS".
PArticioneS".
eSQuemA De volumen" el número de
oPcioneS y seleccione como esquema de partición "tAblA De
19
ES
Page 20

Nota para Mac® OS X Leopard: con el sistema de archivos "HFS+" ("Mac oS
i
extended") tiene a su disposición la función de la "tiMe MacHine".
• Haga clic sobre el botón "
en "PArticioneS" para iniciar el formateo.
Formateo con el sistema de archivos FAT32
El sistema"FAt32" le ofrece la máxima compatibilidad con el tamaño de los diferentes
sistemas operativos; sin embargo, tiene una capacidad limitada para archivos (máx.
4 GB). Para formatear el DataStation en Mac® OS X con el sistema de archivos "FAt32",
proceda como se indica a continuación:
• Haga clic sobre el botón "
de partición y confirme la selección con "AcePtAr".
• En la lista desplegable seleccione el sistema de archivos "mS-DoS"/"mS-DoS (FAt)"
para la partición/disco duro por formatear e introduzca un nombre en el campo
previsto para ello.
Por favor, espere hasta que el formativo de su DataStation haya finalizado por
i
completo. Tenga en cuenta que el formateo bajo Mac® OS X 10.4.x requiere cierto
tiempo.
• Haga clic sobre el botón "
en "PArticioneS" para iniciar el formateo.
APlicAr" y confirme la consulta de seguridad con un clic
oPcioneS", seleccione "mASter boot recorD" como esquema
APlicAr" y confirme la consulta de seguridad con un clic
20
ES
Page 21

Indicaciones de uso y de seguridad:
Sólo personas cualificadas pueden realizar trabajos técnicos con el producto. El producto no debe de
estar abierto ni se deben realizar modificaciones en él. El usuario no puede realizar el mantenimiento
d
de los componentes.
No exponga el aparato a la humedad, agua de condensación ni lo moje.
e
Proteja el aparato de temperaturas extremas y cambios bruscos de temperatura. Utilícelo únicamente
en un intervalo de temperaturas de ambiente de entre 10 ºC y 40 ºC.
j
No aproxime el aparato a fuentes de calor y protéjalo de la luz solar directa.
m
Utilice y guarde el aparato en un ambiente lo más libre de polvo posible.
h
Nunca limpie la superficie del aparato con disolventes, diluyentes, detergentes u otros productos
químicos. Utilice en su lugar un paño suave y seco o un pincel suave.
g
No se recomienda utilizar cables USB de más de 3 m de longitud.
o
Si expone el aparato a una descarga electrostática, es posible que la transferencia de datos entre
el equipo y el ordenador esté interrumpida y/o se estropee alguna función del aparato. En tal caso
p
desconecte el aparato del puerto USB y vuelva a conectarlo.
La capacidad de almacenamiento de un disco duro externo que indica su sistema operativo puede
diferir de la capacidad real. Para indicar la capacidad de almacenamiento, TrekStor utiliza, como la
mayoría de los fabricantes de hardware, los prefijos del Sistema Internacional de Unidades (SI) (p. ej.
1 GB = 1.000.000.000 bytes). Sin embargo, muchos sistemas operativos no se atienen a esta regla y
q
muestran una capacidad de almacenamiento inferior, ya que realizan el cálculo en base a 1 GB = 2
bytes = 1.073.741.824 bytes.
El fabricante reserva el derecho de continuar desarrollando el producto. Los consecutivos cambios en
el producto pueden realizarse sin que aparezcan descritos directamente en este manual. Por lo tanto, la
información contenida en el presente manual de usuario puede no coincidir con el estado técnico de la
última versión.
El fabricante garantiza el producto únicamente para el uso previsto. Asimismo, el fabricante no se
responsabiliza de daños o pérdidas de datos, ni de daños resultantes de estos.
Copyright © 2010 TrekStor GmbH. Todos los derechos reservados. Los nombres de otros productos y
empresas aquí citados son probablemente productos y marcas registradas de sus respectivos propietarios.
21
ES
Page 22
NOTICE D'UTILISATION
b
En cas de problèmes avec ce produit, une aide compétente et rapide est à votre disposition !
i
Il est très rare que vous soyez dans l'obligation d'emporter ce produit chez votre distributeur.
Pour consulter les réponses aux questions les plus fréquemment posées, veuillez vous
rendre sur notre site Web www.trekstor.de à la rubrique « Service » + « Support ». Vous pouvez
naturellement aussi contacter notre service d'assistance primé par le biais du formulaire
d'assistance sur notre site Web, par e-mail ou par téléphone (voir au dos de ce guide). Vous
allez vous réjouir de la rapidité avec laquelle nous allons pouvoir vous aider.
Nous vous félicitons pour l’achat de la DataStation de TrekStor. Nous sommes certains
que vous allez pleinement profiter de ce produit avec grand plaisir.
Conditions système requises
Windows® 7/Vista™/XP/2000, Mac® OS X :
aucun pilote supplémentaire n’est nécessaire pour ces systèmes d’exploitation. Veuillez
noter que Windows® 2000 doit être installé avec le Service Pack 4 et Windows® XP avec
le Service Pack 2 minimum.
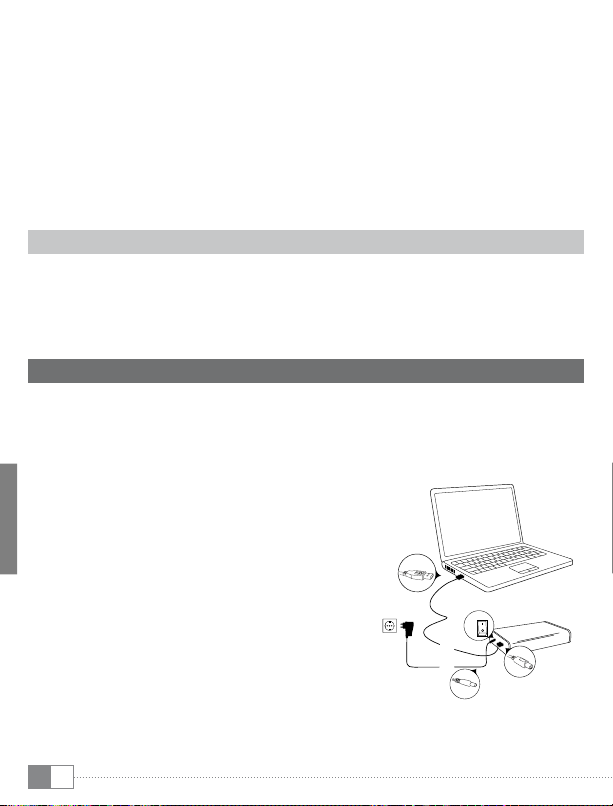
1) Mise en service
1) Si disponible, raccordez le câble d'alimentation fourni au bloc d'alimentation et
enfichez ce dernier dans une prise. Raccordez le bloc d'alimentation avec la prise
« Power » de la DataStation.
2) Utilisez exclusivement le câble de raccordement USB livré afin de raccorder
l'appareil à une prise USB de votre PC.
3) Allumez la DataStation en appuyant brièvement sur
le bouton Marche/Arrêt
Marche/Arrêt ). Votre système d'exploitation
détecte automatiquement la DataStation et ajoute
sur le « PoSte De trAvAil »/« orDinAteur » (Microsoft®
Windows) ou sur le « bureAu » (Mac® OS X et Linux®)
la DataStation comme « DiSQue locAl »
(ou « lecteur locAl »).
Maintenez le bouton Marche/Arrêt
plus longtemps ou actionnez le commutateur
Marche/Arrêt ) pour éteindre la DataStation.
) ou sur le commutateur
) enfoncé
3
2
1
22
FR
Page 23

2) Échange de données
Après la mise en service réussie de l'appareil, un support de données local « trekStor »
apparaît sur votre « PoSte De tr AvAil »/« mon orDin Ate ur » (Windows®) ou sur votre
« bureAu » (Mac® OS X).
Windows® 7/Vista™/XP
• Sélectionnez les fichiers, respectivement les dossiers souhaités avec la souris.
• Positionnez le pointeur de souris sur les fichiers ou les dossiers sélectionnés et
appuyez ensuite sur le bouton de souris droit. Dans le menu contextuel affiché,
sélectionnez la rubrique «
• Dans le «
souhaitée (par exemple le lecteur « trekStor »).
• Appuyez sur le bouton droit de la souris et sélectionnez l’option «
lancer la procédure de copie. Après clôture de la procédure de copie, les données
sont enregistrées sur le lecteur de destination.
PoSte De trAvAil »/« mon orDinAteur »/« bureAu » sélectionnez la destination
coPier ».
inSérer » afin de
Mac® OS X version 10.3 et supérieures
Marquez les fichiers souhaités à l’aide de la souris. Avec la fonction Glisser&Déplacer,
tirez les fichiers dans le « FinDer » sur l'icône du lecteur de votre DataStation.
3) Déconnexion et séparation de la TrekStor DataStation
de l'ordinateur
Windows® 7/Vista™/XP
Avec le bouton gauche de la souris, cliquez dans la barre des tâches en bas à droite sur
l'icône « Déconnexion ou éjection De mAtériel ». Un menu contextuel est affiché. Sélectionnez
ici la rubrique « PériPHériQue De StockAge De mASSe uSb – SuPPrimer le DiSQue » en cliquant sur le
bouton gauche de la souris. La DataStation est ainsi retirée du système d'exploitation de
votre ordinateur. Vous pouvez maintenant séparer la DataStation de votre PC.
Mac® OS X
Vous devez supprimer le lecteur du bureau avant de le déconnecter ou de le mettre
hors circuit. Pour ce faire, cliquez sur le symbole correspondant du lecteur et faites-le
glisser sur l'icône de la corbeille.
Remarque : pour éviter des détériorations sur l’appareil et des pertes de données, suivez
a
scrupuleusement la procédure de déconnexion recommandée !
23
FR
Page 24

4) Formatage du disque dur
Important : sauvegardez toutes les données de votre disque dur avant de le formater.
a
Attention : lors de la procédure de formatage, TOUTES les données enregistrées sur le
a
support de données sont effacées.
Notez que dans le cas d'un disque dur formaté selon le système FAT32, seuls des fichiers
i
d'un volume de 4 Go maximum sont supportés.
Windows® 7/Vista™/XP
La DataStation peut être formatée comme n'importe quel autre disque dur dans
Windows®.
• Avec le bouton de souris droit, cliquez dans le «
sur le support de données local « trekStor ».
• Dans le menu contextuel affiché, sélectionnez la rubrique «
• Avec le bouton de souris gauche, cliquez sur «
en cliquant sur « ok ».
PoSte De trAvAil »/« mon orDinAteur »
FormAter... ».
DémArrer » et confirmez le formatage
Mac® OS X version 10.4 et supérieures
Pour formater la DataStation sous Mac® OS X, procédez de la manière suivante :
• Cliquez sur les rubriques «
« utilitAire De DiSQue ».
• Cliquez sur la DataStation pour sélectionner cette dernière pour le formatage.
Cette dernière est indiquée avec son numéro de modèle.
• Dans la partie droite de la fenêtre, sélectionnez «
• À l'aide de la liste déroulante, sélectionnez le nombre de partitions à créer sous
conFigurAtion De volume ».
«
Formatage avec le système de fichiers HFS+
Pour formater la DataStation sous Mac® OS X avec le système de fichiers « HFS+ »
mAc oS extenDeD »), procédez de la manière suivante :
(«
• Cliquez sur le bouton «
ou « cArte De PArtition APPle » et confirmez votre choix avec « ok ».
• Dans la liste déroulante, déterminez le système de fichiers pour le disque dur/la
partition à formater et entrez un nom dans le champ prévu à cet effet.
FinDer » + « APPlicAtionS » + « utilitAireS » pour ouvrir les
PArtitionner ».
oPtionS » et choisissez ici « tAbleAu De PArtition guiD »
24
FR
Page 25

Remarque pour Mac® OS X Leopard : avec le système de fichiers « HFS+ »
i
(« Mac oS Étendu ») vous disposez de la fonction « tiMe MacHine ».
• Cliquez maintenant sur le bouton «
en cliquant sur « PArtitionner » pour lancer le formatage.
Formatage avec le système de fichiers FAT32
Le système de fichiers « FAt32 » offre une compatibilité maximale avec les différents
systèmes d'exploitation, mais a une limite de taille pour les fichiers (max. 4 Go). Pour
formater la DataStation sous Mac® OS X avec le système de fichiers « FAt32 », procédez
de la manière suivante :
• Cliquez sur le bouton «
« enregiStrement De DémArrAge PrinciPAl (mbr) » et confirmez votre choix avec « ok ».
• Dans la liste déroulante, déterminez le système de fichiers (« FAt32 ») pour le
disque dur/la partition à formater et entrez un nom dans le champ prévu à cet
effet.
S'il vous plaît attendre la fin du formatage du DataStation. S'il vous plaît noter
i
que le formatage sous Mac ® OS X 10.4.x prend beaucoup de temps.
• Cliquez maintenant sur le bouton «
en cliquant sur « PArtitionner » pour lancer le formatage.
oPtionS » et choisissez ici le schéma de partition
APPliQuer » et confirmez la requête de sécurité
APPliQuer » et confirmez la requête de sécurité
25
FR
Page 26

Consignes de sécurité et remarques relatives à l'utilisation :
La réalisation de travaux techniques sur le produit est strictement réservée à des personnes en
possession des qualifications correspondantes. Il est strictement interdit d'ouvrir le produit ou d'y
d
apporter des modifications. Les composants ne peuvent pas être réparés par l'utilisateur.
N'exposez jamais l'appareil à l'humidité, à la condensation et à la pluie.
e
Protégez l'appareil de températures extrêmement basses et élevées ainsi que des fluctuations thermiques.
j
Exploitez l'appareil uniquement à une température ambiante dans une plage entre 10°C et 40°C.
N'installez pas l'appareil à proximité d'une source de chaleur et protégez-le du rayonnement
direct du soleil.
m
Lors de l'utilisation et du stockage de l'appareil, veillez à ce que l'environnement soit le moins
poussiéreux possible.
h
Le nettoyage de la surface de l'appareil ne doit jamais être réalisé avec des solvants, des diluants, des
produits de nettoyage ou d'autres produits chimiques. Utilisez plutôt un chiffon doux et sec ou un
g
pinceau souple.
L’utilisation de câbles USB d’une longueur supérieure à 3 m est déconseillée.
o
Si vous exposez l’appareil à une décharge électrostatique, une interruption du transfert de données
entre l'appareil et l'ordinateur n'est pas exclue. Des fonctions de l'appareil peuvent également être
p
détériorées. Dans ce cas, débranchez l’appareil du port USB et rebranchez-le.
La capacité de mémoire de votre disque dur externe affichée par le système d'exploitation peut
diverger de la capacité réelle. Pour l'indication de la capacité de mémoire, TrekStor utilise, comme la
plupart des fabricants de matériel, les préfixes déterminés par le système international d'unités (SI)
pour la mention des unités (par ex. 1 Go = 1 000 000 000 Byte). De nombreux systèmes d'expoitation
q
ne respectent cependant pas cette règle et affichent une capacité de mémoire plus faible étant donné
qu'ils prennent leurs calculs pour base 1 Go = 2 Byte = 1 073 741 824 Byte.
Le fabricant se réserve le droit de poursuivre le développement du produit en permanence. Ces
modifications peuvent être mises en pratique sans description directe dans cette notice d’utilisation.
Les informations contenues dans cette notice d’utilisation ne reflètent donc pas impérativement l’état
d’exécution technique.
Le fabricant garantit uniquement la fonctionnalité pour la définition intrinsèque de ce produit. En outre, le
fabricant n’endosse aucune responsabilité concernant les dommages ou pertes de données subis ainsi que
les conséquences en résultant.
Copyright © 2010 TrekStor GmbH. Tous droits réservés. Toutes les autres désignations de produits ou de firmes
citées sont dans certains cas des marques déposées ou des noms de marques du propriétaire respectif.
26
FR
Page 27
BRUKSANVISNING
b
Vi gratulerar till ditt köp av TrekStor DataStation och vi är säkra på att du ska få mycket
glädje med denna produkt. Läs följande avsnitt noggrant så att du lär känna
funktionerna för denna produkt och dess användning.
Den aktuella produktinformationen kan du hämta på TrekStors webbsida www.trekstor.de.
Har du frågor om användning eller funktionen av denna produkt? På TrekStor webbsida
Service" + "FAQ" hittar du svaren på de vanligaste frågorna.
under "
Naturligvis står också vår support till ditt förfogande för frågor gällande allt om denna
i
apparat. Bäst är det om du fyller i vårt support formulär på vår webbsida www.trekstor.de
under "Service" + "Support" kontakta eller ring vår support. Ju utförligare du beskriver ditt
problem eller dina funderingar desto snabbare och utförligare kan vi hjälpa dig.
Systemkrav
Windows® 7/Vista™/XP/2000, Mac® OS X:
Till de här operativsystemen behövs ingen särskild drivrutin. Tänk på att för Windows® 2000
minst Service Pack 4 och för Windows® XP minst Service Pack 2 måste vara installerade.
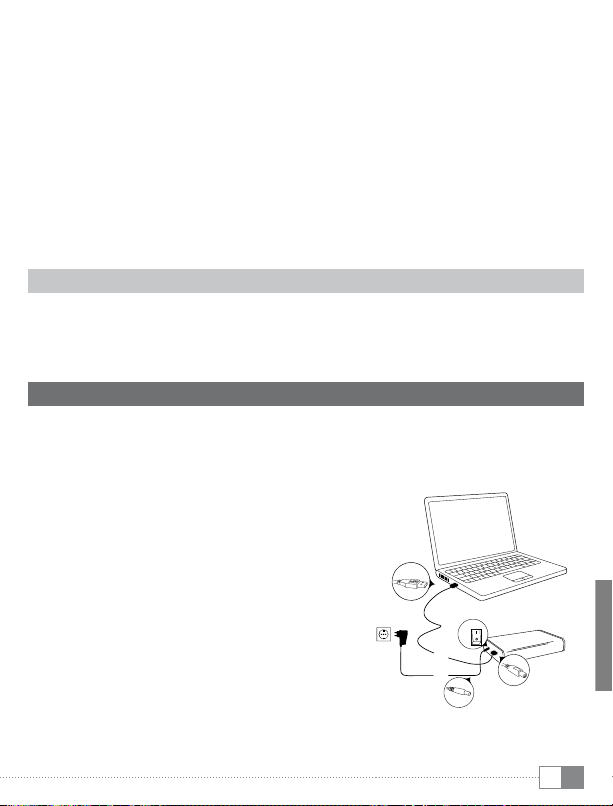
1) Idrifttagning
1) Sätt in den medföljande nätkabeln i nätaggregatet och anslut nätaggregatet till ett
eluttag. Anslut nätaggregatet till "Power"-uttaget på DataStation.
2) Använd enbart den medföljande USB-anslutningskabeln för att ansluta apparaten
till ett USB-uttag på datorn.
3) Starta DataStation genom att trycka kort på
strömbrytaren
strömbrytaren ). Operativsystemet identifierar
DataStation automatiskt och lägger i
"utFo rSkAren "/"Den Här DAtorn" (Microsoft®
Windows) resp. i "SkrivborDet" (Mac® OS X
och Linux®) till DataStation som "lokAl DiSk"
(resp. "lokAl enHet").
Håll strömbrytaren
in strömbrytaren ) när du vill stänga av
DataStation.
) resp. genom att trycka in
) intryckt resp. tryck
3
2
1
27
SE
Page 28

2) Dataöverföring
När apparaten har tagits i drift visas i "utForSkAren"/"Den Här DAtorn" (Windows®) resp. på
"SkrivborDet" (Mac® OS X) en lokal disk "trekStor".
Windows® 7/Vista™/XP
• Markera önskade filer eller mappar med musen.
• Placera muspekaren över de markerade filerna eller mapparna och klicka på höger
musknapp. Markera punkten "
• Markera önskat mål i "
• Högerklicka med musen och markera alternativet "
När kopieringen är färdig finns filerna på måldisken.
koPierA" på den meny som visas.
utForSkAren"/"Den Här DAtorn"/"SkrivborD" (t.ex. disken "trekStor").
inFogA" för att starta kopieringen.
Mac® OS X fr.o.m. 10.3
Markera önskade filer med musen. Dra filerna i "FinDer" till enhetssymbolen för
DataStation.
3) Utloggning och frånkoppling av TrekStor DataStation från datorn
Windows® 7/Vista™/XP
Vänsterklicka med musen nedtill till höger i aktivitetsfältet på symbolen "Säker
borttAgning Av mASkinvArA". Markera i popup-rutan raden "utFör Säker borttAgning Av uSb
mASSlAgringSenHet – enHet" genom att vänsterklicka med musen. Därmed är DataStation
borttagen från datorns operativsystem. Nu kan du ta ut DataStation ur datorn.
Mac® OS X
Du måste ta bort disken från skrivbordet innan du lossar eller stänger av den. Klicka på
den aktuella disksymbolen och dra den till papperskorgssymbolen.
Anmärkning: Följ alltid den rekommenderade utloggningsproceduren så att du inte
a
skadar apparaten eller förlorar några data!
4) Formatera hårddisken
Viktigt: Innan du formaterar hårddisken se till att säkra all data på din hårddisk.
a
Observera: Vid formateringen raderas ALL data på datamediumet.
a
28
SE
Page 29

beakta att vid en FAT32 formaterad hårddisk stöds endast filer med en filstorlek upp till
i
max 4GB. Om du har för avsikt att spara större filer, rekommenderar vi användning av
datasystem NTFS (Windows®) eller HFS+(Mac® OS X).
Windows® 7/Vista™/XP
DataStationen kan liksom varje annan hårddisk i Windows® formateras.
• Klicka på "
databäraren"trekStor".
• På den visade kontextmenyn välj punkten "
• Klicka med den vänstra musknappen på knappen "
formateringen genom att trycka på knappen "ok".
ArbetSPlAtS"/"comPuter" med den högra musknappen på den lokala
FormAterA..." .
StArtA" och bekräfta
Mac® OS X ab 10.4
För att formatera DataStationen i Mac® OS X gör på följande sätt:
• Öppna via "
• Klicka på DataStation för att välja ut denna för formateringen. Denna är försedd
med sitt modellnummer.
• I högra delen av fönstret välj "
• Med hjälp av Drop-Down listan välj "
Formatera med filsystem HFS+
För att formatera DataStationen Mac® OS X med filsystem "HFS+" ("
gör på följande sätt:
• Klicka på knappen "
eller "
• Bestäm med hjälp av Drop-Down listan för datasystemet som innehåller
hårddisken(partitionen som ska formateras ange ett namn i det avsedda fältet.
i
• Klicka på knappen "
"PArtitionerA", för att starta formateringen.
FinDer" + "ProgrAm" + "HjälPProgrAm" "HårDDiSk-HjälPProgrAm".
PArtitionerA" .
ScHemA" antalet partitioneringar.
mAc oS extenDeD"),
oPtioner" och välj här Partitionsschema "guiD-PArtitionStAbell"
APPle-PArtitionStAbell" och bekräfta valet med "ok".
Anvisning för Mac® OS X Leopard: Med filsystem "HFS+" ("Mac oS extended") finns
funktionen"tiMe MacHine" tillgänglig.
AnvänDA" och bekräfta säkerhetsfrågan med ett klick på
29
SE
Page 30

Formatering med filsystem FAT32
Filsystemet "FAt32" erbjuder maximal kompatibilitet med olika operativsystem, har
dock en begränsning i storlek för filerna (max. 4 GB). För att formatera DataStationen
under Mac® OS X med filformatet "FAt32" gör på följande sätt:
• Klicka på knappen "
bekräfta valet med "ok".
oPtioner" och välj här Partitionsschema "mASter boot recorD" och
• Bestäm med Drop-Down-Listan filformatet "mS-DoS"/"mS-DoS (FAt)" för
hårddisken(partitionen som ska formateras och ange ett namn i fältet för detta.
Vänta tills formateringen av din DataStation är helt avslutad. Beakta att
i
formateringen under Mac® OS X 10.4.x tar sin tid.
• Klicka på knappen "
"PArtitionerA", för att starta formateringen.
AnvänDA" och bekräfta säkerhetsfrågan med ett klick på
30
SE
Page 31

Säkerhets- och användningsföreskrifter:
Tekniskt arbete på produkten får bara utföras av personer med erforderlig utbildning. Det är inte
tillåtet att öppna produkten eller göra ändringar på den. Produkten innehåller inga komponenter
d
som användaren själv kan reparera.
Utsätt aldrig produkten för fukt, kondens eller väta.
e
Skydda apparaten mot alltför höga eller låga temperaturer och temperaturvariationer. Använd
den bara om omgivningstemperaturen ligger mellan 10º C och 40º C.
j
Ställ inte upp apparaten nära en värmekälla och skydda den mot direkt solsken.
m
Se noga till att omgivningen där du använder och förvarar apparaten är så dammfri som möjligt.
h
Rengör aldrig apparatens yta med lösningsmedel, förtunningsmedel, rengöringsmedel eller andra
g
kemikalier. Använd istället en mjuk och torr trasa eller en mjuk borste.
Använd inte USB-kablar som är längre än 3 meter.
o
Om du utsätter apparaten för elektrostatiska urladdningar kan det i vissa fall uppstå avbrott i
dataöverföringen mellan apparaten och datorn och apparatens funktioner kan störas. Koppla
p
då bort apparaten från USB-porten och anslut den sedan på nytt.
Den lagringskapacitet hos den externa hårddisken som operativsystemet anger kan avvika från den
verkliga kapaciteten. TrekStor använder i likhet med de flesta hårdvarutillverkare enhetsprefixen
i det internationella enhetssystemet (SI) vid uppgifter om lagringskapacitet (t.ex. 1 GB = 1 000 000 000 byte).
q
Många operativsystem tillämpar dock inte denna metod utan anger en lägre lagringskapacitet,
eftersom de vid sina beräkningar utgår från att 1 GB = 2 byte = 1 073 741 824 byte.
Tillverkaren förbehåller sig rätt till kontinuerlig vidareutveckling av produkten. Ändringar kan företas utan
att de beskrivs direkt i denna bruksanvisning. Upplysningarna i bruksanvisningen överensstämmer därför
inte nödvändigtvis med det verkliga tekniska utförandet.
Tillverkaren garanterar enbart att produkten är lämplig för dess avsedda ändamål. Tillverkaren ansvarar
inte heller för skada på eller förlust av data eller för därav orsakade följdskador.
Copyright © 2010 TrekStor GmbH. Alla rättigheter förbehållna. Om andra produkt- eller företagsbeteckningar
nämns kan de eventuellt avse varubeteckningar eller märkesnamn som tillhör respektive innehavare.
31
SE
Page 32
INSTRUKCJA OBSŁUGI
b
Gratulujemy zakupu TrekStor DataStation i jesteśmy pewni, że sprawi on Państwu wiele
radości. Proszę uważnie przeczytać poniższe rozdziały, aby zapoznać się z działaniem
tego produktu i jego obsługą.
Aktualna informacja o produkcie znajduje się na stronie TrekStor www.trekstor.de.
Czy są pytania odnosnie obsługi lub działania tego produktu? Na portalu TrekStor,
w zakładce „
i
Service” + „FAQ“ znajdują się odpowiedzi na najczęściej zadawane pytania.
Oczywiście nasz dział obsługi klienta jest do dyspozycji Państwa i chętnie odpowie na
pytania dotyczące urządzenia. Najlepiej jeśli się Państwo skontaktujecie korzystając
z formularza na naszej stronie www.trekstor.de w zakładce „Service" + „Support" albo
połączycie się telefonicznie z działem obsługi klienta. Im bardziej jest wyczerpujący
opis powstałej sytuacji tym szybciej i skuteczniej możemy pomóc!
Wymagania systemowe
Windows® 7/Vista™/XP/2000, Mac® OS X:
Do tych systemów operacyjnych nie są wymagane oddzielne sterowniki. Należy
pamiętać, że dla Windows® 2000 musi być zainstalowany co najmniej dodatek
Service Pack 4, a dla Windows® XP co najmniej dodatek Service Pack 2.
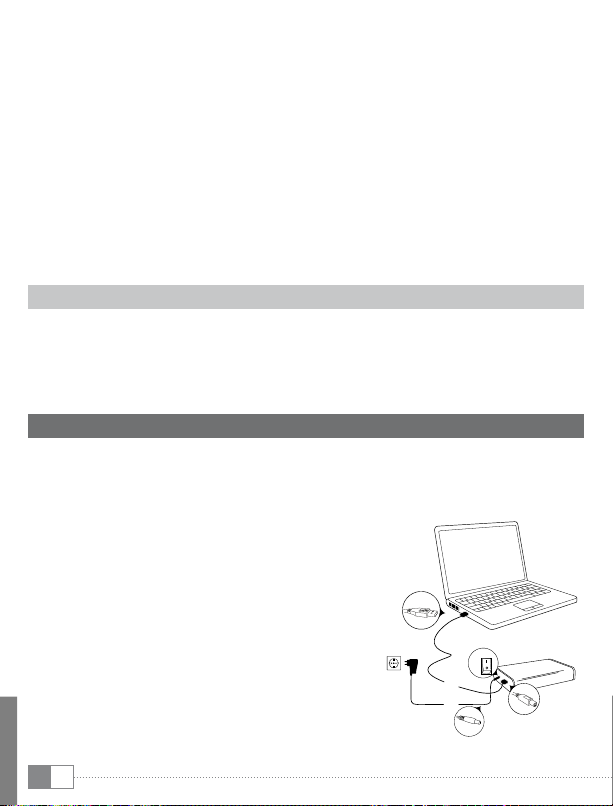
1) Rozpoczęcie pracy
1) Podłączyć załączony przewód zasilający, o ile jest, do zasilacza i podłączyć zasilacz do
gniazdka sieciowego. Podłączyć zasilacz do gniazdka „Power” na dysku DataStation.
2) Do podłączania urządzenia do portu USB komputera należy stosować wyłącznie
załączony przewód USB.
3) Włączyć DataStation, naciskając krótko przycisk
lub naciskając włącznik/wyłącznik ). System
operacyjny rozpoznaje automatycznie podłączony
dysk DataStation i w oknie „mój komPuter”/„komPuter”
(Microsoft® Windows) lub na „PulPicie” (Mac® OS X
i Linux®) dodaje go jako „DySk lokAlny”.
Aby wyłączyć DataStation, należy nacisnąć
i przytrzymać przycisk
wyłącznik ).
) lub nacisnąć
)
3
2
1
32
PL
Page 33

2) Przesyłanie danych
Po pomyślnym uruchomieniu urządzenia w oknie „mój komPuter”/„komPuter” (Windows®)
lub na „PulPicie” (Mac® OS X) pojawia się lokalny dysk o nazwie „trekStor”.
Windows® 7/Vista™/XP
• Zaznaczyć myszą żądane pliki lub foldery.
• Umieścić kursor myszy nad zaznaczonymi plikami lub folderami i nacisnąć prawy
przycisk myszy. W wyświetlonym menu kontekstowym wybrać punkt „
• W oknie „
• Nacisnąć prawy przycisk myszy i wybrać opcję „
mój komPuter”/„komPuter” lub na „PulPicie” wybrać żądaną ścieżkę docelową
(np. dysk „trekStor”).
wklej”, aby rozpocząć kopiowanie.
Po zakończeniu kopiowania dane są zapisane na dysku docelowym.
koPiuj”.
Mac® OS X od wersji 10.3
Zaznaczyć myszą żądane pliki. Przeciągnąć pliki zaznaczone w oknie „FinDer” na symbol
dysku DataStation.
3) Wylogowanie i odłączanie TrekStor DataStation od komputera
Windows® 7/Vista™/XP
Kliknąć lewym przyciskiem myszy symbol „bezPieczne uSuwAnie SPrzętu” na pasku zadań
u dołu po prawej stronie. W wyświetlonym menu kliknąć lewym przyciskiem myszy
polecenie „uSuń mASowe urząDzenie mAgAzynujące uSb”. Dysk DataStation zostanie usunięty
z systemu operacyjnego komputera. Teraz można odłączyć DataStation od komputera.
Mac® OS X
Przed odłączeniem lub wyłączeniem urządzenia należy usunąć dysk z pulpitu. W tym
celu należy kliknąć symbol dysku i przeciągnąć go na symbol kosza.
Wskazówka: Aby zapobiec uszkodzeniom urządzenia lub utracie danych, należy
a
stosować się do zalecanej procedury odłączania!
33
PL
Page 34

4) Formatowanie twardego dysku
Ważne: Przed formatowaniem twardego dysku należy utworzyć kopię zapasową
a
wszystkich danych
Uwaga: Podczas formatowania zostają usunięte z nośnika WSZYSTKIE dane.
a
Należy pamiętać, że w przypadku twardego dysku sformatowanego w systemie plików
i
FAT32 obsługiwane są pliki do maksymalnego rozmiaru 4 GB. Przy konieczności zapisu
większych plików, zaleca się systemy plików NTFS (Windows®) lub HFS+ (Mac® OS X).
Windows® 7/Vista™/XP
Dysk DataStation można formatować tak samo, jak każdy inny twardy dysk w systemie
Windows®.
• W oknie „
• W wyświetlonym menu kontekstowym wybrać punkt „
• Lewym przyciskiem myszy kliknąć przycisk „
mój komPuter“/„komPuter“ kliknąć prawym przyciskiem myszy dysk lokalny
„trekStor“.
FormAtuj…“.
rozPocznij“ i potwierdzić proces
formatowania, klikając przycisk „ok“.
Mac® OS X od wersji 10.4
Aby sformatować DataStation w systemie Mac® OS X, należy wykonać następujące
czynności:
• Za pomocą poleceń „
• Kliknąć DataStation, aby wybrać ten dysk do sformatowania. Jest on widoczny
w postaci numeru modelu.
• W prawej części okna wybrać „
• Za pomocą listy rozwijanej w punkcie „
do utworzenia.
Formatowanie z systemem plików HFS+
Aby sformatować DataStation w systemie Mac® OS X z systemem plików „HFS+“
mAc oS extenDeD“) należy wykonać następujące czynności:
(„
• Kliknąć przycisk „
„mAPA PArtycji APPle“ i potwierdzić wybór przyciskiem „ok“.
• Z rozwijanej listy wybrać system plików formatowanego dysku/partycji i wpisać
jego nazwę w odpowiednim polu.
34
PL
FinDer“ + „ProgrAmy“ + „nArzęDziA“ „nArzęDzie DySkowe“.
PArtycje“.
ScHemAt woluminu“ wybrać liczbę partycji
oPcje“ i wybrać schemat partycji „tAblicA PArtycji guiD“ lub
Page 35

Wskazówka dotycząca systemu Mac® OS X Leopard: W systemie plików „HFS+“
i
(„Mac oS extended") dostępna jest funkcja „tiMe MacHine".
• Kliknąć prz ycisk „
aby rozpocząć formatowanie.
Formatowanie z systemem FAT32
System plików „FAt32“ oferuje najlepszą zgodność różnymi systemami operacyjnymi,
ma jednak ograniczenie wielkości pliku (maks. 4 GB). Aby sformatować w systemie
Mac® OS X z systemem plików „FAt32“ należy wykonać następujące czynności:
• Kliknąć prz ycisk „
wybór przycisk iem „ok“.
• Z rozwijanej listy wybrać system plików „mS-DoS“/„mS-DoS (FAt)“ formatowanego
dysku/partycji i wpisać jego nazwę w odpowiednim polu.
Proszę poczekać na zakończenie formatowania. Proszę pamietać, że
i
formatowanie w systemie Mac® OS X 10.4.x wymaga czasu.
• Kliknąć prz ycisk „
aby rozpocząć formatowanie.
zAStoSuj” i potwierdzić zapytanie kliknięciem na „PoDziel nA PArtycje“,
oPcje“ i wybrać schemat partycji „mASter boot recorD“ i potwierdzić
zAStoSuj” i potwierdzić zapytanie kliknięciem na „PoDziel nA PArtycje“,
35
PL
Page 36

Wskazówki dotyczące bezpieczeństwa i eksploatacji:
Do wykonywania napraw i modyfikacji produktu uprawnione są tylko odpowiednio wykwalifikowane
osoby. Produktu nie wolno otwierać ani modyfikować. Podzespoły urządzenia nie mogą być
d
konserwowane przez użytkownika.
Urządzenie należy zawsze chronić przed wilgocią, skroplinami i wodą.
e
Urządzenie należy chronić przed ekstremalnie wysokimi lub niskimi temperaturami oraz przed
wahaniami temperatury. Podczas eksploatacji temperatura otoczenia musi wynosić od 10ºC do 40ºC.
j
Nie ustawiać urządzenia w pobliżu źródła ciepła i chronić je przed słońcem.
m
Podczas eksploatacji i składowania urządzenia otoczenie powinno być możliwie wolne od kurzu.
h
Do czyszczenia powierzchni urządzenia nie należy nigdy uż ywać rozpuszczalników, rozcieńczalników,
środków czyszczących ani innych substancji chemicznych, a jedynie miękkiej, suchej ściereczki lub
g
miękkiego pędzla.
Nie należy stosować przewodów USB o długości przekraczającej 3 metry.
o
Jeżeli urządzenie narażone jest na wyładowania elektrostatyczne, to może dojść do przerywania
transmisji danych między urządzeniem a komputerem lub do zakłócenia działania urządzenia. W tym
p
przypadku należy odłącz yć urządzenie od portu USB i ponownie je podłączyć.
Pojemność pamięci zewnętrznego dysku może odbiegać od jego pojemności rzeczywistej. Trekstor,
podobnie jak większość producentów sprzętu, podaje ilość pamięci zgodnie ze skrótami jednostek
określonymi przez Międzynarodowy Układ Jednostek Miar (SI) (np. 1 GB = 1000 000 000 bajtów).
q
Liczne systemy operacyjne nie przestrzegają jednak tych zaleceń i podają mniejszą pojemność
pamięci, ponieważ zakładają w swoich obliczeniach, że 1 GB = 2 bajtów = 1 073 741 824 bajtów.
Producent zastrzega sobie prawo do ciągłego rozwoju produktu. Zmiany te mogą być wprowadzone bez
uwzględnienia ich w niniejszej instrukcji obsługi. Informacje zawarte w instrukcji obsługi nie muszą więc
oddawać stanu technicznego wersji urządzenia.
Producent gwarantuje jedynie, że produkt nadaje się do stosowania zgodnie z przeznaczeniem. Ponadto
producent nie odpowiada za uszkodzenia lub utratę danych oraz za ich skutki.
Copyright © 2010 TrekStor GmbH. Wszystkie prawa zastrzeżone. Inne wymienione tu nazwy produktów
i firm mogą być znakami towarowymi lub markami ich właścicieli.
36
PL
Page 37
EC DECLARATION OF CONFORMITY
As manufacturer and importer respectively:
■■■■■■■■■■■■■■■■■■■■■■■■■■■■■■■■■■■■■■■■■■■■■■■■■■■■■■■■■■■■■■■■■■■■■■■■■■■■■■■■■■■■■■■■■■■■■■■■■■■■■■■■■■■■■■■■■■■■■■■■■■■■■■■■■■■■■■■■■■■■■■■■■■■■■■■■■■■■■■■■■■■■■■■■■■■■■■■■
herewith declares that the products
Product: DataStation maxi light
■■■■■■■■■■■■■■■■■■■■■■■■■■■■■■■■■■■■■■■■■■■■■■■■■■■■■■■■■■■■■■■■■■■■■■■■■■■■■■■■■■■■■■■■■■■■■■■■■■■■■■■■■■■■■■■■■■■■■■■■■■■■■■■■■■■■■■■■■■■■■■■■■■■■■■■■■■■■■■■■■■■■■■■■■■■■■■■■
Type: External hard disk drive
■■■■■■■■■■■■■■■■■■■■■■■■■■■■■■■■■■■■■■■■■■■■■■■■■■■■■■■■■■■■■■■■■■■■■■■■■■■■■■■■■■■■■■■■■■■■■■■■■■■■■■■■■■■■■■■■■■■■■■■■■■■■■■■■■■■■■■■■■■■■■■■■■■■■■■■■■■■■■■■■■■■■■■■■■■■■■■■■
comply with the following directive(s):
■
2004/108/EC EMC Directive: Electromagnetic Compatibility
■
2006/95/EC Low Voltage Directive
■■■■■■■■■■■■■■■■■■■■■■■■■■■■■■■■■■■■■■■■■■■■■■■■■■■■■■■■■■■■■■■■■■■■■■■■■■■■■■■■■■■■■■■■■■■■■■■■■■■■■■■■■■■■■■■■■■■■■■■■■■■■■■■■■■■■■■■■■■■■■■■■■■■■■■■■■■■■■■■■■■■■■■■■■■■■■■■■
The following norms were consulted to assess conformity:
■
EN 55022:2006 + A1:2007
■
EN 55024:1998 + A1:2001 + A2:2003
■
EN 60950-1:2006
■■■■■■■■■■■■■■■■■■■■■■■■■■■■■■■■■■■■■■■■■■■■■■■■■■■■■■■■■■■■■■■■■■■■■■■■■■■■■■■■■■■■■■■■■■■■■■■■■■■■■■■■■■■■■■■■■■■■■■■■■■■■■■■■■■■■■■■■■■■■■■■■■■■■■■■■■■■■■■■■■■■■■■■■■■■■■■■■
The CE symbol conrms that this product conforms with the above mentioned norms and regulations.
■■■■■■■■■■■■■■■■■■■■■■■■■■■■■■■■■■■■■■■■■■■■■■■■■■■■■■■■■■■■■■■■■■■■■■■■■■■■■■■■■■■■■■■■■■■■■■■■■■■■■■■■■■■■■■■■■■■■■■■■■■■■■■■■■■■■■■■■■■■■■■■■■■■■■■■■■■■■■■■■■■■■■■■■■■■■■■■■
The manufacturer also declares the conformity of the product according to the following directives:
■
2001/95/EC G eneral Product Safety
■
2002/95/EC R oHS: Hazardous substances in electrical and electronic equipment
■
2005/32/EC Ecodesign requirements for energy-using products
TrekStor GmbH
Kastanienallee 8 - 10
D-64653 Lorsch, Germany
EMC: Information technology equipment – Radio disturbance characteristics – Limits and methods
of measurement
EMC: Information technology equipment – Immunity characteristics – Limits and methods
of measurement
Information technology equipment – Safety – Part 1: General requirements
Lorsch, 01.10.2010
Aaron Taylor, CTO
Page 38

Support
AT
BE
CH
DE
ES
FR
HU
IT
LU
NL
PL
PT
UK
GR
TR
RU
SE
UA
SI
CA
Other Countries
Hotline Language
+49 431 - 24 89 45 70** German
+49 431 - 24 89 45 80** English
+49 431 - 24 89 45 73** German
01805 - TREKSTOR*
01805 - 87 35 78 67* German
+49 431 - 24 89 45 76** English
+49 431 - 24 89 45 74** English
+49 431 - 24 89 45 79** English
+49 431 - 24 89 45 75** English
+49 431 - 24 89 45 72** German, English
+49 431 - 24 89 45 81** English
+49 431 - 24 89 45 77** English
+49 431 - 24 89 45 78** English
+49 431 - 24 89 45 71** English
+49 431 - 24 89 45 82** English
+49 431 - 24 89 45 83** English
+49 431 - 24 89 45 84** English
+49 431 - 24 89 45 92** English
+49 431 - 24 89 45 93** English
+49 431 - 24 89 45 94** English
+49 431 - 24 89 45 95** English
+49 431 - 24 89 45 99** English
Wenn Sie unseren Support per E-Mail kontaktieren möchten, verwenden Sie einfach
unser Supportformular. Sie finden es auf unserer Website http://www.trekstor.de
unter "Service" + "Su PPort". Je detaillierter Ihre Anfrage ist, desto besser und schneller
können wir Ihnen helfen!
If you want to contact our support via e-mail, you can do so via the online support form
that you can find under "
The more detailed your support request is, the quicker and better we will be able
to help you!
* 14 Cent/Min. aus dem deutschen Festnetz der DTAG, max. 42 Cent/Min. aus Mobilfunknetzen.
** Please check with your local telephone provider for connection costs.
TrekStor GmbH
Kastanienallee 8-10
D-64653 Lorsch
Germany
www.trekstor.de
Service" + "SuPPort" on our website http://ww w.trekstor.de/en.
BA-DSML-DE-PL-V1.10-101111
 Loading...