


1
2
3
4
5
6
7
User's Manual
Smart iCAM
Remote HD Wi-Fi Camera
Plea se read c arefu lly bef ore us ing thi s equip ment.
Before you start you need:
iPhone, iPad,
Android smartphone
or Android tablet
Wi-Fi routerSmart iCAM
Smart iCam
Watch
anytime and anywhere
the things that matter to you
Smart iCAM is a wirele ss network camera. I t can connect with y our
smartphone or tablet wireless technology, and monitor everything
on your smartphone or tablet anywhere and anytime.
via
that matters to you
Smartphone,Tablet
Wi-Fi Router
Internet
Pro duct La yout
1.Li ght sen sor
2.Mi croph one
3.Ca mera le ns
4.In frare d LEDs
5.Sp eaker
6.An tenna
Cam era
7.Mi cro SD Ca rd slot
8.Po wer ada pter so cket
9.Temp eratu re sens or
10.P ower ON /OFF sw itch
11.Re set but ton
12. Power /Stat us LED
Pac kage Co ntent s
One C amera
One A dapte r
One S crew an d One Wall An chor
EN
2
Thi s User' s Manua l
Two Ca ble Cli ps
6
7
8
10
9
1
2
3
4
5
11
12
PUSH TO EJECTPUSH TO EJECTPUSH TO EJECTPUSH TO EJECT
Get ting St arted
Download Smart iCAM app
3.1
To get started, key in the keyword “Smart iCAM” and
download the app from Apple App Store (iPhone/iPad) or
Google Play Store (Android).
3
First-time Setup
3.3
1. Connect power adapter to back of the camera and plug into
power outlet.
2. Pus h the pow er butt on on the c amera a nd the LE D
shou ld ligh t up.
Note 1: When you power the camera on, the camera need to
take around 30 to 60 seconds for initial setting.
2: Push the power button around 10 seconds to turn off
camera.
3.
2
Power Supply
3.3 .1
Connect iPhone/iPad or Android mobile to the camera
1. Turn on the Wi-Fi of your iPhone/iPad or Android mobile.
2. Tap the s creen t o selec t “Smar t_iCA M_XXX XXX”
unde r Wi-Fi Ne twork s. Ente r the pas sword a nd tap
conn ect but ton. De fault p asswo rd is “12 34567 8”.
3. After Wi-Fi connected, open the App of “Smart iCAM” and
will see the welcome screen.
3.3 .2
View live video
1. Tap the camera icon in Camera List and you can access the live video.
2. Tap and d rag hor izont ally to p an thro ugh the v ideo.
(Onl y for Pan & Ti lt mode l )
3. Tap and drag vertically to tilt through the video.
(Only for Pan & Tilt model )
4. Tap the v ideo an d slide y our fin gers to gethe r or apar t to
zoom i n or out ma nuall y.
5. Zoo m in to a vid eo and dr ag your f inger a round t he scre en.
1. Download the App of Smart iCAM.
2. Open the App of Smart iCAM.
3. Tap “Add New Camera” button on Camera List page.
Share the camera (Multi-user)
3.4
3.4 .1
Setup in Local Area Network (LAN)
4. Tap the camera name you want to add from “Available Camera List”,
enter the password and confirm. Default password is “admin”.
4. Select Wi-Fi SSID for camera Internet setting
After welcome page, the APP will reveal all the Wi-Fi SSID in range.
Tap the SSID used to connect Smart iCAM and enter the password
for the Wi-Fi AP/Router. Please wait for a minute while system reboot,
and the LED will be in green light. The initial setup is completed.
Note 1: SSID is a wireless network identity code that is also
regarded as name of wireless LAN. The major function of
SSID is to distinguish different wireless LAN. In Wi-Fi
wireless network, SSID represents Wireless Access Point’s
network name during broadcast.
2: If you cannot find the Wi-Fi network you want to connect,
please check the Wi-Fi network is available and functions in
range again.
3: If you enter wrong password of SSID, the camera will beep
3 times and reset to factory default automatically. Please
close App and follow the point 3.3 instructions to setup
camera again.
4: If the camera cannot connect to the Internet, the power/status
LED will glow orange light. Please check your wireless
AP/Router and make sure Wi-Fi connection is not out of range.
5: Make sure your mobile connected to the Wi-Fi AP/Router
before.
10
8 9
11
12
13
14
15
5. Tap the camera icon in Camera List and watch the
live video.
Note : If you enter wrong password of camera, tap the
camera icon and input correct password again.
1. Download the App of Smart iCAM.
2. Open the App of Smart iCAM.
3. Tap “Add New Camera” button on Camera List page.
4. Tap “Add Remote Camera” button on Add New Camera page,
and enter Camera UID and Password and then confirm.
3.4 .2
Setup in Wide Area Network (WAN) or in Internet
5. Tap the camera icon in Camera List and watch the live video.
Note 1: UID is a unique identified code of each camera.
You can read UID by tap the i (information) icon
in live video page.
2: If you enter wrong password of camera, tap the
camera icon and input correct password again.
Add more cameras (Multi-camera)
3.5
Follow the point 3.3 instructions to complete the first- time setup.
Note : Up to 10 cameras can be added.
While the camera is powered on, press the reset button by small
object or pin (i.e. paper clip) for 10 seconds and release it. The
camera will beep 3 times and start to reset to factory default. It
will take around 1 minute to finish reset.
Note 1: If you did not hear the beep, please try again to press
the reset button.
2: When you change wireless AP/Router or forget
camera password, you need to reset the camera to
factory defaults and follow the steps of “3.3 First
time set up” to set up the camera again.
3.6
Reset the camera to factory defaults
Ope ratio n Mode
View Live Video
4.1
4
1
2
4
6
5
3
1. Information
Tap he icon to view APP version、camera UID、
Firmware version.
2. Camera name
3. Temperature
4. Photo folder
Tap the icon and see all of the photos taken before.
5. Snapshot
Tap the icon and save a snapshot of the camera on your
iPhone, iPad or Android mobile.
6. Audio ON/OFF
Tap the icon and turn off audio. Tap it again and turn the
audio on.
Tap the button on camera list to set up.
4.2
Camera Setting
Note : For security and management consideration, some
items of camera setting are not enabled when P2P
connection via WAN or Internet.
5
1
2
3
4
6
7
8
5. Motion Detection
a. Enable and Disable motion detection.
b. Motion detection can trigger push message alert and
recording. To enable motion recording, you need to enable
Motion Detection first and then Record (refer to 4.2.6).
c. Smart iCAM can monitor specific area (detection zone) of
the camera view and ignore others. To add a zone, tap and
drag out a translucent rectangle. Note that with no zone
defined Smart iCAM will monitor the entire camera view.
d. The interval between checks is 1 minute.
1. Reconnect
Re-connect the camera when connection
failed.
Note : Always push this button after
finishing camera setting to make
sure connecting successfully.
2. Delete
Delete camera from Camera List.
3. Event Viewer
View the event logs.
4. Change Name/Password
Change camera name or password.
6. Record
Tap the icon to enable HD 720p recording, tap it again to
stop recording.
Note 1: Only when the micro SD card is inserted to
camera, the recording will be effective.
2: Only support micro SD card up to 32G.
3: If motion detection is not activated, camera will
record continuously.
4: To playback video file
Place the micro SD card into a SD card adapter.
Connect the card adapter to computer.
Use media player like VLC, MS media player or
others to playback the video file.
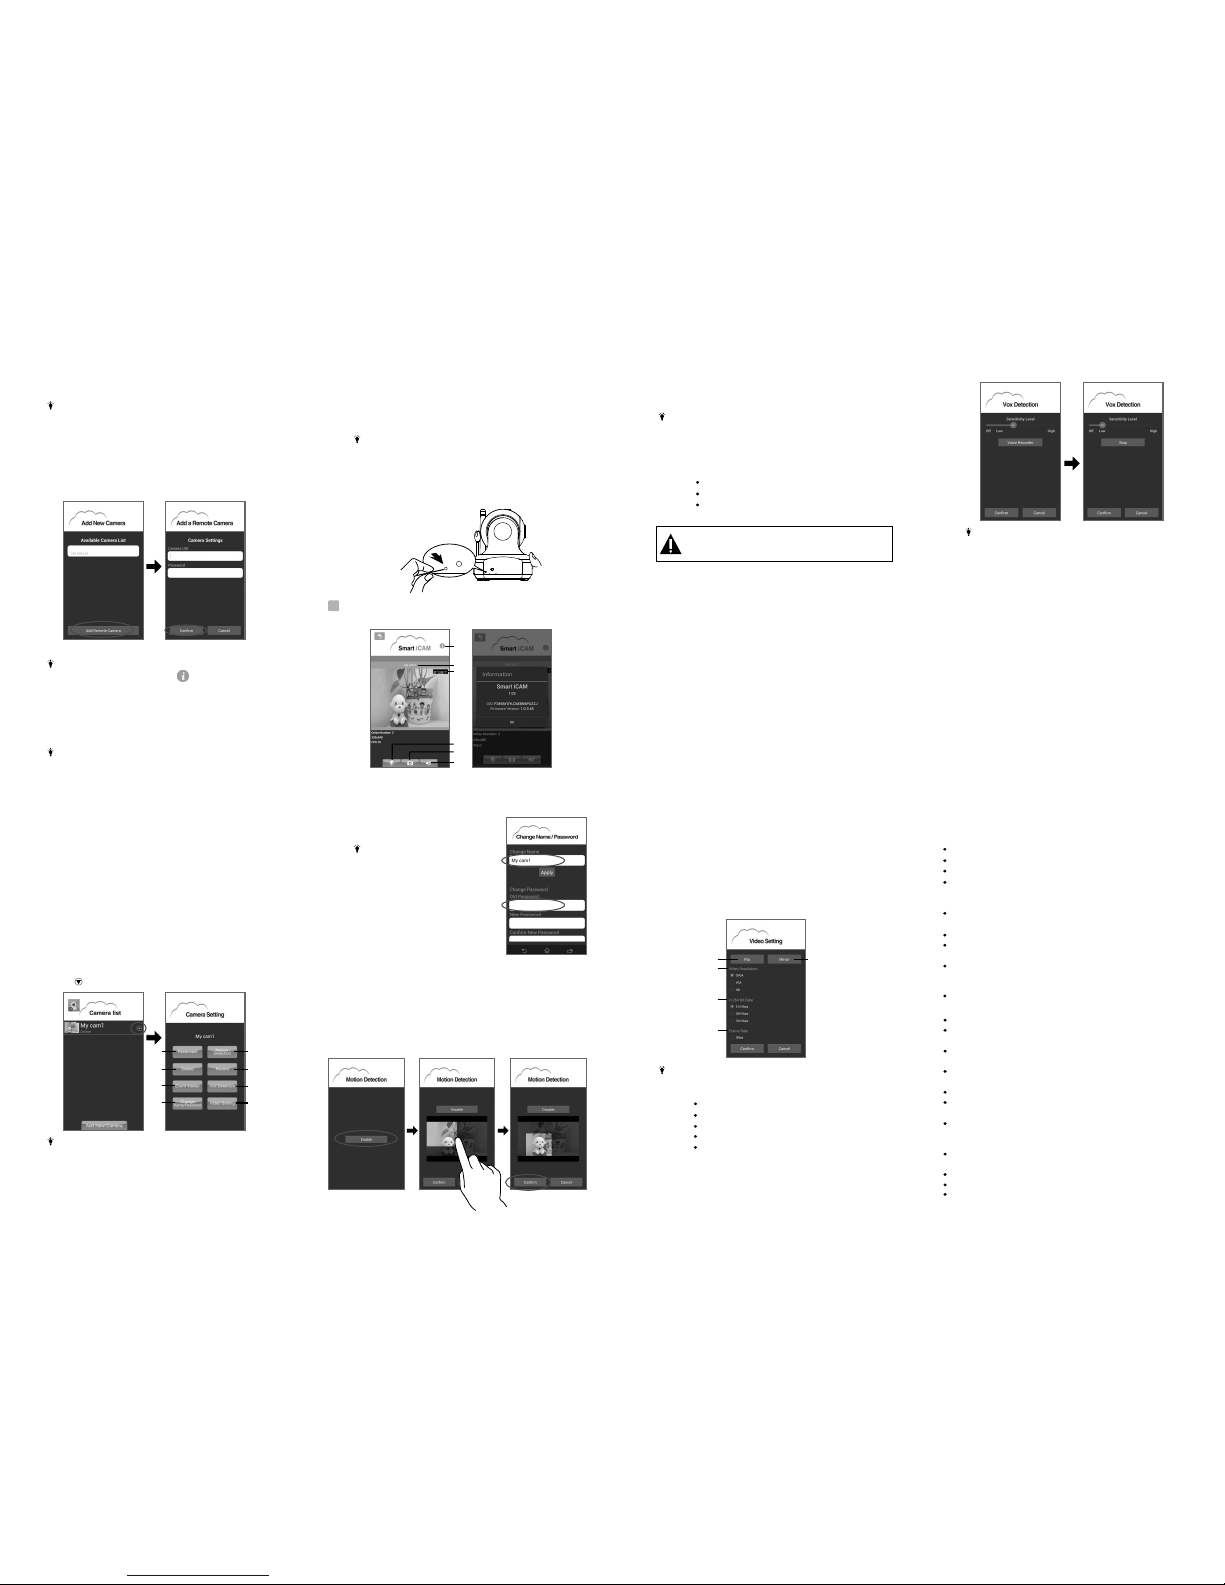
7. VOX Detection ( Voice Operated Transmission)
a. Smart iCAM supports voice detection to trigger
push message alert and even playback a pre-recorded
voice or melody.
b. Drag on the bar to enable VOX and select sensitivity level.
With the level set to high, the camera microphone will detect
lower sounds.
c. Tap the Voice Recorder button to start to record a voice or
melody that will be playbacked from camera when VOX is
activated. Tap the Stop button to stop recording. Maximum
recording time is 10 seconds. Only when the micro SD card
is inserted to camera, the Voice Recorder will be effective.
d. The interval between VOX checks is 1 minute.
Do not remove memory card while recording is still in progress.
It is recommended to power the camera off when you insert or eject
memory card. Hot swapping may cause your memory card damage.
Note 1:
iPhone
or iPad to exit the App, the VOX function can work
and remind you the audio event of camera. If you
want to exit the App completely, please double-click
home button on your iPhone or iPad when it is at
home screen status. When you exit the App completely,
the VOX function can’t work.
2: When using Android mobile: If you turn on the VOX
function and select Background when tap return or
back arrow key on smartphone, the VOX function can
work and remind you the audio event of camera. If you
want to exit the App completely, select Exit. When you
exit the App completely, the VOX function can’t work.
When using iPhone or iPad: If you turn on the VOX
function and press the home button on your
8. Video Setting
a. Flip: Tap Flip button when mounting the camera on the ceiling.
b. Mirror: Mirror or invert the image.
c. Video Resolution: the number of distinct pixels in each
dimension that can be displayed, i.e.
HD (1280X720) /VGA(640X480) /QVGA(360X240).
d. Bit rate: the number of bits that are conveyed per second in
telecommunications. The higher the rate, the greater the
bandwidth consumption.
e. Frame Rate: The frequency at which camera produces unique
consecutive images called frames. The higher frame rate,
the smoother video will appear but the more processing
power and system bandwidth is required. Frame rate varies
according to the network condition, the mobile performance,
the image resolution and the object situation.
b
a
c
d
e
Change Name/Password
Motion Detection
Record
VOX Detection
Video Setting
Note : Following items of camera setting will be disabled
when your mobile and camera are not on the same
network(SSID).
Keep all parts and accessories out of children's reach.
Fingerprints or dirt on the lens surface can adversely affect camera performance.
Avoid touching the lens surface with your fingers.
Should the lens become dirty, use a blower to blow off dirt and dust, or a soft,
dry cloth to wipe off the lens.
Keep the camera dry. Precipitation, humidity, and other liquids containing
will corrode electronic circuits.
Do not use or store in dusty, dirty areas.
Do not store in hot areas. High temperatures can shorten the life of electronic
and warp or melt certain plastics.
Do not store in very cold areas. When the system warms up (to its normal
temperature), moisture can form inside the case, which may damage electronic
circuit boards.
Do not attempt to open the case. Non-expert handling of the device may damage
the system.
Avoid dropping or strong shocks.
Operate this product using only the power supply included or provided as an accessory.
Do not overload electrical outlets or extension cords as this can result in fire or
electric shocks.
minerals
devices
Troubleshooting
If there is a microwave oven in use near the camera or Wi-Fi router,
remove the microwave oven or turn it off.
Make sure the camera and the Wi-Fi router are within range of each other.
The speed of video feed from the camera depends highly on
the speed of the connection you are using.
The Internet speed either from your Wi-Fi network or 3G/4G mobile network
has a high impact on the performance of the product. The faster and more
stable connection speed, the faster you can see the video from the camera.
Lower the video resolution and frame rate.
Video streaming is slow or lags
Make sure the power plug is pushed all the way in.
Make sure the camera is turned on and power/status LED glows green.
Make sure the camera and the Wi-Fi router are within range of each other.
Make sure your smartphone/tablet is connected to the Internet through
Wi-Fi or 3G/4G mobile network.
Cannot connect the camera to your smartphone/tablet through
Wi-Fi router or 3G/4G mobile network
Care and Maintenance
 Loading...