

Page 1
860E Users Manual
Thank you for purchasing 860E 66-Channel GPS Datalogger.
V1.0
a. Package Content
● 860E x 1
● USB to mini-USB cable x 1
● Strap x 1
● CD Tool x 1 (Software)
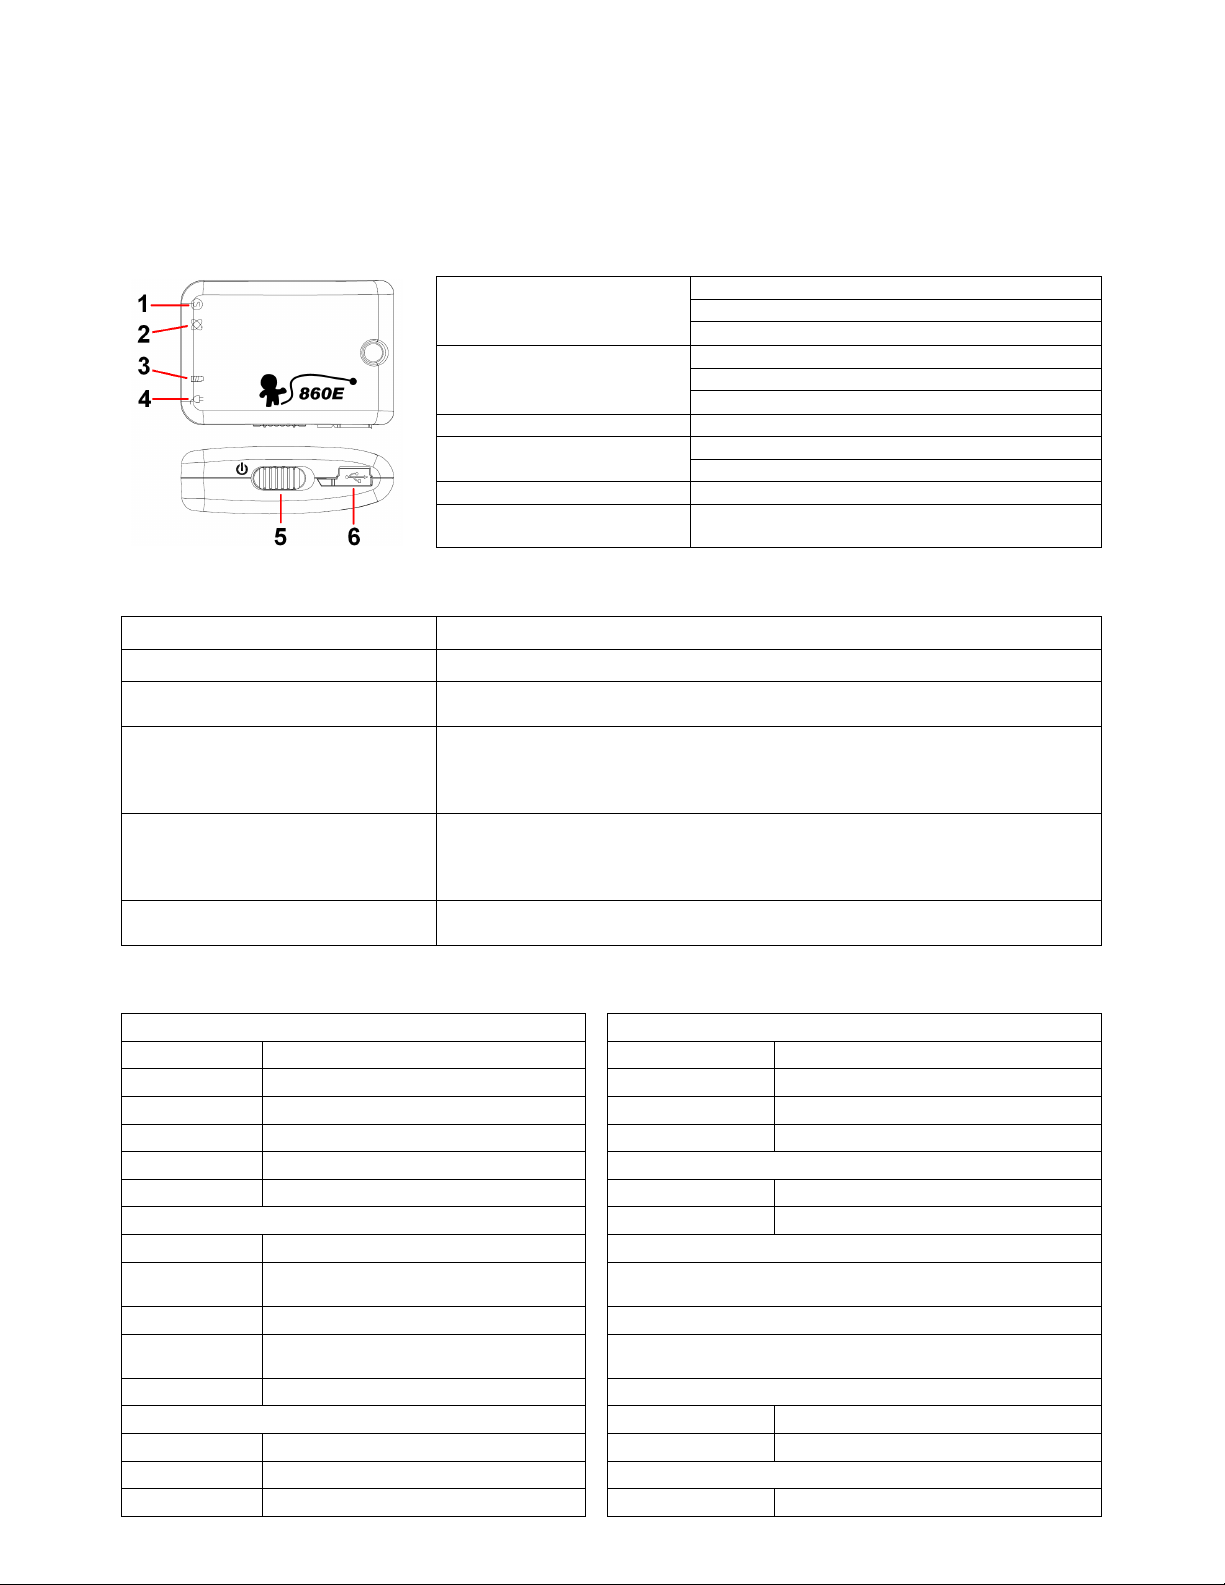
b. Appearance & Led indications.
Blink every 2 seconds = Logging
1. Log/Memory LED (RED)
3. Battery status LED (Red) Always ON = Low battery
4. Charge status LED (Green)
5. Power switch To turn ON/OFF the device
6. USB Port For power supply and data exchange
Always ON = Memory 90% occupied
Blink every 5 seconds = Sleep mode
Blink every 2 seconds = GPS fix
Always ON = Searching for Satellite 2. GPS LED (Orange)
OFF = Sleep mode
Always ON = Charging battery
OFF = Fully charged
c. Hardware function
Built-in MTK II GPS High performance GPS solution with A-GPS for instant fix less than 15 seconds.
Built-in 32Mb memory Capacity for up to 125,000 waypoints recording.
Built-in rechargeable Battery
Built-in motion sensor
(This function is turned on as default
and can be turned off by the provided
software.)
Built-in Mini USB port
Built-in Auto Gear function
Built-in 350mA Li-polymer battery for up to 11 hours operation time and 90 hours
standby time.
For automatically start/ stop logging and smart power management and waypoint
saving.
860E will enter sleep mode when it is static for 2 minutes and recover when motion
is detected.
For power charging and data exchange.
Use USB cable to connect to power source to charge the battery.
Connect to PC to download the logged data or upload the A-GPS EPO data.
*Connect to Laptop via USB cable to work as a wired GPS receiver.
Log time interval will be changed according to the speed detected by the Device.
Speed for each time interval can be programmed by the provided software.
d. Product Specification
General
GPS Chipset MTK 3329
Frequency L1, 1575.42MHz
C/A Code 1.023MHz chip rate
Channels 66-CH for tracking
Antenna Built-in patch antenna with LNA
Datum WGS-84
Performance Characteristic
Position Without aid: 3.0m 2D-RMS
Accuracy
Time 50 ns RMS
Velocity
Cold/Warm/Hot 35/33/1 sec, average
Altitude <18,000m
Velocity <515m/sec
Acceleration 4G
<3m CEP(50%)without SA(horizontal)
DGPS(WAAS,EGNOS,MSAS):2.5m
Without aid:0.1m/s,
DGPS(WAAS,EGNOS,MSAS):0.05m/s
Dynamic condition
Operating -10°C to +60°C
Storage -20°C to +80°C
Charging -10°C to +45°C
Relative Humidity 20% to 80% non-condensing
Charging time 1.5hrs (Typical)
Operation Time 11 hours
NMEA-0183 (V3.01) - GGA, GSA, GSV, RMC (default)
Data bit: 8, stop bit:1 (Default), Baud rate: 115200
RCR, Date, Time, Fix valid, Latitude, Longitude, Altitude,
Speed, Heading
Dimension 46 x 32 x 14.7mm
Weight 22g
Certification CE / FCC / C-tick
Environmental
Power
Protocol
Log data
Physical
Others
Page 2
e. Setup your 860E
Install the software utility and driver for 860E. (System requirement)
Minimum Configuration Recommended Configuration
- Windows XP
- Pentium 3, 500Mhz
- 128M RAM
- 400MB disk space
- Network speed: 128Kbits/sec
- 3D-capable video card with 16Mbytes of VRAM
- 1024x768, "16-bit High Color" screen
- Windows XP, or Vista
- Pentium 4 2.4GHz+ or AMD 2400xp+
- 1G RAM
- 2 GB of free disk space
- Network speed: 768 Kbits/sec or better (DSL/Cable)
- 3D-capable video card with 32 MB of VRAM or greater
- 1280x1024, "32-bit True Color" screen
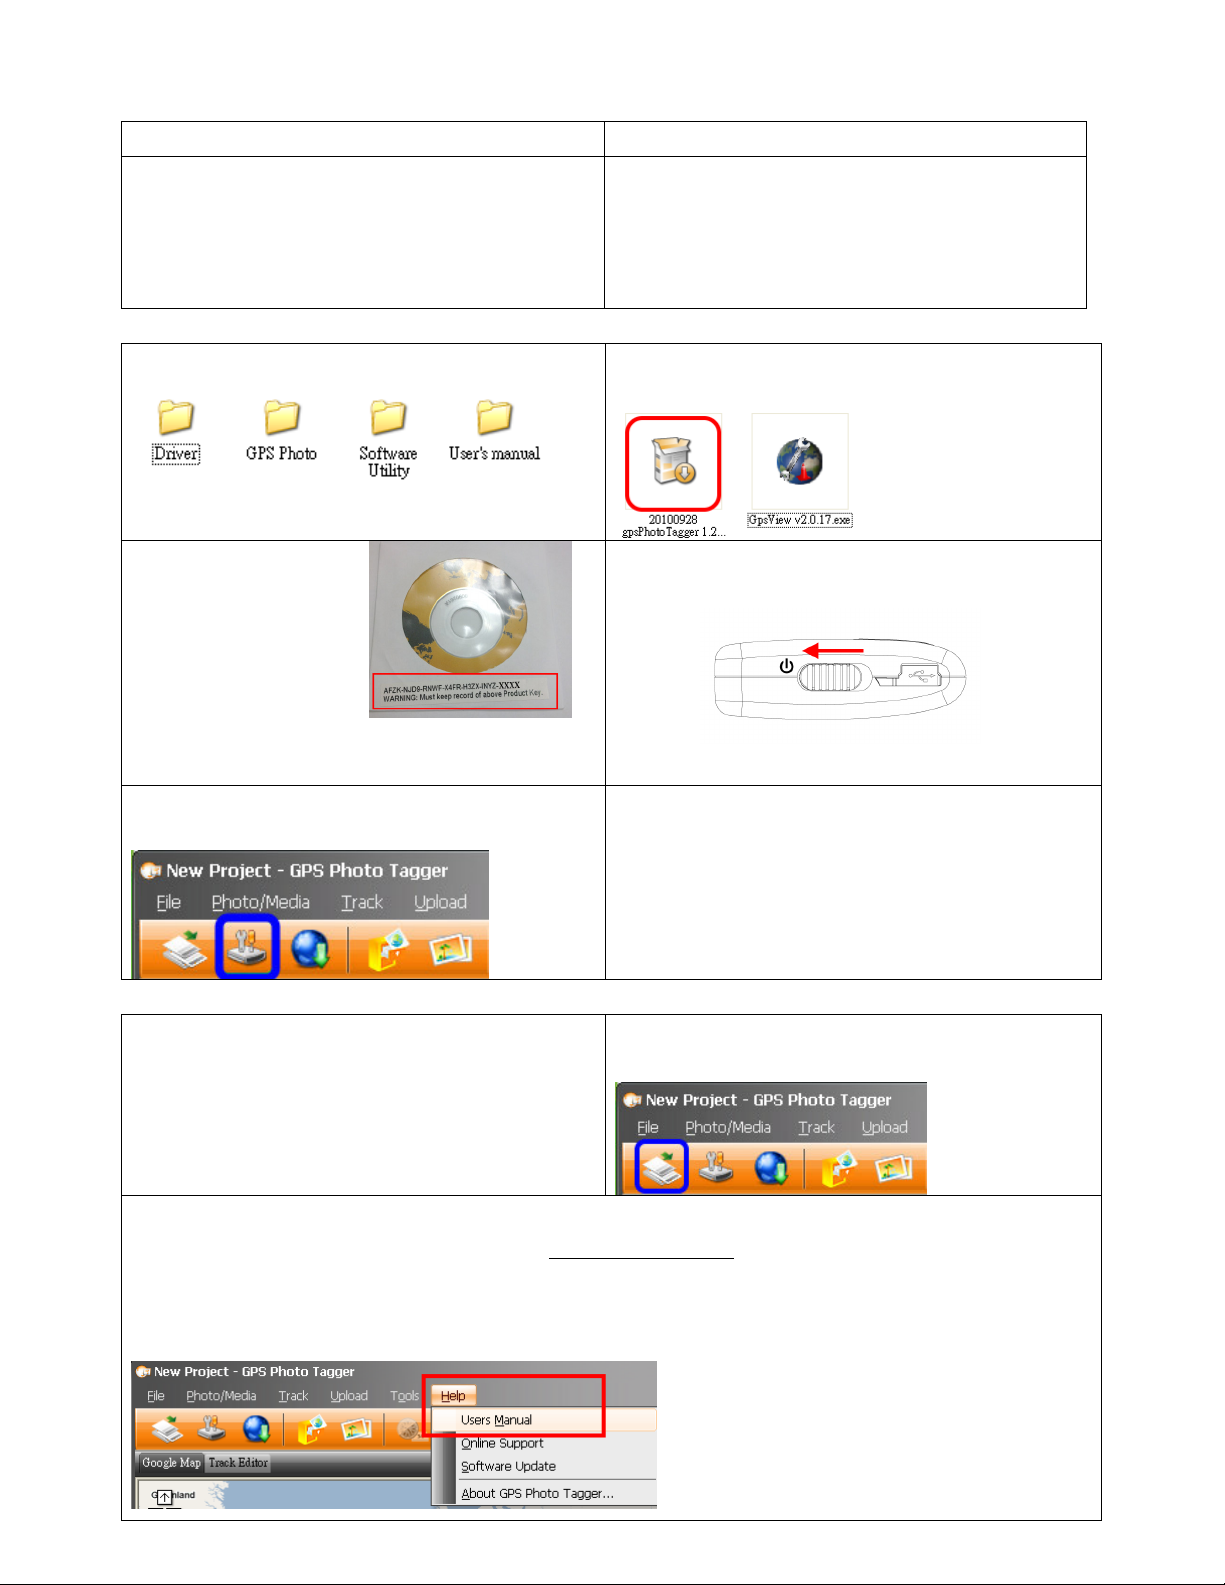
f. How to connect 860E to your PC
Step1.
Find the software in the CD come with the package.
Step2.
Double click on the phototagger in the software utility folder
and follow the process to finish the installation.
Step3.
User will be required to
input the product key of
phototagger at first time use.
Product key can be found on
the envelope of CD come
with the package.
** Note! Please keep the product key in a safe place. **
Step5.
Open phototagger and click on the “config GPS” button
show in the below circled area to setup the device.
g. How to read data from the device.
Step1.
Connect 860E to your computer with USB cable come with
package and turn on the power of the device.
Step4.
Connect 860E to your computer with USB cable come with
package and turn on the power of the device.
Step6.
Remove USB connection after finish the setup and switch on
the power again and then you can enjoy recording of your trip.
Step2.
Open phototagger and click on the “Read from device” button
show in the below circled area to start downloading data.
Step3.
[Note] To display track points on Google Earth, your PC must have Network to access the internet and Google Earth
application. Google Earth installation (Download from http://earth .google.com/)
[Notes and Warning] If you have recorded more than 125,000 waypoints in your 860E, it may take an entire resource of your
computer to show all the logged data in Google Earth. Therefore, with not enough RAM capacity the computer may hang up
(a system frozen).
For detail use of phototagger --- Please refer to Help > User Manual show in the below circled area.
Page 3
h. Helpful tips
● It’s better to turn off 860E when you don’t use it, otherwise it might still keep recording data.
● Some vehicles having heavy metallic sun protecting coating on windshields may affect GPS signal receptions.
● Driving in and around high buildings may affect GPS signal receptions.
● Driving in tunnels or indoor park garage may affect signal receptions.
● In general, 860E performs best in open space where it can see clear sky. Also weather will affect GPS reception –
rain & snow contribute to worse sensitivity.
● For the 1st time you use the 860E, it will take 1 to 3 minutes to obtain the satellite constellation information and
fix your position, this is called “Cold Start”.
● If your 860E can’t fix your position for more than 20 minutes, we suggest you change to another spot with open
space and then try again.
*Google Earth is a trademark of Google.
[Note] When you use AGPS function, we suggest using GpsView to download the AGPS data via USB cable.
AGPS data will expire after 6 days.
i. GpsView
The GpsView program only supports Microsoft Windows XP, Vista and Win 7 OS.
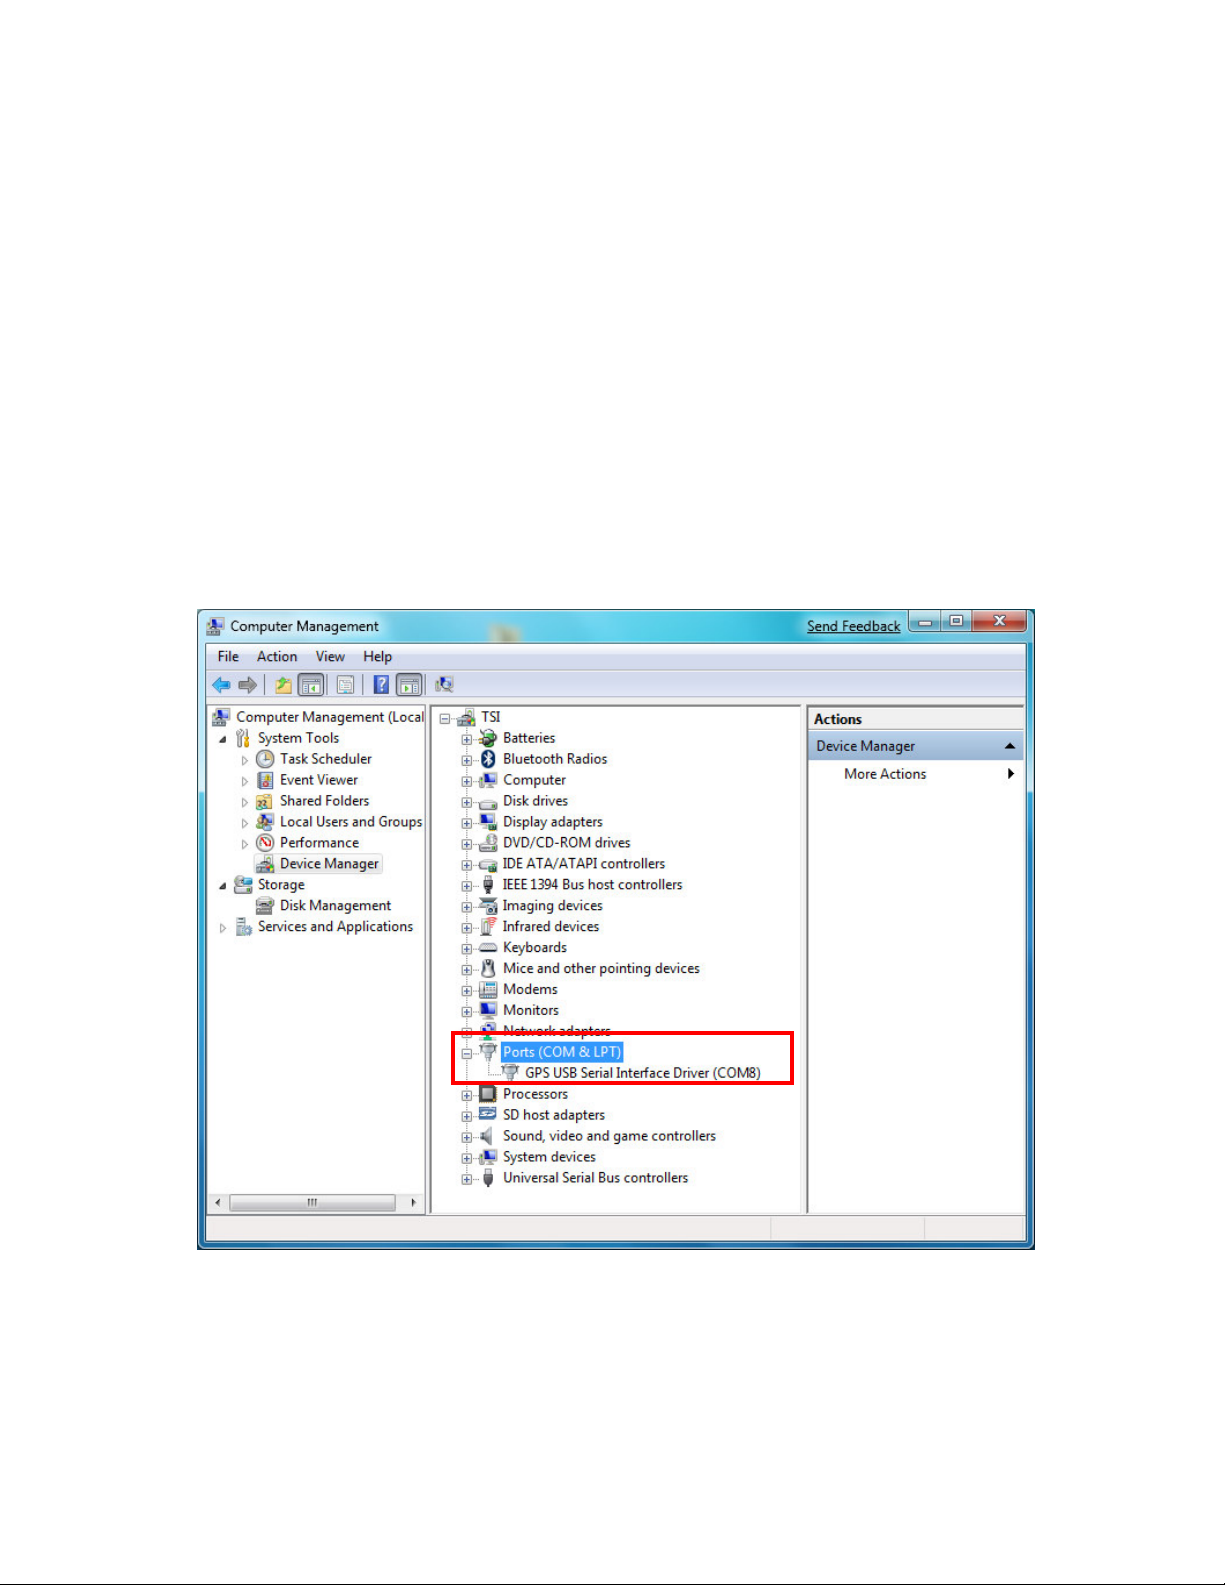
i-1. Driver Installation
Connect 860E to PC with power turn on and then go to USB driver folder to click “InstallDriver.exe” to start the installation
process. The device manager will assign a COM port for 860E after USB driver has been successfully installed.
i-2. GpsView software
Open GpsView software and select correct COM port and Baud Rate and then click “On” button to establish the
communication between 860E and PC. If the connection is successful, the NMEA stream will keep showing.
Page 4

NMEA sentence
Cold, warm and hot
start test button
Satellite reception
i-3. Configuration
Satellite No.
In Setup Page, Output frequency of each NMEA can be changed from 1second to 5 seconds and Fix update–Rate can be
changed from 1 time to 5 times per second. DGPS like WASS, EGNOS, MSAS can be enable or disable. Here also allow users
to update the AGPS and record the NMEA sentence.
NMEA output
setting
Record NMEA
sentence
Update rate
setting
Firmware version &
name
SBAS setting
For example:
NMEA output setting + Fix update-rate =
GGA(1), GSA(1), GSV(1), RMC(1) +
GGA(1), GSA(1), GSV(1), RMC(1) +
GGA(1), GSA(1), GSV(1), RMC(1) +
GGA(1), GSA(1), GSV(1), RMC(1) +
GGA(1), GSA(1), GSV(1), RMC(1) +
Note:
1. GGA(1) means GGA sentence output every 1 second, GGA(2) output every 2 seconds.
2. GGA(1/2) means GGA sentence output 2 times per second, (1/5) output 5 times per second.
1 =
2 =
3 =
4 =
5 =
GGA(1/2), GSA(1/2), GSV(1/2), RMC(1/2)
GGA(1/3), GSA(1/3), GSV(1/3), RMC(1/3)
GGA(1/4), GSA(1/4), GSV(1/4), RMC(1/4)
GGA(1/5), GSA(1/5), GSV(1/5), RMC(1/5)
Real NMEA output
GGA(1), GSA(1), GSV(1), RMC(1)
Page 5

i-4. Update AGPS
Step1. Make sure you have network available for accessing the internet.
Step2. Connect 860E to PC and then open GpsView to establish the communication.
Step3. Go to “Setup” page
Step4. Click “Update” button under AGPS to update the AGPS data. The program will connect to the AGPS server and
download the data automatically. You can also check the valid time of AGPS by clicking Query. Clear AGPS data by clicking
Reset.
Page 6

j. Free software from partners.
- locr GPS Photo software.
Please find the installation file for Windows in CD tool, or go to http://www.locr.com for further information.
- HoudahGeo
Please find the installation file for Mac in CD tool, or go to http://www.houdah.com for further information.
Page 7

k. Certification
FCC Notices
This device complies with part 15 of the FCC rules. Operation is subject to the following two conditions:
1. This device may not cause harmful interface, and
2. This device must accept any interference received, including interference that may cause
undesired operation.
FCC RF Exposure requirements:
This device and its antenna(s) must not be co-located or operation in conjunction with any other antenna or transmitter.
NOTE: THE MANUFACTURER IS NOT RESPONSIBLE FOR ANY RADIO OR TV INTERFERENCE CAUSED BY
UNAUTHOURIZED MODIFICATION TO THIS EQUIPMENT. SUCH MODIFICATIONS COULD VOID THE USER’S
AUTHORITY TO OPERATE THE EQUIPMENT
CE Notice
Is herewith confirmed to comply with the requirements set out in the Council Directive on the Approximation of the Laws of
the Member States relating to Electromagnetic Compatibility (89/336/EEC), Low-voltage Directive (73/23/EEC) and the
Amendment Directive (93/68/EEC), the procedures given in European Council Directive 99/5/EC and 89/3360EEC.
l. Warranty information
Thank you for your purchase of GPS product from the company.
The company warrants this product to be free from defects in materials and workmanship for one year from the date of
purchase. The warranty for accessories is six months. The stamp of distributor or a copy of the original sales receipt is required
as the proof of purchase for warranty repairs. The company will, as its sole option, repair or replace any components, which
fail in normal use. Such repair or replacement will be made at no charge to the customer for parts or labor. The customer is,
however, responsible for any transportation costs.
This warranty does not cover failures due to abuse, misuse, accident or unauthorized alteration of repairs. The company
assumes no responsibility about products which have been improperly used, abused, damaged due to accident or natural
disaster, or damaged due to unauthorized disassembly, repair or modification.
 Loading...