


TRANSTHERM STUDIO INSTALLATION INSTRUCTIONS
INTEGRATED STUDIO MODEL
Instructions for integration (fitting into cupboard with cupboard door in front of
wine cabinet door) of Studio integrated model.
Cabinet dimensions H 630mm – 650mm(20mm adjustable feet)
W 540mm
D 557mm
1. This cabinet requires 10mm clearance both sides so minimum cut out is
560mm for width
2. Minimum height is 640mm as this allows 10mm adjustment of feet for
leveling and for fastening of upper securing plate.
3. Minimum depth measurement is 560mm as the Studio has feet at the rear
which protrude 35mm to ensure that the wine cabinet can not be installed
up against the cupboard/wall at the rear – so with the 560mm depth this
allows 35mm clearance for air circulation
4. The base of the cupboard should be no deeper than 525mm,leaving a
35mm gap at the rear for air circulation up the back of the wine
cabinet.This base section must be elevated off the floor to allow a
ventilation grill to be fitted in kick board.
5. A ventilation grill should be fitted in the kick board to allow minimum
200cm2 airflow.
6. A ventilation grill should also be fitted in the bench top,rear wall at the top
or either side of the cupboard at the top to allow the heat generated by the
wine cabinet to rise and escape.
7. This cabinet has a power switch located on the control panel so power
point location is not critical.
8. This cabinet requires a standard 240 volt/10 amp power point.
9. As with most appliances of today , this cabinet has sensitive electronic
components which are susceptible to damage through lightning and
electricity supply faults.It is therefore advised to use a power surge
protector to avoid problems of this nature.
10. Please see below diagrams for instruction and clarification on installation
procedures including fitting of sliding mechanism and upper securing
plate.
Installing your wine cabinet in a fitted cupboard
.
Ensure that the cupboard base is stable, so as not to interfere with the cabinet.
It is important that there is a space from the bottom to the top behind the cabinet.
In the event that another cabinet is to be installed on top of the one containing
the Transtherm unit, make sure that this space continues right to the top.
Adjusting the feet:
-Tighten the two back feet to the maximum as previously indicated.
Pre-setting the front feet:
- Tighten or loosen the front feet to bring the cabinet level.

2 - Installing the upper securing plate:
Remove the two black plastic bungs. Position and secure the plate using the
two M5X15 screws. Remove the hinge cover.
3 - Placing inside the cupboard:
Position the cabinet inside the cupboard, against the right hand side if the door
is left hand opening, or vice versa for right hand opening.
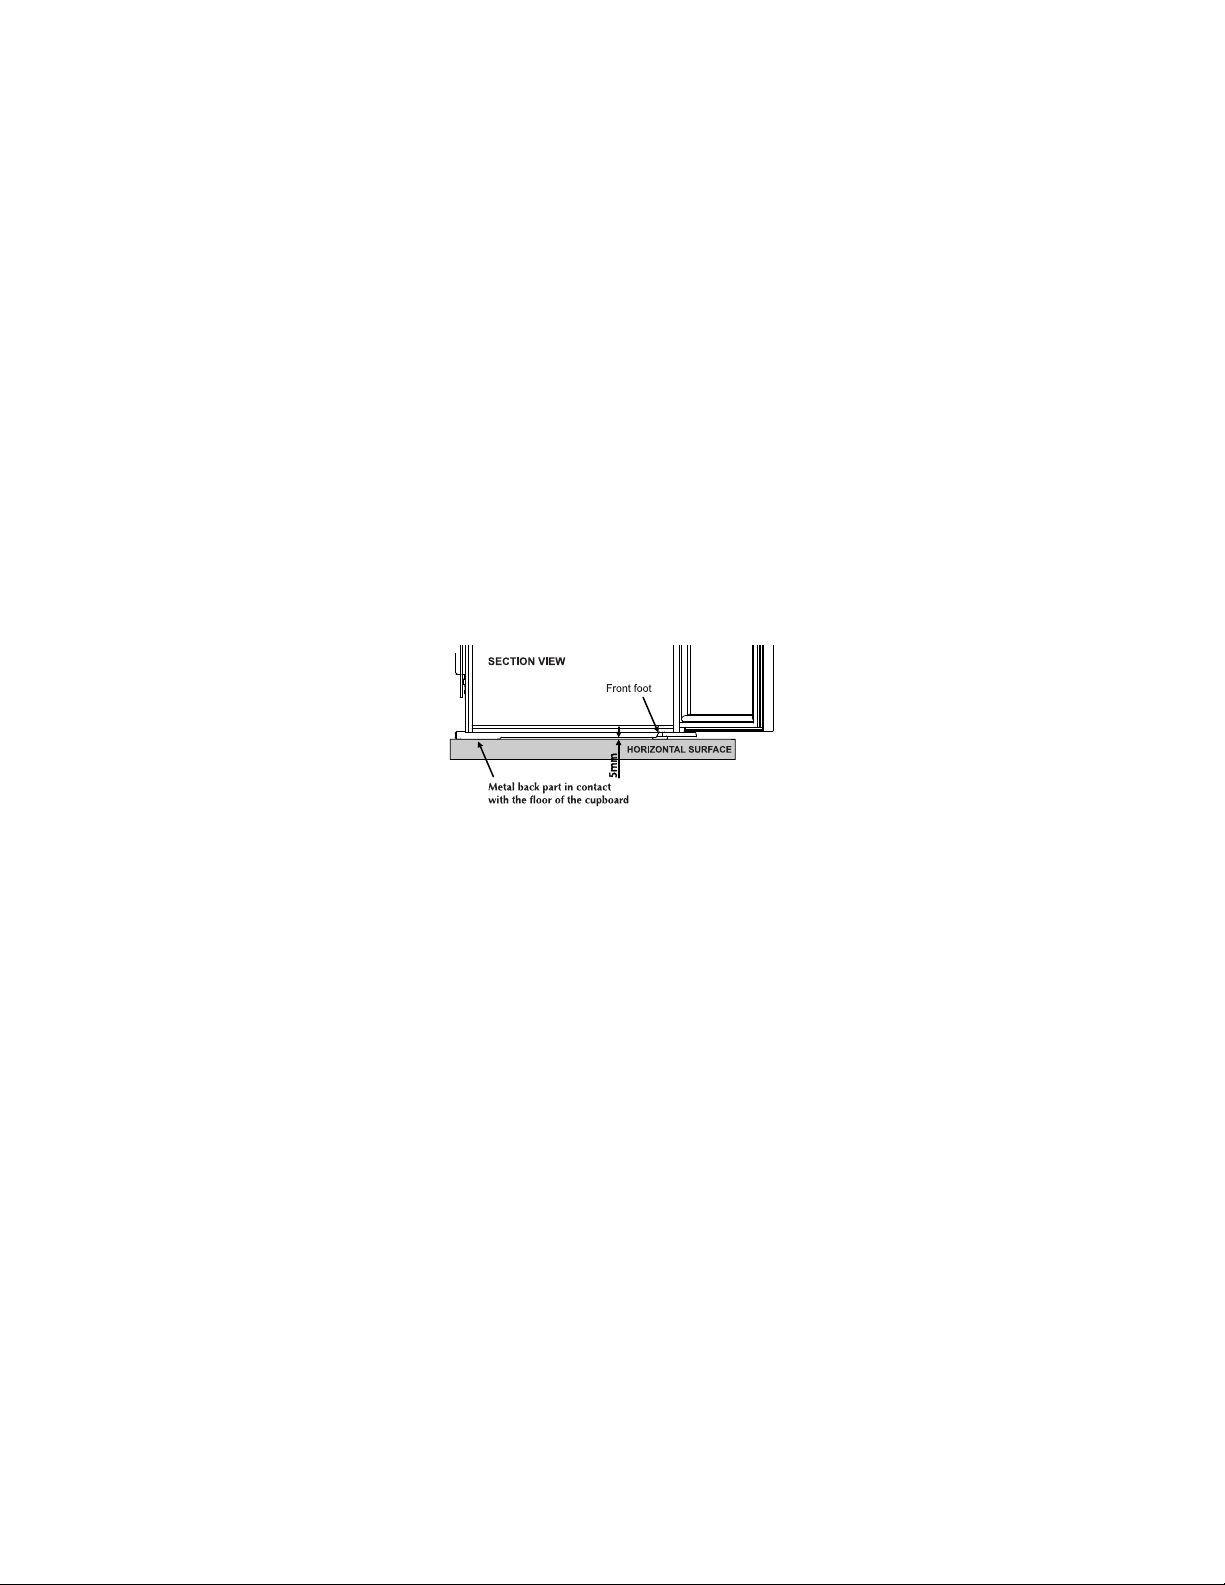
Check for stability , making sure the 2 front feet are in contact with the floor of
the cupboard, thus avoiding any warping of the cabinet body once loaded. If
this is not the case, adjust the feet until contact is achieved. The cabinet must
be located in such a way that the front is a maximum of 8mm from the front of
the cupboard (see diagram on page 7). The cabinet must then be secured using
the upper securing plate (2 cruciform head screws). Leave at least 1mm play
between the cupboard upright and its door, to ensure cabinet sealing.
4 - Securing the accompanying hinge:
Secure the accompanying hinge to the doors of the cabinet and cupboard
(see diagram page 7).
English - P6

27,5
19,5
5
150
Securing the hinge
The line of the 2 holes must be
perfectly parallel with the
edge of the frame.
1 - Screw the hinge guide onto
the door of the wine cabinet.
2 - Open the door of the wine
cabinet to 90°, slide the rail
onto the guide and screw the
rail horizontally onto the
inside of the cupboard door.
46
30
9
36
max. 8
guide
Wine
cabinet door
Cupboard
door

Ventilation
2
200cm
each
Ventilation
200cm
2
50mm
50mm
500mm
Ventilation Grid
560 min
640 min
200cm2 min
560 min
50mm
Hinge Thickness
15mm max
525mm
Slide Support
Hinge
Cellar Depth 555mm total
door and hinge included
Joinery Dimension & Cut Out
Ventilation
400cm
2
Ventilation
200cm2
50mm
50mm
640 min
Ventilation Grid
200cm
2
min
560 min
Hinge Thickness
15mm max
560 min
525mm
Slide Support
Hinge
Cellar Depth 555mm total
door and hinge included
Joinery Dimension & Cut Out
 Loading...