

Transmille 5080, 6080, 6080PLUS Operation Manual


Version 4.10 : March 2010
All product names are trademarks of their respective companies
5080 / 6080 / 6080PLUS
Portable Appliance Testers
Operation Manual

PORTABLE APPLIANCE TESTER OPERATION MANUAL
TRANSMILLE LTD. PAGE 2
TABLE OF CONTENTS
5080 / 6080 / 6080PLUS PAT OPERATION GUIDE..............................................................................................3
S
AFETY AND WARNINGS........................................................................................................................................3
G
ENERAL DESCRIPTION OF 5080, 6080 & 6080PLUS PORTABLE APPLIANCE TESTERS.........................................3
T
ESTS PERFORMED AND SAVED TO MEMORY...........................................................................................................4
F
RONT PANEL CONTROLS & CONNECTORS - 5080.................................................................................................5
F
RONT PANEL CONTROLS & CONNECTORS - 6080.................................................................................................6
F
RONT PANEL CONTROLS & CONNECTORS – 6080 PLUS .....................................................................................7
O
PERATING THE PAT – 5080 / 6080 ONLY ...........................................................................................................8
O
PERATING THE PAT – 6080PLUS ONLY.............................................................................................................9
A
DDITIONAL FUNCTIONS – 6080 / 6080PLUS .....................................................................................................12
R
ECHARGING ......................................................................................................................................................13
U
SING THE PAT SETTING MENU ..........................................................................................................................13
U
SING THE PAT ADVANCED SETTINGS MENU (6080 / 6080PLUS ONLY).............................................................14
5080 S
PECIFICATIONS.........................................................................................................................................15
6080 / 6080PLUS S
PECIFICATIONS....................................................................................................................16
TRANSMILLE PRODRS DOWNLOAD & REPORTING SOFTWARE (OPTION)...............................................17
I
NTRODUCTION ....................................................................................................................................................17
I
NSTALLING THE SOFTWARE.................................................................................................................................17
R
UNNING THE SOFTWARE FOR THE FIRST TIME ......................................................................................................18
M
AIN MENU.........................................................................................................................................................20
D
OWNLOAD APPLIANCES FUNCTION ....................................................................................................................21
P
RINT REPORT(S) FUNCTION ...............................................................................................................................23
P
RINT TEST LABELS FUNCTION............................................................................................................................32
U
PLOAD APPLIANCES FUNCTION (6080PLUS ONLY)...........................................................................................33
E
DIT APPLIANCE FUNCTION (6080PLUS ONLY)...................................................................................................35
S
ETUP FUNCTION ................................................................................................................................................37
GUARANTEE AND SERVICE..............................................................................................................................46
PORTABLE APPLIANCE TESTER OPERATION MANUAL
TRANSMILLE LTD. PAGE 3
5080 / 6080 / 6080PLUS PAT Operation Guide
Safety and Warnings
1: For operator safety please read this manual before using the PAT.
IMPORTANT NOTE
Even though the PATs are battery powered it must be understood that
dangerous voltages
are present on the mains sockets when testing. Appliances
which have damaged cables etc. must be failed on the ‘visual test’, which will
prevent the PAT from proceeding to the tests which apply high voltages.
2: Only a competent person with an understanding of PAT testing should use the
Transmille range of PATs.
3: The calibration and servicing of the PATs must only be carried out by an Authorised agent,
appointed by Transmille Ltd. Unauthorised servicing will invalidate the warranty.
4: The 5080, 6080 & 6080PLUS comply with the safety standard IEC 1010. When using the PATs the
operator must take all necessary safety precautions to ensure that there is no risk of shock when
testing an appliance. If in doubt about how to safely perform an electrical safety test then advice
must be taken before proceeding.
5: Safety markings on the front Panel.
This warning indicates high voltages may be present on the socket(s) of the
tester and suitable precautions should be taken.
This marking indicates that the socket(s) on the PAT should only be used for
appliance testing in accordance with manufacturer guidelines.
General Description of 5080, 6080 & 6080PLUS Portable Appliance Testers
Transmille PAT testers offer an easy to use solution for the testing of electrical safety of both
Class 1 and Class 2 appliances.
Both models share the same main features of being both easy to use, very portable and battery powered.
The results are displayed both graphically on an easy to read LED bar graph and digitally on a LCD display. The
pass/fail limits are scaled automatically from a stored table in the memory based on the type of test (Class 1 or
2) the earth bond current used & the lead length selected.
An optional software package from Transmille allows the PAT to be set to save the results of the tests
to the PATs internal memory under the label ID number. The results can then easily be downloaded
from the PAT by the software to the PC for printing and long term storage.
By selecting ‘new location’ on the PAT menu or noting the first and last Label ID number used at each location
the address for each site tested can be easily entered on the PC back in the office. Reports for different
customers/locations can then be viewed and printed as required
Note : The following applies to 5080/6080 Only
The ‘appliance’ menu and ‘visual check’ test are inhibited when the PAT memory
function is disabled - the appliance list alone can be enabled from the PAT set-up menu.

PORTABLE APPLIANCE TESTER OPERATION MANUAL
TRANSMILLE LTD. PAGE 4
Tests performed and saved to memory
Class 1 Appliance Testing
1: Appliance type
2: Visual test
3: Fuse test
4: Earth bond test at either 100mA (IT equipment), 10A or 25A.
5: Insulation resistance test at minimum 250V / 500V
(depending on setting selected :option for IT equipment)
6: Leakage test at 230V nominal.
After the tests are completed the label ID number for that appliance is displayed. The results of the test are then
saved to the internal memory under the appliance test number along with date, earth bond current used and
lead length for download later (applies if using PAT with memory enabled in conjunction with software)
Class 2 Appliance Testing
1: Appliance type
2: Visual test
3: Fuse test
5:Insulation resistance test at minimum 500V (option for IT equipment)
6:Leakage test at 230V nominal.
The results are saved as per a class 1 test.
230V / 110V Selection (Models 6080 / 6080PLUS Only)
Models 6080 / 6080PLUS PATs allow tests to be performed at either 110V or 230V, depending on the mode
selected (see section ‘operating the PAT’ for details)

PORTABLE APPLIANCE TESTER OPERATION MANUAL
TRANSMILLE LTD. PAGE 5
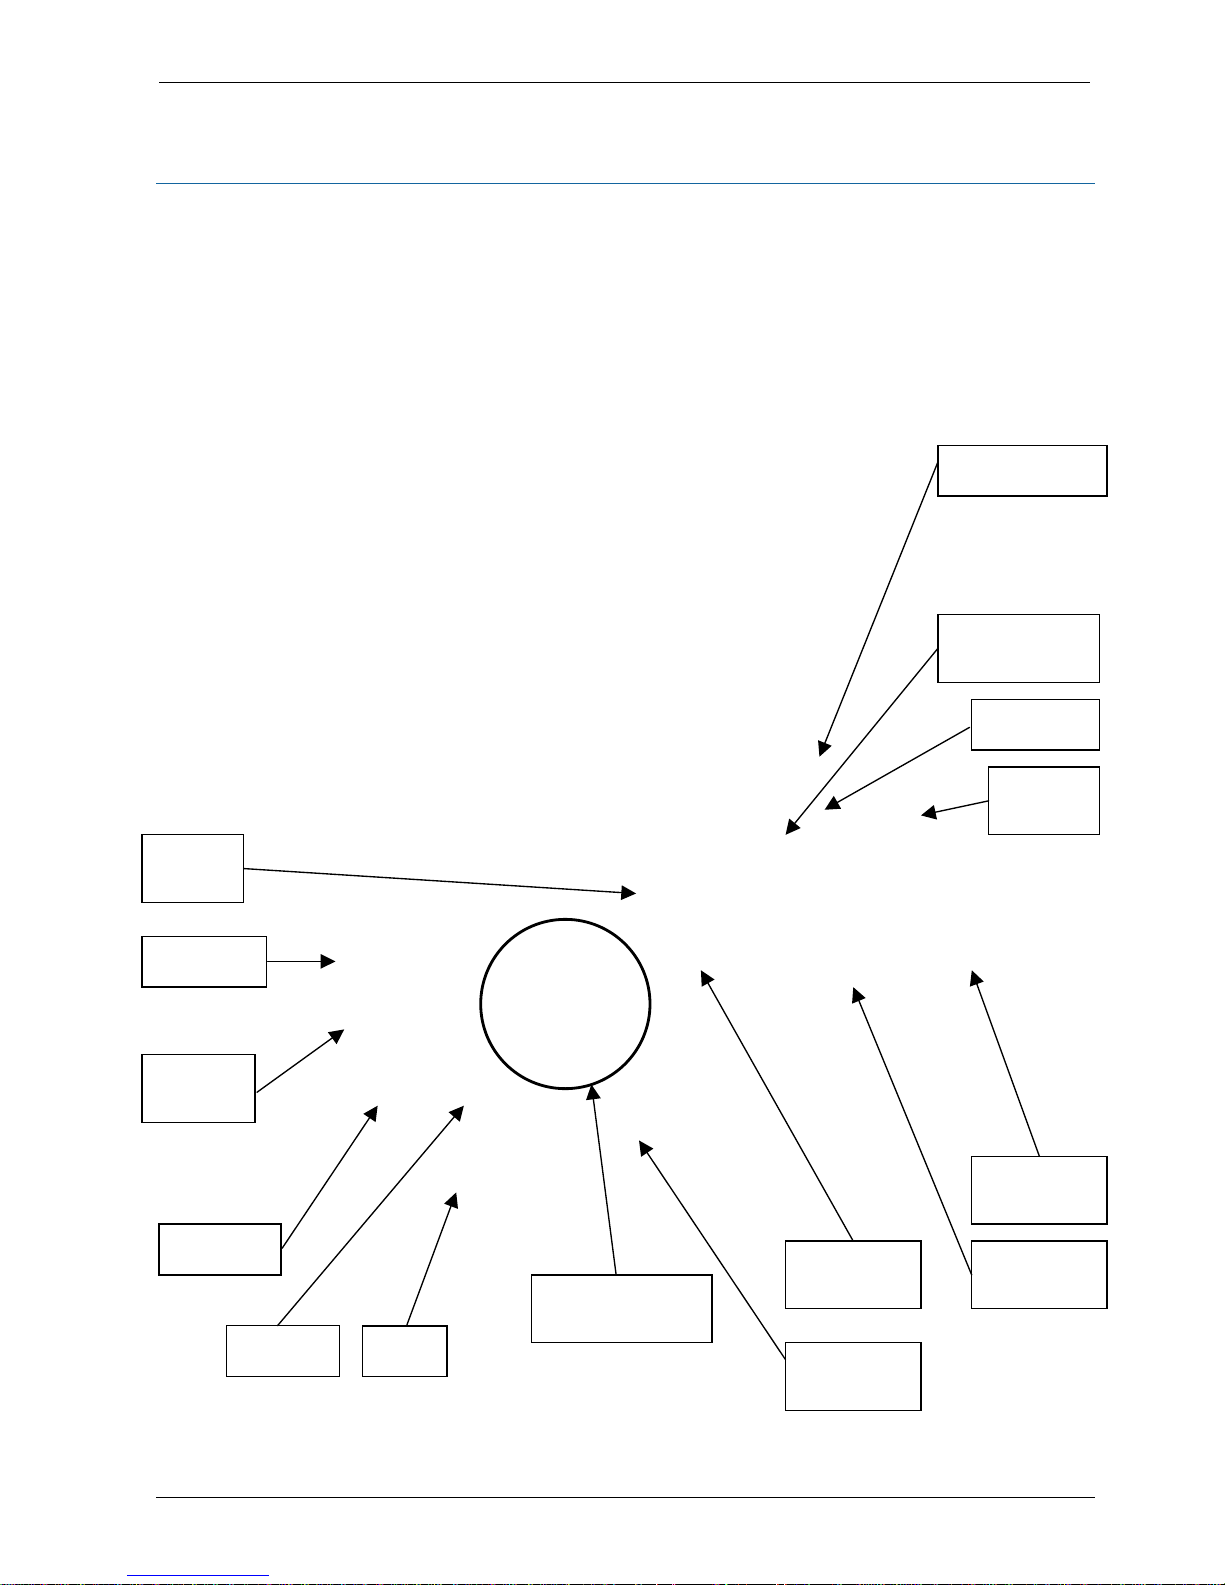
Front Panel Controls & Connectors - 5080
CLASS 1
FUNCTION
CLASS 2
FUNCTION
LCD
DISPLAY
LEAD LENGTH
SLIDER CONTROL
LED BATTERY
LEVEL INDICATION
RECHARGE
SOCKET & LED
INDICATOR
DATA PORT
FUSE TEST & MAIN
TEST FUNCTION
LED INDICATORS
PASS/FAIL LED
INDICATORS
A
PPLIANCE
TEST SOCKET
EARTH BOND
CURRENT
OUTPUTS
PORTABLE APPLIANCE TESTER OPERATION MANUAL
TRANSMILLE LTD. PAGE 6
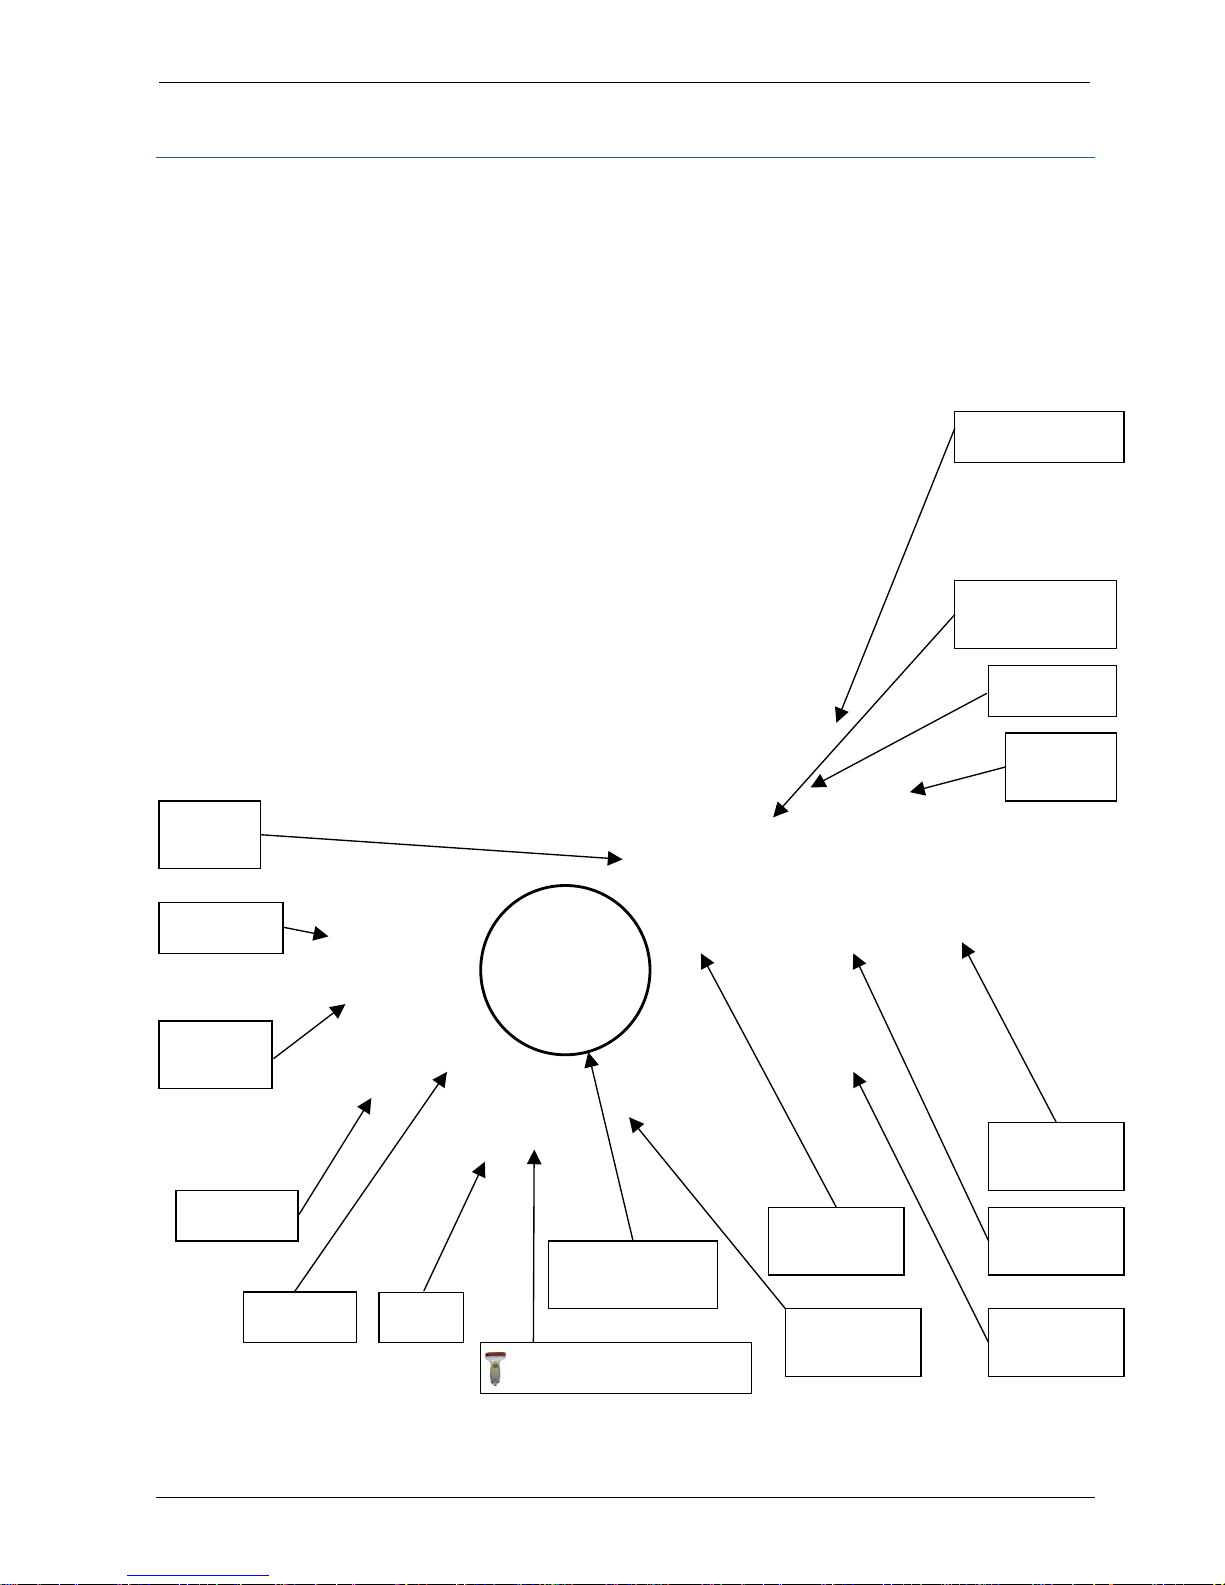
Front Panel Controls & Connectors - 6080
CLASS 1
FUNCTION
CLASS 2
FUNCTION
LCD
DISPLAY
LEAD
LENGTH
SLIDER
LED BATTERY
LEVEL INDICATION
RECHARGE
SOCKET &
LED
DATA
PORT
FUSE TEST & MAIN
TEST FUNCTION
LED INDICATORS
PASS/FAIL
LED
INDICATOR
230V
A
PPLIANCE
TEST SOCKET
EARTH BOND
CURRENT
OUTPUTS
FUSE TEST
FUNCTION
SELF
CHECK
FUNCTION
LEAD TEST
IEC SOCKET &
TEST BUTTON
110V
A
PPLIANCE
TEST SOCKET
PORTABLE APPLIANCE TESTER OPERATION MANUAL
TRANSMILLE LTD. PAGE 7
Front Panel Controls & Connectors – 6080 PLUS
CLASS 1
FUNCTION
CLASS 2
FUNCTION
LCD
DISPLAY
LEAD
LENGTH
SLIDER
LED BATTERY
LEVEL INDICATION
RECHARGE
SOCKET &
LED
DATA
PORT
FUSE TEST & MAIN
TEST FUNCTION
LED INDICATORS
PASS/FAIL
LED
INDICATOR
230V
A
PPLIANCE
TEST SOCKET
EARTH BOND
CURRENT
OUTPUTS
FUSE TEST
FUNCTION
SELF
CHECK
FUNCTION
LEAD TEST
IEC SOCKET &
TEST BUTTON
110V
A
PPLIANCE
TEST SOCKET
OPTIONAL KEYBOARD /
BARCODE SCANNER SOCKET
BUILT-IN
QWERTY
KEYBOARD

PORTABLE APPLIANCE TESTER OPERATION MANUAL
TRANSMILLE LTD. PAGE 8
Operating the PAT – 5080 / 6080 Only
1: Connecting the appliance
Plug in the appliance to be tested and make sure it is switched on.
For the model 6080 plug into appropriate 230V or 110V socket as required (see below for 230V/110V selection).
2: Select the Earth bond current
Plug the earth bond lead into the appropriate earth bond current socket on the PAT for the type of appliance to
be tested. Note this should be done even for Class 2 appliances.
For example use the 100mA socket for IT , office , audio & video equipment etc typically fitted with 2A fuses,
use 10 Amps for appliances with 5A fuses, lights, Power tools etc, and use the 25Amps for appliances fitted with
13A fuses like heaters, kettles etc.
3: Connect the earth bond clip to the appliance
Clip the earth bond lead to any metal part of the appliance. For a class 2 appliances with some parts of the case
being conductive the appliance could be wrapped in tin foil with the earth bond clip to the foil. Although an earth
bond test is not performed on a class 2 appliance, the insulation & leakage test will still detect a fault if there is
any connection from live to any part of the outer casing of the appliance.
4: Set the mains lead length
Set the slider control on the PAT to the length of the appliance mains lead.
5: Press the Class 1 or Class 2 test button on the tester.
For the model 6080 press and release for 230V test or press and hold for 1 second to select 110V. Check
battery indicator (recharge if necessary).
6: Select the Appliance type. Only when enabled **
The LCD displays a list of appliance types; use the ‘NO’ (class 2) key to scroll round the list. Use the ‘YES’
(class 1) key to select when the correct type is displayed.
7: Visual Check.
The LCD display prompts for either a ‘PASS’ – select with the ‘YES’ (class1) Key
or ‘FAIL’ using the ‘NO’ (Class 2) key.
8: Fuse Test
The fuse test checks for continuity between the live and neutral lines.
If the fuse test fails check the appliance is switched on and the fuse is OK, then use the retry option.
Note : Some appliances will always fail this check, in which case select Y to the ignore fuse check.
9: Earth Bond Resistance, Insulation Resistance and Leakage Current
These tests will run automatically in sequence displaying the results on the LED indicators.
10: Appliance Label Number
On completion of the tests, the PAT displays the label number to attach to the appliance. The results for this test
will be stored against this label number.
11: Viewing Results
To see the measured values on the LCD display, choose YES when the Show Results message is displayed.
Note : this message is only displayed for 2 seconds.
** See Software section
VIEW RESULTS (Y/N
)
APP. NUMBER XXXXXXXX
VISUAL CHECK OK Y/N
FUSE TEST -PASS
RE-TEST Y/N
IGNORE FAIL Y/N
EARTH BOND PASS INS RES PASS
L
EAKAGE PASS

PORTABLE APPLIANCE TESTER OPERATION MANUAL
TRANSMILLE LTD. PAGE 9
Operating the PAT – 6080PLUS Only
1: Connecting the appliance
Plug in the appliance to be tested and make sure it is switched on.
For the model 6080 plug into appropriate 230V or 110V socket as required (see below for 230V/110V selection).
2: Select the Earth bond current
Plug the earth bond lead into the appropriate earth bond current socket on the PAT for the type of appliance to
be tested. Note this should be done even for Class 2 appliances.
For example use the 100mA socket for IT , office , audio & video equipment etc typically fitted with 2A fuses,
use 10 Amps for appliances with 5A fuses, lights, Power tools etc, and use the 25Amps for appliances fitted with
13A fuses like heaters, kettles etc.
3: Connect the earth bond clip to the appliance
Clip the earth bond lead to any metal part of the appliance. For a class 2 appliances with some parts of the case
being conductive the appliance could be wrapped in tin foil with the earth bond clip to the foil. Although an earth
bond test is not performed on a class 2 appliance, the insulation & leakage test will still detect a fault if there is
any connection from live to any part of the outer casing of the appliance.
4: Set the mains lead length
Set the slider control on the PAT to the length of the appliance mains lead.
5: Press the Class 1 or Class 2 test button on the tester.
Press and release for 230V test or press and hold for 1 second to select 110V.
Check battery indicator (recharge if necessary).
If keyboard mode is enabled (default) then follow steps 6-14 otherwise follow steps 15-19
6: Enter ASSET No.
Asset Found
Enter or barcode scan the asset/appliance number.
If recognised PAT will display :
Press “Y” to Immediately start the PAT tests (Step 15)
Press “N” if you need to change any of the details for the Asset,
For example, an item may have moved to a different site or room.
The display will briefly show “POST CODE?”, then change to the stored
Postcode for this Asset, the postcode can now be changed as needed.
The same situation will now be repeated for each of the following entries:
Site, Location, Description, Manufacturer, Model Number, & Serial Number
Which can all be changed as needed.
Press “ENTER” when done to move on to the next entry.
Note : “Y” or “N” above can be either those on the keyboard or
the test buttons “Class 1” for Yes or “Class 2” for No.
ENTER ASSET No.
ASSET FOUND
TEST-Y EDIT
-
N

PORTABLE APPLIANCE TESTER OPERATION MANUAL
TRANSMILLE LTD. PAGE 10
Asset Not Found (New Asset)
If a new asset/appliance PAT will display
Press “Y” if you are at the same physical Location (i.e. “Room 1”).
6080Plus will now show the Postcode, Site & Location from the previous test.
Then you can enter the Description, Manufacturer, Model Number,
Serial Number & Retest Period, as normal.
Press “N” if you have moved to a NEW Location (i.e. “Room 2”).
6080Plus will now ask for all new details as usual for a new test.
7: Enter POST CODE
Enter customer post code then press ENTER on the PAT keyboard. If same as previous postcode, PAT will
display SAME POSTCODE If a new/different postcode, PAT will display NEW LOCATION SET and
automatically set a ‘new location’ marker.
8: Enter SITE
Enter site then press ENTER on the PAT keyboard.
9: Enter LOCATION
Enter location then press ENTER on the PAT keyboard.
10: APPLIANCE?
Enter appliance description then press ENTER on the PAT
11: MANUFACTURER?
Enter manufacturer then press ENTER on the PAT keyboard.
12: ENTER MODEL No.
Enter model number then press ENTER on the PAT keyboard.
13: ENTER SERIAL No.
Enter serial number then press ENTER on the PAT keyboard.
14: ENTER CAL/RETEST PERIOD
Enter cal/retest period (in weeks) then press ENTER on the PAT.
15: VISUAL CHECK.
The LCD display prompts for either a ‘PASS’ – select with the ‘YES’ (class1) Key or ‘FAIL’ using the ‘NO’
(Class 2) key.
16: FUSE TEST
The fuse test checks for continuity between the live and neutral lines.
If the fuse test fails check the appliance is switched on and the fuse is OK, then use the retry option.
Note : Some appliances will always fail this check, in which case select Y to the ignore fuse check.
NEW ASSET
ENTER POST CODE
ENTER SITE
ENTER LOCATION
ENTER APPLIANCE
ENTER MANUFACTURER
ENTER MODEL NO.
ENTER SERIAL NO.
ENTER CAL PERIOD
FUSE TEST -PASS
RE-TEST Y/N
IGNORE FAIL Y/N
SAME LOCATION Y/N

PORTABLE APPLIANCE TESTER OPERATION MANUAL
TRANSMILLE LTD. PAGE 11
17: EARTH BOND RESISTANCE, INSULATION RESISTANCE AND LEAKAGE CURRENT
These tests will run automatically in sequence displaying the results on the LED indicators.
18: APPLIANCE LABEL NUMBER
On completion of the tests, the PAT displays the label number to attach to the appliance. The results for this test
will be stored against this label number.
19: VIEWING RESULTS
To see the measured values on the LCD display, choose YES when the Show Results message is displayed.
Note : this message is only displayed for 2 seconds.
VIEW RESULTS (Y/N
)
APP. NUMBER XXXXXXXX
EARTH BOND PASS INS RES PASS
L
EAKAGE PASS

PORTABLE APPLIANCE TESTER OPERATION MANUAL
TRANSMILLE LTD. PAGE 12
Additional Functions – 6080 / 6080PLUS
IEC / Ext. Lead Test Function (Model 6080 / 6080PLUS)
Connect the plug end of the IEC lead into the appropriate 230V / 110V test socket and the IEC connector into
the IEC inlet. Plug earth bond lead into earth bond socket according to cable size
(it is not necessary to connect the croc clip end). PAT will default to the 10A range if the earth bond lead is not
plugged in.
Set the IEC / Extension lead slider to the length of the lead connected.
For extension leads, use a short IEC mains lead plugged into the extension socket to allow
connection to the IEC inlet on the PAT. Ensure the IEC / Ext. lead slider is set to the length of the
extension lead PLUS the mains lead plugged into it.
Press the test button in the IEC / Ext. Lead test section to proceed with testing the lead.
Self Check Function (Model 6080 / 6080PLUS)
Plug earth bond lead into the 10A socket and clip the opposite end onto the stud terminal in the self check
section. Connect using a 1metre IEC lead (earth resistance 50mohm) from the 230V mains socket to
Self Test IEC inlet. Set lead length slider to 1m.
Press Class 1 to begin self check –
Select any appliance description (if appliance list is displayed)
Select Y for visual check
Proceed through tests as normal and once testing is complete choose Y to display results - values displayed
should be as follows :
EARTH BOND = 0.10R
INS RES = 10MR
LEAKAGE = <0.01mA
Fuse Check Function (Model 6080 / 6080PLUS)
Press a fuse across the studs in the fuse test section -the LED will illuminate if fuse continuity is OK

PORTABLE APPLIANCE TESTER OPERATION MANUAL
TRANSMILLE LTD. PAGE 13
Recharging
Connect the supplied charger to the recharge socket of the PAT and connect to the mains. A full recharge
requires a minimum of 6 hours - it is acceptable to leave the PAT on charge for up to 12 hours (e.g. overnight).
The PAT may also be used while connected to the charger.
Using the PAT Setting Menu
The PAT settings menu can be accessed by pressing both the Class 1 and Class 2 buttons together when the
PAT is switched off.
The PAT settings menu comprises of the following items :
SET NEW LOCATION Y/N
This function allows the PAT to store an electronic ‘marker’ which then allows tests to be displayed in the correct
start and end number groups when downloaded to the PC. This useful function removes the need for manual
group selection using the download software after downloading data.
If Y is selected for the NEW LOCATION function, the PAT
will switch off for convenience, ready for testing at the new site.
INSULATION FOR I.T. Y/N
This function allows the PAT 100mA range (I.T. equipment) to be configured to perform an insulation test.
Select Y or N as required.
Y=INS 250V N=500
This function allows the PAT to be configured to use either 250V or 500V for INSULATION tests. The 250V
option is ideal for checking surge protected appliances/test leads and prevents the surge protection circuit
activating.
BEEPER Y/N (6080PLUS ONLY)
Turns the beeper on/off for keyboard presses and testing
APP. LIST Y/N (5080/6080 ONLY)
This function allows the appliance list displayed at the beginning of each test to be turned on or off – this list is
only of use if the PAT tests are to be downloaded to the PC* and can be turned off if not required.
Enabled/disabled by the PATDRS software when PAT memory is enabled / disabled.
Pressing both buttons together when the PAT is switched on will switch the PAT off.
*Optional PAT download software required

PORTABLE APPLIANCE TESTER OPERATION MANUAL
TRANSMILLE LTD. PAGE 14
Using the PAT Advanced Settings Menu (6080 / 6080PLUS Only)
The PAT settings menu can be accessed by pressing both the Class 1 and Lead Test buttons together when
the PAT is switched off.
The PAT Advanced settings menu comprises of the following items :
OPTIONS Y/N
“N” Will move on to the Diagnostics Menu.
“Y” Will enter the “SETUP” menu, with the following questions.
NEW LOCATION Y/N
“N” Does not set the new location marker, moves on to the next question.
“Y” Sets the new location marker and then turns off.
INS. FOR I.T Y/N
“N” Stops PAT running Insulation Test on IT equipment.
“Y” Allows PAT to run Insulation Test on IT equipment.
Y=INS 250V N=500
“N” Insulation Tests are run at 500Volts.
“Y” Insulation Tests are run at 250Volts.
BEEPER Y/N
“N” Turns the Beeper OFF.
“Y” Turns the Beeper ON.
MEMORY ON Y/N
“N” Turns OFF the Memory, Appliance List & Keyboard.
Then moves on to the Diagnostics Menu.
“Y” Turns the Memory ON.
APP. LIST Y/N
“N” Turns the Appliance List OFF.
“Y” Turns the Appliance List ON.
Note: Keyboard must be turned OFF to see the Appliance List.
KEYBOARD Y/N
“N” Turns the Keyboard OFF.
Note: Asset Feature disabled, Appliance List (if ON) will be shown.
“Y” Turns the Keyboard ON.
Note: Asset Feature enabled, Appliance List (even if ON) will not be shown.
Goes back to OPTION Y/N, PAT will automatically turn off after five seconds.
Pressing both buttons together when the PAT is switched on will switch the PAT off.
 Loading...