

Transition Networks PointSystem CPSMC1810-200, PointSystem CPSMC1800-200, PointSystem CPSMC1850-160, PointSystem CPSMC1850-150 User Manual
Page 1
Transition Networks
CPSMC18xx-xxx
18-Slot PointSystem™ Chassis
User’s Guide
(revision C)
CPSMC1800-200
CPSMC1810-200
CPSMC1850-150
CPSMC1850-160
Page 2

2
CPSMC18xx-xxx PointSystem™ Chassis
24-hour Technical Support: 1-800-260-1312 -- International: 00-1-952-941-7600
Compliance Information
UL Listed
C-UL Listed (Canada)
CISPR22/EN55022 Class A & B + EN55024
CE Mark
FCC Regulations
This equipment has been tested and found to comply with the limits for a Class A & B digital device, pursuant to part 15
of the FCC rules. These limits are designed to provide reasonable protection against harmful interference when the
equipment is operated in a commercial environment. This equipment generates, uses, and can radiate radio frequency
energy and, if not installed and used in accordance with the instruction manual, may cause harmful interference to radio
communications. Operation of this equipment in a residential area is likely to cause harmful interference, in which case
the user will be required to correct the interference at the user’s own expense.
Canadian Regulations
This digital apparatus does not exceed the Class A & B limits for radio noise for digital apparatus set out on the radio
interference regulations of the Canadian Department of Communications.
Le présent appareil numérique n'émet pas de bruits radioélectriques dépassant les limites applicables aux appareils
numériques de la Class A & B prescrites dans le Règlement sur le brouillage radioélectrique édicté par le ministère des
Communications du Canada.
Trademark Notice
All trademarks and registered trademarks are the property of their respective owners.
Copyright Restrictions
© 2000-2004 Transition Networks.
All rights reserved. No part of this work may be reproduced or used in any form or by any means – graphic,
electronic, or mechanical – without written permission from Transition Networks.
Printed in the U.S.A.
33185.C
CAUTION: THE RJ CONNECTORS ON THE INDIVIDUAL MEDIA CONVERTER SLIDE-IN-MODULES
ARE NOT INTENDED FOR CONNECTION TO THE PUBLIC TELEPHONE NETWORK. Failure to
observe this caution could result in damage to the public telephone network.
Der Anschluss dieses Gerätes an ein öffentlickes Telekommunikationsnetz in den EG-Mitgliedstaaten verstösst gegen die
jeweligen einzelstaatlichen Gesetze zur Anwendung der Richtlinie 91/263/EWG zur Angleichung der Rechtsvorschriften
der Mitgliedstaaten über Telekommunikationsendeinrichtungen einschliesslich der gegenseitigen Anerkennung ihrer
Konformität.
Page 3

3
CPSMC18xx-xxx PointSystem™ Chassis
Table of Contents
1 Introduction . . . . . . . . . . . . . . . . . . . . . . . . . . . . . . . . . . . . . . .5
1.1 Description . . . . . . . . . . . . . . . . . . . . . . . . . . . . . . . . . . . . . . . . . .5
1.2 Unpacking the CPSMC18xx-xxx Equipment . . . . . . . . . . . . . . . . . .7
2 Slide-in-Modules . . . . . . . . . . . . . . . . . . . . . . . . . . . . . . . . . . .8
2.1 Media Converter Slide-in-Modules . . . . . . . . . . . . . . . . . . . . . . . . .8
2.1.1 Chassis Face Plates . . . . . . . . . . . . . . . . . . . . . . . . . . . . . . . . . . .8
2.1.2 Calculating the Power Consumption . . . . . . . . . . . . . . . . . . . . . .8
2.1.3 Installing the Media Converter Slide-in-Modules . . . . . . . . . . . . .9
2.1.4 Replacing the Media Converter Slide-in-Modules . . . . . . . . . . .10
2.2 Management Modules . . . . . . . . . . . . . . . . . . . . . . . . . . . . . . . . .11
2.2.1 Three Types of Management Modules . . . . . . . . . . . . . . . . . . . .11
2.2.2 Installing the Management Modules . . . . . . . . . . . . . . . . . . . . .12
2.2.3 Replacing the Management Modules . . . . . . . . . . . . . . . . . . . . .13
3 Powering the CPSMC18xx-xxx . . . . . . . . . . . . . . . . . . . . . . . .14
3.1 AC Power Supply Module . . . . . . . . . . . . . . . . . . . . . . . . . . . . . .14
3.2 DC Power Supply Module . . . . . . . . . . . . . . . . . . . . . . . . . . . . . .16
3.3 Optional Dual Power Supply Modules . . . . . . . . . . . . . . . . . . . . .18
3.4 Power Supply Module Maintenance . . . . . . . . . . . . . . . . . . . . . .19
3.4.1 Primary/Secondary-Management/Manual Switch . . . . . . . . . . . .19
3.4.2 Installing the Power Supply Module . . . . . . . . . . . . . . . . . . . . . .20
3.4.3 Replacing the Power Supply Module . . . . . . . . . . . . . . . . . . . . .21
3.4.4 Replacing the Power Supply Fuses . . . . . . . . . . . . . . . . . . . . . . .22
3.5 Optional Fan Module . . . . . . . . . . . . . . . . . . . . . . . . . . . . . . . . . .24
4 CPSMC18xx-xxx Chassis . . . . . . . . . . . . . . . . . . . . . . . . . . . .25
4.1 Installing the CPSMC18xx-xxx Chassis . . . . . . . . . . . . . . . . . . . . .25
4.1.1 Table Top Installation . . . . . . . . . . . . . . . . . . . . . . . . . . . . . . . .25
4.1.2 Standard 19-inch Rack Installation . . . . . . . . . . . . . . . . . . . . . . .25
4.1.3 Grounding Lugs . . . . . . . . . . . . . . . . . . . . . . . . . . . . . . . . . . . . .27
4.2 Telco Option . . . . . . . . . . . . . . . . . . . . . . . . . . . . . . . . . . . . . . . .28
4.3 Cascade Option . . . . . . . . . . . . . . . . . . . . . . . . . . . . . . . . . . . . . .31
4.4 Connecting the Slide-in-Modules to the Network . . . . . . . . . . . . .33
4.5 Operation . . . . . . . . . . . . . . . . . . . . . . . . . . . . . . . . . . . . . . . . . . .33
24-hour Technical Support: 1-800-260-1312 -- International: 00-1-952-941-7600
Page 4

4
CPSMC18xx-xxx PointSystem™ Chassis
5 Network Management . . . . . . . . . . . . . . . . . . . . . . . . . . . . . .34
5.1 Hardware Connections . . . . . . . . . . . . . . . . . . . . . . . . . . . . . . . .34
6 Troubleshooting . . . . . . . . . . . . . . . . . . . . . . . . . . . . . . . . . . .36
Technical Specifications . . . . . . . . . . . . . . . . . . . . . . . . . . . . . . . . . . . . .37
Cable Specifications . . . . . . . . . . . . . . . . . . . . . . . . . . . . . . . . . . . . . . . .38
Contact Us . . . . . . . . . . . . . . . . . . . . . . . . . . . . . . . . . . . . . . . . . . . . . . .40
Warranty . . . . . . . . . . . . . . . . . . . . . . . . . . . . . . . . . . . . . . . . . . . . . . . . .41
24-hour Technical Support: 1-800-260-1312 -- International: 00-1-952-941-7600
Page 5
5
CPSMC18xx-xxx PointSystem™ Chassis
introduction
1 Introduction
1.1 Description
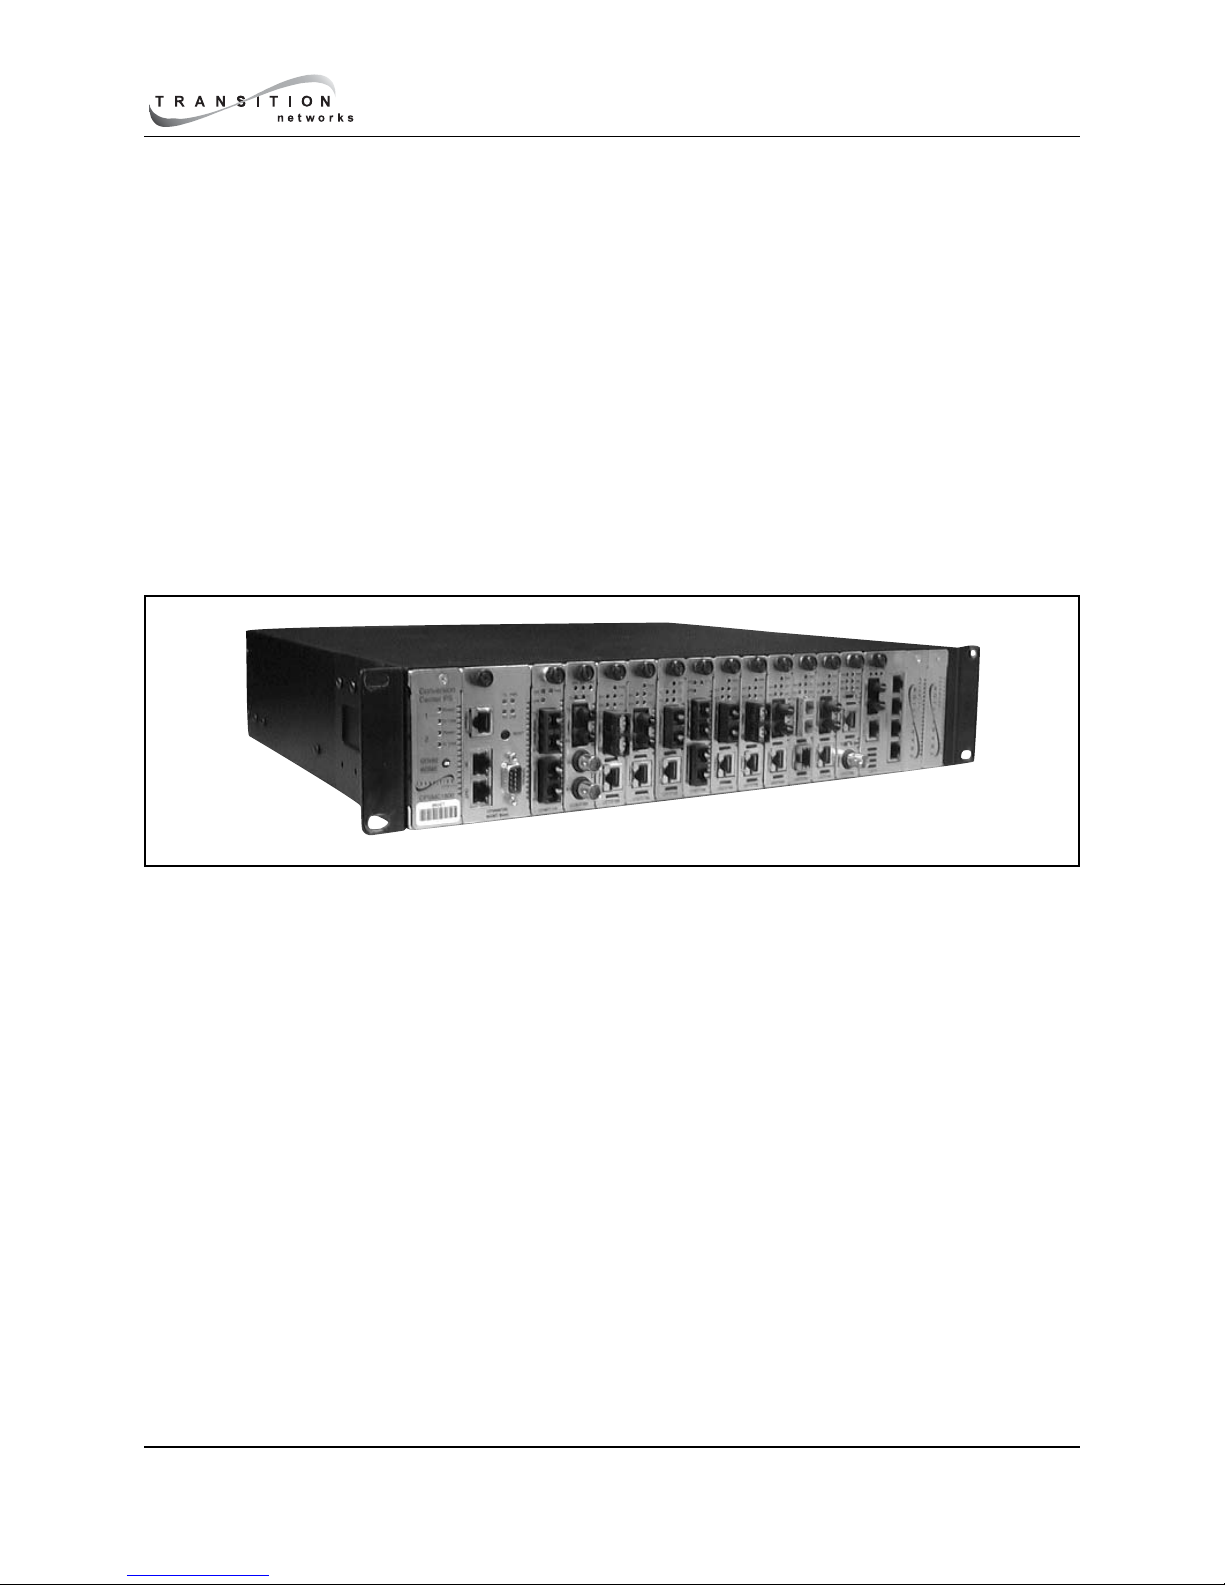
The Transition Networks CPSMC18xx-xxx 18-Slot PointSystem™ chassis is a 19inch, rack-mountable chassis for selected Transition Networks media converter
slide-in-modules. The CPSMC18xx-xxx allows the network administrator to
connect various copper and fiber-optic network media over protocols that include
Ethernet, Fast Ethernet, DS3/E3, and OC-12 and many others. The CPSMC18xx-xxx
provides installation space for up to 18 single-slot media converter slide-in-modules
in the front of the unit.
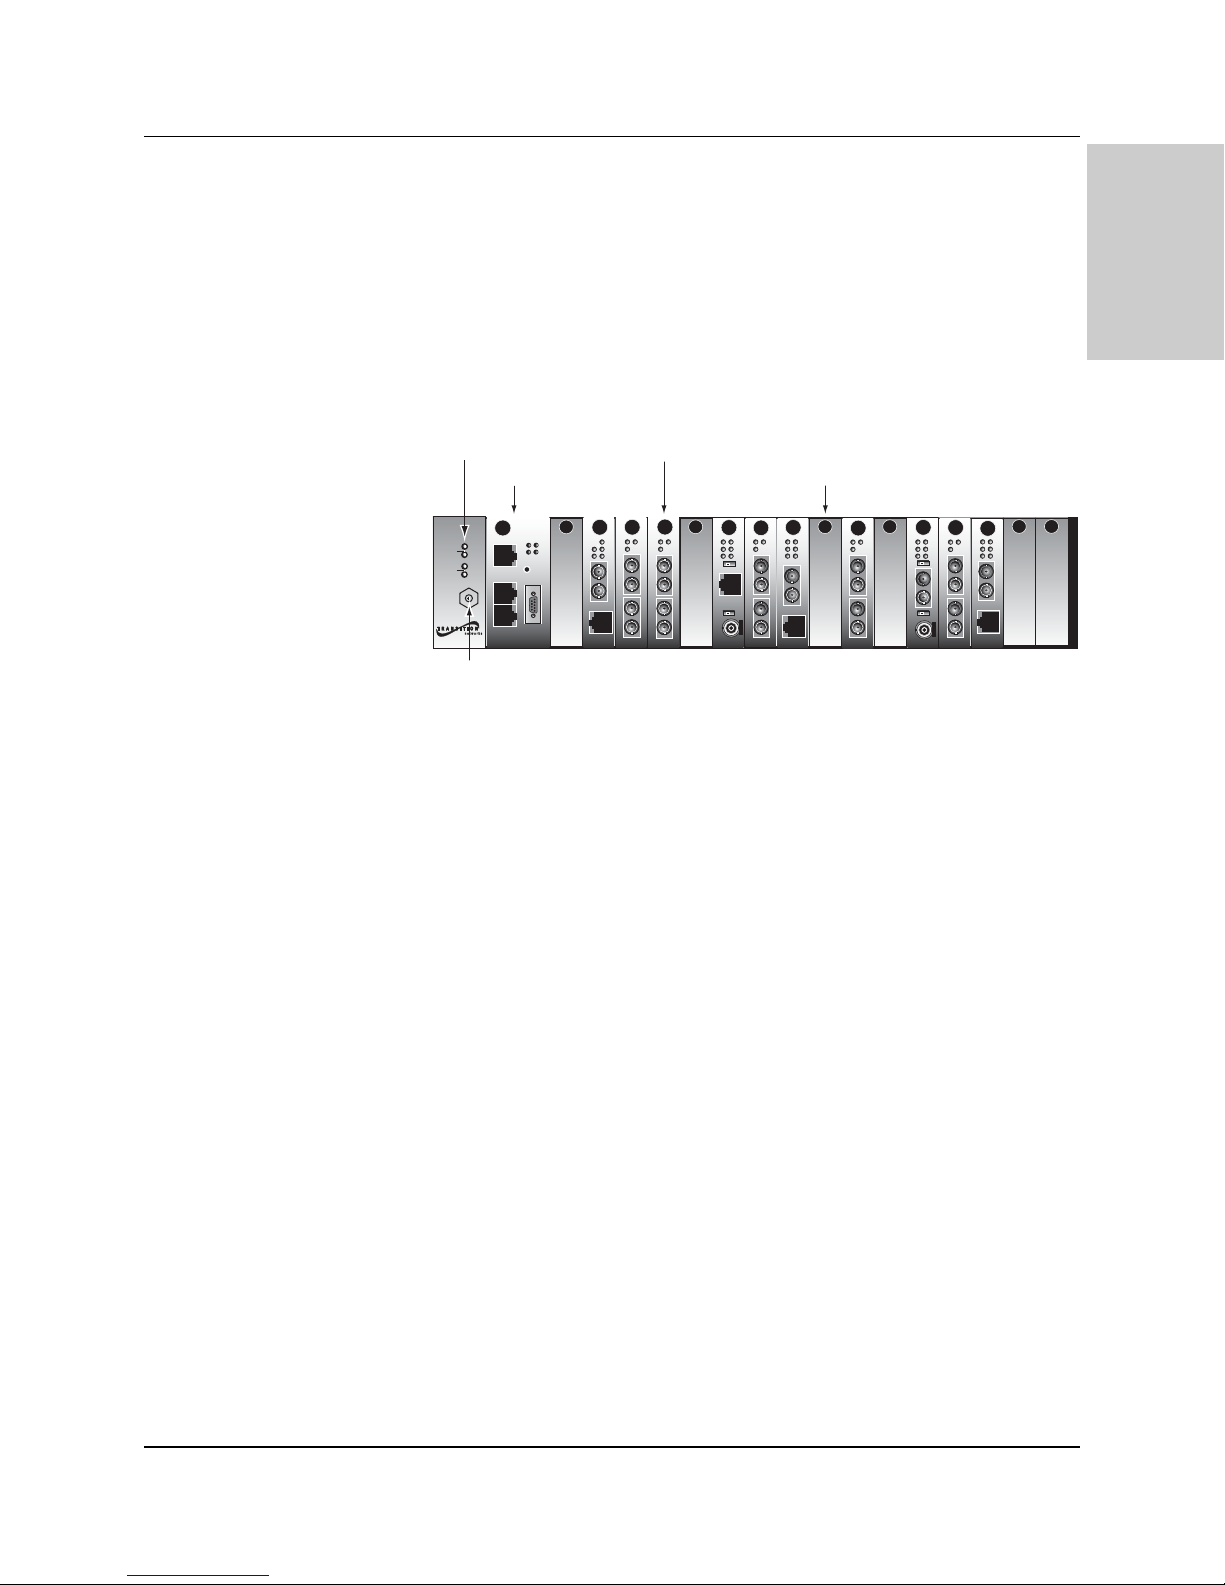
Power and In Use LEDs (located on the front panel of the CPSMC18xx-xxx) indicate
the status of the installed power supply module(s) and optional fan module.
Wearing a wrist guard that is attached to the chassis via the ESD (electrostatic
discharge) banana jack will help suppress electrostatic discharge that may result in
damage to the chassis, slide-in-modules, and/or power supply modules.
With an installed PointSystem™ management module (P/N CPSMM-120 or -200),
the CPSMC18xx-xxx can be managed and monitored via:
• An SNMP application such as Transition Networks FocalPoint™
management software installed at a remote Network Management Station
(NMS).
• A remote Web browser.
• A command-line interface (CLI) at an attached terminal.
• A command-line-interface (CLI) at a remote Telnet connection.
The management modules also make it possible to control up to eight (8) cascaded
CPSMC18xx-xxx chassis fully populated with media converter slide-in-modules.
24-hour Technical Support: 1-800-260-1312 -- International: 00-1-952-941-7600
J
CPSMC1800
Power Supply LEDs
Management Module
Conversion
Center PS
1
2
ESD
Gnd.
Term.
CPSMC1800
ESD
Power
In Use
Power
In Use
MGMT MASTER
ack
MCCM10
PWR
TX
DB-9
RX
LNK
RESET
DB-9
RXF
RXC
TX
10BASE-FL
RX
10BASE-T
LKF
CETTF100
Installed Slide-In-Module
PWR
PWR
LKS
LKS
PWR
LKM
LKM
LKC
TX
TX
Singlemode
Singlemode
RX
RX
TX
TX
Multimode
Multimode
RX
RX
CFMFF100
CFMFF100
LA
RXF
RXC
10BASE-T
10BASE-2
E
0
CECF100
PWR
LNK
COL
Link Alert
D
50½
LKS
LKM
TX
Singlemode
RX
TX
Multimode
RX
CFMFF100
PWR
PWR
SPD
FLNK
FRX
CLNK
CRX
TX
10/100SX
RX
10/100TX
CFETF110
Open Slot
PWR
LKS
LKM
TX
Singlemode
RX
TX
Multimode
RX
CFMFF100
LA
RXF
RXC
10BASE-FL
10BASE-2
Link Alert
E
0
CETCF100
PWR
PWR
LNK
COL
D
50½
LKS
LKM
TX
Singlemode
RX
TX
Multimode
RX
CFMFF100
SPD
FRX
CRX
TX
100BASE-FX
RX
100BASE-TX
CFETF100
PWR
FLNK
CLNK
Page 6
6
CPSMC18xx-xxx PointSystem™ Chassis
introduction
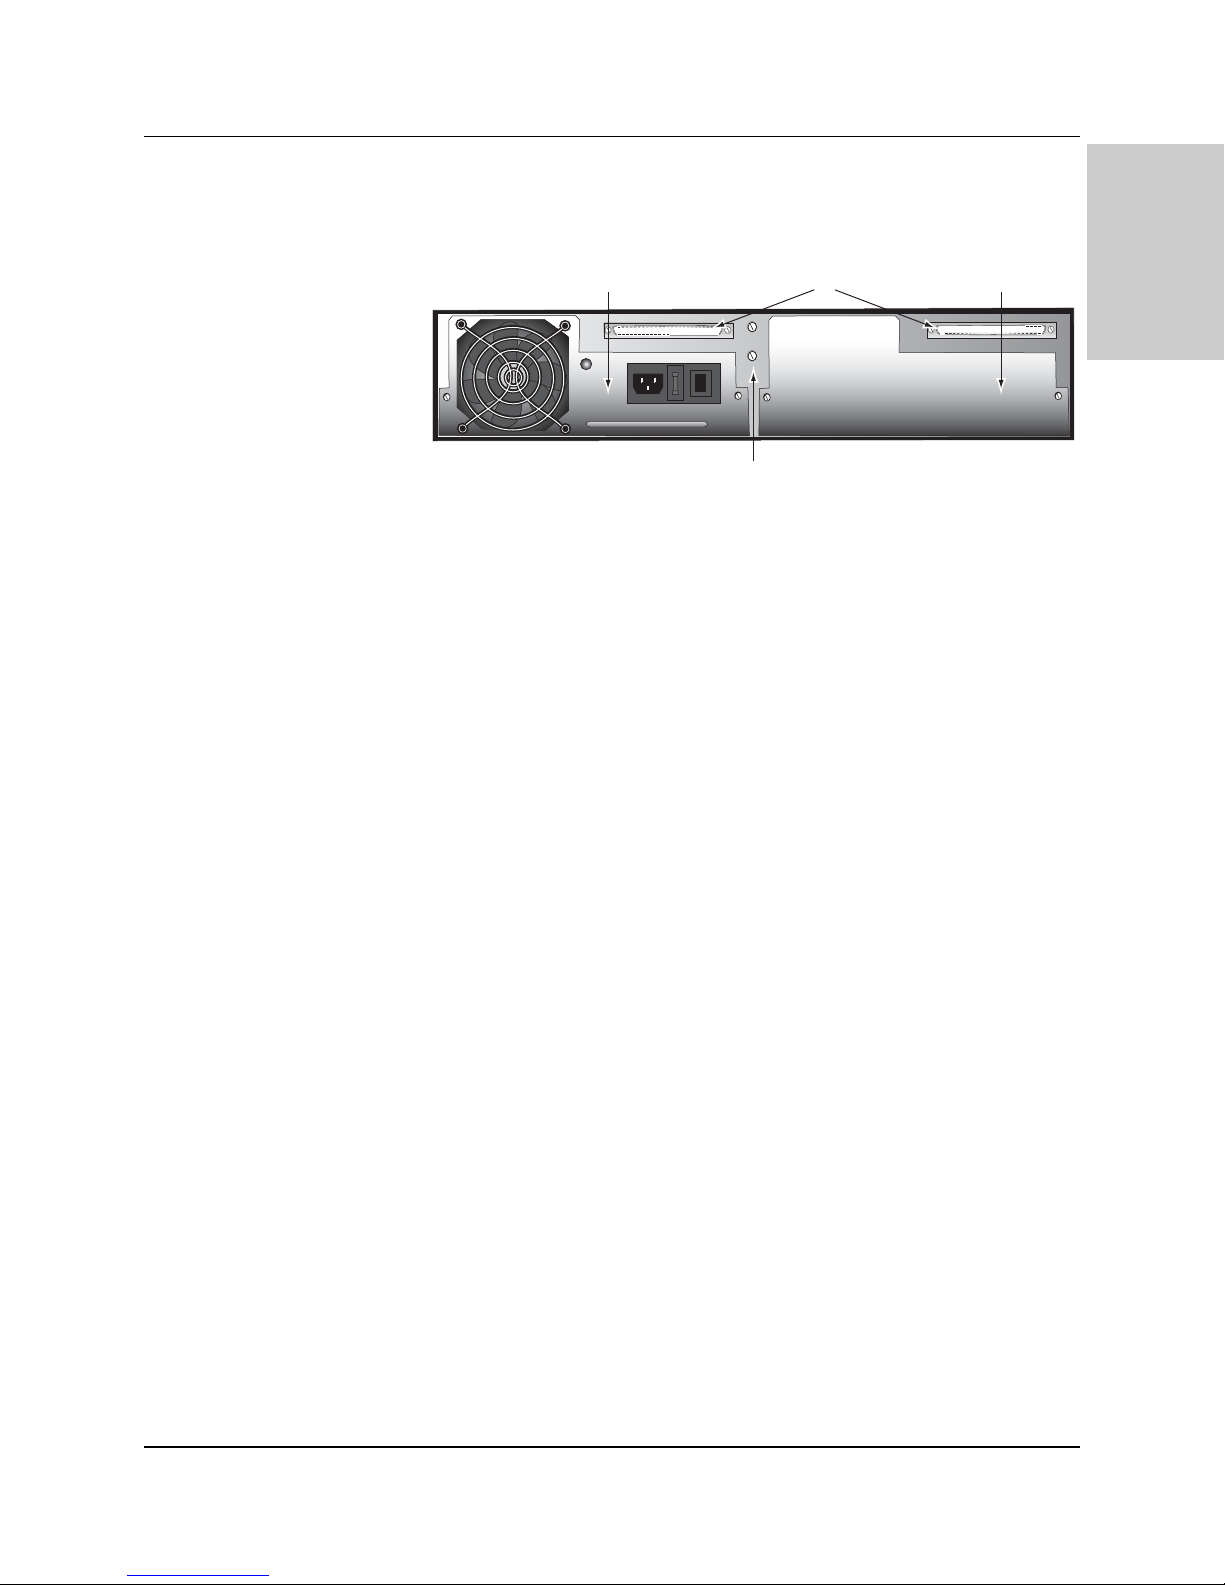
The CPSMC18xx-xxx is equipped with an AC or DC power supply installed in the
back of the chassis. An extra installation space is available for an optional
redundant power supply (AC or DC) or an optional fan module.
The CPSMC18xx-xxx also comes equipped with a pair of grounding terminals
(grounding lugs) for providing proper grounding of the chassis.
Finally, the CPSMC1850-150 and CPSMC1850-160 models include two (2) 50-pin
Telco connectors installed in the back of the chassis.
24-hour Technical Support: 1-800-260-1312 -- International: 00-1-952-941-7600
Power Supply Module
(AC module is pictured)
I
0
Grounding Terminals
(Grounding Lugs)
Optional Telco
Connectors
Extra Installation
Space
Page 7

7
CPSMC18xx-xxx PointSystem™ Chassis
slide-in-modules
1.2 Unpacking the CPSMC18xx-xxx Equipment
Use the following list to verify the shipment:
Item Part Number
18-Slot chassis with AC Power Supply CPSMC1800-200
18-Slot chassis with DC Power Supply CPSMC1810-200
18-Slot chassis with AC Power Supply CPSMC1850-150
and two (2) Telco connectors
18-Slot chassis with DC Power Supply CPSMC1850-160
and two (2) Telco connectors
PointSystem™ Chassis Face Plates (18) CPSFP-200
Power Cord (varies by country)
User’s Guide 33185
The following items are optional accessories for the CPSMC18xx-xxx 18-Slot
PointSystem™ chassis:
Item Part Number
Redundant AC Power Supply Module CPSMP-200 (optional)
Redundant 48-VDC Power Supply Module CPSMP-210 (optional)
Redundant Fan Module CPSFM-200 (optional)
Single-Slot Master Management Module CPSMM-120 (optional)
Dual-Slot Master Management Module CPSMM-200 (optional)
FocalPoint™ Software Disk A1-7227
(included with the management modules)
Expansion Management Module CPSMM-210 (optional)
Management Module Cascade Connector 6026 (optional)
Telco RJ-21 (male) to RJ-45 Hydra cable 21HC45-6 (optional)
Telco RJ-21 to RJ-21 (male-to-male) cable 21HC21-6 (optional)
Rack Mount Ears CPSRE-230 (optional)
Selectable media converter slide-in-module(s) (various P/N) - (optional)
24-hour Technical Support: 1-800-260-1312 -- International: 00-1-952-941-7600
Page 8
8
CPSMC18xx-xxx PointSystem™Chassis
slide-in-modules
2 Slide-in-Modules
2.1 Media Converter Slide-in-Modules
Transition Networks media converter slide-in-modules, installed in slots at the front
of the chassis, allow the network administrator to connect various copper and fiberoptic network media over protocols that include Ethernet, Fast Ethernet, DS3/E3,
and OC-12 as well as many others (see www.transition.com for a complete listing.)
NOTE: Refer to the user’s guide that comes with each media converter slide-inmodule for cable, connector, and LED indicator information specific to that media
converter slide-in-module.
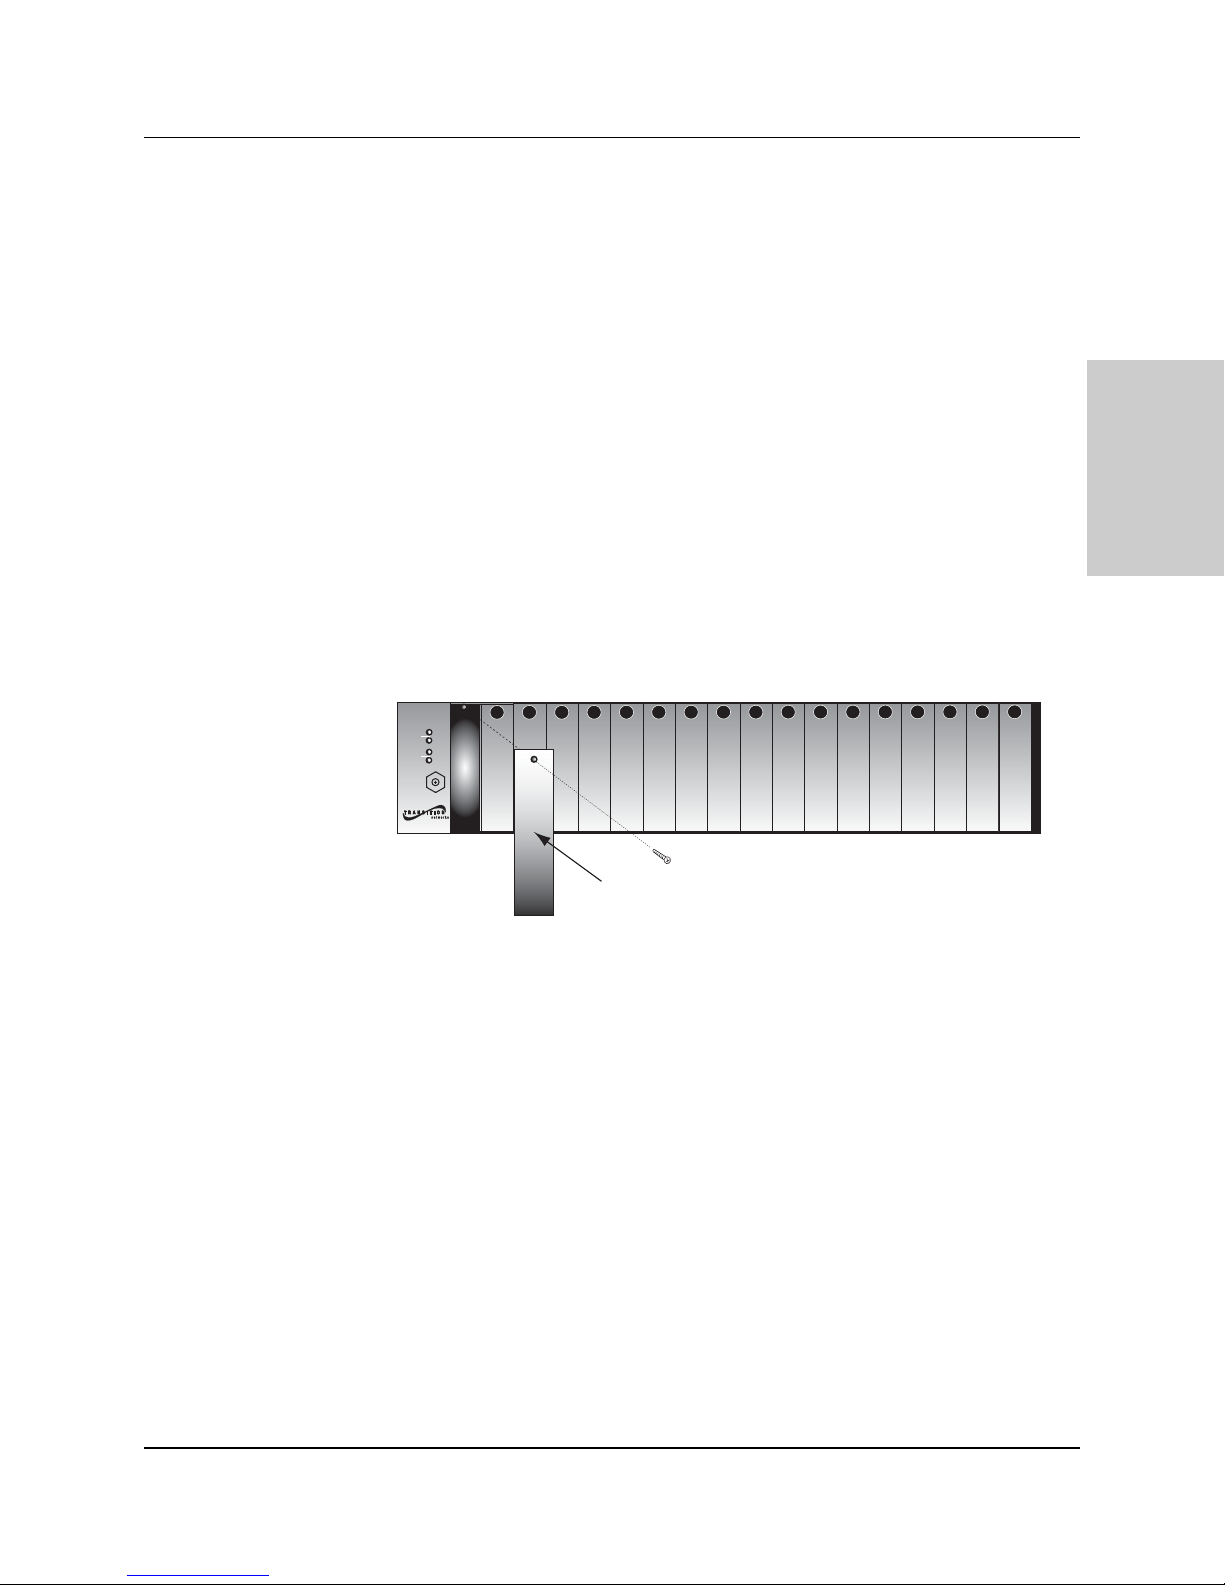
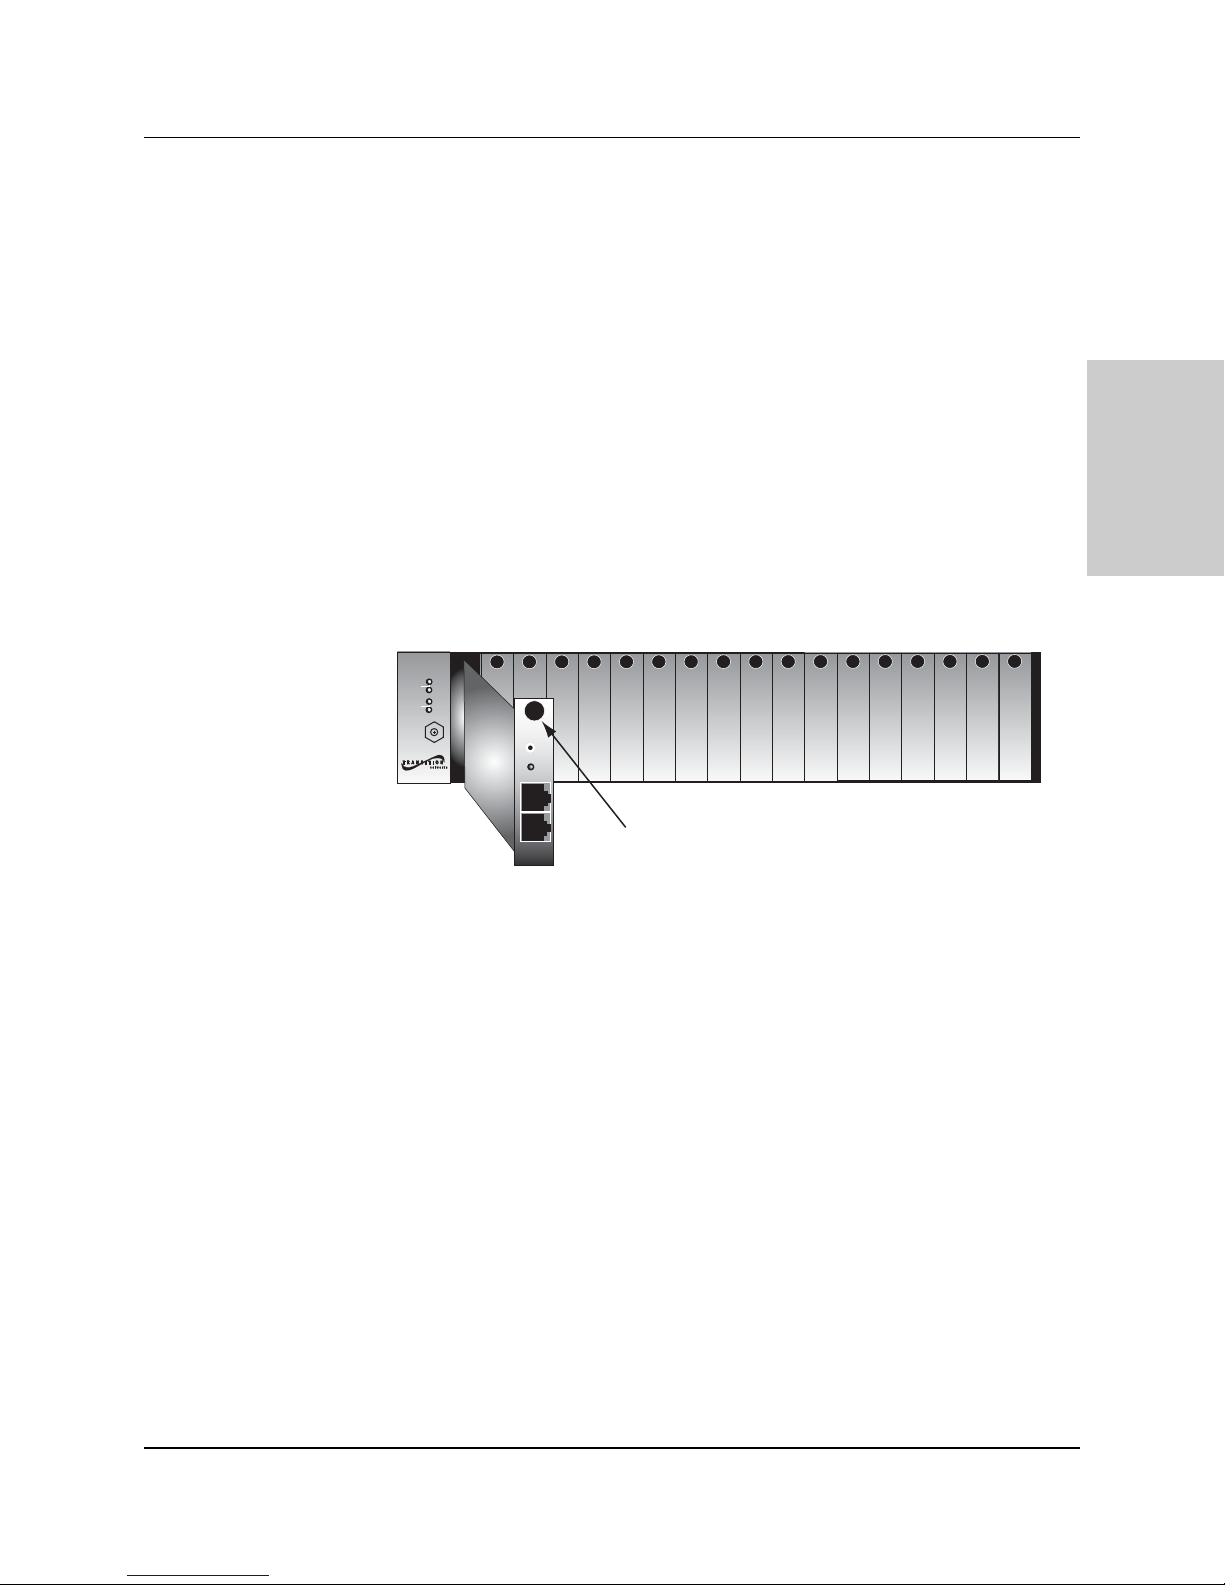
2.1.1 Chassis Face Plates
CAUTION: Slots in the CPSMC18xx-xxx chassis without a slide-in-module
installed MUST have a protective chassis face plate (P/N CPSFP-200) covering the
empty slot for Class A or Class A & B compliance.
Install a chassis face plate over any unused chassis slot by aligning the hole in the
face plate with the threaded hole in the chassis. Secure the face place with the
enclosed bolt.
2.1.2 Calculating the Power Consumption
CAUTION: Before installing the media converter slide-in-modules, refer to the
power consumption data for each individual media converter (provided in the user’s
guide shipped with each media converter). The combined power consumption of
all devices must not exceed the available power supply. Failure to observe this
caution could result in diminishing system reliability.
In other words, the combined power requirements of the CPSMC18xx-xxx chassis
plus all slide-in-modules must be less than the available power.
Contact Transition Networks Tech Support to ensure the power requirements for
your specific application do not exceed the available power.
24-hour Technical Support: 1-800-260-1312 -- International: 00-1-952-941-7600
CPSMC1800
Conversion
Center PS
Power
1
In Use
Power
2
In Use
ESD
Gnd.
Term.
CPSMC1800
Chassis Face Plate
Page 9
9
CPSMC18xx-xxx PointSystem™Chassis
slide-in-modules
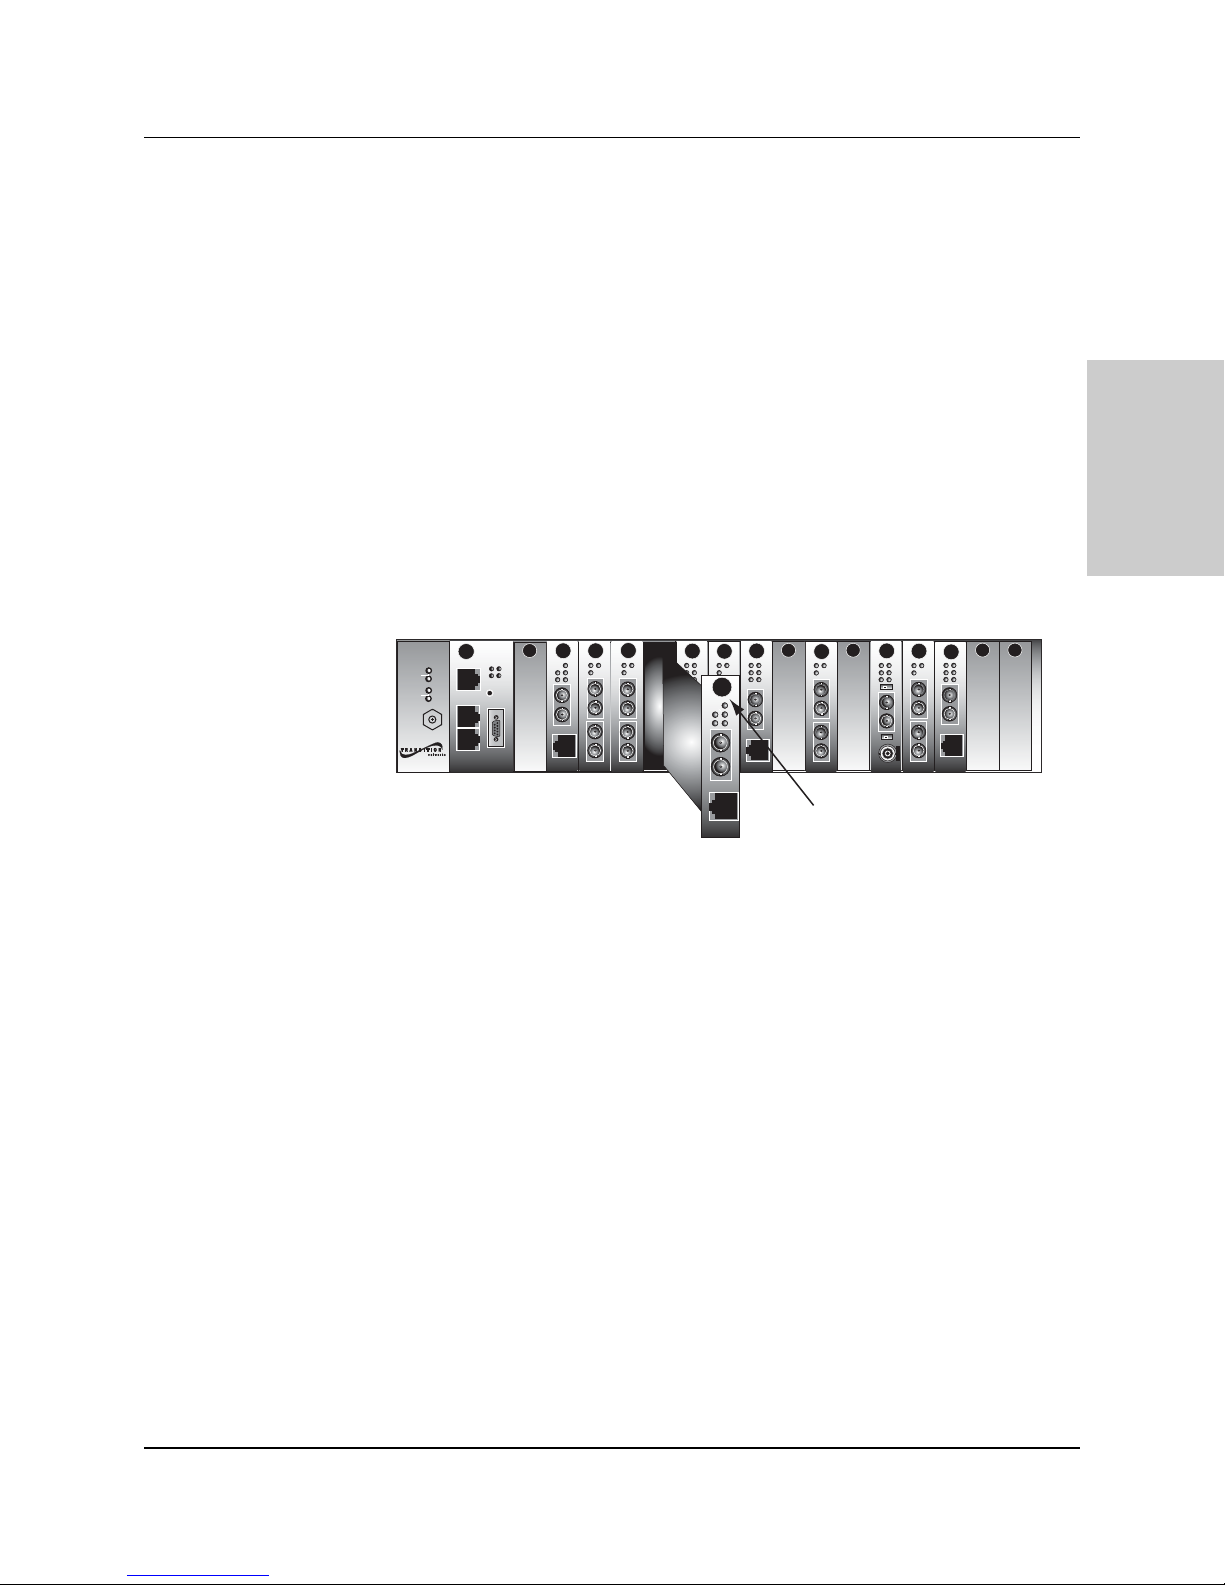
2.1.3 Installing the Media Converter Slide-in-Modules
CAUTION: Wear a grounding device and observe electrostatic discharge
precautions when installing the media converter slide-in-module(s) into the chassis.
Failure to observe this caution could result in damage to, and subsequent failure of,
the media converter slide-in-module(s).
NOTE: The media converter slide-in-modules can be installed in any installation
slot, in any order.
To install the media converter slide-in-module into the CPSMC18xx-xxx chassis:
1. If a chassis face plate is covering the installation slot, remove the face plate from
the installation slot by removing the one (1) screw that secures the plate to the
front of the chassis.
NOTE: If the slide-in-module requires two slots, remove the face plates from
two (2) adjacent installation slots.
2. Align the slide-in-module with the chassis installation slot so that the panel
fastener screw is at the top of the module.
3. Carefully slide the slide-in-module into the installation slot, while aligning the
module’s circuit board with the installation guides.
NOTE: Ensure that the slide-in-module is firmly seated inside the chassis.
4. Push in and rotate the attached panel fastener screw clockwise to secure the
module to the chassis.
5. Repeat steps 1 through 4 for any additional media converter slide-in-module(s).
24-hour Technical Support: 1-800-260-1312 -- International: 00-1-952-941-7600
CPSMC1800
Media
Conversion
Center
1
2
ESD
Gnd.
Term.
CPSMC1800
PWR
TX
Power
In Use
RX
Power
In Use
RESET
LKF
DB-9
RXF
RXC
LNK
TX
10BASE-FL
RX
DB-9
10BASE-T
PWR
PWR
LKS
LKS
PWR
LKM
LKM
LKC
TX
TX
Singlemode
Singlemode
RX
RX
TX
TX
Multimode
Multimode
RX
RX
LA
RXF
RXC
10BASE-T
10BASE-2
PWR
PWR
SPD
LKS
LNK
FRX
LKM
CRX
COL
TX
Link Alert
Singlemode
E
D
TX
10/100SX
PWR
LKF
RXF
RX
LKC
RXC
TX
RX
Multimode
TX
50½
0
10BASE-FL
10/100TX
RX
RX
10BASE-T
CETTF100
PWR
PWR
LKS
FLNK
LKM
CLNK
TX
Singlemode
RX
TX
Multimode
RX
Panel Fastener Screw
LA
RXF
RXC
10BASE-FL
10BASE-2
PWR
PWR
LNK
COL
Link Alert
E
D
50½
0
LKS
LKM
TX
Singlemode
RX
TX
Multimode
RX
SPD
FRX
CRX
TX
100BASE-FX
RX
100BASE-TX
PWR
FLNK
CLNK
Page 10
10
CPSMC18xx-xxx PointSystem™Chassis
slide-in-modules
24-hour Technical Support: 1-800-260-1312 -- International: 00-1-952-941-7600
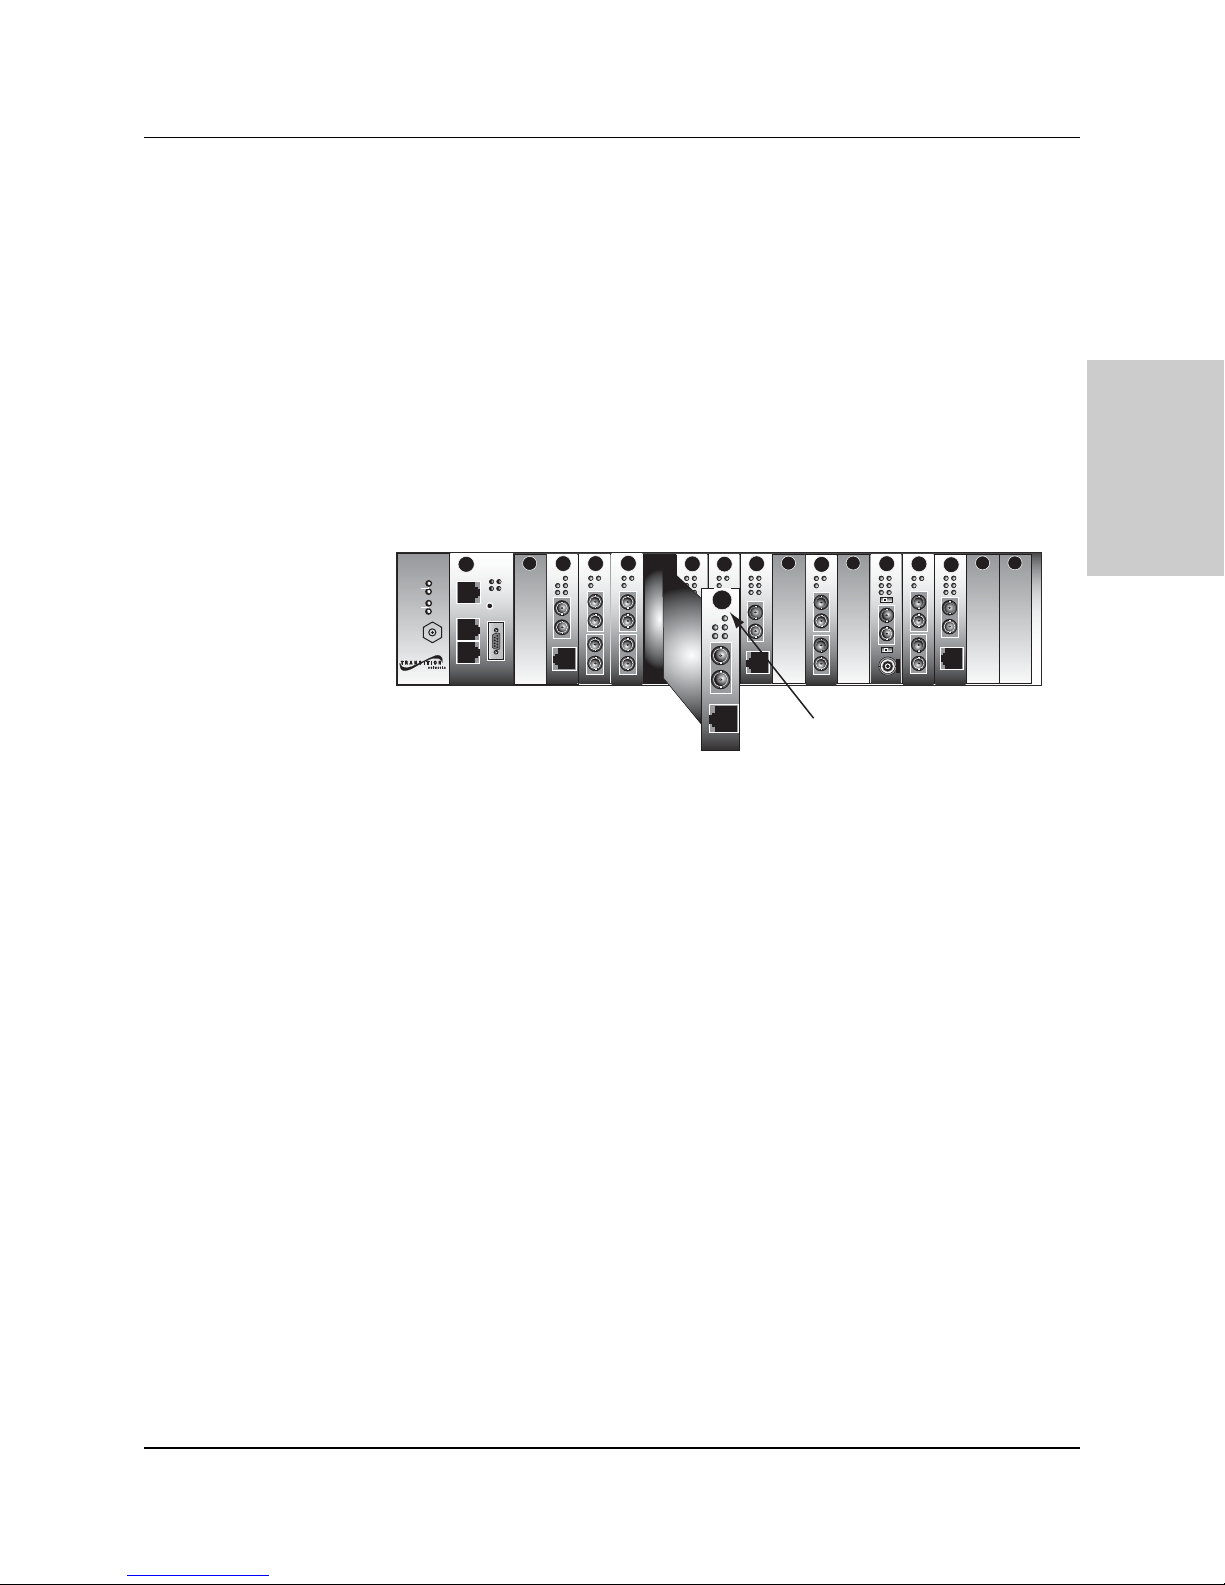
2.1.4 Replacing the Media Converter Slide-in-Modules
CAUTION: Wear a grounding device and observe electrostatic discharge
precautions when replacing media converter slide-in-module(s). Failure to observe
this caution could result in damage to, and subsequent failure of, the media
converter slide-in-module(s).
NOTE: The media converter slide-in-modules can be hot-swapped.
To replace a media converter slide-in-module in the CPSMC18xx-xxx chassis:
1. Remove the slide-in-module to be replaced by loosening the panel fastener
screw that secures the module to the chassis front. Slide the module from the
chassis.
2. Align the replacement slide-in-module with the chassis installation slot so that
the panel fastener screw is at the top.
3. Carefully slide the replacement slide-in-module into the installation slot, while
aligning the module’s circuit board with the installation guides.
NOTE: Ensure that the slide-in-module is firmly seated inside the chassis.
4. Push in and rotate the attached panel fastener screw clockwise to secure the
module to the chassis.
CPSMC1800
Media
Conversion
Center
1
2
ESD
Gnd.
Term.
CPSMC1800
PWR
TX
Power
In Use
RX
Power
In Use
RESET
LKF
DB-9
RXF
RXC
LNK
TX
10BASE-FL
RX
DB-9
10BASE-T
PWR
PWR
LKS
LKS
PWR
LKM
LKM
LKC
TX
TX
Singlemode
Singlemode
RX
RX
TX
TX
Multimode
Multimode
RX
RX
LA
RXF
RXC
10BASE-T
10BASE-2
PWR
PWR
SPD
LKS
LNK
FRX
LKM
CRX
COL
TX
Link Alert
Singlemode
E
D
TX
10/100SX
PWR
LKF
RXF
RX
LKC
RXC
TX
RX
Multimode
TX
50½
0
10BASE-FL
10/100TX
RX
RX
10BASE-T
CETTF100
PWR
PWR
LKS
FLNK
LKM
CLNK
TX
Singlemode
RX
TX
Multimode
RX
RXF
RXC
10BASE-FL
10BASE-2
Panel Fastener Screw
PWR
PWR
LA
LNK
COL
Link Alert
E
D
50½
0
LKS
LKM
TX
Singlemode
RX
TX
Multimode
RX
SPD
FRX
CRX
TX
100BASE-FX
RX
100BASE-TX
PWR
FLNK
CLNK
Page 11
11
CPSMC18xx-xxx PointSystem™Chassis
slide-in-modules
24-hour Technical Support: 1-800-260-1312 -- International: 00-1-952-941-7600
2.2 Management Modules
Optional network management is provided by SNMP software embedded in
Transition Networks
PointSystem
™
management module(s) that can be installed in
the CPSMC18xx-xxx chassis.
Transition Networks provides two such modules:
• CPSMM-120 Single-Slot Master Management Module.
• CPSMM-200 Dual-Slot Master Management Module.
Along with an additional expansion module:
• CPSMM-210 Single Slot Expansion Management Module.
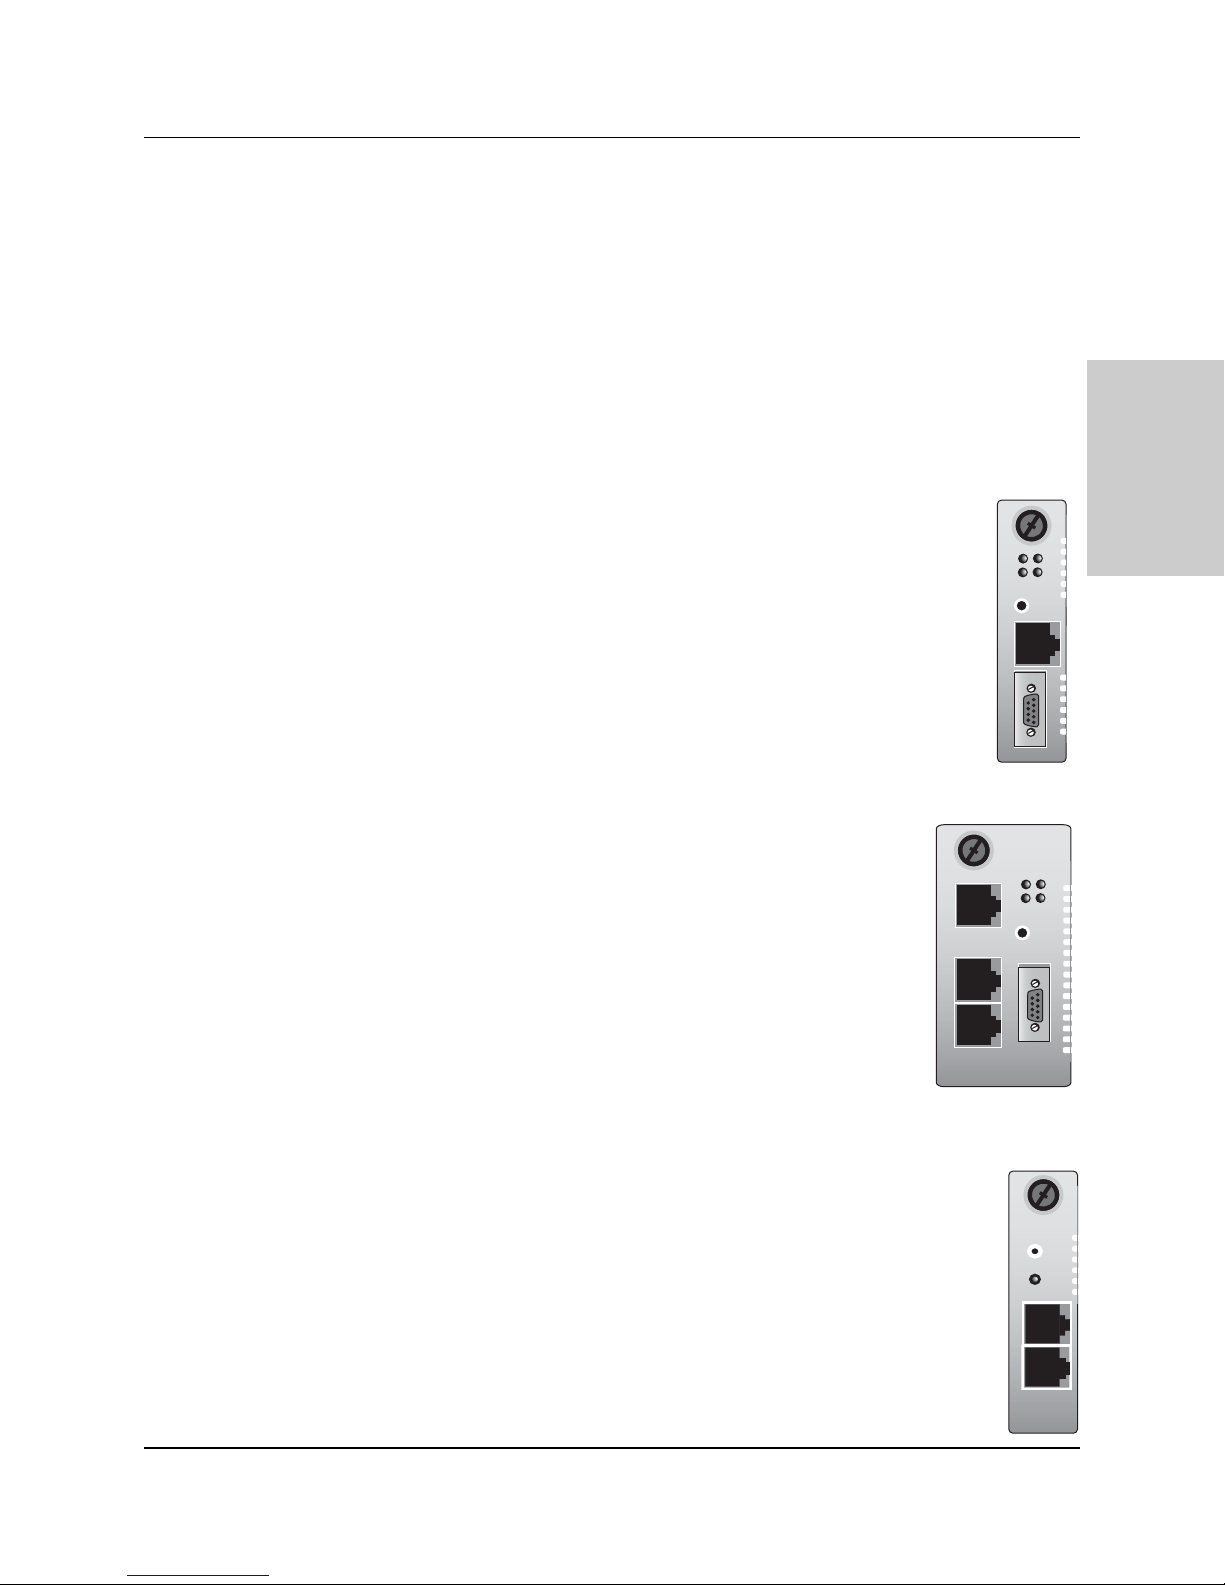
2.2.1 Three Types of Management Modules
CPSMM-120 Single-Slot Master Management Module
The optional CPSMM-120 Single-Slot Master Management Module can
be installed to enable network management of a single CPSMC18xxxxx chassis.
Refer to the CPSMM-120 user’s guide for more information on the
CPSMM-120 Single-Slot Master Management Module.
CPSMM-200 Dual-Slot Master Management Module
The optional CPSMM-200 Dual-Slot Master Management
Module can also be installed in the CPSMC18xx-xxx chassis to
enable network management.
This module has all of the features of the CPSMM-120 plus a pair
of cascade ports, which allow multiple PointSystem™ chassis to
be connected.
Note also that this module requires two adjacent slots in the
CPSMC18xx-xxx chassis for installation.
Refer to the CPSMM-200/-210 user’s guide for more information
on the CPSMM-200 Dual-Slot Master Management Module.
CPSMM-210 Single-Slot Expansion Management Module
The CPSMM-210 is used with the CPSMM-200 to connect up to eight (8)
chassis into one manageable stack.
Refer to the CPSMM-200/-210 user’s guide for more information on the
CPSMM-210 Single-Slot Expansion Management Module.
NOTE: See section 4.3 Cascade Option for details on connecting
multiple CPSMC18xx-xxx chassis.
10BASE-T
SERIAL
CPSMM120
PWR
TX
RX
LNK
RESET
10BASE-T
IN
OUT
CPSMM200
TX
RX
Power
IN
OUT
PWR
LNK
RESET
DB-9
RESET
CPSMM210
Page 12
12
CPSMC18xx-xxx PointSystem™Chassis
slide-in-modules
24-hour Technical Support: 1-800-260-1312 -- International: 00-1-952-941-7600
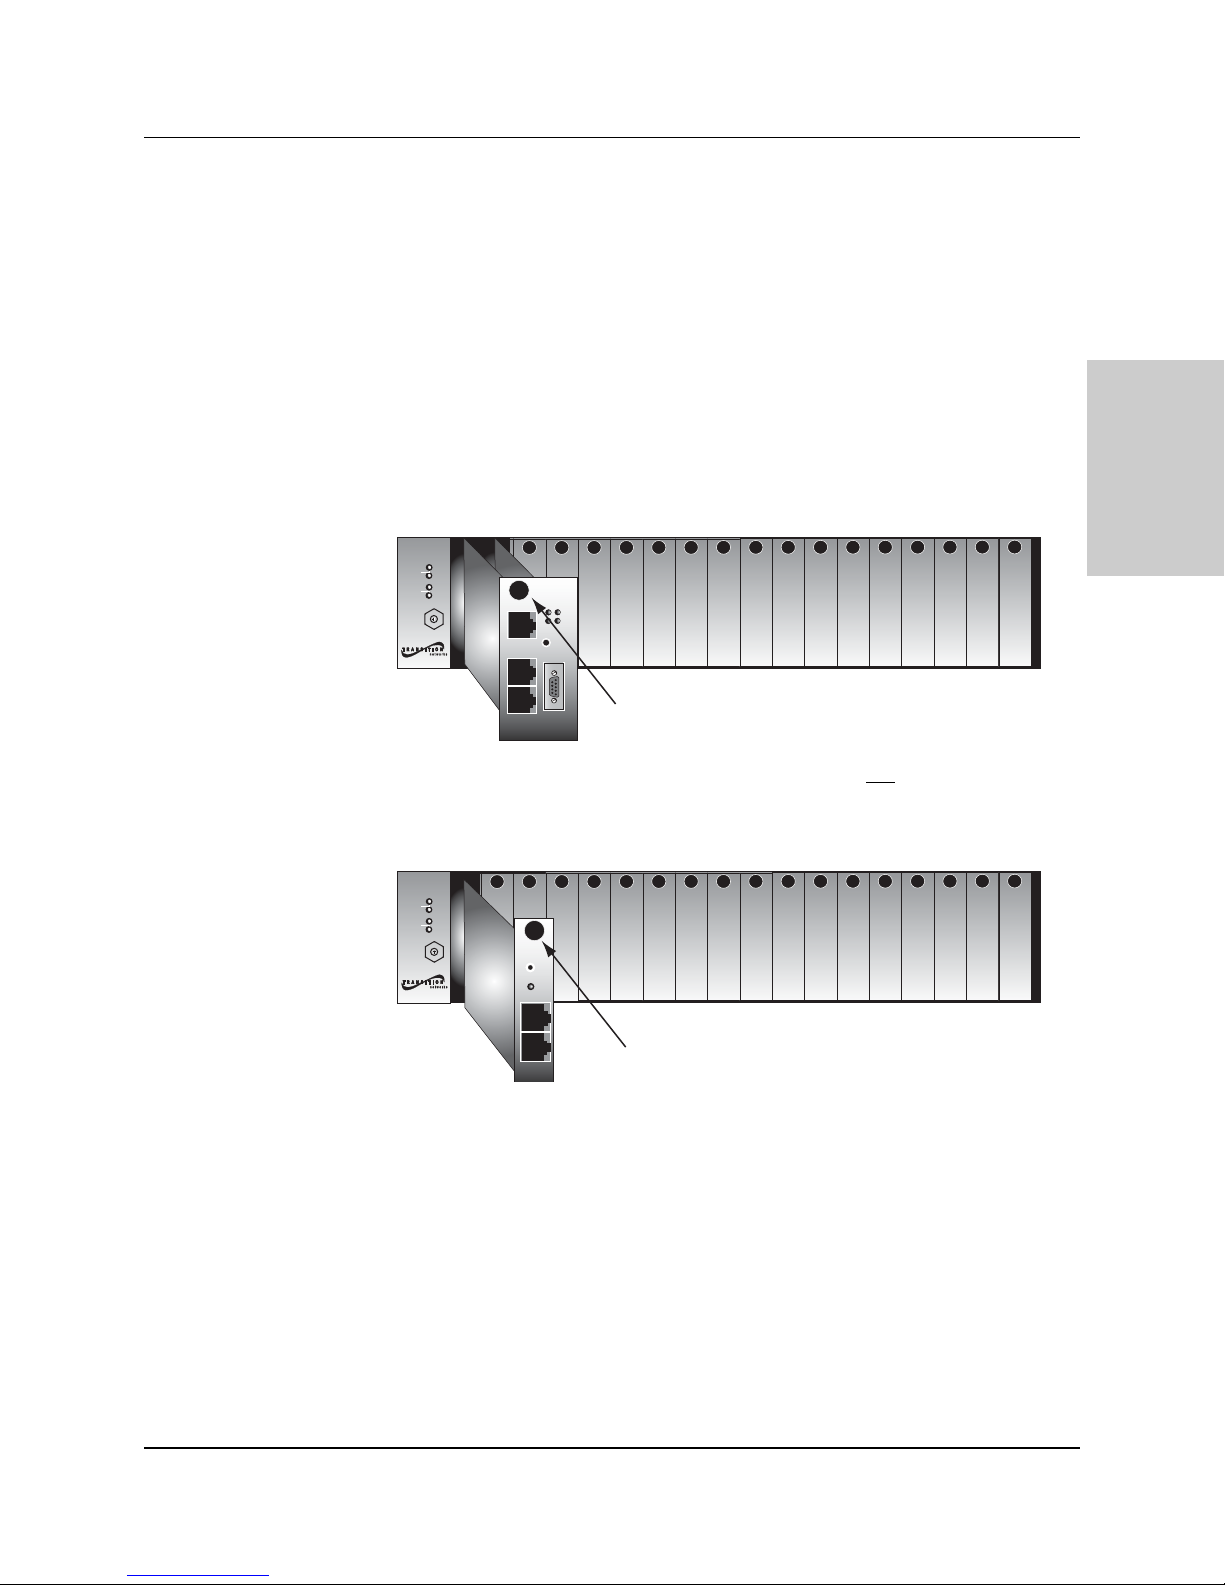
2.2.2 Installing the Management Modules
CAUTION: Wear a grounding device and observe electrostatic discharge
precautions when installing the management module into the CPSMC18xx-xxx
chassis. Failure to observe this caution could result in damage to, and subsequent
failure of, the management module.
NOTE: Transition Networks recommends installing the management module into
the left-most installation slot to keep the management module cables separate from
the media converter cables.
To install a management module into the CPSMC18xx-xxx chassis:
1a. CPSMM-200 Dual-Slot Master Management Module: If
chassis face plates are covering the installation slots, remove the face plates
from the two (2) installation slots at the far-left position of the chassis.
1b. CPSMM-120 Single-Slot Master Management Module OR
CPSMM-210 Single-Slot Expansion Management Module:
If chassis face plates are covering the installation slots, remove the face plate
from the one (1) installation slot at the far-left position of the chassis.
2. Align the management module with the chassis installation slot so that the
panel fastener screw is at the top of the module.
3. Carefully slide the management module into the installation slot, while aligning
the module’s circuit board with the installation guides.
NOTE: Ensure that management module is firmly seated inside the chassis.
4. Push in and rotate the attached panel fastener screw clockwise to secure the
management module to the chassis.
CPSMC1800
CPSMC1800
Conversion
Center PS
Power
1
In Use
Power
2
ESD
Gnd.
Term.
CPSMC1800
In Use
PWR
TX
DB-9
RX
LNK
RESET
DB-9
MCCM10
MGMT MASTER
Panel Fastener Screw
Conversion
Center PS
Power
1
In Use
Power
2
In Use
ESD
Gnd.
Term.
CPSMC1800
RESET
Pwr
INIT
TERM
Panel Fastener Screw
Page 13
13
CPSMC18xx-xxx PointSystem™Chassis
slide-in-modules
2.2.3 Replacing the Management Modules
CAUTION: Wear a grounding device and observe electrostatic discharge
precautions when replacing the media converter slide-in-module(s). Failure to
observe this caution could result in damage to, and subsequent failure of, the
management module(s).
NOTE: The management modules can be replaced while the chassis remains
powered. However, you must configure a new IP address for the replacement
management module. For more information, see the FocalPoint™ 2.0 user’s guide
on the enclosed application CD or on-line at www.transition.com.
To replace a management module in the CPSMC18xx-xxx chassis:
1. Remove the management module to be replaced by loosening the panel
fastener screw that secures the module to the chassis front. Slide the module
from the chassis.
2. Align the replacement Management module with the installation slot so that the
panel fastener screw is at the top.
3. Carefully slide the replacement management module into the installation slot,
while aligning the module’s circuit board with the installation guides.
NOTE: Ensure that the management module is firmly seated inside the chassis.
4. Push in and rotate the attached panel fastener screw clockwise to secure the
module to the chassis.
24-hour Technical Support: 1-800-260-1312 -- International: 00-1-952-941-7600
CPSMC1800
Conversion
Center PS
Power
1
In Use
Power
2
In Use
ESD
Gnd.
Term.
CPSMC1800
RESET
Pwr
INIT
TERM
Panel Fastener Screw
Page 14

14
CPSMC18xx-xxx PointSystem™Chassis
power supply
3 Powering the CPSMC18xx-xxx
3.1 AC Power Supply Module
The CPSMC1800-200 and the CPSMC1850-150 PointSystem™ chassis are
equipped with an AC power supply module (P/N CPSMP-200) installed in the back
of the chassis. The power supply module supplies power to the chassis, installed
media converter slide-in-modules, management modules, and the optional fan
module.
The components of the AC power supply module include:
• An AC power cord that distributes power from an external outlet to an AC
power connector on the power supply module.
• An On/Off switch that, when set to “I”, allows the module to supply power to
the chassis and any installed modules.
•A power LED indicator.
•A fan to prevent the power supply module from overheating.
• An fuse installed in a fuse holder.
Optional Redundant AC Power Supply Module
An extra installation space is available in the back of the chassis for installing an
optional redundant AC power supply module (P/N CPSMP-200).
See section 3.4 Power Supply Module Maintenance for instructions on installation.
24-hour Technical Support: 1-800-260-1312 -- International: 00-1-952-941-7600
Fan Power LED
AC Power Connector
Fuse Holder
Extra Installation
Space
On/Off Switch
I
0
I
0
AC Power Cord
I
0
I
0
Page 15

15
power supply
24-hour Technical Support: 1-800-260-1312 -- International: 00-1-952-941-7600
CPSMC18xx-xxx PointSystem™ Chassis
Powering the AC Power Supply Module
To power the CPSMC1800-200 and the CPSMC1850-150 PointSystem™ chassis
through the AC power supply module:
1. Set the On/Off switch to “0”.
2. Connect female end of the power cord to the AC power connector on the power
supply module.
3. Plug the male end of the power cord into the correct voltage AC rack or wall
socket.
4. Set the On/Off switch to “I”.
5. Verify that the chassis is powered by observing the illuminated power LED and
fan operation.
AC Power Connector
Fan Power LED
On/Off Switch
I
0
I
0
AC Power Cord
Page 16

16
CPSMC18xx-xxx PointSystem™Chassis
power supply
3.2 DC Power Supply Module
The CPSMC1810-200 and the CPSMC1850-160 PointSystem™ chassis are
equipped with a DC power supply module (P/N CPSMP-210) installed in the back
of the chassis. The power supply module supplies power to the chassis, installed
media converter slide-in-modules, management modules, and the optional fan
module.
The components of the DC power supply module include:
• A set of three (3) external power connectors that distribute power from an
external 48-VDC outlet to a chassis ground connector, a positive (+) connector,
and a negative (-) connector on the DC power supply module.
• An On/Off switch that, when set to “I”, allows the DC power supply module to
supply power to the chassis, and any installed modules.
•A power LED indicator.
•A fan to prevent the power supply module from overheating.
•A fuse installed on the power supply module’s circuit board.
Optional Redundant DC Power Supply Module
An extra installation space is available in the back of the chassis for installing an
optional redundant DC power supply module (P/N CPSMP-210).
See section 3.4 Power Supply Module Maintenance for instructions on installation.
24-hour Technical Support: 1-800-260-1312 -- International: 00-1-952-941-7600
External Power Connectors
Fan Power LED
Fuse (on the circuit board) Extra Installation
On/Off Switch
-
+
0
I
Space
-
+
0
I
-
+
0
I
Page 17

17
power supply
24-hour Technical Support: 1-800-260-1312 -- International: 00-1-952-941-7600
CPSMC18xx-xxx PointSystem™ Chassis
Read and follow all warning notices & instructions marked on the product or included in the manual.
CAUTION: All installation and service must be performed by qualified service personnel.
CAUTION: Ensure that the external power source is NOT powered and that the On/Off switch is set to
“0” when connecting the 48-VDC power supply module. Failure to observe this caution could result in
damage to, and subsequent failure of, the 48-VDC power supply module.
Powering the DC Power Supply Module
• This product is intended to be used in a restricted access location. Proper earthing
(grounding) is required to ensure safe operation. Grounding terminals are provided
(section 4.1.3) for proper grounding of the device as per customer installation
requirements and local electrical codes. Prior to installation, use a
voltmeter/ohmmeter to check the wiring for the presence of earth ground.
• A readily accessible disconnect device as part of the building installation shall be
incorporated into the fixed wiring. The disconnect device (a 48 VDC, 15 or 20A
circuit breaker or switch) must be included in the ungrounded supply conductor.
Overcurrent protection must be a 48 VDC, 15 or 20A fuse or circuit breaker.
To power the CPSMC1810-200 and the CPSMC1850-160 chassis through the DC
power supply module:
1. Set the On/Off switch to “0”.
2. Verify that the external power source is NOT powered.
3. Connect the +48-VDC terminal to the chassis external power connector marked
“+”. Turn the terminal screw clockwise to secure.
4. Connect the -48-VDC terminal to the chassis external power connector marked
“-”. Turn the terminal screw clockwise to secure.
5. Connect the ground terminal to the chassis external power connector marked
“chassis ground”. Turn the terminal screw clockwise to secure.
6. Power up the external power source.
7. Set the DC power supply module power switch to “I”.
8. Verify that chassis is powered by observing the illuminated power LED and fan
operation.
External Power Connectors
Fan Power LED
GND
On/Off Switch
-
+
–
+
0
I
Page 18

18
CPSMC18xx-xxx PointSystem™Chassis
power supply
3.3 Optional Dual Power Supply Modules
Alternatively, both an AC power supply module and a DC power supply module
can be installed in the same chassis.
NOTE: The drawing below shows the AC module in the left installation slot and the
DC module in the right, However, either power supply module can be installed in
either installation space.
See section 3.4 Power Supply Module Maintenance for instructions on installation.
24-hour Technical Support: 1-800-260-1312 -- International: 00-1-952-941-7600
I
0
-
+
I
0
Page 19

19
CPSMC18xx-xxx PointSystem™Chassis
power supply
3.4 Power Supply Module Maintenance
3.4.1 Primary/Secondary-Management/Manual Switch
Both the AC (CPSMP-200) and DC (CPSMP-210) power supply modules have a set
of Primary/Secondary-Management/Manual switches installed on the circuit board.
Management/Manual Switch
The Management/Manual switch allows the PointSystem™ software to control and
override the physical setting on the Primary/Secondary switch.
• When set to ‘Management’, the power supply module has the default setting of
‘Primary’ unless changed, at the software interface, to ‘Secondary’.
• When set to ‘Manual’, the power supply module is set by the
Primary/Secondary switch. The software interface cannot change the setting.
Primary/Secondary Switch
The Primary/Secondary switch allows the power supply module to be configured as
the ‘Primary’ or as the ‘Secondary’ power supply module.
• As the ‘Primary’ power supply, it provides power to the entire chassis.
• As the ‘Secondary’ power supply, it waits in stand-by, ready to supply power to
the chassis in the event of power failure from the ‘Primary’ power supply.
Configuring Two Power Supply Modules
• For load sharing, where each module supplies power to half the chassis, set
both power supply modules to ‘Primary’.
• For back-up power supply, set one power supply module to ‘Primary’ (which
supplies power to the entire chassis) and the other to ‘Secondary’. In this mode,
the secondary module is in stand-by and takes over in the event of a power
failure of the ‘Primary’ module.
NOTE: At least one power supply module must
be set to ‘Primary.’ If both modules
are set to ‘Secondary,’ neither will supply power to the chassis.
CAUTION: In a 0 - 60°C (32 - 140°F) environment, two power supplies must
be
installed and both must
be configured for load sharing.
24-hour Technical Support: 1-800-260-1312 -- International: 00-1-952-941-7600
t
Primary
Managemen
I
0
Secondary
Manual
Page 20

20
CPSMC18xx-xxx PointSystem™Chassis
power supply
WARNING: Do NOT connect the Power Supply Module to the external power before installing it into
the Chassis. Failure to observe this caution could result in equipment damage and/or personal injury or
death.
3.4.2 Installing the Power Supply Module
The AC and DC modules are installed in the same manner.
NOTE: At least one power supply module must be set to ‘Primary.’ If both modules
are set to ‘Secondary,’ neither will supply power to the chassis.
1. Remove the power supply module protective plate from the installation slot by
removing and retaining the two (2) screws that secure the plate to the chassis.
2. Set the Primary/Secondary switch and the Management/Manual switch, if
necessary. (See section 3.4.1)
3. Carefully slide the power supply module into the installation slot, aligning the
power supply module with the installation guides. Ensure that the module is
firmly seated inside the chassis.
4. Carefully install the two (2) screws (retained in Step 1) through the power supply
module into the chassis, rotating clockwise to secure.
5. Connect the power supply module to the external power supply (AC: see page
15 / DC: see page 17).
24-hour Technical Support: 1-800-260-1312 -- International: 00-1-952-941-7600
I
0
I
0
I
0
Page 21

21
CPSMC18xx-xxx PointSystem™Chassis
power supply
WARNING: Do NOT connect the power supply module to the external power before installing it
into the chassis. Failure to observe this caution could result in equipment damage and/or personal
injury or death.
3.4.3 Replacing the Power Supply Module
The AC and DC modules are replaced in the same manner.
Both the AC (CPSMP-200) and DC (CPSMP-210) power supply modules may be
“hot swapped” provided the module to be swapped has been disconnected from the
external power source and the On/Off switch has been set to “0”.
NOTE: At least one power supply module must
be set to ‘Primary.’ If both modules
are set to ‘Secondary,’ neither will supply power to the chassis.
1. Set the power supply module power switch to “0”.
2. Disconnect the power supply module from the external power source.
3. Remove the two (2) screws that secure power supply module to the chassis.
Retain the screws for installing the replacement power supply module.
4. Slide the power supply module from the chassis.
5. Set the Primary/Secondary switch and the Management/Manual switch on the
replacement power supply module, if necessary. (See section 3.4.1)
6. Carefully slide the replacement power supply module into the installation slot,
aligning the module with the installation guides. Ensure that the the module is
firmly seated inside the chassis.
7. Carefully install the two (2) retained screws through the power supply module
into the chassis, rotating clockwise to secure.
8. Connect the power supply module to the external power source. (AC: see page
15 / DC: see page 17.)
24-hour Technical Support: 1-800-260-1312 -- International: 00-1-952-941-7600
I
0
I
0
Page 22

22
CPSMC18xx-xxx PointSystem™chassis
power supply
WARNING: Do NOT connect the power supply module to the external power before installing it into
the chassis. Failure to observe this caution could result in equipment damage and/or personal injury or
death.
3.4.3 Replacing the Power Supply Fuses
Replacing the AC Fuse
CAUTION: Wear a grounding device and observe electrostatic discharge
precautions when replacing the fuse in the power supply module. Failure to
observe this caution could result in damage to, and subsequent failure of, the power
supply module.
NOTE: Replace the fuse only with the same size and rating. Failure to observe this
caution could result in equipment damage.
1. Set the AC power supply module power switch to “0”.
2. Disconnect the power supply module from the external power source.
3. From the inside edge of the power receptacle, insert a small flat blade
screwdriver into the groove on the front, inside edge of the fuse holder and
carefully pry the fuse holder from the power supply module.
4. Carefully remove the fuse from the fuse holder.
5. Install a same size and rating replacement fuse in the fuse holder.
6. Return the fuse holder and fuse to the installation position in the power supply
module. Snap the fuse holder into place.
7. Connect the power supply module to the external power source (see page 15).
24-hour Technical Support: 1-800-260-1312 -- International: 00-1-952-941-7600
I
0
Fuse Holder
Fuse
Page 23

23
CPSMC18xx-xxx PointSystem™chassis
power supply
WARNING: Do NOT connect the power supply module to the external power before installing it into
the chassis. Failure to observe this caution could result in equipment damage and/or personal injury or
death.
Replacing the DC Fuse
CAUTION: Wear a grounding device and observe electrostatic discharge
precautions when replacing the fuse in the power supply module. Failure to
observe this caution could result in damage to, and subsequent failure of, the power
supply module.
NOTE: Replace the fuse only with the same size and rating. Failure to observe this
caution could result in equipment damage.
1. Set the DC power supply module power switch to “0”.
2. Disconnect the power supply module from the external power source.
3. Remove the power supply module by removing the two (2) screws that secure
the module to the chassis. Slide the module from the chassis.
4. Remove the fuse from the fuse holder.
5. Install a same size and rating replacement fuse in the fuse holder.
6. Slide the power supply module into the installation slot, aligning the module
with the installation guides. Ensure that the module is firmly seated inside the
chassis.
7. Install the two (2) retained screws through the power supply module into the
chassis, rotating clockwise to secure.
8. Connect the power supply module to the external power source (see page 17).
24-hour Technical Support: 1-800-260-1312 -- International: 00-1-952-941-7600
I
0
Fuse Holder
0
I
Fuse
Page 24

24
CPSMC18xx-xxx PointSystem™chassis
power supply
3.5 Optional Fan Module
The optional fan module (CPSFM-200) can be installed in the extra installation
space in the back of the CPSMC18xx-xxx chassis to provide additional cooling for
the entire chassis.
CAUTION: Wear a grounding device and observe electrostatic discharge
precautions when installing the fan module into the chassis. Failure to observe this
caution could result in damage to, and subsequent failure of, the fan module.
NOTE: The fan module may be “hot swapped”
To install the fan module into the CPSMC18xx-xxx chassis:
1. Remove the protective plate from the installation slot by removing and retaining
the two (2) screws that secure the plate to the chassis.
2. Carefully slide the fan module into the installation slot, aligning the module
with the installation guides. Ensure the module is firmly seated inside the
chassis.
3. Carefully install the two (2) retained screws through the fan module into the
chassis, rotating clockwise to secure.
4. Verify that the fan module is powered by observing the fan operation.
24-hour Technical Support: 1-800-260-1312 -- International: 00-1-952-941-7600
I
0
I
0
Page 25

25
CPSMC18xx-xxx PointSystem™Chassis
chassis
4 CPSMC18xx-xxx Chassis
4.1 Installing the CPSMC18xx-xxx Chassis
The CPSMC18xx-xxx can be installed in a standard 19-inch rack or on a table, shelf,
or other stable surface.
CAUTION: Install the chassis so that the air flow around it is not restricted.
4.1.1 Table-Top Installation
The CPSMC18xx-xxx chassis is shipped with nine (9) rubber feet for optional
installation on a table or other flat, stable surface in a well-ventilated area. If tabletop installation is desired, remove the rubber feet from the card and place them on
the bottom of the chassis. Distribute the feet so that the chassis is level when placed
upright.
4.1.2 Standard 19-inch Rack Installation
The maximum recommended ambient temperature (Tmra) for the CPSMC18xx-xxx
chassis is 50°C. (60°C when using load-sharing power supply modules) If the
CPSMC18xx-xxx chassis is installed in a closed or multi-unit rack assembly, the
operating ambient temperature of the the rack environment may be greater than
room ambient.
NOTE: Rack-mounted equipment must be reliably grounded. Power supply
connections other than direct connections to the branch circuit (e.g., use of power
strips) should be employed.
The CPSMC18xx-xxx chassis is designed so that the installation brackets can be
installed to align the chassis either flush against the front or back edge of the rack
or recessed from the front or back edge of the rack.
WARNING: Select mounting bracket locations on the chassis that will keep the chassis balanced when
mounted in the rack. Failure to observe this warning could allow the chassis to fall, resulting in
equipment damage and/or possible injury to personnel.
24-hour Technical Support: 1-800-260-1312 -- International: 00-1-952-941-7600
Flush Alignment
at front
Recessed Alignment
at front
Flush Alignment
at back
Recessed Alignment
at back
Page 26

26
CPSMC18xx-xxx PointSystem™Chassis
chassis
To install the CPSMC18xx-xxx chassis into a standard 19-inch rack:
1. Determine the preferred alignment of the chassis in the rack.
NOTE: Installation bracket mounting screws are provided. Rack mount screws
and clip nuts are NOT provided.
2. Locate six (6) installation bracket mounting screws (provided) for each chassis
to be installed.
WARNING: Mount the chassis evenly and securely onto the rack. Failure to
observe this warning could allow the chassis to fall, resulting in equipment
damage and/or possible injury to personnel.
3. Align the universal mounting bracket in the selected position against the side of
the chassis so that the chassis installation holes are visible through the universal
bracket installation holes.
4. Using a Phillips screwdriver, install the three (3) screws through the mounting
bracket into the installation holes on side of the chassis.
5. Repeat steps 3 and 4 for the second mounting bracket.
6. Locate four (4) screws (not provided) and optional clip-nuts (not provided) for
each chassis to be installed.
7. Carefully align the chassis at a secure and level position between the 19-inch
site rack mounting rails.
8. Install two (2) screws through the right bracket into the right mounting rail and
two (2) screws through the left bracket into the left mounting rail, using the clip
nuts to secure, if necessary.
24-hour Technical Support: 1-800-260-1312 -- International: 00-1-952-941-7600
CPSMC1800
CPSMC1800
CPSMC1800
Conversion
Center PS
Power
1
In Use
Power
2
In Use
ESD
Gnd.
Term.
CPSMC1800
Media
Conversion
Center
Power
1
In Use
Power
2
In Use
ESD
Gnd.
Term.
CPSMC1800
Page 27

27
CPSMC18xx-xxx PointSystem™Chassis
chassis
4.1.3 Grounding Lugs
The CPSMC18xx-xxx comes equipped with grounding lugs, which are provided for
a grounding conductor wire terminated with a two-hole, compression-type,
grounding connector. The grounding wire -- which must be a copper conductor -is not included with the chassis and must be provided by the customer/installer.
The electrical conducting path from the chassis must:
• Flow via the grounding lugs to the Common Bonding Network (CBN) for
telecom installations; or to an alternate approved grounding system (if required)
for non-telecom installations,
• Be of sufficiently low impedance to conduct fault currents likely to be imposed
on the chassis, and
• Enable proper operation of any over-current protection devices.
The two-hole, compression-type, grounding connector must be fastened to the
grounding lugs with the enclosed, anti-rotation star-washers and lug-nut fasteners.
The required torque to the fasteners is specified by the connector’s manufacturer.
To properly ground the CPSMC18xx-xxx chassis:
1. Obtain one (1) properly-terminated, grounding conductor (12 AWG copper
wire gauge or larger) with a two-hole, compression-type, grounding connector.
Note the manufacturer's applied torque that is required for the connector.
2. Attach the grounding conductor to the chassis by placing the two-hole,
compression-type connector onto the grounding lugs and fasten with
appropriate lock-washers and lug-nuts at the proper torque.
3. Attach the opposite end of the properly-terminated grounding conductor to the
Common Bonding Network (CBN) for telecom installations, or to an approved
grounding system (if required) for non-telecom installations.
24-hour Technical Support: 1-800-260-1312 -- International: 00-1-952-941-7600
p
Grounding lugs
(6-32, 1/8" diam.)
3/4-inch
spacing
Two-hole, compression-type
grounding connector (not included)
Star washer (included)
Lug nuts (included)
12 AWG copper wire
(not included)
Grounding Lugs
I
0
Grounding Wire with a two-hole,
com
ression-type grounding connector
CBN (for telecom installation)
or Earth Ground
Page 28

28
CPSMC18xx-xxx PointSystem™Chassis
chassis
4.2 Telco Option
(CPSMC1850-150 and CPSMC1850-160 Models Only)
The CPSMC1850-150 and CPSMC1850-160 PointSystem™ chassis are shipped
with two (2) 50-pin Telco connectors installed at the back of the chassis.The two
Telco connectors concentrate a total of 24 UTP connections, which are distributed
to twelve (12) installation slots in the front of the CPSMC1850-150 and
CPSMC1850-160 chassis.
Telco Cables
The cables for connecting between the Telco network and the CPSMC1850-1xx
chassis are available from Transition Networks:
• P/N 21HC45-6 Telco cable with twelve (12) RJ-45 connectors at one end and
an RJ-21 connector at the other end.
• P/N 21HC21-6 Telco cable with RJ-21 connectors at both ends.
Chassis Slots 7 through 18
The signals from the Telco connectors are distributed as follows:
• Signals from Telco connector #2 go to slots 7-12.
• Signals from Telco connector #1 go to slots 13-18.
24-hour Technical Support: 1-800-260-1312 -- International: 00-1-952-941-7600
CPSMC1800
Telco connector #1
I
0
Telco connector #2
21HC45-6:
one (1) RJ-21 connector
21HC21-6:
two (2) RJ-21 connector
and 12 RJ-45 connectors
Conversion
Center PS
1
2
ESD
Gnd.
Term.
CPSMC1800
Telco connector #2 Telco connector #1
1
10BASE-T
Power
In Use
Power
In Use
INPORT
OUTPORT
MCCM10
MGMT MASTER
3
2
PWR
TX
DB-9
RX
LNK
RESET
INIT
DB-9
12C
12C-1TERM
RXC
TX
10BASE-FL
RX
10BASE-T
5
4
PWR
LKF
RXF
LKC
CETTF100
7
6
Fiber Port #2
Fiber Port #1
CDFTF100
Fiber Port #2
Fiber Port #1
CDFTF100
9
8
Fiber Port #2
Fiber Port #2
Fiber Port #1
Fiber Port #1
CDFTF100
CDFTF100
10
11
Fiber Port #2
Fiber Port #1
CDFTF100
{
12
13
Fiber Port #2
Fiber Port #2
Fiber Port #1
Fiber Port #1
CDFTF100
CDFTF100
Fiber Port #2
Fiber Port #1
CDFTF100
14
15
Fiber Port #2
Fiber Port #1
CDFTF100
Fiber Port #2
Fiber Port #1
CDFTF100
16
{
17
Fiber Port #2
Fiber Port #1
CDFTF100
18
Fiber Port #2
Fiber Port #1
CDFTF100
Page 29

29
CPSMC18xx-xxx PointSystem™ Chassis
chassis
CDFTFxxxx-10x Media Converter
In order to fully utilize the Telco option on the CPSMC1850-1xx
chassis, the Transition Networks CDFTFxxxx-10x media converter
slide-in-module is required and it must be installed in slots 7 through
18. The CDFTFxxxx-10x (see the drawing to the right) is a dual-port
media converter that connects Telco signals to fiber optic cable.
For more information on the CDFTFxxxx-10x, see the user’s guide online at www.transition.com.
Please note that:
• Slots 1-6 on the CPSMC1850-1xx are designed for any Transition Networks
media converter slide-in-module.
• Slots 7-18 on the CPSMC1850-1xx can accommodate any Transition Networks
media converter slide-in-module. However the Telco option will not function
unless a CDFTFxxxx-10x media converter is installed in those slots.
24-hour Technical Support: 1-800-260-1312 -- International: 00-1-952-941-7600
TL1
FL1
FL2
TL2
Fiber Port #2
Fiber Port #1
PWR
AC1
AC2
CDFTF100
Page 30

30
CPSMC18xx-xxx PointSystem™Chassis
chassis
24-hour Technical Support: 1-800-260-1312 -- International: 00-1-952-941-7600
Telco Signals
The chart below shows the 50 signals that go through each Telco connector on the
CPSMC18xx-xxx to slots 7-12 (Telco connector #2) OR to slots 13-18 (Telco
connector #1).
The chart also shows how the signals are distributed to either the UPPER or LOWER
port on the media converter installed in the CPSMC1850-150 or CPSMC1850-160
chassis (see figure below).
The figure to the right illustrates the locations
of pins 1-50 on the Telco connector.
CPSMC1800
{
{
{
{
{
{
UPPER
{
LOWER
{
UPPER
{
LOWER
{
UPPER
{
LOWER
{
UPPER
{
LOWER
{
UPPER
{
LOWER
{
UPPER
{
LOWER
{
Pin # Signal Pin # Signal
1 Port 1 Transmit - 26 Port 1 Transmit +
2 Port 1 Receive - 27 Port 1 Receive +
3 Port 2 Transmit - 28 Port 2 Transmit +
4 Port 2 Receive - 29 Port 2 Receive +
5 Port 3 Transmit - 30 Port 3 Transmit +
6 Port 3 Receive - 31 Port 3 Receive +
7 Port 4 Transmit - 32 Port 4 Transmit +
8 Port 4 Receive - 33 Port 4 Receive +
9 Port 5 Transmit - 34 Port 5 Transmit +
10 Port 5 Receive - 35 Port 5 Receive +
11 Port 6 Transmit - 36 Port 6 Transmit +
12 Port 6 Receive - 37 Port 6 Receive +
13 Port 7 Transmit - 38 Port 7 Transmit +
14 Port 7 Receive - 39 Port 7 Receive +
15 Port 8 Transmit - 40 Port 8 Transmit +
16 Port 8 Receive - 41 Port 8 Receive +
17 Port 9 Transmit - 42 Port 9 Transmit +
18 Port 9 Receive - 43 Port 9 Receive +
19 Port 10 Transmit - 44 Port 10 Transmit +
20 Port 10 Receive - 45 Port 10 Receive +
21 Port 11 Transmit - 46 Port 11 Transmit +
22 Port 11 Receive - 47 Port 11 Receive +
23 Port 12 Transmit - 48 Port 12 Transmit +
24 Port 12 Receive - 49 Port 12 Receive +
25 N.C. 50 N.C.
CHASSIS SLOT
#7 or 13
CHASSIS SLOT
#8 or 14
CHASSIS SLOT
#9 or 15
CHASSIS SLOT
#10 or 16
CHASSIS SLOT
#11 or 17
CHASSIS SLOT
#12 or 18
upper ports
Conversion
Center PS
1
2
ESD
Gnd.
Term.
CPSMC1800
Power
In Use
Power
In Use
10BASE-T
INPORT
OUTPORT
MCCM10
MGMT MASTER
PWR
TX
DB-9
RX
LNK
RESET
INIT
DB-9
12C
12C-1TERM
RXF
RXC
TX
10BASE-FL
RX
10BASE-T
LKF
CETTF100
PWR
LKC
Fiber Port #2
Fiber Port #1
CDFTF100
Fiber Port #2
Fiber Port #1
CDFTF100
Fiber Port #2
Fiber Port #1
CDFTF100
Fiber Port #2
Fiber Port #1
CDFTF100
Fiber Port #2
Fiber Port #1
CDFTF100
Fiber Port #2
Fiber Port #1
CDFTF100
Fiber Port #2
Fiber Port #1
CDFTF100
lower ports
25
50
Fiber Port #2
Fiber Port #1
CDFTF100
Fiber Port #2
Fiber Port #1
CDFTF100
Fiber Port #2
Fiber Port #1
CDFTF100
Fiber Port #2
Fiber Port #1
CDFTF100
Fiber Port #2
Fiber Port #1
CDFTF100
1
26
Page 31

31
chassis
24-hour Technical Support: 1-800-260-1312 -- International: 00-1-952-941-7600
CPSMC18xx-xxx PointSystem™Chassis
4.3 Cascade Option
The management module cascade option allows the network administrator to
connect up to eight (8) CPSMC18xx-xxx chassis into one manageable stack,
providing a single management source for up to 135 conversion devices.
To create the cascade option, the CPSMM-200 Dual Slot Master Management
Module is installed in the first chassis in the series. The CPSMM-210 Single-Slot
Expansion management module is installed in each subsequent chassis.
An alternative setup involves installing two CPSMM-200 Dual-Slot Master
Management Modules into two adjacent chassis for redundant management.
In this set-up, the two CPSMM-200 management modules auto-negotiate so that
one module is the primary while the other is in stand-by mode. If the primary
module fails, the stand-by module automatically takes over and manages the
network.
CPSMC1800
ESD
Gnd.
Term.
CPSMC1800
ESD
Gnd.
Term.
CPSMC1800
ESD
Gnd.
Term.
CPSMC1800
ESD
Gnd.
Term.
CPSMC1800
ESD
Gnd.
Term.
Media
Conversion
Center
10BASE-T
Power
1
The CPSMM-200
Management Module is
installed in the first
chassis in the series
The CPSMM-210
Management Module is
installed in each
subsequent chassis
2
ESD
Gnd.
Term.
CPSMC1800
Media
Conversion
Center
1
2
ESD
Gnd.
Term.
CPSMC1800
Media
Conversion
Center
1
2
ESD
Gnd.
Term.
CPSMC1800
In Use
Power
In Use
IN
OUT
Power
RESET
In Use
Power
Pwr
In Use
Power
RESET
In Use
Power
Pwr
In Use
PWR
TX
RX
LNK
RESET
DB-9
The CPSMM-200
Management Module is
installed in the first
chassis in the series
Another CPSMM-200
Managment Module is
installed in the next
chassis as a backup
Media
Conversion
Center
1
2
ESD
Gnd.
Term.
CPSMC1800
Media
Conversion
Center
1
2
ESD
Gnd.
Term.
CPSMC1800
PWR
TX
Power
RX
LNK
In Use
Power
RESET
In Use
DB-9
PWR
TX
Power
RX
LNK
In Use
Power
RESET
In Use
DB-9
Page 32

32
chassis
24-hour Technical Support: 1-800-260-1312 -- International: 00-1-952-941-7600
CPSMC18xx-xxx PointSystem™Chassis
Cascading multiple CPSMC18xx-xxx chassis
To cascade two or more CPSMC18xx-xxx chassis:
1. Locate one (1) Transition Networks management module cascade cable (with
RJ-45 connectors installed at both ends) (P/N 6026) for each set of two (2)
chassis to be cascaded.
NOTE: Transition Networks management module cascade cables are one (1)
meter long. Ensure that the chassis are installed within one (1) meter of each
other.
2. At the first chassis in the series: Plug the RJ-45 connector at one end of the
cascade cable into the management module’s RJ-45 port labeled “OUT”.
3. At the next chassis in the series: Plug the RJ-45 connector at the other end of the
cascade cable into the management module’s RJ-45 port labeled “IN”.
4. At the same chassis as in step 3: Plug the RJ-45 connector at one end of the
cascade cable into the management module’s RJ-45 port labeled “OUT”.
5. At the next chassis in the series: Plug the RJ-45 connector at the other end of the
cascade cable into the management module’s RJ-45 port labeled “IN”.
6. Repeat steps 4 and 5 until all chassis have been connected.
Page 33

33
CPSMC18xx-xxx PointSystem™Chassis
chassis
24-hour Technical Support: 1-800-260-1312 -- International: 00-1-952-941-7600
4.4 Connecting the Slide-in-Modules to the Network
Once the CPSMC18xx-xxx chassis has been installed, the media converter slide-inmodules may be connected to the network.
CAUTION: Connect input/output network cables ONLY to media converter slidein-module connectors within the same network protocol (such as Ethernet-to-
Ethernet, Fast Ethernet-to-Fast Ethernet, ATOM-to-ATOM). Failure to observe this
caution will cause data transfer to fail.
Refer to user’s guides included with the media converter slide-in-modules for
cabling specifications and instructions.
4.5 Operation
Daily operation of the CPSMC18xx-xxx chassis requires no network administrator
activity except for the occasional monitoring of the status LED indicators on the
chassis and on the installed media converter slide-In-modules.
Each media converter slide-in-module and each management module has one or
more LED indicators to help monitor the CPSMC18xx-xxx chassis network.
Refer to the user’s guide included with each management module and slide-inmodule to interpret the LED indicators.
CPSMC1800
CPSMC1800
Conversion
Center PS
1
2
ESD
Gnd.
Term.
CPSMC1800
PWR
TX
Power
In Use
RX
Power
In Use
MCCM10
MGMT MASTER
RESET
12C
LKF
DB-9
RXF
RXC
LNK
TX
10BASE-FL
RX
DB-9
10BASE-T
CETTF100
PWR
PWR
LKS
LKS
PWR
LKM
LKM
LKC
TX
TX
Singlemode
Singlemode
RX
RX
TX
TX
Multimode
Multimode
RX
RX
CFMFF100
CFMFF100
LA
RXF
RXC
10BASE-T
10BASE-2
E
0
CECF100
PWR
PWR
SPD
LKS
LNK
FRX
LKM
CRX
COL
TX
Link Alert
Singlemode
D
TX
10/100SX
RX
TX
RX
Multimode
50½
10/100TX
RX
CFMFF100
CFETF110
PWR
PWR
LKS
FLNK
LKM
CLNK
TX
Singlemode
RX
TX
Multimode
RX
CFMFF100
LA
RXF
RXC
E
10BASE-FL
0
10BASE-2
CETCF100
PWR
PWR
LNK
COL
Link Alert
D
50½
LKS
LKM
TX
Singlemode
RX
TX
Multimode
RX
CFMFF100
TX
RX
SPD
FRX
CRX
100BASE-FX
100BASE-TX
CFETF100
PWR
FLNK
CLNK
Check the individual user's guide for specific information on
how to connect each slide-in-module to the network.
Conversion
Center PS
Power
1
In Use
Power
2
In Use
ESD
Gnd.
Term.
MGMT MASTER
CPSMC1800
MCCM10
RXF
RXC
TX
10BASE-FL
RX
10BASE-T
LKF
CETTF100
PWR
LKS
LKS
PWR
LKM
LKM
LKC
TX
TX
Singlemode
Singlemode
RX
RX
TX
TX
Multimode
Multimode
RX
RX
CFMFF100
CFMFF100
PWR
TX
DB-9
RX
LNK
RESET
DB-9
PWR
LA
RXF
RXC
10BASE-T
10BASE-2
E
0
CECF100
PWR
PWR
SPD
LKS
LNK
FRX
LKM
CRX
COL
TX
Link Alert
Singlemode
D
TX
10/100SX
RX
TX
RX
Multimode
50½
10/100TX
RX
CFMFF100
CFETF110
PWR
PWR
LKS
FLNK
LKM
CLNK
TX
Singlemode
RX
TX
Multimode
RX
CFMFF100
LA
RXF
RXC
10BASE-FL
10BASE-2
Link Alert
E
0
CETCF100
PWR
PWR
LKS
LNK
LKM
COL
TX
Singlemode
D
RX
TX
Multimode
50½
RX
CFMFF100
LED indicators on the management module and slide-in-modules
SPD
FRX
CRX
TX
100BASE-FX
RX
100BASE-TX
CFETF100
PWR
FLNK
CLNK
Page 34

34
CPSMC18xx-xxx PointSystem™Chassis
network mgmt.
24-hour Technical Support: 1-800-260-1312 -- International: 00-1-952-941-7600
5 Network Management
The CPSMM100 firmware and the FocalPoint™ application are described in the
FocalPoint™ 2.0 Management Application and CPSMM100 Firmware user’s guide
(P/N 33293). This manual is included on the application CD and is also available
on-line at www.transition.com.
Transition Networks CPSMM100 firmware is embedded in the optional
management modules (see section 2.2). The firmware allows the network
administrator to configure and manage the CPSMC18xx-xxx chassis from an
attached terminal or from a remote, networked computer.
The firmware includes the Transition Networks Command Line Interface (CLI), a
telnet server, a Web browser, and an SNMP (Simple Network Management
Protocol) agent.
In addition, Transition Networks FocalPoint™ application can be installed in the
networked computer to provide a graphical user interface to monitor the
PointSystem™ chassis.
5.1 Hardware Connections
Network management can be implemented either through the DB-9 serial port or
through the RJ-45 Ethernet port of the management modules.
0
PWR
TX
10BASE-T
RX
LNK
RESET
IN
OUT
CPSMM200
CPSMM-200 CPSMM-12
RJ-45 Ethernet Port
DB-9
DB-9 Serial Port
10BASE-T
SERIAL
TX
RX
CPSMM120
PWR
LNK
RESET
Page 35

35
CPSMC18xx-xxx PointSystem™Chassis
network mgmt.
24-hour Technical Support: 1-800-260-1312 -- International: 00-1-952-941-7600
DB-9 Serial Port
The DB-9 serial port allows the network administrator to configure and manage the
CPSMC18xx-xxx chassis using the SNMP Command-Line Interface (CLI) at an
attached terminal or terminal emulator.
Use a null modem cable to attach a terminal to the DB-9 serial port on the
management module as shown.
RJ-45 Ethernet Port
The RJ-45 Ethernet port allows the network administrator to manage the
CPSMC18xx-xxx chassis via a remote Network Management Station (NMS) in one
of two ways:
1. Using the Transition Networks FocalPoint™ graphical user interface.
2. Using a remote Telnet connection.
Use an RJ-45 network cable to attach a terminal (via a network hub or switch) to the
RJ-45 Ethernet port on the management module as shown.
NOTE: To manage the PointSystem™ chassis via a remote NMS, both the RJ-45
Ethernet port and the NMS must be connected to a network with Internet access.
R
CPSMC1800
r
CPSMC1800
Conversion
Center PS
1
2
ESD
Gnd.
Term.
CPSMC1800
PWR
TX
Power
In Use
RX
Power
In Use
MCCM10
MGMT MASTER
LKF
DB-9
RXF
RXC
LNK
TX
RESET
10BASE-FL
RX
DB-9
10BASE-T
CETTF100
PWR
PWR
LKS
LKS
PWR
LKM
LKM
LKC
TX
TX
Singlemode
Singlemode
RX
RX
TX
TX
Multimode
Multimode
RX
RX
CFMFF100
CFMFF100
RXF
RXC
10BASE-T
10BASE-2
PWR
PWR
SPD
LKS
LA
LNK
FRX
LKM
CRX
COL
TX
Link Alert
Singlemode
E
D
TX
10/100SX
RX
TX
RX
Multimode
50½
0
10/100TX
RX
CFMFF100
CECF100
CFETF110
PWR
PWR
LKS
FLNK
LKM
CLNK
TX
Singlemode
RX
TX
Multimode
RX
CFMFF100
LA
RXF
RXC
10BASE-FL
10BASE-2
Link Alert
E
0
CETCF100
PWR
PWR
LNK
COL
D
50½
LKS
LKM
TX
Singlemode
RX
TX
Multimode
RX
CFMFF100
SPD
FRX
CRX
TX
100BASE-FX
RX
100BASE-TX
CFETF100
PWR
FLNK
CLNK
Attached terminal or terminal emulato
connected to the DB-9 serial port
via a
null modem cable
.
Network hub or switch connected
to the RJ-45 Ethernet port.
Conversion
Center PS
1
2
ESD
Gnd.
Term.
CPSMC1800
PWR
TX
MCCM10
MGMT MASTER
DB-9
RX
LNK
RESET
DB-9
Power
In Use
Power
In Use
RXF
RXC
TX
10BASE-FL
RX
10BASE-T
LKF
CETTF100
PWR
LKS
PWR
LKM
LKC
TX
TX
Singlemode
Singlemode
RX
RX
TX
TX
Multimode
Multimode
RX
RX
CFMFF100
LKS
LKM
CFMFF100
Remote NMS with an SNMP application
PWR
LA
RXF
RXC
10BASE-T
10BASE-2
E
0
CECF100
PWR
PWR
SPD
LKS
LNK
FRX
LKM
CRX
COL
TX
Link Alert
Singlemode
D
TX
10/100SX
RX
TX
RX
Multimode
50½
10/100TX
RX
CFMFF100
CFETF110
Remote Telnet connection O
PWR
PWR
LKS
FLNK
LKM
CLNK
TX
Singlemode
RX
TX
Multimode
RX
CFMFF100
LA
RXF
RXC
E
10BASE-FL
0
10BASE-2
CETCF100
PWR
PWR
LNK
COL
Link Alert
D
50½
LKS
LKM
TX
Singlemode
RX
TX
Multimode
RX
CFMFF100
SPD
FRX
CRX
TX
100BASE-FX
RX
100BASE-TX
CFETF100
PWR
FLNK
CLNK
Page 36

36
CPSMC18xx-xxx PointSystem™Chassis
troubleshooting
6 Troubleshooting
1. Are any of the power LEDs on any of the slide-in-modules illuminated, AND are
the fans operating?
YES
• The chassis is receiving power. Proceed to the next step.
NO
• Check all power supply cables for proper connection.
• For AC power: Ensure the AC receptacle on the wall is supplying power.
• If the fuse for the AC receptacle on the wall blows repeatedly, have the AC
receptacle inspected by a qualified electrician.
• For DC power: Ensure the DC power supply is supplying power.
• Check the fans to see if they are operating.
• Contact Technical Support: U.S./Canada: 1-800-260-1312, International:
00-1-952-941-7600.
2. For the management modules (CPSMM-120, CPSMM-200, CPSMM-210), are
ANY of the power LEDs NOT illuminated?
NO
• All management modules are receiving power. Proceed to the next step.
YES
For those management modules where the power LED is NOT illuminated:
• Ensure the management module is firmly seated in the slot.
• Press the RESET button on the management module.
• Contact Technical Support: U.S./Canada: 1-800-260-1312, International:
00-1-952-941-7600.
3. For the remaining slide-in-modules, are ANY of the power LEDs NOT
illuminated?
NO
• All slide-in-modules are receiving power. Proceed to the next step.
YES
For those slide-in-modules where the power LED is NOT illuminated:
• Ensure the slide-in-module is firmly seated in the slot.
• Contact Technical Support: U.S./Canada: 1-800-260-1312, International:
00-1-952-941-7600.
4. To determine if a fault is due to a software problem, consult the troubleshooting
section of the FocalPoint™ 2.0 Management Application and CPSMM100
Firmware User’s Guide (P/N 33293). This manual is available on the enclosed
application CD and on-line at www.transition.com.
5. To determine if a fault is due to an individual management module or slide-inmodule, consult the troubleshooting section of the user’s guide for that
particular module.
6. If none of the solutions listed in this section resolves the problem, contact
Technical Support: U.S./Canada: 1-800-260-1312, International: 00-1-952941-7600.
24-hour Technical Support: 1-800-260-1312 -- International: 00-1-952-941-7600
Page 37

37
CPSMC18xx-xxx PointSystem™Chassis
24-hour Technical Support: 1-800-260-1312 -- International: 00-1-952-941-7600
Technical Specifications
For use with Transition Networks Model CPSMC18xx-xxx or equivalent.
Dimensions 17 x 14.3 x 3.5 inches (430 x 363 x 89 mm)
Weight 17.5 lbs. (8.0 kg)
MTBF (Mean Time Before Failure) MIL217F2 V5.0 (hrs) Bellcore7 V5.0 (hrs)
CPSMC1800 + CPSMP-200 82,539 223,289
CPSMC1800 + CPSMP-200 + CPSMM-200 52,564 170,073
CPSMC1800 + CPSMP-210 166,283 385,512
CPSMC1800 + CPSMP-210 + CPSMM-200 77,383 250,295
CPSMP-200
Power Input: 100-240 V, 50/60 Hz, 0.62-1.5 Amp (typical with a fully-loaded chassis)
Power Output: +12 VDC at 10.83 Amp maximum.
CPSMP-210
Power Input: 48-VDC (38 to 58 VDC) @ 4.0 Amp (typical with a fully-loaded chassis)
Power Output: +12 VDC at 12.5 Amp maximum.
Environment
Tmra*: 0 to 50°C (32 to 122°F) (*Manufacturer’s rated ambient temperature)
0 to 60°C (32 to 140°F) (when redundant power or fan module is used)
Storage Temperature: -40 to 80°C (-40 to 176°F)
Humidity 5 to 95%, non condensing
Altitude 0 to 10,000 feet
Compliance EN 55022:1998+A1:2000 Class A & B; EN 55024:1998; UL Listed;
FCC Part 15 Subpart B; CE Mark; 21 CFR Subpart J
Warranty Lifetime
Product is certified by the manufacturer to comply with DHHS Rule 21/CFR, Subchapter J applicable at the date
of manufacture.
The fiber optic transmitters on this device meets Class I Laser safety requirements per IEC-825/CDRH standards
and complies with 21 CFR1040.10 and 21CFR1040.11.
CAUTION: Visible and Invisible Laser Radiation When Open. Do Not Stare Into Beam Or View Directly
With Optical Instruments.
CAUTION: Use of controls, adjustments or the performance of procedures other than those specified herein
may result in hazardous radiation exposure.
Page 38

38
CPSMC18xx-xxx PointSystem™Chassis
24-hour Technical Support: 1-800-260-1312 -- International: 00-1-952-941-7600
Cable Specifications
Null Modem Cable
The Null Modem Cable is used for connecting a terminal or terminal emulator to
the management module’s DB-9 connector to access the command-line interface.
The table below shows the pin assignments for the DB9 cable.
Function Mnemonic Pin
Carrier Detect CD 1
Receive Data RXD 2
Transmit Data TXD 3
Data Terminal Ready DTR 4
Signal Ground GND 5
Data Set Ready DSR 6
Request To Send RTS 7
Clear To Send CTS 8
The table below shows the pin assignments for the RS-232 null modem cable.
RJ-45 Cable
Category 5:
Gauge: 24 to 22 AWG
Attenuation: 22.0 dB /100m @ 100 MHz
Maximum Cable Distance: 100 meters
• Straight-through OR crossover cable may be used.
• Shielded twisted-pair(STP) OR unshielded twisted-pair (UTP) may be used.
• Pins 1&2 and 3&6 are the two active pairs in an Ethernet network.
(RJ-45 Pin-out: Pin 1 = TD+, Pin 2 = TD-, Pin 3 = RD+, Pin 6 = RD-)
• All pin pairs (1&2, 3&6, 4&5, 7&8) are active in a gigabit Ethernet network.
• Use only dedicated wire pairs for the active pins:
(e.g., blue/white & white/blue, orange/white & white/orange, etc.)
• Do not use flat or silver satin wire.
Page 39

39
CPSMC18xx-xxx PointSystem™ Chassis
COAX Cable
Coaxial cable media is used for circuits such as DS3, E1 and 10Base-2 Ethernet.
The impedance of the coaxial cable is determined by the interface type, for
example:
• 75 ohm for DS3.
• 50 ohm for 10Base-2 Ethernet.
Special attention should be given to the grounding requirements of coaxial cable
circuits. Installation may require grounding at both cable ends or only one cable
end or neither cable end.
Cable Shield Grounding
Media converter network cabling my be shielded or unshielded. Shielded cables
MUST be grounded according to the specific requirements of the media and port
type. For example:
• Shielded RJ-45 cable used for 100Base-Tx Ethernet MUST be grounded at both
cable endpoints via shielded RJ-45 jacks.
• Shielded RS-232 cable MUST have the shield grounded at both cable endpoints
via shielded RS-232 connectors.
• COAX cable used for 10Base-2 Ethernet MUST only be grounded at a single
point.
The media converters provide a jumper option or other grounding mechanism as
required. Special attention should be given to the grounding requirements of
coaxial cable circuits. Installation may require grounding at both cable ends or only
one cable end or neither cable end. See the individual media converter user’s guide
for cable/port grounding requirements.
24-hour Technical Support: 1-800-260-1312 -- International: 00-1-952-941-7600
Page 40

40
CPSMC18xx-xxx PointSystem™Chassis
Contact Us
Technical Support
Technical support is available 24 hours a day:
United States: 1-800-260-1312
International: 00-1-952-941-7600
Transition Now
Chat live via the Web with a Transition Networks Technical Support Specialist.
Log onto www.transition.com and click the Transition Now link.
Web-Based Seminars
Transition Networks provides 12-16 seminars per month via live web-based training.
Log onto www.transition.com and click the Learning Center link.
E-Mail
Ask a question anytime by sending an e-mail message to our technical support staff.
techsupport@transition.com
Address
Transition Networks
6475 City West Parkway
Minneapolis, MN 55344, USA
telephone: 952-941-7600
toll free: 800-526-9267
fax: 952-941-2322
Declaration of Conformity
Name of Mfg: Transition Networks
6475 City West Parkway, Minneapolis MN 55344 USA
Model: PointSystem
™
Chassis
Part Number: CPSMC1800-200, CPSMC1810-200, CPSMC1850-150, CPSMC1850-160
Regulation: EMC Directive 89/336/EEC
Purpose: To declare that the
PointSystem™Chassis
to which this declaration refers is in
conformity with the following standards.
EN 55022:1998+A1:2000 Class A & B; EN 55024:1998; FCC Part 15 Subpart B; UL 1950;
21 CFR Subpart J
I, the undersigned, hereby declare that the equipment specified above conforms to the above Directive(s) and
Standard(s).
July 14, 2000
Stephen Anderson, Vice-President of Engineering Date
Page 41

41
CPSMC18xx-xxx PointSystem™Chassis
Warranty
Limited Lifetime Warranty
Effective for products shipped May 1, 1999 and after. Every Transition Networks'
labeled product purchased after May 1, 1999 will be free from defects in material
and workmanship for its lifetime. This warranty covers the original user only and is
not transferable.
This warranty does not cover damage from accident, acts of God, neglect,
contamination, misuse or abnormal conditions of operation or handling, including
over-voltage failures caused by use outside of the product's specified rating, or
normal wear and tear of mechanical components. If the user is unsure about the
proper means of installing or using the equipment, contact Transition Networks' free
technical support services.
To establish original ownership and provide date of purchase, please complete and
return the registration card accompanying the product or register the product online on our product registration page.
Transition Networks will, at its option:
• Repair the defective product to functional specification at no charge,
• Replace the product with an equivalent functional product, or
• Refund the purchase price of a defective product.
To return a defective product for warranty coverage, contact Transition Networks'
technical support department for a return authorization number. Transition's
technical support department can be reached through any of the following means:
Technical Support is available 24 hours a day at:
• 800-260-1312 x 200 or 952-941-7600 x 200
• fax 952-941-2322
• email techsupport@transition.com
• live web chat: www.transition.com and click the “Transition Now” link
• voice mail 800-260-1312 x 579 or 952-941-7600 x 579
• All messages will be answered within one hour.
Send the defective product postage and insurance prepaid to the following address:
CSI Material Management Center
c/o Transition Networks
508 Industrial Drive
Waconia, MN 55387 USA
Attn: RETURNS DEPT: CRA/RMA # ___________
Failure to properly protect the product during shipping may void this warranty. The
return authorization number must be written on the outside of the carton to ensure
its acceptance. We cannot accept delivery of any equipment that is sent to us
without a CRA or RMA number.
The customer must pay for the non-compliant product(s) return transportation costs
to Transition Networks for evaluation of said product(s) for repair or replacement.
Transition Networks will pay for the shipping of the repaired or replaced inwarranty product(s) back to the customer (any and all customs charges, tariffs,
or/and taxes are the customer's responsibility).
Page 42

42
CPSMC18xx-xxx PointSystem™Chassis
Before making any non-warranty repair, Transition Networks requires a $200.00
charge plus actual shipping costs to and from the customer. If the repair is greater
than $200.00, an estimate is issued to the customer for authorization of repair. If
no authorization is obtained, or the product is deemed not repairable, Transition
Networks will retain the $200.00 service charge and return the product to the
customer not repaired. Non-warranted products that are repaired by Transition
Networks for a fee will carry a 180-day limited warranty. All warranty claims are
subject to the restrictions and conventions set forth by this document.
Transition Networks reserves the right to charge for all testing and shipping
incurred, if after testing, a return is classified as "No Problem Found."
THIS WARRANTY IS YOUR ONLY REMEDY. NO OTHER WARRANTIES, SUCH
AS FITNESS FOR A PARTICULAR PURPOSE, ARE EXPRESSED OR IMPLIED.
TRANSITION NETWORKS IS NOT LIABLE FOR ANY SPECIAL, INDIRECT,
INCIDENTAL OR CONSEQUENTIAL DAMAGES OR LOSSES, INCLUDING LOSS
OF DATA, ARISING FROM ANY CAUSE OR THEORY. AUTHORIZED RESELLERS
ARE NOT AUTHORIZED TO EXTEND ANY DIFFERENT WARRANTY ON
TRANSITION NETWORKS' BEHALF.
 Loading...