

Page 1
JetFlash™
Software User’s Guide
(Version 1.2)
Page 2

Table of Contents
Introduction....................................................................................3
Safely Removing Your JetFlash™...............................................3
Remove the JetFlash™ in Windows® 98SE...............................................................................3
Remove the JetFlash™ in Windows® Me, 2000 and XP............................................................3
Remove the JetFlash™ in Mac™ OS 9.0, or Later and Linux™ Kernel 2.4.2, or Later................3
Driver Installation..........................................................................4
Driver Installation for Windows® 98SE......................................................................................4
Driver Installation for Windows® Me, 2000 and XP...................................................................4
Driver Installation for Mac™ OS 9.0, or Later.............................................................................4
Driver Installation for Linux™ Kernel 2.4.2, or Later...................................................................4
Software Utility Installation ..........................................................5
PC-Lock Function..........................................................................6
PC-Lock Function for Windows® 98SE, Me, 2000 and XP........................................................6
Lock Your Computer.................................................................................................................7
Unlock Your Computer..............................................................................................................7
Boot-Up Function..........................................................................8
Create a Boot-Up Disk for Windows® XP..................................................................................8
System Requirements for the Boot-Up Function.......................................................................9
Enabling the Boot-Up Function.................................................................................................9
Type of Format........................................................................................................................10
Configuration...........................................................................................................................11
Partitioning the JetFlash™.......................................................................................................11
Security Function........................................................................16
Enabling the Security Function in Windows® 98SE, Me, 2000 and XP...................................16
Type of Format........................................................................................................................16
Using the JetFlash™ Security Features...................................................................................18
Changing the Password..........................................................................................................18
If you Forget the Password.....................................................................................................19
Recover Your JetFlash™............................................................20
Troubleshooting..........................................................................21
Page 3
Introduction
Congratulations on purchasing Transcend’s JetFlash™. This small device is designed for the
easy transfer and storage of huge amounts of data and information between it and any desktop
or notebook computer that has a USB port. With a higher storage capacity and much faster data
transfer rates, the JetFlash
photos and other personal digital content. In addition, the JetFlash
superior data retention, and impressive appearance will provide you with a brand-new data
storage experience. Please read this Software User’s Guide in detail to get the most from your
JetFlash
™
.
™
is perfect for storing and transferring your files, folders, documents,
™
’s small convenient size,
Safely Removing Your JetFlash™
Remove the JetFlash™ in Windows® 98SE
Unplug the JetFlash™ from your system directly when data is not transferring.
Remove the JetFlash™ in Windows® Me, 2000 and XP
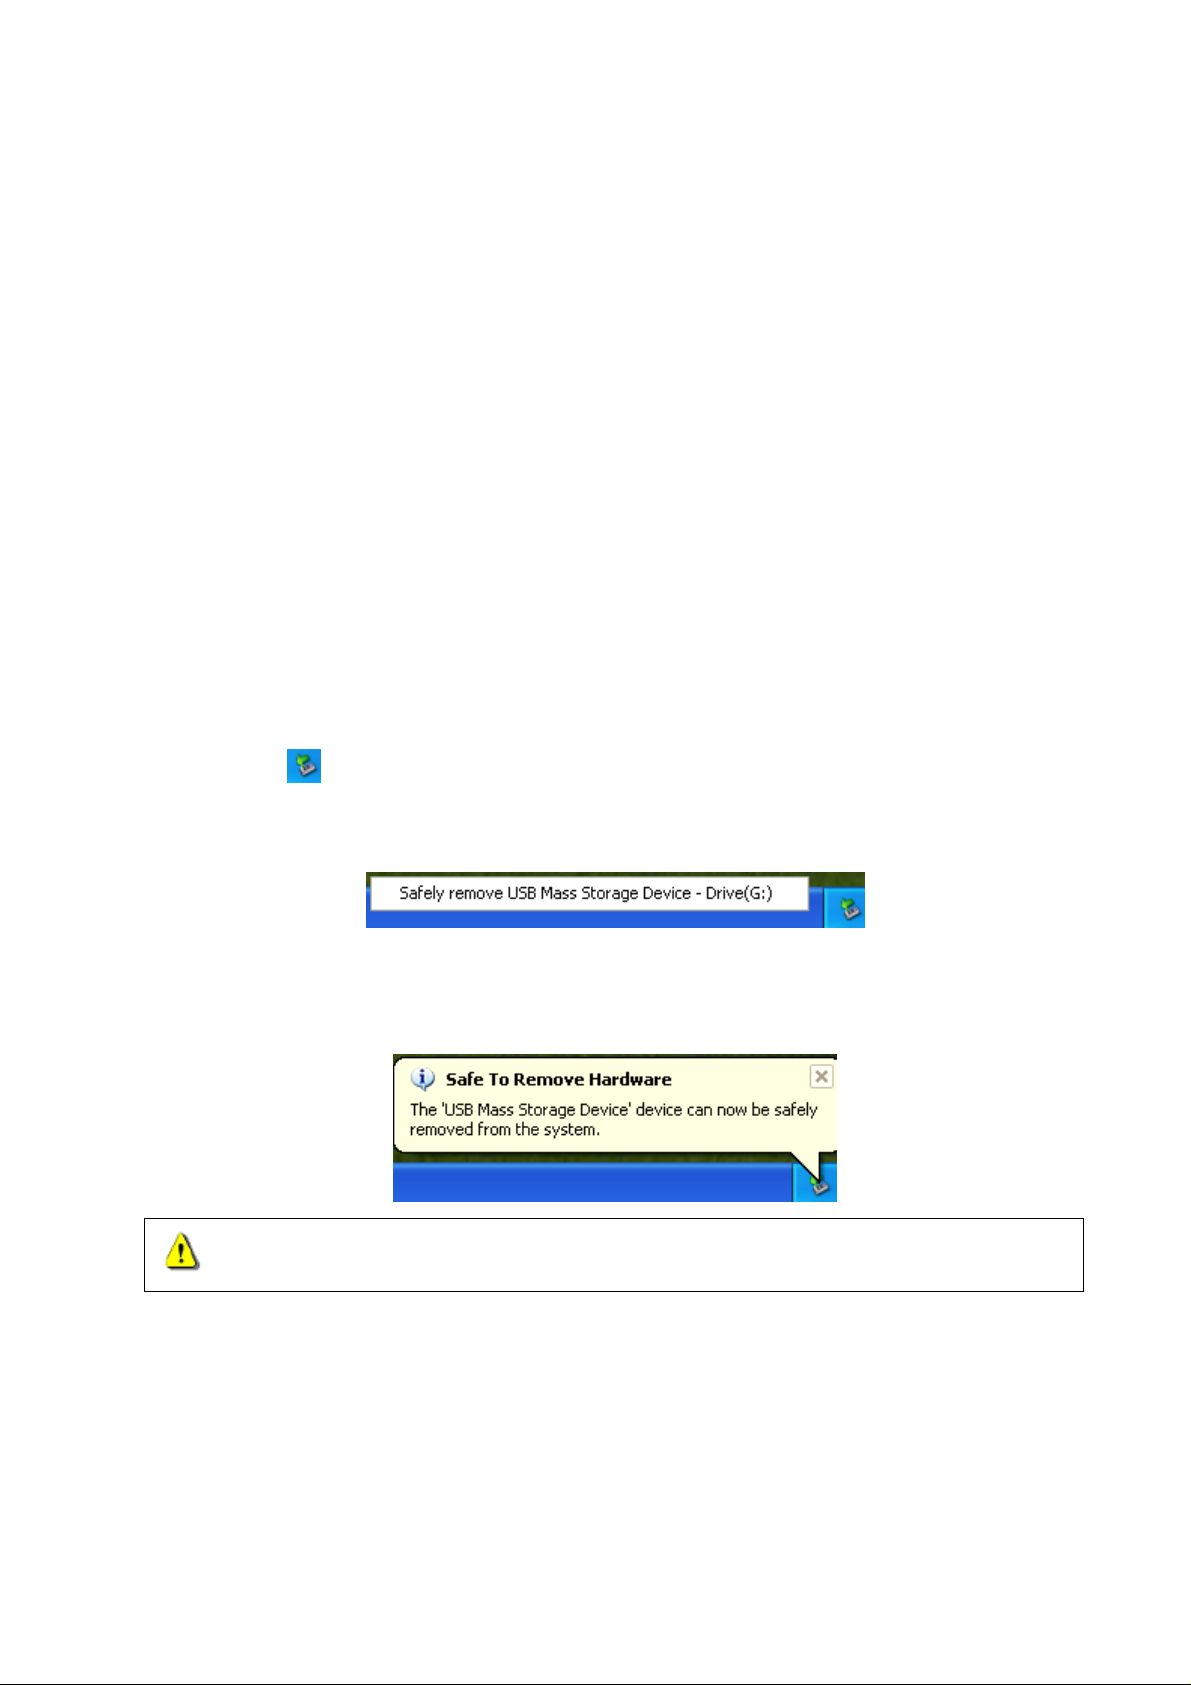
1. Select the icon on the system tray.
2. The Safely remove Hardware pop-up menu will appear. Select it to continue.
3. A message box will appear stating: “The ‘USB Mass Storage Device’ device can now be
safely removed from the system.”
WARNING! To prevent data loss, always use this procedure to remove the
JetFlash
™
from Windows® Me, 2000 and XP.
Remove the JetFlash™ in Mac™ OS 9.0, or Later and Linux™ Kernel
2.4.2, or Later
Drag and drop the Disk icon corresponding to your JetFlash™ into the trashcan, then unplug
your JetFlash
™
from the USB port.
3
Page 4
Driver Installation
Driver Installation for Windows® 98SE
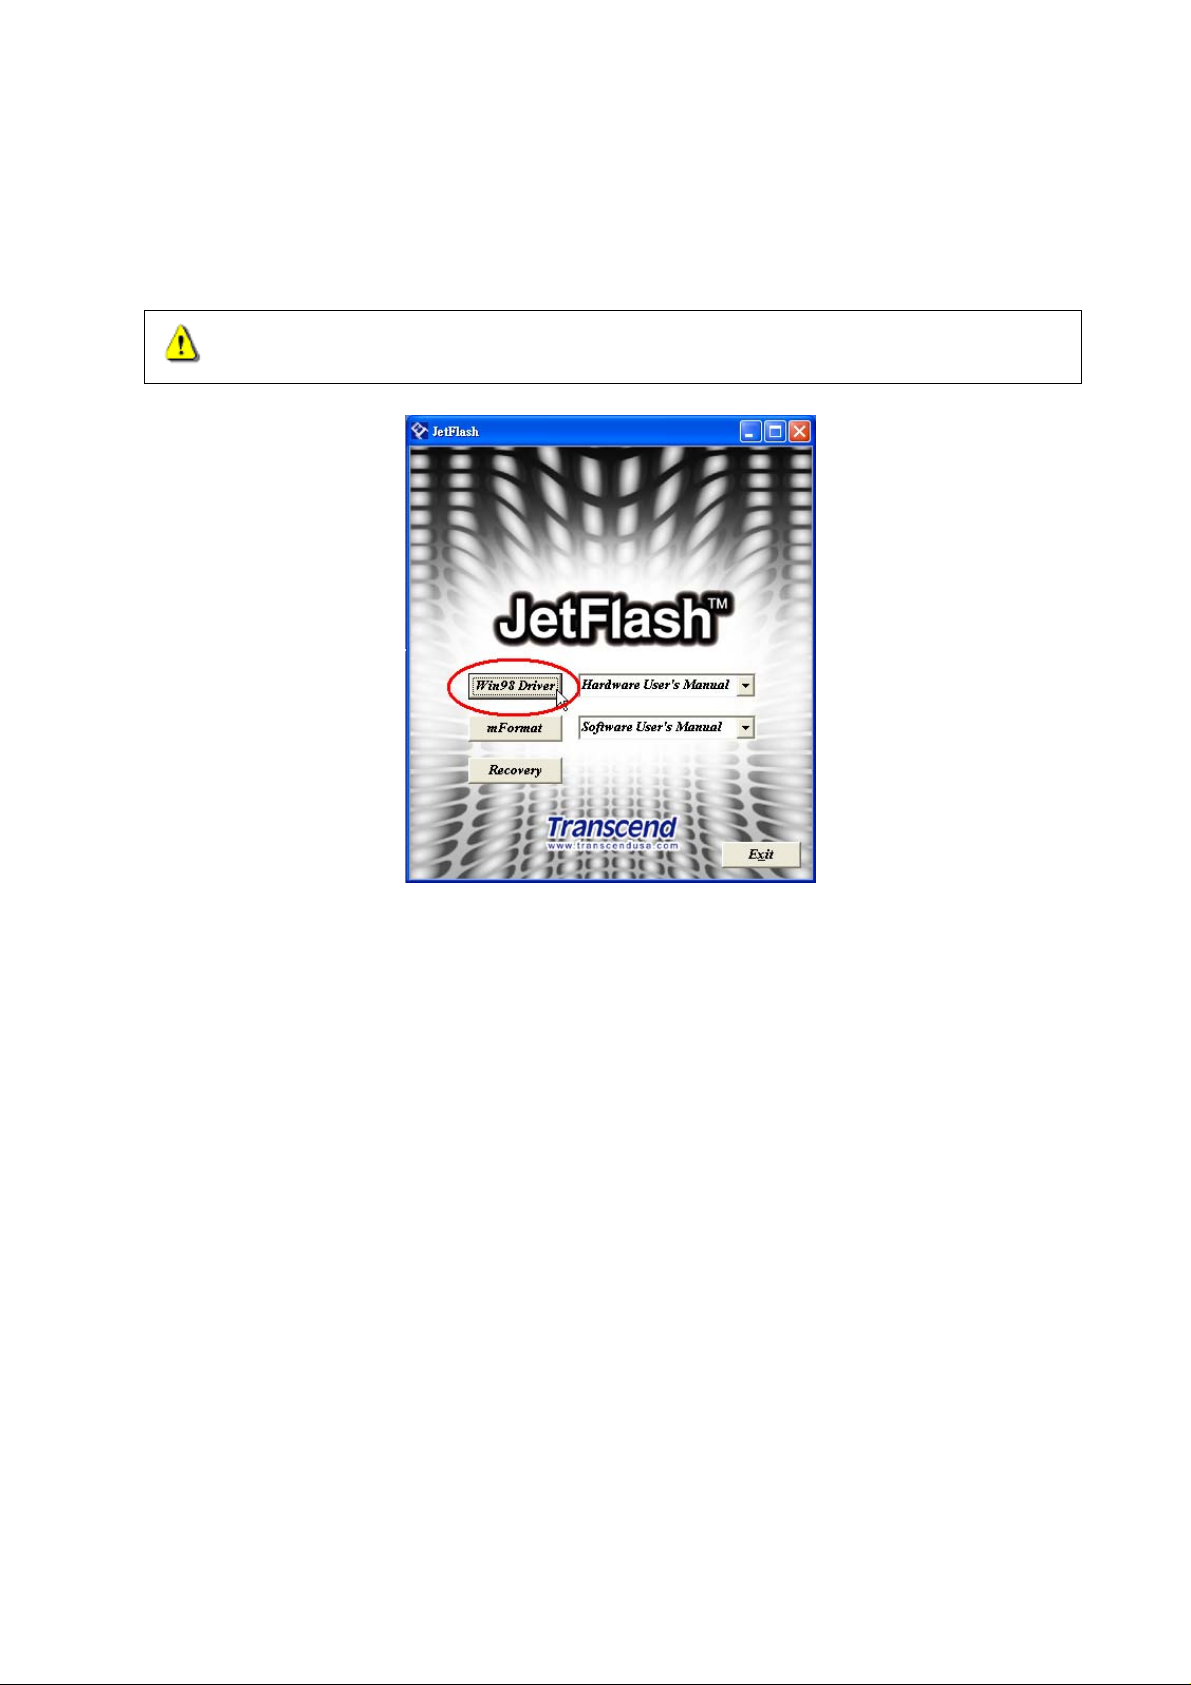
1. Put the Software CD into the CD-ROM (Auto-Run supported). Select the Win98 Driver
button.
WARNING! Please ensure you install the driver before plugging in your
JetFlash
™
.
2. The InstallShield Wizard will guide you through the installation process.
Driver Installation for Windows® Me, 2000 and XP
No drivers are required. These Windows operating systems have built-in drivers to support the
JetFlash
files needed to use your device. A new Removable Disk drive with a newly assigned drive letter
will appear in the My Computer window.
™
. Simply plug the JetFlash™ into an available USB port and Windows will install the
Driver Installation for Mac™ OS 9.0, or Later
No drivers are required. Just plug the JetFlash™ into an available USB port and your computer
will automatically detect it.
Driver Installation for Linux™ Kernel 2.4.2, or Later
No drivers are required. Just plug the JetFlash™ into the USB port and mount it.
Example: 1. First create a directory for the JetFlash
™
mkdir /mnt/jetflash
2. Mount the JetFlash
mount –a – t msdos /dev/sda1 /mnt/jetflash
™
4
Page 5
Software Utility Installation
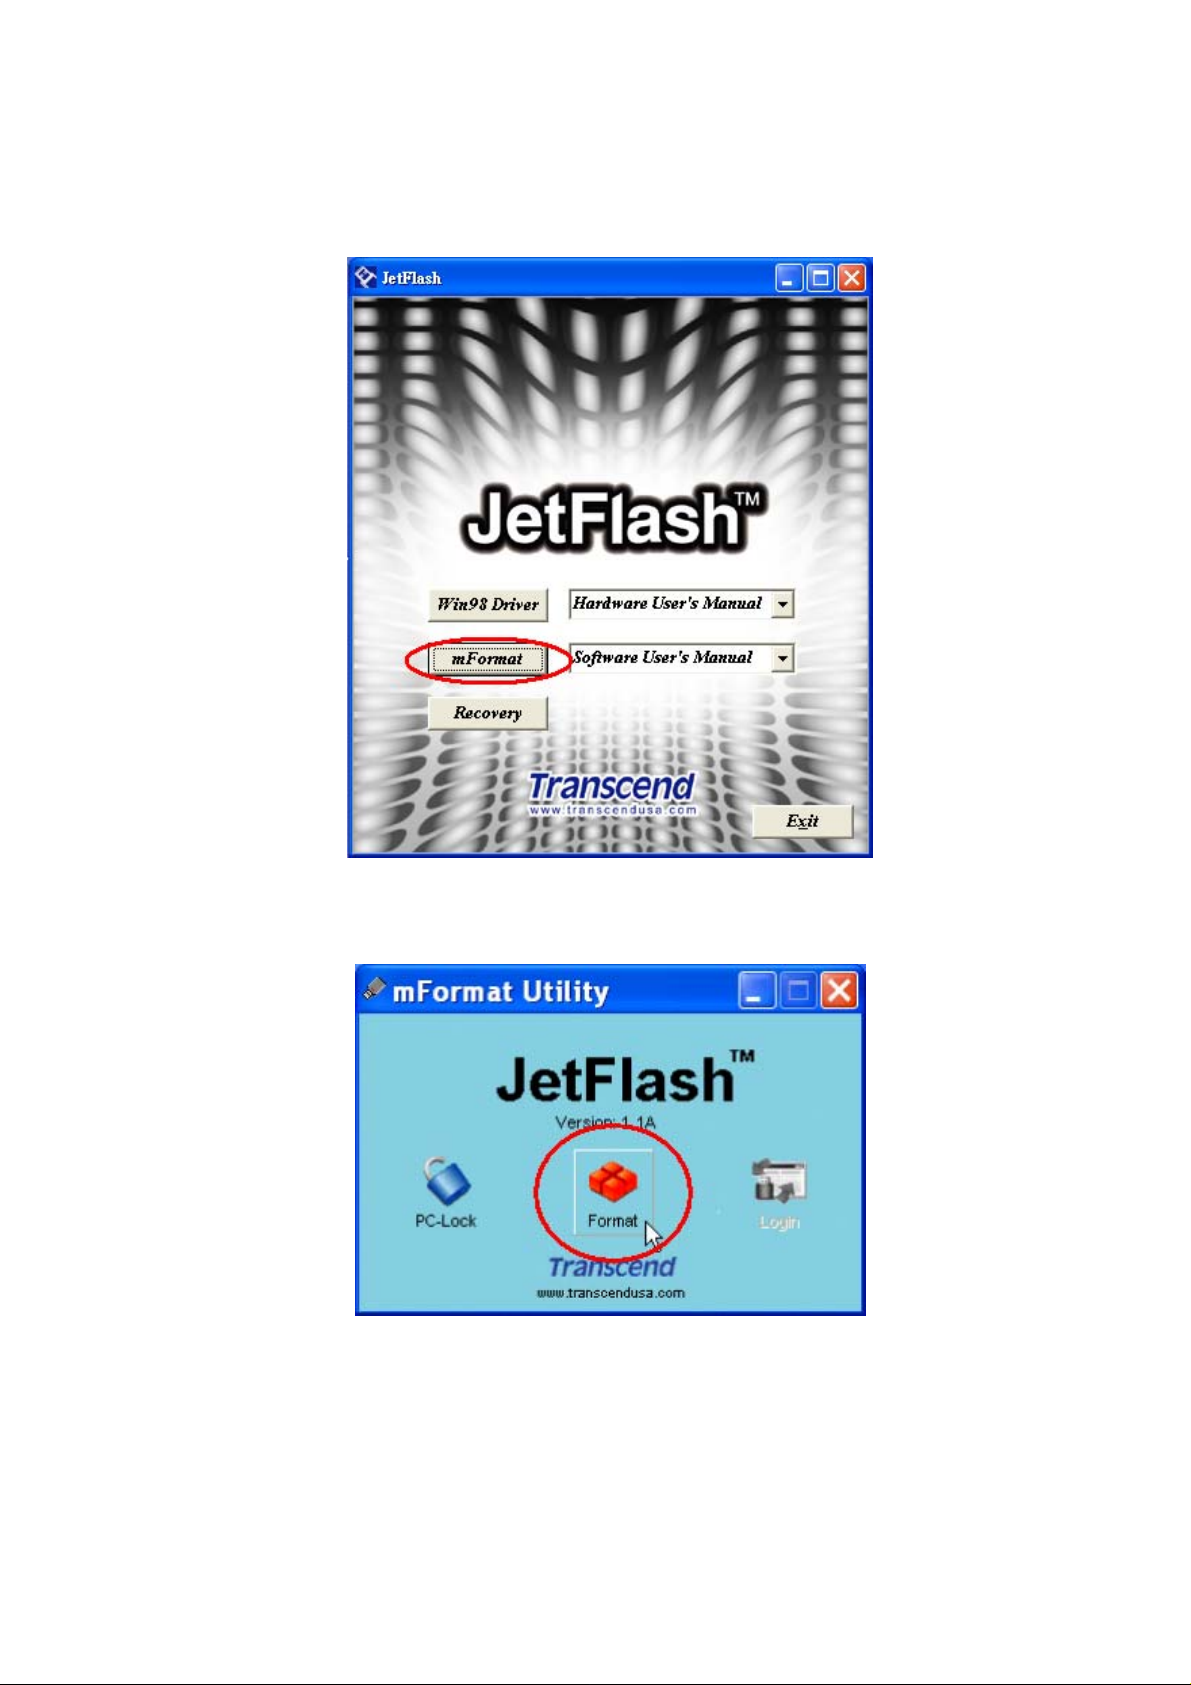
1. Put the Software CD into the CD-ROM (Auto-Run supported). Plug your JetFlash
available USB port and select the mFormat Utility button for your JetFlash
™
.
™
into an
2. Follow the on-screen instructions to complete installing the mFormat Utility. Once the
mFormat Utility has finished installing the mFormat Utility Menu Window will appear.
3. You must select the Format button to install the mFormat Utility executable file on your
JetFlash
™
.
5
Page 6

PC-Lock Function
™
Once the PC-Lock function is enabled, you can use your JetFlash
computer, protecting it from use by others.
™
The PC-Lock function is not supported in the Mac
To use the PC-Lock function, you must log in to the Windows OS with Administrator rights.
or Linux™ Operating Systems.
PC-Lock Function for Windows® 98SE, Me, 2000 and XP
1. Select the PC-Lock button in the JetFlash™ mFormat Utility window.
as a key to lock your
2. The PC-Lock Settings window will appear. Please choose the period of time you wish to
lock the computer for by selecting a time in the Lock Period drop down window.
3. Next, in the Lock screen mode choose whether you wish to have Text, or a Picture of your
choice displayed as a screen saver, while the computer is locked.
6
Page 7
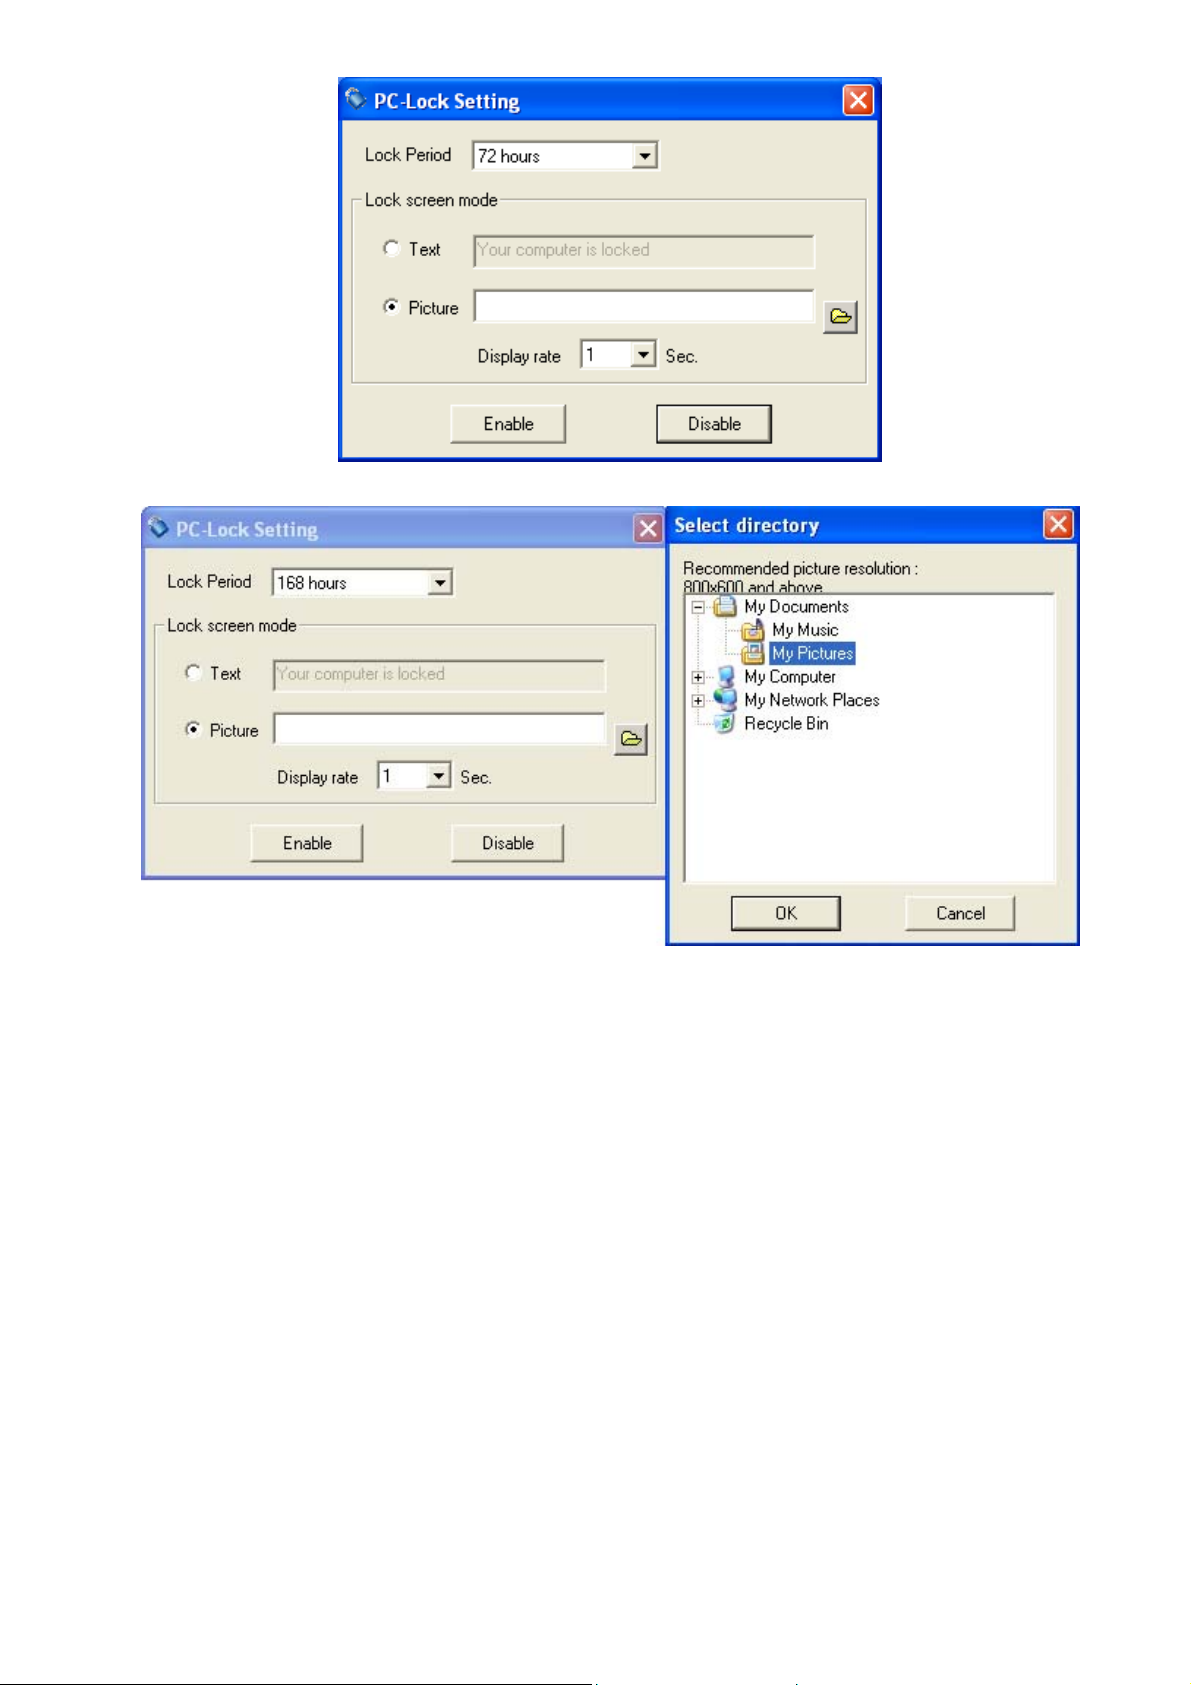
4. Click on the “Enable” button to activate the PC-Lock.
Lock Your Computer
After the PC-Lock function is enabled, your computer will be locked whenever you remove your
JetFlash
Picture screen saver.
™
. If your computer is locked, the screen will indicate the locked status as Text, or a
Unlock Your Computer
To unlock your computer, you must re-insert your JetFlash™. The locked status on the screen
will disappear and you are now free to use your computer. The computer’s locked status will
also be relinquished automatically after the specified lock period has expired.
7
Page 8

Boot-Up Function
If you are using Windows® 98SE, Me, or XP the JetFlash™ can be configured to serve as an
MS-DOS Boot Disk. Upon completion of this procedure, the JetFlash
your computer, allowing you to run MS-DOS programs. This does not make the JetFlash
Rescue Disk for Windows, nor does it put Windows Startup files onto your JetFlash
booting with JetFlash
™
, if you wish to enter Windows, you must start Windows from your hard
drive, or a previously created Rescue Disk.
To use the Boot-Up function, you must log in to the Windows OS with Administrator rights.
A maximum capacity of 512MB is reserved for the Boot-Up disk sector in USB-ZIP and
USB-HDD formats.
™
can be used to boot-up
™
. After
™
a
To use the JetFlash
™
as an MS-DOS Boot Disk for Windows® XP requires you to create a
Floppy Disk (A:) MS-DOS Startup Disk. The XP Operating System (OS) will only recognize
™
the JetFlash
Please see the instructions below for creating a Boot-Up Disk for Windows
as an MS-DOS Boot Disk when it is used in conjunction with the Floppy Disk.
®
XP.
Create a Boot-Up Disk for Windows® XP
1. Insert a new, blank floppy disk into the Floppy Disk Drive (A:). Go to the My Computer
window and right click on the Floppy Disk(A:) icon. Select “Format…” in the pull-down
menu.
2. Select Create an MS-DOS startup disk then click “Start.”
8
Page 9

3. Click on the “OK” button to confirm that you want to format the Floppy.
4. Select OK to complete formatting the Floppy disk.
5. You must use this Floppy Disk in conjunction with the JetFlash
a computer that is running Windows
®
XP.
™
when you want to Boot-Up
System Requirements for the Boot-Up Function
• A desktop or notebook computer that supports USB-ZIP, or USB-HDD as the First Boot
Device in BIOS
• A computer running Windows
• Any anti-virus applications that may be running in the background must be turned off
®
98SE, Me, or XP
Enabling the Boot-Up Function
1. In order to enable the Boot-Up function you must select the “Format” button in the
JetFlash
™
mFormat Utility window.
WARNING! Formatting the Disk will erase all of the data on your JetFlash
™
9
Page 10

p
y
2. The following mFormat Utility window will appear providing you with a number of options
regarding the formatting and configuration of your JetFlash
™
.
JetFlash™ Product Number
Type of Format
Drive Letter and Ca
acit
Partitioned Disk 1 Information
Disk Partition Bar. Adjust the
partition size of Disk 1 and
Disk 2 using this Bar. Minimum
partition size is 2MB.
Partitioned Disk 2 Information
Progress Bar
You have the option of performing a Quick, or Full format, or you may choose to just configure
the JetFlash
™
.
Quick: Scan all memory blocks on the Flash Disk. If there are bad memory blocks, mark
them as bad and perform a DOS format.
Full: Perform a Surface Scan on the Flash Disk that involves a Read/Write check. A
Read/Write check will create a report on any bad memory sector blocks. If there
are bad memory blocks, it marks them as bad and performs a DOS format.
10
Page 11

Configure device only: This option partitions the JetFlash
™
and sets up Password
Protection and Boot-Up information. A USB disk DOS format
will be executed.
The Configure device only option cannot be setup in password protection.
™
WARNING! Formatting the Disk will erase all of the data on your JetFlash
Configuration
The JetFlash™ can be configured using the Format Utility to Partition the disk, Make a
USB-ZIP startup disk, Make a USB-HDD startup disk and Enable password protection.
Partitioning the JetFlash™: The JetFlash
™
can be partition into two separate disks
using the mouse to control the disk partition bar.
Make USB-ZIP startup disk: Choosing this option allows the JetFlash
™
to be used
as a device that will Boot-Up a computer in USB-ZIP
mode. Provided the memory capacity of the disk is set
to at least 2MB, the Format Utility will copy the
necessary startup and Boot-Up files to the JetFlash
™
.
Make USB-HDD startup disk (Windows® 98SE only):
Choosing this option allows the JetFlash™ to be used as a device that will Boot-Up a
computer in USB-HDD mode. Provided the memory capacity of the disk is set to at least
2MB, the Format Utility will copy the necessary startup and Boot-Up files to the
JetFlash
Enable password protection: Choosing this option will partition the JetFlash
™
.
™
into
two disks. Disk 1 will become a public disk and Disk
2 will become a password protected private secure
disk.
Partitioning the JetFlash™
Your JetFlash™ can be partitioned into two disks using the disk partition bar. The bar balances
out the space available on each of the disks and is controlled using the mouse. You can decide
to have one single partition, or two independent partitions on your JetFlash
how you would like to partition your JetFlash
™
you can choose to format the JetFlash™ as a
USB-ZIP, or USB-HDD startup disk.
Create a single Partition:
To create a single partition on the JetFlash™ use your mouse to move the disk partition bar to
the bottom of the slider until Disk 2 reads 0MB.
Create two Partitions:
To partition the JetFlash™ into Disk 1 and Disk 2 use your mouse to move the disk partition bar
11
™
. Once you decide
Page 12

on the slider until Disk 1 and Disk 2 read the desired memory capacity sizes.
®
In order for Windows
®
Windows
2000 SP4 (Service Pack 4) on your computer.
2000 to recognize Disk 2 of the partition you must be running
Mac
MS-DOS will only recognize Disk 1 after booting from the JetFlash
™
users must be running Mac™ OS 10.1.5, or later to recognize the partitioned drive.
™
.
If the Enable password protection option is selected, Disk 1 will be designated a public
disk space and Disk 2 will become a private disk space with password protection after the
JetFlash
™
has been formatted.
Configuring the JetFlash™ as a USB-ZIP startup disk:
1. Select a Type of format, Quick, Full, or Configure device only.
2. Select the Make USB-ZIP startup disk option in Disk 1.
3. Click on the “Start” button to begin formatting the JetFlash
™
.
Figure 1. Single Partition Screen
12
Page 13

Figure 2. Two Partitions Screen
4. After the format process is finished unplug the JetFlash
new USB-ZIP startup disk settings to take effect you must re-insert the JetFlash
™
from the computer. In order for the
™
and
enter the BIOS setup by restarting the computer (please refer to your computer user’s
manual on how to enter the BIOS).
5. Once you are in the BIOS go to the Advanced BIOS Features menu and change the First
Boot Device setting to USB-ZIP. Select Save & Exit Setup and when you are prompted to
SAVE to CMOS and EXIT (Y/N)? type “Y” on the keyboard and press “Enter.”
Your JetFlash
your computer. When using your JetFlash
™
and system are now set up, so that your JetFlash™ can be used to Boot-Up
™
to Boot-Up your computer the disk will be assigned
a drive letter “A:\>,” if your computer has a floppy drive the letter “B” will be used.
As part of the USB-ZIP startup disk setup process Boot-Up files were placed on the
JetFlash
™
, please do NOT delete, or move these files, otherwise the JetFlash™ will not be
able to function as a startup disk.
Configuring the JetFlash™ as a USB-HDD startup disk (Windows® 98SE only):
1. Select a Type of format, Quick, Full, or Configure device only.
2. Select the Make USB-HDD startup disk option in Disk 1.
3. Click on the “Start” button to begin formatting the JetFlash
™
.
13
Page 14

Figure 3. Single Partition Screen
Figure 4. Two Partitions Screen
4. After the format process is finished unplug the JetFlash
new USB-HDD startup disk settings to take effect you must re-insert the JetFlash
™
from the computer. In order for the
™
and
enter the BIOS setup by restarting the computer (please refer to your computer user’s
manual on how to enter the BIOS).
5. Once you are in the BIOS go to the Advanced BIOS Features menu and change the First
Boot Device setting to USB-HDD. Select Save & Exit Setup and when you are prompted to
SAVE to CMOS and EXIT (Y/N)? type “Y” on the keyboard and press “Enter.”
14
Page 15

™
Your JetFlash
your computer. When using your JetFlash
and system are now set up, so that your JetFlash™ can be used to Boot-Up
™
to Boot-Up your computer the disk will be assigned
a drive letter “C:\>,” if your computer has a hard drive the letter “D” will be used.
As part of the USB-HDD startup disk setup process Boot-Up files were placed on the
JetFlash
™
, please do NOT delete, or move these files, otherwise the JetFlash™ will not be
able to function as a startup disk.
You can only choose the Enable password protection option if the JetFlash
configured into two partitioned disks.
™
has been
15
Page 16

Security Function
Mac™, or Linux™ Operating Systems do not support this feature.
Enabling the Security Function in Windows® 98SE, Me, 2000 and XP
1. In order to enable the Security function you must select the “Format” button in the
JetFlash
™
mFormat Utility window.
WARNING! Formatting the Disk will erase all of the data on your JetFlash
™
2. Select a Type of format, Quick, Full, or Configure device only.
Type of Format
You have the option of performing a Quick, or Full format, or you may choose to just configure
the JetFlash
™
.
Quick: Scan all memory blocks on the Flash Disk. If there are bad memory blocks, mark
them as bad and perform a DOS format.
Full: Perform a Surface Scan on the Flash Disk that involves a Read/Write check. A
Read/Write check will create a report on any bad memory sector blocks. If there
are bad memory blocks, it marks them as bad and performs a DOS format.
Configure device only: This option partitions the JetFlash
Protection and Boot-Up information. A USB disk DOS format
will be executed.
™
and sets up Password
The Configure device only option cannot be setup in password protection.
3. Select the Enable password protection option in Disk 1.
16
Page 17

4. The Set default password window requires you to input a Password, Confirm password
and Password hint (a reminder, if you ever forget your password). Click on the “OK” button
to continue.
™
5. A final warning message will appear advising you that all the data on your JetFlash
will be
erased once you choose to format the disk. Click on the “OK” button to continue, or
“Cancel” button to suspend the process.
6. A message will appear to inform you that the formatting of the JetFlash
unplug the JetFlash
™
from the computer and re-insert to complete setting up the Security
™
has finished,
Function.
17
Page 18

Using the JetFlash™ Security Features
1. Plug the JetFlash™ into your computer and start the mFormat Utility application. Click on
the “Login” button.
2. The Login window appears and you must input the correct Password to enter the secure
JetFlash
™
area. Click on the “OK” button to continue.
Changing the Password
1. Plug the JetFlash™ into your computer and start the mFormat Utility application. Click on
the “Login” button.
18
Page 19

2. The Login window appears, Click on the “Change” button to continue.
3. The Change Password window will appear and prompt you to enter the Password (current),
New password, Re-Enter new password and if desired a Hint.
4. Click on the “OK” button to complete changing the password settings.
If you Forget the Password
If you forget your password, you can use the password hint to try and remember it. However, if
you cannot recall the password using the password hint, then you will have to run the Format
Utility program and reformat the JetFlash
JetFlash
before re-formatting the JetFlash
™
you will have a chance to make a backup copy of the data stored on the public disk
™
.
WARNING! Formatting the Disk will erase all of the data on your JetFlash
™
. If you previously created a partition on the
™
19
Page 20

Recover Your JetFlash™
WARNING! Using the Recovery Function will erase all of the data on your
JetFlash
If your JetFlash™ ever stops working properly, or locks up and cannot be used even after
removing and reinserting it into the computer, you can use the Recovery program to restore the
unit’s default settings. Before using the Recovery function, please read the following sections
carefully.
™
The Recovery function is not supported on Mac
To use the Recovery function, you must log in to the Windows
™
or Linux™ Operating Systems.
®
OS with Administrator
rights.
Running the Recovery program will erase all of the data on your JetFlash
™
.
If there are bad memory blocks on the flash memory chip of the JetFlash, the memory size
of the JetFlash will be smaller, than the original memory size after running the Recovery
program.
1. Put the Software CD into the CD-ROM (Auto-Run supported). Plug your JetFlash
™
into an
available USB port and run the Recovery.exe program on the CD-ROM.
2. Formatting the Disk will erase all of the data on your JetFlash™.
™
3. Re-insert the JetFlash
after the recovery is finished.
20
Page 21

Troubleshooting
If an error occurs with your JetFlash™, please first check the information listed below before
taking your JetFlash
please consult your dealer, service center, or local Transcend branch office. Transcend also
provides an FAQ and Support service on our websites.
Software CD cannot auto-run in Windows
Enter Device Manager in the Control Panel and enable the Auto-Insert function of the
CD-ROM drive.
™
for repair. If you are unable to remedy a problem from the following hints,
Operating system cannot detect the JetFlash
™
Check the following:
™
1. Is your JetFlash
2. Is your JetFlash
available USB port on your Mac
properly connected to the USB port? If not, unplug it and plug it in again.
™
connected to the Mac™ keyboard? If yes, unplug it and plug it into an
™
Desktop instead.
3. Is the USB port enabled? If not, refer to the user’s manual of your computer (or motherboard)
to enable it.
®
4. Have the necessary drivers been installed? If your computer is using Windows
98SE, you
must use the Software CD to download the driver, please refer to the “Driver Installation
for Windows
A driver is not required for Windows
®
98SE” section to complete the driver installation before using your JetFlash™.
®
ME/2000/XP, Mac™ OS 9.0 or later, or Linux™ Kernel
2.4.2 or later.
Cannot execute the mFormat Utility
You must be logged in to the computer you are using with Administrator rights in order to use
the mFormat Utility. If you want to access the security functions of your JetFlash
™
, you must
execute the mFormat utility at least once.
21
Page 22

JetFlash™ permanently stops working
If your JetFlash
™
ever stops working properly, or locks up and cannot be used even after
removing and reinserting it into the computer, you can use the Recovery program to restore the
unit’s default settings.
WARNING! Using the Recovery Function will erase all of the data on your
JetFlash
™
Experiencing problems using the mFormat Utility in Windows® 2000
Please ensure you are using Windows® 2000 SP4 (service pack 4). If you do not want to
upgrade to SP4, please install the application InstallDriver.exe on the Software CD in
the folder CD-ROM\Utility\upgrade.
22
 Loading...