


User’s Manual
Digital Photo Frame
PF830
TS2GPF830B
TS2GPF830W
Version 1.5

Table of Contents
Introduction ......................................................................................................................... |
2 |
Package Contents ............................................................................................................... |
2 |
Features ............................................................................................................................... |
2 |
System Requirements ........................................................................................................ |
3 |
Safety Precautions .............................................................................................................. |
4 |
General Use .............................................................................................................................. |
4 |
Cleaning.................................................................................................................................... |
4 |
Backing Up Data....................................................................................................................... |
4 |
Getting Started .................................................................................................................... |
5 |
Setting Up the Photo Frame .................................................................................................... |
6 |
Switching between Portrait and Landscape mode ................................................................ |
7 |
Using a memory card or USB flash drive ............................................................................... |
7 |
Built-in Speaker ........................................................................................................................ |
8 |
Navigation Buttons .................................................................................................................. |
8 |
Quick Menu............................................................................................................................... |
8 |
Options Menu ........................................................................................................................... |
9 |
Adjusting the Volume............................................................................................................... |
9 |
Remote Control ...................................................................................................................... |
10 |
Connecting to a Computer ............................................................................................... |
11 |
Windows® 2000, XP, Vista and 7 ........................................................................................... |
11 |
Mac® OS 10.0 or later ............................................................................................................ |
12 |
Linux® Kernel 2.4 or later ...................................................................................................... |
13 |
Photo Modes ..................................................................................................................... |
14 |
Thumbnail Mode..................................................................................................................... |
14 |
Photo View Mode.................................................................................................................... |
18 |
Slideshow Mode ..................................................................................................................... |
20 |
Music Player ...................................................................................................................... |
22 |
Calendar ............................................................................................................................ |
26 |
Settings .............................................................................................................................. |
28 |
Troubleshooting ................................................................................................................ |
35 |
Specifications ................................................................................................................... |
36 |
Ordering Information ........................................................................................................ |
37 |
Recycling & Environmental Considerations .................................................................. |
37 |
Transcend Limited Warranty ........................................................................................... |
39 |

Introduction
Congratulations on purchasing Transcend’s PF830 Digital Photo Frame. Now you can easily display your entire photo collection at home or at the office. The Photo Frame can conveniently playback videos, photos and music from a variety of sources: USB flash drives, memory cards, or the Photo Frame’s own on-board memory. You can operate the Photo Frame by using the menu buttons on the back of the Photo Frame or with its full-featured wireless remote control. The Photo Frame is also equipped with a rotation sensor that automatically adjusts your pictures to portrait or landscape position when you turn the Photo Frame. The Photo Frame’s 2GB of built-in storage space lets you save your favorite videos, pictures and music inside the Photo Frame for instant playback without even having to use a memory card. You can also connect the Photo Frame to a PC via the USB port for direct access to its internal memory or any memory cards that are plugged into it. This User’s Manual will give you step-by-step instructions and advice to help you get the best experience from your new device. Please read it in carefully before using the Photo Frame.
Package Contents
Upon purchasing your Transcend Photo Frame, please make sure each of the following is included:  Photo Frame
Remote Control (battery included)
Tabletop Stand
AC Power Adapter
USB Cable
User’s Manual CD
Quick Start Guide
Warranty Card
Features
Bright 8” (4:3) high-resolution color TFT LCD panel Built-in speaker for music playback
View photos with background music from MP3s
Supports USB flash drives and SD/SDHC/MMC/CF/microSD/M2/MS/MS PRO/MS Duo/MS PRO Duo/ MS PRO-HG Duo memory cards
2GB of internal memory – works even without a memory card Full motion video playback (Motion-JPEG only)
AOS automatic rotation sensor with adaptive on-screen interface
Fully compliant with High-Speed USB 2.0 and backwards compatible with USB 1.1 Direct USB connection to your PC for easy file transfers
Select multiple photos for convenient one-step transfer to internal memory Slideshow, thumbnail, still picture, and zoom-in viewing options
Attractive frame themes and animations to accent your pictures Important date/event reminders
Clock, alarm and calendar functions Automatic Power-ON/OFF and Sleep timers
Custom alarm clock settings - wake up to your favorite MP3 song User-selectable Color Modes to enhance the look of your photos
2

System Requirements
System requirements for connecting the Photo Frame to a computer:  100~240V voltage power outlet for the AC adaptor
Desktop or notebook computer with a working USB port One of the following Operating Systems:
Windows® 2000
Windows® XP
Windows Vista®
Windows® 7
Mac® OS 10.0 or later
Linux® Kernel 2.4 or later
3

Safety Precautions
These usage and safety guidelines are IMPORTANT! Please follow them carefully to ensure your own personal safety and help protect your Photo Frame from potential damage.
General Use
For indoor use only.
Avoid using or storing the Photo Frame in an extreme temperature environment.
Never allow the Photo Frame to come in contact with water or any other liquids.
Do not use this product in environments with strong magnetic fields or excessive vibration.
Only use the Transcend provided AC adapter with the Photo Frame. Use of other adapters may cause fire or explosion.
Never cover or seal any of the holes on the Photo Frame.
Unplug the Photo Frame if you do not plan to use if for an extended period of time. This prevents accidental damage or corrosion.
To protect your health and your hearing, keep the Photo Frame’s music volume below 80 decibels and do not listen for an extended period of time.
Cleaning
The screen is very delicate and can be damaged by pressing on it with excessive force.
Use a soft non-abrasive cloth, such as for cleaning camera lenses to gently wipe the screen
Backing Up Data
Transcend does NOT take any responsibility for data loss or damage during operation. If you plan to plug a memory card or USB pen drive into Photo Frame, we strongly advise that you first backup the data in those storage devices to a computer or other storage medium before using them in Photo Frame.
To ensure High-Speed USB 2.0 data transfer rates when connecting your Photo Frame to a computer, please check that the computer has the relevant USB drivers. If you are not sure how to check this, please consult the computer or motherboard User’s Manual for USB driver information.
4

Getting Started
A |
8" LCD Panel |
B |
Mini-B USB Port (PC Connection) |
C |
SD/SDHC/MMC Slot |
D |
CF Slot |
E |
MicroSD/M2 Slot |
F |
MS/MS Duo/Pro/HG Slot |
G |
DC Power Input |
H |
Built-in Speaker |
5
I |
USB Port (Flash Drives) |
|
|
J |
Menu/Power Button |
K |
OK Button |
L |
Navigation buttons |
M |
Options Button |
N |
Volume Control Button |
O |
Security Lock Attachment |
P |
Stand Attachment Hole |
Note: Although the Photo Frame supports simultaneous reading from multiple cards, the microSD/M2 slot (E) and the MS/MS Duo/PRO/HG slot (F) cannot be used at the same time.
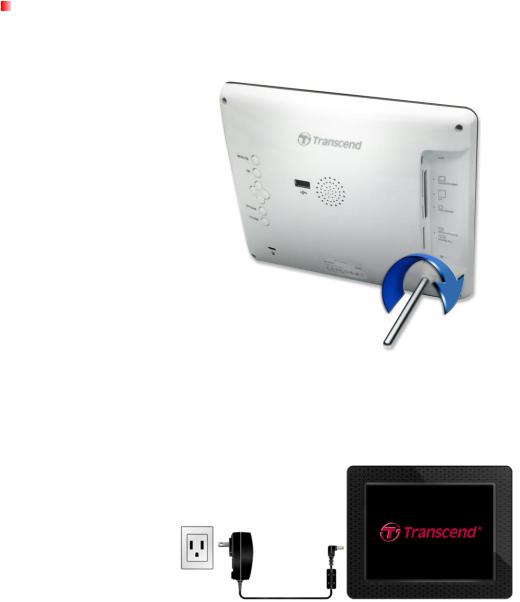
Setting Up the Photo Frame
1.Attach the Tabletop Stand to the back of the Photo Frame by screwing it clockwise into the Stand Attachment Hole shown above.
2.Once the stand is attached, the Photo Frame may be positioned vertically or horizontally (Landscape or Portrait orientation)
3.Connect the power adapter cable to the DC power input jack on your Photo Frame.
4.Plug the power adapter into a wall outlet.
5.The Photo Frame will automatically turn on. If it is already plugged in, press the power button on the back of Photo Frame, or press  on the remote control.
6.To remove the Tabletop Stand, simply twist it counter-clockwise to unscrew it from the Photo Frame.
6

Switching between Portrait and Landscape mode
The Photo Frame can be placed on a table vertically (Portrait mode) or horizontally (Landscape mode). When the Photo Frame is rotated, its intelligent AOS (Automatic Orientation Sensor) will automatically adjust images and the graphical user interface for correct display. The directional buttons will also automatically adjust for easy menu navigation.
Using a memory card or USB flash drive
1.Insert a memory card or USB flash drive into its appropriate slot on the Photo Frame.
2.Once a memory card or USB flash drive is plugged in, the Photo Frame will automatically begin slideshow playback of all photos available on your memory card or flash drive.
3.The Photo Frame will revert to Photo View mode if you unplug a memory card or USB flash drive while displaying photos. Note: never unplug a memory card or flash drive when files are being transferred to or from the internal memory (My Favorites)
7

Built-in Speaker
The Photo Frame includes a built-in speaker for playing back background music during slideshows, or for listening to MP3 music or watching videos.
Navigation Buttons
On the back of the Photo Frame, there are eight navigation buttons used for browsing through menus, selecting files, and accessing the Photo Frame’s numerous features.
Quick Menu
The Quick Menu is a fast and easy way to open the Music Player, the Calendar, or the Settings menu when not using the discrete shortcut buttons on the remote.
1.Press  or
or  to display the Quick Menu.
2.Use  /
/ to select the feature you want to open and press
  .
.
3.If the Music, Calendar, or Settings window is already open, select PHOTO to close it.
8

4. To exit the Quick Menu, simply press or
or  again.
Options Menu
The Options menu allows access to additional functions that are available for the current mode (Slideshow, Calendar, etc.).
1.Press  or
or  to show the Options window.
2.Use the  /
/ and
and  /
/ buttons to select an option and press the
  button to open its submenu.
3. To select a different option, press the |
button and use the |
and |
buttons to |
|
scroll through the other available options, then press |
or |
to move the cursor to the |
||
currently highlighted option’s submenu on the right hand side. |
|
|
||
4.Use the  /
/ and
and  /
/ buttons to browse through the available items within each option and press
  to access the highlighted item or open its sub-menu.
5.Press  or
or  at any time to close the Options window.
Adjusting the Volume
The Volume Control allows you to adjust the volume level of music playback.
1.Press the  button or
  /
/  to show the Volume Control window.
2.Use  /
/ to set your desired volume and press
  to confirm.
3.Press  button again to close the Volume Control window or simply wait a few moments for it to disappear.
9
Remote Control
Your Photo Frame comes with a compact, easy-to-use remote control. You can fully operate your Photo Frame with either the navigation buttons on the front of the Photo Frame or by using the remote control. Note that when using the remote control you should always aim it directly at the front of your Photo Frame and make sure there are no obstacles in the way. All icons like  shown in this User’s Manual and the Quick Start Guide represent functions that you can access directly from the remote control for easy, straightforward operation of your Photo Frame.
 : Open the Music Player, Calendar or Settings Menu
 : Display or hide the Music player
 : Display or hide the Calendar
 : Open or close the settings menu
 : Switch to Thumbnail mode
 : Switch to Photo View mode
 : Switch to Slideshow mode
 : Enables multiple photo selection in Thumbnail mode
 : Select the item you want to view or function you want to perform.
 : Show / hide additional functions available for the current mode.

 : Display the next or previous page of available items
 : Show / hide available music files for audio playback
 : Add or delete the current photo, video, or music file from the Photo Frame’s internal memory.
 : Browse the contents of the Photo Frame’s internal memory (My Favorites)

 : Play/pause, or stop music at any time.
10

 : Skip to the next or previous available music track or video clip.


 : Adjust music volume (up / down / mute).
 : Cycle between music and video repeat modes.

 : Rotate or zoom-in on photos displayed in Photo View mode.
 : Change the brightness of the screen.
 : Enable the sleep timer to automatically shut down the Photo Frame.
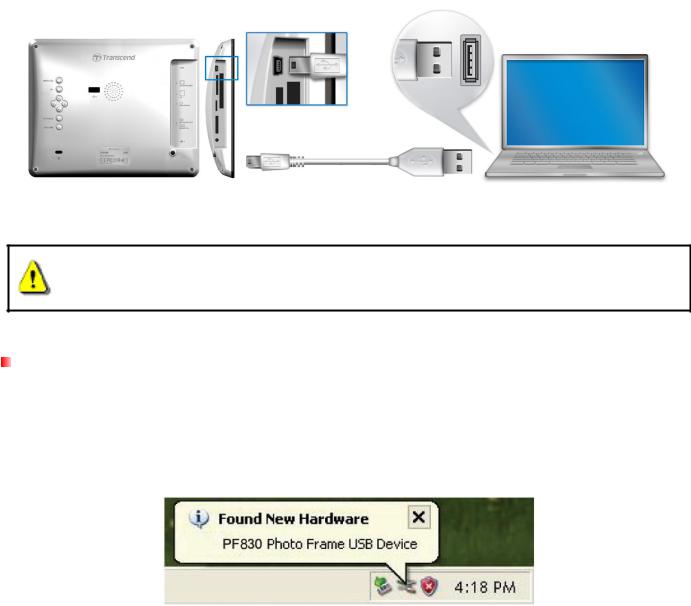
Connecting to a Computer
If you want to transfer pictures and music between the Photo Frame and your computer, connect the Photo Frame to a USB port on your computer using the provided USB cable.
1.Turn on the Photo Frame.
2.Plug the small end of the USB cable into the Mini-B USB port located on the left side of the Photo Frame.
3. Plug the large end of the cable into an available USB port on your desktop or notebook computer.
WARNING! You must plug in the AC adapter to provide the power necessary to run the Photo Frame when connecting to a computer.
Windows® 2000, XP, Vista and 7
No drivers are required for connecting Photo Frame to your desktop or notebook computer. Windows® Operating Systems have built-in drivers to support your Photo Frame. Upon successful connection to your computer, a new Removable Disk drive with a newly assigned drive letter representing the Photo Frame will automatically appear in the My Computer window and a Removable Hardware  icon will appear in the Windows System Tray.
11
 Loading...