

Page 1

TM
StoreJet
elite
Software User’s Manual
(Version 1.0.0)
1 2
Page 2

Table of Contents
Disclaimer of Liability ...........................................................................................3
Introduction ...........................................................................................................4
System Requirements...........................................................................................5
Installation .............................................................................................................6
Getting Started ......................................................................................................7
Starting StoreJetTM elite...............................................................................................7
General navigation.......................................................................................................7
StoreJet Drive Capacity............................................................................................... 8
E-Mail......................................................................................................................9
Portable Outlook Express/Windows Mail Data............................................................ 9
Portable Outlook Data ...............................................................................................10
Favorites ..............................................................................................................14
Internet Favorites Synchronization............................................................................ 14
No Trace Internet Browsing....................................................................................... 15
Deleting Internet Browsing history............................................................................. 16
AutoLogin ............................................................................................................18
Activating AutoLogin Internet Explorer Plug-in.......................................................... 18
Saving Login Data (User Names, Passwords, PINs, etc.)......................................... 19
Saving Multiple Logins for one Website.....................................................................20
Using your saved Login Data.....................................................................................20
Changing / Modifying / Deleting your saved Login Data............................................21
Secret-Zip Setup..................................................................................................23
DataBackup & DataSync.....................................................................................25
My Documents synchronization................................................................................. 25
View and Edit My Documents on the StoreJetTM.......................................................25
Data Compression on the StoreJetTM........................................................................26
Folder and Desktop synchronization .........................................................................26
Settings................................................................................................................28
Autorun...................................................................................................................... 28
One Touch Backup.................................................................................................... 29
Sync All Function....................................................................................................... 29
Working with the system tray menu...........................................................................30
My StoreJet..........................................................................................................31
About....................................................................................................................32
Update Mechanism.................................................................................................... 32
Troubleshooting..................................................................................................33
Transcend Limited Warranty..............................................................................35
Page 3

Disclaimer of Liability
This software is the copyrighted work of a third party provider. Transcend Information, Inc.
does not guarantee or assure the quality of this licensed software. Your use of the software
is governed by the terms of the end user License Agreement, which is included with the
software. You shall not install this software unless you first agree to the terms of the License
Agreement.
TRANSCEND INFORMATION, INC. IS NOT LIABLE FOR ANY DAMAGES SUFFERED AS
A RESULT OF USING, MODIFYING, CONTRIBUTING, OR COPYING THE SOFTWARE.
TRANSCEND INFORMATION, INC. IS ALSO NOT LIABLE FOR ANY INDIRECT,
INCIDENTAL, PUNITIVE, SPECIAL OR CONSEQUENTIAL DAMAGE (INCLUDING LOSS
OF BUSINESS, REVENUE, PROFITS, USE, DATA OR OTHER ECONOMIC ADVANTAGE).
HOWEVER, THE RESPECTIVE THIRD PARTY PROVIDER MAY TAKE ON THOSE
RESPONSIBILITIES.
You can find contact information for the third party provider in the License Agreement, or call
Transcend Information, Inc. for more information.
3
Page 4

Introduction
StoreJetTM elite will enhance the functionality of your StoreJet drive and help you
keep your personal data available on the road.
With StoreJetTM elite added to your StoreJet drive you can:
keep your Internet Explorer Favorites/Firefox Bookmarks synchronized,
keep your Outlook Express/Windows Mail data portable,
keep your Microsoft Office Outlook data synchronized,
keep your Folders, Desktop and My Documents data synchronized,
compress your data to save valuable memory space,
password protect / (encrypt) all the data on your portable storage device,
surf the internet without leaving a trace behind with Internet Explorer and Firefox.
Warning!
While using StoreJetTM elite, you should never disconnect your Device without
TM
closing StoreJet
“Safely Remove Hardware” option in Windows.
elite properly first, via the “exit” button and then using the
4
Page 5

System Requirements
Operating Systems:
o Windows® 2000 Service Pack 4
o Windows® XP Service Pack 2
o Windows VistaTM
Microsoft® Internet Explorer (version 5.0 and higher) or Mozilla Firefox version
1.0 and higher
Outlook Express version 5.0 and higher / Windows Mail:
and to be able to use the portable Outlook Express/Windows Mail e-mail, the
remote PC has to have Outlook Express/Windows Mail installed as well.
In case your Outlook Express/Windows Mail was uninstalled, you will still be
able to use the other functions of StoreJetTM elite. The Outlook Express /
Windows Mail option will be disabled.
Microsoft® Office Outlook (XP - 2002, 2003 and higher) and to be able to
synchronize and use the portable Microsoft® Office Outlook e-mail, the remote
PC has to have Microsoft® Outlook installed as well. In case your Microsoft®
Outlook was uninstalled, you will still be able to use the other functions of
StoreJetTM elite. The Microsoft® Outlook option will be disabled.
Available USB port
StoreJetTM drive
5
Page 6

Installation
No installation on your PC is needed. Download StoreJetTM elite from Transcend’s
website at: http://www.transcendusa.com/Products/SJelite.asp. Open the
downloaded zip file and extract the contents directly to your StoreJetTM drive. This file
is the complete StoreJetTM elite software program, and simply copying it to your
StoreJetTM will allow you to use the software on any compatible computer.
6
Page 7
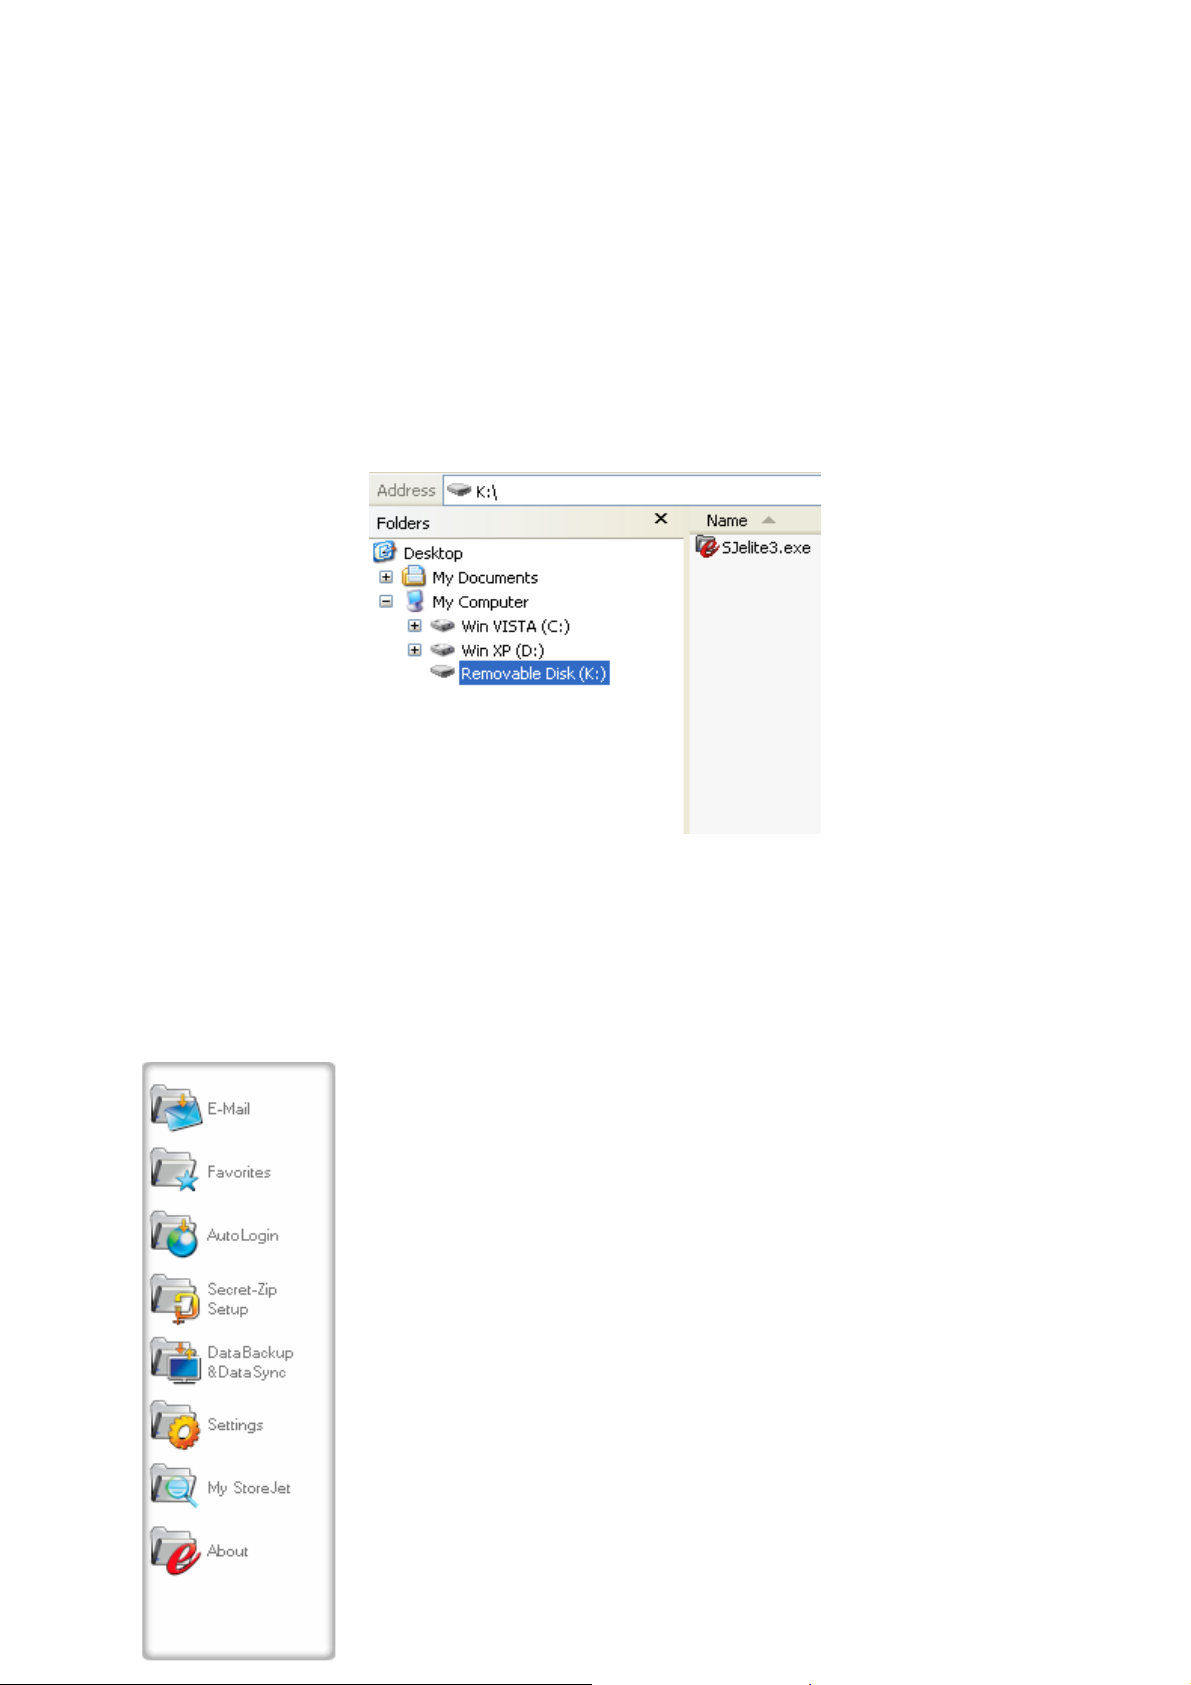
Getting Started
Starting StoreJetTM elite
To start StoreJetTM elite, plug in your StoreJetTM drive and open My Computer
(Windows Explorer).
Open the StoreJetTM drive or the Removable Disk with the drive letter e.g. D: or F:
depending on your computer and double-click on the SJelite3.exe file to start the
application.
The SJelite3.exe file will remain on your USB Drive in order to be able to use the
application when you switch between different computers. Please always run the
application from the StoreJetTM USB Drive and not from your hard disk or your
desktop.
General navigation
On the left side of the welcome window you will have the main
functions permanently available (see picture on the left). Just
click, for example, the Internet Favorites icon, and the function
will appear on the right side of the window. You also have access
to most features through the system tray icon. The system tray
functions are described below.
7
Page 8
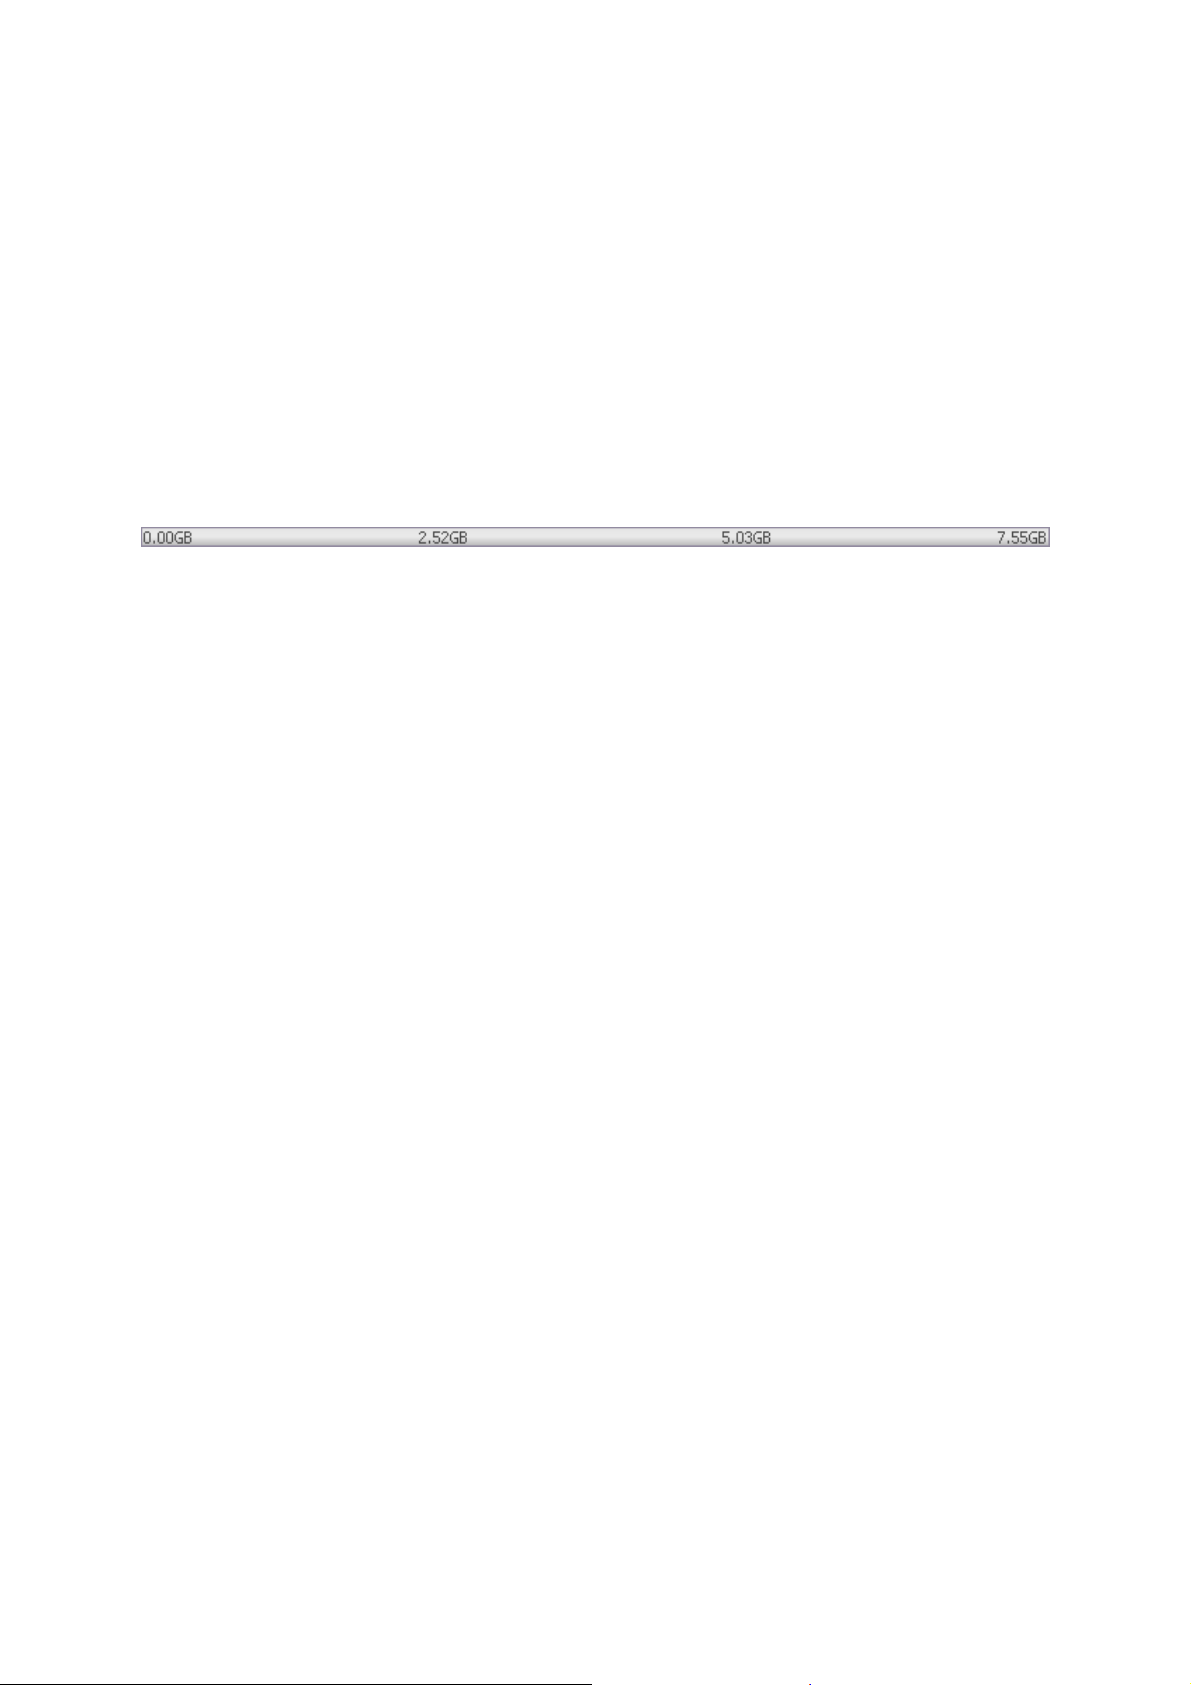
StoreJet Drive Capacity
On the bottom of the main window, an indicator bar will always be displayed
indicating the available space and the already used capacity of your StoreJetTM drive.
When you make a new selection e.g. of a My Documents folder you want to
synchronize, the indicator bar will jump to the new used capacity (in red) to indicate
how much capacity will be left on the StoreJetTM.
8 9
Page 9

E-Mail
Portable Outlook Express/Windows Mail Data
To make your Outlook Express/Windows Mail Data portable, you can select the
“Outlook Express/Windows Mail” option from the “E-mail” icon in the StoreJetTM
elite main window.
Follow these steps to make your Outlook Express/Windows Mail Data portable:
1. To create a backup on your portable storage device, select the Outlook
Express/Windows Mail identity you wish to make portable. The selected
identity will also include its respective address book / contacts. StoreJetTM elite
selects the main identity by default. After selecting your identity, click the
“Create Backup” button. Your Outlook Express/Windows Mail identity
including e-mail messages, contacts, message rules etc. is now saved on your
StoreJetTM drive. Your e-mail account passwords are not saved on the
StoreJetTM for security reasons (Windows doesn’t allow it) so please make
sure that you know the passwords for your e-mail accounts so that you will be
able to check your e-mail with StoreJetTM elite when you are on the road.
2. To run Portable Outlook Express/Windows Mail, click the “Run Backup
from StoreJet” tab, select the identity backup you wish to view and then click
the “Run Outlook Express/Windows Mail” button. If the computer has an
internet connection, you will be able to check your e-mail after providing the
password for your e-mail account. In case the computer doesn’t have an
internet connection, you will still be able to view your saved e-mail messages
and contacts.
3. To manage your portable Outlook Express/Windows Mail data, select the
“Manage Backups on StoreJet” option. Here you will be able to remove email identity backups one at a time by selecting a backup and clicking the
“Remove” button. In case you have received new e-mails and you want to
restore your Outlook Express/Windows Mail data back to your computer,
you can do so by using the restore function. Select the identity that you want
Page 10

to restore and click the “Restore…” button. Then you can choose if you want
to create a new identity or if you want to replace an existing identity.
Portable Outlook Data
To make your Microsoft Outlook Data portable, you can select the “Microsoft
Outlook” option from the “E-mail” icon in the main window of StoreJetTM elite. This
feature of StoreJetTM elite can be used for two different scenarios. One, to make a
backup of your Outlook data on your StoreJetTM drive so you can access the data on
a remote PC and work with it, or two, to use StoreJetTM elite to synchronize your
Outlook data between different PCs (e.g. between your work and home PC).
In order to make your Microsoft Outlook Data portable, please follow the steps
described below:
To create a backup to the StoreJetTM, click on the "Add profile pair..." button and
on the computer side (left), select the Microsoft Outlook profile you want to make
portable.
On the StoreJetTM side (right) select the destination. When using this feature for the
first time, the destination will default to the "New Backup" option. In case you
already have a backup on your portable device you can also select this from the drop
down menu. Use this feature to select the profiles that will be synchronized with one
another.
10
Page 11
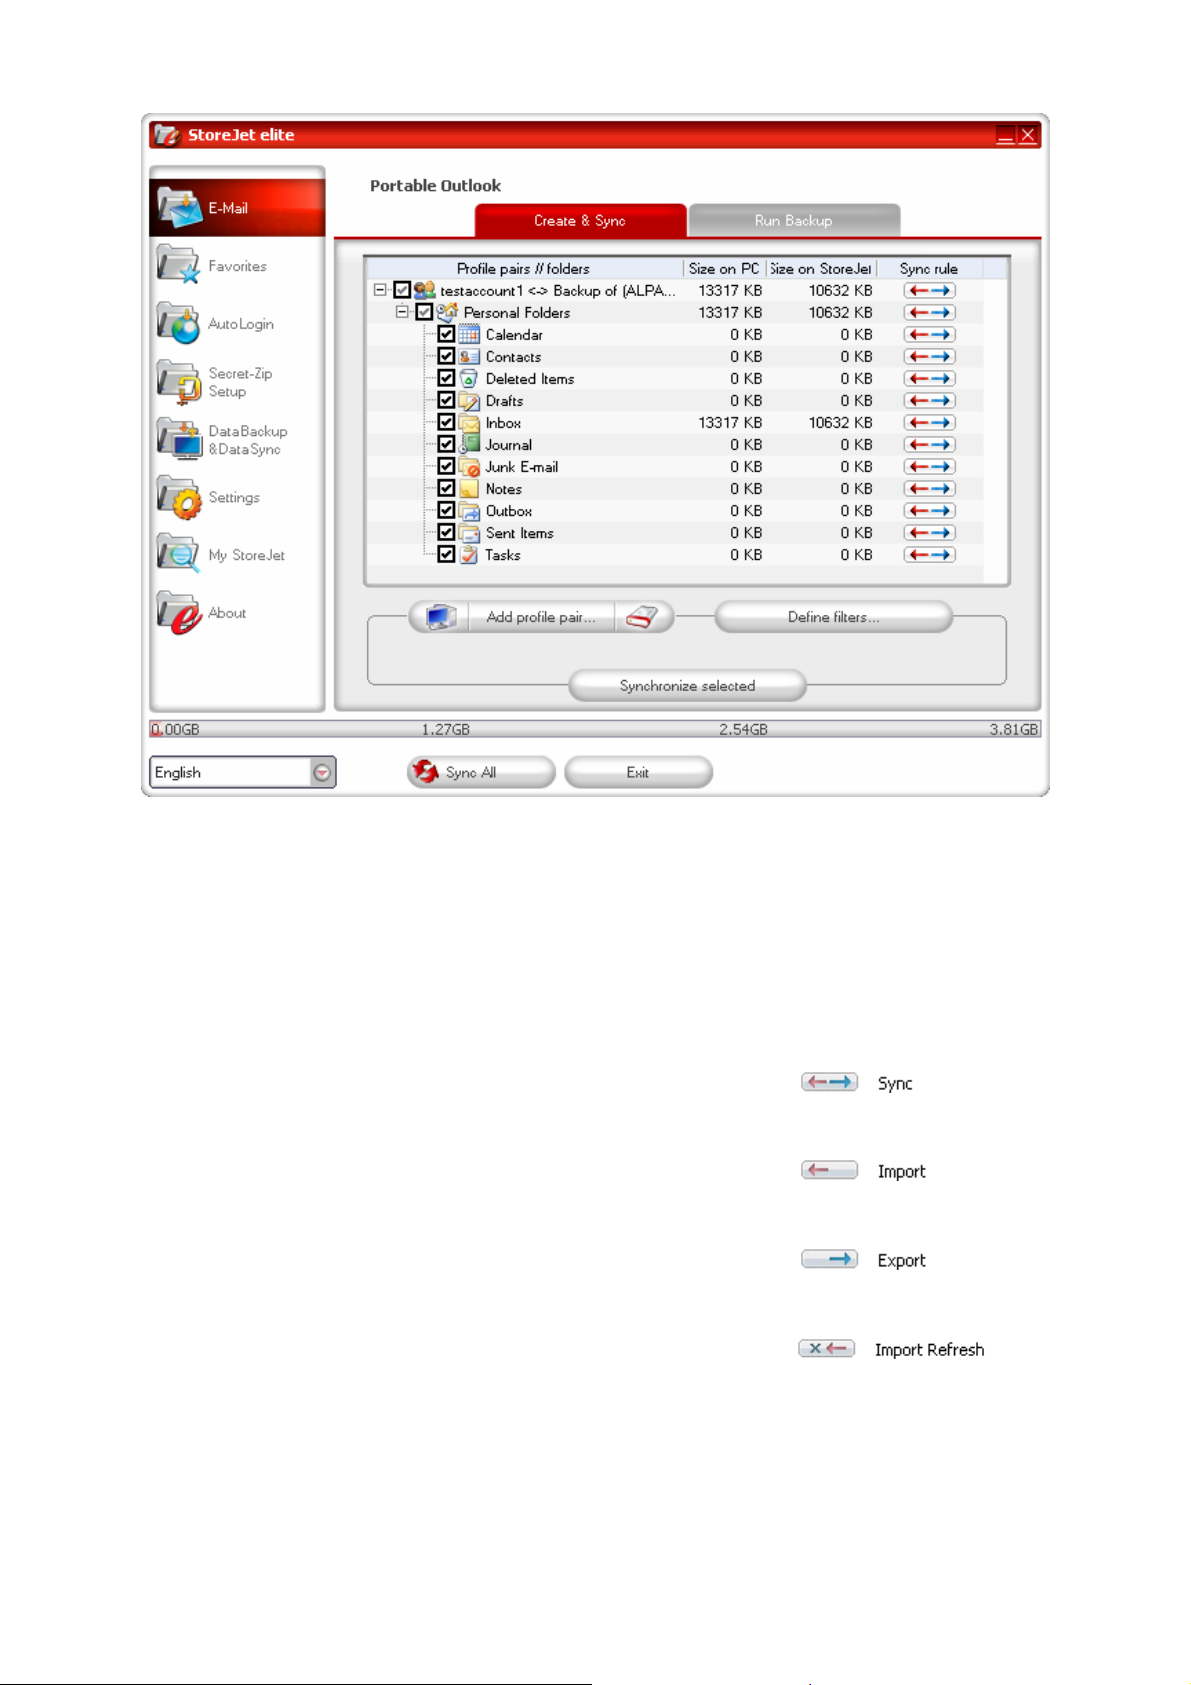
StoreJetTM elite selects the default profile in standard mode when using the
application for the first time when there is only one Outlook profile on the PC. After
selecting a profile, check the folders you want to synchronize (e.g. Contacts, Drafts
etc.), then select the "Sync Rule" you want to apply for each of the folders you
selected for synchronization.
TM
a) Create and/or update all items from PC to StoreJet
drive and vice versa
b) Create and/or update all items from StoreJetTM to PC
c) Create and/or update all items from PC to the
StoreJetTM
d) Overwrite all items on PC with the corresponding
StoreJetTM item, deleting first the item from PC
11
Page 12

e) Overwrite all items on the StoreJetTM with the
corresponding PC item, deleting first the item from
StoreJetTM
If you want to filter the messages you synchronize, clicking on the "Define Filters"
button gives you the option to filter messages by a certain size or a defined time
period. This gives you the option to significantly decrease the size of the Outlook
data you synchronize/backup.
After choosing your synchronization settings, click on the "Synchronize selected"
button from the "Create & Sync" window and the synchronization process will start.
Note: Your e-mail account passwords are not saved on the StoreJetTM for security
reasons (Windows does not allow it). Please make sure that you know the
passwords for your e-mail accounts so that you will be able to check your e-mail with
TM
StoreJet
elite when you are on the road (using a remote PC).
To run Portable Microsoft Office Outlook, select the backup you want to view from
the “Run Backup” tab in the
"Portable Outlook" menu. This function requires that
Outlook be preinstalled on the remote PC that you are using at the time. After
selecting the backup you want to start, click “Run Selected Backup” and Outlook
will start reading your data from the StoreJet
TM
device.
12
Page 13

If the remote PC has an internet connection, you will be able to check your e-mail
after providing the password for your e-mail account. In case the computer doesn’t
have an internet connection, you will still be able to view your Outlook data.
To delete a backup from your StoreJetTM, simply select it and then click on
the ”Remove b
ackup” button.
13
Page 14

Favorites
Internet Favorites Synchronization
To synchronize your Internet Explorer Favorites or your Firefox bookmarks, you have
the choice of 5 different synchronization options. Before you start using this feature,
you should familiarize yourself with these options. After you have synchronized your
Favorites or Bookmarks, you can view them in Internet Explorer or in Firefox, when
you activate the No Trace Browsing option and launch Internet Explorer or the
Firefox browser. When you have a large number of Favorites or Bookmarks, the
launching process can take some time.
The “Favorites” synchronization options are:
a) Create and/or update older Favorites on the
Computer
b) Replace all Favorites on Computer with the
StoreJetTM’s Favorites
+
c) Create and update all missing or older Favorites
d) Create and/or update older Favorites on the
StoreJetTM (default option)
e) Replace all Favorites on the StoreJet
TM
with the
Computer’s Favorites
+
Options a, c and d are chosen by selecting the respective arrow buttons and options
b and e are chosen by selecting the “Delete existing…” check box and the
respective arrow buttons.
After you have selected your preferred synchronization option you can start the
synchronization process by clicking the “Synchronize” button.
When synchronization starts, a progress bar will indicate that the process has begun
and that your Internet Favorites or Bookmarks are being transferred. The “View
Details” option in the progress bar will only display possible errors that have
14 15
Page 15

occurred during synchronization. When the synchronization is finished, the
“Finished” button will become active, indicating that the process has ended.
It can take a few minutes to synchronize a large number of Internet Favorites or
Bookmarks to and from your StoreJetTM drive.
To delete Internet Favorites/Bookmarks on your StoreJetTM or on your Computer you
can use the options in the “No Trace Browsing” window.
No Trace Internet Browsing
With the “No Trace Browsing” option you can surf the internet with Internet Explorer
and Mozilla Firefox without leaving a trace behind on the computer you have your
StoreJetTM drive connected to.
To activate No Trace Browsing simply click on the “Activate No Trace Internet
Browsing” option in the “No Trace Browsing” tab of StoreJetTM elite “Favorites”
window. In case you have an Internet Explorer/Firefox window already open you will
be asked if you want to close it so you can proceed.
The next time you open Internet Explorer or Firefox, either via the “Start No Trace
Browsing” button or any other way, you will not leave a single trace of browsing
history behind on the computer used.
Page 16

When No Trace Browsing is active you will see “No Trace Browsing” written in the
Internet Explorer window’s title bar. All the temporary files, history and cookies will be
redirected and saved to your StoreJetTM drive and not to the Computer.
If you have synchronized your Internet Favorites/Bookmarks, you can access them
through the “Favorites” button in Internet Explorer or the “Bookmarks” button in
Firefox.
After each use, we recommend that you delete the Temporary Files, Cookies and the
History from your StoreJetTM drive as described below, in order to save valuable
memory space on your StoreJetTM.
Deleting Internet Browsing history
To delete your Internet browsing history from your
Computer or from your StoreJetTM, go to the “No
TM
Trace Browsing” tab of StoreJet
elite “Favorites”
window. Check the “Activate No Trace
16 17
Page 17

Browsing” box. Select the objects you want to remove, such as Internet Favorites,
Temporary Files, History, or Cookies and click the “Delete trace” button. You will be
asked if you are sure you want to permanently delete the selected objects. After
confirming, a progress bar will indicate that the deletion is in progress. If you are
removing a large number of files (especially from your StoreJetTM drive), it might take
a few minutes until the process is finished.
Page 18

AutoLogin
With this option you can save usernames and passwords on your StoreJetTM so you
can login to your most frequently used websites faster than ever before.
Activating AutoLogin Internet Explorer Plug-in
To activate this feature, do the following:
1. Click the AutoLogin icon
2. Check “Activate AutoLogin”
3. Click “Launch Internet Explorer”
4. In Internet Explorer activate the AutoLogin toolbar plug-in. To activate the
plug-in move your mouse over the status bar near the top of the Internet
Explorer window and right click to reveal the menu options. Then select
“AutoLogin” from the toolbar list (see picture below).
18
Page 19

Saving Login Data (User Names, Passwords, PINs, etc.)
1. Go to the website where you want to login (for example mail.yahoo.com)
2. Enter your login/user name and your password and click the “Save Password”
button on the Internet Explorer AutoLogin toolbar.
3. Your login data is now saved on your StoreJet
TM
drive.
19
Page 20

Saving Multiple Logins for one Website
If you have different user names for the same website, you have the option to save
multiple sets of user names and login data for each site.
After recording the first set of login data, you can record additional sets of login data
by entering your user name and password on the website again and selecting “Add
as new” from the confirmation pop-up window that will appear when you click “Save
Password” again from the Internet Explorer AutoLogin toolbar.
Using your saved Login Data
When you now go back to a website for which you have saved login data, StoreJet
elite will automatically enter your login data for you. Simply click the Login/Sign In
button on the website to enter the site.
If you have added more than one set of login data for the website, a pop-up window
will appear with a list of accounts you can select from to login to the website with. To
login, select the account that you want to use and click “Login”.
TM
20
Page 21

In StoreJetTM elite you will find a list of all the sites that you have login data saved for.
To enter these websites even faster you can simply double click the website URL in
the StoreJetTM elite AutoLogin list and the site will open in Internet Explorer with your
login data automatically entered for you.
Changing / Modifying / Deleting your saved Login Data
If your user name or password for a website changes, you can simply go to the login
page of that website and modify your username or password, then click the “Save
Password” button on the Internet Explorer AutoLogin toolbar and choose
“Overwrite selected” in the confirmation pop-up window to overwrite the old login
data stored on your StoreJetTM.
To delete login data that is saved on the StoreJetTM, simply select the account from
the StoreJet
TM
elite AutoLogin list of saved accounts and click “Delete selected.”
21
Page 22

22
Page 23

Secret-Zip Setup
When using StoreJetTM elite for the first time, we recommend that you enable the
Secret-Zip password protection security feature to protect your StoreJetTM.drive.
To set a password, select the “Secret-Zip Setup” icon in the main window, check
the “Password protect my data” option and enter a password as well as the
password confirmation and a password reminder, then click the “Apply” button.
Changing your existing password is also done in this window, by selecting the
“Change password” option. In order to be able to change the password you have to
first provide your old password, then you can enter the new password with the
password confirmation and the new password reminder and click the “Apply” button.
If you have already enabled password protection and want to remove password
protection from your StoreJetTM, you can select the “No password protection
required” option, enter your old password and click the “Apply” button to unprotect
your data.
23
Page 24

If you choose to password protect your StoreJetTM data, StoreJetTM elite will encrypt
the selected items in the “Select some items to encrypt” group on your StoreJetTM
drive. Other data that is stored on the StoreJet
TM
but is not synchronized with
StoreJetTM elite or not selected in the “Select some items to encrypt” group will
remain unencrypted.
StoreJetTM elite encrypts only the data synchronized with StoreJetTM elite.
You can manage encrypted files by opening the Secret-Zip Setup window. After you
password-protect your data with the Secret-Zip, the “Manage Secret-Zip Data” tab
will be activated in the Secret-Zip Setup window. In this tab you can “Decrypt &
open” any of your files and then re-encrypt them when you are finished.
Changing the security settings can take a few minutes depending on how many files
are saved on the StoreJetTM drive. You will see a progress bar that indicates how
long the process will take.
24
Page 25

DataBackup & DataSync
My Documents synchronization
To synchronize your My Documents folder, choose the DataBackup & DataSync
option from the main navigation menu on the left. In the “My Documents” tab you will
see your computer’s My Documents directory and all its subdirectories (“Hard Disk”
image). The folders you wish to synchronize with your StoreJetTM drive can be
selected by clicking the checkbox next to each folder (double-clicking the folder name
or description will display the folder’s contents). You may then choose one of the
three synchronization rules:
a) Create and/or update older My Documents files on
the Computer
b) Create and update all missing or older versions of
My Documents files
c) Create and/or update older My Documents files on
the StoreJet
To synchronize data between the Computer and your StoreJetTM you have first select
either the “Hard Drive” icon or the “StoreJetTM Drive” icon and apply one of the three
synchronization options. Select the folders you want to synchronize and click the
“Synchronize” button.
When the synchronization process has begun, a progress bar will appear. In the
progress bar a “View Details” option will be available in the upper right hand corner
that shows any errors that might occur during synchronization. When the process is
complete, the “Finished” button will become active. Click it to continue.
TM
View and Edit My Documents on the StoreJetTM
To view, edit or delete files and folders that are stored in the My Documents folder on
your StoreJetTM, you can simply click on the “StoreJetTM Drive” icon in the My
Documents tab. Right clicking a folder will give you the option to open it to display its
contents or to delete the folder from your StoreJetTM. Note: When data compression
is enabled you will not be able to use the right click function.
25
Page 26

Data Compression on the StoreJet
TM
StoreJetTM elite offers you the option of compressing the documents you want to
synchronize in order to use the space on your StoreJet
TM
more efficiently. Just click
on the “Data compression” check box (C-clamp image) in the “My Documents” or
the “Folder Synchronization” tab. When you check the synchronization box, the
documents you selected for synchronization will be compressed and copied to the
TM
StoreJet
drive.
Folder and Desktop synchronization
StoreJetTM elite lets you create user-specified synchronization profiles so you can
easily synchronize specific documents or folders between two or more computers.
Open the “DataBackup & DataSync” window and click on the “Preset Folders” tab.
To add a folder to the synchronization list, click the “+” button. If you want to edit the
synchronization options for an existing preset folder, select the folder and click the “i”
button. To delete the preset folder, click the “x” button.
To synchronize the selected folders with your StoreJet
TM
click the “Synchronize”
button.
The first time you connect your StoreJet
TM
to another computer and try to
synchronize your documents, you will be asked to select a folder on that computer
TM
with which the data from your StoreJet
will be synchronized. You can do this by
selecting the preset folder you want to synchronize and then clicking the “i” button to
specify the desired folder location on the computer. The next time you want to
synchronize your data with that computer, just select the preset folder and click
“Synchronize”.
26
Page 27

To synchronize your Desktop items follow the same steps as described above.
27
Page 28

Settings
Autorun
Activating this option will start StoreJetTM elite automatically whenever you connect
your StoreJetTM that has StoreJetTM elite on it to your PC. If you have password
protection enabled when you connect your StoreJetTM, the password login window
will appear.
28
Page 29

One Touch Backup
If your StoreJet portable hard drive is equipped with a OneTouch auto-backup button, you
can also perform the Sync-All function by simply pressing the OneTouch button at any time
To enable this feature, click the “Activate” icon in the “OneTouch Backup” section of the
General Settings tab. When enabled, all the items you selected in the Sync All Settings tab
will be synchronized whenever you press the OneTouch auto-backup button on your
StoreJet drive. Enabling this function will also allow the StoreJet elite application to start
automatically when the OneTouch button is pressed.
Sync All Function
In order to make working with StoreJetTM elite easier, you have the option to use the
“Sync All” function. With this feature you can synchronize your Internet
Favorites/Bookmarks, your Outlook data, your My Documents files and other folders
all at once. All you have to do is choose the items that you want to synchronize from
the “Sync All Settings” tab of the Settings window.
Then, you have two options:
29
Page 30

1. You can sy nchronize them now, by clicking on the “Sync All” button from the
bottom right of the window, or
2. You can have them synchronized automatically, at a period of time that you
can specify in the “Automatically Sync All every…” section.
Working with the system tray
menu
Via the StoreJetTM elite Icon in the
system tray you can quickly access
all of StoreJet
With the Quick Start option, you can
view your My Documents or My
Folders content.
TM
elite’s functions.
30
Page 31

My StoreJet
My StoreJet is a convenient shortcut for browsing the contents of your StoreJetTM drive. The
“StoreJet Drive Information” tab will also show you important information about your
TM
StoreJet
drive and the current usage status and settings of the StoreJet elite software, as
shown in the picture below.
31
Page 32

About
Update Mechanism
You can check for the availability of a new StoreJetTM elite version by clicking the
“Update” button in the “About” window. If there is a newer version available you will
be asked if you want to download it. The application will be downloaded directly to
your StoreJetTM device. If it is not possible to replace the running version on your
StoreJetTM device the new version will be saved on your desktop. You will then be
required to replace the older version on the StoreJetTM device with the newer version
by replacing it via copying/overwriting.
32 33
Page 33

Troubleshooting
If a problem occurs with your StoreJetTM, please first check the information listed
below before taking your StoreJetTM in for repair. If you are unable to remedy a
problem with the following hints, please consult your dealer, service center, or local
Transcend branch office. Additional FAQ and Support services can be found on the
Transcend website.
My operating system cannot detect the StoreJet
TM
drive
Check the following:
1. Is your StoreJetTM properly connected to the USB port? If not, unplug it and plug it
in again. If it is properly connected, try using another available USB port.
2. Is your StoreJetTM connected to the Mac® keyboard? If yes, unplug it and plug it
into an available USB port on your Mac® Desktop instead.
3. Is the USB port enabled? If not, refer to the user’s manual of your computer (or
motherboard) to enable it.
Some functions of StoreJet
Some of StoreJet
TM
elite’s functions require you to be logged in to the computer with
TM
elite are unavailable
Administrator rights. If you want to access the security functions of your StoreJetTM,
you must run the StoreJet® elite program at least once with Administrator Rights.
I am experiencing problems using StoreJet
Please ensure you are using Windows® 2000 SP4 (service pack 4).
TM
elite in Windows® 2000
Why does a “Restart Computer” message window appear when I plug in
my StoreJet
Sometimes the computer will mistakenly interpret the StoreJetTM as a new hardware
device that needs to be installed. You can disregard this message and click the
“Cancel” button to continue.
TM
?
Page 34

I Forgot My Password
If you forget your password, the password hint in the Secret-Zip setup window should help
you remember. If you still cannot remember what your password is, unfortunately your only
option is to reformat the StoreJet
program file and all other non-protected files before formatting the StoreJet
TM
drive. Make sure you make a copy of the StoreJetTM elite
TM
drive.
I cannot find the file that was just copied to the StoreJet
TM
You should always open a transferred file in its new location to confirm it has transferred
successfully. Re-copy the file and use the “Safely Remove Hardware” tool to remove the
StoreJet
TM
after the copy process is completed.
A File that was just deleted still appears
Re-delete the file and use the “Safely Remove Hardware” tool to remove the StoreJetTM
after the delete process is completed.
34 35
Page 35

Transcend Limited Warranty
“Above and Beyond” is the standard we have set ourselves for customer
service at Transcend. We consistently position ourselves to be significantly
above the industry norm, which is all part of our commitment to Customer
Satisfaction.
All Transcend information, Inc. (Transcend) products are warranted and tested to
be free from defects in material and workmanship and to conform to the published
specifications. During the warranty period should your Transcend StoreJetTM fail
under normal use in the recommended environment due to improper workmanship or
materials, Transcend will repair the product or replace it with a comparable one. This
warranty is subject to the conditions and limitations set forth herein.
Duration of Warranty: The Transcend StoreJetTM is covered by this warranty for a
period of two (2) years from the date of purchase. Proof of purchase including the
date of purchase is required to collect on the warranty. Transcend will inspect the
product and decide whether to repair or replace it. Transcend reserves the right to
provide a functional equivalent product, or a refurbished replacement product.
Limitations: This warranty does not apply to product failure caused by accidents,
abuse, mishandling, improper installation, alteration, acts of nature, improper usage,
or problems with electrical power. In addition, opening or tampering with the product
casing, or any physical damage, abuse or alteration to the product’s surface,
including all warranty or quality stickers, product serial or electronic numbers will also
void the product warranty. Transcend is not responsible for recovering any data lost
TM
due to the failure of a flash device. Transcend’s StoreJet
must be used with
devices that conform to the recommended industry standards. Transcend will not be
liable for damages resulting from a third party device that causes the Transcend
StoreJet
TM
to fail. Transcend shall in no event be liable for any consequential,
indirect, or incidental damages, lost profits, lost business investments, lost goodwill,
or interference with business relationships as a result of lost data. Transcend is also
not responsible for damage or failure of any third party equipment, even if Transcend
Page 36

has been advised of the possibility. This limitation does not apply to the extent that it
is illegal or unenforceable under applicable law.
Disclaimer: The foregoing limited warranty is exclusive. There are no other
warranties, including any implied warranty of merchantability or fitness for a particular
purpose. This warranty is not affected in any part by Transcend providing technical
support or advice. Some countries and states have limitations on how long a
warranty lasts, so this Limited Lifetime Warranty may not apply to you. Transcend’s
Limited Lifetime Warranty does not affect your statutory consumer rights to bear the
lengthiest warranty period permitted under applicable national legislation. Please
read Transcend’s Warranty Policy in full to understand your rights.
Transcend Warranty Policy: http://www.transcendusa.com/Support/Warranty.asp
Online Registration: To expedite the warranty service, please register your
Transcend Product within 30 days of purchase.
Register online at http://www.transcendusa.com/registration
The specifications mentioned above are subject to change without notice.
Transcend Information, Inc.
www.transcendusa.com
*The Transce nd logo is a registered trademark of Transcend Information, Inc.
*All logos and marks are trademarks of their respective companies.
36
 Loading...