

Page 1

USB
128MB-256MB JetFlash™ DSC
User’s Manual
P/N TS128/256MJF-DSC
Page 2

Table of Contents
Introduction
Package Contents..............................................................................................................1
Features..............................................................................................................................1
System Requirements.......................................................................................................1
Reminders..........................................................................................................................1
Data Storage Function
Driver Installation for Windows 98SE ..............................................................................2
Driver Installation for Windows Me, 2000, and XP..........................................................3
Driver Installation for Mac OS 9.0 or Later ......................................................................3
Driver Installation for Linux Kernel 2.4 or Later..............................................................4
Status Indications (Connected to Computer)..................................................................4
Warning ..............................................................................................................................4
Digital Camera Function
Product Overview ..............................................................................................................5
Power Supply.....................................................................................................................6
Charging the Camera Battery...........................................................................................6
Power On............................................................................................................................6
Power Off............................................................................................................................6
Taking Pictures ..................................................................................................................7
Status Indications..............................................................................................................8
View / Transfer Pictures in Windows................................................................................8
View / Transfer Pictures in Mac OS..................................................................................9
Photo Explorer 8.0
System requirements ........................................................................................................9
Installing Photo Explorer 8.0...........................................................................................10
Enhance Image Quality ................................................................................................... 11
Adjust Image....................................................................................................................13
Learn More .......................................................................................................................14
Safely Remove Your JetFlash
Remove JetFlash in Windows 98SE...............................................................................15
Remove JetFlash in Windows Me, 2000, and XP ..........................................................15
Remove JetFlash in Mac OS...........................................................................................15
Remove JetFlash in Linux...............................................................................................15
Page 3

Troubleshooting.....................................................................................................16
Specifications
Ordering Information
..........................................................................................................19
...........................................................................................19
JetFlash Limited Warranty
Page 4

Introduction
Thank you very much for purchasing Transcend’s JetFlash™ DSC. This small device is more
than a USB Flash Drive. It combines a USB Flash Drive with the function of a Digital Camera.
As a USB flash drive, it can expedite exchanging huge amounts of data between any desktop or
laptop computer. Easily fitting into a pocket or purse, the Digital Camera function lets you take
pictures anytime you want. Transcend’s new JetFlash™ DSC will bring you a whole new
experience in mobile data storage.
Package Contents
The JetFlash package includes the following items:
• JetFlash
• Neck Strap
• Driver CD
• Label
• USB Extension Cable
• Quick Installation Guide
Features
• Compliant with USB specification 1.1, True Plug and Play
• Driverless (only Windows
• Camera Function: Enhance up to 1.3 mega pixel image quality
• Direct battery recharging via USB port
• LEDs indicate the power & storage status of JetFlash
®
98SE needs the enclosed driver)
System Requirements
• Hardware: Desktop or notebook computer with USB port
• Operating System: Windows
®
98SE, Windows® Me, Windows® 2000 or Windows® XP
Mac™ OS 9.0 or later, Linux™ kernel 2.4 or later
Reminders
1. Keep your JetFlash away from heat, direct sunlight, and moisture.
2. Do not bend, flex, or drop your JetFlash.
3. Avoid touching the lens and viewfinder with your fingers. To remove dust or fingerprints, use
a soft, damp cloth.
4. Do not look at the sun through the viewfinder!
5. Remember to charge the battery before taking pictures.
- 1 -
Page 5
Data Storage Function
Driver Installation for Windows 98SE
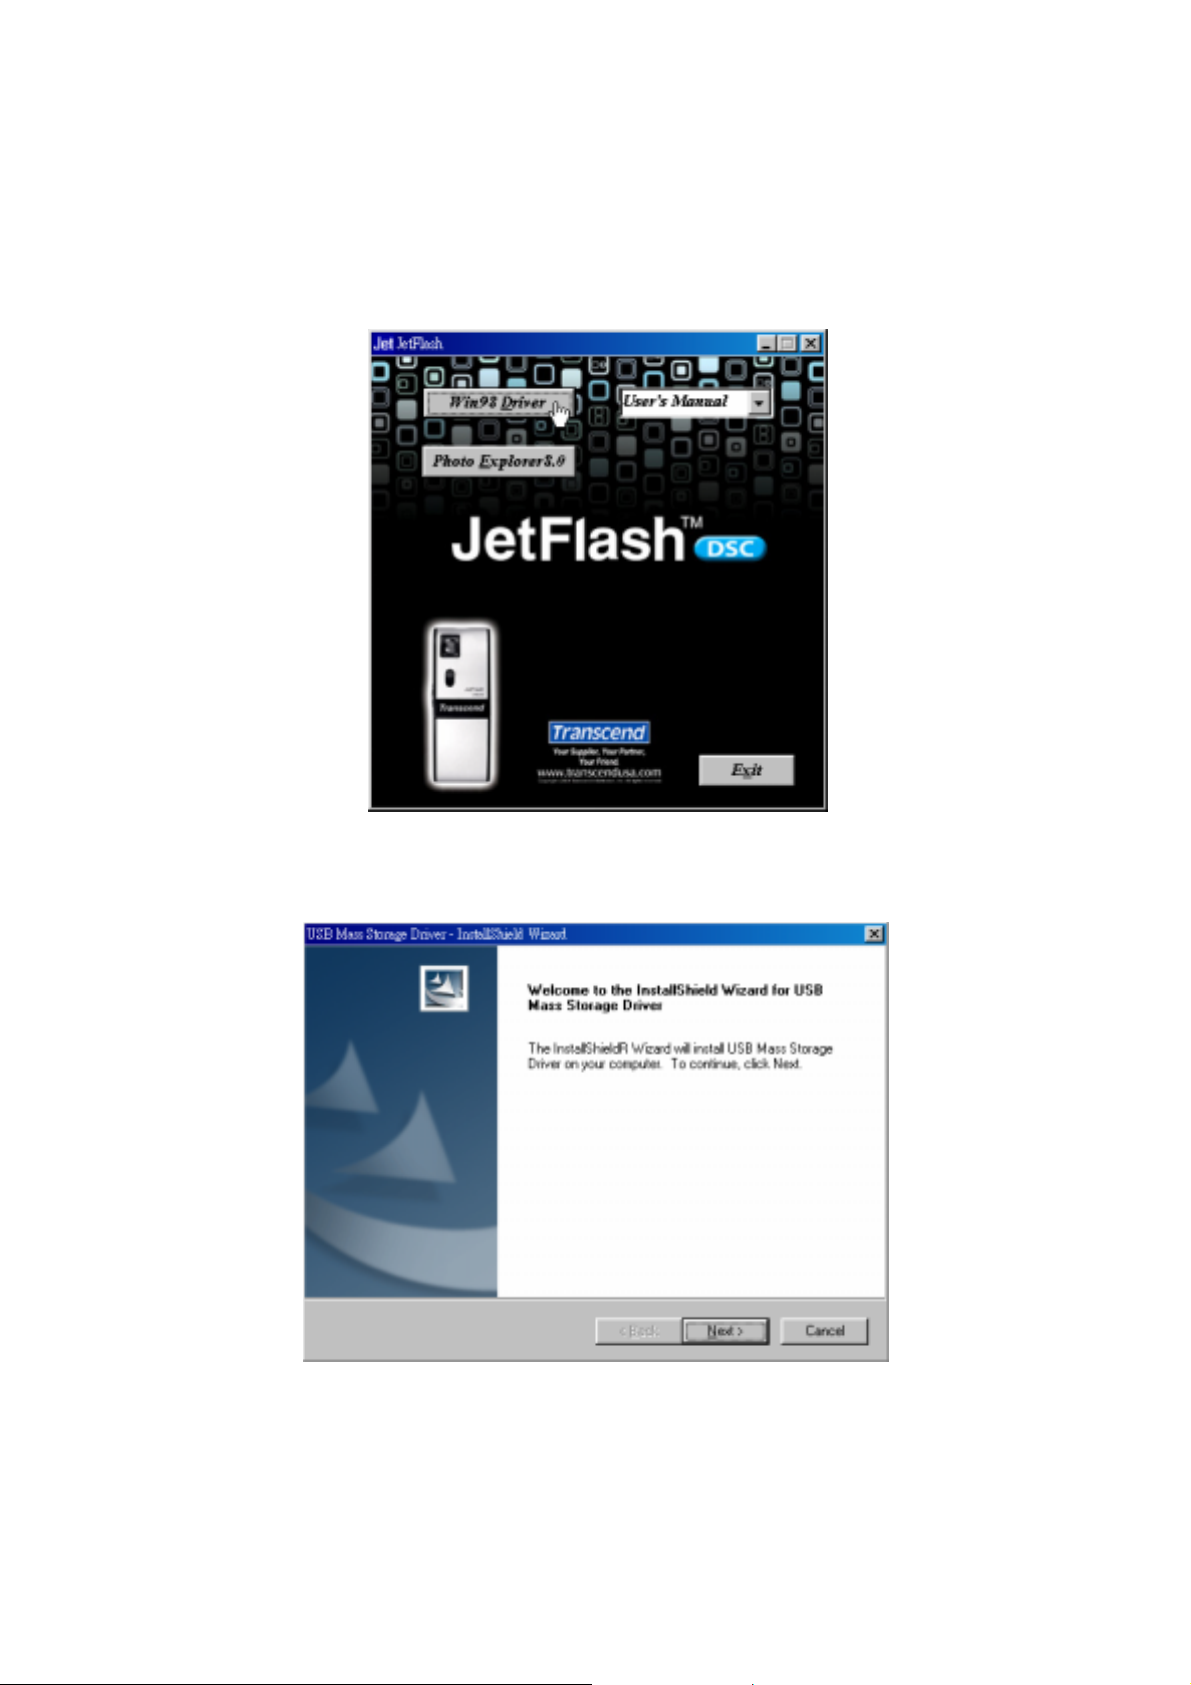
1. Drivers are required for Windows 98SE. Insert the Driver CD into the CD-ROM (Auto-Run
supported). Select the Win98 Driver button.
2. The “USB Mass storage Driver – InstallShield Wizard” window will appear. Select Next to
continue.
3. Select the “Yes, I want to restart my computer“ option. Then select Finish to restart your
computer.
- 2 -
Page 6
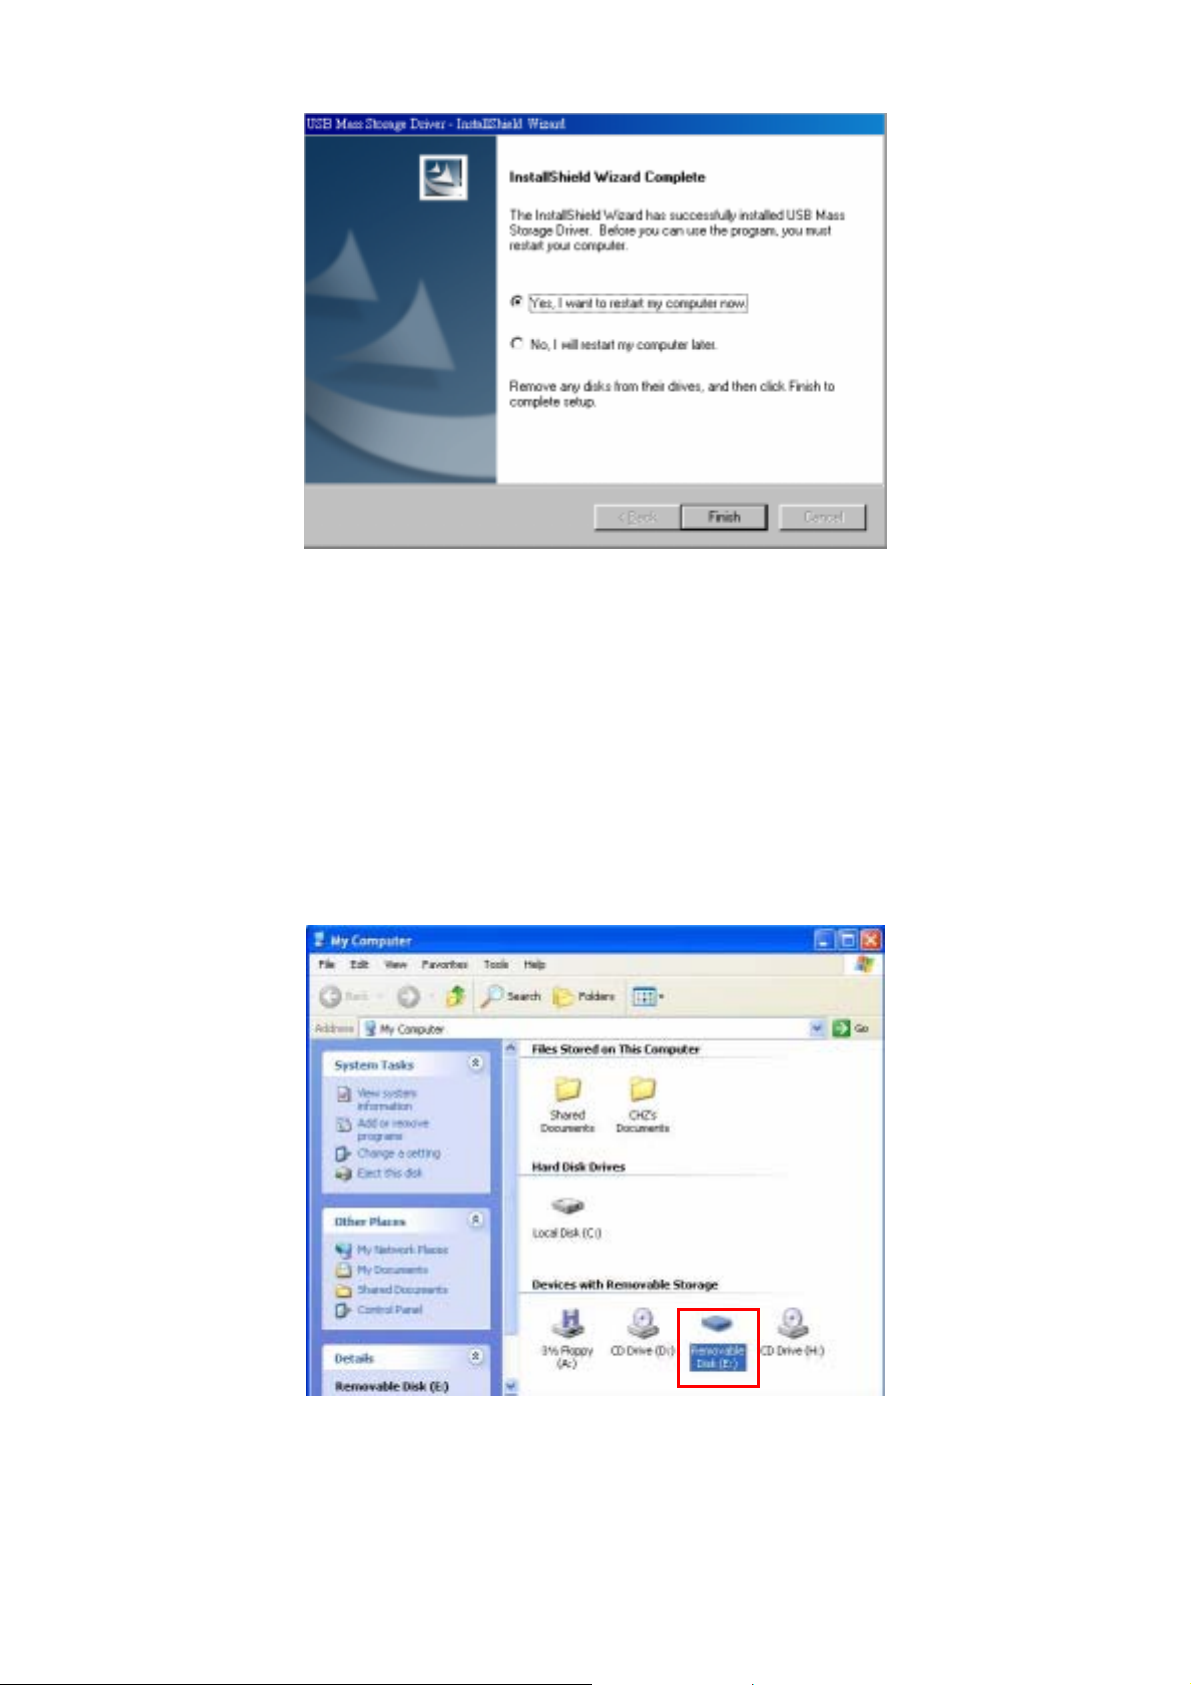
4. After restarting your computer, plug your JetFlash into an available USB port. Your computer
will automatically detect the new device. A new Removable Disk drive with a newly assigned
drive letter will appear in the My Computer window.
Driver Installation for Windows Me, 2000, and XP
No drivers are required. These Windows operating systems have built-in drivers to support the
data portion of your JetFlash. Simply plug your JetFlash into an available USB port, and
Windows will install the files needed to use it as an external hard drive. A new Re movable Disk
drive with a newly assigned drive letter will appear in the My Computer window.
Driver Installation for Mac OS 9.0 or Later
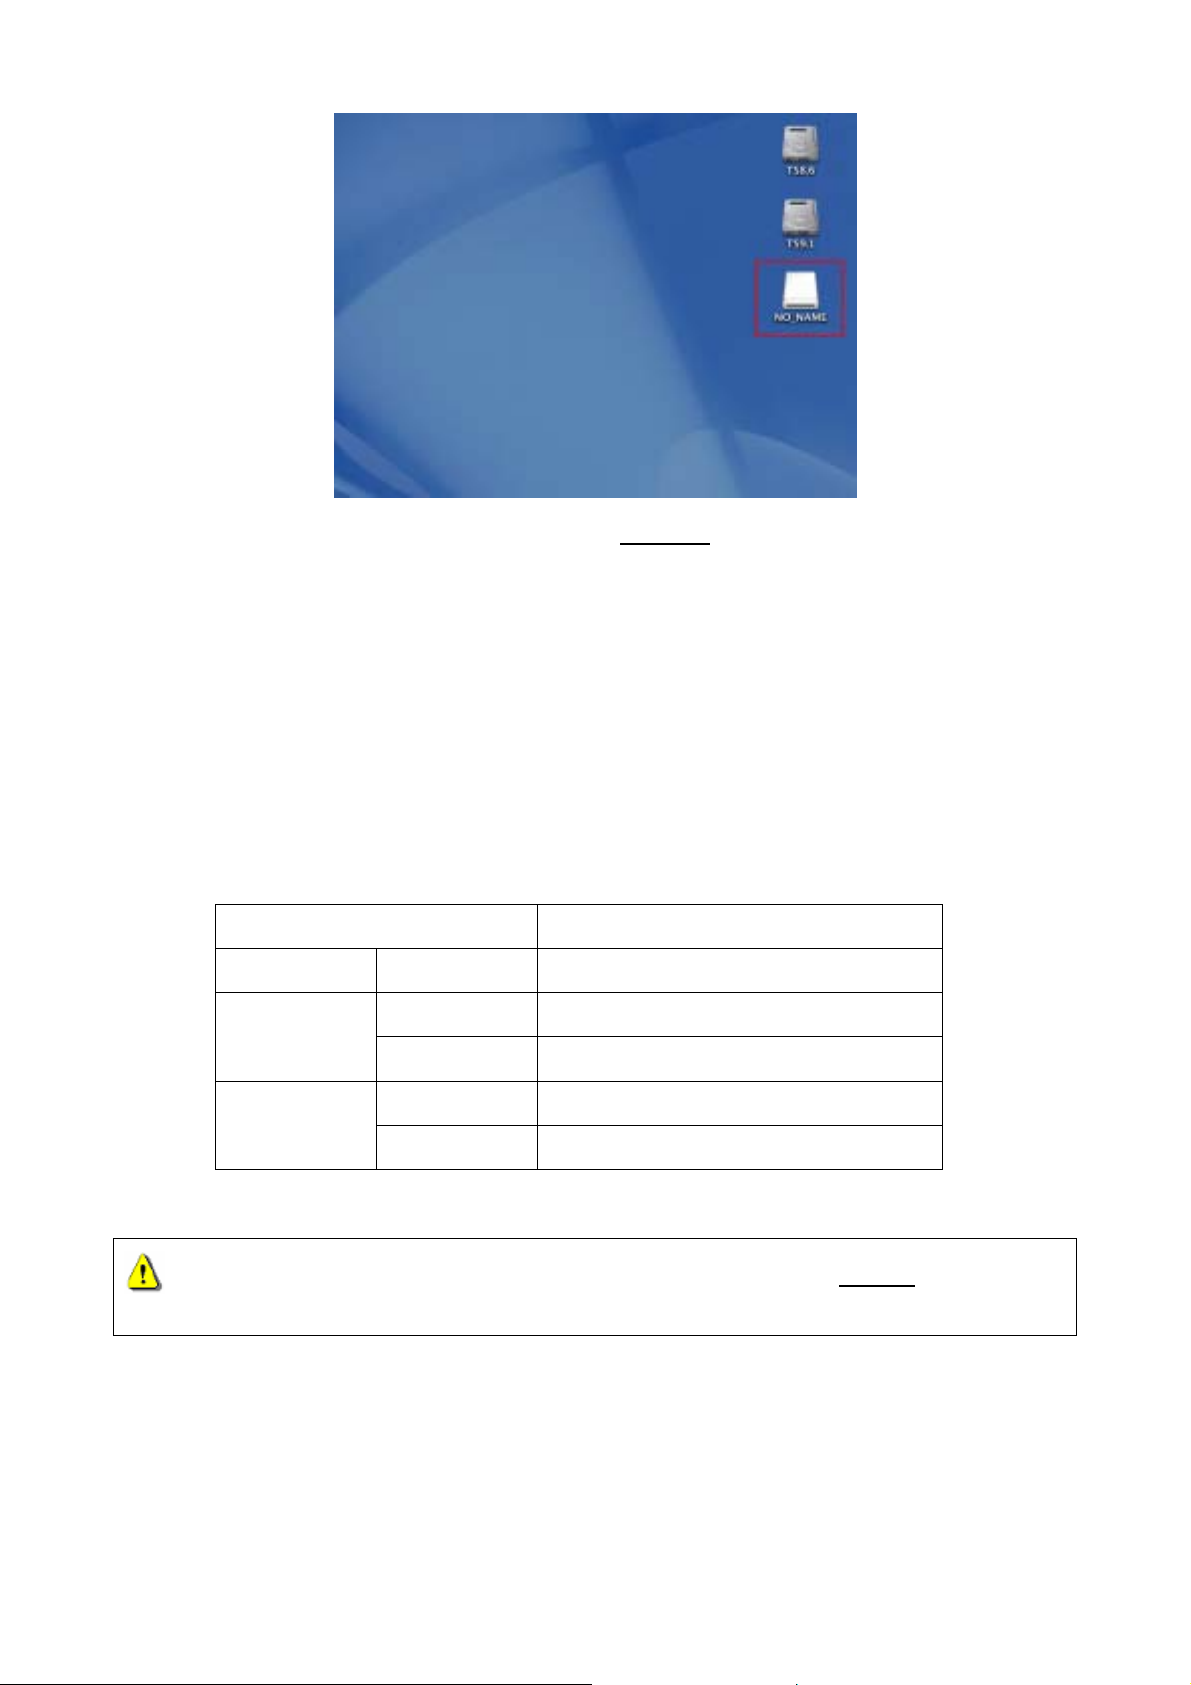
No drivers are required. Simply plug your JetFlash into an available USB port and your computer
will automatically detect it. A new Disk icon will appear on the Desktop.
- 3 -
Page 7
Avoid using the USB connection in your Mac keyboard, it does not have sufficient power to
detect your JetFlash. Please use an available USB port in your Mac Desktop.
Driver Installation for Linux Kernel 2.4 or Later
No drivers are required. Simply plug your JetFlash into the USB port and mount it.
Example: 1. Create directory for JetFlash first
mkdir /mnt/jetflash
2. Mount JetFlash
mount –a –t msdos /dev/sda1 /mnt/jetflash
Status Indications (Connected to Computer)
Indications Status
Buzzer Beep JetFlash is plugged into the USB port
Warning
To prevent loss of data and/or damage to your JetFlash, NEVER remove your
JetFlash from a device while the Memory LED is blinking.
Power LED
(Red)
Memory LED
(Green)
Blinking Camera battery charging
Off Camera battery fully charged
Blinking Data transferring
Off Standby
- 4 -
Page 8

Product Overview
Digital Camera Function
Components Controls
Memory LED (Green) Show the status of the USB Flash Drive status.
Power LED (Red) Shows the power status of the camera.
Viewfinder Window To help frame your picture.
Strap Hole Attach the supplied neck strap here.
Shutter Button Press down to take your picture.
Lens Automatically opens when the power is on. The lens is
closed when the power is off.
Power Switch (Lens Cover) Pull down (open) to turn the power on.
Pull up (close) to turn the power off.
USB Connector Connect to your computer’s USB port to charge your
JetFlash and transfer files.
USB Cover Detach the protective USB cover to reveal your JetFlash’s
USB connector.
- 5 -
Page 9

Power Supply
JetFlash is powered by a built-in rechargeable lithium battery, which you can charge directly from
your computer via the USB port
When you use your JetFlash as a Digital Camera for the very first time, you’ll need to charge
the battery approximately two (2) hours before taking pictures. A fully charged battery will
last approximately five (5) hours with constant use.
.
Charging the Camera Battery
1. Verify the Camera Lens is closed and the Power LED is off. (Power off)
2. Plug your JetFlash into an available USB port. You will hear a beep.
3. Charging will start immediately. While charging, the Power LED will blink with a red light.
4. After the battery is fully charged, the Power LED will stop blinking and turn off.
5. Unplug your JetFlash to complete the battery charging.
Verify you have installed the Win98 drivers from the enclosed Driver CD before initial use in a
Windows 98SE computer. See the “Driver Installation for Windows 98SE” section for
reference.
Power On
Pull down (open) the Power Switch (Lens Cover) until the Lens is revealed. You will hear a
beep and the Power LED will light up.
If the Power LED is blinking red, the power is low and you need to
recharge your JetFlash.
Power Off
Pull up (close) the Power Switch (Lens Cover) until the Lens is covered. The Power LED light
will turn off.
- 6 -
Page 10

Always close the camera lens cover of your JetFlash when not taking
pictures. This will conserve power and protect the camera lens.
Taking Pictures
1. Disconnect your JetFlash from the USB port of your computer.
2. Open the lens cover to power on your JetFlash and verify the Power LED is solid (red).
3. Verify the Memory LED is solid (green). (Available memory is over 100KB.)
4. Look though the viewfinder to frame your subject inside the window.
5. Keep your JetFlash steady and press the shutter button all the way down to capture and store
your picture.
6. Your JetFlash will double beep after a picture is taken.
When you use your JetFlash for the very first time, you must charge the battery
approximately two (2) hours before taking pictures.
Pictures cannot be taken when your JetFlash is connected with your computer. When you
connect your JetFlash to your computer via the USB port, the computer operating system will
recognize your JetFlash as a USB Mass Storage Device.
The JetFlash image files are stored in JPEG format as below:
\DCIM\100-IMG\Img-xxxx.jpg
where xxxx is a JPEG file number (0001 to 9999)
When the Memor y LE D is off, your JetFlash can only take one more picture at the most. To
free up storage space, you must transfer and store your pictures onto your computer.
- 7 -
Page 11

Status Indications
Indications Status
Buzzer
Power LED
(Red)
Beep JetFlash is powered on
Double Beep Picture taken
Solid Full power
Blinking Low Power
Off Power off
Memory LED
(Green)
Solid Space available for pictures
Off Not enough space available for pictures
View / Transfer Pictures in Windows
1. Plug your JetFlash into an available USB port. (Verify you have installed the Win98 drivers
from the enclosed Driver CD before initial use in a Windows 98SE computer. See the “Driver
Installation for Windows 98SE“ section for reference.)
2. Launch Windows File Manager to access the Removable Disk.
3. Double-click Removable Disk \ DCIM \ 100-IMG to access your pictures.
4. Double-click on the file you want to view. You can copy, move, delete, or rename any files at
this time.
5. After viewing, refer to the “Safely Remove Your JetFlash” section to unplug your JetFlash.
To enhance the image quality or edit your pictures, refer to the “ Photo Explorer 8.0” section
- 8 -
Page 12

for detailed instructions.
View / Transfer Pictures in Mac OS
1. Plug your JetFlash into an available USB port on Mac. (Avoid using the USB connection in
your Mac keyboard.)
2. Double-click on the Disk icon of your JetFlash, and select DCIM \ 100-IMG to access your
pictures.
3. Double-click on the file you want to view. You can copy, move, delete, or rename any files at
this time.
4. After viewing, refer to the “Safely Remove Your JetFlash” section to unplug your JetFlash.
Photo Explorer 8.0
For Windows OS users, Photo Explorer 8.0 provides an efficient way to move, categorize,
browse, and adjust your pictures. Also, Photo Explorer 8.0 can create slideshow presentations,
calendars, web albums, or burn the pictures onto CD or DVD.
Photo Explorer 8.0 is not supported for the Mac OS or Linux.
System Requirements
• Intel® Pentium® III or faster processor
• Windows
®
98SE, Windows® Me, Windows® 2000 or Windows® XP
• 64MB RAM or more
• 35MB available hard drive space for program files
• 800 X 600 minimum display resolution
- 9 -
Page 13

Installing Photo Explorer 8.0
1. Insert the Driver CD into the CD-ROM (Auto-Run supported). Select the Photo Explorer 8.0
button.
2. Select your local language and select Next to continue.
3. Follow the on-screen instructions to complete the installation.
After the installation is complete, the Photo Explorer 8.0
desktop.
icon will appear on your
On the task bar, the AutoDetector
your JetFlash and launch the Photo
JetFlash into your computer.
icon will appear in the system tray. This will detect
Explorer 8.0 automatically each time you plug your
- 10 -
Page 14

Enhance Image Quality
1. Double-click the Photo Explorer 8.0 icon on your desktop to execute Photo Explorer
8.0.
2. Select the picture(s) that you want to enhance the image quality.
3. From the Tools pull down menu, select Convert Image Files.... The Convert window will
appear.
- 11 -
Page 15

4. Select the Resample image size to: checkbox and select the pixels option. Refer to
following table and type in the suitable value to enhance the image quality.
Input
Value
640 0.3M pixels 640 x 480 pixels
1280 1.3M pixels 1280 x 960 pixels
1600 2M pixels 1600 x 1200 pixels
2048 3.3M pixels 2048 x 1536 pixels
2288 4.1M pixels 2288 x 1712 pixels
Image
Resolution
Image
Size
5. In the Destination section, select the option(s) you want to save your picture. Select OK to
enhance the image quality.
- 12 -
Page 16

Adjust Image
1. Double-click the Photo Explorer 8.0 icon on your desktop to execute Photo Explorer
8.0.
2. Select the picture that you want to adjust.
3. From the Photo pull down menu, select Adjust Image.... The Adjust Image window will
appear.
4. Select any the following tabs in the Adjust Image window to make your adjustments:
- 13 -
Page 17

• Rotate – Spins an image until the desired appearance
• Crop -- Cuts out undesired parts from an image
• Contrast -- Makes an image look lighter or darker
• Balance -- Adjusts the existing colors in an image to make it look more accurate or to
change the overall tone of the image
• Hue -- Shifts colors to come up with a different range of colors for the image and also
adjusts the intensity (or strength) of the colors
• Focus -- Makes an image look sharper or blurrier
• Histogram -- Lets you correct color imbalances by adjusting the Master channel or the
individual Red, Green, or Blue channel
• Tone -- Applies sepia, duotone, and monochrome effects to images
• Effects -- Applies artistic effects to images
• Lens Distortion -- Corrects the distortion in images
Learn More
To learn more about Photo Explorer’s functions, execute Photo Explorer 8.0 and select Ulead
Photo Explorer Help… from the Help pull down menu to get the necessary information.
- 14 -
Page 18

Safely Remove Your JetFlash
Remove JetFlash in Windows 98SE
Unplug JetFlash from your system directly when data is not transferring.
Remove JetFlash in Windows Me, 2000, and XP
1. Select the icon in the system tray.
2. The Safely Remove Hardware pop-up menu will appear. Select to continue.
3. The Safe To Remove Hardware message balloon will appear. You may now safely unplug
your JetFlash from your computer.
Remove JetFlash in Mac OS
Drag and drop the Disk icon corresponding to JetFlash into the trashcan. `Then unplug your
JetFlash from the USB port.
Remove JetFlash in Linux
Un-mount the device from Linux environment.
Example: umount /mnt/jetflash
- 15 -
Page 19

Troubleshooting
If an error occurs, first check the points listed below before taking your JetFlash for repair. If you
are unable to remedy a problem from the following hints, please consult your dealer or service
center.
How long will the Camera battery last?
With constant use, a fully charged camera battery will last approximately five (5) hours. Assuming
it is completely depleted, it takes approximately two (2) hours to fully charge the camera battery.
Driver CD cannot auto-run in Windows
Enter Device Manager in Control Panel and enable the Auto-Insert function of the CD-ROM
drive. Alternatively, you can execute the JetFlash.EXE in the driver CD manually.
Operating system cannot detect JetFlash
Check followings:
1. Is your JetFlash properly connected to the USB port? If not, unplug it and plug it in again.
2. Is your JetFlash connected to the Mac keyboard? If yes, unplug it and plug it into an available
USB port on your Mac Desktop instead.
3. Is the USB port enabled? If not, refer the user’s manual of your computer (or motherboard) to
enable it.
4. Is the necessary driver installed? If your computer is equipped with Windows 98SE, you must
insert the Driver CD into the CD-ROM and refer to the “Driver Installation for Windows 98SE”
section to complete the driver installation before using your JetFlash.
Cannot power on
The battery power is worn out. Refer to the “Charge Battery” section to recharge your JetFlash.
Cannot take pictur es
Check followings:
1. If the Memory LED is off, there isn’t sufficient storage space for taking pictures. To free the
storage space, you must transfer and store your pictures files onto your computer.
2. If the Pow er LED is off, the battery power is worn out. Refer to the “Charge Battery” section
to recharge your JetFlash.
3. If your JetFlash is connected to the USB port of your computer, you must unplug it.
Pictures are poor, blurred, or dark
Please note the following:
1. Keep your hand steady when pressing the shutter button.
- 16 -
Page 20

2. Avoid touching the lens and viewfinder with your fingers.
3. Avoid taking pictures in low lighting conditions.
Make use of Photo Explorer 8.0 to improve the image quality.
AutoDetector always pop-up
It is a default feature to allow you easily manage your pictures. To remove the AutoDetector
program, you must execute Photo Explorer 8.0 and select Preferences... from the File pull down
menu.
The Preferences window will appear. Select Browser in the directories and clear the check box
“Automatically detect digital camera or memory card”, and then select OK. The
AutoDetector program will be removed.
- 17 -
Page 21

- 18 -
Page 22

Specifications
• Host Interface: USB 1.1
• Dimension: 29 (W) x 80 (L) x 16 (H) mm
• Weight: 26g
• Sensor Resolution: 640 X 480 pixels (VGA)
• Optical Image Size: 1/4”
• Optical Lens: Fixed focus length
• Built-in Battery: Rechargeable lithium battery
• Power On Time: Under 3 seconds
• Shot to Shot Time: Under 2 seconds
• Certificates: CE, FCC, BSMI
Ordering Information
Memory Size Transcend P/N
128MB TS128MJF-DSC
256MB TS256MJF-DSC
- 19 -
Page 23

JetFlash Limited Warranty
“Above and beyond” is the standard we set ourselves for customer service at Transcend.
We consistently position ourselves to be significantly above the industry norm. It’s all part
of our commitment to Customer Satisfaction.
All Transcend Information, Inc. (Transcend) products are warranted and tested to be free from
defects in material and workmanship and to conform to the published specifications. Should your
Transcend JetFlash malfunction during normal use in its recommended environment due to
improper workmanship or materials within the warranty period, Transcend will repair or replace
your product with a comparable product. This warranty is subject to the conditions and limitations
set forth herein.
Duration of Warranty: Transcend JetFlash are covered by this warranty for a period of two (2)
years from the date of purchase. Transcend will inspect the product and make the determination as
to whether the product is eligible for repair or replacement. The decision by Transcend regarding
eligibility of the product for repair or replacement will be final and binding. Transcend reserves the
right to provide a functionally equivalent refurbished replacement product.
Limitations: This warranty does not apply to products that fail due to accident, abuse, mishandling,
improper installation, alteration, and acts of nature, improper usage, or problems with electrical
power. Transcend JetFlash must be used with devices that conform to the recommended industry
standards. Transcend will not be liable for damages resulting from a third party device that causes
the Transcend product to fail. Transcend shall in no event be liable for any consequential, indirect,
or incidental damages, lost profits, lost business investments, lost goodwill, or interference with
business relationships as a result of lost data. Transcend is also not responsible for damage or
failure of any third party equipment, even if Transcend has been advised of the possibility. This
limitation does not apply to the extent that it is illegal or unenforceable under applicable law.
Disclaimer: The foregoing limited warranty is exclusive, with no other warranties, implied or
statutory, including, but not limited to any implied warranty of merchantability or fitness for a
particular purpose. This warranty is not affected in any part by Transcend providing technical
support or advice.
Online Registration: To expedite warranty service, please register your Transcend Product within
30 days of purchase.
Register online at http://www.transcendusa.com/registration
Transcend Information, Inc.
The Transcend logo is a registered trademark of Transcend Information, Inc.
*All logos and marks are trademarks of their respective companies.
www.transcendusa.com
 Loading...