

Page 1
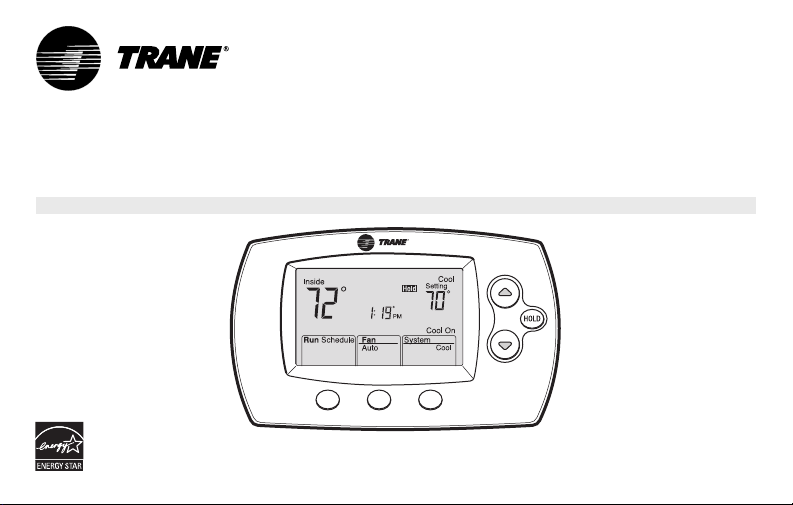
TCONT600AF11MA/TCONT602AF22MA
Programmable Comfort Control
OWNER’S GUIDE
Page 2
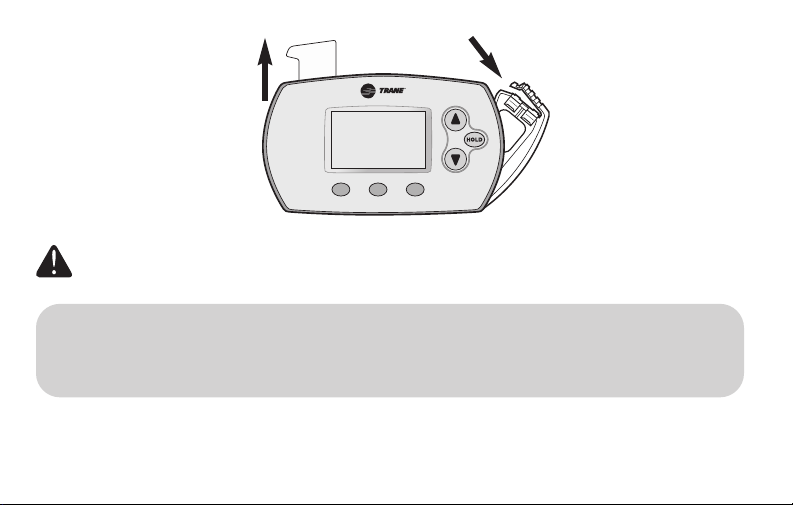
Quick Reference Card
Grasp and pull to see basic
operating instructions at a
glance.
CAUTION: EQUIPMENT DAMAGE HAZARD. To prevent possible compressor damage, do
not operate cooling system when outdoor temperature is below 50°F (10°C).
Battery Holder
Press down and pull to
remove batteries.
Batteries should be
replaced once a year
(see page 17).
Need Help?
For assistance with this product please visit www.trane.com
or call the Customer Assistance Helpline toll-free at 1-800-500-2041.
Read and save these instructions
Page 3
Table of contents
About your new Comfort Control
Control features ..............................2
Programming at a glance ................3
Quick reference to controls............4
Quick reference to display..............5
Programming & Operation
Set time and day..............................6
Select fan setting (auto/on) ............7
Select system setting (heat/cool)......8
Using program schedules................9
Program schedule overrides ........12
Auto-changeover (heat/cool) ........14
Compressor protection ................15
Adaptive Intelligent Recovery
™
....16
Appendices
Battery installation ........................17
In case of difficulty ......................18
Customer assistance......................20
Accessories/replacement parts ....20
Limited warranty ..........................21
This Comfort Control is ready to go!
Your new Comfort Control is preprogrammed and ready to go. See
page 3
1
to check settings.
CAUTION: EQUIPMENT DAMAGE
HAZARD.
compressor damage, do not operate
cooling system when outdoor
temperature is below 50°F (10°C).
To prevent possible
Page 4

About your new Comfort Control
Congratulations on the purchase of your new Comfort Control. It has been
designed to give you many years of reliable service and easy-to-use, push-button
climate control.
Features
• Separately programmable weekday/weekend schedules.
• One-touch temp control overrides program schedule at any time.
• Energy Star®compliant to greatly reduce your heating/cooling expenses.
• Large, clear, backlit display is easy to read — even in the dark.
• Displays both room temperature and temperature setting.
• Removable battery holder for fast, easy replacement.
• Built-in compressor protection.
2
Page 5

This Comfort Control is ready to go!
Your new Comfort Control is pre-programmed and ready to go.All you have to do
is set the time and day. Then check the settings below and change if needed:
1 Set time and day (required for proper operation)................................See page 6
2 Select fan setting (Auto/On): Preset to Auto ......................To change, see page 7
3 Select system setting (Heat/Cool): Preset to Heat..............To change,see page 8
4 Program schedules: Preset to energy-saving levels
while you’re at work or asleep (assumes you
wake at 6 am, leave at 8 am,return at 6 pm
and go to bed at 10 pm) ..............................................To change, see pages 9-11
ONE-TOUCH TEMPERATURE CONTROL: You can override the program schedule at any
time, and manually adjust the temperature (see pages 12-13).
3
Page 6
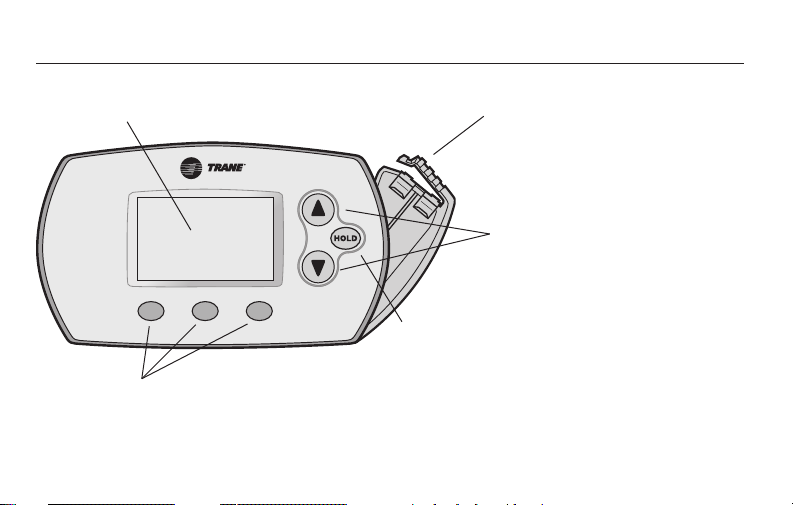
Quick reference to controls
Digital display (see page 5) Battery holder (see page 17)
Temperature buttons
Press to adjust temperature
settings (see page 11-13)
Hold button
Press to override programmed
temperature control (see page 13)
Function buttons
Press to select the function displayed just above each button.
(Functions change depending on the task.)
4
Page 7
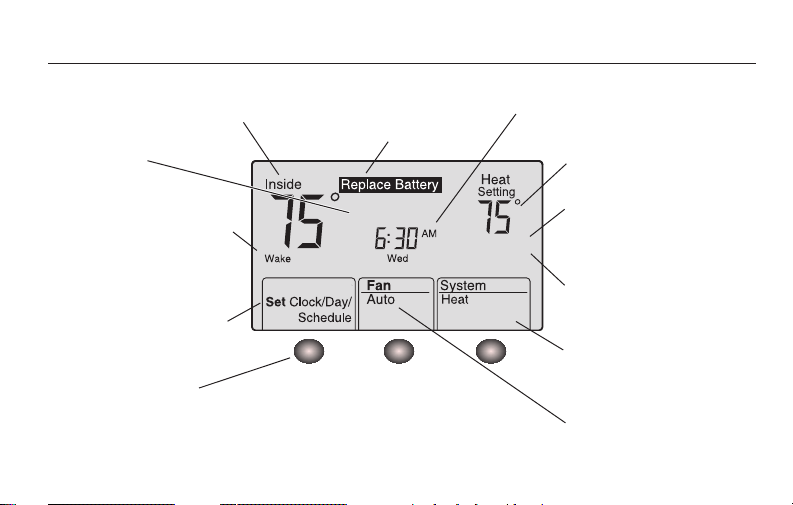
In Recovery
Auxillary
Heat On
Quick reference to display screen
Current inside temperature Low battery warning
In Recovery
(see page 16)
Current program period
Wake/Leave/Return/Sleep
(see pages 9-11)
Set Clock/Day/Schedule
(see pages 6 & 11)
Function buttons
Press the button beneath each function to view or change
settings (functions change depending on the task)
(see page 17)
5
Current time/day
(see page 6)
Temperature setting
(see pages 11-13)
Auxiliary heat
(Only for heat pumps with
auxiliary heat)
System status
Heat On/Cool On
(If flashing, see page 15)
System setting
Heat/Cool/Auto/Off/Em
Heat (see page 8)
Fan setting
Auto/On (see page 7)
Page 8
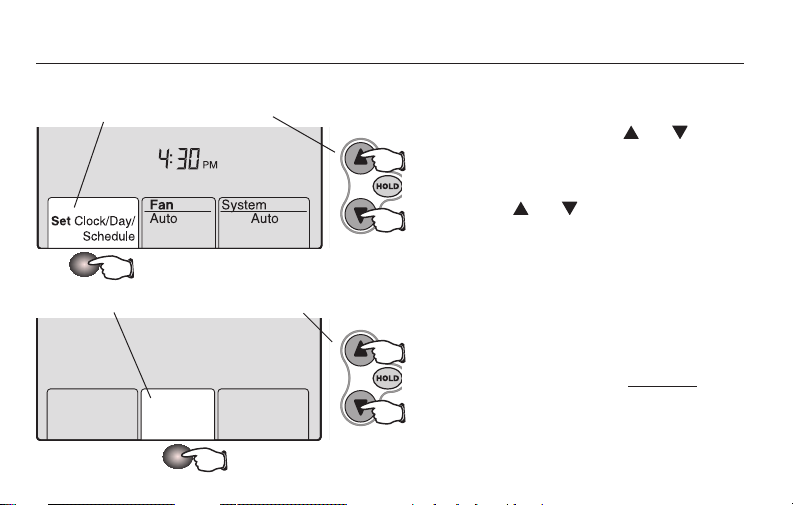
Wed
Done
Set ScheduleSet Day
Set the time and day
Press SET CLOCK/DAY/SCHEDULE, then adjust time
Press SET DAY, then select current day
1 Press the SET CLOCK/DAY/SCHEDULE
button, then press or to set
the clock time.
2 Press the SET DAY button, then
press or to select the day
of the week.
3 Press DONE to save & exit.
Note: If the SET CLOCK/DAY/SCHEDULE option
is not displayed, press DONE or
RUN SCHEDULE.
Note: If the display flashes Set Clock,
the Comfort Control will follow your settings
for the weekday “Wake” time period until
you reset the time and day.
6
Page 9

Heat
HeatOn
Select the fan setting
Press the FAN button to select Auto or On.
In “Auto” mode (the most commonly used
setting), the fan runs only when the
heating or cooling system is on. If set to
“On,” the fan runs continuously. Use this
setting for improved air circulation,or for
more efficient air cleaning.
7
Page 10

Select the system setting
Heat
Cool
Note: The Auto and Em Heat
system settings may not appear,
depending on how your
Comfort Control was installed.
Press the SYSTEM button to select:
• Heat: Controls only the heating system.
• Cool: Controls only the cooling system.
• Off: Heating and cooling systems are off.
• Auto: Automatically selects heating
or cooling depending on the indoor
temperature.
• Em Heat (only for heat pumps with
auxiliary heat): Controls Emergency Heat.
Compressor is locked out.
8
Page 11

Save money by setting program schedules
It’s easy to program your system for maximum energy savings.You can program four
time periods each day, with different settings for weekdays and weekends.
WAKE
8:00 am
LEAVE
8:00 am
RETURN
6:00 pm
SLEEP
10:00 pm
Set to the time you awaken and the temperature you want
during the morning, until you leave for the day.
Set to the time you lea
ve home and the temperature you
want while you are away (usually an energy-saving level).
Set to the time y
ou return home and the temperature you
want during the evening, until bedtime.
Set to the time you go to bed and the temperature you want
overnight (usually an energy-saving level).
9
Page 12

Energy Star®settings for maximum cost savings
(OR CANCEL PERIOD) (OR CANCEL PERIOD)
(OR CANCEL PERIOD) (OR CANCEL PERIOD)
This Comfort Control is pre-set to use Energy Star®program settings.We recommend these settings, since they can reduce your heating/cooling expenses by as
much as 33%. (See next page to adjust times and temperatures of each time period.)
Heat (Mon-Fri) Cool (Mon-Fri) Heat (Sat-Sun) Cool (Sat-Sun)
Wake
(6:00 am)
Leave
(8:00 am)
Return
(6:00 pm)
Sleep
(10:00 pm)
10
Page 13

Done Next
Heat
CancelPeriod
AM
Wed Thu FriTueMon
Leave
Set Schedule
To adjust program schedules
Cool
Done
Set ScheduleSet Day
1 Press SET CLOCK/DAY/SCHEDULE,then SET SCHEDULE.
2 Press or to set your weekday Wake
time (Mon-Fri), then press NEXT.
3 Press or to set the temperature for
this time period, then press NEXT.
4 Set time and temperature for the next
time period (Leave). Repeat steps 2 and 3
for each weekday time period.
5 Press NEXT to set weekend time periods
(Sat-Sun), then press DONE to save & exit.
Note: Make sure the Comfort Control is set to the
system you want to program (Heat or Cool).
Note: You can press CANCEL PERIOD to eliminate
unwanted time periods (except Wake).
11
Page 14

Program schedule override (temporary)
Temporary
Run Schedule
Press to temporarily adjust temperature
Press to cancel temporary setting
and resume program schedule
Note: Make sure the Comfort Control
is set to the system you want to control
(heat, cool or auto).
Press or to immediately adjust the
temperature.This will temporarily override
the temperature setting for the current
time period.
The new temperature will be maintained
only until the next programmed time period
begins (see page 10). For example, if you
want to turn up the heat early in the
morning, it will automatically be lowered
later, when you leave for the day.
To cancel the temporary setting at any time,
press RUN SCHEDULE.
12
Page 15

Program schedule override (permanent)
Hold
Run Schedule
Press to permanently adjust temperature
Press to cancel “Hold” setting
and resume program schedule
Note: Make sure the Comfort Control
is set to the system you want to control
(heat, cool or auto).
Press HOLD to permanently adjust the
temperature.This will override the
temperature settings for all time periods.
The “Hold” feature turns off the program
schedule and allows you to adjust the
Comfort Control manually, as needed.
Whatever temperature you set will be
maintained 24 hours a day, until you
manually change it,or press RUN SCHEDULE
to cancel “Hold” and resume the
programmed schedule.
13
Page 16

Auto Changeover (heat/cool)
Press until screen
displays “Auto”
Note: The Auto system setting
may not appear, depending
on how your Comfort Control
was installed.
Auto Changeover is a feature used in
climates where both air conditioning and
heating are used on the same day.When the
system is set to Auto, the Comfort Control
automatically selects heating or cooling
depending on the indoor temperature.
Heat and cool settings must be at least
3 degrees apart.The Comfort Control will
automatically adjust settings to maintain this
3-degree separation (called “deadband”).
The 3-degree separation between heating
and cooling set temperatures is fixed, and
cannot be changed.
14
Page 17

Set Clock/Day/
Schedule
Built-in compressor protection
This feature helps prevent damage to the
compressor in your air conditioning or
heat pump system.
Damage can occur if the compressor is
re-started too soon after shutdown.This
feature forces the compressor to wait for
a few minutes before restarting.
Message flashes until safe
restart time has elapsed
During the wait time, the display will flash
the message Cool On (or Heat On if you
have a heat pump).When the safe wait time
has elapsed, the message stops flashing and
the compressor turns on.
15
Page 18

Adaptive Intelligent Recovery™(AIR)
Adaptive Intelligent Recovery eliminates guesswork when setting your schedule. It
allows the Comfort Control to “learn” how long your furnace and air conditioner
take to reach the temperature you want.
Just set your program schedule to the time you want the house to reach your
desired temperature.The Comfort Control then turns on the heating or cooling at
just the right time to reach your scheduled temperature at your scheduled time.
For example:Set the Wake time to 6 am,and the temperature to 70°.The heat will
come on before 6 am,so the temperature is 70° by the time you wake at 6.
Note: When Adaptive Intelligent Recovery is in effect, the Comfort Control
will display “In Recovery.”
16
Page 19

Battery replacement
Press and pull to remove
Replace Battery
Insert fresh AA alkaline
batteries, then reinstall
battery holder
Batteries are optional (to provide backup
power) because your Comfort Control was
wired to run on AC power when installed.
Install fresh batteries immediately when the
REPLACE BATTERY warning begins flashing.The
warning flashes about two months before
the batteries are depleted.
Even if the warning does not appear, you
should replace batteries once a year, or before
leaving home for more than a month.
If batteries are inserted within two minutes,
the time and day will not have to be reset.
All other settings are permanently stored in
memory,and do not require battery power.
17
Page 20

In case of difficulty
If you have difficulty with your Comfort Control,please try the suggestions below.
Most problems can be corrected quickly and easily.
Display is blank • Check circuit breaker and reset if necessary.
• Make sure power switch at heating & cooling system is on.
• Make sure furnace door is closed securely.
Temperature
settings do not
change
Make sure heating and cooling temperatures are set to acceptable ranges:
• Heat: 40° to 90°F (4.5° to 32°C).
• Cool: 60° to 99°F (10° to 37°C).
To restore
Energy Star
default settings
®
Follow these steps to restore Energy Star default settings (see page 10):
1 Press SET CLOCK/DAY/SCHEDULE.
2 Press SET SCHEDULE.
3 Press DONE and NEXT at the same time for 4 seconds.
18
Page 21

In case of difficulty
Heating or
cooling system
does not respond
“Cool On” or
“Heat On” is
flashing
• Press SYSTEM button to set system to Heat. Make sure the temperature is
set higher than the Inside temperature.
• Press
• Check circuit breaker and reset if necessary.
• Make sure power switch at heating & cooling system is on.
• Make sure furnace door is closed securely.
• Wait 5 minutes for the system to respond.
• Compressor protection feature is engaged. Wait 5 minutes for the system to
SYSTEM button to set system to Cool. Make sure the temperature is
set lower than the Inside temperature.
restart safely, without damage to the compressor (see page 15).
19
Page 22

Customer assistance
Model number Date code
xxxxxxx xxxxxxx
For assistance with this product, call your
HVAC Contractor or visit www.trane.com.
Or call the Customer Assistance Helpline
toll-free at 1-800-500-2041.
To save time, please remove the battery
holder and note your model number and
date code before calling.
Accessories/replacement parts
Battery holder ..............................Part No.THT02506
Cover plate assembly ........Part No. BAYCOVR700A
(Use to cover marks left by old thermostats.)
20
Page 23

Limited 5-year warranty
Low Voltage Room Comfort Controls
This limited warranty is extended by Trane,to the original purchaser and to
any succeeding owner of the real property to which the Comfort Control is
originally affixed, and applies to products purchased and retained for use within
the U.S.A. and Canada.
If any part of your Comfort Control fails because of a manufacturing defect within
five years from the date of the original purchase,Warrantor will furnish without
charge a new Comfort Control.Any local transportation, related service labor and
diagnosis calls are not included.
21
Page 24

Limited 5-year warranty
THE LIMITED WARRANTY AND LIABILITY SET FORTH HEREIN ARE IN LIEU OF
ALL OTHER WARRANTIES AND LIABILITIES,WHETHER IN CONTRACT OR IN
NEGLIGENCE, EXPRESS OR IMPLIED, IN LAW OR IN FACT, INCLUDING IMPLIED
WARRANTIES OF MERCHANTABILITY AND FITNESS FOR PARTICULAR USE,
AND IN NO EVENT SHALL WARRANTOR BE LIABLE FOR ANY INCIDENTAL OR
CONSEQUENTIAL DAMAGES.
Some states do not allow limitations on how long an implied limited warranty
lasts or do not allow the exclusion or limitation of incidental or consequential
damages, so the above limitation or exclusion may not apply to you.This limited
warranty gives you specific legal rights, and you may also have other rights which
vary from state to state.
22
Page 25

Limited 5-year warranty
Parts will be provided by our factory organization through an authorized service
organization in your area listed in the yellow pages.If you wish further help or
information concerning this limited warranty, contact:
The Trane Company
Troup Highway
Tyler,TX 75711-9010
Attention: Manager,After Sales Support
GW-646-3704
23
Page 26

6200 Troup Highway
Tyler, TX 75711-9010
www.trane.com
® U.S. Registered Trademark • Patents Pending.
© 2005 American Standard All rights reserved
Pub. No. 00-0000-01 05/05
 Loading...