

Page 1
Installation, Operation, &
Maintenance
TM
IntelliPak
Commercial Self-Contained
Modular Series, 20-35 tons
“JO” and later design sequence
Models:
SCWG -020, -025, -030, -032, -035
SIWG -020, -025, -030, -032, -035
SCRG -020, -025, -030, -032
SIRG -020, -025, -030, -032
March 2008
SCXG-SVX01B-EN
Page 2

Introduction
About This Manual
Literature Change History
Use this manual for commercial selfcontained models SCWG, SIWG, SCRG,
and SIRG. This is the second or “B”
revision of this manual. It provides
specific installation, operation, and
maintenance, instructions for “JO” and
later design sequences. The “JO” design
sequence includes the addition of 407c
refrigerant option and VFD change from
Square D 58 to the Trane TR-1. Also, this
literature contains changes in the filter
sizes and quantities for some unit sizes.
For previous design sequences, contact
your local Trane representative.
Hazard Identification
Warnings and cautions appear at
appropriate sections throughout this
manual. Read these carefully.
WARNING
Indicates a potentially hazardous
situation, which could result in
death or serious injury if not
avoided.
CAUTION
Indicates a potentially hazardous
situation, which may result in
minor or moderate injury if not
avoided. Also, it may alert against
unsafe practices.
NOTICE
Indicates a situation that may result in
equipment or property-damage-only
accidents.
WARNING
Grounding Required!
Follow proper local and state electrical
code on requirements for grounding.
Failure to follow code could result in
death or serious injury.
Sample Warnings and Cautions
WARNING
Hazardous Voltage w/Capacitors!
Disconnect all electric power, including
remote disconnects before servicing.
Follow proper lockout/tagout procedures to ensure the power cannot be
inadvertently energized. For variable
frequency drives or other energy storing
components provided by Trane or others,
refer to the appropriate manufacturer’s
literature for allowable waiting periods
for discharge of capacitors. Verify with an
appropriate voltmeter that all capacitors
have discharged. Failure to disconnect
power and discharge capacitors before
servicing could result in death or serious
injury.
Note: For additional information regarding the safe discharge of capacitors, see
PROD-SVB06A-EN or PROD-SVB06A-FR.
NOTICE
Use Copper Conductors Only!
Unit terminals are not designed to
accept other type conductors. Failure to
use copper conductors may result in
equipment damage.
Common HVAC Acronyms
For convenience, a number of acronyms
and abbreviations are used throughout
this manual. These acronyms are
alphabetically listed and defined below.
BAS = Building automation systems
CFM = Cubic-feet-per-minute
CKT. = Circuit
CV = Constant volume
CW = Clockwise
CCW = Counterclockwise
E/A = Exhaust air
ECEM = Exhaust/comparative enthalpy
module
F/A = Fresh air
GBAS = Generic building automation
system
HGBP = Hot gas bypass
HI = Human Interface
HVAC = Heating, ventilation and air
conditioning
IGV = Inlet guide vanes
I/O = Inputs/outputs
IOD= Installation/owner/
diagnosticmanual
IPC = Interprocessor communications
IPCB = Interprocessor communications
bridge
LH = Left-hand
MCM = Multiple compressor module
MWU = Morning warmup
NSB = Night setback
O/A = Outside air
psig = Pounds-per-square-inch, gauge
pressure
R/A = Return air
RH = Right-hand
RPM = Revolutions-per-minute
RTM = Rooftop module
S/A = Supply air
SCM = Single circuit module
SZ = Single-zone (unit airflow)
LCI-I communications module
UCM = Unit control modules
VAV = Variable air volume
VCM = Ventilation control module
VOM = Ventilation override module
w.c. = Water column
WSM = Waterside module
ZSM = Zone sensor module
Special Note on Refrigeration
Emissions
World environmental scientists have
concluded that ozone in our upper
atmosphere is being reduced due to the
release of CFC fully halogenated
compounds.
Trane urges all HVAC service personnel
to make every effort to prevent any
refrigerant emissions while installing,
operating, or servicing equipment.
Always conserve refrigerants for
continued use.
© 2008 Trane All rights reserved SCXG-SVX01B-EN
Page 3

Contents
Cross reference to related publications/information:
• Product Catalog, PKG-PRC003-EN, Modular Series Commercial Self-Contained
• IntelliPak• Self-Contained Programming Guide, PKG-SVP01B-EN
• Remote Air-Cool-Condenser Installation, Owner, and Diagnostic Manual, CXRCSVX01B-EN
Installation …………………………........…....…6
general information …………………………………………6
pre-installation considerations… …………………………11
dimensions & weights ………………………………...…19
mechanical specifications …………………………………30
electrical requirements ……………………………………33
pre-startup requirements …………………………………35
programming ………………………………….……………57
startup …………………………………………………….…67
Operation ………………………………………70
general information ………………………………………70
sequence of operation ………………………………….…84
Maintenance ……………………………………91
maintenance procedures ………………………………92
troubleshooting ………………………………………..…105
diagnostics ………………………………………………..106
SCXG-SVX01B-EN 3
Page 4

Features and
Benefits
Refrigerant Handling
Procedures
Environmental Accountability Policy
Trane urges that all HVAC servicers to
make every effort to eliminate, if possible,
or vigorously reduce the emission of CFC,
HCFC, and HFC refrigerants to the
atmosphere. Always act in a responsible
manner to conserve refrigerants for
continued usage even when acceptable
alternatives are available.
Recover and Recycle Refrigerants
Never release refrigerant to the
atmosphere! Always recover and/or
recycle refrigerant for reuse,
reprocessing (reclaimed), or properly
dispose if removing from equipment.
Always determine the recycle or reclaim
requirements of the refrigerant before
beginning the recovery procedure.
Obtain a chemical analysis of the
refrigerant if necessary. Questions about
recovered refrigerant and acceptable
refrigerant quality standards are
addressed in ARI Standard 700.
Refrigerant Handling and Safety
Consult the manufacturer’s material
safety data sheet (MSDS) for information
on refrigerant handling to fully
understand health, safety, storage,
handling, and disposal requirements. Use
the approved containment vessels and
refer to appropriate safety standards.
Comply with all applicable transportation
standards when shipping refrigerant
containers.
Service Equipment and Procedures
To minimize refrigerant emissions while
recovering refrigerant, use the
manufacturer’s recommended recycling
equipment per the MSDS. Use
equipment and methods which will pull
the lowest possible system vacuum while
recovering and condensing refrigerant.
Equipment capable of pulling a vacuum of
less than 1,000 microns of mercury is
recommended.
Do not open the unit to the atmosphere
for service work until refrigerant is fully
removed/recovered. When leak-testing
with trace refrigerant and nitrogen, use
HCFC-22 (R-22) rather than CFC-12 (R-
12) or any other fully-halogenated
refrigerant . Be aware of any new leak
test methods which may eliminate
refrigerants as a trace gas. Perform
evacuation prior to charging with a
vacuum pump capable of pulling a
vacuum of 1,000 microns of mercury or
less. Let the unit stand for 12 hours and
with the vacuum not rising above 2,500
microns of mercury.
A rise above 2,500 microns of mercury
indicates a leak test is required to locate
and repair any leaks. A leak test is
required on any repaired area.
Charge refrigerant into the equipment
only after equipment does not leak or
contain moisture. Reference proper
refrigerant charge requirements in the
maintenance section of this manual to
ensure efficient machine operation.
When charging is complete, purge or
drain charging lines into an approved
refrigerant container. Seal all used
refrigerant containers with approved
closure devices to prevent unused
refrigerant from escaping to the atmosphere. Take extra care to properly
maintain all service equipment directly
supporting refrigerant service work such
as gauges, hoses, vacuum pumps, and
recycling equipment .
When cleaning system components or
parts, avoid using CFC-11 (R-11) or CFC113 (R-113). Use only cleaning-solvents
that do not have ozone depletion factors.
Properly dispose of used materials.
Refrigeration system cleanup methods
using filters and driers are preferred.
Keep abreast of unit enhancements,
conversion refrigerants, compatible
parts, and manufacturer’s recommendations that will reduce refrigerant emissions and increase equipment operating
efficiencies.
4 SCXG-SVX01B-EN
Page 5
Features and
Benefits
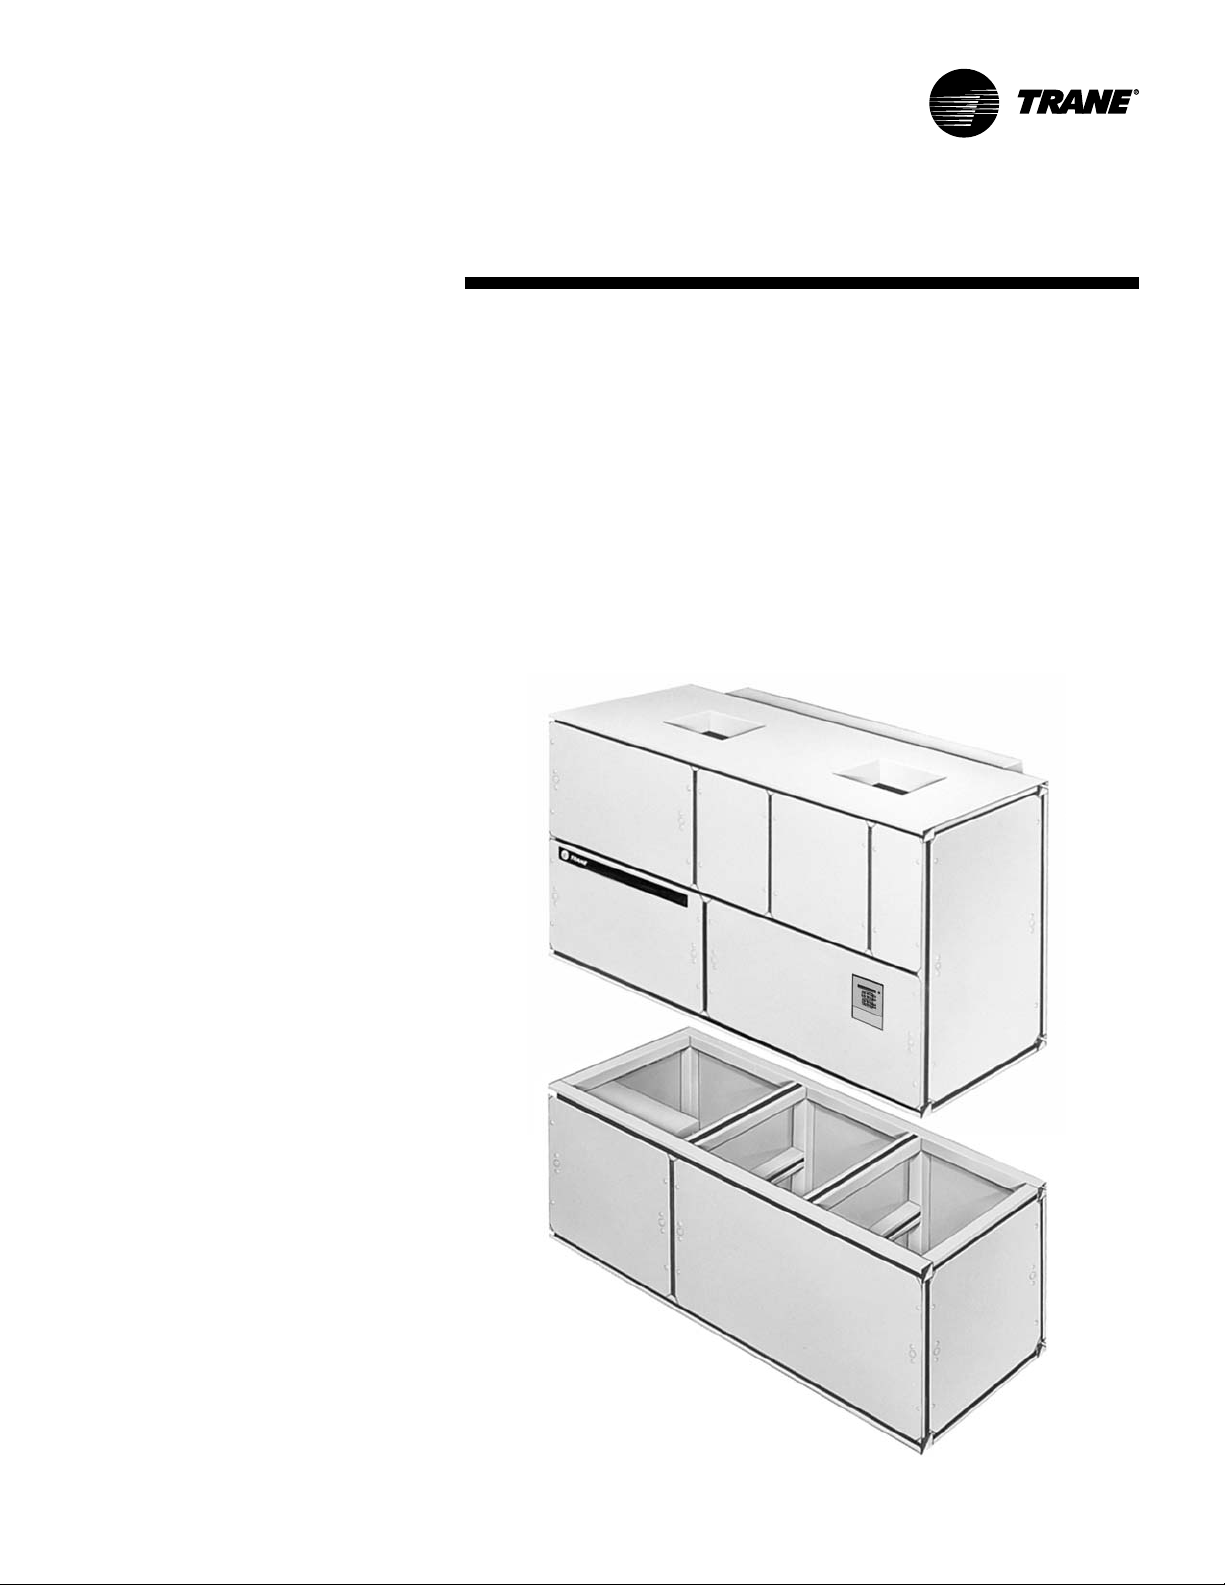
Modular Series Self-Contained
Unit Components
Commercial self contained units are
complete HVAC systems used in floor-byfloor applications. Units are easy to install
because they feature a single point
power connection, factory installed and
tested controls, single water point
connection, factory installed options, and
an internally trapped drain connection.
Modular self-contained units can ship as
split-apart units for installation ease. Splitapart units ship with a dry nitrogen
charge and require field refrigerant
charging.
Units consist of multiple compressors,
water-cooled condensers (water-cooled
units only), an evaporator coil, dual
forward curved fans, and control panel.
Air-cooled units require a remote aircooled condenser, model CXRC. The
hermetically sealed 3-D scroll
compressor motors utilize internal motor
protection and time delays to prevent
excessive cycling. Unit controls are either
an electromechanical thermostat or
microprocessor controls on the IntelliPak
unit. See Figure I-GI-1 for a typical unit.
The hermetically sealed 3-D scroll
compressor motors utilize internal motor
protection and time delays to prevent
excessive cycling.
The water-cooled condensers are shell
and tube type with an internal subcooler.
Condensers are available as mechanically or chemically cleanable. The
evaporator fan is double width, double
inlet and forward curved with a fixed
pitch belt drive assembly. Frequency
drives or inlet guide vanes are optional.
Motor options include open drip proof,
high efficiency, TEFC, or mill and chem
spec.
All water-cooled units ship with a full
refrigerant and oil charge. Air-cooled
units ship with oil and a dry nitrogen
holding charge and require field-piping
refrigerant connections to the air cooled
condensing unit. Also, air-cooled units
have two refrigerant circuits. Watercooled units have four refrigerant circuits;
which include a filter drier, pressure relief
valve, liquid line service valve, sight glass/
moisture indicator, thermal expansion
valve with a sensing bulb and external
equalizing line, discharge line shrader
valve, a suction line shrader valve, and
high and low pressure cutout switches.
Water-cooled units also include a liquid
line service valve for each circuit.
For more detailed information, see the
Owner’s section of this manual.
Figure I-GI-1. IntelliPak® commercial self-contained Modular Series unit.
SCXG-SVX01B-EN 5
Page 6

general
Installation
Control Options
Units may be ordered with either
conventional thermostat interface or
IntelliPak
IntelliPak
Interface (HI) panel with two line by forty
(40) character clear English display for
easy operator interface to unit setup and
control parameters. All basic setup
parameters are preset from the factory.
Human Interface Panel
The HI is unit mounted and accessible
without opening the unit’s front panel. It
allows easy setpoint adjustment using
the HI keypad. In addition, the HI displays
all unit operating parameters and
conditions in a clear language display,
which can be configured for either
English, French, or Spanish.
The optional remote human interface
(RHI) will control up to four self-contained
units, each containing an interprocessor
communications bridge (IPCB). It has all
the same features as the unit-mounted HI
except for the service mode.
For more information on setpoint defaults
and ranges and unit programming, see
the
ming Guide, PKG-SVP01B-EN
ships with each unit.
IntelliPak
IntelliPakTM DDC Control provides “smart”
unit control with safety features and
control relays for pumps, dampers, etc.
The Modular Series IntelliPak selfcontained unit is controlled by a
microelectronic control system that
consists of a network of modules. These
modules are referred to as unit control
modules (UCM). In this manual, the
acronym UCM refers to the entire control
TM
Direct Digital Control (DDC).
TM
controls include a Human
IntelliPak Self-Contained Program-
TM
DDC Control
. A copy
information
system network.
These modules perform specific unit
functions using proportional/integral
control algorithms. They are mounted in
the unit control panel and are factory
wired to their respective internal components. Each module receives and
interprets information from other unit
modules, sensors, remote panels, and
customer binary contacts to satisfy the
applicable request; i.e., economizing,
mechanical cooling, heating, ventilation.
See the Operation section of this manual
for a detailed description of each
module’s function.
Optional Controls
Optional controls include a disconnect
switch, dirty filter switch, water flow
switch (water-cooled only), supply air
temperature reset, or external setpoint
inputs. Daytime heating is available on
units with electric, steam, or hot water
heat control options. Morning warmup
operation is available on all units.
The static pressure probe, zone night
heat/morning warmup, supply air
temperature reset sensor options ship
separate inside the unit control panel for
field installation. For more detailed
information on the unit control options,
see the Owner’s section of this manual.
Unit Nameplate
The unit nameplate identifies the unit
model number, appropriate service
literature, and wiring diagram numbers. It
is mounted on the left end of the unit
control panel.
6 SCXG-SVX01B-EN
Page 7
Model
Number
Description
SCWG
Model Number Description
Each IntelliPak self-contained unit has a multiple character model number unique to that unit. To determine a unit’s specific options,
reference the model number on the unit nameplate using the model number explanation below.
S C W G N 20 4 2 JO A B 2 10 085 B A 1 0 1 0 A A C F A 1 1 0 T 2 0
1 2 3 4 5 67 8 9 10 11 12 13 14 15 16 17 18 19 20 21 22 23 24 25 26 27 28 29 30 31 32 33 34 35 36
Digit 1 - Unit Model
S = Self Contained
Digit 2 - Unit Type
C = Commercial
I = Industrial
Digit 3 - Condenser Medium
W = Water-Cooled
R = Remote Air-Cooled
Digit 4 - Development Sequence
G = Modular Series
Digit 5 - Refrigerant Circuit Configuration
N = Independent, R-22 Refrigerant
R = Independent, 407C Refigerant
Digit 6, 7 - Unit Nominal Capacity
2 0 = 20 Tons (Water or Air Cooled)
2 5 = 25 Tons (Water or Air Cooled)
30 = 30 Tons (Water Cooled Only)
32 = 32 Tons (Air Cooled Only)
35 = 35 Tons (Water Cooled Only)
Digit 8 - Unit Voltage
6 = 200 Volt/60 Hz/3 ph
4 = 460 Volt/60 Hz/3 ph
5 = 575 Volt/60 Hz/3 ph
Digit 9 - Air Volume/Temp Control
1 = I-Pak & IGV and Supply Air Temp
Ctrl
2 = I-Pak & VFD and Supply Air
Temp Ctrl
3 = I-Pak & VFD w/ Bypass and
Supply Air Temp Ctrl
4 = I-Pak w/o Vol. CTRL, w/ Zone Temp
Cool
5 = I-Pak w/o Vol. CTRL, w/ Zone Temp
Heat/Cool
6 = I-Pak w/o Vol. CTRL, w/ Supply Air
Temp Ctrl
8 = Thermostat Interface
Digit 10, 11 - Design Sequence
JO= “J” Design
Digit 12 - Unit Construction
A = Vertical Discharge
B = Vertical Discharge with Double Wall
C = Horizontal Discharge
D = Horizontal Discharge w/ Double
Wall
E = Vertical Discharge, Ship Separate
F = Vertical Discharge w/ Double Wall,
Ship Separate
G = Horizontal Discharge, Ship Separate
H = Horizontal Discharge w/ Double
Wall, Ship Separate
Digit 13 - Plenum Type
B = Std Plenum w/ Factory Cut Holes
C = Low Plenum w/ Factory Cut Holes
E = Std Plenum w/ Field Cut Holes
F = Low Plenum w/ Field Cut Holes
H = Std Plenum Double Wall (Perf)
w/ Field Cut Holes
J = Low Plenum Double Wall (Perf)
w/ Field Cut Holes
L = Std. Plenum w/Factory Cut Holes,
Ship Separate
M = Low Plenum with Factory Cut
Holes, Ship Separate
P = Std Plenum w/ Field Cut Holes, Ship
Separate
R = Low Plenum w/ Field Cut Holes,
Ship Separate
U = Std Plenum Double Wall (Perf) w/
Field Cut Holes, Ship Separate
V = Low Plenum Double Wall (Perf) w/
Field Cut Holes, Ship Separate
0 = Without Plenum
Digit 14 - Motor Type
1 = Std. Efficiency ODP
2 = Premium Eff. ODP
3 = Std. Efficiency Totally Enclosed
Digit 15, 16 - Motor HP
05 = 5 HP Motor
07 = 7.5 HP Motor
10 = 10 HP Motor
15 = 15 HP Motor
20 = 20 HP Motor
25 = 25 HP Motor
Digit 17, 18, 19 - Fan RPM
085 = 850 rpm
090 = 900 rpm
095 = 950 rpm
100 = 1000 rpm
105 = 1050 rpm
110 = 1100 rpm
115 = 1150 rpm
120 = 1200 rpm
125 = 1250 rpm
130 = 1300 rpm
135 = 1350 rpm
140 = 1400 rpm
145 = 1450 rpm
150 = 1500 rpm
155 = 1550 rpm
160 = 1600 rpm
165 = 1650 rpm
170 = 1700 rpm
175 = 1750 rpm
180 = 1800 rpm
185 = 1850 rpm
Digit 20 - Heating Type
A = Steam Coil, LH
B = Hot Water Coil, LH
C = Electric Heat, 1 Stage
F = Hydronic Heat Ctrl Interface
G = Elec. Heat Ctrl Interface, 1 stage
K = Steam Coil Ship Separate, LH
L = Hot Water Coil Ship Separate, LH
M = Steam Coil, RH
N = Hot Water Coil, RH
P = Steam Coil Ship Separate, RH
R = Hot Water Coil Ship Separate, RH
T = Hi-cap. hot water coil, LH
U = Hi-cap, hot water coil LH,
Ship Seperate
V = Hi-cap. hot water coil, RH
W = Hi-cap. hot water coil, RH,
Ship Seperate
0 = None
Digit 21 - Unit Isolators
A = Isopads
B = Spring Isolators
0 = None
SCXG-SVX01B-EN 7
Page 8

Model
Number
Digit 22 - Unit Finish
1 = Paint - Executive Beige
2 = Protective Coating
3 = Protective Coating w/ Finish Coat
Digit 23
0 = None
Digit 24 - Unit Connection
1 = Disconnect Switch
2 = Terminal Block
3 = Dual Point Power
Digit 25 - Industrial Options
A = Protective Coated Evaporator Coil
B = Silver Solder
C = Stainless Steel Screws
D = A and B
E = A and C
F = B and C
G = A, B and C
0 = None
Digit 26 - Drain Pan Type
A = Galvanized Sloped
B = Stainless Steel Sloped
Digit 27 - Waterside Economizer
A = Mechanical Clean Full Cap. (4-row)
B = Mechanical Clean Low Cap. (2-row)
C = Chemical Clean Full Cap. (4-row)
D = Chemical Clean Low Cap. (2-row)
E = Mechanical Clean Full Capacity
(4-row) Ship Separate
F = Mechanical Clean Low Capacity
(2-row) Ship Separate
G = Chemical Clean Full Capacity
(4-row) Ship Separate
H = Chemical Clean Low Capacity
(2-row) Ship Separate
0 = None
Description
Digit 28 - Ventilation Control
B = Airside Econ w/ Traq
(Top O/A Inlet)
C = Airside Econ w/ Standard
Dampers (Top O/A Inlet)
E = Airside Econ w/ Traq
Comparative Enthalpy
(Top O/A Inlet)
F = Airside Econ w/ Std Dampers and
Comparative Enthalpy (Top O/A
Inlet)
G = Traq Damper Ventilation Interface
H = Ventilation For 2 Pos. Cntrl Interface
0 = None
Digit 29 - Water Piping
A = Right Hand Condenser Connection
B = Left Hand Condenser Connection
C = Right Hand Basic Piping
D = Left Hand Basic Piping
E = Right Hand Intermediate Piping
F = Left Hand Intermediate Piping
J = Right Hand Basic w/ Flow Switch
K = Left Hand Basic w/ Flow Switch
L = Right Hand Intermediate
w/ Flow Switch
M = Left Hand Intermediate
w/ Flow Switch
0 = None
Digit 30 - Condenser Tube Type
A = Standard Condenser Tubes
B = 90/10 CuNi Condenser Tubes
0 = None
Digit 31 - Compressor Service Valves
1 = With Service Valves
0 = None
™
Damper
™
Damper and
SCWG
Digit 32 - Miscellaneous System Control
1 = Timeclock
2 = Interface for Remote HI
3 = Dirty Filter Switch
4 = 1 and 2
5 = 1 and 3
6 = 2 and 3
7 = 1, 2, and 3
0 = None
Digit 33 - Control Interface Options
A = Generic BAS Module (GBAS)
B = Ventilation Override Module (VOM)
D = Remote Human Interface (RHI)
G = GBAS and VOM
H = GBAS and RHI
J = VOM and RHI
M = GBAS, VOM, and RHI
0 = None
1 = Tracer/LCI-I (COMM5) interface
module
2 = Tracer/LCI-I and GBAS
3 = Tracer/LCI-I and VOM
4 = Tracer/LCI-I and RHI
5 = Tracer/LCI-I, GBAS and VOM
6 = Tracer/LCI-I, GBAS and RHI
7 = Tracer/LCI-I, VOM and RHI
8 = Tracer/LCI-I, GBAS, VOM and RHI
Digit 34 - Agency
T = UL Agency Listing
0 = None
Digit 35 - Filter Type
1 = 2-inch Construction Throwaway
2 = 2-inch Med Eff. Throwaway
Digit 36 - Miscellaneous Control Option
A = Low Entering Air Temp. Protect
Device (LEATPD)
B = High Duct Temp T-Stat
C = Plenum High Static Switch
D = Kit for Heat Mode Output (w/t’stat)
E = A and B
F = A and C
G = B and C
H = A, B, and C
0 = None
8 SCXG-SVX01B-EN
Page 9

Model
Number
Description PSWG
Self-Contained Ship-With Accessory Model Number Description
P S W G S A 1 1 0 JO
1 2 3 4 5 6 7 8 9 10 11
Digit 1 - Parts/Accessories
P = Parts/Accessories
Digit 2 - Unit Model
S= Self-Contained
Digit 3 - Shipment
W = With Unit
Digit 4 - Development Sequence
F = Signature Series
G = Modular Series
Digit 5 - Sensors and Other Accessories
S = Sensors
Digit 6 - Sensors and Thermostats (field
installed)
A = BAYSENS077 - Zone Temp Only (C V
and VAV)
B = BAYSENS073 - Zone Temp with
Timed Override Button (CV and VAV)
C = BAYSENS074 - Zone Temp with
Timed Override Button, Setpoint Dial
(CV and VAV)
D = BAYSENS023 - Remote Min. Position
Potentiometer Control (OA Damper)
E = BAYSENS108 - CV Zone Sensor-dual
setpoint, man/auto changeover
F = BAYSENS110 - CV Zone Sensor-dual
setpoint, man/auto changeover w,
indicator lights
G = BAYSENS019 - CV Programmable
Night Setback Sensor
H = BAYSENS021 - VAV Zone Sensor with
Indicator Lights
J = BAYSENS020 - VAV Programmable
Night Setback Sensor
K = Remote Sensor Kit
L = Outside Air Temperature Sensor Kit
M = Outside Air Humidity Sensor Kit
N = BAYSTAT010 - 2 Heat/2 Cool
Thermostat
P = BAYSTAT037A - 2 Heat/2 Cool
Programmable Thermostat
0 = None
Digit 7 - Mixed Air Temperature Protection Kit (field installed)
1 = Mixed Air Temperature Protection Kit
0 = None
Digit 8 - Carbon Dioxide Sensor (field
installed)
1 = Carbon Dioxide Sensor Kit
0 = None
Digit 9 - Future Option
0 = None
Digit 10, 11 - Design Sequence
J0 = J Design
SCXG-SVX01B-EN 9
Page 10
Model
Number
Description
PSWG
“After-Shipment” Accessory Model Number
P S A G W N 20 4 ** 1 10 0 0 0 1 0 1 0 1 0 1 0 0 1 1 0 0 0 0 0 L 1 0 0 7 0 0
1 2 3 4 5 6 7 8 9 10 11 12 13 14 15 16 17 18 19 20 21 22 23 24 25 26 27 28 29 30 31 32 33 34 35 36 37 38 39 40
0 0 0 0 0
41 42 43 44 45
Digit 1 - Parts/Accessories
P = Parts/Accessories
Digit 2 - Unit Model
S= Self-Contained
Digit 3 - Shipment
A = After Unit
Digit 4 - Development Sequence
F = Signature Series
G = Modular Series
Digit 5 - Condenser Medium
W = Water Cooled
R = remote Air Cooled
Digit 6 - Refrigerant Circuit Configuration
N = Independent (Water-Cooled)
M = Manifolded (Air-Cooled)
Digits 7, 8 - Unit Nominal Capacity
20 = 20 Tons (Water or Air)
22 = 22 Tons (Water Only)
25 = 25 Tons (Water or Air)
29 = 29 Tons (Water or Air)
30 = 30 Tons (Air Only)
32 = 32 Tons (Water Only)
35 = 35 Tons (Water or Air)
38 = 38 Tons (Water Only)
40 = 40 Tons (Air Only)
42 = 42 Tons (Water Only)
46 = 46 Tons (Water Only)
50 = 50 Tons (Air Only)
52 = 52 Tons (Water Only)
58 = 58 Tons (Water Only)
60 = 60 Tons (Air Only)
65 = 65 Tons (Water Only)
72 = 72 Tons (Water Only)
80 = 80 Tons (Water Only)
Digit 9 - Unit Voltage
6 = 200 Volt/60 Hz/3 ph
4 = 460 Volt/60 Hz/3 ph
5 = 575 Volt/60 Hz/3 ph
0 = Not Defined
Digits 10, 11 - Design Sequence
** = Factory Assigned
Digit 12 - Unit Power Connection
1 = Single Point Power
2 = Dual Point Power
0 = Not Defined
Digit 13, 14 - Motor HP
05 = 5 HP Motor
07 = 7.5 HP Motor
10 = 10 HP Motor
15 = 15 HP Motor
20 = 20 HP Motor
25 = 25 HP Motor
30 = 30 HP Motor
40 = 40 HP Motor
50 = 50 HP Motor (460V & 575V Only)
0 = Not Defined
Digit 15 - Exhaust/Comparative Enthalpy
Module (Field Installed)
1 = ECEM Kit
0 = None
Digit 16 - Generic BAS Module
1 = GBAS 0-5 VDC Kit
0 = None
Digit 17 - Heat Module
1 = Electric Heat Module Kit
2 = Hydronic Heat Module Kit
0 = None
Digit 18 - Remote Human Interface and
IPCB
1 = Remote Human Interface Panel Kit
(RHI Only)
2 = Interprocessor Communications
Module Kit (IPCB Only)
3 = RHI and IPCB Kit
0 = None
Digit 19 - LonTalk Communications
Interface Kit (LCI)
2 = Tracer/LCI-I Comm Interface Kit
0 = None
Digit 20 - Ventilation Override Module Kit
(VOM)
1 = VOM Kit
0 = None
Digit 21 - Sensors and Thermostats
A = BAYSENS077 - Zone Temp Only (CV
and VAV)
B = BAYSENS073 - Zone Temp with
Timed Override Button (CV and VAV)
C = BAYSENS074 - Zone Temp with
Timed Override Button, Setpoint Dial
(CV and VAV)
E = BAYSENS108 - CV Zone Sensor-dual
setpoint, man/auto changeover
F = BAYSENS110 - CV Zone Sensor-dual
setpoint, man/auto changeover w,
indicator lights
G = BAYSENS019 - CV Programmable
Night Setback Sensor
H = BAYSENS021 - VAV Zone Sensor
with Indicator Lights
J = BAYSENS020 - VAV Programmable
Night Setback Sensor
K = Remote Sensor Kit
L = Outside Air Temperature Sensor Kit
M = Outside Air Humidity Sensor Kit
0 = None
Digit 22 - Low Entering Air Temperature
Protection Device
1 = Low Entering Air Temperature
Protection Device Kit
0 = None
Digit 23 - High Duct Temperature
Thermostat
1 = High Duct Temp. Thermostat Kit
0 = None
Digit 24 - Plenum High Static Switch
1 = Plenum High Static Switch Kit
0 = None
Digits 25 — 45 - Future Use
0 = None
10 SCXG-SVX01B-EN
Page 11
pre-installation
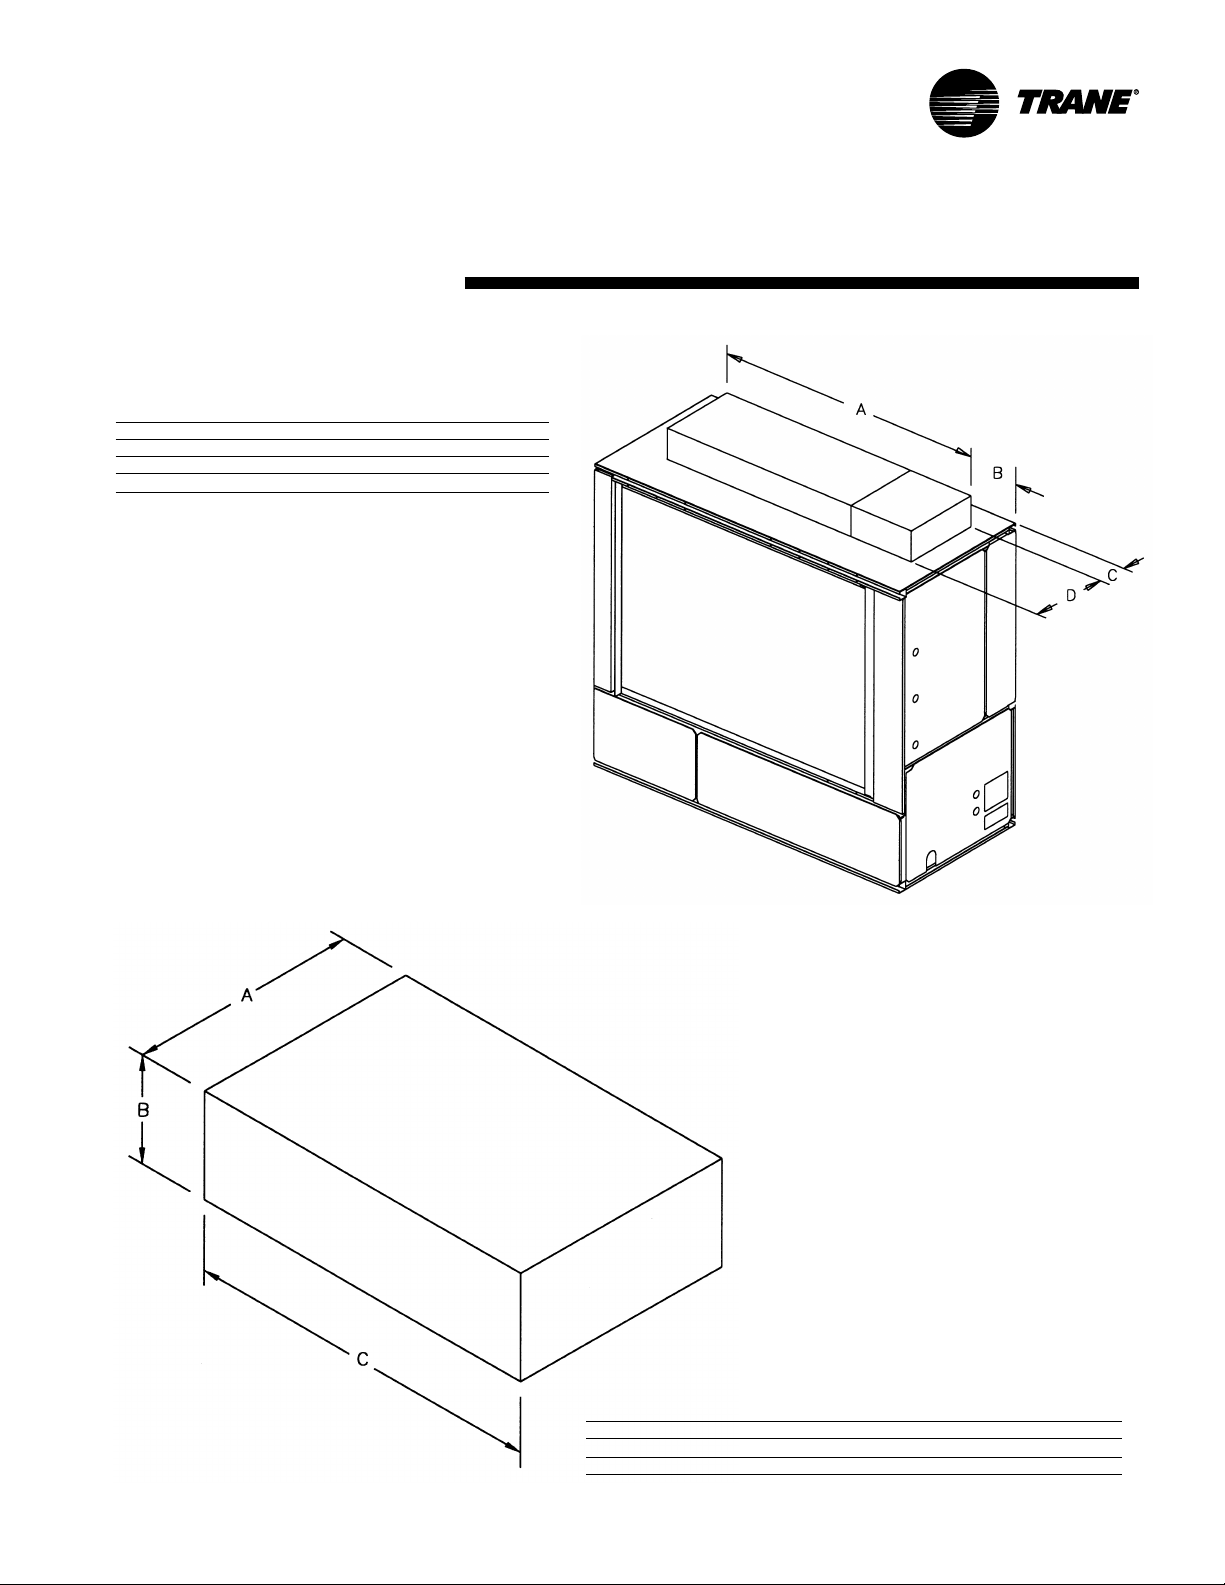
Receiving and Handling
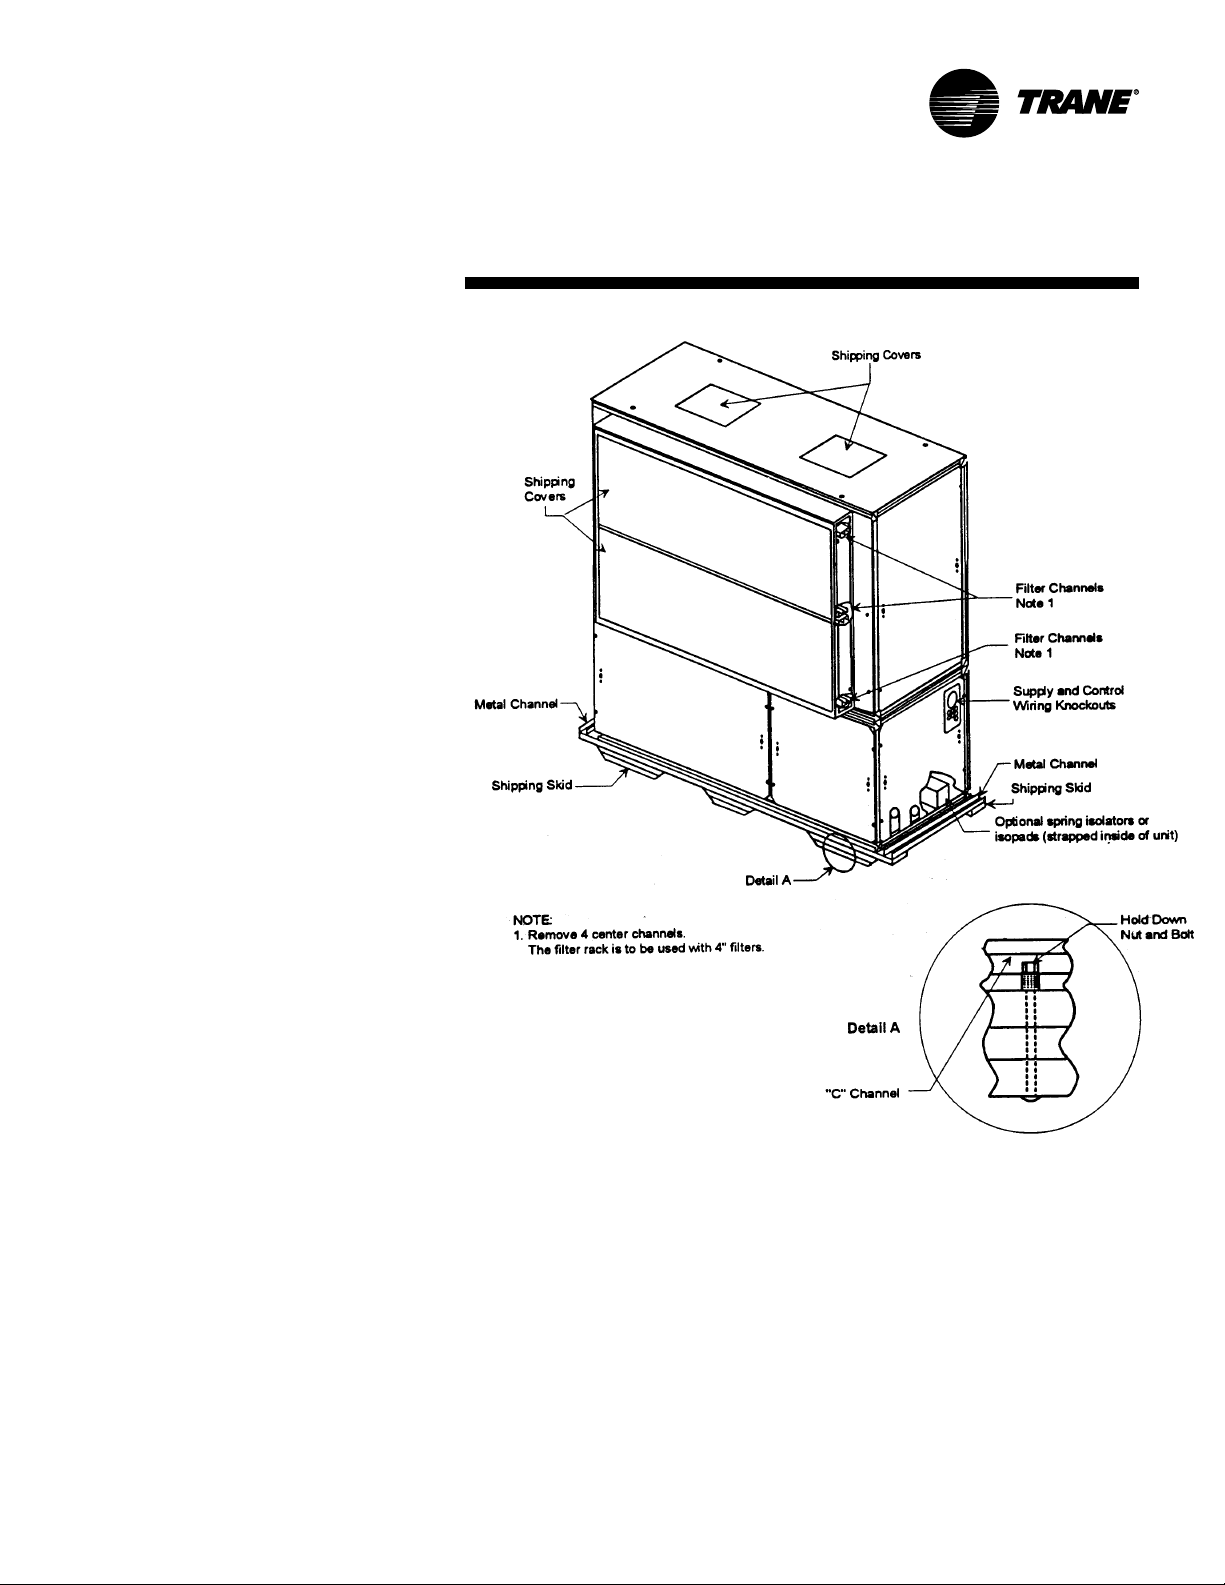
Shipping Package
Commercial self-contained units ship
assembled with protective coverings
over the coil and discharge openings.
Figure I-PC-1 illustrates a typical shipping
package.
Ship-Separate Accessories
Field-installed sensors ship separately
inside the unit’s main control panel. Extra
filters, sheaves, and belts ship in the unit’s
fan motor section. Condenser plugs,
spring isolators, and isopads ship in the
unit’s bottom left side.
Receiving Checklist
Complete the following checklist
immediately after receiving unit
shipment to detect possible shipping
damage.
Inspect individual cartons before
accepting. Check for rattles, bent carton
corners, or other visible indications of
shipping damage.
If a unit appears damaged, inspect it
immediately before accepting the
shipment. Make specific notations
concerning the damage on the freight
bill. Do not refuse delivery.
Inspect the unit for concealed damage
before it is stored and as soon as
possible after delivery. Report
concealed damage to the freight line
within the allotted time after delivery.
Check with the carrier for their allotted
time to submit a claim.
Do not move damaged material from
the receiving location. It is the receiver’s
responsibility to provide reasonable
evidence that concealed damage did
not occur after delivery.
Do not continue unpacking the
shipment if it appears damaged. Retain
all internal packing, cartons, and crate.
Take photos of damaged material if
possible.
Notify the carrier’s terminal of the
damage immediately by phone and
mail. Request an immediate joint
inspection of the damage by the carrier
and consignee.
Notify your Trane representative of
the damage and arrange for repair.
Have the carrier inspect the damage
before making any repairs to the unit.
Installation
Figure I-PC-1. Typical unit mounted on shipping skid.
considerations
SCXG-SVX01B-EN 11
Page 12
pre-installation
Installation
Installation Preparation
Before installing the unit, perform
the following procedures to
ensure proper unit operation.
1. Verify the floor or foundation is level.
Shim or repair as necessary. To ensure
proper unit operation, install the unit
level (zero tolerance) in both horizontal
axis. Failure to level the unit properly
can result in condensate management
problems, such as standing water
inside the unit. Standing water and wet
surfaces inside units can result in
microbial growth (mold) in the drain
pan that may cause unpleasant odors
and serious health-related indoor air
quality problem.
2. Allow minimum recommended
clearances for maintenance and
routine service. See “Service Access”
section on page 13.
3. Position the unit and skid assembly in
its final location. If unit shipped splitapart, follow the procedure in the
“Split-Apart Unit Assembly” section
on page 16 before completing this
step. Test lift the unit to determine exact
unit balance and stability before
hoisting it to the installation location.
See Figure I-PC-7 and I-PC-8 on page 15
for typical rigging procedures,
including cautions and proper uses of
such equipment as fork lifts, spreader
bars, and hooks.
considerations
5. Remove the protective shipping covers
from the unit. Refer to the “Unit
Protective Covers” section on page 35.
Note: Unit height and connection locations
will change if external vibration isolators are
used. The unit may be raised an additional
5-7/8 inches with spring-type isolators.
Note: Unit height and connection locations
will change if the unit is constructed to be
split-a-part in the field. See unit submittal
drawings for connection locations.
6. Electrical supply power must meet
specific balance and voltage
requirements, as described in the
“Electrical Requirements” section on
page 33.
7. Water-cooled units only (model
SCWG): The installer must furnish and
install a condenser main and standby
water pump, cooling tower, pressure
gauges and all components for the
waterside piping. See the “Water
Piping” section on page 30 for general
waterside recommendations.
8. Air-cooled units only (model SCRG):
These units require field-installation of a
remote air-cooled condenser and
refrigerant piping. See the “Refrigerant
Piping” section on page 32 for general
piping recommendations.
4. Remove the skids from under the unit.
See the “Rigging and Handling”
section on page 14. Refer to the “Skid
Removal” section on page 18. If you
find internal damage, file a claim
immediately to the delivering carrier.
12 SCXG-SVX01B-EN
Page 13
pre-installation
Service Access
WARNING
Hazardous Voltage w/Capacitors!
Disconnect all electric power, including
remote disconnects before servicing.
Follow proper lockout/tagout procedures to ensure the power cannot be
inadvertently energized. For variable
frequency drives or other energy storing
components provided by Trane or others,
refer to the appropriate manufacturer’s
literature for allowable waiting periods
for discharge of capacitors. Verify with an
appropriate voltmeter that all capacitors
have discharged. Failure to disconnect
power and discharge capacitors before
servicing could result in death or serious
injury.
Note: For additional information regarding the safe discharge of capacitors, see
PROD-SVB06A-EN or PROD-SVB06A-FR.
See Figure I-PC-2 and Table I-PC-1 for
recommended service and code
clearances. Access to thermostat unit
controls is through a hinged access panel
door on the front, lower left of the unit’s
compressor section.
IntelliPak unit controls access is through
a panel on the middle right of the fan
section. The panel is secured with an
automatic latch and quick-acting fasteners, which require a screwdriver to open.
Removable front unit panels provide
access to compressors, fan, motor, inlet
guide-vane actuator, and belts.
Removable left side panels give access to
drive side, fan bearing, inlet guide-vanes,
condensers, and waterside economizer
control valve. The compressor, condenser and fan motor access panels are
secured with quick-acting fasteners.
Access panels for evaporator coils,
expansion and water valves, and left fan
bearing are sheet metal screws. Access
to other components for service requires
removal of panels secured with sheet
metal screws. During operation, sight
glasses are viewable through portholes
on the upper right side panel of the fan
section.
Installation
Variable Frequency Drives are shipped
separately and field installed. See page 29
for VFD related dimensions and weights.
Top View
CCRC/CIRC 20, 29, 32
48” (1066 mm)
Table I-PC-1. Service and code clearance requirements
Side Distance Purpose
front 42 in. (20-38 tons) NEC code requirement
left 18 in. air-cooled units only
36 in. refrigeration & waterside component service
77 in. fan shaft removal
right 36 in. provides uniform airflow
inlet 18 in. provides uniform airflow
See table
Figure I-PC-2. Top view of self-contained unit showing recommended service and code clearances
considerations
96” (2132 mm)
96” (2132 mm)
air inlet
42” minimum
18” minimum
48” (1066 mm)
Control
Panel
Control
Panel
36”minimum
SCXG-SVX01B-EN 13
Page 14
pre-installation
Rigging and Unit Handling
WARNING
Improper Unit Lift!
Test lift unit approximately 24 inches to
verify proper center of gravity lift point.
To avoid dropping of unit, reposition
lifting point if unit is not level. Failure to
properly lift unit could result in death or
serious injury or possible equipment or
property-only damage.
WARNING
Lifting Equipment Capacity!
Ensure lifting equipment capacity
exceeds unit weight by an adequate
safety factor to prevent injury, death, or
unit damage.
Installation
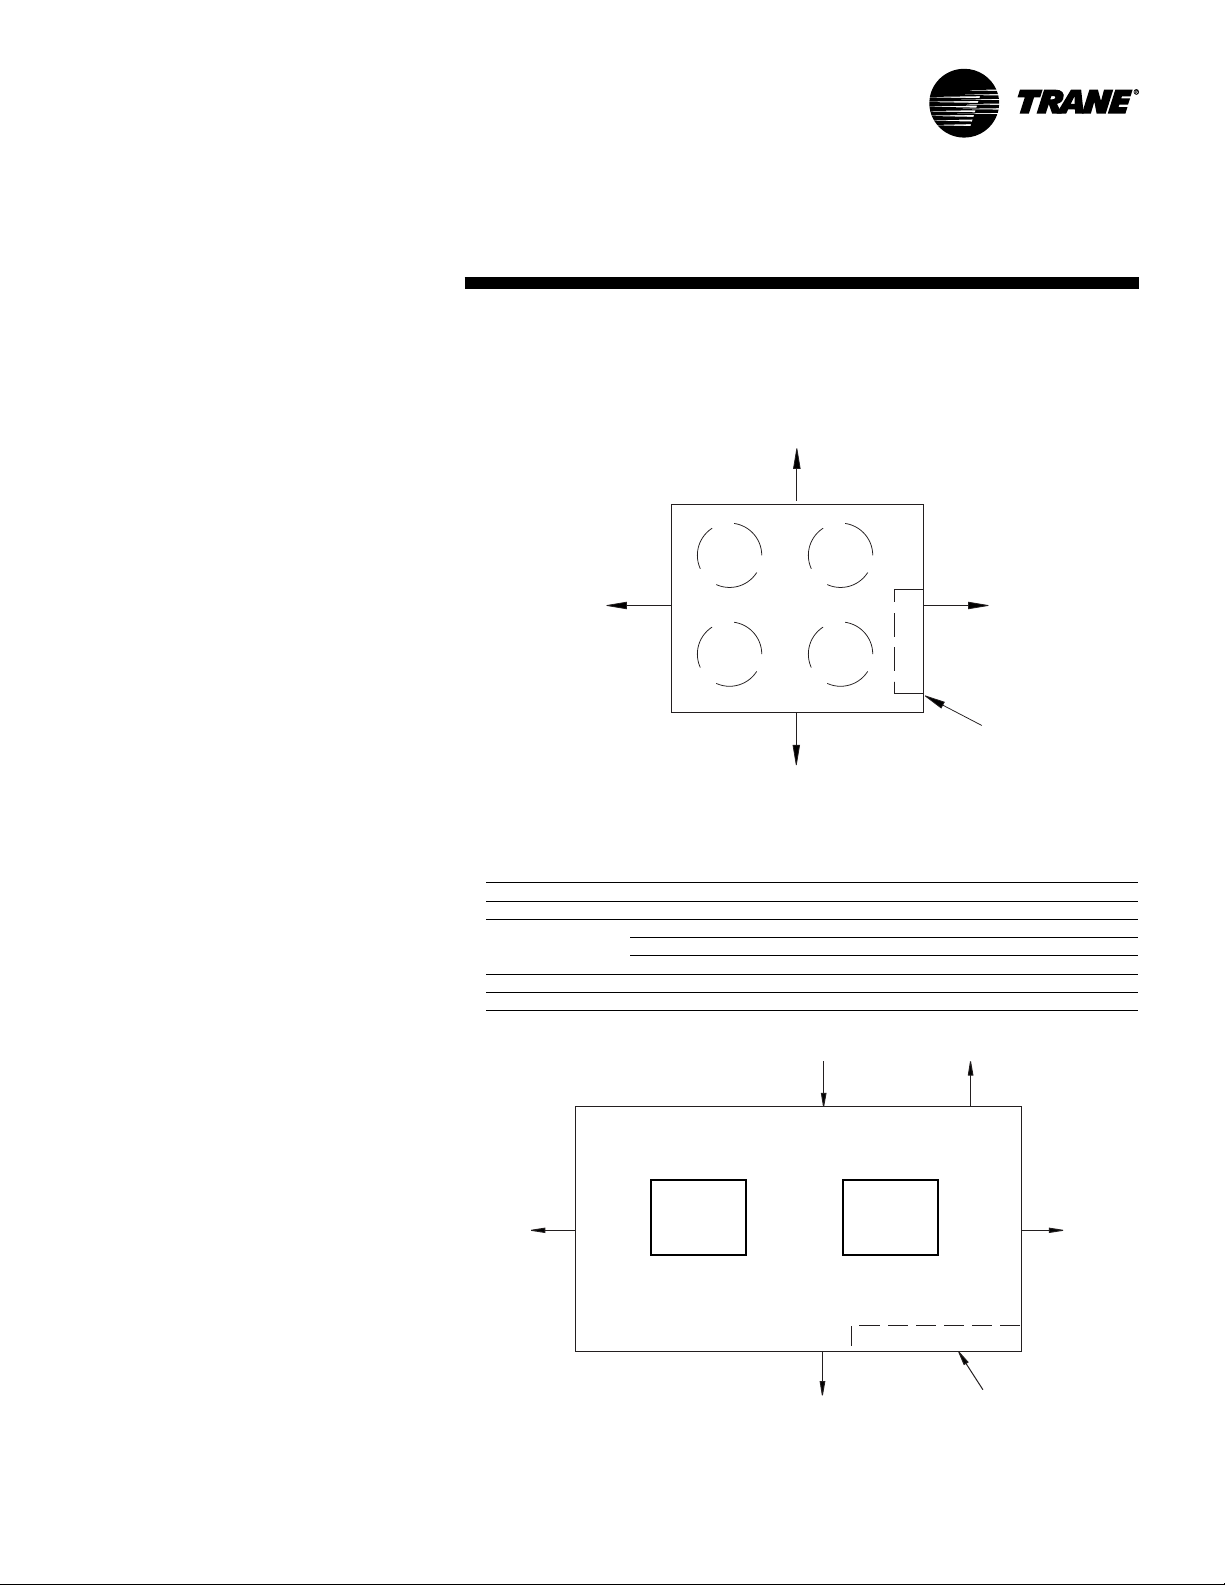
Figure I-PC-5. Assembled unit gravity block location.
considerations
Before lifting the unit or modular
component, determine the approximate
center of gravity for lifting safety. See
Figure I-PC-5 for assembled modular
units and Figure I -PC-6 for split-apart
units. The center of gravity may vary
slightly within the gravity block
depending on unit options.
Always test-lift the unit to determine the
exact unit balance and stability before
hoisting it to the installation location. See
Figures I-PC-7 and I-PC-8 for typical
rigging procedures and proper rigging
equipment usage.
Table I-PC-2. Gravity Block Dimensions
Model A B C D
SCWG 36 14 38 12
SCRG 36 16 40 1 2
Fan Section Only
Compressor Section Only
Figure I-PC-6. Split-apart unit gravity block location.
14 SCXG-SVX01B-EN
Page 15
pre-installation
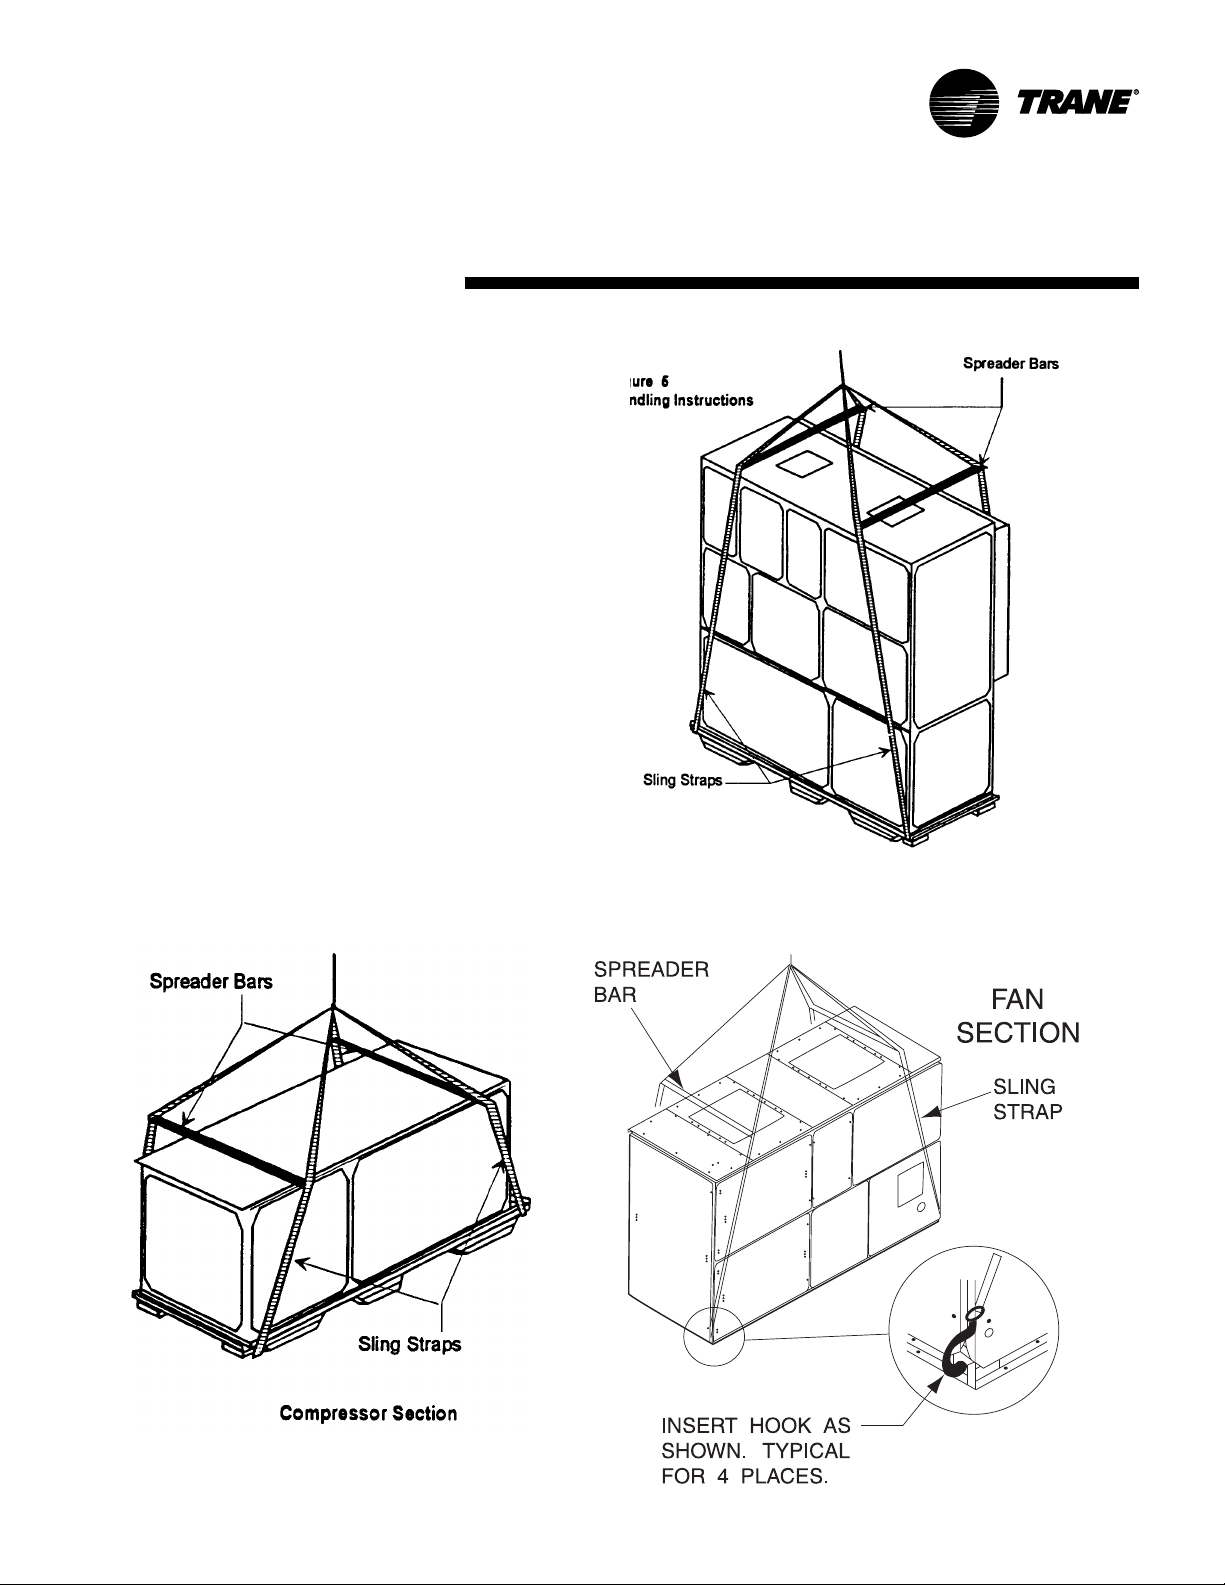
Unit Handling Procedure
NOTICE
Do not use hooks to lift unit or hook into
open channels to lift unit. This could
cause unit damage.
1. Position rigging sling under wood
shipping skid.
2. Use spreader bars to avoid unit
damage.
3. When using a forklift, exercise caution
to prevent unit damage.
4. Use the standard fork length to lift one
end and drag or pull unit while skidding
the opposite end.
5. The unit center of gravity will fall within
center of gravity block at various
locations depending on unit options.
6. Use hooks to lift fan section only. Do not
hook into open channels to lift unit.
7. See unit nameplate for unit weight.
8. Do not stack units.
Installation
Figure I-PC-7. Assembled modular unit proper rigging.
considerations
Figure I-PC-8. Split-apart modular unit proper rigging.
SCXG-SVX01B-EN 15
Page 16

pre-installation
Installation
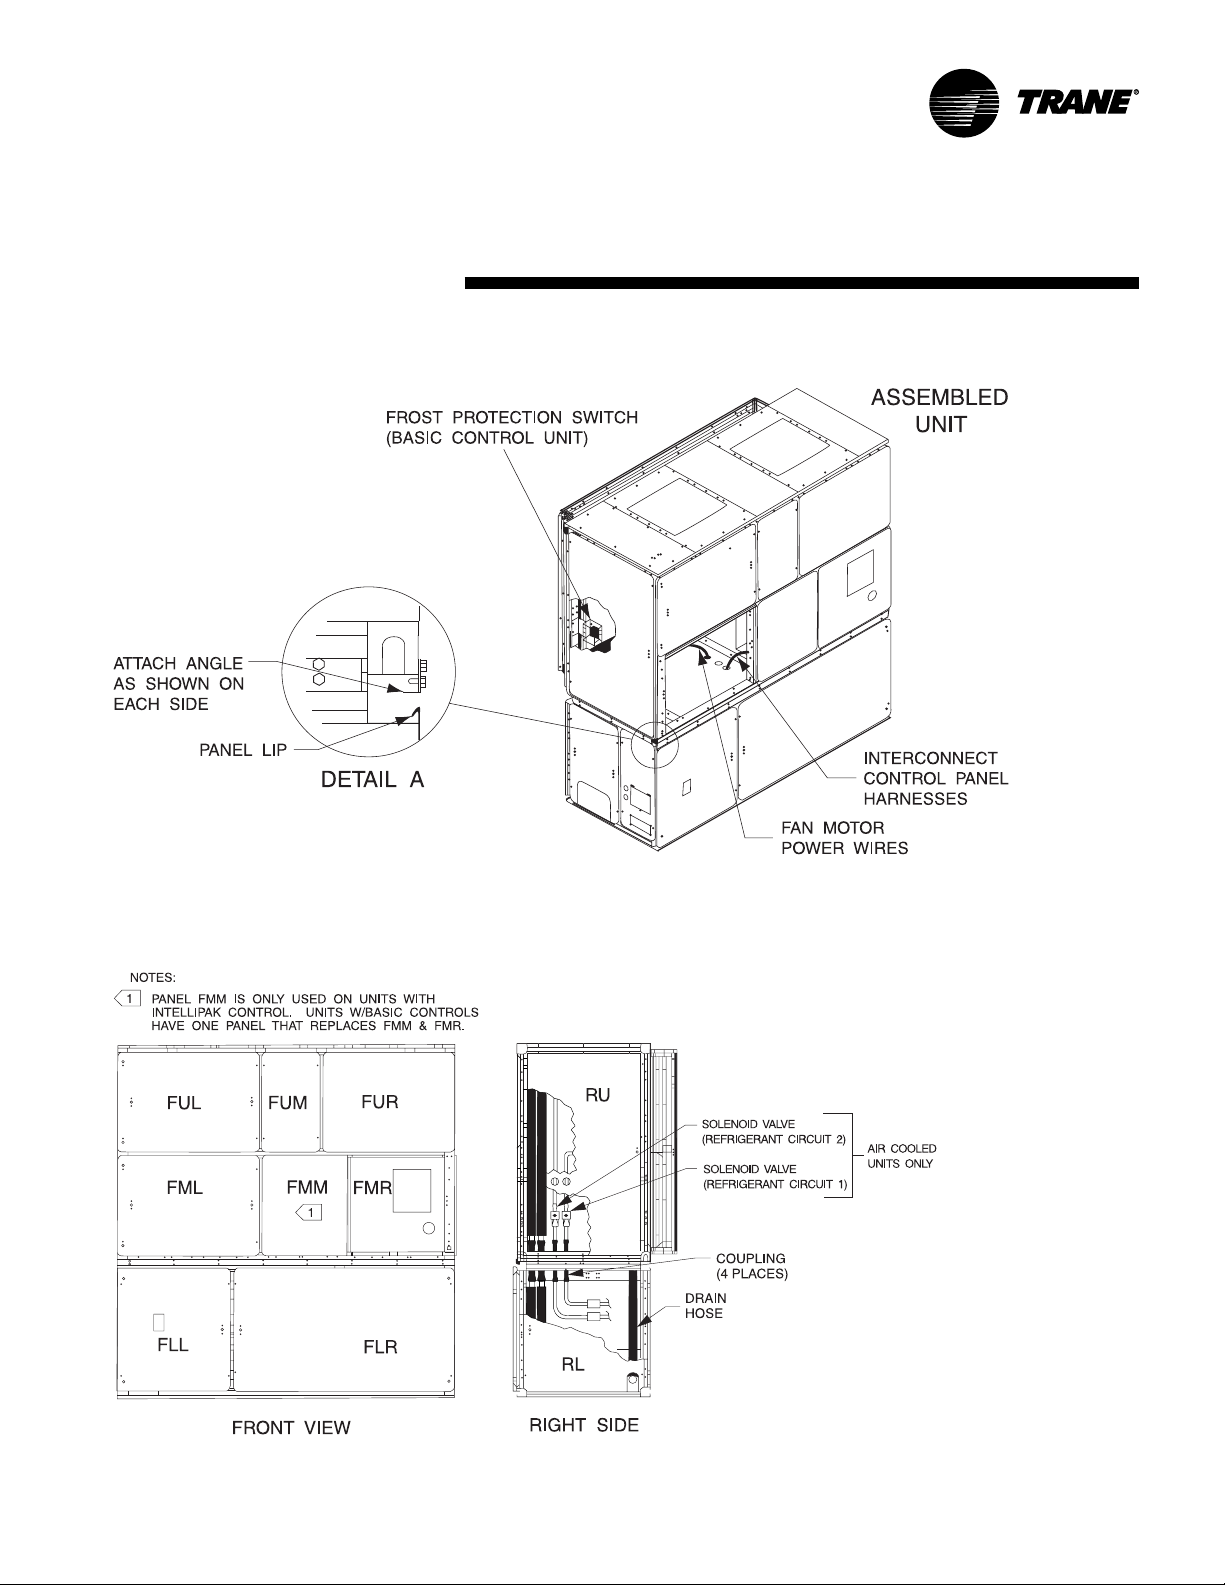
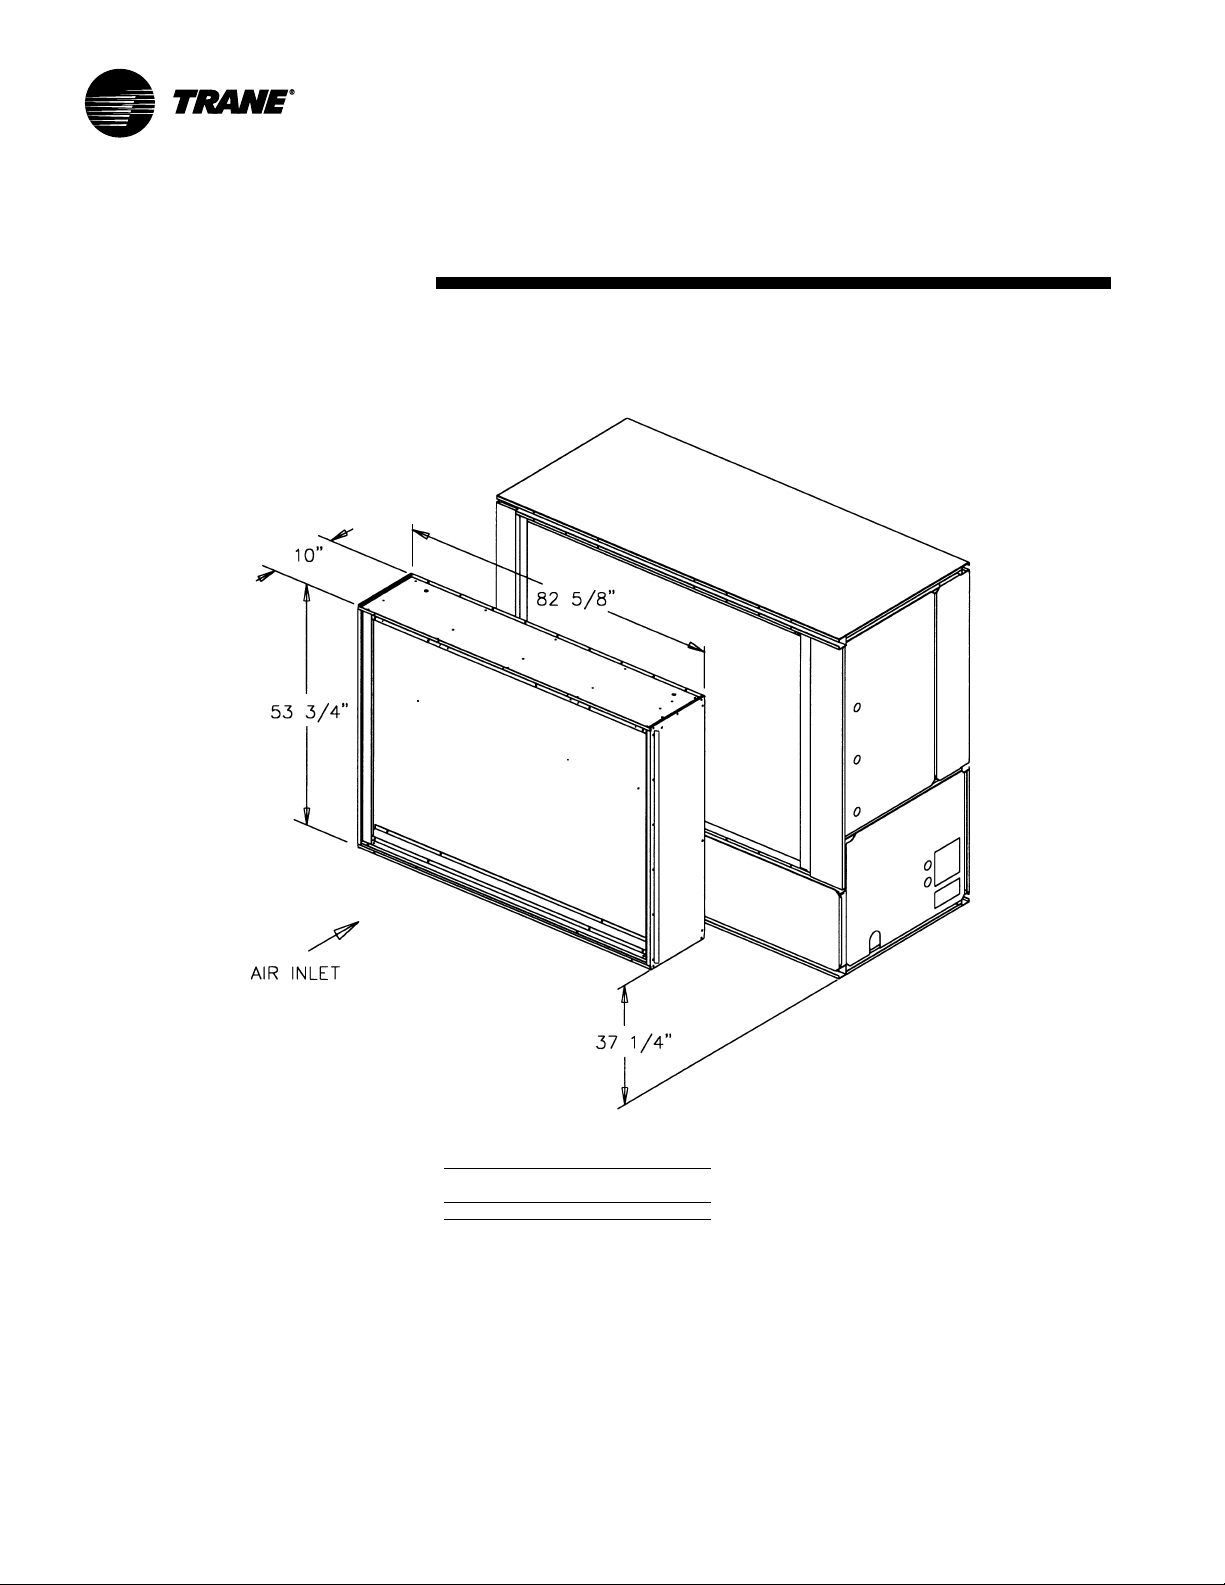
Split-Apart Unit Assembly
1. Ensure the tagging information on the
fan section nameplate matches that on
the compressor nameplate.
2. Remove the connector brackets
holding the the sheet metal shipping
cover on compressor section. Retain
brackets and screws.
3. Remove shipping cover from the
compressor section and verify the shipwith packge contains:
• suction and discharge line couplings
• insulation
• sheet metal screws
4. Lift fan section onto the compressor
section using the rigging method in
Figure I-PC-8 on page 13.
5. Remove skid from the fan section,
placing the fan section onto the
compressor section. Reference Figure IPC-9.
6. Install the connection brackets with the
sheet metal screws (referenced in step
2) on all sides of the unit. Reference
Detail “A” in Figure I-PC-9.
7. Remove the unit panels labeled RU and
RL in Figure I-PC-10 on page 17. To
remove panels, first remove the four
shipping screws located in the corner of
each panel. Next, turn the remaining
turn fasteners to the unlatch position.
The panel is supported by a “lip”
channel. So, lift the panel up and off the
unit to remove it. See Detail “A”in
Figure I-PC-9.
8. Connect the drain hose to the drainpan
outlet fitting and secure it with the drain
hose clamp provided.
9. Circulate nitrogen thoughout
refrigerant circuits.
10. Unbraze and remove the caps on the
discharge and suction lines in both the
compressor and fan sections.
11. Install and braze discharge and
suction line couplings.
1
considerations
12. Insulate discharge and suction lines
with the insulation provided.
13. Remove panel FLR and open the
bottom control panel door, FLL. Pull the
fan motor leads (coiled in the fan
section) through the knockout in the
bottom of the fan section to the control
panel. Ensure that the bushing is
installed in the hole to prevent the
wires from chafing. Refer to the unit
wiring diagrams to connect the fan
motor leads properly and ensure
correct phase sequencing.
IntelliPak Units(UCM) Only
14. Remove panels FML, FMM, and FMR.
15. Pull the circular plug connector (CPC)
from the compressor section through
the knockouts into the fan section.
Install the bushings (provided on the
wiring harnesses) in the knockouts.
16. Using the CPC wiring diagram,
connect the male CPC to the female
CPC in the top control panel.
17. If the unit has the mixed air
temperature option, route the capillary
tube on back of the filter rack.
Units with Thermostat Only
/
4
18. Remove panel FMR. See Note 1 on
Figure I-PC-10.
19. Pull frost protection wires from the
bottom control panel throughknockouts
in bottom of fan section. Route wires to
the appropriate frost protection
switches on the evaporator coil.
Reference the unit wiring diagrams to
connect frost protection wiring
connectors.
Air-Cooled Units Only:
20. Route the refrigerant circuit wires for
circuits 1 and 2 from the bottom control
panel through the knockouts to the
solenoid valves. The solenoid valves
are located in the liquid refrigerant
lines on the right-hand side of the unit.
Refer to the unit wiring diagrams to
make splice connections.
16 SCXG-SVX01B-EN
Page 17
pre-installation
Installation
considerations
Figure I-PC-9 How to assemble the split apart modular unit
Figure I-PC-10 Modular unit panel description and internal connections
SCXG-SVX01B-EN 17
Page 18
pre-installation
Skid Removal
The unit ships on skids to provide forklift
locations from the front or rear. The skid
allows easy maneuverability of the unit
during storage and transportation.
Remove the skids before placing the unit
in its permanent location.
Remove the skids using a forklift or jack.
Lift one end of the unit off of the skids.
See Figure I-PC-5 and I-PC-6 for unit
gravity block location. Slide the skids out
and lower the unit at the installation
location.
Note: External isolation is not necessary
since units are internally isolated. Consult a
vibration specialist before “doubleisolating” the unit.
External Unit Isolation
If your job requires external vibration
isolation, two options are available:
isopads or spring-type isolators. Isopads
should be placed under the unit at
locations indicated on the factoryprovided isolator sheet.
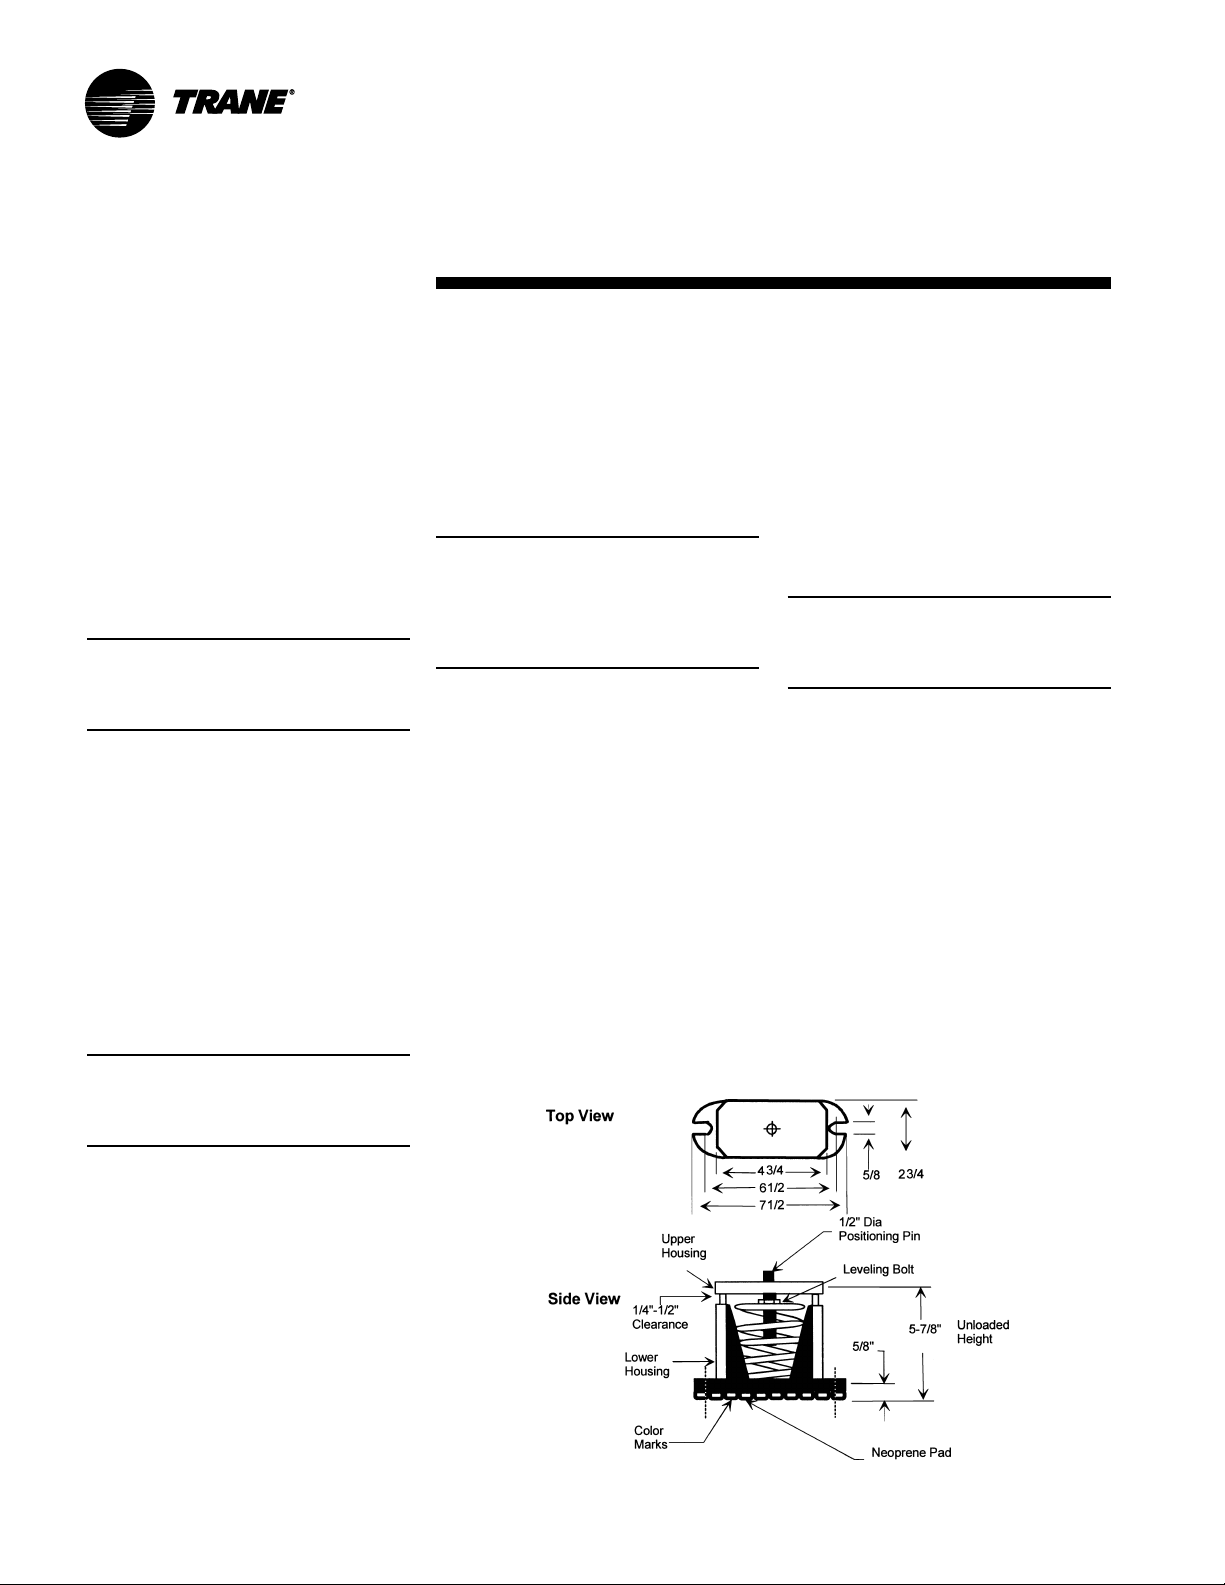
Set the spring-type isolators (Figure I-PC-
9) in position after the unit is removed
from skids before making electrical,
piping, or duct connections. All units
require a minimum of four isolators per
unit. But some may require six isolators,
depending upon unit options.
Installation
view of Figure I-PC-9, must be 1/4 - 1/
inches. To increase the clearance, lift
the unit off the isolator and turn the
leveling bolt counterclockwise. Recheck
the unit level and the housing
clearances. Maximum allowable
difference between isolator heights is
inch. Shim as required under the
isolators.
Note: The compressors and fan assembly
are internally isolated on most units. Due to
this, the addition of external isolation
devices (spring mounting isolators) is at
the discretion of the building or HVAC
system designer.
Pre-Installation Checklist
Complete the following checklist before
beginning unit installation.
Verify the unit size and tagging with the
unit nameplate.
Make certain the floor or foundation is
level, solid, and sufficient to support the
unit and accessory weights. Level or
repair the floor before positioning the
unit if neccesary.
Allow minimum recommended
clearances for routine maintenance and
service. Refer to unit submittals for
dimensions.
2
considerations
Allow three fan diameters above the
unit for the discharge ductwork. Return
air enters the rear of the unit and
conditioned supply air discharges
through the top.
Electrical connection knockouts are on
1
/
the top, left side of the unit.
4
Allow adequate space for piping
access and panel removal. Condenser
water piping, refrigerant piping, and
condensate drain connections are on
the lower left end panel.
Note: Unit height and connection locations
will change if using vibration isolators. The
unit height may increase up to 5 7/8” with
spring type isolators.
Electrical supply power must meet
specific balance and voltage
requirements as described in the
“Electrical Requirements” section.
Water-cooled units only: The installer
is responsible for providing a condenser
main, standby water pump, cooling
tower, pressure gauges, strainers, and
all components for waterside piping.
See the “Water Piping” section for
general waterside recommendations.
Air-cooled units only: The installer is
responsible for providing and installing
the remote air-cooled condenser and
refrigerant piping, including filter driers.
Note: Trane strongly recommends you
consult a vibration specialist before
double-isolating the unit. Double isolation
is not recommended.
If you decide to externally isolate the unit,
use spring-flex, type CP isolators. The
spring number is marked on the outer
housing. See Figure I-PC-9.
To install external isolators, complete the
following procedure.
1. Locate the isolators under unit base at
the locations indicated on the factoryprovided isolator placement sheet. Lift
one end of the unit at a time to position
isolators to the floor, using anchor bolts.
2. Level the unit by adjusting isolator
heights. Unit weight may cause the
upper housing to rest on the lower
housing of the spring isolators. The
isolator clearance shown in the side
18 SCXG-SVX01B-EN
Figure I-PC-9. Optional spring isolator dimensional data.
Page 19
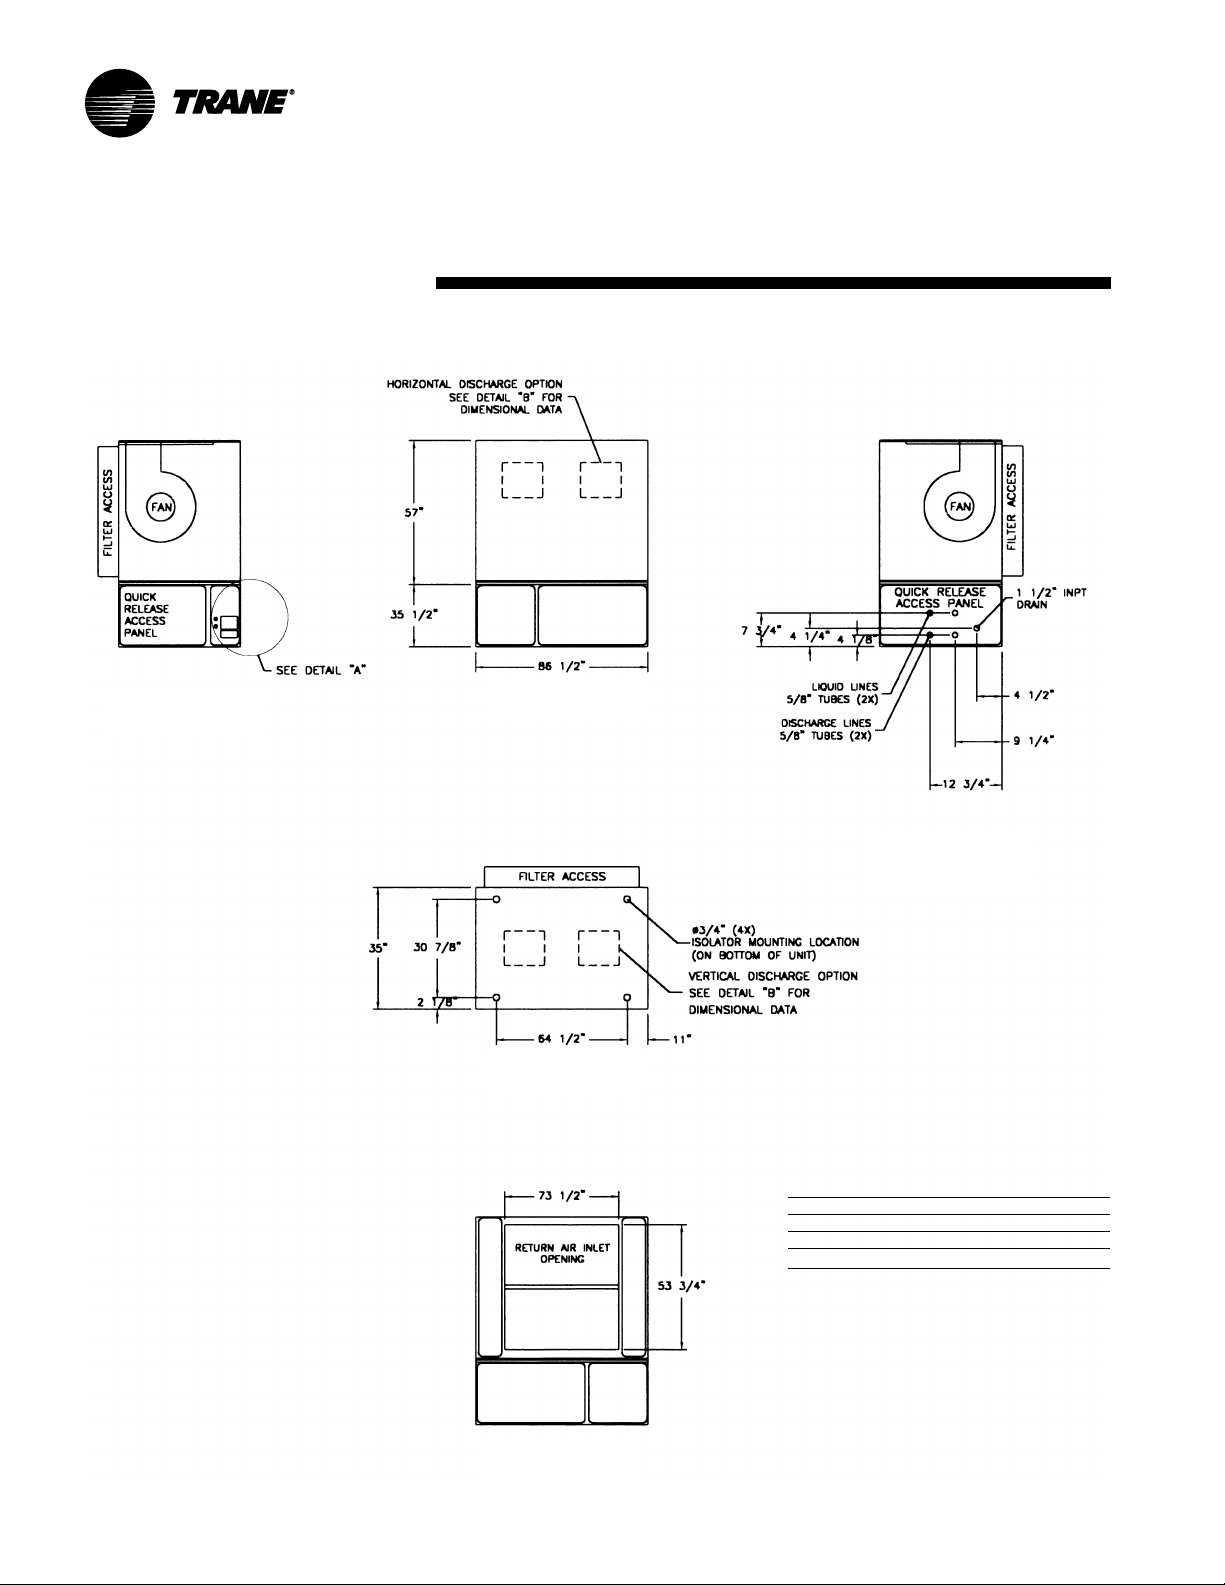
Dimensions &
SCWG
SCWG/SIWG Dimensions, in.
left-side view
factory-piped units
SCWG/SIWG weight, lbs.
unit tons base weight
20 2260
25 2730
30 2864
35 3000
Notes:
1. All unit weights include refrigerant, water, inlet guide
vanes and controllers, electric heat and valves.
2. Add 150 lbs. to total weight to obtain approximate
shipping weight.
3. Split-apart unit weights are approximately: 60% total
unit weight = compressor section, 40% total unit weight
= fan section.
Weights
front view
top view
SIRG
left-side view
direct condenser connections
back view
right-side view
factory-piped units
SCXG-SVX01B-EN 19
right-side view
direct-condenser connections
Page 20
Dimensions &
SCRG /
SCRG/SIRG Dimensions, in.
left-side view
Weights
front view
SIRG
top view
right-side view
SCRG/SIRG Weight, lbs.
unit tons base weight
20 2344
25 2479
32 2614
Notes:
1. All unit weights include refrigerant, water, inlet guide
vanes and controllers, electric heat and valves.
2. Add 150 lbs. to total weight to obtain approximate
shipping weight.
3. Split-apart unit weights are approximately: 60% total
unit weight = compressor section, 40% total unit weight
= fan section.
back view
20 SCXG-SVX01B-EN
Page 21
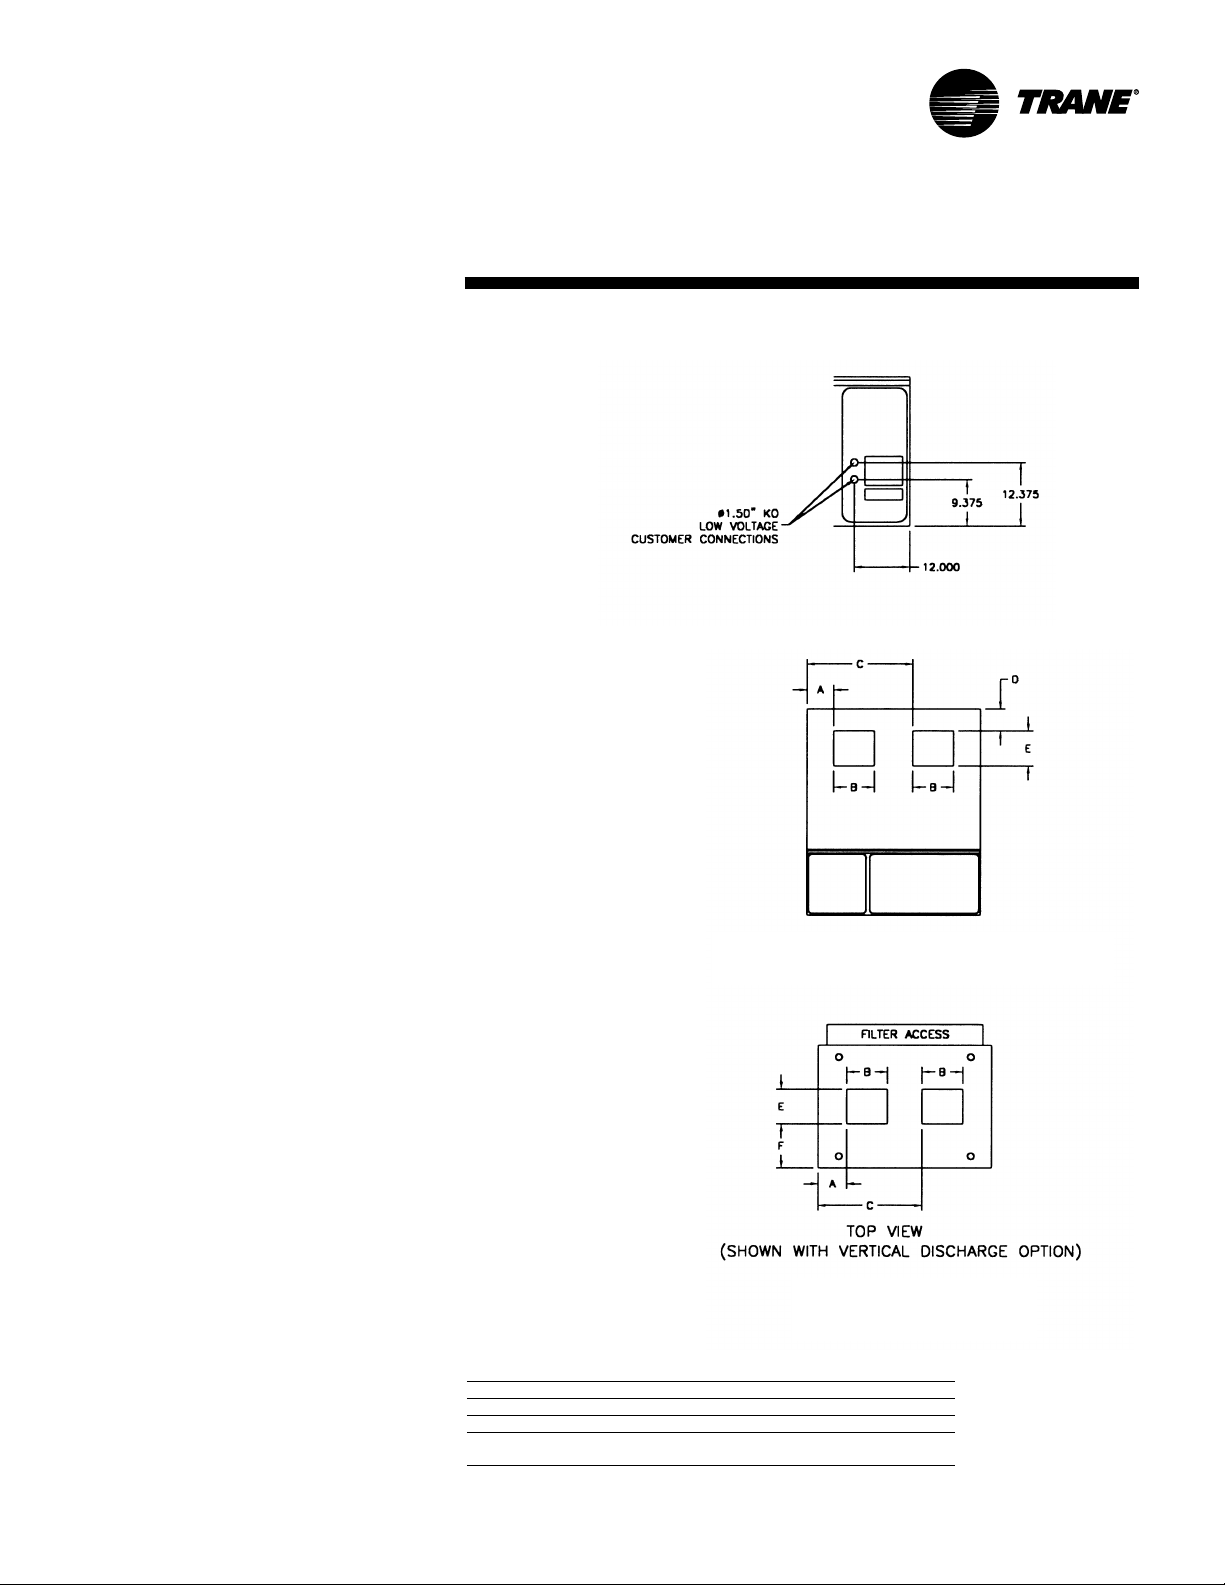
Dimensions &
Weights
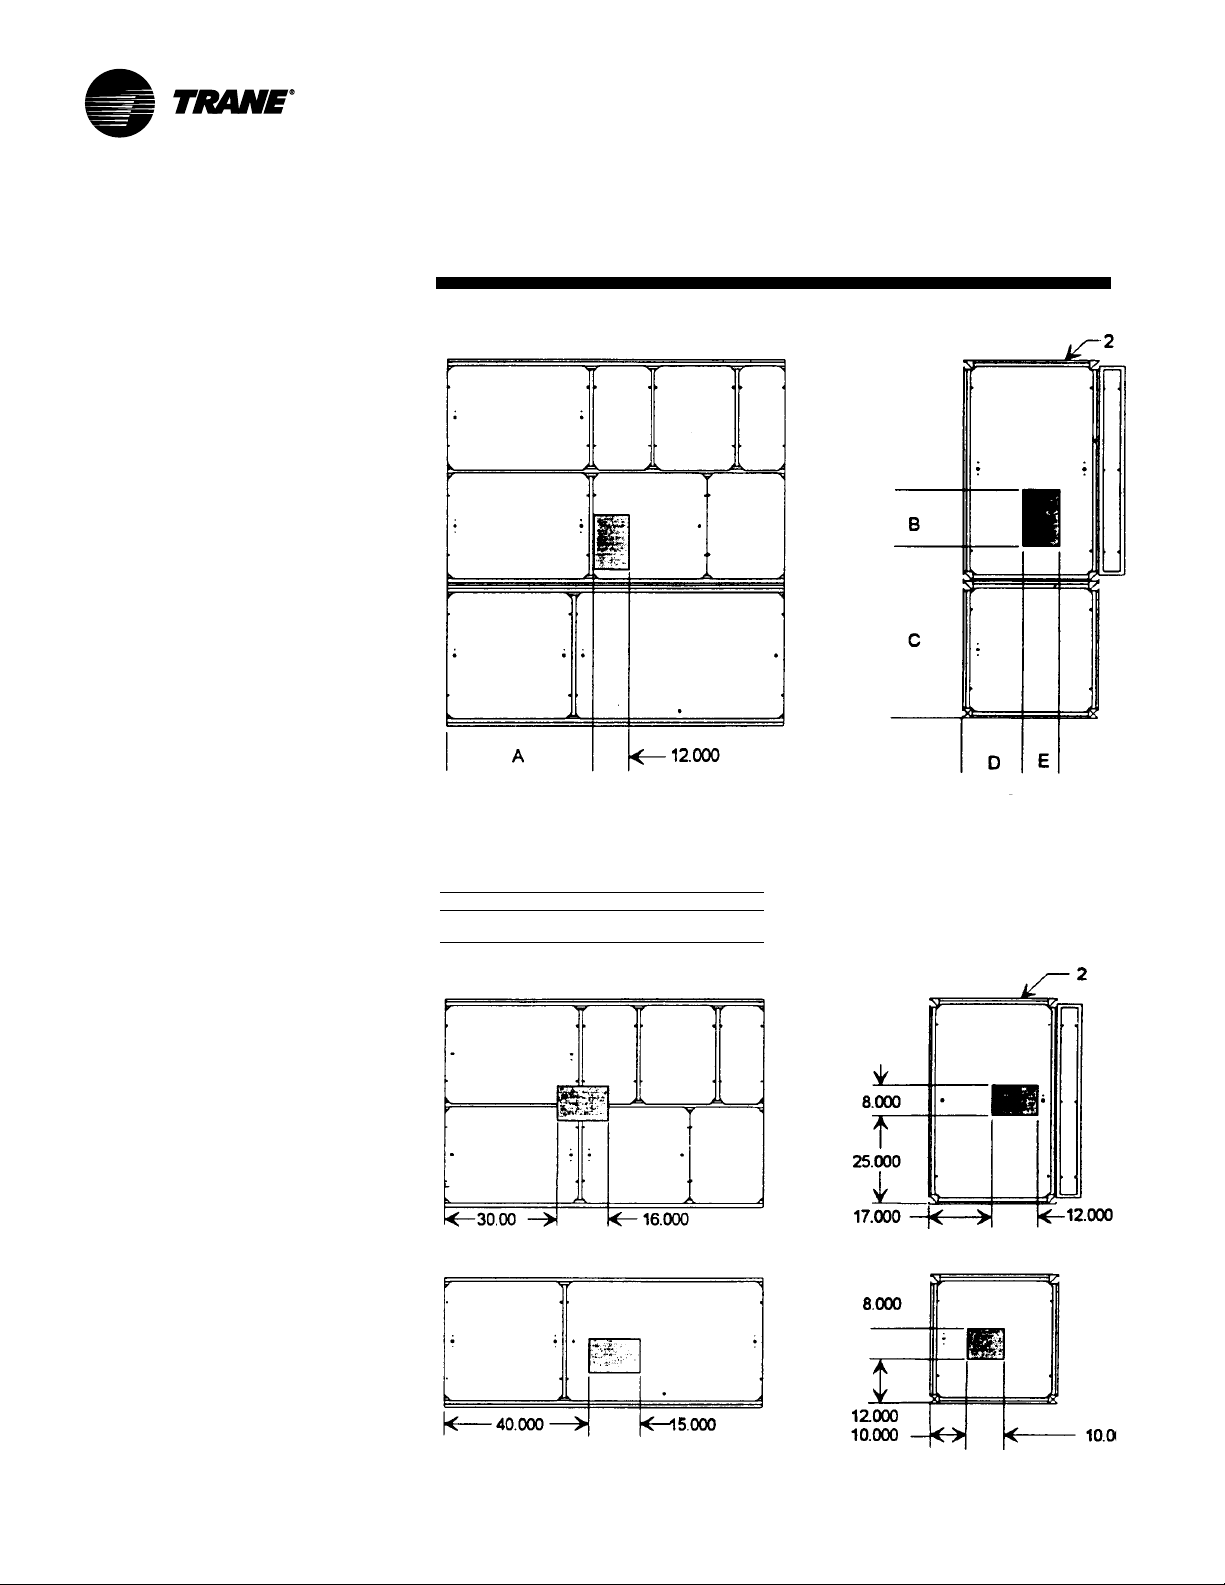
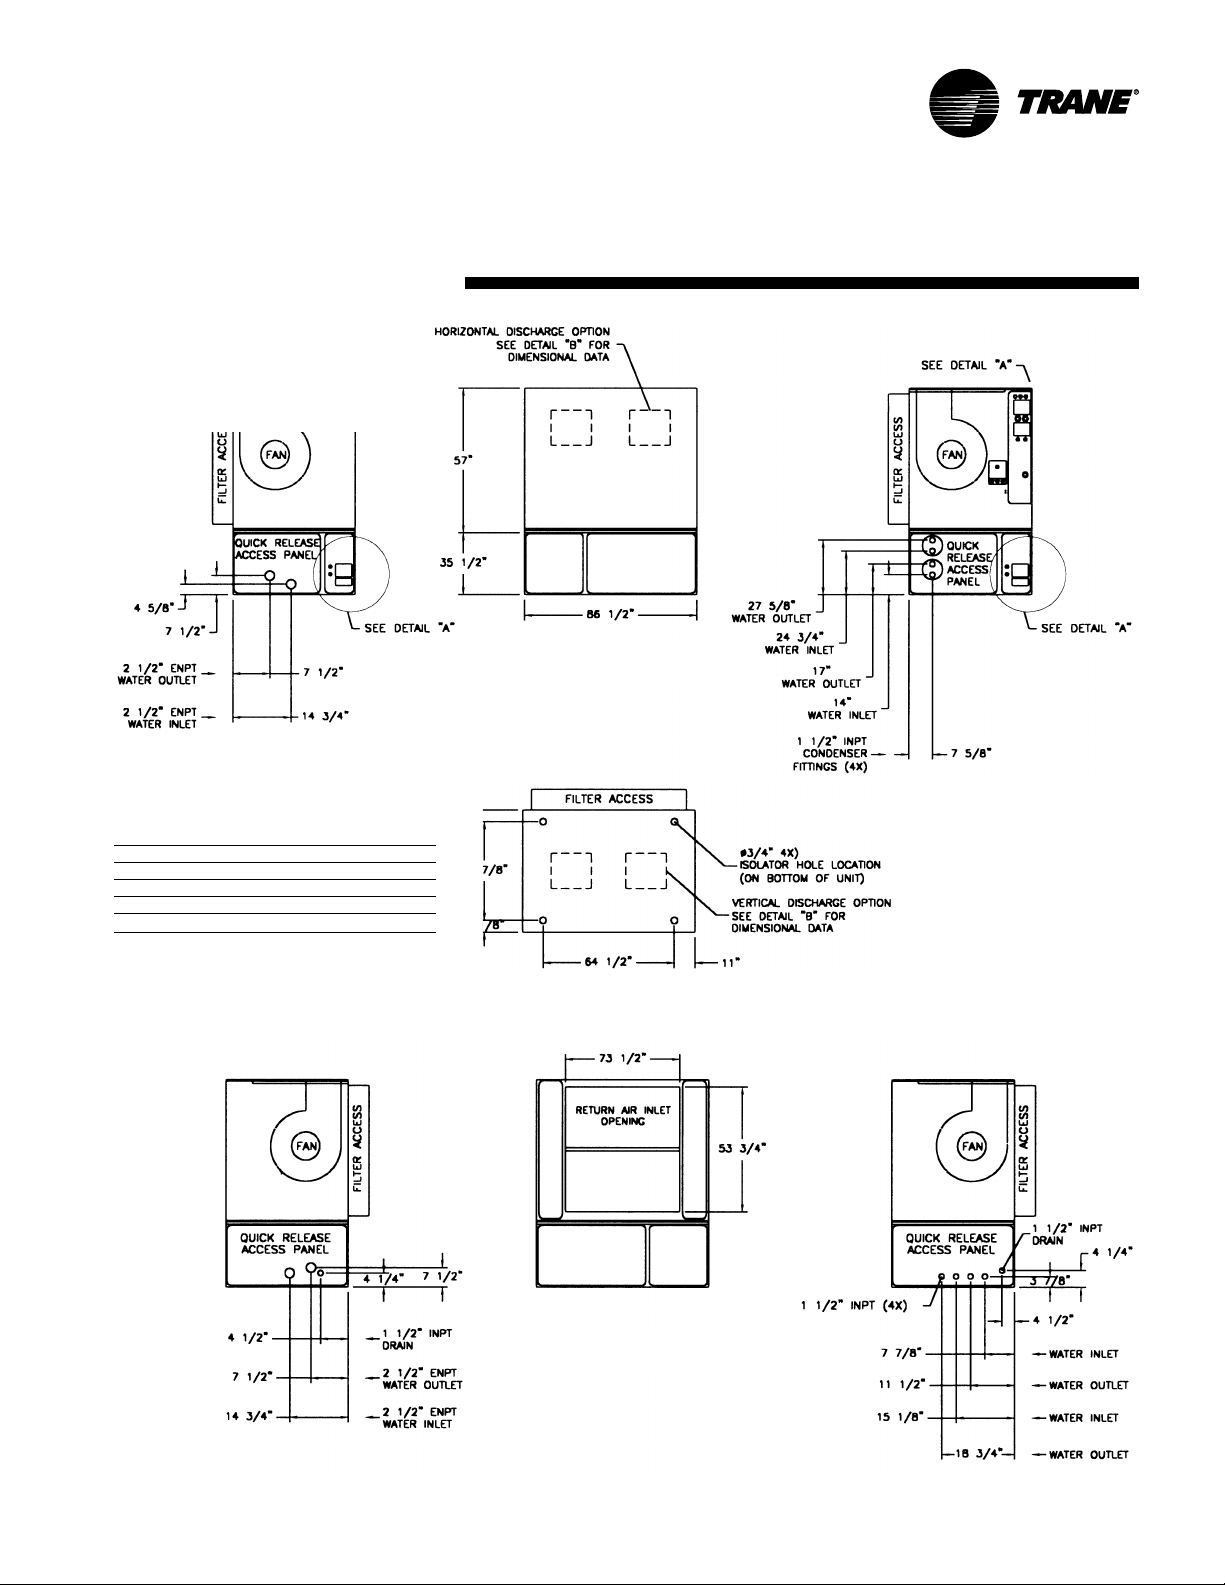
SCRG/SIRG/SCWG/SIWG Detail “A”
Electrical Connections, in.
Detail “B” Discharge Options , in.
front view
shown with horizontal discharge option
top view
shown with vertical discharge option
Detail Dimensions, in.
model A B C D E F
SCWG/SCRG 20 20 10 3/458 1/25 1/813 1/411 1/
SCWG/SCRG 25 19 1/412 1/457 5/85 1/813 1/411 1/
SCWG 30 - 35/SCRG 32 1 8 14 5/856 1/25 1/813 1/
11 1/
2
2
2
4
SCXG-SVX01B-EN 21
Page 22
Dimensions &
CCRC /
Weights
CCRC/CIRC — Air-Cooled Condenser
AA
AB
AC
OPTIONAL LOW
AMBIENT DAMPER
(ONE DAMPER PER
CIRCUIT)
REFRIGERANT
LINE
CONNECTIONS
FRONTAL VIEW
REFRIGERANT CIRCUIT 2
CIRC
REFRIGERANT CIRCUIT 1
OPTIONAL LOW
AMBIENT DAMPER
24 VOLT WIRE ENTRY HOLE SIZED
FOR 3/4” CONDUIT
115 VOLT WIRE ENTRY HOLE SIZED FOR
3
/4” CONDUIT
SUPPLY VOLTAGE WIRE ENTRY HOLE
SIZED FOR 1” CONDUIT
B
C
CCRC/CIRC Air-cooled condenser dimensions & weight, in-lbs.
model A A AB AC weight weight
CCRC/CIRC 20 70 1/8 88 88 2030 1906
CCRC/CIRC 29 70 1/8 88 88 2084 1960
CCRC/CIRC 32 70 1/8 88 88 2138 2014
shipping operating
(LIQUID LINE CONNECTION REFRIG. CIRCUIT 1)
(HOT GAS CONNECTION REFRIG. CIRCUIT 1)
(LIQUID LINE CONNECTION REFRIG. CIRCUIT 2)
(HOT GAS CONNECTION REFRIG. CIRCUIT 2)
CCRC/CIRC Electrical connections, in.
model A B C
CCRC/CIRC 20-32 4 1/210 1/217 1/
2
CCRC/CIRC Refrigerant connections, in.
model E F G H J K L M N
CCRC/CIRC 20-32 66
7
/814
3
/818
1
3
/224
/4295/81 1/
22 SCXG-SVX01B-EN
8
5
/81 1/
8
Page 23

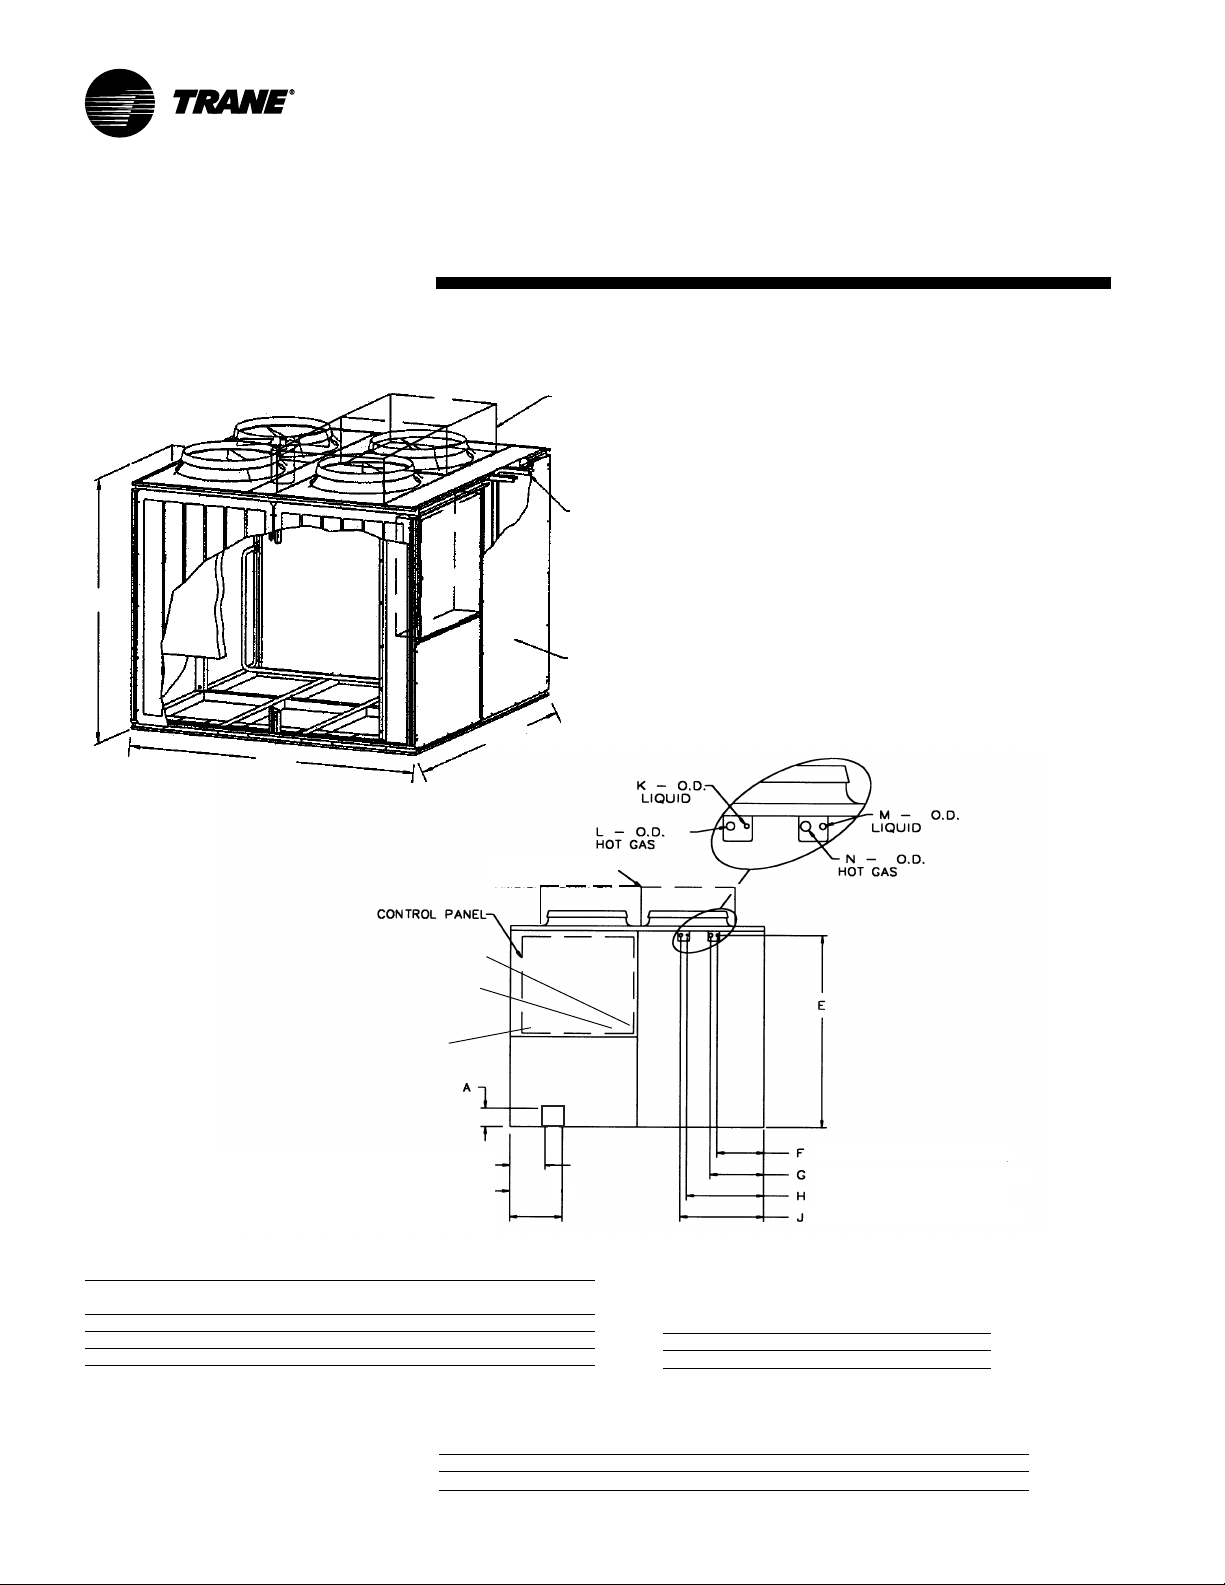
Hot Water Coil
Dimensions &
Weights
Hot water coil dimensions & weight, in-lbs.
unit size A B C D E F G H J weight
20 - 35 tons 37 1/453 3/416 5/873 1/214 7/816 1/443 1/45 5/87 3/4460
SCXG-SVX01B-EN 23
Page 24
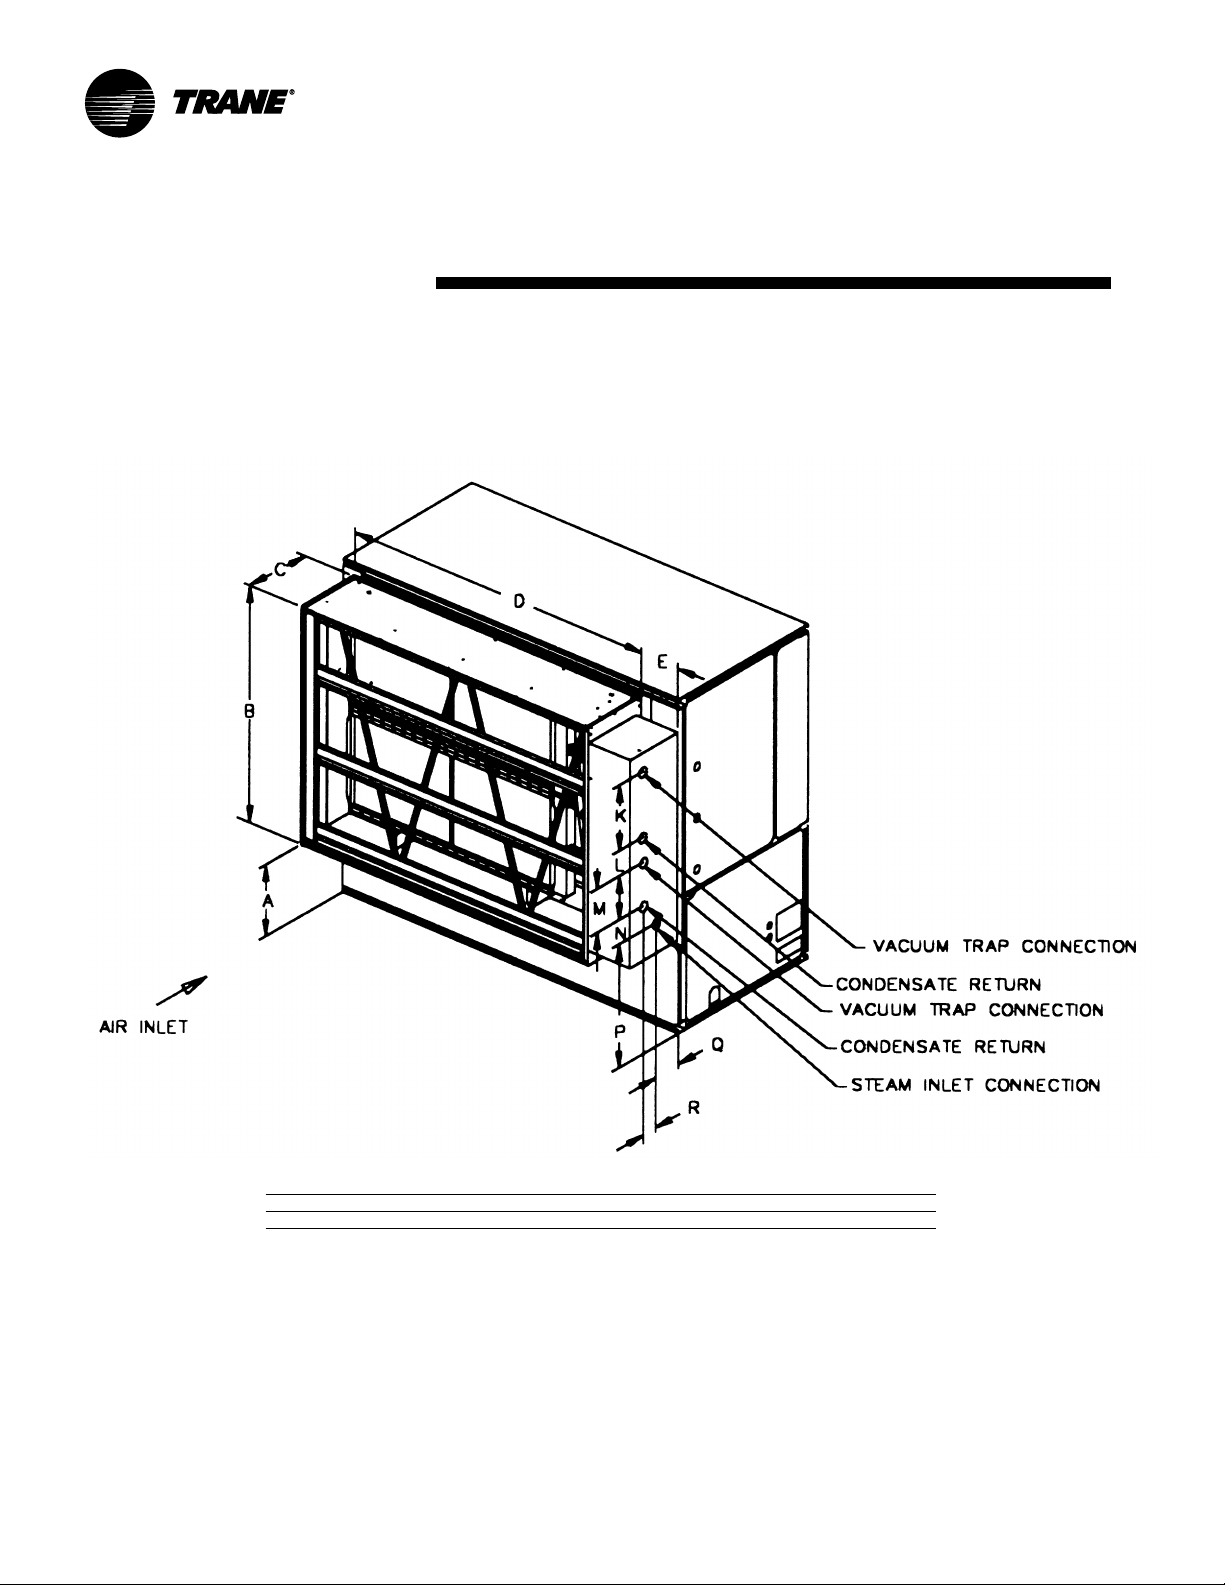
Steam Coil
Dimensions &
Weights
Steam coil dimensions, in-lbs.
unit size A B C D E K L M N P Q R weight
20 - 35 tons 37 1/453 3/416 5/873 1/210 7/822 1/23 3/815 7/81419 3/84
24 SCXG-SVX01B-EN
3
/8460
Page 25
Dimensions &
Weights
Electric Heat Coil
Electric heat coil dimensions & weight, in-lbs.
unit size A B C D weight
20 tons 70 1/44 7/811 1/219 460
25 tons 70 1/44 1/811 1/219 460
30 - 35 tons 70 1/42 7/811 1/219 460
Note: Coil box height is 8 in.
Flexible Horizontal Discharge
Plenum
Flexible horizontal discharge plenum dimensions & weights, in-lbs.
20-35 tons A B C weight
low height 3 5 17 1/486 1/2262
standard height 35 25 1/486 1/2352
SCXG-SVX01B-EN 25
Page 26
Waterside Economizer
Dimensions &
Weights
Waterside economizer weight, in-lbs.
unit size 2-row 4-row
20 - 35 tons 48 8 58 4
26 SCXG-SVX01B-EN
weight
Page 27
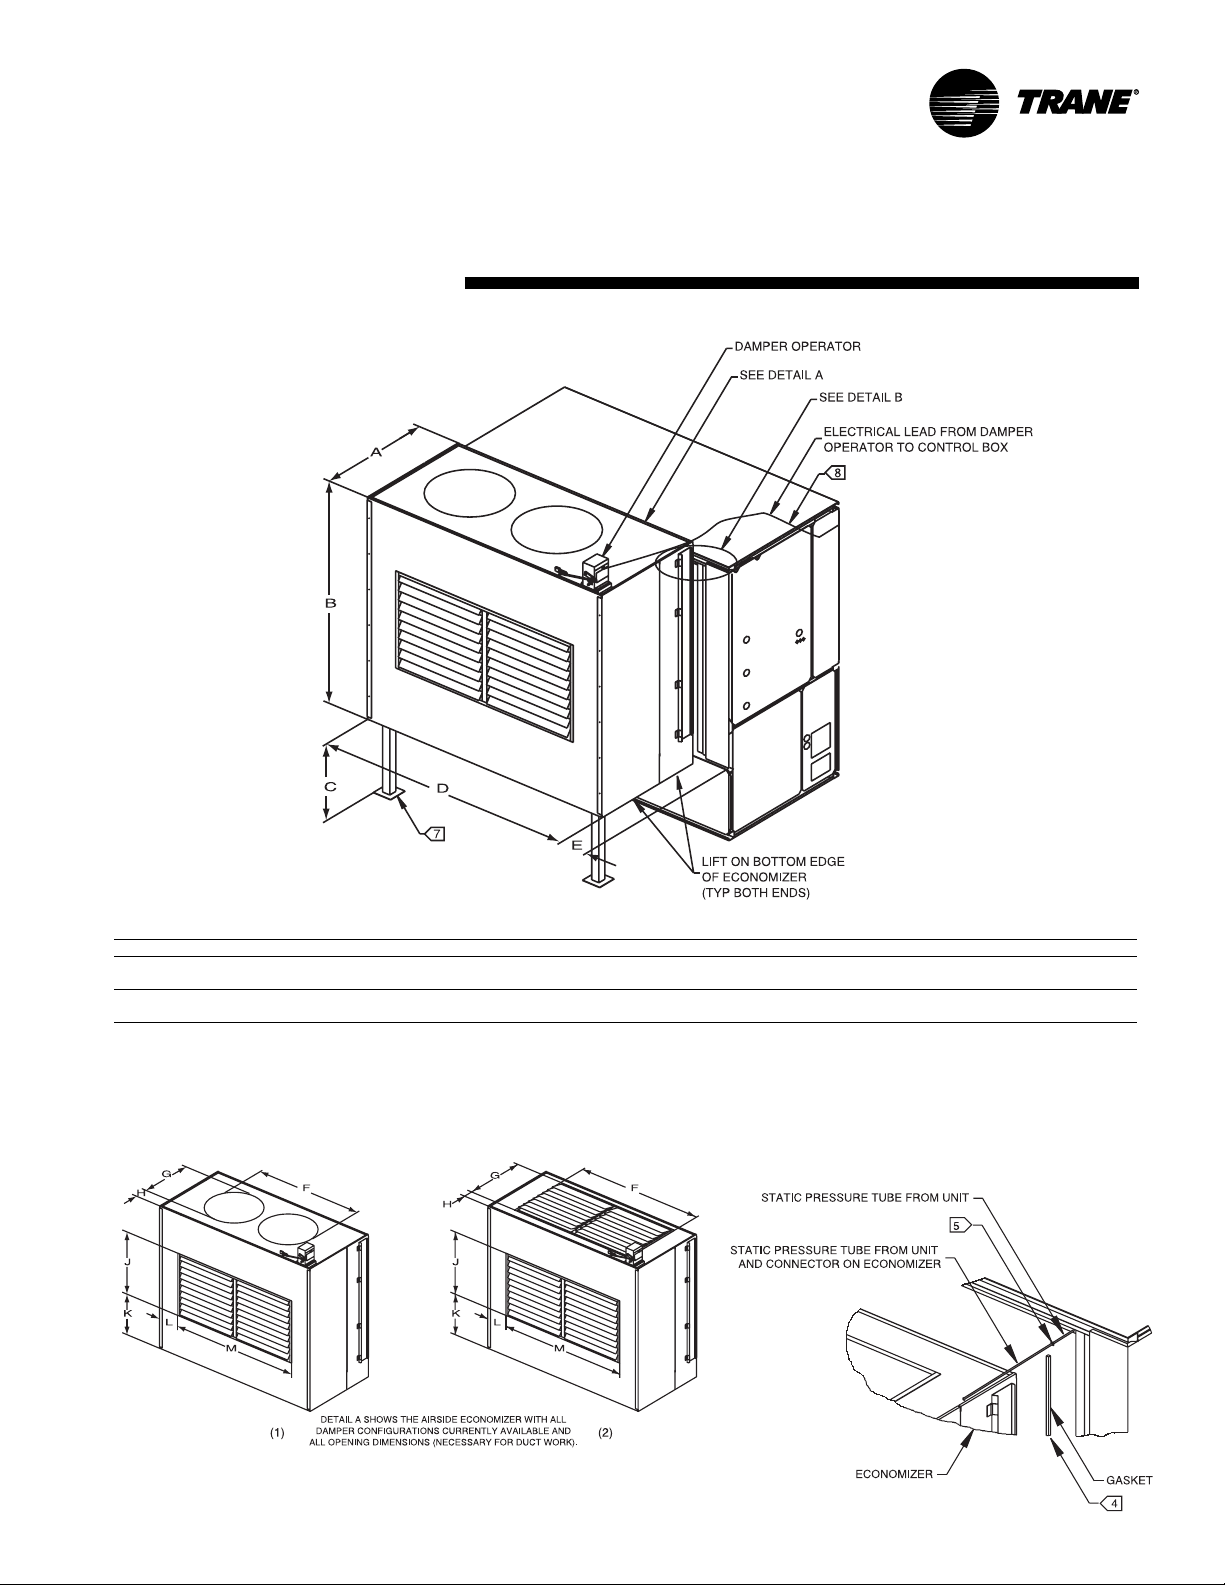
Dimensions &
Airside
Airside Economizer
Weights
Economizer
Airside economizer dimensions & weight, in-lbs.
unit size A B C D E F (1) F (2) G (1) G (2) H (1) H (2) J K L M weight
SCWG/SIWG 20, 25 3 6 65 5/837 74 1/46 1/856 1/249 3/423 1/420 1/25 5/87 20 1/217 1/81 2 49 3/4273
SCRG/SIRG 20
SCWG/SIWG 30, 35 3 6 65 5/837 74 1/46 1/861 3/862 3/428 1/820 1/23 1/47 20 1/217 1/85 1/262 3/4273
SCRG/SIRG 25, 32
Detail “A”
Detail “B”
SCXG-SVX01B-EN 27
Page 28
A
B
C
D
E
F
G
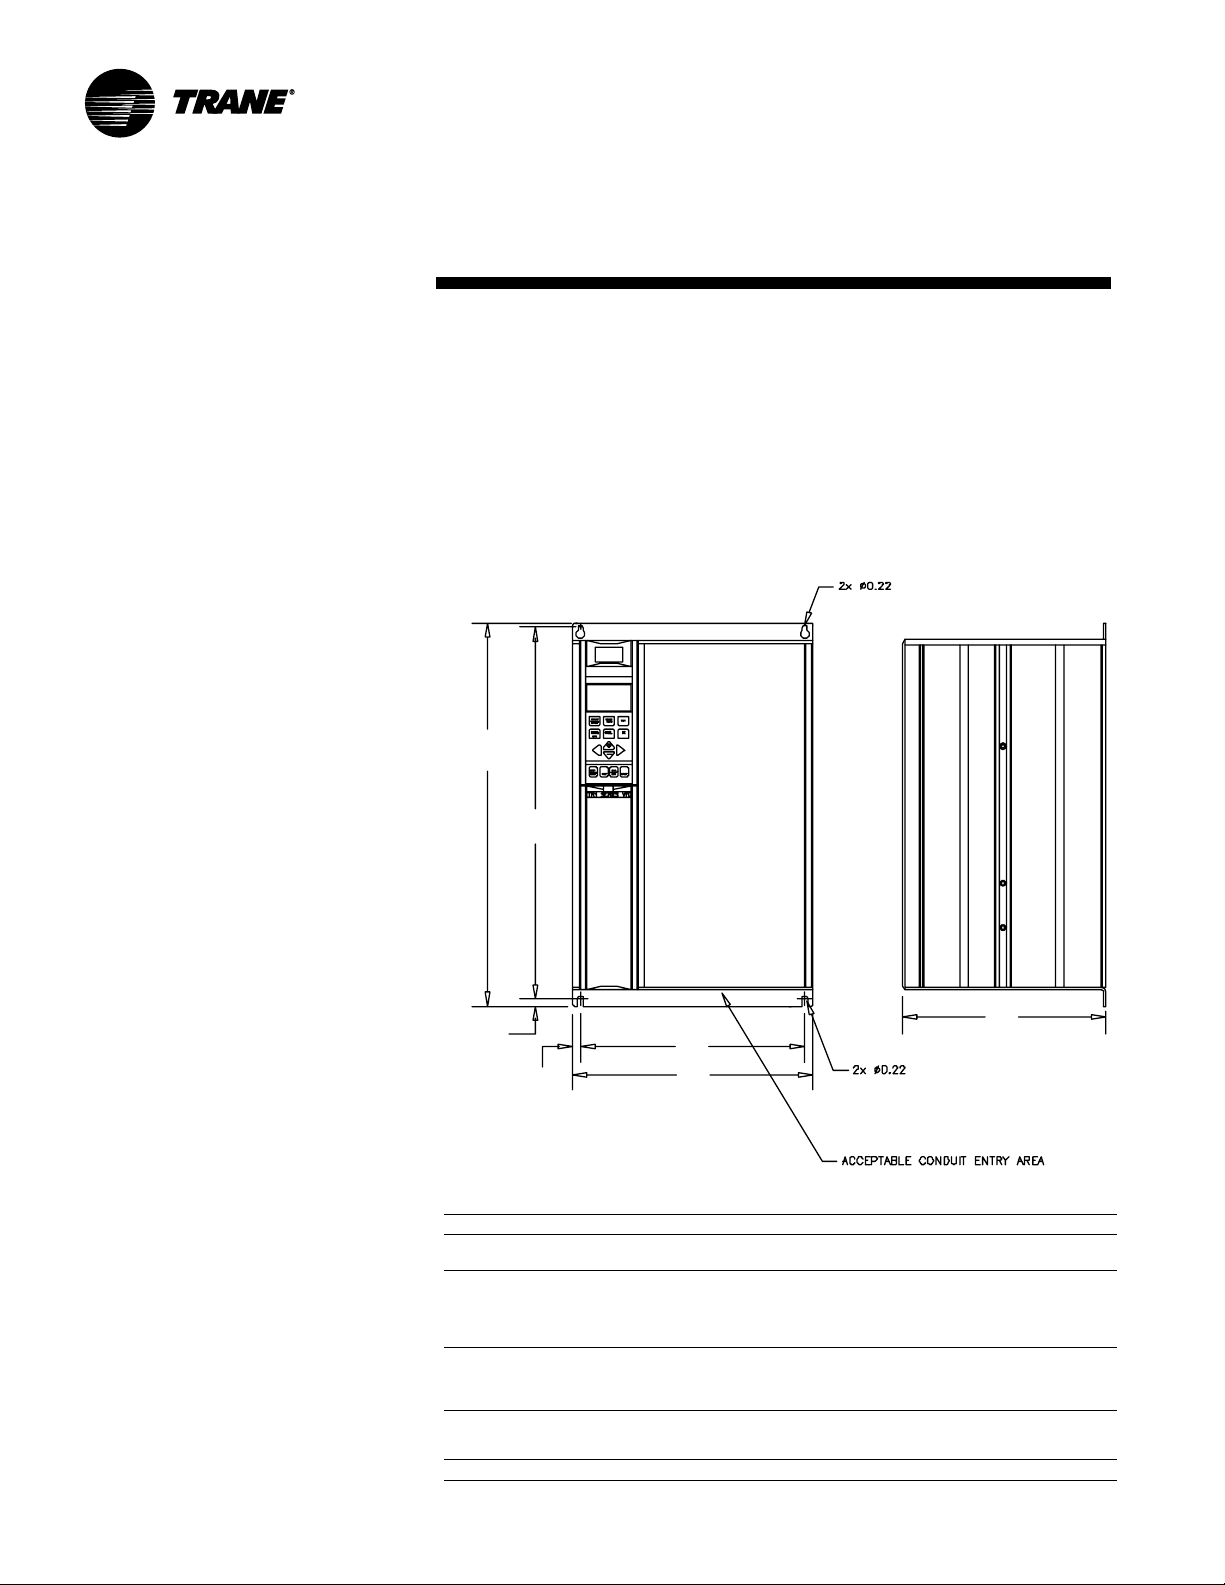
Dimensions &
VFD
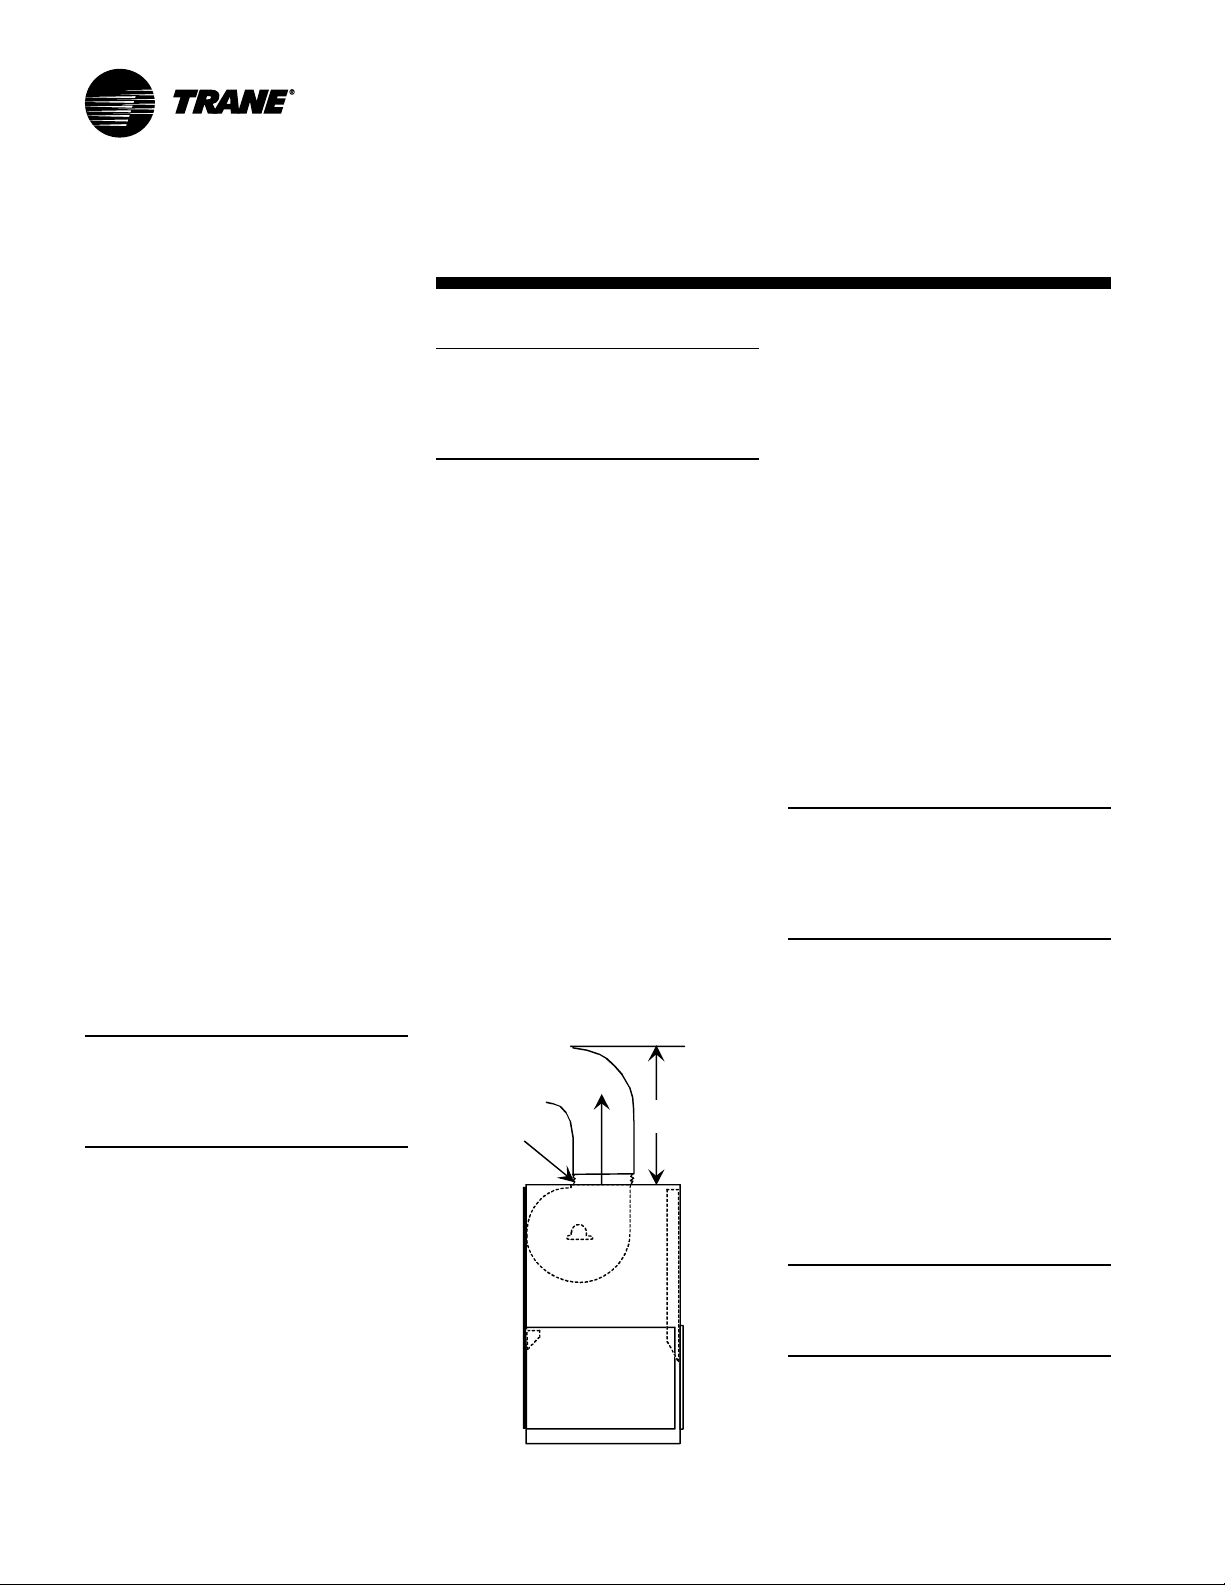
There must be a minimum eight inch
clearance above and below the VFD. A
minimum two inch clearance is required
on each side.
Also, allow enough clearance for opening
the VFD cabinet door. This will ensure
sufficient air space for cooling.
Refer to the “Dimensions and Weights”
section beginning on page 19 for VFD
dimensions and weights.
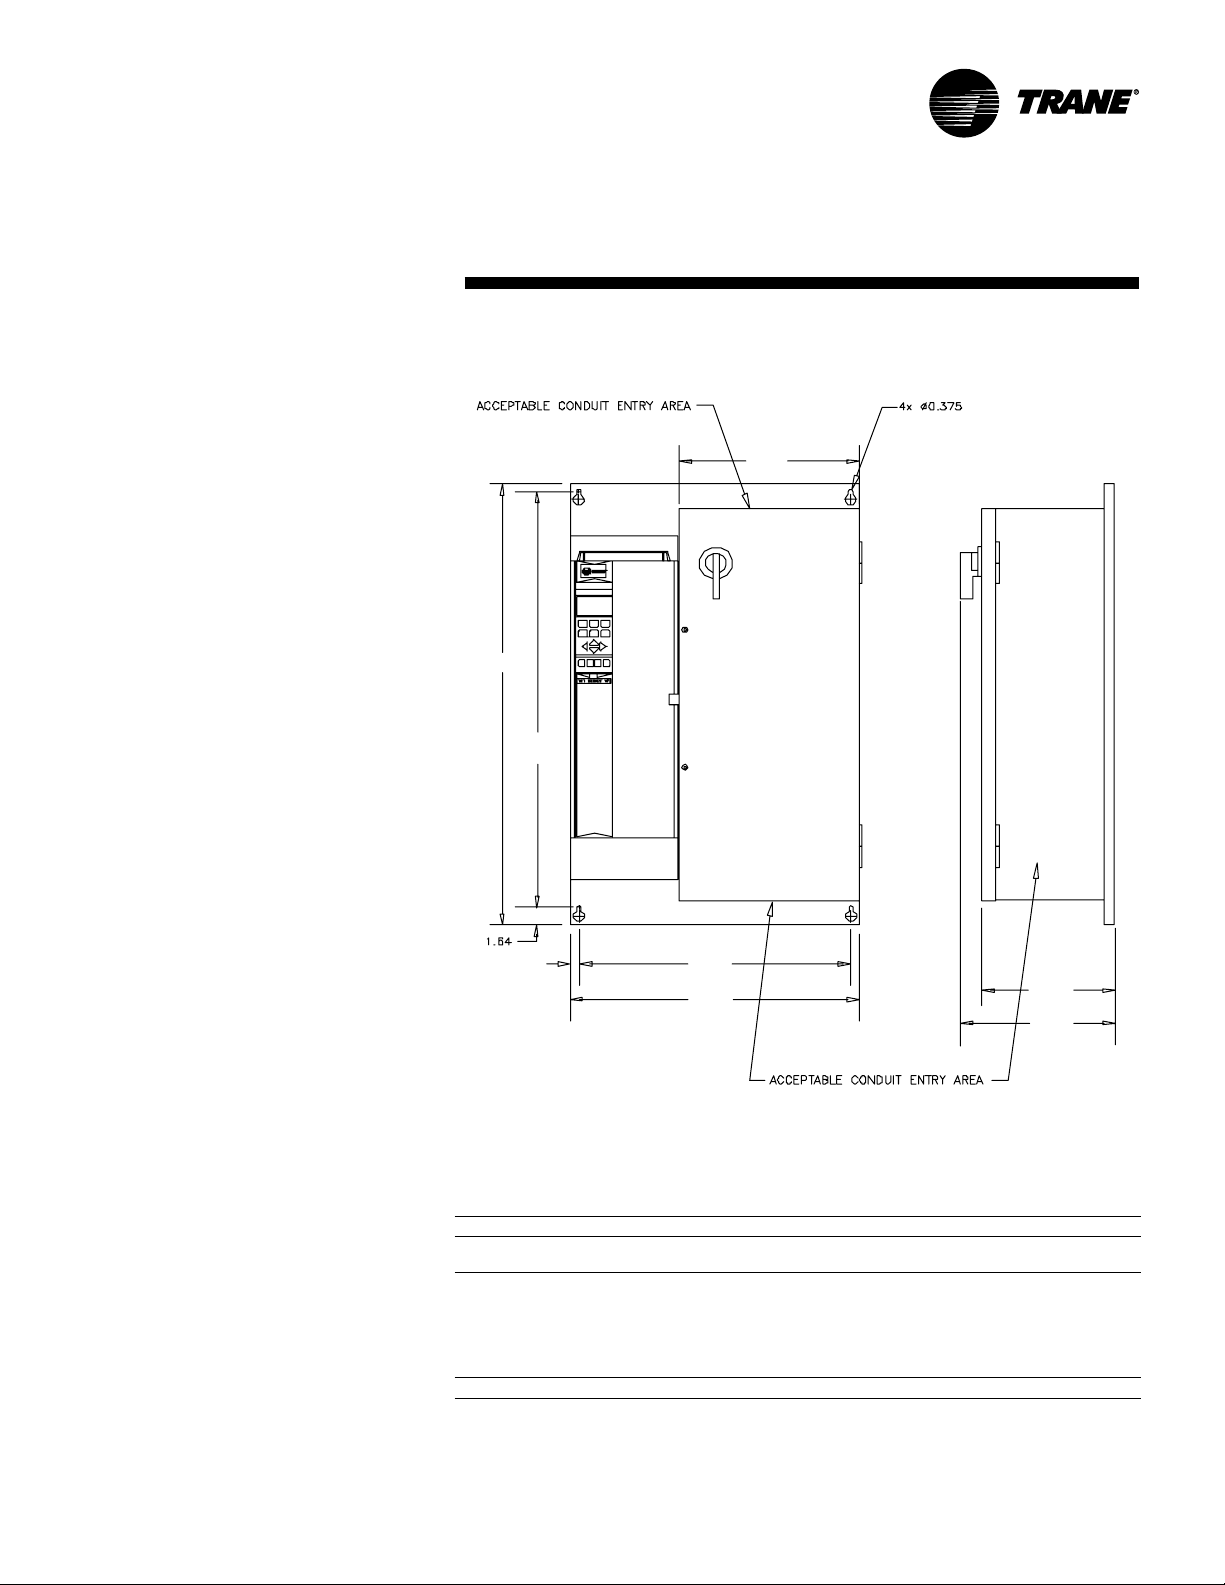
Variable Frequency Drive
Option (VFD)
WARNING
Control and Line Voltage!
Control and line voltage wiring from the
VFD to the unit must be in accordance
with all local and National Electric Codes.
Do not touch circuit components until
main power has been turned off and
“charge” lamp is extinguished. The
capacitors are still charged and could
result in death or serious injury.
WARNING
Weights
Mounting Requirements
Proper location of the VFD is important to
achieve proper performance and normal
operating life. Installation must be in an
area where it will be protected from:
• Direct sunlight, rain or moisture.
• Corrosive gases or liquids.
• Vibration, airborne dust, or metallic
particles.
For effective cooling as well as proper
maintenance, install the VFD vertically to
the ground using four mounting screws.
Hazardous Voltage w/Capacitors!
Disconnect all electric power, including
remote disconnects before servicing.
Follow proper lockout/tagout procedures to ensure the power cannot be
inadvertently energized. For variable
frequency drives or other energy storing
components provided by Trane or others,
refer to the appropriate manufacturer’s
literature for allowable waiting periods
for discharge of capacitors. Verify with an
appropriate voltmeter that all capacitors
have discharged. Failure to disconnect
power and discharge capacitors before
servicing could result in death or serious
injury.
Note: For additional information regarding the safe discharge of capacitors, see
PROD-SVB06A-EN or PROD-SVB06A-FR.
NOTICE
Use Copper Conductors Only!
Unit terminals are not designed to
accept other types of conductors. Failure
to use copper conductors may result in
equipment damage.
The variable frequency drive (VFD) option
can only be used with IntelliPak units. The
VFD and VFD w/bypass is available from
5 to 25 hp and is a Trane TR1. All VFD’s are
pre-configured and run tested at the
factory prior to shipping. The VFD is wall
mounted.
28 SCXG-SVX01B-EN
VFD dimensions, in.
voltage hp A B C D E F G
460 7.5 15.55 15.12 7.87 8.66 0.39 0.24 7.87
208 7.5 22.05 21.26 7.87 9.53 0.83 0.30 10.24
460 15
208 15 27.56 26.77 10.63 12.13 0.83 0.30 11.05
460 30
208 30 31.50 30.71 10.63 12.13 0.75 0.30 11.65
460 50
208 40 31.49 30.71 10.63 14.57 1.97 - 13.19
10
10
20
25
20
40
60
Page 29
Dimensions &
H
G
E
D
F
B
A
C
Electrical Installation Procedure
Refer to the
section 310-16
National Electric Code,
for sizing wires 4B - 9B. All
other control wires should be twisted
shielded or twisted pair shielded, 20 - 14
AWG, with lead length not to exceed 164
feet. When using shielded wire, the shield
sheath must be connected at the VFD
only. The connection on units with VFD is
J13-S. The connection on unis with VFD/
bypass is ITBI-10.
Weights
VFD
Variable Frequency Drive with Bypass
VFD with bypass dimensions, in.
SCXG-SVX01B-EN 29
voltage hp A B C D E F G H
460 7.5 30.40 28.03 16.14 23.35 24.85 0.75 8.59 10.63
208 7.5 41.28 38.89 16.14 24.00 25.5 0.75 10.95 12.99
460 15
208 25 50.81 48.35 21.36 31.61 33.41 0.90 12.36 14.41
10
10
15
20
20
25
Page 30
Mechanical Specifications
Duct Connections
WARNING
Hazardous Voltage w/Capacitors!
Disconnect all electric power, including
remote disconnects before servicing.
Follow proper lockout/tagout procedures to ensure the power cannot be
inadvertently energized. For variable
frequency drives or other energy storing
components provided by Trane or others,
refer to the appropriate manufacturer’s
literature for allowable waiting periods
for discharge of capacitors. Verify with an
appropriate voltmeter that all capacitors
have discharged. Failure to disconnect
power and discharge capacitors before
servicing could result in death or serious
injury.
Note: For additional information regarding the safe discharge of capacitors, see
PROD-SVB06A-EN or PROD-SVB06A-FR.
Return air enters the rear of the unit and
conditioned supply air discharges through
the top. Attach supply air ductwork
directly to the unit’s top panel, around the
fan discharge opening. A duct collar is not
provided.
Note: Units equipped with the flexible
horizontal discharge plenum option may
include a duct collar when holes are factory
cut. If discharge openings are field-cut, refer
to the “Plenum Installation” section.
Install all air ducts according to the
National Fire Protection Association
standards for the “Installation of Air
Conditioning and Ventilation Systems
other than Residence Type (NFPA 90A)
and Residence Type Warm Air Heating
and Air Conditioning Systems (NFPA
90B).
Make duct connections to the unit with a
flexible material such as heavy canvas. If
a fire hazard exists, Trane recommends
using Flexweave 1000, type FW30 or
equivalent canvas. Use three inches for
the return duct and three inches for the
discharge duct. Keep the material loose to
absorb fan vibration.
Note: The compressors and fan assembly are
internally isolated. Therefore, external isolation
devices (spring mounting isolators) are at the
discretion of a vibration specialist consulted
by the building or HVAC system designer.
Run the ductwork straight from the
opening for a minimum of three fan
diameters. See Figure I-MR-1. Extend
remaining ductwork as far as possible
without changing size or direction. Do not
make abrupt turns or transitions near the
unit due to increased noise and excessive
static losses. Use elbows with splitters or
turning vanes to minimize static losses.
Poorly constructed turning vanes may
cause airflow generated noise. Align the
fan outlet properly with the ductwork to
decrease noise levels in the duct and to
increase fan performance. To complete
trunk ductwork to the VAV terminal units,
refer to the VAV box manuals for specific
requirements. Check total external static
pressures against fan characteristics to
be sure the required airflow is available
throughout the ductwork.
To achieve maximum acoustical performance, minimize the duct static pressure
setpoint.
Discharge
Duct
3-inch
Flexible
Duct
Figure I-MR-1. Duct connection recommendations
3 Fan
Diameters
Return
Air
Water Piping
WARNING
High Pressure Water!
Provide relief valves on system water
piping to prevent instantaneous release
of high pressure water. Failure to provide
relief valves could result in death or
serious injury or water pump damage or
unit failure.
Condenser Connections
Condenser water piping knockouts are in
the lower left end panel. If necessary,
remove insulation to gain access. All field
installed piping must conform to
applicable local, state, and federal codes.
To complete condenser water
connections follow the procedure below.
Note: Four condenser waterline drain plugs
ship in a bag in the unit’s left end. The
installer must field install these four plugs
using pipe thread sealer. An additional plug
is provided for units with a waterside
economizer.
1. Attach the water supply line to the inlet
connection, and the return line to the
outlet connection. Entering and leaving
water connections for all condensers
are factory manifolded and require only
single connections for entering and
leaving water. If the unit has a
waterside economizer and/or control
valves, the factory pipes between these
components.
2. If using a cooling tower, refer to Figure
I-MR-2 for a typical piping circuit from
the unit.
3. Ensure the water pressure to the unit
does not exceed 400 psig.
Note: To prevent water pump damage,
design system piping to provide relief
when using energy saving waterside
economizer valves.
30 SCXG-SVX01B-EN
Page 31

Mechanical
Specifications
Condensate Drain Connections
The condensate drain is internally
trapped. Condensate drain connections
are on the unit’s left side. Connect
condensate drain piping to the 1
female fitting, using at least 7/8” OD
copper or
condensate line downward a minimum
of
3
/4“ OD iron pipe. Pitch the
1
/2” for each 10' of horizontal run, away
1
/4“ NPT
from the unit. Be sure to install the
condensate drain “P” trap drain plug.
Before starting the unit, fill the trap with
water to prevent negative pressure in the
fan section from impeding condensate
flow. To facilitate drain pipe cleaning,
install plugged tees in place of
90°elbows.
General Waterside Recommendations:
Cooling Towers
Cooling tower control affects the unit
cycle rates. Condenser water
temperature swings from 10-15°F may
cause excessive compressor, water
valve, and unit cycling. Be sure to set the
tower controls to minimize compressor/
unit cycling.
Table I-MR-1. Water Connection Sizes.
Unit Size Direct Condenser Factory Piped
SCWG 20-35 1-1/2 NPT 2-1/2 NPT
Waterside Piping Arrangements
Install a condenser water pump between
the cooling tower (either open or closed)
and the self-contained unit. Lay out the
remainder of the system’s condenser
piping in reverse returns. This helps
balance the system by equalizing the
length of supply and return pipes.
Multistory buildings may use a direct
return system with balancing valves at
each floor.
Install the supply riser and its return in
close proximity. Furnish both with
permanent thermometers to check the
waterside balance during start-up and
routine maintenance checks.
Also, include strainers at each pump inlet
and unit. Install drain valves at the riser’s
base to allow drainage points for system
flushing during start-up and routine
maintenance. For condenser draining
and header removal, include a shutoff/
balancing valve on the entering and
leaving waterside pipes, drain tees, and
unions of each unit. Also, install a shutoff
valve on the unit entering water pipe for
condenser draining.
Note: Unit does not have floor drains.
Water Temperature Requirements
Do not allow the entering water
temperature to go below 54°F (12.2°C) on
units with constant water flow (basic
piping). This will cause the compressors
to shut down and the mechanical cooling
function will lockout. However, the
economizer (if enabled) will continue to
function. The compressors will reset
when the entering water temperature
reaches 58°F (15°C).
Units with variable water flow
(intremediate piping) have a modulating
condensing pressure control valve that
allows compressor operation down to
entering water temperatures of 35°F
(2°C).
For more information on constant and
variable water flow, see the Sequence of
Operation section of this manual.
Note: Units with a waterside economizer
can be set from the human interface panel
for variable or constant water flow.
Figure I-MR-2. Condenser water piping components for cooling tower system
Figure I-MR-3. Direct condenser connections.
SCXG-SVX01B-EN 31
Page 32

Mechanical
Specifications
Refrigerant Piping (Air-Cooled
Units Only)
See the “Startup” section of this manual
for instructions on refrigerant evacuation,
charging, and superheat measurement.
Leak-test the entire refrigeration system
after all piping is complete.
Leak Test (Remote Air-cooled Units Only)
Units ship with a holding charge of dry
nitrogen. Before installing the unit
refrigerant piping, momentarily depress
either the suction or discharge line access
valve to verify the holding charge has not
been lost. If no nitrogen escapes the
access valve, leak-test the entire
refrigerant system to determine the leak
source. Use a halogen leak detector, a
halide torch, or soap bubbles to leak test.
After finding a leak, remove the test
pressure and repair the leak. Retest the
unit to ensure all leaks are repaired.
Brazing Procedures
Proper brazing techniques are essential
when installing refrigerant piping. The
following factors should be kept in mind
when forming sweat connections:
WARNING
Hazard of Explosion and Deadly
Gases
Never solder, braze or weld on refrigerant lines or any unit components that are
above atmospheric pressure or where
refrigerant may be present. Always
remove refrigerant by following the
guidelines established by the EPA Federal
Clean Air Act or other state or local
codes as appropriate. After refrigerant
removal, use dry nitrogen to bring
system back to atmospheric pressure
before opening system for repairs.
Mixtures of refrigerants and air under
pressure may become combustible in
the presence of an ignition source
leading to an explosion. Excessive heat
from soldering, brazing or welding with
refrigerant vapors present can form
highly toxic gases and extremely
corrosive acids. Failure to follow all
proper safe refrigerant handling practices
could result in death or serious injury.
1. When heating copper in the presence
of air, copper oxide forms. To prevent
copper oxide from forming inside the
tubing during brazing, sweep an inert
gas, such as dry nitrogen, through the
tubing. A nitrogen flow of 6 to 10 cubic
feet per hour is sufficient to displace the
air in the tubing and prevent oxidation
of the interior surfaces. Use a pressure
regulating valve or flow meter to
control the flow.
2. Ensure that the tubing surfaces
requiring brazing are clean, and that the
tube ends are carefully reamed to
remove any burrs.
3. Make sure the inner and outer tubes of
the joint are symmetrical and have a
close clearance, providing an easy ‘slip’
fit. If the joint is too loose, the
connection’s tensile strength is
significantly reduced. Ensure the
overlap distance is equal to the inner
tube diameter.
4. Wrap each refrigerant line component
with a wet cloth to keep it cool during
brazing. Excessive heat can damage
the internal components.
5. If using flux, apply it sparingly to the
joint. Excess flux will contaminate the
refrigerant system.
6. Apply heat evenly over the length and
circumference of the joint.
7. Begin brazing when the joint is hot
enough to melt the brazing rod. The hot
copper tubing, not the flame, should
melt the rod.
8. Continue to apply heat evenly around
the joint circumference until the brazing
material is drawn into the joint by
capillary action, making a mechanically
sound and gas-tight connection.
9. Visually inspect the connection after
brazing to locate any pinholes or
crevices in the joint. Use a mirror if joint
locations are difficult to see.
10. Reference Tables M-MP-6 and M-MP7 for the correct amount of refrigerant
required for charging the unit.
32 SCXG-SVX01B-EN
Page 33

Electrical Requirements
Unit Wiring Diagrams
WARNING
Live Electrical Components!
During installation, testing, servicing and
troubleshooting of this product, it may be
necessary to work with live electrical
components. Have a qualified licensed
electrician or other individual who has
been properly trained in handling live
electrical components perform these
tasks. Failure to follow all electrical
safety precautions when exposed to live
electrical components could result in
death or serious injury.
Specific unit wiring diagrams are
provided on the inside of the control
panel door. Use these diagrams for
connections or trouble analysis.
Supply Power Wiring
WARNING
Hazardous Voltage w/Capacitors!
Disconnect all electric power, including
remote disconnects before servicing.
Follow proper lockout/tagout procedures to ensure the power cannot be
inadvertently energized. For variable
frequency drives or other energy storing
components provided by Trane or others,
refer to the appropriate manufacturer’s
literature for allowable waiting periods
for discharge of capacitors. Verify with an
appropriate voltmeter that all capacitors
have discharged. Failure to disconnect
power and discharge capacitors before
servicing could result in death or serious
injury.
Note: For additional information regarding the safe discharge of capacitors, see
PROD-SVB06A-EN or PROD-SVB06A-FR.
It is the installer’s responsibility to
provide power supply wiring to the unit
terminal block or the non-fused
disconnect switch option. Wiring should
conform to NEC and all applicable code
requirements.
Bring supply wiring through the knockout
in the lower left side of the unit control
panel. Connect the three phase wires to
the power terminal block or the nonfused disconnect switch in the control box
terminals. Refer to specific wiring
diagrams and fuse information in the
unit’s control panel.
NOTICE
Use Copper Conductors Only!
Unit terminals are not designed to
accept other type conductors. Failure to
use copper conductors may result in
equipment damage.
NOTICE
Equipment Damage!
Correct phase sequence is critical. If
phase sequence of the incoming line
voltage is not correct, it may result in
motor damage.
Voltage Range
Voltages must be within +- 10% the
nameplate voltage. Ensure the unit
voltage is balanced by measuring at the
compressor terminals. Voltage imbalance
on three phase systems can cause motor
overheating and premature failure.
Maximum allowable imbalance is 2.0%.
Voltage Imbalance
Read the voltage at the compressor
terminals to determine if it is balanced.
Voltage imbalance on three phase
systems can cause motor overheating
and premature failure. The maximum
allowable imbalance is 2.0%. Voltage
imbalance is defined as 100 times the
sum of the deviation of the three voltages
from the average (without regard to sign)
divided by the average voltage. For
example, if the three measured voltages
are 221, 230, and 227, the average voltage
would be:
(221 + 230 + 227) = 226 volts
The percentage of voltage imbalance is
then:
3
(226-221) = 2.2%
100 *
226
Control Power
NOTICE
Component Failures!
Unit transformers IT1, IT3, 1T4, and IT5
are sized to provide power to the unit
only. Do not use these transformers to
supply power to field equipment. Field
connections to these transformers may
create immediate or premature component failures.
In this example, 2.2% imbalance is not
acceptable. Whenever a voltage
imbalance of more than 2.0% exists,
check the voltage at the unit disconnect
switch. If the imbalance at the unit
disconnect switch does not exceed 2.0%,
faulty unit wiring is causing the
imbalance. Conduct a thorough
inspection of the unit electrical wiring
connections to locate the fault, and make
any repairs necessary.
Access the connection terminal block
through the control panel on the unit’s
upper left side. All wiring should conform
to NEC and applicable local code requirements.
Be sure all wiring connections are secure.
Reference the unit specific diagrams
inside the control panel.
SCXG-SVX01B-EN 33
Page 34

Electrical
Requirements
Selection Procedures
RLA = rated load amps
Compressor LRA = locked rotor amps
Fan motor LRA = locked rotor amps,
N.E.C. table 430 - 150
FLA = full load amps, N.E.C.
Table 430 - 150
Voltage utilization range is ±10%
Determination of minimum circuit
ampacity (MCA).
MCA = 1.25 x largest motor amps/VFD
amps (FLA or RLA) + the sum of the
remaining motor amps.
Determination of maximum fuse size
(MFS) and maximum circuit breaker size
(MCB).
MFS and MCB = 2.25 x largest motor
amps (FLA or RLA) + the sum of the
remaining motor amps.
For units with the dual power option,
there are two electrical circuits that need
calculations using the formulas above:
circuit #1 - fans
circuit #2 - compressors
If the rating value determined does not
equal a standard current rating of over
current protective device, use the next
lower standard rating for the marked
maximum rating.
Table ED-1. Number of Compressors per Unit
SCWG/SIWG 20 25 3 0 3 5
SCRG/SIRG 20 25 32
10 HP 2 2 1 15 HP - - 1 2
Table ED-2. SCWG/SIWG Compressor Motor Data
HP RLA LRA RLA LRA RLA LRA
10 33.1 269 14.4 117 11.5 94
15 46.9 409 20.4 178 16.4 143
200V 460V 575V
Table ED-3. SCRG/SIRG Compressor Motor Data
HP RLA LRA RLA LRA RLA LRA
10 38.4 269 16.7 117 13.4 94
15 55.0 409 24.1 178 19.1 143
200V 460V 575V
Table ED-4. Fan without VFD
HP FLA LRA FLA LRA FLA LRA
5 16.1 105 6.7 46 5.4 37
7.5 25.0 152 10.8 66 8.2 54
10 32.9 193 14.2 84 11.4 66
15 44.8 290 20.3 126 16.2 102
20 61.0 373 25.0 162 20.0 132
25 74.0 469 31.0 204 24.2 162
200V 460V 575V
Table ED-5. Fan with VFD
HP FLA LRA FLA LRA
7.5 13.8 152 10.6 66
10 32.2 193 14.2 84
15 48.3 290 21.0 126
20 61.9 373 27.6 162
25 78.2 469 34.0 204
Note: Values are at the maximum VFD input rating and not the reduced motor values.
200V 460V
Table ED-6. Electric Heat - Single Stage
SCWG/SIWG SCRG/SIRG Heat 200V 460V
Size Size Kw Amps Amps
20 20 16 44.8 19.6
25 25 20 55.6 24.2
30 - 24 66.8 29.0
- 32 26 72.4 31.6
35 - 28 78 34.0
Note: Electric heat amperage should not be considered when determining minimum circuit ampacity. The current of the
unit in the heating mode will not exceed the current of the unit in the cooling mode.
Table ED-7. CCRC/CIRC Condenser Electrical Data
Unit Size Rated MFS/
Tons Voltage # Fans FLA (ea.) LRA (ea.) MCA MCB
20, 29, 32 200 4 4.1 20.7 17.4 20
Note: All motors for CCRC/CIRC units are rated at 1 hp (.7457 kW).
34 SCXG-SVX01B-EN
230 4 4.1 20.7 17.4 20
460 4 1.8 9.0 7.7 15
575 4 1.4 7.2 6.0 15
Page 35

pre-startup
Pre-Startup Procedures
WARNING
Hazardous Voltage w/Capacitors!
Disconnect all electric power, including
remote disconnects before servicing.
Follow proper lockout/tagout procedures to ensure the power cannot be
inadvertently energized. For variable
frequency drives or other energy storing
components provided by Trane or others,
refer to the appropriate manufacturer’s
literature for allowable waiting periods
for discharge of capacitors. Verify with an
appropriate voltmeter that all capacitors
have discharged. Failure to disconnect
power and discharge capacitors before
servicing could result in death or serious
injury.
Note: For additional information regarding the safe discharge of capacitors, see
PROD-SVB06A-EN or PROD-SVB06A-FR.
Installation
Unit Protective Covers
Remove the shipping protection
coverings from the human interface
panel (HI) at the control panel, the filter
box (or air inlet opening), the discharge
air opening, and optional variable
frequency drive (VFD).
Compressor Isolators
Loosen compressor isolator mounting
bolts and remove shipping bracket from
beneath the compressor feet. Retighten
isolator mounting bolts. Torque to 18 ft.
lbs. (+ 2 ft. Lbs.)
requirements
Supply Fan Isolators
Remove the shipping channels and
mounting bolts from beneath the fan. See
Figure I-PR-1. Open both fan
compartment access doors to access the
channels. There are four mounting points
for 20-38 ton units and six mounting
points for 40-80 ton units. See Fig I-PR-2.
Note: For 20-38 ton units, do not remove the
fan assembly shipping blocks and tie down
bolts if the fan speed is 750 rpm or less.
While keeping the fan mounting frame
level, turn the fan isolator height adjusting
bolts until the fan housing P-gasket
compresses
tion piece. See Figure I-PR-1.
1
/4” against the roof transi-
Before starting up units perform the
following procedures to ensure proper
unit operation.
Figure I-PR-1. Supply fan horizontal isolation
shipping bracket.
Figure I-PR-2. Fan isolator locations.
SCXG-SVX01B-EN 35
Page 36

pre-startup
Installation
Plenum Bottom View
requirements
Dashed line indicates correct insulation placement.
Figure I-PR-3. Correct plenum insulation placement
Plenum
Before installing the plenum attach the
insulation strip that ships with the plenum.
See Figure I-PR-3 for proper insulation
location. Align the plenum front with the
control panel side of the unit. Using the
strips and screws provided, secure the
plenum to the unit.
Treat field-cut holes to prevent fiberglass
from entering the airstream.
Note: Plenum insulation must be applied
properly to prevent air bypass around the
plenum. See Figure I-PR-3.
36 SCXG-SVX01B-EN
Page 37

pre-startup
Airside Economizer
Installation
Note: Airside economizer option available on
20-80 tons only.
Unit Handling
1. Hoist the damper cabinet to the
installation location with straps
positioned under the skid as shown in
Figure I-PR-4. Use spreader bars to
prevent unit damage during lifting.
2. With the damper cabinet at its final
location (near the unit), remove the
screws securing it to the skid from the
side flanges. Retain these screws for
later use.
Unit Preparation
3. The support legs are secured to the
skid, and the hanging bracket is secured
with wire ties to an inside flange near
the cabinet’s base. Remove the Cchannel collar and install it on the unit, if
not already installed.
4. Remove the roll of
from the damper cabinet’s W-supports,
and apply it to the C-channel collar
mounted on the rear of the unit. This
gasket will provide a seal between the
damper cabinet and the unit.
5. Attach the legs (with screws provided)
to the leg brackets located on the
damper’s base.
6. Attach a field-provided clevis of
suitable strength (
corner lifting brackets through the
7
/8” diameter holes.
7. Attach to the clevises a means of lifting
the damper cabinet from its skid.
Unit Installation
8. Slowly raise the damper cabinet from
its skid.
9. Attach the hanging bracket across the
front of the damper cabinet. Position it
with its short flange pointing to four
1
/8” thick gasket
> 1/2” ), to each of the
Installation
Figure I-PR-4. Proper lifting of the airside economizer
o’clock, and secure it with screws
provided. See Figure I-PR-5.
10. Lift the damper cabinet and position it
such that the hanging bracket is
positioned over the unit’s C-channel
collar.
11. Lower the damper cabinet until the
holes in its side flanges are aligned with
the holes in the C-channel collar. Install
screws removed in step 3 through the
damper cabinet’s side flanges and into
the C-channel’s corresponding holes.
12. Attach ductwork to the top and back
dampers according to local codes.
Field Wiring Connections
13. Open the damper cabinet’s door and
connect the factory-provided plug from
the actuator to the factory-provided
plug in the unit’s filter section.
Airside
Economizer
requirements
14. Cabinets with TRAQ dampers only:
15. Cabinets with TRAQ dampers only:
Unroll the two rolls of pneumatic tubing
located inside the damper cabinet.
Route these tubes through the cabinet’s
front upper panel (0.25 dia. holes
provided). Connect them to the two
pneumatic tubes protruding from the
customer electrical connection panel on
the unit. Be sure to connect like tubes to
each other (black to black, white stripe
to white stripe).
Locate the “bullet” sensor and rolled up
wiring in the unit’s filter section. Route it
into the damper cabinet and insert the
sensor into the sensor mounting clip
attached to underside of one of the Traq
dampers.
Figure I-PR-5. Proper installation of the airside economizer option
SCXG-SVX01B-EN 37
Page 38

pre-startup
Installation
Static Pressure Transducer
Installation (VAV units only)
Supply air static pressure controls the
inlet guide vane and inverter options. A
static pressure head assembly ships
separate in the control panel for field
installation in the supply air duct work.
The installer is responsible for providing
pneumatic tubing.
Transducer Location
Place the head assembly in an area of the
ductwork that will provide an average
and evenly distributed airflow pattern.
Use the following guidelines to determine
an appropriate installation location.
1. Locate the static head assembly about
2
/3 to 3/4 of the way down the longest
duct run, in an area approximately 10
duct diameters downstream and 2 duct
diameters upstream of any major
interferences, turns, or changes in duct
diameter.
2. When installing pneumatic tubing
between the head assembly and
transducer in the control panel, do not
exceed 250 feet for
500 feet for
1
3
/8” OD tubing.
/4” OD tubing or
requirements
Installing the Transducer
Complete the following procedure to
properly install the inlet guide vane static
pressure transducer.
1. Mount the pressure sensing head
assembly in the duct so that the sensing
tip is in the middle of the duct so that it
will provide a proper pressure
measurement. See Figure I-PR-6.
2. Connect the pneumatic tubing from the
sensing head to the push-on tubing
connection in the control panel. Use a
plastic static pickup tubing. Do not
exceed 250 feet for
500 feet for 3/8” OD tubing.
The transducer inside the control panel
picks up low side or reference pressure.
Note: If plastic tubing pulls away from a
connection, trim it back before replacing it
on the fitting. Stretched tubing may leak
and cause faulty control.
1
/4“ OD tubing or
Figure I-PR-6. Static pressure sensor installation
38 SCXG-SVX01B-EN
Page 39

pre-startup
Installation
Waterside Economizer
Installation Procedure
1. Loosen and pull all end devices that go
throught the bushing on the filter rack
(upper right corner of rack).
2. Remove the filter rack from the back of
the unit by removing the
screws from the top and bottom of the
filter rack assembly. The filter rack
assembly will hang on the unit when
the screws are removed. Remove the
filter rack by lifting it up off the unit.
3. Remove the economizer from the
crate and position it behind the unit with
the headers on the left side, when
facing the back of the unit. Remove the
plastic envelope that is taped to the
economizer box assembly. This
envelope contains the gasket that must
be installed onto the vertical side
flanges of the box.
4. Install the pressure sensitive gasket to
the unit side of the vertical flange on
the economizer box.
5. Hang the economizer on the unit as
shown in Figure I-PR-7. Lift the
economizer by using the holes
provided in the top panel of the
economizer.
1
/4” hex head
requirements
6. Align economizer holes with the holes
in the unit channel. Install screws in the
top (6x) and bottom (6x) of the
economizer.
7. Remove the unit’s rear middle panel
and unbraze the two copper pipes in
5
/8” water pipe. Do not remove
the 2
the pipe outlet blockoff panel.
8. Remove the economizer tubing
assemblies from the shipping box.
Check ship-separate parts against
those shown in Figures I-PR-8, I-PR-9, IPR-10, and I-PR-11. Face the front of the
unit to see which side the water pipe
exits to determine if the unit has either
right or left-hand piping.
9. Assemble tubing as shown in Figure IPR-8 or I-PR-11. Tack all tubes in place
before brazing to ensure proper fit-up.
For right-hand piped units, install the
ball valve actuator assembly and
actuator as shown in Figure I-PR-10.
Refer to the unit wiring diagram for
wiring connection points.
10. Install the pipe insulation on all pipe
line to prevent sweating
11. Install the rear panels.
12. Re-install the filter rack on the back of
the economizer coil box and affix with
screws provided.
Figure I-PR-7. Installing the waterside economizer.
SCXG-SVX01B-EN 39
Page 40

pre-startup
Waterside Economizer with left-hand
factory piping components
Installation
requirements
Figure I-PR-9. Waterside economizer with left-hand factory piping tubing assembly
Item Part Description
A Assembly #1
B Assembly #2
C Assembly #3
Figure I-PR-8. Detail view of ship-separate
tubing assemblies for waterside economizer left-hand piping
40 SCXG-SVX01B-EN
D Assembly #4
E Tube; 2 5/8” x 16 7/8”
F Tube; 2 5/8” x 22 5/
Waterside Economizer Ship-Separate Parts List
Factory Item Part # Qty. Description
Piping
Left-Hand 4001 2 Tube; 2 5/8” x 9”
8
X17110026250 5 Elbow; 2
4003 1 Tube; 2
4740 1 Tube; 2
4009 1
X21040098390 10 ft.
X21080406110 1
X16120203570 1 Plug; 1
X17150027060 1 Bushing; 2
X17170031210 1 Tee; 2
4738 1
4007 1 Tube; 2
X45000032020 1 roll Tape, 1.5’ wide
4006 1 Tube; 2 5/8” x 19 15/16”
5
/8” x 2 5/8”
5
/8” x 26 1/8”
5
/8” x 33 1/2”
*
Tube; 2 5/8” x 14 7/8”
*
Gasket
*
Insulation; 2 5/8” Rubatex
1
/2” Brass
1
/2” ftg. x 1 1/2”
5
/8” x 2 1/8” x 2 5/8”
*
Tube; 2 5/8” x 19 3/4”
5
/8” x 14 1/2”
Page 41

pre-startup
Installation
Waterside Economizer with right-hand
factory piping components
Waterside Economizer Ship-Separate Parts List
Factory Item Part # Qty. Description
Piping
Right-Hand 4001 1 Tube; 2 5/8” x 9”
4607 1 Tube; 2
X17110026250 5 Elbow; 2
4605 2 Tube; 2
X15330177010 1 Water Valve
4008 1
X17 1700 312 10 1 Tee; 2
X16120203570 1 Brass Plug, 1
X17150027060 1 Bushing; 2
4007 1 Tube; 2
4031 1 Tube; 2
4603 1
4006 1 Tube; 2
X13610256010 1
X19110028040 2
X19110028040 3 ft.
X210804060110 14 ft.
X45000032020 1 roll Tape, 1.5’ wide
X21040098390 10 ft.
*
*
*
*
5
/8” x 17”
5
/8” x 2 5/8”
5
/8” x 9 1/2”
Tube; 2 5/8” x 20 1/4”
5
/8” x 2 1/8” x 2 5/8”
1
/8” ftg. x 1 1/2”
5
/8” x 14 1/2”
5
/8” x 62
Tube; 2 5/8” x 11 3/4”
5
/8” x 19 1/4”
Actuator with wires
90 Degree Conduit Fitting
*1
/2” Conduit
*
Rubatex Insulation, 2 5/8”
*
Gasket
requirements
1
/2”
Item Part Description
A Assembly #1
B Assembly #2
C Assembly #3
D Assembly #4
E Tube; 2 5/8” x 11 3/4”
F Tube; 2 5/8” x 20 1/4”
G Actuator Assembly
Figure I-PR-10. Waterside economizer with right-hand factory piping tubing assembly.
Figure I-PR-11. Detail view of ship-separate tubing assemblies for waterside economizer right-hand factory piping.
SCXG-SVX01B-EN 41
Page 42

pre-startup
Installation
Hydronic Coil Installation
These instructions are for steam and hot
water coil installation. The hydronic coil
assembly has a full coil, piping, a modulating temperature control valve, and a
disc temperature limit device located in
the unit near the fan on the motor frame.
Hydronic coils are available with either
right or left-hand pipe connections. Piping
connections are identical to the unit
piping. For example, if you have righthand unit piping, the hydronic coil will
have right-hand connections. The
hydronic coil assembly has temperature
controls to keep the unit’s internal cabinet
temperature below 105 F to prevent
motor and bearing damage.
Installation Procedure
WARNING
Unit Structural Integrity!
Unit panels provide structural integrity.
Do not remove more than two nonadjacent panels at one time as this could
cause the plenum frame to collapse.
Failure to follow these recommendations
could result in death, serious injury or
equipment damage.
1. Remove filter rack from the back of the
unit. Remove the 1/4-inch hex head
screws from the top and bottom of the
filter rack assembly. The filter rack
assembly will hang on the unit when
the screws are removed. The filter rack
can now be removed by lifting up on
the filter rack.
2. Remove the hydronic coil from the
crate and position it behind the unit with
the open side facing the unit evaporator
coil inlet. Also, remove the plastic
envelope that is taped to the coil box
assembly. This envelope contains the
requirements
mounting screws needed to attach the
coil box to the unit and the gasket
required on the vertical side flanges of
the box.
3. Install the pressure sensitive gasket to
the unit side of the vertical flange on the
coil box in two places.
4. Using 2” x
eyebolts, thread into the coil lift plates
to raise the coil up to the height
necessary to attach it to the unit. The top
panel has a “J” hook on it to allow
hanging, similar to the filter rack. Align
the holes so that the coil hangs on the
unit. If the unit has the dirty filter option,
connect the static pressure tube to the
unit before bolting the coil in place.
Locate the static pressure tubing on the
unit evaporator coil and route through
the knockout in the top corner of the
coil box.
5. Align the hydronic coil with the holes in
the unit channel or waterside
economizer option. Move the coil box
up against the unit and install using six
mounting screws in the top and six in
the bottom of the coil box.
6. Remove the valve and pipe cover on
the coil box. Connect the wires that are
coiled in the coil box, referring to the
wiring diagram installed on the unit
control panel door. Route wires into the
unit through knockouts in the top of the
box.
7. Reinstall the filter rack on the back of
the heating coil rack. If the unit has the
waterside economizer option, the filter
rack will require additional support legs.
1
/2” standard thread
42 SCXG-SVX01B-EN
Page 43

pre-startup
Electric Heat Installation
The electric heat option consists of a
single stage heater and is used in
IntelliPak units or units with a fieldinstalled thermostat. The electric heater
ships separate for field installation and
wiring. Available heater kW per unit size
is listed in Table I-PR-2. Electric heat can
be installed on units with a vertical
discharge. However, it cannot be installed
on units with plenums. See Figure I-PR-12
and Table I-PR-3 for electric heat dimensional data.
Table I-PR-2. Available Electric Heat kW
Unit Size Heater kW
20 Tons 16
25 Tons 20
30 Tons 24
32 Tons 26
35 Tons 28
Installation Procedure
1. Remove the fan discharge shipping
covers, if they have not already been
removed.
2. Install the open-cell gasket around the
discharge opening on the heater.
3. Position the electric heater so that the
unit fan discharge openings line up with
the electric heater openings. For a
Installation
vertical discharge unit, position the
electric heater as shown in Figure I-PR-
12.
4. Use the hole pattern in the electric heat
as a template for marking and drilling
3
/16” diameter holes in the unit.
5. Bolt the electric heaters to the unit
Note: It is very important that electric heaters
are selected based on unit voltage and
tonnage because discharge opening sizes vary
by unit tonnage.
Electric Heat Coil Wiring Procedure
NOTICE
Use Copper Conductors Only!
Unit terminals are not designed to
accept other type conductors. Failure to
use copper conductors may result in
equipment damage.
WARNING
Hazardous Voltage w/Capacitors!
Disconnect all electric power, including
remote disconnects before servicing.
1
/4” sheetmetal screws.
using
requirements
Follow proper lockout/tagout procedures to ensure the power cannot be
inadvertently energized. For variable
frequency drives or other energy storing
components provided by Trane or others,
refer to the appropriate manufacturer’s
literature for allowable waiting periods
for discharge of capacitors. Verify with an
appropriate voltmeter that all capacitors
have discharged. Failure to disconnect
power and discharge capacitors before
servicing could result in death or serious
injury.
Note: For additional information regarding the safe discharge of capacitors, see
PROD-SVB06A-EN or PROD-SVB06A-FR.
1. Before wiring the electric heater,
remove the unit wiring diagram from
the unit control panel and refer to the
connection points.
Figure I-PR-12. Electric heater dimensions.
Table I-PR-3. Electric Heat Dimensions - English - (inches)
Unit Size B1 B2 Z
Figure I-PR-12. Vertical discharge electric heat
installation.
SCXG-SVX01B-EN 43
20 Tons 10 3/
25 Tons 12 1/
30, 32, 35 Tons 14 3/
4
4
4
15 5/
15 5/
15 5/
8
8
8
27 3/
26 3/
23 3/
4
4
4
Page 44

pre-startup
Standard with All IntelliPak
Units
Figure I-PR-7. BAYSENS077
zone temperature sensor only
CV Unit Zone Sensor Options
Installation
requirements
Zone Sensor Options for IntelliPak Control Units
Zone sensor options are available and be ordered with the unit or after the unit ships.
Following is a full description of zone sensors and their functions. Installation
instructions are on page 34. Programming instructions for the programmable zone
sensor are on page 36. Refer to Table O-GI-2 on page 61 for the zone sensor
temperature vs. resistance coefficient curve.
BAYSENS077* Description
This zone sensor module ships with all units, and can be used with BAYSENS019,
BAYSENS020, or BAYSENS021 remote sensors. When this sensor is wired to one of
these remote zone sensors, wiring must be 18 AWG shielded twisted pair (Belden 8760
or equivalent). Refer to the specific zone sensor for wiring details. It provides the
following features and system control functions:
• Remote temperature sensing in the zone
• Morning warmup sensor
• Zone sensor for ICS™ systems
• Zone temperature averaging
When used as a remote sensor for standard zone sensor, the thermistor sensor must
be disabled.
(Possible Schematic Designation(s): 5U23, 5U26, 5U30, and 5RT5.)
Figure I-PR-8. BAYSENS108
Dual setpoint, manual/automatic
changeover sensor, accessory model
number digit 6 = E
Figure I-PR-10. BAYSENS110
Dual setpoint, manual/automatic changeover
sensor with system function lights, accessory model number digit 6 = F
BAYSENS108 & BAYSENS110 Description
These zone sensor modules are for use with cooling/heating constant volume units.
They have four system switch settings (heat, cool, auto, and off) and two fan settings
(on and auto). The zone sensor provides either manual or automatic chaneover control
with dual setpoint capability.
BAYSENS108 and BAYSENS110 features and system control functions include:
• System control switch to select heating mode (HEAT), cooling mode (COOL),
automatic selection of heating or cooling as required (AUTO), or to turn the
system off (OFF).
• Fan control switch to select automatic fan operation while actively heating
or cooling (AUTO), or continuous fan operation (ON).
• Dual temperature setpoint levers for setting desired temperature. The blue
lever controls cooling, and the red lever controls heating.
• Thermometer to indicate temperature in the zone. This indicator is factory
calibrated.
(Possible Schematic Designation: 5U29)
BAYSENS110-Specific Feature: Function status indicator lights:
• SYSTEM ON glows continuously during normal operation, or blinks if
system is in test mode.
• COOL glows continuously during cooling cycles, or blinks to indicate a
cooling system failure.
• HEAT glows continuously during heating cycles, or blinks to indicate a
heating system failure.
• SERVICE blinks or glows to indicate a problem. These signals vary
depending on the particular equipment being used.
(Possible Schematic Designation: 5U29)
44 SCXG-SVX01B-EN
Page 45

pre-startup
CV and VAV Unit Zone Sensor
Options
Figure I-PR-11. BAYSENS074
Zone temperature sensor w/timed override
and local setpoint adjustment,
accessory model number digit 6 = C
Installation
requirements
Integrated Comfort™ Systems Sensors for CV and VAV
Applications
These zone sensor options are for use with cooling/heating Integrated Comfort System
(ICS) systems.
BAYSENS074 Description
This electronic analog sensor features single setpoint capability and timed override
with override cancellation.
BAYSENS074 features and system control functions include:
• Remote temperature sensing in the zone
• A timed override button to move an ICS or a building management system from its
“unoccupied” to “occupied” mode.
• Thumbwheel for local setpoint adjustment
• A cancel button to cancel the “unoccupied override” command.
(Possible Schematic Designation: 5U23)
BAYSENS073 Description
This electronic analog sensor features single setpoint capability and timed override
with override cancellation. It is used with a Trane Integrated Comfort
BAYSENS073 features and system control functions include:
• Remote temperature sensing in the zone
• A timed override button to move an ICS or a building management system from its
“unoccupied” to “occupied” mode.
• Cancel button to cancel the “unoccupied override” mode.
(Possible Schematic Designation: 5U23)
system.
Figure I-PR-12. BAYSENS073
Zone temperature sensor w/timed override ,
accessory model number digit 6 = B
VAV Unit Zone Sensor Option
Figure I-PR-9. BAYSENS021
Single setpoint sensor with system
function lights, accessory model number
digit 6 = H
SCXG-SVX01B-EN 45
BAYSENS021 Description
This zone sensor module is for use with VAV units without night setback. It allows the
user to control system operation and monitor unit operating status from a remote
location. The sensor has a system switch, a S/A temperature setpoint indicator, a local
sensor, and four LED’s.
BAYSENS021 features and system control functions include:
• Temperature sensing in the zone
• System control switch with mode setting for "AUTO" and "OFF"
• Supply air single temperature setpoint
• Function status indicator lights:
“SYS ON” glows continuously during normal operation, or blinks if system is in
test mode.
“COOL” glows continuously during cooling cycles, or blinks to indicate a
cooling system failure.
“HEAT” glows continuously during heating cycles, or blinks to indicate a
heating system failure.
“SERVICE” blinks or glows to indicate a problem. These signals vary
depending on the particular equipment being used.
(Possible Schematic Designation: 5U25)
Page 46

pre-startup
Standard zone sensors, BAYSENS077,
ships with all units
Zone Sensor Installation
All sensor options ship in the main control
panel and are field-installed.
Programmable option installation
procedures.
Mounting Location
Mount the sensor on the wall in an area
with good air circulation at an average
temperature. Avoid mounting space
temperature sensor is areas subject to
the following conditions:
• Drafts or “dead” spots behind doors or
in corners
• Hot or cold air from ducts
• Radiant heat from the sun or appliances
• Concealed pipes and chimneys
• Unheated or non-cooled surfaces
behind the sensor, such as outside walls
• Airflows from adjacent zones or other
units
To mount the sensors, remove the dust
cover and mount the base on a flat
surface or 2" x 4" junction box. Sensors
ship with mounting screws.
Installation
literature for allowable waiting periods
for discharge of capacitors. Verify with an
appropriate voltmeter that all capacitors
have discharged. Failure to disconnect
power and discharge capacitors before
servicing could result in death or serious
injury.
Note: For additional information regarding the safe discharge of capacitors, see
PROD-SVB06A-EN or PROD-SVB06A-FR.
NOTICE
Use Copper Conductors Only!
Unit terminals are not designed to
accept other types of conductors. Failure
to use copper conductors may result in
equipment damage.
Remove the zone sensor cover from
subbase, and mount subbase on the wall
or on a 2 x 4 junction box. Route wires
through the wire access hole in the
subbase. See Figure I-PR-14. Seal the hole
in the wall behind the subbase.
Note: Guidelines for wire sizes and lengths
are shown in Table I-PR-1. The total resistance of these low voltage wires must not
exceed 2.5 ohms per conductor. Any resistance greater than 2.5 ohms may cause the
control to malfunction due to excessive
voltage drop.
Note: Do not run low-voltage control wiring in
same conduit with high-voltage power wiring.
requirements
the unit control panel.
3. Replace the zone sensor cover back on
the subbase and snap securely into
place.
Standard Remote Sensor (BAYSENS077)
When using the remote sensor,
BAYSENS077, mount it in the space that
is to be controlled. Wire according to the
interconnecting wiring diagrams on the
unit.
Table I-PR-1. Zone sensor maximum lengths
and wire size
Distance from Recommended
Unit to Controller Wiring Size
0-150 feet 22 gauge
151--240 feet 20 gauge
241-385 feet 18 gauge
386- 610 feet 16 gauge
611-970 feet 14 gauge
Mounting the Subbase
WARNING
Hazardous Voltage w/Capacitors!
Disconnect all electric power, including
remote disconnects before servicing.
Follow proper lockout/tagout procedures to ensure the power cannot be
inadvertently energized. For variable
frequency drives or other energy storing
components provided by Trane or others,
refer to the appropriate manufacturer’s
46 SCXG-SVX01B-EN
Wiring
1. Run wires between the unit control
panel and the zone sensor subbase. To
determine the number of wires
required, refer to the unit wiring
diagrams.
2. Connect the wiring to the appropriate
terminals at the unit control panel and
at the zone sensor subbase. In general,
zone sensor connections to the unit use
the convention of connecting zone
sensor terminals to like numbered unit
terminals (1 to 1, 2 to 2, etc.). The
connection detail is shown on the unit
wiring diagrams, which are located in
Page 47

pre-startup
Installation
1-3/32 [27,43 mm]
3-5/32 [80,00 mm]
1-1/32 [26,16 mm]
RIGHT BACK
Figure I-PR-22. Zone sensor mounting hole locations for: BAYSENS077, BAYSENS073, BAYSENS074,
BAYSENS108, and BAYSENS110.
5/32 [3,81 mm] 4X
3/32 [2,00 mm]
requirements
1-3/8 [35,00 mm]
19/32 [15,00 mm]
15/64 [6,00 mm]
Zone sensor mounting hole locations for: BAYSENS021.
SCXG-SVX01B-EN 47
Page 48

pre-startup
Mounting to Junction Box
Junc
Installation
Mounting Directly to the Wall
requirements
Figure I-PR-23. Typical zone sensor installation for vertically-oriented sensors
48 SCXG-SVX01B-EN
Page 49

pre-startup
Programmable Zone Sensors
Programmable zone sensors provide
programming and zone temperature
sensing for the self-contained unit. It
allows the user to monitor room
temperatures and program settings in
the space, without having to access the
unit control panel.
Reference programming instructions for
these zone sensors beginning on page 44.
Installation
Constant Volume Zone Sensor
BAYSENS019 Description
This seven day programmable sensor
with night setback has four periods for
occupied\unoccupied programming per
day. If power is interrupted, the program
retains in permanent memory. If power is
off longer than two hours, only the clock
and day may have to be reset.
The six programming keys on the front of
the zone sensor allow selection of system
modes (heat, cool, auto, and off), two fan
modes (on and auto). The zone sensor
has dual temperature selection with
programmable start time capability.
The occupied cooling setpoint range is 40
to 80°F. The warmup setpoint range is 50
to 90°F with a 2° deadband. The
unoccupied cooling setpoint range is 45 to
98°F. The heating setpoint range is 43 to
96°F.
Two liquid crystal displays (LCD) display
zone temperature, setpoints, week day,
time, and operational mode symbols.
The DIP switches on the subbase enable
or disable applicable functions; i.e.
morning warmup, economizer minimum
CFM override during unoccupied status,
Fahrenheit or Centigrade, supply air
tempering, remote zone temperature
sensor, 12/24 hour time display, smart
fan, and computed recovery.
During an occupied period, an auxiliary
relay rated for 1.25 amps @ 30 volts AC
with one set of single pole double throw
contacts activates.
requirements
Variable Air Volume Zone Sensor
BAYSENS020B Description
This seven day programmable sensor
with night setback has four periods for
occupied\unoccupied programming per
day. Either one or all four periods can be
programmed. If power is interrupted, the
program retains in permanent memory. If
power is off longer than twohours, only
the clock and day may have to be reset.
The zone sensor keypad allows you to
select occupied/unoccupied periods with
two temperature inputs (cooling supply
air temperature and heating warmup
temperature) per occupied period. The
occupied cooling setpoint ranges between 40 and 80°F. The warmup setpoint
ranges between 50 and 90°F with a 2°
deadband. The unoccupied cooling
setpoint ranges between 45 and 98°F.
The heating setpoint ranges between 43
and 96°F.
The liquid crystal display (LCD) displays
zone temperature, setpoints, week day,
time, and operational mode symbols.
The DIP switches on the subbase enable
or disable applicable functions; i.e.
morning warmup, economizer minimum
position override during unoccupied
status, heat installed, remote zone
temperature sensor, 12/24 hour time
display, and daytime warmup. During an
occupied period, an auxiliary relay rated
for 1.25 amps @ 30 volts AC with one set
of single pole double throw contacts
activates.
Figure I-PR-16. BAYSENS019, programmable night setback sensor, accessory
model number digit 6 = G
SCXG-SVX01B-EN 49
Figure I-PR-17. BAYSENS020, programmable night-setback sensor,
accessory model number digit 6 = J
Page 50

pre-startup
Programmable Zone Sensor
Installation
Mounting Location
Mount the sensor on the wall in an area
with good air circulation at an average
temperature. Choose a location that is
easily accessible, and on a wall where the
subbase can be mounted about 5 feet
(1.5 meters) above the floor.
Avoid mounting space temperature
sensor in areas subject to the following
conditions:
• Drafts or “dead” spots behind doors or
in corners
• Hot or cold air from ducts
• Radiant heat from the sun or appliances
• Concealed pipes and chimneys
• Unheated or non-cooled surfaces
behind the sensor, such as outside walls
• Airflows from adjacent zones or other
units
(95 mm)
(140 mm)
Figure I-PR-18. BAYSENS019 dimensions
Installation
Installation Procedure
1. Remove the zone sensor module from
the subbase. Carefully hold the zone
sensor module with one hand and
firmly grasp the subbase with the other.
See Figure I-PR-20. To remove the zone
sensor module from the subbase,
gently pull away and upward.
Note: The zone sensor module is an
electronic sensitive device. Do not touch
printed circuit board, electronic components, or connector pins. Handle plastic
housing only to prevent damage to
electronic components.
2. After disassembly, protect the internal
surfaces from contact with objects or
substances that could cause damage.
3. Remove the terminal block from
subbase and set aside for wiring.
Discard the tape.
4. Mount the zone sensor module using
the mounting hardware included in the
shipping package. The mounting
hardware is contained in single plastic
bag and includes:
• Plastic wall anchors (3 x)
• Mounting screws (3 x)
The zone sensor module can mount
directly to a wall or to a junction box
mounted to a wall. To mount to a
junction box, you must have the
mounting plate and adapter kit,
BAYMTPL003. Installation instructions
are enclosed with the mounting plate.
5. To mount the zone sensor module
directly to a wall:
requirements
a. Hold the subbase in position and mark
the three mounting hole locations on
the wall.
b. Drill three
tap the plastic wall anchors into the
holes until the anchor tops are flush
with the wall.
6. Pull the zone sensor module wires
through the subbase as shown in Figure
I-PR-21.
7. Loosely secure subbase to the wall
with the mounting screws. Do not
tighten the subbase screws yet.
8. Level the subbase by sight, then firmly
tighten the three subbase mounting
screws.
Note: Do not overtighten the subbase
screws. Overtightening may cause the
screws to crack the subbase.
9. Before wiring the subbase, identify the
wires from the unit’s low voltage
terminal strip. Each screw terminal is
labeled.
10. Remove TB from subbase and
discard the tape.
11. Strip the wires
wires from the unit’s low voltage
terminal strip to the zone sensor
module subbase. Reference connection
details on the unit wiring diagrams,
located on the unit.
12. Firmly tighten each screw terminal.
13. Fit the wires as close to the subbase
as possible.
3
/16” (4.8 mm)
1
/4” and
holes. Gently
connect the
(95mm)
(140mm)
Figure I-PR-19. BAYSENS020 dimensions
50 SCXG-SVX01B-EN
Figure I-PR-20. Removing the zone sensor
module from the subbase
Figure I-PR-21. Securing the subbase
Page 51

pre-startup
Figure I-PR-22. Grasslin time clock option
Installation
Time Clock Option
The time clock option has a
programmable timer that is factory wired
to the unoccupied input to provide on/off
control. The time clock will not allow the
unit to pass through the night setback/
morning warmup mode, except on units
with optional night heat/morning warm
up, or programmable night setback. See
Figure I-PR-22.
The timeclock, a “Digi 20” by Grasslin, is
inside the control panel, but accessible
with the control panel door closed. This
same type timer is also used for programmable night setback/morning warm
up. Programming instructions for the
“Digi 20” timer are in the “Programming” section.
Time Clock Installation
1. Ensure operating temperature is
between 4°F and 131°F.
2. Locate the time clock at least 5 feet
away from any large electrical contact
or machinery to avoid possible
electrical interference problems.
3. Provide a separate independent circuit
for the time clock power supply.
4. Since all electronic instruments are
sensitive to voltage spikes, pay close
attention tot he following:
a. If possible, supply power to the
electronic time clock from a phase
different than the one supplying power
to the load.
b. Provide a suitable Varistor or RC
network across the INDUCTIVE
LOADS supply terminals to reduce
voltage spikes.
c. Place a diode across the DC
OPERATED INDUCTOR terminals to
eliminate back EMF.
d. HIGHLY INDUCTIVE LOADS, especially
fluorescent lights, may require a relay
in which case step a. and c. apply.
The timeclock can be surface or flush
mounted. Lift off the front cover and
loosen the two screws on opposite
corners. Pull off the base’s plug with a left
to right rolling motion.
requirements
Time Clock Installation Checklist
1. Ensure operating temperature is 4°F to
131°F.
2. Locate the time clock at least 5 feet
away from any large electrical contact
or machinery to avoid possible
electrical interference problems.
3. Provide a separate independent circuit
for the time clock
power supply.
4. Since all electronic instruments are
sensitive to voltage spikes, pay close
attention to the following:
a. If possible, supply power to the
electronic time clock from a phase
different than the one supplying power
to the load
b. Provide a suitable Varistor or RC
network across the INDUCTIVE LOADS
supply terminals to reduce voltage
spikes.
c. Place a diode across the DC OPERATED
INDUCTOR terminals to eliminate back
EMF.
d. HIGHLY INDUCTIVE LOADS, especially
fluorescent lights, may require a relay
in which case (A) and (C) apply.
The Digi 20A timeclock unit can be
surface or flush mounted. Lift off the
front cover and loosen the two screws on
opposite corners. Pull off the base’s plug
with a left to right rolling motion.
Surface Mounting Inside Panel
Place screws through the base’s preset
holes and screw to back of panel or wall.
Wire according to the instructions in the
following section. Depending upon the
specific installation, you may find it more
convenient to complete wiring before
attaching the base.
Place the terminal cover over the
terminal block by aligning the two screws
with the corner holes in the base. Push
the timer firmly onto the plug in the base.
Tighten the two screws. A base for DIN
rail mounting is optional.
Wiring theTimeclock
1. Wire 24, 120, or 220 VAC to input
terminals. Make sure to apply correct
voltage. Using incorrect voltage will
void the warranty.
2. Connect wire to the screw terminals
according to the unit wiring diagrams.
Use 12 to 22 AWG wire.
SCXG-SVX01B-EN 51
Page 52

pre-startup
Remote Human Interface Panel
Installation
Human Interface (HI) Panel
The HI enables the user to communicate
necessary unit operating parameters and
receive operating status information
from within the occupied space.
The HI displays top level information in
the LCD window, unless the operator
initiates other displays, for the various
unit functions. It also displays menu
readouts in a clear language 2 line, 40
character format. The 16-key keypad
allows the operator to scroll through the
various menus to set or modify the
operating parameters. See Figure I-PR23 to reference the HI keypad.
Remote Human Interface Panel
The remote human interface (RHI) panel
is identical to the unit mounted HI with the
exception of the “unit select” key. This
key allows the operator to switch from
one unit to the next to program or view
status information regarding a particular
unit.
The RHI functions the same as the unit
mounted HI with two exceptions. The first
is the “test start” function. The operator
can view the service parameters, but can
only initiate the service test function at
the unit. The RHI door has a locking screw
to deter access by unauthorized personnel. Additionally, the RHI can control up to
four different units.
Location Recommendations
The HI microprocessor module is
mounted inside a molded plastic
enclosure for surface mounting. It is not
weatherproof. Therefore, it is only
applicable for indoor use.
Locate the RHI panel in an area that will
ensure the communication link between
the panel and the unit(s) does not exceed
5,000 feet maximum or pass between
buildings. See Table I-PR-2.
The run length of the low voltage AC
power wiring to the remote HI must not
exceed three (3) ohms/conductor. Refer
to Table I-PR-3.
Installation
Figure I-PR-23. Human interface (HI) panel keypad
Table I-PR-2. Maximum communication link
wiring length
max. wire max. capacitance
length between conductors
1,000 ft up to 60 pf/ft
2,000 ft up to 50 pf/ft
3,000 ft up to 40 pf/ft
4,000 ft up to 30 pf/ft
5,000 ft up to 25 pf/ft
Note: pf/ft = picofarads/foot
requirements
Ambient Temperature and Humidity
Limits
Ambient Operating Conditions
• Temperature: 32 to 120°F
• Relative humidity: 10 to 90%, noncondensing
Ambient Storage Conditions
• Temperatures: -50 to 200°F
• Relative humidity: 5 to 95%, noncondensing
Table I-PR-3. Wiring recommendations for the
remote HI panel
distance recommended
to remote HI wire size
0-460 feet 18 gauge
461-732 feet 16 gauge
733-1000 feet 14 gauge
52 SCXG-SVX01B-EN
Page 53

pre-startup
Installation
Mounting the Remote Human
Interface (RHI) Panel
The installer must provide all mounting
hardware such as; hand tools, electrical
boxes, conduit, screws, etc. Refer to
Figure I-PR-24 for the mounting hole and
knockout locations.
Procedure
Refer to Figure I-PR-24 and follow the
procedure below for mounting the
remote HI panel on a 4” by 4” electrical
junction box. Place the microprocessor in
a clean dry location during the enclosure
mounting procedures to prevent
damage.
1. Mount an electrical junction box in the
wall so that the front edge of the box
will be flush with the finished wall
surface.
2. Prior to mounting the panel, the
microprocessor module must be
carefully removed from the enclosure.
To remove the module:
a. Lay the remote panel face up on a flat
surface and remove the locking screw
from the right hand bottom end of the
panel.
b. Remove the recessed hinge screw
from the left hand bottom end of the
panel.
c. Unlatch the door of the enclosure as if
to open it, and slide the left hand side of
the door upward away from the hinge.
Lay it aside.
d. With the key pad visible, remove the
two (2) screws located on the right hand
side of the key pad.
e. Carefully slide the key pad plate
upward from the bottom, releasing the
extruded hinge pin from its socket at
the top.
f. Set the microprocessor aside until
mounting is complete.
3. Remove the junction box knockout in
the back of the enclosure.
Note: The top of the enclosure is marked
“TOP.”
4. With the enclosure in the correct
position; align the mounting holes
around the knockout in the enclosure
with the screw holes in the electrical
handy box and secure with the
appropriate screws.
5. Replace the microprocessor within the
enclosure as follows:
requirements
a. Verify that the terminal block jumpers
are connected properly.
b. Slide the extruded hinge pin at the top
left of the key pad plate into the hole
located at the top left hand side of the
enclosure.
c. Slide the bottom of the plate into place,
aligning the two (2) clearance holes
with the screw holes on the right. Install
the screws but do not tighten.
Note: If the two screws are not installed as
called out in the previous step, hold against
the key pad plate while installing the door
in the next step, to prevent it from falling
out.
d. Slide the extruded hinge pin at the top
left of the door into the hole located
under the bottom left side of the display.
e. Install and tighten the hinge screw
located at the bottom left side of the
enclosure.
Wall Mounting the RHI Panel
1. Prior to mounting the panel, the
microprocessor module must be
removed from the enclosure. Complete
step 2 in the previous discussion,
“Mounting on a 4 in. x 4 in. Electrical
Box,” before proceeding.
2. With the microprocessor removed,
refer to Figure I-PR-24 for the location of
the mounting holes to be used for wall
mounting.
3. Place the enclosure against the
mounting surface and mark the
mounting holes.
Note: The top of the enclosure is marked
with “TOP.”
4. With the enclosure in the correct
position, remove the enclosure and drill
the necessary holes in the surface for
the appropriate fasteners, (plastic
anchors, molly bolts, screws, etc.)
5. Remove the necessary knockouts for
the wire or conduit entry before
mounting the panel.
6. Place the enclosure back onto the
surface and secure it with the
appropriate screws.
7. Follow step 5 in the previous section,
“Mounting on a 4” by 4” Electrical
Box,” to replace the microprocessor
within the enclosure.
SCXG-SVX01B-EN 53
Page 54

pre-startup
Installation
requirements
Figure I-PR-24. Remote HI mounting holes and knockout locations
54 SCXG-SVX01B-EN
Page 55

pre-startup
Wiring the Remote Human
Interface
The remote human interface requires 24
VAC + 4 volts power source and a
shielded twisted pair communication link
between the remote panel and the
interprocessor communication bridge
(ICPB) module at the self-contained unit.
Field wiring for both the low voltage
power and the shielded twisted pair must
meet the following requirements:
Note: To prevent control malfunctions, do
not run low voltage wiring (30 volts or less)
in conduit with higher voltage circuits.
WARNING
Hazardous Voltage w/Capacitors!
Disconnect all electric power, including
remote disconnects before servicing.
Follow proper lockout/tagout procedures to ensure the power cannot be
inadvertently energized. For variable
frequency drives or other energy storing
components provided by Trane or others,
refer to the appropriate manufacturer’s
literature for allowable waiting periods
for discharge of capacitors. Verify with an
appropriate voltmeter that all capacitors
have discharged. Failure to disconnect
power and discharge capacitors before
servicing could result in death or serious
injury.
Note: For additional information regarding the safe discharge of capacitors, see
PROD-SVB06A-EN or PROD-SVB06A-FR.
Installation
Low Voltage (AC) Field Wiring
Connections
To access the wire entry locations, open
the RHI panel door and remove the two
screws on the right-hand side of the key
pad. Swing the keypad open, exposing
both the wire entries and the back of the
HI module. Refer to Figure I-PR-24 and
connect one end of the three conductor
24 volt wires to the remote panel
terminal strip (+), (-), and (ground).
Communication Link (Shielded Twisted
Pair) Wiring
Trim the outer covering of the shielded
cable back approximately 1 inch. See
Figure I-PR-25. Do not cut the bare shield
wire off. Strip approximately
insulation from each insulated wire to
connect them to the terminal strip at the
remote panel.
Connect the white lead to the positive (+)
terminal, the black lead to the negative (-)
terminal, and the bare shield wire to the
terminal at the remote human interface
panel.
Close the key pad plate. Install and
tighten the two screws removed earlier.
Close the outer door and install the
recessed locking screw at the bottom
right hand side of the enclosure to
prevent accidental starting of the unit by
unauthorized personnel while completing
the wiring at the self-contained unit.
At the Self-Contained Unit
Connect the opposite end of the three
conductor 24-volt wire to the appropriate
terminal strip as follows:
1
/2-inch of
requirements
Note: Although the 24 volt power is not
polarity sensitive, do not connect either the +
(plus) or - (minus) terminals from the remote
panel to ground at the self-contained unit.
Connect the wire connected to the
positive (+) terminal at the remote panel.
Connect the wire connected to the
negative (-) terminal at the remote panel.
Connect the ground wire from the remote
panel to the unit control panel casing.
Interprocessor Communication Bridge
Module Wiring
Refer to Figure I-PR-25 and trim the outer
covering of the shielded cable back
approximately one inch. Cut the bare
shield wire off even with the outer
covering. Strip approximately
insulation from each insulated wire in
order to connect them to the terminal
strip at the unit. Wrap tape around any
exposed foil shield and/or base shield
wire.
Note: The communication link is polarity
sensitive.
Refer to the unit wiring diagram and
connect the white lead to the positive (+)
terminal and the black lead to the
negative (-) terminal. (These terminals
are numbered. Reference to color is for
clarification to maintain polarity).
Note: To maintain polarity, do not connect
the base shield wire to ground at the selfcontained unit.
1
/2-inch of
1. All wiring must be in accordance with
NEC and local codes.
2. Reference Table I-PR-3 for
recommended wiring distance and size.
3. Communication link wiring must be 18
AWG shielded twisted pair (Belden
8760, or equivalent).
4. Communication link must not exceed
5,000 feet maximum for each link. See
Table I-PR-2.
5. Do not run communication link
between buildings.
Figure I-PR-25. Dressing shielded twisted wire
SCXG-SVX01B-EN 55
Page 56

pre-startup
Connecting to Tracer Summit
WARNING
Hazardous Voltage w/Capacitors!
Disconnect all electric power, including
remote disconnects before servicing.
Follow proper lockout/tagout procedures to ensure the power cannot be
inadvertently energized. For variable
frequency drives or other energy storing
components provided by Trane or others,
refer to the appropriate manufacturer’s
literature for allowable waiting periods
for discharge of capacitors. Verify with an
appropriate voltmeter that all capacitors
have discharged. Failure to disconnect
power and discharge capacitors before
servicing could result in death or serious
injury.
Note: For additional information regarding the safe discharge of capacitors, see
PROD-SVB06A-EN or PROD-SVB06A-FR.
IntelliPak commercial self-contained
(CSC) units operate with Trane building
automation software, Tracer Summit
version 10.0.4 or later or any OS2
operating system.
Note: Tape the non-insulated end of the
shield on shielded wire at the unit. Any
connection between the shield and ground
will cause a malfunction. If daisy-chained in
the unit, splice and tape the shields to
prevent contact with ground.
Communication Wiring
Note: Communication link wiring is a
shielded, twisted pair of wire and must
comply with applicable electrical codes.
An optional communication link provides
a serial communication interface (SCI)
between Tracer Summit and each
commercial self-contained (CSC) unit in
the system. The CSC system can have a
maximum of 12 CSC units per connection
link to Tracer Summit. Use a single 18
AWG shielded, twisted pair wire with
stranded, thinned copper conductors to
Installation
establish each communication link
between Tracer Summit and each unit.
Pre-Startup Checklist
Complete this checklist after installing the
unit to verify all recommended
installation procedures are complete
before unit start-up. This does not replace
the detailed instructions in the
appropriate sections of this manual.
Always read the entire section carefully
to become familiar with the procedures.
Receiving
Inspect unit and components for
shipping damage. File damage claims
immediately with the delivering carrier.
Check unit for missing material. Look
for ship-with drives, isolators, filters,
and sensors that are packaged
separately and placed inside the main
control panel, fan section, or
compressor section. See the “Receiving
and Handling” section.
Check nameplate unit data so that it
matches the sales order requirements.
Unit Location
Remove crating from the unit. Do not
remove the shipping skid until the unit is
set in its final position.
Ensure the unit location is adequate for
unit dimensions, ductwork, piping, and
electrical connections.
Ensure access and maintenance
clearances around the unit are
adequate. Allow space at the end of the
unit for shaft removal and servicing.
See the “Service Access” section.
Unit Mounting
Place unit in its final location.
Remove shipping skid bolts and skid.
If using isolators, properly mount unit
according to the isolator placement
sheet.
Remove shipping brackets on the
compressors and supply fan.
Remove the unit protective shipping
covers.
Component Overview
Verify the fan and motor shafts are
parallel.
Verify the fan and motor sheaves are
aligned.
Check the belt tension for proper
adjustment.
Ensure the fan rotates freely.
requirements
Tighten locking screws, bearing set
screws and sheaves.
Ensure bearing locking collars do not
wobble when rotated.
Ductwork
If using return ductwork to the unit,
secure it with three inches of flexible
duct connector.
Extend discharge duct upward without
change in size or direction for at least
three fan diameters.
Use a 3” flexible duct connection on
discharge ductwork.
Ensure trunk ductwork to VAV boxes is
complete and secure to prevent leaks.
Verify that all ductwork conforms to
NFPA 90A or 90B and all applicable
local codes
Water-Cooled Unit Piping
Verify the condensate drain piping is
complete for the unit drain pan. Install
and tighten the condensate “P” trap
drain plug.
Install water piping drain plugs,
economizer header, and condenser
vent plugs.
Make return and supply water
connections to the unit and/or waterside
economizer piping package with
recommended valves and piping
components. Refer to the “Water
Piping” section.
Install unions to allow waterside
maintenance.
Install cooling tower and standby
pumps.
Treat water to prevent algae, slime,
and corrosion.
Prevent refrigerant piping from rubbing
against other objects.
Air-Cooled Units Only
Connect refrigerant lines.
Install liquid line filter driers.
Units with Hydronic Heat
Verify the entering water temperature
sensor is installed upstream of the
hydronic coil.
Units with Electric Heat
Verify the supply air temperature
sensor is downstream of the electric
heat coil.
56 SCXG-SVX01B-EN
Page 57

Programmable Zone Sensor
Options
BAYSENS019
programmingInstallation
Figure I-P-1. BAYSENS019 keypad and display configuration
BAYSENS019 Keypad and Display
Explanation
1. Up and Down Buttons
• Increases or decreased programmed
temperature settings in program menu.
• Shifts to temporary manual override in
normal run mode.
•Increases or decreases temperature
while in temporary override menu.
2. Time Adjust Button
Used to set the correct time of day. Used
to set programmed time for temperature
variations.
3. Program Button
Toggles between the display control
screen and the display program screen.
SCXG-SVX01B-EN 57
4. Erase Button
• Erases time and temperature settings
throughout each of the programmed
periods.
• Exits temporary manual override.
5. Day Button
Toggles through the seven days of the
week.
6. Hold Temp Button
Shifts controller to temporary manual
override, and begins temperature
override.
7. Fan Button
Toggles the fan controller between on
and auto mode.
8. Mode Button
Toggles the controller through its 4
modes: off, heat, cool, and auto; if HP
version, also emer (emergency).
9.
• Indicates day of the week
• Indicates begin time in program menu
Indicates time setting in temporary
override mode.
Page 58

BAYSENS020
programmingInstallation
Figure I-P-2. BAYSENS020 keypad and display configuration
BAYSENS020 Keypad and Display
Explanation
1. Up and Down Buttons
• Increases or decreased programmed
temperature settings in program menu.
• Shifts to temporary manual override in
normal run mode.
•Increases or decreases temperature
while in temporary override menu.
• Pressed together, toggles between
unoccupied/occupied setting.
2. Time Adjust Button
Used to set the correct time of day. Used
to set programmed time for temperature
variations.
58 SCXG-SVX01B-EN
3. Program Button
Toggles between the display control
screen and the display program screen.
4. Erase Button
• Erases time and temperature settings
throughout each of the programmed
periods.
• Exits temporary manual override.
5. Day Button
Toggles through the seven days of the
week.
6. Hold Temp Button
Shifts controller to temporary manual
override, and begins temperature
override.
7. Mode Button
• Toggles the controller between the two
modes, off and auto.
• Advances to next setpoint in program
menu.
8. During Programming Indicates:
• Heat supply air
• Cool supply air
• Warmup temperature
Page 59

programmingInstallation
Initial Power-Up
Before applying power to your ZSM, and
before performing setup and operation
procedures, verify that all wiring is
correct. See Figures I-P-9 on page 52 and
I-P-10 on page 53 for a complete zone
sensor icon display description.
For BAYSENS020 only: at initial powerup, the ZSM controls to default temperatures of 68°F (19°C) for warmup, and
55°F (13°C) supply air, until the ZSM is
programmed or the arrow keys are
pressed. If the arrow keys and mode are
moved, the ZSM starts controlling to
these new settings.
Time and Day Settings
On power-up your ZSM will be in normal
run mode and will begin operating using
setpoints. The display will show the
wrong day and time and will need to be
set.
To set the time, there is a single rubber
button on the keypad “minus” and
“plus” mark time.
Depressing the positive side will advance
the time. Depressing the negative side
will decrease the time.
Each time you depress the positive or
negative side “minus” and “plus”, the
time will either advance or decrease
respectively by one minute. If you press
and hold either side of the time button,
the time change will accelerate rapidly.
When you reach the correct time, release
the time button and the time will be set
into permanent memory.
Note: To ensure the time changes are
made, the ZSM will initiate a 30 second
user-stabilization time before making
changes to the ZSM operation mode.
Keypad Operation
Note: After toggling to the program screen,
the week is divided into seven days with
each day divided into four periods.
Therefore, 28 program settings are possible.
Program Button
Depressing the program button will
toggle the display from normal run mode
to the program menu. See Figure I-P-3.
Before toggling to the program menu,
use the mode button to select the type
setpoints to review or program (heat,
cool or auto). For example, if you select
cool mode before toggling to the program
menu, then only the cool setpoints are
reviewed or programmed. If you select
heat mode, then only the heat setpoints
are reviewed or programmed. In auto
mode, both heat and cool setpoints are
reviewed and programmed.
• While in program menu, each time you
press and release the program button,
the ZSM toggles through the four
periods that divide each day. Those four
periods are: Morn(ing), Day, Eve(ning),
and Night.
• To exit the program menu, depress the
program button for two seconds.
Figure I-P-3. Display program menu screen
Program Menu
BAYSENS020 Only
Note: After toggling to the program screen,
the week is divided into seven days with
each day divided into four periods.
Setpoint programming depends on the
setting status, occupied or unoccupied,
and whether or not heat is installed,
modulated heat, morning warmup, or
daytime warmup options are enabled.
In the occupied period, the cool supply air
temperature is always set. If heat
installed and modulated heat options are
on, the supply air heat is also set during
occupied periods. The warmup temperature is also set in occupied periods, if heat
is installed and warmup options are
enabled.
During unoccupied periods, only the
desired room temperature setpoints are
entered. Each unoccupied period has a
heat and cool setpoint, and both setpoints
are offered during programming.
Blank temperature settings may also be
entered. When a setpoint is blank, the
program will default to the last setpoint of
its type. If there is no setpoint of its type,
the default setpoint is used. If all setpoints
in the time period are blank, the entire
time period is erased after exiting from
the program menu.
The ZSM has independent, seven day
programming:
• Each day can be programmed with
different times, temperatures, and
occupied status.
• Each day can be programmed with up
to four periods. Although four periods
are available each day, you can
program just one of the four.
• Each period can be programmed for
occupied or unoccupied.
To begin programming, follow these
steps:
• Determine which periods during the day
will be occupied and unoccupied.
• Write your daily schedule on the sheet
enclosed with the zone sensor.
• Enter your program by following the
steps below.
To program time periods and setpoints
for a day:
• Press the program button to enter
program mode.
• Press the day button to select first day to
be programmed.
• To set the “begin” time for the first
period of the day, press the minus or
plus keys.
• To set the temperature setpoint for that
period, use ↑ or ↓.
• Press the program button to move to
the next period for that day.
• To program time periods and setpoints
for the next day, press the day button.
• When finished, press and hold the
program button for two seconds to
return to the normal run mode.
SCXG-SVX01B-EN 59
Page 60

programmingInstallation
Note: Blank temperature settings may be
entered at any of the four daily periods.
When a setpoint is left blank and in an
occupied condition, the ZSM will default to
the last occupied setpoint. When a setpoint
is left blank and in an unoccupied condition, the ZSM will default to the last
unoccupied setpoint.
Temporary Manual Override
While in normal run mode, depressing
the hold temp button toggles the ZSM to
the temporary manual override menu.
The mode will override any number of
programmed setpoints through any of
the 28 programmed periods. After
entering setpoints and length of override
time, these new settings are used in place
of the setpoints programmed for normal
run mode.
Time Button
• While in the program menu, each time
you press and release the positive or
negative side of the time button, the
time will advance or decrease by ten
minute increments. If you press and
hold the positive or negative side
(“minus” and “plus” keys), the ZSM
will increment rapidly.
• When the display is in the normal run
mode, each time you press and release
the positive or negative side of the time
button (“minus” and “plus”keys), the
time will advance or decrease by one
minute. If you press and hold the
positive or negative side (“minus” and
“plus” keys), the ZSM will increment
rapidly.
Note: Blank temperature settings may be
entered at any of the four daily periods.
When a setpoint is left blank and in an
occupied condition, the ZSM will default to
the last occupied setpoint.
Keypad Lockout
If you simultaneously depress and hold
both the positive and negative sides of
the “minus” and “plus” keys for four
seconds, the lock icon will appear and all
keypad functions will lock out. If you
repeat this operation, the lock icon will
disappear and all keypad functions will be
available again.
• Keypad lockout applies only to normal
run mode and temporary manual
override mode.
Day Button
• In normal run mode, depressing the day
button will move the current day ahead.
• While in the program menu, depressing
the day button will move you through
the seven days of the week and allow
you to program temperature settings
for each of the four daily periods.
Erase Button
• Pressing the erase button while in
normal run mode will turn off the check
filter icon.
• Pressing the erase button while in the
program menu, will erase all time and
temperature setpoints of a given
period.
• The erase button will acknowledge the
failure buzzer (option 16) until 12:00 am.
Mode Button
• BAYSENS019 only: Pressing the mode
button toggles through all modes: off,
heat, cool, auto, and emer (HP unit).
• BAYSENS020 only: Pressing the mode
button while in normal run mode, or
temporary manual override run mode,
will toggle through both modes, off and
auto.
Fan Button
• The fan button allows you to toggle
between on and auto.
Up and Down Button Arrows
• Depressing ↑ or ↓ arrow while in normal
run mode will cause your ZSM to toggle
to the temporary manual override
menu.
• Depressing either ↑ or ↓ arrow while in
the program menu or temporary
override menu will cause the
temperature setpoint to advance or
decrease in one degree increments.
• Depressing and holding either the ↑ or ↓
arrow will cause the temperature
setting to increment rapidly.
Simultaneously depressing the ↑ or ↓
arrow for two seconds while in the
program menu or temporary override
menu will toggle the ZSM between an
occupied and unoccupied condition.
Holdtemp Button
While in normal run mode, depressing
the hold temp button toggles the ZSM to
a temporary manual override menu. See
Figure I-P-4.
This mode overrides any number of
programmed setpoints through any of
the 28 programmed periods. After
entering setpoints and length of override
time, these settings are now used.
Figure I-P-4. Temporary manual override menu
screen
Keypad Operation for Temporary
Manual Override Menu
The keypad has the same function in
temporary manual override menu as in
all other menus, with a few exceptions:
• Depressing the day button will toggle
your ZSM between the day and hour
icon. See Figure I-P-4.
• Depressing the mode button will toggle
your ZSM between the heat and cool
icons and setpoints.
• Depressing the erase button will cancel
the override and return the ZSM to
normal run mode.
• Depressing the holdtemp or program
buttons while in the temporary manual
override menu will toggle your ZSM to
the temporary override mode. See
Figure I-P-5.
Figure I-P-5. Override run mode screen
60 SCXG-SVX01B-EN
Page 61

programmingInstallation
Temporary Override Run Mode
The temporary override run mode sends
setpoint data to the unit control module
(UCM) from the setpoint data entered in
the temporary manual override menu.
In temporary override run mode, most of
the keypad functions lock out with these
exceptions:
• The mode button still functions as in
normal run mode.
• The fan button still functions as in
normal run mode.
• Depressing the holdtemp button toggles
the ZSM between the temporary
manual override menu and override
run mode. (if no button is pressed for 20
seconds while in temporary manual
override menu, the ZSM exits to normal
run mode, ignoring the temporary
override settings.)
• Depressing either the ↑ or ↓ arrow while
in the override run mode will cause the
ZSM to toggle to the temporary manual
override menu.
• The erase button will turn off the check
filter icon if displayed.
• Simultaneously depressing and holding
the positive and negative sides of the
“minus” and “plus” for four seconds
will lock out the keypad.
• Time is not adjustable in this mode.
• The program button is disabled.
Keypad Operation for Temporary
Manual Override Menu
The keypad has the same function in
temporary manual override menu as in
all other menus, with a few exceptions:
• Depressing the holdtemp or program
buttons while in temporary manual
override menu will enter settings and
begin temporary manual override run
mode. See Figure I-P-6.
• Depressing the day button will toggle
the ZSM between the day and hour
icon.
• Depressing the mode button will toggle
the ZSM between the heat and cool
icons and setpoints.
• Depressing the erase button will cancel
the override and return the ZSM to
normal run mode.
• If no button is pressed for 20 seconds,
the ZSM exits temporary manual
override menu and enters the normal
run mode, ignoring the temporary
manual override menu settings.
Temporary Manual Override Run Mode
The temporary manual override run
mode sends setpoint data to the UCM
from the setpoint data entered in the
temporary manual override menu. See
Figure I-P-7.
In temporary manual override run mode,
most of the keypad functions lock out with
these exceptions:
• The mode button still functions as in
normal run mode.
• Depressing the holdtemp button toggles
the ZSM between temporary manual
override menu and temporary manual
override run mode. If no button is
pressed for 20 seconds, while in the
temporary manual override menu, the
ZSM exits to the normal run mode,
ignoring the temporary manual
override settings.
• Depressing either the up or down arrow
keys while in temporary manual
override run mode will cause the ZSM
to toggle to temporary manual override
menu.
• The erase button will turn off the check
filter icon if displayed.
• Simultaneously depressing and holding
the positive and negative sides of the
minus/plus key for four seconds will lock
out the keypad.
• Time is not adjustable in this mode.
Figure I-P-6. Temporary manual override menu
screen
SCXG-SVX01B-EN 61
Page 62

Figure I-P-7. Temporary manual override run
mode screen
Option Menu and Keypad Operation
The operation menu sets all
programmable options built into your
ZSM. All options are retained in
permanent EEPROM memory.
To access the option menu display,
simultaneously depress and hold the
mode button and program button for four
seconds.
The example in Figure I-P-8 shows option
15 displayed and indicates the initial timer
setting in the temporary override run
mode. The option value shown is in
hours, and value selected is five hours.
When the option menu displays, the only
active buttons are the ↑ or ↓ arrow and
the “minus” and “plus” button. The ↑ or
↓ arrow increment through the available
options by number (1-24), and the
“minus” and “plus” button toggles
through the various option values
associated with each option number. See
Table I-P-1.
Note: On both programmable zone sensor
options, changing either option 9 or 10 will
erase the current program. To avoid
reprogramming, set options 9 and 10
before programming.
programmingInstallation
Table I-P-1. Zone sensor BAYSENS019 option menu settings
option description value factory setting
1 morning warmup 0 = disabled 0
2 economizer minimum 0 = disabled 1
3 temperature scale 0 = Fahrenheit 0
4 supply air tempering 0 = disabled 0
5 time clock 0 = 12 hours 0
6 smart fan 0 = disabled 1
7 intelligent temperature recovery 0 = disabled 0
8 programmable days/week 0 = 7 days (M,T,W,T,F,S,S) 0
9 programmable periods/day 2,3,4 4
10 programmable fan operation 0 = disallowed 0
11 remote sensor installed 0 = No 0
12 check filter interval 0 = disabled 350
13 display zone temperature 0 = no 1
14 keypad lockout enabled 0 = disabled 1
15 initial time setting in temporary 1,2,3,4,5 3
16 buzzer options 0 = key press only 1
17 zone temperature calibration displays current temp. 0 offset
18 baud rate 0 = 1024 baud 1
19 CV or HP operation 0 = CV 0
20 default cooling setpoint 45 to 98°F 74°F
21 default heating setpoint 43 to 96°F 68°F
22 minimum cooling setpoint 45 to 98°F 45°F
23 maximum heating setpoint 43 to 96°F 96°F
position override 1 = enabled
override mode (hrs.)
1 = enabled
1 = enabled
1 = enabled
1 = 24 hours
1 = enabled
1 = enabled
1 = 3 days (M-F, S, S)
2 = 2 days (M-F, S,S)
1 = allowed
1 = Yes
3000 to 50 in 50 hour
increments
1 = yes
1 = enabled
1 = key press & check filter
2 = key press, check filter,
and system failures
with any offsets
1 = 1200 baud
1 = HP
Figure I-P-8. Typical option menu screen
62 SCXG-SVX01B-EN
Page 63

programmingInstallation
Note: On both programmable zone sensor
options, changing either option 9 or 10 will
erase the current program. To avoid
reprogramming, set options 9 and 10
before programming.
Intelligent Copy
Note: Once you use Intelligent Copy, you
cannot use it again until you erase all
weekday and weekend time periods by
pressing ERASE for 5 seconds.
If your heating and cooling requirements
are the same for each day of the week,
and for each day of the weekend, your
ZSM is designed to employ Intelligent
Copy.
To program the five weekdays, Monday
through Friday, program only one
weekday. Likewise, to program the
weekend, Saturday and Sunday, program only one day. After programming
one weekday and/or one weekend day,
Intelligent Copy automatically copies your
program to the other days.
To use Intelligent Copy:
1) Be sure to select the seven day
programming format in the Options
Menu. See Tables I-P-1 and I-P-2.
2) Be sure the entire program is blank.
3) Go to Program Menu.
4) Enter your setpoint parameters.
Intelligent Copy will automatically copy
these parameters to the other
weekdays.
5) Depress the DAY pushbutton until a
weekend day icon appears.
6) Enter setpoint parameters. Intelligent
Copy will automatically copy these
parameters to the other weekend day.
Remote Panel Indicator Signals From
UCM to ZSM
The unit control module (UCM) can send
four signals to the ZSM.
• Heat
• Cool
• On
• Service
Each of these four signals have three
different conditions. See Table I-P-3.
• Off
• On
• Flashing
Table I-P-2. Zone sensor BAYSENS020 option menu settings
option description value factory
1 morning warmup 0 = disabled 0
2 economizer minimum 0 = disabled 1
3 temperature scale 0 = Fahrenheit 0
4 heat installed 0 = no 0
5 time clock 0 = 12 hours 0
6 hydronic heat 0 = no 0
7 daytime warmup 0 = disabled 0
8 programmable days/week 0 = 7 days (M,T,W,T,F,S,S) 0
9 programmable periods/day 2,3,4 4
10 remote sensor installed 0 = no 0
11 check filter interval 0 = disabled 350
12 display zone temperature 0 = no 1
13 keypad lockout rnabled 0 = disabled 1
14 initial time setting in temporary 1,2,3,4,5 3
15 buzzer options 0 = key press only 1
16 zone temperature calibration displays current temp. 0 offset
17 default cooling setpoint 45 to 98°F (unoccupied) 74°F
18 default heating setpoint 43 to 96°F (unoccupied) 68°F
19 default supply air cool 40 to 80°F (occupied) 55°F
20 default supply air heat 60 to 160°F 100°F
21 default warmup 50 to 90°F (occupied) 68°F
22 minimum cooling setpoint 45 to 98°F 45°F
23 maximum heating setpoint 43 to 96°F 96°F
24 minimum supply air cool 40 to 80°F (occupied) 40°F
25 maximum supply air heat 60 to 160°F 160°F
26 maximum warmup 5 0 to 90°F 90°F
position override 1 = enabled
override mode (hrs.)
1 = enabled
1 = enabled
1 = yes
1 = 24 hours
1 = yes
1 = enabled
1 = 3 days (M-F, S, S
2 = 2 days (M-F, S,S)
1 = yes
3000 to 50 in 50 hour
increments
1 = yes
1 = enabled
1 = key press & check filter
2 = key press, check filter,
and system failures
with any offsets
setting
Table I-P-3. UCM signal conditions
heat on FlashingHEAT is ON and indicated by a solid HEAT icon in the
cool on FlashingCOOLING is ON and indicated by a solid COOL icon in the
on off FlashingSystem is OFF and indicated by a solid colon on the time of
service flashing ON System requires service and is indicated by a solid SERVICE
Note: There is no indication for a signal in the OFF condition. If option 16 is set to “2,” any flashing signals will
also give audible buzzer indication
signal condition
Display. Failure in the cooling system indicated by a flashing COOL
FAIL icon.
Display. Failure in the cooling system indicated by a flashing
COOL FAIL icon.
on day display. System is ON and indicated by a flashing colon on
the time of day display. System is in TEST mode and indicated by a
flashing TEST icon.
icon. There is a FAN failure indicated by a flashing SERVICE icon.
SCXG-SVX01B-EN 63
Page 64

Figure I-P-9. BAYSENS019 complete icon display
programmingInstallation
Icon Descriptions
BAYSENS019 Icon Descriptions
Refer to Figure I-P-9 for the written
descriptions below.
1. The four periods of the day used only
during programming mode.
2. The seven days of the week used
during programming and in normal
mode to display the day (not current in
Program Menu).
3. Four digits used to display the time of
day in normal run mode. Also used in
Programming Menu and Temporary
manual Override Menu, and options
menu.
4. Time of day colon used on the time of
day clock. The colon blinks to indicate
the UCM system is functional.
5. AM and PM are used to indicate the
time of day when using a 12 hour clock.
AM and PM are not used when a 24
hour clock is selected.
6. DAYS and HOURS are used to set the
override timer period.
7. Displayed in temporary manual
OVERRIDE mode, and when setting the
override timer.
8. Only used when setting the override
timer.
9. Displays the desired state of either
OCCUPIED or UNOCCUPIED.
10. The padlock symbol indicates that the
keyboard lockout is in effect.
11. This extends the mode selection box
in order to accommodate the
emergency heat mode on the ZSM heat
pump version.
12. Fan mode selection box.
13. Displayed in normal run mode when
displaying the actual room
temperature.
14. Displayed in option setting mode only.
15. Digits used to display temperature.
16. HEAT and COOL have two functions:
they indicate UCM status in normal run
mode and indicate which type of
setpoint is DESIRED during
programming and override setting.
17. Only used during programming and
override setting to indicate the
DESIRED setpoint temperature.
18. Flashes when check filter timer is
elapsed.
19. Flashing cooling fail status indicator.
20. Only used during UCP self-test mode.
21. Flashing service status indicator and
fan failure.
22. Flashing heating fail status indicator.
23. Operating MODE selection box.
64 SCXG-SVX01B-EN
Page 65

Figure I-P-10. BAYSENS020 complete icon display
programmingInstallation
BAYSEN020 Icon Descriptions
Refer to Figure I-P-10 for the written
descriptions below.
1. The four periods of the day used only
during programming mode.
2. The seven days of the week used
during programming and in normal run
mode.
3. Four digits used to display the time of
day in normal run mode. Also used in
Programming Mode, override timer
setting menu, and options menu.
4. Time of day colon used on the time of
day clock. The colon blinks to indicate
the UCM system is functional.
5. AM and PM are used to indicate the
time of day when using a 12 hour clock.
AM and PM are not used when a 24
hour clock is selected.
6. DAYS and HOURS are used to set the
override timer period.
7. Displayed in temporary manual
OVERRIDE mode, and when setting the
override timer.
8. Only used when setting the override
timer.
9. Displays the desired state of either
OCCUPIED or UNOCCUPIED in the
Programming, Run, and Menu.
10. The padlock symbol indicates that the
keyboard lockout is in effect.
11. Operating mode selection box.
12. Displayed in normal run mode when
displaying the actual room
temperature.
13. Displayed in option setting mode only.
14. Digits used to display temperature.
15. HEAT and COOL have two functions:
they indicate UCM status in normal run
mode and indicate which type of
setpoint is DESIRED during
programming and override setting.
16. Only used during programming and
override setting to indicate the
DESIRED setpoint temperature.
17. Flashes when check filter timer is
elapsed.
18. Flashing cooling fail status indicator.
19. Only used during UCP self-test mode.
20. Flashing service status indicator and
fan failure.
21. Flashing heating fail status indicator.
22. Used in programming mode to set
HEAT SUPPLY AIR, COOL SUPPLY AIR,
and MORNING WARM-UP
temperatures.
SCXG-SVX01B-EN 65
Page 66

programmingInstallation
Programming the Time Clock
Option
Setting the Time
Important: Depress the reset key before
beginning to set time and program.
1. Select military (24:00 hr.) or AM/PM
(12:00 hr.) time mode by depressing
and holding the “h” key while pressing
“+ 1h” key to toggle between military
and AM/PM. (AM appears in the display
when in AM/PM mode.)
2. Press and hold down “” key.
3. If setting the time when daylight
savings time is in effect, press “+ 1h”
key once (+ 1h will appear in display).
4. Set hour with “h” key. If AM or PM
does not appear in display, the unit is in
military time. See note above to
change display.
5. Set minutes with “m” key.
6. Press “Day” key repeatedly to the day
of the week. (1 is Monday, 7 is Sunday)
7. Release “” key, colon will begin
flashing.
Note: If keys h + or m + are kept depressed
for longer than 2 seconds, a rapid advance
of figures will result.
The “Digi 20” electronic time switch is
freely programmable for each day of the
week in one minute increments. For easy
and quick programming, the following 4
block programs are available:
• Monday through Sunday
• Monday through Saturday
• Monday through Friday
• Saturday and Sunday
Programming
Follow the instructions below for
programming the time clock.
1. Press “Prog.” key. 1234567 AM—:—
will appear in display. (Pressing “Prog.”
key again, display will show the number
of free programs “Fr 20”). Press again
to RETURN to 1st program.
2. Press “%” key, “~” ON symbol will
appear. Pressing the key again will
toggle to OFF “”. Select ON or OFF
for the program.
3. Press “h+” to select hour for switching
time.
4. Press “m+” to select minute for
switching time.
5. If the program is to occur every day of
the week, (24 hour time control) ignore
“Day” key and press “Prog.” key to
advance to program.
6. For 7 day time control, press “Day”
key. 1 2 3 4 5 6 (Monday through
Saturday) block of days appears in
display. Pressing “Day” key again, 1 2 3
4 5 (Monday through Friday) appears in
display. Repeated presses will cycle
through all days of the week and back
to 1 through 7 (Monday through
Sunday). Select day or block of days
desired.
7. Press “Prog.” key and repeat steps 2
through 6a to enter additional
programs of ON and OFF times. (Note
that more than one OFF time may be
programmed, enabling automatic
control or manual overrides.)
8. Press “” key to enter run mode.
To review and change programs:
1. To review a program at any time, press
“Prog.” key. Programs display in the
sequence they were entered with
repeated presses of “Prog.” key.
2. To change a program, select that
program as outlined in step 1. Enter the
time of day and days of week just as in
the programming steps above. The old
program is overwritten with the new
selections. Press “Prog.” to store the
new program.
3. To delete an individual program, select
the program as in step 1 and press “h”
and “m” keys until “—:—” appears in
the display. Press either “Prog.” or “¹”
key until “—:—” flashes. The program
is deleted after a few seconds.
Manual Override
While in the “run” mode (“” symbol is
displayed), pressing the “%” key will
reverse the load status (switch load off if
it is on, or switch it on if it is off). A hand
symbol appears in the display to indicate
the override is active. At the next
scheduled switching time, automatic time
control resumes, eliminating the override.
Pressing the “%” key a second time
“[~]” appears in the display indicating
the load is permanently on.
Pressing the “%” key a third time “[]”
appears in the display indicating the load
is permanently off.
Pressing the “%” key a fourth time
returns to automatic, “%” appears in the
display.
All days shown in the respective blocks
will switch on (or off) at the selected hour
and minute.
66 SCXG-SVX01B-EN
Page 67

startupInstallation
Unit Startup Procedures
WARNING
Hazardous Voltage w/Capacitors!
Disconnect all electric power, including
remote disconnects before servicing.
Follow proper lockout/tagout procedures to ensure the power cannot be
inadvertently energized. For variable
frequency drives or other energy storing
components provided by Trane or others,
refer to the appropriate manufacturer’s
literature for allowable waiting periods
for discharge of capacitors. Verify with an
appropriate voltmeter that all capacitors
have discharged. Failure to disconnect
power and discharge capacitors before
servicing could result in death or serious
injury.
Note: For additional information regarding the safe discharge of capacitors, see
PROD-SVB06A-EN or PROD-SVB06A-FR.
Pre-Startup Checklist
1. Verify electrical connections are tight.
2. Water-cooled: Access the liquid line
service valves. Verify the liquid line
service valve is open at startup.
Note: Each compressor suction line
contains a low pressure sensor that will
shut the compressor down in low pressure
situations. See Table O-SO-2.
3. Ensure system components are
properly set and installed.
4. Inspect all ductwork and connections.
5. Remove compressor and fan
assembly tie down bolts. On 20 - 38 ton
units, do not remove the fan assembly
shipping blocks. Tie down bolts if the fan
speed is 750 rpm or less.
6. Ensure fan rotation is in the direction of
the arrow on the fan housing. If it is
incorrect, verify the incoming power
phasing is correct. Switch wires on the
fan contact to properly phase fan if
necessary.
7. Check the fan belt condition and tension.
Adjust the tension if belts are floppy or
squeal continually. Replace worn or
fraying belts in matched sets.
Startup
WARNING
Live Electrical Components!
During installation, testing, servicing and
troubleshooting of this product, it may
be necessary to work with live electrical
components. Have a qualified licensed
electrician or other individual who has
been properly trained in handling live
electrical components perform these
tasks. Failure to follow all electrical safety
precautions when exposed to live
electrical components could result in
death or serious injury.
NOTICE
Compressor Damage!
Never manually or automatically pump
down system below 7 psig. This will
cause the compressor to operate in a
vacuum and result in compressor
damage.
To start the unit, complete the following
steps in order.
1. Apply power to the unit. Close the unit
disconnect switch option.
2. Make sure the liquid line service valves
are open on water cooled units.
3. Adjust setpoints at the HI.
Note: A sufficient cooling load must be
visible to refrigerant circuit controls for
mechanical refrigeration to operate. If
necessary, temporarily reduce the discharge air setpoint to verify the refrigeration
cycle operation.
4. Check voltage at all compressor
terminals to ensure it is within 10% of
nameplate voltage.
5. Check voltage imbalance from these
three voltage readings at each
compressor. Maximum allowable
voltage imbalance, phase to phase is
2%.
6. Check amp draw at compressor
terminals. RLA and LRA is on the unit
nameplate.
7. Measure amp draw at evaporator fan
motor terminals. FLA data is on the
motor nameplate.
8. After the system has stabilized (15 to 30
minutes), check and record operating
pressures and temperatures for all
circuits.
Using the startup log on the following
pages, establish nominal conditions for
consistent measurements as follows:
• Leaving air greater than 60°F
• Entering air temperature = 70 to 90°F
• Entering water temperature > 60°F
• Inlet guide vanes at least halfway open
With all compressors running at full load:
1. Compute superheat from the suction
line pressure and temperature at the
compressor on each circuit. Adjust the
thermal expansion valve settings if
necessary. Superheat should be
between 12 and 17°F.
2. Inspect refrigerant flow in the liquid line
sight glass. Flow should be smooth and
even, with no bubbles once the system
has stabilized.
Normal startup will occur provided that
Tracer Summit is not controlling the
module outputs or the generic BAS is not
keeping the unit off. To prevent Tracer
Summit from affecting unit operation,
remove Tracer
changes to setpoint and sensor sources.
Operating & Programming Instructions
Reference the
Programming Guide, PKG-SVP01B-EN,
for available unit operating setpoints and
instructions.
For units with the VFD option, reference
the installer guide that ships with each
VFD.
wiring and make required
IntelliPak Self-Contained
A copy ships with each unit.
SCXG-SVX01B-EN 67
Page 68

Installation
startup
Startup Log
Complete this log at unit startup.
Unit: ____________________________ Unit Location: _________________________________________
Unit Voltage: __________ __________ __________
Evaporator:
evaporator fan motor horsepower: __________ evaporator fan motor amps: __________ __________ __________
evaporator fan rpm (actual): ____________________
evaporator system static (from test and balance report or actual readings):
evaporator air conditions with both compressors operating:
evaporator system cfm (test and balance sheet or actual tested): __________
________________________________________________________________________________________________________________________
Compressor Amp Draw:
circuit A: __________ __________ __________ circuit B: __________ __________ __________
circuit C: __________ __________ __________ circuit D: __________ __________ __________
circuit E: __________ __________ __________ circuit F: __________ __________ __________
A B C
A B C
supply duct static: __________
return duct static: __________
entering: leaving:
dry-bulb °F: __________ dry-bulb °F: __________
wet-bulb °F: __________ wet-bulb °F: __________
A B C A B C
A B C A B C
A B C A B C
suction pressure, psig: circuit A: __________ circuit B: __________ circuit C: __________ circuit D: __________
circuit E: __________ circuit F: __________
discharge pressure, psig: circuit A: __________ circuit B: __________ circuit C: __________ circuit D: __________
circuit E: __________ circuit F: _________
super heat °F: circuit A: __________ circuit B: __________ circuit C: __________ circuit D: __________
circuit E: __________ circuit F: _________
liquid line pressure, psig: circuit A: __________ circuit B: __________ circuit C: __________ circuit D: __________
circuit E: __________ circuit F: _________
sub cooling °F: circuit A: __________ circuit B: __________ circuit C: __________ circuit D: __________
circuit E: __________ circuit F: _________
68 SCXG-SVX01B-EN
Page 69

Installation
___________________________________________________________________________________________________________________________
Water Cooled Units:
Circuit A:
entering water temperature °F: __________ leaving water temperature °F: __________
entering water pressure, psig: __________ leaving water pressure, psig: __________
Circuit B:
enter water temperature °F: __________ leaving water temperature °F: __________
entering water pressure, psig: __________ leaving water pressure, psig: __________
Circuit C:
entering water temperature °F: __________ leaving water temperature °F: __________
entering water pressure, psig: __________ leaving water pressure, psig: __________
Circuit D:
enter water temperature °F: __________ leaving water temperature °F: __________
startup
entering water pressure - psig: __________ leaving water pressure, psig: __________
Circuit E:
enter water temperature °F: __________ leaving water temperature °F: __________
entering water pressure - psig: __________ leaving water pressure, psig: __________
Circuit F:
enter water temperature °F: __________ leaving water temperature °F: __________
entering water pressure - psig: __________ leaving water pressure, psig: __________
___________________________________________________________________________________________________________________________
Air Cooled Units:
(data taken from outside condensing unit)
voltage: __________ __________ __________ amp draw: __________ __________ __________
A B C A B C
entering air temperature °F: __________ leaving air temperature °F: __________
refrigerant pressures at condenser, psig: __________/ __________ sub cooling at condenser °F: __________
SCXG-SVX01B-EN 69
Page 70

general
Points List
Binary inputs
• Emergency stop
• External auto/stop
• Unoccupied/occupied
• Dirty filter
• VAV changeover with hydronic heat
Binary outputs
• VAV box drive max (VAV units only)
• CV unoccupied mode indicator (CV units
only)
• Alarm
• Fan run request
• Water pump request (water-cooled only)
Analog input
• Airside economizer damper minimum
position
Analog output
• Outside air damper actuator
Heat Module:
• Analog output
-
RTM Module
Points List - GBAS Module
Binary inputs
• Demand limit contacts
Binary outputs
• Dirty filter relay
• Refrigeration fail relay
• Heat fail relay
• Supply fan fail relay
• Active diagnostics
Analog inputs
• Occupied zone cooling setpoint
• Occupied zone heating setpoint
• Unoccupied zone cooling setpoint
• Unoccupied zone heating setpoint or
minimum outside air flow setpoint
• Supply air cooling setpoint
• Supply air heating setpoint
• Supply air static pressure setpoint
Points List - ECEM Module
Analog inputs
• Return air temperature
• Return air humidity
In addition, units with a VOM have:
Binary inputs
• VOM mode A, unit off
• VOM mode B, pressurize
• VOM mode C, exhaust
• VOM mode D, purge
• VOM mode E, purge w/duct pressure control
Operation
Binary outputs
• V.O. relay
Points List - TracerTM LCI-I Module
Constant Volume (CV) Points
Binary inputs
• Airside economizer enable/disable
• Condensor type (air or water cooled)
• Condensor water flow status
• Emergency shutdown
• Local fan switch enable/disable
• Mechanical cooling lockout
• Mechanical heating lockout
• Mixed air temperature
• Occupancy
• Occupancy override
• Occupancy sensor
Binary outputs
• Airside economizer status
• Alarm status
• Compressor on/off status
• Condensor circuit information
• Condensor water pump status
• Waterside economizer status
Analog inputs
• Airside economizer dry bulb setpoint
• Airside economizer minimum setpoint
• Building static pressure input
• Maintenance required time
• Occupancy bypass time
• Outdoor air damper minimum position
setpoint
• Outdoor air relative humidity
• Outdoor air temperature
• Unit start delay time setpoint
• Zone temperature
• Zone temperature setpoint
• Zone temperature setpoint (default)
• Zone temperature setpoint limits
• Zone temperature setpoint offsets
• Zone temperature setpoint shift
Analog outputs
• Alarm message
• Building static pressure status
•Condensor saturated refrigerant temp
• Condensor water temperature
• Cooling output status
• Effective occupancy
• Exhaust fan status
• Heating output status
• Heating/cooling mode
• Morning warm up sensor temperature
• Outdoor air damper position
• Outdoor air enthalpy
• Outdoor air relative humidity
• Return air temperature
information
• Supply air temperature
• Supply fan status
• Unit status mode
• Zone CO2
• Zone relative humidity
Variable Air Volume (VAV) Points
Binary inputs
• Airside economizer enable/disable
• Condensor water flow input
• Emergency override
• Local fan switch enable/disable
• Mechanical cooling lockout
• Mechanical heating lockout
• Occupancy
Binary outputs
• Airside economizer status
• Alarm status
• Compressor on/off status
• Condensor circuit information
• Condensor type (water or air cooled)
• Condensor waterflow status
• Condensor water pump status
Analog inputs
• Airside economizer dry bulb setpoint
• Airside economizer minimum position
• Building static pressure input
• Building static pressure setpoint
• Daytime warm up setpoint
• Daytime warm up terminate setpoint
• Maintenance required time
• Occupancy bypass time
• Outdoor air damp min position setpoint
• Outdoor airflow minimum setpoint
• Outdoor air relative humidity
• Outdoor air temperature
• Supply air cooling setpoint
• Supply air cooling setpoint (default)
Analog outputs
• Building static pressure status
• Alarm message
• Condensor saturated refrigerant temp.
• Condensor water temperature
• Condensor water temp (local)
• Cooling output status
• Exhaust fan status
• Heating output status
• Heating/cooling mode
• Mixed air temperature
• Morning warm up sensor temperature
• Outdoor air damper position
• Outdoor air enthalpy
• Outdoor air flow
• Outdoor air relative humidity status
• Outdoor air temperature status
• Return air temperature
70 SCXG-SVX01B-EN
Page 71

general
Unit Control Components
The Modular Series IntelliPak selfcontained unit is controlled by a
microelectronic control system that
consists of a network of modules. These
modules are referred to as unit control
modules (UCM). In this manual, the
acronym UCM refers to the entire control
system network.
These modules perform specific unit
functions using proportional/integral
control algorithms. They are mounted in
the unit control panel and are factory
wired to their respective internal components. Each module receives and
interprets information from other unit
modules, sensors, remote panels, and
customer binary contacts to satisfy the
applicable request; i.e., economizing,
mechanical cooling, heating, ventilation.
Following is a detailed description of each
module’s function.
RTM Module Board - Standard
on all Units
The RTM responds to cooling, heating,
and ventilation requests by energizing the
proper unit components based on
information received from other unit
modules, sensors, remote panels, and
customer supplied binary inputs. It
initiates supply fan, exhaust fan, exhaust
damper, inlet guide vane positioning or
variable frequency drive output, and
airside economizer operation based on
that information.
Reference the RTM points list.
Note: Emergency stop and external auto/
stop, stop the unit immediately, emergency
stop generates a manual reset diagnostic
that must be reset at the unit human
interface. External auto-stop will return the
unit to the current operating mode when
the input is closed, so this input is auto
reset.
RTM Remote Economizer Minimum
Position
The remote minimum position
potentiometer, BAYSTAT023A, provides
a variable resistance (0-270 ohms) to
adjust the economizer minimum position
from 0 to 100% when connected to the
economizer remote minimum position
Operation
input of the RTM. The RTM must be
selected as the source for economizer
minimum position. If the RTM is the
selected source for economizer minimum
position, and
Table O-GI-1 is provided to the RTM
remote minimum position input,
cfm compensation function will not
operate, even if enabled. “Default” is the
only possible source for economizer
minimum position when using the OA
cfm compensation function.
Table O-GI-1. Economizer remote minimum
position input resistance
input economizer
resistance min. position
0 - 30 ohms 0 %
30 - 240 ohms 0-100 % (linear)
240 - 350 ohms 100 %
> 350 ohms N/A *
* Note: A resistance greater than 350 ohms is
assumed to be an open circuit. The system will use
the default minimum position value.
RTM Analog Outputs
The RTM has two 0-10 vdc outputs: one
for the inlet guide vane option and one for
the economizer option. These outputs
provide a signal for one or two damper
actuators. There are no terminal strip
locations associated with these wires.
They go directly from pins on the RTM
circuit board to the actuator motor.
RTM Binary Outputs
The RTM has an output with pressure
switch proving inputs for the supply fan.
There is a 40 second delay from when
the RTM starts the supply fan until the fan
proving input must close. A fan failure
diagnostic will occur after 40 seconds.
This is a manual reset diagnostic, and all
heating, cooling, and economizer
functions will shut down. If this proving
input is jumped, other nuisance
diagnostics will occur. If the proving input
fails to close in 40 seconds, the
economizer cycles to the minimum
position. This is a manual reset
diagnostic. External control of the fan is
not recommended.
VAV Drive Max Output
This is a single-pole, double-throw relay
rated at a maximum voltage of 24 vac,
two amps. The relay contacts of this relay
switch when theunit goes from the
occupied mode to the unoccupied mode
bymeans of the occupied binary input.
The contacts will stay switched during the
if a valid resistance per
the OA
information
unoccupied and morning warmup mode.
They will return to the position shown on
the unit wiring diagram when the unit
returns to the occupied mode. This binary
output signals the VAV boxes or other
terminal devices to go full open.
RTM Alarm Relay
This is a single pole, double throw relay
rated at a maximum voltage of 24 vac,
two amps max. Relay contacts can be
programmed from the unit human
interface. This relay can be programmed
to pick up on any one or group of
diagnostics from the unit human
interface.
Status/Annunciator Output
The status annunciator output is an
internal function within the RTM module
on CV and VAV units. It provides:
a. diagnostic and mode status signals to
the remote panel (LEDs) and to the
Human Interface.
b. control of the binary alarm output on
the RTM.
c. control of the binary outputs on the
GBAS module to inform the customer
of the operational status and/or
diagnostic conditions.
Occupied/Unoccupied Inputs
There are four ways to switch to
occupied/unoccupied:
1. Field-supplied contact closure
hardwired binary input to the RTM
2. Programmable night setback zone
sensor
3. Tracer Summit
4. Factory-mounted time clock
VAV Changeover Contacts
These contacts are connected to the RTM
when daytime heating on VAV units with
internal or external hydronic heat is
required. Daytime (occupied) heating
switches the system to a CV unit
operation. Refer to the unit wiring
diagram for the field connection terminals
in the unit control panel. The switch must
be rated at 12 ma @ 24 VDC minimum.
External Auto/Stop Switch
A field-supplied switch may be used to
shut down unit operation. This switch is a
binary input wired to the RTM. When
opened, the unit shuts down immediately
and can be cancelled by closing the
switch. Refer to the unit wiring diagrams
(attached to the unit control panel) for
proper connection terminals. The switch
SCXG-SVX01B-EN 71
Page 72

general
must be rated for 12 ma @ 24 VDC
minimum. This input will override all VOM
inputs, if the VOM option is on the unit.
Occupied/Unoccupied Contacts
To provide night setback control if a
remote panel
with night setback
was not
ordered, install a field-supplied contact.
This binary input provides the building’s
occupied/unoccupied status to the RTM. It
can be initiated by a time clock, or a
building automation system control
output. The relay’s contacts must be rated
for 12 ma @ 24 VDC minimum. Refer to
the appropriate wiring diagrams
(attached to the unit control panel for the
proper connection terminals in the unit
control panel.
Emergency Stop Input
A binary input is provided on the RTM
board for installation of a field-supplied
normally closed (N.C.) switch to use
during emergency situations to shut
down all unit operations. When open, an
immediate shutdown occurs. An
emergency stop diagnostic enters the
human interface and the unit will require
a manual reset. Refer to the unit wiring
diagrams (attached to the unit control
panel for the proper connection
terminals. The switch must be rated for
12 ma @ 24 VDC minimum. This input
will override all VOM inputs, if the VOM
option is on the unit.
VAV Box Option
To interlock VAV box operation with
evaporator fan and heat/cool modes,
wire the VAV boxes/air valves to VAV box
control connections on the terminal block.
Supply Duct Static Pressure Control
The RTM relies on input from the duct
pressure transducer when a unit is
equipped with IGV or VFD to position the
IGV or set the supply fan speed to
maintain the supply duct static pressure
to within the static pressure setpoint
deadband.
RTM Sensors
RTM sensors include: zone sensors with
or without setpoint inputs and modes,
supply air sensor, duct static pressure,
outside air temperature, outside air
humidity, airflow proving, and dirty filter.
Operation
Table O-GI-2. RTM sensor resistance vs. temperature
temperature, °F resistance, Ω ohms temperature, °F resistance, Ω ohms
-40 346.1 7 1 11.60
-30 241.7 7 2 11.31
-20 170.1 7 3 11.03
-10 121.4 74 10.76
-5 103.0 7 5 10.50
0 87.56 76 10.25
5 74.65 77 10.00
10 63.8 7 8 9.76
15 54.66 79 6.53
20 46.94 80 9.30
25 40.40 85 8.25
30 34.85 90 7.33
35 30.18 100 5.82
40 26.22 105 5.21
45 22.85 110 4.66
50 19.96 12 0 3.76
55 17.47 130 3.05
60 15.33 140 2.50
65 13.49 150 2.05
66 13.15 160 1.69
67 12.82 170 1.40
68 12.50 180 1.17
69 12.19 190 0.985
70 11.89 200 0.830
Table O-GI-3. RTM setpoint analog inputs
cooling or heating setpoint input, °F cooling setpoint input, °F
(using RTM as zone temp. source) (using RTM as supply air temp. source) resistance, Ω
ohms
40 40 1084
45 45 992
50 50 899
55 55 796
60 60 695
65 65 597
70 70 500
75 75 403
80 80 305
NA 85 208
N A 9 0 111
Table O-GI-4. RTM resistance value vs. system operating mode
resistance
applied to RTM mode
input terminals, ohms fan mode system mode system mode
2320 auto off off
4870 auto cool
7680 auto auto auto
10,770 on off
13,320 on cool
16,130 on auto
19,480 auto heat
27,930 on heat
Note: Mode boundaries are 1000 to 40,000 ohms. Other boundaries are equal to the midpoint between the
nominal mode resistance.
CV units VAV units
information
72 SCXG-SVX01B-EN
Page 73

general
Compressor Module (MCM Standard on all Units
The compressor module, (single circuit
and multiple circuit) energizes the
appropriate compressors and condenser
fans upon receiving a request for
mechanical cooling. It monitors the
compressor operation through feedback
information it receives from various
protection devices.
Human Interface Module Standard on all Units
The human interface (HI) module enables
the operator to adjust the operating
parameters for the unit using it's 16-key
keypad on the human interface panel.
The HI panel provides a two line, 40
character, clear language (English,
Spanish, or French) LCD screen with unit
status information and menus to set or
modify operating parameters. It is
mounted in the unit’s main control panel
and accessible through the unit’s control
panel door.
Remote Human Interface
Module Option
The optional remote-mount human
interface (RHI) panel has all the functions
of the unit-mounted version except for
service mode. To use a RHI, the unit must
be equipped with an optional
interprocessor communications bridge
(IPCB). Model number digit 32 (=2)
indicates if the ICPB was ordered with the
unit. If not, contact your local Trane
representative to order an ICPB kit for
field installation. The RHI can be located
up to 1,000 feet (304.8 m) from the unit. A
single RHI can monitor and control up to
four self-contained units if each one
contains an IPCB. The IPCB switches must
be set as SW1- off, SW2 - off, and SW3 on.
Interprocessor Communications Board •
Option used with RHI
The interprocessor communication board
expands communications from the unit's
UCM network to a remote human
interface panel. DIP switch settings on the
IPCB module for this application are;
switches 1 and 2 “off,” switch 3 “on.”
Operation
Waterside Module - Standard
on all water-cooled units
The waterside module (WSM) controls all
water valves based on unit configuration.
In addition, the WSM monitors waterflow
proving and the following temperatures:
• entering water
• entering air low
• mixed air
• entering condenser water
• refrigerant circuit 3:
• saturated condenser
• evaporator frost
• motor winding
• refrigerant circuit 4:
• condenser
• evaporator
• motor winding
Cooling Tower Interlock
To interlock condenser pump/tower with
cooling operation, wire the cooling tower
to an external 115 volt control power
source, to ground, and to control terminal
block. Normally open/closed contacts are
provided.
Heat Module
The heat module is standard on all units
with factory-installed heat. It controls the
unit heater to stage up and down to bring
the temperature in the controlled space
to within the applicable heating setpoint.
Also, it includes a freezestat, morning
warmup, and heating outputs.
Ventilation Override Module
(VOM) Option
The ventilation override module can be
field-configured with up to five differnent
override sequences for ventilation
override control purpose. When any one
of the module’s five binary inputs are
activated, it will initiate specified functions
such as; space pressurization, exhaust,
purge, purge with duct pressure control,
and unit off.
Once the ventilation sequences are
configured, they can be changed unless
they are locked using the HI. Once locked,
the ventilation sequences cannot be
unlocked.
The compressors and condenser fans
disable during the ventilation operation. If
more than one ventilation sequence
information
activates, the one with the highest priority
(VOM “A”) begins first, with VOM “E”
having lowest priority and beginning last.
A description of the VOM binary inputs
follows below.
UNIT OFF sequence “A”
When complete system shut down is
required, the following sequence can be
used.
• Supply fan – off
• Supply fan VFD – off (0 Hz)
• Inlet guide vanes – closed
• Outside air dampers – closed
• Heat – all stages – off, modulating heat
output at 0 vdc
• Occupied/Unoccupied output – deenergized
• VO relay – energized
• Exhaust fan (field-installed) - off
• Exhaust damper (field-installed) - closed
PRESSURIZE sequence “B”
This override sequence can be used if a
positively pressured space is desired
instead of a negatively pressurized space.
• Supply fan – on
• Supply fan VFD – on (60 Hz)
• Inlet guide vanes/VAV boxes – open
• Outside air dampers – open
• Heat – all stages – off, hydronic heat
output at 0 vdc
• Occupied/ unoccupied output energized
• VO relay - energized
• Exhaust fan (field-installed) - off
• Exhaust damper (field-installed) - closed
EXHAUST sequence “C”
With the building’s exhaust fans running
and the unit’s supply fan off, the
conditioned space becomes negatively
pressurized. This is desirable for clearing
the area of smoke when necessary; i.e.
from an extinguished fire, to keep smoke
out of areas that were not damaged.
• Supply fan – off
• Supply fan VFD – off (0 Hz)
• Inlet guide vanes – closed
• Outside air dampers – closed
• Heat – all stages – off, hydronic heat
output at 0 vdc
• Occupied/Unoccupied output – deenergized
• VO relay – energized
• Exhaust fan (field-installed) - on
• Exhaust damper (field-installed) - open
SCXG-SVX01B-EN 73
Page 74

general
PURGE sequence “D”
This sequence can purge the air out of a
building before coming out of unoccupied
mode of operation in a VAV system. Also,
it can be used to purge smoke or stale air.
• Supply fan – on
• Supply fan VFD – on (60 hz)
• Inlet guide vanes/VAV boxes – open
• Outside air damper – open
• Heat – all stages – off, modulating heat
output at 0 vdc
• Occupied/Unoccupied output –
energized
• VO relay – energized
• Exhaust fan (field-installed) - on
• Exhaust damper (field-installed) - open
PURGE with duct pressure control “E”
This sequence can be used when supply
air control is required for smoke control.
• Supply fan – on
• Supply fan VFD – on (if equipped)
• Inlet guide vanes – controlled by supply
air pressure control function with
supply air pressure high limit disabled
• Outside air dampers – open
• Heat – all stages – off, hydronic heat
output at 0 vdc
• Occupied/unoccupied output – energized
• VO relay – energized
• Exhaust fan (field-installed) - on
• Exhaust damper (field-installed) - open
Note: Each system (cooling, exhaust,
supply air, etc.) within the unit can be
redefined in the field for each of the five
sequences, if required. Also the definitions
of any or all of the five sequences may be
locked into the software by simple key
strokes at the human interface panel. Once
locked into the software, the sequences
cannot be changed.
Operation
Exhaust/Comparative
Enthalpy (ECEM ) Module Option used on units with
comparative enthalpy option
The exhaust/comparative enthalpy
module receives information from the
return air humidity sensor, and the RTM
outside air temperature sensor and
outside air humidity sensor, the outside
air humidity sensor and temperature
sensor to utilize the lowest possible
enthalpy level when considering
economizer operation. In addition, it
receives space pressure information to
maintain the space pressure within the
setpoint control band. Refer to the Figure
O-GI-1 for humidity vs. voltage values.
Figure O-GI-1. ECEM relative humidity vs.
voltage
information
Ventilation Control Module
(VCM) - Available only with
Traq™ Damper Option
The ventilation control module (VCM) is
located in the airside economizer section
of the unit and linked to the unit’s UCM
network. Using a velocity pressure
transducer/solenoid (pressure sensing
ring) in the fresh air section allows the
VCM to monitor and control fresh air
entering the unit to a minimum airflow
setpoint. See Figure O-GI-2 for a detail
view of the velocity pressure transducer/
solenoid assembly.
An optional temperature sensor can be
connected to the VCM to enable control
of a field installed fresh air preheater.
Also, a field-provided CO
connected to the VCM to control CO
reset. The reset function adjusts the
minimum cfm upward as the CO
concentrations increase. The maximum
effective (reset) setpoint value for fresh
air entering the unit is limited to the
system’s operating cfm. Table O-GI-5 lists
the minimum outside air cfm vs. input
voltage.
Table O-GI-5. Minimum outside air setpoint
w/VCM module and Traq™ sensing
Unit Input Volts CFM
SXWG 20 0.5 - 4.5 vdc 6,350-8,500
SXWG 25 0.5 - 4.5 vdc 7,250-10,625
SXWG 30 0.5 - 4.5 vdc 7,250-12,750
SXWG 35 0.5 - 4.5 vdc 7,250-14,875
SXRG 20 0.5 - 4.5 vdc 7,250-8,500
SXRG 25 0.5 - 4.5 vdc 7,250-10,625
SXRG 32 0.5 - 4.5 vdc 7,250-13,600
sensor can be
2
2
2
Trane IntelliPak Lon-Talk
Communication Module (LCI-I
Option used on units with
Trane ICSTM or 3rd party
Building AutomationSystems)
The LonTalk Communication Interface
module expands communications from
the unit UCM network to a Trane Tracer
Summit
automation system, utilizing LonTalk, and
allows external setpoint and
configuration adjustment and monitoring
of status and diagnostics.
74 SCXG-SVX01B-EN
TM
or a 3rd party building
Figure O-GI-2. Velocity pressure transducer/
solenoid assembly
Page 75

general
Generic Building Automation
System Module Option
The generic building automation system
module (GBAS) provides broad control
capabilities for building automation
systems other than Trane’s Tracer
system. A field provided potentiometer
or a 0-5 vdc signal can be applied to any
of the inputs of the GBAS to provide the
following points:
GBAS Analog Inputs
Four analog inputs that can be configured
to be any of the following:
(1) occupied zone cooling
(2) unoccupied zone cooling
(3) occupied zone heating
(4) unoccupied zone heating
(5) SA cooling setpoint
(6) SA heating setpoint
(7) space static pressure setpoint
(8) SA static pressure setpoint
GBAS Binary Outputs
Five binary outputs to provide
diagnostics, signaling up to five alarms.
Each of the five (5) relay outputs can be
mapped to any/all of the available
diagnostics. Each output contains a dry
N.O. and N.C. contact with a VA rating of 2
amps at 24 VAC.
GBAS Binary Input
One binary input for the self-contained
unit to utilize the demand limit function.
This function is operational on units with a
GBAS and is used to reduce electrical
consumption at peak load times. Demand
limiting can be set at either 50% or
100%. When demand limiting is needed,
mechanical cooling and heating (with
field-provided 2-stage electric heat only)
operation are either partially (50%), or
completely disabled (100%) to save
energy. The demand limit definition is
user definable at the HI panel. Demand
limit binary input accepts a field supplied
switch or contact closure. When the need
for demand limiting has been
discontinued, the unit’s cooling/heating
functions will again become fully enabled.
GBAS Communication (Analog Inputs)
The GBAS accepts external setpoints in
the form of analog inputs for cooling,
heating, supply air pressure. Refer to the
unit wiring diagram for GBAS input
wiring and the various desired setpoints
with the corresponding DC voltage
inputs.
Operation
Any of the setpoint or output control
parameters can be assigned to each of
the four analog inputs on the GBAS
module. Also, any combination of the
setpoint and/or output control parameters can be assigned to the analog
inputs through the HI. To assign the
setpoints apply an external 0-5 vdc
signal:
1. directly to the signal input terminals, or
2. to the 5 vdc source at the GBAS
module with a 3-wire potentiometer.
Note: There is a regulated 5 vdc output on
the GBAS module that can be used with a
potentiometer as a voltage divider. The
recommended potentiometer value is 1000100,000 ohms.
The setpoints are linear between the
values shown in Table O-GI-6 on page 66.
Reference Table O-GI-7 on page 66 for
corresponding input voltage setpoints.
Following are formulas to calculate input
voltage or setpoint. SP = setpoint, IPV =
input voltage.
If the setpoint range is 50-90°F:
IPV = (SP - 50) (0.1) + 0.5
SP = [(IPV - 0.5)/0.1] + 50
If the setpoint range is 40-90°F:
IPV = (SP - 40)(0.8) + 0.5
SP = [(IPV - 0.5)/0.08] + 40
If the setpoint range is 40-180°F:
IPV = (SP - 40)(0.029) + 0.5
SP = [(IPV - 0.5)/0.029] + 40
If the static pressure range is 0.03-0.3
iwc:
IPV = (SP - 0.03)(14.8) + 0.5
SP = [(IPV - 0.5)/14.8] + 0.03
If the static pressure range is 0.0-5.0 iwc:
IPV = (SP)(0.8) + 0.5
SP = [IPV/(0.8 + 0.5)]
GBAS Demand Limit Relay (Binary Input)
The GBAS allows the unit to utilize the
demand limit function by using a
normally open (N.O.) switch to limit the
electrical power usage during peak
periods. Demand limit can initiate by a
toggle switch closure, a time clock, or an
ICS control output. These contacts must
be rated for 12 ma @ 24 VDC minimum.
When the GBAS module receives a
binary input signal indicating demand
limiting is required, a command initiates
to either partially (50%) or fully (100%)
information
inhibit compressor and heater operation.
This can be set at the HI using the setup
menu, under the “demand limit definition
cooling” and “demand limit definition
heating” screens. A toggle switch, time
clock, or building automation system
control output can initiate demand
limiting.
If the cooling demand limit is set to 50%,
half of the cooling capacity will disable
when the demand limit binary input
closes. The heating demand limit definition can only be set at 100%, unless the
unit has field-provided two-stage electric
heat. In that case, if the heating demand
limit is set to 50%, half or one stage of
heating disables when the demand limit
binary input closes. If the demand limit
definition is set to 100%, then all cooling
and/or heating will disable when the
demand limit input closes.
GBAS Diagnostics (Binary Outputs)
The GBAS can signal up to five alarm
diagnostics, which are fully mappable
through the setup menu on the HI. These
diagnostics, along with the alarm output
on the RTM, allow up to six fully
mappable alarm outputs.
Each binary output has a NO and NC
contact with a rating of two amps at 24
VAC. The five binary outputs are factory
preset as shown on the unit wiring
diagram (on the unit control panel door).
However, these outputs can be field
defined in a variety of configurations,
assigning single or multiple diagnostics to
any output.
For a complete listing of possible diagnostics, see the
Programming Guide, PKG-SVP01B-EN
For terminal strip locations, refer to the
unit wiring diagram for the GBAS.
IntelliPak Self-Contained
.
SCXG-SVX01B-EN 75
Page 76

general
Operation
information
Table O-GI-6. GBAS analog input setpoints
control parameter signal range setpoint range
occupied zone cooling setpoint 0.5 to 4.5 vdc 50 to 90°F
(CV units only)
unoccupied zone cooling setpoint 0.5 to 4.5 vdc 50 to 90°F
(CV and VAV)
occupied zone heating setpoint 0.5 to 4.5 vdc 50 to 90°F
(CV units only)
unoccupied zone heating setpoint 0.5 to 4.5 vdc 50 to 90°F
(CV and VAV)
supply air cooling setpoint 0.5 to 4.5 vdc 40 to 90°F
(VAV units only)
supply air hydronic heating setpoint 0.5 to 4.5 vdc 40 to 180 F
(VAV units only)
space static pressure setpoint 0.5 to 4.5 vdc 0.03 to 0.30 IWC
supply air pressure setpoint 0.5 to 4.5 vdc 0.0 to 5.0 IWC
(VAV units only)
Notes: 1. Input voltages less than 0.5 vdc are considered as 0.5 vdc input signal is lost, the setpoint will
“clamp” to the low end of the setpoint scale. No diagnostic will result from this condition.
2. Input voltages greater than 4.5 vdc are considered to be 4.5 vdc.
3. The actual measured voltage is displayed at the HI.
Table O-GI-7. GBAS input voltage corresponding setpoints
temp. temp. temp temp
volts °F volts °F volts °F volts °F
0.5 50 1.6 6 0 2.6 7 0 2.7 8 0
0.6 51 1.7 6 1 2.7 7 1 2.8 8 1
0.7 52 1.8 6 2 2.8 7 2 2.9 8 2
0.8 53 1.9 6 3 2.9 7 3 3.0 8 3
0.9 54 2.0 6 4 3.0 74 3.1 8 4
1.0 55 2.1 65 3.1 7 5 3.2 8 5
1.1 56 2.2 66 3.2 7 6 3.3 8 6
1.2 57 2.3 67 3.3 7 7 3.4 8 7
1.3 58 2.4 68 3.4 7 8 3.5 8 8
1.5 59 2.5 69 3.5 7 9 3.6 8 9
76 SCXG-SVX01B-EN
Page 77

general
Waterside Components
Waterside components consist of water
piping, water valves, water flow switch
option, water cooled condensers (SXWF
only), and the economizer option.
Water Purge
This user-definable feature allows the
user to select a purge schedule to
automatically circulate water through the
economizer and condensers periodically
during non-operational times. This allows
fresh chemicals to circulate in waterside
heat exchangers. This feature is on all
units and is defined at the HI.
Water Piping Options
Water piping is factory-installed with lefthand connections on units without a
waterside economizer. Units can be
ordered with either basic piping or
intermediate piping. Also, units with
waterside economizers can be set for
either variable or constant water flow at
the HI. See Figures O-GI-3, O-GI-4, and OGI-5 for detailed piping configuration
information.
With compatible piping configurations,
the unit can be configured to provide:
1. Constant water flow with basic or
intermediate piping or
2. Variable water flow (head pressure
control) with intermediate piping only.
Constant water flow is for condenser
pumping systems that are not capable of
unloading the water-pumping system.
Variable water flow maximizes energy
saving by unloading the water pumping
system.
Basic Water Piping
This option is available on units without a
waterside economizer and with
condenser water applications above 54°F
(12.2°C) that do not require condensing
pressure control. Left hand water
connections and piping are extended to
the unit exterior. Manifold piping is
factory installed.
Intermediate Water Piping
This option provides condensing
temperature control when the unit is
configured (user defined at the HI) for
variable water flow with or without a
waterside economizer. A two-way
modulating control valve is wired and
installed in the unit to maintains a specific
Operation
range of water temperature rise through
the condenser when entering fluid
temperature is less than 58°F (15°C). This
option allows the compressor to operate
with entering fluid temperature down to
35°F (2°C). The minimum valve position
to maintain minimum condenser flow
rates is user-defined at the HI. This valve
drives closed if the unit shuts down or if a
power failure occurs.
Water Flow Switch Option
A water flow switch is factory installed in
the condenser water pipe within the unit.
Whenever the flow switch detects a
water flow loss prior to or during
mechanical cooling, compressor
operation locks out and a diagnostic code
displays. If water flow is restored, the
compressor operation automatically
restores.
Water-Cooled Condensers
Units that are set up for variable water
flow will modulate a water valve to
maintain a user-defined condensing
temperature setpoint. Condensing
temperature will be referenced utilizing
factory installed sensors located at each
condenser.
Table O-GI-8. Condenser water piping
connection sizes
unit size inlet pipe outlet pipe
SXWG 20, 25, 2 1/
30, 32, 35
Waterside Economizer Option
The waterside economizer option takes
advantage of cooling tower water to
either precool the entering air to aid the
mechanical cooling process or, if the
water temperature is low enough,
provide total system cooling. Waterside
economizing enables when the unit’s
entering water temperature is below the
unit’s entering mixed air temperature by
a minimum of 4°F plus the economizer’s
approach temperature. The approach
temperature default is 4°F. Waterside
economizing disables when the unit’s
entering water temperature is not below
the unit’s entering mixed air temperature
by at least the water economizer
approach temperature. The approach
temperature defaults to 4°F. The
economizer acts as the first stage of
NPT 2
2
1
/2 NPT
information
cooling. If the economizer is unable to
maintain the supply air setpoint, the unit
control module brings on compressors as
required to meet the setpoint.
The waterside economizer includes a coil,
modulating valves, controls, and piping
with cleanouts. The coil construction is ½inch (13 mm) OD seamless copper tubes
expanded into aluminum fins. The
evaporator and economizer coils share a
common sloped (IAQ) drain pan. Drain
pan options are either galvanized or
stainless steel, and are insulated and
internally trapped.
The waterside economizer coil is available with either a two or four row coil,
with no more than 12 fins per inch. The
tubes are arranged in a staggered
pattern to maximize heat transfer. The
coil has round copper supply and return
headers with removable cleanout and
vent plugs. The optional mechanical
cleanable economizer has removable
cast iron headers to allow easy mechanical cleaning of the tubes. The waterside
working pressure is rated for 400 psig
(2758 kPa).
Waterside Economizer Flow Control
Units equipped with a waterside
economizer can be set from the human
interface panel for variable or constant
water flow.
Constant Water Flow
Two-way modulating control shutoff
valves are wired, controlled, and installed
in the unit. One valve is located in the
economizer’s water inlet, and the other is
in the condenser bypass water inlet.
When the waterside economizer enables,
the two-way valves modulate to maintain
the discharge air temperature setpoint.
As the economizer valve opens, the
condenser bypass valve closes, and vice
versa. Full water flow is always
maintained through the condensers. Both
valves will close in the event of a power
failure.
Variable Water Flow
Two-way modulating control shutoff
valves are wired, controlled, and installed
in the unit. One valve is located in the
economizer’s water inlet, and the other is
in the condenser water inlet. When the
economizer valve is active, the
condenser bypass valve closes. The
SCXG-SVX01B-EN 77
Page 78

general
economizer valve modulates, thus water
flow through the unit modulates. If the
water is cool enough for economizing, but
mechanical cooling is also required, the
economizer valve fully opens to establish
full water flow through the condensers.
Whenever the water is too warm for
economizing and there is a call for
cooling, the economizer valve fully closes
and the bypass valve fully opens,
establishing full water flow through the
condensers. Full water flow is always
maintained through the condensers
when mechanical cooling is required.
Both valves close whenever cooling is
not required, and in the event of a power
failure.
Operation
Condenser 1
Condenser 2
Figure O-GI-3. Basic water piping, constant
water flow
information
Condenser 1
Condenser 2
V2
Figure O-GI-4. Intermediate water piping,
variable water flow
Condenser 1
Economizer
V1
V2
Figure O-GI-5. Intermediate piping with waterside economizer, variable or
constant water flow
Condenser 2
78 SCXG-SVX01B-EN
Page 79

general
Unit Airside Components
The unit’s air delivery system consists of
dampers, enthalpy switch option, airside
economizer option, filters, low ambient
sensors, and factory mounted single or
double wall plenums.
Supply Air Fan
The unit has a single supply fan that runs
at a constant speed. However, the fan
may have the IGV or VFD option that
modulates airflow based on supply air
temperature control. Pressing the stop
key on the HI will turn the supply fan off.
The fan is on continuously when a CV unit
is in occupied mode and except when a
unit is in the night heat/morning warmup
mode. During the night heat and setback
mode the fan cycles on and off in
response to a call for heat.
GI-9 for available fan horsepower.
Low Entering Air Temperature Sensor
This is standard on all units with a
hydronic coil or waterside economizer. It
can also be ordered as an option.
A thermostat limit switch is factory
mounted on the unit’s entering air side
with a capillary tube serpentine across
the coil face. If the temperature falls
below 35°F (2°C), the fan shuts down and
the waterside economizer and/or
hydronic heat valve options open to allow
full water flow. The heat output also
energizes. A manual reset is required.
The low entering air temperature
setpoint is adjustable at the HI.
High Duct Temperature Thermostat
A factory-supplied temperature limit
switch with reset element detects the
supply air duct temperature. This sensor
should be field-installed downstream
from the unit’s discharge in the supply air
duct. If the supply air duct temperature
exceeds 240°F (115.6°C), the unit shuts
down and displays a diagnostic. A
manual reset is required at the unit. The
high duct temperature can be adjusted at
the thermostat.
Dirty Filter Sensor Option
A factory installed pressure switch
senses the pressure differential across
the filters. When the differential pressure
exceeds 0.9-inches (23 mm) WG, contact
closure occurs and the HI will display a
diagnostic. The unit will continue to run
until you replace the air filters.
See Table O-
Operation
A field installed indicator device may be
wired to relay terminals to indicate when
filter service is required. Contacts are
rated at 115 VAC and are powered by a
field supplied transformer.
Low Ambient Sensor (Air-Cooled Units)
The low ambient sensor is field-installed
on air-cooled units. Position it in a location
subject to ambient temperatures only
and not exposed to direct sunlight or
exhaust fans.
The low pressure cutout initiates based
on the ambient temperature. A time
delay on the low pressure cutout initiates
for ambient temperatures between 50
(zero minutes) and 0°F (10 minutes). This
helps to prevent nuisance low pressure
cutout trips.
Inlet Guide Vane Option
Inlet guide vanes (IGV’s) are driven by a
modulating 0-10 vdc signal from the RTM
module. A pressure transducer
measures duct static pressure, and the
IGVs modulate to maintain the supply air
static pressure within an adjustable userdefined range. The range is determined
by the supply air pressure setpoint and
supply air pressure deadband, which are
set through the HI panel.
IGV assemblies installed on the supply
fan inlet regulate fan capacity and limit
horsepower at lower system air requirements. When in any position other than
full open, the vanes pre-spin the air in the
same direction as the supply fan rotation.
As the vanes approach the full-closed
position, the amount of “spin” induced by
the vanes increases at the same time
that intake airflow and fan horsepower
diminish. The IGVs will close when the
supply fan is off.
Supply Air Static Pressure Limit
The opening of the IGVs and VAV boxes
coordinate during unit startup and
transition to/from occupied/unoccupied
information
modes to prevent supply air duct
overpressurization. However, if for any
reason the supply air pressure exceeds
the user-defined supply air static
pressure limit set at the HI panel, the
supply fan/VFD shuts down and the IGVs
close. The unit will attempt to restart, up
to three times. If the overpressurization
condition still occurs on the third restart,
the unit shuts down and a manual reset
diagnostic sets and displays at the HI.
Variable Frequency Drive Option
The variable frequency drive (VFD) is
driven by a modulating 0-10 vdc signal
from the RTM module. A pressure
transducer measures duct static
pressure, and the VFD adjusts the fan
speed to maintain the supply air static
pressure within an adjustable userdefined range. The range is determined
by the supply air pressure setpoint and
supply air pressure deadband, which are
set at the HI panel.
VFDs provide supply fan motor speed
modulation. The drives will accelerate or
decelerate as required to maintain the
supply air static pressure setpoint.
VFD with Bypass
Bypass control is an option that provides
full nominal airflow in the event of drive
failure. The user must initiate the bypass
mode at the HI panel. When in bypass
mode, VAV boxes need to be fully open.
The self-contained unit will control
heating and cooling functions to maintain
setpoint from a user-defined zone sensor.
Supply air static pressure limit is active in
this mode.
For more detailed information on VFD
operation, reference the VFD technical
manual that ships with the unit.
Airside Economizer Option
Units with the airside economizer option
are equipped with the necessary control
sequences to use outside air for the first
SCXG-SVX01B-EN 79
Page 80

general
stage of cooling, in occupied or
unoccupied mode and when ambient
conditions are favorable for economizing.
Inherent in the unit controller is the ability
to suppress the setpoint below the
normal unit setpoint. This allows the
building to improve comfort levels when
possible, and at the same time, optimize
building mechanical cooling operation for
peak operating efficiency. An outside air
temperature and relative humidity
sensor are provided to allow monitoring
of reference enthalpy and are field
installed.
If the unit has the ECEM board, economizer operation enables when the
outside air enthalpy is less than 25 BTU’s/
lb. default (adjustable 19-28 BTU’s/lb).
During occupied mode, the outside air
damper opens to 15% (adjustable 0100% at the HI) for ventilation purposes.
Also, the ability to alter the outside air
damper position to compensate for VAV
supply air modulation is inherent in the
unit controls, and can be enabled by the
operator.
If the unit does not have an ECEM board,
it will economize when the O/A temperature falls below the O/A economizer
setpoint.
The mixing box fabrication is galvanized
steel. Opposed low leak damper blades
are fabricated from galvanized steel and
rotate on rustproof nylon bushings. A
factory installed 24V modulating spring
return actuator controls both damper
positions.
When outdoor conditions are not suitable
for economizer cooling, the enthalpy
control disables the economizer function
and permits the outdoor air damper to
open only to the minimum position.
On water-cooled units, compressor
operation lockout will not occur at low
ambient air temperatures. However,
lockout will still occur via low condenser
water temperature.
The outdoor air dampers drive fully
closed whenever the supply air fan is off,
provided there is power to the unit.
Comparative Enthalpy Control
Comparative enthalpy controls the
economizer operation and measures
temperature and humidity of both return
air and outside air to determine which
Operation
source has lower enthalpy. This allows
true comparison of outdoor air and return
air enthalpy by measurement of outdoor
air and return air temperatures and
humidities. A factory-installed control
board, with field-installed outside and
return air temperature and relative
humidity sensors, allows monitoring of
outside and return air.
Note: If comparative enthalpy is not
ordered, the standard method is to
compare outdoor air enthalpy with the
fixed reference enthalpy. The reference
enthalpy is set through the human interface
panel.
Units with comparative enthalpy control
are equipped with the necessary control
sequences to allow using outside air for
the first stage of cooling, in occupied or
unoccupied mode and when ambient
conditions are favorable for economizing.
Inherent in the unit controller is the ability
to suppress the setpoint below the
normal unit setpoint. This allows the
building to improve comfort levels when
possible, and at the same time, optimize
building mechanical cooling operation for
peak operating efficiency.
Economizer operation enables when the
outside air enthalpy is 3 BTu/lb less than
the return air enthalpy. During occupied
mode, the outside air damper opens to
15% (adjustable 0-100%) for ventilation
purposes. Also, the ability to alter the
outside air damper position to compensate for VAV supply air modulation is
inherent in the unit controls, and can be
enabled by the operator.
The mixing box fabrication is galvanized
steel. Opposed low leak damper blades
are fabricated from galvanized steel and
rotate on rustproof nylon bushings. A
factory installed 24V modulating spring
return actuator controls both damper
positions.
TM
Airside Economizers with Traq
Outside air enters the unit through the
TM
damper assembly and is
Tr aq
measured by velocity pressure flow
rings. The velocity pressure flow rings
are connected to a pressure transducer/
solenoid assembly, which compensates
for temperature swings that could affect
the transducer. The ventilation control
Damper
information
module (VCM) utilizes the velocity
pressure input, the RTM outdoor air
temperature input, and the minimum
outside air cfm setpoint to modify the
volume (cfm) of fresh air entering the unit
as the measured airflow deviates from
setpoint.
When the optional preheat temperature
sensor is installed at the auxiliary
temperature on the VCM and the preheat
function is enabled, the sensor will
monitor the combined (averaged) fresh
air and return air temperatures. As this
mixed air temperature falls below the
preheat actuate temperature setpoint,
the VCM activates the preheat binary
output to control a field-installed heater.
The output deactivates when the temperature rises 5°F above the preheat
actuate temperature setpoint.
Using a field-installed CO
CO2 reset enabled, as the CO2 concentration increases above the CO
value, the VCM modifies the minimum
outside air cfm setpoint to increase the
amount of fresh air entering the unit. The
setpoint adjusts upward until reaching the
maximum reset value. The maxi-
CO
2
mum effective (reset) setpoint value for
fresh air is limited to the system’s
operating cfm. As the CO
decreases, the effective (reset) setpoint
value adjusts downward toward the
minimum outside air cfm setpoint. See
Figure O-GI-6 for an airflow cfm vs. CO
concentration curve.
Standard Two-Position Damper Interface
Units with the two-position damper
interface are provided with a 0-10 VDC
control output suitable for controlling a
field-provided modulating actuator. In
occupied mode, the output drives to the
maximum position.
Airside Economizer Interface
Units with airside economizer interface
are equipped with the necessary control
sequences to allow using outside air for
the first stage of cooling, in occupied or
unoccupied mode and when ambient
conditions are favorable for economizing.
Inherent in the unit controller is the ability
to suppress the setpoint below the
normal unit setpoint. This allows the
building to improve comfort levels when
possible, and at the same time, optimize
building mechanical cooling operation for
sensor with
2
reset start
2
concentration
2
2
80 SCXG-SVX01B-EN
Page 81

general
peak operating efficiency. An outside air
temperature and relative humidity
sensor are provided for field installation
to monitor reference enthalpy.
Economizer operation enables when the
outside air enthalpy is less than 25 BTu/lb
(adjustable 19-28 BTu/lb.). During
occupied mode, the outside air damper
opens to 15% (adjustable 0-100%) for
ventilation purposes. Also, the ability to
alter the outside air damper position to
compensate for VAV supply air
modulation is inherent in the unit controls,
and can be enabled by the operator. An
analog 2-10 VDC output (adjustable (0-10
VDC) is provided to modulate the fieldprovided 30 second damper actuators
(adjustable 1-255 seconds).
Airside Economizer Interface with
Comparative Enthalpy
Units with airside economizer interface
and comparative enthalpy are equipped
with the necessary control sequences to
allow using outside air for the first stage
of cooling, in occupied or unoccupied
mode and when ambient conditions are
favorable for economizing. Inherent in the
unit controller is the ability to suppress
the setpoint below the normal unit
setpoint. This allows the building to
improve comfort levels when possible,
and at the same time, optimize building
mechanical cooling operation for peak
operating efficiency. A factory-installed
control board, with outside and return air
Operation
temperature and relative humidity
sensors, are provided for monitoring
outside and return air. The sensors are
field installed. Economizer operation
enables when the outside air enthalpy is
3 BTU’s/lb. less than the return air
enthalpy. During occupied mode, the
outside air damper opens to 15%
(adjustable 0-100%) for ventilation
purposes. Also, the ability to alter the
outside air damper position to
compensate for VAV supply air
modulation is inherent in the unit
controls, and can be enabled by the
operator. An analog 2-10 VDC output
(adjustable (0-10 VDC) is provided to
modulate the field-provided 30-second
damper actuators (adjustable 1-255
seconds).
Figure O-GI-6. CO2 reset function, outside air vs. CO
information
Air-Cooled Condensers
Model SXRF units are designed for use
with the remote air-cooled condenser,
model CXRC. For more information, see
the air-cooled condenser Installation,
Owner, and Diagnostic Manual,
SVX01A-EN.
Condenser fans will stage per a userdefined setting. If the condenser is
equipped with head pressure control (air
modulation on last stage of condenser
capacity), the condenser airflow will
modulate to maintain condensing
temperature setpoint. Condensing
temperature is determined by sensors
located at each condenser coil.
2
CXRC-
SCXG-SVX01B-EN 81
Page 82

general
Input Devices and System
Functions
Following are basic input device and
system function descriptions used within
the UCM network on IntelliPak selfcontained units. Refer to the unit wiring
diagrams for specific connections.
Water Purge
NOTICE
Proper Water Treatment!
The use of untreated or improperly
treated water in coils may result in
scaling, erosion, corrosion, algae or
slime. It is recommended that the
services of a qualified water treatment
specialist be engaged to determine what
water treatment, if any, is required. Trane
assumes no responsibility for equipment
failures which result from untreated or
improperly treated water or saline or
brackish water.
During the unoccupied mode, watercooled units will periodically circulate
water through the condensers and
waterside economizer if the user has
enabled the purge function at the HI. The
water purge function circulates water to
introduce fresh water-treatment
chemicals and help prevent water
stagnation. The number of hours between
each periodic purge, or purge duration, is
user-defined at the HI between 1-999
hours. If the periodic purge timer expires
while the unit is in occupied mode, it will
wait for the next available unoccupied
time before initiating water purge.
Contrary, if a request for cooling occurs
during a purge sequence, purge will
terminate and cooling will commence.
Compressor Circuit Breakers
The compressors are protected by circuit
breakers that interrupt the compressor
power supply if the current exceeds the
breakers “must trip” value. During a
request for compressor operation, if the
compressor module (MCM or SCM)
detects a problem outside of it’s normal
parameters, it turns any operating
compressor(s) on that circuit off, locks
out all compressor operation for that
circuit, and initiates a manual reset
diagnostic.
Operation
Compressor Motor Winding Thermostats
A thermostat is embedded in the motor
windings of each compressor. Each
thermostat opens if the motor windings
exceed approximately 221°F. The
thermostat resets automatically when the
winding temperature decreases to
approximately 181°F. Rapid cycling, loss
of charge, abnormally high suction
temperatures, or the compressor running
backwards could cause the thermostat to
open. During a request for compressor
operation, if the compressor module
detects a problem outside of it's normal
parameters, it turns any operating
compressor(s) on that circuit off, locks
out all compressor operation for that
circuit, and initiates a manual reset
diagnostic.
Low Pressure Control
Low pressure (LP) control is
accomplished using a binary input device.
LP cutouts are mounted on the suction
lines near the compressors. The LP
control contacts close when the suction
pressure exceeds 27 ± 4
control is open when a compressor
starts, none of the compressors on that
circuit will operate. They are locked out
and a manual reset diagnostic initiates.
The LP cutouts open if the suction
pressure approaches 7 ± 4 psig. If the LP
cutout opens after a compressor starts,
all compressors operating on that circuit
will turn off immediately and will remain
off for a minimum of three minutes.
If the LP cutout trips four consecutive
times during the first three minutes of
operation, the compressors on that circuit
will lock out and a manual reset diagnostic initiates.
Evaporator Temperature Sensor
Frostat™
The evaporator temperature sensor is an
analog input device used to monitor
refrigerant temperature inside the
evaporator coil to prevent coil freezing. It
is attached to the suction line near the
evaporator coil with circuits 1 and 2
connected to the SCM/MCM and circuits
3 and 4 connected to the WSM. The coil
frost cutout temperature is factory set at
30°F. It is adjustable at the HI from 25-35°F.
The compressors stage off as necessary
to prevent icing. After the last
compressor stages off, the compressors
psig. If the LP
information
will restart when the evaporator
temperature rises 10°F above the coil
frost cutout temperature and the
minimum three minute “off” time
elapses.
Saturated Condenser Temperature
Sensors
The saturated condenser temperature
sensors are analog input devices. They
are mounted inside a temperature well
located on a condenser tube bend on aircooled units, and in the condenser shell
on water-cooled units. The sensors
monitor the saturated refrigerant
temperature inside the condenser coil
and are connected to the SCM/MCM for
circuits 1 and 2 (air or water cooled), and
WSM for circuits 3 and 4 (only watercooled).
Head Pressure Control
Head pressure control is accomplished
using two saturated refrigerant
temperature sensors on air-cooled units
and up to four sensors on water-cooled
units.
Air-cooled units: During a request for
compressor operation when the condensing temperature rises above the
lower limit of the control band, the
compressor module (SCM/MCM)
sequences condenser fans on. If the
operating fans cannot bring the condensing temperature to within the control
band, more fans turn on. As the saturated condensing temperature approaches the lower limit of the control
band, fans sequence off. The minimum
on/off time for condenser fan staging is
5.2 seconds. If the system is operating at
a given fan stage below 100% for 30
minutes the saturated condensing
temperature is above the efficiency
check point setting, a fan stage will be
added. If the saturated condensing
temperature falls below the efficiency
check point setting, fan control remains at
the present operating stage. If the fan
stage cycles four times within a 10
minute period, the lower limit temperature is redefined as being equal to the
lower limit minus the temporary low limit
suppression setting. The unit will utilize
this new low limit temperature for one
hour to reduce condenser fan short
cycling.
82 SCXG-SVX01B-EN
Page 83

general
Water-cooled: Units without WSE, the
condenser valve modulates to maintain
an average saturated condenser temperature. Units with WSE, if economizing
and mechanical cooling is necessary the
economize valve will sacrifice free
cooling and modulate to maintain
condensing saturated temperature. If not
economizing, the condenser valve will
modulate to maintain condensing
saturated temperature.
Water-cooled units without head pressure control will lock out mechanical
cooling at entering condenser water
temperatures below 54°F. Mechanical
cooling will resume when the entering
condenser water temperature exceeds
58°F.
Low Ambient Control (Air-Cooled Units
Only)
The low ambient modulating output on
the compressor module is functional on
all units with or without the low ambient
option. When the compressor module
stages up to it's highest stage (stage 2 or
3 depending on unit size), the modulating
output is 100% (10 VDC). When the
control is at stage 1, the modulating
output (0-10 VDC) controls the saturated
condensing temperature to within the
programmable condensing temperature
low ambient control point.
Low Ambient Compressor Lockout (AirCooled Units Only)
The low ambient compressor lockout
utilizes an analog input device. When the
system is configured for low ambient
compressor lockout, the compressors will
not operate if the temperature of the
outside air falls below the lockout
setpoint. When the temperature rises 5°F
above the lockout setpoint, the
compressors will operate. The setpoint
for units without the low ambient option is
50°F. For units with the low ambient
option, the setpoint is 0°F. The setpoints
are adjustable at the human interface
panel.
Return Air Temperature Sensor
The return air temperature sensor is an
analog input device used with a return
humidity sensor on units with the
comparative enthalpy option. The sensor
monitors the return air temperature and
compares it to the outdoor temperature
to establish which temperature is best
Operation
suited to maintain cooling requirements.
It is mounted in the return air path and
connected to the ECEM.
Supply Fan Circuit Breaker, Fuses, and
Overloads
The supply fan motor is protected by
either circuit breakers fuses or a
combination of fuses and overloads,
dependent upon unit configuration.
Circuit breakers are used on units
without a VFD. They will trip and interrupt
the motor power supply if the current
exceeds the breaker trip value. The RTM
shuts all system functions off when
detecting an open fan proving switch.
Units with a VFD have fuses to protect
the VFD and motor. Units with a VFD w/
bypass have fuses to protect VFD circuit
and overloads to protect the motor when
in bypass.
Supply Air Temperature Low Limit
The supply air temperature low limit
function uses the supply air temperature
sensor input to modulate the economizer
damper to the minimum position if the
supply air temperature falls below the
occupied heating setpoint temperature.
Supply Air Temperature Sensor
The supply air temperature sensor is an
analog input device. It monitors the
supply air temperature for supply air
temperature control, supply air
temperature reset, supply air
temperature low limiting, and supply air
tempering. It is mounted in the supply air
discharge section of the unit and
connected to the RTM.
Supply Airflow Proving Switches
This is binary input device used on units
to signal the RTM when the supply fan is
operating. It is mounted in the supply fan
section and is connected to the RTM.
During a request for fan operation and if
the differential switch opens for 40
consecutive seconds, compressor
operation turns off, heat operation turns
off, the request for supply fan operation is
turns off and locks out, IGV option closes,
economizer damper option closes, and a
manual reset diagnostic initiates.
Low Entering Air Protection Device
(LEATPD)
The low entering air protection device
(LEATPD) is a binary input on units with
hydronic heat or a waterside economizer.
It is optional on water-cooled units.
information
If the LEATPD is on a unit with factoryinstalled heat, it is mounted in the heat
section and connected to the heat
module. If the entering air temperature to
the heating coil falls to 40°F, the normally
open contacts on the LEATPD close and
cause the following events:
a. the hydronic heat actuator fully opens.
b. the supply fan turns off
c. the outside air damper closes
d. the SERVICE light at the remote zone
sensor option turns on.
e. a LEATPD diagnostic displays at the
human interface panel.
If the LEATPD is on a water-cooled unit
without factory-installed heat, it is wired
to the WSM. It will trip if the entering
water temperature falls to 34°F, open the
economizer valve, and energize the
pump output.
High Duct Temp Thermostat Option On
Units with an LCI-I
The high duct temperature thermostats
are binary input devices used on units
with a Trane communication interface
module (Tracer/LCI-I). They provide a high
limit unit shutdown and require a manual
reset. The thermostats are factory set to
open if the supply air temperature
reaches 240°F, or the return air
temperature reaches 135°F. Once tripped,
the thermostat requires a manual reset.
Reset by pressing the sensor’s reset
button when the air temperature
decreases approximately 25°F below the
cutout point.
Filter Switch
The filter switch is a binary input device
that measures the pressure differential
across the unit filters. It is mounted in the
filter section and connected to the RTM. A
diagnostic SERVICE signal displays at the
remote panel if the pressure differential
across the filters is at least 0.5”
contacts automatically open when the
pressure differential across the filters
decrease to
differential is field adjustable between
0.17” to 5.0” w.c. ± 0.05 “.
High Duct Static Switch Option
The high duct static switch is fieldmounted in the ductwork or plenums
with smoke dampers. It will cause a
manual reset diagnostic if the duct static
exceeds the pre-set static limit. The static
limit is adjustable at the HI.
0.4” w.c. The switch
w.c. The
SCXG-SVX01B-EN 83
Page 84

sequence of
Operation
Control Sequences of
Operation
Occupied/Unoccupied Switching
There are four ways to switch occupied/
unoccupied:
(1) Night setback zone sensor
(2) Field-supplied contact closure
(hardwired binary input to RTM)
(3) Tracer Summit
(4) Factory-mounted time clock
Field Supplied Occupied/Unoccupied
Input on the RTM
This input accepts a field supplied switch
or contacts closure, such as a time clock,
with a rating of 12 mA at 24 VDC
minimum.
Tracer Summit System
The Tracer Summit system can control
the occupied/unoccupied status of the
self-contained unit.
Factory Mounted Time Clock
A time clock can control the
occupied/unoccupied status of the
self-contained unit.
Unoccupied Sequence of
Operation
The unoccupied mode helps conserve
energy during times when a building is
usually unoccupied. When in unoccupied
mode, the unit will control to the
unoccupied setpoints (usually a lower
operation
heating setpoint and higher cooling
setpoint). Setpoints can be programmed
at the HI, Tracer Summit, or the night
setback zone sensor.
The unit enters the unoccupied mode
when the RTM receives a closed signal
on the unoccupied input for more than
five seconds.
For units with supply air temperature
control entering unoccupied mode, the
following sequence will occur:
• Heating/cooling functions cease and the
economizer option closes fully. The
supply fan shuts down for proper cooldown time of the heat exchanger.
However, the supply fan may remain
on for a short period of time.
• After the supply fan shuts down, the
occupied/unoccupied relay energizes
and the IGV option fully opens. Also, the
VAV box stroke time begins. The VAV
box stroke time is field adjustable to
allow time for VAV boxes to go to the
full open airflow position.
• After the max VAV box stroke time
expires and the IGV’s are fully open, the
supply fan, economizer (if enabled),
compressors, and heat are enabled to
satisfy the unoccupied zone
temperature setpoints.
Note: Unoccupied economizer operation
can be enabled or disabled at the HI or
using Tracer Summit.
Figure O-SO-1. Typical cycling morning warmup cycle
84 SCXG-SVX01B-EN
Page 85

sequence of
Operation
For units without volume control entering
unoccupied mode, the following sequence will occur:
• The occupied/unoccupied relay energizes and the economizer option fully
closes.
• The fan mode is set to auto and the unit
will control to the unoccupied zone
temperature setpoints.
With MWU enabled at the HI, if the zone
temperature is below the MWU setpoint,
the unit enters the MWU mode.
Morning Warmup
This feature can be enabled at the HI, and
can be used with factory or field-installed
heat. If MWU is not required disable the
function in the setup menu at the HI.
MWU transitions the zone from
unoccupied to occupied. It will heat until
the MWU setpoint is met. The unit is then
released to occupied mode. Supply duct
static pressure is maintained during this
sequence. MWU can be set (at the HI) to
function as either full or cycling capacity.
Full Capacity Morning Warmup (MWU)
Full capacity morning warmup uses full
heating capacity to heat the zone as
quickly as possible. Full heating capacity
is provided until the morning warmup
setpoint is met. At this point, the unit is
released to daytime mode.
Cycling Capacity Morning Warmup
(MWU)
Cycling capacity morning warmup
provides a more gradual heating to
overcome “building sink” as the zone is
heated. Normal zone temperature control
with varying capacity is used to raise the
zone temperature to the MWU zone
temperature setpoint. This method of
warmup is used to overcome the
“building sink” effect.
Reference Figure O-SO-1 on page 73 for
a pictorial explanation of the cycling
MWU sequence. Cycling capacity MWU
will heat until MWU temperature setpoint
operation
is reached. Next a 60 minute timer
begins. If the building load reaches the
MWU ventilation setpoint, or the 60
minutes expire, whichever is first, the
airside economizer will control to the
minimum position. MWU will end when
the zone temperature rises above the
MWU terminate setpoint.
Timed Override Activation - ICS™
This function is operational whenever the
unit’s RTM module is used as the zone
temperature sensor source, which can be
set at the HI panel. When this function is
initiated by the push of the override
button on the zone sensor, the unit will
switch to the occupied mode. Unit
operation (occupied mode) during timed
override is terminated by a signal from
Tracer.
Timed Override Activation - Non-ICS
This function is active whenever the unit’s
RTM module board is selected as the
zone temperature source, which can be
set at the human interface panel. When
this function is initiated by the push of the
override button on the zone sensor, the
unit will switch to the occupied mode.
Automatic cancellation of the timed
override mode occurs after three hours
of operation.
VAV Drive Max Output
This is a single-pole, double-throw relay
rated at a maximum voltage of 24 vac,
two amps max. The relay contacts of this
relay switch when the unit goes from the
occupied mode to the unoccupied mode
by means of the unoccupied binary input,
night setback zone sensor, or Tracer
Summit. The contacts will stay switched
during the unoccupied and morning
warmup mode. They will return to the
position shown on the unit wiring
diagram when the unit returns to the
occupied mode. The intent of this binary
output is to signal the VAV boxes or other
terminal devices to go to a full open
airflow position.
SCXG-SVX01B-EN 85
Page 86

sequence of
Occupied Sequence
All setpoints can be adjusted using the HI
panel. Also, cooling/heating setpoints can
be adjusted in the zone, if using one of the
zone sensor options (BAYSENS020,
BAYSENS021, BAYSENS108,
BAYSENS110, BAYSENS019, or
BAYSENS074). For a complete list of unit
setpoint default values and ranges, see
IntelliPak Self-Contained
the
Programming Guide, PKG-SVP01B-EN
Occupied Zone Temperature - Cooling
The unit transitions from unoccupied to
occupied when the occupied/unoccupied
input on the RTM is open for more than
five seconds after having been closed.
This input can be received from Tracer
Summit, the remote NSB zone sensor,
the timed override function, or a field
supplied contact. Dependent on unit
options and the HI programming, the
following sequence will occur:
• The unit will begin MWU and then
switch to the occupied mode after the
MWU setpoint is met.
• Purge will be enabled by Tracer Summit.
Then Tracer Summit will enable the
occupied mode.
• The unit will switch from unoccupied to
occupied control immediately.
Upon entering occupied mode,the IGV
option will close while the supply fan
remains on. The occupied/unoccupied
relay will de-energize.
Zone Temperature Control
(Unit Model Number Digit 9 = 4 or 5)
A zone sensor located directly in the
space sends input to the RTM while the
CV unit is in occupied cooling mode.
When the unit is in occupied cooling, the
RTM controls the zone temperature
within the cooling setpoint deadband by
modulating the economizer option and/or
staging mechanical cooling on and off as
required.
Supply Air Temperature Control
(Unit Model Number Digit 9 = 1, 2, 3, or 6)
When the VAV unit is in occupied cooling,
the RTM controls the supply air
temperature to the specified supply air
cooling setpoint by modulating the
economizer option and/or staging
mechanical cooling on and off as
required. The changeover relay contacts
(field supplied) must be open on units
with hydronic heat for cooling to operate.
.
Operation
Cooling
Upon entering occupied mode, the RTM
receives an input from either the HI, RHI,
Tracer Summit, or the GBAS to start the
supply fan. The RTM supply fan contacts
close and energize the supply fan
contactor. On VAV units with IGV, the fan
delays until the IGV fully close. When the
supply fan starts, the fan proving switch
closes, signaling the RTM that airflow is
established. Depending on unit options,
either the IGV will begin to drive open, the
VFD will ramp the fan, and/or the airside
economizer dampers will open to the
user-defined minimum position.
When a cooling request is sent to the
RTM from the zone sensor, the RTM
evaluates the system operating conditions using the supply air and outdoor
temperature input before sending the
request to the MCM for mechanical
cooling. If outdoor conditions (temperature and humidity) are suitable or the
EWT is within specified setpoints, the
RTM will attempt to use “free cooling”
without using any compressors. The RTM
will use either the airside or waterside
economizer option. When outdoor air
conditions are not suitable, only mechanical cooling will function and outside air
dampers will remain at their minimum
position. If the unit does not have an
economizer, mechanical cooling will
operate to satisfy cooling requirements.
Units With Economizer
If the entering condenser water
temperature (units with a WSE) or the
outside air enthalpy (units with an ASE) is
appropriate to use “free cooling,” the
economizer will attempt to satisfy the
cooling zone temperature setpoint.
Note: When using an ASE with economizer
enabled, O/A temperature enable can be
used instead of comparative enthalpy if the
O/A temperature falls below the economizer
setpoint.
Then compressors will stage on as
necessary to maintain supply air temperature setpoint, which is user-defined
at the HI. Minimum on/off timing of
compressors prevents rapid cycling.
When both airside and waterside
economizers are on a single unit, priority
must be set at the HI. The economizer
operation
with the highest priority attempts cooling
first. Once it is operating at its maximum,
and if additional cooling is necessary, the
other economizer enables before
mechanical cooling begins.
Cooling/Waterside Economizer
Waterside economizing enables when
the unit’s entering water temperature is
below the unit’s entering mixed air
temperature by 4°F plus the user
adjustable economizer approach
temperature. The approach temperature
default is 4°F.
Waterside economizing disables when
the unit’s entering water temperature is
not below the unit’s entering mixed air
temperature by at least the water
economizer approach temperature
(default value of 4°F). The economizer
acts as the first stage of cooling. If the
economizer is unable to maintain the
zone (CV units) or supply air (VAV units)
temperature setpoint, the compressor
module will bring on compressors as
required to meet the setpoint.
Cooling/Airside Economizer
On units with an airside economizer, a call
for cooling will modulate the fresh air
dampers open. The rate of economizer
modulation is based on deviation of the
zone temperature from setpoint; i.e., the
further away from setpoint, the faster the
fresh air damper will open. The first stage
of cooling will start after the economizer
reaches full open.
Note: The airside economizer will only
function freely if ambient conditions are
below the enthalpy control settings or
below the return air enthalpy if unit has
comparative enthalpy installed. If outside
air is not suitable for “economizing,” the
fresh air dampers drive to the minimum
open position. A field adjustable, factory
default setting at the HI panel or Tracer
Summit can provide the input to establish
the minimum damper position.
When outdoor air conditions are above
the setpoint or comparative enthalpy
control setting, only mechanical cooling
will function and outside air dampers will
remain at their minimum position.
86 SCXG-SVX01B-EN
Page 87

sequence of
Mechanical Cooling
If the zone temperature cannot be
maintained within the setpoint deadband
using the economizer option or if there is
no economizer, the RTM sends a cooling
request to the MCM. The compressor
module checks the compressor
protection circuit before closing stage
one. After the first functional stage starts,
the compressor module monitors the
saturated refrigerant temperature and
closes the condenser fan output contact
when the saturated refrigerant
temperature rises above the lower limit
setpoint.
Air-Cooled Units Only
The compressor module closes the
condenser fan output contact when the
saturated refrigerant temperature rises
above the lower limit setpoint.
Water-Cooled Units Only
The WSM modulates the condenser coil
water valves to maintain condenser
temperature, if applicable. Otherwise, it
will check the entering condenser water
temperature to ensure it is greater than
54°F or if not, it will lock out cooling.
Auto Changeover (Units with Heat Only)
When the system mode is in auto, the
mode will change to cooling or heating as
necessary to satisfy the zone cooling
andheating setpoints. The zone cooling
and heating setpoints can be as close as
2°F (1.1°C).
Occupied Zone Temperature - Heating
Relies on input from a sensor directly in
the space, while a system is in occupied
heating mode or an unoccupied period, to
stage electric heat on and off or modulate
the hydronic heating valve as required to
maintain the zone temperature within the
heating setpoint deadband. The supply
fan will operate when there is a request
for heat.
Electric Heat
On units with electric heat, the zone
temperature can be controlled to a
heating setpoint during the occupied
mode by cycling a single stage electric
heater. An interface is provided for field
supplied single stage electric heat. The
zone temperature heating setpoint and
deadband are user defined at the HI
panel.
Operation
Hydronic Heat: Hot Water or Steam
On units with hot water or steam heating,
the zone temperature can be controlled
to a heating setpoint during the occupied
mode. The zone temperature heating
setpoint and deadband are user defined
at the HI panel or zone sensor. VAV
occupied heating initiates by closing a
field-supplied switch or relay contacts
connected to the changeover input on the
RTM. Supply air static pressure is
maintained.
Supply Air Setpoint Reset (VAV Units
Only)
Supply air reset can be used to adjust the
supply air temperature setpoint on the
basis of a zone temperature or outdoor
air temperature. Supply air reset
adjustment is available at the HI panel for
supply air heating and supply air cooling
control.
Reset based on outdoor air temperature
Outdoor air cooling reset is sometimes
used in applications where the outdoor
temperature has a large effect on
building load. When the outside air
temperature is low and the building
cooling load is low, the supply air setpoint
can be raised, thereby preventing
subcooling of critical zones. This reset can
lower usage of mechanical cooling, thus
savings in compressor kW, but an
increase in supply fan kW may occur.
Outdoor air heating reset is the inverse of
cooling, with the same principles applied.
For both outdoor air cooling reset and
heating reset, there are three user
defined parameters that are adjustable
through the human interface panel.
• Beginning reset temperature
• Ending reset temperature
• Maximum amount of temperature reset
Reset based on zone temperature
Zone reset is applied to the zone(s) in a
building that tends to overcool or
overheat. The supply air temperature
setpoint is adjusted based on the
temperature of the critical zone(s). This
can have the effect of improving comfort
and/or lowering energy usage. The userdefined parameters are the same as for
outdoor air reset.
operation
Supply Air Tempering (Hot Water and
Steam VAV Units Only)
When supply air temperature falls below
the supply air temperature deadband low
end, the heating valve modulates open to
maintain the minimum supply air
temperature setpoint.
Daytime Warmup (Units with Supply Air
Temperature Control Only)
During occupied mode, if the zone
temperature falls to a preset, userdefined zone low limit temperature
setpoint, the unit is put into daytime
warmup. The system changes over to CV
heating, the VAV boxes drive full open.
However, unit airflow modulation control
operates to maintain duct static setpoint,
and full heating capacity is provided until
the daytime warmup setpoint is reached.
The unit is then returned to normal
occupied mode.
Supply Air Tempering
Supply air tempering is available on units
without volume control and with hot
water, steam, or electric heat or units with
supply air temperature control with
steam or electric heat. When the unit is in
heat mode but not actively heating, if the
supply air temperature drops to 10°F
(5.5°C) below the occupied zone heating
temperature setpoint, electric heat will
stage on or the hydronic valve will
modulate to maintain a minimum supply
air temperature. The unit transitions out
of heat mode if the supply air
temperature rises to 10°F (5.5°C) above
the occupied zone heating temperature
setpoint.
Changeover
This mode only functions on units with
supply air temperature control with
hydronic heat. When the changeover
binary input is closed the unit will control
to a discharge air heating setpoint. This
setpoint is entered from the HI, and can
be a higher temperature than the supply
air cooling setpoint. This function
maintains duct static pressure.
SCXG-SVX01B-EN 87
Page 88

sequence of
Compressors
Units use two sizes of hermetic scroll
compressors, 10 and 15 hp, and can use
from two to six compressors. When
viewing the front of the unit, compressors
are identified A through B from left to
right. The second compressor from the
left, or B compressor, is always the first to
come on, unless locked out for a
malfunction or shut off on frost protection.
Refer to Table O-SO-1 for compressor
cycling stages and Table O-SO-3 on page
78 for percent cooling capacity by stage.
The control system logic permits compressor operation only after the supply
fan is on. If the supply fan shuts down,
compressors will not operate. Units
without head pressure control (units with
intermediate piping packages) will lock
out mechanical cooling when the entering
condenser water temperature falls below
54°F. Mechanical cooling will resume
when the entering condenser water
temperature exceeds 58°F.
When there are more than two compressors in an air cooled unit, the first two
Operation
compressors are manifolded together. If
there are four compressors, the second
two are manifolded.
Compressor Cycling
Compressors cycle to maintain the
operating state required by the
temperature controls. In the event of a
compressor failure, the next available
compressor turns on. Refer to Table OSO-1 for compressor cycling by unit
model and tons.
During normal conditions, compressors
will not shut off until they have been on
for at least three minutes and will not turn
on until they have been off for at least
three minutes. Normal operating conditions are established on an individual
compressor basis. When a compressor
starts, its timer also starts. The compressor evaporator circuit frost protection can
override the “minimum” timer and
reduce the five minute minimum required time period.
When the unit is powered up, or manually
reset there will be a three to eight minute
delay before the first compressor may be
operation
turned on as requested by the unit
temperature control algorithm.
Compressor Lead/Lag Operation
Compressor lead/lag is a user-selectable
feature at the HI panel and is available on
all units. After each request for
compressor operation, the lead
refrigeration circuit or compressor
switches, thereby causing a more
equitable or balanced run time among
compressors.
When lead/lag is enabled, each time the
system cycles, it will alternate between
the standard compressor staging and the
lead/lag staging. Using Table O-SO-1, a
SXWG 30-ton unit will first stage compressor B then A, then AB for first cycle
and A, then AB for the second cycle.
Appropriate condenser valves (watercooled and condenser fans (air-cooled)
will stage with appropriate compressors
to maintain saturated condensing
temperature. Enabling lead/lag may drop
a cooling stage when compared to
standard staging. See Table O-SO-1 for
compressor staging.
Table O-SO-1. Compressor Stages.
Unit Refrigerant Compressor HP Standard Lead/Lag SCM
Size Circuit Type by Stage Compressor Compressor or
SXWG 20, 25 Independent 10 1 0 B/AB A/AB MCM
SXRG 20
SXWG 30 Independent 15 10 B/A/AB A/AB MCM
SXRG 25
SXWG 35 Independent 15 15 B/AB A/AB MCM
SXRG 32
88 SCXG-SVX01B-EN
Model # Digit 5 A B Staging Staging MCM
Page 89

sequence of
Compressor Safety Devices
The compressors have motor
temperature cutout switches in the motor
windings. These switches are provided
to take the compressors off line during
high motor winding temperature
conditions.
If a compressor low pressure cutout
opens during compressor start-up, the
UCM will not shut the compressor off
during the first two to three minutes after
start-up. This prevents possible nuisance
trips during low ambient start conditions.
See Table O-SO-2.
Each compressor’s discharge line
contains a high pressure cutout. Under
abnormal operating conditions, the cutout
will open to stop compressor operation.
Table O-SO-2. Pressure cutouts
Unit High Pressure Low Pressure
Model Cutout Cutout
SXWF 360/270 20/35
SXRF 405/350 12/27
Step Control
Steps of mechanical cooling are control
based on supply air or zone temperature.
See Table O-SO-1 for compressor
staging.
Capacity is based on an integrating
control concept. The unit capacity
matches the existing load and maintains
an average supply air temperature within
the supply air setpoint temperature
control band region.
The supply air temperature control band
is centered around supply air temperature setpoint and is adjustable from 2 to
12°F. In a steady state, the unit will either
maintain a constant level of cooling
capacity with the supply air temperature
within the control band, or the highest
active cooling level will cycle to provide
an average supply air temperature equal
to the setpoint.
If the supply air temperature swings
outside the limits of the control band, the
mechanical cooling capacity will increase
or decrease by one level accordingly. The
change occurs by integrating the temperature offset from the control band
limit.
Operation
A minimum time delay of five minutes
follows each change in cooling level. This
time delay promotes stability by allowing
the system to respond to the change
before any further control action occurs.
As the supply air temperature approaches setpoint, the time duration
between changing levels of cooling
capacity increases.
See Figure O-SO-2 for the typical unit
operating curve. Figure O-SO-3 shows
typical unit performance when supply air
temperature swings exceed the control
band limits.
Adjust the supply air temperature control
band according to the desired unit
performance. Increasing the control band
reduces the equipment cycle rate and
increases the maximum potential supply
air temperature deviation from setpoint.
Conversely, decreasing the control band
reduces the maximum potential temperature deviation, but increases the
compressor cycle rate.
Follow these recommendations concerning the supply air temperature control
band settings based on expected unit
sizing:
2 Cooling stage unit: 9°F
3 Cooling stage unit: 7°F
4 Cooling stage unit: 6°F
operation
Low Ambient Compressor Lockout
This function will lock out the compressor
if the outdoor air temperature sensor
reads an outdoor temperature below the
low ambient compressor lockout
temperature setpoint. This setpoint is
adjustable at the human interface panel.
Compressors will lock out when outdoor
air temperature falls below that selected
temperature and will start again when
the temperature rises 5°F above the
setpoint.
Evaporator Coil Frost Protection
FROSTAT
The FROSTAT™ system eliminates the
need for hot gas bypass. It utilizes an
evaporator temperature sensor mounted
on the suction line near the TXV bulb of
each circuit to protect the evaporator
from freezing.
If the evaporator temperature approaches the specified setpoint (adjustable between 25 and 35°F at the HI) the
compressor(s) will cycle off. The supply
fan remains on to help de-ice the coil. The
compressors will restart when the
evaporator temperature has risen 10°F
above the specified cutout temperature
and when the compressor(s) have been
off a minimum of three minutes. This
prevents rapid cycling of the compressors.
™
SCXG-SVX01B-EN 89
Page 90

sequence of
Service Valve Option
If ordered, service valves are factory
installed on each circuit before and after
the compressor to allow compressor
isolation for servicing.
Operation
Figure O-SO-2. Typical pulldown curve for unit operating properly within control band
operation
Figure O-SO-3. Typical pulldown curve for unit operating improperly outside control band
90 SCXG-SVX01B-EN
Page 91

general
Maintenance
information
Table M-GI-1. SCWG/SIWG/SCRG/SIRG General Maintenance Data
Unit Size 20 2 5 30 35 2 0 2 5 32
Compressor Data
Quantity 2 2 1/1 2 2 1/1 2
Nominal Ton/Comp 10 10 10/15 15 10 10/15 15
Circuits 2 2 2 2 2 2 2
Evaporator Coil Data
Rows 2 4 4 4 3 4 4
Sq. Ft. 22.5 25.0 25.0 25.0 25.0 25.0 25.0
FPF 144 144 144 144 144 144 144
Condenser Data
Minium GPM w/o Econ 36 36 46 54 – – –
Minimum GPM w/ Econ 41 41 60 65 – – –
Maximum GPM 80 80 102 119 – – –
Evaporator Fan Data
Quantity 2 2 2 2 2 2 2
Size (Dia. x width - inches) 12
Minimum HP 5 5 5 5 5 5 5
Maximum HP 20 2 5 25 25 20 25 25
Minimum Design CFM 6350 7250 7250 7250 7250 7250 7250
Maximum Design CFM 8500 10,625 12,750 14,875 8500 10,625 13600
R-22 Refrigerant Data
EER 12.6 13.9 13.4 12.5 10.3 10.7 10.1
IPLV 13.2 14.1 12.9 12.2 11.4 11.4 10.4
Refrigerant Charge - lbs.
Circuit A 25 25 27 27 – – –
Circuit B 25 25 25 27 – – –
Capacity Steps - % 100/53/0 100/53/0 100/65/47/0 100/53/0 100/52/0 100/66/47/0 100/52/0
407C Refrigerant Data
EER 11.6 13.2 12.3 11.3 – – –
IPLV 12.3 13.5 12.2 11.5 – – –
Refrigerant Charge - lbs
Circuit A 23.5 23.5 26.5 26.5
Circuit B 23.5 23.5 23.5 26.5
Capacity Steps - % 100/53/0 100/53/0 100/65/42/6 100/53/0
Filter Data
Quantity 4 4 4 4 4 4 4
Size (inc hes) (16x25x2) (16x25x2) (16x25x2) (16x25x2) 16x25x2 16x25x2 16x25x2
Quantity 4 4 4 4 4 4 4
Size (inches ) 20x25x2 20x25x2 20x25x2 20x25x2 20x25x2 20x25x2 20x25x2
CCRC/CIRC Condenser Match – – – – 20 29 32
Notes:
1. Compressors are Trane 3D® scroll.
2. EER and IPLV are rated in accordance to the ARI Standard 340/360-93 for large unitary equipment. Based on 80/67°F (26.7/19.4°C) to the evaporator coil, nominal airflow and 85-95°F (29.435°C) condenser water.
3. All units operate with R-22. Units ships with full operating charge.
4. Maximum cfm limits are set to prevent moisture carryover on the evaporator coil.
5. Minimum cfm limits are set to ensure stable thermal expansion valve operation at low load conditions.
6. Filter sizes are for units without hot water or steam heating coils
Water-Cooled Units Air-Cooled Units
5
/8”x8" 125/8”x9" 125/8”x11" 125/8 x11" 125/8”x8" 125/8”x9" 125/8”x11"
Table M-GI-2. SCWG/SIWG/SCRG/SIRG Self-Contained Heating Coil Maintenance Data
Filter Data for Heating Coil
Quantity 4
Size (inches ) 20x18x2
Size (mm) (508x457x51)
Quantity 8
Size (inches ) 20x20x2
Size (mm) (508x508x51)
Coil Data Type Rows No. - Size (in) No. - Size (mm) fpf
Steam Coil NS 1 2 - 24 x 58 2 - 609.6x1473.2 42
Hot Water Coil WC 1 2 - 24 x 58 2 - 609.6x1473.2 80
Notes: 1. Hot water and steam heating coils have Prima-Flo® fins and do not have turbulators. 2. For coil capacities, use TOPSS™ (Trane Official
Product Selection Program). 3. Full capacity coils consist of two coils stacked and piped in parallel.
SCXG-SVX01B-EN 91
Page 92

maintenance
Maintenance
Maintenance Procedures
Air Filters
is this correct?
without steam or hot water coil with steam or hot water coil
18 x 20 18 x 20 18 x 20 18 x 20
20 x 20 20 x 20 20 x 20 20 x 20
18 x 20 18 x 20 18 x 20 18 x 20
Note: All filters are 2". These views are from the back of the unit (L-R).
Figure M-MP-1. Unit Filter Sizes and Placement for SXWG 20-38 tons or SXRG 20-40 tons
Filter access doors are on the unit’s left
side. Filter access for the 2” filter rack on
optional steam and hot water coils and
airside economizers is also on the left side
16 x 20 16 x 20 16 x 20 16 x 20
20 x 20 20 x 20 20 x 20 20 x 20
18 x 20 18 x 20 18 x 20 18 x 20
Note: All filters are 2". These views are from the back of the unit (L-R).
procedures
of the unit. To replace throwaway filters,
remove the dirty elements and install
new filters with the filter’s directional
arrows pointing toward the fan. Verify
that no air bypasses the filters. See
Figures O-M-1 and O-M-2 for proper filter
placement.
WARNING
Hazardous Voltage w/Capacitors!
Disconnect all electric power, including
remote disconnects before servicing.
Follow proper lockout/tagout procedures to ensure the power cannot be
inadvertently energized. For variable
frequency drives or other energy
storing components provided by Trane
or others, refer to the appropriate
manufacturer’s literature for allowable
waiting periods for discharge of capacitors. Verify with an appropriate voltmeter that all capacitors have discharged.
Failure to disconnect power and
discharge capacitors before servicing
could result in death or serious injury.
Note: For additional information
regarding the safe discharge of capacitors, see PROD-SVB06A-EN or PRODSVB06A-FR.
92 SCXG-SVX01B-EN
Page 93

maintenance
Maintenance
Inspecting and Cleaning the
Drain Pan
Check the condensate drain pan and
drain line to ensure that the condensate
drains properly at least every six months
or as dictated by operating experience.
If evidence of standing water or condensate overflow exists, take steps to identify
and remedy the cause immediately.
Refer to the trouble shooting section of
this manual for possible causes and
solutions.
WARNING
Hazardous Voltage w/Capacitors!
Disconnect all electric power, including
remote disconnects before servicing.
Follow proper lockout/tagout procedures to ensure the power cannot be
inadvertently energized. For variable
frequency drives or other energy storing
components provided by Trane or others,
refer to the appropriate manufacturer’s
literature for allowable waiting periods
for discharge of capacitors. Verify with an
appropriate voltmeter that all capacitors
have discharged. Failure to disconnect
power and discharge capacitors before
servicing could result in death or serious
injury.
Note: For additional information regarding the safe discharge of capacitors, see
PROD-SVB06A-EN or PROD-SVB06A-FR.
Clean drain pans using the following
procedure:
1. Disconnect all electrical power to the
unit.
2. Don the appropriate personal
protective equipment (PPE).
3. Remove all standing water.
4. Use a scraper or other tools to remove
and solid matter. Remove solid matter
with a vacuum device that utilizes high
efficiency particulate arrestance (HEPA)
filters with a minimum efficiency of
99.97% at 0.3 micron particle size.
procedures
5. Thoroughly clean the contaminated
area(s) with a mild bleach and water
solution or an EPA-approved sanitizer
specifically designed for HVAC use.
Carefully follow the sanitizer
manufacturer’s instructions regarding
product use.
6. Immediately rinse the drain pan
thoroughly with fresh water to prevent
potential corrosion from the cleaning
solution.
7. Allow the unit to dry thoroughly before
putting the system back into service.
8. Properly dispose of all contaminated
materials and cleaning solution.
Inspecting and Cleaning the
Fan
Inspect the fan section every six months
or more frequently if operating
experience dictates. Clean accumulated
dirt and organic matter on the fan interior
surfaces following the procedure below:
1. Disconnect all electrical power to the
unit.
2. Wear the appropriate personal
protective equipment (PPE).
3. Use a portable vacuum with HEPA
filtration to remove the loose dirt and
organic matter. The filter should be
99.97% efficient at 0.3 micron particle
size.
4. Thoroughly clean the fan and
associated components with an
industrial cleaning solution. Carefully
follow the cleaning solution
manufacturer’s instructions regarding
personal protection and ventilation
when using their product.
5. Rinse the affected surfaces thoroughly
with fresh water and a fresh sponge to
prevent potential corrosion of metal
surfaces.
6. Allow the unit to dry completely before
putting it back into service.
7. Properly dispose of all contaminated
materials and cleaning solution.
SCXG-SVX01B-EN 93
Page 94

maintenance
Variable Frequency Drive (VFD)
The VFD access panel is hinged to allow
service access to the fan motor and belt
drive components that are located behind
it. To swing the panel open:
• Remove the unit center cover panel to
the left of the VFD panel.
• Remove and discard the sheet metal
shipping screws along the top and
bottom edges of the VFD panel.
• Disconnect the communications cable
from the keypad on the VFD door panel.
• Turn the two slotted-head fasteners on
the right edge of the VFD panel fully
counterclockwise.
• Pull on the handle to swing the panel
180°.
To close and reattach the panel, reverse
the procedures listed above.
Note: To secure the panel in the open
position during service procedures, attach
the chain mounted to the cabinet frame
behind the unit center cover panel to the
chain retainer notch on the edge of the VFD
panel.
Maintenance
literature for allowable waiting periods
for discharge of capacitors. Verify with an
appropriate voltmeter that all capacitors
have discharged. Failure to disconnect
power and discharge capacitors before
servicing could result in death or serious
injury.
Note: For additional information regarding the safe discharge of capacitors, see
PROD-SVB06A-EN or PROD-SVB06A-FR.
1. Rotate the fan wheel to ensure it turns
freely in the proper direction and is not
rubbing on the fan housing, inlet, or inlet
guide vanes. If necessary, center the
fan wheel again.
2. Check the position of both shafts. Fan
and motor shafts should operate
parallel to each other for maximum belt
and bearing life. Shim as necessary
under the motor or fan bearings to
obtain proper alignment.
3. Check the fan motor sheave alignment
with straight edge or a tightly pulled
string. For sheaves of different widths,
place a string in the center groove of
procedures
each sheave and pull it tight for a center
line. See Figure M-MP-6 for
recommended torques.
4. Once the sheaves are properly aligned,
tighten sheave set screws to proper
torque. See Tables M-MP-1 and M-MP-2
for recommended torques.
5. Check belt tension. Refer to the
“Measuring Belt Tension” section.
6. If required, adjust belt to the minimum
recommended tension. Refer to
“Adjusting Belt Tension” section.
7. Retighten bearing set screws to the
proper torques after aligning the
sheaves. See Tables M-MP-1 and MMP-2 for proper torques.
8. Check the fan bearing locking collars
for tightness on the shaft. To tighten the
locking collar, loosen the set screw and
slide the collar into its proper position
over the extended end of the inner
case. Tighten the set screw to the
torque value in Tables M-MP-1 and MMP-2.
9. During air balancing, verify the sheave
alignment, belt tension, and that the
shaft is parallel.
Note: Verify that all wires are in their proper
position and not rubbing before replacing
the panel.
Note: Panel weight rating = 225 lbs. total,
including factory-installed components.
Supply Fan
Fan Drive
Perform the following procedures
according to the “Periodic Maintenance
Check List”.
WARNING
Hazardous Voltage w/Capacitors!
Disconnect all electric power, including
remote disconnects before servicing.
Follow proper lockout/tagout procedures to ensure the power cannot be
inadvertently energized. For variable
frequency drives or other energy storing
components provided by Trane or others,
refer to the appropriate manufacturer’s
Figure M-MP-4. Fan shaft and motor sheave alignment
94 SCXG-SVX01B-EN
Page 95

Maintenance
maintenance
procedures
Fan Bearings
The opposite drive end bearing is a
special bearing with close tolerance fit of
balls and races. Replace this bearing with
the same part number as the original
bearing. Follow the fan bearing
lubrication schedules in Tables M-MP-1
and M-MP-2. Use Table M-MP-3 to
reference compatible fan bearing grease
for specific bearings.
Table M-MP-1. Baldor Fan Bearing Lubrication Schedule
Baldor Rated Speed, rpm
Nema/ (IEC) Frame Size 3600 1800 1200 900
up to 210 incl. (132) 5500 hrs 12,000 hrs 18,000 hrs 22,000 hrs
over 210 to 280 incl. (180) 3600 hrs 9500 hrs 15,000 hrs 18,000 hrs
over 360 to 5800 incl. (300) 2200 hrs 3500 hrs 7400 hrs 10,500 hrs
Table M-MP-2. AO Smith Bearing Lubrication Schedule
Speed Frame Standard Service Severe Service Extreme
Service
Over 1800 rpm All 6 mths 3 mths 3 mths
1800 rpm 140-180 3 yrs 1 yr 6 mths
Note: Service standard - 8 hrs/day, normal to lgith loading, 100°F ambient temp. max.
Severe service - 24 hrs/day, shock loading, vibration, dirt or dust, 100 to 150°F ambient temp.
Extreme service - heavy shock or vibration, dirt or dust, 100 to 150°F ambient temp.
210-280 2 1/2 yrs 10 1/2 mths 5 1/2 mths
320-360 2 yrs 9 mths 4 1/2 mths
400-440 1 1/2 yrs 8 mths 4 mths
Table M-MP-3. Compatible Fan Bearing Grease
Motor Vendor Recommended Oil
AO Smith Exxon Polyrex EM
Baldor Exxon Polyrex EM
Chevron SRI 2
Dolium R Grease
Chevron Black Perl EP1
Texaco Polystar
Rykon Premium #2
Pennzoil Pen 2 Lube
Chevron SRI
SCXG-SVX01B-EN 95
Page 96

Maintenance
maintenance
procedures
Fan Belt Tension
Note: Check fan belt tension at least twice
during the first days of new belt operation
since there is a rapid decrease in tension
until belts are run-in.
Proper belt tension is necessary to
endure maximum bearing and drive
component life and is based on fan brake
horsepower requirements. If frayed or
worn, replace belts in matched sets.
Measuring Belt Tension
Measure fan belt tension with a
Browning, Gates, or equivalent belt
tension gauge. Determine deflection by
dividing the belt span distance (in inches)
by 64. See Figure M-MP-6. Follow the
procedure below to measure belt tension.
1. Measure belt span between centers of
sheaves and set the large “O” ring of
the tensioning gauge at
1
/64 inch for each
inch of belt span.
2. Set the load “O” ring at zero.
3. Place the large end of the gauge at the
center of the belt span. Press down until
the large “O” ring is even with the top
of the belt line or the next belt as in
Figure M-MP-6. Place a straight edge
across the sheaves as a reference
point. See Figure M-MP-4.
4. Remove the gauge. Note that the load
“O” ring now indicates a number on the
plunger scale. This number represents
pounds of force required to deflect the
belt.
5. Check the reading from step 4 against
the values given in Table M-MP-4. If
necessary, readjust belt tension.
Table M-MP-4. Fan shaft bearing torques
setscrew hex-size recommended torque
size across flats In-lb ft-lb
1/4"-20 1/8" 180 15
5-16"-18 5-32" 402 33.5
Table M-MP-5. Fan hub and sheave torques
unit fan setscrew torque
size dia. size (ft-lbs)
SCWF 20 16.5"5/16" 12
SCWF 22
SCWF 25
SCRF 20
SCWF 29 18"5/16" 12
SCWF 32
SCRF 25
SCRF 30
SCWF 35 20"5/16" 14
SCWF 38
SCRF 30
SCRF 35
SCWF 42 25"3/8" 24
SCWF 46
SCWF 52
SCWF 58
SCRF 40
SCRF 50
SCWF 65 27"3/8" 24
SCWF 72
SCWF 80
SCRF 60
SCWF 90
SCWF C0
SCWF C1
deflection = belt span/64
Figure M-MP-5. Belt tension gauge
Figure M-MP-6. Fan belt adjustment
96 SCXG-SVX01B-EN
Page 97

maintenance
Adjusting Belt Tension
NOTICE
Do not over-tension belts. Excessive belt tension will reduce fan
and motor bearing life, accelerate
belt wear, and possibly cause
shaft failure.
To adjust belt tension refer to Figure MMP-6 and perform the following
procedure:
1. Loosen bolts A, B, and E on both sides
of the sliding motor base. See Figure MMP-7.
2. Loosen nuts C and D (as required for
motor horsepower) to slide the motor
on its mounting plate in the proper
direction to tension or relieve tension on
the belt.
3. Adjust nuts A-D and bolt E. Do not
stretch the belts over the sheaves.
4. Retighten all nuts and bolts.
5. Verify tension is adjusted properly.
Recommended belt tension range values
are on the unit fan scroll. To access the
fan scroll, face the right-hand side of the
unit and remove the top left panel. The
belt tension label is on the top right-hand
corner of the fan scroll. See Figures O-M8 and O-M-9.
The correct operation tension for a V-belt
drive is the lowest tension at which the
belt will not slip under the peak load
conditions. It may be necessary to
increase the tension of some drives to
reduce flopping or excessive startup
squealing.
Maintenance
Figure O-M-5. Fan assembly.
procedures
Figure M-MP-7. Belt tensioning with fan adjustment points
Figure M-MP-8. Location of fan belt label on
fan scroll
SCXG-SVX01B-EN 97
Page 98

maintenance
Refrigerant System
Special Note on Refrigerant Emissions
Follow the Trane recommended
procedures on operation, maintenance,
and service to ensure refrigerant
conservation and emission reduction.
Also, pay specific attention to the
following:
• Whenever removing refrigerant from
air conditioning or refrigerating
equipment, recover for reuse, recycle,
reprocess (reclaim), or properly destroy
it.
• Always determine possible refrigerant
recycling or reclaiming requirements
before beginning recovery. Questions
about recovered refrigerants and
acceptable refrigerant quality
standards are addressed in ARI
Standard 700.
• Use approved containment vessels and
safety standards. Comply with all
applicable transportation standards
when shipping refrigerant containers.
• To minimize emissions while recovering
refrigerant, use recycling equipment.
Always attempt to use methods which
will pull the lowest possible system
vacuum while recovering and
condensing refrigerant into
containment.
• Be aware of any new leak test methods
which eliminate refrigerant as a trace
gas.
• When cleaning system components or
parts, do not use CFC11 (R11) or
CFC113 (R113). Refrigeration system
clean up methods using filters and
dryers are recommended. Do not use
solvents which have ozone depletion
factors. Properly dispose of used
materials.
• Take extra care to properly maintain all
service equipment directly supporting
refrigerant service work such as
gauges, hoses, vacuum pumps, and
recycling equipment.
• Stay aware of unit enhancements,
conversion refrigerants, compatible
parts, and vendor components and
manufacturer’s recommendations that
will reduce refrigerant emissions and
increase equipment operating
efficiencies. Follow specific
manufacturer’s guidelines for
conversion of existing systems.
Maintenance
• To assist in reducing power generation
emissions, always attempt to improve
equipment performance with improved
maintenance and operations that will
help conserve energy resources.
WARNING
Confined Space Hazards!
Do not work in confined spaces where
sufficient quantities of refrigerant or
other hazardous, toxic, or flammable gas
may be leaking. Refrigerant or other
gases could displace available oxygen to
breathe, causing possible asphyxiation
or other serious health risks. Some
gases may be flammable and or explosive. Evacuate the area immediately and
contact the proper rescue or response
authority. Failure to take appropriate
precautions or to react properly to a
potential hazard could result in death or
serious injury.
WARNING
Hazard of Explosion!
Use only dry nitrogen with a pressure
regulator for pressurizing unit. Do not
use acetylene, oxygen or compressed air
or mixtures containing them for pressure
testing. Do not use mixtures of a
hydrogen containing refrigerant and air
above atmospheric pressure for pressure testing as they may become
flammable and could result in an explosion. Refrigerant, when used as a trace
gas should only be mixed with dry
nitrogen for pressurizing units. Failure to
follow these recommendations could
result in death or serious injury or
equipment or property-only damage.
procedures
WARNING
Leak Testing!
Do not exceed 200 psig when leak
testing system. Failure to follow these
instructions could result in an explosion
causing death or serious injury.
In the event of required system repair,
leak test the liquid line, evaporator coil,
and suction line at pressures dictated by
local codes, and using the following
guidelines.
1. Charge enough dry nitrogen into the
system to raise the pressure to 100
psig.
2. Use a halogen leak detector, halide
torch, or soap bubbles to check for leaks.
Check interconnecting piping joints, the
evaporator coil connections, and all
accessory connections.
3. If a leak is detected, release the test
pressure, break the connections and
reassemble it as a new joint, using
proper brazing techniques.
4. If no leak is detected, use nitrogen to
increase the test pressure to 150 psig
and repeat the leak test. Also, use soap
bubbles to check for leaks when
nitrogen is added.
5. Retest the system to make sure new
connections are solid.
6. If a leak is suspected after the system
has been fully charged with refrigerant,
use a halogen leak detector, halide
torch, or soap bubbles to check for leaks.
Refrigerant Evacuation
For field evacuation, use a rotary style
vacuum pump capable of pulling a
vacuum of 400 microns or less.
When connecting the vacuum pump to a
refrigeration system, it is important to
manifold the pump to both the high and
low side of the system. Follow the pump
manufacturer’s directions.
98 SCXG-SVX01B-EN
Page 99

maintenance
NOTICE
Motor Winding Damage!
Do not use a megohm meter or apply
voltage greater than 50 DVC to a
compressor motor winding while it is
under a deep vacuum. Voltage sparkover
may cause damage to the motor
windings.
Refrigerant Charging
• R22 units
After leak testing and evacuating the
system, charge liquid refrigerant into the
system through the liquid line valve. After
some refrigerant has entered each
circuit, charge gaseous refrigerant into
the suction line shrader valve with the
compressors running.
• R407c
After leak testing and evacuating the
system, charge liquid refrigerant into the
system through the liquid line valve.
NOTICE
Compressor Damage!
Do not operate the compressors without
some refrigerant in each circuit. Failure
to do so may result in compressor
damage.
Special Note on Refrigerant Emissions
Follow the Trane recommended
procedures on operation, maintenance,
and service to endure refrigerant
conservation and emission reduction.
Also, pay specific attention to the
following:
• When removing refrigerant from air
conditioning or refrigerating equipment
recover for reuse, recycling,
reprocessing (reclaim), or properly
destroy it.
• Always determine possible refrigerant
recycling or reclaiming requirements
before beginning recovery. Questions
about recovered refrigerants and
acceptable refrigerant quality
standards are addressed in ARI
Standard 700.
• Use approved containment vessels and
safety standards when shipping
Maintenance
refrigerant containers.
• To minimize emissions while recovering
refrigerant, use recycling equipment.
Always attempt to use methods that
will pull the lowest possible system
vacuum while recovering and
condensing refrigerant into
containment.
• Be aware of any new leak test methods
that eliminate refrigerant as a trace gas.
• When cleaning system components or
parts, do not use CFC11 (R11) or CFC
113 (R113). Refrigeration system cleanup methods using filters and dryers are
recommended. Do not use solvents
which have ozone depletion factors.
Properly dispose of used materials.
• Take extra care to properly maintain all
service equipment directly supporting
refrigerant service work such as
gauges, hoses, vacuum pumps, and
recycling equipment.
• Stay aware of unit enhancements,
conversion refrigerants, compatible
parts, and manufacturer’s
recommendations that will reduce
refrigerant emissions and increase
equipment operating efficiencies.
Follow specific manufacturer’s
guidelines for conversion of existing
systems.
• To assist in reducing power generation
emissions, always attempt to improve
equipment performance with improved
maintenance and operations that will
help conserve energy resources.
Refrigerant Leak Testing
It is important to follow all warnings and
cautions in this section when leak testing
equipment.
WARNING
Use of Pressure Regulator Valves - Gauges!
Always use pressure regulators, valves,
and gauges to control drum and line
pressures when pressure testing
equipment. Failure to follow these
instructions could result in an explosion
causing death, serious injury, or equipment damage.
procedures
WARNING
Leak Testing!
Do not exceed 200 psig when leak
testing system. Failure to follow these
instructions could result in an explosion
causing death or serious injury.
In the event of required system repair,
leak test the liquid line, evaporator coil,
and suction line at pressures dictated by
local codes, using the following
guidelines.
1. Charge enough refrigerant and dry
weight. Use an accurate scale or
charging cylinder to determine the
exact weight of the refrigerant entering
the system. Failure to use either a scale
or a charging cylinder can lead to
undercharging or overcharging
resulting in unreliable operation.
WARNING
Hazardous Pressures!
If a heat source is required to raise the
tank pressure during removal of refrigerant from cylinders, use only warm water
or heat blankets to raise the tank
temperature. Do not exceed a temperature of 150°F. Do not under any circumstances apply direct flame to any portion
of the cylinder. Failure to follow these
safety precautions could result in a
violent explosion, which could result in
death or serious injury.
CAUTION
Freezing Temperatures!
Do not allow liquid refrigerant to contact
skin. If it does, treat the injury similar to
frostbite. Slowly warm the affected area
with lukewarm water and seek immediate medical attention. Direct contact
with liquid refrigerant may cause minor
or moderate injury.
SCXG-SVX01B-EN 99
Page 100

maintenance
To charge the system, complete the
following procedure:
1. Charge liquid refrigerant into the liquid
line service valve of each compressor
circuit. The vacuum will draw some of
the required refrigerant into the
system. See Figure O-M-9.
2. Complete the charging process by
charging gaseous refrigerant into the
suction line shrader valve with the unit
running. However, make sure that
some refrigerant is present in each
circuit before starting the compressors.
The refrigerant container should be
upright so that gaseous refrigerant is
drawn off the top.
Note: See Tables M-MP-6 and M-MP-7 for
refrigerant charge requirements.
NOTICE
Compressor Damage!
Do not allow liquid refrigerant to enter
the suction line. Excessive liquid accumulation in the liquid lines may result in
compressor damage.
Maintenance
procedures
Figure M-MP-10. Typical water-cooled (SXWF) compressor section components
100 SCXG-SVX01B-EN
 Loading...