

Page 1
TRANE ELECTRONIC MORTISE LOCK
ELECTRONIC LOCK
I NTERACTIVE
OWNER’S GUIDE
Page 2

2 24000994
Contents
Mechanical Key Hole
Emergency Battery Terminal (9V battery)
Outside Lever
Outside Activation Button
Key fob Reading Area
Emergency Cover
Figure - 1
Away
Home
Passage
Night Latch
Inside Lever
Inside Activation Button
Away Button
Night Latch Button
Passage Button
Home Button
Battery Cover
Figure - 2
Page 3
3 24000994
Contents
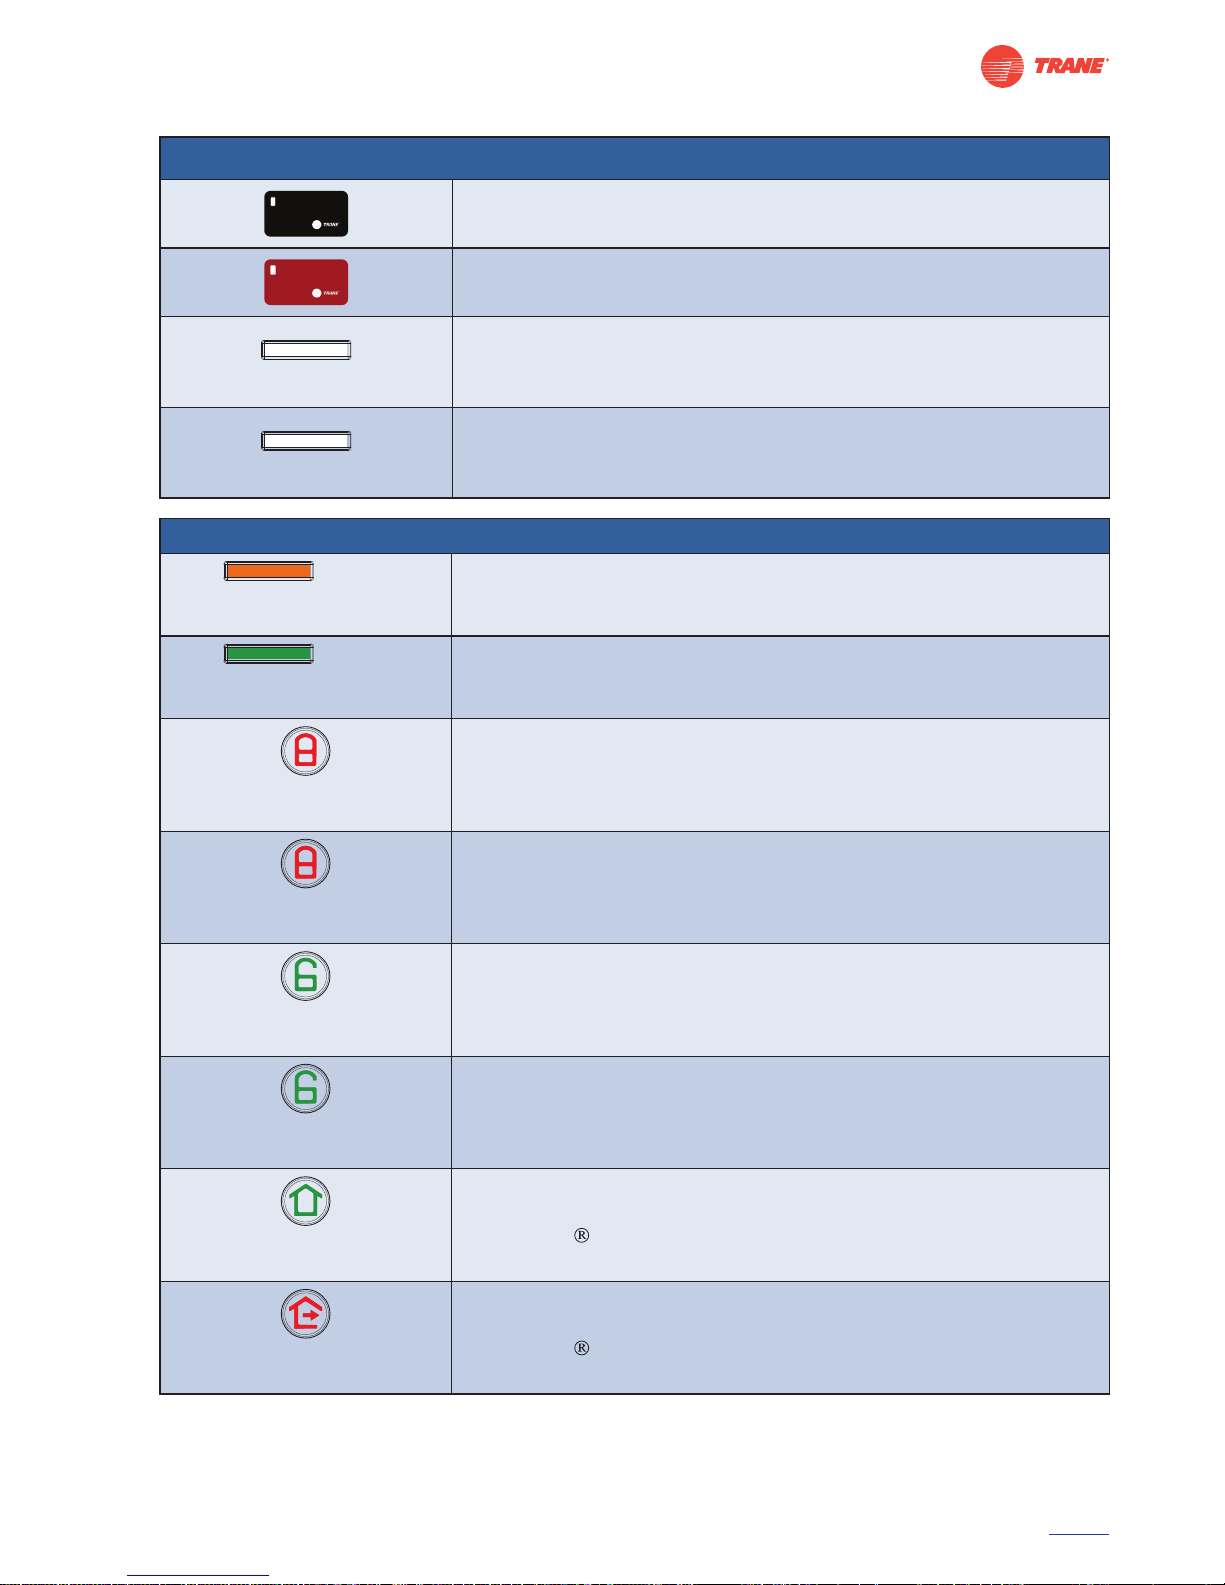
Programming Legend
User Key Fob
Use to unlock.•
Programming Key Fob
To program user key fobs and enable or disable other operations.•
IN
Inside Activation Button
To wake up lock.
To enable, disable or examine the functionalities of lock.
•
•
OUT
Outside Activation Button
To wake up lock.
To register key fob.
•
•
Lights/Beeps Legend
IN / OUT
Three Beeps
Orange - Blinks three times
Step Conrmation
Correct entry made in programming and accepted by lock.•
IN / OUT
Three Beeps
Green - Blinks three times
Function Successful
Set of steps completed successfully.•
Three Beeps
Red - Blinks three times
Function Enable/Check - NIGHT LATCH
Night latch mode enabled.•
One Beep
Red - Blinks one time
Function Disable - NIGHT LATCH
Night latch mode disabled.•
Three Beeps
Green - Blinks three times
Function Enable/Check - PASSAGE
Passage mode enabled.•
One Beep
Green - Blinks one time
Function Disable - PASSAGE
Passage mode disabled.•
Three Beeps
Green - Blinks three times
Function Enable - HOME
TRANE Air Conditioner(s) switched ON.•
Three Beeps
Red - Blinks three times
Function Enable - AWAY
TRANE Air Conditioner(s) switched OFF.•
Page 4
4 24000994
Contents
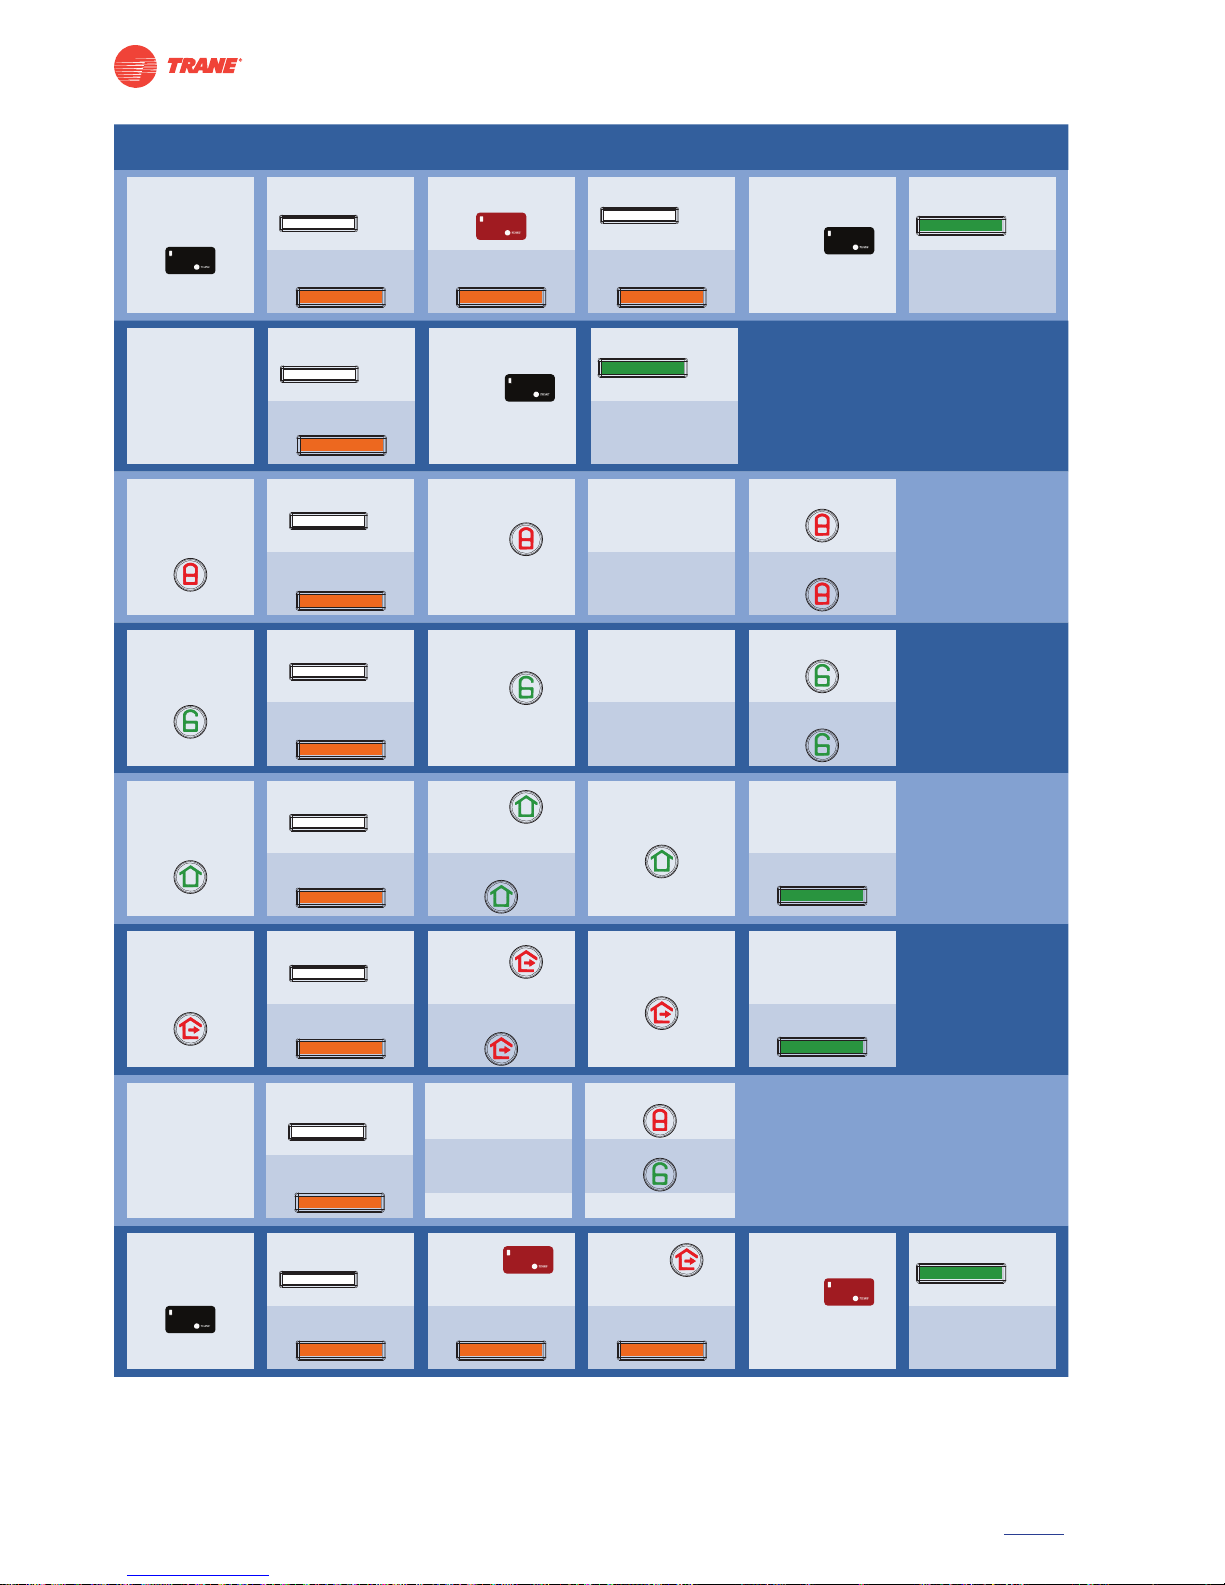
Manual Programming Functions
Press
OUT
3 beeps† + 3 blinks
Success!
OUT
3 beeps† + 3 Blinks
3 beeps† + 3 blinks
Press
OUT
within 30 secs
Show
within 30 secs
Add
3 beeps† + 3 blinks
Show
Unlock
Door
Show
within 10 secs
Success!
OUT
3 beeps† + 3 Blinks
3 beeps† + 3 blinks
Press
OUT
Enable/Disable
Night latch
Enabled
Disabled
Press
within 10 secs
3 beeps
†
+ 3 blinks
1 beep† + 1 blink
Press
IN
Two time
3 beeps
†
+ 3 blinks
Enable/Disable
Passage
Enabled
Disabled
Press
within 10 secs
3 beeps
†
+ 3 blinks
1 beep† + 1 blink
Press
IN
Two time
3 beeps† + 3 blinks
Press
IN
Two time
3 beeps† + 3 blinks
Press
within 10 secs
Success
AC ON
3 beeps† + 3 blinks 1 beep† + 1 Blink
3 beeps† + 3 blinks
Enable
Home
Press
IN
Two time
Success
AC OFF
3 beeps† + 3 blinks
Press
within 10 secs
1 beep
†
+ 1 Blink
3 beeps† + 3 blinks
Enable
Away
3 beeps† + 3 blinks
Night latch ON
Passage ON
Normal State
3 beeps† + 3 blinks
3 beeps† + 3 blinks
No Indication
Press
IN
1 beep† + 1 blink
Check
Lock Status
Press
within 30 secs
3 beeps
†
+ 3 blinks
Show
within 10 secs
3 beeps† + 3 blinks
Press
OUT
Success!
OUT
3 beeps† + 3 Blinks
3 beeps† + 3 blinks
Show
within 10 secs
Delete All
Page 5

5 24000994
Contents
Contents
Programming Legend ......................................................................................................................3
Lights/Beeps Legend ....................................................................................................................... 3
Manual Programming Functions .................................................................................................... 4
1. User Operations ............................................................................................................................. 7
1.1. Other Lock Parts ........................................................................................................................ 7
1.2. Basic Functions ..........................................................................................................................8
1.2.1. Unlocking the Door ............................................................................................................... 8
1.2.2. Check Mode of Lock ............................................................................................................... 8
1.3. Night Latch & Passage Functions .............................................................................................8
1.3.1. Enabling Night Latch Mode ....................................................................................................8
1.3.2. Disabling Night Latch Mode ...................................................................................................9
1.3.3. Enabling / Disabling Night latch Mode (from AC Remote) ......................................................... 9
1.3.4. Enabling Passage Mode ......................................................................................................... 9
1.3.5. Disabling Passage Mode ......................................................................................................10
1.4. Home Connect Operations ..................................................................................................... 10
1.4.1. Away Mode .........................................................................................................................10
1.4.2. Home Mode.........................................................................................................................11
1.5. Registration of Key fobs .........................................................................................................11
1.5.1. User Key Fob Registration ....................................................................................................11
1.5.2. Programming Key Fob Registration ......................................................................................12
1.6. Emergency and Miscellaneous Operations ...........................................................................12
1.6.1. Emergency Unlock - Using Mechanical Key ............................................................................12
1.6.2. How to Use Emergency / 9V Battery ......................................................................................12
1.6.3. Delete all User Key Fobs ....................................................................................................... 13
1.6.4. Factory Settings ..................................................................................................................13
1.6.5. Disable Audio ......................................................................................................................14
1.6.6. Enable Audio .......................................................................................................................14
1.6.7. Lock Activation ....................................................................................................................15
1.7. Battery Installation .................................................................................................................15
2. Trouble shooting Guide .............................................................................................................16
3. Maintenance Guide ..................................................................................................................... 17
4. After Sales Service....................................................................................................................... 17
Warranty ............................................................................................................................................. 18
Warranty Clause ............................................................................................................................. 18
Page 6

6 24000994
Contents
Dear Customer,
Welcome to the TRANE family.
We are TRANE , a part of $ 14 billion Ingersoll Rand group. Driven by the passion for
technological innovations, we are always pushing the boundaries to oer the customers what is
essential to human living in order to progress. Our 1500 patents are a testimony to our sprit of
innovation. Today we bring innovation to your home.
Enter a whole new level of comfort, convenience and security
Thank you for choosing TRANE Electronic Mortise Lock. It is designed and developed by
Schlage , the most trusted and preferred brand for home security in US.
TRANE electronic mortise lock makes your everyday living simple and intuitive. The
innovative technology used in our security systems will take you to a new level of safety and
convenience.
Before Use
Read all documentation supplied with this product. Do not discard manuals. Keep manuals
readily available for all personnel.
Product Functions
Door is assumed to be in closed condition.
The TRANE lock oers below features :
S.No. Function Description
1
Normal Mode
Registered user key fob is required to unlock the door.
Lock can always be opened from inside.
2 Night latch Mode
Registered user key fob cannot unlock the door.
Night latch mode gets deactivated once door is opened.
Lock can always be opened from inside.
3 Passage Mode
Open door from outside without user key fob or mechanical key.
Lock will stay in this mode until deactivated.
Door open indication alarm gets deactivated in this mode.
Lock can always be opened from inside.
4 Home Function
#
Turns ON TRANE air conditioner(s) in TRANE network.
5 Away Function
#
Turns OFF TRANE air conditioner(s) in TRANE network.
6 Mechanical Key Opens lock from outside irrespective of lock mode.
7 Factory Reset
Lock goes to passage mode, deletes all registered user key fobs,
programming key fob stays active.
8 Audio OFF
Turns OFF audio indications except door open indication alarm,
and intruder alarm.
9 Audio ON Turns ON audio indications.
10 Door open alarm
When the door is left open or not closed properly it will beep
continuously in Normal mode or Privacy mode.
11 Remote night latch Night latch mode can be enabled/disabled using remote controller
# This function is applicable to the lock which is purchased with Trane AC unit(s).
Page 7

7 24000994
Contents
1. User Operations
1.1. Other Lock Parts
AA Batteries
+
-
+
-
+
-
+
-
Mechanical Keys
Door Position Sensor (DPS) and
User Keyfobs Programming Keyfob
Strike Plate & Dust Box
Mortise Lock Unit
Face Plate
Latch Bolt
Guard Latch
Dead Bolt
Figure - 3
Page 8

8 24000994
Contents
* Press two times in less than two seconds.
†
Beeps only when audio is enabled.
1.2. Basic Functions
1.2.1. Unlocking the Door
1
2
3
Press Once
Press outside activation button. See these indications:
Three Beeps
†
OU
T
Outside activation button blinks three times
in orange colour
Show user key fob (black) on area in less than ten seconds. See these indications:
Three Beeps
†
OUT
Outside activation button blinks three times
in green colour
Turn outside lever in less than ve seconds to unlock.
1.2.2. Check Mode of Lock
Press inside activation button. See these indications:
One Beep
†
IN
Inside activation button blinks one time in
orange colour
On successful operation following lock status indications are observed:
Night latch ON
Three Beeps
†
Night latch button blinks
three times in red colour
OR
Passage ON
Three Beeps
†
Passage button blinks three
times in green colour
Note: No indications are observed when night latch or passage mode is disabled.
1.3. Night Latch & Passage Functions
1.3.1. Enabling Night Latch Mode
Press Twice Press Once
Away
Home
Passage
Night Latch
Away
Home
Passage
Night Latch
21
Press inside activation button two times to activate lock*. See these indications:
Three Beeps
†
IN
Inside activation button blinks three times
in orange colour
Press night latch button in less than ten seconds to enable night latch mode.
On successful operation, see these indications:
Three Beeps
†
Night latch button blinks three times in red colour
Note: If door is opened from inside, night latch mode is disabled and normal mode is enabled.
1.
2.
3.
1.
2.
1.
2.
Page 9

9 24000994
Contents
* Press two times in less than two seconds.
†
Beeps only when audio is enabled.
1.3.2. Disabling Night Latch Mode
Press Twice Press Once
Away
Home
Passage
Night Latch
Away
Home
Passage
Night Latch
21
Press inside activation button two times to activate lock*. See these indications:
Three Beeps
†
IN
Inside activation button blinks three times
in orange colour
Press night latch button in less than ten seconds to disable night latch mode. On successful
operation, lock will be in normal mode. See these indications:
One Beep
†
Night latch button blinks one time in red colour
1.3.3. Enabling / Disabling Night latch Mode (from AC Remote)
AC Remote
e
Display
Press on remote to activate or deactivate night latch mode on lock. Night latch will show on
remote display after it has been activated (approximately 30 seconds for display to update).
Night latch mode operates only when Lock and AC are connected on network.
Refer AC manual for remote features.
1.3.4. Enabling Passage Mode
Away
Home
Passage
Night Latch
Away
Home
Passage
Night Latch
Press Twice Press Once
1 2
Press inside activation button two times to activate lock*. See these indications:
Three Beeps
†
IN
Inside activation button blinks three times
in orange colour
Press passage button in less than ten seconds to enable passage mode. On successful
activation, see these indications:
Three Beeps
†
Passage button blinks three times in green colour
1.
2.
1.
2.
3.
1.
2.
Page 10

10 24000994
Contents
* Press two times in less than two seconds.
†
Beeps only when audio is enabled.
1.3.5. Disabling Passage Mode
Away
Home
Passage
Night Latch
Away
Home
Passage
Night Latch
Press Twice Press Once
1 2
Press inside activation button two times to activate lock*. See these indications:
Three Beeps†
IN
Inside activation button blinks three times
in orange colour
Press passage button in less than ten seconds to disable passage mode. On successful operation
lock will be in normal mode and see these indications:
One Beep†
Passage button blinks one time in green colour
1.4. Home Connect Operations
User operations 1.4.1 and 1.4.2 are part of home connect solution (TRANE Lock and TRANE Residential
air conditioners). Make sure that lock and air conditioner(s) are connected to TRANE network to ensure
that the user operations work as mentioned in 1.4.1 and 1.4.2. Refer AC user guide for procedure to
connect lock and air conditioner(s). Refer AC user guide for AC Audio - Visual indications.
1.4.1. Away Mode
In this mode lock will switch o all the TRANE air conditioner(s) which are ON.
Away
Home
Passage
Night Latch
Away
Home
Passage
Night Latch
Press Twice Press Once
1 2
Press inside activation button two times to activate lock*. See these indications:
Three Beeps†
IN
Inside activation button blinks three times
in orange colour
Press away button to enable away mode in less than ten seconds. See these indications:
One Beep†
Away button blinks one time in red colour
On successful operation air conditioner(s) will be in stand by and see these indications:
Three Beeps†
IN
Inside activation button blinks three times
in green colour
Three Beeps
†
Away button blinks three times in red colour
#
Note: This function applicable for lock purchased with TRANE air conditioner(s).
1.
2.
1.
2.
3.
Page 11

11 24000994
Contents
* Press two times in less than two seconds.
†
Beeps only when audio is enabled.
1.4.2. Home Mode
In this mode lock will switch ON all the TRANE air conditioner(s) which were switched OFF using the lock
away command. This will not switch ON those air conditioner(s) which are switched OFF using remote
controller.
Away
Home
Passage
Night Latch
Away
Home
Passage
Night Latch
Press Twice Press Once
1 2
Press inside activation button two times to activate lock*. See these indications:
Three Beeps†
IN
Inside activation button blinks three times
in orange colour
Press home button in less than ten seconds. See these indications:
One Beep†
Home button blinks one time in green colour
On successful operation air conditioner(s) will be turned on and see these indications:
Three Beeps†
IN
Inside activation button blinks three times
in green colour
Three Beeps†
Home button blinks three times in green colour
1.5. Registration of Key fobs
1.5.1. User Key Fob Registration
2 4
1
3
Press Once Press Once
Press outside activation button. See these indications:
Three Beeps†
OUT
Outside activation button blinks three times
in orange colour
Show the programming key fob (red) on area in less than ten seconds. See these indications:
Three Beeps†
OUT
Outside activation button blinks three times
in orange colour
Press outside activation button in less than thirty seconds. See these indications:
Three Beeps†
OUT
Outside activation button blinks three times
in orange colour
1.
2.
3.
1.
2.
3.
Page 12

12 24000994
Contents
* Press two times in less than two seconds.
†
Beeps only when audio is enabled.
Show unregistered user key fob (black) on area in less than thirty seconds. On successful
registration, see these indications:
Three Beeps†
OUT
Outside activation button blinks three times
in green colour
Repeat steps 3 & 4 to add multiple user key fobs (black). To register next user key fob (black), show in
less than thirty seconds
Note: Maximum of 20 user key fobs can be registered.
1.5.2. Programming Key Fob Registration
Remove batteries (Refer section 1.7.1)
Keep home button pressed till beep sound while inserting batteries.
One Beep†
IN
All buttons blinks one time
Three Beeps†
OUT
Outside activation button blinks three times
in orange colour
Show programming key fob (red) on area in less than thirty seconds. On successful registration,
see these indications:
Three Beeps†
OUT
Outside activation button blinks three times
in green colour
1.6. Emergency and Miscellaneous Operations
1.6.1. Emergency Unlock - Using Mechanical Key
Slide down emergency cover.
Insert and turn mechanical key to unlock.
1.6.2. How to Use Emergency / 9V Battery
1
2
3
Wrong polarity will lead to lock failure
Slide down emergency cover.
Place 9V battery on emergency battery terminals (make sure polarity is correct).
Use user key fob (black) to gain access (Refer section 1.2.1).
4.
5.
1.
2.
3.
1.
2.
1.
2.
3.
1 21 2
Page 13

13 24000994
Contents
* Press two times in less than two seconds.
†
Beeps only when audio is enabled.
1.6.3. Delete all User Key Fobs
Away
Home
Passage
Night Latch
2 4
1
3
Press Once Press Once
Press outside activation button. See these indications:
Three Beeps†
OUT
Outside activation button blinks three
times in orange colour
Show programming key fob (red) on area in less than ten seconds. See these indications:
Three Beeps†
OUT
Outside activation button blinks three
times in orange colour
Press the away button in less than thirty seconds. See these indications:
Three Beeps†
OUT
Outside activation button blinks three
times in orange colour
Show programming key fob (red) on area in less than thirty seconds. On successful operation all
user key fobs (black) are deleted. See these indications:
Three Beeps†
OUT
Outside activation button blinks three
times in green colour
Three Beeps
†
Passage button blinks three times in green colour
Note: Lock will be in passage mode.
Once new user key fob (black) is registered, lock will be in normal mode.
1.6.4. Factory Settings
Remove batteries (Refer Section 1.7).
Insert three batteries and keep inside activation button pressed till beep sound while
inserting fourth battery. See these indications:
One Beep†
IN
All buttons blinks one time
One Beep†
IN
Inside activation button blink one time in
red colour
Three Beeps†
IN
Inside activation button blinks three times
in green colour
Three Beeps
†
Passage button blinks three times in green colour
Lock will be in passage mode, deletes all user key fobs (black) and disconnects air conditioner(s) in
TRANE network. All programming key fob functions are retained.
1.
2.
3.
4.
1.
2.
3.
Page 14

14 24000994
Contents
1.6.5. Disable Audio
Away
Home
Passage
Night Latch
2
1
3
Press Once Press Once
Press outside activation button. See these indications:
Three Beeps†
OUT
Outside activation button blinks three
times in orange colour
Show programming key fob (red) on area in less than ten seconds. See these indications:
Three Beeps†
OUT
Outside activation button blinks three
times in orange colour
Press home button in less than thirty seconds. On successful operation, audio is disabled and
see these indications:
No Audio
Home button blinks three times in green colour
Tamper alarm and Door open alert audio does not turn o.
1.6.6. Enable Audio
Away
Home
Passage
Night Latch
2
1
3
Press Once Press Once
Press outside activation button. See these indications:
No Beep
OUT
Outside activation button blinks three
times in orange colour
Show programming key fob (red) on area in less than ten seconds. See these indications:
No Beep
OUT
Outside activation button blinks three
times in orange colour
Press home button in less than thirty seconds. On successful operation audio is enabled and
see these indications:
Three Beeps†
Home button blinks three times in green colour
1.
2.
3.
1.
2.
3.
* Press two times in less than two seconds.
†
Beeps only when audio is enabled.
Page 15

15 24000994
Contents
* Press two times in less than two seconds.
†
Beeps only when audio is enabled.
1.6.7. Lock Activation
Insert four AA batteries (Refer Section 1.7). See these indications:
One Beep†
IN
All buttons blink one time
On successful activation, lock will be in normal mode.
1.7. Battery Installation
Remove battery cover screw holding the cover in place (Refer gure - 4).
Slide battery cover down.
Remove four batteries.
Replace all with four new batteries of recommended specications.
(Duracell®# ‘AA’ batteries rated 1.5V)
Slide Battery cover to its original position.
Secure battery cover with battery cover screw.
Batteries
Screw, Battery Cover
Inside Face
-
+
+
-
+
-
-
+
Figure - 4
1.
2.
1.
2.
3.
4.
5.
6.
Page 16

16 24000994
Contents
* Press two times in less than two seconds.
†
Beeps only when audio is enabled.
2. Trouble shooting Guide
Sl.
No.
Problem/
Symptom
Indication Cause Remedy
1
Unable to unlock with
registered user key
fob (black)
One long beep† and
OUT
outside activation
button blinks one time
in red colour (time out
indication).
Key fob is not shown
on area and/or is
out of range (2 cms).
Key fob shown
after ten seconds
of pressing outside
activation button.
1.
2.
Show registered user
key fob (black) on
area not more than 2
cms away.
Show key fob in less
than ten seconds.
1.
2.
Five beeps† and
OUT
outside activation
button blinks ve times
in red colour.
Battery low.
Replace with new
batteries
(Refer section 1.7)
Two beeps† and
OUT
outside activation
button blinks two times
in red colour.
Lock is in night latch
mode.
Use mechanical key.
2
Unregistered user key
fob (black) shown/
Unauthorized Access
Three beeps† and
OUT
outside activation
button blinks three
times in green colour.
Lock is in passage mode
ON/OFF passage mode
as required.
Two beeps† and
OUT
outside activation
button blinks two times
in red colour.
User key fob (black) is
unregistered.
Register user key fob
(black) (Refer section
1.5.1)
3 Continuous beeps
†
Continuous dual
tone.
Lock is tampered.
Call customer care
helpline
(alarm can be stopped
by removing batteries).
4 Continuous beeps
†
Beeps† every second.
Door open indication
alarm is on.
Close door.
5
Continuous beeps
and/or blink
Beeps† every second
and
IN
inside
activation button blinks
intermittently in red
colour.
Lock malfunction.
Call customer care
helpline.
6 Continuous blinks
IN
Inside activation
button blinks
continuously in red
colour.
Electronics error.
Call customer care
helpline.
8
Lock functions with
no audio indications.
No beep†.
Audio disabled.
Enable audio
(Refer section 1.6.6)
#
Registered trademark of Duracell, P&G Inc.
Page 17

17 24000994
Contents
* Press two times in less than two seconds.
†
Beeps only when audio is enabled.
Sl.
No.
Problem/
Symptom
Indication Cause Remedy
7
No audio/visual
indications
-
Battery exhausted.
Connect 9V batteries.
Replace batteries.
Use mechanical key.
Call customer care
helpline.
1.
2.
3.
4.
Three invalid user
key fobs shown
continuously
Lock is in sleep mode
for 90 seconds to
avoid further attempts.
Present valid key fob
after 90 seconds to
unlock.
9
Programming key
fob (red) does not
work.
Two beeps
†
OUT
outside activation
button blinks two times
in red colour.
Programming key
fob (red) is not
registered.
Register
programming key fob
(red) (Refer section 1.5.2)
10 Unable to close door.
Beeps† every second.
Warp door. Rectify door warping.
11
No door position
sensor indication
when door is open.
No beep†.
Lock is in passage mode. Disable passage mode.
3. Maintenance Guide
Wipe with soft cloth.
Avoid paint smears, thinners and strong cleaning agents as they destroy protective coatings.
In case lock is damaged and not working, do not try to x it, call customer care helpline.
4. After Sales Service
On calling customer care helpline, provide following information:
Complete address and contact number.
Serial Number.
Warranty number
Nature of malfunction.
Do not allow any unauthorized person to service or repair the lock. This may aect functioning and
quality of the product. This may also make the product warranty null and void. Call our customer
care helpline 1-800-102-9986 (toll free) or email us on care@trane.com for any product related
queries.
1.
2.
3.
1.
2.
3.
4.
5.
Page 18

18 24000994
Contents
Warranty
Warranty Clause
Subject to the terms and conditions of this warranty, TRANE extends a one-year limited warranty on the mechanical and nish warranty and a
one-year limited electronics warranty to the original consumer user (“Original User”) of our TRANE brand product (“Product”) from the proven
date of purchase against defects in material and workmanship, as long as the Original User occupies the residential premises upon which the
Product is originally installed.
The customer should retain the warranty card (after lling the details required and stamping done from the relevant dealer/distributor where it
was originally purchased), along with the cash memo/invoice indicating date and time.
Original User: This warranty only applies to the Original User of Products. This warranty is not transferable.
What TRANE will do: Upon return of the faulty Product to TRANE, TRANE’s sole obligation, at its option, is to either repair or replace the
Product, In case of a repair or replacement of the product, the period of warranty would continue from the original date of purchase. Replaced
parts/products will be the property of the company.
What is not covered?
Surface Finish discoloration/shade of the product is not applicable to the above warranty.
Labour costs including, but not limited to, such costs as the removal and reinstallation of Product;
Shipping and freight expenses required to return Product to TRANE;
Any other incidental, consequential, indirect, special and/or punitive damages, whether based on contract, warranty, tort (including,
but not limited to, strict liability or negligence), patent infringement, or otherwise, even if advised of the possibility of such damages.
Warranty on the product will not be applicable under the conditions including but not limited to:
Misuse/mishandling/negligence/improper installations done by other personnel apart from TRANE or its authorized dealers/
improper application/improper repair/tampering.
Failure to follow instructions of use.
Installation with unapproved accessories.
Modication to the product or removal/ alteration of parts and components.
Entry or seepage of liquids/oils/chemicals.
Non-functioning of locks due to use of key other than company make or entry of foreign material in the key hole.
Damage due to accidents/re/robbery/natural calamities or any force majeure events which are beyond the reasonable control of
TRANE.
Damage due to harsh environmental conditions by the Original User.
Damage due to third party peripherals.
The provisions of this warranty do not apply to Products:
(i) used in commercial applications; (ii) used in common area applications; (iii) used for purposes for which they are not designed or intended
or purpose thereof; (iv) which have been subjected to alteration, abuse, misuse, negligence or accident; (v) which have been improperly stored,
installed, maintained or operated; (vi) which have been used in violation of written instructions provided by TRANE from time to time;
(vii) which have been subjected to improper temperature, humidity or other environmental conditions; or (viii) which, based on TRANE’s
examination, do not disclose to TRANE’s satisfaction non-conformance to the warranty. Additionally, this warranty DOES NOT COVER scratches,
abrasions, or deterioration due to the use of paints, solvents or other chemicals and other associated faults which are or will become part of
applicable law in force.
Additional terms:
TRANE does not authorize any person to create for it any obligation or liability in connection with the Product. No action arising out of any
claimed breach of this warranty by TRANE may be brought by the Original User more than one (1) year after the cause of action has arisen or
from the date of purchase whichever is earlier.
In case a product which requires installation is found to be non-operational within one week after installation, the same would be replaced
after due verication by the nearest dealer/distributor.
TRANE reserves the right to modify the designs without prior notice in pursuance of its policy of continuous technical improvement.
Visit charges – if within the municipal limits or the authorised dealer/distributor oce limits, then there won’t be any charge. If the Products
need to be picked outside the municipal limits, then the charges (including incidental) will have to be borne by the Original Buyer. Decision of
TRANE locks on the admissibility of the claim under warranty would be nal and binding.
Maximum liability under the warranty would be limited to the cost of the Product. This warranty expressly excludes any claim for accidental
or consequential loss or damage. Any representations, warranties or promises inconsistent with or in addition to the warranties contained
herewith are unauthorized and shall not be binding on TRANE under any applicable law which is in force.
This warranty is valid in India only. This warranty is issued in Bangalore and courts at Bangalore shall have exclusive jurisdiction over matters
covered or owing from this warranty. TRANE reserves its rights to amend the above terms and conditions without notice.
Contact details given in the warranty card are subject to change without prior notice.
i)
ii)
iii)
iv)
i)
ii)
iii)
iv)
v)
vi)
vii)
viii)
ix)
Page 19

Corporate Office: Plot No.35, KIADB Industrial Area, Bidadi, Ramanagaram Taluk,
Bangalore-562109, Karnataka, INDIA. www.traneindia.com
For more information call on 1800 102 9986 or write to care@trane.com
24000994 | Edition 1 | June 2012
 Loading...