

Page 1

CGA-SVX01A-EN
Installation
Operation
Maintenance
Air-Cooled Cold Generator
Air-Cooled Cold Generator
With Heat Pump Option
®
®
Page 2

© American Standard Inc. 2001 CGA-SVX01A-EN
2
MODEL NOMENCLATURE
INSTALLATION
RIGGING
MOUNTING
WATER PIPING
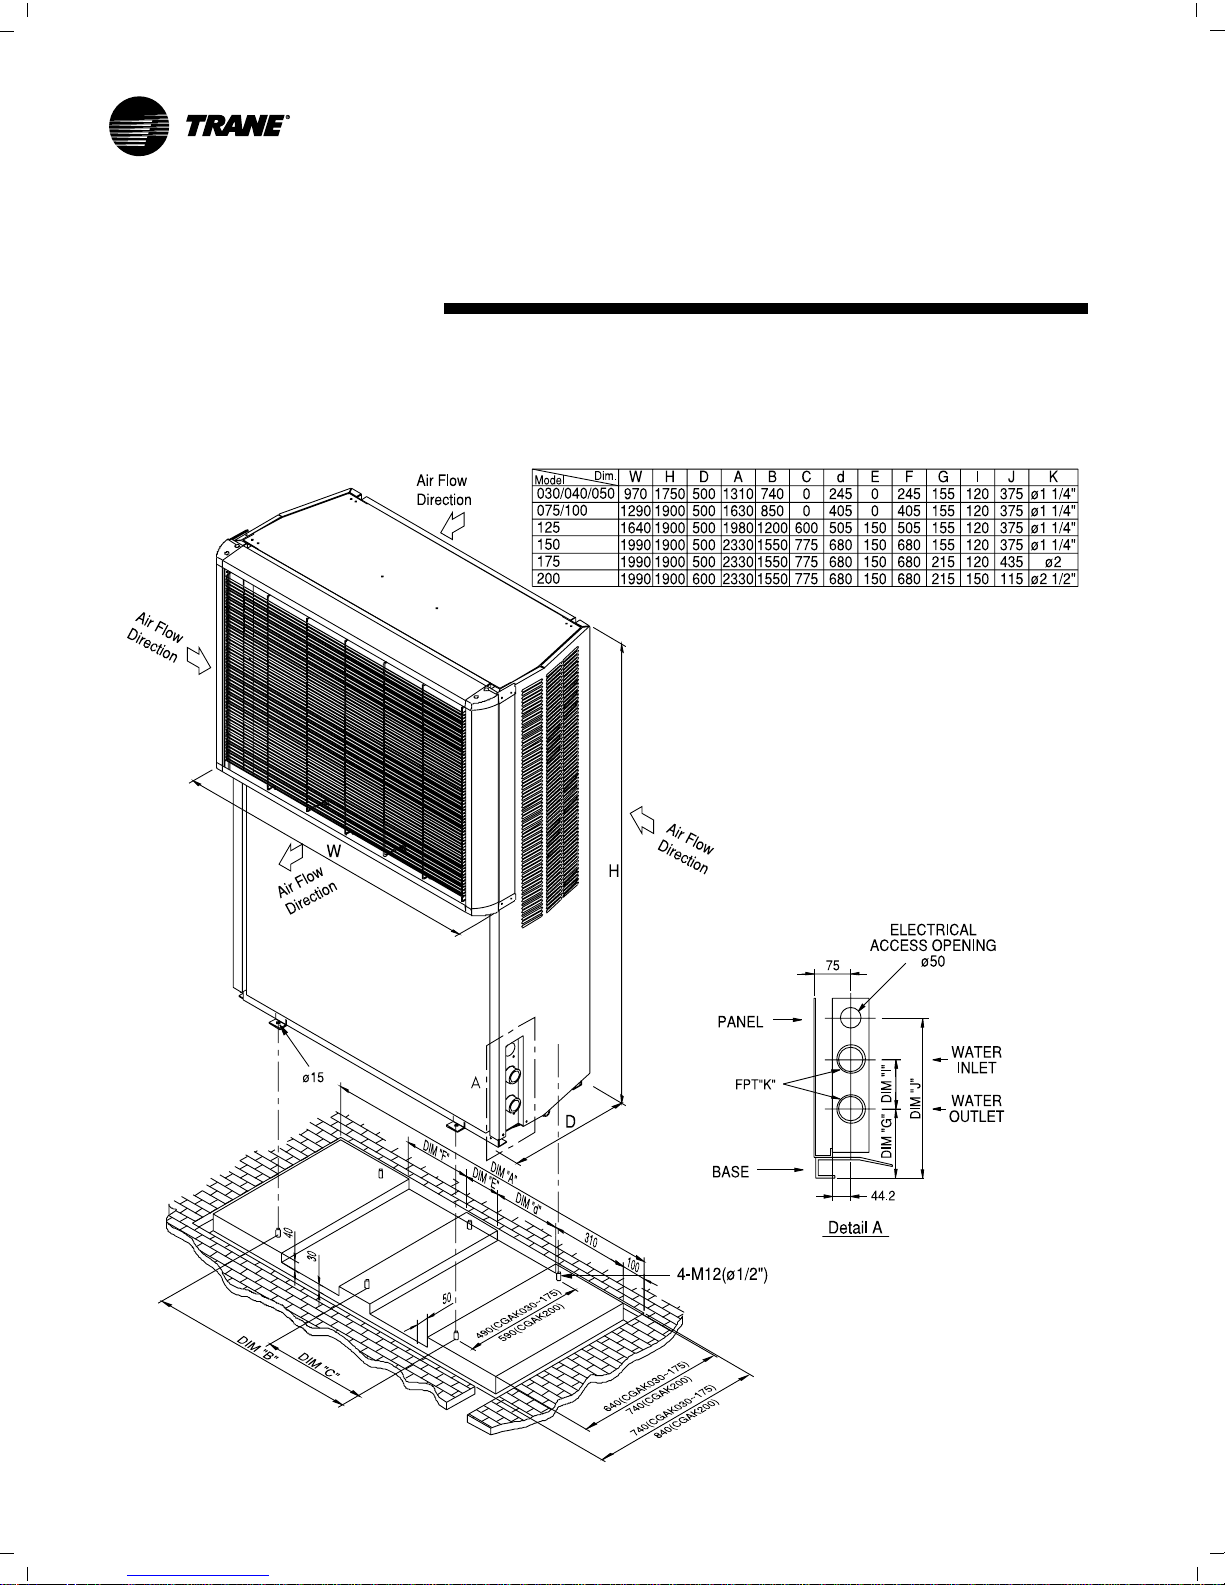
FIGURE 1: RECOMMENDED HOISTING ARRANGEMENT
FIGURE 2: DIMENSION FOR MOUNTING
FIGURE 3: SERVICE & MAINTENANCE CLEARANCE
ELECTRICAL WIRING
UNIT POWER SUPPLY
FIGURE 4: TYPICAL PIPING ARRANGEMENT
FIGURE 5: TYPICAL SYSTEM APPLICATION
ELECTRICAL DATA
FLOW SWITCH INTERLOCK
CIRCUIT DIAGRAM FOR CGAK 030 - 075
CIRCUIT DIAGRAM FOR CGAR 030 - 075
CIRCUIT DIAGRAM FOR CGAK 100 - 200
CIRCUIT DIAGRAM FOR CGAR 100 - 150
INSTALLATION CHECKLIST
PRE-START PROCEDURE
VOLTAGE UTILIZATION RANGE
VOLTAGE IMBALANCE
WATER FLOW RATE
UNIT WATER PRESSURE DROP
FIGURE 6: HYDRAULIC CHARACTERISTIC
PRE-START CHECKLIST
OPERATION
START-UP PROCEDURE
EXTENDED UNIT SHUT-DOWN/WINTERIZATION
STANDARD AMBIENT OPERATION
OPTIONAL LOW AMBIENT OPERATION (CGAK)
OPTIONAL HEAT PUMP OPERATION (CGAR)
ELECTRICAL CONTROL & PROTECTION SYSTEM
MAINTENANCE
TROUBLE ANALYSIS
TABLE OF CONTENTS
3
4
11
12
17
22
26
27
Page 3

3
CGA
1,2,3
K4050
5,6,7
58D9F10R11M12R13N14A
15
CGA-SVX01A-EN
MODEL NOMENCLATURE
DIGIT 1,2,3
CGA=Air-Cooled Cold Generator
®
DIGIT 4 - Model
K=Cooling Only (030~200)
R=Cooling With Heat Pump Option (030~150)
DIGIT 5,6,7 - Number
030
040
050
075
100
125
150
175
200
DIGIT 8 - Voltage
1=220V/60Hz/1Ph
(For model 030,040,050)
2=220V/60Hz/3Ph
(For model 050,075,100,125,150, 175, 200)
3=380V/60Hz/3Ph
(For model 050,075,100,125,150, 175, 200)
4=460V/60Hz/3Ph
(For model 050,075,100,125,150, 175, 200)
5=380V/50Hz/3Ph
(For model 050,075,100,125,150, 175, 200)
6=400V/50Hz/3Ph
(For model 050,075,100,125,150, 175, 200)
7=415V/50Hz/3Ph
(For model 050,075,100,125,150, 175, 200)
DIGIT 9 - Development Sequence
D=Fourth Design
DIGIT 10 - Controls
F=Fixed Entering Water Temperature Control
(Standard Option)
A=Adjustable Entering Water Temperature
Control
(Microprocessor Controller)
(For CGAK Models as Optional)
(For CGAR Models as Standard Option)
DIGIT 11- Water Pump
N = No Pump
R = Standard Pump
(Standard Option)
DIGIT 12 - Refrigerant Pressure Gauges
M = No
(Standard Option)
G = With High/Low Pressure Gauges
DIGIT 13 - Temperature Kit
R = Standard Ambient Temperature Kit
(Standard Option)
L = Low Ambient Temperature Kit
(For CGAK Models Only)
DIGIT 14 - Other Options
M = Standard Fin + Standard Grille Cover
N = Standard Fin + Luxury Grille Cover
C = Blue Fin + Standard Grille Cover
B = Blue Fin + Luxury Grille Cover
DIGIT 15 - Service Sequence
A = First
Page 4

© American Standard Inc. 2001
4
INSTALLATION
Table 1 - Unit Shipping Weights
Maximum Shipping Weight (Kg)
230
250
260
370
450
500
530
550
570
Model
030
040
050
075
100
125
150
175
200
CGA-SVX01A-EN
Complete the “Installation Checklist” during
installation to verify completion of all
recommended procedures before unit
start-up.
RIGGING
Each unit is bolted to a shipping skid for
shipment to the job site. Move the unit using
a forklift of suitable capacity. See Table 1 for
unit shipping weights.
Locate the unit near a large-capacity drain to
allow system drainage during unit shutdown
and repair. Rig the unit using canvas belt.
Fasten the belt to the unit over the unit’s
base as show in Figure 1.
MOUNTING
Mounting methods that will minimize sound
and vibration problems are:
1. Mount the unit directly on an isolated
concrete pad or on isolated concrete
footings at each unit mounting point.
2. Install the optional neoprene or spring
isolators at each mounting location.
Refer to Figure 2 for unit and base
dimensions and Figure 3 for recommended
service clearance.
WATER PIPING
Thoroughly flush all water system piping
before making the final piping connections to
the unit.
Page 5

5
Figure - 1:
Recommended Hoisting Arrangement
(CGAK-075 As Shown)
CGA-SVX01A-EN
Page 6
© American Standard Inc. 2001
6
Figure - 2:
Dimension for Mounting
(CGAK-075 As Shown)
Note: All Dimensions in Millimeter
CGA-SVX01A-EN
Page 7

7
Figure - 3:
Service and Maintenance Clearance
(CGAK-075 As Shown)
CGA-SVX01A-EN
Page 8
© American Standard Inc. 2001
8
CGA-SVX01A-EN
CAUTION: If using an acidic commercial
flushing solution, construct a temporary
bypass around the unit to prevent
damage to the evaporator.
CAUTION: To avoid possible equipment
damage, do not use untreated or
improperly treated water.
For unit’s water connection sizes and
locations, please refer to Figure 2.
CAUTION: To prevent unit damage, do
not reverse system piping connections to
the unit; water entering the unit must
enter at the designated “Water In” and
leaving water must exit the unit through
the designated “Water Out” connection.
Figure 4 illustrates typical unit piping
components. Components and layout will
vary slightly depending upon the locations
of the connections and water source.
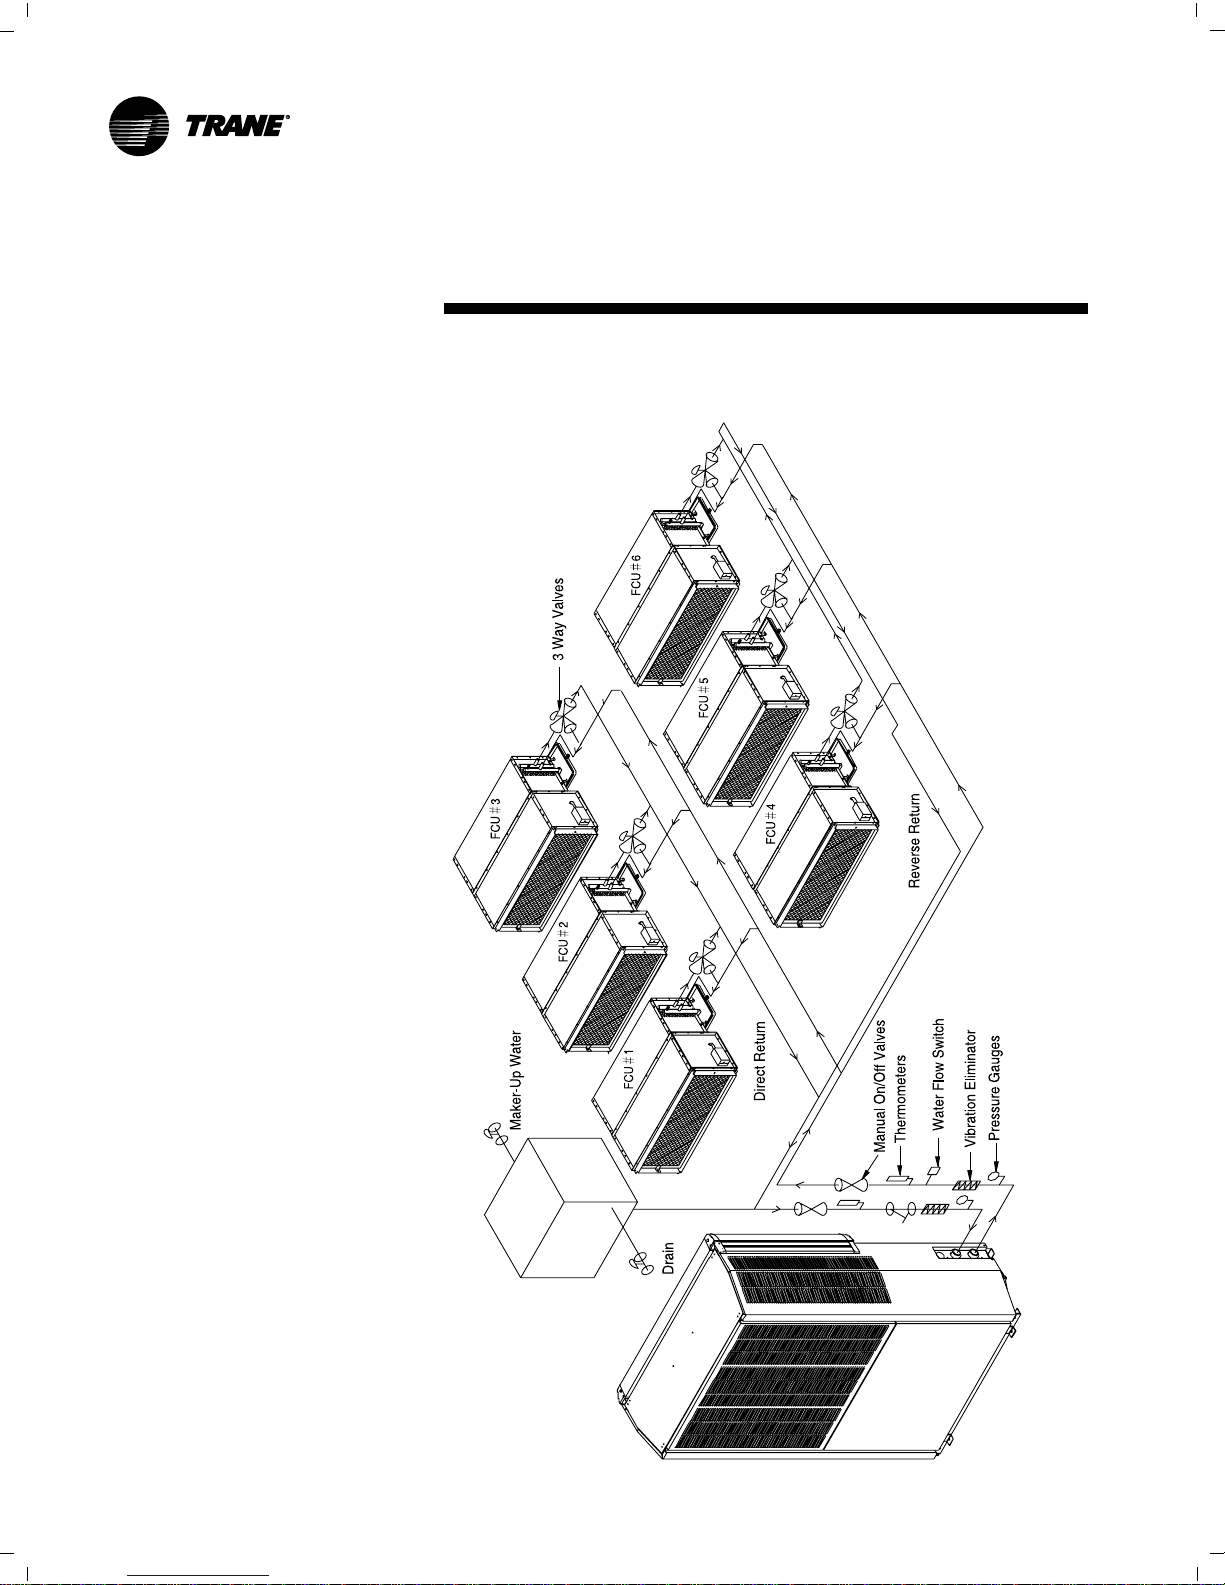
Figure 5 gives a schematic of a typical
system application for this unit.
Provide vents at high points in the piping to
bleed air from the chilled water system.
Install pressures gage(s) to monitor entering
and leaving chilled water pressure.
CAUTION: To prevent damage to the
waterside components of unit, do not
allow evaporator pressure to exceed 100
psig (i.e. maximum working pressure).
Use an expansion tank to isolate this
pressure if water pressure exceeds this
value.
ELECTRICAL WIRING
WARNING: To prevent injury or death,
disconnect electrical power source
before completing wiring connections to
the unit.
CAUTION: Use only copper conductors
for terminal connections to avoid
corrosion or over heating.
Figure 2 shows the location of the unit
electrical access openings. Table 2 provides
minimum circuit ampacities, recommended
fuse sizes, and motor electrical data.
UNIT POWER SUPPLY
Refer to the unit wiring schematic fixed to
the control panel cover. The installer must
provide a power supply of proper voltage
and a fused disconnect switch to the unit.
Run properly sized power wirings through the
electrical access opening on the side of the
unit, and connect it to the Voltage Terminal
Block (1TB1) in the unit control panel. Install
a fused disconnect switch as required by
local codes. Provide proper equipment
grounds for the ground connections in the
unit control panel and at the fused disconnect
switch.
Refer to wiring diagrams from Page 13 to
Page 16 for reference of a typical unit installation. For actual wiring diagram, refer to the
one fixed to the control panel cover.
FLOW SWITCH INTERLOCK
To avoid possible evaporator freeze-up
resulting from reduced water flow, install a
flow switch ( or other flow sensing device) in
the evaporator outlet water line. This sensing
device must be adjusted to stop compressor
operation if water flow to the evaporator
drops below 70% of the system design fullflow rate.
The installer must provide interconnecting
wiring between the unit control panel and the
water flow sensing switch in the evaporator
water line.
Page 9

9
Figure - 4:
Typical Piping Arrangement
(CGAK-075 As Shown)
CGA-SVX01A-EN
Page 10
© American Standard Inc. 2001
10
Figure - 5:
Typical System Application
(CGAK-075 And Fans As Shown)
CGA-SVX01A-EN
Page 11

11
CGA-SVX01A-EN
ELECTRICAL DATA
Table 2 - Electrical Data
60Hz
Electrical
Power
(V/Hz/Ph)
220/60/1
220/60/1
220/60/1
220/60/1
220/60/3
380/60/3
220/60/3
380/60/3
220/60/3
380/60/3
220/60/3
380/60/3
220/60/3
380/60/3
220/60/3
380/60/3
220/60/3
380/60/3
Model
Water
Pump
FLA
4.4
4.4
4.4
6.5
2.7
1.6
4.2
2.4
4.2
2.4
5.4
3.1
5.4
3.1
6.0
3.5
9.1
5.3
Comp
1
RLA
14.4
19.4
24.4
24.4
15.3
8.8
23.0
13.3
15.3
8.8
17.4
10.1
23.0
13.2
26.0
15.0
32.4
18.7
Comp
2
RLA
-
-
-
24.4
-
-
-
-
15.3
8.8
17.4
10.1
23.0
13.2
26.0
15.0
32.4
18.7
Fan
1
FLA
2.8
2.8
2.8
4.3
3.0
1.7
3.0
1.7
4.5
2.6
4.5
2.6
3.0
1.7
4.5
2.6
4.5
2.6
Fan
2
FLA
-
-
-
-
-
-
-
-
-
-
-
-
3.0
1.7
4.5
2.6
4.5
2.6
Unit
MCA
25.2
31.5
37.7
65.7
24.8
14.3
36.0
20.7
43.1
24.8
49.1
28.4
63.2
36.2
73.5
42.5
91.0
52.6
Rec.
Fuse
Size
28.8
36.3
43.8
71.8
28.7
16.5
41.7
24.1
47.0
27.0
53.4
31.0
68.9
39.5
80.0
46.2
99.1
57.3
Max
Fuse
Size
39.6
50.9
62.1
90.1
40.1
23.1
59.0
34.0
58.4
33.6
66.5
38.5
86.2
49.4
99.5
57.5
123.4
71.3
030
040
050
100
050
050
075
075
100
100
125
125
150
150
175
175
200
200
50Hz
Electrical
Power
(V/Hz/Ph)
380-415/50/3
380-415/50/3
380-415/50/3
380-415/50/3
380-415/50/3
380-415/50/3
380-415/50/3
Model
Water
Pump
FLA
1.1
1.4
1.4
1.7
1.7
2.0
2.8
Comp
1
RLA
7.4
11.6
7.4
8.7
11.6
13.0
15.1
Comp
2
RLA
-
-
7.4
8.7
11.6
13.0
15.1
Fan
1
FLA
1.5
1.5
2.2
2.2
1.5
2.2
2.2
Fan
2
FLA
-
-
-
-
1.5
2.2
2.2
Unit
MCA
11.9
17.4
20.3
23.5
30.8
36.5
41.2
Rec.
Fuse
Size
13.7
20.3
22.1
25.7
33.7
39.8
45.0
Max
Fuse
Size
19.3
29.0
27.7
32.2
42.4
49.5
56.3
050
075
100
125
150
175
200
Note:
• All voltages supply must fall within the utilization range of ±10 %
• Minimum Circuit Ampacity (MCA) = Largest Load x 1.25 + Sum of additional Loads. (Used for sizing wire)
• Recommended Fuse Size (REC) = Largest Load x 1.5 + Sum of additional Loads. (Select closest fuse size)
• Maximum Fuse Size (MFS) = Largest Load x 2.25 + Sum of additional Loads. (Select equal or next lower fuse size)
Page 12

© American Standard Inc. 2001
12
Circuit Diagram:
For CGAK 030 - 075
CGA-SVX01A-EN
FLOW SWITCH INTERLOCK
Page 13

13
Circuit Diagram:
For CGAR 030 - 075
CGA-SVX01A-EN
Page 14

© American Standard Inc. 2001
14
Circuit Diagram:
For CGAK 100 - 200
CGA-SVX01A-EN
Page 15

15
Circuit Diagram:
For CGAR 100 - 150
CGA-SVX01A-EN
Page 16

© American Standard Inc. 2001
16
CGA-SVX01A-EN
INSTALLATION CHECKLIST
RECEIVING
Verify that unit nameplate data
corresponds with sales order information.
Inspect unit for shipping damages and
material shortages; report any damages
or shortages found to the carrier.
UNIT LOCATION AND MOUNTING
Inspect unit installation location for
adequate ventilation.
Provide drainage facilities for water
accumulated from the base.
Remove and discard any shipping
materials (e.g. cartons, crates, etc.)
Inspect to determine that service access
clearances are adequate.
Install optional unit neoprene-in-shear or
spring isolators.
Secure unit to mounting surface.
Level the unit.
EVAPORATOR PIPING
Flush and clean all chilled water piping.
CAUTION: If using an acidic commercial
flushing solution, construct a temporary
bypass around the unit to prevent
damage to the evaporator.
CAUTION: To avoid possible equipment
damage, do not use untreated or
improperly treated water.
Make evaporator water connections.
Vent the air from chilled water system at
high points.
Install pressure gauges, thermometers
and shutoff valves on water inlet and
outlet piping.
Install water strainer in evaporator supply
line.
Install balancing valve and flow switch on
water outlet piping.
ELECTRICAL WIRING
CAUTION: Use only copper conductors
to prevent galvanic corrosion and
overheating at terminal connections.
Connect unit power supply wiring (with
fused disconnect) to appropriate
terminals on terminal block (TB) in power
section of unit control panel.
In order to turn on/off the chiller from
indoors, connect wiring across reserved
terminals 2 & 3 in the unit control panel
from an indoor REMOTE OFF/ON switch.
For heat pump options only, in addition to
an indoor REMOTE ON/OFF switch, an
indoor cooling mode and heating mode
switch should be connected. Please
connect another set of wiring to switch
between cooling mode and heating mode
indoors. For CGAR-030 to CGAR-075,
connect wiring across terminals 12 & 13
for cooling mode, terminals 12 & 17 for
heating mode. For CGAR-100, CGAR150, and CGAR-150, connect wiring
across terminals 17 & 18 for cooling
mode and terminals 17 & 27 for heating
mode.
Properly ground the unit, the chilled water
pump motor, all disconnects, and other
devices which require grounds.
Install wiring to connect flow switch to unit
control panel.
FOR NO-PUMP OPTION ONLY
Connect chilled water pump power supply
wiring (with fused disconnect) to the
proper terminals of the chilled water
pump.
Install wiring to connect chilled water
pump switch to chilled water pump
starter.
Connect auxiliary contacts of chilled
water pump starter to flow switch and unit
control panel.
Page 17

17
CGA-SVX01A-EN
PRE-START PROCEDURES
VOLTAGE UTILIZATION
RANGE
Electrical power to the unit must meet
stringent requirements for unit to operate
properly. Total voltage supply and voltage
imbalance between phases should be within
the following tolerances.
Measure each leg supply voltage at all line
voltage disconnect switches. Readings must
fall within the voltage utilization range shown
on the unit nameplate (±10%). If voltage on
any leg does not fall within the tolerance,
notify the power company to correct this
situation before operating the unit.
Inadequate voltage to the unit will cause
control components to malfunction and
shorten the life of electrical components and
compressor motors.
VOLTAGE IMBALANCE
Excessive voltage imbalance between
phases in all 3-phase system will cause
motors to overheat and eventually fail.
Maximum allowable imbalance is 2 %.
Voltage imbalance is defined as follows:
The 2.2% imbalance that exists in the
example above exceeds maximum
allowable imbalance by 0.2 %. This much
imbalance between phases can equal as
much as 20 % current imbalance with a
resulting increase in winding temperature
that will decrease compressor motor life.
WATER FLOW RATE
Establish a balanced water flow through the
unit. Flow rates should fall between the
minimum and maximum values indicated in
TABLE 3. Evaporator water flow rates below
the minimum acceptable values will result in
a stratified flow; this reduces heat transfer
and causes either loss of expansion valve
control or repeated nuisance low pressure
cutouts. Conversely, excessively high flow
rate may cause erosion in the water system.
% Voltage Imbalance =
Where
Va = (V1 + V2 +V3) / 3(Average Voltage)
V1, V2, V3 = Line Voltages
Vd = Maximum Line Voltage deviation from Va
Example:
If the three voltages measured at the line 221
Volts, 230 Volts, and 227 Volts, the average
(Va) would be:
Va = (221 + 230 + 227)/3 = 226 Volts
then Vd = 221 Volts
The percentage of imbalance is then:
100x Va-Vd
Va
100x 226-221
226
2.2%
Page 18

© American Standard Inc. 2001
18
TABLE 3 - Unit Water Flow Rate - 60HZ
60Hz
Model
030
040
050
075
100
125
150
175
200
Minimum Flow
18.5
22.9
30.2
44.9
59.1
74.7
89.5
102.6
120.0
Rated Flow
27.7
34.3
45.3
67.3
88.7
112.0
134.3
154.0
180.0
Maximum Flow
38.8
48.0
63.4
94.2
124.2
150.0
150.0
175.0
240.0
Model
050
075
100
125
150
175
200
Minimum Flow
25.1
37.3
49.1
62.1
74.4
85.5
98.3
Rated Flow
37.7
56.0
73.7
93.3
111.7
128.3
149.0
Maximum Flow
56.6
84.0
110.6
140.0
150.0
160.0
190.0
CGA-SVX01A-EN
Units: LPM
50Hz Units: LPM
UNIT WATER PRESSURE
DROP
Measure the water pressure rise across the
standard unit (with built-in pump). The
Externally Available Head (E.A.H) should
approximate those indicated by the E.A.H.
curves, with the corresponding flow rates.
For units (without built-in pump) with fieldinstalled pump outside the unit, water
pressure drop across the unit should
approximate those indicated by the Internal
Pressure Loss (I.P.L.) curves, with the
corresponding flow rates.
For standard unit with built-in pump, refer to
the E.A.H. curve for the system hydraulic
design. For optional unit without a built-in
pump, refer to the I.P.L. curves. (Refer to
Figure 6 for hydraulic characteristics of all
models.)
Page 19

19
CGA-SVX01A-EN
Figure - 6:
Hydraulic Characteristics - 60Hz
Page 20

© American Standard Inc. 2001
20
CGA-SVX01A-EN
Figure - 6:
Hydraulic Characteristics - 50Hz
Page 21

21
CGA-SVX01A-EN
PRE-START CHECKLIST
Inspect all wiring connections; electrical
connections should be clean and tight.
Check power supply voltage to the unit at
the main power fused disconnect switch.
Fill the chilled water circuit, leaving the
system air vents open. Close vents after
all air is out, and the system is completely
filled.
Remove jumper wire across terminals 1
and 5 (in the control panel) for water
system testing.
Close the fused disconnect switch and
start the unit by turning the REMOTE/
OFF/ON switch to ON position. Pump
should start and with water circulating
through the chilled water system, inspect
all piping connections for leaks and make
any necessary repairs.
Adjust the water flow rate through the
chilled water circuit, and check the
external available water pressure of the
unit (for standard unit) or the evaporator
water pressure drop for the no-pump
option unit.
NOTE: With the water pump operating,
throttle the water flow to approximately
50% of the full flow rate. Following the
manufacturer’s instructions, adjust the
flow switch contacts to open at this
point. Use an ohmmeter to verify opening
and closure of the flow switch contacts.
Stop the chilled water pump.
Open all fused disconnect switches.
Make electrical connection of flow switch
to terminals 1 & 5 in the control panel.
Page 22

© American Standard Inc. 2001
22
CGA-SVX01A-EN
OPERATION
START-UP PROCEDURE
Close the fused disconnect switch and
turn REMOTE/OFF/ON switch to ON.
Pump will start immediately. After 2
minutes, compressors1 will start. 1
minute later, compressor2 will start
(only in units with two refrigerant circuits).
For CGAR models, turn REMOTE/OFF/
ON switch to ON as described above,
turn the already installed indoors cooling
and heating mode switch to cooling
mode, then the operation of the chiller
would be similar to what is described
above (see section on electrical wiring of
the installation checklist). As for start-up
with heating mode, first turn REMOTE/
OFF/ON switch to OFF. Then, turn the
cooling and heating mode switch to
heating. Finally, turn the REMOTE/OFF/
ON switch to ON.
To start-up the CGAR at the chiller i.e.
outdoors, remove the wiring of indoors
cooling and heating mode switch. For
CGAR-030 to CGAR-075, connect wiring
across terminals 12 & 13 for cooling
mode, terminals 12 & 17 for heating
mode. For CGAR-100, CGAR-125, and
CGAR-150, connect wiring across
terminals 17 & 18 for cooling mode and
terminals 17 & 27 for heating mode. After
the completion of testing, reconnect the
wiring of indoors cooling and heating
mode switch back to the original
terminals.
Once the unit has operated for at least 30
minutes and the system has stabilized,
complete the following checklist to ensure
proper unit operation.
Re-check unit water flow and pressure
rise (for no built-in pump unit with field-
installed pump system). These readings
should be stable at proper levels.
Measure unit suction and discharge
pressures by installing pressure gauges
on the discharge and suction line access
ports. Normal operation should render
suction pressure in the range of 50-85
psig and discharge pressure 200-310
psig.
Check compressor amp draw.
Check electrical power supply.
Check the liquid line sight glasses.
NOTE: Bubbles in the liquid line may
indicate either a low refrigerant charge,
or excessive pressure drop in the liquid
line. Such a restriction can often be
identified by a noticeable difference in
line temperature on either side of the
restricted area. (Frost often forms on the
outside of the liquid line at the point of
restriction, as well). Bubbles are not
necessarily a symptom of improper
system operation.
CAUTION: A clear sight glass does not
necessarily mean that the system is
sufficiently charged; be sure to consider
system superheat, subcooling, and unit
operating pressures and ambient
temperatures.
Proper unit refrigerant charge-per circuit-is
indicated on the unit nameplate.
Measure system superheat.
Normal system superheat is 6.7°C to 8.3°C
for each circuit at ARI conditions (12.2°C
entering water, 6.7°C leaving water, and
35°C ambient temperature). If the superheat
measured for either circuit does not fall
within this range, alter the setting of the
superheat adjustment on the thermal
expansion valve to obtain the desired
reading. Allow 15 to 30 minutes between
adjustments for the expansion valve to
stabilize at each new setting.
Measure system subcooling.
Normal subcooling for each circuit is 6.7°C
to 12.2°C ARI conditions (12.2°C entering
water, 6.7°C leaving water, and 35°C
ambient temperature). If subcooling for
either circuit is normal but subcooling is not
in this range, check superheat for the circuit
and adjust, if required. If superheat is normal
but subcooling is not, contact a qualified
service technician.
If operating pressure, sight
glass,superheat and subcooling readings
indicate refrigerant shortage, find and
repair leaks and, gas-charge refrigerant
into each circuit. Refrigerant shortage is
indicated if operating pressures are low
and subcooling is also low.
CAUTION: If suction and discharge
pressures are low, but subcooling is
normal, no refrigerant shortage exists.
Adding refrigerant will result in
overcharging.
Add refrigerant vapor with the unit running
by charging through the access port on the
suction line until operating pressures are
normal.
If operating pressures indicate an
overcharge, slowly (to minimize oil loss)
recover refrigerant at the liquid line
service valve.
Be sure that all remote sensing bulbs are
properly installed in bulb wells with heat
transfer grease. Remote bulb capillary
tubes must be secured (i.e. protected
from vibration and abrasion) and
undamaged.
Inspect the unit. Remove any debris,
tools and hardware. Secure all exterior
panels, including the control and
compressor access panels. Replace and
tighten all retaining screws.
Page 23

23
CGA-SVX01A-EN
EXTENDED UNIT SHUT-DOWN/
WINTERIZATION
If the system is taken out of operation for
long periods of time for any reasons (e.g.,
seasonal shutdown), use this procedure to
prepare the system for shutdown.
1. Check the refrigerant piping for leaks,
fixing any that exist.
2. Service the chilled water pump and any
air handling equipment according to the
manufacturers recommendtions.
3. Open both electrical disconnect switches
for the unit and chilled water pump; lock
both disconnects in the open position.
WINTERIZATION: Close all evaporator
water supply valves and drain the
evaporator by removing the drain plug
and opening the vent on the entering
water line just outside the unit. Re-install
the drain plug. Since the evaporator does
not drain completely, add ethylene glycol
antifreeze to the remaining water through
the vent or evaporator drain hole, to keep
the water from freezing. Protect system
to 5.5°C below the expected ambient
temperature.
SYSTEM RESTART AFTER EXTENDED
SHUTDOWN
1. Remove winterization antifreeze as it can
reduce system capacity.
2. Fill the chilled water circuit by opening the
gate valves at the returning and supply
water piping. Be sure to vent the system
while filling it, and close the vents when
system is full.
3. Remove compressor delay on timer(s)
(TR1, TR2). Record down the original
socket for the respective timer so that the
correct timer(s) are replaced correctly
later.
4. Close the unit disconnect switch for power
supply.
5. Turn the REMOTE/OFF/ON switch to ON
position. With water circulating through
the chilled water system, inspect all
piping connections for leaks and make
any necessary repairs.
6. Adjust the water flow rate, using the
balancing valve, through the chilled water
circuit, and check the water pressure rise
(or drop) through the unit.
7. Adjust the flow switch (installed on the
unit outlet piping) to provide proper
operation.
NOTE: With the unit operating, throttle
the water flow to approximately 50% of
the full flow rate. Following the
manufacturer’s instructions, adjust the
flow switch contacts to open at this
point. Use an ohmmeter to check for
contact opening and closure.
8. Stop the unit by turning the REMOTE/
OFF/ON switch to OFF position.
9. Replace compressor delay on timer (TR1,
TR2) back to their original sockets.
This unit now is ready for normal operation.
STANDARD AMBIENT
OPERATION
Standard unit will operate in outdoor ambient
temperature down to 15°C.
OPTIONAL LOW AMBIENT
OPERATION (CGAK)
A factory installed Low Ambient Unit (LAU)
option will enable units to operate at outdoor
ambient temperature down to 4°C (except
Model 100).
When the unit is started at ambient
temperature below 15.6°C, the low ambient
mode is activated. Timer TR3 & TR4 will
activate the solenoid valve connected
across the thermostatic expansion valves for
a period of 1.5 minutes, bypassing
refrigerant, to prevent suction pressure
dipping too low. Also, a fan cycle switch
prevents the condenser fan from starting
until the condensing pressure reaches 350
psig. This switch switches off condensing
fan when condensing pressure drops to 115
psig.
OPTIONAL HEAT PUMP
OPERATION (CGAR)
A factory installed heat pump unit (CGAR)
option will enable units to get either cooling
and heating performance (not simultaneous).
When the unit is switched to heating mode,
the four-valve is activated. Evaporator
becomes the condenser while the condenser
becomes the evaporator. There are two
liquid lines in a CGAR unit. One is for cooling
mode while another is for heating mode.
To carefully measure the high pressure,
there are two access ports in these two
liquid lines. If you operate this unit in cooling
mode, connect high pressure gauge to the
access port of the cooling liquid line. While
operating this unit in heating mode, must
change the connection to the access port of
the heating liquid line.
A timer override low pressure switch delays
for 2 minutes to prevent nuisance trip-outs.
Page 24

© American Standard Inc. 2001
24
CGA-SVX01A-EN
ELECTRICAL CONTROL &
PROTECTION SYSTEM
Low Pressure Cutouts (LP1, LP2)
These units are protected by low pressure
cutouts that open and stop compressor
operation if the operating pressure drops
below 45 ± 4 psig . The cutout automatically
resets when the pressure reaches 60 ± 4
psig. The LP is a SPDT device and if it
opens at low ambient start-up, there will be
a 1.5 minute override to prevent nuisance
trip-outs ( for LAU only).
For CGAR unit, the low pressure cutout
setpoints 25 ± 4 psig.
High Pressure Cutouts (HP1, HP2)
These units have high pressure cutouts that
open and stop compressor operation if the
discharge pressure reaches 405 ± 7 psig.
The cutout automatically resets when
pressure drops to 300 ± 20 psig.
Reset Relays (CR1,CR2)
If the unit is shut down by safety devices
(LP, HP, FS, FU, KF etc.) the reset relay
locks out the compressor contactor (MC1,
MC2). This prevents the system from
recycling until the condition that caused the
safety devices to trip is determined and
corrected.
CAUTION: To prevent unit damage, do
not reset the control circuit until the
cause of the safety lockout is identified
and corrected.
To reset CR1 and CR2, open and reclose
the unit REMOTE/OFF/ON switch.
Anti-freeze Cutout (FS1, FS2, FU)
The FS and FU are designed to protect the
evaporator from freeze damage in the event
of a water temperature thermostat (WTT)
malfunction or restricted water flow. The
FU’s remote sensing bulb is mounted at the
outlet end of the evaporator, where it
monitors leaving water temperature. If
during normal unit operation, the leaving
chilled water temperature falls to the trip
point, the FU will open to interrupt compressor operation.
When leaving chilled water temperature falls
down, the suction temperature also falls
down. For further protection to avoid freeze
damage, another freezestat ( FS1 , FS2 ) in
contact with the suction line. If suction
temperature falls to the trip point , the FS1
(FS2) will open to interrupt compressor
operation.
Motor Overloads
These units have internal compressor and
condenser fan motor overloads to protect
the motors from overcurrent and overheating conditions and automatically reset as
soon as they cool sufficiently. Pump motor
has thermal overload installed at the load
contactor. Pump overload needs manual
reset.
Cooling Mode
Water Temperature Thermostat
Operation (TS1, TS2) for cooling mode
For Double Refrigeration Circuit Operation
At Start-up, the pump will come on immediately. Two minutes after the pump is on and
EWT(entering water temperature)is above
14.0 °C, compressor 1 will start. One
minute later, if the EWT is above 13.5°C,
compressor 2 will start.
When cooling demand is met and EWT
drops to 10.0 °C. Compressor 1 will stop,if
EWT continues to fall to 9.5 °C,compressor
2 will stop. Subsequently,when load
builds up and EWT rises to 13.5 °C compressor 2 comes on, and if EWT rises
further to 14.0°C, compressor 1 comes on.
Pump remains on unless the unit is turned
off.
For Single Refrigeration Circuit Operation
For units with only one refrigerant circuit, the
operation of water pump, fan and compressor is exactly the same. The only difference
is the unit will operate the single compressor
from any temperature over 14.0 °C and
10.0°C when the compressor will stop.
Heating Mode
Water Temperature Thermostat
Operation (TS3, TS4) for cooling mode
For Double Refrigeration Circuit Operation
At start-up, pump will come on immediately.
Two minutes after the pump is on and EWT
(entering water temperature)is below
38.0°C, compressor 1 will start. One
minute later, if EWT is below 39.0 °C,
compressor 2 will start.
When heating demand is met and EWT
rises to 42.0 °C, compressor 1 will stop, if
EWT continues to rise to 43.0
°C,compressor 2 will stop.
Subsequently,when load builds up and EWT
drops to 39.0 °C, compressor 2 comes on,
and if EWT drops further to 38.0 °C,
compressor 1 comes on. Pump remains
on unless the unit is turned off.
For Single Refrigeration Circuit Operation
For units with only one refrigerant circuit, the
operation of water pump, fan and compressor is exactly the same. The only difference
is the unit will operate the single compressor
from any temperature below 38.0 °C and
42.0 °C when the compressor will stop.
Page 25

25
Table 4 - Range of Operating Ambient
Model
All Models Cooling Mode
All Models Heating Mode
Standard Unit
15˚C-46˚C
Over 4˚C
Low Ambient Unit (If LAU option is added)
15°C-46°C
Over -4˚C
Table 5 - Control Settings and Time Delays
Control Description
High Pressure Cutoff
Low Pressure Cutoff (CGAK)
Low Pressure Cutoff (CGAR)
Antifreeze Cutout (Refrigerant Side)
Antifreeze Cutout (Water Side)
1st compressor On Delay
2nd compressor On Delay
Low Suction Pressure Override Delay
Low Suction Pressure Override Delay
(LAU Only)
Electrical Designation
HP1, HP2
LP1, LP2
LP1, LP2
FS1, FS2
FU
TR1
TR2
TR3, TR4
TR3, TR4
Contacts Open
4057 psig
454 psig
254 psig
-3˚C2.0˚C
1.8˚C1.5˚C
Normally Open, Time Closed
Normally Open, Time Closed
Normally Closed, Time Open
Normally Closed, Time Open
Contacts Close (Reset)
30020 psig
604 psig
504 psig
3˚C2.0˚C
7˚C1.5˚C
2 Minutes
3 Minutes
2 Minutes
1.5 Minutes
CGA-SVX01A-EN
Page 26

© American Standard Inc. 2001
26
Maintenance
CGA-SVX01A-EN
Once the unit has been operating for about
30 minutes and the system has stabilized,
check operating conditions and complete the
checkout procedure described below:
Monthly
Check suction and discharge pressures
for normal operating pressures.
Check the liquid line sight glass indicator
for normal operating conditions.
If operating pressures and sight glass
conditions indicate a refrigerant shortage,
measure system superheat and
subcooling.
If operating conditions indicate an
overcharge, slowly (to minimize oil loss)
recover refrigerant from the schraeder
valve.
Open the unit disconnect switch; then
manually rotate the condenser fan(s) to
ensure proper orifice clearance.
Inspect the fan mounting bolts for
tightness.
Check fan set screws for tightness.
Please clean up internal and pipe’s
strainer once the unit first starts running
and monthly after use.
Annually
Perform all monthly maintenance
procedure.
Have a qualified service technician check
the setting and function of each control
and inspect the condition of all contactors
and replace as necessary.
Drain water from unit. Inspect piping for
damage. Clean out the built-in water
strainer and any other in-line water
strainer.
Clean and repaint any corroded surfaces.
Clean condenser coil with soft brush and
water spray.
Inspect the expansion valve(s) sensing
bulbs for cleanliness; clean if required.
These bulbs must make good contact
with the suction lines and must be
properly insulated.
Clean condenser fan.
Page 27

27
TROUBLE ANALYSIS
CGA-SVX01A-EN
Probable Cause
(1) No power to unit
(2) No call for cooling
(3) Compressor start delay (TR1,TR2) timer has not timed out time out
(4) Unit locked out by reset relay (CR)
(5) Compressor contactor will not close
(6) Compressor winding stat open
Recommended Action
Check for followings:
a. Disconnect switch open
b. Fuse(s) blown
Check for followings:
a. Defective thermostat
b. Broken or improper control wiring
c. Blown control power fuse
Wait at least 2 minutes for the timer to time out
Check for the followings:
a. Excessive discharge pressure
b. Defective high pressure control
c. Low charge; Low pressure cut-out
d. Gate/water valve not open causing flow switch or anti-freeze
cutoff to trip
e. Fan motor internal temperature switch open
f . Defective reset relay contact
Check for the followings:
a. Defective compressor contactor
b. Improper wiring
c. Reset relay (CR) open
d. Low pressure cut-out open
Check compressor amp draw
A. Compressor Neither Starts Nor Hums
B. Compressor Hums, But Will Not Start
Probable Cause
(1) Low voltage at compressor
(2) Defective compressor
(3) Insufficient starting voltage (Single-Phase Units Only)
Recommended Action
Check for the followings:
a. Single blown fuse
b. Low line voltage
c. Defective compressor contactor
d. Loose wiring connections
Check for the followings:
a. Open motor winding
b. Excessive amp draw on all phases
Check for the followings:
a. Defective start capacitor
b. Defective start relay
Page 28

© American Standard Inc. 2001
28
CGA-SVX01A-EN
C. 2nd Stage Compressor Fails To Start
Probable Cause
(1) Time delay contacts fail to close
(2) No call for cooling
(3) Unit locked out by reset relay (CR)
(4) Compressor contactor will not close
Recommended Action
Replace time delay relay
Check for the followings:
a. Defective thermostat
b. Broken or improper control winding
See (A) item (4)
See (A) item (5)
D. Compressor Short Cycles
Probable Cause
(1) Intermittent contact in control circuit
Recommended Action
Check for the followings:
a. Defective relay contacts
b. Loose wiring connections
E. Compressor Runs Continuously
Probable Cause
(1) Unit undersized for load (cannot maintain water temperature)
(2) Thermostat setpoint too low
(3) Defective thermostat or control wiring
(4) Welded contacts on compressor contactor
(5) Leaky valves in compressor (indicated by abnormally low
discharge and high suction pressures)
(6) Shortage of refrigerant (indicated by reduced capacity, high
superheat, low subcooling, and low suction pressure)
Recommended Action
Check for cause of excessive load
Readjust thermostat
Replace thermostat
Replace or repair control wiring
Repair or replace contactor
Replace compressor
Find and repair refrigerant leak
Recharge system
F. Compressor Motor Winding Stat Open
Probable Cause
(1) Excessive load on evaporator (indicated by high supply water
temperature)
(2) Lack of motor cooling (indicated by excessive superheat)
(3) Improper voltage at compressor
(4) Internal parts of compressor damaged
Recommended Action
Check for the followings:
a. Excessive water flow
b. High return water temperature
Check for the followings:
a. Improper expansion valve setting
b. Faulty expansion valve
c. Restriction in liquid line
Check for the followings:
a. Low or imbalanced line voltage
b. Loose power wiring
c. Defective compressor contactor
Replace compressor
Page 29

29
CGA-SVX01A-EN
G. Compressor is Noisy
Probable Cause
(1) Internal parts of compressor damaged or broken (compressor
knocks)
(2) Liquid floodback (indicated by abnormally cold suction line and
low superheat)
(3) Liquid refrigerant in compressor at start-up (indicated by
abnormally cold compressor shell)
Recommended Action
Replace compressor
Check and adjust superheat
Check for refrigerant overcharge
H. System Short of Capacity
Probable Cause
(1) Low refrigerant charge (indicated by high superheat and low
subcooling)
(2) Clogged filter drier (indicated by temperature change in
refrigerant line through drier)
(3) Incorrect expansion valve setting
(4) Expansion valve stuck or obstructed(i.e., high superheat and
high water temperature)
(5) Low evaporator water flow
(6) Noncondensibles in system
(7) Leaky valves in compressor (i.e., operation at abnormally high
suction and low discharge pressures)
Recommended Action
Add refrigerant
Replace filter drier or filter drier core
Readjust expansion valve
Repair or replace expansion valve
Check strainers. Adjust water flow
Evacuate and recharge system
Replace compressor
I. Suction Pressure Too Low
Probable Cause
(1) Shortage of refrigerant (i.e., high superheat, low subcooling)
(2) Thermostat set too low (i.e., low discharge pressure, low leaving
water temperature)
(3) Low water flow
(4) Clogged filter drier
(5) Expansion valve power assembly has lost charge
(6) Obstructed expansion valve (i.e., high superheat)
Recommended Action
Find and repair leak; recharge system
Readjust thermostat
Check for clogged strainers and ncorrect balancing valve settings
Check for frost on filter drier. Replace if needed
Repair or replace expansion valve power head assembly
Clean or replace valve
J. Suction Pressure Too High
Probable Cause
(1) Excessive cooling load (i.e., high supply water temperatures)
(2) Expansion valve overfeeding (i.e.,superheat too low, liquid
flooding to compressor)
(3) Suction valves broken (i.e. noisy compressor)
Recommended Action
See (E) above
Adjust superheat setting; verify that remote bulb is properly attached
to suction line
Replace compressor
Page 30

© American Standard Inc. 2001
30
CGA-SVX01A-EN
K. Discharge Pressure Too Low
Probable Cause
(1) Shortage of refrigerant (i.e., low subcooling, high superheat,
bubbles in sight glass)
(2) Broken or leaky compressor discharge valves
(3) Defective low pressure switch
(4) Unit running below minimum operating ambient
Recommended Action
Find and repair leak; recharge system
Replace compressor
Replace defective control
Provide adequate head pressure controls, or an ambient lockout
switch
L. Discharge Pressure Too High
Probable Cause
(1) Too little or too warm condenser air; airflow restricted
(2) Air or non-condensable gas in system (i.e., exceptionally hot
condenser)
(3) Refrigerant overcharge (i.e., high subcooling, low superheat,
high suction pressure)
(4) Excessive system load
(5) Defective condenser fan or fan pressure control (i.e., 1 fan off,
high condenser pressure)
Recommended Action
Clean coil; Check fans and motors for proper function
Evacuate and recharge system
Recover excess refrigerant
Reduced load
Repair or replace switch
M. System Cannot Heating Mode (CGAR Model Only)
Probable Cause
(1) Broken or improper control wiring
(2) Defective four-way valve
Recommended Action
Check control wiring
Replace four-way valve
N. Suction Pressure Too Low - Heating Mode (CGAR Model Only)
Probable Cause
(1) Low refrigerant charge
(2) Too little or too cold evaporator air; airflow restricted
(3) Unit running below minimum operating ambient
(4) Expansion valve power assembly has lost charge
Recommended Action
Add refrigerant
Clean coil; Check fans and motors for proper function
Provide an ambient lockout switch
Repair or replace expansion valve power head assembly
O. Discharge Pressure Too High - Heating Mode (CGAR Model Only)
Probable Cause
(1) Low water flow
(2) Defective heating thermostat switch
Recommended Action
Check for clogged strainers and incorrect balancing valve settings
a. Verify that sense bulb is properly inserted bulbwell of
heat-exchanger
b. Replace heating thermostat switch
Page 31

31
CGA-SVX01A-EN
NOTE
Page 32

Literature Order Number
File Number
Supersedes
Stocking location
CGA-IOM-6
CGA-SVX01A-EN-0701
CGA-IOM-5
Taipei Taiwan
ISO 9002 Qualified factory - Trane Taiwan
FM38631
An American-Standard Company
Since The Trane Company has a policy of continuous product improvement, it reserves the right to change design and
specifications without notice.
North American Group
The Trane Company
3600 Pammel Creek Road
La Crosse, Wl 54601-7599
http : // www.trane.com
 Loading...