


User Manual
Temperature/RH Touch-Screen Monitor
with NIST-Traceable Calibration
Model 20250-40
THE STANDARD IN PRECISION MEASUREMENT
5 Commo
Woburn, MA 01801
Phone 781-665-1400
Toll Free 1-800-517-8431
nwealth Ave

Introduction
The Digi-Sense Temperature/RH Touch-Screen Monitor (Model 20250-40)
measures and logs temperature, relative humidity, and dew point readings in
real time and displays them in digital and graphic forms. Intuitive touch-screen
menu allows you to program data collection parameters and adjust the graphic
display for the best presentation of the data. Software is pre-installed so no
downloading is required; just turn the instrument on and it is ready to run.
The 8 GB of memory means you have nearly unlimited data collection capability
which is easily downloaded to a computer in CSV format for simple integration
with standard applications. The instrument is fully tested and calibrated to
NIST-traceable standards. Careful use of this unit will provide years of reliable
service.
Unpacking
Check individual parts against the list of items below. If anything is missing or
damaged, please contact your instrument supplier immediately.
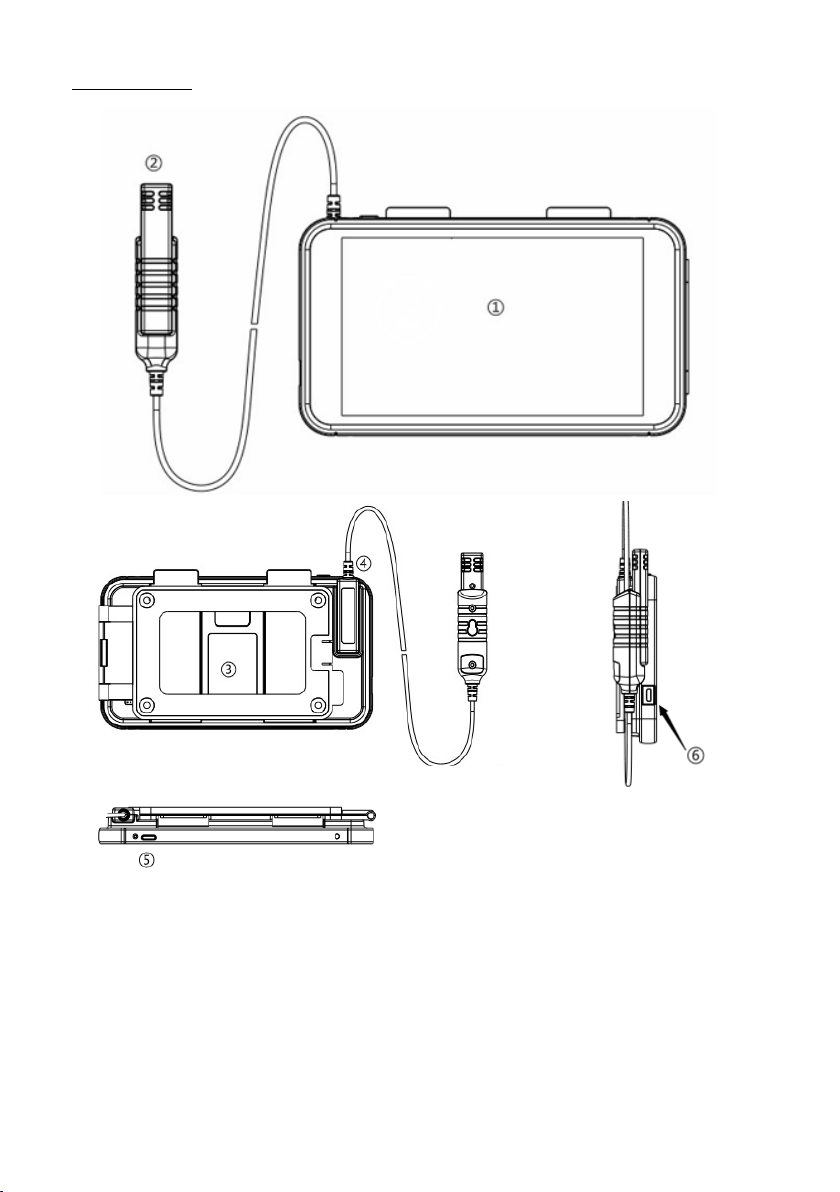
1. Touch-screen monitor tablet
2. Temperature/RH sensor
3. Sensor extension cable, 6-ft (1.8-m) long
4. Wall-mounting bracket
5. USB cable
6. Power supply
7. NIST-traceable calibration report with data
2
Description
1. Touch-screen monitor tablet
2. Temperature/RH sensor
3. Built-in desk stand and wall-mounting bracket
4. Slot for short probe and the probe of extension cord
5. On/Off button
6. USB interface for charging power and reviewing data via PC
3

Key Features
• Graphical and digital touch-screen display interface
• Multifunction content-rich interactive menu
• Large high-resolution color LCD, resolution 1024 x 600
• Touch-screen operation, zoom in/out curve
• User-adjustable high and low alarms, sampling rates, and data points
• Live and future recording options
• Selectable temperature units (°F/°C)
•
Max/Min readings
• Date and time setting
• Adjustable brightness and screen saver timing
• Export the recording data to computer
• Built-in desktop stand and wall-mounting bracket options
Applications
• Food processing
• Environmental monitoring
• Health care
• Storage and warehouse monitoring
• Ofce and workspace monitoring
4

Setup and Operation
Caution: The sensor or sensor extension cable should be connected to the
instrument before turning it on to prevent data corruption.
Main Interface
1. Memory progress bar: “Used” indicating used memory,
“Free” indicating memory remaining
2. System real time and date
3. Numerical scale of the temperature, humidity, and dew point
4. Date and time scale
5. Temperature, humidity, and dew point trend curves
6. “Live” showing real-time mode
7. Date and time of “Live” and “History” mode
8. Value of real-time temperature, humidity, and dew point
9. Max/Min settings
10. History mode selection
11. Live mode selection
12. Best Fit selection to provide the optimal view of the data curves
13. Menu selection
14. Parameter curve display on or off
15. Battery capacity
5
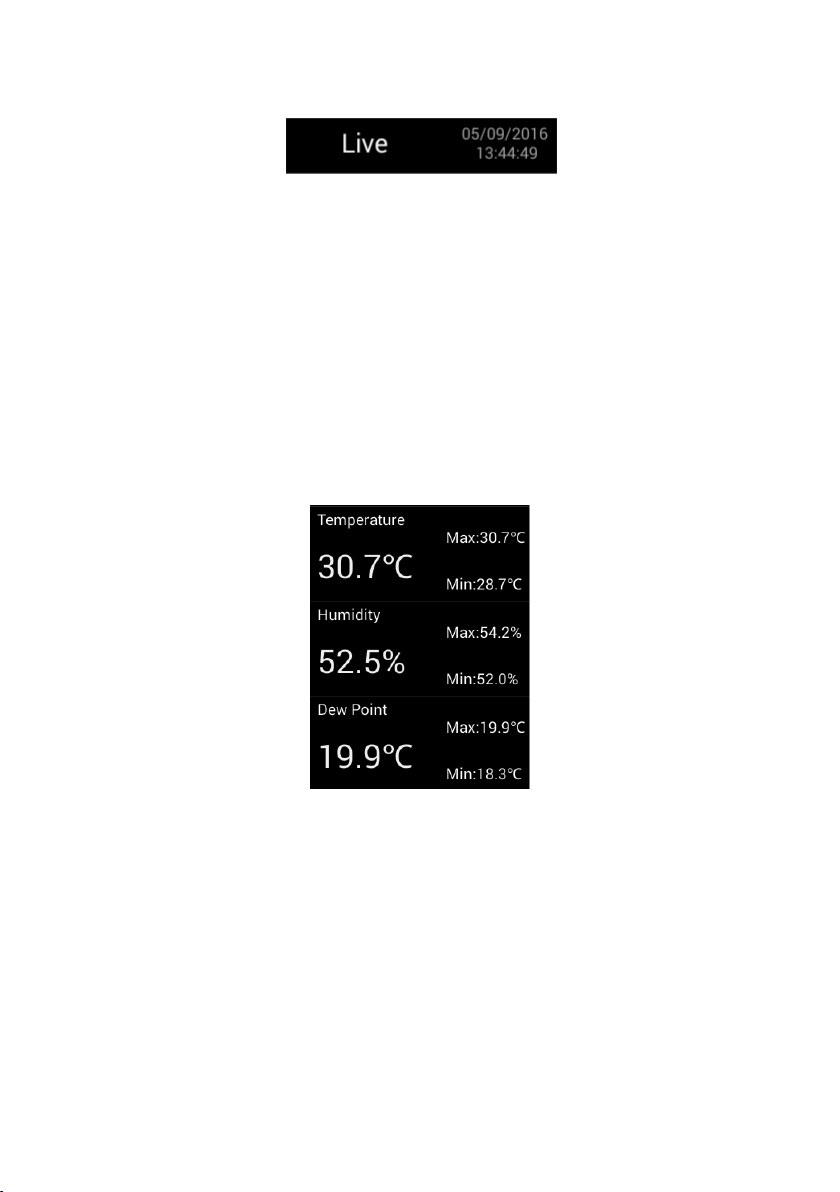
Live Mode
"Live" indicates that the instrument is in Live mode, default of starting up is
1.
Live Mode with sampling rate of one measurement per minute. There are three
modes: Live, Recording and History
.
Live: Default mode, the instrument will start to record according
to a sampling rate of 1 per minute.
Recording: Set by the user according to the sampling rate, time,
and data points.
History: Pulls up historical data recorded.
2. The right side indicates the current data and time of sampling points.
Digital Area
T
1.
emperature indicates the temperature value in Fahrenheit or Celsius.
2. Humidity indicates humidity value in % RH.
3. Dew Point indicates dew point value in Fahrenheit or Celsius.
4. Max/Min indicates the maximum or minimum value that has been recorded.
6

Curve Display Area
2. Green
1. Red
3. White
1. Red curve indicates “temperature” trend.
2. Green curve indicates “humidity” trend.
3. White curve indicates “dew point” trend.
Ordinate scale shows the value of temperature, humidity, and dew point.
4.
5. Abscissa scale shows the date and time.
6. Check or uncheck each box at the bottom of screen to show or hide the curve.
Main Interface Buttons
1.
History brings up saved data les when selected.
2. Live places the instrument in “Live” mode when selected.
Best Fit gives an optimal presentation of the trend curves when selected.
3.
4. Menu pulls up user-selectable parameters.
7

How to Review History Recorded Data
Click History button on main screen to pull up a menu of recorded les as
shown below:
1. Click Delete All to delete all historical les.
2. Click Cancel to return to the main menu.
3.
Clicking on a history le pulls up an Open/Delete option.
Selecting
shown below:
Open will open and display the recorder data in the le as
Once in the interface:
1. Click Best Fit to get the best view.
2.
Clicking Save
connected to a computer, you can open the CSV le).
3. Click Back to return to main interface.
8
will generate a CSV le (Note: When the instrument is

Menu
Clicking the Menu button on main screen brings up the menu below
which allows you to set various parameters.
General Setup: Allows you to set temperature units and temperature/humidity
alarm levels.
1. Temperature Unit: Switch between units (°F/°C).
2. Alarm: Check the box to set alarm values for temperature and humidity.
3. Click Save to save the settings.
4. Click Cancel to return to main screen.
9

Recording Setup: Allows you to set sampling rate, start time, and data points.
1. Sample Rate: Set sampling rate.
Star
2.
t Time: Set recording starting time (Note: The default time is the current
date and time in the system; a start time can be set into the future and the
instrument will be automatically start recording at the future date and time)
Max Data Points: Select the number of sample points from 500, 1000, 5000,
3.
10000, 20000, or MAX.
4. Click Save to save the setting parameters.
5. Click Cancel to return to main screen.
View Alarms: Lets you view recorded alarm values.
1. Sort by Date: View recorded alarms sorted by date.
2. Sort by Value: View recorded alarms sorted by temperature and humidity
alarm value.
10

Delete CSV
A CSV le is generated automatically when placed in Recording Mode.
It can be reviewed when connected to a computer.
1. Delete: Click on a selected le and that le will be deleted.
2. Delete All: Deletes all les.
3. Select Cancel to return to main screen.
Display: Allows you to adjust the brightness and screen saver “Sleep Mode”
timing.
Brightness: Drag the dot to adjust the screen brightness level.
1.
2. Sleep Mode: Use to set the screen saver timing at 30 minutes, 4 hours,
12 hours, or Never
.
11

Date & Time
1. Click on Set Date to set the current date.
2. Click Set Time to set the current time.
3. Click Cancel to return to main screen.
12

Info: Shows version information and upgrade software.
1. Version: Indicates the current software version.
2. Click on Update App to upload free future software updates over the life
of the product.
3. Click on
Done to return to main interface.
Note: Future software updates can be easily installed from your computer
as follows:
Connect the instrument to your computer via the USB cable provided.
1.
2. Copy the downloaded software le from your computer to the root directory
of the instrument.
3. Click Update App to activate the upgrade.
13
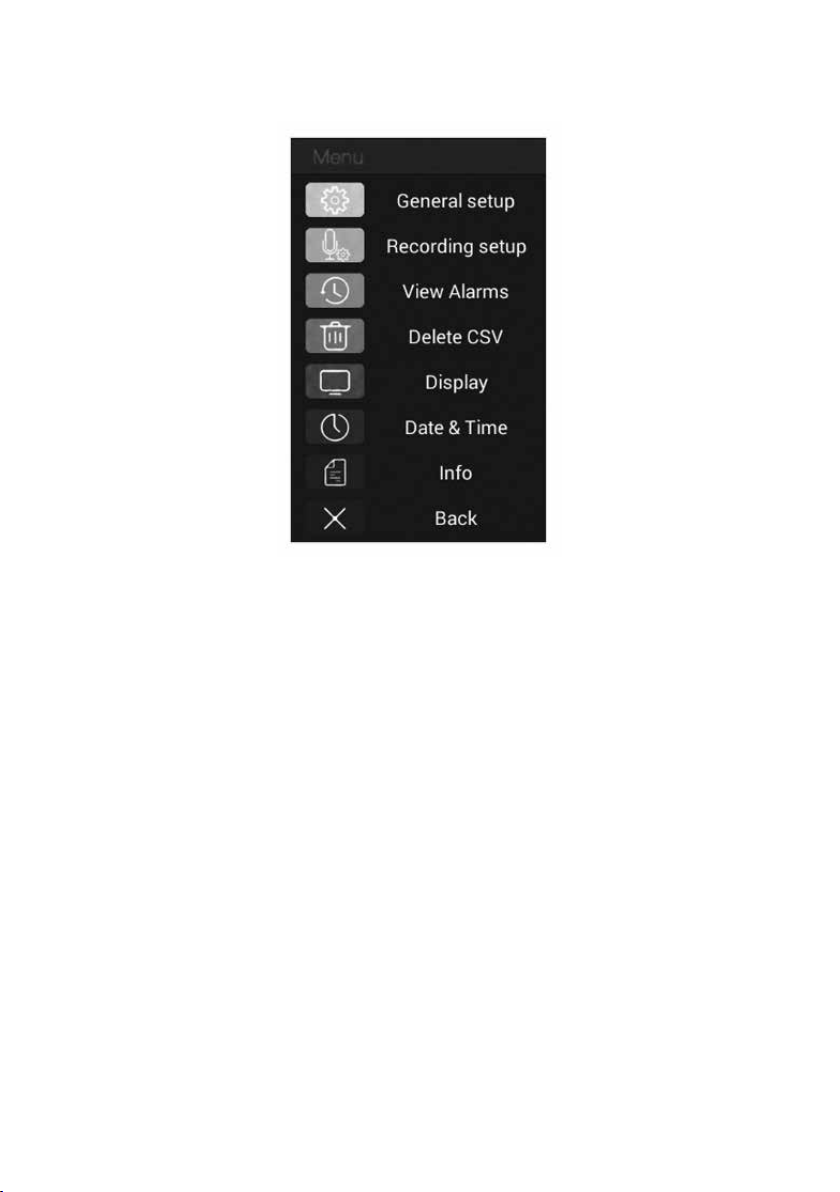
Back
1. Selecting Back returns you to the main screen.
14

Specifications
Humidity range 0 to 100% RH
Humidity accuracy ±1.5% RH
Temperature range 14 to 176°F (–10 to 80°C)
Temperature accuracy ±0.36°F (±0.2°C)
Dew point temperature range –4 to 176°F (–20 to 80°C)
Data points 500 to 20,000
Internal storage 8 GB
5
Dimensions (W x H x D) 7
Adapter 5 V 2 A AC adapter
Battery 2500 mAh lithium battery
⁄8" x 41⁄4" x 5⁄8" (19.4 x 10.8 x 1.6 cm)
15

Maintenance, Recalibration, and Repair
Cleaning and storage
•
The instrument should be cleaned with a damp cloth and mild detergent when
necessary
•
Store the instrument in an area with moderate temperature and humidity
It is recommended that Digi-Sense products are calibrated annually to ensure
proper function and accurate measurements; however, your quality system or
regulatory body may require more frequent calibrations. To schedule your
recalibration, please contact InnoCal, an ISO 17025
calibration laboratory accredited by A2LA.
. Do not use solvents or abrasives.
.
For Product and Ordering Information, Contact:
1065DGMAN_20250-40
Manual Part No. 00100-27
 Loading...