

Page 1

Quick Installation
Guide
TP-LINK TECHNOLOGIES CO., LTD.
Specifications are subject to change without notice. TP-LINK is a registered trademark of TP-LINK
TECHNOLOGIES CO., LTD. Other brands and product names are trademarks or registered trademarks
of their respective holders.
No part of the specifications may be reproduced in any form or by any means or used to make any
derivative such as translation, transformation, or adaptation without permission from TP-LINK
TECHNOLOGIES CO., LTD. Copyright © 2016 TP-LINK TECHNOLOGIES CO., LTD. All rights reserved.
www.tp-link.com
MADE IN CHINA
7106506080 REV1.0.0
• English
• Қазақша
• Slovenčina
• Azərbaycan dili
• Polski
• Srpski jezik
11ac DSL Modem Router
• Češna
• Русский язык
• Українська мова
Page 2

CONTENTS
1 / English
5 / Azərbaycan dili
9 / Čeština
13 / Қазақша
17 / Polski
21 / Русский язык
25 / Slovenčina
29 / Srpski jezik
33 / Українська мова
Page 3
English
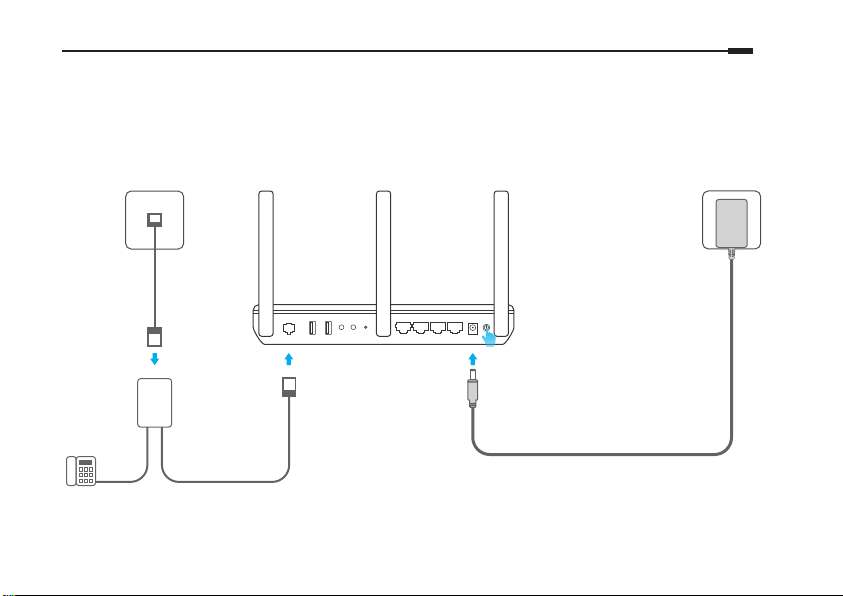
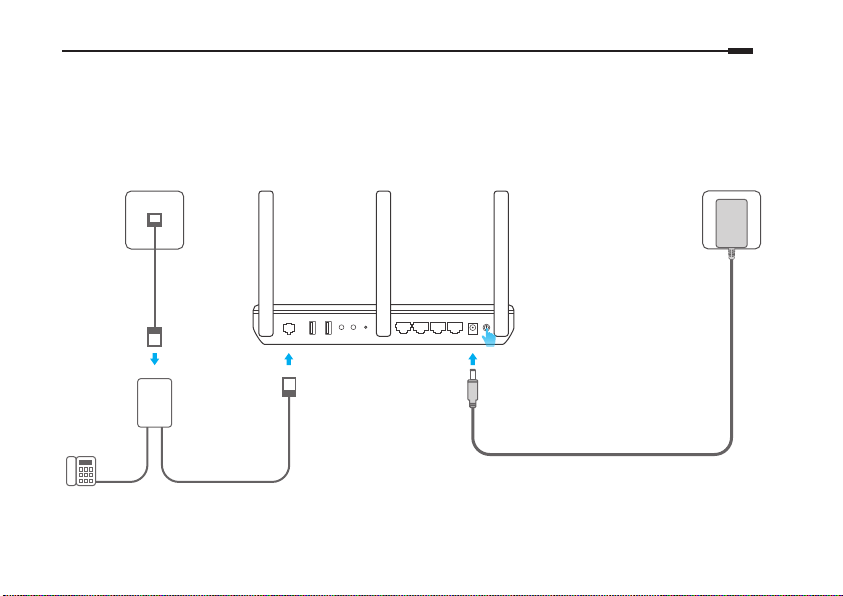
Connect the Hardware
If you don’t need the phone service, just directly connect the modem router to the phone jack with the provided
phone cable, then follow steps 3 and 4 to complete the hardware connection.
Phone Jack
Power Jack
Phone Cable
DSL USB1 USB2 LAN1 LAN2 LAN3 LAN4/WAN POWER POWER
WPS RESETWiFi
ON/OFF
1 2
LINE
PHONE
MODEM
DSL Splitter
Phone(Optional)
* Image may dier from actual product. Note: The DSL LED takes about 1 to 2 minutes to stabilize.
Phone Cable
Modem Router
ON/OFF
Turn on the modem router.
3
Verify that the Power and DSL LEDs are on and
4
stable before continuing with the conguration.
Power Adapter
1
Page 4
English
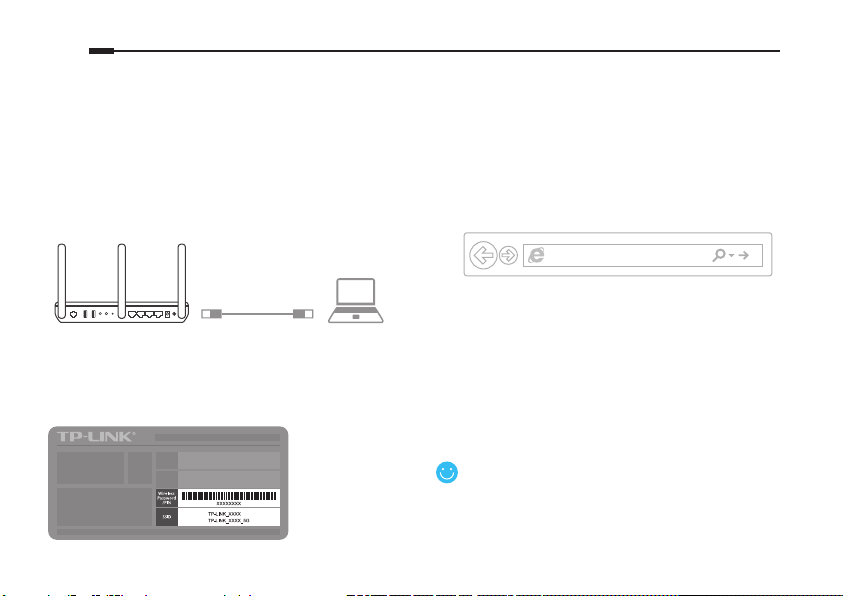
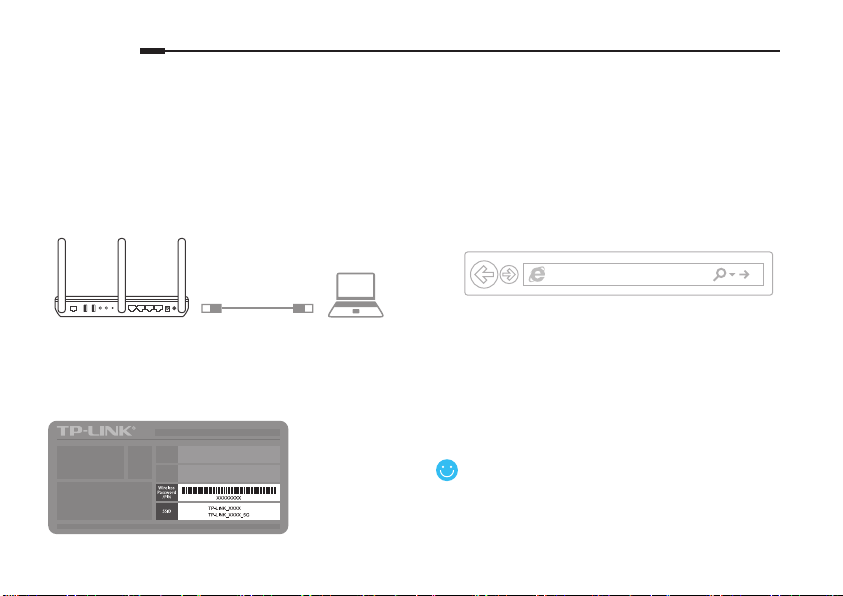
Congure via Web Browser
1 Connecting your computer to the modem router
via a wired or wireless connection
Wired
Connect your computer to the LAN (or 1/2/3/4) port
using an Ethernet cable.
2 Conguring the modem router via a web browser
A Launch a web browser and type in http://
tplinkmodem.net or 192.168.1.1. Create a new
password (1-15 characters) and click Save.
Note: If the login page does not appear, please refer to FAQ > Q1.
http://tplinkmodem.net
DSL USB1 USB2 LAN1 LAN2 LAN3 LAN4/WAN POWERPOWER
WPS RESETWiFi
ON/OFF
Ethernet Cable
ON/OFF
Wireless
Connect wirelessly by using the SSID (network
name) and Wireless Password printed on the
product label at the bottom of the modem router.
2
B Enter the password you set and click Log in.
Note: For subsequent logins, enter the password that you have
set to log in.
C Follow the step-by-step instructions of the Quick
Setup to complete the initial configuration.
Now you can enjoy your Internet.
For more advanced settings, refer to the User
Guide on TP-LINK ocial website at
www.tp-link.com.
Page 5

English
FAQ (Frequently Asked Questions)
Q1. What can I do if the login page does not appear?
A1. If the computer is set to a static or xed IP address, change it to obtain an IP address automatically from the modem router.
A2. Verify http://tplinkmodem.net is correctly entered in the web browser and press Enter.
A3. Use another web browser and try again.
A4. Reboot your modem router and try again.
A5. Disable and enable the active network adapter.
Q2. What can I do if the DSL LED does not turn solid on?
A1. Check your cables and make sure they are all plugged in correctly, including the telephone lines and power adapter.
A2. Restore your modem router to its factory default settings.
A3. Remove the DSL splitter, directly connect the modem router to the phone jack and then recongure the modem router by following the
instructions in this Quick Installation Guide.
A4. Contact your ISP to verify if the DSL line is in good status.
A5. If you have tried all the suggestions above and the problem still exists, contact our Technical Support.
Q3. What can I do if I cannot access the Internet?
A1. Make sure the telephone and Ethernet cables are plugged in correctly.
A2. Try to log into the web management page of the modem router using the default address at http://tplinkmodem.net. If you can, tr y the
following answers. If you cannot, change your computer to obtain an IP address automatically from the modem router.
A3. Consult your ISP and make sure all the VPI/VCI (or VLAN ID), Connection Type, account username and password are correct. If they are not,
replace them with the correct settings and try again.
A4. Restore the modem router to its factory default settings and recongure the modem router by following the instructions in this Quick
Installation Guide.
A5. Please contact our Technical Support if the problem still exists.
3
Page 6

English
Q4. What can I do if I forget my password?
• Web Management page password:
Restore the modem router to its factory default settings and then set a new password using 1-15 characters.
• Wireless Network password:
A1. The default Wireless Password/PIN is printed on the product label of the modem router.
A2. If the default wireless password has been changed, log into the modem router’s web management page and go to Basic > Wireless to
retrieve or reset your password.
Q5. How do I restore the modem router to its factory default settings?
A1. With the modem router powered on, press and hold down the reset button of the modem router until there is an obvious change of LEDs,
and then release the button.
A2. Log in Web Management page of the modem router, and go to Advanced > System Tools > Backup & Restore, click Factory Restore and
wait until the reset process is complete.
4
Page 7

Azərbaycan dili
Avadanlığı Qoş
Əgər sizə telefon xidmə lazım deyilsə, sadəcə olaraq modem yönləndiricisini verilən telefon kabeli ilə birbaşa
telefonun yuvasına qoşun, sonra avadanlıq qoşulmasını tamamlamaq üçün 3 və 4-cü addımları yerinə yerin.
Telefon Yuvası
Elektrik rozetkası
Telefon Kabeli
DSL USB1 USB2 LAN1 LAN2 LAN3 LAN4/WAN POWER POWER
WPS RESETWiFi
ON/OFF
1 2
LINE
PHONE
MODEM
DSL Bölüşdürücüsü
Telefon(İxyari)
* Təsvir real məhsuldan fərqli ola bilər. Qeyd: DSL LED -i stabilləşdirmək 1-2 dəqiqə çəkir.
Telefon Kabeli
Modem Yönləndiricisi
ON/OFF
Modem yönləndiricisini yandır.
3
Konqurasiyanı davam etdirməmişdən öncə
4
enerji və DSL LED-lərinin yanılı və stabil olubolmadığını yoxlayın.
Enerji adapteri
5
Page 8
Azərbaycan dili
Veb-Brauzer vasitəsilə konqurasiya edin
1 Simli və ya simsiz bağlan vasitəsilə kompüterinizin
modem yönləndiricisinə qoşulması
Simli
Ethernet kabelindən isfadə etməklə, kompüterinizi
LAN (və ya 1/2/3/4) portuna qoşun.
DSL USB1 USB2 LAN1 LAN2 LAN3 LAN4/WAN POWERPOWER
WPS RESETWiFi
ON/OFF
ON/OFF
Ethernet Kabeli
Simsiz
SSID (şəbəkənin adı) və modem yönləndiricisinin
aşağısında məhsulun ekendə çap olunmuş Simsiz
Şifrədən isfadə etməklə simsiz şəkildə qoşulun.
6
2 Veb-brauzer vasitəsilə modem yönləndiricisinin
konqurasiya olunması
A Veb-brauzeri işə salın və http://tplinkmodem.
net, yaxud 192.168.1.1 yazın. Yeni şifrə (1-15
simvol) yaradın və Save klikləyin.
Qeyd: Əgər giriş səhifəsi görünməzsə, FAQ > Q1-ə isnad edin.
B Təyin etdiyiniz şifrəni daxil edin və Log in klikləyin.
Qeyd: Sonrakı girişlər üçün daxil olmaq üçün təyin etdiyiniz şifrəni
daxil edin.
C İlkin konfiqurasiyanı tamamlamaq üçün Quick
Setup -da (Cəld Quraşdırma) verilən addım-addım
göstərişlərə əməl edin.
İndi internenizdən həzz ala bilərsiniz.
Daha təkmil parametrlər üçün TP-LINK -in rəsmi
veb-say olan www.tp-link.com səhifəsində
İsfadəçi Təlimana isnad edin.
http://tplinkmodem.net
Page 9

Azərbaycan dili
FAQ (Frequently Asked Quesons)
S1. Giriş səhifəsi görünmürsə, mən nə edə bilərəm?
C1. Əgər kompüter stak və ya sabit IP ünvanına təyin olunubsa, onu avtomak olaraq IP ünvanını modem yönləndiricisindən əldə etməyə
dəyişdirin.
C2. hp://tplinkmodem.net ünvanını veb-brauzerə düzgün daxil etdiyinizi yoxlayın və Enter basın.
C3. Başqa veb-brauzerdən isfadə edin və yenidən cəhd edin.
C4. Modem yönləndiricinizi yenidən yükləyin və yenidən cəhd edin.
C5. Akv şəbəkə adapterini qeyri-akv edin və akvləşdirin.
S2. DSL LED tam yanmadıqda nə edə bilərəm?
C1. Kabellərinizi yoxlayın və onların hamısının, o cümlədən telefon xətləri və enerji adapterinin düzgün qoşulduğuna əmin olun.
C2. Modem yönləndiricinizi standart zavod parametrlərinə bərpa edin.
C3. DSL Bölüşdürücüsünü çıxarın, modem yönləndiricisini birbaşa telefon yuvasına qoşun, sonra Cəld Quraşdırma Təlimanda verilən
göstərişlərə əməl etməklə, modem yönləndiricisini yenidən konqurasiya edin.
C4. DSL xənin yaxşı vəziyyətdə olduğunu yoxlamaq üçün ISP-nizlə əlaqə saxlayın.
C5. Əgər yuxarıdakı bütün təkliəri sınaqdan keçirdinizsə və problem hələ də davam edirsə, Texniki Dəstəyimizlə əlaqə saxlayın.
S3. İnternetə daxil ola bilmirəmsə, nə edə bilərəm?
C1. Telefon və Ethernet kabellərinizin düzgün qoşulduğuna əmin olun.
C2. hp://tplinkmodem.net veb-sayndakı standart ünvandan isfadə etməklə, modem yönləndiricisinin veb-idarəetmə səhifəsinə daxil
olmağa cəhd edin. Əgər bacarırsınızsa, aşağıdakı cavabları sınaqdan keçirin. Bacarmırsınızsa, kompüterinizi avtomak olaraq modem
yönləndiricisindən IP ünvanını əldə etməyə dəyişdirin.
C3. ISP-nizlə məsləhətləşin və bütün VPI/VCI (və ya VLAN idenkatoru), Bağlan Növü, hesab üzrə isfadəçi adı və şifrənin düzgün olduğuna
əmin olun. Əgər düzgün olmasalar, onları düzgün parametrlərlə əvəzləyərək yenidən cəhd edin.
C4. Modem yönləndiricisini standart zavod parametrlərinə bərpa edin və Cəld Quraşdırma Təlimanda verilən göstərişlərə əməl etməklə,
modem yönləndiricisini yenidən konqurasiya edin.
C5. Problem hələ də davam edərsə, Texniki Dəstəyimizlə əlaqə saxlayın.
7
Page 10

Azərbaycan dili
S4. Şifrəmi unutsam nə edə bilərəm?
• Veb İdarəetmə səhifəsinin parolu:
Modem yönləndiricisini standart zavod parametrlərinə bərpa edin, sonra 1-15 simvoldan isfadə etməklə, yeni şifrə təyin edin.
• Simsiz Şəbəkə şifrəsi:
C1. Standart Simsiz Şifrə/PIN modem yönləndiricisinin məhsul ekenin üzərinə çap olunur.
C2. Əgər standart simsiz şifrə dəyişdirilibsə, modem yönləndiricisinin veb-idarəetmə səhifəsinə daxil olun və şifrəni əldə etmək və ya sırlamaq
üçün Basic > Wireless seçiminə keçin.
S5. Modem yönləndiricisini standart zavod parametrlərinə necə bərpa edə bilərəm?
C1. Modem yönləndiricisini yandırın, LED-lərdə aşkar dəyişikliyi müşahidə etməyənə kimi modem yönləndiricisində reset düyməsinə basıb
saxlayın, sonra düyməni buraxın.
C2. Modem yönləndiricisinin Veb İdarəetmə səhifəsinə daxil olun və Advanced > System Tools > Backup & Restore seçiminə keçin, Factory
Restore klikləyin və sırlama prosesinin tamamlanmasını gözləyin.
8
Page 11
Připojte hardware
V případě, že nepotřebujete telefonní služby, připojte modem router přímo do telefonní zdířky přibaleným
telefonním kabelem. Poté pokračujte kroky 3 a 4 pro dokončení připojení hardwaru.
Telefonní zdířka
El. zásuvka
Čeština
Telefonní kabel
DSL USB1 USB2 LAN1 LAN2 LAN3 LAN4/WAN POWER POWER
WPS RESETWiFi
ON/OFF
1 2
LINE
PHONE
MODEM
DSL Splitter
Telefon (volitelný)
*Obrázek se může lišit od skutečného produktu. Poznámka: Trvá asi 1 až 2 minuty než se DSL LED ustálí.
Telefonní kabel
Modem router
ON/OFF
Zapněte modem router.
3
Ověřte, že LED “Zapnuto” a “DSL” trvale svítí a
4
poté pokračuje s kongurací.
Síťový adapter
9
Page 12

Čeština
Kongurace přes Webový prohlížeč
1 Připojení vašeho počítače k modem routeru
kabelem či bezdrátovým připojením
Připojení kabelem
Připojte svůj počítač do LAN (nebo 1/2/3/4) portu
použitím ethernetového kabelu.
2 Kongurace modem routeru přes webový
prohlížeč
A Spusťte webový prohlížeč a jděte na adresu
http://tplinkmodem.net nebo 192.168.1.1.
Vytvořte nové heslo (1-15 znaků) a klikněte na
Save.
Poznámka: V případě, že se přihlašovací stránka neobjeví,
prostudujte FAQ > Q1.
DSL USB1 USB2 LAN1 LAN2 LAN3 LAN4/WAN POWERPOWER
WPS RESETWiFi
ON/OFF
ON/OFF
Ethernetový kabel
Bezdrátové připojení
Připojte se bezdrátově použitím SSID (jméno sítě) a
hesla bezdrátového připojení, které jsou uvedeny na
štítku zespodu modem routeru.
10
http://tplinkmodem.net
B Vložte heslo, které jste nastavili, a klikněte na Log
in.
Poznámka: Při dalším přihlášení vložte heslo, které jste pro
přihlášení nastavili.
C Postupuje přesně podle pokynů Quick Setup pro
dokončení prvotní konfigurace.
Nyní si můžete užít váš internet.
Pro pokročilé nastavení si prostudujte Uživatelský
průvodce na ociálních stránkách TP-LINK
www.tp-link.com.
Page 13

Čeština
FAQ (často kladené otázky)
Q1. Co mám dělat, když se neobjeví přihlašovací stránka?
A1. V případ, že je počítač nastaven na stálou nebo xní IP adresu, změňte nastavení tak, abyste získali IP adresu z modem routeru automaticky.
A2. Ověřte, jestli je adresa http://tplinkmodem.net správně zadána ve webovém prohlížeči a stiskněte Enter.
A3. Použijte jiný webový prohlížeč a zkuste to znovu.
A4. Restartujte váš modem router a zkuste to znovu.
A5. Zakažte a povolte aktivní síťový adapter.
Q2. Co mám dělat v případě, že DSL LED nesvítí trvale?
A1. Zkontrolujte vaše kabely a ujistěte se, že jsou zapojeny správně, telefonní linky a síťový adapter nevyjímaje.
A2. Vraťte modem router do původního výrobního nastavení.
A3. Vyjměte DSL splitter, modem router zapojte přímo do telefonní zástrčky a poté překongurujte modem router podle instrukcí uvedených v
tomto Průvodci rychlou instalací.
A4. Kontaktujte vašeho poskytovatele internetu, jestli je DSL linka v pořádku.
A5. V případě, že jste vyzkoušeli všechny výše uvedená doporučení a problém přetrvává, kontaktujte naši technickou podporu.
Q3. Co mám dělat v případě, že se nemohu připojit k internetu?
A1. Ujistěte se, že jsou telefonní a ethernetové kabely zapojeny správně.
A2. Zkuste se přihlásit na stránku webové správy modem routeru použitím standardní adresy http://tplinkmodem.net. V případě, že je
to možné, zkuste následující odpovědi. V případě, že ne, změňte nastavení vašeho počítače tak, aby získal IP adresu z modem router
automaticky.
A3. Poraďte se s vaším poskytovatelem internetu a ujistěte se, že všechny VPI/VCI (nebo VLAN ID), druh připojení, uživatelské jméno k účtu a
heslo jsou správná. V případě, že nejsou, opravte nastavení a zkuste to znovu.
A4. Vraťte modem router do původního výrobního nastavení a překongurujte modem router podle pokynů v tomto Průvodci rychlou
instalací.
11
Page 14

Čeština
A5. Kontaktujte naši technickou podporu případě, že problém stále přetrvává.
Q4. Co mám dělat v případě, že zapomenu heslo?
• Heslo na stránku webové správy:
Vraťte modem router do původního výrobního nastavení a poté nastavte nové heslo použitím 1-15 znaků.
• Heslo bezdrátové sítě:
A1. Původní heslo bezdrátového připojení (PIN) je uvedeno výrobním štítku modem routeru.
A2. V případě, že původní heslo bylo změněno, přihlaste se na stránku webové správy modem routeru a jděte na Basic > Wireless pro
obnovení a resetování vašeho hesla.
Q5. Jak vrátím modem router do jeho původního výrobního nastavení?
A1. Při zapnutém modem routeru, stiskněte a držte tlačítko reset na modem routeru dokud se zřetelně nezmění rozsvícení LED kontrolek. Poté
tlačítko pusťte.
A2. Přihlaste se na stránku webové správy modem routeru a jděte na Advanced > System Tools > Backup & Restore, Factory Restore a čekejte
dokud se proces resetování nedokončí.
12
Page 15

Жабдықты қосыңыз
Егер сізде телефон аппарат жоқ болса, модем-роутерді телефон розеткасына қосыңыз, кейін 3 және 4
қадамға қосылуды аяқтауға барыңыз.
Телефон розеткасы
Қуат көзі
Қазақша
Телефон кабелі
1 2
LINE
PHONE
MODEM
DSL сплиттер
Телефон (Таңдалмалы)
*Жабдықтың түрі шынында
суреттегіден ерекше болуы мүмкін.
Телефон кабелі
DSL USB1 USB2 LAN1 LAN2 LAN3 LAN4/WAN POWER POWER
WPS RESETWiFi
ON/OFF
модем-роутер
Қуат адаптері
ON/OFF
Өзіңіздің модем-роутеріңізді
3
қосыңыз.
Жабдықты орнатуды жалғастырудың
4
алдында қуат қосылып және DSL индикаторы
жанып тұрғанына көз жеткізіңіз.
Ескертпе: DSL индикаторына тұрақтану үшін 1-2 минут
қаж ет.
13
Page 16

Қазақша
веб-браузер арқылы орнату
1 Сіздің компьютеріңізді модем-роутерге сыммен
немесе сымсыз қосылу арқылы жалғау
Сыммен жалғау
Компьютерді модем-роутердің LAN 1, LAN 2,
LAN 3 или LAN 4 портына Ethernet сымы арқылы
жалғаңыз.
2 Модем-роутерді веб-браузер арқылы
орнатыңыз
A Браузеріңіздің мекенжай жолына http://
tplinkmodem.net немесе http://192.168.1.1
енгізіңіз. Жаңа құпиясөз (1-15 рәзімдер)
құрыңыз және Save басыңыз.
Ескертпе: Егер кіру терезесі шықпаса, Жиі қойылатын
сұрақтарды қараңыз > В1.
DSL USB1 USB2 LAN1 LAN2 LAN3 LAN4/WAN POWERPOWER
WPS RESETWiFi
ON/OFF
Ethernet сымы
ON/OFF
Сымсыз тарату
Модем-роутердің төменгі панельде көрсетілген
әдепкі жүйенің аты мен құпиясөзді қолданыңыз.
14
http://tplinkmodem.net
B Сіз жасаған құпиясөзді енгізіңіз және Log in
басыңыз.
Ескертпе: Келесі рет кіру үшін сіз жасаған құпиясөзді енгізіңіз.
C Бастапқы орнатуды бітіру үшін Quick Setup
терезесінде қадам нұсқауларға еріңіз
Енді сіз ғаламторды қолдана аласыз.
Қосымша орнатуға қол жеткізу үшін
қолданушы нұсқауларына TP-LINK
www.tp-link.com ресми сайтына сүйеніңіз.
Page 17

Қазақша
Жиі қойылатын сұрақтар
В1. Егер де жабдыққа кіру терезесі ашылмаса не істеуге болады?
1. Егер сіздің компьютеріңіздің параметрлер орнатуларында статикалық IP-адрес көрсетілсе, компьютеріңізде орнатуды “IP-
мекенжайды автоматты түрде алуға” өзгертіңіз.
2. Мекенжай жолында hp://tplinkmodem.net дұрыс енгіздіңіз бе және Enter басқаныңызды тексеріңіз.
3. Басқа веб-браузерді қолданып көріңіз және қайтадан әрекет етіңіз.
4. Модем-роутерді қайта жүктеңіз және қайтадан әрекет етіңіз.
5. Желі адаптерін өшіріп, кайтадан қосыңыз.
В2. Егер DSL индикаторы жанбай жатса не істеуге болады?
1. Бүкіл сымдардың, соның ішінде телефон және куат сымы жөнді екенін тексеріңіз.
2. Модем-роутердің зауыттық орнатуларын қайтарыңыз.
3. DSL сплиттерді қосылу тәсімінен шығарыңыз. Осы жетекшілікте берілген нұсқауларға еріп, модем-роутерді тікелей телефон
розеткасына қосыңыз және қайтадан орнатыңыз.
4. Өзіңіздің интернет қызметтерін жеткізушімен байланысып, DSL желісі дұрыс екеніне көз жеткізіңіз.
5. Егер де бірде бір кеңес көмектеспесе, біздің техникалық қолдау қызметімен хабарласыңыз.
В3. Ғаламторға кіру мүмкіндігі жоқ болып кетсе не істеуге болады?
1. Телефон және Ethernet сымдары дұрыс қосылғанына көз жеткізіңіз.
2. Модем-роутерді басқару бетіне hp://tplinkmodem.net кіріп көріңіз. Егер кіре алсаңыз, келесі қадамдарды істеп көріңіз. Егер
кірмесе, сіздің компьютеріңізде “IP-мекенжайды автоматты түрде алуды” IP орнату параметрлерінде көрсетіңіз.
3. Өзіңіздің интернет қызметтерін жеткізушімен байланысыңыз және VPI/VCI, қосылу түрі, ғаламторға кіру үшін қолданушының аты
мен құпиясөзінің дұрыс енгізілгенін тексеріңіз.
4. Осы жетекшілікте берілген нұсқауларға еріп, модем-роутердің зауыттық орнатуларын қайтарыңыз және қайтадан орнатыңыз.
5. Егер мәселе шешілмесе, біздің техникалық қолдау қызметімен хабарласыңыз.
15
Page 18

Қазақша
В4. Егер мен құпиясөзді ұмытсам не істеуге болады?
• Веб басқарудың құпиясөзі:
Модем-роутердің зауыттық орнатуларын қайтарыңыз және жаңа құпиясөз (1-15 рәзімдер) құрыңыз .
• Сымсыз желінің құпиясөзі:
1. Әдепкі құпиясөз/PIN модем-роутердің төменгі панелінде фирмалық жапсырмада көрсетілген.
2. Егер сіз құпиясөзді өзгертсеңіз, құпиясөзді білу немесе қайта орнату үшін веб утилитаның орнатуына кіріңіз, менюде Basic > Wireless
таңдаңыз.
В5. Роутердің зауыттық орнатуларын қалай қайтаруға болады?
1. Роутердің қуатын өшірмей, модем-роутерде Reset батырмасын ұстап тұрыңыз және индикаторлардың өзгерісін күтіңіз, кейін
батырманы жіберіңіз.
2. Модем-роутердің веб утилита орнатуына кіріңіз, менюде Advanced > System Tools > Backup & Restore таңдаңыз, нажмите кнопку
Factory Restore батырмасын басыңыз және аяқталуын күтіңіз.
16
Page 19

Podłączanie sprzętu
Jeśli nie jesteś zainteresowany usługami telefonicznymi, połącz port ADSL routera z gniazdem telefonicznym za
pomocą przewodu telefonicznego i przejdź do kroku 3.
Gniazdo telefoniczne
Wejście zasilania
Polski
Kabel telefoniczny
1 2
LINE
PHONE
MODEM
Splitter
Telefon (Opcjonalnie)
* Urządzenie na rysunku może różnić się
od posiadanego.
Kabel telefoniczny
DSL USB1 USB2 LAN1 LAN2 LAN3 LAN4/WAN POWER POWER
WPS RESETWiFi
ON/OFF
Router
ON/OFF
Włącz router.
3
Sprawdź czy diody zasilania oraz DSL świecą
4
się, aby upewnić się, że urządzenie działa
prawidłowo.
Uwaga: Odczekaj 1-2 minuty na zapalenie się diody DSL.
Zasilacz
17
Page 20

Polski
Konguracja przez przeglądarkę
1 Podłącz swój komputer do routera za pomocą
przewodu lub bezprzewodowo
Za pomocą przewodu
Podłącz komputer do portu LAN (1/2/3/4) za
pomocą kabla Ethernet.
2 Skonguruj router przez przeglądarkę
A Wprowadź http://tplinkmodem.net lub
http://192.168.1.1 w pasek adresu. Utwórz nowe
hasło (1-15 znaków) i naciśnij przycisk Save
(Zapisz).
Uwaga: Jeśli okno logowania nie pojawi się, zastosuj się do sekcji
FAQ > Q1.
DSL USB1 USB2 LAN1 LAN2 LAN3 LAN4/WAN POWERPOWER
WPS RESETWiFi
ON/OFF
Kabel Ethernet
ON/OFF
Bezprzewodowo
Połącz się bezprzewodowo, wybierając z listy
domyślną nazwę sieci (SSID) oraz wprowadzając
hasło. Informacje te znajdują się na naklejce u spodu
routera/modemu.
18
http://tplinkmodem.net
B Wprowadź nowe hasło i naciśnij Log in (Zaloguj).
Uwaga: Przy następnych logowaniach wystarczy wpisać
ustawione hasło.
C Postępuj zgodnie z krokami Quick Setup
(Szybkiej konfiguracji), aby zakończyć proces.
Możesz teraz korzystać z Internetu.
Instrukcje konguracji zaawansowanych funkcji
routera znajdziesz w Instrukcji użytkownika
dostępnej na stronie www.tp-link.com.pl.
Page 21

Polski
FAQ (Często zadawane pytania)
Q1. Co mogę zrobić jeżeli nie pojawia się okno logowania?
A1. Jeżeli komputer ma ustawiony statyczny adres IP zmień ustawienia karty sieciowej na automatyczne uzyskiwanie adresu IP.
A2. Upewnij się, że adres http://tplinkmodem.net wprowadzony w pasek adresu jest prawidłowy i naciśnij klawisz Enter.
A3. Otwórz inną przeglądarkę internetową i spróbuj ponownie.
A4. Zrestartuj router i spróbuj ponownie.
A5. Wyłącz i włącz kartę sieciową komputera, a następnie spróbuj ponownie.
Q2. Co mogę zrobić jeżeli dioda DSL nie świeci się?
A1. Sprawdź czy wszystkie przewody podłączone są prawidłowo - przewód telefoniczny, przewód Ethernet i zasilacz.
A2. Przywróć ustawienia fabryczne routera.
A3. Podłącz router do gniazdka telefonicznego bezpośrednio (z pominięciem splittera) i skonguruj router ponownie.
A4. Skontaktuj się z dostawcą Internetu i upewnij się, że usługa działa poprawnie.
A5. Jeżeli problem nadal występuje, skontaktuj się ze wsparciem technicznym TP-LINK.
Q3. Co mogę zrobić jeżeli nie mam dostępu do Internetu?
A1. Sprawdź czy wszystkie przewody podłączone są prawidłowo - przewód telefoniczny, przewód Ethernet i zasilacz.
A2. Sprawdź czy możesz zalogować się na stronę konguracyjną routera. Domyślny adres to http://tplinkmodem.net. Jeżeli to możliwe,
przejdź do kolejnych kroków. (Jeżeli nie jest to możliwe, zmień ustawienia karty sieciowej na automatyczne uzyskiwanie adresu IP i spróbuj
ponownie.)
A3. Skontaktuj się ze swoim dostawcą usług internetowych, aby upewnić się, że VPI/VCI, typ połączenia, nazwa użytkownika i hasło są
prawidłowe. Jeżeli są błędne, wprowadź nowe ustawienia i spróbuj ponownie.
A4. Jeżeli nadal nie możesz uzyskać dostępu do Internetu, przywróć ustawienia fabryczne routera i ponownie skonguruj urządzenie, stosując
się do wskazówek zawartych w niniejszej instrukcji.
A5. Jeżeli problem nadal występuje, skontaktuj się z działem wsparcia technicznego.
19
Page 22

Polski
Q4. Co mogę zrobić jeżeli zapomniałem hasła?
• Hasło do strony konguracyjnej routera:
Przywróć ustawienia fabryczne routera, a następnie ustaw nowe hasło (o długości 1-15 znaków).
• Hasło sieci bezprzewodowej:
A1. Domyślne hasło do sieci bezprzewodowej znajduje się na naklejce u spodu routera.
A2. Jeżeli hasło było zmieniane, zaloguj się na stronę konguracyjną routera i przejdź do zakładki Basic > Wireless (Podstawowe > Sieć
bezprzewodowa), aby odczytać lub zmienić hasło.
Q5. Jak mogę przywrócić fabryczne ustawienia routera?
A1. Przy włączonym zasilaniu urządzenia przytrzymaj przycisk RESET z tyłu routera przez do momentu zaświecenia się diod.
A2. Zaloguj się na stronę konguracyjną routera, przejdź do zakładki Advanced > System Tools > Backup & Restore (Zaawansowane >
Narzędzia systemowe > Zapis i odczyt ustawień) i naciśnij przycisk Factory Restore, a następnie zaczekaj aż pasek postępu załaduje się.
20
Page 23

Русский язык
Подключите устройство
Если у Вас нет телефонного аппарата, подключите модем-маршрутизатор непосредственно в телефонную
розетку и перейдите к шагам 3 и 4 для завершения подключения.
Телефонная розетка
Разъём питания
Телефонный
кабель
1 2
LINE
PHONE
MODEM
DSL сплиттер
Телефон (Опционально)
* Изображение может отличаться от
фактического вида устройства.
Телефонный кабель
DSL USB1 USB2 LAN1 LAN2 LAN3 LAN4/WAN POWER POWER
WPS RESETWiFi
ON/OFF
Модем-маршрутизатор
ON/OFF
Включите ваш модем-
3
маршрутизатор.
Убедитесь, что питание включено и
4
индикаторы Питание и DSL горят, перед тем,
как продолжить настройку устройства.
Примечание: Индикатору DSL необходимо 1-2
минуты для стабилизации.
Адаптер питания
21
Page 24

Русский язык
Настройка через веб-браузер
1 Подключение вашего компьютера к
модему-маршрутизатору по проводной или
беспроводной связи
Проводное подключение
Подключите компьютер к любому порту LAN
модем-маршрутизатора с помощью кабеля
Ethernet.
2 Настройте модем-маршрутизатор через веб-
браузер
A Введите в адресной строке вашего браузера
http://tplinkmodem.net или http://192.168.1.1.
Создайте новый пароль (от 1-15 символов) и
нажмите Save.
Примечание: Если окно входа не появляется, смотрите раздел
Часто задаваемые вопросы > В1.
Кабель Ethernet
DSL USB1 USB2 LAN1 LAN2 LAN3 LAN4/WAN POWERPOWER
WPS RESETWiFi
ON/OFF
ON/OFF
Беспроводное вещание
Используйте имя сети (SSID) и пароль по
умолчанию, которые указаны на нижней панели
модем-маршрутизатора.
22
http://tplinkmodem.net
B Введите созданный вами пароль и нажмите
Log in.
Примечание: Для последующих входов введите созданный
вами пароль.
C Следуйте пошаговым инструкциям в окне Quick
Setup для завершения начальной настройки.
Для доступа к дополнительным настройкам,
обратитесь к Руководству пользователя на
официальном сайте TP-LINK www.tp-link.com.
Page 25

Русский язык
Часто задаваемые вопросы
В1. Что делать, если окно входа в устройство не появляется?
1. Если в настройках параметров вашего компьютера указан статический IP-адрес, измените настройку на вашем компьютере “Получить
IP-адрес автоматически”.
2. Проверьте, правильно ли вы ввели в адресной строке http://tplinkmodem.net и нажали Enter.
3. Попробуйте использовать другой веб-браузер и повторите попытку.
4. Перезагрузите модем-маршрутизатор и повторите попытку.
5. Отключите сетевой адаптер, а затем снова включите его.
В2. Что делать если индикатор DSL не горит?
1. Проверьте корректность подключения всех кабелей, в том числе телефонных кабелей и кабеля питания.
2. Восстановите заводские настройки модем-маршрутизатора.
3. Исключите DSL сплиттер из схемы подключения. Подключите модем-маршрутизатор непосредственно в телефонную розетку и
настройте заново, следуя инструкциям в данном руководстве.
4. Свяжитесь с вашим поставщиком Интернет-услуг и убедитесь, что DSL линия в порядке.
5. Если ни один из советов не помог, свяжитесь с нашей службой Технической поддержки.
В3. Что делать если у меня пропал доступ в Интернет?
1. Убедитесь, что телефонные и Ethernet кабели подключены правильно.
2. Попробуйте зайти на страницу управления модем-маршрутизатором http://tplinkmodem.net. Если вы сможете зайти, попробуйте
выполнить следующие шаги. Если нет, укажите в настройках параметров IP на вашем компьютере “Получить IP-адрес автоматически”.
3. Свяжитесь с вашим поставщиком Интернет-услуг и проверьте правильность введенных VPI/VCI, типа подключения, имени
пользователя и пароля для доступа к Интернет. Если что-либо неверно, введите их заново и повторите попытку.
4. Сбросьте модем-маршрутизатор до настроек по умолчанию и настройте заново, следуя инструкциям в данном руководстве.
5. Если проблема не решена, свяжитесь с нашей службой Технической поддержки.
23
Page 26

Русский язык
В4. Что делать, если я забыл пароль?
• Пароль для веб управления:
Сбросьте модем-маршрутизатор до настроек по умолчанию и создайте новый пароль (от 1-15 символов).
• Пароль беспроводной сети:
1. Пароль/PIN по умолчанию указан на нижней панели модем-маршрутизатора на фирменной наклейке.
2. Если вы изменили пароль, войдите в веб-утилиту настройки, выберите в меню Basic > Wireless, чтобы узнать или сбросить пароль.
В5. Как восстановить заводские настройки маршрутизатора?
1. Не отключая питания маршрутизатора, зажмите кнопку Reset на модем-маршрутизаторе и дождитесь изменения состояния
индикаторов, затем отпустите кнопку.
2. Войдите в веб-утилиту настройки модем-маршрутизатора, выберите в меню Advanced > System Tools > Backup & Restore, нажмите
кнопку Factory Restore и дождитесь завершения.
24
Page 27

Slovenčina
Zapojte hardvér
Ak nepotrebujete telefónne služby, jednoducho zapojte modemový router priamo do telefónneho konektora
pomocou poskytnutého telefónneho kábla, potom postupujte podľa krokov 3 a 4 pre dokončenie pripojenia
hardvéru.
Telefónna zásuvka
Napájací konektor
Telefónny kábel
1 2
LINE
PHONE
MODEM
DSL Splitter
Telefón (voliteľné)
* Obrázok sa môže oproti aktuálnemu výrobku líšiť.
Telefónny kábel
DSL USB1 USB2 LAN1 LAN2 LAN3 LAN4/WAN POWER POWER
WPS RESETWiFi
ON/OFF
Modemový router
Sieťový adaptér
ON/OFF
Zapnite modemový router.
3
Skontrolujte, či LED kontrolky Napájanie a DSL
4
svietia stabilne predtým, ako budete pokračovať
s konguráciou.
Poznámka: LED kontrolke DSL trvá približne 1 až 2 minúty,
kým sa stabilizuje.
25
Page 28

Slovenčina
Kongurácia cez webový prehliadač
1 Pripojenie vášho počítača k smerovaču môže byť
káblové alebo bezdrôtové
Káblové pripojenie
Pomocou ethernetového kábla pripojte svoj počítač
k portu LAN (alebo 1/2/3/4).
2 Kongurácia modemového routera cez webový
prehliadač
A Spustite webový prehliadač a vpíšte http://
tplinkmodem.net alebo 192.168.1.1. Vytvorte
nové heslo (1-15 znakov) a kliknite na Save
(Uložiť).
Note (Poznámka): Ak sa prihlasovacia stránka nezobrazí, pozrite si
Často kladené otázky -> Otázka č. 1.
DSL USB1 USB2 LAN1 LAN2 LAN3 LAN4/WAN POWERPOWER
WPS RESETWiFi
ON/OFF
ON/OFF
Ethernetový kábel
Bezdrôtové pripojenie
Pripojte sa bezdrôtovo pomocou predvoleného
názvu siete (SSID) a hesla, ktoré sú vytlačené na
produktovom štítku na spodnej časti modemového
routera.
26
http://tplinkmodem.net
B Zadajte heslo, ktoré ste vytvorili a kliknite na Log
in (Prihlásiť sa).
Poznámka: Pri následných prihláseniach je potrebné zadať už len
heslo, ktoré ste nastavili pre prihlásenie.
C Postupujte podľa inštrukcií krok za krokom pre
Quick Setup (Rýchle nastavenie) a dokončite
počiatočnú konfiguráciu.
Teraz môžete používať Internet.
Ak chcete informácie pre pokročilejšie nastavenia,
pozrite si Používateľskú príručku na ociálnej
webovej stránke TP-LINK na adrese
www.tp-link.com.
Page 29

Slovenčina
Často kladené otázky
Otázka č. 1. Čo mám robiť, ak sa nezobrazí prihlasovacia stránka?
Odpoveď č. 1. Ak je počítač nastavený na statickú alebo pevnú IP adresu, zmeňte ju na získavanie IP adresy automaticky z modemového
Odpoveď č. 2. Overte, či je http://tplinkmodem.net správne zadané do webového prehliadača a stlačte Enter.
Odpoveď č. 3. Použite iný webový prehliadač a skúste znova.
Odpoveď č. 4. Reštartujte váš modemový router a skúste znova.
Odpoveď č. 5. Deaktivujte a aktivujte aktívny sieťový adaptér.
Otázka č. 2: Čo mám robiť, ak LED kontrolka DSL nesvieti trvale?
Odpoveď č. 1. Skontrolujte káblové pripojenia a ubezpečte sa, či sú zapojené správne, vrátane telefónnych liniek a napájacieho adaptéra.
Odpoveď č. 2. Obnovte predvolené výrobné nastavenia modemového routera.
Odpoveď č. 3. Odstráňte DSL splitter, modemový router pripojte priamo do telefónneho konektora a potom opäť nakongurujte modemový
Odpoveď č. 4. Kontaktujte svojho poskytovateľa internetových služieb, aby overil, či je DSL linka v dobrom stave.
Odpoveď č. 5. Ak ste vyskúšali všetky odporúčania uvedené vyššie a problém pretrváva, kontaktujte oddelenie pre technickú podporu.
Otázka č. 3. Čo mám robiť, ak nemám prístup na internet?
Odpoveď č. 1. Ubezpečte sa, či sú telefónne a ethernetové káble pripojené správne.
Odpoveď č. 2. Skúste sa prihlásiť na webovej stránke pre správu smerovača pomocou predvolenej adresy na http://tplinkmodem.net. Ak sa
Odpoveď č. 3. Konzultujte so svojím poskytovateľom internetových služieb a ubezpečte sa, či sú všetky údaje VPI/VCI (alebo VLAN ID), typ
routera.
router pomocou inštrukcií z tohto sprievodcu rýchlou inštaláciou.
vám to podarí, vyskúšajte nasledovné odpovede. Ak sa vám to nepodarí, zmeňte nastavenie svojho počítača tak, aby sa IP adresa
získavala automaticky z modemového routera.
pripojenia, používateľské meno k účtu a heslo, správne. Ak nie sú správne, nahraďte ich správnymi nastaveniami a skúste to
znova.
27
Page 30

Slovenčina
Odpoveď č. 4. Obnovte nastavenia modemového routera na továrenské predvolené hodnoty a opäť nakongurujte modemový router
Odpoveď č. 5. Kontaktujte, prosím, oddelenie pre technickú podporu, ak problém stále pretrváva.
pomocou inštrukcií z tohto sprievodcu rýchlou inštaláciou.
Otázka č. 4. Čo mám robiť, keď zabudnem moje heslo?
• Heslo na webovú stránku pre správu:
Nastavenia modemového routera obnovte na továrenské predvolené hodnoty a potom nastavte nové heslo s použitím 1-15 znakov.
• Heslo pre bezdrôtovú sieť:
Odpoveď č. 1. Predvolené heslo pre bezdrôtovú sieť/PIN je vytlačené na produktovom štítku, ktorý sa nachádza na modemovom routeri.
Odpoveď č. 2. Ak bolo predvolené heslo pre bezdrôtovú sieť zmenené, prihláste sa na webovú stránku pre správu modemového routera a
prejdite na Basic (Základné) > Wireless (Bezdrôtové), kde opäť získate alebo resetujte svoje heslo.
Otázka č. 5. Ako obnovím predvolené nastavenia modemového routera od výroby?
Odpoveď č. 1. Keď je modemový router zapnutý, stlačte a podržte tlačidlo reset na smerovači, kým LED kontrolky nezačnú blikať inak, ako
Odpoveď č. 2. Prihláste sa na webovú stránku pre správu modemového routera a prejdite na Advanced (Pokročilé) > System Tools (Systémové
28
obvykle, a potom tlačidlo uvoľnite.
nástroje) > Backup & Restore (Zálohovanie a obnovenie), kliknite na Factory Restore (Obnoviť na továrenské nastavenia) a
čakajte, kým sa proces resetovania nedokončí.
Page 31

Povežite opremu
Ako Vam nije potrebna telefonska linija, povežite direktno modem ruter sa telefonskom utičnicom pomoću
telefonskog kabla, a zatim pratite korake 3 i 4 da biste završili povezivanje opreme.
Telefonska utičnica
Strujna utičnica
Srpski jezik
Telefonski kabl
1 2
LINE
PHONE
MODEM
DSL račva
Telefon (opciono)
* Slika može biti različita od stvarnog proizvoda.
Telefonski kabl
DSL USB1 USB2 LAN1 LAN2 LAN3 LAN4/WAN POWER POWER
WPS RESETWiFi
ON/OFF
Modem ruter
Strujni adapter
ON/OFF
Uključite modem ruter.
3
Proverite da li su Power i DSL LED-ovi uključeni i
4
svetle pre nego što pristupite podešavanju.
Napomena: DSL LED-u je potrebno 1 do 2 minuta da
počne neprekidno da svetli.
29
Page 32

Srpski jezik
Podešavanje pomoću pretraživača
1 Povezivanje Vašeg računara na modem ruter
žičnim ili bežičnim putem
Žično
Povežite Vaš računar na LAN (ili 1/2/3/4) port
pomoću mrežnog kabla.
DSL USB1 USB2 LAN1 LAN2 LAN3 LAN4/WAN POWERPOWER
WPS RESETWiFi
ON/OFF
ON/OFF
Mrežni kabl
Bežično
Povežite bežično koristeći SSID (ime mreže) i šifru
bežične mreže odštampanu na nalepnici na poleđini
modem rutera.
30
2 Podešavanje modem rutera preko pretraživača
A Pokrenite pretraživač i ukucajte http://
tplinkmodem.net ili 192.168.1.1. Ukucajte novu
lozinku (1 do 15 simbola) i kliknite Save.
Napomena: Ako se pristupna stranica ne pojavi, pogledajte u
FAQ > P1.
B Unesite lozinku koju ste postavili i kliknite Log in.
Napomena: Pri narednim pristupima unesite lozinku koju ste sami
postavili da biste pristupili.
C Pratite korak-po-korak uputstvo u Quick Setup da
biste završili početna podešavanja.
Sada možete da uživate u vašem internetu.
Za naprednija podešavanja pogledajte Korisničko
uputstvo na TP-LINK zvaničnom sajtu
www.tp-link.com.
http://tplinkmodem.net
Page 33

Srpski jezik
FAQ (Često postavljana pitanja)
P1. Šta da uradim ako se ne pojavi pristupna stranica?
O1. Ako je računar podešen na statičku ili ksnu IP adresu, promenite da dobija IP adresu automatski od modem rutera.
O2. Proverite da li je http://tplinkmodem.net tačno ukucano u pretraživaču i pritisnite Enter.
O3. Pokušajte ponovo pomoću drugog pretraživača.
O4. Restratujte Vaš modem ruter i pokušajte ponovo.
O5. Isključite, pa uključite mrežnu kartu na računaru.
P2. Šta da uradim ako DSL LED ne počne neprekidno da svetli?
O1. Proverite kablove i uverite se da su svi ispravno priključeni, uključujući i telefonsku liniju i strujni adapter.
O2. Vratite Vaš modem ruter na fabrička podešavanja.
O3. Uklonite DSL račvu, direktno povežite modem ruter na telefonsku utičnicu i zatim ponovo podesite modem ruter prateći korake iz Kratkog
uputstva za podešavanje.
O4. Pozovite Vašeg internet provajdera da proveri ispravnost DSL linije.
O5. Ako ste pokušali sve gore navedeno i problem i dalje postoji, pozovite našu Tehničku podršku.
P3. Šta da uradim ako ne mogu da pristupim internetu?
O1. Proverite da li su telefonski i mrežni kabl ispravno priključeni.
O2. Pokušajte da pristupite stranici za podešavanje modem rutera koristeći podrazumevanu adresu http://tplinkmodem.net. Ako možete,
isprobajte neki od narednih odgovora. Ako ne možete, promenite podešavanja tako da računar dobija IP adresu automatski od modem
rutera.
O3. Pozovite Vašeg internet provajdera i proverite da li su VPI/VCI (ili VLAN ID), vrsta veze, korisničko ime i lozinka ispravni. Ako nisu, ispravite ih i
pokušajte ponovo.
O4. Vratite modem ruter na fabrička podešavanja i ponovo ga podesite prateći korake iz Kratkog uputstva za podešavanje.
O5. Ako problem i dalje postoji, obratite se našoj Tehničkoj podršci.
31
Page 34

Srpski jezik
P4. Šta da uradim ako sam zaboravio lozinku?
• Lozinka za podešavanje uređaja u pretraživaču:
Vratite modem ruter na fabrička podešavanja, a zatim podesite novu lozinku koristeći 1 do 15 simbola.
• Lozinka bežične mreže:
O1. Podrazumevana lozinka/PIN su odštampani na nalepnici modem rutera.
O2. Ako je podrazumevana lozinka promenjena, ulogujte se na stranicu za podešavanje modem rutera i idite na Basic > Wireless da biste
pogledali ili izmenili lozinku.
P5. Kako vraćam modem ruter na fabrička podešavanja?
O1. Kada je modem ruter uključen, pritisnite i držite reset dugme sve dok LED-ovi ne promene način treperenja, a potom pustite dugme.
O2. Ulogujte se na stranicu za podešavanje modem rutera i idite na Advanced > System Tools > Backup & Restore, kliknite na Factory
Restore i sačekajte dok se procedura reseta ne završi.
32
Page 35

Українська мова
Підключіть обладнання
Якщо Вам не потрібна телефонна служба, просто під’єднайте модем-маршрутизатор до телефонної розетки
за допомогою телефонного кабелю у комплекті, потім виконайте кроки 3 та 4 для завершення процесу
підключення обладнання.
Телефонна
розетка
Роз’єм живлення
Телефонний
кабель
1 2
LINE
PHONE
MODEM
Спліттер DSL
Телефон
(Не обов’язково)
* Зображення може відрізнятися від
фактичного вигляду продукції.
Телефонний кабель
DSL USB1 USB2 LAN1 LAN2 LAN3 LAN4/WAN POWER POWER
WPS RESETWiFi
ON/OFF
Модем-маршрутизатор
ON/OFF
Увімкніть модем-маршрутизатор
3
Переконайтеся, що світлодіодні індикатори
4
живлення та DSL увімкнені та постійно
працюють перед тим, як продовжити
подальше налаштування.
Примітка: світлодіодний індикатор DSL стабілізується
на протязі 1-2хв.
Адаптер живлення
33
Page 36

Українська мова
Налаштування через Веб-браузер
1 Підключіть Ваш комп’ютер до модема-
маршрутизатора через дротове чи бездротове
з’єднання
Дротове з’єднання
Під’єднайте Ваш комп’ютер до порту LAN (або 1/2/3/4) за
допомогою кабелю Ethernet.
2 Налаштування модема-маршрутизатора через
веб-браузер
A Запустіть веб-браузер та введіть в адресну
строку http://tplinkmodem.net або 192.168.1.1.
Створіть новий пароль (від 1 до 15 символів) та
натисніть Save.
Примітка: Якщо сторінка авторизації не з’являється, зверніться
до FAQ > Q1.
DSL USB1 USB2 LAN1 LAN2 LAN3 LAN4/WAN POWERPOWER
WPS RESETWiFi
ON/OFF
Кабель Ethernet
ON/OFF
Бездротове з’єднання
Під’єднайте без використання дротів за допомогою
ідентифікатора SSID (ім’я мережі) та Паролю до
Бездротової мережі, які надруковано на етикетці
продукту, на нижній панелі модема-маршрутизатора.
34
http://tplinkmodem.net
B Введіть встановлений Вами пароль та натисніть
Log in.
Примітка: Для подальших спроб входу в систему введіть
пароль, який Ви встановили під час процедури реєстрації.
C Крок за кроком дотримуйтесь інструкцій зі
Quick Setup для завершення процедури
початкової конфігурації.
Тепер Ви можете користуватися Інтернетом.
Для більш розширених налаштувань зверніться
до Керівництва Користувача на офіційному вебсайті компанії TP-LINK www.tp-link.com.
Page 37

Українська мова
FAQ (Найбільш розповсюдженні питання)
Q1. Що робити, якщо не з’являється сторінка авторизації?
A1. Якщо на комп’ютері встановлена статична IP-адреса, змініть її, щоб отримати IP-адресу від модема-маршрутизатора автоматично.
A2. Перевірте правильність введеної у веб-браузер адреси http://tplinkmodem.net та натисніть Enter.
A3. Використайте інший веб-браузер та спробуйте знову.
A4. Перезавантажте Ваш модем-маршрутизатор та спробуйте знову.
A5. Відключіть та підключіть повторно активний адаптер мережі.
Q2. Що робити, якщо світлодіодний індикатор DSL не горить постійно?
A1. Перевірте Ваші кабелі та переконайтеся, що всі вони підключені правильно, включаючи телефонні лінії та адаптер живлення.
A2. Відновіть налаштування Вашого модема-маршрутизатора до його заводських налаштувань за замовчуванням.
A3. Видаліть спліттер DSL, під’єднайте безпосередньо модем-маршрутизатор до телефонної розетки, а потім налаштуйте повторно
модем-маршрутизатор, дотримуючись інструкцій, які наведені у цьому Керівництві зі Швидкої Установки.
A4. Зверніться до Вашого Інтернет-провайдера, щоб переконатись, що лінія DSL знаходиться у хорошому стані.
A5. Якщо Ви спробували усі вищевказані поради, а проблема залишилась не вирішеною, зверніться до нашої служби Технічної
Підтримки.
Q3. Що робити, якщо відсутній доступ до Інтернету?
A1. Переконайтеся у правильності підключення телефонного та Ethernet-кабелів.
A2. Спробуйте увійти на веб-сторінку керування модема-маршрутизатора, використовуючи адресу за замовчуванням http://
tplinkmodem.net. Якщо у Вас вийшло увійти, спробуйте наступні поради. Якщо ні, спробуйте використати інший комп’ютер, щоб
отримати IP-адресу від модема-маршрутизатора автоматично.
A3. Зверніться до Вашого Інтернет-провайдера та переконайтеся, що усі VPI/VCI (або VLAN ID), Тип З’єднання, ім’я користувача та пароль
в обліковому записі правильні. Якщо ні, замініть їх на правильні та спробуйте знову.
A4. Відновіть налаштування Вашого модема-маршрутизатора до його заводських налаштувань за замовчуванням та налаштуйте
35
Page 38

Українська мова
повторно модем-маршрутизатор у відповідності до інструкції у цьому Керівництві зі Швидкої Установки.
A5. Будь ласка, зверніться до нашої служби Технічної Підтримки, якщо проблему не вирішено.
Q4. Що робити, якщо забули власний пароль?
• Пароль до веб-сторінки керування:
Відновіть налаштування Вашого модема-маршрутизатора до його заводських налаштувань, а потім встановіть новий пароль від 1 до 15
символів.
• Пароль до Бездротової Мережі:
A1. Пароль/PIN-код до Бездротової Мережі за замовчуванням надрукований на товарній етикетці модема-маршрутизатора.
A2. Якщо пароль за замовчуванням було змінено, виконайте вхід на веб-сторінку керування модема-маршрутизатора та перейдіть на
вкладку Basic > Wireless, щоб відновити або скинути пароль.
Q5. Як відновити налаштування модема-маршрутизатора до його заводських налаштувань за замовчуванням?
A1. В той час, коли модем-маршрутизатор увімкнений, натисніть та утримуйте кнопку reset модема-маршрутизатора, поки світлодіодні
індикатори не почнуть світитися, після чого відпустіть кнопку.
A2. Виконайте вхід на веб-сторінку керування модема-маршрутизатора та перейдіть на вкладку Advanced > System Tools > Backup &
Restore, натисніть Factory Restore та зачекайте поки не завершиться процес скидання.
36
 Loading...