

Page 1

User Guide
AC4000 MU-MIMO Tri-Band Wi-Fi Router
Archer C4000
REV2.0.0 1910012258
Page 2

Contents
About This Guide . . . . . . . . . . . . . . . . . . . . . . . . . . . . . . . . . . . . . . . . . . . . . . . . . . . . .1
Chapter 1. Get to Know About Your Router . . . . . . . . . . . . . . . . . . . . . . . . . . . 2
1. 1. Product Overview. . . . . . . . . . . . . . . . . . . . . . . . . . . . . . . . . . . . . . . . . . . . . . . . . . . . . . . . . . . . 3
1. 2. Appearance . . . . . . . . . . . . . . . . . . . . . . . . . . . . . . . . . . . . . . . . . . . . . . . . . . . . . . . . . . . . . . . . . 3
1. 2. 1. The Back Panel. . . . . . . . . . . . . . . . . . . . . . . . . . . . . . . . . . . . . . . . . . . . . . . . . . . . . . . . 3
1. 2. 2. The Front Panel . . . . . . . . . . . . . . . . . . . . . . . . . . . . . . . . . . . . . . . . . . . . . . . . . . . . . . . 4
Chapter 2. Connect the Hardware . . . . . . . . . . . . . . . . . . . . . . . . . . . . . . . . . . . .6
2. 1. Position Your Router . . . . . . . . . . . . . . . . . . . . . . . . . . . . . . . . . . . . . . . . . . . . . . . . . . . . . . . . . 7
2. 2. Connect Your Router. . . . . . . . . . . . . . . . . . . . . . . . . . . . . . . . . . . . . . . . . . . . . . . . . . . . . . . . . 7
Chapter 3. Log In to Your Router. . . . . . . . . . . . . . . . . . . . . . . . . . . . . . . . . . . . 10
Chapter 4. Set Up Internet Connection . . . . . . . . . . . . . . . . . . . . . . . . . . . . . 12
4. 1. Use Quick Setup Wizard . . . . . . . . . . . . . . . . . . . . . . . . . . . . . . . . . . . . . . . . . . . . . . . . . . . . 13
4. 2. Quick Setup via Bluetooth with TP-Link Tether App . . . . . . . . . . . . . . . . . . . . . . . . . . 13
4. 3. Manually Set Up Your Internet Connection . . . . . . . . . . . . . . . . . . . . . . . . . . . . . . . . . . 14
4. 4. Set Up the Router as an Access Point . . . . . . . . . . . . . . . . . . . . . . . . . . . . . . . . . . . . . . . 18
4. 5. Set Up an IPv6 Internet Connection . . . . . . . . . . . . . . . . . . . . . . . . . . . . . . . . . . . . . . . . . 20
4. 6. Set Up WAN Aggregation . . . . . . . . . . . . . . . . . . . . . . . . . . . . . . . . . . . . . . . . . . . . . . . . . . . 23
Chapter 5. TP-Link Cloud Service . . . . . . . . . . . . . . . . . . . . . . . . . . . . . . . . . . 25
5. 1. Register a TP-Link ID. . . . . . . . . . . . . . . . . . . . . . . . . . . . . . . . . . . . . . . . . . . . . . . . . . . . . . . . 26
5. 2. Change Your TP-Link ID Information. . . . . . . . . . . . . . . . . . . . . . . . . . . . . . . . . . . . . . . . . 26
5. 3. Manage the User TP-Link IDs . . . . . . . . . . . . . . . . . . . . . . . . . . . . . . . . . . . . . . . . . . . . . . . 27
5. 3. 1. Add TP-Link ID to Manage the Router. . . . . . . . . . . . . . . . . . . . . . . . . . . . . . . . . 28
5. 3. 2. Remove TP-Link ID(s) from Managing the Router . . . . . . . . . . . . . . . . . . . . . . 28
5. 4. Manage the Router via the TP-Link Tether App . . . . . . . . . . . . . . . . . . . . . . . . . . . . . . 29
Chapter 6. Guest Network. . . . . . . . . . . . . . . . . . . . . . . . . . . . . . . . . . . . . . . . . . 30
6. 1. Create a Network for Guests . . . . . . . . . . . . . . . . . . . . . . . . . . . . . . . . . . . . . . . . . . . . . . . 31
6. 2. Set Portal Authentication . . . . . . . . . . . . . . . . . . . . . . . . . . . . . . . . . . . . . . . . . . . . . . . . . . . 31
6. 3. Customize Guest Network Options. . . . . . . . . . . . . . . . . . . . . . . . . . . . . . . . . . . . . . . . . . 32
Page 3

Chapter 7. USB Settings. . . . . . . . . . . . . . . . . . . . . . . . . . . . . . . . . . . . . . . . . . . . 34
7. 1. Access the USB Storage Device . . . . . . . . . . . . . . . . . . . . . . . . . . . . . . . . . . . . . . . . . . . . 35
7. 1. 1. Access the USB Device Locally. . . . . . . . . . . . . . . . . . . . . . . . . . . . . . . . . . . . . . . 35
7. 1. 2. Access the USB Device Remotely . . . . . . . . . . . . . . . . . . . . . . . . . . . . . . . . . . . . 36
7. 1. 3. Customize the Access Settings. . . . . . . . . . . . . . . . . . . . . . . . . . . . . . . . . . . . . . . 38
7. 2. Media Sharing . . . . . . . . . . . . . . . . . . . . . . . . . . . . . . . . . . . . . . . . . . . . . . . . . . . . . . . . . . . . . . 40
7. 3. Printer Sharing. . . . . . . . . . . . . . . . . . . . . . . . . . . . . . . . . . . . . . . . . . . . . . . . . . . . . . . . . . . . . . 41
7. 4. Time Machine . . . . . . . . . . . . . . . . . . . . . . . . . . . . . . . . . . . . . . . . . . . . . . . . . . . . . . . . . . . . . . 45
Chapter 8. HomeCare – Parental Controls, QoS, Antivirus. . . . . . . . . . . 46
8. 1. Parental Controls . . . . . . . . . . . . . . . . . . . . . . . . . . . . . . . . . . . . . . . . . . . . . . . . . . . . . . . . . . . 47
8. 1. 1. Scenario 1: Setting Up Access Restrictions. . . . . . . . . . . . . . . . . . . . . . . . . . . 47
8. 1. 2. Scenario 2: Monitoring Internet Usage. . . . . . . . . . . . . . . . . . . . . . . . . . . . . . . . 49
8. 2. QoS . . . . . . . . . . . . . . . . . . . . . . . . . . . . . . . . . . . . . . . . . . . . . . . . . . . . . . . . . . . . . . . . . . . . . . . . 50
8. 3. Antivirus. . . . . . . . . . . . . . . . . . . . . . . . . . . . . . . . . . . . . . . . . . . . . . . . . . . . . . . . . . . . . . . . . . . . 51
Chapter 9. Network Security . . . . . . . . . . . . . . . . . . . . . . . . . . . . . . . . . . . . . . . 53
9. 1. Protect the Network from Cyber Attacks . . . . . . . . . . . . . . . . . . . . . . . . . . . . . . . . . . . . 54
9. 2. Access Control . . . . . . . . . . . . . . . . . . . . . . . . . . . . . . . . . . . . . . . . . . . . . . . . . . . . . . . . . . . . . 54
9. 3. IP & MAC Binding . . . . . . . . . . . . . . . . . . . . . . . . . . . . . . . . . . . . . . . . . . . . . . . . . . . . . . . . . . . 56
Chapter 10. NAT Forwarding. . . . . . . . . . . . . . . . . . . . . . . . . . . . . . . . . . . . . . . . . 57
10. 1. Share Local Resources on the Internet by Virtual Servers. . . . . . . . . . . . . . . . . . . . 58
10. 2. Open Ports Dynamically by Port Triggering. . . . . . . . . . . . . . . . . . . . . . . . . . . . . . . . . . 59
10. 3. Make Applications Free from Port Restriction by DMZ . . . . . . . . . . . . . . . . . . . . . . . 60
10. 4. Make Xbox Online Games Run Smoothly by UPnP . . . . . . . . . . . . . . . . . . . . . . . . . . . 61
Chapter 11. VPN Server . . . . . . . . . . . . . . . . . . . . . . . . . . . . . . . . . . . . . . . . . . . . . 63
11. 1. Use OpenVPN to Access Your Home Network. . . . . . . . . . . . . . . . . . . . . . . . . . . . . . . 64
11. 2. Use PPTP VPN to Access Your Home Network . . . . . . . . . . . . . . . . . . . . . . . . . . . . . . 65
Chapter 12. Customize Your Network Settings. . . . . . . . . . . . . . . . . . . . . . . 71
12. 1. Change the LAN Settings . . . . . . . . . . . . . . . . . . . . . . . . . . . . . . . . . . . . . . . . . . . . . . . . . . . 72
12. 2. Set Up Link Aggregation . . . . . . . . . . . . . . . . . . . . . . . . . . . . . . . . . . . . . . . . . . . . . . . . . . . . 72
12. 3. Configure to Support IPTV Service. . . . . . . . . . . . . . . . . . . . . . . . . . . . . . . . . . . . . . . . . . 73
12. 4. Specify DHCP Server Settings . . . . . . . . . . . . . . . . . . . . . . . . . . . . . . . . . . . . . . . . . . . . . . 74
12. 5. Set Up a Dynamic DNS Service Account . . . . . . . . . . . . . . . . . . . . . . . . . . . . . . . . . . . . 75
12. 6. Create Static Routes. . . . . . . . . . . . . . . . . . . . . . . . . . . . . . . . . . . . . . . . . . . . . . . . . . . . . . . . 77
12. 7. Specify Wireless Settings. . . . . . . . . . . . . . . . . . . . . . . . . . . . . . . . . . . . . . . . . . . . . . . . . . . 79
Page 4

12. 8. Use WPS for Wireless Connection . . . . . . . . . . . . . . . . . . . . . . . . . . . . . . . . . . . . . . . . . . 81
12. 8. 1. Push the WPS Button . . . . . . . . . . . . . . . . . . . . . . . . . . . . . . . . . . . . . . . . . . . . . . . 81
12. 8. 2. Connect via the Router’s PIN . . . . . . . . . . . . . . . . . . . . . . . . . . . . . . . . . . . . . . . . 81
12. 8. 3. Connect via the Client’s PIN . . . . . . . . . . . . . . . . . . . . . . . . . . . . . . . . . . . . . . . . . 82
12. 9. Schedule Your Wireless Function . . . . . . . . . . . . . . . . . . . . . . . . . . . . . . . . . . . . . . . . . . . 82
Chapter 13. Manage the Router . . . . . . . . . . . . . . . . . . . . . . . . . . . . . . . . . . . . . 84
13. 1. Set Up System Time . . . . . . . . . . . . . . . . . . . . . . . . . . . . . . . . . . . . . . . . . . . . . . . . . . . . . . . . 85
13. 2. Control the LED. . . . . . . . . . . . . . . . . . . . . . . . . . . . . . . . . . . . . . . . . . . . . . . . . . . . . . . . . . . . . 87
13. 3. Test the Network Connectivity . . . . . . . . . . . . . . . . . . . . . . . . . . . . . . . . . . . . . . . . . . . . . . 87
13. 4. Test Your Internet Speed. . . . . . . . . . . . . . . . . . . . . . . . . . . . . . . . . . . . . . . . . . . . . . . . . . . . 89
13. 5. Upgrade the Firmware . . . . . . . . . . . . . . . . . . . . . . . . . . . . . . . . . . . . . . . . . . . . . . . . . . . . . . 90
13. 5. 1. Online Upgrade . . . . . . . . . . . . . . . . . . . . . . . . . . . . . . . . . . . . . . . . . . . . . . . . . . . . . 90
13. 5. 2. Manual Upgrade . . . . . . . . . . . . . . . . . . . . . . . . . . . . . . . . . . . . . . . . . . . . . . . . . . . . 91
13. 6. Backup and Restore Configuration Settings . . . . . . . . . . . . . . . . . . . . . . . . . . . . . . . . . 91
13. 7. Set the Router to Reboot Regularly. . . . . . . . . . . . . . . . . . . . . . . . . . . . . . . . . . . . . . . . . . 93
13. 8. Change the Login Password . . . . . . . . . . . . . . . . . . . . . . . . . . . . . . . . . . . . . . . . . . . . . . . . 93
13. 9. Password Recovery. . . . . . . . . . . . . . . . . . . . . . . . . . . . . . . . . . . . . . . . . . . . . . . . . . . . . . . . . 94
13. 10. Local Management . . . . . . . . . . . . . . . . . . . . . . . . . . . . . . . . . . . . . . . . . . . . . . . . . . . . . . . . . 95
13. 11. Remote Management. . . . . . . . . . . . . . . . . . . . . . . . . . . . . . . . . . . . . . . . . . . . . . . . . . . . . . . 96
13. 12. System Log. . . . . . . . . . . . . . . . . . . . . . . . . . . . . . . . . . . . . . . . . . . . . . . . . . . . . . . . . . . . . . . . . 97
13. 13. Monitor the Internet Traffic Statistics. . . . . . . . . . . . . . . . . . . . . . . . . . . . . . . . . . . . . . . . 99
FAQ. . . . . . . . . . . . . . . . . . . . . . . . . . . . . . . . . . . . . . . . . . . . . . . . . . . . . . . . . . . . . . . . 101
Page 5
About This Guide
This guide is a complement of Quick Installation Guide. The Quick Installation Guide
instructs you on quick internet setup, and this guide provides details of each function
and shows you the way to configure these functions appropriate to your needs.
When using this guide, please notice that features of the router may vary slightly
depending on the model and software version you have, and on your location, language,
and internet service provider. All screenshots, images, parameters and descriptions
documented in this guide are used for demonstration only.
Conventions
In this guide the following conventions are used:
Convention Description
Underlined
Teal
>
Note:
Tips:
symbols on the web
page
Underlined words or phrases are hyperlinks. You can click to redirect to a
website or a specific section.
Contents to be emphasized and texts on the web page are in teal, including the
menus, items, buttons, etc.
The menu structures to show the path to load the corresponding page.
For example, Advanced > Wireless > MAC Filtering means the MAC Filtering
function page is under the Wireless menu that is located in the Advanced tab.
Ignoring this type of note might result in a malfunction or damage to the device.
Indicates important information that helps you make better use of your device.
click to edit the corresponding entry.
•
click to delete the corresponding entry.
•
click to enable or disable the corresponding entry.
•
click to view more information about items on the page.
•
More Info
The latest software, management app and utility can be found at Download Center at
http://www.tp-link.com/support.
The Quick Installation Guide can be found where you find this guide or inside the
package of the router.
Specifications can be found on the product page at http://www.tp-link.com.
A Technical Support Forum is provided for you to discuss our products at
http://forum.tp-link.com.
Our Technical Support contact information can be found at the Contact Technical
Support page at http://www.tp-link.com/support.
1
Page 6

Chapter 1
Get to Know About Your Router
This chapter introduces what the router can do and shows its appearance.
It chapter contains the following sections:
• Product Overview
• Appearance
Page 7
Chapter 1
Get to Know About Your Router
1. 1. Product Overview
The TP-Link router is designed to fully meet the need of Small Office/Home Office
(SOHO) networks and users demanding higher networking performance. The powerful
antennas ensure continuous Wi-Fi signal to all your devices while boosting widespread
coverage throughout your home, and the built-in Ethernet ports supply high-speed
connection to your wired devices.
Moreover, it is simple and convenient to set up and use the TP-Link router due to its
intuitive web interface and the powerful Tether app.
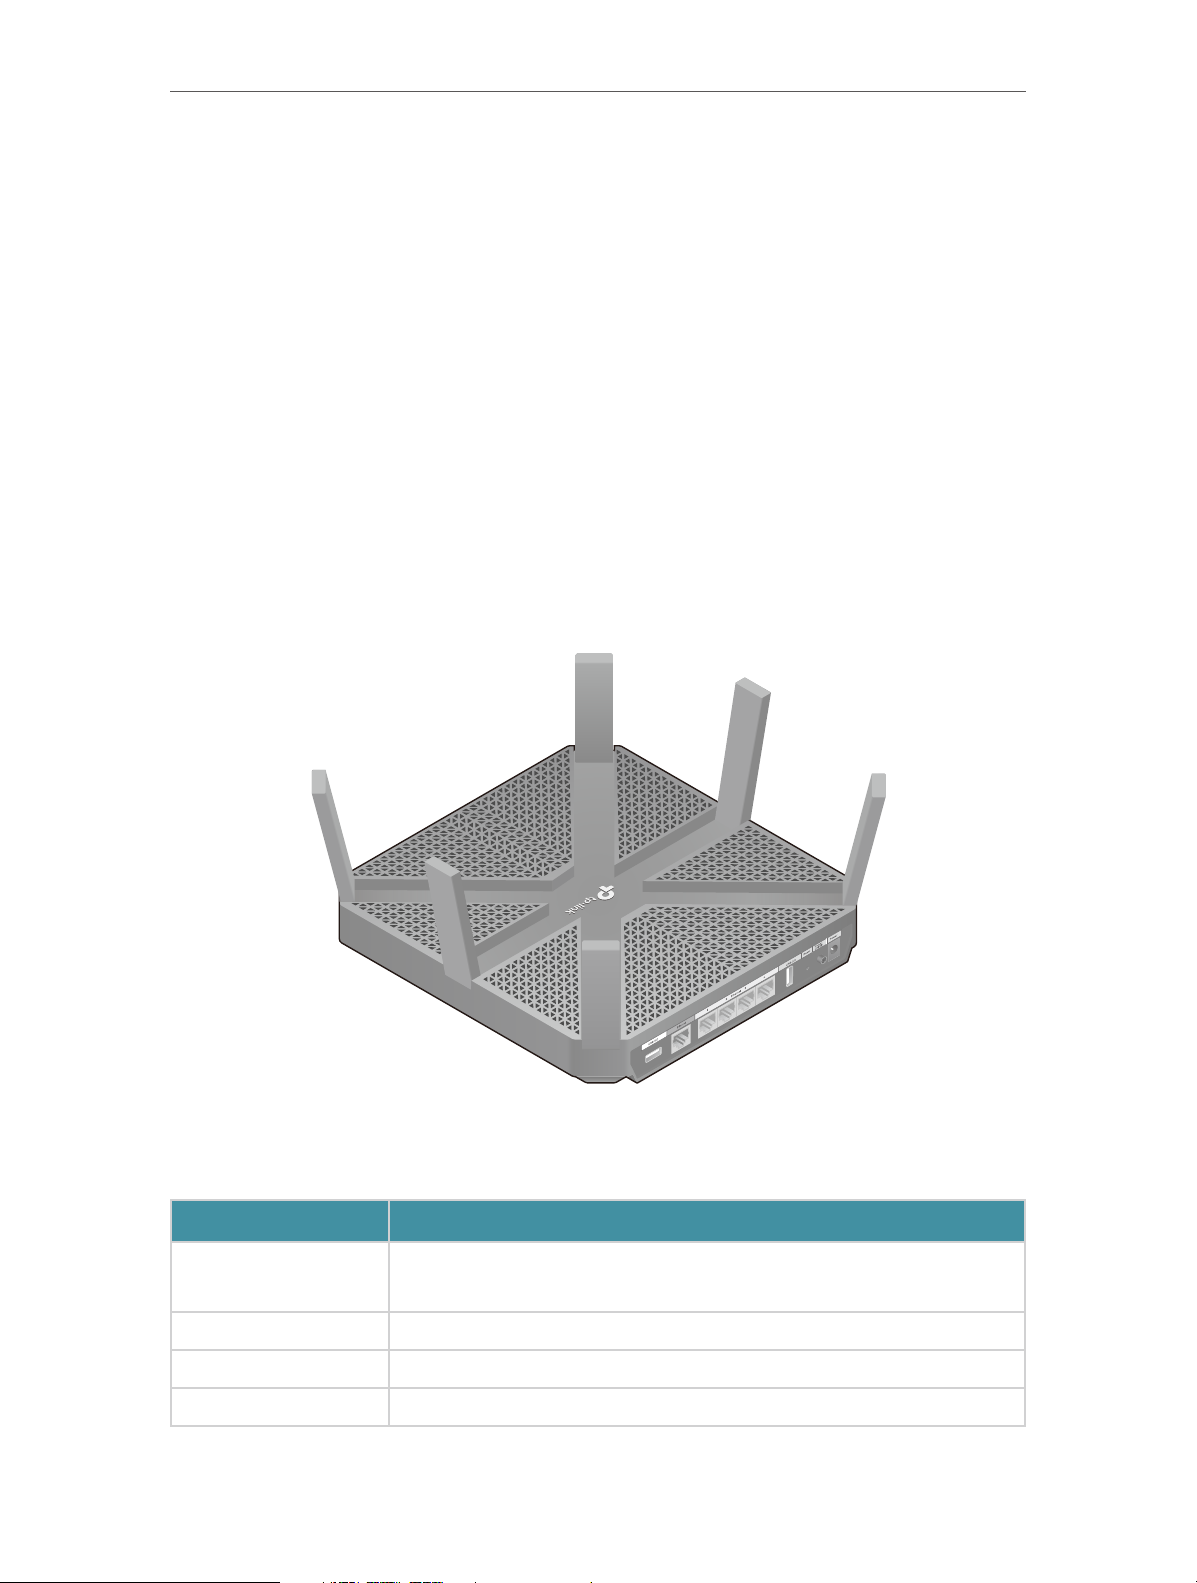
1. 2. Appearance
1. 2. 1. The Back Panel
The router’s ports (view from left to right) are located on the rear panel.
Item Description
USB 3.0 Port
Internet Port For connecting to a DSL/Cable modem, or an Ethernet jack.
Ethernet Ports (1/2/3/4) For connecting your PC or other wired devices to the router.
USB 2.0 Port For connecting to a USB 2.0 device or a USB 2.0 printer.
For connecting to a USB 3.0 device or a USB 3.0 printer. It is also compatible
with USB 2.0 devices.
3
Page 8

Chapter 1
Item Description
Get to Know About Your Router
Reset Button
Power On/Off Button Press this button for 1 second to power on or off the router.
Power Port For connecting the router to power socket via the provided power adapter.
Antennas
Press this button for more than 5 seconds to reset the router to its factory
default settings.
Used for wireless operation and data transmit. Upright them for the best WiFi performance.
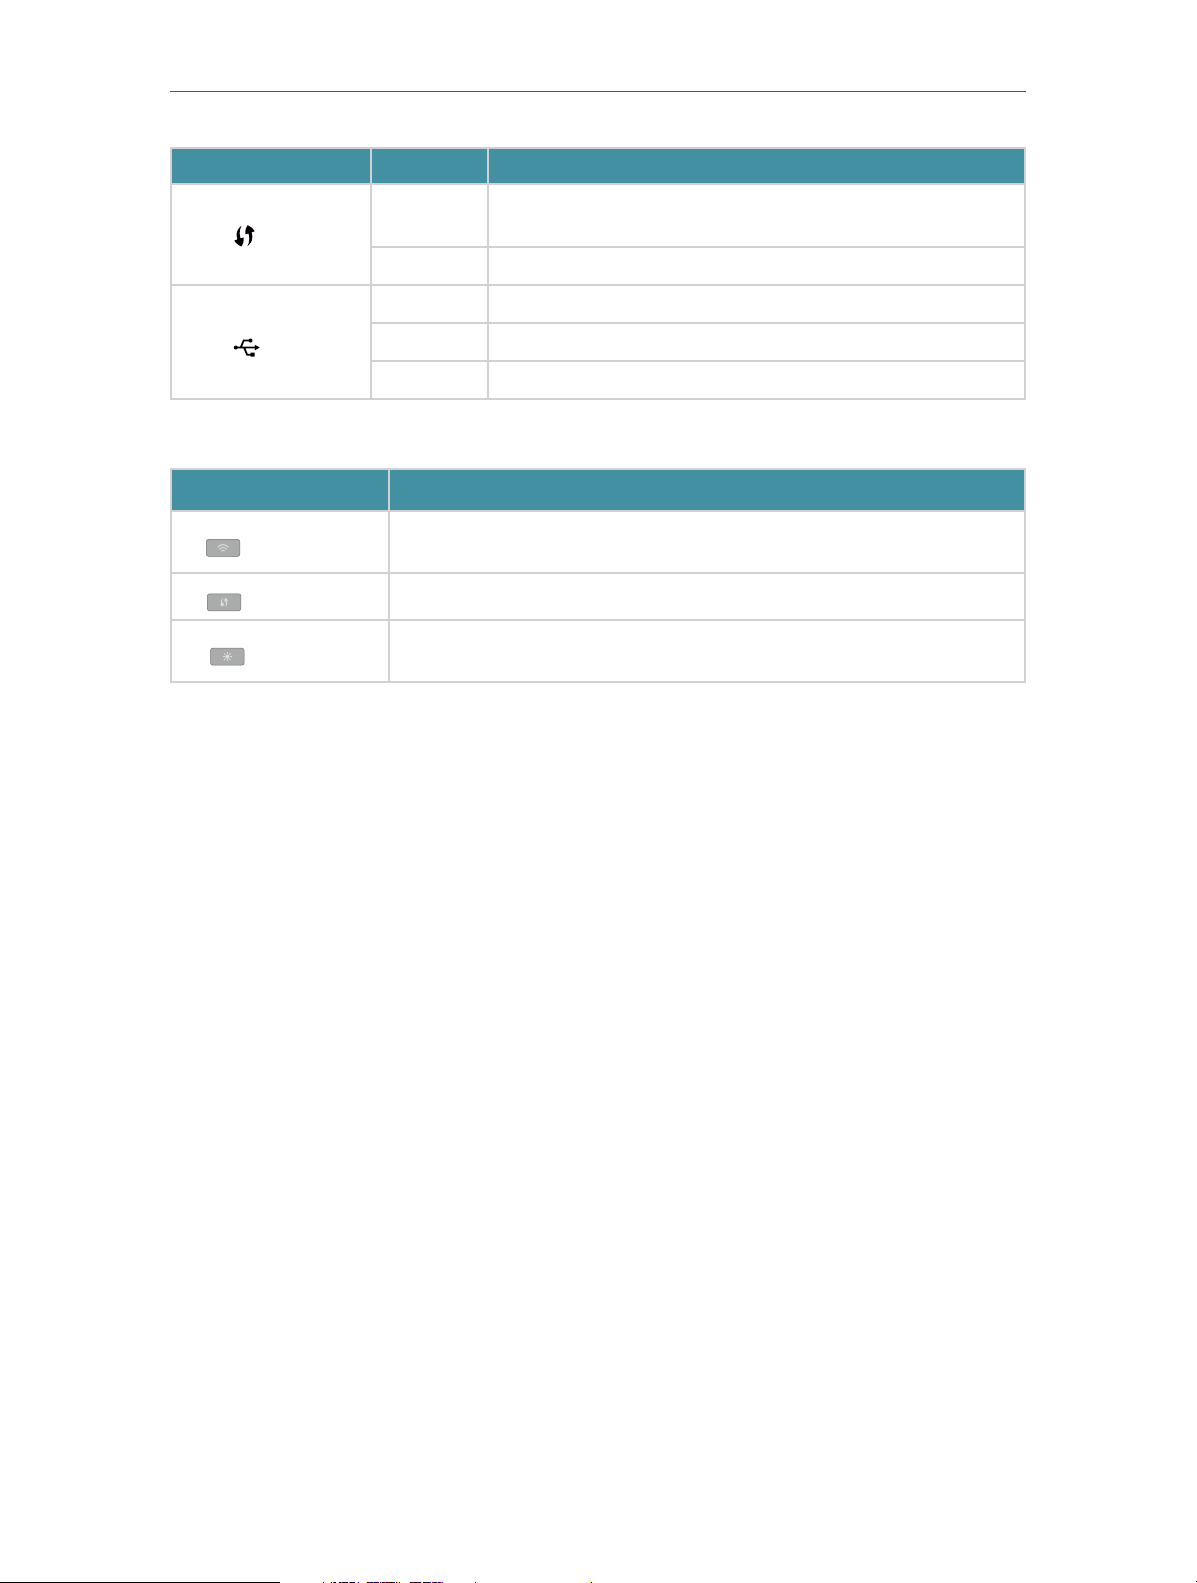
1. 2. 2. The Front Panel
The router’s LEDs and buttons (view from left to right) are located on the front panel.
You can check the router’s working status by following the LED Explanation table.
LED Explanation
Name Status Indication
(Power)
(2.4GHz Wireless)
(5GHz-1 Wireless)
(5GHz-2 Wireless)
(Ethernet)
(Internet)
On The system has started up successfully.
Flashing
Off Power is off.
On The 2.4GHz wireless band is enabled.
Off The 2.4GHz wireless band is disabled.
On The 5GHz-1 wireless band is enabled.
Off The 5GHz-1 wireless band is disabled.
On The 5GHz-2 wireless band is enabled.
Off The 5GHz-2 wireless band is disabled.
On
Off
Blue On The internet is available.
Orange On
The system is starting up or the firmware is being upgraded. Do
not disconnect or power off your router.
At least one powered-on device is connected to the router’s
Ethernet port.
No powered-on device is connected to the router’s Ethernet
port.
The router’s Internet port is connected, but the internet is not
available.
Off The router’s Internet port is unplugged.
4
Page 9
Chapter 1
Get to Know About Your Router
Name Status Indication
(WPS)
(USB)
Button Explanation
Item Description
(Wi-Fi Button)
(WPS Button)
(LED Button)
On/Off
Flashing WPS connection is in progress. This may take up to 2 minutes.
On The inserted USB device is ready to use.
Flashing A USB device is being identified.
Off No device is plugged into the USB port.
Press and hold the Wi-Fi button for about 1 second to turn on or off the
wireless function of your router.
Press this WPS button for 1 second to enable the WPS function.
Press the LED button for about 1 second to turn on or off the LEDs of your
router.
This light remains on for 5 minutes when a WPS connection is
established, then turns off.
5
Page 10

Chapter 2
Connect the Hardware
This chapter contains the following sections:
• Position Your Router
• Connect Your Router
Page 11
Chapter 2
Connect the Hardware
2. 1. Position Your Router
• The product should not be located in a place where it will be exposed to moisture or
excessive heat.
• Place the router in a location where it can be connected to multiple devices as well as
to a power source.
• Make sure the cables and power cord are safely placed out of the way so they do not
create a tripping hazard.
• The router can be placed on a shelf or desktop.
• Keep the router away from devices with strong electromagnetic interference, such as
Bluetooth devices, cordless phones and microwaves.
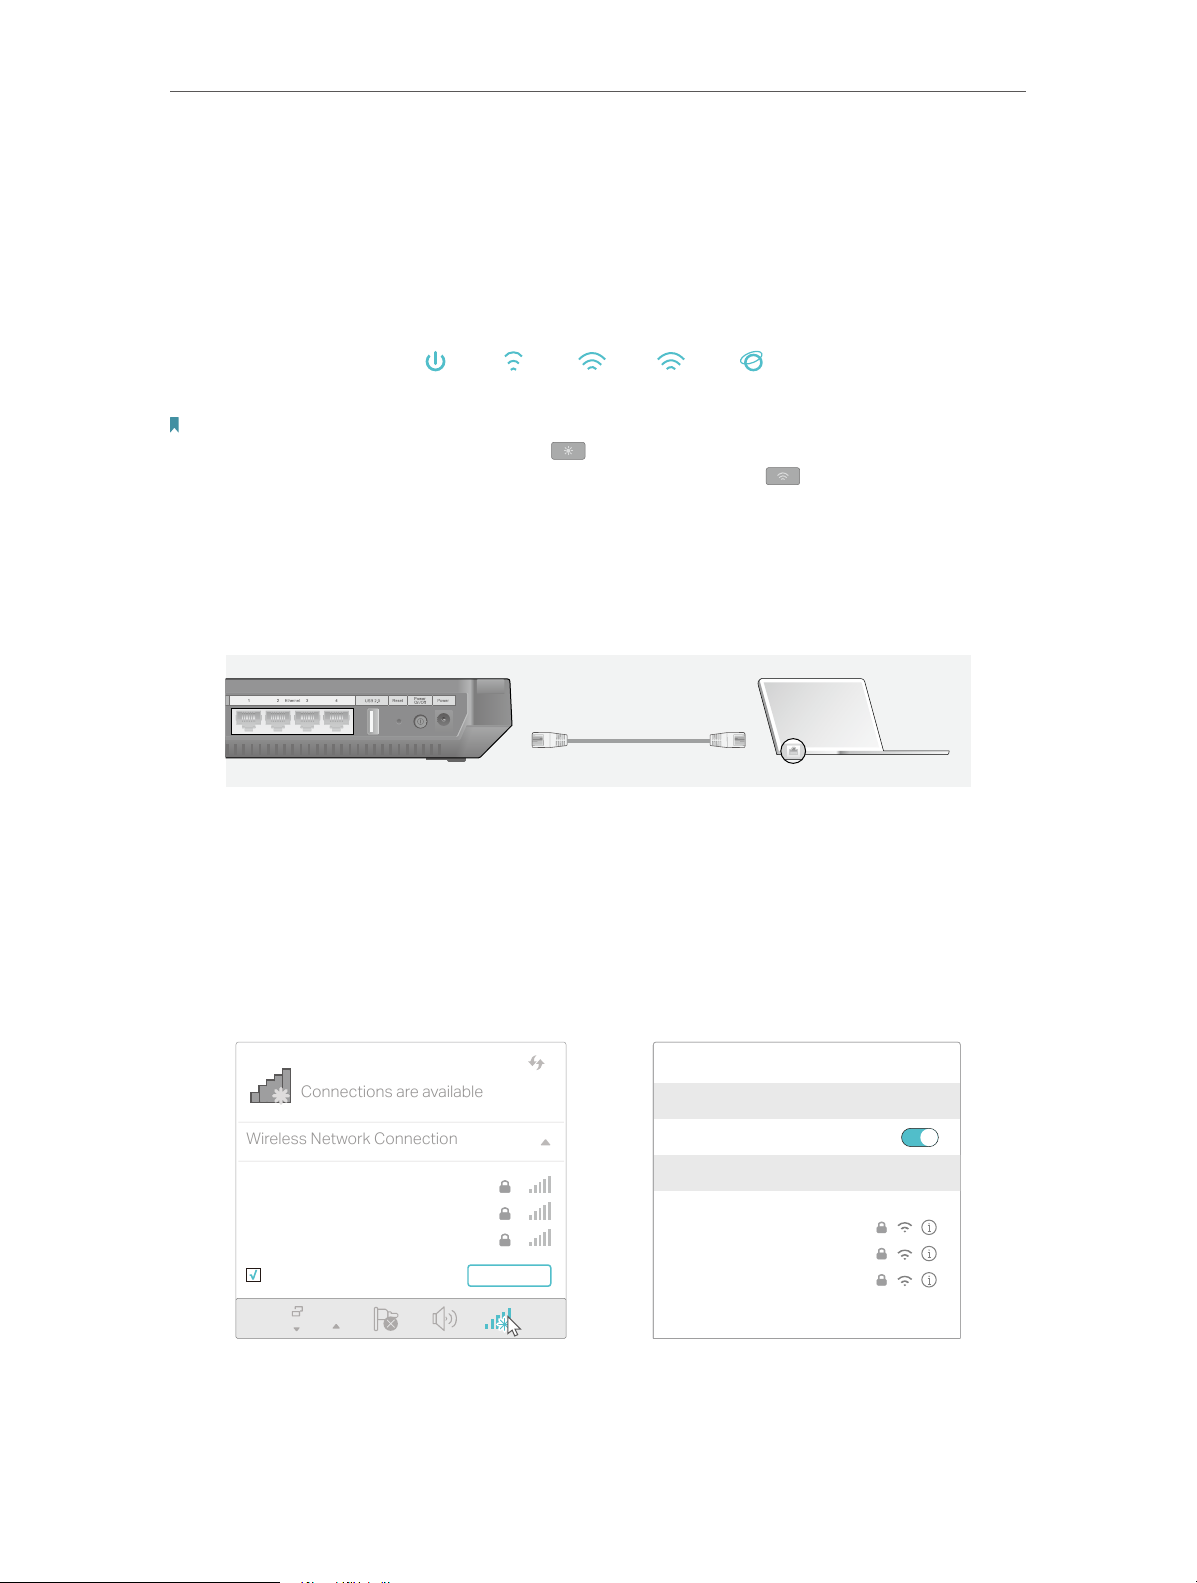
2. 2. Connect Your Router
Follow the steps below to connect your router.
If your internet connection is through an Ethernet cable from the wall instead of through
a DSL / Cable / Satellite modem, connect the Ethernet cable directly to the router’s
Internet port, and then follow Step 1, 5 and 6 to complete the hardware connection.
Power adapter
1
5
Router
Internet
2
3
Power adapter
Modem
4
1. Install the antennas.
2. Turn off the modem, and remove the backup battery if it has one.
7
Page 12
Chapter 2
Connections are available
Wireless Network Connection
Connect the Hardware
3. Connect the modem to your router’s Internet port with an Ethernet cable.
4. Turn on the modem, and then wait about 2 minutes for it to restart.
5. Connect the power adapter to the router and turn on the router.
6. Confirm that the following LEDs are on and solid to verify the hardware is connected
correctly.
Power
On
Note:
• If all the LEDs are off, press the LED On/Off button for about 1 second, and then check the LEDs again.
• If the 2.4GHz, 5GHz-1, and 5GHz-2 LEDs are off, press the Wi-Fi On/Off button for about 1 second and all the
three LEDs should turn solid on.
2.4GHz
On
5GHz-1On5GHz-2
On
Internet
On
7. Connect your computer to the router.
• Method 1: Wired
Turn off the Wi-Fi on your computer and connect the devices as shown below.
Ethernet cable
• Method 2: Wirelessly
1 ) Find the SSID (Network Name) and Wireless Password printed on the label at
the bottom of the router.
2 ) Click the network icon of your computer or go to Wi-Fi Settings of your smart
device, and then select the SSID to join the network.
TP-Link_XXXX
TP-Link_XXXX_5G_1
TP-Link_XXXX_5G_2
Connect automatically Connect
OR
Smart DeviceComputer
< Settings
Wi-Fi
CHOOSE A NETWORK...
TP-Link_XXXX
TP-Link_XXXX_5G_1
TP-Link_XXXX_5G_2
Other...
Wi-Fi
8
Page 13

Chapter 2
Connect the Hardware
• Method 3: Use the WPS button
Wireless devices that support WPS, including Android phones, tablets, and most USB
network cards, can be connected to your router through this method.
Note:
• WPS is not supported by iOS devices.
• The WPS function cannot be configured if the wireless function of the router is disabled. Also, the WPS function will be
disabled if your wireless encryption is WEP. Please make sure the wireless function is enabled and is configured with
the appropriate encryption before configuring the WPS.
1 ) Tab the WPS icon on the device’s screen. Here we take an Android phone for
instance.
2 ) Within two minutes, press the WPS button on your router.
WLAN
On
TP-Link
MyHome
David
HomeNetwork
TP-Link_Home
TP-Link_Router
Test
close to
9
Page 14

Chapter 3
Log In to Your Router
Page 15

Chapter 3
Log In to Your Router
With a web-based utility, it is easy to configure and manage the router. The web-based
utility can be used on any Windows, Mac OS or UNIX OS with a web browser, such as
Microsoft Internet Explorer, Mozilla Firefox or Apple Safari.
Follow the steps below to log in to your router.
1. Set up the TCP/IP Protocol in Obtain an IP address automatically mode on your
computer.
2. Visit http://tplinkwifi.net, and create a login password for secure management
purposes. Then click Let’s Get Started to log in.
Note:
• If the login window does not appear, please refer to the FAQ Section.
• If you have registered a TP-Link ID and bound your cloud router to it, the login password you created here will be
invalid. Please log in to the cloud router using your TP-Link ID.
11
Page 16

Chapter 4
Set Up Internet Connection
This chapter introduces how to connect your router to the internet. The router is
equipped with a web-based Quick Setup wizard. It has necessary ISP information built
in, automates many of the steps and verifies that those steps have been successfully
completed. Furthermore, you can also set up an IPv6 connection if your ISP provides
IPv6 service.
It contains the following sections:
• Use Quick Setup Wizard
• Quick Setup via Bluetooth with TP-Link Tether App
• Manually Set Up Your Internet Connection
• Set Up the Router as an Access Point
• Set Up an IPv6 Internet Connection
• Set Up WAN Aggregation
Page 17
Chapter 4
Set Up Internet Connection
4. 1. Use Quick Setup Wizard
The Quick Setup Wizard will guide you to set up your router.
Tips: If you need the IPv6 internet connection, please refer to the section of Set Up an IPv6 Internet Connection.
Follow the steps below to set up your router.
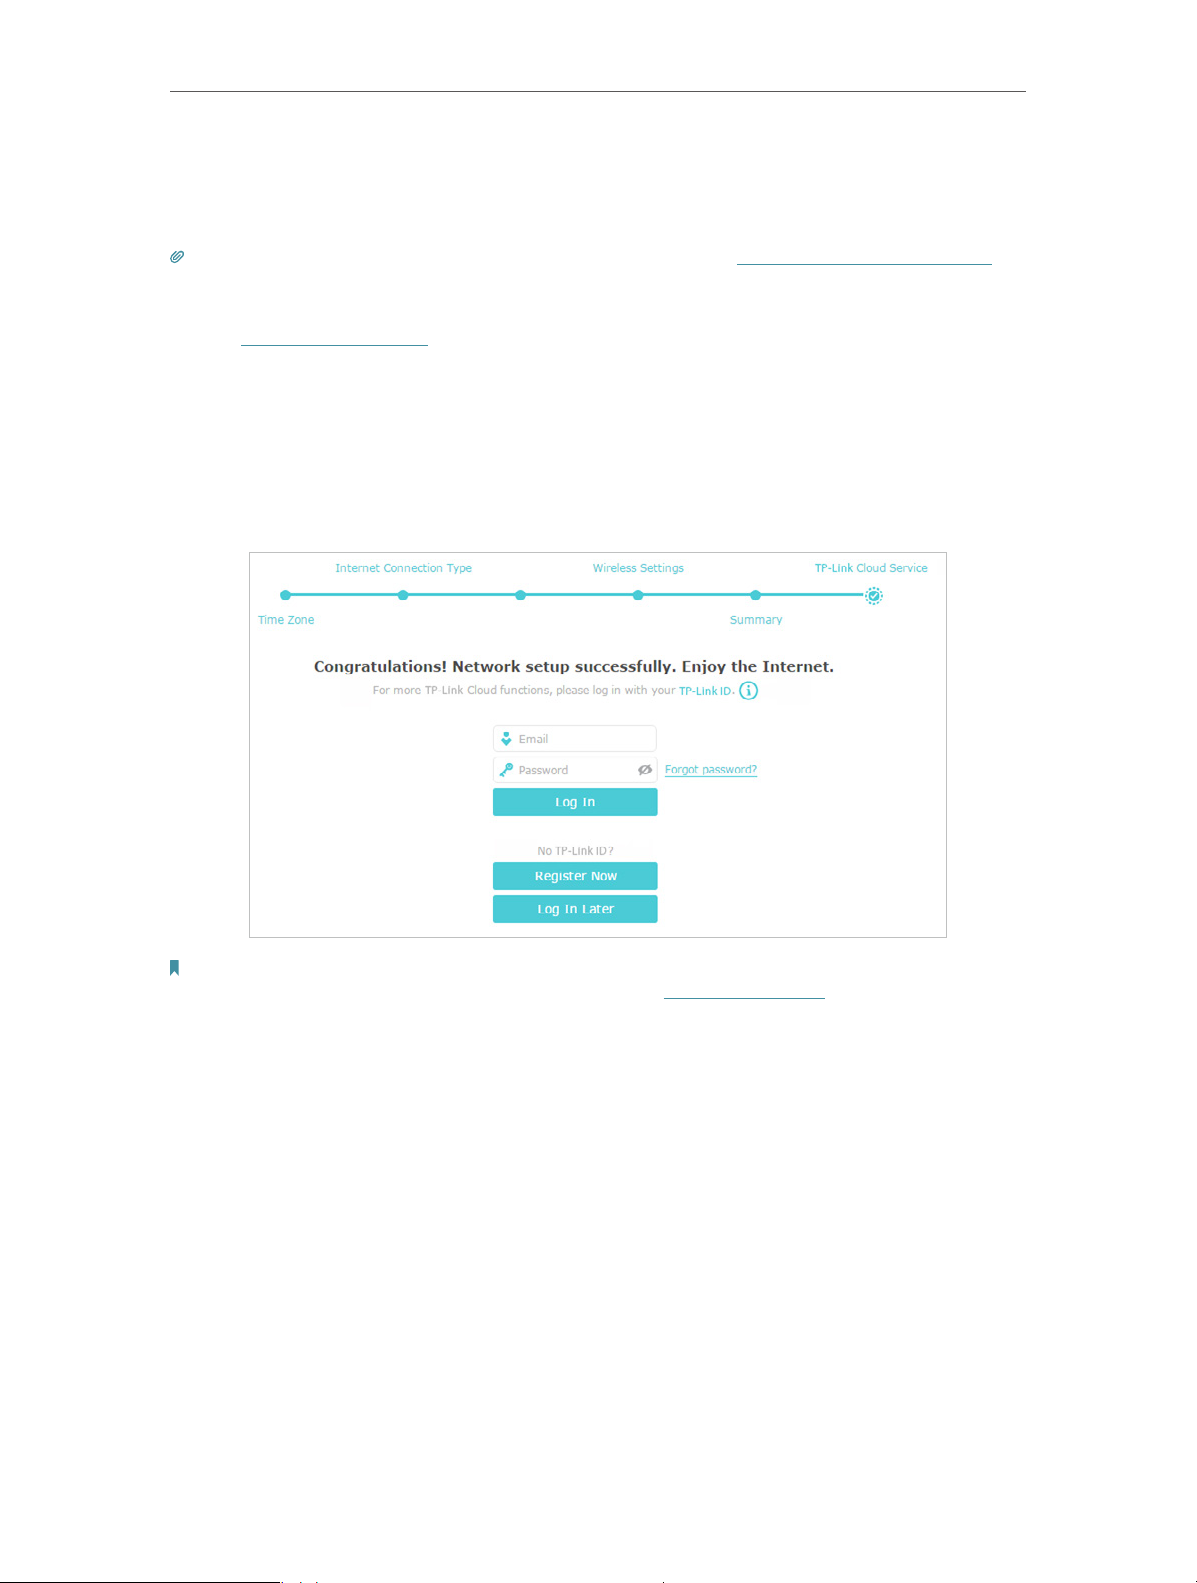
1. Visit http://tplinkwifi.net, and log in with the password you set for the router.
2. Click Quick Setup on the top of the page. Then follow the step-by-step instructions
to connect your router to the internet.
3. To enjoy a more complete service from TP-Link (remote management, TP-Link DDNS,
and more.), log in with your TP-Link ID or click Resigter Now to get one. Then follow
the instructions to bind the cloud router to your TP-Link ID.
Note:
• To learn more about the TP-Link Cloud service, please refer to the TP-Link Cloud Service section.
• If you do not want to register a TP-Link ID now, you may click Log In Later to proceed.
• If you have changed the preset wireless network name (SSID) and wireless password during the Quick Setup process,
all your wireless devices must use the new SSID and password to connect to the router.
4. 2. Quick Setup via Bluetooth with TP-Link Tether
App
TP-Link Tether lets you set up the router via Bluetooth, avioding the hassle of rejoining
the configured wireless network.
1. Launch the Apple App Store or Google Play store and search “TP-Link Tether” or
simply scan the QR code to download and install the app.
13
Page 18

Chapter 4
Set Up Internet Connection
OR
2. Enable your phone’s Bluetooth (and location for Android).
iOS Android
3. Launch the Tether app. Select TP-Link C4000 and follow the steps to set up the
internet connection.
Device
Local Device
TP-Link C4000
50-C7-BF-02-EA-DC
!
4. Connect your devices to the newly configured wireless networks of the router and
enjoy the internet!
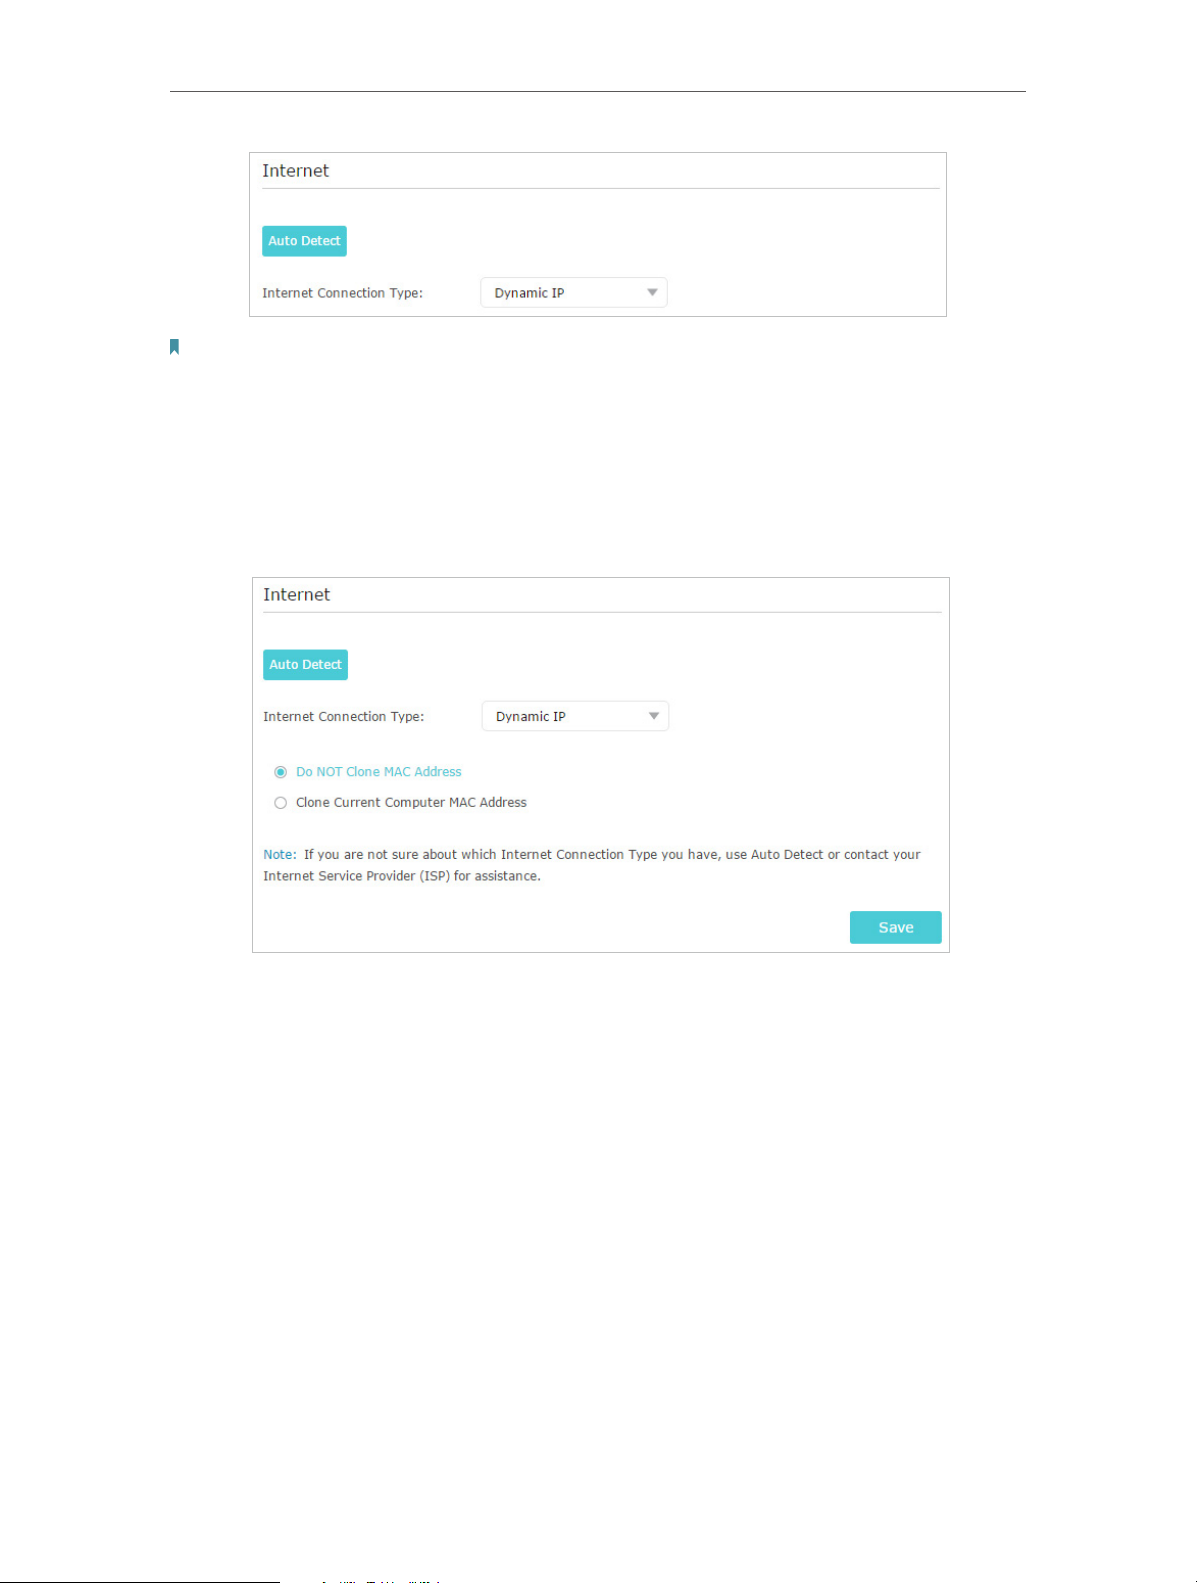
4. 3. Manually Set Up Your Internet Connection
In this part, you can check your current internet connection settings. You can also
modify the settings according to the service information provided by your ISP.
Follow the steps below to check or modify your internet connection settings.
1. Visit http://tplinkwifi.net, and log in with your TP-Link ID or the password you set for
the router.
2. Go to Basic > Internet.
3. Select your internet connection type from the drop-down list.
14
Page 19
Chapter 4
Note: If you are unsure of what your connection type is, click Auto Detect. Since different connection types require
different cables and connection information, you can also refer to the demonstrations in Step 4 to determine your
connection type.
Set Up Internet Connection
4. Follow the instructions on the page to continue the configuration. Parameters on the
figures are just used for demonstration.
1 ) If you choose Dynamic IP, you need to select whether to clone the MAC address.
Dynamic IP users are usually equipped with a cable TV or fiber cable.
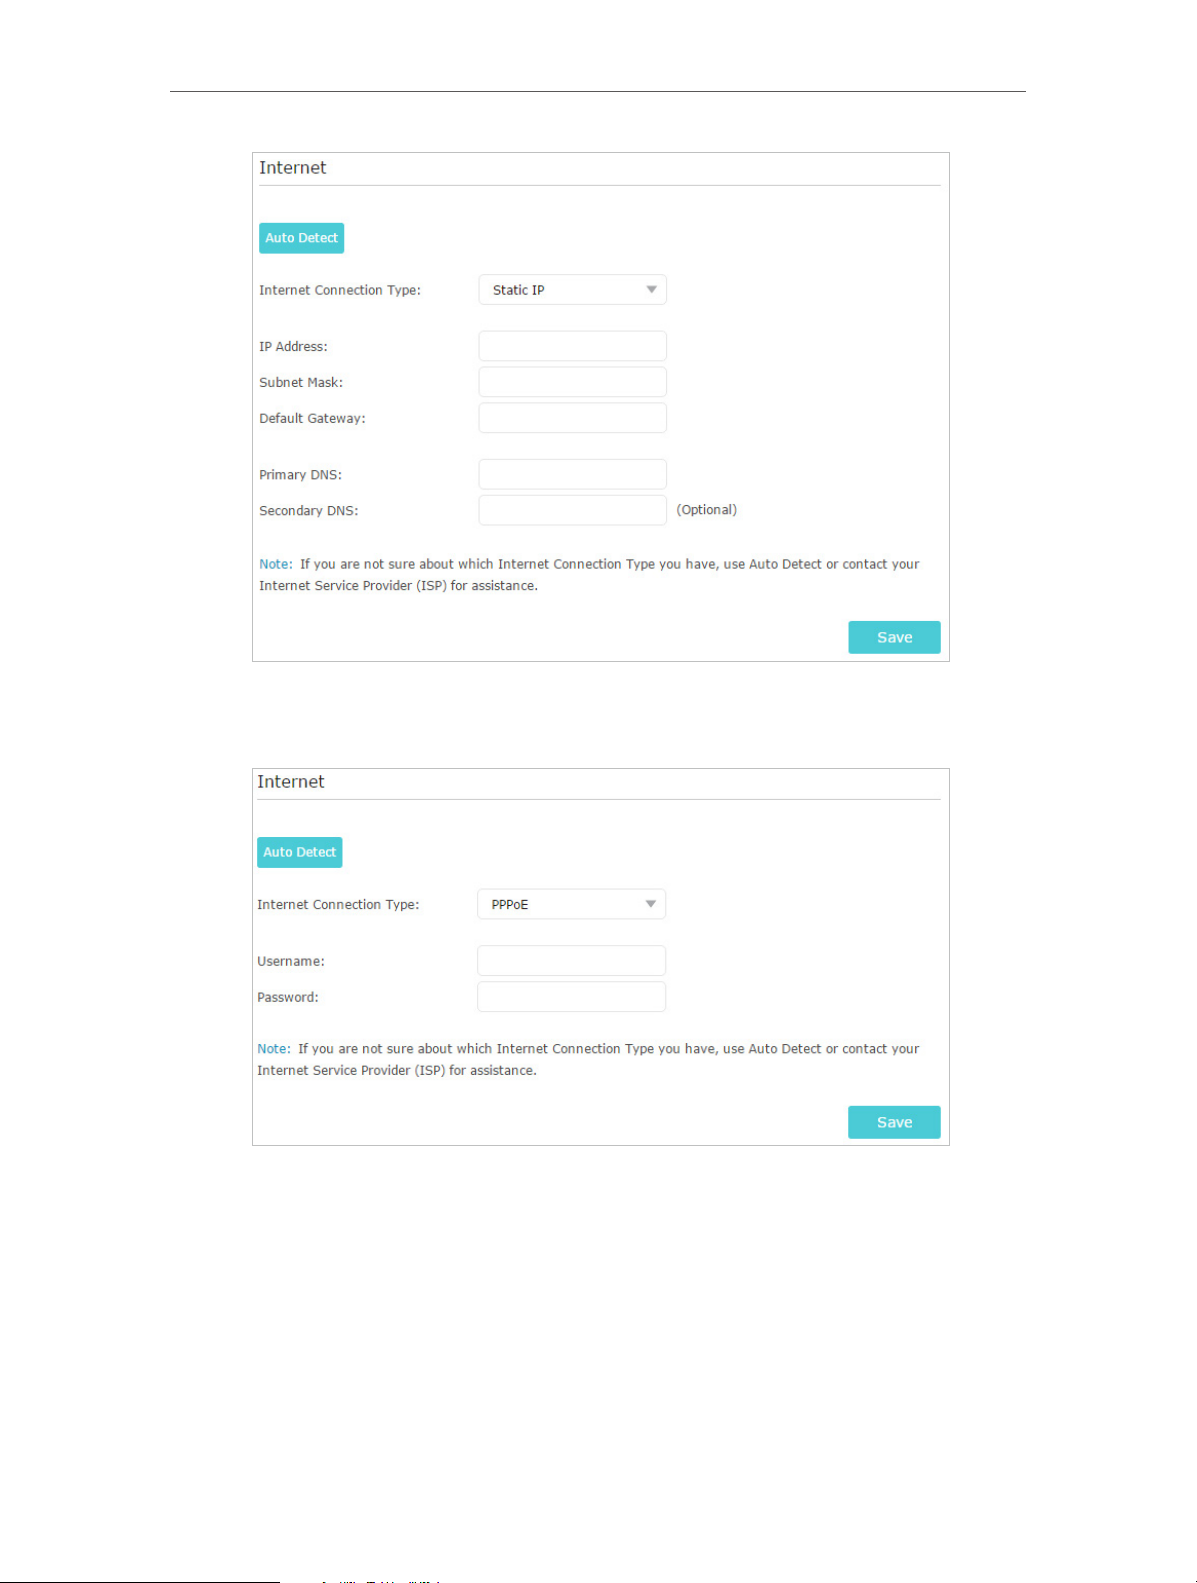
2 ) If you choose Static IP, enter the information provided by your ISP in the
corresponding fields.
15
Page 20
Chapter 4
Set Up Internet Connection
3 ) If you choose PPPoE, enter the Username and Password provided by your ISP.
PPPoE users usually have DSL cable modems.
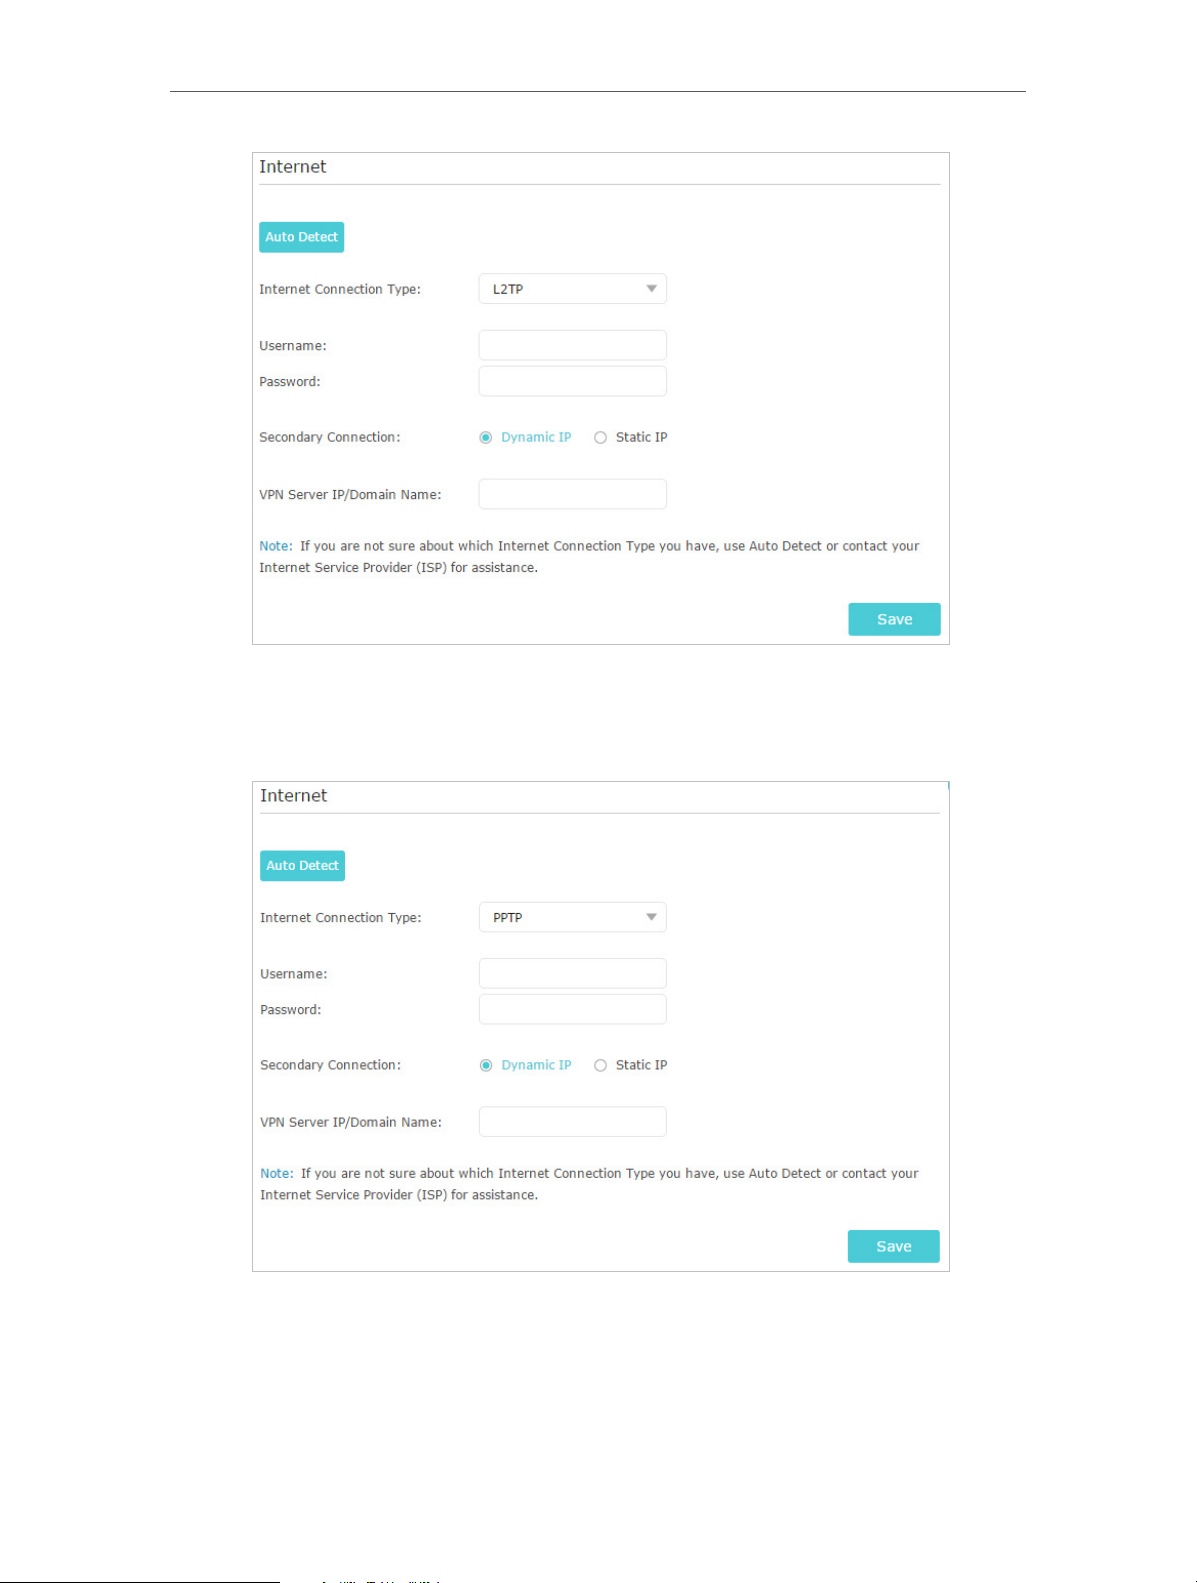
4 ) If you choose L2TP, enter the Username and Password and choose the
Secondary Connection provided by your ISP. Different parameters are needed
according to the Secondary Connection you have chosen.
16
Page 21
Chapter 4
Set Up Internet Connection
5 ) If you choose PPTP, enter the Username and Password, and choose the
Secondary Connection provided by your ISP. Different parameters are needed
according to the Secondary Connection you have chosen.
5. Click Save.
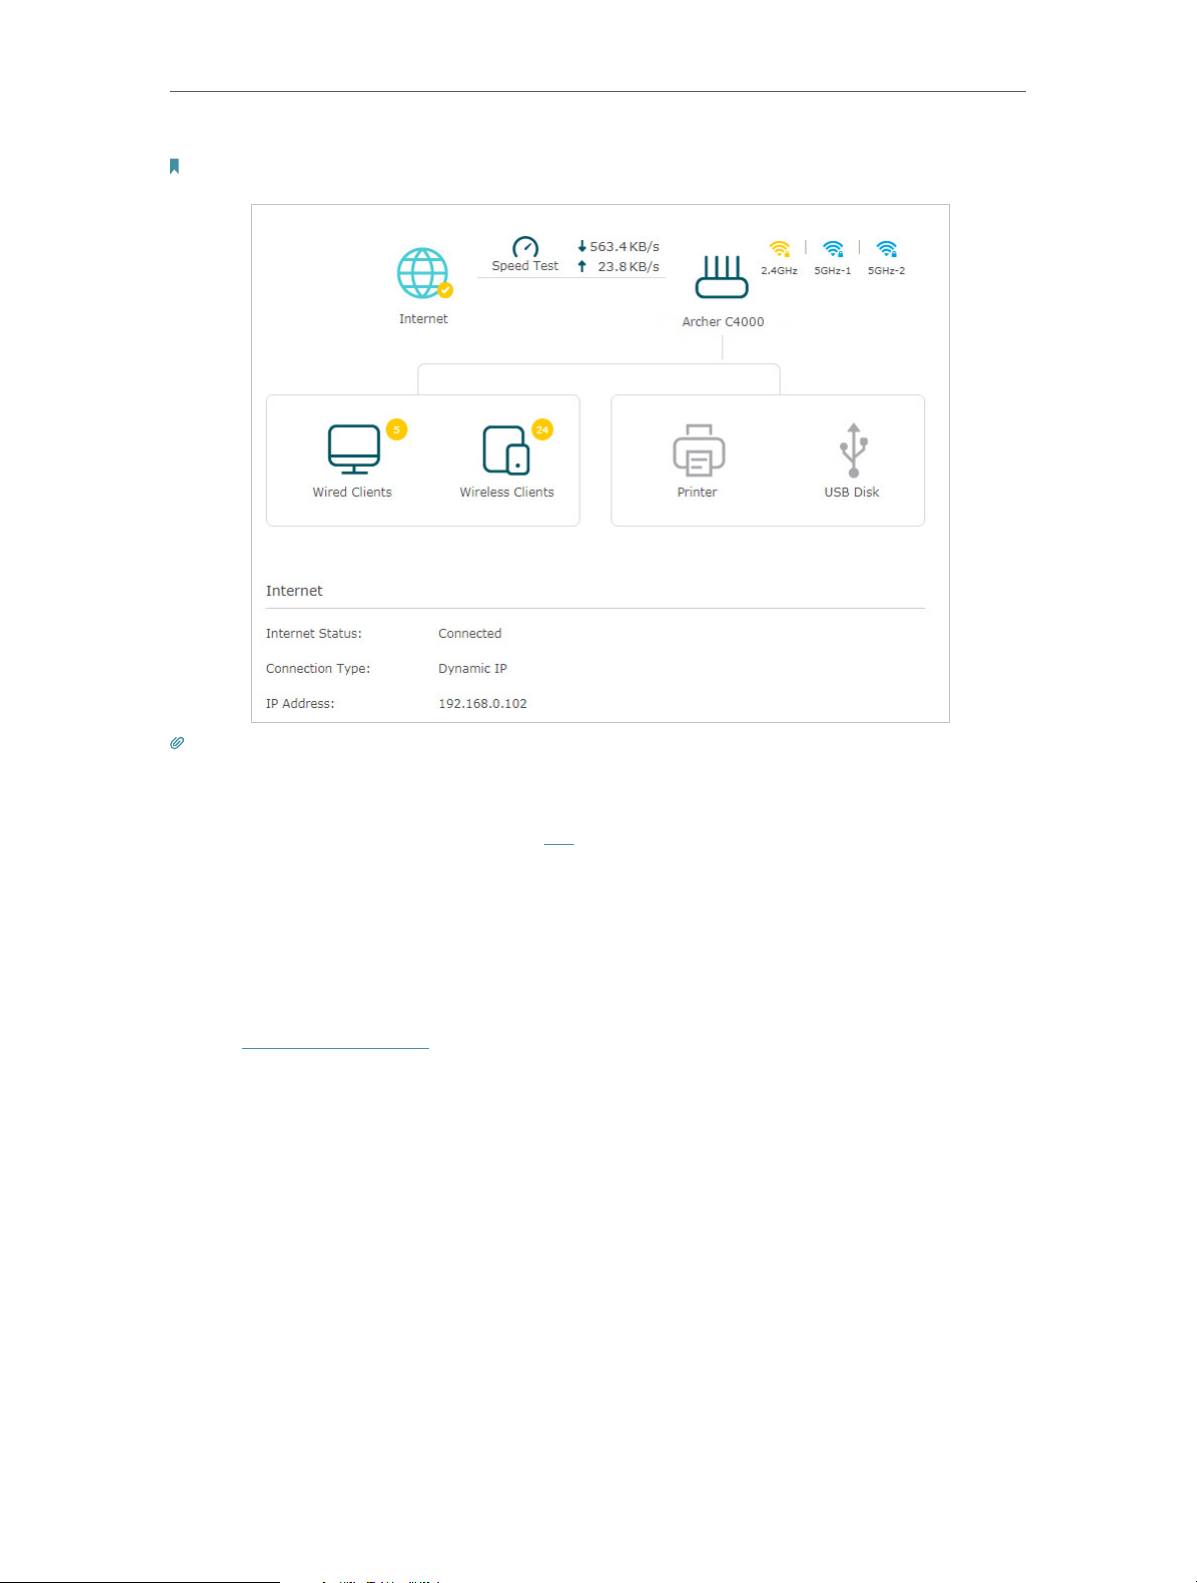
6. To check your internet connection, click Network Map on the left of the page. After
the connection succeeds, the screen will display as follows. Here we take Dynamic
IP as an example.
17
Page 22
Chapter 4
Note: It may take 1-2 minutes to make the settings valid.
Set Up Internet Connection
Tips:
• If your internet connection type is BigPond Cable, please go to Advanced > Network > Internet to set your router.
• If you use Dynamic IP and PPPoE and you are provided with any other parameters that are not required on the page,
please go to Advanced > Network > Internet to complete the configuration.
• If you still cannot access the internet, refer to the FAQ section for further instructions.
4. 4. Set Up the Router as an Access Point
The router can work as an access point, transforming your existing wired network to a
wireless one.
1. Visit http://tplinkwifi.net, and log in with your TP-Link ID or the password you set for
the router.
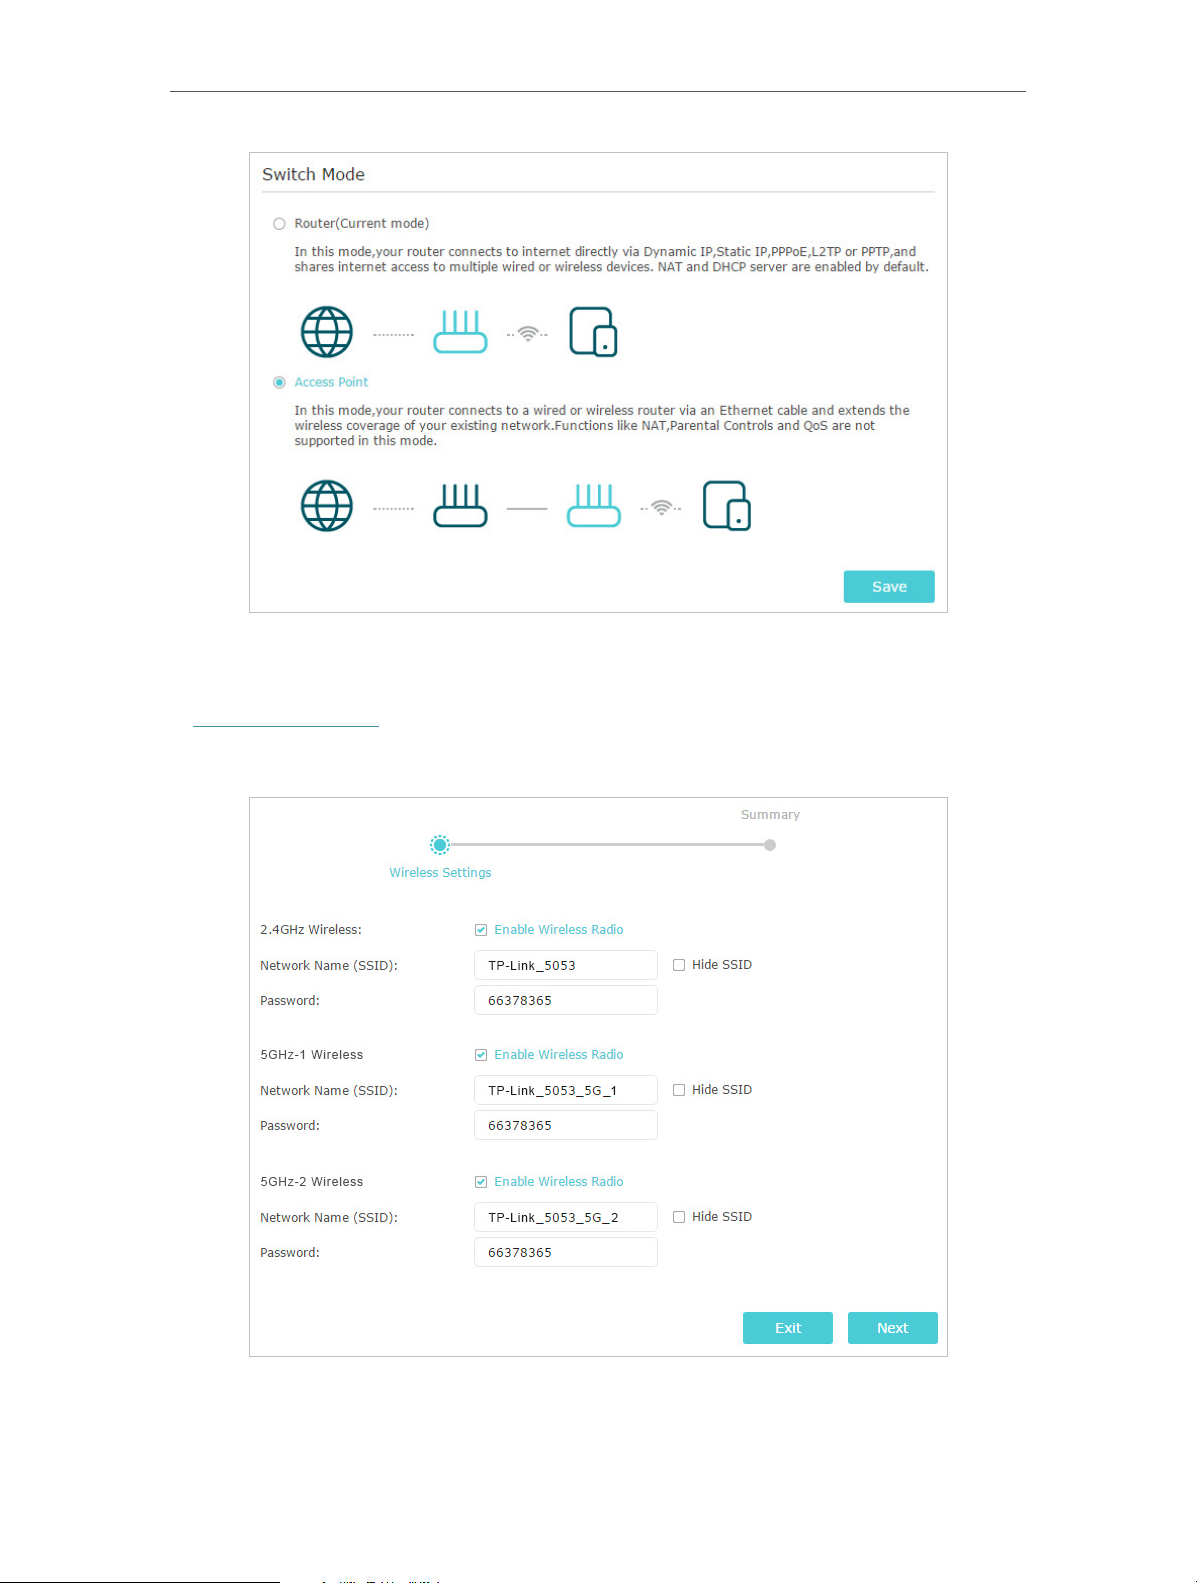
2. Go to Advanced > Operation Mode, select Access Point and click Save. The router
will reboot and switch to Access Point mode.
18
Page 23
Chapter 4
Set Up Internet Connection
3. After rebooting, connect the router to your existing wired router via an Ethernet cable.
4. Connect to the Wi-Fi of the router and log in again to the web management page
http://tplinkwifi.net, and click Quick Setup.
5. Configure your wireless settings and click Next.
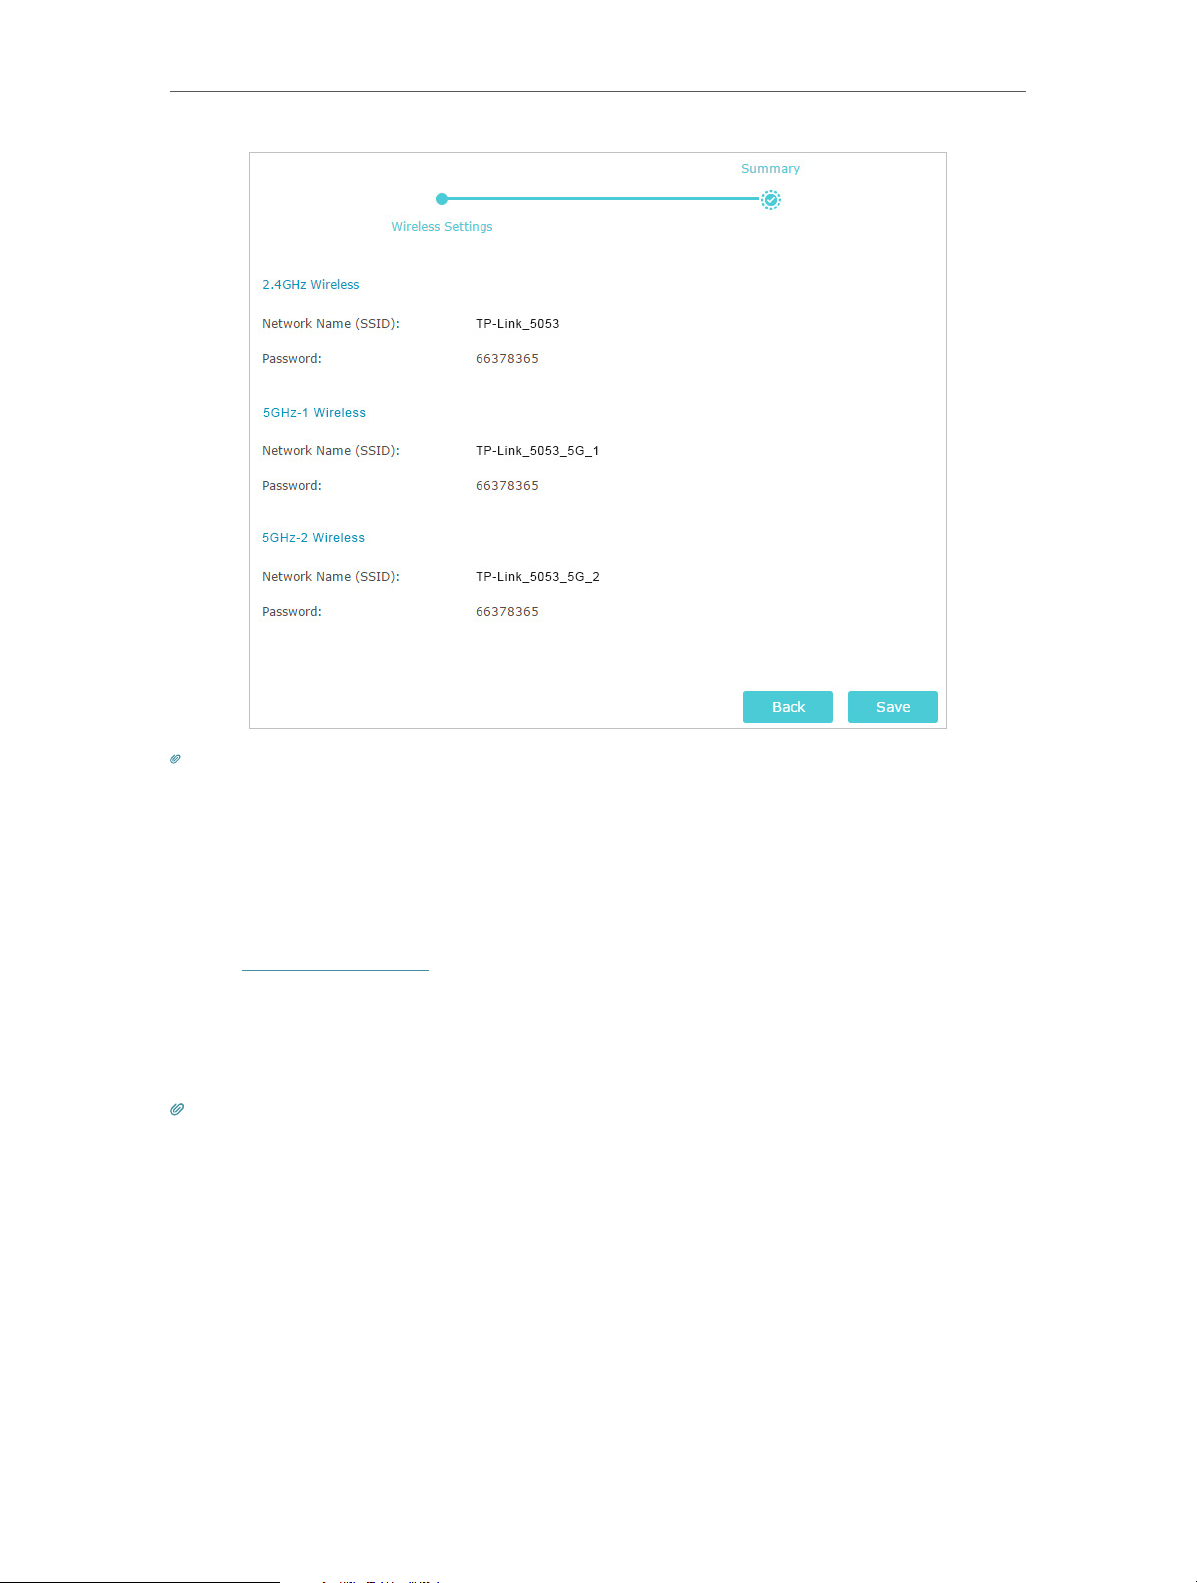
6. Confirm the information and click Save. Now, you can enjoy Wi-Fi.
19
Page 24
Chapter 4
Set Up Internet Connection
Tips: Functions, such as Parental Controls, Qos and NAT Forwarding, are not supported in the Access Point mode.
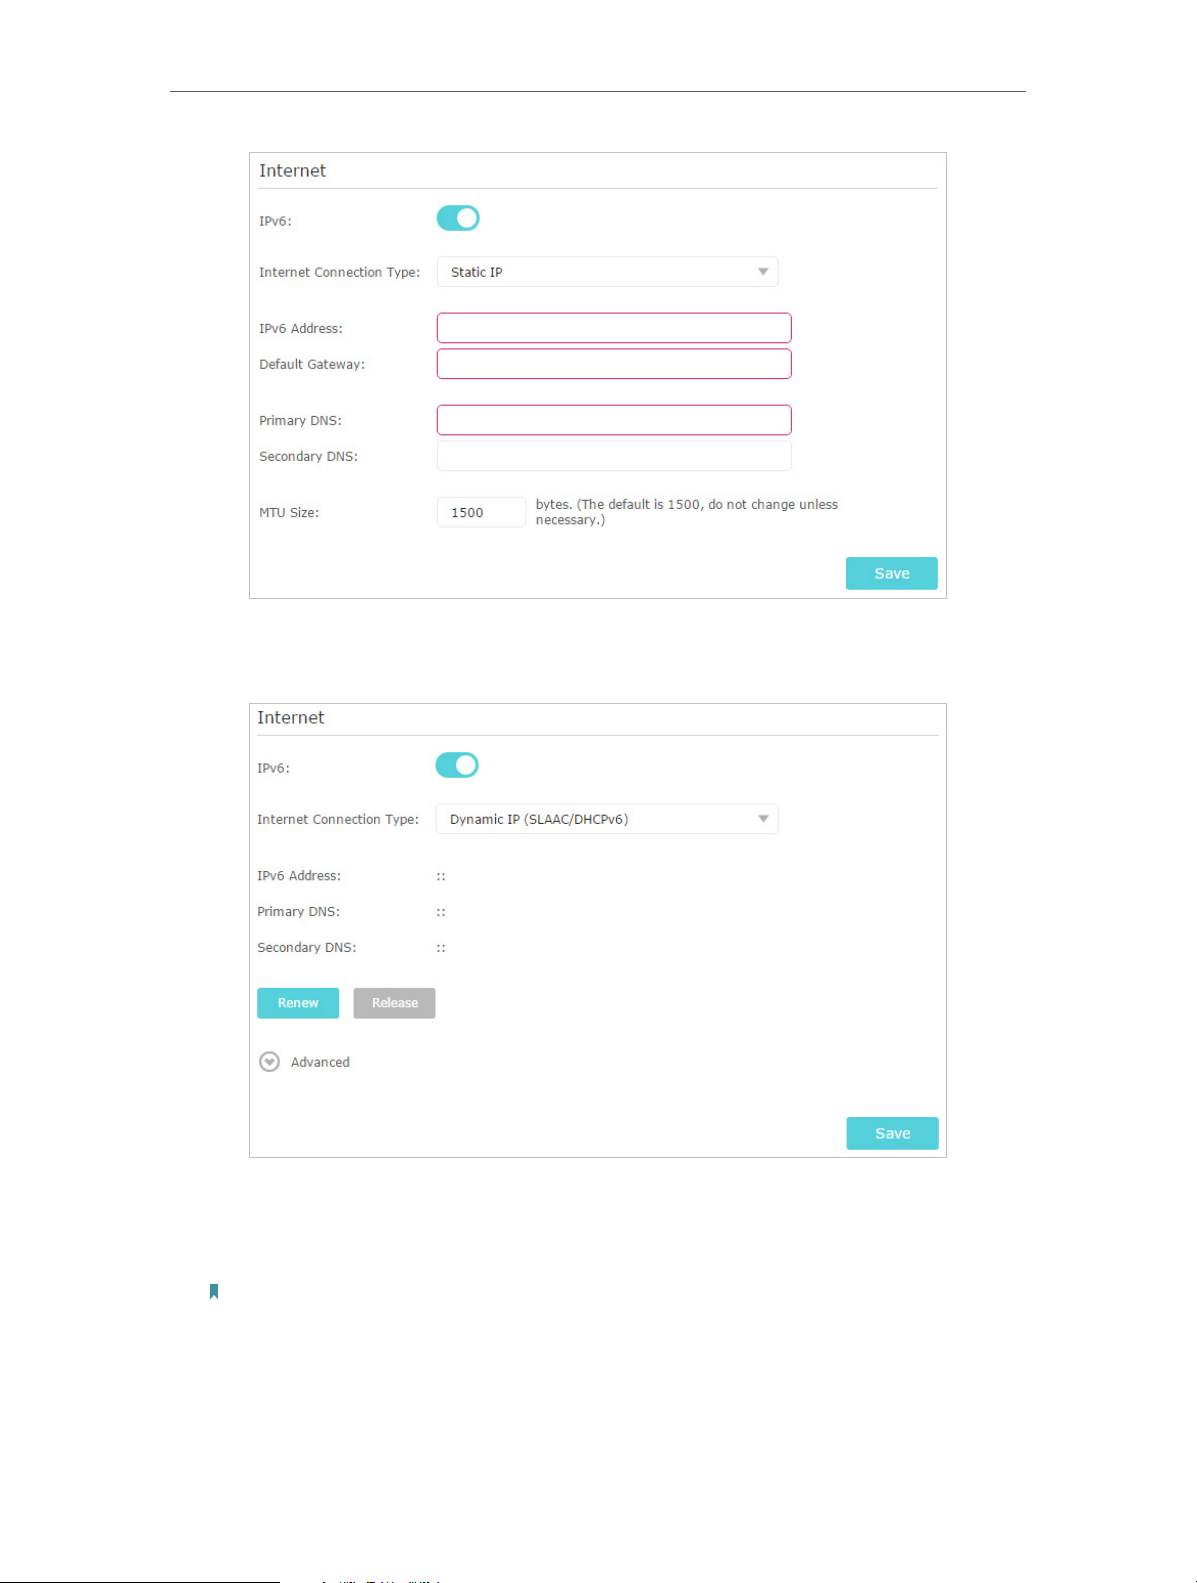
4. 5. Set Up an IPv6 Internet Connection
Your ISP provides information about one of the following IPv6 internet connection types:
PPPoE, Dynamic IP(SLAAC/DHCPv6), Static IP, 6to4 tunnel, Pass-Through (Bridge).
1. Visit http://tplinkwifi.net, and log in with your TP-Link ID or the password you set for
the router.
2. Go to Advanced > IPv6.
3. Enable IPv6 and select the internet connection type provided by your ISP.
Tips: If you do not know what your internet connection type is, contact your ISP or judge according to the already
known information provided by your ISP.
4. Fill in information as required by different connection types. Red blanks must be filled
in.
1 ) Static IP: Fill in blanks and click Save.
20
Page 25
Chapter 4
Set Up Internet Connection
2 ) Dynamic IP (SLAAC/DHCPv6): Click Advanced to input further information if
your ISP requires. Click Save.
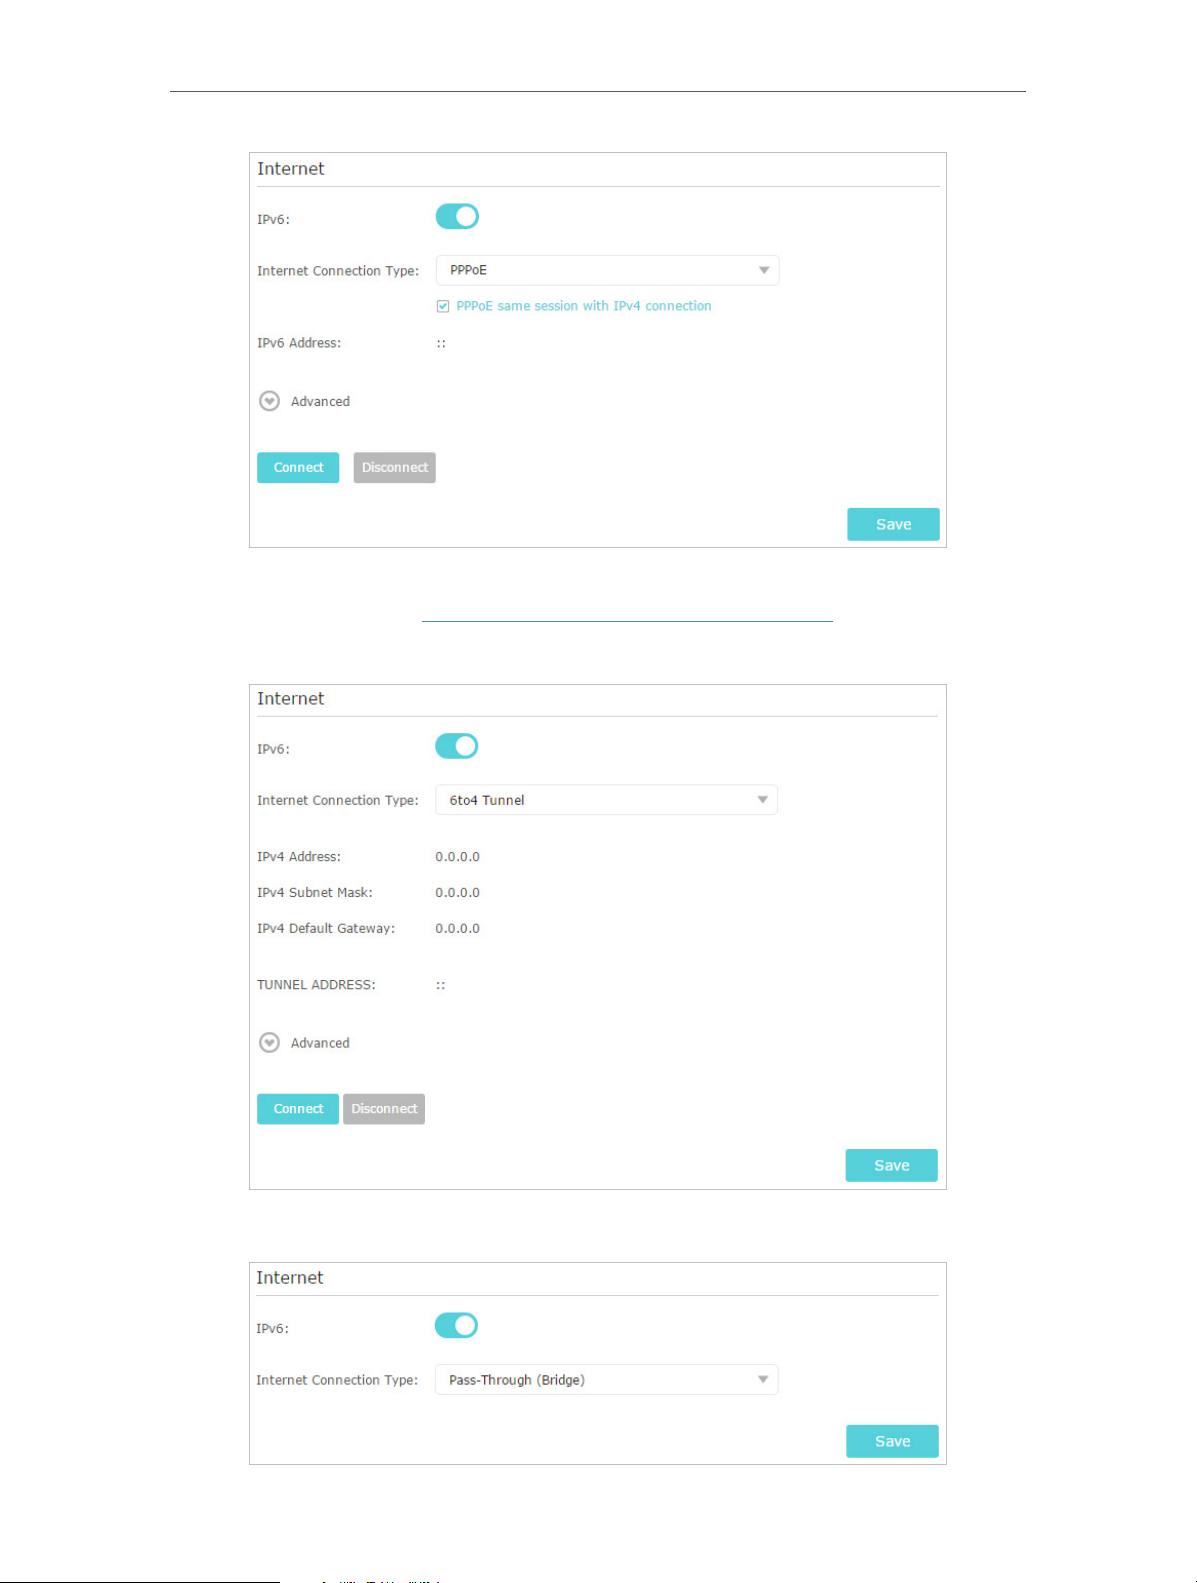
3 ) PPPoE: By default, the router uses the IPv4 account to connect to the IPv6
server. Click Advanced to input further information if your ISP requires. Click
Save and then click Connect.
Note: If your ISP provides two separate accounts for the IPv4 and IPv6 connections, please untick the PPPoE
same session with IPv4 connection checkbox and manually enter the username and password for the IPv6
connection.
21
Page 26
Chapter 4
Set Up Internet Connection
4 ) 6to4 Tunnel: An IPv4 internet connection type is a prerequisite for this
connection type (Manually Set Up Your Internet Connection). Click Advanced to
input further information if your ISP requires. Click Save and then click Connect.
5 ) Pass-Through (Bridge): Click Save and skip to Step 6.
22
Page 27

Chapter 4
Set Up Internet Connection
5. Configure LAN ports. Windows users are recommended to choose from the first two
types. Fill in Address Prefix provided by your ISP, and click Save.
Tips: Find Help on the web management page to know more about items.
6. Click Status to check whether you have successfully set up an IPv6 connection. The
following figure is an example of a successful PPPoE configuration.
Tips: Visit the FAQ section if there is no internet connection.
4. 6. Set Up WAN Aggregation
WAN Aggregation transforms the LAN1 port to an additional WAN port, and makes
a single high-bandwidth data path. Unleash faster internet from ISPs that provide
bandwidth rates over 1Gbps and no longer be limited by your networking hardware.
Note: Before enabling this feature, make sure that your ISP supports WAN Aggregation and your modem has two WAN
ports.
1. Visit http://tplinkwifi.net, and log in with your TP-Link ID or the password you set for
the router.
2. Go to Advanced > Network > Internet.
3. Toggle on WAN Aggregation to enable it and the router will reboot to apply the
settings.
23
Page 28

Chapter 4
Set Up Internet Connection
4. Connect the router’s WAN port and LAN1 port to your modem’s two WAN ports with
two Ethernet cables.
24
Page 29

Chapter 5
TP-Link Cloud Service
TP-Link Cloud service provides a better way to manage your cloud devices. Log in to
your router with a TP-Link ID, and you can easily monitor and manage your home network
when you are out and about via the Tether app. To ensure that your router stays new and
gets better over time, the TP-Link Cloud will notify you when an important firmware
upgrade is avaliable. Surely you can also manage multiple TP-Link Cloud devices with a
single TP-Link ID.
This chapter introduces how to register a new TP-Link ID, bind or unbind TP-Link IDs
to manage your router, and the Tether app with which you can manage your home
network no matter where you may find yourself.
It contains the following sections:
• Register a TP-Link ID
• Change Your TP-Link ID Information
• Manage the User TP-Link IDs
• Manage the Router via the TP-Link Tether App
Page 30
Chapter 5
TP-Link Cloud Service
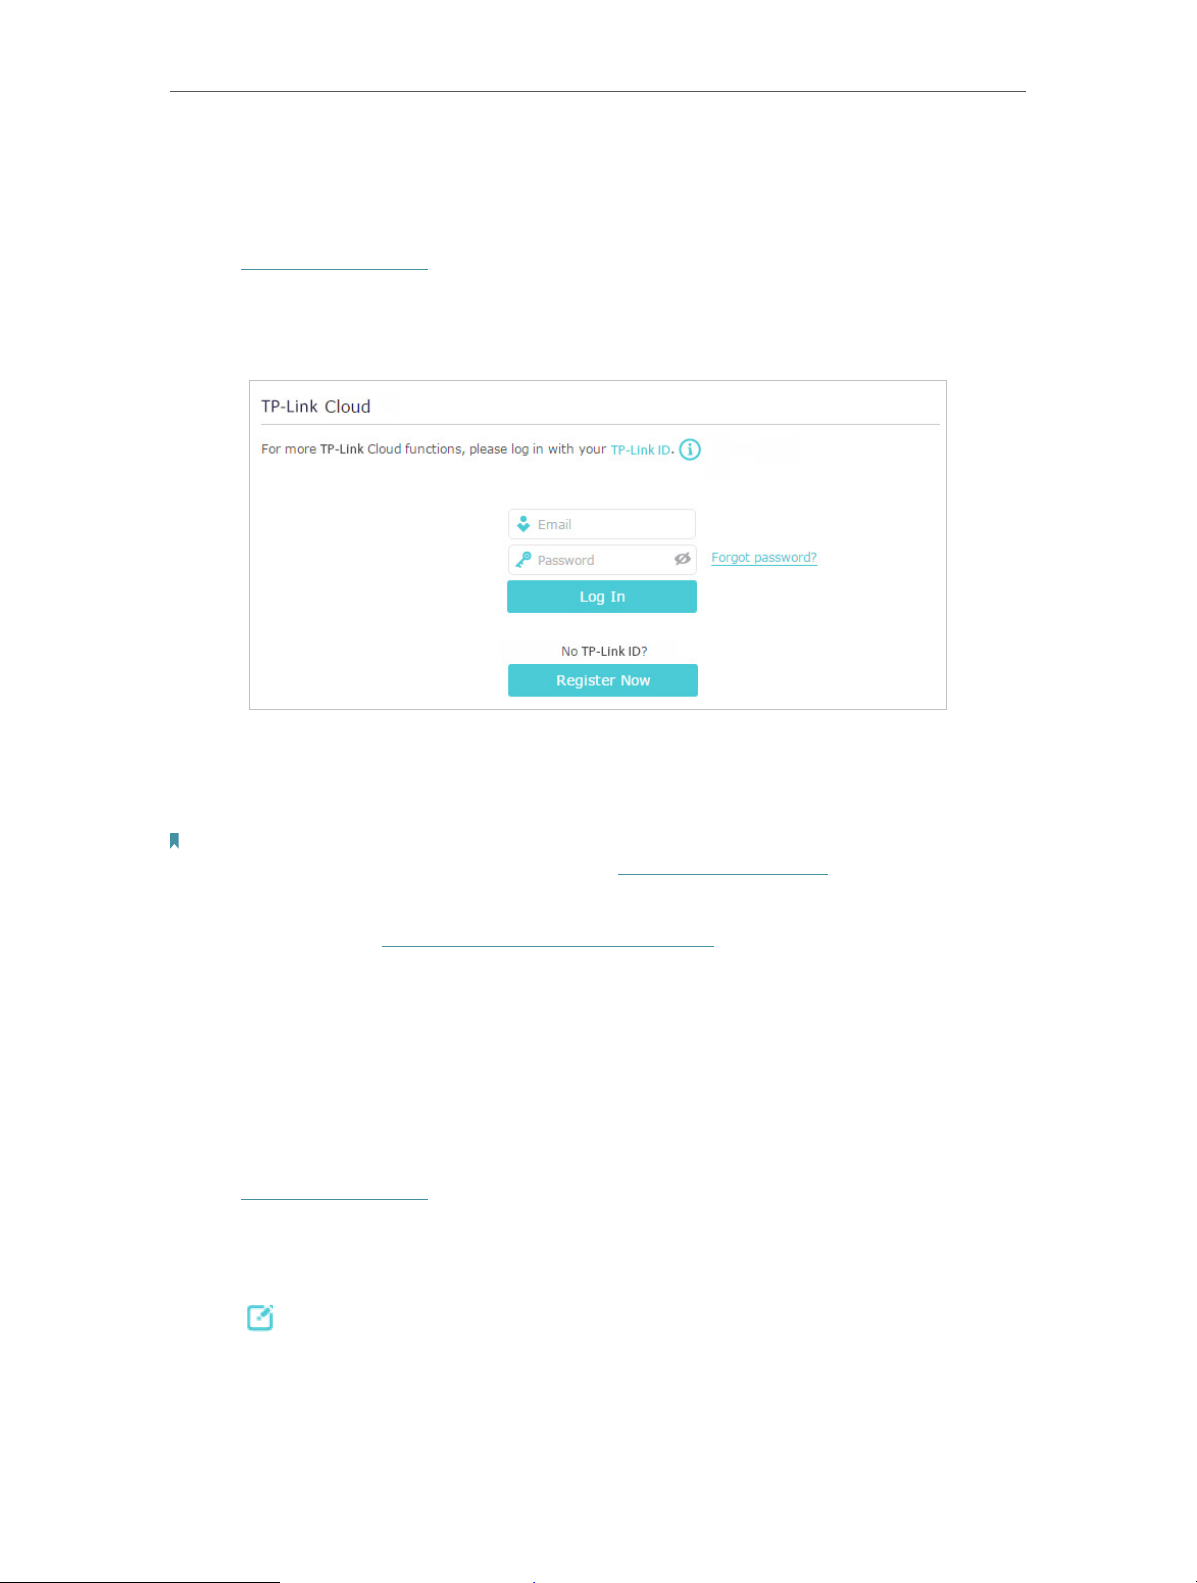
5. 1. Register a TP-Link ID
If you have skipped the registration during the Quick Setup process, you can:
1. Visit http://tplinkwifi.net, and log in with the password you set for the router.
2. Go to Basic > TP-Link Cloud.
3. Click Register Now and follow the instructions to register a TP-Link ID.
4. After activating your TP-Link ID, come back to the TP-Link Cloud page to log in. The
TP-Link ID used to log in to the router for the first time will be automatically bound as
an Admin.
Note:
• To learn more about the Admin and User TP-Link ID, refer to Manage the User TP-Link IDs.
• Once the router is bound to your TP-Link ID, you need to log in to the router with the TP-Link ID.
• Once you have registered a TP-Link ID on the web management page, you can only register another TP-Link ID via the
Tether APP. Please refer to Manage the Router via the TP-Link Tether App to install the app.
• If you want to unbind the admin TP-Link ID from your router, please go to Basic > TP-Link Cloud, an click Unbind in the
Device Information section.
5. 2. Change Your TP-Link ID Information
Follow the steps below to change your email address and password of your TP-Link ID
as needed.
1. Visit http://tplinkwifi.net, and log in with your TP-Link ID.
2. Go to Basic > TP-Link Cloud, and focus on the Account Information section.
¾ To change your email address:
1. Click
behind the Email.
2. Enter the password of your TP-Link ID, then a new email address. And click Save.
26
Page 31

Chapter 5
¾ To change your password:
TP-Link Cloud Service
1. Click
2. Enter the current password, then a new password twice. And click Save.
behind the Password.
5. 3. Manage the User TP-Link IDs
The TP-Link ID used to log in to the router for the first time will be automatically bound
as the Admin account. An admin account can add or remove other TP-Link IDs to or
from the same router as Users. All accounts can monitor and manage the router locally
or remotely, but user accounts cannot:
• Reset the router to its factory default settings either on the web management page
or in the Tether app.
27
Page 32

Chapter 5
TP-Link Cloud Service
• Add/remove other TP-Link IDs to/from the router.
5. 3. 1. Add TP-Link ID to Manage the Router
1. Visit http://tplinkwifi.net, and log in with your TP-Link ID.
2. Go to Basic > TP-Link Cloud, and focus on the Bound Accounts section.
3. Click
Note: If you need another TP-Link ID, please register a new one via the Tether app. Refer to Manage the Router via the
TP-Link Tether App to install the app and register a new TP-Link ID.
, enter another TP-Link ID as needed and click Save.
4. The new TP-Link ID will be displayed in the Bound Accounts table as a User.
5. 3. 2. Remove TP-Link ID(s) from Managing the Router
1. Visit http://tplinkwifi.net, and log in with your TP-Link ID.
2. Go to Basic > TP-Link Cloud, and focus on the Bound Accounts section.
3. Tick the checkbox(es) of the TP-Link ID(s) you want to remove and click Unbind.
28
Page 33

Chapter 5
TP-Link Cloud Service
5. 4. Manage the Router via the TP-Link Tether App
The Tether app runs on iOS and Android devices, such as smartphones and tablets.
1. Launch the Apple App Store or Google Play store and search “TP-Link Tether” or
simply scan the QR code to download and install the app.
OR
2. Connect your device to the router’s wireless network.
3. Launch the Tether app, select the model of your router and log in with your TP-Link ID
or the password you set for the router.
4. Manage your router as needed.
Note: If you need to remotely access your router from your smart devices, you need to:
• Log in with your TP-Link ID. If you don’t have one, refer to Register a TP-Link ID.
• Make sure your smartphone or tablet can access the internet with cellular data or a Wi-Fi network.
29
Page 34

Chapter 6
Guest Network
This function allows you to provide Wi-Fi access for guests without disclosing your
main network. When you have guests in your house, apartment, or workplace, you can
create a guest network for them. In addition, you can customize guest network options
to ensure network security and privacy.
It contains the following sections:
• Create a Network for Guests
• Set Portal Authentication
• Customize Guest Network Options
Page 35

Chapter 6
Guest Network
6. 1. Create a Network for Guests
1. Visit http://tplinkwifi.net, and log in with your TP-Link ID or the password you set for
the router.
2. Go to Advanced > Guest Network. Locate the Wireless section.
3. Create a guest network as needed.
1 ) Tick the Enable Guest Network checkbox for the 2.4GHz/5GHz-1/5GH-2
wireless network.
2 ) Customize the SSID. Don‘t select Hide SSID unless you want your guests to
manually input the SSID for guest network access.
3 ) Set Security to WPA/WPA2 Personal, keep the default Version and Encryption
values, and customize your own password.
4. Click Save. Now your guests can access your guest network using the SSID and
password you set!
Tips: To view guest network information, go to Advanced > Status and locate the Guest Network section.
6. 2. Set Portal Authentication
Imagine that you run a small shop and provide a guest network for your customers.
You want to seize every opportunity to promote your shop, which makes portal
authentication an excellent choice. Customers will be directed to a web page for access
31
Page 36

Chapter 6
verification, on which your personalized promotion is displayed. Moreover, you can
specify a web link so that the newly connected guest will be redirected to, for example,
the official website of your shop.
1. Visit http://tplinkwifi.net, and log in with your TP-Link ID or the password you set for
the router.
2. Go to Advanced > Guest Network. Locate the Wireless section.
3. Select Portal for Security.
Guest Network
4. Select the Authentication Type.
• Simple Password – Specify a password for authentication (8-16 alphanumeric
or “_” characters are allowed).
• No Authentication – Clients can access the network without any authentication.
5. Specify the Authentication Timeout. When a guest’s authentication expires, they
have to reconnect to the network.
6. (Optional) Enable Redirect and enter the desired web link. The newly connected guest
will be redirected to the website you have specified.
7. (Optional) You can click Click to Edit to personalize the authentication page.
• Portal Title – Up to 31 characters.
• Terms of Use – Up to 1023 characters.
• Logo Image – Upload a JPG or PNG image (less than 100KB) to customize the
logo.
• Background Image – Upload a JPG or PNG image (less than 2MB) to customize
the background.
8. Click Save.
6. 3. Customize Guest Network Options
1. Visit http://tplinkwifi.net, and log in with your TP-Link ID or the password you set for
the router.
32
Page 37

Chapter 6
Guest Network
2. Go to Advanced > Guest Network. Locate the Settings section.
3. Customize guest network options according to your needs.
• Allow guests to see each other
Tick this checkbox if you want to allow the wireless clients on your guest network
to communicate with each other via methods such as network neighbors and Ping.
• Allow guests to access my local network
Tick this checkbox if you want to allow the wireless clients on your guest network
to communicate with the devices connected to your router’s LAN ports or main
network via methods such as network neighbors and Ping.
4. Click Save. Now you can ensure network security and privacy!
Tips: To view guest network information, go to Advanced > Status and locate the Guest Network section.
33
Page 38

Chapter 7
USB Settings
This chapter describes how to use the USB ports to share files, media and a printer
from the USB storage devices over your home network locally, or remotely through the
internet.
The router supports USB external flash drives, hard drives and USB printers.
It contains the following sections:
• Access the USB Storage Device
• Media Sharing
• Printer Sharing
• Time Machine
Page 39

Chapter 7
USB Settings
7. 1. Access the USB Storage Device
Insert your USB storage device into the router’s USB port and then access files stored
there locally or remotely.
Tips:
• If you use USB hubs, make sure no more than 4 devices are connected to the router.
• If the USB storage device requires using bundled external power, make sure the external power has been connected.
• If you use a USB hard drive, make sure its file system is FAT32, exFat, NTFS or HFS+.
• Before you physically disconnect a USB device from the router, safely remove it to avoid data damage: Go to Advanced
> USB Storage Device > Device Settings and click Remove.
7. 1. 1. Access the USB Device Locally
Insert your USB storage device into the router’s USB port and then refer to the following
table to access files stored on your USB storage device.
Windows
computer
Go to Computer > Network, then click the Network Server Name (TP-
SHARE by default) in the Computer section.
Note: Operations in different systems are similar. Here we take Windows 7 as an example.
35
Page 40

Chapter 7
Windows
computer
USB Settings
Open the Windows Explorer (or go to Computer) and type the server
address \\tplinkwifi.net or ftp://tplinkwifi.net in the address bar, then
press Enter.
1 ) Select Go > Connect to Server.
2 ) Type the server address smb://tplinkwifi.net.
3 ) Click Connect.
Mac
4 ) When prompted, select the Guest radio box. (If you have set up a
username and a password to deny anonymous access to the USB
disks, you should select the Registered User radio box. To learn how
to set up an account for the access, refer to To set up authentication
for data security:.)
Tablet
Tips: You can also access your USB disk by using your Network/Media Server Name as the server address. Refer to
To customize the address of the USB disk: to learn more.
Use a third-party app for network files management.
7. 1. 2. Access the USB Device Remotely
You can access your USB disk outside the local area network. For example, you can:
36
Page 41

Chapter 7
USB Settings
• Share photos and other large files with your friends without logging in to (and paying
for) a photo-sharing site or email system.
• Get a safe backup for the materials for a presentation.
• Remove the files on your camera’s memory card from time to time during the journey.
Note: If your ISP assigns a private WAN IP address (such as 192.168.x.x or 10.x.x.x), you cannot use this feature
because private addresses are not routed on the Internet.
Follow the steps below to configure remote access settings.
1. Visit http://tplinkwifi.net, and log in with your TP-Link ID or the password you set for
the router.
2. Go to Advanced > USB Sharing > USB Storage Device.
3. Tick the FTP(Via Internet) checkbox, and then click Save.
4. Refer to the following table to access your USB disk remotely.
37
Page 42

Chapter 7
Computer
USB Settings
1 ) Open the Windows Explorer (or go to Computer, only for Windows
users) or open a web browser.
2 ) Type the server address in the address bar:
Type in ftp://<WAN IP address of the router>:<port number> (such
as ftp://59.40.2.243:21). If you have specified the domain name
of the router, you can also type in ftp://<domain name>:<port
number> (such as ftp://MyDomainName:21)
3 ) Press Enter on the keyboard.
4 ) Access with the username and password you set in To set up
authentication for data security:.
Tips: You can also access the USB disk via a third-party app for network files management,
which can resume broken file transfers.
Tablet
Tips: Click Set Up a Dynamic DNS Service Account to learn how to set up a domain name for you router.
Use a third-party app for network files management.
7. 1. 3. Customize the Access Settings
By default, all the network clients can access all folders on your USB disk. You can
customize your sharing settings by setting a sharing account, sharing specific contents
and setting a new sharing address on the router’s web management page.
1. Visit http://tplinkwifi.net, and log in with your TP-Link ID or the password you set for
the router.
2. Go to Advanced > USB Sharing > USB Storage Device.
¾ To customize the address of the USB disk:
You can customize the server name and use the name to access your USB disk.
1. In the Access Address section, make sure Network Neighborhood is ticked, and
enter a Network/Media Server Name as you like, such as MyShare, then click Save.
38
Page 43

Chapter 7
USB Settings
2. Now you can access the USB disk by visiting \\MyShare (for Windows) or smb://
MyShare (for Mac).
¾ To only share specific content:
1. Focus on the Sharing Contents and Security section. Click the
button to specify
sharing folders and click Save.
2. Decide the way you share the folder:
• Access Authentication: Tick to enable access authentication for sharing
folders, and you will be required to log in to the Sharing Account to access the
USB disk. Refer to To customize the address of the USB disk: to learn more.
• Enable Media Sharing: Tick to enable media sharing for sharing folders, and you
can view photos, play music and watch movies stored on the USB disk directly
from DLNA-supported devices. Click Media Sharing to learn more.
39
Page 44

Chapter 7
USB Settings
¾ To set up authentication for data security:
You can set up authentication for your USB device so that network clients will be
required to enter username and password when accessing the USB disk.
In the Sharing Contents and Security part, enable Access Authentication. The default
accounts are admin and visit. Click
Note: For Windows users, do not set the sharing username the same as the Windows username. Otherwise, Windows
credential mechanism may cause the following problems:
• If the sharing password is also the same as the Windows password, authentication will not work since the Windows
will automatically use its account information for USB access.
• If the sharing password is different from the Windows password, the Windows will be unable to remember your
credentials and you will always be required to enter the sharing password for USB access.
• Due to Windows credential mechanism, you might be unable to access the USB disk after changing Authentication
settings. Please log out from the Windows and try to access again. Or you can change the address of the USB disk by
referring to To customize the address of the USB disk:.
to customize the username and a password.
7. 2. Media Sharing
The feature of Media Sharing allows you to view photos, play music and watch movies
stored on the USB disk directly from DLNA-supported devices, such as your computer,
tablet and PS2/3/4.
1. When your USB disk is inserted into the router, your DLNA-supported devices (such
as your computer and pad) connected to the router can detect and play the media
files on the USB disks.
2. Refer to the following table for detailed instructions.
40
Page 45

Chapter 7
Windows
Computer
• Go to Computer > Network, then click the Media Server Name (Model
number-share by default) in the Media Devices section.
Note: Here we take Windows 7 as an example.
USB Settings
Tablet
• Use a third-party DLNA-supported player.
7. 3. Printer Sharing
The feature of Printer Sharing helps you share a printer with different computers
connected to the router.
Note: Printers unlisted on this page may be incompatible with the router:
http://www.tp-link.com/common/compatible/print-server/.
1. Install the Driver of the Printer
Make sure you have installed the driver of the printer on each computer that needs
printer service.
If you do not have the driver, contact the printer manufacturer.
2. Connect the Printer
Connect a printer to the USB port with the USB cable. Wait several seconds until the
USB LED becomes solid on.
3. Install the TP-Link USB Printer Controller Utility
TP-Link USB Printer Controller Utility helps you access the shared printer. Download
and install the utility on each computer that needs printer service.
1 ) Visit http://www.tp-link.com/app/usb/.
41
Page 46

Chapter 7
USB Settings
2 ) Click PC Utility (for Windows users) or Mac Utility to download the installation
file and uncompress it.
3 ) Open the uncompressed folder, then click TP-Link USB Printer Controller Setup
(for Windows users) or TP-Link UDS Printer Controller Installer (for Mac users)
to install the utility.
4. Access the Printer
You should set the shared printer as Auto-Connect Printer on every computer that
needs printer service.
1 ) Double- click the icon
on your desktop to launch the USB Printer Controller.
2 ) Highlight the printer you share.
Windows
Mac
3 ) Click the Auto-Connect for Printing tab to pull down a list, then select Set Auto-
Connect Printer.
42
Page 47

Chapter 7
Windows
Mac
4 ) Select the printer you share, then click Apply.
USB Settings
Windows
43
Page 48

Chapter 7
USB Settings
Mac
5 ) You will see the printer marked as Auto-Connect Printer. Now you can print with
this printer.
Windows
Mac
Tips: The Print Server also allows different clients to share the scan feature of MFPs (Multi-Function Printers).
To scan with TP-Link USB Printer Controller, right-click the printer and select Network Scanner. Then, a scanning
window will pop up. Finish the scanning process by following on-screen instructions.
44
Page 49

Chapter 7
USB Settings
7. 4. Time Machine
Time Machine backs up all files on your Mac computer to a USB storage device
connected to your router.
1. Visit http://tplinkwifi.net, and log in with your TP-Link ID or the password you set for
the router.
2. Go to Advanced > USB Sharing > Time Machine.
3. Tick the checkbox to enable Time Machine.
4. Click Select to select a location for Time Machine backups.
5. Set the Size Limit for Backups.
Note: 0 means no limit for the space.
6. Click Save.
45
Page 50

Chapter 8
HomeCare – Parental Controls, QoS, Antivirus
TP-Link HomeCareTM powered by Trend MicroTM provides a kit of features to help
you create a personalized network that caters for the whole family. You can ensure
appropriate internet access for everyone with Parental Controls, save bandwidth for
the things that matter with QoS and keep your network secure with built-in Antivirus.
It contains the following sections:
• Parental Controls
• QoS
• Antivirus
Page 51

Chapter 8
HomeCare – Parental Controls, QoS, Antivirus
8. 1. Parental Controls
Parental Controls allows you to set up unique restrictions on internet access for each
member of your family. You can block inappropriate content, set daily limits for the total
time spent online and restrict internet access to certain times of the day.
8. 1. 1. Scenario 1: Setting Up Access Restrictions
I want to:
How can I
do that?
Block access to inappropriate online content for my child’s
devices, restrict internet access to 2 hours every day and block
internet access during bed time (10 PM to 7 AM) on weekdays.
1. Visit http://tplinkwifi.net, and log in with your TP-Link ID or
the password you set for the router.
2. Go to Basic > HomeCare > Parental Controls or Advanced >
Parental Controls.
3. Click
4. Add basic profile information.
to create a profile for a family member.
1 ) Enter a Name for the profile to make it easier to identify.
2 ) Under Devices, click
3 ) Select the devices that belong to this family member.
Access restrictions will be applied to these devices. Click
Add when finished.
.
47
Page 52

Chapter 8
Note: Only devices that have previously been connected to your router’s network
are listed here. If you are unable to find the device you want to add, connect it to your
network and then try again.
HomeCare – Parental Controls, QoS, Antivirus
4 ) Click Next.
5. Block content for this profile.
1 ) Select a filter level based on the age of the family member
this profile belongs to. Blocked content will then be
displayed in the Filter Content list.
2 ) If needed, you can edit the blocked content by clicking
and to move categories between the Filter Content
and Available Categories lists.
3 ) You can also block a specific website or application
by clicking
next to Filter Content. Enter a keyword
(for example, “Facebook”) or a URL (for example,
“www.facebook.com”), then click Add.
48
Page 53

Chapter 8
4 ) Click Next.
6. Set time restrictions on internet access.
HomeCare – Parental Controls, QoS, Antivirus
1 ) Enable Time Limits on Monday to Friday and Saturday &
Sunday then set the allowed online time to 2 hours each
day.
2 ) Enable Bed Time on Monday to Friday and use the up/
down arrows or enter times in the fields. Devices under
this profile will be unable to access the internet during
this time period.
3 ) Click Save.
Done!
The amount of time your child spends online is controlled and
inappropriate content is blocked on their devices.
8. 1. 2. Scenario 2: Monitoring Internet Usage
I want to:
How can I
do that?
Check which websites my child has visited and how much time
they have spent online recently.
1. Visit http://tplinkwifi.net, and log in with your TP-Link ID or
the password you set for the router.
49
Page 54

Chapter 8
HomeCare – Parental Controls, QoS, Antivirus
2. Go to Basic > HomeCare > Parental Controls or Advanced >
Parental Controls.
3. Find the correct profile and click in the Insights column.
Note: If you have not set up a profile for your child yet, you should do that first by
clicking , then follow the steps to create a profile. Refer to Scenario 1: Setting Up
Access Restrictions for detailed instructions.
4. Use the drop-down menu to view the websites visited and
time spent online for any of the last 7 days. Click
to view a
complete history.
Tips: Click to block the corresponding content for this profile.
Done!
You can now check up on your child’s online activities.
8. 2. QoS
QoS (Quality of Service) allows you to prioritize the internet traffic of specific online
activities, such as gaming or streaming. Activities set as high priority will be allocated
more bandwidth and so continue to run smoothly even when there is heavy traffic on
the network. You can also prioritize the connection of specific devices for a set duration.
I want to:
Ensure a fast connection while I play online games with friends
on my computer for the next 2 hours.
How can I
do that?
1. Visit http://tplinkwifi.net, and log in with your TP-Link ID or
the password you set for the router.
2. Go to Basic > HomeCare > QoS or Advanced > QoS.
50
Page 55

Chapter 8
3. In the Application Priority tab, click Gaming to prioritize this
online activity. The default is Standard, with no application
prioritized.
4. In the Device Priority tab, find your computer and toggle on
Priority. Click the entry in the Timing column and select 2
hours as the duration you want the device to be prioritized
fo r.
HomeCare – Parental Controls, QoS, Antivirus
Done!
Yo u can now enjoy playing games without lag on your computer
for the next 2 hours.
8. 3. Antivirus
Your router supports built-in Antivirus powered by Trend MicroTM. It provides malicious
content filtering and intrusion prevention for your home network, as well as a quarantine
for infected devices. An active database protects every connected device from external
threats.
Antivirus includes the following protection:
• Malicious Content Filter
Blocks malicious websites listed in Micro Trend’s database. The database is automatically
updated so new malicious websites are blocked when they go live.
• Intrusion Prevention System
51
Page 56

Chapter 8
HomeCare – Parental Controls, QoS, Antivirus
Identifies and blocks potential threats from attackers and fixes vulnerabilities in the
network.
• Infected Device Quarantine
Prevents infected devices from sending your sensitive information to clients outside
your network or spreading security threats.
¾ To access your router’s Antivirus settings:
1. Visit http://tplinkwifi.net, and log in with your TP-Link ID or the password you set for
the router.
2. Go to Basic > HomeCare > Antivirus or Advanced > Security > Antivirus.
3. Choose the protection types you want to enable. It is recommended to keep them all
enabled to ensure the best protection for your network.
4. Click
to view threats that have been detected and resolved.
52
Page 57

Chapter 9
Network Security
This chapter guides you on how to protect your home network from cyber attacks
and unauthorized users by implementing these three network security functions. You
can protect your home network against DoS (Denial of Service) attacks from flooding
your network with server requests using DoS Protection, block or allow specific client
devices to access your network using Access Control, or you can prevent ARP spoofing
and ARP attacks using IP & MAC Binding.
It contains the following sections:
• Protect the Network from Cyber Attacks
• Access Control
• IP & MAC Binding
Page 58

Chapter 9
Network Security
9. 1. Protect the Network from Cyber Attacks
The SPI (Stateful Packet Inspection) Firewall protects the router from cyber attacks
and validate the traffic that is passing through the router based on the protocol. This
function is enabled by default.
1. Visit http://tplinkwifi.net, and log in with your TP-Link ID or the password you set for
the router.
2. Go to Advanced > Security > Firewall. It’s recommended to keep the default settings.
If necessary, deselect corresponding checkbox and click Save.
9. 2. Access Control
Access Control is used to block or allow specific client devices to access your network
(via wired or wireless) based on a list of blocked devices (Blacklist) or a list of allowed
devices (Whitelist).
I want to:
How can I
do that?
Block or allow specific client devices to access my network (via
wired or wireless).
1. Visit http://tplinkwifi.net, and log in with your TP-Link ID or
the password you set for the router.
2. Go to Advanced > Security > Access Control.
3. Enable Access Control.
4. Select the access mode to either block (recommended) or
allow the device(s) in the list.
To block specific device(s):
1 ) Select Blacklist and click Save.
54
Page 59

Chapter 9
Network Security
2 ) Select the device(s) to be blocked in the Online Devices
table by ticking the checkbox(es).
3 ) Click Block above the Online Devices table. The selected
devices will be added to Devices in Blacklist automatically.
To allow specific device(s):
1 ) Select Whitelist and click Save.
2 ) Click Add in the Devices in Whitelist section. Enter the
Device Name and MAC Address (You can copy and paste
the information from the Online Devices list if the device
is connected to your network).
Done!
3 ) Click OK.
Now you can block or allow specific client devices to access your
network (via wired or wireless) using the Blacklist or Whitelist.
55
Page 60

Chapter 9
Network Security
9. 3. IP & MAC Binding
IP & MAC Binding, namely, ARP (Address Resolution Protocol) Binding, is used to bind
network device’s IP address to its MAC address. This will prevent ARP Spoofing and
other ARP attacks by denying network access to an device with matching IP address in
the Binding list, but unrecognized MAC address.
I want to:
How can I
do that?
Prevent ARP spoofing and ARP attacks.
1. Visit http://tplinkwifi.net, and log in with your TP-Link ID or
the password you set for the router.
2. Go to Advanced > Security > IP & MAC Binding.
3. Enable IP&MAC Binding.
4. Bind your device(s) according to your need.
To bind the connected device(s):
Click
To bind the unconnected device:
1 ) Click Add in the Binding List section.
to add the corresponding device to the Binding List.
Done!
2 ) Enter the MAC address and IP address that you want to
bind. Enter a Description for this binding entry.
3 ) Tick the Enable This Entry checkbox and click OK.
Now you don’t need to worry about ARP spoofing and ARP
attacks!
56
Page 61

Chapter 10
NAT Forwarding
The router’s NAT (Network Address Translation) feature makes devices on the LAN use
the same public IP address to communicate with devices on the internet, which protects
the local network by hiding IP addresses of the devices. However, it also brings about
the problem that an external host cannot initiatively communicate with a specified
device on the local network.
With the forwarding feature the router can penetrate the isolation of NAT and allows
devices on the internet to initiatively communicate with devices on the local network,
thus realizing some special functions.
The TP-Link router supports four forwarding rules. If two or more rules are set, the
priority of implementation from high to low is Virtual Servers, Port Triggering, UPNP and
DMZ.
It contains the following sections:
• Share Local Resources on the Internet by Virtual Servers
• Open Ports Dynamically by Port Triggering
• Make Applications Free from Port Restriction by DMZ
• Make Xbox Online Games Run Smoothly by UPnP
Page 62

Chapter 10
NAT Forwarding
10. 1. Share Local Resources on the Internet by Virtual Servers
When you build up a server on the local network and want to share it on the internet,
Virtual Servers can realize the service and provide it to internet users. At the same time
Virtual Servers can keep the local network safe as other services are still invisible from
the internet.
Virtual Servers can be used for setting up public services on your local network, such as
HTTP, FTP, DNS, POP3/SMTP and Telnet. Different services use different service ports.
Port 80 is used in HTTP service, port 21 in FTP service, port 25 in SMTP service and port
110 in POP3 service. Please verify the service port number before the configuration.
I want to:
How can I
do that?
Share my personal website I’ve built in local network with my
friends through the internet.
For example, the personal website has been built on my home
PC (192.168.0.100). I hope that my friends on the internet can
visit my website in some way. The PC is connected to the router
with the WAN IP address 218.18.232.154.
Personal Website
Home
1. Assign a static IP address to your PC, for example
192.168.0.100.
2. Visit http://tplinkwifi.net, and log in with your TP-Link ID or
the password you set for the router.
3. Go to Advanced > NAT Forwarding > Virtual Servers.
Router
INTERNET
WAN: 218.18.232.154LAN
4. Click Add. Click View Existing Services and select HTTP. The
External Port, Internal Port and Protocol will be automatically
filled in. Enter the PC’s IP address 192.168.0.100 in the
Internal IP field.
5. Click OK.
58
Page 63

Chapter 10
Tips:
• It is recommended to keep the default settings of Internal Port and Protocol if you are
not clear about which port and protocol to use.
• If the service you want to use is not in the Service Type, you can enter the
corresponding parameters manually. You should verify the port number that the
service needs.
• You can add multiple virtual server rules if you want to provide several services in a
router. Please note that the External Port should not be overlapped.
NAT Forwarding
Done!
Users on the internet can enter http:// WAN IP (in this example:
http:// 218.18.232.154) to visit your personal website.
Tips:
• The WAN IP should be a public IP address. For the WAN IP is assigned dynamically by
the ISP, it is recommended to apply and register a domain name for the WAN referring
to Set Up a Dynamic DNS Service Account. Then users on the internet can use
http:// domain name to visit the website.
• If you have changed the default External Port, you should use
http:// WAN IP: External Port or http:// domain name: External Port to visit the website.
10. 2. Open Ports Dynamically by Port Triggering
Port Triggering can specify a triggering port and its corresponding external ports.
When a host on the local network initiates a connection to the triggering port, all the
external ports will be opened for subsequent connections. The router can record the
IP address of the host. When the data from the internet return to the external ports, the
router can forward them to the corresponding host. Port Triggering is mainly applied to
online games, VoIPs, video players and common applications including MSN Gaming
Zone, Dialpad and Quick Time 4 players, etc.
Follow the steps below to configure the Port Triggering rules:
1. Visit http://tplinkwifi.net, and log in with your TP-Link ID or the password you set for
the router.
2. Go to Advanced > NAT Forwarding > Port Triggering and click Add.
59
Page 64

Chapter 10
NAT Forwarding
3. Click View Existing Applications, and select the desired application. The Triggering
Port, External Port and Protocol will be automatically filled in. The following picture
takes application MSN Gaming Zone as an example.
4. Click OK.
Tips:
• You can add multiple port triggering rules according to your network need.
• The triggering ports can not be overlapped.
• If the application you need is not listed in the Existing Applications list, please enter the parameters manually. You
should verify the external ports the application uses first and enter them into External Port field according to the
format the page displays.
10. 3. Make Applications Free from Port Restriction
by DMZ
When a PC is set to be a DMZ (Demilitarized Zone) host on the local network, it is totally
exposed to the internet, which can realize the unlimited bidirectional communication
between internal hosts and external hosts. The DMZ host becomes a virtual server with
all ports opened. When you are not clear about which ports to open in some special
applications, such as IP camera and database software, you can set the PC to be a DMZ
host.
60
Page 65

Chapter 10
Note: When DMZ is enabled, the DMZ host is totally exposed to the internet, which may bring some potential safety
hazards. If DMZ is not in use, please disable it in time.
NAT Forwarding
I want to:
How can I
do that?
Make the home PC join the internet online game without port
restriction.
For example, due to some port restriction, when playing the
online games, you can login normally but cannot join a team with
other players. To solve this problem, set your PC as a DMZ host
with all ports open.
1. Assign a static IP address to your PC, for example
192.168.0.100.
2. Visit http://tplinkwifi.net, and log in with your TP-Link ID or
the password you set for the router.
3. Go to Advanced > NAT Forwarding > DMZ and select Enable
DMZ.
4. Enter the IP address 192.168.0.100 in the DMZ Host IP
Address filed.
5. Click Save.
Done!
The configuration is completed. You’ve set your PC to a DMZ
host and now you can make a team to game with other players.
10. 4. Make Xbox Online Games Run Smoothly by UPnP
The UPnP (Universal Plug and Play) protocol allows applications or host devices
to automatically find the front-end NAT device and send request to it to open the
corresponding ports. With UPnP enabled, the applications or host devices on the
local network and the internet can freely communicate with each other thus realizing
the seamless connection of the network. You may need to enable the UPnP if you
want to use applications for multiplayer gaming, peer-to-peer connections, real-time
communication (such as VoIP or telephone conference) or remote assistance, etc.
61
Page 66

Chapter 10
Tips:
• UPnP is enabled by default in this router.
• Only the application supporting UPnP protocol can use this feature.
• UPnP feature needs the support of operating system (e.g. Windows Vista/ Windows 7/ Windows 8, etc. Some of
operating system need to install the UPnP components).
NAT Forwarding
For example, when you connect your Xbox to the router which has connected to
the internet to play online games, UPnP will send request to the router to open the
corresponding ports allowing the following data penetrating the NAT to transmit.
Therefore, you can play Xbox online games without a hitch.
LAN WAN
Internet
XBOX Router
If necessary, you can follow the steps to change the status of UPnP.
1. Visit http://tplinkwifi.net, and log in with your TP-Link ID or the password you set for
the router.
2. Go to Advanced > NAT Forwarding > UPnP and toggle on or off according to your
needs.
62
Page 67

Chapter 11
VPN Server
The VPN (Virtual Private Networking) Server allows you to access your home network in
a secured way through internet when you are out of home. The router offers two ways
to setup VPN connection: OpenVPN and PPTP (Point to Point Tunneling Protocol) VPN.
OpenVPN is somewhat complex but with greater security and more stable. It is suitable
for restricted environment, such as campus network and company intranet.
PPTP VPN is more easily used and its speed is faster, it’s compatible with most
operating systems and also supports mobile devices. Its security is poor and your
packets may be cracked easily, and PPTP VPN connection may be prevented by some
ISP.
It contains the following sections, please choose the appropriate VPN server
connection type as needed.
• Use OpenVPN to Access Your Home Network
• Use PPTP VPN to Access Your Home Network
Page 68

Chapter 11
VPN Server
11. 1. Use OpenVPN to Access Your Home Network
In the OpenVPN connection, the home network can act as a server, and the remote
device can access the server through the router which acts as an OpenVPN Server
gateway. To use the VPN feature, you should enable OpenVPN Server on your router,
and install and run VPN client software on the remote device. Please follow the steps
below to set up an OpenVPN connection.
Step1. Set up OpenVPN Server on Your Router
1. Visit http://tplinkwifi.net, and log in with your TP-Link ID or the password you set for
the router.
2. Go to Advanced > VPN Server > OpenVPN, and select Enable VPN Server.
Note:
• Before you enable VPN Server, we recommend you configure Dynamic DNS Service (recommended) or assign a
static IP address for router’s WAN port and synchronize your System Time with internet.
• The first time you configure the OpenVPN Server, you may need to Generate a certificate before you enable the VPN
Server.
3. Select the Servive Type (communication protocol) for OpenVPN Server: UDP, TCP.
4. Enter a VPN Service Port to which a VPN device connects, and the port number
should be between 1024 and 65535.
5. In the VPN Subnet/Netmask fields, enter the range of IP addresses that can be leased
to the device by the OpenVPN server.
64
Page 69

Chapter 11
VPN Server
6. Select your Client Access type. Select Home Network Only if you only want the
remote device to access your home network; select Internet and Home Network if
you also want the remote device to access internet through the VPN Server.
7. Click Save.
8. Click Generate to get a new certificate.
Note: If you have already generated one, please skip this step, or click Generate to update the certificate.
9. Click Export to save the OpenVPN configuration file which will be used by the remote
device to access your router.
Step 2. Configure OpenVPN Connection on Your Remote Device
1. Visit http://openvpn.net/index.php/download/community-downloads.html to
download the OpenVPN software, and install it on your device where you want to run
the OpenVPN client utility.
Note: You need to install the OpenVPN client utility on each device that you plan to apply the VPN funxtion to access
your router. Mobile devices should download a third-party app from Google Play or Apple App Store.
2. After the installation, copy the file exported from your router to the OpenVPN client
utility’s “config” folder (for example, C:\Program Files\OpenVPN\config on Windows).
The path depends on where the OpenVPN client utility is installed.
3. Run the OpenVPN client utility and connect it to OpenVPN Server.
11. 2. Use PPTP VPN to Access Your Home Network
PPTP VPN Server is used to create a VPN connection for remote device. To use the VPN
feature, you should enable PPTP VPN Server on your router, and configure the PPTP
connection on the remote device. Please follow the steps below to set up a PPTP VPN
connection.
Step 1. Set up PPTP VPN Server on Your Router
1. Visit http://tplinkwifi.net, and log in with your TP-Link ID or the password you set for
the router.
2. Go to Advanced > VPN Server > PPTP VPN, and select Enable VPN Server.
65
Page 70

Chapter 11
Note: Before you enable VPN Server, we recommend you configure Dynamic DNS Service (recommended) or assign a
static IP address for router’s WAN port and synchronize your System Time with internet.
VPN Server
3. In the Client IP Address filed, enter the range of IP addresses (up to 10) that can be
leased to the devices by the PPTP VPN server.
4. Click Advanced to set the PPTP connection permission according to your needs.
• Select Allow Samba (Network Place) access to allow your VPN device to access
your local Samba server.
• Select Allow NetBIOS passthrough to allow your VPN device to access your
Samba server using NetBIOS name.
• Select Allow Unencrypted connections to allow unencrypted connections to
your VPN server.
5. Click Save.
6. Configure the PPTP VPN connection account for the remote device, you can create
up to 16 accounts.
1 ) Click Add.
66
Page 71

Chapter 11
VPN Server
2 ) Enter the Username and Password to authenticate devices to the PPTP VPN
Server.
3 ) Click OK.
Step 2. Configure PPTP VPN Connection on Your Remote Device
The remote device can use the Windows built-in PPTP software or a third-party PPTP
software to connect to PPTP Server. Here we use the Windows built-in PPTP software
as an example.
1. Go to Start > Control Panel > Network and Internet > Network and Sharing Center.
2. Select Set up a new connection or network.
3. Select Connect to a workplace and click Next.
67
Page 72

Chapter 11
VPN Server
4. Select Use my Internet connection (VPN).
5. Enter the internet IP address of the router (for example: 218.18.1.73) in the Internet
address field. Click Next.
68
Page 73

Chapter 11
VPN Server
6. Enter the User name and Password you have set for the PPTP VPN server on your
router, and click Connect.
7. The PPTP VPN connection is created and ready to use.
69
Page 74

Chapter 11
VPN Server
70
Page 75

Chapter 12
Customize Your Network Settings
This chapter guides you on how to configure advanced network features.
It contains the following sections:
• Change the LAN Settings
• Set Up Link Aggregation
• Configure to Support IPTV Service
• Specify DHCP Server Settings
• Set Up a Dynamic DNS Service Account
• Create Static Routes
• Specify Wireless Settings
• Use WPS for Wireless Connection
• Schedule Your Wireless Function
Page 76

Chapter 12
Customize Your Network Settings
12. 1. Change the LAN Settings
The router is preset with a default LAN IP 192.168.0.1, which you can use to log in to
its web management page. The LAN IP address together with the Subnet Mask also
defines the subnet that the connected devices are on. If the IP address conflicts with
another device on your local network or your network requires a specific IP subnet, you
can change it.
1. Visit http://tplinkwifi.net, and log in with your TP-Link ID or the password you set for
the router.
2. Go to Advanced > Network > LAN.
3. Type in a new IP Address appropriate to your needs. And leave the Subnet Mask as
the default settings.
4. Click Save.
Note: If you have set the Virtual Server, DMZ or DHCP address reservation, and the new LAN IP address is not in the
same subnet with the old one, then you should reconfigure these features.
12. 2. Set Up Link Aggregation
The Link Aggregation feature combines two ports together to make a single
highbandwidth data path, thus sustaining a higher-speed and more stable wired
network.
1. Visit http://tplinkwifi.net, and log in with your TP-Link ID or the password you set for
the router.
2. Go to Advanced > Network > LAN.
3. Tick the Enable checkbox to enable Link Aggregation.
72
Page 77

Chapter 12
4. Specify two ports for Link Aggregation.
Note: LAN ports used for IPTV or WAN aggregation cannot be selected.
Customize Your Network Settings
5. Click Save.
12. 3. Configure to Support IPTV Service
I want to:
How can
I do that?
Configure IPTV setup to enable Internet/IPTV/Phone service
provided by my internet service provider (ISP).
1. Visit http://tplinkwifi.net, and log in with your TP-Link ID or
the password you set for the router.
2. Go to Advanced > Network > IPTV.
3. If your ISP provides the networking service based on IGMP
technology, e.g., British Telecom(BT) and Talk Talk in UK:
1 ) Tick the IGMP Proxy checkbox and select the IGMP
Version, either V2 or V3, as required by your ISP.
2 ) Click Save.
73
Page 78

Chapter 12
Customize Your Network Settings
3 ) After configuring IGMP proxy, IPTV can work behind your
router now. You can connect your set-top box to any of
the router’s Ethernet port.
If IGMP is not the technology your ISP applies to provide
IPTV service:
1 ) Tick Enable IPTV.
2 ) Select the appropriate Mode according to your ISP.
• Select Bridge if your ISP is not listed and no other
parameters are required.
• Select Custom if your ISP is not listed but provides
necessary parameters.
3 ) After you have selected a mode, the necessary
parameters, including the LAN port for IPTV connection,
are predetermined. If not, select the LAN type to
determine which port is used to support IPTV service.
4 ) Click Save.
5 ) Connect the set-top box to the corresponding LAN port
which is predetermined or you have specified in Step 3.
Done!
Your IPTV setup is done now! You may need to configure your
set-top box before enjoying your TV.
Tips: Qos and IPTV cannot be enabled at the same time.
12. 4. Specify DHCP Server Settings
By default, the DHCP (Dynamic Host Configuration Protocol) Server is enabled and
the router acts as a DHCP server; it dynamically assigns TCP/IP parameters to client
devices from the IP Address Pool. You can change the settings of the DHCP Server if
necessary, and you can reserve LAN IP addresses for specified client devices.
1. Visit http://tplinkwifi.net, and log in with your TP-Link ID or the password you set for
the router.
74
Page 79

Chapter 12
2. Go to Advanced > Network > DHCP Server.
¾ To specify the IP address that the router assigns:
1. Tick the Enable DHCP Server checkbox.
Customize Your Network Settings
2. Enter the starting and ending IP addresses in the IP Address Pool.
3. Enter other parameters if the ISP offers. The Default Gateway is automatically filled in
and is the same as the LAN IP address of the router.
4. Click Save.
¾ To reserve an IP address for a specified client device:
1. Click Add in the Address Reservation section.
2. Click View Exsiting Devices or enter the MAC address of the client device.
3. Enter the IP address to reserve for the client device.
75
Page 80

Chapter 12
Customize Your Network Settings
4. Enter the Description for this entry.
5. Tick the Enable This Entry checkbox and click OK.
12. 5. Set Up a Dynamic DNS Service Account
Most ISPs assign a dynamic IP address to the router and you can use this IP address
to access your router remotely. However, the IP address can change from time to time
and you don’t know when it changes. In this case, you might apply the DDNS (Dynamic
Domain Name Server) feature on the router to allow you and your friends to access your
router and local servers (FTP, HTTP, etc.) using a domain name without checking and
remembering the IP address.
Note: DDNS does not work if the ISP assigns a private WAN IP address (such as 192.168.1.x) to the router.
1. Visit http://tplinkwifi.net, and log in with your TP-Link ID or the password you set for
the router.
2. Go to Advanced > Network > Dynamic DNS.
3. Select the DDNS Service Provider: TP-Link, NO-IP or DynDNS. It is recommended
to select TP-Link so that you can enjoy TP-Link’s superior DDNS service. Otherwise,
please select NO-IP or DynDNS. If you don’t have a DDNS account, you have to
register first by clicking Go to register.
Note: To enjoy TP-Link’s DDNS service, you have to log in with a TP-Link ID. If you have not logged in with one, click
Log in.
76
Page 81

Chapter 12
Customize Your Network Settings
4. Click Register in the Domain Name List if you have selected TP-Link, and enter the
Domain Name as needed.
If you have selected NO-IP or DynDNS, enter the username, password and domain
name of your account.
5. Click Login and Save.
Tips: If you want to use a new DDNS account, please click Logout first, and then log in with a new account.
12. 6. Create Static Routes
Static routing is a form of routing that is configured manually by a network administrator
or a user by adding entries into a routing table. The manually-configured routing
information guides the router in forwarding data packets to the specific destination.
I want to:
Visit multiple networks and servers at the same time.
For example, in a small office, my PC can surf the internet through
Router A, but I also want to visit my company’s network. Now I
have a switch and Router B. I connect the devices as shown in
77
Page 82

Chapter 12
Customize Your Network Settings
the following figure so that the physical connection between my
PC and my company’s server is established. To surf the internet
and visit my company’s network at the same time, I need to
configure the static routing.
How can
I do that?
Router A
LAN: 192.168.0.1
Switch
192.168.0.100
Router B
WAN: 172.30.30.100
LAN: 192.168.0.2
PC
Company’s server
172.30.30.1
1. Change the routers’ LAN IP addresses to two different IP
addresses on the same subnet. Disable Router B’s DHCP
function.
2. Visit http://tplinkwifi.net, and log in with your TP-Link ID or
the password you set for Router A.
3. Go to Advanced > Network > Static Routing.
4. Click Add and finish the settings according to the following
explanations:
Network Destination: The destination IP address that you want
to assign to a static route. This IP address cannot be on the same
78
Page 83

Chapter 12
subnet with the WAN IP or LAN IP of Router A. In the example,
the IP address of the company network is the destination IP
address, so here enter 172.30.30.1.
Subnet Mask: Determines the destination network with the
destination IP address. If the destination is a single IP address,
enter 255.255.255.255; otherwise, enter the subnet mask of
the corresponding network IP. In the example, the destination
network is a single IP, so here enter 255.255.255.255.
Default Gateway: The IP address of the gateway device to which
the data packets will be sent. This IP address must be on the
same subnet with the router’s IP which sends out data. In the
example, the data packets will be sent to the LAN port of Router
B and then to the Server, so the default gateway should be
192.168.0.2.
Interface: Determined by the port (WAN/LAN) that sends out
data packets. In the example, the data are sent to the gateway
through the LAN port of Router A, so LAN should be selected.
Customize Your Network Settings
Description: Enter a description for this static routing entry.
5. Click OK.
6. Check the System Routing Table below. If you can find the
entry you’ve set, the static routing is set successfully.
Done!
Open a web browser on your PC. Enter the company server’s IP
address to visit the company network.
12. 7. Specify Wireless Settings
The router’s wireless network name (SSID) and password, and security option are preset
in the factory. The preset SSID and password can be found on the label of the router.
You can customize the wireless settings according to your needs.
Visit http://tplinkwifi.net, and log in with your TP-Link ID or the password you set for the
router.
¾ To enable or disable the wireless function:
79
Page 84

Chapter 12
Customize Your Network Settings
1. Go to Basic > Wireless.
2. The wireless radio is enabled by default. If you want to disable the wireless function
of the router, just untick the Enable Wireless Radio checkbox. In this case, all the
wireless settings will be invalid.
¾ To change the wireless network name (SSID) and wireless password:
1. Go to Basic > Wireless.
2. Create a new SSID in Network Name (SSID) and customize the password for the
network in Password. The value is case-sensitive.
Note: If you change the wireless settings with a wireless device, you will be disconnected when the settings are
effective. Please write down the new SSID and password for future use.
¾ To hide SSID:
1. Go to Basic > Wireless.
2. Select Hide SSID, and your SSID won’t display when you scan for local wireless
networks on your wireless device and you need to manually join the network.
¾ To use the smart connect function:
The smart connect function lets you to enjoy a more high-speed network by assigning
your devices to best wireless bands based on actual conditions to balance network
demands.
1. Go to Advanced > Wireless > Wireless Settings.
2. Enable Smart Connect.
3. Keep the default values or set a new SSID and password, and click Save. This SSID
and password will be applied for the 2.4GHz and 5GHz wireless networks.
¾ To change the security option:
1. Go to Advanced > Wireless > Wireless Settings.
2. Select the wireless network 2.4GHz, 5GHz-1 or 5GHz-2.
3. Select an option from the Security drop-down list. We recommend you don’t change
the default settings unless necessary. If you select other options, configure the
related parameters according to the help page.
In addition
• Mode - Select a transmission mode according to your wireless client devices. It is
recommended to just leave it as default.
80
Page 85

Chapter 12
• Channel Width - Select a channel width (bandwidth) for the wireless network.
• Channel - Select an operating channel for the wireless network. It is recommended
to leave the channel to Auto, if you are not experiencing the intermittent wireless
connection issue.
• Transmit Power - Select either High, Middle or Low to specify the data transmit power.
The default and recommended setting is High.
¾ To enable the Airtime Fairness feature:
The Airtime Fairness feature can improve the overall network performace by sacrificing
a little bit of network time on your slow devices. Enable Airtime Fairness when you wish
to sacrifice some of the networking time from the slow devices, so that your faster
devices can achieve better quality of service.
For example, you have a gaming computer next to the router in the living room, and a
slower family computer upstairs. Enable the airtime fairness feature so that your gaming
computer can perform as optimally as possible.
Customize Your Network Settings
1. Go to Advanced > Wireless > Wireless Settings.
2. Select the wireless network 2.4GHz, 5GHz-1 or 5GHz-2.
3. Check the box for Enable Airtime Fairness.
4. Click Save.
12. 8. Use WPS for Wireless Connection
Wi-Fi Protected Setup (WPS) provides an easier approach to set up a security-protected
Wi-Fi connection.
1. Visit http://tplinkwifi.net, and log in with your TP-Link ID or the password you set for
the router.
2. Make sure the Wi-Fi of your router is on and go to Advanced > Wireless > WPS.
12. 8. 1. Push the WPS Button
Click Start WPS on the screen. Within two minutes, press the WPS button on your
device. Success will appear on the above screen and the
change from pulsing white to solid on, indicating successful WPS connection.
LED of the router should
81
Page 86

Chapter 12
Customize Your Network Settings
12. 8. 2. Connect via the Router’s PIN
Router’s PIN is enabled by default to allow wireless devices to connect to the router
using the PIN. You can use the default one or generate a new one.
Note:
• If you want to enable/disable the WPS feature, go to System Tools > System Parameters > WPS, tick or untick the
Enable WPS checkbox.
• PIN (Personal Identification Number) is an eight-character identification number preset to each router. WPS supported
devices can connect to your router with the PIN. The default PIN is printed on the label of the router.
12. 8. 3. Connect via the Client’s PIN
Enter the PIN of your device and click Connect. Then your device will get connected to
the router.
12. 9. Schedule Your Wireless Function
The wireless network can be automatically off at a specific time when you do not need
the wireless connection.
1. Visit http://tplinkwifi.net, and log in with your TP-Link ID or the password you set for
the router.
2. Go to Advanced > Wireless > Wireless Schedule.
3. Enable the Wireless Off Time Schedule feature.
82
Page 87

Chapter 12
Customize Your Network Settings
4. Click Add to specify a wireless off period during which you need the wireless off
automatically, and click Save.
Note:
• The Effective Time Schedule is based on the time of the router. You can go to Advanced > System Tools > Time
Settings to modify the time.
• The wireless network will be automatically turned on after the time period you set.
83
Page 88

Chapter 13
Manage the Router
This chapter will show you the configuration for managing and maintaining your router.
It contains the following sections:
• Set Up System Time
• Control the LED
• Test the Network Connectivity
• Test Your Internet Speed
• Upgrade the Firmware
• Backup and Restore Configuration Settings
• Set the Router to Reboot Regularly
• Change the Login Password
• Password Recovery
• Local Management
• Remote Management
• System Log
• Monitor the Internet Traffic Statistics
Page 89

Chapter 13
Manage the Router
13. 1. Set Up System Time
System time is the time displayed while the router is running. The system time you
configure here will be used for other time-based functions like Parental Controls. You
can choose the way to obtain the system time as needed.
1. Visit http://tplinkwifi.net, and log in with your TP-Link ID or the password you set for
the router.
2. Go to Advanced > System Tools > Time Settings.
¾ To get time from the internet:
1. In the Set Time field, select Get from the Internet.
2. Select your local Time Zone from the drop-down list.
3. In the NTP Server I fileld, enter the IP address or domain name of your desired NTP
Server.
4. (Optional) In the NTP Server II fileld, enter the IP address or domain name of the
second NTP Server.
5. Click Obtain to get the current Internet time and click Save.
¾ To get time from your computer:
1. In the Set Time field, select Get from PC.
85
Page 90

Chapter 13
2. The time of your computer will then be displayed and click Save.
¾ To manually set the date and time:
1. In the Set Time field, select Manually.
Manage the Router
2. Set the current Date (In MM/DD/YYYY format).
3. Set the current Time (In HH/MM/SS format).
4. Click Save.
¾ To set up Daylight Saving Time:
1. Select Enable Daylight Saving Time.
86
Page 91

Chapter 13
2. Select the correct Start date and time when daylight saving time starts at your local
time zone.
3. Select the correct End date and time when daylight saving time ends at your local
time zone.
4. Click Save.
Manage the Router
13. 2. Control the LED
The LED of the router indicates its activities and status. You can enable the Night Mode
feature to specify a time period during which the LED is off.
1. Visit http://tplinkwifi.net, and log in with your TP-Link ID or the password you set for
the router.
2. Go to Advanced > System Tools > LED Control.
3. Enable Night Mode.
4. Specify a time period in the LED Off Time filed, and the LED will be off during this
period every day.
5. Click Save.
13. 3. Test the Network Connectivity
Diagnostics is used to test the connectivity between the router and the host or other
network devices.
1. Visit http://tplinkwifi.net, and log in with your TP-Link ID or the password you set for
the router.
87
Page 92

Chapter 13
Manage the Router
2. Go to Advanced > System Tools > Diagnostics.
3. Enter the information with the help of page tips:
1 ) Choose Ping or Traceroute as the diagnostic tool to test the connectivity;
• Ping is used to test the connectivity between the router and the tested host,
and measure the round-trip time.
• Traceroute is used to display the route (path) your router has passed to reach
the tested host, and measure transit delays of packets across an Internet
Protocol network.
2 ) Enter the IP Address or Domain Name of the tested host.
4. Click Start to begin the diagnostics.
Tips: Click Advanced, you can modify the ping count, ping packet size or the Traceroute Max TTL. It’s recommended
to keep the default value.
The figure below indicates the proper connection between the router and the Yahoo
server (www.Yahoo.com) tested through Ping.
The figure below indicates the proper connection between the router and the Yahoo
server (www.Yahoo.com) tested through Traceroute.
88
Page 93

Chapter 13
Manage the Router
13. 4. Test Your Internet Speed
Speed Test provides an easy way to monitor your network speed. It reveals the current
upload and download speeds received from your provider and gives practical advice
about the activities you can enjoy.
¾ To test your internet speed:
1. Visit http://tplinkwifi.net, and log in with your TP-Link ID or the password you set for
the router.
2. Go to Basic > Network Map and click
.
3. If it is the first time you run a test, the router will start the test automatically. Otherwise,
click Test Again.
Note:
• To run a speed test, your router must be connected to the internet.
• For a more accurate result, make sure no apps or programs are running on devices on your network.
¾ To view history of internet speeds:
1. Visit http://tplinkwifi.net, and log in with your TP-Link ID or the password you set for
the router.
2. Go to Basic > Network Map and click
3. Click
to view a record of previous speed test results.
.
89
Page 94

Chapter 13
Manage the Router
13. 5. Upgrade the Firmware
TP-Link aims at providing better network experience for users.
We will inform you through the web management page if there’s any update firmware
available for your router. Also, the latest firmware will be released at the TP-Link official
website www.tp-link.com, and you can download it from the Support page for free.
Note:
• Make sure you remove all attached USB devices from the router before the firmware upgrade to prevent data loss.
• Backup your router configuration before firmware upgrade.
• Do NOT turn off the router during the firmware upgrade.
13. 5. 1. Online Upgrade
1. Visit http://tplinkwifi.net, and log in with your TP-Link ID or the password you set for
the router.
2. When the latest firmware is available for your router, the update icon
in the top-right corner of the page. Click the icon to go to the Firmware Upgrade page.
Alternatively, you can go to Advanced > System Tools > Firmware Upgrade, and click
Check for upgrade to see whether the latest firmware is released.
will display
3. Focus on the Online Upgrade section, and click Upgrade.
90
Page 95

Chapter 13
Manage the Router
4. Wait a few minutes for the upgrade and reboot to complete.
Tips: If there’s a new and important firmware update for your router, you will see the notification (similar as shown
below) on your computer as long as a web browser is opened. Click Upgrade Now, and log into the web management
page with the username and password you set for the router. You will see the Firmware Upgrade page.
13. 5. 2. Manual Upgrade
1. Download the latest firmware file for the router from www.tp-link.com.
2. Visit http://tplinkwifi.net, and log in with your TP-Link ID or the password you set for
the router.
3. Go to Advanced > System Tools > Firmware Upgrade.
4. Focus on the Device Information section. Make sure the downloaded firmware file is
matched with the Hardware Version.
5. Focus on the Manual Upgrade section. Click Browse to locate the downloaded new
firmware file, and click Upgrade.
6. Wait a few minutes for the upgrade and reboot to complete.
Note: If you fail to upgrade the firmware for the router, please contact our Technical Support.
13. 6. Backup and Restore Configuration Settings
The configuration settings are stored as a configuration file in the router. You can
backup the configuration file to your computer for future use and restore the router to
91
Page 96

Chapter 13
Manage the Router
a previous settings from the backup file when needed. Moreover, if necessary you can
erase the current settings and reset the router to the default factory settings.
1. Visit http://tplinkwifi.net, and log in with your TP-Link ID or the password you set for
the router.
2. Go to Advanced > System Tools > Backup & Restore.
¾ To backup configuration settings:
Click Backup to save a copy of the current settings to your local computer. A ‘.bin’ file of
the current settings will be stored to your computer.
¾ To restore configuration settings:
1. Click Browse to locate the backup configuration file stored on your computer, and
click Restore.
2. Wait a few minutes for the restoring and rebooting.
Note: During the restoring process, do not turn off or reset the router.
¾ To reset the router except your login password and TP-Link ID:
1. Click Restore under the Factory Default Restore session.
2. Wait a few minutes for the resetting and rebooting.
Note:
• During the resetting process, do not turn off the router.
• After reset, you can still use the current login password or the TP-Link ID to log in to the web management page.
¾ To reset the router to factory default settings:
1. Click Factory Restore to reset the router.
92
Page 97

Chapter 13
Manage the Router
2. Wait a few minutes for the resetting and rebooting.
Note:
• During the resetting process, do not turn off or reset the router.
• We strongly recommend you backup the current configuration settings before resetting the router.
13. 7. Set the Router to Reboot Regularly
The Scheduled Reboot feature cleans the cache to enhance the running performance
of the router.
1. Visit http://tplinkwifi.net, and log in with your TP-Link ID or the password you set for
the router.
2. Go to Advanced > System Tools > Reboot Schedule.
3. Check the box to enable Reboot Schedule.
4. Specify the Reboot Time when the router reboots and Repeat to decide how often it
reboots.
5. Click Save.
13. 8. Change the Login Password
The account management feature allows you to change your login password of the web
management page.
Note: If you are using a TP-Link ID to log in to the web management page, the account management feature will be
disabled. To manage the TP-Link ID, go to Basic > TP-Link Cloud.
1. Visit http://tplinkwifi.net, and log in with the password you set for the router.
93
Page 98

Chapter 13
Manage the Router
2. Go to Advanced > System Tools > Administration and focus on the Account
Management section.
3. Enter the old password, then a new password twice (both case-sensitive). Click Save.
4. Use the new password for future logins.
13. 9. Password Recovery
This feature allows you to recover the login password you set for you router in case you
forget it.
Note: If you are using a TP-Link ID to log in to the web management page, the Password Recovery feature will be
disabled. To manage the TP-Link ID, go to Basic > TP-Link Cloud.
1. Visit http://tplinkwifi.net, and log in with the password you set for the router.
2. Go to Advanced > System Tools > Administration and focus on the Password
Recovery section.
3. Tick the Enable Password Recovery checkbox.
4. Specify a mailbox (From) for sending the recovery letter and enter its SMTP Server
address. Specify a mailbox (To) for receiving the recovery letter. If the mailbox (From)
to send the recovery letter requires encryption, select Enable Authentication and
enter its username and password.
Tips:
• SMTP server is available for users in most webmail systems. For example, the SMTP server address of Gmail is
smtp.gmail.com. You can refer to their Help page to learn the SMTP server address.
• Generally, Enable Authentication should be selected if the login of the mailbox requires username and
password.
94
Page 99

Chapter 13
5. Click Save.
You can click Test Email to test whether the configuration is successful.
To recover the login password, please visit http://tplinkwifi.net, click Forgot Password?
on the login page and follow the instructions to set a new password.
Manage the Router
13. 10. Local Management
This feature allows you to limit the number of client devices on your LAN from accessing
the router by using the MAC address-based authentication.
1. Visit http://tplinkwifi.net, and log in with your TP-Link ID or the password you set for
the router.
2. Go to Advanced > System Tools > Administration and complete the settings In Local
Management section as needed.
¾ Allow all LAN connected devices to manage the router:
Toggle on Unrestricted LAN Access.
¾ Allow specific devices to manage the router:
1. Toggle off Access for All LAN Connected Devices.
2. Click Add.
95
Page 100

Chapter 13
Manage the Router
3. Click Scan and select the device to manage the router from the Existing Devices list,
or enter the MAC address of the device manually.
4. Specify a Description for this entry.
5. Tick the Enable This Entry checkbox and click OK.
13. 11. Remote Management
This feature allows you to control remote devices’ authority to manage the router.
1. Visit http://tplinkwifi.net, and log in with your TP-Link ID or the password you set for
the router.
2. Go to Advanced > System Tools > Administration and complete the settings in
Remote Management section as needed.
¾ Forbid all devices to manage the router remotely:
96
 Loading...