

Page 1
Quick Installation Guide
AC2600 Wireless Dual Band Gigabit Router
Power adapter
7106505554 REV1.0.1
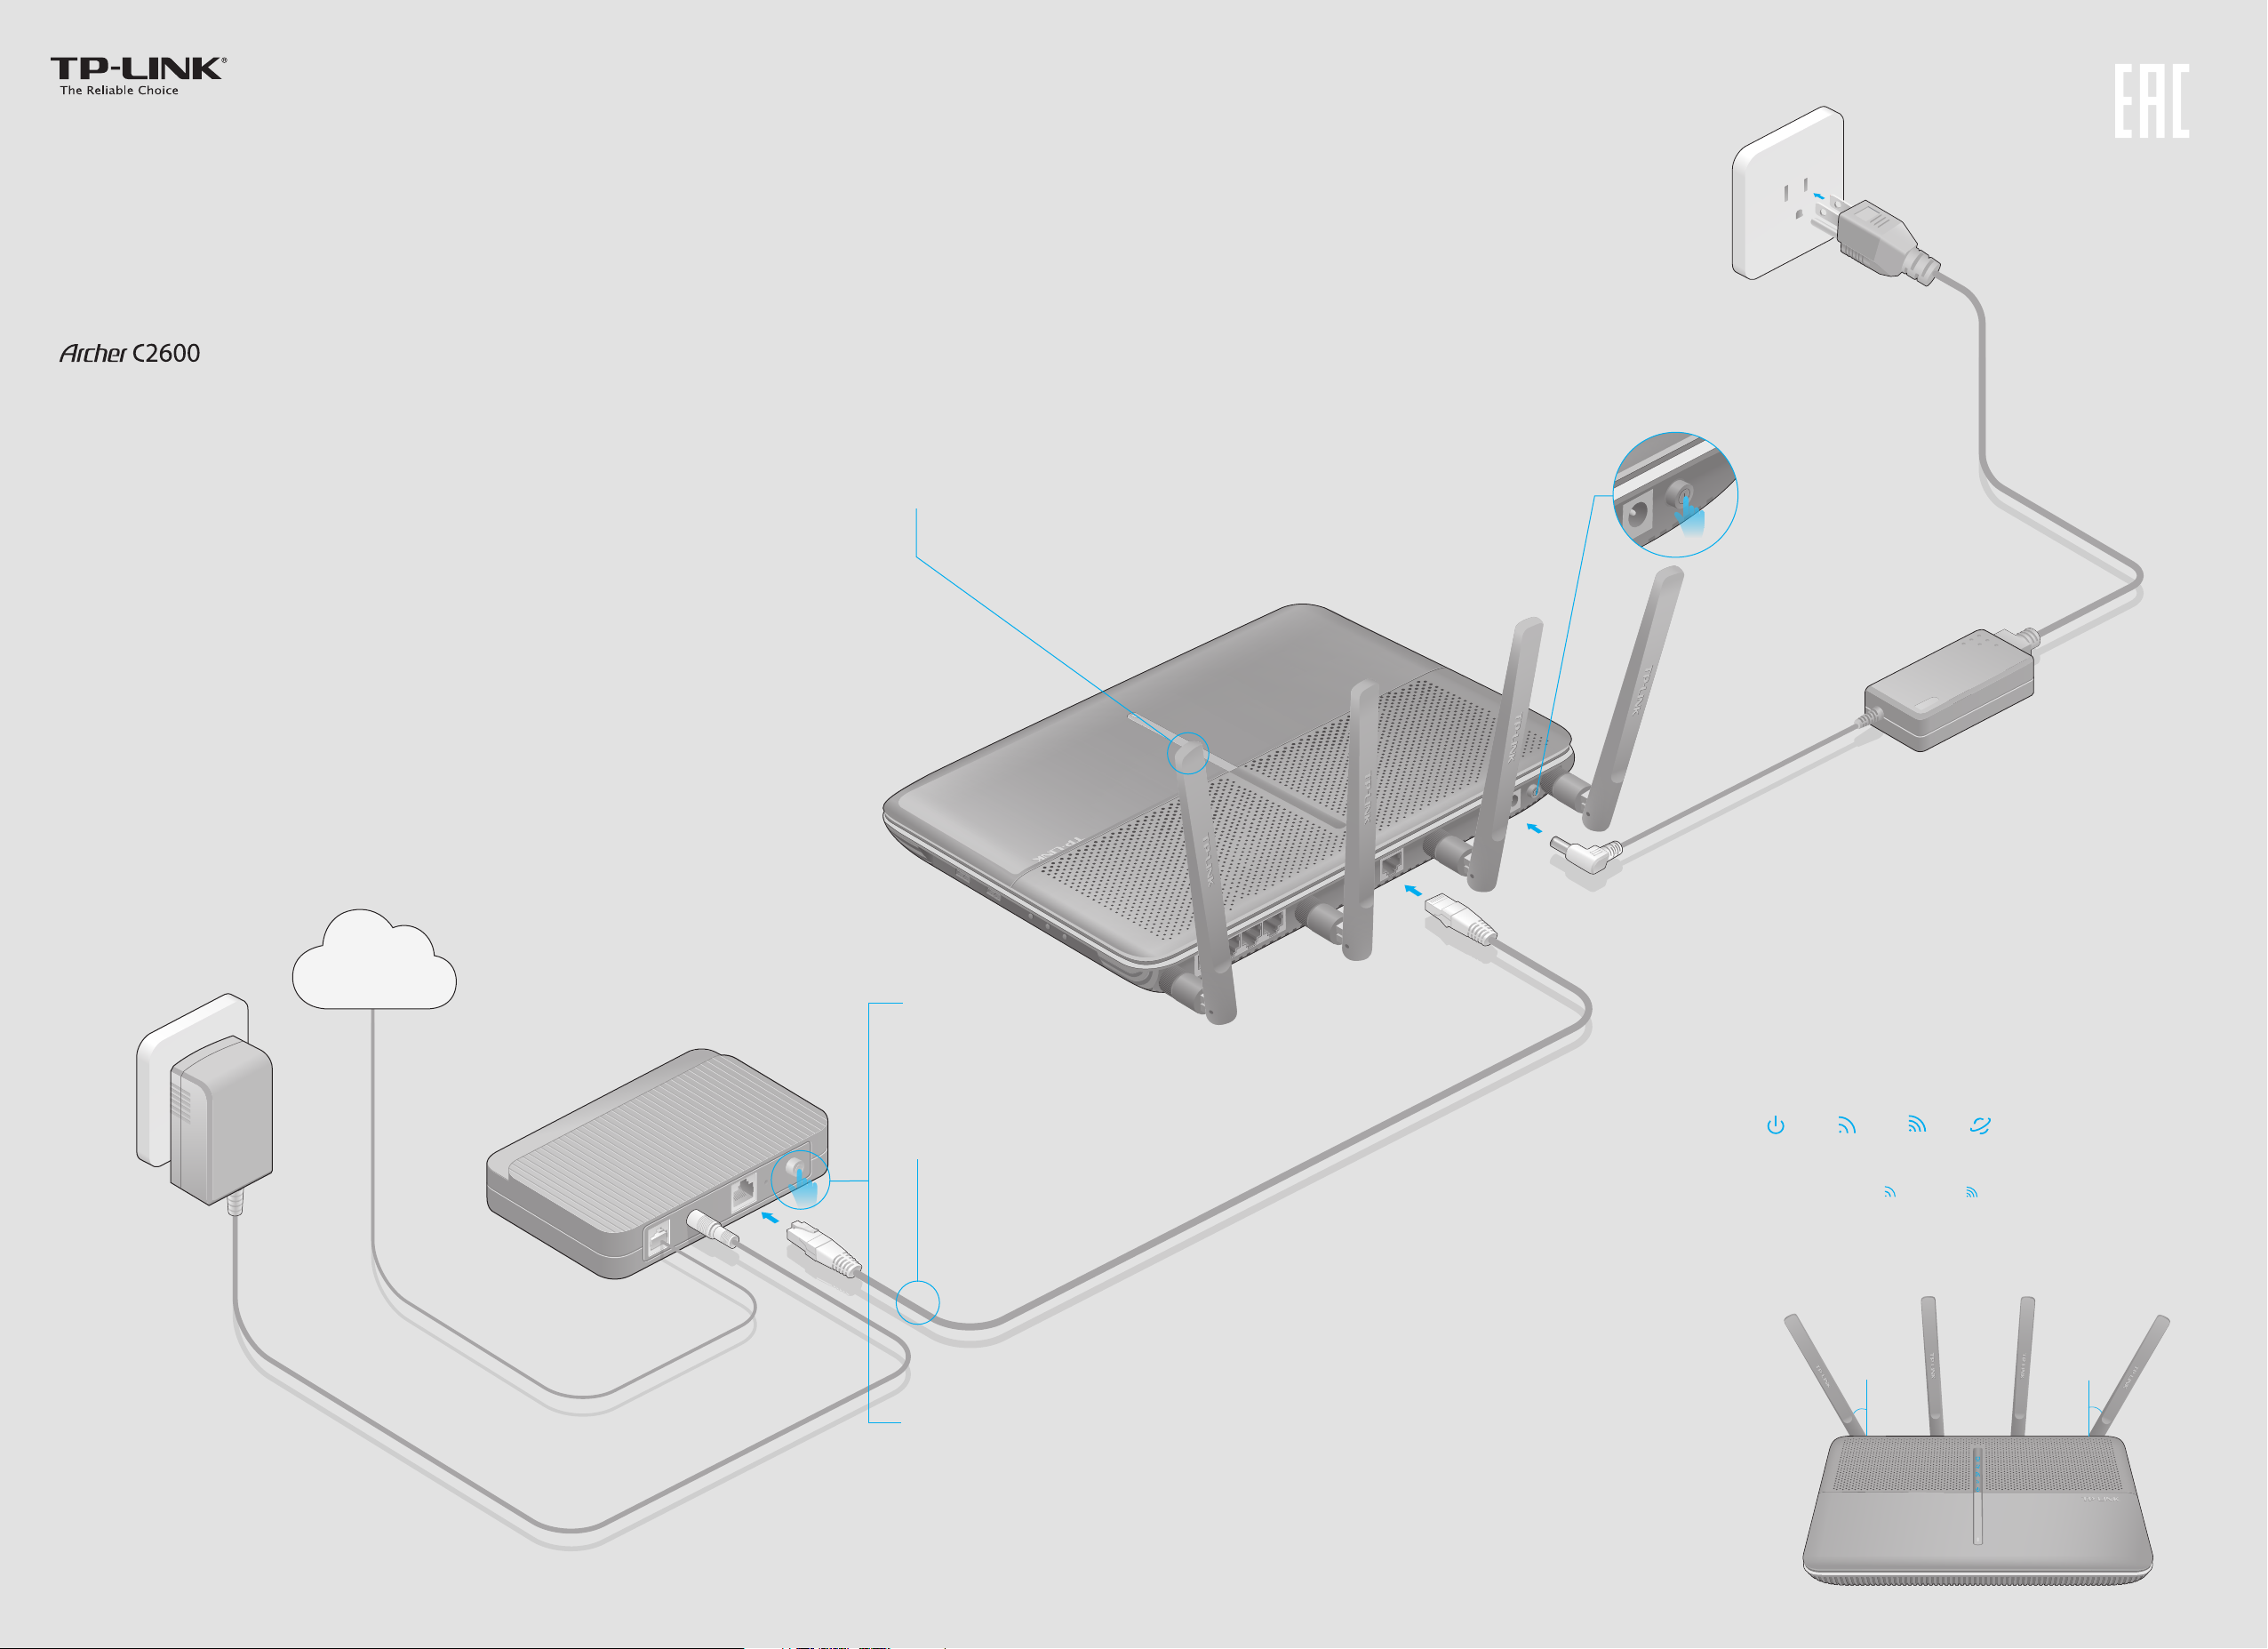
Connect the Hardware
If your Internet connection is through an Ethernet cable from the wall
instead of through a DSL / Cable / Satellite modem, connect the Ethernet
cable directly to the router’s Internet port, then follow steps 5 and 6 to
complete the hardware connection.
Internet
Modem
Install the antennas.
1
Turn off the modem,
2
and remove the backup
battery if it has one.
Router
Turn on the router.
5
Verify that the following LEDs are on and solid
6
before continuing with the configuration.
Power adapter
Connect the modem to the
3
Internet port on your router
with an Ethernet cable.
4
Turn on the modem, and then
wait about 2 minutes for it to
restart.
Power
On
Note: If the 2.4G LED and 5G LED are off, please press the Wi-Fi On/Off
button on the side panel for 2 seconds and check the LEDs again a few
seconds later.
For optimum performance, orient the four antennas
as shown in the drawing below.
2.4G
On
30° 30°
5G
On
Internet
On
Page 2
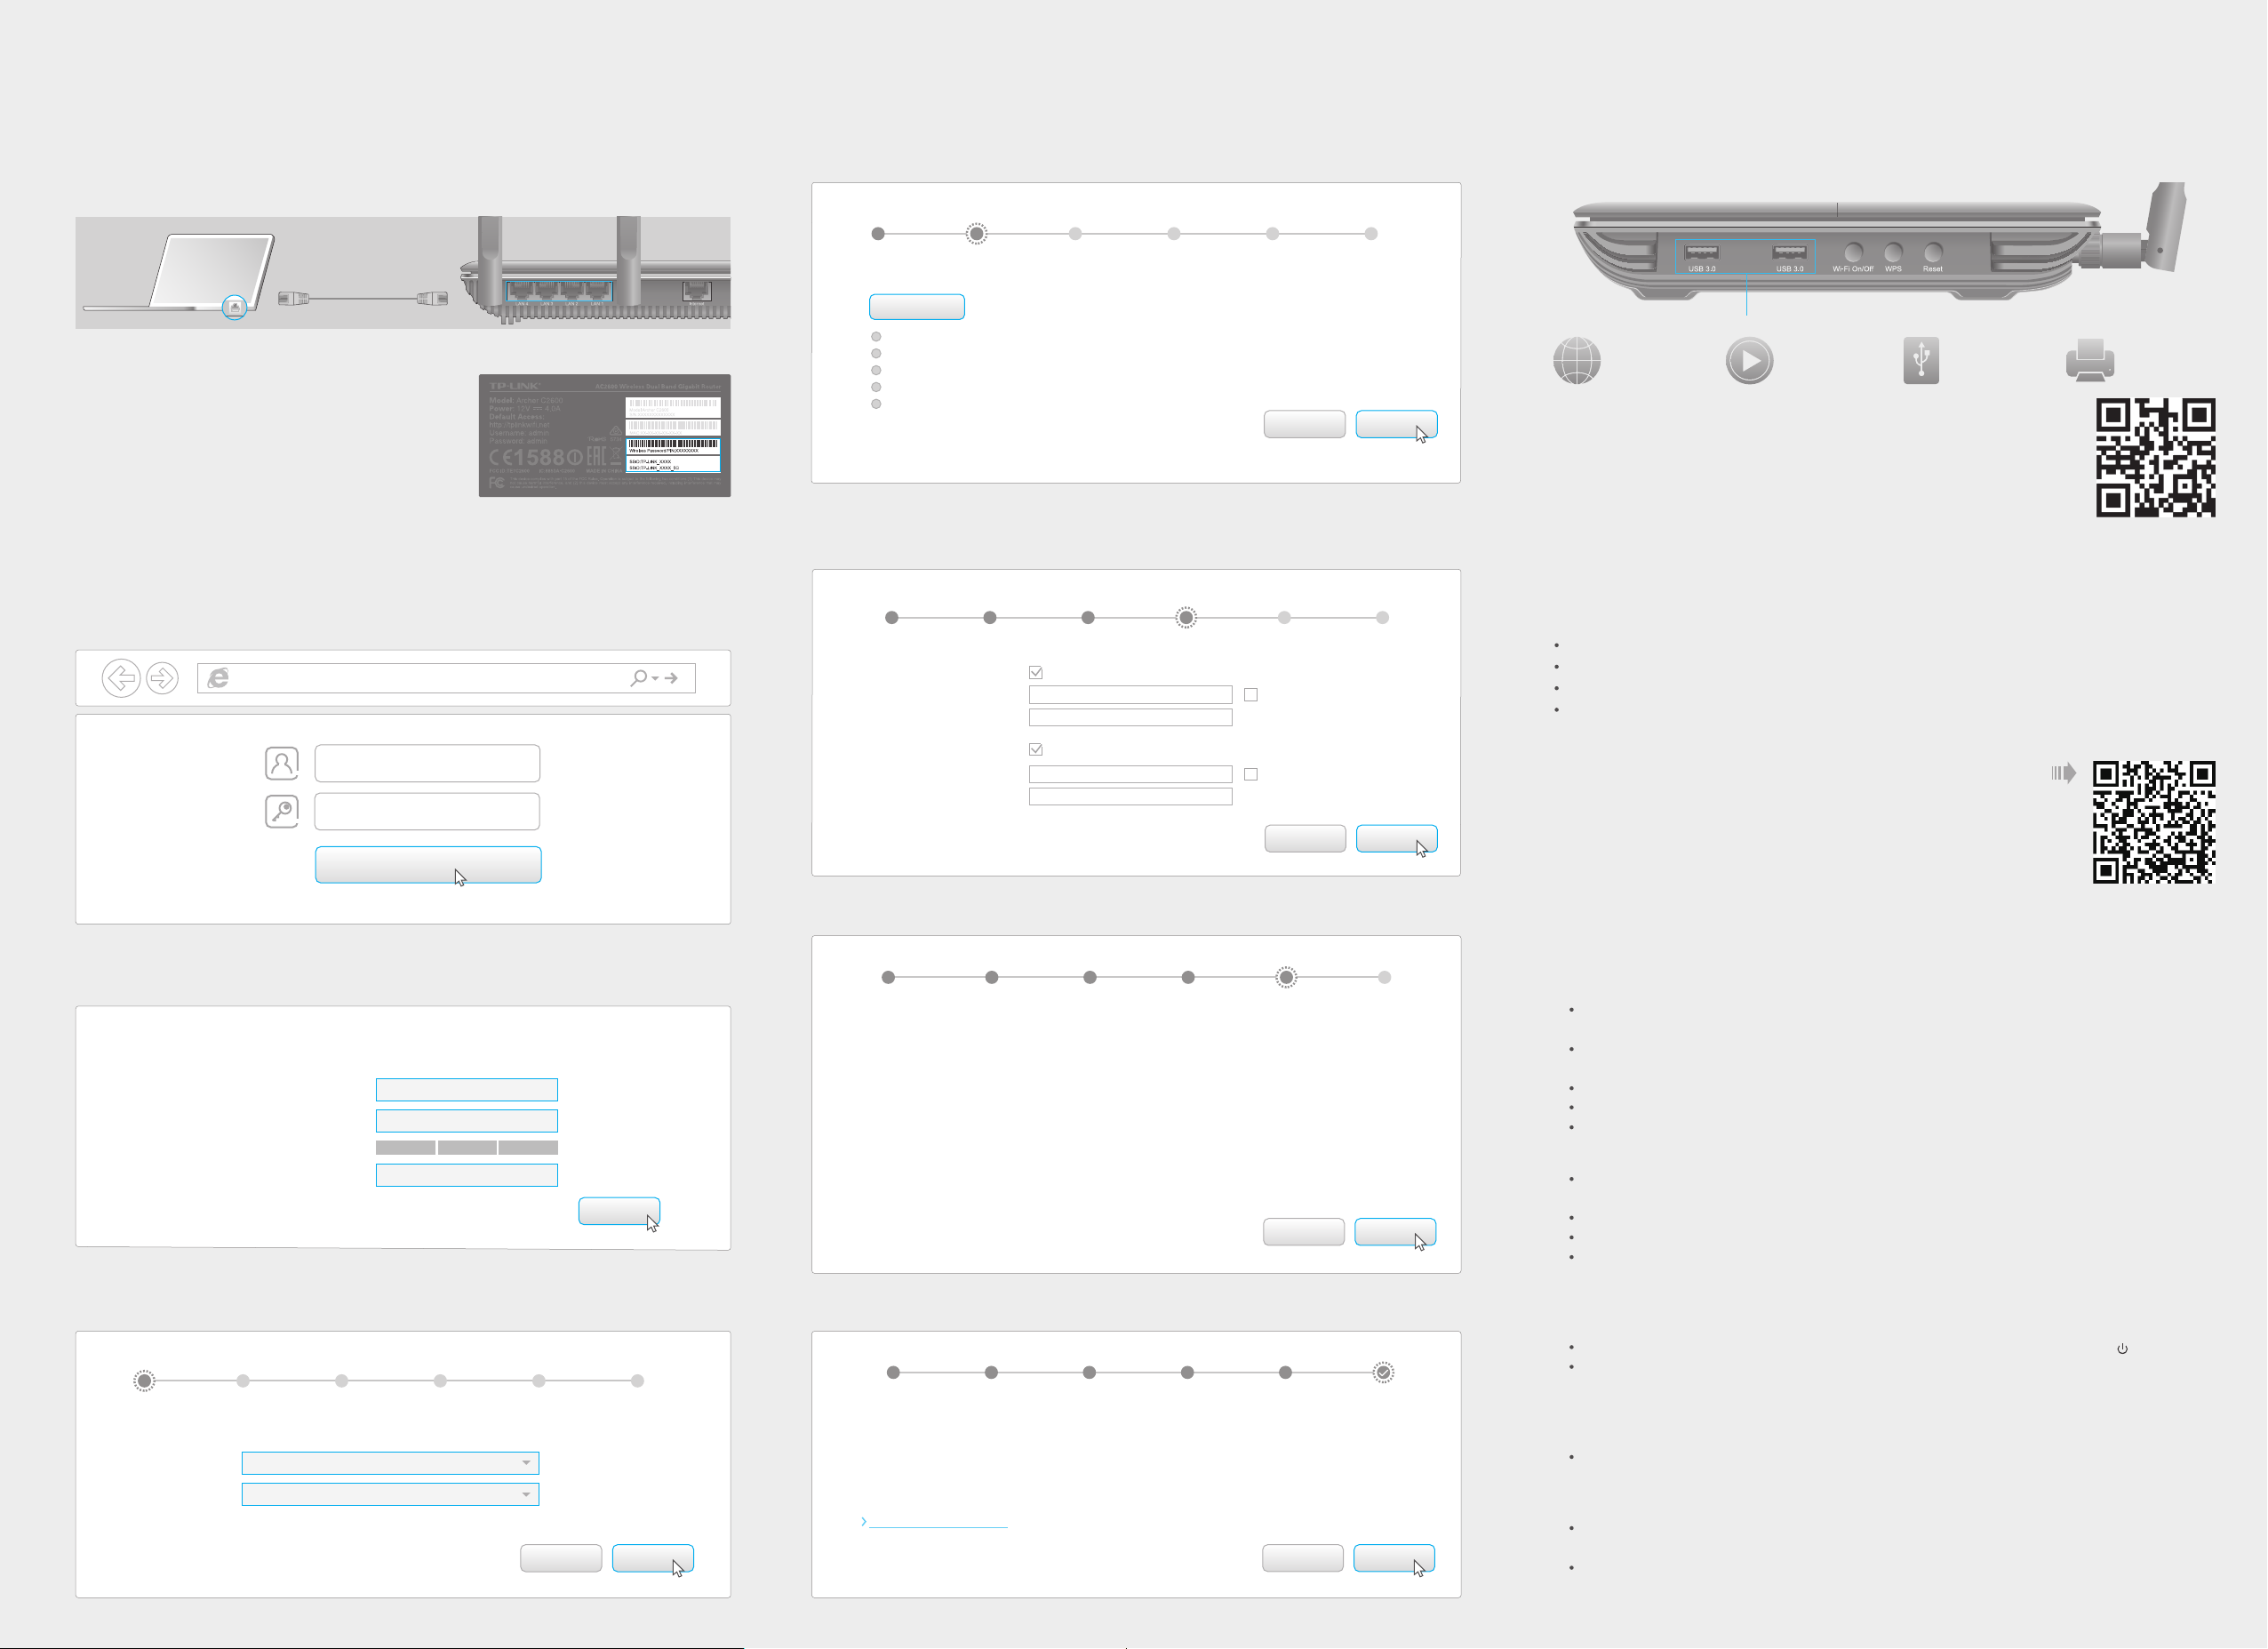
Configure via Web Browser
USB Features
Connect your computer to the router (Wired or Wireless)
1.
Wired
Turn off the Wi-Fi on your computer and connect the devices as shown below.
Ethernet cable
Wireless
Connect wirelessly by using the SSID (Network
Name) and Wireless Password/PIN printed on
the product label at the bottom of the router.
Configure the router using a web browser
2.
Enter http://tplinkwifi.net or http://192.168.0.1 in the address bar of a web
A
browser. Use admin for both username and password, and then click Login.
Note: If the login window does not appear, please refer to FAQ > Q1.
http://tplinkwifi.net
admin
admin
Login
Select your WAN Connection Type, or click Auto Detect if you are unsure of
D
what your connection type is. Click Next and follow the instructions.
WAN Connection Type
Region and Time zone
Auto Detect
Dynamic IP
Static IP
PPPoE
L2TP
PPTP
E
Use the default or change the wireless settings, and click Next.
Note: If you change the default SSID and password, write down the new wireless settings.
WAN Connection Type
Region and Time zone
Wireless 2.4GHz:
Network Name(SSID):
Password:
Wireless 5GHz:
Network Name(SSID):
Password:
Enable Wireless Radio
TP-LINK_8815
12345670
Enable Wireless Radio
TP-LINK_8815_5G
12345670
Wireless Settings
Summary
Wireless Settings
Test Your Connection
Back Next
Test Your Connection
Summary
Hide SSID
Hide SSID
Back Next
Use the USB 3.0 ports for media sharing, storage sharing and printer sharing across your
local network. You can also set up an FTP server to access your files remotely through the
Internet.
USB 3.0 Port
Remote Access
via FTP Server
Media Sharing
Local Storage
Sharing
Printer Sharing
To learn more about the USB features, visit http://tp-link.com/app/usb,
or simply scan the QR code.
Configure via Tether App
TP-LINK's Tether app lets you conveniently access the router and:
View information about the clients on your network.
Block network access from specific users or devices.
Set up Parental Control with access time and content restrictions.
Change the basic wireless network settings easily.
How to start?
1 Scan the QR code to download the TP-LINK Tether app from the
Apple App Store or Google Play.
2 Ensure your smart device is wirelessly connected to the home
network.
3 Launch the Tether app and start managing your home network.
Create a new username and password, then click Confirm. Re-login using the new
B
credentials.
Set up a new username and password
New Username:
New Password:
Confirm New Password:
Select your region and time zone, and click Next.
C
Note: Per FCC regulations, all Wi-Fi products marketed in the U.S. is locked to the U.S. region.
WAN Connection Type
Region and Time zone
Region:
Time zone:
United States
(GMT-08:00) Pacific Time
User_123
●●●●●●●●
●●●●●●●●
Wireless Settings
HighMiddleLow
Summary
Exit
Confirm
Test Your Connection
Next
Confirm your settings, and then click Save to continue or Back to make changes.
F
WAN Connection Type
Region and Time zone
Region:
Time Zone:
WAN Connection Type:
Wireless 2.4GHz
Name(SSID):
Password:
Wireless 5GHz
Name(SSID):
Password:
G
Test your Internet connection, then click Finish to quit the Quick Setup.
WAN Connection Type
Region and Time zone
United States
(GMT-08:00) Pacific Time
Dynamic IP
On
TP-LINK_7AFF
12345670
On
TP-LINK_7AFF_5G
12345670
Wireless Settings
Summary
Wireless Settings
Summary
Test Your Connection
Back Save
Test Your Connection
Congratulations!
You have completed the Quick Setup process.
Click Test Internet Connection below, then click Finish.
Test Internet Connection
Back Finish
FAQ (Frequently Asked Questions)
What can I do if the login window does not appear?
Q1.
If the computer is set to a static or fixed IP address, change the setting to obtain an IP address
automatically.
Verify if http://tplinkwifi.net or http://192.168.0.1 is correctly entered in the web browser.
Alternatively, enter http://192.168.1.1 in the web browser.
Use another web browser and try again.
Reboot your router and try again.
Disable and enable the the network adapter in use again.
Q2.
What can I do if I cannot access the Internet?
Check if the Internet is working properly by connecting a computer directly to the modem via an
Ethernet. If it is not, contact your Internet Service Provider.
Open a web browser, enter http://tplinkwifi.net or http://192.168.0.1 and run the setup again.
Reboot your router and try again.
For cable modem users, reboot the modem first. If the problem still exists, log into the Web
Management page of the router, and go to Advanced > Network > Internet > MAC Clone, click Use
Current Computer MAC Address and then click Save.
How do I restore the router to its factory default settings?
Q3.
While the router is powered on, press and hold the Reset button on the back until the LED blinks.
Log into the Web Management page of the router, and go to Advanced > System Tools > Backup &
Restore > Factory Default Restore, click Factory Restore. The router will restore and reboot
automatically.
Q4.
What can I do if I forgot my Web Management password?
Refer to FAQ > Q3 to reset the router, and then use the default admin (all lowercase) for both
username and password to log in.
Q5.
What can I do if I forgot my wireless network password?
If you have not changed the default Wireless Password, it can be found on the product label of the
router.
Log into the Web Management page, go to Basic > Wireless to retrieve or reset your wireless
password.
©2015 TP-LINK
 Loading...