

Toyota Odyssey Owner's Manual

owner’s manual

SAFETY REGULATIONS REGARDING LP GAS SYSTEMS
AND LP GAS APPLIANCES
The manufacturer of this recreational vehicle is required to furnish the following
consumer information as provided by the National Fire Prevention Association and
the American National Standards Institute. The information and warnings found here
may also be found in other sections of this Owner’s Manual. Please see sections
titled “Liquid Petroleum Gas System” and “Appliances” for other safety and operating
information.
WARNING:
LP GAS CONTAINERS SHALL NOT BE PLACED OR STORED INSIDE THE VEHICLE. LP GAS
CONTAINERS ARE EQUIPPED WITH SAFETY DEVICES WHICH RELIEVE EXCESSIVE
PRESSURE BY DISCHARGING GAS TO THE ATMOSPHERE.
WARNING:
IT IS NOT SAFE TO USE COOKING APPLIANCES FOR COMFORT HEATING. COOKING
APPLIANCES NEED FRESH AIR FOR SAFE OPERATION. BEFORE OPERATION:
I. OPEN OVERHEAD VENT OR TURN ON EXHAUST FAN. AND
2. OPEN WINDOW.
THIS WARNING LABEL HAS BEEN LOCATED IN THE COOKING AREA TO REMIND YOU
TO PROVIDE AN ADEQUATE SUPPLY OF FRESH AIR FOR COMBUSTION. UNLIKE HOMES,
THE AMOUNT OF OXYGEN SUPPLY IS LIMITED DUE TO THE SIZE OF THE RECREATIONAL
VEHICLE. AND PROPER VENTILATION WHEN USING THE COOKING APPLIANCES(S) WILL
AVOID DANGERS OF ASPHYXIATION. IT IS ESPECIALLY IMPORTANT THAT COOKING
APPLIANCES NOT BE USED FOR COMFORT HEATING AS THE DANGER OF ASPHYXIATION IS
GREATER WHEN THE APPLIANCE IS USED FOR LONG PERIODS OF TIME.
WARNING:
PORTABLE FUEL-BURNING EQUIPMENT. INCLUDING WOOD AND CHARCOAL GRILLS AND
STOVES, SHALL NOT SE USED INSIDE THIS RECREATIONAL VEHICLE. THE USE OF
THIS EQUIPMENT INSIDE THE RECREATIONAL VEHICLE MAY CAUSE FIRES OR
ASPHYXIATION.
WARNING:
DO NOT BRING OR STORE LP GAS CONTAINERS, GASOLINE, OR OTHER FLAMMABLE
LIQUIDS INSIDE THE VEHICLE BECAUSE A FIRE OR EXPLOSION MAY RESULT.
A warning label has been located near the LP gas container. This label reads: DO NOT FILL
CONTAINER(S) TO MORE THAN 80 PERCENT OF CAPACITY.
Overfilling the LP gas container can result in uncontrolled gas flow which can cause fire or explosion.
A properly filled container will contain approximately 80 percent of its volume as liquid LP gas.
The following label has been placed in the vehicle near the range area:
IF YOU SMELL GAS:
1. Extinguish any open flame, pilot lights, and all smoking materials.
2. Do not touch electrical switches.
3. Shut off the gas supply at the tank valves or gas supply connection.
4. Open doors and other ventilating openings.
5. Leave the area until odor clears.
S. Have the gas system checked and leakage source corrected before using again.
LP gas regulators must always be installed with the diaphragm vent facing downward. Regulators that
are not in compartments have been equipped with a protective cover. Make sure that regulator vent
faces downward and the cover is kept In place to minimize vent blockage which could result In
excessive gas pressure causing fire or explosion.

TABLE OF CONTENTS
INTRODUCTION …………………………………....… 1
LP Gas Regulator …………………………………..…… 10
Front End Alignment ……………..…………......….. 1
PLANNING AND PREPARATION………………...…. 2
Read the Book ……………………….…………....... 2
Inspect and Maintain ……………….………….……. 2
Loading and Weight Distribution ………………..…. 2
Control of the Motor Home ……………………..….. 2
MOTOR HOME LOADING ………………………..….. 3
Determining and Distributing
Your Motor Home Load ……………………..…….. 3
Loading Tips ………………………………....…… 3
READY TO LEAVE …………………………….…….. 2
Starting and Warmup ………………………..….…… 2
Safety Belts ………………………………….....….. 2
ON THE ROAD ……………………………………..…. 4
Driving and Parking …………………………..…..…. 4
Miscellaneous Safety Tips ………………....…. 4
Carbon Monoxide Safety Precautions ………….…. 4
Using LP Gas System at Low Temperatures …..…… 10
LP Gas System Leak Checks ……………….………… 10
Lighting LP Gas Appliances …………………………… 10
LP Gas Precautions ……………………………………. 11
PLUMBING …..…………………………………………… 12
Fresh Water System …………………………………… 12
The Water Pump ……………………………………….. 13
The Monitor Panel ……………………………………… 13
Troubleshooting the Fresh Water System …..……… 13
Water Pump Troubleshooting ……………….………… 14
The Waste Water System …………………………….. 15
Water System Winterizing ………...…………………… 16
ELECTRICAL SYSTEM ………………………………….. 18
Batteries …………………………………………………. 18
Power Converter …………...…………………………… 19
Auxiliary Battery ………………………...………………. 19
Fuses and Circuit Breakers ……………………………. 19
Overheating ………………….………………….....…. 5
12-Volt Fuse Replacement …………………….…… 5
Tires …………………………………………..…..…… 5
Changing A Flat Tire …………………………....…... 5
Towing …………………………………………...…... 7
SERVICE …………………………………………..…… 8
Auxiliary Start System ………………………..…...… 8
Automotive Air Conditioner ……………………....… 8
Motor Home Chassis Operator’s Manual ………..… 8
Service Parts and Replacement ……………..….… 8
Battery Service ………………………………..….…. 8
Generator Power Plant System Service ……....…. 8
INTERIOR AND FURNISHING …………………..….. 9
Storage ………………………………………………… 9
Dinette Conversions ………………………….…….. 9
Pull-out Lounge Conversion ………………..….….. 9
Emergency Exit Window ……………………………. 9
Ground Fault Interrupter ………………….……………. 19
Entertainment Equipment ……………………………… 20
Generator Power Plant ………………………………… 20
Electrical System Wiring ……………………………….. 21
APPLIANCES ……………………………………..……… 22
Water Heater ……………………………………………. 22
Furnace ………………………………………………….. 22
Range ……………………………………………………. 22
Range Exhaust Hood …………………………...……… 22
Air Conditioner ……………………………………..…… 22
Refrigerators …………………………………………….. 22
MAINTENANCE ………………………………………….. 23
Exterior …………………………………………………. 23
Sealant Renewal ……………………………………….. 23
Interior …………………………………………………… 24
MAINTENANCE …………………………………...……… 25
TRAVEL CHECK LIST ……………………………...…… 26
Effects of Prolonged Occupancy ….……….. 9
Controlling Moisture Condensation …………..…... 9
LIQUID PETROLEUM GAS SYSTEM ……………. 10
Filling LP Gas Tanks …………………………..…. 10

INTRODUCTION
Welcome to the recreational vehicle lifestyle and the
growing family of motor home owners. We sincerely thank
you for choosing our product.
Your motor home has been designed to provide you
with many years of carefree, pleasant traveling and
vacationing. This manual describes many features of your
motor home and provides a guide to operating procedures
so that you can obtain the best performance from those
features. Your motor home has been designed to conform
with, or exceed, the American National Standards Institute
A119.2, NFPA SOW, Canadian CSA Standard Z-240
(Canadian-built or units built for Canada), and applicable
motor vehicle standards. These standards establish the
plumbing, heating, electrical and other requirements for
quality and safety. Compliance with these standards is
indicated by the seal attached just outside the entry door.
This seal is the outward sign of internal quality.
Like all finely crafted equipment, your motor home will
require care and regular maintenance in order to retain its
maximum performance characteristics. This manual, along
with the information provided in your Owner’s Information
Kit and Chassis Operator’s Manual outlines important
areas of maintenance and provides a maintenance
schedule that you should follow to ensure safe, troublefree service from your motor home. Study these
instructions carefully. A good working knowledge or your
motor home and how to care for it will help you enjoy
many miles and years of recreational living.
The motor home has been thoroughly inspected before
shipment. It is the duty of your dealer to inspect the motor
home and to prepare it for you during the pre-delivery
phase of the sale.
YOUR DEALER IS RESPONSIBLE FOR PERFORMING A COMPLETE PREDELIVERY INSPECTION OF
THE CHASSIS AND ALL MOTOR HOME COMPONENTS
AS SPECIFIED IN THE PREDELIVERY CHECKLISTS.
YOU SHOULD RECEIVE A COPY OF THESE
COMPLETED CHECKLISTS FROM YOUR DEALER
WHEN YOUR MOTOR HOME IS DELIVERED TO YOU.
He will instruct you in its basic use; however, supplement this instruction by reading all instructional material
furnished with the motor home. If, after taking delivery of
your new motor home, you feel it requires additional
conditioning or adjustment, please return it to your dealer
as soon as possible.
If you have any questions regarding operation,
maintenance, or service, please contact your dealer
immediately so he can assist you. Your dealer’s Service or
Sales Department will handle any normal problem which
might occur. Customer service is of
utmost importance to your dealer, and is just as important to
the manufacturer. Your motor home is covered by one of the
most comprehensive warranty programs in the industry.
Please read carefully. You will be better Informed in case
you have a warranty related problem, and your dealer will be
better able to get you on the road again. If, for some reason,
a problem is not handled to your satisfaction:
1. Discuss any warranty-related problems directly with the
manager or owner of the dealership, giving him an
opportunity to help his service department resolve the matter
for you.
2. If a problem arises that cannot be resolved to your
satisfaction by your local dealer, contact the factory service
manager.
3. We sincerely believe that your dealer and the factory
representative will be able to solve any problem which might
arise. if their combined efforts are not satisfactory, please
send a letter describing the circumstances to:
4. If you wish to call for assistance, please use these
telephone numbers.
From California: (714) 796-8331
Outside California: 1-800-826-9943
Please include the serial number of your motorhome,
Dealer end Purchase date. Thank you for choosing our
product. Your dealer and we, the manufacturer, will
continually strive to merit your confidence.
NOTE: Some equipment and features described or
shown in this manual may be optional on some models. This
instructional manual is of general nature only.
NOTE: This product is designed for recreational use
and short term occupancy only. It is not designed or
intended to be used as permanent housing. Use of this
product for long term or permanent occupancy may lead to
premature deterioration of interior finishes, fabrics, carpeting,
and drapes. Damage or deterioration due to long-term
occupancy may not be considered normal, and may under
the terms of the warranty, constitute misuse, abuse. or
neglect, and may therefore reduce your warranty protection.
FRONT END ALIGNMENT
AS A PART OF THE PREDELIVERY INSPECTION
PROCEDURE, THE DEALER IS TO ROAD TEST THE
MOTOR HOME. NOTING AND CORRECTING ANY
STEERING PROBLEMS BEFORE DELIVERY TO THE
RETAIL CUSTOMER.
1

PLANNING AND PREPARATION
The camping trip is one of the most popular types of
vacations, and each year millions of Americans embark
on camping trips using some type of recreational vehicle.
Proper planning of your trip, including familiarity with your
equipment, your itinerary, anticipated activities, and
anticipated needs will ensure a pleasurable experience.
That is what this manual is all about. The ideas and
instructions presented here are intended to help you get
the most from your new RV, and enjoy your trip.
READ THE BOOK
A thorough knowledge of your RV is important if you
are going to get the most out of the convenience and
safety items built into your vehicle. Be as familiar with it
as you are with your personal car or truck. Study all the
booklets included in your Owner’s Information Kit. These
booklets cover details of operation for the major
appliances and equipment built into your motor home for
your comfort, convenience and safety.
INSPECT AND MAINTAIN
Follow a consistent schedule of inspection and
maintenance for your motor home. Your continuing safety
and comfort depend on it. Pay particular attention to
brakes, tires, suspension and exhaust system
components, steering linkages, and electrical systems.
This manual includes a section outlining motor home
maintenance items and recommended maintenance
intervals. Adherence to these schedules will minimize
the possibility of failure of any important system or part
of your motor home. The time spent inspecting and
maintaining your motor will provide you with many years
of recreational pleasure.
LOADING AND WEIGHT DISTRIBUTION
Proper loading is one of the most important considerations when traveling in a motor home. Your motor
home is built to withstand a certain maximum load.
Check the labels and tags attached to the motor home
to determine the safe load limits. For safety’s sake,
NEVER OVERLOAD THE MOTOR HOME. This manual
contains information about proper loading and weighing
of your motor home.
CONTROL OF THE MOTOR HOME
Know how to control your motor home on the
highway. Be familiar with passing and stopping
requirements, and problems that can develop. Know
how to brake properly, how to back up, and how to turn.
Practice in a secluded place until you become familiar
with the handling characteristics and techniques of your
motor home. Don’t overlook the laws of your state or
province that govern driving a motor home. Your state
Motor Vehicle Department office can provide you with
the applicable vehicle codes that spell out your rights
and responsibilities as a motor home owner.
READY TO LEAVE
BE SURE TO PLACE THE ENTRY STEP IN TRAVEL
POSITION.
STARTING AND WARMUP
Follow the recommendations in your Chassis
Operator’s Manual when starting or operating your
engine.
NOTE: Be sure transmission is in “P” park and parking
brake is engaged to keep the motor home from
rolling. If the parking brake needs adjustment, see
the Chassis Operator’s Manual for adjustment
instructions.
SAFETY BELTS
Seat belts are an important safety feature of your vehicle.
For your protection, fasten all belts while the motor home
is in motion. The driver’s seat and all other seats
designed to carry passengers while under way have been
equipped with lap belts.
NOTE: All riders should be furnished with and use
seat belts while the vehicle is in motion. Seats which
are not equipped with safety belts should not be
occupied while the vehicle is in motion and will be
labeled: “NOT FOR USE WHILE THE VEHICLE IS
IN MOTION”. It is not possible to belt in persons
using beds.
WARNING: WHILE THE MOTOR HOME IS IN
MOTION, FASTEN SEAT BELTS AND DO NOT
ALLOW PASSENGERS TO OCCUPY ANY SEAT OR
BED THAT IS NOT EQUIPPED WITH A SEAT BELT.
Adjust seat belts as follows:
• Pivot buckle at right angles to the belt and pull
to the desired length.
• To fasten belt, be sure it is not twisted, then
push the tongue end of one belt into the
buckle of the mating belt. Be sure it latches.
Pull the loose end of the belt to tighten.
• To release the belt, depress the button in the
center of the buckle and slide the tongue out
of the buckle.
Adjust the belt as low on the abdomen and as snug as
comfort will allow, for greatest safety. Never use a belt
for more than one person at a time If your belts have
been equipped with retractors, be sure belt is pulled all
the way out of the retractor.
2

MOTOR HOME LOADING
A motor home chassis (springs, wheels, tires, axles, and
frame) is designed to carry a certain maximum load. This
load consists of the weight of the empty motor, home
itself, plus anything else that may be stored in or attached
to the motor home. The maximum load for which the
motor home is designed is called the GROSS VEHICLE
WEIGHT RATING (GVWR).
DETERMINING AND DISTRIBUTING YOUR MOTOR
HOME LOAD
The Gross Vehicle Weight Rating for your motor home is
shown on the certification tag posted on the driver’s
doorjamb, or sidewall at the driver’s window or door.
These ratings are for a fully loaded vehicle including
passengers and normal belongings. You must compare
the GVWR to the loaded weight of your motor home. If
the loaded weight of your motor home exceeds the
GVWR, the motor home is overloaded and you’ll have to
remove items to bring the weight down to or below the
GVWR
Follow the method outlined here to determine the weight
of your motor home. Use a platform scale, and keep the
motor home as level as possible during all
measurements.
1. Drive the entire vehicle (both axles) onto the scale
and take a reading. This is the Gross Vehicle Weight.
2. Compare reading 2 with the GVWR (Gross Vehicle
Weight Rating) of your vehicle. If the reading exceeds
the GVWR rating, you will have to reduce the total
vehicle load.
WARNING: EXCEEDING THE LABELED GVWR OF
YOUR MOTOR HOME CAN CAUSE UNDESIRABLE
HANDLING CHARACTERISTICS AND MAY CREATE A
SAFETY HAZARD. MODIFICATION OF YOUR
VEHICLE BY ADDITION OF RACKS NOT SPECIFIED
BY THE MANUFACTURER TO CARRY ADDITIONAL
EQUIPMENT OR VEHICLES IS NOT RECOMMENDED.
MAY CREATE A SAFETY HAZARD, AND MAY
VOID YOUR WARRANTY
LOADING TIPS
After you have determined how much weight you can
safely carry and selected those items to make up that
weight, make a list and keep it for future reference. Load
the motor home and distribute the load so that you get
proper weight on the axles. Don’t load heavy items in
upper cabinets. Secure and brace items so they won’t
move during travel, thereby shifting motor home load.
Do not load heavy items near either end of the motor
home or on the rear bumper.
WARNING: DO NOT INSTALL ANY TYPE OF
WEIGHT CARRYING RACK OR FRAME TO THE
REAR BUMPER OR ANY CHASSIS OR BODY
COMPONENT OF THE MOTOR HOME. DAMAGE TO
THE MOTOR HOME BODY AND UNSTABLE HANDLING CHARACTERISTICS MAY RESULT.
Make a loading diagram of your properly loaded motor
home. It will help you locate where specific items are
stored, and will help speed the loading process. Store
emergency items in a readily accessible location.
Include a fire extinguisher tools, jack, first-aid kit, rain
gear, flashlight, highway warning devices, and an
electric cord with light.
WARNING: DO NOT STORE OR CARRY LP GAS
CONTAINERS, GASOLINE, OR OTHER FLAMMABLE
LIQUIDS INSIDE YOUR MOTOR HOME.
Periodically reweigh your motor home. Different
traveling configurations may change your loading and
weight pattern.
NOTE: Every motor home is provided with an approved
dry chemical fire extinguisher. It is UL rated 10—BC.
Instructions
extinguisher itself, as well as in the owner’s manual
which accompanies it. Please read carefully and
understand these instructions before starting on a trip.
for its use are printed plainly on the fire
3

ON THE ROAD
DRIVING AND PARKING
Once you become accustomed to the feel of the
controls and the reference points from the driver’s seat,
you will find driving the motor home comparable to driving
your family car. Become familiar with the position of the
motor home in traffic, and be cautious when maneuvering
to allow for the length and width of the vehicle. Always
allow extra room to corner and to change lanes. Learn to
use the side mirrors to view the road behind. Check them
often.
Drive with consideration on the highway, observing all
speed and safety regulations. The best cruising speed of
your motor home will vary with road and weather
conditions. -
Remember that your motor home is heavier than a
car, making it less maneuverable and harder to stop.
Also, because of its greater side surface area, it is more
easily affected by, cross winds. Allow extra distances for
passing and stopping, and drive at a moderate speed,
particularly in traffic and in gusty wind conditions.
Driving on winding or mountain roads is not difficult if
done with reasonable care. Observe proper vehicle
speeds when ascending or descending hills and always
operate in the proper transmission range. Downshift on
hills to avoid overheating or undue engine loads.
Downshift when descending grades. Engine braking
power will help control vehicle speed, and relieve some of
the strain on the brakes.
Road conditions, terrain, weather, and other driving
factors are sometimes unpredictable, and mountain
driving or desert temperatures can put extreme demands
on drivetrain components — especially the transmission.
Under extreme heat conditions you may need to turn off
the vehicle air conditioner to improve engine and
transmission cooling.
Allow for the extra height of your motor home and
avoid areas having low, overhead clearance. Check for
low-hanging tree branches or other obstructions
whenever you drive or park. Avoid low roofs when pulling
in for service. This may be particularly important if you
drive with the overhead vents open or if the motor home
is equipped with a roof air conditioner, roof rack, CB or
TV/radio antenna.
When parking parallel to a curb, be sure to allow for
poles or obstructions as the front and rear portions of the
motor home swing wider than an automobile. When
parking on an incline, turn the front wheels into the curb
in the direction of the roll to aid the parking brake. Always
shift the transmission to PARK (“P”) and set the parking
brake when parking.
MISCELLANEOUS SAFETY TIPS
• Read and understand the Chassis Operator’s Manual.
• When backing the motor home, have a person stand
to the rear on the driver’s side, if possible to guide you.
• Before departing on a trip, check your routes.
Remember, some tunnels prohibit motor homes with
LP gas systems.
• Drive at moderate speeds, particularly in traffic and in
gusty wind conditions.
• Allow extra distance for passing and stopping.
• While traveling, make sure all occupants use their seat
belts.
• While traveling, make sure all doors are closed and
that cabinets, drawers, and loose objects are Secure.
• Instruct your family on what to do in case of fire, and
hold fire drills periodically.
• Maintain proper charge in the fire extinguisher.
• Gas detectors are available from RV equipment
dealers and may be considered as safety accessories.
• Keep a well-stocked first aid kit handy.
• Keep a toolbox handy.
• Check tires often while traveling. Inside rear duals
should receive special attention, as these tires may go
flat and not be noticed. Running a flat on an inside
dual could lead to a tire fire that would be extremely
difficult to extinguish. Make it a habit to check tire
pressures before each trip, and when refueling give
each tire a sharp rap on the tread surface with a piece
of pipe or similar object. Properly inflated tires produce
a ‘bung” sound when rapped. If the tire is flat, the
sound will be a dull ‘thud’.
CARBON MONOXIDE
SAFETY PRECAUTIONS
WARNING: EXHAUST GASES ARE DEADLY. DO
NOT BLOCK THE TAILPIPES OR SITUATE THE
VEHICLE IN A PLACE WHERE THE EXHAUST
GASES HAVE ANY POSSIBILITY OF ACCUMULATING EITHER OUTSIDE, UNDERNEATH, OR
INSIDE YOUR VEHICLE OR ANY NEARBY
VEHICLES. OUTSIDE AIR MOVEMENTS CAN CARRY
EXHAUST GASES INSIDE THE VEHICLE THROUGH
WINDOWS OR OTHER OPENINGS REMOTE FROM
THE EXHAUST OUTLET OPERATE THE ENGINE
ONLY WHEN SAFE DISPERSION OF EXHAUST
GASES CAN BE ASSURED, AND MONITOR
OUTSIDE CONDITIONS TO BE SURE THAT
EXHAUST CONTINUES TO BE DISPERSED SAFELY.
4

• Beware of exhaust gas (carbon monoxide)
poisoning Symptoms:
Dizziness
Intense Headache
Weakness and Sleepiness
Vomiting
Muscular Twitching
Throbbing in Temples
If symptoms indicate the possibility of carbon
monoxide poisoning, turn off the engine immediately,
open all windows, get out into fresh air at once, and
summon medical assistance.
WARNING: DO NOT UNDER ANY CIRCUMSTANCES
OPERATE THE ENGINE(S) WHILE SLEEPING.
• You would not be able to monitor outside conditions to
assure that engine exhaust does not enter the interior,
and you would not be alert to exhaust odors or
symptoms of carbon monoxide poisoning.
• Check the exhaust system during routine main tenance, and repair any leaks or obstructions before
further operations.
• Do not modify the exhaust system in any way without
first consulting the RV manufacturer.
OVERHEATING
The engine and cooling system in your vehicle should
be operated and serviced as recommended in your
Chassis Operator’s Manual.
VARIABLE SPEED ENGINE FAN
The motor home chassis is equipped with a variable
speed fan clutch. When the engine is under load or
requires maximum cooling, the fan automatically adjusts
and turns faster. The fan requires a lot of horsepower,
and becomes very noisy at high speed. Maximum cooling
is required only a small percentage of the time. When the
engine doesn’t need maximum cooling, the fan just idles
along. This conserves fuel and the fan is less noisy.
High speed fan noise can sometimes be
misinterpreted as transmission slippage. This is not the
case. When the engine is hot and requires extra cooling,
the fan turns at full speed. High engine speed and
temperature conditions, such as pulling away from a stop
after long freeway driving, can cause loud fan noise until
the engine cools down. The fan noise is good noise. The
fan is doing what it is supposed to do. This noise is not a
defect in the fan or the transmission.
12-VOLT FUSE REPLACEMENTS
If part of your vehicle electrical system should fail while
on the road, check the fuses located under the hood on
the driver’s side. The fuse block is labeled with circuit
functions and fuse values. The fuses are automotive
type, and are available at most service stations and parts
distributors. Refer to the ELECTRICAL section for
information on living area 12-volt fuses and circuit
breakers.
TIRES
Your motor home is equipped with truck tires. Under
normal circumstances and with proper maintenance, you
should receive thousands of miles of trouble-free
service.
For safety, motor home stability, and maximum tire
life, proper inflation pressure must be maintained. The
load range and maximum inflation pressure are stamped
on the tire sidewall.
WARNING: CHECK TIRE PRESSURES OFTEN.
ALWAYS CHECK PRESSURE WHEN TIRES ARE
COLD, AND DO NOT BLEED AIR OUT OF WARM
TIRES. FOLLOW THE TIRE PRESSURE
INSTRUCTIONS IN THE CHASSIS OPERATOR’S
MANUAL.
WARNING: KEEP TIRES PROPERLY INFLATED. A
TIRE THAT IS RUN LONG DISTANCES OR AT HIGH
SPEEDS WHILE SERIOUSLY UNDER INFLATED
WILL OVERHEAT TO THE POINT WHERE THE TIRE
MAY LOSE AIR SUDDENLY AND/OR CATCH FIRE.
POSSIBLY RESULTING IN DAMAGE TO THE
VEHICLE AND ITS CONTENTS AND/OR PERSONAL
INJURY.
TIRE REPLACEMENT
Replacement tires must be the same size and have
at least the same weight carrying capacity as the original
equipment tires. The original equipment tires supplied
on your motor home have weight carrying capacities to
support gross axle weight ratings (GAWR) as stated on
the Federal Certification Tag located on the sidewall
near the driver’s seat.
Refer to the Federal Certification Tag for specific axle
capacities for your motor home.
CHANGING A FLAT TIRE
CONSULT THE CHASSIS OPERATOR’S MANUAL
FOR INFORMATION ON TIRE CHANGING.
Even with good tire maintenance and normal driving,
you may experience a flat tire. The best way to solve
this problem is to summon professional help through
your auto club, travel service, or a local truck service
facility. If none of these is available, and circumstances
require you to change the tire yourself, there are several
items that you MUST be aware of before you attempt to
change a flat tire:
• Your motor home is built on a truck chassis. The tires
and wheels can weigh up to 50 pounds or more. IF
YOU ARE NOT PHYSICALLY CAPABLE OF
LIFTING AND MOVING 50 POUNDS OR MORE, DO
NOT UNDER ANY CIRCUMSTANCES TO
ATTEMPT TO CHANGE A FLAT TIRE.
5
• Truck tires and wheels are installed with the wheel
nuts tightened very tightly. IF YOU ARE NOT
PHYSICALLY CAPABLE OF BREAKING LOOSE NUTS
THAT HAVE BEEN TIGHTENED UP TO 180 LB/FT OF
TORQUE, AND THEN RE-TIGHTEN TO THIS TORQUE.
DO NOT UNDER ANY CIRCUMSTANCES ATTEMPT
TO CHANGE A FLAT TIRE.
• The motor home itself with all of your travel gear is
extremely heavy, weighing up to three tons. The axle jack
furnished with your motor home is Capable of lifting the
weight on one wheel, or about one-fourth of the total
gross weight of the vehicle. The ground or road surface
under the vehicle may not support the weight of the
vehicle on the small surface area of the jack. A strong
board or other flat surface may be necessary under the
jack to spread the load and stabilize the jack.
WARNING: TO AVOID PERSONAL INJURY AND/OR
PROPERTY DAMAGE IF A BLOWOUT OR OTHER
TIRE DAMAGE OCCURS, TRY TO OBTAIN EXPERT
TIRE SERVICE HELP. IF YOU MUST REMOVE ANY
WHEELS AND CHANGE THE TIRE WITHOUT
PROFESSIONAL HELP, TAKE OFF THE TIRE AND RIM
ASSEMBLY AND PUT ON THE SPARE TIRE AND RIM
ASSEMBLY FOLLOWING THE INSTRUCTIONS IN THE
CHASSIS OPERATIONS MANUAL. DO NOT
REINFLATE A TIRE THAT HAS BEEN FLAT, OR IS
SERIOUSLY LOW ON AIR. HAVE THE TIRE
REMOVED FROM THE WHEEL AND CHECK THE TIRE
AND TUBE FOR DAMAGE. NEVER ADD AIR TO TIRES
UNLESS AN ACCURATE PRESSURE GAUGE IS
USED.
REQUIRED TOOLS AND EQUIPMENT
• JACK
WARNING: THE JACK IS DESIGNED FOR USE AS A
TOOL FOR TIRE CHANGING ONLY. IT IS NOT
INTENDED FOR USE AS A LEVELING DEVICE OR AS
A LIFT FOR SERVICE PURPOSES.
Lug wrench to fit wheel nuts, with breaker bar handle.
Torque wrench with at least 300 LB/FT. capacity.
Wheel blocks
Board or other flat surface to place under the jack.
WARNING: DO NOT CRAWL UNDER VEHICLE.
CONSULT THE CHASSIS OPERATOR’S MANUAL
FOR INFORMATION ON TIRE CHANGING.
TO CHANGE A FRONT WHEEL:
1. Move the vehicle to a level, firm surface.
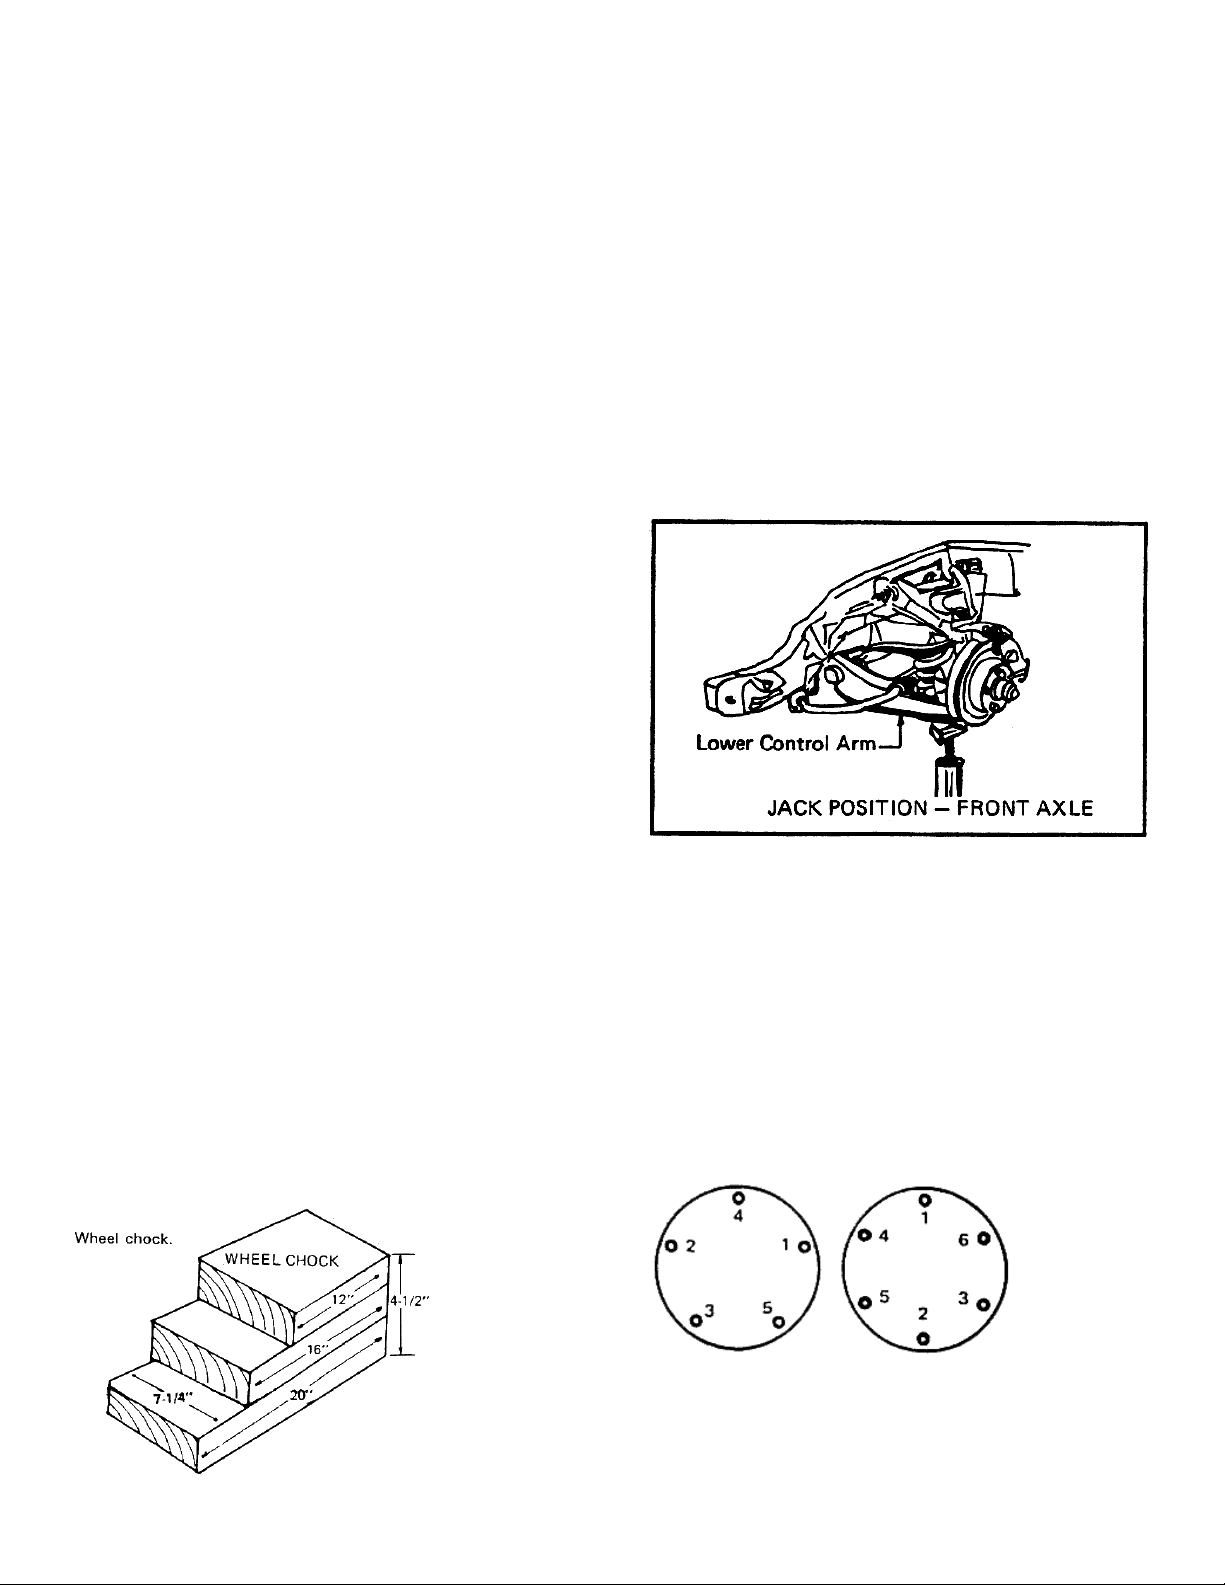
2. To provide clearance for the jack, carefully drive the
flat tire up on the wheel chock.
3. Turn off the engine, place transmission selector in “P”
and set the parking brake.
4. Block both the front and back of the wheel in the
opposite corner from the wheel to be changed.
5. On Questionable surfaces, use a board or other
solid, flat material under the jack to provide a firm
base and minimize the possibility of shifting.
6. Slide the jack under the front spring lower control arm
(see illustration), and turn the screw extension up
until it touches the control arm surface.
7. Begin jacking until the jack is firmly positioned, but do
not lift the tire off the ground.
8. Loosen but do not remove the wheel nuts.
9. Raise the vehicle until the tire clears the ground.
10. Remove wheel nuts and wheels. Put spare wheel in
place.
11. Replace wheel nuts. Carefully tighten the nuts
snugly with the wheel and tire off the ground.
12. Lower the vehicle until the tire contacts the ground.
Do not put the full weight of the vehicle on the tire.
13. Tighten the wheel nuts following the sequence
shown in the diagram, to the specified torque.
WHEEL NUT TIGHTENING SEQUENCES
6
 Loading...