

Page 1
QUICK
REFERENCE
GUIDE
2020
Page 2

2020
COROLLA
This Quick Reference Guide is a summary of basic vehicle
operations. It contains brief descriptions of fundamental
operations so you can locate and use the vehicle’s main
equipment quickly and easily.
The Quick Reference Guide is not intended as a substitute for
the Owner’s Manual located in your vehicle’s glove box. We
strongly encourage you to review the Owner’s Manual and
supplementary manuals so you will have a better understanding
of your vehicle’s capabilities and limitations.
Your dealership and the entire staff of Toyota Motor North
America, Inc. wish you many years of satisfied driving in your
new Corolla.
A word about safe vehicle operations
This Quick Reference Guide is not a full description of Corolla operations.
Every Corolla owner should review the Owner’s Manual that accompanies this
vehicle.
Pay special attention to the boxed information highlighted in color throughout
the Owner’s Manual. Each box contains safe operating instructions to help you
avoid injury or equipment malfunction.
All information in this Quick Reference Guide is current at the time of printing.
Toyota reserves the right to make changes at any time without notice.
Page 3

INDEX
OVERVIEW
Engine maintenance 9
Fuel tank door release & cap 7
Hood release 8
Indicator symbols 5
Instrument cluster 4
Instrument panel 2-3
Instrument panel light control 8
Keyless entry
Smart Key system
FEATURES & OPERATIONS
1,2
6
1,2
7
Air conditioning/heating 22-23
Audio 20
Auto lock/unlock
1,2
11
Blind Spot Monitor (BSM) 24
Bottle holders 23
Clock 24
Continuously variable transmission 10
Cup holders 23
Door locks 12
Driving mode select 11
Electric parking brake 14
1
Lights
& turn signals 17
Manual transmission 10
Moonroof 12
Multi-Information Display (MID)
1
15
Parking brake 13
Power outlet-12V DC 18
Qi Wireless charger 19
Rear seats-Folding 16
Rear view monitor system 25
Seat adjustments-Front 16
Seat heaters 23
Seats-Head restraints 16
Steering lock release 13
Steering wheel switches &
telephone controls (Bluetooth
®
) 21
Tilt & telescopic steering wheel 13
USB charge-Port 19
USB media/AUX Port 18
FEATURES & OPERATIONS (continued)
Vehicle Stability Control (VSC)/
TRAC OFF switch 25
Windows-Power 12
Windshield wipers & washers 18
TOYOTA SAFETY SENSE™ (TSS)
Automatic High Beams (AHB) 40
Dynamic Radar Cruise Control (DRCC)
or Full-Speed Range DRCC 37-39
Lane Departure Alert with
Steering Assist (LDA w/SA) 30-33
Lane Tracing Assist (LTA) 33-36
Pre-Collision System with Pedestrian
Detection (PCS w/PD) 27-29
Road Sign Assist (RSA) 41
Quick overviewToyota Safety Sense
™
(TSS) 26
Sensors 27
SAFETY & EMERGENCY FEATURES
Floor mat installation 48
Rear door child safety locks 42
Safety Connect 43
Seat belts 42
Seat belts-Shoulder belt anchor 42
Spare tire & tools 45
Star Safety System
TM
47-48
Tire Pressure Monitoring
(warning) System (TPMS) 44
Tire repair kit & tools 46
Trunk-Internal release 43
BLUETOOTH
PAIRING SECTION
®
DEVICE
50-52
OVERVIEWFEATURES & OPERATIONSTOYOTA SAFETY SENSESAFETY & EMERGENCY FEATURES
1
Visit your Toyota dealer for information on customizing this feature.
2
Programmable by customer. Refer to the Owner’s Manual for instructions and more information.
3
HomeLink® is a registered trademark of Gentex Corporation.
1
Page 4
OVERVIEW
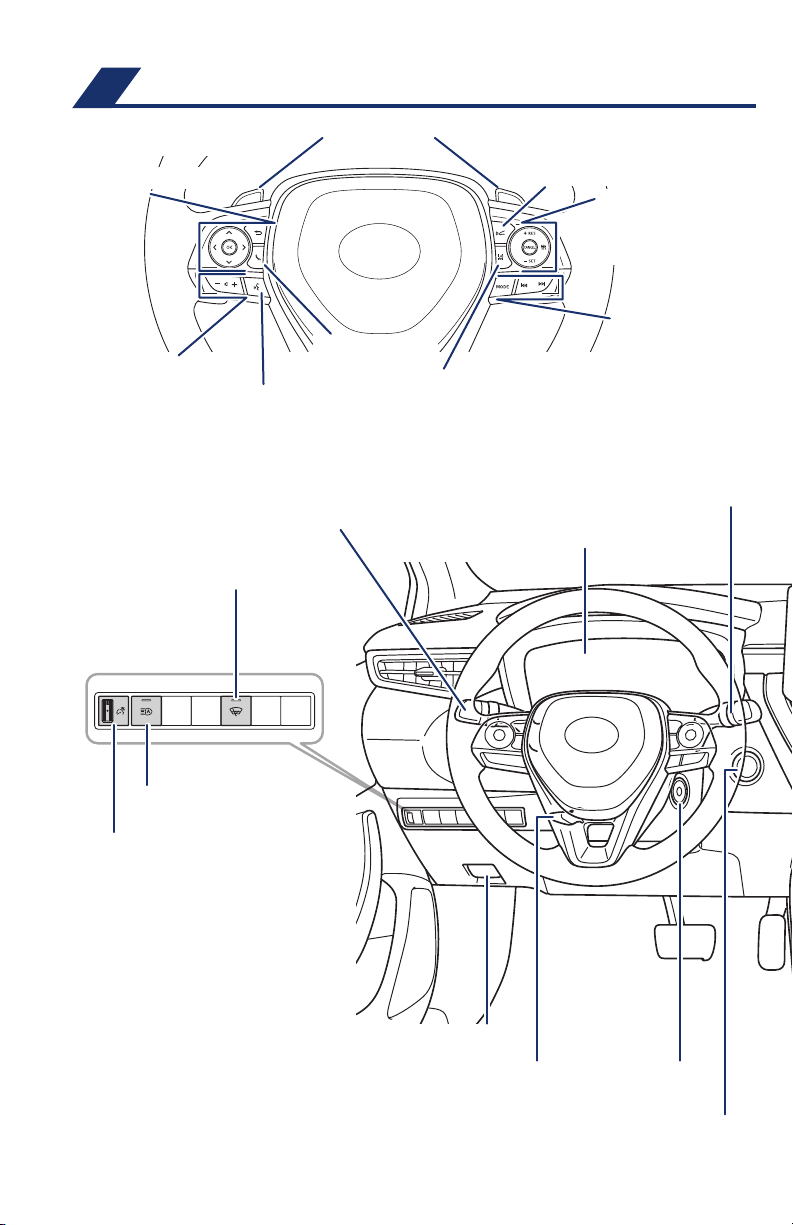
Instrument panel
Meter control switches
Paddle shifters
1
Full-Speed Range Dynamic Radar
Cruise Control/Dynamic Radar
Cruise Control Vehicle-to-vehicle
distance switch
Full-Speed Range
Dynamic Radar Cruise
Control/ Dynamic Radar
Cruise Control switch
Audio volume control
2
switch
Voice command switch
Headlights/turn signals control
Window wiper de-icer switch
Automatic High Beam
(AHB) switch
Instrument panel light control dial
Telephone switch
2
2
LTA (Lane Tracing Assist)
Alert with Steering Assist (LDA w/SA) switch
Steering wheel controls
1
Audio control switches
1
/Lane Departure
Windshield wiper and washer control
Meters/Multi-Information Display (MID)
2
Hood lock release lever
Tilt and telescopic steering
lock release lever
(below the steering wheel)
2
Ignition swtich
1
“ENGINE START STOP” swtich
1
Page 5
1
If equipped.
2
For details, refer to the “Navigation and Multimedia System Owner’s Manual” or visit www.toyota.com/
entune for additional audio/multimedia resources.
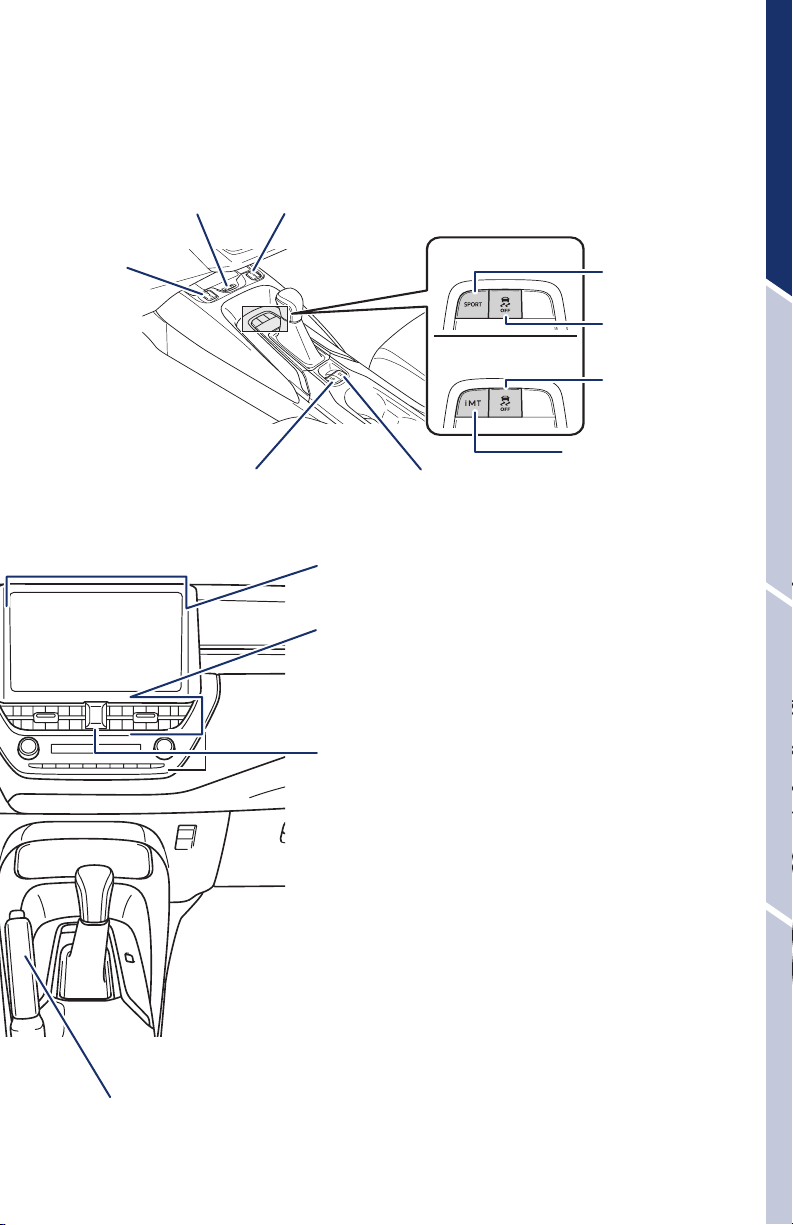
Qi Wireless charger switch
1
Seat heater switch
1
OVERVIEWFEATURES & OPERATIONSTOYOTA SAFETY SENSESAFETY & EMERGENCY FEATURES
Seat heater switch
1
Parking brake switch
1
Audio system
Navigation system
Air Conditioning controls
Emergency flasher switch
With a continuously
variable transmission
With a manual
transmission
Brake hold switch
1,2
/
1,2
“SPORT” mode
switch
VSC OFF switch
VSC OFF switch
“iMT” (Intelligent
1
Manual Transmission)
1
switch
Parking brake
1
3
Page 6
OVERVIEW
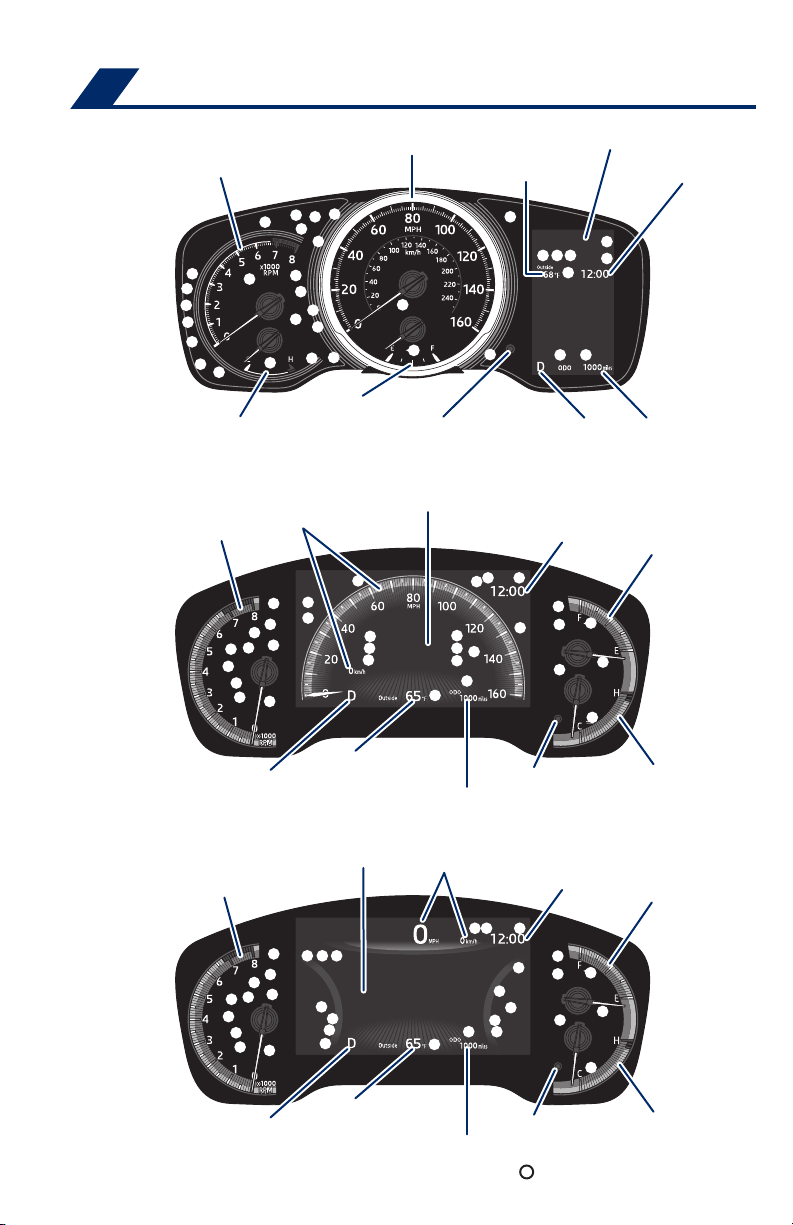
Instrument cluster
4.2-inch display
Tachometer
Fuel gauge
Engine coolant temperature gauge
7-inch display (Analog speedometer)
Tachometer
Speedometer
Speedometer
Odometer/Trip meter
display change button
Multi-Information Display (MID)
Multi-Information Display (MID)
Outside temperature
Shift position
indicator
Clock
Clock
Odometer and
trip meter display
Fuel gauge
Shift position indicator
Outside temperature
Odometer and trip meter display
7-inch display (Digital speedometer)
Multi-Information Display (MID)
Tachometer
Outside temperature
Shift position indicator
Odometer and trip meter display
Speedometer
4
Odometer/Trip meter
display change button
Clock
Odometer/Trip meter
display change button
Service indicators and reminders
Engine coolant
temperature gauge
Fuel gauge
Engine coolant
temperature gauge
Page 7
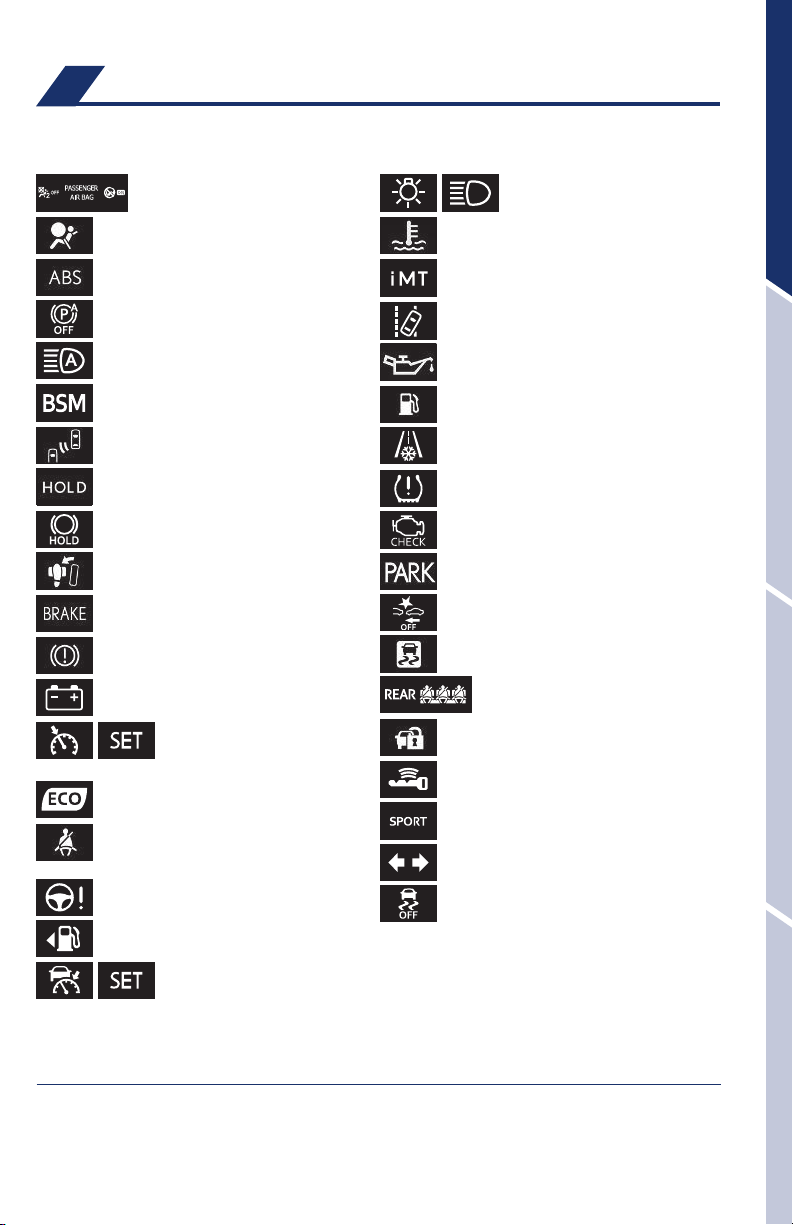
Indicator symbols
For details, refer to “Indicators and warning lights,” Section 2-2, 2020 Owner’s
Manual.
“AIR BAG ON/OFF” indicator
Airbag SRS warning
1
1
Anti-lock Brake System (ABS) warning
Auto EPB OFF indicator
1,4
Automatic High Beam (AHB) indicator
High coolant temperature warning
1
iMT indicator
(orange/green indicator)
Lane Tracing Assist (LTA)4/
Lane Departure Alert (LDA) indicator
Low engine oil pressure warning
Headlight low/high beam
indicators
4
OVERVIEWFEATURES & OPERATIONSTOYOTA SAFETY SENSESAFETY & EMERGENCY FEATURES
Blind Spot Monitor (BSM) indicator
4
BSM outside rear view mirror indicators
Brake hold operated indicator
Brake hold standby indicator
1,2,4
1,4
Brake Overrride System/Drive-Start
Control warning
Brake system warning
1
Brake system warning (yellow indicator)
Charging system warning
1
Constant speed cruise control
indicator/Constant speed
cruise control SET indicator
ECO driving indicator light
Driver’s and front passenger’s seat belt
reminder (alarm will sound if speed is over
12 mph)
Electric power steering system warning
(red/yellow indicator)
1,4
1
Fuel tank door position
Full-Speed Dynamic Radar
Cruise Control (DRCC) indicator/
DRCC SET indicator
Low fuel level warning
4
1
Low outside temperature indicator
Low Tire Pressure Warning
1
Malfunction/Check Engine indicator
Parking brake indicator
2
Pre-Collision System (PCS) warning
Slip indicator
1,3
1
1,2
Rear passengers’ seat belt reminder
Security indicator
Smart Key system indicator
SPORT mode indicator
4
4
Turn signal indicator
Vehicle Stability Control (VSC) OFF
1
indicator
1
If the indicator does not turn off within a few seconds of starting the engine, there may be a
malfunction. Have the vehicle inspected by your Toyota dealer.
2
If the indicator flashes, there may be a malfunction. Refer to the Owner’s Manual.
3
If the indicator flashes, it indicates that the system is operating.
4
If equipped.
5
Page 8
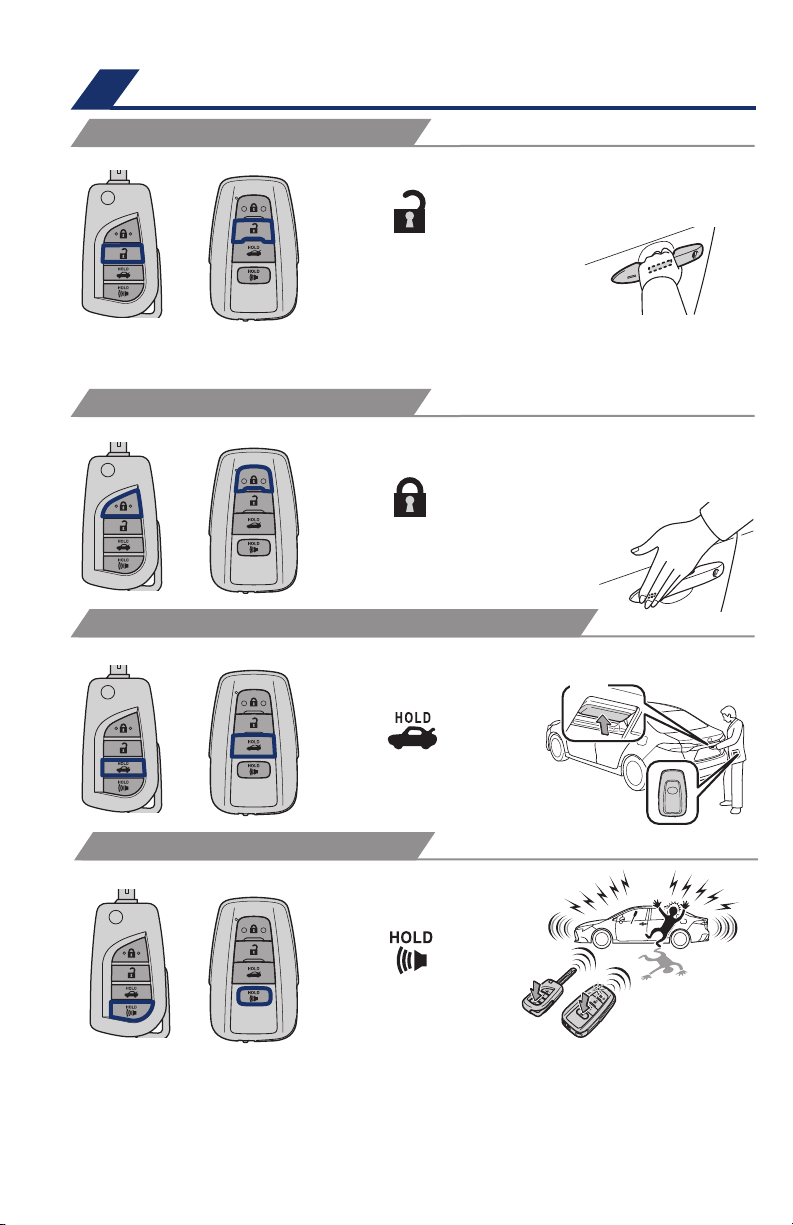
OVERVIEW
Keyless entry (if equipped)
UNLOCKING OPERATION
Smart Key
Push
Push ONCE: Driver door
TWICE: All doors
NOTE: If a door is not opened within 60 seconds of unlocking, all doors will relock
for safety.
LOCKING OPERATION
Smart Key
Push
TRUNK LOCKING/UNLOCKING
Smart Key
Carry Smart
Front door unlock*
Grasp
Carry Smart
All-door lock
Touch
Carry Smart
Push
Key remote
Key remote
Key remote
Push and hold
PANIC BUTTON
Smart Key
Push and hold
* Driver door unlocking function can be programmed to unlock driver door only,
or all doors. In some models, grasping front passenger door handle will unlock all
doors.
Please refer to the Owner’s Manual for more details on how to program the doors.
NOTE: Doors may also be locked/unlocked using remote.
6
Page 9
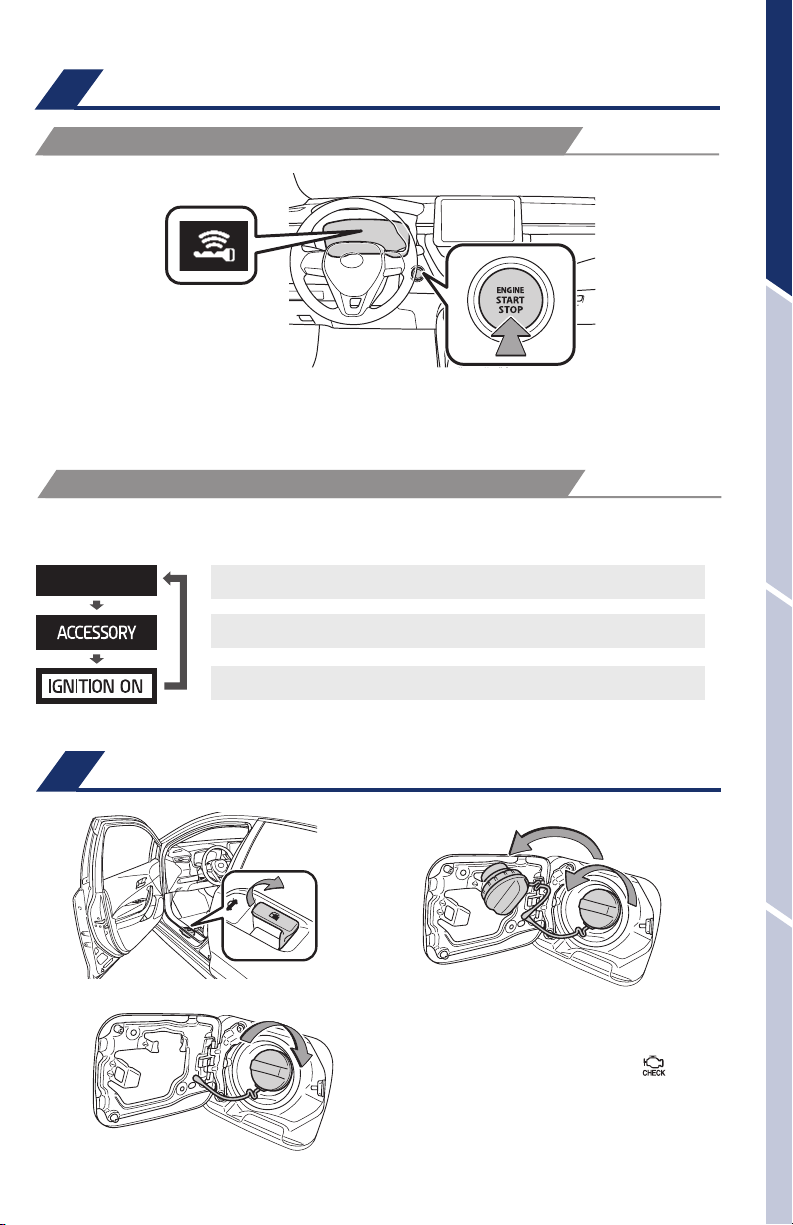
Smart Key system (if equipped)
START FUNCTION
NOTE: The Smart Key must be carried to enable the start function. With gear
shift lever in Park* or N** and the brake pedal* or clutch pedal** depressed,
push the “ENGINE START STOP” switch.
* Continuously variable transmission, ** Manual transmission
POWER (WITHOUT STARTING ENGINE)
Without depressing the brake pedal* or clutch pedal**, pressing the “ENGINE
START STOP” switch will change the operation mode in succession from:
Off - All systems OFF. Emergency flashers can be used.
Accessory – Some electrical components can be used.
OVERVIEWFEATURES & OPERATIONSTOYOTA SAFETY SENSESAFETY & EMERGENCY FEATURES
On - All electrical components can be used.
* Continuously variable transmission, ** Manual transmission
Fuel tank door release & cap
Store
Close
NOTE: Tighten until one click is
heard. If the cap is not locked or
tightened, Check Engine “
indicator may illuminate.
7
Turn to open
”
Page 10
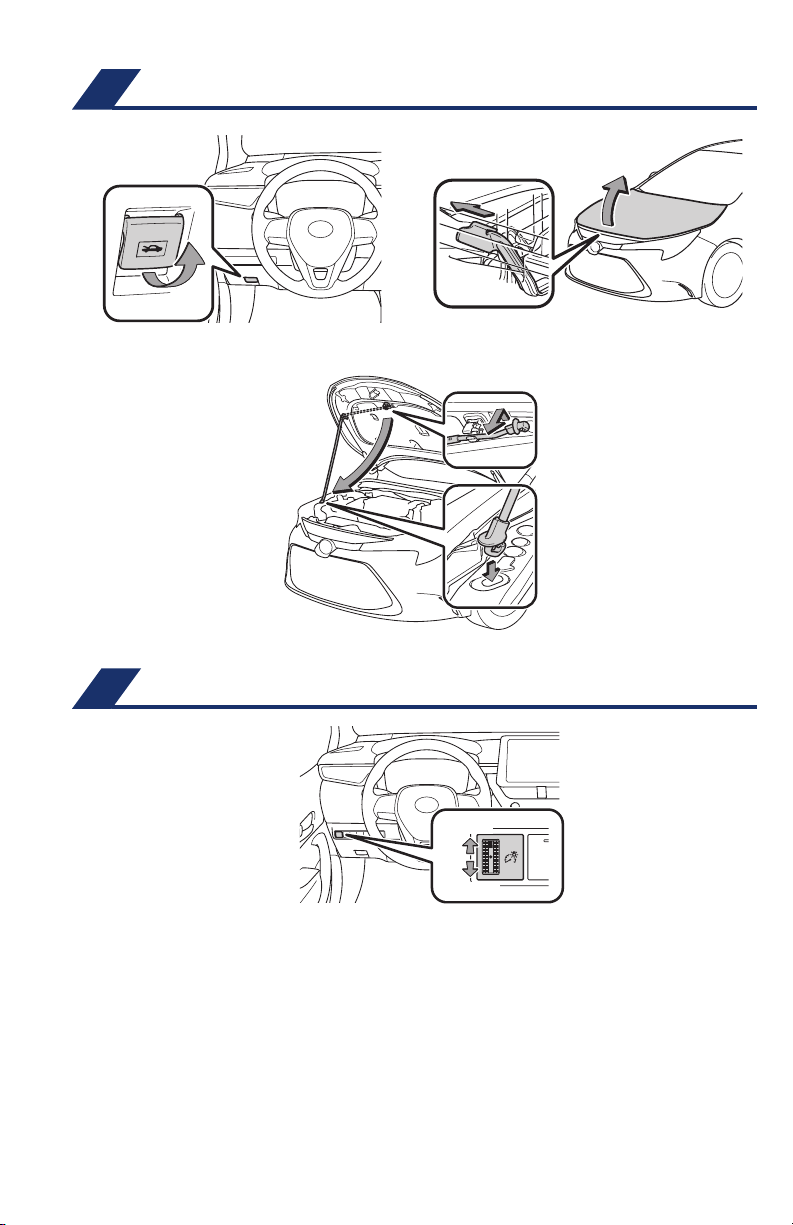
OVERVIEW
Hood release
Pull
Pull up latch and
raise hood
Instrument panel light control
Darker
Insert rod to hold
hood open
Brighter
8
Page 11
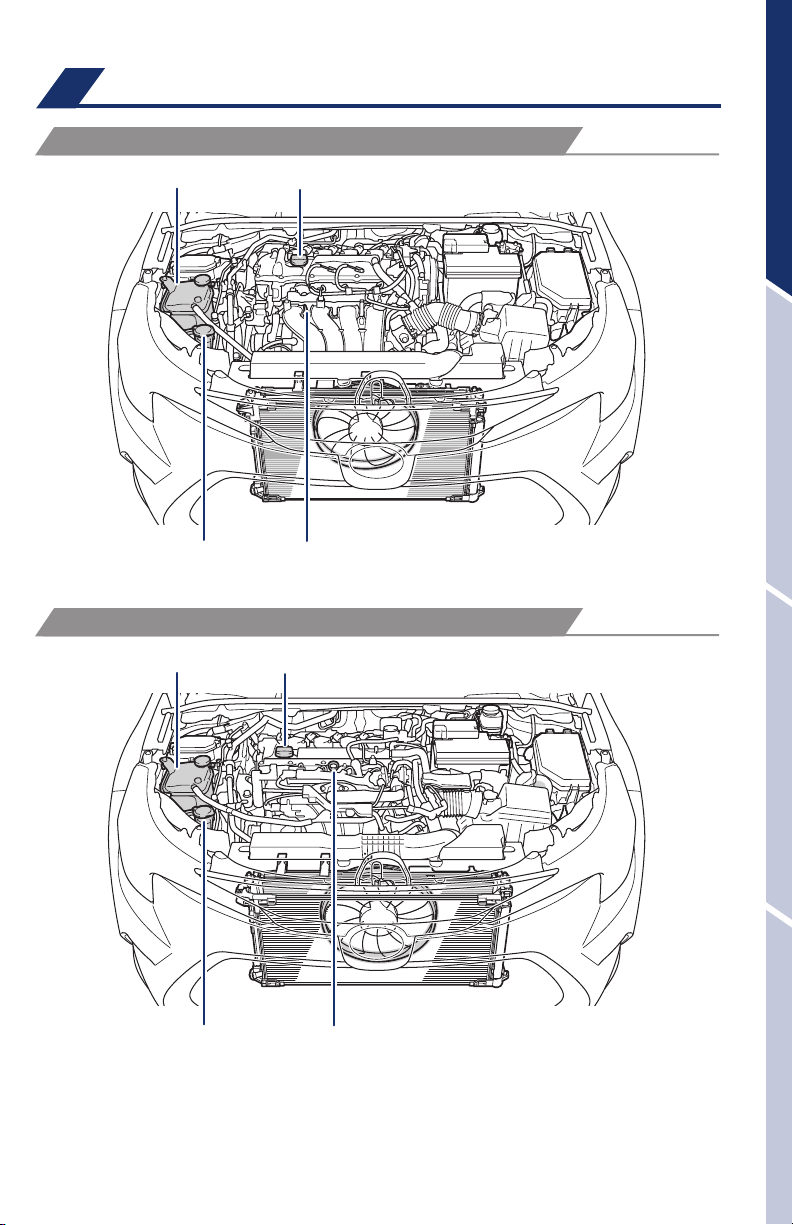
Engine maintenance
1.8 L 4-CYLINDER (2ZR-FAE) ENGINE
Engine coolant reservoir
Engine oil filler cap
OVERVIEWFEATURES & OPERATIONSTOYOTA SAFETY SENSESAFETY & EMERGENCY FEATURES
Windshield washer fluid tank
Engine oil level dipstick
2.0 L 4-CYLINDER (M20A-FKS) ENGINE
Engine coolant reservoir
Windshield washer fluid tank
Engine oil filler cap
Engine oil level dipstick
NOTE: Regularly scheduled maintenance, including oil changes, will help
extend the life of your vehicle and maintain performance. Please refer to the
“Warranty & Maintenance Guide.”
9
Page 12
B
P
R
N
D
P
R
N
D
M
FEATURES & OPERATIONS
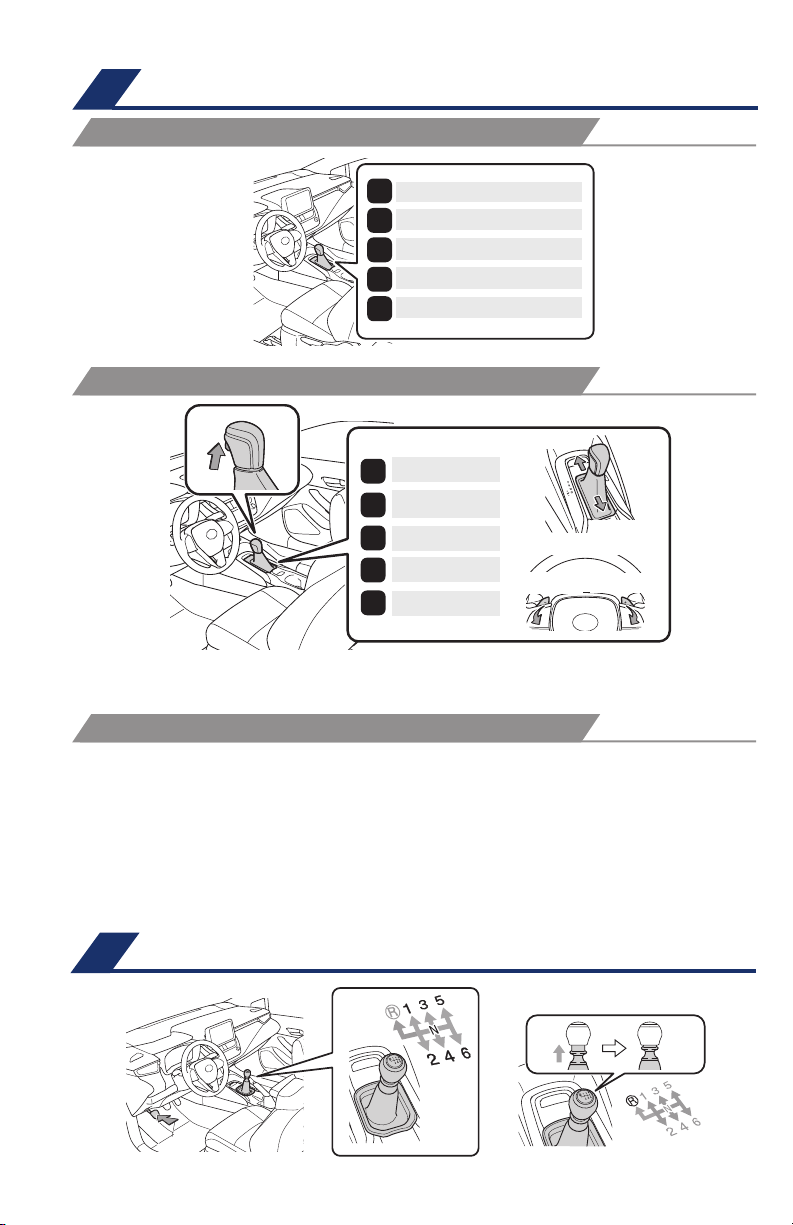
Continuously variable transmission (if equipped)
WITHOUT PADDLE SHIFTERS
Park
Reverse
Neutral
Drive
Maximum Engine Braking
WITH PADDLE SHIFTERS
Park
Reverse
Neutral
Drive
“M” position*
1
+ (“M” mode)
1
- (“M” mode)
- (“M” mode)
+ (“M” mode)
1
The engine switch must be “ON” (without Smart Key) and “IGNITION ON” mode
(with Smart Key) and the brake pedal depressed to shift from Park.
CHANGING GEAR STEPS IN THE M POSITION
Shift the shift lever to “M” position from “D” position.
+: Upshifting
-: Downshifting
Downshifting increases power going uphill, or provides engine braking downhill. For
best fuel economy during normal driving conditions, always drive with the shift lever
in the “D” position.
Refer to the Owner’s Manual for more details.
Manual transmission (if equipped)
Lift up ring to shift into reverse
10
Page 13
Auto lock/unlock
Automatic door locks can be programmed to operate in different modes, or turned
OFF.
Shift position linked door locking/unlocking function
-Doors lock when shifting from Park.
-Doors unlock when shifting into Park.
Speed linked door locking function
-Doors lock when the vehicle speed goes above approximately 12 mph.
Driver’s door linked door unlocking function
-Doors unlock when the engine switch is set to OFF and driver’s door is opened.
Refer to the Owner’s Manual for more details.
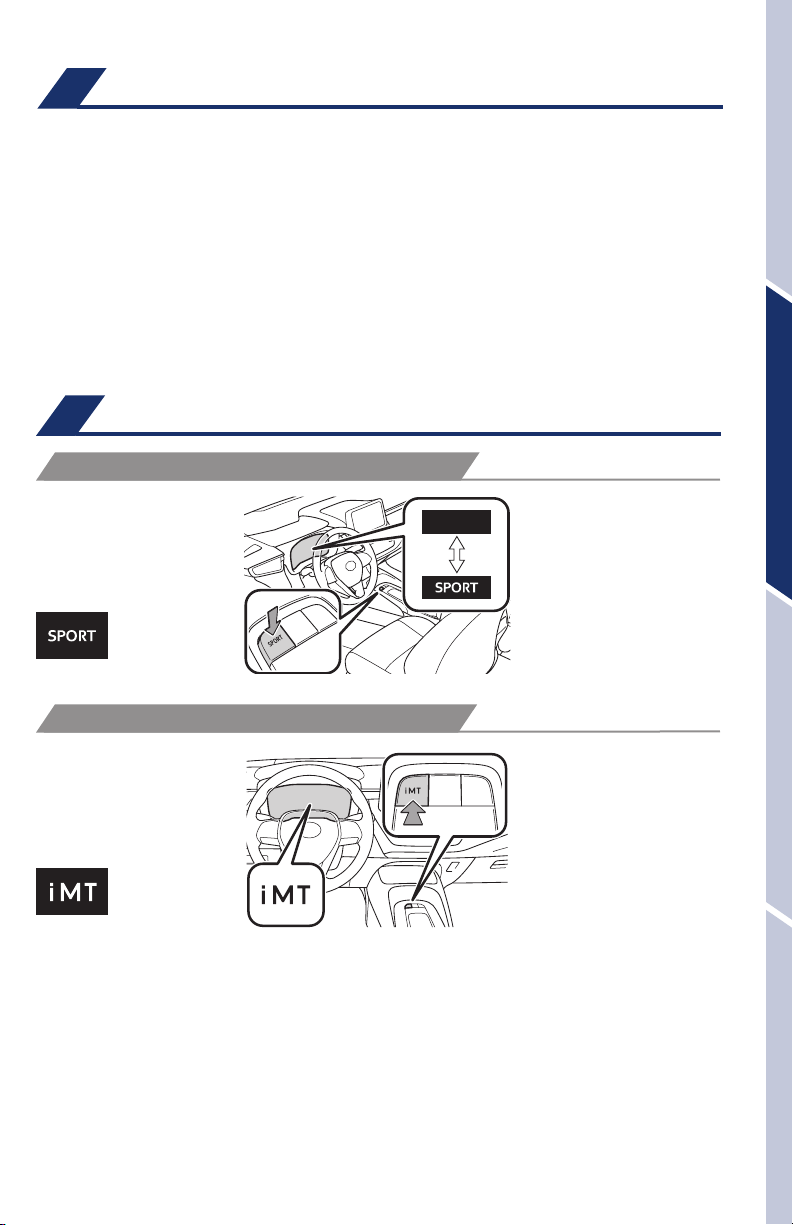
Driving mode select
SPORT MODE (IF EQUIPPED)
Normal mode
Sport mode
OVERVIEWFEATURES & OPERATIONSTOYOTA SAFETY SENSESAFETY & EMERGENCY FEATURES
iMT (WITH A MANUAL TRANSMISSION)
Refer to the Owner’s Manual for more information.
11
Page 14
FEATURES & OPERATIONS
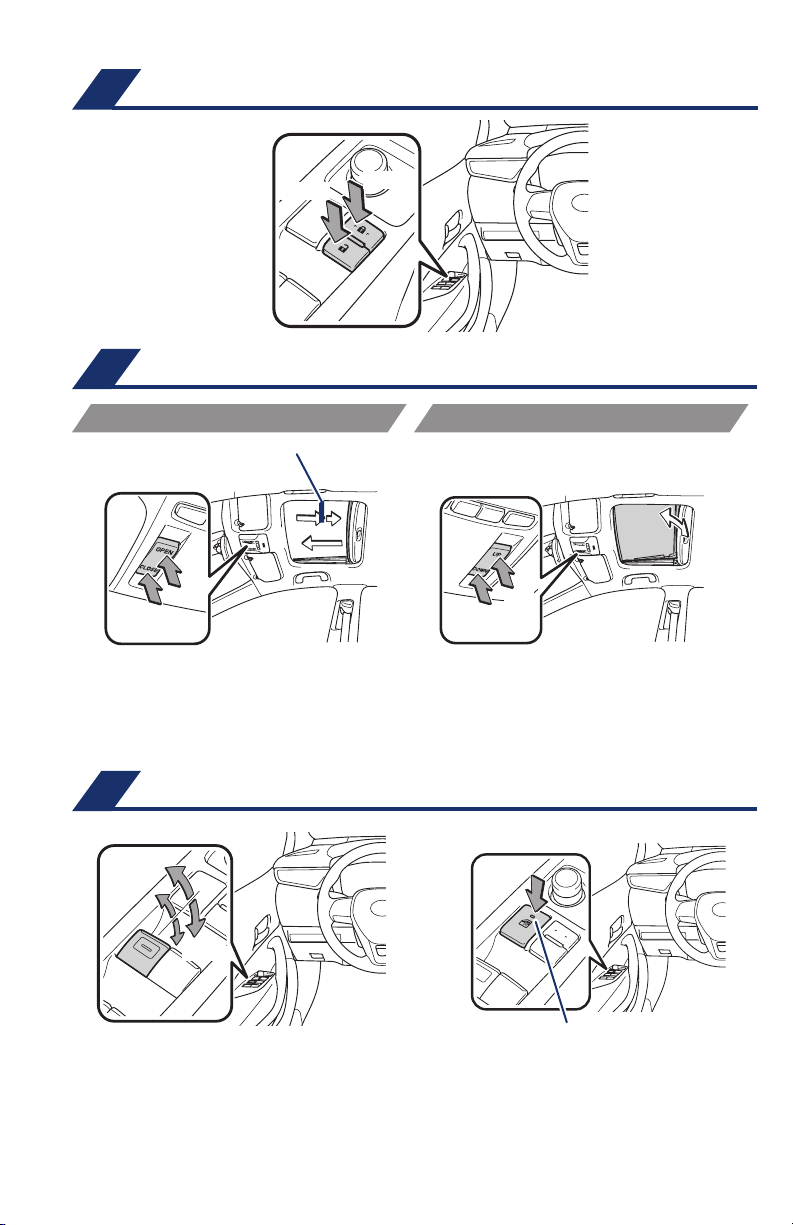
Door locks
Unlock
Lock
Moonroof (if equipped)
SLIDING OPERATION TILTING OPERATION
Recommended open position
to minimize wind noise.
Open
Close
Push once to open partway; again to open
completely.
Lightly press either side of the moonroof switch while opening/tilting is in progress,
the moonroof stops partway.
Push once to open completely.
Close
Tilt
Windows-Power
Driver side
Up
Down
All window auto up/down
Push the switch completely down or pull it completely up and release to fully open
or close. To stop the window partway, operate the switch in the opposite direction.
Window lock switch
Deactivates all passenger windows. Driver’s window remains operable.
12
Window lock switch
Indicator
Page 15
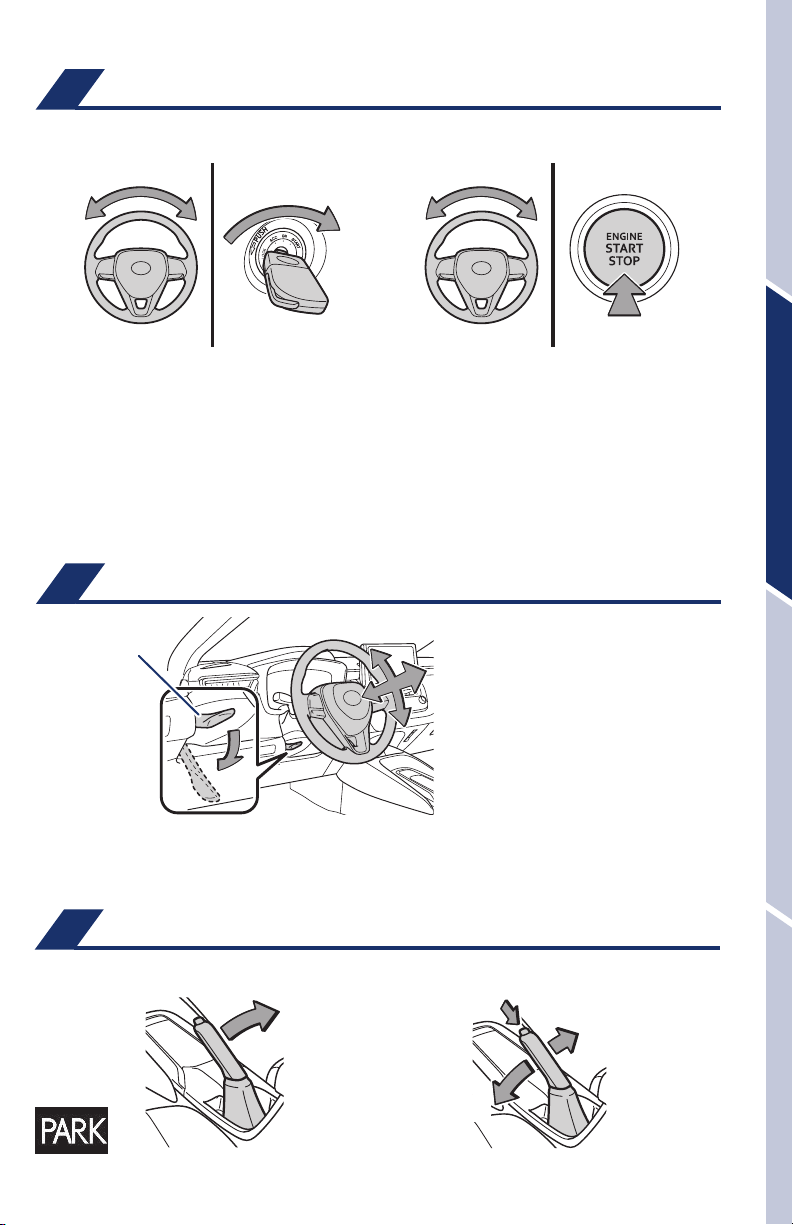
Steering lock release
With Smart Key systemWithout Smart Key system
OVERVIEWFEATURES & OPERATIONSTOYOTA SAFETY SENSESAFETY & EMERGENCY FEATURES
When starting the engine, the engine
switch may seem stuck in OFF. To
free it, turn the key while turning the
steering wheel slightly left and right.
When the steering lock cannot be
released, “Push Engine Switch while
Turning Steering Wheel in Either
Direction” will be displayed on the multiinformation display.
Press the engine switch shortly and
firmly while turning the steering wheel
left and right.
Tilt & telescopic steering wheel
Lock release lever
Hold wheel, push lever down, set angle and length, and return lever.
NOTE: Do not attempt to adjust while the vehicle is in motion.
Angle
Length
Parking brake (if equipped)
Set
Pull
Release
(3) Lower
13
(2) Push
(1) Pull slightly
Page 16

FEATURES & OPERATIONS
Electric parking brake (if equipped)
Driver side
Automatic mode ON
Continuously variable
transmission
Manual mode (Brake HOLD switch)
Manual transmission
Driver side
Automatic mode OFF
Continuously variable
transmission
Manual transmission
Automatic (shift lever operation)
Standby indicator Operated indicator
* Continuously variable transmission
** Manual transmission
Parking brake light
To turn automatic mode ON, while vehicle is stopped, pull and hold switch until
“EPB Shift Interlock Function Activated”* displays in Multi-Information Display
(MID) or auto EPB OFF indicator** turns off. While depressing brake, shifting into
P position will automatically set the brake and turn the parking brake indicator and
parking brake light on. To release brake, depress brake and shift out of P. The
indicator light and the light on the switch turn off.
To turn automatic mode OFF, push and hold parking brake switch until “EPB Shift
Interlock Function Deactivated”* displays on the MID or auto EPB OFF indicator**
turns on.
Manual
While vehicle is stopped and brake pedal is depressed, pull to set parking brake
and turn the parking brake indicator and parking brake light on. To release, press
the brake pedal and push switch. The indicator light turns off.
Brake hold
The brake hold system keeps the brake applied when the shift lever is in D, M*/a
forward driving position** or N with the system on and the brake pedal has been
depressed to stop the vehicle. The system releases the brake when the accelerator
pedal is depressed with the shift lever in D or M*/a forward driving position** to
allow smooth start off.
Refer to the Owner’s Manual for limitations and more details.
14
Page 17
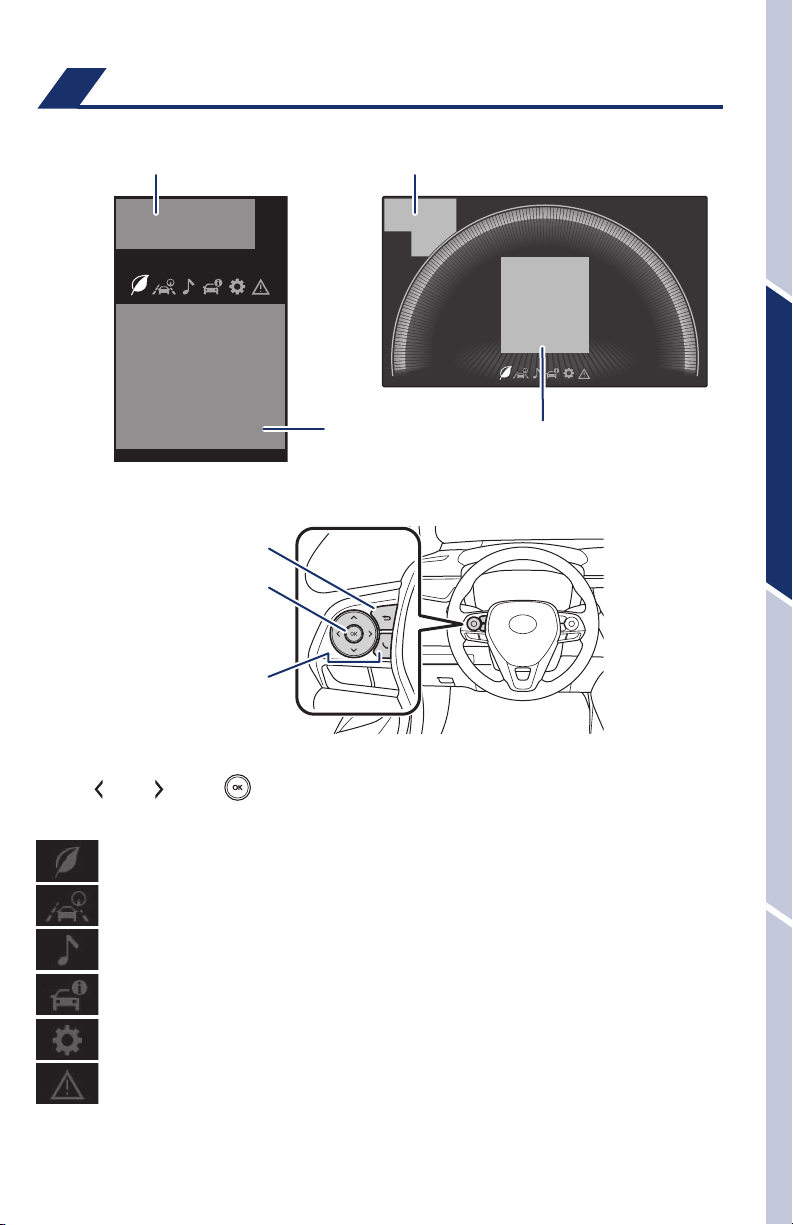
Multi-Information Display (MID)
4.2-inch display
Driving support system status display area Driving support system status display area
7-inch display
Content display areaContent display area
Meter control switches
Previous screen
Enter/Select
Scroll/search screens
OVERVIEWFEATURES & OPERATIONSTOYOTA SAFETY SENSESAFETY & EMERGENCY FEATURES
Push “ ” or “ ” and “ ” on steering wheel to change and select information in
the following:
Driving information display
Driving support system information display
Audio system-linked display
Vehicle information display
Settings display
Warning message display
15
Page 18
FEATURES & OPERATIONS
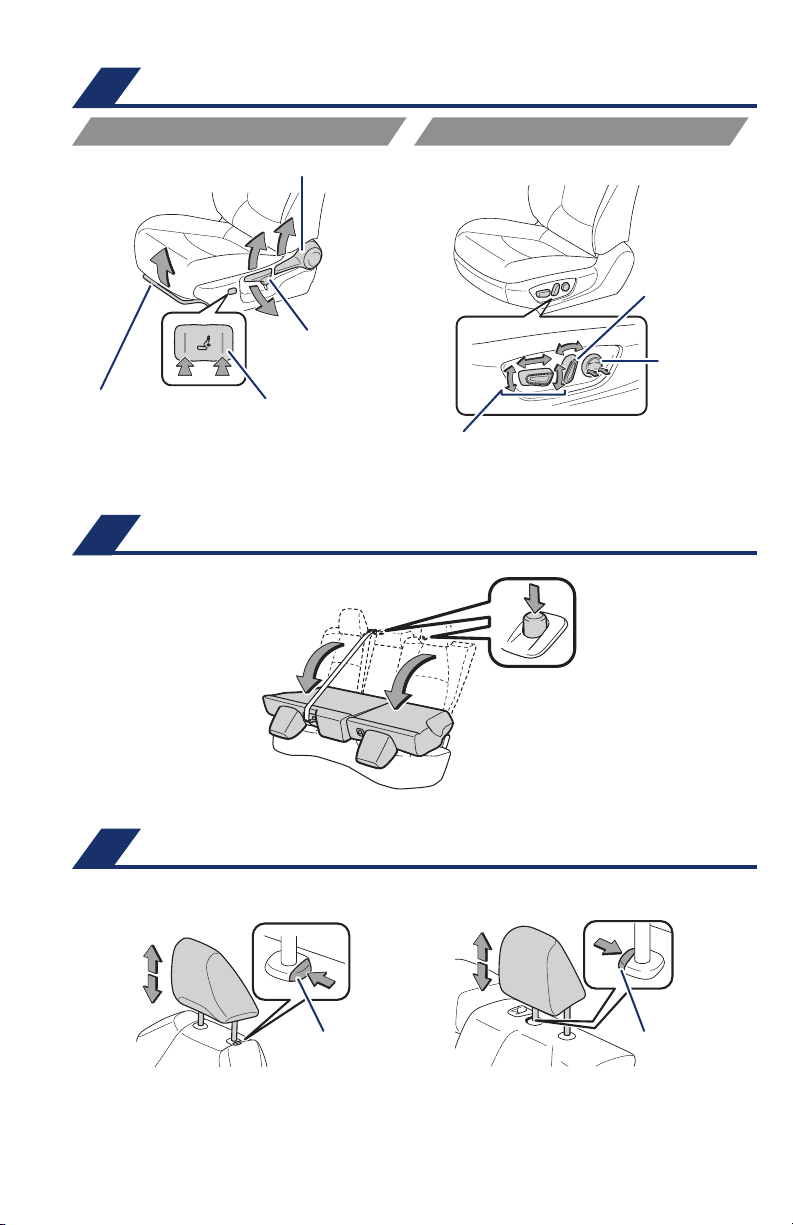
Seat adjustments-Front
MANUAL SEAT
Seat position
(forward/backward)
Rear seats-Folding
Seatback angle
Lumber support*
(driver’s side only)
Fold down
Height crank
(driver’s side only)
POWER SEAT (DRIVER’S SIDE ONLY)
Seatback angle
Lumber support*
(driver’s side
only)
Seat position (forward/backward),
cushion (front) angle and height
Push
*If equipped *If equipped
Front
Seats-Head restraints
Rear outside (adjustable type)
Lock release button Lock release button
16
Page 19
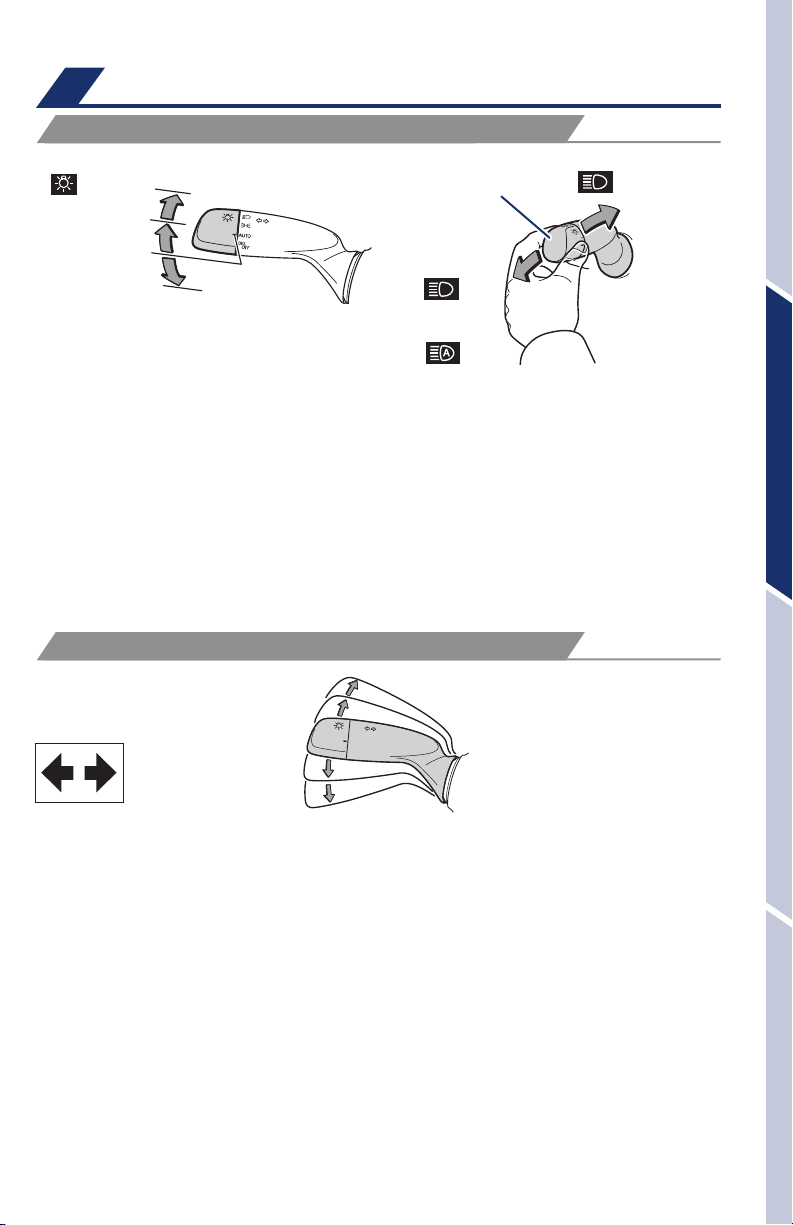
Lights & turn signals
HEADLIGHTS
Headlights
Parking lights
AUTO
OFF
Low beam
(Original position)
High beam (Push)
or
Automatic High Beam*
High beam flasher
(Pull)
-Daytime Running Light system (DRL) Automatically turns on under certain
conditions to make vehicle more visible to other drivers. Not for use at night.
-Automatic light cut off system Automatically turns lights off after 30 second
delay, or lock switch on remote is pushed after all doors are locked.
-Automatic High Beam (AHB) system Automatically switches between high
and low beams as appropriate for enhanced vision at night.
Refer to Toyota Safety Sense™ (TSS) in this guide or the Owner’s Manual for
more details on the Automatic High Beam feature.
* Operating conditions must be met. Refer to the Owner’s Manual for details.
TURN SIGNALS
Right turn
Lane change*
OVERVIEWFEATURES & OPERATIONSTOYOTA SAFETY SENSESAFETY & EMERGENCY FEATURES
Lane change*
Left turn
* Move lever partway and release; the signals will flash three times
17
Page 20
FEATURES & OPERATIONS
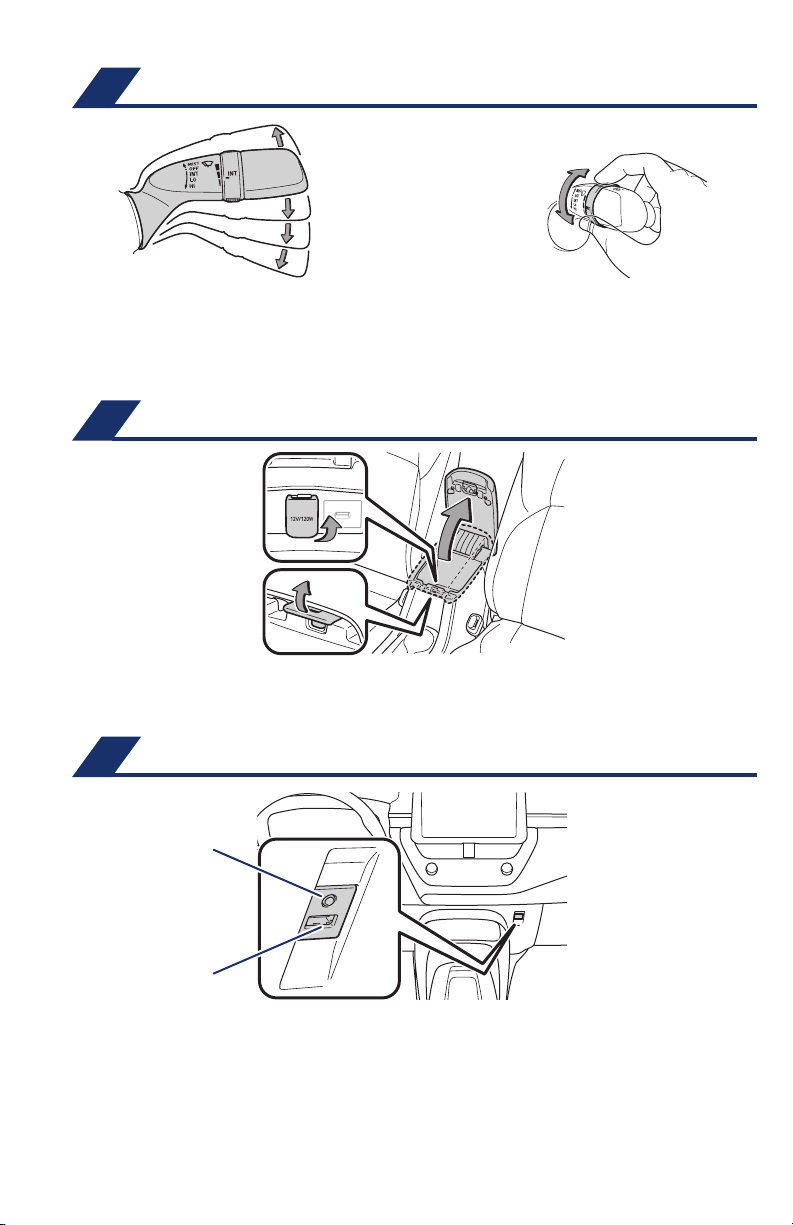
Windshield wipers & washers
Mist
Adjust frequency*
Interval wipe
Slow
Pull to wash and wipe
*
Intermittent windshield wiper frequency adjustment Rotate to increase/
decrease wipe frequency. (Available on select grades.)
Refer to the Owner’s Manual for more information.
Fast
Pull to wash and wipe
Power outlet-12V DC
The engine switch must be in the “ACC” or “ON” (without a Smart Key system),
ACCESSORY or IGNITION ON mode (with a Smart Key system) position for use.
USB media/AUX port
AUX port
USB media port
USB media port
By connecting a USB-compatible portable audio device or USB memory stick into
the USB media port, you can listen to music through the vehicle’s speaker system.
AUX port
By inserting an AUX cable into the AUX port, you can listen to music from a
portable audio device through the vehicle’s speaker system while in AUX mode.
18
Page 21
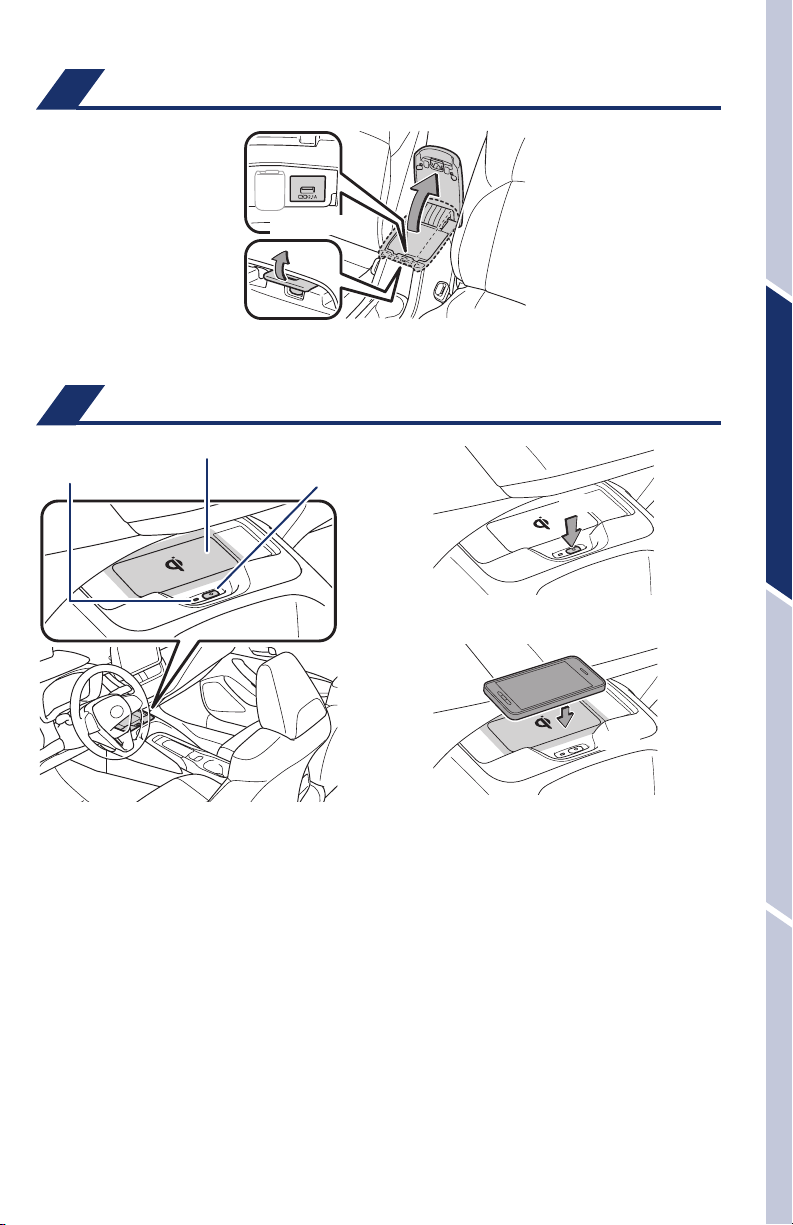
USB charge-port (if equipped)
(Charge-only)
Qi Wireless charger (if equipped)
OVERVIEWFEATURES & OPERATIONSTOYOTA SAFETY SENSESAFETY & EMERGENCY FEATURES
(1)
Press
When the engine is turned off, the last state (ON/
OFF) of the charger is memorized.
Operation indicator light
Charge area
Power switch
(2)
Place
Place device nearest the center of charging area for
best results. Moving device may result in stopping
or restarting the charging process.
A mobile device can be charged wirelessly on the tray. (1) Press the wireless
charger power switch and the green operation indicator light turns on. (2) Place
a compatible mobile device on the tray as shown in the illustration. An amber
indicator illuminates while charging is in progress. When charging is complete, the
indicator illuminates green. Some phones, cases or cover type wireless chargers
may not cause the green indicator to illuminate even though it is fully charged.
Refer to the Owner‘s Manual for more details on this system before attempting to
use it.
19
Page 22
FEATURES & OPERATIONS
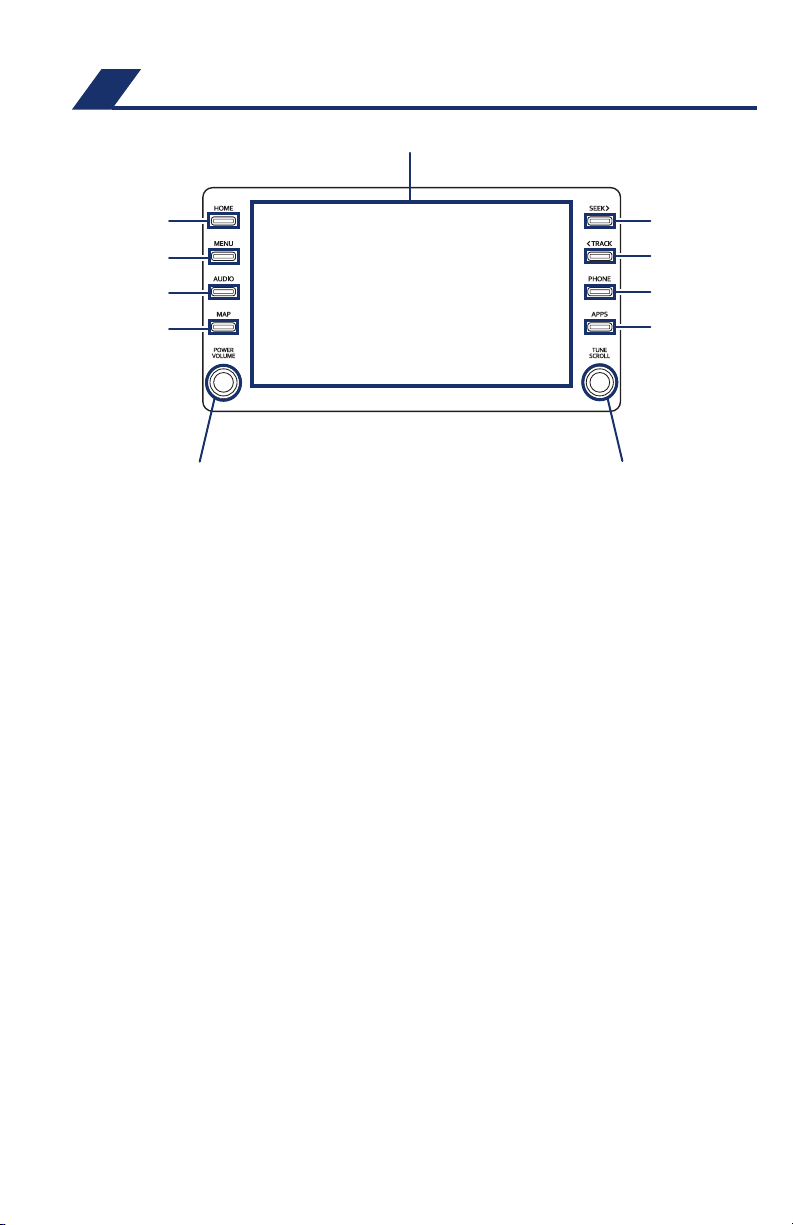
Audio
Touch screen display
Access
HOME screen
Access
MENU screen
Access
AUDIO screen
Access
MAP screen
Seek
station/CD
track select
Access
Bluetooth
hands-free system
Access
APPS screen
Push to turn ON/OFF or
turn to adjust volume
Turn to tune radio stations
manually or select tracks or files
Refer to the “Navigation and Multimedia System Owner’s Manual” or visit www.
toyota.com/entune for additional Audio Multimedia resources.
NOTE: Concentrating on the road should always be your first priority while
driving. Do not use the Audio Multimedia system if it will distract you.
20
Page 23
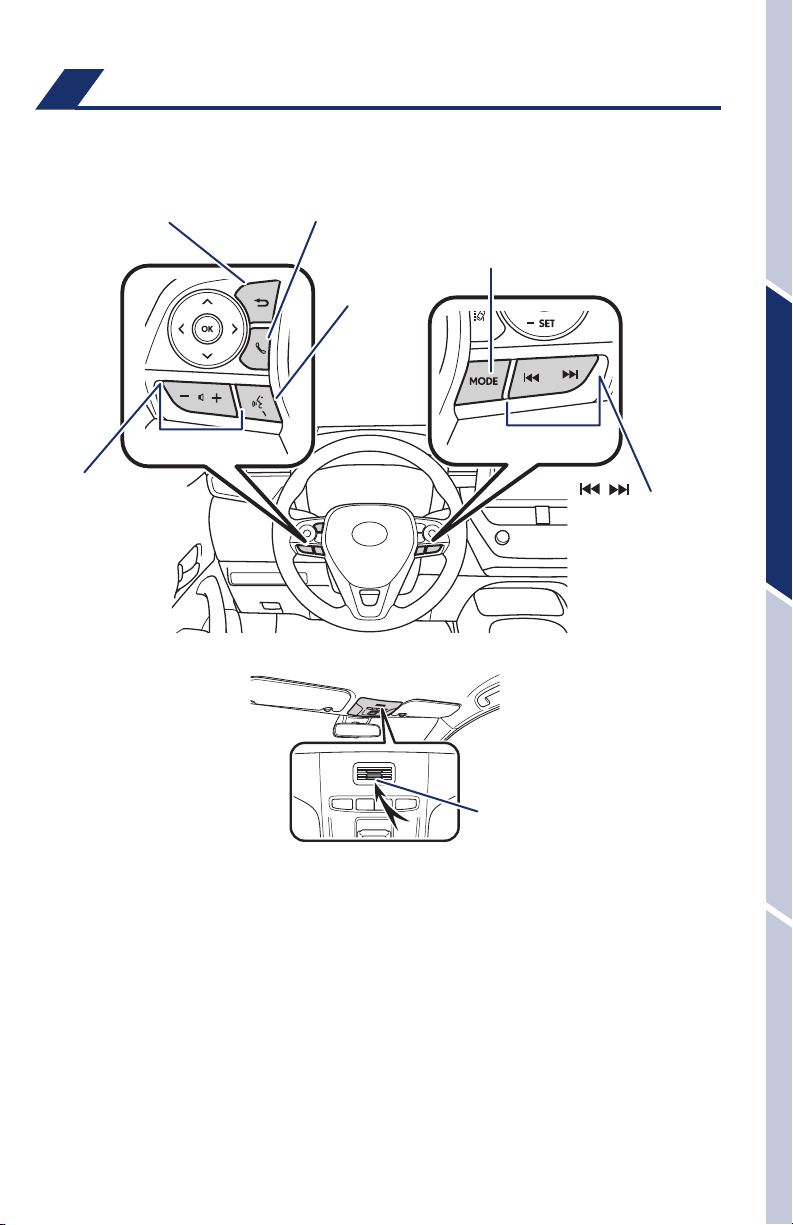
Steering wheel switches
& telephone controls (Bluetooth
Steering wheel telephone switches
Back switch
Start and end call
Voice command
switch/
Mobile Assistant
access*
®
)
“MODE”
Push to change an audio
mode. Push and hold to turn
the audio mutes or pauses.
OVERVIEWFEATURES & OPERATIONSTOYOTA SAFETY SENSESAFETY & EMERGENCY FEATURES
Volume control
Microphone
Microphone
“ ”
Use to search within the
selected audio medium
(radio, CD, etc.).
Bluetooth® technology allows dialing or receipt of calls without removing your hands
from the steering wheel.
*
Push and hold to access Mobile Assistant. When a compatible smartphone is
Bluetooth
access Siri
Refer to the “Bluetooth
®
connected push and hold the Voice command switch 2-3 seconds to
®
Eyes Free.
®
Device Pairing Section” in this guide for more information
about phone connections and compatibility.
Refer to the “Owner’s Manual” and the “Navigation and Multimedia System Owner’s
Manual” for more details.
NOTE: Concentrating on the road should always be your first priority while
driving. Do not use the Entune system if it will distract you.
21
Page 24
FEATURES & OPERATIONS
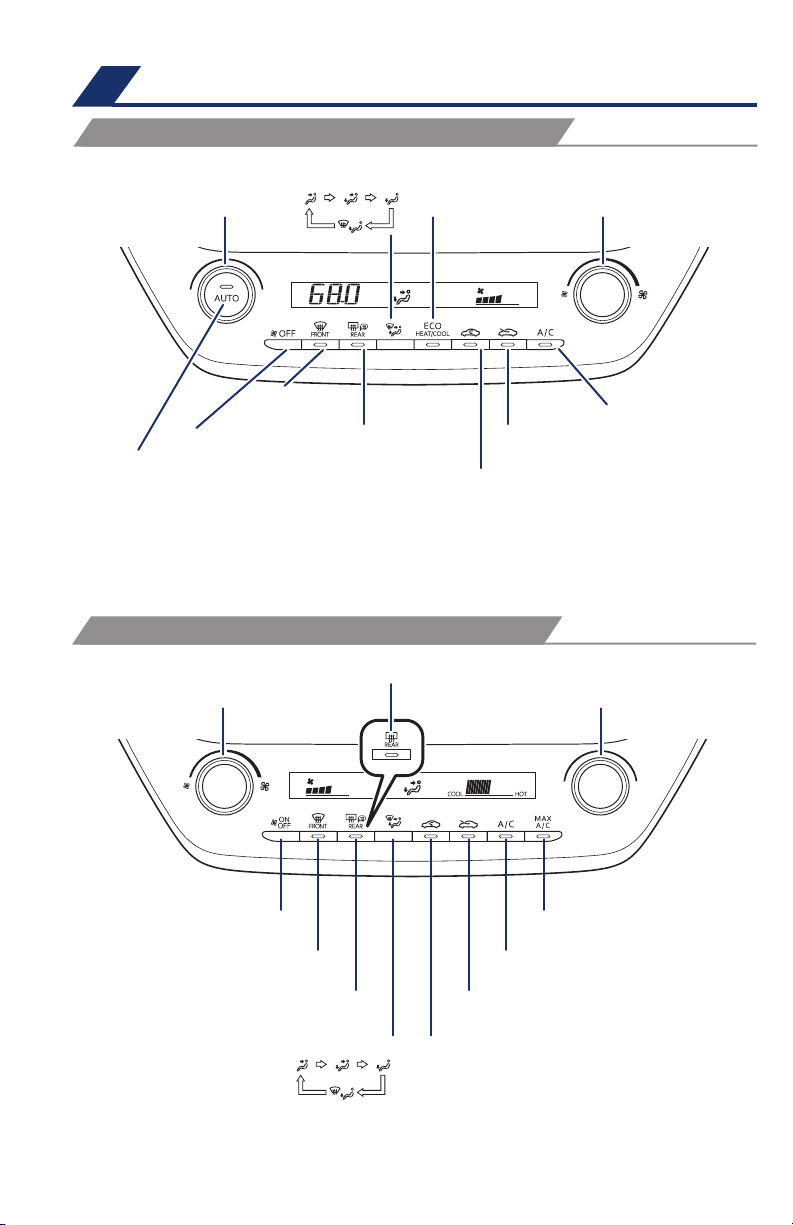
Air conditioning/heating
AUTOMATIC AIR CONDITIONING (IF EQUIPPED)
Airflow vent mode
Temperature control Fan speed
Windshield
defogger
Climate control OFF
Automatic climate control ON
Adjusting the temperature setting
will cause the airflow vents,
air intake and fan to adjust
automatically to set temperature.
Outside rearview
mirror defogger/Rear
window defogger
MANUAL AIR CONDITIONING (IF EQUIPPED)
Rear window defogger switch*
Fan speed control
Eco air
conditioning mode
Outside air
Recirculate cabin air
(outside air when OFF)
Air Conditioning
ON/OFF
Temperature control
Climate control OFF
Windshield defogger Air Conditioning ON/OFF
Outside rearview mirror defogger*/
Rear window defogger
Airflow vent mode
Outside air
Recirculate cabin air
(outside air when OFF)
“MAX AC” switch
22
* If equipped
Page 25
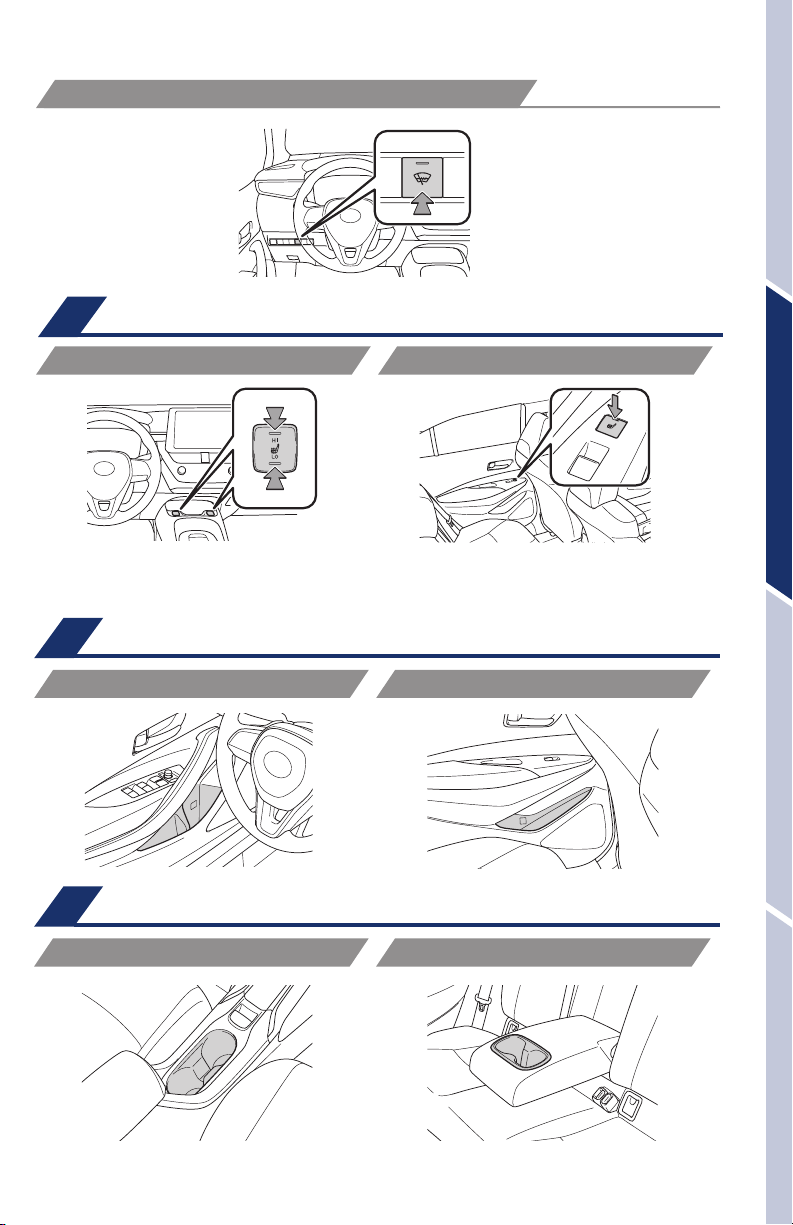
WINDSHIELD WIPER DE-ICER (IF EQUIPPED)
Seat heaters (if equipped)
OVERVIEWFEATURES & OPERATIONSTOYOTA SAFETY SENSESAFETY & EMERGENCY FEATURES
FRONT
The engine switch must be in the “ON” (without a Smart Key system) or “IGNITION
ON” (with a Smart Key system) mode.
REAR
Bottle holders
FRONT
REAR
Cup holders
FRONT
REAR (IF EQUIPPED)
23
Page 26
FEATURES & OPERATIONS
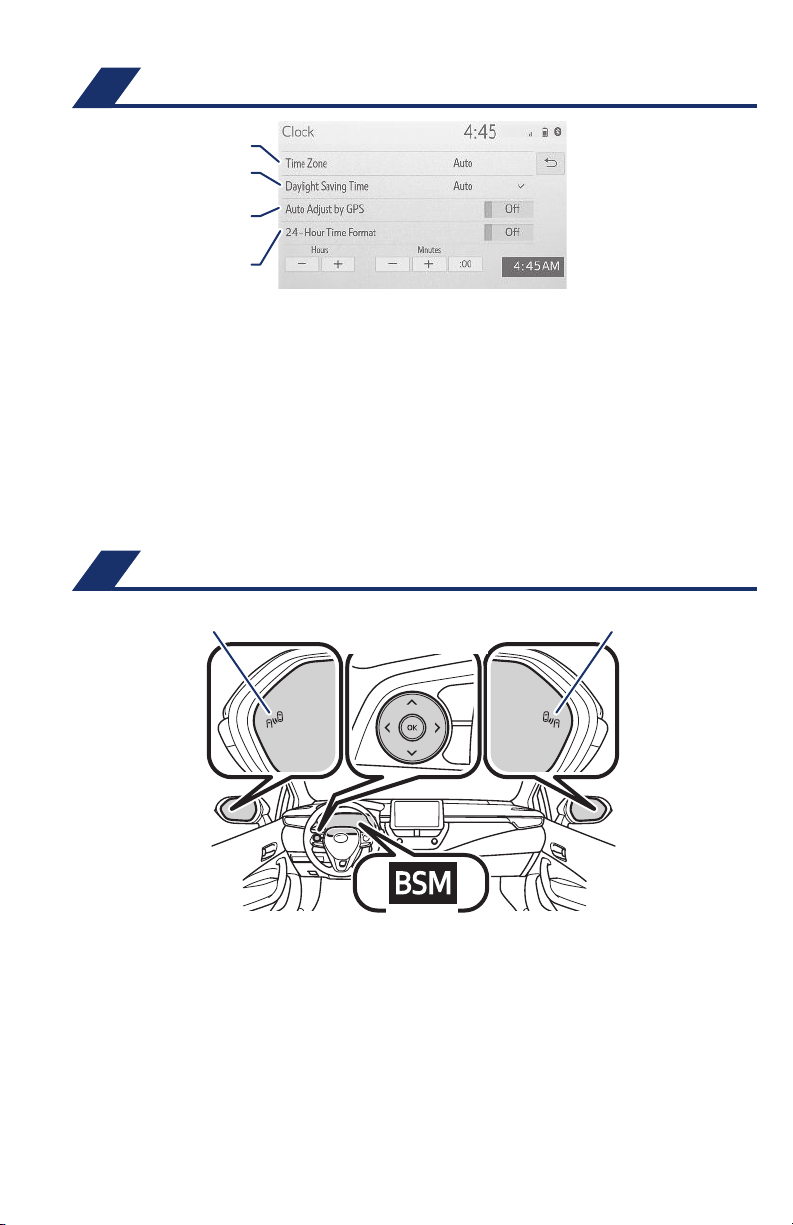
Clock
Select to change time zone
Select to daylight savings
time ON/OFF/AUTO.*
Select to set to automatic
GPS adjustment of clock.
Select to set hour display
to 12 or 24 hour time.
To find your system, refer to Audio section of this guide.
1) Push “MENU” button next to the screen.
2) Select “Setup” or “General” in the touch screen to access the general settings
screen.
3) Select “Clock.”
4) Then select desired items to be reset.
Refer to the “Navigation and Multimedia System Owner’s Manual” for more details.
* Entune
™
3.0 Premium Audio only.
Blind Spot Monitor (if equipped)
Outside rear view mirror indicators
Meter control switches
Indicators
The system is designed to use radar sensors to detect vehicles traveling in the
Corolla’s blind spot and advises the driver of the vehicles’ presence via the outside
rear view mirror indicators.
Refer to the Owner‘s Manual for limitations and more details on this system before
attempting to use it.
24
Outside rear view mirror indicators
Page 27
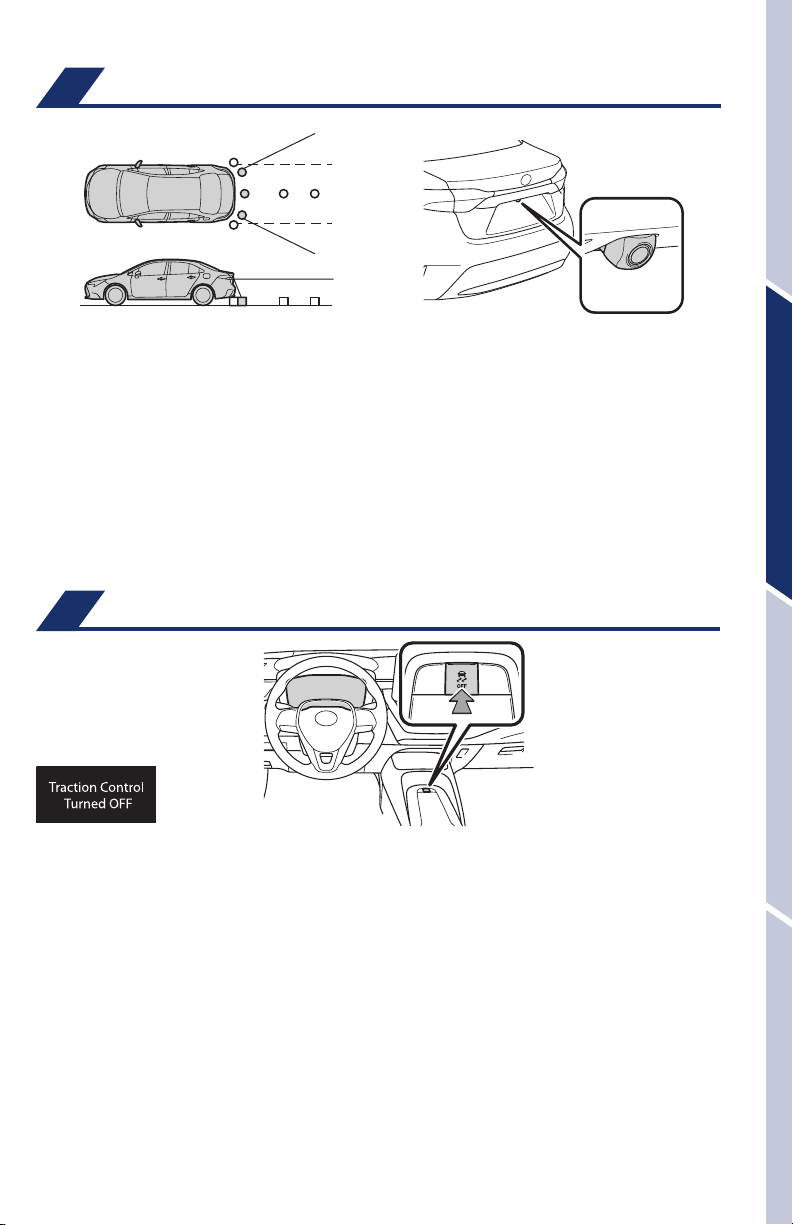
Rear view monitor system
The rear view monitor system displays an image of the view from the bumper of
the rear area of the vehicle. The camera for the rear view monitor system is located
above the license plate.
To adjust the image on the rear view monitor screen, press the “MENU” button and
select “Display” on the screen. Select “Camera” to adjust the screen contrast and
brightness.
Refer to the Owner’s Manual and the Navigation and Multimedia Owner‘s Manual
for limitations and more details on this system.
Vehicle Stability Control (VSC)/ TRAC OFF switch
OVERVIEWFEATURES & OPERATIONSTOYOTA SAFETY SENSESAFETY & EMERGENCY FEATURES
The VSC OFF switch can be used to help free a stuck vehicle in surroundings like
mud, dirt or snow. While the vehicle is stopped, press switch to disable the TRAC
system.
To disable both VSC and TRAC systems, press and hold the switch for at least 3
seconds.
Refer to the Owner’s Manual for limitations and more details.
25
Page 28
TOYOTA SAFETY SENSE
™
Quick overview-Toyota Safety Sense™ 2.0
Toyota Safety Sense™ (TSS) is a set of active safety technologies designed to help
mitigate or prevent collisions across a wide range of traffic situations, in certain
conditions. TSS is designed to help support the driver’s awareness, decision
making and vehicle operation contributing to a safe driving experience.
Refer to the Owner’s Manual for operation, setting adjustments, limitations and
more details to understand these functions and complete safety precautions. For
more information, please go to http://www.toyota.com/safety-sense
Pre-Collision System with Pedestrian Detection (PCS w/PD)
PCS w/PD is designed to provide alert, mitigation, and/or avoidance
support in certain conditions, when the system detects a potential
collision with a preceding vehicle is likely to occur.
Advanced millimeter-wave radar sensor system is designed to work
with the camera sensor to help recognize a preceding pedestrian or
bicyclist, and provide an alert, mitigation and/or avoidance support in
certain conditions.
Lane Departure Alert with Steering Assist (LDA w/SA)
LDA w/SA is designed to provide notification when the system detects
an unintended lane departure.
The Steering Assist function is designed to provide small corrective
steering inputs to the steering wheel for a short period of time to help
keep the vehicle in its lane.
The Sway Warning function is designed to detect vehicle swaying
(based on the vehicle location and steering wheel operation) and alert
the driver with an audio and visual alert, urging them to take a break.
Lane Tracing Assist (LTA)**
LTA is designed to help keep the vehicle in the center of a lane by
assisting the driver in steering control when using Full-Speed Range
DRCC**.
Dynamic Radar Cruise Control (DRCC)* or
Full-Speed Range Dynamic Radar Cruise Control (DRCC)**
DRCC is designed to help maintain a pre-set distance to a preceding
vehicle when the preceding vehicle is traveling at a lower speed.
Full-Speed Range DRCC is the same as regular DRCC except the
available speed range is extended down to 0 MPH.
Automatic High Beams (AHB)
AHB is designed to detect the headlights of oncoming vehicles and
the tail lights of preceding vehicles and switch between high beams
and low beams as appropriate.
Road Sign Assist (RSA)
RSA is designed to recognize specific road signs using the forward
facing camera to provide information to the driver via the display.
* Manual transmission, ** Continuously variable transmission
26
Page 29
Sensors
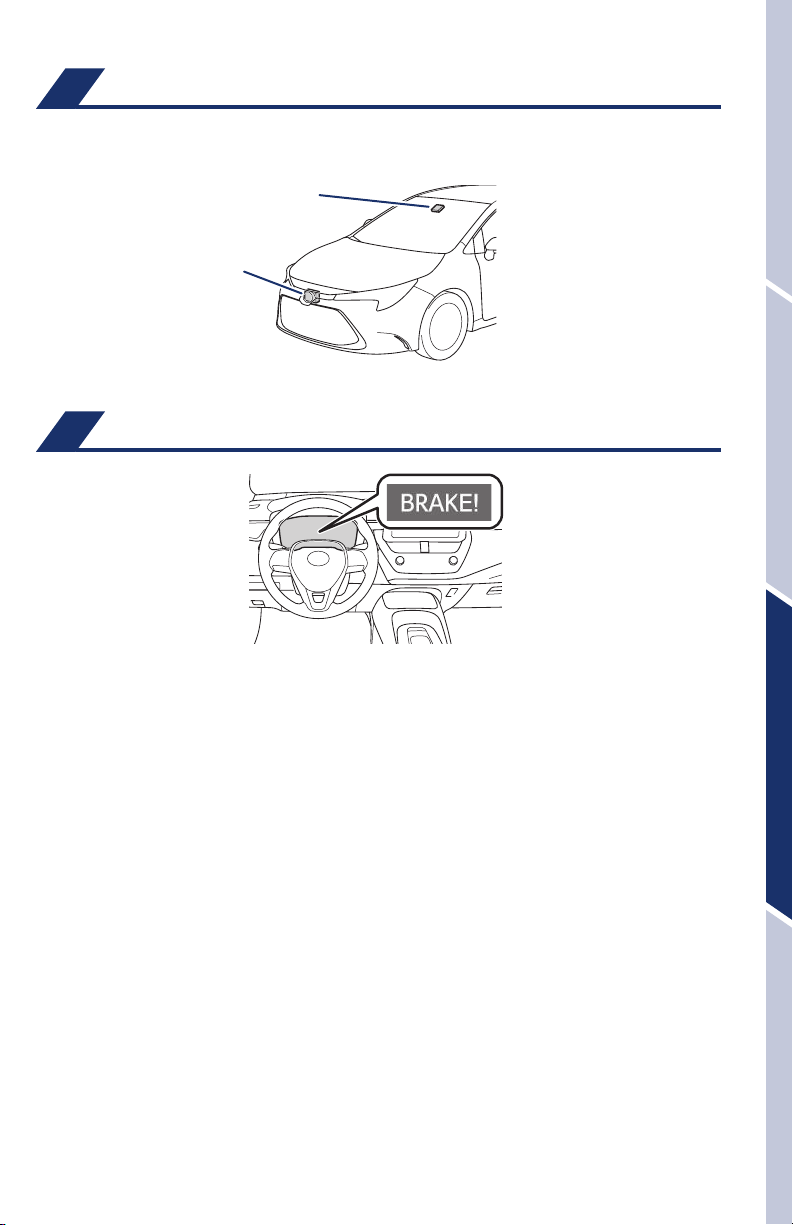
TSS combines an in-vehicle camera mounted in front of the inside rear view mirror and
a radar mounted in the front grill. These sensors support the driver assist systems.
Camera sensor
Radar sensor
Pre-Collision System with Pedestrian Detection (PCS w/PD)
The Pre-Collision System uses a radar sensor and camera sensor to help detect a
vehicle or pedestrian or bicyclist in front of your vehicle.
As there is a limit to the degree of recognition accuracy and control performance that
this system can provide, do not overly rely on this system. This system will not prevent
collisions or lessen collision damage or injury in every situation. Do not use PCS
instead of normal braking operations under any circumstances. Do not attempt to test
the operation of the Pre-Collision System yourself, as the system may not operate or
engage, possibly leading to an accident. In some situations, such as when driving in
inclement weather such as heavy rain, fog, snow or a sandstorm or while driving on a
curve and for a few seconds after driving on a curve, a vehicle or pedestrian or bicyclist
may not be detected by the radar and camera sensors, preventing the system from
operating or engaging properly.
Refer to the Toyota Owner’s Manual for a list of additional situations in which the
system may not operate properly.
OVERVIEWFEATURES & OPERATIONSTOYOTA SAFETY SENSESAFETY & EMERGENCY FEATURES
Pre-Collision Warning
When the system determines that the possibility of a frontal collision is high, a buzzer
will sound and a warning message will be displayed on the Multi-Information Display
(MID) to urge the driver to take evasive action.
Pre-Collision Brake Assist
If the driver notices the hazard and brakes, the system may provide additional braking
force using Brake Assist. This system may prime the brakes and may apply greater
braking force in relation to how strongly the brake pedal is depressed.
27
Page 30
TOYOTA SAFETY SENSE
PRE-COLLISION SYSTEM (CONTINUED)
Pre-Collision Braking
If the driver does not brake in a set time and the system determines that the possibility
of a frontal collision with a preceding vehicle is extremely high, the system may
automatically apply the brakes, reducing speed in order to help the driver reduce the
impact and in certain cases avoid the collision.
Refer to the Toyota Owner’s Manual for additional information on PCS operation,
settings adjustments, limitations, and precautions before attempting to use it.
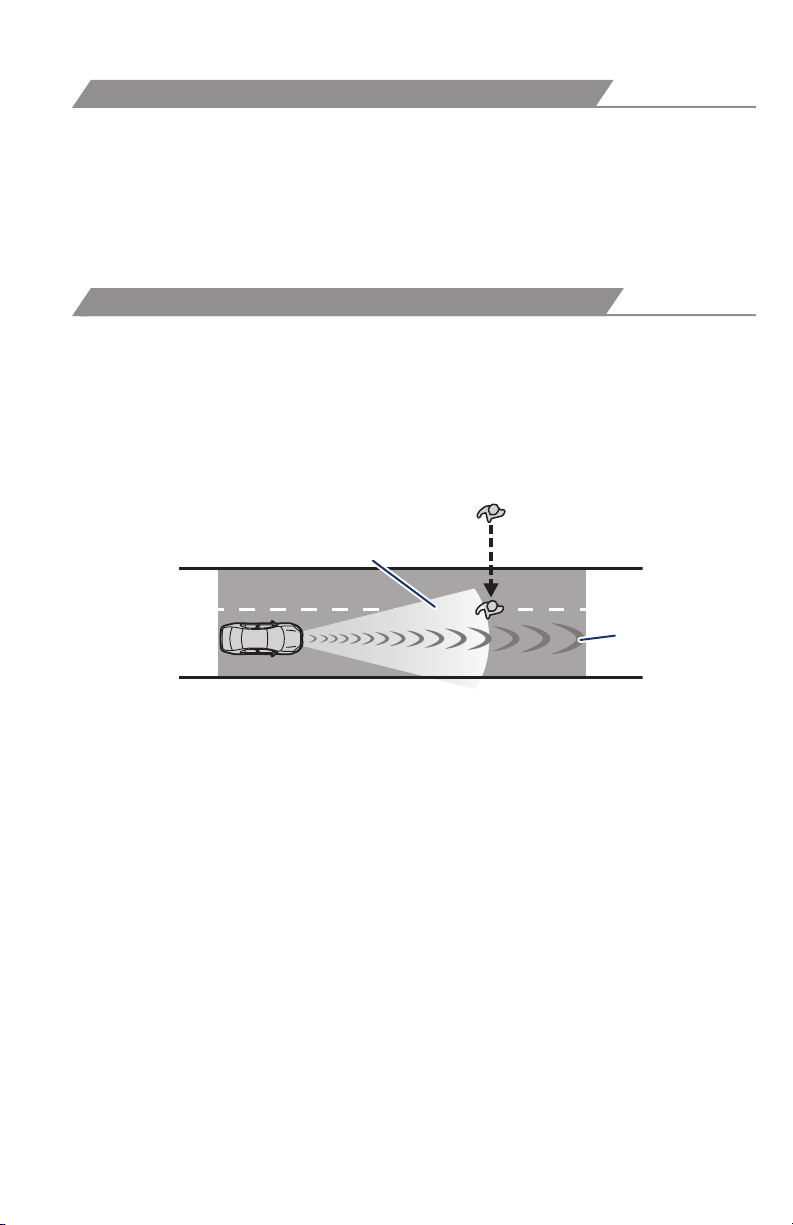
PCS PEDESTRIAN DETECTION
Under certain conditions, the PCS system included with the TSS package may
also help to detect a pedestrian or bicyclist in front of your vehicle using the
in-vehicle camera and millimeter-wave radar. The in-vehicle camera of PCS detects
a potential pedestrian or bicyclist based on size, profile, and motion of the detected
pedestrian or bicyclist. However, a pedestrian or bicyclist may not be detected
depending on the conditions, including the surrounding brightness and the motion,
posture, size, and angle of the potential detected pedestrian or bicyclist, preventing
the system from operating or engaging.
Monocular camera sensor
™
Millimeter
wave radar
As part of the Pre-Collision System, this function is also designed to first provide an
alert and then automatic braking if needed.
Refer to the Toyota Owner’s Manual for additional limitations and information.
28
Page 31
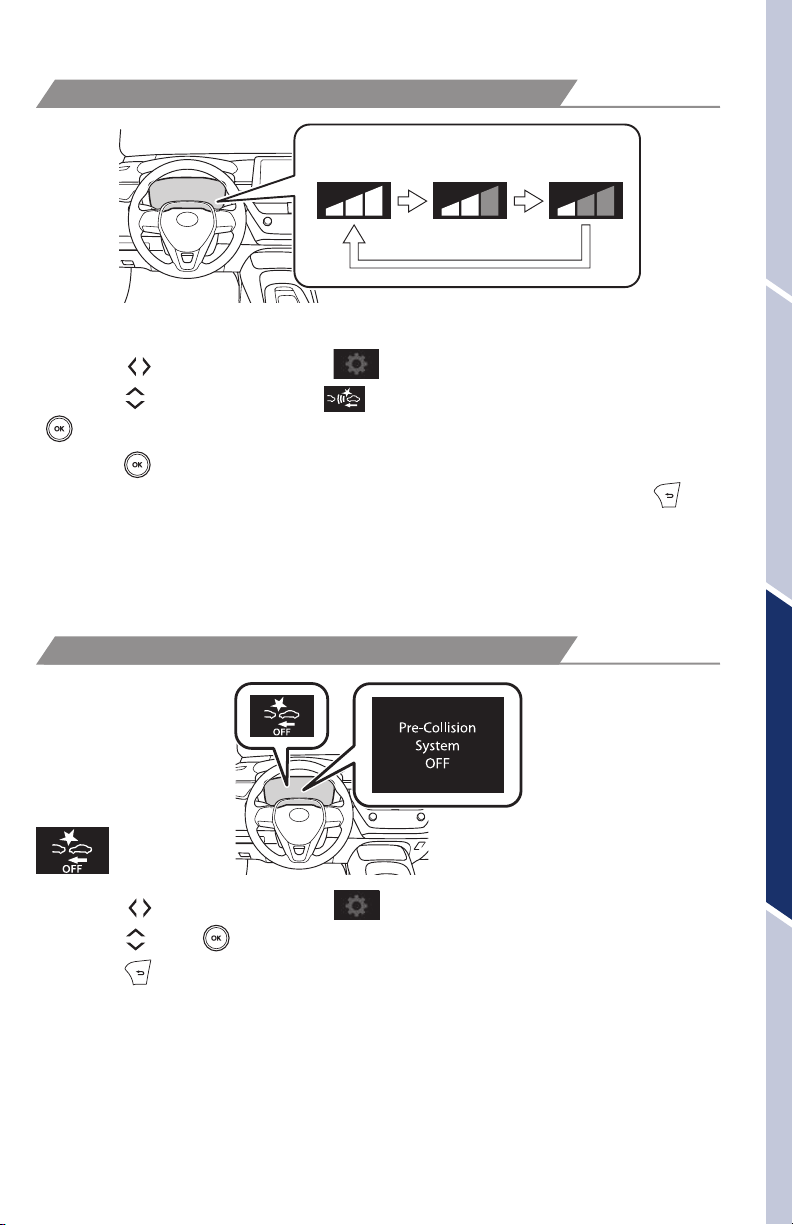
CHANGING PRE-COLLISION ALERT TIMING
Far
Middle
(default)
Near
Each time the PCS switch is pressed, the response to the PCS alert timing changes.
(1) Press “ ” switches and select from the Multi-Information Display (MID).
(2) Press “
”. The setting screen is displayed.
“
(3) Press “
response to the PCS alert timing changes as shown above. You can press “
” switches and select from the MID and then press
” each time to change the setting. Each time it is pressed, the
” to
go back to the menu.
Note: PCS is enabled each time the engine switch is turned to Ignition On.
The system can be disabled/enabled and the alert timing of the system can be
changed. (Alert timing only, brake operation remains the same).
DISABLING PRE-COLLISION SYSTEM (PCS)
OVERVIEWFEATURES & OPERATIONSTOYOTA SAFETY SENSESAFETY & EMERGENCY FEATURES
(1) Press “
(2) Press “
(3) Press “
” switches and select from the Multi-Information Display (MID).
” and “ ” switches to change the setting.
” to go back to the menu.
Note: The system is enabled each time the power switch is turned to ON
mode.
Refer to the Toyota Owner’s Manual for additional information on PCS operation,
settings adjustments, limitations, and precautions before attempting to use it.
29
Page 32
TOYOTA SAFETY SENSE
™
Lane Departure Alert with Steering Assist (LDA w/SA)
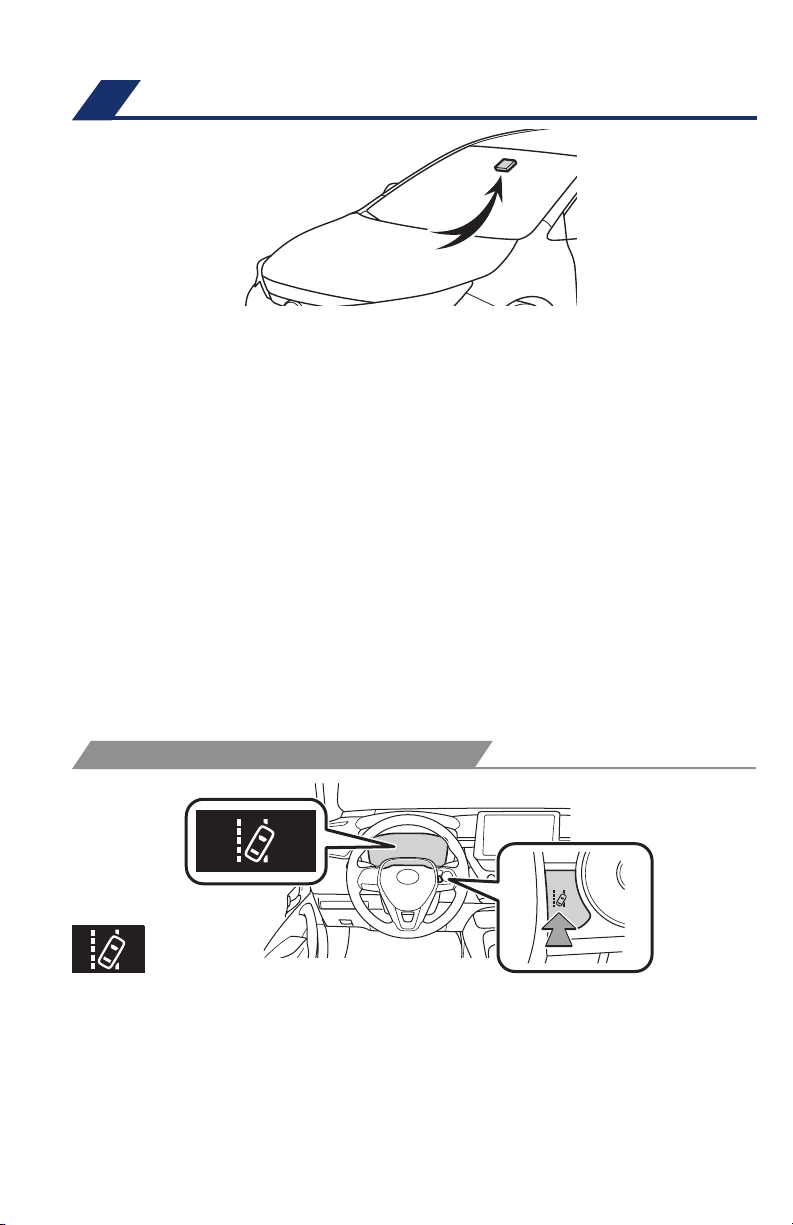
LDA in TSS uses an in-vehicle camera designed to detect visible white and yellow
lane markers or road edge in front of the vehicle and the vehicle’s position on the
road. If the system determines that the vehicle is starting to unintentionally deviate
from its lane, the system alerts the driver with an audio and visual alert. When the
alerts occur, the driver must check the surrounding road situation and carefully
operate the steering wheel to move the vehicle back to the center part of their lane.
LDA is designed to function at speeds of approximately 32 mph (50 km/h) or higher
on relatively straight roadways.
In addition to the alert function, LDA w/SA also features a steering assist
function. When enabled, if the system determines that the vehicle is on a path to
unintentionally depart from its lane, the system may provide small corrective steering
inputs to the steering wheel for a short period of time to help keep the vehicle in its
lane.
If the vehicle repeatedly deviates from the lane, the vehicle drifts within the lane due
to inattention, or the driver abruptly operates the steering wheel after an inattentive
period, when enabled, the vehicle sway warning function alerts the driver with an
audio and visual alert, urging them to take a break.
TURNING THE LDA SYSTEM ON/OFF
Press the LDA switch to turn the LDA system on. Depress again to turn it off.
Note: Operation of the LDA system and setting adjustments continues in the
same condition regardless of Ignition cycle until changed by the driver or the
system is reset.
Refer to the Toyota Owner’s Manual for additional information on LDA operation,
settings adjustments, limitations, and precautions before attempting to use it.
30
Page 33
LANE DEPARTURE ALERT
LDA function display
LDA indicator
Operation display
of steering wheel
operation support
Lane markers/road edge
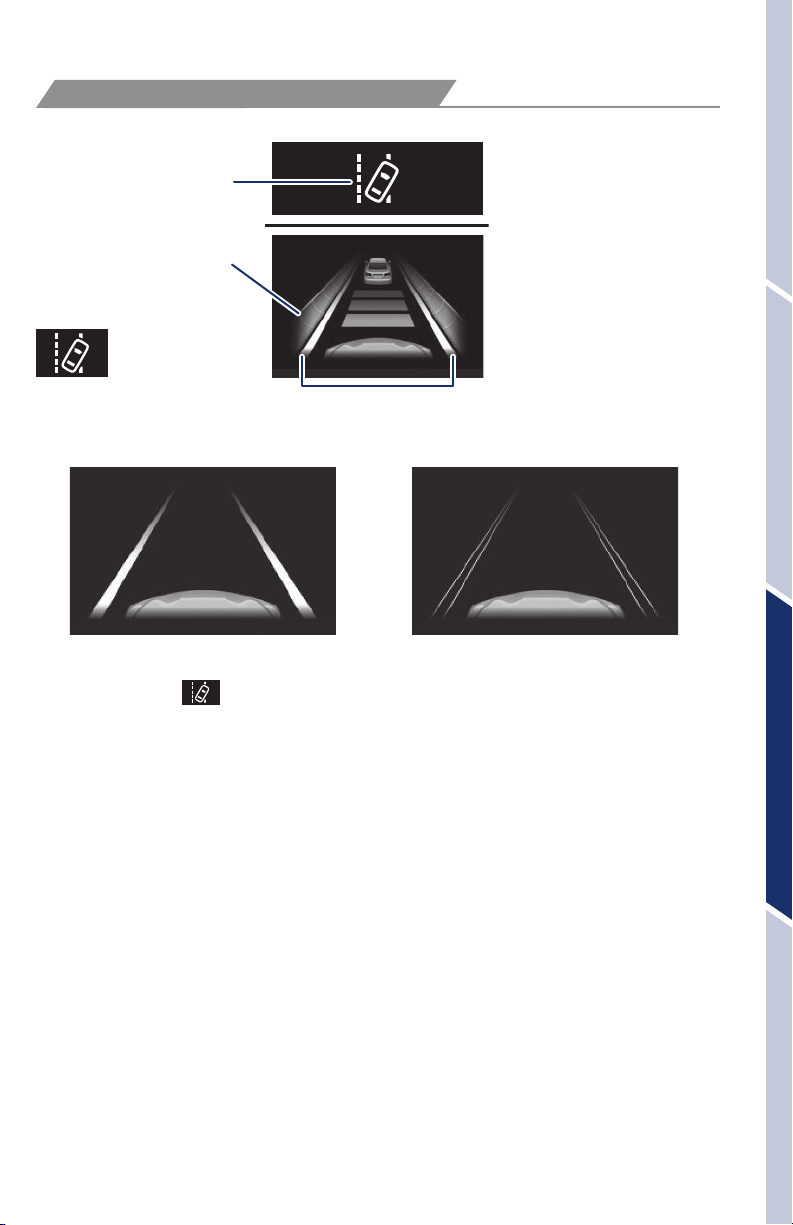
Lane Departure Alert (LDA) indicator flashes orange when operating.
(2)(1)
The LDA function displays when the Multi-Information Display (MID) is switched
to the driving assist system information screen.
(1) The system displays solid white lines on the LDA indicator when visible lane
markers or the road are detected. A side flashes orange to alert the driver when the
vehicle deviates from its lane.
(2) The system displays outlines on the LDA indicator when lane markers or the road
are not detected or the function is temporarily cancelled.
OVERVIEWFEATURES & OPERATIONSTOYOTA SAFETY SENSESAFETY & EMERGENCY FEATURES
Note: When operation conditions are no longer met, a function may be
temporarily canceled. However, when the operation conditions are met again,
operation of the function is automatically restored. For example, LDA may not
function on the side(s) where white/yellow lines are not detectable.
Refer to the Toyota Owner’s Manual for additional information on LDA operation,
settings adjustments, limitations, and precautions before attempting to use it.
31
Page 34
TOYOTA SAFETY SENSE
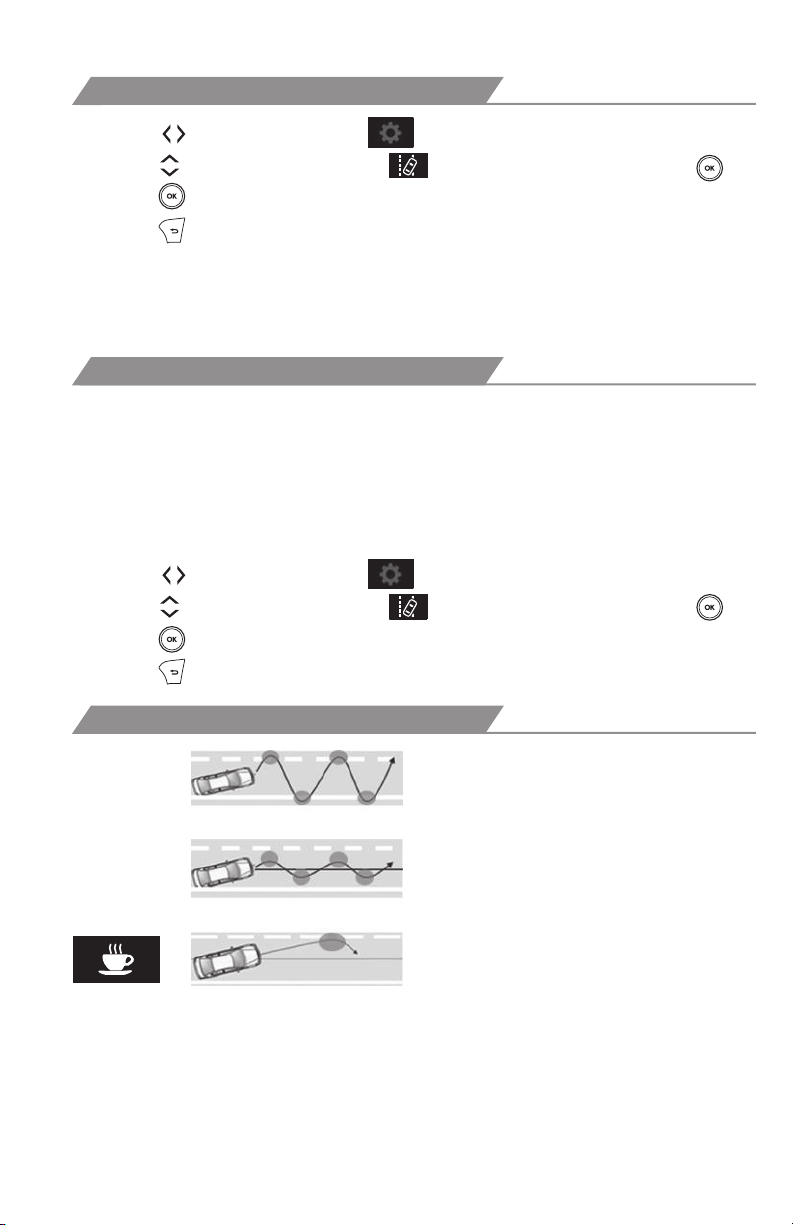
DISABLING STEERING ASSIST
™
(1) Press “
(2) Press “
(3) Press “
(4) Press “
” switches and select from the Multi-Information Display (MID).
” switches and select the setting function and then press “ .”
” each time to change the setting.
” to go back to the menu.
Note: Operation of the LDA system and setting adjustments continues in the
same condition regardless of Ignition cycle until changed by the driver or the
system is reset.
ADJUSTING LDA ALERT SENSITIVITY
The driver can adjust the sensitivity of the LDA (warning) function from the
Multi-Information Display (MID) customization screen.
High - Is designed to warn approximately before the front
tire crosses the lane marker.
Normal - Is designed to warn approximately when the front
tire crosses the lane marker.
(1) Press “
(2) Press “
(3) Press “
(4) Press “
” switches and select from the Multi-Information Display (MID).
” switches and select the setting function and then press “ .”
” each time to change the setting.
” to go back to the menu.
SWAY WARNING SYSTEM
Continuous lane deviations from
swaying.
Gentle swaying from driver’s
inattentiveness.
Acute steering wheel operation after the
number of operations decrease due to driver’s
inattentiveness.
SWS is a function of LDA and is designed to detect swaying based on the vehicle
location in the lane and the driver’s steering wheel operation. To help prevent
swaying, the system alerts the driver using a buzzer sound and a warning displays
in the MID.
32
Page 35
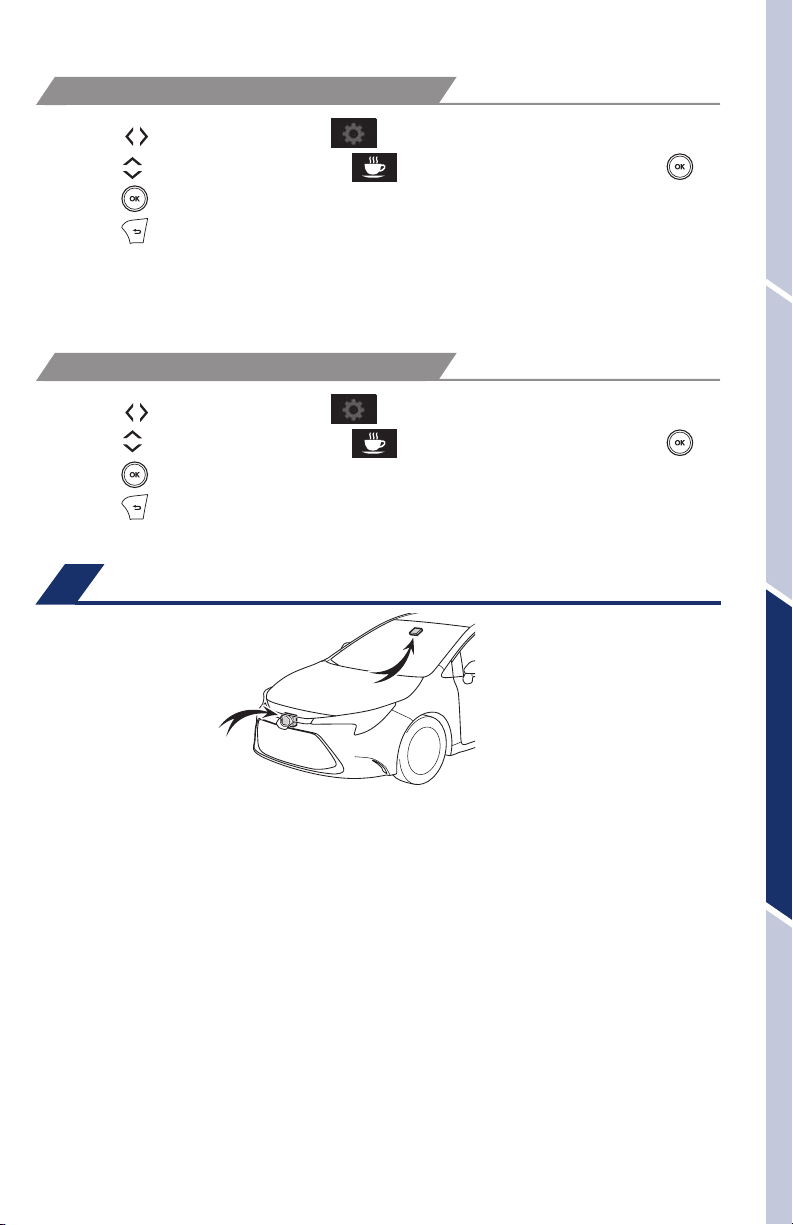
DISABLING LDA SWAY WARNING ALERT
(1) Press “
(2) Press “
(3) Press “
(4) Press “
Note: Operation of the LDA system and setting adjustments continues in the
same condition regardless of Ignition cycle until changed by the driver or the
system is reset.
ADJUSTING SWAY ALERT SENSITIVITY
(1) Press “
(2) Press “
(3) Press “
(4) Press “
” switches and select from the Multi-Information Display (MID).
” switches and select the setting function and then press “ .”
” each time to change the setting.
” to go back to the menu.
” switches and select from the Multi-Information Display (MID).
” switches and select the setting function and then press “ .”
” each time to change the setting.
” to go back to the menu.
Lane Tracing Assist (LTA)*
OVERVIEWFEATURES & OPERATIONSTOYOTA SAFETY SENSESAFETY & EMERGENCY FEATURES
* Continuously variable transmission
When the LTA system is enabled, the lane centering function will automatically
provide assistance to help keep the vehicle in the center of the lane when FullSpeed DRCC is set.
33
Page 36
TOYOTA SAFETY SENSE
™
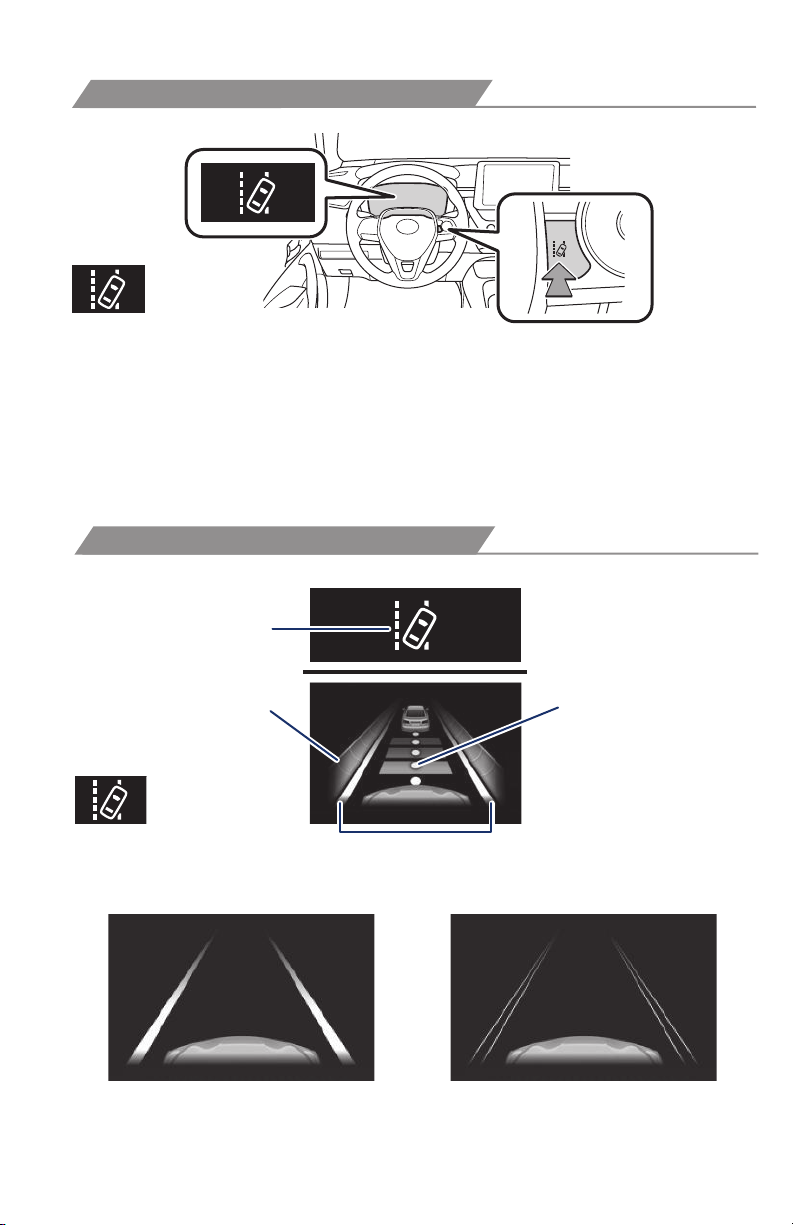
TURNING THE LTA SYSTEM ON/OFF
Press the LTA switch to turn the LTA system on. Depress again to turn it off.
Note: Operation of the LTA system and setting adjustments continues in the
same condition regardless of Ignition cycle until changed by the driver or the
system is reset.
Refer to the Toyota Owner’s Manual for additional information on LTA operation,
settings adjustments, limitations, and precautions before attempting to use it.
LANE TRACING ASSIST
LTA function display
LTA indicator
Operation display
of steering wheel
operation support
Lane markers
Follow-up
cruising display
Lane Tracing Assist (LTA) indicator flashes orange when operating.
(2)(1)
34
Page 37
LANE TRACING ASSIST (CONTINUED)
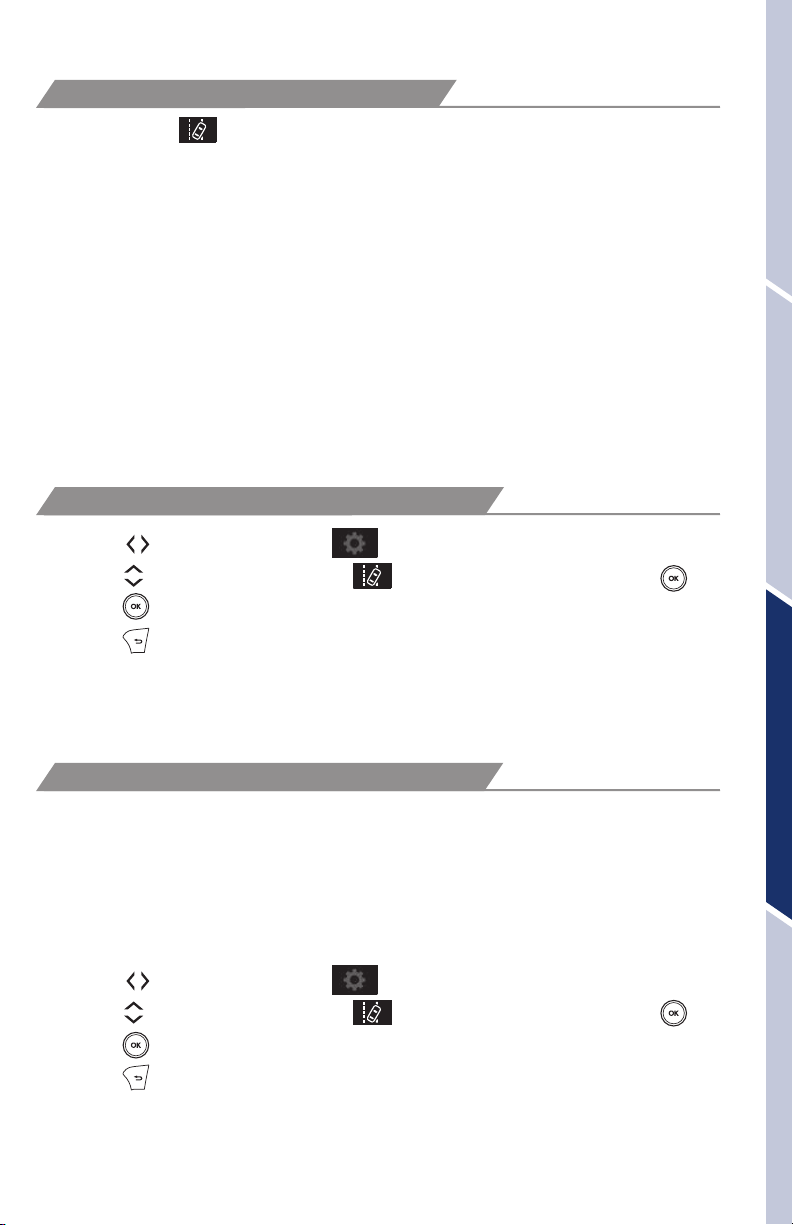
The LTA function displays when the Multi-Information Display (MID) is switched
to the driving assist system information screen.
(1) The system displays solid white lines on the LTA indicator when visible lane
markers on the road are detected. A side flashes orange to alert the driver when the
vehicle deviates from its lane.
(2) The system displays outlines on the LTA indicator when lane markers on the road
are not detected or the function is temporarily cancelled.
Note: When operation conditions are no longer met, a function may be
temporarily canceled. However, when the operation conditions are met again,
operation of the function is automatically restored. For example, LTA may not
function on the side(s) where white/yellow lines are not detectable.
Refer to the Toyota Owner’s Manual for additional information on LTA operation,
settings adjustments, limitations, and precautions before attempting to use it.
DISABLING STEERING ASSIST
OVERVIEWFEATURES & OPERATIONSTOYOTA SAFETY SENSESAFETY & EMERGENCY FEATURES
(1) Press “
(2) Press “
(3) Press “
(4) Press “
” switches and select from the Multi-Information Display (MID).
” switches and select the setting function and then press “ .”
” each time to change the setting.
” to go back to the menu.
Note: Operation of the LTA system and setting adjustments continues in the
same condition regardless of Ignition cycle until changed by the driver or the
system is reset.
ADJUSTING LTA ALERT SENSITIVITY
The driver can adjust the sensitivity of the LTA (warning) function from the
Multi-Information Display (MID) customization screen.
High - Is designed to warn approximately before the front
tire crosses the lane marker.
Normal - Is designed to warn approximately when the front
tire crosses the lane marker.
(1) Press “
(2) Press “
(3) Press “
(4) Press “
” switches and select from the Multi-Information Display (MID).
” switches and select the setting function and then press “ .”
” each time to change the setting.
” to go back to the menu.
35
Page 38
TOYOTA SAFETY SENSE
LANE CENTERING
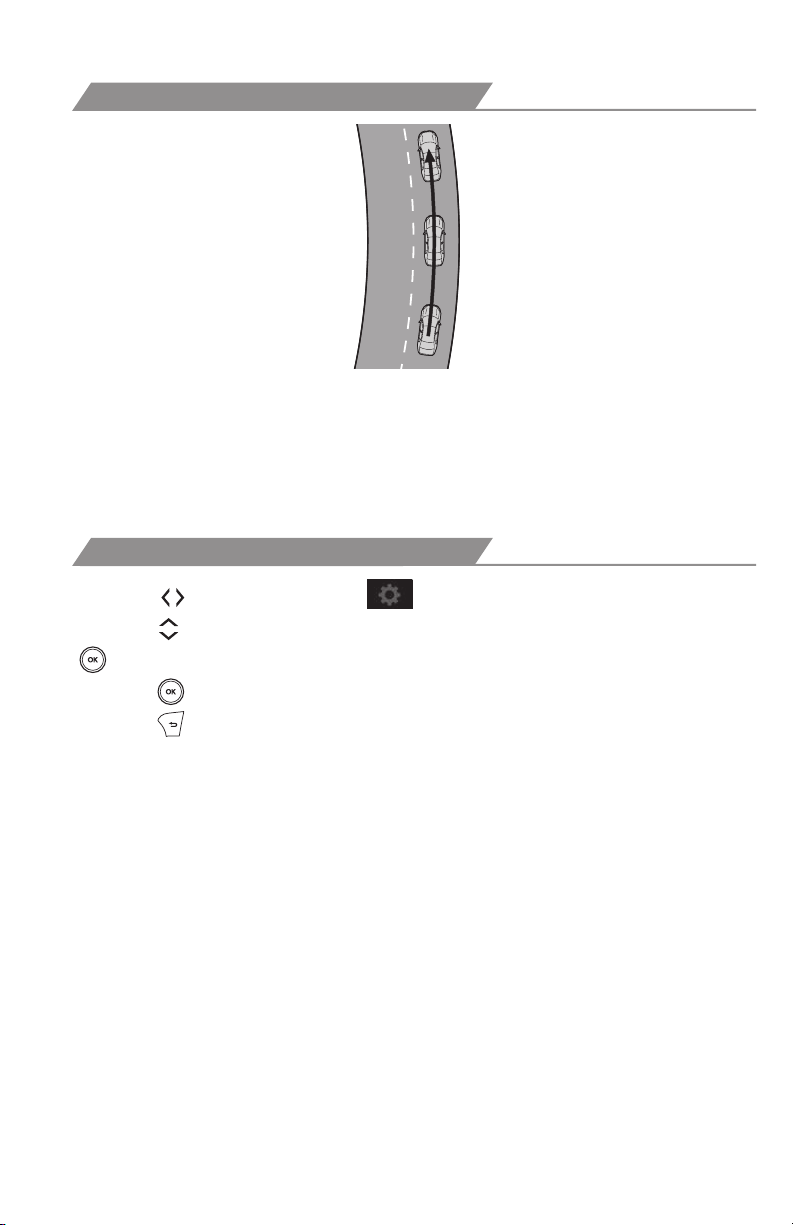
The lane centering function is linked with Full-Speed Range Dynamic Radar Cruise
Control (DRCC) and provides the required assistance by operating the steering
wheel to keep the vehicle in its current lane.
When dynamic radar cruise control with full-speed range is not operating, the lane
centering function does not operate.
DISABLING LANE CENTERING FUNCTION
(1) Press “ ” switches and select from the Multi-Information Display (MID).
(2) Press “
.”
“
(3) Press “
(4) Press “
” switches and select the “Lane center” setting function and then press
” each time to change the setting.
” to go back to the menu.
™
Note: Operation of the LTA system and setting adjustments continues in the
same condition regardless of Ignition cycle until changed by the driver or the
system is reset.
36
Page 39
Dynamic Radar Cruise Control (DRCC)* or Full-Speed Range DRCC**
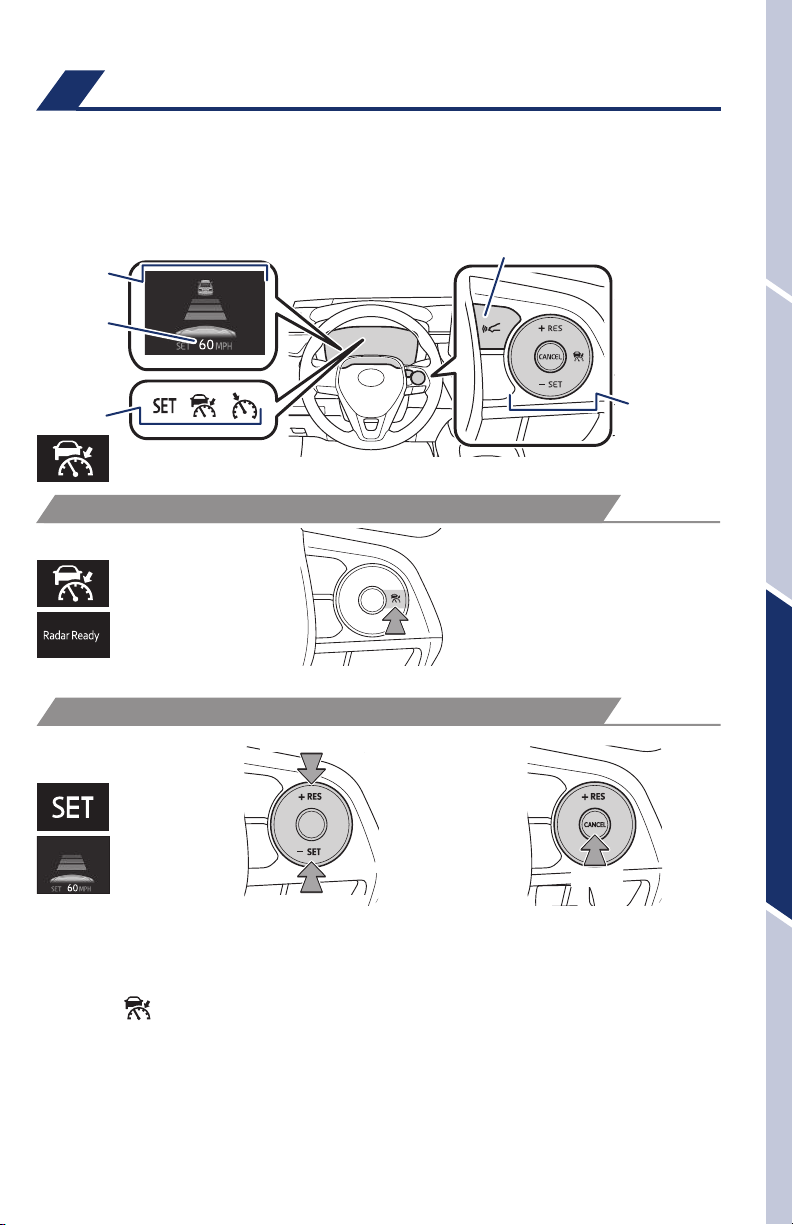
DRCC helps maintain a pre-set distance to a preceding vehicle when the preceding
vehicle is traveling at a lower speed. This mode is always selected first when the
cruise control button is depressed. Constant speed cruise control mode is also
available. Full-Speed Range DRCC is designed to function at speeds between 0 to
approximately 110 MPH and is intended for highway use.
Dynamic Radar Cruise Control
vehicle-to-vehicle distance button
Display
Set speed
OVERVIEWFEATURES & OPERATIONSTOYOTA SAFETY SENSESAFETY & EMERGENCY FEATURES
Indicators
* Manual transmission, ** Continuously variable transmission
Cruise control
switch
TURNING SYSTEM ON/OFF
(1)
Push once: On
Push twice: Off
Refer to page 39 for switching to Constant Speed (Cruise) Control Mode.
ADJUSTING SET SPEED
(2)
Increase speed/Resume
Decrease speed
1
(3)
2
Cancel
Vehicle will cruise at a set speed, decelerate to maintain selected distance from a
slower vehicle traveling in front and accelerate back up to the selected speed if the
vehicle in front changes lanes or speeds up.
(1) Push “
” to turn DRCC system ON.
(2) Use the steering wheel controls to increase speed by pushing “+RES” or
decrease the speed by pushing “-SET”. Push and hold to make a large
adjustment or push each time to make fine adjustments (1 mph [1.6 km/h] or 1
km/h [0.6 mph] increments).
(3) Push “Cancel” to cancel the adjusting speed operation.
1
The set speed may be resumed once vehicle speed exceeds 25 mph.
2
The set speed may also be cancelled by depressing the brake pedal.
37
Page 40
TOYOTA SAFETY SENSE
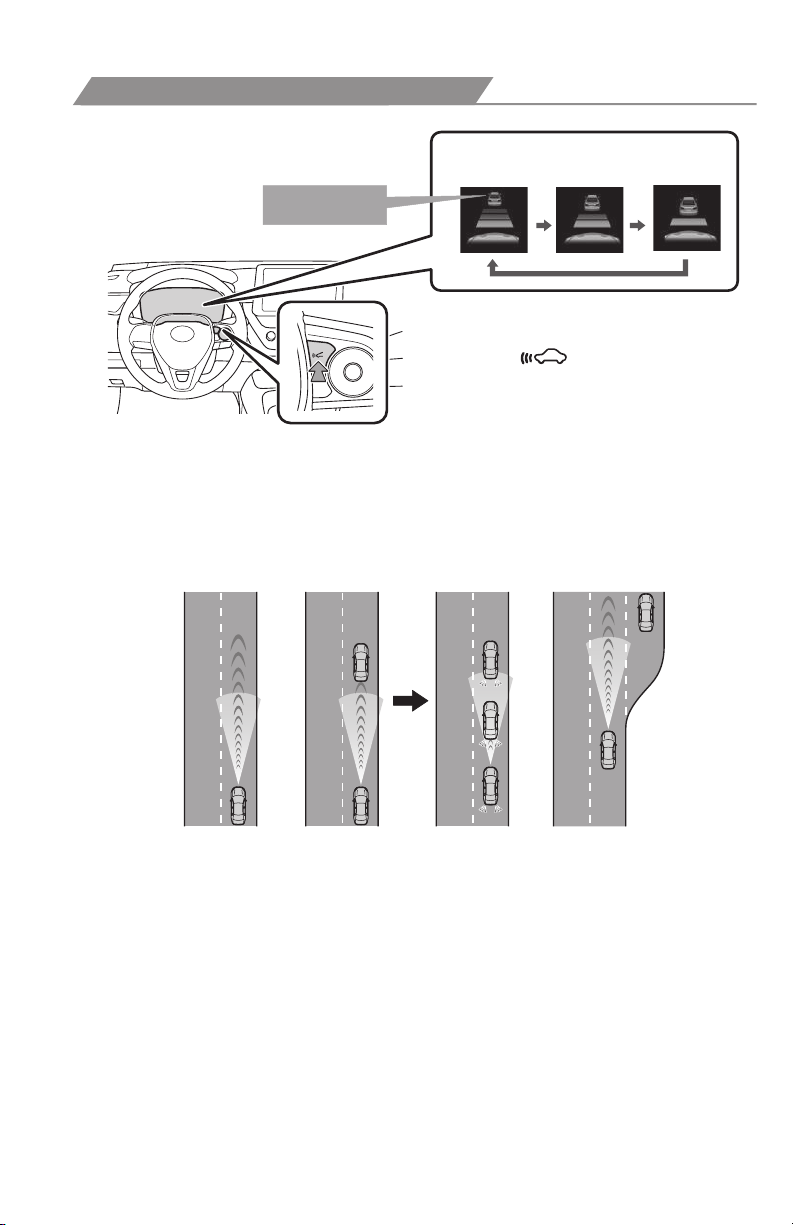
ADJUSTING DISTANCE
™
Preceding vehicle
mark
LONG
(default setting)
To change the vehicle-to-vehicle distance
Push the “ ” button to cycle
through the settings, which will
change progressively.
MIDDLE
SHORT
This mode employs a radar sensor to detect the presence of a preceding vehicle
up to approximately 328 ft (100 m) ahead, determines the current vehicle-to-vehicle
following distance and operates to maintain a preset following distance from the
vehicle ahead. These distances vary based on vehicle speed.
Note: Vehicle-to-vehicle distance will close in when traveling on long downhill
slopes.
(1) (2) (3)
(1) Constant speed cruising when there are no vehicles ahead
The vehicle travels at the speed set by the driver. The desired vehicle-to-
vehicle distance can also be set by operating the vehicle-to-vehicle distance
control.
(2) Deceleration cruising and follow-up cruising when a preceding vehicle
driving slower than the set speed appears
When a vehicle is detected running ahead of you, the system automatically
decelerates your vehicle. When a greater reduction in vehicle speed is
necessary, the system applies the brakes (the brake lights will come on at this
time). The system will respond to changes in the speed of the vehicle ahead
in order to maintain the vehicle-to-vehicle distance set by the driver. A warning
tone warns you when the system cannot decelerate sufficiently to prevent your
vehicle from closing in on the vehicle ahead.
38
Page 41
ADJUSTING DISTANCE (CONTINUED)
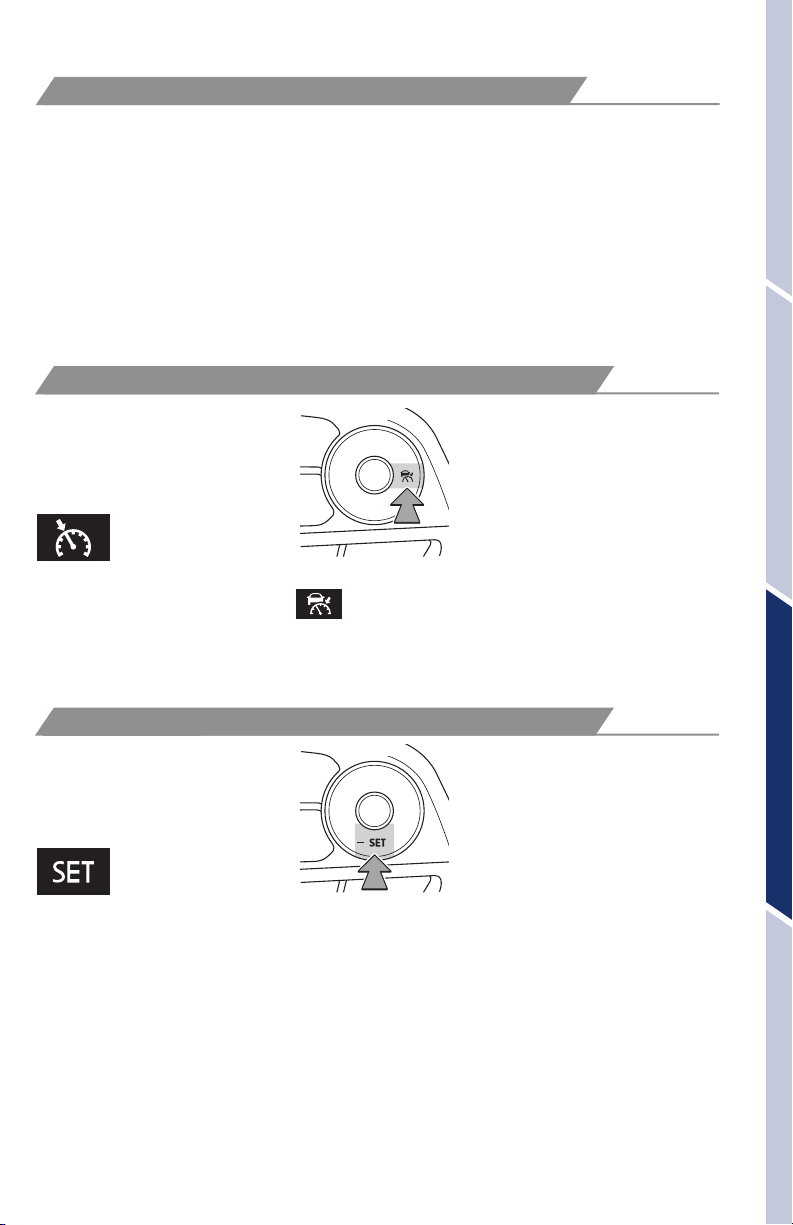
(3) Acceleration when there are no longer any preceding vehicles driving
slower than the set speed
The system accelerates until the set speed is reached. The system then
returns to constant speed cruising.
Note: When your vehicle is too close to a vehicle ahead, and sufficient automatic
deceleration via the cruise control is not possible, the display will flash and the
buzzer will sound to alert the driver. An example of this would be if another driver
cuts in front of you while you are following a vehicle. Depress the brake pedal to
ensure an appropriate vehicle-to-vehicle distance.
SWITCHING TO CONSTANT SPEED (CRUISE) CONTROL MODE
1.5 seconds
If you are already using DRCC “ ”, push ON-OFF button to turn the system off
first, then push and hold ON-OFF button for at least 1.5 seconds to switch.
Note: When the engine is turned off, it will automatically default to DRCC.
OVERVIEWFEATURES & OPERATIONSTOYOTA SAFETY SENSESAFETY & EMERGENCY FEATURES
SETTING CONSTANT SPEED (CRUISE) CONTROL
Set
To adjust speed or cancel, see steps (2) and (3) of ADJUSTING SET SPEED on
page 37.
Refer to the Toyota Owner’s Manual for additional information on DRCC operation,
settings adjustments, limitations, and precautions before attempting to use it.
39
Page 42
TOYOTA SAFETY SENSE
Automatic High Beams (AHB)
™
(1)
AHB is a safety system designed to help drivers see more of what’s ahead at nighttime
while reducing glare for oncoming drivers. AHB uses an in-vehicle camera to help
detect the headlights of oncoming vehicles and tail lights of preceding vehicles,
then automatically switches between high and low beams as appropriate to provide
the most light possible and enhance forward visibility. By using high beams more
frequently, the system may allow earlier detection of pedestrians and obstacles.
Refer to the Toyota Owner’s Manual for additional information on AHB operation,
settings adjustments, limitations, and precautions before attempting to use it.
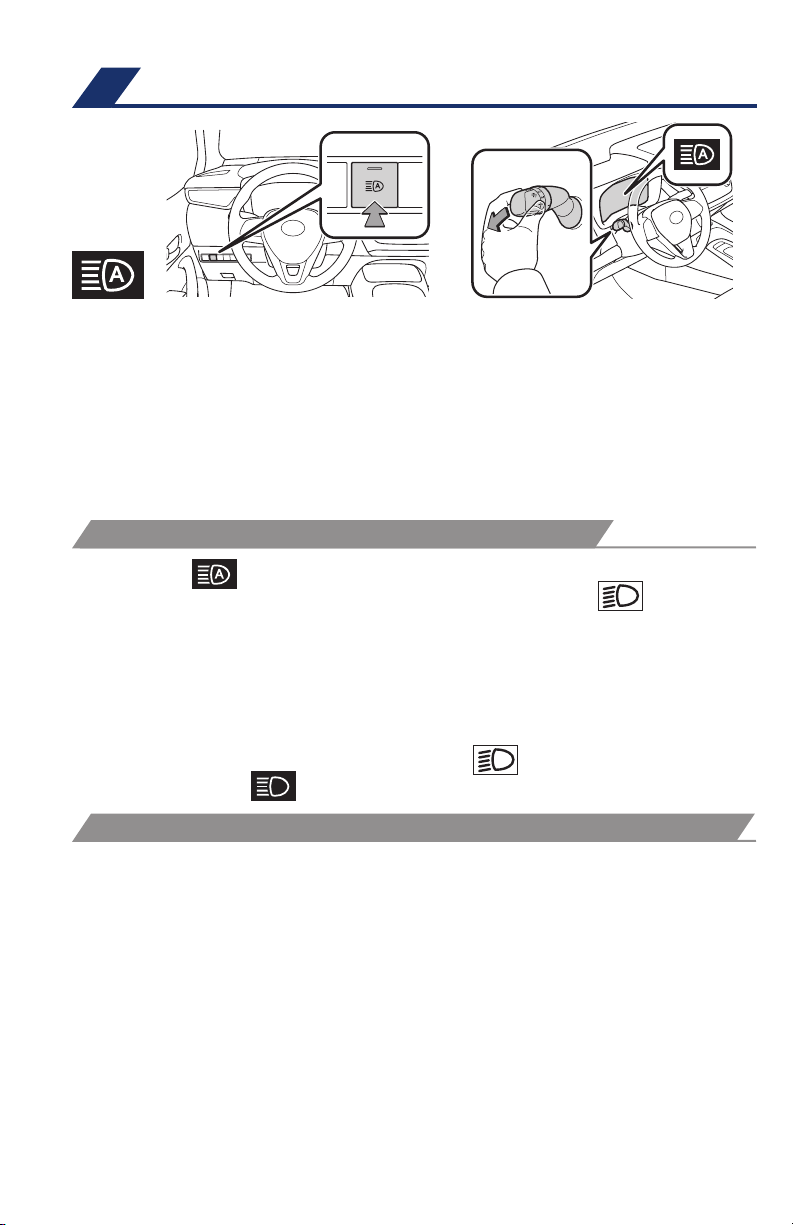
ACTIVATING THE AHB SYSTEM
(1) Press the “
(2) Push lever away from you with the headlight switch is in the “
position.
The AHB indicator will come on when the headlights are turned on automatically
to indicate that the system is active.
Note: Pull the lever back toward you or press the AHB switch to turn the AHB
system off.
” switch.
(2)
” or “AUTO”
The AHB indicator will turn off. To turn switch to “
high beam indicator “
CONDITIONS WHERE AHB WILL TURN ON/OFF AUTOMATICALLY
When all of these conditions are met, high beams will be automatically turned on
(after approximately 1 second):
• Vehicle speed is above approximately 21 mph (34 km/h).
• The area ahead of the vehicle is dark.
• There are no oncoming or preceding vehicles with headlights or tail lights turned
on.
• There are few streetlights on the road ahead.
If any of these conditions occur, high beams will be automatically turned off:
• Vehicle speed drops below approximately 17 mph (27 km/h).
• The area ahead of the vehicle is not dark.
• Oncoming or preceding vehicles have headlights or tail lights turned on.
• There are many streetlights on the road ahead.
” turns on.
40
” position and the manual
Page 43
Road Sign Assist (RSA)
Road Sign Assist is designed to help ensure drivers are kept informed. The RSA
system recognizes specific road signs using a forward-facing intelligent camera to
provide information to the driver via a Multi-information Display (MID). If the system
judges that the vehicle is being driven over the speed limit, or performing actions
prohibited by other support types of road signs, it alerts the driver using a warning
display and may sound a warning buzzer.
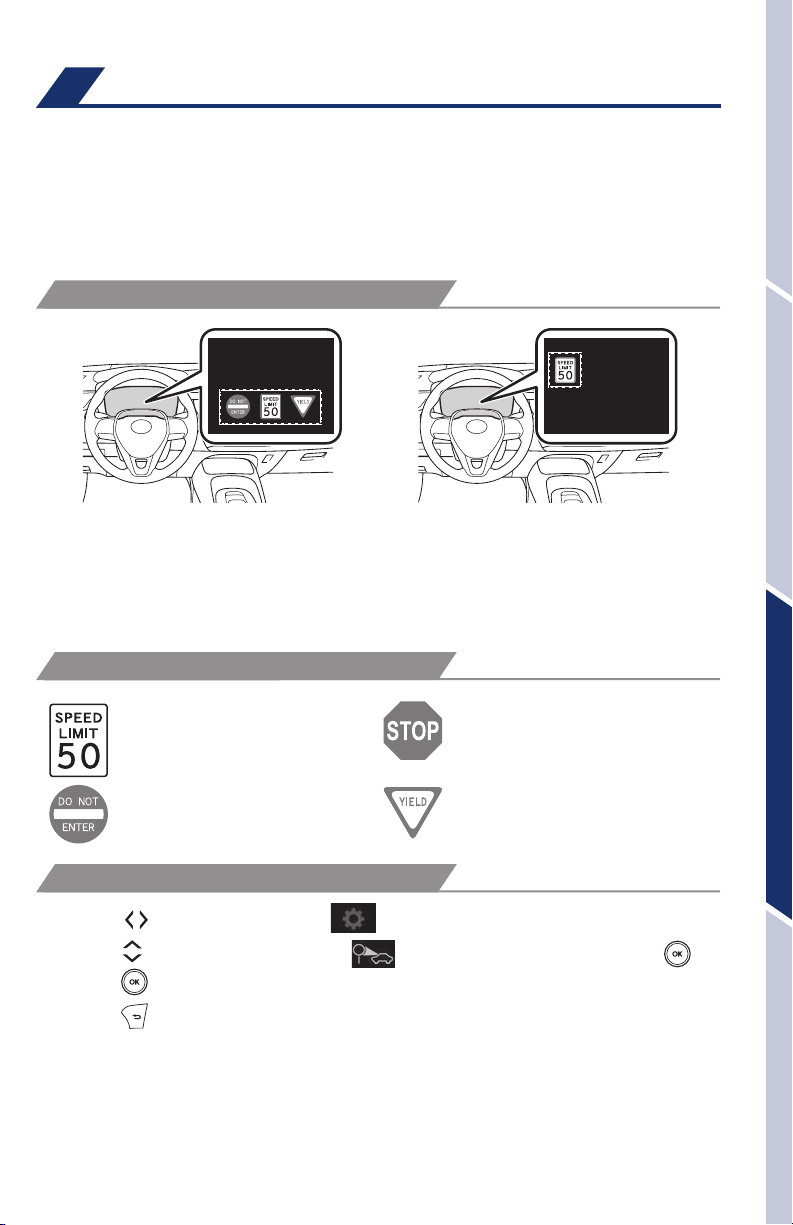
RSA DISPLAY
OVERVIEWFEATURES & OPERATIONSTOYOTA SAFETY SENSESAFETY & EMERGENCY FEATURES
When the driving support system
information is selected, a maximum of
3 signs can be displayed.
SUPPORTED TYPES OF ROAD SIGNS
Speed limit Stop
Do Not Enter Yield
SETTING RSA
(1) Press “
(2) Press “
(3) Press “
(4) Press “
Note: If the engine switch was last turned off while a speed limit sign was
displayed on the multi-information display, the same sign displays again when
the engine switch is turned back ON.
” switches and select from the Multi-Information Display (MID).
” switches and select the setting function and then press “ .”
” each time to change the setting.
” to go back to the menu.
When a tab other than the driving
support system information is selected,
only a recognized speed limit sign or
do not enter sign (when notification is
necessary) will be displayed.
Refer to the Toyota Owner’s Manual for additional information on RSA operation,
settings adjustments, limitations, and precautions before attempting to use it.
41
Page 44
SAFETY & EMERGENCY FEATURES
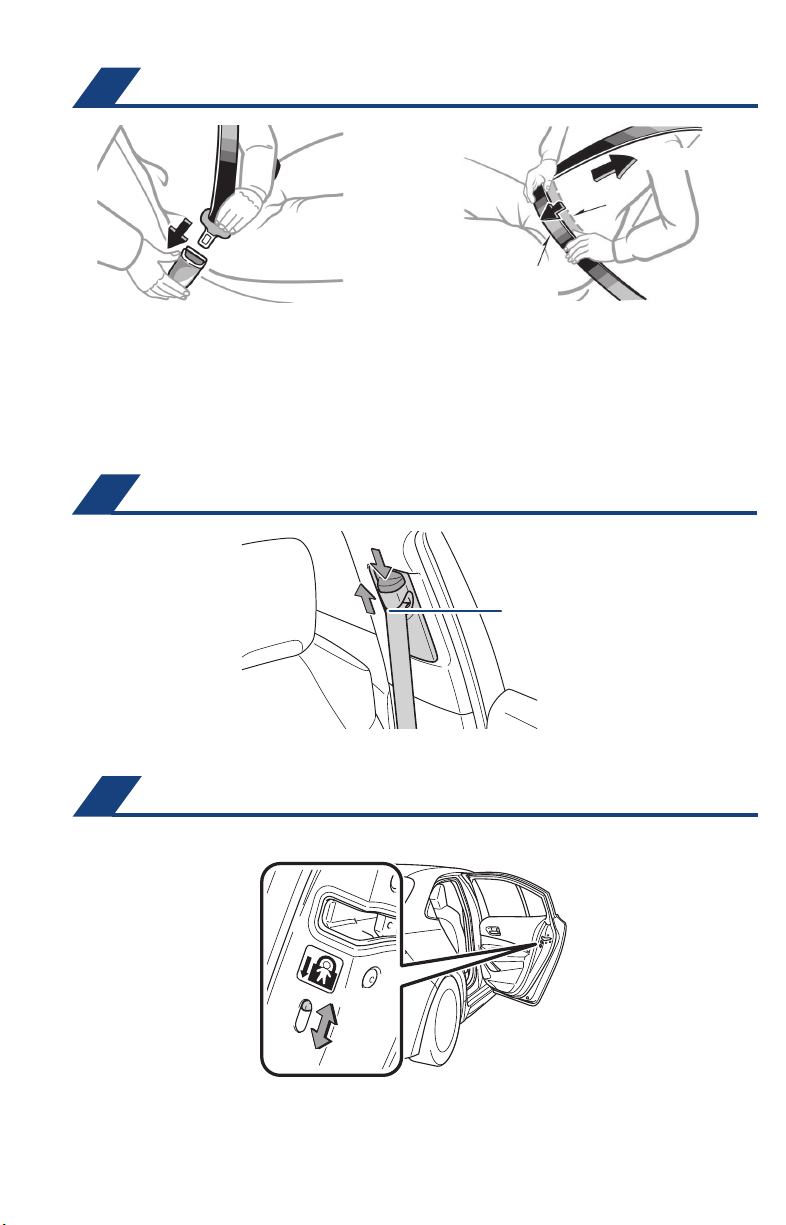
Seat belts
Take up slack
Keep as low on
hips as possible
NOTE: If a passenger’s seat belt is fully extended, then retracted even slightly,
the Automatic locking retractor (ALR) will prevent it from being re-extended
beyond that point, unless fully retracted again. This feature is used to help
hold child restraint systems securely.
To find more information about seat belts, and how to install a child restraint
system, refer to the Owner’s Manual.
Seat belts-Shoulder belt anchor
Push up, or squeeze
lock release to lower
Rear door child safety locks
Rear door
Unlock
Lock
Moving the lever downward will allow the door to be opened only from the outside.
Page 45
SAFETY & EMERGENCY FEATURES
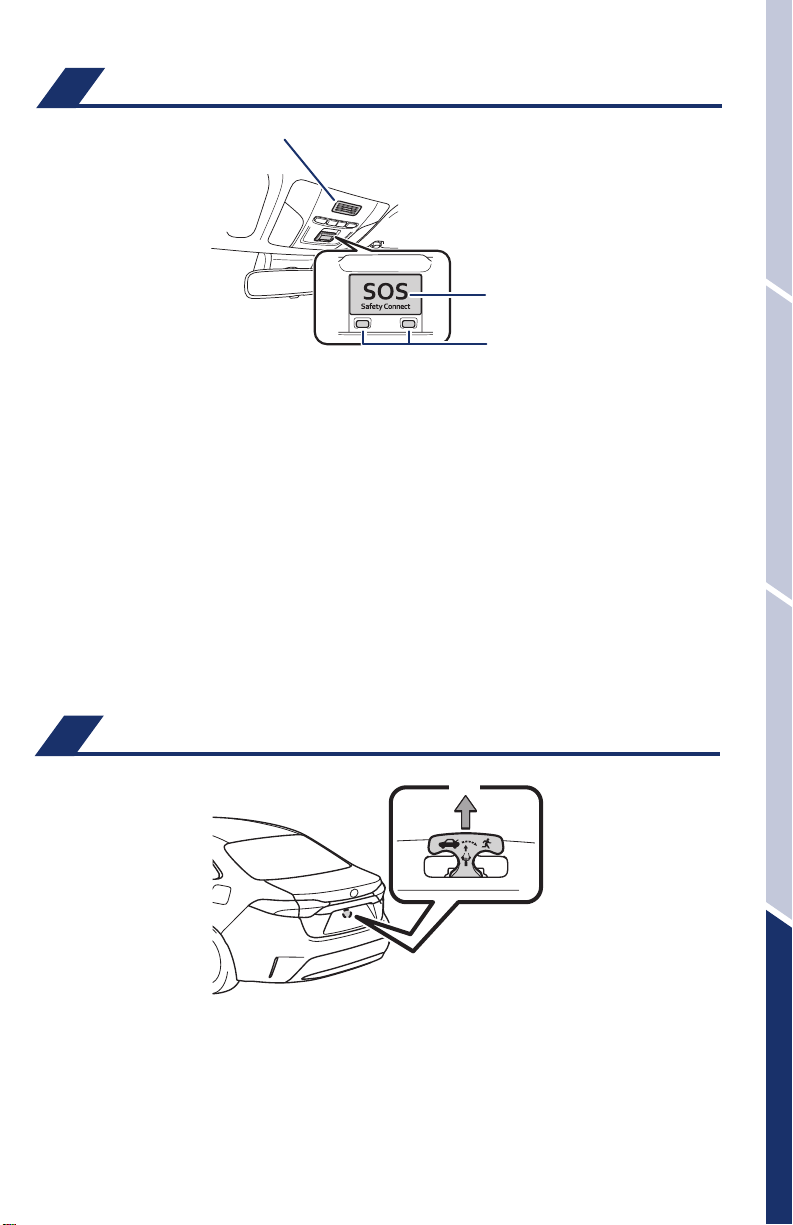
Safety Connect
Safety Connect is a subscription-based telematics service that uses Global
Positioning System (GPS) data and embedded cellular technology to provide safety
and security features to subscribers. Safety Connect is supported by Toyota’s
designated response center, which operates 24 hours per day, 7 days per week.
Services for subscribers include:
• Automatic collision notification
• Stolen vehicle location
• Emergency assistance (“SOS” button)
• Enhanced roadside assistance
Contact your dealer for more information about Safety Connect.
For details, refer to the “Owner’s Manual” or visit www.Toyota.com/safety-connect.
(if equipped)
Microphone
“SOS” button
LED light indicators
OVERVIEWFEATURES & OPERATIONSTOYOTA SAFETY SENSESAFETY & EMERGENCY FEATURES
Trunk-Internal release
43
Pull
Page 46
SAFETY & EMERGENCY FEATURES
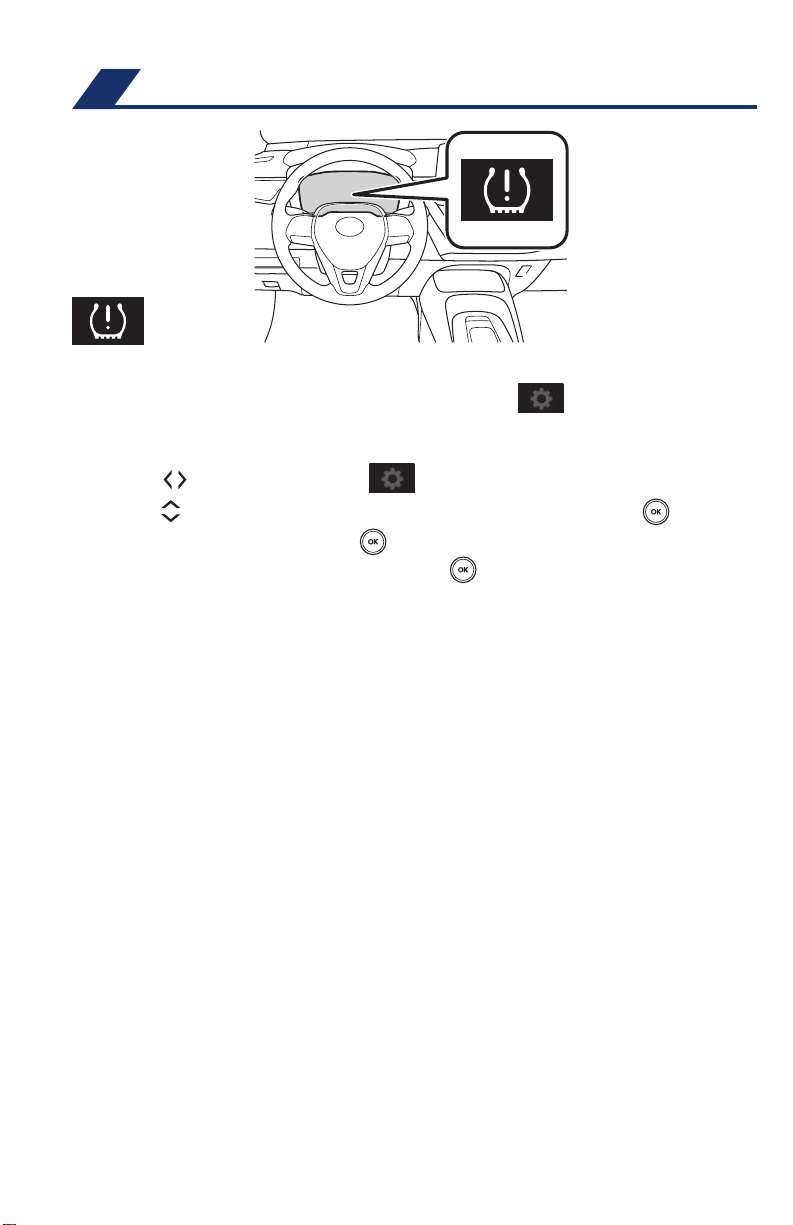
Tire Pressure Monitoring (warning) System (TPMS)
The tire pressure warning system can be selected on “ ” of the multiinformation display (MID).
System rest initialization
(1) Press “ ” switches and select from the Multi-Information Display (MID)..
(2) Press “
(3) Select “TPWS” and them push “
(3) Select “Set Pressure” then push and hold “
three times.
The tire pressure detected by the tire pressure warning system can
be displayed on the multi-information display (MID).
Refer to the load label on the door jamb or the Owner’s Manual for tire inflation
specifications.
” switches and select the “Vehicle Settings”, them push “ ”.
”.
” until the warning light blinks
If the tire pressure indicator flashes for more than 60 seconds and then remains on,
take the vehicle to your local Toyota dealer.
NOTE: The warning light may come on due to temperature changes or
changes in tire pressure from natural air leakage. If the system has not been
initialized recently, setting the tire pressures to factory specifications should
turn off the light.
44
Page 47
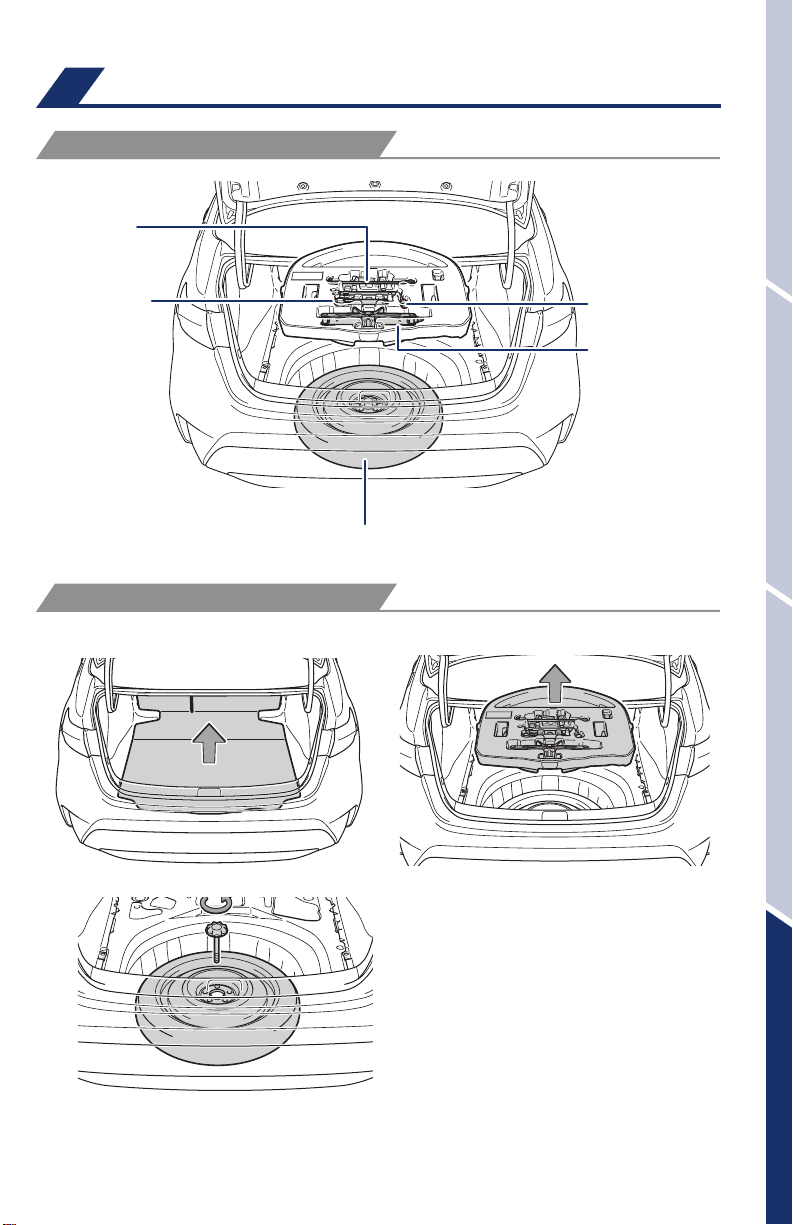
Spare tire & tools (if equipped)
TOOL LOCATION
Jack handle
OVERVIEWFEATURES & OPERATIONSTOYOTA SAFETY SENSESAFETY & EMERGENCY FEATURES
Towing eyelet
(if equipped)
REMOVE THE SPARE TIRE
Remove the luggage floor cover.
Wheel nut wrench
Jack
Spare tire
Remove the tool tray.
Loosen the center fastener that secures the spare tire.
Refer to the Owner’s Manual for tire changing and jack positioning procedures.
45
Page 48
SAFETY & EMERGENCY FEATURES
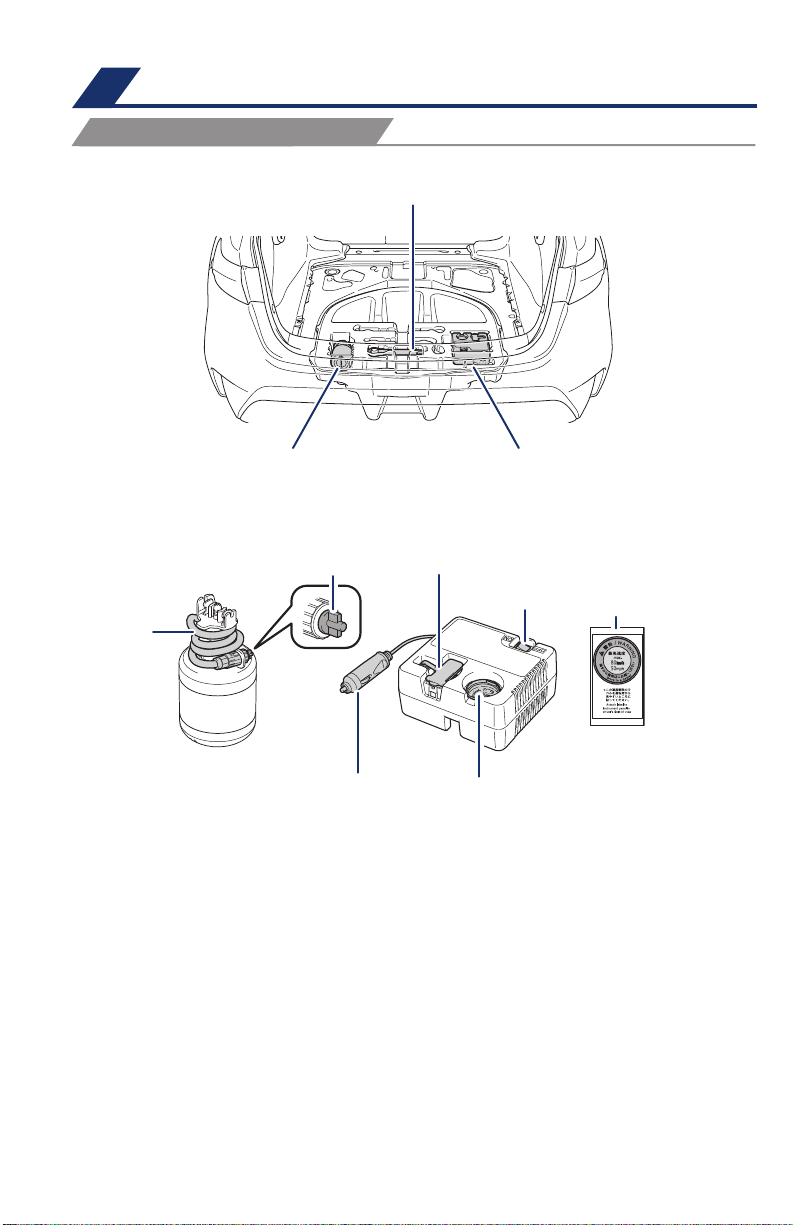
Tire repair kit & tools (if equipped)
TOOL LOCATION
Jack and tools
Towing eyelet
Emergency tire
puncture repair kit
Tire repair kit components
Air release cap Rubber stopper
Hose
Power plug
Refer to the Owner’s Manual for jack positioning and tire changing procedures.
Air pressure gauge
Emergency tire
puncture repair kit
Compressor switch
*If equipped.
Sticker
46
Page 49
Star Safety System
Your vehicle comes standard with the Star Safety System
™
TM
, which combines Antilock Braking System (ABS), Brake Assist (BA), Electronic Brake-force Distribution
(EBD), Smart Stop Technology (SST), Traction Control (TRAC) and Vehicle Stability
Control (VSC).
Refer to the Owner’s Manual for more details and important information on limitations
to these systems.
ANTI-LOCK BRAKE SYSTEM (ABS)
Toyota’s ABS sensors detect which wheels are locking up and limits wheel lockup
by “pulsing” each wheel’s brakes independently. Pulsing releases brake pressure
repeatedly for fractions of a second. This helps the tires attain the traction that
current road conditions will allow, helping you to stay in directional control.
BRAKE ASSIST (BA)
Brake Assist is designed to detect sudden or “panic” braking, and then add braking
pressure to help decrease the vehicle’s stopping distance. When there’s only a split
second to react, Brake Assist can add additional brake pressure more quickly than
just the driver alone can.
ELECTRONIC BRAKE FORCE DISTRIBUTION (EBD)
Toyota’s ABS technology has Electronic Brake-force Distribution (EBD) to help
maintain control and balance when braking. EBD responds to sudden stops by
redistributing brake force to enhance the braking effectiveness of all four wheels.
OVERVIEWFEATURES & OPERATIONSTOYOTA SAFETY SENSESAFETY & EMERGENCY FEATURES
SMART STOP TECHNOLOGY (SST)
Smart Stop Technology automatically reduces engine power when the accelerator
and brake pedals are pressed simultaneously under certain conditions.
SST engages when the accelerator is depressed first and the brakes are applied
firmly for longer than one-half second at speeds greater than five miles per hour.
SST doesn’t engage if the brake pedal is depressed before the accelerator pedal,
allowing vehicles to start on a steep hill and safely accelerate without rolling
backward.
ENHANCED VEHICLE STABILITY CONTROL (VSC)
Enhanced Vehicle Stability Control provides cooperative control of the ABS, TRAC,
VSC and EPS.
Enhanced VSC helps to maintain directional stability when loss of traction occurs
during a turn.
47
Page 50
SAFETY & EMERGENCY FEATURES
TRACTION CONTROL (TRAC)
VSC helps prevent loss of traction during cornering by reducing engine power, and
Traction Control helps maintain traction on loose gravel and wet, icy, or uneven
surfaces by applying brake force to the spinning wheel(s).
Toyota’s TRAC sensors are activated when one of the drive wheels starts to slip.
TRAC limits engine output and applies the brakes to the spinning wheel. This
transfers power to the wheels that still have traction to help keep you on track.
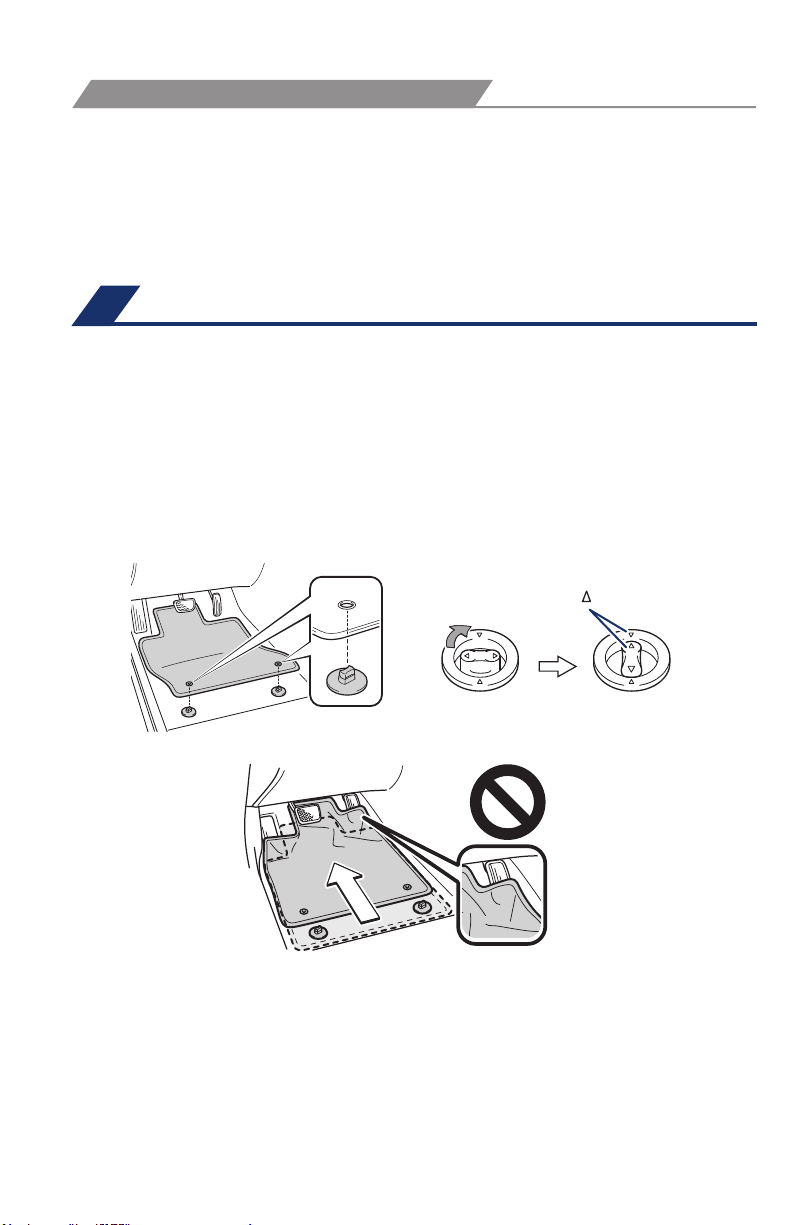
Floor mat installation
There are two types of Toyota floor mats: carpeted and all-weather. Each vehicle
has model-specific floor mats. Installation is easy.
To keep your floor mat properly positioned, follow these steps:
• Only use Toyota floor mats designed for your specific model.
• Use only one floor mat at a time, using the retaining hooks to keep the mat in
place.
• Install floor mats right side up.
Always align the marks
48
Page 51

OVERVIEWFEATURES & OPERATIONSTOYOTA SAFETY SENSESAFETY & EMERGENCY FEATURES OVERVIEWFEATURES & OPERATIONSTOYOTA SAFETY SENSESAFETY & EMERGENCY FEATURES
49
Page 52

BLUETOOTH® DEVICE PAIRING
SECTION
Do not attempt the Bluetooth® Pairing process while driving.
50
Page 53
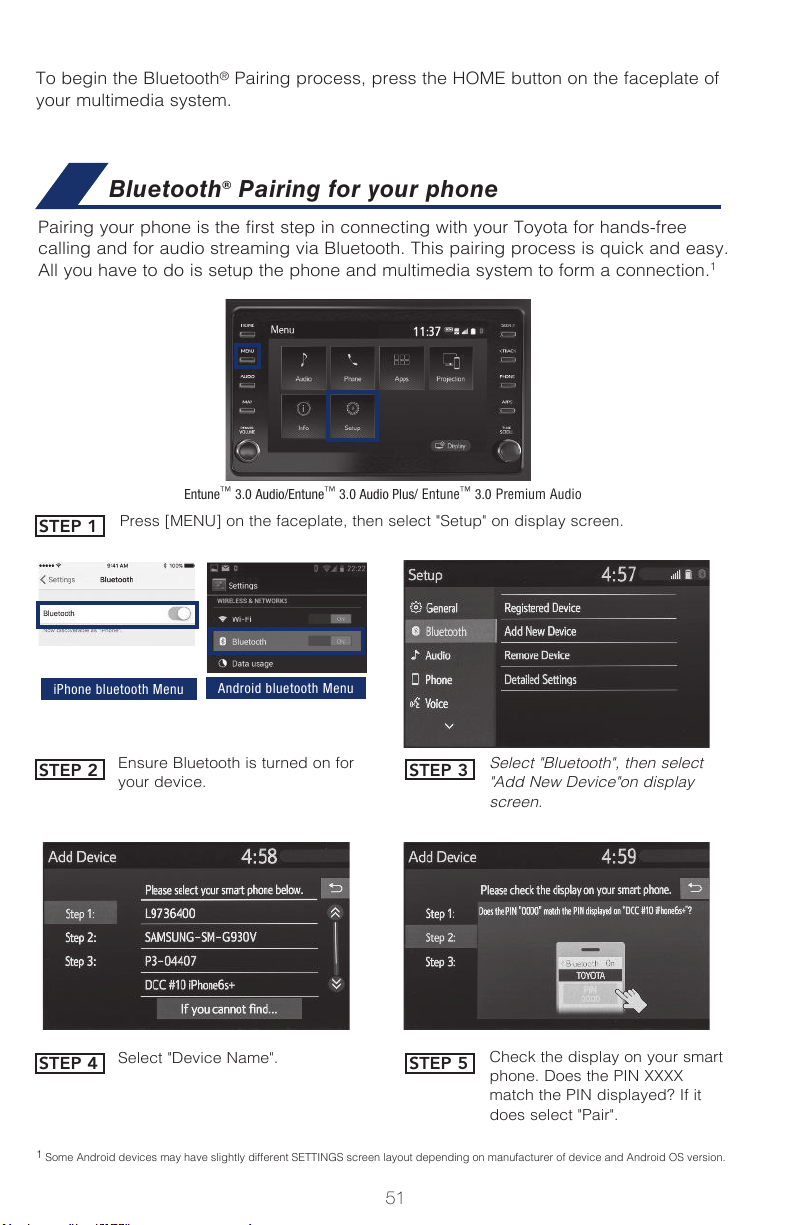
To begin the Bluetooth® Pairing process, press the HOME button on the faceplate of
your multimedia system.
Bluetooth® Pairing for your phone
Pairing your phone is the first step in connecting with your Toyota for hands-free
calling and for audio streaming via Bluetooth. This pairing process is quick and easy.
All you have to do is setup the phone and multimedia system to form a connection.
Entune™ 3.0 Audio/Entune™ 3.0 Audio Plus/ Entune™ 3.0 Premium Audio
STEP 1
Press [MENU] on the faceplate, then select "Setup" on display screen.
1
iPhone bluetooth Menu
STEP 2
Ensure Bluetooth is turned on for
your device.
Android bluetooth Menu
STEP 3
Select "Bluetooth", then select
"Add New Device"on display
screen.
STEP 4
Select "Device Name".
STEP 5
Check the display on your smart
phone. Does the PIN XXXX
match the PIN displayed? If it
does select "Pair".
1
Some Android devices may have slightly different SETTINGS screen layout depending on manufacturer of device and Android OS version.
51
Page 54
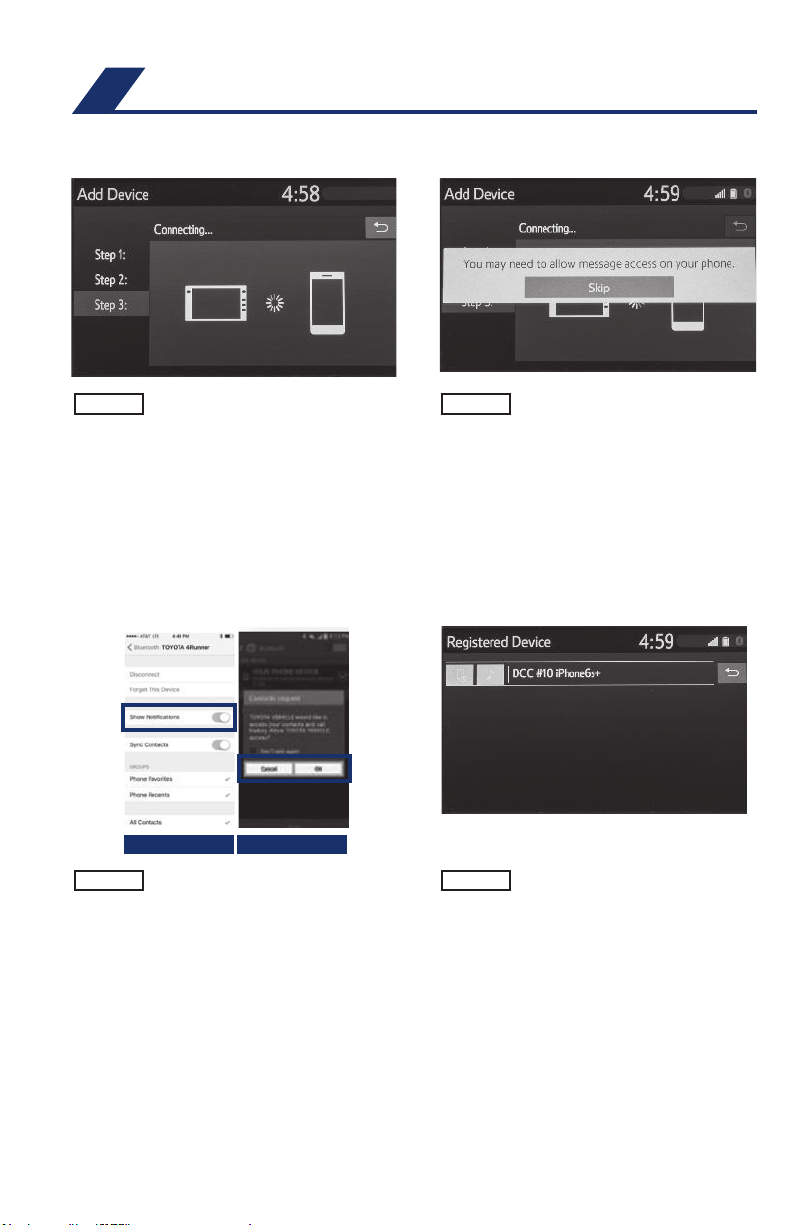
BLUETOOTH® DEVICE PAIRING
Bluetooth® Pairing for your phone (cont.)
STEP 6
STEP 8
"Connecting" displays while
device is forming the connection
to your multimedia system.
iPhone
Android
Turn on "Show Notifications" for
iPhone or "ON" for Android.
STEP 7
STEP 9
Enable Notifications (text
message). While pairing your
device message will display:
"You may need to allow
message access on your
phone".
Note: You may also select
"Skip" on display screen to skip
enabling notifications. If skipped
proceed to Step 8.
A confirmation will appear once
your phone has been paired and
connected.
52
Page 55

Page 56

Quick Reference Guide 2020
Printed in U.S.A. 1/19
18-TCS- 125 86
toyota.com
 Loading...