

Toyota Celica 1996 Owner's Manual

Foreword
Welcome to the growing group of value-conscious people who drive Toyotas. We
are proud of the advanced engineering and quality construction of each vehicle we
build.
This Owner’s Manual explains the features of your new Toyota. Please read it and
follow the instructions carefully so that you can enjoy many years of safe motoring.
When it comes to service, remember that your Toyota dealer knows your vehicle
best and is interested in your complete satisfaction. He will provide quality maintenance and any other assistance you may require.
Please leave this Owner’s Manual in this vehicle at the time of resale. The next
owner will need this information also.
All information and specifications in this manual are current at the time of
printing. However, because of Toyota’s policy of continual product improvement, we reserve the right to make changes at any time without notice.
Please note that this manual applies to all models and explains all equipment,
including options. Therefore, you may find some explanations for equipment
not installed on your vehicle.
TOYOTA MOTOR CORPORATION
1996 TOYOTA MOTOR CORPORATION
All rights reserved. This material may not be reproduced or copied, in whole or in
part, without the written permission of Toyota Motor Corporation.

New vehicle warranty
Your new vehicle is covered by the following Toyota
limited warranties:
New vehicle warranty
Emission control systems warranty
Others
For further information, please refer to the separate
“Owner’s Guide”, “Owner ’s Manual Supplement” or
“Warranty Booklet”.
Your responsibility for maintenance
It is the owner’s responsibility to make sure that the
specified maintenance is performed. Part 6 gives details of these maintenance requirements. Also included in Part 6 is general maintenance. For scheduled maintenance information, please refer to the
separate “Owner’s Manual Supplement/Maintenance Schedule”.
Accessories, spare parts and
modification of your Toyota
A wide variety of non genuine spare parts and accessories for Toyota vehicles are currently available in the
market. You should know that Toyota does not warrant these products and is not responsible either for
their performance, repair or replacement, or for any
damage they may cause to, or adverse effect they
may have on, your Toyota vehicle.
This vehicle should not be modified with non genuine
Toyota products. Modification with non genuine Toyota products could affect its performance, safe t y o r durability, and may even violate governmental regulations. In addition, damage or performance problems
resulting from the modification may not be covered
under warranty.
Spark ignition system of your Toyota
The spark ignition system in your T oyota meets all requirements of the Canadian Interference-Causing
Equipment Standard.

Installation of a mobile
two-way radio system
As the installation of a mobile two-way radio system
in your vehicle could affect electronic systems such
as multiport fuel injection system/sequential multiport
fuel injection system, cruise control system, anti-lock
brake system and SRS airbag system, be sure to
check with your Toyota dealer for precautionary measures or special instructions regarding installation.
Scrapping of your Toyota
The SRS airbag device in your Toyota contains explosive chemicals. If the vehicle is scrapped with the airbags left as they are, it may cause an accident such
as a fire. Be sure to have the SRS airbag system removed and disposed of by a qualified service shop or
by your Toyota dealer before you dispose of your vehicle.


Quick index
If a service reminder indicator or warning buzzer comes on 53. . . . .
If your vehicle will not start 123. . . . . . . . . . . . . . . . . . . . . . . . . . . . . . . . . . .
If your engine stalls while driving 126. . . . . . . . . . . . . . . . . . . . . . . . . . . . . .
If your vehicle overheats 126, 127. . . . . . . . . . . . . . . . . . . . . . . . . . . . . . . .
If you have a flat tire 128. . . . . . . . . . . . . . . . . . . . . . . . . . . . . . . . . . . . . . . . .
If your vehicle needs to be towed 134. . . . . . . . . . . . . . . . . . . . . . . . . . . . .
Tips for driving during break- in period 103. . . . . . . . . . . . . . . . . . . . . . . . .
How to start the engine 113. . . . . . . . . . . . . . . . . . . . . . . . . . . . . . . . . . . . . . .
General maintenance 148. . . . . . . . . . . . . . . . . . . . . . . . . . . . . . . . . . . . . . . . . .
Complete index 197. . . . . . . . . . . . . . . . . . . . . . . . . . . . . . . . . . . . . . . . . . . . . . .
Gas station information
Fuel type:
7A- FE engine—UNLEA DED gas oline, R esearc h Oc tane Number 91 (Oct ane
Rating 87) or higher.
5S- FE engine—UNLEA DED gas oline, R esearc h Oc tane Number 91 (Oct ane
Rating 87) or higher. For improved vehicle perf ormance, t he use of premium
unleaded gasoline with a Research Octane Number of 96 (Octane Rating
91) or higher is recommended.
See page 103 for detailed information.
Fuel tank capacity:
60 L (15.9 gal., 13.2 lmp. gal.)
Engine oil:
API SH, ’’Energy - Conservi ng II’’ multigrade engine oil or ILSA C m ultigrade
engine oil is recommended.
See page 162 for detailed information.
Tire information: See pages 166 through 170.
Tire pressure: See page 192.
−7
Publication No. OM20676U
Part No. 01999-20676
Printed in Japan 03- 9603- 02
c

Part 1
OPERATION OF
INSTRUMENTS
AND CONTROLS—
Chapter 1-1
Overview of instruments
and controls
Instrument panel overview
Instrument cluster overview
Indicator symbols on the
instrument panel
1
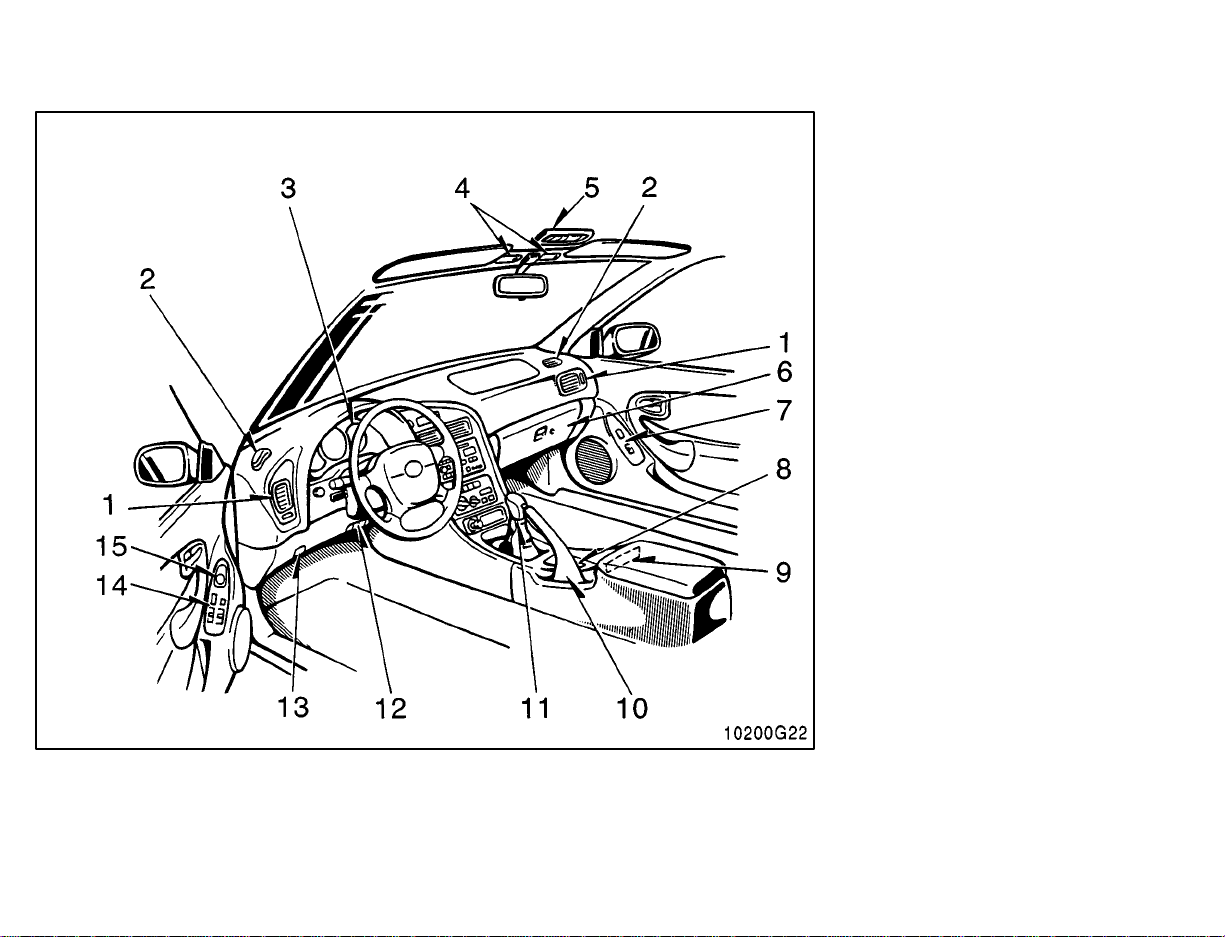
Instrument panel overview
1. Side vent
2. Side defroster outlet
3. Instrument cluster
4. Personal lights
5. Electric moon roof switches and
interior lights
6. Glovebox
7. Power window switch and power
door lock switch
8. Ashtray
9. Cup holder
10.Parking brake lever
11.Manual transmission gear shift lever
or automatic transmission selector
lever
12.Lower vent
13.Hood lock release lever
14.Power window switches and power
door lock switch
15.Power rear view mirror control switch
(with power windows)
2
1. Headlight and turn signal switch
2. Wiper and washer switches
3. Emergency flasher switch
4. Clock
5. Center vents
6. Car audio
7. Air conditioning controls
8. Rear window defoggers switch
9. Coupe and liftback—
Power rear view mirror control
switch (without power windows)
Convertible—
Convertible top control switch and
quarter window control switches
10. Cigarette lighter
11. Ignition switch
12. Cruise control switch
13. Tilt steering lock release lever
14. Instrument panel light control knob
3
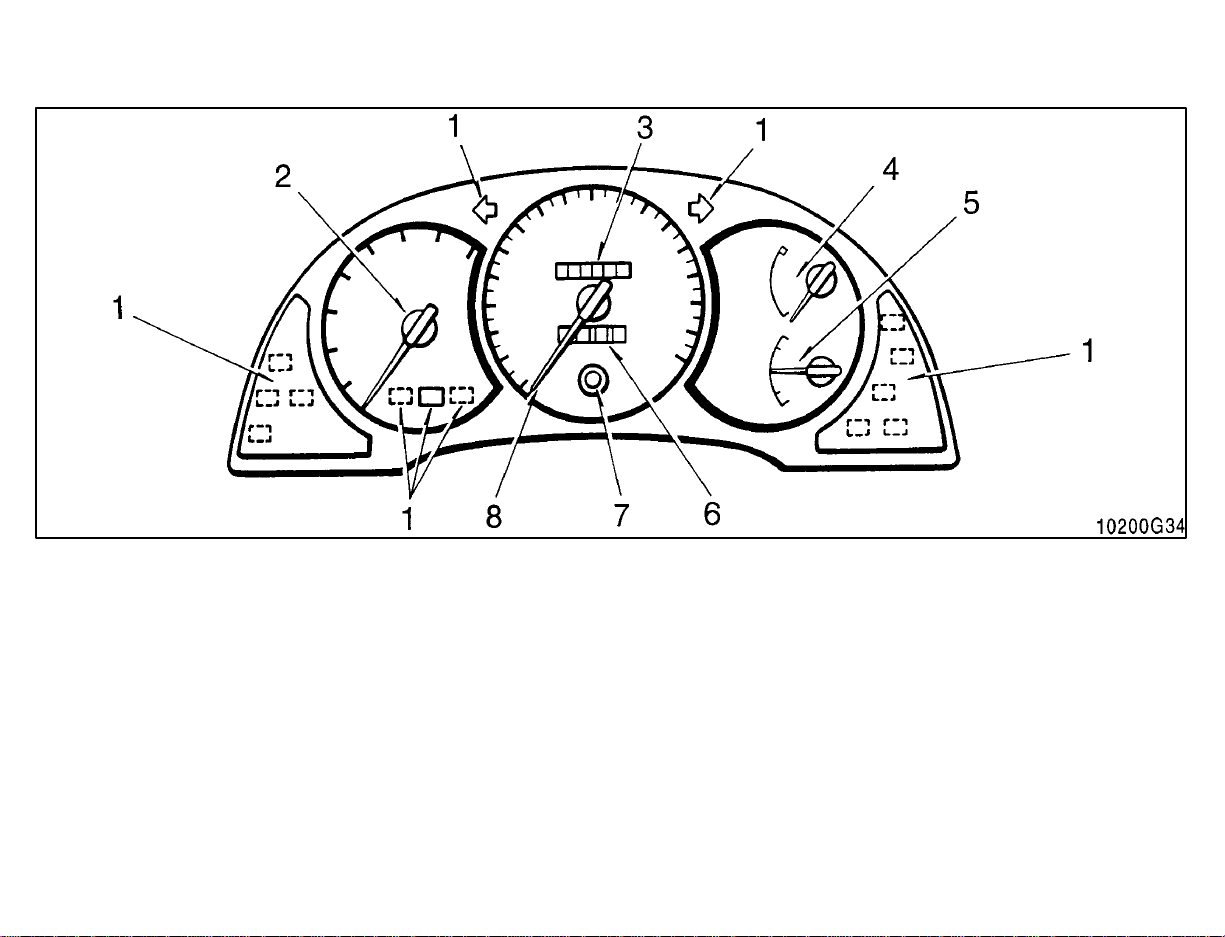
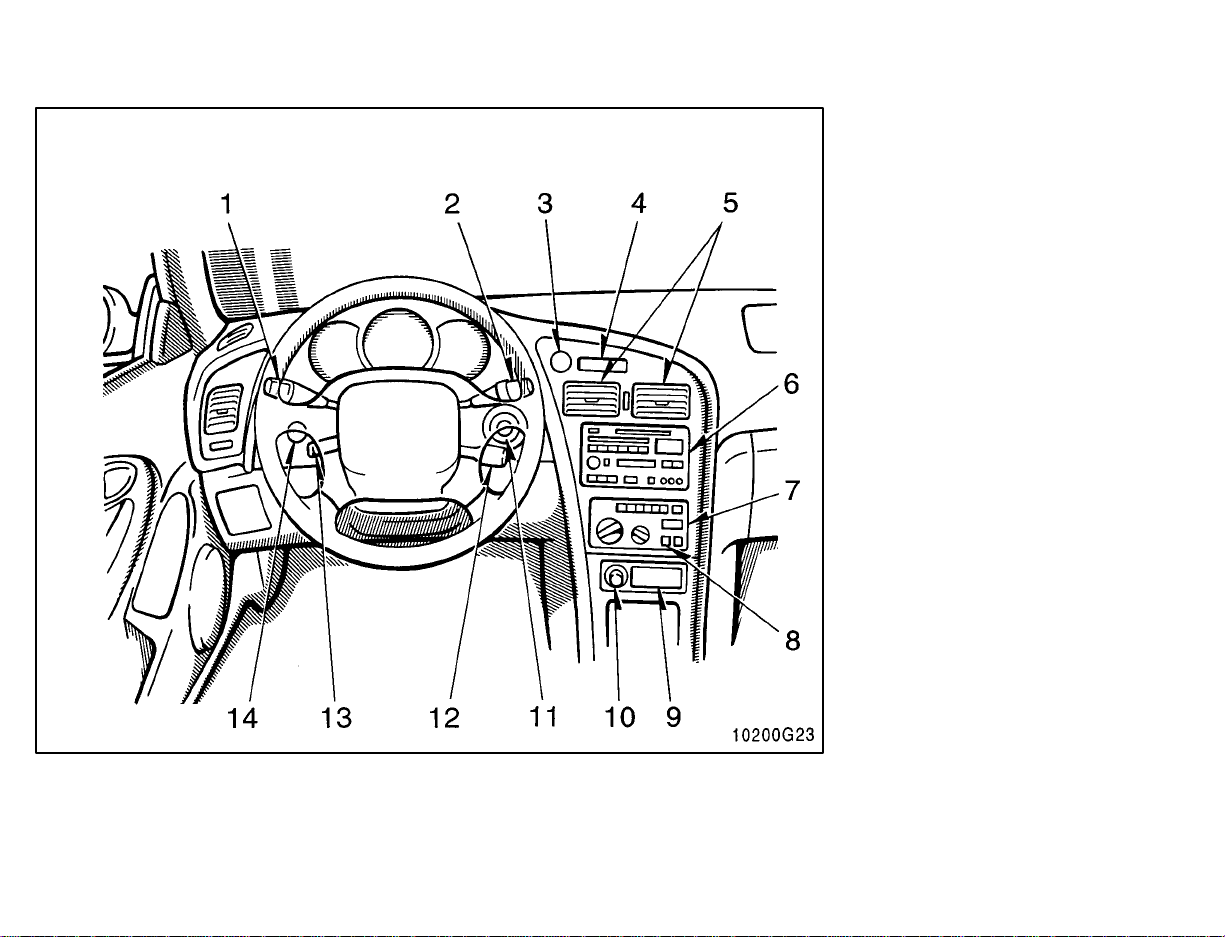
Instrument cluster overview
1. Service reminder indicators or
indicator lights
2. Tachometer
3. Odometer
4
4. Engine coolant temperature gauge
5. Fuel gauge
6. Trip meter
7. Trip meter reset knob
8. Speedometer
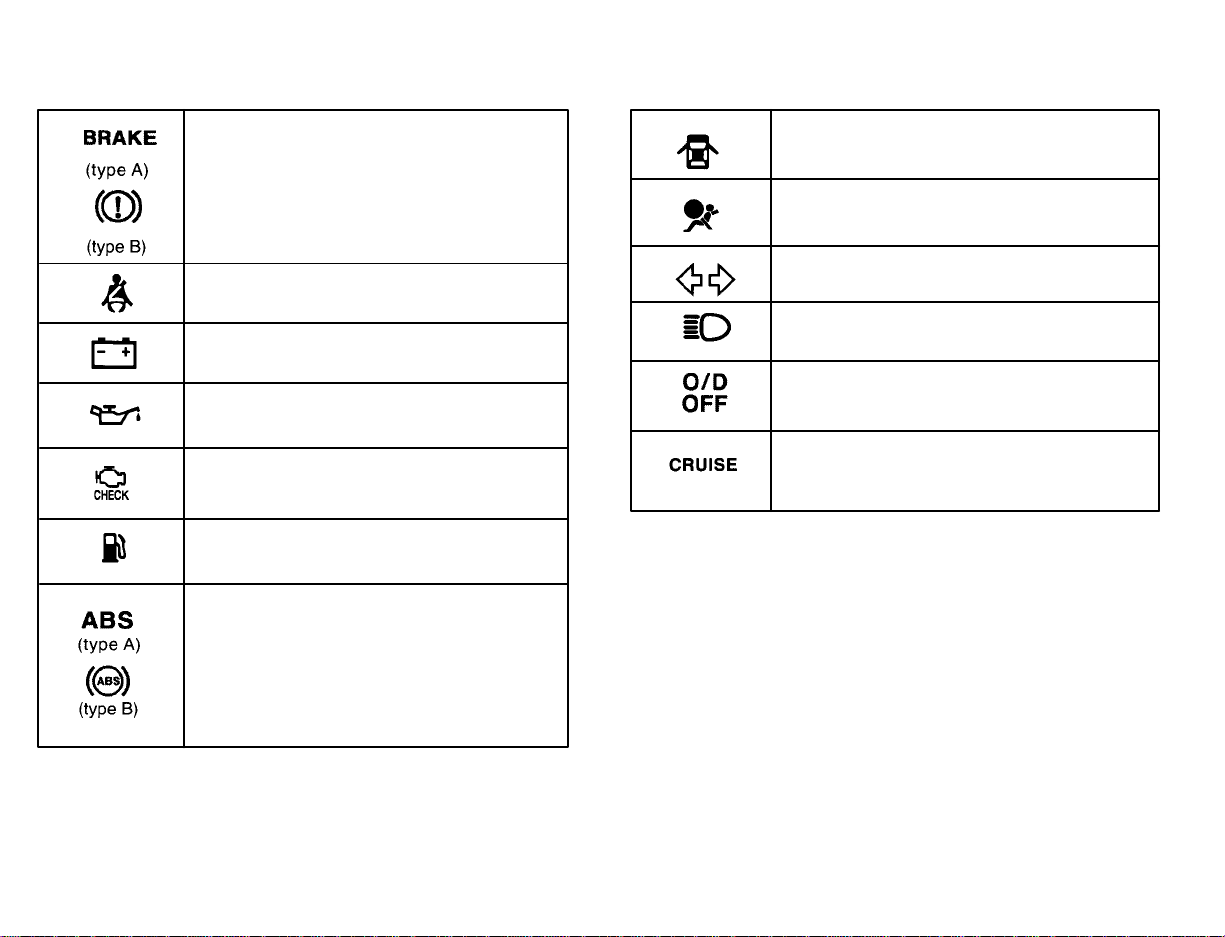
Indicator symbols on the instrument panel
Brake system warning light *
Seat belt reminder light*
Discharge warning light*
Low oil pressure warning light*
Malfunction indicator lamp*
Low fuel level warning light *
1
1
1
1
1
1
Anti-lock brake system warning light *
Open door warning light*
SRS airbag warning light*
1
1
Turn signal indicator lights
Headlight high beam indicator light
Overdrive-off indicator light
Cruise control indicator light*
2
*1: For details, see “Service reminder indicators and warning
buzzers” in Chapter 1-5.
*2: If this light flashes, see “Cruise control” in Chapter 1-6.
1
5

6
Part 1
OPERATION OF
INSTRUMENTS AND
CONTROLS—
Chapter 1-2
Keys and Doors
Keys
Side doors
Power windows
Trunk lid/Back door
Hood
Fuel tank cap
Electric moon roof
Convertible top
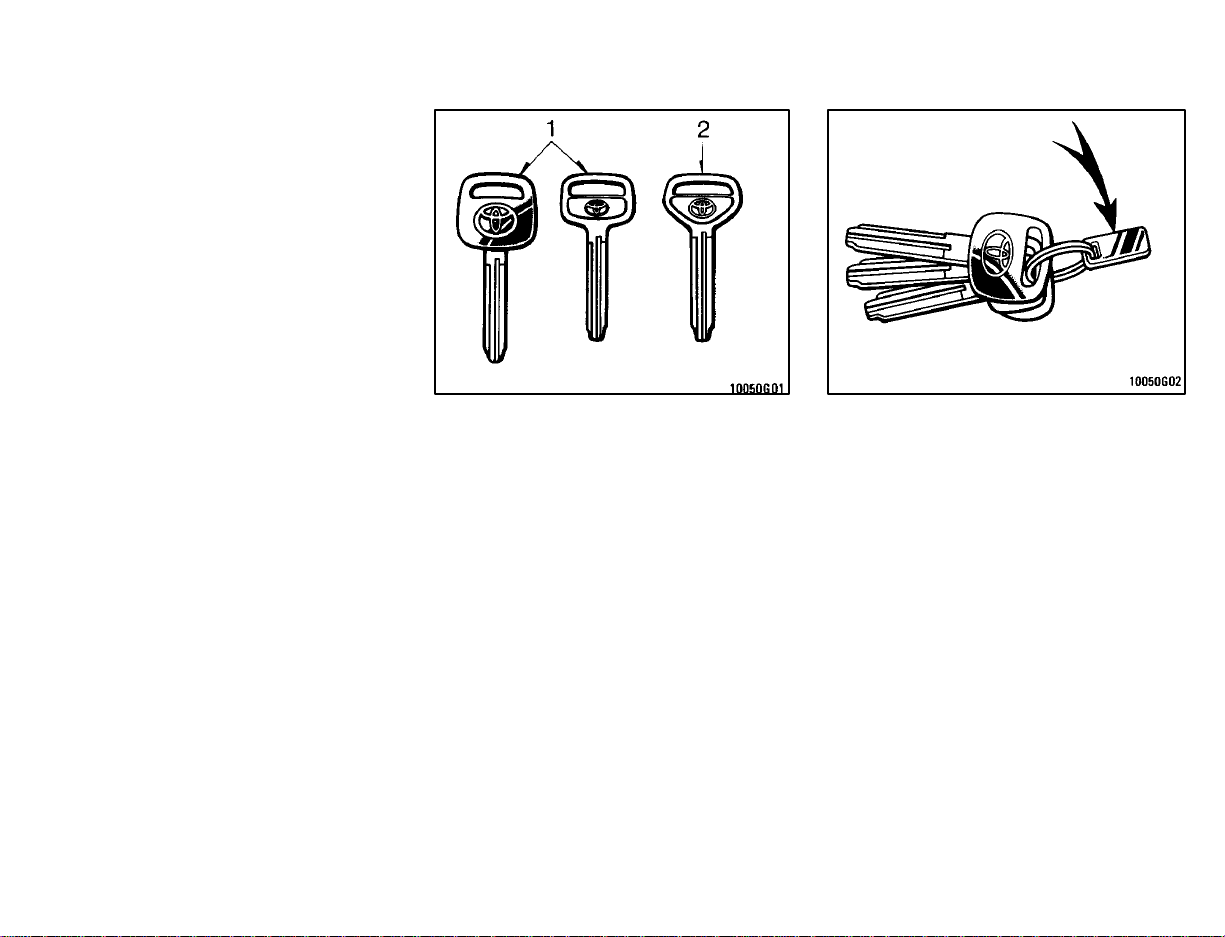
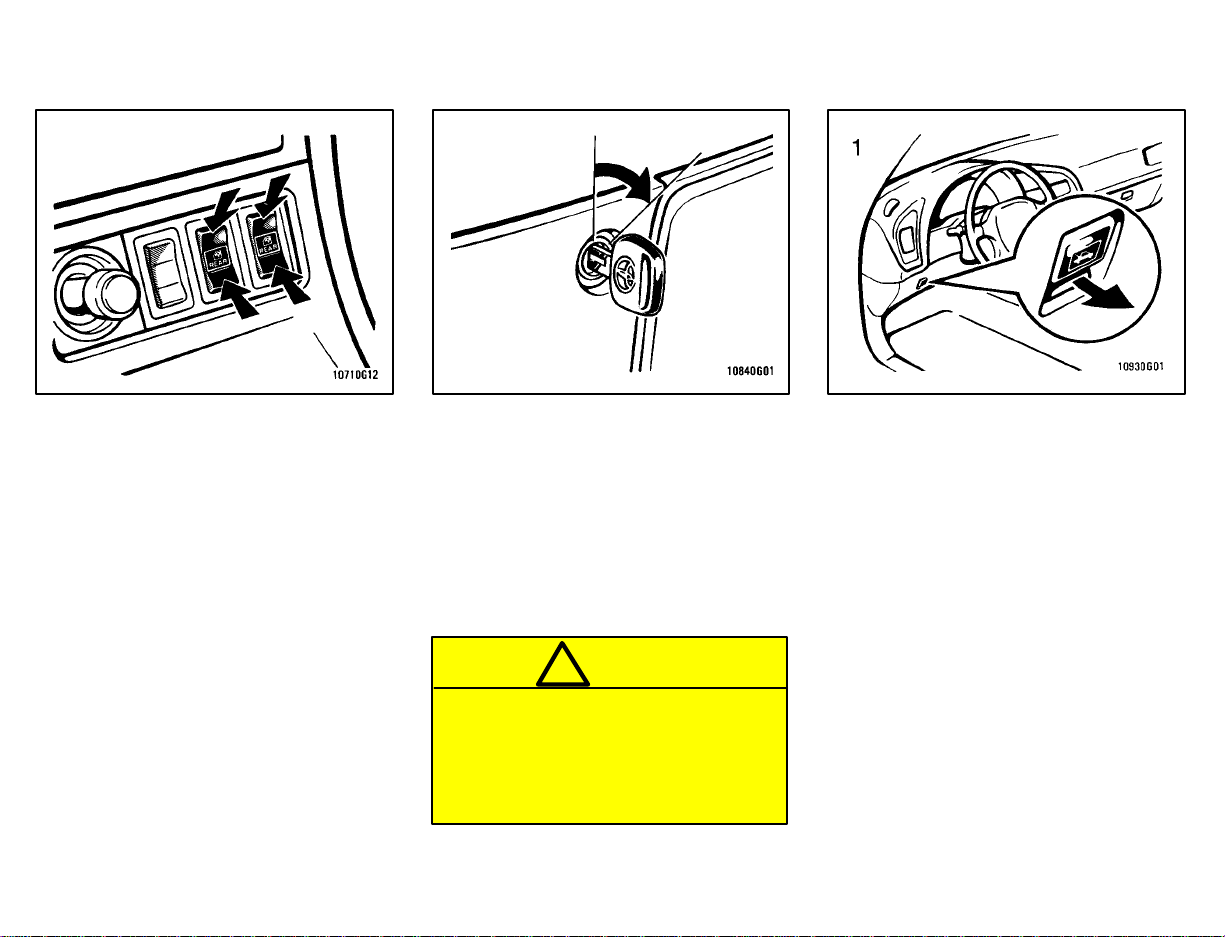
Keys
Your vehicle is supplied with two
kinds of key.
1 Master key—This key works in every
lock.
2 Subkey—This key is for side doors.
To protect things locked in the glovebox,
trunk or luggage compartment when you
have your vehicle parked, leave the subkey with the attendant.
Since the side doors, trunk lid and back
door can be locked without a key, you
should always carry a spare master key in
case you accidentally lock your keys inside the vehicle.
KEY NUMBER PLATE
Your key number is shown on the
plate. Keep the plate in a safe place
such as your wallet, not in the vehicle.
If you should lose your keys or if you need
additional keys, duplicates can be made
by a Toyota dealer using the key number.
You should also put a copy of the key
number with your important papers.
7
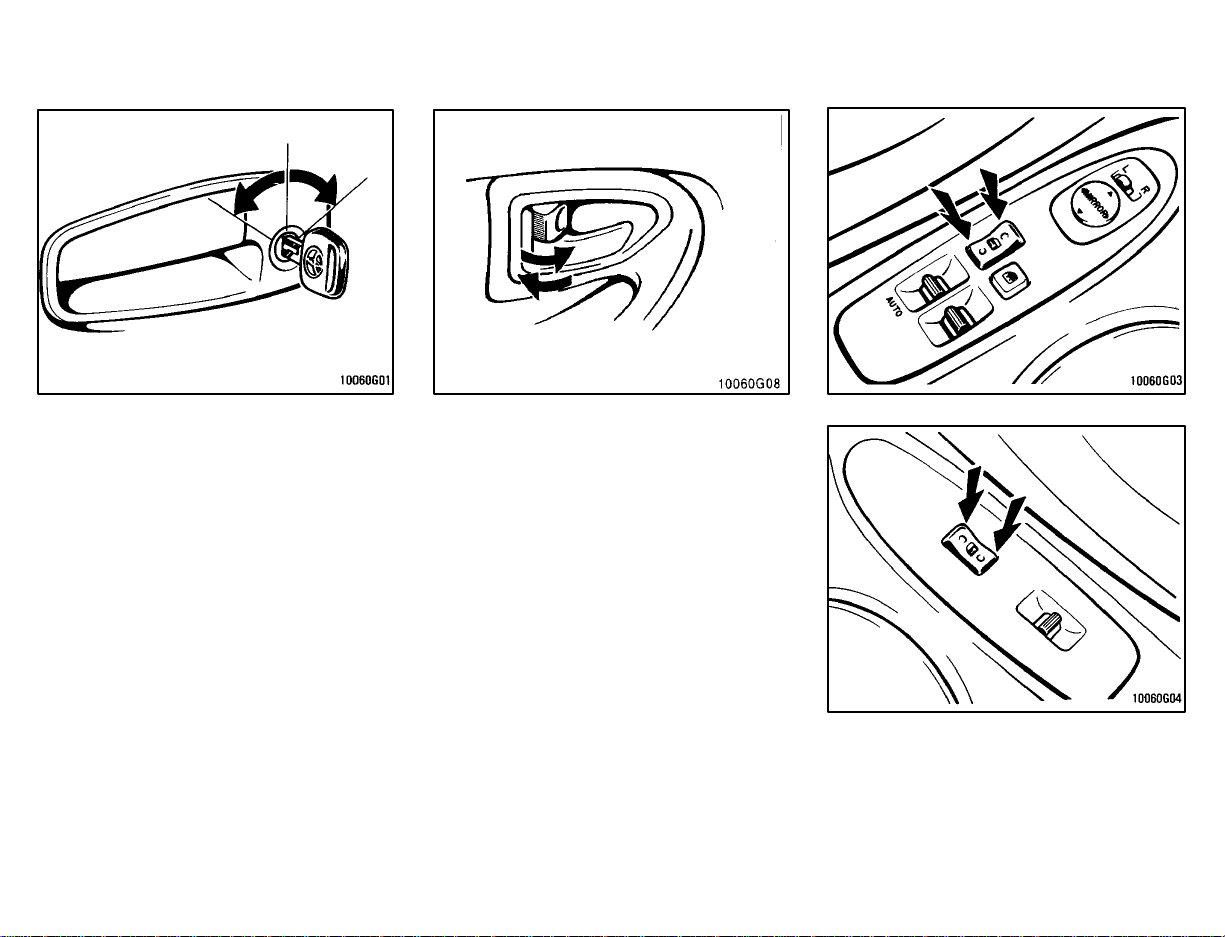
Side doors
LOCKING AND UNLOCKING WITH
KEY
Insert the key into the keyhole and turn
it.
To lock: Turn the key forward.
To unlock: Turn the key backward.
Both side doors lock and unlock simulta-
neously with either side door. In the driver’s door lock, turning the key once will unlock the driver’s door and twice in
succession will unlock both side doors simultaneously.
8
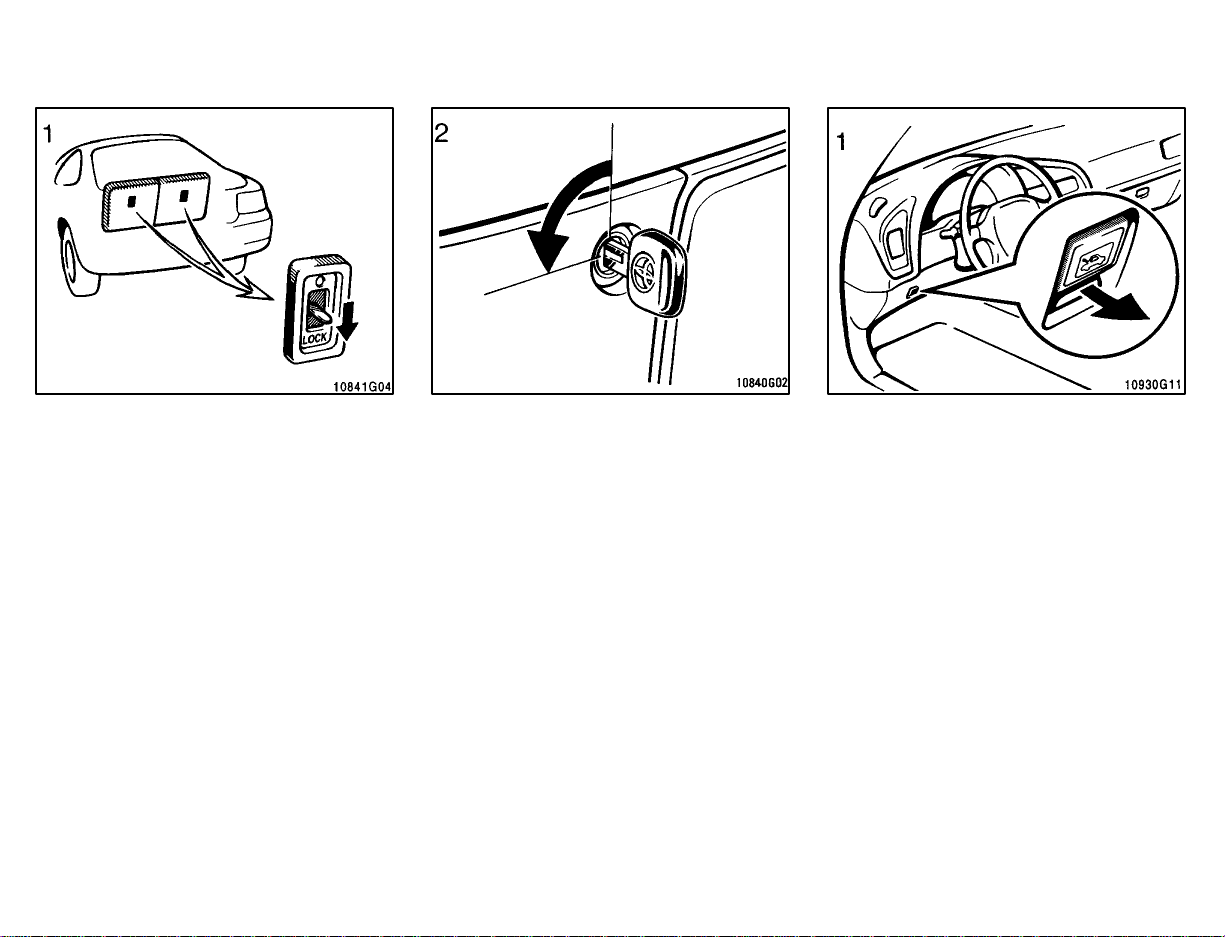
LOCKING AND UNLOCKING WITH INSIDE LOCK KNOB
Move the lock knob.
To lock: Push the knob forward.
To unlock: Pull the knob backward.
Closing the side door with the lock knob in
the lock position will also lock the side
door. Be careful not to lock your keys in
the vehicle.
Vehicles with power door lock system—
The side door cannot be locked if you
leave the key in the ignition switch.
Driver’s side
Passenger’s side
LOCKING AND UNLOCKING WITH
POWER DOOR LOCK SWITCH
Push the switch.
To lock: Push the switch on the front side.
To unlock: Push the switch on the rear
side
Both doors lock or unlock simultaneously.
CAUTION
!
Before driving, be sure that the side
doors are closed and locked, especially when small children are in the
vehicle. Along with the proper use of
seat belts, locking the side doors
helps prevent the driver and passengers from being thrown out from the
vehicle during an accident. It also
helps prevent the side doors from
being opened unintentionally.
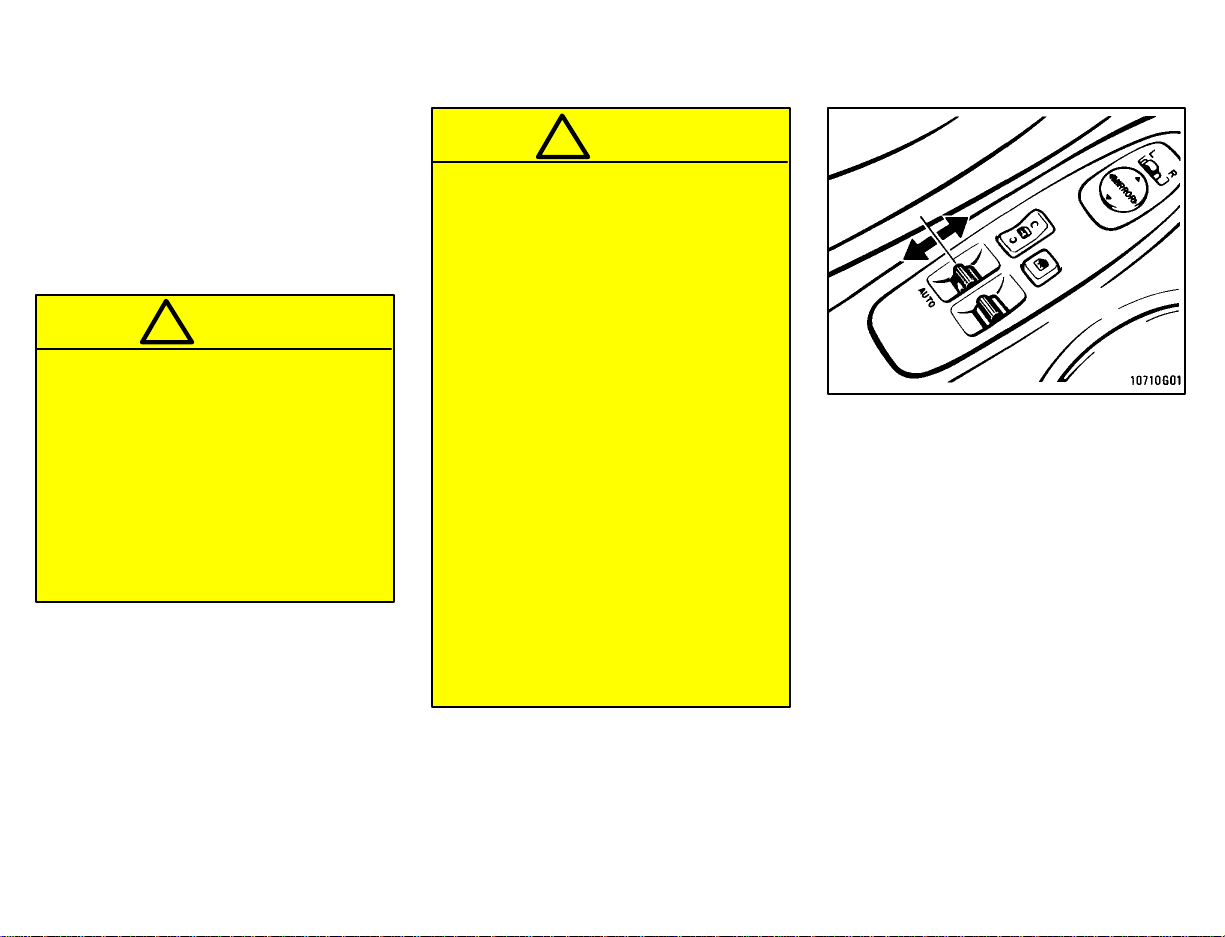
Power windows—
—Power window precautions —Side windows
CAUTION
!
To avoid serious personal injury, you
must do the following.
Al ways make sure the head, hands
and other p a r t s of the body o f all occupants are kept completely inside
the vehicle before you close the
power windows. If someone’s neck,
head or h a nds gets caught i n a closing window, it could result in a serious injury. When anyone closes the
power windows, be sure that they
operate the windows safely.
When small children are in the ve-
hicle, never let them use the power
window switches without supervision. Use the window lock button
to prevent them from making unexpected use of the switches.
Never leave small children alone in
the vehicle, especially with the ignition key still inserted. They could
use the power w indow swit ches a nd
get t r appe d i n a w indow. Unat tende d
children can become involved in serious accidents.
The windows can be operated with the
switch on each side door.
The power windows work when the ignition switch is in the “ON” position. However, if both side doors are closed, they work
for 60 seconds even after the ignition
switch is turned off. They stop working
when either side door is opened.
OPERATING THE DRIVER’S WINDOW
Use the switch on the driver’s door.
Normal operation: The window moves
as long as you hold the switch.
To open: Lightly pull down the switch.
To close: Push up the switch.
9
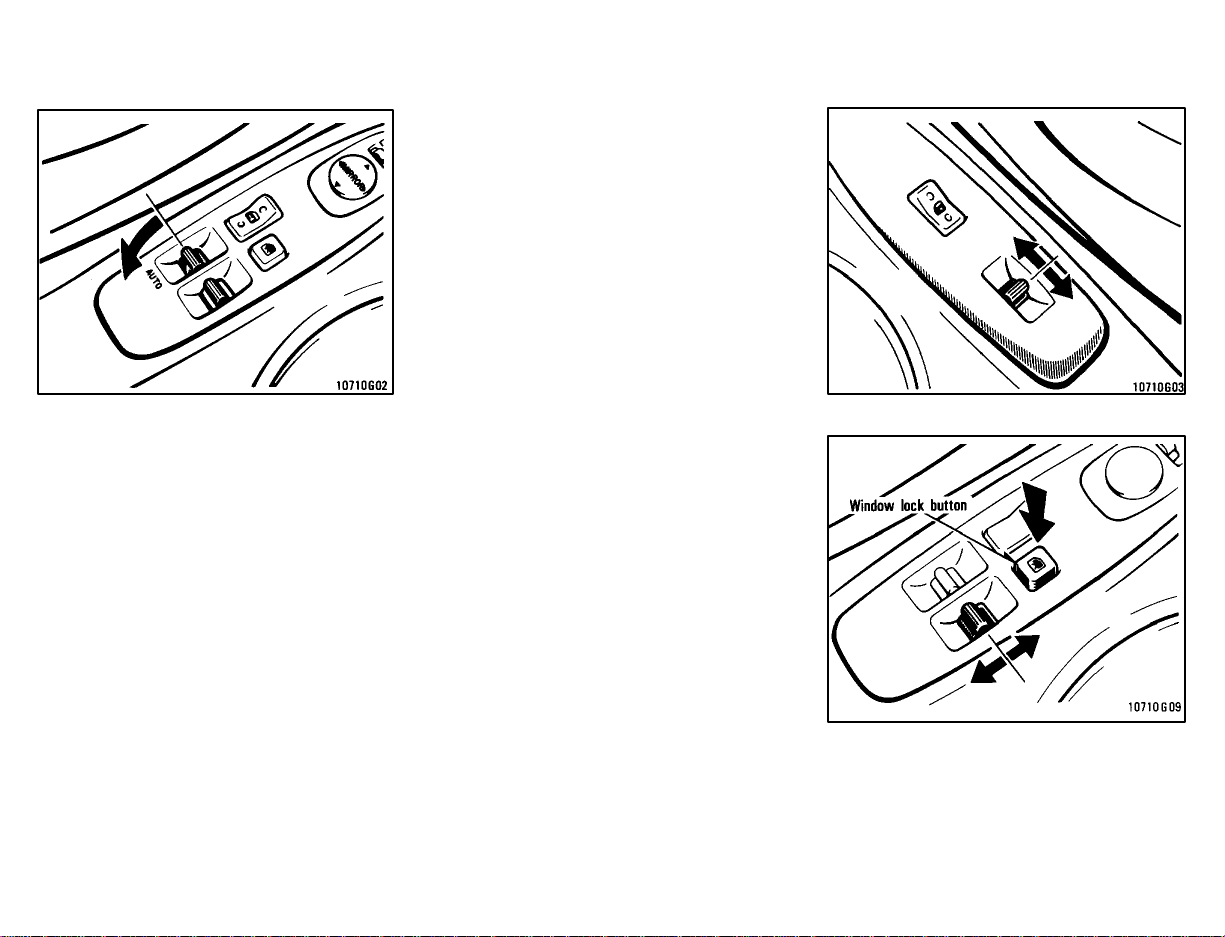
Automatic operation (to open only):
Pull the switch completely down and then
release it. The window will fully open. To
stop the window partway, lightly push the
switch up and then release it.
OPERATING THE PASSENGERS’ WINDOW
Use the switch on the passenger’s
door. The driver’s door also has a
switch that controls the passengers’
window.
The window moves as long as you hold
the switch.
To open: Pull down the switch.
To close: Push up the switch.
If you push in the window lock button on
the driver’s door, the passenger’s window
cannot be operated.
Convertible models—The window lock
button also locks the quarter windows.
For front passenger’s use
10
For driver’s use
—Quarter windows
(convertible)
Trunk li d ( c oupe and convertible)/
Back door (liftback)—
—Lock release lever
The windows can be operated with
switches on the center console.
The windows move as long as you hold
the switch.
To open: Push on the lower side of the
switch.
To close: Push on the upper side of the
switch.
To open the trunk lid or back door from
the outside, insert the master key and
turn it clockwise.
See “Luggage stowage precautions” in
Part 2 for precautions to observe in loading luggage.
To close the trunk lid or back door, lower
it and press down on it. After closing the
trunk lid or back door, try pulling it up to
make sure it is securely closed.
CAUTION
!
Keep the trunk lid or back door closed
while driving. This not only keeps the
luggage from being thrown out but
also prevents exhaust gases from entering th e vehicle.
To open the trunk lid or back door
from the driver’s seat, pull up on the
lock release lever.
11
—Luggage security system Hood
This system deactivates the lock release lever so that things locked in the
trunk or luggage compartment can be
protected.
1. (Except convertible) Push down the
security lock levers to lock the rear
seatbacks.
After locking the rear seatbacks, try folding them down to make sure they are securely locked—otherwise, someone
could get into the trunk or luggage
compartment by folding down a rear seat.
12
2. After closing the trunk lid or back
door, insert the master key and turn it
counterclockwise to deactivate the
lock release lever.
After closing the trunk lid or back door, try
pulling it up to make sure it is securely
locked.
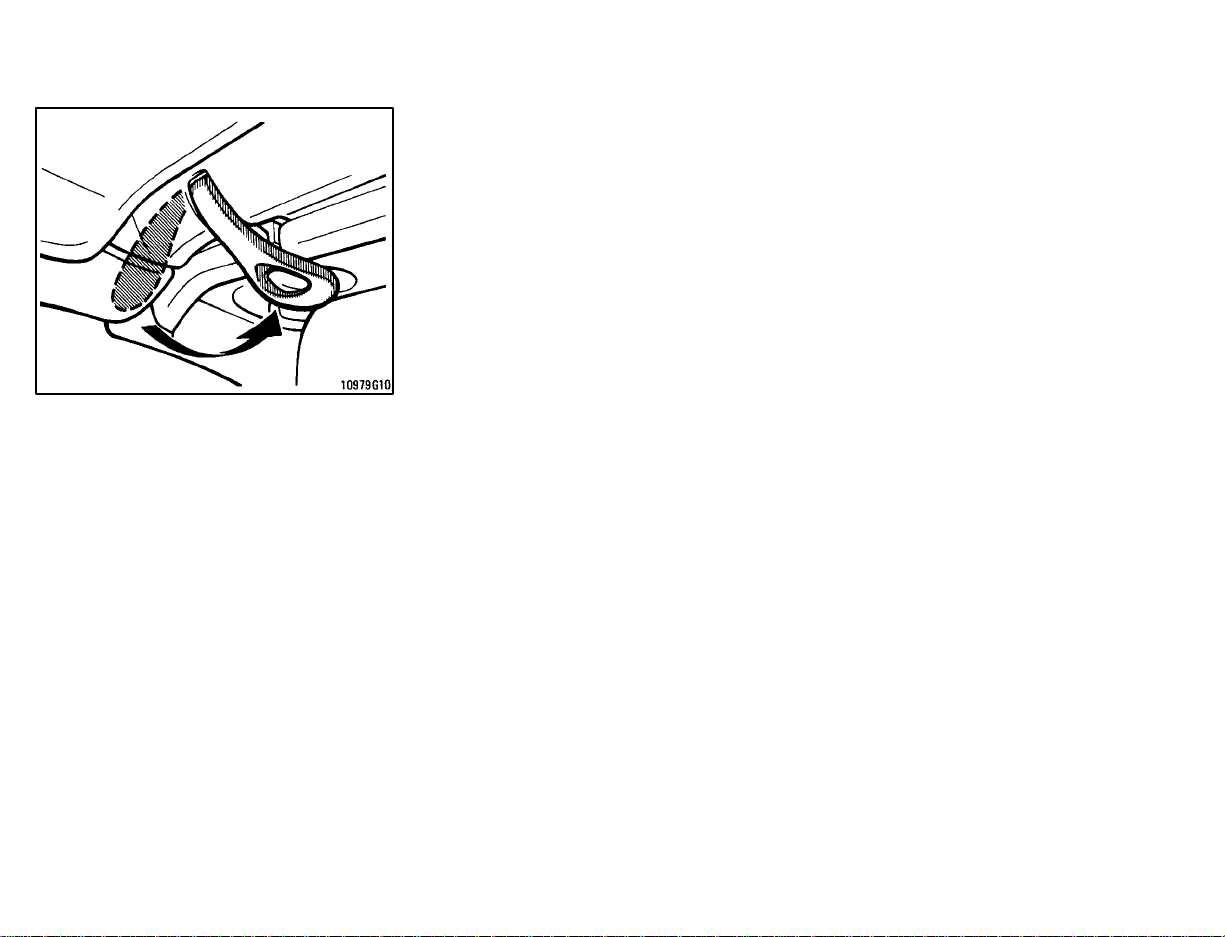
To open the hood, do the following.
1. Pull the hood lock release lever.
The hood will spring up slightly.
Fuel tank cap
2. In front of the vehicle, pull up on the
auxiliary catch lever and lift the hood.
3. Hold the hood open by inserting the
support rod into the slot.
Before closing the hood, check to see that
you have not forgotten any tools, rags,
etc. and return the support rod to its clipthis prevents rattles. Then lower the hood
and make sure it locks into place. If necessary, press down gently on the front edge
to lock it.
CAUTION
!
After inserting the support rod into
the slot, make sure the rod supports
the hood securely.
1. To open the fuel filler door, pull the
lever up.
CAUTION
!
Do not smoke, cause sparks or al-
low open flames when refuelling.
The fumes are flammable.
When opening the cap, do not re-
move the cap quickly. In hot
weather, fuel under pressure
could cause injury by spraying out
of the filler neck if the cap is suddenly removed.
13
2. To remove the fuel tank cap, turn
the cap slowly counterclockwise, then
pause slightly before removing it. After removing the cap, hang it on the
cap hang er.
It is not unusual to hear a slight swoosh
when the cap is opened. When installing,
turn the cap clockwise till you hear a click.
CAUTION
!
Make sure the cap is tightened se-
curely to prevent fuel spillage in
case of an accident.
Use only a genuine Toyota fuel
tank cap for replacement. It has a
built-in check valve to reduce fuel
tank vacuum.
Electric moon roof
Sliding operation
Tilting operation
To operate the moon roof, use the
switches beside the interior light.
The moon roof works when the ignition
switch is in the “ON” position. However,
if both side doors are closed, it works for
60 seconds even after the ignition switch
is turned off. It stops working when either
side door is opened.
Sun shade operation—
The sun shade can be opened or closed
by hand.
Sliding operation—
To open: Push the switch on the “SLIDE”
side.
The sun shade will be opened together
with the roof.
To close: Push the switch on the opposite
side of the “SLIDE” side.
As a precaution when closing, the roof
stops at the three-quarters closed position before fully closing. Therefore, release the switch and then push it again to
close it completely.
Tilting operation—
To tilt up: Push the switch on the “UP”
side.
To lower: Push the switch on the ”opposite
of the “UP” side.
You may st op the moon roof at any desired
position. The roof will move while the switch
is being pushed and stop when released.
14
CAUTION
!
To avoid serious personal injury, you
must do the following.
When the vehicle is moving, always
keep the head, hands and other
parts of the body of all occupants
away from the roof opening. Otherwise, you could be seriously injured if the vehicle stops suddenly
or if the vehicle is involved in an accident.
Always make sure nobody places
his/her head, hands and other parts
of the body in the roof opening before you close the roof . If someone’s neck, head or hands gets
caught in the closing roof, it could
result in a se r i ous injury. When anyone closes the roof, first make sure
it is safe to do so.
Never leave small children alone in
the vehicle, especially with the ignition key still inserted. They could
use the moon roof switches and get
trapped in the roof opening. Unattended children can become involved in serious accidents.
Never sit on top of the vehicle
around the roof opening.
Convertible top—
—Convertible top precautions
CAUTION
!
When raising or lowering the con-
vertible top, keep hands clear from
the hinges of the top side rails and
any part of the top linkage.
The vehicle should never be driv-
en with the convertible top partially lowered. Make sure the top has
been either fully latched to the
windshield frame or fully lowered
before driving.
NOTICE
Make sure there are no items or
packages between the rear seatback and the convertible top storage area when raising or lowering
the convertible top. Even small
items may interfere with convertible top operation and can cause
damage.
Do not sit or place excessive
weight on the convertible top;
when the top is up or down, damage to the top may result.
Do not raise or lower the convertible top when the temperature is
below 5C (41 F), or damage to the
top material or rear window may result. If necessary to do so, warm
the vehicle in a heated garage prior
to operating the convertible top
mechanism.
Do not lower the convertible top if
the top is damp or wet. Possible interior water damage, water stains
or mildew of the top material may
result.
When the convertible top is completely lowered, keep the rear window defogger turned off to avoid
damage to the convertible top.
15
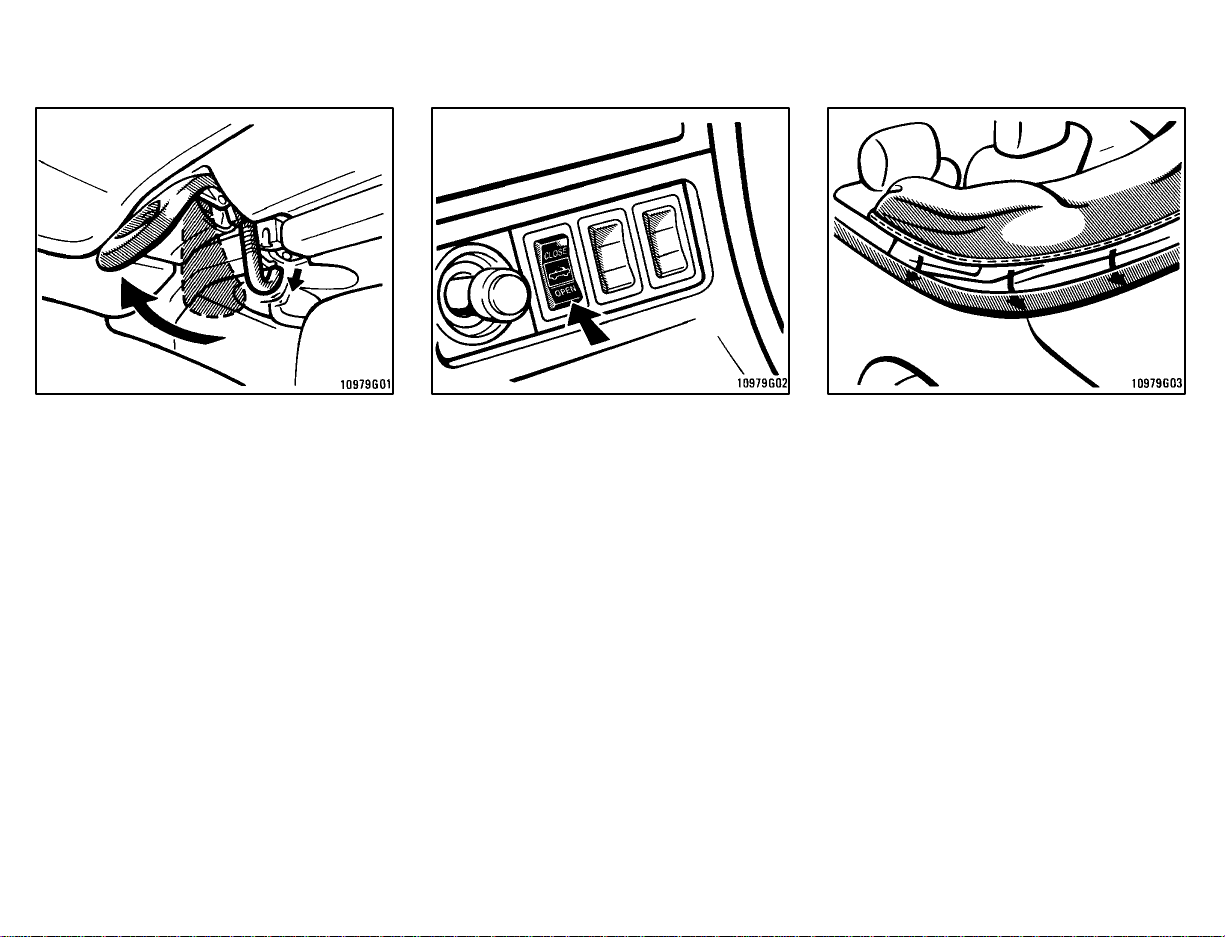
—Lowering the convertible top
LOWERING THE CONVERTIBLE TOP
The ignition switch must be in the “ON”
position to operate the convertible top.
1. Lower all the side windows, quarter
windows, and sun visors. Then pull
the latch handles fully backward.
Before operating, make sure the manual
control switch is not in the “MANUAL”
position. (See “If the convertible top does
not raise or lower” in Part 4.)
16
2. Push and hold the convertible top
control switch on the “OPEN” side until the convertible top is completely
lowered. Raise the sun visors.
INSTALLING THE TOP BOOT
The top boot is used to cover and conceal
the completely lowered convertible top. It
is in the trunk, and is stored in a plastic
bag.
3. Place the top boot over the lowered
convertible top. Then tuck its outer
edge under the body moldings.
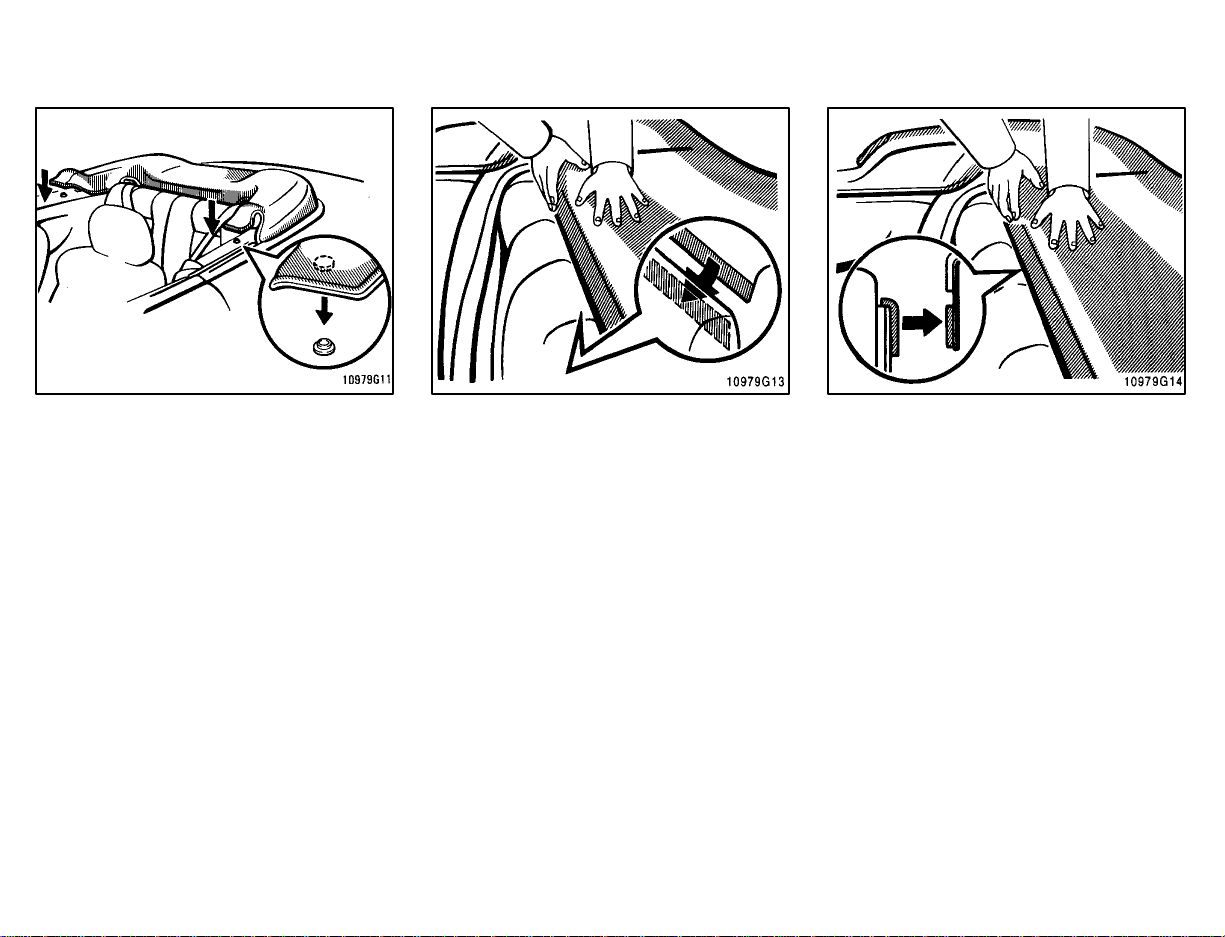
—Raising the convertible top
4. Secure the top boot snaps to the
ones on the quarter trim.
5. Attach the fastener tape on the top
boot to that on the rear seatback.
REMOVING THE TOP BOOT
1. Push the top boot backward to separate its fastener tape from the tape behind the rear seatback.
17
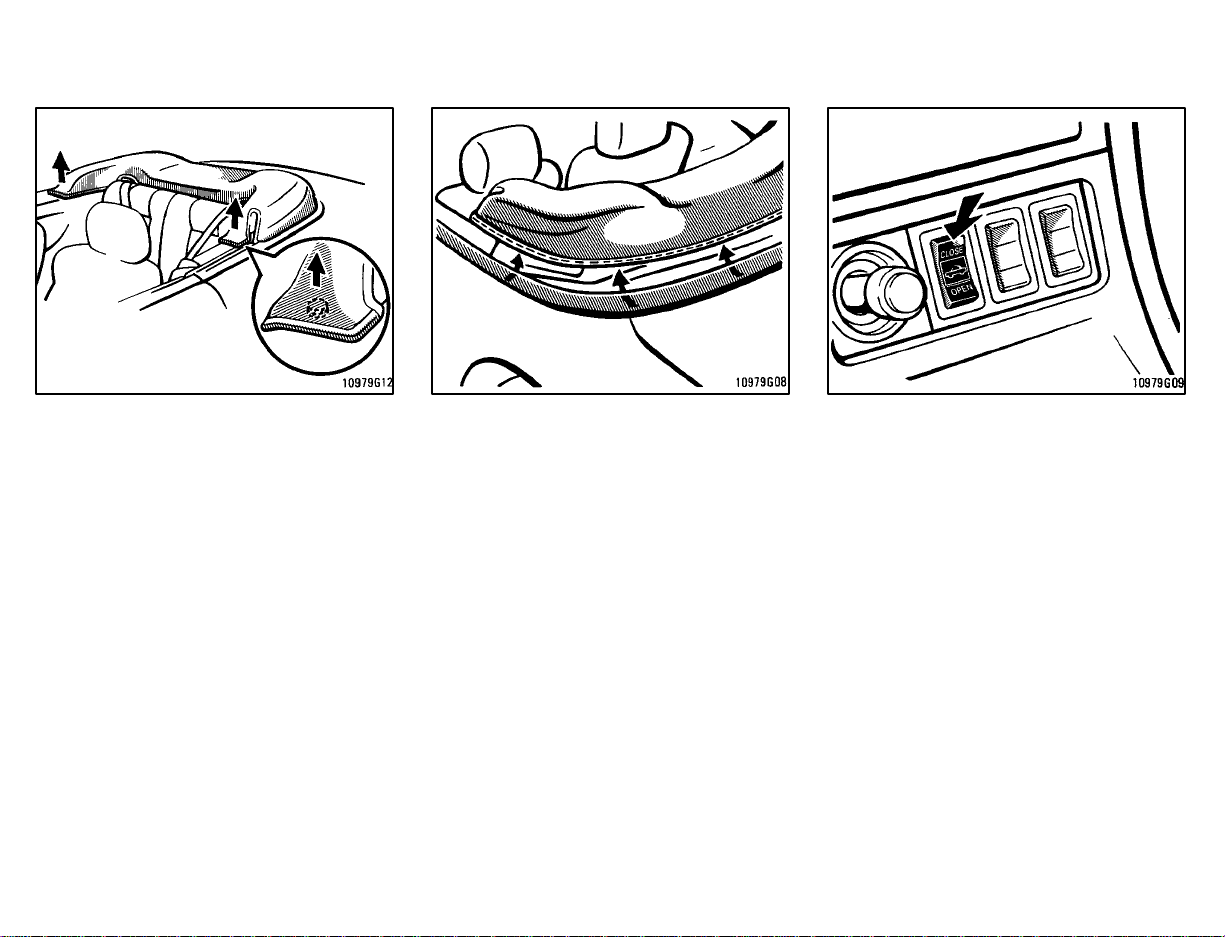
2. Release the top boot snaps from
the quarter trim.
18
3. Pull out the outer edge of the top
boot from under the body moldings.
Put the removed top boot in the plastic
bag and store it in the trunk.
RAISING THE CONVERTIBLE TOP
The ignition switch must be in the “ON”
position to operate the convertible top.
4. Lower the sun visors. Check that all
the side windows and quarter windows are lowered. Then push and hold
the convertible top control switch on
the “CLOSE” side until the top
touches the windshield frame.
5. Push the latch handles fully forward
till they are hooked.
Visually check that the latch handles are
fully seated in the strikers. Also, pull on
the convertible top side rails to make sure
the top is securely hooked.
6. Raise all the side windows, quarter
windows, and sun visors.
19

20
Part 1
OPERATION OF
INSTRUMENTS AND
CONTROLS—
Chapter 1-3
Seats, Seat belts, Steering
wheel and Mirrors
Seats
Front seats
Fold-down rear seat
Head restraints
Seat belts
SRS airbags
Child restraint
Tilt steering wheel
Outside rear view mirrors
Anti-glare inside rear view
mirror
Seats
While the vehicle is being driven, all vehicle occupants should have the seatback
upright, sit wel l back in the seat and properly wear the seat belt provided.
CAUTION
!
Do not drive with the vehicle occu-
pants not properly seated, such as
sitting on top of a folded-down
seatback, or in the luggage
compartment. Persons not properly seated and restrained by seat
belts can be severely injured in the
event of emergency braking or a
collision.
During driving, do not let passen-
gers stand up or move around between seats. Balance can be unsteady and severe injuries can occur in the event of emergency
braking or a collision.
Front seats—
—Seat adjustment precautions
Adjust the driver’s seat so that the foot
pedals, steering wheel and instrument
panel controls are within easy reach of the
driver.
CAUTION
!
Adjustments should not be made
while the vehicle is moving, as the
seat may unexpectedly move and
cause the driver to lose control of
the vehicle.
When adjusting the seat, be care-
ful not to hit the seat against a passenger or luggage.
After adjusting the seat position,
try sliding it forward and backward
to make sure it is locked in position.
After adjusting the seatback, exert
body pressure to make sure it is
locked in position.
Do not put objects under the seats
as they may interfere with the seatlock mechanism or unexpectedly
push up the seat position adjusting lever; the seat may suddenly
move, causing the driver to lose
control of the vehicle.
While adjusting the seat, do not
put your hands under the seat or
near the moving parts. You may
jam your hands or fingers.
21
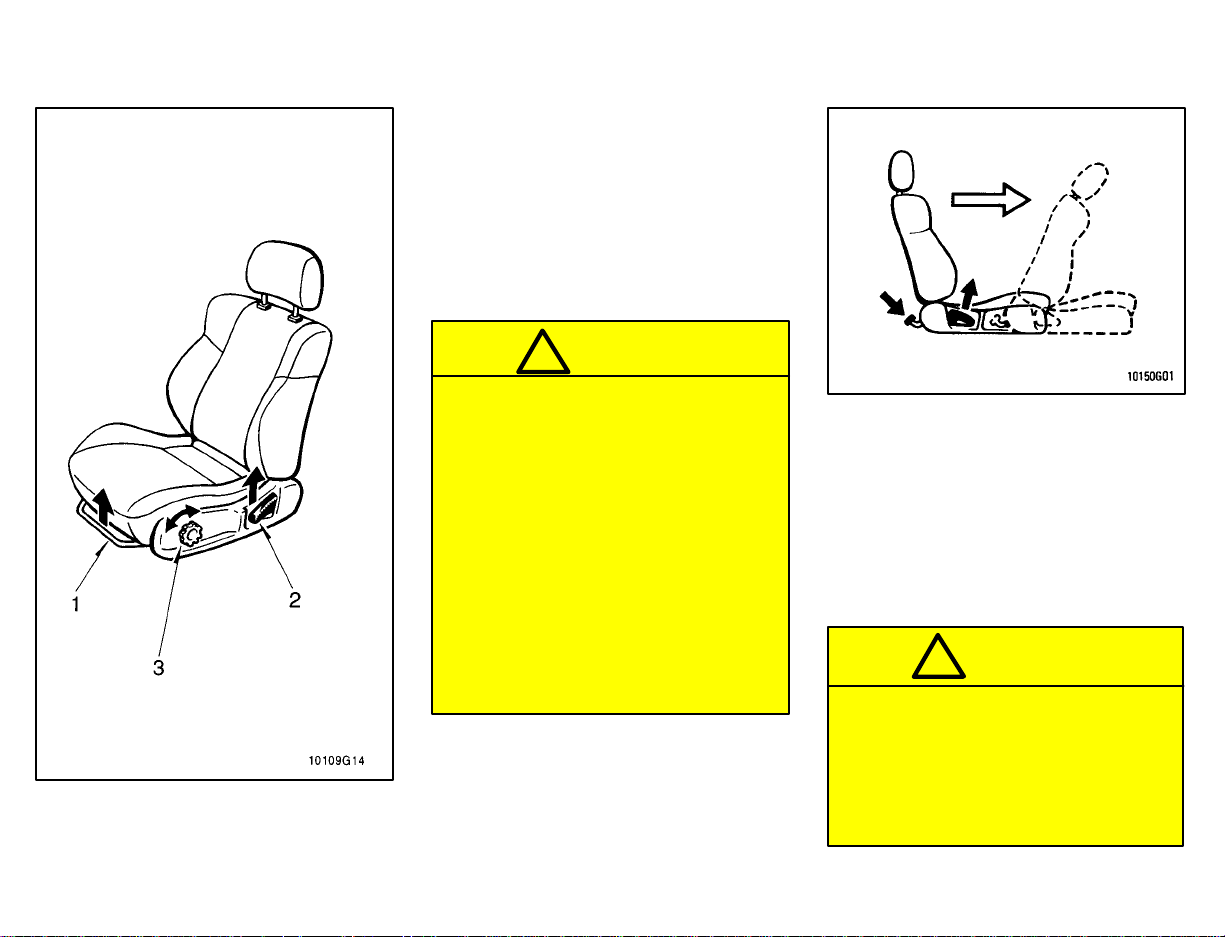
—Adjusting front seats
1. SEAT POSITION ADJUSTING LEVER
Pull the lever up. Then slide the seat to
the desired position with slight body
pressure and release the lever.
2. SEATBACK ANGLE ADJUSTING
LEVER
Lean forward and pull the lever up.
Then lean back to the desired angle
and release the lever.
CAUTION
!
To reduce the risk of sliding under
the lap belt during a collision, avoid
reclining the seatback any more than
needed. The seat belts provide maximum protection when the driver and
the passenger are sitting up straight
and well back in the seats. If you are
reclined, the lap belt may slide past
your hips and apply restraint forces
directly to the abdomen. Therefore,
in the event of a frontal collision, the
risk of personal injury may increase
with increasing recline of the seatback.
3. DRIVER’S SEAT CUSHION ANGLE
ADJUSTING KNOB
Turn the knob either way.
—Moving passenger’s seat
for rear seat entry
For easy access to the rear seat, do
this.
1. Lift the seatback angle adjusting lever
or press the pedal behind the seatback.
The seat will slide forward slightly.
2. Move the seat to the front-most position.
After passengers are in, lift up the seatback and return the seat until it locks.
CAUTION
!
After putting back the seat, try
pushing the seat forward and rearward to make sure it is secured in
place.
Never allow anyone to rest their
foot on the release pedal while the
vehicle is moving.
22
Fold-down rear seat Head restraints
CAUTION
!
When returning the seatback to the
upright position:
Make sure the seat belts are not
twisted or caught in the seatback
and are arranged in their proper
position for ready use.
Make sure the seatback is securely
locked by pushing forward and
rearward on the top of the seatback.
1. Pull up the seatback security lock
lever 1 to the unlock position.
2. Pull up the lock release button 2.
3. Fold down the seatback.
Each seatback may be folded separately .
This will enlarge the trunk room (coupe) or
luggage compartment (liftback) as far as
the front seatbacks. See “Luggage stowage precautions” in Part 2 for precautions
to observe in loading luggage.
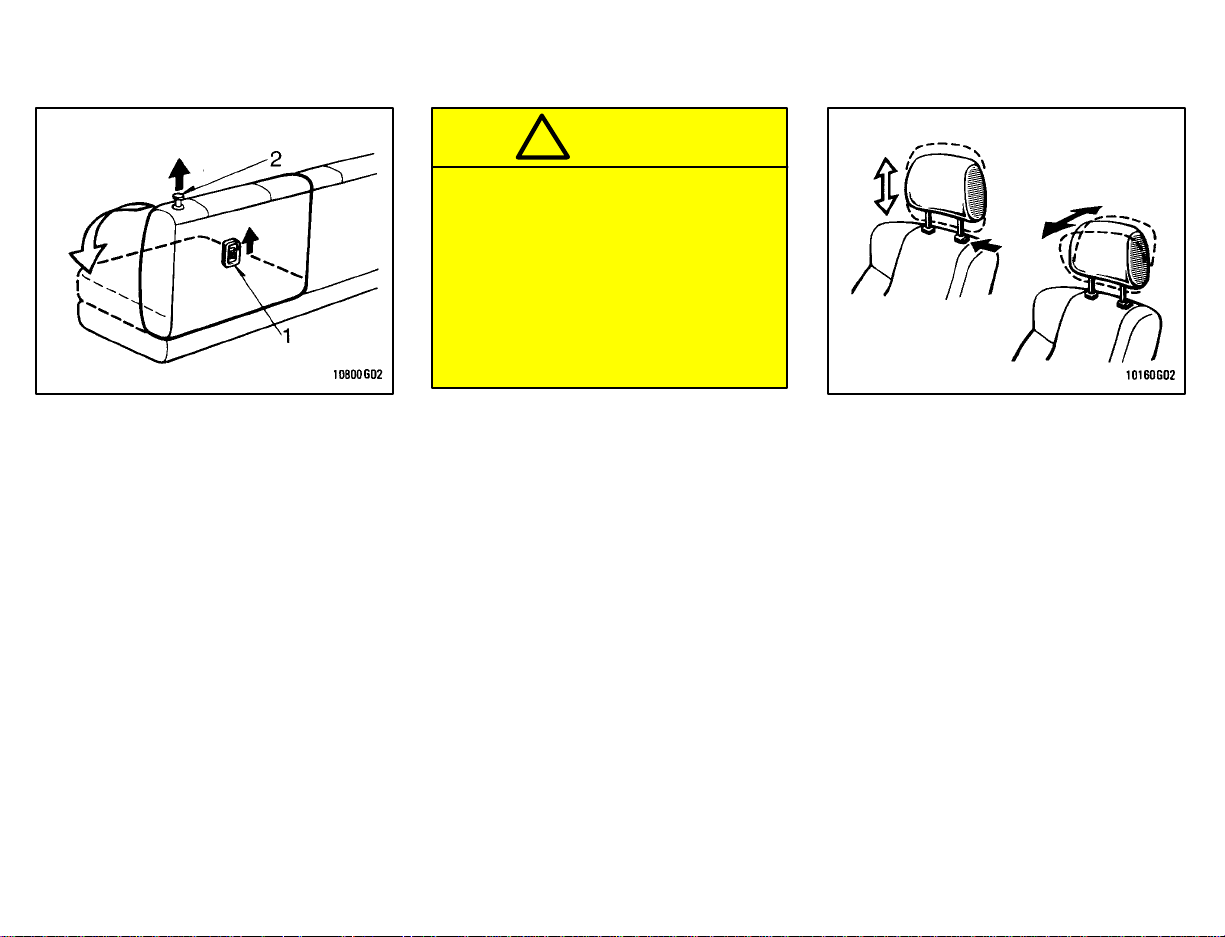
For your safety, adjust the head restraint before driving.
To raise: Pull it up.
To lower: Push it down while pressing the
lock release button.
On some models, you can also move the
head restraint forward or backward. If
such adjustment is desired, pull or push
the head restraint.
The head restraint is most effective when
it is close to your head. Therefore, using
a cushion on the seatback is not recommended.
23
CAUTION
!
Adjust the top o f t h e head restraint
so that it is closest to the top of
your ears.
After adjusting the head restraint,
make sure it is locked in position.
Do not drive with the r e s tr aint s re-
moved.
Seat belts—
—Seat belt precautions
Toyota recommends that the driver and
passengers in the vehicle be properly restrained at all times with the seat belts
provided. Failure to do so could increase
the chance of injury and/or the severity of
injury in accidents.
Baby or small child. Use a child restraint
system which fits your vehicle. See “Child
restraint” for details.
Child. If a child is too large for a child restraint system, the child should sit in the
rear seat and must be restrained using the
vehicle’s seat belt. According to accident
statistics, the child is safer when properly
restrained in the rear seat than in the front
seat. Do not allow the child to stand up or
kneel on either rear or front seats. If the
shoulder belt falls across the child’s neck
or face, have the child sit slightly closer to
the center of the vehicle so that the belt
lays across the shoulder.
Pregnant woman. Toyota recommends
the use of a seat belt. Ask your doctor for
specific recommendations. The lap belt
should be worn securely and as low as
possible over the hips and not on the
waist.
Injured person. Toyota recommends the
use of a seat belt. Depending on the injury ,
however, first check with your doctor.
CAUTION
!
Persons should ride in their seats
properly wearing their seat belts
whenever the vehicle is moving.
Otherwi se, they are much mo re likely
to suffer serious bodily injury in the
event of sudden br ak ing o r a c ollis ion.
When using the seat belts, observe
the following:
Use the belt for only one person at
a time. Do not use a single belt for
two or more people—even children.
Avoid reclining the seatbacks too
much. The seat belts provide maximum protection when the seatbacks are in the upright position.
(See the seat adjustment instructions.)
Be careful not to damage the belt
webbing or hardware. Take care
that they do not get caught or
pinched in the seat or doors.
Inspect the belt system periodical-
ly. Check for cuts, fraying, and
loose parts. Damaged parts should
be replaced. Do not disassemble or
modify the system.
24

CAUTION
!
Adjust the top of the head restraint
so that it is closest to the top of
your ears.
After adjusting the head restraint,
make sure it is locked in position.
Do not drive with the restraints re-
moved.
Seat belts—
—Seat belt precautions
Toyota recommends that the driver and
passengers in the vehicle be properly restrained at all times with the seat belts
provided. Failure to do so could increase
the chance of injury and/or the severity of
injury in accidents.
Baby or small child. Use a child restraint
system which fits your vehicle. See “Child
restraint” for details.
Child. If a child is too large for a child restraint system, the child should sit in the
rear seat and must be restrained using the
vehicle’s seat belt. According to accident
statistics, the child is safer when properly
restrained in the rear seat than in the front
seat. Do not allow the child to stand up or
kneel on either rear or front seats. If the
shoulder belt falls across the child’s neck
or face, have the child sit slightly closer to
the center of the vehicle so that the belt
lays across the shoulder.
Pregnant woman. Toyota recommends
the use of a seat belt. Ask your doctor for
specific recommendations. The lap belt
should be worn securely and as low as
possible over the hips and not on the
waist.
Injured person. Toyota recommends the
use of a seat belt. Depending on the injury ,
first check with your doctor for specific
recommendations.
CAUTION
!
Persons should ride in their seats
properly wearing their seat belts
whenever the vehicle is moving.
Otherwi se, they are much mo re likely
to suffer serious bodily injury in the
event of sudden br ak ing o r a c ollis ion.
When using the seat belts, observe
the following:
Use the belt for only one person at
a time. Do not use a single belt for
two or more people—even children.
Avoid reclining the seatbacks too
much. The seat belts provide maximum protection when the seatbacks are in the upright position.
(See the seat adjustment instructions.)
Be careful not to damage the belt
webbing or hardware. Take care
that they do not get caught or
pinched in the seat or doors.
Inspect the belt system periodical-
ly. Check for cuts, fraying, and
loose parts. Damaged parts should
be replaced. Do not disassemble or
modify the system.
24
 Loading...