


i
Foreword
Welcome to the growing group of value−conscious people who drive Toyotas. We
are proud of the advanced engi neering and qualit y construction of each vehicle we
build.
This Owner’s Manual explains the operation of your new Toyota. Please read
it thoroughl y and have all the occupants follow the instruct ions carefully.
Doing so will h elp you that you can enjoy many years of saf e and trouble−free
motoring. For important informat ion about this manual and your Toyota, read
the following pages carefully.
When it comes to servic e, remember that y our Toyota dealer knows y our vehicle
very well and is interested in your complete satisfaction. Your Toyota dealer will
provide quality maintenance and any o ther ass istanc e you may require.
Please leave this Owner’s Manual in this vehi cle at the time of resale. The next
owner will need this information also.
All information and specif icati ons in this manual are current at the time of pr inting.
However, because of Toyota’s policy of continual product improvement, we reserve
the right to make changes at any time without notice.
Please note that this manual appl ies to all models and explains all equipment,
including options. Therefore, you may find some explanations for equipment
not installed on your vehicle.
© 2008 TOYOTA MOTOR CORPORATION
All rights res erved. This mater ial may not be reproduced or copied, in whole or in
part, without the wr itten permission of Toyota Motor Corpor ation.
ii
Important information about this manual
Safety and vehicle damage warnings
Throughout this manual , you will see safety and vehicle damage warnings. You must follow these warnings careful ly to
avoid possi ble injury or damage.
The types of warnings, what they look like, and how they are
used in this manual are explained as follows :
CAUTION
This is a warning against anything which may cause
injury to people if the warning is ignored. You are
informed about what you must or must not do in
order to reduce the risk of injury to yourself and
others.
NOTICE
This is a warning against anything which may cause
damage to the vehicle or its equipment if the warning
is ignored. You are informed about what you must or
must not do in order to avoid or reduce the risk of
damage to your vehicle and its equipment .
Safety symbol
When you see the safety symbol
shown above, it means: “Do not...”;
“Do not do this”; or “Do not let this
happen”.

iii
Important information about your Toyota
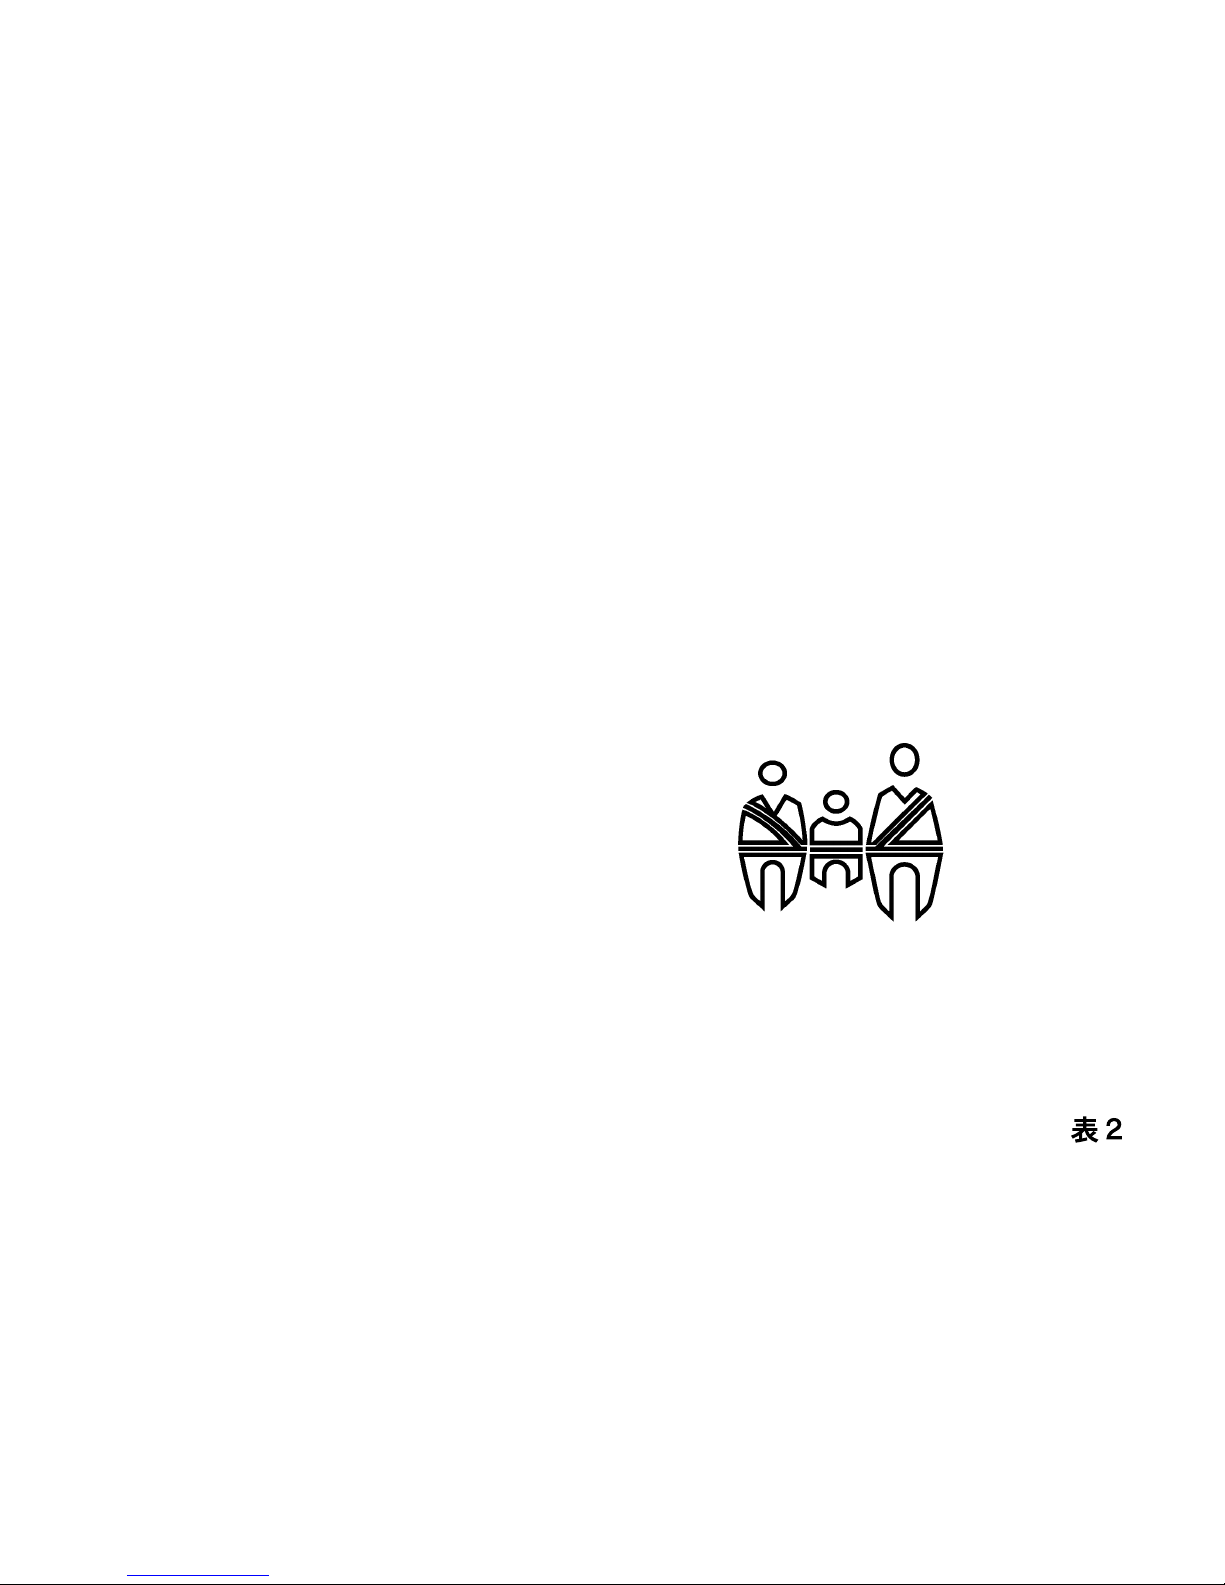
Occupant restraint systems
Toyota encour ages you and your family to take the time
to read Section 1−3 of this Owner’s Manual carefully. In
terms of helping you understand how you can receive
the maximum benefit of the occupant res traint systems
this vehicle provides, S ection 1−3 of this Owner’s Manual is the most important section for you and your family
to read.
Section 1−3 descri bes the function and operation concerning seats, seat belts, SRS airbags and child restraint systems of this vehicle and some potential hazards you should be aware of. These systems work together along with the overall structure of this vehicle in
order to provide occupant res traint in the event of a
crash. The effect of each sy stem is enhanced when it is
used properly and together with other syst ems. No
single occupant res traint sy stem can, by itself, prov ide
you or your family with the equal level of restraint
which these syst ems can provide when used together.
That is why it is important for you and your family to
understand the purpose and proper use of each of these
systems and how they relate to each other.
The purpose of all occupant restraint systems is to help
reduce the possibility of death or serious injury in the
event of a collis ion. None of these sy stems, either individually or toget her, can ensure that there is no injury
in the event of collision. However, the more you know
about these sys tems and how to use them properly, the
greater your chances become of surviving an accident
without death or s erious inj ury.
Seat belts provide the primary r estraint to all occupants
of the vehicl e, and every occ upant of the vehic le should
wear seat belts properly at all times. Children should
always be secured in child restraint systems that are
appropriate for their age and size. SRS (Supplemental
Restraint System) airbags are, as their names imply,
designed to work with, and be supplemental to, seat
belts and ar e not substitut es for them. SRS airbags can
be very effective in reducing the ri sk of head and chest
injuries by preventing contact of the head and chest
with interi or portions of the vehicle.

iv
In order to be effecti ve, the SRS airbags mus t deploy
with tremendous speed. The rapid deployment of the
SRS airbags makes the SRS airbags themselv es potential sourc es of death or serious inj ury if an occ upant is
too close to an airbag, or if an object or some part of
his or her body has been placed between the occupant
and the airbag at the time of deployment. This is just
one example of how the instructions in Section 1−3 of
this Owner ’s Manual will h elp ensure proper use of the
occupant res traint systems, and increas e the safet y they
can provide to you and your family in the event of an
accident.
Toyota recommends you to read the provisions in Section 1−3 carefully and refer to them as needed during
your time of ownership of this vehicle.
New vehicle warranty
Your new vehicle is covered by the following Toyota
limited warranties:
D New vehicle warr anty
D Others
For further information, please refer to the “Owner’s
Warranty Infor mation”.
Your responsibility for maintenance
It is the owner’s responsibility to make sure the specified maintenance is performed. Sect ion 6 gives details
of these maintenance requirements . Also included in
Section 6 is general mai ntenance.

v
Accessories, spare parts and
modification of your Toyota
A wide variety of non−genuine spare par ts and access ories
for Toyota vehicles are currently available in the market.
Using these spare parts and accessories which are not
genuine Toyota products may adver sely affec t the safety of
your vehicle, even though thes e parts may be approved by
certain authorities in your count ry. Toyota therefore cannot
accept any liabi lity or guarant ee spare parts and accessories which are not genuine Toyota products, nor for replacement or installat ion involving such parts.
This vehicle should not be modified with non−genuine
Toyota product s. Modification wit h non−genuine Toyota
products coul d affect its perfor mance, safety or durabil ity, and may even violate gover nmental regulations. In
addition, damage or perfor mance problems resul ting fr om
the modification may not be cover ed under warranty.
Installation of a mobile
two−way radio system
As the installation of a mobile two−way radio syst em in
your vehic le could affec t electr onic systems such as the
multi−port fuel injection sys tem/sequential multi−port fuel
injection system, anti−lock brake system or SRS airbag
system, be sure to check with your Toyota dealer for
precautionar y measures or special instructions regarding
install ation.

vi
Scrapping of your Toyota
The SRS airbag devices in your Toyota contain explosive chemic als. If the vehicle is scrapped with the airbags left a s they are, this may cause an accident such
as fire. Be sure to have the system of the SRS airbag
removed and disposed of by a qualified service shop or
by your Toyota dealer before you scr ap your vehic le.
On−pavement and off−road
driving tips
This vehicle will handle and maneuver differently from
an ordinary pas senger car because it is designed for
off−road use also. It has a significantly higher rollover
rate than other types of vehicles. In addition, this vehicle has a higher gr ound clearance and center of gravity than that of an ordinary passenger car. This vehicle
design feature causes this type of vehicle to be more
likely to rollover. Failure to operate this vehicle correctly
may result in loss of control, accidents or vehicle rollover causing death or serious injury. Be sure to read
“Off−road vehicle prec autions” on page 116 and “Off−
road driving precautions” on page 133.
vii
Model code
T G N 3 6 L − P
Check the model code to see what type of model your vehicle is.
The model code appears on the manufact urer’s pl ate with the heading “MODEL” .
See “Your Toyota’s identifi cation” on page 126 for the manufacturer ’s plate location.
Cab type
T: Single−cab
P: Double−cab

viii
WE REALLY CARE ABOUT YOU PLEASE BUCKLE UP
Toyota has made a special effort to encourage use of seat belts.
Toyota belts are:
D Comfortable
D Easy to use
D Convenient
We encourage you to use your belts every time you drive.

Publication No. OM99345a
Quick index
D If a service reminder indicator or warning buzzer comes on 69. . . . . . . .
D If your vehicle will not start 138. . . . . . . . . . . . . . . . . . . . . . . . . . . . . . . . . . . . . .
D If your engine stalls while driving 141. . . . . . . . . . . . . . . . . . . . . . . . . . . . . . . . .
D If your vehicle overheats NO TAG. . . . . . . . . . . . . . . . . . . . . . . . . . . . . . . . . . . . .
D If you have a flat tire NO TAG. . . . . . . . . . . . . . . . . . . . . . . . . . . . . . . . . . . . . . . .
D If your vehicle needs to be towed NO TAG. . . . . . . . . . . . . . . . . . . . . . . . . . . .
D Tips for driving during break−in period 117. . . . . . . . . . . . . . . . . . . . . . . . . . . .
D How to start the engine NO TAG. . . . . . . . . . . . . . . . . . . . . . . . . . . . . . . . . . . . . .
D General maintenance 167. . . . . . . . . . . . . . . . . . . . . . . . . . . . . . . . . . . . . . . . . . . . .
D Maintenance schedule NO TAG. . . . . . . . . . . . . . . . . . . . . . . . . . . . . . . . . . . . . . . .
D Complete index NO TAG. . . . . . . . . . . . . . . . . . . . . . . . . . . . . . . . . . . . . . . . . . . . . .
Gas station information
Fuel type:
Unleaded gasoline, Oct ane Rating 87 (Research Octane Number 91) or
higher.
See page 117 for detailed information.
Fuel tank capacity:
80 L (21.1 gal., 17.6 Imp. gal.)
Engine oil: See pages 187.
Tire information: See pages NO TAG t hrough 1 98.
Tire inflation pressure: See pages 192 and 217.
( )

1
OPERATION OF INSTRUMENTS AND
CONTROLS
Overview of instruments and controls
Instrument panel overview 2. . . . . . . . . . . . . . . . . . . . . . . . . . . . . . . . . . . . .
Instrument cluster overview 4. . . . . . . . . . . . . . . . . . . . . . . . . . . . . . . . . . . .
Indicator symbols on the instrument panel 5. . . . . . . . . . . . . . . . . . . . . . .
SECTION 1− 1
2
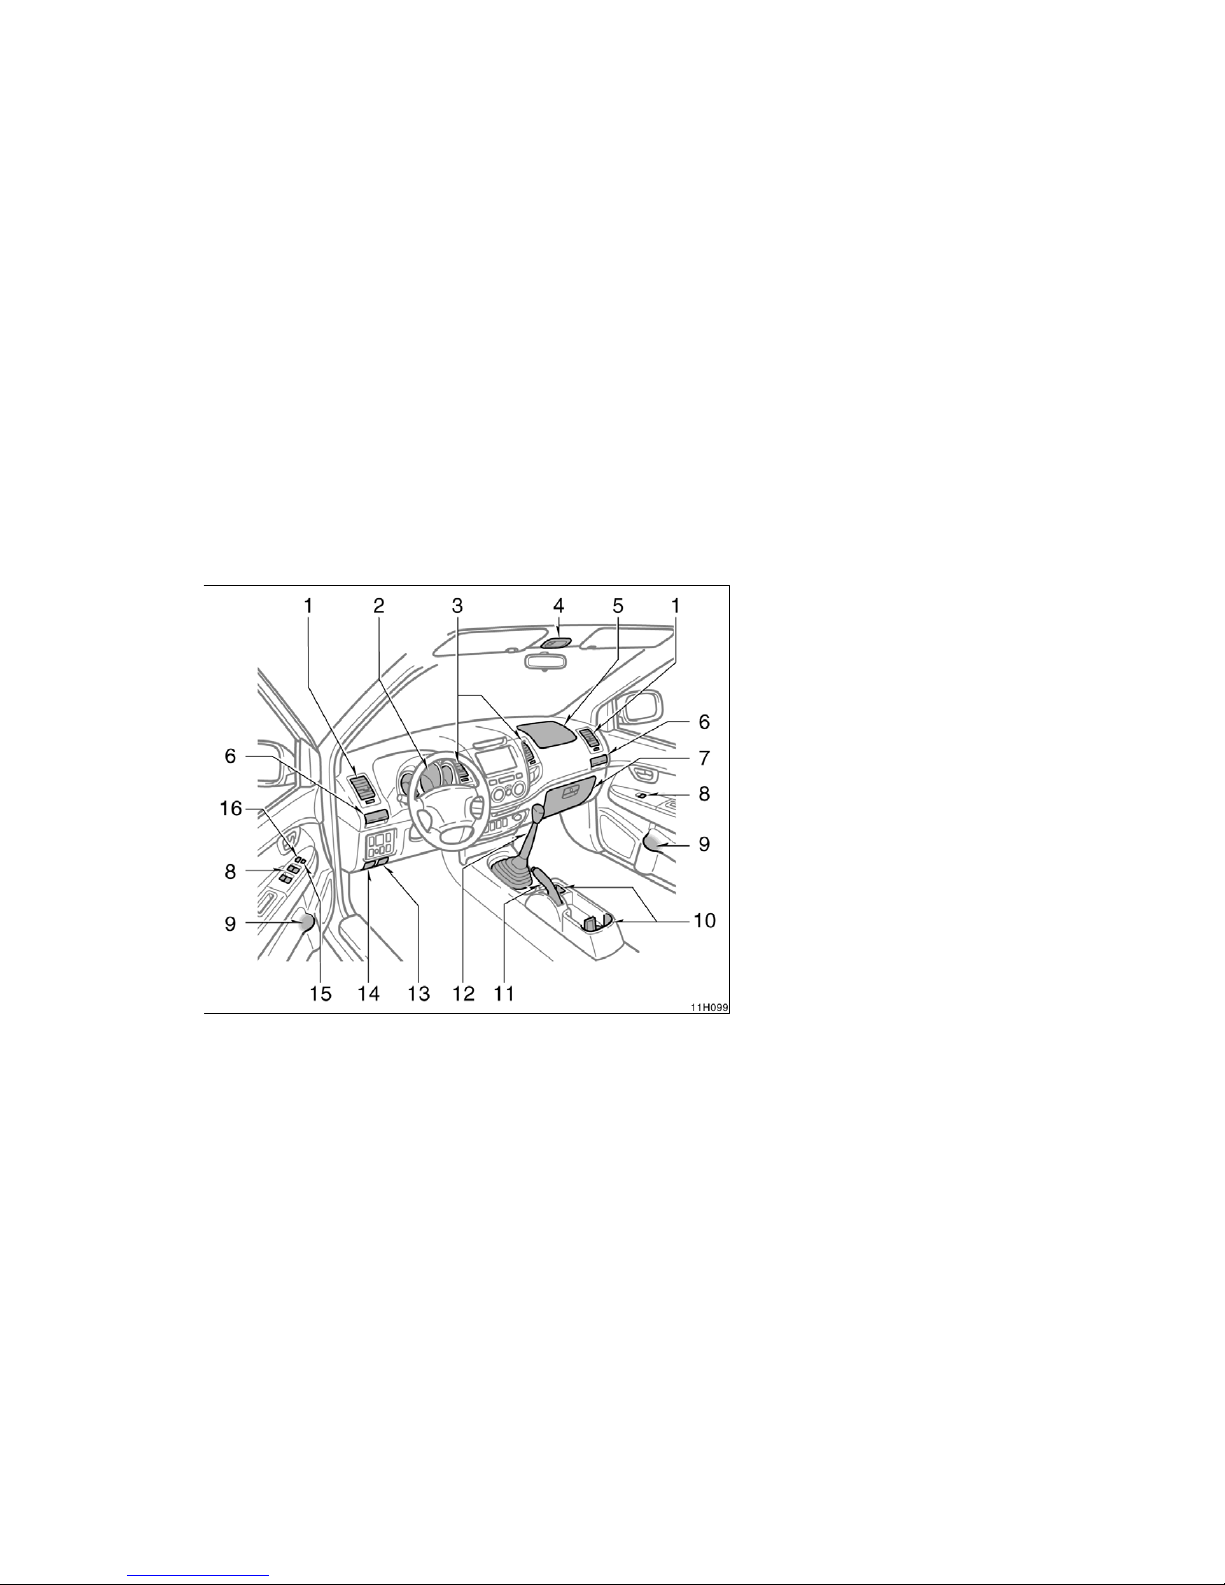
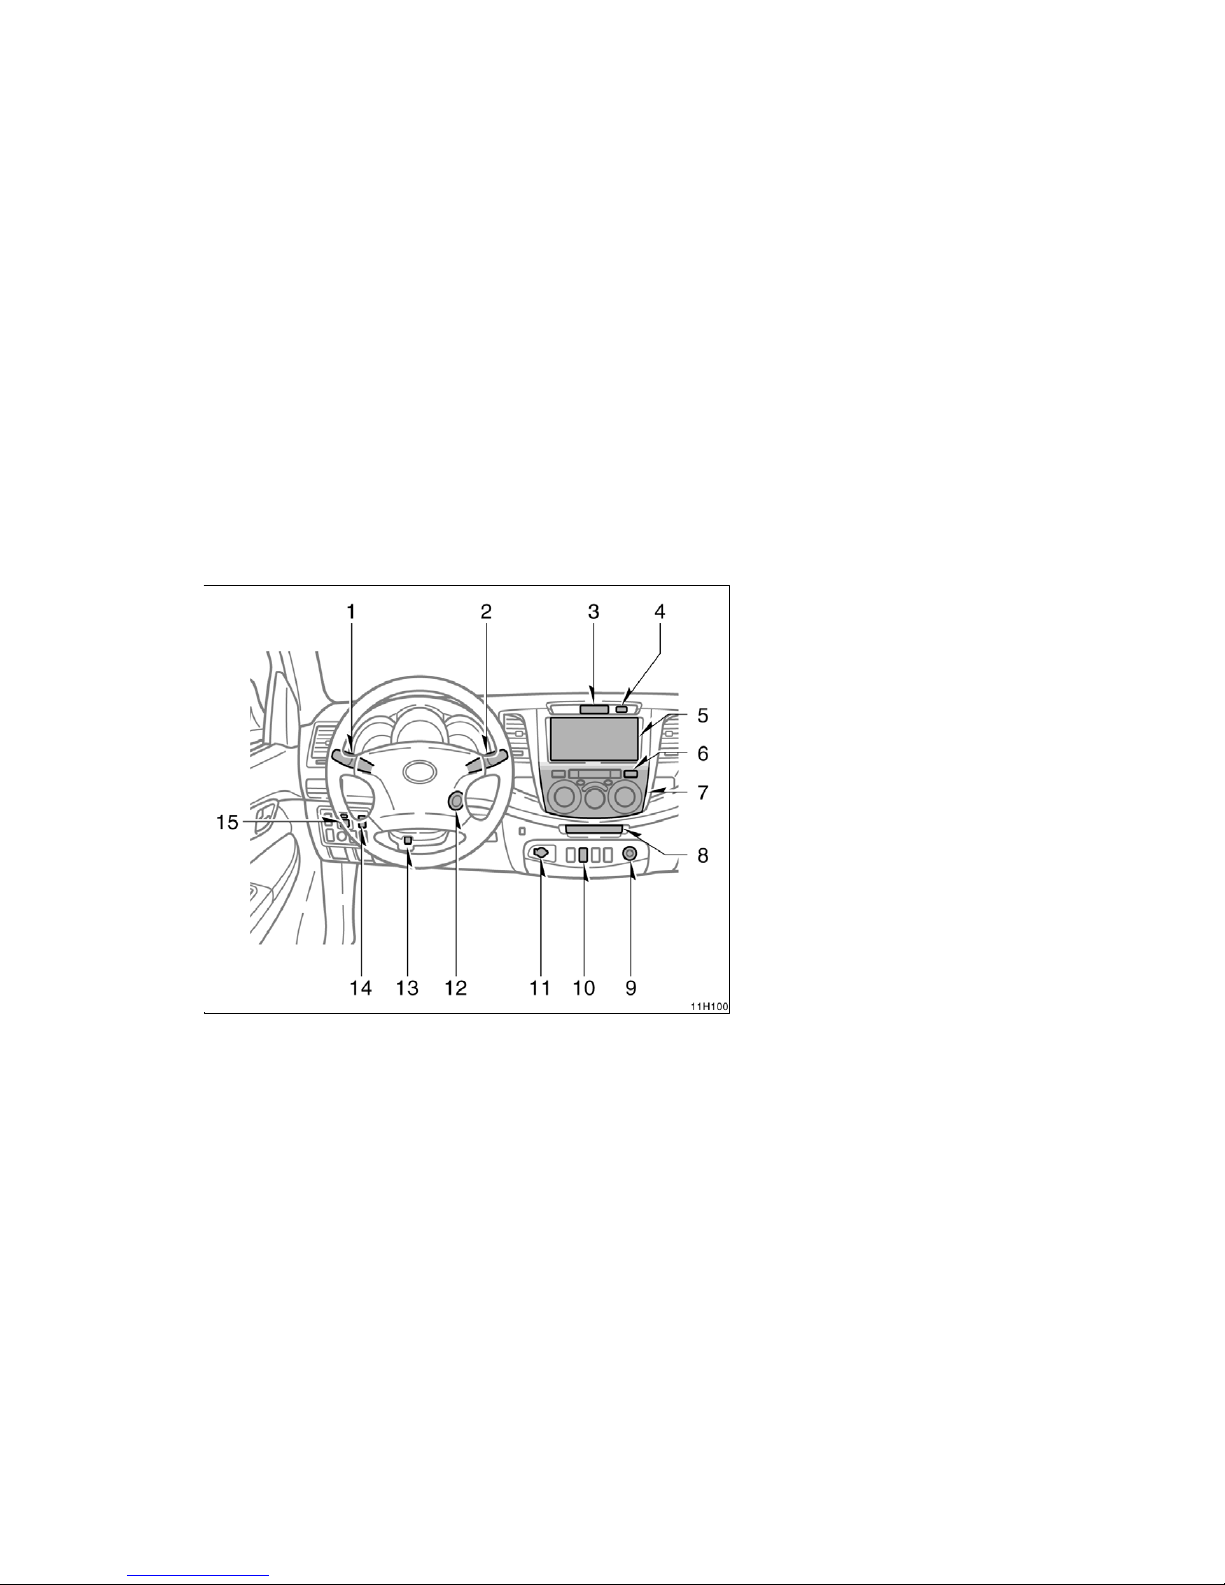
1. Side vent 104. . . . . . . . . . . . . . . . . . . . . . .
2. Instrument cluster 4. . . . . . . . . . . . . . . . .
3. Center vent s 104. . . . . . . . . . . . . . . . . . . .
4. Interior light 62. . . . . . . . . . . . . . . . . . . . . .
5. Upper glov e box* 110. . . . . . . . . . . . . . . .
6. Cup holder 111. . . . . . . . . . . . . . . . . . . . . .
7. Lower glov e box 110. . . . . . . . . . . . . . . . .
8. Power window s witches * 13. . . . . . . . . .
9. Bottle holder 112. . . . . . . . . . . . . . . . . . . .
10. Cup holders * 111. . . . . . . . . . . . . . . . . . . .
11. Parking brake lever 78. . . . . . . . . . . . . . .
12. Manual transmission gear shift
lever 77. . . . . . . . . . . . . . . . . . . . . . . . . . . .
13. Hood lock rel ease lever 17. . . . . . . . . .
14. Fuel fi ller door opener 19. . . . . . . . . . . .
15. Window lock switch* 14. . . . . . . . . . . . . .
16. Power door l ock switch* 12. . . . . . . . . .
*: If equipped
Instrument panel overview
"View A
11h099
3
1. Headlight, turn signal
and front fog light switches 60. . . . . . . .
2. Wiper and washer swit ches 62. . . . . . .
3. Clock 108. . . . . . . . . . . . . . . . . . . . . . . . . . .
4. Front pas senger’s seat belt
reminder light* 69. . . . . . . . . . . . . . . . . . .
5. Audio sys tem* 80. . . . . . . . . . . . . . . . . . . .
6. Emergenc y flasher swi tch 61. . . . . . . . .
7. Air condi tioning contr ols 98. . . . . . . . . . .
8. Ashtray 108. . . . . . . . . . . . . . . . . . . . . . . . .
9. Cigarette lighter 108. . . . . . . . . . . . . . . . .
10. Rear window defogger switch* 63. . . . .
11. Power outlet* 110. . . . . . . . . . . . . . . . . . . .
12. Engine (igni tion) switch 76. . . . . . . . . . .
13. Tilt steering lock release lever 56. . . . .
14. Engine immobilizer system
indicator light* 10. . . . . . . . . . . . . . . . . . . .
15. Power rear vi ew mirror
control switches* 57. . . . . . . . . . . . . . . . .
*: If equipped
"View B
11h100
4
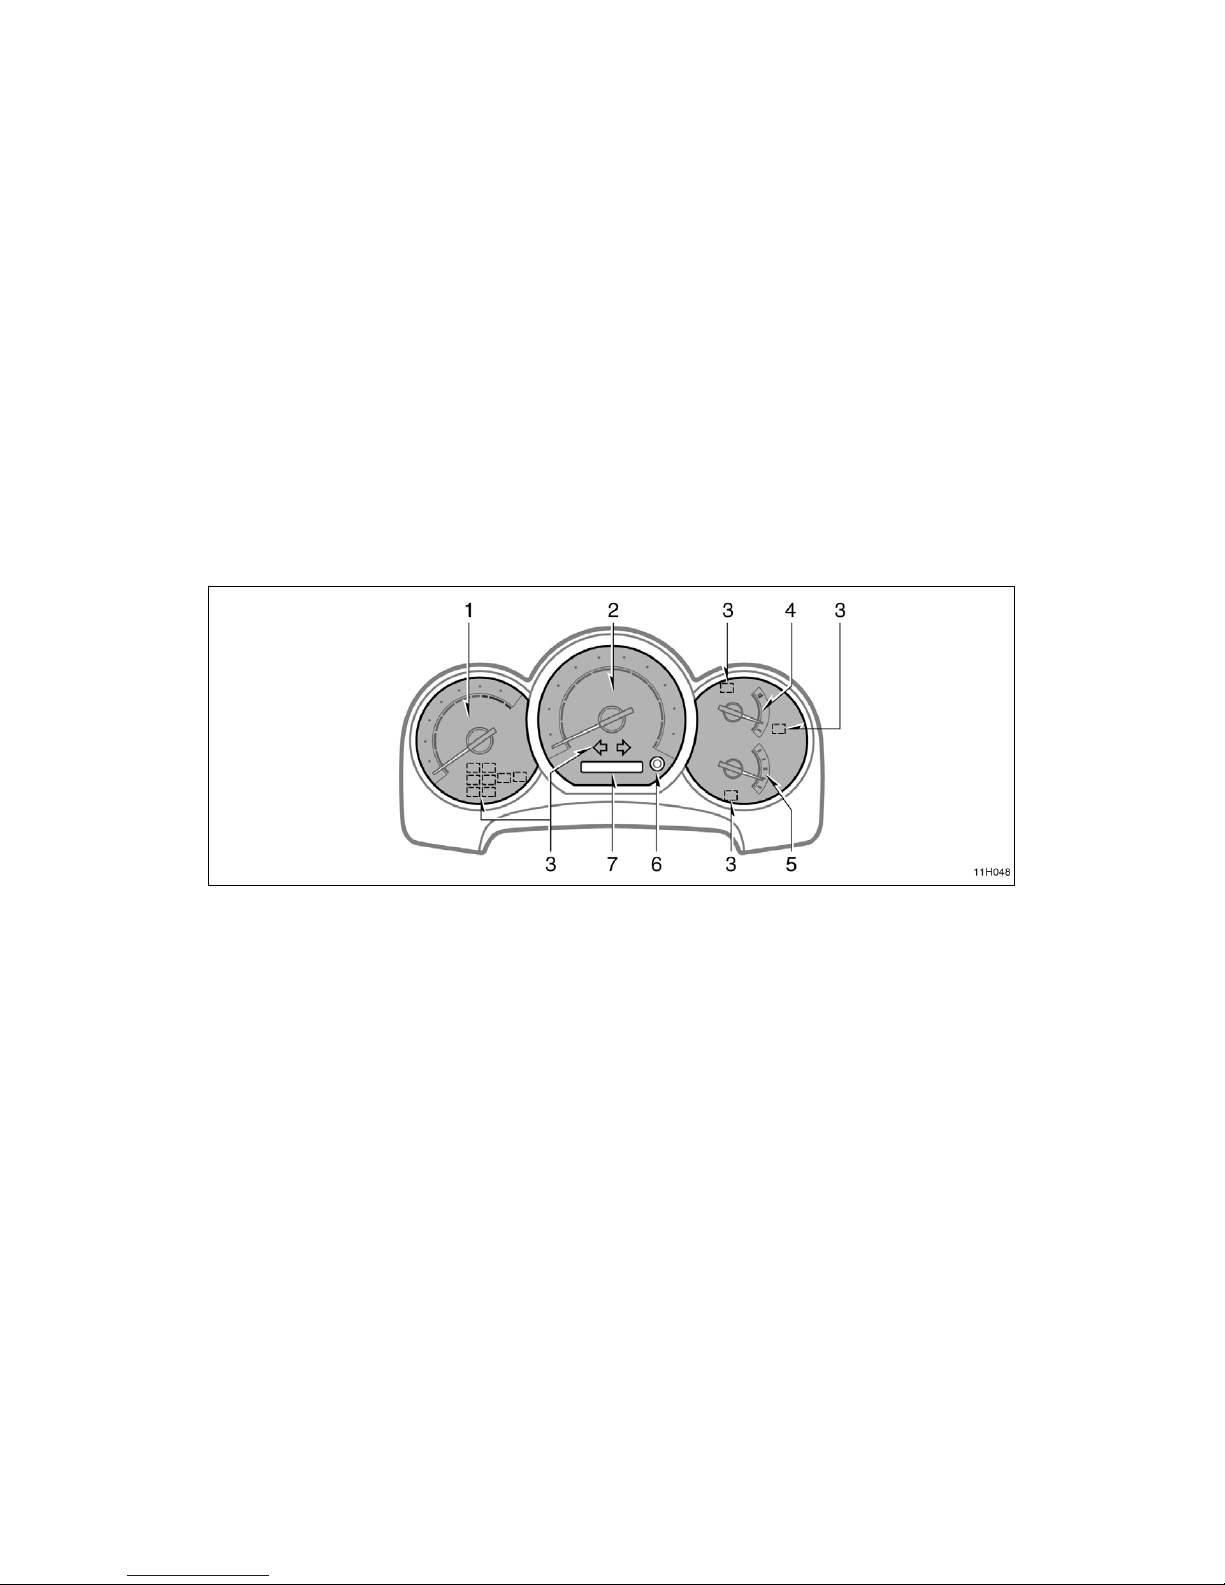
11h048
1. Tachometer 67. . . . . . . . . . . . . . . . . . . . . . .
2. Speedometer
3. Servi ce reminder indicators
and indicator l ights 69. . . . . . . . . . . . . . . .
4. Engine coolant temper ature
gauge 66. . . . . . . . . . . . . . . . . . . . . . . . . . . .
5. Fuel gauge 66. . . . . . . . . . . . . . . . . . . . . . .
6. Trip meter reset knob 67. . . . . . . . . . . . .
7. Odometer and two trip meter s 67. . . . .
Instrument cluster overview
5
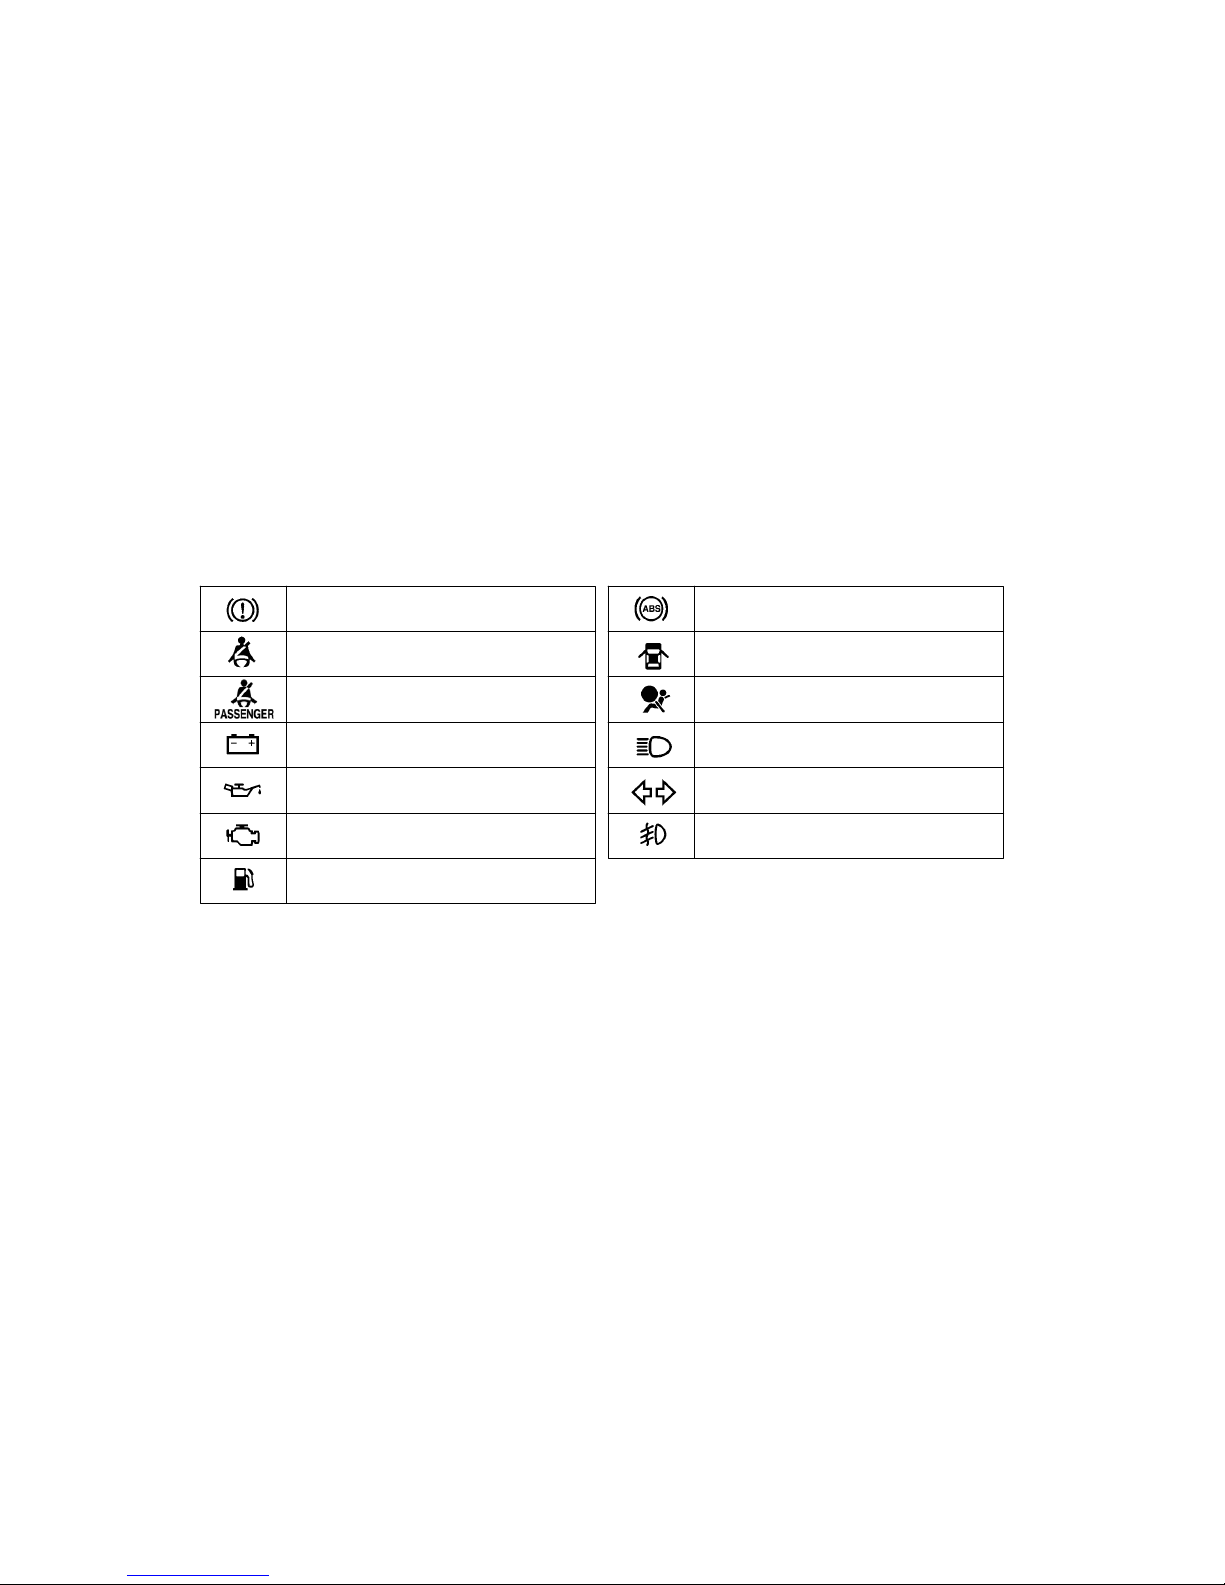
Brake syst em warning light*
Charging system warning light *
Low engine oil pr essure warning light *
Low fuel level warni ng light*
Open door warning light*
Headlight high beam indic ator light
Turn signal indicator lights
Malfuncti on indicator lamp*
*: For details, s ee “Service reminder indicators and warning
buzzers” on page 69.
Driver ’s seat belt reminder light*
(on some models)
Front passenger ’s seat belt reminder light*
(on some models)
Anti−lock brake system warning light*
(on some models)
SRS warning light * (on some models)
Front fog light indic ator light (on some models)
Indicator symbols on the instrument panel

6

7
OPERATION OF INSTRUMENTS AND
CONTROLS
Keys and Doors
Keys 8. . . . . . . . . . . . . . . . . . . . . . . . . . . . . . . . . . . . . . . . . . . . . . . . . . . . . . . .
Engine immobilizer system 10. . . . . . . . . . . . . . . . . . . . . . . . . . . . . . . . . . .
Side doors 11. . . . . . . . . . . . . . . . . . . . . . . . . . . . . . . . . . . . . . . . . . . . . . . . . .
Power windows 13. . . . . . . . . . . . . . . . . . . . . . . . . . . . . . . . . . . . . . . . . . . . . .
Tailgate 15. . . . . . . . . . . . . . . . . . . . . . . . . . . . . . . . . . . . . . . . . . . . . . . . . . . . .
Hood 17. . . . . . . . . . . . . . . . . . . . . . . . . . . . . . . . . . . . . . . . . . . . . . . . . . . . . . .
Fuel tank cap 18. . . . . . . . . . . . . . . . . . . . . . . . . . . . . . . . . . . . . . . . . . . . . . .
SECTION 1− 2
8
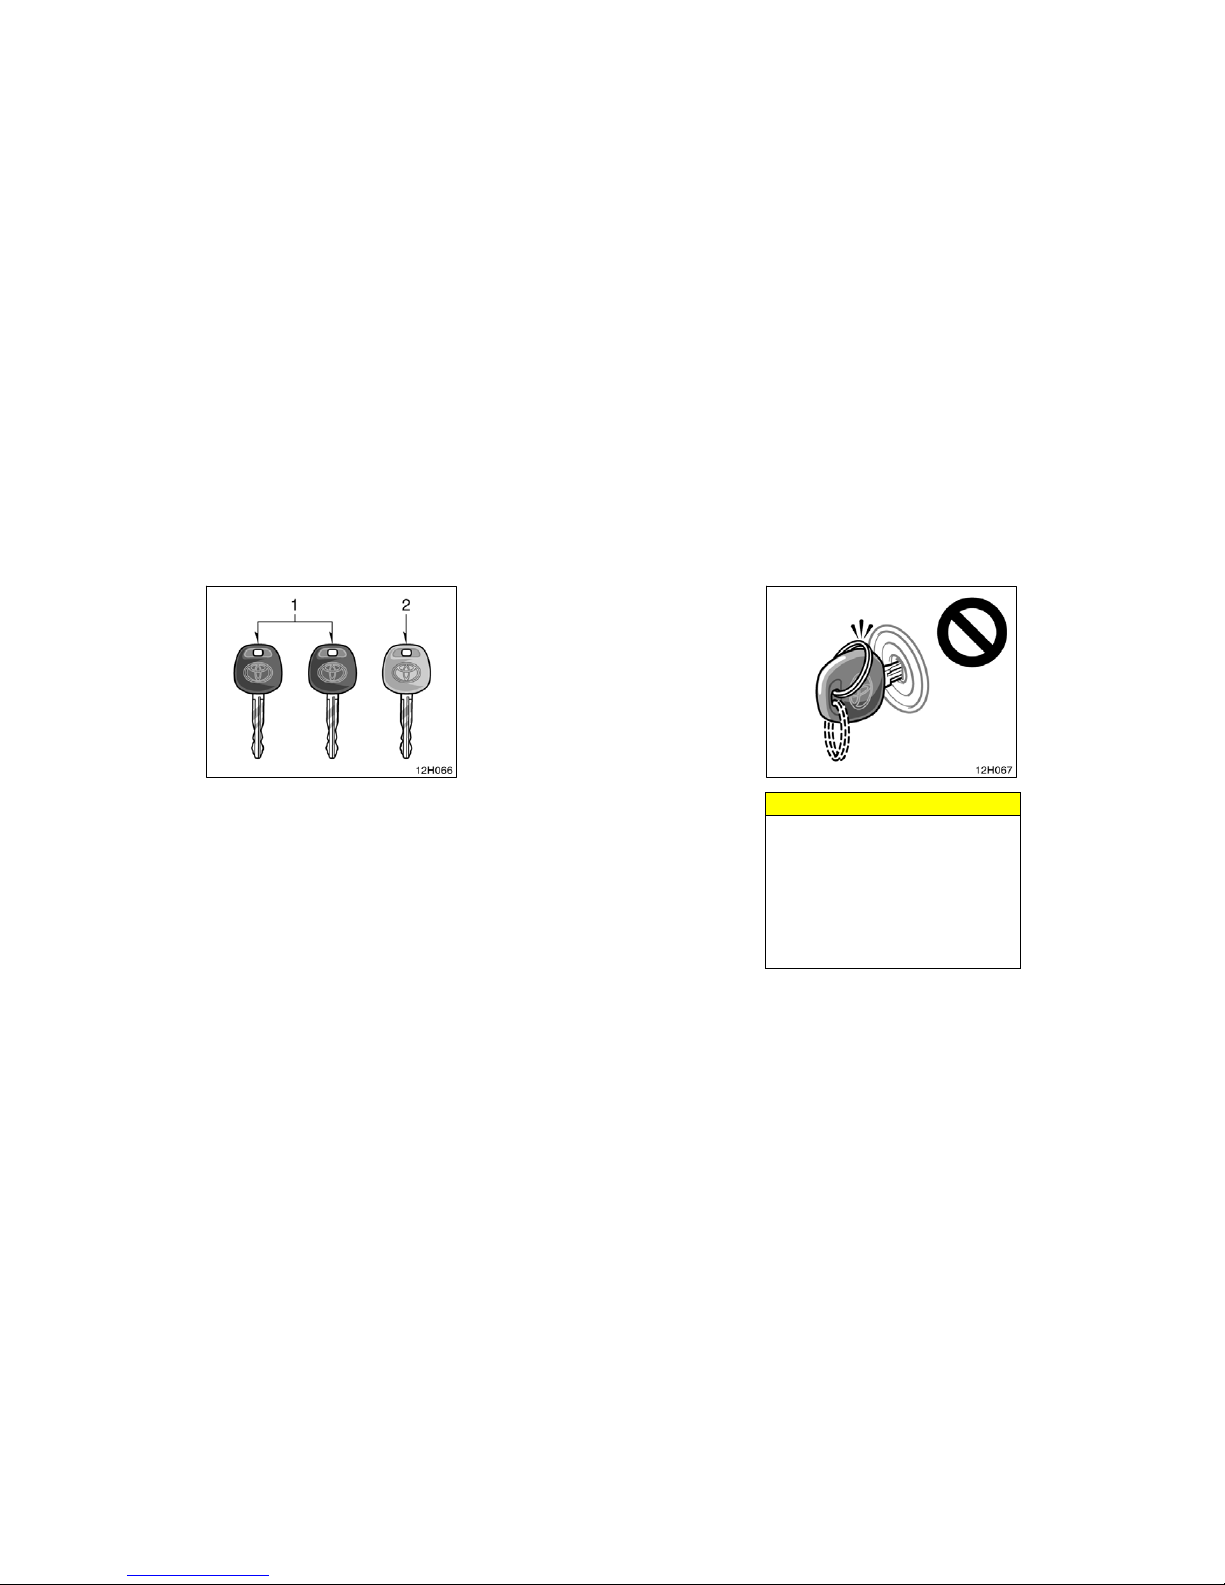
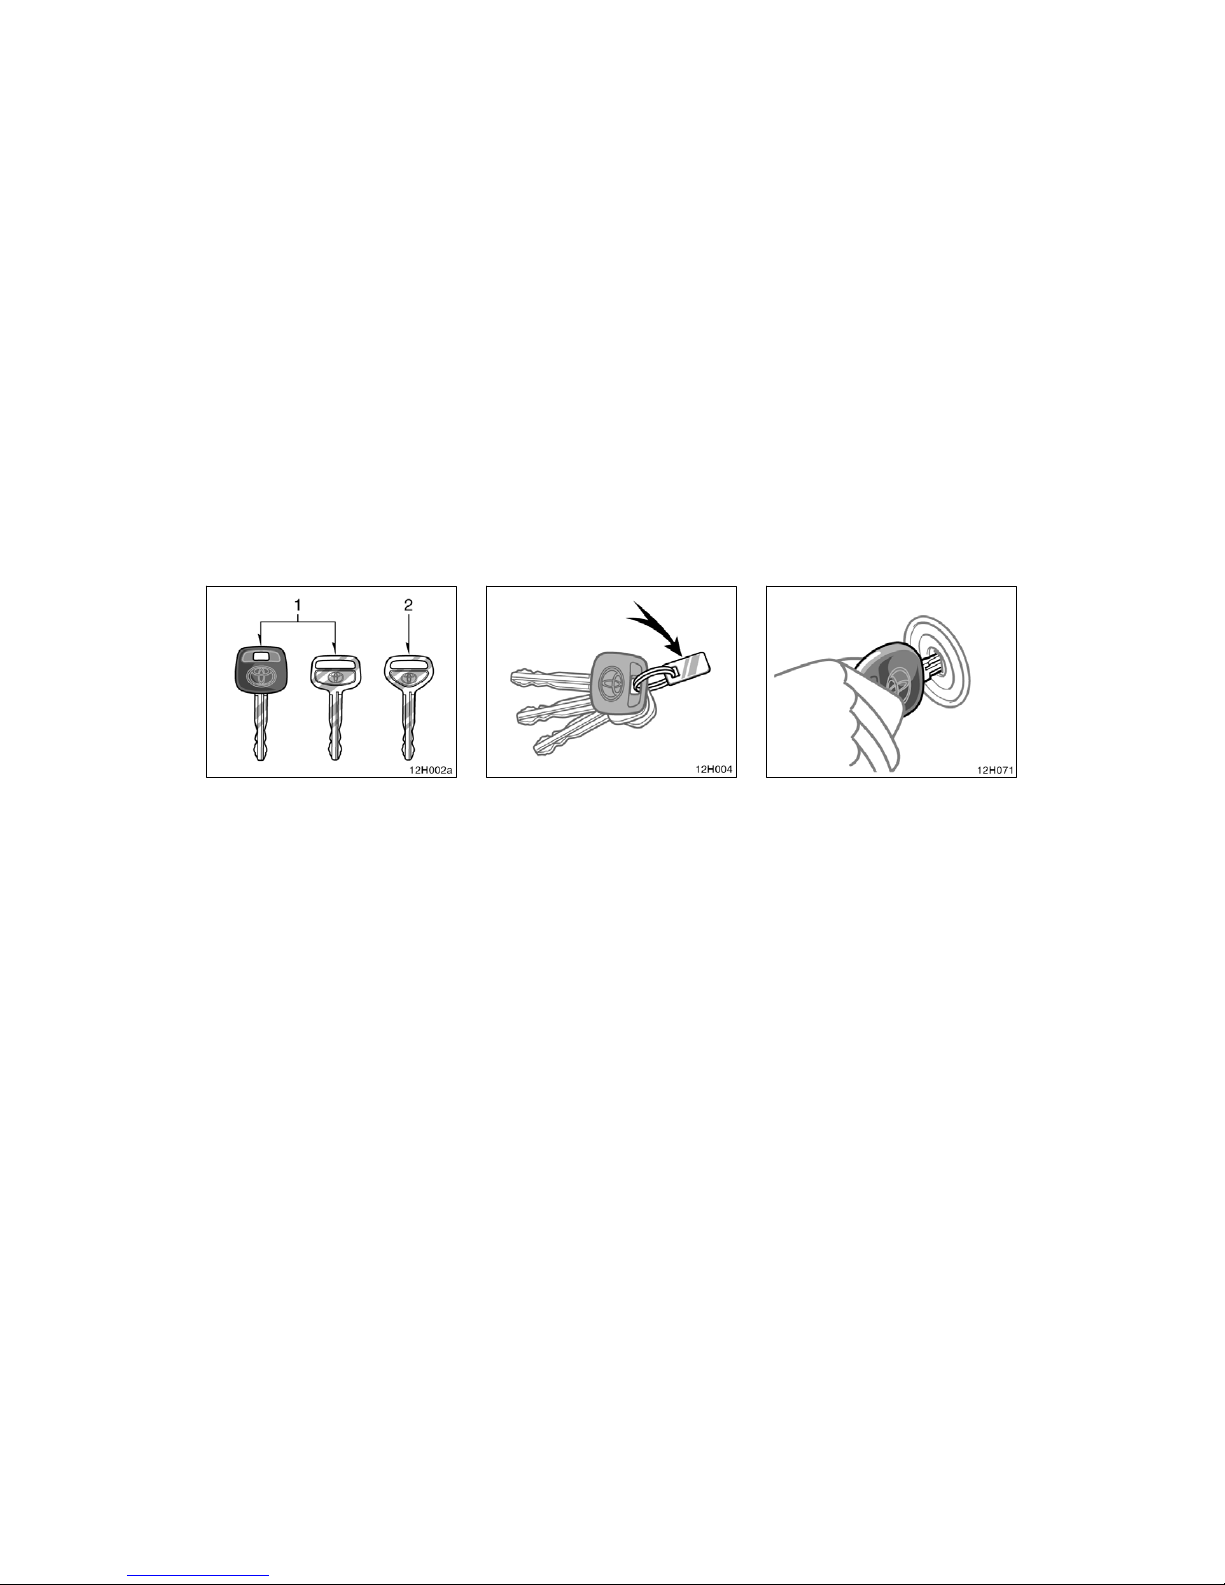
12h056
Your vehicle is supplied with two kinds
of keys.
1. Master keys—These keys work in every lock.
2. Sub key—This key does not work in
the glove box.
A transponder chi p for engine immobili zer
system has been placed in the head of
the master and sub keys. These chips are
needed to enable the system to function
correctly, so be careful not to lose these
keys. If you make your own duplicate key,
you will not be able to cancel the system
or start the engine.
Your Toyota dealer will need one of master keys to make a new key with a built−
in transponder chip.
To protect items locked in the glove box
when using valet parking, leave the sub
key with the attendant.
Since the door s can be l ocked without a
key, you should always carry a spare key
in case you accidental ly lock your key s
inside the vehicle.
12h005
NOTICE
When using a k ey containing a transponder chip, observe the following
precautions:
z When starting the engine, do not
use the key with a key ring resting
on the key grip and do not press
the key ring against the key grip.
Otherwise the engine may not start,
or may stop soon after it starts.
Keys (with engine immobilizer
system)

9
12h006
z When starting the engine, do not
use the key with other transponder
keys around (including keys of other vehicles) and do not press other
key plates against the key grip.
Otherwise the engine may not start,
or may stop soon after it starts. If
this happens, remove the key once
and then insert it again after removing other transponder keys (incl uding keys of other vehicles) from the
ring or while gripping or covering
them with your hand to start the
engine.
12h007
z Do not bend the key grip.
z Do not cover the key grip with any
material that cuts off electromagnetic waves.
z Do not knock the key hard against
other objects.
z Do not leave the key exposed to
high temperatures for a long period,
such as on the dashboard a nd hood
under direct sunli ght.
z Do not put the key in water or
wash it in an ultrasonic washer.
z Do not use the key with electromag-
netic materials.
12h003
KEY NUMBER PLATE
Your key number is shown on the plate.
Keep the plate in a safe place such as
your wallet, not in the vehicle.
If you should los e your keys or if you
need additional key s, duplic ates c an be
made by a Toyota dealer using the key
number.
We recommend writing down the key number and storing it in a safe place.
10
12h002a
Your vehicle is supplied with two kinds
of keys.
1. Master keys—These keys work in every lock.
2. Sub key—This key will not work in the
glove box.
To protect items locked in the glove box
when using valet parking, leave the sub
key with the attendant.
Since the doors can be locked without a
key, you should always carry a spare key
in case you accidental ly lock your key s
inside the vehicle.
12h004
KEY NUMBER PLATE
Your key number is shown on the plate.
Keep the plate in a safe place such as
your wallet, not in the vehicle.
If you should los e your keys or if you
need additional key s, duplic ates c an be
made by a Toyota dealer using the key
number.
We recommend writing down the key number and storing it in a safe place.
12h008
The engine immobilizer system is a
theft prevention system. When you insert the key in the engine switch, the
transponder chip in the key’s head
transmits an electronic code to the vehicle. The engine will start only when
the electronic code in the chip corresponds to the registered ID code for
the vehicle.
Keys (without engine
immobilizer system)
Engine immobilizer system
(on some models)
11
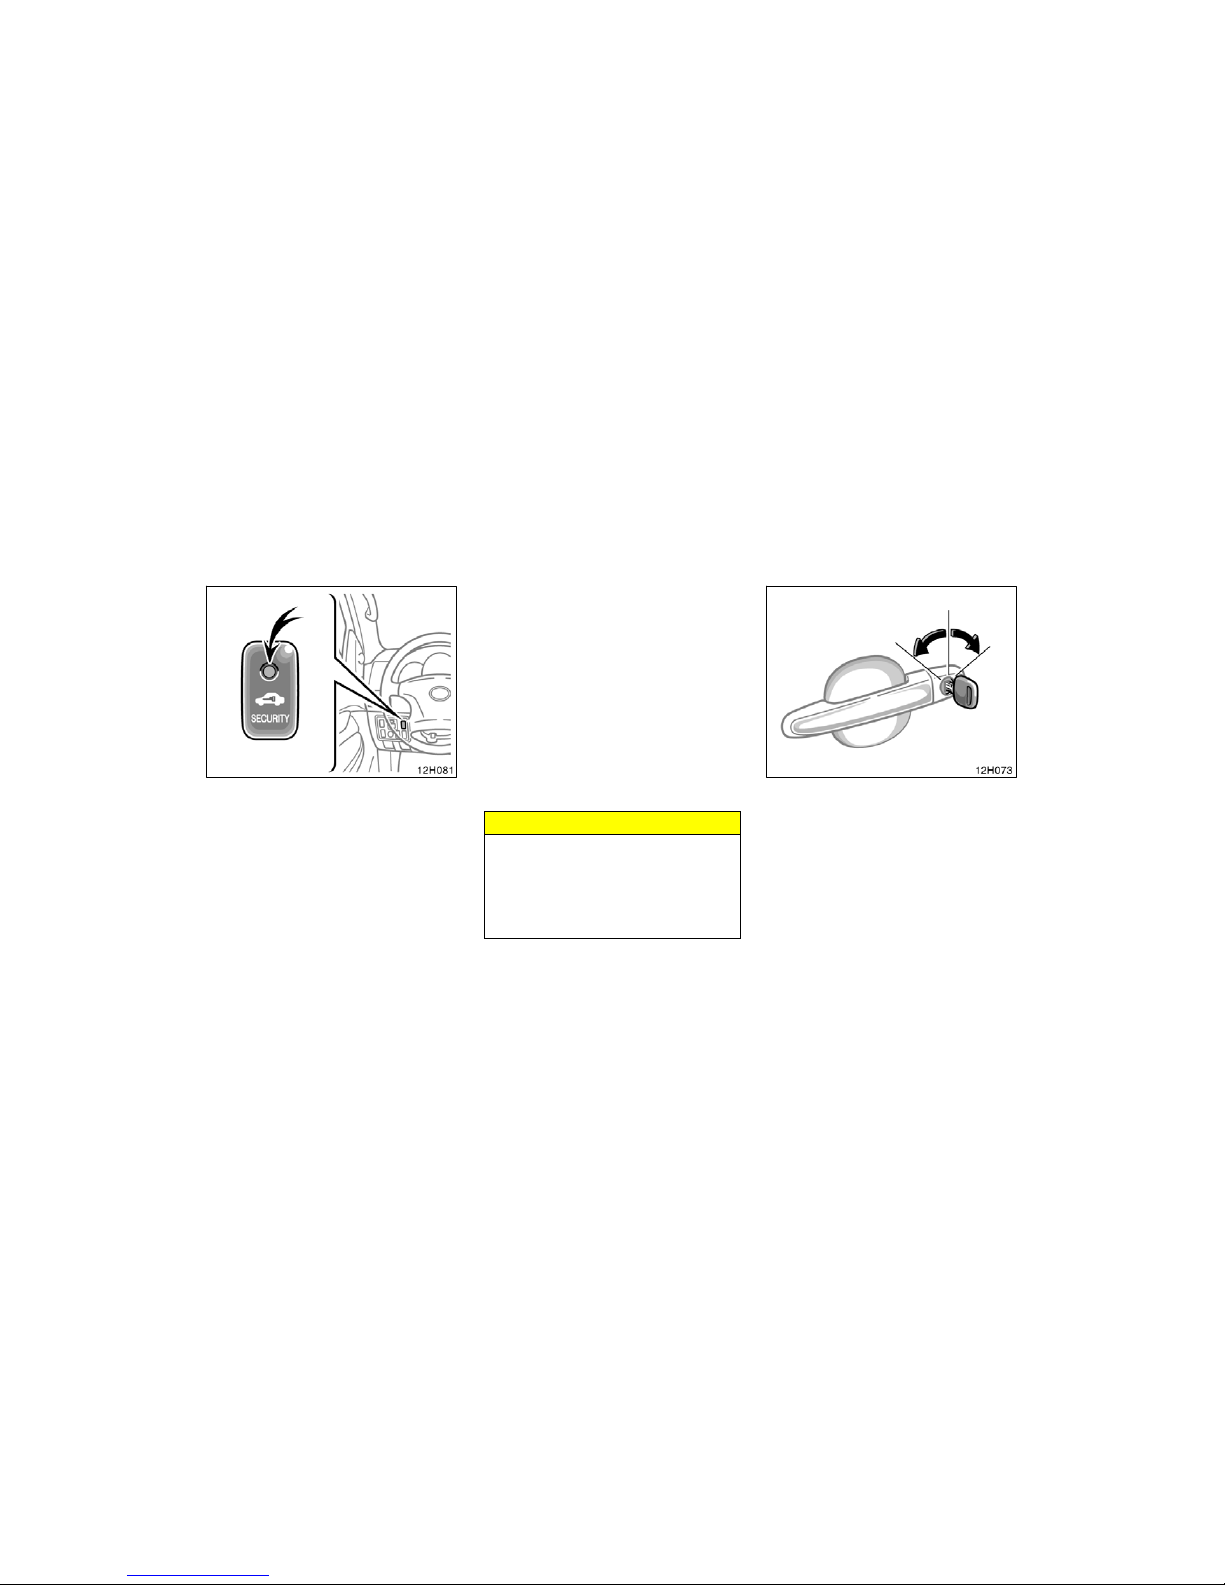
12h081
The system is automatically set when the
key is removed from the engine switch.
The indicator light wi ll start flashing to
show the system is set.
If any of the foll owing indicat or conditions
occurs, contact your Toyota dealer.
D The indicator l ight stay s on.
D The indicator light does not start flas h-
ing when the key is removed from the
engine switch.
D The indicator li ght flashes inconsistent-
ly.
Inserti ng the registered key in the engine
switch automatically cancels the system,
which enables the engine to start. The
indicator light will go off.
The system is maintenance−free.
For your Toyota dealer to make you a
new key with a built−in transponder chi p,
your dealer will need your key number
and master key. However, there is a limit
to the number of additional keys your
Toyota dealer can make for you.
If you make your own duplicate key,
you will not be able to cancel the system or start the engine.
NOTICE
Do not modify, remove or disassemble the engine immobilizer system. If any unauthorized changes or
modifications are made, proper operation of the system cannot be guaranteed.
12h041
LOCKING AND UNLOCKING WITH KEY
Insert the key into the keyhole and turn
it.
To lock: Turn the key forward.
To unlock: Turn the key backward.
Vehicles with a power door lock system—All the doors lock and unlock simultaneously with the driver’s door.
Side doors

12
12h042
LOCKING AND UNLOCKING WITH
INSIDE LOCK KNOB
Move the lock knob.
To lock: Push the knob forward.
To unlock: Pull the knob backward.
If you want to lock the door from the
outside, set the knob in the lock position
before closing the door. The outside door
handle must be held up while the front
door is being clos ed. Be careful not to
lock your keys in the vehicle.
12h043b
LOCKING AND UNLOCKING WITH
POWER DOOR LOCK SWITCH
(on some models)
Push the switch.
To lock: Push the switch down on the
front side.
To unlock: Push the switch down on the
rear side.
All the doors lock or unlock simultaneously.
12h018
REAR DOOR CHILD−PROTECTORS (on
double−cab models)
Move the lock lever to the “LOCK”
position as shown on the label.
When the child−protector is locked, you
cannot open the rear door by the inside
door handle. We recommend using this
feature whenever small c hildren are in the
vehicle.
13
CAUTION
Before driving, be sure that the doors
are closed and locked, especially
when small children are in the vehicle. Along with the proper use of
seat belts, locking the doors helps
prevent the driver and passengers
from being thrown out from the vehicle in an accident. It also helps prevent the doors from being opened unintentionally.
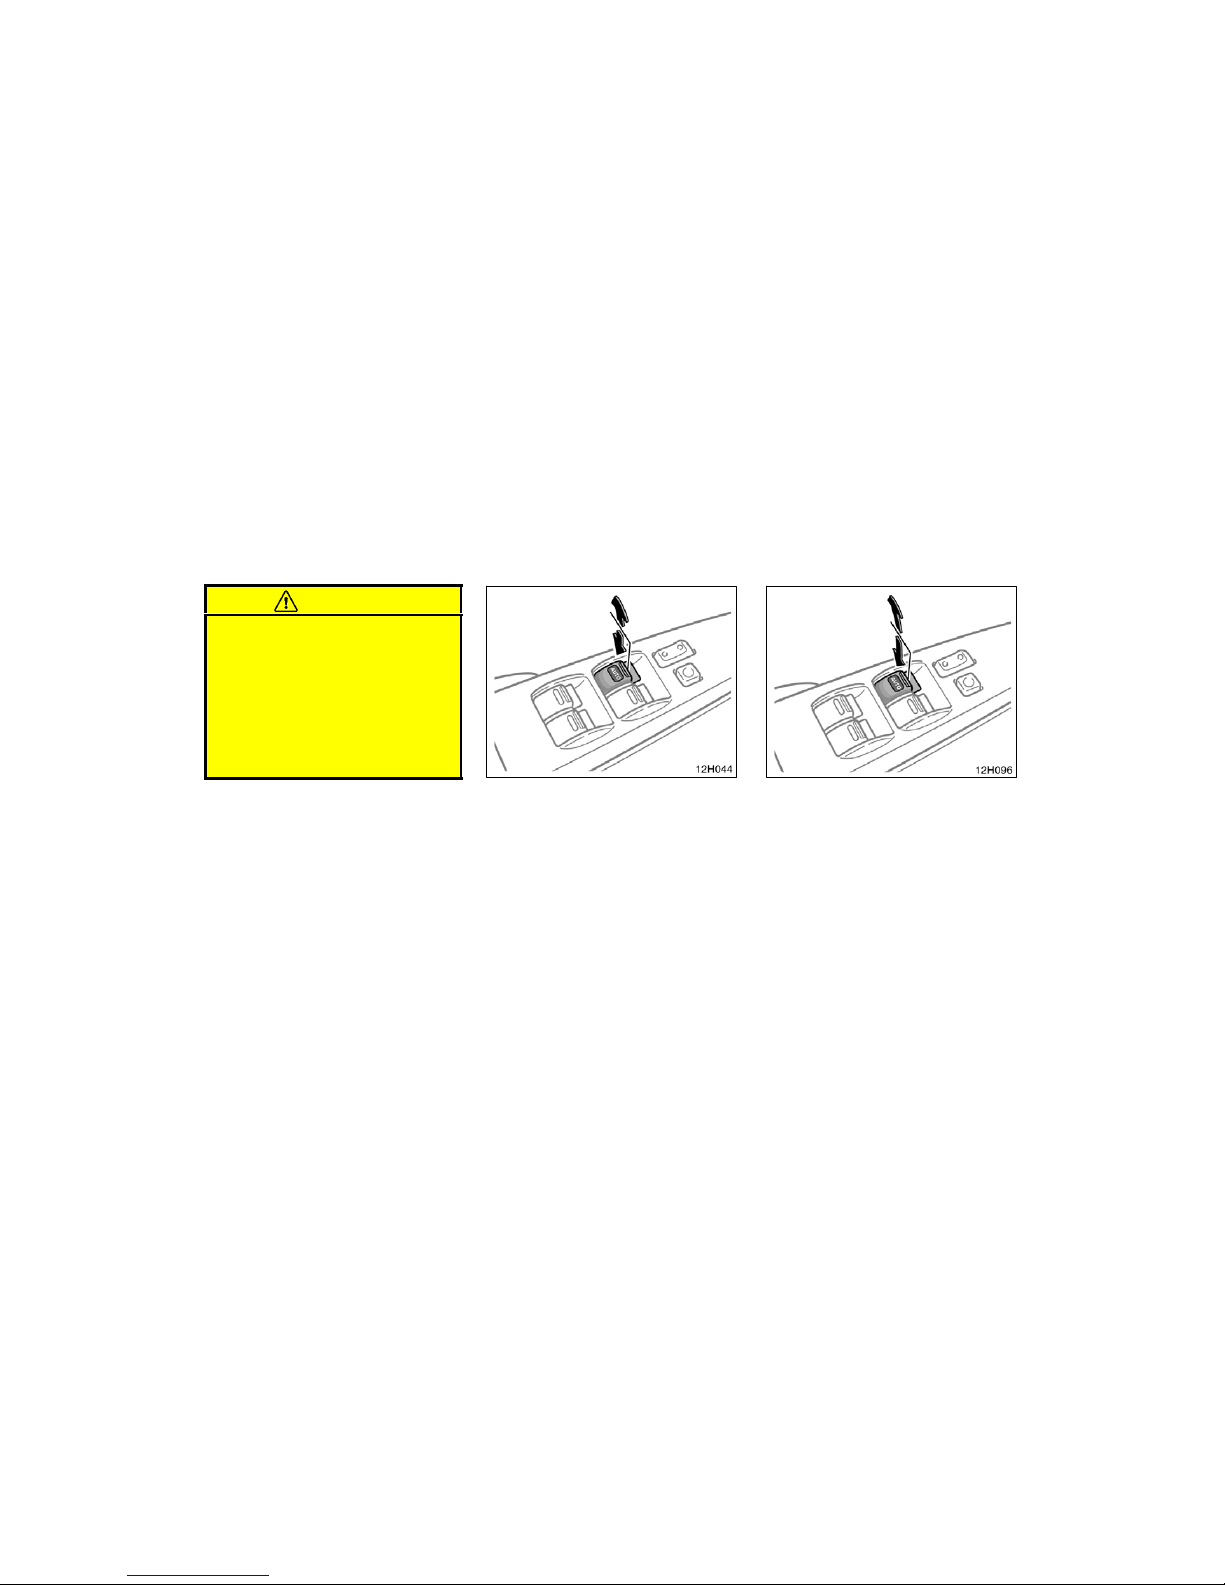
12h044
The windows can be operated with the
switch on each door.
The power windows work when the engine
switch is in the “ON” position.
OPERATING THE DRIVER’S WINDOW
Use the switch on the driver’s door.
Normal operati on: The window moves as
long as you hold the switch.
To open: Lightl y push down the switc h.
To close: Pull up the switch.
Automatic operation: Push the switch
completely down or pull it completely up,
and then release it. The window will fully
open or close. To stop the window partway, lightly move the switch in the opposite direction and then release it.
Jam protection function: During automatic closing operation, the window stops and
opens half way if somethi ng gets caught
between the window and window frame.
If the window receives a strong impact,
this function may work even if nothing is
caught.
Power windows
(on some models)
14
If the battery is disconnected or run
down after the reconnection, the wi ndow
may not operate automatically. In this
case, you should return the window to
normal.
To normalize the window, pull up and hold
the switch for a few seconds with the
window closed.
CAUTION
To avoid death or serious injury, you
must do the following.
D Never try jamming any p art of your
body in a window to activate the
jam protection function int entionally, as it could result in death or
serious injury.
D The jam protection functi on may
not work if something gets caught
just before the window is fully
closed.
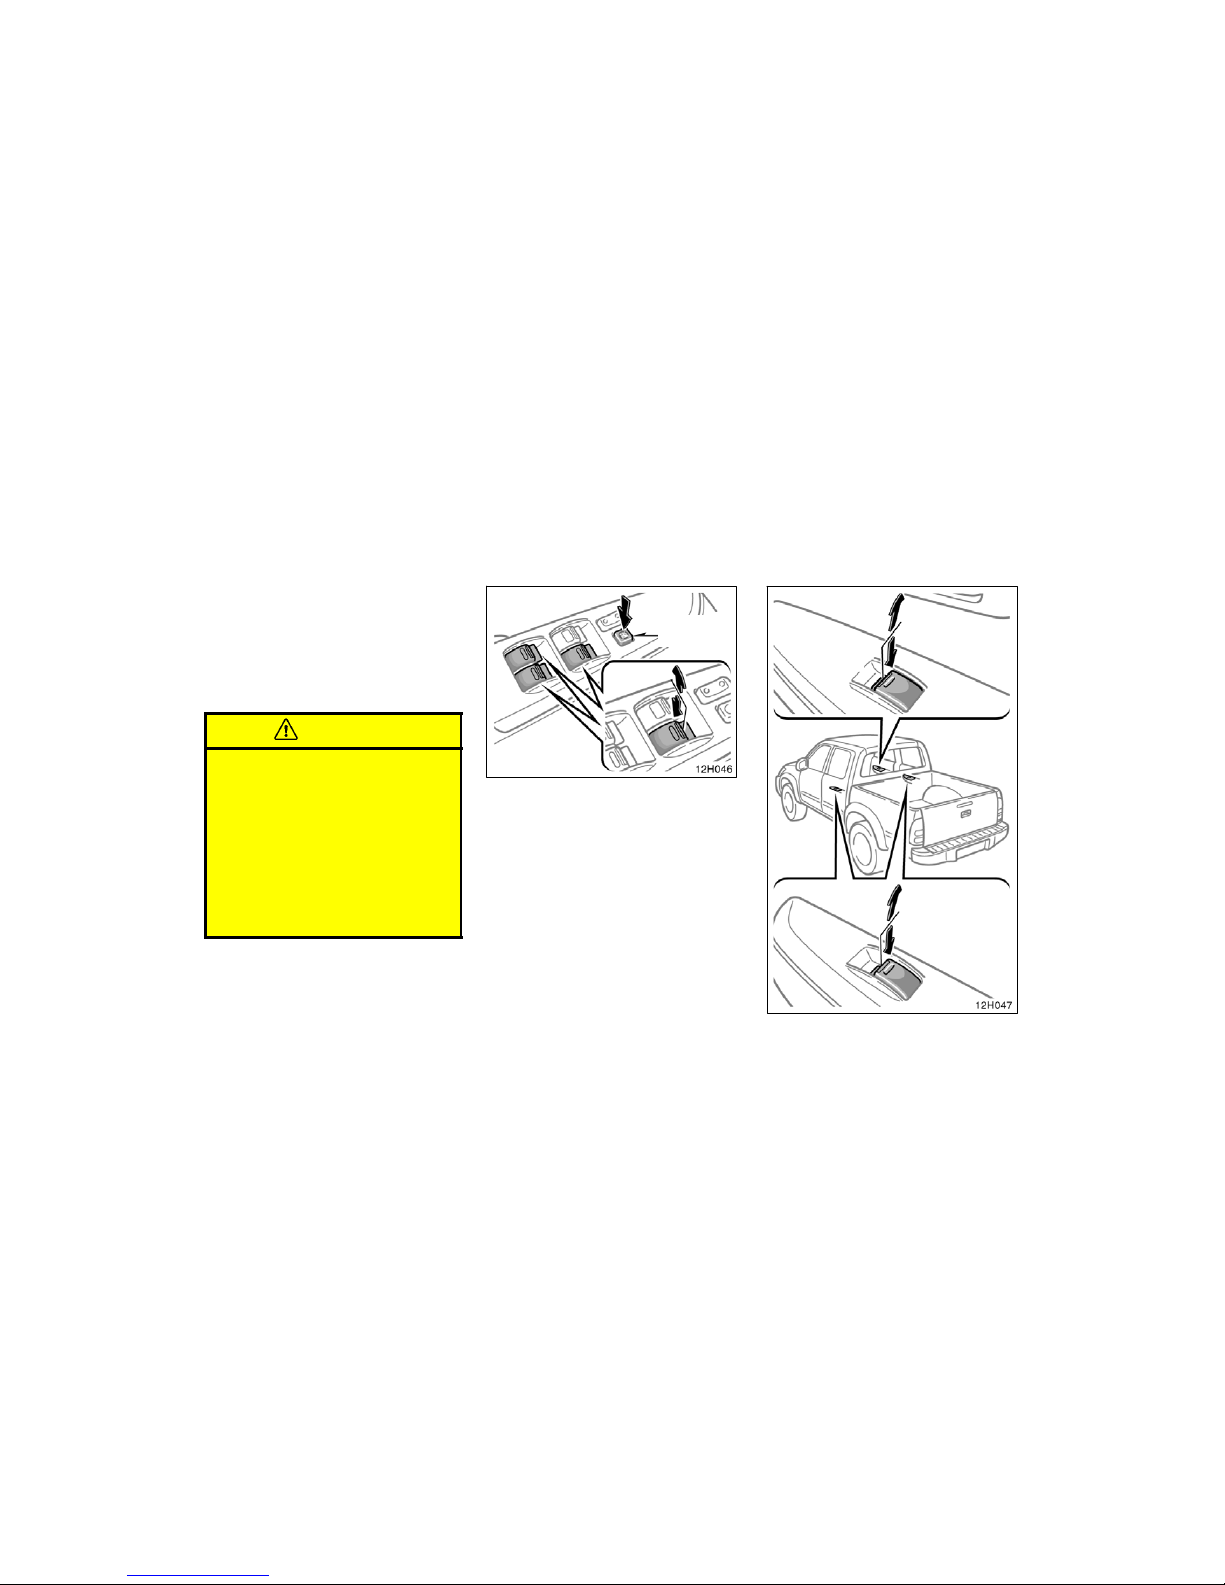
12h046
Window lock
switch
OPERATING THE PASSENGERS’
WINDOWS
Use the switch on each passenger’s
door or the switches on the driver’s
door that control each passenger ’s window.
The window moves as long as you hold
the switch.
To open: Push down the switc h.
To close: Pull up the switch.
If you pus h in the window lock switch on
the driver ’s door, the passenger s’ windows
cannot be operated.
12h047
15
CAUTION
To avoid death or serious injury, you
must do the following.
D Before you close the power win-
dows, always make sure there is
nobody around the power windows.
You must also make sure the
heads, hands and other parts of the
bodies of all occupants a re kept
completely inside the vehicle. If
someone’s neck, head or hands get
caught in a closing window, it
could result in death or serious injury. When anyone closes the power
windows, make sure he/she operates the windows safely.
D When small children are in the ve-
hicle, never let them use the power
window switches without supervision. Use the window lock switch to
prevent them from making unexpected use of the switches.
D Be sure to remove the ignition key
when you leave your vehicle.
D Never leave anyone (particularly a
small child) alone in your vehicle,
especially with the ignition key still
inserted. Otherwise, he/she could
use the power window switches and
get trapped in a wi ndow. Unattended person (particularly a small
child) can be involved in a serious
accident.
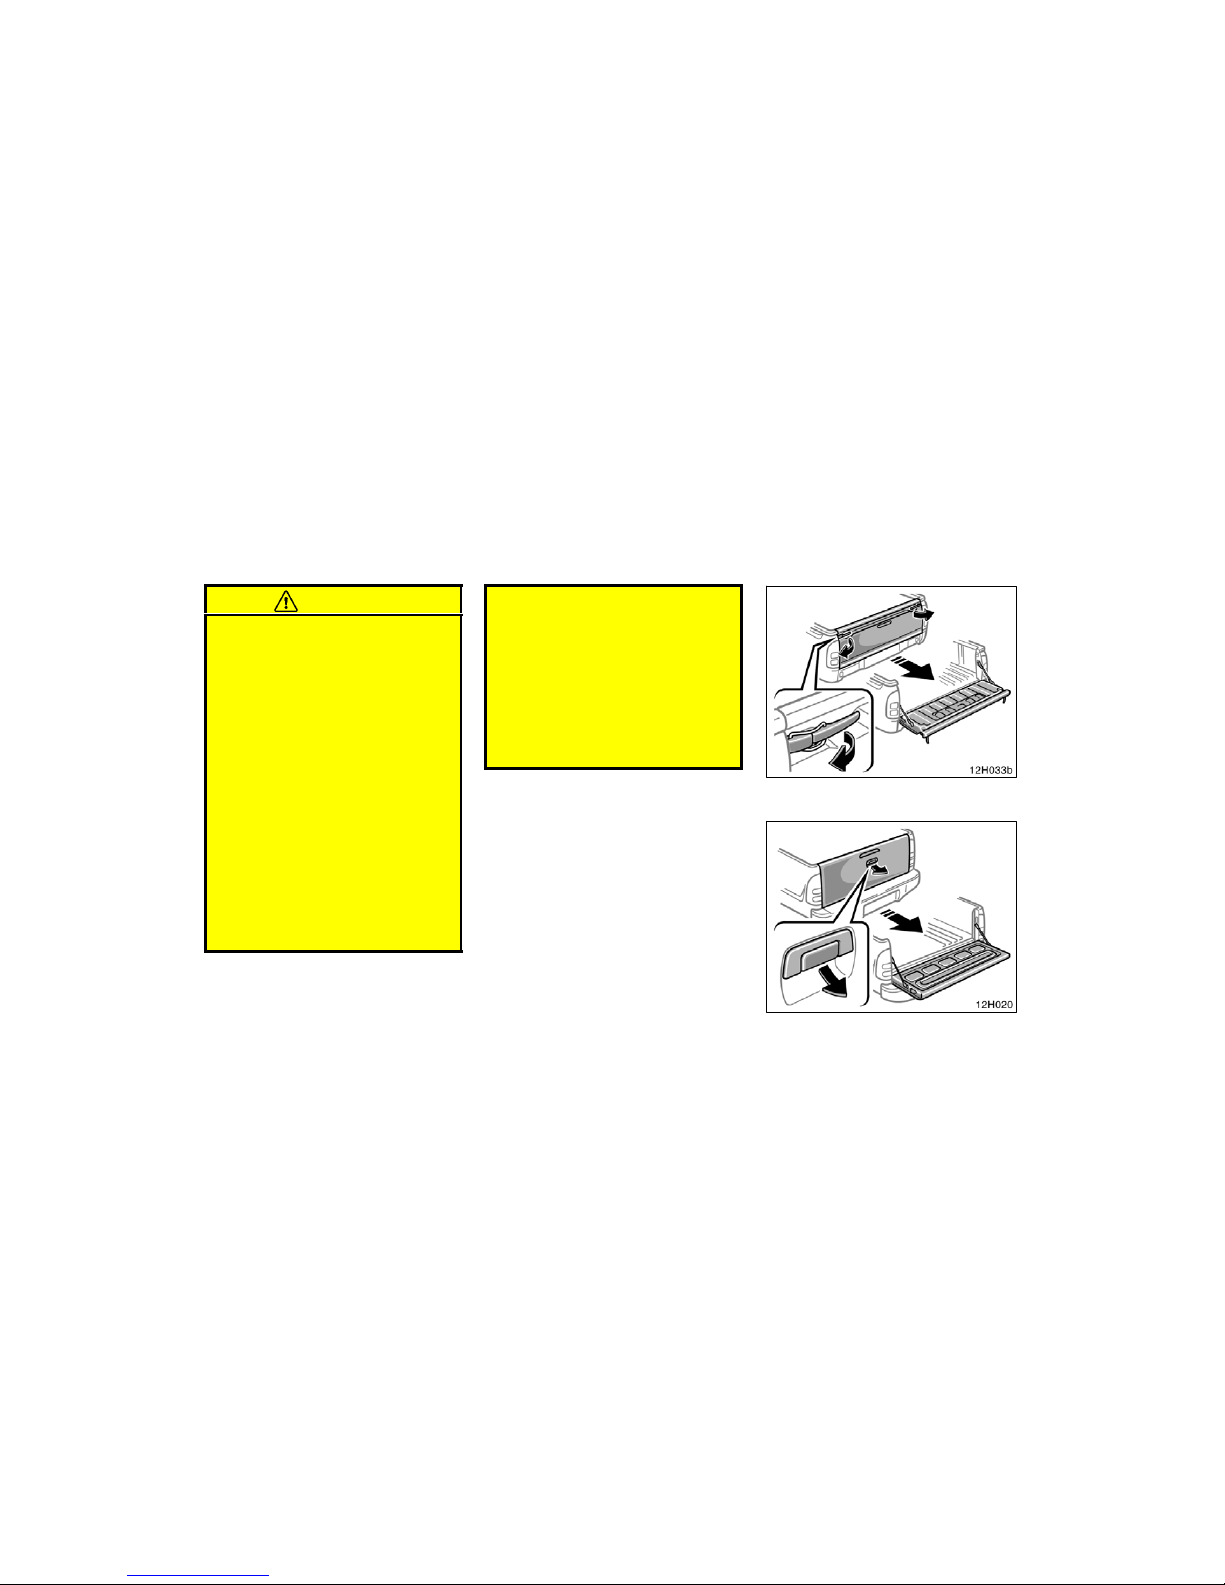
12h033b
Type A
12h020
Type B
Tailgate
16
Type A: To open the tailgate, unlock the
latches as shown.
Type B: To open the tailgate, pull the
handle up.
The support cables will hold the tailgate
horizontal .
See “Luggage stowage precautions” on
page 125 for precautions when loading
luggage.
After closing the tailgate, try pulling it toward you to make sure it is securely
locked.
CAUTION
If the open tailgate hides the stop/tail
lights, rear tur n signal lights, back−up
lights or rear retro reflectors while
you are parked, other road users
must be warned of the pr esence of
your vehicle by a warning triangle or
other device.
NOTICE
Avoid driving with the tailgate open.
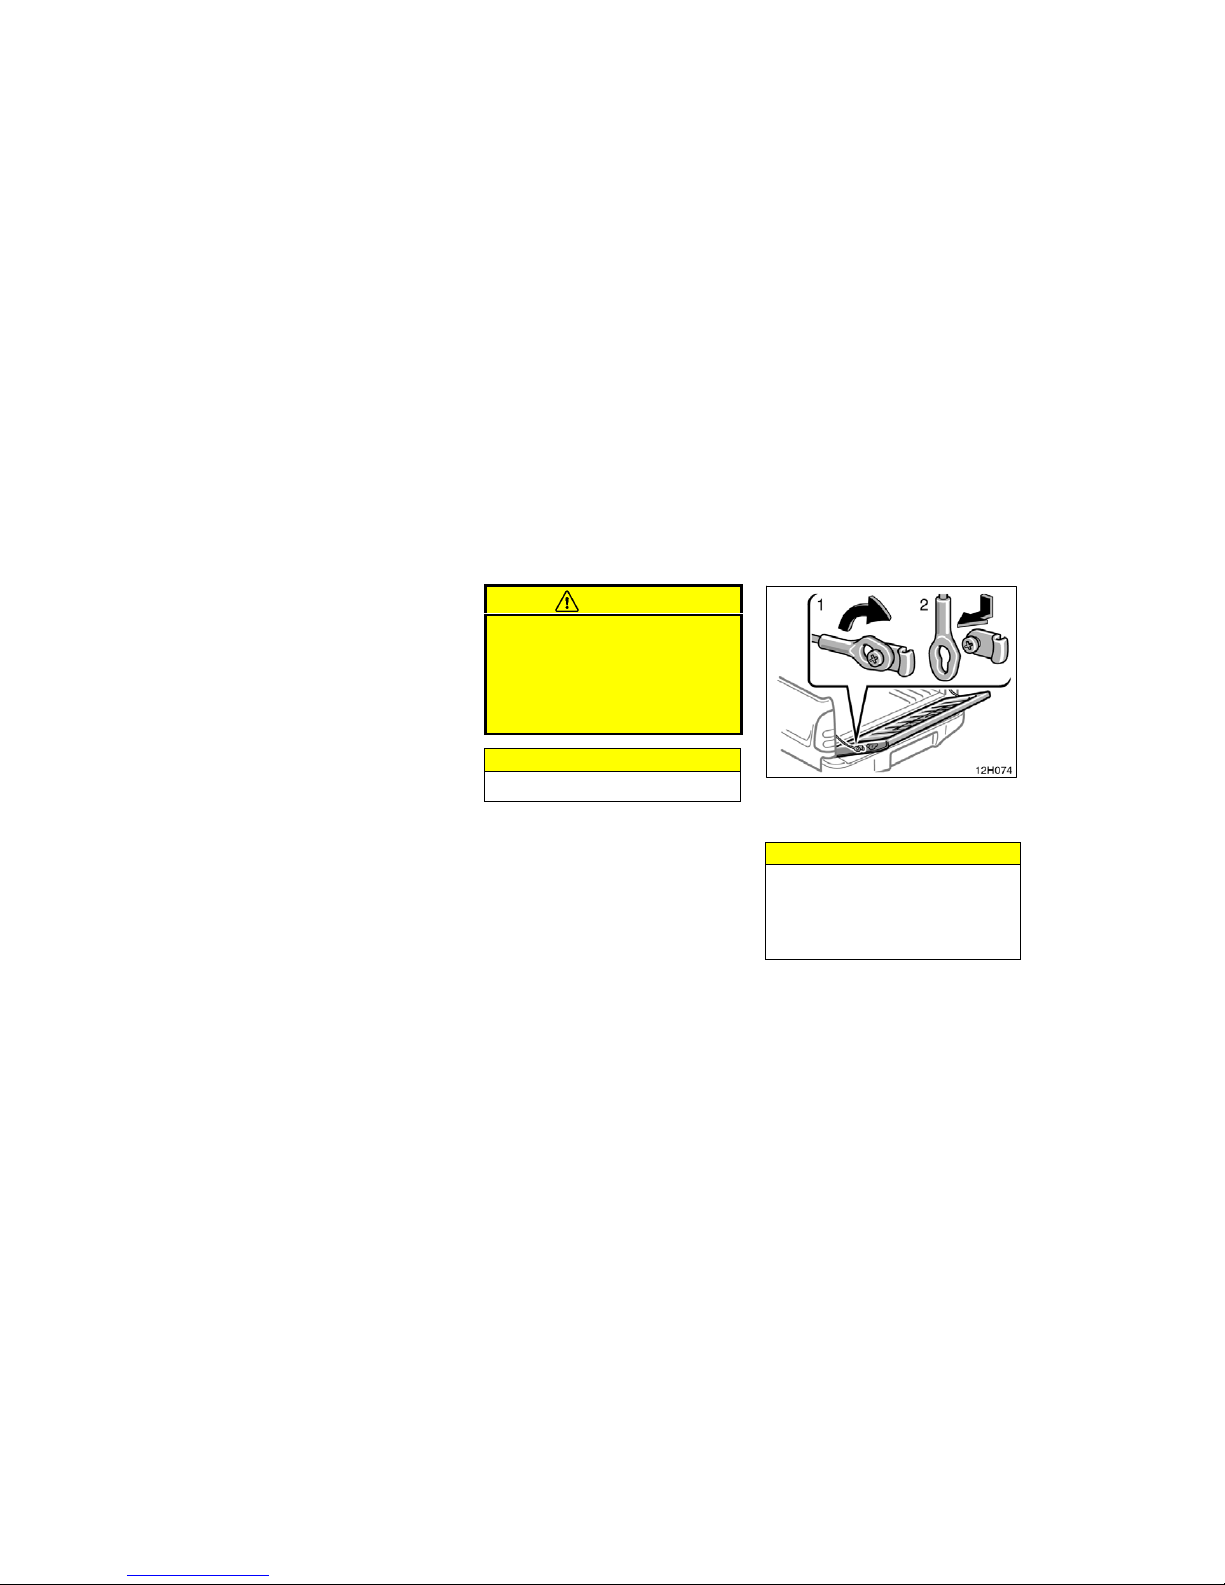
12h021
To lower the tailgate fully, release the
support brackets fr om the lugs as
shown.
NOTICE
z Lower the tailgate gently when it is
unhooked.
z Make sure the tailgate is securely
caught by the support brackets before closing the tailgate.
17
LOCKING AND UNLOCKING WITH KEY
(type B only)
Insert the master key into the keyhole
and turn it to lock or unlock the tailgate.
To lock: Turn the key clockwise.
To unlock: Turn the k ey counterc lockwi se.
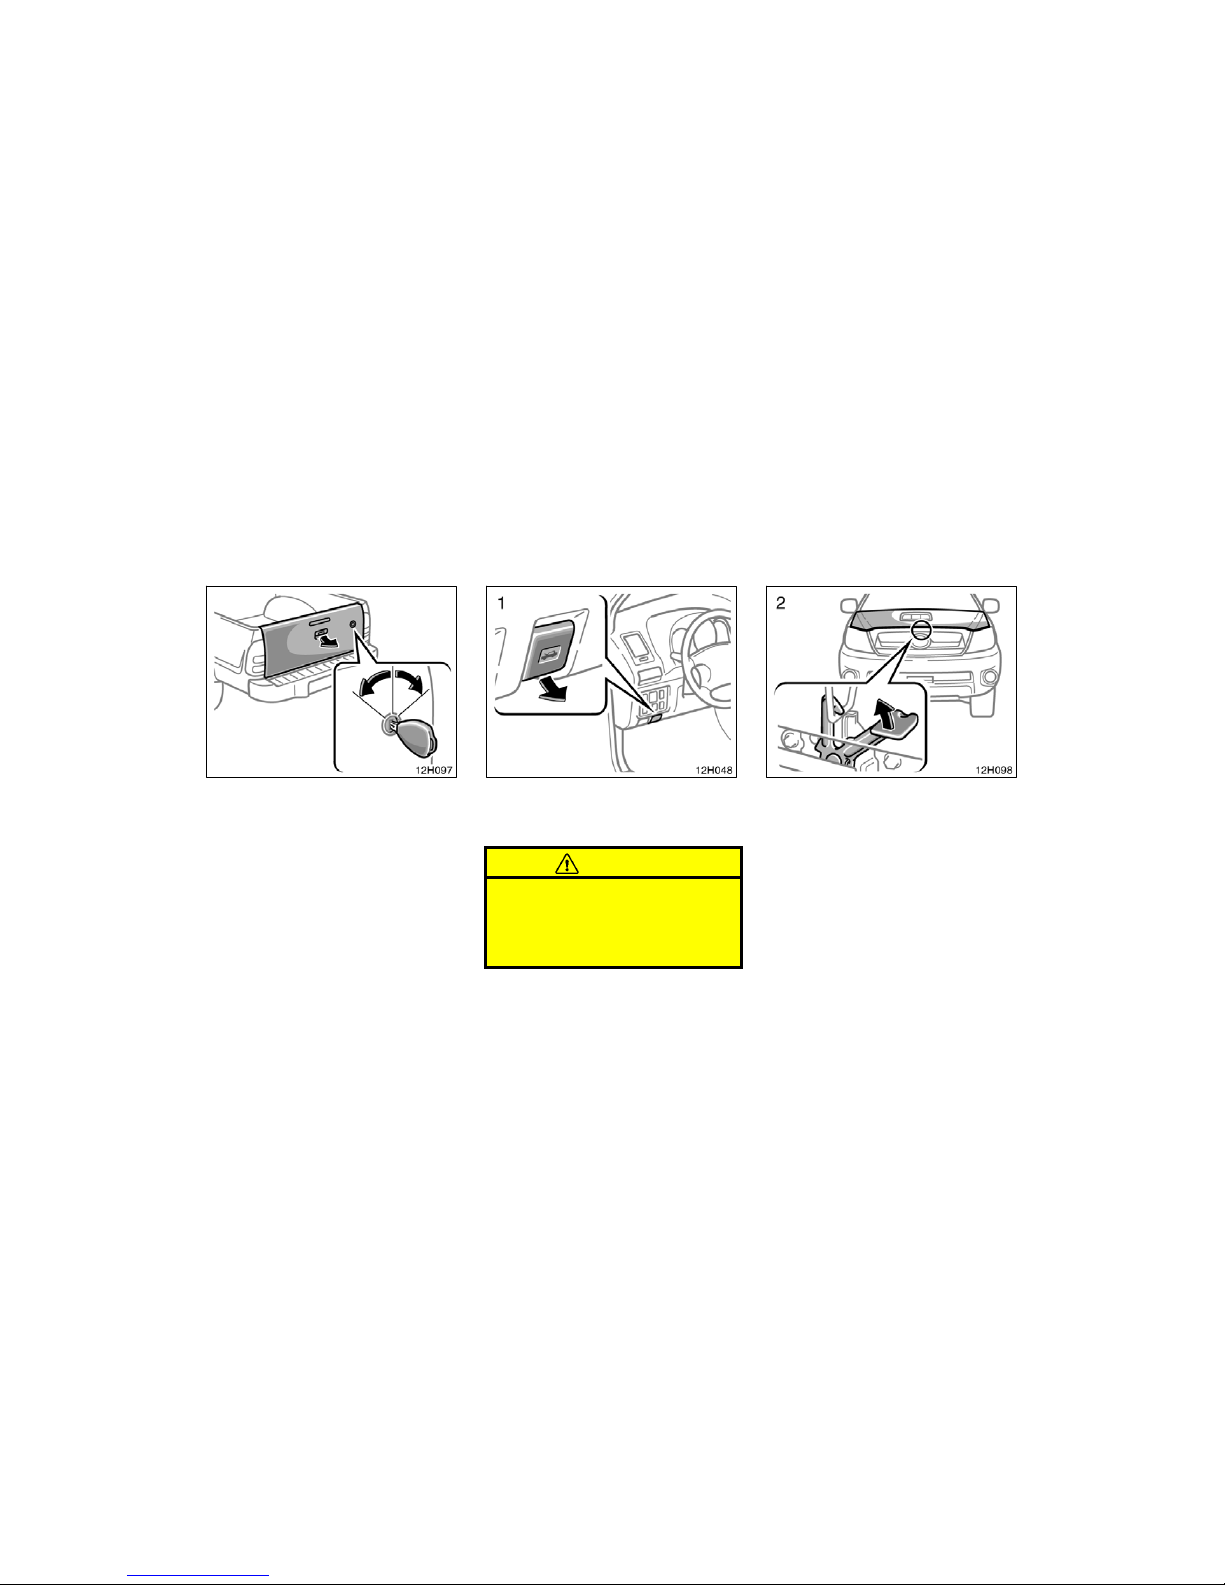
12h048
To open the hood:
1. Pull the hood lock release lever. The
hood will spring up slight ly.
CAUTION
Before driving, be sure that the hood
is closed and securely locked. Otherwise, the hood may open unexpectedly while driving and an accident may
occur.
2. In front of the vehicle, pull up the
auxiliary catch lever and lift the
hood.
Hood
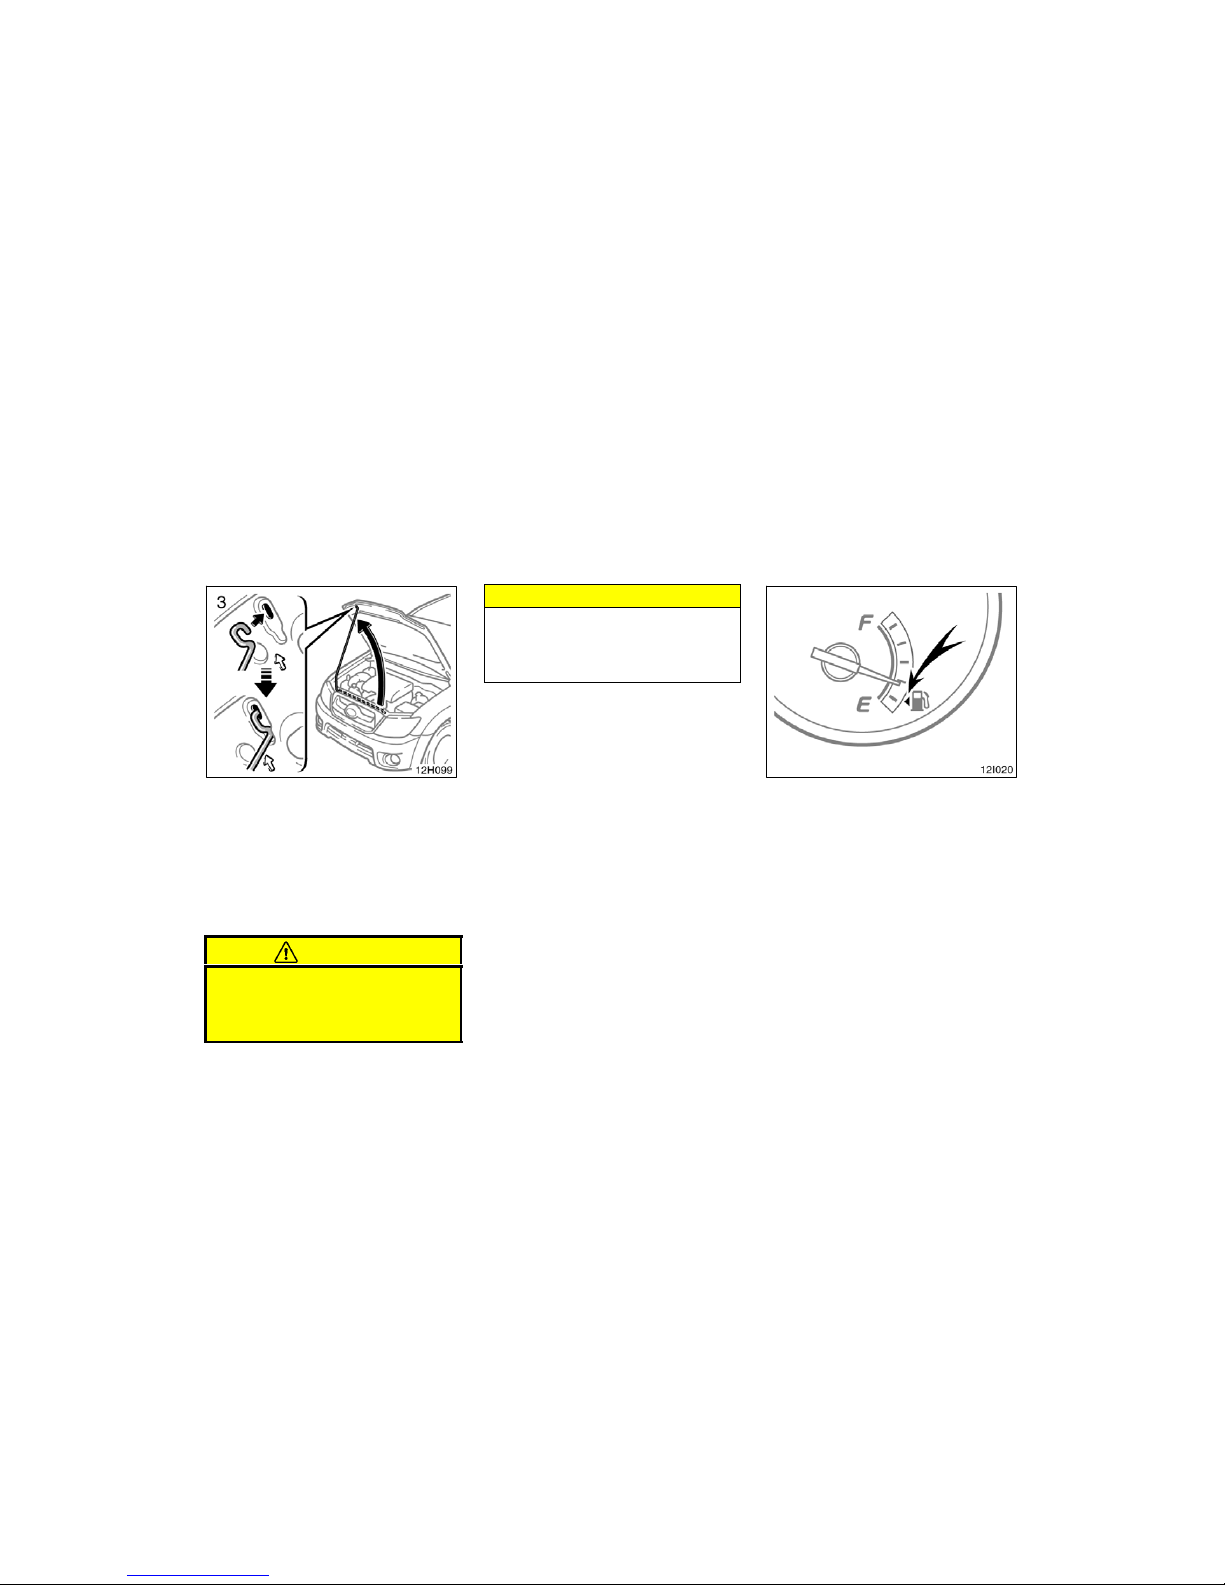
18
3. Hold the hood open by inserting the
support rod into the slot.
Before closing the hood, check to see that
you have not forgotten any tools, rags,
etc. and retur n the support rod to its
clip—thi s prevent s rattl es. Then lower the
hood and make sure it loc ks into place.
If necessary, press down gently on the
front edge to lock it.
CAUTION
After inserting the support rod into
the slot, make sure the rod supports
the hood securely from falling down
on to your head or body.
NOTICE
Be sure to return the support rod to
its clip before closing the hood. Closing the hood with the support rod up
could cause the hood to bend.
12i020
This indicates that the fuel filler door
is on the left side of your vehicle.
Fuel tank cap
19
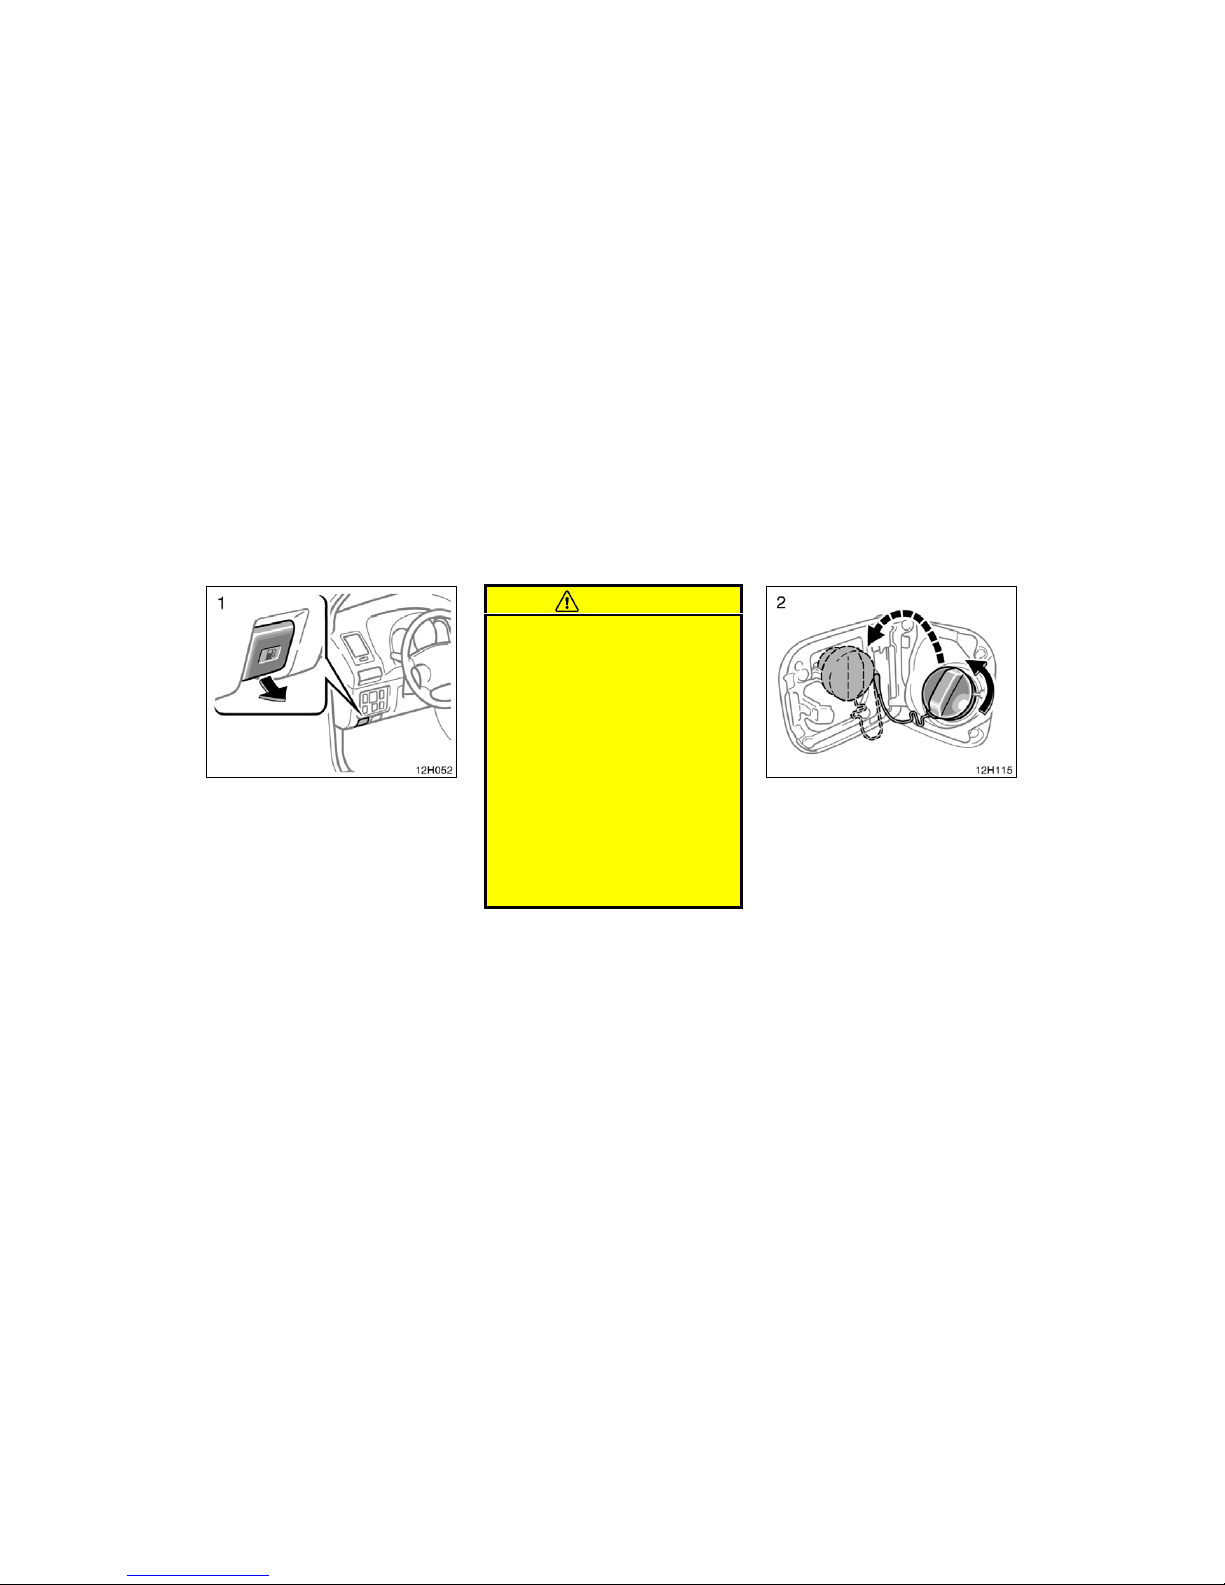
12h052
1. To open the fuel filler door, pull the
lever up.
When refueling, turn off the engine.
CAUTION
D Do not smoke, cause sparks or al-
low open flames when refuel ing.
The fumes are flammable.
D When opening the cap, do not re-
move the cap quickly. In hot weather, fuel under pressure could cause
injury by spraying out of the filler
neck if the cap is suddenly removed.
D Do not fill a fuel container with fuel
on a plastic truck bed liner, a rubber truck bed mat, or any other insulating material. A stati c electricit y
charge coul d cause a spar k and fi re
hazard. The proper procedure is to
place an approved fuel container on
the ground away from the truck for
filling.
2. To remove the fuel tank cap, turn
the cap slowly counterclockwise,
then pause slightly before removing
it. After removing the cap, hang it
on the cap hanger.
It is not unusual to hear a slight swoosh
when the cap is opened. When ins talling,
turn the cap clockwise until you hear a
click.
20
CAUTION
D Make sure the cap is tightened se-
curely to prevent fuel spillage in
the event of an accident.
D Use only a genuine Toyota fuel tank
cap for replacement. It is designed
to regulate fuel tank pressure.
 Loading...