


TABLE OF CONTENTS
1 QUICK GUIDE 9
2 BASIC FUNCTION 27
3 NAVIGATION SYSTEM 55
4
PHONE
5 AUDIO/VIDEO SYSTEM 173
6 VOICE COMMAND SYSTEM 241
7 INFORMATION 253
119
8
APPS
275
9 PERIPHERAL MONITORING SYSTEM 287
INDEX 313
1

Introduction
NAVIGATION SYSTEM OWNER’S MANUAL
This manual explains the operation of the Navigation System. Please read this
manual carefully to ensure proper use. Keep this manual in your vehicle at all
times.
The screen shots in this document and the actual screens of the navigation system differ depending on whether the functions and/or a contract existed and the
map data available at the time of producing this document.
NAVIGATION SYSTEM
The Navigation System is one of the most technologically advanced vehicle accessories ever developed. The system receives satellite signals from the Global
Positioning System (GPS) operated by the U.S. Department of Defense. Using
these signals and other vehicle sensors, the system indicates your present position and assists in locating a desired destination.
The navigation system is designed to select efficient routes from your present
starting location to your destination. The system is also designed to direct you
to a destination that is unfamiliar to you in an efficient manner. The system uses
DENSO maps. The calculated routes may not be the shortest nor the least traffic congested. Your own personal local knowledge or “short cut” may at times
be faster than the calculated routes.
The navigation system’s database includes Point of Interest categories to allow
you to easily select destinations such as restaurants and hotels. If a destination
is not in the database, you can enter the street address or a major intersection
close to it and the system will guide you there.
The system will provide both a visual map and audio instructions. The audio instructions will announce the distance remaining and the direction to turn in when
approaching an intersection. These voice instructions will help you keep your
eyes on the road and are timed to provide enough time to allow you to maneuver, change lanes or slow down.
Please be aware that all current vehicle navigation systems have certain limitations that may affect their ability to perform properly. The accuracy of the vehicle’s position depends on satellite conditions, road configuration, vehicle
condition or other circumstances. For more information on the limitations of the
system, refer to pages 117 through 118.
2
IMPORTANT INFORMATION ABOUT THIS MANUAL
CAUTION
NOTICE
For safety reasons, this manual indicates items requiring particular attention
with the following marks.
● This is a warning against anything which may cause injury to people if the warning is
ignored. You are informed about what you must or must not do in order to reduce the risk
of injury to yourself and others.
● This is a warning against anything which may cause damage to the vehicle or its equip-
ment if the warning is ignored. You are informed about what you must or must not do in
order to avoid or reduce the risk of damage to your vehicle and its equipment.
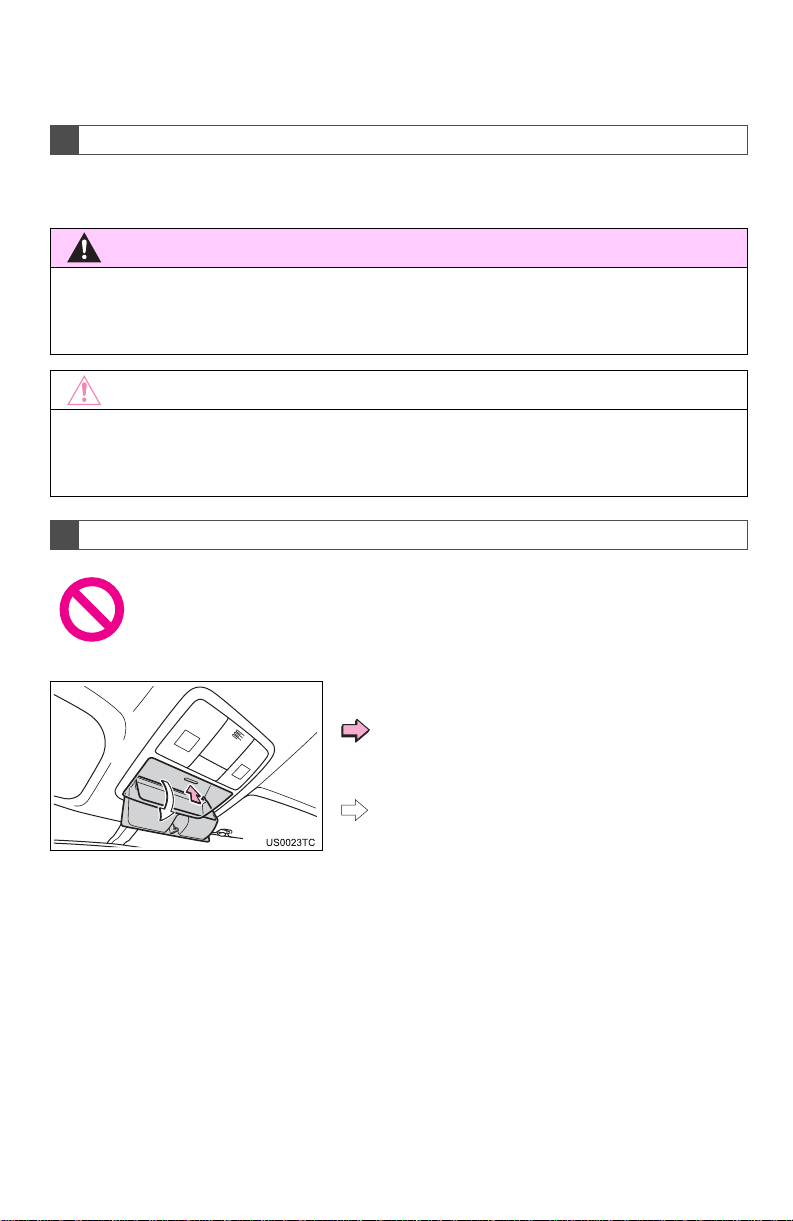
SYMBOLS USED IN ILLUSTRATIONS
Safety symbol
The symbol of a circle with a slash through it means “Do not”, “Do not do
this”, or “Do not let this happen”.
Arrows indicating operations
Indicates the action (pushing, turning, etc.)
used to operate switches and other devices.
Indicates the outcome of an operation (e.g.
a lid opens).
3

HOW TO READ THIS MANUAL
No. Name Description
Operational Outlines An outline of the operation is explained.
Main Operations The steps of an operation are explained.
Related Operations A main operation’s supplementary operations are described.
Information Useful information for the user is described.
■INFORMATION FOR GASOLINE VEHICLES IS WRITTEN IN BRACKETS
NEXT TO THE INFORMATION FOR HYBRID VEHICLES
Different writing styles for gasoline and hybrid vehicles
Example
When the power*1 <engine>*2 switch is in ACCESSORY or ON*
<IGNITION ON>*2 mode, the initial screen will be displayed and the system
will begin operating.
1
: Vehicles with hybrid system
*
2
: Vehicles with gasoline engine
*
4
1

SAFETY INSTRUCTION
CAUTION
To use this system in the safest possible
manner, follow all the safety tips shown
below.
This system is intended to assist in reaching the destination and, if used properly,
can do so. The driver is solely responsible
for the safe operation of your vehicle and
the safety of your passengers.
Do not use any feature of this system to
the extent it becomes a distraction and
prevents safe driving. The first priority
while driving should always be the safe operation of the vehicle. While driving, be
sure to observe all traffic regulations.
Prior to the actual use of this system, learn
how to use it and become thoroughly familiar with it. Read the entire Navigation System Owner’s Manual to make sure you
understand the system. Do not allow other
people to use this system until they have
read and understood the instructions in
this manual.
For your safety, some functions may become inoperable when driving. Unavailable screen buttons are dimmed. Only
when the vehicle is not moving, can the
destination and route selection be done.
● For safety, the driver should not operate
the navigation system while he/she is
driving. Insufficient attention to the road
and traffic may cause an accident.
● While driving, be sure to obey the traffic
regulations and maintain awareness of
the road conditions. If a traffic sign on
the road has been changed, route guidance may not have the updated information such as the direction of a one way
street.
While driving, listen to the voice instructions as much as possible and glance at
the screen briefly and only when it is safe.
However, do not totally rely on voice guidance. Use it just for reference. If the system cannot determine the current position
correctly, there is a possibility of incorrect,
late, or non-voice guidance.
The data in the system may occasionally
be incomplete. Road conditions, including
driving restrictions (no left turns, street closures, etc.) frequently change. Therefore,
before following any instructions from the
system, look to see whether the instruction
can be done safely and legally.
This system cannot warn about such
things as the safety of an area, condition of
streets, and availability of emergency services. If unsure about the safety of an area, do not drive into it. Under no
circumstances is this system a substitute
for the driver’s personal judgement.
Use this system only in locations where it
is legal to do so. Some states/provinces
may have laws prohibiting the use of video
and navigation screens next to the driver.
5

TABLE OF CONTENTS
QUICK GUIDE
1
1. NAVIGATION OPERATION ............ 10
OVERVIEW BUTTON AND
GUIDANCE SCREEN ......................... 10
REGISTERING HOME .......................... 12
REGISTERING PRESET
DESTINATIONS.................................. 14
OPERATION FLOW:
GUIDING THE ROUTE....................... 16
SETTING HOME AS
THE DESTINATION............................ 17
2. FUNCTION INDEX........................... 18
NAVIGATION SYSTEM
FUNCTION INDEX.............................. 18
3. QUICK REFERENCE....................... 20
“Destination” SCREEN........................... 20
“Setup” SCREEN................................... 22
“Information” SCREEN........................... 24
BASIC FUNCTION
2
1. BASIC INFORMATION BEFORE
OPERATION .................................. 28
INITIAL SCREEN................................... 28
TOUCH SCREEN OPERATION............ 29
INPUTTING LETTERS AND
NUMBERS/LIST SCREEN
OPERATION....................................... 30
SCREEN ADJUSTMENT....................... 32
MAP SCREEN OPERATION................. 34
2. SETUP ............................................. 42
GENERAL SETTINGS........................... 42
VOICE SETTINGS................................. 51
NAVIGATION SYSTEM
3
1. DESTINATION SEARCH ................ 56
DESTINATION SEARCH....................... 56
STARTING ROUTE GUIDANCE............ 71
2. ROUTE GUIDANCE........................ 74
ROUTE GUIDANCE SCREEN............... 74
TYPICAL VOICE GUIDANCE
PROMPTS........................................... 77
DISTANCE AND TIME
TO DESTINATION............................... 80
SETTING AND DELETING
DESTINATIONS.................................. 81
SETTING ROUTE.................................. 83
3. ADDRESS BOOK ........................... 91
NAVIGATION SETTINGS...................... 91
4. SETUP........................................... 105
DETAILED NAVIGATION
SETTINGS......................................... 105
VEHICLE SETTINGS........................... 112
5. GPS (GLOBAL POSITIONING
SYSTEM)..................................... 117
LIMITATIONS OF THE NAVIGATION
SYSTEM............................................ 117
6

4
PHONE
VOICE COMMAND SYSTEM
6
1. PHONE OPERATION.................... 120
QUICK REFERENCE.......................... 120
PHONE (HANDS-FREE SYSTEM
FOR CELLULAR PHONE)................ 122
REGISTER A Bluetooth
CALL ON THE Bluetooth
RECEIVE ON THE Bluetooth
PHONE ............................................. 137
TALK ON THE Bluetooth
Bluetooth
®
PHONE MESSAGE
FUNCTION........................................ 141
®
PHONE....... 127
®
PHONE..... 131
®
®
PHONE..... 138
2. SETUP ........................................... 144
PHONE SETTINGS............................. 144
Bluetooth
5
®
SETTINGS ........................ 163
AUDIO/VIDEO SYSTEM
1. AUDIO/VIDEO SYSTEM
OPERATION................................ 174
QUICK REFERENCE.......................... 174
SOME BASICS.................................... 176
RADIO OPERATION........................... 181
HD Radio™ TECHNOLOGY
INFORMATION................................. 184
RADIO OPERATION
(XM Satellite Radio BROADCAST)... 188
RADIO OPERATION
(INTERNET RADIO
BROADCAST)................................... 193
DVD PLAYER OPERATION................ 194
USB MEMORY OPERATION.............. 212
iPod OPERATION............................... 217
Bluetooth® AUDIO OPERATION ........ 221
AUDIO/VIDEO REMOTE CONTROLS
(STEERING SWITCHES) ................. 229
AUDIO/VIDEO SYSTEM
OPERATING HINTS......................... 230
2. SETUP ........................................... 239
AUDIO SETTINGS .............................. 239
1. VOICE COMMAND SYSTEM
OPERATION................................ 242
VOICE COMMAND SYSTEM.............. 242
NATURAL SPEECH INFORMATION
(ENGLISH ONLY) ............................. 248
EXPANDED VOICE COMMANDS....... 249
COMMAND LIST ................................. 250
INFORMATION
7
1. INFORMATION DISPLAY............. 254
FUEL CONSUMPTION........................ 254
MAP DATABASE VERSION AND
COVERAGE AREA ........................... 256
2. XM FUNCTION-OVERVIEW......... 259
XM SERVICES .................................... 259
3. XM FUNCTION OPERATION....... 260
XM Sports............................................ 260
XM Stocks............................................ 263
XM Fuel Prices..................................... 265
XM NavWeather™............................... 268
XM NavTraffic
®
.................................... 271
4. SETUP........................................... 274
XM SETTINGS..................................... 274
1
2
3
4
5
6
7
8
9
7

TABLE OF CONTENTS
APPS
8
1. ENTUNE-OVERVIEW.................... 276
ENTUNE SERVICE ............................. 276
BEFORE USING ENTUNE.................. 278
2. ENTUNE OPERATION .................. 279
ACTIVATING “APPS” .......................... 279
LINKING “APPS” AND NAVIGATION
LOCAL FUNCTION........................... 282
INPUTTING KEYWORD
OPERATION..................................... 284
PERIPHERAL MONITORING
9
SYSTEM
1. TOYOTA PARKING ASSIST
MONITOR..................................... 288
TOYOTA PARKING ASSIST
MONITOR ......................................... 288
PERPENDICULAR PARKING
(ESTIMATED COURSE LINE
DISPLAY MODE).............................. 294
PERPENDICULAR PARKING
(PARKING ASSIST GUIDE LINE
DISPLAY MODE).............................. 296
PARALLEL PARKING.......................... 298
TOYOTA PARKING ASSIST
MONITOR PRECAUTIONS .............. 305
THINGS YOU SHOULD KNOW .......... 310
INDEX
ALPHABETICAL INDEX ................... 314
8

1
QUICK GUIDE
NAVIGATION OPERATION
1
1
1. OVERVIEW BUTTON AND
GUIDANCE SCREEN.................. 10
2. REGISTERING HOME .................. 12
3. REGISTERING PRESET
DESTINATIONS.......................... 14
4. OPERATION FLOW:
GUIDING THE ROUTE................ 16
5. SETTING HOME AS
THE DESTINATION.................... 17
FUNCTION INDEX
2
1. NAVIGATION SYSTEM
FUNCTION INDEX...................... 18
QUICK REFERENCE
3
1. “Destination” SCREEN................ 20
2. “Setup” SCREEN ......................... 22
3. “Information” SCREEN................ 24
2
3
4
5
6
7
8
9
9
1. NAVIGATION OPERATION
*
1. OVERVIEW BUTTON AND GUIDANCE SCREEN
No. Name Function Page
This symbol indicates whether the map orientaNorth-up or
heading-up symbol
tion is set to north-up or heading-up. Touching
this symbol changes the map orientation. Both
north-up and heading-up symbols display the ve-
hicles direction as a letter (e.g. N for north).
41
10
Scale indicator This figure indicates the map scale. 40
24, 254,
“INFO/APPS”
(“INFO”) button
“SETUP” button Press to display the “Setup” screen.
“DEST” button Press to display the “Destination” screen.
“MAP/VOICE”
button
Zoom out button Touch to reduce the map scale. 40
Press to display the “Information” screen.
For vehicles sold in Canada, the “INFO” button is
used instead of the “INFO/APPS” button.
Press to repeat a voice guidance, cancel scrolling
on the map screen, start guidance, and to display
the current position.
256, 260,
263, 265,
268, 271,
279, 282
22, 32, 42,
51, 91, 105,
112, 144,
163, 239,
274
12, 14, 16,
17, 20, 56
34

1. NAVIGATION OPERATION
No. Name Function Page
Touch to obtain a broader view. Some of the but-
“ Off”
“Mark”
“Route” Touch to change the route. 81, 83
“Show on Map”
Zoom in button Touch to magnify the map scale. 40
“Map Mode” Touch to display the “Map Mode” screen. 38
tons on the screen will not be displayed. They are
displayed again by touching “On ”.
Touch to register the current position or the cursor position as an address book entry.
Touch to browse information about guidance
route, to set the POI (Point of Interest) icons to be
displayed on the screen, to record the route, etc.
109
35
87, 272
1
BASIC FUNCTION
Distance and
time to destination
XM indicator
“GPS” mark (Global Positioning
System)
Displays the distance, estimated travel and arrival time to the destination.
This mark is displayed when XM information is received.
Whenever the vehicle is receiving signals from
the GPS, this mark is displayed.
80
270, 272
117
*: Press and hold the “PWR VOL” knob for 6 seconds or more to turn off the screen and restart
the navigation system. Do this when the vehicle-mounted device response is extremely slow.
The touch button sensitivity for the buttons outside of the screen (e.g. DEST, INFO, RADIO) can
be changed.
For details, refer to “Owner’s Manual”.
11
1. NAVIGATION OPERATION
123
4
5
2. REGISTERING HOME
Press the “DEST” button.
Touch “Go Home”.
If a home address has not been registered, it can be registered by touching
“Go Home”.
There are 4 different methods to
search your home. (See “DESTINATION SEARCH” on page 56.)
Touch “Enter”.
The “Edit Home” screen is displayed.
Touch “Yes”.
12

Touch “OK”.
6
Registration of home is complete.
Home can also be registered by touch-
ing “Navigation” on the “Setup” screen.
(See “REGISTERING HOME” on page
92.)
The name, location, phone number and
icon can be changed. (See “EDITING
HOME” on page 92.)
The registered points can be used on
the “Destination” screen. (See “DESTINATION SEARCH BY HOME” on page
57.)
1. NAVIGATION OPERATION
1
BASIC FUNCTION
13
1. NAVIGATION OPERATION
1
2
345
3. REGISTERING PRESET DESTINATIONS
Press the “DEST” button.
Touch one of the preset destination buttons.
A preset destination can be set to any
preset destination button that has not
yet been set.
There are 4 different methods to
search preset destinations. (See
“DESTINATION SEARCH” on
page 56.)
Touch “Enter”.
The “Edit Preset Destination” screen is
displayed.
Touch “Yes”.
14

Touch “OK”.
6
Registration of preset destinations is
complete.
Preset destinations can also be registered by touching “Navigation” on the
“Setup” screen. (See “REGISTERING
PRESET DESTINATIONS” on page 94.)
The name, location, phone number and
icon can be changed. (See “EDITING
PRESET DESTINATIONS” on page 94.)
The registered points can be used on
the “Destination” screen. (See “DESTINATION SEARCH BY PRESET DESTINATIONS” on page 57.)
1. NAVIGATION OPERATION
1
BASIC FUNCTION
15
1. NAVIGATION OPERATION
123
4
4. OPERATION FLOW: GUIDING THE ROUTE
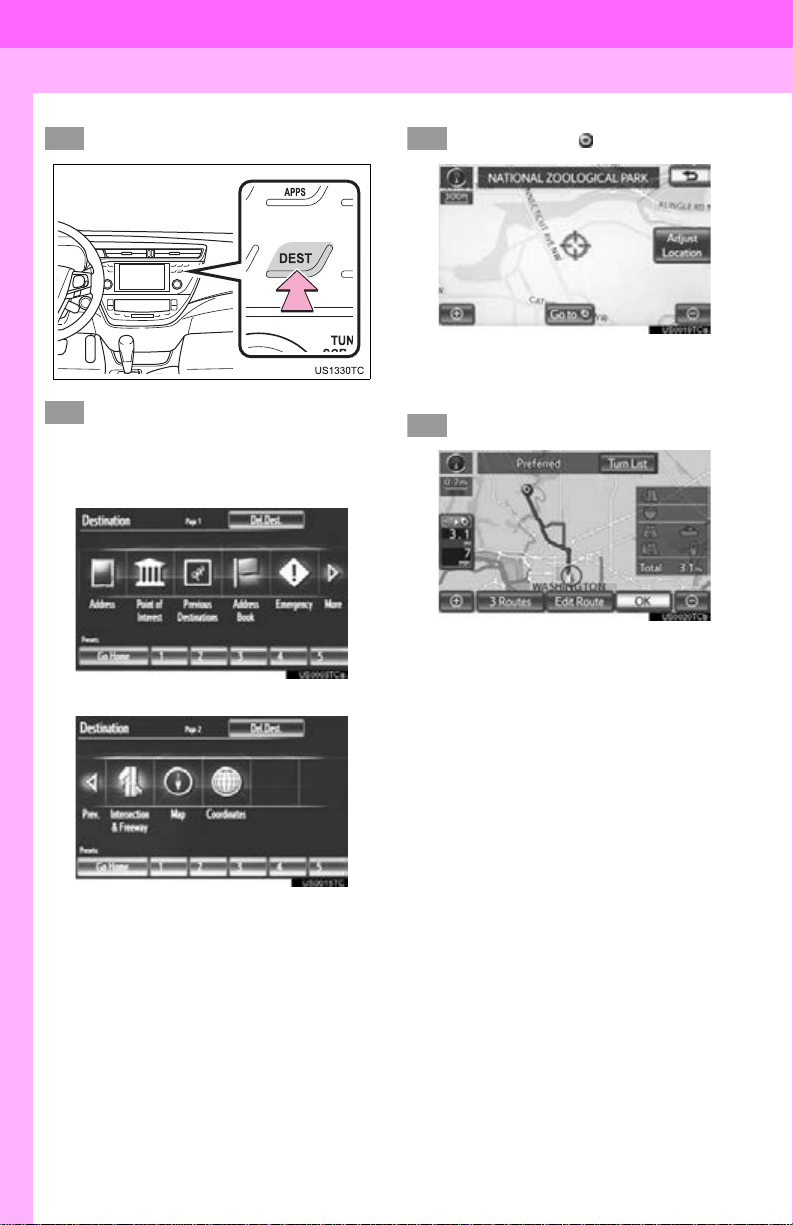
Press the “DEST” button.
There are 10 different methods to
search destinations. (See “DESTINATION SEARCH” on page 56.)
Page 1
Page 2
Touch “Go to ”.
The navigation system performs a
search for the route.
Touch “OK”, and start driving.
Routes other than the one recommended can also be selected. (See “STARTING ROUTE GUIDANCE” on page 71.)
Guidance to the destination is displayed
on the screen and can be heard via
voice guidance.
16
1. NAVIGATION OPERATION
123
5. SETTING HOME AS THE DESTINATION
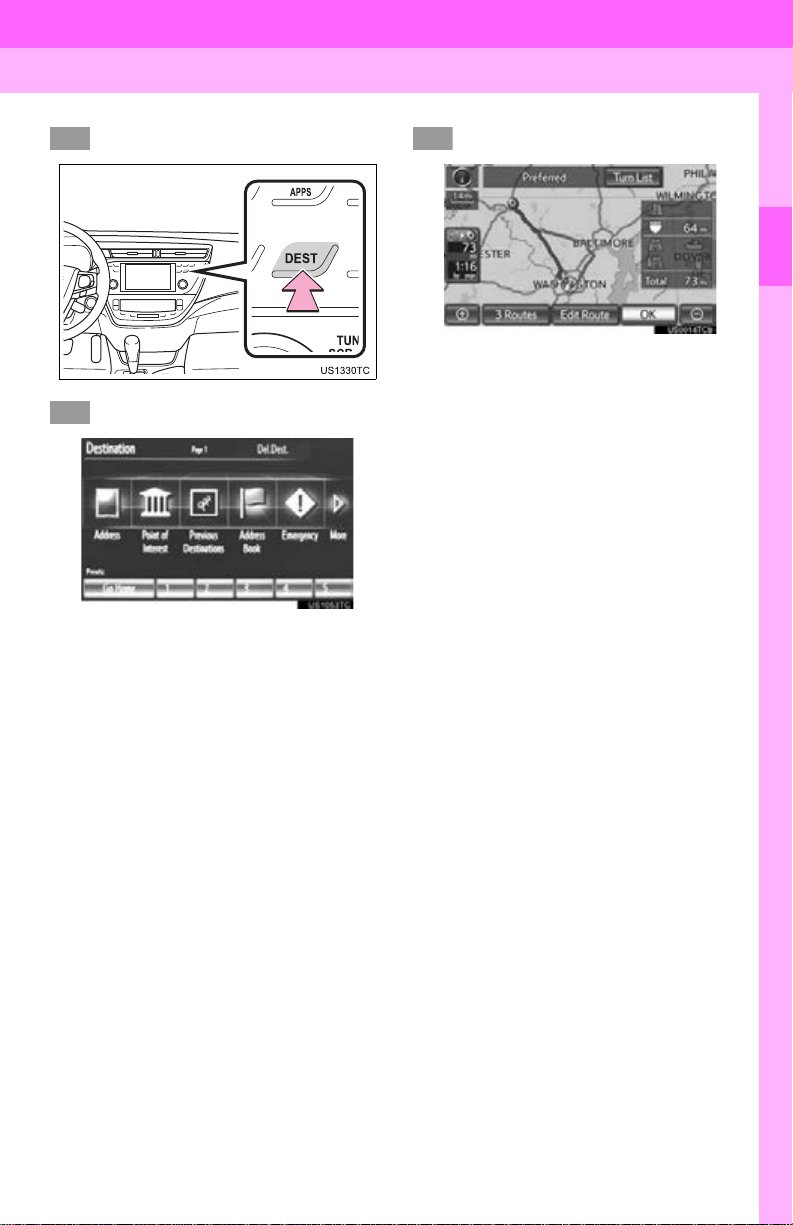
Press the “DEST” button.
Touch “Go Home”.
“Go Home” can be used if your home
address has been registered. (To register home, see “REGISTERING HOME”
on page 92.)
Your home address is set as the destination. The navigation system performs
a search for the route.
Touch “OK”, and start driving.
1
BASIC FUNCTION
Routes other than the one recommended can also be selected. (See “STARTING ROUTE GUIDANCE” on page 71.)
Guidance to the destination is displayed
on the screen and can be heard via
voice guidance.
17

2. FUNCTION INDEX
1. NAVIGATION SYSTEM FUNCTION INDEX
Map
Displaying maps Page
Viewing the map screen 10
Displaying the current position 34
Viewing the current position vicinity map 34
Changing the scale 40
Changing the map orientation 41
Displaying Points of Interest 87
Displaying the estimated travel/arrival time to the destination 80
Selecting the map mode 38
Deleting map screen buttons 109
Displaying traffic information 271
Searching destinations Page
Searching the destination 56
Changing the selected search area 56
Operating the map location of the selected destination 71
Route guidance
Before starting route guidance Page
Setting the destination 71
Viewing alternative routes 72
Starting route guidance 71
Before starting or during route guidance Page
Viewing the route 71
Adding destinations 81
Changing the route 83
Displaying the estimated travel/arrival time to the destination 80
18

2. FUNCTION INDEX
During route guidance Page
Pausing route guidance 86
Adjusting route guidance volume 52
Deleting the destination 82
Displaying the entire route map 84
Useful functions
Address book Page
Registering address book entries 96
Marking icons on the map 97
Information Page
Displaying vehicle maintenance 112
Hands-free system (for cellular phone) Page
Initiating Bluetooth
Making a call on a Bluetooth® phone 131
Receiving a call on the Bluetooth® phone 137
Operating the system with your voice 242
®
Voice command system Page
122
1
BASIC FUNCTION
19
3. QUICK REFERENCE
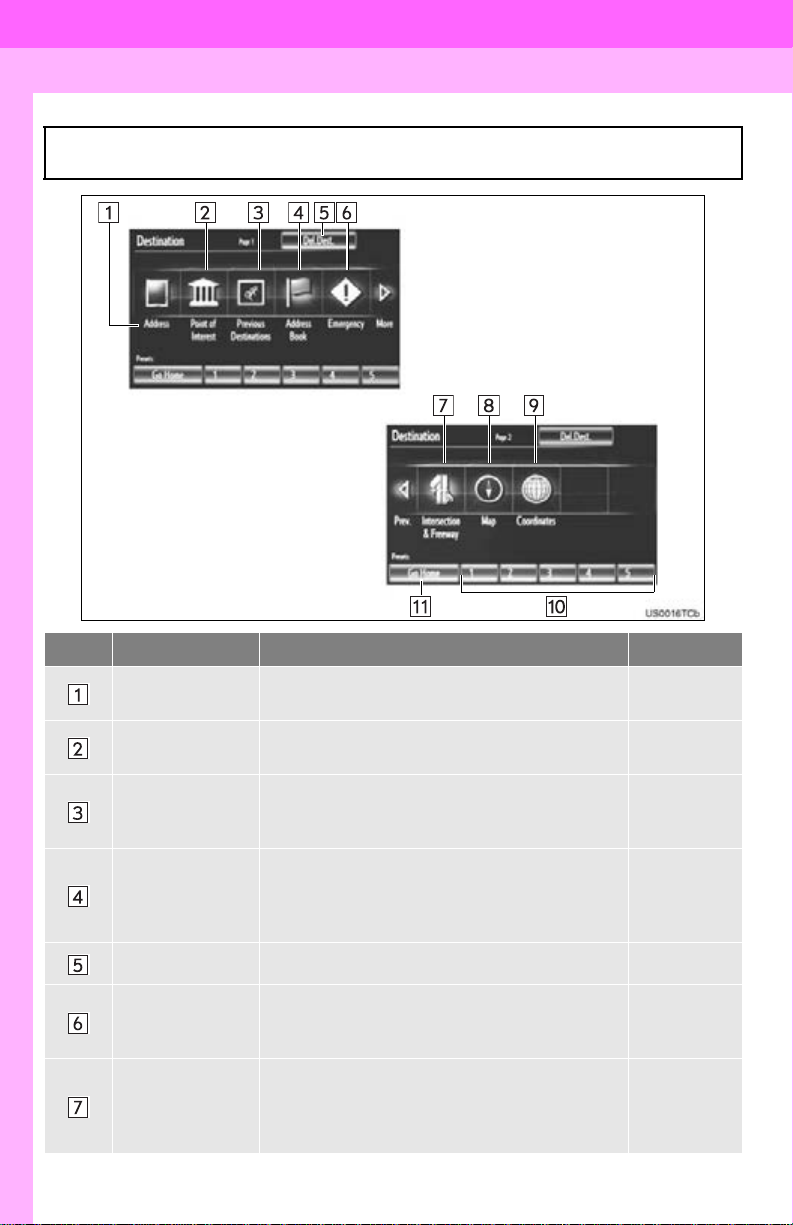
1. “Destination” SCREEN
The “Destination” screen enables a destination search. Press the “DEST” button
to display the “Destination” screen.
No. Name Function Page
“Address”
“Point of Interest”
“Previous Destinations”
“Address Book”
“Del.Dest.” Touch to delete set destinations. 70
“Emergency”
“Intersection &
Freeway”
20
Touch to input a house number and the street ad-
dress using the input keys.
Touch to select one of the POIs that have already
been stored in the system’s database.
Touch to select a destination from any of the last
100 previously set destinations and from the pre-
vious starting point.
Touch to select the desired location from a regis-
tered entry in “Address book”. (To register ad-
dress book entries, see “REGISTERING
ADDRESS BOOK ENTRIES” on page 96.)
Touch to select one of the 4 categories of emer-
gency service points that have already been
stored in the system’s database.
Touch to enter the names of two intersecting
streets or a freeway (interstate) entrance or exit.
This is helpful if only the general vicinity, not the
specific address, is known.
58
60
65
66
66
67

3. QUICK REFERENCE
No. Name Function Page
“Map”
Touch to enable setting a destination by touching
a location on the map screen.
69
“Coordinates” Touch to enter latitude and longitude coordinates. 69
Touch to select one of the 5 preset destination
points as a destination. If a preset destination
Preset destination buttons
point has not been registered, a message will be
displayed asking if it is desirable to set a destination to the preset screen button. (To register a
57
preset destination, see “REGISTERING PRESET DESTINATIONS” on page 94.)
Touch to select your personal home address
without having to enter the address each time. If
“Go Home”
a home address has not been registered, a message will be displayed and the setting screen will
57
automatically appear. (To register home, see
“REGISTERING HOME” on page 92.)
1
BASIC FUNCTION
21
3. QUICK REFERENCE
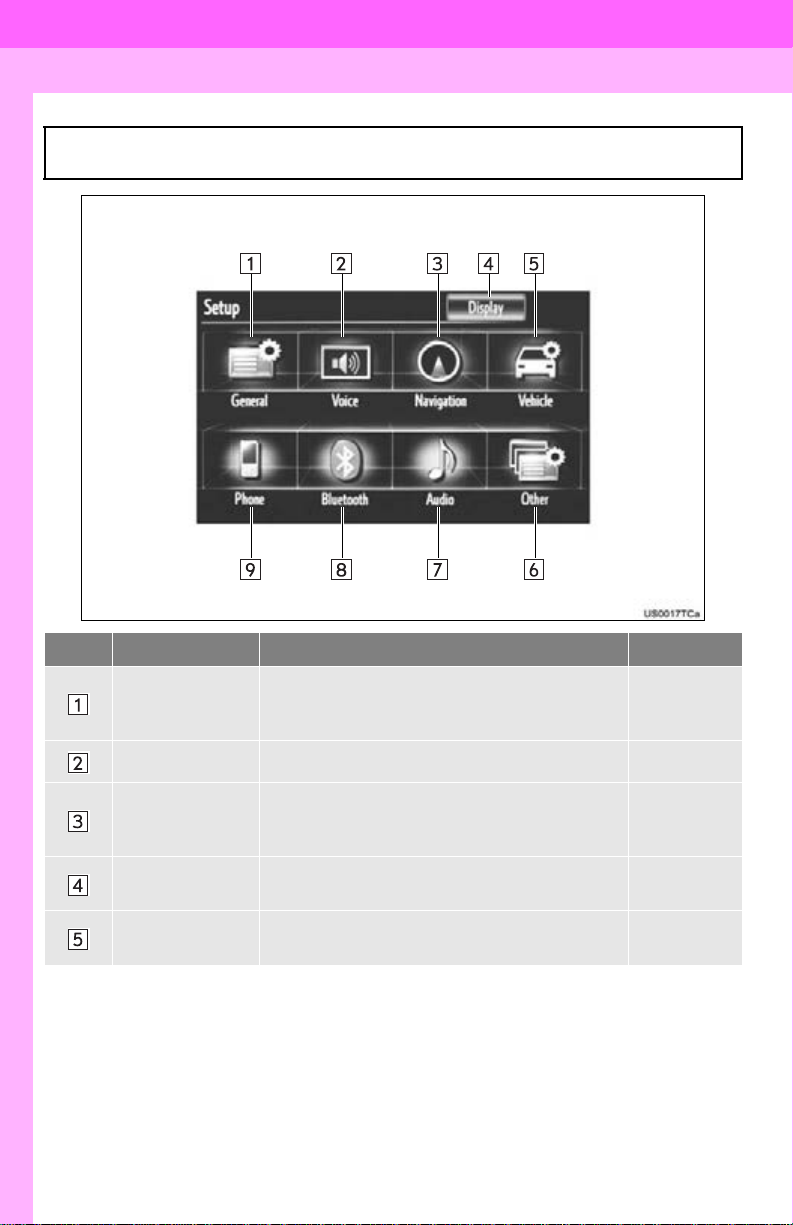
2. “Setup” SCREEN
The items shown on the “Setup” screen can be set. Press the “SETUP” button to
display the “Setup” screen.
No. Name Function Page
Touch to change the selected language, opera“General”
“Voice” Touch to set the voice guidance settings. 51
“Navigation”
“Display”
“Vehicle”
22
tion sound settings, automatic screen change,
etc.
Touch to set home, preset destinations, address
book, areas to avoid, etc. or to delete previous
destinations.
Touch to adjust the contrast and brightness of the
screens, turn the display off, etc.
Touch to set vehicle information such as mainte-
nance information.
42
91
32
112

3. QUICK REFERENCE
No. Name Function Page
“Other”
Touch to set XM Sports, XM Stocks and XM Fuel
Prices.
274
“Audio” Touch to set iPod and HD Radio channel. 239
“Bluetooth*”
“Phone”
Touch to set Bluetooth® phones and Bluetooth
audio devices.
Touch to set the phone sound, phone book and
message settings, etc.
*: Bluetooth is a registered trademark of Bluetooth SIG, Inc.
1
®
163
BASIC FUNCTION
144
23
3. QUICK REFERENCE
3. “Information” SCREEN
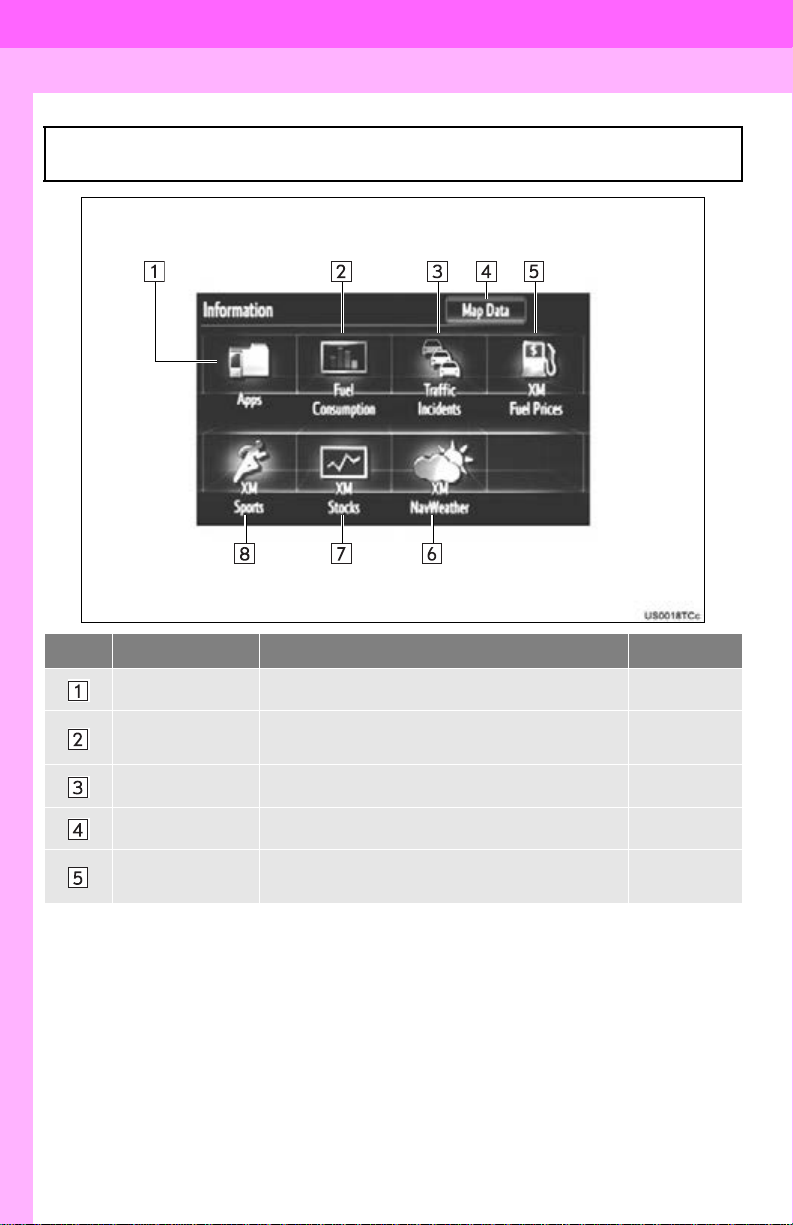
This screen can be used to display the XM satellite system, fuel consumption, etc.
Press the “INFO/APPS” button to display the “Information” screen.
No. Name Function Page
“Apps” Touch to display the “Apps” screen. 279
“Fuel Consump-
tion”
“Traffic Incidents” Touch to display traffic incidents. 271
“Map Data” Touch to display map data information. 256
“XM Fuel Prices”
24
Touch to display fuel consumption information. 254
Touch to display current fuel prices and gas sta-
tion locations information.
265

3. QUICK REFERENCE
No. Name Function Page
“XM NavWeather”
“XM Stocks”
“XM Sports”
Touch to display weather information. 268
Touch to display personally selected stocks information.
Touch to display personally selected sports
teams information.
263
260
1
BASIC FUNCTION
25

3. QUICK REFERENCE
26

2
BASIC FUNCTION
BASIC INFORMA TION BEFORE
1
OPERATION
1. INITIAL SCREEN .......................... 28
1
2
2. TOUCH SCREEN OPERATION.... 29
3. INPUTTING LETTERS AND
NUMBERS/LIST SCREEN
OPERATION ............................... 30
4. SCREEN ADJUSTMENT .............. 32
SCREEN SETTINGS ADJUSTMENT.... 32
5. MAP SCREEN OPERATION......... 34
CURRENT POSITION DISPLAY........... 34
SCREEN SCROLL OPERATION .......... 34
SWITCHING THE SCREENS................ 38
MAP SCALE .......................................... 40
ORIENTATION OF THE MAP ............... 41
STANDARD MAP ICONS...................... 41
SETUP
2
1. GENERAL SETTINGS .................. 42
SCREENS FOR GENERAL
SETTINGS .......................................... 42
2. VOICE SETTINGS......................... 51
SCREEN FOR VOICE SETTINGS ........ 51
3
4
5
6
7
8
9
27
1. BASIC INFORMATION BEFORE OPERATION
CAUTION
1. INITIAL SCREEN
1 When the power <engine> switch is in
ACCESSORY or ON <IGNITION ON>
mode, the initial screen will be displayed and the system will begin operating.
Images sh own on the initial screen can
be changed to suit individual preferences. (See page 46.)
● When the vehicle is stopped with the
hybrid system operating <the engine
>, always apply the parking
running
brake for safety.
After a few seconds, the “CAUTION”
screen will be displayed.
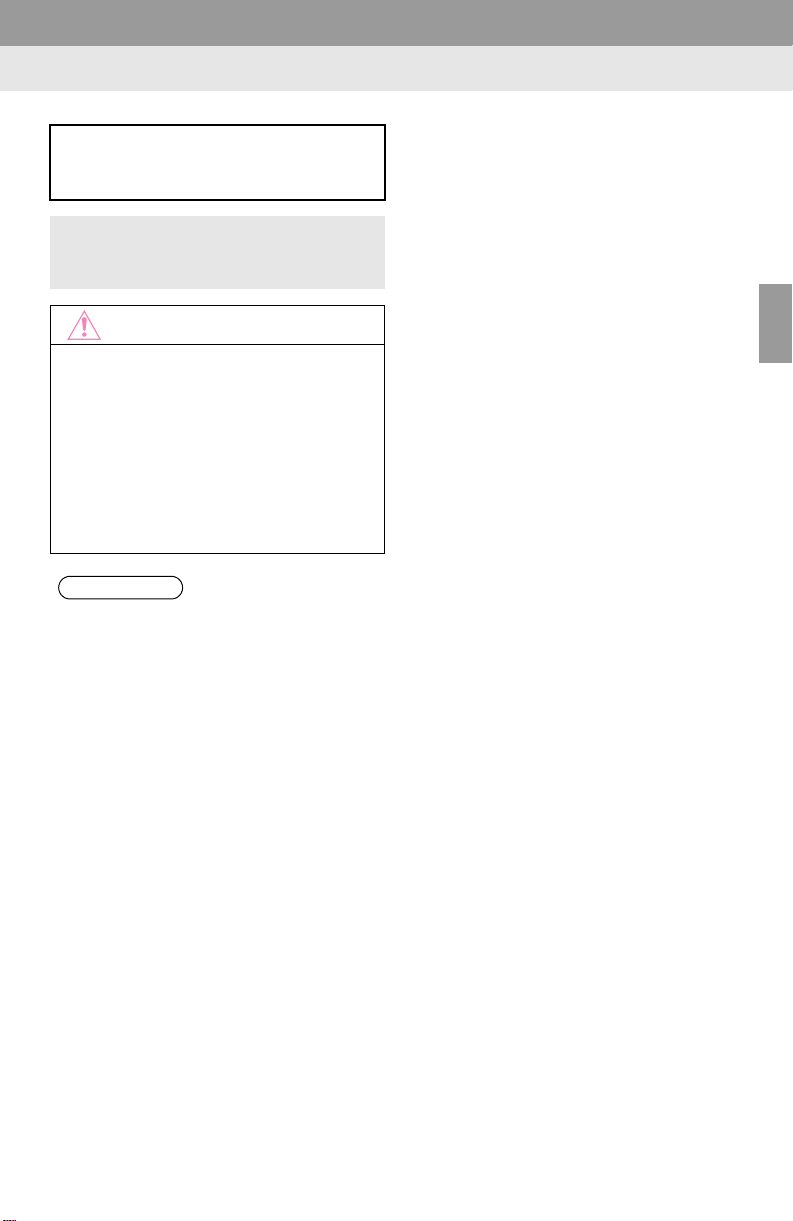
MAINTENANCE INFORMATION
This system reminds users when to replace certain parts or components and
shows dealer information (if registered) on the screen.
When the vehicle reaches a previously
set driving distance or date specified
for a scheduled maintenance check,
the “Maintenance Reminder” screen
will be displayed when the navigation
system is turned on.
This screen goes off if the screen is not
operated for several seconds.
To prevent this screen from being dis-
played again, touch “Do Not Display
This Message Again”.
To register maintenance information,
see “MAINTENANCE” on page 112.
After about 5 seconds, the “CAUTION”
screen automatically switches to the map
screen. (If a button other than the “MAP/
VOICE” button is pressed, the function’s
corresponding screen will be displayed.)
28
1. BASIC INFORMATION BEFORE OPERATION
NOTICE
INFORMATION
2. TOUCH SCREEN OPERATION
This system is operated mainly by the
buttons on the screen. (Referred to as
screen buttons in this manual.)
When a screen button is touched, a
beep sounds. (To set the beep sound,
see page 42.)
2
● To prevent damaging the screen, lightly
touch the screen buttons with your finger.
● Do not use objects other than your finger
to touch the screen.
● Wipe off fingerprints using a glass cl ean-
ing cloth. Do not use chemical cleaners
to clean the screen, as they may damage the touch screen.
● If the system does not respond to touch-
ing a screen button, move your finger
away from the screen and then touch it
again.
● Dimmed screen buttons cannot be oper-
ated.
● The displayed image may become
darker and moving images may be
slightly distorted when the screen is
cold.
● In extremely cold conditions, the map
may not be displayed and the data input
by a user may be deleted. Also, the
screen buttons may be harder than
usual to depress.
● When you look at the screen through
polarized material such as polarized
sunglasses, the screen may be dark and
hard to see. If so, look at the screen
from different angles, adjust the screen
settings on the “Display” screen or take
off your sunglasses.
BASIC FUNCTION
29
1. BASIC INFORMATION BEFORE OPERATION
3. INPUTTING LETTERS AND NUMBERS/LIST SCREEN OPERATION
When searching for an address or
name, or entering data, letters and
numbers can be input via the screen.
Keyboard layout can be changed. (See
page 45.)
TO INPUT LETTERS AND
NUMBERS
1 Touch “A-Z” to display the alphabet
keys.
2 Touch the keys directly to enter letters
or numbers.
TO INPUT SYMBOLS
1 Touch “Other” to display symbol keys.
2 Touch the symbol keys directly to enter
symbols.
: Touch to erase one symbol.
Touch and hold to continue erasing symbols.
: Touch to erase one character.
Touch and hold to continue erasing characters.
On certain letter entry screens, letters can
be entered in upper or lower case.
Icon Function
Touch to enter in lower case.
Touch to enter in upper case.
30
TO DISPLAY THE LIST
1 Touch “OK” to search for an address
or a name.
Matching items from the database are
listed even if the entered address or name
is incomplete.
The list will be displayed automatically if
the maximum number of characters is
entered or the number of matching items
is 5 or less.

1. BASIC INFORMATION BEFORE OPERATION
INFORMATION
SORTING
The order of a list displayed on the
screen can be rearranged.
1 Touch “Sort”.
2
● The number of matching items is shown
on the right side of the screen. If the
number of matching items is more than
999, the system displays “” on the
screen.
LIST SCREEN OPERATION
When a list is displayed, use the appropriate screen button to scroll through
the list.
Icon Function
Touch to skip to the next or previous page.
Touch and hold or to scroll
through the displayed list.
This indicates the displayed
screen’s position.
If appears to the right of an
item name, the complete name is
too long to display.
Touch to scroll to the end of the
name.
Touch to scroll to the beginning
of the name.
2 Touch the desired sorting criteria.
Screen button Function
Touch to sort in order of
“Distance”
“Date”
“Category”
“Icon”
“Name”
“Brand”
“Price”
distance from the current
position.
Touch to sort in order of
date.
Touch to sort in order of
category.
Touch to sort in order of
icon.
Touch to sort in order of
name.
Touch to sort in order of
brand name. (XM functions)
Touch to sort in order of
price. (XM functions)
BASIC FUNCTION
31

1. BASIC INFORMATION BEFORE OPERATION
4. SCREEN ADJUSTMENT
The contrast and brightness of the
screen display and the image the camera displays can be adjusted. The display can also be turned off, and/or
changed to either day or night mode.
(For information regarding audio/video
screen adjustment, see “AUDIO
SCREEN ADJUSTMENT” on page
204.)
SCREEN SETTINGS
ADJUSTMENT
ADJUSTING SCREEN DISPLAY
AND CAMERA SETTINGS
1 Press the “SETUP” button.
Adj usting the screen display
“Camera”: Touch to adjust the image the
camera displays.
Adjusting the image the camera displays
“Map·Menu”: Touch to return to the
screen display settings.
2 Touch “Display”.
32

1. BASIC INFORMATION BEFORE OPERATION
INFORMATION
CONTRAST AND BRIGHTNESS
ADJUSTMENT
The contrast and brightness of the
screen can be adjusted according to
the brightness of your surroundings.
The display can also be turned off.
1 Touch “” or “” to select the desired
function (“Contrast” or “Brightness”).
2 Touch the desired screen button to ad-
just contrast and brightness.
Screen button Function
“Contrast” “+”
“Contrast” “-”
“Brightness” “+”
Touch to strengthen the
contrast of the screen.
Touch to weaken the
contrast of the screen.
Touch to brighten the
screen.
CHANGING BETWEEN DAY
AND NIGHT MODE
Depending on the position of the headlight switch, the screen changes to day
or night mode.
1 To display the screen in day mode,
even with the headlight switch on,
touch “Day Mode”.
When the instrument panel light control
knob is turned fully clockwise, the navigation system screen will always be in day
mode regardless of the headlight switch
position.
● If the screen is set to day mode with the
headlight switch turned on, this condition
is memorized even with the hybrid system <engine> turned off.
2
BASIC FUNCTION
“Brightness” “-”
Touch to darken the
screen.
3 After adjusting the screen, touch
“OK”.
The screen goes off when “Screen Off” is
touched. To turn the screen back on,
press any button. The selected screen
appears.
33

1. BASIC INFORMATION BEFORE OPERATION
INFORMATION
5. MAP SCREEN OPERATION
CURRENT POSITION
DISPLAY
When starting the navigation system,
the current position is displayed first.
This screen displays the current position and a map of the surrounding area.
The current position mark ( ) appears in
the center or bottom center of the map
screen.
A street name will appear on the bottom of
the screen, depending on the scale of the
map ( ).
The screen can be returned to this map
screen that shows the current position at
any time, from any screen by pressing the
“MAP/VOICE” button.
To correct the current position manually,
see page 109.
● While driving, the current position mark
is fixed on the screen and the map
moves.
● The current position is automatically set
as the vehicle receives signals from the
GPS (Global Positioning System). If the
current position is not co rrect, it is automatically corrected after the vehicle
receives signals from the GPS.
● After 12-volt battery disconnection, or on
a new vehicle, the current position may
not be correct. As soon as the system
receives signals from the GPS, the correct current position is displayed.
SCREEN SCROLL
OPERATION
When any point on the map is touched,
that point moves to the center of the
screen and is shown by the cursor
mark ( ).
Use the scroll feature to move the desired
point to the center of the screen for looking at a point on the map that is different
from the current position.
If a finger touches and holds the map
screen, it will continue scrolling in that
direction until the finger is removed.
A street name, city name, etc. of the
touched point will be shown, depending
on the scale of the map ( ). Distance
from the current position to will also be
shown ( ).
After the screen is scrolled, the map
remains centered at the selected location until another function is activated.
The current position mark will continue
to move along your actual route and
may move off the screen. When the
“MAP/VOICE” button is pressed, the
current position mark returns to the center of the screen and the map moves as
the vehicle proceeds along the designated route.
When the scroll feature is used, the cur-
rent position mark may disappear from
the screen. Press the “MAP/VOICE”
button to display the current position on
the map screen.
34

1. BASIC INFORMATION BEFORE OPERATION
INFORMATION
TO SET THE CURSOR
POSITION AS A DESTINATION
A specific point on the map can be set
as a destination using the scroll function.
1 Touch “Enter ”.
The screen changes and displays the map
location of the selected destination and
the route preference. (See “STARTING
ROUTE GUIDANCE” on page 71.)
TO REGISTER THE CURSOR
POSITION AS AN ADDRESS
BOOK ENTRY
Address book entry registration enables easy access to a specific point.
2 This screen is displayed.
The registered point is shown by on the
map.
To change the icon or name, etc., see
“EDITING ADDRESS BOOK ENTRIES”
on page 97.
● Up to 100 address book entries can be
registered. If there is an attempt to re gister more than 100 address book entries,
an error message will appear.
TO SEE INFORMATION ABOUT
THE ICON WHERE THE
CURSOR IS SET
2
BASIC FUNCTION
1 Touch “Mark”.
To display information about an icon, set
the cursor on it.
35

1. BASIC INFORMATION BEFORE OPERATION
■POI INFORMATION
When the cursor is set on a POI icon,
the name and “Info” are displayed at
the top of the screen.
1 Touch “Info”.
2 Information such as the name, ad-
dress, position and phone number are
displayed.
■ADDRESS BOOK ENTRY INFOR-
MATION
When the cursor is set on an address
book entry icon, the name and
“Info”
are displayed at the top of the screen.
1 Touch “Info”.
2 Information such as the name, ad-
dress, position and phone number are
displayed.
If “Enter ” is touched, the cursor
position will be set as a destination.
If a destination has already been set,
“Go Directly” and “Add to Route” will
be displayed.
“Go Directly”: Touch to delete the existing destination(s) and set a new one.
“Add to Route”: Touch to add a destination.
To register this POI as an address book
entry, touch “Mark”. (See “REGISTERING ADDRESS BOOK ENTRIES” on
page 96.)
If is touched, the registered
phone number can be called.
The desired POI can be displayed on
the map screen. (See “SHOW ON MAP”
on page 87.)
36
If “Enter ” is touched, the cursor
position will be set as a destination.
If a destination has already been set,
“Go Directly” and “Add to Route” will
be displayed.
“Go Directly”: Touch to delete the existing destination(s) and set a new one.
“Add to Route”: Touch to add a destination.
To edit an address book entry, touch
“Edit”. (See “EDITING ADDRESS
BOOK ENTRIES” on page 97.)
To delete an address book entry, touch
“Delete”.
If is touched, the registered
phone number can be called.

1. BASIC INFORMATION BEFORE OPERATION
■DESTINATION INFORMATION
When the cursor is set on a destination
icon, the name and “Info” are displayed on the top of the screen.
1 Touch “Info”.
2 Information such as the name, ad-
dress, position and phone number are
displayed.
■XM NavTraffic
®
TEXT INFORMA-
TION
When the XM NavTraffic® icon on the
map screen is touched, the XM
NavTraffic
®
information bar will appear
on the upper part of the screen.
1 Touch “Info”.
2 Traffic information is displayed on the
screen.
2
BASIC FUNCTION
To delete a destination, touch “Delete”.
If is touched, the registered
phone number can be called.
To display detailed traffic event informa-
tion, touch “Detail”.
37

1. BASIC INFORMATION BEFORE OPERATION
SWITCHING THE SCREENS
Any of the screen configurations can
be selected.
1 Touch “Map Mode”.
2 Touch the screen buttons to select the
desired configuration.
Depending on the conditions, certain
screen configuration buttons cannot be
selected.
Screen button Function
“Fuel Con-
sumption”
“Other Infor-
mation”
“Dual map”
“Compass”
“Turn-by-Turn
Arrow”
“Freeway Exit
List”
Touch to display the fuel
consumption screen. (See
page 254.)
Touch to display the following 4 screen configurations: “Dual map”,
“Compass”, “Turn-by-Turn
Arrow” and “Freeway Exit
List”.
Touch to display the dual
map screen. (See page
39.)
Touch to display the com-
pass mode screen. (See
page 40.)
Touch to display the turnby-turn arrow screen.
(See page 76.)
Touch to display the freeway exit list screen. (See
page 74.)
SCREEN CONFIGURATIONS
■MAP ONLY
Screen button Function
Touch to display the single
“Map Only”
“Turn List”
“Intersection”
“Audio”
38
map screen. (See page
38.)
Touch to display the turn
list screen. (See page 76.)
Touch to display the inter-
section guidance screen
or the guidance screen on
the freeway. (See page
75.)
Touch to display the audio
screen. (See page 39.)
This is a regular map screen.
The screen shows the single map.
While on a different screen, touching
“Map Only” will display the single map
screen.

1. BASIC INFORMATION BEFORE OPERATION
■AUDIO
The audio screen and the map screen
are displayed.
Information on the current radio station or
track is displayed.
If a different screen is displayed, touch
“Audio” on the “Map Mode” screen.
For audio system operation, refer to
“AUDIO/VIDEO SYSTEM OPERATION”. (See page 174.)
■FUEL CONSUMPTION
The fuel consumption screen and the
map screen are displayed.
If a different screen is displayed, touch
“Fuel Consumption” on the “Map
Mode” screen.
For an explanation on each fuel con-
sumption mode, refer to “FUEL CONSUMPTION”. (See page 254.)
■DUAL MAP
The map screen can be split into two.
This screen shows the dual map. The map
on the left is the main map.
While on a different screen, touching
“Dual map” will display the dual map
screen.
■EDITING RIGHT MAP
2
BASIC FUNCTION
Vehicles with hybrid system
Touching “” or “” allows selection of
the desired mode (“Energy Monitor”, “Trip
Information” or “Past Record”).
Vehicles with gasoline engine
Touching “” or “” allows selection of
the desired mode (“Trip Information” or
“Past Record”).
The right side map can be edited by
touching any point on the right side
map.
1 Touch the desired screen button.
39

1. BASIC INFORMATION BEFORE OPERATION
INFORMATION
INFORMATION
The following procedures can be per-
formed on this screen:
No. Function
Changing the orientation of
the map
Displaying POI icons
Showing XM NavTraffic® in-
formation (See page 272.)
● The destination mark is displayed in the
direction of the destination. When driving, refer to the longitude and latitude
coordinates, and the compass, to make
sure that the vehicle is headed in the
direction of the destination.
● When the vehicle travels out of the cov-
erage area, the guidance screen
changes to the compass mode screen.
Changing the map scale
2 Touch “OK” when editing is complet-
ed.
The screen returns to the dual map
screen.
■COMPASS
The current position is indicated with a
compass.
Information about the destination, current
position and a compass is displayed on
the screen.
While on a different screen, touching
“Compass” will display the compass
mode screen.
MAP SCALE
1 Touch or to change the scale
of the map screen.
The scale bar and indicator at the bottom
of the screen indicate the map scale
menu. The scale range is from 150 feet
(50 m) to 250 miles (400 km).
Touch and hold or to continue
changing the scale of the map screen.
The scale of the map screen can be
changed by touching the scale bar
directly. This function is not available while
driving.
● The map scale is displayed under the
north-up or heading-up symbol at the
top left of the screen.
● When the map scale is at the maximum
range of 250 miles (400 km), is not
shown. When the map scale is at the
minimum range of 150 feet (50 m),
is not shown.
40

1. BASIC INFORMATION BEFORE OPERATION
ORIENTATION OF THE MAP
The orientation of the map can be
changed from north-up to heading-up
by touching the orientation symbol at
the top left of the screen.
1 Touch or .
North-up screen
Heading-up screen
STANDARD MAP ICONS
Icon Name
Island
Park
2
Industry
BASIC FUNCTION
Business facility
Airport
Military
University
Hospital
Stadium
: North-up symbol
Regardless of the direction of veh icle travel, north is always up.
: Heading-up symbol
The direction of vehicle travel is always up.
Both the north-up and heading-up sym-
bols display the vehicles direction as a
letter (e.g. N for north).
Shopping mall
Golf
41

2. SETUP
1. GENERAL SETTINGS
Used for language selection and the
on/off settings of operation sounds and
automatic screen change, etc.
1 Press the “SETUP” button.
2 Touch “General”.
3 Touch the items to be set.
SCREENS FOR GENERAL
SETTINGS
4 Touch “Save”.
42
On this screen, the following functions can
be performed:
No. Function
Touch to change the time zone and
select “On” or “Off” for daylight saving time. (See “SYSTEM TIME SETTINGS” on page 43.)
Touch to change the language. (See
“SELECTING A LANGUAGE” on
page 44.)
Touch to change the distance unit.
(See “UNIT OF MEASUREMENT” on
page 45.)
Touch to turn the sound beeps “On”
or “Off”.

No. Function SYSTEM TIME SETTINGS
Touch to change the screen button
color. (See “SELECTING A BUTTON
COLOR” on page 45.)
Touch to change the keyboard layout. (See “SELECTING A KEYBOARD LAYOUT” on page 45.)
Used for changing time zones and the
on/off settings of daylight saving time.
1 Press the “SETUP” button.
2 Touch “General” on the “Setup”
screen.
Touch to customize the opening image. (See “CHANGING THE STARTUP IMAGE” on page 46.)
Touch to customize the screen off
image. (See “CHANGING THE
SCREEN OFF IMAGE” on page 48.)
Touch to select “On” or “Off” for automatic screen changes from the audio screen to the previous screen. If
“On” is selected, the screen will automatically return to the previous
screen from the audio screen after no
operations have been performed for
20 seconds.
Touch to delete personal data. (See
“DELETING PERSONAL DATA” on
page 49.)
3 Touch “System Time”.
4 Touch the items to be set.
2. SETUP
2
BASIC FUNCTION
Touch to update program versions.
For details, contact your Toyota dealer.
Touch to update gracenote database
versions. For details, contact your
Toyota dealer.
On this screen, the following functions can
be performed:
No. Function
Touch to change the time zone. (See
“TIME ZONE” on page 44.)
Touch to select “On” or “Off” for
daylight saving time.
5 Touch “Save”.
43

2. SETUP
■TIME ZONE
A time zone can be selected and GMT
can be set.
1 Press the “SETUP” button.
2 Touch “General” on the “Setup”
screen.
3 Touch “System Time” on the “Gener-
al Settings” screen.
4 Touch “Time Zone”.
5 Touch the desired time zone.
SELECTING A LANGUAGE
The language can be changed.
1 Press the “SETUP” button.
2 Touch “General” on the “Setup”
screen.
3 Touch “Language”.
4 Touch the desired screen button.
If “Other” is touched, the zone can be
adjusted manually. Touch “+” or “-” to
adjust the time zone and then touch
“OK”.
6 Touch “Save”.
44
5 Touch “Yes”.
The previous screen will be displayed.
6 Touch “Save”.

2. SETUP
UNIT OF MEASUREMENT
Distance unit can be changed.
1 Press the “SETUP” button.
2 Touch “General” on the “Setup”
screen.
3 Touch “Unit of Measurement”.
4 Touch “km” or “mile”.
The previous screen will be displayed.
5 Touch “Save”.
This function is available only in English
or Spanish. To change language, see
“SELECTING A LANGUAGE” on page
44.
3 Touch “Button Color”.
2
4 Touch the desired screen button color.
BASIC FUNCTION
The previous screen will be displayed.
5 Touch “Save”.
SELECTING A KEYBOARD
LAYOUT
Keyboard layout can be changed.
1 Press the “SETUP” button.
2 Touch “General” on the “Setup”
screen.
3 Touch “Keyboard Layout”.
SELECTING A BUTTON COLOR
The color of the screen buttons can be
changed.
1 Press the “SETUP” button.
2 Touch “General” on the “Setup”
screen.
45

2. SETUP
INFORMATION
4 Touch “ABC” or “QWERTY” of “Key-
board Layout” to select a keyboard layout.
The previous screen will be displayed.
5 Touch “Save”.
■LAYOUT TYPE
“ABC” type
“QWERTY” type
CHANGING THE STARTUP
IMAGE
When the power <engine> switch is in
ACCESSORY or ON <IGNITION ON>
mode, the initial screen will be displayed.
An image can be copied from a USB
memory and used as the startup image. (For information regarding the
opening image, see “INITIAL
SCREEN” on page 28.)
● When saving the images to a USB,
name the folder that the startup image is
saved to “StartupImage” and name the
folder that the screen off image is saved
to “DisplayOffImage”. If these folder
names are not used, the navigation system cannot download the images. (The
folder names are case sensitive.)
● The images file extension is JPG or
JPEG.
● The images file name, including the file
extension, can be up to 32 characters.
● Image files of 10MB or less can be
saved.
● Up to 3 images can be downloaded.
46

2. SETUP
■TRANSFERRING DATA
1 Open the lid.
2 Open the cover and connect a USB
memory.
Turn on the power of the USB memory if it
is not turned on.
3 Press the “SETUP” button.
6 Touch “Transfer”.
2
7 Touch “Yes”.
BASIC FUNCTION
■SETTING THE STARTUP IMAGE
1 Press the “SETUP” button.
2 Touch “General” on the “Setup”
screen.
3 Touch “Customize Startup Image”
on the “General Settings” screen.
4 Touch the desired image.
4 Touch “General” on the “Setup”
screen.
5 Touch “Customize Startup Image”.
5 Touch “Save”.
■DELETING TRANSFERRED IMAG-
ES
1 Press the “SETUP” button.
2 Touch “General” on the “Setup”
screen.
3 Touch “Customize Startup Image”
on the “General Settings” screen.
47

2. SETUP
4 Touch “Delete All”.
5 Touch “Yes”.
CHANGING THE SCREEN OFF
IMAGE
Touch “Screen Off” to turn off the
screen. An image can be copied from a
USB memory and can be set to display
when “Screen Off” is touched. (For
more information on “Screen Off”,
see “SCREEN ADJUSTMENT” on
page 32.)
■TRANSFERRING DATA
1 Open the lid.
2 Open the cover and connect a USB
memory.
Turn on the power of the USB memory if it
is not turned on.
3 Press the “SETUP” button.
4 Touch “General” on the “Setup”
screen.
5 Touch “Customize Screen Off Im-
age”.
48
6 Touch “Transfer”.
7 Touch “Yes”.

2. SETUP
■SETTING THE SCREEN OFF IMAGE
1 Press the “SETUP” button.
2 Touch “General” on the “Setup”
screen.
3 Touch “Customize Screen Off Im-
age” on the “General Settings” screen.
4 Touch the desired image.
5 Touch “Save”.
■DELETING TRANSFERRED IMAG-
ES
1 Press the “SETUP” button.
2 Touch “General” on the “Setup”
screen.
3 Touch “Customize Screen Off Im-
age” on the “General Settings” screen.
4 Touch “Delete All”.
DELETING PERSONAL DATA
1 Press the “SETUP” button.
2 Touch “General” on the “Setup”
screen.
3 Touch “Delete Personal Data”.
2
BASIC FUNCTION
4 Touch “Delete”.
5 Touch “Yes”.
5 Touch “Yes”.
49

2. SETUP
INFORMATION
The following personal data can be
deleted or returned to their default settings:
• Maintenance conditions
• Address book
• Areas to avoid
• Previous points
• Route guidance
• Route trace
• Phonebook data
• Call history data
• Speed dial data
®
•Bluetooth
phone data
• Phone sound settings
• Phone display settings
• Message settings
• Audio setting
®
•Bluetooth
audio setting
• Startup image data
• Screen off image data
● This function is not ava ilable while driv-
ing.
50

2. SETUP
2. VOICE SETTINGS
Voice guidance etc. can be set.
1 Press the “SETUP” button.
2 Touch “Voice”.
3 Touch the items to be set.
4 Touch “Save”.
SCREEN FOR VOICE
SETTINGS
2
BASIC FUNCTION
On this screen, the following functions can
be performed:
No. Function
The voice guidance volume can be
adjusted or switched off. (See
“VOICE VOLUME” on page 52.)
Voice guidance during route guidance can be set to “On” or “Off”.
Voice guidance during audio system
use can be set to “On” or “Off”.
Voice recognition prompts can be set
to “On” or “Off”. This setting can
also be changed on the “Shortcut
Menu” screen. (See page 242.)
When “On” is selected, the audio/
video system can be operated using
voice commands.
When using the traffic information
function, voice guidance can be set
to “On” or “Off”. (See “TRAFF IC INCIDENT WARNING” on page 52.)
51

2. SETUP
INFORMATION
No. Function TRAFFIC INCIDENT WARNING
When using the XM NavWeather™
function, the severe weather warning
can be set to “On” or “Off”.
To reset all setup items, touch “Default”.
Traffic congestion information can be
received via voice guidance while being guided to the desired destination.
1 Press the “SETUP” button.
VOICE VOLUME
2 Touch “Voice” on the “Setup” screen.
The voice guidance volume can be adjusted or switched off.
1 Press the “SETUP” button.
2 Touch “Voice” on the “Setup” screen.
3 Select the desired level by touching the
appropriate number.
If voice guidance is not needed, touch
“Off” to disable the feature.
4 Touch “Save”.
3 Touch “On” of “Traffic Incident Warn-
ing”.
4 Touch “Save”.
● When the “Traffic Information” indicator
is dimmed, “Avoid Traffic”, “Traffic Incident Warning” and “Show Free Flowing
Traffic” will not operate.
52

2. SETUP
2
BASIC FUNCTION
53

3
NAVIGATION SYSTEM
DESTINATION SEARCH
1
1. DESTINATION SEARCH............... 56
SELECTING THE SEARCH AREA........ 56
DESTINATION SEARCH BY HOME...... 57
DESTINATION SEARCH BY
PRESET DESTINATIONS................... 57
DESTINATION SEARCH BY
“Address”............................................. 58
DESTINATION SEARCH BY
“Point of Interest”................................. 60
DESTINATION SEARCH BY
“Previous Destinations”........................ 65
DESTINATION SEARCH BY
“Address Book”.................................... 66
DESTINATION SEARCH BY
“Emergency”........................................ 66
DESTINATION SEARCH BY
“Intersection & Freeway”...................... 67
DESTINATION SEARCH BY “Map”....... 69
DESTINATION SEARCH BY
“Coordinates”....................................... 69
DELETING SET DESTINATIONS.......... 69
54
2. STARTING ROUTE GUIDANCE... 71

3
NAVIGATION SYSTEM
1
ROUTE GUIDANCE
2
1. ROUTE GUIDANCE SCREEN....... 74
2. TYPICAL VOICE GUIDANCE
PROMPTS.................................... 77
3. DISTANCE AND TIME
TO DESTINATION....................... 80
4. SETTING AND DELETING
DESTINATIONS........................... 81
ADDING DESTINATIONS..................... 81
REORDERING DESTINATIONS........... 81
DELETING DESTINATIONS................. 82
5. SETTING ROUTE .......................... 83
DETOUR SETTING............................... 83
ROUTE OVERVIEW.............................. 84
ROUTE PREFERENCE ........................ 85
PAUSING AND RESUMING
GUIDANCE......................................... 86
SHOW ON MAP .................................... 87
ROUTE TRACE..................................... 90
ADDRESS BOOK
3
1. NAVIGATION SETTINGS ............. 91
SETTING UP THE “Home” .................... 91
SETTING UP THE
“Preset Destinations”........................... 93
SETTING UP THE “Address Book” ....... 96
SETTING UP THE “Areas to Avoid” .... 100
DELETING PREVIOUS
DESTINATIONS................................ 104
SETUP
4
1. DETAILED NAVIGATION
SETTINGS................................. 105
SCREENS FOR NAVIGATION
SETTINGS ........................................ 105
2. VEHICLE SETTINGS .................. 112
MAINTENANCE................................... 112
VEHICLE CUSTOMIZATION............... 116
GPS (GLOBAL POSITIONING
5
SYSTEM)
1. LIMITATIONS OF THE
NAVIGATION SYSTEM ............ 117
2
3
4
5
6
7
8
9
55

1. DESTINATION SEARCH
INFORMATION
1. DESTINATION SEARCH
1 Press the “DEST” button.
2 This screen is displayed.
One of 10 different methods can be used
to search a destination. (See pages 57
through 69.)
● When searching a destination, the
response to the screen button may be
slow.
SELECTING THE SEARCH
AREA
The selected state (province) can be
changed to set a destination from a different state (province) by using “Address”, “Point of Interest” or
“Intersection & Freeway”.
1 Touch “Change State/Province” to
display a list of the states/provinces/
territories of the United States and
Canada.
For map database information and
updates, see “MAP DATABASE VERSION AND COVERAGE AREA” on
page 256.
If a state (province) has not been
selected yet, “Select State/Province”
is displayed.
56
2 Touch the desired state (province).
The previous screen will be displayed.

1. DESTINATION SEARCH
INFORMATION
INFORMATION
DESTINATION SEARCH BY
HOME
1 Press the “DEST” button.
2 Touch “Go Home”.
Your home address is set as the destina-
tion. The navigation system performs a
search for the route.
3 Touch “OK”.
To use this function, it is necessary to
set a home address. (To register home,
see page 92.)
● If a home address has not been regis-
tered, a message confirming if it is desi rable to set a home will be displayed, and
the setting screen will appear.
● Guidance starts from the current posi-
tion to the set home address if “OK” is
touched even while driving.
DESTINATION SEARCH BY
PRESET DESTINATIONS
1 Press the “DEST” button.
2 Touch any of the preset destination
buttons (1-5) on the “Destination”
screen.
3
NAVIGATION SYSTEM
The selected preset destination point is
set as the destination. The navigation system performs a search for the route. (See
“STARTING ROUTE GUIDANCE” on
page 71.)
3 Touch “OK”.
To use this function, it is necessary to
set preset destinations to the preset
screen buttons (1-5). (See “REGISTERING PRESET DESTINATIONS” on
page 94.)
● If a preset destination point has not been
registered, a message confirming if it is
desirable to set a preset destination will
be displayed, and the setting screen will
appear.
● Guidance starts from the current posi-
tion to the preset destination point if
“OK” is touched even while driving.
57

1. DESTINATION SEARCH
DESTINATION SEARCH BY
“Address”
There are 2 methods to search a destination by address:
(a)Search by city
(b)Search by street address
1 Press the “DEST” button.
2 Touch “Address” on the “Destination”
screen.
3 Touch a screen button to select the de-
sired search method.
SELECTING A CITY TO
SEARCH
4 Input a city name and touch “OK”.
5 Touch the screen button of the desired
city name from the displayed list.
6 Input the street name and touch “OK”.
1 Press the “DEST” button.
2 Touch “Address” on the “Destination”
screen.
3 Touch “City”.
58
7 When the desired street name is
found, touch the corresponding screen
button.

When the desired street name is selected,
INFORMATION
the “Confirm Destination” screen may be
displayed. If “Go” is touched on the “Confirm Destination” screen, the navigation
system performs a search for the route.
(See “STAR TING ROUTE GUIDANCE” on
page 71.)
8 Input a house number.
If the same address exists in more than
one city , the current screen changes t o the
address list screen.
■SEARCHING FROM THE LAST 5
CITIES
1. DESTINATION SEARCH
● If the navigation system has never been
used, this function will not be available.
SEARCH BY STREET
ADDRESS
1 Press the “DEST” button.
2 Touch “Address” on the “Destination”
screen.
3 Touch “Street Address”.
3
NAVIGATION SYSTEM
1 Touch “Last 5 Cities”.
2 Touch the screen button of the desired
city name from the displayed list.
The current screen changes to the
screen for inputting a street name. (See
“SELECTING A CITY TO SEARCH” on
page 58.)
4 Touch numbers directly on the screen
to input the house number.
After inputting the house number, touch
“OK” to display the screen for inputting
the street name.
5 Input the street name and touch “OK”.
59

1. DESTINATION SEARCH
INFORMATION
6 When the desired street name is
found, touch the corresponding screen
button.
When the desired street name is selected,
the “Confirm Destination” screen may be
displayed. If “Go” is touched on the “Confirm Destination” screen, the navigation
system performs a search for the route.
(See “START ING ROUTE GUIDANCE” on
page 71.)
If the same address exists in more than 1
city, a screen requesting the city name to
be input or selected will be displayed.
7 Input a city name.
● A street name can be searched using
only the body part of its name.
● For example: S WESTERN AVE
• A search can be performed by inputting “S WESTERN AVE”, “WESTERN
AVE” or “WESTERN”.
DESTINATION SEARCH BY
“Point of Interest”
There are 3 methods to search a destination by Points of Interest:
(a)Search by name
(b)Search by category
(c)Search by phone #
1 Press the “DEST” button.
2 Touch “Point of Interest” on the
“Destination” screen.
8 Touch the screen button of the desired
city name from the displayed list.
60
3 Touch a screen button to select the de-
sired search method.
SEARCH BY “Name”
1 Press the “DEST” button.
2 Touch “Point of Interest” on the
“Destination” screen.
3 Touch “Name” on the “Point of Inter-
est” screen.

1. DESTINATION SEARCH
INFORMATION
4 Input the name of the POI and touch
“OK”.
5 Touch the screen button of the desired
destination.
When the desired destination is selected,
the “Confirm Destination” screen may be
displayed. If “Go” is touched on the “Confirm Destination” screen, the navigation
system performs a search for the route.
(See “STAR TING ROUTE GUIDANCE” on
page 71.)
When inputting the name of a specific
Point of Interest, and there are 2 or more
sites with the same name, the list screen
is displayed.
6 Touch the screen button of the desired
destination.
If the same name exists in more than one
city, a search can be performed more easily using “City” or “Category”. (See
“SELECTING A CITY TO SEARCH” on
page 58 and “SELECTING FROM THE
CATEGORIES” on page 62.)
The desired Point of Interest can be dis-
played on the map screen. (See “DISPLAY POI ICONS” on page 87.)
● To search for a facility name using multi-
ple search words, put a space between
each word.
■SELECTING A CITY TO SEARCH
1 Touch “City”.
2 Input the city name.
3
NAVIGATION SYSTEM
To cancel the city setting, touch “Any
City”.
61

1. DESTINATION SEARCH
3 Touch the screen button of the desired
city name from the displayed list.
When the desired category is touched, the
POI name list screen is displayed.
■SELECTING FROM THE CATEGO-
RIES
1 Touch “Category”.
2 Touch the screen button of the desired
category.
If the desired POI category is on the
screen, touch its screen button to display
a detailed list of the POI category.
If the desired POI category is not on the
screen, touch “List All Categories” to list
all POI categories.
SEARCH BY “Category”
The destination can be set by touching
the search point and the POI category.
1 Press the “DEST” button.
2 Touch “Point of Interest” on the
“Destination” screen.
3 Touch “Category”.
4 This screen is displayed.
62

1. DESTINATION SEARCH
INFORMATION
Set the search point by one of the follow-
ing methods:
• Set the search point from near the current position
• Set the search point from along the
selected route
• Set the search point from near a city
center
• Set the search point from near a destination
● The names of POIs located within
approximately 200 miles (320 km) from
the selected search point can be displayed.
■SETTING THE SEARCH POINT
FROM NEAR HERE
1 Touch “Near Here”.
The search point is set at the current posi-
tion, and the “POI Category” screen will be
displayed. (See page 64.)
■SETTING THE SEARCH POINT
FROM ALONG MY ROUTE
1 Touch “Along My Route”.
The search point is set and the “POI Cate-
gory” screen will be displayed. (See page
64.)
■SETTING THE SEARCH POINT
FROM NEAR CITY CENTER
3 Touch the screen button of the desired
city center name.
The search point is set and the “POI Cate-
gory” screen will be displayed. (See page
64.)
*: XX represents the selected search area
name.
■SELECTING FROM THE LAST 5
CITIES
1 Touch “Near a City Center in XX*”.
2 Touch “Last 5 Cities”.
3 Touch the screen button of the desired
city center name.
3
NAVIGATION SYSTEM
1 Touch “Near a City Center in XX*”.
2 Input the city center name.
The search point is set and the “POI Cate-
gory” screen will be displayed. (See page
64.)
*: XX represents the selected search area
name.
63

1. DESTINATION SEARCH
■SETTING THE SEARCH POINT
FROM NEAR A DESTINATION
1 Touch “Near a Destination”.
2 Touch the screen button of the desired
destination.
The search point is set and the “POI Cate-
gory” screen will be displayed. (See page
64.)
■TO SEARCH FOR POIs NEAR THE
SEARCH POINT
When the search point is set, the “POI
Category” screen will be displayed.
1 Touch the desired POI category.
2 Touch the desired POI category from
the list.
3 Touch the screen button of the desired
item.
When the desired item is selected, the
“Confirm Destination” screen may be displayed. If “Go” is touched on the “Confirm
Destination” screen, the navigation system performs a search for the route. (See
“STARTING ROUTE GUIDANCE” on
page 71.)
If the desired POI category is not on the
screen, touch “List All Categories” to list
all POI categories.
If “Favorite POI Categories” is touched,
a search can be performed using the 6
POIs that have been previously set. For
more details, see “POI CATEGORY
CHANGE (SELECT POI ICONS)” on pag e
108.
64
SEARCH BY “Phone #”
1 Press the “DEST” button.
2 Touch “Point of Interest” on the
“Destination” screen.
3 Touch “Phone #” on the “Point of In-
terest” screen.
4 Input a phone number.

1. DESTINATION SEARCH
INFORMATION
5 After inputting a phone number, touch
“OK”.
When a phone number is input, the “Con-
firm Destination” screen may be displayed. If “Go” is touched on the “Confirm
Destination” screen, the navigation system performs a search for the route. (See
“STARTING ROUTE GUIDANCE” on
page 71.)
If there is more than one site with the
same number, the following screen will be
displayed.
To set an address book entry as a desti-
nation using the phone number, the
number must already be registered with
the address book entry. (See page 96.)
● If there is no match for the phone num-
ber input, a list of identical numbers with
different area codes will be displayed.
DESTINATION SEARCH BY
“Previous Destinations”
1 Press the “DEST” button.
2 Touch “Previous Destinations” on
the “Destination” screen.
3 Touch the screen button of the desired
destination.
3
NAVIGATION SYSTEM
The previous starting point and up to 100
previously set destinations are displayed
on the screen.
“Delete”: Touch to delete the previous
destination. (To delete previous destinations, see page 70.)
When the desired destination is selected,
the “Confirm Destination” screen may be
displayed. If “Go” is touched on the “Confirm Destination” screen, the navigation
system performs a search for the route.
(See “START ING ROUTE GUIDANCE” on
page 71.)
The list of previous destinations can
also be deleted by touching “Delete
Previous Dest.” on the “Navigation
Settings” screen when the vehicle is
stopped. (See “DELETING PREVIOUS
DESTINATIONS” on page 104.)
65

1. DESTINATION SEARCH
DESTINATION SEARCH BY
“Address Book”
1 Press the “DEST” button.
2 Touch “Address Book” on the “Desti-
nation” screen.
3 Touch the screen button of the desired
address book entry.
A list of registered address book entries is
displayed.
“Options”: Touch to register or edit address book entries. (See page 97.)
When the desired address book entry is
selected, the “Confirm Destination” screen
may be displayed. If “Go” is touched on
the “Confirm Destination” screen, the navigation system performs a search for the
route. (See “STARTING ROUTE GUIDANCE” on page 71.)
DESTINATION SEARCH BY
“Emergency”
1 Press the “DEST” button.
2 Touch “Emergency” on the “Destina-
tion” screen.
The display changes to a screen to select
police stations, dealers, hospitals or fire
stations.
3 Touch the desired emergency catego-
ry.
The selected emergency category is dis-
played.
4 Touch the screen button of the desired
destination.
66
When the desired destination entry is
selected, the “Confirm Destination” screen
may be displayed. If “Go” is touched on
the “Confirm Destination” screen, the navigation system performs a search for the
route. (See “STARTING ROUTE GUIDANCE” on page 71.)

INFORMATION
● The navigation system does not guide in
areas where route guidance is unavailable. (See page 118.)
● The emergency function can be used
even while driving.
● While driving, only the currently dis-
played items and the items on the next
page can be viewed.
1. DESTINATION SEARCH
3 Touch “Intersection” on the “Intersec-
tion & Freeway” screen.
4 Input the name of the first intersecting
street which is located near the destination to be set, and touch “OK”.
DESTINATION SEARCH BY
“Intersection & Freeway”
There are 2 methods to search a destination by Intersection & Freeway:
(a)Search by intersection
(b)Search by freeway
1 Press the “DEST” button.
2 Touch “Intersection & Freeway” on
the second page of the “Destination”
screen.
3 Touch a screen button to select the de-
sired method.
SEARCH BY “Intersection”
1 Press the “DEST” button.
5 Touch the screen button of the desired
item.
6 Input the name of the second intersect-
ing street.
7 Touch the screen button of the desired
item.
3
NAVIGATION SYSTEM
2 Touch “Intersection & Freeway” on
the second page of the “Destination”
screen.
67

1. DESTINATION SEARCH
INFORMATION
When the desired item is selected, the
“Confirm Destination” screen may be displayed. If “Go” is touched on the “Confirm
Destination” screen, the navigation system performs a search for the route. (See
“STARTING ROUTE GUIDANCE” on
page 71.)
● If the same 2 streets cross at more than
one intersection, the screen changes
and displays the menu to select the city
name where the streets intersect. Select
the city, and the map location of the
selected destination and the route preference. (See “STARTING ROUTE
GUIDANCE” on page 71.)
SEARCH BY “Freeway
Entrance / Exit”
5 Touch the screen button of the desired
freeway.
6 Either a freeway “Entrance” or “Exit”
can be selected.
7 Input a freeway entrance or exit name,
and touch “OK”.
1 Press the “DEST” button.
2 Touch “Intersection & Freeway” on
the second page of the “Destination”
screen.
3 Touch “Freeway Entrance / Exit” on
the “Intersection & Freeway” screen.
4 Input a freeway name.
68
8 Touch the screen button of the desired
entrance or exit name.

1. DESTINATION SEARCH
INFORMATION
When the desired entrance or exit is
selected, the “Confirm Destination” screen
may be displayed. If “Go” is touched on
the “Confirm Destination” screen, the navigation system performs a search for the
route. (See “STARTING ROUTE GUIDANCE” on page 71.)
● Be sure to use the complete name of the
freeway or highway, including the
hyphen, when entering the destination.
Freeways and interstates use an “I” (I-
405). US highways use the state designation before the number (CA-118).
DESTINATION SEARCH BY
“Map”
1 Press the “DEST” button.
2 Touch “Map” on the second pag e of
the “Destination” screen.
3 Scroll the map to the desired point.
DESTINATION SEARCH BY
“Coordinates”
1 Press the “DEST” button.
2 Touch “Coordinates” on the second
page of the “Destination” screen.
3 Input the latitude and the longitude.
3
NAVIGATION SYSTEM
4 After inputting the latitude and longi-
tude, touch “OK”.
When the desired screen button is
selected, the “Confirm Destination” screen
may be displayed. If “Go” is touched on
the “Confirm Destination” screen, the navigation system performs a search for the
route. (See “STARTING ROUTE GUIDANCE” on page 71.)
4 Touch “Go to ”.
The navigation system performs a search
for the route. (See “STARTING ROUTE
GUIDANCE” on page 71.)
Guidance starts if “OK” is touched even
while driving. However, the cursor cannot
be moved.
69

1. DESTINATION SEARCH
DELETING SET
DESTINATIONS
A set destination can be deleted.
1 Press the “DEST” button.
2 Touch “Del.Dest.” on the “Destina-
tion” screen.
When more than one destination is set, a
list will be displayed on the screen.
3 Touch the destination to be deleted.
“Delete All”: Touch to delete all destina-
tions on the list.
4 Touch “Yes” to delete the destina-
tion(s).
A message appears to confirm the request
to delete.
If “Yes” is touched, the data cannot be
recovered. If more tha n 1 destination has
been set, the system will recalculate the
route(s) to the set destination(s) as necessary.
If “No” is touched, the previous screen
will be displayed.
Set destinations can also be deleted by
touching “Route”. (See “DELETING
DESTINATIONS” on page 82.)
70

1. DESTINATION SEARCH
CAUTION
2. STARTING ROUTE GUIDANCE
When “Map” is touched on the “Confirm Destination” screen, the map
screen will be displayed. The map location of the selected destination can
be set as a destination.
1 Scroll the map to the desired point.
“Adjust Location”: Touch to adjust the
position in smaller increments.
When an arrow facing the desired point is
touched, the map scrolls in that direction.
When the screen button is released, the
scrolling stops.
2 Touch “Go to ”.
The system starts route search and dis-
plays recommended routes.
3 To start guidance, touch “OK”.
No. Function
Current position
Destination point
Type of route and its distance
Distance of the entire route
Touch to display a list of the turns re-
quired to reach the destination.
Touch to select the desired route
from 3 possible routes. (See page
72.)
Touch to change the route. (See
page 73.)
Guidance can be paused or resumed.
(See “PAUSING AND RESUMING
GUIDANCE” on page 86.)
If “OK” is touched until a beep sounds,
demo mode will start. Press the “MAP/
VOICE” button to end demo mode.
3
NAVIGATION SYSTEM
If a destination has already been set,
“Go to ” and “Add to Route” will be
displayed.
“Go to ”: Touch to delete the existing
destination(s) and set a new one.
“Add to Route”: Touch to add a destination.
“Info”: If this screen button is displayed
on the top of the screen, touch it to view
items such as name, address, position
and phone number.
● Be sure to obey traffic regulations and
keep road conditions in mind while driving. If a traffic sign on the road has been
changed, the route guidance may not
indicate such changed information.
71

1. DESTINATION SEARCH
INFORMATION
● The route for returning may not be the
same as that for going.
● The route guidance to the destination
may not be the shortest route nor a
route without traffic congestion.
● Route guidance may not be available if
there is no road data for the specified
location.
● When setting the destination on a map
with a scale larger than 0.5 miles (800
m), the map scale changes to 0.5 miles
(800 m) automatically. If this occurs, set
the destination again.
● If a destination that is not located on a
road is set, the vehicle will be guided to
the point on a road nearest to the destination. The road nearest to the point
selected is set as the destination.
3 ROUTES SELECTION
No. Function
Touch to display the recommended
route.
Touch to display the alternative
route.
Touch to display the route that is the
shortest distance to the set destination.
Touch to display the information
shown below about each of the 3
routes.
1 Touch “3 Routes” to select the de-
sired route from 3 routes.
2 Touch “Preferred”, “Alternate” or
“Short” to select the desired route.
72
No. Function
Time necessary for the entire trip
Distance of the entire trip
Toll road
Freeway
Ferry

EDIT ROUTE
INFORMATION
Conditions for the route to the destination can be set again.
1 Touch “Edit Route”.
1. DESTINATION SEARCH
● Even if the “Freeways” indicator is
dimmed, the route cannot avoid including a freeway in some cases.
● If the calculated route includes a trip by
ferry, the route guidance shows a sea
route. After you travel by ferry, the current position may be incorrect. Upon
reception of GPS signals, it is automatically corrected.
3
2 This screen is displayed.
No. Function Page
Touch to add destinations. 81
Touch to delete destina-
tions.
Touch to reorder destina-
tions.
Touch to display the choic-
es available when setting
the conditions the system
uses to determine the route
to the destination.
NAVIGATION SYSTEM
82
81
85
73

2. ROUTE GUIDANCE
INFORMATION
1. ROUTE GUIDANCE SCREEN
During route guidance, various types
of guidance screens can be displayed
depending on conditions.
SCREEN LAYOUT
No. Function
Distance to the next turn and an arrow indicating the turning direction
Guidance route
Current position
Distance and travel/arrival time to
the destination
Current street name
DURING FREEWAY DRIVING
During freeway driving, the freeway
exit information screen will be displayed.
This screen displays the distance to
the next junction/exit, or POIs in the vicinity of the freeway exit.
No./
Icon
Distance from the current position to
the exit or junction
Exit number and junction name
Current position
Points of Interest that are close to a
freeway exit
Function
● If the vehicle goes off the guidance
route, the route is searched again.
● For some areas, the roads have not
been completely digitized in our database. For this reason, the route guidance may select a road that should not
be traveled on.
● When arriving at the set destination the
destination name will be displayed on
the top of the screen. Touching “Off”
clears the display.
74
Current street name
Touch to display the selected map of
the exit vicinity.
Touch to scroll to farther junctions or
exits.
Touch to scroll to closer junctions or
exits.
Touch to display the closest 3 junc-
tions or exits.

2. ROUTE GUIDANCE
WHEN APPROACHING A
FREEWAY EXIT OR JUNCTION
When the vehicle approaches an exit
or junction, the freeway guidance
screen will be displayed.
No. Function
Next street name
Current position
Distance from the current position to
the exit or junction
: Touch to hide the freeway guidance
screen.
Touch “Intersection”, or press the “MAP/
VOICE” button, to change back to the
freeway guidance screen.
WHEN APPROACHING AN
INTERSECTION
When the vehicle approaches an intersection, the intersection guidance
screen will be displayed.
3
NAVIGATION SYSTEM
No. Function
Next street name
Current position
Distance to the intersection
: Touch to hide the intersection guid-
ance screen.
Touch “Intersection”, or press the “MAP/
VOICE” button, to change back to the
intersection guidance screen.
75

2. ROUTE GUIDANCE
OTHER SCREENS
■TURN LIST SCREEN
On this screen, the list of turns on the
guidance route can be viewed.
1 Touch “Turn List” during guidance to
display the turn list.
No. Function
Turn direction
Distance between turns
Next street or destination name
Current street name
■ARROW SCREEN
On this screen, information about the
next turn on the guidance route can be
viewed.
1 Touch “Turn-by-Turn Arrow” during
guidance to display the arrow screen.
No. Function
Exit number or street name
Turn direction
Distance to the next turn
Current street name
76

2. ROUTE GUIDANCE
INFORMATION
0.5 miles
5 miles
4 miles
0.5 miles
2. TYPICAL VOICE GUIDANCE PROMPTS
As the vehicle approaches an intersection, or point, where maneuvering the
vehicle is necessary, the system’s
voice guidance will provide various
messages.
No. Voice guidance
“Proceed about 4 miles to the traffic
circle.”
“In half of a mile, traffic circle ahead
and then the 3rd exit onto Main
No. Voice guidance
“Proceed about 5 miles to Main
street.”
“In half of a mile, right turn onto Main
street.”
“Next right.”/“Right turn ahead.”
street.”
“The 3rd exit ahead.”
“The exit ahead.”
(Beep sound only)
3
NAVIGATION SYSTEM
(Beep sound only)
● The street names may not be pro-
nounced correctly or clearly due to the
text-to-speech function.
● On freeways, interstates or other high-
ways with higher speed limits, the voice
guidance will be made at earlier points
than on city streets in order to allow time
to maneuver the vehicle.
77

2. ROUTE GUIDANCE
INFORMATION
*: The system indicates a U-turn if the distance between two one-way roads (of opposite directions) is less than 50 feet (15
m) in residential areas or 164 feet (50 m) in
non-residential areas.
No. Voice guidance
“In half of a mile, make a legal Uturn.”
“Make a legal U-turn ahead.”
(Beep sound only)
The system announces the approach to
the final destination.
No. Voice guidance
“In half of a mile, your destination is
ahead.”
“Your destination is ahead.”
“You have arrived at your destina-
tion. The route guidance is now finished.”
If a voice guidance command cannot be
heard, press the “MAP/VOICE” button
to hear it again.
To adjust the voice guidance volume,
see “VOICE VOLUME” on page 52.
● If the system cannot determine the cur-
rent position correctly (in cases of poor
GPS signal reception), the voice guidance may be early or late.
78

■ROUTES INCLUDING IPD ROADS
CAUTION
2. ROUTE GUIDANCE
Even when on IPD roads (roads that
are not completely digitized in our database), you will be guided along the
searched route via voice guidance.
After it has made a route calculation, the
system will advise the user whether IPD
roads are included in the route or not.
The portion of the route that covers IPD
roads is indicated by light blue.
No. Voice guidance
“On the way to your destination,
there will be roads with incomplete
data.”
“In half of a mile, left turn.”
● Be sure to obey the traffic regulations
and keep the road condition in mind
especially when you are driving on IPD
roads. The route guidance may not have
the updated information such as the
direction of a one way street.
3
NAVIGATION SYSTEM
“Next left. Upcoming roads have incomplete data. Please carefully observe the local traffic restrictions, as
they may not match the navigation
guidance.”
IPD roads are roads that are not yet
completely digitized in our database.
However, their geometry, name and
administrative coding are already
known.
79

2. ROUTE GUIDANCE
INFORMATION
3. DISTANCE AND TIME TO DESTINATION
When the vehicle is on the guidance
route, the distance and the estimated
travel/arrival time to the destination are
displayed. When the vehicle is not on
the guidance route, the distance and
direction of the destination are displayed.
When driving on the guidance route
with more than one destination set, the
distance and estimated travel/arrival
time from the current position to each
destination are displayed.
1 Touch the screen button indicated by
the arrow.
2 Touch the number screen button to
display the desired destination.
Icon Function
Estimated travel time is displayed.
Estimated arrival time is displayed.
Touch to switch to estimated arrival time.
Touch to switch to estimated
travel time.
Displayed while driving off the
guidance route. The destination
direction is indicated by an arrow.
● When the vehicle is on the guidance
route, the distance measured along the
route is displayed. Travel time and
arrival time are calculated based on the
set vehicle speed information. (See
“DRIVING SPEEDS” on page 106.)
However, when the vehicle is not on the
guidance route, the distance is the l ine ar
distance between the current position
and the destination.
The distance, estimated travel time and
estimated arrival time from the current
position to the selected destination are
displayed.
80

2. ROUTE GUIDANCE
4. SETTING AND DELETING DESTINATIONS
ADDING DESTINATIONS
Destinations can be added and routes
can be searched again.
1 Touch “Route”.
2 Touch “Add”.
3 Input an additional destination in the
same way as a destination search.
(See “DESTINATION SEARCH” on
page 56.)
4 Touch the desired “Add Destination
Here” to insert the new destination into
the route.
REORDERING
DESTINATIONS
When more than one destination is set,
the arrival order of the destinations can
be changed.
1 Touch “Route”.
3
NAVIGATION SYSTEM
2 Touch “Reorder”.
3 Touch the desired destination and
touch “Move Up” or “Move Down” to
change the arrival order.
4 After selecting the destinations, touch
“OK”.
The system searches for the guidance
route again, and displays the entire route.
81

2. ROUTE GUIDANCE
DELETING DESTINATIONS
A set destination can be deleted.
1 Touch “Route”.
2 Touch “Delete”.
When more than one destination is set, a
list will be displayed on the screen.
3 Touch the destination to be deleted.
4 Touch “Yes” to delete the destina-
tion(s).
If “Yes” is touched, the data cannot be
recovered. If more than 1 destination has
been set, the system will recalculate the
route(s) to the set destination(s) as necessary.
If “No” is touched, the previous screen
will be displayed.
“Delete All”: Touch to delete all destinations on the list.
A message appears to confirm the request
to delete.
82

2. ROUTE GUIDANCE
INFORMATION
5. SETTING ROUTE
DETOUR SETTING
While the route guidance is operating,
the route can be changed to detour
around a section of the route where a
delay is caused by road repairs, or an
accident, etc.
1 Touch “Route”.
2 Touch “Detour”.
3 Touch a screen button to select the de-
sired detour distance.
“1 mile (km)”, “3 miles (km)” or “5 miles
(km)”: Touch one of these screen buttons
to start the detour process. After detouring,
the system returns to the original guidance
route.
“Whole Route”: Touch to make the system calculate an entire new route to the
destination.
“Around Traffic”: Touch to make the system search for the route based on the traffic congestion information received from
XM NavTraffic
NavTraffic
● This picture shows an example of how
the system would guide around a delay
caused by a traffic jam.
This position indicates the location of a
traffic jam caused by road repairs, an
accident, etc.
This route indicates the detour suggested by the system.
● When the vehicle is on a freeway, the
detour distance selections are 5, 15 and
25 miles (or 5, 15 and 25 km if units are
in km).
● The system may not be able to calculate
a detour route depending on the
selected distance and surrounding road
conditions.
®
. For details, see “XM
®
” on page 271.
3
NAVIGATION SYSTEM
83

2. ROUTE GUIDANCE
INFORMATION
ROUTE OVERVIEW
1 Touch “Route”.
2 Touch “Overview”.
3 The entire route from the current posi-
tion to the destination is displayed.
TURN LIST
1 Touch or to skip to the next page
of the list of roads. Touch and hold
or to scroll through the list of roads.
: This mark indicates the direction in
which you should turn at the intersection.
“Map”: The selected point is displayed on
the map screen.
No. Function
Touch to display a list of the turns required to reach the destination.
Touch to start guidance.
84
● However , n ot all roa d na mes i n t he ro ute
may appear on the list. If a road
changes its name without requiring a
turn (such as on a street that runs
through 2 or more cities), the name
change will not appear on the list. The
street names will be displayed in order
from the starting point, along with the
distance to the next turn.

2. ROUTE GUIDANCE
ROUTE PREFERENCE
TO SELECT ROUTE TYPE
The Preferred, Short or Alternative
route can be selected.
1 Touch “Route”.
2 Touch “Preferences”.
4 The entire route from the starting point
to the destination is displayed.
“OK”: Touch to start guidance.
“Edit Route”: Touch to change a route.
(See page 73.)
TO SELECT ROUTE FEATURES
A number of choices are available
when setting the conditions the system
uses to determine the route to the destination.
1 Touch “Route”.
3
NAVIGATION SYSTEM
3 Touch “Preferred”, “Short” or “Alter-
nate” and touch “OK”.
2 Touch “Preferences” to display condi-
tions that can be selected when the
system determines the route to the
destination.
85

2. ROUTE GUIDANCE
INFORMATION
INFORMATION
3 Select the desired route preference by
touching the screen button.
The system will avoid using routes that
include items whose indicators are off.
4 After selecting the desired route prefer-
ence, touch “OK”.
STARTING ROUTE FROM
ADJACENT ROAD
The route guidance can be started
from an adjacent road.
(e.g. When route guidance is set on the
freeway, but the vehicle is driven parallel along the freeway.)
1 Touch “Route”.
3 Touch “Start from Adjacent Road”.
● When there is no adjacent road, this
screen button will not be displayed.
PAUSING AND RESUMING
GUIDANCE
TO PAUSE GUIDANCE
1 Touch “Route”.
2 Touch “Preferences”.
86
2 Touch “Pause Guidance”.
The screen will return to the current posi-
tion map without route guidance.
● Without route guidance, “Pause Guid-
ance” cannot be used.

2. ROUTE GUIDANCE
TO RESUME GUIDANCE
1 Touch “Route”.
2 Touch “Resume Guidance”.
The map screen, with the current position
displayed, will be returned to.
SHOW ON MAP
DISPLAY POI ICONS
POI icons such as gas stations and
restaurants can be displayed on the
map screen. Their location can also be
set as a destination and used for route
guidance.
2 Touch “Select POI” to display a partic-
ular type of POI icon on the screen.
When the POI icons to be displayed on
the map screen have already been set,
“Change POI” is displayed.
A screen with a limited choice of Points of
Interest will be displayed. (To change the
displayed POI list, see page 108.)
SELECTING POI ICONS TO BE
DISPLAYED
Up to 5 categories of icons can be displayed on the map screen.
1 Touch the desired Point of Interest cat-
egory to display POI location icons on
the map screen.
3
NAVIGATION SYSTEM
1 Touch “Show on Map”.
87

2. ROUTE GUIDANCE
By touching the desired POI category and
then touching “OK”, the selected POI
icons are displayed on the map screen.
To turn off the Points of Interest icons on
the map screen, touch “Clear”.
“Other POIs”: Touch to display other
Points of Interest categories if the desired
Points of Interest cannot be found on the
limited choice screen.
“Find Local POI”: Touch to search for the
nearest POIs. Then select one of the categories. The system will list the points within
20 miles (32 km). (See page 88.)
2 Touch “Other POIs” on the “Select
POI Icons” screen.
When a POI category is selected from
either the limited list or the complete list,
the icons of those locations will be displayed on the map screen.
3 Touch the desired POI categories.
Touch th e desir ed POI catego ries f rom t he
list.
• The selected category icon appears on
the top left of the screen.
• By touching the desired POI category
and then touching “OK”, the selected
POI icons are displayed on the map
screen.
• To return to the POI category selection
screen, touch “More”.
TO DISPLAY THE LOCAL POI
LIST
Points of Interest that are within 20
miles (32 km) of the current position
will be listed from among the selected
categories.
1 Touch “Find Local POI”.
The selected category’s icon will appear
on the top left of the screen.
By touching the desired POI category and
then touching “OK”, the selected POI
icons are displayed on the map screen.
If the desired POI category is not on the
screen, touch “List All Categories” to list
all POI categories.
88
2 Touch the screen button of the desired
Point of Interest.
The selected Points of Interest are dis-
played on the map screen.
“Near...”: Touc h to search for Poin ts of Interest near the current position or along
the route.

2. ROUTE GUIDANCE
2 When the desired Point of Interest over-
laps with the cursor, touch “Enter ”.
The screen changes and displays the map
location of the selected destination and
route preference. (See “STARTING
ROUTE GUIDANCE” on page 71.)
TO HIDE POI ICONS
No. Function
Touch to display the list of Points of
Interest near the current position.
Touch to display the list of Points of
Interest along the route.
TO SET A POI AS A
DESTINATION
One of the Point of Interest icons can
be selected on the map screen as a
destination and can be used for route
guidance.
1 Directly touch the desired Point of In-
terest icon to set it as a destination.
The map will shift so that the icon is cen-
tered on the screen and overlaps with the
cursor . At this time, the distance from
the current position is displayed on the
screen. The distance shown is measured
as a straight line from the current position
to the POI.
1 Touch “Show on Map”.
3
NAVIGATION SYSTEM
2 Touch “POI Icons”.
The “POI Icons” indicator is dimmed.
The map screen will be displayed with the
POI icons hidden.
To display the POI icons again, touch
“POI Icons” on the “Show on Map”
screen.
89

2. ROUTE GUIDANCE
INFORMATION
ROUTE TRACE
Up to 124 miles (200 km) of the traveled route can be stored and retraced
on the display.
● This feature is available when the map
scale is more than 30 miles (50 km).
TO START RECORDING THE
ROUTE TRACE
1 Touch “Show on Map”.
2 Touch “Route Trace”.
TO STOP RECORDING THE
ROUTE TRACE
1 Touch “Show on Map”.
2 Touch “Route Trace”.
Touching “Yes” stops recording and the
route trace remains displayed on the
screen.
Touching “No” stops recording and the
route trace is erased.
The “Route Trace” indicator is highlighted.
90

3. ADDRESS BOOK
1. NAVIGATION SETTINGS
Points or areas on the map can be registered.
The registered points can be used on
the “Destination” screen. (See “DESTINATION SEARCH BY HOME” on
page 57, and “DESTINATION
SEARCH BY ‘Address Book’” on page
66.)
Registered areas to avoid, will be
avoided when the system searches for
a route.
1 Press the “SETUP” button.
2 Touch “Navigation”.
On this screen, the following operations
can be performed:
No. Function Page
Touch to set home. 91
Touch to set preset desti-
nations.
Touch to set the address
book.
Touch to set areas to
avoid.
Touch to delete previous
destinations.
Touch to set detailed navi-
gation settings.
93
96
100
104
105
SETTING UP THE “Home”
If home has been registered, that information can be recalled by touching
“Go Home” on the “Destination”
screen. (See “DESTINATION
SEARCH BY HOME” on page 57.)
3
NAVIGATION SYSTEM
3 Touch the desired items to be set.
1 Press the “SETUP” button.
2 Touch “Navigation” on the “Setup”
screen.
3 Touch “Home”.
91

3. ADDRESS BOOK
4 Touch the desired screen button.
No. Function Page
Registering home 92
Editing home 92
Deleting home 93
REGISTERING HOME
1 Press the “SETUP” button.
2 Touch “Navigation” on the “Setup”
screen.
3 Touch “Home” on the “Navigation Set-
tings” screen.
4 Touch “Set Home”.
5 Touch the desired screen button and
enter the location in the same way as
for a destination search. (See “DESTINATION SEARCH” on page 56.)
When registration of home is completed,
the “Edit Home” screen will be displayed.
6 Touch “OK”.
To edit registered information, see
“EDITING HOME” on page 92.
EDITING HOME
1 Press the “SETUP” button.
2 Touch “Navigation” on the “Setup”
screen.
3 Touch “Home” on the “Navigation Set-
tings” screen.
4 Touch “Edit”.
92

3. ADDRESS BOOK
5 Touch “Edit” next to the item to be ed-
ited.
No. Function Page
To edit the home name.
The name can be displayed on the map.
To edit location information.
To edit the phone number. 99
To change the icon to be
displayed on the map.
“Show Name on Map”: The name of a
home can be set to be displayed on the
map by touching “On” or “Off”. (See page
98.)
98
99
97
6 Touch “OK”.
4 Touch “Delete”.
5 Touch “Yes” to delete home and touch
“No” to cancel the deletion.
SETTING UP THE “Preset
Destinations”
If preset destination has been registered, that information can be recalled
by using “Preset Destinations” on
the “Navigation Settings” screen. (See
“DESTINATION SEARCH BY PRESET DESTINATIONS” on page 57.)
1 Press the “SETUP” button.
2 Touch “Navigation” on the “Setup”
screen.
3 Touch “Preset Destinations”.
3
NAVIGATION SYSTEM
DELETING HOME
1 Press the “SETUP” button.
2 Touch “Navigation” on the “Setup”
screen.
3 Touch “Home” on the “Navigation Set-
tings” screen.
4 Touch the desired screen button.
93

3. ADDRESS BOOK
No. Function Page
Registering a preset destination
Editing a preset destination 94
Deleting a preset destina-
tion
REGISTERING PRESET
DESTINATIONS
94
95
1 Press the “SETUP” button.
2 Touch “Navigation” on the “Setup”
screen.
3 Touch “Preset Destinations” on the
“Navigation Settings” screen.
4 Touch “Set”.
6 Touch a position for this preset desti-
nation.
When registration of a preset destination
is completed, the “Edit Preset Destination”
screen will be displayed.
7 Touch “OK”.
To edit registered information, see
“EDITING PRESET DESTINATIONS”
on page 94.
EDITING PRESET
DESTINATIONS
1 Press the “SETUP” button.
2 Touch “Navigation” on the “Setup”
screen.
5 Touch the desired screen button and
enter the location in the same way as
for a destination search. (See “DESTINATION SEARCH” on page 56.)
94
3 Touch “Preset Destinations” on the
“Navigation Settings” screen.
4 Touch “Edit”.

3. ADDRESS BOOK
5 Touch the screen button of the desired
preset destination.
6 Touch “Edit” next to the item to be ed-
ited.
No. Function Page
To edit the preset destination name. The name can
be displayed on the map.
98
DELETING PRESET
DESTINATIONS
1 Press the “SETUP” button.
2 Touch “Navigation” on the “Setup”
screen.
3 Touch “Preset Destinations” on the
“Navigation Settings” screen.
4 Touch “Delete”.
3
NAVIGATION SYSTEM
5 Touch the preset destination to be de-
leted.
To edit location information.
To edit the phone number. 99
To change the icon to be
displayed on the map.
“Show Name on Map”: The name of a preset destination can be set to be displayed
on the map by touching “On” or “Off”.
(See page 98.)
99
97
7 Touch “OK”.
Screen button Function
“Select All”
“Unselect All”
Touch to select all preset
destinations.
Touch to cancel the “Select All” function.
6 Touch “Delete”.
7 Touch “Yes” to delete the preset des-
tination and touch “No” to cancel the
deletion.
95

3. ADDRESS BOOK
INFORMATION
SETTING UP THE “Address
Book”
Points or areas on the map can be registered.
1 Press the “SETUP” button.
2 Touch “Navigation” on the “Setup”
screen.
3 Touch “Address Book”.
4 Touch the desired screen button.
REGISTERING ADDRESS
BOOK ENTRIES
1 Press the “SETUP” button.
2 Touch “Navigation” on the “Setup”
screen.
3 Touch “Address Book” on the “Navi-
gation Settings” screen.
4 Touch “New”.
5 Touch the desired screen button and
enter the location in the same way as
for a destination search. (See “DESTINATION SEARCH” on page 56.)
No. Function Page
Registering address book
entries
Editing address book entries
Deleting address book entries
96
96
97
99
After the address book entry has been
registered, the “Edit Address Book Entry”
screen will be displayed.
6 Touch “OK”.
To edit registered information, see
“EDITING ADDRESS BOOK ENTRIES”
on page 97.
● Up to 100 address book entries can be
registered.

3. ADDRESS BOOK
EDITING ADDRESS BOOK
ENTRIES
The icon, name, location and/or phone
number of a registered address book
entry can be edited.
1 Press the “SETUP” button.
2 Touch “Navigation” on the “Setup”
screen.
3 Touch “Address Book” on the “Navi-
gation Settings” screen.
4 Touch “Edit”.
5 Touch the screen button of the desired
address book entry.
No. Function Page
To edit the address book
entry name. The name can
be displayed on the map.
To edit location information.
To edit the phone number. 99
To change the icon to be
displayed on the map.
“Show Name on Map”: The name of an address book entry can be set to be displayed on the map by touching “On” or
“Off”. (See page 98.)
98
99
97
7 Touch “OK”.
■TO CHANGE “Icon”
1 Touch “Edit”.
3
NAVIGATION SYSTEM
6 Touch “Edit” next to the item to be ed-
ited.
2 Touch the desired icon.
Change pages by touching the “Page 1”,
“Page 2” or “With Sound” tab.
97

3. ADDRESS BOOK
INFORMATION
■SOUND ICONS
A sound for some address book entries
can be set. When the vehicle approaches the location of the address
book entry, the selected sound will be
heard.
1 Touch the “With Sound” tab on the
“Address Book Entry Icon” screen.
2 Touch the desired sound icon.
The next screen appears when “Bell
(with Direction)” is touched.
3 Touch either or to adjust the
direction. Touch “OK”.
■TO CHANGE “Name”
1 Touch “Edit”.
2 Enter the name using the alphanumer-
ic keys.
Up to 70 characters can be entered.
3 Touch “OK”.
The previous screen will be displayed.
■DISPLAYING ADDRESS BOOK EN-
TRY NAMES
● The bell sounds only when the vehicle
approaches this point in the direction
that has been set.
98
1 Touch “On” to display the name on the
map and touch “Off” to not display it.

3. ADDRESS BOOK
■TO CHANGE “Location”
1 Touch “Edit”.
2 Touch one of the 8 directional screen
buttons to move the cursor to the
desired point on the map.
3 Touch “OK”.
The previous screen will be displayed.
■TO CHANGE “Phone #” (PHONE
NUMBER)
2 Enter the number using the number
keys.
3 Touch “OK”.
The previous screen will be displayed.
DELETING ADDRESS BOOK
ENTRIES
1 Press the “SETUP” button.
2 Touch “Navigation” on the “Setup”
screen.
3 Touch “Address Book” on the “Navi-
gation Settings” screen.
4 Touch “Delete”.
3
NAVIGATION SYSTEM
1 Touch “Edit”.
99

3. ADDRESS BOOK
5 Touch the address to be deleted.
Screen button Function
“Select All”
“Unselect All”
Touch to select all registered addresses.
Touch to cancel the “Select All” function.
6 Touch “Delete”.
7 Touch “Yes” to delete the address
book entries and touch “No” to cancel
the deletion.
SETTING UP THE “Areas to
Avoid”
Areas to be avoided because of traffic
jams, construction work or other reasons can be registered as areas to
avoid.
4 Touch the desired screen button.
No. Function Page
Registering areas to avoid 100
Editing areas to avoid 101
Deleting areas to avoid 103
REGISTERING AREAS TO
AVOID
1 Press the “SETUP” button.
2 Touch “Navigation” on the “Setup”
screen.
3 Touch “Areas to Avoid” on the “Navi-
gation Settings” screen.
4 Touch “New”.
1 Press the “SETUP” button.
2 Touch “Navigation” on the “Setup”
screen.
3 Touch “Areas to Avoid”.
100
 Loading...