


’05 AVALON_U (L/O 0501)
SECTION 1-
OPERATION OF INSTRUMENTS AND
CONTROLS
Overview of instruments and controls
Instrument panel overview 2. . . . . . . . . . . . . . . . . . . . . . . . . . . . . . . . . . . . .
Instrument cluster overview 7. . . . . . . . . . . . . . . . . . . . . . . . . . . . . . . . . . . .
Center cluster overview 8. . . . . . . . . . . . . . . . . . . . . . . . . . . . . . . . . . . . . . .
Indicator symbols on the instrument panel 9. . . . . . . . . . . . . . . . . . . . . . .
1
2005 AVALON from Jan. ’05 Prod. (OM41408U)
1
Instrument panel overview
View A
’05 AVALON_U (L/O 0501)
1. Side vents
2. Side defroster o utlets
3. Instrument cluster
4. Center cluster
5. Garage door opener switches
6. Auxiliary boxes
7. Front personal lights, interior light
and/or electric moon roof switches
8. Center vents
9. Glove box
10. Power door lock switches
11. Power window switches
12. Trunk opener main switch
13. Rear console box
14. Rear vents
15. Power outlets
16. Seat ventilator/heater switches
17. Cup holder
18. Automatic transmission selector lever
19. Hood lock release lever
20. Parking b rake pedal
21. Window lock switch
22. Drivi ng posit ion memory swit ches
2
2005 AVALON from Jan. ’05 Prod. (OM41408U)
View B (with key cylinder- type ignition switch)
’05 AVALON_U (L/O 0501)
1. Instrument panel light control knob
2. Headlight, turn signal and front fog
light switches
3. Audio remote control switches
4. Speech command switch (See the
separate “Navigation System Owner’s
Manual.”)
5. Climate remote control switches
6. Wiper and washer switches
7. Rear window and outside rear view
mirror defogger switch
8. Emergency flasher switch
9. Audio system
10. Air conditioning controls
11. Cigarette lighter and ashtray, auxiliary
box, cassette player or navigation
system controller (For the navigation
system, see the separate “Navigation
System Owner’s M anual.”)
12. Ignition switch
13. Cruise control switch
14. Tilt steering lock release lever
15. Telescopic steering lock release lever
16. Glass breakage sensor
17. Trunk opener switch
2005 AVALON from Jan. ’05 Prod. (OM41408U)
3

18. Fuel filler door opener switch
19. Power rear view mirror control switches
’05 AVALON_U (L/O 0501)
4
2005 AVALON from Jan. ’05 Prod. (OM41408U)
View B (with smart key system)
’05 AVALON_U (L/O 0501)
1. Instrument panel light control knob
2. Headlight, turn signal and front fog
light switches
3. Audio remote control switches
4. Speech command switch (See the
separate “Navigation System Owner’s
Manual.”)
5. Climate remote control switches
6. Wiper and washer switches
7. Rear window and outside rear view
mirror defogger switch
8. Emergency flasher switch
9. Audio system
10. Air conditioning controls
11. Cigarette lighter and ashtray, auxiliary
box, cassette player or navigation
system controller (For the navigation
system, see the separate “Navigation
System Owner’s M anual.”)
12. Ignition switch (engine switch)
13. Cruise control switch
14. Distance switch
15. Tilt steering lock release lever
16. Telescopic steering lock release lever
17. Glass breakage sensor
2005 AVALON from Jan. ’05 Prod. (OM41408U)
5

18. Rear electric sunshade switch
19. Trunk opener switch
20. Fuel filler door opener switch
21. Power rear view mirror control switches
’05 AVALON_U (L/O 0501)
6
2005 AVALON from Jan. ’05 Prod. (OM41408U)

Instrument cluster overview
’05 AVALON_U (L/O 0501)
1. Engine coolant temperature gauge
2. Service reminder indicators and
indicator lights
3. Tachometer
4. Speedometer
5. Fuel gauge
6. Low fuel level warning light
7. Trip m eter res et knob
8. Odometer and two trip meters
9. Automatic transmission shift range
position display
10. Dynamic laser cruise control display
11. Dynamic laser cruise control master
warning light
7
2005 AVALON from Jan. ’05 Prod. (OM41408U)

Center cluster overview
’05 AVALON_U (L/O 0501)
1. Clock
∗
2. Center display
3. Front passenger’s seat belt reminder
∗
2
light
∗
1
: If your vehicle has equipped navigation system, see the separate “Navigation System Owner’s Manual”.
∗
2
: For details, see “Service reminder indicators and warning buzzers” on page 145 in Section 1- 6.
1
4. “AIRBAG ON” and “AIRBAG OFF”
indicator lights
5. Pattern selector knob (for center
display)
8
2005 AVALON from Jan. ’05 Prod. (OM41408U)
Indicator symbols on the instrument panel
∗
or
Brake system warning li ght
1
’05 AVALON_U (L/O 0501)
Open door warni ng light
∗
SRS war ning light
1
∗
1
∗
Driver’s seat belt reminder light
∗
Dischar ge warning light
1
Low engine oil p ressure warni ng light
or
Malfunction indicator lamp
1
∗
1
∗
1
Vehicle stability control system and traction
control system warni ng light
Low windshield washer fluid level warning
∗
1
light
Automatic headlight leveling system warning
∗
1
light
Engine oil replacement reminder light
Smart key system warning light
∗
1
∗
1
∗
1
Engine immobilizer/theft deterrent system
∗
or
Anti- lock brake system warning light
1
indicator light
Headlight low beam indicator light
9
2005 AVALON from Jan. ’05 Prod. (OM41408U)

Tail light indicator light
Headlight high beam indicator light
Turn signal indicator lights
Automatic transmission indicator lights
Slip indicator/traction control system off light
∗
Cruise control indicator light
cruise control indicator light
2
or dynamic laser
∗
3
’05 AVALON_U (L/O 0501)
∗
1
: For details, see “Service reminder indicators and warning
buzzers” on page 145 in Section 1- 6.
∗
2
: If this light flashes, see “Cruise control” on page 169 in
Section 1- 7.
∗
3
: If this light flashes, see “Dynamic laser cruise control” on
page 172 in Section 1- 7.
10
Dynamic laser cruise control ready mode
indicator light
Conventional cruise control mode indicator light
2005 AVALON from Jan. ’05 Prod. (OM41408U)

’05 AVALON_U (L/O 0501)
SECTION 1-
OPERATION OF INSTRUMENTS AND
CONTROLS
Other equipment
Center display 238. . . . . . . . . . . . . . . . . . . . . . . . . . . . . . . . . . . . . . . . . . . . . .
Clock 241. . . . . . . . . . . . . . . . . . . . . . . . . . . . . . . . . . . . . . . . . . . . . . . . . . . . . .
Compass 241. . . . . . . . . . . . . . . . . . . . . . . . . . . . . . . . . . . . . . . . . . . . . . . . . .
Cigarette lighter and ashtrays 246. . . . . . . . . . . . . . . . . . . . . . . . . . . . . . . .
Power outlets 247. . . . . . . . . . . . . . . . . . . . . . . . . . . . . . . . . . . . . . . . . . . . . .
Garage door opener 248. . . . . . . . . . . . . . . . . . . . . . . . . . . . . . . . . . . . . . . .
Glove box 251. . . . . . . . . . . . . . . . . . . . . . . . . . . . . . . . . . . . . . . . . . . . . . . . . .
Auxiliary boxes 251. . . . . . . . . . . . . . . . . . . . . . . . . . . . . . . . . . . . . . . . . . . . .
Rear console box 253. . . . . . . . . . . . . . . . . . . . . . . . . . . . . . . . . . . . . . . . . . .
Cup holders 253. . . . . . . . . . . . . . . . . . . . . . . . . . . . . . . . . . . . . . . . . . . . . . . .
Rear electric sunshade 254. . . . . . . . . . . . . . . . . . . . . . . . . . . . . . . . . . . . . .
Floor mat 255. . . . . . . . . . . . . . . . . . . . . . . . . . . . . . . . . . . . . . . . . . . . . . . . . .
10
237
2005 AVALON from Jan. ’05 Prod. (OM41408U)

Center display—
’05 AVALON_U (L/O 0501)
1. Audio display
(For details, see “Audio system” on
page 189 in Section 1- 8.)
2. Air conditioning display
(For details, see “Air conditioning
system” on page 223 in Section 1- 9.)
3. Pattern selector knob
4. Cruise information display
5. Outside temperature display
238
2005 AVALON from Jan. ’05 Prod. (OM41408U)
—Before using the center
display
Operate the center display with the
ignition switch on.
When the ignition switch is set at ON, the
last previously used mode displayed just
before the ignition switch is turned off will
appear.
If the electrical power source has been
disconnected from the center display, the
display will automatically be set to the
initial mode.
When the instrument panel lights are
turned on, the brightness of the display
may be reduced.
’05 AVALON_U (L/O 0501)
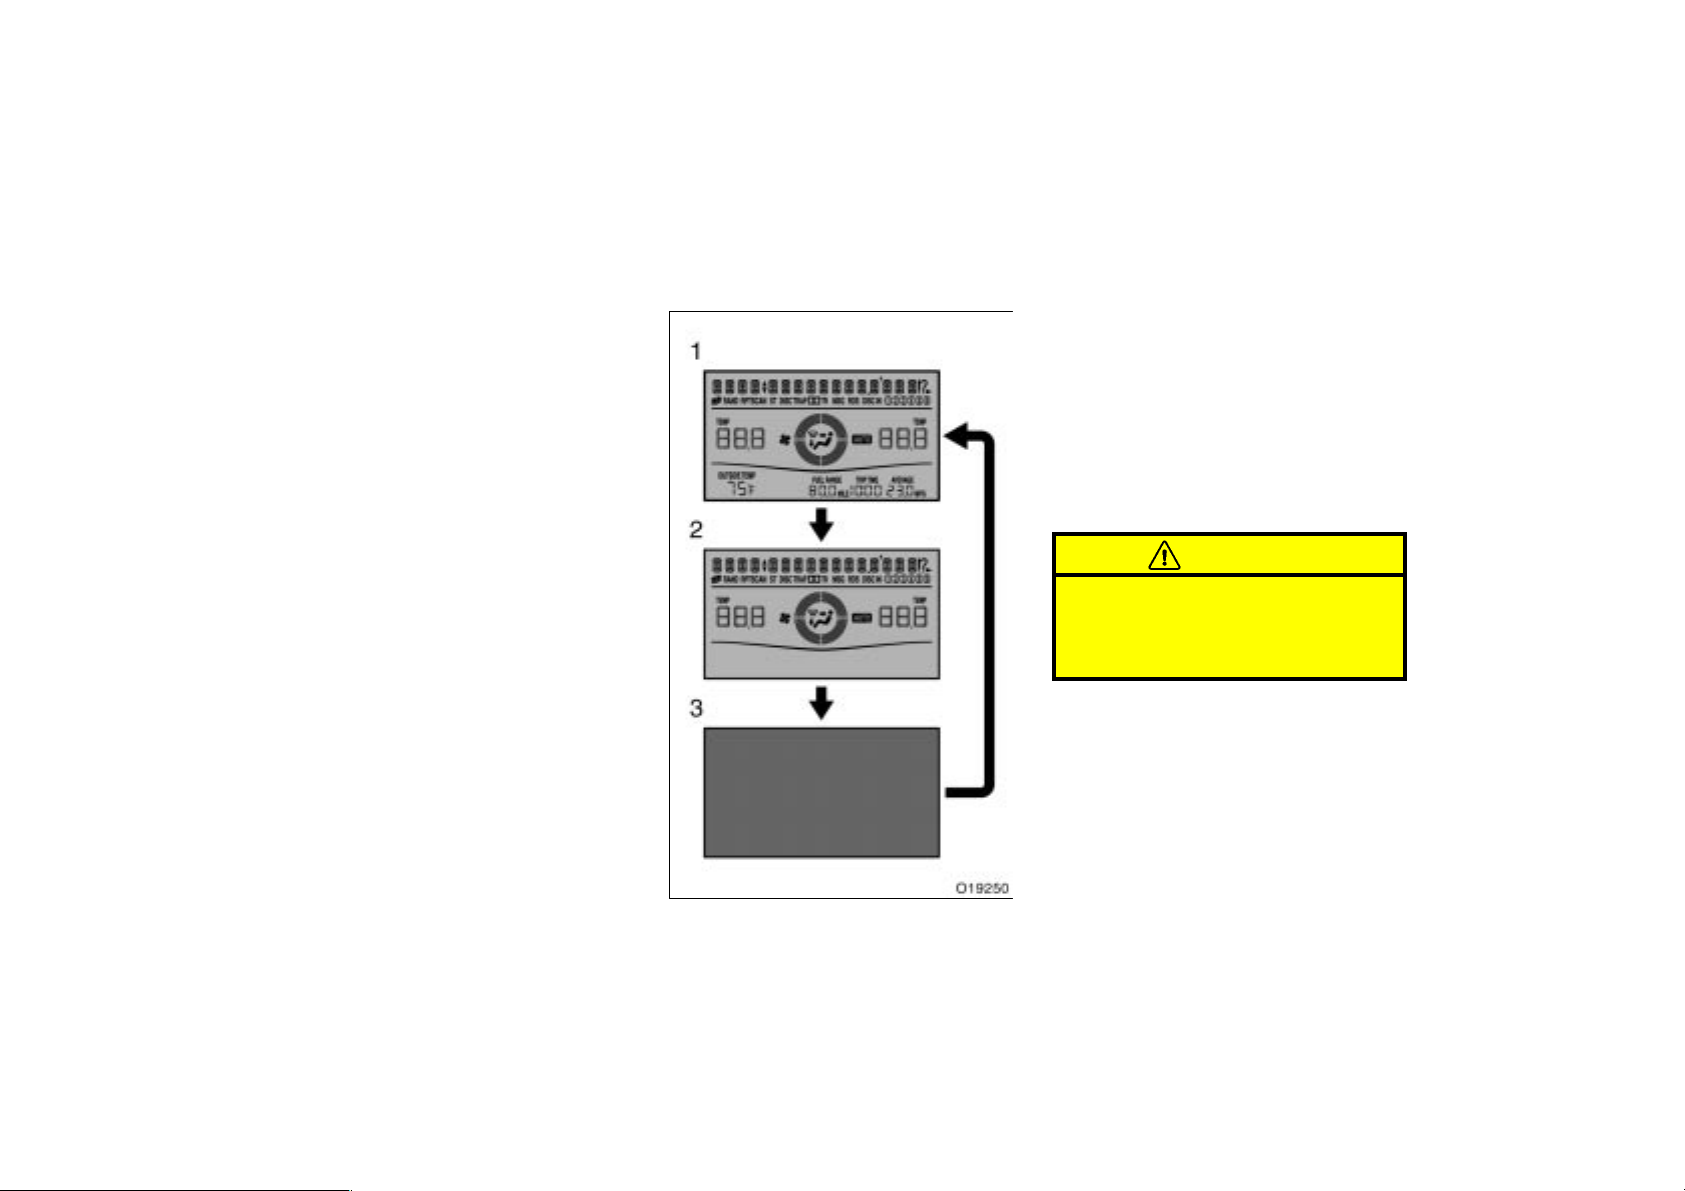
Pattern selector knob
This knob is used to select the pattern
of the display.
Every time you push the pattern selector
knob, the display in the following order.
1. All the display
2. Audio display and air conditioning display
3. Display off
CAUTION
Do not adjust the display while the
vehicle is moving. Be sure to adjust
the display only when the vehicle is
stopped.
239
2005 AVALON from Jan. ’05 Prod. (OM41408U)
’05 AVALON_U (L/O 0501)
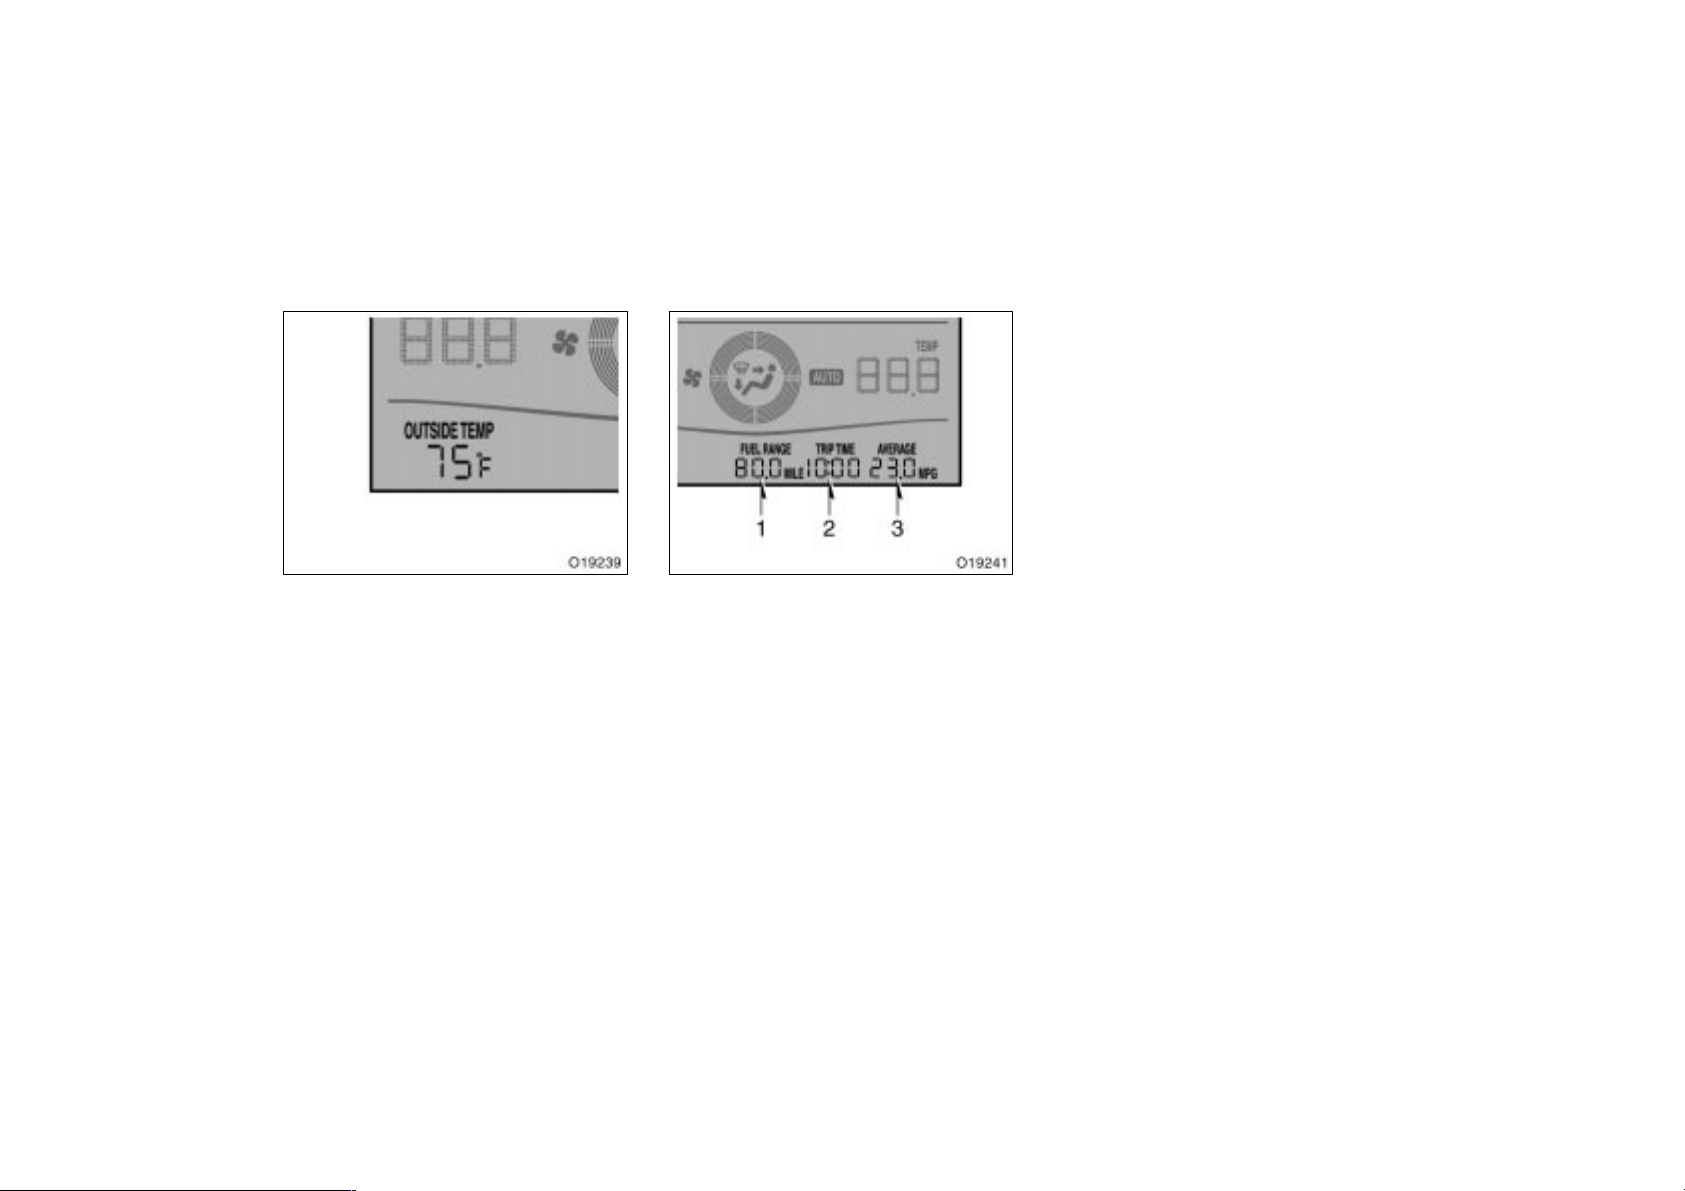
—Outside temperature display —Cruise information display
The outside temperature value is updated
every 1 second.
The displayed temperature ranges from
-30C (- 22F) up to 50C (122F).
If an abnormality exists in the connection
of the outside air temperature sensor,
“- - ”, “F” or “E” will appear on the display.
If “- -”, “F” or “E” appears on the display,
contact your Toyota dealer.
There may be a case that “- -”, “F” or “E”
appears momentarily when the ignition
switch is quickly set to ON. It is normal
if it goes out soon.
1. Driving range
(“FUEL RANGE”)
The distance the vehicle can travel with
the remaining fuel is calculated and
displayed based on the quantity of remaining fuel and past fuel consumption.
The displayed value is updated every 10
seconds.
Every time you refuel the vehicle, the
driving range calculation is automatically
reset.
240
The actual driving range varies with driving habits and road conditions. If fuel consumption is good, the driving range will be
longer than indicated. If fuel consumption
is poor, the driving range will be shorter
than indicated.
2. Elapsed time
(“TRIP TIME”)
The elapsed time after the engine starts
is displayed.
When the engine is started, driving time
is counted from 0:00. Up to 99:59 (99
hours, 59 minutes) can be displayed.
When the driving time exceeds 99:59, the
counter returns to 0:00.
The calculation is reset when the ignition
switch is turned off.
3. Average fuel consumption after refueling
(“AVERAGE”)
Average fuel consumption after refueling is calculated and displayed based
on total driving distance and total fuel
consumption with the engine running.
The displayed value is updated every 10
seconds.
Every time you refuel the vehicle, the average fuel consumption after refueling calculation is automatically reset.
2005 AVALON from Jan. ’05 Prod. (OM41408U)

’05 AVALON_U (L/O 0501)
Clock Compass
When the instrument panel lights are
turned on, the brightness of the time indication may be reduced.
To reset the hour: Push the “H” button.
To reset the minutes: Push the “M” button.
If quick adjustment to a full hour is desired, push the “:00” button.
For example, if the “:00” button is depressed when the time is between
1:01—1:29, the time will change to 1:00.
If the time is between 1:30—1:59, the
time will change to 2:00.
The ignition switch must be set at ON.
If the electrical power source has been
disconnected from the clock, the time display will automatically be set to 1:00 (one
o’clock).
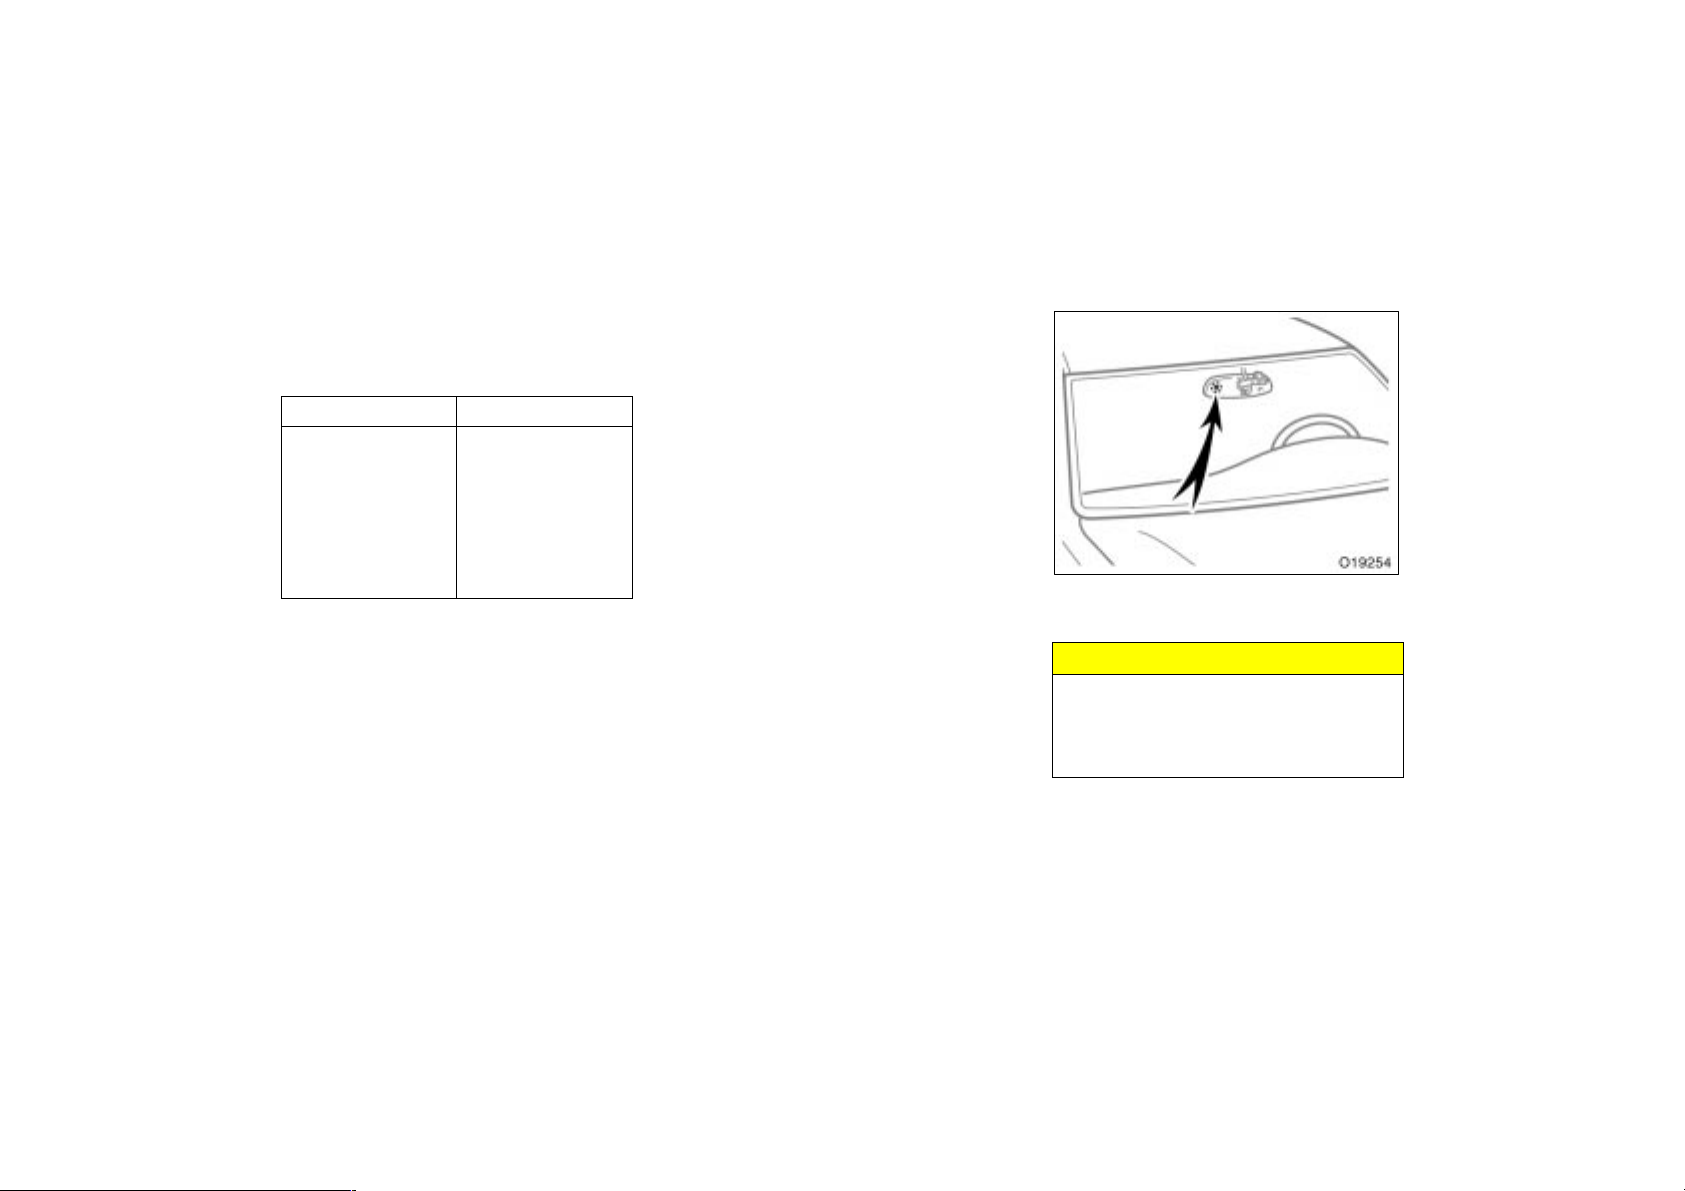
The direction is indicated on the inside
rear view mirror.
If the ignition switch was turned off with
the system on, the system will automatically turn back on when the ignition switch
is turned on.
Push the “
pass system on and off.
” switch to turn the com-
241
2005 AVALON from Jan. ’05 Prod. (OM41408U)
’05 AVALON_U (L/O 0501)
The compass indicates the direction
that the vehicle is heading. In the
above case, it shows that the vehicle is
heading north.
Displays
N
NE
E
SE
S
SW
W
NW
The compass may not show the correct
direction in the following conditions:
Directions
North
Northeast
East
Southeast
South
Southwest
West
Northwest
The vehicle is stopped immediately af-
ter turning.
The compass does not adjust while the
vehicle is stopped.
The ignition switch is turned off imme-
diately after turning.
The vehicle is on an inclined surface.
The vehicle is in a place where the
earth’s magnetic field is subject to interference by artificial magnetic fields
(underground parking, under a steel
tower, between buildings, roof parking,
near a crossing, near a large vehicle,
etc.).
The vehicle is magnetized. (There is a
magnet or a metal object on or near
the inside rear view mirror.)
The battery has been disconnected.
If your vehicle is out of the set zone,
refer to “CALIBRATING THE COMPASS”
below to set the zone number.
If the deviation is small, the compass
works to calibrate the direction automatically while the vehicle is in motion.
For additional precision or for complete
calibrating, see “CALIBRATING THE
COMPASS” below.
The compass sensor is in the inside
rear view mirror.
NOTICE
Do not put magnets or a metal object
on or near the inside rear view mirror
of the vehicle. Doing this may cause
malfunction of the compass sensor.
242
2005 AVALON from Jan. ’05 Prod. (OM41408U)

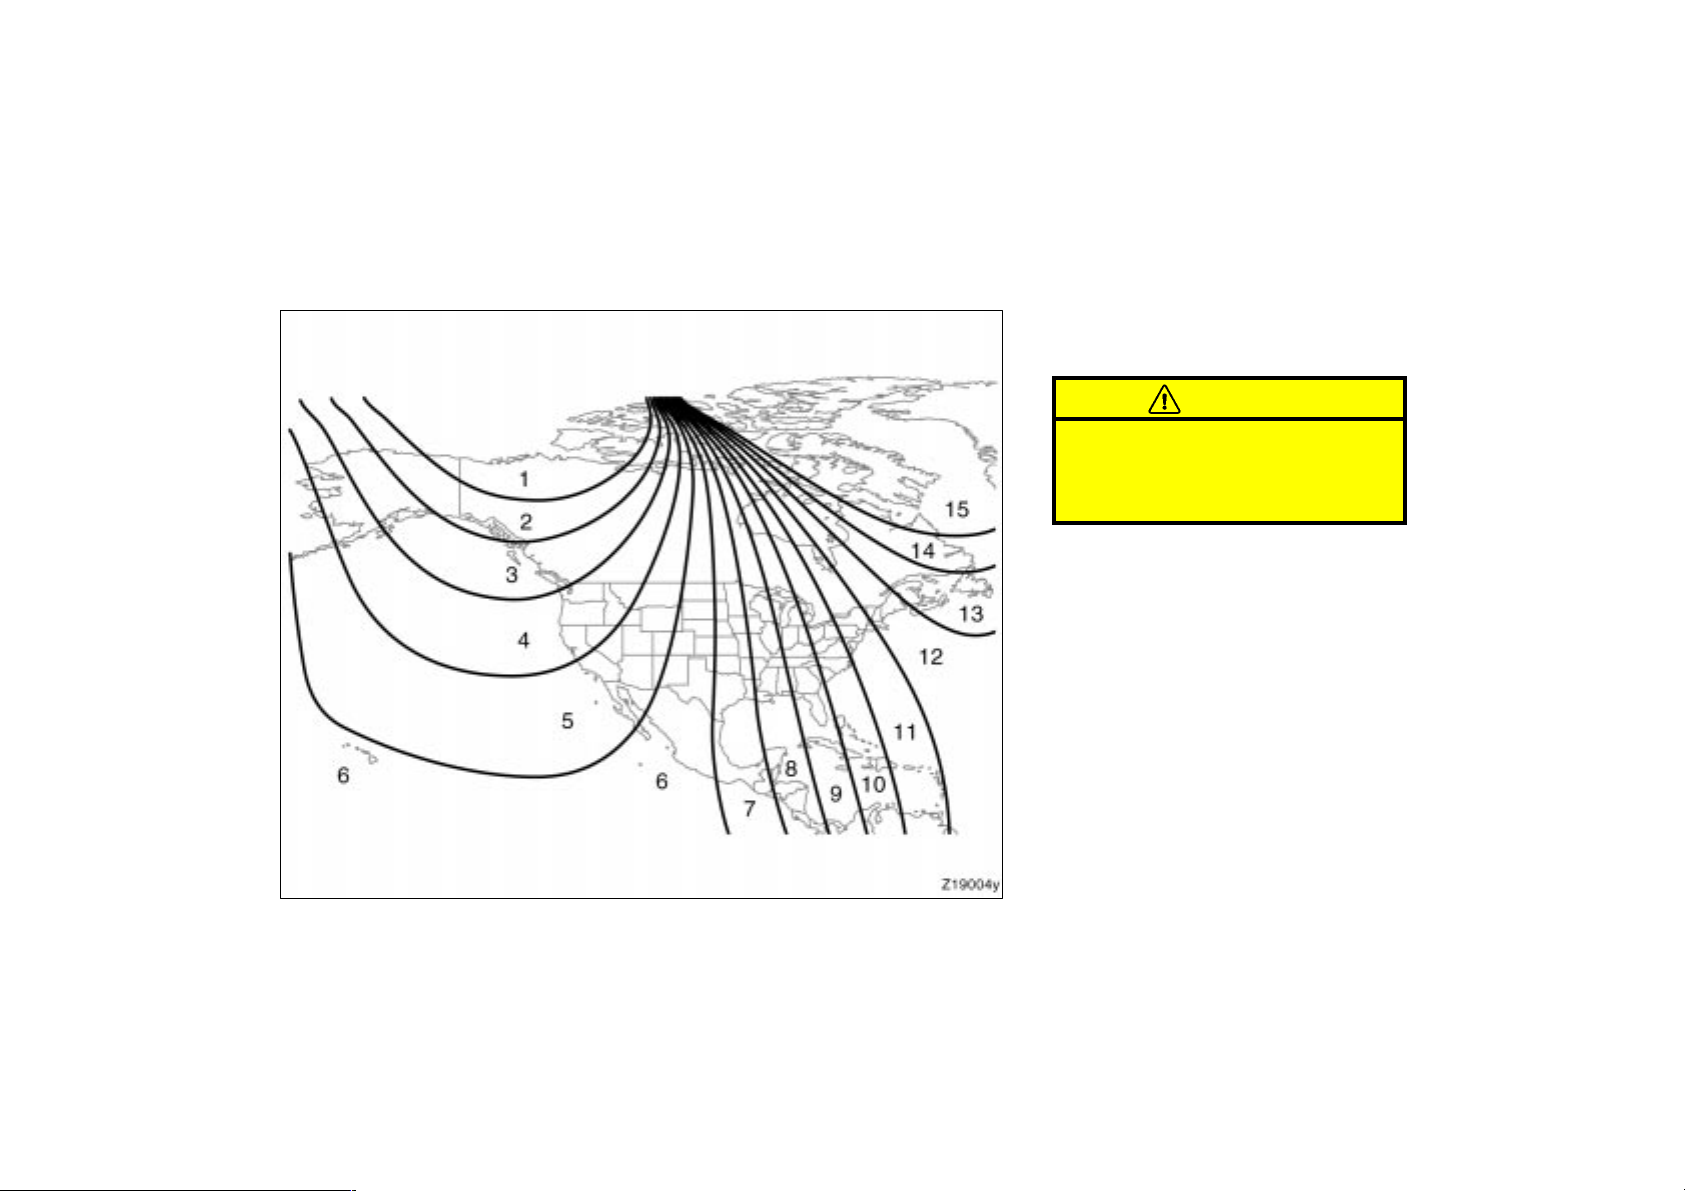
CALIBRATING THE COMPASS (deviation
calibration)
The direction display on the compass
deviates from the true direction determined by the earth’s magnetic field. The
angle of deviation varies according to the
geographic position of the vehicle.
To adjust this deviation, stop the vehicle,
then push and hold the “
the zone number appears on the display.
Then push the “
the following map to select the number of
the zone where the vehicle is.
” switch, referring to
” switch until
’05 AVALON_U (L/O 0501)
243
2005 AVALON from Jan. ’05 Prod. (OM41408U)
’05 AVALON_U (L/O 0501)
Samoa: 5 Guam: 8 Saipan: 8
After calibration, leaving the system for
several seconds returns it to the compass
mode.
CAUTION
Do not adjust the display while the
vehicle is moving. Be sure to adjust
the display only when the vehicle is
stopped.
Zone number
244
2005 AVALON from Jan. ’05 Prod. (OM41408U)

CALIBRATING THE COMPASS (circling
calibration)
Sometimes the direction display on the
compass may not change after a turn. To
rectify this, stop the vehicle and push and
hold the “
the display.
If “C” appears on the display because of
a drastic change in the magnetic field,
perform circling calibration.
” switch until “C” appears on
’05 AVALON_U (L/O 0501)
Drive the vehicle in a circle at 8 km/h (5
mph) or less. If there is not enough space
to drive in a circle, drive around the
block.
After driving 1 to 3 circles in the above
method, calibration is completed when the
direction is shown on the display.
If calibration cannot be performed because
of the magnetized vehicle etc., take your
vehicle to Toyota dealer.
Perform circling calibration just after
you have purchased your Toyota. And
then always perform circling calibration
after the battery has been removed, replaced or disconnected.
Do not perform circling calibration of
the compass in a place where the
earth’s magnetic field is subject to interference by artificial magnetic fields
(underground parking, under a steel
tower, between buildings, roof parking,
near a crossing, near a large vehicle,
etc.).
During calibration, do not operate elec-
tric systems (moon roof, power windows, etc.) as they may interfere with
the calibration.
245
2005 AVALON from Jan. ’05 Prod. (OM41408U)

CAUTION
When doing the circling calibration,
be sure to secure a wide space,
and watch out for people and vehicles in the neighborhood. Do not
violate any local traffic rules while
performing circling calibration.
Do not adjust the display while the
vehicle is moving. Be sure to adjust
the display only when the vehicle is
stopped.
’05 AVALON_U (L/O 0501)
Cigarette lighter and ashtrays
Type A
CIGARETTE LIGHTER (type A)
To use the cigarette lighter, first open
the ashtray lid, then press in the lighter. After it finishes heating up, it automatically pops out ready for use.
If the engine is not running, the ignition
switch must be set at ACC.
Do not hold the cigarette lighter pressed
in.
Use a Toyota genuine cigarette lighter or
equivalent for replacement.
ASHTRAY
Type A: To use the ashtray, push the lid
to open.
Type B: Open the lid of the cup holder
and set the ashtray in it. It can be used
outside the vehicle. To use the ashtray,
raise the lid.
When finished with your cigarette, thoroughly extinguish it in the ashtray to prevent other cigarette butts from catching
fire. After using the ashtray, close the lid
completely.
To detach the ashtray, pull it out.
246
Type B
2005 AVALON from Jan. ’05 Prod. (OM41408U)
CAUTION
To reduce the chance of injury in
case of an accident or sudden stop
while driving, always completely close
the ashtray after use.
Power outlets
Rear console box
’05 AVALON_U (L/O 0501)
The power outlets are designed for
power supply for car accessories.
The ignition switch must be set at ACC
or ON for the power outlet to be used.
To prevent the fuse from being
blown, do not use the electricity
over the total vehicle capacity of 12
V/120W.
To prevent the battery from being
discharged, do not use the power
outlet longer than necessary when
the engine is not running.
Close the power outlet lids when
the power outlets are not in use.
Inserting anything other than an appropriate plug that fits the outlet,
or allowing any liquid to get into
the outlet may cause electrical failure or short circuits.
NOTICE
Center auxiliary box
247
2005 AVALON from Jan. ’05 Prod. (OM41408U)

Garage door opener
The garage door opener (
Universal Transceiver) is manufactured
under license from HomeLink
be programmed to operate garage
doors, gates, entry doors, door locks,
home lighting systems, and security
systems, etc.
and can
’05 AVALON_U (L/O 0501)
(a) Programming the HomeLink
The HomeLink in your vehicle has 3
buttons and you can store one program
for each button.
To ensure correct programming into the
HomeLink
hand- held transmitter prior to programming.
The battery side of the hand- held transmitter must be pointed away from the
HomeLink
cess.
For Canadian users, follow the procedure
in “Programming an entrance gate/Programming all devices in the Canadian
market”.
1. Decide which of 3 HomeLink
2. Place your hand- held garage transmit-
Keep the indicator light on the HomeLink
in view while programming.
3. Simultaneously press and hold the
, install a new battery in the
during the programming pro-
you want to program.
ter 25 to 75 mm (1 to 3 in.) away from
the surface of the HomeLink
hand- held garage transmitter button
along with the selected HomeLink
ton.
buttons
.
but-
4. When the indicator light on the
HomeLink
changes from a slow to a
rapid flash after 20 seconds, you can
release b oth buttons.
5. Test the operation of the HomeLink
pressing the newly programmed button.
If programming a garage door opener,
check to see if the garage door opens
and closes.
If the garage door does not operate, identify if your garage transmitter is of the
“Rolling Code” type. Press and hold the
programmed HomeLink
button. The garage door has the rolling code feature if
the indicator light (on the HomeLink
flashes rapidly and then remains lit after
2 seconds. If your garage transmitter is
the “Rolling Code” type, proceed to the
heading “Programming a rolling code system”.
6. Repeat steps 2 through 5 for each remaining HomeLink
another device.
button to program
by
)
248
2005 AVALON from Jan. ’05 Prod. (OM41408U)

’05 AVALON_U (L/O 0501)
Programming a rolling code system
If your device is “Rolling Code”
equipped, it is necessary to follow
steps 1 through 4 under the heading
“Programming the HomeLink
” before
proceeding with the steps listed below.
1. Locate the “training” button on the ceiling mounted garage door opener motor.
The exact location and color of the
button may vary by brand of garage
door opener. Refer to the owner’s
guide supplied by the garage door
opener manufacturer for the location of
this “training” button.
2. Press the “training” button on the ceiling mounted garage door opener motor.
Following this step, you have 30 seconds
in which to initiate step 3 below.
3. Press and release the vehicle’s programmed HomeLink
button twice. The
garage door may open. If the door
does open, the programming process is
complete. If the door does not open,
press and release the button a third
time. This third press and release will
complete the programming process by
opening the garage door.
The ceiling mounted garage door opener
motor should now recognize the
HomeLink
unit and be able activate the
garage door up/down.
4. Repeat steps 1 through 3 for each remaining HomeLink
button to program
another rolling code system.
Programming an entrance gate/Programming all devices in the Canadian market
1. Decide which of the 3 HomeLink
but-
tons you want to program.
2. Place your hand-held gate/device
transmitter 25 to 75 mm (1 to 3 in.)
away from the surface of the
HomeLink
.
Keep the indicator light on the HomeLink
in view while programming.
3. Press and hold the selected
HomeLink
button.
4. Continuously press and release (cycle)
the hand- held gate/device transmitter
button every two seconds until step 5
is complete.
5. When the indicator light on the
HomeLink
changes from a slow to a
rapid flash after 20 seconds, you can
release b oth buttons.
6. Test the operation of the HomeLink
pressing the newly programmed button.
Check to see if the gate/device operates correctly.
7. Repeat steps 1 through 6 for each remaining HomeLink
button to program
another device.
Programming other devices
To program other devices such as home
security systems, home door locks or
lighting, contact your authorized Toyota
dealer for assistance.
Reprogramming a button
Individual HomeLink
erased, however, to reprogram a single
button, follow the procedure “Programming
the HomeLink
”.
buttons cannot be
(b) Operating the HomeLink
To operate the HomeLink, press the
appropriate HomeLink
button to activate
the programmed device. The HomeLink
indicator light should come on. The
HomeLink
continues to send the signal
for up to 20 seconds as long as the
button is pressed.
by
249
2005 AVALON from Jan. ’05 Prod. (OM41408U)
’05 AVALON_U (L/O 0501)
(c) Erasing the entire HomeLink
memory (all three programs)
To erase all previously programmed codes
at one time, press and hold down the 2
outside buttons for 20 seconds until the
indicator light flashes.
If you sell your vehicle, be sure to erase
the programs stored in the HomeLink
memory.
For additional programming assistance
with your HomeLink
Universal
Transceiver call:
The Toyota Customer Experience
Center at 1- 800- 331-4331 (U.S.A.)
Toyota Customer Interaction Centre at
1- 888-869- 6828 (Canada)
Refer to HomeLink
WWW.HOMELINK.COM
on the internet at:
CAUTION
When programming the HomeLink
Universal Transceiver, you may be
operating a garage door or other
device. Make sure people and ob-
jects are out of the way of the garage door or other device to prevent potential harm or damage.
Do not use this HomeLink
sal Transceiver with any garage
door opener that lacks the safety
stop and reverse feature as required by federal safety standards.
(This includes any garage door
opener model manufactured before
April 1, 1982.) A garage door opener which cannot detect an object
(signaling the door to stop and reverse), does not meet current federal safety standards. Using a garage
door opener without these features
increases risk of serious injury or
death.
Univer-
This device complies with Part 15 of the
FCC Rules and with RSS- 210 of the IC
Rules. Operation is subject to the following two conditions: (1) This device
may not cause harmful interference, and
(2) this device must accept any interference that may be received, including
interference that may cause undersired
operation.
WARNING: This transmitter has been
tested and complies with FCC and IC
rules. Changes or modifications not
expressly approved by the party responsible for compliance could void
the user’s authority to operate the
device.
250
2005 AVALON from Jan. ’05 Prod. (OM41408U)

’05 AVALON_U (L/O 0501)
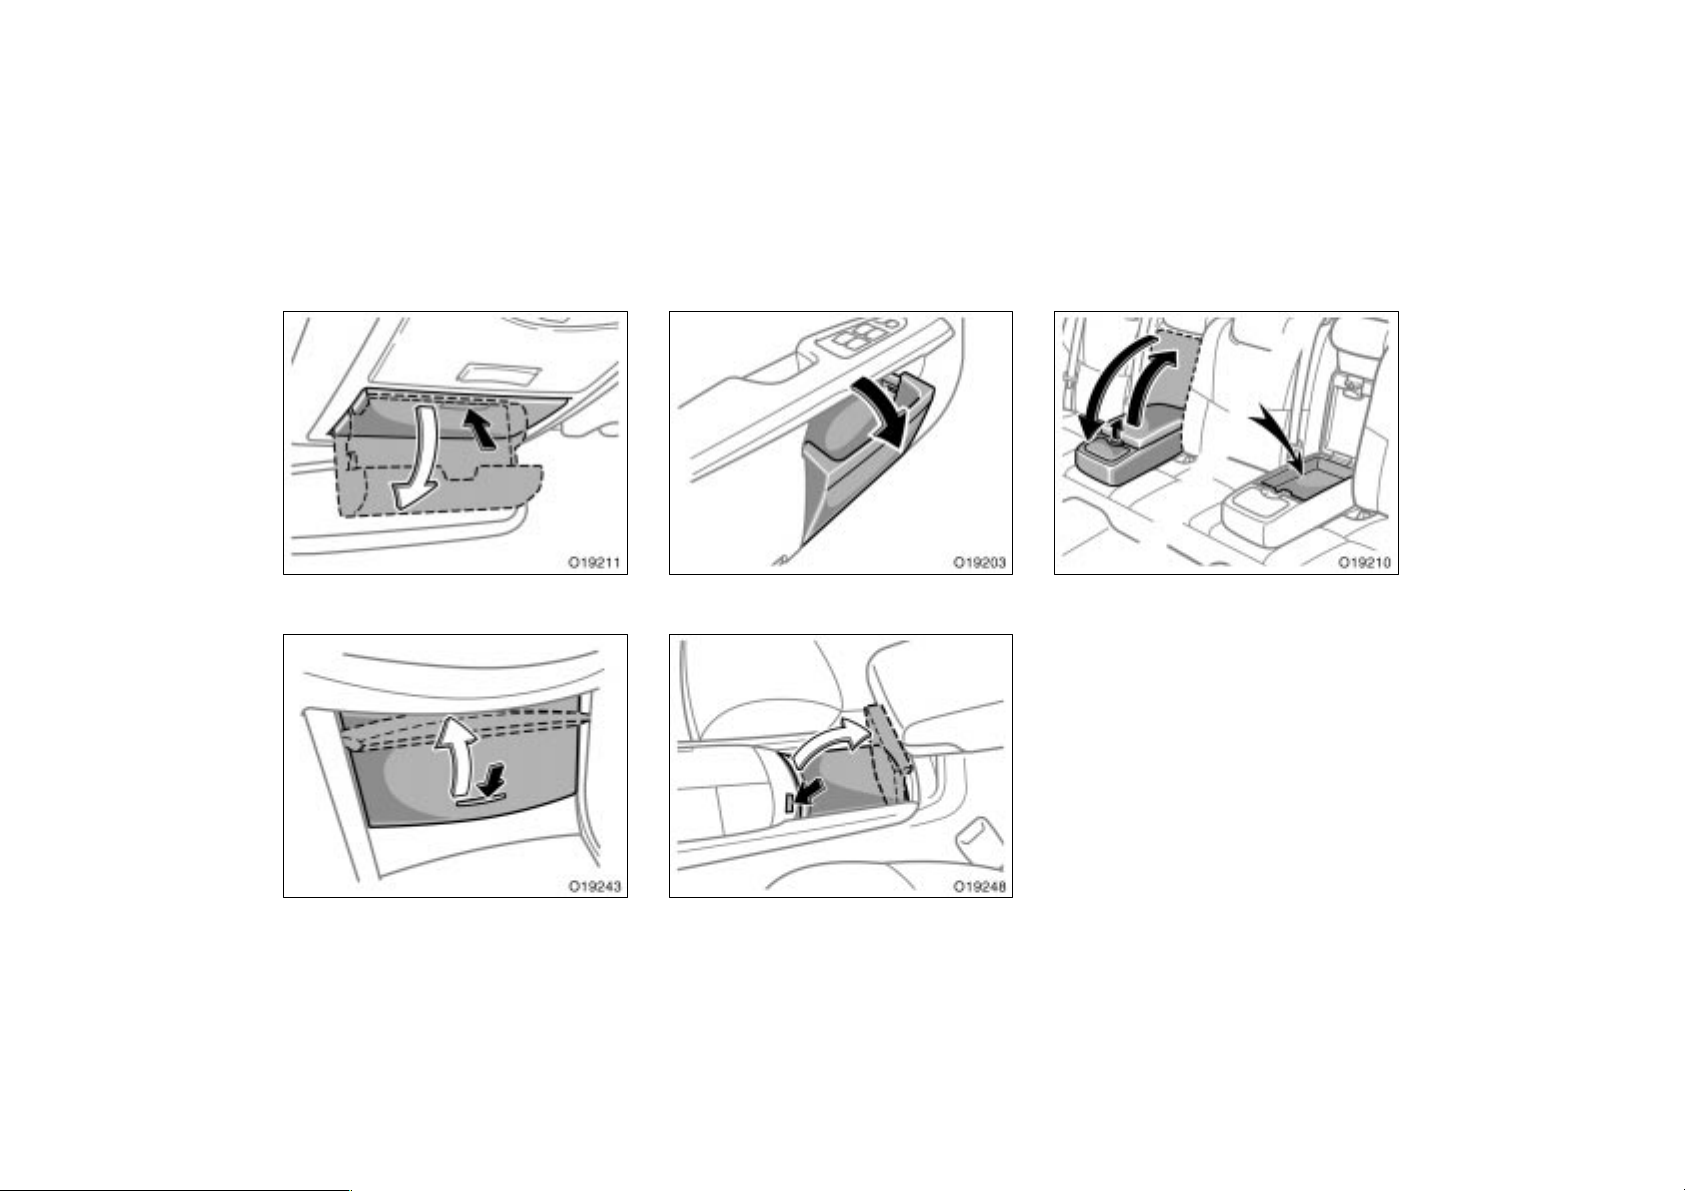
Glove box Auxiliary boxes
CAUTION
To reduce the chance of injury in
case of an accident or a sudden stop,
always keep the glove box door
closed while driving.
To use the auxiliary boxes, open the
lids as shown in the following illustrations.
CAUTION
To reduce the chance of injury in
case of an accident or sudden stop,
always keep the auxiliary box
closed while driving.
Type A—It is designed for holding
a light objects, do not place any
heavy objects in it. Heavy objects
To use the glove box:
Open by pulling the lever.
Lock by inserting the master key (vehicles
with key cylinder- type ignition switch) or
mechanical key (vehicles with smart key
system) and turning it clockwise.
Unlock by inserting the master key (vehicles with key cylinder- type ignition
switch) or mechanical key (vehicles with
smart key system) and turning it counterclockwise.
With the instrument panel lights on, the
glove box light will come on when the
glove box is open.
may cause the holder to open and
contents to fly out resulting in injuries.
NOTICE
Type A—During hot weather, the interior of the vehicle becomes very hot.
Do not leave anything flammable or
deformable such as a lighter, glasses,
etc. inside.
251
2005 AVALON from Jan. ’05 Prod. (OM41408U)
’05 AVALON_U (L/O 0501)
Type A (ceiling)
Type B (front console)
252
Type C (door panel)
Type D (center console)
Type E (rear seat)
2005 AVALON from Jan. ’05 Prod. (OM41408U)
’05 AVALON_U (L/O 0501)
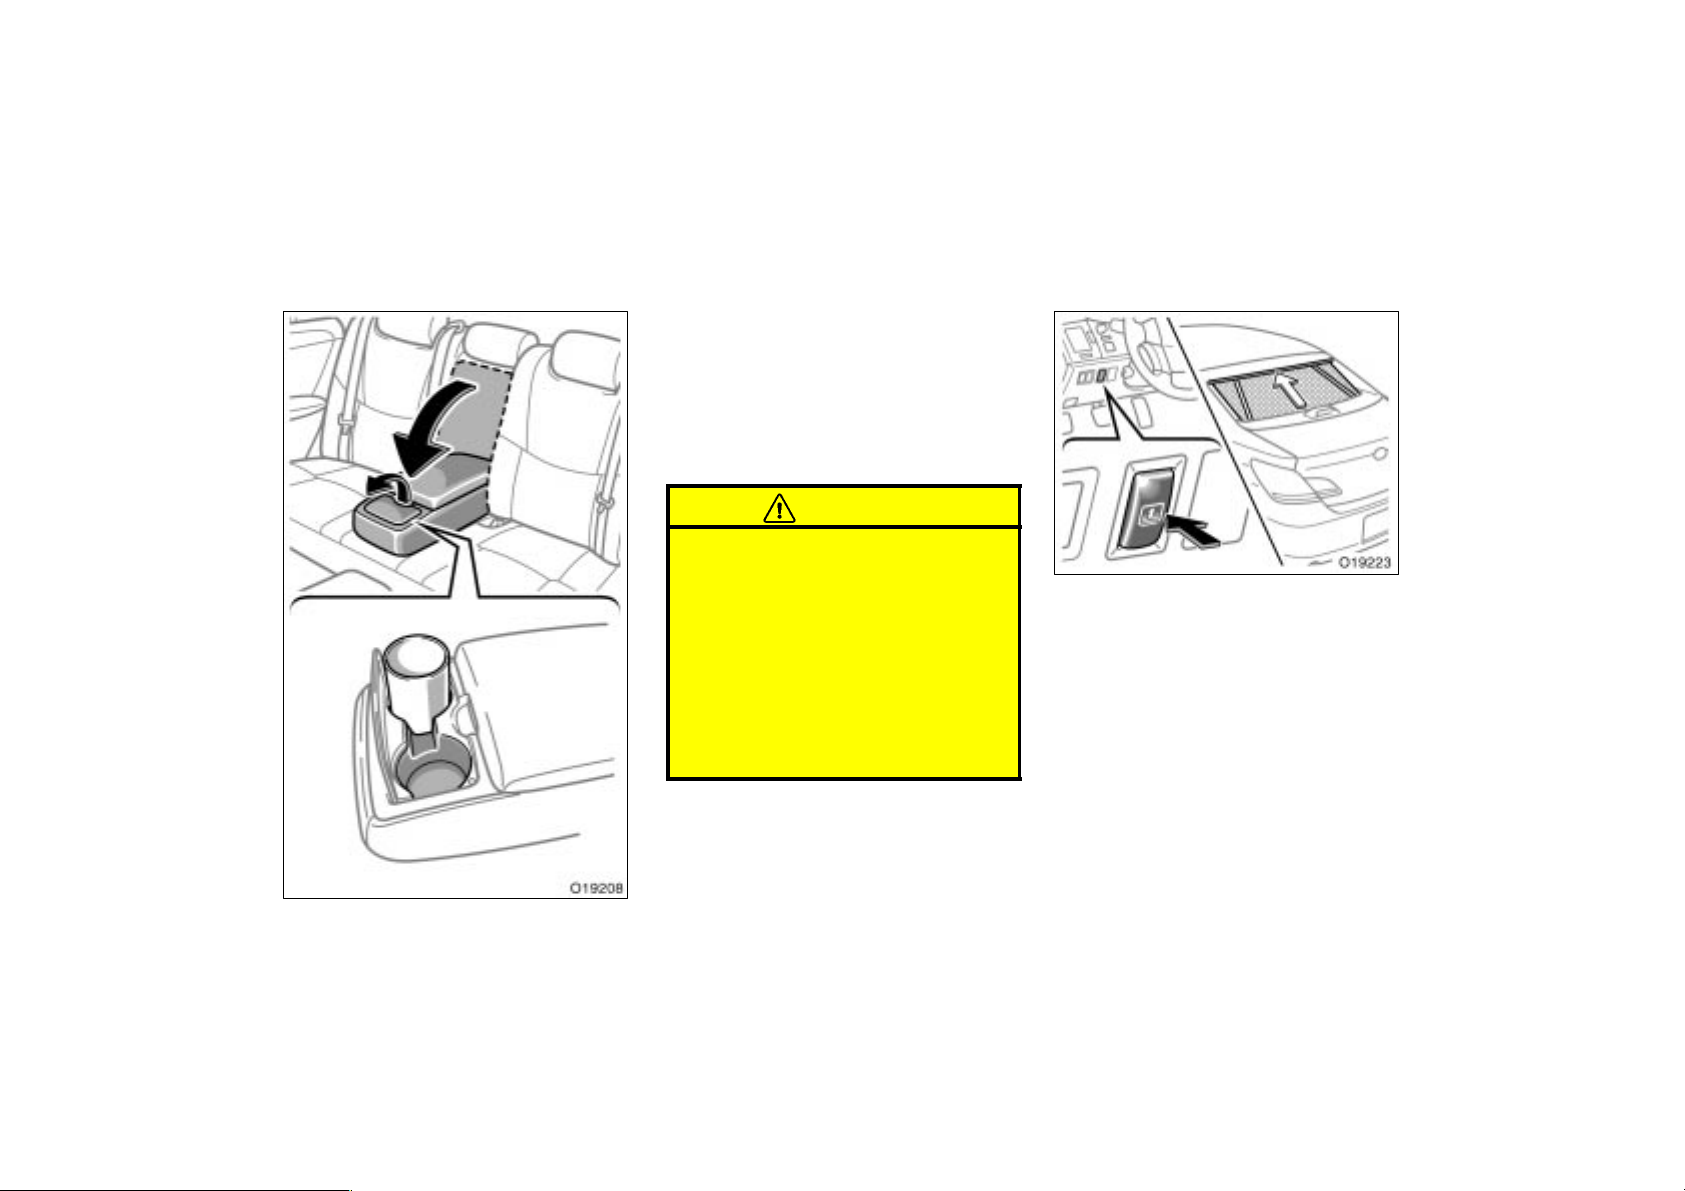
Rear console box Cup holders
To access the rear console box, pull up
the lock release lever while raising the
rear console box lid.
CAUTION
To reduce the chance of injury in
case of an accident or a sudden stop,
always keep the console box closed
while driving.
It is possible to use the rear console
box lid as an armrest by moving it as
show in the illustration.
When using the console box, return the lid
to its original position.
Type A (center console)
Type B (rear armrest)
253
2005 AVALON from Jan. ’05 Prod. (OM41408U)
’05 AVALON_U (L/O 0501)
The cup holders are designed for holding cups or drink- cans securely.
To use the cup holder, do the following.
Type A—Push on the lid.
Type B—Pull down the rear armrest.
Type C—Pull down the rear armrest and
open the lid on the armrest.
CAUTION
Do not place anything else other
than cups or drink-cans on the cup
holder, as such items may be
thrown about in the compartment
and possibly injure people in the
vehicle during sudden braking or in
an accident.
To reduce the chance of injury in
case of an accident or sudden stop
while driving, keep the cup holder
closed when it is not in use.
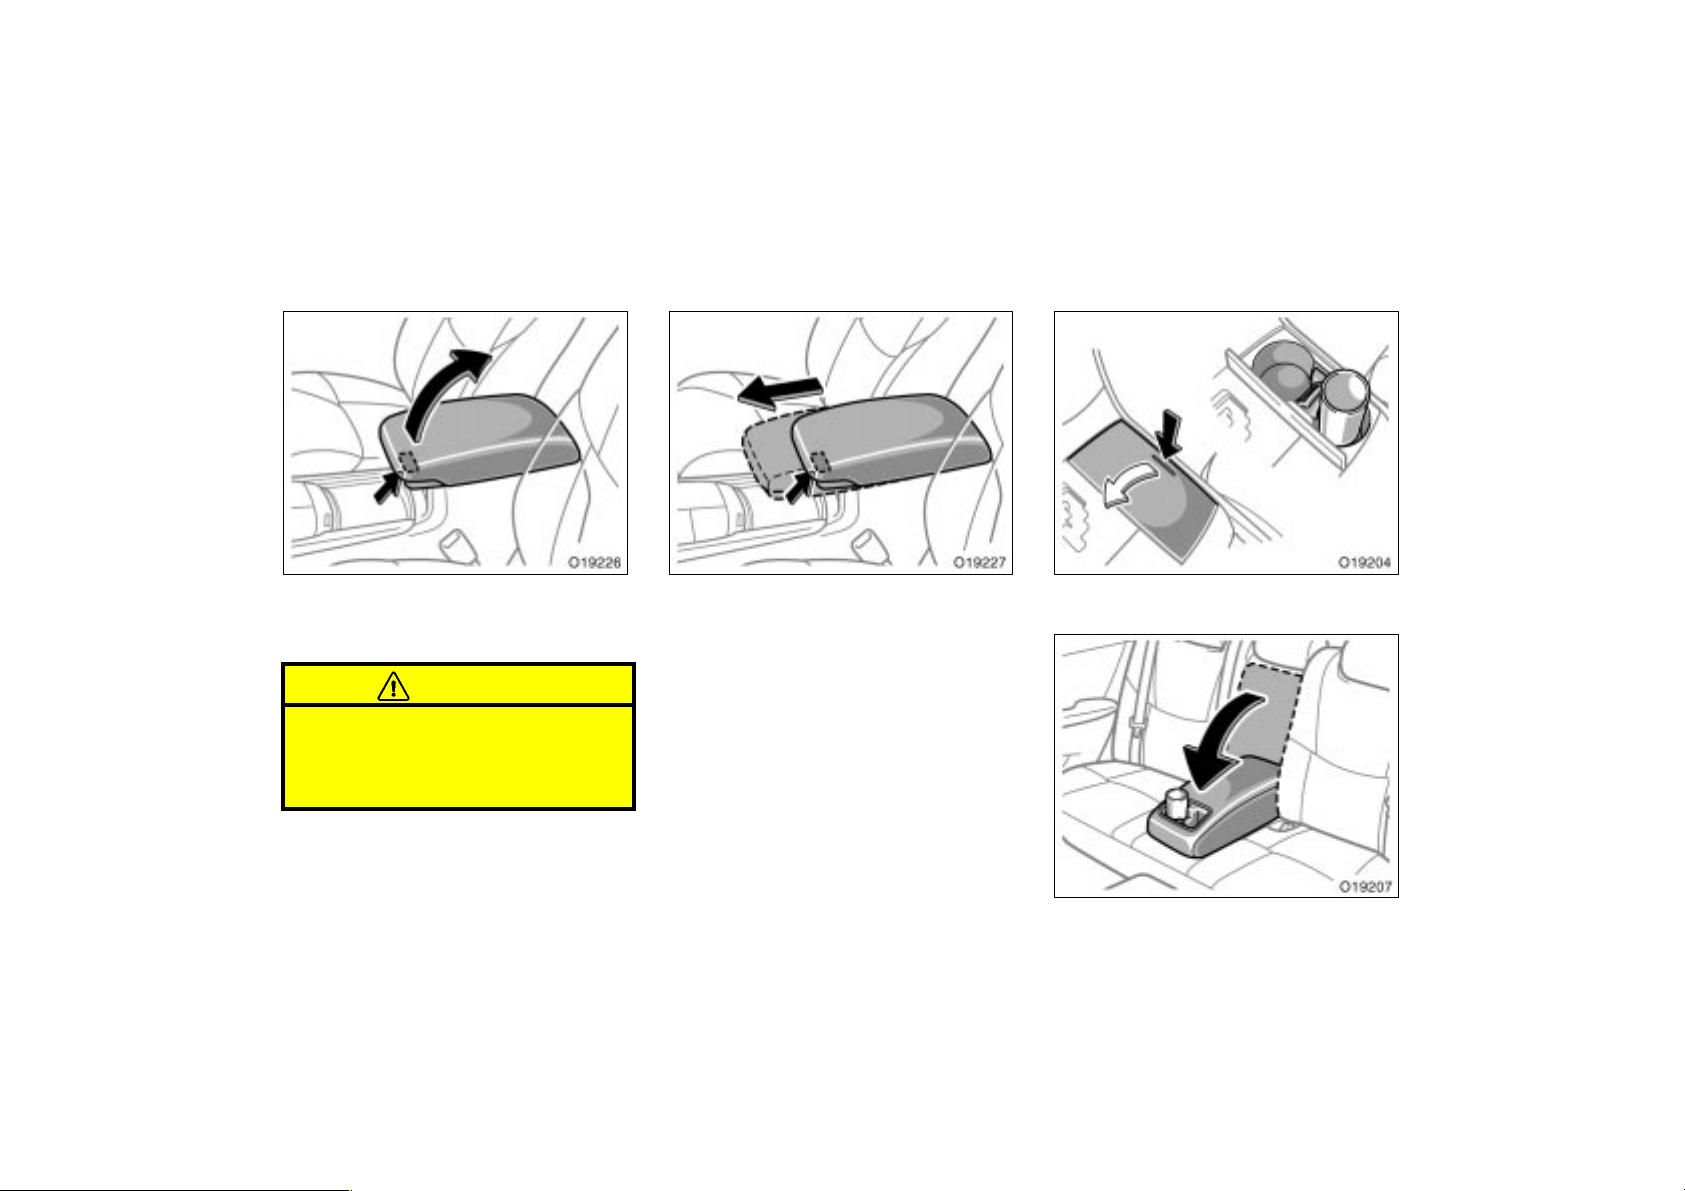
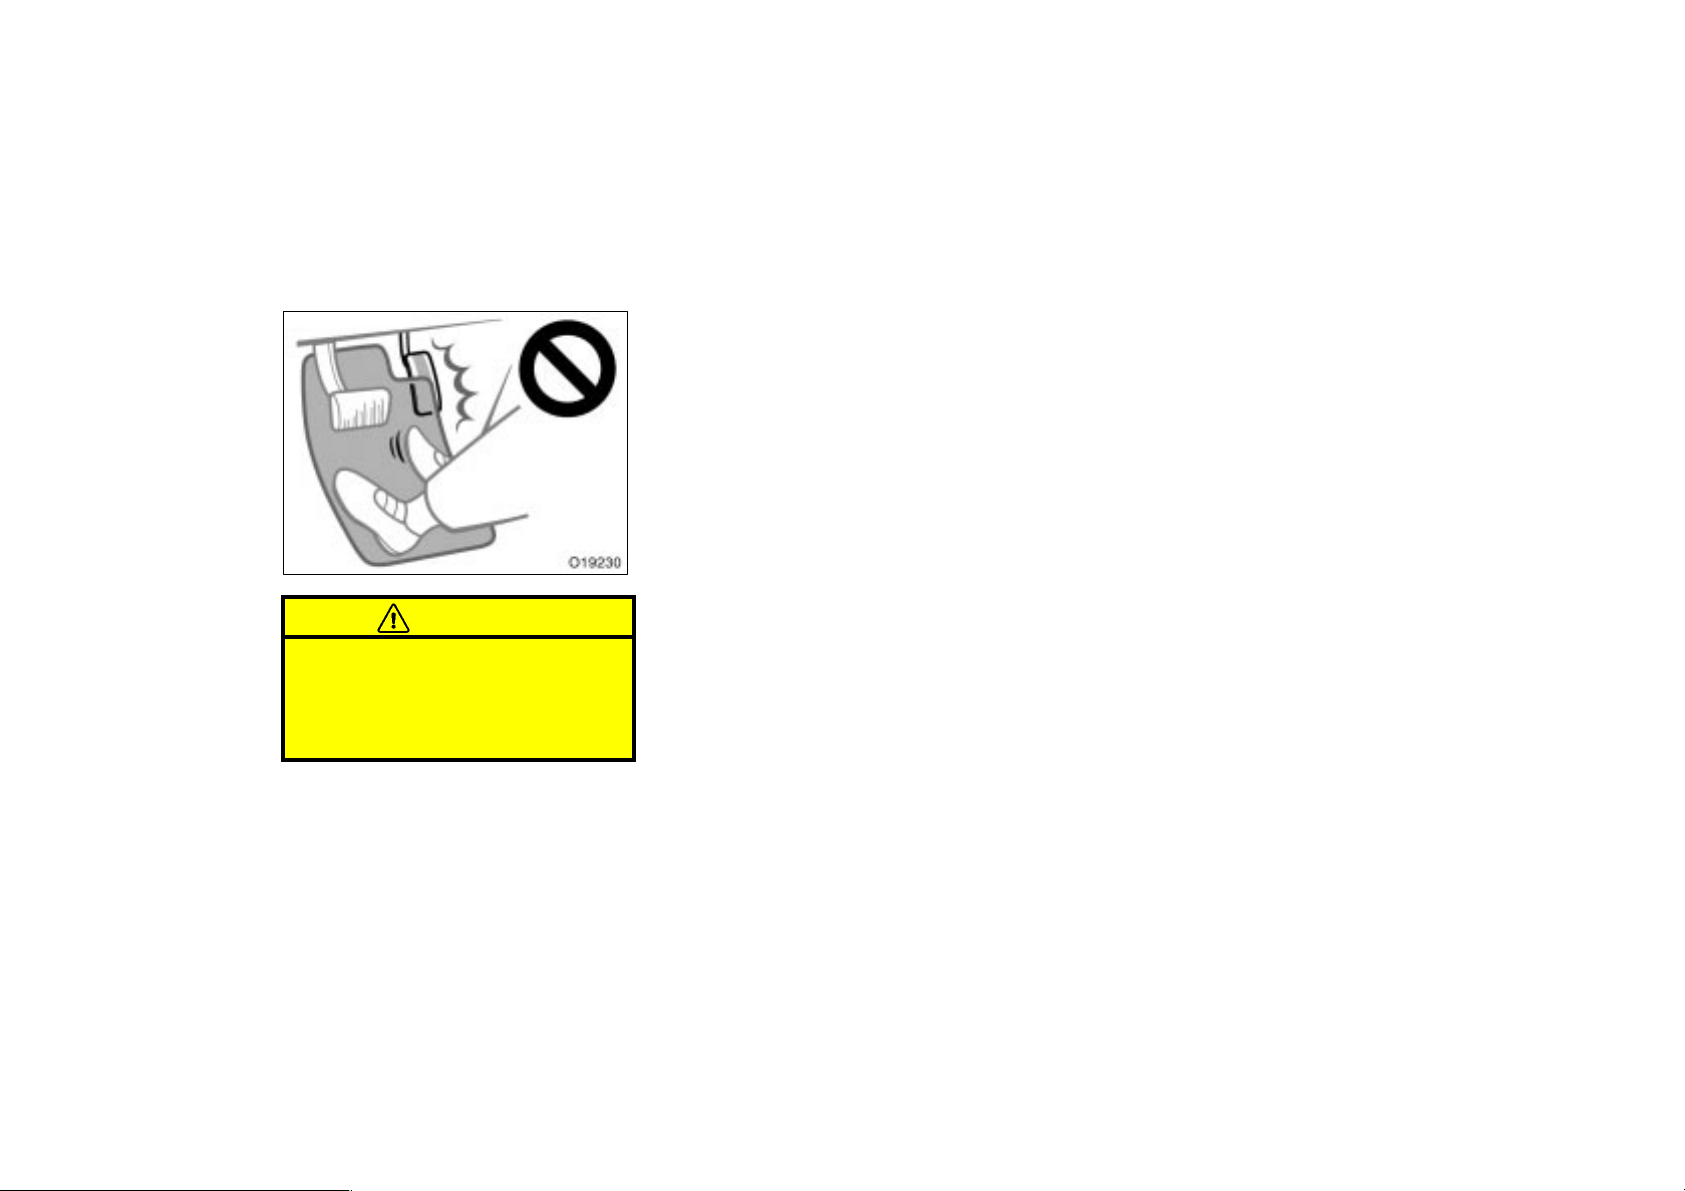
Rear electric sunshade
To raise the rear electric sunshade,
push the switch. To lower the sunshade, push the switch again.
The sunshade works when the ignition
switch is set at ON.
When the selector lever is shifted into
the “R” position while the sunshade is
raised, the sunshade will be automatically lowered. To raise the sunshade,
move the selector lever out of “R”
position and push the switch.
Type C (rear armrest)
254
2005 AVALON from Jan. ’05 Prod. (OM41408U)

’05 AVALON_U (L/O 0501)
Floor mat
CAUTION
Do not touch the brackets fastening
the sunshade to avoid injuring your
fingers or hands.
Do not put your fingers in the sun-
shade groove while the sunshade is
operating to avoid getting them
caught or injured by the runner.
NOTICE
To prevent the vehicle battery from
being discharged, always operate
the sunshade while the engine is
running.
Observe the following to avoid damage and/or malfunction:
Do not overload the sunshade motor and other parts (for instance by
pushing down on the sunshade
bracket while it is opening).
Do not place anything where they
may hinder the opening/closing of
the sunshade.
Do not affix anything to the sunshade.
Clean the sunshade groove if there
is any foreign matter or dust on it.
Do not operate the rear electric
sunshade repeatedly for a long time
as its motor may overheat.
Use a floor mat of the correct size.
If the floor carpet and floor mat have a
hole, then it is designed for use with a
locking clip. Fix the floor mat with locking
clip into the hole in the floor carpet.
255
2005 AVALON from Jan. ’05 Prod. (OM41408U)
CAUTION
Make sure the floor mat is properly
placed on the floor carpet. If the floor
mat slips and interferes with the
movement of the pedals during driving, it may cause an accident.
’05 AVALON_U (L/O 0501)
256
2005 AVALON from Jan. ’05 Prod. (OM41408U)

’05 AVALON_U (L/O 0501)
SECTION 1-
OPERATION OF INSTRUMENTS AND
CONTROLS
Keys and Doors
Keys 12. . . . . . . . . . . . . . . . . . . . . . . . . . . . . . . . . . . . . . . . . . . . . . . . . . . . . . .
Engine immobilizer system 16. . . . . . . . . . . . . . . . . . . . . . . . . . . . . . . . . . .
Wireless remote control 18. . . . . . . . . . . . . . . . . . . . . . . . . . . . . . . . . . . . . .
Smart key system 27. . . . . . . . . . . . . . . . . . . . . . . . . . . . . . . . . . . . . . . . . . . .
Side doors 32. . . . . . . . . . . . . . . . . . . . . . . . . . . . . . . . . . . . . . . . . . . . . . . . . .
Power windows 40. . . . . . . . . . . . . . . . . . . . . . . . . . . . . . . . . . . . . . . . . . . . . .
Trunk lid 43. . . . . . . . . . . . . . . . . . . . . . . . . . . . . . . . . . . . . . . . . . . . . . . . . . . .
Hood 47. . . . . . . . . . . . . . . . . . . . . . . . . . . . . . . . . . . . . . . . . . . . . . . . . . . . . . .
Theft deterrent system 47. . . . . . . . . . . . . . . . . . . . . . . . . . . . . . . . . . . . . . .
Fuel tank cap 49. . . . . . . . . . . . . . . . . . . . . . . . . . . . . . . . . . . . . . . . . . . . . . .
Electric moon roof 51. . . . . . . . . . . . . . . . . . . . . . . . . . . . . . . . . . . . . . . . . . .
2
2005 AVALON from Jan. ’05 Prod. (OM41408U)
11

Keys (with key cylinder- type
ignition switch)
’05 AVALON_U (L/O 0501)
To protect items locked in the trunk or
glove box when using valet parking, leave
the sub key with the attendant.
Your vehicle is supplied with two kinds
of keys.
1. Master keys (black)—These keys work
in every lock. Your Toyota dealer will
need one of them to make a new key
with a built- in transponder chip.
2. Sub key (gray)—This key will not work
in the glove box and armrest door in
the rear seat.
A transponder chip for engine immobilizer
system has been placed in the head of
the master and sub keys. These chips are
needed to enable the system to function
correctly, so be careful not to lose these
keys. If you make your own duplicate key,
you will not be able to cancel the system
or start the engine.
12
NOTICE
When using a key containing a transponder chip, observe the following
precautions:
When starting the engine, do not
use the key with a key ring resting
on the key grip and do not press
the key ring against the key grip.
Otherwise the engine may not start,
or may stop soon after it starts.
2005 AVALON from Jan. ’05 Prod. (OM41408U)

When starting the engine, do not
use the key with other transponder
keys around (including keys of other vehicles) and do not press other
key plates against the key grip.
Otherwise the engine may not start,
or may stop soon after it starts. If
this happens, remove the key once
and then insert it again after removing other transponder keys (including keys of other vehicles) from the
ring or while gripping or covering
them with your hand to start the
engine.
’05 AVALON_U (L/O 0501)
Do not bend the key grip.
Do not cover the key grip with any
material that cuts off electromagnetic waves.
Do not knock the key hard against
other objects.
Do not leave the key exposed to
high temperatures for a long period,
such as on the dashboard and hood
under direct sunlight.
Do not put the key in water or
wash it in an ultrasonic washer.
Do not use the key with electromagnetic materials.
13
2005 AVALON from Jan. ’05 Prod. (OM41408U)

KEY NUMBER PLATE
Your key number is shown on the plate.
Keep the plate in a safe place such as
your wallet, not in the vehicle.
If you should lose your keys or if you
need additional keys, duplicates can be
made by a Toyota dealer using the key
number.
We recommend writing down the key number and storing it in a safe place.
’05 AVALON_U (L/O 0501)
Keys (with smart key system)
The key consists of an electronic key
and a mechanical key. The mechanical
key is for emergency use. If the electronic key does not operate, you can
open the driver’s door using the mechanical key.
1. Electronic keys—These keys can lock
or unlock all the doors and can open
the trunk by using the wireless remote
control function or entry function of the
smart key system.
2. Mechanical keys—These keys can lock
or unlock the driver’s door, glove box
and armrest door in the rear seat.
Spare keys should not be left in the
cabin. In the event that a spare key is
left in the cabin, the smart key system
will remain actuated even after the
doors have been locked. Under these
circumstances, the trunk can be opened
even after the driver has exited and
locked the vehicle, increasing the danger of theft. (Refer to “OPENING
TRUNK WITH SMART KEY SYSTEM” on
page 43 in this Section.)
To protect items locked in the trunk or the
glove box when using valet parking, lock
the trunk opener switch and leave the
electronic key with the attendant. Keep the
mechanical key with you. For details about
locking the trunk opener switch, see
“—Luggage security system” on page 45
in this Section.
A transponder chip for engine immobilizer
system has been placed in the electronic
keys. These chips are needed to enable
the system to function correctly, so be
careful not to lose these keys.
14
2005 AVALON from Jan. ’05 Prod. (OM41408U)

NOTICE
When using a electronic key containing a transponder chip, observe the
following precautions:
Do not affix any material that cuts
off electromagnetic waves (such as
a metal seal) on the electronic key.
Do not knock the electronic key
hard against other objects.
Do not leave the electronic key exposed to high temperatures for a
long period, such as on the dashboard or hood under direct sunlight.
Do not put the electronic key in
water or wash it in an ultrasonic
washer.
Do not keep the electronic key together with the products emitting
electromagnetic waves such as a
cellular phone.
’05 AVALON_U (L/O 0501)
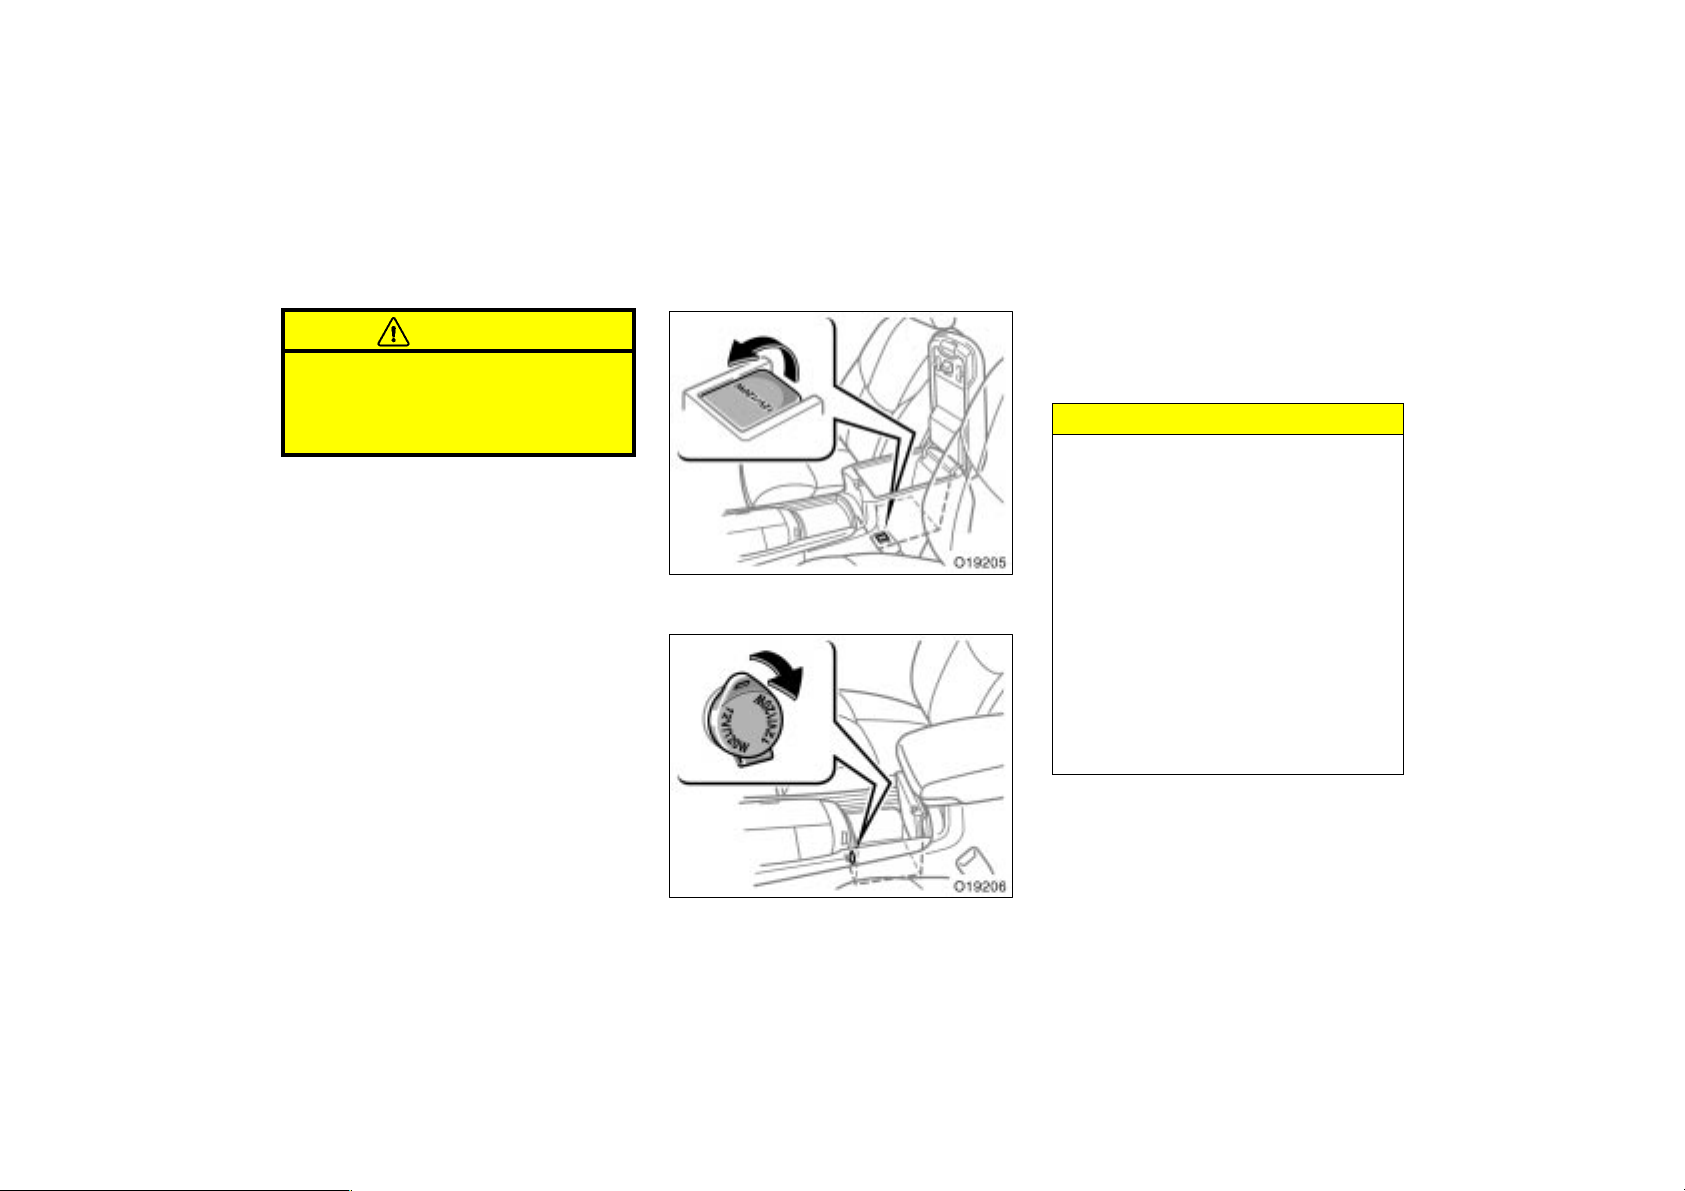
USING A MECHANICAL KEY
When you use the mechanical key push
the release button and take out the mechanical key as shown. Be sure to put the
mechanical key back when not it use.
KEY NUMBER PLATE
Your key number is shown on the plate.
Keep the plate in a safe place such as
your wallet, not in the vehicle.
If you should lose your keys or if you
need additional keys, duplicates can be
made by Toyota dealer using the key
number.
We recommend writing down the key number and storing it in a safe place.
15
2005 AVALON from Jan. ’05 Prod. (OM41408U)

Engine immobilizer system
The engine immobilizer system is a
theft prevention system using an electronic code. The transponder chip in
the key has an electronic code and
transmits the code to the vehicle. Only
when the electronic code in the chip
corresponds to the register ID code for
the vehicle, the engine immobilizer system will be canceled and the engine
will start.
’05 AVALON_U (L/O 0501)
The engine immobilizer system is automatically set when:
Vehicles with key cylinder- type ignition
switch—The key is removed from the ignition switch.
Vehicles with smart key system—The ignition switch is turned off.
The indicator light will start flashing to
show that the system is set.
If any of the following indicator conditions
occur, contact your Toyota dealer.
The indicator light remains on.
The indicator light does not start flash-
ing under the following situations.
Vehicles with key cylinder- type ignition
switch—When the key is removed from
the ignition switch.
Vehicles with smart key system—When
the ignition switch is turned off.
The indicator light flashes inconsistent-
ly.
The engine immobilizer system is automatically canceled when:
Vehicles with key cylinder- type ignition
switch—
You insert the key to the ignition switch.
Vehicles with smart key system—
You enter the vehicle carrying a key with
smart key system and press the “ENGINE
START STOP” switch (engine switch). For
further information, see “Smart key system” on page 27 in this Section.
If the key battery is dead, you should hold
the electronic key up to the “ENGINE
START STOP” switch.
When the system is canceled, the indicator light will go off.
16
2005 AVALON from Jan. ’05 Prod. (OM41408U)

’05 AVALON_U (L/O 0501)
For your Toyota dealer to make you a
new key with built- in transponder chip,
your dealer will need your key number
and master key (vehicles with key cylinder- type ignition switch) or electronic key
(vehicles with smart key system). However, there is a limit to the number of additional keys your Toyota dealer can make
for you.
NOTICE
Do not modify, remove or disassemble the engine immobilizer system. If any unauthorized changes or
modifications are made, proper operation of the system cannot be guaranteed.
For vehicles sold in U.S.A.
FCC ID: MOZRI- 21BTY
FCC ID: NI4TMIMB- 1
This device complies with Part 15 of the
FCC Rules. Operation is subject to the
following two conditions:
(1) This device may not cause harmful
interference, and (2) this device must
accept any interference received, including interference that may cause undesired operation.
CAUTION
Changes or modifications not expressly approved by the party responsible for compliance could void the
user’s authority to operate the equipment.
For vehicles sold in Canada
This device complies with RSS-210 of
Industry Canada. Operation is subject to
the following two conditions:
(1) This device may not cause interference, and (2) this device must accept
any interference, including interference
that may cause undesired operation of
the device.
17
2005 AVALON from Jan. ’05 Prod. (OM41408U)

Wireless remote control—
Vehicles with key cylinder-type ignition
switch
’05 AVALON_U (L/O 0501)
1. Lock switch
2. Unlock switch
3. Alarm switch
4. Trunk opener switch
5. Indicator light (vehicles with smart key
system only)
The wireless remote control system is
designed to lock or unlock all the
doors, open the trunk lid, or activate
the alarm from a distance within
approximately 1 m (3 ft.) of the vehicle.
When you operate any switch, push it
slowly and securely.
Vehicles with smart key system only—
When the switch is operated, the indicator
light flashes once. If not, the battery may
be dead. Replace the battery at the earliest opportunity.
The wireless remote control transmitter is
an electronic component. Observe the following instructions in order not to cause
damage the key.
Do not leave the transmitter in places
where the temperature becomes high
such as on the dashboard.
Do not disassemble it.
Avoid knocking it hard against other
objects or dropping it.
Avoid putting it in water.
Vehicles with smart key system
18
2005 AVALON from Jan. ’05 Prod. (OM41408U)

’05 AVALON_U (L/O 0501)
You can use up to 4 wireless remote control transmitters (for vehicles with key cylinder- type ignition switch) or 7 wireless
remote control transmitters (for vehicles
with smart key system) for the same vehicle. Contact your Toyota dealer for detailed information.
If the wireless remote control transmitter
does not actuate the doors, or does not
operate from a normal distance, or if the
indicator on the transmitter is dimmed or
does not come on:
Check for closeness to a radio trans-
mitter such as a radio station or an
airport which can interfere with normal
operation of the transmitter.
The battery may have been consumed.
Check the battery in the transmitter. To
replace the battery, see “—Replacing
battery” on pages 23 or 25 in this Section.
If you lose your transmitter, contact your
Toyota dealer as soon as possible to
avoid the possibility of theft, or an accident. (See “If you lose your wireless remote control transmitter” on page 323 in
Section 4.)
For vehicles sold in U.S.A.
This device complies with Part 15 of the
FCC Rules. Operation is subject to the
following two conditions:
(1) This device may not cause harmful
interference, and (2) this device must
accept any interference received, including interference that may cause undesired operation.
NOTICE:
This equipment has been tested and
found to comply with the limits for a
Class B digital device, pursuant to Part
15 of the FCC Rules. These limits are
designed to provide reasonable protection against harmful interference in a
residential installation. This equipment
generates, uses and can radiate radio
frequency energy and, if not installed
and used in accordance with the instructions, may cause harmful interference to
radio communications. However, there is
no guarantee that interference will not
occur in a particular installation. If this
equipment does cause harmful interference to radio or television reception,
which can be determined by turning the
equipment off and on, the user is encouraged to try to correct the interference by one or more of the following
measures:
19
2005 AVALON from Jan. ’05 Prod. (OM41408U)

Reorient or relocate the receiving an-
tenna.
Increase the separation between the
equipment and receiver.
Connect the equipment into an outlet
on a circuit different from that to
which the receiver is connected.
Consult the dealer or an experienced
radio/TV technician for help.
FCC WARNING:
Changes or modifications not expressly approved by the party responsible for compliance could void the
user’s authority to operate the equipment.
For vehicles sold in Canada
’05 AVALON_U (L/O 0501)
—Locking and unlocking
doors
Locking operation (vehicles with key cylinder- type ignition switch)
Locking operation (vehicles with smart
key system)
Operation is subject to the following two
conditions:
(1) this device may not cause interference, and (2) this device must accept
any interference, including interference
that may cause undesired operation of
the device.
20
Unlocking operation (vehicles with key
cylinder- type ignition switch)
Unlocking operation (vehicles with smart
key system)
2005 AVALON from Jan. ’05 Prod. (OM41408U)

’05 AVALON_U (L/O 0501)
To lock or unlock all the doors, push
the switches slowly and securely.
To lock: Push the lock switch. All the
doors are locked simultaneously. At this
time one beep will sound and turn signal
lights flash once.
Vehicles with smart key system—For three
seconds after the doors have been locked,
the doors cannot be re- unlocked via the
smart key system.
Check to see that the doors are securely
locked.
If any of the doors is not securely closed,
or if the key is in the ignition switch (vehicles with key cylinder- type ignition
switch) or key left in the vehicle (vehicles
with smart key system), locking cannot be
performed by the lock switch and a beep
will sound continuously for 10 seconds.
To stop the beep, take out the key from
the vehicle or push the unlock switch.
The buzzer can be disabled. For details,
contact your Toyota dealer.
To unlock: Push the unlock switch once to
unlock the driver’s door alone. Pushing
the switch twice within 3 seconds unlocks
all the doors simultaneously. Each time
the unlock switch is pushed, two beeps
will sound and turn signal lights flash
twice.
This double switch operation to unlock all
doors can be changed to a single switch
operation. For details, contact your Toyota
dealer.
If the key is in the ignition (vehicles with
key cylinder- type ignition switch) or the
ignition switch is set to ACC or ON (vehicles with smart key system), the vehicle
cannot be unlocked via the unlock switch.
When all the doors are unlocked simultaneously with a key, wireless remote control or entry function, the following lights
come on for about 15 seconds and then
fade out, even if the door is not opened.
Vehicles with key cylinder- type ignition
switch—Ignition switch light, interior light,
front personal lights and rear personal
lights
Vehicles with smart key system—Ignition
switch light, interior light, front personal
lights, rear personal lights and exterior
foot lights
(For further information, see “Illuminated
entry system” on page 134 in Section
1- 5.)
You have 30 seconds to open a door after
using the wireless remote unlock feature.
If a door is not opened by then, all the
doors will be automatically locked again.
If the wireless remote control is used to
lock the doors near the window or door
handle, there is a possibility that the door
may not unlocked by entry function of
smart key system. Under these circumstances, use the wireless remote control
to unlock the doors.
The time before automatic door lock function can be changed. For details, contact
your Toyota dealer.
If the lock or unlock switch is kept
pressed in, the locking or unlocking operation is not repeated. Release the switch
and then push again.
21
2005 AVALON from Jan. ’05 Prod. (OM41408U)

’05 AVALON_U (L/O 0501)
—Opening trunk lid —Activating alarm
To open the trunk lid, push the trunk
opener switch of the transmitter for 1
second. A long beep will sound.
If the ignition switch is set at ON, the
trunk lid cannot be opened by the trunk
opener switch.
Opening of the trunk lid with the wireless
remote control can be changed as follows.
Ask your Toyota dealer for details.
Trunk lid opens by pushing the trunk
opener switch twice in succession.
Trunk lid opens by pushing the trunk
Vehicles with key cylinder-type ignition
switch
opener switch once regardless of how
long the switch is being pressed.
Vehicles with key cylinder-type ignition
switch
Opening of the trunk lid is disabled
using the wireless remote control transmitter.
Vehicles with smart key system
22
Vehicles with smart key system
2005 AVALON from Jan. ’05 Prod. (OM41408U)

’05 AVALON_U (L/O 0501)
Pushing the switch blows the horn intermittently and flashes the headlights,
tail lights and interior light.
Vehicles with smart key system only—
When pushing the switch, the indicator
light flashes.
The alarm switch is used to deter vehicle
theft when you witness anyone attempting
to break into or damage your vehicle.
The alarm will last for one minute. To stop
the alarm midway, push the switch once
again, unlock a door with the transmitter,
or set the ignition switch to ON.
The alarm does not work when the ignition
switch is set at ON.
This alarm function can be disabled. For
details, contact your Toyota dealer.
—Switching beep sound
(with key cylinder- type ignition
switch only)
You can switch the beep sound on and
off. (The beep sound is on initially and
after battery replacement.)
To switch the beep sound on and off:
With the driver’s door opened—
1. Insert the ignition key and remove it.
2. Within 5 seconds, set the ignition
switch to ON.
3. After 10 seconds, push any switch on
the transmitter twice within 10 seconds.
Two beep sounds inform you that the
program has been switched on or off.
If this procedure is not followed exactly,
the beep sound will not operate as expected.
Check the beep sound on/off operation by
pushing the transmitter switch after you
finish this procedure. If the beep does not
operate as expected, repeat this procedure from step 1.
—Replacing battery
(with key cylinder- type
ignition switch)
For replacement, use a CR2016 lithium
battery or equivalent.
CAUTION
Special care should be taken to prevent small children from swallowing
the removed transmitter battery or
components.
NOTICE
When replacing the transmitter battery, be careful not to lose the components.
Replace only with the same or
equivalent type recommended by a
Toyota dealer.
Dispose of used batteries according
to the local laws.
Replace the transmitter battery by following these procedures:
23
2005 AVALON from Jan. ’05 Prod. (OM41408U)

’05 AVALON_U (L/O 0501)
1. Using a coin or equivalent, open the
transmitter case.
24
2. Remove the circuit board, then remove
the discharged transmitter battery.
NOTICE
Take care not to damage the circuit
board.
Do not bend the terminals.
3. Put in a new transmitter battery with
positive (+) side up. Install the circuit
board into the transmitter case.
Close the transmitter case securely.
NOTICE
Make sure the positive side and
negative side of the transmitter battery are faced correctly.
Do not replace the battery with wet
hands. Water may cause unexpected
rust.
Do not touch or move any components inside the transmitter, or it
may interfere with proper operation.
2005 AVALON from Jan. ’05 Prod. (OM41408U)

Be careful not to bend the electrode
when inserting the transmitter battery and that dust or oils do not
adhere to the transmitter case.
Close the transmitter case securely.
’05 AVALON_U (L/O 0501)
—Replacing battery
(with smart key system)
The transmitter can easily be damaged
when replacing the battery. We recommend having the battery replaced by your
Toyota dealer. If you have to do it yourself, use a CR1632 lithium battery or
equivalent and a flat- bladed screwdriver.
After replacing the battery, check that the
transmitter operates properly. If the transmitter still does not operate properly, contact your Toyota dealer.
CAUTION
Special care should be taken to prevent small children from swallowing
the removed transmitter battery or
components.
NOTICE
Be careful not to touch the circuit,
as this may generate static electricity that can damage the transmitter.
When replacing the transmitter battery, be careful not to lose the components.
Replace only with the same or
equivalent type recommended by a
Toyota dealer.
Dispose of used batteries according
to the local laws.
Replace the transmitter battery by following these procedures:
1. Push the release button and take out
the mechanical key.
25
2005 AVALON from Jan. ’05 Prod. (OM41408U)

’05 AVALON_U (L/O 0501)
2. Using a flat- bladed screwdriver or
equivalent, open the transmitter case.
26
3. Remove the discharged transmitter battery by flat- bladed screwdriver or
equivalent. Insert the guide groove and
lift as shown in the above illustration.
NOTICE
Do not modify the battery case. It
may cause a trouble.
4. Put in a new battery with the positive
(+) side up. Install the cover and insert
the mechanical key into the transmitter.
Close the transmitter case securely.
2005 AVALON from Jan. ’05 Prod. (OM41408U)

NOTICE
Make sure the positive side and
negative side of the battery are
faced correctly.
Do not replace the battery with wet
hands. Water may cause unexpected
rust.
Do not touch or move any components inside the transmitter, or it
may interfere with proper operation.
Be careful not to bend the electrode
when inserting the transmitter battery and that dust or oils do not
adhere to the case.
Close the transmitter case securely.
After replacing the battery, check that the
transmitter operates properly. If the transmitter still does not operate properly, contact your Toyota dealer.
’05 AVALON_U (L/O 0501)
Smart key system
The smart key system consists mainly
of the following functions.
Engine immobilizer function (For de-
tails, see “Engine immobilizer system”
on page 16 in this Section.)
Wireless remote control function (For
details, see “Wireless remote control”
on page 18 in this Section.)
Push button start function (For details,
see “How to start the engine” on page
288 in Section 3.)
Entry function and start function (See
“ENTRY FUNCTION AND START
FUNCTION” described below.)
Steering lock function (See “STEERING
LOCK FUNCTION” described below.)
CAUTION
Weak radio waves emitted from the
smart key system may affect pacemakers. If you or other passengers
use a pacemaker, use the vehicle only
after checking the pacemaker manual
to confirm that it is safe. If necessary, the entry function can be disabled. See “DISABLING THE SMART
KEY SYSTEM” on page 32 in this
Section.
27
2005 AVALON from Jan. ’05 Prod. (OM41408U)

’05 AVALON_U (L/O 0501)
Entry function
ENTRY FUNCTION AND START
FUNCTION
By carrying the key, you can lock and
unlock the doors and start the engine.
Entry function—You can lock and unlock
the doors and open the trunk without inserting the key in the keyhole. For further
information, see “Side doors” on page 32
in this Section.
Start function—You can shift the power
supply mode and start the engine when
the electronic key is in the vehicle. For
further information, see “Ignition switch”
on page 159 in Section 1-7 and “How to
start the engine ”on page 288 in Section
3.
STEERING LOCK FUNCTION
When the driver’s door is opened after
turning off the engine, the steering wheel
will lock.
The steering lock is automatically unlocked when the “ENGINE START STOP”
switch (engine switch) is pressed. If the
indicator light on the “ENGINE START
STOP” switch flashes green, this indicates
that the steering wheel remains locked. If
the amber indicator light flashes, this indicates that the steering lock is malfunctioning. For details, see “How to start the
engine” on page 288 and “Driving and
parking using smart key system” on page
291 in Section 3.
Start function
28
2005 AVALON from Jan. ’05 Prod. (OM41408U)

’05 AVALON_U (L/O 0501)
ACTUATION AREA
The entry function and start function
are available to use when a registered
key is in the actuation area.
1. Entry function actuation area—About
1 m (3 ft.) from each outside door
handle and trunk opener switch.
If the key is close to the door handle,
windows and center of the rear bumper, the entry function may not be activated.
2. Start function actuation area—Inside
of the cabin.
The start function may not be activated
if the key is on the instrument panel,
on the package tray, in the glove box
or on the floor, etc.
In the following cases, the smart key system may not operate properly.
When facilities issuing strong electro-
magnetic waves such as TV towers,
electric power stations, broad casting
stations are nearby.
When you are carrying an electronic
key together with a mobile communications system such as a two- way radio
or cellular phone.
When the electronic key is in contact
with or covered by a metallic object.
When another person is operating a
wireless remote control function on
another vehicle near your vehicle.
When the battery is dead. To replace
the battery, see “—Replacing battery”
on page 25 in this Section.
Depending on the position of the key,
the key may not work well even within
the actuation area.
If the smart key system does not operate properly and you cannot enter, you
can lock and unlock all the doors by
using mechanical key attached to the
master key or wireless remote control
function.
29
2005 AVALON from Jan. ’05 Prod. (OM41408U)

’05 AVALON_U (L/O 0501)
IF KEY BATTERY DEAD
If the key indicator does not flash and
the engine cannot be started by using
the start function, the battery may be
dead. Replace the key battery as soon
as possible. (See “—Replacing battery”
on page 25 in this Section.)
However the engine can be started in the
following procedures.
1. With the brake pedal depressed, hold
the electronic key close to the
“ENGINE START STOP” switch.
2. Start the engine within 5 seconds after
the green indicator light on the
“ENGINE START STOP” switch comes
on and a buzzer sounds.
BATTERY POWER S AVIN G
The transmitters on the outside of the
vehicle and in the key transmit electromagnetic waves to each other while doors
are locked.
To prevent the batteries from being discharged, the smart key system is automatically deactivated in the following conditions:
If the electronic key is left outside of
the vehicle and within the effective
range of the entry function actuation
area for more than 10 minutes.
If there is no response from the key
for more than 2 weeks.
To reactivate the smart key system, perform any of the following:
(a) Press the lock button on the outside
front door handle or trunk opener
switch while carrying the electronic
key.
(b) Perform a wireless remote control op-
eration.
(c) Insert and turn the mechanical key in
the keyhole of the driver’s door.
If the electronic key receives strong electromagnetic waves over a period of time,
the battery can be drastically run down.
You should always keep the at least 1 m
(3 ft.) away from the electronic key following electrical appliances.
TV
Personal computer
Cellular phone
Cordless phone recharger unit
Electric light stand
Fluorescent desk light
30
2005 AVALON from Jan. ’05 Prod. (OM41408U)

’05 AVALON_U (L/O 0501)
For vehicles sold in U.S.A.
FCC ID: NI4TMLF- 1
This device complies with Part 15 of the
FCC Rules. Operation is subject to the
following two conditions:
(1) This device may not cause harmful
interference, and (2) this device must
accept any interference received, including interference that may cause undesired operation.
CAUTION
Changes or modifications not expressly approved by the party responsible for compliance could void the
user’s authority to operate the equipment.
For vehicles sold in Canada
This device complies with RSS-210 of
Industry Canada. Operation is subject to
the following two conditions:
(1) This device may not cause interference, and (2) this device must accept
any interference, including interference
that may cause undesired operation of
the device.
For vehicles sold in U.S.A.
This device complies with Part 15 of the
FCC Rules. Operation is subject to the
following two conditions:
(1) This device may not cause harmful
interference, and (2) this device must
accept any interference received, including interference that may cause undesired operation.
NOTICE:
This equipment has been tested and
found to comply with the limits for a
Class B digital device, pursuant to Part
15 of the FCC Rules. These limits are
designed to provide reasonable protection against harmful interference in a
residential installation. This equipment
generates, uses and can radiate radio
frequency energy and, if not installed
and used in accordance with the instructions, may cause harmful interference to
radio communications. However, there is
no guarantee that interference will not
occur in a particular installation. If this
equipment does cause harmful interference to radio or television reception,
which can be determined by turning the
equipment off and on, the user is encouraged to try to correct the interference by one or more of the following
measures:
31
2005 AVALON from Jan. ’05 Prod. (OM41408U)

Reorient or relocate the receiving an-
tenna.
Increase the separation between the
equipment and receiver.
Connect the equipment into an outlet
on a circuit different from that to
which the receiver is connected.
Consult the dealer or an experienced
radio/TV technician for help.
FCC WARNING:
Changes or modifications not expressly approved by the party responsible for compliance could void the
user’s authority to operate the equipment.
For vehicles sold in Canada
Operation is subject to the following two
conditions:
(1) this device may not cause interference, and (2) this device must accept
any interference, including interference
that may cause undesired operation of
the device.
’05 AVALON_U (L/O 0501)
DISABLING THE SMART KEY SYSTEM
The following functions can be disabled:
A function that allows you to lock/un-
lock the doors and open the trunk by
simply carrying a key
A function that causes the vehicle to
beep if keys are forgotten inside the
vehicle or trunk and a door is closed
A function that recalls the position of
the driver’s seat and side rear view
mirror
A function that shifts the power supply
mode and starts the engine when the
electronic key is in the vehicle.
Warning lights and buzzers
For details, contact your Toyota dealer.
If the smart key system does not operate properly because of a system malfunction, consult your Toyota dealer.
Make sure to bring all of the keys. They
may be necessary to repair the system.
Side doors—
—Locking and unlocking with
key
Vehicles with key cylinder-type ignition
switch
32
Vehicles with smart key system
2005 AVALON from Jan. ’05 Prod. (OM41408U)

Insert the key into the keyhole and turn
it.
To lock: Turn the key forward.
To unlock: Turn the key backward.
All the doors lock and unlock simultaneously with the driver’s door. In the driver’s door lock, turning the key once will
unlock the driver’s door and twice in succession will unlock all the doors simultaneously.
This double key turning operation to unlock all the doors can be changed to a
single key turning operation. For details,
contact your Toyota dealer.
Vehicles with smart key system—For three
seconds after the doors have been locked,
the doors cannot be re- unlocked via the
smart key system.
’05 AVALON_U (L/O 0501)
When you unlock the doors, the interior
light, ignition switch light, front personal
lights and rear personal lights come on for
about 15 seconds and then fade out, even
if the door is not opened. (For further
information, see “Illuminated entry system”
on page 134 in Section 1- 5.)
—Locking and unlocking with
smart key system
When you carry the registered key with
smart key system into the actuation area,
you can lock and unlock the side doors
without using the key. For further information of actuation area, see “Smart key
system” on page 27 in this Section.
33
2005 AVALON from Jan. ’05 Prod. (OM41408U)

’05 AVALON_U (L/O 0501)
When the key is left in the vehicle. A
beep will sound continuously for 2 seconds.
The beep may not sound if the key is on
the instrument panel, on the package tray,
in the glove box or on the floor, etc.
Locking operation
Push the lock button on the outside
door handle. All the doors lock simultaneously. At this time one beep will be
heard and turn signal lights flash once.
In the following cases, you cannot be
locked by pushing the lock button and a
beep will sound as an indicator.
When any of the doors is not securely
closed. A beep will sound continuously
for 10 seconds.
When the engine is not turned off. A
beep will sound continuously for 2 seconds.
34
Unlocking operation
Grasp the outside door handle (sensors
are located on the underside of the
door handles). Only the driver’s door
unlocks when the driver’s door handle
is grasped. All the doors unlock when
any door handle other than the driver’s
door handle is grasped. At this time
two beeps will be heard and the turn
signal lights flash twice.
Wearing gloves may slow response time.
For three seconds after the doors have
been locked, the doors cannot be re- unlocked via the smart key system.
2005 AVALON from Jan. ’05 Prod. (OM41408U)

’05 AVALON_U (L/O 0501)
When you enter the entry function actuation area, the interior and exterior lights
come on for about 15 seconds. After the
lights come on, all the side doors can be
unlocked by grasping the outside door
handle.
You have 30 seconds to open a door after
using the unlocking function. If a door is
not opened by then, all the doors will be
automatically locked again.
SELECTING DOORS TO BE UNLOCKED
WITH ENTRY FUNCTION
The unlock operation has 2 modes. To
change the mode, press the lock switch
and either the alarm switch or the trunk
opener switch simultaneously for five
seconds.
In order to change unlock modes, the ignition switch must be turned off.
Repeating this procedure allows you to
toggle between the following 2 modes:
1. Driver’s door only (default)—In this
mode, only the driver’s door unlocks
when the driver’s door handle is
grasped. All the doors unlock when any
door handle other than the driver’s
door handle is grasped. At this time
the vehicle will beep two times.
2. All doors—In this mode, all doors (except the trunk) unlocks when any of
the door handles is grasped. At this
time the vehicle will beep three times.
After the mode change operation is complete, wait 5 seconds before repeating the
operation.
When you unlock the doors, the interior
lights, ignition switch light, front personal
lights, rear personal lights and exterior
foot lights come on for about 15 seconds
and then fade out, even if the door is not
opened. (For further information, see “Illuminated entry system” on page 134 in
Section 1- 5.)
35
2005 AVALON from Jan. ’05 Prod. (OM41408U)

’05 AVALON_U (L/O 0501)
—Locking and unlocking with
inside lock knob
Move the lock knob.
To lock: Push the knob forward.
To unlock: Pull the knob backward.
The front doors can be opened by pulling
the inside handle even if the lock knobs
are in the locked position.
CAUTION
Do not pull the inside handle of the
doors while driving. The doors will
open and an accident may occur.
Toyota strongly recommends that all
children be placed in the rear seat of
the vehicle.
—Locking and unlocking with
power door lock switch
Closing the door with the lock knob in the
lock position will also lock the door. Be
careful not to lock your keys in the vehicle.
Doors cannot be locked when either front
door is open and the key is in the ignition
(vehicles with key cylinder- type ignition
switch) or key is left in the vehicle (vehicles with smart key system).
Driver’s side
Passenger’s side
36
2005 AVALON from Jan. ’05 Prod. (OM41408U)

Push the switch.
To lock: Push the switch down on the
front side.
To unlock: Push the switch down on the
rear side.
All the doors lock or unlock simultaneously.
When the front doors are locked from the
outside or locked with the wireless remote
control transmitter, the power door lock
switch will not work until either front door
is unlocked with the key, lock knob, or
wireless remote control transmitter.
If the vehicle is subjected to a severe
frontal, rear or side impact with the ignition switch set at ON, all doors will unlock
automatically after a few seconds.
’05 AVALON_U (L/O 0501)
—Automatic door locking and
unlocking functions
AUTOMATIC DOOR LOCKING
You can select the following functions:
Locking linked with the shift position
All doors are automatically locked when
the selector lever is moved out of “P”
position.
Locking linked with vehicle speed
All doors are automatically locked when
the vehicle speed goes above about 20
km/h (12 mph).
You can set or cancel the automatic
door locking functions:
Be sure to apply the parking brake when
performing the following operations.
To select the locking linked with the
shift position:
1. Close all doors and turn the ignition
switch to the ON.
2. Shift the selector lever to the “P” position.
3. Within 10 seconds of turning the ignition switch to the ON, press and hold
the driver’s side power door lock
switch in the lock position for 5 seconds and then release.
The doors will be locked and unlocked
to indicate that the function is set.
To cancel the function, do the above operation again.
37
2005 AVALON from Jan. ’05 Prod. (OM41408U)

’05 AVALON_U (L/O 0501)
To select the locking linked with the
vehicle speed:
1. Close all doors and turn the ignition
switch to the ON.
2. Shift the selector lever from “P” to the
”N” position.
3. Within 10 seconds of turning the ignition switch to the ON, press and hold
the driver’s side power door lock
switch in the lock position for 5 seconds and then release.
The doors will be locked and unlocked
to indicate that the function is set.
To cancel the function, do the above operation again.
AUTOMATIC DOOR UNLOCKING
You can select the following functions:
Unlocking linked with the ignition
switch
All doors are automatically unlocked
when the driver’s door is opened within
10 seconds after the ignition switch is
set from ON to ACC or OFF.
Unlocking linked with the shift posi-
tion
All doors are automatically unlocked
when the selector lever is moved to
“P” position.
You can set or cancel the automatic
door unlocking functions:
Be sure to apply the parking brake when
performing the following operations.
To select the unlocking linked with the
ignition switch:
1. Close all doors and turn the ignition
switch to the ON.
2. Shift the selector lever from “P” to the
“N” position.
3. Within 10 seconds of turning the ignition switch to the ON, press and hold
the driver’s side power door lock
switch in the unlock position for 5 seconds and then release.
The doors will be locked and unlocked
to indicate that the function is set.
To cancel the function, do the above operation again.
38
2005 AVALON from Jan. ’05 Prod. (OM41408U)

To select the unlocking linked with the
shift position:
1. Close all doors and turn the ignition
switch to the ON.
2. Shift the selector lever to the “P” position.
3. Within 10 seconds of turning the ignition switch to the ON, press and hold
the driver’s side power door lock
switch in the unlock position for 5 seconds and then release.
The doors will be locked and unlocked
to indicate that the function is set.
To cancel the function, do the above operation again.
’05 AVALON_U (L/O 0501)
—Rear door child- protectors
CAUTION
Before driving, be sure that the doors
are closed and locked, especially
when small children are in the vehicle. Along with the proper use of
seat belts, locking the doors helps
prevent the driver and passengers
from being thrown out from the vehicle in an accident. It also helps prevent the doors from being opened
unintentionally.
Move the lock knob to the “LOCK”
position as shown on the label.
When the child-protector is locked, you
cannot open the rear door by the inside
door handle. We recommend using this
feature whenever small children are in the
vehicle.
39
2005 AVALON from Jan. ’05 Prod. (OM41408U)

Power windows
Driver’s door switches
Window lock switc h
’05 AVALON_U (L/O 0501)
The windows can be operated with the
switch on each door.
The power windows work when the ignition
switch is set at ON.
Key off operation: If both front doors are
closed, it works for 43 seconds even after
the ignition switch is turned off. It stops
working when either front door is opened.
OPERATING THE FRONT WINDOWS
Use the switches on the driver’s door
and front passenger’s door.
Normal operation: The window moves as
long as you hold the switch.
To open: Lightly push down the switch.
To close: Lightly pull up the switch.
If you push in the window lock switch on
the driver’s door, the passenger’s window
cannot be operated.
The indicator lights on the switch tell you
which of the switches can be operated.
Driver’s door switches
Front passenger’s door switch
40
Front passenger’s door switch
2005 AVALON from Jan. ’05 Prod. (OM41408U)
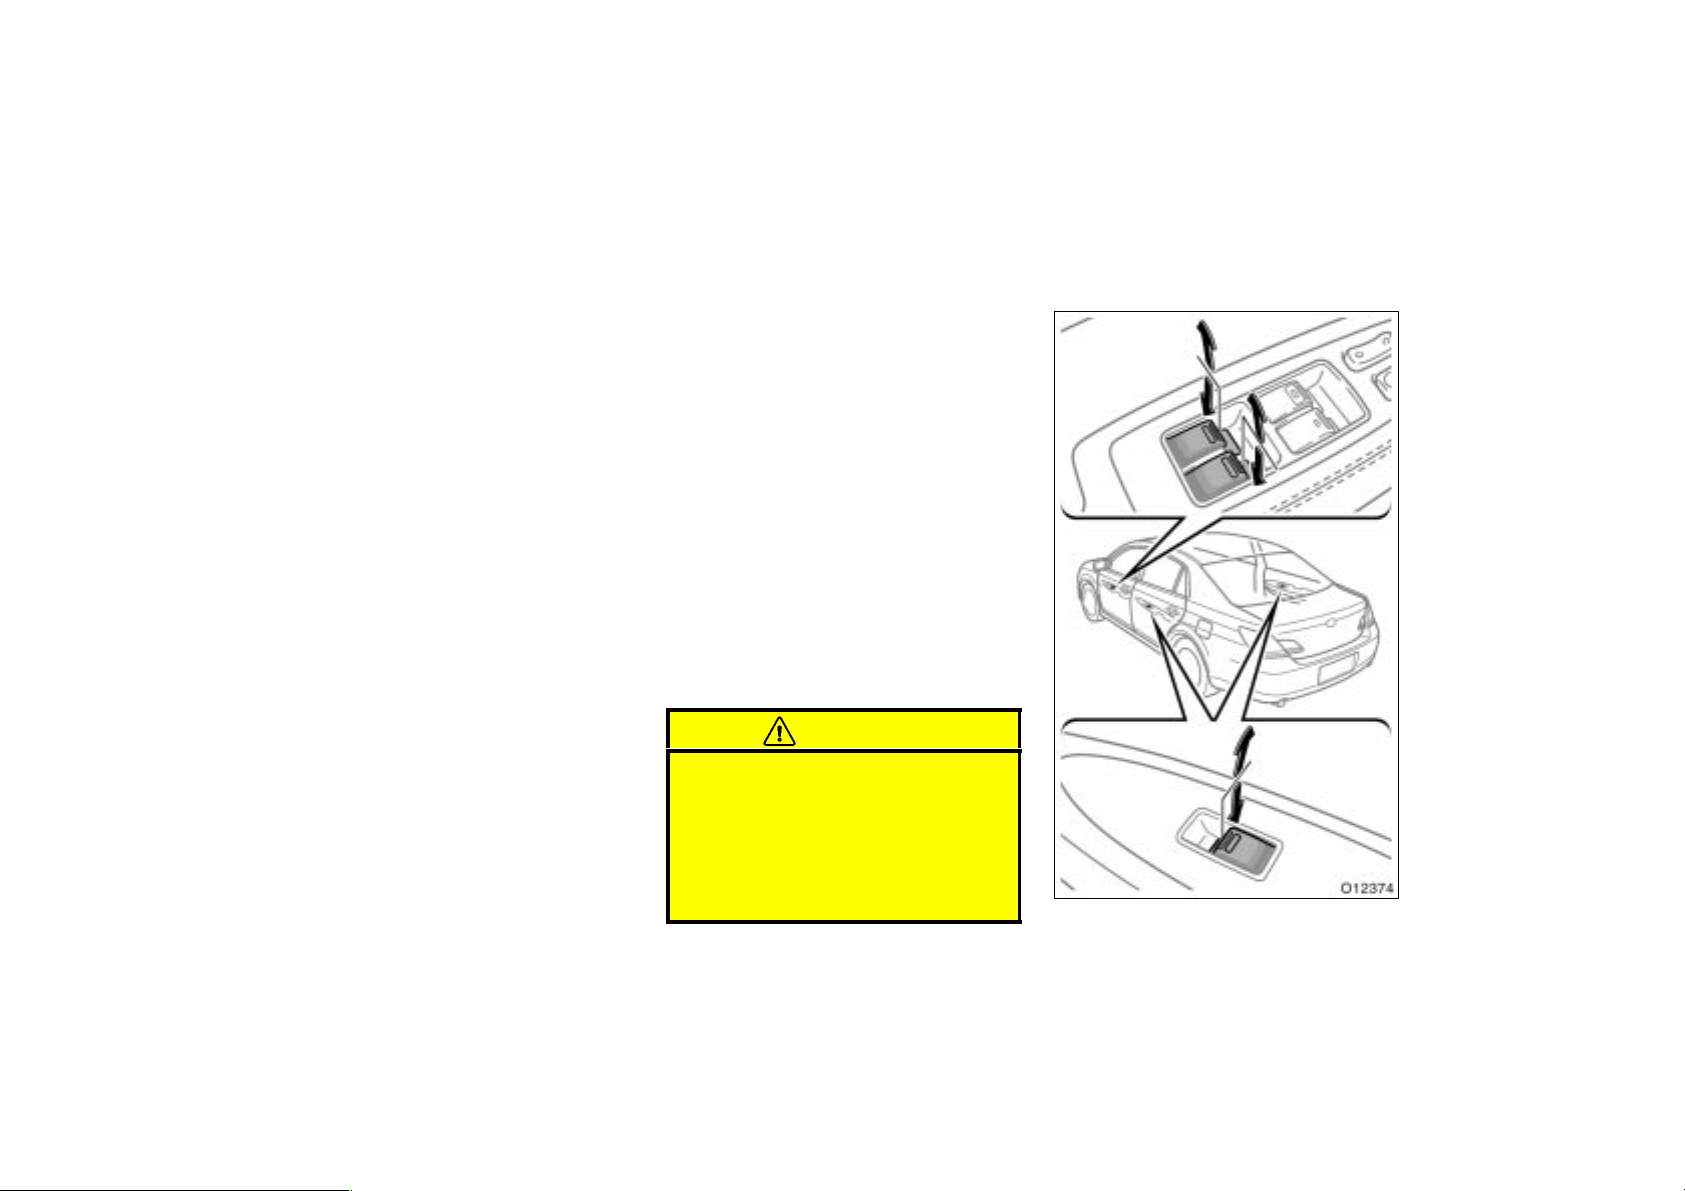
’05 AVALON_U (L/O 0501)
Automatic operation: Push the switch
completely down or pull it completely up,
and then release it. The window will fully
open or close. To stop the window partway, lightly move the switch in the opposite direction and then release it.
If you push in the window lock switch on
the driver’s door, the front passengers’
window cannot be operated.
The indicator lights on the switch tell you
which of the switches can be operated.
Jam protection function: During automatic closing operation or key off closing operation, the window stops and opens half
way if something gets caught between the
window and window frame.
If the window receives a strong impact,
this function may work even if nothing is
caught.
If the battery is disconnected or run
down, the power window may not operate
automatically and the jam protection function will not function correctly after you
reconnect, replace or recharge the battery.
In any of these cases, you should normalize the power window.
To normalize the power window:
1. Push down the power window switches
of each front door and lower the windows halfway.
2. Pull up the switches until the windows
close and hold the switches for a second.
Make sure that the windows open and
close automatically. If the power windows
cannot be operated properly, have it
checked by your Toyota dealer.
CAUTION
Never try jamming any part of your
body to activate the jam protection
function intentionally.
The jam protection function may
not work if something gets caught
just before the window is fully
closed.
41
2005 AVALON from Jan. ’05 Prod. (OM41408U)

’05 AVALON_U (L/O 0501)
OPERATING THE REAR WI NDOWS
Use the switch on each rear doors or
the switches on the driver’s door that
control rear passengers’ windows.
The window moves as long as you hold
the switch.
To open: Push down the switch.
To close: Pull up the switch.
If you push in the window lock switch on
the driver’s door, the passengers’ windows
cannot be operated.
CAUTION
To avoid serious personal injury, you
must do the following.
Before you close the power win-
dows, always make sure there is
nobody around the power windows.
You must also make sure the
heads, hands and other parts of the
bodies of all occupants are kept
completely inside the vehicle. If
someone’s neck, head or hands get
caught in a closing window, it
could result in death or serious injury. When anyone closes the power
windows, make sure he or she operates the windows safely.
When small children are in the ve-
hicle, never let them use the power
window switches without supervision. Use the window lock switch to
prevent them from making unexpected use of the switches.
Be sure to carry the key when you
leave your vehicle.
Never leave anyone (particularly a
small child) alone in your vehicle,
with the key left in the vehicle.
Otherwise, he/she could use the
power window switches and get
trapped in a window. Unattended
person (particularly a small child)
can be involved in a serious accident.
42
2005 AVALON from Jan. ’05 Prod. (OM41408U)

Trunk lid—
’05 AVALON_U (L/O 0501)
CAUTION
Keep the trunk lid closed while driving. This not only keeps the luggage
from being thrown out but also prevents exhaust gases from entering
the vehicle.
To open the trunk lid from the driver’s
seat, push the trunk opener switch.
See “Cargo and luggage” on page 282 in
Section 2 for precautions when loading
luggage.
To close the trunk lid, lower it and press
down on it. After closing the trunk lid, try
pulling it up to make sure it is securely
closed.
To deactivate this lock release switch from
opening the trunk lid, see “—Trunk opener
main switch” described below.
The trunk lid can be opened with the wireless remote control transmitter, see
“—Opening trunk lid” on page 22 in this
Section.
OPENING TRUNK WITH SMART KEY
SYSTEM
When you carry the registered key into
the actuation area, the trunk can be
opened. For further information of actuation area, see “Smart key system” on
page 27 in this Section.
43
2005 AVALON from Jan. ’05 Prod. (OM41408U)

A warning buzzer may sound when:
The key is brought into the cabin after
the trunk is opened, and the trunk is
then closed.
The key is near the trunk when the
trunk is closed.
The buzzer may sound even when the key
is not in the trunk. This does not indicate
a problem. However, under these circumstances, the trunk cannot be opened using
the smart key system. Open the trunk
using other methods.
If you left the key in the trunk and close
it when all side doors are locked, a beep
will sound continuously for 2 seconds. You
can open the trunk pushing the trunk
opener switch without carrying another
key. However, in some instances, the
beep may not sound when the trunk is
closed depending on the location of the
key in the trunk. In addition, when the
doors are open or unlocked, the beep may
not sound when the trunk is closed. When
closing the trunk, make sure that the key
is not left in it.
’05 AVALON_U (L/O 0501)
—Trunk opener main switch
On Off
If you do not want to activate the trunk
lid opener system, turn off the trunk
opener main switch in the glove box.
To turn it on, push in the trunk opener
main switch again.
—In case the trunk opener is
not actuated
1. Pull down the rear armrest and open
the armrest door.
44
2005 AVALON from Jan. ’05 Prod. (OM41408U)

’05 AVALON_U (L/O 0501)
—Luggage security system
2. Pull the loop of wire to unlock the
trunk lid.
This is used in case the trunk lid cannot
be unlocked due to a discharged battery
or other trouble.
This system helps protect things locked
in the trunk by safeguarding the trunk
opener main switch from unwanted access.
1. To cancel the trunk opener switch,
turn off the trunk opener main
switch in the glove box.
2. After closing the glove box lid, insert the master key (vehicles with
key cylinder- type ignition switch) or
mechanical key (vehicles with smart
key system) and turn it clockwise to
safeguard the lock release switch.
45
2005 AVALON from Jan. ’05 Prod. (OM41408U)

’05 AVALON_U (L/O 0501)
—Internal trunk release strap
CAUTION
Always lock the trunk lid and all
doors, and keep away the vehicle
keys out of children’s reach.
Never leave children unattended in
the vehicle. Unsupervised children
may lock themselves in the vehicle
or trunk and suffer serious injuries
or death.
3. After closing the armrest door, insert
the master key (vehicles with key
cylinder- type ignition switch) or mechanical key (vehicles with smart key
system) and turn it clockwise to lock
the armrest door.
After closing the trunk lid, try pulling it up
to make sure it is securely locked.
46
If a person is locked in the trunk,
he/she can pull down the phosphorescent strap on the inside of trunk lid to
open the trunk lid.
The phosphorescent (glow- in- the- dark)
strap will continue to glow for a time after
the trunk lid is closed. Exposing the strap
to stronger light will cause it to glow longer.
2005 AVALON from Jan. ’05 Prod. (OM41408U)

’05 AVALON_U (L/O 0501)
Hood Theft deterrent system
To open the hood:
1. Pull the hood lock release lever. The
hood will spring up slightly.
CAUTION
Before driving, be sure that the hood
is closed and securely locked. Otherwise, the hood may open unexpectedly while driving and an accident may
occur.
2. In front of the vehicle, pull up the
auxiliary catch lever and lift the
hood.
Before closing the hood, check to see that
you have not forgotten any tools, rags,
etc. Then lower the hood and make sure
it locks into place. If necessary, press
down gently on the front edge to lock it.
To deter vehicle theft, the system is
designed to sound an alarm if any of
the doors, trunk or hood is forcibly unlocked or the battery terminal is disconnected and then reconnected when the
vehicle is locked.
The alarm also sounds, when someone
attempts to break the side windows.
The alarm blows the horn intermittently
and flashes the headlights, tail lights and
interior light.
47
2005 AVALON from Jan. ’05 Prod. (OM41408U)

’05 AVALON_U (L/O 0501)
Indicator light
Glass breakage sensor
SETTING THE SYSTEM
1. Vehicles with key cylinder- type ignition
switch—The key is removed from the
ignition switch.
Vehicles with smart key system—The
ignition switch is turned off.
The engine immobilizer system is set and
the indicator light will start flashing. (See
“Engine immobilizer system” for details.)
2. Have all passengers get out of the
vehicle.
3. Close and lock all the doors, trunk and
hood.
The indicator light will remain on when all
the doors, trunk and hood are closed and
locked.
The theft deterrent system will automatically be set after 30 seconds. When the
system is set, the indicator light will start
flashing again.
4. After making sure the indicator light
starts flashing, you may leave the vehicle.
Never leave anyone in the vehicle when
you set the system, because unlocking
from the inside will activate the system.
WHEN THE SYSTEM IS SET
Activating the system
The system will sound the alarm under
the following conditions:
If any of the doors is unlocked or if
the trunk or hood is forcibly opened
without the key, wireless remote control
or entry function.
If the battery terminal is disconnected
and then reconnected.
If the ignition is hotwired.
Vehicles with the glass breakage sensor—
The side windows are tapped or bro-
ken.
The indicator light will come on when the
system is activated.
All the doors will be automatically locked
again when the following two conditions
are met:
If any of the doors is unlocked without
the key, wireless remote control or
entry function.
If the key is not in the ignition switch
(vehicles with key cylinder- type ignition
switch) or the ignition switch is set to
off (vehicles with smart key system).
48
2005 AVALON from Jan. ’05 Prod. (OM41408U)

After one minute, the alarm will automatically stop and the indicator light will start
flashing again.
Reactivating the alarm
Once set, the system automatically resets
the alarm after the alarm stops.
The alarm will activate again under the
same circumstances described in
“Activating the system”.
Stopping the alarm
The alarm will be stopped by the following
three ways:
Set the ignition switch to ON.
Unlock any of the doors with the key
or wireless remote control.
Open the trunk with the wireless re-
mote control or entry function.
CANCELLING THE SYSTEM
The system will be cancelled by the
above mentioned 3 ways.
If the tail lights come on for 2 seconds,
the theft deterrent system has been
alarmed. Check to see if there is any
abnormality with your vehicle.
’05 AVALON_U (L/O 0501)
TESTING THE SYSTEM
1. Open all the windows.
2. Set the system as described above.
The doors should be locked with the
key, wireless remote control or entry
function. Be sure to wait until the indicator light starts flashing.
3. Unlock any door from the inside. The
system should activate the alarm.
4. Stop the alarm as described above.
5. Repeat this operation for the other
doors, trunk and hood. When testing
the hood, also check that the system
is activated when the battery terminal
is disconnected and then reconnected.
If the system does not work properly,
have it checked by your Toyota dealer.
Fuel tank cap
This indicates that the fuel filler door
is on the left side of your vehicle.
49
2005 AVALON from Jan. ’05 Prod. (OM41408U)

’05 AVALON_U (L/O 0501)
1. To open the fuel filler door, push the
opener switch.
When refueling, turn off the engine.
CAUTION
Do not smoke, cause sparks or al-
low open flames when refueling.
The fumes are flammable.
When opening the cap, do not re-
move the cap quickly. In hot weather, fuel under pressure could cause
injury by spraying out of the filler
neck if the cap is suddenly removed.
50
2. To remove the fuel tank cap, turn
the cap counterclockwise by 90 degrees (to the pressure point 1), and
then turn it an additional 30 degrees
(to point 2). Pause slightly before
removing it.
It is not unusual to hear a slight swoosh
when the cap is opened.
3. The removed cap can be stored on
the back side of the fuel filler door.
Position the cap so that the hooks point
to the left and right, and set it in the
receptacle on the back side of the door.
2005 AVALON from Jan. ’05 Prod. (OM41408U)

When installing the cap, turn the cap
clockwise until you hear a click. When
you hear the click, the cap is fully
closed.
If the cap is not installed securely, the
malfunction indicator lamp comes on.
Make sure the cap is tightened securely.
The indicator lamp goes off after driving
several times. If the indicator lamp does
not go off, contact your Toyota dealer as
soon as possible.
CAUTION
Make sure the cap is tightened se-
curely to prevent fuel spillage in
the event of an accident.
Use only a genuine Toyota fuel tank
cap for replacement. It is designed
to regulate fuel tank pressure.
NOTICE
To prevent damage to the cap, apply
force only in the turning direction to
the cap. Do not pull or pry it.
Electric moon roof
Sliding operation
Tilting operation
’05 AVALON_U (L/O 0501)
To operate the moon roof, use the
switch between the personal lights.
The moon roof works when the ignition
switch is set at ON.
The sunshade can be opened or closed
by hand.
Sliding operation—
To open: Push and hold the switch for 1
second on the “SLIDE OPEN” side.
The roof will open and stop partway 50
mm (2.0 in.) from the fully opened position. When you push the “SLIDE OPEN”
side again, the moon roof will open fully.
To stop the roof partway, push the switch
on either the “SLIDE OPEN” or “TILT UP”
side briefly.
As driving with the moon roof opened fully
will cause wind throbs, we recommend
you to drive with the moon roof partway
50 mm (2.0 in.) from the fully opened
position.
The sunshade will be opened together with
the roof.
To close: Push and hold the switch for 1
second on the “TILT UP” side.
The roof will fully close automatically. To
stop the roof partway, push the switch on
either the “SLIDE OPEN” or “TILT UP”
side briefly.
51
2005 AVALON from Jan. ’05 Prod. (OM41408U)

’05 AVALON_U (L/O 0501)
Tilting operation—
To tilt up: Push and hold the switch for
1 second on the “TILT UP” side.
The roof will fully tilt up automatically. To
stop the roof partway, push the switch on
either the “SLIDE OPEN” or “TILT UP”
side briefly.
To tilt down: Push and hold the switch for
1 second on the “SLIDE OPEN” side.
The roof will fully tilt down automatically.
To stop the roof partway, push the switch
on either the “SLIDE OPEN” or “TILT UP”
side briefly.
Key off operation: If both front doors are
closed, the moon roof works for 43 seconds even after the ignition switch is
turned off. It stops working when either
door is opened.
Jam protection function:
If something gets caught between the
moon roof and frame during closing operation, the moon roof stops and opens half
way.
If the moon roof receives a strong impact,
this function may work even if nothing is
caught.
If the battery is disconnected or run
down, the moon roof may not operate
automatically and the jam protection function will not function correctly after you
reconnect, replace or recharge the battery.
In any of these cases, you should normalize the moon roof.
To normalize the moon roof, push and
hold the switch on the “TILT UP” side until
the moon roof tilts all the way up and
then tilts down a little automatically.
Make sure that the moon roof opens and
closes automatically. If the moon roof cannot be operated properly, have it checked
by your Toyota dealer.
CAUTION
To avoid serious personal injury, you
must do the following.
While the vehicle is moving, always
keep the heads, hands and other
parts of the bodies of all occupants
away from the roof opening. Otherwise, they could be seriously injured if the vehicle stops suddenly
or if the vehicle is involved in an
accident.
Before you close the moon roof,
always make sure there is nobody
around the moon roof. You must
also make sure nobody places his
or her head, hands and other parts
of the body in the roof opening. If
someone’s neck, head or hands get
caught in the closing roof, it could
result in death or serious injury.
When anyone closes the moon roof,
first make sure it is safe to do so.
Be sure to carry the key when you
leave your vehicle.
52
2005 AVALON from Jan. ’05 Prod. (OM41408U)

Never leave anyone (particularly a
small child) alone in your vehicle,
with the key left in the vehicle.
Otherwise, he/she could use the
moon roof switches and get trapped
in the roof opening. Unattended
person (particularly a small child)
can be involved in a serious accident.
Never sit on top of the vehicle
around the roof opening.
Never try jamming any part of your
body to activate the jam protection
function intentionally.
The jam protection function may
not work if something gets caught
just before the moon roof is fully
closed.
’05 AVALON_U (L/O 0501)
53
2005 AVALON from Jan. ’05 Prod. (OM41408U)

’05 AVALON_U (L/O 0501)
54
2005 AVALON from Jan. ’05 Prod. (OM41408U)

’05 AVALON_U (L/O 0501)
SECTION 1-
OPERATION OF INSTRUMENTS AND
CONTROLS
Occupant restraint systems
Seats 56. . . . . . . . . . . . . . . . . . . . . . . . . . . . . . . . . . . . . . . . . . . . . . . . . . . . . .
Front seat s 56. . . . . . . . . . . . . . . . . . . . . . . . . . . . . . . . . . . . . . . . . . . . . . . . .
Driving position memory system 60. . . . . . . . . . . . . . . . . . . . . . . . . . . . . . .
Rear seats 62. . . . . . . . . . . . . . . . . . . . . . . . . . . . . . . . . . . . . . . . . . . . . . . . . .
Trunk storage extension 63. . . . . . . . . . . . . . . . . . . . . . . . . . . . . . . . . . . . . .
Head rest raints 64. . . . . . . . . . . . . . . . . . . . . . . . . . . . . . . . . . . . . . . . . . . . . .
Armrest 65. . . . . . . . . . . . . . . . . . . . . . . . . . . . . . . . . . . . . . . . . . . . . . . . . . . . .
Seat ventilators/heater s 65. . . . . . . . . . . . . . . . . . . . . . . . . . . . . . . . . . . . . .
Seat belts 67. . . . . . . . . . . . . . . . . . . . . . . . . . . . . . . . . . . . . . . . . . . . . . . . . . .
SRS airbags 78. . . . . . . . . . . . . . . . . . . . . . . . . . . . . . . . . . . . . . . . . . . . . . . .
Child restraint 98. . . . . . . . . . . . . . . . . . . . . . . . . . . . . . . . . . . . . . . . . . . . . . .
3
55
2005 AVALON from Jan. ’05 Prod. (OM41408U)

Seats
While the vehicle is being driven, all vehicle occupants should have the seatback
upright, sit well back in the seat and properly wear the seat belts provided.
CAUTION
Do not drive the vehicle unless the
occupants are properly seated. Do
not allow any passengers to sit in
the luggage compartment or cargo
area. Persons not properly seated
and/or not properly restrained by
seat belts can be severely injured
in the event of emergency braking
or a collision.
During driving, do not allow any
passengers to stand up or move
around between seats. Otherwise,
severe injuries can occur in the
event of emergency braking or a
collision.
’05 AVALON_U (L/O 0501)
Front seats—
—Front seat precautions
Driver seat
CAUTION
The SRS driver airbag deploys with
considerable force, and can cause
death or serious injury especially if
the driver is very close to the airbag.
The National Highway Traffic Safety
Administration (“NHTSA”) advises:
Since the risk zone for driver airbag
is the first 50—75 mm (2—3 in.) of
inflation, placing yourself 250 mm (10
in.) from your driver airbag provides
you with a clear margin of safety.
This distance is measured from the
center of the steering wheel to your
breastbone. If you sit less than 250
mm (10 in.) away now, you can
change your driving position in several ways:
Move your seat to the rear as far
as you can while still reaching the
pedals comfortably.
Slightly recline the back of the
seat. Although vehicle designs vary,
many drivers can achieve the 250
mm (10 in.) distance, even with the
driver seat all the way forward, simply by reclining the back of the
seat somewhat. If reclining the back
of your seat makes it hard to see
the road, raise yourself by using a
firm, non- slippery cushion, or raise
the seat if your vehicle has that
feature.
If your steering wheel is adjustable,
tilt it downward. This points the airbag toward your chest instead of
your head and neck.
The seat should be adjusted as recommended by NHTSA above, while
still maintaining control of the foot
pedals, steering wheel, and your view
of the instrument panel controls.
56
2005 AVALON from Jan. ’05 Prod. (OM41408U)

Front passenger seat
CAUTION
The SRS front passenger airbag also
deploys with considerable force, and
can cause death or serious injury especially if the front passenger is very
close to the airbag. The front passenger seat should be as far from the
airbag as possible with the seatback
adjusted, so the front passenger sits
upright.
’05 AVALON_U (L/O 0501)
Front seats
CAUTION
The SRS side airbags are installed in
the driver and front passenger seats.
Observe the following precautions.
Do not lean against the front door
when the vehicle is in use, since
the side airbag inflates with considerable speed and force. Otherwise,
you may be killed or seriously injured.
Do not use seat accessories which
cover the area where the side airbags inflate. Such accessories may
prevent the side airbags from activating correctly, causing death or
serious injury.
Do not modify or replace the seats
or upholstery of the seats equipped
with side airbags. Such change may
prevent the side airbag system from
activating correctly, disable the system, or cause the side airbags to
inflate accidentally, resulting in
death or serious injury.
—Seat adjustment precau tio ns
CAUTION
Do not adjust the seat while the
vehicle is moving as the seat may
unexpectedly move and cause the
driver to lose control of the vehicle.
Be careful that the seat does not
hit a passenger or luggage.
After adjusting the seat position, re-
lease the lever and try sliding the
seat forward and backward to make
sure it is locked in position.
After adjusting the seatback, push
your body back against the seat to
make sure the seat is locked in
position.
Do not put objects under the seats.
Otherwise, the objects may interfere
with the seat- lock mechanism or
unexpectedly push up the seat position adjusting lever and the seat
may suddenly move, causing the
driver to lose control of the vehicle.
While adjusting the seat, do not put
your hands under the seat or near
the moving parts. Otherwise, your
hands or fingers may be caught and
injured.
57
2005 AVALON from Jan. ’05 Prod. (OM41408U)

NOTICE
Do not operate the control switch in
more than one dimension at a time.
It may cause electrical overload.
’05 AVALON_U (L/O 0501)
—Adjusting front seats
(manual seat)
1. SEATBACK ANGLE ADJUSTING
LEVER
Lean forward and pull the lever up.
Then lean back to the desired angle
and release the lever.
CAUTION
Avoid reclining the seatback any
more than needed. The seat belts provide maximum protection in a frontal
or rear collision when the driver and
front passenger are sitting up straight
and well back in the seats. If you are
reclined, the lap belt may slide past
your hips and apply restraint forces
directly to the abdomen or your neck
may contact the shoulder belt. In the
event of a frontal collision, the more
the seat is reclined, the greater the
risk of death or personal injury.
58
2. SEAT POSITION ADJUSTING LEVER
Hold the center of the lever and pull it
up. Then slide the seat to the desired
position with slight body pressure and
release the lever.
2005 AVALON from Jan. ’05 Prod. (OM41408U)

—Adjusting front seats (power
seat)
’05 AVALON_U (L/O 0501)
1. SEAT LEG SUPPORT ADJUSTING
SWITCH (some models on driver’s
side)
Operating this switch raises the front
edge of the seat cushion.
Push the switch on either side.
Releasing the switch will stop the seat
cushion at that position.
Do not place anything under the front
seats, as this might interfere with the seat
movement.
2. SEAT POSITION AND SEAT CUSHION
ANGLE ADJUSTING SWITCH
Move the control switch in the desired
direction.
Releasing the switch will stop the seat at
that position.
Do not place anything under the front
seats, as this might interfere with the seat
movement.
3. SEATBACK ANGLE ADJUSTING
SWITCH
Move the control switch in the desired
direction.
Releasing the switch will stop the seatback at that position.
CAUTION
Avoid reclining the seatback any
more than needed. The seat belts provide maximum protection in a frontal
or rear collision when the driver and
the front passenger are sitting up
straight and well back in the seats. If
you are reclined, the lap belt may
slide past your hips and apply restraint forces directly to the abdomen
or your neck may contact the shoulder belt. In the event of a frontal
collision, the more the seat is reclined, the greater the risk of death
or personal injury.
4. SEAT LUMBAR SUPPORT
ADJUSTING SWITCH (driver’s side
only)
Push the switch on either side.
The amount of lumbar support will change
while the switch is pushed.
59
2005 AVALON from Jan. ’05 Prod. (OM41408U)

Driving position memory
system
This system can memorize the position
of the driver’s seat and outside rear
view mirrors, and recall them at the
touch of a button.
Buttons “1” and “2” can memorize two
separate positions.
’05 AVALON_U (L/O 0501)
To make only slight changes to an already
memorized position, the easiest way is to
first activate the memorized position, then
make the desired changes and perform
step 2 above.
SETTING THE DRIVING POSITION
The ignition switch must be set at ON and
the shift lever is in the “P” position.
1. Adjust the driver’s seat and outside
rear view mirrors to the desired
position.
2. While pushing the “SET” button,
push button “1” or “2” until a beep
is heard.
The system can memorize up to 2 positions by repeating the above steps. If step
2 is performed when both buttons “1” and
“2” are memorized, the previous position
will be erased and a new position will be
set.
60
2005 AVALON from Jan. ’05 Prod. (OM41408U)

’05 AVALON_U (L/O 0501)
RECALLING THE MEMORIZED POSITION
When you push button “1” or “2”, a
beep will sound and the driving position will be automatically adjusted to
the position recorded for that button.
The memorized position can be recalled
under the following conditions:
The ignition switch is set at ON and
the shift lever is in the “P” position
with the brake pedal released.
The key is not in the ignition switch or
the ignition is turned off (when the
smart key system is on), and less than
30 seconds have passed since opening
the driver’s door.
To stop the operation, push any driving
position memory button.
To reactivate the system, push the button
“1” or “2” again.
If the vehicle’s battery is disconnected,
the memory will be erased and the positions will have to be set again.
CAUTION
Do not start the vehicle while the
adjustments are being made.
Take care not to select the wrong
button, or the seat could strike the
rear passenger or hit your body
against the steering wheel. If this
happens, you can stop the movement by pressing another driving
position memory switch, or depressing the brake pedal.
MEMORY RECALL FUNCTION
You can recall the memorized position
using the wireless remote control function or entry function of the smart key
system.
If you unlock the door by pushing the
unlock button on the electronic key, or by
grasping the door outside handle the
memorized seat and outer mirror positions
are recalled when the driver’s door is
opened.
This function can be used after setting the
driving position by following procedure.
Setting the driving position onto the
electronic key
An electronic key can memorize only one
driving position.
The driver’s door must be closed with the
ignition switch is turned off.
1. Push and hold the previously memorized driving position button “1” or “2”.
2. While depressing the button abovementioned, push and hold the lock or
unlock button on the electronic key until a beep sounds.
If you want to set other driving position,
repeat the above procedure. The previous
setting will be erased and the new position will be set.
61
2005 AVALON from Jan. ’05 Prod. (OM41408U)

Resetting the driving position onto the
electronic key
The driver’s door must be closed with the
ignition switch is turned off.
1. Push and hold the “SET” button.
2. Push and hold the lock or unlock button on the wireless remote control until
2 beeps sounds.
’05 AVALON_U (L/O 0501)
Rear seats
SEATBACK ANGLE ADJUSTING LEVER
Lean forward and pull the lever up.
Then lean back to the desired angle
and release the lever.
CAUTION
Adjustment should not be made
while the vehicle is moving.
When adjusting the seat, be careful
that the seat does not hit a passenger or luggage.
After adjusting the seatback, push
back your body to make sure it is
locked in position.
When operating the seat, be careful
not to get your hands or feet
pinched in the seat.
62
2005 AVALON from Jan. ’05 Prod. (OM41408U)

Flap area
’05 AVALON_U (L/O 0501)
Trunk storage extension
Do not place objects on the flap
area. Objects placed behind the rear
seat may fall into the gap behind
the seatback. If objects are left in
the gap, the reclining seatback will
not lock properly, leaving the seatback free to move. When the vehicle is in operation, moving seatbacks may cause injury.
In the event that an object gets
caught behind the rear seatback,
contact your Toyota dealer.
1. Pull down the armrest in the rear
seat.
2. Push down the handle of the armrest
door and open the armrest door.
Access to the trunk can be prevented by
locking the armrest door with the master
key (vehicles with key cylinder- type ignition switch) or mechanical key (vehicles
with smart key system).
To lock, turn the key counterclockwise.
See “Cargo and luggage” on page 282 in
Section 2 for precautions when loading
luggage.
63
2005 AVALON from Jan. ’05 Prod. (OM41408U)

CAUTION
To reduce the chance of injury in
case of an accident or a sudden stop,
always keep to close the armrest
door when not in use.
’05 AVALON_U (L/O 0501)
Head restraints
For your safety and comfort, adjust the
head restraint before driving.
To raise: Pull it up.
To lower: Push it down while pressing the
lock release button.
The head restraint is most effective when
it is close to your head. Therefore, using
a cushion on the seatback is not recommended.
CAUTION
64
Front
Rear
Adjust the center of the head re-
straint so that it is closest to the
top of your ears.
After adjusting the head restraint,
make sure it is locked in position.
Do not drive with the head re-
straints removed.
2005 AVALON from Jan. ’05 Prod. (OM41408U)

Armrest
’05 AVALON_U (L/O 0501)
Seat ventilators/heaters—
—Seat heater
To use the armrest, pull it down as
shown above.
Type A
Type B
With seat ventilator
Without seat ventilator
65
2005 AVALON from Jan. ’05 Prod. (OM41408U)

’05 AVALON_U (L/O 0501)
The front seat heater has two switches:
one marked “L” (for driver’s seat) and
the other marked “R” (for front passenger’s seat).
To turn on the seat heater, push the
knob to pop it out and turn the knob
clockwise.
At this time, the indicator light will illuminate to indicate the seat heater is operating.
The ignition switch must be set at ON to
operate seat heaters.
With seat ventilator: Three setting levels
are available.
To disable this function, turn the knob to
the center position. The indicator light
goes off.
Without seat ventilator: To adjust temperature, turn the knob.
To disable this function, turn the knob to
the leftmost position. The indicator light
goes off.
Push the knob into the recessed position
when not in use.
CAUTION
Occupants must use caution when operating the seat heater because it
may make them feel too hot or cause
burns at low temperatures (erythema,
varicella). Use extra caution for;
Babies, small children, elderly per-
sons, sick persons or persons with
physical disabilities
Persons who have sensitive skin
Persons who are exhausted
Persons who have taken alcohol or
drugs which induce sleep (sleeping
drug, cold remedy, etc.)
To prevent the seat overheating, do
not use the seat heater with a blanket, cushion, or other insulating objects which cover the seat.
NOTICE
Do not put unevenly weighed objects on the seat and do not stick
sharp objects (needles, nails, etc.)
into the seat.
When cleaning the seats, do not
use organic substances (paint thinner, benzine, alcohol, gasoline,
etc.). They may damage the heater
and seat surface.
Before cleaning the seats, fully
wring out the towel that will be
used. Water entering the seats may
cause the seat ventilation/heating
system to malfunction.
To prevent the battery from being
discharge, turn the switch off when
the engine is not running.
66
2005 AVALON from Jan. ’05 Prod. (OM41408U)

—Seat ventilator
The front seat ventilator has two
switches: one marked “L” (for driver’s
seat) and the other marked “R” (for
front passenger’s seat).
To turn on the seat ventilator, push the
knob to pop it out and then turn the
knob counterclockwise.
At this time, the indicator light will illuminate to indicate the seat ventilator is operating.
The ignition switch must be set at ON to
activate seat ventilators.
Three setting levels are available.
To disable this function, turn the knob to
the center position. The indicator light
goes off.
’05 AVALON_U (L/O 0501)
Push the knob into the recessed position
when not in use.
NOTICE
Do not put unevenly weighted objects on the seat and do not stick
sharp objects (needles, nails, etc.)
into the seat.
When cleaning the seats, do not
use organic substances (paint thinner, benzine, alcohol, gasoline,
etc.). They may damage the seat
ventilation/heating system or seat
surface.
Before cleaning the seats, fully
wring out the towel that will be
used. Water entering the seats may
cause the seat ventilation/heating
system to malfunction.
To prevent the battery from being
discharged, turn the switches off
when the engine is not running.
Seat belts—
—Seat belt precautions
Toyota strongly urges that the driver and
passengers in the vehicle be properly restrained at all times with the seat belts
provided. Failure to do so could increase
the chance of injury and/or the severity of
injury in accidents.
The seat belts provided for your vehicle
are designed for people of adult size,
large enough to properly wear them.
Child. Use a child restraint system appropriate for the child until the child becomes large enough to properly wear the
vehicle’s seat belts. See “Child restraint”
on page 98 in this Section for details.
If a child is too large for a child restraint
system, the child should sit in the rear
seat and must be restrained using the
vehicle’s seat belt. According to accident
statistics, the child is safer when properly
restrained in the rear seat than in the
front seat.
If a child must sit in the front seat, the
seat belts should be worn properly. If an
accident occurs and the seat belts are not
worn properly, the force of the rapid inflation of the airbag may cause death or
serious injury to the child.
67
2005 AVALON from Jan. ’05 Prod. (OM41408U)

’05 AVALON_U (L/O 0501)
Do not allow any children to stand up or
kneel on either rear or front seats. An
unrestrained child could suffer serious injury or death during emergency braking or
a collision. Also, do not let the child sit
on your lap. Holding a child in your arms
does not provide sufficient restraint.
Pregnant woman. Toyota recommends the
use of a seat belt. Ask your doctor for
specific recommendations. The lap belt
should be worn securely and as low as
possible over the hips and not on the
waist.
Injured person. Toyota recommends the
use of a seat belt. Depending on the injury, first check with your doctor for specific
recommendations.
CAUTION
Persons should ride in their seats
properly wearing their seat belts
whenever the vehicle is moving.
Otherwise, they are much more likely
to suffer serious bodily injury or
death in the event of sudden braking
or a collision.
When using the seat belts, observe
the following:
Use the belt for only one person at
a time. Do not use a single belt for
two or more people—even children.
Avoid reclining the seatback any
more than needed. The seat belts
provide maximum protection in a
frontal or rear collision when the
driver and the front passenger are
sitting up straight and well back in
the seats. If you are reclined, the
lap belt may slide past your hips
and apply restraint forces directly
to the abdomen or your neck may
contact the shoulder belt. In the
event of a frontal collision, the
more the seat is reclined, the greater the risk of death or personal injury.
Be careful not to damage the belt
webbing or hardware. Take care that
they do not get caught or pinched
in the seat or doors.
Inspect the belt system periodically.
Check for cuts, fraying, and loose
parts. Damaged parts should be replaced. Do not disassemble or
modify the system.
Keep the belts clean and dry. If
they need cleaning, use a mild soap
solution or lukewarm water. Never
use bleach, dye, or abrasive cleaners, or allow them to come into
contact with the belt—they may severely weaken the belts. (See
“Cleaning the interior” on page 329
in Section 5.)
Replace the belt assembly (includ-
ing bolts) if it has been used in a
severe impact. The entire assembly
should be replaced even if damage
is not obvious.
68
2005 AVALON from Jan. ’05 Prod. (OM41408U)

—Fastening front and rear
seat belts
Tab
Buckle
’05 AVALON_U (L/O 0501)
When a passenger’s shoulder belt is completely extended and is then retracted
even slightly, the belt is locked in that
position and cannot be extended. This feature is used to hold the child restraint
system securely. (For details, see “Child
restraint” on page 98 in this Section.) To
free the belt again, fully retract the belt
and then pull the belt out once more.
If the seat belt cannot be pulled out of the
retractor, firmly pull the belt and release
it. You will then be able to smoothly pull
the belt out of the retractor.
Ta k e u p
slack
To o h i g h
Keep as low on
hips as possible
Adjust the seat as needed and sit up
straight and well back in the seat. To
fasten your belt, pull it out of the retractor and insert the tab into the
buckle.
You will hear a click when the tab locks
into the buckle.
The seat belt length automatically adjusts
to your size and the seat position.
The retractor will lock the belt during a
sudden stop or on impact. It also may
lock if you lean forward too quickly. A
slow, easy motion will allow the belt to
extend, and you can move around freely.
CAUTION
After inserting the tab, make sure
the tab and buckle are locked and
that the belt is not twisted.
Do not insert coins, clips, etc. in
the buckle as this may prevent you
from properly latching the tab and
buckle.
If the seat belt does not function
normally, immediately contact your
Toyota dealer. Do not use the seat
until the seat belt is fixed, because
it cannot protect an adult occupant
or your child from injury.
Adjust the position of the lap and
shoulder belts.
Position the lap belt as low as possible
on your hips—not on your waist, then adjust it to a snug fit by pulling the shoulder
portion upward through the latch plate.
69
2005 AVALON from Jan. ’05 Prod. (OM41408U)

’05 AVALON_U (L/O 0501)
CAUTION
Both high- positioned lap belts and
loose- fitting belts could cause serious injuries due to sliding under
the lap belt during a collision or
other unintended event. Keep the
lap belt positioned as low on hips
as possible.
Do not place the shoulder belt un-
der your arm.
CAUTION
Always make sure the shoulder belt
is positioned across the center of
your shoulder. The belt should be
kept away from your neck, but not
falling off your shoulder. Failure to
do so could reduce the amount of
protection in an accident and cause
serious injuries in a collision.
Seat belts with an adjustable shoulder
anchor—
Adjust the shoulder anchor position to
your size.
To raise: Slide the anchor up.
To lower: Push in the lock release button
and slide the anchor down.
After adjustment, make sure the anchor is
locked in position.
70
2005 AVALON from Jan. ’05 Prod. (OM41408U)

’05 AVALON_U (L/O 0501)
—Seat belt comfort guides
To release the belt, press the buckle
release button and allow the belt to
retract.
If the belt does not retract smoothly, pull
it out and check for kinks or twists. Then
make sure it remains untwisted as it retracts.
The shoulder belt comfort guides for
the rear seat outside positions will provide added seat belt comfort for children who have outgrown child restraints and for small adults. When the
outside shoulder belt is inserted
through the guide, the comfort guide
pulls the belt away from the neck and
head of an occupant.
To use the comfort guide, do as follows.
Seat belt comfort guides are stored in the
both pockets on the sides of the rear
seatback.
71
2005 AVALON from Jan. ’05 Prod. (OM41408U)

’05 AVALON_U (L/O 0501)
INSTALLING THE COMFORT GUIDE
Adjust the seatback to the upright most
position.
1. Pull the comfort guide from the
pocket.
72
2. Pinch the two edges of the shoulder
belt for the rear seat outside position with your fingers and slide the
belt past the slot of the guide as
shown above. At this time, the elastic cord must be behind the seat
belt.
CAUTION
Make sure the belt is not twisted and
that it lies flat. The elastic cord must
be behind the belt and the guide
must be on the front.
3. Buckle, position and release the seat
belt. (For wearing the seat belt, see
“—Fastening front and rear seat
belts” on page 69 in this Section.)
2005 AVALON from Jan. ’05 Prod. (OM41408U)

CAUTION
Always make sure the shoulder belt
is positioned across the center of the
shoulder. The belt should be kept
away from the neck, and should not
fall off the shoulder. Failure to observe these precautions could reduce
the effectiveness of the seat belt in
an accident, causing death or serious
injury.
’05 AVALON_U (L/O 0501)
—Stowing the rear seat belt
buckles
REMOVING AND STORING THE
COMFORT GUIDE
Pinch the two edges of the seat belt
together so that you can slide them out
of the guide. Store the guide with the
elastic cord into the pocket.
CAUTION
To reduce the chance of injury in
case of an accident or a sudden stop
while driving, remove and store the
comfort guide in its pocket when it is
not in use.
The rear seat belt buckles can be
stowed when not in use.
73
2005 AVALON from Jan. ’05 Prod. (OM41408U)

—Seat belt extender
If your seat belts cannot be fastened securely because they are not long enough,
a personalized seat belt extender is available from your Toyota dealer free of
charge.
Please contact your local Toyota dealer to
order the proper required length for the
extender. Bring the heaviest coat you expect to wear for proper measurement and
selection of length. Additional ordering information is available at your Toyota dealer.
CAUTION
When using the seat belt extender,
observe the following precautions.
Failure to follow these instructions
could reduce the effectiveness of the
seat belt restraint system in case of
an accident, increasing the chance of
personal injury.
Remember that the extender pro-
vided for you may not be safe when
used on a different vehicle, for
another person, or at a different
seating position than the one originally intended.
’05 AVALON_U (L/O 0501)
If the seat belt extender has been
connected to the driver’s seat belt
buckle without wearing the seat belt
when using the extender in the
driver’s seat, the SRS driver’s airbag system will judge that the driver wears the seat belt even if not
wearing it. In this case, the driver’s
airbag may not activate correctly,
causing death or serious injury in
the event of collision. Be sure to
wear the seat belt with the seat belt
extender.
Make sure the “AIRBAG ON”
indicator light is illuminated when
using the seat belt extender for the
front passenger seat. If the
“AIRBAG OFF” indicator light is
illuminated, disconnect the extender
tongue from the seat belt buckle,
then reconnect the seat belt.
Reconnect the seat belt extender
after making sure the “AIRBAG ON”
indicator light is illuminated. If you
use the seat belt extender while the
“AIRBAG OFF” indicator light is
illuminated, the front passenger
airbag and side airbag on the front
passenger side may not activate
correctly, causing death or serious
injury in the event of collision.
Be sure to wear the seat belt with-
out the seat belt extender if you
can fasten the seat belt without the
extender.
74
2005 AVALON from Jan. ’05 Prod. (OM41408U)

’05 AVALON_U (L/O 0501)
Do not use the seat belt extender
when installing a child restraint
system on the front or rear passenger seat. If installing a child restraint system with the seat belt
extender connected to the seat belt,
the seat belt will not securely hold
the child restraint system, which
could cause death or serious injury
to the child or other passengers in
the event of collision.
To connect the extender to the seat
belt, insert the tab into the seat belt
buckle so that the “PRESS” signs on
the buckle release buttons of the extender and the seat belt are both facing
outward as shown.
You will hear a click when the tab locks
into the buckle.
When releasing the seat belt, press on
the buckle release button on the extender,
not on the seat belt. This helps prevent
damage to the vehicle interior and extender itself.
As far as the seat belt extender on the
front passenger side is concerned, do not
fail to disconnect the extender from the
seat belt after the above operation in order to activate the front passenger airbag
correctly when getting into the vehicle
next time.
When not in use, remove the extender
and store in the vehicle for future use.
CAUTION
After inserting the tab, make sure
the tab and buckle are locked and
that the lap and shoulder portion of
the belt and the seat belt extender
are not twisted.
Do not insert coins, clips, etc. in
the buckle as this may prevent you
from properly latching the tab and
buckle.
If the seat belt does not function
normally, immediately contact your
Toyota dealer. Do not use the seat
until the seat belt is fixed, because
it cannot protect an adult occupant
or your child from injury.
75
2005 AVALON from Jan. ’05 Prod. (OM41408U)
—Seat belt pretensioners
The driver and front passenger seat
belt pretensioners are designed to be
activated in response to a severe frontal impact.
When the sensor detects a severe frontal
impact, the front seat belts are quickly
drawn back by the retractors so that the
belts snugly restrain the occupants.
’05 AVALON_U (L/O 0501)
The front passenger’s seat belt pretensioner will not activate if no passenger is
detected in the front passenger seat by
the front passenger occupant classification
system. However, the front passenger’s
seat belt pretensioner may activate if luggage is put on the seat, or the seat belt
is buckled up regardless of the presence
of an occupant in the seat. (As for the
front passenger occupant classification
system, see “—Front passenger occupant
classification system” on page 93 in this
Section.)
The seat belt pretensioners and SRS airbags may not operate together in all collisions.
The seat belt pretensioner system consists mainly of the following components,
and their locations are shown in the illustration.
1. Front airbag sensors
2. SRS warning light
3. “AIRBAG ON” and “AIRBAG OFF” indicator lights
4. Front passenger occupant classification
system (ECU and sensors)
5. Seat belt pretensioner assemblies
6. Front passenger’s seat belt buckle
switch
7. Airbag sensor assembly
76
2005 AVALON from Jan. ’05 Prod. (OM41408U)

’05 AVALON_U (L/O 0501)
The seat belt pretensioners are controlled
by the airbag sensor assembly. The airbag
sensor assembly consists of a safing sensor and airbag sensor.
When the seat belt pretensioners are activated, an operating noise may be heard
and a small amount of non- toxic gas may
be released. This does not indicate that
a fire is occurring. This gas is normally
harmless.
Once the seat belt pretensioners have
been activated, the seat belt retractors
remain locked.
CAUTION
Do not modify, remove, strike or open
the seat belt pretensioner assemblies,
airbag sensor or surrounding area or
wiring. Failure to follow these instructions may prevent the seat belt pretensioners from activating correctly,
cause sudden operation of the system
or disable the system, which could
result in death or serious injury. Consult your Toyota dealer about any repair and modification.
NOTICE
Do not perform any of the following
changes without consulting your
Toyota dealer. Such changes can
interfere with proper operation of the
seat belt pretensioners in some
cases.
Installation of electronic devices
such as a mobile two- way radio,
cassette tape player or compact
disc player
Repairs on or near the front seat
belt retractor assemblies
Modification of the suspension system
Modification of the front end structure
Attachment of a grille guard (bull
bar, kangaroo bar, etc.), snowplow,
winches or any other equipment to
the front end
Repairs made on or near the front
fenders, front end structure or console
This indicator comes on when the ignition switch is set at ON. It goes off
after about 6 seconds. This means the
seat belt pretensioners are operating
properly.
77
2005 AVALON from Jan. ’05 Prod. (OM41408U)

This warning light system monitors the
airbag sensor assembly, front airbag sensors, side and curtain shield airbag sensors, curtain shield airbag sensors, driver’s seat position sensor, driver’s seat belt
buckle switch, front passenger occupant
classification system, “AIRBAG ON” indicator light, “AIRBAG OFF” indicator light,
front passenger’s seat belt buckle switch,
seat belt pretensioner assemblies, inflators, interconnecting wiring and power
sources. (For details, see “Service reminder indicators and warning buzzers” on
page 145 in Section 1-6.)
If any of the following conditions occurs,
this indicates a malfunction of the airbags
or seat belt pretensioners. Contact your
Toyota dealer as soon as possible.
The light does not come on when the
ignition switch is set at ON or remains
on for more than 6 seconds.
The light comes on while driving.
If any seat belt does not retract or
cannot be pulled out due to a malfunction or activation of the relevant seat
belt pretensioner.
The seat belt pretensioner assembly or
surrounding area has been damaged.
’05 AVALON_U (L/O 0501)
In the following cases, contact your Toyota
dealer as soon as possible:
The front of the vehicle (shaded in the
illustration) was involved in an accident
that was not severe enough to cause
the seat belt pretensioners to operate.
Either seat belt pretensioner assembly
or surrounding area is scratched,
cracked, or otherwise damaged.
SRS airbags—
—SRS driver airbag, driver knee
airbag and front passenger airbag
The SRS (Supplemental Restraint System) front airbags are designed to provide further protection for the driver
and front passenger in addition to the
primary safety protection provided by
the seat belts.
Your vehicle equipped with “ADVANCED
AIRBAGS” designed based on US motor
vehicle safety standards (FMVSS208). The
airbag system controls airbag deployment
power for the driver and front passenger.
The driver airbag system consists of the
driver seat’s position sensor etc. The front
passenger’s airbag system consists of the
front passenger occupant classification
sensor etc.
78
2005 AVALON from Jan. ’05 Prod. (OM41408U)

’05 AVALON_U (L/O 0501)
In response to a severe frontal impact,
the SRS front airbags work together with
the seat belts to help reduce injury by
inflating. The SRS front airbags help reduce injuries mainly to the driver’s or front
passenger’s head, chest or knee caused
by hitting the vehicle interior.
The SRS front passenger airbag will not
activate if there is no passenger sitting in
the front passenger seat. However, the
front passenger airbag may deploy if luggage is put in the seat, or the seat belt
is buckled up, regardless of the presence
of an occupant in the seat. (As for the
front passenger occupant classification
system, see “—Front passenger occupant
classification system” on page 93 in this
Section.)
Always wear your seat belt properly.
CAUTION
The SRS front airbag system is de-
signed only as a supplement to the
primary protection of the driver and
front passenger seat belt systems.
The driver and front passenger can
be killed or seriously injured by the
inflating airbags if they do not wear
the available seat belts properly.
During sudden braking just before
a collision, an unrestrained driver
or front passenger can move forward into direct contact with or
close proximity to the airbag which
may then deploy during the collision. To ensure maximum protection
in an accident, the driver and all
passengers in the vehicle must
wear their seat belts properly. Wearing a seat belt properly during an
accident reduces the chances of
death or serious injury or being
thrown out of the vehicle. For
instructions and precautions concerning the seat belt system, see
“Seat belts” on page 67 in this Section.
Improperly seated and/or restrained
infants and children can be killed
or seriously injured by the deploying front airbags. An infant or child
who is too small to use a seat belt
should be properly secured using a
child restraint system. Toyota
strongly recommends that all infants and children be placed in the
rear seat of the vehicle and properly restrained. The rear seat is the
safest for infants and children. For
instructions concerning the installation of a child restraint system, see
“Child restraint” on page 98 in this
Section.
79
2005 AVALON from Jan. ’05 Prod. (OM41408U)

The SRS front airbags are designed to
deploy in severe (usually frontal) collisions where the magnitude and duration
of the forward deceleration of the vehicle exceeds the designed threshold
level.
The SRS front airbags will deploy if the
severity of the impact is above the designed threshold level, comparable to an
approximate 25 km/h (15 mph) collision
when the vehicle has the impact straight
into a fixed barrier that does not move or
deform.
However, this threshold velocity will be
considerably higher if the vehicle strikes
an object, such as a parked vehicle or
sign pole, which can move or deform on
impact, or if the vehicle is involved in an
underride collision (e.g. a collision in
which the front of the vehicle “underrides”,
or goes under, the bed of a truck, etc.).
It is possible that in some collisions
where the forward deceleration of the vehicle is very close to the designed threshold level, the SRS front airbags and the
seat belt pretensioners may not activate
together.
Always wear your seat belts properly.
’05 AVALON_U (L/O 0501)
Collision from the rear
Collision from the side
Vehicle rollover
The SRS front airbags are generally not
designed to inflate if the vehicle is involved in a side or rear collision, if it
rolls over, or if it is involved in a lowspeed frontal collision. But, whenever a
collision of any type causes sufficient
forward deceleration of the vehicle, deployment of the SRS front airbags may
occur.
Hitting a curb,
edge of pavement
or hard surface
Landing hard or vehicle f alling
Falling into or
jumping over
a deep hole
The SRS front airbags may also deploy
if a serious impact occurs to the underside of your vehicle. Some examples
are shown in the illustration.
80
2005 AVALON from Jan. ’05 Prod. (OM41408U)
 Loading...