Toyota 5FG, 5FD33~45 Repair Manual
FOREWORD
This manual covers the service procedures of the TOYOTA FORKLIFT
5FGi5FD33 - 45 series. Please use this manual for providing quick, correct
servicing of the corresponding forklift models.
This manual has been edited by combining Repair Manual Pub. No.
as Part I (Sections 0 to 15) and Repair Manual (Supplement)
Pub. No.
Part
August, 1988 while Part
change in September, 1994. For servicing the vehicles after the minor
change, please refer to both Part
Please understand that disagreement can take place between the de
scriptions in the manual and actual vehicles due to change in design
and specifications. Any change or modifications thereafter will be in
formed by Toyota Industrial Equipment Parts & Service News.
For the service procedures of the mounted engine, read the repair man
uals listed below as reference together with this manual.
CE014. as Part 11 (Sections 0 to 4).
I
explains the service procedures for the models produced since
IIcovers those for the models subject to the minor
I
and Part
II.
CEO05
-
-
-
(Reference)
Repair manuals related to this manual are as follows:
TOYOTA INDUSTRIAL EQUIPMENT 3F ENGINE
REPAIR MANUAL (No.
TOYOTA INDUSTRIAL EQUIPMENT 1FZ ENGINE
REPAIR MANUAL (No.
TOYOTA INDUSTRIAL EQUIPMENT 1 IZ, 122 ENGINE
REPAIR MANUAL (N
CE614)
CE627)
O
. CE615-1)
TOYOTA MOTOR CORPORATION
PART
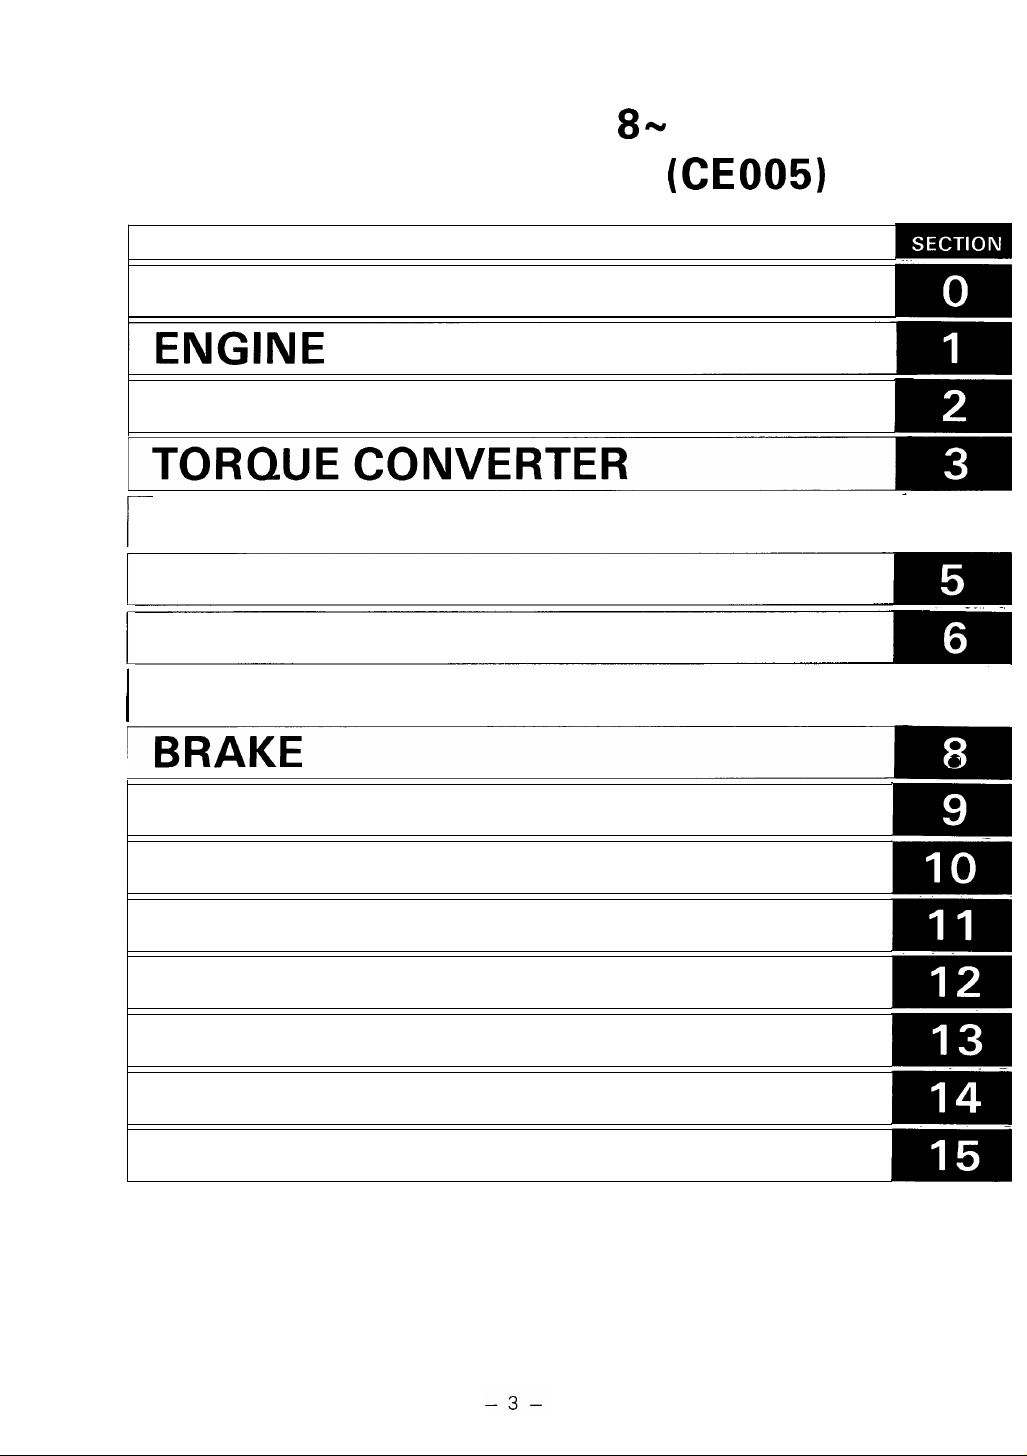
SECTION INDEX (CE005)
GENERAL
I
:
1988.
8-
ENGINE0
CLUTCH
CR
TRANSMISSION
FRONT AXLE
REAR AXLE
&
DIFFERENTIAL
BRAKE
BODY
MATERIAL HANDLING SYSTEM
MAST
CYLINDER
OIL PUMP
OIL CONTROL VALVE
a
a
APPENDIX
GENERAL
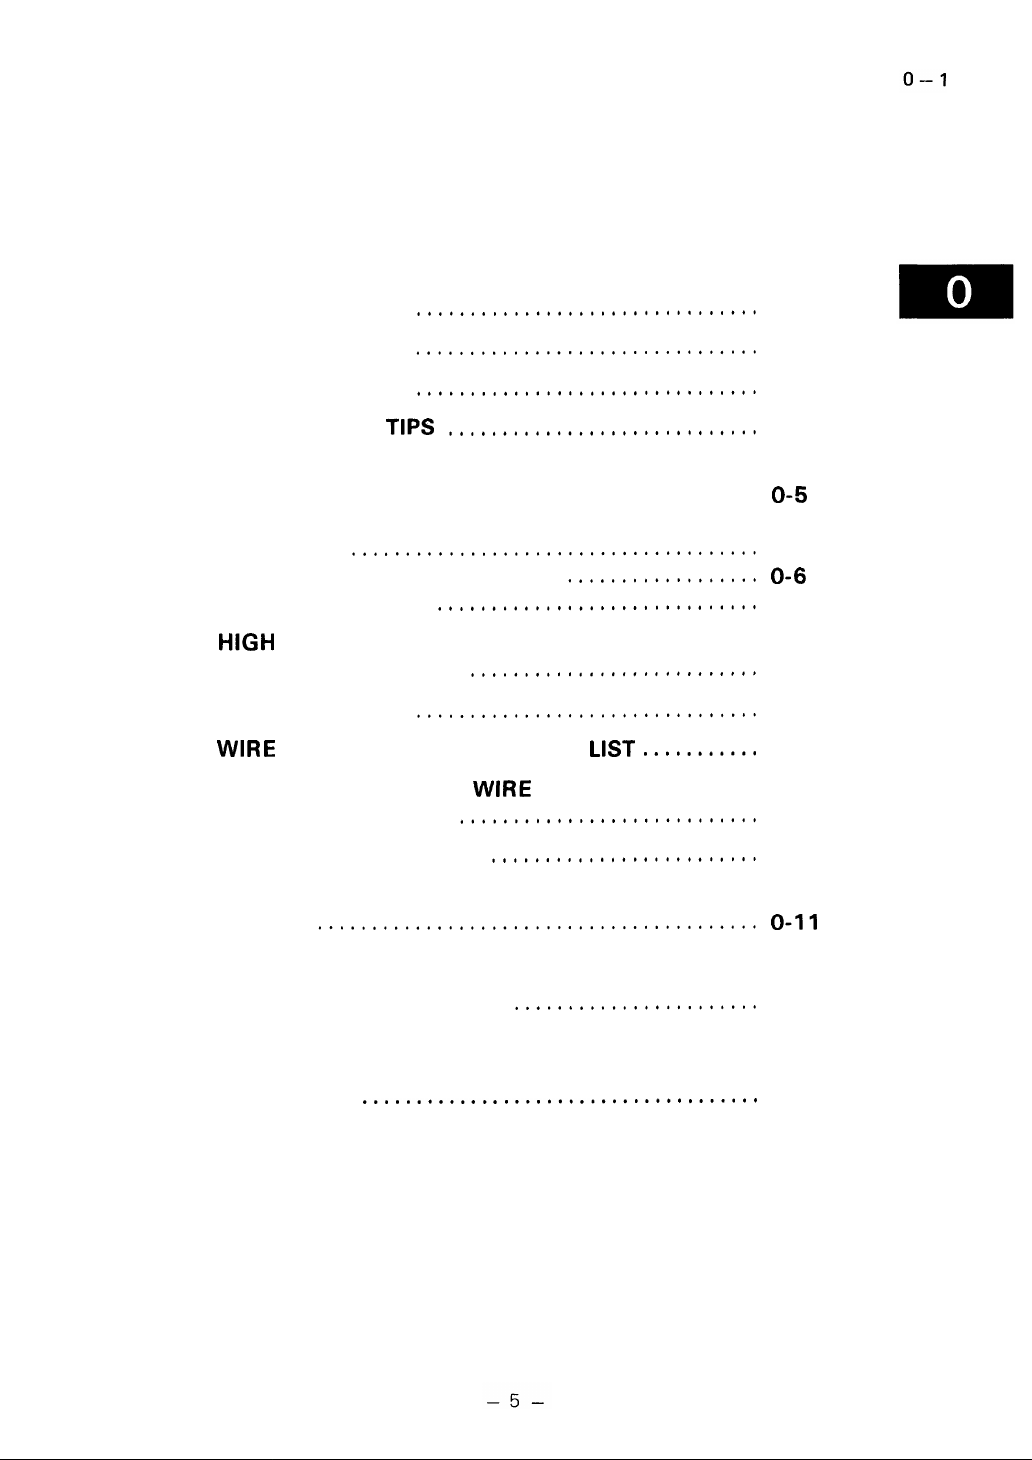
Page
EXTERIOR VIEWS
VEHICLE LISTING
ABBREVIATIONS
OPERATIONAL
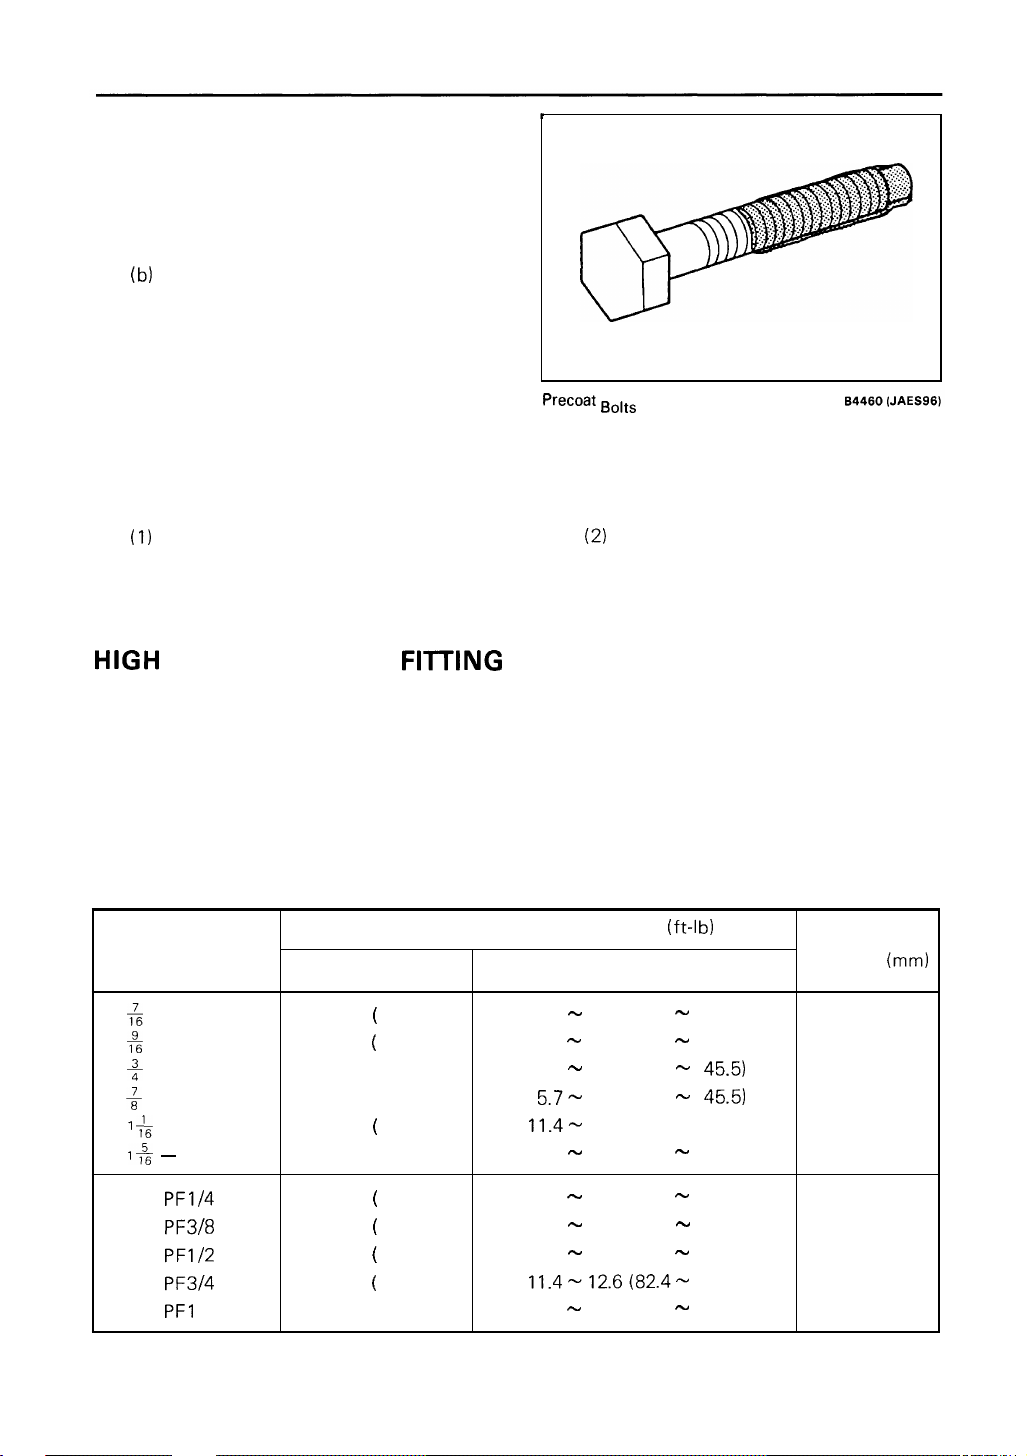
STANDARD BOLT
TORQUE 0-5
BOLT STRENGTH TYPE IDENTIFICATION
METHOD
TIGHTENING TORQUE TABLE
PRECOAT BOLTS
HIGH PRESSURE HOSE FITTING
TIGHTENING TORQUE
FRAME NUMBER
WIRE ROPE SUSPENSION ANGLE LIST
SAFE LOAD FOR EACH
SUSPENSION ANGLE
COMPONENTS WEIGHT
.........................................
......................................
................................
................................
................................
TIPS
.............................
&
NUT TIGHTENING
..................
..............................
...........................
................................
...........
WlRE ROPE
............................
.........................
0-2
0-3
0-4
0-4
0-5
0-6
0-7
0-7
0-8
0-9
0-10
0-10
RECOMMENDED LUBRICANT QUANTITY
&TYPES
LUBRICATION CHARTS 0-12
PERIODIC MAINTENANCE
INSPECTION METHOD 0-14
PERIODIC REPLACEMENT LUBRICANTS
AND PARTS
.........................................
..........................
.......................
.........................
.....................................
0-11
0-14
0-20
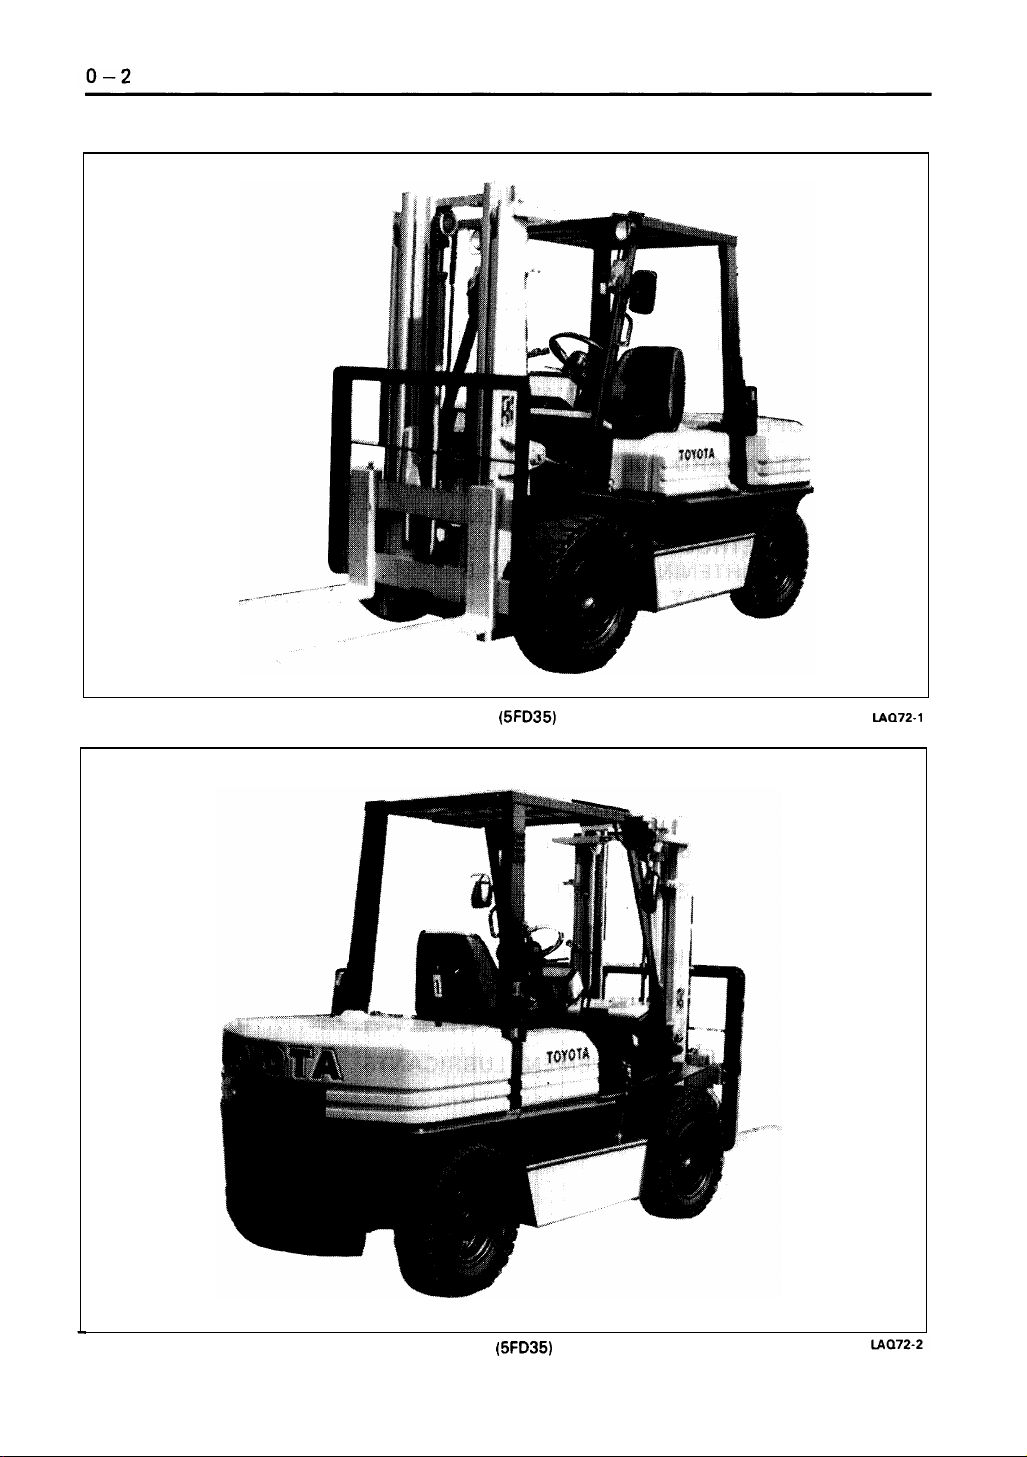
EXTERIOR
VIEWS
Front
View
(5FD35)
~~0.72-1
Rear
View
- 6 -
(5FD35)
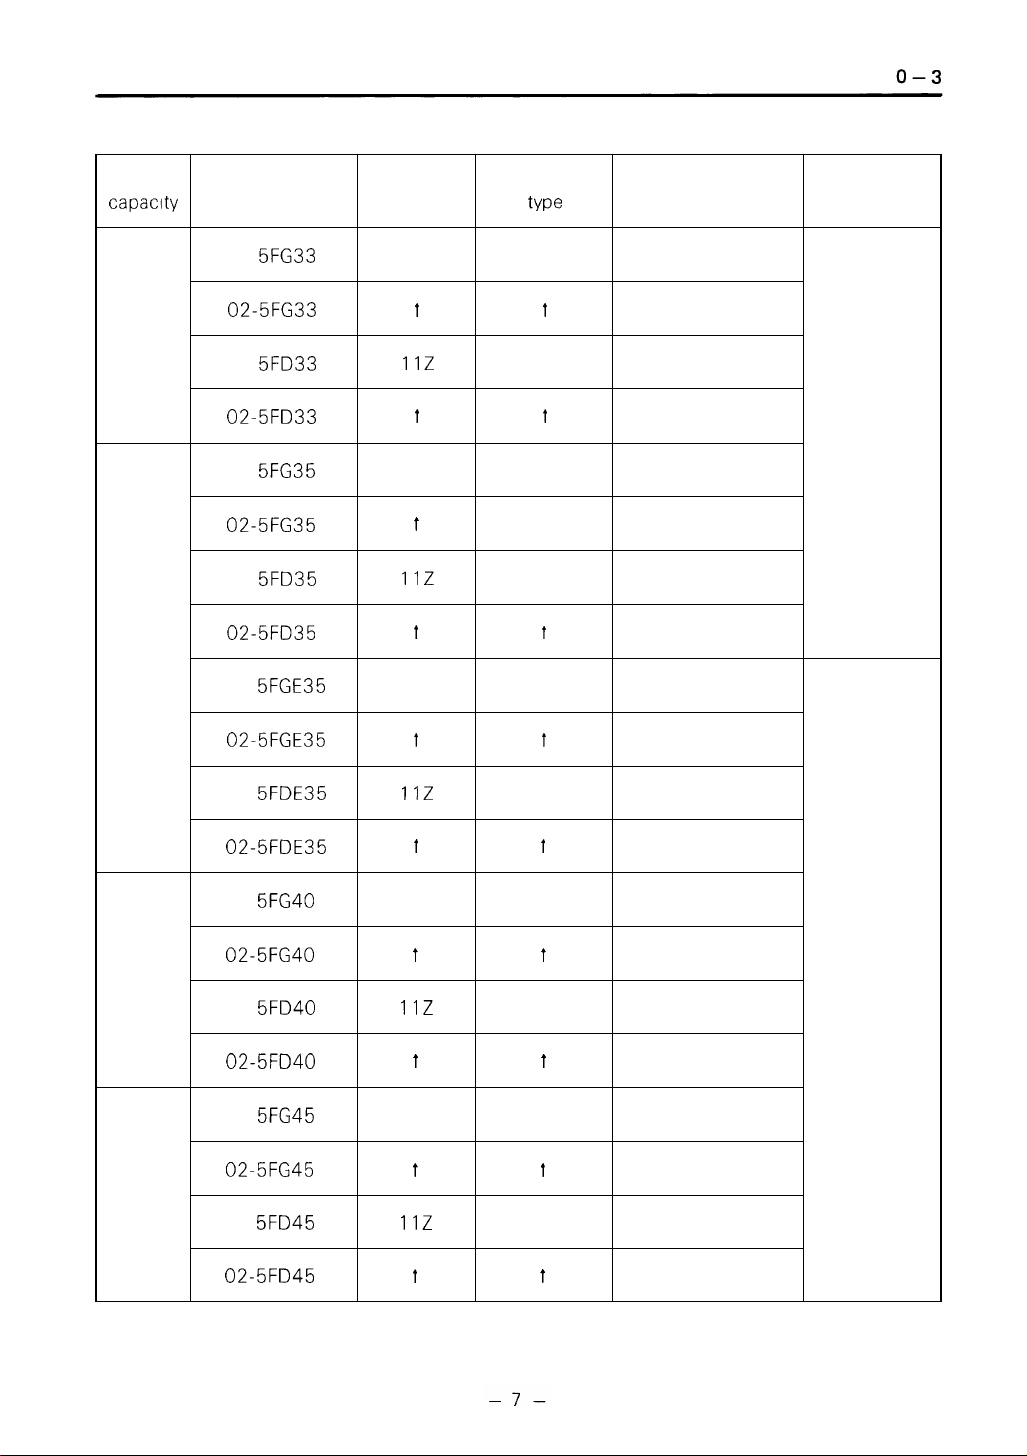
VEHICLE LISTING
Load
capaclty
3.25 ton
3.5 ton
Model
5FG33
02-5FG33
5FD33
02-5FD33
5FG35
02-5FG35
5FD35
02-5FD35
5FGE35
02-5FGE35
Engine
model
3F
t
11Z
t
3F
t
11Z
t
3F
t
Engine
tY Pe
Gasoline
t
Diesel
t
Gasoline
t
Diesel
t
Gasoline
t
Drive system
Clutch
Torgue converter
Clutch
Torque converter
Clutch
Torque converter
Clutch
Torque converter
Clutch
Torque converter
Remarks
Wheel base
1800 mm
(71
in)
4.0 ton
4.5 ton
5FDE35
02-5FDE35
5FG40
02-5FG40
5FD40
02-5FD40
5FG45
02-5FG45
5FD45
02-5FD45
11Z
t
3F
t
11Z
t
3F
t
11Z
t
Diesel
t
Gasoline
t
Diesel
t
Gasoline
t
Diesel
t
Clutch
Torque converter
Clutch
Torque converter
Clutch
Torque converter
Clutch
Torque converter
Clutch
Torque converter
Wheel base
2000
mm
(78.5 in)
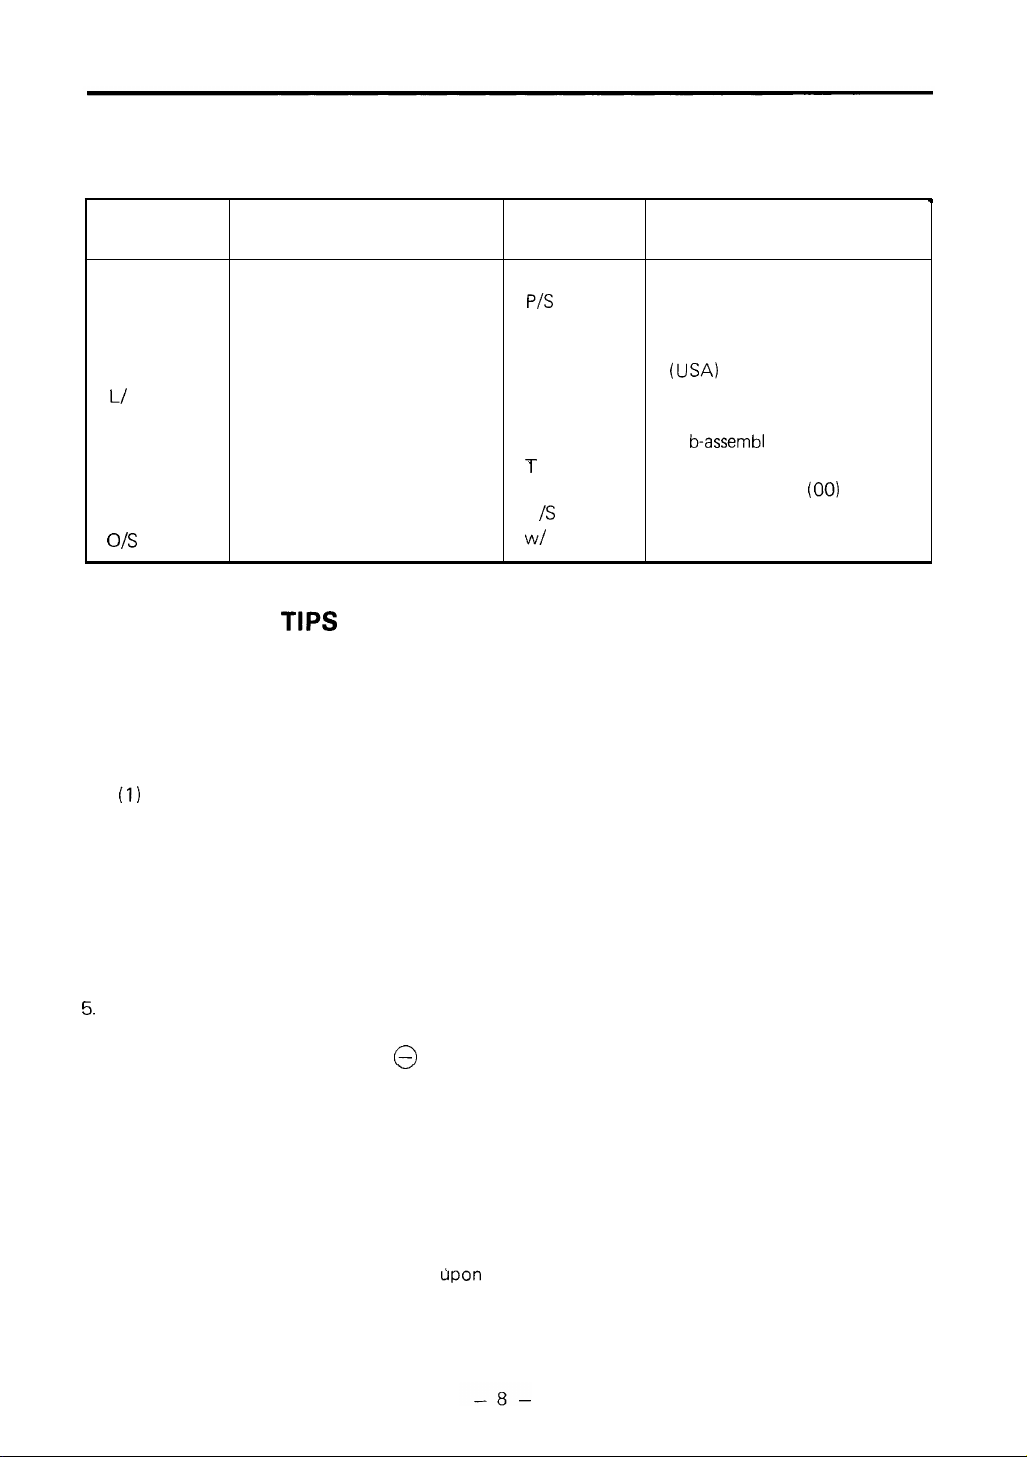
ABBREVIATIONS
Abbreviations used in this manual are as follows:
Abbreviation
(Code)
Meaning
Abbreviation
(Code)
4
Meaning
ABDC
ASSY
ATDC
ATM
BTDC
L/
LH
LLC
MTM
OHV
0
PT
0
/s
After button dead center
Assembly
After top dead center
Automatic transmission
Before top dead center
Less
Left hand
Long life coolant
Manual transmission
Overhead valve
Option
Oversize
PS
P/S
RH
SAE
SST
STD
SUB
T
=
OOT
U
/S
W/
-
ASSY
OPERATIONAL TIPS
1. Safe operation
(1) Make sure that correct size wire is used for hoisting a heavy material.
(2)
After jacking up, always support with rigid racks or stands.
2.
Preparation of SSTs and measuring tools
(1)
Prepare SSTs and measuring tools before starting operation.
3.
Clearing and arrangement
(1) Always keep the workshop neat and orderly for easy operation.
(2)
Disassembly of hydraulic equipment shall always be done in a clean place using clean tools.
Horsepower
Power steering
Right hand
Society of automotive engineers
(USA)
Special service tool
Standard
b-assem bl y
Su
Tightening torque
Number of teeth
U
ndersize
With
(00)
4.
Genuine Toyota parts
-
Genuine Toyota parts should be used even in the replacement of packings, gaskets and O
5.
Repairs on electrical system
Before doing any repairs on the electical system, disconnect the cables from the battery terminals.
Be sure to disconnect the negative
6.
Tightening torque for installation
Be sure to observe the tightening torque given in this manual. If not specified, tighten
&
listed in standard bolt
7.
Defect status grasp
Do not start disassembly and replacement as soon as a defect is found, but first grasp whether the
defect requires disassembly and replacement. In the case of torque converter for example, do not
attempt torque converter disassembly
factors as the oil, pressure and rotation status causing the failure.
nut tightening torque.
cable first.
dpon a failure in starting the vehicle, but first check such
rings.
to
the torque
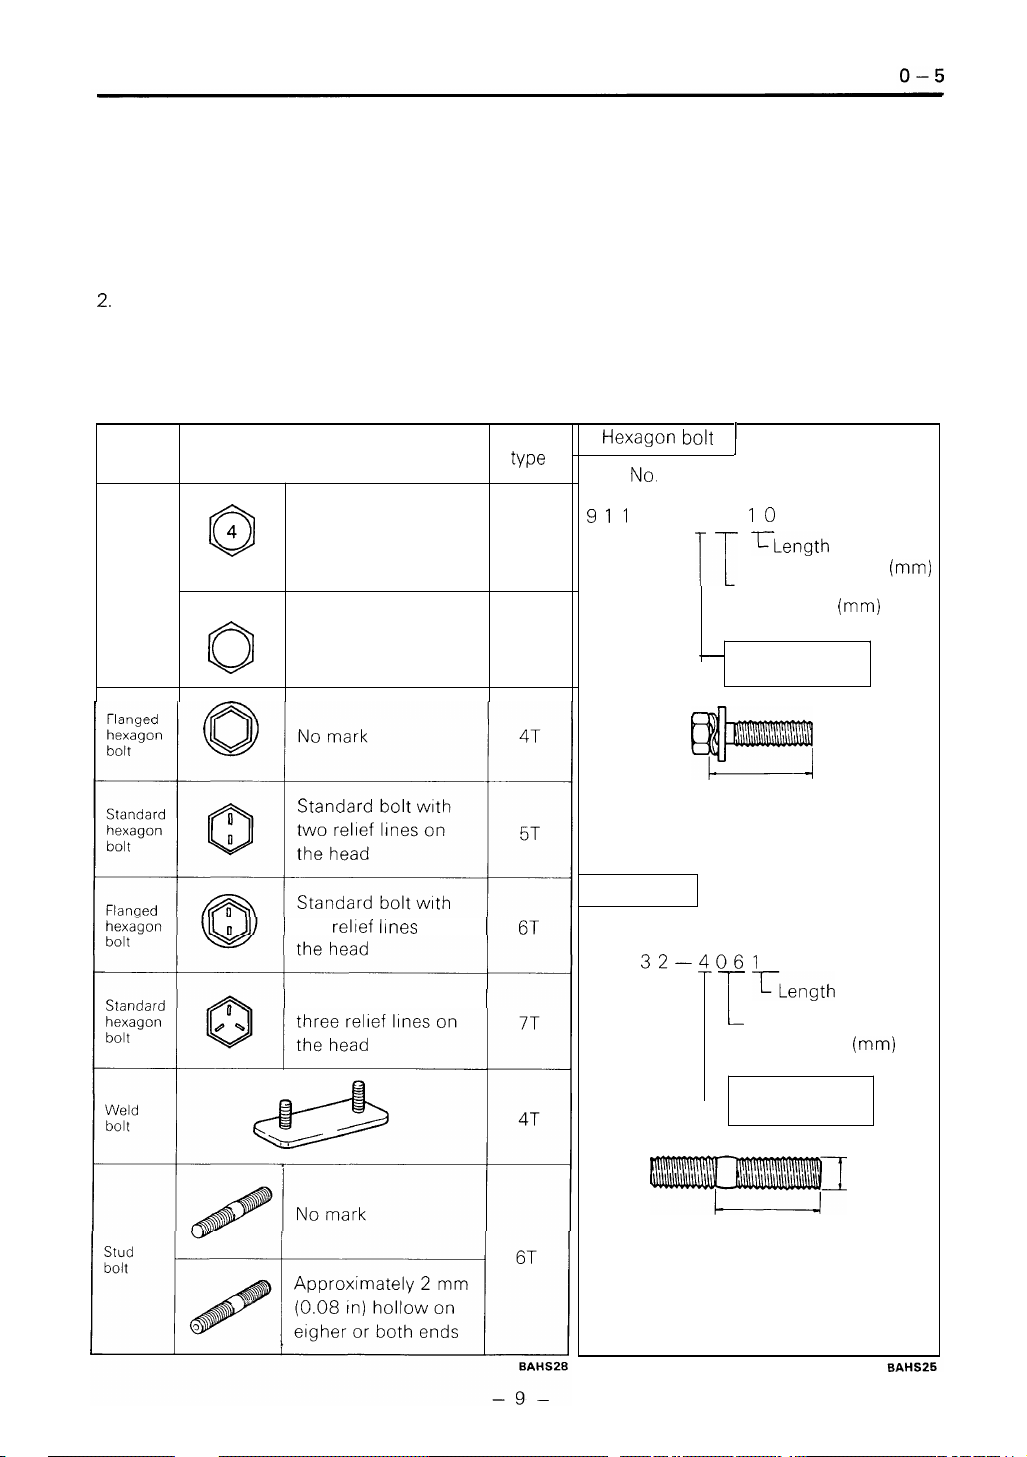
STANDARD BOLT & NUT TIGHTENING TORQUE
Standard bolt and nut tightening torques are not indicated.
Judge the standard tightening torque as shown below.
Find out the straight type of bolt from the list below and then find the bolt tightening torque from
1.
the table.
The nut tightening torque can be judged from the mating bolt type.
2.
BOLT STRENGTH TYPE IDENTIFICATION METHOD
1.
Identification by bolt shape
2.
Identification by part
No.
Standard
hexagon
bolt
Shape and identification method
Number in relief or
0
@
hallmark on the head
No mark
two rel~ef l~nes on
Standard bolt with
Strength
type
4 = 4T
5
=
5T
=
6T
6
7
=
7T
4T
Hexagon bolt
Part
NO.
example
9
I1
11
-
Stud bolt
Part
No.
example
921 32-4-061 4
I
406 10
T~ength under head
-1
Nominal diamter
-
Strength type
Length under head
T~ength (mm)
1
Nominal diameter
(mm)
Nominal
I
diameter
(mm)
-
(mm)
-
Strength type
Length
Nominal
diameter
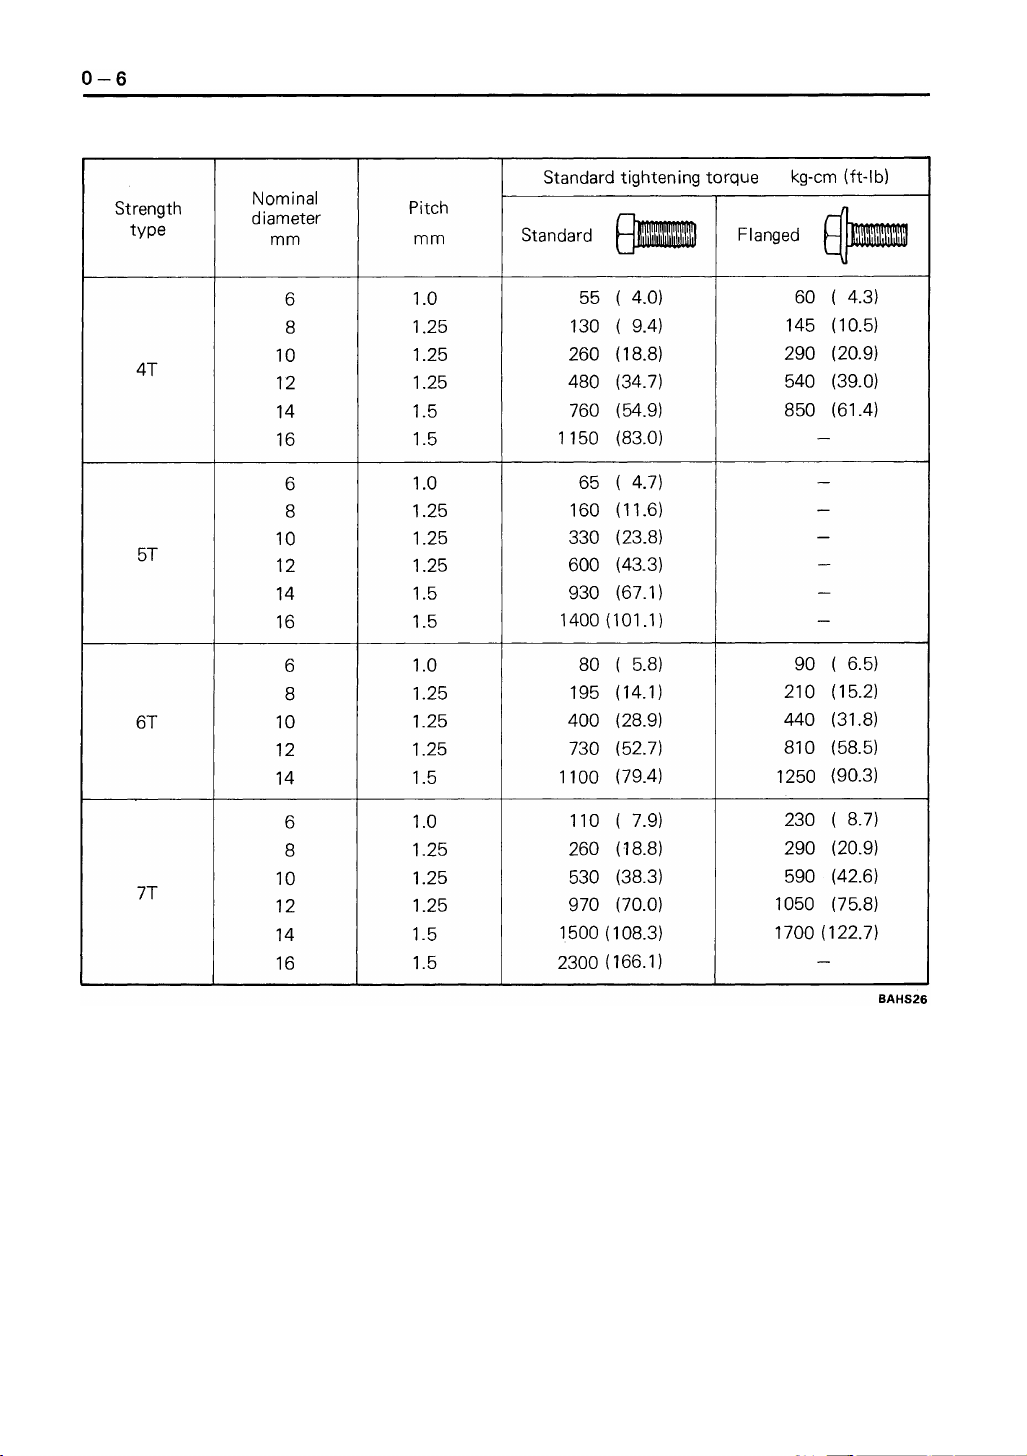
TIGHTENING
TORQUE
TABLE
PR
ECOAT BOLTS
(Bolts with seal lock agent coating on threads)
Do not use the precoat bolt as it is in either
1.
of the following cases:
(a) After it
(b)
When the precoat bolt
ened or tightened) by tightness check,
etc.
Note
:
For torque check, use the lower limit of the
allowable tightening torque range.
bolt moves, retighten
steps below.
Method for reuse of precoat bolts
2.
(1) Wash the bolt and threaded hole. (The (2) Perfectly dry the washed parts by air
threaded hole must be washed even for
replacement of the bolt.)
is
removed.
is
moved (loos
it
according to the
-
Bolts
If the
blowing.
(3) Coat the specified seal lock agent to the
threaded portion of the bolt.
HIGH PRESSURE HOSE FllTlNG TIGHTENING TORQUE
When connecting a high pressure hose, wipe the hose fitting and mating nipple contact sufaces with
1.
clean cloth to remove foreign matters and dirt. Also check no dent or other damage on the contact
surfaces before installation.
a
When connecting
2.
the fitting.
The maximum tightening torque must not exceed twice the standard tightening torque.
3.
Nominal diameter
of screw
5
-
20
UNF
%
-
18
UNF
-
16
UNF
5
-
14
UNF
-
12 UNF
I&
-
12 UNF
PF1/4
PF3/8
PF1/2
PF314
PFI
high pressure hose, hold the hose to align the fitting with the nipple and tighten
-
cm (ft-l b)
Standard tightening torque
Standard
(
18.1)
2.5
5.0
(
36.2)
6.0
(
43.4)
(
43.4)
6.0
(
86.6)
12.0
14.0 (101.2)
(
36.2)
5.0
(
36.2)
5.0
(
43.4)
6.0
(
86.8)
12.0
14.0 (101.2)
2.4
4.8
5.7
5.7- 6.3 (41.2 - 45.5)
11.4- 12.6 (82.4- 91.1)
13.3
4.8
4.8
5.7
11.4-12.6(82.4- 91.1)
13.3
kg
Tightening range
--
2.6
(1
7.4
--
--
5.3 (34.7
-
6.3 (41.2
-
14.7 (96.2
--
5.3 (34.7
-
5.3 (34.7 - 38.3)
-
6.3 (41.2 - 45.5)
--
14.7 (96.2
--
--
--
--
--
Hose inside
diameter
18.8)
38.3)
45.5)
106.3)
38.3)
106.3)
(mm)
6
9
12
12
19
25
9
9
12
19
25
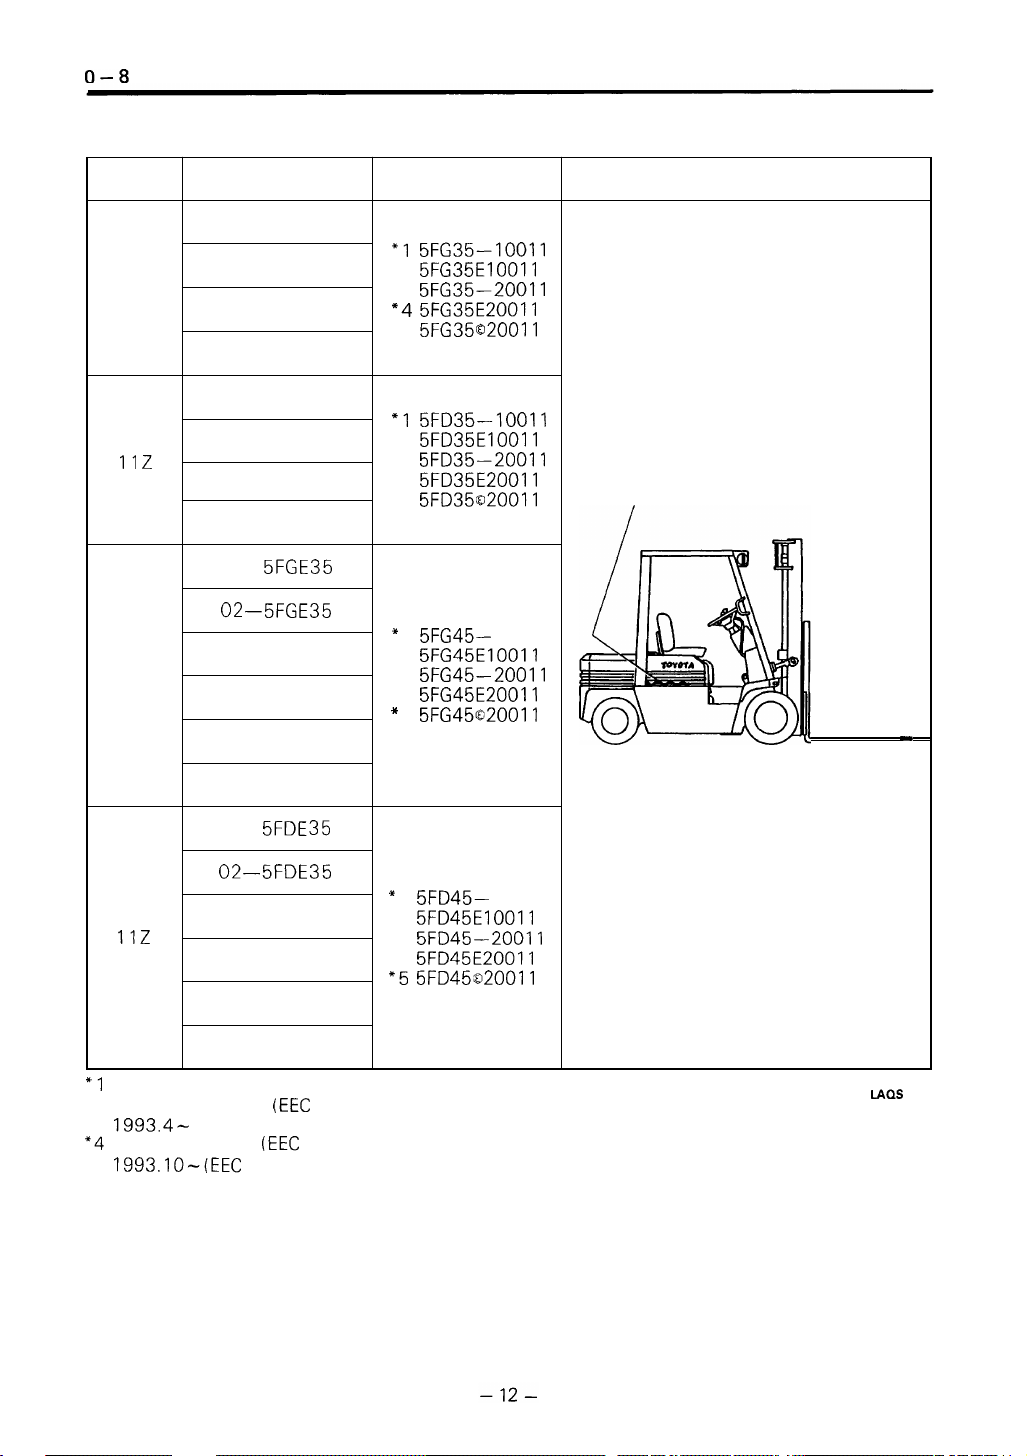
FRAME
NUMBER
Engine
3F
11Z
3F
Model
5FG 33
02
-
5FG 33
5FG 35
-
5FG 35
02
5FD 33
-
5FD 33
02
5FD 35
-
5FD 35
02
5FGE35
02-5FGE35
5FG 40
02
-
5FG 40
5FG 45
Punching
format
"1 5FG35-10011
"
2 5FG35E10011
"
3 5FG35-20011
"4 5FG35E20011
"
5 5FG35O20011
"1 5FD35-10011
"
2 5FD35E10011
"
3 5FD35-20011
"
4 5FD35E20011
*
5 5FD35020011
"
1 5FG45- 1001 1
"
2 5FG45E10011
"
3 5FG45-20011
"
4 5FG45E20011
"
5 5FG45Q20011
Punching ,position
Frame
No. punching position
a
-
5FG 45
02
5FDE35
02-5FDE35
5FD 40
11Z
02
-
5FD 40
5FD 45
-
5FD 45
02
"1 1988.6-1993.3
"
2 1992.11 -1993.3 (EEC
"
3 1993.4-
"4 1993.4- 1993.9 (EEC
"
5
1993.10-(EEC
spec.)
spec.)
spec.)
"
1 5FD45- 1001 1
"
2 5FD45E10011
"
3 5FD45-20011
"
4 5FD45E20011
"5 5FD45~20011
LAQS 1 29
 Loading...