

Toyota 5603 User Manual
3651 N Highway 89 • Chino Valley, AZ 86323
(928) 636-7080 • www.p-a-g.net
TOYOTA TACOMA
(AUTO. & MANUAL TRANS., 2 &
4WD, EXT. & CREW CAB, W/O
O.E. TRAILER HITCH)
3” BODY LIFT
INSTALLATION INSTRUCTIONS
2005-2006 KIT# 5603*
*VEHICLES EQUIPPED WITH O.E. TRAILER
HITCH REQUIRE KIT# 5903
WARNING
Installation of a Performance Automotive Group body
lift kit will change the vehicle’s center of gravity and
handling characteristics both on- and off-road. You
must drive the vehicle safely! Extreme care must be
taken to prevent vehicle rollover or loss of control,
which could result in serious injury or death. Avoid sudden sharp turns or abrupt maneuvers and always make
sure all vehicle occupants have their seat belts fastened.
WARNING
Before you install this kit, read and understand all
instructions, warnings, cautions, and notes in this
instruction sheet and in the vehicle owner’s manual.
CAUTION
Proper installation of this kit requires knowledge of the
factory recommended procedures for removal and
installation of original equipment components. We recommend that the factory shop manual and any special
tools needed to service your vehicle be on hand during
the installation. Installation of this kit without proper
knowledge of the factory recommended procedures
may affect the performance of these components and
the safety of the vehicle. We strongly recommend that
a certified mechanic familiar with the installation of similar components install this kit.
WARNING
DO NOT combine suspension, body, or other lift
devices. Use of vehicle with combined lifts may result
in unsafe and/or unexpected handling characteristics.
WARNING
This kit should only be installed on a vehicle that is in
good working condition. Before you install the kit, thoroughly inspect the vehicle for corrosion or deformation
of the sheet metal around the factory body mounts. If
the vehicle is suspected to have been in a collision or
misused, do not install this kit. Off-road use of your
vehicle with this kit installed may increase the stress
applied to the factory body mounts. We do not recommend that any vehicle with a body lift kit installed be
involved in any extreme off-road maneuvers such as
jumping. Failure to observe this warning may result in
serious personal injury and/or severe damage to your
vehicle.
WARNING
Many states and municipalities have laws restricting
bumper heights and vehicle lifts. Consult state and
local laws to determine if the changes you intend to
make to the vehicle comply with the law.
WARNING
The installation of larger tires may reduce the effectiveness of the braking system.
WARNING
Always wear eye protection when operating power
tools.
WARNING
Before you install this kit, block the vehicle tires to prevent the vehicle from rolling.
WARNING
Accidental deployment of the air bag can result in serious personal injury or death. To avoid accidental
deployment during installation of the kit, the Supplemental Restraint System (SRS, or airbag) must remain
deactivated. Do not allow anyone near the airbag during installation. Refer to the factory service manual or
owner's manual for the recommended procedure to
disable the SRS. After you install the kit, reactivate the
SRS before driving the vehicle.
NOTE
Performance Automotive Group recommends using
the Loctite® supplied in the kit on the threads of all kit
nuts and bolts unless specified otherwise in these
instructions.
1 ‘05-‘06 Tacoma (W/O Hitch) - 3” Kit 5603
Before Starting Installation
Inside Cab
NOTE
Kit parts are prefaced by the word kit and appear in
bold print.
1. Carefully read all warnings and instructions com-
pletely before beginning.
2. Verify all parts have been received in this kit by
checking the parts list at the end of this document.
NOTE
If parts are missing from kit, please be prepared to provide the following information:
1. Name of purchase location
2. Bar Code on side of box
3. Date above bar code
4. Date inside box cover
5. Inspector # from inside box cover
3. Only install this kit on the vehicle for which it is
specified. If anytime during the installation you
encounter something different from what is outlined
in the instructions, call technical support at (928)
636-7080.
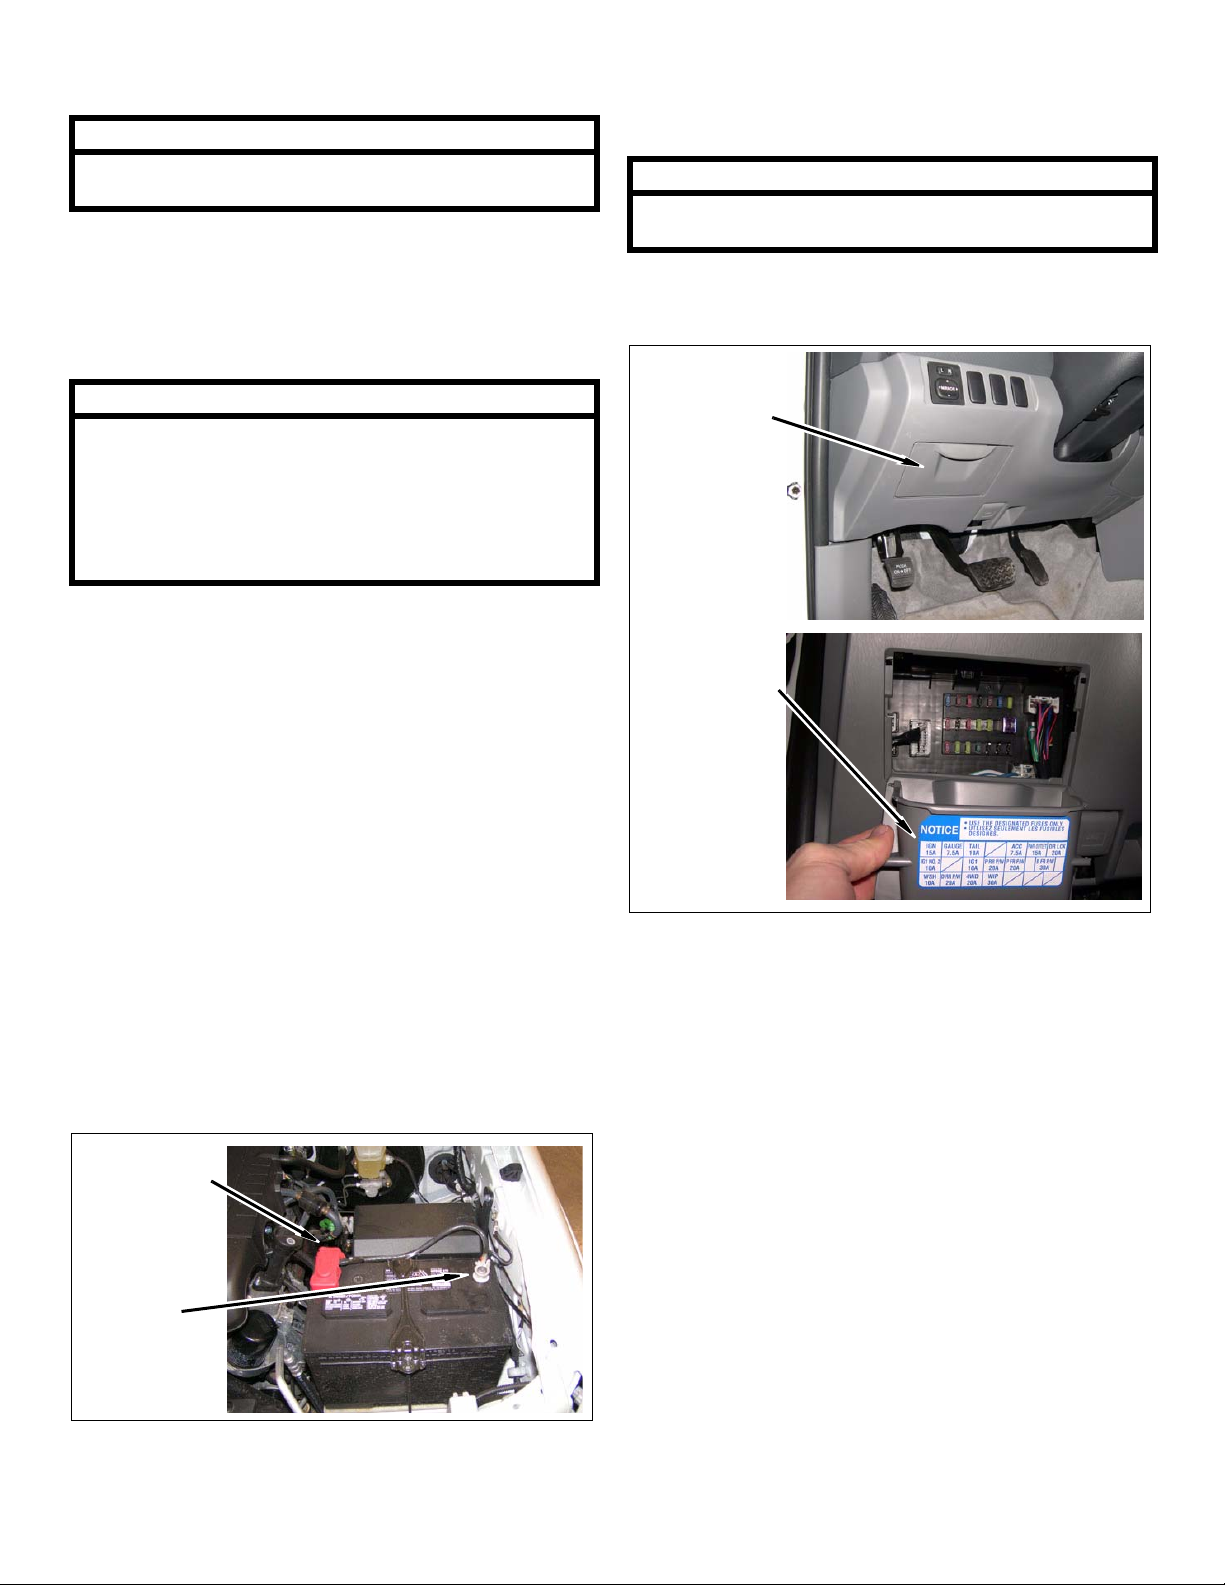
1. Airbag Fuse
NOTE
The location of the airbag fuse may vary; check the
owner's manual.
a. Remove fuse cover.
b. Remove airbag fuse.
Fuse Cover
Airbag Fuse
4. Special tools needed:
a. Welder or access to a professional welding
shop.
b. Die grinder or similar tool capable of cutting
metal.
5. Park vehicle on a clean, dry, flat, level surface and
block tires so vehicle cannot roll in either direction.
Engine Compartment
1. Disconnect both battery cables. Disconnect nega-
tive cable first, then positive cable.
Positive
Cable (Red)
Negative
Cable (Black)
Fuse Location
May Vary
Prepare to Install Kit
Measurements
1. Measure and record distance between rear bumper
and bed
Driver Side ________ Passenger Side _________
2. Measure and record distance between cab and bed.
Driver Side ________ Passenger Side _________
2 ‘05-‘06 Tacoma (W/O Hitch) - 3” Kit 5603
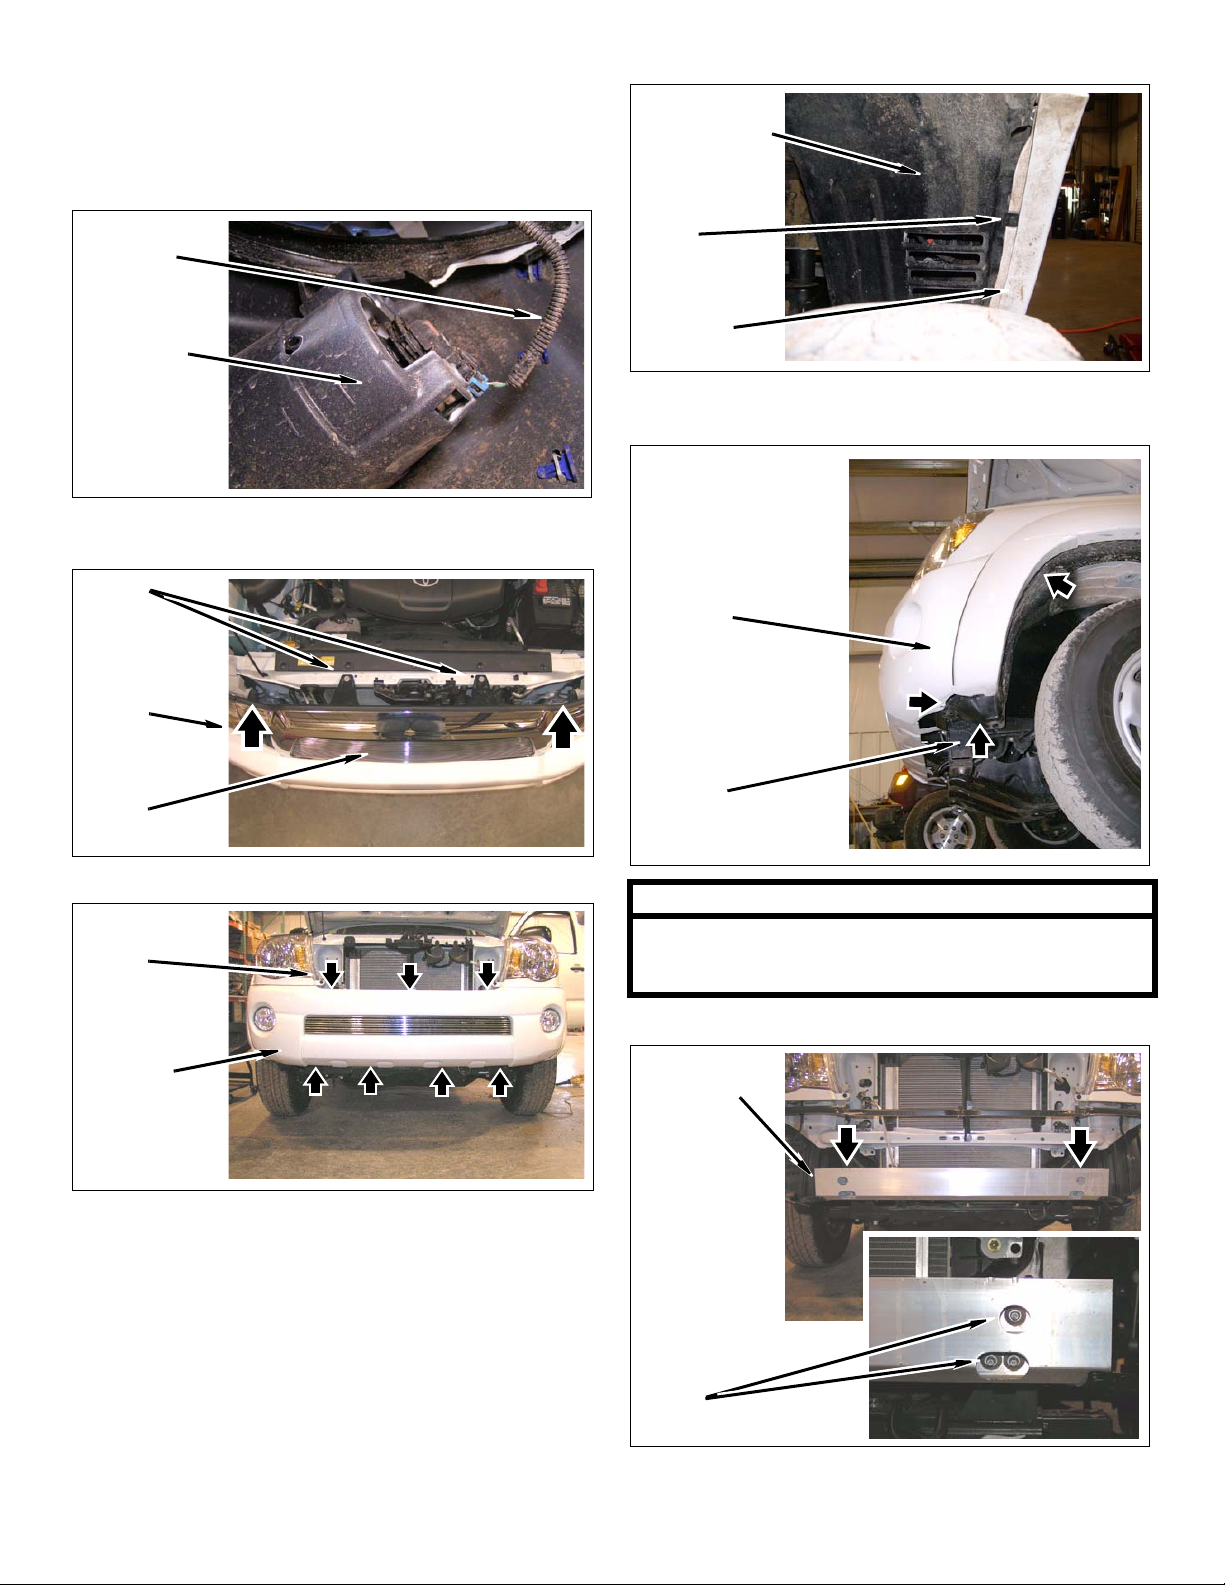
Front of Vehicle
d. Remove two pop-up clips from fender wells.
1. Front bumper
a. Remove wiring harnesses from fog lights, if
equipped.
Wiring
Harness
Fog Light
b. Remove two pop-up clips, two bolts and grille
from core support.
Bolts
Pop-up
Clips
Fender Well
Pop-up
Clip
Front
Bumper
e. Remove six screws and front bumper fascia
from vehicle.
Front
Bumper
Fascia
Grille
c. Remove seven pop-up clips from front bumper.
Pop-up
Clips
Front
Bumper
Fascia
Screws
NOTE
Use caution when removing front bumper fascia from
vehicle. Carefully pull outward from fenders on the
sides of front bumper cover to loosen.
f. Remove six nuts and front bumper from vehicle.
Front
Bumper
Nuts
3 ‘05-‘06 Tacoma (W/O Hitch) - 3” Kit 5603
g. Remove six nuts and two front bumper brackets
from frame rails.
Nuts
Front Bumper
Brackets
2. Automatic Transmission Cooler: (if equipped)
Engine Compartment
1. 6 cyl. models: Loosen airbox clamp, two clips and
remove airbox cover from engine.
Airbox Cover
Clamp
Clips
a. Remove four bolts and allow automatic trans-
mission cooler to hang loose from core support.
Bolts
Bolts
b. Remove two bolts and automatic transmission
cooler lines from lower core support.
Bolts
Radiator
Auto
Trans
Lines
Lower Core Support
2. 6 cyl. models: AC Line
a. Remove bolt and AC line bracket from body.
AC Line
Bolt
AC Line
Bracket
b. Remove two nuts, clamp and rubber isolator
from AC line and bracket.
Nuts
Clamp
AC Line
AC Line
Bracket
4 ‘05-‘06 Tacoma (W/O Hitch) - 3” Kit 5603
3. 6 cyl. models: Remove power steering reservoir,
three bolts and bracket from fender. DO NOT DISCONNECT power steering lines.
6. 4 cyl. models: Remove nut and AC line from passenger side AC line bracket.
Power
Steering
Reservoir
Bracket
Bolts
4. 4 cyl. models: Loosen two engine intake clamps
and remove engine intake hose.
Clamps
Air Hose
AC Line
Bracket
Nut
AC Line
7. 4 cyl. models: Remove lower AC line from two cl ips
and passenger side body.
Passenger
Side Body
Clip
5. 4 cyl. models: Remove bolt from passenger side
AC line bracket.
AC Line
Bolt
AC Line
Bracket
AC Line
8. Remove vent tubes from driver side body bracket.
Vent
Tubes
Bracket
Battery
5 ‘05-‘06 Tacoma (W/O Hitch) - 3” Kit 5603
9. Remove heater hoses from clip on backside of
engine.
11. Remove ABS wire harnesses from driver and passenger side brackets.
Heater
Hoses
Clip
10. Remove wire harness clip from fi re wall and bracket.
Clip
Bracket
Driver
Side
ABS Wire
Harnesses
Passenger
Side
12. Remove wire harness and two clips from alternator
bracket and driver side body bracket.
Wire
Harness
Alternator
Bracket
Wire
Harness
Body
Bracket
Battery
6 ‘05-‘06 Tacoma (W/O Hitch) - 3” Kit 5603
13. Radiator
14. Steering Shaft
a. Remove nine pop-up clips and radiator cover
from core support.
Pop-up
Clips
Radiator
Cover
Core
Support
b. Remove four bolts and radiator from core sup-
port. Allow radiator to hang on core support by
tabs.
Core
Support
Radiator
Bolts
WARNING
Accidental deployment of the air bag can result in serious personal injury or death. To avoid accidental
deployment during installation of the lift kit, the Supplemental Restraint System (SRS, or airbag) must remain
deactivated. Do not allow anyone near the airbag during installation. Refer to the factory service manual or
owner's manual for the recommended procedure to
disable the SRS. After kit installation, the SRS must be
reactivated before driving the vehicle.
CAUTION
If the following step is not performed, the airbag clockspring could be damaged. Do not turn the steering
wheel while the steering shaft is disconnected.
a. Strap steering wheel to prevent accidental
movement.
b. Mark upper steering shaft in relation to coupler
and lower steering shaft.
Upper Steering
Shaft
Alignment Mark
Tab
NOTE
Lower the radiator onto the frame prior to the lifting procedures.
Coupler
Bolts
Lower Steering
Shaft
c. Remove coupler bolts, slide coupler up onto
upper steering shaft and disconnect steering
shaft.
d. Slide coupler down and off of upper steering
shaft.
e. Position steering coupler onto lower steering
shaft.
7 ‘05-‘06 Tacoma (W/O Hitch) - 3” Kit 5603
Inside of Vehicle
b. Remove dead pedal.
1. Manual transmission
a. Remove center console and shifter console inte-
rior panels.
Shifter
Console
Center
Console
b. Remove shift lever from vehicle.
Shift Lever
Kick Panel
Dead Pedal
c. Remove driver and passenger kick panels.
Kick Panel
Plastic Cap
2. Front interior trim panels
a. Remove driver and passenger door sill plates.
Door Sill
Plate
d. Pull driver and passenger carpet back from cor-
ner and expose body mount bolt access cover.
e. Remove driver and passenger body mount bolt
access cover.
Carpet
Body Mount
Bolt
Access
Cover
NOTE
Procedures may vary depending on cab model for
access to rear body mount bolt access covers.
8 ‘05-‘06 Tacoma (W/O Hitch) - 3” Kit 5603
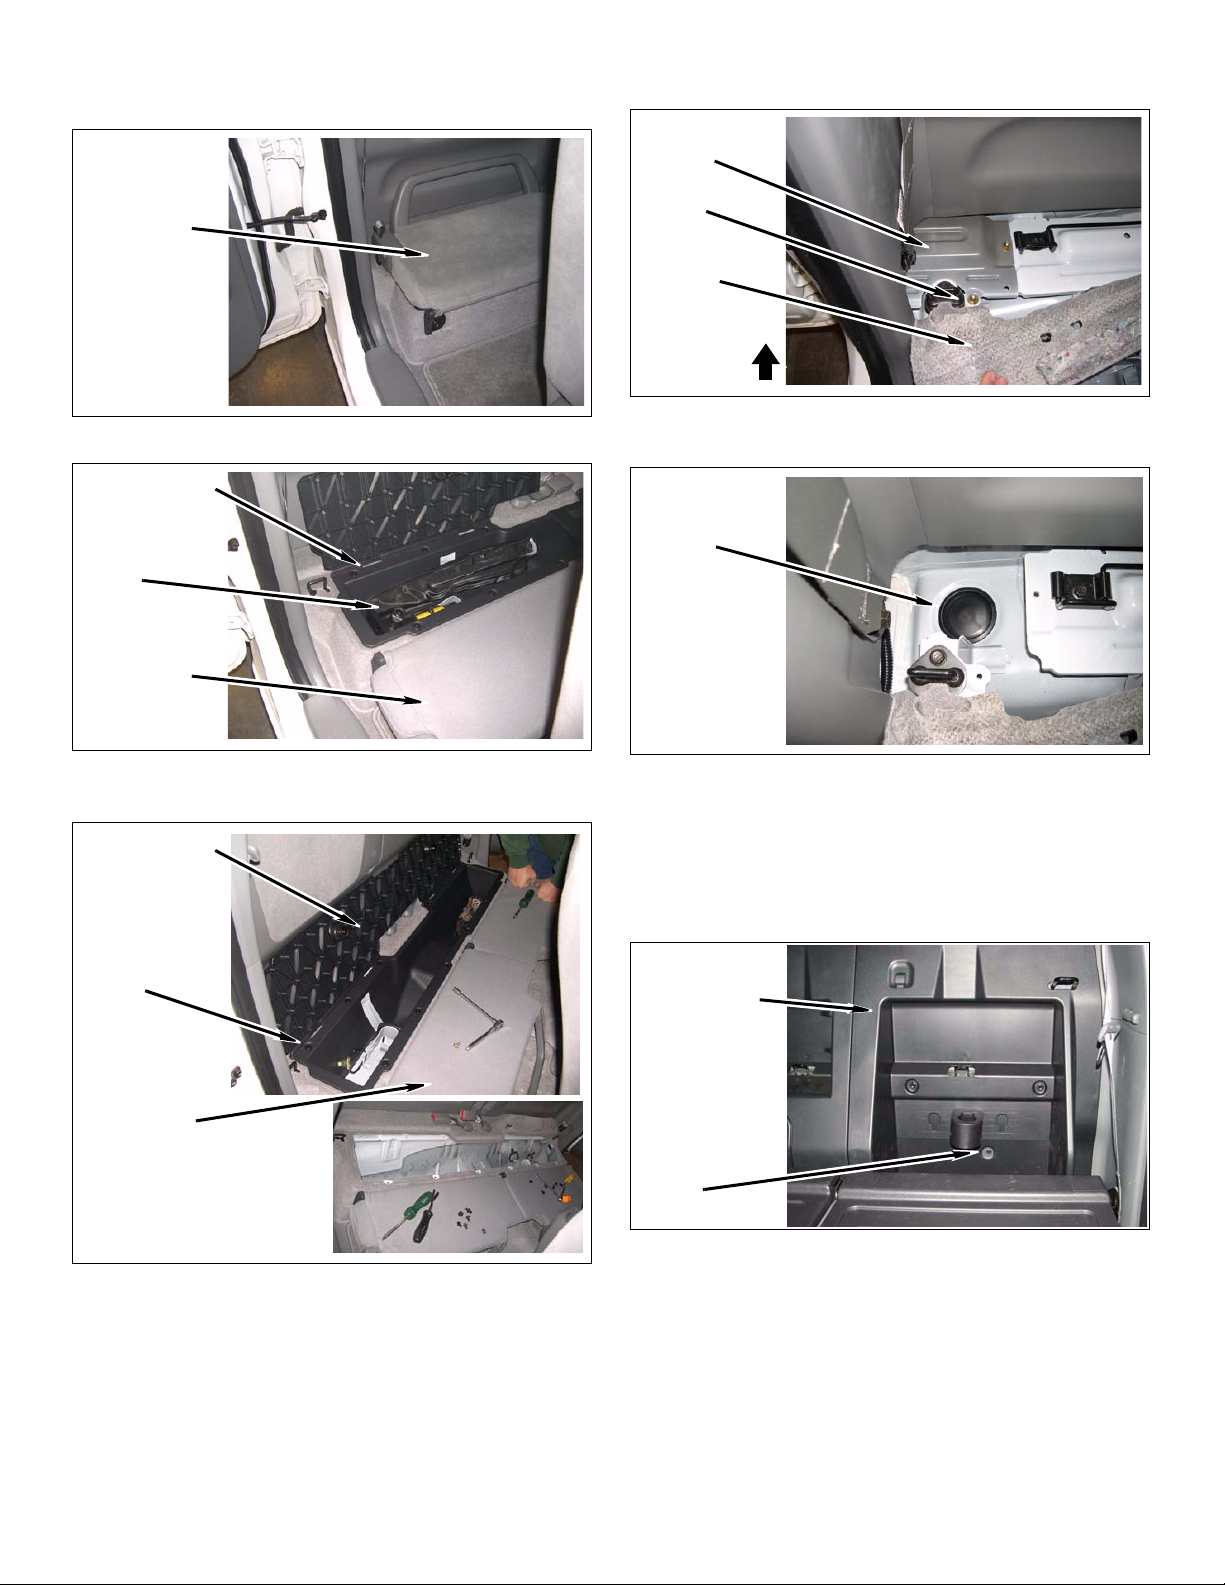
3. Extended cab models: Rear interior trim panels
a. Fold down rear seats.
e. Remove four bolts, and driver and passenger
body mount access plates.
Access
Plate
Rear Seat
b. Open floor storage tray and remove jack.
Storage Tray
Jack
Rear Seat
c. Remove pop-up clips and storage tray from
vehicle.
Storage Tray
Bolts
Carpet
Rear
f. Remove driver and passenger body mount bolt
access covers.
Access
Cover
4. Crew cab models: Rear interior trim panels
a. Remove three headrests from seatbacks and
fold seatbacks down.
Pop-up
Clips
Rear Seat
d. Pull carpet up to expose driver and passenger
body mount access plates.
b. Remove three bolts and pop-clips from driver
side rear panel and cab.
Driver Side
Rear Panel
Bolts
9 ‘05-‘06 Tacoma (W/O Hitch) - 3” Kit 5603
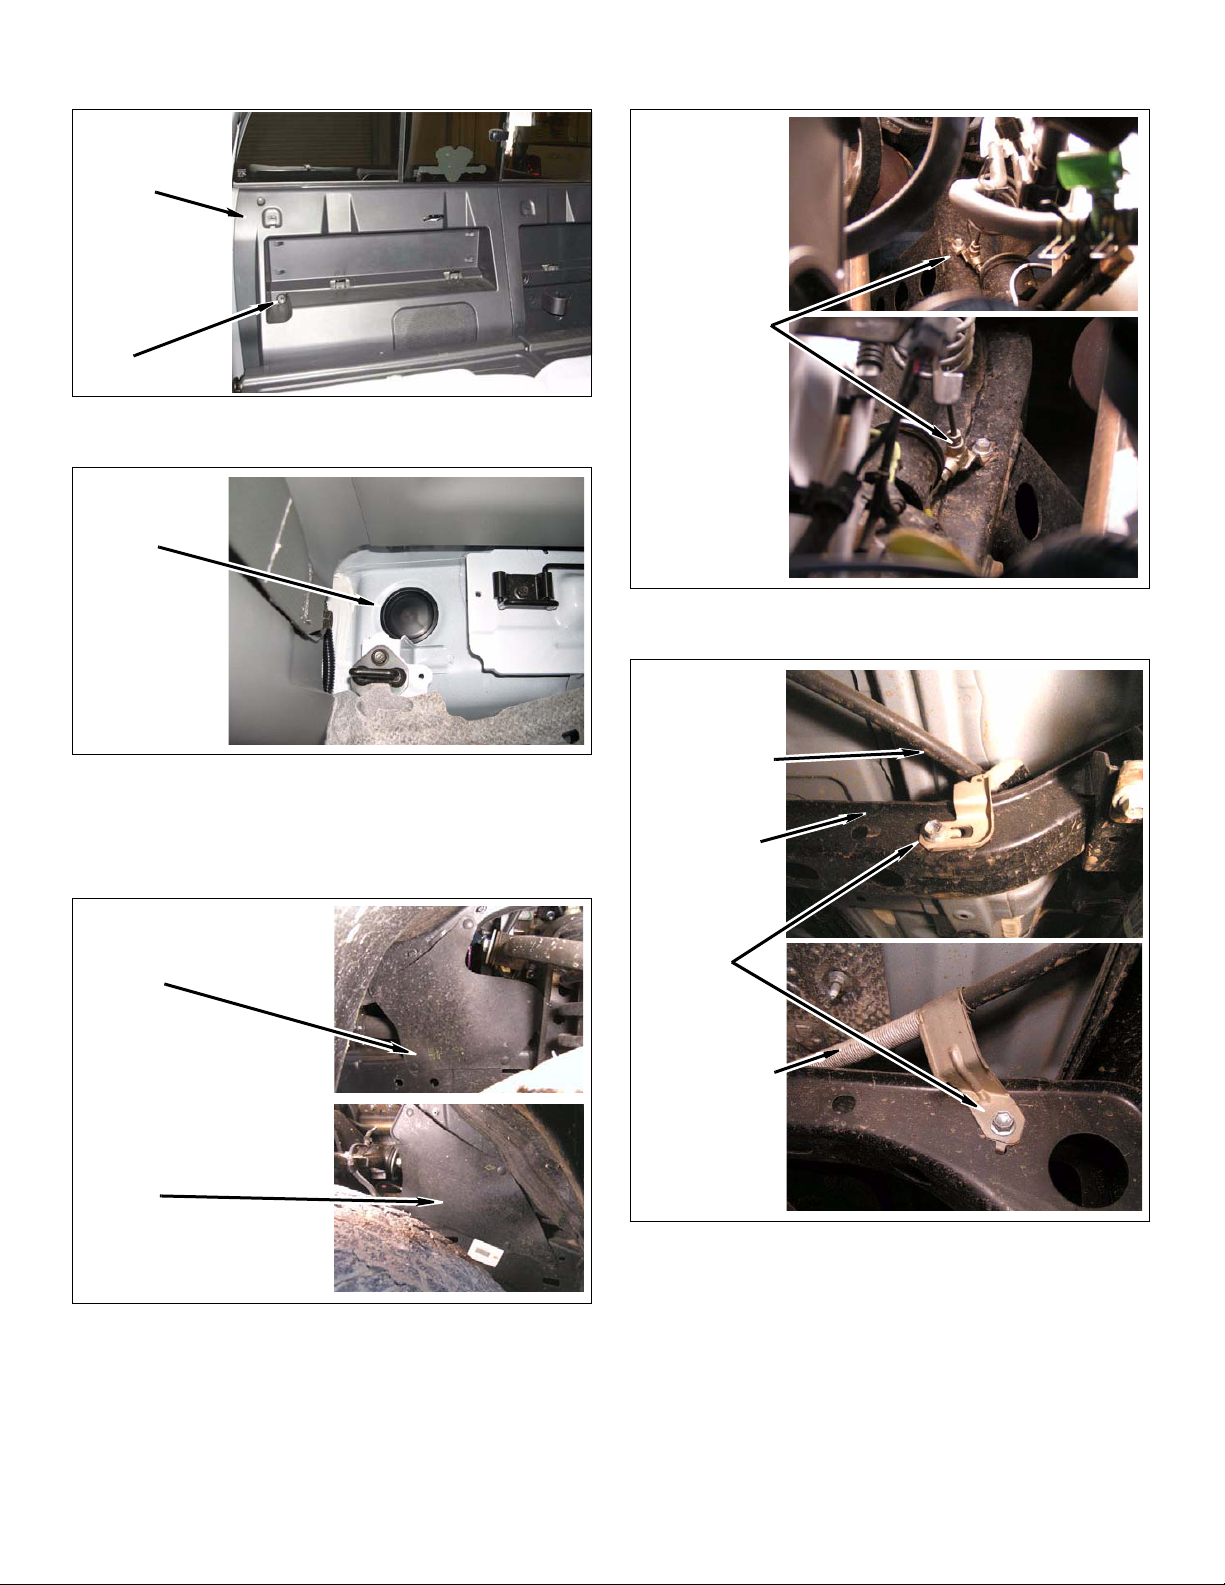
c. Remove bolt and pop-clips from passenger side
rear panel and cab.
3. Remove two bolts and brake line brackets from
driver and passenger side frame rails.
Passenger
Side Rear
Panel
Bolt
d. Remove driver and passenger body mount bolt
access covers.
Access
Cover
Driver
Side
Bolt & Brake
Line
Passenger
Side
4. Remove two bolts and parking brake cable brackets
from crossmember.
Driver
Side
Parking
Brake Cable
Underside of Vehicle
1. Remove all clips and two driver side engine guards
from driver side wheel well.
Driver Side
Front Engine
Guard
Rear Engine
Guard
2. Repeat above step for passenger side.
Crossmember
Bolt &
Bracket
Parking
Brake Cable
Passenger
Side
10 ‘05-‘06 Tacoma (W/O Hitch) - 3” Kit 5603
 Loading...