

Page 1
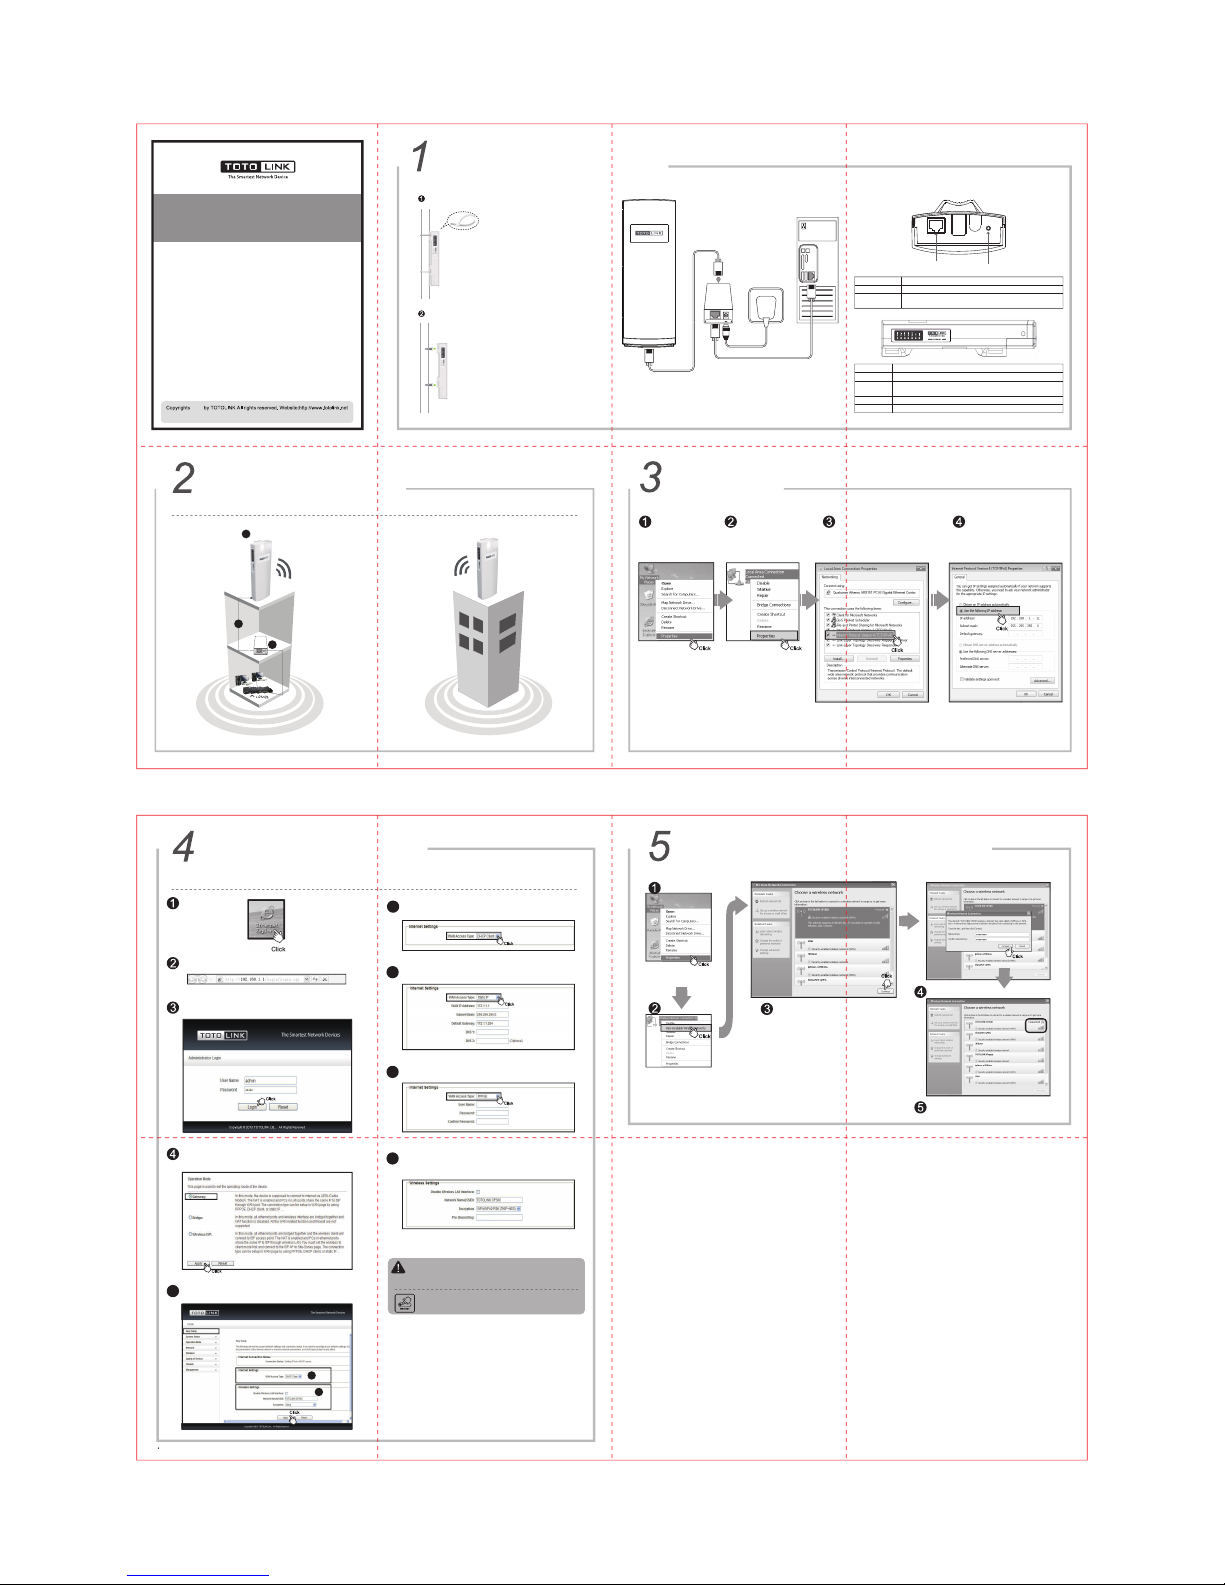
Hardware Installation
Typical Application
Set Up PC
Right-click “My Network
Places”, click “Properties”
Right-click “Local Area
Connection”, click “Properties”
Double-click “Internet Protocol
Version 4 (TCP/IPv4)”
Choose “Use the following IP
address”, input the IP address in
the same network segment with
your router’s default IP address,
as below, then click “OK”.
Quick Installation Guide
Wireless Outdoor CPE
Configure the Device
Please set up the CPE following below steps.
Run the Web browser.
1.1 Device Mounting
WISP
1.2 Network Connection
1.3 Port, Button, LED Indicators Description
Pole Mount
Wall Mount
Type 192.168.1.1 in the Web browser address bar, then press Enter.
For more information, please go to www.totolink.net
Input User Name and Password and click “Login”.
(By default, both are “admin” in lower case)
Select Gateway mode and click Apply. In the Gateway mode, you
should connect to the device wirelessly (please refer to Section 5
Wireless Network Connection).
After connected to the device, please login again. In the main setup
interface, click Easy Setup on the sidebar.
Suitable for: CP150, CP300
V1.1411
Port and Button
LAN
Reset
Description
This port is used to connect with PoE injector by cable.
With the CPE powered on, press and hold the button for about 10
seconds, the CPE will reboot to factory default settings.
LED Indicator
POWER
LAN
WLAN
Signal
Description
The POWER LED will light blue when properly connected to a power source.
This Ethernet LED will light solid blue when an active Ethernet connection
is made to the LAN port and flash when there is activity.
This WLAN LED flash blue when the wireless function working.
These LEDs display the signal strength.
5
5 -1
5 -2
DHCP Client: If you choose this mode, you will get a dynamic
IP address from your ISP automatically
5 -1a
Static IP: If your ISP has provided a fixed IP for you to access
Internet, please choose this option.
5 -1b
Wireless Settings: Please define the Network Name (SSID)
and set encryption key for security. WPA/WPA2-PSK
(TKIP+AES) is recommended.
5 -2
POE box
Power Adapter
PC
1. Attach the groove part of the device to the pole.
2. Thread through the hole of CP300 and ties the
straps firmly on the pole.
1. Drive the nail into the wall and make sure the nail
position is exactly matching the device.
2. Hang the CP300 on the wall.
RJ45 PORT
(PoE Supported)
RESET
PPPoE: If you use ADSL virtual dial-up to connect Internet,
please choose this option.
5 -1c
Wireless Network Connection
Right-click “My Network
Places”, click “Properties”
Right-click “Wireless Network
Connection”, and click “View
Available Wireless Networks”
Confirm the wireless network SSID name,
choose one that you would like to connect,
then click “Connect”
Input the encrytion key and click “Connect”
Have connected wireless network, you can access
Internet through wireless mode.
CP500
CP500
CP300
Switch
Computer
Computer
POE power supply
3
Cable
2
CP300
1
POE
Information in this docutment is subject to change without prior notice.
2015
Press and hold the WPS/RST button for about 5 seconds, it is WPS
working which will last for 2 minutes. For about 10 seconds, the router
will restore to factory default settings.
NOTE:
After you set the Encryption Key, please remember your Network Name (SSID)
and the Encryption Key to connect with your wireless LAN.
Note
1.Locate a suitable mounting site for your CPE. For choosing the best location, select an elevated
location where trees, buildings and large steel structures will not obstruct the antenna signals and
which offers maximum line-of-sight prop-agation with the users.
2.Adjust the direction of your CPE for a best signal. Place the straps through the slots on the back
of the CPE and then around the pole. Tighten the Straps.
3.Please make sure the two CPEs are placed face to face, otherwise the wireless signal strength
might be weak.
 Loading...