

Page 1

USER MANUAL BEDIENUNGSANLEITUNG
Page 2
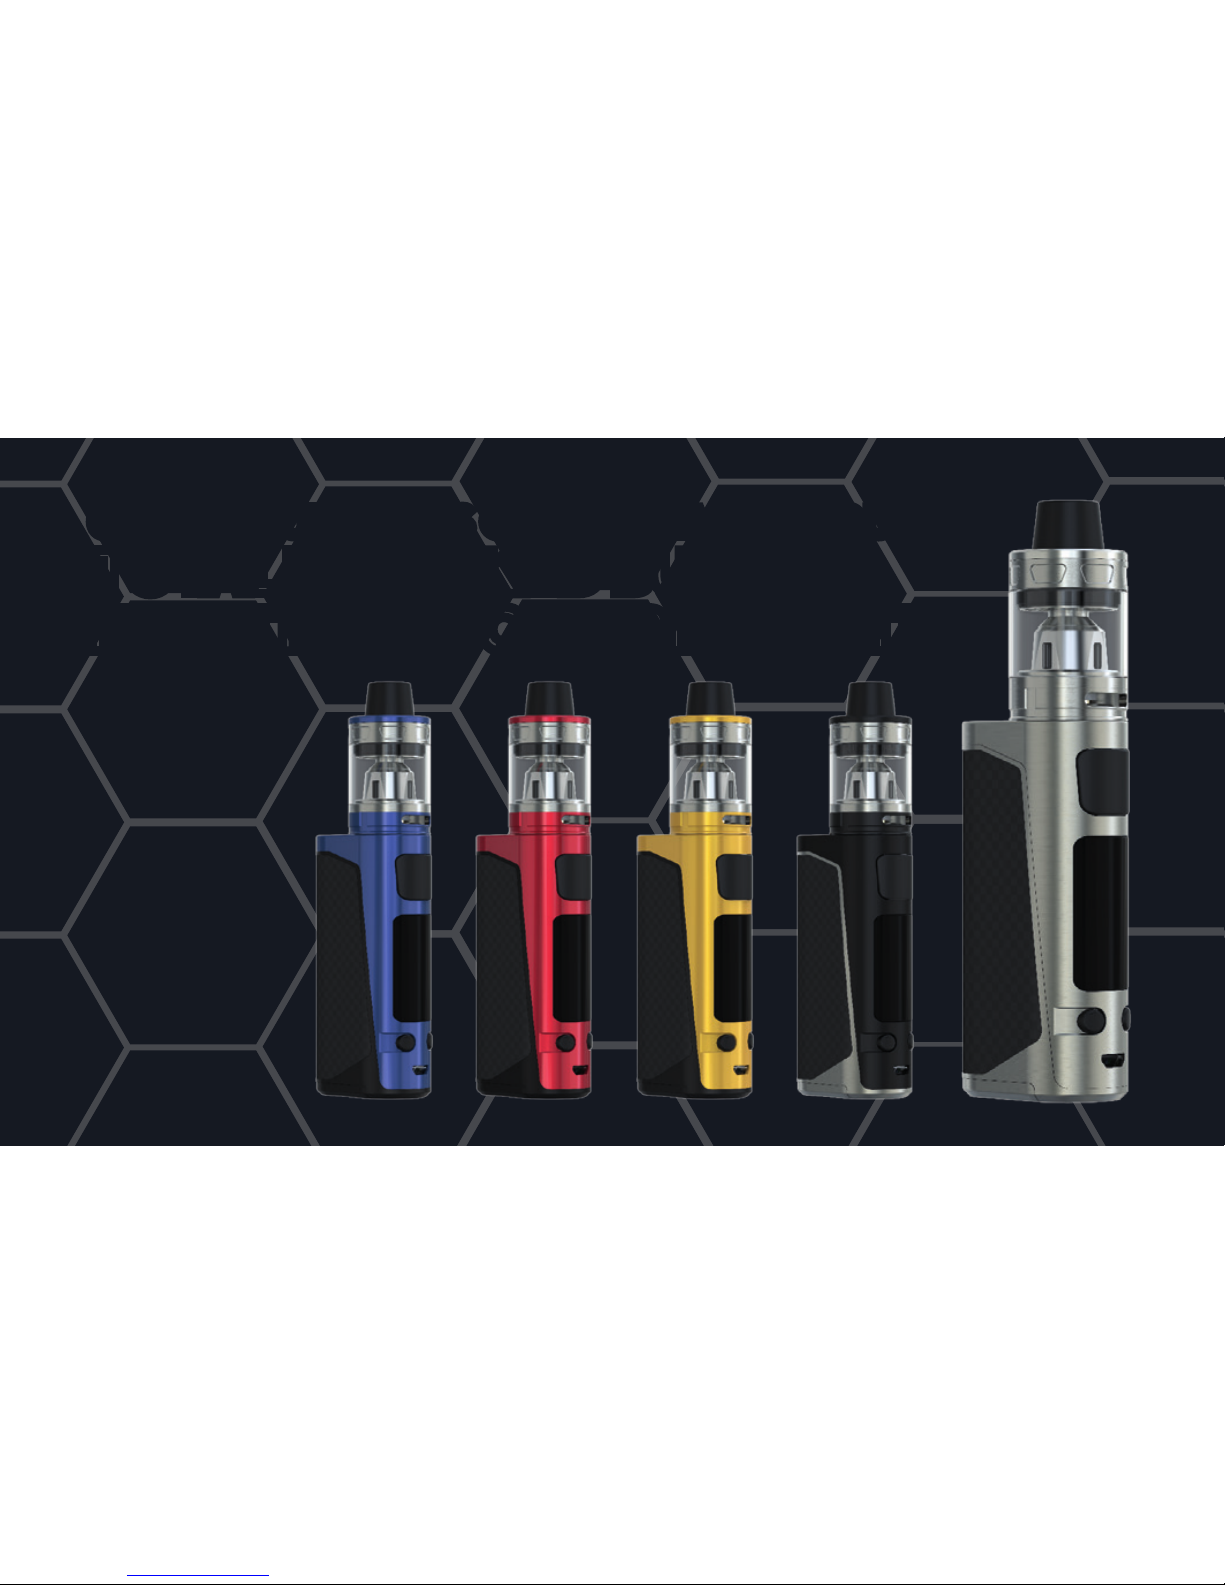
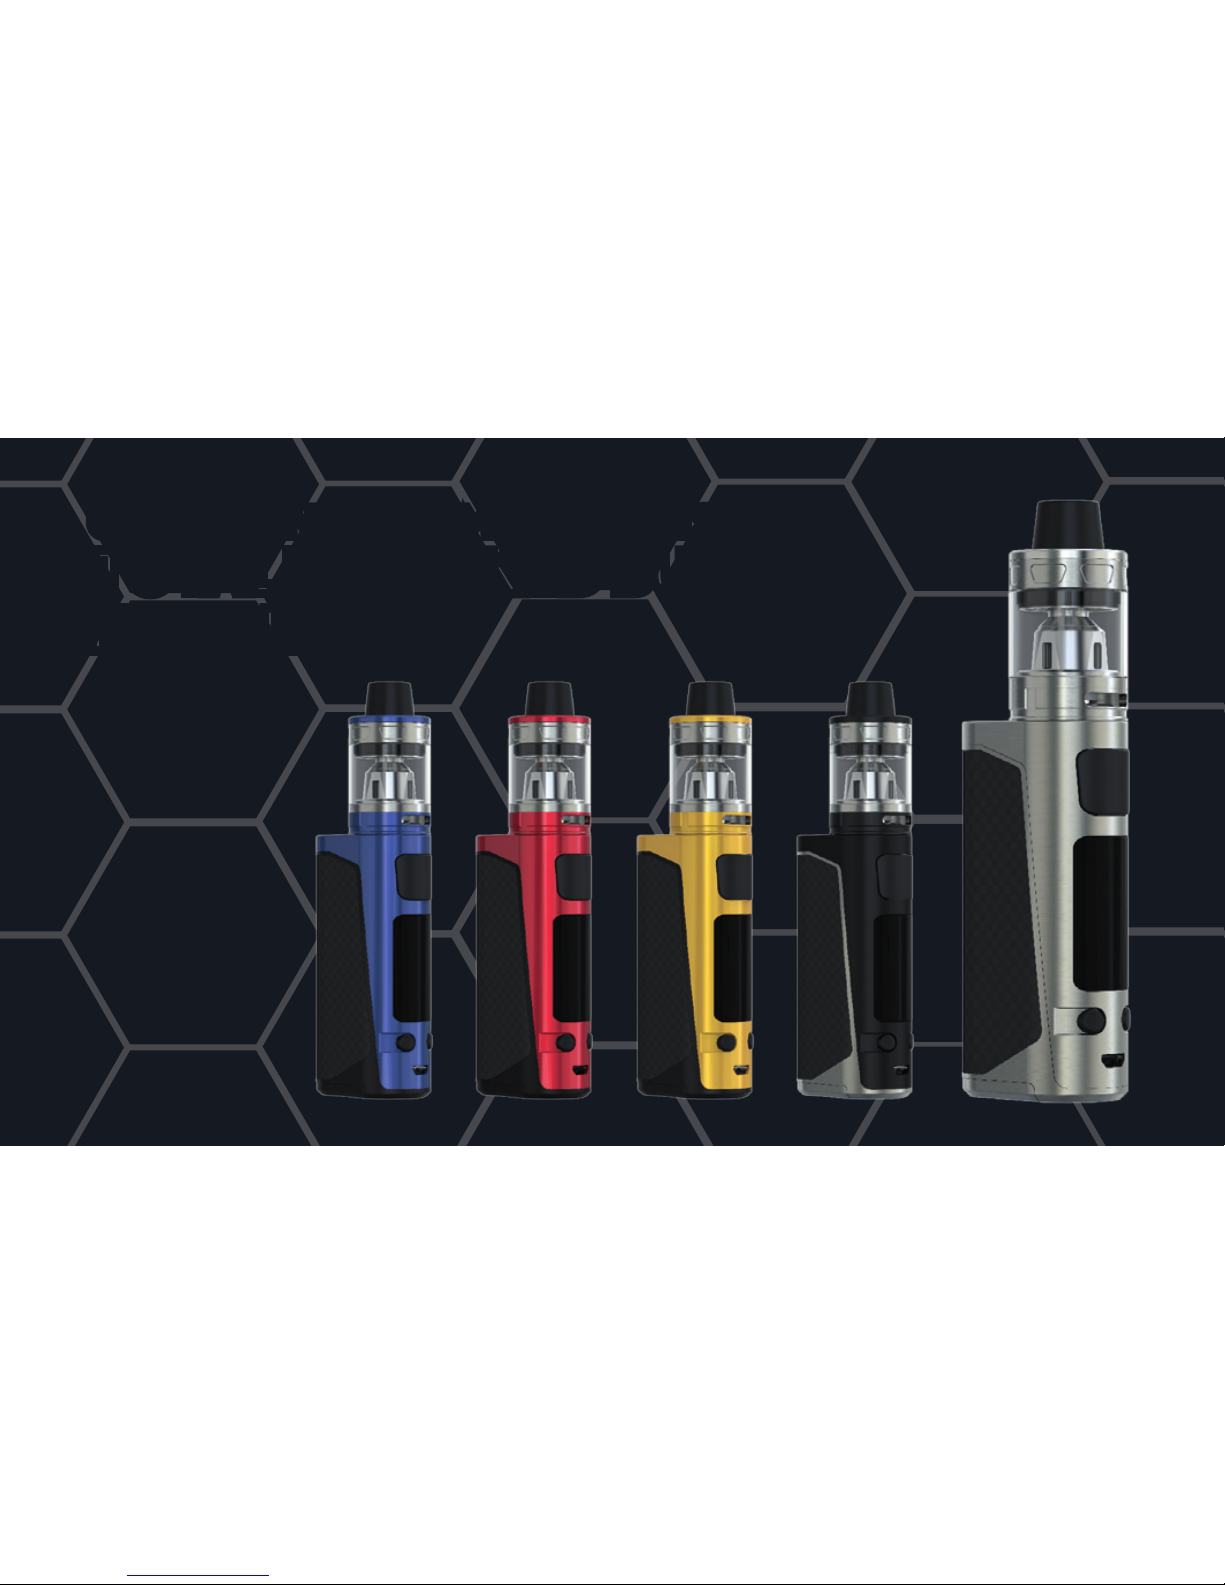
CONGRATULATIONS ON PURCHASING YOUR
TOTALLY WICKED BUZZ
ELECTRONIC CIGARETTE KIT
Page 3
3
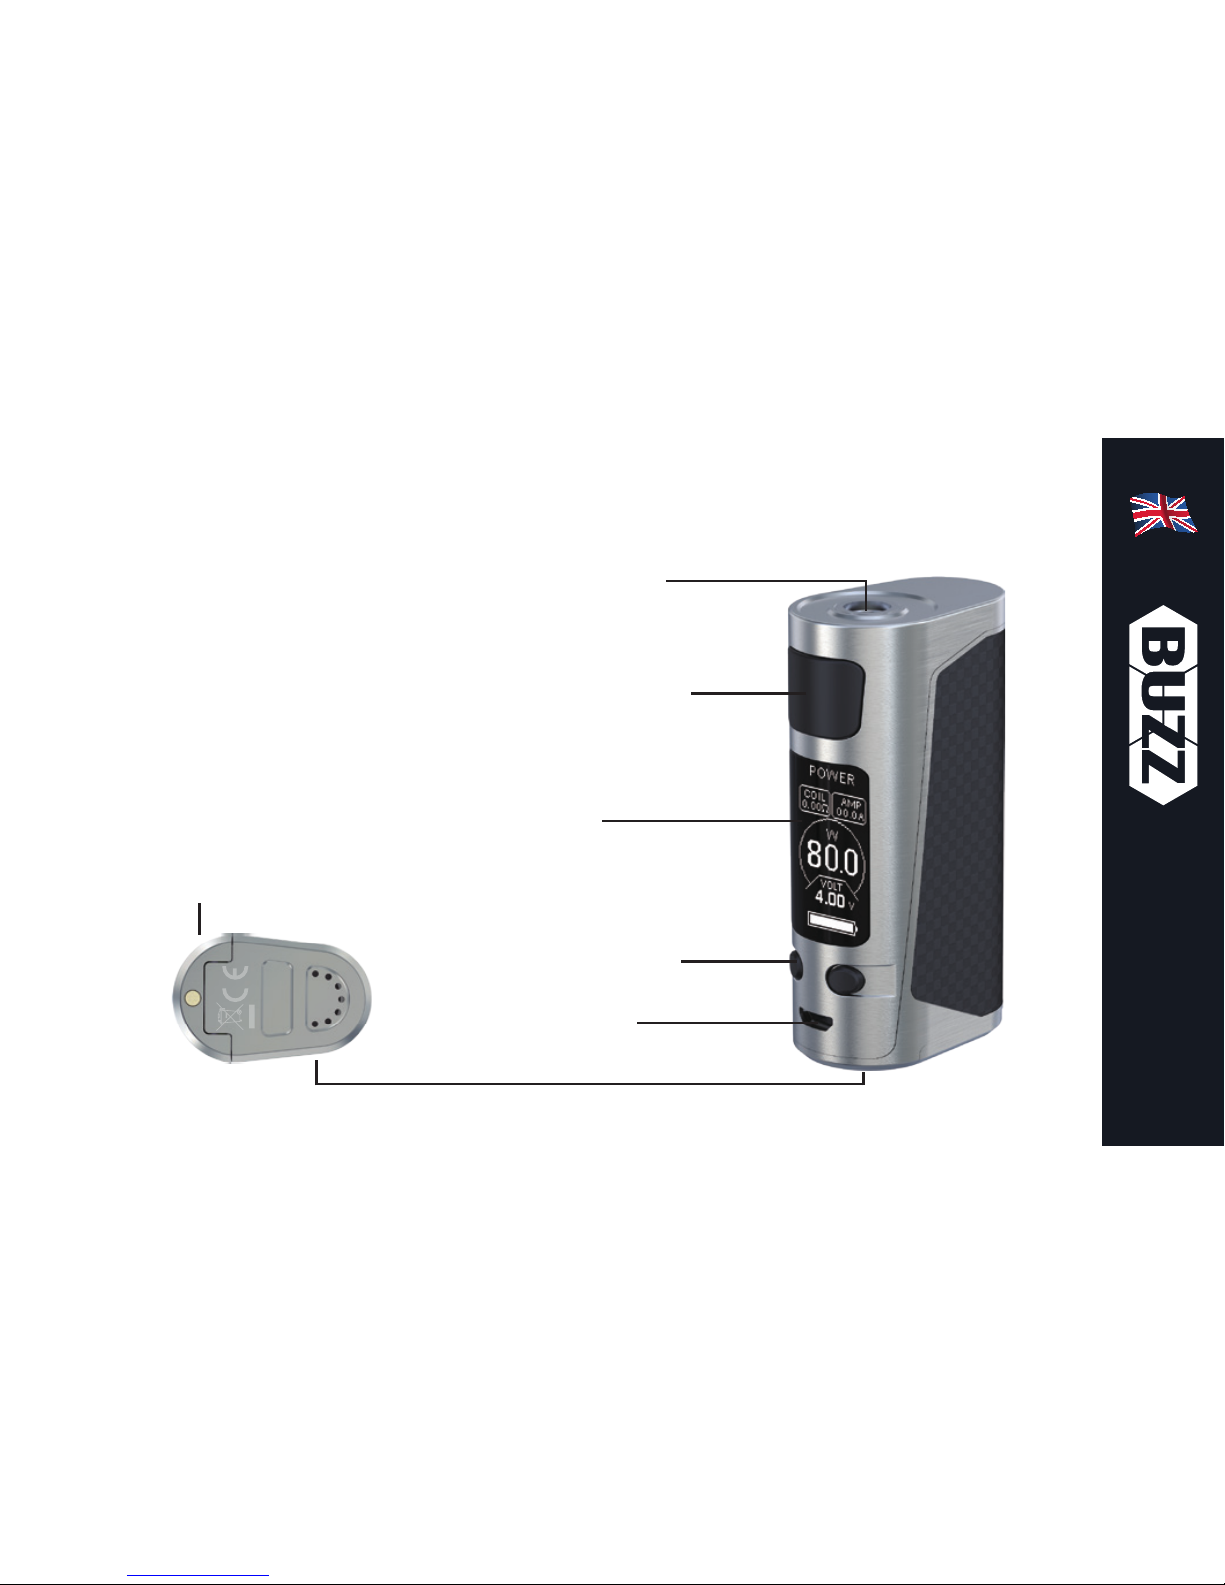
Using your Buzz Kit
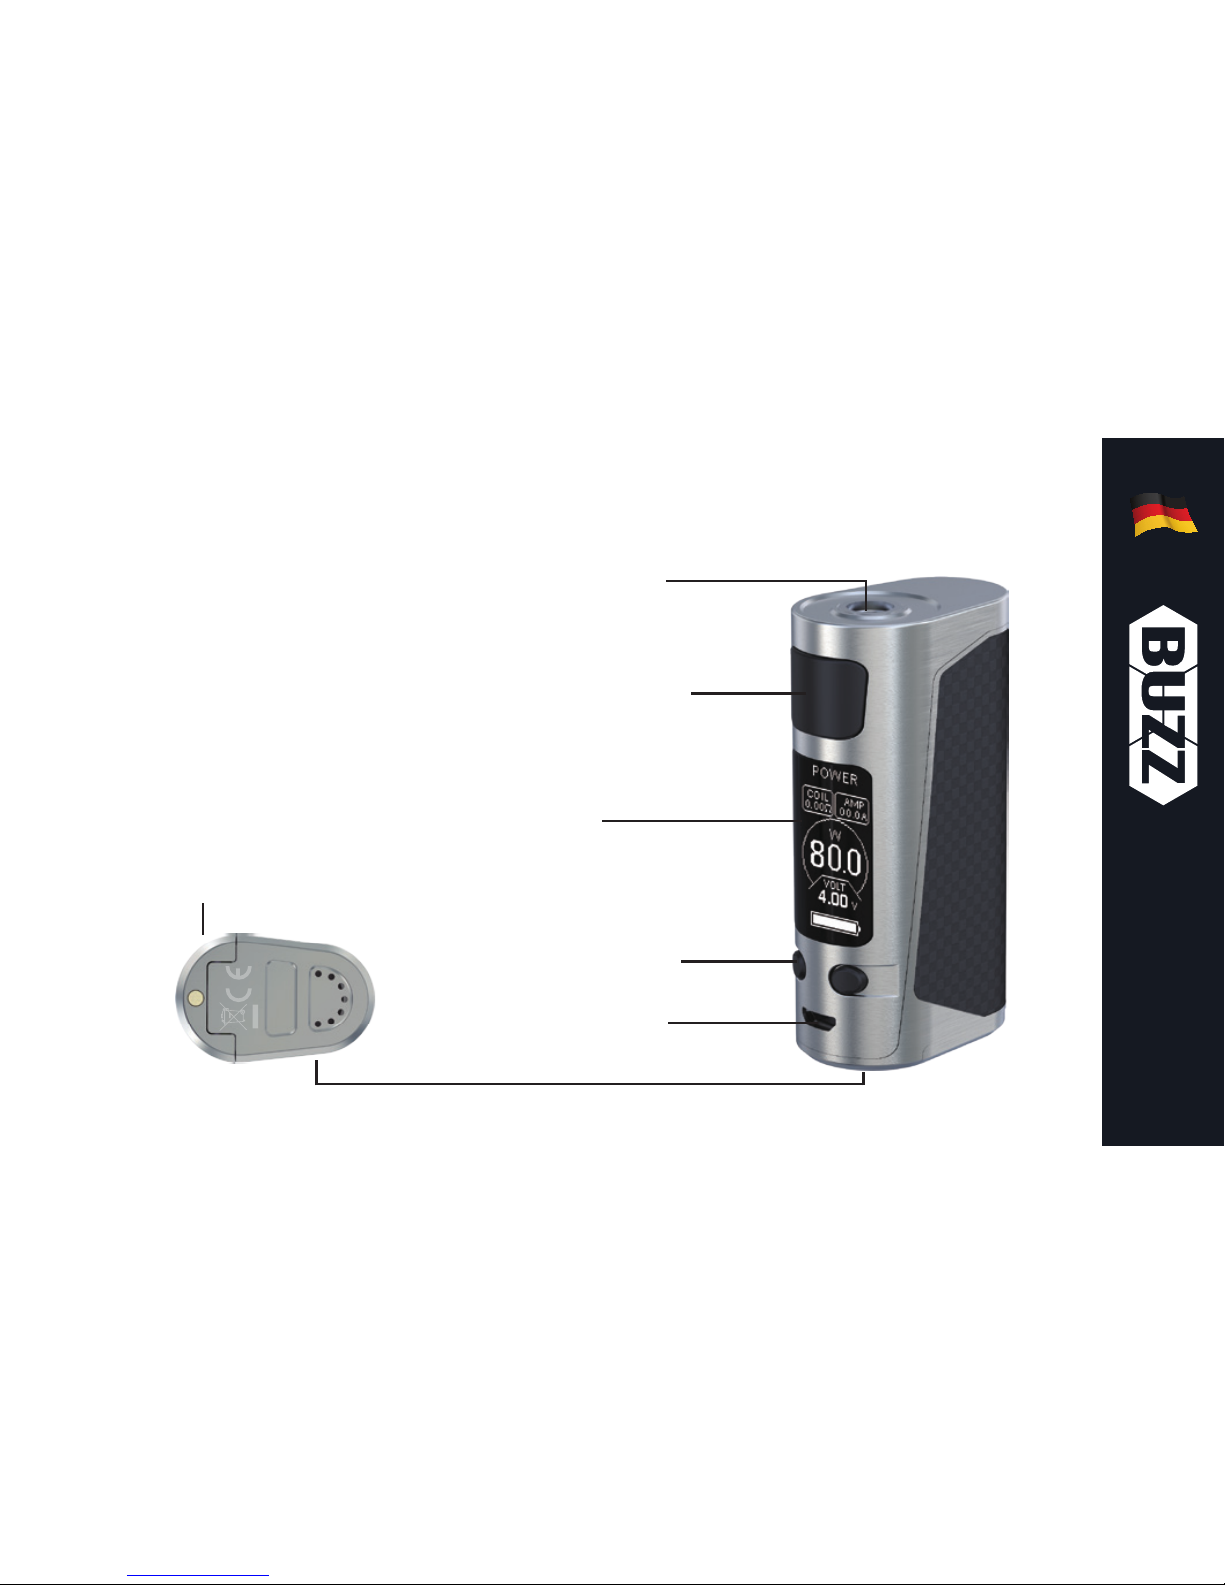
510 Connector
Power Button
OLED Display
Adjustment Buttons
Micro-USB Port
Battery Cover
Page 4
4
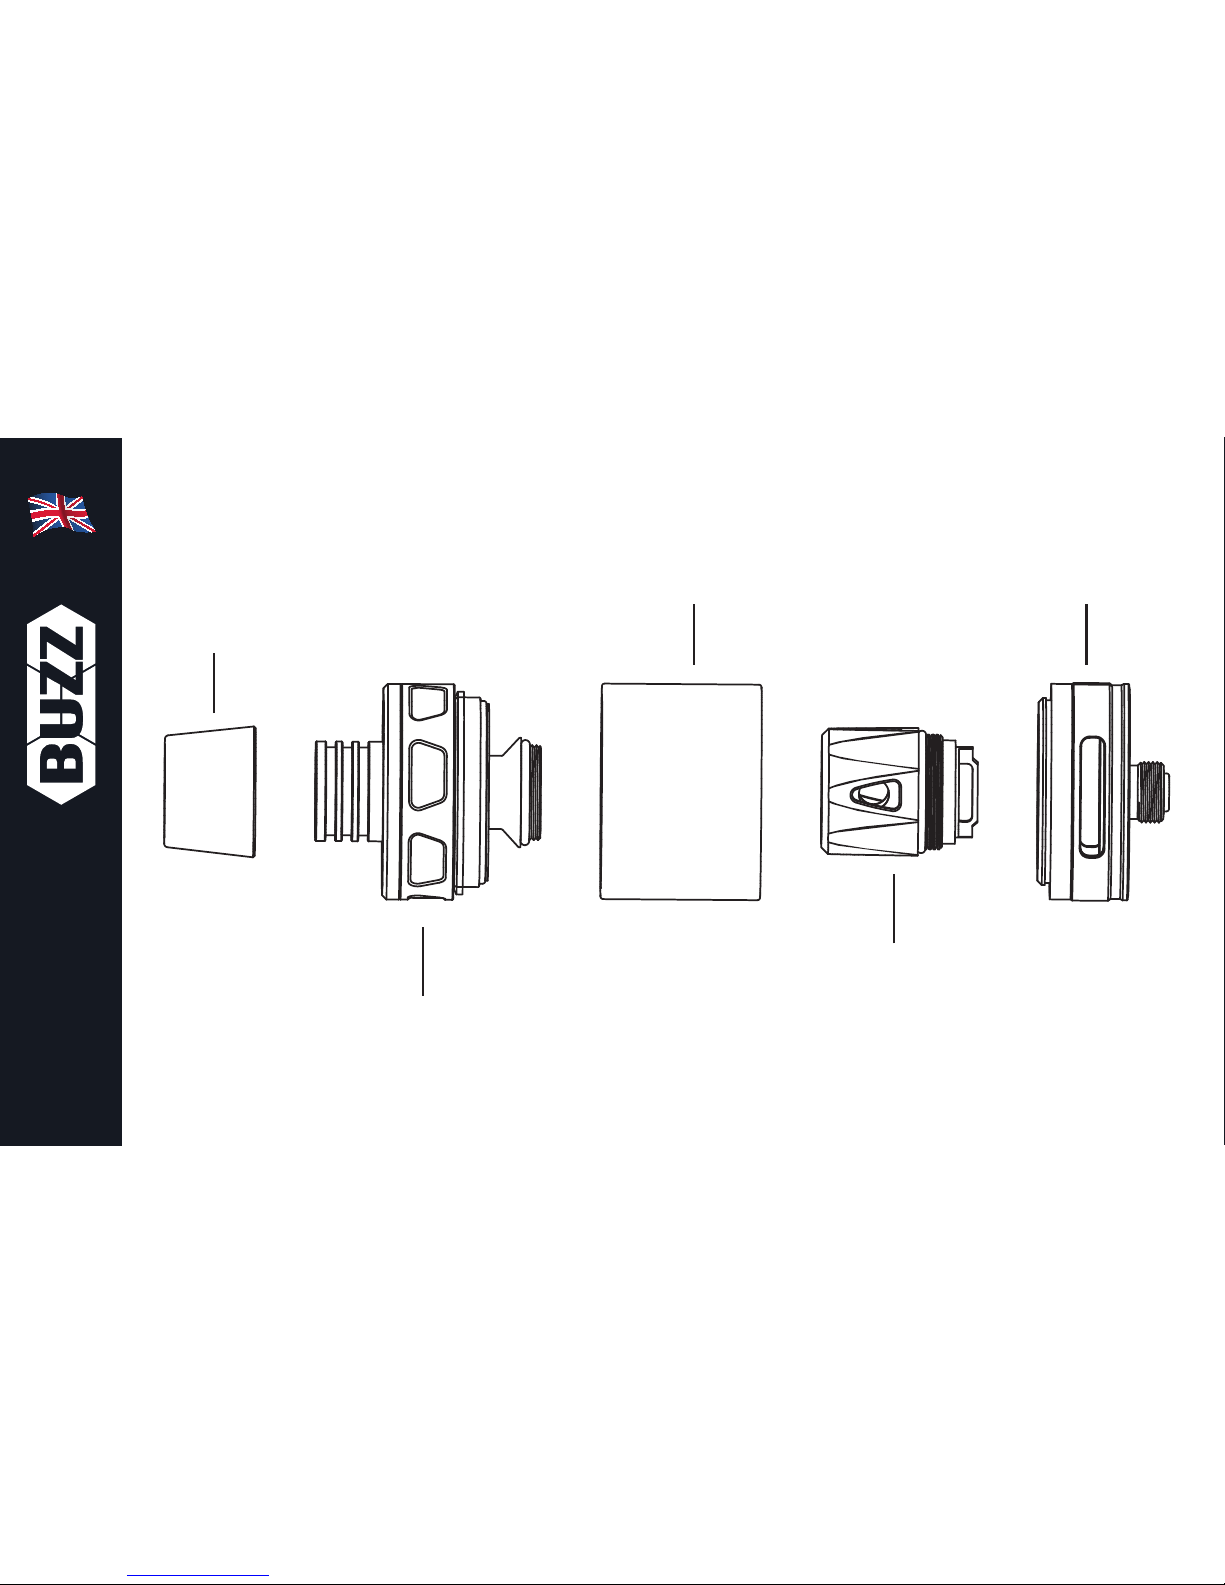
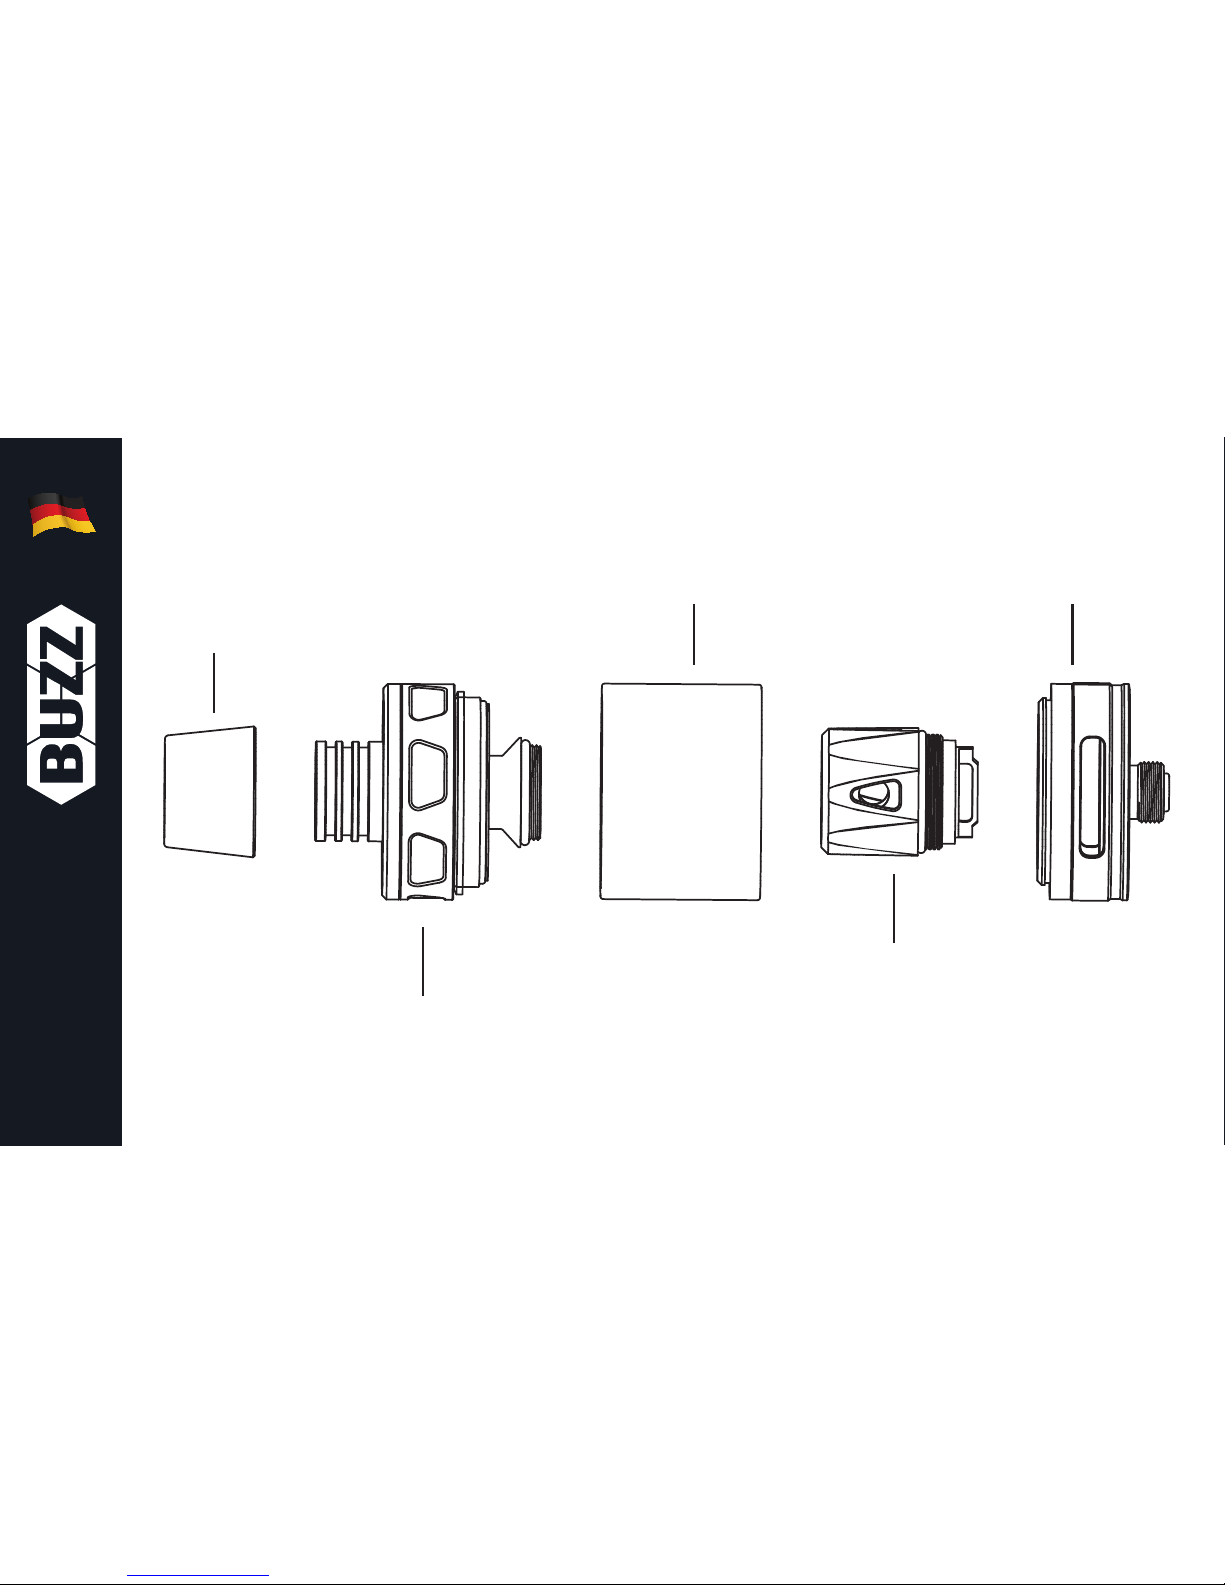
Mouthpiece
Top Cap
Glass Tube
Atomizer Head
Atomizer Base
Page 5
5
Using your Buzz Kit
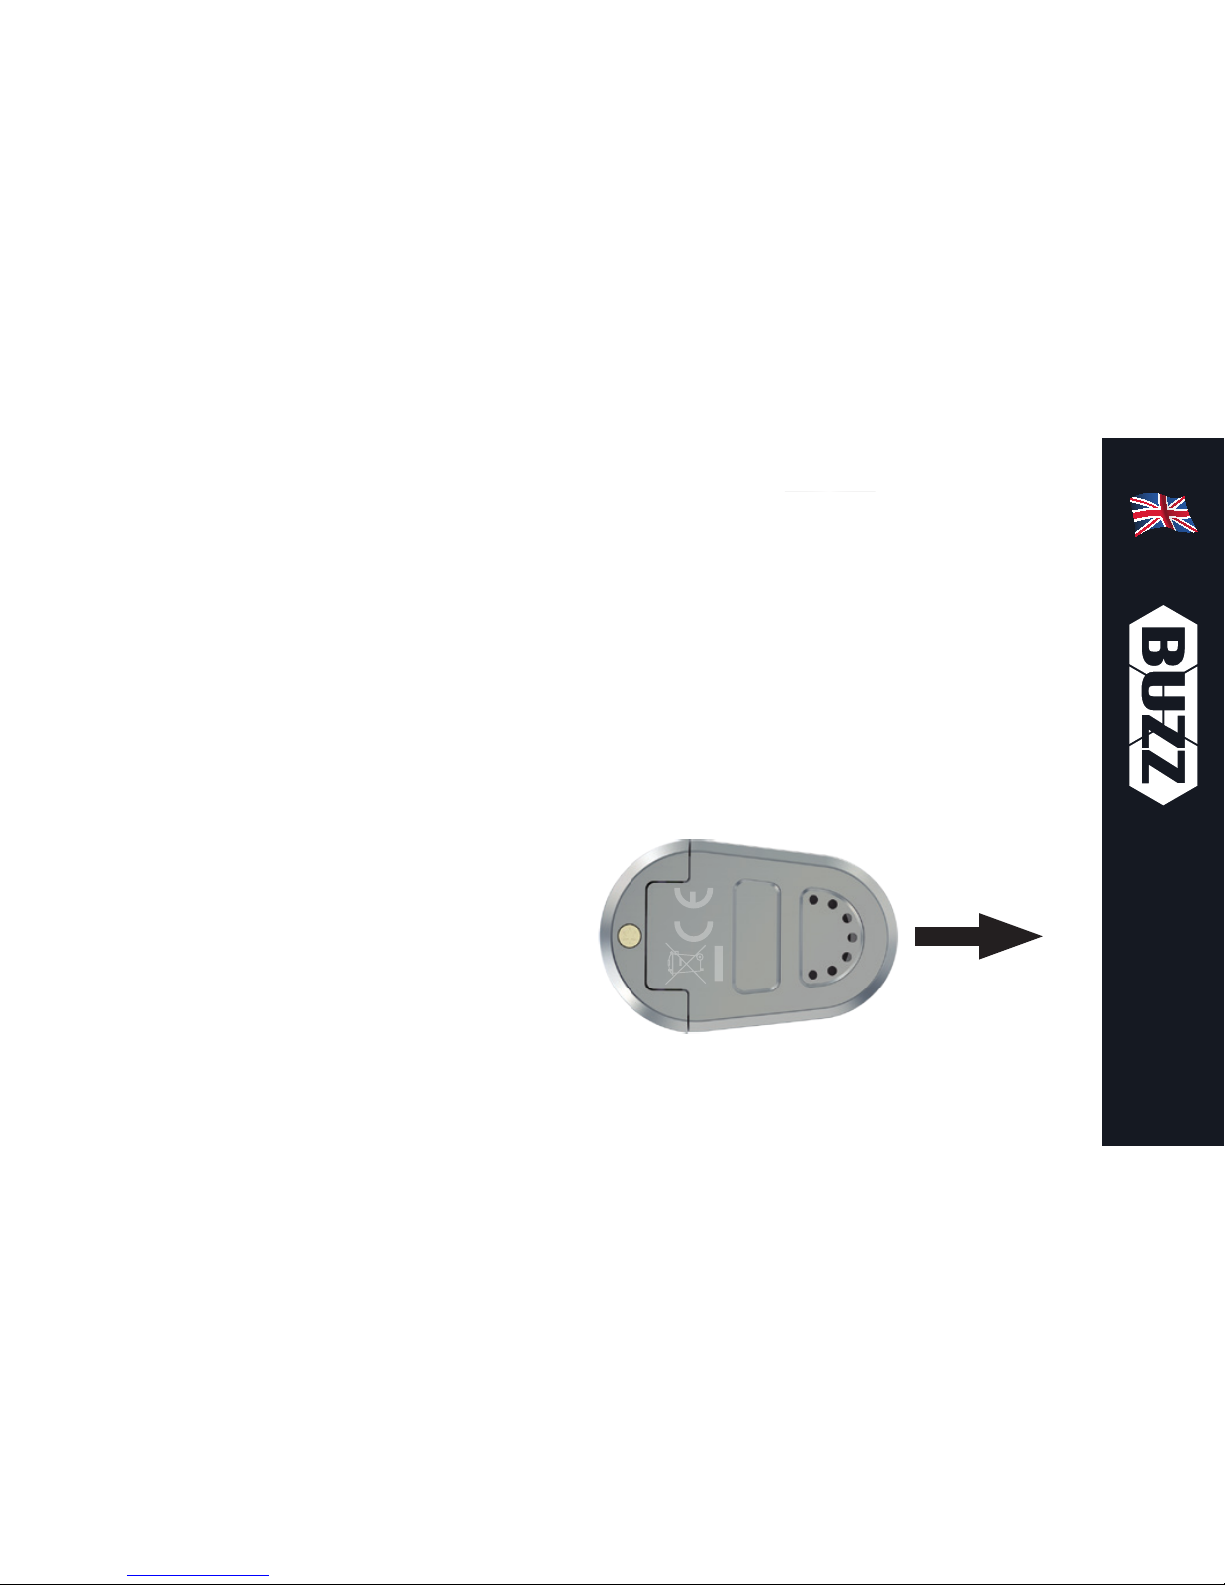
Installing an 18650 battery:
To insert the battery, turn the Buzz
body upside down, locate the
battery door and use a finger to slide
open the battery door to release
it from the locking mechanism.
Insert the battery into the battery
compartment ensuring the battery’s
positive connection is inserted first.
Finally, push the battery door closed
then slide to lock, ensure the battery
door is fully locked into place.
Note: Ensure only a high drain cell
with a continual discharge rate of
25 amperes or above is installed
into the Buzz kit. Do not use any
batteries that have torn battery
wraps.
Page 6

6
Using your Buzz Kit
Powering On and Off:
The Buzz kit uses a 5 click on/off
function. To switch the Buzz on,
press the power button five times in
quick succession, the OLED display
will illuminate to indicate the Buzz
has been switched on. Similarly,
when the device is powered on,
press the power button five times in
quick succession to turn the Buzz
off, the OLED display will deactivate
to indicate the Buzz has been
switched off.
Charging the Battery:
The Buzz is recharged by inserting
the micro USB cable into the micro
USB port located directly beneath
the left and right adjustment buttons,
insert the other end of the USB cable
into a powered USB port or suitable
USB wall adaptor. The battery status
symbol on the OLED display will
initially flash to indicate charging
activity, the battery status symbol
will then rise and fall while charging.
Once fully charged, the OLED
display will deactivate. Charging with
Page 7

7
Using your Buzz Kit
a QC2.0 Wall Adaptor will be around
30% faster than charging with a
standard 1.0A USB adaptor.
Alternatively, the 18650 battery
can be removed from the Buzz
and charged in an external battery
charger.
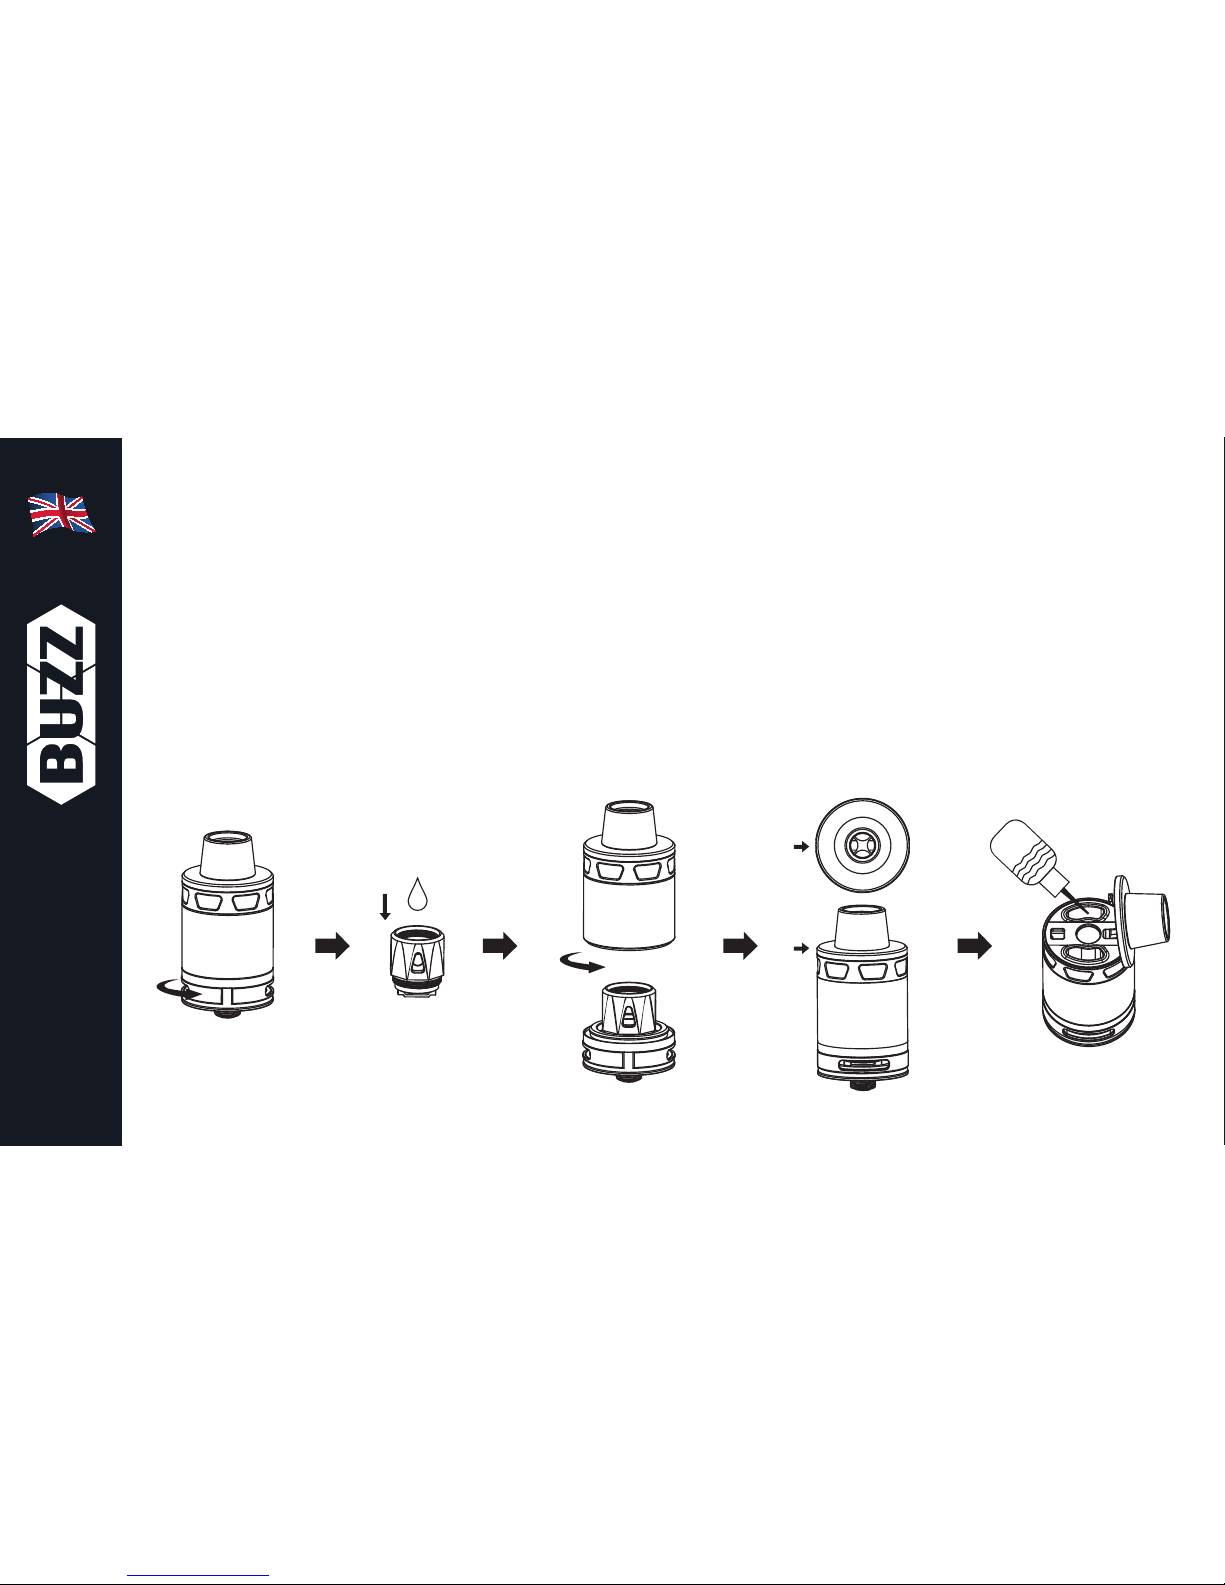
Installing/Replacing an Atomizer
Head:
To install a new atomizer head, turn
the Hornet tank upside down so the
mouthpiece points toward the floor,
hold the Hornet tank firmly, then
unscrew the base to fully dismantle
the tank. Place the upper section
of the tank to one side, ensuring it
remains upside down to prevent fluid
spillage. Unscrew the atomizer head
from the tank base. Screw the new
atomizer head into the tank base,
and reassemble the tank using the
reverse of the above procedure.
Page 8
8
Note: Be sure to “prime” the
atomizer head before first use by
dripping in a few drops of e-liquid,
then allowing it to sit in a tank
full of E-liquid for a few minutes
before vaping. This ensures the
atomizer head is fully saturated
with E-liquid.
Using your Buzz Kit
Page 9
9
Using your Buzz Kit
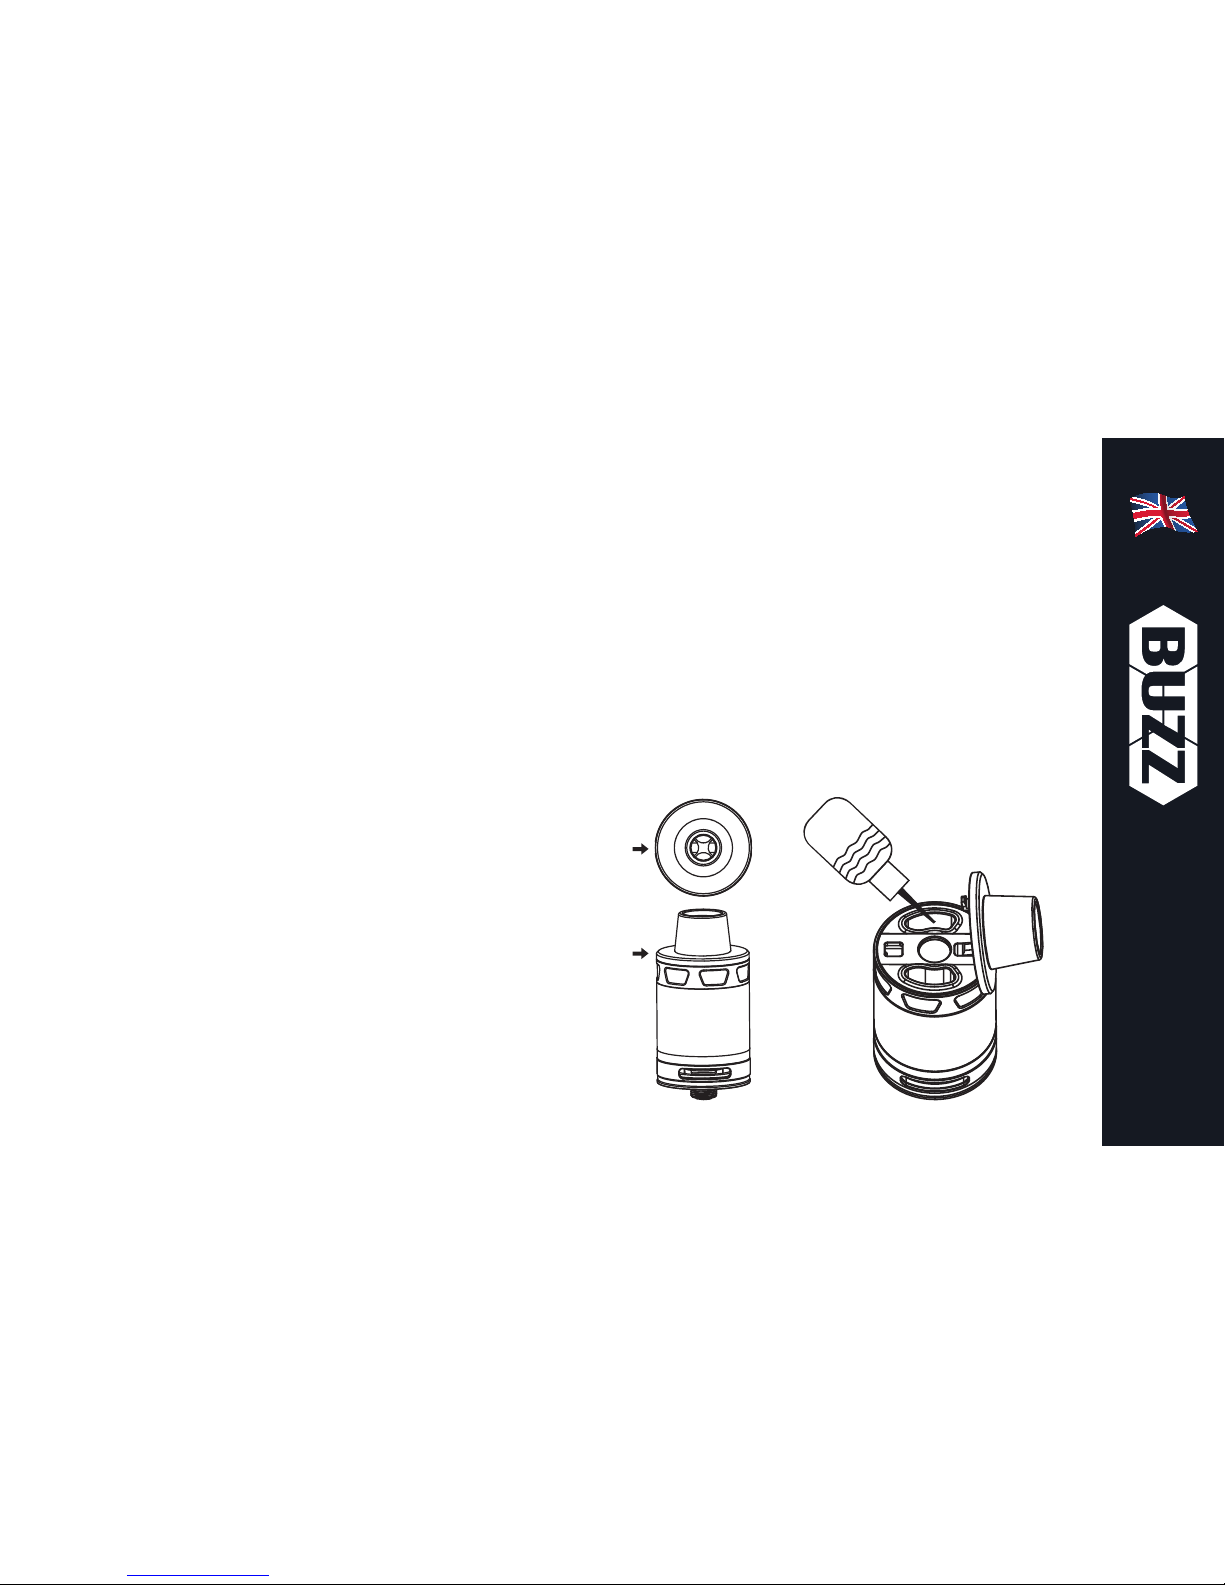
Filling with E-liquid:
To fill the Hornet tank, locate for
the fill symbol located on top of the
Hornet tank, grasp the mouthpiece
firmly and push/slide in the direction
pictured below to open the tank.
The entire hinged top cap assembly
will open up to reveal two E-liquid
fill holes. Carefully fill the Hornet
tank with E-liquid until the tank is
full. Take care to avoid filling down
the large, central chimney hole, only
fill with E-liquid using either of the
designated fill holes located either
side of the central chimney hole.
Once filled with E-liquid, close the
hinged top cap assembly then firmly
slide it shut in the opposite direction,
an audible click will be heard once
the locking mechanism is fully
engaged.
Page 10
10
Using your Buzz Kit
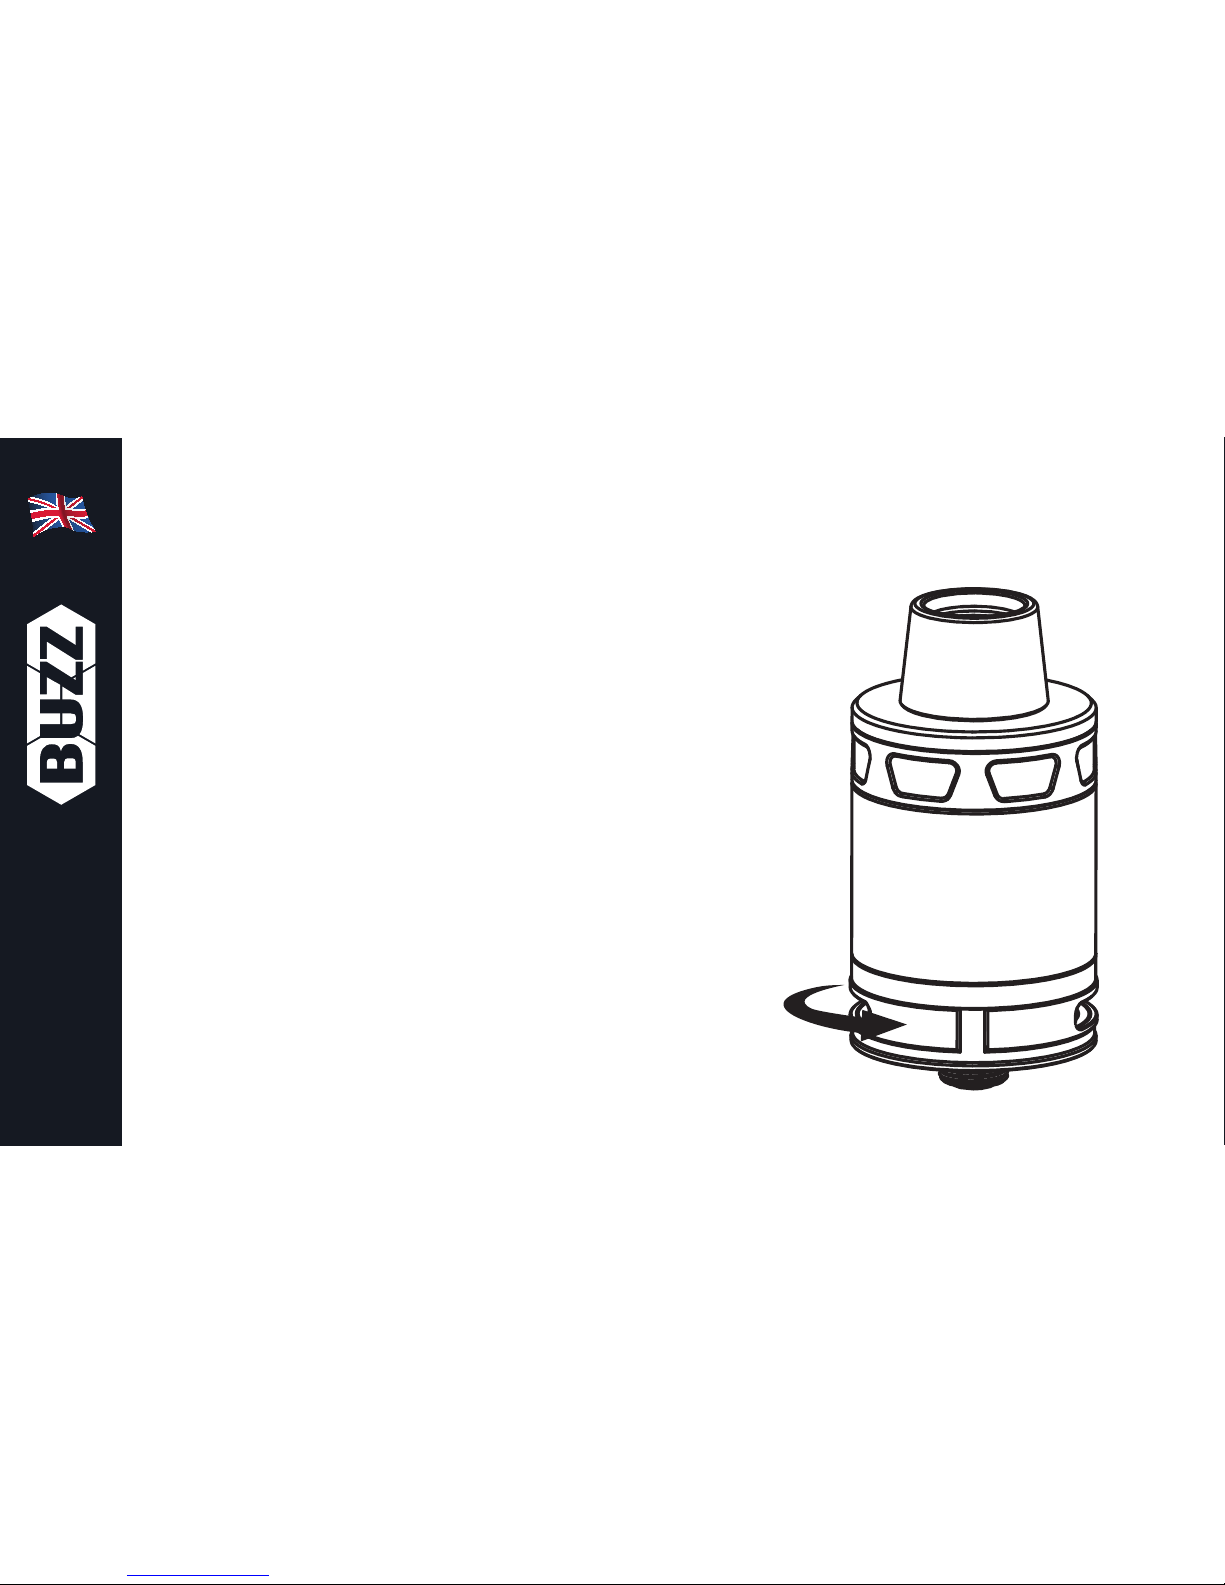
Hornet Tank Airflow Adjustment:
To adjust the amount of airflow
the Hornet tank provides, slowly
rotate the airflow control ring on the
atomizer base to expose the desired
proportion of the airflow slot.
Page 11
11
Using your Buzz Kit
Vaping:
Press and hold the large power
button as you inhale the vapour.
Shift between VW/Bypass/Smart/
Clock/VT/TCR Modes:
When powered on, quickly press
the power button 3 times in quick
succession, this will activate the
mode selection display. Use the
left and right adjustment buttons to
cycle through the VW/Bypass/Smart/
Clock/VT-Ni/VT-Ti/VT-SS/TCR-M1/
TCR-M2/TCR-M3 modes. Press the
power button to select the mode
which is currently displayed, or
alternatively, wait 10 seconds with
the mode of choice displayed on the
screen to select that mode.
Page 12

12
Using your Buzz Kit
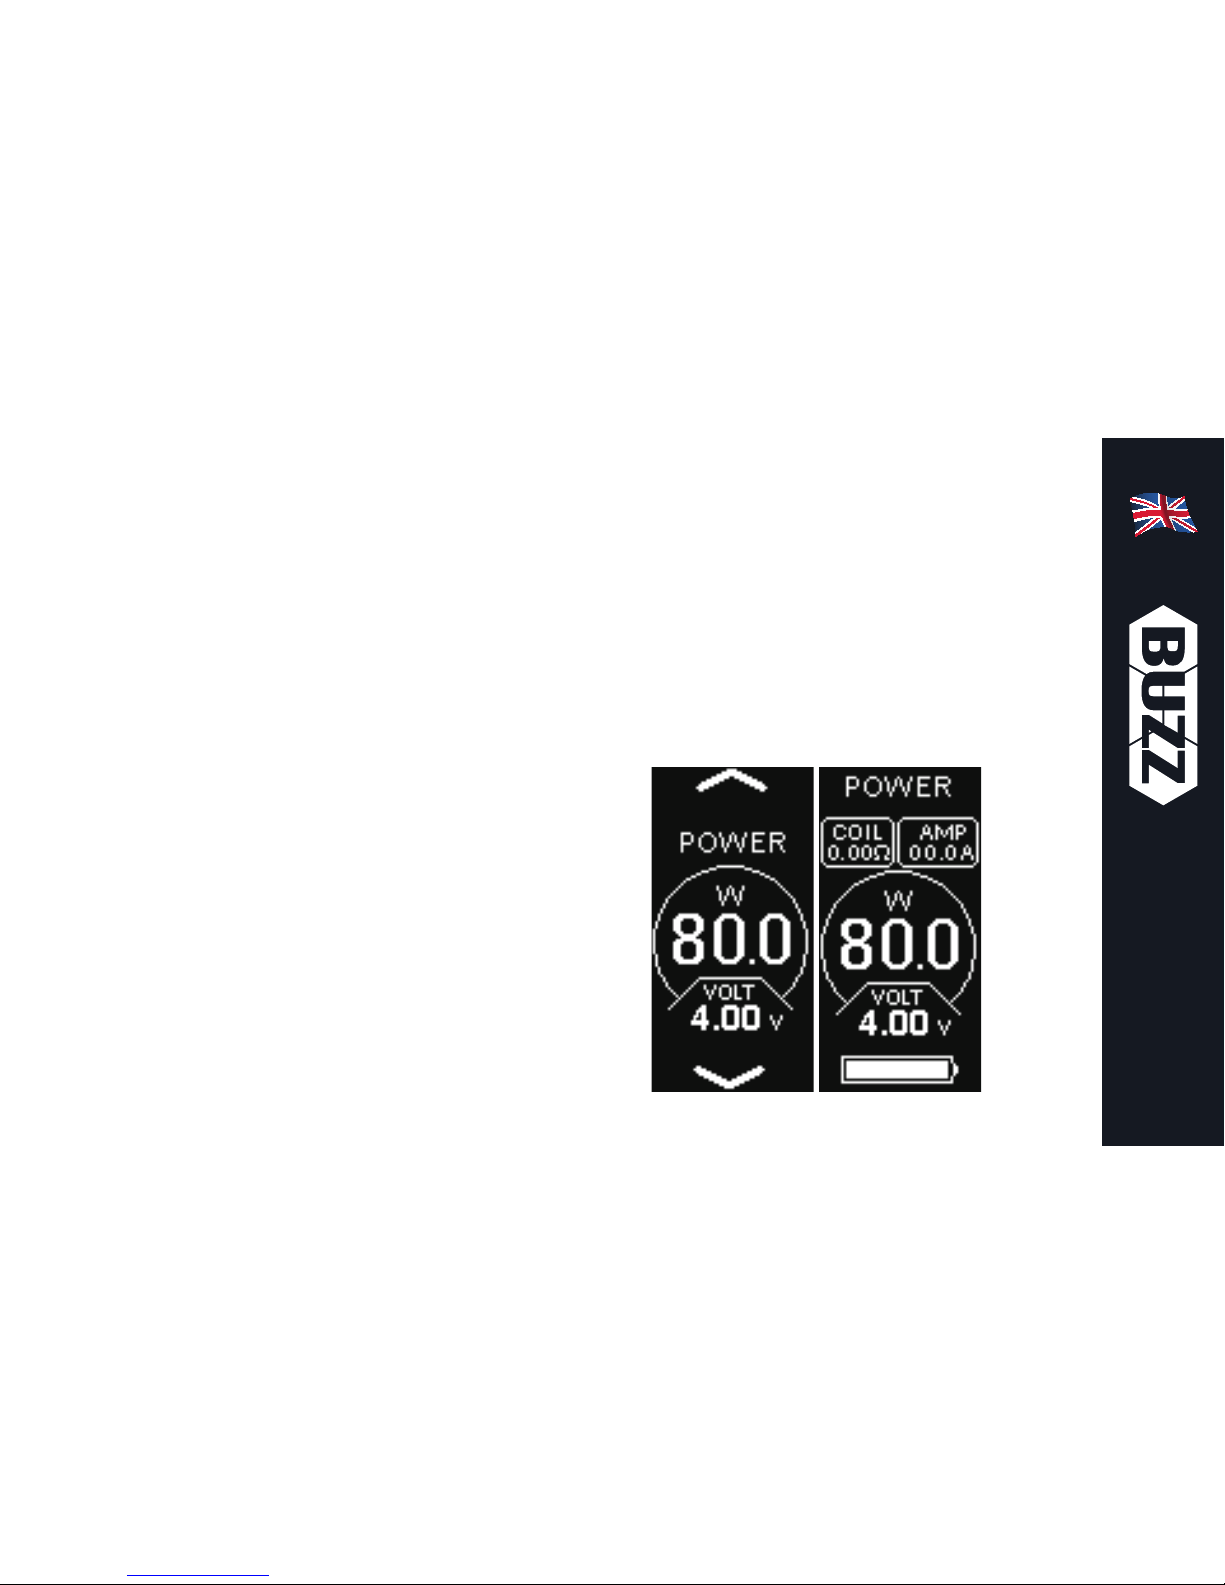
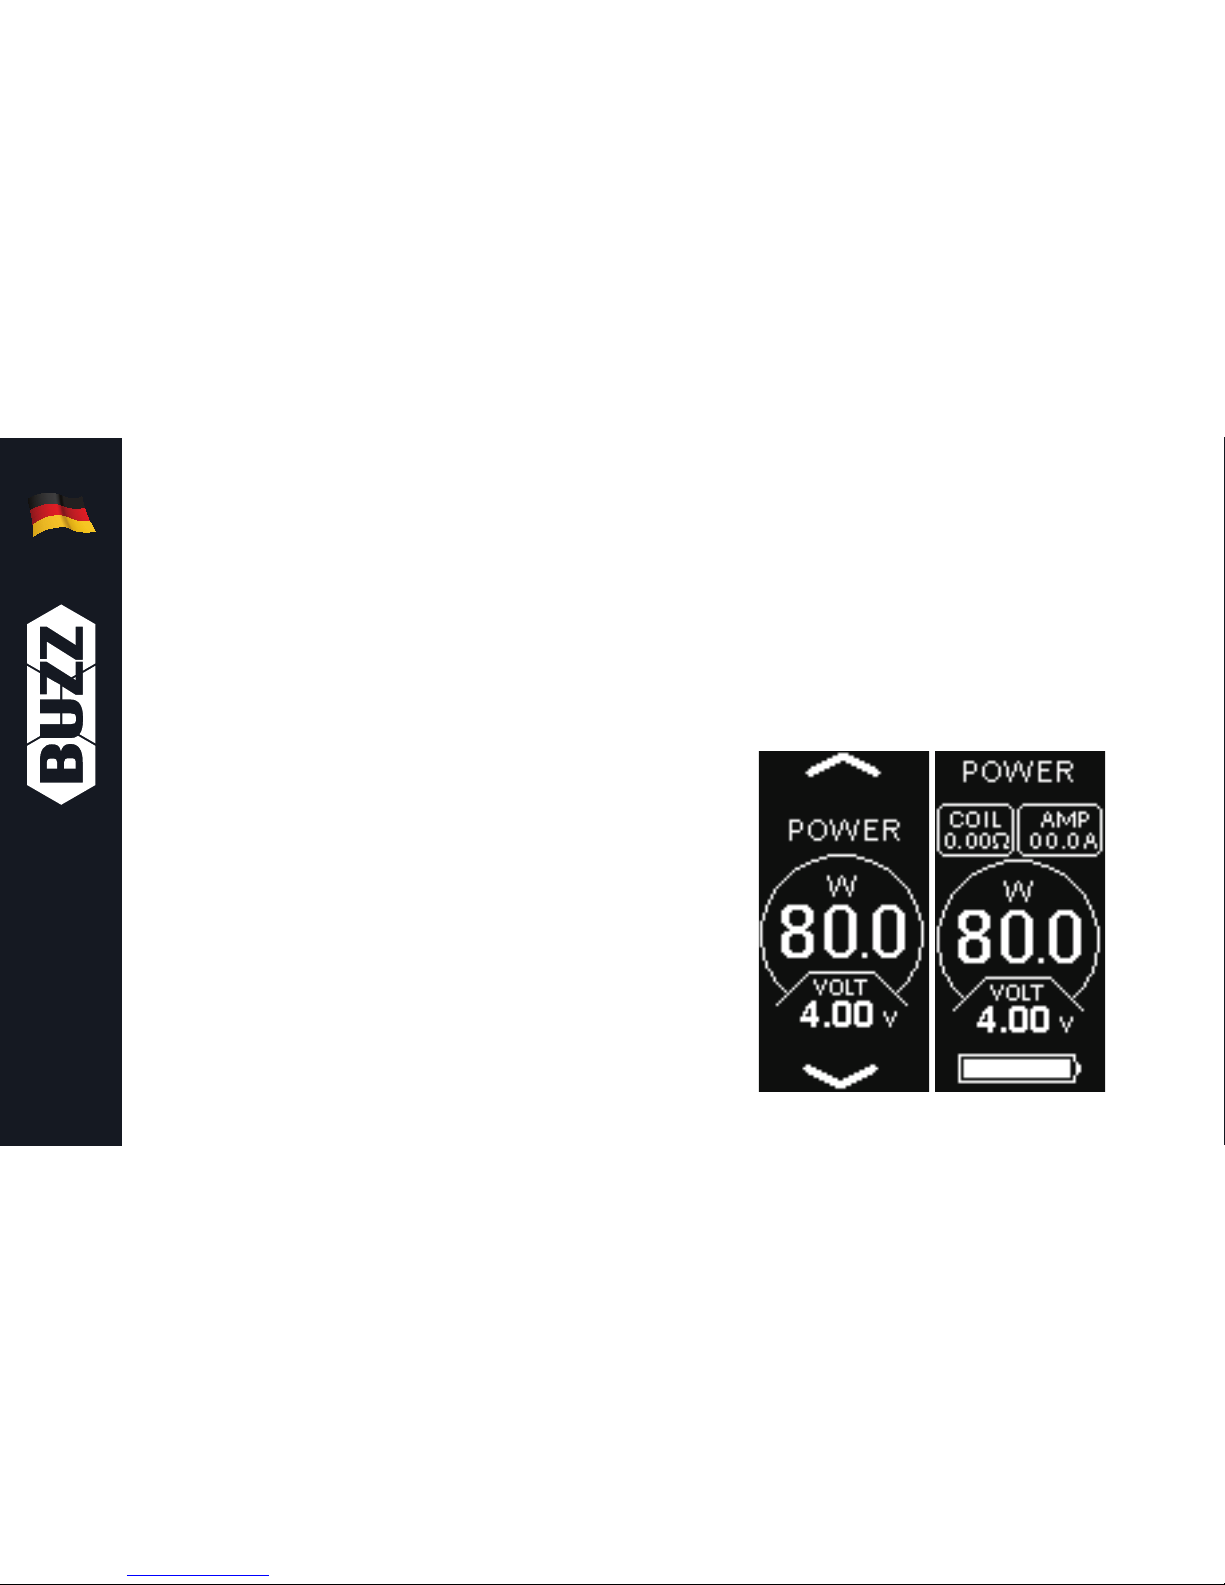
VW (Power) and Smart Mode:
When in VW or smart mode, use
the left or right adjustment buttons
to increase or decrease the level
of wattage respectively. The
available wattage range is 1W –
80W in increments of 0.1W. Smart
mode allows for wattage settings
to be saved automatically to the
device dependent on the atomizer
resistance which is installed, 10
profiles can be saved at one time
and if this is exceeded the first saved
profile will be overwritten. If the
wattage is changed for a particular
resistance, this will automatically be
saved to that resistance profile.
Bypass Mode:
When in bypass mode we are using
the battery’s direct voltage output,
the output power is dependent on
a combination of remaining battery
voltage and atomizer resistance.
Note: The wattage cannot be
adjusted or altered in this mode.
Page 13

13
Using your Buzz Kit
VT Mode (Ni/Ti/SS) and TCR Mode
(M1/M2/M3):
When in VT or TCR mode, use
the left and right adjustment
buttons to increase or decrease
the temperature respectively. The
available temperature range is
100-315°C or 200-600°F. To adjust
the wattage while in VT or TCR
mode, press the power button 4
times in quick succession to activate
the adjustment menu, the current
wattage setting will flash. Press the
right adjustment button once to
activate wattage adjustment, then
press the left or right adjustment
buttons to increase or decrease
wattage to the desired setting.
To lock the atomizer resistance while
in VT or TCR mode, press the power
button 4 times in quick succession
to activate the adjustment menu,
then press the left adjustment button
once, the coil resistance setting will
now begin to flash, press the right
adjustment button to lock/unlock
the atomizer resistance. Press the
large power button to confirm the
selection.
Page 14

14
Note: Only attempt to lock the
atomizer resistance when using
nickel, titanium or stainless steel
atomizer heads in temperature
control mode and ensure the
atomizer heads are currently at
room temperature.
Configuring TCR Mode (M1/M2/
M3):
To configure TCR modes M1, M2
and M3, when the device is powered
off, hold down both the large power
button and the right adjustment
button simultaneously until you enter
the TCR configuration menu. Use
the left and right buttons to cycle
through M1, M2 and M3 modes and
single press the large power button
to select the mode that you wish
to configure. Use the left and right
buttons to increase or decrease
the TCR value depending on your
choice of coil material.
Using your Buzz Kit
Page 15
15
Using your Buzz Kit
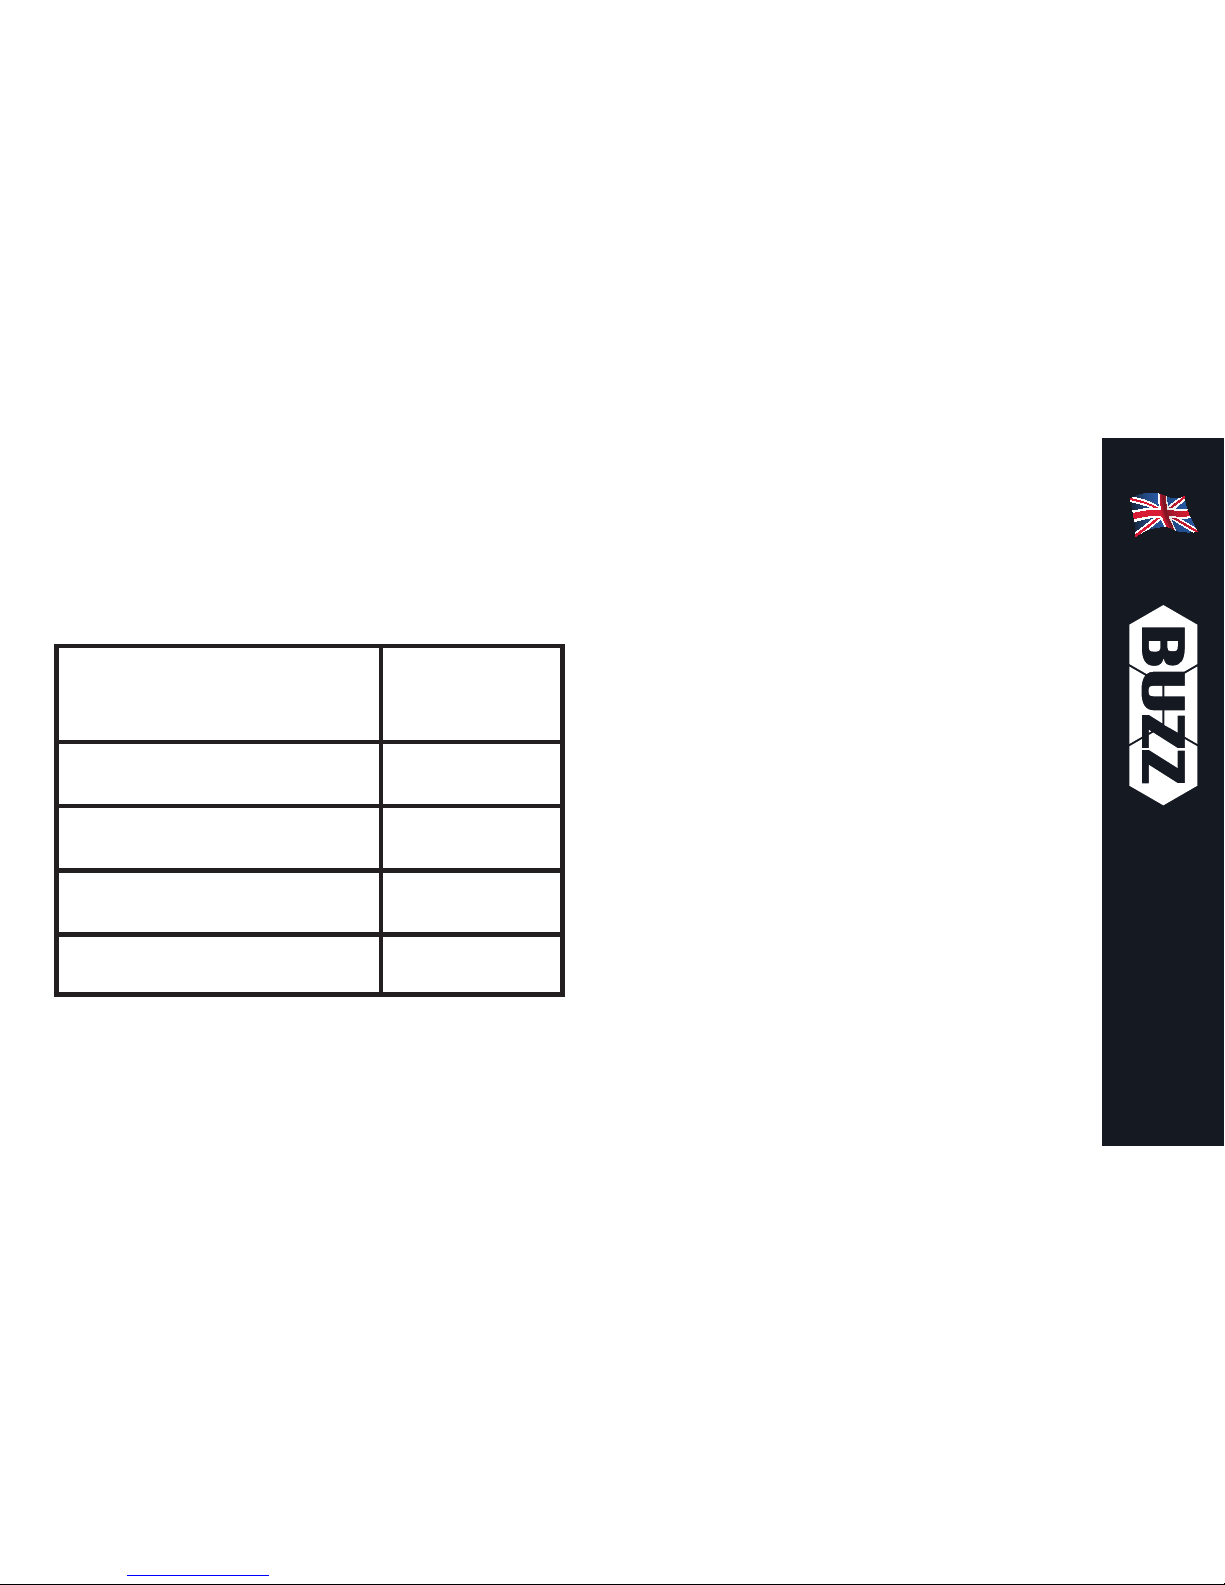
TCR Value Range:
Material TCR Value
Range
Nicke 600-700
NiFe 300-400
Titanium 300-400
SS (303, 304, 316, 317) 80-200
Note: The TCR value displayed is
105 (100,000) times greater than
the actual TCR value and is for
Buzz usage only.
Page 16

16
Clock and Date Mode:
To switch between analogue or
digital clock modes, while in clock
mode press the large power button 4
times in quick succession to activate
the adjustment menu, use the right
adjustment button to switch between
analogue and digital.
To configure the date and time
settings, while in clock mode
press the power button 4 times in
quick succession to activate the
adjustment menu, press the left
adjustment button to cycle through
the hour/minute/day/month/year
values, use the right adjustment
button to select the correct value.
Press the large power button to
confirm your adjustments.
Amp/Puff/Time Display:
When in VW, Bypass, VT or TCR
mode, the real-time current,
puff counter or puff time can be
displayed at the top-right corner of
the display. To switch between these
displays, press the large power
button 4 times in quick succession
to activate the adjustment menu,
Using your Buzz Kit
Page 17

17
Using your Buzz Kit
then keep pressing the right
adjustment button to cycle through
Amp, Puff or Time. Once your choice
is displayed press the large power
button to confirm your selection.
Screen Lock/ Screensaver
Function:
To set the duration of time for which
the device must be inactive for
the screensaver to activate, hold
both the power button and right
adjustment button simultaneously
while the Buzz is powered on for 5
seconds, this will activate the screen
lock menu. Use the left adjustment
button to cycle through the available
durations, select the desired time
and press the large power button to
confirm the selection.
Stealth Mode:
When powered on, simultaneously
hold the power button and the
left adjustment button to activate
stealth mode. Repeat the process to
deactivate stealth mode.
Page 18

18
Using your Buzz Kit
Key Lock Mode:
When powered on, simultaneously
hold the two adjustment buttons for
3 seconds to activate key lock mode.
Repeat the process to deactivate the
key lock mode.
Display Modes:
When powered off, hold both
adjustment buttons to rotate the
display 180º. Two display states are
available.
Indications and Warnings
Battery Life Indication:
As the level of battery charge
increases or decreases the onscreen battery status symbol will
accurately reflect the amount of
remaining battery charge.
Short Circuit Protection:
If an atomizer short circuit occurs, an
‘atomizer short’ error message will
be displayed onscreen. Replacing
the atomizer head with a brand new
one will resume normal operation.
Page 19

19
Using your Buzz Kit
Atomizer Protection:
If the power button is pressed for
longer than ten seconds, the Buzz
will cease to function and screen will
display “Over 10’s protection”.
Weak Battery Alert:
If the Buzz kit is being operated and
the remaining battery cell voltage
drops below 2.9V, the screen will
display “weak battery” and the
output power will be reduced
accordingly. Recharging the battery
will return the device to normal
operation.
Low Power Alert:
If the battery’s voltage drops to 3.3V
the screen will display “Battery low”.
If you continue to use the Buzz kit
the screen will display the message
“Battery low lock” and stop working.
Recharge the Buzz kit to remove
the message and allow normal
operation.
Page 20

20
No Atomizer Alert:
If no tank is attached to the Buzz
kit or the atomizer head is not
fully secured into the base of the
tank, the screen will display a “No
atomizer found” error message.
Replace the atomizer head with
a brand new one or ensure the
atomizer head is properly secured
into the base of the tank to return to
allow normal operation.
Temperature Protection:
In VT mode, if the actual
temperature of the coil reaches
the set temperature, ‘temperature
protection’ will be displayed on the
screen. The device can continue to
be used normally.
Temperature Alert:
If the temperature of the device
exceeds the maximum safe
operating temperature, ‘Device
Too Hot’ will be displayed on the
screen and the output will shut off
automatically. Let the device cool
down before continuing to vape.
Using your Buzz Kit
Page 21

21
Kit Contents
1 x Buzz Body
1 x Hornet Tank
1 x 0.4ohm ProC1 DL Atomizer Head
1 x 0.5ohm ProC1-S MTL Atomizer Head
1 x Spare Glass
1 x Set of Sealing Rings
1 x USB Cable
1 x User Manual
Page 22

22
Specications
Buzz Specifications:
Dimensions: 80mm x 38mm x
25mm
Battery Type: 18650
Wattage Range in VW Mode, VT
Mode and TCR Mode: 1W – 80W
Temperature Range in VT Mode:
100-315°C / 200-600°F
Temperature Coefficient of
Resistance Range in TCR Mode:
1-1000
Resistance Range: 0.05 - 1.5ohm
in VT Mode, 0.1 - 3.5ohm in VW/
Bypass Mode
Firmware Type: Upgradeable
Tank Connector: 510 Connector
Hornet Tank Specifications:
Dimensions: 25mm (diameter) x
44mm (length)
Tank Capacity: 2ml
Atomizer Type: ProC
Maximum Filling Nozzle Diameter:
3.4mm
Page 23

23
Additional product information
There are no reported medical side effects with this product. If you believe you
experience a side effect, please contact the manufacturer.
Page 24

24
Product Storage and Battery Precautions
• Store the Buzz and its accessories away from children when not in use.
• Ensure the Buzz is powered off when not in use.
• Avoid accidentally pressing the Buzz power button when not in use.
• Please only use the charging cable provided.
• Please dispose of dead batteries in accordance with your country’s
appropriate legislation.
• Use only a maximum of 1.5ohm when in VT mode. The mode will
automatically be switched to VW mode when the coil is larger than 1.5ohm or
a normal coil is used.
• Do not charge the batteries in a damp environment.
• Do not use the device when temperatures are outside the range -10 - 60°C.
• Do not charge the battery when temperatures are outside the range 0 - 45°C.
• Do not attempt to repair a faulty Buzz as these are sealed units with no
serviceable parts. Attempted repairs will void the warranty.
Page 25

25
Warranty
The Buzz kit components have a 28-day parts warranty, with the exception
of atomizer heads, which are a consumable item and covered by ‘dead on
arrival’ warranty only. The USB cable supplied has a 12-month warranty. If
any parts are found to be faulty within this time please contact our customer
service team, whose details are on the back page of this booklet and we will
arrange for a replacement. We may require the goods to be returned for further
investigation.
Page 26
GLÜCKWUNSCH ZUM KAUF IHRES
TOTALLY WICKED BUZZ
E-ZIG KIT
Page 27
27
Bedienung der Buzz
510er Anschluss
Powertaster
OLED Display
Einstell-Taster
Micro USB Ladeport
Batterieklappe
Page 28
28
Mundstück
Top Cap
Glaszylinder
Verdampferkopf
Verdampferbasis
Page 29
29
Bedienung der Buzz
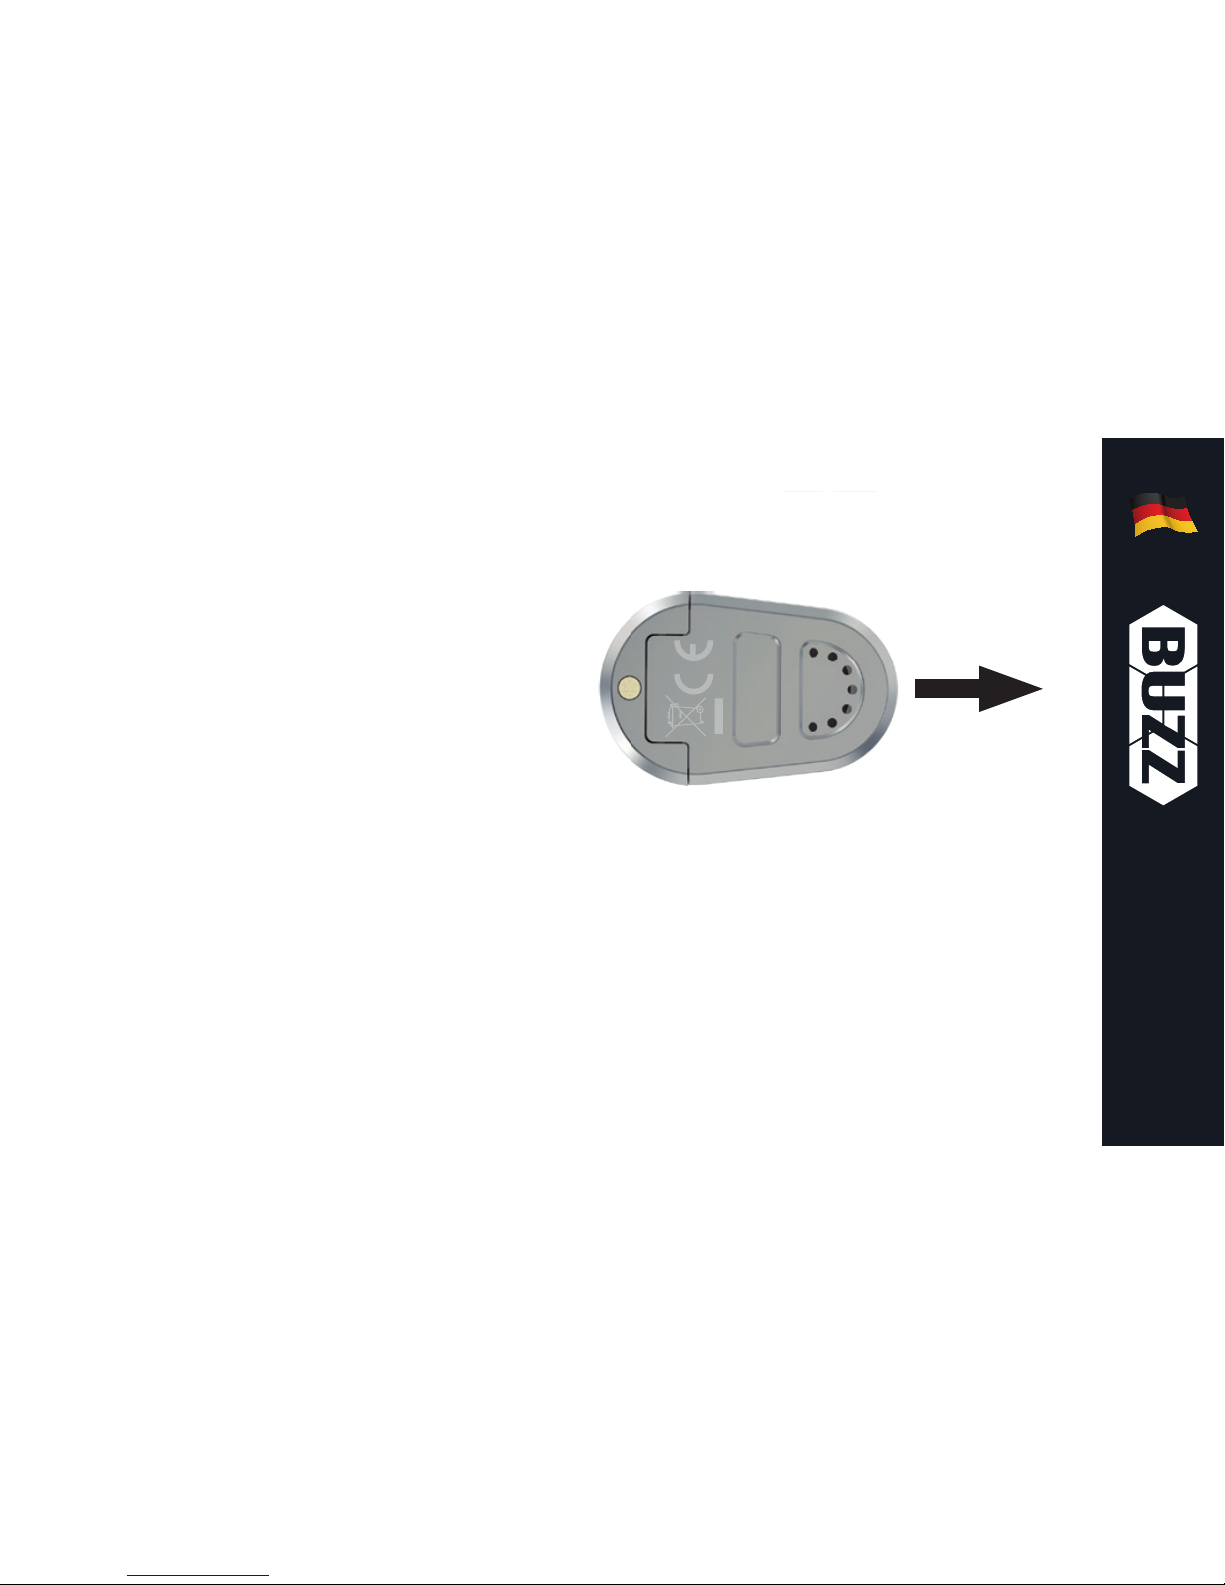
18650 Akku einsetzen:
Drehen Sie den Buzz Body auf den
‘Kopf’ und entriegeln Sie mit einem
Finger die Batterieklappe. Legen Sie
einen geeigneten 18650 Akku mit
dem Pluspol voran in das Gehäuse
ein und verriegeln Sie anschließend
wieder die Batterieklappe.
Hinweis: Vergewissern Sie sich,
dass nur qualitativ hochwertige
Lithium-Ionen-Akkus zum Einsatz
kommen, die Stromstärken von
mindestens 25A standhalten
können.
Power Ein/Aus:
Powertaster 5-mal in Folge drücken;
das OLED-Display leuchtet auf
und signalisiert, dass die Buzz an
und zur Nutzung bereit ist. Zum
Ausschalten, Powertaster ebenfalls
5-mal in Folge drücken.
Page 30

30
Bedienung der Buzz
Akku Aufladen:
Laden Sie die Buzz einfach mit dem
USB-Kabel an einem geeigneten
USB-Port oder USB-Netzstecker auf
(Ladevorgang ist mit einem QC2.0
Adapter um bis zu 30% schneller).
Der Ladefortschritt kann hierbei auf
dem Display verfolgt werden. Das
OLED Display erlischt sobald der
Akku vollständig aufgeladen wurde.
Der Akku kann auch alternativ
mit einem externen Ladegerät
aufgeladen werden.
Verdampferkopf einsetzen/
wechseln:
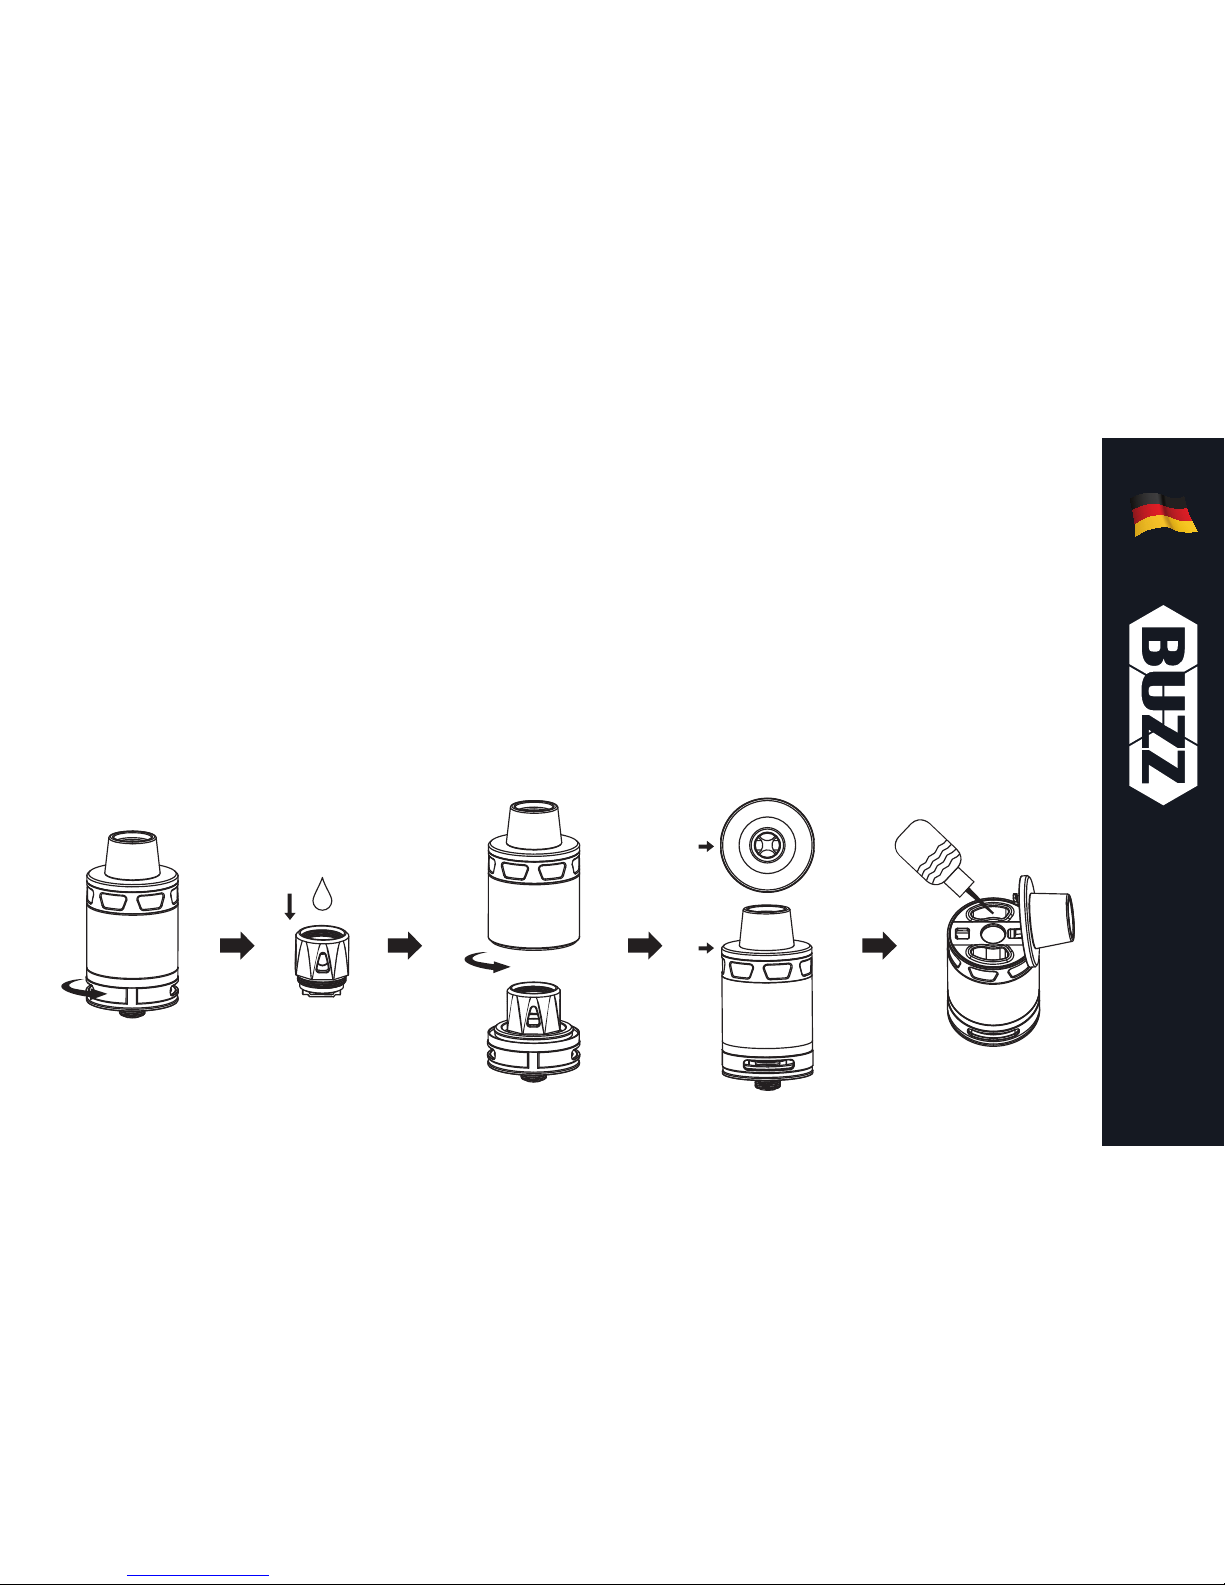
Drehen Sie den Hornet Tank mit dem
Mundstück Richtung Boden um und
schrauben Sie den Sockel ab. Legen
Sie den Tank mit der Kopfseite nach
unten zur Seite, damit Flüssigkeit
nicht auslaufen kann. Schrauben
Sie den Verdampferkopf aus dem
Tankboden und ersetzen Sie diesen
durch einen Neuen. Setzen Sie
anschließend alle Komponenten in
umgekehrter Reihenfolge wieder
zusammen.
Page 31
31
Bedienung der Buzz
Hinweis: Träufeln Sie vor der
ersten Benutzung etwas E-Liquid
direkt in den Verdampferkopf
– hierdurch werden präventiv
Trockenzüge vermieden und
eine bessere Langlebigkeit des
Verdampfers erreicht.
Page 32
32
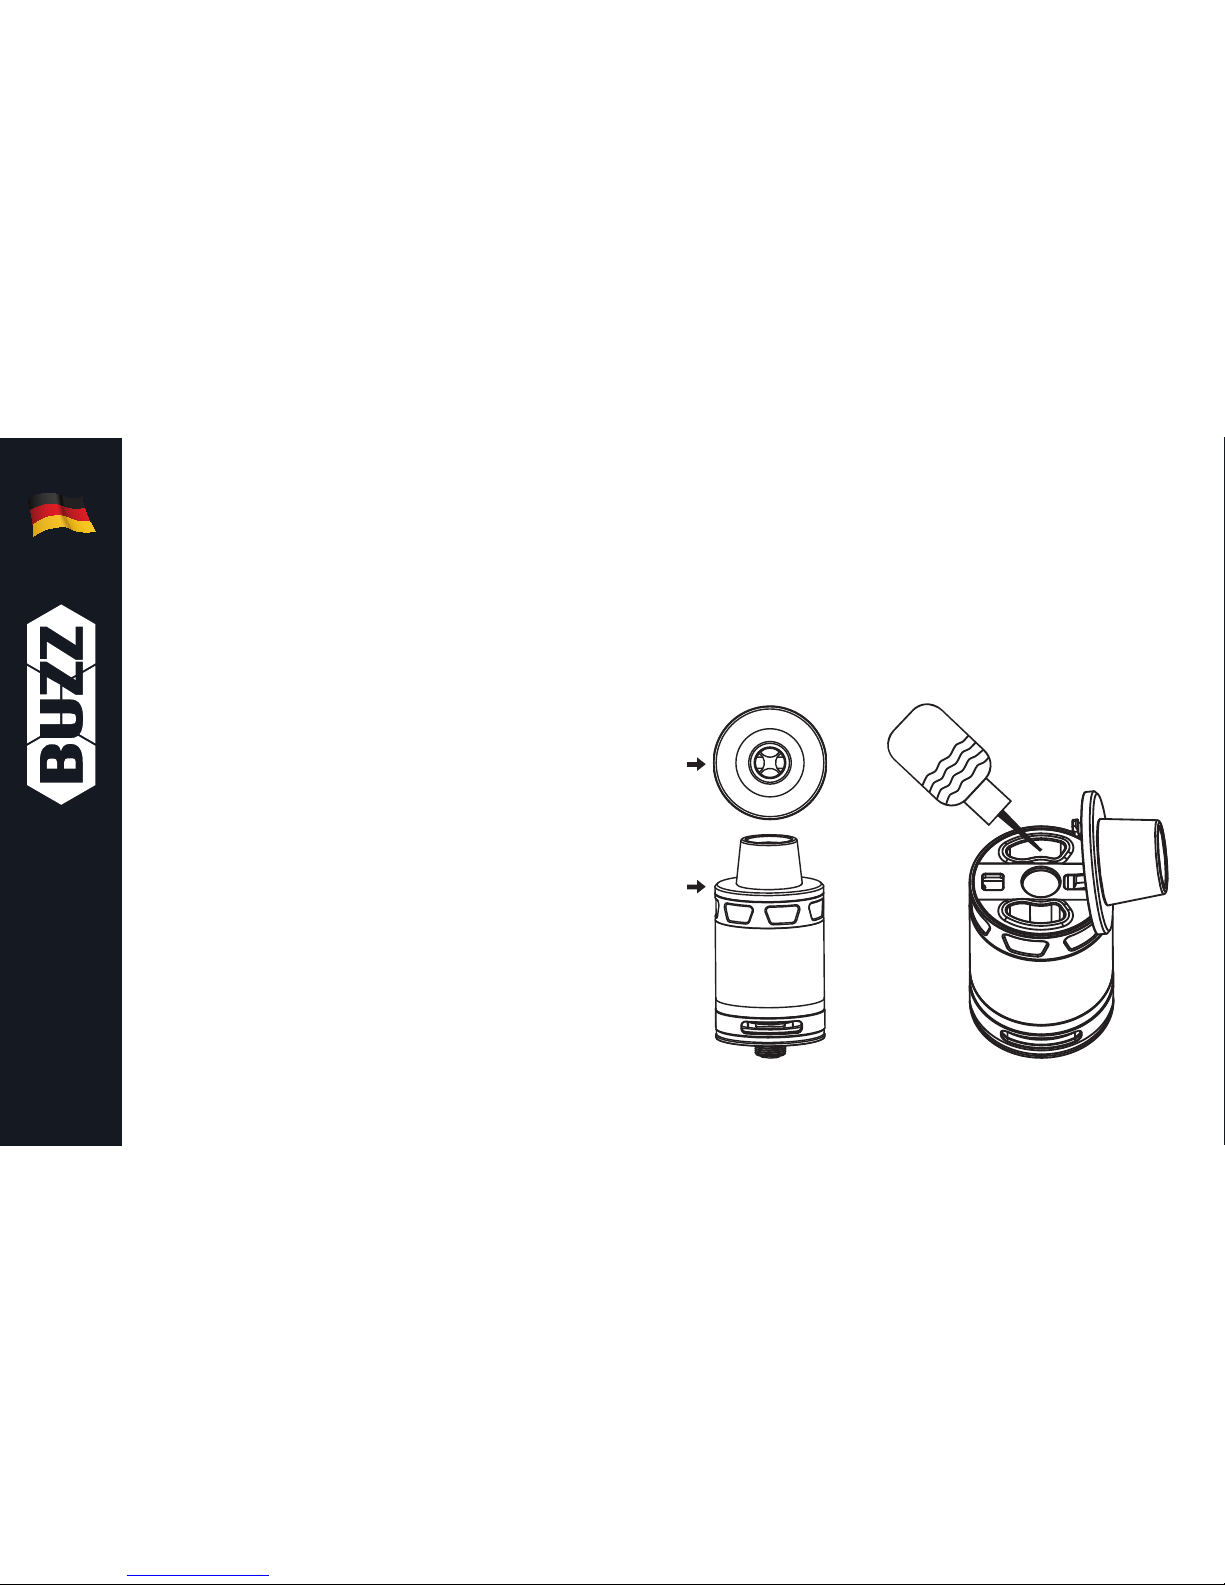
Tank befüllen:
Schieben Sie die Top-Cap mithilfe
des Mundstücks am Füll-Symbol
entlang nach Vorn und klappen
Sie die Top-Cap auf, um die
zwei seitlichen Befüllöffnungen
freizulegen. Füllen Sie den Tank
mit E-Liquid und achten Sie darauf
nicht in die zentrale Luftöffnung zu
träufeln. Klappen und schieben Sie
anschließen die Top-Cap wieder in
Position bis es hörbar einrastet, um
den Tank zu verschließen.
Bedienung der Buzz
Page 33
33
Bedienung der Buzz
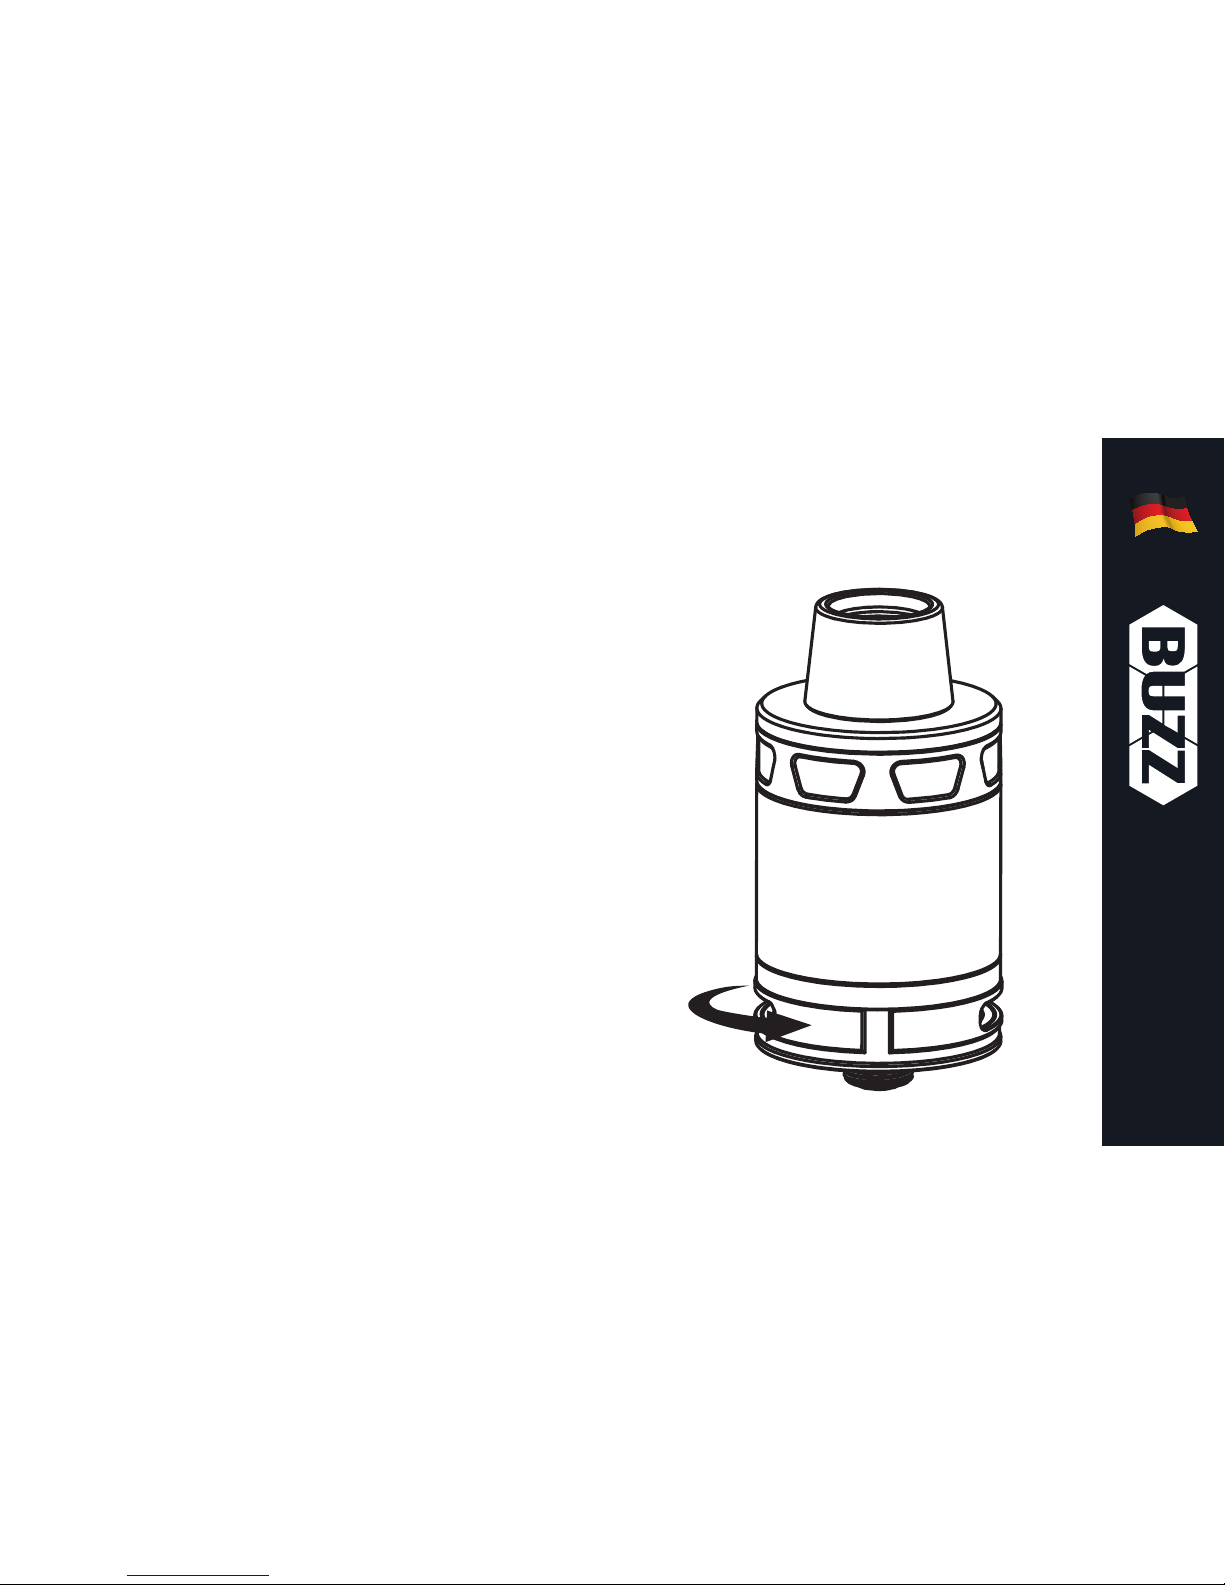
Luftzug einstellen:
Durch Drehen des Luftzugringes
an der Verdampferbasis variiert die
Öffnungsgröße des Lufteinlasses
und somit die Menge an Luft, die
zum Verdampferkopf angesaugt
wird – dies erlaubt eine perfekte
Abstimmung des Zugwiderstandes.
Page 34
34
Bedienung der Buzz
Dampfen:
Powertaster beim Inhalieren
drücken.
Modus wechseln - VW/Bypass/
Smart/Clock/VT/TCR:
Wenn das Gerät eingeschaltet ist,
drücken Sie 3-mal den Powertaster
und danach den Rauf- oder
Runter-Taster, um rotierend in
die verschiedenen Modi (VW/
Bypass/Smart/Clock/VT-Ni/VT-Ti/
VT-SS/TCR-M1/TCR-M2/TCR-M3) zu
wechseln. Drücken Sie anschließend
den Powertaster um die Auswahl
zu bestätigen oder verweilen
Sie alternativ 10 Sekunden im
gewünschten Modus.
Page 35

35
Bedienung der Buzz
VW-Modus (Power) und SmartModus:
Im VW- oder Smart-Modus kann
mit den Rauf- und Runter-Taster die
Ausgangsleistung zwischen 1W und
80W verringert oder erhöht werden.
Im Smart-Modus merkt sich die
Buzz Ihre Leistungs-Einstellungen
von bis zu 10 VerdampferkopfWiderständen. Wurde die Anzahl
von 10 überschritten, wird das
erste Profil überschrieben. Wenn
die Leistungseinstellung bei
einem bestimmten Widerstand
geändert wird, erfolgt ebenso
die automatische Speicherung
der Werte im entsprechenden
Widerstands-Profil.
Bypass Modus:
Ungeregelte und direkte
Stromabgabe an den Verdampfer
(Leistungswerte sind abhängig
von der anliegenden Akku-(Rest)
Spannung und VerdampferkopfWiderstand).
Page 36

36
Bedienung der Buzz
Hinweis: Die Leistung kann in
diesem Modus nicht eingestellt
werden.
VT-Modus (Ni/Ti/SS) und TCRModus (M1,M2,M3):
Im VT/TCR-Modus kann mit
den Rauf- und Runter-Taster die
Temperatur zwischen 100-315C /
200-600F verringert oder erhöht
werden. Zum Einstellen der
Wattleistung im VT/TCR-Modus,
drücken Sie 4-mal den Powertaster
und danach den Rauf-Taster, um
die Wattkonfiguration aufzurufen.
Nutzen Sie den Rauf- oder RunterTaster, um die Wattwerte zu erhöhen
oder zu verringern. Zum Sperren/
Entsperren des VerdampferkopfWiderstandes, drücken Sie 4-mal
den Powertaster und danach den
Runter-Taster. Drücken Sie den RaufTaster zum Sperren oder Entsperren.
Mit Drücken des Powertasters
bestätigen Sie anschließend diese
Einstellung.
Hinweis: Der Verdampferkopf-
Page 37

37
Bedienung der Buzz
Widerstand kann nur bei Nickel-,
Titan- oder Edelstahl-Coils
gesperrt werden und sollte stets
bei Raumtemperatur erfolgen.
TCR-Modus konfigurieren (M1/
M2/M3):
Halten Sie beim ausgeschalteten
Gerät den Powertaster und den RaufTaster gleichzeitig gedrückt, bis das
TCR Konfigurationsmenü erscheint.
Drücken Sie den Rauf- und RunterTaster, um in das Untermenü
M1, M2 oder M3 zu gelangen (3
verschiedene Material- TCR-Werte)
und bestätigen Sie die Auswahl
mit dem Powertaster. Drücken Sie
danach den Rauf- oder Runter-Taster,
um die Werte nach Ihren Vorlieben
zu verändern.
Page 38
38
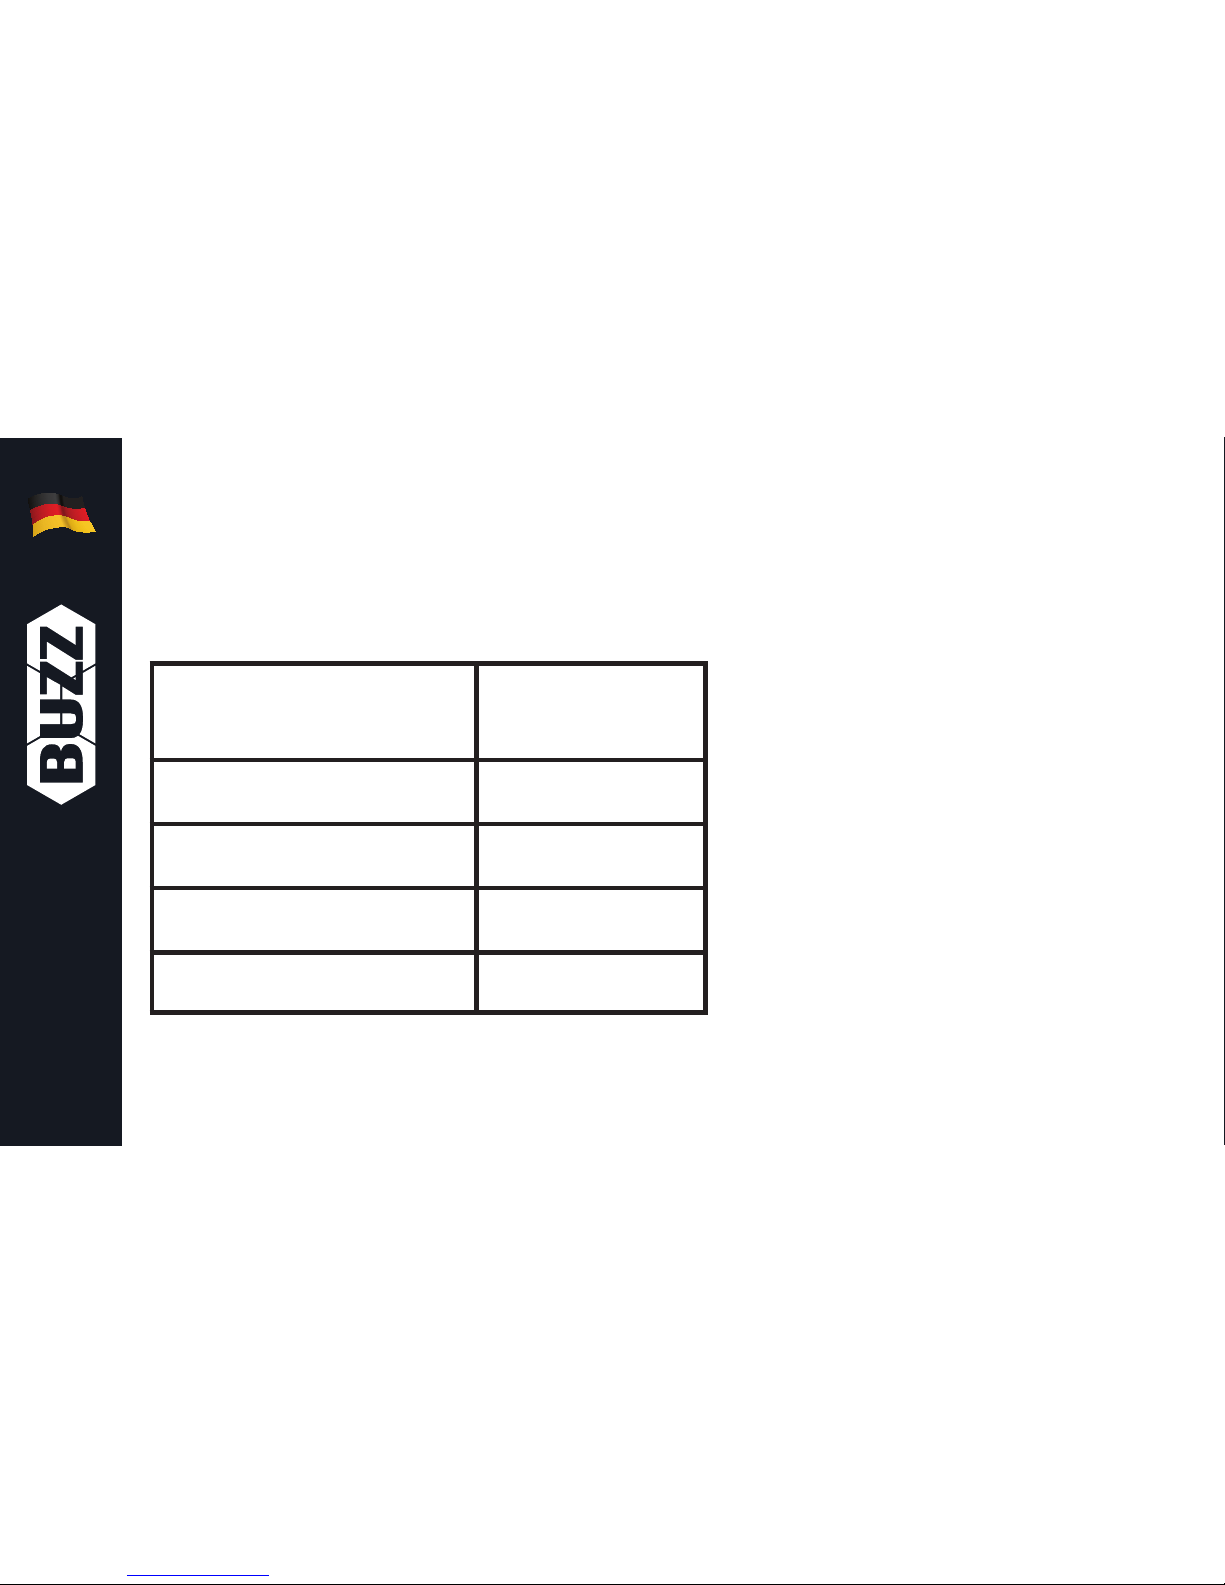
TCR Wertebereich Hinweis: Der tatsächliche TCR-
Wert ist im Dezimalsystem
100000-mal größer als der
angezeigte TCR-Wert am
Display und ist ausschließlich
für die Buzz anzuwenden.
Bedienung der Buzz
Material TCR
Wertebereich
Nicke 600-700
NiFe 300-400
Titan 300-400
SS (303, 304, 316, 317) 80-200
Page 39

39
Bedienung der Buzz
Datum und Uhrzeit ändern:
Zum Anzeigen analoger oder
digitaler Uhr auf dem Display,
drücken Sie im Clock-Modus 4-mal
den Powertaster, um das Menü zu
aktivieren. Drücken Sie den RaufTaster, um zwischen digitaler oder
analoger Uhrzeitanzeige zu wählen.
Zum Einstellen des Datums und
der Uhrzeit, drücken Sie im ClockModus 4-mal den Powertaster, um
das Menü zu aktivieren. Drücken
Sie den Runter-Taster, um rotierend
zwischen Hour/Minute/Year/Month/
Day (Stunde/Minute/Jahr/Monat/Tag)
zu wechseln und den Rauf-Taster
um Einstellungen vorzunehmen.
Bestätigen Sie durch Drücken des
Powertasters Ihre Einstellungen.
Stromstärke-/ Zugzähler-/
Zugdauer-Anzeige:
Die Echtzeitstromstärke (AMP),
die Anzahl der getätigten Züge
(Puff) oder die Zugdauer (Time)
werden auf dem Display rechts
oben angezeigt. Um zwischen den
Page 40

40
einzelnen Anzeige-Modi zu wechseln
drücken Sie den Power-Taster 4-mal
in Folge, um das Menü zu aktivieren.
Drücken Sie mehrmals den RaufTaster, um aus AMP, Puff oder Time
zu wählen. Bestätigen Sie durch
Drücken des Powertasters Ihre
Einstellungen.
Bildschirmanzeigedauer /
Bildschirmschoner:
Wenn die Buzz eingeschaltet
ist, halten Sie den Rauf- und
den Power-Taster gleichzeitig
gedrückt, um in das Menü für die
Bildschirmanzeigeoptionen zu
gelangen. Drücken Sie den linken
Einstelltaster für eine rotierende
Auswahl und anschließend den
Power-Taster, um die ausgewählte
Zeit zu bestätigen.
Stealth-Modus:
Wenn die Buzz eingeschaltet
ist, drücken Sie gleichzeitig den
Power- und Runter-Taster, um den
Stealth-Modus (OLED-Display aus)
zu aktivieren oder zu deaktivieren.
Bedienung der Buzz
Page 41

41
Bedienung der Buzz
Tastensperre:
Wenn die Buzz eingeschaltet
ist, drücken Sie gleichzeitig den
Rauf- und Runter-Taster – mit
dieser Abfolge können diese Taster
gesperrt und entsperrt werden.
Display-Anzeige drehen:
Wenn die Buzz ausgeschaltet ist,
drücken sie gleichzeitig den Raufund Runter-Taster, um die DisplayAnzeige um 180° zu drehen.
Hinweise und Warnungen
Akku-Ladestandanzeige:
Der Ladestand des Akkus wird auf
dem Display angezeigt.
Kurzschluss-Schutzfunktion:
Wenn das Gerät einen
Verdampferkopf-Kurzschluss
erkannt hat, erscheint am Display
die Meldung ‘Atomizer Short’. Wenn
dies passiert, installieren Sie einen
neuen Verdampferkopf.
Page 42

42
Bedienung der Buzz
10 Sek. Sicherheitsabschaltung:
Hält man den Powertaster länger
als 10 Sek. gedrückt, wird die
Stromzufuhr an den Verdampfer
unterbrochen - am Display erscheint
die Meldung ‘Over 10s Protection’.
Niedrige Akkuspannung:
Fällt während des Betriebes die
tatsächliche Akkuspannung auf
unter 2.9V, erscheint am Display die
Meldung ‘Weak Battery’. Hierbei wird
die Ausgabeleistung automatisch
angepasst und reduziert. Wird der
Akku aufgeladen, erfolgt wieder eine
normale Leistungsabgabe.
Tiefentladeschutz:
Fällt die tatsächliche Akkuspannung
auf unter 3.1V, erscheint auf dem
Display die Meldung ‘Battery low’,
gefolgt von der Meldung ‘Battery
low lock’, wenn versucht wird das
Gerät weiter zu nutzen. Solange kein
Ladevorgang erfolgt, ist das Gerät
für eine weitere Nutzung gesperrt.
Page 43

43
Bedienung der Buzz
Keinen Verdampfer erkannt:
Wenn kein Tank an der
Buzz angeschlossen oder
der Verdampferkopf nicht
ordnungsgemäß eingesetzt wurde,
erscheint auf dem Display die
Meldung ‘No atomizer found’ (keinen
Verdampfer erkannt).
Temperaturwert erreicht:
Wenn im VT-Modus der eingestellte
Temperaturwert erreicht wurde,
erscheint auf dem Display die
Meldung ‘Temp Protection’. Das
Gerät kann normal weiter genutzt
werden.
Temperatur-Alarm:
Wenn die Betriebs-Temperatur des
Gerätes bei 70°C angelangt ist, wird
die Stromzufuhr an den Verdampfer
automatisch unterbrochen und am
Display ‘Device Too Hot’ angezeigt.
Lassen Sie bei dieser Meldung das
Gerät abkühlen.
Page 44

44
Kit Inhalt
1 x Buzz Body
1 x Hornet Tank
1 x 0.4 Ohm ProC1 DL Verdampferkopf
1 x 0.5ohm ProC1-S MTL Verdampferkopf
1 x Ersatz Tankglas
1 x Satz Dichtungsringe
1 x USB-Kabel
1 x Bedienungsanleitung
Page 45

45
Technnische Daten
Technische Daten - Buzz:
Abmessungen: 80mm x 38mm x
25mm
Akku-Typ: 18650
Leistung im VW-, VT- und TCRModus: 1W – 80W
Temperaturregelbereich im VTModus: 100-315°C / 200-600°F
TemperaturkoeffizientRegelbereich im TCR-Modus:
1-1000
Akzeptierte
Verdampferwiderstände: 0.05-1.5
Ohm in VT-Modus, 0.1-3.5 Ohm in
VW-Modus
Firmware: Aktualisierbar
Verdampferanschluss: 510er
Gewinde
Technische Daten – Hornet Tank:
Abmessungen: 25mm x 44mm
Tankkapazität: 2ml
Verdampferkopf-Typ: ProC
Maximaler Durchmesser für
Einfüllstutzen: 3,4mm
Page 46

46
Ergänzende Produktinformation
Es bestehen keine Erkenntnisse über medizinische Nebenwirkungen mit
diesem Produkt. Sollten Sie glauben eine Nebenwirkung zu verspüren,
kontaktieren Sie bitte den Hersteller.
Garantie
Die Buzz Komponenten haben eine 28-tägige Garantie. Verdampferköpfe
sind als Verschleißteil von der Garantie ausgeschlossen und durch eine DOARegulierung abgedeckt. Das mitgelieferte USB-Kabel hat eine 12-monatige
Garantie. Sollte eine Komponente fehlerhaft sein, bitten wir Sie Ihren Händler
oder den Totally Wicked Kundenservice zu kontaktieren.
Page 47

47
Aufbewahrungshinweise und Sicherheitsinformationen
• Die Buzz und das Zubehör außerhalb der Reichweite von Kindern und Tieren
aufbewahren.
• Schalten Sie die Buzz aus, wenn nicht in Gebrauch.
• Vermeiden Sie versehentliches Drücken des Powertasters, wenn die Buzz
nicht in Gebrauch ist.
• Verwenden Sie nur das beigefügte USB-Ladekabel.
• Alte oder defekte Akkus nach den gesetzlichen Bestimmungen entsorgen.
• Sollte im VT-Modus eine Heizwendel mit einem Widerstand höher als
1.5 Ohm zum Einsatz kommen, schaltet das Gerät automatisch in den
leistungsgeregelten VW-Modus.
• Akku nicht in feuchter Umgebung aufladen.
• Bei Außentemperaturen unter -10°C und über 60°C Gerät nicht nutzen.
• Akku nicht bei Temperaturen unter 0°C oder über 45°C aufladen.
• Versuchen Sie nicht eine defekte Buzz zu reparieren. Beim Reparaturversuch
erlischt die Garantie.
Page 48

Manufactured in China
under the authority
of Pillbox38 UK Ltd,
Stancliffe Street,
Blackburn, Lancashire,
BB2 2QR.
Tel 01254 692244
www.totallywicked.co.uk
Tel 1(888) 761-9425
www.totallywicked.com
Tel 0941-78447082
www.totallywicked.de
 Loading...