

Page 1

USER MANUAL
Page 2

TOTALLY WICKED
AURA
ELECTRONIC
CIGARETTE KIT.
CONGRATULATIONS
ON PURCHASING YOUR
Page 3
3
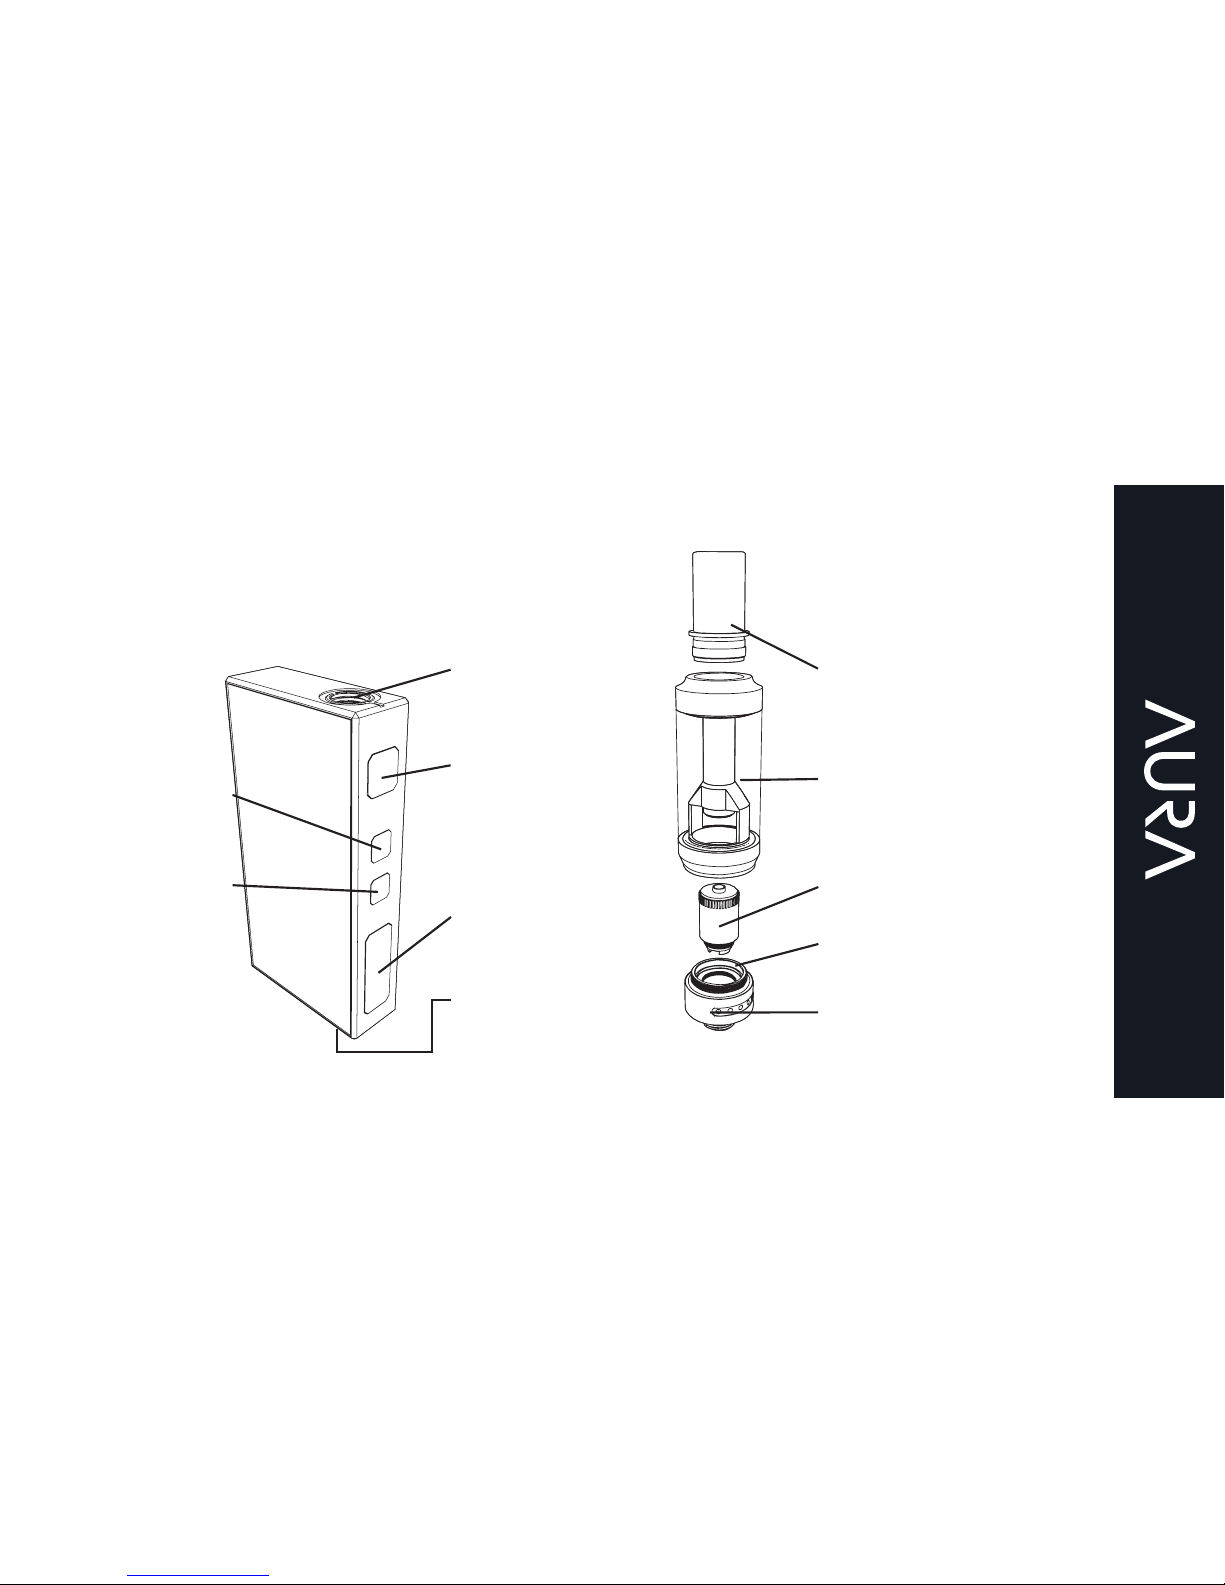
Tank
connection
Power
button
UP
adjustment
button
DOWN
adjustment
button
AURA BATTERY CS AURA TANK
Mouthpiece
Glass
section
Airflow
control ring
Atomizer
head
Tank
base
LED
screen
USB
charging
port
Page 4
4
AURA QUICK START GUIDE
If you are familiar with using e-cigarettes, follow the quick start guide
below to get vaping in minutes:
• Prime the atomizer head.
• Fill the tank.
• Switch the Aura on (5 clicks of the power button).
• Set the Aura to 12 watts.
• Press the power button and inhale
• Charge the battery (possibly not shipped with a full charge).
Detailed descriptions of these steps and more are given in the full user guide below.
Page 5
5
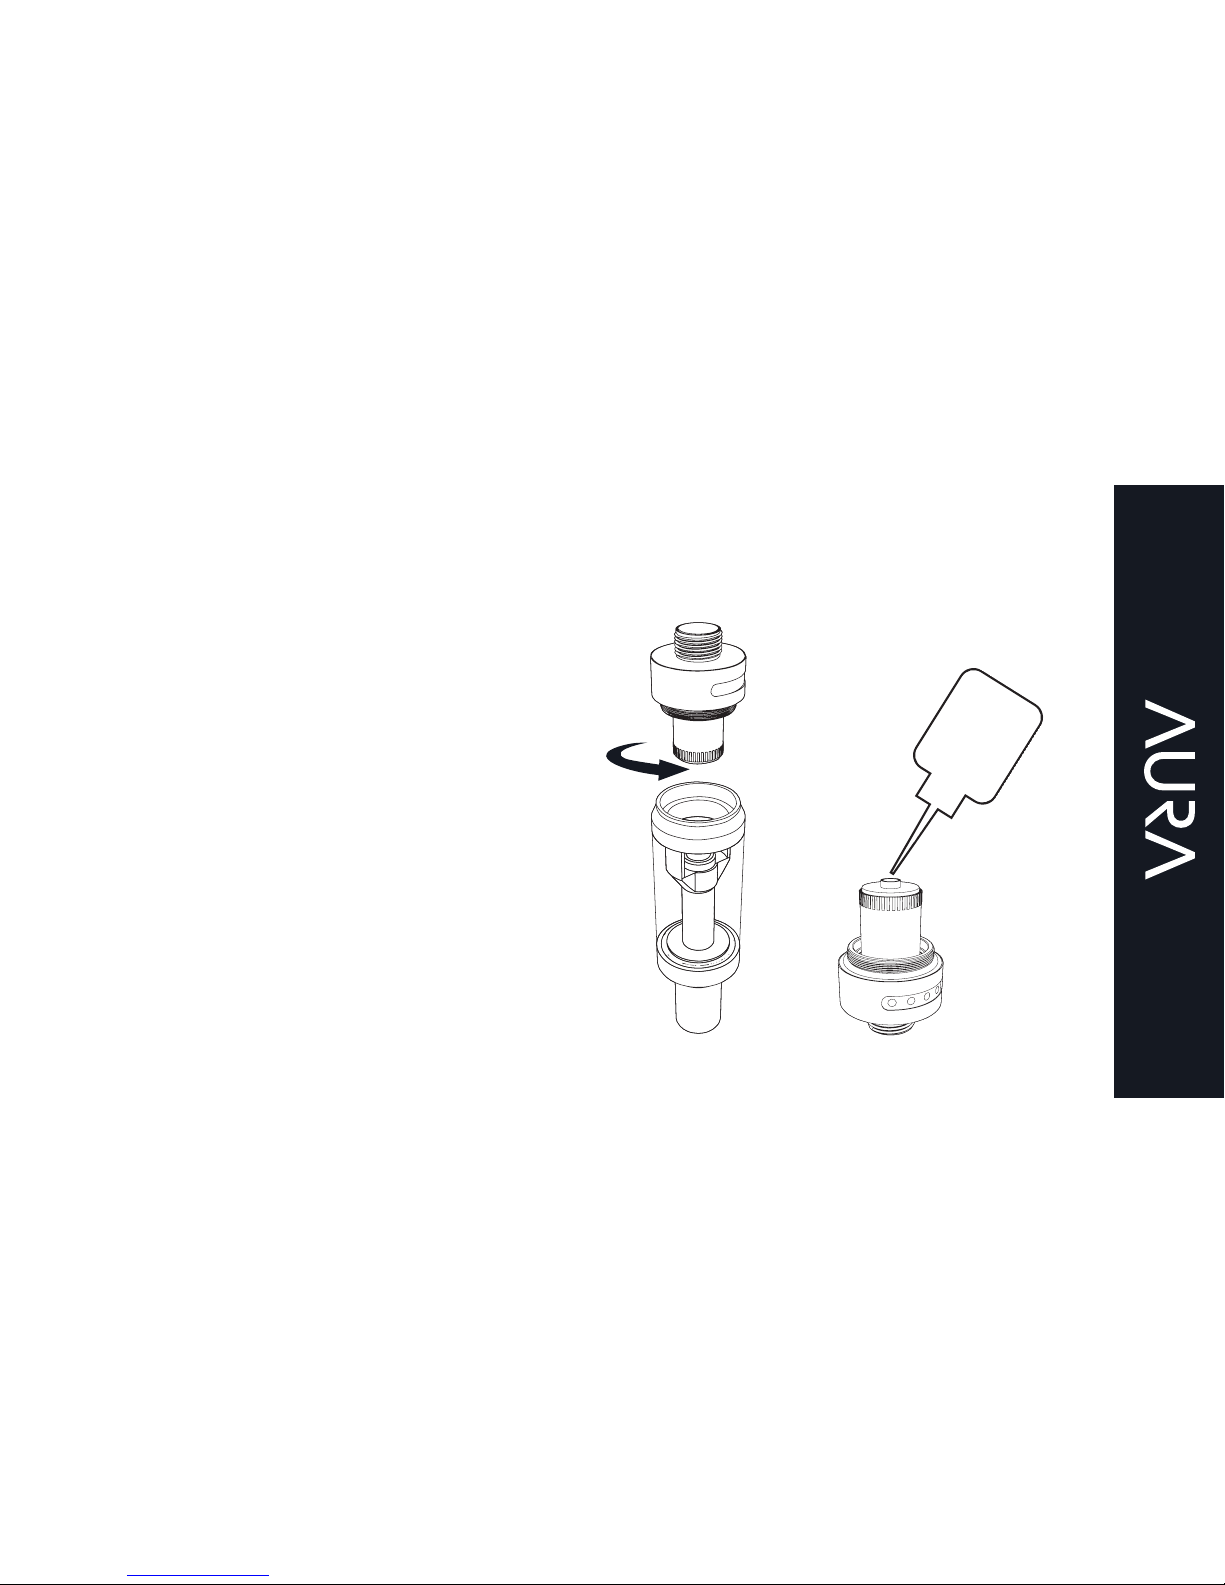
Priming the Atomizer Head
Remove the tank from the Aura battery by
unscrewing at the tank base. Turn the tank
upside down, then unscrew the tank base
from the glass section of the tank. Prime
the atomizer head by dripping a few drops
of e-liquid into its central hole.
USING YOUR AURA - PRIMING
Page 6
6
USING YOUR AURA - FILLING
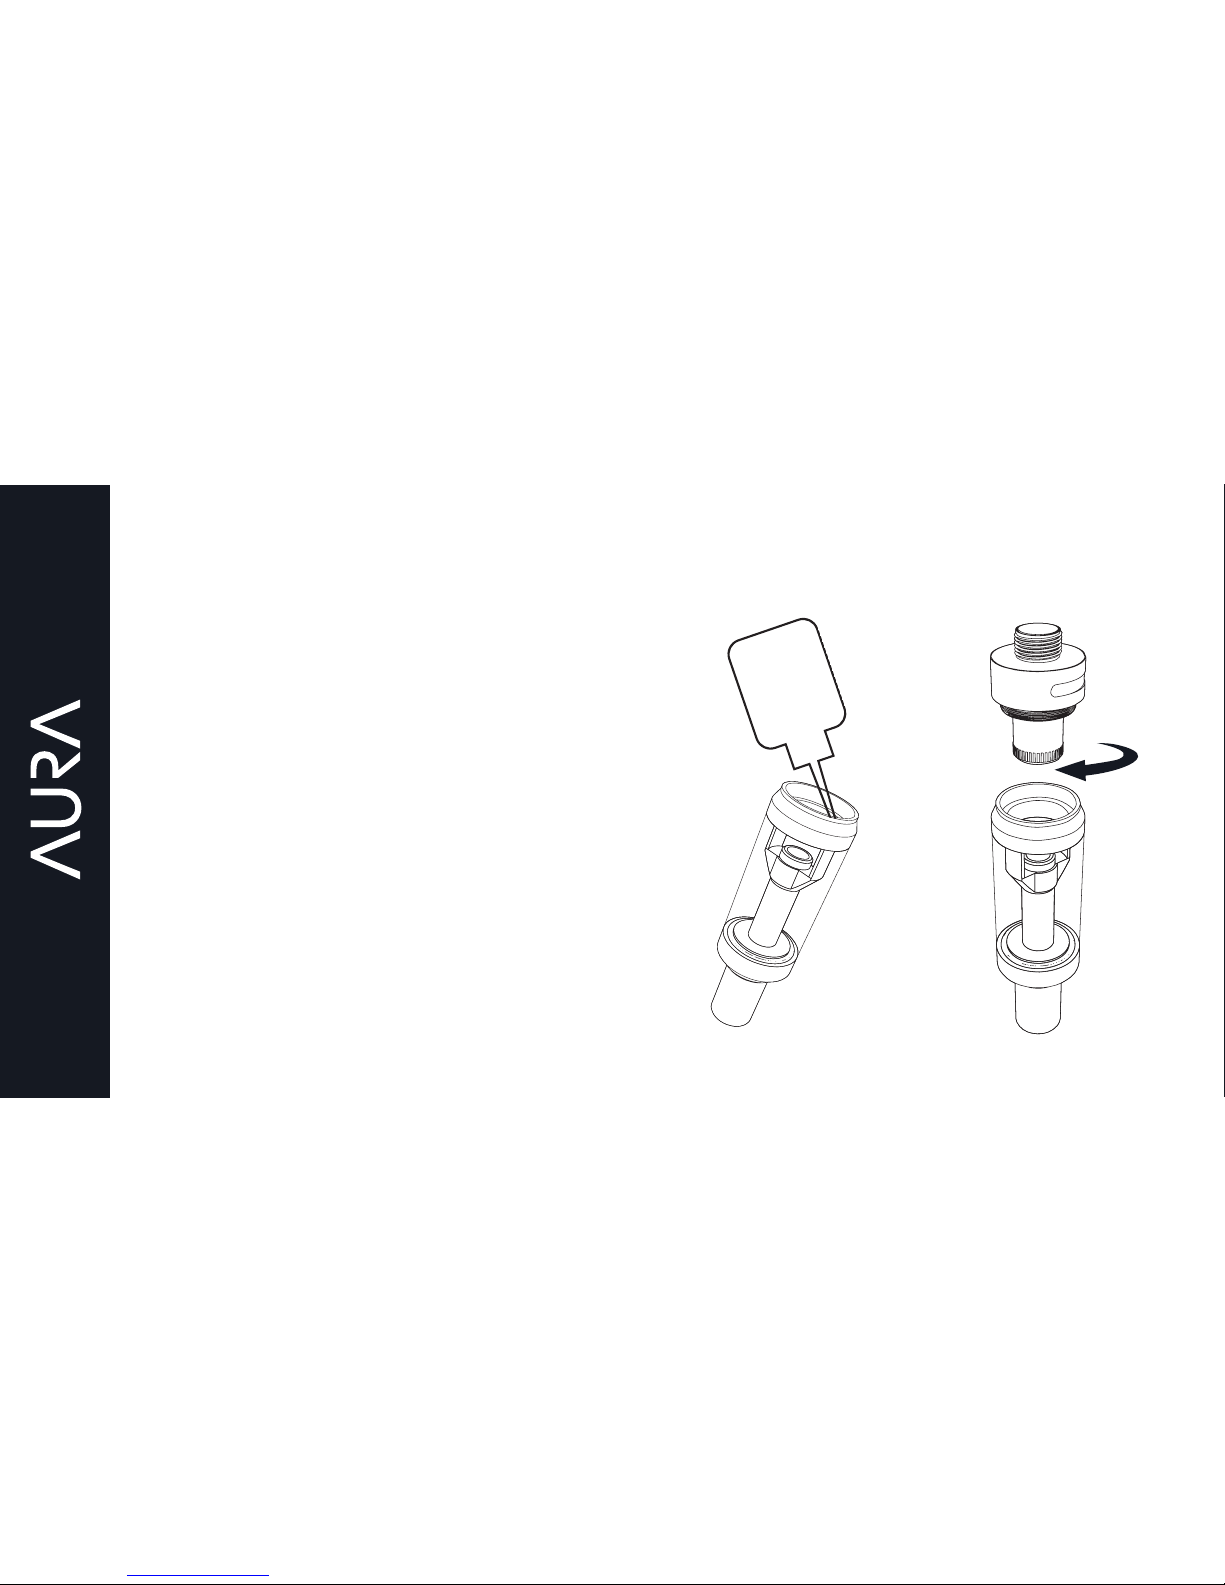
Filling the Tank
Fill the tank through one of the apertures
either side of the central air hole. Do not
allow any e-liquid to enter the central air
hole. Once filled, screw the tank base back
onto the glass section of the tank then fit
the tank back onto the Aura battery.
Note: After priming a new atomizer head
and filling the tank, it is recommended to
wait 5 minutes before vaping to ensure the
atomizer head is fully saturated.
Page 7

7
Atomizer Head Lifespan
Atomizer heads do not last forever and
need to be periodically replaced. Time
in use before replacement is required
is generally from a few days to several
weeks, depending on power used, vaping
style, flavour and type of e-liquid used. A
slight burnt taste, general loss of vapour
production or a reduction in flavour
intensity can all be indicators that the
atomizer head requires replacement.
Powering On and Off
Switch the Aura on by quickly pressing
the power button five times, the screen
will activate indicating the Aura has been
switched on. Quickly pressing the power
button five times will switch the Aura off, the
screen will deactivate indicating the Aura
has been switched off.
USING YOUR AURA
Page 8
8
USING YOUR AURA - SETTING THE CORRECT WATTAGE
The wattage on the Aura battery is
adjustable and can be set from 1-30 watts.
The wattage is set to 30W out of the box,
we recommend reducing the wattage to
12W to prevent the atomizer head from
burning prematurely. To set the correct
wattage, ensure the Aura is switched on;
then keep pressing the down adjustment
button until the screen reads 12W. Lower
wattage settings produce cooler, less
dense vapour: but setting the wattage too
low will produce little, if any vapour. Higher
wattage settings produce larger clouds of
vapour, but setting the wattage too high
can lead to poor flavour; or even a burnt
taste in the vapour. Experiment to find your
own favourite setting, which will generally
be between 7W and 15W.
Tip: Press and hold down either of the
adjustment buttons to make speedy
changes to the wattage.
Vaping
Press and hold the power button as you
inhale the vapour, the screen will display
a vape timer while the power button is
held down.
Page 9
9
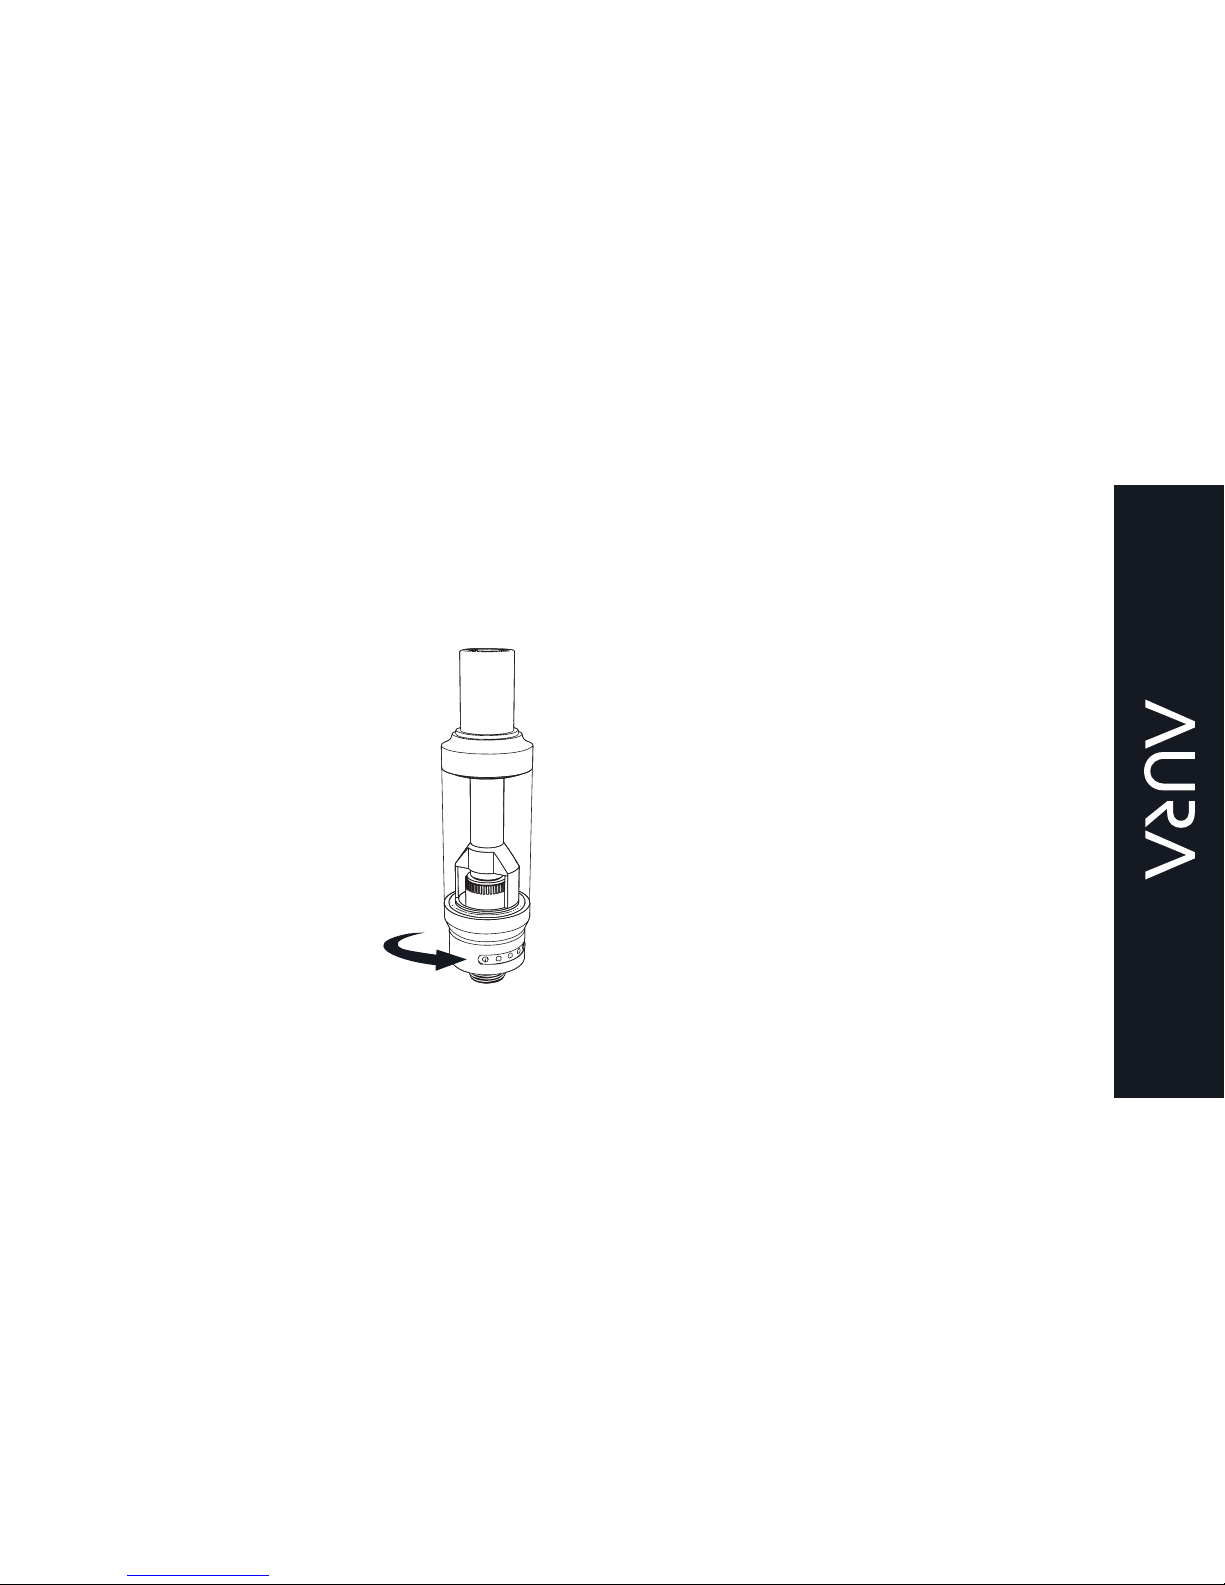
Adjusting Airflow
If you find the air flow
too airy or too tight
while vaping, rotate the
airflow control ring on
the base of the tank.
Exposing more holes
will provide more air
flow while exposing
fewer holes will restrict
the air flow. Experiment
to find your preference.
E-liquid Level
To prevent the atomizer head from
becoming dry and burning prematurely,
ensure the e-liquid level does not drop
below the bottom of the glass section of
the tank.
USING YOUR AURA
Page 10
10
USING YOUR AURA
Atomizer Head Protection
If the power button is held down for longer
than 10 seconds while vaping, the screen
will display “OVER 10S” and the Aura will
refuse to power or produce any vapour.
Releasing the power button will allow
normal operation to resume.
Charging the Battery
The Aura is charged by connecting the
charge port on the battery to a USB port
or suitable wall adaptor with the supplied
charging lead. The screen will activate
when the charge lead is first connected,
and display an animated battery icon while
charging. Once the battery is fully charged
the screen will switch off.
Page 11
11
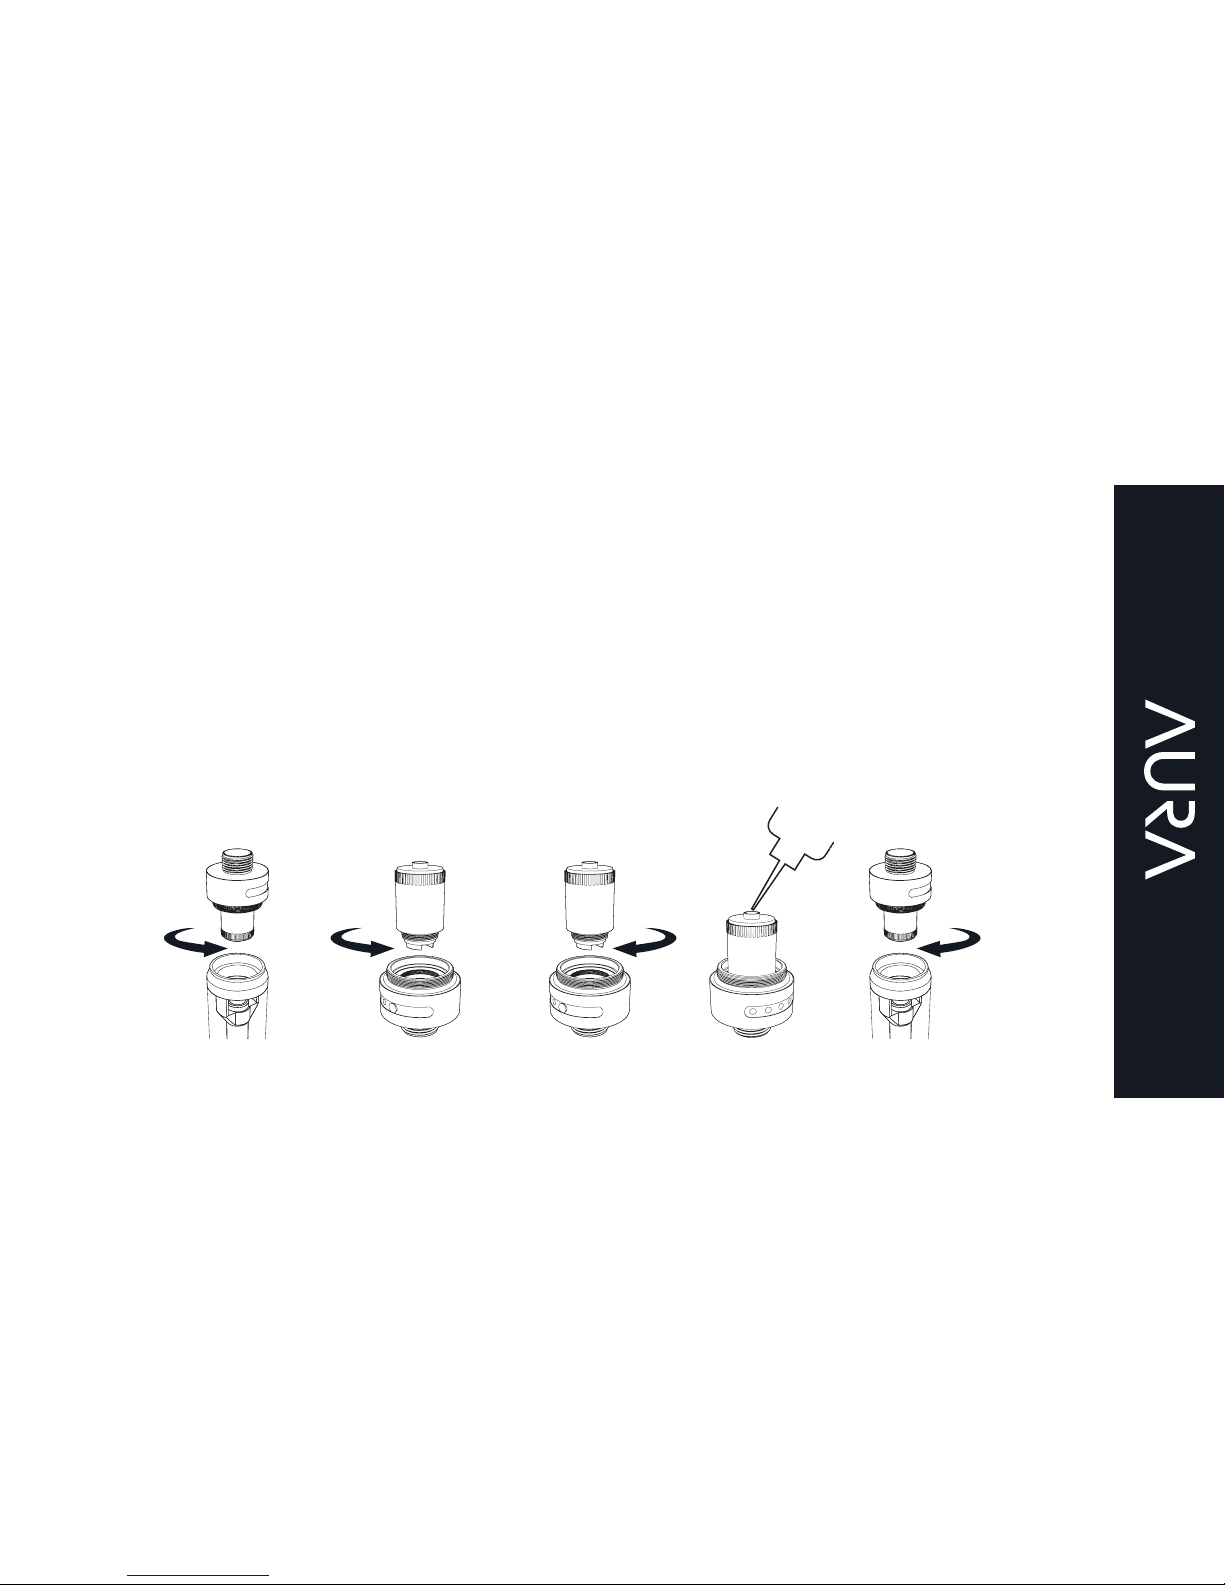
To replace the atomizer head, unscrew the tank from the Aura battery. Turn the tank upside
down, then unscrew the tank base from the glass section of the tank. Unscrew the atomizer
head from the tank base and replace. Prime the new atomizer head by dripping a few drops of
e-liquid into its central hole. Reassemble the tank and refit the tank back onto the Aura battery.
Reminder: After priming a new atomizer head it is recommended to wait 5 minutes before
vaping to ensure the atomizer head is fully saturated.
USING YOUR AURA - REPLACING THE ATOMIZER HEAD
Page 12
12
USING YOUR AURA - SETTINGS
Changing Information
Displayed Onscreen
Ensure the Aura is switched on, then
press and hold down the power and up
adjustment buttons at the same time
until the screen begins to flash. Once the
screen is flashing, keep pressing either of
the adjustment button to cycle between
voltage (V), puff counter (P), total time
vaping in seconds (S) or bigger battery
icon displayed onscreen. Press the power
button to confirm the selection.
Stealth Mode
If stealth mode is enabled, the display
will not activate when pressing the power
button to vape. Tapping the power button
will briefly activate the display enabling you
to view current settings, the display will also
activate whenever the adjustment buttons
are pressed to make changes to wattage.
To enable/disable stealth mode, ensure the
Aura is switched on; then press and hold
down the power and down adjustment
buttons at the same time, the screen will
display “STEALTH ON” when enabled and
“STEALTH OFF” when disabled.
Page 13

13
Key Lock Mode
Key lock mode prevents accidental
changes to the wattage. If key lock is
enabled, the screen will display “LOCK”
if the adjustment buttons are pressed.
Adjustments to wattage cannot be made
until key lock has been disabled. To
enable/disable key lock, ensure the Aura
is switched on; then press and hold down
both adjustment buttons at the same time,
then screen will display “LOCK” when
enabled and “UNLOCK” when disabled.
Rotating The Display
Switch the Aura off, then press and hold
down both adjustment buttons at the same
time to rotate the display 180°. Switch the
Aura back on.
Page 14

14
Short Circuit Protection
If an atomizer short circuit occurs, or the
resistance of the fitted atomizer head
is below 0.6ohm the screen will display
“ATOMIZER SHORT” and the Aura will
refuse to power or produce any vapour.
Replacing the atomizer head should allow
normal operation to resume. To replace the
atomizer head follow the steps outlined in
REPLACING THE ATOMIZER HEAD above.
No Atomizer Head Detected Protection
If no atomizer head is detected, or the
resistance of the atomizer heads exceeds
3.0ohm; the screen will display “NO
ATOMIZER” and the Aura will refuse to
power or produce any vapour. Ensure the
fitted atomizer head is fully screwed into the
base of the tank, then refit the tank onto the
battery. If the “NO ATOMIZER” message
continues, replacing the atomizer head
should allow normal operation to resume.
To replace the atomizer head follow
the steps outlined in REPLACING THE
ATOMIZER HEAD above.
PROTECTIONS
Page 15

15
Low Voltage Protection
To prevent damaging the battery, if battery
voltage drops to 3.3V, “LOCK” will be
displayed onscreen and the Aura will
refuse to power or produce any vapour.
Charge the battery using the steps outlined
in CHARGING THE BATTERY above to
unlock the Aura allowing normal operation
to resume.
Temperature Alert
If the temperature of the Aura exceeds the
maximum safe operating temperature,
the screen will display “DEVICE TOO
HOT” and the Aura will refuse to power or
produce any vapour. Stop vaping and allow
the Aura to cool down for normal operation
to resume.
Page 16
16
Cleaning And Maintenance
The Aura battery and tank connection can
be cleaned by wiping down with tissue or a
dry cloth. The CS Aura tank can be cleaned
by removing it from the battery, unscrewing
the tank base from the glass section of the
tank then removing the atomizer head. The
entire tank and base can now be cleaned
under hot running water. Allow the tank to
fully dry before refitting the atomizer head
into the tank base. Reassemble the tank.
Note: Do not attempt to clean the atomizer
head with water. Do not submerge the Aura
battery unit in water or allow it to get wet.
Available Atomizer Heads
If you would like to try vaping with
increased power, vapour production and
more air flow, CS 0.75ohm and 1.2ohm
atomizer heads are available to purchase
separately. The CS 0.75ohm can be vaped
from 14W – 25W and the CS 1.2ohm can
be vaped from 13W – 30W. Higher wattage
settings will require more frequent battery
charging and may require the atomizer
head to be replaced more often.
Note: you may need to reduce the strength
of your e-liquid when vaping at higher
power settings.
Page 17

17
SPECIFICATIONS
Aura Battery
Dimensions: 77mm (length)
x 37mm (depth) x 15.0mm (width).
Weight: 120g.
Battery capacity: 1500mAh.
Output mode: Variable Wattage.
Wattage range: 1 – 30 watts.
Voltage range: 0.5 – 8.0 volts.
Maximum charging current: 2.0 amperes.
Thread type: 510 Connection.
Atomizer resistance compatibility:
0.6ohm – 3.0ohm.
CS Aura Tank
Dimensions: 15mm (diameter)
x 57mm (length).
Weight: 24g.
Tank capacity: 1.8ml.
Atomizer type: CS.
Thread type: 510 Connection.
Atomizer head resistance: 1.5ohm .
Airflow type: Bottom, adjustable.
Maximum refill nozzle diameter: 3.3mm.
Recommended power: 7-15W.
Suggested power: 12W.
Page 18
18
• Store the Aura e-cigarette and its accessories away from children whilst not in use.
• Please only use the charging cable provided.
• Please dispose of dead batteries in accordance with your country’s appropriate legislation.
• Do not charge the battery in a damp environment, or in temperatures under 0°C
or above 45°C.
• Do not use the device in temperatures under -10°C or above 60°C.
• Do not carry batteries in a pocket or bag with other metallic objects.
• Do not attempt to repair a faulty Aura battery as these are sealed units with
no serviceable parts. Attempted repairs will void the warranty.
Additional Product Information
There are no reported medical side effects with this product. If you believe you experience a
side effect, please contact the manufacturer.
PRODUCT STORAGE AND BATTERY PRECAUTIONS
Page 19

19
Aura components have a 28-day parts
warranty with the exception of atomizer
heads which are consumable items and
are covered by our ‘Dead on Arrival’
warranty only. The USB cable supplied has
a 12-month warranty. If any parts are found
to be faulty within this time please contact
our customer service team, whose details
are on the back page of this booklet and
we will arrange for a replacement. We may
require the goods to be returned for further
investigation.
WARRANTY KIT CONTENTS
1 x Aura battery
1 x CS Aura tank
1 x CS 1.5ohm atomizer head (fitted)
1 x USB charging cable
1 x User manual
Page 20
Manufactured in China
under the authority
of Pillbox38 UK Ltd,
Stancliffe Street,
Blackburn, Lancashire,
BB2 2QR.
Tel 01254 692244
www.totallywicked.co.uk
Tel 1(888) 761-9425
www.totallywicked.com
Tel 0941-78447082
www.totallywicked.de
 Loading...