

Page 1
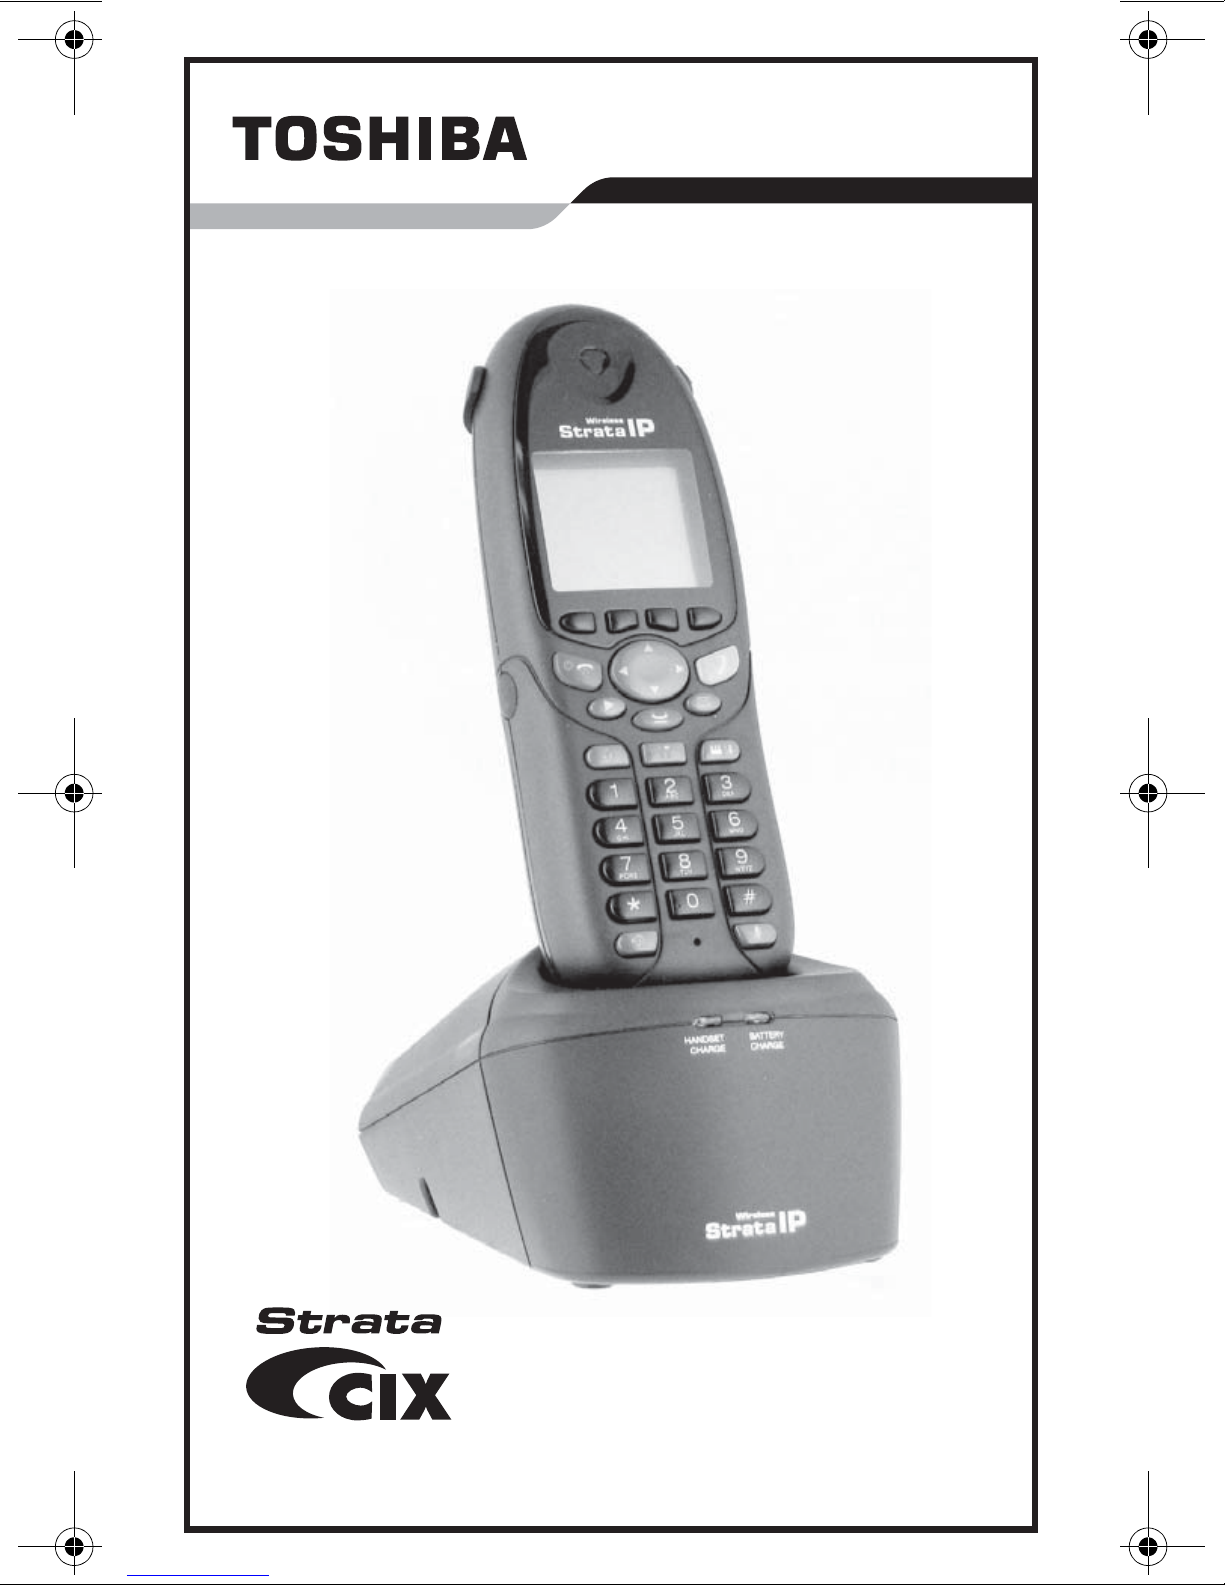
Strata Wireless IP Telephone
Quick Reference Guide
The Full-Featured IP Telephone Solution
Page 2

© Copyright 2004
Toshiba America Information Systems, Inc.
Digital Solutions Division
All rights reserved. No part of this ma nu al, cov er e d by the cop y rig hts hereon, may
be reproduced in any form or by any means—graphic, electronic, or mechanical,
including recording, taping, photocopying, or information retrieval systems—
without express written permission of the publisher of this material.
Strata is a registered trademark of T oshiba Corporation.
Trademarks, registered trademarks, and service marks are the property of their
respective owners.
Safety and Compliance Instructions
Review the Safety and Compliance Instructions sheet found in your Wireless IP
Telephone box and all the other product safety instructions that are included on the
product.
Publication Information
T oshiba America Information Systems, Inc., Digital Solutions Division, reserves the
right, without prior notice, to revise this information publication for any reason,
including, but not limited to, utilization of new advances in the state of technical arts
or to simply change the design of this document.
Further, Toshiba America Information Systems, Inc., Digital Solutions Division,
also reserves the right, without prior notice, to make such changes in equipment
design or components as engineering or manufacturing methods may warrant.
CIX-QR-WIPT2-VA - Draft 3
Version A, October 2004
Printed in China
Draft - Wireless IPT Quick Reference Guide 10/04
Page 3

Contents
Introduction....................................................................1
Packaging List................................ ..... .... ..... ..................1
Battery Charging............................................................2
Spare Battery Pack.........................................................3
Belt Clip.........................................................................3
Headset (Optional)....................................... .... ..............4
Strata Wireless IP Telephone.........................................4
Setup for New Users......................................................5
Vibrate Mode.................................................................5
What’s My Line?...........................................................6
Which Outgoing/Incoming Call Features Do I Have?...6
Which Codes Do I Use?.................................................7
Unlock Telephone..........................................................7
Soft Keys........................................................................7
Flexible Buttons.............................................................8
Making a Call.................................................................9
Answering a Call ..........................................................9
Account Code Calls.......................................................9
Call Transfer................................................................10
Conference Calls..........................................................10
Hold .............................................................................12
Call Forward - Any Calls.............................................13
Call Park Orbits ...........................................................13
Call Pickup...................................................................14
Echo Cancel.................................................................14
Paging ..........................................................................14
Redial...........................................................................15
Speed Dial....................................................................15
One Touch Buttons......................................................15
Voice Mail Call Monitor..............................................16
Voice Mail - Direct Transfer .......................................16
Volume Control ...........................................................16
LCD Features...............................................................17
Draft - Wireless IPT Quick Reference Guide 10/04 i
Page 4
Introduction
This quick reference guide applies to Toshiba Strata Wireless IP
Telephone (WIPT) connected to a Strata CIX/CTX system. The
WIPT handset supports 11 fixed buttons, four LCD Control
Buttons/Soft Keys and 10 Flexible buttons (Programmable
buttons).
This telephone has 160 x 100 pixel Graphic LCD Display which
supports Toshiba’s two-line by 24-character and 10 Flexible
Buttons display. The LCD also includes a Local Status bar update.
See “Strata Wireless IP Telephone” on page 4.
Important! Your handset may not have all of the features
mentioned in this manual. See your Strata CIX/CTX
System Administrator for more information. Use the
check boxes or blank lines to enter the variable
selections for your telephone.
Packaging List
Your Toshiba WIPT package includes the following:
WIPT2000 Strata Wireless IP Handset
WIPT2000A-BTT Battery pack
WIPT2000A-CHG Charger for handset and spare battery pack
WIPT2000A-CLP Belt clip
WIPT2000A-ACA-A AC adapter for the Charger (North America)
WIPT2000A-CVR Battery cover plate
CIX-QR-WIPT2-VA Quick reference guide (QRG)
CIX-SC-WIPT2-VA Safety and Compliance Instruction Sheet
CAUTION
Do not use cleansers that contain benzene, paint
thinner, alcohol or other solvents on the telephone
charger’s rubber feet. The color of the rubber may
transfer to the desk or mounting surface.
1 Draft - Wireless IPT Quick Reference Guide 10/04
Page 5
Battery Charging
Important! You must charge the battery continuously for five
hours before using the telephone for the first time.
³ To charge the Battery
1. Remove the battery cover on the back of the handset by
pressing the latch and sliding the cover down and off the
handset.
2. Slide the battery pack into the handset.
3. Securely close the battery compartment cover by sliding it up
until it snaps into place.
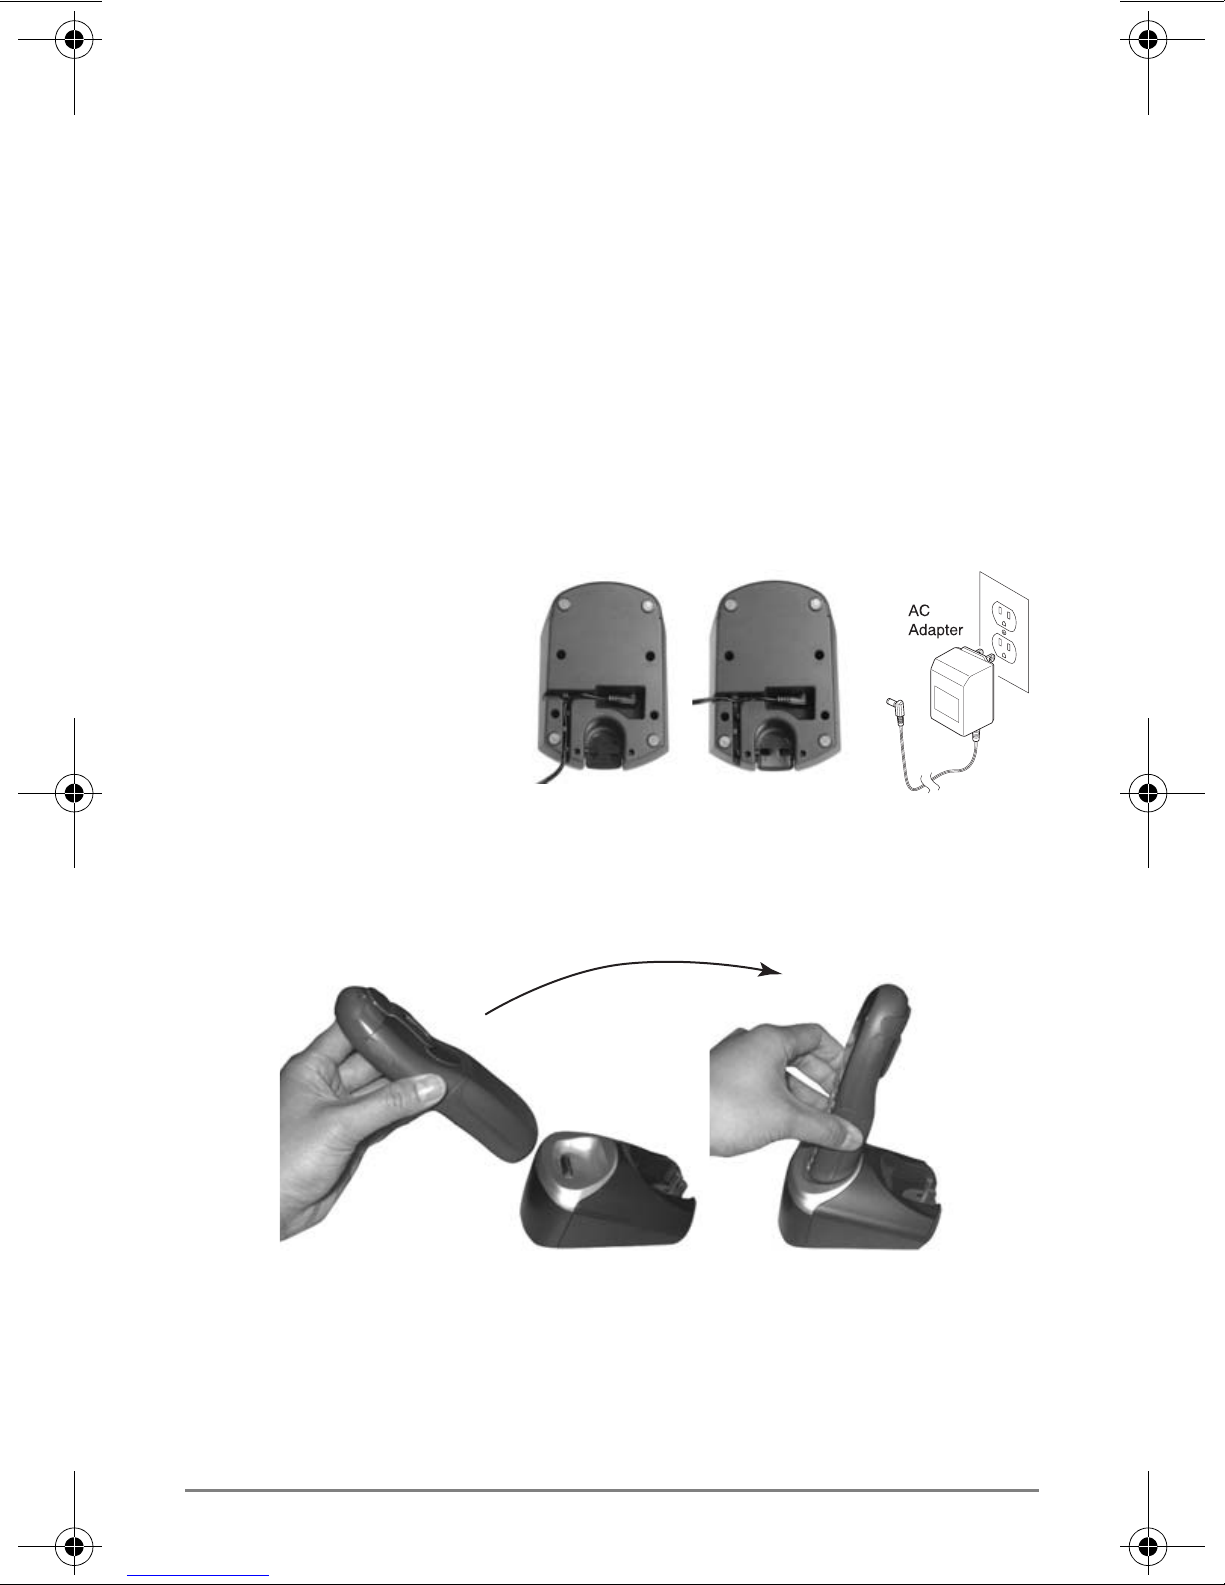
4. Plug the AC
adapter cord into
the input jack on
the charging unit
(shown right).
You can wire the
a
b
7623
AC adapter cord
either to the rear (figure a) or to the left side (figure b).
5. Plug the AC adapter into a standard 120VAC wall outlet.
6. Place the handset in the charging unit (shown below).
7622
7. Ensure that the HANDSET CHARGE LED lights steady Red.
If it does not, make sure that the AC adapter is plugged in and
that the handset is making good contact with the charging unit
contacts.
Draft - Wireless IPT Quick Reference Guide 10/04 2
Page 6
Note You can place the handset in the charging unit with or
without the belt clip attached.
CAUTION
Use only the supplied AC adapter.
Refer to Packaging List on page 1 for the proper type.
CAUTION
Always route the power cord where it is not a trip
hazard, and where it cannot become chafed and
create a fire or electrical hazard.
Spare Battery Pack
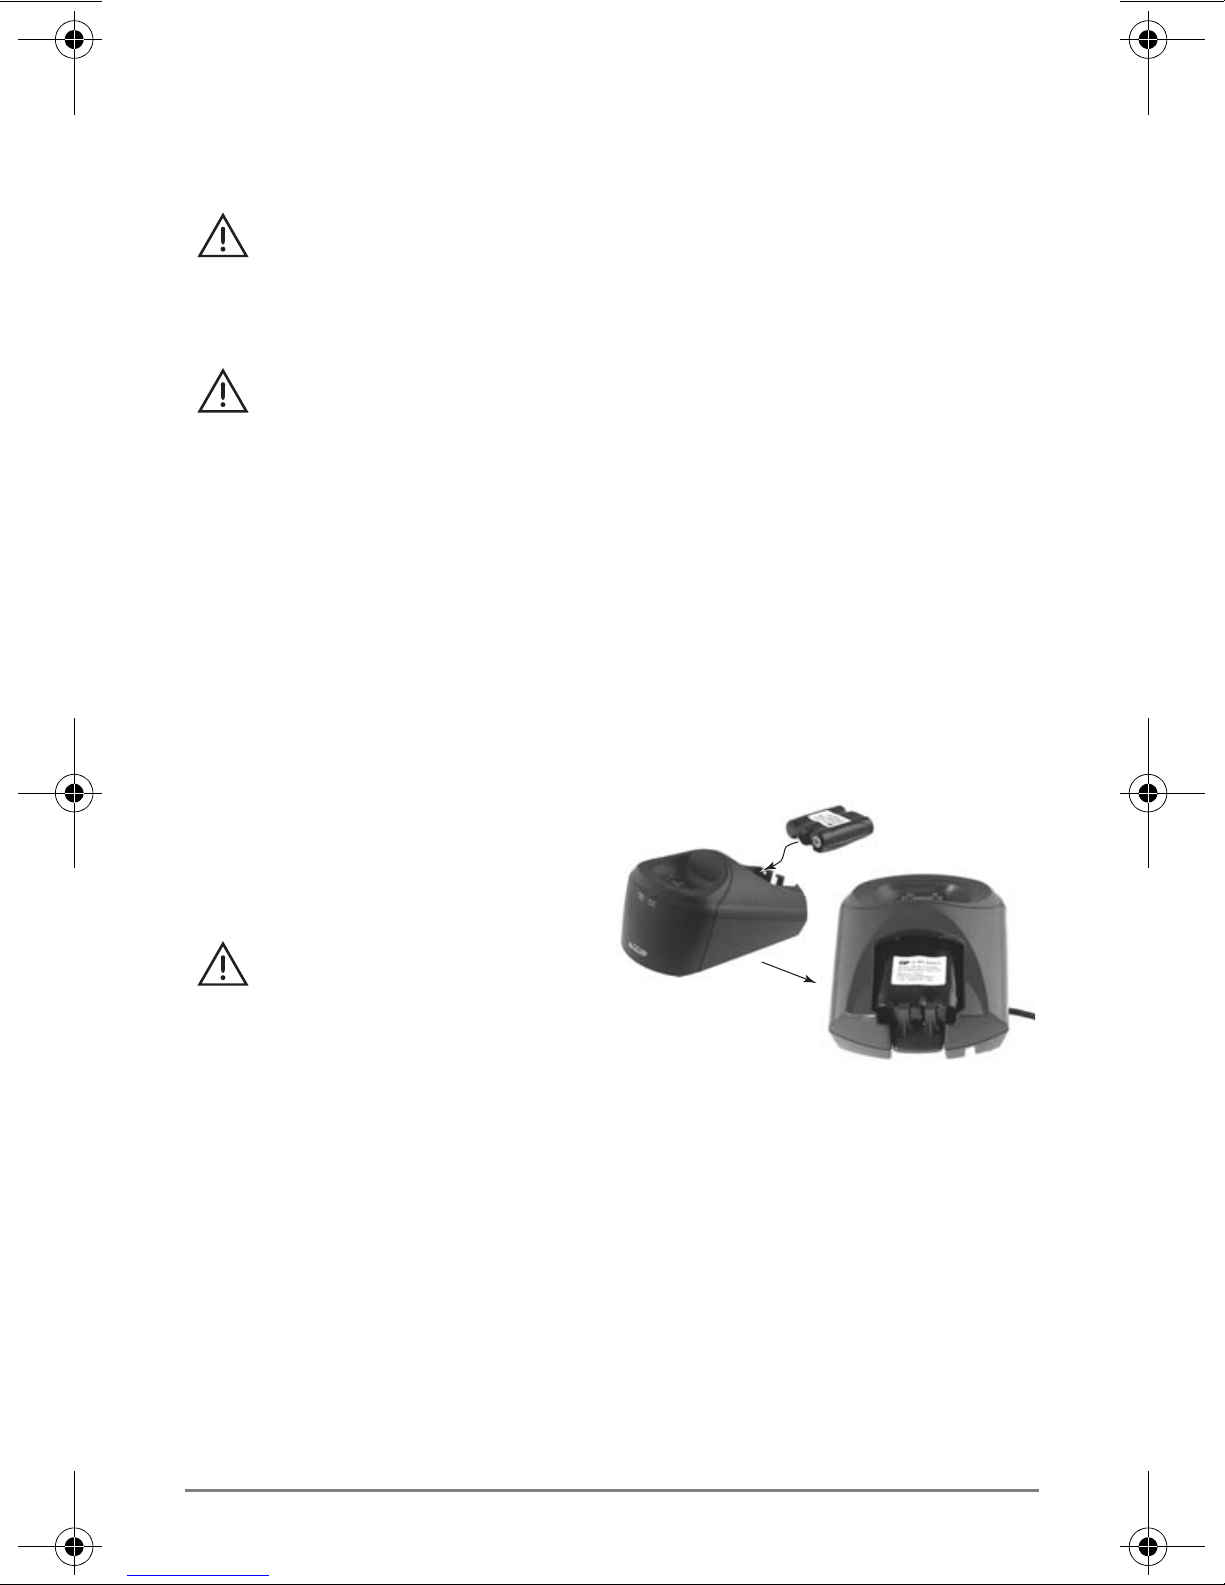
You can purchase an additional battery pack from Toshiba. The
charging unit is equipped to charge the spare battery pack with or
without the telephone in the back slot.
³ Place the additional battery
Place the additional battery
pack in the back slot of the
CAUTION
Use only the
rechargeable battery
type listed in the
Packaging List on Page 1.
Belt Clip
Use the belt clip to attach the handset to your belt or pocket.
Note The belt clip is designed to fit snugly onto the handset.
7624
1. On the back of the handset, snap the belt clip clasps onto the
holes on either side of the handset. (See “Strata Wireless IP
Telephone” on page 4.
2. Press firmly until it snaps into place.
3 Draft - Wireless IPT Quick Reference Guide 10/04
Page 7
Headset (Optional)
With the headset installed, you can use the belt clip to carry
the telephone and conduct a hands-free conversation.
³ Open the cover over the headset jack that is located on the right side
of the telephone and plug in the headset.
Important! Only use headsets especially designed or modified
for use with radio frequency equipment.
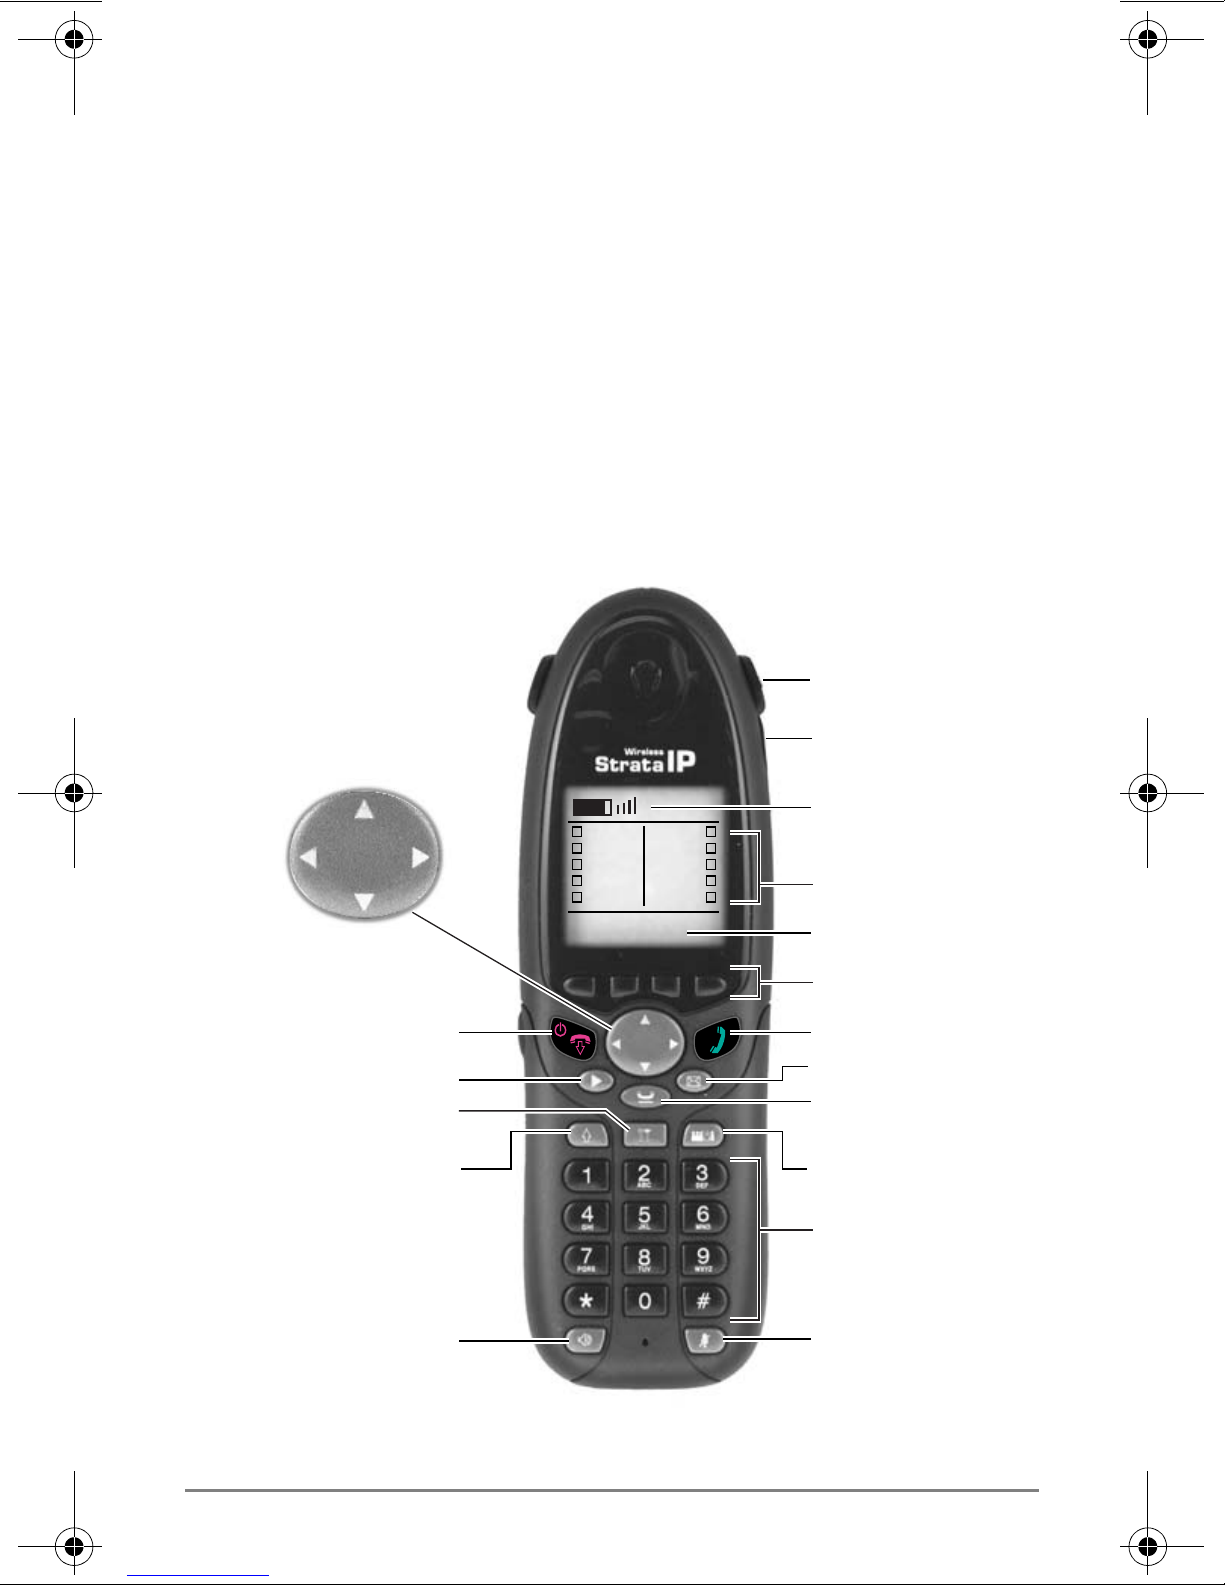
Strata Wireless IP Telephone
Learn your Strata Wireless IP Telephone (WIPT)
Belt Clip
UP
Down
Power On/Off &
On Hook
Flexible Button Access (FBA)
Set up
Speed Dial/Redial
(shift)
5
4
3
2
1
SK1 SK2 SK3 SK4
0
9
8
7
6
Headset Jack
Battery & Wireless Signal
Indicators
Flexible Buttons Display
2 x 24 Display
Soft Keys
Off Hook
Message
Hold
Conference Tranfer
Dial Pad
Speaker
Strata Wireless IP Telephone
Draft - Wireless IPT Quick Reference Guide 10/04 4
Mute
7621
Page 8

Setup for New Users
Important! Ask your System Administrator if your WIPT has
been setup and ready to use. If the telephone is not
setup, then you will require the following
information – SSID, DHCP, Telephone IP address,
subnet mask, router address, Station ID, and the
IP Address for the BIPU.
³ To View your Wireless IP Setup
1. Press
2. Use the S and T arrows to go through the different screens
or press End (On Hook).
Note The following screens display when using the Up/Down
• SSID screen
• Boot option DHCP screen – To edit this screen press the Edit
• IP Sett ing s screen
• Netw ork Information and MAC Address screen
• LCD Cont rast – You can adjust the cont rast on your screen
• Fl exible Button Label Editor screen – You can change the
Setup button. The Local Setup screen displa ys.
arrows:
soft key, make the change, then press SK1 (OK soft key).
using SK2 and SK3
labels of the flexible buttons on your screen. See “To Label
Flexible Buttons” on page 8.
Vibrate Mode
³ To enable, press Mute and S arrow.
³ To disable, press Mute and T arrow.
5 Draft - Wireless IPT Quick Reference Guide 10/04
Page 9

What’s My Line?
Throughout this guide, the word “line” is mentioned. Check mark
which Line type you have. For example, you will be instructed to
“select a line.” “Line” can be:
p Line button
p Pooled Line Group
p Group Line button
p Line out requiring an access code – where you enter an outside line or
line group access code (e.g., dial
9).
Which Outgoing/Incoming Call
Features Do I Have?
Check mark here which outgoing/incoming feature you have on
your system. Then go through the rest of this guide and check mark
that feature where it’s noted.
p Automatic Line Selection (ALS): For outgoing calls: You
have ALS if you hear dial tone and the Line LED lights steady
green when you press
Off-hook or press Spkr.
p Ringing Line Preference: You answer an incoming Line
ringing your station by pressing
Off-hook or Spkr.
p Tone Signaling: Internal/External incoming call: you hear
successive ring tones, then press
Off-hook or Spkr.
p Voice First Signaling: Internal incoming call: your phone does
not ring; instead you hear a long tone, then the caller’s voice.
Talk in the direction of your phone, or answer the call as you
normally would by pressing
Note You can change between Tone and Voice Signaling on a
call-by-call basis by pressing
telephone number.
Off-hook or Spkr.
1 after dialing an internal
p Hot Dialing: If your telephone is programmed for “hot
dialing,” you do not have to press
dialing internal or external calls. When you dial a number, the
speakerphone automatically turns on and the Spkr lights up.
Draft - Wireless IPT Quick Reference Guide 10/04 6
Spkr or go Off-hook before
Page 10
Which Codes Do I Use?
Default feature codes are listed in this guide. Check with your
System Administrator to see if these codes have been changed. If
so, write the new codes in the blank lines and cross out the default
codes. For example:
Cnf/Trn + #46 or .
Unlock Telephone
The telephone will auto lock in a preset time.
³ To Unlock
1. Hold down the setup button for two seconds.
2. Enter your password, then press
#.
Soft Keys
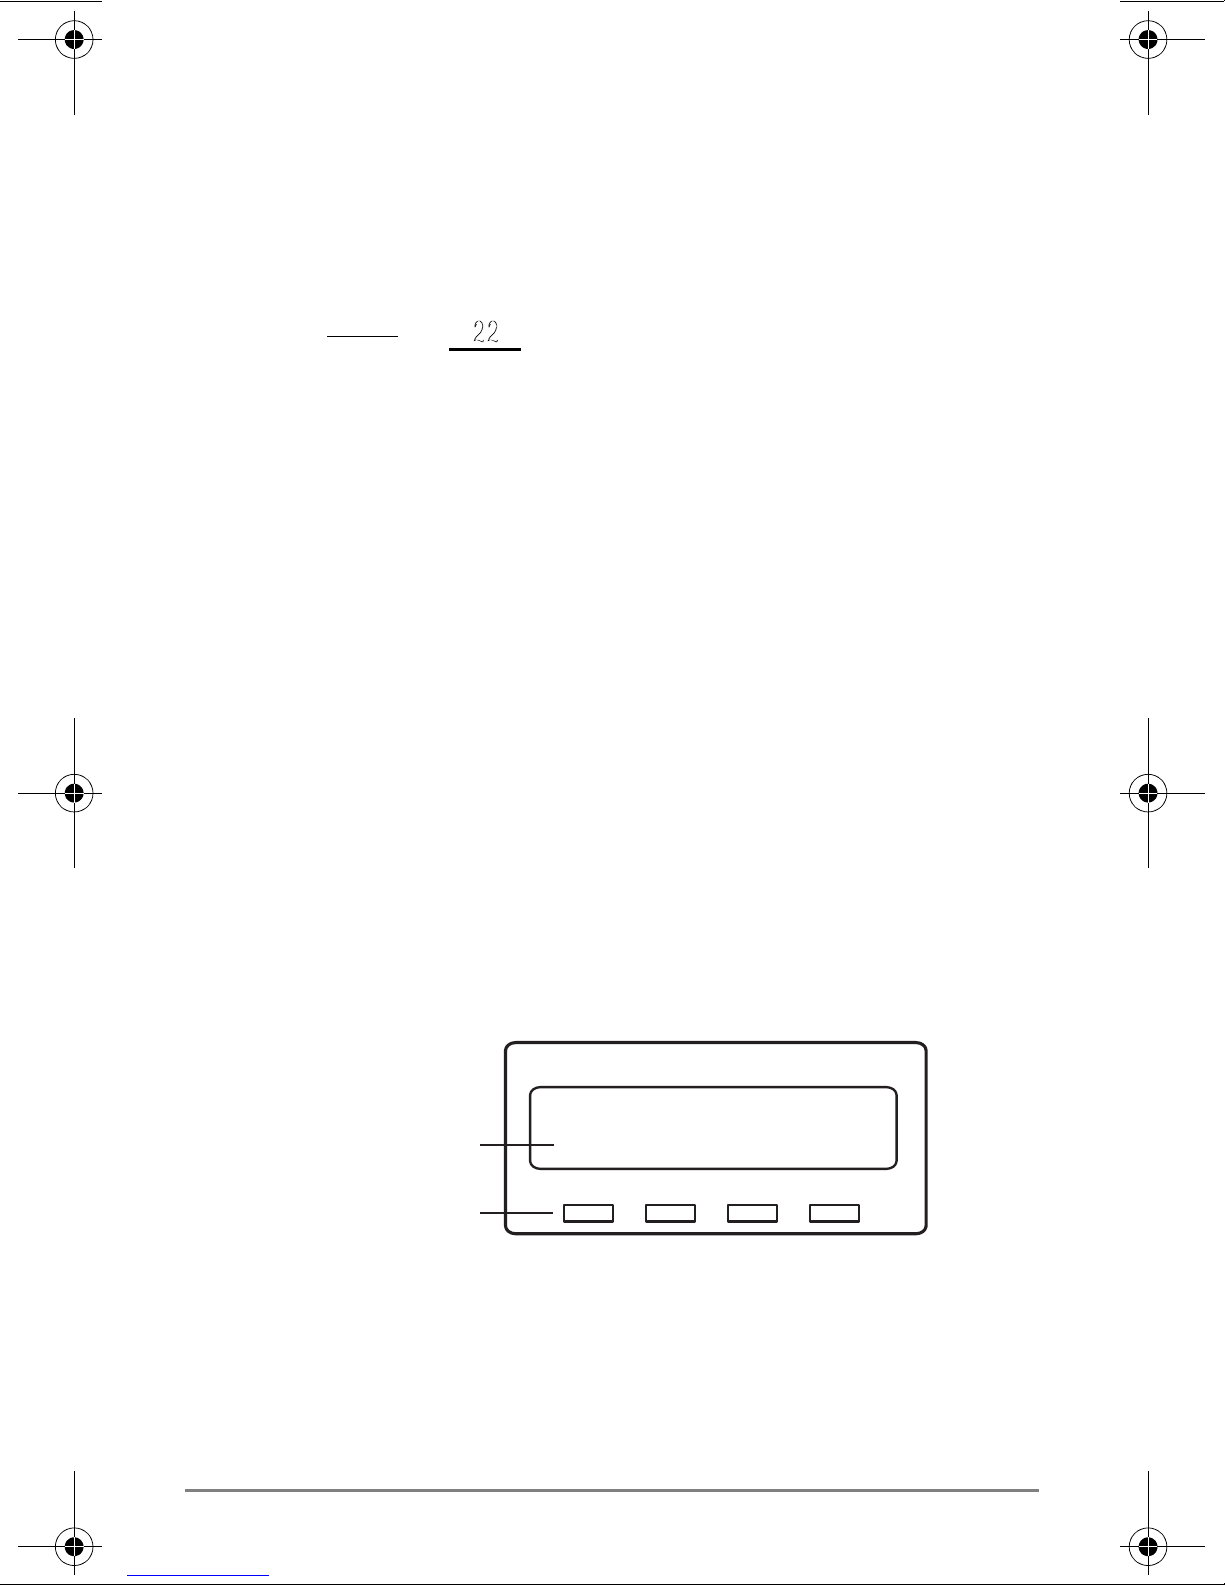
When Soft Key prompts appear on the LCD, the LCD Control
Button just below the prompt offers access to that feature. In this
document we refer to Soft Key/LCD Control Buttons as SK1~SK4,
starting from Left to Right. Here’s an example of how Soft Keys
work.
When an outside call is in progress, the LCD appears as shown
below.
00:01:01
Soft Key
Prompts
LCD Control
Buttons/Soft Keys
ABR CONF PGE
SK1 SK2 SK3 SK4
6060
ABR = Automatic Busy Redial
CONF = Conference
PAGE = Pa ging
Press
SK2 to select CONF, then the display changes.
7 Draft - Wireless IPT Quick Reference Guide 10/04
Page 11

Flexible Buttons
There are 10 Flexible Buttons on your telephone. These buttons are
virtual buttons located on your telephone display that can be used to
store System features.
³ To Access your Flexible Buttons
1. Press
Flexible Button Access (FBA).
2. Use the dial pad to press any number associated with a
Flexible Button feature.
Important!
• Contact your System Administrator to find out the default
features assigned to the Flexible Buttons on your telephone.
• You cannot program your telephone flexible buttons features,
however, you can label the Flexible buttons using your
Telephone.
³ To Label Flexible Buttons
1. Press the
Setup button. The Local Setup screen displays.
2. Use the T arrow untill the “Flexible Label Editor” screen
displays.
This screen displays the soft key labels.
3. Press
4. Press
SK2 or SK3 to move up or down to select a key.
SK1 to Edit.
5. Change the label. You can use the soft keys to Backspace,
Clear and switch to lower and upper case.
6. Press
SK1 to OK.
Draft - Wireless IPT Quick Reference Guide 10/04 8
Page 12

Making a Call
1. To make a call, press Speaker or Off Hook.
2. Dial the number. The display indicates that it is calling. When
connected, you can talk.
...or
³ Press FBA, then press the associated Flexible button number.
Answering a Call
³ Press either Spkr or Off-hook or FAB and the PDN.
Account Code Calls
³ To dial with a Forced Account Code (FAC)
1. Place a call in the normal method.
2. After the tone burst, enter the Account Code.
If the code is invalid, you hear re-order tone and the call is
rejected.
³ To use an Emergency Override of an FAC
You can bypass Forced Account Code requirements with
three emergency numbers, including
Administrator for these numbers: __________ __
³ To dial with Voluntary Account Codes
1. After accessing a CO line, press
...or
Cnf/Trn + #46 ________.
You can enter it at any time during a call.
2. Enter the Account Code.
You should hear confirmation tone if the code is valid or two
short tones if it is invalid.
911. See your System
Account Code
3. Dial a telephone number if you entered the code after
accessing an outside line or resume talking or hang up if you
entered the code after the call.
9 Draft - Wireless IPT Quick Reference Guide 10/04
Page 13

Call Transfer
1. While on a call, press Cnf/Trn.
2. Dial the extension and announce the call or “blind transfer”
(hang up).
During call transfer, you can reconnect to the original caller
by pressing question what???.
3. Camp on to a busy station: If the station is busy, hang up.
The called station receives a tone. Once the busy line (why
was this underlined) is free, the transferred line is called back.
Conference Calls
1. While on a call, press Cnf/Trn.
2. Call another station or outside line.
3. When the called party answers, press
there’s no answer, press
original connection. All parties are conferenced.
4. Repeat the above steps to add more lines. You can conference
up to eight parties.
Note When the person who initiates the conference (master)
hangs up, control transfers to the first internal station added
to the conference. If no internal stations are in the
conference, the call disconnects.
³ To transfer conference control
1. Do steps 1 and 2 above to add the line to which you wish to
transfer conference control.
2. Announce the call and hang up to transfer the call. This
station is now the conference “master” with the ability to add
or delete parties.
Cnf/Trn again to return to the
Cnf/Trn. If it’s busy or
³ To hold a conference call
³ If you are the “master” conference controller, press Hold once (or
twice for Executive Hold) to place the conference call on hold.
Draft - Wireless IPT Quick Reference Guide 10/04 10
Page 14

The conference continues and you can join at any time
without giving up “master” abilities. Music-on-hold is
suppressed in this mode.
³ To delete the last member added to a conference
³ While a call is in progress, press the Cancel button.
³ To conference two outside Lines
1. While talking on an outside call, press
Cnf/Trn.
2. Access an outside line.
3. After the party answers, press
Cnf/Trn.
4. If you receive a busy tone or if the station does not answer,
press the flashing button to return to the original call.
5. Press
Note Most phone companies provide auto disconnect, but if it is
Cnf/Trn and hang-up.
not provided, the lines must be supervised to disconnect.
6. To supervise a tandem call, press the extension button. If the
parties have finished, hang up or if the parties are still talking,
press
Cnf/Trn and hang-up.
11 Draft - Wireless IPT Quick Reference Guide 10/04
Page 15

Hold
1. To place a call on Hold, press the Hold button.
2. To return to the held call, press
FBA and the held line’s
button.
If you do not return to the held call, it rings back to your
phone. If you are busy on another call, you hear two tone
bursts. If the held party hangs up, the call is released.
3. If you have additional lines at your station to hold, repeat
Step 1 above.
³ To place a call on Exclusive Hold
³ While on a call, press Hold twice. (No one can accidently pick up
your call.)
³ To place a call on Automatic Hold
³ While on a call, p ress an other extension button to receive/o riginate a
new call. You can switch between calls without having to press
Hold. Is this statement true???
Make sure this feature is programmed on your system; if not,
existing calls will drop.
³ To place a call on Consultation Hold
If you have multiple extensions on your phone, you can hold
a different call on each extension.
³ Press Cnf/Trn.
Draft - Wireless IPT Quick Reference Guide 10/04 12
Page 16

Call Forward - Any Calls
³ To perform each Call Forward for any call – Internal/
External
³ Enter the button sequence below
All Calls:
Extension + # (Tone)
Busy: Press Off Hook + #6021 (Tone) + Dest. No./Extension + #
(Tone)
No Answer: Press Off Hook + #6031 (Tone) + Dest. No./
Extension
Busy No Answer: Press Off Hook + #6041 + Dest. No. + # +
Timer
Cancel: Press Off Hook + #6051 (Tone)
Press Off Hook + #6011 (Tone) + Destination No./
+ # (Tone) + Timer (seconds, 2-digits) + #
(seconds, 2-digits) + #
Call Park Orbits
³ To park a call
1. While on a call, press
...or
Cnf/Trn + #33 or ________ .
Park in Orbit flexible button
2. Specify the Park Orbit using one of the following:
• Press
Orbit between
and the system automatically selects a General Park
*
7000~7019. The chosen orbit appears on the
LCD.
• Enter a valid extension.
• Press
# and the system automatically selects your extension
as the orbit.
3. Hang up. If the parked call is not retrieved, the call rings back
to your phone.
³ To retrieve a parked call
1. Press
...or press
Park in O rbit flexible button
Off Hook button + #32 or ________ .
2. Enter the Orbit Number where the call is parked.
13 Draft - Wireless IPT Quick Reference Guide 10/04
Page 17

Call Pickup
1. Press the Off Hook button.
2. Enter a code from the following list:
Group Pickup:
Directed Terminal Pickup: #5#5 or ________
Other (see System Administrator):________ _
3. Dial the extension that is holding the ringing or held call to be
picked up.
#5#34 or ________
Echo Cancel
³ If you experience echo while conversing on your IP telephone, tap
Vol V or W once to cancel the echo sound.
Paging
³ To make a page announcement to a phone or external
speakers
1. Press the
#30 or ________ (all groups)
..or
#31 or ________ + _____ the Group page access code.
See “Vibrate Mode” for more paging codes.
2. Make your announcement, then press the
³ To make an All Call Page
1. With the handset off-hook, press
button
...or extension +
Page Group, and may page external speakers (depends on
programming).
2. Make your announcement then hang up.
Off Hook button, and enter:
All Call Page flexible
#30. This pages all phones in the All Call
On-hook button.
Draft - Wireless IPT Quick Reference Guide 10/04 14
Page 18

Redial
Use this button to redial the last number dialed from your phone.
³ To redial the last number, press Redial or
*
0.
Speed Dial
³ To store a Station Speed Dial Number
We suggest storing Speed Dial numbers on a One Touch
button; use Speed Dial Codes to store more numbers.
³ Dial #66 + nnn + Phone No. + #
nnn = 100~199 SD bin numbers
³ To clear a number from a Station Speed Dial code
³ How do we do this ???
³ To make a call using Speed Dial
³ Press Spdial. Then dial the Station Speed Dial Number.
One Touch Buttons
This feature is useful for storing frequently dialed numbers.
³ To change a One Touch Button
1. Press
2. Press the One T ouch button to set.
3. Enter the digits or special buttons to be stored.
4. Press the One T ouch button to save the entry.
If these steps do not work, you may have to create a One
Touch button (see “Vibrate Mode” ).
³ To Use a One Touch Button, just press it.
#9876 to enter User Programming Mode.
15 Draft - Wireless IPT Quick Reference Guide 10/04
Page 19

Voice Mail Call Monitor
³ To enable and disable Voice Mail Call Monitor
1. Press
2. Enter your voice mail password, then press
³ To cancel Call Monitor
Call Monitor button.
#.
³ Press Call Monitor button.
³ To monitor a call using Call Monitor
1. The flashing Call Monitor button indicates that a message is
being recorded in voice mail.
2. To listen, press the
3. To talk to the caller, press the
Call Monitor button.
Call Monitor button again.
Voice Mail - Direct Transfer
1. While on a call, press Cnf/Trn.
2. Press
3. Enter the voice mailbox number (may be the same as the
extension number), then press
4. Hang up (the caller is connected to the voice mailbox) or
press
#407 ____.
#.
Cnf/Trn to return to the calling party.
Volume Control
³ To adjust handset volume
³ During a call, press down Vol V or W. When you hang up, volume
returns to default.
³ To adjust the speaker volume for internal/external calls and
background music
³ Press Spkr. Select a line and press Vol V or W.
Draft - Wireless IPT Quick Reference Guide 10/04 16
Page 20
³ To adjust Ring Tone, Handsfree Answerback and Speaker
Off-hook Call Announce
³ With an idle phone and handset on-hook, press Vol V or W. When
you hang up, volume returns to default.
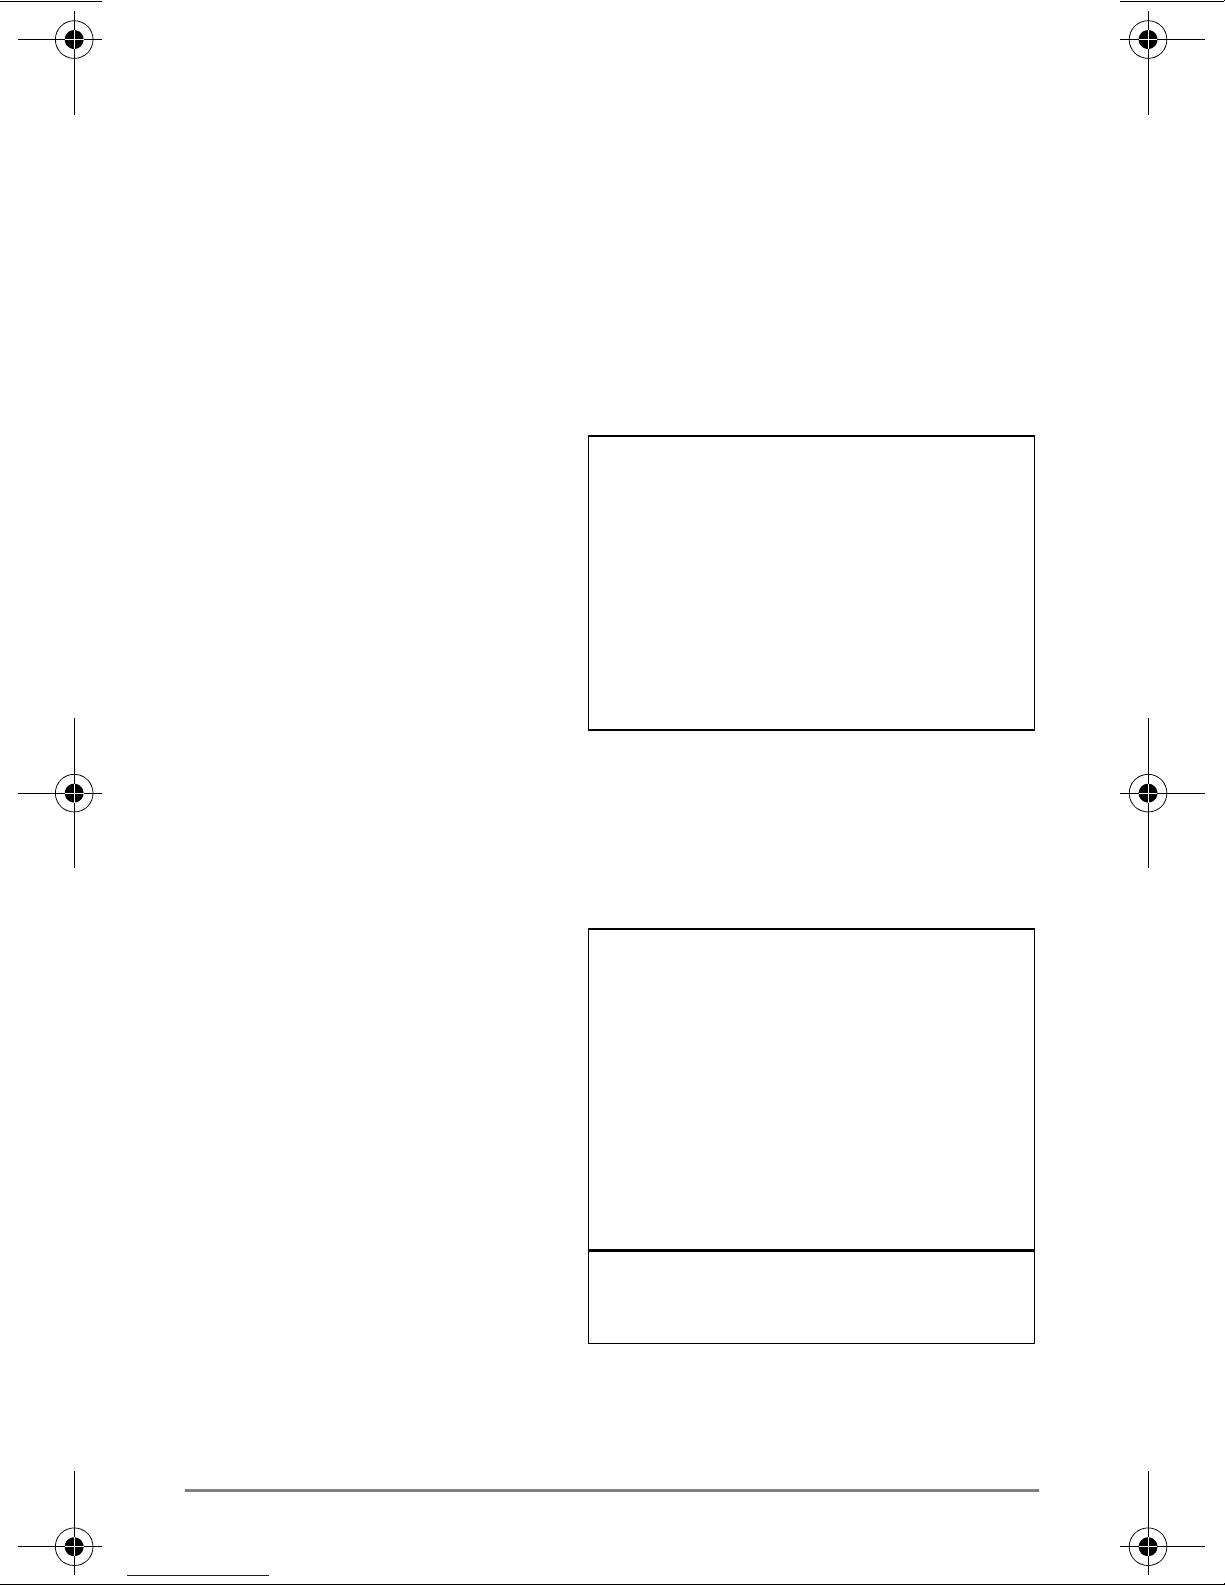
LCD Features
³ To use Speed Dial or Directory Menus
1. Press the Soft Key next
to the Speed Dial (
or Directory (
DIR) to
SD)
view the first screen.
2. To view the other
pages, press the soft
keys
PREVIOUS ...or
LEFT or RIGHT.
MORE or
FRED J NO. 3371
FEB 18 MONDAY 12:00
DIRECT SS
SYSTEM SD
PERSONAL SD
EXTERNAL DIR
INTERNAL DIR
3. Select someone from the list by pressing the Soft Key next to
the name.
³ To Use Direct Station Selection
1. Press the
Soft Key to view the
first screen.
DIRECT SS
FRED J NO. 3371
MAR 18 MONDAY 01:35
BOB T
2. To view other pages,
press the
PREVIOUS Soft Keys.
MORE or
3. To select someone from
the list, press the Soft
Key next to the name.
17 Draft - Wireless IPT Quick Reference Guide 10/04
DON U
CAROL F FRED M
CUST SERV GRAY W
PREVIOUS MORE
EXIT
CALLING
BOB T NO. 3200
Page 21

Draft - Wireless IPT Quick Reference Guide 10/04 18
Page 22
Toshiba America Information Systems, Inc.,
Digital Solutions Division
9740 Irvine Blvd., Irvine, CA 92618-1697
(949) 583-3700 www.telecom.toshiba.com
Toshiba of Canada Limited
Office Products Group
191 McNabb Street, Markham, Ontario L3R 8H2, Canada
(905) 470-3500 www.toshiba.ca
© 2004 Toshiba America Information Systems, Inc. Printed in U.S.A.
Digital Solutions Division. Strata is a registered trademark of Toshiba
Corporation. Specifications subject to change without notice. Some
features require optional hardware to support full capabilities.
 Loading...