

Page 1
Computer Telephony Integration
Application Bulletin
AB50-0001 Page 1 of 8
January 10, 1997
Using ACT! Phone Link with Strata DK
ACT! is a very powerful contact management PC application which can add important
functionality to your telephone system. It works well with a Strata DK system, as a TAPI
compatible application, to provide database lookup and Screen Pop features.
When using ACT!, it is important to understand its capabilities and limitations so it can be
used properly. The purpose of this bulletin is to assist you in understanding how to install, set
options, and use ACT! as a TAPI application with the Strata DK system.
Linking ACT! Phone Link to the Toshiba TAPI Service Provider
The popular ACT! for Microsoft® Windows® (V2.04 or greater) contact management software
package, with help from the ACT! Phone Link utility, can tightly integrate with the Toshiba
TAPI Service Provider. For outgoing calls, ACT! Phone Link receives the dial string sent by
ACT! and relays the number to the Toshiba TAPI Service Provider. For incoming calls, TAPI
messages are sent dire ctly fr om the Toshiba TAPI Service Provid er to A C T! Phone Li nk which
causes ACT! to lookup the phone number in the database and display any matching entries,
commonly referred to as a “Screen Pop.”
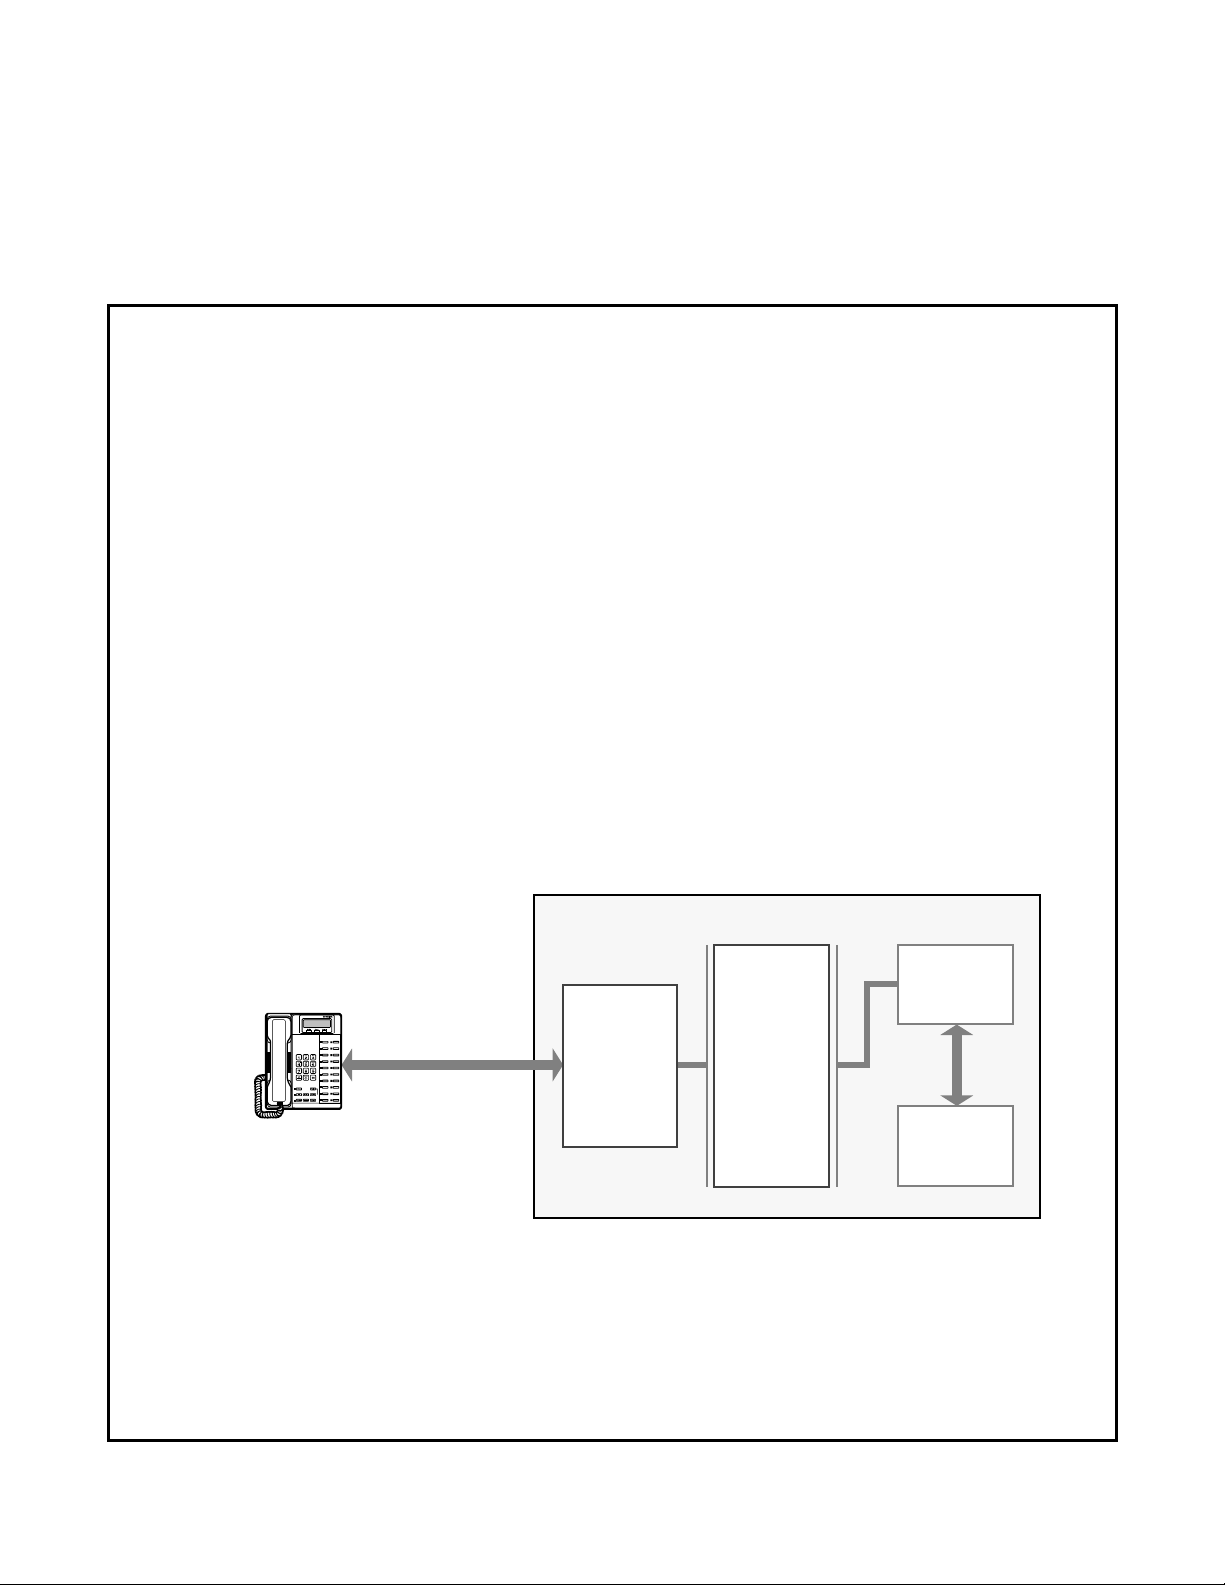
Microsoft Windows PC
ACT!
Strata DKT
RS-232 Link
RPCI to COM Port
TAPI
Service
Provider
TAPI
DLL
(Windows)
Phone Link
ACT!
V2.0
1951
ACT! Phone Link has several characteristics that should be understood before using. First,
ACT! Phone Link can handle only a single call at a time. When connected to the Strata DK,
calls arriving on other line appearances while on a call will be ignored by ACT! Your phone
will continue to ring and the call can be answered from your phone, but ACT! will not
automatically change screens to match the next call.
Toshiba America Information Systems, Inc.
Telecommunication Systems Division
9740 Irvine Bl vd., Ir vin e, CA 92618-1697 (714) 583-3700
4170106
Page 2

AB50-0001 Page 2 of 8
January 10, 1997
Using ACT! Phone Link with Strata DK
ACT! Phone Li nk requ ires a manu al int erv ent ion to open the gr oup to all recor ds in the file for
the next call to make a selection. This is done by going to the Group listing and selecting
“ALL.” ACT! can only have one database file open at a time; therefore, all records to be used
must be kept in the same database file using its single format. ACT! does allow sub-grouping
of records w ithin the file.
ACT! Ph one Link ex pects the Toshiba Service Pr o vider to be d e vic e zer o (0) . This requi res the
installer to remove all existing drivers in the Telephony Control Panel, install the Toshiba
Service Provider, and re-install the other drivers.
Note
ACT! Phone Link uses th e fi rst Calle r ID it receives to attempt the “Screen Pop.” F or e xamp le,
when a transferred call re mains on the same k ey as t he transferr ing call, ACT! Phone Link will
not update the Caller ID field to the outside number and search for the matching record
associated with the outside caller. This is typical of Strata DK280 Release 3 systems using
Directory Numbers [DNs] for all call appearances and calls answered by an Auto-Attendant.
To get around this situation, use the LCD Names feature to name the phones that will be
transferring the ca lls. When a n ame is used f or th e LCD Displa y in p la ce of the s ta tion n umber
(and the Name is not entered with the [DN]), then the Service Provider provides ACT! with the
Caller Name in place of the Caller Number. The first Caller ID seen by ACT! will be that of
the outside line; thus ACT! Phone Link will search using this number.
The dial codes fo r acce ss ing out side P BX li nes must be incl uded in th e Locat ion se ction of the
Telephony Control Panel. In this section, you should define the home area code and a trunk
access code for local and long distance calls. ACT! uses these settings to adjust the dialed
number to be sent to the Service Provider for dialing.
This may require adjust ing the settings for the appropriate device on the other
applications.
Installing ACT!
Step 1: Install the Toshiba TAPI Service Provider.
Use the installation instructions for the service provider found in Chapter 13 – Computer
Telephony Integration of the Strata DK Installation and Maintenance Manual.
Step 2: Install ACT! (V2.04 or greater)
Use the installation instructions provided by the ACT! User Guide to install the software. For
the Trial Size copy of ACT! available with the TAPI demo kit, use the procedures in
Application Bulletin AB50-0002 for ACT! Trial Size.
Step 3: Install ACT! Phone Link
See ACT! Phone Link “Read Me” files for proper setup information.
Step 4: ACT! Phone Link Tutorial (Optional)
When ACT! Phone Link is installed, a new program group labeled ACT! Phone Link is added
to the Windows Program Manager. Within the ACT! group, there are two files called ACT!
Phone Link T utor ial P ar t 1 and 2. The tutoria ls pro vid e an e xce llen t o ve rview of the new TAPI
features supported by Symantec’s ACT! when used with the Toshiba RPCI-DI.
Page 3
AB50-0001 Page 3 of 8
January 10, 1997
Using ACT! Phone Link with Strata DK
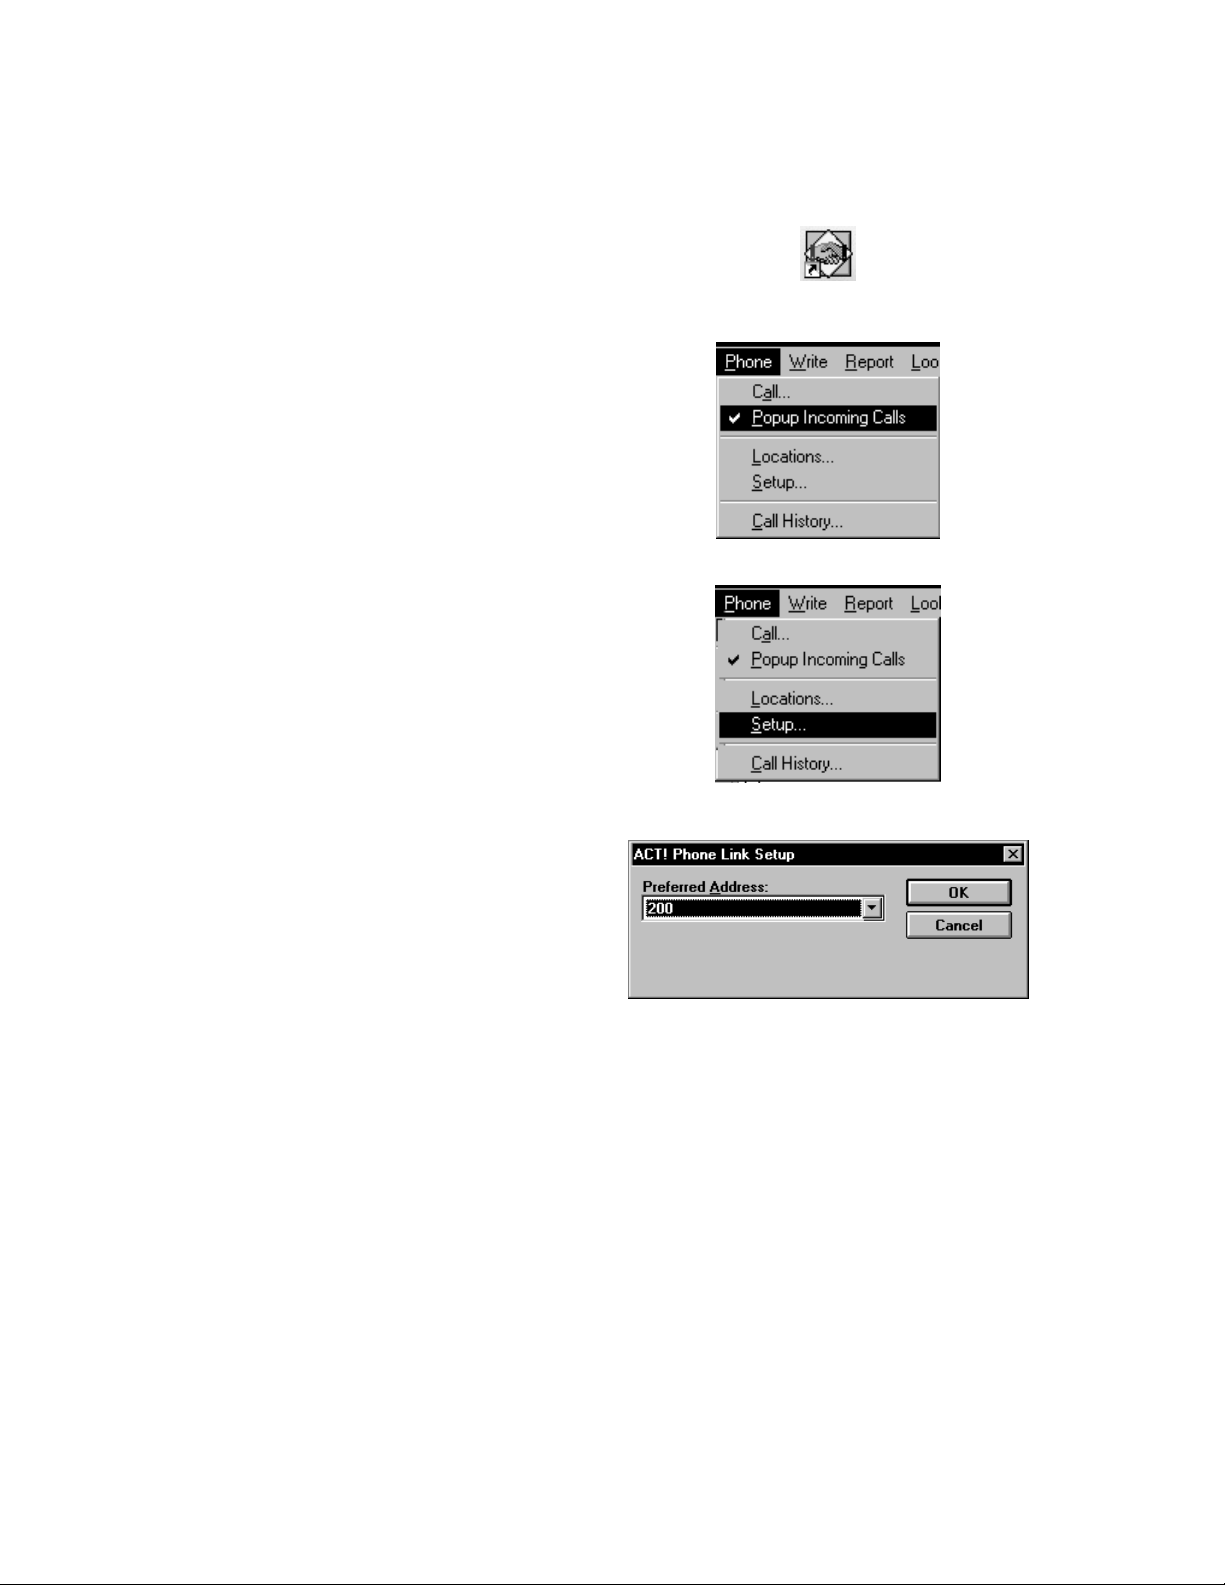
Step 5: Enter ACT! Settings
1. Double click on the ACT!
Phone Link icon to start the
program.
2. From the Phone pull-down
menu, select (check) the
“Popup Incoming Calls”
option.
Phone Link displays the
Station number in b racket s, b ut
with name and data from the
current ACT! Contact record.
3. From the Phone pull-down
menu, select (check) the
“Setup” option.
4. Make sure the button for your
Intercom or [PDN] appear anc e
is selected from the pull-down
window; click the OK button.
Page 4
AB50-0001 Page 4 of 8
January 10, 1997
Using ACT! Phone Link with Strata DK
Setting up ACT! Phone Link
Phone Numbers in the Database
The Strata system delivers Caller ID/ANI information via TAPI to the ACT! Software. ACT!
uses this Caller ID to lookup the record in the open database and compares the received
number with the numbers recorded in the “Phone” field of each record. The Caller ID’s
received will need to match records in the databa se in order to find a match.
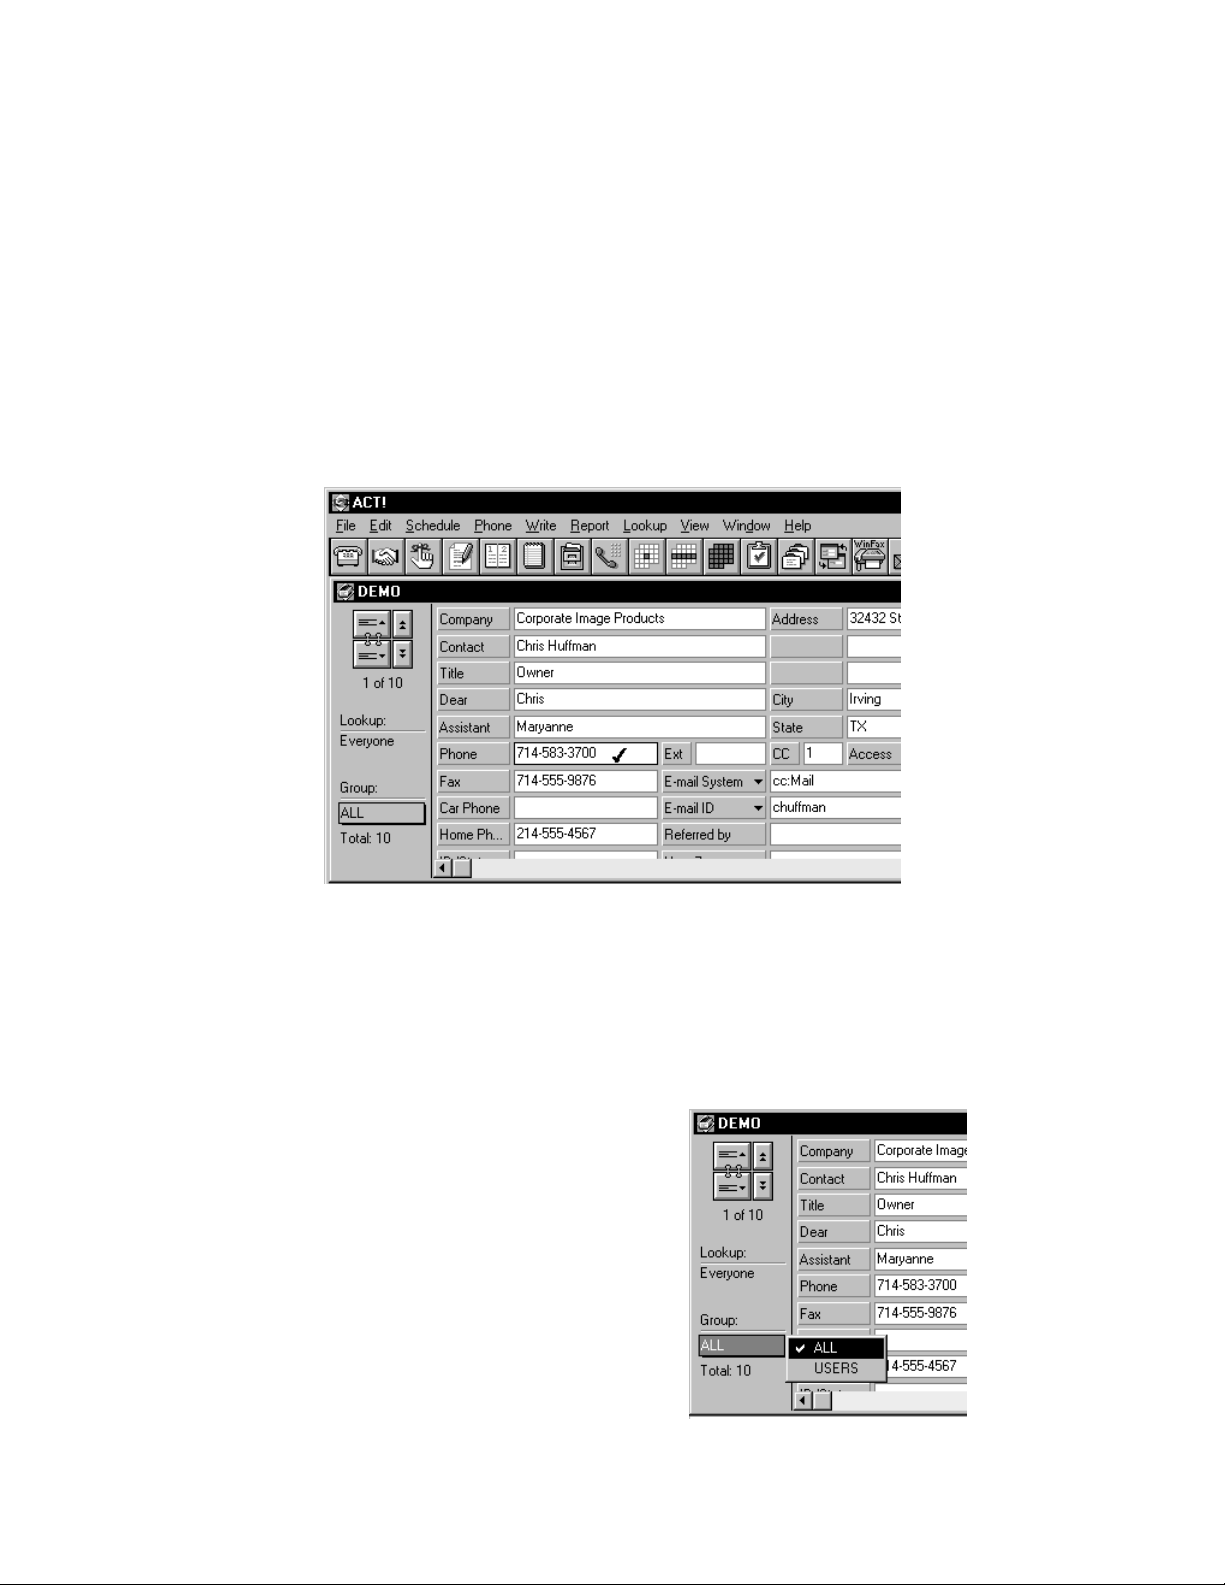
1. Select or create records in your ACT! database. Phone numbers entered into the phone
field must have the following format: 214-555-9665. You must put hyphens between the
area/exchange codes and between the exchange code and the last four (4) digits.
Note
2. Each time you perform a call to the stati on ca usi ng a screen pop in AC T! Dat aba se, ACT!
3. Go to the Group function
Access codes for trunk access are specified in the Location Settings within the
Telephony Control Panel.
selects a group of records that match the search criteria. Thus, the system reduces the
number of records in the search to only those that meet the criteria, typically only one. A
manual intervention will be required to open the search to all records.
located on the left side of the
screen and select ALL. This
will open the next search to all
records.
Page 5

AB50-0001 Page 5 of 8
January 10, 1997
Using ACT! Phone Link with Strata DK
Phone Link Settings
Phone Link has two setup parameters necessary for operation. First, an option must be set to
request the screen to pop- up ba sed upon the received Caller Number. Second, the specific line
button must be se t for making outgoing calls. The button should be the Intercom or [PDN]
function to enable the features to operate properly.
1. Select the handset icon in the
middle of the tool bar or
select the Call option from
the Phone pull-down menu
from the Main Menu.
2. If the Phone Link dialog box
appears, then you have
successfully verified the
Phone Link.
3. If you see the My Record
dialog box, TAPI did not
load and ACT! will attempt
to use the COM port modem
to dial. Be sure you:
♦ Start ACT! using ACT!
Phone Link rather than
ACT! 2.0 for Windows.
♦ Installed the Toshiba
Service Provider as
device zero ( 0). See note.
♦ The RPCI-DI and cable
connection to the
computer are working.
Note
ACT! Phone Link requires that Toshiba Service Provider be the first driver installed
(Driver 0). You may need to remove all other drivers listed in Settings, Control Panel,
Telephony . I n Windows 95 this includes dou ble -c li cki ng on Unimodem and removing
any modems installed. These drivers may be added back into the list, if needed, once
you get your application working.
4. If the Phone Link dialog box did not work, but appears with the Dial, Forward, Pickup,
and Unpark buttons grayed out, then the connection between the PC and RPCI-DI is no
longer working.
Verify the RPCI-DI and cable connection to the computer.
Page 6

AB50-0001 Page 6 of 8
January 10, 1997
Using ACT! Phone Link with Strata DK
DKT Display Mode Settings
To identify the calling party, TAPI looks for the Station Identif i cati on in the LCD displa y data.
When the DKTs are in the name mode, TAPI sends the Caller ID Name to the application in
place of the Caller ID Number. ACT! ignores the name information and displays the current
record information in its database. The To shiba Servic e Provider uses the information on the
top line of the LCD display for Caller ID information.
To have ACT! find the record of the calling DKT, clear the Name display on all phones
involved in the Screen Pop s. To reset the display mode:
♦ For Strata DK8 /16/96, press the
each phone.
♦ For Strata DK16e/280/424, press the [PDN] button, dial
on each phone.
Note
Make sure the correct switch type has been selected in the installation process of the
DKT Service P rovider. This information i s used to deter m ine the form at of the
received data for presenting it to the TAPI appli cation.
Operating ACT! Phone Link
The following example shows the main screen. When calls ring-in or a call is being placed, a
dialog box for Phone Link appears.
Intercom
button, dial
, and press the
620
, and press the
#620
Spkr
Spkr
button on
button
Page 7

AB50-0001 Page 7 of 8
January 10, 1997
Using ACT! Phone Link with Strata DK
1. As the call rings-in, the
Toshiba TAPI Service
Provider sends the TAPI event
which causes ACT! to do a
Screen Pop. If the data base ha s
three records matching the
Caller ID phone number, ACT!
displays the first matching
record and selects all thre e
possible records. Thus,
multiple contacts from the
same location are selected.
2. Once the call is ans wered, a
series of option s for the cal l are
available, including Hold,
Transfer, and Conference.The
following screens show the
steps that occur if you want to
transfer a call, for example to
extension 20 0. Select the
Transfer option.
3. Click on OK to continue the
transfer . If you cl ick on Cancel,
the screen in Step 2 is
displayed again and you can
choose another option.
Page 8

AB50-0001 Page 8 of 8
January 10, 1997
Using ACT! Phone Link with Strata DK
4. You can announce the
call or just select
Complete to finish the
transfer.
 Loading...