

Page 1
Page 2

Table of contents
Network Services 4
Toshiba Corporation 5
EU Warranty 8
Licenses 9
Before using your Toshiba TS705
phone 12
Declaration of conformity 13
Safety instructions 14
Care and maintenance 14
FCC notice 15
Information to user 15
Getting started 16
Unpacking 16
Phone layout and functions 17
Display indicators 19
Installing the SIM card, battery and microSD 22
Charging the battery 24
Switching the power on and off 24
Installing the software 25
Call functions 26
Making a call 26
Operations during calls 27
Call history 27
Video calls 28
Contacts 30
Creating a new contact 30
Editing contacts 32
Adding to speed dial 32
Adding contacts to groups 32
Creating groups 32
Editing groups 33
Creating SIM contacts 33
Using the filter 33
Voice-activated dialling 34
Messages 35
Creating messages 35
Checking messages 36
Table of contents
1
Page 3

Table of contents
Templates 38
Message settings 39
Voicemail settings 42
Text input 43
Character input mode 43
Table of contents
Settings 44
Phone profile settings 44
Display settings 44
Phone settings 45
Call settings 46
Security settings 46
Network settings 47
Connectivity settings 48
Memory settings 48
Organiser 49
Stopwatch 49
Alarm clock 49
Calendar 49
Calculator 50
Sound recorder 51
2
Tasks 51
Unit converter 51
World clock 52
Browser 53
Bookmarks 54
Browser settings 54
Media player 55
Playing music 55
Viewing pictures 57
Playing videos 58
Using bookmarks 58
Camera 59
Taking a picture 59
Recording a video 60
My files 62
Folders 62
Searching files 62
License manager 62
Page 4

Table of contents
Connectivity 63
Connecting your Toshiba phone to a PC
63
Specifications 64
Toshiba TS705 64
Troubleshooting 65
Health and safety 66
General 66
Operating environment 66
Electronic devices 67
Battery safety 68
Emergency calls 69
FCC RF exposure information 69
European RF Exposure Information 70
Purchase record 72
Menu tree 73
Table of contents
3
Page 5

Network services
Network Services
To use your Toshiba phone you must have service from a wireless service provider. Many of the features
in your Toshiba phone depend on features in the wireless network to function. These Network Services
may not be available on all networks or you may have to make specific arrangements with your service
provider before you can utilise Network Services. Your service provider may need to give you additional
instructions for their use and explain what charges will apply. Some networks may have limitations that
affect how you can use Network Services. For instance, some networks may not support all language-
Network services
dependent characters and services.
This phone is a 3GPP GSM Release 99 terminal supporting GPRS service, and is designed to support
also Release 97 GPRS networks. However, there may be some compatibility issues when used in some
Release 97 GPRS networks. For more information, contact your service provider.
The availability of particular products may vary by region. Please check with the dealer nearest to you.
4
Page 6

Toshiba Corporation
Toshiba Corporation
IMPORTANT NOTE: PLEASE READ BEFORE
USING YOUR MOBILE PHONE BY ATTEMPTING
TO USE ANY SOFTWARE ON THE SUPPLIED
PHONE CONSTITUTES YOUR ACCEPTANCE
OF THESE EULA TERMS. IF YOU REJECT OR
DO NOT AGREE WITH ALL THE TERMS O F THIS
EULA, PLEASE DO NOT ATTEMPT TO ACCESS
OR USE THE SUPPLIED SOFTWARE.
End User License Agreement
This End User License Agreement ("EULA") is a
legal agreement between you (as the user) and
TOSHIBA CORPORATION ("Toshiba") with regard
to the copyrighted software installed in a Toshiba
3G mobile phone supplied to you (the "Phone").
Use or employment of any software installed in the
Phone and related documentations (the "Software")
will constitute your acceptance of these terms,
unless separate terms are provided by the Software
supplier on the Phone, in which case certain
additional or different terms may apply. If you do not
agree with the terms of this EULA, do not use or
employ the Software.
1.
License Grant
personal, non-transferable and non-exclusive
right to use the Software as set out in this EULA.
Modifying, adapting, translating, renting,
copying, making available, transferring or
assigning all or part of the Software, or any
rights granted hereunder, to any other persons
and removing any proprietary notices, labels or
marks from the Software is strictly prohibited,
except as expressly permitted in this EULA.
Furthermore, you hereby agree not to create
derivative works based on the Software.
Copyright
2.
You acknowledge that no title to the intellectual
property in the Software is or will be transferred
to you. You further acknowledge that title and
full ownership rights to the Software will remain
the exclusive property of Toshiba, Toshiba's
affiliates, and/or their suppliers, and you will not
acquire any rights to the Software, except as
expressly set out in this EULA. You may keep a
backup copy of the Software only so far as
necessary for its lawful use. All copies of the
Software must contain the same proprietary
notices as contained in the Software and are
subject to the terms of this EULA. All rights not
expressly granted under this EULA are
. Toshiba grants to you a
. The Software is licensed, not sold.
Toshiba Corporation
5
Page 7

Toshiba Corporation
reserved to Toshiba, Toshiba's affiliates and/or
their suppliers.
Reverse Engineering
3.
not attempt, and if you are a business
organisation, you will use your best efforts to
prevent your employees, workers and
contractors from attempting to reverse
engineer, decompile, modify, translate or
Toshiba Corporation
disassemble the Software in whole or in part
except to the extent that such actions cannot be
excluded by mandatory applicable law and only
if those actions are taken in accordance with
such applicable law. Any failure to comply with
the above or any other terms and conditions
contained herein will result in the automatic
termination of this license and the reversion of
the rights granted hereunder to Toshiba.
LIMITED WARRANTY
4.
warranty period for the Phone, Toshiba,
Toshiba's affiliate, its suppliers or its authorized
service company will repair or replace, at
Toshiba's sole discretion, defective Software
unless such defect results from acts or
incidences beyond the reasonable control of
Toshiba. EXCEPT AS PROVIDED IN THIS
EULA: (A) TOSHIBA, TOSHIBA'S AFFILIATES,
AND THEIR SUPPLIERS DISCLAIM ALL
6
. You agree that you will
. Only during the
WARRANTIES, CONDITIONS OR OTHER
TERMS (WHETHER EXPRESS OR IMPLIED),
INCLUDING BUT NOT LIMITED TO
WARRANTIES, CONDITIONS AND TERMS
OF SATISFACTORY QUALITY,
MERCHANTABILITY, FITNESS FOR A
PARTICULAR PURPOSE AND NON-INFRINGEMENT OF THIRD-PARTY RIGHTS;
AND (B) THE ENTIRE RISK AS TO THE
QUALITY AND PERFORMANCE OF THE
SOFTWARE IS WITH YOU. YOU ACCEPT
THAT SOFTWARE MAY NOT MEET YOUR
REQUIREMENTS AND NO WARRANTY CAN
BE GIVEN THAT OPERATION OF THE
SOFTWARE WILL BE UNINTERRUPTED OR
ERROR-FREE.
LIMITATION OF LIABILITY
5.
FULLEST EXTENT LEGALLY PERMITTED, IN
NO EVENT SHALL TOSHIBA, TOSHIBA'S
AFFILIATES OR THEIR SUPPLIERS BE
LIABLE TO YOU FOR ANY DAMAGES FOR
(A) LOST BUSINESS OR REVENUE,
BUSINESS INTERRUPTION, LOSS OF
BUSINESS DATA; OR (B) CONSEQUENTIAL,
SPECIAL, INCIDENTAL OR INDIRECT
DAMAGES OF ANY KIND (WHETHER UNDER
CONTRACT, TORT OR OTHERWISE)
. TO THE
Page 8

Toshiba Corporation
ARISING OUT OF: (I) THE USE OR INABILITY
TO USE THE SOFTWARE, EVEN IF TOSHIBA,
TOSHIBA'S AFFILIATES OR THEIR
SUPPLIER HAS BEEN ADVISED OF THE
POSSIBILITY OF SUCH DAMAGES; OR (II)
ANY CLAIM BY A THIRD PARTY. SAVE AS
SET OUT IN THIS SECTION, TOSHIBA'S
ENTIRE LIABILITY UNDER THIS EULA SHALL
NOT EXCEED THE PRICE PAID FOR THE
SOFTWARE, IF ANY. THE ABOVE
DISCL AIMER AND LI MITA TIO N DOES NO T
EXCLUDE OR LIMIT (A) LIABILITY FOR
DEATH OR PERSONAL INJURY CAUSED
BY NEGLIGENCE; OR (B) ANY
MANDATORY LEGAL RIGHT OR LIABILITY
TO THE EXTENT THAT IT CANNOT BE
LAWFULLY EXCLUDED OR LIMITED UNDER
APPLICABLE LAW.PLEASE MAKE AND
RETAIN A COPY OF ALL DATA YOU HAVE
INSERTED INTO YOUR PRODUCT, FOR
EXAMPLE NAMES, ADDRESSES, PHONE
NUMBERS, PICTURES, RINGTONES ETC,
BEFORE SUBMITTING YOUR PRODUCT
FOR A WARRANTY SERVICE, AS SUCH
DATA MAY BE DELETED OR ERASED AS
PART OF THE REPAIR OR SERVICE
PROCESS.
Laws
. This EULA will be governed by the laws
6.
of England and Wales. All disputes arising out of
this EULA shall be subject to the exclusive
jurisdiction of the English Courts.
Export Laws
7.
employment of the Software involves products
and/or technical data that may be controlled
under the export laws of applicable countries or
region and may be subject to the approval of
the applicable governmental authorities prior to
export. Any export, directly or indirectly, in
contravention of the export laws of applicable
countries or region is prohibited.
Third Party Beneficiary
8.
suppliers of the Software to Toshiba have a right
as a third party beneficiary to enforce the terms
of this EULA against you as a user.
Transfers
9.
only as installed on the Phone to a lawful third
party user, where that party accepts the terms of
this EULA which will continue to apply.
10. IF YOU ARE DEALING AS A CONSUMER IN
THE UK & THE SOFTWARE QUALIFIES AS
'GOODS', YOUR STATUTORY RIGHTS
UNDER APPLICABLE LAW ARE NOT
AFFECTED.
. Any use, duplication or
. You agree that certain
. The Software may be transferred
Toshiba Corporation
7
Page 9

Toshiba Corporation
EU Warranty
Your Toshiba phone contains no user serviceable
parts. For further information on service please contact your retailer or service provider.
Toshiba Corporation
8
Page 10

Licenses
Licenses
Licensed by QUALCOMM Incorporated under one
or more of the following United States Patents and/
or their counterparts in other nations:
4,901,307 5,504,773 5,109,390 5,535,239
5,267,262 5,600,754 5,416,797 5,778,338
5,490,165 5,101,501 5,511,073 5,267,261
5,568,483 5,414,796 5,659,569 5,056,109
5,506,865 5,228,054 5,544,196 5,337,338
5,657,420 5,710,784
T9 Text Input is licensed under one or more of the
following:
U.S. Pat. Nos. 5,187,480, 5,818,437, 5,945,928,
5,953,541, 6,011,554, 6,286,064, 6,307,548,
6,307,549, and 6,636,162, 6,646,573; Australian
Pat. Nos. 727539, 746674, and 747901; Canadian
Pat. Nos. 1,331,057, 2,302,595, and 2,227,904;
United Kingdom Pat. No. 2238414B; Hong Kong
Standard Pat. No. HK1010924; Republic of
Singapore Pat. No. 51383, 66959, and 71979;
European Pat. Nos. 0 842 463 (96927260.8),
1 010 057 (98903671.0), 1 018 069 (98950708.2);
Republic of Korea
Pat. Nos. KR201211B1 and KR226206B1.
People's Republic of China Pat. Application Nos.
98802801.8, 98809472.X and 96196739.0; Mexico
Pat. No. 208141; Russian Federation Pat.
No. 2206118; and additional patents are pending
worldwide.
ä
Java™ and all Java-based marks are trademarks or
registered trademarks of Sun Microsystems, Inc.
Licenses
9
Page 11

Licenses
10
Bluetooth™ is a trademark of Bluetooth SIG,
Inc.USA.
Licenses
THIS PRODUCT IS LICENSED UNDER THE
MPEG-4 VISUAL PATENT PORTFOLIO LICENSE
FOR THE PERSONAL AND NON-COMMERCIAL
USE OF A CONSUMER FOR (i) ENCODING
VIDEO IN COMPLIANCE WITH THE MPEG-4
VISUAL STANDARD (“MPEG-4 VIDEO”) AND/OR
(ii) DECODING MPEG-4 VIDEO THAT WAS
ENCODED BY A CONSUMER ENGAGED IN A
PERSONAL AND NON-COMMERCIAL ACTIVITY
AND/OR WAS OBTAINED FROM A VIDEO
PROVIDER LICENSED BY MPEG-LA TO
PROVIDE MPEG-4 VIDEO. NO LICENSE IS
GRANTED OR SHALL BE IMPLIED FOR ANY
OTHER USE. ADDITIONAL INFORMATION
INCLUDING THAT RELATING TO
PROMOTIONAL, INTERNAL AND COMMERCIAL
USES AND LICENSING MAY BE OBTAINED
FROM MPEG LA, LLC.
SEE HTTP://WWW.MPEGLA.COM.
MPEG Layer-3 audio coding technology licensed
from Fraunhofer IIS and Thomson Multimedia.
The microSD™ logo is a trademark.
Copyright © 1998-2003 The OpenSSL Project.
All rights reserved. Copyright © 1995-1998 Eric
Young (eay@cryptsoft.com). All rights reserved.
THIS SOFTWARE IS PROVIDED BY THE
OpenSSL PROJECT AND/OR BY ERIC YOUNG
“AS IS” AND ANY EXPRESSED OR IMPLIED
WARRANTIES, INCLUDING, BUT NOT LIMITED
TO, THE IMPLIED WARRANTIES OF
MERCHANTABILITY AND FITNESS FOR A
PARTICULAR PURPOSE ARE DISCLAIMED. IN
NO EVENT SHALL THE OpenSSL PROJECT,
ERIC YOUNG OR ITS CONTRIBUTORS BE
LIABLE FOR ANY DIRECT, INDIRECT,
INCIDENTAL, SPECIAL, EXEMPLARY, OR
CONSEQUENTIAL DAMAGES (INCLUDING, BUT
NOT LIMITED TO, PROCUREMENT OF
SUBSTITUTE GOODS OR SERVICES; LOSS OF
Page 12
Licenses
USE, DATA, OR PROFITS; OR BUSINESS
INTERRUPTION) HOWEVER CAUSED AND ON
ANY THEORY OF LIABILITY, WHETHER IN
CONTRACT, STRICT LIABILITY, OR TORT
(INCLUDING NEGLIGENCE OR OTHERWISE)
ARISING IN ANY WAY OUT OF THE USE OF
THIS SOFTWARE, EVEN IF ADVISED OF THE
POSSIBILITY OF SUCH DAMAGE.
Licenses
11
Page 13

Before using your Toshiba TS705 phone
Before using your Toshiba TS705 phone
THIS PRODUCT CONTAINS SOFTWARE WHICH ALLOWS YOU TO TRANSFER SPECIFIED MUSIC
DATA STORED ON YOUR PC TO YOUR TOSHIBA TS705. THIS SOFTWARE DOES NOT INCLUDE
THE CAPABILITY TO RECORD CDS TO YOUR PC. RECORDING MUSIC FILES CAN BE DONE
USING MICROSOFT WINDOWS MEDIA(R) PLAYER BY MICROSOFT CORPORATION OR OTHER
SIMILAR SOFTWARE AND APPLICATIONS. WINDOWS MEDIA IS A REGISTERED TRADEMARK OF
MICROSOFT CORPORATION IN THE UNITED STATES AND OTHER COUNTRIES. MUSIC AND
MUSIC FILES ARE PROTECTED BY COPYRIGHT LAWS IN THE RESPECTIVE COUNTRIES AND
THE TRANSFER AND REPRODUCTION OF COPYRIGHTED MATERIALS IS PERMITTED FOR
PRIVATE PERSONAL USE ONLY. ANYONE FOUND DUPLICATING OR DISTRIBUTING MUSIC DATA
OVER A NETWORK (OR ASSISTING OTHERS TO DO SO) WITHOUT THE AGREEMENT OF THE
RELEVANT RIGHTS HOLDERS, WILL BE IN VIOLATION OF COPYRIGHT LAWS. TOSHIBA
DISCLAIMS ALL RESPONSIBILITY AND LIABILITY FOR ANY CONSEQUENCES ARISING FROM
ILLEGAL USE OF TOSHIBA OR THIRD PARTY SOFTWARE.
12
Page 14
Declaration of conformity
Declaration of conformity
We, Toshiba Information Systems UK (Ltd), Mobile Communications Division, of
Toshiba Court, Addlestone Road, Weybridge, KT15 2UL declare under our sole responsibility that this
product (Toshiba TS705-G, Type (Model) Name SF4 - E02) conforms with the following standards and/or
other normative documents:
3GPP TS 51.010-1, 3GPP TS 34.121, EN 301 489-1, EN 301 489-7, EN 301-489-24, EN 300 328,
EN 301 489-17, EN 60950 and EN 50360
We hereby declare that all essential radio test suites, EMC & safety requirements have been carried out
and that the above named product is in conformity to all the essential requirements of Directive 1999/5/EC.
The conformity assessment procedure referred to in Article 10(5) and detailed in Annex IV of Directive
1999/5/EC has been followed with the involvement of the following Notified Body(ies):
Cetecom GmbH, Im Teelbuch 122, 45219 Essen, Germany
27 July 2006
Noritaka Tanigawa
Deputy Managing Director of TIU
General Manager Mobile Communications Division
Declaration of conformity
13
Page 15

Safety instructions
Safety instructions
Care and maintenance
You can greatly enhance the life span of your
Toshiba phone, and the parts and accessories, by
following the suggestions below.
Safety instructions
TIP: Maintaining your Toshiba phone, and
the parts and accessories, in a good
condition will help you fulfil the warranty
obligations.
• Keep your Toshiba phone and all the parts and
accessories out of the reach of small children.
• Keep your Toshiba phone dry, as moisture of
any kind can contain minerals that will corrode
the electronic circuits.
• Do not use or store your Toshiba phone in dusty
or dirty locations as the moving parts of the
phone can be damaged.
• Do not use or store your Toshiba phone in hot
areas. High temperatures will shorten the life
span of the phone, damage the battery or warp/
melt internal circuits.
• Do not store your Toshiba phone in cold areas.
A big difference between room temperature and
the temperature in the phone can cause
14
condensation to form inside the phone, causing
damage to the electronic circuits.
• Do not open your Toshiba phone unless
absolutely necessary.
• Do not mishandle or abuse your Toshiba phone.
Dropping the phone, knocking or shaking it can
damage the internal circuits.
• Do not use harsh chemicals, strong detergents,
or cleaning solvents to clean your Toshiba
phone. Use a soft, clean, dry, lint-free cloth to
clean the phone.
• Do not apply paint or other such substances to
your Toshiba phone.
• If your Toshiba phone, or any of the accessories,
are not working as they should, please consult
your dealer who can provide you with the
expert assistance you require.
• Interference may affect the performance of your
Toshiba phone. This is normal and the phone
should operate as usual once you move away
from the source of the interference.
• Do not attempt to disassemble your Toshiba
phone. Only Toshiba authorised personnel
should service the phone.
Page 16
Safety instructions
FCC notice
This device complies with Part 15 of the FCC rules.
Operation is subject to the following two conditions:
(1) This device may not cause harmful interference,
and (2) This device must accept any interference
received, including interference that may cause
undesired operation.
Changes or modifications not expressly approved
by the party responsible for compliance could void
the user’s authority to operate the equipment.
Information to user
This equipment has been tested and found to
comply with the limits of a Class B digital device,
pursuant to Part 15 of the FCC Rules. These limits
are designed to provide reasonable protection
against harmful interference in a residential
installation. This equipment generates, uses and
can radiate radio frequency energy and, if not
installed and used in accordance with the
instructions, may cause harmful interference to
radio communications. However, there is no
guarantee that interference will not occur in a
particular installation; if this equipment does cause
harmful interference to radio or television reception,
which can be determined by turning the equipment
off and on, the user is encouraged to try to correct
the interference by one or more of the following
measures:
1. Reorient/relocate the receiving aerial.
2. Increase the separation between the
equipment and receiver.
3. Connect the equipment into an outlet on a
circuit different from the outlet the receiver is
currently connected.
4. Consult the dealer or an experienced radio/TV
technician for help.
WARNING: Changes or modifications not
expressly approved by the manufacturer
responsible for compliance could void the
user’s authority to operate the equipment.
Safety instructions
15
Page 17

Getting started
Getting started
Unpacking
Please ensure that the contents of your sales pack includes:
• Phone
Getting started
• AC adapter
• CD-ROM
• Battery pack
• USB cable
• User guide
16
Page 18
Getting started
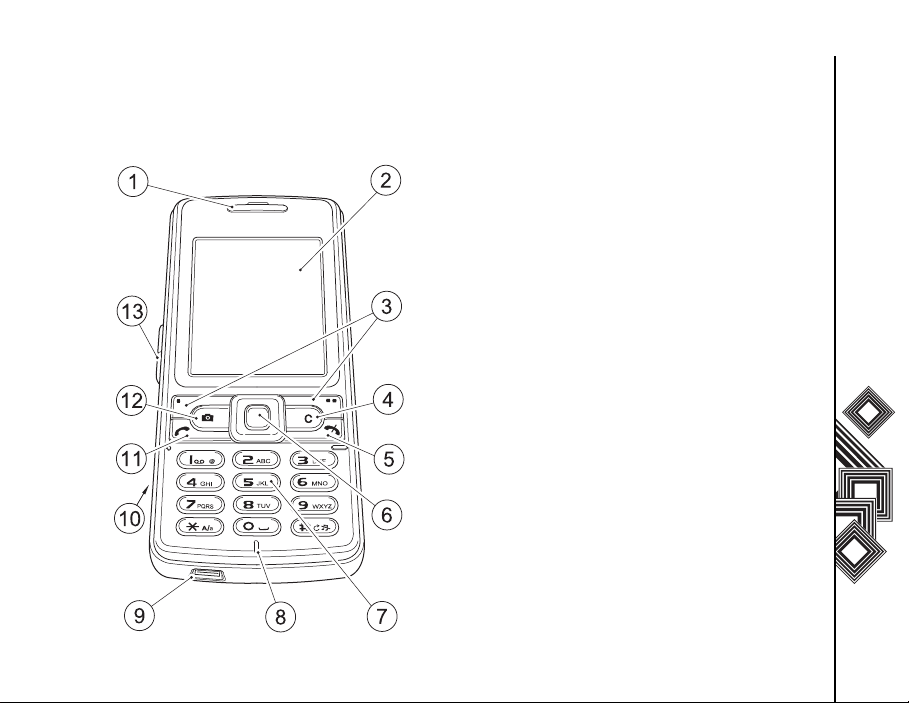
Phone layout and functions
1. Earpiece
2. Main display
3. Right and Left Softkey: performs operations
indicated on the main display.
4. Clear key: clears characters in text input mode.
Press and hold to delete text quickly.
5. End/Power key: turns power on/off, ends calls/
operations and returns to standby mode.
6. Navigation key/Centre key: moves the cursor
up, down, left or right, confirms operations and
accesses shortcuts. The centre key is also
used to open the main menu or start a function
in the main menu.
7. Keypad: enter phone numbers and characters.
To switch the phone to silent mode, press and
hold the # key in standby mode. To lock the
keypad, press and hold the
8. Microphone: used for voice calls.
9. Cable and Phone charging connector(s)
10. Memory card slot
11. Send key: makes and answers calls.
12. Camera/Task Switch key: activates the
camera. Press and hold for two second to
activate the Task handler.
13. Side key: adjusts the volume.
* key.
Getting started
17
Page 19

Getting started
14. Battery cover
15. Speaker
Getting started
18
16. Antenna port
17. Handstrap hole
18. Earphone jack
19. Camera
Page 20

Getting started
Display indicators
The GSM network signal strength indicator
Call forwarding indicator
Auto answer is activated
The alarm is set
Bluetooth connection - inactive visible
Bluetooth connection - inactive invisible
Bluetooth connection - active visible
Bluetooth connection - active invisible
Charging
The battery charge level - the higher the level, the stronger the charge
Downloading data from WAP
Getting started
19
Page 21

Getting started
Display indicators
Fax is received
Getting started
GPRS connection
Keyguard is activated
New or unread SMS or MMS message
A file on the microSD card is performing
Indicates an ongoing call
Indicates an ongoing data call
Phone profile - general
Phone profile - silent
Phone profile - meeting
Phone profile - outdoor
Phone profile - headset
20
Page 22
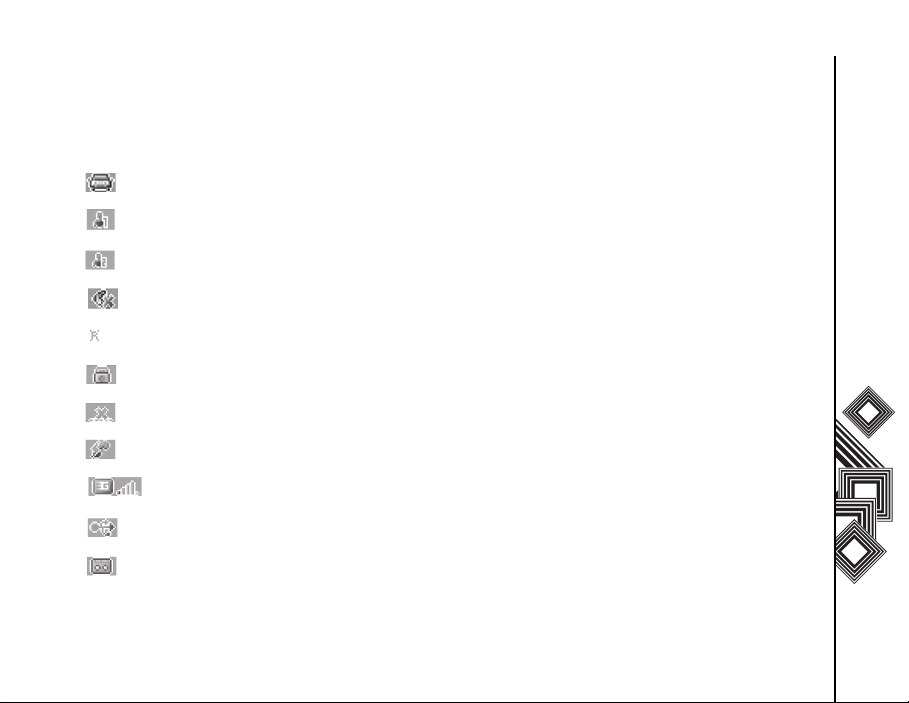
Getting started
Display indicators
Phone profile - car kit
Phone profile - User 1
Phone profile - User 2
Indicates that you are in silent mode
Indicates you are in an area with roaming when using your Toshiba phone abroad
Indicates a connection to a Web page with security protection
Indicates you are out of the service provider service area
Indicates SOS calls are possible
Indicates the UMTS signal strength is at one of six levels
Indicates the status of the USB connection
Indicates a recorded message at the voicemail centre
Getting started
21
Page 23
Getting started
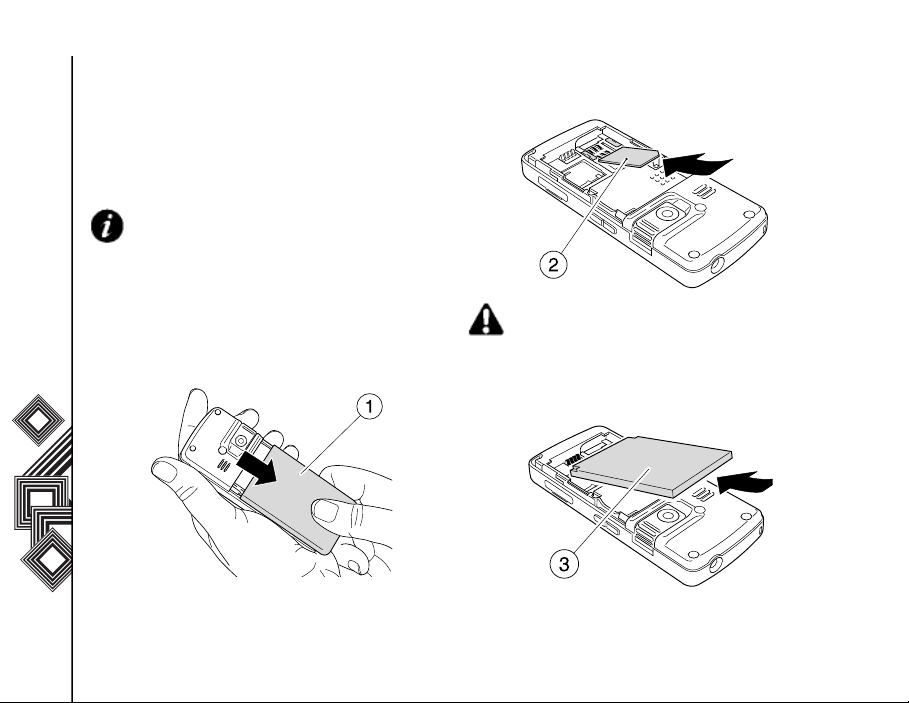
Installing the SIM card, battery and microSD
Getting started
1. With the back of the phone facing you, slide the
battery case in the direction of the arrow (1) and
remove the battery from the battery
compartment.
2. Insert the SIM card into the SIM card holder (2),
with the gold connectors facing downwards.
22
IMPORTANT: The SIM card and microSD
memory card are easily damaged by
scratching and bending, so be careful when
handling.
WARNING: Keep the SIM card and microSD
memory card out of the reach of small
children.
3. Insert the battery into the battery compartment
with the gold connectors facing downwards (3).
Page 24
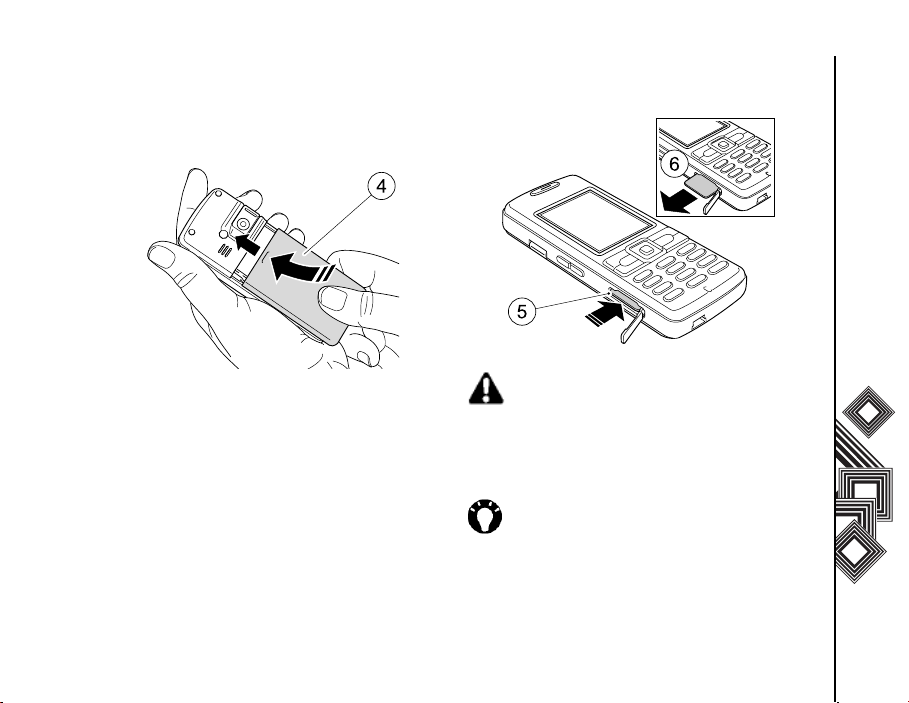
Getting started
4. Slide the battery case into position, in the
direction of the arrow (4).
Getting started
5. If you have a microSD memory card, open the
slot cover and gently push the microSD card
with the gold contacts facing up until it clicks
into position (5). To eliminate the risk of losing
data, ensure that the power is turned off before
inserting or removing the microSD card.
To remove, gently press the edge of the
microSD card and slide out in the direction of
the arrow (6).
WARNING: Pushing the microSD with
excessive force may cause damage to the
slot and microSD card.
6. To close the microSD slot cover, gently press
downwards.
TIP: Regularly back up the data in your
Toshiba phone to the memory card.
23
Page 25

Getting started
Charging the battery
You need to fully charge the battery before you can
switch your Toshiba phone on for the first time.
The battery will only achieve optimum performance
Getting started
after two or three complete charges.
To charge your battery, simply plug the AC adapter
into an AC outlet and connect to the charger
connector on your Toshiba phone. The charger
connection screen will light up.
When the battery is fully charged, unplug the AC
adapter from the AC outlet and disconnect from the
charger connector by gripping tightly and pulling
gently.
24
TIP: You can charge your battery by
connecting your Toshiba phone to a PC with
the USB cable. Ensure that your Toshiba
phone is on before connecting to your PC.
Low battery indicator
When the battery charge level is running low, a
warning tone sounds and the Battery Low message
is displayed repeatedly. If the battery charge level
runs too low for normal operation, your Toshiba
phone will automatically switch off.
Switching the power on and off
To switch your Toshiba phone on:
1. Press and hold the End/Power key. The
standby screen is displayed.
2. If a PIN or security code is requested, enter the
code.
NOTE: The PIN code activates the services
in your Toshiba phone and should be
provided in the documentation supplied by
your service provider.
To switch your Toshiba phone off:
1. Press and hold the End/Power key.
Page 26

Getting started
Installing the software
USB driver installation
To install a USB driver:
1. Connect your Toshiba phone to the PC using
the USB cable.
2. Turn your Toshiba phone on.
3. Install the USB driver (on the installation CD
supplied in the sales pack) and check your
device manager and Com port number.
PC Management Program installation
You can synchronize your PC with your Toshiba
phone by sending and receiving your Contacts list,
Task, Calendar, SMS and My Files data.
Before you can do this you must install the PC
Management software (on the installation CD)
supplied in the sales pack.
Getting started
25
Page 27

Call functions
Call functions
Making a call
Before making a call, ensure that your Toshiba
phone is switched on, that there is a valid SIM card
installed and that the signal is sufficiently strong.
Call functions
To make a call, enter the phone number from the
standby display, or select the contact (Menu >
Contacts) from the Contacts list, and press the
Send key.
Making a call from call history
To view all calls, dialled calls, missed calls or
received calls, press the send key and select All
calls, Dialled calls, Missed calls or Received
calls. To call a number, scroll to the number and
press the Send key.
26
NOTE:
• To adjust the volume of the call, press the
volume increase or decrease buttons on
the Side key.
• If a video call connection cannnot be
established, a message is displayed and
a warning tone is played.
Answering a call
The name and telephone number of the incoming
call is displayed (if allowed by the caller), or just the
number if the caller is not included in the contacts
list.
To answer a call, press the Send key. To end a call,
press the End key.
NOTE: To reject an incoming call, press the
End key while the phone is ringing.
Speed dialling
In standby mode, press and hold the speed dial
number you want to call for two seconds.
Page 28

Call functions
Operations during calls
Adjusting the earpiece volume
To adjust the earpiece volume to one of five volume
levels, press the volume increase or decrease
buttons on the Side key.
Other operations during a call
Select Options during a call to perform the
following operations:
Task handler Activates the Task handler
Hold call Places the call on hold
Mute call Mutes the outgoing sound
Speakerphone Switches the sound to the
DTMF Allows you to disable or enable
Upgrade to video Changes to video call from
Add to contacts Adds the caller’s phone
Use bluetooth/Use
phone
during a call
speakerphone to enable a
handsfree call
the sending of DTMF tones
voice call
number to the contacts list
Transfers the call to the
accessory in use/to the phone
Call history
You can view calls that you have recently dialed,
missed or received, as well as the call duration and
charges of your calls and data transfer rates, on
your Toshiba phone.
Press the send key in standby mode to view the
following call history information:
All calls View the last 100 dialled,
missed or received calls
Dialled calls View the last 100 dialled
calls
Missed calls View the last 100 missed
calls
Received calls View the last 100 received
calls
Time & costs View the time and cost for
the last call - dialled or
received
Data counter Allows you to view the data
transfer volume for GPRS
and UMTS.
Call functions
27
Page 29

Call functions
Whilst viewing your call history, select Options to
perform the following operations:
Voice call Makes a voice call
Call functions
Video call Makes a video call
Create message Allows you to create an
View contact View your contacts list
Add to contacts Add to your contacts list
Details Displays the call details
Delete Deletes the call entry
Delete all Deletes the history of all
Exit Exits the call history
Video calls
Video calls allow you to enjoy live ‘face-to-face’
conversations with friends, family and colleagues.
Making a video call
Before making a video call, you must confirm that
the person you are video calling also has a video-
28
SMS/MMS message
calls
enabled phone. Then, whilst in standby mode,
confirm that the 3G network indicator is displayed.
To make a video call:
1. Enter the phone number from the standby
display, or select the contact (Menu >
Contacts) from the Contacts list, and select
Options > Video call.
2. Rotate the camera to face you.
3. Press the end key to end the call.
NOTE: If a video call connection cannnot be
established, a message appears and a
warning tone sounds. To make a voice call
instead, press yes.
Answering a video call
When a video call is received, the ringtone plays,
the external light flashes and Video call is
displayed.
To answer a video call, simply press the send key
and rotate the camera to face you. Press the end
key to end the video call.
Page 30

Call functions
Other operations during a video call
• To use the zoom, press the Up or Down
Navigation keys.
• To adjust brightness, press the Right or Left
Navigation keys.
To view the list of other operations during a video
call, select Options whilst you are on a video call.
You can perform the following operations:
• Mute(Unmute) video: mute or unmute the
outgoing video. If you select mute video, the
Videomute picture will be transmitted.
• Mute(Unmute) sound: mute or unmute only
outgoing sound.
• Pause(Resume) outgoing: pause or resume
outgoing video.
• Pause(Resume) incoming: pause or resume
incoming video.
• Full/Split-Screen: select the screen display
orientation.
• Frame rate: select the frame rate, low (7fps) or
high (15fps).
• White balance: select the white balance from
auto, indoor or outdoor.
• Flicker adjustment: set the frame rate for the
video call.
• Send picture: send a picture in My files during
the video call.
• Speakerphone: turn the speakerphone option
on and off.
• Switch to voice call: stop the video call and
switch to voice call.
• Use Bluetooth (phone): transfers the call to the
accessory currently in use/to the phone.
• Add to contacts: add the phone number to
Contacts.
TIP: Rotate the camera to show your caller
a panoramic view of your surroundings.
Call functions
29
Page 31

Contacts
30
Contacts
The Contacts feature has four tabs:
Contacts
• All contacts - the default tab, contains a list of
all contacts and distribution lists entered.
• Groups - a list of all groups. Groups are
categories of contacts.
• SIM contacts - a list of all contacts stored on the
SIM card, a subset of the All contacts list.
• Filter - used to apply different filter criteria to all
contacts.
Creating a new contact
To create a new contact (when saving to the phone
memory):
1. In standby mode, press the Centre key. The
main menu is displayed.
2. Select Contacts > Option > Save Location >
Phone memory.
3. Select New Entry.
4. Enter the contact’s details on the General info
tab and press the Centre key.
To add additional information to the contact, select
Options > Switch tab. You can add the following
information:
• Private: E-mail, E-mail 2, URL, Fax, Address
and Notes.
• Business: E-mail, E-mail 2, URL, Fax,
Company, Job title, Address and Notes.
• Personal: Audio ringtone, Picture, Group,
Birthday and Display name.
5. Select Save contact to save contact.
• Text edit menu: modify the text
• Text input method: change the text input
method.
Option menu
The following functions are listed when you select
Options. Some functions depend on the selected
menu or item.
• New contact: create a new contact.
• New distribution list: create a new distribution
list.
• Create business card: create a business card
phone contact.
Page 32

Contacts
• View: display the details screen for a contact.
• Voice call: make a voice call to the selected
contact.
• Video call: make a video call to the selected
contact.
• Edit: edit the selected contact.
• Create message: create a message for the
selected contact or group.
• Send contact: send the selected contact via
MMS, e-mail or bluetooth.
• Duplicate: open new contact details in edit
mode, with duplicate information.
• Add to distribution list: add the selected
contact to a new or existing distribution list.
• Add to group: add the selected contact to a
new or existing group.
• Add to speed dial: add the selected contact to
speed dial.
• Copy/Move contact: copy or move a contact to
SIM card memory or phone memory.
• Mark: check contacts to enable multiple items to
be selected and acted upon.
• Delete: delete the selected contact.
• Find: search or filter the list. This function is not
shown if the list has less than two items.
• Set as a business card: convert the selected
contact to a business card.
• Memory status: displays the number of contact
entries on your Toshiba phone, SIM card and
memory card.
• Save location: select where the contact will be
saved.
• Exit: exit the contacts application.
NOTE: Some of the functionality, such as
Copy/Move contact(s), will not be available
unless the same category of contacts (such
as Phone contacts only) is selected in the
Mark function.
Contacts
31
Page 33

Contacts
32
Editing contacts
Contacts
To edit a contact:
1. In standby mode, press the Centre key. The
main menu is displayed.
2. Select Contacts and the contact you want to
edit.
3. Select Options > Edit.
4. Edit the necessary details and press the Centre
key.
5. Select Save contact. The edited contact is
saved.
Adding to speed dial
Speed dialling enables you to make calls quickly
and easily to phone numbers in your speed dial list.
To add a number to your speed dial list:
1. In standby mode, press the Centre key. The
main menu is displayed.
2. Select Contacts and the contact you want to
add to the speed dial list.
3. Select Options > Add to speed dial.
4. Select the number key you want to assign the
contact to and press the Centre key.
5. Select Back to return to the Contacts menu.
Adding contacts to groups
1. In standby mode, press the Centre key. The
main menu is displayed.
2. Select Contacts and the contact you want to
add to a group.
3. Select Options > Add to group.
NOTE: To specify a new group at this stage,
simple select New group, enter the group
name and select Save.
4. Select the group you want to add the contact to
and press the Centre key.
Creating groups
1. In standby mode, press the Centre key. The
main menu is displayed.
2. Select Contacts.
3. Use the Right Navigation Key to access the
Groups tab.
4. Select New group.
Page 34

Contacts
5. Enter the name of the new group and press the
Centre key.
6. Select Save. The new group is saved.
Editing groups
1. In standby mode, press the Centre key. The
main menu is displayed.
2. Select Contacts.
3. Use the Right Navigation Key to access the
Groups tab.
4. Select the group you want to edit and select
Options > Edit.
5. Edit the necessary details and press the Centre
key.
6. Select Save. The edited group is saved.
Creating SIM contacts
1. In standby mode, press the Centre key. The
main menu is displayed.
2. Select Contacts.
3. Use the Right Navigation Key to access the
SIM contacts tab.
4. Select New entry.
5. Enter the contact’s details and press the
Centre key.
6. Select Save contact. The contact is saved to
the SIM card.
Select Options to access the following functions:
• New SIM contact: create a new SIM contact.
• Special numbers: show or hide special
numbers.
• Memory status: check status of SIM or phone
memory.
Using the filter
The Filter tab contains a list of all contacts filtered
by various criteria.
1. In standby mode, press the Centre key. The
main menu is displayed.
2. Select Contacts.
3. Use the Right Navigation Key to access the
Filter tab.
4. Select a criteria type and press the Centre key.
The filtered contact list is displayed.
Contacts
33
Page 35

Contacts
34
Voice-activated dialling
Contacts
You can dial numbers from your contacts list by
speaking the contact’s name into your Toshiba
phone.
NOTE: SIM contacts cannot have voice
tags.
To enjoy voice-activated dialling you must record a
voice tag for every number in your contacts list.
Recording a voice tag
Record the voice tag in a quiet environment. You
should speak into the phone from a distance of
about 25cm. The voice tag must not be longer than
three seconds.
To record a voice tag:
1. In standby mode, press the Centre key. The
main menu is displayed.
2. Select Contacts and select the contact from
the list.
3. Select Options > Edit. Select the registered
phone number or enter the phone number.
4. Select Options > Record voice tag. A prompt
is displayed. Select Start.
5. Follow the prompt message, speak the name
clearly into your Toshiba phone and repeat the
name after playback.
6. Press the Centre key to confirm the recording.
If the two recordings are too different or if they
are too similar to an existing voice tag, you will
be prompted to repeat the recording. If you
need to re-record the voice tag, select
Re-record voice and start recording again.
NOTE: When you repeat the name, please
follow the prompt to speak immediately.
Dialling a voice tag
NOTE: To perform voice-actiavted dialling,
voice dialling must be enabled on your
Toshiba phone.
1. Press and hold the Up Navigation key.
2. Speak the name clearly into your Toshiba
phone after the signal tone. If the name
matches the saved voice tag, the number is
dialled.
Page 36

Messages
Messages
Creating messages
Creating an SMS message
The Short Message Service (SMS) allows you to
exchange text messages with other phones. For
details on SMS, contact your service provider.
Your Toshiba phone can send linking SMS
messages. You can send up to five SMS messages
at one time.
To create and send a SMS message:
1. In standby mode, press the Centre key. The
main menu is displayed.
2. Select Messages > Create message > SMS.
The SMS screen is displayed.
3. Enter a message and press the Centre key.
4. Enter the phone number of the person you are
sending the SMS to and press the Centre key.
To add a number from the Contacts list, select
Add from Address Book. The message is
sent and saved in Sent messages.
Creating an MMS message
The Multimedia Messaging Service (MMS) allows
you to exchange multimedia messages containing
data such as text, pictures, sounds, animation and
video clips. For details on MMS, contact your
service provider.
To create and send an MMS message:
1. In standby mode, press the Centre key. The
main menu is displayed.
2. Select Messages > Create message > MMS.
The MMS screen is displayed.
3. Select Options > Add item. Add the picture,
text, video, sound or contact and press the
Centre key. To write a subject for the MMS
message, select Options > Add subject.
4. Enter the phone number or e-mail address of
the person you are sending the MMS to and
press the Centre key. To add a number from
the Contacts list, select Add from Address
Book. The message is sent and saved in Sent
messages.
TIP: To check an MMS message before
sending, select Options > Preview MMS.
Messages
35
Page 37

Messages
Messages
36
Creating an e-mail
To create and send an e-mail message:
1. In standby mode, press the Centre key. The
main menu is displayed.
2. Select Messages > Create message > E-mail.
The e-mail screen is displayed.
3. Enter a message.
4. To enter a subject, select Options >
Add Subject. To attach file(s) to the e-mail, select Options > Attach item.
5. Select Options > Add recipient >Add from
Contacts or Enter e-mail address. You can
also set CC and BCC addresses.
6. Select Options > Send. The message is sent
and saved in Sent messages.
NOTE: To save your sent e-mails, select
Menu > Messages > Message settings >
E-mail > Options > Edit >
Msg preferences > Save sent messages >
Yes.
Checking messages
Checking inbox SMS, MMS or CBS
messages
When a message is received in standby mode, you
are notified by a ringtone and/or a vibration. At the
top of the main display, the message indicator is
displayed. The received message is saved to the
Inbox.
To check inbox SMS, MMS or CBS messages:
1. In standby mode, press the Centre key. The
main menu is displayed.
2. Select Messages > Inbox > SMS/MMS/CB
tab.
3. The list of received messages is displayed.
4. Select the message you want to read and press
the Centre key.
Page 38

Messages
Checking inbox e-mails
To check inbox e-mails:
1. In standby mode, press the Centre key. The
main menu is displayed.
2. Select Messages > Inbox
3. Using the Right Navigation Key, access the
E-mail tab.
4. The list of received e-mail messages is
displayed.
5. Select the e-mail message you want to read
and press the Centre key.
Checking inbox WAP push messages
WAP Push is an information delivery service that
enables you to receive notifications from the web
server in real time.
To check inbox WAP push messages:
1. In standby mode, press the Centre key. The
main menu is displayed.
2. Select Messages > Inbox.
3. Using the Right Navigation Key, access the
Wap Push tab.
4. The list of received WAP Push messages is
displayed. Select the message you want to
read and press the Centre key.
Checking drafts
To check draft messages:
1. In standby mode, press the Centre key. The
main menu is displayed.
2. Select Messages > Drafts > SMS/MMS or
E-mail tab.
3. Select the message you want to use and select
Options.
You can use the following options:
• Edit: edit the message.
• Send: send the message.
• Delete: delete the message.
• Mark: select multiple items.
• Sort by: change the order of the items.
• Memory status: view the memory status of the
Drafts items.
Messages
37
Page 39

Messages
Messages
38
Checking sent messages
To check sent messages:
1. In standby mode, press the Centre key. The
main menu is displayed.
2. Select Messages > Sent messages > SMS/
MMS or E-mail tab.
3. Select the message you want to use and select
Options.
Checking voicemail
To check your voicemail:
1. In standby mode, press the Centre key. The
main menu is displayed.
2. Select Messages > Voicemail. You are
connected to the voicemail centre.
NOTE: Before you can check your
voicemail, you need to set the voicemail
number. Select Menu > Messages > Voice-
mail > Select > Yes and then enter the
number.
Templates
You can use templates to enter messages easily.
You can create both MMS and text message
templates.
To use text/MMS templates:
1. In standby mode, press the Centre key. The
main menu is displayed.
2. Select Messages > Templates > Text or MMS.
The list of Text or MMS templates is displayed.
3. Select the template you want to use and press
the Centre key.
Creating a text template:
1. In standby mode, press the Centre key. The
main menu is displayed.
2. Select Messages > Templates > Text >
Options > New template.
3. Enter the message and press the Centre key.
NOTE: To set the template as a header or
signature, select Options > Set as header
or Set as signature.
4. Select Save and press the Centre key.
Page 40

Messages
Creating an MMS template:
1. In standby mode, press the Centre key. The
main menu is displayed.
2. Select Messages > Create Message > MMS.
The Create MMS screen is displayed.
3. Enter the message and select Options > Save
as.
4. Select Template and press the Centre key.
Message settings
SMS settings
To access the SMS settings:
1. In standby mode, press the Centre key. The
main menu is displayed.
2. Select Messages > Message settings > SMS.
The SMS settings menu is displayed.
You can change the following settings:
• SMS profiles: change SMS profiles and to edit
SMS profiles.
• Auto-header: automatically insert the Header
template.
• Auto-signature: automatically insert the
Signature template at the end of any newly
composed SMS message.
• Auto-save sent items: automatically keep all
sent messages.
• Smileys: display emoticons on a SMS
message.
• Text size: set the text size.
Messages
39
Page 41

Messages
Messages
40
MMS settings
To access the MMS settings:
1. In standby mode, press the Centre key. The
main menu is displayed.
2. Select Messages > Message settings > MMS.
The MMS settings menu is displayed.
You can change the following settings:
• MMS profiles: edit MMS profiles.
• Home retrieval: select whether to download an
MMS message or not.
• Roaming retrieval: select whether to download
an MMS message when abroad.
• Request read report: receive read reports to
confirm if sent messages were read by
recipients.
• Request delivery report: receive delivery
reports to confirm if sent messages were
delivered successfully.
• Delivery time: specify a time, up to seven days,
for delivering messages from the service
centres.
• Validity period: set the length of time a sent
message is stored on the mail server.
• Hide number: hide your phone number.
• Anonymous messages: receive any
anonymous message.
• Allow read report: prevent read reports from
automatically being sent when requested.
• Allow delivery report: select whether to have a
Status Report message sent back when an
MMS is successfully delivered.
• Creation mode: select the content to be added.
• Auto-signature: automatically insert the
Signature template at the end of any newly
composed MMS message.
• Auto-save sent items: keep all sent messages.
• Allow advertisements: receive MMS-based
advertisement messages.
• Smileys: display emoticons on MMS messages.
• Text size: set the text size of MMS messages.
• Max. msg. size: set the maximum message
size.
NOTE: Availability of the Hide number
functionality depends on your network
provider.
Page 42

Messages
E-mail settings
To access the e-mail settings:
1. In standby mode, press the Centre key. The
main menu is displayed.
2. Select Messages > Message settings >
E-mail. The E-mail accounts screen is
displayed. You can set up to five different e-mail
accounts.
3. Select an account and select Options.
You can change the following settings:
• Activate: activate an account.
• Edit: edit User info, Connection info, Msg
preferences, Add signature and Create
signature.
• Rename: change an account name.
• Delete: delete an account.
Cell broadcast settings
You can receive a variety of messages through cell
broadcast. CBS (Cell Broadcast) Messages are
sent to your Toshiba phone automatically by the
message centre.
To access the cell broadcast settings:
1. In standby mode, press the Centre key. The
main menu is displayed.
2. Select Messages > Message settings > Cell
broadcast.
You can change the following settings:
• Receive broadcasts: decide whether to receive
broadcasts or not.
• Cell info display: set whether the local cell
information appears on the idle screen or not.
• Topic list: select the topics you want to receive.
Messages
41
Page 43

Messages
Voicemail settings
To access the voicemail settings:
Messages
1. In standby mode, press the Centre key. The
main menu is displayed.
2. Select Messages > Message settings >
Voicemail.
You can change the following settings:
• Voicemail number: change voicemail numbers.
• Notification: set the notifications of new
voicemails.
42
Page 44

Text input
Text input
Character input mode
When using your Toshiba phone, you will often
need to enter text when saving new contact entries,
creating text messages or scheduling events on
your calendar.
To switch the character input mode on a character
input screen, select Options > Text input method
and the character input mode.
NOTE:
The selected character input mode is
displayed at the top of the character input
screen.
Your Toshiba phone has the following text input
modes:
T9 mode
Allows you to enter words with only one keystroke
per letter. Every key has more than one letter
assigned to it. For example, pressing the 3 key can
enter the letters D, E or F. T9 mode compares your
preceding keystrokes with an internal dictionary to
formulate the most likely word. As a result, entering
text in T9 mode requires far fewer keystrokes than
ABC mode.
EXAMPLE: To enter the word Toshiba in T9
mode, press 8 6 7 4 4 2 2. Press the Centre
key to confirm.
ABC mode
Allows you to directly enter letters of the alphabet.
Each press of a key switches the letter to the next
letter assigned to that key. Press the key once,
twice, three or four times until the desired letter is
displayed. Select abc for all lowercase characters,
Abc for the initial uppercase character and ABC for
all uppercase characters.
EXAMPLE: To enter the word Toshiba in
Abc mode, press 8 once, 6 three times, 7
four times, 4 twice, 4 three times, 2 twice and
2 once.
Number mode
Allows you to enter numbers.
Symbolic mode
Allows you to enter symbols and punctuation
marks.
To enter symbols and emoticons, press the # key.
Text input
43
Page 45

Settings
Settings
Phone profile settings
Settings
This feature enables you to change sound and
vibration settings to suit your environment. Your
Toshiba phone has six preset profiles. You can
change the sound and vibration settings of each
profile.
To access the profile settings:
1. In standby mode, press the Centre key. The
main menu is displayed.
2. Select Settings > Phone profile.
You have the following profile options:
• General: profile for ordinary use.
• Silent: set your Toshiba phone to silent mode.
• Meeting: profile for meetings.
• Outdoor: profile for incoming ringtone set to
maximum, to be heard outdoors.
• Headset: profile for use with headset.
• Car kit: profile for when you are driving a car.
• User Profile 1 and User Profile 2: configure the
two profiles with your personal settings.
Display settings
This feature enables you to customise the look of
your Toshiba phone.
To access the display settings:
1. In standby mode, press the Centre key. The
main menu is displayed.
2. Select Settings > Display settings.
You have the following display options:
• Wallpaper: use a picture, or one taken with the
camera, as a wallpaper when the phone is in
standby mode.
• Themes: set a theme for the main menu and
wallpaper.
• Screensaver: set a screensaver.
• Greeting message: set greeting messages
displayed during power up sequences.
• Backlight time: select backlight duration, from 5
to 60 seconds.
• Brightness: select between four levels of preset
brightness.
44
Page 46

Settings
• Power save: automatically control when the
display is powered off. If you configures this
setting to Never, the dialogue on the standby
time display will notify you that the standby time
of the phone will be reduced, due to battery
drain.
Phone settings
This feature enables you to change sound and
vibration to suit your surrounding environment.
To access the phone settings:
1. In standby mode, press the Centre key. The
main menu is displayed.
2. Select Settings > Phone settings.
You have the following phone settings options:
• Language: select the languages for display and
input.
• T9 mode: select the T9 input method.
• Key tone volume: select the key tone volume.
• Info tones: control whether or not info tones are
played.
• Phone identity: you can view and edit your
name and phone number.
• Flight mode: use your Toshiba phone
applications without transmitting wireless
signals, for air traffic safety.
• Clock: set the time, date, time zone, time
format, date format and show clock on/off.
• Ringtones: adjust the volume, select tones for
the following:
- Call and messaging
- Calendar
- Alarm
- Task
Also switch the Game sound, Startup sound and
Shutdown sound on/off.
• Vibration: control whether or not you want your
Toshiba phone to vibrate when it rings.
• Accessories: select the volume, ringtone and
answering mode when you are using a headset
or car kit. You can also select whether or not to
charge via USB.
• Shortcuts: set shortcuts for each function. The
Shortcuts screen is a two-line zoom list. The first
line displays the key name. The second line
displays the currently assigned shortcut function
for the key. You can set four shortcuts.
Settings
45
Page 47

Settings
46
Call settings
Settings
To access the call settings:
1. In standby mode, press the Centre key. The
main menu is displayed.
2. Select Settings > Call settings.
You have the following call settings options:
• Hide ID: set whether or not to automatically
notify the person you are calling of your phone
number.
• Call waiting: enable or disable the call waiting
feature. The default setting is operator
customizable on the network only. The network
must be contacted to change this setting or
check the status of the setting.
• Call barring: enable or disable call barring for a
selected call type and to check the current state.
• Call divert: set to divert incoming calls to
another phone number. You can divert voice
calls, video calls, data and fax.
• Auto redial: control whether or not redial can be
tried automatically when it fails to originate call.
If set to On, a maximum of ten redials are made.
• Any key answer: control whether or not an
incoming call can be answered by keys other
than the Send key. Additional keys to answer
calls include the Select key, Up, Down, Left
and Right Navigation keys, Clear key, and any
digit key.
• Video calls: select whether or not to show the
caller’s image and select an image to be shown.
Also, decide whether or not to activate the
speaker phone, and select the frame rate for the
video call.
Security settings
To access the security settings:
1. In standby mode, press the Centre key. The
main menu is displayed.
2. Select Settings > Security settings.
You have the following security options:
• Auto key lock: determines whether or not the
keyguard is activated automatically after two
minutes if no keys are pressed from the standby
display.
Page 48

Settings
• Fixed dialling: restrict outgoing calls to only
those that are stored in the protected SIM card.
• PIN codes: decide whether or not to enable the
PIN control, change PIN/PIN2/phone code.
When PIN control is enabled, you are prompted
for the PIN code when you switch your Toshiba
phone on. If the PIN code is not entered, the
phone will be disabled. You must enter the PIN
code to toggle this setting.
• This SIM only: restrict your Toshiba phone to
work only with the current SIM card installed. If
this setting is disabled, the phone will work with
any SIM card.
• Rights manager: access the Digital Rights
Manager. Selecting this setting launches the
DRM’s Rights Manager screen.
• Content download prompt: enable or disable
the Content Download prompt before
downloading DRM contents.
Network settings
To access the network settings:
1. In standby mode, press the Centre key. The
main menu is displayed.
2. Select Settings > Network settings.
You have the following network settings options:
• Network info: contact and retrieve information
about the current settings network operator.
• Choose network: choose a service provider.
• Search mode: determine whether the phone will
automatically search and select a network
operator, or if it must be set manually.
• Preferred network: customise this listing by
changing each entry to a desired network.
• Mode selection: change the mode at which
your Toshiba phone operates. The choices are:
Dual, GSM only and UMTS only. The default
setting is Dual. The user may choose to limit
only to GSM or to UMTS.
• Fast search: enables your Toshiba phone to
search for a network faster than a normal search
at the expense of power consumption.
Settings
47
Page 49

Settings
48
Connectivity settings
Settings
To access the connectivity settings:
1. In standby mode, press the Centre key. The
main menu is displayed.
2. Select Settings > Connectivity.
Bluetooth™ is a technology that facilitates wireless
communication between PCs and your Toshiba
phone. You can transfer data and use a wireless
headset device in your car for handsfree calls. We
recommend using Bluetooth™ whilst your Toshiba
phone and the pairing devices are within 10 meters
of each other.
To activate the Bluetooth connection, select
Bluetooth > Bluetooth active and press the
Centre key.
You also have the following connectivity options:
• Connection profiles: select and edit a
connection profile, which contains Profile name,
APN, Login, Password, Authentication, DNS1
and DNS2.
• Internet profiles: select and edit an internet
profile which contains Profile name, Type,
Security, Proxy server, Proxy port, Login and
Password.
• Linger time: specify linger time. This is a
universal setting which will apply to all
applications.
Memory settings
To access the memory settings:
1. In standby mode, press Centre key. The main
menu is displayed.
2. Select Settings > Memory settings.
You have the following memory settings options:
• File system: manage saved pictures, videos,
sounds, games, applications and other
miscellaneous items.
• Master reset: reset the phone. If you proceed
with the reset process, all customised settings
for certain applications will be reset to the default
settings.
Page 50

Organiser
Organiser
Stopwatch
Stopwatch allows you to measure elapsed time.
This is especially useful for various sports. The
stopwatch is precise to one-tenth of a second.
To use the stopwatch:
1. In standby mode, press the Centre key. The
main menu is displayed.
2. Select Organiser > Stopwatch.
3. Press the Centre key to start and stop the
stopwatch.
TIP: To record and save your lap times,
select Lap at the completion of every lap
while the stopwatch is running.
Alarm clock
To set an alarm:
1. In standby mode, press the Centre key. The
main menu is displayed.
2. Select Organiser > Alarm clock and the
desired alarm.
3. Enter the following criteria:
• Subject: edit the alarm name
• Time: set the time of the alarm
• Repeat: set the alarm repeat method (Once,
Day of the week, Selected day or Everyday)
• Snooze: activate the snooze function
Calendar
NOTE: The alarm will sound even if your
Toshiba phone is switched off.
Calendar allows you to use your Toshiba phone
to create and view scheduled events and
appointments.
TIP: Synchronize your calendar data with a
compatible computer.
Entering a new event
1. In standby mode, press the Centre key. The
main menu is displayed.
2. Select Organiser > Calendar > Options >
New event.
Organiser
49
Page 51

Organiser
Organiser
50
3. Enter the subject and set the start date, start
time, end date, end time, alarm and repeat.
NOTE:
• The Repeat tool enables you to set a
repeat interval for the event - Never,
Daily, Weekly, Monthly or Yearly.
• The Alarm tool enables you to set a
reminder for the event – Never, 1 min
before, 5 mins before, 10 min s before,
15 mins before, 30 mins before, 1 hour
before, and 1 day before.
4. Select Options > Save to save the new event.
Options
• Daily view: view the schedule in a daily format.
• Weekly view: view the schedule in a weekly
format.
• Monthly view: view the schedule in a monthly
format.
• Go to date: go directly to the date that you want
• Settings: set the alarm default setting.
• Memory status: check the number of events
currently entered and current memory status.
• Delete events: delete calender events.
• Exit: exit the calender application.
Calculator
To access the calculator:
1. In standby mode, press the Centre key. The
main menu is displayed.
2. Select Organiser > Calculator.
3. Enter numbers with the number keys and
operations with the navigation key.
Operations
• To input a decimal point, press the * key.
• To change the sign of the displayed number,
press the
• To delete the number you entered, press the
Clear key.
• To initialize the calculator, press the Left
Softkey key
• To exit the calculator, press the Right Softkey
key
# key.
Page 52

Organiser
Sound recorder
To make a sound recording:
1. In standby mode, press the Centre key. The
main menu is displayed.
2. Select Organiser > Sound recorder > Record
new.
3. Press the Centre key to start recording.
Press the Centre key again to pause recording.
Press the Left Softkey to save the recording.
NOTE: You can save the sound file to the
phone memory or to the memory card. If the
memory card is inserted, you can select the
save location by selecting Record new.
Tasks
To enter a task:
1. In standby mode, press the Centre key. The
main menu is displayed.
2. Select Organiser > Tasks > New Task.
3. Enter the Title, Content, Start date, Due date,
Notify date, Notify time, Alarm and Task
status.
NOTE: To enter subsequent tasks, select
Organiser > Tasks > Options > New.
Unit converter
To use the unit converter:
1. In standby mode, press the Centre key. The
main menu is displayed.
2. Select Organiser > Unit converter.
3. Select the Unit and Input types.
4. Enter the value and select the Output type.
5. Press the Centre key. The result is displayed.
Organiser
51
Page 53

Organiser
World clock
To set a time zone:
Organiser
1. In standby mode, press the Centre key. The
main menu is displayed.
2. Select Organiser > World clock.
3. Select the time zone using the Left and Right
Navigation keys.
4. Select the city using the Up and Down
Navigation keys.
5. Select Options > Set time zone > Yes.
NOTE:
Search and select a city from major cities all
around the world using the Search city
function.
52
Page 54

Browser
Browser
A separate subscription may be required to use the
browser. For details, contact your service provider.
Launching the browser
1. In standby mode, press the Centre key. The
main menu is displayed.
2. Select Browser. The Browser menu is dis-
played.
You have the following options:
• Browser: Displays your chosen homepage.
• Enter URL: access a web page directly by
entering the website address.
• Bookmarks: shows the list of your favourite web
pages.
• History: displays the history of web pages
accessed.
• Browser Settings: set various browser
settings.
NOTE: To set up your internet profiles,
select Settings > Connectivity > Internet
profiles. (See page 48 for further details)
Navigation keys f or br o wsing the web
• Left Softkey: selects an item or displays the
Options menu.
• Right Softkey: returns to the previous screen.
• Centre key: selects an item.
• Up and down Navigation keys: scrolls up or
down
• Left and right Navigation keys: scrolls left or
right
• End/Power key: exits the browser.
• 1 to 9: acts as a shortcut to a link with a number
• * and #: acts as shortcut to a link with * or #. You
can also use these keys to perform support operations
• Side keys: adjusts the volume
Browser
53
Page 55

Browser
54
Bookmarks
Browser
To add a bookmark, select Options >
Add Bookmark while a web page is displayed.
Accessing a web page from a
bookmark
1. In standby mode, press the Centre key. The
main menu is displayed.
2. Select Browser > Bookmarks
3. Select the title of the page you want to access
and press the Centre key. The web page is
displayed.
Browser settings
Browser settings enables you to configure the
browser for more convenient use.
You can configure the following browser settings:
1. Multimedia
- Images: show or hide images.
- Sound: decide whether to play the sounds.
- Object: control download activity.
2. Look and feel
- Text wrap: character bounds or word bounds.
- Scroll step: select scroll margin.
- Connection timeout: set idle time duration.
3. Security
- Secure prompt: display security prompt or not.
- ID cache: keeps your ID and password.
- Cookies: keep browser information.
- Link referral: browse the previous web page.
4. Certificates: verify all digital certificates
installed on your Toshiba phone.
5. WAP Push: confirm the contents level before
browsing.
6. Browser Profiles: select the service providers.
Page 56

Media player
Media player
Playing music
To play music:
1. In standby mode, press the Centre key. The
main menu is displayed.
2. Select Media player. The Music tab is
displayed by default.
The following options are displayed:
• Playlist: create playlists or play music from the
playlists.
• Recent: play music from recently played files.
• All: play music from all music files.
3. Select a playlist, or a file within a folder, and
press the Centre key. The track begins.
Operations while music is playing
• Adjust the volume: press the Side Keys
• Pause/resume: press the Centre key.
• Rewind: press and hold the Left Navigation
Key.
• Fast forward:press and hold the Right
Navigation Key.
• Play the previous track: press the Left
Navigation Key.
• Play the next track: press the Right
Navigation Key.
• Stop playing track: press the Right Softkey.
Select Options while the music is playing to access
the following functions:
• Play/Pause: play or pause the track.
• Details: view track information in detail.
• Set as ringtone
• Send: send a selected file via MMS, email or
Bluetooth.
Select Options to access the following functions in
the All menu:
•Play: play music
• Add to playlist: adds the selected file to the
playlist.
• History: view the recently played media files.
• New sound: use the sound recorder.
• Delete: delete the selected file.
• Rename: rename the selected file.
• Send: send a selected file via MMS, email or
Bluetooth.
Media player
55
Page 57

Media player
• Sort by: sort files by name, type or date.
• Details: view the file information in detail.
• Exit: exit the media player application.
Media player
Using the playlist
You can create playlists using your Toshiba phone
memory.
Creating a playlist
1. In standby mode, press the Centre key. The
2. Select Media player > Playlists > New
3. Enter the playlist name and press the Centre
4. Select Save and press the Centre key.
Adding files to a playlist
1. In standby mode, press the Centre key. The
2. Select Media player > Recent or All.
3. Select the file you want to add to the playlist and
56
main menu is displayed.
playlist.
key.
main menu is displayed.
select Options > Add to playlist.
4. Select Options > Done.
You have the following options when adding files to
a playlist:
•Mark: mark the selected files.
• Unmark: unmark the selected files.
• Mark all: mark all files.
• Unmark all: unmark all files.
5. Select the playlist you want to add the file(s) to
and press the Centre key.
Editing a playlist
You can add or delete tracks in a playlist, as well as
change the playback order.
1. In standby mode, press the Centre key. The
main menu is displayed.
2. Select Media player > Playlists.
3. Select a playlist you want to edit and select
Options.
4. Select Edit playlist.
5. Select Remove tracks or Change order.
Page 58

Media player
Select Options in Playlists to access the following
functions:
•Play: play music
• Edit playlist: edit the selected playlist.
• Rename: rename the selected playlist.
• Delete: delete the selected playlist.
Viewing pictures
1. In standby mode, press the Centre key. The
main menu is displayed.
2. Select Media player.
3. Use the Right Navigation Key to switch to the
Pictures tab.
4. Select the picture you want to view and press
the Centre key.
In the Pictures file list, you can use the following
functions:
• View: view the picture you select.
• History: view the recently played media files.
• New picture: take a picture.
• Delete: delete selected pictures.
• Rename: change the name of a picture.
• Send: send a selected file via MMS, email or
Bluetooth.
• Sort by: sort by name, type or date.
• Details: view the file information in detail.
• Exit: exit the media player application.
Select Options while viewing pictures to use the
following functions:
• Zoom in: zoom the pictures in and out.
• Full screen: view the pictures in full screen.
• Slideshow: view the pictures in a slideshow.
• History: view the recently played media files.
• New picture: take a picture.
• Send: send a selected file via MMS, email or
Bluetooth.
• Set as wallpaper: set the selected picture as
wallpaper.
• Details: view the file information in detail.
• Exit: exit the media player application.
Media player
57
Page 59

Media player
Playing videos
1. In standby mode, press the Centre key. The
Media player
2. Select Media player.
3. Use the Right Navigation Key to switch to the
4. Select the video you want to see and press the
Select Options while the video is playing to use the
following functions:
• Play/Pause: play or pause the video.
• Full screen: view the videos in full screen.
• Send: send a selected file via email or
• Details: view the file information in detail.
Select Options in the Videos file list to use the
following functions:
• Play: play the video you select.
• History: view the recently played media files.
• New video: record a video.
• Delete: delete selected videos.
• Rename: change the name of a video.
58
main menu is displayed.
Videos tab.
Centre key.
Bluetooth.
• Send: send a selected file via email or
Bluetooth.
• Sort by: sort by name, type or date.
• Details: view the file information.
• Exit: exits the media player application.
Using bookmarks
The Bookmarks tab shows a list of all links to
streaming content on your Toshiba phone. These
bookmarks can only be accessed through the
Media Player. Each URL must correspond to a
single online audio or video file.
To access the Bookmarks list:
1. In standby mode, press the Centre key. The
main menu is displayed.
2. Select Media player.
3. Use the Right Navigation Key to switch to the
Bookmarks tab.
4. Select the bookmark you want to access and
press the Centre key.
NOTE: To deactivate silent mode while in
application, go to the idle screen by selecting
Home in Task handler. You will be able to
deactivate silent mode by pressing # key.
Page 60

Camera
Camera
Taking a picture
To take a picture:
1. In standby mode, press the Centre key. The
main menu is displayed.
2. Select Camera > Picture mode.
3. Press the Centre key to take the picture.
4. Press the Centre key to save the picture. You
can view the picture in the Pictures folder in My
files.
TIP: To take a self portrait, swivel the
camera lens outwards. With both the
camera lens and main display facing you,
press the Centre key to take the picture.
Monitor screen options
To perform the following operations select Options
whilst in camera mode:
• View pictures: view the pictures you have
taken.
• Video mode: change to video mode.
• Self-timer: take pictures using the self-timer.
• Picture settings: set picture quality and size.
• Exit: exit the camera application.
Preview screen options
• New picture: take a new picture.
• Send picture: send a picture via MMS, email or
Bluetooth.
• Rename picture: change the name of a picture.
Setting the self-timer
1. In standby mode, press the Centre key. The
main menu is displayed.
2. Select Camera > Picture mode > Options >
Self timer.
3. Press the Centre key to begin the self timer.
A prompt will sound three seconds before the
picture is taken.
4. Press the Centre key to save the picture. You
can view the picture in the pictures folder in My
files.
Camera
59
Page 61

Camera
60
Picture settings
Camera
1. In standby mode, press the Centre key. The
main menu is displayed.
2. Select Camera > Picture mode > Options >
Picture settings.
3. Press the Centre key.
You can alter the following settings:
• Resolution: select picture resolution
(1280x960, 640x480, 320x240).
• Default name: change the default name of the
picture.
• Save location: choose to save the picture on
the phone memory or on the memory card.
• White balance: adjust how sensitive the sensor
is to light. (Auto, Indoor, Outdoor).
• Flicker adjustment: adjust the sensitivity to
indoor lighting flicker rates (Off, 50Hz or 60Hz).
Recording a video
To record a video:
1. In standby mode, press the Centre key. The
main menu is displayed.
2. Select Camera > Video mode.
3. Press the Centre key. The recording starts.
To pause the recording, select Pause.
To resume the recording, select Resume.
4. Select Stop to save the video to your phone or
memory card. To rename the video, select
Options > Rename video.
You can view the video in the Videos folder in
My files.
Monitor screen options
To perform the following operations select Options
whilst in video mode:
• View videos: view the videos you have
recorded.
• Picture mode: change to picture mode.
• Message mode: change to messages mode.
• Audio record: set to record sound during
recording.
Page 62

Camera
• Video call: change to video call mode.
• Video settings: set the video quality and video
effects.
• Exit: exit the camera application.
Preview screen options
• New video: take a new video.
• Play video: play a video.
• Send video: send a video via MMS, e-mail or
Bluetooth.
• Rename video: change the name of a video.
Video settings
1. In standby mode, press the Centre key. The
main menu is displayed.
2. Select Camera > Video mode > Options >
Video settings.
3. Press the Centre key.
You can alter the following settings:
• Default name: change the video default name.
• Save location: choose to save the picture on
the phone memory or on the memory card.
• Frame rate: adjust how many frames per
second the video will capture (Low = 7fps, High
= 15fps).
• White balance: adjust the light sensitivity (Auto,
Indoor or Outdoor).
• Flicker adjustment: adjust the sensitivity to
indoor lighting flicker rates (Off, 50Hz or 60Hz).
Camera
61
Page 63

My files
My files
The My files menu contains six default folders for
My files
storing files. Additionally, you can create your own
personal folders and you can use My files to store
data contained on your memory card.
To access My files, in standby mode press the
Centre key and select My files.
Folders
You can save files to the following My files default
folders:
• Pictures
• Videos
• Sounds
• Games
• Applications
• Other documents
Searching files
To search files in the My files menu:
1. In standby mode, press the Centre key. The
main menu is displayed.
2. Select My files > Options > Search.
3. Enter the file name you want to find and press
the Centre key. The file is displayed.
License manager
License Manager displays an alphabetical list of all
Rights Objects (ROs) associated with the protected
content stored in My files.
To view the License Manager:
1. In standby mode, press the Centre key. The
main menu is displayed.
2. Select My files > Options > License Manager.
3. Press the Centre key.
62
Page 64

Connectivity
Connectivity
Connecting your Toshiba phone to a PC
You can use a USB cable to connect your Toshiba
phone to a PC, allowing you to send and receive the
Contact list, Tasks, Calendar, SMS and My files
data.
IMPORTANT: Before you connect the USB
cable, the USB host driver and PC
management software (included on the
CD-ROM supplied in the sales pack) must
be installed on the PC.
To connect your Toshiba phone to a PC:
1. Insert the plug of the USB cable into the
external connector.
2. Connect the USB cable to the USB port of the
PC.
To disconnect your Toshiba Phone from the PC:
1. Press the End key on your Toshiba phone.
2. Select the Disconnect button, on the PC
SYNC menu bar.
3. Firmly grip the USB cable and gently pull from
your Toshiba phone. The connection between
your Toshiba phone and the PC is now terminated.
Connectivity
63
Page 65

Specifications
Specifications
Toshiba TS705
Frequency Range
Within 3G (UMTS) 2100
Specifications
Within GSM 900
Within DCS 1800
Within PCS 1900
Continuous Talk Time
Within 3G (UMTS) area
Video Call
Within GSM area
Continuous Standby Time
Within 3G (UMTS) area
Within GSM area
Charging Time Approx. 170 mins
Dimensions (H × W × D) Approx. 105mm x 46mm x 15mm
Maximum Output
Within 3G (UMTS) 2100
Within GSM 900
Within DCS 1800
Within PCS 1900
Weight Approx. 95 g
AC Adapter
Input Voltage
Charging Temperature Range
1920 - 2170 MHz
880 - 960 MHz
1710 - 1880 MHz
1850 - 1990 MHz
Approx. 180 mins
Approx. 105 mins
Approx. 210 mins
Approx. 250 hrs
Approx. 220 hrs
Class 3
Class 4
Class 1
Class 1
100 to 240 VAC
5 to 35 °C
0.25 W
2 W
1 W
1 W
50/60Hz
64
Page 66

Troubleshooting
Troubleshooting
Problem Possible Causes and Solutions
Cannot turn the
power on
Cannot charge the
battery
Cannot make or
receive voice and
video calls
Cannot use the Web • Check your subscription status. Contact your service provider.
Cannot use SMS
and MMS
• Ensure that the battery is inserted correctly (pg 22).
• Ensure that the battery is charged (pg 24).
• Ensure that the battery is inserted correctly.
• Ensure that the AC adapter and battery pack connectors are clean.
• Check the signal strength indicator. If the display indicates a poor signal adjust
your physical location to be clear of obstructions that may block the signal.
• A video call can only be made or received in an area with 3G coverage. Ensure
that the sign for indicating you are in an area with 3G coverage appears on the
display in standby mode.
• If you enter the PIN code incorrectly three times in a row, the PIN lock will be
set, preventing calls being made because access to the SIM card is blocked
(pg 24). Enter the PUK code to cancel the PIN lock.
• If the indicator appears on the display, enter your security code to cancel the
phone lock.
• The network settings may be incorrect. Check the network settings. For details
on network settings, contact your service provider (pg 47).
• Check your subscription status. Contact your service provider.
• Ensure that the service centre number is correct. For details on the service
centre number, contact your service provider.
Troubleshooting
65
Page 67

Health and safety
Health and safety
General
• Always use your Toshiba phone in the intended
manner. Incorrect usage may affect
performance. Only qualified service personnel
should install or repair the phone and its
accessories.
Health and safety
• To avoid permanent damage to your Toshiba
phone, use only compatible batteries and
accessories.
• Before connecting your Toshiba phone to
another device, read the supporting
documentation to confirm that the other device is
compatible.
• When making emergency calls from your
Toshiba phone, ensure that the phone is
switched on and in service.
• Interference may affect the performance of your
Toshiba phone. If the display indicates a poor
signal adjust your physical location to be clear of
obstructions that may block the signal.
• When your Toshiba phone is used for extended
periods of time, especially in high temperature
conditions, the phone surface could become
hot. Please use caution when touching the
phone under such conditions.
66
• When using ear buds or other headphones, be
careful not to listen at excessive volumes.
Listening to very loud sound levels may lead to
hearing loss. Also, listening through the ear
buds or headphones for prolonged periods of
time, even at normal sound levels, may lead to
hearing loss. You should consult your doctor for
more information on proper use of ear buds or
headphones.
Operating environment
• Do not handle your Toshiba phone while driving
or when operating machinery. If you must
handle the phone while driving, park the vehicle
before conversing. If using an integrated hands
free device, make sure the phone is securely
placed in its holder.
• Switch your Toshiba phone off if you are
entering a hospital or health care facilities.
Medical equipment may be affected by phone
usage. Always follow building regulations
governing phone usage.
• Switch your Toshiba phone off when travelling
on an aircraft. The phone signal may interfere
Page 68

Health and safety
with the systems in the aircraft. You are legally
bound to comply with this recommendation.
• Switch your Toshiba phone off in any facility
where posted notices prohibit phone usage.
• Do not use your Toshiba phone when refuelling.
You should keep the phone away from fuel and
chemicals.
• Switch your Toshiba phone off when blasting is
in progress and observe all provided guidelines
and regulations.
• Switch your Toshiba phone off in areas with
potentially explosive atmospheres. For
example, fuel storage areas and spray paint
facilities.
• Only qualified personnel should install the
device in a vehicle. Faulty installation or service
may be dangerous and may invalidate any
warranty. For more information, consult your
vehicle manufacturer or representative.
Electronic devices
• If you wear a pacemaker, or are in the company
of someone who does, you should be aware that
there is a small risk of mobile phone usage
interfering with the operation of the pacemaker.
You should contact your doctor, or the
manufacturer of the pacemaker, for more
information.
• Mobile phone usage may interfere with some
hearing aids. If this happens you should contact
your service provider or doctor.
• Mobile phone usage may interfere with the
functionality of inadequately shielded
medical devices. Consult a physician or the
manufacturer of the device to ensure safe
procedures are used.
• Mobile phone usage may interfere with the
functionality of any inadequately shielded
electronic system in a motor vehicle. Examples
include airbags and fuel injection. You should
contact the manufacturer of the vehicle to
ensure that the electronic system is properly
shielded.
Health and safety
67
Page 69

Health and safety
Battery safety
Your Toshiba phone is powered by a rechargeable
battery. The full performance of a new battery is
achieved only after two or three complete charge
and discharge cycles. The battery can be charged
and discharged hundreds of times but it will
Health and safety
eventually wear out. When the talk and standby
times are noticeably shorter than normal, it is
recommended that you buy a new battery.
• A new battery, or one that has not been used for
a long time, could have reduced capacity during
initial use.
• The battery can only be charged in temperatures
between +5 °C (+41 °F) and +35°C (+95 °F).
• Only use batteries approved by Toshiba and
only recharge the battery with the recommended
charger supplied by Toshiba.
• When the charger is not in use, disconnect it
from the power source.
• Do not leave the battery connected to the
charger and power source for longer than
necessary as overcharging will shorten the
lifespan of the battery.
68
• Do not short-circuit the battery. Accidental
short-circuiting can occur when a metallic object
causes a direct connection between the + and -
terminals of the battery.
• Do not leave the battery in areas of extreme cold
or heat as this will affect the performance of the
battery. Areas of extreme cold include a
refrigerator, and areas of extreme heat include a
car exposed to direct sunlight.
• Do not dispose of the battery in a fire.
• Do not dispose of the battery in an ordinary bin.
The battery contains toxic chemicals and must
be disposed appropriately. Contact your local
authorities for more information.
Page 70

Health and safety
Emergency calls
Calls cannot be made to emergency services while
data communication is being performed within a
GSM area. If the system mode is set to UMTS Only
or GSM Only, calls cannot be made to emergency
services if the selected network is unavailable.
Also, calls may not be able to be made to
emergency services depending on the network
services of some service providers.
IMPORTANT: You can still make calls to
emergency services when the SIM card is
not inserted, the SIM card is locked, the
phone lock is set, Fixed Dialling Numbers is
set, Flight Mode is set or Call Barring Service
is set.
There is no guarantee that a connection can be
established in all countries and areas because
operation of your phone differs depending on the
wireless network, wireless signal and your setting
status. Do not rely solely on your mobile phone
when you need to make emergency calls.
FCC RF exposure information
Your Toshiba phone is a radio transmitter and
receiver. It is designed and manufactured not to
exceed the emission limits for exposure to radio
frequency (RF) energy set by the Federal
Communications Commission of the U.S.
Government.
The guidelines are based on standards that were
developed by independent scientific organisations
through periodic and thorough evaluation of
scientific studies. The standards include a
substantial safety margin designed to assure the
safety of all persons, regardless of age and health.
The exposure standard for wireless handsets
employs a unit of measurement known as the
Specific Absorption Rate, or SAR. The SAR limit set
by the FCC is 1.6W/kg. The tests are performed in
positions and locations (e.g., at the ear and worn on
the body) as required by the FCC for each model.
The highest SAR value for this model handset when
tested for use at the ear is 0.641W/kg and when
worn on the body, as described in this user guide, is
0.665W/kg.
Health and safety
69
Page 71

Health and safety
Body-worn operation
This phone was tested for typical body-worn
operations with the back of the phone kept at a
distance of 1.5cm from the body. To maintain
compliance with FCC RF exposure requirements,
use accessories that maintain a 1.5cm separation
Health and safety
distance between your body and the back of the
phone. The use of belt clips, holsters and similar
accessories should not contain metallic
components. The use of accessories that do not
satisfy these requirements may not comply with
FCC RF exposure requirements, and should be
avoided.
The FCC has granted an Equipment Authorization
for this model handset with all reported SAR levels
evaluated as in compliance with the FCC RF
emission guidelines. SAR information on this model
handset is on file with the FCC and can be found
under the Display Grant section of http://
www.fcc.gov/oet/fccid after searching on FCC ID
SP2-SF4-E02.
Additional information on Specific Absorption Rates
(SAR) can be found on the Cellular
Telecommunications & Internet Association (CTIA)
website at http://www.phonefacts.net.
70
European RF Exposure Information
Your Toshiba phone is a radio transmitter and
receiver. It is designed not to exceed the limits for
exposure to radio waves recommended by
international guidelines. These guidelines were
developed by the independent scientific
organisation ICNIRP and include safety margins
designed to assure the protection of all persons,
regardless of age and health.
The guidelines use a unit of measurement known
as the Specific Absorption Rate, or SAR. The SAR
limit for mobile devices is 2 W/kg and the highest
SAR value for this device when tested at the ear
was 0.808W/kg*. As mobile devices offer a range
of functions, they can be used in other positions,
such as on the body as described in this user’s
guide**. In this case, the highest tested SAR value
is 0.783W/kg.
As SAR is measured utilising the device’s highest
transmitting power, the actual SAR of this device
while operating is typically below that indicated
above. This is due to automatic changes to the
power level of the device to ensure it only uses the
minimum level required to reach the network.
Page 72

Health and safety
The World Health Organization has stated that
present scientific information does not indicate the
need for any special precautions for the use of
mobile devices. They state that if you want to
reduce your exposure then you can do so by limiting
the length of calls or using a ‘hands-free’ device to
keep the mobile phone away from the head and
body. Additional Information can be found on the
website of the World Health Organization (http://
www.who.int/emf).
* The tests are carried out in accordance with
international guidelines for testing.
** Please see the <FCC RF Exposure Information>
section about body worn operations.
The following Information is only for EU-Member
States:
Health and safety
The use of the above symbol indicates that this
product may not be treated as household waste. By
ensuring this product is disposed of correctly, you
will help prevent potential negative consequences
for the environment and human health, which could
otherwise be caused by inappropriate waste
handling of this product. For more detailed
information about recycling of this product, please
contact your local city office, your household waste
disposal service or the shop where you purchased
the product.
71
Page 73

Health and safety
Purchase record
For your future reference, we recommend that you
fill in your purchase details in the form below.
Serial Number*:
Health and safety
Dealer Name:
Purchase Date:
* The serial number is printed on the bottom of the
battery compartment.
72
Page 74

Menu tree
Menu tree
Camera
Picture mode
Video mode
Contacts
All contacts
Groups
SIM contacts
Filter
Settings
Phone profile
Display settings
Phone settings
Call settings
Security settings
Network settings
Connectivity
Memory settings
Call history
All calls
Dialled calls
Missed calls
Received calls
Time & costs
Data counter
Messages
Create message
Inbox
Drafts
Sent messages
Voicemail
Templates
Message settings
Browser
My files
Pictures
Videos
Sounds
Games
Applications
Other documents
Media player
Music
Pictures
Videos
Bookmarks
Organiser
SIM Toolkit (if available in the
SIM)
Stopwatch
Alarm clock
Calendar
Calculator
Sound recorder
Tasks
Unit converter
World clock
Menu tree
73
Page 75

Index
74
Index
Numerics
3G coverage 65
A
AC adapter 16, 24, 64
Alarm clock 49
All contacts 30
Antenna port 18
B
Battery cover 18
Battery pack 16, 65
Battery safety 68
Bluetooth 10, 19, 29
Bookmarks 54
Browser 53
Browser settings 54
Business card 30, 31
C
Cable charging connector(s) 17
Calculator 50
Calendar 49, 66
Call history 26, 27
Camera 18, 59
Camera/Task Switch key 17
CBS 36
CD-ROM 16
Cell broadcast settings 41
Character input mode 13, 43
Charging the battery 24
Clear key 17
D
DTMF 27
E
Earphone jack 18
Earpiece 17
Earpiece volume 27
E-mails 37
Emergency calls 69
End/Power key 17
F
FCC notice 15
Page 76

Index
Filter 30, 33
Fixed dialling 47
Flicker adjustment 29, 60, 61
Frame rate 29
G
Groups 30
GSM 47
H
Handstrap hole 18
I
ID 46
Information to user 15
Installing the software 25
K
Keypad 17
L
License manager 62
M
Main display 17
Memory status 31
Microphone 17
MicroSD 20, 22
MMS 20, 35
N
Navigation key/Centre key 17
Number mode 43
O
Operating environment 66
P
PC Management Program installation 25
Phone charging connector(s) 17
Picture settings 60
R
Rights manager 47
Ringtones 45
Index
75
Page 77

Index
76
Index
S
Self-timer 59
Send key 17
Side key 17
SIM contacts 30
SMS 20, 35
Softkey 17
Sound recorder 51
Speaker 18
Speakerphone 27, 29
Speed dialling 26, 32
Stopwatch 49
Symbolic mode 43
T
T9 mode 43
Tasks 51
Templates 38
U
UMTS 47
UMTS signal strength 21
Unit converter 51
USB cable 16
USB driver installation 25
User guide 16
V
Video 60
Video calls 28
W
WAP 19
WAP push 37
White 60
White balance 29, 60, 61
World clock 52
 Loading...