

Page 1
TP50H60/TP55H60/TP61H60
INTRODUCTION 4
GETTING STARTED 20
ColorStream™
BASIC OPERATION 26
32
ADVANCED OPERATION
CONNECTING OTHER
EQUIPMENT 51
60
TOSHIBA CORPORATION, 1998
ADDITIONAL REFERENCE
Page 2

Dear Customer
Welcome to the high quality picture world created by the TOSHIBA Projection Color
Television.
This manual will help you use the TV’s many exciting and useful features.
Before operating the TV, please read all the safety and operating instructions in this manual
INTRODUCTION
thoroughly, and keep the manual for future reference.
Customer’s Record
You will find the model number and serial number on the back of the TV.
Record these numbers in the spaces provided below.
Refer to them whenever you call upon your TOSHIBA dealer regarding this product.
Model Number Serial Number
Safety Precautions
WARNING:
TO REDUCE THE RISK OF FIRE OR ELECTRIC SHOCK, DO NOT EXPOSE
THIS APPLIANCE TO RAIN OR MOISTURE.
WARNING
RISK OF ELECTRIC SHOCK
DO NOT OPEN
AVIS: RISQUE DE CHOC ÉLECTRIQUE
NE PAS OUVRIR
WARNING: TO REDUCE THE RISK OF
ELECTRIC SHOCK, DO NOT REMOVE
COVER (OR BACK). NO USERSERVICEABLE PARTS INSIDE. REFER
SERVICING TO QUALIFIED SERVICE
PERSONNEL.
The lightning symbol in the triangle
tells you that the voltage inside this
product may be strong enough to
cause an electric shock.
DO NOT TRY TO SERVICE THIS
PRODUCT YOURSELF.
The exclamation point in the triangle
tells you that important operating and
maintenance instructions follow this
symbol.
CAUTION:
As a safety feature, the AC plug has one prong wider than the other.
It will fit only one way into a standard electrical outlet.
If the plug will not fit into the outlet, try turning it around.
If the plug will not fit either way, the outlet is probably old and
non-standard. You will need to have a new outlet installed by
an electrician.
DO NOT CHANGE THE SAFETY FEATURE OF THE PLUG.
Wide prong
CAUTION:
TO PREVENT ELECTRIC SHOCK, DO NOT USE THIS POLARIZED PLUG WITH AN EXTENSION CORD
RECEPTACLE OR OTHER OUTLET UNLESS THE PRONGS CAN BE FULLY INSERTED INTO THE OUTLET TO
PREVENT ANY EXPOSURE OF THE PRONGS OF THE POLARIZED PLUG.
NOTE TO CATV SYSTEM INSTALLERS IN THE USA:
This reminder is provided to call the CATV system installer’s attention to Article 820-40 of the NEC that
provides guidelines for proper grounding and, in particular, specifies that the cable ground shall be
connected to the grounding system of the building, as close to the point of cable entry as practical.
2
Page 3

Table of Contents
CHAPTER 1 INTRODUCTION
Care and Cleaning ........................................................ 4
Installation .................................................................... 5
To install the TV ....................................................... 5
Antenna/Cable TV Connections ................................. 6
To connect a home antenna ................................... 7
To connect a Cable TV............................................. 8
To connect an Antenna/Cable TV and VCR ........... 9
Location of Controls................................................... 11
TV front ................................................................... 11
Remote Control ...................................................... 12
Before Using the Remote Control ............................ 13
Introduction and battery installation.................... 13
Using the Remote with VCR or
Cable TV Converter ............................................... 14
VCR and CABLE function buttons ........................ 14
Programming the Remote Control ........................... 15
To program the Remote Control .......................... 15
Quick Reference Menu Guide.................................... 18
Menus and functions ............................................. 18
CHAPTER 2 GETTING STARTED
Turning the TV On/Off ............................................... 20
To turn the TV on/off ............................................. 20
Selecting the Antenna Input ..................................... 21
To select the antenna input .................................. 21
Programming Channel Memory ............................... 22
TV/CABLE and CH PROGRAM functions.............. 22
ADD/ERASE function ............................................. 23
Aligning the colors ..................................................... 24
To align the colors ................................................. 24
CHAPTER 3 BASIC OPERATION
Watching TV Programs.............................................. 26
To watch a TV program......................................... 26
Convenient Remote Functions.................................. 27
To use On-screen displays/Sound muting/
Channel return .................................................. 27
Controlling the Picture............................................... 28
To adjust the picture.............................................. 28
Controlling the Sound ............................................... 30
To adjust the sound ............................................... 30
Selecting Stereo and SAP Broadcasts ..................... 31
To listen to Stereo/SAP broadcasts...................... 31
CHAPTER 4 ADVANCED OPERATION
CHAPTER 5 CONNECTING OTHER EQUIPMENT
INTRODUCTION
Enhancing the Surround Sound Effect..................... 32
To activate the Surround sound function ............ 32
Operating the Sub-Bass System............................... 33
To operate the Sub-Bass System ......................... 33
Setting the OFF Timer and the Clock ....................... 34
To set the OFF timer .............................................. 34
To set the clock ...................................................... 35
Watching Picture-in-Picture ...................................... 36
To display a small picture ..................................... 36
To use advanced functions ................................... 37
Multi-Window Function ............................................. 38
To use the PREVIEW/FAVORITE/STROBE
functions ............................................................ 38
Locking Channels ....................................................... 40
To lock out channels.............................................. 40
Labeling Channels ...................................................... 42
To program channel labels ................................... 42
Programming Your Favorite Channels ..................... 44
To program your favorite channels ..................... 44
Flesh Tone/Noise Reduction ..................................... 46
To activate the Flesh Tone and Noise Reduction
Functions ........................................................... 46
Displaying XDS Information...................................... 47
To display XDS information ................................. 47
Operating the Closed Captioning Feature ............... 48
To display Closed Captioning ............................... 48
To display text information ................................... 49
Changing the On-screen Display Language............. 50
To select a language for the on-screen
displays .............................................................. 50
Connecting External Equipment.............................. 51
To connect video/audio equipment ..................... 51
Monitor panel......................................................... 52
To connect a standard VCR................................... 53
To connect a VCR with an S-video jack ............... 54
To dub/edit video tapes using two VCRs ............. 55
To connect a DVD video player ............................ 56
To connect a video camera ................................... 57
To connect an audio amplifier .............................. 58
To connect an A/V receiver ................................... 59
CHAPTER 6 ADDITIONAL REFERENCE
Specifications ............................................................. 60
Before Calling Service Personnel ............................. 61
Limited United States Warranty ............................... 62
3
Page 4
CHAPTER 1 INTRODUCTION
Mild detergent
dissolved in water
Care and Cleaning
INTRODUCTION
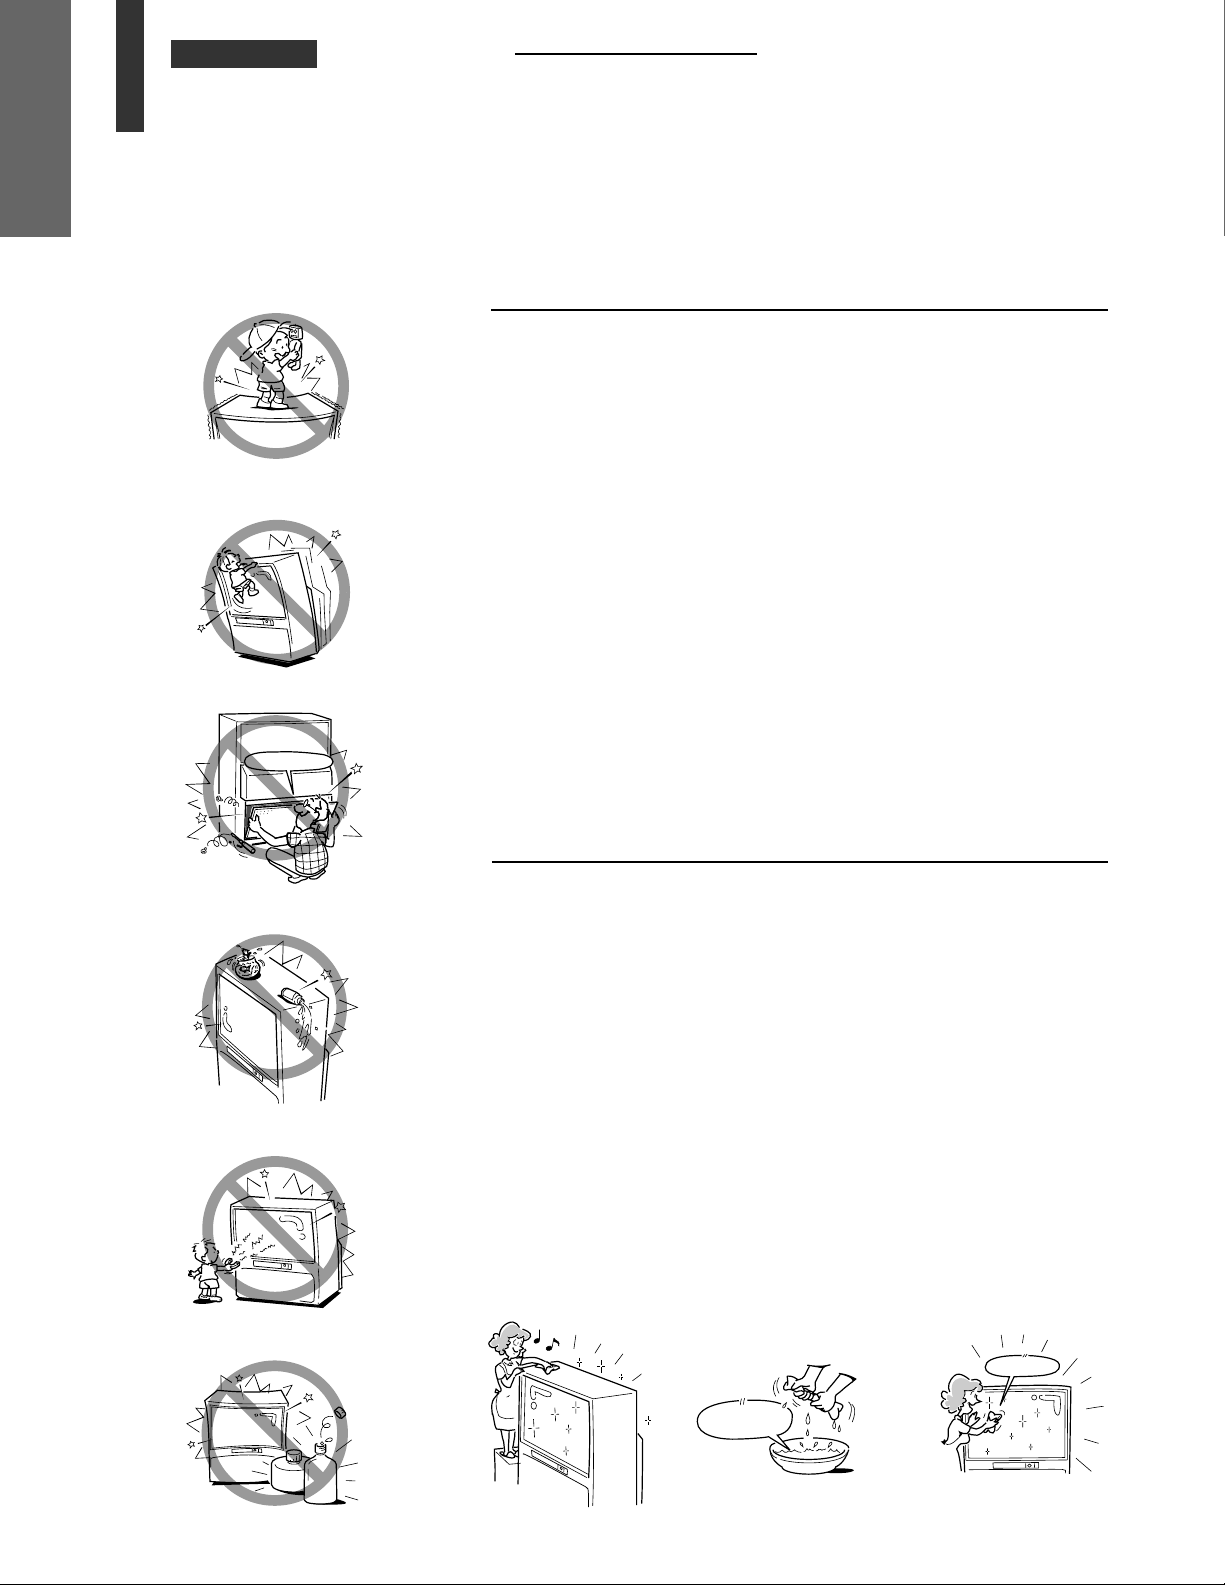
Care
Do not stand or climb on the TV.
• The TV is dangerous if broken or if it has fallen over.
• Be careful when children are present.
Do not remove the back cover and never remodel the cabinet or
components.
• Let only qualified technicians check and adjust your TV.
Do not place containers with liquids such as drinks or cosmetics on the
TV.
If any foreign material or water leaks into the TV, unplug the AC cord
and contact your dealer.
High voltage !
Keep magnets, toys with magnets, electric clocks, speakers, etc.
away from the TV.
Cleaning
Do not use solvents such as benzine or thinner to clean the TV.
— These solvents may distort the cabinet or damage its finish.
— If rubber or vinyl products remain in contact with the TV for a long
time, a stain may result.
When the cabinet becomes dirty, clean it with a soft, dry cloth.
When the cabinet is very dirty,
1 Use a damp cloth to wipe the cabinet clean.
2 Finish with a dry cloth.
When cleaning the screen:
1 Turn off the TV.
2 Clean the screen with a soft, dry cloth.
4
Thinner
Benzine
Wipe gently !
Page 5

CHAPTER 1 INTRODUCTION
Installation
To install the TV
INTRODUCTION
Downward spot lights or fluorescent lights in an
overhead “Honeycomb” prevent direct
illumination of the screen.
Use curtains or
blinds to shut out
direct sunlight.
Cover shiny surfaces (floor and walls) with nonreflective materials (carpet, rugs, wallpaper, etc.).
Where to install
Place the TV on the floor or on a sturdy platform. The mounting
surface should be flat and steady. If you install the TV on a soft
floor, make sure that the floor is not damaged by the weight of
the TV.
Air Circulation
Place the TV far enough away from the walls to allow proper
ventilation. This will prevent the TV from overheating and avoid
possible damage to the TV. Avoid dusty places too.
Heat Damage
Damage may occur if you leave the TV in direct sunlight or near
a heater. Avoid places subject to extremely high temperatures
or humidity, and temperatures of 41°F (5°C) or lower.
Power Supply
Plug the TV into an electrical outlet with standard household
power (120 volt AC, 60 Hz). Do not change the plug’s safety
prong.
See page 2.
Moisture Condensation
If the room temperature suddenly rises (or if the TV is moved
from a cool place to a hot place), condensation may occur on
the lenses resulting in picture distortion or color fading. In such
a case, simply wait a while (with the power on) and the
condensation will evaporate.
Best Viewing
Sit approximately 10-25 feet away from the TV. Sitting too far to the left or right of the screen will cause the picture to
appear dull as will direct sunlight and room lights. Turn the TV off to check for reflections on the screen. Then remove
the source of any reflections while viewing.
VERTICAL VIEWING
ANGLE [SIDE VIEW]
4 feet
10 feet
Viewing Range
HORIZONTAL VIEWING
ANGLE [TOP VIEW]
24 feet
10 feet
Viewing Range
5
Page 6
CHAPTER 1 INTRODUCTION
Antenna/Cable TV
INTRODUCTION
Connections
• You can use either an indoor or outdoor antenna to receive VHF and UHF channels.
• Channels 2-13 are VHF channels, and channels 14-69 are UHF channels.
• We recommend using an outdoor antenna for better picture quality.
• You can receive Cable TV by connecting the cable supplied by your local cable
company.
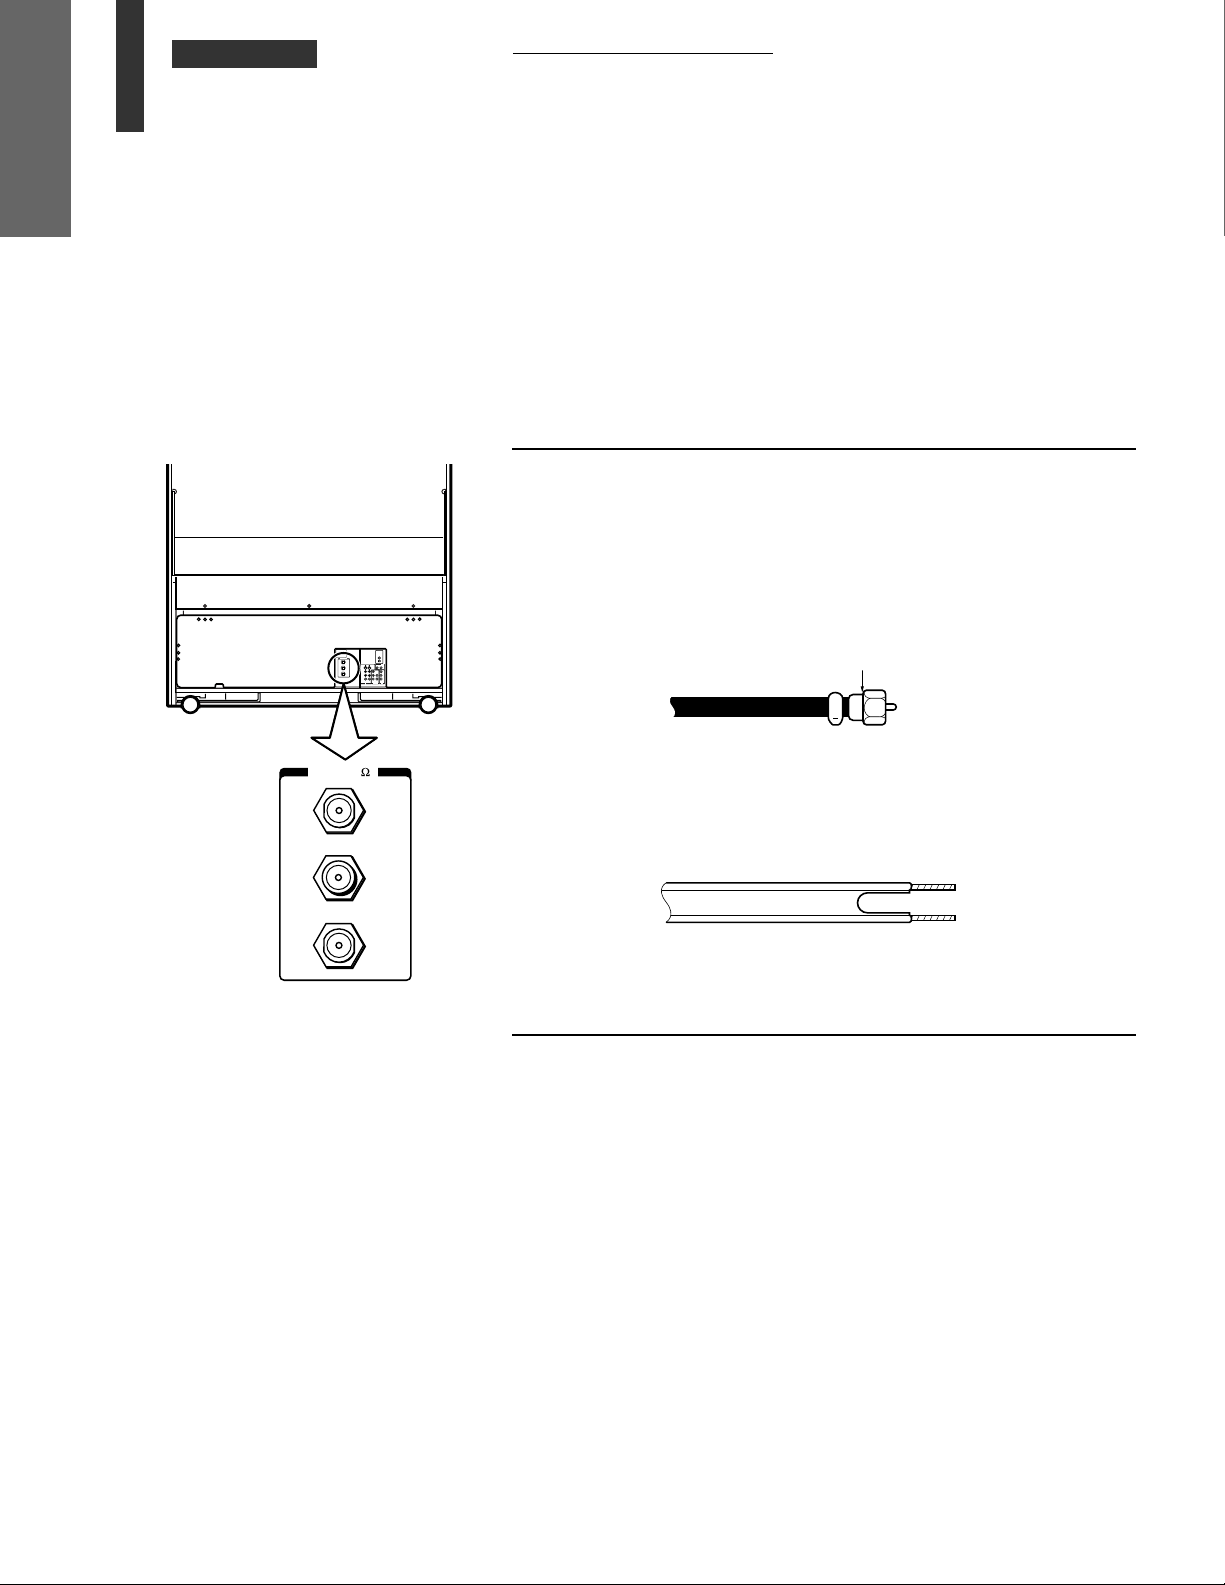
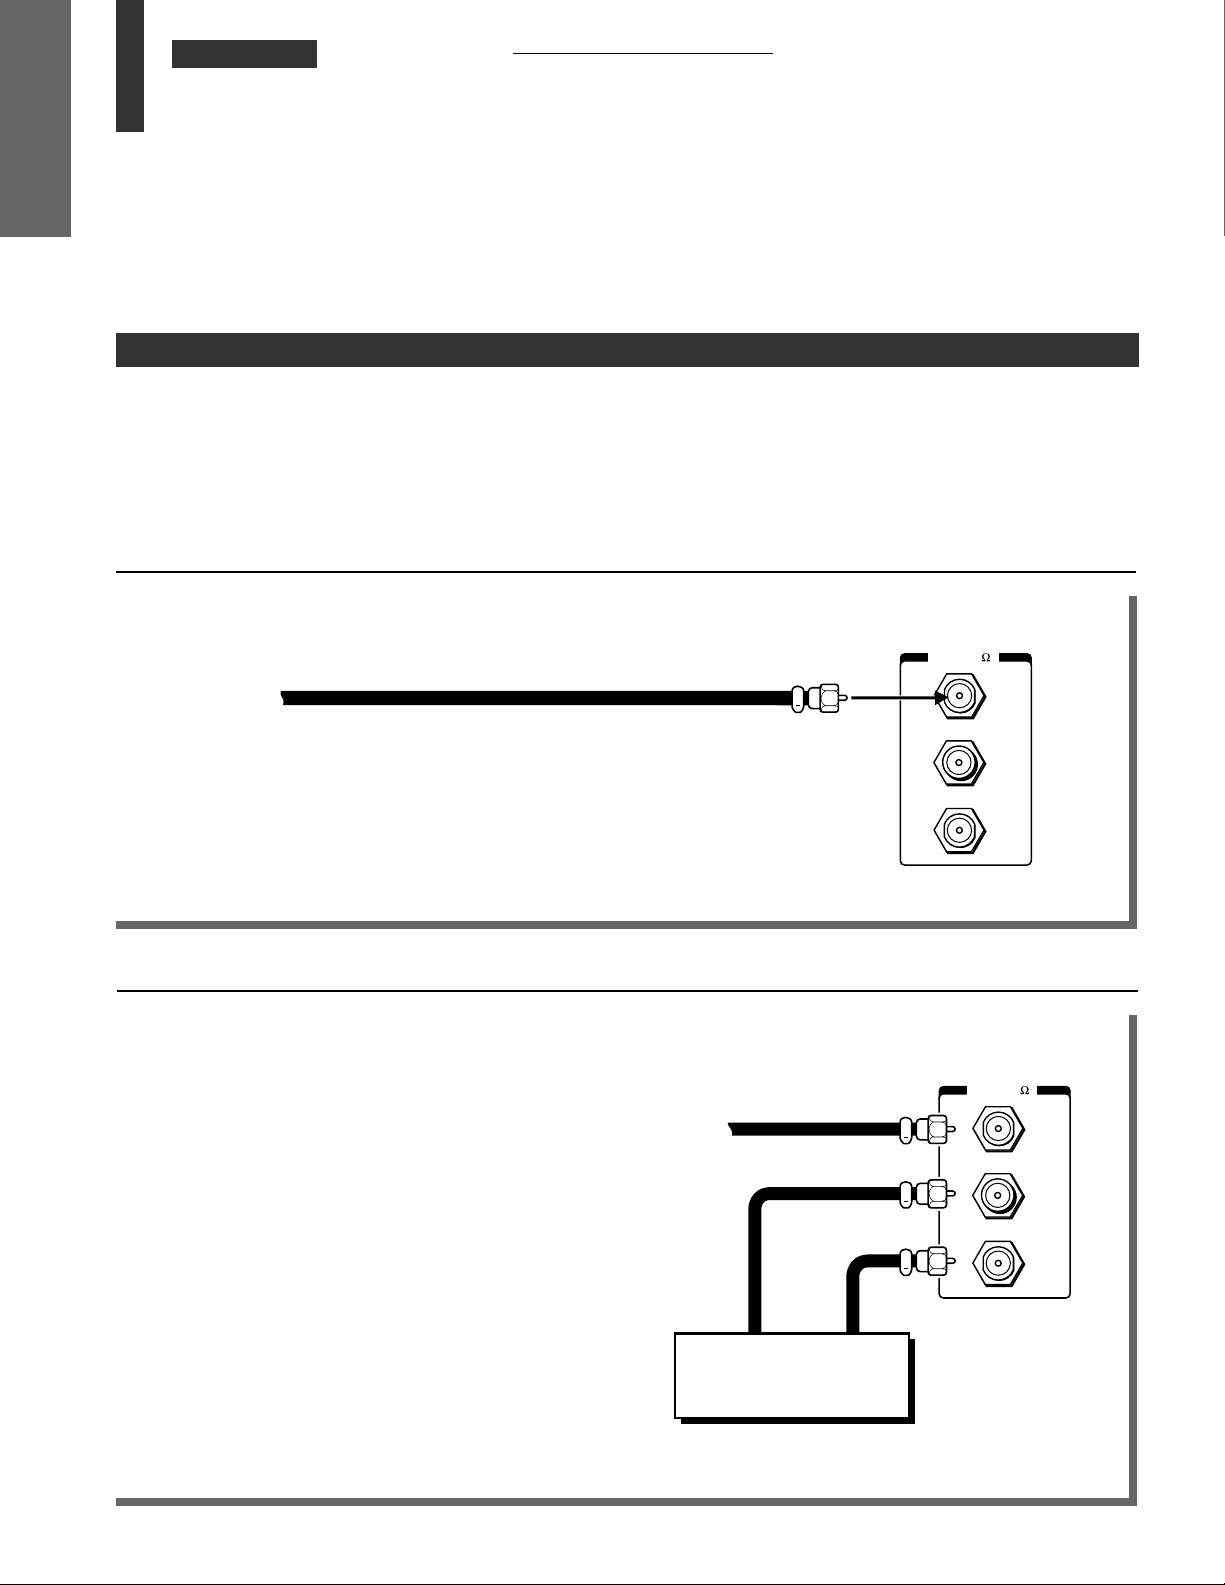
Types of antenna cables
TV rear
Shown below are two basic types of antenna cables.
Signals from a home antenna may be conveyed by either type. Cable TV
signals are conveyed by a 75 ohm coaxial cable.
1 A 75 ohm coaxial cable is generally a round cable with F-type
connectors that can easily be attached to a terminal without tools.
F-type connector (Not supplied)
ANT( 75
)
ANT-1
OUT
ANT-2
2 A 300 ohm cable is a flat “twin-lead” cable that can be attached to a
terminal using the supplied antenna adapter.
Antenna connection panel
There are two separate 75 ohm F-type connector input terminals and a
converter output terminal as shown at the left.
The ANT-1 and ANT-2 terminals are for connecting a VHF/UHF antenna
or cable TV system. The signal input through ANT-1 is output from the
OUT terminal whenever the RF switch on the TV is in the ANT-2 position.
You can switch between the ANT-1 and ANT-2 inputs in the ANT 1/2
menu or with the ANT/VIDEO button on the TV. See page 21.
6
Page 7
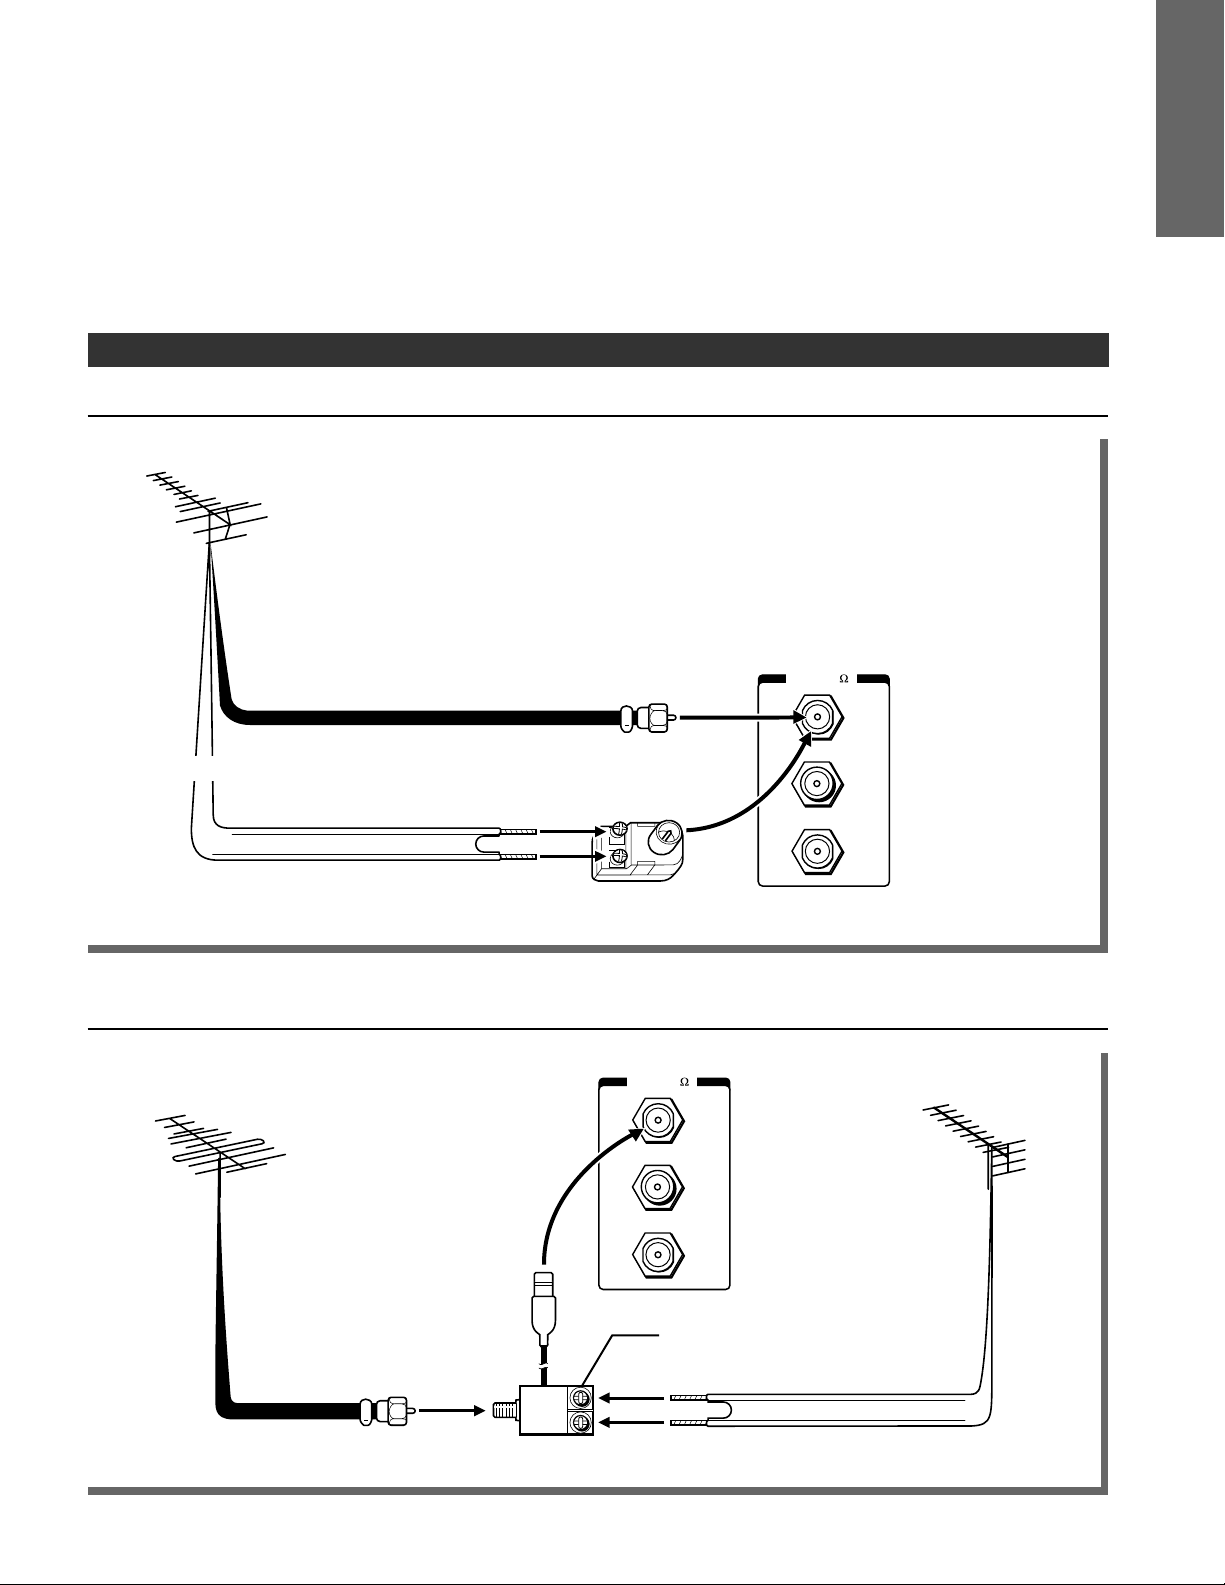
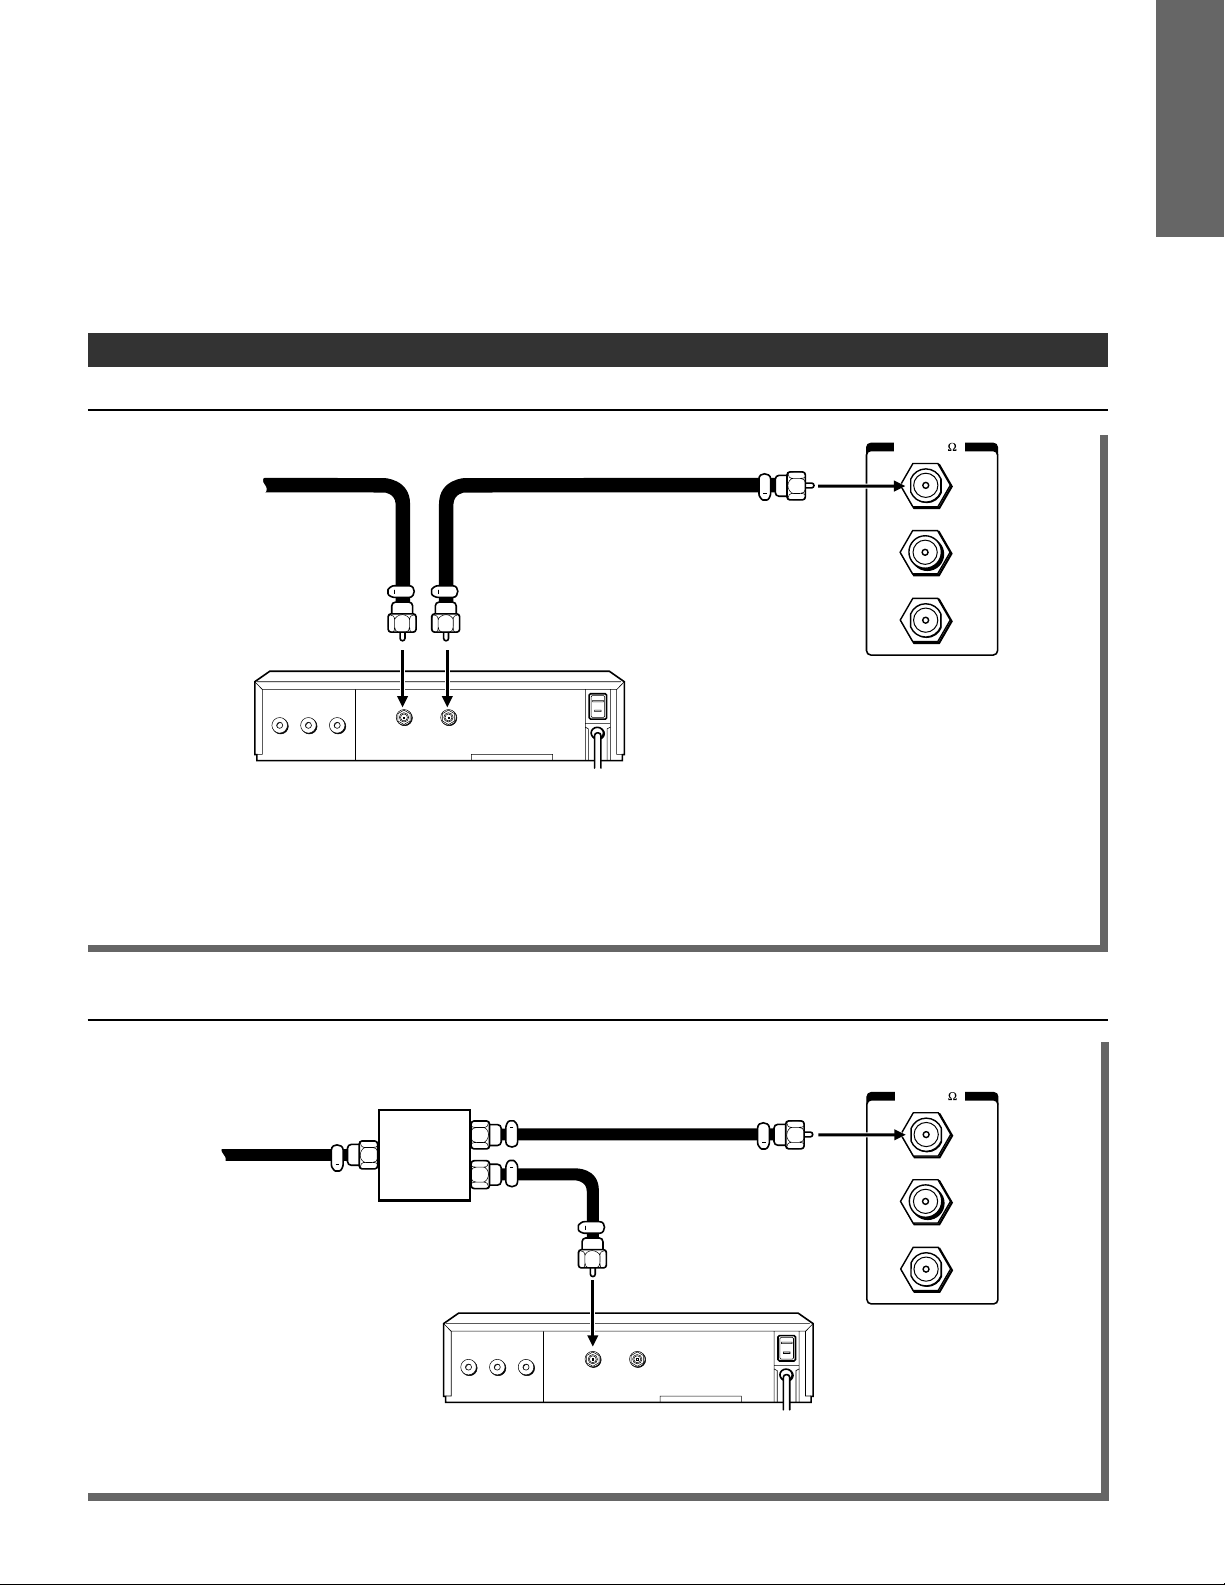
To connect a home antenna
Single antenna cable
VHF, UHF or
VHF/UHF combination
antenna
75 ohm coaxial cable (round)
ANT( 75
INTRODUCTION
)
ANT-1
OR
Antenna adapter
(Not supplied)
OUT
300 ohm twin-lead cable (flat)
ANT-2
Note:
You can connect another signal source such as a cable TV system or video game to the ANT-2 terminal.
Separate VHF and UHF antenna cables
)
VHF antenna
ANT( 75
ANT-1
OUT
ANT-2
U/ V mixer
(Not supplied)
UHF antenna
VHF
UHF
Note:
You can connect another signal source such as a cable TV system or video game to the ANT-2 terminal.
7
Page 8
CHAPTER 1 INTRODUCTION
Antenna/Cable TV
INTRODUCTION
Connections
(continued)
To connect a Cable TV
Generally, the cable TV system can be connected directly to the TV’s antenna terminal just like a home antenna.
(A-1)
Some cable companies, however, offer premium pay channels. Since premium pay channel signals are scrambled, a
cable TV converter/decoder is generally provided to subscribers by the cable TV company. This decoder box is
necessary for normal viewing of the scrambled channels. We recommend that you consult your cable TV company for
more specific instructions on installing cable TV. (A-2)
(A-1) Cable without a decoder box (Unscrambled channels)
)
ANT( 75
Cable TV
ANT-1
Note:
You can connect another signal source such as an antenna or video game to the ANT-2 terminal.
(A-2) Cable with a decoder box (Scrambled and Unscrambled channels)
• The unscrambled channels are input through the
ANT-1 terminal whenever the ANT1/2 menu, or the
ANT/VIDEO button on the TV, is in “ANT 1” mode.
See page 21.
• The scrambled channels from the decoding device are
input through the ANT-2 terminal whenever the ANT
1/2 menu, or the ANT/VIDEO button, is in “ANT 2”
mode. Set the TV to channel 3 or 4 to match the
output channel of the decoding device.
Cable
TV
OUT
ANT-2
ANT( 75
)
ANT-1
OUT
ANT-2
Note:
The decoding device may or may not be a part of the cable converter.
8
IN OUT
Cable TV converter/
decoder
Page 9
To connect an Antenna/Cable TV and VCR
Antenna/Cable TV connection via VCR (Simplified method)
Antenna
or
Cable TV
VIDEO
AUDIO
VIDEO
AUDIO
OUT
R OUT L
OUT
R OUT L
VHF
ANT
IN
OUT
OUTIN
UHF
ANT( 75
INTRODUCTION
)
ANT-1
OUT
ANT-2
VCR
Notes:
• Tape playback may often cause the VCR to interrupt the antenna signal to the TV. If you cannot select a certain
channel, try pressing the TV/VCR button on the Remote Control.
• VIDEO/AUDIO connections from the VCR to the TV are required for stereo tape playback from stereo VCRs.
See page 51.
Using a 2-way signal splitter
You can view either TV programs or VCR tapes regardless of the position of the VCR’s TV/VCR switch.
)
ANT( 75
Antenna
or
Cable TV
2-way
signal
splitter
(Not supplied)
R OUT L
AUDIO
VIDEO
OUT
ANT
OUTIN
ANT-1
OUT
ANT-2
VCR
Note:
VIDEO/AUDIO connections from the VCR to the TV are required for playback. See page 51.
9
Page 10
CHAPTER 1 INTRODUCTION
Antenna/Cable TV
INTRODUCTION
Connections
(continued)
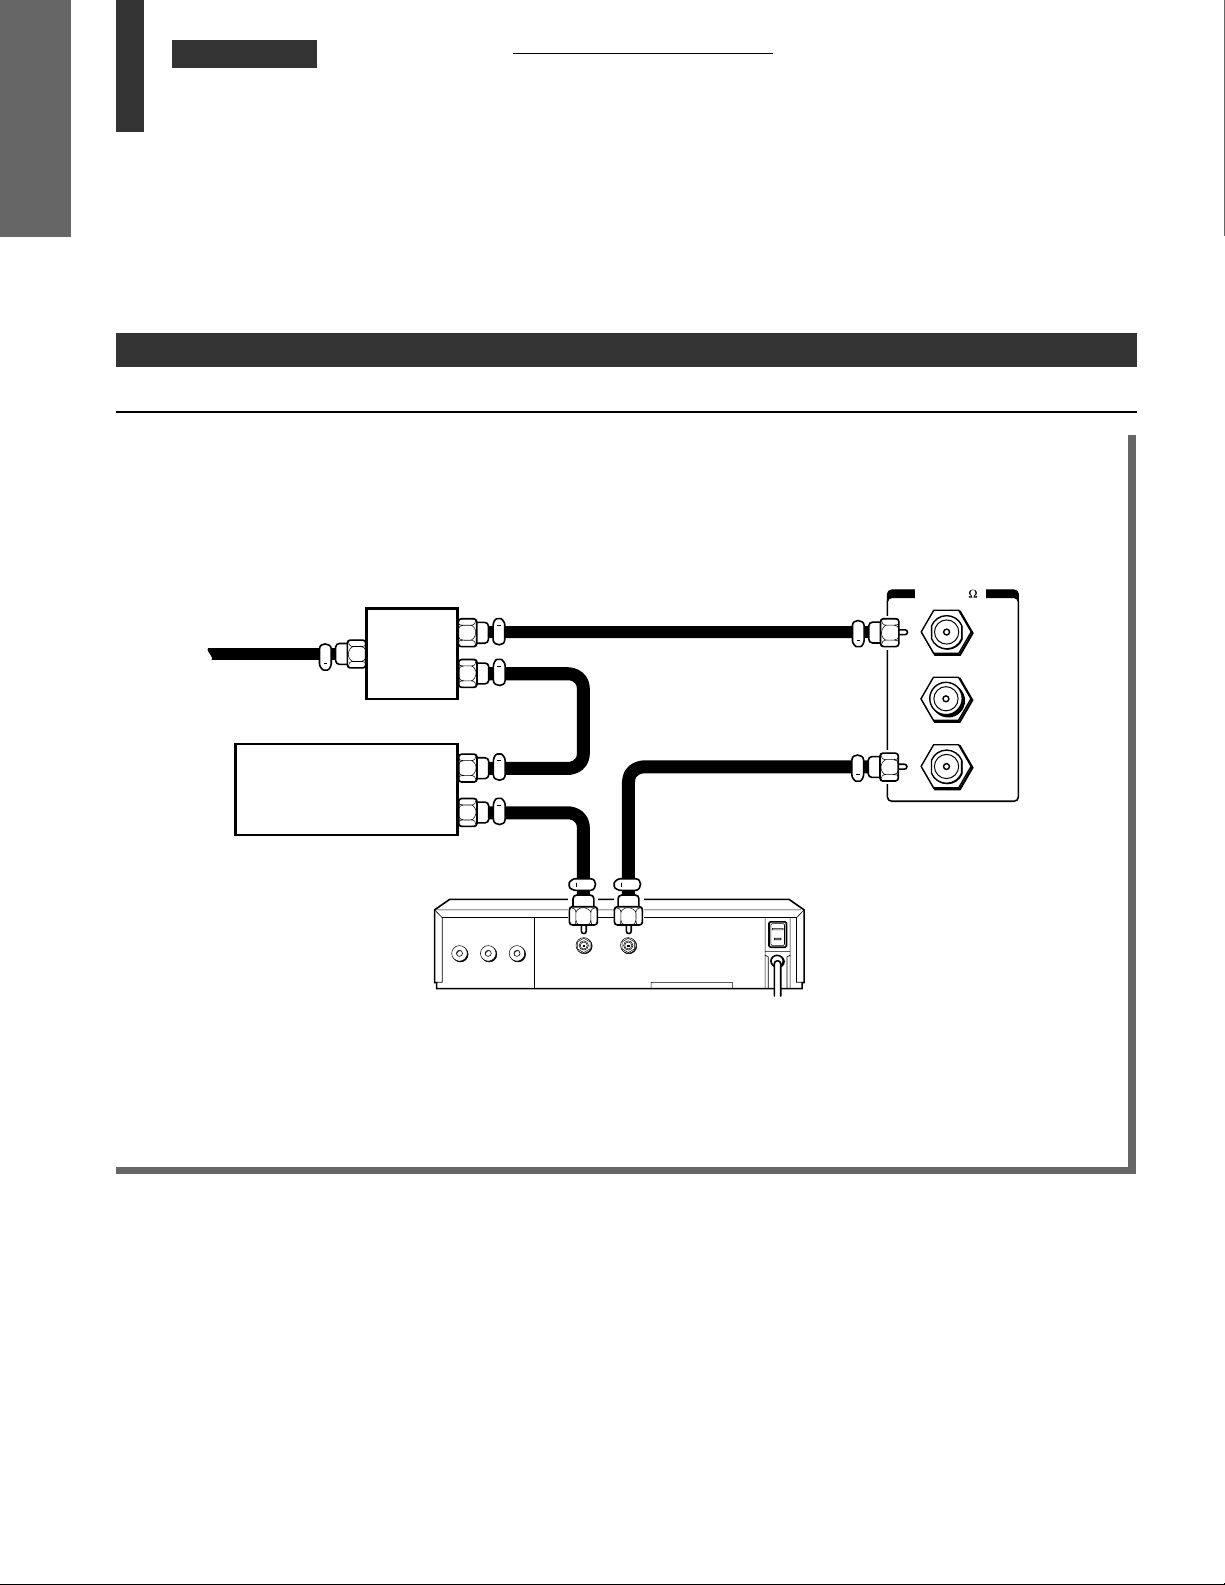
To connect an Antenna/Cable TV and VCR (continued)
Cable with a decoder box
• The unscrambled channels are input through the ANT 1 terminal whenever the ANT1/2 menu , or the ANT/VIDEO
button on the TV, is in the “ANT 1” position. See page 21.
• The scrambled channels from the decoder box are input through the VCR and the ANT 2 terminal whenever the
ANT1/2 menu, or the ANT/VIDEO button, is in the “ANT 2” position. Set the TV and the VCR to channel 3 or 4 to
match the output channel of the decoding device.
ANT( 75
2-way
Cable TV
signal
splitter
(Not supplied)
)
ANT-1
OUT
Cable TV converter/
decoder
Notes:
• VIDEO/AUDIO connections from the VCR to the TV are required for stereo tape playback from stereo VCRs.
See page 51.
• The decoding device may or may not be a part of the cable converter.
IN
OUT
AUDIO
R OUT L
VIDEO
OUT
ANT
VCR
OUTIN
ANT-2
10
Page 11
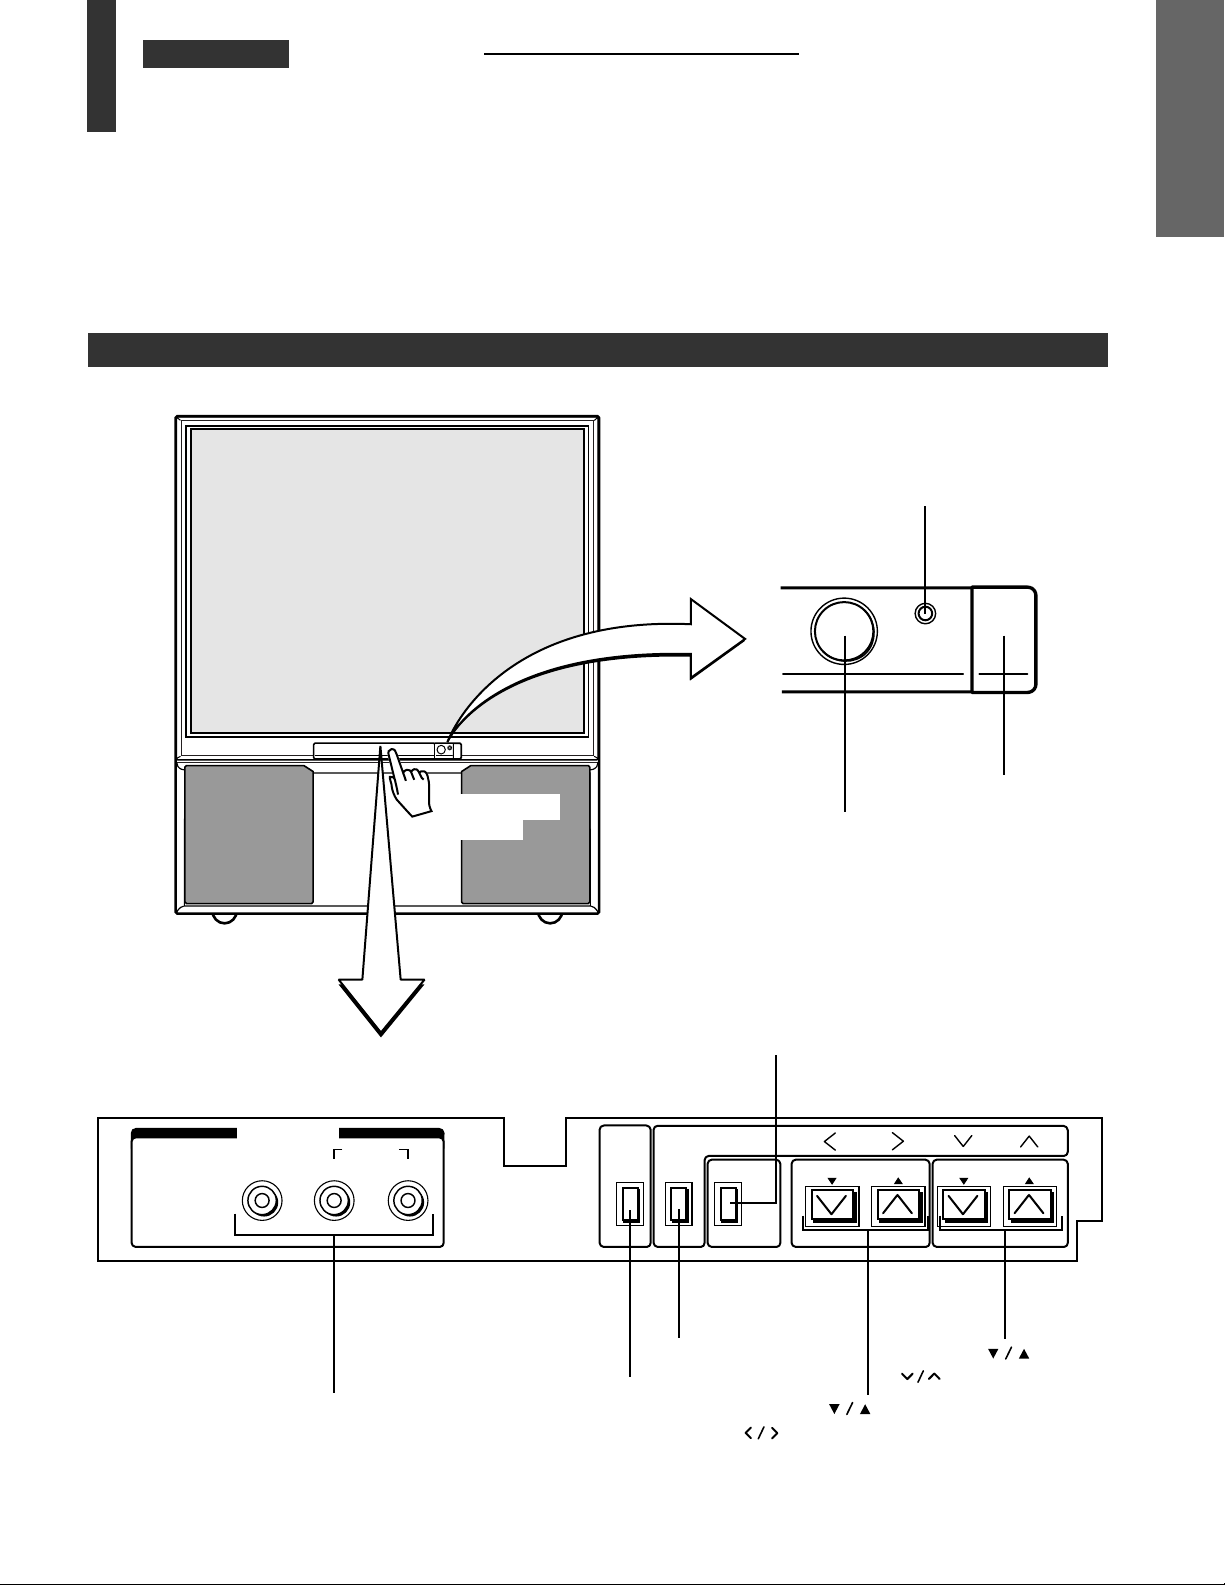
CHAPTER 1 INTRODUCTION
Location of Controls
• The following describes the functions of each part of the TV and the Remote Control.
For details on the use of each control, refer to the page numbers in brackets.
TV front
Illustrations represent TP55H60.
POWER indicator
INTRODUCTION
POWER
Behind the door
IN–VIDEO 3
VIDEO
VIDEO 3 INPUTS [57]
AUDIO
L/MONO R
Press to open
the door.
ANT/VIDEO button* [21]
ENTER button [19]
DEMO
MENU
MENU button [18]
DEMO button [20]
POWER button [20]
ENTER
ANT/VIDEO
VOLUME buttons* [26]
VOLUME CHANNEL
CHANNEL
buttons [18]
Remote sensor
buttons* [26]
buttons [18]
* Dual function buttons
11
Page 12
123
456
789
ENT
100
0
CH
VOL
POWER
TIMER
RECALL
TV/VIDEO
MUTE
TV
CABLE
VCR
CH RTN
STROBE
EXIT
LIGHT
STOP SOURCE
ADV/
PIP CH
ADV/
PIP CH
FAV
FAV
PLAY PIP
REC TV/VCR REW FF
STILL LOCATE SWAP
FAVORITE
MENU/
PREVIEW
ENTER
CHAPTER 1 INTRODUCTION
Location of Controls (continued)
INTRODUCTION
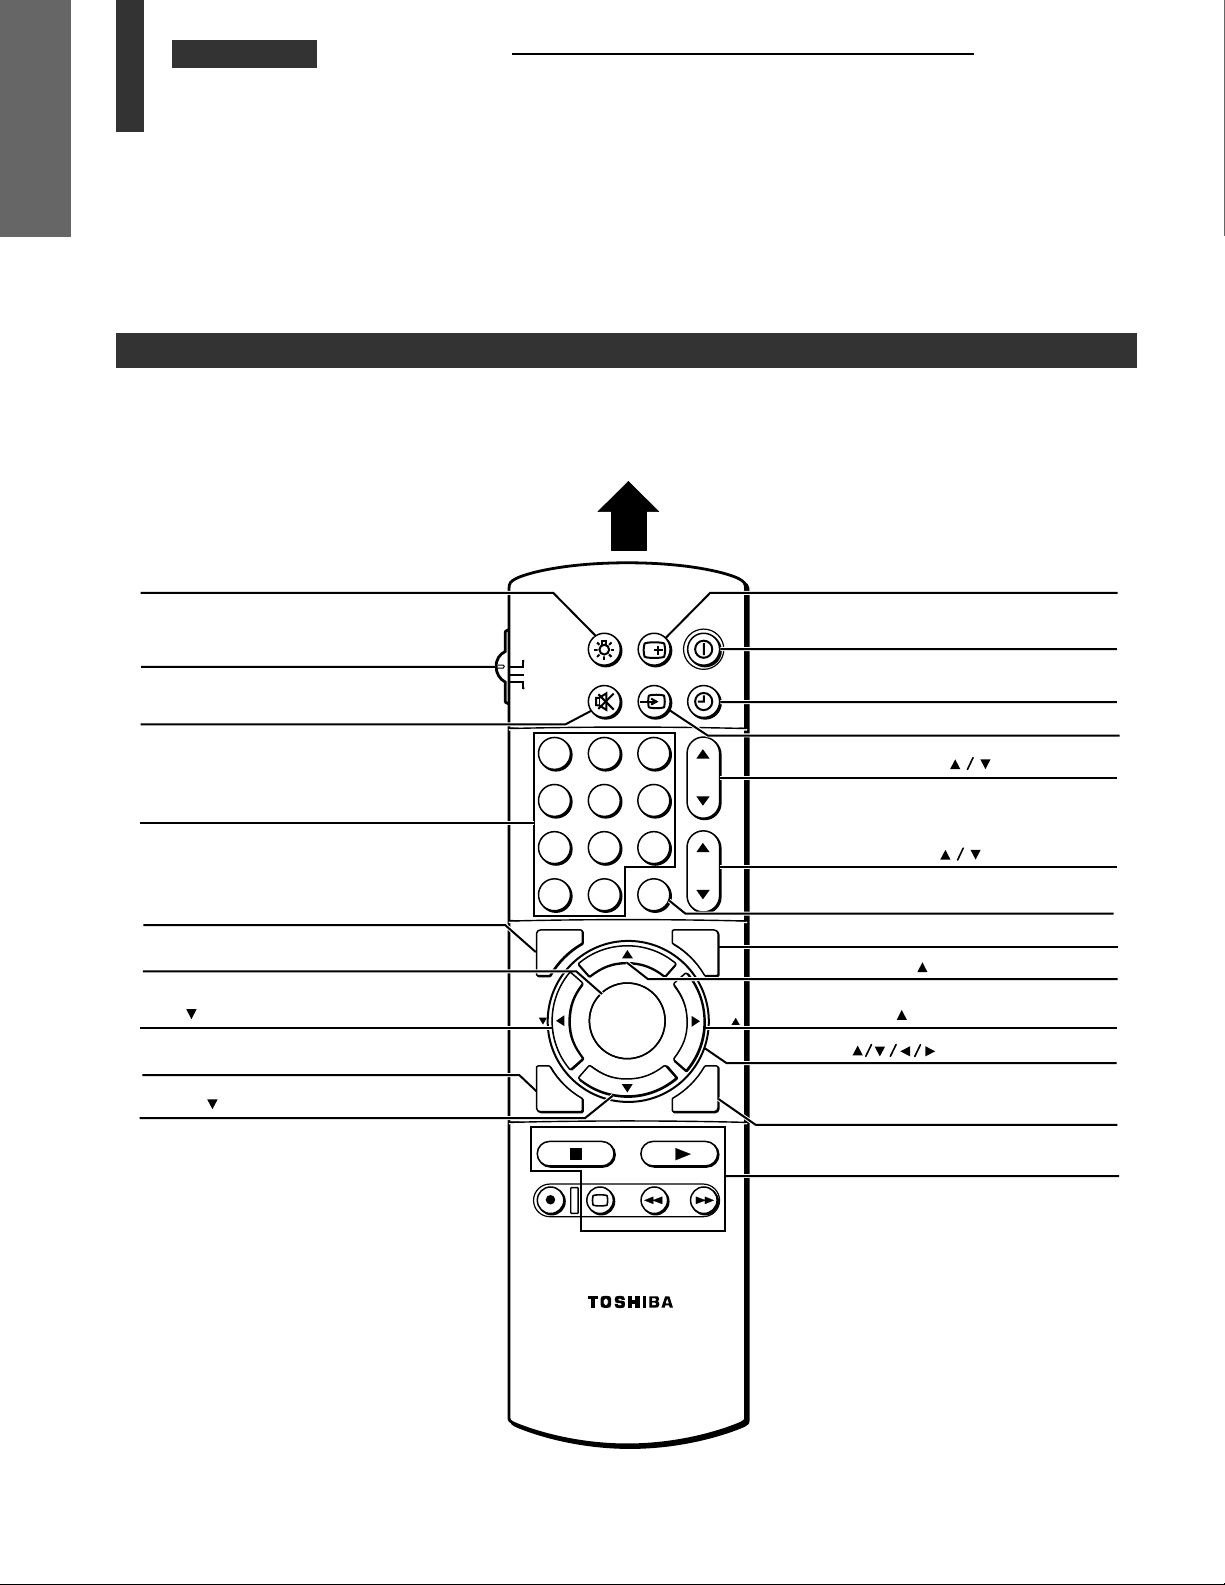
Remote Control
Only the buttons used to operate the TV are described here.
For details on the use of each control, refer to the pages in brackets.
Aim at the remote sensor on the TV
LIGHT
*
RECALL
[27]
TV/CABLE/VCR switch
[15]
Set to “TV” to control the TV.
MUTE
[27]
Channel Number
FAVORITE
MENU/ENTER
FAV
[44]
PREVIEW
PIP CH
[38]
[36]
[26]
[38, 44]
[18]
POWER
TIMER
TV/VIDEO
CHANNEL
VOLUME
CH RTN
STROBE
PIP CH
FAV
[20]
[34, 35]
[53]
[26]
[26]
[27]
[39]
[36]
[44]
[18]
EXIT
[19]
PIP functions
[36, 37]
(For “TV” and “CABLE” modes)
* You can light up these buttons by
pushing LIGHT.
12
Page 13

CHAPTER 1 INTRODUCTION
Before Using the Remote Control
Introduction and battery installation
With this Remote Control, you can operate your TV and most VCR and cable box models regardless of the
manufacturer. However, this Remote Control must first be programmed to control other VCR and cable box brands.
See page 15.
If you have a TOSHIBA VCR, your Remote Control has already been programmed for you.
Before attempting to operate your Remote Control, install the batteries according to “To install the batteries” below.
Notes:
• After installing new batteries, the Remote Control will set itself to the codes for TOSHIBA TVs and VCRs. If you are
using the Remote Control to operate other manufacturer’s equipment, you will have to reprogram those codes.
• This Remote Control may have functions not available on your VCR and cable box remote controllers.
These functions may or may not operate your VCR or cable box. Refer to the owner’s manuals supplied with the
equipment to see which functions are available.
• The remote controller supplied with your VCR or cable box may have keys not duplicated on this Remote Control. If
you want to use these functions, please use the original remote controller.
To install the batteries
INTRODUCTION
Place the Remote Control face down and remove
1
the battery cover.
Press and slide
to remove.
Insert two “AA” size alkaline batteries, matching
2
the + and – signs on each battery with the + and –
signs in the battery compartment.
Slide the battery cover shut until the lock clicks.
3
CAUTIONS
• Do not throw your batteries into a fire. Dispose of
your batteries in a designated disposal area.
• Do not combine used batteries with new ones.
• Do not mix battery types.
Tips for best operation
• For optimum performance, aim the Remote Control
directly at the TV from a distance within 16 feet (5 m),
and be sure there is no obstruction between the
Remote Control and the TV.
• If your Remote Control does not always operate the
TV as you wish, you probably need to replace the
batteries.Use alkaline batteries for longer use.
• If the Remote Control will not be used for a long
period of time or when the batteries are worn out,
remove the batteries to prevent leakage.
• Do not drop, dampen or disassemble the Remote
Control.
13
Page 14
CHAPTER 1 INTRODUCTION
Using the Remote with VCR
INTRODUCTION
or Cable TV Converter
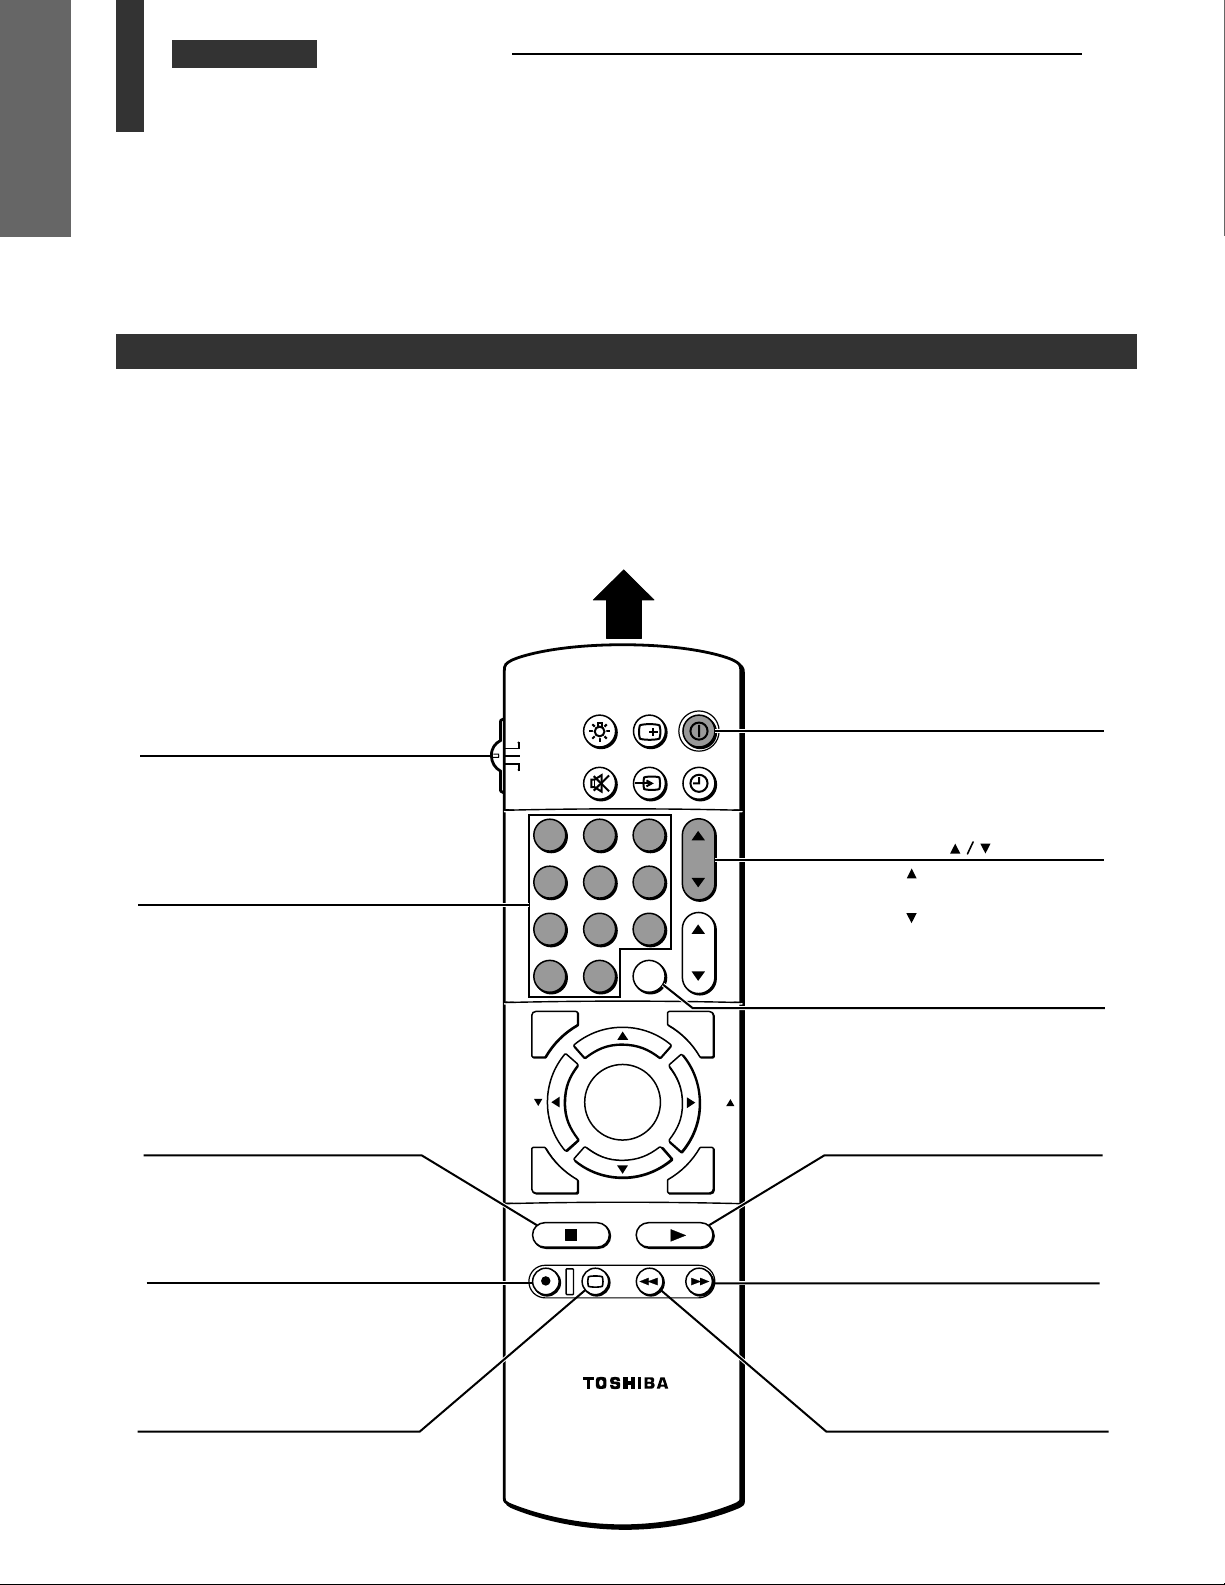
VCR and CABLE function buttons
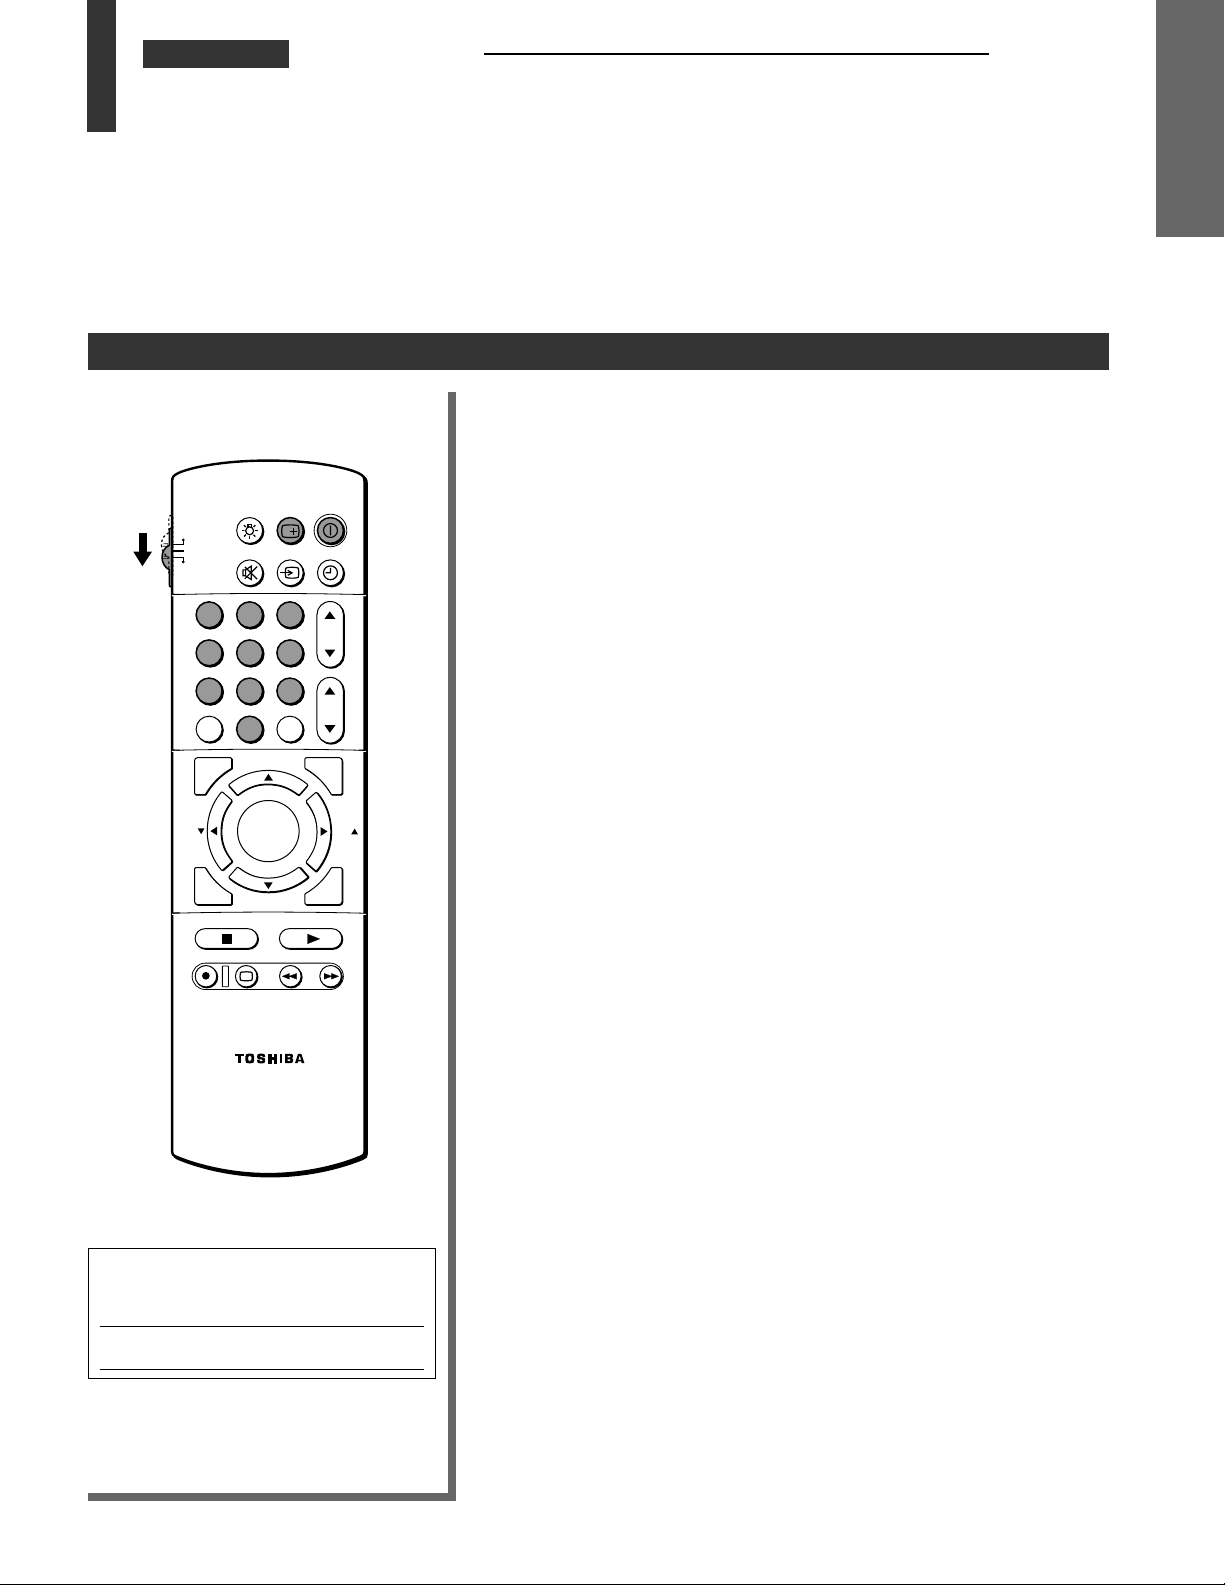
• To control a TOSHIBA VCR, first set the TV/CABLE/VCR switch to “VCR.” The buttons shown below will then control
the VCR. The rest of the buttons operate the TV as usual.
If you have another brand of VCR, you can probably program the Remote Control to control it. Details are on page 15.
• To control a cable TV converter, this Remote Control must be programmed to recognize the brand of your converter.
See page 15. The shaded buttons can be used to control the cable TV converter.
Set the TV/CABLE/VCR switch to “CABLE” whenever you want to control the cable TV converter.
Aim at the VCR or cable TV converter
POWER
RECALL
TV/CABLE/VCR switch
CABLE: To control a cable
TV converter
VCR: To control a VCR
Channel Number
Press the numbers to select
a channel.
LIGHT
TV
CABLE
MUTE
VCR
123
456
789
0
100
ADV/
PIP CH
FAVORITE
FAV
MENU/
ENTER
TV/VIDEO
CH RTN
ENT
TIMER
CH
VOL
STROBE
FAV
POWER
Press to turn the VCR (or
cable TV converter) on.
Press again to turn off.
CHANNEL
Press to select the next
higher channel.
Press
to select the next
lower channel.
ENT
Some VCR’s and cable TV
converters require “ENT” to
change channel number.
14
STOP
Press to stop the tape.
REC
Press to start recording.
TV/VCR
Press to select the TV mode to
view one program while
recording another program.
PREVIEW
ADV/
PIP CH
STOP SOURCE
REC TV/VCR REW FF
STILL LOCATE SWAP
PLAY PIP
EXIT
PLAY
Press to begin tape playback.
FF
Press to rapidly advance a tape.
In playback mode, press to view
the picture moving rapidly
forward.
REW
Press to rewind a tape.
In playback mode, press to
view the picture moving
rapidly in reverse.
Page 15
CHAPTER 1 INTRODUCTION
Programming the Remote Control
To program the Remote Control
POWER
RECALL
LIGHT
TV
CABLE
VCR
123
456
789
100
FAVORITE
FAV
PREVIEW
STOP SOURCE
REC TV/VCR REW FF
TV/VIDEO
MUTE
0
PIP CH
MENU/
ENTER
PIP CH
STILL LOCATE SWAP
ADV/
ADV/
CH RTN
ENT
PLAY PIP
TIMER
CH
VOL
STROBE
EXIT
FAV
• This Remote Control is programmed to operate TOSHIBA VCRs.
• To operate VCRs (or Cable converters) other than TOSHIBA models,
perform the following procedures before operating.
Refer to the
1
on pages 16 and 17 to find the code number that corresponds to the
brand name of your VCR (or your converter).
If more than one number is listed, try each one separately until you
find the one that works.
Set the TV/CABLE/VCR switch to “VCR” (or “CABLE”).
“VCR code table”
(or
“Cable TV converter code table”
2
While holding down RECALL, press the Number buttons to enter
3
the three digit code number for your brand of VCR (or converter).
Point the Remote Control at the VCR (or at the converter) and press
4
POWER to test the code number.
—If the number is correct, the VCR should turn on.
—If the VCR does not respond to the Remote Control, repeat steps
1 through 4 with another code number.
Reset the TV/CABLE/VCR switch to “TV” to control the TV.
5
Notes:
• Some newer VCRs are capable of working on either of two remote
codes. These VCRs have a switch labeled “VCR 1/VCR 2.”
If your VCR has this kind of switch, and does not respond to any of
the code numbers for your VCR brand name, set the switch to the
other position (“VCR 1” or “VCR 2”) and reprogram the Remote
Control.
• In some rare cases, you may not be able to operate your non-
TOSHIBA equipment with the supplied Remote Control. This is
because your equipment may use a code that is not provided with
this Remote Control. In this case, please use the equipment’s own
remote control.
INTRODUCTION
)
For future reference, write the code
number you set.
VCR CODE:
CABLE CODE:
Note:
You have to reprogram the Remote
Control when you change its batteries.
15
Page 16

CHAPTER 1 INTRODUCTION
Programming the Remote
INTRODUCTION
Control
• The code numbers listed below were the most recent ones available at the time of
VCR code table
BRAND NAME CODE NUMBER
Adventura ................ 019
Aiko .......................... 297
Aiwa ......................... 019
Akai .......................... 060, 068, 080, 125,
Akiba ........................ 091
Alba .......................... 039, 228, 297, 314
American High ........ 054
Amstrad ................... 019
Anam ....................... 181
Anitech .................... 091
ASA .......................... 056, 100
Asha ......................... 259
Asuka ....................... 056
Audiovox ................. 056
Baird ........................ 019, 123
Basic Line ................ 039, 091, 297
Beaumark ................ 259
Bell & Hawell ........... 123
Blaupunkt ................ 053, 181
Brandt ...................... 206
Broksonic ................. 140, 203, 230, 380
Bush ......................... 091, 228, 297
Calix ......................... 056
Canon ...................... 054
Capehart .................. 039
Carver ...................... 100
CCE .......................... 091, 297
CGE .......................... 019
Cimline .................... 091
Citizen ...................... 056, 297
Clatronic .................. 039
Colt ........................... 091
Condor ..................... 039
Craig ........................ 056, 066, 091, 259
Crown ...................... 091, 297
Curtis Mathes .......... 054, 079
Cybernex ................. 259
Daewoo ................... 039, 064, 065, 297
Dansai ...................... 091
Daytron .................... 039
De Graff ................... 061
Decca ....................... 019, 100
Dual .......................... 060
Dumont .................... 019, 100, 123, 124
Dynatech ................. 019
Elcatech ................... 091
Electrohome ............ 056
Electronic ................. 019
Electrophonic .......... 056
Emerex .................... 051
Emerson .................. 019, 021, 056, 062,
ESC .......................... 297
Ferguson ................. 060
Fidelity ..................... 019
Finlandia .................. 100, 123, 129
Finlux ....................... 019, 061, 100, 123,
Firstline .................... 056, 062, 064, 091,
16
(continued)
printing. New code numbers may or may not have been added since printing.
261
080, 087, 140, 203,
227, 228, 230, 231,
313, 314, 380
124
228
BRAND NAME CODE NUMBER
Fisher ........................ 065, 066, 073, 085,
.................................. 123
Frontech ................... 039
Fuji ............................ 052, 054
Fnai ...........................019
Garrard .....................019
GE ............................. 054, 079, 084, 221
GEC ........................... 100
General ..................... 071
Go Video .................. 251, 298
Goldstar ................... 037, 056, 057
Goodmans ............... 019, 039, 056, 081,
091, 297
Gradiente ................. 019
Graetz ....................... 060, 123
Granada ................... 065, 100, 123
Grandin .................... 019, 056, 091
Grundig .................... 100
Harley Davidson ...... 019
Harman/Kardon ....... 057, 094
Harwood .................. 087, 091
HCM .......................... 091
Headquarter ............. 065
HI-Q .......................... 066
Hinari ........................091, 227
Hitachi ...................... 019, 060, 061, 084,
124, 254
Hypson ..................... 091
Imperial .................... 019
Interfunk ................... 100
ITT ............................. 060, 065, 123, 125
ITV ............................ 056, 297
JCL ............................ 054
Jensen ...................... 060
JVC ........................... 027, 060, 086
Kaisui ........................ 091
Kendo ....................... 125, 228
Kenwood .................. 057, 060, 065, 086
KLH ........................... 091
Kodak ....................... 054, 056
Korpel .......................091
Leyco ........................ 091
Lloyd ......................... 019
Loewe .......................056
Loewe opta .............. 100
logik ..........................091, 259
Luxor ........................ 062, 065, 123, 125
LXI ............................ 056
M-Electronic ............. 019
Magnavox ................ 019, 054, 058, 100,
129, 168
Magnin ..................... 259
Manesth ................... 064, 091
Narantz .....................054, 057, 081, 100
Marta ........................ 056
Masushita ................ 054
Matsui ...................... 227, 228, 314
MEI ........................... 054
Memorex .................. 019, 054, 056, 058,
065, 066, 067, 123,
259
Memphis .................. 091
Metz .......................... 181
MGA ......................... 062, 080
BRAND NAME CODE NUMBER
MGN Technology .... 259
Minolta ..................... 061, 124
Mitsubishi ................ 062, 080, 086, 094,
Motorola .................. 054, 067
MTC .......................... 019, 259
Multitech .................. 019, 091
Murphy ..................... 019
NEC ........................... 057, 059, 060, 069,
Neckermann ............ 100
Nesco ....................... 091
Nikko ........................ 056
Noblex ...................... 259
Nokia ........................ 060, 065, 123, 125,
Nordmende .............. 060
Oceanic .................... 019
Olympus ................... 054
Optimus ................... 056, 067
Optonica ................... 067, 081
Orion ........................ 140, 227, 228, 314
Osaki ......................... 019, 056, 091
Otto Versand ............ 100
Palladdium ............... 056, 091
Panasonic ................. 054, 096, 115, 181,
Penney ..................... 054, 056, 057, 059,
Pentax ...................... 061, 084, 124
Perdio ....................... 019
Philco ........................ 054
Philips ....................... 054, 081, 100, 129
Phonola .................... 100
Pilot .......................... 056
Pioneer ..................... 086, 100
Portland .................... 039
Profitronic ................ 259
Proline ...................... 019
protec ....................... 091
Pulsar ....................... 058
Pye ............................ 100
Quarter ..................... 065
Quartz ....................... 065
Quasar ...................... 054, 096, 115
Quelle ....................... 100
Radio Shack ............. 019, 056
Radiola ..................... 100
Radix ........................ 056
Randex ..................... 056
RCA ........................... 054, 061, 079, 084,
RCA Unified ............. 079
Realistic .................... 019, 054, 056, 065,
Rex ............................ 060
Ricoh ........................ 053
Roadstar ................... 056, 091, 259, 297
Runco ....................... 058
Saba ......................... 060
Saisho ...................... 227, 228
Salora ....................... 062, 065, 125
100, 192, 233, 261
086
259
244
061, 073, 259
096, 115, 124, 125,
168, 221
066, 067, 081, 085,
123, 259
Page 17

Cable TV converter code table
INTRODUCTION
BRAND NAME CODE NUMBER
Sansung ................... 064, 259
Sanky ........................ 058, 067
Sansui ...................... 060, 086
Sanyo ....................... 065, 066, 123, 259
SBR ...........................100
Schaub Lorenz .........019, 060
Schneider ................. 019, 091, 100, 129
Scott ......................... 062, 064, 140, 203,
229, 230, 231
Sears ........................ 054, 056, 061, 065,
066, 073, 085, 123,
124
SEG ........................... 259
SEI ............................ 100
Seleco ....................... 060
Sentra .......................039
Sharp ........................067, 081
Shintom ................... 091
Shgun .......................259
Siemens ................... 056, 123
Silva .......................... 056
Singer .......................091
Sindyne .................... 100
Sontec ...................... 056
Sony ......................... 051, 052, 053, 054
STS ........................... 061
Sunstar .....................019
Sylvania ................... 019, 054, 062, 100,
129
Symphonic ............... 019
Tandy ....................... 019, 123
Tashiko .....................019
Tatung ...................... 019, 060, 100
Teac .......................... 019, 060
Technics ................... 054, 181
Teknika ..................... 019, 054, 056, 071
Teleavia .................... 060
Telefunken ............... 060, 206
Tenosal ..................... 091
Tensai .......................019
Thomson ..................060
Thorn ........................060, 123
TMK .......................... 227, 259
Toshiba .................... 060, 062, 064, 085,
229, 231, 385
Totevision ................ 056, 259
Triumph ................... 227
Untech ...................... 259
Universum ............... 019, 056, 068, 100,
125
Vector ....................... 064
Vector research ....... 057, 059
Victor ........................ 027, 060, 086
Video Concepts ....... 059, 064, 080
Videosonic ............... 259
Wards ....................... 019, 054, 061, 066,
067, 081, 091, 168,
231, 259
XR-1000 .................... 019, 054, 091
Yamaha .................... 057, 060
Yamishi .................... 091
Yokan ....................... 091
Yoko ......................... 039, 259
Zenith ....................... 052, 053, 058
BRAND NAME CODE NUMBER
ABC ........................... 020, 022, 026, 030,
032, 033, 036, 066
Antronix ................... 041
Archer ....................... 041, 058, 172
Belcor ....................... 075
Cable Star ................ 075
Cabletenna ............... 041
Cableview ................ 041
Century ..................... 172
Citizun ...................... 172
Color Voice .............. 044, 050
Comtronics .............. 059, 079
Contec ...................... 038
Eastern ..................... 021
Garrard .....................172
GC Electronics ......... 035, 075
Gemini ...................... 034, 089
General
Instrument .......... 030
Hamlin ......................028, 039, 053, 278,
292
Hitachi ...................... 030
Hytex ........................ 026
Jasco ........................ 172
Jerrold ......................022, 030, 031, 033,
034, 043, 045, 066,
295
Macom ..................... 052
Magnavox ................ 046
Memorex .................. 019
Movie Time ..............175
NSC .......................... 089, 175
Oak ........................... 026, 038, 267
Panasonic ................. 040, 126
Paragon .................... 019
Philips ....................... 044, 046, 047, 048,
049, 050, 079, 172
Pioneer ..................... 042, 163
Popular
Mechanics .......... 419
Pulsar ....................... 019
PVP Stereo
Visual Matrix ...... 022
RCA ........................... 040
Regal ........................ 039, 278, 292
Regency ................... 021
Rembrandt ............... 030, 089
Runco ....................... 019
Samsung ..................059, 163
Scientific Atlanta ..... 025, 027, 036, 296,
346
Signal ....................... 034, 059
Signature ................. 030
SL Marx .................... 059
Sprucer ..................... 040
Standard
Components ....... 174
Starcom .................... 022, 034, 066
Stargate .................... 034, 059
Starquest .................. 034
STS ........................... 175
Sylvania ................... 020
Teleview ...................059
Texcan ...................... 020
BRAND NAME CODE NUMBER
Tocom ...................... 031, 032, 078
Toshiba .................... 019
Tusa .......................... 034
Unika ........................ 041, 172
United Artists ........... 026
United Cable ............ 022
Universal ..................041, 058, 075, 096,
172, 210
Viewstar ................... 046, 079, 230
Zenith ....................... 019
17
Page 18
CHAPTER 1 INTRODUCTION
Quick Reference Menu Guide
INTRODUCTION
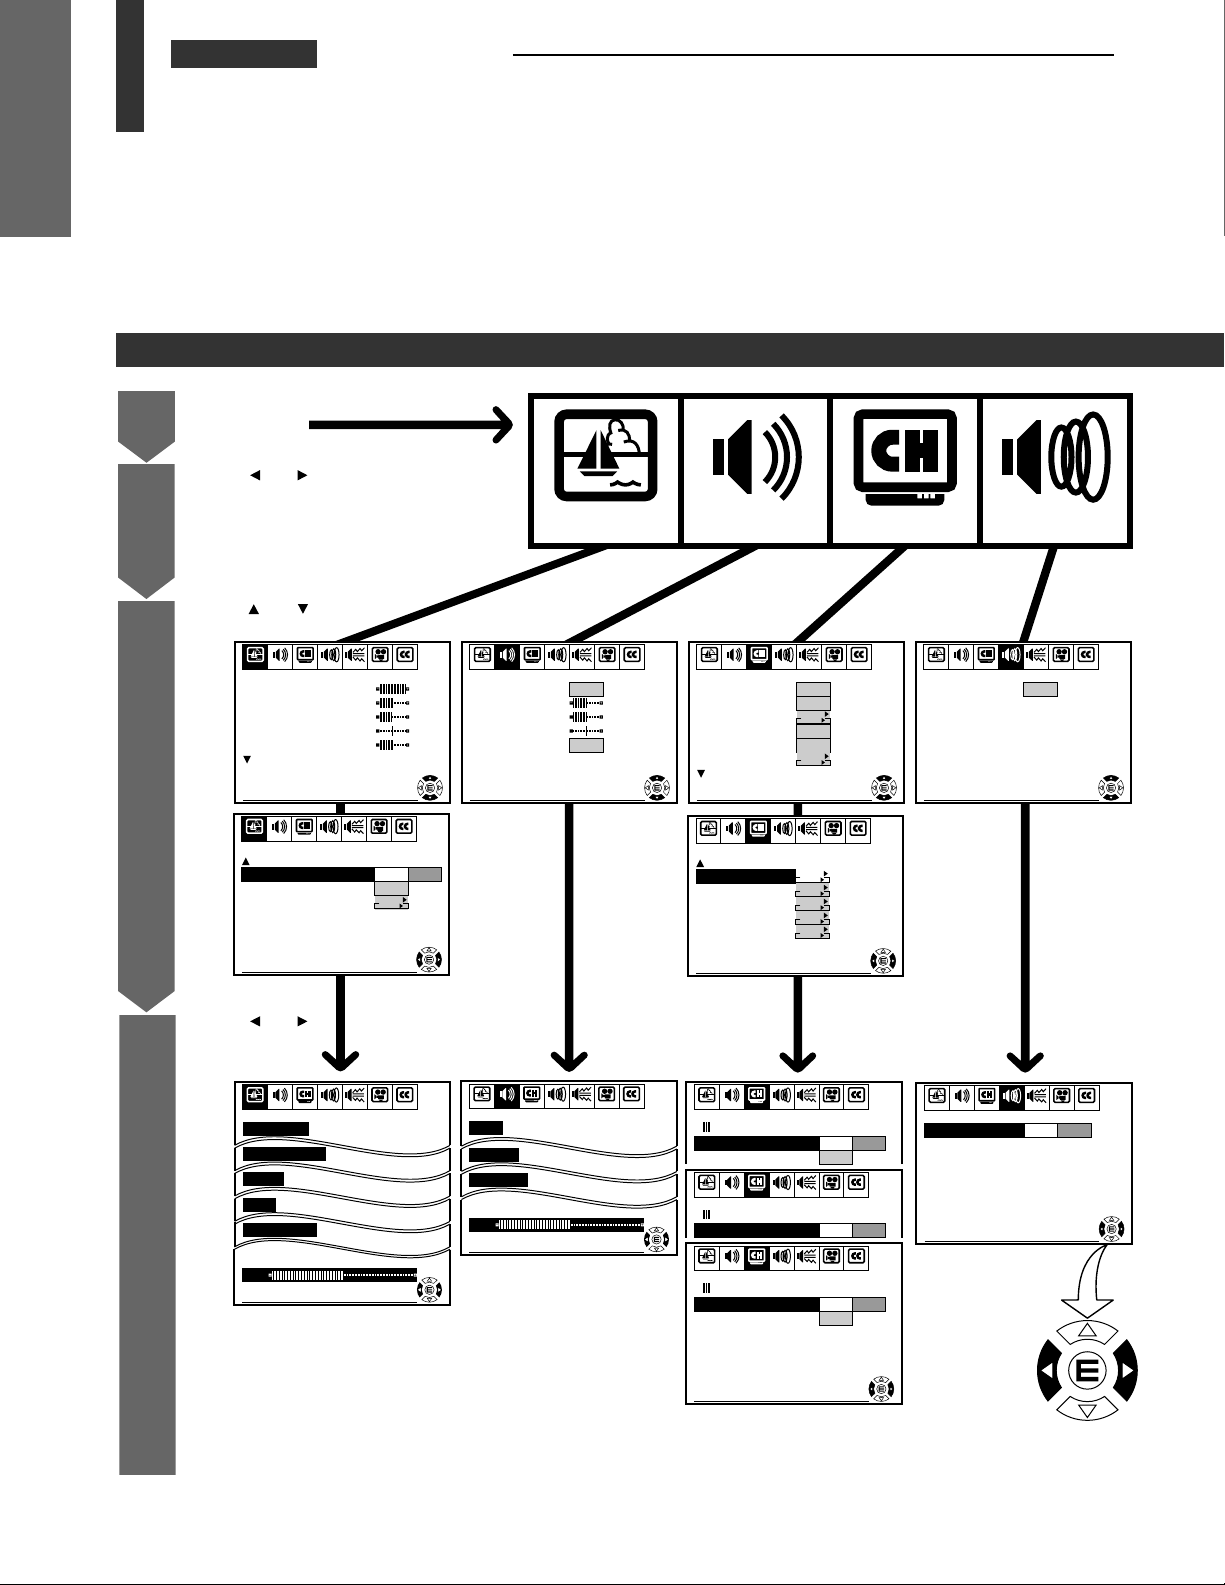
• We recommend that you familiarize yourself with these procedures for using the Menu
Menus and functions
1
2
3
function.
Press MENU to call up an on-screen
menu.
Press or to
select the menu.
Press
an item.
or to select
SET UP C.CAPTIONAUDIO PREMIUM SBS
PICTURE
CONTRAST
BR IGHTNESS
COLOR
TINT
SHARPNE SS
PREFERENCE SET UP C.CAPTIONSBSPICTURE PREFERENCE
PICTURE
MTS
BASS
TREBLE
BAL ANCE
SPEAKERS
SET UP C.CAPTIONAUDIO PREMIUM SBS
STR
On
PREFERENCE
SET UP C.CAPTIONAUDIO PREMIUM SBS
PICTURE
L ANGUAGE
TV /CABLE
CH PROGRAM
ADD/ ERASE
ANT 1 / 2
T IMER / CLOCK
English
TV
START
PUSH
Add
ANT2
START
PUSH
PREFERENCE
SET UPAUDIO PREMIUMPICTURE
PREMIUM
AUDIO
SURROUND
On
4
SET UP C.CAPTIONAUDIO PREMIUM SBS
PICTURE PREFERENCE
FL ESH TONE
NOI SE REDUCT I ON
CONVERGENCE
Press
or
to select or
adjust a setting.
SET UP C.CAPTIONAUDIO PREMIUM SBSPICTURE PREFERENCE
CONTRAST
BR IGHTNESS
COLOR
TINT
SHARPNESS
47
To end push EXIT
On Off
On
START
PUSH
To end push EXIT
To end push EXIT
BASS
TREBLE
BAL ANCE
47
To end push EXIT
SET UP C.CAPTIONAUDIO PREMIUM SBSPICTURE PREFERENCE
To end push EXIT
To end push EXIT
SET UP C.CAPTIONAUDIO PREMIUM SBS
PICTURE PREFERENCE
CH L OCK
CH L ABEL
FA VOR I TE CH1
FA VOR I TE CH2
RESET
CH LOCK
SET /C LEAR
W
CH L ABEL
SET /C LEAR
PICTURE PREFERENCE
FA VOR I TE CH 1
SET /C LEAR
CH INPUT
SET UP
CH 0 0 0
TV
CABLE
START
PUSH
START
PUSH
START
PUSH
START
PUSH
START
PUSH
To end push EXIT
SET UP C.CAPTIONAUDIO PREMIUM SBSPICTURE PREFERENCE
ORD
SET UP C.CAPTIONAUDIO PREMIUM SBSPICTURE PREFERENCE
SET UP C.CAPTIONAUDIO PREMIUM SBS
----PASS
000
000
To enter push 0-9
To set push ENTER
To end push EXIT
Set Clear
Set Clear
Set Clear
CH
PICTURE
SURROUND
SET UP C.CAPTIONAUDIO PREMIUM SBS
To end push EXIT
PREFERENCE
On Off
To end push EXIT
18
This mark indicates
which button you
should press next.
Page 19

PICTURE
SBS
SBS LEVEL
SET UP C.CAPTIONAUDIO PREMIUM SBS
PREFERENCE
Off
SET UP C.CAPTIONAUDIO PREMIUM SBS
PICTURE
COLOR
TEMPERA TURE
P I CTURE
PREFERENCE
C.CAPTIONSBS PREFERENCE
PREFERENCE SET UP C.CAPTIONAUDIO PREMIUM SBS
Cool
Normal
PICTURE
XDS
CLOSED
CAPT I ON
START
PUSH
Off
INTRODUCTION
PREFERENCE
To end push EXIT
SET UP C.CAPTIONAUDIO PREMIUM SBS
PICTURE
SBS
SBS LEVEL
SET UP C.CAPTIONAUDIO PREMIUM SBS
PICTURE PREFERENCE
SBS LEVEL
60
PREFERENCE
On Off
To end push EXIT
To end push EXIT
SET UP C.CAPTIONAUDIO PREMIUM SBS
PICTURE
COLOR
TEMPERA TURE
P I CTURE
PREFERENCE
To end push EXIT
PREFERENCE
Cool Medium Warm
Normal
To end push EXIT
Notes:
• Use the ENTER button to activate the function settings in the
• The main menu display will disappear automatically if you do
• If you want to close all the on-screen displays instantly, press
• The
• The
• The
To end push EXIT
SET UP C.CAPTIONAUDIO PREMIUM SBS
PICTURE PREFERENCE
XDS
CLOSED
CAPT I ON
START
PUSH
C1
C4
T3
C2
T1
T4
To end push EXIT
C3
T2
Off
SET UP menu after step 4.
not press a button within 15 seconds, and the other displays will
disappear within 6 seconds.
the EXIT button on the Remote Control.
buttons on the TV function as the CHANNEL
buttons when no menu display is on the screen.
buttons on the TV function as the VOLUME
buttons when no menu display is on the screen.
buttons on the Remote Control function as the
FAV
and buttons when no menu display is on the screen.
19
Page 20

CHAPTER 2 GETTING STARTED
Turning the TV On/Off
To turn the TV on/off
First set the TV/CABLE/VCR switch on the
Remote Control to “TV.”
GETTING STARTED
ENTER
DEMO
MENU
ANT/VIDEO
TV
CABLE
VCR
VOLUME CHANNEL
RECALL
LIGHT
TV/VIDEO
MUTE
POWER
123
456
789
CH RTN
0
100
FAVORITE
FAV
PREVIEW
STOP SOURCE
REC TV/VCR REW FF
ADV/
PIP CH
MENU/
ENTER
ADV/
PIP CH
ENT
STROBE
PLAY PIP
TIMER
CH
VOL
EXIT
FAV
POWER
Press POWER on the Remote Control or
1
the TV.
The picture will appear in a few seconds.
The following on-screen information will
2
be displayed for a few seconds.
STEREO
SAP
• Antenna input (when in TV mode)
• Channel label (if previously preset)
• Channel number or VIDEO mode
selected
ANT 2
TV
W
XYZ
• STEREO or SAP audio status
To turn the TV off, press POWER again.
3
Auto-Power-Off
If an empty channel is selected, or the TV broadcast for the day is
finished, the TV will automatically turn off after about 15 minutes.
This
Auto-Power-Off
Last Mode Memory
If the power supply is cut off while you are watching the TV, the
Mode Memory
restored. If you know the power is going to be cut off, or you are leaving
home for a long time, remove the power plug from the wall outlet to
prevent the TV from turning on in your absence.
feature does not operate in the VIDEO mode.
Last
feature automatically turns on the TV when the power is
4
STILL LOCATE SWAP
Note:
The TV/VIDEO button or ANT/VIDEO
button is used to input signals from other
sources such as VCRs or Laser Disc
Players connected to this TV.
See page 53 for details.
20
Demonstration mode
When you press DEMO, the TV will
automatically display a variety of its on-screen
menus and special features. This function is
provided for demonstration purposes only.
Press DEMO.
The on-screen demonstration will start after
about 4 seconds.
• While in TV or VIDEO mode, the Multi-
Window features demonstrate.
• While in “COLOR STREAM” mode, other
menus and features demonstrate.
To stop the on-screen demonstration
Press Exit, Recall on Remote or DEMO.
TOSHI BA COLOR T V
TEC HNOLOGY
PERF ORMANCE
EXC I TEMENT
Page 21

CHAPTER 2 GETTING STARTED
Selecting the Antenna Input
• Your TV has two separate antenna inputs (ANT 1 and ANT 2) that allow you to connect
two different signal sources, if desired.
To select the antenna input
DEMO
ENTER
ANT/VIDEO
MENU
TV
CABLE
VCR
100
FAV
PREVIEW
STOP SOURCE
REC TV/VCR REW FF
VOLUME CHANNEL
RECALL
LIGHT
TV/VIDEO
MUTE
123
456
789
CH RTN
0
ENT
ADV/
PIP CH
FAVORITE
MENU/
ENTER
ADV/
PIP CH
PLAY PIP
STILL LOCATE SWAP
POWER
TIMER
CH
VOL
STROBE
FAV
EXIT
Using the SET UP menu
Press MENU, then press or until
1
the SET UP menu appears.
Press (or ) until “ANT 1/2” is
2
highlighted.
Press or to select “ANT 1” or
3
“ANT 2.”
Using the ANT/VIDEO button (on the TV)
Each time you press this button, the ANT 1,
VIDEO 1, VIDEO 2, VIDEO 3, COLOR STREAM
or ANT 2 mode will be selected in this order.
The selected mode will be displayed in purple
to show which signal source you are
watching.
Press the button until “ANT 1” or “ANT 2” is
displayed in purple to match the antenna
terminal you want to use.
Note:
This button functions as the ENTER button
while the menu is on the screen.
SET UP C.CAPTIONAUDIO PREMIUM SBS
PICTURE
L ANGUAGE
TV/CABLE
CH PROGRAM
ADD/ ERASE
ANT 1 / 2
T IMER / CLOCK
SET UP C.CAPTIONAUDIO PREMIUM SBS
PICTURE
L ANGUAGE
TV/CABLE
CH PROGRAM
ADD/ ERASE
ANT 1 / 2
T IMER / CLOCK
V IDEO 1
V IDEO 2
V IDEO 3
TO SEL ECT PUSH ANT / V IDEO
PREFERENCE
English
TV
START
PUSH
Add
ANT2
START
PUSH
To end push EXIT
PREFERENCE
English
TV
START
PUSH
Add
ANT1
ANT2
START
PUSH
To end push EXIT
ANT 1
ANT 2
COLOR STREAM
GETTING STARTED
21
Page 22

CHAPTER 2 GETTING STARTED
Programming Channel Memory
• The channel memory is a list of TV channel numbers the TV tunes in when you press
the CHANNEL button. First, use the TV/CABLE and CH PROGRAM functions to
preset all active channels in your area automatically.
If necessary, arrange the preset channels with the ADD/ERASE function so you tune into
only the desired channels.
TV/CABLE and CH PROGRAM functions
DEMO
GETTING STARTED
MENU
ENTER
ANT/VIDEO
TV
CABLE
VCR
VOLUME CHANNEL
LIGHT
MUTE
123
456
789
0
100
ADV/
PIP CH
FAVORITE
FAV
STOP SOURCE
MENU/
ENTER
PREVIEW
ADV/
PIP CH
REC TV/VCR REW FF
STILL LOCATE SWAP
RECALL
TV/VIDEO
CH RTN
ENT
PLAY PIP
POWER
TIMER
CH
VOL
STROBE
EXIT
FAV
TV/CABLE function
Press MENU, then press or until
1
the SET UP menu appears.
Press (or ) until “TV/CABLE” is
2
highlighted.
Press or to select “TV” or “Cable”
3
whichever you use.
CH PROGRAM function
Select “CH PROGRAM” following steps 1
1
and 2 above.
Press or to start channel
2
programming.
The TV automatically cycles through all
TV or CABLE channels depending on the
mode selected, storing received
channels in the channel memory.
SET UP C.CAPTIONAUDIO PREMIUM SBS
PICTURE
L ANGUAGE
TV /CABLE
CH PROGRAM
ADD/ ERASE
ANT 1 / 2
T IMER / CLOCK
SET UP C.CAPTIONAUDIO PREMIUM SBS
PICTURE
L ANGUAGE
TV /CABLE
CH PROGRAM
ADD/ ERASE
ANT 1 / 2
T IMER / CLOCK
SET UP C.CAPTIONAUDIO PREMIUM SBS
PICTURE
L ANGUAGE
TV /CABLE
CH PROGRAM
ADD/ ERASE
ANT 1 / 2
T IMER / CLOCK
PROGRAMMI NG NO
PLEASE WAIT
English
TV
START
PUSH
Add
ANT1
START
PUSH
English
TV
START
PUSH
Add
ANT1
START
PUSH
English
Cable
START
PUSH
Add
ANT1
START
PUSH
PREFERENCE
To end push EXIT
PREFERENCE
Cable
To end push EXIT
PREFERENCE
To end push EXIT
W
CABLE
15
22
When channel programming is complete,
3
the message at the right appears.
Press CHANNEL to make sure
4
channel programming has been done
properly.
COMPL E TE D
CABLE
2
Page 23

ADD/ERASE function
DEMO
ENTER
ANT/VIDEO
MENU
TV
CABLE
VCR
100
FAVORITE
FAV
PREVIEW
STOP SOURCE
REC TV/VCR REW FF
VOLUME CHANNEL
RECALL
LIGHT
TV/VIDEO
MUTE
123
456
789
CH RTN
0
ENT
ADV/
STROBE
PIP CH
MENU/
ENTER
ADV/
PIP CH
PLAY PIP
STILL LOCATE SWAP
POWER
TIMER
CH
VOL
EXIT
FAV
After performing the CH PROGRAM function, you can add or erase
specific channels.
Select the channel to erase using the
1
CHANNEL
or button, or select the
channel to add with the Channel Number
buttons.
See page 26 on how to select channels.
Press MENU, then press or until
2
the SET UP menu appears.
Press (or ) until “ADD/ERASE” is
3
highlighted.
SET UP C.CAPTIONAUDIO PREMIUM SBS
PICTURE
L ANGUAGE
TV/CABLE
CH PROGRAM
ADD/ ERASE
ANT 1 / 2
T IMER / CLOCK
SET UP C.CAPTIONAUDIO PREMIUM SBS
PICTURE
L ANGUAGE
TV/CABLE
CH PROGRAM
ADD/ ERASE
ANT 1 / 2
T IMER / CLOCK
PREFERENCE
English
Cable
START
PUSH
Add
ANT1
START
PUSH
To end push EXIT
PREFERENCE
English
Cable
START
PUSH
Add Erase
ANT1
START
PUSH
To end push EXIT
Press or .
4
To erase the channel
Press
channel will be erased from the memory.
To add the channel
Press
channel will be memorized.
or to select “Erase”. The
or to select “Add”. The
GETTING STARTED
Repeat steps 1 through 4 for other
5
channels.
23
Page 24

CHAPTER 2 GETTING STARTED
Aligning the colors
• This projection TV uses three separate TV tubes: a red one, a green one, and a blue one.
The red, green, and blue images are projected onto the screen where they converge to
form a full color picture. You can see a clear picture only when they converge correctly.
• Convergence may drift over time or if you move the TV. If you can see clear images on
the screen, skip this procedure.
To align the colors
DEMO
GETTING STARTED
MENU
ENTER
ANT/VIDEO
TV
CABLE
VCR
VOLUME CHANNEL
LIGHT
MUTE
123
456
789
0
100
ADV/
PIP CH
FAVORITE
FAV
STOP SOURCE
MENU/
ENTER
PREVIEW
ADV/
PIP CH
REC TV/VCR REW FF
STILL LOCATE SWAP
RECALL
TV/VIDEO
CH RTN
ENT
PLAY PIP
POWER
TIMER
CH
VOL
STROBE
EXIT
FAV
This adjustment should be made after the TV has been on for at least 30
minutes.
To check and align the colors
Press MENU, then press or until
1
the PICTURE menu appears.
Press (or ) until “CONVERGENCE”
2
is highlighted.
Press or to display the center
3
CONVERGENCE menu.
If alignment is correct, there will be one
vertical and one horizontal white line.
If you see separate colored lines, you
4
have to align the colors.
Press ENTER to select “RED” or “BLUE.”
The selected color is highlighted.
SET UP C.CAPTIONAUDIO PREMIUM SBS
PICTURE
CONTRAST
BR IGHTNESS
COLOR
TINT
SHARPNE SS
SET UP C.CAPTIONAUDIO PREMIUM SBS
PICTURE PREFERENCE
FL ESH TONE
NOI SE REDUCT I ON
CONVERGENCE
RED BLUE
PUSH ENTER
TO SEL ECT COLOR
PUSH EX
RED BLUE
PUSH ENTER
TO SEL ECT COLOR
PUSH EX
IT
TO SELECT POS
IT
TO SELECT POS
PREFERENCE
To end push EXIT
START
PUSH
To end push EXIT
ITION
To end push EXIT
ITION
To end push EXIT
On
On
24
Press the “ (up)”, “ (down)”, “
5
(left)” or “ (right)” button to converge
the red or blue line into the green line.
When color convergence is correctly
adjusted, you will see two single white
lines.
RED BLUE
PUSH ENTER
TO SEL ECT COLOR
PUSH EX
IT
TO SELECT POS
ITION
To end push EXIT
Page 25

To align the colors (continued)
Press EXIT to display the circumference
6
CONVERGENCE memu.
Press the corresponding Number
7
button (1-9) to select the place you
want to adjust.
Example: Number 1
Press ENTER to select “RED” or
8
“BLUE”. The selected color is
highlighted.
Press , , , or to converge the
9
red or blue line into the green line.
Repeat steps 8 and 9 until you see two
single white lines.
1 2 3
4 6
PUSH 1–9
7 8 9
RED BLUE
PUSH ENTER
TO SEL ECT COLOR
PUSH EX
TO SELECT POS
RED BLUE
PUSH ENTER
TO SEL ECT COLOR
PUSH EX
TO SELECT POS
RED BLUE
PUSH ENTER
TO SEL ECT COLOR
PUSH EX
TO SELECT POS
IT
IT
IT
ITION
ITION
ITION
GETTING STARTED
Press EXIT once to select any other
10
place you want to adjust,then repeat
steps 7 through 9.
Example: Number 6
Press EXIT twice to close the
11
CONVERGENCE menu.
RED BLUE
PUSH ENTER
TO SEL ECT COLOR
PUSH EX
TO SELECT POS
IT
ITION
25
Page 26

CHAPTER 3 BASIC OPERATION
Watching TV Programs
To watch a TV program
ENTER
DEMO
MENU
ANT/VIDEO
BASIC OPERATION
FAV
VOLUME CHANNEL
RECALL
LIGHT
TV
CABLE
VCR
MUTE
TV/VIDEO
123
456
789
CH RTN
0
100
FAVORITE
PREVIEW
STOP SOURCE
REC TV/VCR REW FF
ADV/
PIP CH
MENU/
ENTER
ADV/
PIP CH
ENT
PLAY PIP
POWER
TIMER
CH
VOL
STROBE
FAV
EXIT
POWER
Press POWER on the Remote Control or
1
the TV.
STEREO
SAP
Select the desired program in one of the
2
following two ways.
To scan the memorized channels in
numerical sequence
Press CHANNEL
to select the next
higher channel.
Press CHANNEL
to select the
next lower channel.
Press the button again to select the next
memorized channel.
To select a channel directly
Press the Channel Number buttons (0 – 9 and 100).
To select channel 4, press “4” (or press “0” and “4” in order).
To select channel 38, press “3” and “8” in order.
To select channel 125, press “100,” “2,” and “5” in order.
Adjust the sound volume with the
3
VOLUME
on the Remote Control
or the TV.
Press
to increase the volume; to
decrease the volume.
VO LUME
47
ANT 1
TV
ABCD
10
4
26
STILL LOCATE SWAP
To turn off the TV, press POWER again.
4
If you cannot select certain channels (either TV broadcast or CABLE
channels)
Check to see if the TV/CABLE function is properly set. See page 22.
Notes:
• The CHANNEL
while a menu is on the screen.
• The VOLUME
while a menu is on the screen.
on the TV function as the menu buttons
on the TV function as the menu buttons
Page 27

CHAPTER 3 BASIC OPERATION
Convenient Remote Functions
To use On-screen displays/Sound muting/Channel return
To display on-screen information
RECALL
LIGHT
TV
CABLE
VCR
MUTE
TV/VIDEO
123
456
789
CH RTN
0
100
FAVORITE
FAV
PREVIEW
STOP SOURCE
REC TV/VCR REW FF
ENT
ADV/
PIP CH
MENU/
ENTER
ADV/
PIP CH
STILL LOCATE SWAP
POWER
STROBE
PLAY PIP
TIMER
CH
VOL
EXIT
FAV
Press RECALL to display the following onscreen information.
• Antenna input (when in TV mode)
• Channel label (if previously preset)
• Channel number or VIDEO mode selected
• Time (if the clock has been set)
• STEREO or SAP audio status
STEREO
SAP
10:25
To mute the sound
Press MUTE to mute the sound
immediately without affecting the
1
picture.
To restore the sound, press MUTE again.
2
Note:
When the MUTE button is pressed, the Closed Captioned feature
“C1” is activated. To deactivate it, press the MUTE button again.
This feature only functions when the Closed Caption mode is set to
“Off.” ( See page 48.)
To return to the previously viewed channel
Using this function, you can watch two channels alternately.
Select the first channel you want to
1
watch.
ANT 1
TV
MUTE
ABCD
4
BASIC OPERATION
Select the other channel with the
2
Channel Number buttons.
Press CH RTN.
3
The previous channel returns.
Each time you press CH RTN, the TV will
switch back and forth between the two
channels.
(Current channel)
2
(Previous channel)
6
27
Page 28

CHAPTER 3 BASIC OPERATION
Controlling the Picture
To adjust the picture
ENTER
MENU
ANT/VIDEO
DEMO
BASIC OPERATION
VOLUME CHANNEL
RECALL
LIGHT
TV
CABLE
VCR
MUTE
TV/VIDEO
123
456
789
CH RTN
0
100
FAVORITE
ADV/
PIP CH
ENT
POWER
TIMER
CH
VOL
STROBE
To adjust the picture quality
You can adjust the picture quality (CONTRAST, BRIGHTNESS, COLOR,
TINT, and SHARPNESS) to suit your personal preference.
Press MENU, then press
1
the PICTURE menu appears.
Press (or ) until the item you want
2
to adjust is highlighted.
Example: CONTRAST adjustment
mode display
Press or to adjust the level.
3
or until
SET UP C.CAPTIONAUDIO PREMIUM SBS
PICTURE
CONTRAST
BR IGHTNESS
COLOR
TINT
SHARPNE SS
SET UP C.CAPTIONAUDIO PREMIUM SBS
PICTURE
CONTRAST
BR IGHTNESS
COLOR
TINT
SHARPNE SS
SET UP C.CAPTIONAUDIO PREMIUM SBS
PICTURE
CONTRAST
PREFERENCE
To end push EXIT
PREFERENCE
To end push EXIT
PREFERENCE
28
FAV
STOP SOURCE
MENU/
ENTER
PREVIEW
ADV/
PIP CH
REC TV/VCR REW FF
STILL LOCATE SWAP
PLAY PIP
EXIT
FAV
83
To end push EXIT
Item
CONTRAST
BRIGHTNESS
COLOR
TINT
SHARPNESS
lower
darker
weaker
reddish
softer
Pressing
higher
lighter
stronger
greenish
sharper
When you adjust any of the five PICTURE items, the new setting will be
stored in the “MEMORY.” (See page 29.)
Note:
You can reset the PICTURE setting to the factory preset status by using
the RESET function. (See page 30.) When you turn on the RESET
function, the TV will return to the NORMAL mode. (The settings you have
adjusted remain in the MEMORY mode.)
Page 29

To adjust the picture (continued)
DEMO
ENTER
ANT/VIDEO
MENU
TV
CABLE
VCR
100
FAVORITE
FAV
PREVIEW
STOP SOURCE
REC TV/VCR REW FF
VOLUME CHANNEL
RECALL
LIGHT
TV/VIDEO
MUTE
123
456
789
CH RTN
0
ENT
ADV/
STROBE
PIP CH
MENU/
ENTER
ADV/
PIP CH
PLAY PIP
POWER
TIMER
CH
VOL
EXIT
FAV
To select the color temperature
These selections change the appearance of gray and white tones of the
picture.
Press MENU, then press
1
the PREFERENCE menu appears.
Press or until “COLOR
2
TEMPERATURE” is highlighted.
Press or to select the temperature
3
you want.
Cool: Bluish
or until
SET UP C.CAPTIONAUDIO PREMIUM SBS
PICTURE
COLOR
TEMPERA TURE
P I CTURE
PREFERENCE
SET UP C.CAPTIONAUDIO PREMIUM SBS
PICTURE
COLOR
TEMPERA TURE
P I CTURE
PREFERENCE
PREFERENCE
Cool
Normal
To end push EXIT
PREFERENCE
Cool Medium Warm
Normal
To end push EXIT
Medium: Neutral
Warm: Redish
To select the picture preference
You can select the type of picture you want from three preset picture
modes (Normal, Theater, and Memory).
Select the PREFERENCE menu.
1
Press or until “PICTURE
2
PREFERENCE” is highlighted.
SET UP C.CAPTIONAUDIO PREMIUM SBS
PICTURE
COLOR
TEMPERA TURE
P I CTURE
PREFERENCE
PREFERENCE
Cool
Normal
BASIC OPERATION
STILL LOCATE SWAP
Press or to select the mode you
3
want.
Mode
Normal
Theater
Memory
the picture quality preset at the factory
movie-like picture setting
the picture quality you set (See page 28.)
PICTURE
COLOR
TEMPERA TURE
P I CTURE
PREFERENCE
Picture quality
SET UP C.CAPTIONAUDIO PREMIUM SBS
Normal
To end push EXIT
PREFERENCE
Cool
TheaterMemory
To end push EXIT
29
Page 30

CHAPTER 3 BASIC OPERATION
Controlling the Sound
• You can adjust the sound quality (BASS, TREBLE and BALANCE) to suit your personal
preference.
To adjust the sound
ENTER
MENU
ANT/VIDEO
DEMO
BASIC OPERATION
FAV
VOLUME CHANNEL
RECALL
LIGHT
TV
CABLE
VCR
MUTE
TV/VIDEO
123
456
789
CH RTN
0
100
ADV/
PIP CH
FAVORITE
MENU/
ENTER
PREVIEW
ADV/
PIP CH
STOP SOURCE
ENT
PLAY PIP
POWER
TIMER
CH
VOL
STROBE
EXIT
FAV
Press MENU, then press or until
1
the AUDIO menu appears.
Press (or ) until the item you want
2
to adjust is highlighted.
Example: Adjusting “BASS.”
Press or to adjust the level.
3
Item
BASS
TREBLE
BALANCE
weaker
weaker
decreases the
right channel
SET UP C.CAPTIONAUDIO PREMIUM SBS
PICTURE
MTS
BASS
TREBLE
BAL ANCE
SPEAKERS
SET UP C.CAPTIONAUDIO PREMIUM SBS
PICTURE
MTS
BASS
TREBLE
BAL ANCE
SPEAKERS
SET UP C.CAPTIONAUDIO PREMIUM SBSPICTURE PREFERENCE
BASS
83
Pressing
stronger
stronger
decreases the left
channel
PREFERENCE
STR
On
To end push EXIT
PREFERENCE
STR
On
To end push EXIT
To end push EXIT
30
REC TV/VCR REW FF
STILL LOCATE SWAP
RESET function
To reset the PICTURE and AUDIO adjustments to the factory preset level
(maximum CONTRAST and all other adjustments centered)
Select RESET in the SET UP menu with or , then press or .
(See page 18.)
The RESET function also performs the
following adjustments.
• COLOR TEMPERATURE ......................... Cool
• PICTURE PREFERENCE ..................... Normal
• NOISE REDUCTION ................................... Off
RESE T
Page 31

CHAPTER 3 BASIC OPERATION
Selecting Stereo and SAP Broadcasts
• The MTS (Multi-channel TV Sound) feature allows you to improve your TV viewing with
high fidelity stereo sound. MTS also provides for an extra audio channel, SAP (Second
Audio Program), used to transmit a second language or other audio information.
To listen to Stereo/SAP broadcasts
DEMO
ENTER
ANT/VIDEO
MENU
TV
CABLE
VCR
100
FAV
PREVIEW
STOP SOURCE
REC TV/VCR REW FF
VOLUME CHANNEL
RECALL
LIGHT
TV/VIDEO
MUTE
123
456
789
CH RTN
0
ENT
ADV/
PIP CH
FAVORITE
MENU/
ENTER
ADV/
PIP CH
PLAY PIP
STILL LOCATE SWAP
POWER
TIMER
CH
VOL
STROBE
FAV
EXIT
To listen to stereo sound
When the TV receives a stereo broadcast, the
word “STEREO” (or “SAP”) is displayed on
the screen. It is also displayed whenever the
TV is turned on, a channel is selected, or the
RECALL button is pressed.
Press MENU, then press or until
1
the AUDIO menu appears.
Press (or ) until “MTS” is
highlighted.
2
Press or to select “STR.”
3
If a stereo broadcast is received, “STR”
will be displayed in yellow.
Normally this function can be left in the
stereo mode (“STR”). Your TV will then
automatically reproduce either stereo or
monaural sound, whichever is broadcast.
To listen to a second language
STEREO
SAP
PICTURE
MTS
BASS
TREBLE
BAL ANCE
SPEAKERS
PICTURE
MTS
BASS
TREBLE
BAL ANCE
SPEAKERS
SET UP C.CAPTIONAUDIO PREMIUM SBS
SET UP C.CAPTIONAUDIO PREMIUM SBS
4
PREFERENCE
STR
BASIC OPERATION
On
To end push EXIT
PREFERENCE
STR SAP MONO
On
To end push EXIT
If the stereo sound is noisy
If a broadcast signal is not strong
enough, and noise-free stereo sound is
not available, select “MONO” in the MTS
menu.
The noise should be reduced.
Follow steps 1 and 2 above.
1
Press or to select “SAP.”
2
You will hear only the second language
from the left and right speakers.
Notes:
• Be sure to select the “STR” mode if the broadcast is in stereo.
• The MTS function is not available while in VIDEO mode.
PICTURE
MTS
BASS
TREBLE
BAL ANCE
SPEAKERS
SET UP C.CAPTIONAUDIO PREMIUM SBS
PREFERENCE
STR SAP MONO
On
To end push EXIT
31
Page 32

CHAPTER 4 ADVANCED OPERATION
Enhancing the Surround Sound Effect
• This TV allows you to activate or deactivate the stereo surround effect.
To activate the Surround sound function
ENTER
MENU
ANT/VIDEO
TV
CABLE
VCR
DEMO
123
456
789
100
ADVANCED OPERATION
FAVORITE
VOLUME CHANNEL
POWER
RECALL
LIGHT
TIMER
TV/VIDEO
MUTE
CH
VOL
CH RTN
0
ENT
ADV/
STROBE
PIP CH
Select the “STR” (stereo) mode
1
following steps 1 through 3 on the
previous page.
Press MENU, then press or until
2
the PREMIUM menu appears.
Press or to select “SURROUND.”
3
Press or to highlight “On.”
4
SET UP C.CAPTIONAUDIO PREMIUM SBS
PICTURE PREFERENCE
SURROUND
PICTURE
SURROUND
PICTURE
SURROUND
SET UP C.CAPTIONAUDIO PREMIUM SBS
SET UP C.CAPTIONAUDIO PREMIUM SBS
Off
To end push EXIT
PREFERENCE
To end push EXIT
PREFERENCE
On Off
OffOn
32
FAV
PREVIEW
STOP SOURCE
REC TV/VCR REW FF
MENU/
ENTER
ADV/
PIP CH
STILL LOCATE SWAP
PLAY PIP
FAV
To end push EXIT
EXIT
To deactivate the Surround sound function
Select “Off” in step 4 above.
Note:
Normally you can leave the MTS function set to “STR” and the
SURROUND sound function set to “On”. The TV will automatically
produce either Surround, stereo or monaural, whichever is broadcast.
Page 33

CHAPTER 4 ADVANCED OPERATION
Operating the Sub-Bass System
• The Sub-Bass System allows you to improve bass performance (even when the sound
volume is low).
To operate the Sub-Bass System
DEMO
MENU
ENTER
ANT/VIDEO
LIGHT
TV
CABLE
VCR
123
456
789
100
FAVORITE
VOLUME CHANNEL
POWER
RECALL
TV/VIDEO
MUTE
0
PIP CH
ADV/
CH RTN
ENT
TIMER
CH
VOL
STROBE
To activate the Sub-Bass System
Press MENU, then press or until
1
the SBS menu appears.
Press or until “SBS” is
2
highlighted.
Press or to select “On.”
3
To adjust the SBS level
Select “SBS LEVEL” in the SBS menu.
1
PICTURE
SBS
SBS LEVEL
PICTURE
SBS
SBS LEVEL
PICTURE
SBS
SBS LEVEL
SET UP C.CAPTIONAUDIO PREMIUM SBS
SET UP C.CAPTIONAUDIO PREMIUM SBS
SET UP C.CAPTIONAUDIO PREMIUM SBS
PREFERENCE
Off
To end push EXIT
PREFERENCE
On Off
To end push EXIT
PREFERENCE
On Off
ADVANCED OPERATION
FAV
STOP SOURCE
MENU/
ENTER
PREVIEW
ADV/
PIP CH
REC TV/VCR REW FF
STILL LOCATE SWAP
PLAY PIP
EXIT
FAV
To end push EXIT
Press or to adjust the SBS level.
2
SET UP C.CAPTIONAUDIO PREMIUM SBS
PICTURE PREFERENCE
SBS LEVEL
60
To end push EXIT
To deactivate the Sub-Bass System function
Select “Off” in step 3 above.
Note:
The Sub-Bass System signal does not pass through the “VARIABLE
AUDIO OUTPUT” jacks. (See page 58.) However, the above on-screen
displays will appear when the buttons are pressed.
33
Page 34

CHAPTER 4 ADVANCED OPERATION
Setting the OFF Timer and
the Clock
• With the OFF timer, you can set the TV to turn off automatically after a pre-determined
period of time (in 10 minute increments, up to 180 minutes).
To set the OFF timer
TV
CABLE
VCR
123
456
789
100
FAVORITE
FAV
ADVANCED OPERATION
PREVIEW
STOP SOURCE
REC TV/VCR REW FF
POWER
RECALL
LIGHT
TIMER
TV/VIDEO
MUTE
CH
VOL
CH RTN
0
ENT
ADV/
STROBE
PIP CH
MENU/
ENTER
ADV/
PIP CH
STILL LOCATE SWAP
EXIT
PLAY PIP
FAV
Press TIMER to select the TIMER mode.
1
The first digit will flash.
OFF T I MER
Press any two Number buttons to enter
2
the length of time you want the TV to
OFF T I MER
stay on.
The remaining number(s) to be adjusted
will flash continuously.
OFF T I MER
Example: 120 minutes
Press 1, then 2.
Press TIMER again to start the timer.
3
The display color will change from
OFF T I MER
purple to blue, then the display will
disappear.
TO SET OFF T IME
PUSH 0 - 9
TO START
PUSH T I MER
You can also set the OFF timer using the on-screen menu.
Select the SETUP menu, then press
1
(or ) until “TIMER/CLOCK” is
highlighted.
SET UP C.CAPTIONAUDIO PREMIUM SBS
PICTURE
L ANGUAGE
TV /CABLE
CH PROGRAM
ADD/ ERASE
ANT 1 / 2
T IMER / CLOCK
0 00
1 0 0
1 20
120
START
PUSH
START
PUSH
START
PUSH
START
PUSH
START
PUSH
START
PUSH
PREFERENCE
To end push EXIT
To cancel the OFF timer
Press POWER twice, once to turn the TV
off and once to turn it on again.
34
Press or until the TIMER mode is
2
displayed. Then press two Number
buttons to enter the length of time you
want the TV to stay on.
Example: 30 minutes
Press 0, then 3.
Press ENTER to start the timer.
3
MODE
TI
MER / CLOCK
SET UP C.CAPTIONAUDIO PREMIUM SBSPICTURE PREFERENCE
Timer Clock
0
30OFF T I MER
To enter push 0-9
To set push ENTER
To end push EXIT
Page 35

To set the clock
Press TIMER twice to select the CLOCK
1
mode.
The first digit will flash.
CLOCK
0 0:00
RECALL
LIGHT
TV
CABLE
VCR
MUTE
TV/VIDEO
123
456
789
CH RTN
0
100
FAVORITE
FAV
PREVIEW
STOP SOURCE
REC TV/VCR REW FF
ENT
ADV/
PIP CH
MENU/
ENTER
ADV/
PIP CH
STILL LOCATE SWAP
POWER
TIMER
STROBE
PLAY PIP
CH
VOL
EXIT
FAV
Press four Number buttons to enter the
2
correct time.
The remaining number(s) to be adjusted
will flash continuously.
Example: To set 9:25 a.m.
Press 0, 9, 2 and 5.
• The clock operates on a 12 hour-cycle.
Press TIMER to start the clock.
3
The display color will change from
purple to blue, then the display will
disappear.
TO SET HOUR AND M I NUTE
PUSH 0 - 9
TO START
PUSH T I MER
You can also set the clock using the on-screen menu.
Select the SETUP menu, then press
1
(or ) until “TIMER/CLOCK” is
highlighted.
PICTURE
L ANGUAGE
TV /CABLE
CH PROGRAM
ADD/ ERASE
ANT 1 / 2
T IMER / CLOCK
CLOCK
09 :0 0
CLOCK
09:20
CLOCK
0 9:25
CLOCK
09:25
SET UP C.CAPTIONAUDIO PREMIUM SBS
START
START
START
START
START
START
PUSH
PUSH
PUSH
PUSH
PUSH
PUSH
ADVANCED OPERATION
PREFERENCE
To monitor the time
Press RECALL.
Note:
If the power source for the TV is
interrupted (i.e., AC cord unplugged or
power failure), the clock will have to be
reset. (The time display will show
“00:00.”)
Press or until the CLOCK mode is
2
displayed. Then press four Number
buttons to enter the correct time.
Example: To set 12:06 p.m.
Press 1, 2, 0, and 6.
Press ENTER to start the clock.
3
MER / CLOCK
TI
MODE
To end push EXIT
SET UP C.CAPTIONAUDIO PREMIUM SBSPICTURE PREFERENCE
Timer Clock
12:06CLOCK
To enter push 0-9
To set push ENTER
To end push EXIT
35
Page 36

CHAPTER 4 ADVANCED OPERATION
Watching Picture-in-Picture
• This TV is capable of displaying two pictures simultaneously. This is called the Picture-
in-Picture function. A TV broadcast picture, or a picture from an external source such as
a VCR, can be displayed as a small picture.
To display a small picture
Note:
Signal sources input through the ANT-2
and COLOR STREAM terminals cannot be
displayed as a small picture.
Also, when the main picture source is
“COLOR STREAM”, PIP is not available.
POWER
RECALL
LIGHT
TV
CABLE
VCR
MUTE
TV/VIDEO
TIMER
123
456
789
CH RTN
0
100
ADVANCED OPERATION
FAVORITE
FAV
PREVIEW
STOP SOURCE
ADV/
PIP CH
MENU/
ENTER
ADV/
PIP CH
ENT
STROBE
PLAY PIP
CH
VOL
EXIT
FAV
To display a TV broadcast picture as a small picture
Turn on the TV and select the desired
1
program.
Small picture
Press PIP once to display a small picture.
2
The 1/9 size window picture will appear.
If you press PIP again, the 1/16 size
window picture will appear.
Press PIP CH or to select the
3
desired program for the small picture.
To turn off the small picture, press PIP
4
again.
1/9
1/16
PIP
To display a picture from an external source as a small picture
Connect the external source equipment for the small picture.
(For connections, see pages 53 – 57.)
Turn on the TV, and select the desired
1
program.
4
36
REC TV/VCR REW FF
STILL LOCATE SWAP
Press PIP to display a small picture.
2
Press SOURCE repeatedly to select the
3
input source (TV, VIDEO 1, VIDEO 2, or
VIDEO 3) for the small picture.
The selected mode will be displayed in
purple.
PIP
TV
VIDEO 1
VIDEO 2
VIDEO 3
TO SELECT PUSH SOURCE
Page 37

To use advanced functions
To change the position of the small picture
Press LOCATE repeatedly while the small picture is displayed. The
display position of the small picture will change in order.
To switch the main and small pictures
Press SWAP while the small picture is displayed.
The main and small pictures will switch.
To switch them again, press SWAP again.
CAUTION:
Avoid displaying stationary images on
your TV screen for an extended period of
time. Stationary patterns generated by the
PIP display,Multi-Window display,
computer displays, videogames, stock
market reports etc. can become
permanently ingrained on the picture tube.
This damage is not protected by your
warranty as it is the result of misuse. If you
use your TOSHIBA Television to display
still images, it is always advisable to
reduce the brightness and contrast
settings. Never leave a PIP display, MultiWindow display, computer display or
videogame unattended.
ADVANCED OPERATION
To freeze the small picture
Press STILL while the small picture is displayed.
The small picture will become a still picture.
To return it to a moving picture, press STILL again.
Still picture
37
Page 38

CHAPTER 4 ADVANCED OPERATION
7
69
12 18
42 97 106
7
33
Multi-Window Function
• The Multi-Window function provides two channel search modes. One is the “PREVIEW” that scans
the channels programmed in the TV memory by the CH PROGRAM function(6-picture multisearch), and the other is the “FAVORITE” that scans the channels programmed in the TV memory
by the FAVORITE CH function(9-picture multi-search).
• The STROBE function is convenient when watching a scene at an instant of quickly moving picture
such as a sport program.
To use the PREVIEW/FAVORITE/STROBE functions
Notes:
• When the main picture source is
“COLOR STREAM”, the PREVIEW,
FAVORITE and STROBE buttons are
not available.
• The FAVORITE button activates only
after you have programmed your
favorite channels. See page 44 for
details.
RECALL
LIGHT
TV
CABLE
VCR
MUTE
TV/VIDEO
123
456
789
CH RTN
0
ADVANCED OPERATION
100
FAVORITE
FAV
ADV/
PIP CH
MENU/
ENTER
ENT
POWER
TIMER
CH
VOL
STROBE
FAV
To use PREVIEW function
Press PREVIEW to scan the channels of “ANT1” programmed in the TV memory by the CH
PROGRAM function.
The 6-picture multi-search will start.
To cancel the PREVIEW function
Press PREVIEW again.
To use FAVORITE function
Press FAVORITE to scan the channels
1
programmed in the TV memory by the
FAVORITE CH1 function.
The 9-picture multi-search will start.
The first window will be displayed with a
moving picture.
Each time you press FAVORITE, the
display will change in the following
order.
FAVORITE CH1 FAVORITE CH2 OFF
↑
Press to select a channel you
2
want to see with a moving picture.
→→
9121546 7
69
12 18
42
7
7
33
PREVIEW
ADV/
PIP CH
STOP SOURCE
REC TV/VCR REW FF
STILL LOCATE SWAP
38
PLAY PIP
EXIT
Press ENTER to display your desired
3
channel you have selected at step 2 with
a normal picture.
To cancel the FAVORITE function
Press FAVORITE again.
Page 39

To use the PREVIEW/FAVORITE/STROBE functions (continued)
To use the STROBE function
Press STROBE to start the STROBE function.
9-picture multi-strobe starts for the present main picture.
POWER
RECALL
LIGHT
TV
CABLE
VCR
123
456
789
100
FAVORITE
MUTE
0
ADV/
PIP CH
TV/VIDEO
CH RTN
ENT
TIMER
CH
VOL
STROBE
For example,you can watch a decisive moment of a sport program that
has been recorded previously.
To cancel the STROBE function
Press STROBE again.
FAV
STOP SOURCE
MENU/
ENTER
PREVIEW
ADV/
PIP CH
REC TV/VCR REW FF
STILL LOCATE SWAP
PLAY PIP
EXIT
FAV
ADVANCED OPERATION
39
Page 40

CHAPTER 4 ADVANCED OPERATION
Locking Channels
• With this function, you can lock out specific channels by entering your own 4-digit code.
The TV will not be able to tune to those channels for the next 24 hours, unless you
enter the code.
This TV has 8 memory spaces total — 4 for TV mode and 4 for CABLE mode.
To lock out channels
TV
CABLE
VCR
123
456
789
100
FAVORITE
FAV
ADVANCED OPERATION
PREVIEW
STOP SOURCE
REC TV/VCR REW FF
POWER
RECALL
LIGHT
TV/VIDEO
MUTE
0
PIP CH
MENU/
ENTER
PIP CH
STILL LOCATE SWAP
ADV/
ADV/
CH RTN
ENT
TIMER
CH
VOL
STROBE
EXIT
PLAY PIP
FAV
Press MENU, then press
1
the SET UP menu appears.
Press (or ) until “CH LOCK” is
2
highlighted.
Press or to display the CH LOCK
3
menu.
“SET/CLEAR” will be highlighted.
Press or to select “Set.”
Press until “PASSWORD” is
4
highlighted.
or until
SET UP C.CAPTIONAUDIO PREMIUM SBS
PICTURE
L ANGUAGE
TV /CABLE
CH PROGRAM
ADD/ ERASE
ANT 1 / 2
T IMER / CLOCK
SET UP C.CAPTIONAUDIO PREMIUM SBS
PICTURE PREFERENCE
CH L OCK
CH L ABEL
FA VOR I TE CH1
FA VOR I TE CH2
RESET
SET UP C.CAPTIONAUDIO PREMIUM SBSPICTURE PREFERENCE
CH LOCK
SET /C LEAR
W
ORD
CH INPUT
LOCKE D
CH
TV
CABLE
SET UP C.CAPTIONAUDIO PREMIUM SBSPICTURE PREFERENCE
CH LOCK
SET /C LEAR
PASSWORD
CH INPUT
LOCKE D
CH0000
TV
CABLE
PREFERENCE
English
TV
START
PUSH
Add
ANT2
START
PUSH
To end push EXIT
START
PUSH
START
PUSH
START
PUSH
START
PUSH
START
PUSH
To end push EXIT
----PASS
0000
0000
To enter push 0-9
To set push ENTER
To end push EXIT
----
0000
To enter push 0-9
To set push ENTER
To end push EXIT
Set Clear
CH
Clear
Set
CH
Note:
If a different code number is used to lock
out a channel, the last one has priority
over the preceding ones.
40
Press the Number buttons (0-9) to enter
5
a 4-digit code. The numbers you enter
will replace the dashes in the display.
Pick a number that is easy to remember.
Example: To enter “1234”.
Press 1, 2, 3, and 4 in order.
1 ---→ 12 --→ 123 -→1234
Press until “CH INPUT” is
6
highlighted, then press the Number
buttons (0-9, 100) to enter the channel
number.
SET UP C.CAPTIONAUDIO PREMIUM SBSPICTURE PREFERENCE
CH LOCK
SET /C LEAR
PASSWORD 1 234
CH INPUT
LOCKE D
CH0000
TV
CABLE
SET UP C.CAPTIONAUDIO PREMIUM SBS
PICTURE PREFERENCE
CH LOCK
SET /C LEAR
W
ORD
CH INPUT
LOCKE D
CH0000
TV
CABLE
Set Clear
0000
To enter push 0-9
To set push ENTER
To end press EXIT
Set Clear
1234PASS
0000
To enter push 0-9
To set push ENTER
To end press EXIT
CH
15CH
Page 41

To lock out channels (continued)
Press ENTER.
7
Repeat steps 6 and 7 for other channels.
8
To unlock channels
Select CH LOCK in the SET UP menu,
1
then press
Press until “PASSWORD” is
2
highlighted, and enter the 4-digit code
used to lock out the channels with the
Number buttons (0-9).
or to select “Clear.”
SET UP C.CAPTIONAUDIO PREMIUM SBSPICTURE PREFERENCE
CH LOCK
SET /C LEAR
W
ORD
PASS
CH INPUT
LOCKE D
CH 000015
TV
CABLE
CH LOCK
SET /C LEAR
W
ORD
CH INPUT
LOCKE D
CH 0 3 0 2 4 15
TV
CABLE
CH LOCK
SET /C LEAR
W
ORD
CH INPUT
LOCKE D
CH 0 3 0 24 1 5
TV
CABLE
000
SET UP C.CAPTIONAUDIO PREMIUM SBSPICTURE PREFERENCE
0000
SET UP C.CAPTIONAUDIO PREMIUM SBSPICTURE PREFERENCE
0000
Set Clear
1234
15
To enter push 0-9
To set push ENTER
To end push EXIT
Set Clear
----PASS
To enter push 0-9
To set push ENTER
To end push EXIT
Set Clear
1234PASS
To enter push 0-9
To set push ENTER
To end push EXIT
CH
CH
ADVANCED OPERATION
CH
Press ENTER.
3
CH LOCK
SET /C LEAR
CH INPUT
LOCKE D
TV
CABLE
If a wrong code has been entered
These messages appear. Try to enter the
correct code again.
W
RONG PAS SWORD
ENT ER CORRECT ONE
If you want to know the channels you have locked out
Call up the CH LOCK menu.
SET UP C.CAPTIONAUDIO PREMIUM SBSPICTURE PREFERENCE
W
ORD
CH 0 0 0 0
Set Clear
1234PASS
To enter push 0-9
To set push ENTER
To end push EXIT
CH
0000
41
Page 42

CHAPTER 4 ADVANCED OPERATION
Labeling Channels
• This feature allows you to enter a 4 letter channel identifier of your choice that will
appear over the channel number display. The label can be anything you want
(for example the station call letters).
• The label you set will appear when you turn the TV on, select a channel, or press the RECALL
button.
To program channel labels
TV
CABLE
VCR
123
456
789
100
FAVORITE
ADVANCED OPERATION
FAV
PREVIEW
STOP SOURCE
LIGHT
MUTE
0
ADV/
PIP CH
MENU/
ENTER
ADV/
PIP CH
RECALL
TV/VIDEO
CH RTN
ENT
PLAY PIP
POWER
TIMER
CH
VOL
STROBE
EXIT
FAV
Press MENU, then press or until
1
the SET UP menu appears.
Example: To assign “ABCD” to channel 4.
Press (or ) until “CH LABEL” is
2
highlighted.
Press or to display the CH LABEL
3
menu.
“SET/CLEAR” will be highlighted.
Press or to select “Set.”
4
Press until “CH INPUT” is highlighted,
5
and select the channel you want to label
with the Channel Number buttons.
SET UP C.CAPTIONAUDIO PREMIUM SBS
PICTURE
L ANGUAGE
TV /CABLE
CH PROGRAM
ADD/ ERASE
ANT 1 / 2
T IMER / CLOCK
SET UP C.CAPTIONAUDIO PREMIUM SBS
PICTURE PREFERENCE
CH L OCK
CH L ABEL
FAVORITE CH1
FAVORITE CH2
RESET
SET UP C.CAPTIONAUDIO PREMIUM SBSPICTURE PREFERENCE
CH L ABEL
SET /C LEAR
CH INPUT
LABEL
SET UP C.CAPTIONAUDIO PREMIUM SBSPICTURE PREFERENCE
CH L ABEL
SET /C LEAR
CH INPUT 4 CH
L ABEL
English
TV
START
PUSH
Add
ANT2
START
PUSH
START
PUSH
START
PUSH
START
PUSH
START
PUSH
START
PUSH
PREFERENCE
To end push EXIT
To end push EXIT
Set Clear
----
To enter push 0-9
To clear push ENTER
To end push EXIT
Set Clear
----
CH
42
REC TV/VCR REW FF
STILL LOCATE SWAP
Press until “LABEL” is highlighted.
6
To enter push 0-9
To clear push ENTER
To end push EXIT
SET UP C.CAPTIONAUDIO PREMIUM SBSPICTURE PREFERENCE
CH L ABEL
SET /C LEAR
CH INPUT 4 CH
L ABEL
Set Clear
----
To enter push
To clear push ENTER
To end push EXIT
Page 43

To program channel labels (continued)
Press or to select the first character
7
for the label, then press ENTER.
Letters of the alphabet, numbers and
other graphic symbols are available for
labeling.
Each time you press the
or button,
the displayed character will change in
the following order.
button → – → 0 --→ 9 → A --→ Z → [] → +
button → – → + → [] → Z --→ A → 9 --→ 0
Repeat step 7 to enter the second, third
8
and fourth characters.
To label another channel, repeat steps 5
9
through 8. You can label 32 channels.
To clear the channel label
SET UP C.CAPTIONAUDIO PREMIUM SBSPICTURE PREFERENCE
CH L ABEL
SET /C LEAR
CH INPUT 04CH
L ABEL
blank
↓
SET UP C.CAPTIONAUDIO PREMIUM SBSPICTURE PREFERENCE
CH L ABEL
SET /C LEAR
CH INPUT 04CH
L ABEL
Set Clear
A---
To enter push
To clear push ENTER
To end push EXIT
Set Clear
ABCD
To enter push
To clear push ENTER
To end push EXIT
ADVANCED OPERATION
Select CH LABEL in the SET UP menu.
1
Press or to select “Clear.”
2
Press until “CH INPUT” is highlighted,
3
then select the channel you want to clear
with the Channel Number buttons.
Press ENTER.
4
Repeat steps 3 and 4 for other channels.
5
SET UP C.CAPTIONAUDIO PREMIUM SBSPICTURE PREFERENCE
CH L ABEL
SET /C LEAR
CH INPUT
L ABEL
SET UP C.CAPTIONAUDIO PREMIUM SBSPICTURE PREFERENCE
CH L ABEL
SET /C LEAR
CH INPUT 4 CH
L ABEL
Set Clear
To enter push 0-9
To clear push ENTER
To end push EXIT
Set Clear
To enter push 0-9
Toclearpush ENTER
To end push EXIT
CH
43
Page 44

CHAPTER 4 ADVANCED OPERATION
Programming Your Favorite Channels
• The Favorite Channel Programming feature allows you to program up to 9 of your favorite
channels each for “FAVORITE CH 1” and “FAVORITE CH 2” mode. Program your favorite channels
for these modes separately.
To program your favorite channels
TV
CABLE
VCR
123
456
789
100
FAVORITE
ADVANCED OPERATION
FAV
PREVIEW
STOP SOURCE
REC TV/VCR REW FF
POWER
RECALL
LIGHT
TV/VIDEO
MUTE
0
PIP CH
MENU/
ENTER
PIP CH
STILL LOCATE SWAP
ADV/
ADV/
CH RTN
ENT
TIMER
CH
VOL
STROBE
EXIT
PLAY PIP
FAV
Press MENU, then press or until
1
the SET UP menu appears.
Press (or ) until “FAVORITE CH1”
2
or “FAVORITE CH2” is highlighted.
FAVORITE CH1
FAVORITE CH2
Press or to display the FAVORITE
3
CH1 menu for example.
“SET/CLEAR” will be highlighted.
SET UP C.CAPTIONAUDIO PREMIUM SBS
PICTURE
L ANGUAGE
TV /CABLE
CH PROGRAM
ADD/ ERASE
ANT 1 / 2
T IMER / CLOCK
SET UP C.CAPTIONAUDIO PREMIUM SBS
PICTURE PREFERENCE
CH LOCK
CH L ABEL
FAVORITE CH1
FAVORITE CH2
RESET
SET UP C.CAPTIONAUDIO PREMIUM SBS
PICTURE PREFERENCE
CH L OCK
CH L ABEL
FAVORITE CH1
FAVORITE CH2
RESET
SET UP C.CAPTIONAUDIO PREMIUM SBSPICTURE PREFERENCE
FA VOR I TE CH1
SET/ CLEAR
CH INPUT
SET UP
CH 0 0 0
TV
CABLE
PREFERENCE
English
TV
START
PUSH
Add
ANT2
START
PUSH
To end push EXIT
START
PUSH
START
PUSH
START
PUSH
START
PUSH
START
PUSH
To end push EXIT
START
PUSH
START
PUSH
START
PUSH
START
PUSH
START
PUSH
To end push EXIT
Set Clear
000
000
To enter push 0-9
To set push ENTER
To end push EXIT
CH
44
Press or to select “Set.”
4
Press until “CH INPUT” is highlighted,
5
then press the Channel Number buttons
to enter the channel number.
SET UP C.CAPTIONAUDIO PREMIUM SBS
PICTURE PREFERENCE
FA VOR I TE CH1
SET /C LEAR
CH INPUT
SET UP
CH 0 0 0
TV
CABLE
Set Clear
000
000
To enter push 0-9
To set push ENTER
To end push EXIT
7 CH
Page 45

To program your favorite channels (continued)
Press ENTER.
6
FA VOR I TE CH1
SET /C LEAR
CH INPUT
SET UP
CH 0 0 0
TV
CABLE
Repeat steps 5 and 6 for other channels.
7
To scan your favorite channels in order one by one
Press FAV
To scan your favorite channels with a 9-picture multi-window
Press FAVORITE. (See page 38 for details.)
To clear the channels you have programmed
Select “FAVORITE CH1” or “FAVORITE
1
CH2” in the SET UP menu.
Example: FAVORITE CH2
.
FA VOR I TE CH2
SET /C LEAR
CH INPUT
SET UP
CH 0 0 0
TV
CABLE
SET UP C.CAPTIONAUDIO PREMIUM SBSPICTURE PREFERENCE
Set Clear
700
000
SET UP C.CAPTIONAUDIO PREMIUM SBSPICTURE PREFERENCE
71118
000
07CH
To enter push 0-9
To set push ENTER
To end push EXIT
Set Clear
To enter push 0-9
To set push ENTER
To end push EXIT
CH
Note:
The FAV
and FAVORITE buttons will
activate only after you have programmed
your favorite channels.
ADVANCED OPERATION
Press or to select “Clear.”
2
Press ENTER.
3
All the favorite channels you have
programmed are cleared.
SET UP C.CAPTIONAUDIO PREMIUM SBSPICTURE PREFERENCE
FA VOR I TE CH2
SET /C LEAR
CH INPUT
SET UP
CH 0 0 0
TV
CABLE
SET UP C.CAPTIONAUDIO PREMIUM SBSPICTURE PREFERENCE
FA VOR I TE CH2
SET /C LEAR
CH INPUT
SET UP
CH
TV
CABLE
Set Clear
To enter push 0-9
To set push ENTER
To end push EXIT
Set Clear
To enter push 0-9
To set push ENTER
To end push EXIT
CH
CH
71118
000
000
000
000
45
Page 46

CHAPTER 4 ADVANCED OPERATION
Flesh Tone/Noise Reduction
To activate the Flesh Tone and Noise Reduction Functions
ENTER
MENU
ANT/VIDEO
TV
CABLE
VCR
DEMO
123
456
789
100
ADVANCED OPERATION
FAVORITE
FAV
VOLUME CHANNEL
POWER
RECALL
LIGHT
TIMER
TV/VIDEO
MUTE
CH
VOL
CH RTN
0
ENT
ADV/
STROBE
PIP CH
MENU/
ENTER
FAV
Flesh Tone Function
This function allows you to obtain natural flesh tones by correcting the
difference of tint between TV stations.
Press MENU, then press or until
1
the PICTURE menu appears.
Press (or ) until “FLESH TONE” is
2
highlighted.
SET UP C.CAPTIONAUDIO PREMIUM SBS
PICTURE
CONTRAST
BR I GHTNE SS
COLOR
TINT
SHARPNE SS
SET UP C.CAPTIONAUDIO PREMIUM SBS
PICTURE PREFERENCE
FL ESH TONE
NOI SE REDUCT I ON
CONVERGENCE
PREFERENCE
To end push EXIT
START
PUSH
On Off
On
Press or to select “On.”
3
To end push EXIT
Noise Reduction Function
This function allows you to reduce visible interference in your TV picture.
This is useful when receiving a broadcast with a weak signal or playing
back a video cassette or disc damaged by repeated use.
46
PREVIEW
ADV/
PIP CH
STOP SOURCE
REC TV/VCR REW FF
PLAY PIP
STILL LOCATE SWAP
EXIT
Press MENU, then press
1
the PICTURE menu appears.
Press (or ) until “NOISE
2
REDUCTION” is highlighted.
Press or to select “On.”
3
To deactivate these functions
Select “Off” in step 3 above.
or until
SET UP C.CAPTIONAUDIO PREMIUM SBSPICTURE
CONTRAST
BR IGHTNESS
COLOR
TINT
SHARPNE SS
SET UP C.CAPTIONAUDIO PREMIUM SBSPICTURE PREFERENCE
FL ESH TONE
NOISE REDUCTION
CONVE RGE NCE
PREFERENCE
To end push EXIT
OnOnOff
START
PUSH
To end push EXIT
Page 47

CHAPTER 4 ADVANCED OPERATION
Displaying XDS Information
To display XDS information
DEMO
ENTER
ANT/VIDEO
MENU
TV
CABLE
VCR
123
456
789
100
FAVORITE
FAV
PREVIEW
STOP SOURCE
REC TV/VCR REW FF
VOLUME CHANNEL
POWER
RECALL
LIGHT
TIMER
TV/VIDEO
MUTE
CH
VOL
CH RTN
0
ENT
ADV/
STROBE
PIP CH
MENU/
ENTER
ADV/
PIP CH
STILL LOCATE SWAP
FAV
EXIT
PLAY PIP
Select the desired program.
1
Press MENU, then press or until
2
the CLOSED CAPTION menu appears.
Press or until “XDS” is highlighted.
3
Press or to display the
4
following XDS (eXtended Data
Service) information for about 30
seconds.
• Network name 1
• Call letters 2
• Program name 3
• Program type 4
• Program length 5
• Elapsed time in show 6
• Program description 7
Some of the above information may not be displayed.
1
3
5
4
7
SET UP C.CAPTIONAUDIO PREMIUM SBS
PICTURE
XDS
CLOSED
CAPT I ON
SET UP C.CAPTIONAUDIO PREMIUM SBS
PICTURE PREFERENCE
XDS
CLOSED
CAPT I ON
PBS
SESAME STREET
Education
00 : 4 5
XDS ON
An educ at i on pr ogr am f or
school ch i ldr en teach ing the
al phabe t and numer a ls
START
PUSH
Off
START
PUSH
Off
PREFERENCE
To end push EXIT
To end push EXIT
W
00 : 1 2
GBH
2
6
ADVANCED OPERATION
To close the XDS display
Press EXIT.
If the TV program you are watching does not
include XDS information
Only “XDS ON” will be displayed for about 4
seconds when you select the XDS mode.
XDS ON
47
Page 48

CHAPTER 4 ADVANCED OPERATION
Operating the Closed Captioning Feature
To display Closed Captioning
To view captions
Closed captioning is a printed version of the dialogue, narration, and/or
sound effects of a TV program. Captions will appear at either the top or
bottom of the screen during captioned broadcasts as shown. Captioning
is especially helpful for hearing impaired individuals.
Giant pandas eat leaves.
Select the desired program.
1
ENTER
MENU
ANT/VIDEO
TV
CABLE
VCR
DEMO
123
456
ADVANCED OPERATION
789
100
FAVORITE
FAV
PREVIEW
STOP SOURCE
REC TV/VCR REW FF
VOLUME CHANNEL
POWER
RECALL
LIGHT
TIMER
TV/VIDEO
MUTE
CH
VOL
CH RTN
0
ENT
ADV/
STROBE
PIP CH
MENU/
ENTER
ADV/
PIP CH
STILL LOCATE SWAP
EXIT
PLAY PIP
FAV
Press MENU, then press or until
SET UP C.CAPTIONAUDIO PREMIUM SBS
2
the CLOSED CAPTION menu appears.
Press or until “CLOSED CAPTION”
3
is highlighted.
PICTURE
PICTURE
XDS
CLOSED
CAPT I ON
SET UP C.CAPTIONAUDIO PREMIUM SBS
XDS
CLOSED
CAPT I ON
START
PUSH
START
Press or to select the caption you want — C1 (Caption 1), C2
4
(Caption 2), C3 (Caption 3), or C4 (Caption 4).
Select “C1” for a transcription of the primary language in your area.
To deactivate this function
Select “Off” in step 4 above.
Note:
A closed-captioned signal may not be decoded in the following
situations.
• When a video tape has been dubbed.
• When the signal reception is weak.
• When the signal reception is non-standard.
Off
PUSH
C1
C4
T3
PREFERENCE
To end push EXIT
PREFERENCE
C2
T1
T4
To end push EXIT
C3
T2
Off
48
Page 49

To display text information
DEMO
WORLD WEATHER
Temps Current
F C Weather
LONDON 51 11
MENU
MOSCOW
PARIS
ROME
TOKYO
ENTER
ANT/VIDEO
TV
CABLE
VCR
57 14
53 12
66 19
65 18
VOLUME CHANNEL
RECALL
LIGHT
TV/VIDEO
MUTE
123
456
789
CH RTN
0
100
ADV/
PIP CH
FAVORITE
ENT
POWER
TIMER
CH
VOL
STROBE
Clear
Cloudy
Clear
Cloudy
Rain
To view text
Text is information presented using all of the television screen. It is
usually not related to the current program.
For example, it could be a listing of closed captioned programs, news,
weather information, or stock market reports.
Select the desired program.
1
Press MENU, then press or until
2
the CLOSED CAPTION menu appears.
Press or until “CLOSED CAPTION”
3
is highlighted.
Press or to select the text you want
4
T1 (Text 1), T2 (Text 2), T3 (Text 3), or T4
(Text 4).
PICTURE
SET UP C.CAPTIONAUDIO PREMIUM SBS
XDS
CLOSED
CAPT I ON
SET UP C.CAPTIONAUDIO PREMIUM SBSPICTURE
XDS
CLOSED
CAPT I ON
START
PUSH
Off
START
PUSH
C1
C4
T3
PREFERENCE
To end push EXIT
PREFERENCE
C2
T1
T4
To end push EXIT
C3
T2
Off
ADVANCED OPERATION
FAV
STOP SOURCE
MENU/
ENTER
PREVIEW
ADV/
PIP CH
REC TV/VCR REW FF
STILL LOCATE SWAP
PLAY PIP
FAV
To deactivate this function
Select “Off” in step 4 above.
EXIT
Note:
When you select a caption format channel and the Text mode, the Text
screen will always be displayed.
However, if Text character signals are not transmitted, the characters will
not be displayed.
49
Page 50

CHAPTER 4 ADVANCED OPERATION
Changing the On-screen
Display Language
• You can choose from three different languages (English, French and Spanish) for the on-screen
displays (adjustment menus and messages).
To select a language for the on-screen displays
ENTER
MENU
ANT/VIDEO
TV
CABLE
VCR
DEMO
123
456
789
100
ADVANCED OPERATION
FAVORITE
FAV
PREVIEW
STOP SOURCE
VOLUME CHANNEL
POWER
RECALL
LIGHT
TV/VIDEO
MUTE
0
PIP CH
MENU/
ENTER
PIP CH
ADV/
ADV/
CH RTN
ENT
PLAY PIP
TIMER
CH
VOL
STROBE
FAV
EXIT
Press MENU, then press
1
the SET UP menu appears.
or until
Press (or ) until “LANGUAGE” is
2
highlighted.
Press or to select the language you
3
want.
“English”
SET UP C.CAPTIONAUDIO PREMIUM SBS
PICTURE
L ANGUAGE
TV /CABLE
CH PROGRAM
ADD/ ERASE
ANT 1 / 2
T IMER / CLOCK
SET UP C.CAPTIONAUDIO PREMIUM SBSPICTURE
L ANGUAGE
TV /CABLE
CH PROGRAM
ADD/ ERASE
ANT1 / 2
T IMER / CLOCK
REGLAGE S.TITRAGEAUDIO PREMIUM SBSIMAGE
L ANGUE
TV /CABLE
PROG CAN
ADD / EFF
ANT 1 / 2
T IMER / CLOCK
SET UP C.CAPTIONAUDIO PREMIUM SBSPICTURE
L ANGUAGE
TV /CABLE
CH PROGRAM
ADD/ ERASE
ANT1 / 2
T IMER / CLOCK
English
TV
START
PUSH
Add
ANT2
START
PUSH
English
TV
START
PUSH
Add
ANT2
START
PUSH
English
Cable
SUIVANT
APPDYEZ
AddCan
ANT2
START
PUSH
English
TV
START
PUSH
Add
ANT2
START
PUSH
PREFERENCE
To end push EXIT
PREFERENCE
Francais
To end push EXIT
PREFERENCE
Francais
To end push EXIT
PREFERENCE
Francais
Espanol
Espanol
Espanol
50
REC TV/VCR REW FF
STILL LOCATE SWAP
“French”
“Spanish”
REGLAGE S.TITRAGEAUDIO PREMIUM SBSIMAGE
L ANGUE
TV /CABLE
PROG CAN
ADD / EFF
ANT 1 / 2
T IMER / CLOCK
COLOCAR C.CERRADOAUDIO PREMIUM SBSIMAGEN
IDI OMA
TV / CABLE
CAN P ROGRAMA
ANAD / BORRADO
ANT 1 / 2
T IMER / CLOCK
English
Cable
SUIVANT
APPDYEZ
AddCan
ANT2
START
PUSH
English
Cable
SIGUIENTE
APRETAR
Anadido
ANT2
START
PUSH
To end push EXIT
PREFERENCE
Francais
To end push EXIT
PREFERENCIA
Francais
To end push EXIT
Espanol
Espanol
Page 51

CHAPTER 5 CONNECTING OTHER EQUIPMENT
Connecting External Equipment
To connect video/audio equipment
VCR
VCR
Laser Disc Player
DVD video player
Stereo system
Notes:
• Refer also to the owner’s manual of the equipment to be connected.
• When connecting other equipment to the TV, first turn off all main power switches.
Video camera, etc.
CONNECTING OTHER
EQUIPMENT
51
Page 52

CHAPTER 5 CONNECTING OTHER EQUIPMENT
Connecting External
Equipment
Monitor panel
TV front
(continued)
Behind the door
Illustrations represent TP55H60.
IN–VIDEO 3
VIDEO
AUDIO
L/MONO R
VIDEO/AUDIO INPUT jacks (VIDEO 3)
CONNECTING OTHER
EQUIPMENT
TV rear
ANT( 75
VIDEO 1 IN jacks
)
ANT-1
OUT
ANT-2
VIDEO 2 IN jacks
S-VIDEO
VIDEO
L/
MONO
AUDIO
R
VIDEO-1 VIDEO-2
IN
COLOR
STREAM
INPUT
DVD IN
CB
CR
COLOR STREAM
INPUT jacks
AUDIO CENTER
CHANNEL IN jack
AUDIO CENTER
CHANNEL IN
ON OFF
OUT
VAR
RL
AUDIO
AUDIO
VIDEO
L/
L
MONO
AUDIO
R
R
OUT
Y
VIDEO/AUDIO
OUT jacks
VARIABLE
AUDIO
OUT jacks
52
Page 53

To connect a standard VCR
Connect the VIDEO 1 or VIDEO 2 IN jacks on the rear panel of the TV to the video/audio output jacks of the VCR, Laser
Disc Player, etc. for playback of video recordings.
Antenna/Cable TV
See pages 9 - 10 for details on
Antenna/Cable TV connections.
Antenna
input
Audio
outputs
Antenna
output
Video
output
VCR
Video cable (Not supplied)
Audio cable (Not supplied)
To select the video input source
Press TV/VIDEO on the Remote Control (or ANT/VIDEO
on the TV) repeatedly to select the appropriate source.
Each time you press the button, the TV, VIDEO 1, VIDEO
2, VIDEO 3, or COLOR STREAM source will be selected
in order.
Select “VIDEO 1” in this example.
The selected source will be displayed in purple.
TV
V IDEO 1
V IDEO 2
V IDEO 3
TO SEL ECT PUSH TV / V IDEO
COLOR STREAM
TV rear
AUDIO CENTER
CHANNEL IN
)
ANT( 75
ANT-1
OUT
ANT-2
S-VIDEO
VIDEO
L/
MONO
AUDIO
R
VIDEO-1 VIDEO-2
IN
COLOR
STREAM
INPUT
DVD IN
Y
CB
CR
ON OFF
OUT
VAR
RL
AUDIO
VIDEO
L/
L
MONO
AUDIO
R
R
AUDIO
OUT
Note on the VIDEO 2 IN jacks
The VIDEO 2 IN jacks can also be used for connecting a
second piece of video equipment with video/audio
outputs.
To view signals from equipment connected to the VIDEO
2 IN jacks, select “VIDEO 2.”
Note on the VIDEO 3 INPUT jacks
The VIDEO 3 INPUT jacks on the TV front panel are
convenient for connecting portable video/audio
equipment.
To view signals from equipment connected to the VIDEO
3 INPUT jacks, select “VIDEO 3.”
Note:
If you connect a monaural VCR, connect the audio
output of the VCR to the L/MONO jack.
CONNECTING OTHER
EQUIPMENT
53
Page 54

CHAPTER 5 CONNECTING OTHER EQUIPMENT
CHANNEL IN
ON OFF
OUT
RL
VAR
AUDIO
OUT
VIDEO
L/
MONO
AUDIO
R
IN
DVD IN
L
R
CR
CB
Y
L/
MONO
AUDIO
S-VIDEO
VIDEO
R
ANT( 75
)
ANT-1
OUT
ANT-2
AUDIO CENTER
VIDEO-1 VIDEO-2
COLOR
STREAM
INPUT
AUDIO
Connecting External
Equipment
(continued)
To connect a VCR with an S-video jack
If you connect a VCR with an S-video jack to the “S-VIDEO” jack on the back of the TV, you must also connect the
audio cables to the “VIDEO 1 IN” AUDIO jacks. The S-video cable supplies video signals only.
Antenna/Cable TV
Antenna
input
Audio
outputs
Antenna
output
S-video
output
See pages 9 - 10 for details on
Antenna/Cable TV connections.
TV rear
VCR
To select the video input source
Turn on the TV and the VCR.
1
Press TV/VIDEO on the Remote Control (or ANT/
2
CONNECTING OTHER
EQUIPMENT
VIDEO on the TV) to select “VIDEO 1” in this
example.
Operate your VCR normally.
3
54
S-video cable (Not supplied)
Audio cable (Not supplied)
TV
V IDEO 1
V IDEO 2
V IDEO 3
TO SEL ECT PUSH TV / V IDEO
COLOR STREAM
Notes on the VIDEO 2 IN jacks
The VIDEO 2 IN jacks can also be used for connecting a
second piece of video equipment with S-video out.
To view signals from equipment connected to the VIDEO
2 IN jacks, select “VIDEO 2”.
Notes:
• When the S-video cable is connected to the S-VIDEO
IN jack, the video cable (phono-type) should not be
connected.
• The S-VIDEO jack accepts SEPARATED Luminance/
Chrominance (Y/C) signals conforming to the NTSC
standard.
Page 55

To dub/edit video tapes using two VCRs
To connect equipment for dubbing/editing
Connect the output jacks of the playback VCR to the input jacks (VIDEO 1, VIDEO 2 or VIDEO 3) on the TV.
1
Connect the output jacks (VIDEO/AUDIO OUT) on the TV to the input jacks of the recording VCR.
2
TV rear
OUT
VAR
RL
AUDIO
VIDEO
L/
L
MONO
AUDIO
R
R
OUT
Video
output
Audio
outputs
S-VIDEO
VIDEO
L/
MONO
AUDIO
R
VIDEO-1 VIDEO-2
IN
CB
CR
COLOR
STREAM
INPUT
DVD IN
Y
AUDIO
Playback VCR Recording VCR
Note:
Do not connect one VCR to the output and input jacks on the TV at the same time.
To monitor dubbing/editing
Turn on the TV and both VCRs.
1
Press TV/VIDEO on the Remote Control (or ANT/
2
VIDEO on the TV) to select the input source of the
playback VCR.
Set the recording VCR to record mode and the
3
playback VCR to play.
You can view the video signal from the playback
4
VCR on the TV screen while dubbing it onto the
recording VCR.
CAUTION:
The unauthorized recording of television programs,
video tapes and other materials may infringe upon the
provisions of the copyright laws.
Notes:
• The input switch of the VCR is normally in the TV
position. Change the switch of the recording VCR to
the LINE or CAMERA position when using the video/
audio inputs of the VCR as above. Some VCRs
automatically switch when cables are plugged into the
video/audio inputs.
• The PIP picture cannot be output through the VIDEO
OUTPUT.
Audio
inputs
Video
input
CONNECTING OTHER
EQUIPMENT
55
Page 56

CHAPTER 5 CONNECTING OTHER EQUIPMENT
Connecting External
Equipment
(continued)
To connect a DVD video player with ColorStream™ (Color Difference) VIDEO OUTPUT
This connection allows you to view pictures from a DVD video player, an advanced video/audio device.
TV rear
COLOR
STREAM
INPUT
DVD IN
Y
CB
CR
AUDIO CENTER
CHANNEL IN
ON OFF
OUT
VAR
RL
AUDIO
VIDEO
L/
L
MONO
AUDIO
R
R
AUDIO
OUT
Audio
outputs
DVD video player
Y/CB/CR
outputs
Video cables (not supplied)
Y cable
ANT( 75
)
ANT-1
OUT
ANT-2
S-VIDEO
VIDEO
L/
MONO
AUDIO
R
VIDEO-1 VIDEO-2
IN
To select the video input source
Turn on the TV and the DVD video player.
1
Press TV/VIDEO on the Remote Control (or ANT/
2
CONNECTING OTHER
EQUIPMENT
VIDEO on the TV) to select “COLOR STREAM”.
CB cable
CR cable
Audio cable (not supplied)
TV
V IDEO 1
V IDEO 2
V IDEO 3
TO SEL ECT PUSH TV / V IDEO
COLOR STREAM
Note:
While the PIP or Multi-Window is on the screen,
“COLOR STREAM” will be skipped.
When the Color Stream input is selected, the VIDEO
OUT signal will not have color. To receive a color
VIDEO OUT signal, A VIDEO or S-VIDEO input must be
used instead of the Color Stream connection.
56
Operate your DVD video player normally.
3
Page 57

To connect a video camera
This connection allows you to view pictures from a video camera.
Connect the audio/video cable to the IN-VIDEO 3 jacks.
Video camera
Audio/Video
outputs
Audio/Video cable (not supplied)
Usually supplied
()
with the video camera
To select the video input source
Video plug
L
R
Audio plugs
TV front
IN–VIDEO 3
VIDEO
L/MONO R
AUDIO
To operate your video camera properly, see the
instructions supplied with the connected video camera.
Turn on the TV and the video camera.
1
Press TV/VIDEO on the Remote Control (or ANT/
2
VIDEO on the TV) to select “VIDEO 3.”
TV
V IDEO 1
V IDEO 2
V IDEO 3
TO SEL ECT PUSH TV / V IDEO
Operate your video camera normally.
COLOR STREAM
3
Notes:
• If you connect a monaural video camera, connect the
audio output to the L/MONO jack.
• If you have a video camera with an S-video jack, the
VIDEO 1 or VIDEO 2 IN jacks at the rear of the TV can
also be used.
CONNECTING OTHER
EQUIPMENT
57
Page 58

CHAPTER 5 CONNECTING OTHER EQUIPMENT
Connecting External
Equipment
(continued)
To connect an audio amplifier
Connect the VARIABLE AUDIO OUT jacks to the auxiliary input jacks on the stereo amplifier. You can control the audio
signal going to the audio equipment using the Remote Control for this TV.
TV rear
S-VIDEO
CB
CR
COLOR
STREAM
INPUT
DVD IN
Y
VIDEO
L/
MONO
AUDIO
R
VIDEO-1 VIDEO-2
IN
* The “fixed level” AUDIO OUT jacks are also available for connecting to an audio cassette recorder (or amplifier) to
record audio from the TV. This constant audio signal is not affected by pressing the VOLUME buttons on the TV or
the TV’s Remote Control.
OUT
VAR
RL
AUDIO
VIDEO
L/
L
MONO
AUDIO
R
R
AUDIO
OUT
Audio Cable
(not supplied)
Fixed level AUDIO OUT*
AUX. input
Stereo amplifier
To turn off the built-in speakers
Press MENU, then press
1
2
CONNECTING OTHER
EQUIPMENT
3
or until the AUDIO
menu appears.
Press or until
“SPEAKERS” is
highlighted.
Press or to select
“Off.”
MTS
BASS
TREBLE
BAL ANCE
SPEAKERS
MTS
BASS
TREBLE
BAL ANCE
SPEAKERS
MTS
BASS
TREBLE
BAL ANCE
SPEAKERS
SET UP C.CAPTIONAUDIO PREMIUM SBSPICTURE
PREFERENCE
STR
To turn on the built-in speakers
Select “On” in step 3.
Note:
On
To end push EXIT
SET UP C.CAPTIONAUDIO PREMIUM SBSPICTURE
SET UP C.CAPTIONAUDIO PREMIUM SBSPICTURE
STR
On
STR
On
PREFERENCE
Off
To end push EXIT
PREFERENCE
Off
To end push EXIT
Make sure the volume control of your stereo amplifier is
set to a moderate listening level.
58
Page 59

• If you use a system that delivers Dolby Pro Logic* surround sound, you will probably want to use
the TV speakers as center channel speakers.
A center channel speaker adds to the realism of a surround sound system such as Dolby Pro Logic.
To connect an A/V receiver
CAUTION
Make sure the TV is turned off before connecting or disconnecting an audio cable to the AUDIO CENTER CHANNEL IN
jack.
VideoAudio
VCR LDP
Video
Audio
To A/V receiver
Left
speaker
Surround
speaker L
A/ V receiver
Video
Audio
T V
TV
Audio
center
Surround
speaker R
channel
Right
speaker
ANT( 75
)
ANT-1
OUT
ANT-2
Video
out
S-VIDEO
VIDEO
AUDIO
L/
MONO
R
TV in
VIDEO-1 VIDEO-2
IN
ON OFF
COLOR
STREAM
INPUT
DVD IN
Y
CB
CR
AUDIO
Center
out
AUDIO CENTER
CHANNEL IN
ON OFF
OUT
VAR
RL
AUDIO
VIDEO
L/
L
MONO
AUDIO
R
R
OUT
CONNECTING OTHER
EQUIPMENT
Notes:
• Refer to the instructions furnished with the connected
equipment.
• When the AUDIO CENTER CHANNEL ON/OFF switch
is in the “ON” position, the TV speakers will function
only as the center channel speakers.
• Adjust the volume for center channel speakers with
the center level control on the A/V receiver.
• If you use the TV speakers as normal speakers, set the
AUDIO CENTER CHANNEL ON/OFF switch to the
“OFF” position.
* “Dolby Pro Logic” is a trademark of Dolby
Laboratories Licensing Corporation.
59
Page 60

CHAPTER 6
ADDITIONAL REFERENCE
Specifications
TELEVISION SYSTEM NTSC standard
CHANNEL COVERAGE VHF: 2 through 13
UHF: 14 through 69
Cable TV: Mid band (A-8 through A-1, A through I)
Super band (J through W)
Hyper band (AA through ZZ, AAA, BBB)
Ultra band (65 through 94, 100 through 125)
POWER SOURCE 120 V AC, 60 Hz
POWER CONSUMPTION TP50H60: 178 W
TP55H60: 180 W
TP61H60: 180 W
AUDIO POWER 14 W + 14 W
SPEAKER TYPE Two 6-1/4 inches (16 cm) round
VIDEO/AUDIO TERMINALS S-VIDEO INPUT (VIDEO 1/VIDEO 2)
Y-INPUT: 1 V(p-p), 75 ohm, negative sync.
C-INPUT: 0.286 V(p-p) (burst signal), 75 ohm
VIDEO 1/VIDEO 2/VIDEO 3 INPUT
VIDEO: 1 V(p-p), 75 ohm, negative sync.
AUDIO: 150 mV(rms) (30% modulation equivalent, 47 kohm)
ColorStream™ (Color Difference) VIDEO/AUDIO INPUT
Y-INPUT: 1V(p-p), 75 ohm
Cr-INPUT: 0.7 V(p-p), 75 ohm
Cb-INPUT: 0.7 V(p-p), 75 ohm
AUDIO: 150 mV(rms), 47 kohm
VIDEO/AUDIO OUTPUT
VIDEO: 1 V(p-p), 75 ohm, negative sync.
AUDIO: 150 mV(rms) (30% modulation equivalent, 4.7 kohm)
VARIABLE AUDIO OUTPUT
0–350 mV(rms) (30% modulation equivalent, 4.7 kohm)
AUDIO CENTER CHANNEL INPUT
1 V(rms) (30% modulation equivalent, 10 kohm)
DIMENSIONS/MASS
TP50H60
TP55H60
TP61H60
SUPPLIED ACCESSORIES Remote Control with 2 size “AA” alkaline batteries
Design and specifications are subject to change without notice.
ADDITIONAL REFERENCE
Dimension (W/H/D) Mass
42-3/4 × 50-1/4 × 20-13/16 inches
(1,086 × 1,276 × 529 mm)
46-3/4 × 53-9/16 × 22-7/16 inches
(1,188 × 1,360 × 570 mm)
51-9/16 × 57-3/16 × 25-1/4 inches
(1,310 × 1,452 × 641 mm)
60
217 lbs
(98.4 kg)
250 lbs
(113 kg)
288 lbs
(131 kg)
Page 61

CHAPTER 6 ADDITIONAL REFERENCE
Before Calling Service Personnel
• Before calling service personnel, please check the following chart for the possible
cause of the problem you are experiencing.
Symptom
The TV does not turn on.
No picture, no sound
No sound, picture OK
Poor sound, picture OK
Poor picture, sound OK
Poor reception of broadcast channels
Solutions
• Make sure power cord is plugged in, then press
POWER.
• Check the batteries in the Remote Control. If the
batteries are dead, replace them with new ones.
• Check the antenna/cable connections.
• Maybe the sound is muted. Press VOLUME
• Maybe there is station trouble. Try another channel.
• Check that the SPEAKERS function in AUDIO menu
is properly set.
• Maybe there is station trouble or local interference
from an appliance. Try another channel.
• Check the antenna/cable connections.
• Maybe there is station trouble or local interference.
Try another channel.
• Adjust the picture quality.
• Try another channel.
• Check the antenna/cable connections.
• If using a VCR, check the TV/VCR switch.
.
Pages
20
13
7
26
58
28
14
Cannot receive UHF channels, VHF OK
Black box appears on the screen.
Cannot select a certain channel
Multiple images (ghosts)
Poor color or no color
No stereo or SAP sound from an MTS broadcast
The Remote Control does not operate.
• Make sure the TV/CABLE function is in “TV” mode.
• Captioning may be turned on.
• That channel may be locked out with the CH LOCK
function, or erased with the ADD/ERASE function.
• Maybe there is station trouble. Try another channel.
• Use a highly directional outdoor antenna.
• Maybe there is station trouble or local interference.
Try another channel.
• Adjust TINT and/or COLOR in the PICTURE menu.
• Check that the MTS function is properly set.
• Check that the TV/CABLE/VCR switch is properly set.
• Maybe something is between the Remote Control
and the sensor.
• Maybe batteries are dead. Try replacing batteries
with new ones.
22
48
40
23
28
31
12, 14
13
ADDITIONAL REFERENCE
61
Page 62

CHAPTER 6 ADDITIONAL REFERENCE
Limited United States Warranty
Toshiba America Consumer Products, Inc. (“TACP”) and Toshiba Hawaii Inc. (“THI”) make the following limited warranties. These
limited warranties extend to the original consumer purchaser or any person receiving this set as a gift from the original consumer
purchaser and to no other purchaser or transferee.
Limited One (1) Year Warranty
TACP and THI warrant this product and its parts against defects in
materials or workmanship for a period of one (1) year after the
date of original retail purchase. During this period, TACP and THI
will repair a defective product or part, without charge to you.
“Authorized TACP/THI service station personnel will come to your
home when warranty service is required. Depending on the type
of repair required, the service will either be performed in your
home or the set will be taken to the authorized TACP/THI service
station for repair and returned to your home at no cost to you.”
Limited Two (2) Year Warranty of Picture Tube
TACP and THI further warrant the picture tube in this product
against defects in materials or workmanship for a period of two (2)
years after the date of original retail purchase. During this period,
TACP and THI will replace a defective picture tube without charge
(1) year from the date of the original retail purchase, you pay labor
charges involved in the replacement.
Rental Units
The warranty for rental units begins with the first rental or thirty
(30) days from the date of shipment to the rental firm, whichever
comes first.
Commercial Units
Products sold and used for commercial use have a limited ninety
(90) day warranty for all parts, labor and picture tube.
Owner’s Manual and Demographic Card
You should read this owner’s manual thoroughly before operating
this product. You should complete and mail the enclosed
Demographic card within ten days after you., or the person who
has given you this product as a gift, purchased this product. This
is one way to enable TACP/THI to provide you with better customer
service and improved products. Failure to return the Demographic
card will not affect your rights under this warranty.
Your Responsibility
The above warranties are subject to the following conditions;
(1) You must retain your bill of sale or provide other proof of
purchase.
(2) All warranty servicing of this product must be made by an
Authorized TACP/THI Service Station.
(3) These warranties are effective only if the product is purchased
and operated in the U.S.A. or Puerto Rico.
(4) Labor service charges for set installation, set up, adjustment of
customer controls and installation or repair of antenna systems
are not covered by this warranty. Reception problems caused
by inadequate antenna systems are your responsibility.
(5) Warrant extend only to defects in materials or workmanship as
limited above and do not extend to any product or parts which
have been lost or discarded by you or to damage to products
or parts caused by misuse, accident, damage caused by Acts
of God, such as lightning or fluctuations in electric power,
improper installation, improper maintenance or use in violation
of instructions furnished by us; or to units which have had the
serial number removed, altered, defaced or rendered illegible.
How to Obtain Warranty Service
If after following all of the operating instructions in this manual and checking the section “BEFORE CALLING SERVICE
PERSONNEL,” you find that service is needed;.
(1) Call the TACP toll free number 1-800-631-3811 after you find a defective
product or part to find the nearest TOSHIBA Authorized Service Station.
(2) Please present your bill of sale or other proof to the Authorized Service
Station. “Authorized TACP/THI service station personnel will come to
your home when warranty service is required. Depending on the type of
repair required, the service will either be performed in your home or the
set will be taken to the TACP/THI Authorized service station for repair and
returned to your home at no cost to you.”
All warranties implied by state law, including the implied warranties of merchantability and fitness for a particular purpose, are expressly
limited to the duration of the limited warranties set forth above. With the exception of any warranties implied by state law as hereby limited,
the foregoing warranty is exclusive and in lieu of all other warranties, guarantees, agreements and similar obligations of manufacturer or
seller with respect to the repair or replacement of any parts. In no event shall TACP or THI be liable for consequential or incidental damages.
No person, agent, distributor, dealer or company is authorized to change, modify or extend the terms of these warranties in any manner
whatsoever. The time within which action must be commenced to enforce any obligation of TACP or THI arising under this warranty or under
any state, or law of the United States or any state thereof, is hereby limited to 90 days from the date you discover or should have discovered,
the defect. This limitation does not apply to implied warranties arising under state law.
This warranty gives you specific legal rights and you may also have other rights which may vary from state to state. Some states do not
allow limitation on how long an implied warranty lasts, when an action may be brought, or the exclusion or limitation of incidental or
consequential damages, so the above provisions may not apply to you.
In the Continental United States call:
Toll Free
1-800-631-3811
HAWAII
327 Kamakee Street, Honolulu, HI 96814 (808) 521-5377
ATTENTION CANADIAN CONSUMERS:
Canadian consumers are requested to complete the special Canadian “Warranty Registration Form” enclosed, and
ADDITIONAL REFERENCE
Products purchased in the U.S.A. and used in Canada are not covered by these warranties.
Products Purchased in Canada and used in the U.S.A. are not covered by these warranties.
62
forward this completed form with a copy of bill of sale to TOSHIBA OF CANADA to “Register and Validate” their
warranty.
Page 63

HEAD OFFICE/82 TOTOWA ROAD, WAYNE, NEW JERSEY 07470
HEAD OFFICE/327 KAMAKEE STREET, HONOLULU, HAWAII 96814, U.S.A. TEL: (808) 521-5377
HEAD OFFICE/191 McNABB STREET MARKHAM, ONTARIO L3R 8H2, CANADA TEL: (905) 470-5400
FACTORY SERVICE CENTERS/NORTHEAST: 82 TOTOWA ROAD, WAYNE, NEW JERSEY 07470
MIDWEST: 1010 JOHNSON DRIVE, BUFFALO GROVE. ILLINOIS 60089-6900
WEST: 5490 E. FRANCIS ST., ONTARIO, CA 91761
SOUTHWEST: 1421 CHAMPION DRIVE, SUITE 304 CARROLLTON, TEXAS 75006
SOUTHEAST: 6115 JIMMY CARTER BLVD., SUITE C2, NORCROSS, GA 30071-4607
SERVICE CENTERS/TORONTO: 191 McNABB STREET MARKHAM, ONTARIO L3R 8H2, CANADA TEL: (905) 470- 5400
MONTREAL: 1643, NORTH SERVICE RD., TRANS-CANADA HIGHWAY, DORVAL QUEBEC, H9P 1J1, CANADA
TEL: (514) 856-4100
VANCOUVER: 22171 FRASERWOOD WAY, RICHMOND, B.C. V6W 1J5, CANADA TEL: (604) 303-2500
MANUFACTURED BY
PRINTED IN USA
(98-05) 23563344
 Loading...