

Toshiba TP50H50 Owner’s Manual

TOSHIBA
Projection Television
OWNER'S MANUAL
TP5OH50
ColorStream TM
@ TOSHIBA CORPORATION, 1998

Dear Customer
Welcome to the high quality picture world created by the TOSHIBA Projection Color
Television. 13_._
---- I=* r. .... a , ...... _ • o ,
T .......... . vv...emp you u_e the "IV s many excltmng and useful features.
Before on_rp*_" 3 *.h_-.'_._, pl_8_elread all the safety and operating instructions in this manual
-- thoroughly, and k_e_D.L_ r_l for future reference.
Cu'- ' ,_G_LI-------,J
stomer _weetTra _,'i ,
yo. will _=-._;_- .... J_7_r _nd serial number on the back of the TV.
-- Record these p.rnh°_o ;.. t_j_'l_i_es provided below.
-- nur_r t'othem wheneveLYo_ €_aJ_gponyour TOSHIBA dealer regarding this product.
Model Number
Serial Number
Safety Precautions
WARNING:
TO REDUCE THE RISK OF FIRE OR ELECTRIC SHOCK, DO NOT EXPOSE
THIS APPLIANCE TO RAIN OR MOISTURE.
The lightning symbol in the triangle
| WARNING / /_
NEP/_ OU_tlR
WARNING: TO REDUCE THE RISK OF
ELECTRIC SHOCK, DO NOT REMOVE
COVER (OR BACK). NO USER-
SERVICEABLE PARTS INSIDE. REFER
SERVICING TO QUALIFIED SERVICE
PERSONNEL.
CAUTION:
As • safety feature, the AC plug has one prong wider than the other.
It will fit only one way into a standard electrica| outlet.
If the plug will not fit into the outlet, try turning it around.
If the plug will not fit either way. the outlet is probably old and
non-standard. You will need to have a new outlet installed by
an electrician.
DO NOT CHANGE THE SAFETY FEATURE OF THE PLUG.
tells you that the voltage inside this
product may be strong enough to
cause an electric shock.
DO NOT TRY TO SERVICETHIS
PRODUCT YOURSELF.
The exclamation point in the triangle
tells you that important operating and
maintenance instructions fo|low this
symbol.
Wide prong
\
CAUTION:
TO PREVENT ELECTRIC SHOCK, DO NOT USE THIS POLARIZED PLUG WITH AN EXTENSION CORD
RECEPTACLE OR OTHER OUTLET UNLESS THE PRONGS CAN RE FULLY INSERTED INTO THE OUTLET TO
PREVENT ANY EXPOSURE OF THE PRONGS OF THE POLARIZED PLUG.
NOTE TO CATV SYSTEM INSTALLERS IN THE USA:
This reminder is provided to call the CATV system instailer's attention to Article 820-40 of the NEC that
provides guidelines for proper grounding and, in particular, specifies that the cable ground shall be
connected to the grounding system of the building, as close to the point of cable entry as practical.
2

Table of Contents
INTRODUCTION
Care and Cleaning ........................................................ 4
Installation .................................................................... 5
To install the TV ....................................................... 5
Aotenna/Cable TV Connections ................................. 6
To connect a home antenna ................................... 6
To connect a Cable "iV ............................................. 7
To connect an Antenna/Cable TV and VCR ........... 8
Location of Controls ..................................................... 9
Front and Rear control views .................................. 9
Remote Control ...................................................... 10
Before Using the Remote Control ............................ 11
Introduction ano-battery installation .................... 11
Using the Remote with VCR or
Cable TV Converter ............................................... 12
VCR and CABLE function buttons ........................ 12
Programming the Remote Control ........................... 13
To program the Remote Control .......................... 13
Quick Reference Menu Guide .................................... 16
Menus and functions ............................................. 16
r;J_'_Xr-J'_FI GETTING STARTED
TV/CABLE and CH PROGRAM functions .............. 18
ADD/ERASE function ............................................. 19
I Programming Channel Memory ............................... 18
Aligning the colors ..................................................... 20
To align the colors ................................................. 20
113JI_FJ"_i'_RI BASIC OPERATION
Watching 1_/Programs .............................................. 22
To watch a TV program ......................................... 22
Convenient Remote Functions .................................. 23
To use On-screen displays/Sound muting/
Channel return .................................................. 23
Controlling the Picture ............................................... 24
To adjust the picture .............................................. 24
Controlling the Sound ............................................... 26
To adjust the sound ............................................... 26
Selecting Stereo and SAP Broadcasts ..................... 27
To listen to Stereo/SAP broadcasts...................... 27
ADVANCED OPERATION
Enhancing the Surround Sound Effect ..................... 28
To activate the Surround sound function ............ 28
Operating the Sub-Bass System ............................... 29
To operate the Sub-Bass System ......................... 29
Setting the OFF Timer and the Clock ....................... 30
To set the OFFtimer .............................................. 30
To set the clock ...................................................... 31
Watching Picture-in-Picture ...................................... 32
To di.splay a small picture ..................................... 32
To display a picture from an external source,..... 33
To use advanced functions ................................... 34
Displaying XDS Information ...................................... 35
To display XDS information ................................. 35
Operating the Closed Captioning Feature ............... 36
To display Closed Captioning ............................... 36
To display text information ................................... 37
Locking Channels ....................................................... 38
To lock out channels .............................................. 38
Labeling Channels ...................................................... 40
To program channel labels ................................... 40
Programming Your Favorite Channels ..................... 42
To program your favorite channels ..................... 42
To clear the channels you have programmed ..,. 43
Flesh Tone/Noise Reduction ..................................... 44
To activate the Flesh Tone and Noise Reduction
Functions ........................................................... 44
Changing the On-screen Display Language ............. 45
To select a language for the on-screen
displays .............................................................. 45
CONNECTING OTHER EQUIPMENT--
Connecting External Equipment .............................. 46
Monitor panel ......................................................... 46
To connect a standard VCR ................................... 47
To connect a VCR with an S-video jack ............... 48
To dub/edit video tapes using two VCRs ............. 49
To connect a DVD video player with Color
Stream TM (Color Difference) VIDEO OUTPUT .,. 50
To connect an audio amplifier .............................. 51
ADDITIONAL REFERENCE
Before Calling Service Personnel ............................. 53
I Specifications ............................................................. 52
Limited United States Warranty ............................... 54
3
I _ INTRODUCTION
Care and Cleaning
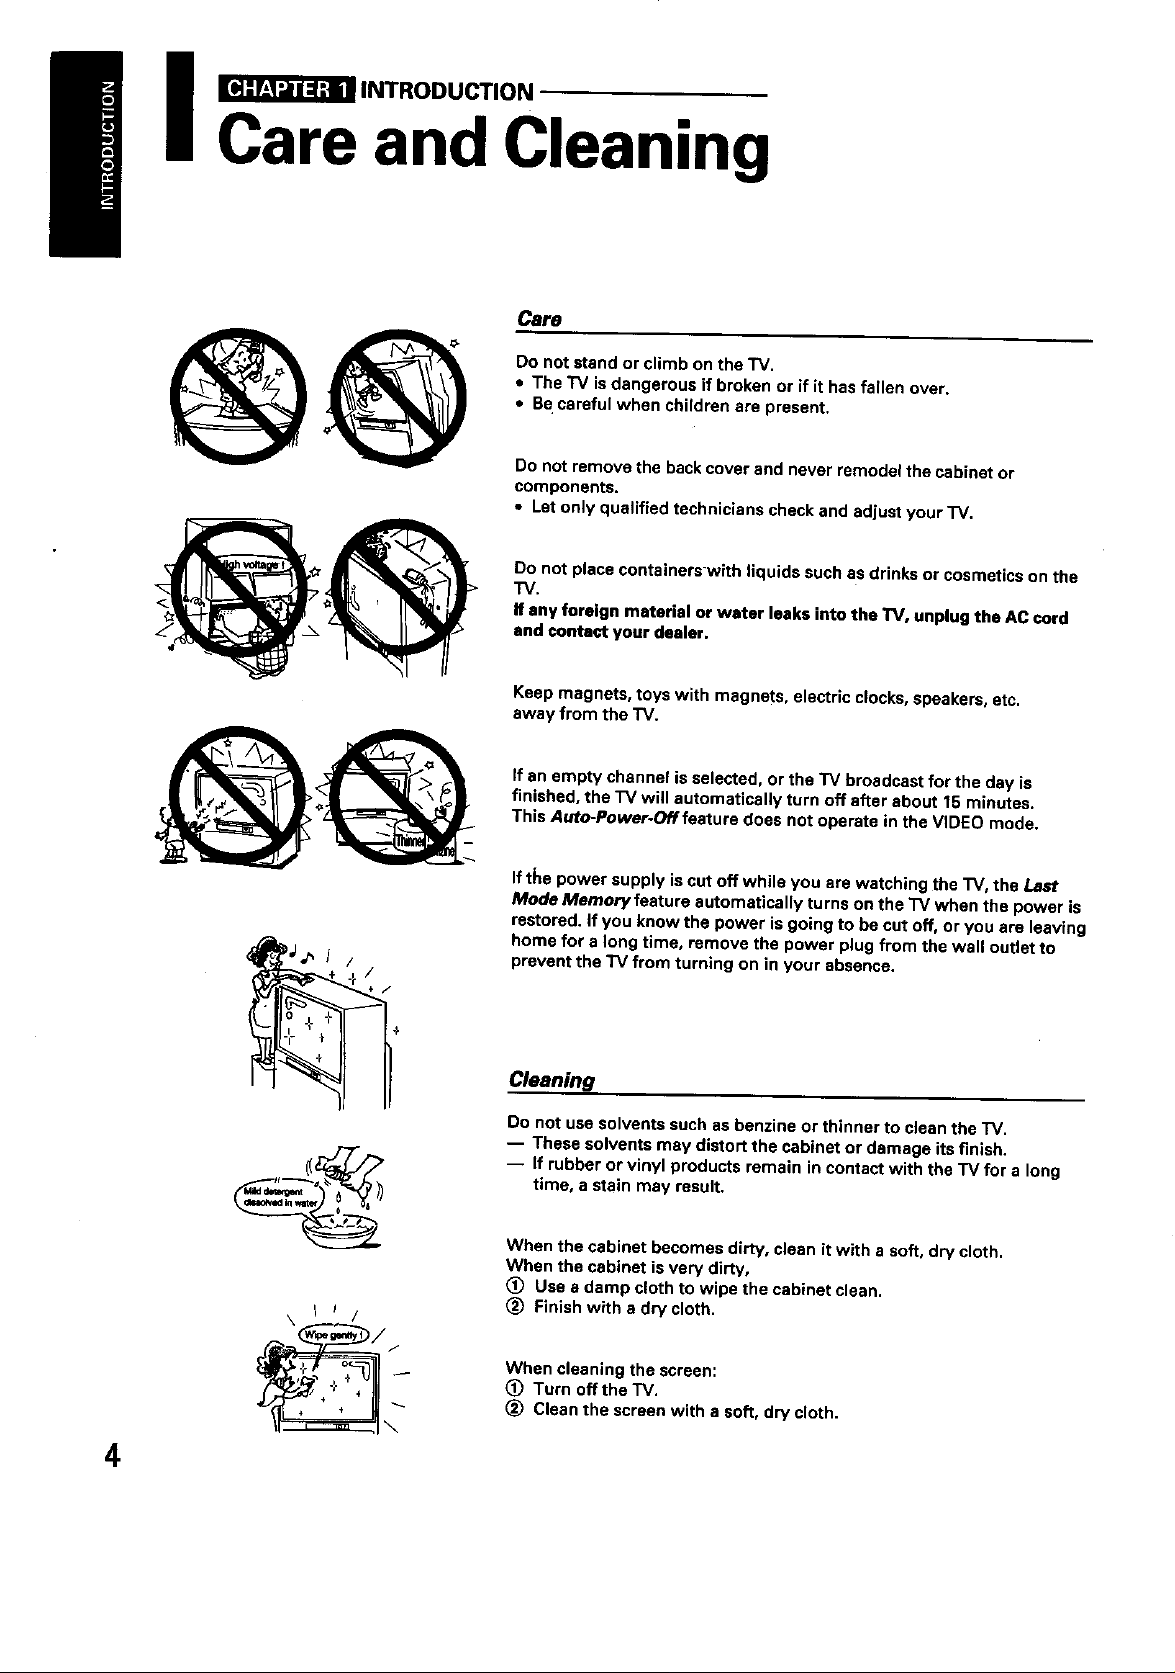
Csre
Do not stand or climb on the TV.
• The "IV is dangerous if broken or if it has fallen over.
• Be careful when children are present.
@@
Do not remove the back cover and never remodel the cabinet or
components.
• Let only qualified technicians check and adjust your'IV.
Do not place containerswlth liquids such as drinks or cosmetics on the
TV.
If any foreign material or water teaks into the TV, unplug the AC cord
and contact your dealer.
Keep magnets, toys with magnets, electric clocks, speakers, etc.
away from the "IV.
If an empty channel is selected, or the TV broadcast for the day is
finished, the "IV will automatically turn off after about 15 minutes.
This Auto-Power-Off feature does not operate in the VIDEO mode.
If t_e power supply is cut off while you are watching the TV, the La_
Mode Memory feature automatically turns on the TV when the power is
restored. If you know the power isgoing to be cut off, or you are leaving
home for a long time, remove the power plug from the wall outlet to
prevent the TV from turning on in your absence.
Cleaning
Do not use solvents such as benzine or thinner to clean the "IV.
-- These solvents may distort the cabinet or damage its finish.
-- tf rubber or vinyl products remain in contact with the "iV for a long
time, a stain may result,
When the cabinet becomes dirty, clean it with a soft, dry cloth.
When the cabinet is very dirty,
(_ Use a damp cloth to wipe the cabinet clean.
(_ Finish with a dry cloth.
4
When cleaning the screen:
(_ Turn offtheTV.
(_ Clean the screen with a soft, dry cloth.
_ INTRODUCTION
Installation
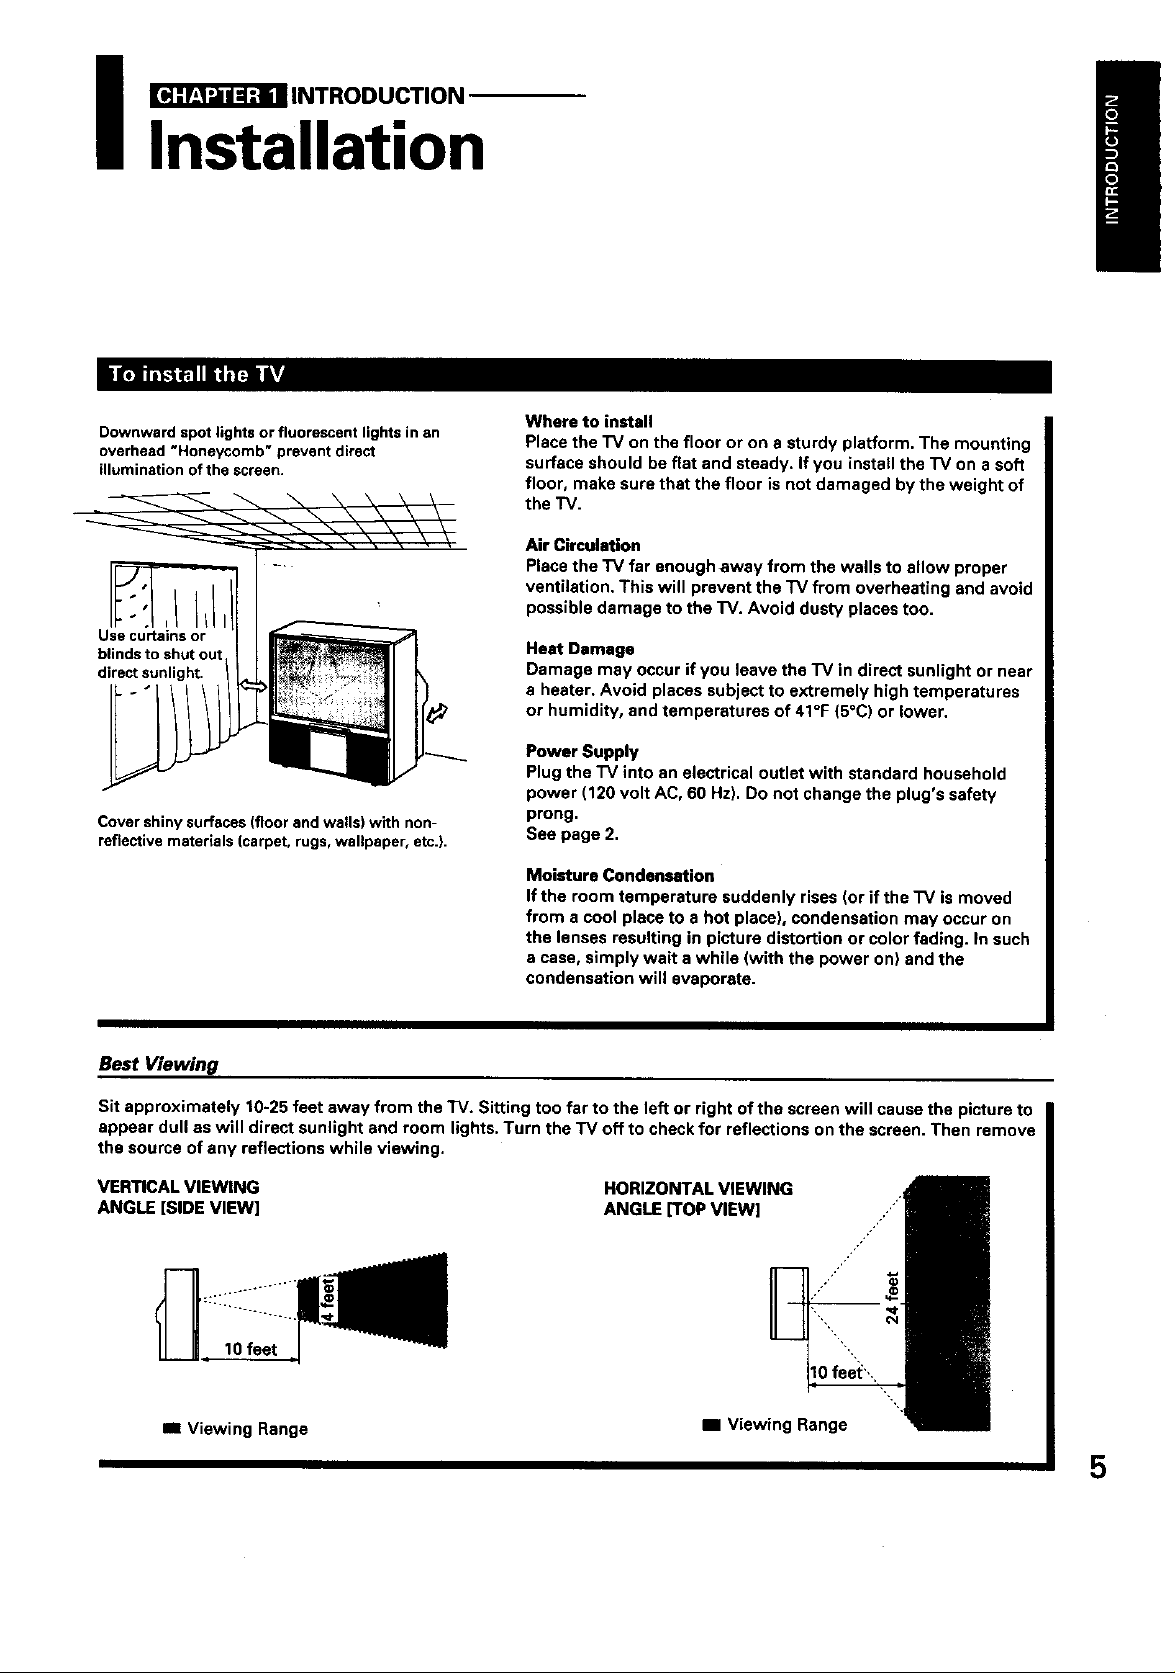
Downward spot lights or fluorescent lights in an
overhead "Honeycomb" prevent direct
illumination of the screen.
I
Use curtairis or
blinds to shut out
direct sunlight.
Cover shiny surfaces (floor and walls) with non-
reflective materials (carpet, rugs, wallpaper, etc.).
Where to install
Place the "IV on the floor or on a sturdy platform. The mounting
surface should be flat and steady. If you instatl the "IV on a soft
floor, make sure that the floor is not damaged by the weight of
the TV.
Air Circulation
Place the TV far enough away from the walls to allow proper
ventilation, This will prevent the TV from overheating and avoid
possible damage to the TV. Avoid dusty places too.
Heat Damage
Damage may occur if you leave the "IV in direct sunlight or near
a heater, Avoid places subject to extremely high temperatures
or humidity, and temperatures of 41°F (5°C) or lower.
Power Supply
Plug the "IV into an electrical outlet with standard household
power (120 volt AC, 60 Hz), Do not change the plug's safety
prong,
See page 2,
Moisture Condensation
If the room temperature suddenly rises (or if the TV is moved
from a cool place to a hot place), condensation may occur on
the lenses resulting in picture distortion or color fading. In such
a case, simply wait a while (with the power on) and the
condensation will evaporate.
Best Viewing
Sit approximately 10-25 feet away from the TV. Sitting too far to the left or right ofthe screen will cause the picture to
appear dull as will direct sunlight and room lights. Turn the "IV off to check for reflections on the screen. Then remove
the source of any reflections while viewing.
VERTICAL VIEWING
ANGLE [SIDE VIEW]
10 feet
BI Viewing Range
HORIZONTAL VIEWING
ANGLE [TOP VIEW]
ml Viewing Range
5
I _ INTRODUCTION
Antenna/Cable TV
Connections
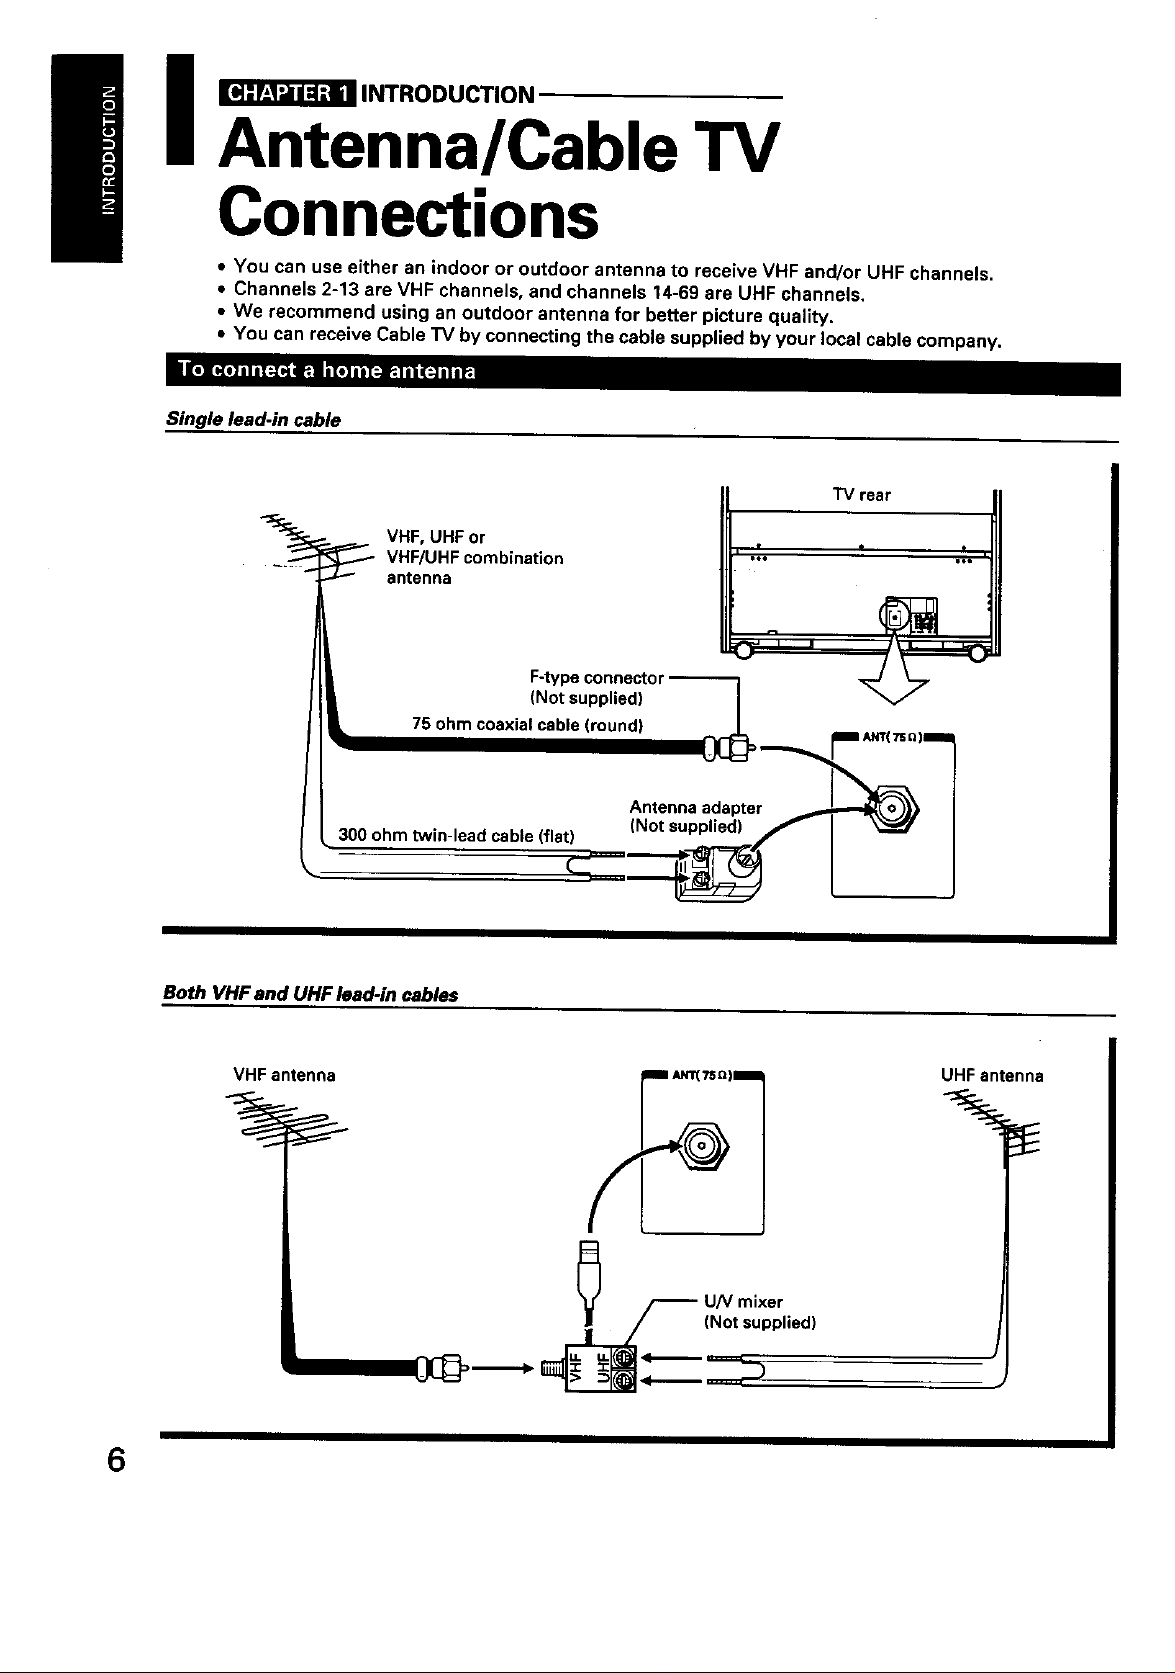
• You can use either an indoor or outdoor antenna to receive VHF and/or UHF channels,
• Channels 2-13 are VHF channels, and channels 14-69 are UHF channels.
• We recommend using an outdoor antenna for better picture quality.
• You can receive Cable TV by connecting the cable supplied by your local cable company,
• o " . o II " I_]I_(:JI|IP,I
Single lead-in cable
VHF, UHF or
VHF/UHF combination
antenna
Both VHF and UHF lead-in cables
VHF antenna
6
UHF antenna
F UN mixer
_/ (Not supplied)
lI_ F]L"_IiliiT_i[s,]_"_ ILTI
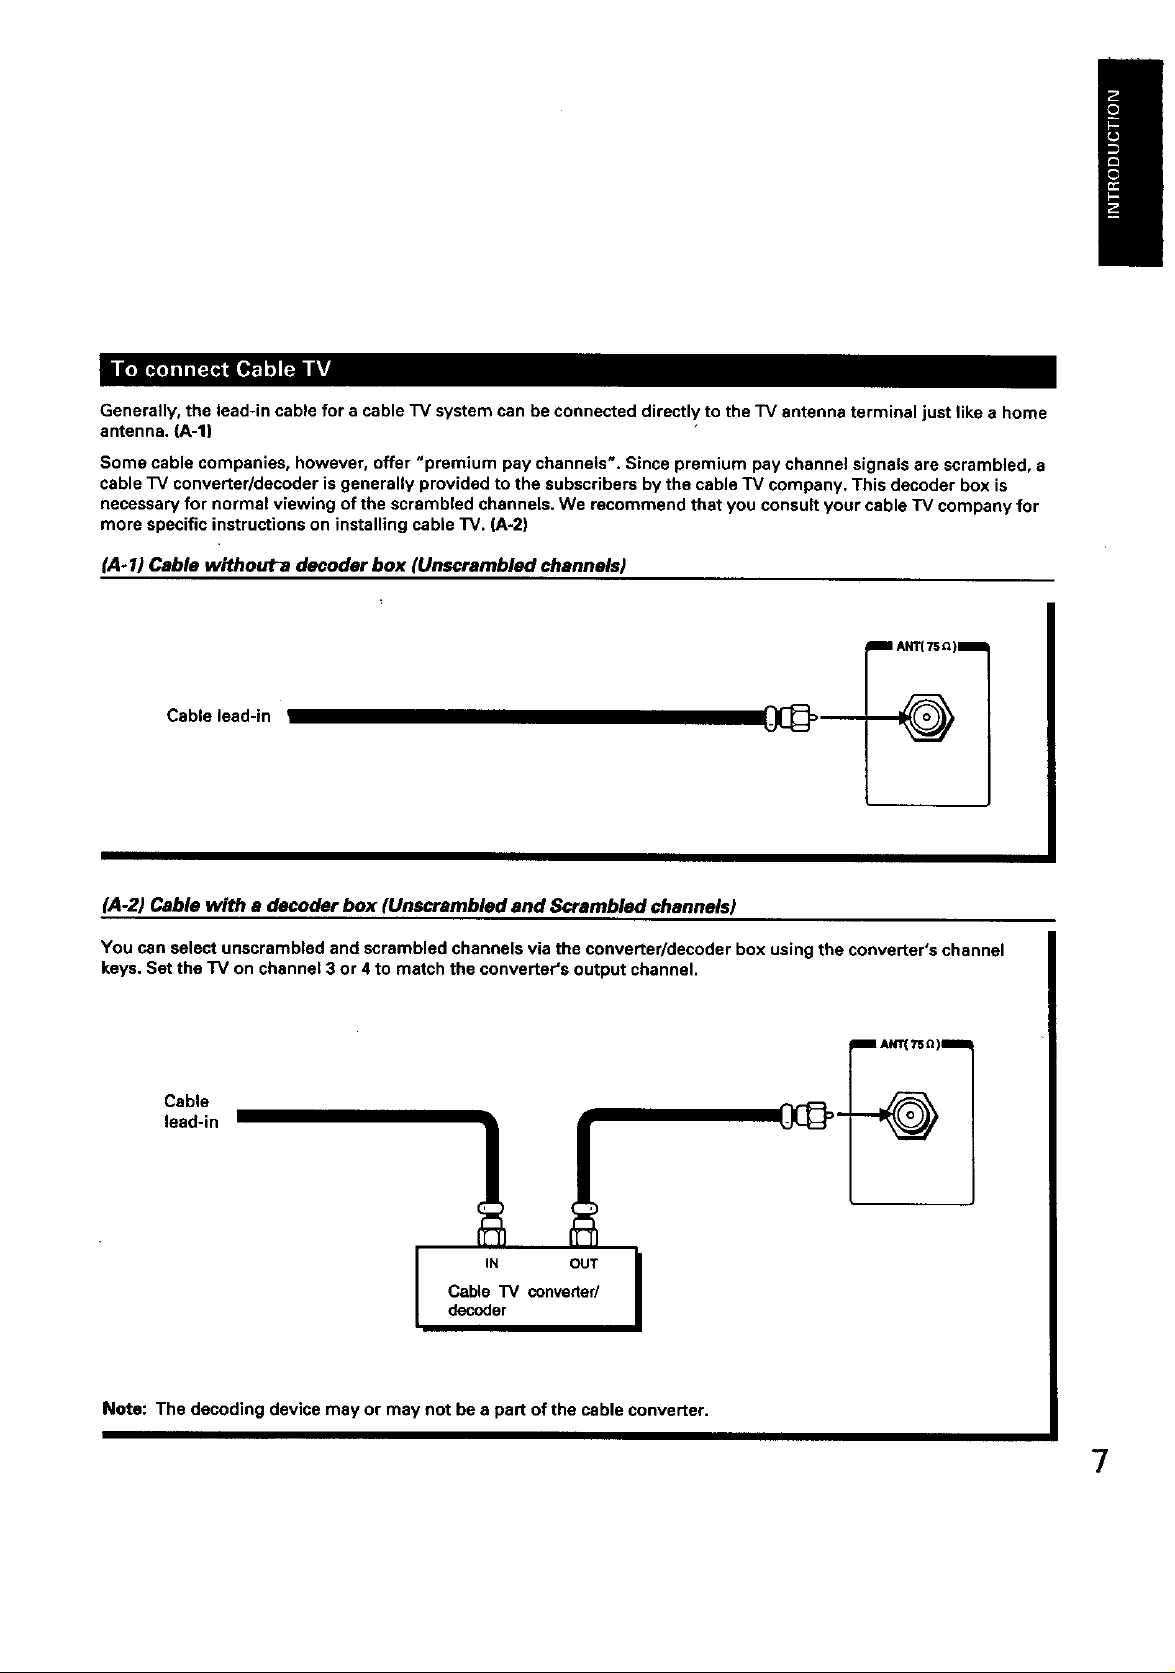
Generally, the lead-in cable for a cable "IV system can be connected directly to the TV antenna terminal just like a home
antenna. {A-l)
Some cable companies, however, offer "premium pay channels'. Since premium pay channel signals are scrambled, a
cable TV converter/decoder is generally provided to the subscribers by the cable TV company. This decoder box is
necessary for normal viewing of the scrambled channels. We recommend that you consult your cable "IV company for
more specific instructions on installing cable TV. (A-2)
(A-1) Cable withouta decoder box (Unscrambled channels)
i A_TE_)I
Cable lead-in
(,4-2) Cable with e decoder box (Unscrambled and Scrambled channels)
You can select unscrambled and scrambled channels via the converter/decoder box using the converter's channel
keys, Set the TV on channel 3 or 4 to match the converter's output channel.
Cable
lead-in
Cable TV converter/
IN OUT I
decoder
Note: The decoding device may or may not be e part of the cable converter.
7
I _ INTRODUCTION
Antenna/Cable TV
Connections (continued)
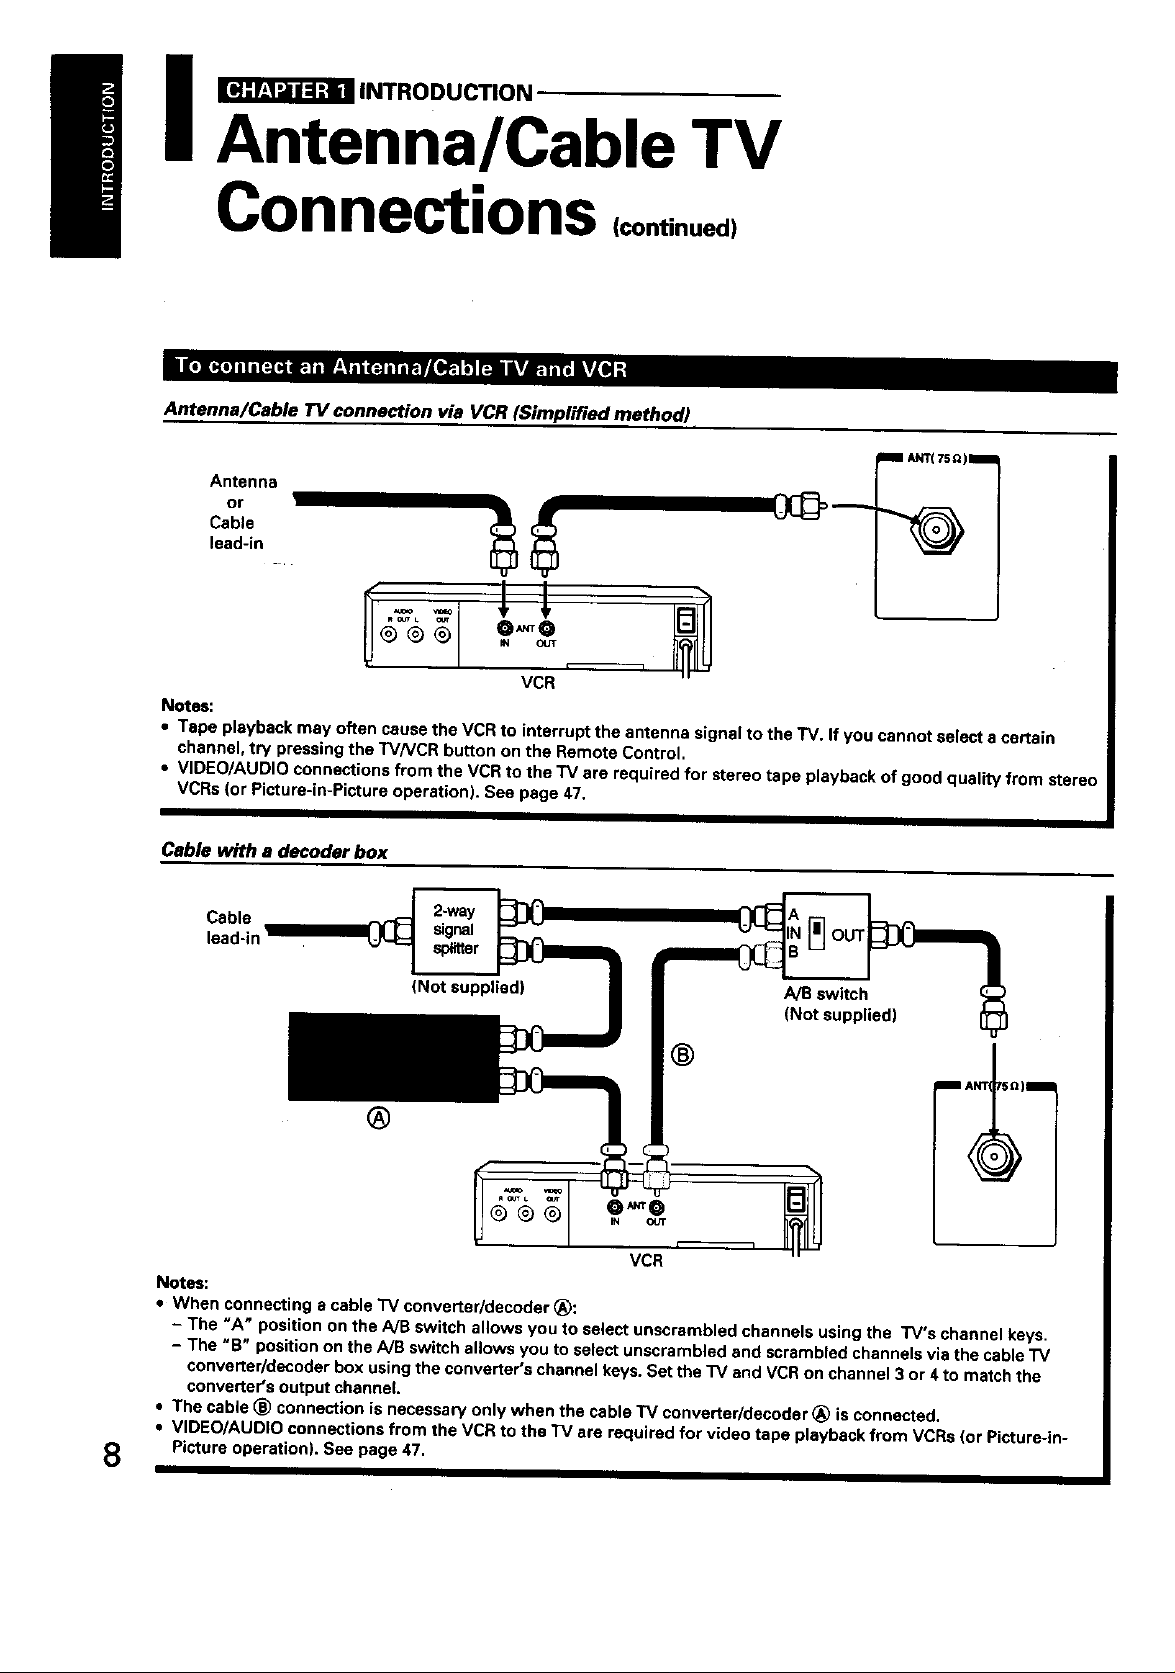
Antenna/Cable TV connection via VCR (Simplified method)
Antenna
or
Cable
lead-in
VCR
Notes:
• Tape playback may often cause the VCR to interrupt the antenna signal to the TV. If you cannot select a certain
channel, try pressing the TV/VCR button on the Remote Control.
• VIDEO/AUDIO connections from the VCR to the TV are required for stereo tape playback of good quality from stereo
VCRs (or Picture-in-Picture operation). See page 47.
Cable with a decoder box
Cable OUT
lead-in
(Not supplied) A/B switch
(Not supplied)
®
®
Notes:
• When connecting e cable "IV converter/decoder (_:
- The "A" position on the A/B switch allows you to select unscrambled channels using the TV's channel keys.
- The "B" position on the/VB switch allows you to select unscrambled and scrambled channels via the cable "IV
converter/decoder box using '_heconverter's channel keys. Set the TV and VCR on channel 3 or 4to match the
converter's output channel.
• The cable _) connection is necessary only when the cable TV converter/decoder (_ is connected.
• VIDEO/AUDIO connections from the VCR to the TV are required for video tape playback from VCRs {or Picture-|n-
8
Picture operation). See page 47.
_ INTRODUCTION
Location of Controls
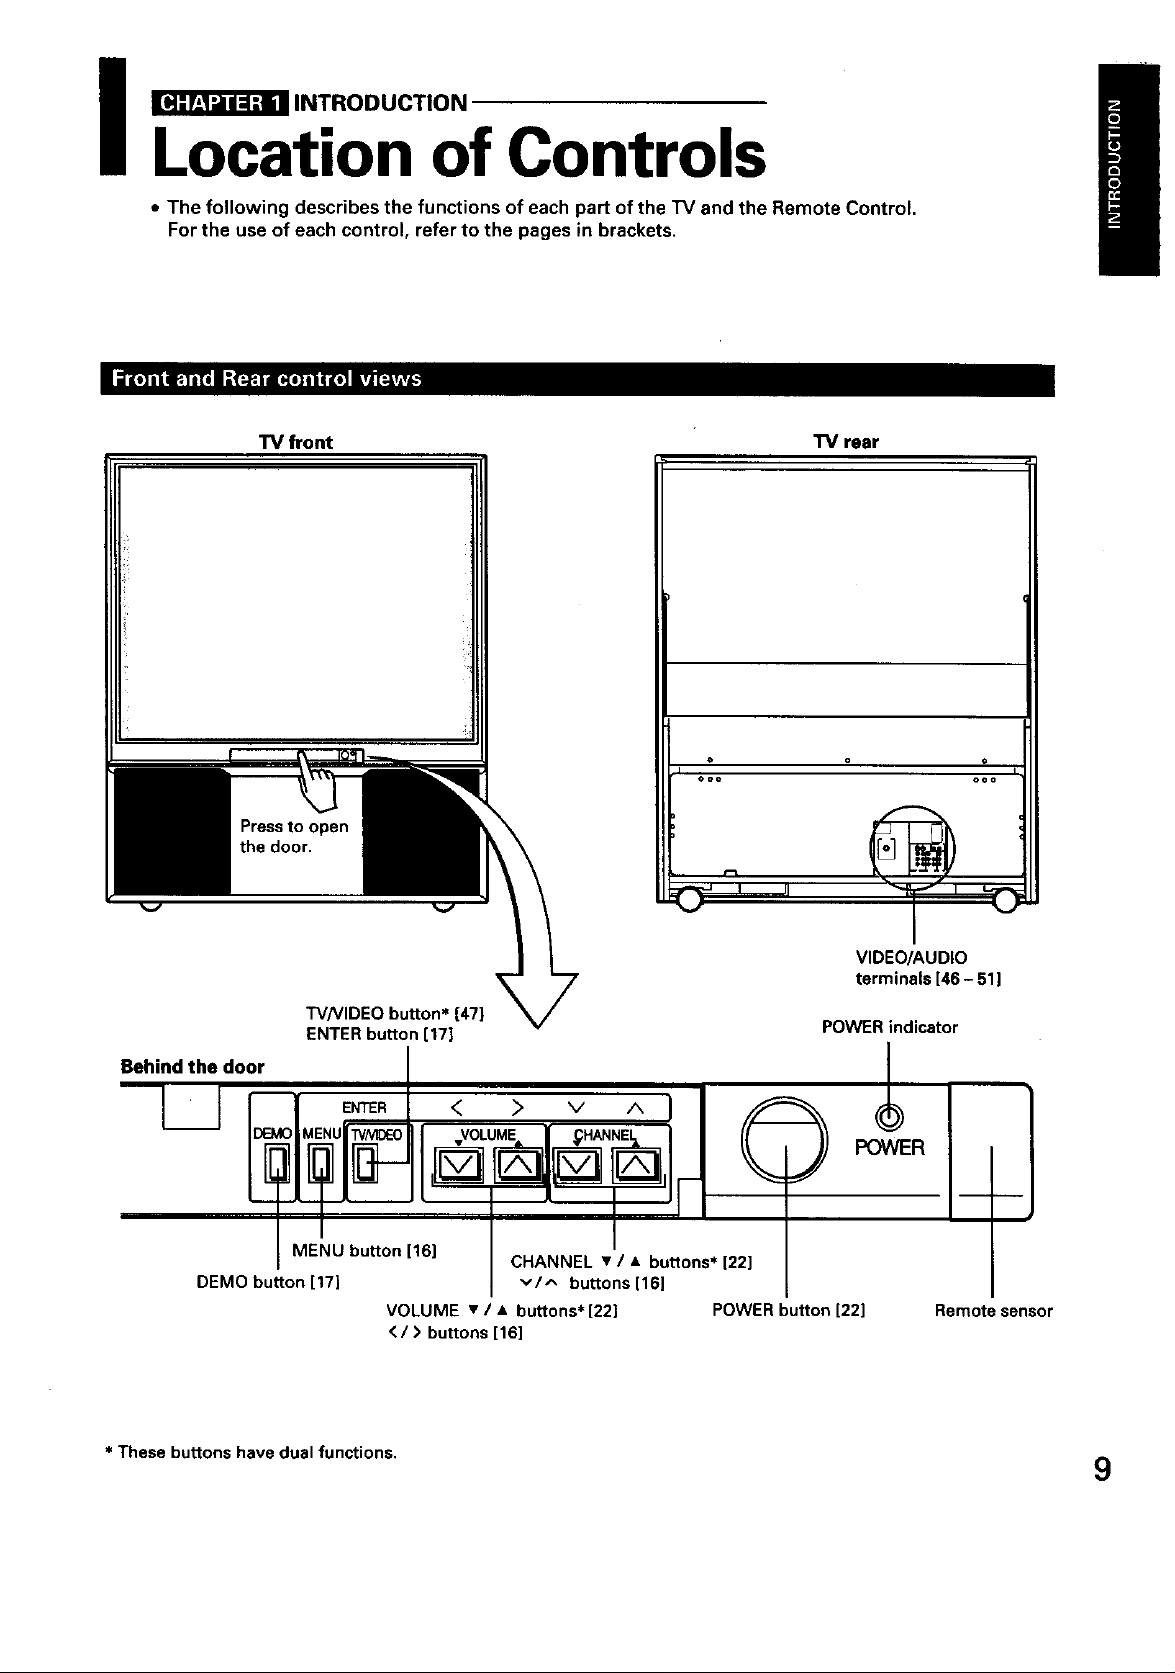
• The following describes the functions of each part ofthe "IV and the Remote Control.
Forthe use of each control, refer to the pages in brackets.
TV front TV rear
I
ooo ooo
Press to open
the door.
VIDEO/AUDIO
terminals [46 - 51]
W/VIDEO button* [47]
ENTER button [17]
Behind the door /
ME!U button1161 ! I,
CHANNEL • / • buttons [22]
DEMO button 17 v/^ buttons[16]
VOLUME • / • buttons*[22] POWER button [22]
</> buttons [16]
POWER indicator
/
I-
Remote sensor
* These buttons have dual functions. 9
_ INTRODUCTION
Location of Controls
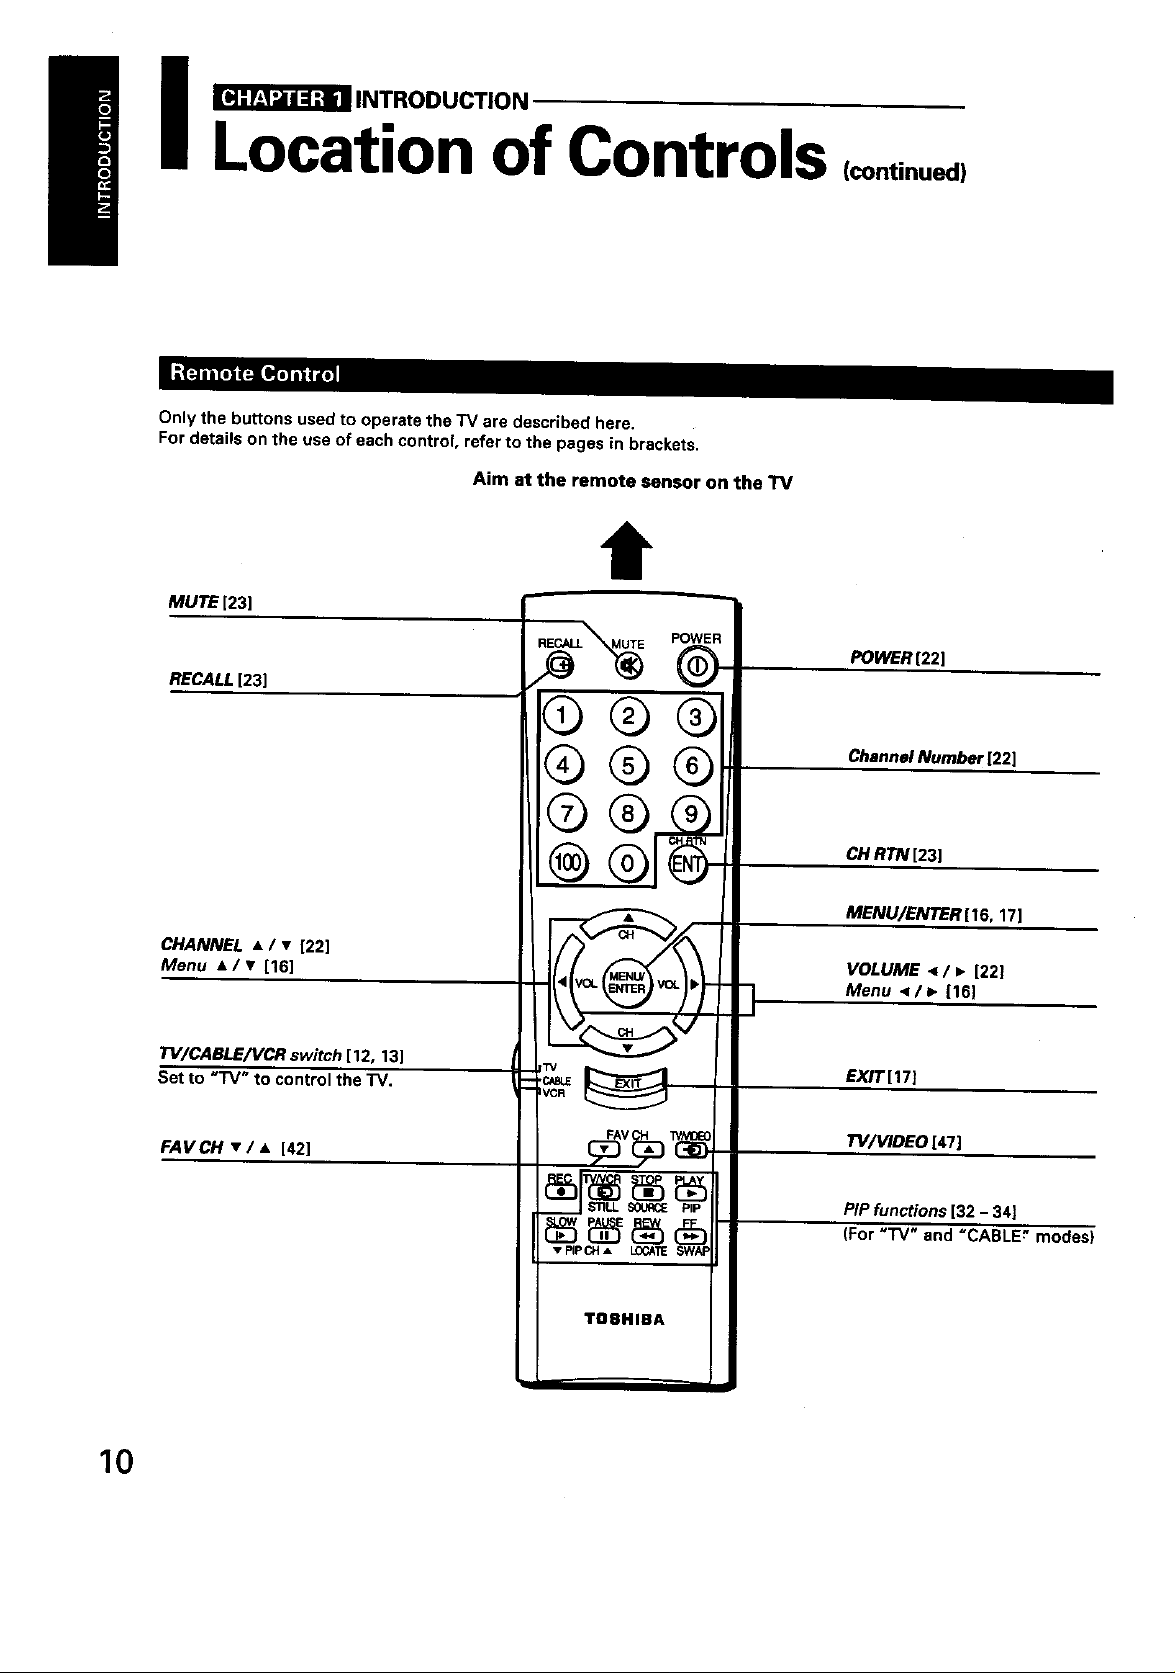
Only the buttons used to operate the TV are described here.
For details on the use of each control, refer to the pages in brackets.
Aim at the remote sensor on the TV
l
MUTE [23]
RECALL [23]
@®®
¢)®®
(continued)
POWER [22]
Channel Number [22]
CHANNEL • / • [22]
Menu A/• [16]
TV/CABLE/VCR switch [12, 13]
Set to "IV" to control the TV.
FAVCH • / • [42]
$$£
@
VCR
_v_
SOURCE PiP
v PIPCH A LOCATE
TO8HIBA
CH RTN [23]
MENU/ENTER[16, 17]
VOLUME < / • [22]
Menu </_. [16]
EXIT[17]
W/VIDEO [47]
PiP functions [32 - 34]
(For "rv" and =CABLE_ modes)
10
_ INTRODUCTION
Before Using the Remote
Control
With this Remote Control, you can operate your "IV and most VCR and cable box models regardless of the
manufacturer. However, this Remote Control must first be programmed to control other VCR and cable box brands.
See page 13.
If you have a TOSHIBA VCR, your Remote Control has already been programmed for you.
Before attempting to operate your Remote Control, install the batteries according to "To install the batteries" below.
Notes:
• After installing newt_atteries, the Remote Control will set itself to the codes for TOSHIBA TVs and VCRs. If you are
using the Remote Control to operate other manufacturer's equipment, you will have to reprogram those codes.
• This Remote Control may have functions not available on your VCR and cable box remote controllers.
These functions may or may not operate your VCR or cable box, Refer to the owner's manuals supplied with the
equipment to see which functions are available.
• The remote controller supplied with your VCR or cable box may have keys not duplicated on this Remote Control. If
you want to usethese functions, please usethe original remote controller.
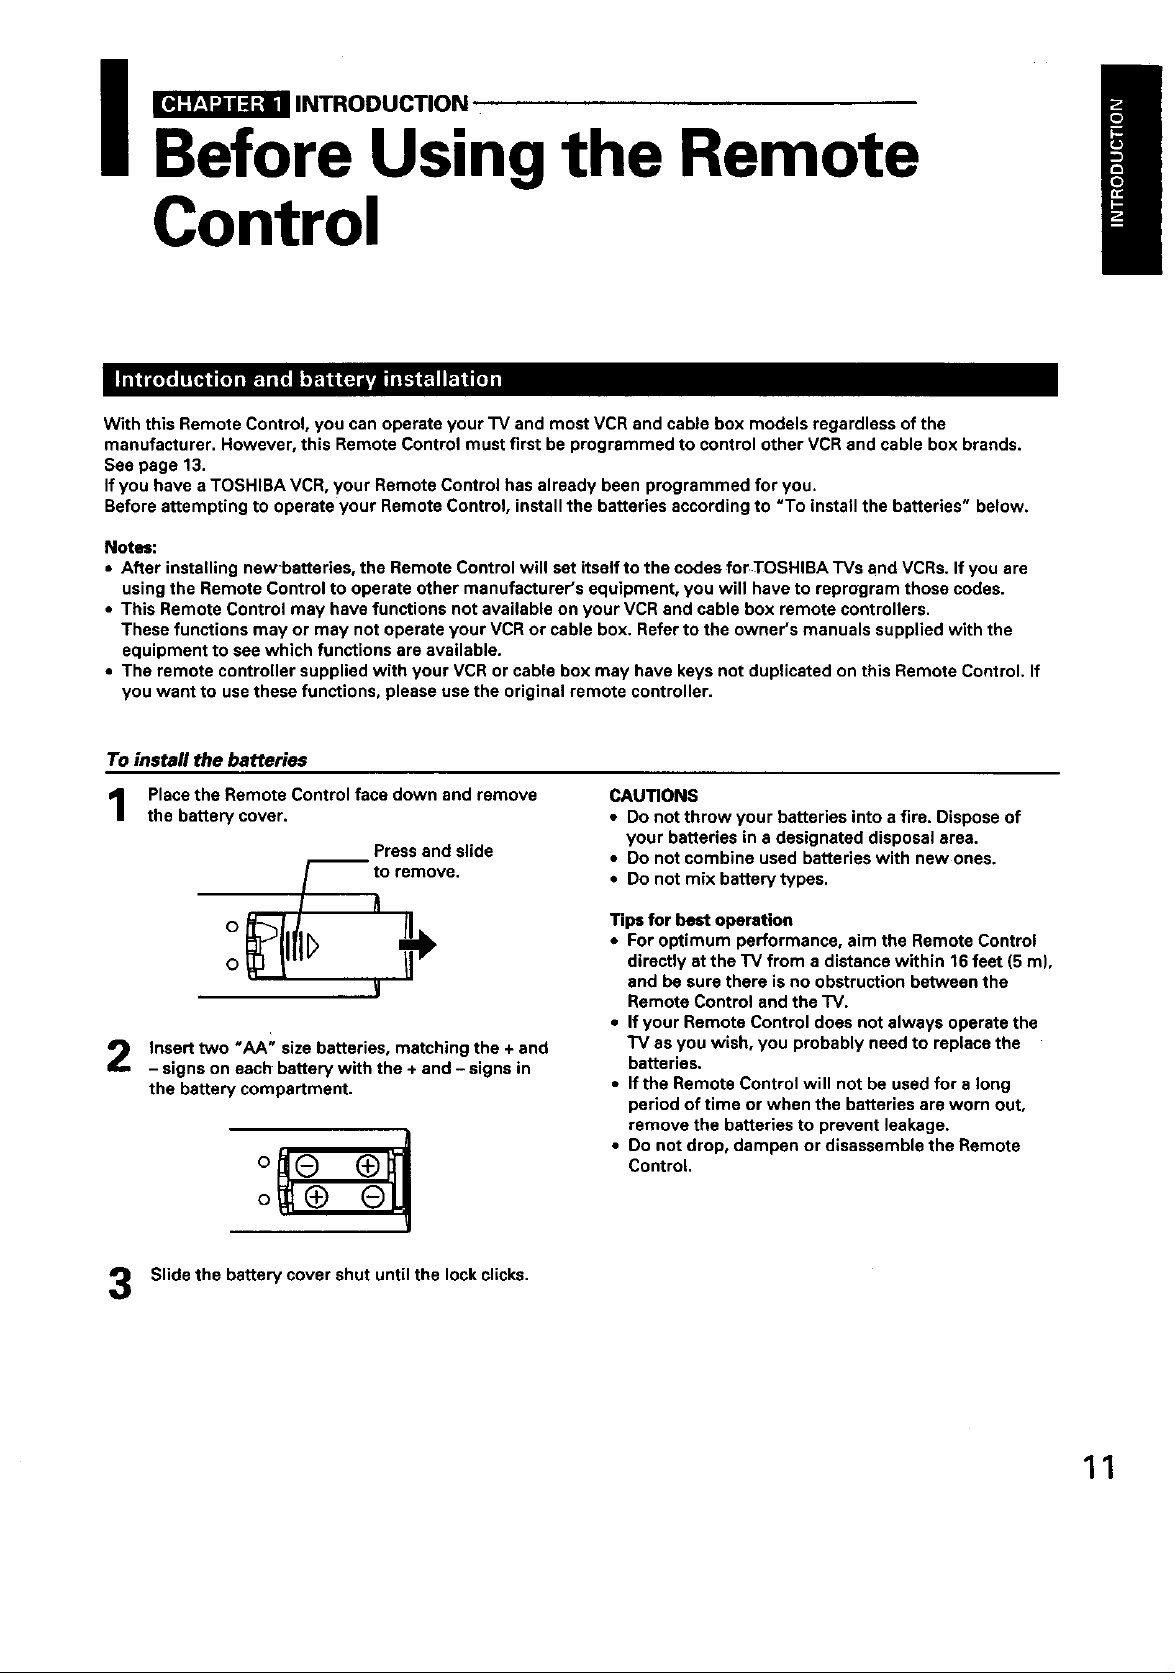
To instafl the batteries
Place the Remote Control face down and remove
the battery cover.
Pressand slide
_to ramova.
o fl
Insert two "AA" size batteries, matching the + and
- signs on each battery with the + and - signs in
the battery compartment.
o
I
Slide the battery cover shut until the lock clicks.
CAUTIONS
• Do not throw your batteries into a fire. Dispose of
your batteries in a designated disposaJarea.
• Do not combine used batteries with new ones.
• Do not mix battery types.
Tips for best operation
• For optimum performance, aim the Remote Control
directly at the TV from a distance within 16 feet (5 m),
and be sure there is no obstruction between the
Remote Control and the TV.
• If your Remote Control does not always operate the
"IV as you wish, you probably need to replace the
batteries.
• If the Remote Control will not be used for a long
period of time or when the batteries are worn out,
remove the batteries to prevent leakage.
• Do not drop, dampen or disassemble the Remote
Control.
11
I _INTRODUCTION
Using the Remote with VCR
or Cable TV Converter
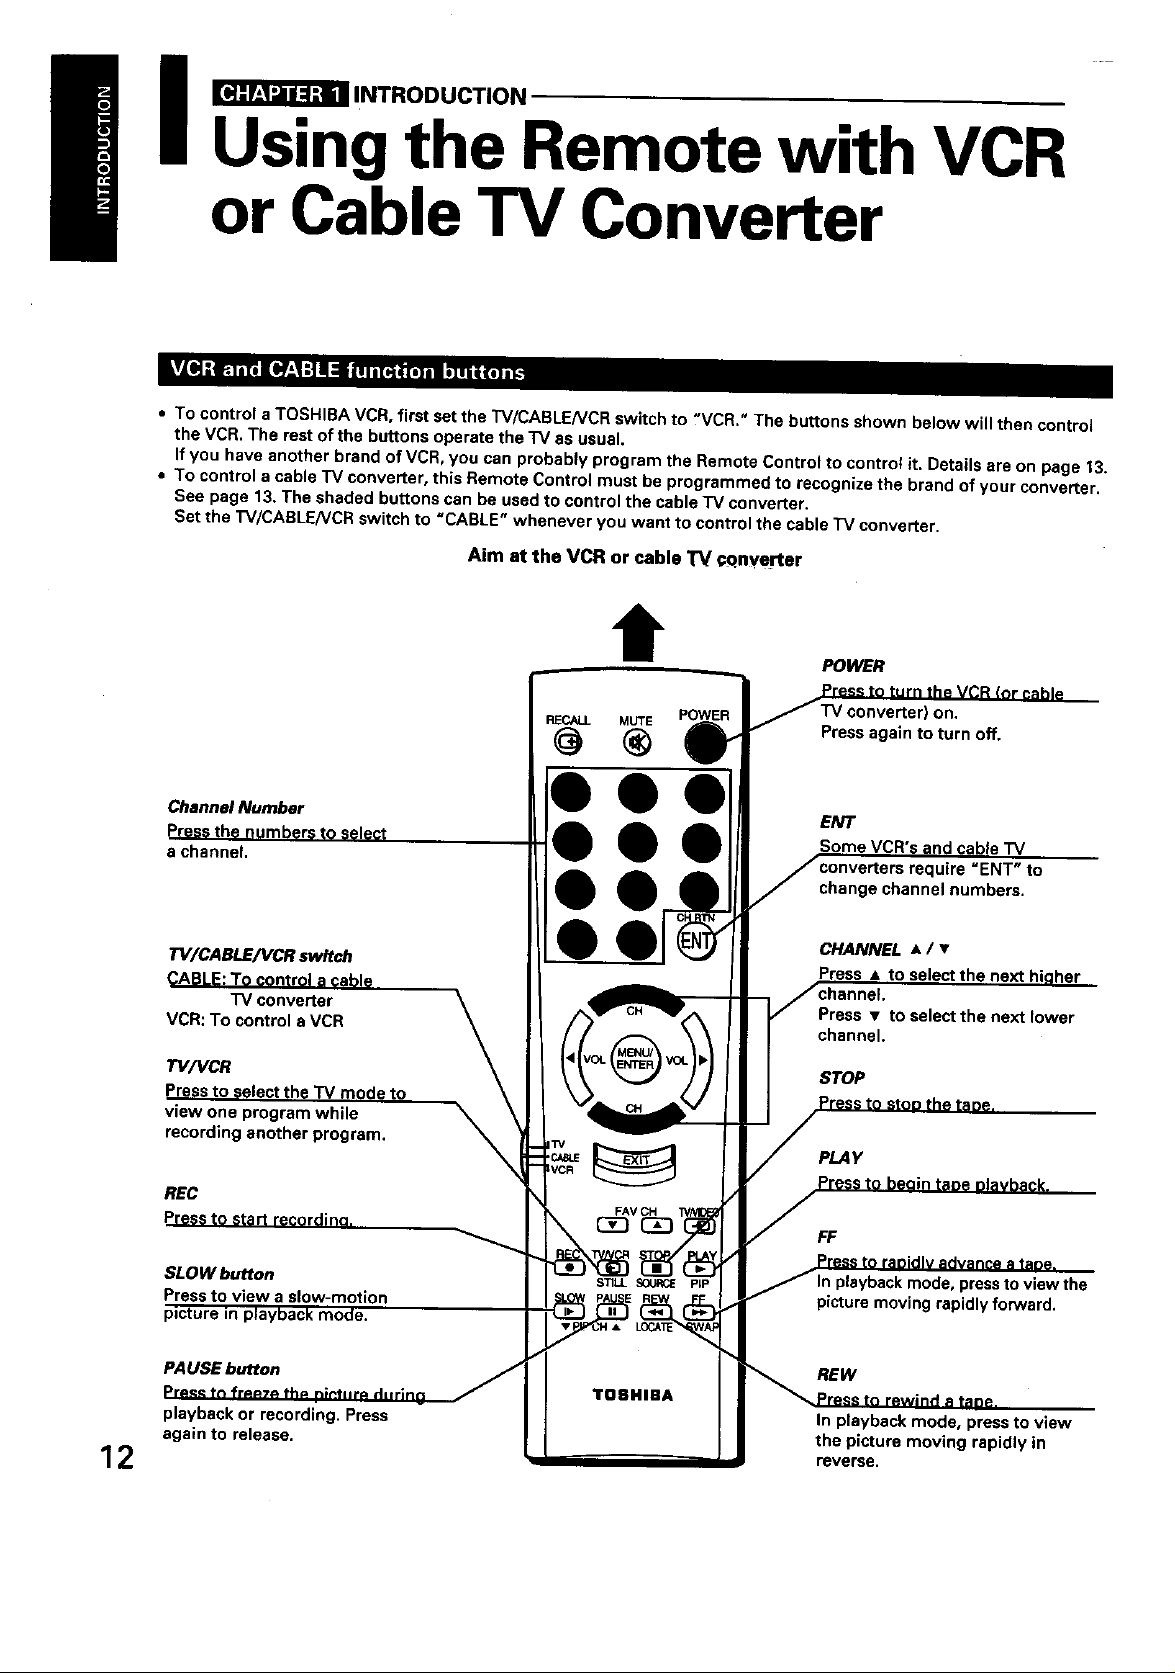
• To control a TOSHIBA VCR, first set the TV/CABLENCR switch to ?VCR." The buttons shown below will then control
the VCR. The rest of the buttons operate the TV as usual.
If you have another brand of VCR, you can probably program the Remote Control to contro_ it. Details are on page _3.
• To control a cable "IV converter, this Remote Control must be programmed to recognize the brand of your converter.
See page 13. The shaded buttons can be used to control the cable "IV converter.
Set the TV/CABLENCR switch to "CABLE" whenever you want to control the cable "IV converter.
Aim at the VCR or cable TV cQnyerter
t POWER
Channel Number
Press the numbers to select
a channel.
"rV/CABLENCR switch
CABLE:To control a cable
"IV converter
VCR: To control aVCR
TV/VCR
Press to select the TV mode to
view one program while
recording another program.
REC
Pressto st_ r_9ordina.
SLOW button
Press to view a slow-motlon
picture in playback mode.
RECALL MUTE POWER
ON.
Press again to turn off.
ENT
Som I cable "IV
"ENT" to
change channel numbers.
CHANNEL • / •
Press • to s
Press • to select the next lower
channel
STOP
PLAY
FF
, pressto view the
picture moving rapidly forward.
12
PAUSE button
Pr_ tn fr_7_ th_
playback or recording. Press
again to release.
REW
In playback mode, press to view
the picture moving rapidly in
reverse.
_ INTRODUCTION
Programming the Remote
Control
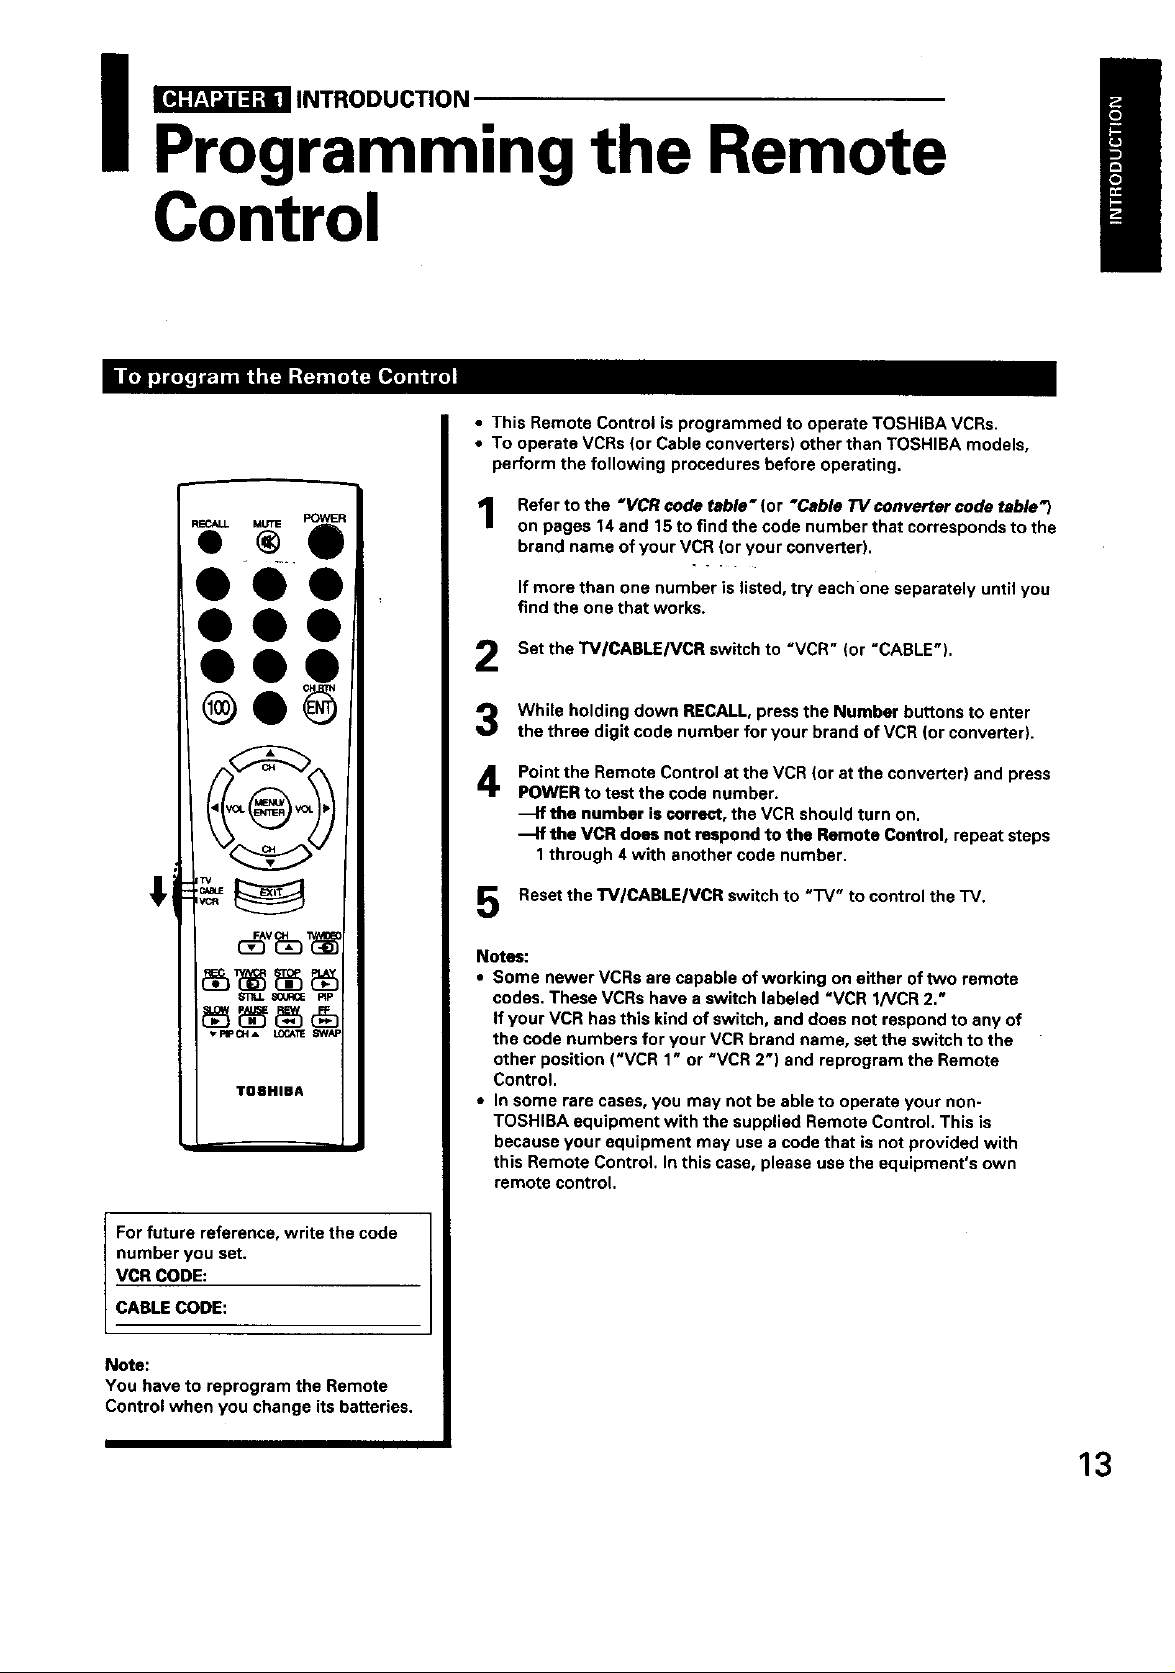
• This Remote Control is programmed to operate TOSHIBA VCRs.
• To operate VCRs (or Cable converters) other than TOSHIBA models,
perform the following procedures before operating.
00
00
@
TOaHIBA
POWER
Refer to the "VCR code table" (or "Cable TV converter code table_)
1
on pages 14 and 15 to find the code number that corresponds to the
brand name of your VCR (or your converter),
If more than one number is listed, try eachone separately until you
find the one that works.
Set the TV/CABLE/VCR switch to "VCR" (or "CABLE").
While holding down RECALL, press the Number buttons to enter
the three digit code number for your brand of VCR (or converter).
Point the Remote Control at the VCR (or at the converter) and press
4
POWER to test the code number.
the number is correct, the VCR should turn on.
_lf the VCR does not respond to the Remote Control, repeat steps
1through 4 with another code number.
Reset the TV/CABLE/VCR switch to "'IV" to control the TV.
Notes:
• Some newer VCRs are capable of working on either of two remote
codes. These VCRs have a switch labeled "VCR 1/VCR 2."
If your VCR has this kind of switch, and does not respond to any of
the code numbers for your VCR brand name, set the switch to the
other position ("VCR 1" or "VCR 2") and reprogram the Remote
Control.
• In some rare cases, you may not be able to operate your non-
TOSHIBA equipment with the supplied Remote Control. This is
because your equipment may use a code that is not provided with
this Remote Control. In this case, please use the equipment's own
remote control.
For future reference, write the code
number you set,
VCR CODE:
CABLE CODE:
Note:
You have to reprogram the Remote
Control when you change its batteries.
13
_ INTRODUCTION
Programming the Remote
Control (continued)
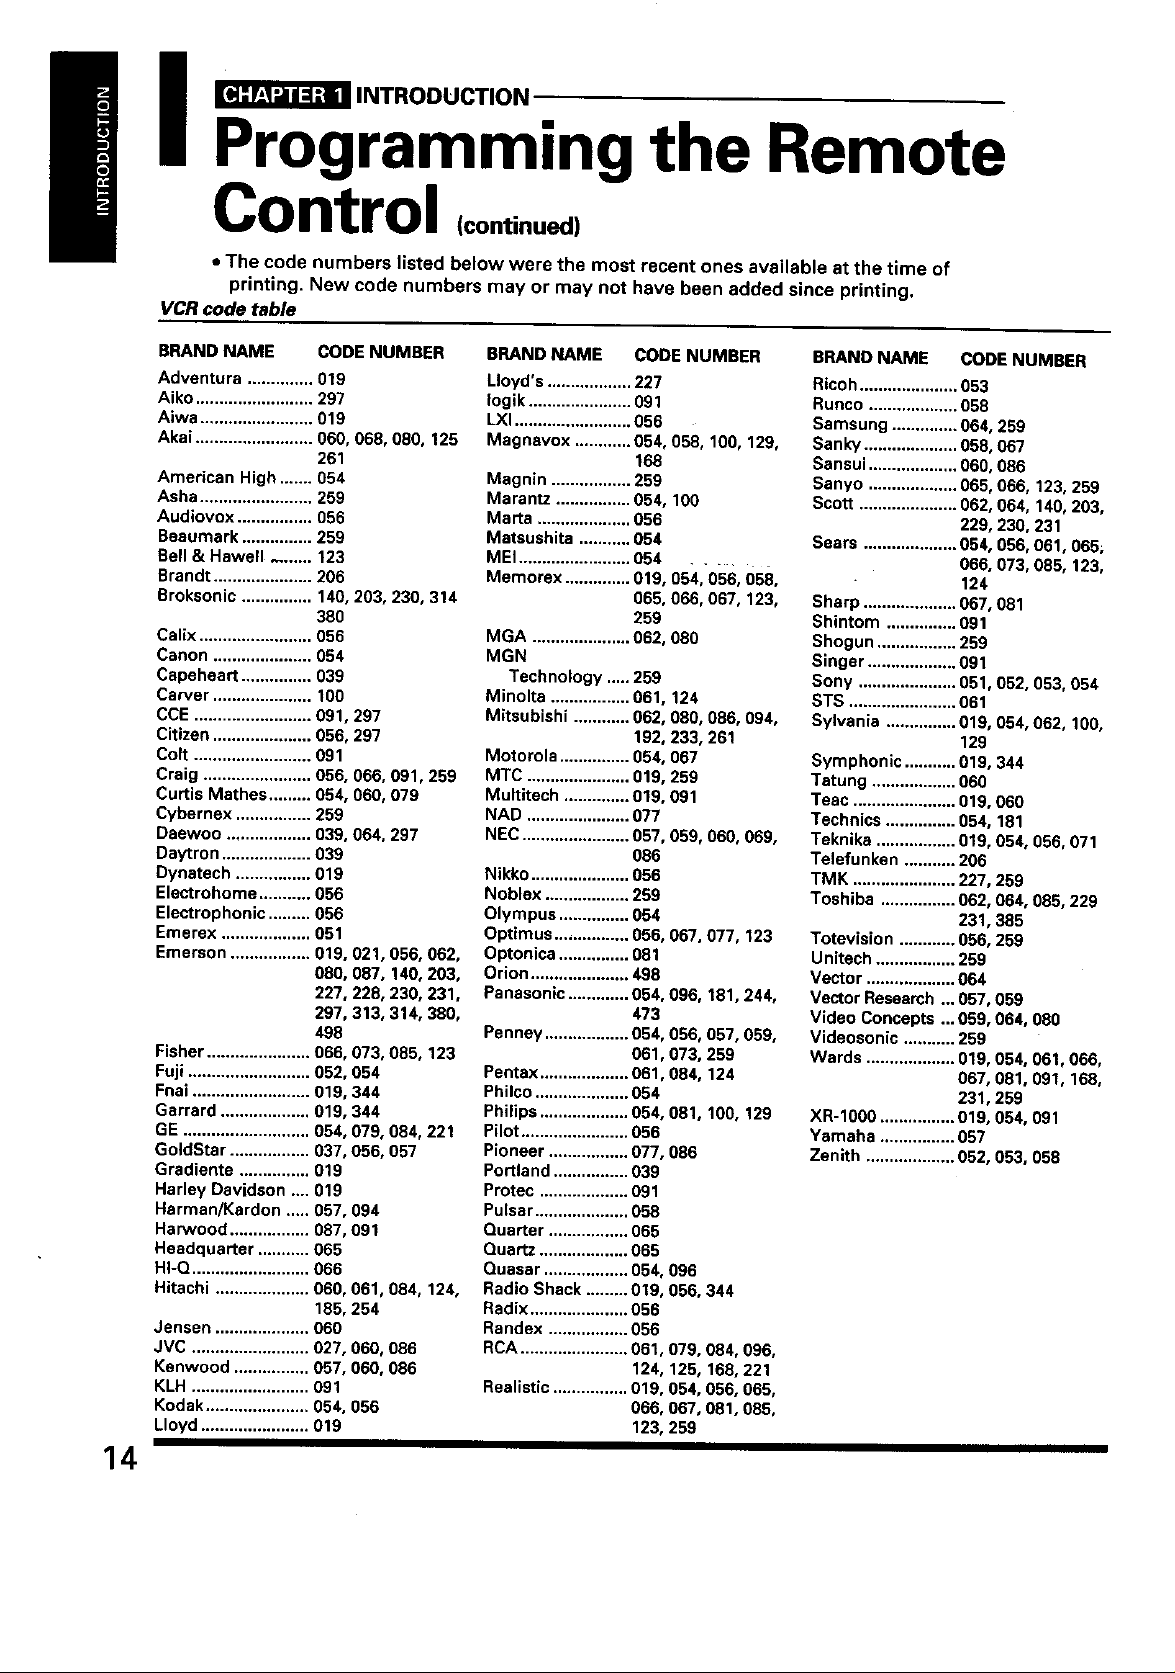
• The code numbers listed below were the most recent ones available at the time of
printing. New code numbers may or may not have been added since printing,
VCR code table
BRAND NAME CODE NUMBER
Adventura .............. 019
Aiko ......................... 297
Aiwa ........................ 019
Akai ......................... 060, 068, 080, 125
261
American High ....... 054
Asha........................ 259
Audiovox ................ 056
Beaumark ............... 259
Bell & Hawell ....... 123
Brandt ..................... 206
Broksonic ............... 140, 203, 230, 314
380
Calix ........................ 056
Canon ..................... 054
Capeheart ............... 039
Carver ..................... 100
CCE ......................... 091,297
Citizen ..................... 056. 297
Colt ......................... 091
Craig ....................... 056, 066, 091,259
Curtis Mathes ......... 054, 060, 079
Cybernex ................ 259
Daewoo .................. 039, 064, 297
Dsytron ................... 039
Dynetech ................ 019
Electrohome ........... 056
Electrophonic ......... 056
Emerex ................... 051
Emerson ................. 019, 021,056, 062,
080, 087, 140, 203,
227, 228, 230, 231,
297,313, 314, 380,
498
Fisher ...................... 066, 073, 085, 123
Fuji .......................... 052. 054
Fnai ......................... 019, 344
Garrard ................... 019, 344
GE ........................... 054, 079, 084, 221
GoldStar ................. 037, 056, 057
Gradiente ............... 019
Harley Davidson .... 019
Harman/Kardon ..... 057,094
Harwood ................. 087,091
Headquarter ........... 065
HI-O ......................... 066
Hitachi .................... 060, 081,084, 124,
185, 254
Jansen .................... 060
JVC ......................... 027,000, 086
Kenwood ................ 057, 060, 086
KLH ......................... 091
Kodak...................... 054, 056
Lloyd ....................... 019
14
BRAND NAME CODE NUMBER
Lloyd's .................. 227
Iogik ...................... 091
LXI......................... 056
Magnavox ............ 054, 059, 100, 129,
168
Magnin ................. 259
Marantz ................ 054, 100
Maria .................... 056
Matsushita ........... 054
MEI ........................ 054 .....
Memorex .............. 019, 054, 056, 058,
065, 066, 067, 123,
259
MGA ..................... 062, 080
MGN
Technology ..... 259
Minolta ................. 061,124
Mitsubishi ............ 062, 080, 086, 094,
192, 233, 261
Motorola ............... 054, 067
MTC ...................... 019, 259
Multitech .............. 019, 091
NAD ...................... 077
NEC....................... 057,059, 060, 069,
086
Nikko..................... 056
Noblex .................. 289
Olympus ............... 054
Optimus ................ 056, 067, 077, 123
Optonica ............... 081
Orion ..................... 498
Panasonic ............. 054, 096, 181,244,
473
Penney .................. 054, 056, 057, 089,
061,073, 259
Pentax ................... 061. 084, 124
Philco .................... 084
Philips ................... 054, 081,100, 129
Pilot ....................... 056
Pioneer ................. 077, 086
Portland ................ 039
Protec ................... 091
Puisar .................... 058
Quarter ................. 065
Quartz ................... 065
Quasar .................. 054, 096
Radio Shack ......... 019, 056, 344
Radix ..................... 056
Randex ................. 056
RCA ....................... 061,079, 084, 098,
124, 125, 168, 221
Realistic ................ 019, 054, 056, 065,
066. 067, 081,085,
123, 259
BRAND NAME CODE NUMBER
Ricoh ..................... 053
Runco ................... 058
Samsung .............. 064, 259
Sank'/ .................... 058, 067
Sansui ................... 060, 086
Sanyo ................... 065, 066, 123, 259
Scott ..................... 062, 064, 140,203,
229, 230, 231
Sears .................... 084, 056, 061,065;
066, 073, 085, 123,
124
Sharp .................... 067, 081
Shintom ............... 091
Shogun ................. 259
Singer ................... 091
Sony ..................... 051,052, 053, 054
STS ....................... 061
Sylvania ............... 019, 054, 062, 100,
129
Symphonic ........... 019, 344
Tatung .................. 060
Teac ...................... 019, 060
Technics ............... 054, 181
Teknika ................. 019, 054, 056, 071
Telefunken ........... 206
TMK ...................... 227,259
Toshiba ................ 062, 064, 085, 229
231,385
Totevision ............ 056, 259
Unitech ................. 259
Vector ................... 064
Vector Research ... 057, 059
Video Concepts ...059, 064, 080
Videosonic ........... 259
Wards ................... 019, 054, 061,066,
067, 081. 091. 168.
231,259
XR-1000 ................ 019, 054, 091
Yamaha ................ 057
Zenith ................... 052, 053, 058

Cable "IV converter code table
BRAND NAME CODE NUMBER
ABC ....................... 020, 022, 026, 027,
030, 032, 033, 036,
066
Antronix ............... 041
Archer ................... 041,058, 172
Belcor ................... 075
Cable Star ............ 075
Cabletenna ........... 041
Cableview ............ 041
Century ................. 172.
Citizen ................... 172
Color Voice ..........044, 050
Comtronics .......... 059, 079
Contec .................. 038
Dae Ryung ........... 027
Eastern ................. 021
Focus.................... 419
Garrard ................. 172
GC Electronics ..... 075
Gemini .................. 034, 089
General
Instrument ....... 030, 295
GoldStar .., ........... 059, 163
Hamlin .................. 028, 039, 053, 278,
292
Hitachi .................. 030
Hytex .................... 026
Jasco .................... 172
Jerrold .................. 022, 030, 031,033,
034, 066, 295
Macom ................. 052
Magnavox ............ 046
Memorex .............. 019
Movie Time .......... 175
NSC ...................... 089, 175
Oak ....................... 026, 038, 267
Panasonic ............. 019, 040, 126
Paragon ................ 019
Pbilips ................... 044, 046, 047, 048,
049, 050, 172
Pioneer ................. 042, 163, 552
Popular
Mechanics ....... 419
Pulsar ................... 019
RCA ....................... 040
Recoton ................ 419
Regal .................... 039, 278, 292
Regency ............... 021
Rembrandt ........... 030, 089
Runco ................... 019
Samsung .............. 059, 163
Scientific
Atlanta ............. 025, 027, 036, 296
Signal ................... 034, 059
BRAND NAME CODE NUMBER
Signature ............. 030
SL Marx ................ 059
Sprucer ................. 040
Standard
Components.... 174
Starcom ................ 022, 034, 066
Stargate ................ 034, 059
Starquest .............. 034
Sylvania ............... 020
Teleview ............... 059
Texscan ................ 020
Tocom .................. 031,032,078
Toshiba ................ 019
Tusa ...................... 034
Unika .................... 041,172
United Artists ....... 026
United Cable ........ 022
Universal .............. 041,058, 075, 172
Viewstar ............... 046, 079, 230
Zenith ................... 019
Zentek ................... 419
15

I _ INTRODUCTION
Quick Reference Menu Guide
• We recommend that you familiarize yourself with these procedures for using the Menu
function.
[v_F'Jtl_l_l_J[_
Press MENU to call up an on-screen
Ill
menu. 4p
Press < or I_ to
select the menu.
PICTURE AUDIO SETUP PREMIUM
Press • or • to select
an item.
CONTRAST _ MTS
BRIGHTNESS _ BASS
COLOR _ TREBLE
TiNT _ BALANCE
SHARPNESS _ SPEN_ESS
NOISE REDUCTION
CONVERGENCE
Press < or •
to selector
adjusta se_ing.
I TV/CABLE
CH PROGRAM
ADD/ERASE
LANGUAGE i
SURROUND
16
®
This mark indicates
which button you
should press next.
SBS PREFERENCE
SBS LEVEL
o_1
P ICTURE
PREFERENCE !
@
C.CAPTION
Co¢
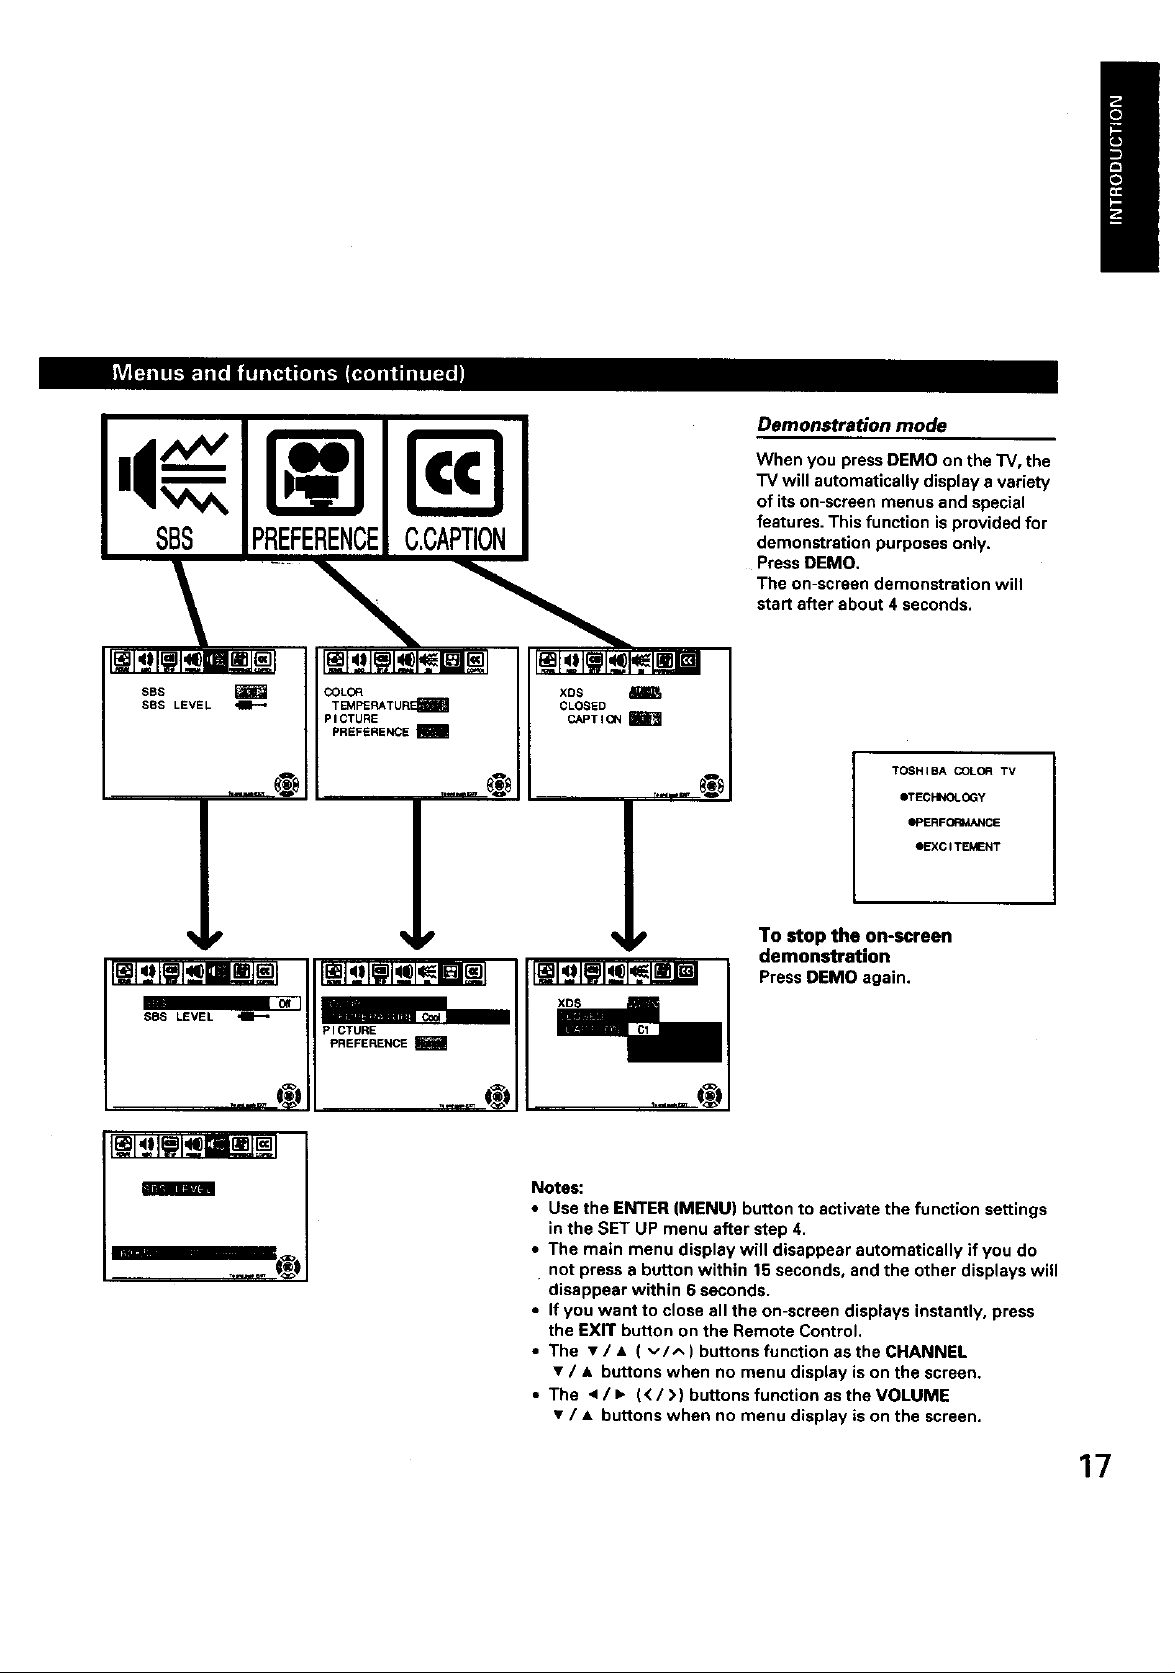
Demonstration mode
When you pressDEMO on the "IV, the
TV will automatically display a variety
of itson-screen menus and special
features. This function is provided for
demonstration purposes only.
PressDEMO.
The on-screen demonstration will
start after about 4 seconds.
TOSHIBA COLOfl TV
eTECHNOLOGY
ePERFOI_V_NCE
eEXCITEMENT
To stop the on-screen
demonstration
Press DEMO again.
Notes:
Use the ENTER (MENU) button to activate the function settings
in the SET UP menu after step 4.
• The main menu display will disappear automatically if you do
not press a button within 15 seconds, and the other displays will
disappear within 6 seconds.
• If you want to close all the on-screen displays instantly, press
the EXIT button on the Remote Control.
• The • / • ( v/A ) buttons function as the CHANNEL
• / • buttons when no menu display is on the screen,
• The < / • (< / >) buttons function as the VOLUME
• / • buttons when no menu display is on the screen.
17
 Loading...