

Page 1
A
F
E
B
20
19
18
1
2
15
C
D
H
G
I
J
14
13
9
8
21
1
23
475
3
6
8
9
0
MEMORY
12
4
7
5
6
22
11
17
10
16
1
Page 2

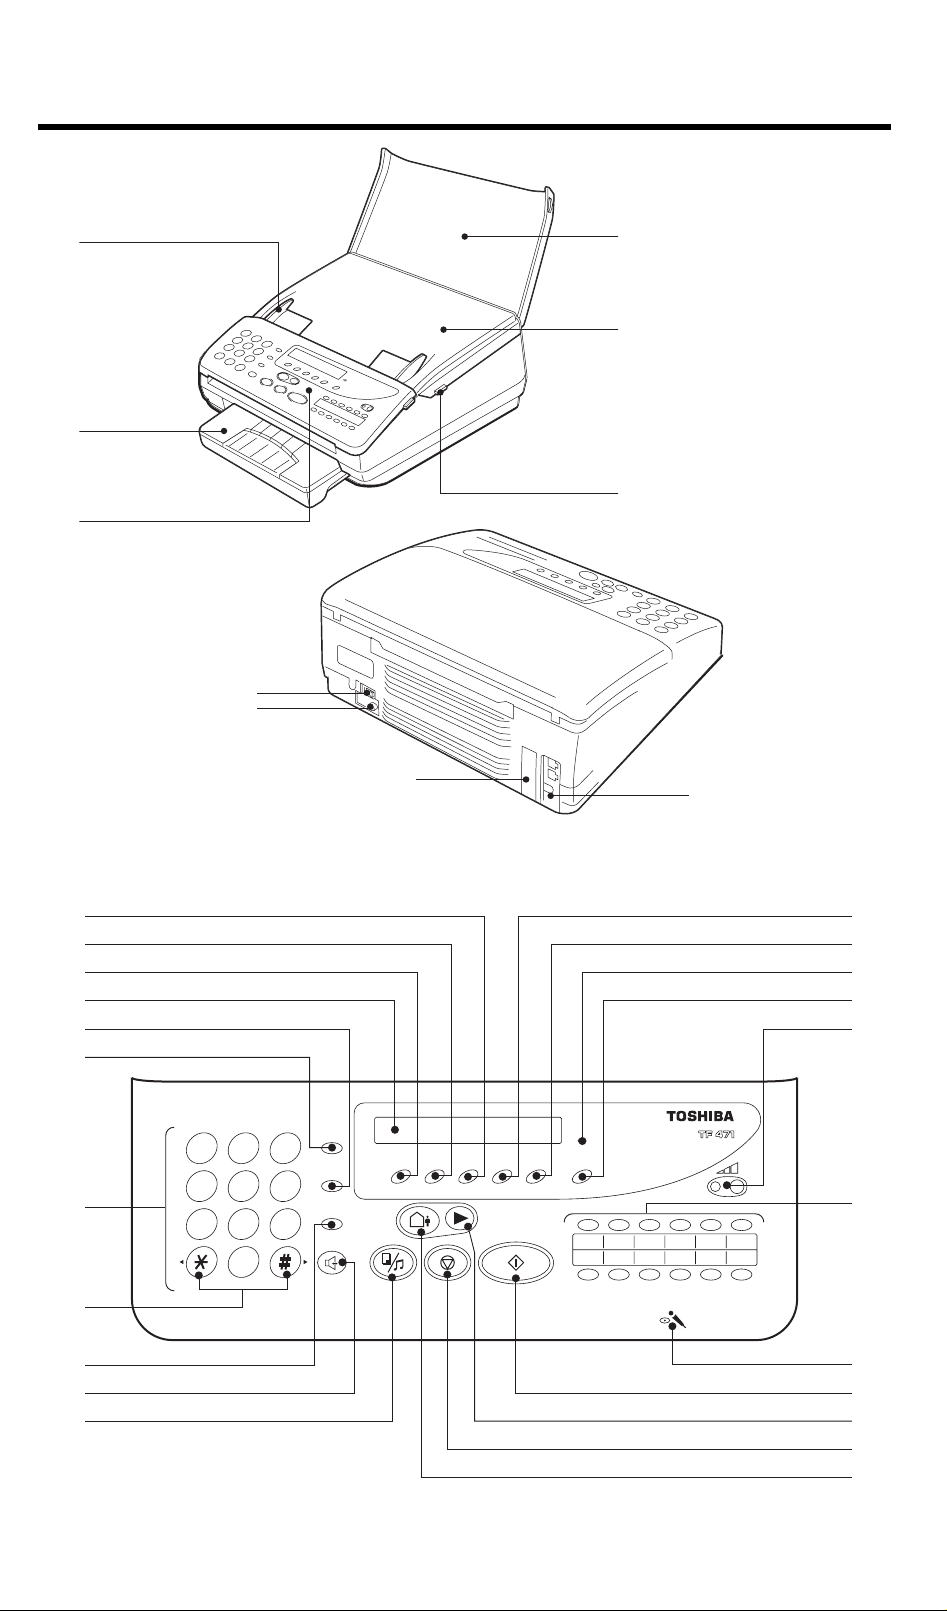
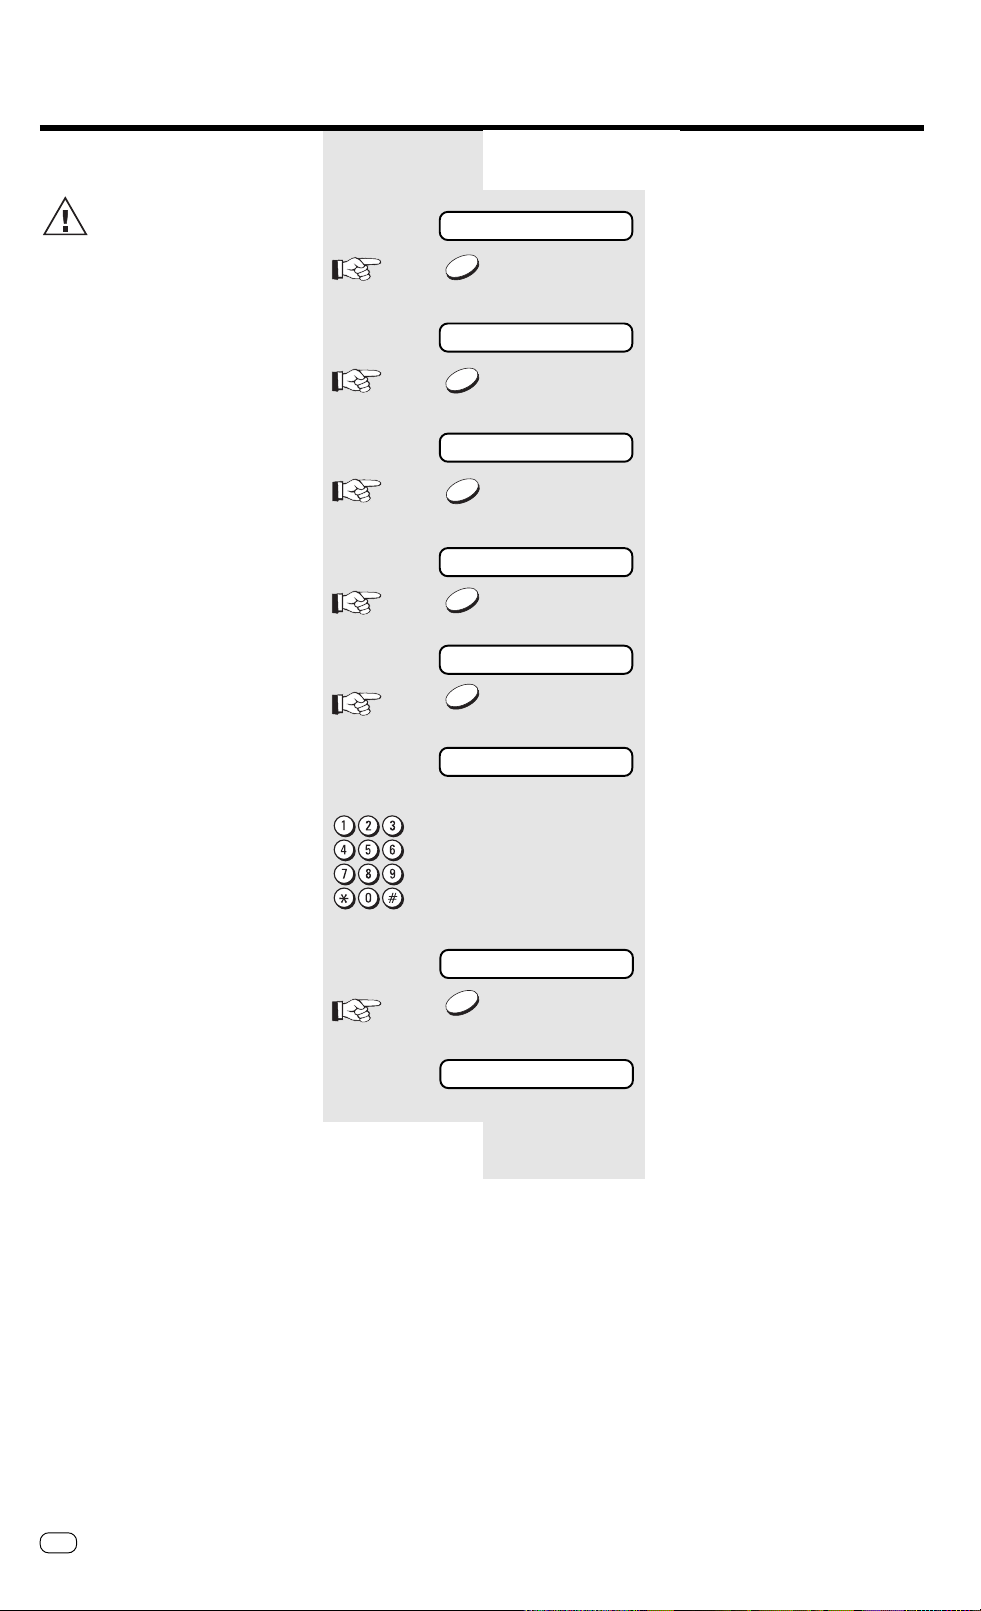
Welcome to your fax machine
Document guides
A
Recording paper cassette
B
Control panel
C
Release button
D
Cover
E
Display
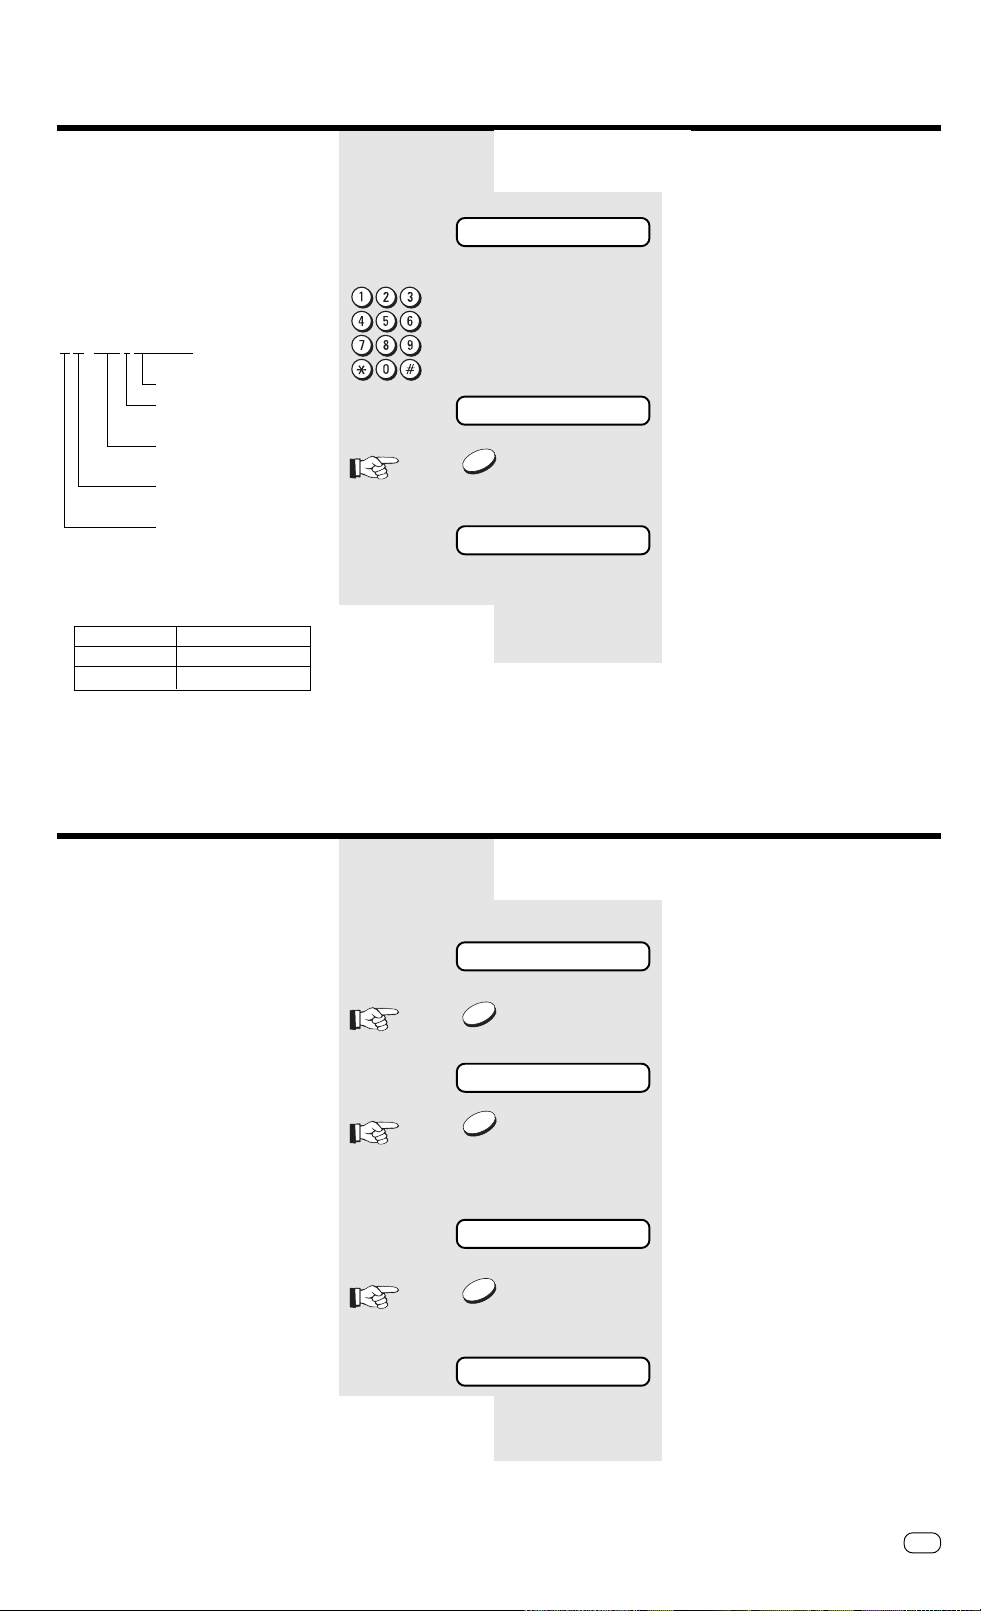
1
Displays indications about the operating
modes of your fax machine. Your
control monitor for all function settings.
ABB. DIAL / ALPHABET
2
Press this key in order to select a stored
alphabet dial number or a name.
Keypad
3
Use the keypad to enter numbers or
select characters
"*" and "#" KEY
4
Fast forward / rewind
Moves the cursor to the left or right.
SP Phone
5
This key replaces the external
telephone. Press this key to establish a
connection with the telephone line. You
can then use the keypad to dial, listen
to the other party via the loudspeaker
and talk with the other party via the
built-in microphone (speakerphone
facility).
If you have dialled a connection to a fax
machine, press the START key to start
the fax transmission. In order to end a
call (on-hook), press the SP PHONE key
again.
HOLD / COPY
6
During a call During a call
During a call (only via the speakerphone
During a call During a call
facility), the line is “muted” if this key is
pressed. The other party hears a brief
melody during this period. Press the key
again to clear the muting facility. If it is
not cleared manually, it is automatically
cleared after approx. 30 seconds. In
this case, you are notified by means of
three short tones.
In the standby mode, In the standby mode,
In the standby mode, when a
In the standby mode, In the standby mode,
document is inserted, this key is used
for making a copy.
Cover / document support
F
Mains connection
G
Power switch
H
Interface
I
Connection for telephone line (LINE) and
J
external telephone (TEL)
REDIAL / PAUSE
7
For speakerphone operation:For speakerphone operation:
For speakerphone operation:
For speakerphone operation:For speakerphone operation:
Activates the previous number dialled
under speakerphone operation.
If a fax number is entered:If a fax number is entered:
If a fax number is entered:
If a fax number is entered:If a fax number is entered:
Inserts a dialling pause of three
seconds.
MEMORY KEY
8
Activates transmission from memory.
MEMORY LED
9
Indicate whether there is a document
in the memory, do not switch off the fax
machine if this is the case.
STOP-KEY
10
Clears error messages and terminates
input.
START KEY
11
Initiates the sending and receiving
options.
ONE-T OUCH DIALLING KEYS
12
Sends documents at the push of a
button.
FUNCTION / NO KEY
13
Press this key to select menu items or
reject settings
MODE / YES KEY
14
With this key, you can choose between
four receiving modes and confirm
settings
TX-Report/Call
15
In standby mode:In standby mode:
In standby mode:
In standby mode:In standby mode:
This defines the output criteria of the TX
report (see page 61) (TX report always/
only on error)
During fax mode:
For an operator call, press this key if you
wish to indicate to the other party that
you wish to speak after the fax
transmission has been completed.
TAD
16
Switchover between T elephone
Answering Device and preselected
standby mode.
PLAY
17
Play back stored messages
TALK
18
Record a call
Memo / Erase
19
Record a memo
Erase individual messages
OGM
20
Record / play back the announcement
text
>>>>
21
Change playback volume
Microphone
22
GB
2
Welcome to your fax machine
TOSHIBA TF 471
Page 3

Preparation
Contents
Preparation
Unpacking................................................... 4
The correct location ................................... 4
Connection to the mains............................. 5
Connection of a telephone ......................... 5
Insert recording paper................................. 6
Insert print film............................................ 7
Installation
Enter user name ......................................... 8
Enter terminal ID......................................... 9
Setting dialling method............................... 9
Connection to PABX,
obtaining a public line............................... 10
Set date and time..................................... 12
Set language ............................................ 13
Reception of Documents
Set receiving mode: ................................. 14
Automatic reception (FAX)........................ 14
Set standby mode..................................... 14
Manual reception (TEL)............................. 15
Remote reception ..................................... 15
Call answering mode (FAX/T AD):............... 16
Combined mode (TEL/FAX): ...................... 16
Junk mail .................................................. 17
Polling ....................................................... 18
Reception reduction ................................. 19
Local copy ................................................ 20
Stop reception .......................................... 20
Memory reception..................................... 20
Set call delay............................................ 21
Transmit Documents
Last number redial .................................... 29
Delayed transmission ................................ 30
Single multi-address transmission ............. 32
Reserve polling.......................................... 33
Protected transmission.............................. 34
Switch off error correction ....................... 35
Adjust basic contrast ................................ 36
Stop transmission ..................................... 36
Store Numbers
Alphabet dial memory............................... 37
One-touch dial keys................................... 39
Telephony without a
Telephone
The speakerphone facility ......................... 41
Muting ...................................................... 41
Telephone Answering
Device (TAD)
Overview ................................................... 42
Recording, Playing and Deleting The Out-
Going Message ......................................... 43
Activate/deactivate the Telephone
Answering Device ..................................... 44
Record, played back, clear messages....... 44
Record, play back, delete memo.............. 47
Recording calls ......................................... 48
Remote polling.......................................... 49
Change recording time ............................. 50
Screen call during TAD mode ................... 51
Activate/deactivate message display ........ 52
Set call delay............................................ 53
Advanced Settings
Set transmission header position .............. 59
Cancellation of jobs .................................. 60
Change screening volume......................... 60
Set individual TX reports ........................... 61
Set journal printout ................................... 62
PC connection .......................................... 63
Operator call ............................................. 63
Possible Problems
Error codes ............................................... 64
Error messages in the Display ................... 64
Transmission problems.............................. 65
Receiving problems................................... 66
Document jam .......................................... 67
Paper jam ................................................. 67
Remote maintenance (COMLINE) ............. 68
Connection to PABXs................................. 69
Reset ........................................................ 69
UK Connection Information
EPA ENERGY STAR ................................... 70
Index
Index ......................................................... 71
Document format ..................................... 22
Automatic fax messages........................... 23
Transmission with alphabet dialling........... 24
Transmission with one-touch dialling......... 25
Long dialling.............................................. 26
Transmission with telephone
(manual transmission)............................... 27
Transmission with directory function......... 28
Set resolution ........................................... 29
Report Prints
Activate report printing ............................. 54
The transmission report ............................ 54
The multitransmission report..................... 54
Transmission and reception journal........... 55
The number list......................................... 56
The function list ........................................ 57
The reservation list.................................... 58
TOSHIBATF 471 Contents
Preparation
GB
3
Page 4

Preparation
Unpacking
When unpacking your machine, please check that all parts shown
here are present and in perfect condition.
1. Fax machine
2. User manual
3. Telephone cable
(not supplied in
all Countries)
4. Cover
The correct location
for your fax machine ist easily found:
• near a 230 V AC socket
• near a telefphone connection
* If you wish to switch your machine off for a longer period, cut the
power supply by removing the power cable from the machine or
socket.
* No other equipment with high power consumption (such as a
photocopier) or equipment which generates electrical noise (such
as a radio, computer, radio transmitting and receiving equipment)
should be connected to this mains supply.
AC power
You will find the mains connection on the back of the machine. The
ON/OFF switch is situated above the mains jack.
Please protect your machine from:
vibration
5. Paper cassette
6. Inkfilm
7. Ink film adapters
8. Powercable
direct sunlight
dust
humidity
heat
If anything is missing, or damaged, please contact your dealer
immediately.
GB
4
Preparation
TOSHIBA TF 471
Page 5
Preparation
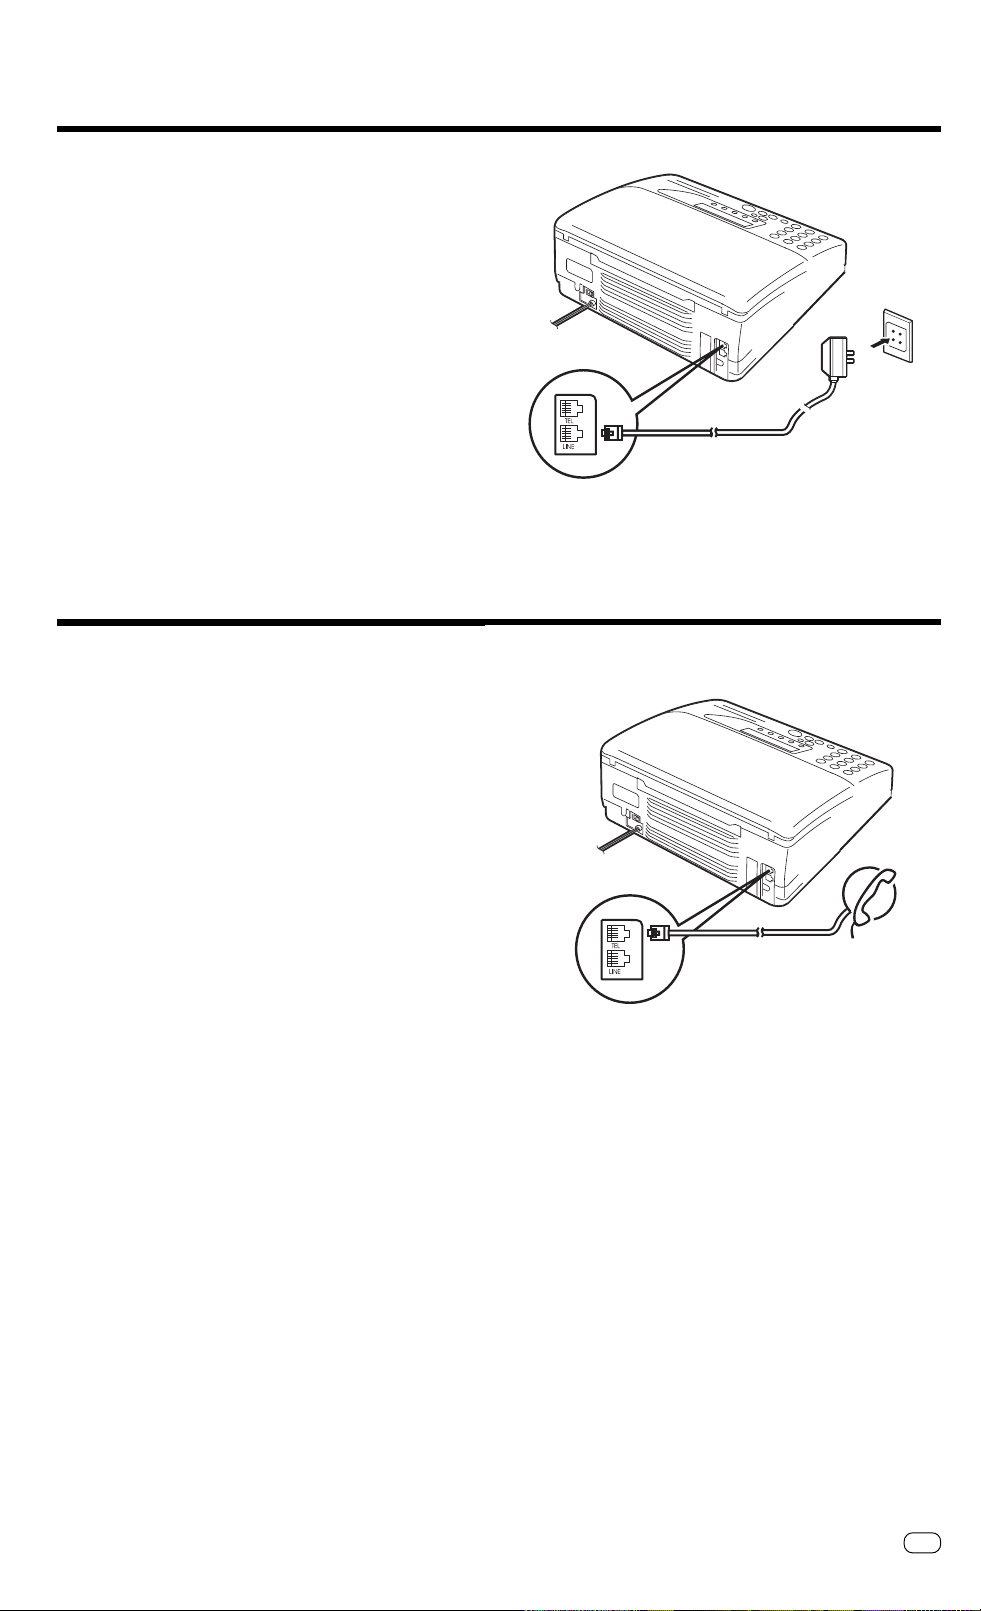
Connection to the mains
Connect your fax machine (LINE jack) to the telephone socket, as
shown on the right.
Connection of a telephone
Liability in case of wrong connection by the user is excluded.
In the UK, connection of an external telephone or cordless telephone
should be made at the socket on the “break in adaptor”. The “break
in adaptor” is the small white box found at the end of the telephone
cable supplied with the TF471 in the UK.
GB
TOSHIBATF 471
Preparation
5
Page 6
Preparation
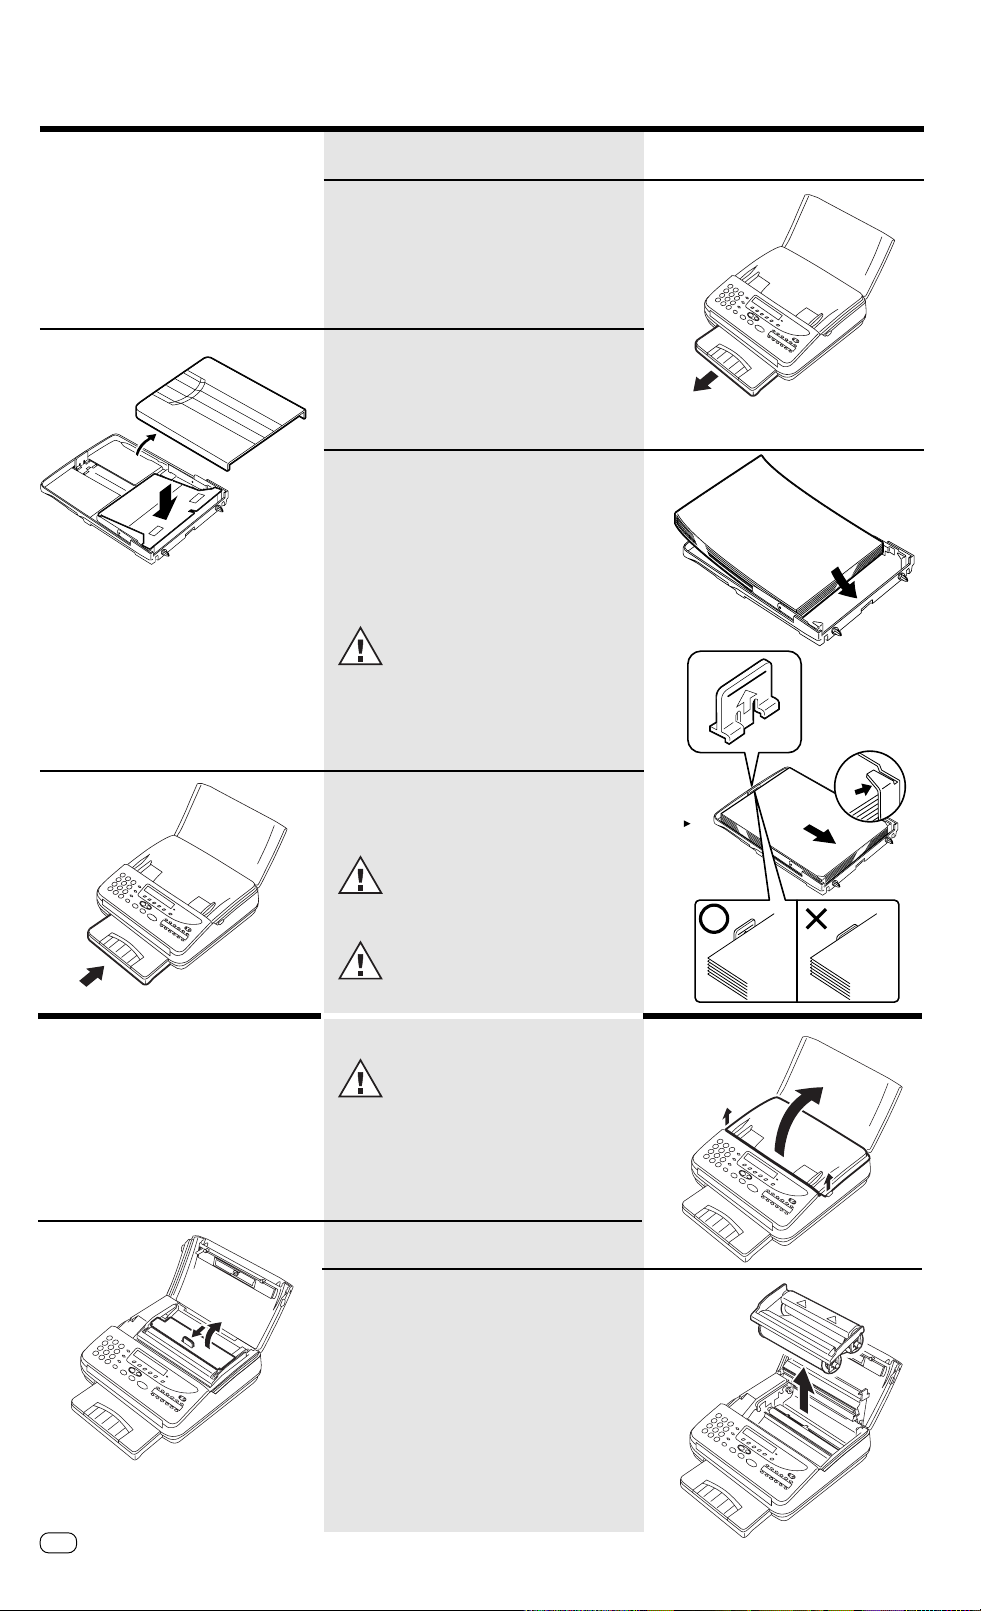
Insert recording paper
Remove the paper cassette
Press down the cassette plate until it locks into
place.
Insert a stack of A4 paper.
Prepare the recording paper by flexing and
fanning out the stack to separate the sheets.
Place the paper so that it lies straight in the
cassette with the side to be printed facedown
and don’t forget:
The paper cassette holds a maximum
160 sheets (80 g/qm).
Insert print film
Then: Slide the cassette into the slot
until you hear it lock into place.
Ensure that the base plate is pressed
correctly into possition. Otherwise there
will be a paper jam.
Do not use damp, wrinkeld or torn
paper.
Do not switch off machine during this
process.
Open the cover.
Pull up the release button on the right side of your
fax machine. The cover opens.
Unlock the printer unit
Lift out the film holder
When installing for the first time: Carefully remove
the protective strip above the gold-coloured print
head to avoid damaging it.
GB
6
Preparation
TOSHIBA TF 471
Page 7
Preparation
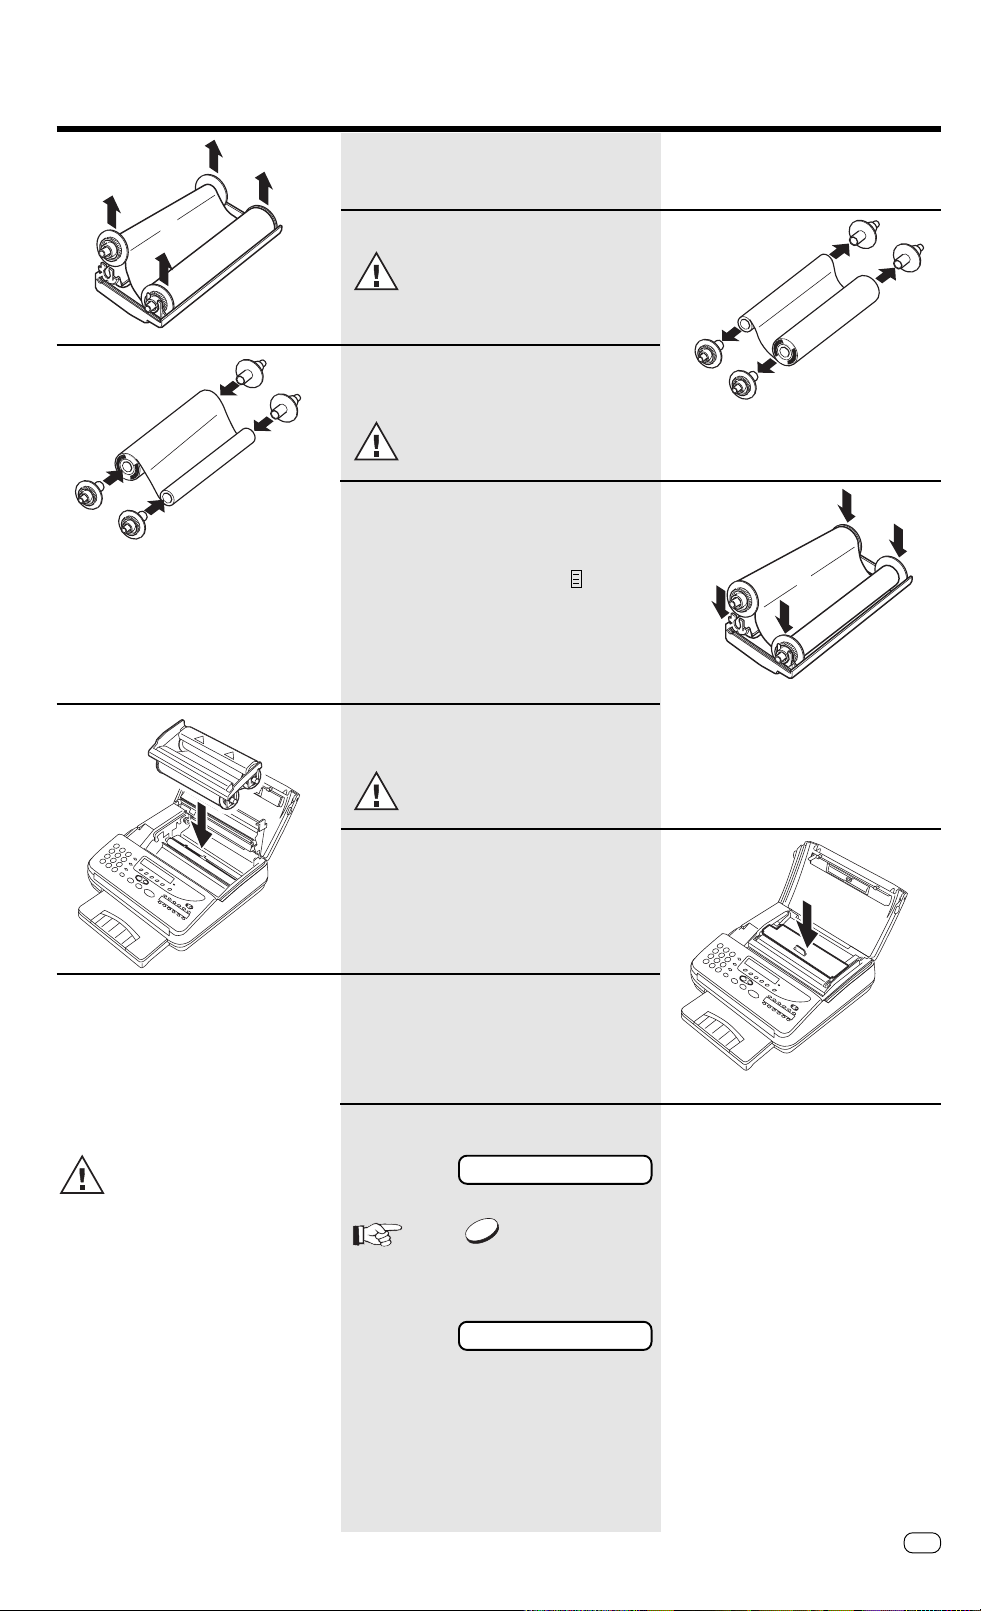
Remove the old film.
Pull out the hubs.
Do not throw them away.
Insert the hubs into the new film
The drive hubs with the gear teeth are
placed on the side of the film with the
grooves.
Replace the film in the film holder.
Consider the film holder for a moment.
• On the base, there is a marking . The drive
hubs with gear teeth must be located on this
side.
• The full roll must be located to the rear. See
the marking mm on the holder.
• The empty roll must be located at the front.
This message always appears
when closing the cover. If the ink
film is not been replaced, confirm
with NO.
Replace the film holder in the fax
machine.
Ensure that the marking mm on the
holder is pointing to the rear (see
diagram).
Close the printer unit
Close the cover
INK F IL M C HANGE D ?
YES
Confirm with YES
The ink film counter will be reseted.
15.03 TEL 00
TOSHIBATF 471
Standby mode
Preparation
GB
7
Page 8
Installation
_
_
Enter user name
The following steps include
entering the name, the terminal
identification, the dialling
procedure and the line type. These
settings should be made quickly, as the
maximum permitted pause between data
entry is approx. one minute. Take your
time therefore to read the information
concerning the name, identification,
dialling procedure and line type, and only
start the procedure when you have
finished reading.
If you have not entered all the data within
the permitted time, the details will not be
completely stored. In this case, repeat the
entire procedure again.
The transmission header not only contains
the terminal ID but also the user name.
This can contain up to 20 characters.
Use the digit input keys for entering the
alphanumeric characters.
Each digit features several characters
which can be activated by repeatedly
pressing the corresponding key. If you
have found a character of your choice,
press the ”#” key to go to the next
position. Use the ‘*’ key to go back one
letter and make any corrections. Use the
”0” key to select special characters.
If you have entered one letter too many,
delete it by pressing the NO key.
When the name is complete, press the
YES key. Example: TOSHIBA
Part 1
3 x
2 x
15.03 TEL 00
NO
INSTALLATION ?
YES
SET RECEIVE MODE ?
NO
IN ITIAL SE TTING ?
YES
SET TERMINAL ID ?
YES
ID=
ID=TOSHIBA
standby mode
Start the menu. Press ...
...until this menu item appears.
Confirm.
Press NO ...
Confirm.
Confirm.
Machine prompts user to enter the user
name
Enter the name
Example: TOSHIBA
1 x 8 = T# 3 x 4 = I#
3 x 6 = O# 2 x 2 = B#
4 x 7 = S# 1 x 2 = A
2 x 4 = H#
YES
TEL=
Confirm with YES.
Machine prompts user to enter the
sender's number (Continue with part 2
without interruption)
Part 2
GB
8
Installation
TOSHIBA TF 471
Page 9
Installation
_
Enter terminal ID
The terminal ID which is part of the
transmissing header contains the number
under which your fax machine can be
reached. The number should be entered
in the international format:
Example:
+44-1931-12345678
Fax number
Space
(to improve legibilitly)
Area code (without initial
0)
Country code (here:
Germany)
Plus symbol (for the
international form)
Character Key to be pressed
+ * - Key
Hyphen REDIAL/PAUSE key
Enter the actual figures via the dial keypad
(as usual).
Part 2
TEL=
TEL=+44-1932-12345678
YES
SET DIAL TYPE ?
Part 3
Machine prompts user to enter the
sender's number
Enter terminal ID
Terminal ID is complete.
Confirm with YES.
Machine prompts user to enter the dial
type (Continue with part 3 without
interruption)
Setting dialling method
There are two dialling methods. The
pulse-dialling method is normally used in
the public switched telephone network. If
your fax machine is connected to a PABX,
the DTMF dialling method may also be
used. As the public network is
modernised, this dialling method may also
be used in the public network. If you are
in any doubt, first try the pulse-dialling
method (basic setting). If the dialling
procedure fails, try DTMP dialling. How
ever DTMF is the most efficient.
*) This function is not available in certain
cases depending on the design for a
specific country.
Part 3
SET DIAL TYPE ?
YES
DIAL TYPE = MF
NO
DIAL TYPE = DP
YES
EXCHANGE = PSTN
Part 4
Machine prompts user to enter the line
type
Confirm.
Enter the current dialling procedure
Press NO ...
...until the desired menu item appears
(here pulse-dialling)
Confirm with YES.
Current line type is displayed (Continue
with part 4 without interruption)
TOSHIBATF 471
Installation
GB
9
Page 10
Installation
Connection to PABX, obtaining a public line
The TF471 can be connected not only to
the public switched telephone network
(public line) but also to a PABX. In this
case, additional parameters have to be
entered.
With PABXs, the public line is obtained in
various ways:
• Number Dial one digit (or several
digits) in order to obtain
the public line
•Earth key Earth potential is
connected to the voice
wire(s) in order to obtain
the public line
• Flash key With this method of
obtaining the public line,
the connection circuit is
interrupted briefly.
With this method of obtaining
the public line, the connection
circuit is interrupted briefly.
When the method of obtaining a public
line has been entered, you must always
press the key ”*” before the actual
number when you dial your fax partner.
This is also applicable for saving the fax
numbers (see page 38).
Part 4
EXCHANGE = PSTN
NO
Go to A Go to B
EXCHANGE = PSTN
A
EXCHANGE = PSTN
YES
SET DATE & TIME ?
STOP
15.03 TEL 00
EXCHANGE = PABX
B
EXCHANGE = PABX
Current line type is displayed
Press NO ...
...until the desired menu item appears
EXCHANGE = PABX EXCHANGE = PSTN
Confirm with YES.
Next menu item is displayed
Press STOP, return to standby
mode
Obtaining
public line
=digit
Go to C
YES
ACCESS TYPE = DIGIT
NO
Obtaining
public line
=earth key
Go to D
Obtaining
public line
=flash
Go to E
Confirm with YES.
Current method of obtaining a public line
is displayed
Press NO ...
...until the desired menu item appears
GB
10
Installation
TOSHIBA TF 471
Page 11

Installation
_
ACCESS TYPE = DIGIT
C
ACCESS TYPE = DIGIT
YES
ACCESS DIGIT =
ACCESS DIGIT = 0
YES
SET DATE & TIME ?
STOP
15.03 TEL 00
ACCESS TYPE = EARTH
D
ACCESS TYPE = EARTH
Confirm with YES.
Machine prompts user to enter the code
Enter the digit(s) for obtaining
public line
(max. 3 digits)
Confirm with YES.
Next menu item is displayed
Press STOP, return to standby
mode
YES
STOP
15.03 TEL 00
E
ACC ES S TY PE = FLAS H
ACC ES S TY PE = FLAS H
YES
STOP
15.03 TEL 00
SET DATE & TIME ?
SET DATE & TIME ?
Confirm with YES.
Next menu item is displayed
Press STOP, return to standby
mode
Confirm with YES.
Next menu item is displayed
Press STOP, return to standby
mode
TOSHIBATF 471
Installation
11
GB
Page 12
Installation
Set date and time
Enter the current date and time at this
point so that all details relating to date and
time is correct. The internal clock of your
fax machine then runs automatically - even
in the event of a power failure.
15.03 TEL 00
3 x
NO
INSTALLATION ?
YES
SET RECEIVE MODE ?
2 x
NO
IN ITIA L S E T T IN G ?
YES
SET TERMINAL ID ?
2 x
NO
SET DATE & TIME ?
standby mode
Start the menu. Press ...
...until this menu item appears.
Confirm.
Press NO ...
Confirm.
Page through the menu ...
...until this menu item appears.
STOP
YES
DD - MM- Y Y H H :MM
1503981956
YES
15.03 TEL 00
Confirm with YES.
Machine prompts user to enter date and
time
Example:
15th March, 1998, 19:56 hours
Confirm with YES.
Press STOP, return to standby
mode
GB
12
Installation
TOSHIBA TF 471
Page 13
Installation
Set language
Your fax machine is set to English. Please
carry out the following menu steps if you
wish to use another language for the
menu and the list prints.
15.03 TEL 00
7 x
NO
LANGUAGE ?
YES
SELECT LANGUAGE ?
YES
ENGLISH ?
NO
DEUTSCH ?
YES
SELECT OGM LANGUAGE?
standby mode
Start the menu. Press ...
...until this menu item appears.
Confirm with YES.
Confirm with YES.
first available language is displayed
Press NO ...
• ENGLISH
• ITALIANO
• DEUTSCH
• ...
... until the desired menu item appears.
Confirm with YES.
Language of announcement text in the
TEL/FAX setting
YES
ENGLISH ?
NO
DEUTSCH ?
YES
15.03 TEL 00
Confirm with YES.
first available language is displayed
Press NO ...
• ENGLISH
• ITALIANO
• DEUTSCH
• ...
...until the desired menu item appears.
Confirm with YES.
standby mode
TOSHIBATF 471
Installation
13
GB
Page 14

Reception of documents
Set standby mode
If your fax machine is connected to the
telephone network or to a PABX, four
different modes are available for receiving
documents or messages.
Use the TAD key to switch on the
Telephone Answering Device of your fax
machine (FAX/TAD mode). Press this key
again to restore the preset receiving
mode.
Set receiving mode:
Press once
Press twice
333335
TAD
333335
TAD
Depending on setting
15.03 TEL 00
3 x
NO
INSTALLATION ?
YES
FAX/TAD
TEL
FAX
TEL/FAX
standby mode
Start the menu. Press ...
...until this menu item appears.
Confirm.
Description of the individual
receiving modes:
Automatic reception (FAX)
SET RECEIVE MODE ?
YES
RECEIVE MODE=TEL
NO
RECEIVE MODE=FAX
YES
15.03 FAX 00
If the line is reserved exclusively for fax
operation.
15.03 FAX 00
Confirm.
Current receiving mode is displayed
Press NO ...
...Until the required receiving mode is
displayed
Confirm.
standby mode
The fax machine switches over to
reception as soon as the line rings (see
page 21).
The fax machine is always
activated, even if the call is
initiated by a voice partner.
GB
Reception of documents
14
TOSHIBA TF 471
Page 15

Reception of documents
Manual reception (TEL)
Remote reception
If the line is used primarily for telephone traffic If a telephone call is received, the fax
machine is not activated *). The call
15.03 FAX 00
15.03 FAX 00
must be picked up via the speakerphone
facility (SP phone key) or via the external
telephone. If a fax transmission is
requested, the start key of the fax
machine must be pressed (while the
connection still exists).
Ensure that any fax calls can
indeed be accepted; it is always
necessary to press the START
key.
*) In order to enable the Telephone
Answering Device to be activated
(see page 42) via the remote control
facility, the fax machine enters the
polling standby mode approx. 45
seconds after the first ring. If a
document is then not remotely polled,
the line is released shortly afterwards.
standby mode
If you have connected the cordless
telephone to your fax machine, it is
possible that you may pick up a call which
is destined for your fax machine. This can
for instance be heard in the form of
periodic whistle. Use the key code 5#
(with pulse dialling = 5) to activate the
fax machine virtually by remote control).
Remote reception can be activated or
deactivated:
3 x
NO
INSTALLATION ?
YES
SET RECEIVE MODE ?
4 x
NO
C O MM. SET TING ?
YES
SET REMOTE REC EIVE ?
YES
ON ?
/
YES
NO
Start the menu. Press ...
...until this menu item appears.
Confirm.
Press NO ...
...until this menu item appears.
Confirm with YES.
...until this menu item appears.
Confirm with YES.
The machine prompts whether remote
reception is to be activated.
Press YES to activate the menu
item, press NO to deactivate the
item.
STOP
15.03 FAX 00
TOSHIBATF 471
mode
standby mode
Reception of documents
15
GB
Press STOP, return to standby
Page 16
Reception of documents
Combined mode (TEL/ FAX):
If the line is defined for telephone as well as for
fax operation, and if you are primarily situated in
the room.
In the event of a call, the fax machine
decides on the subsequent mode fully
automatically:
If the connection is a telephone call, the
fax machine generates ringing signal via
the loudspeaker so that this call is
indicated as a call. In parallel, the calling
party receives an announcement with a
subsequent ringing signal to indicate that
the other party is being called *).
In order to collect the call, simply lift the
external handset or press the
speakerphone key for the speakerphone
facility.
If the call is a fax transmission, your fax
machine does not generate a ringing
signal and automatically receives the
document.
Ensure that, in this mode, there
is always somebody present to
collect the call. As soon as the
announcement is made, the
connection is established and the calling
party incurs charges.
*) During the announcement, the
T elephone Answering Device (see
page 42) can be activated via a
remote polling transmitter.
Call answering mode (FAX/TAD):
If the fax machine is operated with the
T elephone Answering Device.
This mode enables you to receive fax
documents and also to handle callers.
T wo situations are possible:
You are at home:You are at home:
You are at home:
You are at home:You are at home:
The TAD is not activated (is not lit). The
fax machine operates in accordance with
the reception mode of your choice (see
page 14).
You are absent:You are absent:
You are absent:
You are absent:You are absent:
T o activate the Telephone Answering
Device, press the TAD key (permanently
lit). The T elephone Answering Device
records all calls. If a fax document
arrives, your fax machine automatically
handles the process of receiving the
document.
Please refer to page 42 et seq.
for the settings of the Telephone
Answering Device.
GB
Reception of documents
16
TOSHIBA TF 471
Page 17
Reception of documents
Junk mail
There are no restrictions applicable for
receiving documents. However, if the
reception protection facility is activated,
the machine is only able to receive
documents from fax machines whose
code has been stored as a fax number in
the speed dialling memory of your fax
machine. The transmitted code of the
transmitter is compared against the
contents of your speed dialling memory. If
no number is stored, every transmission is
rejected.
Only the final five digits are
compared.
15.03 TEL 00
15.03 FAX 00
3 x
NO
INSTALLATION ?
YES
SET RECEIVE MODE ?
4 x
NO
COMM. SETTING ?
YES
2 x
NO
SET PRIVILEGED RX ?
YES
ON ?
standby mode
Start the menu. Press ...
...until this menu item appears.
Confirm.
Press NO ...
...until this menu item appears.
Confirm with YES.
Press NO ...
...until this menu item appears.
Confirm with YES.
The machine prompts whether reception
protection is to be activated.
/
YES
NO
15.03 FAX 00
15.03 TEL 00
Press YES to activate the menu
item, press NO to deactivate the
item.
standby mode
TOSHIBATF 471
Reception of documents
17
GB
Page 18
Reception of documents
Polling
In a type of self-service mode, you can
retrieve documents from any other fax
partner if the partner has prepared this
function. This also permits “fax on
demand”, i.e. the process of retrieving
information from mail boxes, e.g.
weather, traffic conditions or stock market
news.
15.03 FAX 00
START
123456789
15.03 FAX 00
5 x
NO
POLLING ?
YES
POLLING RESERVE ?
NO
Simple polling
standby mode
Enter the fax number of the fax
machine from which you wish to
poll a document (do not insert a
document!)
(You can of course also enter an alphabet
dialling number or press a speed dialling
key).
Press START key
Your fax machine now dials your fax
partner and polls the document which is
reserved.
Delayed polling
standby mode
Start the menu. Press ...
...until this menu item appears.
Confirm with YES.
Press NO ...
POLLING ERROR
If this display appears in conjunction with
a long tone, the polling procedure has not
been successful. The reason may have
been that no document was reserved for
polling, or the reservation was protected.
Press the STOP key to delete the display,
and try to poll again. This error message
does not have any effect on subsequent
functioning of the fax machine.
Error messages in the display are
retained until they are
acknowledged with the STOP
key.
*) Information concerning the TOSHIBA
password is set out on page 33.
POLLING RECEIVE ?
YES
DELAYED POLL ?
YES
HH :MM= _ :
HH:MM= 04:25
YES
SECURITY CODE ?
NO
TEL=_
123456789
START
15.03 FAX 00
Confirm with YES.
Confirm with YES.
Entry field for polling time
Enter the time
(Example 4:25)
Confirm with YES.
Activate TOSHIBA password? *)
Press NO ...
Entry field for fax number
Enter the fax number of the other
station
Press START key
Delayed polling job is stored
GB
Reception of documents
18
TOSHIBA TF 471
Page 19
Reception of documents
Reception reduction
Your fax machine uses A4 paper. For
technical reasons aspects mean that the
entire length of this page cannot be used.
For this reason, the fax machine reduces
the length of the incoming document.
This means that the received image may
be slightly compressed.
In general, this effect is not
problematical. However, if the sizes of the
documents must be absolutely identical, it
is necessary to deactivate the reception
reduction facility. In this case, that part
of the copy which no longer fits on the
page is printed out on a second page. If
you are able to do without the ”rest” of
the page, activate the discard facility to
suppress printout on the second page.
Original (A4)
15.03 FAX 00
3 x
NO
INSTALLATION ?
YES
C O MM. SET TING ?
3 x
NO
PRINTER SETTING ?
YES
SET RX REDUCTION ?
ON ?
YES
15.03 FAX 00
Reception reduction ON/OFF
standby mode
Start the menu. Press ...
...until this menu item appears.
Confirm.
Press NO ...
...until this menu item appears.
Confirm with YES.
Press YES to activate the menu
/
NO
item, press NO to deactivate the
item.
standby mode
Reception reduction: ON
Reception reduction: OFF
Discard: OFF
Reception reduction: OFF
Discard: ON
15.03 FAX 00
3 x
NO
INSTALLATION ?
YES
C OMM. SE TT ING ?
3 x
NO
PRINTER SETTING ?
YES
SET RX REDUCTION ?
NO
SET DIS C AR D ?
ON ?
Discard ON/OFF
standby mode
Start the menu. Press ...
...until this menu item appears.
Confirm.
Press NO ...
...until this menu item appears.
Confirm with YES.
Press NO ...
Confirm with YES.
YES
/
YES
15.03 FAX 00
TOSHIBATF 471
NO
Press YES to activate the menu
item, press NO to deactivate the
item.
standby mode
Reception of documents
19
GB
Page 20
Reception of documents
_
Local copy
You can use your fax machine to make
one or more copies (up to 10).
The copy is also reduced (see
page 19).
For local copies the resolution is always
"FINE".
STD NORMAL
COPY
COPY N BR(1- 10) = 1
FOR MULTIPLE COPIES:
NO
COPY N BR(1- 10) =
COPY N BR(1- 10) = 5
YES
ENLARGE ?
NO
Load original
Remember:
Printed side face-down
Press COPY key.
Current number of copies
Enter NO to delete current setting
Enter the new value (e.g. 5)
Confirm with YES.
Press NO ...
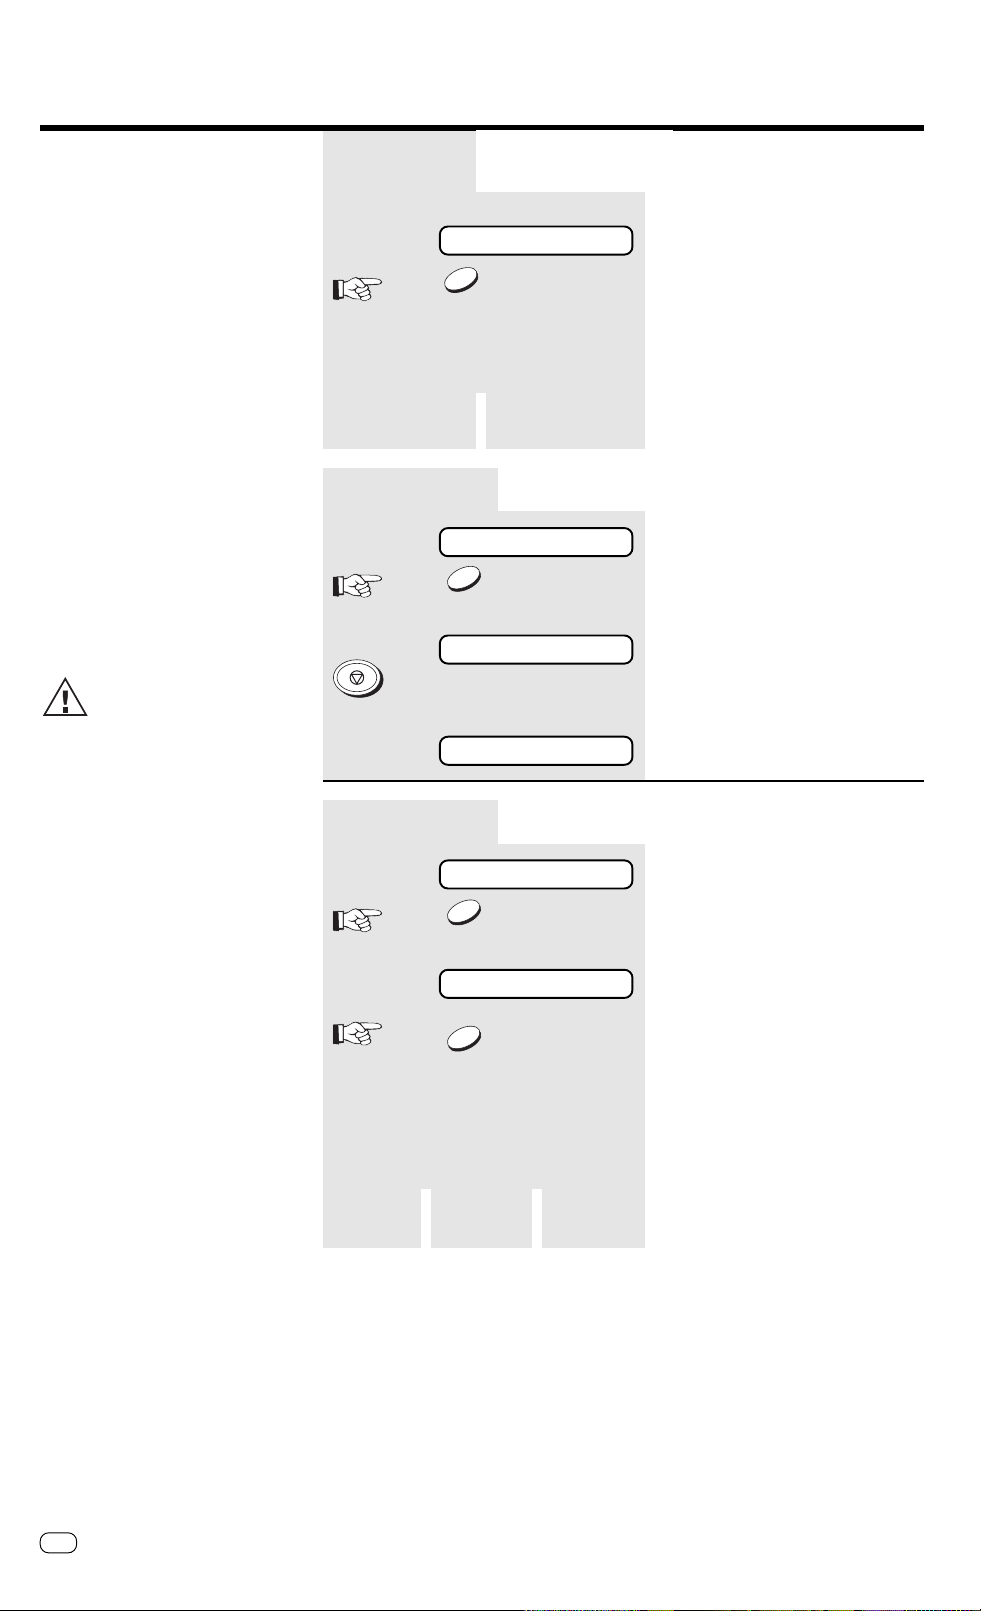
Stop reception
Incoming documents are received via a
reception memory in your fax machine.
This means that the document is printed
out only after it has been completely
received in the machine’s memory.You
can stop the reception process at any
time, and the fragment of the documents
which has been received up to that time
is then printed out.
Memory reception
Under certain circumstances, the
machine cannot print out any further
incoming copies:
• If there is no recording paper
• If there is a paper jam
In order to prevent problems with
reception, the remaining pages are
buffered in the memory of your fax
machine. Once the problem has been
solved, the document is printed out
automatically.
Do not switch off the power
supply as otherwise the contents
of the memory will be lost.
STO P
MEMORY
REDUCE ?
YES
HS N ORMAL
ARE YOU S UR E ?
YES
PAPER E MPT Y
...until this menu item appears.
Confirm with YES.
Fax machine receiving into memory
Press the STOP key to stop
reception.
Double check
Confirm with YES.
The fragment which has been received
up to that point is printed out.
Indication that there is no more
paper.
GB
Reception of documents
20
TOSHIBA TF 471
Page 21
Reception of documents
_
Set call delay
If your fax machine is set to automatic
receive (FAX, TEL/FAX, see page 14,16), it
will immediately collect the call as soon
as it is called. The following setting can
be used to define a delay applicable
before the fax machine is activated
(number of rings).
The setting of the call counter
for the call answering mode
(FAX/TAD), is detailed on page
53.
15.03 FAX 00
3 x
NO
INSTALLATION ?
YES
SET RECEIVE MODE ?
4 x
NO
COMM. SETTING ?
YES
1 x
NO
SET C ALL TIME ?
YES
CALL TIME = 1
/
YES
standby mode
Start the menu. Press ...
...until this menu item appears.
Confirm with YES.
Press NO ...
...until this menu item appears.
Confirm with YES.
Press NO ...
Confirm with YES.
Current number of calls
Press YES to confirm the figure
Press NO to delete the display
NO
Press NO:
CALL TIME =
CALL TIME = 5
YES
Enter the new call number
(1 ~ 5)
The new call number (5 in this case) has
been set
Confirm with YES.
TOSHIBATF 471
Reception of documents
21
GB
Page 22

Transmit documents
Document format
The following table gives you an idea of
which documents your fax machine can
handle.
Please note:
• Documents longer than 381 mm can
only be loaded manually.
• If you load severeal sheets at one
time, they should all be of the same
size and paper quality.
Single sheet 2 or more sheets
Document size (max) 216 mm (W) x 1000 mm (L) 216 mm (W) x 297 mm (L)
Document size (min) 148 mm (W) x 100 mm (L)
Effective scanning width 215 mm
How many sheets stacks up to
can be loaded at 20 sheet A4
one time?
Thickness of paper 0,05 ~ 0,15 mm 0,06 ~ 0,12 mm
Quality of paper Uncoated on both sides
Problem documents ...
May not feed. This applies to
• torn, wrinkled or damp pages
• folded pages or pages with holes
• transparent pages or pages with a smooth,
shiny finish
• textile or metallic douments
There are two ways of avoiding this problem:
...by photocopying or using a carrier
sheet.
Your TOSHIBA dealer can supply you with the
necessary carrier sheets.
How to use carrier sheets:
Place your document face-up on the carrier
sheet under the transparent cover. Carrier
sheets can be used like normal documents
except for one restriction: only one carrier sheet
can be fed at one time.
How to load documents correctly
Remove any paper-clips, staples and similar
objects before transmitting the document. Now
place your documents on the document tray up to 20 at one time - as shown.
Automatic document feeder
Most important: Only the document sheets
placed facedown on the document tray can be
read. If you can still read your text, you’ll be
sending empty pages or the back of pages!
Adjust the document guides to the edges of the
sheets. After 2 seconds, your document will be
automatically pulled in by about 2 cm.
If the machine pulls in more
than one document if the
weather is damp, or if the
documents are from the printer, insert
only the first document. When this
document has been pulled into the
machine, place the remaining documents
on top.
GB
22
Transmit documents
TOSHIBA TF 471
Page 23

Transmit documents
Automatic fax messages
To send fax messages in the traditional
manner: Insert document(s), enter the fax
number and the connection is
automatically established.
Please note that you must press
the „❊“ button before the
actual fax number if your fax
machine is connected to a PABX.
START
15.03 FAX 00
STD NORMAL
12345678
DIALING
123.....
Load original
Remember:
Printed side face-down
Wait until the document is pulled in by
2 cm.
Enter the number of the other
machine via the keypad of your
fax machine.
Press START key
The line is checked
If this message continues to be
displayed, this indicates that the
access line is defective, or that
the line type is incorrect (see page 65
”Transmission problems”).
The dialling digits then pass through the
display.
HS N ORMAL
COMMUNICATION ERROR
after a brief time:
Your document is now scanned line by
line and transmitted.
If this text is displayed in conjunction with
a long tone, the transmission process has
not been successful. Cancel the display
by pressing the STOP key and attempt to
send the document again. This error
message does not affect subsequent
functioning of the fax machine.
Tips concerning communication errors
are set out on page 64/65.
Error messages continue to be
displayed until they are
acknowledged with the STOP
key.
GB
TOSHIBATF 471
Transmit documents
23
Page 24

Transmit documents
Transmission with alphabet dialling
Alphabet dialling enables you to enter a
double-digit “address” instead of the
(frequently-long) fax number of your
partner. The real fax number is then
permanently stored under this “address”.
The alphabet dialling facility thus enables
you to save time with frequently used fax
numbers.
Please refer to page 37 for
details of how to save alphabet
dialling numbers.
2 x
ABB.DIAL
ALPHABET
START
15.03 FAX 00
STD NORMAL
ABB. NUMBER = (01-50)
ABB. N U MBER = 0 1
TOSHIBA
Insert document
Remember:
Printed side face-down..
Wait until the document is pulled in by
2 cm.
Start alphabet dialling
Enter the alphabet dialling number
of your partner.
Press the START key *)
The name which is stored under the
alphabet dialling number is briefly
displayed, or the stored fax number is
displayed.
DIA LING
123.. . . .
HS N ORMAL
*)
NUMBER NOT LISTED
The line is checked
If this message continues to be
displayed, this indicates that the
access line is defective, or that
the line type is incorrect (see page 65
”Transmission problems”).
The dialling digits then run through the
display.
after a brief time:
Your document is now scanned line by
line and transmitted.
This message is displayed if there is
nothing stored under the abbreviated
dialling number which you have selected.
GB
24
Transmit documents
TOSHIBA TF 471
Page 25

Transmit documents
Transmission with onetouch dialling
One-touch dialling provides you with a very
easy method of dialling the number of
your partner. Your can assign any fax
numbers to 12 keys. You need to press a
key only once in order to reach your
partner.
Please refer to page 39 for
details of how to store one-touch
dialling numbers.
15.03 FAX 00
STD NORMAL
TOSHIBA
DIA LING
123.....
HS N ORMAL
Load original
Remember:
Printed side face-down
Wait until the document is pulled in by
2 cm.
Press the one-touch dialling
key *)
The name which is stored under the onetouch dialling key is briefly displayed, or
the stored fax number is displayed.
The line is checked
If this message continues to be
displayed, this indicates that the
access line is defective, or that
the line type is incorrect (see page 65
”Transmission problems”).
The dialling digits then run through the
display
after a brief time:
Your document is now scanned line by
line and transmitted
*)
NUMBER NOT LISTED
This message is displayed if there is
nothing stored under the one-touch
dialling key which you have selected.
GB
TOSHIBATF 471
Transmit documents
25
Page 26

Transmit documents
Long dialling
With the long dialling facility, a fax
number which is stored under a speed
dialling key is combined with an additional
fax number. The additional fax number
can be a further speed dialling number, an
alphabet dialling number or a user-defined
number.
For instance, access numbers to private
telephone companies can be easily
combined with other stored fax numbers
at the push of a button.
Criteria for long dialling:
• The first fax number is stored on a
speed dialling key (see page 39)
• The first fax number is terminated with
PAUSE (see page 2)
• Further numbers may be speed dialling
numbers, alphabet dialling numbers or
user-defined numbers
The long dialling facility is also
compatible with the listening-in
function (see page 41). In this
way, you can listen to any
messages, etc. between the
numbers.
START
15.03 FAX 00
STD NORMAL
TOSHIBA
✽01234.....
DIA LING
Load original
Remember:
Printed side face-down
Wait until the document is pulled in by
2 cm.
Press the one-touch dialling
key *)
The name which is stored under the onetouch dialling key is briefly displayed, or
the stored fax number is displayed.
The first part of the number is displayed
Enter additional number
• Speed dialling key
• Alphabet dialling number
• User-defined number
Press the START key
The line is checked
If this message continues to be
displayed, this indicates that the
access line is defective, or that
the line type is incorrect (see page 65
”Transmission problems”).
*) Example of a long dialling number:
✽ 01234- (the number is terminated
with PAUSE)
123.....
HS N ORMAL
The dialling digits then run through the
display
after a brief time:
Your document is now scanned line by
line and transmitted
GB
26
Transmit documents
TOSHIBA TF 471
Page 27

Transmit documents
Transmission with telephone (manual transmission)
In this case, the connection is established
with an external telephone which is
additionally connected to the fax
machine. In this way, you can speak to
the other party before you send the fax.
START
15.03 FAX 00
STD NORMAL
ON L INE
COMMUNICATION ERROR
Load original
Remember:
Printed side face-down
Wait until the document is pulled in by
2 cm.
Dialling with telephone
If you have agreed the transmission with
your fax partner, or if you hear the fax
tone at the other end:
Press START key
Transmission commences
(You can replace the handset, as the fax
machine has now assumed control).
If this message is displayed in conjunction
with a long tone, the transmission
procedure has not been successful.
Delete the display by pressing the STOP
key, and attempt to send the document
again. This error message does not have
any effect on subsequent functioning of
the fax machine.
Tips concerning communication errors are
set out on page 64-66.
Error messages continue to be
displayed until they are
acknowledged with the STOP
key.
GB
TOSHIBATF 471
Transmit documents
27
Page 28

Transmit documents
Transmission with directory function
This type of dialling is similar to searching
in a telephone directory. Enter the initial
letter of your partner to search for the
corresponding fax number in the alphabet
dialling memory. This type of dialling is
particularly useful if you know the name of
a specific partner.
ABB.DIAL
ALPHAB E T
START
15.03 FAX 00
STD NORMAL
SE AR CH CHARAC T ER= _
ALABASTER
BAUER
BLUME
DIALING
Load original
Remember:
Printed side face-down
Wait until the document is pulled in by
2 cm.
Activate directory function
You can now enter the initial letter of your
fax partner *)
(Example: „B“)
The first name of the corresponding letter
(here „A“) is displayed, followed by the
alphabet dialling memory position where
it is stored.
Press the key ”2” to display the next letter
(here „B“) which is stored under this key.
Use the keys „*“ and „#“ to select the
desired fax partner with identical starting
letters.
Press the START key
The line is checked
If this message continues to be
displayed, this indicates that the
access line is defective, or that
the line type is incorrect (see page 65
”Transmission problems”).
123.....
HS N ORMAL
*)
A------------------------: --
The dialling digits then run through the
display
after a brief time:
Your document is now scanned line by
line and transmitted
This display appears if no name is stored
under the selected letter.
GB
28
Transmit documents
TOSHIBA TF 471
Page 29

Transmit documents
Set resolution
In its basic setting, your fax machine uses
high resolution for transmitting or copying
your documents. You can however also
adjust the resolution to suit the particular
documents. Use the following as a rough
guide:
STD (basic setting)
For hand-written or
typewritten documents
FINE For documents with small
type such as newspapers
and diagrams
SF (Superfine) For documents with very
small and detailed
diagrams
GREY 64 grey stages for
photographs
or colour documents
You can assess the effect of this setting and thus the result of your fax
transmission - with the self-copy facility
(see page 20).
A higher resolution or the grey
stage mode always involves a
longer transmission time (and
also higher costs), as all lines are
scanned.
MODE
15.03 FAX 00
STD NORMAL
FINE NORMAL
Load original
Remember:
Printed side face-down
Wait until the document is pulled in
by 2 cm.
Press several times ...
...to send at the desired resolution.
This resolution is retained until you
change it again (except GREY).
Proceed now as usual...
Last number redial
There may be various reasons why your
fax document cannot be transmitted
(please refer to pages 64 et seq.). A
possible reason is that the fax machine at
the other end is busy. In this case, it is
advisable to call the other fax party again
at a later date. The dialling procedure is
automatically repeated every three
minutes for up to 12 times. The
document remains in the document tray.
If the other fax machine is definitively not
reached, the machine displays LINE BUSY.
If you have established a
connection via the SP-PHONE
key, you can start the last
number redial facility with the REDIAL key.
GB
TOSHIBATF 471
Transmit documents
29
Page 30

Transmit documents
Delayed transmission
You are able to define a certain time at
which the documents will be transmitted;
this enables you to overcome the
problems involved with different time
zones or will enable you to transmit
documents at off-peak rates.
When you have set the time, delayed
transmission is applicable for the next
message which you enter . In this way, you
cannot only send delayed fax messages;
you can also send delayed broadcast
messages, or use the delayed polling
facility.
Y ou can choose between two
versions of delayed fax
transmission:
Fax transmission from the document
tray:
In this case, the document remains in the
document tray until the transmission time
is attained. The disadvantage of this
method is that you are not able to send
any faxes during this time.
Fax transmission from memory:
This solves the above problem. Your
document is pulled into the machine, and
the document tray is subsequently
available for further documents.
Please note that you can only
store one job in the memory.
15.03 FAX 00
STD NORMAL
4 x
NO
OPTIONS ?
YES
SET TX TIME ?
YES
HH:MM= _:
HH:MM= 04:25
YES
STD NORMAL
Fax transmission from the
document tray
Load original
Remember:
Printed side face-down
Wait until the document has been pulled
in by 2 cm.
Start the menu. Press ...
...until this menu item appears.
Confirm with YES.
Confirm with YES.
Entry field for the transmission time
Enter the time
(example 4:25)
Confirm with YES.
standby mode
The subsequent transmission job is not
sent directly; it is sent at 4:25. Then
activate a number.
GB
30
Transmit documents
TOSHIBA TF 471
Page 31

Transmit documents
Delayed transmission from
memory
15.03 FAX 00
STD NORMAL
4 x
NO
OPTIONS ?
YES
SET TX TIME ?
YES
HH:MM= _:
HH:MM= 04:25
YES
Load original
Remember:
Printed side face-down
Wait until the document has been pulled
in by 2 cm.
Start the menu. Press ...
...until this menu item appears.
Confirm with YES.
Confirm with YES.
Entry field for the transmission time
Enter the time
(example 4:25)
Confirm with YES.
*) If the capacity of the memory is not
sufficient, you should reduce the
number of pages which belong to the
transmission. In this case, break down
the transmission into several parts.
The choice of resolution (see page 29)
also has an effect on the memory.
The higher the resolution, the greater
the demand on the fax memory.
MEMORY
STD NORMAL
MEMORY
ENTER TEL NUMBER
02131158901
START
15.03 FAX 00
standby mode
Press MEMORY key
You can now enter the number to which
you wish to send the fax document.
In addition to entering the number via the
digit keypad, you can also enter the
number with the one-touch dialling or
alphabet dialling facility (see pages 24-
25).
Example: Dial using keypad
Enter number
Press START key
The document is read into the memory.
In the display, you can see the
percentage utilisation of memory.*)
The memory lamp indicates that the
memory is now full. It cannot be used for
any other purpose.
GB
TOSHIBATF 471
Transmit documents
31
Page 32

Transmit documents
Single multi-address transmission
If you wish to send one document to
several partners without spending a lot of
time, this function can be used to create
a group on one single occasion. The
group is deleted after the procedure has
been completed. Up to 67 users can be
grouped together from one-touch dialling
numbers, alphabet dialling numbers or
standard numbers.
MANUAL BROADCAST
FAXNO .
ONE TOUCH
+
FAXNO . FAXNO .
or
ABB
or or or
ONE TOUCH ONE TOUCH
+
or or
ABB ABB
15.03 FAX 00
STD NORMAL
MEMORY
MULTI TRANSMIT
ENTER TE L NUMBER
YES
Load original
Remember:
Printed side face-down
Wait until the document is pulled in by 2
cm
Press MEMORY key
Then...
You can now enter the fax numbers with
which you intend to form a group.
In addition to entering the numbers via
the digit keypad, you can also enter the
numbers with the one-touch dialling or
alphabet dialling facility (see pages 24-
25). A mixture of the above options is
also possible.
The number of entries is limited:
Free numbers: 5
One-touch dialling: 12
Alphabet dialling: 50
Enter number
Confirm with YES.
START
MEMORY
ENTER MORE OR[S TART]
MEMO RY X X % U SED
15.03 FAX 00
Enter further numbers
-or-
Press START key
The document is read into the memory.
In the display, you can see the
percentage utilisation of memory.
*) If the capacity of the memory is not
sufficient, you should reduce the
number of pages which belong to the
transmission. In this case, break down
the transmission into several parts.
The choice of resolution (see page
29) also has an effect on the memory.
The higher the resolution, the greater
the demand on the fax memory.
The memory lamp indicates that the
memory is now full. It cannot be used for
any other purpose.
Group dialling commences
GB
32
Transmit documents
TOSHIBA TF 471
Page 33

Transmit documents
_
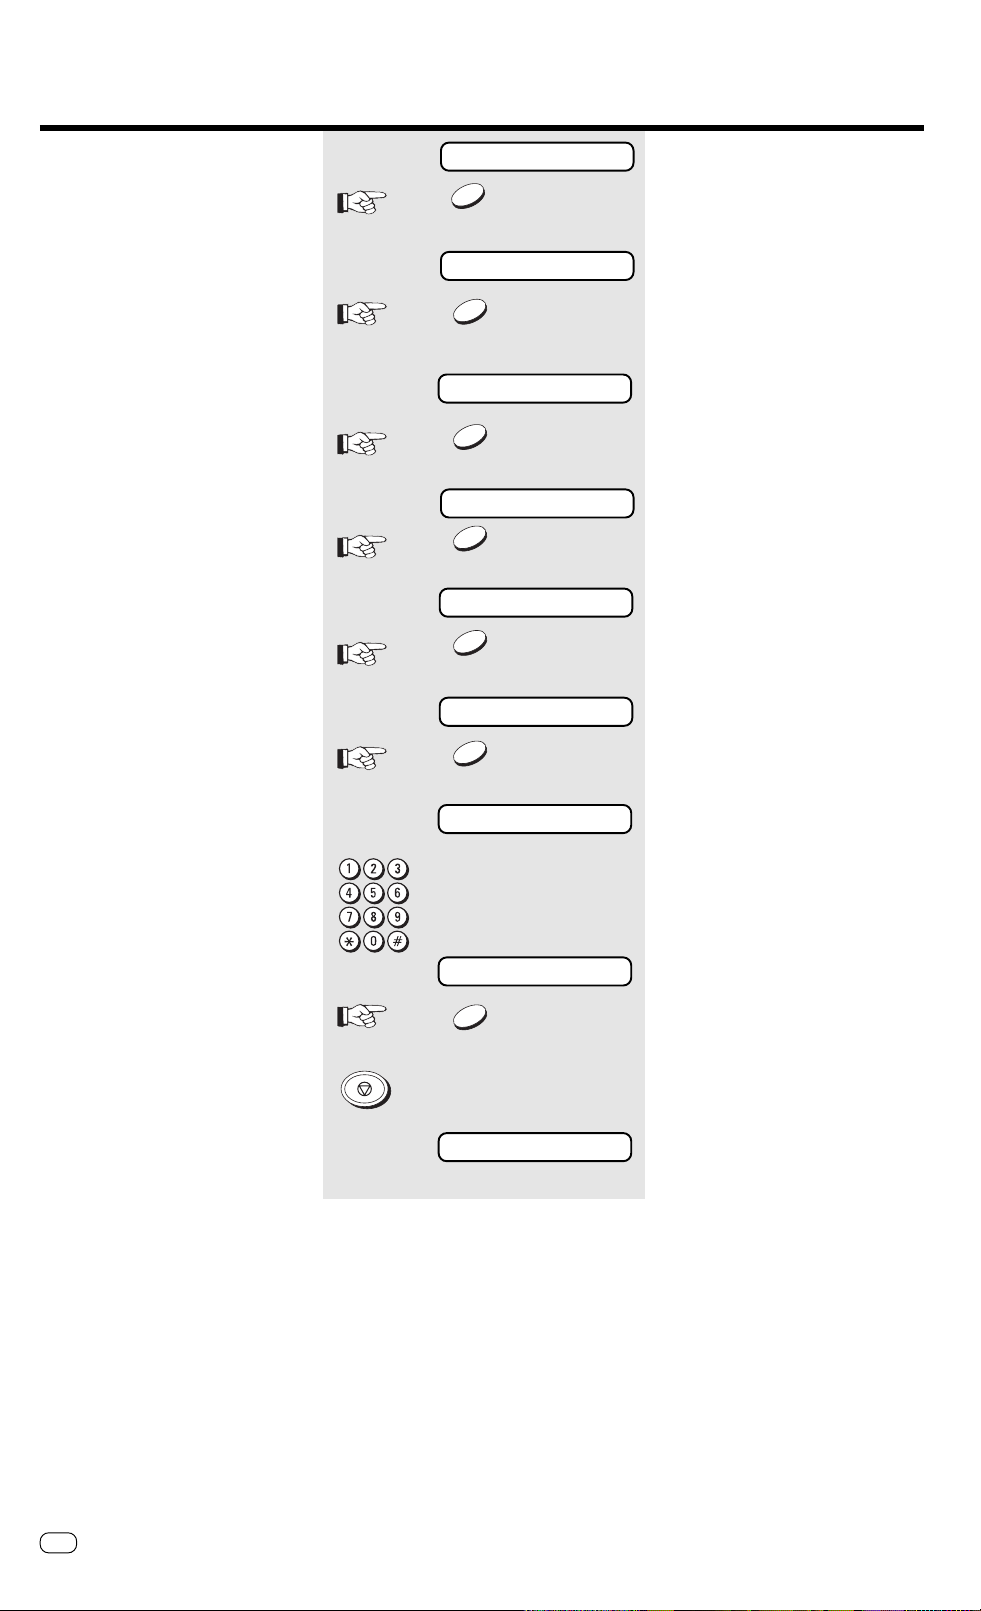
Reserve polling
Other fax partners can poll information
from your fax machine if you set up this
facility with this function.
T wo options are available:
1. Polling via the document tray:
In this case, your documents remain
in the document tray until they are
polled. Accordingly, you cannot send
any further fax messages during this
period as the document tray is
blocked.
2. Polling from memory:
The reserved document is read into
the memory; it is then available for
polling. Your fax machine can
continue to send fax documents.
The polling facility reserved in this way is
unprotected. This means that every fax
machine which is able to poll documents
can also poll documents from your
machine. In order to prevent unauthorised
polling, you can activate polling
protection.
There are two options available for polling
protection:
• POLLING PROTECTION: Enter the
number of the fax machine which may
poll documents from your machine.
The code of the polling fax machine
must be identical to the number
which you enter as polling protection.
It is adequate if you enter the number
without the dialling code, as only the
final four digits are checked.
2.2.
2. PASSWORD:
2.2.
the polling facility exclusively for
TOSHIBA fax machines, you can use
the four-digit TOSHIBA code as polling
protection. A document is only polled
if this code is identical in both fax
machines.
If you wish to reserve
15.03 FAX 00
STD NORMAL
5 x
NO
POLLING ?
YES
POLLING RESERVE ?
YES
SECURITY CODE ?
YES
SECURITY CODE = _
SEC UR ITY C ODE = 1234
YES
NO
SECURITY TEL ?
/
YES
YES
TEL=
NO
Reservation via document tray
Load original
Remember:
Printed side face-down
Wait until the document is pulled in by 2
cm
Start the menu. Press ...
...until this menu item appears.
Confirm with YES
Confirm with YES
Aktivate TOSHIBA security code?
TOSHIBA password activated
Confirm with YES
Entry field for four-digit number
Enter password (example: 1234)
Confirm with YES
Skip menu item ...
Activate polling protection?
Press YES to activate polling
protection,
press NO if you do not require
polling protection.
Polling protection activated
Confirm with YES
Entry field for the number of the fax
machine which may poll documents from
your machine
*) If the capacity of the memory is not
sufficient, you should reduce the
number of pages which belong to the
transmission. In this case, break down
the transmission into several parts.
The choice of resolution (see page 29)
also has an effect on the memory.
The higher the resolution, the greater
the demand on the fax memory.
TOSHIBATF 471
12345678
YES
MEMO R Y IN PU T ?
/
YES
NO
POLL RSV.
Enter the number
Confirm with YES
If you press YES, the document is read
into the memory; the document tray is
then free for further documents.*)
If you press NO, the document remains in
the document tray, and the document
tray is blocked until the document is
polled.
Polling is reserved
GB
Transmit documents
33
Page 34

Transmit documents
Protected transmission
The transmission of documents is
restricted!
Documents can only be faxed to fax
machines whose code is identical to the
dialled fax number. This means that you
can fax your documents only to specific
fax partners.
15.03 FAX 00
STD NORMAL
4 x
NO
OPTIONS ?
YES
SET TX TIME ?
NO
SET SECURITY TX ?
YES
ON ?
Load original
Remember:
Printed side face-down
Wait until the document is pulled in by 2
cm
Start the menu. Press ...
...until this menu item appears.
Confirm with YES.
Skip menu item...
Confirm with YES.
Depending on the particular setting, the
fax machine prompts whether the
operator wishes to change to the other
status.
YES
Confirm with YES.
The following can only be sent to a fax
partner whose code is identical to the
dialled fax number.
GB
34
Transmit documents
TOSHIBA TF 471
Page 35

Transmit documents
Switch off error correction
Your fax machine is equipped with an
error correction facility (ECM). If your fax
partner also has an error correction
facility, this permits error-free fax
transmission. One effect linked with ECM
is that the transmission time increases if
there are any problems on the line. This
may involve very high costs with oversees
calls. For this reason, the error correction
facility can be temporarily disabled.
15.03 FAX 00
STD NORMAL
4 x
NO
OPTIONS ?
YES
SET TX TIME ?
2 x
NO
SET ECM ?
YES
OFF ?
Load original
Remember:
Printed side face-down
Wait until document is pulled in by 2 cm.
Start the menu. Press ...
...until this menu item appears.
Confirm with YES.
Press NO ...
...until this menu item appears.
Confirm with YES.
Depending on the setting, the fax
machine prompts whether the operator
wishes to change to the other status.
YES
Confirm with YES.
The following transmission is sent without
error correction (ECM).
GB
TOSHIBATF 471
Transmit documents
35
Page 36

Transmit documents
Adjust basic contrast
Some characters cannot be transmitted
where the printing on documents is weak
or where colour character sets are used.
For this case, you should set contrast to
DARKER.
On the other hand, there are documents
which contain characters in colour fields.
In this case, you should set contrast to
LIGHTER.
You can assess the effect of this setting and thus also the result of your fax
transmission - via the self-copy facility
(see page 20).
The setting of the basic contrast
is permanent.
15.03 FAX 00
3 x
NO
INSTALLATION ?
YES
SET RECEIVE MODE ?
1 x
NO
SET CONTRAST ?
YES
STD LIGHTER
1 x
NO
Load original
Remember:
Printed side face-down
Start the menu. Press ...
Wait until document is pulled in by 2 cm.
Confirm with YES.
Press NO ...
...until this menu item appears.
Confirm with YES.
Depending on the particular setting, the
machine prompts a response for
changing to the other status.
Press NO ...
Stop transmission
During fax transmission, the transmission
can be interrupted at any time by pressing
the STOP key. The receiver then receives
that fragment of your document which
had been sent up to the point of
interruption.
STOP
STD DARKER
YES
15.03 FAX 00
...until this menu item appears.
Confirm with YES.
standby mode
GB
36
Transmit documents
TOSHIBA TF 471
Page 37

Store numbers
_
_
Alphabet dial memory
The alphabet dial facility enables you to
enter a two-digit “address” instead of the
(frequently long) fax number of your
partner. The real fax number is stored
under this “address”. With frequently used
fax numbers, the alphabet dial facility
enables you to save time.
50 alphabet dial memories are available
and the name as well as the number of
your partner can be stored in this
memory. You can use up to 20 characters
of your choice in this memory.
ABB NO. 50 09154/87823 MEIER
ABB NO. 49 024/8768 MÜLLER
•
•
•
ABB NO. 01
ABB NO. 02 04544/6723 KRAMER
ABB NO. 03
054/938734 SCHULTE
054/376014 OTTO
15.03 FAX 00
2 x
NO
TEL N UMBER ENTRY ?
YES
ONE TOUCH N BR EN TR Y?
NO
ABB. NUMBER EN TRY ?
YES
ABB. NUMBER = (01-50)
ABB. N U MBER = 0 1
Enter alphabet dialling numbers:
standby mode
Start the menu. Press ...
...until this menu item appears.
Confirm with YES.
Skip menu item...
Confirm with YES.
Entry field for alphabet dialling numbers,
from 01 to 50
Enter alphabet dial no.
Example: 1
Use the numeric keys for entering the
alpha-numeric characters. Each digit
features several characters which can be
activated by repeatedly pressing the
corresponding key. If you have found a
character of your choice, press the “#”
key to go to the next position. Use the
“❊” key to go back one letter and make
any corrections.
*) Please note that you must
press the “❊” button before the
actual fax number if your fax
machine is connected to a
PABX.
YES
TEL=
TEL=021311580
YES
ID=
YES
ABB. NUMBER EN TRY ?
Confirm with YES.
Entry field for fax number
Enter the fax number
(Where the machine is connected to a
PABX, please enter the ✽ key before the
actual number
)
Confirm with YES.
Entry field for the name
(If you do not wish to enter a name, skip
this point with
Yes)Yes)
Yes)
Yes)Yes)
Enter the name
(Example TOSHIBA)
1 X 8 = T # 3 X 4 = I #
3 X 6 = O # 2 X 2 = B #
4 X 7 = S # 1 X 2 = A
2 X 4 = H #
Confirm with YES.
Enter alphabet dial number again
-or-
15.03 FAX 00
STOP
TOSHIBATF 471
Press STOP, return to standby
mode
Store numbers
37
GB
Page 38

Store numbers
Correction of alphabet dialling
numbers:
TEL=021311580
/
YES
NO
ID=TOSHIBA
/
YES
ABB. NUMBER EN TRY ?
NO
Select the alphabet dialling number
whose entries you wish to change (see
under “entry of alphabet dialling
numbers”)
The current fax number is displayed
Press YES key to skip:
The displayed entry is not changed, the
next entry is displayed.
Press NO key to delete:
The current entry is deleted, you can
YY
enter a new entry. Press
new entry.
The current name is displayed:
es es
Y
es to confirm
YY
es es
Press YES key to skip:
The displayed entry is not changed, the
next entry is displayed.
Press NO key to delete:
The current entry is deleted, you can
YY
enter a new entry. Press
new entry.
Facility for entering further alphabet
dialling numbers
es es
Y
es to confirm
YY
es es
-or-
STO P
15.03 FAX 00
Press STOP, return to standby
mode
GB
38
Store numbers
TOSHIBA TF 471
Page 39

Store numbers
_
_
One-touch dial keys
The one-touch dialling facility is a very
easy method of dialling your partner. You
can store fax numbers on 12 keys. You
need only press one key in order to dial
your partner.
*) Please note that, if your fax
machine is connected to a
PABX, the “❊” key must be
stored before the actual fax number.
15.03 FAX 00
2 x
NO
TEL N UMBER ENTRY ?
YES
ONE TOUCH N BR EN TR Y?
YES
ENTER ON E TOUCH KEY
TEL=
Entry of speed dialling numbers:
standby mode
Start the menu. Press ...
...until this menu item appears.
Confirm with YES.
Confirm with YES.
Press the one-touch dial key of
your choice
Entry field for fax number
Enter the number
(If the machine is connected to a PABX,
please enter the ✽ key before the actual
number)
TEL=021311580
YES
ID=
YES
ONE TOUCH N BR EN TR Y?
Confirm with YES.
Entry field for the name
(If you do not wish to enter a name,
press YES to skip this point)
Confirm with YES.
Enter the name
Example: TOSHIBA
1 X 8 = T # 3 X 4 = I #
3 X 6 = O # 2 X 2 = B #
4 X 7 = S # 1 X 2 = A
2 X 4 = H #
Confirm with YES.
Option of using further one-touch dialling
keys
-or-
15.03 FAX 00
STOP
TOSHIBATF 471
Press STOP, return to standby
mode
Store numbers
39
GB
Page 40

Store numbers
TEL=021311580
Correction of speed dialling
numbers:
Select the speed dialling key whose
entries you wish to change (see page 39
under “entry of speed dialling numbers”)
The current fax number is displayed
STOP
/
YES
NO
ID=TOSHIBA
/
YES
ABB. NUMBER EN TRY ?
15.03 FAX 00
NO
Press YES key to skip:
The displayed entry is not changed, the
next entry is displayed.
Press NO key to delete:
The current entry is deleted, you can
YY
enter a new entry. Press
new entry.
The current name is displayed.
es es
Y
es to confirm
YY
es es
Press YES key to skip:
The displayed entry is unchanged, the
next entry is displayed.
Press NO key to delete:
The current entry is deleted, you can
enter a new entry. Press
new entry
Facility for entering further speed dialling
numbers
-or-
YES YES
YES to confirm
YES YES
Press STOP, return to standby
mode
GB
40
Store numbers
TOSHIBA TF 471
Page 41

Telephony without a telephone
The speakerphone facility
Your fax machine has a built-in
speakerphone facility. Press the SP-PHONE
key to establish a connection to the
telephone line, as if you were to lift the
handset of a telephone. You can then use
a keypad to dial a number, listen to the
other party via the loudspeaker and speak
with the other party via the built-in
microphone. If you have selected a
connection to a fax machine, you can
press the START key to initiate a fax
transmission. With an incoming call
(receive mode TEL or TEL/FAX), the call
can be collected in this way. In order to
terminate a call (go on-hook), press the
SPEAKERPHONE key again.
Tips for using the speakerphone
facility:
• Do not move too far away from the
fax machine during a call
• Avoid background noise (traffic noise,
machine noise, music)
• Avoid speaking at the same time as
the other party
15.03 TEL 00
SP-PHONE
TEL=12345678
SP-PHONE
15.03 TEL 00
Speakerphone - during telephony:
standby mode
Press speakerphone key
Enter the telephone number
Dial
Conduct telephone call
Terminate telephone call
Speakerphone - pick up telephone
call:
standby mode
Muting
Press the COPY/HOLD key to activate the
muting facility. The other party hears a
brief melody during this period. Press the
key again to clear the muting facility.
If the muting facility is not cleared
manually, it is automatically cleared after
approx. 30 seconds. In this case, you are
notified by means of three brief tones.
Incoming call
Press speakerphone key
SP-PHONE
Conduct telephone call
Terminate telephone call
SP-PHONE
Muting does not have any effect
on a call routed via the external
telephone.
TOSHIBATF 471
T elephony without a telephone
41
GB
Page 42

T elephone Answering Device (TAD)
Overview
The
TT
Telephone
TT
AA
Answering
AA
DD
Device (TAD) of your fax machine operates entirely without any mechanical tape drives. Total memory capacity of
DD
15 minutes is available for recording max. 30 messages. These messages are retained even in the event of a power failure. The range of
features of the telephone answering device is rounded off by the facility for recording telephone calls and also for recording a memo.
Brief overview
Function
Record announcement text
Record memo
Record calls
Play back messages
Play back memo
Play back talk
Play back announcement
Fast forward
Rewind
Operation
OGM, YES
MEMO, YES
TALK, YES
OGM
MEMO
TALK
PLAY
MEMO, YES
TALK, YES
OGM, YES
MEMO
TALK
OGM
FF (#) during operation
REW (❊) during operation
YES
YES
YES
YES
YES
YES
Remote polling
-
-
#, 1, 0
#, 1, 1
-
#, 3 (during operation)
#, 2 (during operation)
Page
43
47
48
45ff
47
48
43
45
45
Stop playback or recording
Delete all messages
Delete individual messages
Delete memo
Delete talk
Delete announcement
Maintain remote polling
Activate/deactivate telephone
answering device*)
Start remote polling
T erminate remote polling
STOP
8 x NO
8 x
NO
ERASE, YES during operation
MEMO, NO, YES
TALK, NO , YES
OGM, NO, YES
MEMO
TALK
OGM
TAD
NO
NO
ERASE
YES
YES
NO
#, 4 (during operation)
#, 6, 0 (repeat sequence after
confirmation tone)
YES
#, 6, 0 (during operation)
#, 6, 1 (repeat sequence after
confirmation tone)
YES
-
#, 8
#, 9
#, ❊
-Acknowledgement tone
xxxx (Polling code)
-Acknowledgement tone
#, ❊
45
46
46
47
48
43
49
44
49
49
Important: Important:
*)
Important:
Important: Important:
You can use the remote polling code #9 for activating and deactivating the telephone answering device. Please ensure that the
receive mode (see page 14) is set to “TEL” or “TEL/FAX”. The telephone answering device can only be reactivated via the remote
polling facility in these two receive modes.
GB
T elephone Ansering Device (T AD)
42
TOSHIBA TF 471
Page 43

Telephone Answering Device (TAD)
Recording, Playing and Deleting The Out-Going Message
Record the announcement text:
Before the telephone answering device
can be started, you must first record the
announcement text. You can record a text
maximum duration of 60 secondsmaximum duration of 60 seconds
with a
maximum duration of 60 seconds
maximum duration of 60 secondsmaximum duration of 60 seconds
via the built-in microphone
distance of approx. 30-60 cm between
your mouth and the microphone, and
speak with normal volume. Use an
informative announcement text. In
particular, indicate that the caller can
leave a message and also send a fax.
Example of announcement:
“ Good morning, this is xyz. You are able
to leave a fax or a message outside our
office hours. Please press the start key on
your fax machine or speak after the signal
tone. “
• Where possible, avoid background
noise when recording the
announcement text (particularly
music), as this can result in
malfunctioning of the telephone
answering device.
• If the error message MESSAGE FULL is
displayed when you are recording the
announcement text, there is not
enough memory available. In this
case, clear the message memory (see
page 44).
The telephone answering device
can only be started when the
announcement text has been
recorded.
. Keep a
15.03 TEL 00
OGM
RECORD OGM ?
YES
RECORDING
END CANCEL PLAY
Go to A
END
A
CANCEL
B
STOP
PLAY
C
Go to B
OGM
15.03 TEL 00
15.03 TEL 00
TAD
15.03 TEL 00
Go to C
Recording the announcement text
Standby mode
Press the OGM key
confirm...
You can now immediately start to record
the text...
End the recording: See A
Cancel the recording: See B
Play the recording: See C
Press OGM key
Standby mode
(Announcement text has been saved)
Press STOP
Standby mode
(Announcement text has not been saved)
Press T AD key ...
...Key is lit
The TAD mode is displayed and the
announcement text is played back.
Playback volume can be
regulated via keys
Clear existing and record new
15.03 TEL 00
OGM
announcement text
Standby mode
Press OGM key
MESSAGE IS RECORDED
PL AY O G M ?
Press NO
NO
ERASE OGM ?
(Yes key: Play back current
announcement)
Confirm with YES
YES
RECORD OGM ?
YES
RECORDING
TOSHIBATF 471
T elephone Ansering Device (T AD)
Confirm with YES
You can immediately start to record the
new announcement...
End recording: See A
Cancel recording: See B
Play recording: See C
43
GB
Page 44

T elephone Answering Device (TAD)
Activate/deactivate the Telephone Answering Device
The TAD key is used for activating the
telephone answering device of the fax
machine (FAX/TAD mode). Press this key
again to restore the preset receive mode
(see page 14).
Activate/deactivate the T elephone
Answering Device via remote
polling:
If the telephone answering device is to be
activated or deactivated via the remote
polling facility (see page 29), please
ensure that the receive mode (see page
14 et seq. ) is set to “TEL” or “TEL/FAX”.
The telephone answering device can only
be reactivated by remote polling in these
two receive modes. In order to enable the
telephone answering device to be
activated via the remote polling facility in
the TEL mode, the fax machine switches
to the polling standby mode approx. 45
seconds after the first ring. If remote
polling does not take place, the line is
released shortly afterwards.
The telephone answering device
can only be started when the
announcement text has been
recorded.
Press once
Press twice
333335
333335
Depending on setting
15.03 TEL 00
TAD
15.03 FAX/TAD 00
TAD
15.03 TEL 00
FAX/TAD
TEL
FAX
TEL/FAX
standby mode
Press T AD key ...
...Key is lit
TT
elephone answering device is activatedelephone answering device is activated
T
elephone answering device is activated
TT
elephone answering device is activatedelephone answering device is activated
announcement text is played
back.Playback volume can
be adjusted via keys
Press TAD key (again)
confirm...
...key is no longer lit
T elephone answering device is
deactivated
Preset receive mode is displayed.
Record, played back, clear messages
Recording the messages:
When the signal is generated, the caller is
able to record a message within a period
of 30 seconds *). A total recording
capacity of 15 minutes is available, or 30
different messages can be stored. After
the first message has been recorded, the
TAD key
flashes in order to indicate that messages
have been recorded. Whenever a
message has been recorded, the counter
on the display is incremented by one.
*) The capacity per message can be
increased to 60 seconds or 120
seconds.
Notes:Notes:
Notes:
Notes:Notes:
• If the end of recording time is reached, a
signal is generated for the caller and the line
is then cleared.
• If the caller goes on-hook prematurely, no
message is recorded.
• The user is able to listen into the message
while it is being recorded (see page 51).
• Use the SP-PHONE key (speakerphone) to
terminate the recording and speak to the
caller.
• If an external telephone is connected to your
fax machine, you can lift the handset and
terminate the recording and speak to the
caller.
• If no message is recorded after the signal
has been generated, the fax machine
automatically switches on after approx. 6
seconds in order to receive a possible fax.
• If the message memory is full, the machine
switches over to the fax mode directly when
a call is received.
15.03 FAX/TAD 00
RECORDING
15.03 FAX/TAD 01
Please ensure that there is
always adequate capacity
available for incoming calls. For
this reason, you should immediately
delete messages which are no longer
required, see page 46.
Display before message is recorded
Message is being recorded
Display after recording
GB
T elephone Ansering Device (T AD)
44
TOSHIBA TF 471
Page 45

Telephone Answering Device (TAD)
Playback current messages:
As soon as the TAD key flashes, there are
messages on your telephone answering
device. You can listen to the currently
received messages and also messages
recorded at an earlier date. Use the
keys to regulate the playback
volume.
To change the value, press the
corresponding key several times.
Press the STOP key to stop playback of
the messages. The recording is not
deleted by this process.
Playback volume
Low High
15.03 FAX/TAD 03
PLA Y
MS G . 0 1
MS G . 02
STOP
15.03 FAX/TAD 03
Playback current messages:
Three new messages have been
received
Press PLAY key
The first message (MSG.01) is played
back.
Use the >>>> keys to regulate the
playback volume.
In the absence of further input, the next
message is played back, etc.
(Use the STOP key to stop)
standby mode
Repeat, skip, fast forward, rewind
message:
You can repeat the message you have just
played back as often as you wish. In
addition, use “rewind” to play back any
message again. It is also possible to “skip”
messages at the push of a button.
MS G . 0 3
MS G . 03
MS G . 03
MS G . 01
MS G . 0 3
MS G . 0 4
Repeat:
While the message is being played
back...
Press REW key once
The message is played back from the
beginning
Rewind:
While the message is being played
back...
Press the REW key several times
The selected message is played back
Skip:
While the message is being played back..
Press the FF key once
The next message is played back
Fast forward:
MS G . 0 1
While the message is being played
back...
Press the FF key several times
MS G . 0 4
TOSHIBATF 471
T elephone Ansering Device (T AD)
The selected message is played back
45
GB
Page 46

T elephone Answering Device (TAD)
Play back older messages:
As soon as you deactivate the standby
mode of the telephone answering device
(press ABSENT key - the LED goes out),
the currently recorded messages are
added to the existing messages. You can
listen to all these stored messages as
described on page 45. If you reactivate
the telephone answering device, the
current message counter is set to 0.
Clearing individual messages:
While a message is being played back, it
can be deleted.
15.03 FAX/TAD 03
TAD
15.03 TEL 12
TAD
15.03 FAX/TAD 00
MS G . 04
ERASE
ARE YO U SUR E ?
YES
Telephone answering device on, display
current messages
Press T AD key ...
...The LED goes out
Number of current messages (3) is added
to the existing messages (9)
All messages can be played back with
the playback key.
Press the TAD key (again)
...The key lights up
Telephone answering device on, current
message counter is set to 0.
Message number 4 is being played back
Press the ERASE key
Are you sure
Confirm with YES
Delete all messages:
ERASED
MS G . 05
15.03 TEL 22
8 x
NO
ERASE ALL MESSAGES ?
YES
ARE YO U SUR E ?
YES
ERASED
15.03 TEL 00
Message number 4 deleted
Message number 5 is played back
Standby mode, 22 messages are stored
Start the menu. Press ...
...until this menu item appears.
confirm...
Are you sure
confirm...
Standby mode, all messages are deleted
GB
T elephone Ansering Device (T AD)
46
TOSHIBA TF 471
Page 47

Telephone Answering Device (TAD)
Record, play back, delete memo
Record memo:
You can use the built-in microphone for
directly recording a message on the
telephone answering device. The length
of this acoustic memo can be max. 3
minutes, and the memo is always placed
at the start of the message memory. This
ensures that your memo is always the first
item to be played back when the
messages are played back.
Notes:Notes:
Notes:
Notes:Notes:
• You can only ever record one memo.
• If the error message MESSAGE FULL is
displayed when you are recording the
memo, there is not enough memory
available. In this case, delete the
message memory (see page 46).
Play back memo:
T wo options are available:
1. The memo is played back when you
play back messages (see page 45) as
it is virtually recorded as the first
“message”. All criteria which are
applicable for messages (playback and
delete) are also available when a
memo is played back.
2. Use the MEMO key to play back the
memo (see adjacent diagram).
15.03 FAX/TAD 03
MEMO
RECO RD ME MO ?
YES
RECORDING
MEMO
15.03 FAX/TAD 04
15.03 FAX/TAD 03
MEMO
MESSA GE IS RE CO RD E D
PL A Y I NG ME MO
YES
PLAYIN G
Recording a memo:
Standby mode, (3 new messages have
been recorded)
Press MEMO key
Record a memo?
Confirm with Yes
End recording
Standby display (the memo has been
placed at the start of the message
memory)
Play back a memo:
Standby mode
Press MEMO key
Memo is recorded
(If PLAY BACK MEMO? is displayed at this
point, no memo has been recorded)
Confirm with YES
The memo is played back
Delete memo:
T wo options are available:
1. If the memo is played back as a
message, it can also be deleted as a
message (see page 45).
2. If the memo is played back via the
MEMO key, proceed according to the
adjacent diagram.
STOP
STOP
15.03 FAX/TAD 03
MEMO
MESS AGE IS R E COR DE D
PLAYIN G MEMO
NO
ARE Y O U S U R E ?
YES
ERASED
REC OR D MEMO ?
Press the STOP key to cancel
Delete a memo:
Standby mode
Press MEMO key
Memo has been recorded
(if PLAY BACK MEMO? is displayed at this
point, no memo has been recorded)
skip with NO
Are you sure?
Confirm with YES
Message deleted
(a new memo can alternatively be
recorded)
Press the STOP key to cancel
TOSHIBATF 471
T elephone Ansering Device (T AD)
47
GB
Page 48

T elephone Answering Device (TAD)
Recording calls
If you have connected an external
telephone to your fax machine, you can
use the telephone answering device to
record calls.
Notes:Notes:
Notes:
Notes:Notes:
• Calls cannot be recorded via the
speakerphone facility.
• If the error message MESSAGE FULL is
displayed while a call is being
recorded, not enough memory is
available. In this case, clear the
message memory (see page 46).
• Press the HOLD key to end the
recording (the recording is stored).
• The capacity for recording calls is
3 minutes3 minutes
max.
3 minutes.
3 minutes3 minutes
• This function is not fully available
depending on the particular version for
a specific country.
Only one call can be recorded at
one time.
STOP
OFF HOOK
TALK
RECORD TALK ?
YES
RECORDING
TALK
OFF HOOK
RECORDING
Record call:
Off hook
Press TALK key
Confirm with YES
Call is recorded (max. 3 minutes)
Press TALK key
Recording terminated, call has been
recorded.
- or -
Replace handset
Recording ended, call has been
recorded.
Stop recording:
Call is recorded
Press the STOP key to stop
recording
Recording ended, call is NOT recorded
Play recording:
Erase recording:
STOP
15.03 FAX/TAD 00
TALK
MESS AGE IS RECOR DE D
PL AY T A LK ?
YES
PL AY I NG
15.03 FAX/TAD 00
MEMO
MESS AGE IS RECOR DE D
PL AY T A LK ?
NO
ARE YO U S UR E ?
Play a recording:
Standby
Press TALK key
Recording in memory
(if RECORD TALK? is displayed at this
point, there is no recording in memory)
Confirm with YES
Recording is played back
Press STOP key to stop
Erase a recording:
Standby
Press MEMO key
Recording in memory
(if RECORD CALL? is displayed at this
point, there is no recording in memory)
Press NO to skip
Are you sure?
*) If you are conducting a call at this
time, the machine then displays
“RECORD TALK?”, and this enables you
to record your call directly.
GB
T elephone Ansering Device (T AD)
48
YES
ERASE TALK ?
ERASED
Confirm with YES
Recording erased *)
TOSHIBA TF 471
Page 49

Telephone Answering Device (TAD)
Remote polling
With the remote polling facility, you are
able to play back messages stored on
your telephone answering device from any
telephone. In addition, the remote polling
facility provides further options for
accessing the telephone answering
device.
Please refer to page 42 for an overview of
the TAD functions with the corresponding
remote polling codes.
Access code:
The access code protects your telephone
answering device against unauthorised
access. The polling facility is only
available after the correct code has been
entered. If the wrong code is entered on
three occasions, the connection is
cleared down.
Before you use the remote polling facility
for the first time, you must program an
appropriate code in your telephone
answering device.
15.03 FAX/TAD 00
3 x
NO
INSTALLATION ?
YES
SET RECEIVE MODE ?
5 x
NO
TAD SETTING ?
YES
SET TAD DELAY ?
3 x
NO
SET REMOTE CODE ?
YES
Program access code:
standby mode
Start the menu. Press ...
...until this menu item appears.
Confirm with YES.
Press NO...
...until this menu item appears.
confirm...
Page through the menu...
...until this menu item appears.
Confirm with YES
Prompt for programming the access code
Carry out remote polling:
Action:Action:
Action:
Action:Action:
Call
Prepare for remote polling
Enter security code
REMOTE CODE =
REMOTE CO DE = 1234
YES
STOP
Operator:Operator:
Operator:
Operator:Operator:
Call the fax machine from any telephone
Announcement is heard
During the announcement, enter
may be necessary to repeat it several times)
Acknowledgement tone is heard and announcement is
deactivated
Enter the security code
Acknowledgement tone is heard
15.03 FAX/TAD 00
##
# ✽ successively (it
##
Enter the 4-digit number code
Example: 1234
Confirm with YES
Press STOP to return standby
mode
TT
elephone answering device:elephone answering device:
T
elephone answering device:
TT
elephone answering device:elephone answering device:
The fax machine is set to the TAD mode. It connects
to the line after the pre-set ring delay (see page 53).
Announcement is played
Remote polling is detected, acknowledgement tone is
generated
Security code is accepted, acknowledgement tone is
generated
Carry out remote polling
End remote polling
The connection for remote polling is automatically cleared down after approx. 45 seconds. This situation is announced immediately
beforehand by means of an acoustic signal (beeeep, beep). During this period, press the key sequence #8 on your remote polling
transmitter in order to maintain the remote polling facility.
TOSHIBATF 471
Enter remote polling code
##
Enter
# ✽
##
Action is carried out
Line is cleared down
T elephone Ansering Device (T AD)
49
GB
Page 50

T elephone Answering Device (TAD)
Change recording time
The recording time for each incoming
message is limited to 30 seconds. You can
extend this period to 60 or 120 seconds.
Please note that, if you extend
the recording time, the number
of possible messages may be
reduced.
15.03 FAX/TAD 00
3 x
NO
INSTALLATION ?
YES
SET RECEIVE MODE ?
5 x
NO
TAD SETTING ?
YES
SET TAD DELAY ?
4 x
NO
SET TAD TIME ?
YES
Change recording time:
standby mode
Start the menu. Press ...
...until this menu item appears.
Confirm with YES.
Press NO...
...until this menu item appears.
confirm...
Page through the menu...
...until this menu item appears.
Confirm with YES.
STOP
TAD TIME = 30SEC
NO
TAD TIME = 120SEC
YES
15.03 FAX/TAD 00
Preset recording time is displayed
Press NO...
...until the required value is displayed
Confirm with YES.
Press STOP to return standby
mode
GB
T elephone Ansering Device (T AD)
50
TOSHIBA TF 471
Page 51

Telephone Answering Device (TAD)
Screen call during TAD mode
While a message is being recorded, the
operator has the option of screening the
recording via the loudspeaker. If you wish
to talk to the caller, simply lift the handset
of the connected telephone. The
loudspeaker is then automatically deactivated (only for variant 2, see page 5).
The speakerphone facility cannot
be activated while the operator
is screening a call.
15.03 FAX/TAD 00
3 x
NO
INSTALLATION ?
YES
SET RECEIVE MODE ?
5 x
NO
TAD SETTING ?
YES
SET TAD DELAY ?
2 x
NO
SET SCREENING CALL ?
Screen call during recording:
standby mode
Start the menu. Press ...
...until this menu item appears.
Confirm with YES.
Press NO...
...until this menu item appears.
confirm...
Page through the menu...
...until this menu item appears.
STOP
YES
ON ?
OFF ?
YES
15.03 FAX/TAD 00
Confirm with YES.
alternative setting is proposed
Confirm with YES.
Press STOP to return standby
mode
TOSHIBATF 471
T elephone Ansering Device (T AD)
51
GB
Page 52

T elephone Answering Device (TAD)
Activate/deactivate message display
The message display enables you to
recognise whether messages have already
been recorded via the call behaviour of
the fax machine.
If the message display facility is activated,
the fax machine switches on at the
second ring if messages are present. On
the other hand, if there are no messages
on the telephone answering device, the
connection is only established at the fifth
ring (factory setting). This prevents costs
from being incurred as a result of
unsuccessful polling attempts.
The function is only effective if
the call delay (see page 53) has
been set to at least 4 times.
15.03 FAX/TAD 00
3 x
NO
INSTALLATION ?
YES
SET RECEIVE MODE ?
5 x
NO
TAD SETTING ?
YES
SET TAD DELAY ?
1 x
NO
SET TOLL SAVER ?
Activate/deactivate message
display:
standby mode
Start the menu. Press ...
...until this menu item appears.
Confirm with YES.
Press NO ...
...until this menu item appears.
confirm...
Page through the menu...
...until this menu item appears.
STOP
YES
ON ?
OFF ?
YES
15.03 FAX/TAD 00
Confirm with YES.
alternative setting is proposed
Confirm with YES.
Press STOP to return standby
mode
GB
T elephone Ansering Device (T AD)
52
TOSHIBA TF 471
Page 53

Telephone Answering Device (TAD)
Set call delay
If your fax machine is in the TAD mode, it
connects to the line after the fifth ring
(factory setting). This delay enables you
for instance to collect the call via the
external telephone when you are present.
You can set the call delay to 1-9 rings via
the menu.
15.03 FAX/TAD 00
3 x
NO
INSTALLATION ?
YES
SET RECEIVE MODE ?
5 x
NO
TAD SETTING ?
YES
SET TAD DELAY ?
YES
TAD DEL AY(1-9) = 5
Program access code:
standby mode
Start the menu. Press ...
...until this menu item appears.
Confirm with YES.
Press NO...
...until this menu item appears.
confirm...
Confirm with YES.
STOP
NO
TAD DELAY(1-9 ) =
TAD DEL AY(1-9) = 6
YES
15.03 FAX/TAD 00
press NO to delete old value
enter new value
Example: 6
Confirm with YES.
Press STOP to return standby
mode
TOSHIBATF 471
T elephone Ansering Device (T AD)
53
GB
Page 54

Report prints
Activate report printing
Not all reports are printed out
automatically; they have to be requested
specially. These lists can provide
information concerning the current state
of the fax machine. The following reports
can be printed:
• T ransmission report
• Multitransmission report
• Transmission and reception journal
• Number list
• Function list
• Reservation list
The transmission report
This report can be printed after every
transmission or in the event of a defective
transmission. It provides information about
the most important transmission data.
Please refer to page 61 for switching ON/
OFF.
The multitransmission report
After a broadcast transmission (group
dialling), the machine prints out a list of
fax partners who have been reached or
who have not been reached by group
dialling. This list is always printed out
when group dialling has been completed.
TRANSMISSION-REPORT
TIME : 02.05.98 15:49
TEL. NUMBER : +44-1932-158156
NAME : TOSHIBA
NBR. DATE TIME DURATION PGS TO MODE STATUS
005 23.11 13:32 00/00 00 +492131158170 OK 30
MULTITRANSMISSION REPORT
TIME : 02.05.98 15:49
TEL. NUMBER : +44-1932-158156
NAME : TF P100
OT NUMBER : 01
ABB. NUMBER : 02
TEL NUMBER : *0033142046491
START TIME : 02.05.98 11:52
END TIME : 02.05.98 11:56
PAGES : 01
GB
54
Report prints
SUCSESSFUL TEL NUMBER
NBR. NAME TEL NUMBER
OT NUMBER : 01 ADAM *158170
ABB. NUMBER : 02 AGENCY *02114373110
TEL NUMBER : *0033142046491
UNSUCSESSFUL TEL NUMBER
NBR. NAME TEL NUMBER SENT PGS
OT NUMBER :
ABB. NUMBER :
TEL NUMBER :
TOSHIBA TF 471
Page 55

Report prints
Transmission and reception journal
Your fax machine will record messages
which you transmit or receive in the form
of transmission and reception journals.
These lists are printed out automatically
after every 40 transmissionss or receptions
or at your request:
15.03 FAX 00
1 x
NO
LISTS ?
YES
JOURN AL ?
YES
PRINTING
TRANSMISSION-JOURNAL
standby mode
Start the menu. Press ...
...until this menu item appears.
Confirm with YES.
Confirm with YES.
The report is printed
TIME : 02.05.98 15:49
TEL. NUMBER : +44-1932-158156
NAME : TOSHIBA
NBR. DATE TIME DURATION PGS TO MODE STATUS
001 12.02 17:22 00/24 01 +492131158170 E C NG 50
002 12.02 17:23 00/25 01 +492131158280 EC OK
RECEPTION-JOURNAL
TIME : 102.05.98 15:49
TEL. NUMBER : +44-1932-158156
NAME : TOSHIBA
NBR. DATE TIME DURATION PGS FROM MODE STATUS
001 12.02 17:37 00/24 01 +492131158170 EC NG 50
002 12.02 17:40 00/25 01 +492131158280 EC OK
NBR:
Lists the communications in the order
they occurred.
DURATION:
Gives the length of each communication
in minutes and seconds.
PGS:
Gives the number of pages per
transmission or reception.
MODE:
Indicates the type of
communication.
HS: High Speed Transmission, only
possible between TOSHIBA
machines.
EC: Error correction mode.
G3: Communication in standard groups
operational mode.
P: Documents were sent/received by
polling.
M: Indicates a memory
communication.
STA TUS: (of communication)
OK means successful
NG stands for communication error
TO or FROM:
Gives ID or telephone number of
the receiver or sender.
see: error codes page 64.
GB
TOSHIBATF 471
Report prints
55
Page 56

Report prints
The number list
This list details the fax numbers which you
have stored. These are the numbers of
the one-touch dialling keys as well as the
numbers of the alphabet dialling memory
positions.
15.03 FAX 00
1 x
NO
LISTS ?
YES
JOURN AL ?
NO
TELEPHONE NBRS LIST?
YES
PRINTING
* TELEPHONE NUMBERS LIST *
standby mode
Start the menu. Press ...
...until this menu item appears.
Confirm with YES.
Skip menu item...
Confirm with YES.
The report is printed
TIME : 02.05.98 15:49
TEL. NUMBER : +44-1932-158150
NAME : TOSHIBA
ONE TOUCH KEY INFORMATION
OT NBR. NAME TEL. NUMBER
01 ADAM 0158170
02 AGENCY 02114373110
03 SALES 0003345503330
ABBREVIATED TEL. NUMBER INFORMATION
ABB. NBR. NAME TEL. NUMBER
01 BAFI 02114373110
02 UK 00044932516452
GB
56
Report prints
TOSHIBA TF 471
Page 57

Report prints
The function list
This list provides information concerning
all settings of the fax machine. They
correspond with the settings which you
have made. Keep this list for any service
work which may be necessary.
15.03 FAX 00
1 x
NO
LISTS ?
YES
JOURN AL ?
2 x
NO
FUNCTION LIST ?
YES
PRINTING
standby mode
Start the menu. Press ...
...until this menu item appears.
Confirm with YES.
Press NO ...
...until this menu item appears.
Confirm with YES.
The report is printed
FUNCTION LIST
TIME : 02.05.98 15:49
TEL. NUMBER : +44-1932-158156
NAME : TOSHIBA TELEFAX
* RECEIVE MODE SETTING*
* CONTRAST SETTING*
* INITIAL SETTING *
DIAL TYPE : DP defined dialling procedure (see page 9)
EXCHANGER : PSTN defined connection type (see page 10)
MONITOR LEVEL : DIGIT 0 obtaining outside line (see page 11)
* PRINTER SETTINGS *
RX REDUCTION : OFF Reduce page (see page 19)
DISCARD : ON Discard (see page 19)
* COMMUNICATION SETTING *
REMOTE RX : OFF Fax can be activated by 5# (see page 15)
CALL TIME : 5 Number of rings (see page 21)
PRIVILEGED RX : OFF Receiving protection status (see page 17)
TTI : INSIDE Transmission header (see page 59)
ECM : ON Error correction (see page 35)
* TAD SETTING*
TAD DELAY : 2 Call delay in the TAD mode (see page 53)
TOLL SAVER : OFF Message display (see page 52)
SCREENING CALL : OFF Screening call during recording (see page 51)
RECORDING TIME : 30 SEC Recording time per message (see page 50)
* LIST SETTING*
AUTO JOURNAL : ON Journal output (see page 62)
TX REPORT : ALWAYS Special repot output (see page 61)
´DOCUMENT ID : ON
MULTI TX REPORT : ON
* TOTAL PAGE*
SCAN : 00001 Number of scanned pages
PRINT : 00007 Number of printed pages
: FAX current setting of the receive mode (see page 14)
: NORMAL Setting of basic contracts (see page 36)
GB
TOSHIBATF 471
Report prints
57
Page 58

Report prints
The reservation list
This list provides information relating to
reserved jobs in your fax machine. For
instance, you may have entered a delayed
transmission in memory and also entered
a polling job which has not yet been
completed. These are both known as
“jobs”.
15.03 FAX 00
1 x
NO
LISTS ?
YES
JOURN AL ?
3 x
NO
RESERVATION LIST ?
YES
PRINTING
standby mode
Start the menu. Press ...
...until this menu item appears.
Confirm with YES.
Press NO ...
...until this menu item appears.
Confirm with YES.
The report is printed
RESERVATION LIST
TIME : 02.05.98 15:49
TEL. NUMBER : +44-1932-158156
NAME : TOSHIBA TELEFAX
1. DOCUMENT TRANSMISSION
OT NUMBER
ABB. NUMBER
TEL NUMBER
TIME OF TRANS. :
2. MEMORY TRANSMISSION
OT NUMBER
ABB. NUMBER
TEL NUMBER
TIME OF TRANS. :
NUMBER OF PAGES
3. POLLING
OT NUMBER
ABB. NUMBER
TEL NUMBER
TIME OF TRANS. :
GB
58
Report prints
TOSHIBA TF 471
Page 59

Advanced settings
Set transmission header position
The transmission header contains the
code, the name, time of transmission and
the current page number. Normally it
appears in the top 5 mm of the incoming
copy. If this area contains important
information, this information is overwritten
by the transmission header. In order to
prevent this from happening, you are able
to displace the transmission header.
Accordingly, the transmission header is first
printed before the copy is printed. The
effect is that the length of the incoming
copy is extended by approx. 5 mm.
In Germany, the code must be
specified!
15.03 FAX 00
3 x
NO
INSTALLATION ?
YES
SET RECEIVE MODE ?
4 x
NO
COMM. SETTING ?
YES
SET REMOTE REC EIVE ?
3 x
NO
standby mode
Start the menu. Press ...
...until this menu item appears.
Confirm with YES.
Press NO ...
...until this menu item appears.
Confirm with YES.
Press NO ...
SET TTI ?
YES
IN S ID E ?
NO
OUTSIDE ?
YES
...until this menu item appears.
Confirm with YES.
Specify the current position
Press NO ...
• INSIDE?
• OUTSIDE?
...until the desired menu item appears
(here: outside transmission header)
Confirm with YES.
GB
TOSHIBATF 471
Advanced settings
59
Page 60

Advanced settings
Change screening volume
Use the key to regulate the
playback volume for loudspeaker dialling
(see page 41).
Press the corresponding key several times
to change the value.
The setting of playback volume
also influences the playback
function of the telephone
answering device (see page 42).
Playback volume
low high
Cancellation of jobs
All procedures which initiate a transmit or
receive activity of your fax machine are
defined as jobs. Press the STOP key to
terminate the job. If several jobs are
activated (e.g. delayed transmission from
memory and polling reservation), the
individual jobs are displayed in the form of
a selection menu, and the relevant job can
thus be deleted accordingly.
STOP
15.03 FAX 00
DOCUMENT FEEDER ?
/
YES
NO
CANCELLED
standby mode
Press Stop
first job is displayed
(Example: polling reservation)
Confirm with YES.
(or skip with NO)
The selected job is deleted
GB
60
Advanced settings
TOSHIBA TF 471
Page 61

Advanced settings
Set individual TX reports
The transmission report is printed out after
every transmission (basic setting). You can
limit the printout of the transmission report
(e.g. in order to save paper) by specifying
that it is only printed out if transmission is
defective.
TX REPORT
CALL
3 x
15.03 FAX 00
SET TX REPORT ?
ON ERROR ?
NO
ON ?
YES
15.03 FAX 00
NO
INSTALLATION ?
YES
SET RECEIVE MODE ?
Set TX report
standby mode
Press TX REPORT
alternative setting is displayed
Press NO ...
...until this menu item appears.
Confirm with YES.
Set group TX report
standby mode
Start the menu. Press ...
...until this menu item appears.
Confirm with YES.
6 x
NO
LIST SETTING ?
YES
SET AUTO JOURNAL ?
NO
SET MULTI TX REPORT?
YES
AL WAYS ?
NO
ON ERROR ?
YES
Press NO ...
...until this menu item appears.
Confirm with YES.
Skip menu item...
Confirm with YES.
Specify the current setting
Press NO ...
• ALWAUS?
• ON ERROR?
• OFF?
...until the desired menu item appears.
(here: Transmission report only printed out
after errored transmission)
Confirm with YES.
DOCUMENT ID ?
Select whether the first page
/
YES
NO
TOSHIBATF 471
transmitted from memory is to be
printed on the transmission report.
GB
Advanced settings
61
Page 62
Advanced settings
Set journal printout
Your fax machine documents all fax
messages which you send or receive in the
form of sending and receiving journals.
This list is automatically printed out
whenever 40 documents have been sent or
received.
You are able to disable this automatic
printout facility, so that it can only be
activated at your request.
15.03 FAX 00
3 x
NO
INSTALLATION ?
YES
SET RECEIVE MODE ?
6 x
NO
LIST SETTING ?
YES
SET AUTO JOURNAL ?
YES
standby mode
Start the menu. Press ...
...until this menu item appears.
Confirm with YES.
Press NO ...
....until this menu item appears.
Confirm with YES.
Confirm with YES.
OFF ?
YES
YES
Depending on the particular setting, the
machine now prompts whether to change
to the other status.
OFF:
Journal printed out only on request
/
NO
ON: Journal printed out automatically,
every 40 documents
Confirm with YES.
GB
62
Advanced settings
TOSHIBA TF 471
Page 63

Advanced settings
Operator call
During the fax transmission, the fax
partners can signal that they wish to
conduct a call following the fax
transmission (without releasing the
connection). The operator call facility is
used for this purpose. It does not matter
whether the operator call is initiated by the
receiver or by the transmitter.
The operator call facility must be initiated
during the transmission.
Notes:Notes:
Notes:
Notes:Notes:
•At the end of the fax transmission,
ringing signal is generated for approx.
15 seconds on the equipment of your
fax partner.
•If your operator call is accepted, your
own fax machine also generates
ringing signal. If this response does not
take place, your operator call has been
rejected.
•If the operator call is rejected, your fax
machine returns to the normal standby
mode after approx. 15 seconds.
•If the operator call signal is generated,
press the speakerphone key, or lift the
handset of the external telephone in
order to speak with your fax partner.
STD
TX REPORT
CALL
CALL REQUEST
SP-PHONE
SP-PHONE
Transmission running
Press the CALL key
(press the key again to cancel the operator
call)
Operator call reserved
Signal is generated
Press the SP-PHONE key
-orlift the handset of the external telephone.
Conduct telephone call
End telephone call
PC connection
You can also use your fax machine for
printing and scanning under Windows
(95 / 98 / NT). Please contact your dealer.
1.Switch off the PC and the TF 471.
2.Connect the 25-pin sub-D connector to the
corresponding socket on the fax machine,
and secure the connection with the
connector screws.
Pin assignment of serial cable
Sub-D 9 pin socket (female)
Sub-D 25 pin socket (male)
3.Connect the cable to the serial interface of
your PC.
PC-Fax
Connect the TF 471 before the
installation.
GB
TOSHIBATF 471
Advanced settings
63
Page 64

Possible problems
Error messages in the Display
Problem
LOAD DOCUMENT
NUMBER NOT LISTED
OPERATION ERROR
DOCUMENT JAM
PAPER EMPTY
PAPER JAM
MEMORY ERASED
MEMORY FULL
Your fax machine reports an operating error or
fails to perform the required function. Before you
make an unnecessary call on your service
technician, take your time and see if you can help
yourself. This checklist will help
possible causes ...
Document not loaded.
There is no telephone number stored on this
abbreviated number/one-touch key.
You are trying to enter incorrect data.
Documents have jammed in the document feeder.
The recording paper has run out.
The recording paper has jammed.
T elephone numbers stored and initial settings have
been erased.
The memory has become full. Any documents
being stored are automatically ejected.
you recognise and eliminate errors.
Press STOP to clear error
messages.
... and solutions
Feed in document.
Enter the abbreviated number/one-touch
number.
Enter correct data.
Press STOP. Eliminate the error
(see page 67).
Load a new roll of recording paper (see
page 6).
Remove the jammed paper referring to the
instructions on page 67.
Press START . This resets initial data stored
by the back-up battery.
You can reduce memory storage
requirements:
- reduce the resolution
- avoid using the Grey mode
- print out any fax messages received wich
are still in the memory
- reduce the number of pages you send at
one time
COMMUNICATION ERROR
INK FILM EMPTY
TPH OVERHEAT
LINE BUSY
POWER FAILURE
COVER OPEN
Error codes
List of error codes on jounal/
Transmission report
10 = Paper empty
11 = Recording paper jam
12 = Document jam
13 = Cover open
16 = Ink film empty
20 = Power failure
Connection to your partner’s fax machine as
impossible or the connection was poor.
The printer system stops.
When the thermal print head (TPH) overheats,
your machine is temporarily switched off.
The required number was busy during all dialling
attempts, or the fax partner was not available.
Your machine reports a power failure.
The cover is open.
25 = TPH overheated
30 = STOP was pressed
31 = Operator call requested
33 = Polling error
50 = Error in automatic redialling*
53 = Security code error
80 - 86 = Problem with telephone line or receiver’s
fax machine
Retransmit the document. If the error
occurs frequently when sending to this
partner, contact your service centre.
Insert new ink film.
Wait a few minutes until the print head has
cooled down and your machine is on the
standby mode again.
Press STOP and send the documents later.
See also automatic redialling on page 29.
Press STOP. Your machine should be ready
to transmit and receive again.
Close the cover and press START.
*) Operating your fax machine at an
extension
When operating your fax machine
at an extension, you must always
enter “❊”, before you dial,
whether you use the dial key-pad or store
telephone numbers.
GB
64
Possible problems
TOSHIBA TF 471
Page 65

Possible problems
Transmission problems
Problem
Your document is not automatically pulled
into the feeder.
The text ”transmission” is not displayed
when you press the START key.
The document is damaged during sending
or copying.
Your fax machine reports an operating error or
fails to perform the required function. Before you
make an unnecessary call on your service
possible causes ...
Your machine displays an error.
The display is blank.
Document size or thickness of paper are not
acceptable.
The operator control panel is not firmly locked.
You replaced the receiver before pressing START.
Document format or paper thickness not as
specified.
The document guides are not properly adjusted to
the paper size.
technician, take your time and see if you
can help yourself. This checklist will help
you recognise and eliminate errors.
... and solutions
If the display gives an error message,
clear the fault and delete the display with
STOP.
Check there is power on the machine.
The machine must be switched on (see
page 4).
Use acceptable documents only (see page
22).
Close the cover. It should be firmly locked in
place on both sides.
Try again. Replace the receiver only when
you have pressed START.
Use acceptable documents only (see page
22).
Adjust the document guides accordingly.
Your fax machine performed transmission
correctly but the message was not received
by the receiver.
The receiver received a blank sheet instead
of the document sent.
The receiver reports: The document
transmitted is difficult to read.
Abbreviated or one-touch dialling do not
work.
No dial tone is heard when handset is offhook.
The other machine is out of paper.
You loaded your document in the machine with
the image face-up.
Your machine’s document reader is dirty or
damaged.
RESOLUTION and CONTRAST are not set
correctly.
The telephone connection is poor.
Abbreviated or one-touch dialling number is not
correctly stored.
The telephone is not correctly connected.
The fax machine is not correctly connected.
Ask the receiver to put paper in his
machine.
Send your document again: the image
must be face-down on your document
feeder.
Make a copy of your document on your fax
machine (see page 20). If your copy is also
difficult to read, clean the document
reader.
Make a copy on your fax machine (see
page 20) and adjust the settings to your
document. You can also improve document
quality: By making the print on the
photocopy darker, enlarging or reducing.
(see page 29). Then send again.
Redial. You may get a better conncection.
Check and correct stored numbers (see
page 37/38).
Check that your telephone is connected
correctly to the socket (see page 5).
Plug the connecting cable of your fax
machine into the socket (see page 5).
Your call does not arrive although you have
dialled the correct number.
TOSHIBATF 471
Your fax machine has been set to the wrong
dialling mode.
If you are connected to a PABX: You have set the
wrong line type.
Your fax machine is not connected to the PSTN.
Switch to the correct dialling procedure:
DTMF or pulse-dialling (see page 9).
Set the line types to EXTENSION (see page
10).
Plug the connecting cable of your fax
machine into the socket (see page 5).
GB
Possible problems
65
Page 66

Possible problems
Receiving problems
Problem
You press START to receive an document.
But you receive nothing.
Your recording paper is not fed out.
The dcoument received is difficult to read.
Your fax machine reports an operating error or
fails to perform the required function. Before you
make an unnecessary call on your service
possible causes ...
Your have an error displayed.
The fax machine is not correctly connected.
The display is blank.
There is still a document in the feeder.
Your fax machine is set in manual receiving mode
and you replaced the handset before pressing
START.
The operator control panel is not closed.
The recording paper in your machine is jammed.
Document quality is poor.
technician, take your time and see if you
can help yourself. This checklist will help
you recognise and eliminate errors.
... and solutions
If the display shows an error message,
eliminate the fault and delete the display
with STOP.
Check the wiring. See page 5.
Check there is power to the machine. The
machine must be switched on (see page
4).
Press STOP and remove the document.
When receiving the next fax, be sure to
replace the handset only after you have
pressed START.
Close the cover. Both sides of the cover
must be firmly locked in place.
Remove the jammed paper (see page 67).
Ask t he sender to reset the resolution and
contrast or improve the quality of the
document e.g. by making the print on the
photocopy darker, enlarging or reducing.
Then have it send again.
You receive a completely blank document.
The document received is partially printed.
You can send fax messages without any
problem, although you cannot receive any.
The telephone connection is poor.
The sender made a mistake when loading the
document.
The operator control panel of your fax machine is
not closed properly on both sides.
Receiving protection is activated.
Ask the sender to transmitt the document
again (see Page 6).
Check whether the sender loaded in the
correct manner.
Close the cover. Both sides of the cover
must be firmly locked in place.
Switch off receiving protection (see page
17).
GB
66
Possible problems
TOSHIBA TF 471
Page 67

Possible problems
Document jam
How to clear a document jam
Press the rlease button
to open the control panel cover.
Keep the power ON.
The jammed document
can be carefully removed.
Do not try to send the jammed
document again. Use a carrier sheet or
make a photocoopy and transmitt this
instead.
Close the control panel
Take care that the cover locks firmly into place.
Now by pressing STOP delete the error message.
Pull out the paper tray. Remove any paper in the
tray.
Paper jam
How to clear a recording paper jam
After opening
Keep the power ON.
Unlock the printer unit
Lift out the film holder.
Remove any jammed paper
Do not damage the print head
Replace the film holder and close the print unit.
When closing the machine,
ensure that all covers firmly lock into place.
GB
TOSHIBATF 471
Possible problems
67
Page 68
Possible problems
Remote maintenance (COMLINE)
Your fax machine permits remote diagnosis.
This means that the internal settings can be
read and changed via a telephone line. In
order to ensure that data protection is
assured, COMLINE is possible only after you
enable your machine for this facility.
15.03 FAX 00
6 x
NO
TEST ?
YES
OPE. PANE L TE S T ?
2 x
NO
REMOTE ?
YES
ON ?
YES
standby mode
Start the menu. Press ..
...until this menu item appears.
Confirm with YES.
Start the menu. Press ...
Confirm with YES.
Confirm with YES.
After remote service is
completed, reset your fax
machine to the initial mode:
15.03 FAX 00
6 x
NO
TEST ?
YES
OPE. PANEL TEST ?
2 x
NO
REMOTE ?
YES
ON ?
NO
OFF ?
standby mode
Start the menu. Press ..
Confirm with YES.
Press No...
Confirm with YES.
Reject
GB
68
Possible problems
YES
Confirm with YES.
TOSHIBA TF 471
Page 69

Possible problems
Connection to PABXs
You should consider the following points if
your fax machine is connected to a PABX.
•Is the extension authorised to dial an
outside line?
•Does the extension have DDI
authorisation?
•Has the facility for obtaining an outside
line been correctly programmed (code,
earth, flash)?
•Is an outside line obtained with the ✽ key?
• Has the correct dialling procedure been
set (DTMF, pulse dialling)?
Where appropriate, discuss these questions
with the customer service of your PABX.
Reset
If you cannot remedy a problem with the
proposed measures (see page 64 et seq.),
you can carry out a RESET. All parameters
are then reset to their factory settings.
The stored numbers are
deleted!
notnot
not
notnot
START
STOP
15.03 FAX 00
Switch off your fax machine.
Keep START and STOP pressed down
while switching your machine back on.
As soon as a message is displayed, release.
After reset, repeat the installation
procedure (see page 8).
GB
TOSHIBATF 471
Possible problems
69
Page 70

UK Connection information
This TOSHIBA Facsimile
Transceiver is intended for
connection to public
telecommunication services as
follows:
By using the cable described as
TEL LINE CABLE in the packaging
list of the instruction manual. This
cable plugs into the socket on the
left hand side of the TF 471 which
is marked LINE and the other end
into the standard PSTN analogue
socket found in the UK.
We declare, that TOSHIBA is using
mark in compliance with
EN 50 082-1, EN 55 022/B and
EN 60 950
This terminal equipment complies with
the following requirements:
Group 3 fax modem
Automatic call initiation
Storage of telephone numbers for
retrieval by a predetermined code
Automatic dialling
Automatic repeat attempts
Call progress monitor
Series connection facility
LD or MF dialling
Operation with or without dial tone
being present.
Any other usage will invalidate
the approval of the apparatus if as
a result, it then ceases to conform
to the standards against which
approval was granted.
EPA ENERGY STAR
Addendum to the TF471 Operator’s Manual
The United States Environmental Protection Agency (EPA) has introduced a voluntary program, the ENERGY STAR
Program, to encourage the widespread and voluntary use of energy-efficient technologies that enhance the
workplace, improve product performance, prevent pollution, and reduce your energy costs. As an ENERGY ST AR
Partner, to Toshiba Europa (I.G.) GmbH has determinded that this facsimile model meets the ENERG Y STAR
guidelines for energy efficiency. ENERG Y ST AR guidelines require that all ENERG Y STAR facsimiles maintain very low
power consumption during idle state or have a „Power Saver“ feature that will automatically stand-down to an idle
state after a period of inactivity.
For more information on the ENERGY ST AR P rogram, please contact:
ENERGY ST AR P rinters/F ax Machines
US EP A (62021)
Washington, DC 20460
ENERGY ST AR is an U.S. registered mark.
GB
70
TOSHIBA TF 471UK Connection information
Page 71

Index
Access code ............................................. 49
Alphabet dialling memory ......................... 37
Alphabet dialling memory ......................... 37
Alphabet dialling ....................................... 24
Announcement text .................................. 43
Automatic fax messages........................... 23
Broadcast report ....................................... 54
Broadcast.................................................. 32
Call delay ............................................ 21, 53
Carrier sheets ........................................... 22
Change recording time ............................. 50
Code ......................................................... 10
COMLINE .................................................. 68
Connection to mains................................... 5
Contrast .................................................... 36
Copy ......................................................... 20
Date.......................................................... 12
Deactivate telephone answering device.... 44
Delayed..................................................... 30
Delete job ................................................. 60
Dialling method........................................... 9
Digital PABX.............................................. 10
Document jam .......................................... 67
Document................................................. 22
DTMF dialling ............................................ 42
DTMF dialling .............................................. 9
Earth key................................................... 10
ECM.......................................................... 35
Enlarge ..................................................... 20
Error codes ............................................... 64
Error correction......................................... 35
Error messages ......................................... 64
Excess length............................................ 19
Extension .................................................. 10
Fast forward.............................................. 45
FAX/T AD .................................................... 16
Flash key ................................................... 10
Function list............................................... 57
Group dialling............................................ 32
ID................................................................ 9
Insert print film............................................ 7
Insert recording paper................................. 6
Job ........................................................... 58
Journal ............................................... 55, 62
Language .................................................. 13
Last number redial .................................... 29
Local copy ................................................ 20
Long dialling.............................................. 26
Main line................................................... 10
Memo ....................................................... 47
Memory reception..................................... 20
Memory ........................................ 20, 31, 33
Message display........................................ 52
Messages.................................................. 44
Mute ......................................................... 41
Name ......................................................... 8
Number list ............................................... 56
Number of calls ........................................ 21
Obtaining a public line .............................. 10
Operator call ............................................. 63
PABX ................................................... 10, 69
Paper jam ................................................. 67
Paper size ................................................. 22
Password .................................................. 33
PC connection .......................................... 63
Play back, messages................................. 45
Polling protection ...................................... 33
Polling ....................................................... 18
Pulse dialling ............................................... 9
Receive protection.................................... 17
Receiving mode ........................................ 14
Receiving problems................................... 66
Reception reduction ................................. 19
Recording ................................................. 48
Reduce ..................................................... 20
Remote maintenance ............................... 68
Remote polling transmitter ....................... 42
Remote polling.......................................... 49
Remote reception ..................................... 15
Reservation list.......................................... 58
Reserve polling.......................................... 33
Reset ........................................................ 69
Resolution................................................. 29
Rewind ..................................................... 45
Rewind/fast forward ................................. 45
Ring .......................................................... 21
Screening volume ..................................... 60
Screening ................................................. 51
Set TX report ............................................ 61
Speakerphone........................................... 41
Speed dialling keys ................................... 39
Speed dialling ........................................... 25
Standby mode .......................................... 14
Stop reception .......................................... 20
Stop transmission ..................................... 36
T AD........................................................... 42
TEL/FAX..................................................... 16
T elephone Answering Device (TAD) ..... 16, 42
Telephone directory................................... 28
Telephone, connection of external .............. 5
Time ......................................................... 12
TOSHIBA code .......................................... 33
Transmission problems.............................. 65
TX header line........................................... 59
TX header position .................................... 59
TX protection ............................................ 34
TX report................................................... 54
Unpacking................................................... 4
Volume ..................................................... 60
GB
IndexTOSHIBATF 471
71
 Loading...