

Page 1

TOSHIBA
DISK PRODUCTS DIVISION
SD-W1111
DVD-RAM DRIVE
PRODUCT SPECIFICA TION
JUNE 1999
REV. 1.0
Specifications are subject to change without notice
DOCUMENT NUMBER
12043
Page 2

OD-A017-02
TOSHIBA DVD-RAM SD-W1111 ‘99/06/26 Version 1.0
Matters to be attended to:
This drive adopts RPC-II for its “Standard Specification Model”.
This DVD-RAM Drive adopts RPC-II, the Phase II System of RPC (Regional Playback Control) for “Standard
Specification Model”, on the basis of a contract with the CSS (Contents Scramble System) organization. (all of our
former DVD-RAM Drives adopted RPC-I, the Phase I System.)
The CSS rule requires that all the products not only DVD-RAM Drives but also PC systems installing DVD-RAM
Drives sold from Jan.1, 2000 need to support RPC-II described above.
To playback a DVD-Movie Software with the Regional Code specified by using a DVD-RAM Drive with RPC-II
adopted, either the hardware or software used as applications on PC system side is also required to meet RPC-II.
Namely, in the status that a hardware or a software for a DVD-Movie Playback Application planned to use in a PC
does not support RPC-II, if the "RPC-II (Standard Specification) Drive" is used in combination, DVD-Movie
Softwares with the Regional Code specified (most of DVD-Movie Softwares currently available on the market)
cannot be reproduced. So, in such a case, "RPC-I Specifications Supported Model" must be purchased for a while.
However, all the drive manufacturers must obey to the deadline specified by the CSS rule saying; all DVD-RAM
Drives have to implement Phase II from Jan.1, 2000. So we recommend that you will change your DVD-Movie
Playback Hardware or Software to those applicable to the PRC-II as soon as possible and investigate to combine
your system with the RPC-II Specification Drives.
Since we determine the drives are of RPC-I or RPC-II when manufacturing at factory and ship, the specification
change after shipping is not available in principle. Especially, changing the RPC-II specification drive to the RPCI is prohibited by the CSS rule.
In the combination of the drive and PC system with RPC-II supported, as far as the Regional Code of a DVD-Movie
Software and the code memorized in the RPC-II Specification Drive coincides, the Movie Software is allowed to
carry out.
In the RPC-II Specification Drive, the region change by an end user is permitted up to 5 times in total including the
initial region set. After change to the fifth region is carried out, the Drive enters Parm State (“no change allowed”
status).
The drive with Parm State is permitted up to 4 times of "reinitialization" by a drive manufacturer or a specific
service center authorized by the CSS. Since it is considered that the reinitialization is carried out after the
completion of the region confirmation through test items in the PC manufacturer’s manufacturing line or the
completion of drive repair, etc., the number of reinitialization times may vary from 0 (no reinitialization available)
to 4 times. So, we recommend that not to disclose the reinitialization process to end users but only to inform the
number of region setting times as "end user’s direct region setting is available up to 5 times in total."
Page 2 Product Specification
Page 3

OD-A017-02
TOSHIBA DVD-RAM SD-W1111 ‘99/06/26 Version 1.0
Precaution
This equipment (an optical disc drive) handled under the conditions out of product specifications may
cause injury, heat generation, trouble, erroneous operation and performance degradation, so, care will be
necessary, and proper handling according to the precautions shown below will be required. In case of
mishandling without keeping the cautions, safety, reliability and performance of the product are not
guaranteed. For systems using this equipment, please note it above mentioned on manuals etc. to
understand the users completely.
Cautions
(1)Don’t loosen screws except persons trained with specified instructions. The reliability, safety and
performance specified in this specification can not be satisfied.
(2)Don’t modify this equipment. The reliability, safety and performance specified in this specification can
not be satisfied.
(3)Don’t insert any objects or cartridge other than specified from the cartridge insertion slot. It may cause
trouble or erroneous operation.
(4) Don’t give excessive vibration and shock this equipment. It may cause trouble or erroneous operation.
(5) Toshiba Corporation makes no warranty of any kind, either expressed or implied, including, but not
limited to, the implied warranties of merchantability and fitness for a particular purpose. This product
may sustain damages which may cause errors and failures. The causes are not confined to what are
mentioned or implied in this document. Therefore, the possibilities of error and failure should be taken
into consideration when furnishing systems should be protected by such means as system backup and
mirroring disk subsystem, especially when this product is used for systems as medical appliances.
Toshiba Corporation shall not be liable for incidental or consequential losses or damages to tangible
property, injury or death of person in connection with the errors and failures which may occur when
furnishing, operating or using this product
(6) When a disc cannot be ejected because of some troubles, etc., turn off the power for this equipment and
eject the disc using the emergency eject mechanism after passing more than 1 minute. When the
emergency eject is carried out while the power is on or immediately after the power off, the disc may be
ejected in a rotating status. Toshiba Corporation does not assure if the disc is damaged by this.
Page 3 Product Specification
Page 4

OD-A017-02
TOSHIBA DVD-RAM SD-W1111 ‘99/06/26 Version 1.0
1. Scope....................................................................................................................................................6
2. Features................................................................................................................................................6
3. External views and dimensions .............................................................................................................7
4. Basic specifications .............................................................................................................................. 8
5. Power supply specifications................................................................................................................ 10
5.1 Input power supply....................................................................................................................... 10
5.2 Power consumption...................................................................................................................... 10
5.3 Allowable ripple voltage............................................................................................................... 10
6. Mechanical specifications................................................................................................................... 10
6.1 Dimensions .................................................................................................................................. 10
6.2 Mass ............................................................................................................................................10
6.3 Disc loading................................................................................................................................. 10
6.4 Optical head auto-lock mechanism................................................................................................ 10
7. Reliability specifications..................................................................................................................... 11
7.1 Error rate...................................................................................................................................... 11
7.2 Life.............................................................................................................................................. 11
8. Environmental specifications .............................................................................................................. 11
8.1 Temperature................................................................................................................................. 11
8.2 Relative humidity......................................................................................................................... 12
8.3 Vibration...................................................................................................................................... 12
8.4 Shock........................................................................................................................................... 12
8.5 Altitude........................................................................................................................................ 12
8.6 Static electricity............................................................................................................................ 12
8.7 Acoustic noise .............................................................................................................................. 12
8.8 Applicable regulations.................................................................................................................. 12
9. Block diagram.................................................................................................................................... 14
10. Mounting............................................................................................................................................ 15
10.1 Mounting......................................................................................................................................15
10.2 Mounting direction....................................................................................................................... 16
10.3 Notes on mounting .......................................................................................................................17
11. Front bezel .......................................................................................................................................... 19
11.1 Standard Bezel ............................................................................................................................. 19
11.2 LED lighting ................................................................................................................................ 19
12. Rear View and Connectors.................................................................................................................. 21
12.1 Power supply connector ................................................................................................................ 21
12.2 I/F connector (SCSI connector).....................................................................................................22
12.2.1 Pin No. table of connector terminal ..........................................................................................22
12.2.2 External view diagram..............................................................................................................23
12.2.3 Signal interface........................................................................................................................ 23
12.3 Mode select headers functions ......................................................................................................24
12.3.1 SCSI ID setting........................................................................................................................ 24
12.3.2 Parity check setting ..................................................................................................................24
12.3.3 VERIFY setting .......................................................................................................................24
12.3.4 ONE LUN/TWO LUN setting.................................................................................................. 25
12.3.5 Termination setting................................................................................................................... 25
12.3.6 Change of setting .....................................................................................................................25
12.4 Audio Connector ..........................................................................................................................25
13. Host interface specification ................................................................................................................. 26
13.1 Applicable standard ...................................................................................................................... 26
13.2 SCSI command set ....................................................................................................................... 26
14. Notes on data guarantee...................................................................................................................... 28
14.1 Disappearance of data in buffer in a write cache operation............................................................ 28
14.2 Error report in a write cache operation.......................................................................................... 28
14.3 Automatic sector replacement at a write operation........................................................................ 28
14.4 Verification of a block address...................................................................................................... 28
14.5 Error generation in Read Modify Write operation .........................................................................28
Page 4 Product Specification
Page 5

OD-A017-02
TOSHIBA DVD-RAM SD-W1111 ‘99/06/26 Version 1.0
15. MISCELLANEOUS........................................................................................................................... 30
15.1 Accessories .................................................................................................................................. 30
15.2 A bare disc setting at vertical installation...................................................................................... 30
15.3 Disc eject at emergency................................................................................................................ 33
Page 5 Product Specification
Page 6

OD-A017-02
TOSHIBA DVD-RAM SD-W1111 ‘99/06/26 Version 1.0
1. Scope
The specification is applied to DVD-RAM drive SD-W1111.
2. Features
(1) 2.6 GBytes capacity on one side of a 120 mm disc
• Using 650 nm short-wavelength laser, 0.74 µm single spiral land and groove tracking and Z-CLV
system, realizes the memory of 2.6 GBytes (decimal) on one side of a 120 mm disc.
(2) High data recording rate by over-writing system
• Phase change recording technology enables to write data directory into the media without waiting for
pre-erasing (one-path direct over-writing system).
(3) Playback interchangeability for CD-ROM and DVD-ROM discs
• Playback a disc either for CD-ROM, CD audio or DVD-ROM.
(4) High-speed data transfer rate
• Possible to record and playback MPEG2 compressed motion picture (MP@ML) in a real time.
• Owing to the read/write cache, improves the data throughput marvelously.
(5) Low power consumption of 6.7W (typ.) using +5V single power supply
• Owing to the low power consumption design to operate using +5V single power supply, no exclusive
fan is required.
(6) Dust prevention structure
• Original sealing structure provides dust prevention features.
(7) Easy contact and operation
• Employs the SCSI interface that is easy to connect with various platform .
• Possible to install vertically as well as horizontally.
(8) High reliability
• MTBF 100,000H (under specified conditions)
• Powerful error correction ability by employing the erasure correction system using the ECC block
which is same as the DVD-ROM system.
Page 6 Product Specification
Page 7
OD-A017-02
TOSHIBA DVD-RAM SD-W1111 ‘99/06/26 Version 1.0
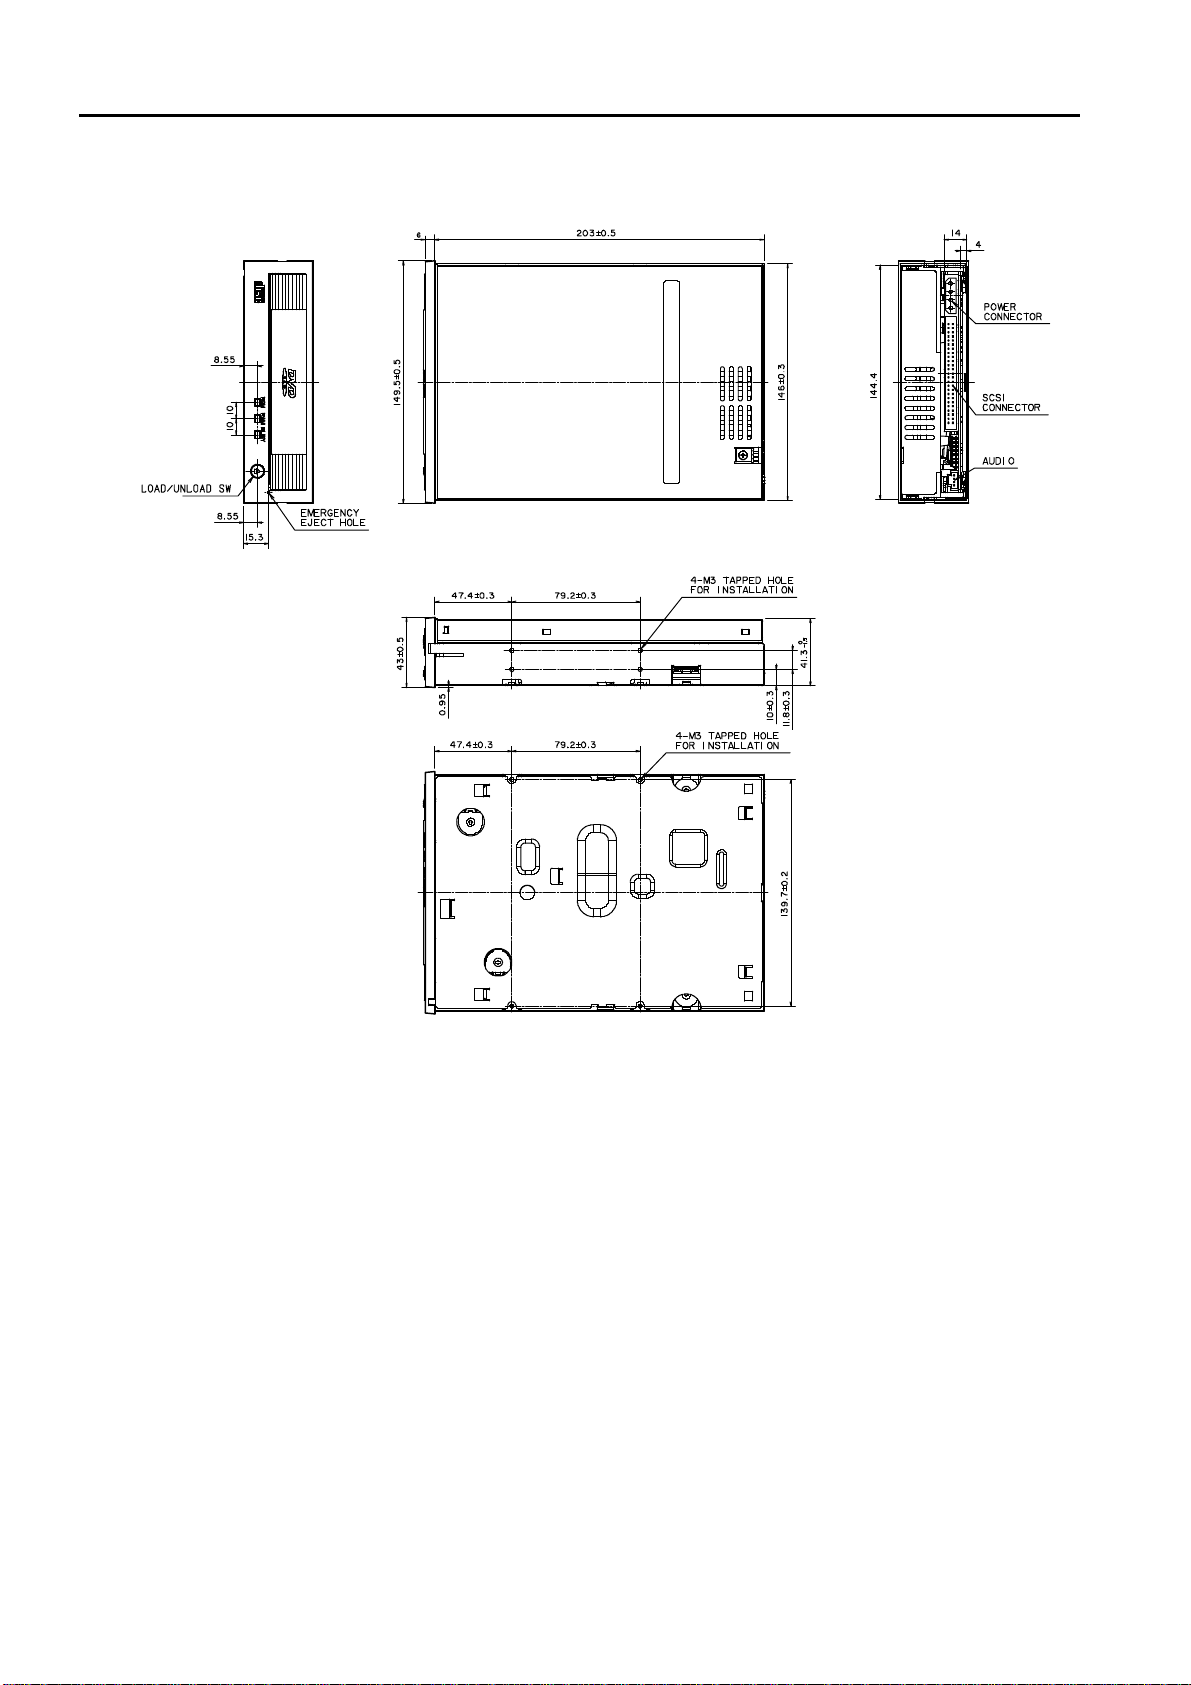
3. External views and dimensions
External views: 146.0 x 203.0 x 41.3 (mm) (W x D x H) (Except for front bezel)
Page 7 Product Specification
Page 8

OD-A017-02
TOSHIBA DVD-RAM SD-W1111 ‘99/06/26 Version 1.0
4. Basic specifications
• 5.25” half height form factor
• Applicable discs(1GB = 2
1) DVD-RAM *
1
DVD Specifications for Rewritable Disc Part 1 Version 1.0
2.42 GBytes*2 x 1 (Cartridge with a single-sided disc provided / No cartridge) *
2.42 GBytes x 2 (Cartridge with a double-sided disc is provided / No cartridge)
2) DVD-ROM
DVD Specifications for Read-Only Disc Part 1 Version 1.0
4.38 GBytes x 1 or 2 Single-layer disc
7.96 GBytes x 1 or 2 Dual-layer disc
3) DVD-R (Read only) *
4) CD-ROM
Red-book, Yellow-Book, CD-ROM XA, CD-I Bridge (Photo-CD, Video-CD)
30
Byte, 1MB = 2
4
20
Byte 1KB = 2
10
Byte)
3
CD-I*5, CD-I Ready, CD-G, CD-TEXT, Multi-session (Photo CD Disc, CD-Extra)
5) CD-DA playback to Analog audio output
6) CD-R (Read only) *
7) CD-RW (Read only) *
4
4
*1: Toshiba designate a recommend disc the performance of which has been checked by this drive.
*2: Formatted user capacity: 2.32GB
*3: When using a disc without using a cartridge, limitation on function features may occur.
*4: Depending on the feature of a recording unit that records data, playback function may not be
guaranteed.
*5: Need special hardware and software for playback.
• Disc diameter 120 mm/80mm (CD single, DVD-ROM single)
• Rotational speed
1,028 – 2,400 rpm (DVD-RAM)
1,200 – 2,800 rpm (DVD-ROM Single-layer)
1,300 – 3,000 rpm (DVD-ROM Dual-layer and DVD-R)
3,516 rpm (CD-ROM)
• Transfer rate (sustained) (1KB = 2
10
Byte=1,024 Byte)
1,350 KB/s (DVD-RAM)
2,700 KB/s (DVD-ROM, DVD-R)
990 – 2,400 KB/s (CD-ROM, CAV, 6.6 to 16X )
• Host I/F
SCSI
Command set SFF8090 Ver. 2 Rev 0.95
ANSI X3T9.2 Rev10L
Transfer rate (burst) 5MB/s max. (at asynchronous transfer)
10MB/s max. (at synchronous transfer)
Single ended driver
Page 8 Product Specification
Page 9

OD-A017-02
TOSHIBA DVD-RAM SD-W1111 ‘99/06/26 Version 1.0
• Average seek time (Operating time of SEEK command)
DVD-RAM 120 ms (typ.)
DVD-ROM 210 ms (typ.)
CD-ROM 140 ms (typ.)
• Average access time
DVD-RAM playback 180 ms*1 (typ.)
DVD-ROM 260 ms*1 (typ.)
CD-ROM 170 ms*2 (typ.)
*1 Operation time when playing back 1ECC block by READ command
*2 Operation time when playing back 1 sector by READ command
• Start time (average): START UNIT command execution time (w/o loading tray)
DVD-RAM 15.0 s*
DVD-ROM (Single-layer) 7.0 s
DVD-ROM (Dual-layer) 12.0 s
CD-ROM 7.0 s
* Start time may be longer depending on the defect number registered
• Restart time
1.0 s (from idle to active)
2.0 s (from sleep to standby)
• I/O terminal
I/F connector Applicable to 2.54 mm pitch flat cable.
Mode select header
CD audio connector 1 Vrms, Unbalanced
Power supply connector
• Physical recording size(DVD-RAM) 32 KBytes (ECC block unit)
• Logical sector size 2 KBytes
• Data buffer 2 MBytes
• Initialize time Less than 1.0s
(Time until the unit responds to the command after power turns on.)
Page 9 Product Specification
Page 10

OD-A017-02
TOSHIBA DVD-RAM SD-W1111 ‘99/06/26 Version 1.0
5. Power supply specifications
5.1 Input power supply
+5V ± 5%, peak current 3A (Max. 2 sec., at spindle motor ON/OFF)
Note: Power supply current is usually 1.4A. But at a spin-up time the current increase to 3.0A. If the
power supply cable that is long and thin, power supply voltage is drop and out of the
operational condition of this drive. Please use a short and thick power supply cable.
Note: The voltage drop with the power supply cable is approximately as follows.
Wire Resistance (Ω/km) Voltage drop (V)* at 1m wire length and 3A current
AWG22 (Twist wire) 57.4 0.344
AWG18 (Twist wire) 23.7 0.142
AWG22 (Single wire) 56.3 0.338
AWG18 (Single wire) 22.2 0.133
* The drop voltage in the both of the ground line and the power supply line
* This value changes according to the electric wire maker and the use temperature.
5.2 Power consumption
Average Less than 6.7W
Stand-by period: Less than 6.0W
Seek period: Less than 11.0W
Sleep period: Less than 1.0W
5.3 Allowable ripple voltage
Less than 100 mVp-p (includes spike noise)
6. Mechanical specifications
6.1 Dimensions
Refer to the drawing attached. (3. External views and dimensions)
6.2 Mass
1.14kg (Net ,include front bezel)
6.3 Disc loading
Auto-loading tray system (Bare disc, cartridge disc)
Tray load/unload mechanism
1) Load/Unload operation by the load/unload switch
2) Load operation by pressing the tray.
3) Load/Unload operation by the command.
4) Emergency eject function
6.4 Optical head auto-lock mechanism
To protect the optical head while transporting the drive, the optical head auto-lock function is
provided.
Be sure to avoid transport with a disc loaded.
Page 10 Product Specification
Page 11

OD-A017-02
TOSHIBA DVD-RAM SD-W1111 ‘99/06/26 Version 1.0
According to the steps described below, the optical head auto-lock mechanism can be functioned.
• Eject a disc.
• Pull-in the tray inside the drive.
• After “BUSY” lamp turns off, the auto-lock function completes.
When transporting, transport the drive after performing the steps above and turning off the power.
7. Reliability specifications
7.1 Error rate
DVD-RAM
Read error rate less than 10
Seek error rate less than 10
DVD-ROM
Read error rate less than 10
Seek error rate less than 10
CD-ROM
Read error rate (Mode 1) less than 10
Read error rate (Mode 2) less than 10
Seek error rate less than 10
–15
(Byte error rate)
–6
error/seek
–15
(Byte error rate)
–6
error/seek
–15
(Byte error rate)
–12
(Byte error rate)
–6
error/seek
Allows five times internal retry operations.
7.2 Life
Either of shorter life of 5 years or 15,000 POH
Loading mechanism 10,000 times
MTBF 100,000 H
Setting conditions:
Power on period 5,436 H/year (17 H/day)
Power on time 313 times/year
Access times 600,000 times/year
Using duty Playback : 20%
Recording : 2%
8. Environmental specifications
The drive might satisfy the basic specification over the following conditions.
8.1 Temperature
Operating 5 to 50 °C
Storing –10 to 60 °C
(Temperature variation gradient: 10°C/h)
(Temperature variation gradient: 20°C/h, except for media)
Transporting (with packing) –40 to 65 °C
(Temperature variation gradient 20°C/h, except for media)
Page 11 Product Specification
Page 12

OD-A017-02
TOSHIBA DVD-RAM SD-W1111 ‘99/06/26 Version 1.0
8.2 Relative humidity
Operating 8 to 80% RH
Storing 5 to 95% RH
Transporting (with packing) 5 to 95% RH
(Temperature variation gradient: 10% /h, absolute humidity: 30 gm3) * No dew condensation
8.3 Vibration(5 to 300 Hz)
Operating 2.45 m/s2 (0.25G)0-p
Non-operating 9.8 m/s2 (1.0G)0-p
Transporting (with packing) 9.8 m/s2 (1.0G)0-p
8.4 Shock(Half sine wave 11 msec., interval 2 sec., 5 cycle)
Operating 14.7 m/s2 (1.5G)0-p
Non-operating (disc not loaded) 490 m/s2 (50G)0-p
8.5 Altitude
Operating 0 to 3,000 m
Transporting (with packing) 0 to 12,000m
8.6 Static electricity
Specification IEC801-2
Operation 6 KV or lower
Damage 15 KV or upper
8.7 Acoustic noise
45 dB (Max.)
Measurement conditions:
• 1m away from the drive
• JIS A correction
• Standard front bezel attached
8.8 Applicable regulations
(1) UL1950 3rd
(2) CSA C22.2 No. 950 3rd
(3) TUV (EN60950/EN60825-1)
(4) DHHS 21 CFR Sub-Chapter J
(5) CE standard EN50081-1 : 1992
EN55022+A1 : 1994 class B
EN50082-1 : 1997
EN61000-4-2 : 1995
EN61000-4-3 : 1996
ENV50204 : 1995
EN61000-4-4 : 1995
EN61000-4-5 : 1995
Page 12 Product Specification
Page 13

OD-A017-02
TOSHIBA DVD-RAM SD-W1111 ‘99/06/26 Version 1.0
EN61000-4-6 : 1996
EN61000-4-8 : 1993
EN61000-4-11 : 1994
Page 13 Product Specification
Page 14

OD-A017-02
Mode select
Actuator driver x 2
Pre-amp
LD controller for CD
TOSHIBA DVD-RAM SD-W1111 ‘99/06/26 Version 1.0
9. Block diagram
I/FAuthent
DRAM(16Mbit)
TC203C620
DRAM(2Mbit)
SCSI
SPC7426
processor
DVD-RAM/ROM
Servo
F452658
controller
ication
processor
40MHz
TC9449AF
decoder
CD-ROM
CD
processor
Audio out
Audio-amp
33.86MHz
jumper
MC68HC16
CPU
15MHz
ROM(2Mbit)
Loading unitSensor
DISC
RF-amp
TLS1040
Pre-
amp
LD controller
Head
Lens
actuator
Ho-
LD
Spindle motor
SM9403
Servo-amp
SM9103
Linear motor
MPC17A66
MPC17A66
Linear motor driver
Loading motor driver
TPIC1312
Spindle motor driver
LED
Load/Unload SW
Page 14 Product Specification
Page 15

OD-A017-02
Flatness deviation under 0.5mm
TOSHIBA DVD-RAM SD-W1111 ‘99/06/26 Version 1.0
10. Mounting
10.1 Mounting
Mount the drive using four M3 tapping holes bottom and two M3 tapping holes on each side.
The following shows an example mounting on a personal computer or a sub system.
Use screws of which length
inside the drive should be
more than 2.5mm and less
than 3.5 mm from the drive
frame surface.
Keep this gap less than
0.5mm .
Before fixing After fixing
Page 15 Product Specification
Page 16

OD-A017-02
15° max
15° max
15° max
10° max
10° max
TOSHIBA DVD-RAM SD-W1111 ‘99/06/26 Version 1.0
10.2 Mounting direction
Install direction Horizontal or vertical installation
(When using an 80mm disc, vertical direction installation is not allowed.)
Allowable slants (Refer to the drawing.)Left/right directions: Within ±15°.
(When installing vertically, the allowable slants toward the top plate bottom
should be 0°.)
Front/rear directions:Within 10°
Page 16 Product Specification
Page 17

OD-A017-02
TOSHIBA DVD-RAM SD-W1111 ‘99/06/26 Version 1.0
10.3 Notes on mounting
• Keep more than 5mm clearance to circulate an adequate amount of air by convection around the drive
and mounting metal parts.
• Keep more than 0.8mm clearance around the top cover in order to secure absorbing shock and
vibration.
Page 17 Product Specification
Page 18

OD-A017-02
2.5-3.5mm
M3 screw
Drive Frame
TOSHIBA DVD-RAM SD-W1111 ‘99/06/26 Version 1.0
• Do not apply force (under 1.5N : 150gf) caving in the top plate.
• Use screws of which length inside the drive should be more than 2.5mm and less than 3.5 mm from the
drive frame surface.
Page 18 Product Specification
Page 19

OD-A017-02
Emergency
Load/Unload switch
LED: “ROM” “RAM ” “BUSY”
“ROM” or “RAM”
“BUSY”
“BUSY”
all LEDs turn off
“ROM” or “RAM”
TOSHIBA DVD-RAM SD-W1111 ‘99/06/26 Version 1.0
11. Front bezel
11.1 Standard Bezel
The front view of the drive with a standard bezel
disc eject hole
• Load/Unload switch:
Push when ejecting/pulling-in the tray
• Emergency disc eject hole:
When ejecting a disc with power turned off, insert an exclusive tool to eject a disc. (Refer to 15.3)
• LED:
“BUSY” (orange): Lights when the drive operates.
“RAM” (green): Lights when DVD-RAM disc is loaded.
“ROM” (green): Lights when either of DVD-ROM, DVD-R or CD-** is loaded.
11.2 LED lighting
Closing the tray, “BUSY” LED lights and the drive status becomes as follows;
(1) A disc is loaded and the drive status becomes “Ready”, “RAM” LED or “ROM” LED turns on
according to the disc type and “BUSY” LED turns off.
(2) A disc is loaded but the drive status doesn’t become “Ready”, all LEDs turn off.
Page 19 Product Specification
Page 20

OD-A017-02
1.6 s
“BUSY”
“BUSY”
all LEDs turn off
“ROM” or “RAM”
2.0 s
“BUSY”
“BUSY”
executing the command
TOSHIBA DVD-RAM SD-W1111 ‘99/06/26 Version 1.0
(3) A disc is not loaded, all LED’s turn off.
(4) While executing following command, “BUSY” LED turns on.
Command
REASIGN READ
WRITE SEEK
WRITE & VERIFY VERIFY
SEND DIAGONOSTIC READ HEADER
SET READ AHEAD GET PERFORMANCE
START / STOP UNIT
(5) While executing FORMAT command, “RAM” LED turns on and “BUSY” LED blinks on about
1.6sec cycle.
(6) While playing a CD audio track, “ROM” LED turns on and “BUSY” LED blinks on about 2.0sec
cycle.
Page 20 Product Specification
Page 21

OD-A017-02
1 2 3 4
TOSHIBA DVD-RAM SD-W1111 ‘99/06/26 Version 1.0
12. Rear View and Connectors
The rear view of the drive
• Power supply connector (4 pin): DC power supply is to be connected.
• I/F (SCSI) connector (50 pin): SCSI connector is to be connected.
• Modes select headers (2 x 8 bits):Used to perform function settings.
• Audio connector for CD (4 pin): CD audio outputs.
12.1 Power supply connector
Pin No. Connection
1 +5V
2 GND
3 GND
4 NC
Use the plug of IRISO ELECTRONICS P/N9047b-54Z12-GT or equivalent one.
Mode select headersAudio connector for CD
I/F (SCSI) connector
Power supply
connector
Page 21 Product Specification
Page 22

OD-A017-02
TOSHIBA DVD-RAM SD-W1111 ‘99/06/26 Version 1.0
12.2 I/F connector (SCSI connector)
12.2.1 Pin No. table of connector terminal
Pin Signal Pin Signal
1 Ground 2 DB0
3 Ground 4 DB1
5 Ground 6 DB2
7 Ground 8 DB3
9 Ground 10 DB4
11 Ground 12 DB5
13 Ground 14 DB6
15 Ground 16 DB7
17 Ground 18 DBP
19 Ground 20 Ground
21 Ground 22 Ground
23 Ground 24 Ground
25 Open 26 TERMPWR
27 Ground 28 Ground
29 Ground 30 Ground
31 Ground 32 ATN
33 Ground 34 Ground
35 Ground 36 BSY
37 Ground 38 ACK
39 Ground 40 RST
41 Ground 42 MSG
43 Ground 44 SEL
45 Ground 46 C/D
47 Ground 48 REQ
49 Ground 50 I/O
*Notes 1) the low level of all signals returns TRUE.
Use Hirose Electronics Co. HIF 3BB-50DA-2.54R, Molex 5320-50AT2 or equivalent one for the
connector on cable side.
The voltage is added on the TERMPWER signal from the internal side of a drive. The maximum
power supply current from internal side of a drive is 1.1A. If the current exceeds this level, the
internal current limiter operates to stop the voltage addition. After the cause of excess current is
removed, the signal returns to the original status.
Page 22 Product Specification
Page 23

OD-A017-02
TOSHIBA DVD-RAM SD-W1111 ‘99/06/26 Version 1.0
12.2.2 External view diagram
12.2.3 Signal interface
Type 50 core flat cable or 25 couple stranded wire cable
Inductor size more than AWG28
Characteristic impedance 100ohm ± 10%
Maximum cable length 3.0m
Page 23 Product Specification
Page 24

OD-A017-02
Pin No. 1 2 3 4 5 6 7 8
Interface
Mode Select Headers
TOSHIBA DVD-RAM SD-W1111 ‘99/06/26 Version 1.0
12.3 Mode select headers functions
By inserting the jumper wire to the mode select headers , each kind of operation mode is made.
Mode select headers:2.54-mm pitch
CD Audio
Connector
Pin No. Functions Setting at shipping
1 SCSI ID1 (LSB) Open
2 SCSI ID2 Open
3 SCSI ID4 (MSB) Short
4 PARITY CHECK Open
5 VERIFY Open
6 ONE LUN/TWO LUN Open
7 Reserved Open
8 Termination Open
12.3.1 SCSI ID setting
Pin 1 Pin 2 Pin 3 Pin 4
ID1 ID2 ID3 ID4
Open Open Open 0
Short Open Open 1
Open Short Open 2
Short Short Open 3
Open Open Short 4
Short Open Short 5
Open Short Short 6
Short Short Short 7
Connector
12.3.2 Parity check setting
Open Data parity check enable.
Short Data parity check disable.
12.3.3 VERIFY setting
l Verify setting function is effective to WRITE command only.
l The RAM disc re-inserted into TYPE-2 case is verified ,even if the pin5 is shorted.
Open The drive verifies the written data, on the media
Short The drive does not verify the written data after the
Pin 4 Functions
Pin 5 Functions
after the write operation. Writing speed is lower,
but data reliability is better.
write operation. The drive cannot detect the
defect on the media, but Writing speed is higher.
Page 24 Product Specification
Page 25

OD-A017-02
1 2 3 4
2.85V
I/F signal
110
TOSHIBA DVD-RAM SD-W1111 ‘99/06/26 Version 1.0
12.3.4 ONE LUN/TWO LUN setting
Pin 6 Function
Open The drive operates in ONE LUN mode.
Short The drive operates in TWO LUN mode.
ONE LUN mode: The drive operates in one LUN (Logical Unit Number) for all discs to
which SFF8090 Ver. 0.2 supports.
TWO LUN mode: The drive operates in the following two LUNs.
LUN = 0: CD-ROM, CD-R, CD-RW, DVD-ROM, DVD-R disc (Device type = 5)
LUN = 1: DVD-RAM disc (Device type = 7)
(LUN = 0/1 The selection of either 0 or 1 is switched according to a disc inserted.)
12.3.5 Termination setting
Pin 8 Function
Open Termination disable.
Short Termination enable.
When the termination enabled, the following circuit is connected to each SCSI signal.
Ω
12.3.6 Change of setting
The setting change should be carried out after turning off the power.
12.4 Audio Connector
When playing back a CD audio disc, the terminal develops the audio signal.
Pin No. Signal
1 R
2 GND
3 GND
4 L
Connection should be done using a connector, part number:103959-3, manufactured by AMP or
equivalent one.
Page 25 Product Specification
Page 26

OD-A017-02
TOSHIBA DVD-RAM SD-W1111 ‘99/06/26 Version 1.0
13. Host interface specification
13.1 Applicable standard
SCSI
Command set SFF8090 Ver. 2 Rev 0.95
ANSI X3T9.2 Rev 10L
13.2 SCSI command set
Code (Hex.) Command
00 TEST UNIT READY
01 REZERO UNIT
03 REQUEST SENSE
04 FORMAT UNIT
07 REASSIGN BLOCKS
12 INQUIRY
15 MODE SELECT (6)
16 RESERVE (6)
17 RELEASE (6)
1A MODE SENSE (6)
1B START STOP UNIT
1D SEND DIAGNOSTIC
1E PREVENT/ALLOW MEDIUM REMOVAL
23 READ FORMAT CAPACITIES
25 READ CD/DVD CAPACITY
28 READ (10)
2A WRITE (10)
2B SEEK
2E WRITE AND VERIFY (10)
2F VERIFY (10)
35 FLUSH CACHE
37 READ DEFECT DATA
3B WRITE BUFFER
3C READ BUFFER
42 READ SUB-CHANNEL
43 READ TOC/PMA/ATIP
44 READ HEADER
45 PLAY AUDIO (10)
46 GET CONFIGURATION
47 PLAY AUDIO MSF
4A GET EVENT/STATUS NOTIFICATION
4B PAUSE/RESUME
4E STOP PLAY/SCAN
55 MODE SELECT (10)
56 RESERVE (10)
57 RELEASE (10)
Page 26 Product Specification
Page 27

OD-A017-02
TOSHIBA DVD-RAM SD-W1111 ‘99/06/26 Version 1.0
Code (Hex.) Command
5A MODE SENSE (10)
A2 SEND EVENT
A3 SEND KEY
A4 REPORT KEY
A5 PLAY AUDIO (12)
A7 SET READ AHEAD
A8 READ (12)
AA WRITE (12)
AC GET PERFORMANCE
AD READ DVD STRUCTURE
AE WRITE AND VERIFY (12)
AF VERIFY (12)
B6 SET STREAMING
B9 READ CD MSF
BA SCAN
BD MECHANISM STATUS
BE READ CD
Page 27 Product Specification
Page 28

OD-A017-02
TOSHIBA DVD-RAM SD-W1111 ‘99/06/26 Version 1.0
14. Notes on data guarantee
14.1 Disappearance of data in buffer in a write cache operation
In a write cache operation, before data are actually written to a disc, a status response to the WRITE
command or WRITE & VERIFY command is sent. If the power supply is switched off immediately
after the status response, there is a possibility that the data in the buffer will disappear before being
written to the disc. To avoid this problem, execute FLUSH CACHE command before switching off
the power supply.
Always execute FLUSH CACHE command before switching off the power supply, to avoid any risk
of disappearance of data in buffer.
14.2 Error report in a write cache operation
When an error which cannot be recovered before all the data is received and written in the buffer and
a status response to the command is sent in the write cache operation, the error is reported as 71H in
REQUEST SENSE DATA. This shows that the error occurred on the last WRITE command or
WRITE & VERIFY command.
14.3 Automatic sector replacement at a write operation
When data can not be written to the disc normally due an unrecoverable error, such as ID NOT
FOUND, the drive replaces the sector by sector replacement processing. The drive prevents data
from being lost by this operation as much as possible. Because automatic sector replacement
processing is executed after write retry ends in an error, a time of between 7 to 15 seconds is needed.
Therefore, it is recommended that the time-out to the command generating access to the disc is set at
20 seconds or more. In a write cache operation, when automatic sector replacement processing is
done after a status response to the command is send, execution of the following command can be
made to wait. However, when the following command is a WRITE command or WRITE & VERIFY
command, the first data transfer of one block is executed without waiting, to prevent a time-out of the
host.
14.4 Verification of a block address
When the command is received, a drive calculates block addresses where the data are written or read,
with the start address and length specified by the command, and verifies whether the block addresses
contain a block address which does not exist. If such a block address exists is founded, the drive does
not record nor read, and reports on the error to the command at once.
14.5 Error generation in Read Modify Write operation
If, in a WRITE command and WRITE &VERIFY command, a start address number is not other than
*****0H or a block length is other than *16 x (integer)* though the start address number is *****0H,
the drive reads all data in an ECC block which contain the specified address once, and replaces the
data in the ECC block by the data of the specified address. This chain of operations is called "Read
Modify Write Operation". In "Read Modify Write Operation", in WRITE command and
WRITE&VERIFY command, an error occurs when the data of the ECC block cannot be read for
some reasons.
Page 28 Product Specification
Page 29

OD-A017-02
TOSHIBA DVD-RAM SD-W1111 ‘99/06/26 Version 1.0
Moreover, not only the data which tried to be recorded but also the data of other addresses in the
same ECC block might be lost due to the failure to record.
Page 29 Product Specification
Page 30

OD-A017-02
TOSHIBA DVD-RAM SD-W1111 ‘99/06/26 Version 1.0
15. MISCELLANEOUS
15.1 Accessories
Function setting jumper pins 5 pieces.
Emergency eject tool 1 piece.
15.2 A bare disc setting at vertical installation
In case of using a bare disc (ex. DVD-ROM or CD-ROM) at vertical installation, use disc holders on
the tray. Please read the following explanations thoroughly at this time.
1. Draw three disc holders among the four holders on the tray, two pieces are both holders in down
side, one piece is on a rear part in upper side while made to vertical posture as follows.
(Note) Please use 3 pieces holders because the set of the disc becomes difficult when four disc
holders are drawn out.
2. Drawing out a disc holder (pull return) can be easily done with inserting a propelling pencil ahead
in the hole that is installed on the disc holder.
Page 30 Product Specification
Page 31

OD-A017-02
TOSHIBA DVD-RAM SD-W1111 ‘99/06/26 Version 1.0
3. First hang a disc on a disc holder in an upper and rear side of a tray, and then put the disc on disc
holders in a down side of the tray.
4. Check three disc holders to confirm to the disc surely.
Page 31 Product Specification
Page 32

OD-A017-02
TOSHIBA DVD-RAM SD-W1111 ‘99/06/26 Version 1.0
Notes in use
(1) A disc might be scratched, damaged and dropped from a tray when used with a disc not correctly
installed. Please install correctly and use a disc.
(2) Please do drawing out (pulling return) a disc holder before setting a disc in a tray.
(3) Please do drawing out (pulling return) a disc holder with the power supply not supplied to the
drive as much as possible, because the auto-loading function might work and the tray might enter
the drive during drawing out or pulling return the disc holder.
When doing with the power supply to the drive unavoidably, work carefully holding the tray by
hand firmly.
(4) When using a drive by vertical posture, 80 mm DVD/CD cannot be used.
(5) When DVD-RAM (cartridge type) is used, the position of a disc holder need not be returned.
Page 32 Product Specification
Page 33

OD-A017-02
TOSHIBA DVD-RAM SD-W1111 ‘99/06/26 Version 1.0
15.3 Disc eject at emergency
Please do according to the following procedures when it is necessary to take out a disc from the drive
in the emergency.
Check that the power supply of the drive is turned off and one minute or more passes.
Insert an attached emergency eject tool in the emergency eject hole and push bumping inside. (Figure
1)
Front bezel opens a little and an inside tray rises. (Figure 2)
When the tray comes out forward, draws out it and the disc is taken out. (Figure 3)
Please draw out the tray with an emergency eject tool, when the tray does not come out. (Figure 4)
Fig. 1
Fig. 2
Fig. 3
Fig. 4
Page 33 Product Specification
Page 34

Deviation List
Page Item Rev # 0.9a Rev # 1.0
3 Cautions --- Add (6)
8 Rotational speed(DVD-RAM) 1,130 - 2,640 rpm 1,028 – 2,400 rpm
Host I/F ANSI ~ Rev 10k ANSI ~ Rev 10L
9 Average access time 150 ms (typ.) 170 ms (typ.)
12 8.3 vibration 9.8 cm/s
2
9.8 m/s
17 10.3 Notes on mounting 150 gf : 0.015N 1.5N : 150 gf
20 12 Rear View and Connectors Audio ~ CD(3 pin) Audio ~ CD(4 pin)
23 12.4 Audio Connector Connector chart(3 pin) Connector chart(4 pin)
(0082 ~ Kyosera Elco part number ~ AMP
26 13.1 Applicable standard ANSI ~ Rev 10k ANSI ~ Rev 10L
32 Notes in use (4) 8 cm DVD/CD ~ 80 mm DVD/CD ~
2
 Loading...