

Page 1

®
Satellite
1620CDS/
1640CDT
User’s Guide
If you need assistance, please see Appendix E in this guide
Page 2

ii
Models: Satellite 1620CDS/1640CDT
Instructions for IC CS-03 certified equipment
NOTICE: The Industry Canada label identifies certified equipment. This
1
certification means that the equipment meets certain telecommunications
network protective, operational and safety requirements as prescribed in the
appropriate Terminal Equipment T echnical Requirements document(s). The
Department does not guarantee the equipment will operate to the user’s
satisfaction.
Before installing this equipment, users should ensure that it is permissible to
be connected to the facilities of the local telecommunications company . The
equipment must also be installed using an acceptable method of connection.
The customer should be aware that compliance with the above conditions
may not prevent degradation of service in some situations.
Repairs to certified equipment should be coordinated by a representative
designated by the supplier. Any repairs or alterations made b y the user to
this equipment, or equipment malfunctions, may give the
telecommunications company cause to request the user to disconnect the
equipment.
Users should ensure for their own protection that the electrical ground
connections of th e po wer utilit y, telephone lines an d interna l metallic water
pipe system, if present, are connected together. This precaution may be
particularly important in rural areas.
Caution: Users should not attempt to make such connections themselves,
but should contact the appropriate electric inspection authority, or
electrician, as appropriate.
The user manual of analog equipment must contain the equipment’s Ringer
2
Equivalence Number (REN) and an explanation notice similar to the
following:
The Ringer Equivalence Number (REN) of this device is 0.9B.
NOTICE: The R inger Equi v alence Number (REN ) assigned to each
terminal device provides an indication of the maximum number of
terminals allowed to be connected to a telephone interface. The termination
on an interface may consist of any combination of devices subject only to
the requirement that the sum of the Ringer Equi v alence Numbers of all the
devices does not exceed 5.
Page 3
The standard connecting arrangement (telephone jack type) for this
3
equipment is jack type(s): USOC RJ11C.
CD-ROM Safety Instruction
The CD-ROM drive employs a laser system. To ensure proper use of this
product, please read this instruction manual carefully and retain for future
reference. Should the unit ever require maintenance, contact an authorized
service location.
Use of controls, adjustments or the performance of procedures other than those
specified may result in hazardous radiation exposure.
T o prev ent direct exposure to the laser beam, do not try to open the enclosure.
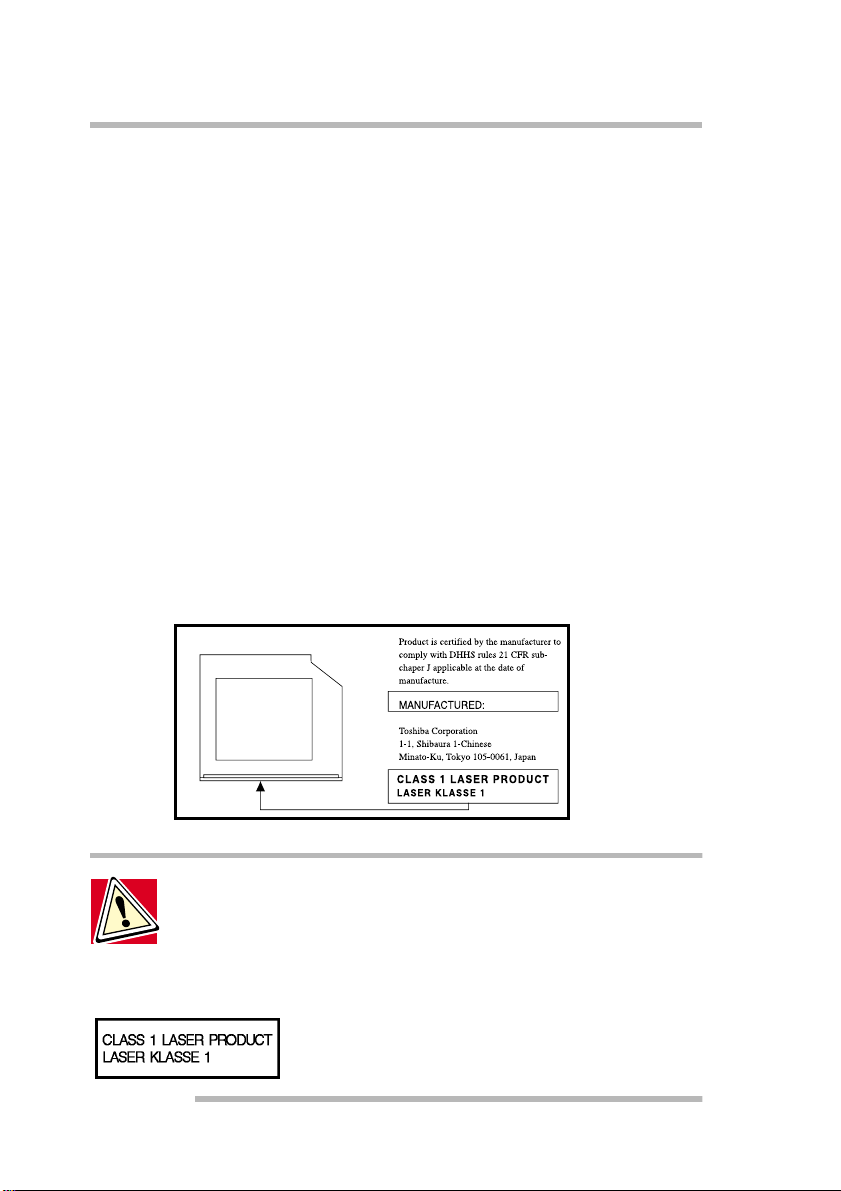
Location of the required label
(Sample shown below . Location of the label and manufacturing information may
vary.)
iii
CAUTION:
CLASS 1 LASER PRODUCT. To use this model properly, read the
instruction manual carefully and keep it for your future reference. In case
of any trouble with this model, please contact your nearest AUTHORIZED
service station. To prevent direct exposure to the laser beam, do not try
to open the enclosure.
This appliance contains a laser system and is classified as a
Use of controls or adjustments or performance of
procedures other than those specified in the owners manual
may result in hazardous radiation exposure.
Page 4

iv
General Precautions
T oshiba computers are designed to optimise safety, minimise strain and withstand
the rigors of portability. Howe v er , certain precautions should be observed to
further reduce the risk of personal injury or damage to the computer. Be certain to
read the general precautions below and to note the cautions included in the text of
the manual.
Stress injury
Carefully read the Safety Instructio n Manual. It contains info rmation on
prevention of stress injuries to your hands and wrists than can be caused by
extensive ke yboard use. The User's Guide also includes information on work
space design, posture and lighting that can help reduce physical stress.
Heat Warning
The base of the PC can become very warm; while the temperature will not be too
hot to the touch, prolonged physical contact may result in a temporary heat
imprint on the skin. It is recommended that prolonged physical contact is
avoided.
Also, if the computer has been used for a long time, avoid direct contact with the
metal plate supporting the I/O ports. It can become hot.
Mobile phones
Use of mobile phones can interfere with the PC sound system. The PC operation
is not impaired but it is recommended that a distance of 30cm is maintained
between the PC & the mobile phone.
Pressure or impact damage
Do not apply heavy pressure to the computer or subject it to strong impact.
Excessive pressure or impact can cause damage to computer components or
otherwise cause malfunctions.
PC card overheating
Some PC cards can become hot with prolonged use. If two cards are installed,
both can become hot even if only one is used extensively . Ov erheating of a PC
card can result in errors or instability in the PC card operation. Also, be careful
when you remove a PC card that has been used for a long time.
Page 5

EU Declaration of Conformity
T oshiba declares, that this conforms to the following Standards:
"The product complies with the requirements of the Low Voltage Directive 73/
23/EEC and the EMC Directive 89/336/EEC."
This product carries the CE-Mark in accordance with the related European
Directives. CE-Marking is the responsibility of Toshiba Europe,
Hammfelddamm 8, 41460 Neuss, Germany.
Working environment
This product was des igned to fulf il the EMC (elec trom agnet ic compat ibil ity)
requirements to be observed for so-called "Residential, commercial and light
industry environments".
T oshiba do not approve the use of this product in working environments other
than the above mentioned "Residential, commercial and light industry
environments".
For example, the following environments are not approved:
Industrial Environments (environments with a mains voltage >230V~)
❖
Medical Environments
❖
Automotive Environments
❖
Aircraft Envi ronments
❖
v
If this product is supplied with a network port, please refer
to the paragraph "Network connection".
Any consequences resulting from the use of this product in working
environments that are not approved are not the responsibility of Toshiba Europe
GmbH.
The consequences of the use of this product in non-approved working
environments may be:
Page 6

vi
Interference with other devices or machines in the near surrounding area
❖
Malfunction of, or data loss from, this product caused by disturbances
❖
generated by other devices or machines in the near surrounding area
Therefore Toshiba strongly recommend that the electromagnetic compatibility of
this product should be suitably tested in all non-approved working environments
before use. In the case of automobiles or aircraft, the manufacturer or airline
respectively should be asked for permission before use of this product.
Furthermore, for general safety reasons, the use of this product in environments
with explosive atmospheres is not permitted.
Network connection (class A warning)
If this product has networking capabilities and will be connected to a network,
Class A radiation limits will be observed (in accordance with technical
conventions). This means that if the product will be used in a domestic
environment, other devices in the near surrounding may suffer interference.
Consequently, please do not use this product in such environments (for example a
living room), otherwise you could be held responsible for any ensuing
interference.
CE compliance
This product and the original options are designed to observe the related EMC
(Electromagnetic compatibility) and safety standards. However, Toshiba should
not guarantee that this product still observes these EMC standards if options or
cables not produced by Toshiba are connected or implemented. In this case the
persons who have connected/ implemented those options / cables have to assure
that the system (PC plus options / cables) still fulf ils the required standards. To
avoid in general EMC problems following advice should be observed:
Only CE marked options should be connected / implemented
❖
Only best shielded cables should be connected
❖
Conformity Statement
The equipment has been approved to [Commission Decision "CTR21"] for panEuropean single terminal connection to the Public Switched Telephone Network
(PSTN).
Page 7

Howev er , due to dif ferences between the indi vidual PSTNs pro vided in differ ent
countries the approval does not, of itself, give an unconditional assurance of
successful operation on every PSTN network termination point.
In the event of problems, you should contact your equipment supplier in the first
instance.
Network Compatibility Statement
This product is designed to work with, and is compatible with the following
networks. It has been tested to and found to conform with the additional
requirements contained in EG 201 121.
Germany - ATAAB AN005, AN006, AN007, AN009, AN010, and
DE03, 04, 05, 08, 09, 12, 14, 17
Greece - ATAAB AN005, AN006 and GR01, 02, 03, 04
Portugal - ATAAB AN001, 005, 006, 007, 011 and P03, 04, 08, 10
Spain - ATAAB AN005, 007, 012, and ES01
Switzerland - ATAAB AN002
All other countries - ATAAB AN003, 004
Specific switch settings or software setup are required for each network.
The hookflash (timed break register recall) function is subject to separate national
type approval. It has not been tested for conformity to national type regulations,
and no guarantee of successful operation of that specific function on specific
national networks can be given.
vii
Copyright
This guide is copyrighted by Toshiba Corporation with all rights reserved. Under
the copyright laws, this guide cannot be reproduced in any form without the prior
written permission of Toshiba. No patent li ability is assumed, howe v er , with
respect to the use of the information contained herein.
©2000 by Toshiba Corporation. All rights reserved.
Page 8

viii
Notice
The information contained in this manual, including but not limited to any
product specifications, is subject to change without notice.
TOSHIB A CORPORATION (TOSHIBA) PROVIDES NO WARRANTY
WITH REGARD TO THIS MANUAL OR ANY OTHER
INFORMATION CONTAINED HEREIN AND HEREBY EXPRESSLY
DISCLAIMS ANY IMPLIED WARRANTIES OF
MERCHANTABILITY OR FITNESS FOR ANY PARTICULAR
PURPOSE WITH REGARD T O ANY OF THE F OREGOING.
TOSHIB A ASSUMES NO LIABILITY FOR ANY DA MAGES
INCURRED DIRECTLY OR INDIRECTL Y FROM ANY TECHNICAL
OR TYPOGRAPHICAL ERR ORS OR OMISSIONS C ONTAINED
HEREIN OR FOR DISCREP ANCIE S BETWEEN THE PR ODUCT AND
THE MANUAL. IN NO EVENT SHALL T OSHIBA BE LIABLE FOR
ANY INCIDENTAL, CONSEQUENTIAL, SPECIAL, OR EXEMPLARY
DAMAGES, WHETHER BASED ON T OR T, CONTRA CT OR
OTHER WISE, ARISING OUT OF OR IN CONNECTION WITH THIS
MANU AL OR ANY OTHER INFORMATION CONTAINED HEREIN
OR THE USE THEREOF.
Trademarks
Satellite, Noteworthy, and AccuPoint are registered trademarks, SecureSleep is a
trademark, and InTouch is a service mark of Toshiba America Information
Systems, Inc. and/or Toshiba Corporation.
AMD and K6-2 are registered trademarks of Adv anced Micro De vices.
Microsoft, MS-DOS, Windows, NetMeeting, and Outlook are registered
trademarks of Microsoft Corporation.
Photo CD is a trademark of Eastman Kodak.
PS/2 is a trademark of International Business Machines Corporation.
SoundBlaster is a registered trademark of Creative T echnology, Ltd.
All other brand and product names are trademarks or registered trademarks of
their respective companies.
Page 9

Contents
Part I: Getting To Know Your Computer
Chapter 1: Finding Your Way Around........................................ 1
Front with the display closed.................................................. 1
Left side.................................................................................... 2
Right side ................................................................................. 3
Back.......................................................................................... 4
Underside................................................................................. 5
Front with the display open .................................................... 6
System indicator panel....................................................... 7
Chapter 2:
Getting Started .......................................................................... 11
Making sure you have everything........................................ 11
Selecting a place to work...................................................... 11
Creating a computer-friendly environment..................... 11
Keeping yourself comfortable.......................................... 12
Other precautions.................................................................. 15
Setting up your computer..................................................... 16
Connecting the AC adapter .............................................. 17
ix
Page 10

x
Charging the battery......................................................... 18
Connecting a printer (optional)........................................ 19
Adding memory (optional)................................................... 20
Installing a memory module............................................ 20
Removing a memory module......................................... 22
Connecting a mouse............................................................. 23
Using a serial mouse........................................................ 23
Using a PS/2 mouse ........................................................ 23
Using the computer for the first time .................................. 24
Opening the display panel................................................ 24
Turning on the computer for the first time..................... 25
Adjusting brightness and contrast.................................. 26
Using the AccuPoint pointing device.............................. 26
Registering your computer.............................................. 29
Chapter 3: Learning the Basics................................................ 31
Precautions............................................................................ 31
Computing tips...................................................................... 32
Using the keyboard............................................................... 33
Character keys .................................................................. 33
Ctrl, Fn, and Alt keys......................................................... 34
Function keys.................................................................... 34
Windows special keys...................................................... 34
Overlay keys ...................................................................... 35
Starting a program................................................................ 36
Starting a program from the Start menu........................ 36
Starting a program from Explorer................................... 37
Starting a program from Run menu on the taskbar...... 37
Saving your work.................................................................. 38
Printing your work ................................................................ 39
Backing up your files ............................................................ 40
Copying to a diskette........................................................ 40
Using the Backup Wizard................................................. 40
Using compact discs ............................................................ 41
Page 11

xi
Inserting compact discs into the CD-ROM drive ........... 42
Removing a CD with the computer on ........................... 43
Removing a CD with the computer off ........................... 43
Caring for compact discs................................................. 43
Using PC Cards ..................................................................... 44
Inserting PC Cards............................................................ 45
Removing PC Cards ......................................................... 46
Hot swapping .................................................................... 47
Using your computer at the office ....................................... 48
Using a computer lock.......................................................... 48
Setting up for communications ........................................... 49
Connecting the modem to a telephone line.................... 50
Connecting your computer to a network........................ 50
Connecting directly to a remote computer ......................... 51
File transfer protocols ....................................................... 52
Tos hi ba ’s online resources ................................................... 52
Turning off the computer...................................................... 52
Caring for your computer..................................................... 53
Cleaning the computer ..................................................... 53
Moving the computer ....................................................... 54
Restoring the preinstalled software..................................... 54
Restoring the complete system....................................... 54
Restoring Toshiba utilities and drivers............................ 55
Chapter 4: Mobile Computing.................................................. 57
Tos hi ba ’s energy-saver design............................................. 57
Managing power usage........................................................ 58
Running the computer on battery power............................ 58
Using additional battery packs......................................... 59
Battery safety precautions ............................................... 59
Maximizing battery life...................................................... 59
Charging batteries ................................................................. 60
Charging the main battery................................................ 60
Charging the RTC battery................................................. 61
Page 12

xii
Using a battery charger.................................................... 62
Monitoring battery power..................................................... 62
Determining remaining battery power............................ 62
Conserving battery power ............................................... 63
What to do when the battery runs low ........................... 63
Changing the main battery................................................... 65
Removing the battery ...................................................... 65
Inserting a charged battery.............................................. 66
Disposing of used batteries safely....................................... 67
Traveling tips.......................................................................... 67
Part II: Technical Reference
Chapter 5: Exploring Your Options.......................................... 73
Adding a printer..................................................................... 73
Personalizing your desktop.................................................. 76
Customizing the taskbar .................................................. 77
Emulating a full-size keyboard............................................. 77
Using MS-DOS programs.................................................... 78
Chapter 6: If Something Goes Wrong..................................... 81
Problems that are easy to fix................................................ 82
Problems when you turn on the computer ........................ 84
Fixing device-related problems............................................ 85
Memory card problems .................................................. 85
Power problems .............................................................. 86
Keyboard problems.......................................................... 87
AccuPoint problems......................................................... 88
Display problems ............................................................. 89
Disk drive problems ........................................................ 91
CD-ROM drive problems ................................................. 93
Sound system problems ................................................ 94
PC Card problems ........................................................... 95
Printer problems .............................................................. 97
Page 13

xiii
Modem problems ............................................................ 98
Develop good computing habits.......................................... 99
If you need further assistance ............................................ 100
Before you call................................................................. 100
Contacting Toshiba ......................................................... 101
Part III: Appendixes
Appendix A: Hot Keys............................................................. 105
Appendix B: Features and Specifications.............................. 109
Certification...................................................................... 114
Optional accessories and devices.................................. 115
Appendix C: Power Cable Connectors.................................. 117
Appendix D: Video Modes ..................................................... 119
Appendix E: International Warranty....................................... 125
What the warranty covers.............................................. 125
Toshiba's Worldwide Computer Representatives........ 127
Toshiba addresses for the Internet/World Wide Web.. 130
Toshiba Bulletin Board Service addresses in Europe.. 130
Appendix F: If your computer is stolen................................. 133
Index......................................................................................... 137
Page 14

This guide . . . . . . . . . . . . . . . . . . . . . . . . . . . . . . . . . . . . . . . . . . . . . . . . . . . xv
Safety icons . . . . . . . . . . . . . . . . . . . . . . . . . . . . . . . . . . . . . . . . . . . . . . . . . xvi
Other documentation . . . . . . . . . . . . . . . . . . . . . . . . . . . . . . . . . . . . . . . . . xvii
Service options . . . . . . . . . . . . . . . . . . . . . . . . . . . . . . . . . . . . . . . . . . . . . xviii
Page 15

Introduction
Welcome to the world of portable computing. With your ne w
Toshiba Satellite
wherever you go.
Satellite 1620CDS and 1640CDT computers provide fas t and easy
Internet access. Microsoft
already installed on your computer . It of fers exciting ne w features
and easy Internet access.
This guide
This guide introduces the computer’s features. Y ou can:
Read the entire guide from beginning to end.
❖
Skim through and stop when a topic interests you.
❖
Use the table of contents and the index to find speci fic
❖
information.
If you are new to computers, or hav e not used a notebook
computer before, read through the first couple of chapters to
familiarize yourself with the parts of the computer and how to turn
it on. After that, seek out whatever inte rests you most.
®
computer, your work can accompan y you
®
Windo ws® 98 Second Edition is
xv
Page 16

xvi
Safety icons
This manual contains safety instructions that must be observed in
order to avoid potent ial hazards that could result in personal
injuries, damage to your equipment, or loss of data. The safety
cautions have been classif ied according to the ser iousness of the
risk, and the following icons highlight thes e instructions as
follows:
DANGER: This icon indicates the existence of a hazard that
could result in death or serious bodily injury if the safety
instruction is not observed.
WARNING: This icon indicates the existence of a hazard that
could result in bodily injury if the safety instruction is not
observed.
CAUTION: This icon indicates the existence of a hazard that
could result in damage to equipment or property if the
safety instruction is not observed.
NOTE: This icon indicates information that relates to the safe
operation of the equipment or related items.
Page 17
Other icons used
Additional icons highlight other helpful or educational
information:
TECHNICAL NOTE: This icon provides technical information
about the unit.
HINT: This icon denotes helpful hints and tips.
DEFINITION: This icon indicates the definition of a term
used in the text.
Other documentation
xvii
Your computer comes with the following documentation:
This user’s guide, which contains technical information about
❖
how the computer works.
Safety Instruction manual.
❖
The Windo ws 98 Second Edition documentation which
❖
explains the features of the Microsoft W indo ws 98 Second
Edition operating system.
Page 18

xviii
Service options
T oshi ba of fers a full line of service opti ons bui lt around its
warranty programs. See the warranty and service material
included with your computer for registration information.
If you have a problem or need to contact Toshiba, see Appendix E.
Page 19

xix
Page 20

P
ART
I
G
ETTING TO
C
OMPUTER
What is in Part I
This part is designed to give a quick o vervi ew of your computer. Many
details and all technical information can be found in P arts II and III. Do not
hesitate to skip around. This user’s guide was not meant to be read from
cover to cov er.
K
NOW
Y
OUR
Page 21

xxi
Page 22

Chapter
Front with the display closed . . . . . . . . . . . . . . . . . . . . . . . . . . . . . . . . . . . . 1
Left side . . . . . . . . . . . . . . . . . . . . . . . . . . . . . . . . . . . . . . . . . . . . . . . . . . . . . 2
Right side . . . . . . . . . . . . . . . . . . . . . . . . . . . . . . . . . . . . . . . . . . . . . . . . . . . . 3
Back . . . . . . . . . . . . . . . . . . . . . . . . . . . . . . . . . . . . . . . . . . . . . . . . . . . . . . . . 4
Underside . . . . . . . . . . . . . . . . . . . . . . . . . . . . . . . . . . . . . . . . . . . . . . . . . . . . 5
Front with the display open . . . . . . . . . . . . . . . . . . . . . . . . . . . . . . . . . . . . . 6
1
Page 23

Finding Your Way
Around
This chapter presents a “grand tour” of your Satellite computer
with illustrations to guide you along your way. It serves as a
reference when you need to locate specific parts of the compute r .
Front with the display closed
Battery
Display latch
The display latch keeps the display panel closed and locked. To
open the display panel, slide the latch to the right and raise the
panel.
The diskette driv e allo ws you to use either high-densit y or
double-density 3.5-inch diskettes.
The CD-ROM driv e allo ws you to instal l and run programs from
application CDs. You can also use it to play audio, and view video
and PhotoCD™ discs.
Diskette drive
CD-ROM drive
1
Page 24
2
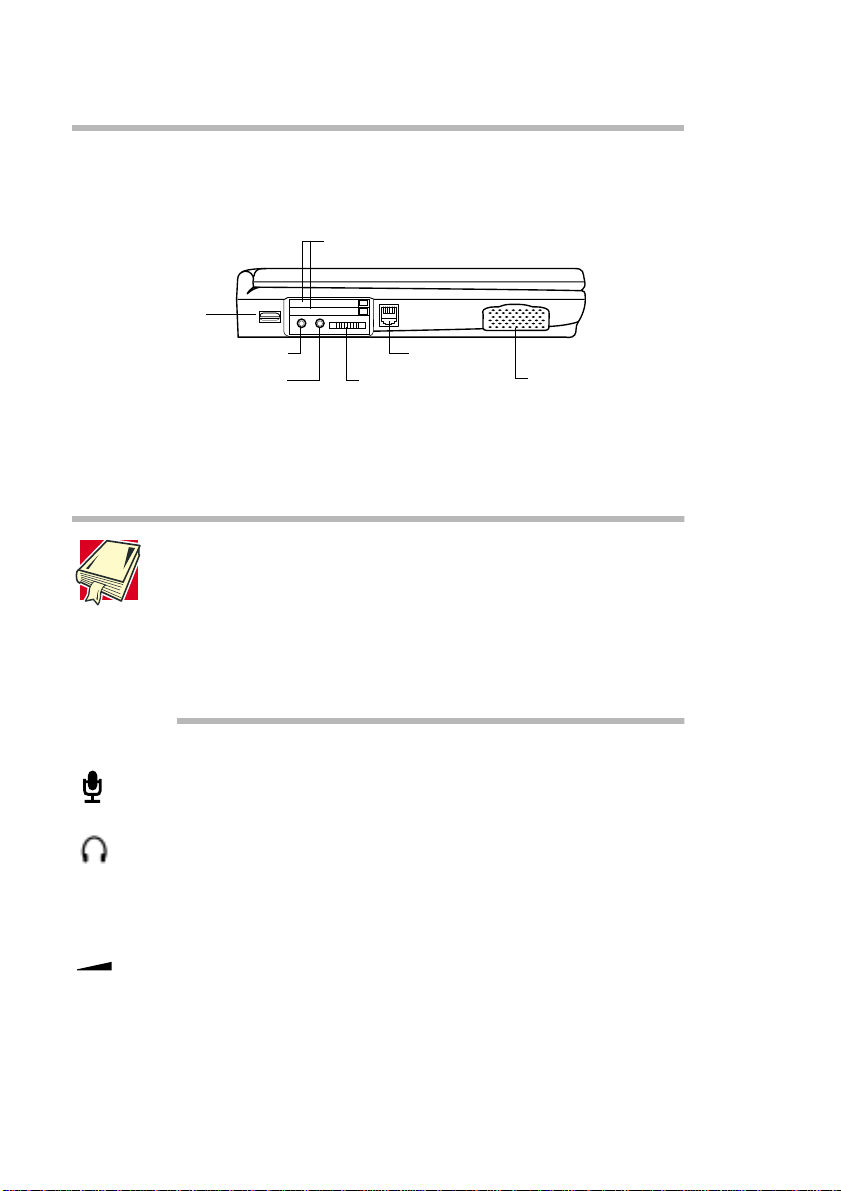
Left side
USB port
Finding Your Way Around
Left side
PC Card slots (2)
Microphone jack
Headphone jack
The USB (Universal Serial Bus) port allo ws you to connect USB
peripherals to your computer, such as a ke yboard, pointing de vice
or monitor .
DEFINITION: USB is a peripheral expansion standard that
supports a data-transfer rate of up to 12 Mbps. USB
peripherals have a single standard for cables and
connectors.
The USB standard allows you to install and remove USB
devices while the computer is on. Switching devices without
turning off the computer is called hot swapping.
The 3.5 mm microphone jack lets you connect an external
monaural microphone or other audio-input device.
The 3.5 mm headphone jack lets you connect stereo headphones
or other audio-output device, such as external speak ers.
Connecting headphones or other devices to t his jack automatically
disables the internal speakers.
Modem jack
Volume control dial
Speaker
The volume control dial lets you adjust the loudness of the
system speak ers.
The modem jack lets you use a modular phone cable to connect
the modem directly to a standard telephone outlet.
P art I: Getting to Know Your Computer
Page 25
The two stacked CardBus-ready PCMCIA-compatible PC Card
slots allow you to install additional de vices. Each slot can
accommodate a T ype I or T ype II PC Card. Both slots are required
to install a T ype III PC Card.
CAUTION: Keep foreign objects out of the PC Card slots. A
pin or similar object that accidentally gets into a slot can
damage the computer's circuitry.
The left stereo speaker lets you hear the computer’s audio
output—such as system alarms ass ociated with your softw are and
music from audio CDs.
Right side
Finding Your Way Around
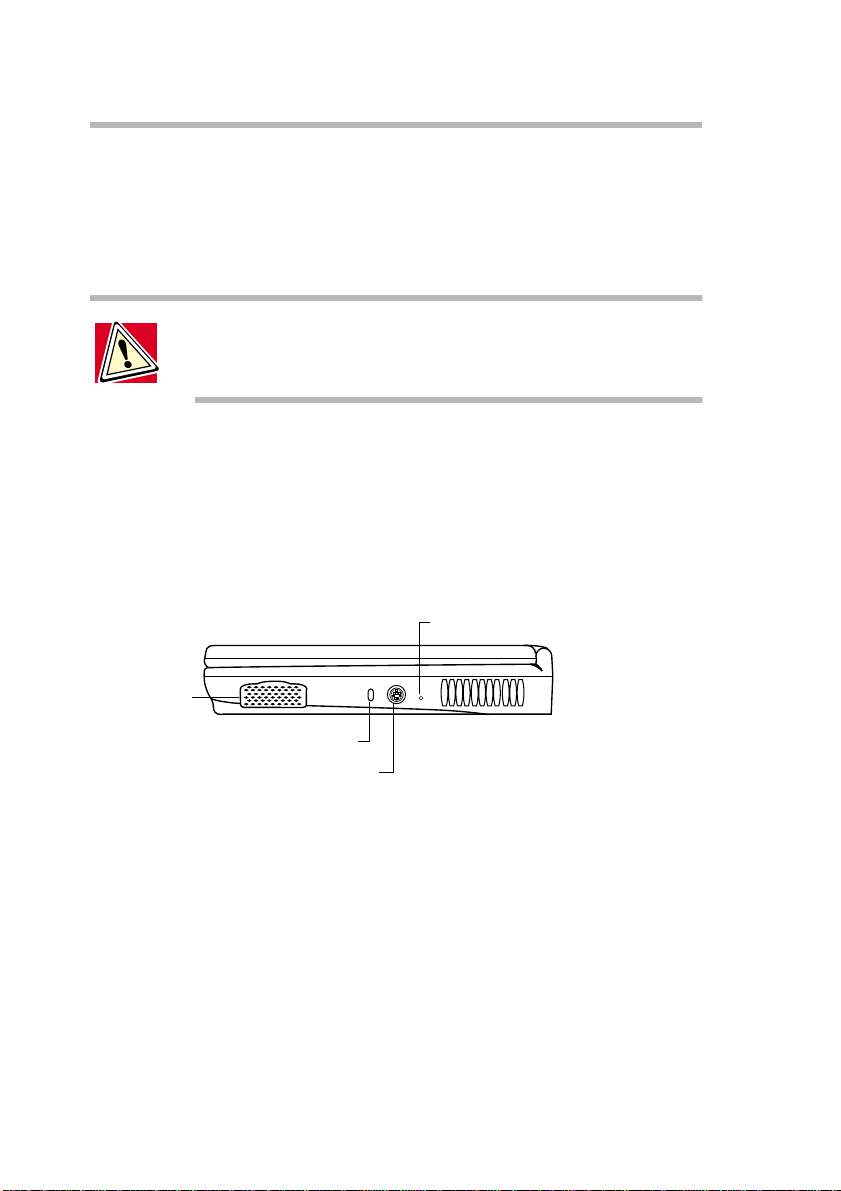
Right side
Shutdown button
3
Speaker
Security lock slot
PS/2 port
The security lock slot allows you to attach an optional comput er
cable lock to secure the computer to a large, heavy objec t, such as
your desk.
The PS/2
compatible mouse or external ke yboard. You can attach an
optional Y-cable that allows you to use a PS/2 mouse and a PS/2
keyboard simultaneously.
The Shutdown button allo ws you to turn of f the computer when it
is not responding to the keyboard. Pressing this bu tton ov erri des
the Windo ws 98 Second Edition Po wer Options settings. Use this
™
port allows you to connect an optional PS/2-
P art I: Getting to Know Your Computer
Page 26

4
Back
Finding Your Way Around
Back
button only if all other attempts at turning of f the computer ha ve
failed.
CAUTION: Do not use a pencil to press the Shutdown
button. Pencil lead can break off inside the computer and
damage it. Instead, use a slim object such as a straightened
paper clip.
The right stereo speaker lets you hear the computer’s audio
output—such as system alarms ass ociated with your softw are and
music from audio CDs.
Fan
Serial port
The fan prev ents the computer’s central processing unit (CPU) and
internal electronic components from ov erheating.
The serial port lets you connect a serial mouse, serial printer , or
other serial device.
The parallel port lets you connect a parallel printer , or other
parallel device, including ECP-compatible de vices.
DEFINITION: ECP (Extended Capabilities Port) is a parallelport standard for PCs that support bi-directional
communication between the PC and attached devices (such
as a printer).
The video port allows you to connect an ext ernal monitor.
P art I: Getting to Know Your Computer
Video port
Parallel port
DC IN socket
Page 27

The DC IN socket is where you plug in the AC adapter.
CAUTION: To prevent possible overheating of the CPU,
avoid blocking the fan vents.
Underside
Battery
Finding Your Way Around
Underside
Memory slot cover
5
Battery release
latch
The memory slot cover protects the expansion memor y module.
The battery provides DC power to the computer.
The battery release latch secures the battery to the computer and
prevents it from falling out.
P art I: Getting to Know Your Computer
Page 28

Finding Your Way Around
6
F r ont with the display open
Front with the display open
Power
button
Keyboard
The screen is a 12.1-inch diagonal, DSTN or TFT color liquid
crystal display (LCD) with 800 x 600 resolution.
Screen
Status panel
AccuPoint
pointing device
Primary control
button
Secondary control
button
DEFINITION: DSTN (Double-layer SuperTwist Nematic) is a
passive-matrix LCD technology that uses two display layers
to counteract the color shifting that occurs with
conventional supertwist displays.
TFT (Thin Film Transistor) is a type of LCD flat-panel display
screen in which each pixel is controlled by from one to four
transistors. Screens with TFT technology (sometimes called
active-matrix LCDs) provide the best resolution of all the
flat-panel displays.
The power button turns the computer on and off.
The keyboard provides all t he functionality of a full-size keyboar d.
The front panel provides a palm rest to assist you in maintaining
proper posture while using the computer .
The function keys, when used with the
system functions, such as access to the Internet.
P art I: Getting to Know Your Computer
key, activ ate v arious
Fn
Page 29

The computer’s pointing device comprises an AccuPoint pointing
device and two control b uttons. The AccuPoint allo ws you to
position the cursor on the screen. The control buttons work with
the AccuPoint. The larger button acts as the primary b utton on a
mouse. The smaller button acts as the secondary mouse butt on.
The lights on the status panel provide information about v arious
keyboard and system functions.
System indicator panel
Finding Your Way Around
Front with the display open
7
On/off Hard disk
The on/off light glo ws green when the computer is on.
On
The hard disk drive li ght flashes green when the hard disk dri v e is
being accessed.
Battery
Numeric Caps Cursor
Scroll
lock
CAUTION: Never turn off the computer while any of the
drives are in use. Doing so may result in a loss of data.
The battery light indicates the main battery’s current charge. It
glows green when the battery is fully char ged. It flashes green
while the battery is being charged. It glows red when the charge is
below 10 percent. It flashes red when the char ge reaches 2 percent.
It does not glow if the ext ernal po wer source is disconnected or if
the battery is completely discharged.
The numeric mode light glows when the numeric ov erlay is on.
When this light is on, pressing an o verlay key displays the number
printed on the right front of the key instead of the le tter printed on
the top of the key.
controlmode lockdrive
P art I: Getting to Know Your Computer
Page 30

8
Finding Your Way Around
F r ont with the display open
The caps lock light glows when you press the
this light is on, pressing a letter key on the k eyboard produces an
uppercase (capital) letter.
The scroll lock light glows when the scroll lock funct ion is activ e.
The scroll lock key temporarily prev ents the display from updating
and controls the way the cursor control ke ys work with some
programs. It’s up to the program to implement this behavior . Many
programs ignore the scroll lock setting.
The cursor control mode light glows when the cursor control
overlay is on. When this l ight is on, pressing an ov erlay key mo ves
the cursor in the direction of the white arro w printed on the left top
of the key instead of the letter printed on the k e y.
Caps Lock
key . When
P art I: Getting to Know Your Computer
Page 31

Finding Your Way Around
Front with the display open
9
P art I: Getting to Know Your Computer
Page 32

Chapter
Selecting a place to work . . . . . . . . . . . . . . . . . . . . . . . . . . . . . . . . . . . . . . 11
Other precautions . . . . . . . . . . . . . . . . . . . . . . . . . . . . . . . . . . . . . . . . . . . . . 15
Setting up your computer . . . . . . . . . . . . . . . . . . . . . . . . . . . . . . . . . . . . . . 16
Adding memory (optional) . . . . . . . . . . . . . . . . . . . . . . . . . . . . . . . . . . . . . 20
Connecting a mouse . . . . . . . . . . . . . . . . . . . . . . . . . . . . . . . . . . . . . . . . . . 23
Using the computer for the first time . . . . . . . . . . . . . . . . . . . . . . . . . . . . . 24
2
Page 33

Getting Started
This chapter provides tips for working comfortably , describes ho w
to connect components, and explains what to do the first time you
use your notebook computer .
Making sure you have everything
Before doing anything else, consult the Quick Start card to make
sure you received e v erything. If an y items are missing or
damaged, notify your dealer immediately .
Selecting a place to work
Your computer is portable and designed to be used in a variety of
circumstances and locations.
Creating a computer-friendly environment
Place the computer on a flat surface which is large enough for the
computer and any other items you need to use, such as a printer.
Leave enough space around the computer and other equipment to
provide adequate ventilat ion and prev ent o verheating.
11
Page 34

12
Getting Started
Selecting a place to work
T o k eep your computer in prime operating condition, prot ect your
work area from:
Dust, moisture, and direct sunlight.
❖
Liquids and corrosi v e chemic als.
❖
CAUTION: If you spill liquid into the computer, turn it off,
unplug it from the AC power source, and let it dry out
completely before turning it on again.
If the computer does not operate correctly after you turn it
back on, contact a Toshiba authorized service provider.
Equipment that generates a strong electromagnetic f ield, such
❖
as stereo speakers (other than speakers t hat are connected to
the computer) or speakerphones.
Rapid changes in temperature or humidity and sources of
❖
temperature change such as air conditioner vents or heater s.
Extreme heat, cold, or humidity . Operate the computer within
❖
a temperature range of 5° to 35° C and 0% to 90%
noncondensing humidity.
Keeping yourself comfortable
Strain and stress injuries are becoming more common as people
spend more time using their computers. Howe ver , with a little care
and proper use of the equipment, you can work comfortably
throughout the day .
This section provides hints on a voiding str ain and stress injuries.
For more information, consult books on ergonomics, repetit iv estrain injury, and repetitive-st ress syndrome.
P art I: Getting to Know Your Computer
Page 35

Getting Started
Selecting a place to work
13
Placement of the computer
Proper placement of the computer and external devi ces is
important to avoid st ress-related injuri es.
Place the computer on a flat surface at a comfortable height
❖
and distance. You should be able to type without twisting your
torso or neck, and look at the screen without slouching.
If you are using an external monitor , the top of the dis play
❖
should be no higher than eye lev el.
If you use a paper holder, set it at about the same height and
❖
distance as the screen.
Seating and posture
When using your computer, maintain good posture with your
body relaxed and your weight dist ributed ev enly. Proper seating is
a primary factor in reducing work strain. Some people fi nd a
backless chair more comfortable than a conv entional chair.
Below eye level
Approximately
90-degree angles
Footrest
Correct postur e and positioning of the computer
Whichever type you choose, use the fol lowing guidelines to adjust
your chair for maximum computing comfort.
Position your chair so that the ke yboard is at or slightly be low
❖
the level of your elbo w. Y ou should be able to type
P art I: Getting to Know Your Computer
Page 36

14
Getting Started
Selecting a place to work
comfortably with your shoulders relaxed and your forearms
parallel to the floor .
If you are using a conv entional chair:
Your knees should be slightly higher than your hips. If
❖
necessary , use a footrest to raise the le v el of your knees and
ease the pressure on the back of your thighs.
Adjust the back of your chair so that it supports the lower
❖
curve of your spine. If necessary, use a cushion to provide
extra back support. Lower -back-support cushions are
avail able at many of f ice supply stores.
Sit with your back straight so that your knees, hips, and
❖
elbows form approximately 90-degree angle s when you work.
Do not slump forward or lean back too far.
Lighting
Proper lighting can improv e the visibility of the display and reduce
eyestrain.
Position the display panel or external monitor so that sunl ight
❖
or bright indoor lighting does not reflect off the screen. Use
tinted windows or shades to reduce glare.
A v oid placing your computer in front of a bri ght light that
❖
could shine directly in your eyes.
If possible, use soft, indirect lighting in your computer work
❖
area.
Arms and wrists
A void bending, arching, or twisting your wrist s. Keep them in
❖
a relaxed, neutral position while typing.
Exercise your hands, wrists, and arms to improv e circulation.
❖
P art I: Getting to Know Your Computer
Page 37

Getting Started
Other precautions
WARNING: Using the computer keyboard incorrectly may
result in discomfort and possible injury. If your hands,
wrists, and/or arms bother you while typing, stop using the
computer and rest. If the discomfort persists, consult a
physician.
15
Work habits
The key to av oiding discomfort or injur y from strain is to v ary
your activities. If possible, schedule a v ariety of tasks into your
working day . Finding ways to break up the routine can reduce
stress and improve your ef f icienc y.
T ake frequent breaks to cha nge position, stretch your muscles,
❖
and relieve your e yes. A break of two or three minutes e v ery
half hour is more effecti v e than a long break after se ve ral
hours.
A v oid performing repetitive activities for l ong periods.
❖
Intersperse such activit ies with other tasks.
Focusing your eyes on your computer screen for l ong periods
❖
can cause eyestrain. Look away f rom the computer frequently
and focus your eyes on a distant object for at least 30 seconds.
Other precautions
Your Satellite computer is designed to optimize safety, minim ize
strain, and withstand the rigors of portability. However , you should
observe certain precautions to further reduce the ris k of personal
injury or damage to the computer .
P art I: Getting to Know Your Computer
Page 38

16
Getting Started
Setting up your computer
WARNING: Avoid prolonged physical contact with the
underside of the computer. If the computer is used for long
periods, its case can become very warm. While the
temperature may not feel too hot to the touch, if you
maintain physical contact with the computer for a long time
(if you rest the computer on your lap, for example), your
skin might suffer low-heat injury.
CAUTION: Never apply heavy pressure to the computer or
subject it to sharp impacts. Excessive pressure or impact
can damage computer components or otherwise cause
your computer to malfunction.
Some PC Cards can become hot with prolonged use. If two
cards are installed, both can become hot even if only one is
being used. Overheating of a PC Card can result in errors or
instability in its operation.
Be careful when you remove a PC Card that has been used
for a long period.
Setting up your computer
Setting up your computer may include:
Connecting the AC adapter
❖
Connecting a printer
❖
Upgrading your computer by installing more memory
❖
Connecting a mouse
❖
P art I: Getting to Know Your Computer
Page 39

Connecting the AC adapter
Your computer contains a rechargeable battery pack which needs
to be charged before you can use it the firs t time.
The AC adapter enables you to po wer the computer from an AC
outlet and to charge the computer’s batteries. A status light on the
AC adapter glo ws when the de vice is in use.
Status light
AC adapter and Power cable
T o connect A C po wer to the computer:
1 Connect the power cable to the A C adapter.
Getting Started
Setting up your computer
17
Connecting the power cable to the AC adapter
2 Plug the AC adapter into the com puter’s DC IN socket.
Connecting the adapter to the computer
P art I: Getting to Know Your Computer
Page 40

18
Getting Started
Setting up your computer
3 Connect the power cable to a liv e AC outlet.
The in-use LED on the A C adapter comes on. If t he battery is
being charged, the battery light on the system indicator panel
blinks. Once the battery is fully charged the battery light
remains on.
DANGER: To avoid electric shock, do not modify, forcibly
bend, damage, place heavy objects on top of, or apply heat
to the power cable. If the power cable becomes damaged
or the plug overheats, discontinue use.
Never remove the power plug from the outlet with wet
hands.
CAUTION: Using the wrong AC adapter could damage your
computer. Toshiba assumes no liability for any damage in
such cases.
Never pull directly on the power cable to unplug it. Hold the
power plug when removing the cable from the outlet.
Charging the battery
Before you can use the battery to power the computer , you must
charge it. Connect the computer to a liv e A C outl et using the A C
adapter and power cable. The on/off l ight glo ws green and the
green battery light flashes.
Once the computer is connected to a power outlet, you can charge
the battery with the computer turned off or on. When the computer
is turned off, the battery char ges in two to three hours.
When the computer is turned on, the battery charges in four to ten
hours provided the computer is not consuming full po wer.
P art I: Getting to Know Your Computer
Page 41

CAUTION: Once the battery is charged for the first time,
avoid leaving the computer plugged in and turned off for
more than a few hours at a time. Continuing to charge a fully
charged battery can damage the battery.
Connecting a printer (optional)
CAUTION: Connecting the printer cable while the computer
is on may damage the printer, the computer, or both.
Before connecting a printer , you need to know whether it requires
a serial or a parallel interface. Check the printe r’s documentation.
If the printer can be switched between serial and parallel mode,
choose parallel because it is faster.
You also need a suitable printer cable—which may come with
your printer . If not, you can purchase one from a computer or
electronics store.
Getting Started
Setting up your computer
19
NOTE: If your printer is ECP- or IEEE-compliant, make sure
your printer cable is an IEEE 1284 cable.
The following instructions assume you ha ve a parall el printer ,
which is the most common type of interface.
1 Turn of f the computer.
2 Connect the printer cable to the printer and to the computer’s
parallel port.
To the computer
Identifying the ends of a parallel printer cable
To the printer
P art I: Getting to Know Your Computer
Page 42

Getting Started
20
Adding memory (optional)
3 Plug the printer’s power cable into a li ve AC outlet.
Refer to your printer documentation for additional configurat ion
steps.
Adding memory (optional)
Y our computer comes with enough memory to run most of today’s
popular applications. Howev er, you may want to increase the
computer’s memory if you use complex software or process large
amounts of data.
Additional memory comes in 32 MB, 64 MB, and 128 MB
modules. You can only install one module in your computer at a
time. For example, if your system has a total of 64 MB (32 MB
standard and a 32 MB module installed), and you w ant to increas e
the memory capacity to 86 MB, you must replace the 32 MB
module with a 64 MB module.
Installing a memory module
If you are adding memory after you have started to use the
computer, be gin at step 1. Otherwise skip to step 3.
1 If the computer is on, click Start, then click Shut Down.
2 In the Shut Down W indows dial og box, select Shut Down,
then click OK.
Windo ws 98 Second Edition shuts of f the computer.
3 Remove all cables connected to the computer.
4 Close the display panel and turn the computer upside down.
5 Remove two scre ws securing the e xpansion memory cover,
then remove the cover.
P art I: Getting to Know Your Computer
Page 43

Getting Started
Adding memory (optional)
Removing the expansion memory cover
CAUTION: Static electricity can damage the memory
module. Before you handle the module, touch a grounded
metal surface to discharge any static electricity you may
have built up.
Do not touch the connectors on the memory module or on
the computer. Oil or dust on the connectors can cause
memory access problems.
21
6 Hold the memory module by its edges so that the gold
connector bar faces left, then slide the module into the sock et.
7 Gently push the module down until the latches on either side
of the socket engage, securing the module in the socket.
Inserting the memory module
P art I: Getting to Know Your Computer
Page 44

22
Getting Started
Adding memory (optional)
8 Position the memory module cover on the computer and
secure it with two screws.
Inserting the memory module
9 Turn your computer right side up.
10 Reconnect any cables you disconnected.
11 Turn on the computer and v erify that it corr ectly recognizes
the amount of memory currently installed in the computer .
Removing a memory module
1 Perform steps 1 through 5 in "Installing a memory module"
(see above), to access the computer’s memory socket
2 Release the memory module by gently pressing outward on
the latches on either side of the memory socket.
One edge of the module pops up.
3 Remove the memory module from the computer .
CAUTION: Avoid touching the connectors on the memory
module or on the computer. Grease or dust on the
connectors can cause memory access problems.
4 Position the memory module cover on the computer and
secure it with two screws.
P art I: Getting to Know Your Computer
.
Page 45

5 Turn the computer ri ght side up.
6 Reconnect any cables you remo v ed.
7 Turn on the computer and v erify that it corr ectly recognizes
the amount of memory installed in the computer .
Connecting a mouse
You may want to use a mouse or trackball instead of the
computer’s built-in AccuPoint pointing de vice. Your Satellite
computer supports serial and PS/2-compatible pointing devices.
The AccuPoint remains operable, even if you connect a secondary
pointing device to the computer.
Using a serial mouse
1 Connect the mouse cable to the serial port.
Getting Started
Connecting a mouse
23
2 Install the vendor supplied software that came with the
mouse.
Using a PS/2 mouse
1 Turn of f the computer.
TECHNICAL NOTE: The system cannot detect a PS/2 mouse
if you connect it after starting the computer.
CAUTION: Make sure the computer is off before you attach
the mouse. Connecting a PS/2 mouse with the computer's
power on may damage the mouse, the computer, or both.
P art I: Getting to Know Your Computer
Page 46

Getting Started
24
Using the computer for the first time
2 Attach the PS/2 mouse cable to the PS/2 port, the n turn on the
computer .
TECHNICAL NOTE: You can only connect one PS/2 device
at a time, unless you purchase an optional Y-cable. Using a
Y-cable allows you to connect a PS/2 mouse and a PS/2
keyboard simultaneously.
3 Refer to your mouse documentation for configuration steps.
Using the computer for the first time
Opening the display panel
Slide the display panel latch to the right, then lift the panel.
Opening the display panel
CAUTION: Dont force the display panel open beyond the
point where it moves easily.
Never lift or move the computer by grasping the display
panel.
P art I: Getting to Know Your Computer
Page 47

Getting Started
Using the computer for the first time
Turning on the computer for the first time
1 Make sure that the diskette dri ve i s empty.
2 Open the display panel.
3 If you have a printer connected to your computer, turn the
printer on and wait until it indicates that it is ready.
4 Turn on the computer b y momentarily pressing then r eleasing
the power b utton.
25
On
When you release the power button, the on/of f light on the
system indicator panel comes on.
NOTE: When turning on the computer for the first time,
dont turn it off until the operating system has loaded
completely. Turning off the computer during its initial startup
will cause an error the next time you start the computer.
When the computer is connected to an external po wer source,
the battery light glows. If the battery is being charged, the
battery light flashes.
The hard disk drive light flashe s when the hard disk dri ve is
accessed.
CAUTION: To avoid data loss, never turn off the computer
while a drive is in use.
T o help you get st arted, W indo ws guides you through se v eral
essential steps for setting up your computer.
Getting Started - Allows you to enter your name to
❖
personalize your copy of W indo ws 98 Second Edition.
P art I: Getting to Know Your Computer
Page 48

Getting Started
26
Using the computer for the first time
NOTE: To perform online operations, your computer must
be connected to a voice-grade telephone line.
Final Settings - Completes your Windows setup. During this
❖
step you will be prompted to set the current date and time.
Press the ESC key on the keyboard t o exit setup and display
the Windows desktop.
Adjusting brightness and contrast
Use the following hot ke y combinations to adjust the screen
brightness on the Satellite 1620CDS and 1640CDT :
Ke y com binatio n Effect
+ Up arrow key Increases brightness
Fn
+ Down arro w k e y Decreases b right ness
Fn
If you have a Satellite 1620CDS, you can use the follo wing hot
key combinations to adjust screen contrast :
Ke y com binatio n Effect
+ Right arrow key Increases contrast
Fn
+ Left ar row key Decreases con tr as t
Fn
Using the AccuPoint pointing device
The round button in the middle of the ke yboard is the AccuPoint
pointing device. It enables you to mo ve the cursor and to sele ct
items on the screen. (If you would rather use a mouse or trackball,
you can connect one to the computer’s serial port or PS/2 port. See
"Connecting a Mouse".)
P art I: Getting to Know Your Computer
Page 49

Getting Started
Using the computer for the first time
AccuPoint
pointing device
Primary AccuPoint
control button
Secondary AccuPoint
control button
AccuP oint pointing device and control buttons
T o mov e the cursor , gently push the AccuPoint in the direction you
want the cursor to move. Pushing harder on the AccuPoint mov es
the cursor faster.
When a step instructs you to click or choose an item, move the
cursor to the item, then press and release the primary butt on. To
double-click, press the primary button twice in rapi d succession.
The primary button usually corresponds to the left mouse b utton.
The function of the secondary but ton depends on the program you
are using. It usually corresponds to the right mouse button. Check
your program’s documentation to find whether it uses the right
mouse button.
27
Setting the date and time
The Date/Time Properties dialog box contai ns a T ime Zone tab
and a Date and Time tab .
1 On the Time Zone tab, select your time zone by cl icking the
up and down arrow k eys.
2 On the Date and Time tab, set the correct date and time, if
necessary.
3 When you have finished, click Close.
Setup displays the Add Printer Wiza rd.
P art I: Getting to Know Your Computer
Page 50

28
Getting Started
Using the computer for the first time
Setting up your printer
If you started your computer with a printer connected and turned
on, it may have been detected automatically (Plug and Play). If
this is not the case, then you have to install the printer dri ver for the
model printer that is connected to your computer, either following
the instructions provided in your printer manual, or using the
Windo ws 98 Second Edition Add Printer W izard.
T o set up a printer using the Add Printer W i zard:
1 On the Windo ws desktop, click Star t, Settings , Control
Panel.
2 In the Control Panel window, double-click the Add Printer
icon to launch the Add Printer W izard. The W izard will guide
you though setting up your printer .
3 Select the manufacturer and the printer model, then click
Next.
If your printer is not listed, use the printer dri v er that came
with the printer to complete the setup process. Insert the CD/
diskette containing the printer dri v er into the appropriate
drive, click Ha v e Disk, then in the Install From Disk dialog
box, click OK.
4 Set the printer port as follows:
If you have a parallel printer, set the port to LPT1.
❖
If you have a serial printer, set the port to COM1.
❖
HINT: If you are not sure which type of printer you have,
refer to your printer manual.
5 Enter a name for your printer, or use the name supplied in the
Printer name text box.
P art I: Getting to Know Your Computer
Page 51

Getting Started
Using the computer for the first time
6 If you want to set the printer as the default pri nter for
Windo ws-based programs, click Yes, then click Next.
7 If you want to print a test page, click Yes (recommended),
then click Finish.
TECHNICAL NOTE: Some printers require a specific
installation process. In this case, the Windows 98 Second
Edition Add Printer Wizard will display an error message. If
this happens, refer to your printer installation guide for
further instructions.
29
Customizing the desktop
Set up your computer to suit your needs. If you do not like the
colors or the fonts on the screen, you can change them by clicking
a blank area of the desktop with the secondary button, then
clicking Properties. This causes W indo ws 98 Second Edition to
open the Display Properties window. On the Appearance tab you
can set the color scheme for the desktop.
Registering your computer
Registering your computer lets Toshiba keep you up-to-date with
information about new products and upgrades, and also pro vides
T oshi ba worldwide war ranty cov erage. See the regi stration card
and warranty information for details about the warra nty options
avail able from Toshiba.
P art I: Getting to Know Your Computer
Page 52

Chapter
Precautions . . . . . . . . . . . . . . . . . . . . . . . . . . . . . . . . . . . . . . . . . . . . . . . . . . 31
Computing tips . . . . . . . . . . . . . . . . . . . . . . . . . . . . . . . . . . . . . . . . . . . . . . 32
Using the keyboard . . . . . . . . . . . . . . . . . . . . . . . . . . . . . . . . . . . . . . . . . . . 33
Starting a program . . . . . . . . . . . . . . . . . . . . . . . . . . . . . . . . . . . . . . . . . . . . 36
Saving your work . . . . . . . . . . . . . . . . . . . . . . . . . . . . . . . . . . . . . . . . . . . . 38
Printing your work . . . . . . . . . . . . . . . . . . . . . . . . . . . . . . . . . . . . . . . . . . . . 39
Backing up your files . . . . . . . . . . . . . . . . . . . . . . . . . . . . . . . . . . . . . . . . . 40
Using compact discs . . . . . . . . . . . . . . . . . . . . . . . . . . . . . . . . . . . . . . . . . . 41
Using PC Cards . . . . . . . . . . . . . . . . . . . . . . . . . . . . . . . . . . . . . . . . . . . . . . 44
Using your computer at the office . . . . . . . . . . . . . . . . . . . . . . . . . . . . . . . 48
Using a computer lock . . . . . . . . . . . . . . . . . . . . . . . . . . . . . . . . . . . . . . . . 48
Setting up for communications . . . . . . . . . . . . . . . . . . . . . . . . . . . . . . . . . . 49
Connecting directly to a remote computer . . . . . . . . . . . . . . . . . . . . . . . . 51
Toshiba’s online resources . . . . . . . . . . . . . . . . . . . . . . . . . . . . . . . . . . . . . 52
Turning of f the computer . . . . . . . . . . . . . . . . . . . . . . . . . . . . . . . . . . . . . . 52
Caring for your computer . . . . . . . . . . . . . . . . . . . . . . . . . . . . . . . . . . . . . . 53
Restoring the preinstalled software. . . . . . . . . . . . . . . . . . . . . . . . . . . . . . . 56
3
Page 53

Learning the
Basics
This chapter covers precautions and computing tips that you
should follow when using your Satellite computer . It also provides
important information about the basic features of your system.
Precautions
Don’t spill li quids into the computer’s keyboard.
❖
If you do spill a liquid that gets into the ke yboard, turn of f the
computer immediately . Lea v e the computer turned of f
overnight to let it dry out bef ore you use it again.
Don’t turn of f the computer if a dri ve light i ndicates a dri ve is
❖
active.
Turning of f the computer whil e it is reading from or writing to
a disk may damage the disk, the drive, or both.
Keep the computer and disks away from objects that generate
❖
strong magnetic fields, such as large st ereo speakers.
Information on disks is stored magnetically. Placing a magnet
too close to a disk can erase important files.
31
Page 54

Learning the Basics
32
Computing tips
Scan all new files for vir uses.
❖
This precaution is especially important for file s you recei ve
via diskette, email, or download from the Inte rnet.
Occasionally , e v en new programs you b uy from a supplier
may contain a computer virus. You’ll need a special program
to check for viruses. Ask your dealer to help you.
Computing tips
Save your work frequently.
❖
Your work stays in the computer’s temporary memory until
you save it to the disk. You will lose all the work done since
you last saved, if, for e xample, a system error occurs and you
must restart your computer, or your batter y runs out of charge
while you are working.
HINT: Some programs have an automatic save feature
which you can turn on. This feature saves your file to the
hard disk at preset intervals. See your software
documentation for details.
Back up your files to diskettes (or other remo v able media) on
❖
a regular basis. Label the backup copies clearly and store
them in a safe place.
It is easy to put off backing up because it takes time. Howe ver ,
if your hard disk suddenly fails, you may lose all the data on it
unless you have a separate backup cop y.
Use ScanDisk, Disk Defragmenter, and the Maintenance
❖
Wizard re gularly to conserv e disk space and help your
computer perform at its optimal leve l. Consult your Windo ws
98 Second Edition documentation for more information on
these and other utilities.
P art I: Getting to Know Your Computer
Page 55

T ak e frequent breaks to a v oid repetiti v e-motion injuries and
❖
eyestrain.
Before turning off the computer, always use the Shut Down
❖
command in Windo ws 98 Second Edition.
Using the keyboard
86-key k e yboar d
Character keys
Learning the Basics
Using the ke yboard
33
T yping with t he character ke ys is very much lik e typing on a
typewriter , e xcept that:
The spacebar creates a space character instead of just passing
❖
over an area of the page.
The lowercase letter l (el) and the number 1 are not
❖
interchangeable.
The uppercase letter O and the number 0 are not
❖
interchangeable.
The
❖
Caps Lock
case—the number and symbol ke ys are not af fected. The caps
lock light on the keyboard indicator panel illuminates when
you press the
key changes only the alphabet ke ys to upper
Caps Lock
key .
P art I: Getting to Know Your Computer
Page 56

Learning the Basics
34
Using the keyboar d
Ctrl, Fn, and Alt keys
Alt
Fn
Ctrl
Ctrl, Fn and Alt keys
.
Ctrl, Fn
, and
Alt
The
program you are using. For more information, see your program
documentation.
Function keys
The function keys (not to be confused with the Fn key) are the 12
keys at the top of the ke yboard.
F1 F2 F3 F4 F5 F6 F7 F8 F9 F10 F11 F12
Function ke ys
through
F1
are called function keys because the y perform
F12
programmed functions when pressed. Used in combination with
the
key, function keys marked with icons e xec ute specif ic
Fn
functions on the computer .
Windows special keys
Wi ndows special ke ys
keys do dif ferent things depending on the
Application key
Windows logo key
The keyboard provides tw o keys tha t hav e special functions in
Windo ws. The W indo ws logo ke y acti v ates the Start menu. The
Application key has t he same function as the secondar y mouse (or
the AccuPoint) button.
P art I: Getting to Know Your Computer
Page 57

Overlay keys
∗
8
790
Home PgUp
78 9
UIOP
456
JKL
End PgDn
Ke yboar d o verlay ke ys
The keys with numbers and symbols on the front of them form the
numeric and cursor overlay. This overlay lets you enter numeric
data or control the cursor as you would using the ten-ke y ke ypad
on a desktop computer’s keyboard.
Using the overlay to type numeric data
()&
∗
-
123
M
Ins Del
>
.
0
.
Learning the Basics
Using the ke yboard
:
;
+
?
/
/
35
T o tur n the numeric ov erlay on and of f, press Fn and
F11
simultaneously . The numeric mode light on the st atus panel glows
when the numeric overlay is on.
You can still use the overlay keys to type alphabetic characters
while the numeric overlay is on.
For lowercase let ters, hold do wn Fn while you type the letters.
❖
For uppercase letters, hold down both Fn and
❖
while you
Shift
type the letters.
T o use the cur sor control ke ys when the numeric o verlay is on,
press and hold down
T o ret urn to the numeric o verlay, release
while you use the cursor control keys.
Shift
.
Shift
Using the cursor control overlay
T o tur n the cursor control ov erlay on and of f, press Fn and
simultaneously . The cursor control li ght on the keyboard indicator
panel glows when the cursor control o verlay is on.
P art I: Getting to Know Your Computer
F10
Page 58

36
Learning the Basics
Starting a pr ogram
T o type al phabetic characters while the o v erlay is on:
For lowercase let ters, hold do wn Fn while you type the letters.
❖
For uppercase letters, hold down both Fn and
❖
type the letters.
T o use the numeric ov erlay keys when the cursor control o verlay is
on, hold down
return to the cursor control ov erlay, release
while you use the numeric overlay ke ys. To
Shift
Starting a program
In Windo ws 98 Second Edition there are three wa ys to start a
program—from the Start menu, from W indo ws Explorer , or from
the Run menu on the taskbar.
Starting a program from the Start menu
1 Click Start, then point to Programs.
Windo ws 98 Second Edition displays the Programs menu,
which lists programs and program groups. If your program is
listed, go to step 3; otherwise, continue with step 2.
2 Point to the program group containing the program that you
want to start.
Windo ws 98 Second Edition displays the associated progr am
menu.
Shift
Shift
.
while you
3 Click the program’s icon to start the program.
T o clos e the program, click the Close but ton at the upper-right
corner of the program’s window.
P art I: Getting to Know Your Computer
Page 59

Starting a program from Explorer
If a program is not in the Programs menu, you can start it from
Windo ws Explorer. Windo ws Explorer gi v es you a vie w of your
computer’s contents as a hierarchy or “tree.” You can easily see
the contents of each driv e and folder on your computer . T o use this
method, you need to know the name and location of the program’s
executable fi le (this f ile ends with .ex e.)
1 Click Start, point to Programs, and then click Windows
Explorer .
HINT: Another way to open Windows Explorer is to use the
secondary AccuPoint button to click the My Computer icon,
then click Explore.
To show or hide folders on the left side of the window, click
the plus or minus sign beside the folder.
Learning the Basics
Starting a pr o gram
37
The left side of the window displays the disk dri ves and
❖
folders on your computer .
The right side of the window displays the contents of the
❖
item you click on the left.
2 T o open a document or start a program, double-click its icon
in the right side of the window.
Starting a program from Run menu on the taskbar
You can start a program from the taskbar if you know i ts name and
location.
1 Click Start on the taskbar .
2 Point to Run.
3 In the dialog box, type the command line.
4 Click OK.
P art I: Getting to Know Your Computer
Page 60

Learning the Basics
38
Saving your work
Saving your work
Before you turn off the computer , sa ve your work t o the hard disk
drive or a disk ette. This is one of the most important rules of
computing. You can never save your files too oft en.
NOTE: Save your data even when you are using Standby, in
case the battery discharges before you return to work.
Many programs offer a feature that sa ves documents at re gular
intervals, such as e ver y 15 minutes. Check your program’s
documentation to see whether they ha ve an automatic sa ve feature .
T o sa v e a f ile you are updating, open the programs’s File
❖
menu and click Save.
T o sa v e the current f ile with a ne w name, choose Save As
❖
from the File menu, type a name for the file and click OK.
HINT: To make another copy of the file you are currently
working with, choose Save As from the File menu and give
the new file a different name.
File names
Windo ws 98 Second Edition supports f ile names of up to 255
characters. You may use all the letters and numbers on the
keyboard plus the follow ing characters: _, ^, $, ~, !, #, %, &, {, }, (,
), @, [, ], +, -, ; , and '. The names can include spaces.
If you plan to share your files with a computer using MS-DOS
a pre-Windo ws 95 versi on of W indo ws, the f ile name must be no
more than eight characters followed b y a period and a three
character extension. An MS-DOS file name may not contain a
space.
P art I: Getting to Know Your Computer
®
or
Page 61

Most programs assign an extension that identif ies the f ile as
having a particular format. For e xample, Microsoft Word saves
files with a .doc extension.
Printing your work
Make sure that Windo ws 98 Second Edition is set up for your
printer .
TECHNICAL NOTE: You only need to set up the printer the
first time you connect it. If you use more than one printer or
are changing printers, you will need to set up Windows 98
Second Edition to run with the additional printer(s).
1 If your printer is not on, turn it on now.
2 In the File menu of your Windo ws program, click Print.
Learning the Basics
Printing your work
39
The program displays a Print dialog box similar to the one
below.
A sample Print dialog box
3 Click OK to print.
P art I: Getting to Know Your Computer
Page 62

Learning the Basics
40
Backing up your files
Backing up your files
Backing up your files simply means copying indi vidual f iles to a
diskette or copying entire sections of your hard disk to another
device, such as a tape dri ve.
Copying to a diskette
1 Insert a formatted diskette into the disk ette dri ve.
2 Double-click the My Computer icon on the Windo ws
desktop.
3 Double-click the driv e that contains the f ile you want to cop y.
4 Double-click the folder containing the file, then cli ck the fil e
you want to copy.
HINT: Use the Ctrl and Shift keys to select more than one
file.
5 Click File, then click Send To.
6 Click the icon for the diskette dri ve (dri v e A:).
HINT: You can also back up a file to a diskette by clicking the
file (or files) you want to back up with the secondary button,
then pointing to Send To and clicking 3 1/2 Floppy (A:).
Using the Backup Wizard
Windo ws 98 Second Edition provides a si mple way to back up
multiple files. Using the Backup W izard allo ws you to choose the
files and the type of backup in simple steps.
1 Connect the backup device to your computer as sho wn in the
manufacturer’s instructions.
P art I: Getting to Know Your Computer
Page 63

2 Click Start, point to Programs, Accessories, System Tools,
then click Backup to display the Backup Wizard dialog box.
Backup W izar d
3 Follow the instruct ions sho wn by the Backup Wizard.
Using compact discs
The full-size, maximum 24X speed CD-ROM dri ve lets you run
compact discs.
Learning the Basics
Using compact discs
41
CAUTION: When inserting and removing CDs, be careful not
to touch the lens on the disc tray or the area around it.
Doing so could cause the drive to malfunction.
Eject button
The CD-ROM drive
Press the eject button to open the disc tray. The eject button will
not open the disc tray when the computer is off.
The manual eject button—acc essed through the small hole just to
the right of the eject button—all ows you to open the disc tr ay
when the computer is off. For instr uctions on using the manual
P art I: Getting to Know Your Computer
Manual eject button
Page 64

Learning the Basics
42
Using compact discs
eject button, see “Remo ving a CD with the computer off” on
page 43.
Inserting compact discs into the CD-ROM drive
1 With the computer turned on, press the ej ect button t o open
the disc tray.
2 Pull the disc tray until it is fully open.
3 Hold the CD by its edges, ensure it is dust-free, and place it
carefully in the disc tray, with the label side up.
Inserting a CD into the CD-ROM drive
4 Press down on the CD until the disc locks on the spindle.
CAUTION: If the CD is not seated properly when you close
the disc tray, the CD might be damaged and the tray may
not open fully when you press the eject button.
5 Close the disc tray .
P art I: Getting to Know Your Computer
Page 65

Learning the Basics
Using compact discs
Removing a CD with the computer on
1 Press the eject button.
CAUTION: Do not press the eject button while the computer
is accessing the CD-ROM drive.
If the CD is still spinning when you open the disc tray, wait
for it to stop before you remove it.
2 Pull the disc tray until it is fully open, remove t he CD, and
place it in its protecti ve co ver.
3 Close the disc tray .
Removing a CD with the computer off
1 Insert a slender object, such as a straightened paper clip, into
the manual eject hole.
43
CAUTION: Never use a pencil to press the manual eject
button. Pencil lead can break off inside the computer and
damage it.
2 Pull the disc tray until it is fully open, remove t he CD, and
place it in its protecti ve co ver.
3 Close the disc tray .
Caring for compact discs
Store your CDs in their original containers to protect them
❖
from scratches and keep them clean.
Don’t bend a CD or place hea vy objects on top of it.
❖
Don’t apply a label to, or other wise mar , the surf ace of a CD.
❖
P art I: Getting to Know Your Computer
Page 66

Learning the Basics
44
Using PC Cards
Hold a CD by its outside edge. Fingerprints on the surf ace of a
❖
CD can prevent the CD-R OM dri v e from reading the data
properly .
Don’t e xpose CDs to direct sunlight or e xtreme heat or cold.
❖
T o cle an a CD, wipe it with a clean, dry cloth—starting from
❖
the center of the CD and wiping to ward the outw ard edge. Do
not wipe using a circular motion. If necessary , moisten the
cloth with water or a neutral cleaner (not benzine or rubbing
alcohol). Let the CD dry completely before inserting it in the
drive.
Using PC Cards
PC Cards expand your computer’s capabilities and usefulness.
You can purchase additional PC Cards from your dealer . Most PC
Cards conform to the PCMCIA (Personal Computer Memory
Card International Association) standard.
Your Satellite computer comes with two stacked PC Card slots
and supports three types of PC Cards:
T ypeI cards and T ypeII cards are typically used for fax/
❖
modems, memory storage, network cards, etc. You can install
up to two of these cards, one in each slot.
T ypeIII cards are used for removable hard di sks and other
❖
functions that require a larger card. You can install just one of
these cards.
Check the documentation that came with the PC Card to see if it
conforms to the PCMCIA 2.1 standard, or later. Other cards may
work with your computer, b ut are lik ely to be much more dif ficul t
to set up and use.
P art I: Getting to Know Your Computer
Page 67

Inserting PC Cards
PC Cards require Card and Socket Services software—a set of
programs that acts as a translator between the PC Card and the
computer, and that makes hot sw apping (switching cards while the
computer is on) possible.
TECHNICAL NOTE: Windows 98 Second Edition provides
the Card and Socket Services for your PC Card. Even if your
PC Card comes with its own version of Card and Socket
Services, you should use the files included in Windows 98
Second Edition.
Some PC Cards do not support hot swapping. Refer to your
PC Cards manual for verification.
1 If your PC Card does not support hot swapping, save your
data and turn off the computer before inserting the PC Card.
For more information, see "Hot swapping".
Learning the Basics
Using PC Cards
45
2 Hold the PC Card with the arrow side up and the connector
side toward the slot.
3 Align the card connectors with an avai lable PC Card slot and
carefully slide the card into the slot until it locks into place.
There are two eject buttons, one per slot. When the PC card is
seated, the eject button for that slot pops out.
NOTE: If you have a Type III card, insert the connector into
the lower slot. If you have a Type I or Type II card, insert it
into either the upper or the lower slot.
P art I: Getting to Know Your Computer
Page 68

Learning the Basics
46
Using PC Cards
Inserting a PC Card into a PC Car d slot
CAUTION: To avoid damaging the computer or the PC Card,
don't force the card into the slot.
4 Press the eject button to put it in its retract ed position.
Removing PC Cards
CAUTION: If your PC Card supports hot swapping, you can
remove it at any time. However, to avoid data loss, never
remove a card while it is in use. For more information, see
"Hot swapping".
Eject button
1 Click the PC Car d but ton on the taskbar.
2 Click Stop xxxx where xxxx is the identif ier for your
PC Card.
Windo ws 98 Second Edition advises you that you may safely
remove the card.
3 T o remo ve the PC Card, press the respecti ve eject button once.
The eject button pops out.
4 Press the eject button again to eject the PC Card.
P art I: Getting to Know Your Computer
Page 69

Ejecting a PC Card
The upper eject button will eject a Type I or Type II PC Card
from the upper slot. The lower but ton will eject a Type I,
T ypeII, or T ypeIII card from the lower slot.
5 Remove the PC Card and store it properly.
Hot swapping
With PC Cards, you can replace one PC Card with another while
the computer is on. This is called “hot swapping.”
Hot swapping precautions
Eject button
Learning the Basics
Using PC Cards
47
Although you can insert a PC Card at any time, to av oid data loss
do not remove a card while it is in use. Before removing a PC
Card, stop it by clicking the PC Card (PCMCIA) icon on the
taskbar . After the PC Card is stopped, it is safe to remov e it.
Don’t remov e a hard disk card while the syst em is accessing
❖
it.
Don’t remov e a netw ork card while you are connected to a
❖
network.
P art I: Getting to Know Your Computer
Page 70

Learning the Basics
48
Using your computer at the office
Don’t remov e a SCSI card while an y of the SCSI devices
❖
connected to it is operating.
DEFINITION: SCSI is an acronym for Small Computer
Systems Interface. A single SCSI PC Card enables you to
connect several SCSI devices, such as a scanner or digital
camera to your computer.
Using your computer at the office
By connecting an external monitor , e xternal full-size k eyboard,
and a mouse, you can work with your notebook as if it were a
standard office computer.
An external monitor connects to the monitor port.
An external PS/2-compatible ke yboard or a PS/2 mouse connects
to the PS/2 port. An optional Y-cable lets you connect both devices
to the port simultaneously.
A serial mouse connects to the serial port.
Using a computer lock
You may want to secure your computer to a heavy object such as
your desk. The easiest way to do this is to purchase a computer
cable lock.
Computer cable lock
P art I: Getting to Know Your Computer
Page 71

Learning the Basics
Setting up for communications
1 Loop the cable through or around some part of a heavy object.
Make sure there is no way for a potenti al thief to slip the cable
off the object.
2 Pass the locking end through the loop.
3 Insert the cable’s locking end into the security lock slot, then
rotate the key a quarter turn and remo ve it.
The computer is now securely locked.
Locking the computer
49
Setting up for communications
T o connect to the Internet, use an online service, or communicate
across the telephone lines with another computer , you need:
A modem (supplied with your Satellite notebook computer)
❖
A telephone line
❖
A browser or communications program
❖
An Internet Service Provider (ISP) or online service if you
❖
plan to use the Internet
P art I: Getting to Know Your Computer
Page 72

Learning the Basics
50
Setting up for communications
Connecting the modem to a telephone line
Before you can use the modem, you must connect it to a standard
voice-grade telephone line.
TECHNICAL NOTE: Disable Call Waiting before you connect
through the modem. Call Waiting interrupts data
transmission.
1 Attach one end of a standard RJ-11 telephone cable to the
modem port.
Connecting the internal modem
2 Attach the other end of the RJ-11 telephone cable into the
modular jack of a standard voice-grade telephone line .
NOTE: The plug may be dif ferent in your country.
Connecting your computer to a network
T o acces s a network:
At the office, you need to instal l a network card in one of the
❖
PC Card slots. For specific information about connecting t o
the LAN or WAN, consult your network administrator.
While you are at home or traveling, you need a dial-up
❖
connection. Ask your network administrator for the telephone
number of the network.
P art I: Getting to Know Your Computer
Page 73

Learning the Basics
Connecting directl y to a remote computer
T o set up the connection, use the Dial-Up Networking Wizard:
1 Click Start and point to Programs.
2 Point to Accessories, then to Communications, and click
Dial-Up Networking.
CAUTION: When you are connected to a network, disable
the Windows 98 Second Edition Standby command. The
Standby command can disrupt your network connection.
Connecting directly to a remote computer
If you are connecting directly to a remote computer or a bulletin
board service (BBS), you need a general-purpose communications
program.
In addition, there are two things you need to kno w before you can
connect to another computer:
51
The communications parameters
❖
The file transfer protocol (only if you are do wnloading or
❖
uploading files)
Communications parameters
There are four communications parameters:
Modem speed - The speed at which the modem transfers
❖
information. Speeds are measured in bits per second. Your
modem manual documents the speed of your modem.
Data bits - The number of bits in one character . This number
❖
is usually seve n or eight.
Stop bits - Indicate the end of a character . This number is
❖
usually one or two.
P art I: Getting to Know Your Computer
Page 74

Learning the Basics
52
Toshiba’s online r esour ces
Parity - An error-checki ng method, which will be set to ev en,
❖
odd, or none.
Communications parameters, except for the modem speed, are
usually abbreviated and combined. Common examples are N81
(no parity , eight data bits and one stop bit) and E72 (e ven parit y,
seven data bits and two stop bits).
You set each of these parameters in your communications
program. Each parameter must be set the same on both computers
or you will not be able to connect.
File transfer protocols
File transfer protocols are standards that gov ern ho w computers
transfer files be tween modems ov er a tele phone l ine. Protocols
determine what type of error checking and data compression, if
any, occur during transfer .
You do not really need to know anything about specific protocolsjust make sure you are using the same protocols as the computer
with which you are communicating.
Tos hiba ’s online resources
T oshi ba maintains a number of online sites to which you can
connect. These sites can provide information about Toshiba
products, give help with technical quest ions, and keep you up to
date with future upgrades. For more information, see Appendix E.
Turning off the computer
It is a good idea to turn off your computer when you are not using
it for a while.
If you have work in progress and e xpect to resume shortly , use
❖
the Windo ws 98 Second Edition Standby command to sa ve
P art I: Getting to Know Your Computer
Page 75

Caring for your computer
your system settings so that, when you turn on the computer
again, you automatically return to where you left off.
T o leave the computer turned off for a longer period, use the
Windo ws 98 Second Edition Shut Down command instead.
Never turn of f the po wer if the hard disk dri v e light is on.
❖
Doing so may damage your hard disk drive.
If you close the display panel while the computer is on, the
❖
Panel Close Alarm beeps loudly.
Caring for your computer
This section gives tips on cleaning and moving your computer . For
information about taking care of your computer’s battery , see
"Running the computer on battery power".
Cleaning the computer
Learning the Basics
53
T o k eep your computer clean, gently wipe the display panel and
exterior case with a lightly dampened cloth. Ask your Toshiba
dealer for suggestions for appropriate cleaning products.
CAUTION: Keep liquid, including cleaning fluid, out of the
computers keyboard, speaker grille, and other openings.
Never spray cleaner directly onto the computer. Never use
harsh or caustic chemical products to clean the computer.
P art I: Getting to Know Your Computer
Page 76

Learning the Basics
54
Restoring the preinst alled softwar e
Moving the computer
Before moving your computer, e v en across the room, make sure
that all disk activity has ended and all e xternal peripheral cables
are disconnected.
CAUTION: Dont pick up the computer by its display panel
or by the back (where the ports are located).
Although your notebook computer is built to withstand reasonable
shock and vibration, transport it in a carrying case for long trips.
You can purchase a carrying case from your Toshiba dealer or
through the Toshiba Accessories Catalog.
Restoring the preinstalled software
If preinstalled files are damaged, use the Product Recov ery CDROM or the Toshiba Tool s & Utilities CD-R OM to rest ore them.
Restoring the complete system
T o res tore the operating system and all preinst alled software,
follow the steps belo w.
When you reinstall the Windows operating system, the hard
disk will be reformatted and all data will be lost. Make sure
you have a backup copy of your data, before you perform a
complete system recovery.
1. Load the Product Recovery CD-R OM in the dri v e and turn of f
the computer's power.
2. Hold down the C key and turn on the po wer. When In T ouch
with T omorrow TOSHIBA appears, release the C key.
3. Follow the on-screen dire ctions.
P art I: Getting to Know Your Computer
Page 77

Learning the Basics
Restoring the preinstal led software
4. After recovery is complete, remov e the Product Recov ery CD.
5. Press Ctrl + Alt + Del to restart the system. Refer to your
Windo ws 98 user's manual for W i ndow s' setup instructions.
Restoring Toshiba utilities and drivers
If Windo ws is working pr operly, individual drivers or applications
can be separately restored. Use the Tools & Utilities CD-R OM
according to instructions in the booklet contained in the the CD
box to reinstall Toshiba utilities and dri vers.
55
P art I: Getting to Know Your Computer
Page 78

Chapter
Toshiba’s energy-sa ver design . . . . . . . . . . . . . . . . . . . . . . . . . . . . . . . . . . 57
Managing power usage . . . . . . . . . . . . . . . . . . . . . . . . . . . . . . . . . . . . . . . . 58
Running the computer on battery power . . . . . . . . . . . . . . . . . . . . . . . . . . 58
Charging batteries . . . . . . . . . . . . . . . . . . . . . . . . . . . . . . . . . . . . . . . . . . . . 60
Monitoring battery power . . . . . . . . . . . . . . . . . . . . . . . . . . . . . . . . . . . . . . 62
Changing the main battery . . . . . . . . . . . . . . . . . . . . . . . . . . . . . . . . . . . . . 65
Disposing of used batteries safely . . . . . . . . . . . . . . . . . . . . . . . . . . . . . . . 67
Trav eling tips . . . . . . . . . . . . . . . . . . . . . . . . . . . . . . . . . . . . . . . . . . . . . . . . 67
4
Page 79

Mobile
Computing
This chapter covers all aspect s of using your computer while
traveling.
Tos hiba ’s energy-saver design
T oshi ba is a partner in the En vironmental Protection Agency’s
(EPA) Energy Star Program and has designed this product to meet
the Energy Star guidelines for ener gy ef fi ciency.
Your computer enters a low-power state when it is not being used,
thereby conserving energy and saving mone y in the process. It has
a number of other features that enhance its energy ef f icienc y.
Many of these energy-sa ving features ha v e been set by Toshiba.
We recommend you leave these features acti v e, allo wing your
computer to operate at its maximum energy eff icienc y , so that you
can use it for longer periods while trav eling.
57
Page 80

Mobile Computing
58
Managing power usage
Managing power usage
Your computer’s po wer-sa ving options great ly increase the length
of time you can use the computer before you need to recharge the
battery .
Your computer supports the following power usage schemes:
Home/Office desk
❖
Portable/Laptop
❖
Always On
❖
T o change the power usage mode, click Start, point to Settings,
then click Control Panel. In Control Panel, double-click the
Power Management icon to display the Power Management
Properties window.
Select the power scheme with the most appropriate setti ngs for
your computer . Keep in mind that changi ng any settings on the
Power Management Properties window will modify the cur rently
selected scheme.
Consult your Windo ws 98 Second Edition documentation for
more information on the Power Management utility.
Running the computer on battery power
The computer contains a removable nickel metal hydride (NiMH)
battery pack that provides power when you are a way from an AC
outlet. You can recharge it many times.
In addition to the removabl e main battery, the computer has an
internal NiMH real-time clock (RTC) battery . The RTC battery
powers the RTC memory , which stores your system conf iguration
settings and the current time and date for up to a month while the
computer is turned off.
P art I: Getting to Know Your Computer
Page 81

Running the computer on battery power
Using additional battery packs
If you spend a lot of time traveling and need to wor k for many
hours without an AC po wer source, you may want to carry
additional charged battery packs with you. You can then replace a
discharged battery and continue working.
Battery safety precautions
Never try to disass emble a battery pack.
❖
Don’t o verch arge or re v erse char ge a battery. Overcharging
❖
will shorten its life and rev erse char ging could destro y it,
causing the release of toxic fumes.
Don’t touch the metal term inals of the battery with another
❖
metal object. Short-circuiting the battery will cause it to
overheat and may cause permanent damage to the batter y or
the computer.
Never incinerat e a spent battery as this will cause it to
❖
explode, releasing toxic materials.
Mobile Computing
59
If a battery is leaking or damaged, replace it immediately. Use
❖
protectiv e glov es when handling a damaged battery.
When you need to replace the main battery , use an identic al
❖
battery that you can purchase from Toshiba or through the
Toshiba Accessories Catalog.
Maximizing battery life
A main battery can be recharged many t imes. Gradually over time
it will lose its ability to hold a charge. To maximize the life of your
main battery:
Don’t lea ve the computer pl ugged in and unused for more
❖
than a few hours. Overchar ging the main battery may shorten
its life.
P art I: Getting to Know Your Computer
Page 82

Mobile Computing
60
Charging batteries
If you are not going to use the computer for a long period of
❖
time, re mo ve t he bat ter y.
Alternate between battery packs if you hav e a spare.
❖
Make sure the computer is off when you are replacing the
❖
battery .
Store spare battery packs in a cool dry place out of direct
❖
sunlight.
Charging batteries
The main battery needs to be charged before you can use it to
power the computer. You can charge the battery using your
computer, or you can use an optional batt ery charger.
Charging the main battery
T o char ge the main battery while it is in your computer, plug the
computer into a liv e A C outlet. It tak es se ver al hours to charge the
battery with the computer off. It takes much longer to char ge the
battery while the computer is on.
TECHNICAL NOTE: The battery does not charge while the
computer is consuming full power.
The battery may not start charging immediately if:
The battery is extremely hot or cold.
❖
T o ensure that the battery charges to its full capaci ty , wait until
it reaches room temperature (50 to 80 degrees Fahrenheit, 10
to 26 degrees Celsius).
P art I: Getting to Know Your Computer
Page 83

The battery is almost completely discharged.
❖
Leave the po wer connected, and the battery should be gin
charging after a f e w minutes.
HINT: Once a battery pack is fully charged, we recommend
that you operate your computer on battery power until the
battery pack discharges completely. Doing this extends
battery life and helps ensure accurate monitoring of battery
capacity.
Charging the RTC battery
In addition to the main battery, the computer contains an internal
battery for the real-time clock (RTC). The RTC batter y provides
power for the internal real-t ime clock and calendar.
During normal use, the main battery keeps the RTC battery
adequately charged. Occasionally, the R TC battery may lose its
charge completely, especially if you hav e had the computer tur ned
off for a long time.
Mobile Computing
Charging batteries
61
It is seldom necessary to charge the RTC battery because it
charges while the computer is on. Howe v er , if the RTC battery is
low, the real-time clock and calendar may display the incorrect
time and date or stop working.
T o recha rge the RTC battery, plug in the computer and turn it on
for at least 24 hours.
The computer can be used while the RTC battery is being charged.
Although the charging status of the RTC battery cannot be
monitored, if the power is on, it takes approximately 24 hours to
fully charge the RTC battery . If the po wer is of f, the RTC battery
will not charge.
P art I: Getting to Know Your Computer
 Loading...