

Page 1

The Rockbox Manual
for
Toshiba Gigabeat F Series
rockbox.org
December 23, 2008
Page 2

Rockbox
http://www.rockbox.org/
Open Source Jukebox Firmware
2
Rockbox and this manual is the collaborative effort of the Rockbox team and
its contributors. See the appendix for a complete list of contributors.
c
2003-2008 The Rockbox Team and its contributors,c 2004 Christi Alice
Scarborough,c 2003 Jos´e Maria Garcia-Valdecasas Bernal & Peter Schlenker.
Version r19569-081223. Built using pdfLATEX.
Permission is granted to copy, distribute and/or modify this document under
the terms of the GNU Free Documentation License, Version 1.2 or any later
version published by the Free Software Foundation; with no Invariant Sections, no Front-Cover Texts, and no Back-Cover Texts. A copy of the license
is included in the section entitled “GNU Free Documentation License”.
The Rockbox manual Toshiba Gigabeat F Series
Page 3

Contents 3
Contents
1 Introduction 9
1.1 Welcome . . . . . . . . . . . . . . . . . . . . . . . . . . . . . . . . . . . . . 9
1.2 Getting more help . . . . . . . . . . . . . . . . . . . . . . . . . . . . . . . 9
1.3 Naming conventions and marks . . . . . . . . . . . . . . . . . . . . . . . . 10
2 Installation 11
2.1 Overview . . . . . . . . . . . . . . . . . . . . . . . . . . . . . . . . . . . . 11
2.2 Prerequisites . . . . . . . . . . . . . . . . . . . . . . . . . . . . . . . . . . 12
2.3 Installing Rockbox . . . . . . . . . . . . . . . . . . . . . . . . . . . . . . . 12
2.3.1 Automated Installation . . . . . . . . . . . . . . . . . . . . . . . . 12
2.3.2 Manual Installation . . . . . . . . . . . . . . . . . . . . . . . . . . 13
2.3.3 Enabling Speech Support (optional) . . . . . . . . . . . . . . . . . 15
2.4 Running Rockbox . . . . . . . . . . . . . . . . . . . . . . . . . . . . . . . . 15
2.5 Updating Rockbox . . . . . . . . . . . . . . . . . . . . . . . . . . . . . . . 15
2.6 Uninstalling Rockbox . . . . . . . . . . . . . . . . . . . . . . . . . . . . . 16
2.6.1 Automatic Uninstallation . . . . . . . . . . . . . . . . . . . . . . . 16
2.6.2 Manual Uninstallation . . . . . . . . . . . . . . . . . . . . . . . . . 16
3 Quick Start 17
3.1 Basic Overview . . . . . . . . . . . . . . . . . . . . . . . . . . . . . . . . . 17
3.1.1 The player’s controls . . . . . . . . . . . . . . . . . . . . . . . . . . 17
3.1.2 Turning the player on and off . . . . . . . . . . . . . . . . . . . . . 18
3.1.3 Putting music on your player . . . . . . . . . . . . . . . . . . . . . 18
3.1.4 The first contact . . . . . . . . . . . . . . . . . . . . . . . . . . . . 18
3.1.5 Basic controls . . . . . . . . . . . . . . . . . . . . . . . . . . . . . . 19
3.1.6 Basic concepts . . . . . . . . . . . . . . . . . . . . . . . . . . . . . 19
3.2 Customising Rockbox . . . . . . . . . . . . . . . . . . . . . . . . . . . . . 20
3.3 Charging . . . . . . . . . . . . . . . . . . . . . . . . . . . . . . . . . . . . 20
4 Browsing and playing 21
4.1 File Browser . . . . . . . . . . . . . . . . . . . . . . . . . . . . . . . . . . . 21
4.1.1 File Browser Controls . . . . . . . . . . . . . . . . . . . . . . . . . 22
4.1.2 Context Menu . . . . . . . . . . . . . . . . . . . . . . . . . . . . . 22
4.1.3 Virtual Keyboard . . . . . . . . . . . . . . . . . . . . . . . . . . . . 24
4.2 Database . . . . . . . . . . . . . . . . . . . . . . . . . . . . . . . . . . . . 25
4.2.1 Introduction . . . . . . . . . . . . . . . . . . . . . . . . . . . . . . 25
4.2.2 Initializing the Database . . . . . . . . . . . . . . . . . . . . . . . . 25
The Rockbox manual Toshiba Gigabeat F Series
Page 4

Contents 4
4.2.3 The Database Menu . . . . . . . . . . . . . . . . . . . . . . . . . . 26
4.2.4 Using the Database . . . . . . . . . . . . . . . . . . . . . . . . . . 27
4.3 While Playing Screen . . . . . . . . . . . . . . . . . . . . . . . . . . . . . . 28
4.3.1 WPS Key Controls . . . . . . . . . . . . . . . . . . . . . . . . . . . 29
4.3.2 Peak Meter . . . . . . . . . . . . . . . . . . . . . . . . . . . . . . . 29
4.3.3 The WPS Context Menu . . . . . . . . . . . . . . . . . . . . . . . 30
4.4 Working with Playlists . . . . . . . . . . . . . . . . . . . . . . . . . . . . . 32
4.4.1 Playlist terminology . . . . . . . . . . . . . . . . . . . . . . . . . . 32
4.4.2 Creating playlists . . . . . . . . . . . . . . . . . . . . . . . . . . . . 33
4.4.3 Adding music to playlists . . . . . . . . . . . . . . . . . . . . . . . 34
4.4.4 Modifying playlists . . . . . . . . . . . . . . . . . . . . . . . . . . . 35
4.4.5 Saving playlists . . . . . . . . . . . . . . . . . . . . . . . . . . . . . 36
4.4.6 Loading saved playlists . . . . . . . . . . . . . . . . . . . . . . . . 36
4.4.7 Helpful Hints . . . . . . . . . . . . . . . . . . . . . . . . . . . . . . 36
5 The Main Menu 37
5.1 Introducing the Main Menu . . . . . . . . . . . . . . . . . . . . . . . . . . 37
5.2 Navigating the Main Menu . . . . . . . . . . . . . . . . . . . . . . . . . . 38
5.3 Recent Bookmarks . . . . . . . . . . . . . . . . . . . . . . . . . . . . . . . 38
5.4 Files . . . . . . . . . . . . . . . . . . . . . . . . . . . . . . . . . . . . . . . 38
5.5 Database . . . . . . . . . . . . . . . . . . . . . . . . . . . . . . . . . . . . 38
5.6 Now Playing/Resume Playback . . . . . . . . . . . . . . . . . . . . . . . . 38
5.7 Settings . . . . . . . . . . . . . . . . . . . . . . . . . . . . . . . . . . . . . 39
5.7.1 Sound Settings . . . . . . . . . . . . . . . . . . . . . . . . . . . . . 39
5.7.2 Playback Settings . . . . . . . . . . . . . . . . . . . . . . . . . . . 39
5.7.3 General Settings . . . . . . . . . . . . . . . . . . . . . . . . . . . . 39
5.7.4 Manage Settings . . . . . . . . . . . . . . . . . . . . . . . . . . . . 39
5.7.5 Theme Settings . . . . . . . . . . . . . . . . . . . . . . . . . . . . . 39
5.8 Playlist . . . . . . . . . . . . . . . . . . . . . . . . . . . . . . . . . . . . . 39
5.9 Plugins . . . . . . . . . . . . . . . . . . . . . . . . . . . . . . . . . . . . . 40
5.10 System . . . . . . . . . . . . . . . . . . . . . . . . . . . . . . . . . . . . . . 40
5.11 Quick Screen . . . . . . . . . . . . . . . . . . . . . . . . . . . . . . . . . . 41
6 Sound Settings 42
6.1 Volume . . . . . . . . . . . . . . . . . . . . . . . . . . . . . . . . . . . . . 42
6.2 Bass . . . . . . . . . . . . . . . . . . . . . . . . . . . . . . . . . . . . . . . 43
6.3 Treble . . . . . . . . . . . . . . . . . . . . . . . . . . . . . . . . . . . . . . 43
6.4 Balance . . . . . . . . . . . . . . . . . . . . . . . . . . . . . . . . . . . . . 43
6.5 Channels . . . . . . . . . . . . . . . . . . . . . . . . . . . . . . . . . . . . 43
6.6 Stereo Width . . . . . . . . . . . . . . . . . . . . . . . . . . . . . . . . . . 43
6.7 Crossfeed . . . . . . . . . . . . . . . . . . . . . . . . . . . . . . . . . . . . 44
6.8 Equalizer . . . . . . . . . . . . . . . . . . . . . . . . . . . . . . . . . . . . 45
6.9 Dithering . . . . . . . . . . . . . . . . . . . . . . . . . . . . . . . . . . . . 47
The Rockbox manual Toshiba Gigabeat F Series
Page 5

Contents 5
7 Playback Settings 48
7.1 Shuffle . . . . . . . . . . . . . . . . . . . . . . . . . . . . . . . . . . . . . . 48
7.2 Repeat . . . . . . . . . . . . . . . . . . . . . . . . . . . . . . . . . . . . . . 48
7.3 Play Selected First . . . . . . . . . . . . . . . . . . . . . . . . . . . . . . . 49
7.4 Fast-Forward/Rewind . . . . . . . . . . . . . . . . . . . . . . . . . . . . . 49
7.5 Anti-Skip Buffer . . . . . . . . . . . . . . . . . . . . . . . . . . . . . . . . 49
7.6 Fade on Stop/Pause . . . . . . . . . . . . . . . . . . . . . . . . . . . . . . 49
7.7 Party Mode . . . . . . . . . . . . . . . . . . . . . . . . . . . . . . . . . . . 49
7.8 Crossfade . . . . . . . . . . . . . . . . . . . . . . . . . . . . . . . . . . . . 49
7.9 Replaygain . . . . . . . . . . . . . . . . . . . . . . . . . . . . . . . . . . . 51
7.10 Beep Volume . . . . . . . . . . . . . . . . . . . . . . . . . . . . . . . . . . 51
7.11 Auto-Change Directory . . . . . . . . . . . . . . . . . . . . . . . . . . . . 51
7.12 Pause on Headphone Unplug . . . . . . . . . . . . . . . . . . . . . . . . . 52
7.13 Last.fm Log . . . . . . . . . . . . . . . . . . . . . . . . . . . . . . . . . . . 52
7.14 Cuesheet Support . . . . . . . . . . . . . . . . . . . . . . . . . . . . . . . . 52
7.15 Skip Length . . . . . . . . . . . . . . . . . . . . . . . . . . . . . . . . . . . 53
8 General Settings 54
8.1 Playlist . . . . . . . . . . . . . . . . . . . . . . . . . . . . . . . . . . . . . 54
8.2 File View . . . . . . . . . . . . . . . . . . . . . . . . . . . . . . . . . . . . 54
8.3 Database . . . . . . . . . . . . . . . . . . . . . . . . . . . . . . . . . . . . 56
8.4 Display . . . . . . . . . . . . . . . . . . . . . . . . . . . . . . . . . . . . . 56
8.5 System . . . . . . . . . . . . . . . . . . . . . . . . . . . . . . . . . . . . . . 58
8.5.1 Start Screen . . . . . . . . . . . . . . . . . . . . . . . . . . . . . . . 58
8.5.2 Battery . . . . . . . . . . . . . . . . . . . . . . . . . . . . . . . . . 58
8.5.3 Disk . . . . . . . . . . . . . . . . . . . . . . . . . . . . . . . . . . . 59
8.5.4 Idle Poweroff . . . . . . . . . . . . . . . . . . . . . . . . . . . . . . 59
8.5.5 Limits . . . . . . . . . . . . . . . . . . . . . . . . . . . . . . . . . . 59
8.5.6 Car Adapter Mode . . . . . . . . . . . . . . . . . . . . . . . . . . . 60
8.5.7 Button Light Timeout . . . . . . . . . . . . . . . . . . . . . . . . . 60
8.5.8 Button Light Brightness . . . . . . . . . . . . . . . . . . . . . . . . 60
8.6 Bookmarking . . . . . . . . . . . . . . . . . . . . . . . . . . . . . . . . . . 60
8.7 Language . . . . . . . . . . . . . . . . . . . . . . . . . . . . . . . . . . . . 61
8.8 Voice . . . . . . . . . . . . . . . . . . . . . . . . . . . . . . . . . . . . . . . 62
9 Theme Settings 64
10 Plugins 66
10.1 Games . . . . . . . . . . . . . . . . . . . . . . . . . . . . . . . . . . . . . . 66
10.1.1 Blackjack . . . . . . . . . . . . . . . . . . . . . . . . . . . . . . . . 67
10.1.2 BrickMania . . . . . . . . . . . . . . . . . . . . . . . . . . . . . . . 68
10.1.3 Bubbles . . . . . . . . . . . . . . . . . . . . . . . . . . . . . . . . . 70
10.1.4 Chessbox . . . . . . . . . . . . . . . . . . . . . . . . . . . . . . . . 71
10.1.5 Chopper . . . . . . . . . . . . . . . . . . . . . . . . . . . . . . . . . 72
The Rockbox manual Toshiba Gigabeat F Series
Page 6

Contents 6
10.1.6 Dice . . . . . . . . . . . . . . . . . . . . . . . . . . . . . . . . . . . 72
10.1.7 Doom . . . . . . . . . . . . . . . . . . . . . . . . . . . . . . . . . . 73
10.1.8 Flipit . . . . . . . . . . . . . . . . . . . . . . . . . . . . . . . . . . 75
10.1.9 Jewels . . . . . . . . . . . . . . . . . . . . . . . . . . . . . . . . . . 76
10.1.10 MazezaM . . . . . . . . . . . . . . . . . . . . . . . . . . . . . . . . 77
10.1.11 Minesweeper . . . . . . . . . . . . . . . . . . . . . . . . . . . . . . 78
10.1.12 Pacbox . . . . . . . . . . . . . . . . . . . . . . . . . . . . . . . . . 79
10.1.13 Pegbox . . . . . . . . . . . . . . . . . . . . . . . . . . . . . . . . . 81
10.1.14 Pong . . . . . . . . . . . . . . . . . . . . . . . . . . . . . . . . . . . 82
10.1.15 Robotfindskitten . . . . . . . . . . . . . . . . . . . . . . . . . . . . 83
10.1.16 Rockblox . . . . . . . . . . . . . . . . . . . . . . . . . . . . . . . . 84
10.1.17 Rockblox1d . . . . . . . . . . . . . . . . . . . . . . . . . . . . . . . 85
10.1.18 Sliding Puzzle . . . . . . . . . . . . . . . . . . . . . . . . . . . . . . 85
10.1.19 Snake . . . . . . . . . . . . . . . . . . . . . . . . . . . . . . . . . . 86
10.1.20 Snake 2 . . . . . . . . . . . . . . . . . . . . . . . . . . . . . . . . . 87
10.1.21 Sokoban . . . . . . . . . . . . . . . . . . . . . . . . . . . . . . . . . 88
10.1.22 Solitaire . . . . . . . . . . . . . . . . . . . . . . . . . . . . . . . . . 90
10.1.23 Spacerocks . . . . . . . . . . . . . . . . . . . . . . . . . . . . . . . 91
10.1.24 Star . . . . . . . . . . . . . . . . . . . . . . . . . . . . . . . . . . . 92
10.1.25 Sudoku . . . . . . . . . . . . . . . . . . . . . . . . . . . . . . . . . 93
10.1.26 Wormlet . . . . . . . . . . . . . . . . . . . . . . . . . . . . . . . . . 95
10.1.27 Xobox . . . . . . . . . . . . . . . . . . . . . . . . . . . . . . . . . . 98
10.2 Demos . . . . . . . . . . . . . . . . . . . . . . . . . . . . . . . . . . . . . . 99
10.2.1 Bounce . . . . . . . . . . . . . . . . . . . . . . . . . . . . . . . . . 99
10.2.2 Credits . . . . . . . . . . . . . . . . . . . . . . . . . . . . . . . . . 100
10.2.3 Cube . . . . . . . . . . . . . . . . . . . . . . . . . . . . . . . . . . . 100
10.2.4 Demystify . . . . . . . . . . . . . . . . . . . . . . . . . . . . . . . . 101
10.2.5 Fire . . . . . . . . . . . . . . . . . . . . . . . . . . . . . . . . . . . 102
10.2.6 Logo . . . . . . . . . . . . . . . . . . . . . . . . . . . . . . . . . . . 102
10.2.7 Mandelbrot . . . . . . . . . . . . . . . . . . . . . . . . . . . . . . . 103
10.2.8 Mosaique . . . . . . . . . . . . . . . . . . . . . . . . . . . . . . . . 104
10.2.9 Oscilloscope . . . . . . . . . . . . . . . . . . . . . . . . . . . . . . . 105
10.2.10 Plasma . . . . . . . . . . . . . . . . . . . . . . . . . . . . . . . . . 106
10.2.11 Snow . . . . . . . . . . . . . . . . . . . . . . . . . . . . . . . . . . . 107
10.2.12 Starfield . . . . . . . . . . . . . . . . . . . . . . . . . . . . . . . . . 108
10.2.13 VU meter . . . . . . . . . . . . . . . . . . . . . . . . . . . . . . . . 109
10.3 Viewers . . . . . . . . . . . . . . . . . . . . . . . . . . . . . . . . . . . . . 109
10.3.1 Shortcuts . . . . . . . . . . . . . . . . . . . . . . . . . . . . . . . . 110
10.3.2 Chip-8 Emulator . . . . . . . . . . . . . . . . . . . . . . . . . . . . 111
10.3.3 JPEG viewer . . . . . . . . . . . . . . . . . . . . . . . . . . . . . . 112
10.3.4 Midiplay . . . . . . . . . . . . . . . . . . . . . . . . . . . . . . . . . 112
10.3.5 MPEG Player . . . . . . . . . . . . . . . . . . . . . . . . . . . . . . 113
10.3.6 PPM viewer . . . . . . . . . . . . . . . . . . . . . . . . . . . . . . . 114
10.3.7 Rockboy . . . . . . . . . . . . . . . . . . . . . . . . . . . . . . . . . 115
The Rockbox manual Toshiba Gigabeat F Series
Page 7

Contents 7
10.3.8 Search . . . . . . . . . . . . . . . . . . . . . . . . . . . . . . . . . . 116
10.3.9 Sort . . . . . . . . . . . . . . . . . . . . . . . . . . . . . . . . . . . 116
10.3.10 Text Viewer . . . . . . . . . . . . . . . . . . . . . . . . . . . . . . . 116
10.3.11 VBRfix . . . . . . . . . . . . . . . . . . . . . . . . . . . . . . . . . 118
10.3.12 ZXBox . . . . . . . . . . . . . . . . . . . . . . . . . . . . . . . . . . 118
10.4 Applications . . . . . . . . . . . . . . . . . . . . . . . . . . . . . . . . . . . 120
10.4.1 Battery Benchmark . . . . . . . . . . . . . . . . . . . . . . . . . . 120
10.4.2 Calculator . . . . . . . . . . . . . . . . . . . . . . . . . . . . . . . . 122
10.4.3 Calendar . . . . . . . . . . . . . . . . . . . . . . . . . . . . . . . . 122
10.4.4 Chess Clock . . . . . . . . . . . . . . . . . . . . . . . . . . . . . . . 123
10.4.5 Clock . . . . . . . . . . . . . . . . . . . . . . . . . . . . . . . . . . 125
10.4.6 Disk Tidy . . . . . . . . . . . . . . . . . . . . . . . . . . . . . . . . 127
10.4.7 Keybox . . . . . . . . . . . . . . . . . . . . . . . . . . . . . . . . . 128
10.4.8 Lamp . . . . . . . . . . . . . . . . . . . . . . . . . . . . . . . . . . 128
10.4.9 md5sum . . . . . . . . . . . . . . . . . . . . . . . . . . . . . . . . . 128
10.4.10 Metronome . . . . . . . . . . . . . . . . . . . . . . . . . . . . . . . 128
10.4.11 Random Folder Advance Configuration . . . . . . . . . . . . . . . 129
10.4.12 Stats . . . . . . . . . . . . . . . . . . . . . . . . . . . . . . . . . . . 130
10.4.13 Stopwatch . . . . . . . . . . . . . . . . . . . . . . . . . . . . . . . . 131
10.4.14 Text Editor . . . . . . . . . . . . . . . . . . . . . . . . . . . . . . . 131
11 Advanced Topics 133
11.1 Customising the User Interface . . . . . . . . . . . . . . . . . . . . . . . . 133
11.1.1 Getting Extras . . . . . . . . . . . . . . . . . . . . . . . . . . . . . 133
11.1.2 Loading Fonts . . . . . . . . . . . . . . . . . . . . . . . . . . . . . 133
11.1.3 Loading Languages . . . . . . . . . . . . . . . . . . . . . . . . . . . 133
11.1.4 Changing Colours . . . . . . . . . . . . . . . . . . . . . . . . . . . 133
11.1.5 Changing Filetype Colours . . . . . . . . . . . . . . . . . . . . . . 134
11.1.6 Loading Backdrops . . . . . . . . . . . . . . . . . . . . . . . . . . . 134
11.2 Configuring the WPS . . . . . . . . . . . . . . . . . . . . . . . . . . . . . 134
11.2.1 WPS – General Info . . . . . . . . . . . . . . . . . . . . . . . . . . 134
11.2.2 WPS – Build Your Own . . . . . . . . . . . . . . . . . . . . . . . . 134
11.3 Managing Rockbox Settings . . . . . . . . . . . . . . . . . . . . . . . . . . 137
11.3.1 Introduction to .cfg Files. . . . . . . . . . . . . . . . . . . . . . . 137
11.3.2 Specifications for .cfg Files. . . . . . . . . . . . . . . . . . . . . . 138
11.3.3 The Manage Settings menu . . . . . . . . . . . . . . . . . . . . 139
11.4 Firmware Loading . . . . . . . . . . . . . . . . . . . . . . . . . . . . . . . 139
11.4.1 Using ROLO (Rockbox Loader) . . . . . . . . . . . . . . . . . . . . 139
A File formats 140
A.1 Supported file formats . . . . . . . . . . . . . . . . . . . . . . . . . . . . . 140
A.2 Supported audio formats . . . . . . . . . . . . . . . . . . . . . . . . . . . . 141
B WPS Tags 142
The Rockbox manual Toshiba Gigabeat F Series
Page 8

Contents 8
B.1 Status Bar . . . . . . . . . . . . . . . . . . . . . . . . . . . . . . . . . . . . 142
B.2 ID3 Info . . . . . . . . . . . . . . . . . . . . . . . . . . . . . . . . . . . . . 142
B.3 Power Related Information . . . . . . . . . . . . . . . . . . . . . . . . . . 143
B.4 File Info . . . . . . . . . . . . . . . . . . . . . . . . . . . . . . . . . . . . . 143
B.5 Playlist/Song Info . . . . . . . . . . . . . . . . . . . . . . . . . . . . . . . 144
B.6 Runtime Database . . . . . . . . . . . . . . . . . . . . . . . . . . . . . . . 144
B.7 Sound (DSP) settings . . . . . . . . . . . . . . . . . . . . . . . . . . . . . 144
B.8 Virtual LED . . . . . . . . . . . . . . . . . . . . . . . . . . . . . . . . . . 145
B.9 Repeat Mode . . . . . . . . . . . . . . . . . . . . . . . . . . . . . . . . . . 145
B.10 Playback Mode Tags . . . . . . . . . . . . . . . . . . . . . . . . . . . . . . 145
B.11 Changing Volume . . . . . . . . . . . . . . . . . . . . . . . . . . . . . . . . 145
B.12 Settings . . . . . . . . . . . . . . . . . . . . . . . . . . . . . . . . . . . . . 146
B.13 Images . . . . . . . . . . . . . . . . . . . . . . . . . . . . . . . . . . . . . . 147
B.14 Alignment . . . . . . . . . . . . . . . . . . . . . . . . . . . . . . . . . . . . 148
B.15 Conditional Tags . . . . . . . . . . . . . . . . . . . . . . . . . . . . . . . . 148
B.16 Real Time Clock . . . . . . . . . . . . . . . . . . . . . . . . . . . . . . . . 149
B.17 Other Tags . . . . . . . . . . . . . . . . . . . . . . . . . . . . . . . . . . . 149
C Config file options 150
D User feedback 154
D.1 Bug reports . . . . . . . . . . . . . . . . . . . . . . . . . . . . . . . . . . . 154
D.1.1 Rules for submitting new bug reports . . . . . . . . . . . . . . . . 154
D.2 Feature ideas . . . . . . . . . . . . . . . . . . . . . . . . . . . . . . . . . . 154
D.2.1 Rules for submitting a new feature idea . . . . . . . . . . . . . . . 154
D.2.2 Features we will not implement . . . . . . . . . . . . . . . . . . . . 155
E Changelog 156
E.1 What is new since v3.0? . . . . . . . . . . . . . . . . . . . . . . . . . . . . 156
E.1.1 New features . . . . . . . . . . . . . . . . . . . . . . . . . . . . . . 156
E.1.2 Enhancements . . . . . . . . . . . . . . . . . . . . . . . . . . . . . 156
E.2 What is new since v2.5? . . . . . . . . . . . . . . . . . . . . . . . . . . . . 156
E.2.1 New features . . . . . . . . . . . . . . . . . . . . . . . . . . . . . . 156
E.2.2 Enhancements . . . . . . . . . . . . . . . . . . . . . . . . . . . . . 158
E.2.3 New codecs supported . . . . . . . . . . . . . . . . . . . . . . . . . 158
F Credits 160
G Licenses 163
G.1 GNU Free Documentation License . . . . . . . . . . . . . . . . . . . . . . 163
G.2 The GNU General Public License . . . . . . . . . . . . . . . . . . . . . . . 171
The Rockbox manual Toshiba Gigabeat F Series
Page 9

Chapter 1. Introduction 9
1 Introduction
1.1 Welcome
This is the manual for Rockbox. Rockbox is an open source firmware replacement
for a growing number of digital audio players. Rockbox aims to be considerably more
functional and efficient than your device’s stock firmware while remaining easy to use
and customisable. Rockbox is written by users, for users. Not only is it free to use, it
is also released under the GNU General Public License (GPL), which means that it will
always remain free both to use and to change.
Rockbox has been in development since 2001, and receives new features, tweaks and
fixes each day to provide you with the best possible experience on your digital audio
player. A major goal of Rockbox is to be simple and easy to use, yet remain very
customisable and configurable. We believe that you should never need to go through a
series of menus for an action you perform frequently. We also believe that you should
be able to configure almost anything about Rockbox you could want, pertaining to
functionality. Another top priority of Rockbox is audio playback quality – Rockbox,
for most models, includes a wider range of sound settings than the device’s original
firmware. A lot of work has been put into making Rockbox sound the best it can, and
improvements are constantly being made. All models have access to a large number
of plugins, including many games, applications, and graphical “demos”. You can load
different configurations quickly for different purposes (e.g. a large font for in your car,
different sound settings for at home). Rockbox features a very wide range of languages,
and all supported models also have the ability to talk to you – menus can be voiced and
filenames spelled out or spoken.
1.2 Getting more help
This manual is intended to be a comprehensive introduction to the Rockbox firmware.
There is, however, more help available. The Rockbox website at http://www.rockbox.org/
contains very extensive documentation and guides written by members of the Rockbox
community and this should be your first port of call when looking for further help.
If you cannot find the information you are searching for on the Rockbox website there
are a number of support channels you should have a look at. You can try the Rockbox
forums located at http://forums.rockbox.org/. Another option are the mailing lists which
can be found at http://www.rockbox.org/mail/. From that page you can subscribe to the
lists and browse the archives. For searching the list archives simply use the search field
that is located on the left side of the website. Also you can ask on IRC. The main
The Rockbox manual Toshiba Gigabeat F Series
Page 10

Chapter 1. Introduction 10
channel for Rockbox is #rockbox on irc://irc.freenode.net. A bunch of helpful developers
and users are usually around. Just join and ask – if someone knows the answer you’ll
usually get an answer pretty quickly. More information including IRC logs can be found
at http://www.rockbox.org/irc/. We also have a web client for joining the rockbox IRC
channel so there is no need for you to install additional software to your computer.
If you think you have found a bug please make sure it actually is a bug and is still
present in the most recent version of rockbox. You should try to confirm that by using
the above mentioned support channels first. After that you can submit that issue to our
tracker. Refer to section D (page 154) for details on how to use the tracker.
1.3 Naming conventions and marks
We have some conventions especially on naming that are intended to be consistent
throughout this manual.
Manufacturer and product names are formatted in accordance with the standard rules
of English grammar, e.g. “Toshiba playback is currently unsupported”. Manufacturer
and model names are proper nouns, and thus are written beginning with a capital letter.
This manual has some parts that are marked with icons on the margin to help you
finding important parts or parts you could skip. The following icons are used:
Note: This indicates a note. A note starts always with the text “Note”. For easier
finding of notes we have put this an icon in the margin like here. Notes are used to
mark information that could help you or indicate a possible “weirdness” in rockbox that
would be explained.
Warning: This is a warning. In contrast to notes mentioned above, a warning should be
taken more seriously. While ignoring notes will not cause any serious damage ignoring
warnings could cause serious damage. If you are new to rockbox you should really read
the warnings before doing anything that is warned about.
This icon marks a section that is intended especially for the blind and visually impaired.
As they cannot read the manual in the same way sighted people do we have added some
additional descriptions. If you are not blind or visually impaired you most likely can
completely skip these blocks. To make this easier, there is an icon shown in the margin
on the right.
Links to the wiki are abbreviated by the name of the wiki page. Those names are still
linked so you can simply follow them like any other link in this manual. If you want to
access a wiki page manually go to Z http://www.rockbox.org/wiki/ and type the page
name in the “Go” box at the top of the page. Links to wiki pages are also indicated by
the symbol Z in front of the page name.
b
!
¸
The Rockbox manual Toshiba Gigabeat F Series
Page 11

Chapter 2. Installation 11
2 Installation
2.1 Overview
There are two ways of installing Rockbox: automated and manual. While the manual
way is older, more tested and proven to work correctly, the automated installation is
based on a nice graphical application that does almost everything for you. It is still
important that you have an overview of the installation process to be able to select the
correct installation options.
There are three separate components, two of which need to be installed in order to
run Rockbox:
The Toshiba bootloader. The Toshiba bootloader is the program that tells your player
how to load and start the original firmware. It is also responsible for any emergency,
recovery, or disk modes on your player. This bootloader is stored in special flash
memory in your Toshiba and comes factory-installed. It is not necessary to modify
this in order to install Rockbox.
The Rockbox bootloader. The Rockbox bootloader is loaded from disk by the Toshiba
bootloader. It is responsible for loading the Rockbox firmware and for providing
the dual boot function. It directly replaces the Toshiba firmware in the player’s
boot sequence.
Note: Dual boot does not currently work on the Gigabeat.
The Rockbox firmware. Similar to the Toshiba firmware, most of the Rockbox code is
contained in a “build” that resides on your player’s drive. This makes it easy to
update Rockbox. The build consists of a directory called .rockbox which contains
all of the Rockbox files, and is located in the root of your player’s drive.
Apart from the required parts there are some addons you might be interested in
installing.
Fonts. Rockbox can load custom fonts. The fonts are distributed as a separate package
and thus need to be installed separately. They are not required to run Rockbox
itself but a lot of themes require the fonts package to be installed.
Themes. The view of Rockbox can be customized by themes. Depending on your taste
you might want to install additional themes to change the look of Rockbox.
b
The Rockbox manual Toshiba Gigabeat F Series
Page 12

Chapter 2. Installation 12
2.2 Prerequisites
Before installing Rockbox you should make sure you meet the prerequisites. You may
need some additional tools for installation. In most cases these will already be available
on your computer, but if not, installing some additional software might be necessary.
USB connection. To transfer Rockbox to your player you need to connect it to your
computer. For manual installation/uninstallation, or should autodetection fail
during automatic installation, you need to know where to access the player. On
Windows this means you need to figure out the drive letter associated with the
player. On Linux you need to know the mount point of your player.
Warning: During installation, do not connect your player using the cradle but
plug the USB cable directly to the player.
For manual installation and customization additional software is required.
ZIP utility. Rockbox is distributed as a compressed archive using the .zip format. Your
computer will normally already have a means of handling such archive files. Windows XP has built-in support for .zip files and presents them to you as directories
unless you have installed a third party program that handles compressed files. For
other operating systems this may vary. If the .zip file format is not recognised on
your computer you can find a program to handle them at http://www.info-zip.org/
or http://sevenzip.sf.net/, both of which can be downloaded and used free of charge.
Text editor. As you will see in the following chapters, Rockbox is highly configurable.
In addition to saving configurations, Rockbox also allows you to create customised
configuration files. If you would like to edit custom configuration files on your
computer, you will need a text editor like Windows’ “Wordpad”.
2.3 Installing Rockbox
2.3.1 Automated Installation
To automatically install Rockbox, download the official installer and housekeeping tool
Rockbox Utility. It allows you to:
!
• Automatically install all needed components for using Rockbox (“Small Installation”)
• Automatically install all suggested components (“Full Installation”)
• Selectively install optional components
• Install additional themes
• Install voice files and generate talk clips
The Rockbox manual Toshiba Gigabeat F Series
Page 13

Chapter 2. Installation 13
• Uninstall all components you installed using Rockbox Utility
Prebuilt binaries for Windows, Linux and MacOS X are available at the ZRockboxUtility
wiki page.
Warning: When first starting Rockbox Utility run “Autodetect”, found in the con-
figuration dialog (File → Configure). Autodetection can detect most player types. If
autodetection fails or is unable to detect the mountpoint, make sure to enter the correct
values. The mountpoint indicates the location of the player in your filesystem. On Windows, this is the drive letter the player gets assigned, on other systems this is a path in
the filesystem.
Note: Rockbox Utility currently lacks some guiding messages. Please have a look at the
manual installation instructions if you are stuck during installation.
2.3.2 Manual Installation
Choosing a Rockbox version
There are three different types of firmware binaries available from the Rockbox website:
Release version, current build and daily build. You need to decide which one you want
to install and get the appropriate version for your player.
Release. The release version is the latest stable release, free of known critical bugs. The
current stable release of Rockbox, version 3.1, is available at http://www.rockbox.
org/download/.
Current Build. The current build is built at each source code change to the Rockbox
SVN repository and represents the current state of Rockbox development. This
means that the build could contain bugs but most of the time is safe to use. You
can download the current build from http://build.rockbox.org/.
!
b
Archived Build. In addition to the release version and the current build, there is also
an archive of daily builds available for download. These are built once a day from
the latest source code in the SVN repository. You can download archived builds
from http://www.rockbox.org/daily.shtml.
Warning: Because current builds and daily builds are development versions which
change frequently, they may behave differently than described in this manual, or they
may introduce new (and maybe annoying) bugs. If you do not want to get undefined
behaviour from your player, you should stick to the current stable release if there is one
for your player. If you want to help with project development, you can try development
builds and help by reporting bugs. Just be aware that these are development builds that
are highly functional but not perfect!
The Rockbox manual Toshiba Gigabeat F Series
!
Page 14

Chapter 2. Installation 14
Installing the firmware
1. Download your chosen version of Rockbox from the links in the previous section.
2. Connect your player to the computer via USB as described in the manual that
came with your player.
3. Take the .zip file that you downloaded and use the “Extract all” command of
your unzip program to extract the files onto your player.
Note: The entire contents of the .zip file should be extracted directly to the root
of your player’s drive. Do not try to create a separate directory on your player
for the Rockbox files! The .zip file already contains the internal structure that
Rockbox needs.
Note: If the contents of the .zip file are extracted correctly, you will have a directory
called .rockbox, which contains all the files needed by Rockbox, in the main directory
of your player’s drive. If you receive a “-1” error when you start Rockbox, you have not
extracted the contents of the .zip file to the proper location.
Installing the fonts package
Rockbox has a fonts package that is available at http://www.rockbox.org/daily.shtml or
from the extras link in the menu on the Rockbox website. While the current builds
and daily builds change frequently, the fonts package rarely changes and is therefore not
included in these builds. When installing Rockbox for the first time, you should install
the fonts package. The release version, on the other hand, does not change, so fonts are
included with it.
1. Download the fonts package from the link above.
2. Take the file that you downloaded above, and use the “Extract all” command
of your unzip program to extract the files in the .zip file onto your player. As
with the firmware installation, the entire contents of the fonts .zip should be
extracted directly to the root of your player’s drive. Do not try to create a separate
directory on your player for the fonts! The .zip already contains the correct
internal structure.
b
b
Installing the bootloader
Installing the bootloader is only needed once. It simply requires you to replace a file
on your player with the Rockbox bootloader. To be able booting the original firmware
please make sure to rename the original file properly. If you ever wish to uninstall
Rockbox you should keep a backup copy of the original file.
• Download the Rockbox bootloader from http://download.rockbox.org/bootloader/
gigabeat/
The Rockbox manual Toshiba Gigabeat F Series
Page 15

Chapter 2. Installation 15
• Starting at the root directory of your player browse into the directory GBSYSTEM
and from that into the subdirectory FWIMG. These directories are hidden. Make
sure that you have configured your browser to show hidden files or you may be
unable to see FWIMG.
• In that directory you’ll find a file called FWIMG01.DAT. This too may be hidden.
Rename the file to FWIMG01.DAT.ORIG. Make sure you spelled that name correctly
as it is needed for booting the Toshiba firmware.
• Now copy the file FWIMG01.DAT you downloaded to that directory. Make sure the
spelling is correct.
Warning: After installing the bootloader you need to power-cycle the player by doing
the following steps. Failure to do so may result in problems.
• Eject / unmount USB drive and unplug the USB cable.
• Unplug any power adapter.
• Hold the Power button to turn off the player.
• Slide the battery switch located on the bottom of the player from ‘on’ to ‘off’
• Slide the battery switch back from ‘off’ to ‘on’
2.3.3 Enabling Speech Support (optional)
If you wish to use speech support you will also need a voice file, English ones are available
from http://www.rockbox.org/daily.shtml. Download the “voice” package for your player
and unzip it directly to the root of your player. You should now find an english.voice
in the /.rockbox/langs directory on your player. Voice menus are enabled by default
and will come into effect after a reboot. See section 8.8 (page 62) for details on voice
settings.
2.4 Running Rockbox
!
Remove your player from the computer’s USB port. Unplug any connected power supply
and turn the unit off. When you next turn the unit on, Rockbox should load. When
you see the Rockbox splash screen, Rockbox is loaded and ready for use.
2.5 Updating Rockbox
Updating Rockbox is easy even if you do not use the Rockbox Utility. Download a
Rockbox build. (The latest release of the Rockbox software will always be available
from http://www.rockbox.org/download/). Unzip the build to the root directory of your
player like you did in the installation stage. If your unzip program asks you whether to
The Rockbox manual Toshiba Gigabeat F Series
Page 16

Chapter 2. Installation 16
overwrite files, choose the “Yes to all” option. The new build will be installed over your
current build.
Note: If you use Rockbox Utility be aware that it cannot detect manually installed
components.
2.6 Uninstalling Rockbox
2.6.1 Automatic Uninstallation
You can uninstall Rockbox automatically by using Rockbox Utility. If you installed
Rockbox manually you can still use Rockbox Utility for uninstallation but will not be
able to do this selectively.
2.6.2 Manual Uninstallation
If you wish to clean up your disk, you may also wish to delete the .rockbox directory
and its contents. Turn the Toshiba off. Turn the player back on and the original Toshiba
software will load.
b
The Rockbox manual Toshiba Gigabeat F Series
Page 17
Chapter 3. Quick Start 17
3 Quick Start
3.1 Basic Overview
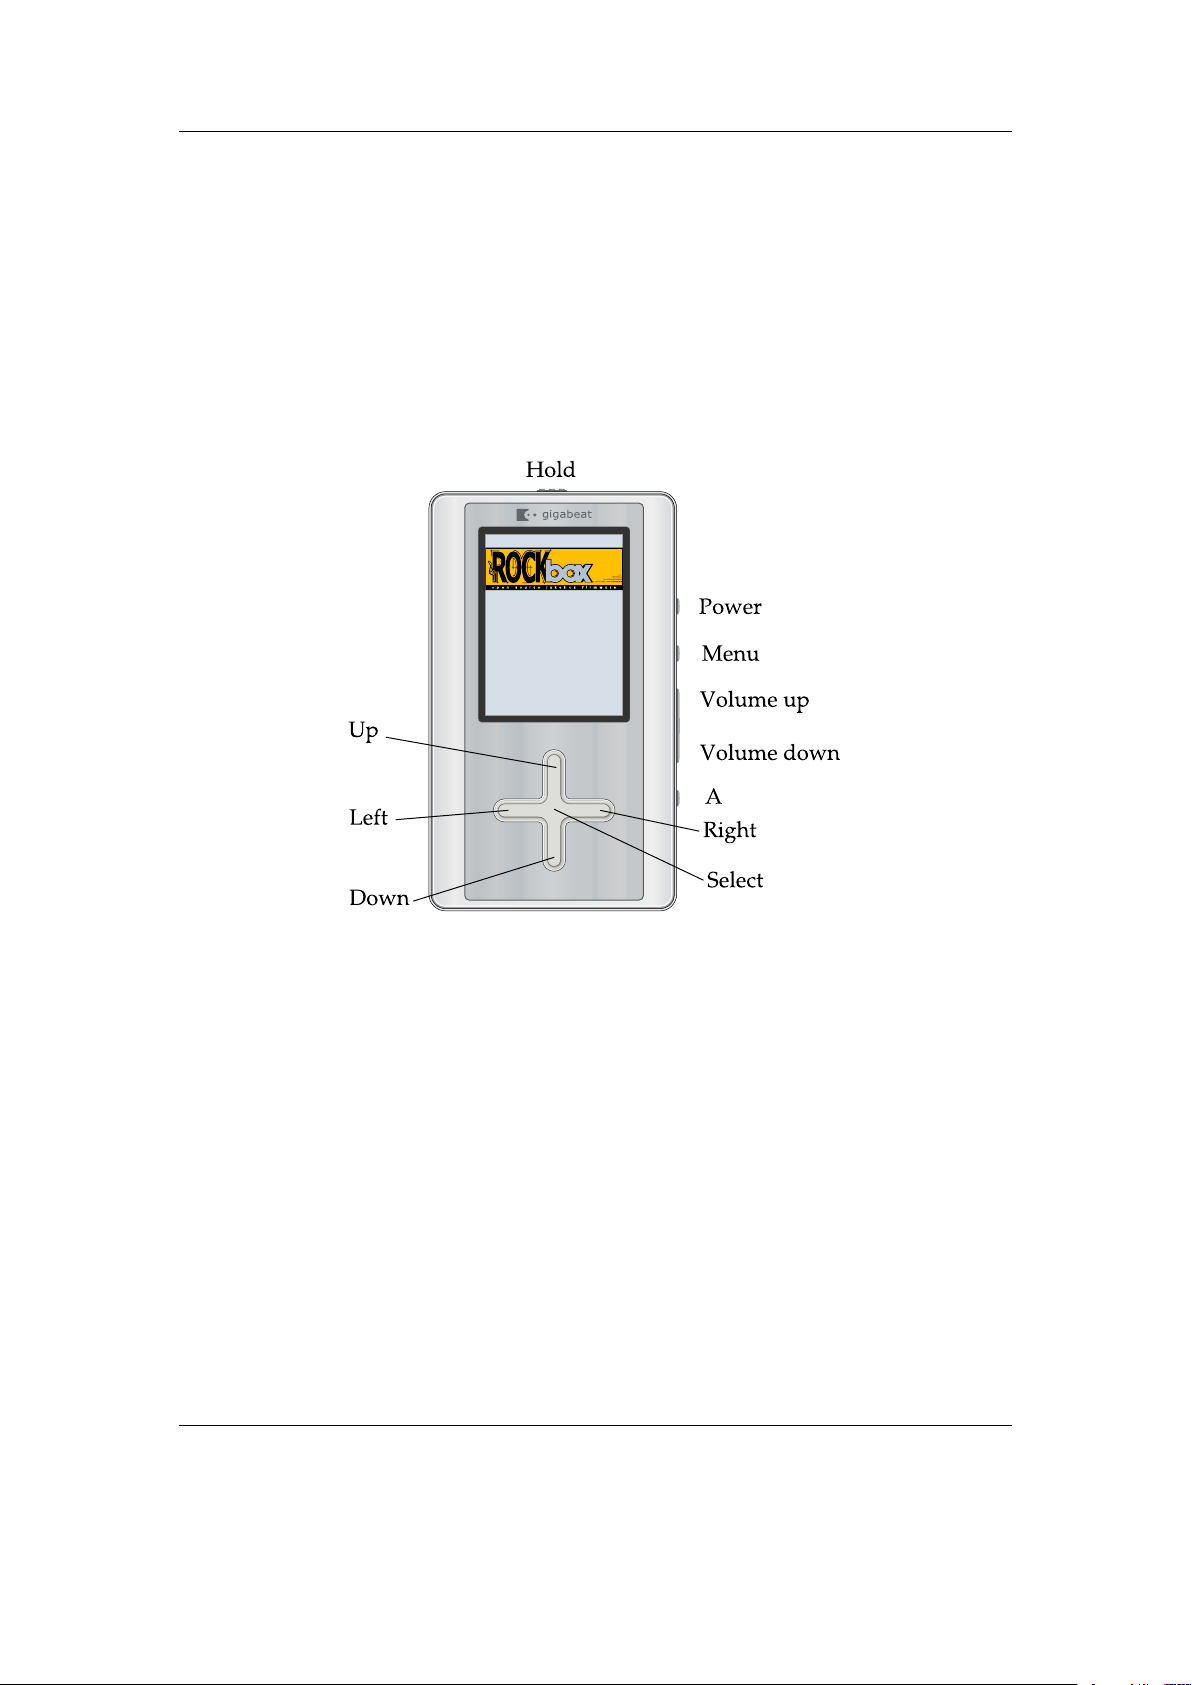
3.1.1 The player’s controls
Throughout this manual, the buttons on the player are labelled according to the
picture above. Whenever a button name is prefixed by “Long”, a long press of approximately one second should be performed on that button. The buttons are described in
detail in the following paragraph.
Additional information for blind users is available on the Rockbox website at ZBlindFAQ.
Hold the player with the screen on top and the controls on the right hand side. Below
the screen is a cross-shaped touch sensitive pad which contains the Up, Down, Left
and Right controls. On the top of the unit from left to right are the power socket, the
Hold switch, and the headphone socket. The Hold switch puts the player into hold
mode when it is switched to the right of the unit. The buttons will have no effect when
this is the case.
Starting from the left hand side on the bottom of the unit, nearer to the front than
the back, is a recessed switch which controls whether the battery is on or off. When this
switch is to the left, the battery is disconnected. This can be used for a hard reset of
the unit, or if the player is being placed in storage. Next to that is a connector for the
The Rockbox manual Toshiba Gigabeat F Series
¸
Page 18

Chapter 3. Quick Start 18
docking station and finally on the right hand side of the bottom of the unit is a mini
USB socket for connecting directly to USB.
Finally on the right hand side of the unit are some control buttons. Going from the
bottom of the unit to the top there is a small round A buttton then a rocker volume
switch with of the Volume down button below the Volume up button. Above that is
are two more small round buttons, the Menu button and nearest to the top of the unit
the Power button, which is held down to turn the player on or off.
3.1.2 Turning the player on and off
To turn on and off your Rockbox enabled player use the following keys:
Key Action
Power Start Rockbox
Long Power Shutdown Rockbox
On shutdown, Rockbox automatically saves its settings.
If you have problems with your settings, such as accidentally having set the colours to
black on black, they can be reset at boot time. See the Reset Settings in section 11.3.3
(page 139) for details.
In the unlikely event of a software failure, hardware poweroff or reset can be performed
by holding down the battery switch until the player shuts off or reboots.
3.1.3 Putting music on your player
With the player connected to the computer as an MSC/UMS device (like a USB Drive),
music files can be put on the player via any standard file transfer method that you would
use to copy files between drives (e.g. Drag ’n’ Drop). The default directory structure
that is assumed by some parts of Rockbox (album art searching, and missing-tag fallback
in some WPSes) uses the parent directory of a song as the Album name, and the parent
directory of that folder as the Artist name. While files may be organized however you
like, the ZAlbumArt wiki page explains the requirement for Album Art to work properly,
and WPSes may display information incorrectly if your files are not properly tagged, and
you have your music organized in a way different than they assume when attempting to
guess the Artist and Album names from your filetree. See section A.2 (page 141) for
a list of supported audio formats.
3.1.4 The first contact
After you have first started the player you’ll be presented by the Main Menu. From
this menu you can reach every function of Rockbox, for more information (see section 5.1
(page 37)). To browse the files on you player select Files (see section 4.1 (page 21)), and
The Rockbox manual Toshiba Gigabeat F Series
Page 19

Chapter 3. Quick Start 19
to browse in a view that is based on the meta-data1of your audio files, select Database
(see section 4.2 (page 25)).
3.1.5 Basic controls
When browsing files and moving through menus you usually get a list view presented.
The navigation in these lists are usually the same and should be pretty intuitive. In the
tree view use Down and Up to move around the selection. Use Select or Right to
select an item. When browsing the file system selecting an audio file plays it. The view
switches to the “While playing screen”, usually abbreviated as “WPS” (see section 4.3
(page 28). The dynamic playlist gets replaced with the contents of the current directory.
This way you can easily treat directories as playlists. The created dynamic playlist can
be extended or modified while playing. This is also known as “on-the-fly playlist”. To
go back to the File Browser stop the playback with the Power button or return to
the file browser while keeping playback running using Select. In list views you can go
back one step with Left.
3.1.6 Basic concepts
Playlists
Rockbox is playlist oriented. This means that every time you play an audio file, a socalled “dynamic playlist” is generated, unless you play a saved playlist. You can modify
the dynamic playlist while playing and also save it to a file. If you do not want to use
playlists you can simply play your files directory based. Playlists are covered in detail
in section 4.4 (page 32).
Menu
From the menu you can customise Rockbox. Rockbox itself is very customisable. Also
there are some special menus for quick access to frequently used functions.
Context Menu
Some views, especially the file browser and the WPS have a context menu. From the file
browser this can be accessed with Long Select. The contents of the context menu vary,
depending on the situation it gets called. The context menu itself presents you with
some operations you can perform with the currently highlighted file. In the file browser
this is the file (or directory) that is highlighted by the cursor. From the WPS this is
the currently playing file. Also there are some actions that do not apply to the current
file but refer to the screen from which the context menu gets called. One example is the
playback menu, which can be called using the context menu from within the WPS.
1
ID3 Tags, Vorbis comments, etc.
The Rockbox manual Toshiba Gigabeat F Series
Page 20

Chapter 3. Quick Start 20
3.2 Customising Rockbox
Rockbox’ User Interface can be customised using “Themes”. Themes usually only affect
the visual appearance, but an advanced user can create a theme that also changes various
other settings like file view, LCD settings and all other settings that can be modified
using .cfg files. This topic is discussed in more detail in section 11.3 (page 137). The
Rockbox distribution comes with some themes that should look nice on your player.
Note: Some of the themes shipped with Rockbox need additional fonts from the fonts
package, so make sure you installed them. Also, if you downloaded additional themes
from the Internet make sure you have the needed fonts installed as otherwise the theme
may get displayed garbled.
3.3 Charging
The player can be powered over USB without connecting to your computer by holding
Menu while plugging in. This allows you to continue using the player normally.
b
The Rockbox manual Toshiba Gigabeat F Series
Page 21
Chapter 4. Browsing and playing 21
4 Browsing and playing
4.1 File Browser
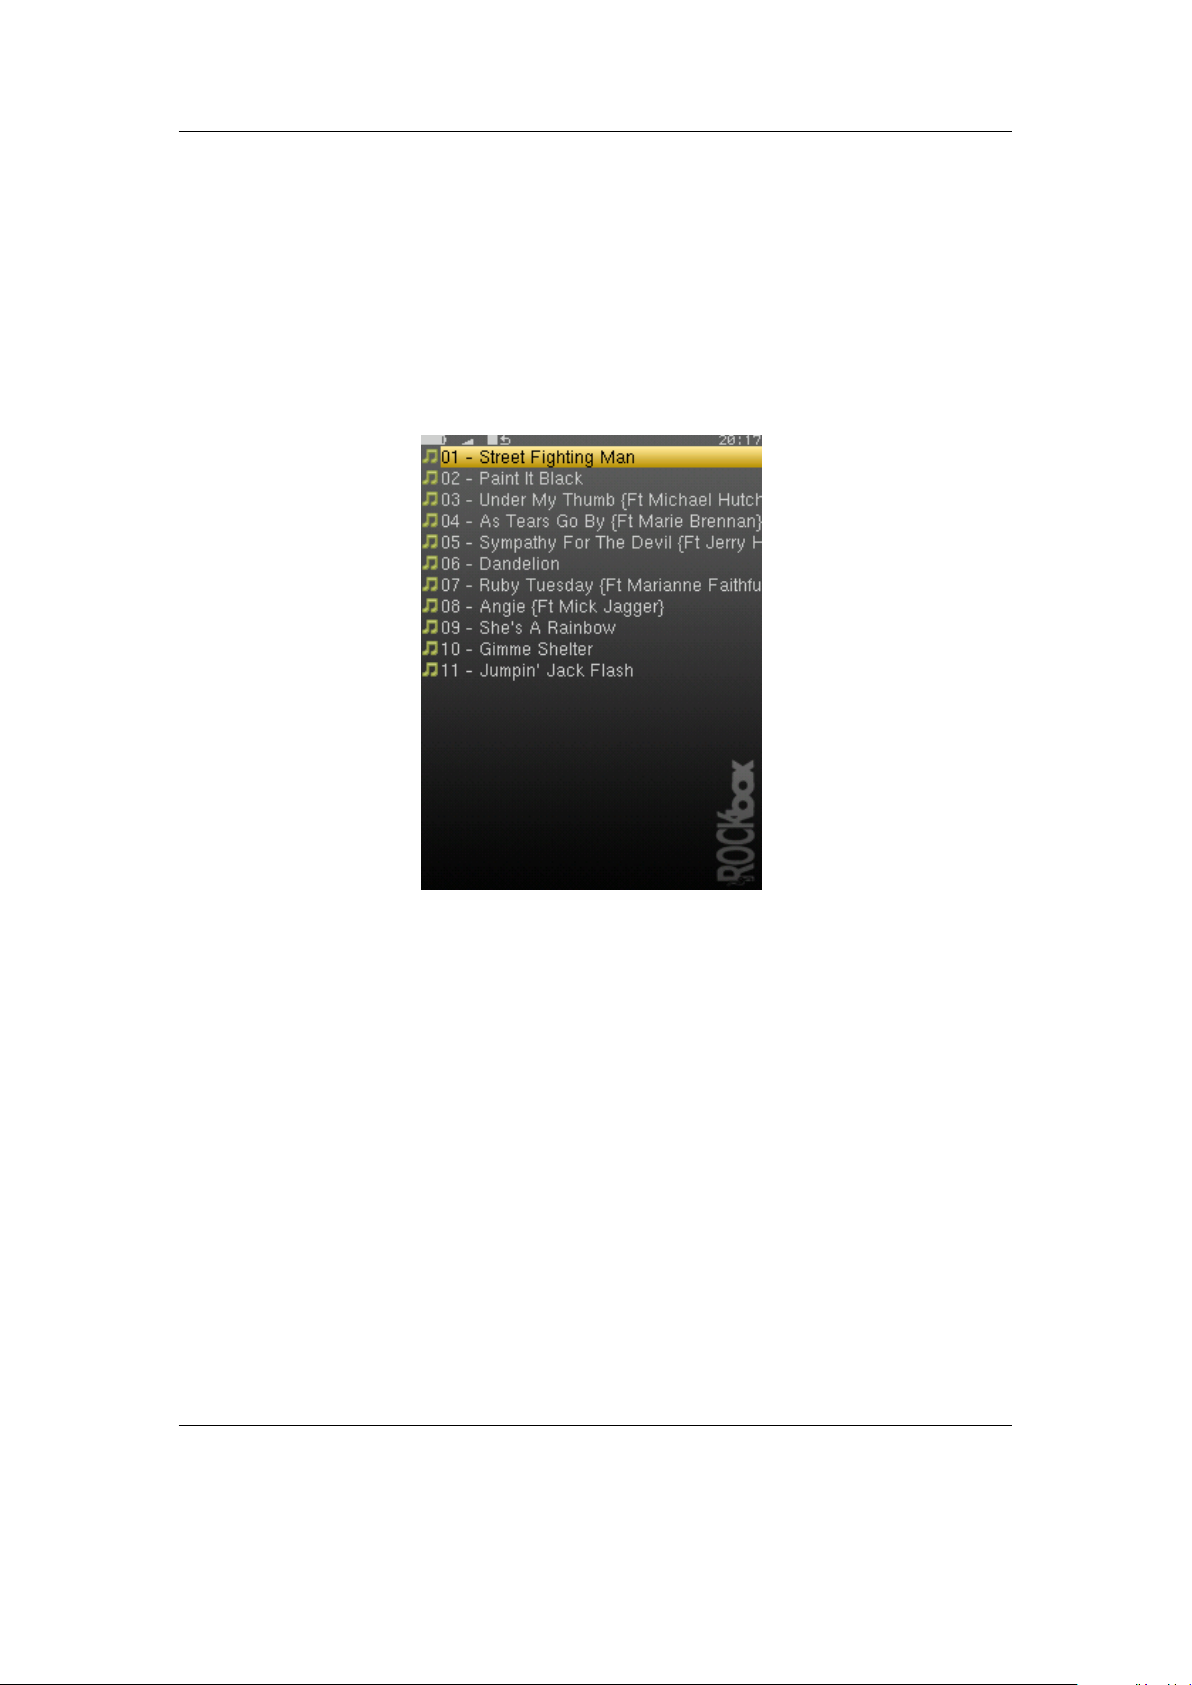
Figure 4.1: The file browser
Rockbox lets you browse your music in either of two ways. The File Browser lets you navigate through the files and directories on your player, entering directories and executing the default action on each file. To help differentiate files, each file format is displayed with an icon.
The Database Browser, on the other hand, allows you to navigate through the
music on your player using categories like album, artist, genre, etc.
You can select whether to browse using the File Browser or the Database Browser
by selecting either Files or Database in the Main Menu. If you choose the File
Browser, the Show Files setting lets you select what types of files you wish to view.
See section 8.2 (page 55) for more information on the Show Files setting.
Note: The File Browser allows you to manipulate your files in ways that are not
available within the Database Browser. Read more about Database in section 4.2
(page 25). The remainder of this section deals with the File Browser.
The Rockbox manual Toshiba Gigabeat F Series
b
Page 22
Chapter 4. Browsing and playing 22
4.1.1 File Browser Controls
Key Action
Up/Down Go to previous/next item in list. If you
are on the first/last entry, the cursor will
wrap to the last/first entry.
Left Go to the parent directory.
Select or Right Executes the default action on the se-
lected file or enters a directory.
A If there is an audio file playing, returns
to the While Playing Screen (WPS)
without stopping playback. Power Stops audio playback. Long Select Enter the Context Menu Menu Enter the Main Menu Long Menu Switches to the Quick Screen (see sec-
tion 5.11 (page 41))
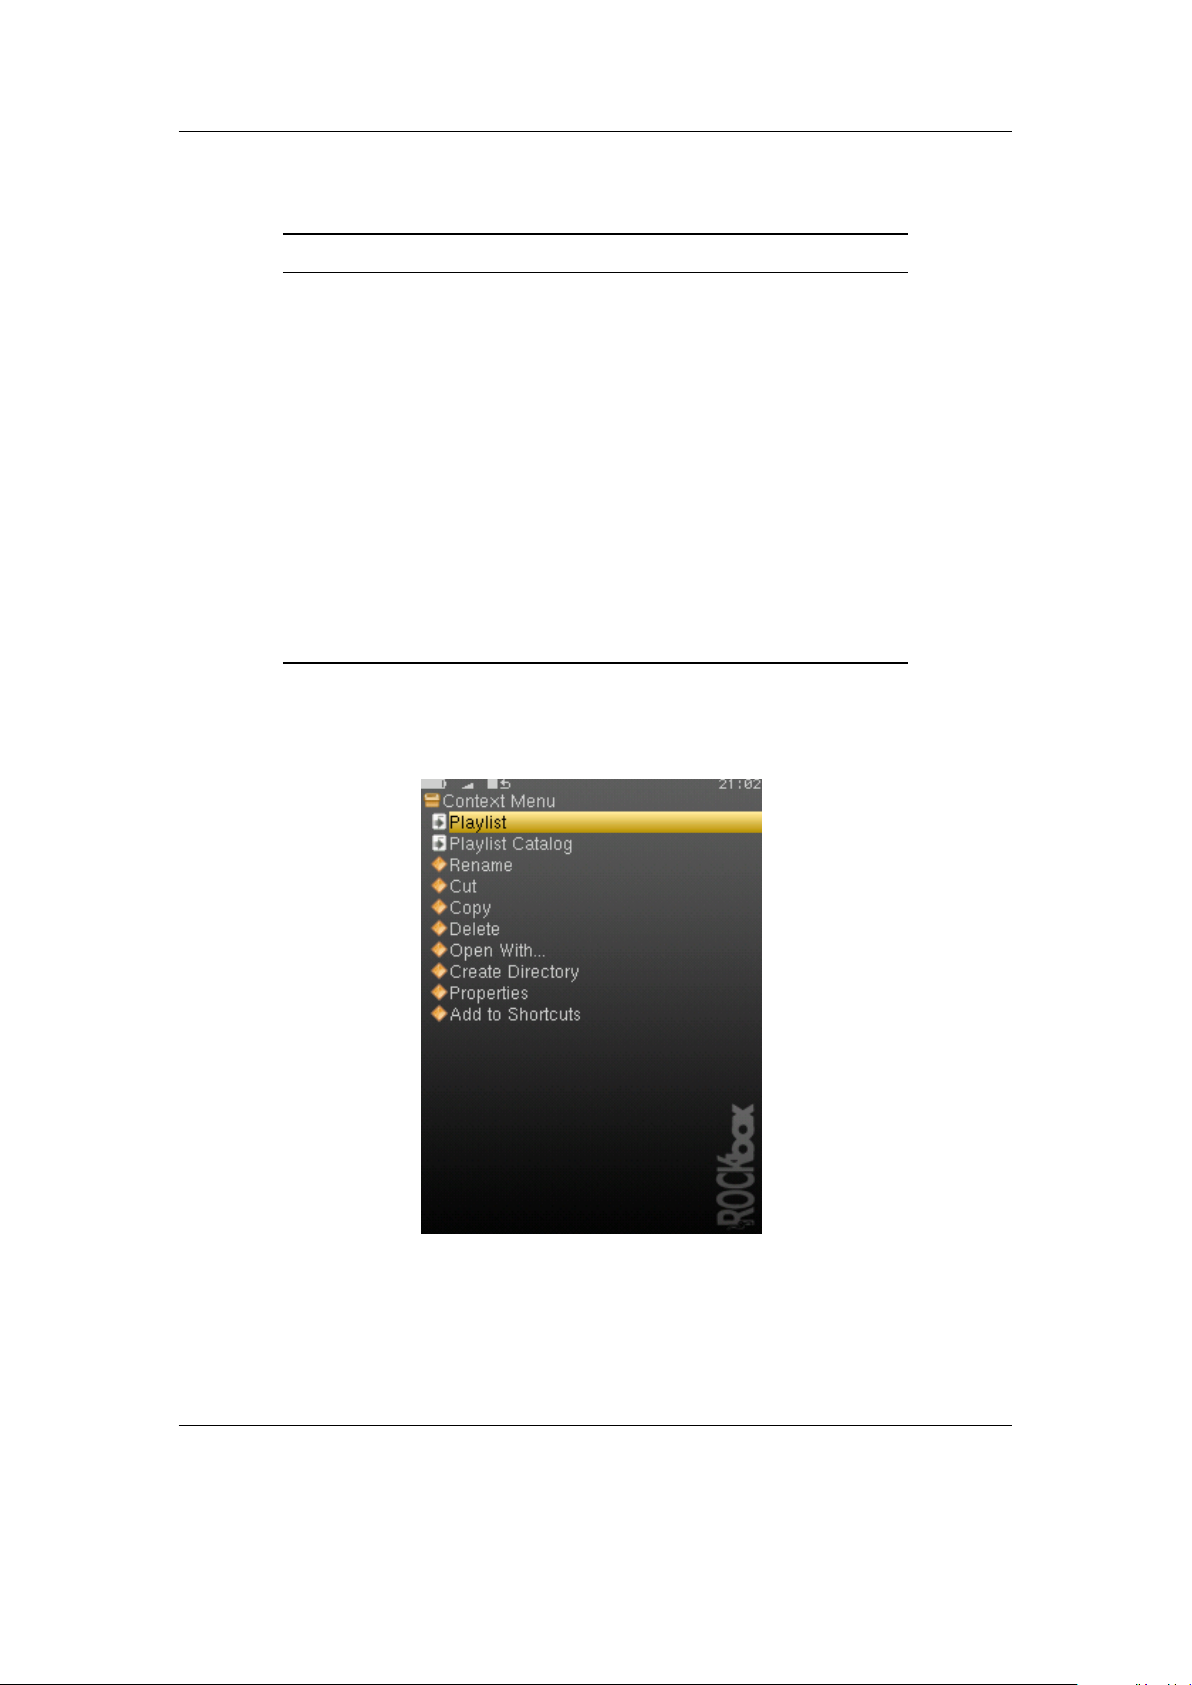
4.1.2 Context Menu
Figure 4.2: The Context Menu
The Rockbox manual Toshiba Gigabeat F Series
Page 23

Chapter 4. Browsing and playing 23
The Context Menu allows you to perform certain operations on files or directories.
To access the Context Menu, position the selector over a file or directory and access
the context menu with Long Select.
Note: The Context Menu is a context sensitive menu. If the Context Menu is
invoked on a file, it will display options available for files. If the Context Menu is
invoked on a directory, it will display options for directories.
The Context Menu contains the following options (unless otherwise noted, each
option pertains both to files and directories):
Playlist. Enters the Playlist Submenu (see section 4.4.3 (page 34)).
Playlist Catalog. Enters the Playlist Catalog Submenu (see section 4.4.2 (page 33)).
Rename. This function lets the user modify the name of a file or directory.
Cut. Copies the name of the currently selected file or directory to the clipboard and
marks it to be ‘cut’.
Copy. Copies the name of the currently selected file or directory to the clipboard and
marks it to be ‘copied’.
b
Paste. Only visible if a file or directory name is on the clipboard. When selected it will
move or copy the clipboard to the current directory.
Delete. Deletes the currently selected file. This option applies only to files, and not to
directories. Rockbox will ask for confirmation before deleting a file. Press Select
to confirm deletion or any other key to cancel.
Delete Directory. Deletes the currently selected directory and all of the files and subdi-
rectories it may contain. Deleted directories cannot be recovered. Use this feature
with caution!
Set As Backdrop. Set the selected bmp file as background image. The bitmaps need to
meet the conditions explained in section 11.1.6 (page 134).
Open with. Runs a viewer plugin on the file. Normally, when a file is selected in Rock-
box, Rockbox automatically detects the file type and runs the appropriate plugin.
The Open With function can be used to override the default action and select a
viewer by hand. For example, this function can be used to view a text file even if
the file has a non-standard extension (i.e., the file has an extension of something
other than .txt). See section 10.3 (page 109) for more details on viewers.
Create Directory. Create a new directory in the current directory on the disk.
Properties. Shows properties such as size and the time and date of the last modification
for the selected file. If used on a directory, the number of files and subdirectories
will be shown, as well as the total size.
The Rockbox manual Toshiba Gigabeat F Series
Page 24
Chapter 4. Browsing and playing 24
Add to Shortcuts. Adds a link to the selected item in the shortcuts.link file. If the
file does not already exist it will be created in the root directory. Note that if you
create a shortcut to a file, Rockbox will not open it upon selecting, but simply
bring you to it’s location in the File Browser.
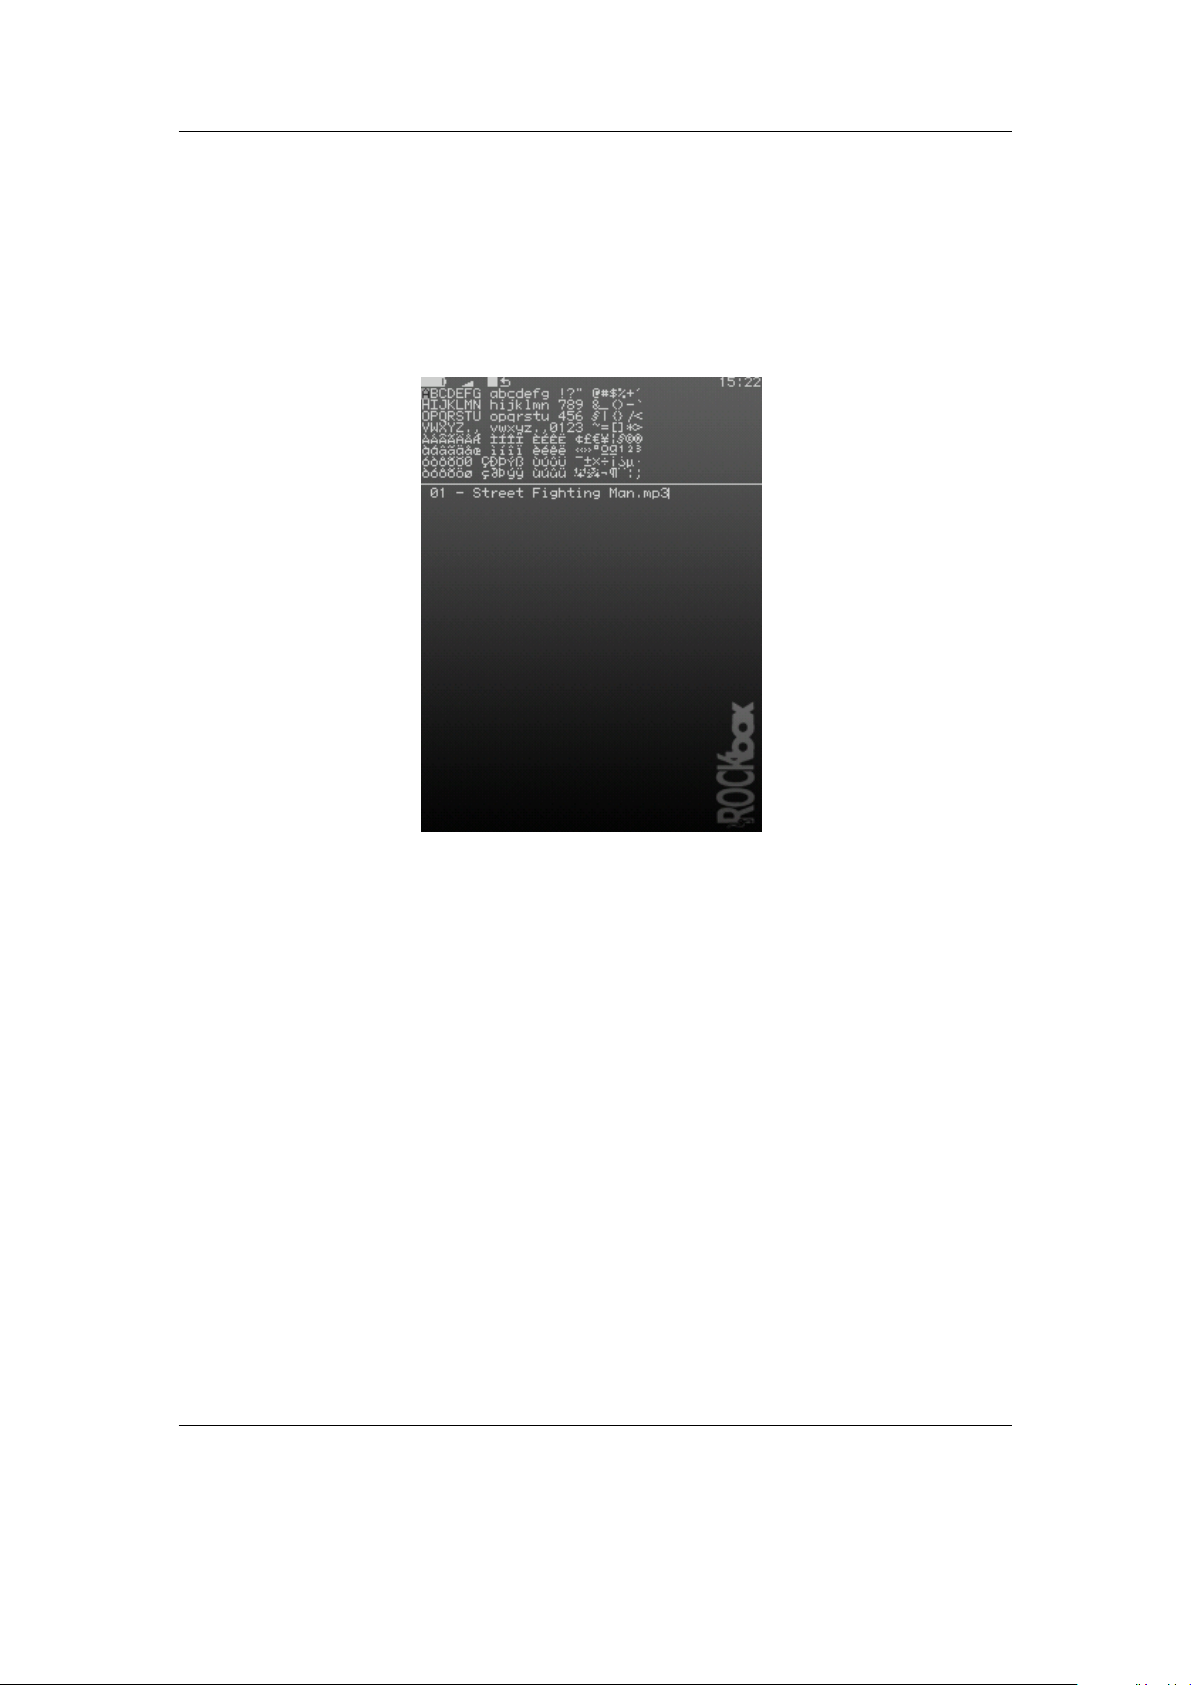
4.1.3 Virtual Keyboard
Figure 4.3: The virtual keyboard
This is the virtual keyboard that is used when entering text in Rockbox, for example
when renaming a file or creating a new directory. The virtual keyboard can be easily
changed by making a text file with the required layout. More information on how to
achieve this can be found on the Rockbox website at ZLoadableKeyboardLayouts.
The Rockbox manual Toshiba Gigabeat F Series
Page 25

Chapter 4. Browsing and playing 25
Key Action
Left / Right /
Up / Down
A + Left or A +
Right
Select Inserts the selected keyboard letter at the
Power Exits the virtual keyboard without saving
A Exits the virtual keyboard and saves any
Menu Deletes the character before the line cur-
A + Power Enters Morse input mode
Select Tap to select a character in Morse input
Move about the virtual keyboard (moves
the solid cursor)
Move the line cursor within the text line
current cursor position
any changes
changes
sor
mode
4.2 Database
4.2.1 Introduction
This chapter describes the Rockbox music database system. Using the information contained in the tags (ID3v1, ID3v2, Vorbis Comments, Apev2, etc.) in your audio files, Rockbox builds and maintains a database of the music files on your player and allows you to browse them by Artist, Album, Genre, Song Name, etc. The criteria the database uses to sort the songs can be completely customised. More information on how to achieve this can be found on the Rockbox website at ZDataBase.
4.2.2 Initializing the Database
The first time you use the database, Rockbox will scan your disk for audio files. This can
take quite a while depending on the number of files on your player. This scan happens
in the background, so you can choose to return to the Main Menu and continue to listen
to music. If you shut down your player, the scan will continue next time you turn it on.
After the scan is finished you may be prompted to restart your player before you can
use the database.
Ignoring Directories During Database Initialization
You may have directories on your player whose contents should not be added to the
database. Placing a file named database.ignore in a directory will exclude the files in
that directory and all its subdirectories from scanning their tags and adding them to the
database. This will speed up the database initialization.
The Rockbox manual Toshiba Gigabeat F Series
Page 26

Chapter 4. Browsing and playing 26
If a subdirectory of an ’ignored’ directory should still be scanned, place a file named
database.unignore in it. The files in that directory and its subdirectories will be
scanned and added to the database.
4.2.3 The Database Menu
Load To RAM The database can either be kept on disk (to save memory), or loaded into
RAM (for fast browsing). Setting this to Yes loads the database to RAM, allowing
faster browsing and searching. Setting this option to No keeps the database on
the disk, meaning slower browsing but it does not use extra RAM and saves some
battery on boot up.
Note: If you browse your music frequently using the database, you should load
to RAM, as this will reduce the overall battery consumption because the disk will
not need to spin on each search.
Auto Update If Auto update is set to on, each time the player boots, the database
will automatically be updated.
Note: The Auto Update will only check for deleted files if the Directory
Cache (Settings → General Settings → System → Disk → Directory
Cache) is enabled. Update now includes that check whether dircache has been
enabled or not.
Initialize Now You can force Rockbox to rescan your disk for tagged files by using the
Initialize Now function in the Database Menu.
Warning: Initialize Now removes all database files (removing runtimedb data
also) and rebuilds the database from scratch.
Update Now Update now causes the database to detect new and deleted files
Note: Unlike the Auto Update function, Update Now will update the database
regardless of whether the Directory Cache is enabled. Thus, an update using
Update now may take a long time.
Unlike Initialize Now, the Update Now function does not remove runtime
database information.
b
b
!
b
Gather Runtime Data When enabled, rockbox will record how often and how long a
track is being played, when it was last played and its rating. This information can
be displayed in the WPS and is used in the database browser to, for example, show
the most played, unplayed and most recently played tracks.
Export Modifications This allows for the runtime data to be exported to the file
/.rockbox/database changelog.txt, which backs up the runtime data in ASCII
format. This is needed when database structures change, because new code cannot
read old database code. But, all modifications exported to ASCII format should
be readable by all database versions.
The Rockbox manual Toshiba Gigabeat F Series
Page 27

Chapter 4. Browsing and playing 27
Import Modifications. Allows the /.rockbox/database changelog.txt backup to be
conveniently loaded into the database. If Auto Update is enabled this is per-
formed automatically when the database is initialized.
4.2.4 Using the Database
Once the database has been initialized, you can browse your music by Artist, Album, Genre, Song Name, etc. To use the database, go to the Main Menu and select
Database.
Note: You may need to increase the value of the Max files in dir browser setting
(Settings → General Settings → System → Limits) in order to view long lists
of tracks in the ID3 database browser.
There is no option to turn off database completely. If you do not want to use it just
do not do the initial build of the database and do not load it to RAM.
b
The Rockbox manual Toshiba Gigabeat F Series
Page 28

Chapter 4. Browsing and playing 28
Tag Type Origin
filename string system
album string id tag
albumartist string id tag
artist string id tag
comment string id tag
composer string id tag
genre string id tag
grouping string id tag
title string id tag
bitrate numeric id tag
discnum numeric id tag
year numeric id tag
tracknum numeric id tag/filename
autoscore numeric runtime db
lastplayed numeric runtime db
playcount numeric runtime db
Pm (play time min)
Ps (play time - sec) numeric runtime db
rating numeric runtime db
commitid numeric system
entryage numeric system
length numeric system
Lm (track len min)
Ls (track len - sec) numeric system
numeric runtime db
numeric system
4.3 While Playing Screen
The While Playing Screen (WPS) displays various pieces of information about the currently playing audio file. The appearance of the WPS can be configured using WPS
configuration files. The items shown depend on your configuration – all item can be
turned on or off independently. Refer to section B (page 142) for details on how to
change the display of the WPS.
• Status bar: The Status bar shows Battery level, charger status, volume, play mode,
repeat mode, shuffle mode and clock. In contrast to all other items, the status bar
is always at the top of the screen.
• (Scrolling) path and filename of the current song.
• The ID3 track name.
The Rockbox manual Toshiba Gigabeat F Series
Page 29

Chapter 4. Browsing and playing 29
• The ID3 album name.
• The ID3 artist name.
• Bit rate. VBR files display average bitrate and “(avg)”
• Elapsed and total time.
• A slidebar progress meter representing where in the song you are.
• Peak meter.
See section 11.2 (page 134) for details of customising your WPS (While Playing
Screen).
4.3.1 WPS Key Controls
Key Action
Up / Down Volume up/down.
Left Go to beginning of track, or if pressed
while in the first seconds of a track, go
to previous track.
Long Left Rewind in track.
Right Go to next track.
Long Right Fast forward in track.
A Toggle play/pause.
Power Stop playback.
Select Return to the File Browser.
Long Select Enter WPS Context Menu.
Menu Enter Main Menu.
Long Menu Switches to the Quick Screen. (see sec-
tion 5.11 (page 41))
A + Up/Down Show Pitch Screen (see section 4.3.3
(page 32)).
A + Menu Enter ID3 Viewer.
A + Right or
Short Right +
Long Right
A + Left or Short
Left + Long Left
Skip to the next directory.
Skip to the previous directory.
4.3.2 Peak Meter
The peak meter can be displayed on the While Playing Screen and consists of several
indicators.
The Rockbox manual Toshiba Gigabeat F Series
Page 30

Chapter 4. Browsing and playing 30
The bar: This is the wide horizontal bar. It represents the current volume value.
The peak indicator: This is a little vertical line at the right end of the bar. It indicates
the peak volume value that occurred recently.
The clip indicator: This is a little black block that is displayed at the very right of the
scale when an overflow occurs. It usually does not show up during normal playback
unless you play an audio file that is distorted heavily.
Note: Note that the clip detection is not very precise. Clipping might occur
without being indicated.
The scale: Between the indicators of the right and left channel there are little dots.
These dots represent important volume values. In linear mode each dot is a 10%
mark. In dbfs mode the dots represent the following values (from right to left):
0db, -3db, -6db, -9db, -12db, -18db, -24db, -30db, -40db, -50db, -60db.
4.3.3 The WPS Context Menu
Like the context menu for the File Browser, the WPS Context Menu allows you
quick access to some often used functions:
Playlist
The Playlist submenu allows you to view, save, search and reshuffle the current playlist.
To change settings for the Playlist Viewer press Menu while viewing the playlist to
bring up the Playlist Viewer Menu.
Playlist Viewer Menu
Show Icons. This toggles display of the icon for the currently selected playlist entry and
the icon for moving a playlist entry
b
Show Indicies. This toggles display of the line numbering for the playlist
Track Display. This toggles between filename only and full path for playlist entries
Save Current Playlist. Allows the current playlist to be saved as a .m3u playlist file
Playlist catalog
View catalog. This lists all playlists that are part of the Playlist catalog. You can load
a new playlist directly from this list.
Add to playlist. Adds the currently playing file to a playlist. Select the playlist you
want the file to be added to and it will get appended to that playlist.
Add to new playlist. Similar to the previous entry this will add the currently playing
track to a playlist. You need to enter a name for the new playlist first.
The Rockbox manual Toshiba Gigabeat F Series
Page 31

Chapter 4. Browsing and playing 31
Sound Settings
This is a shortcut to the Sound Settings Menu, where you can configure volume, bass,
treble, and other settings affecting the sound of your music. See section 6 (page 42) for
more information.
Playback Settings
This is a shortcut to the Playback Settings Menu, where you can configure shuffle,
repeat, party mode, study mode and other settings affecting the playback of your music.
Rating
The menu entry is only shown if Gather Runtime Information is enabled. It allows
the asignment of a personal rating value (0 – 10) to a track which can be displayed in
the WPS and used in the Database browser. Press Right to increment the value. The
value wraps at 10.
Bookmarks
This allows you to create a bookmark in the currently-playing track.
Show Track Info
Figure 4.4: The track info viewer
The Rockbox manual Toshiba Gigabeat F Series
Page 32

Chapter 4. Browsing and playing 32
This screen is accessible from the WPS screen, and provides a detailed view of all the
identity information about the current track. This info is known as meta data and is
stored in audio file formats to keep information on artist, album etc. To access this
screen,
Open With...
This Open With function is the same as the Open With function in the file browser’s
Context Menu.
Delete
Delete the currently playing file.
Pitch
The Pitch Screen allows you to change the pitch and (at the same time) the playback
speed of your player. The pitch value can be adjusted between 50% and 200%. 50%
means half the normal playback speed and the pitch that is an octave lower than the
normal pitch. 200% means double playback speed and the pitch that is an octave
higher than the normal pitch. It is not possible to change the pitch without changing
the playback speed and vice versa. Changing the pitch can be done in two modes:
procentual and semitone. Initially (after the player is switched on), procentual mode is
active.
Key Action
Menu Toggle pitch changing mode
Up / Down Increase / Decrease pitch by 0.1% (in pro-
centual mode) or a semitone (in semitone
mode)
Long Up / Long
Down
Right / Left Temporarily increase / decrease pitch by
A Reset pitch to 100%
Power Leave the Pitch Screen
Increase / Decrease pitch by 1% (in pro-
centual mode) or a semitone (in semitone
mode)
2.0%
4.4 Working with Playlists
4.4.1 Playlist terminology
Some common terms that are used in Rockbox when referring to playlists:
The Rockbox manual Toshiba Gigabeat F Series
Page 33

Chapter 4. Browsing and playing 33
Directory. A playlist! One of the keys to getting the most out of Rockbox is under-
standing that Rockbox always considers the song that it is playing to be part of a
playlist, and in some situations, Rockbox will create a playlist automatically. For
example, if you are playing the contents of a directory, Rockbox will automatically
create a playlist containing all songs in it. This means that just about anything
that is described in this chapter with respect to playlists also applies to directories.
Dynamic playlist. A dynamic playlist is a playlist that is created “On the fly.” Any
time you insert or queue tracks using the Playlist submenu (see section 4.4.3
(page 34)), you are creating (or adding to) a dynamic playlist.
Insert. In Rockbox, to Insert an item into a playlist means putting an item into a
playlist and leaving it there, even after it is played. As you will see later in this
chapter, Rockbox can Insert into a playlist in several places.
Queue. In Rockbox, to Queue a song means to put the song into a playlist and then
to remove the song from the playlist once it has been played. The only difference
between Insert and Queue is that the Queue option removes the song from the
playlist once it has been played, and the Insert option does not.
4.4.2 Creating playlists
Rockbox can create playlists in four different ways.
By selecting (“playing”) a song from the File Browser
Whenever a song is selected from the File Browser with Select or Right, Rockbox
will automatically create a playlist containing all of the songs in that directory and start
playback with the selected song.
Note: If you already have created a dynamic playlist, playing a new song will erase the
current dynamic playlist and create a new one. If you want to add a song to the current
playlist rather than erasing the current playlist, see the section below on how to add
music to a playlist.
By using Insert and Queue functions
If playback is stopped, the Insert and Queue functions can be used as described in
4.4.3 to create a new playlist instead of adding to an existing one. This will erase any
dynamic playlist.
By using the Playlist catalog
The Playlist catalog makes it possible to modify and create playlists that are not
currently playing. To do this select Playlist catalog in the Context Menu. There
you will have two choices, Add to playlist adds the selected track or directory to an
b
The Rockbox manual Toshiba Gigabeat F Series
Page 34

Chapter 4. Browsing and playing 34
existing playlist and Add to a new playlist creates a new playlist containing the
selected track or directory.
Note: All playlists in the Playlist catalog are stored by default in the /Playlists
directory in the root of your player’s disk and playlists stored in other locations are
not included in the catalog. It is however possible to move existing playlists there (see
section 4.1.2 (page 22)).
By using the Main Menu
To create a playlist containing all music on your player, you can use the Create
Playlist command in the Playlist Options menu found in the Main Menu. The
created playlist will be named root.m3u and saved in the root of your player’s disk.
4.4.3 Adding music to playlists
Adding music to a dynamic playlist
b
Figure 4.5: The Playlist Submenu
The Playlist Submenu is a submenu in the Context Menu (see section 4.1.2 (page 22)),
it allows you to put tracks into a “dynamic playlist”. If there is no music currently playing, Rockbox will create a new dynamic playlist and put the selected track(s) into it.
If there is music currently playing, Rockbox will put the selected track(s) into the current playlist. The place in which the newly selected tracks are added to the playlist is
determined by the following options:
The Rockbox manual Toshiba Gigabeat F Series
Page 35

Chapter 4. Browsing and playing 35
Insert. Add track(s) immediately after any tracks added via the most recent Insert
operation. If no tracks have yet been added via an Insert, new tracks will be
added immediately after the current playing track. If playback is stopped a new
dynamic playlist will get created with the selected tracks.
Insert Next. Add track(s) immediately after current playing track, no matter what else
has been inserted.
Insert Last. Add track(s) to end of playlist.
Insert Shuffled. Add track(s) to the playlist in a random order.
Queue. Queue is the same as Insert except queued tracks are deleted immediately from
the playlist after they have been played. Also, queued tracks are not saved to the
playlist file (see section 5.8 (page 39)).
Queue Next. Queue track(s) immediately after current playing track.
Queue Last. Queue track(s) at end of playlist.
Queue Shuffled. Queue track(s) in a random order.
Play Next. Replaces all but the current playing track with track(s). Current playing
track is queued.
The Playlist Submenu can be used to add either single tracks or entire directories
to a playlist. If the Playlist Submenu is invoked on a single track, it will put only
that track into the playlist. On the other hand, if the Playlist Submenu is invoked
on a directory, Rockbox adds all of the tracks in that directory to the playlist.
Note: You can control whether or not Rockbox includes the contents of subdirectories
when adding an entire directory to a playlists. Set the Settings → General Settings
→ Playlist → Recursively Insert Directories setting to Yes if you would like
Rockbox to include tracks in subdirectories as well as tracks in the currently-selected
directory.
Dynamic playlists are saved so resume will restore them exactly as they were before
shutdown.
Note: To view, save or reshuffle the current dynamic playlist use the Playlist sub
menu in the WPS context menu or in the Main Menu.
4.4.4 Modifying playlists
Reshuffling
Reshuffling the current playlist is easily done from the Playlist sub menu in the WPS,
just select Reshuffle.
b
b
The Rockbox manual Toshiba Gigabeat F Series
Page 36

Chapter 4. Browsing and playing 36
Moving and removing tracks
To move or remove a track from the current playlist enter the Playlist Viewer by
selecting View Current Playlist in the Playlist submenu in the WPS context
menu or the Main Menu. Once in the Playlist Viewer open the context menu on
the track you want to move or remove. If you want to move the track, select Move in
the context menu and then move the blinking cursor to the place where you want the
track to be moved and confirm with Select or Right. To remove a track, simply select
Remove in the context menu.
4.4.5 Saving playlists
To save the current playlist either enter the Playlist submenu in the WPS Context
Menu (see section 4.3.3 (page 30)) and select Save Current Playlist or enter the
Playlist Options menu in the Main Menu and select Save Current Playlist.
Either method will bring you to the Virtual Keyboard (see section 4.1.3 (page 24)),
enter a filename for your playlist and accept it and you are done.
4.4.6 Loading saved playlists
Through the File Browser
Playlist files, like regular music tracks, can be selected through the File Browser.
When loading a playlist from disk it will replace the current dynamic playlist.
Through the Playlist catalog
The Playlist catalog offers a shortcut to all playlists in your player’s specified playlist
directory. It can be used like the File Browser.
4.4.7 Helpful Hints
Including subdirectories in playlists
You can control whether or not Rockbox includes the contents of subdirectories when
adding an entire directory to a playlists. Set the Main Menu → Settings → Playlist
→ Recursively Insert Directories setting to Yes if you would like to include tracks
in subdirectories as well as tracks in the currently selected directory.
The Rockbox manual Toshiba Gigabeat F Series
Page 37
Chapter 5. The Main Menu 37
5 The Main Menu
5.1 Introducing the Main Menu
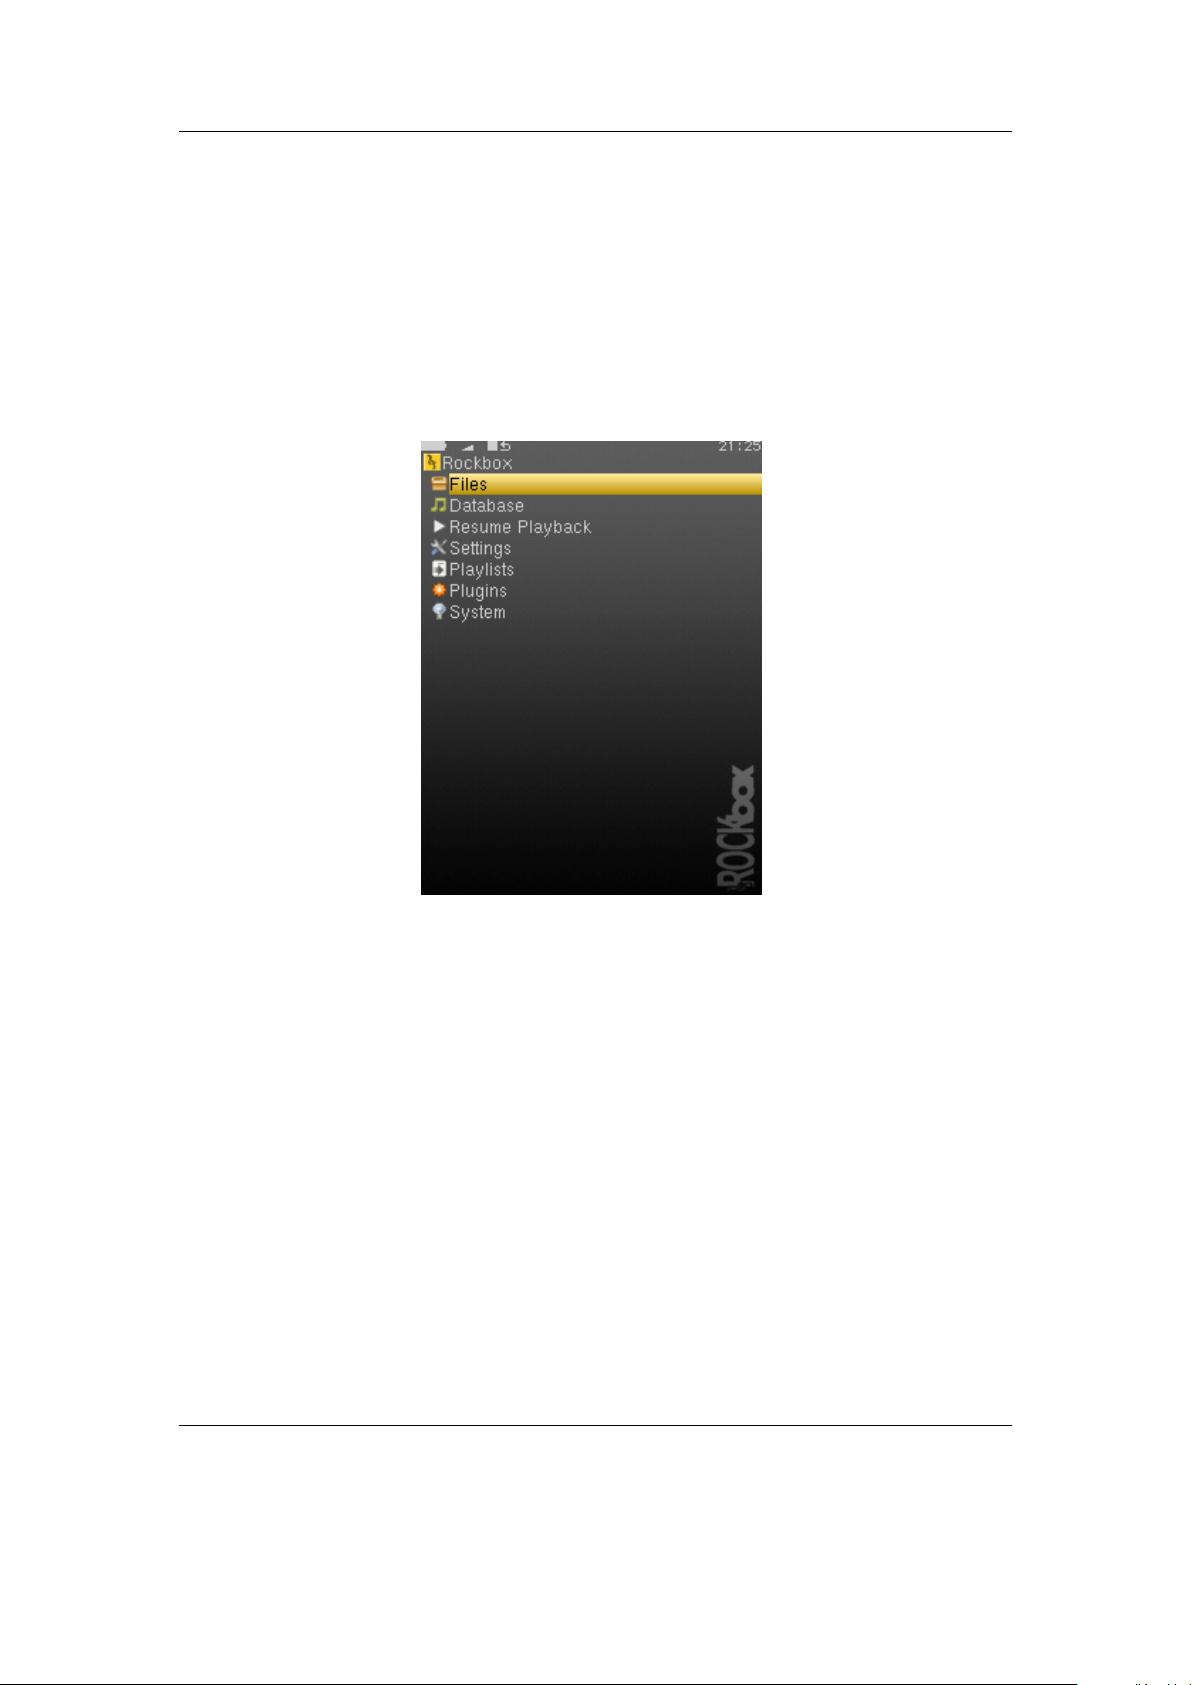
Figure 5.1: The main menu
The Main Menu is the screen from which all of the Rockbox functions can be accessed.
This is the first screen you will see when starting Rockbox. To return to the Main
Menu, press the Menu button.
All settings are stored on the unit. However, Rockbox does not spin up the disk solely
for the purpose of saving settings. Instead, Rockbox will save settings when it spins up
the disk the next time, for example when refilling the MP3 buffer or navigating through
the File Browser. Changes to settings may therefore not be saved unless the player
is shut down safely (see section 3.1.2 (page 18)).
The Rockbox manual Toshiba Gigabeat F Series
Page 38

Chapter 5. The Main Menu 38
5.2 Navigating the Main Menu
5.3 Recent Bookmarks
Figure 5.2: The list bookmarks screen
If the Save a list of recently created bookmarks option is enabled then you can
view a list of several recent bookmarks here and select one to jump straight to that track.
See section 8.6 (page 60) for more details on configuring bookmarking in Rockbox.
Note: This entry is not shown in the Main Menu when the option is off and the option
is off by default.
5.4 Files
Browse the files on your player (see section 4.1 (page 21)).
5.5 Database
Browse by the meta-data in your audio files (see section 4.2 (page 25)).
5.6 Now Playing/Resume Playback
Go to the While Playing Screen and resume if music playback is stopped or paused
and there is something to resume (see section 4.3 (page 28)).
b
The Rockbox manual Toshiba Gigabeat F Series
Page 39

Chapter 5. The Main Menu 39
5.7 Settings
The Settings menu allows to set or adjust many parameters that affect the way your player works. There are many submenus for different parameter areas. Every time you are setting a value of a parameter, and that value is selected from a list of some predefined available values, you can press Long Select, and the selection cursor will jump to the default value for the parameter. You can then confirm or cancel the value. This is useful if you have changed the value of the parameter from the default to some other value and would like to restore the default value.
5.7.1 Sound Settings
The Sound Settings menu offers a selection of sound properties you may change to customise your listening experience. The details of this menu are covered in section 6 (page 42).
5.7.2 Playback Settings
The Playback Settings menu allows you to configure settings related to audio playback. The details of this menu are covered in section 7 (page 48).
5.7.3 General Settings
The General Settings menu allows you to customise the way Rockbox looks and the way it plays music. The details of this menu are covered in section 8 (page 54).
5.7.4 Manage Settings
The Manage Settings option allows the saving and re-loading of user configuration settings, browsing the hard drive for alternate firmwares, and finally resetting your player back to initial configuration. The details of this menu are covered in section 11.3 (page 137).
5.7.5 Theme Settings
The Theme Settings menu contains options that control the visual apperance of Rockbox. The details of this menu are covered in section 9 (page 64).
5.8 Playlist
This menu allows you to work with playlists. Playlists can be created in three ways. Playing a file in a directory causes all the files in it to be placed in a playlist. Playlists can be created manually by either using the Context Menu (see section 4.1.2 (page 22)) or using the Playlist menu. Both automatically and manually created playlists can be edited using this menu.
The Rockbox manual Toshiba Gigabeat F Series
Page 40

Chapter 5. The Main Menu 40
Create Playlist: Rockbox will create a playlist with all tracks in the current directory
and all sub-directories. The playlist will be created one directory level “up” from
where you currently are.
View Current Playlist: Displays the contents of the playlist currently stored in memory.
Save Current Playlist: Saves the current dynamic playlist, excluding queued tracks, to
the specified file. If no path is provided then playlist is saved to the current
directory.
Playlist Catalog: The Playlist Catalog provides a simple interface to maintain sev-
eral playlists (see section 4.4 (page 32)).
5.9 Plugins
With this option you can load and run various plugins that have been written for Rockbox. There are a wide variety of these supplied with Rockbox, including several games,
some impressive demos and a number of utilities. A detailed description of the different
plugins is to be found in section 10 (page 66).
5.10 System
This option shows RAM buffer size, battery voltage level and estimated time remaining,
disk total space and disk free space.
Time and Date: Time related menu options. Pressing Long Select will voice the cur-
rent time if voice support is enabled
Set Time/Date: Set current time and date.
Sleep Timer: The Sleep Timer powers off your player after playing for a given
time. It can be set from Off to 5 hours in 5 minute steps. The Sleep Timer
is reset on boot.
Time Format: Choose 12 or 24 hour clock.
Rockbox Info: Displays some basic system information. This is, from top to bottom,
the amount of memory Rockbox has available for storing music (the buffer). The
battery status. Hard disk size and the amount of free space on the disk.
Version: Software version and credits display.
Debug (Keep Out!): This sub menu is intended to be used only by Rockbox developers.
It shows hardware, disk, battery status and other technical information.
Warning: It is not recommended that users access this menu unless instructed
to do so in the course of fixing a problem with Rockbox. If you think you have
messed up your settings by use of this menu please try to reset all settings before
asking for help.
!
The Rockbox manual Toshiba Gigabeat F Series
Page 41

Chapter 5. The Main Menu 41
5.11 Quick Screen
Whilst not strictly part of the Main Menu, it is worth noting that a few of the more commonly used settings are available from the Quick Screen. The Quick Screen screen is accessed with Long Menu and exited with Menu. It allows rapid access to the Shuffle and Repeat modes (section ?? (page ??)) and the Show Files option (section 8.2 (page 55)).
The Rockbox manual Toshiba Gigabeat F Series
Page 42

Chapter 6. Sound Settings 42
6 Sound Settings
Figure 6.1: The sound settings screen
The sound settings menu offers a selection of sound settings you may change to customise
your listening experience.
6.1 Volume
This setting adjusts the volume of your music. Like most professional audio gear and
many consumer audio products, Rockbox uses a decibel scale where 0 dB is a reference that indicates the maximum volume that the player can produce without possible
distortion (clipping). All values lower than this reference will be negative and yield a
progressively softer volume. The volume can be adjusted from a minimum of -73 dB
to a maximum of +6 dB.
The Rockbox manual Toshiba Gigabeat F Series
Page 43

Chapter 6. Sound Settings 43
6.2 Bass
This setting emphasises or suppresses the lower (bass) frequencies in the sound. A value
of 0 dB means that bass sounds are unaltered (flat response).
6.3 Treble
This setting emphasises or suppresses the higher (treble) frequencies in the sound. A
value of 0 dB means that treble sounds are unaltered (flat response).
6.4 Balance
This setting controls the balance between the left and right channels. The default, 0,
means that the left and right outputs are equal in volume. Negative numbers increase
the volume of the left channel relative to the right, positive numbers increase the volume
of the right channel relative to the left.
6.5 Channels
A stereo audio signal consists of two channels, left and right. The Channels setting determines if these channels are to be combined in any way, and if so, in what manner they will be combined. Available options are:
Setting Description
Stereo Leave the audio signal unmodified.
Mono Combine both channels and send the resulting signal to both stereo
channels, resulting in a monophonic output.
Custom Allows you to manually specify a stereo width with the Stereo Width
setting described later in this chapter.
Mono Left Plays the left channel in both stereo channels.
Mono Right Plays the right channel in both stereo channels.
Karaoke Removes all sound that is common to both channels. Since most music
is recorded with vocals being equally present in both channels to make
the singer sound centrally placed, this often (but not always) has the
effect of removing the voice track from a song. This setting also very
often has other undesirable effects on the sound.
6.6 Stereo Width
Stereo width allows you to manually specify the effect that is applied when the Channels setting is set to “custom”. All values below 100% will progressively mix the con-
The Rockbox manual Toshiba Gigabeat F Series
Page 44

Chapter 6. Sound Settings 44
tents of one channel into the other. This has the effect of gradually centering the stereo
image, until you have monophonic sound at 0%. Values above 100% will progressively
remove components in one channel that is also present in the other. This has the effect
of widening the stereo field. A value of 100% will leave the stereo field unaltered.
6.7 Crossfeed
Crossfeed attempts to make the experience of listening to music on headphones more
similar to listening to music with stereo speakers. When you listen to music through
speakers, each ear will hear sound originating from both speakers. However, the sound
from the left speaker reaches your right ear slightly later than it does your left ear, and
vice versa.
The human ear and brain together are very good at interpreting the time differences
between direct sounds and reflected sounds and using that information to identify the
direction that the sound is coming from. On the other hand, when listening to headphones, each ear hears only the stereo channel corresponding to it. The left ear hears
only the left channel and the right ear hears only the right channel. The result is that
sound from headphones does not provide the same spatial cues to your ear and brain as
speakers, and might for that reason sound unnatural to some listeners.
The crossfeed function uses an algorithm to feed a delayed and filtered portion of the
signal from the right channel into the left channel and vice versa in order to simulate the
spatial cues that the ear and brain receive when listening to a set of loudspeakers placed
in front of the listener. The result is a more natural stereo image that can be especially
appreciated in older rock and jazz records, where one instrument is often hard-panned
to just one of the speakers. Many people will find such records tiring to listen to using
earphones and no crossfeed effect.
Crossfeed has the following settings:
Crossfeed: Selects whether the crossfeed effect is to be enabled or not.
Direct Gain: How much the level of the audio that travels the direct path from a speaker
to the corresponding ear is supposed to be decreased.
Cross Gain: How much the level of the audio that travels the cross path from a speaker
to the opposite ear is to be decreased.
High-Frequency Attenuation: How much the upper frequencies of the cross path audio
will be dampened. Note that the total level of the higher frequencies will be a
combination of both this setting and the Cross Gain setting.
High-Frequency Cutoff Decides at which frequency the cross path audio will start to
be cut by the amount described by the High-Frequency Attenuation setting.
Most users will find the default settings to yield satisfactory results, but for the more
adventurous user the settings can be fine-tuned to provide a virtual speaker placement
suited to ones preference.
The Rockbox manual Toshiba Gigabeat F Series
Page 45

Chapter 6. Sound Settings 45
Beware that the crossfeed function is capable of making the audio distort if you choose
settings which result in a too high output level.
6.8 Equalizer
Figure 6.2: The graphical equalizer
Rockbox features a parametric equalizer (EQ). As the name suggests, a parametric EQ
lets you control several different parameters for each band of the EQ. In some ways the
EQ is similar to the Bass and Treble settings described earlier, but the EQ allows you
to control the sound much more carefully.
Rockbox’s parametric EQ is composed of five different bands:
Band 0: Low shelf filter The low shelf filter boosts or lowers all frequencies below a
certain frequency limit, much like what a “bass” control found on ordinary stereo
systems does. Adjust the “cutoff” frequency parameter to decide where the shelving starts to take effect. For example, a cutoff frequency of 50 Hz will adjust only
very low frequencies. A cutoff frequency of 200 Hz, on the other hand, will adjust
a much wider range of bass frequencies. The “gain” parameter controls how much
the loudness of the band is adjusted. Positive numbers make the EQ band louder,
while negative numbers make that EQ band quieter. The “Q” parameter should
always be set to 0.7 for the shelving filters. Higher values will add a small boost
around the cutoff frequency that is almost always undesirable.
The Rockbox manual Toshiba Gigabeat F Series
Page 46

Chapter 6. Sound Settings 46
Bands 1-3: Peaking filters Peaking EQ filters boost or lower a frequency range centered
at the center frequency chosen. Graphic equalizers in home stereos are usually
peaking filters. The peaking filters in Rockbox’s EQ lets you adjust three different
parameters for EQ bands 1 through 3. The “center” parameter controls the center
frequency of the frequency range that is affected as described above. The “gain”
parameter controls how much each band is adjusted, and works as for the low
shelf filter. Finally, the “Q” parameter controls how wide or narrow the affected
frequency range is. Higher Q values will affect a narrower band of frequencies,
while lower Q values will affect a wider band of frequencies.
Band 4: High shelf filter A high shelf filter boosts or lowers all frequencies above a
certain frequency limit, much like what a “treble” control found on ordinary stereo
systems does. The high shelf filter is adjusted the same way as the low shelf filter,
except that it works on the high end of the frequency spectrum rather than the
low end.
As a general guide, EQ band 0 should be used for low frequencies, EQ bands 1 through
3 should be used for mids, and EQ band 4 should be used for highs.
Enable EQ: This option controls whether the EQ is on or off.
Graphical EQ: This option brings up a graphic EQ screen, which allows adjustment of
each of the three parameters described above (gain, center frequency, and Q) for
each of the five EQ bands.
Key Action
Raises the highlighted parameter.
Lowers the highlighted parameter.
Moves to the previous EQ band.
Moves to the next EQ band.
Toggles the cursor among the three parameters (gain, center frequency, Q) for
the selected EQ band.
Exits the graphic EQ screen.
Pre-cut: If too much gain is added through the graphical EQ, your music may distort.
The Precut setting allows you to adjust the overall gain of the EQ.
If your music distorts when using the EQ, trying changing this setting to a negative
value.
Simple EQ: This option provides an easier alternative for those who are daunted by all
of the parameters that can be adjusted using the graphical EQ. With the Simple
EQ, the only parameter that can be adjusted is the gain.
The Rockbox manual Toshiba Gigabeat F Series
Page 47

Chapter 6. Sound Settings 47
Advanced EQ: This sub menu provides options for adjusting the same parameters as the
Graphical EQ. The only difference is that the parameters are adjusted through
textual menus rather than through a graphic interface.
Save EQ Preset: This option saves the current EQ configuration in a .cfg file.
Browse EQ Presets: This menu displays a list of EQ presets, as well as any EQ con-
figurations saved using the Save EQ Preset option. Users unfamiliar with the
operation of a parametric EQ may wish to use the presets instead of trying to
configure the EQ, or use the presets for designing their own custom EQ settings.
6.9 Dithering
This setting controls the dithering and noise shaping functionality of Rockbox.
Most of Rockbox’ audio file decoders work at a higher bit depth than the 16 bits used
for output on the player’s audio connectors. The simplest way to convert from one bit
depth to another is simply discarding all the surplus bits. This is the default behaviour,
and adds distortion to the signal that will vary in character along with the desired sound.
Dithering adds low-level noise to the signal prior to throwing away the surplus bits,
which gives the resulting signal a uniform noise floor which is independent of the signal. Most people find this noise preferable to the time-varying noise heard when not
performing dithering.
After dithering, noise shaping is performed. This basically just pushes the dithering
noise to the parts of the frequency spectrum humans cannot hear so easily. In Rockbox’
case, some of the noise is pushed up to above 10 kHz.
This setting will be put to its best use when listening to dynamic music with frequently
occuring quiet parts, classical music being a typical example. It is worth noting that the
effects of dithering and noise shaping are very subtle, and not easily noticable.
Rockbox uses highpass triangular distribution noise as the dithering noise source, and
a third order noise shaper.
The Rockbox manual Toshiba Gigabeat F Series
Page 48

Chapter 7. Playback Settings 48
7 Playback Settings
The Playback Settings menu allows you to configure settings related to audio playback.
7.1 Shuffle
Turning shuffle on will cause Rockbox to randomly re-order the playlist. Thus, to shuffle
all of the audio files on the player, you first need to create a playlist containing all of
them. For more information on creating playlists refer to section 4.4 (page 32).
Options: Yes/No.
7.2 Repeat
Configures settings related to repeating of directories or playlists. Options: Off / All / One / Shuffle / A-B:
Off The current playlist will not repeat when it is finished.
Note: If you have the Auto-Change Directory option set to Yes, Rockbox
will move on to the next directory on your hard drive. If the Auto-Change
Directory option is set to No, playback will stop when the current directory or
playlist is finished.
All The current playlist will repeat when it is finished.
One Repeat one track over and over.
Shuffle When the current playlist has finished playing, it will be shuffled and then
repeated.
A-B Repeats between two user defined points within a track, typically used by musi-
cians when attempting to learn a piece of music. This option is more complicated
to use than the others as the player must first be placed into A-B repeat mode and
then the start and end points defined.
To set the Start Point (A) press A + Left. Setting the End Point (B) is done
accordingly using A + Right. To reset the markers press A + Select.
b
The Rockbox manual Toshiba Gigabeat F Series
Page 49

Chapter 7. Playback Settings 49
7.3 Play Selected First
This setting controls what happens when you select a file for playback while shuffle mode is on. If the Play Selected First setting is Yes, the file you selected will be played first. If this setting is No, a random file in the directory will be played first.
7.4 Fast-Forward/Rewind
These settings control the speed and acceleration during fast forward and rewind. The
setting FF/RW Min Step controls the initial speed and FF/RW Accel controls the
acceleration.
7.5 Anti-Skip Buffer
This setting controls how early Rockbox starts refilling the music buffer from the hard
drive when playing. A longer Anti-Skip Buffer helps prevent skips in music playback if
Rockbox has trouble reading from the disk. This can happen if the player is knocked,
shaken or jogged heavily while Rockbox is trying to read the hard drive.
The anti-skip buffer can be set to various values between 5 seconds and 10 minutes.
Note: Having a large anti-skip buffer tends to use more power, and may reduce your
battery life. It is recommended to always use the lowest possible setting that allows
correct and continuous playback.
b
7.6 Fade on Stop/Pause
Enables and disables a fade effect when you pause or stop playing a song. If the Fade
on Stop/Pause option is set to Yes, your music will fade out when you stop or pause
playback, and fade in when you resume playback.
7.7 Party Mode
Enables unstoppable music playback. When new songs are selected, they are queued at
the end of the current dynamic playlist instead of being played immediately. Pausing
and stopping playback is disabled as well as skipping songs and launching plugins.
7.8 Crossfade
This setting enables a cross-fader. At the end of a song, the song will fade out as the
next song fades in, creating a smooth transition between songs. The crossfade setting is
particularly effective when the player is set on shuffle.
Options for crossfade settings are:
The Rockbox manual Toshiba Gigabeat F Series
Page 50

Chapter 7. Playback Settings 50
Enable Crossfade If set to Off, crossfade is disabled. If set to Always, songs will
always crossfade into one another. If set to Shuffle, crossfade is enabled when
the shuffle feature is set to Yes, but disabled otherwise. If set to track skip only,
tracks will only crossfade when you manually change tracks.
Fade In Delay The “fade in delay” is the length of time between when the crossfade
process begins and when the new track begins to fade in.
Fade In Duration The length of time, in seconds, that it takes your music to fade in
once the Fade In Delay has ended.
Fade Out Delay The “fade out delay” is the length of time between when the crossfade
process begins and when the old track begins to fade out.
Fade Out Duration The length of time, in seconds, that it takes your music to fade out
once the Fade Out Delay has ended.
Fade Out Mode If set to Crossfade, one song will fade out and the next song will
simultaneously fade in. If set to Mix, the ending song will continue to play as
normal until its end, while the starting song will fade in from under it. Mix mode
is not used for manual track skips, even if it is selected here.
Note: The rules above apply except in the instance where Fade Out Delay plus Fade
Out Duration is less then Fade In Delay (which would create a gap in the audio).
In this case, the Fade In Delay is reduced to eliminate the gap.
The graphic below illustrates how the different settings work in practice.
b
The Rockbox manual Toshiba Gigabeat F Series
Page 51

Chapter 7. Playback Settings 51
7.9 Replaygain
This allows you to control the replaygain function. The purpose of replaygain is to
adjust the volume of the music played so that all songs (or albums, depending on your
settings) have the same apparent volume. This prevents sudden changes in volume when
changing between songs recorded at different volume levels. For replaygain to work, the
songs must have been processed by a program that adds replaygain information to the
ID3 tags (or Vorbis tags).
Note: APEv2 tags are not currently supported.
Options for replaygain are:
Enable Replaygain This turns on/off the replaygain function.
Prevent Clipping Avoid clipping of a song’s waveform. If a song would clip during
playback, the volume is lowered for that song. Replaygain information is needed
for this to work.
Replaygain Type Choose the type of replaygain to apply:
Album Gain Maintain a constant volume level between albums, but keep any in-
tentional volume variations between songs in an album. (If album gain value
is not available, uses track gain information).
Track Gain Maintain a constant volume level between tracks. If track gain value
is not available, no replaygain is applied.
Track Gain If Shuffling Maintains a constant volume between tracks if Shuffle
is set to Yes. Reverts to album mode if Shuffle is set to No.
b
Pre-amp This allows you to adjust the volume when replaygain is applied. Replaygain
often lowers the volume, sometimes quite much, so here you can compensate for
that. Please note that a (large) positive pre-amp setting can cause clipping, unless
prevent clipping is enabled. The pre-amp can be set to any decibel (dB) value
between -12dB and +12dB, in increments of 0.1dB.
7.10 Beep Volume
Controls the volume of the beep that is heard when skipping forward or backward between tracks. The beep is disabled when set to Off.
7.11 Auto-Change Directory
Control what Rockbox does when it reaches the end of a directory. If Auto-Change Directory is set to Yes, Rockbox will continue to the next directory. If Auto-Change Directory is set to No, playback will stop at the end of the current playlist. Using
the Random feature requires you to first generate a folder list via the Random Folder
Advance Configuration plugin (see section 10.4.11 (page 129)).
The Rockbox manual Toshiba Gigabeat F Series
Page 52

Chapter 7. Playback Settings 52
Note: You must have the Repeat option set to No for Auto-Change Directory to
function properly.
Note: This feature only works when songs have been played from the file browser. Using
it with the database may cause unexpected behavior.
7.12 Pause on Headphone Unplug
Enables and disables automatic pausing of playback when the headphones are disconnected from the player’s headphone socket.
Pause on Headphone Unplug Options for automatic pause:
Off. Disables automatic pause.
Pause. Pauses the player when the headphones are removed.
Pause and Resume. Pauses when the headphones are removed, and resumes play-
back when they are reconnected.
Duration to Rewind Number of seconds (between 0 and 15) to rewind playback when
the headphones are removed.
Disable Auto-Resume If Phones Not Present This option will disable the automatic
resumption of playback at startup if the headphones are not connected to the
player.
b
b
Note: This requires Resume on Startup to be enabled.
7.13 Last.fm Log
Enables logging of your played tracks for submittal to http://www.last.fm. This service
was formely known as Audioscrobbler. When you enable this option, you’ll have to
reboot to start the logging. The log-file is called .scrobbler.log,and is to be found in
the root directory of your player.
Note: See ZLastFMLog for a further description, and for tools you can use to submit
your Last.fm log.
7.14 Cuesheet Support
Enables reading of cuesheet files for played tracks. If a cuesheet is found for a track,
track markers are displayed on the progressbar and it is possible to skip between the
tracks within the cuesheet. Also the information found in the cuesheet file will replace
the information from the ID3 tags. When you enable this option, you’ll have to reboot
for it to come into effect.
b
b
The Rockbox manual Toshiba Gigabeat F Series
Page 53

Chapter 7. Playback Settings 53
7.15 Skip Length
Designed to speed up navigation and prevent unintentional track skipping when listening to long audio tracks, Skip Length changes the behavior of the Left and Right buttons so that they skip by a given number of minutes instead of skipping to a new track.
Note: To skip tracks with this setting set to a time interval, press Short Left + Long
Right to go forward and Short Right + Long Left to go back.
b
The Rockbox manual Toshiba Gigabeat F Series
Page 54

Chapter 8. General Settings 54
8 General Settings
Figure 8.1: The general settings screen
8.1 Playlist
The Playlist sub menu allows you to configure settings related to playlists.
Recursively Insert Directories. If set to On, then when a directory is inserted or
queued into a dynamic playlist, all subdirectories will also be inserted. If set
to Ask, Rockbox will prompt the user about whether to include sub-directories.
Warn When Erasing Dynamic Playlist. If set to Yes, Rockbox will provide a warning
if the user attempts to take an action that will cause Rockbox to erase the current
dynamic playlist.
8.2 File View
The File View menu deals with options relating to how the File Browser displays files.
The Rockbox manual Toshiba Gigabeat F Series
Page 55

Chapter 8. General Settings 55
Sort Case Sensitive: If this option is set to Yes, all files that start with upper case
letters will be listed first, followed by all files that begin with lower case letters. If
this option is set to NO, then case will be ignored when sorting files.
Sort Directories: This option controls how Rockbox sorts directories. The default is to
sort them alphabetically. By date sorts them with the oldest directory first. By
newest date sorts them with the newest directory first.
Sort Files: This option controls how Rockbox sorts files. All of the options for Sort
Directories are available in this option. In addition, there is a By type option
which sorts files alphabetically by their type (such as .mp3) then alphabetically
within each type.
Show Files: This option controls which files are displayed in the File Browser.
All: The File Browser displays all files and directories. Extensions are shown.
No files or directories are hidden.
Supported: The File Browser displays all directories and files supported by
Rockbox (see section A.1 (page 140)). Files and directories starting with .
(dot) or with the hidden flag set are hidden.
Music: The File Browser displays only directories, playlists and the supported
audio file formats. Extensions are stripped. Files and directories starting
with . or with the “hidden” flag set are hidden.
Playlists: The File Browser displays only directories and playlists, for simplified
navigation.
Show Filename Extensions: This option controls how file extensions are shown in the
File Browser.
Off: The file extensions are never shown.
On: The file extensions are always shown.
Only unknown types: Only the extensions of unknown filetypes are shown.
Only when viewing all types: Only show file extensions when Show Files is set
to All.
Follow Playlist: This option determines what directory the File Browser displays
first. If Follow Playlist is set to Yes, when you enter the File Browser from
the WPS, you will find yourself in the same directory as the currently playing file.
If Follow Playlist is set to No, when you enter the File Browser from the
WPS, you will find yourself in the directory you were in when you last left the
File Browser.
Show Path: If this setting is set to Full Path the full path to the current directory
will be displayed on the first line in the File Browser. If set to Current
Directory Only only the name of the current directory will be displayed.
The Rockbox manual Toshiba Gigabeat F Series
Page 56

Chapter 8. General Settings 56
This has a similar effect on the Database browser. If set to Current Directory
Only or Full Path, then the title of each menu will be displayed on the first line
in the Database Browser.
8.3 Database
This sub menu allows you to configure the database. See section 4.2 (page 25) for more
information about using the database.
8.4 Display
LCD Settings: This sub menu contains settings that relate to the display of the player.
Backlight: The amount of time the backlight shines after a key press. If set to
Off, the backlight will not light when a button is pressed. If set to On, the
backlight will never shut off. If set to a time (1 to 90 seconds), the backlight
will stay lit for that amount of time after a button press.
Backlight (While Plugged In): This setting is equivalent to the Backlight set-
ting except it applies when the player is plugged into the charger.
Backlight on Hold: This setting controls the behavior of the backlight when the
Hold switch is toggled. If set to Normal the backlight will behave as usual.
If set to Off the backlight will be turned off immediately when the Hold
switch is engaged and if set to On the backlight will be turned on and stay
on while the Hold switch is engaged.
Caption Backlight: This option turns on the backlight a number of seconds before
the start of a new track, and keeps it on for the same number of seconds after
the beginning so that the display can be read to see song information. The
amount of time is determined by the value of the backlight timeout setting,
but is no less than 5 seconds.
First Keypress Enables Backlight Only: With this option enabled the first key-
press while the backlight is turned off will only turn the backlight on without
having any other effect. When disabled the first keypress will also perform
its appropriate action.
Sleep (After Backlight Off): This setting controls how long rockbox will wait be-
fore turning off the display after the backlight is turned off. Turning off the
display saves a little bit of battery power but turning on the display takes
noticeably longer than just turning on the backlight.
Brightness: Changes the brightness of your LCD display.
Upside Down: Displays the screen so that the top of the display is nearest the
buttons. This is sometimes useful when carrying the player in a pocket for
easy access to the headphone socket.
Scrolling This feature controls how text will scroll in Rockbox. You can configure the
following parameters:
The Rockbox manual Toshiba Gigabeat F Series
Page 57

Chapter 8. General Settings 57
Scroll Speed: Sets how many times per second the automatic horizontal scrolling
text will move a step.
Scroll Start Delay: Controls how many milliseconds Rockbox should wait before
a new text begins automatically scrolling.
Scroll Step Size: Defines the number of pixels the text should move for each step,
as used by the Scroll Speed setting.
Bidirectional Scroll Limit: Rockbox has two different automatic horizontal scrolling
methods: 1) always scrolling the text to the left until the line has ended and
then beginning again at the start, and 2) moving to the left until you can
read the end of the line and then scrolling right until you see the beginning
again. Rockbox chooses which method it should use depending of how much
it has to scroll to the left. This setting lets you tell Rockbox where that limit
is, expressed in percentage of the line length.
Screen Scrolls Out of View: Screens can be manually scrolled horizontally by
pressing Long Right/Left. Setting this option to Yes will keep the list
entries at their fixed positions and allow them to be scrolled out of view,
whereas No will only scroll those entries which surpass the right margin.
Screen Scroll Step Size: Defines the number of pixels the horizontal manual screen
scroll should move for each step.
Paged Scrolling: When set to Yes scrolling vertically on pages that surpass the
screen size will page up/down instead of simply changing lines. This can be
useful on slow displays.
Status/Scrollbar: Settings related to on screen status display and the scrollbar.
Scroll Bar: Enables or disables the scroll bar at the left.
Status Bar: Enables or disables the status bar at the upper side.
Volume Display: Controls whether the volume is displayed as a graphic or a nu-
meric value on the Status Bar. If you select a numeric display, volume is
displayed in decibels. See section 6.1 (page 42) for more on the volume setting.
Battery Display: Controls whether the battery charge status is displayed as a
graphic or numerical percentage value on the Status Bar.
Peak Meter: The peak meter can be configured with a number of parameters.
Peak Release: This determines how fast the bar shrinks when the music becomes
softer. Lower values make the peak meter look smoother. Expressed in scale
units per 10ms.
Peak Hold Time: Specifies the time after which the peak indicator will reset. For
example, if you set this value to 5s, the peak indicator displays the loudest
volume value that occurred within the last 5 seconds. Larger values are useful
if you want to find the peak level of a song, which might be of interest when
copying music from the player via the analogue output to some other recording
device.
The Rockbox manual Toshiba Gigabeat F Series
Page 58

Chapter 8. General Settings 58
Clip Hold Time: The number of seconds that the clipping indicator will be visible
after clipping is detected.
Scale: Select whether the peak meter displays linear or logarithmic values. The
human ear perceives loudness on a logarithmic scale. If the Scale setting is
set to Logarithmic (dB) scale, the volume values are scaled logarithmically.
The volume meters of digital audio devices usually are scaled this way. On
the other hand, if you are interested in the power level that is applied to
your headphones you should choose Linear display. This setting cannot
be displayed in units like volts or watts because such units depend on your
headphones.
Minimum and maximum range: These two options define the full value range
that the peak meter displays. Recommended values for the Logarithmic
(dB) setting are -40 dB for minimum and 0 dB for maximum. Recommended
values for Linear display are 0 and 100%. Note that -40 dB is approximately 1% in linear value, but if you change the minimum setting in linear
mode slightly and then change to the dB scale, there will be a large change.
You can use these values for ‘zooming’ into the peak meter.
Default Codepage: A codepage describes the way extended characters that are not
available within the ASCII character set are encoded. ID3v1 tags do not have a
codepage encoding contained so Rockbox needs to know what encoding has been
used when generating these tags. This should be “ISO-8859-1” but to support languages outside Western Europe most applications use the setting of your operating
system instead. If your operating system uses a different codepage and you are
getting garbled extended characters you should adjust this settings. In most cases
sticking to “ISO-8859-1” would be sufficient.
8.5 System
8.5.1 Start Screen
Set the screen that Rockbox will start in. Selecting Resume Playback will resume
playback where it was when the player was shut off if there is a playlist to resume and
will then end up in the WPS. Selecting Previous Screen will make Rockbox start in
the screen it was when the player was shut off.
8.5.2 Battery
Options relating to the battery in the player.
Battery Capacity: This setting can be used to tell Rockbox what capacity (in mAh)
the battery being used has. The default is , which is the capacity value for the
standard battery shipped with the player. Rockbox uses this value to estimate
remaining battery life for the info screen and WPS. Changing this setting has no
The Rockbox manual Toshiba Gigabeat F Series
Page 59

Chapter 8. General Settings 59
effect whatsoever on actual battery life. This setting only affects the accuracy of
the battery life estimation as shown on screen.
Charge During USB Connection: This option lets you control whether the player should
charge during the USB connection and hence draw the full 500mA. Turning it Off
is recommended if the dap is connected through an unpowered USB hub or a laptop
port.
8.5.3 Disk
Options relating to the hard disk.
Disk Spindown: Rockbox has a timer that makes it spin down the hard disk after it is
idle for a certain amount of time. This setting controls the amount of time between
the last user activity and the time that the disk spins down. This idle time is only
affected by user activity, like navigating through the File Browser. When the
hard disk spins up to fill the audio buffer, it automatically spins down afterwards.
Directory Cache: Rockbox has the ability to cache the contents of your drive in RAM.
The Directory Cache takes a small amount of memory away from Rockbox
that would otherwise be used to buffer music, but it speeds up navigation in the
file browser by eliminating the slight pause between the time a navigation button
is pressed and the time Rockbox responds. Turning this setting on activates the
directory cache, and turning it off deactivates the directory cache.
Note: The first time you enable the directory cache, Rockbox will request a reboot
of the player and upon restarting take a few minutes to scan the drive. After this,
the directory cache will work in the background.
8.5.4 Idle Poweroff
Rockbox can be configured to turn off power after the unit has been idle for a defined
number of minutes. The player is idle when playback is stopped or paused. It is not idle
while the USB or charger is connected . Settings are either Off or 1 to 10 minutes in
1 minute steps. Then 15,30,45 and 60 minutes are available.
8.5.5 Limits
This sub menu relates to limits in the Rockbox operating system.
Max Entries in File Browser: This setting controls the limit on the number of files
that you can put in any particular directory in the file browser. You can configure
the size to be between 50 and 10,000 files in steps of 50. The default is 400. Higher
values will shorten the music buffer, so you should increase this setting only if you
have directories with a large number of files.
b
The Rockbox manual Toshiba Gigabeat F Series
Page 60

Chapter 8. General Settings 60
Max Playlist Size: This setting controls the maximum size of a playlist. The playlist
size can be between 1,000 and 32,000 files, in steps of 1,000 (default is 10,000).
Higher values will shorten the music buffer, so you should increase this setting only
if you have very large playlists.
8.5.6 Car Adapter Mode
This option turns On and Off the car ignition auto stop function.
Car Adapter Mode: When using the player in a car, Car Adapter Mode automat-
ically stops playback on the player when power (i.e. from cigarette lighter power
adapter) to the external DC in jack is turned off. If the Car Adapter Mode
is set to On, Rockbox will pause playback when the external power off condition
is detected. Rockbox will then shutdown the player after the length of time set
in the Idle Poweroff setting (see above). If power to the DC in jack is turned
back on before the Idle Poweroff function has shut the player off, playback will be
resumed 5 seconds after the power is applied. This delay is to allow for the time
while the car engine is being started.
Once the player is shut off either manually, or automatically with the Idle Poweroff
function, it must be powered up manually to resume playback.
8.5.7 Button Light Timeout
This setting controls the amount of time the button lights shine after a button press. If
set to Off, the LEDs will not light when a button is pressed. If set to On, the lights
will never shut off. If set to a time (1 to 120 seconds), the buttons will stay lit for that
amount of time after a button press.
8.5.8 Button Light Brightness
Changes the brightness of the button lights.
8.6 Bookmarking
Bookmarks allow you to save your current position within a track so that you can return
to it at a later time. Bookmarks are saved on a per directory basis (for dynamic playlists)
or for individual (saved) playlists. They are stored next to the directory/playlist they
reference. You can store multiple bookmarks for the same track.
Bookmark on Stop. This option controls whether Rockbox writes a bookmark to the
disk when playback is stopped. Setting this to No turns automatic bookmarking
completely off. In contrast Yes turns automatic bookmarking on while Ask asks
on stopping the track if a bookmark should be created. With the above options
Yes and Ask if there is an existing .bmark file the current position information
The Rockbox manual Toshiba Gigabeat F Series
Page 61

Chapter 8. General Settings 61
will be added to the front of the existing list, up to the maximum number of allowed
bookmarks per file (currently 10). If no .bmark file exists, one will be created with
the new bookmark information. Finally, if the Maintain a list of Recently
Used Bookmarks option is enabled, the bookmarking information will be added
to recent bookmarks list.
Yes – Recent Only. Turns on automatic bookmarking – One bookmark only
Ask – Recent Only. Asks if a bookmark should be created when stopping track –
One bookmark only
With the two Recent Only options, nothing is written to the .bmark file. If
the Maintain a list of Recently Used Bookmarks option is enabled, the
bookmarking information will however be added to recent bookmarks list.
Note: The Resume function remembers your position in the most recently ac-
cessed track regardless of how the Bookmark on Stop option is set.
Load Last Bookmark. When the Load Last Bookmark option is set to Yes, Rock-
box automatically returns to the position of the last bookmark within a file when
that file is played.
When the Load Last Bookmark option is set to Ask, Rockbox will give the user
the option of starting from the beginning of the track of or from the bookmark.
When the Load Last Bookmark option is set to No, playback always starts
from the beginning of the track, and the user must play the bookmark or use the
Load Bookmark function in the Main Menu, while the file is playing, to resume
at the bookmarked location.
Maintain a list of Recently Used Bookmarks. This list of Most Recent Bookmarks
(MRB’s) may be accessed through the Recent Bookmarks option of the Book-
marks sub menu of the Main Menu. When set to Yes each new bookmark will be
added to the MRB list. Setting this to No disables the addition of bookmarks to
the MRB list. Unique Only behaves like the Yes setting but in addition all older
entries for the current (dynamic) playlist will be removed from the MRB whenever
a new entry is added.
Bookmark Actions context menu. When viewing any bookmark list, pressing the stan-
dard context menu key (Long Select) will bring up the Bookmark Actions context
menu.
b
Resume will commence playback of the currently-selected bookmark entry.
Delete will remove just the currently-selected bookmark entry from the list.
8.7 Language
This setting controls the language of the Rockbox user interface. Selecting a language
will activate it. The language files must be in the /.rockbox/langs/ directory. See
section 11.1.3 (page 133) for further details about languages.
The Rockbox manual Toshiba Gigabeat F Series
Page 62

Chapter 8. General Settings 62
8.8 Voice
Voice Menus. This option controls the voicing of menus/settings as they are selected
by the cursor. In order for this to work, a voice file must be present in the
/.rockbox/langs/ directory on the player. Voice files are large and are not
shipped with Rockbox by default. The voice file is the name of the language
for which it is made, followed by the extension .voice. So for English, the file
name would be english.voice. This option is on by default, but will do nothing
unless the appropriate voice file is installed in the correct place on the player. The
Voice Menus have several limitations:
• Setting the Sound Option Channels to Karaoke may disable voice menus.
• Plugins and the wake up alarm do not support voice features.
Voice Directories. This option controls voicing of directory names. A voice file must be
present for this to work. Several options are available.
Spell. Speak the directory name by spelling it out letter by letter. Support is
provided only for the most common letters, numbers and punctuation.
Numbers. Each directory is assigned a number based upon its position in the file
list. They are then announced as “Directory 1”, “Directory 2” etc.
Off. No attempt will be made to speak directory names.
You can use pre-generated .talk clips to have directory names spoken properly, but
you must enable this explicitly (see below).
Use Directory .talk Clips. This option turns on the use of .talk clips for directories.
On. Use special pre-recorded MP3 files ( dirname.talk) in each directory. These
must be generated in advance, and are typically produced synthetically using
a text-to-speech engine on a PC.
Off. No checking is made for directory .talk clips; they are not used even if present.
This can reduce disk activity.
Use of a .talk clip takes precedence over other directory name voicing. Otherwise (e.g. if a .talk clip is not available), voicing uses the method set under Voice Directories above.
Voice Filenames. This option controls voicing of filenames. Again, a voice file must be
present for this to work. The options provided are Spell, Numbers, and Off
which function the same as for Voice Directories. You can use pre-generated
.talk clips to have filenames spoken properly, but you must enable this explicitly
(see below).
Use File .talk Clips. This option turns on the use of .talk clips for files.
On. Use special pre-recorded MP3 files for each file. This functions the same as
for directories except that the .talk clip file must have the same name as the
described file with an extra .talk extension (e.g. Punkadiddle.mp3 would
require a file called Punkadiddle.mp3.talk).
The Rockbox manual Toshiba Gigabeat F Series
Page 63

Chapter 8. General Settings 63
Off. No checking is made for file .talk clips; they are not used even if present. This
can reduce disk activity.
Use of a .talk clip takes precedence over other filename voicing. Otherwise (e.g. if
a .talk clip is not available), voicing uses the method set under Voice Filenames
above.
Say File Type. This option turns on voicing of file types when Voice Filenames is set
to Spell or Numbers. When Voice Directories is set to Spell, “Directory”
will be voiced after each spelled out directory.
Announce Battery Level. When this option is enabled the battery level is announced
when it falls under 50%, 30% and 15%.
See ZVoiceHowto for more details on configuring speech support in Rockbox.
The Rockbox manual Toshiba Gigabeat F Series
Page 64

Chapter 9. Theme Settings 64
9 Theme Settings
The Theme Settings menu offers options that you can change to customize the visual
apperance of Rockbox.
Browse Themes. This option will display all the currently installed themes on the
player, press Select or Right to load the chosen theme and apply it.
A theme is a configuration file, stored in a specific directory, that typically changes
the WPS , font used and on some platforms additional information such as background image and text colours.
There are a number of themes that ship with Rockbox. If none of these suit your
needs, many more can be downloaded from . Some of the downloads from this
website will actually be standalone WPS files, others will be full-blown themes.
Note: Themes do not have to be purely visual. It is quite possible to create a theme
that switches between audio configurations for use in the car, with headphones and
when connected to an external amplifier. See section 11.2.2 (page 134) for more
details.
Browse Fonts. Browse the installed fonts on your player. Selecting one will activate it.
See section 11.1.2 (page 133) for further details about fonts.
Browse WPS files. Opens the File Browser in the /.rockbox/wps directory and
displays all .wps files. Selecting one will activate it, stop will exit back to the
menu. For further information about the WPS see section 4.3 (page 28). For
information about editing a .wps file see section 11.2 (page 134).
Show Icons. Rockbox has the ability to display an icon to the left of the file in the File
Browser. For details of these icons, see section A.1 (page 140). These icons can
also be customised. See the ZIconSets and ZCustomIcons Wiki pages for details.
Clear Backdrop: Rockbox allows you to select bitmap pictures to use as backdrops, see
section 11.1.6 (page 134) for further information. This option allows you to clear
the backdrops that you set.
Line Selector Type. This option allows you to select which type of line selector to use.
Pointer: A small arrow to the left of the menu text.
Bar (inverse): A bar with inverted foreground and background colour.
Bar (Solid Colour): A bar with a solid colour, the colour is set in the Colours
submenu.
b
The Rockbox manual Toshiba Gigabeat F Series
Page 65

Chapter 9. Theme Settings 65
Bar (Gradient Colour): A bar with a colour gradient, the colours are set in the
Colours submenu.
Colours. The options in this menu sets the colours for visual elements in Rockbox.
Line Selector Colours. These options sets the colours for the line selector bars.
Primary Colour: Set the primary colour used for the gradient line selector
bar and the colour used for the solid color line selector bar.
Secondary Colour: Set the secondary colour used for the gradient line selec-
tor bar.
Text Colour: Set the colour of the selected text when using the solid colour
or the gradient colour line selection bars.
Background Colour: Sets the background colour for the display.
Foreground Colour: Sets the colour used for text and icons.
Reset Colours: Resets the LCD display to Rockbox’s default colours.
The Rockbox manual Toshiba Gigabeat F Series
Page 66

Chapter 10. Plugins 66
10 Plugins
Plugins are programs that Rockbox can load and run. Only one plugin can be loaded at
a time. Plugins have exclusive control over the user interface. This means you cannot
switch back and forth between a plugin and Rockbox. When a plugin is loaded, you
need to exit it to return to the Rockbox interface. Most plugins will not interfere with
music playback but some of them will stop playback while running. Plugins have the
file extension .rock. Most of them can be started from Browse Plugins in the Main
Menu.
Viewer plugins get started automatically by opening an associated file (i.e. text files,
chip8 games), or from the Open with option on the Context Menu.
10.1 Games
See also the Chip-8 emulator in section 10.3.2 (page 111) and Rockboy in section 10.3.7
(page 115).
The Rockbox manual Toshiba Gigabeat F Series
Page 67

Chapter 10. Plugins 67
10.1.1 Blackjack
Figure 10.1: Blackjack
Blackjack, a game played in casinos around the world, is now available in the palm of
your hand! The rules are simple: try to get as close to 21 without going over or simply
beat out the dealer for the best hand. Although this may not seem difficult, blackjack
is a game renowned for the strategy involved. This version includes the ability to split,
buy insurance, and double down.
For the full set of rules to the game, and other facinating information visit
http://www.blackjackinfo.com/blackjack-rules.php
The Rockbox manual Toshiba Gigabeat F Series
Page 68

Chapter 10. Plugins 68
Key Action
In menu
A Start new game
Menu Resume saved game
Right Show high scores
Power Quit
In game
Left / Right /
Up / Down Enter betting amount
Volume up Hit (Draw new card)
Volume down Stay (End hand)
Select Double down
Menu Save game
Power Return to menu or cancel
10.1.2 BrickMania
Figure 10.2: BrickMania
BrickMania is a clone of the classic game Breakout. The aim of the game is to destroy
all the bricks by hitting them with the ball once or more. Sometimes a special item falls
down when you destroy a brick. For a special item to take effect, you must catch it with
The Rockbox manual Toshiba Gigabeat F Series
Page 69

Chapter 10. Plugins 69
the paddle. Look out for the bad ones.
Special items
Displayed Name Description
N Normal Returns paddle to normal.
D Die Ball dies; lose a life.
L Life Gain a life.
F Fire Allows you to shoot bricks with paddle.
G Glue Ball sticks to paddle each time it hits.
B Ball Immediately fires another ball.
FL Flip Flip left / right movement.
Key Action
Left / Right Moves the paddle
Select / Up Release the ball / Fire
Power Open menu / Quit
The Rockbox manual Toshiba Gigabeat F Series
Page 70

Chapter 10. Plugins 70
10.1.3 Bubbles
Figure 10.3: Bubbles
The goal of the game is to beat each level as quickly as possible by clearing the board of
all bubbles. Bubbles are removed from the board when a cluster of three of more of the
same type is formed. The game is over when any bubbles on the board extend below
the bottom line. To make things more difficult, the entire board is shifted down every
time a certain number of shots have been fired. Points are awarded depending on how
quickly the level was completed.
Key Action
Power Pause game
Left / Right Aim the bubble
Select Fire bubble
Menu Save game
Power Exit to menu
The Rockbox manual Toshiba Gigabeat F Series
Page 71

Chapter 10. Plugins 71
10.1.4 Chessbox
Figure 10.4: Chessbox
Chessbox is a one-person chess game with computer artificial intelligence. The chess
engine is a port of GNU Chess 2 by John Stanback.
It also works as a PGN file viewer. Instead of executing the game from the plugin
menu, look for any file with .pgn extension in the file browser and execute it. Chessbox
will show the list of matches included in the file and allow you to select the one you want
to watch. After that, you can scroll back and forth through the moves of the game. If
the menu is invoked while in the viewer, the user is allowed to select a new match from
the same file or quit the game.
“Force play” while the computer is thinking will cause it to make its move immediately.
If done while it’s your turn, the computer will move for you and flip the board so that
you are playing from the other side. If you want, you can force play an entire game and
watch the artificial intelligence fight against itself.
When you quit the game the current state will be saved and restored when you resume
the game. The menu also allows the user to reload the last game saved, save the current
position and start a new game without having to quit the game.
The Rockbox manual Toshiba Gigabeat F Series
Page 72

Chapter 10. Plugins 72
Keys
Key Action
Direction keys Move the cursor
Select Pick up / Drop piece
Menu Change level
A Force play
Power Show the menu
10.1.5 Chopper
Navigate a cavernous maze without banging into walls, the ceiling, or the floor. How
long can you fly your chopper?
Key Action
Select Make chopper fly
Menu Enter menu
10.1.6 Dice
Dice is a simple dice rolling simulator. Select number and type of dice to roll in a menu
and start by choosing “Roll Dice”. The result is shown as individual numbers as well as
the total of the rolled dice.
Key Action
A Roll dice again
Power Quit
The Rockbox manual Toshiba Gigabeat F Series
Page 73

Chapter 10. Plugins 73
10.1.7 Doom
Figure 10.5: Doom
This is the famous Doom game.
Getting started
For the game to run you need .wad game files located in /.rockbox/doom/ on your
player. Create the directory and save the following files there:
rockdoom.wad. The Rockbox .wad, based on prboom.wad from prboom-2.2.6
Your wad files. Copy all Doom wads you wish to play into that directory.
The needed files can be found at ZPluginDoom
To play addon wads create the addons directory within the doom directory. Place wad
files in this directory. Currently doom only supports a maximum number of 10 addons.
A free alternative for Doom 2 is FreeDoom (http://freedoom.sourceforge.net). This
can be used in place of doom2.wad, or it may be used as an addon in Doom, by placing
it in the addons directory.
Menus
Rockdoom Menu. The Rockdoom menu is shown when Doom is first launched. This is
the only time it can be accessed (before starting the game). To re-adjust Rockdoom
options, you will need to quit your current game and restart the plugin.
The Rockbox manual Toshiba Gigabeat F Series
Page 74

Chapter 10. Plugins 74
Main Menu. The Doom plugin has a main menu, which is brought up before a game
is started. It has the following entries:
Game. Select which (official) wad to launch
Addon. Select which unofficial addon wad to launch (From /.rockbox/doom/addons
directory)
Demos. Select which demo file to play on game start
Options. Configure low-level Doom options
Play Game. Launch the wad/addon/Demo chosen
Options Menu. This menu has the following options:
Sound. Enable or Disable sound in Doom
Set Keys. Change the game key configuration
Time Demo. Run a timed demo, to test game speed on a player (Only runs on
Doom Shareware)
Player Bobbing. Enable or Disable player up/Down movement
Translucency. Enable or Disable sprite translucency (Fireballs, Plasma...)
Fake Contrast. Enable or Disable modified game lighting
Always Run. Make the player always run
Headsup Display. Show the player status when in fullscreen
Statusbar Always Red. Disable color response statusbar
InGame Main Menu. This menu can only be accessed from within a running game,
and is displayed by
New Game. Start a new game
Options. In game options
Load Game. Load a saved game
Save Game. Save the current game
Quit. Quit the game
InGame Options Menu. This menu has the folloing options:
End Game. Ends the current game
Messages. Enable or Disable in game messages
Screen Size. Shrink or Enlarge the displayed portion of the game
Gamma. Change the brightness (Gamma) of the game
Sound Volume. Change the sound, music and system volume
Note: In game music is not currently supported
b
The Rockbox manual Toshiba Gigabeat F Series
Page 75

Chapter 10. Plugins 75
Keys
Key Action
Up Move Forward
Down Down
Left Turn Left
Right Turn Right
A Shoot
Menu Open
Power Escape
Select Enter
Volume down Change Weapon
Playing the game
After installation of the wad files is complete you can start the game.
10.1.8 Flipit
Figure 10.6: Flipit
Flipping the colour of the token under the cursor also flips the tokens above, below, left
and right of the cursor. The aim is to end up with a screen containing tokens of only
The Rockbox manual Toshiba Gigabeat F Series
Page 76

Chapter 10. Plugins 76
one colour.
Key Action
Up / Down /
Left / Right
Select Flip
Menu Shuffle
Volume up Solve
Volume down Solve step by step
Power Quit the game
10.1.9 Jewels
Move the cursor
Figure 10.7: Jewels
Jewels is a simple yet addicting game which involves swapping pairs of jewels in order
to form connected segments of three or more of the same type.
The goal of the game is to score as many points as possible before running out of
available moves. Higher points are awarded to larger combos. The game advances to
the next level after every one hundred points and randomly clears several jewels.
The Rockbox manual Toshiba Gigabeat F Series
Page 77

Chapter 10. Plugins 77
Key Action
Left/Right/
Up/Down Move the cursor around the jewels
Select Select a jewel
Long Select Show the in-game menu
Power Exit
10.1.10 MazezaM
Figure 10.8: MazezaM
The goal of this puzzle game is to escape a dungeon consisting of ten “mazezams”. These
are rooms containing rows of blocks which can be shifted left or right. You can move
the rows only by pushing them and if you move the rows carelessly, you will get stuck.
You can have another go by selecting “retry level” from the menu, but this will cost you
a life. You start the game with three lives. Luckily, there are checkpoints at levels four
and eight.
The Rockbox manual Toshiba Gigabeat F Series
Page 78

Chapter 10. Plugins 78
Key Action
Up, Down, Left,
Right
Power Menu
10.1.11 Minesweeper
Move Character
Figure 10.9: Minesweeper plugin
The classic game of minesweeper. Use to select the required percentage of mines to
set the difficulty then press the key to begin.
The aim of the game is to uncover all of the squares on the board. If a mine is
uncovered then the game is over. If a mine is not uncovered, then the number of mines
adjacent to the current square is revealed. The aim is to use the information you are
given to work out where the mines are and avoid them. When the player is certain that
they know the location of a mine, it can be tagged to avoid accidentally “stepping” on
it.
The Rockbox manual Toshiba Gigabeat F Series
Page 79

Chapter 10. Plugins 79
Key Action
Up / Down /
Left / Right
A Toggle flag on / off
Select Reveal the contents of the current square
Menu Display the current game status
Power Exit the game
10.1.12 Pacbox
Move the cursor across the minefield
Figure 10.10: Pacbox
Pacbox is an emulator of the Pacman arcade machine hardware. It is a port of PIE –
Pacman Instructional Emulator (http://www.ascotti.org/programming/pie/pie.htm).
ROMs
To use the emulator to play Pacman, you need a copy of ROMs for “Midway Pacman”.
The Rockbox manual Toshiba Gigabeat F Series
Page 80

Chapter 10. Plugins 80
Filename MD5 checksum
pacman.5e 2791455babaf26e0b396c78d2b45f8f6
pacman.5f 9240f35d1d2beee0ff17195653b5e405
pacman.6e 290aa5eae9e2f63587b5dd5a7da932da
pacman.6f 19a886fcd8b5e88b0ed1b97f9d8659c0
pacman.6h d7cce8bffd9563b133ec17ebbb6373d4
pacman.6j 33c0e197be4c787142af6c3be0d8f6b0
These need to be stored in the /.rockbox/pacman/ directory on your player. In the
MAME ROMs collection the necessary files can be found in pacman.zip and puckman.zip.
The MAME project itself can be found at http://www.mame.net.
Keys
Key Action
Up Move Up
Down Move Down
Left Move Left
Right Move Right
A Insert Coin
Select 1-Player Start
Power 2-Player Start
Menu Menu
The Rockbox manual Toshiba Gigabeat F Series
Page 81

Chapter 10. Plugins 81
10.1.13 Pegbox
Figure 10.11: pegbox
To beat each level, you must destroy all of the pegs. If two like pegs are pushed into
each other they disappear except for triangles which form a solid block and crosses which
allow you to choose a replacement block.
Key Action
In game
Up, Down,
Left, Right
Select to select/save
A to restart level
Volume up to go up a level
Volume down to go down a level
Power to quit
to move around
The Rockbox manual Toshiba Gigabeat F Series
Page 82

Chapter 10. Plugins 82
10.1.14 Pong
Figure 10.12: Pong
Pong is a simple two player “tennis game”. Whenever a player misses the ball the other
scores.
Key Action
Up Left player up
Down Left player down
Volume up Right player up
Volume down Right player down
Power Quit
The Rockbox manual Toshiba Gigabeat F Series
Page 83

Chapter 10. Plugins 83
10.1.15 Robotfindskitten
Figure 10.13: Robotfindskitten
In this game, you are robot (#). Your job is to find kitten. This task is complicated
by the existence of various things which are not kitten. Robot must touch items to
determine if they are kitten or not. The game ends when robotfindskitten.
Key Action
Up, Down, Left,
Right
Power Quit
Move robot
The Rockbox manual Toshiba Gigabeat F Series
Page 84

Chapter 10. Plugins 84
10.1.16 Rockblox
Figure 10.14: Rockblox
Rockblox is a rockbox version of the classic falling blocks game. The aim of the game is
to make the falling blocks of different shapes form full rows. Whenever a row is complete
it will be cleared and the game score will increase. For every ten lines completed the
game level increases, making the blocks fall faster. If the pile of blocks reach the ceiling
the game is over.
Key Action
A Restart game
Left Move left
Right Move right
Down Move down
Volume up Rotate left
Volume down Rotate right
Select Drop
Hold switch Pause
Power Quit
The Rockbox manual Toshiba Gigabeat F Series
Page 85

Chapter 10. Plugins 85
10.1.17 Rockblox1d
Rockblox1d is a game for people who find rockblox too hard. In this version the second
dimension is missing so the user only has to move the bricks down. No horizontal moving
anymore and no need to rotate the brick!
Key Action
Select Move down faster
Power Quit
10.1.18 Sliding Puzzle
Figure 10.15: Sliding puzzle
The classic sliding puzzle game. Rearrange the pieces so that you can see the whole
picture, or switch to number tiles if you like it a little easier
Key controls:
The Rockbox manual Toshiba Gigabeat F Series
Page 86

Chapter 10. Plugins 86
Key Action
Left, Right, Up
and Down
Select Shuffle
A Change between picture and numbered
Power Stop the game
10.1.19 Snake
Move Tile
tiles
Figure 10.16: Snake
This is the popular snake game. The aim is to grow your snake as large as possible by
eating the dots that appear on the screen. The game will end when the snake touches
either the borders of the screen or itself.
Key Action
Up/Down Change levels (1 is slowest, 9 is fastest)
Select Toggle Play/Pause
The Rockbox manual Toshiba Gigabeat F Series
Page 87

Chapter 10. Plugins 87
10.1.20 Snake 2
Figure 10.17: Snake 2 – The Snake Strikes Back
Another version of the Snake game. Move the snake around, and eat the apples that
pop up on the screen. Each time an apple is eaten, the snake gets longer. The game
ends when the snake hits a wall, or runs into itself.
Key Action
In menu
Up / Down Set game speed
Right / Left Select starting maze
Menu Select game type (A or B)
Select Start the game
In game
Up / Down /
Left / Right
Select Pause and resume the game
Power Quit
In game A, the maze stays the same, in game B after an increasing number of apples
eaten the maze is replaced by a new one.
Steer the snake
The Rockbox manual Toshiba Gigabeat F Series
Page 88

Chapter 10. Plugins 88
10.1.21 Sokoban
Figure 10.18: Sokoban
The object of the game is to push boxes into their correct position in a crowded warehouse
with a minimal number of pushes and moves. The boxes can only be pushed, never
pulled, and only one can be pushed at a time.
Sokoban may be used as a viewer for viewing saved solutions and playing external
level sets with the .sok extension. Level sets should be in the standard Sokoban text
format or RLE (Run Length Encoded). For more information about the level format,
see http://sokobano.de/wiki/index.php?title=Level format
The Rockbox manual Toshiba Gigabeat F Series
Page 89

Chapter 10. Plugins 89
Key Action
In game
Up, Down, Left,
Right
Power Menu
Volume down Back to previous level
Menu Restart level
Volume up Go to next level
Select Undo last movement
A Redo previously undone move
Select Pause/resume
Up/Down Increase/decrease playback speed
Left/Right Go backward/forward (while paused)
Power Quit
Some places where can you can find level sets:
Move the “sokoban” up, down, left, or
right
Solution playback
• http://www.sourcecode.se/sokoban/levels.php
• http://sokobano.de/en/levels.php
Note that some level sets may contain levels that are too large for this version of Sokoban
and are unplayable as a result.
The Rockbox manual Toshiba Gigabeat F Series
Page 90

Chapter 10. Plugins 90
10.1.22 Solitaire
Figure 10.19: Klondike solitaire
This is the classic Klondike solitaire game for Rockbox. This is probably the best-known
solitaire in the world. Many people do not even realize that other games exist. Though
the name may not be familiar, the game itself certainly is. This is due in no small part
to Microsoft’s inclusion of the the game in every version of Windows. Though popular,
the odds of winning are rather low, perhaps one in thirty hands.
For the full set of rules to the game, and other interesting information visit http:
//www.solitairecentral.com/rules/klondike.html
The Rockbox manual Toshiba Gigabeat F Series
Page 91

Chapter 10. Plugins 91
Key Action
Up / Down /
Left / Right
Select Select cards, move cards, reveal hidden
Menu If a card was selected – unselect it, else
A + Left Put the card from the top of the remains
Long Select Put the card under the cursor on one of
A + Right Put the card on top of the remains stack
Power Show menu
10.1.23 Spacerocks
Move Cursor around.
cards...
Draw 3 new cards from the remains stack
stack on top of the cursor
the 4 final colour stacks.
on one of the final colour stacks.
Figure 10.20: Spacerocks
Spacerocks is a clone of the old arcade game Asteroids. The goal of the game is to blow
up the asteroids and avoid being hit by them. Once in a while, a UFO will appear –
shoot this for extra points.
The Rockbox manual Toshiba Gigabeat F Series
Page 92

Chapter 10. Plugins 92
Key Action
Select Shoot
Up Thrust
Left/ Right Turn left/right
Down Teleport
A Pause game
Power Quit
10.1.24 Star
Figure 10.21: Star game
This is a puzzle game. It is actually a rewrite of Star, a game written by CDK designed
for the hp48 calculator.
Rules: Take all of the “o”s to go to the next level. You can switch control between
the filled circle, which can take “o”s, and the filled square, which is used as a mobile
wall to allow your filled circle to get to places on the screen it could not otherwise reach.
The block cannot take “o”s.
The Rockbox manual Toshiba Gigabeat F Series
Page 93

Chapter 10. Plugins 93
Key Action
Left Move Left
Right Move Right
Up Move Up
Down Move Down
Select Switch between circle and square
Volume down Previous level
A Reset level
Volume up Next level
Power Exit the game
10.1.25 Sudoku
Figure 10.22: Sudoku
Sudoku in Rockbox can act as both a plugin and a viewer. When starting Sudoku from
the Browse Plugins menu, a random game will be generated automatically, and an
estimate of its difficulty (very easy, easy, medium, hard or fiendish) will be displayed
on the screen. New games can be generated from the Generate menu option. When
“playing” an existing Sudoku game file from Rockbox’ file browser the plugin is invoked
as viewer. The selected Sudoku will get loaded and you can start solving it. The sudoku
games need to be stored as text files with the extension .ss as single file per game.
The Rockbox manual Toshiba Gigabeat F Series
Page 94

Chapter 10. Plugins 94
You can create and save your own grids under the New menu option. Enter the menu
(as described in the key table below) when you have finished and enter the full path to
save to including the .ss extension (e.g. /sudoku/new.ss).
The scratchpad
When you play Sudoku on paper most people like to mark numbers in cells that are
possible candidates for the cells. This can be done with the scratchpad, shown as separate
column. Change the number under the cursor to the number you want to put on the
scratchpad and press the scratchpad button, the number will then be added. If the
number was already on the scratchpad it will get removed again. The column is stored
seperatly for every cell on the board. The stored values can be displayed inline as small
dots by enabling the Show Markings settings.
Note: The scratchpad is not saved when saving the game.
Key Action
b
Up / Down /
Left / Right
Select Change number under the cursor
Long Select Constantly changing the number under
Menu Open Menu
A Add/Remove number to scratchpad
Power Quit
Some places where can you can find .ss files:
• Simple Sudoku (Advanced Puzzle Packs 1 and 2 located near the bottom of that
page): http://www.angusj.com/sudoku/
• Kjell’s Sudoku generator/solver: http://kjell.haxx.se/sudoku/
Move the cursor
the cursor
The Rockbox manual Toshiba Gigabeat F Series
Page 95

Chapter 10. Plugins 95
10.1.26 Wormlet
Figure 10.23: Wormlet game
Wormlet is a multi-worm game on a multi-threaded multi-functional Rockbox console.
You navigate a hungry little worm. Help your worm to find food and to avoid poisoned
argh-tiles. The goal is to turn your tiny worm into a big worm for as long as possible.
Menu controls:
Key Action
Left / Right Controls number of worms in the game
Game controls:
Key Action
Left Turn left
Right Turn right
Up Turn Up
Down Turn Down
The Rockbox manual Toshiba Gigabeat F Series
Page 96

Chapter 10. Plugins 96
The game
Use the control keys of your worm to navigate around obstacles and find food. Worms
do not stop moving except when dead. Dead worms are no fun. Be careful as your worm
will try to eat anything that you steer it across. It won’t distinguish whether it is edible
or not.
Food. The small square hollow pieces are food. Move the worm over a food tile to eat
it. After eating the worm grows. Each time a piece of food has been eaten a new
piece of food will pop up somewhere. Unfortunately for each new piece of food
that appears two new “argh” pieces will appear, too.
Argh. An “argh” is a black square poisoned piece - slightly bigger than food - that
makes a worm say “Argh!” when run into. A worm that eats an “argh” is dead.
Thus eating an “argh” must be avoided under any circumstances. “Arghs” have
the annoying tendency to accumulate.
Worms. Thou shall not eat worms. Neither other worms nor thyself. Eating worms is
blasphemous cannibalism, not healthy and causes instant death. And it doesn’t
help anyway: the other worm isn’t hurt by the bite. It will go on creeping happily
and eat all the food you left on the table.
Walls. Don’t crash into the walls. Walls are not edible. Crashing a worm against a wall
causes it a headache it doesn’t survive.
Game over. The game is over when all worms are dead. The longest worm wins the
game.
Pause the game. Press to pause the game. Press again to resume the game.
Stop the game. There are two ways to stop a running game.
• If you want to quit Wormlet entirely simply hit . The game will stop
immediately and you will return to the game menu.
• If you want to stop the game and still see the screen hit . This freezes
the game. If you hit button again a new game starts with the same
configuration. To return to the games menu you can hit . A stopped game
can not be resumed.
The scoreboard
On the right side of the game field is the score board. For each worm it displays its
status and its length. The top most entry displays the state of worm 1, the second worm
2 and the third worm 3. When a worm dies its entry on the score board turns black.
Len: Here the current length of the worm is displayed. When a worm is eating food it
grows by one pixel for each step it moves.
The Rockbox manual Toshiba Gigabeat F Series
Page 97

Chapter 10. Plugins 97
Hungry: That’s the normal state of a worm. Worms are always hungry and want to eat.
It is good to have a hungry worm since it means that your worm is alive. But it is
better to get your worm growing.
Growing: When a worm has eaten a piece of food it starts growing. For each step it
moves over food it can grow by one pixel. One piece of food lasts for 7 steps. After
your worm has moved 7 steps the food is used up. If another piece of food is eaten
while growing it will increase the size of the worm for another 7 steps.
Crashed: This indicates that a worm has crashed against a wall.
Argh: If the score board entry displays “Argh!” it means the worm is dead because it
tried to eat an “argh”. Until we can make the worm say “Argh!” it is your job to
say “Argh!” aloud.
Wormed: The worm tried to eat another worm or even itself. That’s why it is dead
now. Making traps for other players with a worm is a good way to get them out
of the game.
Hints
• Initially you will be busy with controlling your worm. Try to avoid other worms
and crawl far away from them. Wait until they curl up themselves and collect the
food afterwards. Don’t worry if the other worms grow longer than yours - you can
catch up after they’ve died.
• When you are more experienced watch the tactics of other worms. Those worms
controlled by artificial stupidity head straight for the nearest piece of food. Let
the other worm have its next piece of food and head for the food it would probably
want next. Try to put yourself between the opponent and that food. From now
on you can ’control’ the other worm by blocking it. You could trap it by making
a 1 pixel wide U-turn. You also could move from food to food and make sure you
keep between your opponent and the food. So you can always reach it before your
opponent.
The Rockbox manual Toshiba Gigabeat F Series
Page 98

Chapter 10. Plugins 98
10.1.27 Xobox
Figure 10.24: Xobox
Xobox is a simple clone of the well known arcade game Qix. The aim of the game is to
section off parts of the arena with your trail in order to remove that section from the
game. Be careful not to get in the way of enemy balls because, if they hit you or your
trail, you lose a life. To finish a level you have to section off more than 75%.
Key Action
Up, Down, Left,
Right
A Pause
Power Open menu
Move around the arena
The Rockbox manual Toshiba Gigabeat F Series
Page 99

Chapter 10. Plugins 99
10.2 Demos
10.2.1 Bounce
Figure 10.25: Bounce
This demo is of the word “Rockbox” bouncing across the screen. There is also an
analogue clock in the background. In Scroll mode the bouncing text is replaced by a
different one scrolling from right to left.
Key Action
Up / Down Moves to next/previous option
Left / Right Increases/decreases option value
A Toggles Scroll mode
Power Exits bounce demo
Available options are:
Xdist/Ydist. The distance to X axis and Y axis respectively
Xadd/Yadd. How fast the code moves on the sine curve on each axis
Xsane/Ysane. Changes the appearance of the bouncing.
The Rockbox manual Toshiba Gigabeat F Series
Page 100

Chapter 10. Plugins 100
10.2.2 Credits
The credits plugin scrolls the entire list of the names of all the Rockbox contributors after
displaying the Rockbox logo and version. This plugin is called when selecting Version
from the System section of the Rockbox main menu. Exit at any time by pressing Left
or Power.
10.2.3 Cube
Figure 10.26: Cube
This is a rotating cube screen saver in 3D.
Key Action
A Display at maximum frame rate
Select Pause
Menu Cycle draw mode
Right / Left Select axis to adjust
Up / Down Change speed/angle (speed can not be
changed while paused)
Power Quit
The Rockbox manual Toshiba Gigabeat F Series
 Loading...