

Page 1
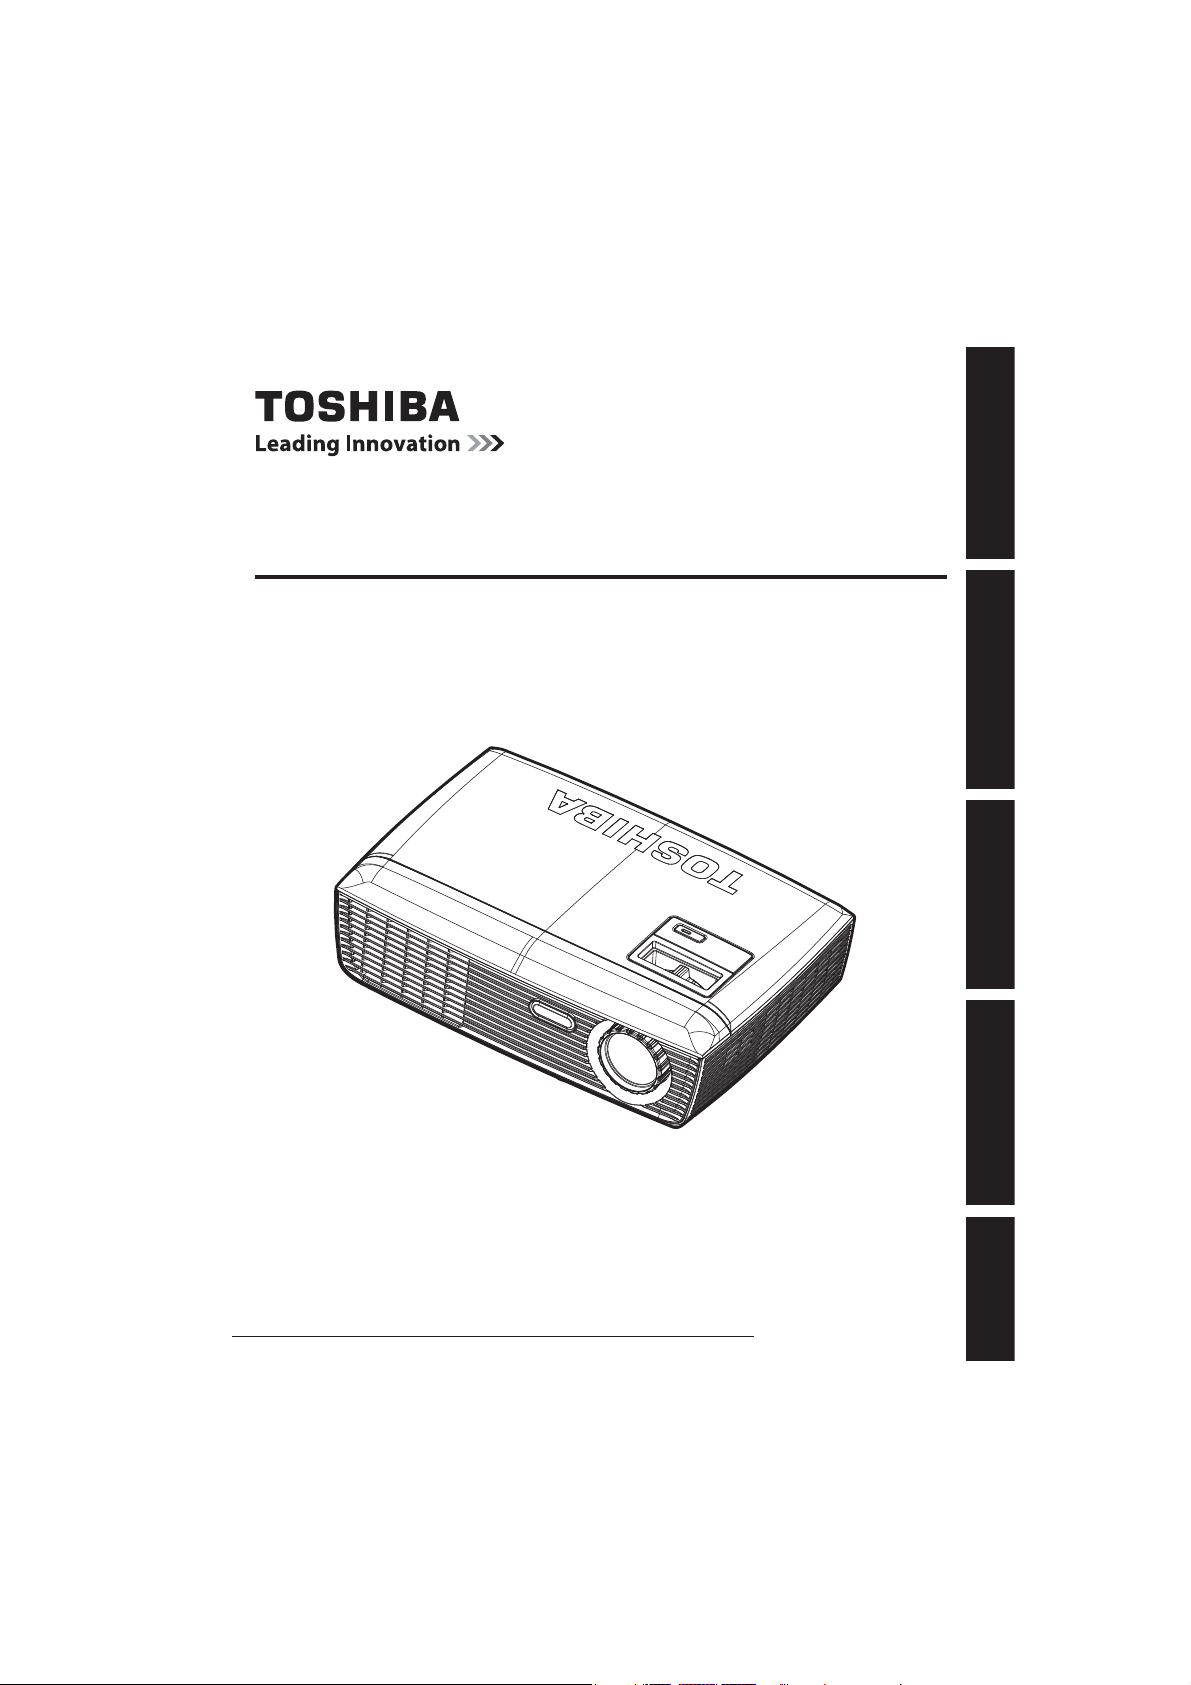
NPS10A/NPX10A
DATA PROJECTOR
USER’S MANUAL
Before UsingPreparationsOperationsMaintenanceOthers
In the spaces provided below, record the Model and Serial No. located at the bottom of
your projector.
Model No.
Retain this information for future reference.
Serial No.
Page 2
SAFETY INFORMATION
The lightning flash with arrowhead symbol, within an equilateral triangle, is
intended to alert the user to the presence of uninsulated “dangerous voltage” within the product’s enclosure that may be of sufficient magnitude to
constitute a risk of electric shock to persons.
The exclamation point within an equilateral triangle is intended to alert the
user to the presence of important operating and maintenance (servicing)
instructions in the literature accompanying the appliance.
WARNING: TO REDUCE THE RISK OF FIRE OR ELECTRIC SHOCK, DO NOT
EXPOSE THIS APPLIANCE TO RAIN OR MOISTURE. DANGEROUS
HIGH VOLTAGES ARE PRESENT INSIDE THE ENCLOSURE. DO NOT
OPEN THE CABINET. REFER SERVICING TO QUALIFIED PERSONNEL
ONLY.
IMPORTANT SAFETY INSTRUCTIONS
CAUTION: PLEASE READ AND OBSERVE ALL WARNINGS AND INSTRUC-TIONS
GIVEN IN THIS USER’S MANUAL AND THOSE MARKED ON THE UNIT.
RETAIN THIS BOOKLET FOR FUTURE REFER-ENCE.
This unit is fully transistorized and does not contain any parts that can be repaired by the
user.
WARNING: DO NOT REMOVE THE CABINET COVER, OR YOU MAY BE EX-POSED
TO DANGEROUS VOLTAGE. REFER SERVICING TO QUALIFIED
SERVICE PERSONNEL ONLY.
1. Read User’s Manual
After unpacking this product, read
the user’s manual carefully, and
follow all of the operating and
other instructions.
2. Power Sources
This product should be operated
only from the type of power source
which does not exceed the voltage
range specified on the rating label
and the power cord. If you are not
sure of the type of power supply to
your home, consult your product
dealer or local power company.
2
Page 3
IMPORTANT SAFETY INSTRUCTIONS (Continued)
3. Source of Light
Do not look into the lens while the
lamp is on. The strong light from
the lamp may cause damage to
your eyesight.
4. Ventilation
Openings in the cabinet are provided for ventilation and to ensure
reliable operation of the product
and protect it from overheating.
These openings must not be
blocked or covered. Never block
an opening by placing the product
on a bed, sofa, rug or other similar
surface. Do not place it in a built-in
installation such as a bookcase or
rack, unless proper ventilation is
provided.
5. Heat
The product should be situated
away from heat sources such as
radiators, heat registers, stoves, or
other products (including amplifiers) that produce heat.
6. Water and Moisture
Do not use this product near
water. - for example, near a bath
tub, wash bowl, kitchen sink, or
laundry tub; in a wet basement; or
near a swimming pool and the like.
Before Using
7. Cleaning
Unplug this product from the wall
outlet before cleaning. Do not use
liquid cleaners or aerosol cleaners. Always use a soft cloth for
cleaning.
8. Be sure that you fimly
insert the plug into the
wall outlet.
Incorrect or faulty connections
may result in fire or electric shock.
Avoid using an unsound or loose
outlet.
3
Page 4
IMPORTANT SAFETY INSTRUCTIONS (Continued)
9. Power Cord Protection
Power cords should be routed
so that they are not likely to be
walked on or pinched by items
placed upon or against them, paying particular attention to cords at
plugs, convenience receptacles,
and the point where they exit from
the product.
10. Overloading
Do not overload wall outlets. To
reduce the risk of electric shock,
do not use the polarized plug with
an extension cord, receptacle, or
other outlet unless the blades can
be inserted completely with threewire grounding type to prevent
blade exposure. Failure to follow
these instructions may result in fire
or electric shock.
11. Lightning storms
For added protection for this
product during a storm, or when it
is left unattended and unused for
long periods of time, unplug it from
the wall outlet. This will prevent
damage to the product due to
lightning and power-line surges.
Never operate this unit on AC
power during a thunderstorm. If
you see lightning or hear thunder,
never touch the unit, cables and/or
peripherals. An electric surge
caused by the storm, may result in
an electrical shock or damage to
the unit.
12. Object and Liquid Entry
Never push objects of any kind
into this product through openings as they may touch dangerous
voltage points or short-out parts
that could result in a fire or electric
shock. Never spill liquid of any
kind on the product.
13. Do not place or keep the
projector within the reach
of the children.
It may fall or tip over, possibly
causing serious injury.
4
Page 5
IMPORTANT SAFETY INSTRUCTIONS (Continued)
14. Do not place the product
vertically
Do not use the product in the upright position or any other vertical
positions to project the pictures. It
may fall which could result in serious injury and/or damage to the
product.
15. Stack Inhibited
Do not stack other equipment on
this product and do not place this
product on other equipment. The
top and bottom surface of this
product increase in temperature
during normal use and may damage the other unit.
16. Attachments
Do not use attachments not recommended by the product manufacturer. Use of an incompatible
attachments could cause hazards
or damage to the product.
17. Accessories
Do not place this product on an
unstable cart, stand, tripod, bracket, or table. The product may fall,
causing serious injury to a child or
adult, and serious damage to the
product. A product and cart combination should be moved with care.
Quick stops, excessive force, and
uneven surfaces may cause the
product and cart combination to
overturn.
S3125A
18. Damage Requiring Service
Unplug this product from the wall
outlet and take the product to
qualified service personnel if you
encounter any of the following
conditions:
a) The power supply cord or plug is
damaged.
b) Liquid has been spilled, or objects
have fallen into the product.
c) The product has been exposed to
rain or water.
d) The product does not oper-
ate normally when following the
operating instructions. Adjust only
those controls that are covered by
the operating instructions since an
improper adjustment of other controls may result in damage and will
often require extensive work by a
qualified technician to restore the
product to its normal operation.
Before Using
5
Page 6
IMPORTANT SAFETY INSTRUCTIONS (Continued)
e) The product has been dropped or
damaged in any way (If the cabinet should break, please handle
with care to avoid injury).
f) The product exhibits a distinct
change in performance, which
indicates a need for service.
19. If glass components,
including lens and lamp,
should break, contact your
dealer for repair service.
This product incorporates glass
components, including a lens and
a lamp. If these should break,
please handle with care to avoid
injury and contact your dealer for
repair service. Avoid any broken
pieces of glass since they may
cause injury. In the unlikely event
that the lamp ruptures, thoroughly
clean the area around the projector and discard any edible items
placed in that area since they may
be contaminated.
20. Servicing
Do not attempt to service this
product yourself as opening or
removing covers may expose you
to dangerous voltage or other hazards. Refer all servicing to qualified service personnel.
21. Replacement Parts
When replacement parts are required, be sure the service technician has used replacement parts
specified by the manufacturer or
have the same characteristics as
the original part.
Unauthorized substitutions may
result in fire, electric shock, or
other hazards.
22. Safety Check
Upon completion of any service or
repairs to this product, ask the service technician to perform safety
checks to verify that the product is
in proper operating condition.
23. Do not leave thermalpaper documents or easily
deformed items on top
of the unit or near the air
exhaust for long periods
of time.
The heat from the unit could erase
the information on the thermal
paper, or cause deformation or
warping.
24. Do not use the product
in a closed installation
location.
Do not place the product in a box
or in any other closed installation
location. Otherwise it may overheat, which could result in a risk
of fire.
6
Page 7

IMPORTANT PRECAUTIONS
Moisture Condensation
Never operate this unit immediately after moving it from a cold location to a warm
location. When the unit is exposed to such a change in temperature, moisture may
condense on the lens and the crucial internal parts. Do not use the unit for at least 2
hours when there is an extreme or sudden change in temperature to prevent the unit
from possible damage.
Place and Manner of Installation
Do not place in hot locations, such as near heating equipment. Doing so could cause
malfunction, and shorten the life of the projector.
Avoid locations with oil or cigarette smoke. Doing so will dirty the optical parts, short-
ening their lives, and darkening the screen.
Do not use this product in the upright position or tilt it up or down by more than 20°
from level. Doing so may cause a failure or shorten the life of the product.
Using this instrument near a TV or radio may cause interference to the images or
audio sound. If this happens, move it away from the TV or radio.
Moving the projector from a low-temperature room to a high-temperature room may
cause condensation on the lens or internal parts. If you continue to use it in that situation it may malfunction. Wait until the condensation naturally disappears.
In a high altitude location where air is thin, cooling efficiency is reduced so use the
projector with [High Altitude] set to [On].
The set of projector is hot after use. Handle with care.
Do not use the projector while holding it in your hands or lap.
Do not use the projector near a power source and the like, or in locations like a ship
or vehicle that are subject to vibration or shock. Doing so may lead to a malfunction or
shorten service life.
Only plug the power cord into outlets rated for use with the power cord’s specified
voltage range. Do not overload extension cords or power strips as this can result in
fire or electric shock.
Route the power cable or the connecting cable away from where people could trip
over it. The projector may fall, which could result in severe injury.
Be sure the power cord is easily reached for unplugging in case of emergency. Do not
place any obstacles near a wall outlet in which the cord is plugged.
p.34
Before Using
Avoid Volatile Liquid
Do not use volatile liquids, such as an insect spray, near the unit. Do not leave rubber
or plastic products touching the unit for a long time, as they will leave marks on the
finish. Do not use a chemically saturated cloth.
7
Page 8

EXEMPTION CLAUSES
Toshiba Corporation bears no responsibility in the case of damages arising from natu-
ral disaster such as earthquakes, lightning, etc., fire not liable to Toshiba Corporation,
acts by third parties, other accidents, or use under abnormal conditions including
erroneous or improper operation and other problems.
Toshiba Corporation bears no responsibility for incidental damages (lost profit, work
interruption, corruption or loss of the memory contents, etc.) arising from the use of or
the inability to use this unit.
Toshiba Corporation accepts no liability whatsoever for any damages arising from not
having followed the descriptions in this User’s Manual.
Toshiba Corporation accepts no liability whatsoever for any damages arising from
malfunctions arising from combination with equipment or software that is not related
to Toshiba Corporation.
OTHER INFORMATION
Copyright
© 2011 by TOSHIBA Corporation. All rights reserved. Under the copyright laws, this
manual cannot be reproduced in any form without the prior written permission of
TOSHIBA. No patent liability is assumed, with respect to the use of the information
contained herein.
Showing or transmitting commercial imaging software or broadcast or cable-broad
casting programs with the purpose of other than the personal and private viewing,
including modifying images using the freeze functions, or displaying with the varying aspect ratio of the images, could violate the direct or indirect copyrights of the
imaging software or broadcast program, etc., if done without first consulting with the
copyright holder. For this reason, take appropriate measures before performing one
of the actions listed above, including obtaining a license from the copyright holder.
Disclaimer
This manual has been validated and reviewed for accuracy. The instructions and
descriptions it contains are accurate for your computer at the time of this manual’s
production. However, succeeding computers and manuals are subject to change without notice. TOSHIBA assumes no liability for damages incurred directly from errors,
omissions or discrepancies between the computer and the manual.
8
Page 9

OTHER INFORMATION (Continued)
Trademarks
VGA, SVGA, XGA, SXGA, UXGA are trademarks or registered trademarks of Interna-
tional Business Machines Corporation.
DLP (Digital Light Processing) is a registered trademark of Texas Instruments, Inc.
Macintosh is a registered trademark of Apple Computer, Inc.
Windows is a registered trademark of Microsoft Corporation in the U.S. and other
countries.
Adobe and Acrobat Reader are registered trademarks of Adobe Systems Incorpo-
rated.
All other brand and product names are trademarks or registered trademarks of their
respective companies.
Notational Conventions Used in This Manual
References to pages with related information are annotated as follows.
For example, if making a reference to page 32:
The illustrations in this document are for reference purposes only and may not reflect
your package exactly.
p.32
REMOTE CONTROL BATTERY
Warning
Never throw a battery into a fire.
Using the battery improperly may cause them to explode or leak and may result in
serious injury. If battery-leaking fluid contacts skin, wash the fluid off immediately with
clean water and consult a doctor. If the fluid spills on an instrument, avoid contact and
wipe it off using tissue paper. Then dispose of the used tissue paper as flammable
garbage after moistening it with water.
Keep the battery away from the reach of children. Battery is choking hazard and can
be very dangerous if swallowed. If the battery is swallowed, seek medical assistance
immediately.
Before Using
Notes
Be sure to use a CR2025 battery.
Dispose of a battery in a designated disposal area.
Check and follow your local regulations before disposal.
Attention should be drawn to the environmental aspects of battery disposal.
If the remote control does not operate correctly, or if the operating range becomes
reduced, replace the battery with a new one.
If the battery is dead or if you will not be using the remote control for a long time,
remove the battery to prevent battery acid from leaking into the battery compartment.
9
Page 10

CONTENTS
Before Using
SAFETY INFORMATION ..............................................................................................2
IMPORTANT SAFETY INSTRUCTIONS ......................................................................2
IMPORTANT PRECAUTIONS ......................................................................................7
EXEMPTION CLAUSES ...............................................................................................8
OTHER INFORMATION ...............................................................................................8
REMOTE CONTROL BATTERY ..................................................................................9
CONTENTS ................................................................................................................10
Preparations
Checking the package contents ..................................................................................12
Names of each part on the main unit ..........................................................................13
Names of each part on the control panel ....................................................................14
Names of each part on the remote control..................................................................15
Parts on the rear panel ...............................................................................................17
Preparing and using the remote control ......................................................................18
Placement ...................................................................................................................19
Connection ..................................................................................................................21
Operations
Turning the power on and off ......................................................................................22
Basic operations .........................................................................................................24
Using the handy features ............................................................................................26
Using auto setting (For computer input only) ........................................................26
Correcting the keystone distortion .........................................................................26
Cutting off the picture and sound temporarily (Mute) ............................................27
Freezing the image (Freeze) .................................................................................27
Changing picture mode .........................................................................................27
Resizing image ......................................................................................................28
Using the menus .........................................................................................................29
How to use the menus...........................................................................................29
The image adjustment menu .................................................................................30
The screen setting menu .......................................................................................32
The default setting menu .......................................................................................33
The options setting menu ......................................................................................34
Maintenance
About lamp ..................................................................................................................35
Lamp replacement ......................................................................................................36
Lens and main unit cleaning .......................................................................................38
10
Page 11

CONTENTS (Continued)
Others
Trouble indicators .......................................................................................................39
Before calling service personnel .................................................................................40
Specifications ..............................................................................................................41
List of general specifications .................................................................................41
List of supported signals (RGB signals) ................................................................42
List of supported signals (HDMI) ...........................................................................43
List of supported signals (Video) ...........................................................................44
Pin assignment of COMPUTER IN terminal ..........................................................45
SERIAL terminal ....................................................................................................45
11
Page 12
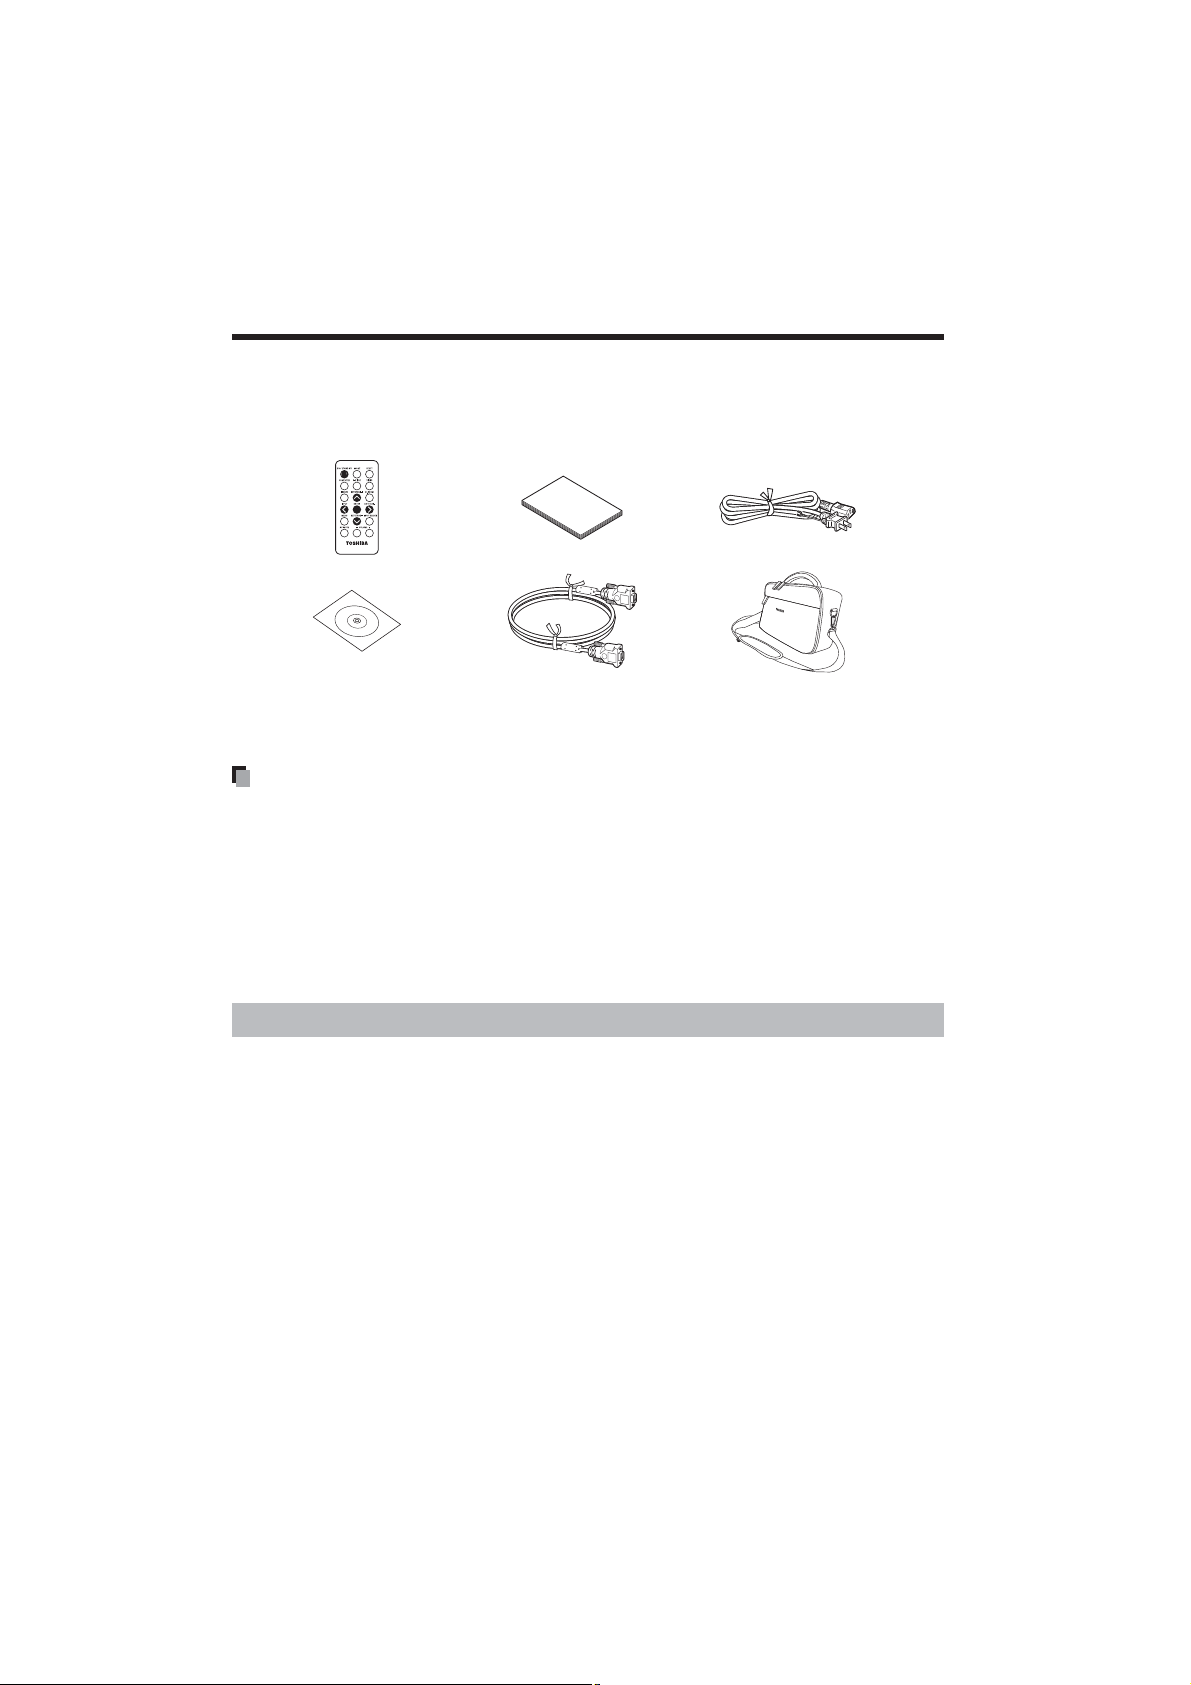
Checking the package contents
Please make sure that the following items are included in the box, along with the main
unit. If any item is missing, immediately contact the store where you purchased the product.
(1) (3) (5)
(2) (4) (6)
(1) Remote control
(2) CD-ROM (User’s Manual)
(3) Quick Start Guide
(4) RGB cable
(5) Power cord
(6) Bag
(See note below)
(See note below)
Notes
The shape and number of supplied power cords vary depending on the product destination.
To maintain original performance, always use the supplied cables.
Save Original Packing Materials
The original shipping carton and packing materials will come in handy if you ever
have to ship your projector. For maximum protection when shipping your projector,
repack the set as it was originally packed at the factory.
The Supplied CD-ROM
The supplied CD-ROM contains the user’s manual in Portable Document Format (PDF).
Please use Acrobat Reader 5 or later version to view the manual.
Adobe
®
Acrobat® Reader® or Adobe® Reader
®
The supplied CD-ROM does not contain Acrobat® Reader®. If you cannot read PDF
files, please install Adobe Reader software in your computer by downloading it from
the Adobe Systems website.
Viewing the manual
Run the CD-ROM and double-click on Start.pdf. Acrobat
®
Reader® launches, and the
menu screen of the user’s manual appears. Click on your language. The User’s Manual cover and list of bookmarks appear. Click on a bookmark title to view that section
of the manual. See the Help menu for more information about Acrobat® Reader®.
12
Page 13
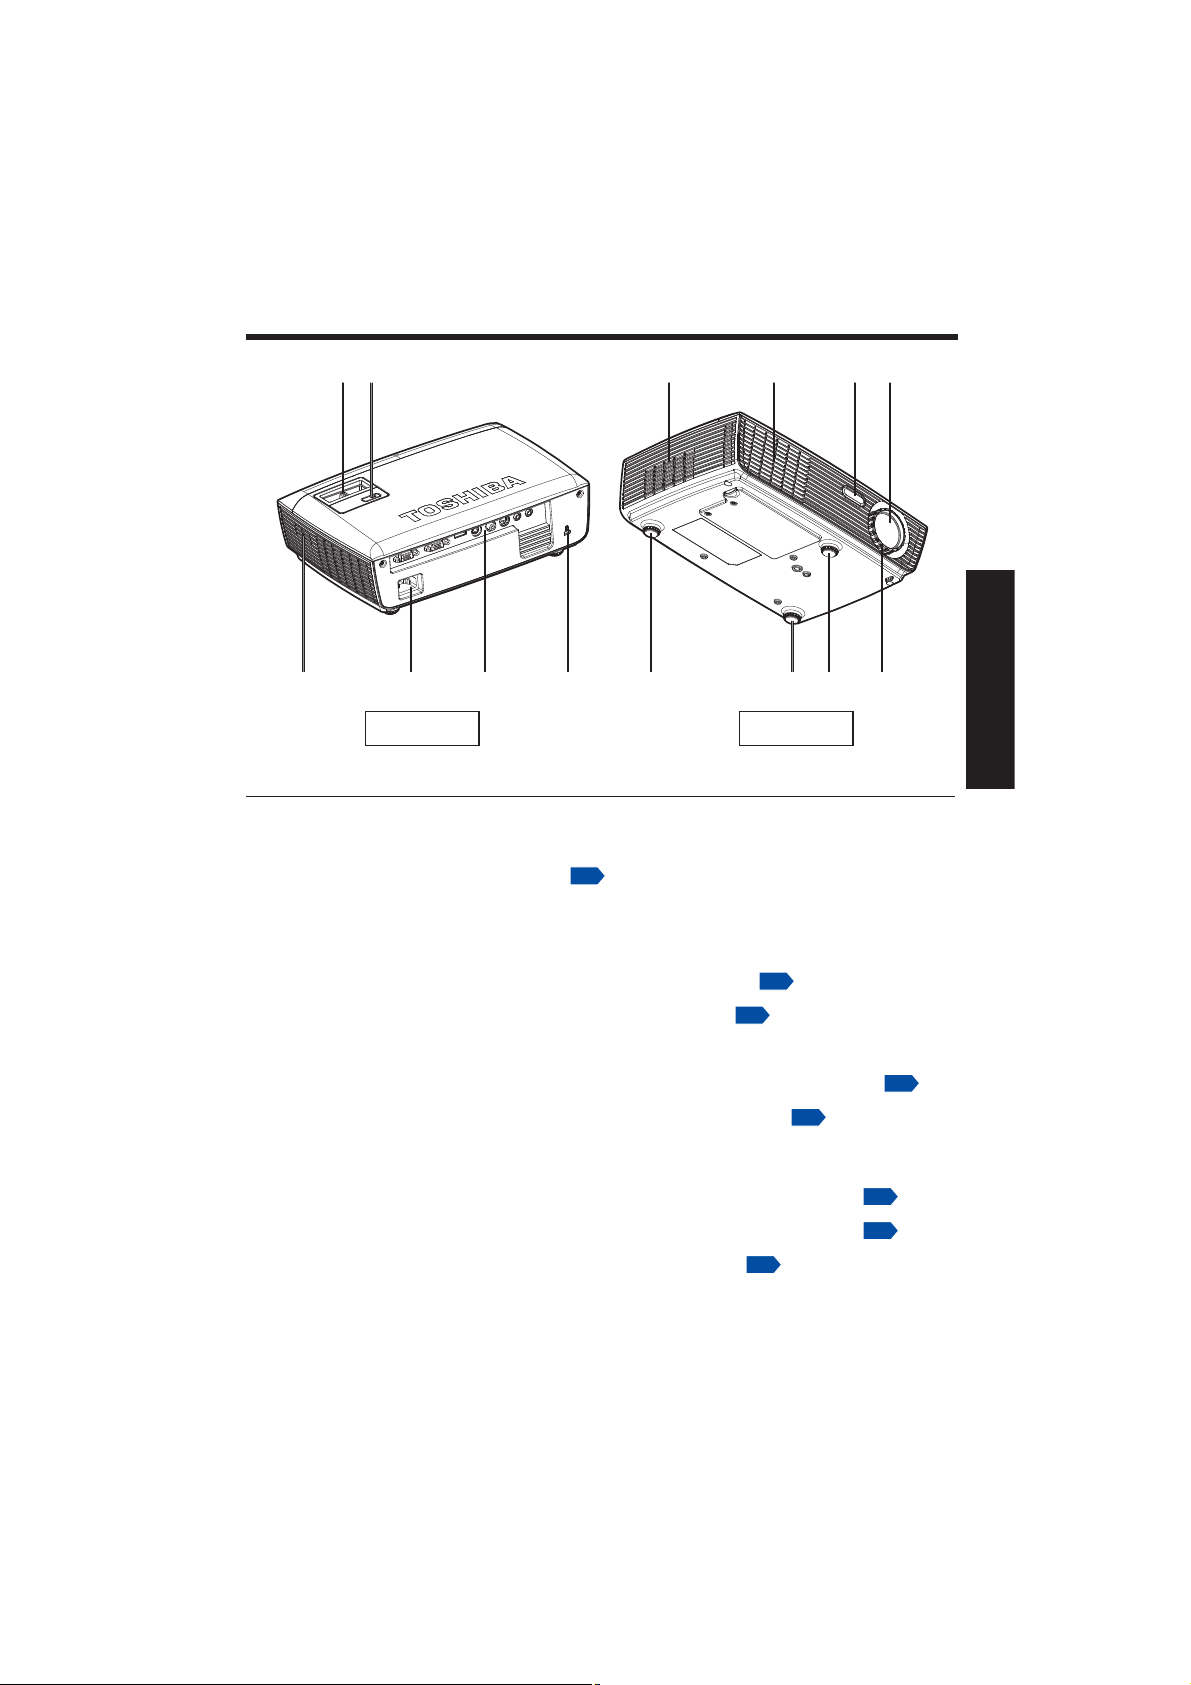
Names of each part on the main unit
(2)(3)(4)(5)(6)
(1)
(7) (8) (9)
Back Front
Name : Function
(1) Lens : Projects expanded image.
(2) Infrared remote sensor : Senses commands from the remote control.
(3) Air exhaust : Expels hot air out of the projector.
(4) Air intake : Draws in air from outside the projector for
(5) Control panel : Operates the projector.
(6) Zooming ring : Adjusts screen size.
(7) Speaker : Outputs audio sound.
(8) AC IN socket : Connect the supplied power cord here.
(9) Rear panel : Connects external devices.
(10) Antitheft lock slot : Attach a safety cable or any other antitheft
(11) Tilt adjuster : Adjusts the projector’s horizontal tilt.
(12) Foot adjuster : Adjusts the vertical projection angle.
(13) Focusing ring : Adjusts screen focus.
(10)
p.18
internal cool down.
device.
(11) (11) (12) (13)
p.14
p.25
p.22
p.17
p.25
p.25
p.25
Preparations
13
Page 14
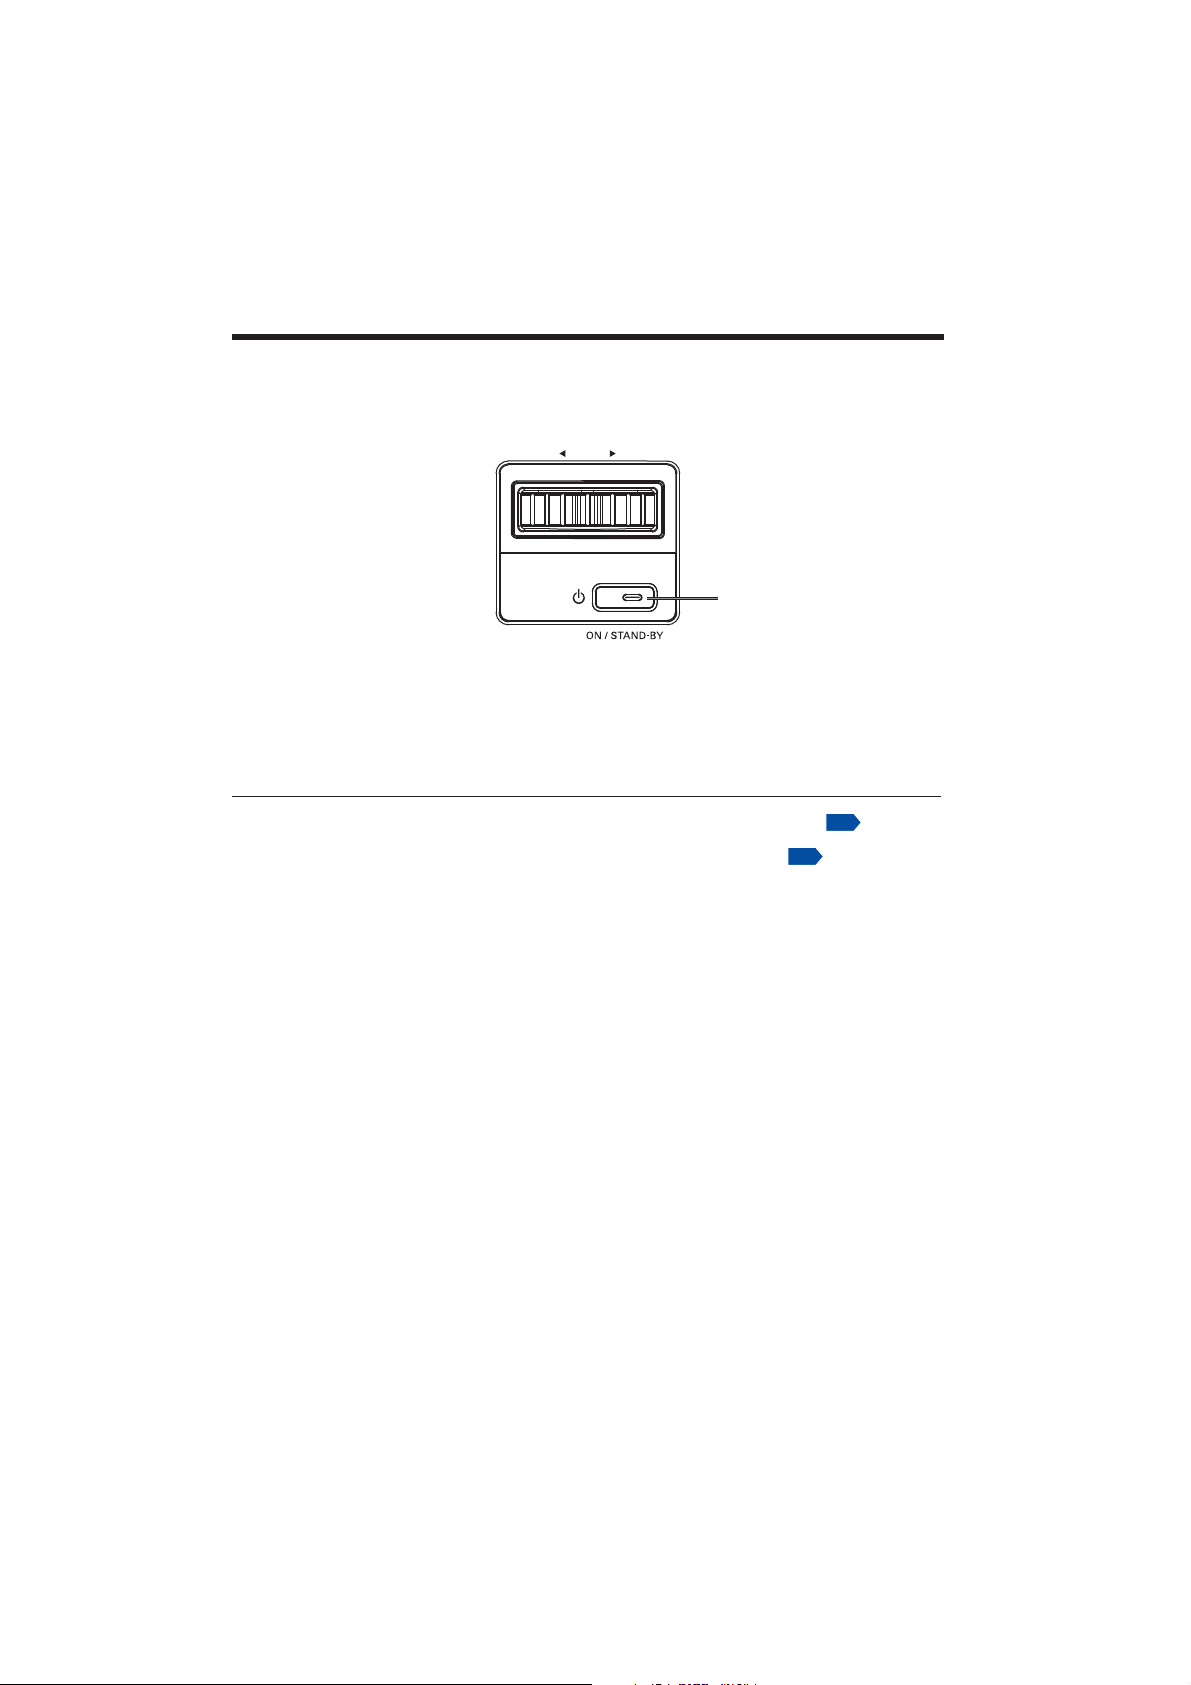
Names of each part on the control panel
zoom
(1)
Name : Main Function
(1) ON/STANDBY button/ : Turns the power on/off (standby).
indicator : Displays power on/off mode.
p.22
14
p.22
Page 15

Names of each part on the remote control
Remote control
transmitter
(1)
(2)
(3)
(4)
(5)
(6)
(7)
(4)
(8)
(9)
(10)
Name : Main Function
(1) ON/STANDBY button : Turns the power on/off (standby).
(2) IMAGE button : Changes picture mode.
(3) COMPUTER button : Selects COMPUTER input source.
(4) KEYSTONE +/- button : Adjusts keystone distortion.
(5) FREEZE button : Pauses image.
p.27
(17)
(16)
(15)
(14)
(13)
(12)
(11)
p.27
p.26
Preparations
p.22
(6) ENTER button : Accepts the selected mode.
(7) INPUT button : Selects input source.
(8) MENU button : Displays menus.
(9) AV-MUTE button : Momentarily turns off/on the audio and video.
(10) VOLUME +/- button : Adjusts the volume.
(11) INPUT SEARCH button : This function detects the input signal
(12) AUTO ADJ. button : Performs auto-adjustment of input signals from
p.27
automatically. When finding a signal, the search
will stop.
computer.
p.24
p.26
p.24
p.29
15
Page 16

Names of each part on the remote control (Continued)
Name : Main Function
(13) D. ZOOM button : Zoom out or zooms in the projector display.
(14) Selection buttons : Menu selections and adjustments.
(15) VIDEO button : Selects VIDEO input source.
(16) S-VIDEO button : Selects S-VIDEO input source.
(17) RESET button : Resets all adjustments and settings to their
p.28
p.29
factory settings.
16
Page 17

Parts on the rear panel
(1) (2) (3) (4) (5) (6) (7) (8)
AUDIO-OUTAUDIO-INSERIALVIDEOS-VIDEOHDMIMONITOR-OUTCOMPUTER-IN
(9)
Name : Main Function
(1) COMPUTER IN terminal : Input analog RGB signal from a computer or
(2) MONITOR OUT terminal : Connect to a computer display, etc.
(3) HDMI terminal : Input HDMI (Digital Audio/Video) signal from
(4) S-VIDEO terminal : Input S video signals from video equipment.
(5) VIDEO terminal : Input video signals from video equipment.
(6) SERIAL terminal : Maintenance use only.
(7) AUDIO IN terminal : Input audio signals.
(8) AUDIO OUT terminal : Outputs audio signals.
(9) AC IN socket : Connect the supplied power cord here.
(10) Antitheft lock slot : Attach a safety cable or any other antitheft
Notes
HDMI terminal is NOT supported for NPS10A.
other source, or a component video signal
(Y/Pb/Pr) from video equipment.
video equipment.
device.
(10)
Preparations
17
Page 18

Preparing and using the remote control
Loading a coin cell battery into the
remote control
Remove the battery holder.
Hold down the side release firmly and
pull out the battery holder.
Load a coin cell battery (CR2025).
Be sure to align the plus and minus
ends of the battery properly.
5
2
S
T
L
O
V
CR20
3
Replace the battery holder back into
the remote control.
5
2
S
0
T
2
L
M
R
O
V
C
3
Notes
When you use for the first time after
purchase, a plastic sheet is provided
between the battery and its contact.
Be sure to remove by pulling it off.
When operating the remote control
from behind the projector, the infrared
beam is reflected on the projecting
surface and may travel a shorter distance to reach the projector depending on the shape and material of the
projecting surface.
Operating the remote control
Point toward the projector’s infrared
remote sensor, and press a button on
the remote control.
Operating the projector from the front
Approx. 7m
Approx.15°
Coin cell battery
Before using the battery, be sure to observe the Safety Precautions described in
previous pages.
Remove the battery from remote control when not using for extended periods.
If the remote control stops working, or if its range decreases, replace the battery with
a new one.
Keep the battery away from the reach of children. Battery is choking hazard and can
be very dangerous if swallowed. If the battery is swallowed, seek medical assistance
immediately.
The remote control
The remote control may fail to operate if the infrared remote sensor is exposed to
bright sunlight or fluorescent lighting.
Do not drop or bang.
Do not leave in hot or humid locations.
Do not allow it to get wet or place it on top of wet objects.
Do not take apart.
In rare cases, ambient conditions could impede the operation of the remote control. If
this happens, point the remote control at the main unit again, and repeat the operation.
18
Page 19

Placement
Placement Styles
As shown in the figures below, this device can be placed in 4 different styles.
The factory setting is “floor-mounted front projection.” Set the [Mounting] in the Default
setting menu.
Floor-mounted front projection
Floor-mounted rear projection
Ceiling-mounted front projection
p.33
Ceiling-mounted rear projection
WARNING
Always obey the instructions listed in IMPORTANT SAFETY INSTRUCTIONS when placing the unit. At-
tempting to clean or replace the lamp in a high location by yourself may cause you to fall, resulting in injury.
If you wish to mount the projector on the ceiling, be sure to ask your dealer to do so. Mounting the projector
on a ceiling requires special ceiling brackets (sold separately) and specialized knowledge. Improper mounting
could cause the projector to fall, resulting in an accident.
If the projector is ceiling-mounted, install the breaker for turning off the power in case of anomaly. Let
everyone involved with the use of the projector know that fact.
19
Maintenance
Page 20

Placement (Continued)
Projection Distance and Size
Use the figures, tables, and formulas below to determine the projection size and projection distance. (Projection sizes are approximate values for full-size picture with no
keystone adjustment.)
As seen from above
Screen
90
As seen from the side
Lens center
H
90
a
Projection
size
(inches)
30 1.19 3.90 1.31 4.30 6.86 0.22
40 1.58 5.20 1.75 5.73 9.14 0.30
60 2.38 7.80 2.62 8.60 13.72 0.45
70 2.77 9.10 3.06 10.03 16.00 0.52
80 3.17 10.40 3.50 11.46 18.29 0.60
90 3.57 11.70 3.93 12.90 20.57 0.67
100 3.96 13.00 4.37 14.33 22.86 0.75
120 4.75 15.60 5.24 17.20 27.43 0.90
150 5.94 19.50 6.55 21.49 34.29 1.12
180 7.13 23.39 7.86 25.79 41.15 1.35
250 9.91 32.49 10.92 35.82 57.15 1.87
300 11.89 38.99 13.11 42.99 68.58 2.25
Wide Tele Offset
distance (a) distance (a) height (H)
(m) (feet) (m) (feet) (cm) (feet)
a is the distance (m, feet) between the lens and the screen, and corresponds to a range
of 1.19 m to 11.89 m (3.90 ft. to 38.99 ft.). H is the height (cm, feet) from the image bottom to the center of the lens.
20
Page 21

Connection
Before connection
Read the user’s manual of the device you are connecting to the projector.
Some computers cannot be used with or connected to this projector.
Check for an RGB output terminal, supported signal, etc.
Turn off the power of both devices before connecting.
The figure below shows sample connections. This does not mean that all of these
devices can or must be connected simultaneously.
Computer
To RGB
output
RGB cable
(not supplied)
To YPbPr
output
Monitor cable Mini
D-sub 15P-BNC
(not supplied)
Conversion
adapter BNC-pin
(not supplied)
DVD video recorder,
To RGB
To audio
output
Audio cable
(not supplied)
output
RGB cable
(supplied)
DVD player, etc.
Computer
To HDMI
output
HDMI cable (not supplied)
To audio
output
Audio cable
(not supplied)
To audio
output
Audio cable
(not supplied)
To S-video output
S-Video cable
(not supplied)
Video recorder,
DVD player, etc.
Monitor
AUDIO-OUTAUDIO-INSERIALVIDEOS-VIDEOHDMIMONITOR-OUTCOMPUTER-IN
To video
output
Video cable
(not supplied)
Video recorder, etc.
To audio input
White (L)/Red (R)
Audio cable
(not supplied)
Audio amplifier, etc.
Notes
Moving pictures played back on computers using DVD software may appear unnatural
when projected with this projector. However, it is not a malfunction of the projector.
When an AUDIO OUT terminal is connected, sound is not output from the projector
speaker.
Output volume of AUDIO OUT terminal can be adjusted by the VOLUME+/- button.
The MONITOR OUT terminal outputs analog RGB signals or component video signals
(Y/Pb/Pr) from the COMPUTER IN terminal.
A computer monitor usually cannot accept Y/Pb/Pr signals correctly.
21
Maintenance
Page 22

Turning the power on and off
Connecting the power cord
Insert the power cord connector into
1
the AC IN socket of the projector.
Insert the power cord plug into a wall
2
or other power outlet.
Removing the lens cover
Be sure to remove the lens cover when the power is
turned on. If the cover is left on the projector, it could
become deformed due to heat.
Turning the power on
Press the ON/STANDBY
1
button.
The power is turned on, and the ON/
STANDBY indicator lights blue. After a
moment, the start-up screen appears.
Control panel Start-up screen
zoom
Remote
Control
Power cord connector
(Supplied)
CAUTION
Do not look into the lens while the lamp is on. The strong light from the lamp may cause damage to your
eyesight.
Do not block the air intake or exhaust. Doing so could cause a fire due to internal overheating.
Do not place your hands, face, or other objects near the air exhaust, the lamp cover or the bottom of the
unit. Doing so could result in injury and/or damage the object.
Notes
The start-up screen will disappear after a moment. You can also configure the system
to prevent the start-up screen from appearing. To do this, use the Default setting
p.33
menu.
The first time you use the projector after purchase, after the start-up screen disap-
pears, the start menu is displayed.
Do not touch the lens directly with your hand. If fingerprints or stains are left on the
projection lens surface, they may interfere with the projector’s ability to project images
on the screen.
p.24
22
Page 23

Turning the power on and off (Continued)
Turning the power off
Press the ON/STANDBY button.
1
A message appears on the screen, confirming that you wish to shut off the power.
To shut off the power, press the ON/STANDBY button again. If you do not wish to
shut off the power, wait for a while without conducting any operations. The message
will disappear shortly. (This operation is no longer valid after the message disappears.)
Press the ON/STANDBY button again.
2
The screen turns off, but the internal cooling fan continues to operate for a short
while. Then, the projector goes into standby mode.
When cooling lamp
A B
During cooling ,the ON/STANDBY indicator flashes. In this state, the power
A
cannot be turned back on.
However, there is no problem with unplugging the power cord in this state.
In standby mode
B
Notes
The projector consumes about 0.5W of power in standby. We recommend that you
unplug the power cord if you will not be using the projector for an extended period.
Precaution
If the power cord is unplugged before cooling is complete, give the lamp time (about 5
minutes) to cool before plugging it back in. If the lamp overheats, it may fail to light.
Right after turning off the power, the unit may become very hot, especially air exhaust
and the bottom of the unit. Please handle with care to avoid burn injuries.
After cooling complete
Maintenance
23
Page 24

Basic operations
Turn the power.
1
Turn on the power by following the instructions in “Turning the power on”.
Select the language (When using the first time).
2
The screen turns off, but the internal cooling fan continues to operate for a short
while. Then, the projector goes into standby mode.
p.22
Use the
the
Message for setup confirmation is displayed in a selected language.
English
Notes
When the projector is turned on the next time, the start menu does not appear upon
startup.
The language can also be set via the Default setting menu.
This user’s manual assumes that English has been selected.
Activate the connected device.
3
Turn on and start the connected device such as a computer.
Press the INPUT button.
4
An image of the connected equipment is projected.
Each time you press the INPUT button, it switches to another source signal from the
equipment which is connected to the projector.
Notes
When [Input search] is set to [On] in the Default setting menu
is [On]), the input is switched to the connected equipment that is outputting video
signals each time you press the INPUT button.
Right after the input source is switched to the other, the color of the image may
change slightly.
, , or button to select the desired language and press
button.
French
Thai
p.33
p.33
p.42
Simplified Chinese
Bahasa Indonesia
(factory setting
24
Page 25

Basic operations (Continued)
Projector placement angle adjustments.
5
The placement angle and the height of the projected image can be adjusted by the
foot adjuster.
Lift up the front of the projector to the
desired angle, then use the foot adjuster.
To adjust the horizontal angle, use the tilt
adjuster.
To stow the foot adjuster, hold up the projector
while pressing the foot adjuster release button,
then slowly lower the projector.
Adjusting the screen size and focus.
6
7
Use the zooming ring to adjust the screen size.
Use the focusing ring to adjust the focus.
Adjusting the volume with VOLUME +/- buttons.
The speaker volume can be adjusted when an audio signal is being input.
Notes
Lamp characteristics may rarely cause the brightness to fluctuate slightly.
A lamp is consumable item. If used for extended periods, images will appear dark,
and the lamp could burn out. This is characteristic of a lamp, and is not malfunction.
(The lifetime of the lamp depends on conditions of use.)
The DLP
spots (pixels that do not light) or bright spots (pixels that are constantly lit) on the
panel. These are intrinsic characteristics of the technology and are not malfunctions.
Although this projector supports a wide range of RGB signals
not supported by this projector (SVGA, XGA) will be expanded or shrunk, which will
affect image quality slightly. To view high-quality images, set the computer’s external
output to SVGA / XGA.
With some models of computer having LCD displays or the like, displaying images si-
multaneously on the projector and the monitor’s display may prevent the images from
displaying properly. If this happens, turn off the computer’s LCD display. For information on how to turn off the LCD display, see the computer’s user’s manual.
If no signal is being input from the connected equipment or signal input is stopped
while projecting, the “No signal” message will appear.
If a signal not supported by the projector is input, the “Unsupported signal” mes-
sage will appear.
If an unavailable operation button is pressed, the
®
chip is made using extremely advanced technology. There may be black
p.42
, any resolutions
icon will appear.
25
Operations
Page 26

Using the handy features
Using auto setting (For computer input only)
This function automatically sets up the projector to the optimum state. It
sets up sampling phase, frequency and screen position for each type of
the input signal by using simple operations.
Press the remote control’s AUTO ADJ. button.
Notes
The image may not be projected or auto adjustment/setting may not
be performed correctly for input signals other than those supported by
the projector.
If auto setting fails adjustment, adjust manually with Image adjust-
ment menu.
Correcting the keystone distortion
When the projector placement angle against the screen is changed while projecting
the image, the picture will undergo keystone (trapezoidal) distortion.
This projector is capable of correcting this keystone distortion.
p.42
p.30
Before correction After correction
Remote
Control
Press the remote control’s KEYSTONE +/- button.
You can also select [V Keystone] in the Screen setting menu.
Notes
Depending on the amount of keystone adjustment and the content
of images, some information may be lost, or the picture quality may
suffer.
26
p.32
Remote
Control
Page 27

Using the handy features (Continued)
Cutting off the picture and sound temporarily (Mute)
When you want to project the images of another projector, overhead projector, etc. temporarily, this projector’s images and sound can be turned
off.
Press the remote control’s AV-MUTE button.
The picture and sound are cut off. (The Mute function is released
when pressing the AV-MUTE button again.)
Notes
Operating any other functions will also cancel the muting.
Freezing the image (Freeze)
The projected image can be frozen. This function is used to pause a
video during a presentation, etc.
Remote
Control
Press the remote control’s FREEZE button.
The picture pauses. (The Freeze function is released by pressing
the FREEZE button again.)
Notes
Other operations will also release the freeze.
Although an image is frozen on the projector, the pictures are running
on the video or other equipment.
If you use this function on commercial video software, broadcast or
cable-broadcasting except for the purpose of your private viewing and
listening, it may infringe the copyright protected by the copyright laws.
Changing picture mode
The projected image mode can be selected.
Press the remote control’s IMAGE button.
The picture mode menu appears.
1
1: Presentation
2: Bright
3: Movie
4: sRGB
Select a mode using then press .
2
Though the button is not pressed, the picture mode changes as the setting is
changed and the display turns off automatically in a few seconds.
Notes
[Image mode] of the Image adjustment menu has the same function.
5: Blackboard
6: Classroom
7: User1
8: User2
Remote
Control
Remote
Control
Operations
27
Page 28

Using the handy features (Continued)
Resizing image
The projected image can be resized (zoomed in/out).
Press the remote control’s D. ZOOM and buttons.
1
Each time you press the button, zoom ratio is up. You can keep
pressing.
2
Press the remote control’s D. ZOOM and buttons.
Each time you press the button, zoom ratio is down. You can
keep pressing. (However, the image cannot be smaller than the original size.)
To move the area to zoom in/out, use the buttons.
3
You can keep pressing.
Remote
Control
When the image returns to the original size by pressing D. ZOOM
4
button several times, the zoom will be reset.
Notes
Operating a function other than AV-Mute will release resizing.
As zooming is processed digitally, the image quality is degraded in
larger zoom ratio.
During resizing or moving the zooming area, the image may be
distorted.
28
Page 29

Using the menus
You can call up on-screen menus, and conduct a number of adjustments and settings
using the operation buttons on the remote control.
How to use the menus
p.15
The menu shown below is for operation instructions purposes and might differ from
the actual display.
1. Press the MENU button
Display the Image adjustment menu
2. Select a Category
Select a category by using .
There are following 4 categories:
Image adjustment menu
Screen setting menu
Default setting menu
Options setting menu
p.30
p.32
p.33
p.34
Press the or button.
Displays the current
adjustments and settings
of selected category. Item
shown with gray cannot
be adjusted with the current input source.
3. Adjustment & Settings
Item
Adjustment/Setting Value
These marks signify the
items can be adjusted/
set by using
These marks signify the items
can selected from the list by
using .
After an item is selected,
apply it by pressing
The figure shows displays given for operation instructions purposes. As the display may differ depending
on the item, use the information in this manual as a reference.
.
.
4. Back
Press the Menu Button
5. End
Press the Menu Button again. The menu disappears.
29
Operations
Page 30

Using the menus (Continued)
The image adjustment menu
Use this menu to set or adjust image-related items. Items that can be set or adjusted are
marked “Yes”, and those that cannot are marked “No”. (When an item is masked, it
indicates that you cannot select for the current input.)
Item
Image Mode Toggle the picture mode with
Description RGB Y/Pb/Pb Video S-video HDMI
Yes Yes Yes Yes Yes
/
Presentation/Bright/
Movie/sRGB/Blackboard/
Classroom/User 1/User 2
Brightness Adjust the brightness of the
Contrast Adjust the image contrast.
Sharpness Adjust the sharpness of the
Saturation Adjust the saturation of the
Tint Adjust the tint of the image
Advanded
Gamma Toggle the gamma type with
image.
Darker
Lower
image.
Softer
image.
Unsaturated
color.
Reddish
Brighter
Higher
Sharper
Saturated
Greenish
Yes Yes Yes Yes Yes
Yes Yes Yes Yes Yes
No Yes Yes Yes Yes
No Yes Yes Yes Yes
No No Yes Yes Yes
Yes Yes Yes Yes Yes
/
Film/Video/Graphics/PC
BrilliantColor™ This adjustable item utilizes a new color-processing algorithm and
system level enhancements to enable higher brightness while providing
true, more vibrant colors in picture. The range is from “0” to “10”. If you
prefer a stronger enhanced image, adjust toward the maximum setting.
For a smoother, more natural image, adjust toward the minimum setting.
Color Temp.
Toggle the color temperature with
Low/Medium/High
(At higher temperature, the screen looks colder; at lower temperature,
the screen looks warmer.)
/ .
30
Page 31

Using the menus (Continued)
Item
Color Adjust the color of the
/
/
/
Color Space Select an appropriate color
Input Use this option to enable/
Description RGB Y/Pb/Pb Video S-video HDMI
image.
Red/Red Gain
Lighter
Green/Green Gain
Lighter
Blue/Blue Gain
Lighter
Cyan
Lighter
Magenta
Lighter
Yellow
Lighter
matrix type with
AUTO/RGB/YUV
disable input sources.
Deeper
Deeper
Deeper
Deeper
Deeper
Deeper
/
No Yes Yes Yes Yes
No Yes Yes Yes Yes
No Yes Yes Yes Yes
No Yes Yes Yes Yes
No Yes Yes Yes Yes
No Yes Yes Yes Yes
No Yes Yes Yes Yes
Yes Yes Yes Yes Yes
Yes Yes Yes Yes Yes
31
Operations
Page 32

Using the menus (Continued)
The screen setting menu
Use this menu to set screen display-related items.
(The items in gray color cannot be set with the current input selection.)
Item
Aspect Ratio Screen size setting.
4:3: This format is for 4x3 input sources.
AUTO: Automatically selects the appropriate display format.
16:9: This format is for 16x9 input sources, like HDTV and DVD
enhanced for widescreen TV.
16:10: This format is for 16x10 input sources, like widescreen laptop.
Native: This format displays the original image without any scaling.
Description
Overscan Overscan function removes the noise in a video image. Overscan the
D. Zoom Adjust the size of projected image.
H Image Shift Shift the projected image position horizontally.
V Image Shift Shift the projected image position vertically.
V Keystone Correct the keystone (trapezoid) distortion of the screen.
image to remove video encoding noise on the edge of video source.
Minify
Move left
Move down
Screen shrinking
at bottom
Magnify
Move right
Move up
Screen shrinking
at top
32
Page 33

Using the menus (Continued)
The default setting menu
This menu shows placement status and other settings. Items that can be set or adjusted
are marked “Yes”, and those that cannot are marked “No”. (When an item is masked, it
indicates that you cannot select for the current input.)
33
Description
:Selection] [Apply: ]
/
/Bahasa Indonesia
ไทย
p.19
Yes No No No No
Yes No No No No
Yes No No No No
Yes No No No No
/
Item
Language Select one of the languages below to use for displaying the menu and
Mounting
Menu Location Set the menu location on the display screen.
Projector ID ID definition can be set up by menu (range 1~99), and allow user control
Signal RGB Y/Pb/Pb Video S-video HDMI
Mute Cut off the picture and sound temporarily.
Volume Adjust sound volume.
Advanced
Logo Set whether the start-up screen displays when power is turned on.
Closed
Captioning
messages.
: Enter setting mode] [
[
English/Français/
Set projection mode in accordance with Placement Style.
(Standard) (Rear) (Ceiling) (Rear ceiling)
(Left top) (Right top) (Middle) (Left bottom) (Right bottom)
an individual projector by RS232.
Fine Sync
Adjust with
flicker.
Total Dots
Adjust the number of total
dots in one horizontal period
with
H. Position
Adjust the horizontal position
of the image.
Move left
V. Position
Adjust the vertical position of
the image.
Move down
On
Quieter
On
Select the closed captioning with
Off/CC1/CC2
Off
Off
ㅔԧЁ᭛
to eliminate
Move right
Move up
Louder
Operations
Page 34

Using the menus (Continued)
The options setting menu
Use this menu to set lamp-related and other settings.
(The items in gray color cannot be set with the current input selection.)
Blue
Description
Green
White
Item
Input Search Set whether the input source with signals is only selected or not.
Off
Off
Off
Off
Red
Active
On
High Altitude Set whether to spin the the cooling fan speed or not.
On
Information
Hide
Background
Color
Advanced
Power Mode Set the power mode.
Direct Power On Set whether to turn on the power when the ON/STANDBY button is
Auto Power Off
(min)
Set whether to dispay the searching message or not.
On
Screen to display when there is no input signal.
Black
Standby
pressed (On), or when the power cord is plugged in (Off).
On
Set the countdown timer interval. The countdown timer will start
when there is no signal being sent to the projector. The projector will
automatically power off when the countdown has finished (in minutes).
Sleep Timer
(min)
Lamp Settings
Lamp Counter
(Normal)
Lamp Counter
(ECO)
Lamp Life
Reminder
ECO Mode Set whether to dim the projector lamp or not.
Lamp Counter
Reset
Reset Press [Yes].
Set the countdown timer interval. The countdown timer will start
with or without a signal being sent to the projector. The projector will
automatically power off when the countdown has finished (in minutes).
Display the projection time of normal mode.
Display the projection time of ECO mode.
Set whether to display the lamp end of life warning message or not.
Off
Off
On
On
Press [Yes].
Reset the lamp hour counter after replacing the lamp.
Reset all adjustments and settings to their factory settings.
34
Page 35

About lamp
The product’s light source is a mercury lamp that lights at increased internal pressure.
Be sure to fully understand the following characteristics of the lamp and handle it with
extreme care.
The lamp may burst with a loud noise due to impact or deterioration, or fail to light at
the expiration of its life.
How long it takes before the lamp bursts or the life expires may vary greatly by lamp.
Some may burst shortly after first use.
Burst is likely to happen if the lamp is used after the replacement period has
elapsed.
When the lamp bursts, the broken pieces of glass may get inside the product or be
released outside from the openings for ventilation.
When the lamp bursts, a slight amount of mercury gas enclosed in the lamp along
with glass dust may be released from the openings for ventilation.
Immediately replace the lamp when a replacement mes-
sage appears on the screen.
When the replacement time approaches, a message will appear on the screen.
The risk of burst will increase if the lamp is continuously used without being re-
placed.
Frequently check the used hours. (Refer to the Options setting menu.)
When the lamp is broken
If glass components, including a lamp and a lens, should break, handle the broken
pieces with care to avoid injury and contact your dealer for repair service.
In the event of lamp burst, unplug the product from the wall outlet, leave and com-
pletely ventilate the room. Then, thoroughly clean the area around the projector and
discard any edible items placed in that area, as they may be contaminated.
When the lamp bursts, consult a doctor if glass dust or mercury gas gets into your
eyes or is inhaled.
p.34
35
Maintenance
Page 36

Lamp replacement
A lamp is consumable supply. If used for extended periods, images will appear dark, and
the lamp could burn out. This is characteristic of a lamp, and is not malfunction. (The lifetime of the lamp depends on condition of use.) If this happens, replace it with a new one.
WARNING
If the projector is mounted on the ceiling, it is recommended to use your Toshiba dealership when the
lamp has to be exchanged.
Uncovering the lamp while the projector is mounted on a ceiling may lead to a danger of damage from falling
pieces of glass if the lamp is broken. Besides, working at high elevations can also be hazardous. Do not attempt to
replace the lamp by yourself.
When replacing, always use lamp “PA3976U-1ET2” (sold separately). If the lamp other than the specifi ed one is
used, it may cause a malfunction or damage to the unit due to the difference in the connector shape or the lamp rate.
CAUTION
If you have been using the projector, the lamp will be very hot, and may cause burn injuries.
Wait for the lamp to cool (for longer than 1 hour) before replacing it.
If the lamp should break, please handle with care to avoid injury due to broken pieces and contact your
dealer for repair service.
1
Unplug power cord.
2
Wait until lamp is suffi ciently cooled.
Wait for at least 1 hour.
Remove the lamp cover.
3
Loosen the two screws, raise the lamp cover with
your fi ngers to remove the lamp cover. Use care
to avoid any damage to nails and/or tip of your
fi nger(s). If you have any diffi culty in removal, you
can use a screwdriver or any other smaller tool for
your convenience.
Pull up the lamp.
4
Loosen the two screws holding the lamp in place,
and pull up the handle to remove the lamp.
36
3
Lamp cover
4
1
2
1
2
Page 37

Lamp replacement (Continued)
Mount the new lamp.
5
Align the orientation, press down the new lamp until
the bottom is reached, and lock in place using the
two lamp locking screws.
Replace the lamp cover.
6
Align the orientation, press down the new lamp until
the bottom is reached, and lock in place using the two
lamp locking screws.
Reset the lamp time.
7
See the lamp’s manual for instructions on resetting the
lamp time.
Notes and Precautions
The [Lamp counter (Normal) / Lamp counter (ECO)] item in the Options setting
menu indicates the time of lamp use (as a rough guide).
It is recommended that the lamp be replaced after 3,000 hours of normal use / 4,000
hours of eco mode. When [Lamp counter (Normal) / Lamp counter (ECO)] reaches
3,000 hours (Normal) / 4,000 hours (ECO), a message will appear. (After 3,000 hours
(Normal) / 4,000 hours (ECO), the message will appear when the power is first turned
on after each 100 hour period of use.) This display disappears when you press the
button.
Attach the lamp cover correctly so that it is not loose. If it is not attached correctly, the
projector may fail to be powered on or the lamp may fail to come on.
Always replace the lamp with a new one.
The lamp is made out of glass. Do not touch the glass surface with your bare hands,
bang it, or scratch it. (Dirt, jolts, scratches and the like could break the lamp.)
Used Lamps
This projector’s lamps contain trace amounts of environmentally harmful inorganic
mercury. Be careful not to break used lamps, and dispose of them in accordance with
local regulations.
5
p.34
2
1
37
Others
Page 38

Lens and main unit cleaning
WARNING
Request cleaning and maintenance of a ceiling-mounted unit from your projector dealership.
Attempting to clean or replace the lamp in a high location by yourself may cause you to fall, resulting in injury.
Lens cleaning
Clean the lens with a commercially available blower and/or
lens cleaner.
The lens is easily scratched, so do not rub it with hard
objects, or strike it.
Main unit cleaning
Unplug the power cord before cleaning the main
unit.
Wipe dirt off the main unit gently with a soft cloth.
Do not wipe the main unit with a damp cloth. Doing
so may allow water to get inside, resulting in an
electric shock or unit failure.
Do not use benzene, thinner and the like as they
may deform or discolor the unit or damage the
paint surface.
Do not use a chemically saturated cloth.
38
Page 39

Trouble indicators
The indicator lights to inform you of internal abnormalities.
Power LED
(Blue) (Red)
Off On
On Off
Blink
(1 sec)
Blink
(0.5 sec)
Blink
(1 sec)
Off
Off
Off
Off
Off
Off
Blink
(0.5 sec)
Blink
(1 sec)
Blink
(0.5 sec on,
2 sec off)
Message
In standby state
When connecting the power cord, the projector will
be in standby state.
In normal state
When turning the power on (press ON/STANDBY
button), the projector will be in normal state.
Powering up
The projector is warming up and will show the start-
up logo
Power off
Cooling-I: It cannot accept any key at this status.
Power off
Cooling-II: It can accept ON/STANDBY button to
power on the projector.
Power went out during use
Problem with lamp.
Unplug the power cord, and contact your dealer.
Power went out during use
Problem with internal cooling fan.
Unplug the power cord, and contact your dealer.
After approx. 5 second of abnormal display, the
projector returns to the standby state waiting for
internal cool down.
Power went out during use
Internal overheating, or the outside temperature is
too high.
Place the projector so that the air intake and
exhaust are not blocked.
Unplug the power cord and wait for a short
while, then turn the power back on.
After approx. 5 second of abnormal display, the
projector returns to the standby state waiting for
internal cool down.
39
Others
Page 40

Before calling service personnel
If you think something is wrong, check the followings before contacting customer service.
Please see “Trouble indications” as well.
p.39
If This Happens Check
No power Is the power cord plugged in? Is it connected to the
projector?
Is the lamp cover attached properly?
Power goes out during
use
No picture Is the input source selected correctly? (When [Input
No audio Is the mute function on?
Picture not displayed
correctly
Is the ambient temperature high?
Is the air intake or air exhaust blocked?
search] is [Off]).
Is the mute function on?
Is the brightness setting minimized?
Are the connections set up correctly?
Are all the connected devices functioning properly?
Is the volume setting minimized?
Are the connections set up correctly?
Are all the connected devices functioning properly?
Is the input signal supported by the projector?
Is there something generating an abnormal video sig-
p.24
p.27
p.27
p.39
p.39
p.30
p.21
p.25
p.21
p.42
nal, for instance the video tape?
Picture blurred
Part of picture out of
focus
Image is dark Are the brightness or contrast adjustments off?
Colors too light
Bad shading
Remote control doesn’t
work
Is the lens dirty?
Is the lens focus adjusted optimally?
Is the projection distance within the projector’s supported
range?
Is the projector’s screen placement angle tilted too far?
Are the sharpness or sampling phase adjustments off?
Is the lamp nearing the end of its service life?
Are the color, tint adjustments off?
Is the screen dirty?
Is the lamp nearing the end of its service life?
Is the remote control’s battery drained?
Is the battery inserted into the remote control correctly?
Is the remote control being used within the effective
range?
Are there any obstructions between the remote control
p.20
p.20
p.18
p.18
p.38
p.25
p.30
p.34
and projector?
Are there any fluorescent or other bright lights shining
at the projector’s infrared remote sensor?
40
Page 41

Specifications
List of general specifications
Item Specification
Consumption Power Normal mode: 255W
Standby mode: <0.5 Watt
Weight 2.3 kg
External Dimensions
(including protruding parts)
Cabinet material PC resin
Conditions for usage environment
Display pixels 1 DLP
Picture elements 480,000 pixels (SVGA, 800H x 600V) NPS10A model
Projection system Single Chip DLP® Technology
Lens Zoom lens F=2.41-2.55 f=21.8-24 mm
Lamp High-pressure mercury lamp (180 W)
Projection screen size 30 - 300 inches
Projection distance 1.19 m - 11.89 m
Speaker 2W
SERIAL terminal Mini DIN 3 pin (Maintenance use only)
COMPUTER IN terminal Mini D sub 15 pin Analog RGB / Y/Pb/Pr (dual use)
286 x 192 x 100 mm (W x D x H)
Temp: 5ºC ~ 35ºC; relative humidity: 20% ~ 80%
®
chip
786,432 pixels (XGA, 1024H × 768V) NPX10A model
VIDEO terminal S-VIDEO: Mini DIN 4 pin
VIDEO: RCA Pin Jack
AUDIO: 3.5mm dia. stereo mini-jack
HDMI: 19-pin HDMI (V1.3)
Connection terminal
MONITOR OUT terminal Mini D sub 15 pin RGB / Y/Pb/Pr (dual use)
AUDIO OUT terminal 3.5mm dia. stereo mini-jack
Notes
This model complies with the above specifications.
Designs and specifications are subject to change without notice.
This model may not be compatible with features and/or specifications that may be
added in the future.
41
Others
Page 42

Specifications (Continued)
List of supported signals (RGB signals)
This projector supports the following RGB signals. Note, however, that depending on the
computer model, the screen may show flicker or streaking. Please adjust the projector if
this happens.
Mode Resolution V-Sync [Hz] H-Sync [KHz]
VGA 640x350 85 37.9
VGA 640x400 85 37.9
VGA 640x480 60 31.5
VGA 640x480 72 37.9
VGA 640x480 75 37.5
VGA 640x480 85 43.3
VGA 720x400 70 31.5
VGA 720x400 85 37.9
SVGA 800x600 56 35.2
SVGA 800x600 60 37.9
SVGA 800x600 72 48.1
SVGA 800x600 75 46.9
SVGA 800x600 85 53.7
XGA 1024x768 60 48.4
XGA 1024x768 70 56.5
XGA 1024x768 75 60
XGA 1024x768 85 68.7
WXGA 1280x768 60 47.4
WXGA 1280x768 75 60.3
WXGA 1280x720 60 45
WXGA 1280x800 60 49.3
SXGA 1152x864 60 53.8
SXGA 1152x864 70 63.8
SXGA 1152x864 75 67.5
SXGA 1152x864 85 77.1
SXGA 1280x1024 60 63.98
SXGA 1280x1024 75 79.98
SXGA 1280x1024 85 91.1
SXGA 1280 x 960 60 60.0
SXGA+ 1400x1050 60 65.31
UXGA 1600x1200 60 75
Notes
Signals of which resolution exceeds the native resolution (800 x 600 pixels / 1024 ×
768 pixels) will be compressed. For this reason, some information may be lost, or image quality may be affected.
42
Page 43

Specifications (Continued)
List of supported signals (HDMI)
Mode Resolution V-Sync [Hz] H-Sync [KHz]
(1) HDMI - PC Signal
VGA 640x480 60 31.47
VGA 640x480 72 37.86
VGA 640x480 75 37.5
VGA 640x480 85 43.27
SVGA 800x600 56 35.2
SVGA 800x600 60 37.88
SVGA 800x600 72 48.08
SVGA 800x600 75 46.88
SVGA 800x600 85 53.67
SVGA 800x600 119.85 77.2
XGA 1024x768 60 48.36
XGA 1024x768 70 56.48
XGA 1024x768 75 60.02
XGA 1024x768 119.804 98.8
SXGA 1152x864 75 67.5
SXGA 1152x864 85 77.1
SXGA 1280x1024 60 64
SXGA 1280x1024 75 79.98
SXGA 1280x1024 85 91.15
SXGA 1280x960 75 75
(2) HDMI - Extended Wide timing
WXGA 1280x768 60 47.78
WXGA 1280x768 75 60.29
WXGA 1280x768 85 68.63
WXGA 1280x720 60 44.8
WXGA 1280x800 60 49.6
WXGA 1440x900 60 55.9
WXGA 1680x1050 60 65.3
WXGA 1366x768 60 47.71
WXGA 1920x1080-RB 60 66.6
Others
43
Page 44

Specifications (Continued)
Mode Resolution V-Sync [Hz] H-Sync [KHz]
(3) HDMI - Video Signal
480i 720x480(1440x480) 59.94(29.97) 27
480p 720x480 59.94 31.47
576i 720x576(1440x576) 50(25) 27
576p 720x576 50 31.25
720p 1280x720 60 45
720p 1280x720 50 37.5
1080i 1920x1080 60(30) 33.75
1080i 1920x1080 50(25) 33.75
1080p 1920x1080 60 67.5
1080p 1920x1080 50 56.26
1080p 1920x1080 24 27
1080p 1920x1080 23.98 26.97
List of supported signals (Video)
NTSC M (3.58MHz), 4.43 MHz
PAL B, D, G, H, I, M, N
SECAM B, D, G, K, K1, L
SDTV 480i/p, 576i/p
HDTV 720p(50/60Hz), 1080i/p(50/60Hz)
44
Page 45

Specifications (Continued)
Pin assignment of COMPUTER IN terminal
11 15
6
10
15
Mini D sub 15 Pin connector
Input Signal
RGB input
RGB signals: 0.7V (p-p) 75 Ω
Horizontal sync signal: TTL level (Pos/neg polarity)
Vertical sync signal: TTL level (Pos/neg polarity)
Y/Pb/Pr input
Y signal: 1.0V (p-p) 75 Ω
Pb/Pr signals: 0.7V (p-p) 75 Ω
SERIAL terminal
Pin assignment
Pin No. Signal Name Description
3
12
1 TXD Sending data
2 RXD Receiving data
3 GND Signal ground
Pin
No.
During RGB input During Y/Pb/Pr input
1
Video signal (R) Color difference signal (Pr)
2
Video signal (G) Luminance signal (Y)
3
Video signal (B) Color difference signal (Pb)
4
N.C
GND
5
6
GND (R) GND (Pr)
7
GND (G) GND (Y)
8
GND (B) GND (Pb)
9
+5V
10
GND
N.C
11
12
SDA
Horizontal sync signal
13
Vertical sync signal
14
SCL
15
Pin description
Do not connect anything.
Mini DIN 3 pin connector
Notes
Contact your dealer for control cable and commands.
45
Others
Page 46

 Loading...