

Toshiba MMK-AP0073H, MMK-AP0073H-C, MMK-AP0093H, MMK-AP0093H-C, MMK-AP0123H Owner Manual
...Page 1

SUPER MODULAR MULTI SYSTEM AIR CONDITIONER
Owner’s Manual
For wireless remote controller
Indoor Unit
Model name:
Для коммерческого использования
For commercial use
Pour usage commercial
Nur für gewerbliche Nutzung
Per uso commerciale
Para uso comercial
Para uso comercial
Voor commercieel gebruik
Για εμπορική χρήδη
Ticari amaçlý kullaným için
High-Wall Type
MMK-AP0073H, MMK-AP0073H-C
MMK-AP0093H, MMK-AP0093H-C
MMK-AP0123H, MMK-AP0123H-C
MMK-AP0153H, MMK-AP0153H-C
MMK-AP0183H, MMK-AP0183H-C
MMK-AP0243H, MMK-AP0243H-C
Owner’s Manual 1
Manuel du proprietaire 25
Betriebsanleitung 49
Manuale del proprietario 73
Manual del propietario 97
Manual do utilizador 121
Gebruiksaanwijzing 145
Εγχειρίδιο χρήσης 169
Руководство пользователя 193
English
Français
Deutsch
Italiano
Español
Português
Nederlands
Ελληνικά
Русский
Kullanım Kılavuzu 217
241
Türkçe
Page 2
SMMS High-Wall Type
Thank you very much for purchasing TOSHIBA Air Conditioner.
Owner’s Manual
Please read this owner’s manual carefully before using your Air Conditioner.
• Be sure to obtain the “Owner’s manual” and “Installation manual” from constructor (or dealer).
Request to constructor or dealer
• Please clearly explain the contents of the Owner’s manual and hand over it.
NOTE
This manual describes operations of the indoor unit and the wireless remote controller.
For details of the wired remote controller and the outdoor unit, refer to the operation manual supplied with
the outdoor unit. (Keep these manuals carefully.)
ADOPTION OF NEW REFRIGERANT
This Air Conditioner is a new type which adopts a new refrigerant HFC (R410A) instead of the
conventional refrigerant R22 in order to prevent destruction of the ozone layer.
Contents
1 PRECAUTIONS FOR SAFETY . . . . . . . . . . . . . . . . . . . . . . . . . . . . . . . . . . . . . . . 2
2 ACCESSORIES . . . . . . . . . . . . . . . . . . . . . . . . . . . . . . . . . . . . . . . . . . . . . . . . . . . 4
3 PARTS NAME . . . . . . . . . . . . . . . . . . . . . . . . . . . . . . . . . . . . . . . . . . . . . . . . . . . . . 4
4 PARTS NAME OF REMOTE CONTROLLER . . . . . . . . . . . . . . . . . . . . . . . . . . . . 6
5 ADJUSTING CLOCK . . . . . . . . . . . . . . . . . . . . . . . . . . . . . . . . . . . . . . . . . . . . . . . 8
6 LIMITED OPERATION BY GROUP CONTROL . . . . . . . . . . . . . . . . . . . . . . . . . . . 9
7 HANDLING THE REMOTE CONTROLLER . . . . . . . . . . . . . . . . . . . . . . . . . . . . . 10
8 HOW TO USE REMOTE CONTROLLER . . . . . . . . . . . . . . . . . . . . . . . . . . . . . . . 11
9 HINTS FOR ECONOMICAL OPERATION . . . . . . . . . . . . . . . . . . . . . . . . . . . . . . 18
10 TEMPORARY OPERATION . . . . . . . . . . . . . . . . . . . . . . . . . . . . . . . . . . . . . . . . . 19
11 MAINTENANCE . . . . . . . . . . . . . . . . . . . . . . . . . . . . . . . . . . . . . . . . . . . . . . . . . . 20
12 TROUBLES AND CAUSES . . . . . . . . . . . . . . . . . . . . . . . . . . . . . . . . . . . . . . . . . 23
1-EN
–1–
Page 3
SMMS High-Wall Type
1 PRECAUTIONS FOR SAFETY
DANGER
• Do not attempt to install this unit by yourself.
This unit requires qualified installer.
• Do not attempt to repair the unit by yourself.
This unit has no components which you can repair.
• Opening or removing the cover will expose you to dangerous voltage.
• Turning off the power supply will not prevent potential electric shock.
WARNING
WARNING ABOUT INSTALLATION
• Make sure to ask a dealer or a store specialized in electric work to install
the air conditioner.
If the air conditioner is imperfectly installed by yourself, it may cause
some problems such as water leak, electric shock, fire, and so on.
• Ground the air conditioner without fail.
Do not connect the ground wire to gas pipe, water pipe, lightning rod or
ground wire of telephone. If the air conditioner is imperfectly grounded, it
may cause electric shock.
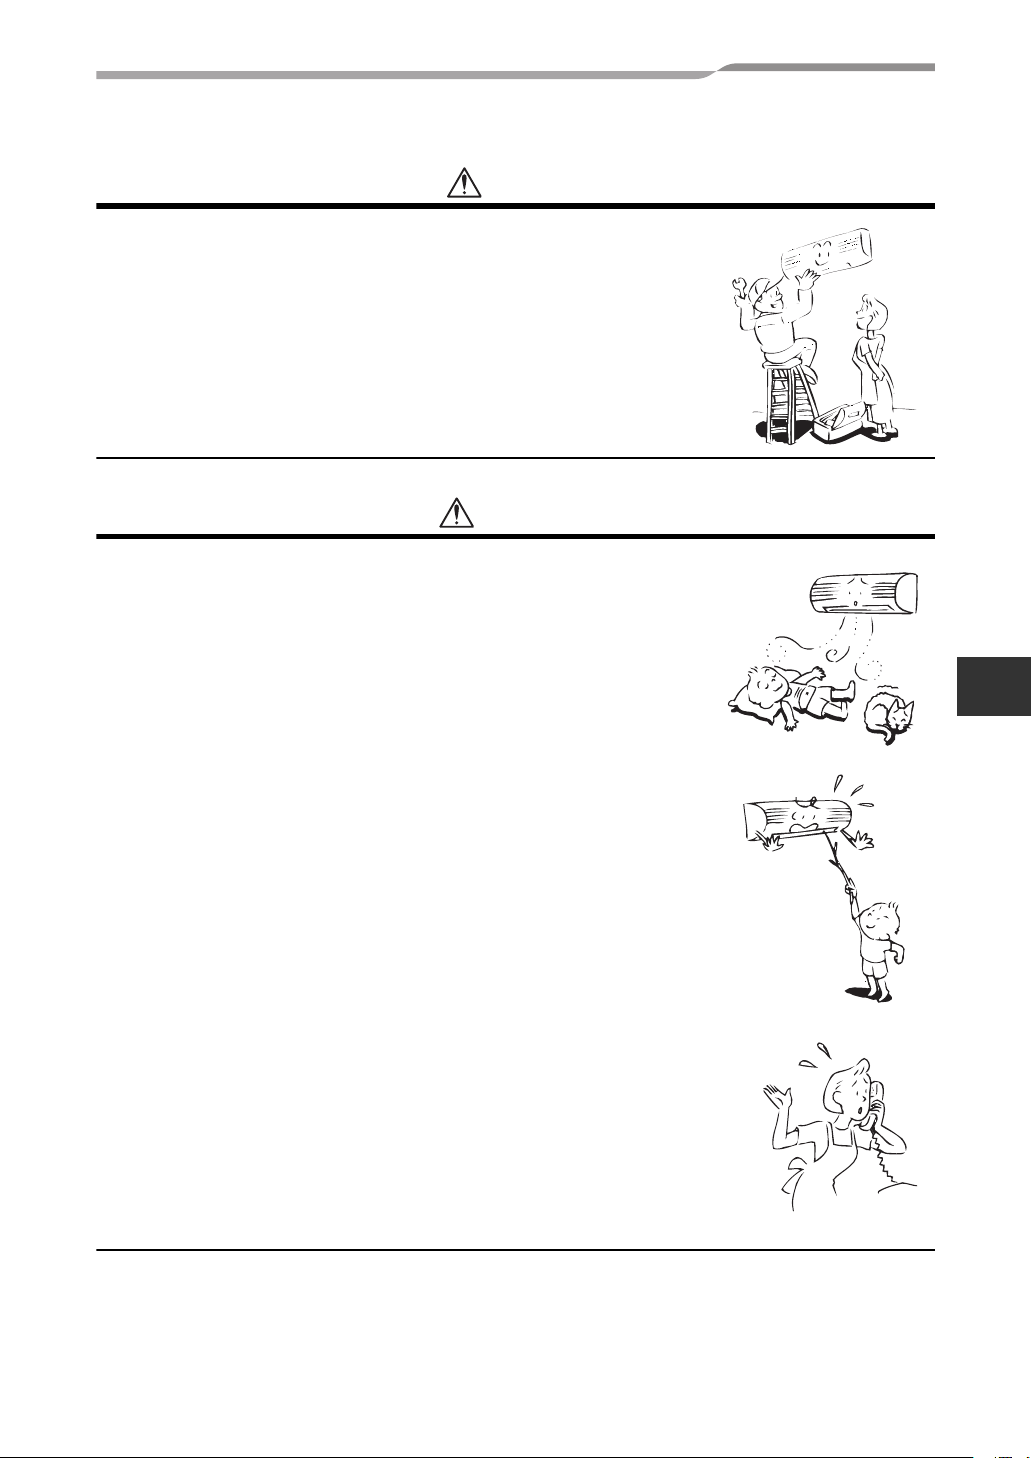
WARNING ABOUT OPERATION
• Avoid cooling the room too strong or exposing the human body to cool
wind for a long time, because it is bad for the health.
• Do not insert fingers and sticks into the air outlet and air inlet to avoid
getting injured and damaging the machine, because there are fans
running at a high speed inside both the air inlet and air outlet.
• When you are aware of something abnormal with the air conditioner
(smells something scorching, cools weak, etc.), immediately turn off the
main switch, the circuit breaker, from the main power supply to stop the
air conditioner, and make contact with the dealer.
If the air conditioner is continuously operated with something abnormal,
it may cause machine failure, electric shock, fire, and so on.
• Do not spill water or other liquid on the indoor unit. If the unit is wet, it may
cause an electric shock.
WARNING ABOUT MOVEMENT AND REPAIR
• Do not move nor repair any unit by yourself.
Since there is high voltage inside the unit, you may get an electric shock
when removing the cover and main unit.
• When moving the air conditioner for re-installing in another place, ask the
dealer to do it. If it is imperfectly installed, it may cause electric shock or
fire.
Owner’s Manual
EN
–2–
2-EN
Page 4

SMMS High-Wall Type
CAUTION
CAUTIONS ABOUT INSTALLATION
• Certainly lay the drain hose for perfect draining.
Wrong drainage may cause flooding in the house and getting furniture
wet.
• Make sure to connect the air conditioner to an exclusive power supply
of the rated voltage; otherwise, the unit may break down or cause a fire.
• Do not install the unit in a place where inflammable gas may leak.
If inflammable gas accumulates around the unit, it may cause a fire.
CAUTIONS ABOUT OPERATION
• Carefully read this manual and the manual supplied with the outdoor
unit before starting the air conditioner. The manual includes many
important things for daily operation.
• Do not use this air conditioner for other purposes such as preserving
food, precision instruments, art objects, breeding animals, growing
potted plants, etc.
• Do not install this air conditioner in a special-purpose room such as a
ship or any kind of vehicle, otherwise it deteriorates the machine
performance.
• Avoid exposing potted plants and animals to wind of the air conditioner,
because it badly affects the health and growing of them.
• When the air conditioner is operated together with a combustion
appliance in the same place, be careful of ventilation to let fresh air into
the room.
Poor ventilation causes oxygen shortage.
• When the air conditioner is used in a closed room, be careful of
sufficient ventilation of the room. Poor ventilation causes oxygen
shortage.
• Do not touch operation button with wet finger; otherwise, you may get
an electric shock.
• Do not place any combustion appliance in a place where it is directly
exposed to wind of the air conditioner; otherwise, it may cause
imperfect combustion.
• When the air conditioner won’t be used for a considerably long time,
turn off the main switch or the circuit breaker, for safety. Disconnection
from the power supply prevents the unit from lightning and power
source surge.
• Do not put a vessel with water such as a vase on the unit, because
water may possibly sink into the unit and will bring about electric shock
because of deterioration in electric insulation.
• Do not wash the unit with water. It may cause an electric shock.
• Do not use alcohol, benzene, thinner, glass cleaner, polishing powder,
etc. for cleaning the unit, because they deteriorate or damage the air
conditioner.
• When cleaning the unit, make sure to turn off the main switch or circuit
breaker beforehand for preventing you from getting injured by the
electric fan running inside.
For details of cleaning method, refer to “Maintenance”.
• To make the air conditioner demonstrate its original performance,
operate it within the range of the operating temperature specified in the
instructions.
Otherwise it may malfunction, break down or water may leak from the
unit.
Owner’s Manual
3-EN
–3–
Page 5

SMMS High-Wall Type
2 ACCESSORIES
Remote controller Remote controller holder Batteries (two)
3 PARTS NAME
Indoor unit
Owner’s Manual
11
TIMER SET
FAN
TIME
FILTER
SET
TEST
RESET
MODE
SAVE
VENT
CL
SWING/FIX
UNIT LOUVER
10
1 Room temperature sensor
2 Front panel
3 Air inlet grille
4 Air filter
5 Air outlet
3
4
5
6
7
6 Horizontal airflow louver
7 Vertical airflow louver
8 Display panel
9 Infrared signal receiver
10 Remote controller (wireless)
11 Remote controller (wired, sold separately)
8, 9
2
EN
1
–4–
4-EN
Page 6
SMMS High-Wall Type
Owner’s Manual
Names and functions of
indicators and controls on
indoor unit
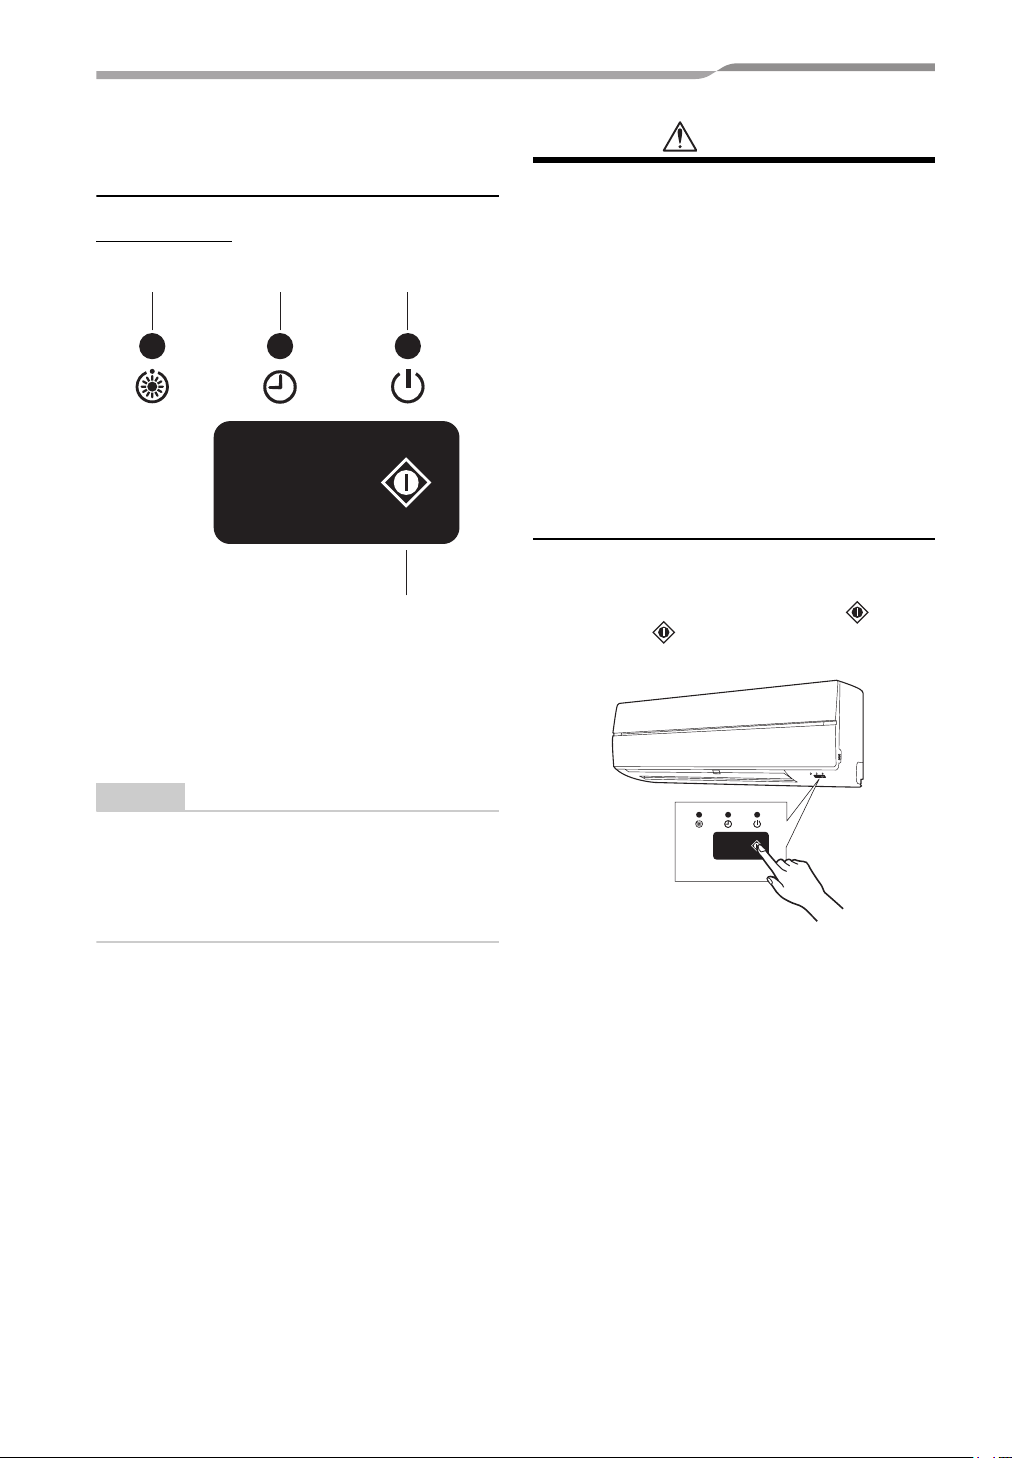
Display panel
123
4
The operating conditions are indicated below.
1 OPERATION (Green)
This lamp goes on during operation.
2 TIMER (Green)
This lamp goes on white the timer reserved.
CAUTION
• Disagreement in operation mode
If you select AUTOMATIC OPERATION in a
model with no auto-changeover (cooling/
heating) control setting or if you select HEAT in
a Cool Only model, an alarm sound (pi, pi) from
the air conditioner due to disagreement in
operation mode. Change the operation mode
with the MODE button on the wireless remote
controller. This disagreement indication cannot
be deleted by the wired remote controller.
• When local prohibition is set by the central
control from other equipment, no signal is
received even if the remote controller button is
pressed. However, a signal of START/STOP
button is accepted. (An alarm sound “pi ” arises
intermittently five times.)
4 TEMPORARY operation
If you misplace or lose the wireless remote controller
or its batteries are exhausted, push the button.
• Push the button to start the air conditioner.
Push this button once again to stop it.
NOTE
In case of timer setting by wired remote controller,
TIMER lamp does not light.
In case of group control, TIMER lamp goes on
header unit only. (see “6 LIMITED OPERATION
BY GROUP CONTROL”)
3 Preheat/Defrost (Orange)
This lamp lights up when the power is turned on or
right after heating operation starts or during defrost
operation.
5-EN
–5–
Page 7
SMMS High-Wall Type
0
4 PARTS NAME OF REMOTE CONTROLLER
Owner’s Manual
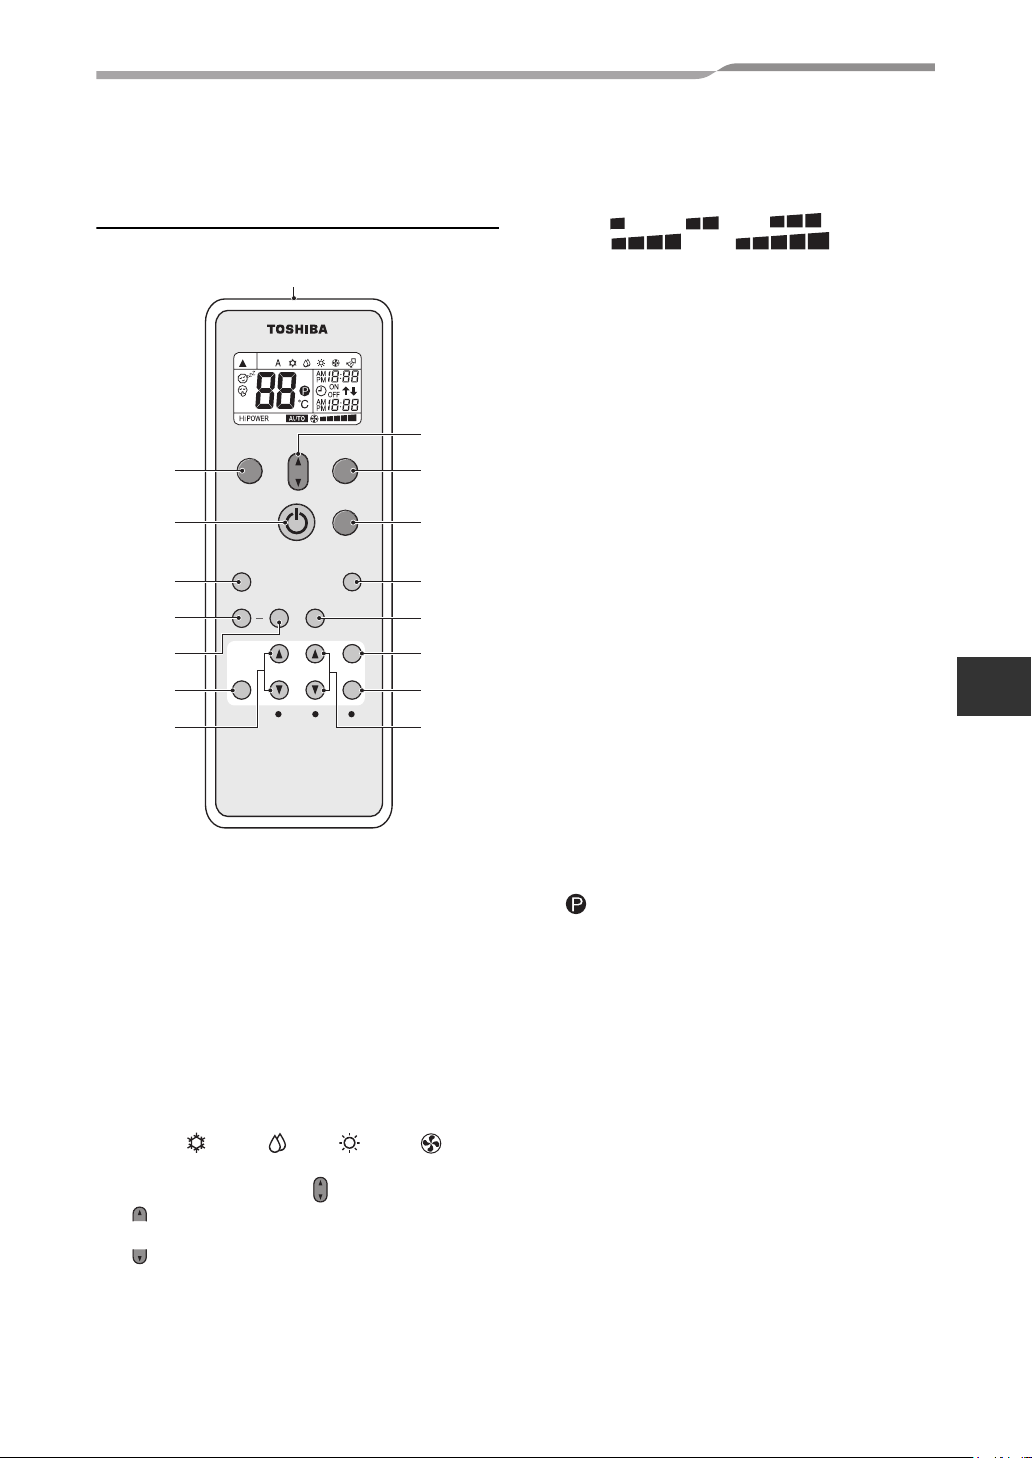
Wireless remote controller and
its functions
1
PRESET
13
TEMP
MOD
F
AN
E
2
OMFORT
C
SLEEP
Hi-
POWE
R
16
Q
U
IET
FIX
SWI
N
G
6
7
14
TIME
SLEEP
R
O
N
FILTE
CHK
CLR
OFF
SET
R
CLOCK
9
1 Infrared signal emitter
Transmits a signal to the indoor unit.
2 START/STOP button
Press the button to start operation.
(A receiving beep is heard.)
Press the button again to stop operation.
(A receiving beep is heard.)
If no receiving sound is heard from the indoor unit,
press the button twice.
3 Mode select button (MODE)
Press this button to select a mode.
Each time you press the button, a mode is selected in
a sequence that goes from A : Auto changeover
control, : Cool, : Dry, : Heat, : Fan
only, and back to A. (A receiving beep is heard.)
4 Temperature button ( )
............ The set temperature is increased up to
TEMP
TEMP
30°C.
............ The set temperature is dropped down to
17°C. (A receiving beep is heard.)
5 Fan speed button (FAN)
Press this button to select fan speed. When you
select AUTO, the fan speed is automatically adjusted
according to the room temperature.
TEMP
4
5
3
15
12
11
1
8
You can also manually select the desired fan speed
from among five settings.
(LOW , LOW
+
MED
(A receiving beep is heard.)
+
, MED ,
, HIGH )
6 Auto louver button (SWING)
Press this button to swing the louver.
(A receiving beep is heard.)
Press the SWING button to stop the louver swinging.
(A receiving beep is heard.)
7 Set louver button (FIX)
Press this button to adjust the airflow direction.
(A receiving beep is heard.) While this button is kept
depressed, the receiving tone continuously sounds.
8 Off timer button (OFF)
Press this button to set the OFF timer.
9 On timer button (ON)
Press this button to set the ON timer.
10 Reserve button (SET)
Press this button to reserve time settings.
(A receiving beep is heard.)
11 Cancel button (CLR)
Press this button to cancel ON timer and OFF timer.
(A receiving beep is heard.)
12 High power button (Hi POWER)
Press this button to start the high power operation.
This function is not operated group control.
13 PRESET button
Press this button to change the operation mode to the
preferred operation mode memorized previously. To
memorize the operation mode, press this button for at
least 3 seconds during the preferred operation mode.
is displayed and the operation mode is
memorized.
14 SLEEP button
Press this button to start the OFF timer operation that
automatically adjusts the room temperature and the
fan speed.
You can select the OFF timer time from four durations
(1, 3, 5 or 9 hours).
15 COMFORT SLEEP button
Press this button to start the OFF timer operation that
automatically adjusts the room temperature and the
fan speed.
You can select the OFF timer time from four durations
(1, 3, 5 or 9 hours).
During group control operation, the set temperature
and the fan speed are not automatically adjusted.
Only off timer function is activated.
16 QUIET button
Press this button to start quiet operation.
Pressing this button again will restore normal
operation.
EN
–6–
6-EN
Page 8
SMMS High-Wall Type
0
Owner’s Manual
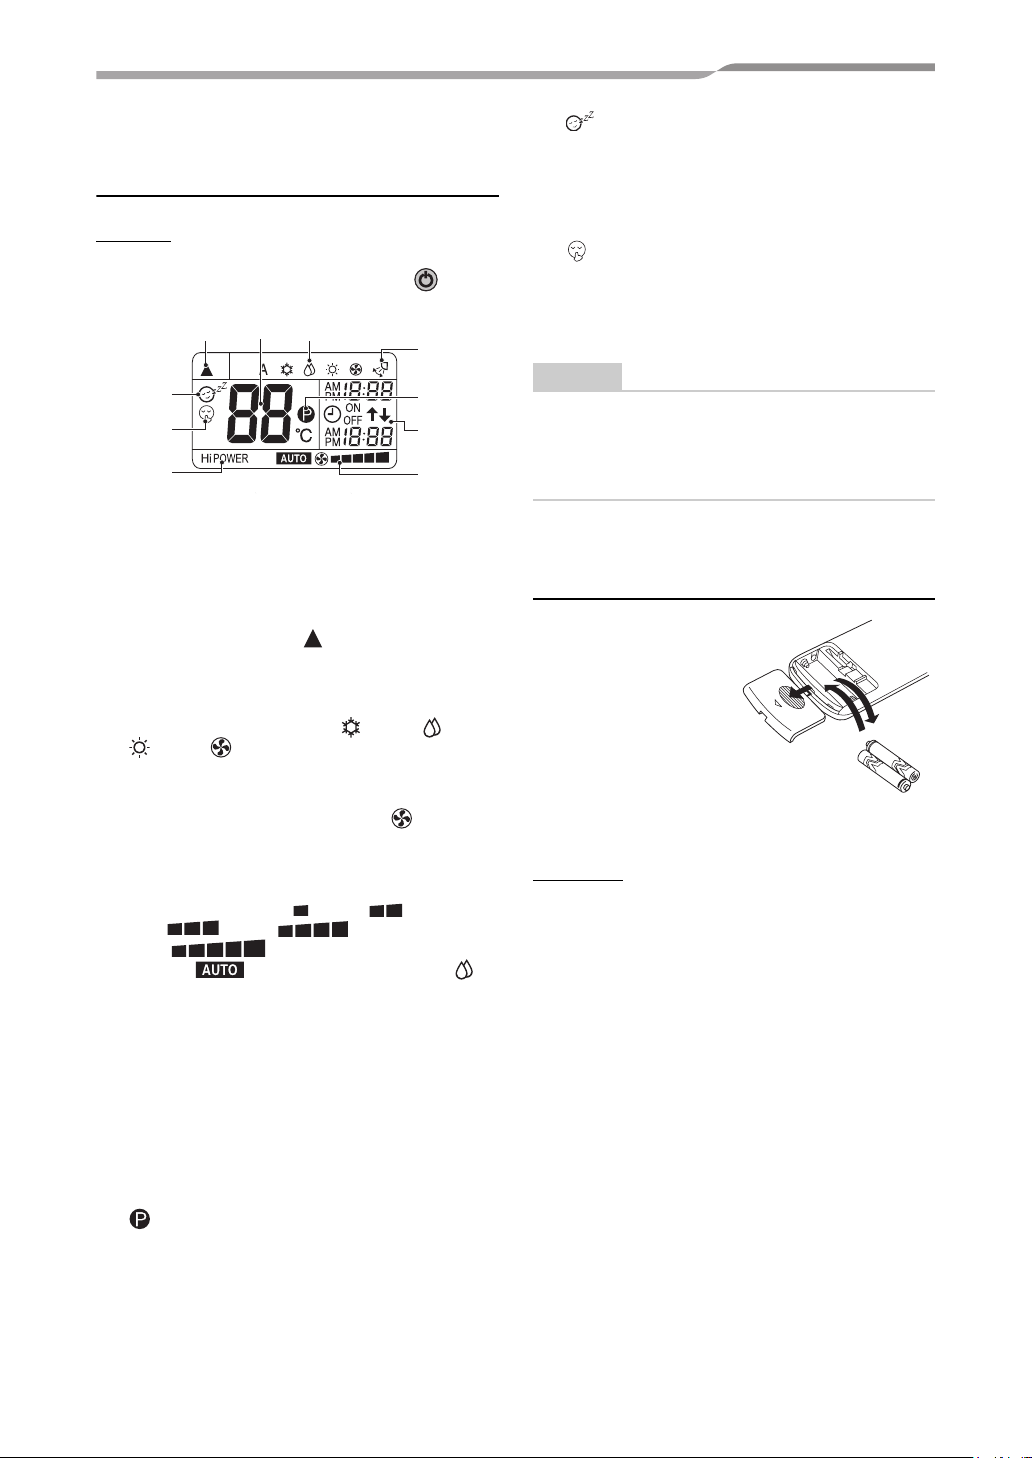
Names and functions of
indications on wireless remote
controller
Display
All indications, except for clock time indication, are
indicated by pressing the START/STOP button.
3
12
1
8
9
6
• In the illustration, all indications are indicated for
explanation.
During operation, only the relevant indications
will be indicated on the remote controller.
1 Transmission mark
This transmission mark ( ) indicates when the
remote controller transmits signals to the indoor unit.
2 Mode display
Indicates the current operation mode.
(A : Auto changeover control, : Cool, : Dry,
: Heat, : Fan only)
3 Temperature display
Indicates the temperature setting (17°C to 30°C).
When you set the operating mode to : Fan only,
no temperature setting is indicated.
4 FAN speed display
Indicates the selected fan speed. AUTO or one of five
fan speed levels (LOW , LOW
MED , MED
HIGH ) can be indicated.
Indicates when the operating mode is :
Dry.
+
5 TIMER and clock time display
The time set for timer operation or clock time is
indicated.
The present time is always indicated except for
TIMER operation.
6 Hi POWER display
Indicates when the high power operation starts.
Press the Hi POWER button to start and press it
again to stop the operation.
7 (PRESET) display
Indicated when memorizing the preferred operation
mode or when it has been memorized.
Also, this icon is indicated when the memorized
preferred operation is displayed.
+
,
7
5
4
,
8 (COMFORT SLEEP) display
Indicated during the OFF timer operation that
automatically adjusts the room temperature and the
fan speed. Each time you press the COMFORT
SLEEP button, the display changes in the sequence
of 1h, 3h, 5h, and 9h.
9 (QUIET) display
Indicated during the quiet operation.
10 Swing display
Indicated during the swinging operation where the
horizontal louver automatically moves up and down.
NOTE
When both wired remote controller and wireless
remote controller are used, display on the screen of
wireless remote controller may differ from the
actual operation in some cases.
Preparation and check before
use
1. Loading Batteries
• Remove the battery
cover.
• Insert 2 new batteries
(R03 [AAA]) following
the (+) and (-)
positions.
2. Removing Batteries
• Remove the battery
cover.
• Remove the 2 used batteries.
Batteries
• To replace the batteries, use two new batteries
(R03 [AAA]) .
• In normal use, the batteries will last about one
year.
• Replace the batteries if there is no receiving
beep from the indoor unit or when the air
conditioner cannot be operated using the remote
controller.
• To avoid malfunctions by battery leakage,
remove the batteries when not using the remote
controller for more than one month.
• Please dispose of the used batteries according
to the local regulation.
A
C
L
2
1
7-EN
–7–
Page 9
SMMS High-Wall Type
2
3
2
Owner’s Manual
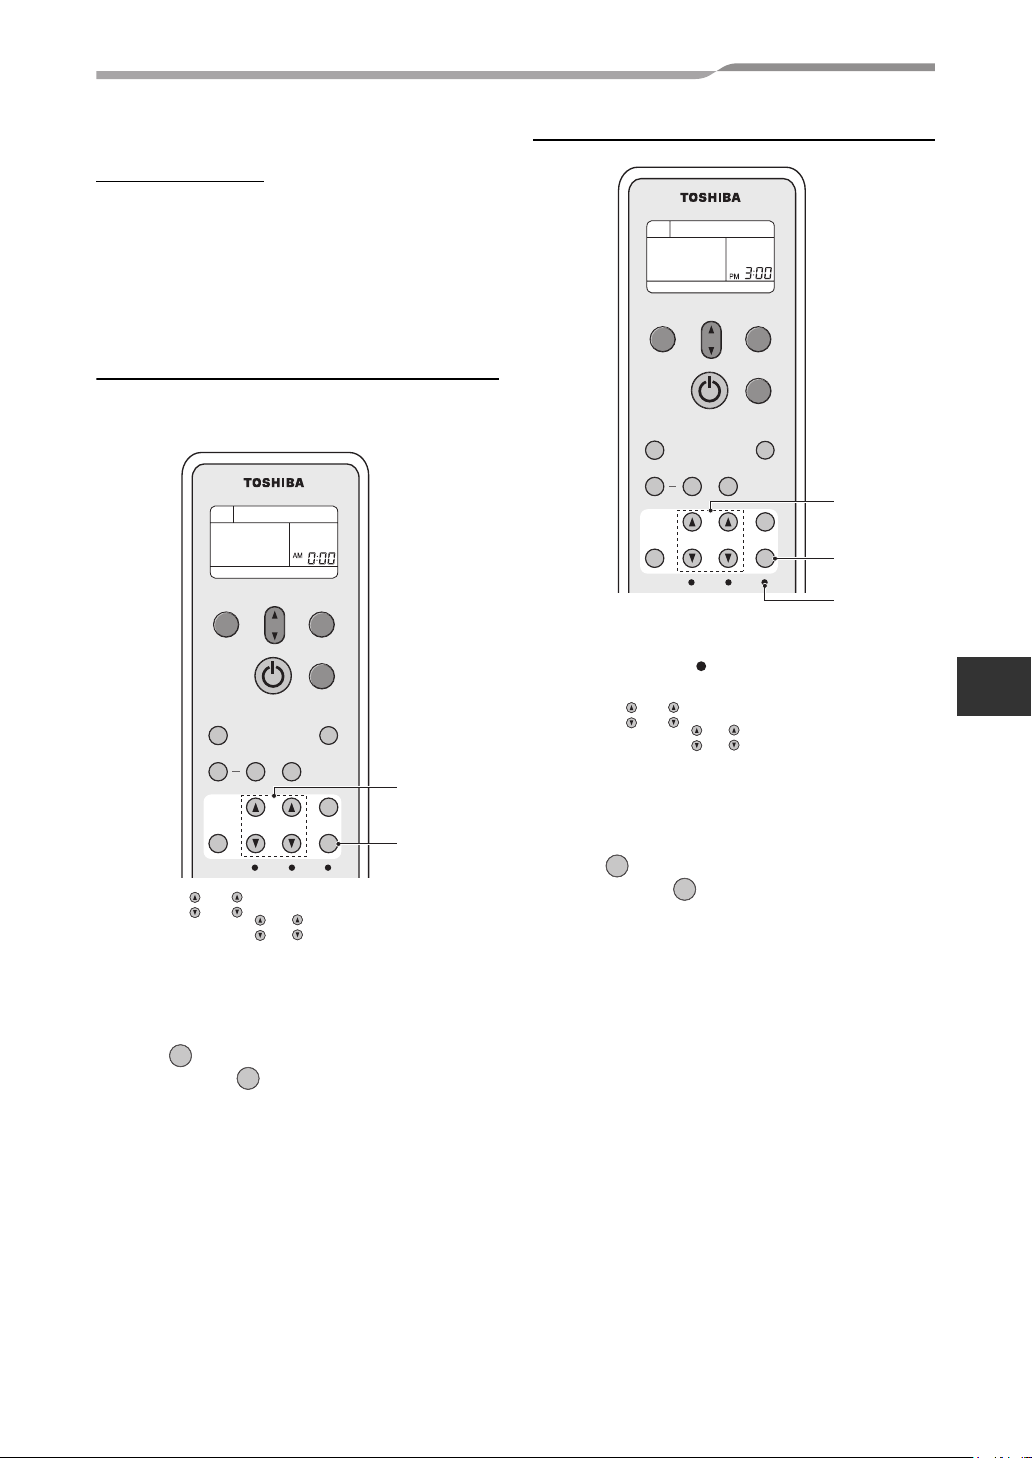
5 ADJUSTING CLOCK
Setting the clock
Before you start operating the air conditioner, set
the clock of the remote controller using the
procedures given in this section. The clock panel
on the remote controller will indicate the time
regardless of whether the air conditioner is in use or
not.
Initial setting
When batteries are inserted in the remote controller
the clock panel will indicate AM 0:00 and will flash.
PRESET
Q
U
IET
FIX
SWI
N
G
TIME
R
O
SLEEP
CHK
OFF
1 TIMER or button
ON
Press the TIMER or button to set the current
time.
Each press of the TIMER button changes the time in
one minute steps.
Pressing the TIMER button continually changes the
time in ten minute steps.
2 SET button
SET
Press the SET button.
SET
The current time is indicated and the clock starts.
N
ON
TEMP
FILTE
F
AN
MOD
E
OMFORT
C
SLEEP
Hi-
POWE
R
CLR
OFF
SET
R
CLOCK
OFF
1
Clock adjusting
PRESET
QUIET
SWING
TIMER
SLEEP
FIX Hi-POWER
ON
CHK
TEMP
FILTER
OFF
MODE
COMFORT
CLOCK
FAN
SLEEP
CLR
SET
1
1 CLOCK button
Press the CLOCK by tip of a pencil.
The CLOCK display flashes.
OFF
SET
ON
OFF
ON
SET
2 TIMER or button
Press the TIMER or button to set the current
time.
Each press of the TIMER button changes the time by
one minute.
Pressing the TIMER button continually changes the
time by ten minutes.
3 SET button
Press the SET button.
The current time is indicated and the clock starts.
EN
–8–
8-EN
Page 10
SMMS High-Wall Type
Owner’s Manual
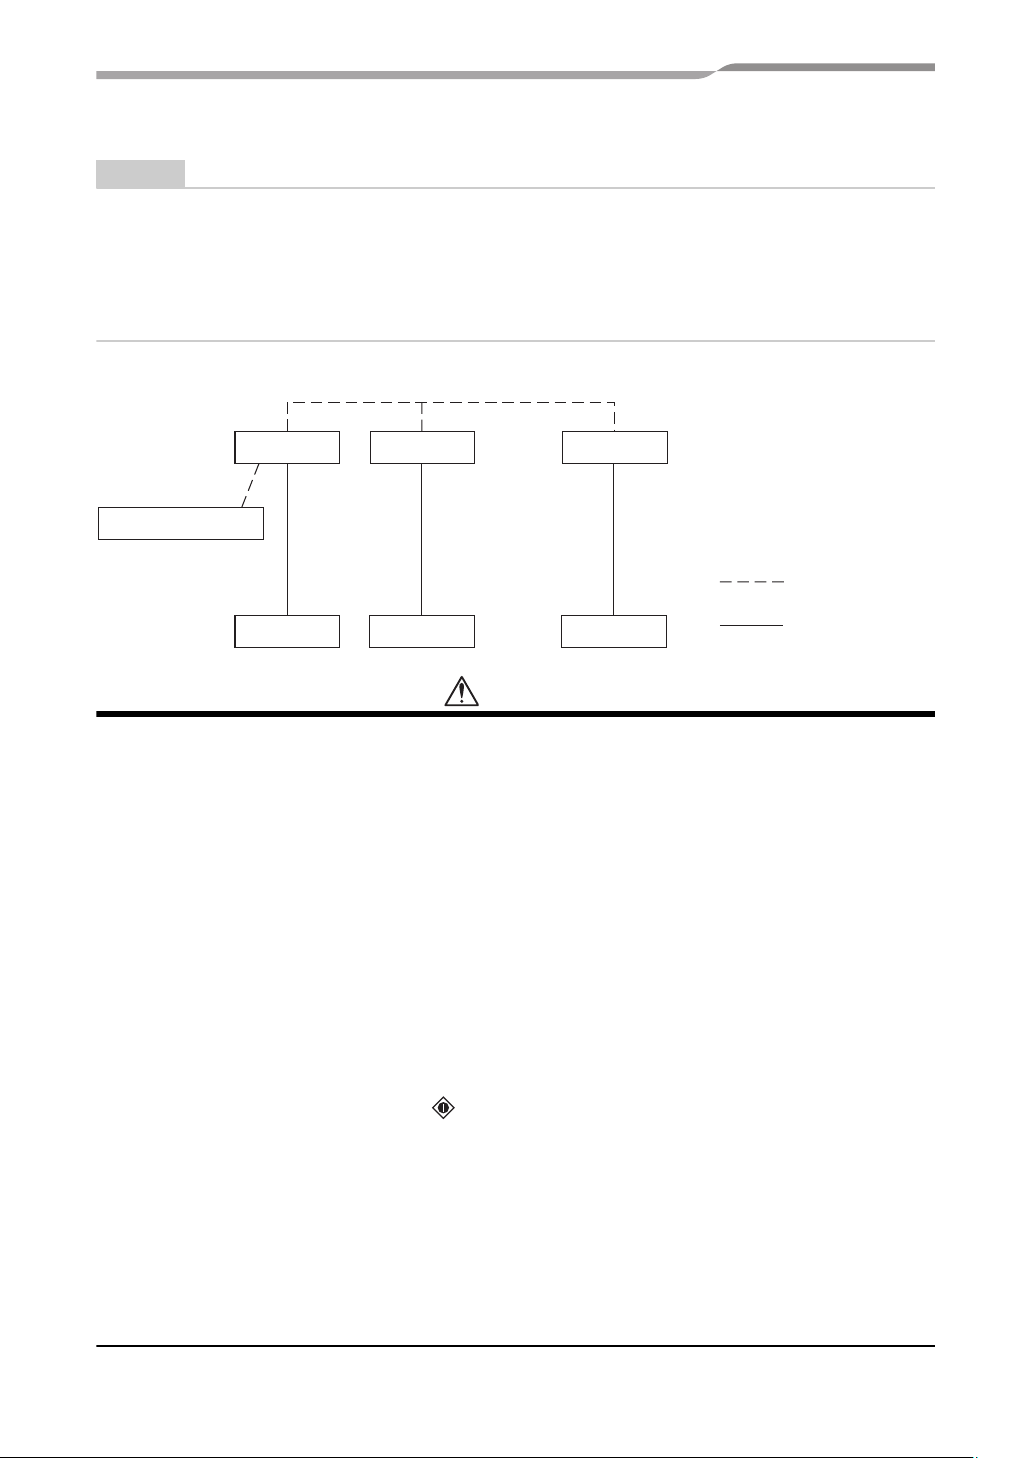
6 LIMITED OPERATION BY GROUP CONTROL
NOTE
Group control: Operate air conditioners in more than one system in same time.
Header indoor unit: The representative unit during group control. Receive commands from wired remote
controller and transmit the commands to follower units.
(Header indoor unit is indoor unit that receives START/STOP signal from the wireless remote control.)
Follower indoor unit: Indoor units other than the Header unit are called follower unit.
A wired remote controller (separately available) is required for the group control.
▼ Example of group combination
Indoor Indoor Indoor
Wired Remote controller
Control line
Outdoor
Outdoor
Outdoor
Other connecting line
CAUTION
When using indoor unit in group control,
1. Hi POWER operation will not function.
When Hi POWER is transmitted from wireless remote controller the receiving sound will be heard from the
indoor unit and display on the wireless remote controller will also change. However, the indoor unit does not
operate Hi POWER operation. Restore the display on the wireless remote controller pushing Hi POWER
button.
2. COMFORT SLEEP
When COMFORT SLEEP is transmitted from wireless remote controller, the receiving sound will be heard
from the indoor unit and the display on the wireless remote controller will also be changed as same as Hi
POWER operation. However, the set temperature and the fan speed will not be automatically adjusted. Only
off timer function is activated.
3. Units other than the Header unit cannot be operated with remote controller and the
TEMPORARY operation.
When operating air conditioner with wireless remote controller transmission should be sent to the Header
unit.
Header and follower indoor units are decided through address setting upon installation. Follower unit will not
receive any signals from wireless remote controller.
Air conditioner will not work even if the button on the follower unit is pressed.
(Some Follower units may receive SWING and FIX, but these operations are performed only on the unit that
received the signal.)
(When wireless remote controller is used, only the Header unit receives SWING signal. If the SWING signal
is transmitted to follower unit, the sound to refuse receiving signal (3 beeps) is heard and the follower unit
does not receive the signal.
For FIX operation, both Header and follower unit perform the operation by itself.
When wired remote controller is used, airflow direction can be changed on each unit by selecting the indoor
unit.)
4. TIMER lamp lights up only on the Header unit.
When the timer is set with wired remote controller, even the TIMER lamp on the Header unit will not light up.
9-EN
–9–
Page 11
SMMS High-Wall Type
7 HANDLING THE REMOTE CONTROLLER
Owner’s Manual
CAUTION
• The air conditioner will not operate if curtains,
doors or other materials block the signals from
the remote controller to the indoor unit.
• Prevent any liquid from falling into the remote
controller.
Do not expose the remote controller to direct
sunlight or heat.
• If the infrared signal receiver on the indoor unit
is exposed to direct sunlight, the air conditioner
may not function properly.
Use curtains to prevent the sunlight from
reaching the receiver.
• If the room using the air conditioner has
fluorescent lighting with electronic starters,
signals may not be properly received. If you are
planning to use such fluorescent lamps, consult
your local dealer.
• If other electrical appliances react to the remote
controller move these appliances or consult
your local dealer.
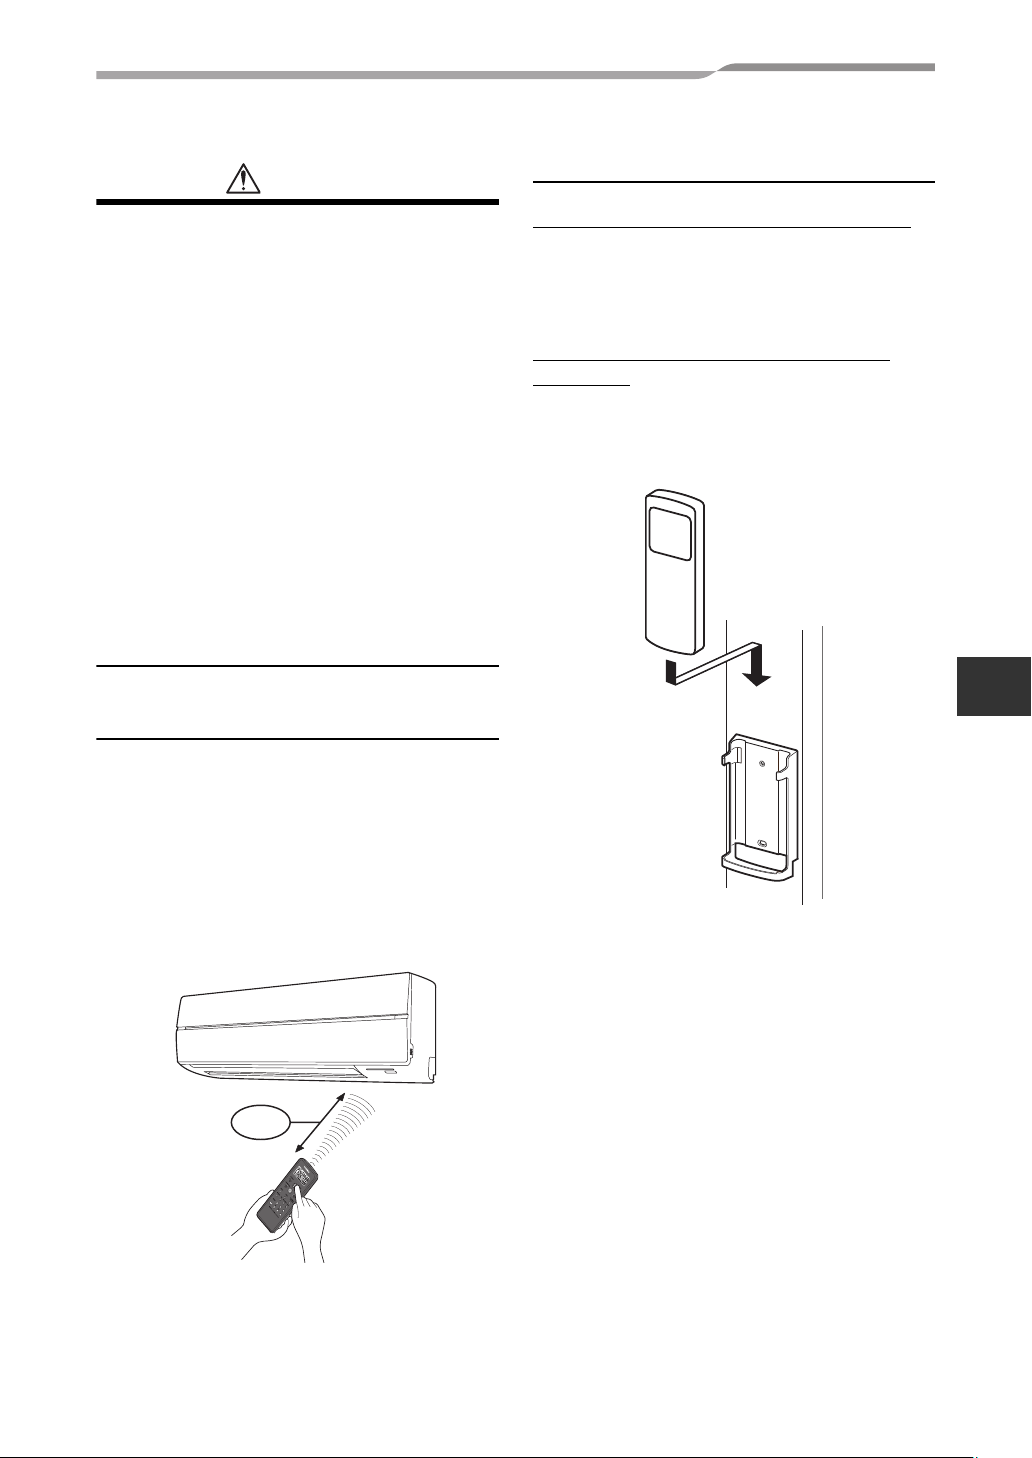
Location of the remote controller
Remote controller holder
Installing the remote controller holder
• Before you actually install the remote controller
holder on a wall or pillar, check whether the
remote controller signals can be received by the
indoor unit.
Mounting and removing the remote
controller
• To mount the remote controller hold it parallel to
the remote controller holder and push it in fully.
To remove the remote controller slide the remote
controller upwards and out from the holder.
EN
• Keep the remote controller where its signals can
reach the receiver of the indoor unit (a distance
of 7 m is allowed).
• When you select the timer operation, the remote
controller automatically transmits a signal to the
indoor unit at the specified time.
If you keep the remote controller in a position that
hinders proper signal transmission, a time lag of
up to 15 minutes may occur.
7 m
–10–
10-EN
Page 12
SMMS High-Wall Type
2
4
3
2
3
8 HOW TO USE REMOTE CONTROLLER
Owner’s Manual
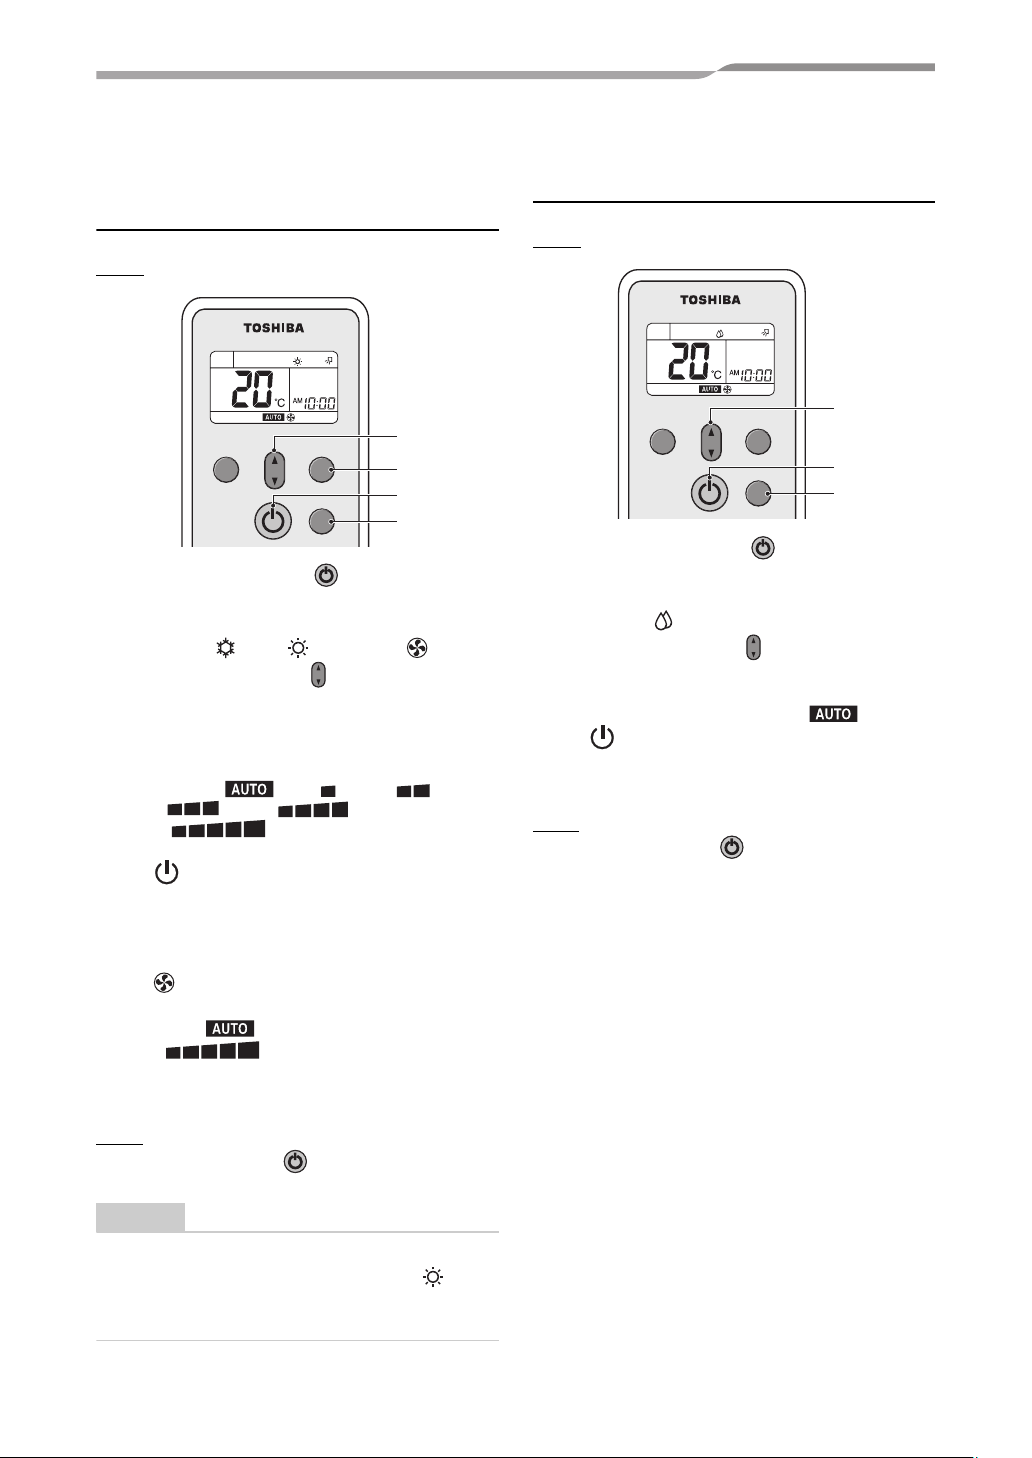
Cooling/heating/fan only
operation
Start
PRESET
TEMP
FAN
MODE
1
1 START/STOP button ( )
Press this button to start the air conditioner.
2 Mode select button (MODE)
Select Cool , Heat , or Fan only .
3 Temperature button ( )
Set the desired temperature.
When the air conditioner is in FAN ONLY operation,
the temperature display is not indicated.
TEMP
4 Fan speed button (FAN)
Select one of LOW , LOW
MED , MED
HIGH .
• The OPERATION lamp (green) on the
display panel of the indoor unit goes on. And
operation starts after approximately 3 minutes.
(If you select FAN ONLY mode, the unit will start
immediately.)
• The : Fan only mode does not control
temperature.
• Fan speed is the same as
HIGH .
Therefore, perform only steps
select this mode.
+
+
,
,
1, 2 and 4 to
Dry operation
Start
PRESET
TEMP
FAN
MODE
1
1 START/STOP button ( )
Press this button to start the air conditioner.
2 Mode select button (MODE)
Select DRY .
3 Temperature button ( )
Set the desired temperature.
• The fan speed display indicates
• The OPERATION lamp (green) on the
display panel of the indoor unit lights, and
operation starts after approximately 3 minutes.
Stop
START/STOP button ( )
Press this button again to stop the air conditioner.
TEMP
Stop
START/STOP button ( )
Press this button again to stop the air conditioner.
NOTE
When the indoor unit is operated together with a
cooling only outdoor model outdoor unit,
appears on the remote controller but the heating
operation is disabled.
11-EN
–11–
Page 13
SMMS High-Wall Type
2
4
2
3
Owner’s Manual
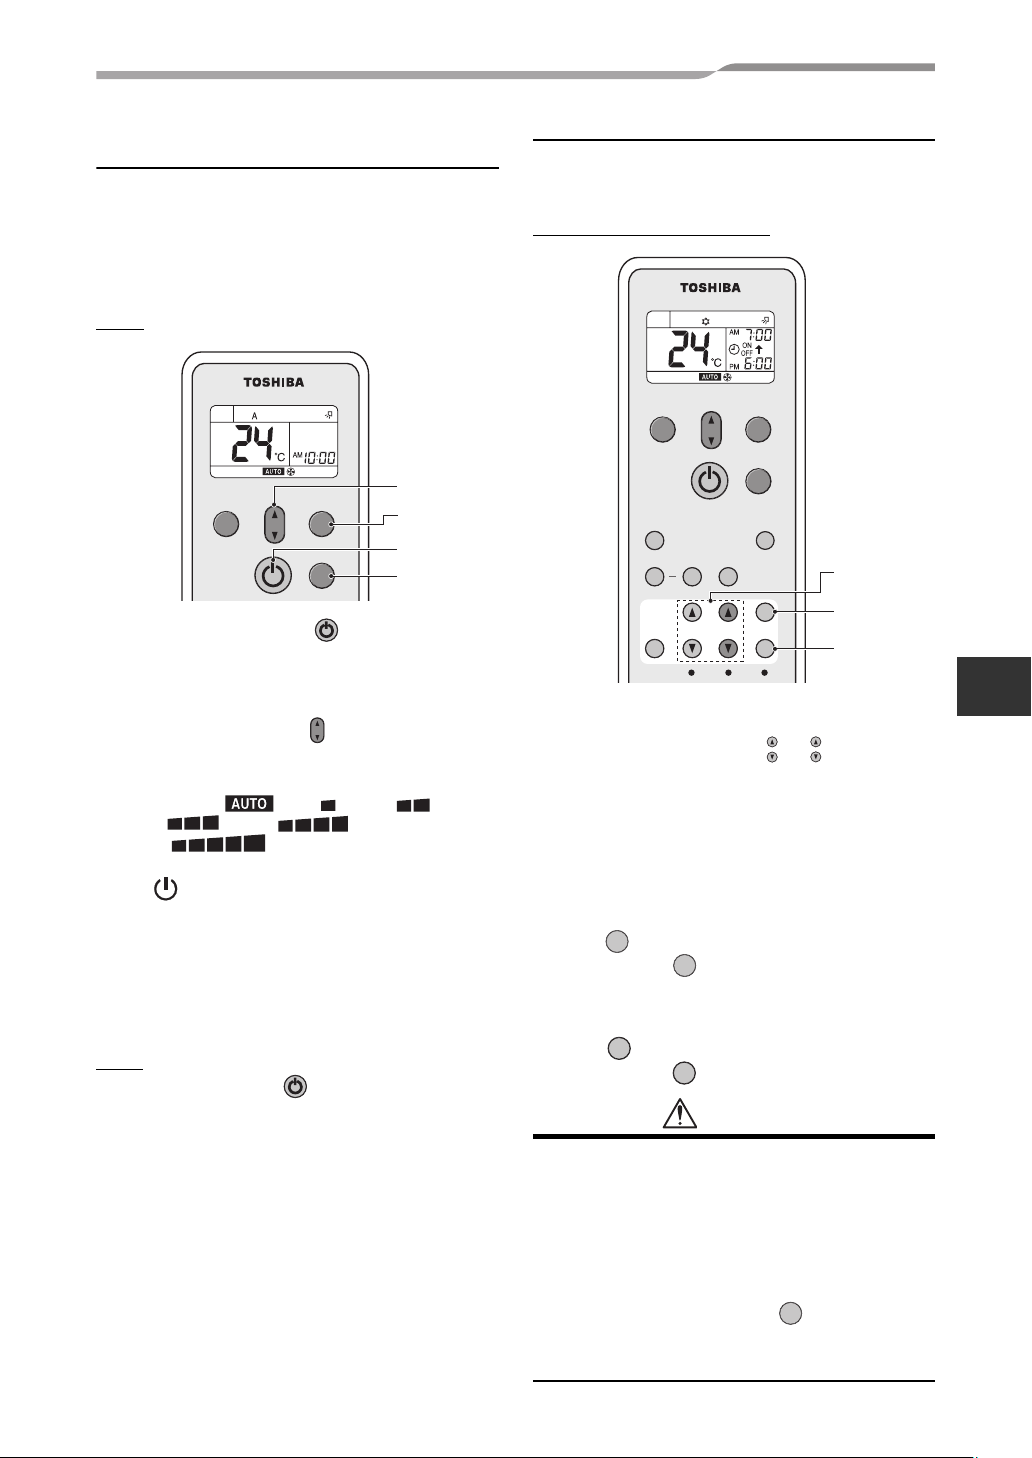
Automatic operation
(auto changeover)
This function is available only for use in
combination with a heat recovery model outdoor
unit. If this function is used with another model of
outdoor unit, “A” (Auto) appears on the remote
controller but the automatic operation is disabled.
Start
PRESET
FAN
TEMP
MODE
3
1
1 START/STOP button ( )
Press this button to start the air conditioner.
2 Mode select button (MODE)
Select A.
3 Temperature button ( )
Set the desired temperature.
TEMP
4 Fan speed button (FAN)
Select one of LOW , LOW
MED , MED
HIGH .
+
• The OPERATION lamp (green) on the
display panel of the indoor unit lights.
The operating mode is selected in accordance
with the room temperature and operation starts
after approximately 3 minutes.
• If the “A” mode is uncomfortable, you can select
the desired conditions manually.
Stop
START/STOP button ( )
Press this button again to stop the air conditioner.
+
,
,
Timer operation
Use the wired remote controller for timer setting if it
is also in use.
ON timer and OFF timer
PRESET
QUIET
SWING
FIX Hi-POWER
TEMP
FAN
MODE
COMFORT
SLEEP
1
TIMER
ON
SLEEP
FILTER
CHK
Setting TIMER
1 ON/OFF TIMER button ( or )
Press the ON or OFF TIMER buttons as required.
• The previous timer setting is displayed and flashes
along with ON/OFF timer display.
Set the timer to the desired time.
Each press of the TIMER button changes the time in
ten minute steps.
Pressing the TIMER button continually changes the
time in one hour step.
2 SET button
Cancelling TIMER
3 CLR button
SET
Press the SET button to set the timer.
The timer time is indicated and the timer starts.
CLR
Press the CLR button to cancel the timer setting.
SET
CLR
CLR
OFF
SET
CLOCK
ON
CAUTION
OFF
EN
• When you select the timer operation, the
remote controller automatically transmits the
timer signal to the indoor unit at the specified
time. Therefore, keep the remote controller in a
location where it can transmit the signal to the
indoor unit properly. Otherwise, the time lag of
up to 15minutes will occur.
• If you do not press the SET button within 30
SET
seconds after setting the time, the setting will
be cancelled.
–12–
12-EN
Page 14
SMMS High-Wall Type
Owner’s Manual
Once you select the timer operation mode, the
settings are saved in the remote controller.
Thereafter, the air conditioner will start operating
under the same conditions when you simply press
the ON/OFF button of the remote controller.
If the clock display is flashing, you cannot set the
timer.
Follow the instructions in the section “SETTING
THE CLOCK” and then set the timer.
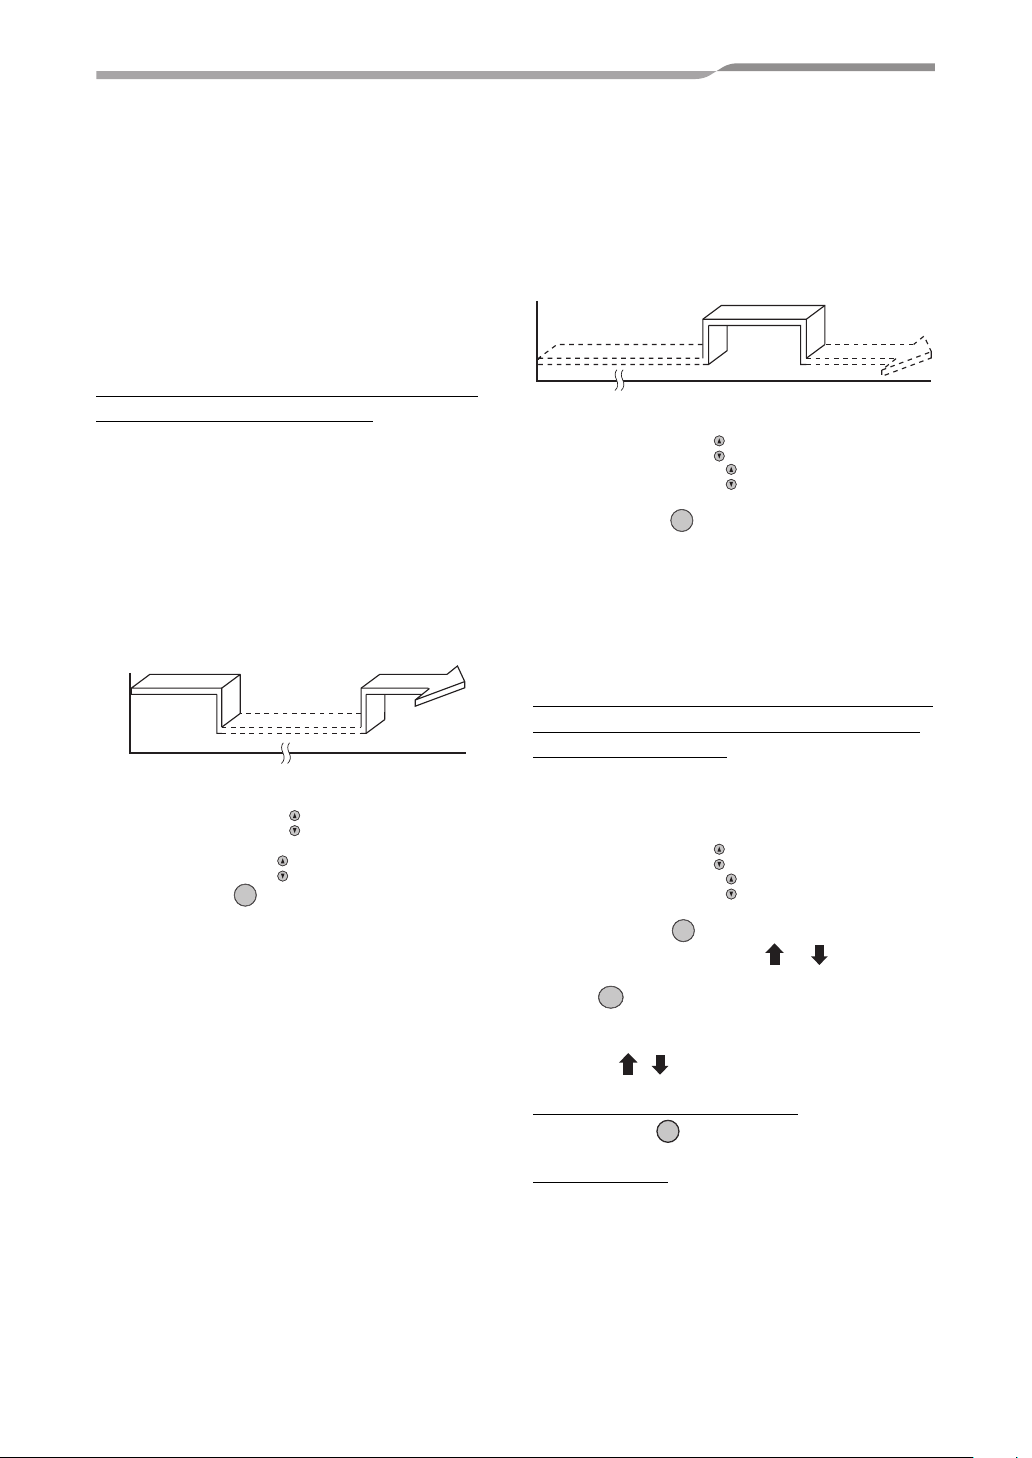
Combined timer (Setting both ON and
OFF timers simultaneously)
OFF timer —> ON timer
(Operation —> Stop —> Operation)
This feature is useful when you want to stop the air
conditioner after you go to sleep, and start it again
in the morning when you wake up or you return
home.
Example:
To stop the air conditioner and start it again next
morning.
Operation
▼ Setting combined TIMER
1. Press the OFF TIMER button to adjust the OFF
timer.
2. Press the ON TIMER button to adjust the ON timer.
3. Press the SET button.
SET
Operation again
Stop
OFF
ON
ON timer —> OFF timer
(Stop —> Operation —> Stop)
You can use this setting to start the air conditioner
when you wake up and stop it when you leave the
house.
Example:
To start the air conditioner next morning and stop it.
Operation
Stop Stop
▼ Setting combined TIMER
1. Press the ON TIMER button to adjust the ON timer.
2. Press the OFF TIMER button to adjust the OFF
timer.
3. Press the SET button.
ON
OFF
SET
• Either ON or OFF timer function which is closer
to the current time, is activated first.
• If the same time is set for both ON and OFF
timers, no timer operation is performed.
Also, the air conditioner may stop operating.
Every day combined timer (setting both
ON and OFF timer simultaneously and
activate every day.)
This feature is useful when you want to use
combined timer at the same time every day.
▼ Setting combined TIMER
1. Press the ON TIMER button to adjust the ON timer.
2. Press the OFF TIMER button to adjust the OFF
timer.
3. Press the SET button.
4. After step 3, an arrow mark ( or ) flashes for
about 3 seconds and during this flashing, press the
SET button.
SET
ON
OFF
SET
13-EN
• During the every day timer is activating, both
arrows ( , ) are indicated.
Cancel the timer operation
Press the CLR button.
CLR
Clock display
During the TIMER operation (ON-OFF, OFF-ON,
OFF timer) clock display is disappeared so as to
show the setting time. To see the present time,
press SET button briefly and the present time is
displayed about 3 seconds.
–13–
Page 15
SMMS High-Wall Type
Owner’s Manual
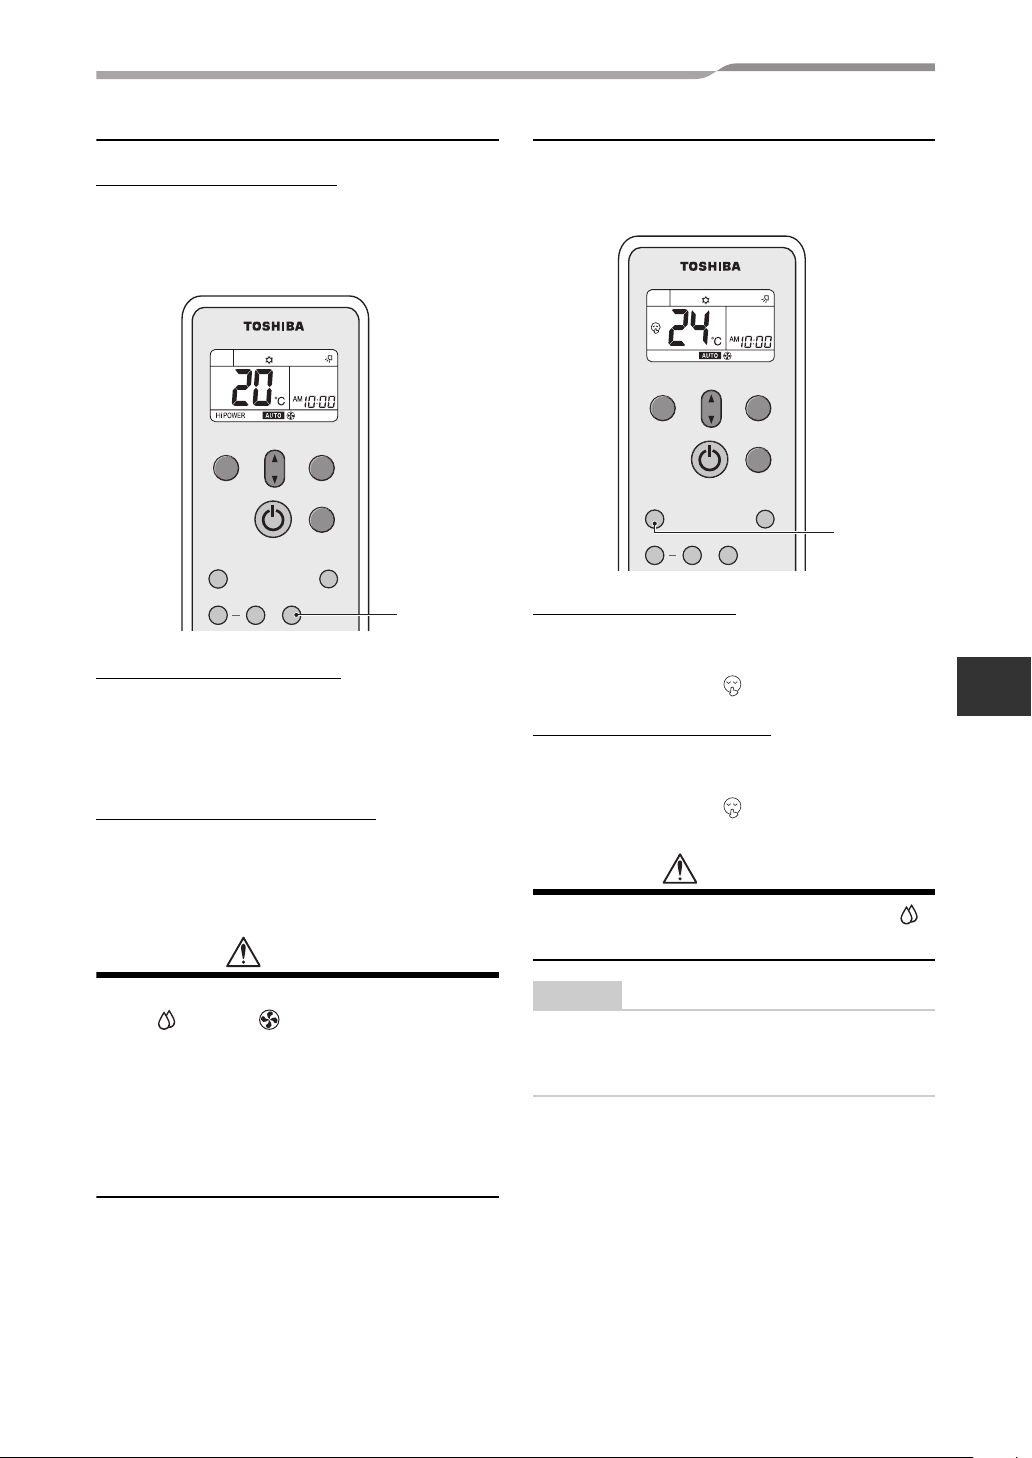
High power operation
High power (Hi POWER)
• The Hi POWER (high power operation) mode
automatically controls room temperature, airflow
and operation mode so that the room is quickly
cooled in summer and warmed in winter.
PRESET
QUIET
SWING
FIX Hi-POWER
TEMP
FAN
MODE
COMFORT
SLEEP
1
Setting Hi POWER mode
1 Hi POWER button
Press the Hi POWER button after starting any
operation. At the same time, the “Hi POWER” mark
on the remote controller is indicated.
Cancelling Hi POWER mode
1 Hi POWER button
Press the Hi POWER button once again.
At the same time, the “Hi POWER” mark on the
remote controller goes out.
CAUTION
Quiet operation
• The QUIET mode provides quiet operating
status by automatically setting the fan speed to
the lowest speed.
PRESET
QUIET
SWING
FIX Hi-POWER
TEMP
FAN
MODE
COMFORT
SLEEP
1
Setting QUIET mode
1 QUIET button
Press the QUIET button after starting any operation.
At the same time, the mark is indicated.
Cancelling QUIET mode
1 QUIET button
Press the QUIET button once again.
At the same time, the mark on the remote
controller disappears.
CAUTION
The QUIET mode cannot be activated in the
DRY operation.
EN
• The Hi POWER mode cannot be activated in
DRY and FAN ONLY operation and
the
when the ON TIMER operation is reserved.
• Hi POWER mode is not available for group
control.
When Hi POWER is transmitted to the Header
indoor unit, the receiving sound is heard but the
Hi POWER mode will not be performed. Please
cancel the Hi POWER mode.
NOTE
Under certain conditions, the quiet operation may
not provide adequate cooling or heating due to the
feature of quietness.
–14–
14-EN
Page 16

SMMS High-Wall Type
Owner’s Manual
Preset Operation
Set your preferred operation mode for future use.
The setting is memorized by the unit for future
operation (except airflow direction).
PRESET
1
FAN
TEMP
Select your preferred operation.
1 Press the PRESET button for 3 seconds to
memorize the setting.
The mark is displayed.
When you press this button next time, the memorized
operation mode will be enabled.
Comfort sleep operation
COMFORT SLEEP mode is a OFF timer operation
with automatic temperature and fan speed
adjustment.
CAUTION
The COMFORT SLEEP mode is not enabled in
DRY or FAN ONLY operation.
the
NOTE
• For the cooling operation, the set temperature
will automatically increase 1 degree/hour for
2 hours (maximum 2 degrees increase).
For the heating operation, the set temperature
will decrease.
• During group control operation, the set
temperature and the fan speed are not
automatically adjusted. Only off timer function is
activated.
Sleep timer operation
To start the sleep timer (OFF timer) operation
PRESET
QUIET
TEMP
FAN
MODE
COMFORT
SLEEP
1
1 Press the COMFORT SLEEP button.
Select 1, 3, 5 or 9 hours for the OFF timer operation.
1
PRESET
QUIET
SWING
TIMER
SLEEP
FIX Hi-POWER
ON
CHK
TEMP
FILTER
OFF
MODE
COMFORT
CLOCK
FAN
SLEEP
CLR
SET
1 Press the SLEEP button.
Select 1, 3, 5 or 9 hours for the OFF timer operation.
15-EN
–15–
Page 17

SMMS High-Wall Type
Owner’s Manual
Adjusting airflow direction
• Adjust the airflow direction properly. Otherwise, it
might cause discomfort and make the room
temperature uneven.
• Adjust the vertical airflow using the remote
controller.
• Adjust the horizontal airflow manually.
Adjust the vertical airflow
The air conditioner automatically adjusts the
vertical airflow direction in accordance with the
operating conditions when AUTO or A mode is
selected.
To set the airflow direction you desire
Perform this function when the air conditioner is in
operation.
To automatically swing the airflow
direction
Perform this function when the air conditioner is in
operation.
PRESET
FAN
TEMP
MODE
EN
PRESET
QUIET
SWING
FIX Hi-POWER
TEMP
FAN
MODE
COMFORT
SLEEP
1
1 FIX button
Keep pressing or pressing briefly the FIX button on
the remote controller to move the louver in the
desired direction.
• In subsequent operations, the vertical airflow is
automatically set in the direction to which you
adjusted the louver using the FIX button.
NOTE
Operating angle of vertical airflow louver will be
different during cooling, dry and heating operation.
QUIET
SWING
FIX Hi-POWER
COMFORT
SLEEP
1
1 SWING button
Press the SWING button on the remote controller.
• To stop the function, press the SWING button.
–16–
16-EN
Page 18

SMMS High-Wall Type
CAUTION
• The FIX and SWING buttons will be disabled
when the air conditioner is not in operation
(including when the ON timer is set).
• Do not operate the air conditioner for long
hours with the airflow direction set downward
during the cooling or dry operation.
Otherwise, condensation may occur on the
surface of the vertical airflow louver and cause
dew dripping.
• Do not move the vertical airflow louver
manually. Always use the FIX button.
If you move the louver manually, it may
malfunction during operation.
If the louver malfunctions, stop the air
conditioner once, and restart.
• When the air conditioner is started immediately
after it was stopped, the vertical airflow louver
might not move for 10 seconds or so.
• Louver operation is limited when performing
group control. (see page 9)
Owner’s Manual
Adjust the horizontal airflow
Preparation
• Take hold of the lever on the horizontal airflow
louver and move them to adjust the airflow
direction as required.
• You can adjust the airflow at the left, and right
locations of the louver.
17-EN
–17–
Page 19

SMMS High-Wall Type
9 HINTS FOR ECONOMICAL OPERATION
Maintain room temperature at comfortable level
Clean air filters
The clogged air filters impairs the performance of
the air conditioner.
Clean them once two weeks.
Owner’s Manual
Never open doors and windows more
often than necessary
To keep cool or warm air in the room, never open
doors and windows more often than necessary.
Window curtains
In cooling, close the curtains to avoid direct
sunlight.
In heating, close the curtains to keep the heat in.
Use the timer effectively
Set the timer for the desired operating time.
Get uniform circulation of room air
Adjust airflow direction for even circulation of
room air.
Clean, please
Please close
TIMER
Blows upward
Cool
and
dry
air
Warm
air
Blows downward
Air flow adjustment
Gee, chilly
Control
Use the timer
effectively
EN
–18–
18-EN
Page 20

SMMS High-Wall Type
Owner’s Manual
10 TEMPORARY OPERATION
TEMPORARY operation
This function is used to operate the unit temporarily in case you misplace the wireless remote controller or
its batteries are exhausted.
• Push the button once (less than 3 seconds) to start the air conditioner.
• The last operation conducted with the wireless remote controller will be performed. (When wireless
remote controller is not used, models with the auto-changeover (cooling/heating) function perform “A”
operation, and those without the function perform cooling operation (set temperature: 24 °C, fan: HIGH).)
I cannot find the
remote controller
A temporary
operation feature
is provided!
CAUTION
Continuous pressing of the button for 10 seconds and above will start the forced cooling operation.
(This will impose burden on the air conditioner. Do not perform this for the purposes other than test run.)
In this time all indicators of indoor unit go on.
19-EN
–19–
Page 21

SMMS High-Wall Type
Owner’s Manual
11 MAINTENANCE
WARNING
Before you clean the air conditioner, be sure to turn off the circuit breaker or main power switch.
Cleaning of indoor unit and remote controller
CAUTION
• Use a dry cloth to wipe the indoor unit and remote controller.
• A cloth dampened with cold water may be used on the indoor unit if
it is very dirty.
• Never use a damp cloth on the remote controller.
• Do not use a chemically-treated duster for wiping or leave such
materials on the unit for long. It may damage or fade the surface of
the unit.
• Do not use benzine, thinner, polishing powder, or similar solvents
for cleaning.
These may cause the plastic surface to crack or deform.
Wipe with dry cloth
If you will not use the unit for at least 1 month
1. Operate the air conditioner in FAN ONLY mode for about half a day to
dry the inside of the unit.
2. Stop the air conditioner and turn off the main power switch.
3. Remove the batteries from the remote controller.
Check before operation
CAUTION
• Check that the air filters are installed.
• Check that the air outlet or inlet of the outdoor unit is not blocked.
EN
With
the MODE
button set to
FAN ONLY.
–20–
20-EN
Page 22

SMMS High-Wall Type
Owner’s Manual
Cleaning the air filter
Clean the air filters every 2 weeks.
If the air filters are covered with dust, the
performance of the air conditioner will deteriorate.
Clean the air filters as often as possible.
1. Open the air inlet grille.
Lift the air inlet grille up to the horizontal position.
2. Take hold of the left and right handles of the air filter
and lift it up slightly, then pull it downward to take it out
from the filter holder.
Air filter
Filter holder
3. Use a vacuum cleaner to remove the dust from the
filters or wash them with water.
If you wash the air filters, dry them in the shade.
4. Insert the upper portion of air filter confirming to fit its
right and left edges on the indoor unit until it is firmly
set.
Filter holder
5. Close the air inlet grille.
Cleaning the air inlet grille
1. Remove the air inlet grille.
Hold the two sides of the air inlet grille and open
upwards.
Move the centre arm to the left and remove the grille.
21-EN
2. Wash it with water using a soft sponge or towel.
(Do not use metallic scrubbing brush or other hard
brushes.)
• Use of such hard objects will cause scratches on
the surface of the grille, and the metal coating to
peel off.
• If very dirty, clean the air inlet grille with a neutral
detergent for kitchen use, and rinse it off with
water.
–21–
Page 23

SMMS High-Wall Type
3. Wipe out water from the air inlet grille and dry it.
4. Fit the left and right arms of the air inlet grille to the
shafts on the two sides of the air conditioner and push
in completely, and then push in the centre arm.
5. Check that the centre arm has been completely
inserted and close the air inlet grille.
• Push the arrow locations (four) at the bottom of the
air inlet grille to check whether the grille is
completely closed.
Owner’s Manual
EN
–22–
22-EN
Page 24

SMMS High-Wall Type
Owner’s Manual
12 TROUBLES AND CAUSES
For contents of the outdoor unit, combinations, etc., refer to the owner’s manual supplied with the outdoor
unit.
CAUTION
If any of the following conditions occur, stop the air conditioner immediately, set to off the main power
switch and contact the dealer:
• Switch operation are erratic.
• The main power fuse often blows out, or the circuit breaker is often activated.
• Foreign matter or water has fallen inside the air conditioner.
• Any other unusual condition is observed.
• Abnormal display appears on the remote controller display while using wired remote controller.
Before you ask for servicing or repairs, check the following points.
▼ Recheck
Inoperative
• The power main switch is turned off. (Indoor)
• The circuit breaker is activated to cut off the power supply.
• The main power fuse has blown out.
• Stoppage of electric current.
• The batteries in the remote controller are exhausted.
• ON TIMER is set.
• Signal is sent to the follower indoor unit with the remote controller.
(see page 10)
• Operation of the indoor unit is limited by the wired remote controller that is
controlling some other system.
(When signal is transmitted, warning sound (5 beeps) will be heard.)
• Disagreement in operation mode occurred.
(When the operation mode disagrees, the “ OPERATION” lamp lights
up, and the “ TIMER” and “ Preheat/Defrost” lamps blink
alternately with an alarm sound.) (see page 5)
Poor cooling or heating performance
• Doors or windows are opened.
• The air filter is clogged with dust.
• The louver is not at the correct position.
• The fan speed is set to low.
• The air conditioner is set in the QUIET or DRY mode.
• The set temperature is too high. (In cooling operation)
• The set temperature is too low. (In heating operation)
• (Only when the air is not cooled even during cooling operation)
When another indoor unit in the same system is heating.
23-EN
–23–
Page 25

SMMS High-Wall Type
▼ These are not failures.
The back of indoor unit is dewed.
• Dewdrops on the back of the indoor unit are automatically collected and drained
out.
Indoor unit or outdoor unit makes a strange noise.
• When temperature sharply changes, the indoor or outdoor unit occasionally
makes a strange noise because of expansion/contraction of parts or change of
refrigerant flow.
The room air is smelly.
A bad odor comes from the air conditioner.
• Smells impregnated in the wall, carpet, furniture, clothing, or furs, are coming
out.
Louver does not work in the FIX or SWING mode.
• The FIX and SWING modes are restricted under the group control.
(see page 9)
Owner’s Manual
Fan and louvers of the indoor unit moves when the unit is not operated.
• When the other indoor unit(s) is operating within the system, a fan of switched off indoor unit may
temporary operate.
EN
–24–
24-EN
Page 26

SMMS High-Wall Type
Nous vous remercions d’avoir choisi un climatiseur TOSHIBA.
Owner’s Manual
Veuillez lire attentivement ce Manuel du proprietaire avant d’utiliser votre climatiseur.
• Pensez à vous procurer le « Manuel du proprietaire » et le « Manuel d’installation » auprès du
fabricant ou du revendeur.
À l’attention des constructeurs ou revendeurs.
• Veuillez expliquer clairement le contenu du Manuel du proprietaire et le remettre au client.
REMARQUE
Ce manuel décrit le fonctionnement de l’unité intérieure et de la télécommande sans fil.
Pour plus de renseignements sur la télécommande sans fil et l’unité intérieure, veuillez consulter le manuel
d’utilisation fourni avec l’unité extérieure. (Gardez ces manuels en lieu sûr.)
CHOIX D’UN NOUVEAU RÉFRIGÉRANT
Ce climatiseur est d’un type inédit qui utilise le nouveau réfrigérant HFC (R410A) à la place du
réfrigérant traditionnel R22 afin d’éviter la dégradation de la couche d’ozone.
Table des matières
1 MESURES DE SÉCURITÉ . . . . . . . . . . . . . . . . . . . . . . . . . . . . . . . . . . . . . . . . . . 26
2 ACCESSOIRES . . . . . . . . . . . . . . . . . . . . . . . . . . . . . . . . . . . . . . . . . . . . . . . . . . 28
3 NOM DES PIÈCES . . . . . . . . . . . . . . . . . . . . . . . . . . . . . . . . . . . . . . . . . . . . . . . . 28
4 NOM DES FONCTIONS DE LA TÉLÉCOMMANDE . . . . . . . . . . . . . . . . . . . . . . 30
5 RÉGLAGE DE L’HORLOGE . . . . . . . . . . . . . . . . . . . . . . . . . . . . . . . . . . . . . . . . 32
6 FONCTIONNEMENT LIMITÉ PAR LA COMMANDE DE GROUPE . . . . . . . . . . 33
7 MANIPULATION DE LA TÉLÉCOMMANDE . . . . . . . . . . . . . . . . . . . . . . . . . . . . 34
8 UTILISATION DE LA TÉLÉCOMMANDE . . . . . . . . . . . . . . . . . . . . . . . . . . . . . . 35
9 SUGGESTIONS POUR UN FONCTIONNEMENT ÉCONOMIQUE . . . . . . . . . . . 42
10 FONCTIONNEMENT TEMPORAIRE . . . . . . . . . . . . . . . . . . . . . . . . . . . . . . . . . . 43
11 ENTRETIEN . . . . . . . . . . . . . . . . . . . . . . . . . . . . . . . . . . . . . . . . . . . . . . . . . . . . . 44
12 PROBLÈMES ET CAUSES . . . . . . . . . . . . . . . . . . . . . . . . . . . . . . . . . . . . . . . . . 47
1-FR
–25–
Page 27

SMMS High-Wall Type
Owner’s Manual
1 MESURES DE SÉCURITÉ
DANGER
• N’essayez pas d’installer l’unité vous-même.
Faites appel à un installateur professionnel.
• N’essayez pas de réparer l’unité vous-même.
Cette unité ne comporte aucun élément que vous puissiez vous-même
réparer.
• L’ouverture ou le démontage du couvercle vous expose à des tensions
dangereuses.
• La mise hors tension de l’appareil ne suffit pas à écarter tout risque
d’électrocution.
AVERTISSEMENT
AVERTISSEMENTS CONCERNANT L’INSTALLATION
• Assurez-vous de faire installer le climatiseur par un électricien
professionnel ou un revendeur autorisé.
Si vous réalisez l’installation du climatiseur de manière imparfaite,
certains problèmes comme une fuite d’eau, une électrocution ou un
incendie peuvent se produire.
• Raccordez le climatisateur à la terre.
Ne branchez pas le fil de terre à la conduite de gaz, à la conduite d’eau,
au paratonnerre ou au fil de terre du téléphone. Une mise à la terre
incorrecte du climatisateur peut entraîner une électrocution.
AVERTISSEMENT CONCERNANT LE FONCTIONNEMENT
• Évitez de trop refroidir la pièce ou de rester exposé pendant de trop
longues périodes au souffle d’air froid, car ceci est nuisible à la santé.
• N’introduisez pas vos doigts ou tout objet dans l’entrée et la sortie d’air
sous peine de vous blesser ou d’endommager l’appareil. En effet,
l’entrée et la sortie d’air comportent des ventilateurs tournant à grande
vitesse.
• Si vous constatez une anomalie au niveau du climatiseur (odeur de brûlé,
refroidissement faible, etc.), actionnez immédiatement l’interrupteur
principal ou le disjoncteur du secteur pour l’arrêter, puis contactez votre
revendeur.
Si le climatiseur présente une anomalie lors de son fonctionnement en
continu, vous risquez d’être confronté à certains problèmes tels que :
fuite d’eau, électrocution ou incendie.
• Évitez de renverser de l’eau ou tout autre liquide sur l’unité intérieure. Si
l’unité est mouillée, elle peut entraîner une électrocution.
AVERTISSEMENT CONCERNANT DÉPLACEMENTS ET
RÉPARATIONS
• Ne déplacez pas et ne réparez pas l’unité vous-même.
L’unité étant sous haute tension, vous pourriez vous électrocuter en
démontant le couvercle et l’unité principale.
• Si vous souhaitez modifier l’emplacement de votre climatiseur, demandez à votre revendeur de s’en
charger. S’il est installé de manière imparfaite, une électrocution ou un incendie peuvent avoir lieu.
FR
–26–
2-FR
Page 28

SMMS High-Wall Type
ATTENTION
AVERTISSEMENTS CONCERNANT L’INSTALLATION
• Placez correctement le tuyau d’évacuation pour un bon écoulement.
Une mauvaise évacuation risquerait d’inonder la maison et de mouiller
les meubles.
• Assurez-vous de raccorder le climatiseur à une alimentation exclusive
correspondant à la tension nominale, faute de quoi l’unité pourrait
tomber en panne ou provoquer un incendie.
• N’installez pas l’unité dans un emplacement où un gaz inflammable
pourrait fuir.
S’il s’accumulait autour de celle-ci, le gaz inflammable risquerait de
provoquer un incendie.
PRÉCAUTIONS CONCERNANT LE FONCTIONNEMENT
• Veuillez lire attentivement ce manuel ainsi que le manuel fourni avec
l’unité extérieure avant de mettre le climatiseur en marche. Ils décrivent
plusieurs aspects importants de son fonctionnement quotidien.
• N’utilisez pas ce climatiseur à d’autres fins et notamment à des fins de
conservation d’aliments, d’instruments de précision, d’œuvres d’art,
d’animaux d’élevage, de plantes vertes.
• N’installez pas ce climatiseur dans un local prévu pour un usage
particulier comme un bateau ou tout autre véhicule sous peine de
diminuer les performances de l’équipement.
• Évitez d’exposer les plantes vertes et les animaux au souffle du
climatiseur car ce dernier à des effets négatifs sur leur santé et leur
croissance.
• Lorsque le climatiseur et un appareil à combustion fonctionnent dans
un même local, veillez ce que la pièce soit bien aérée.
Une ventilation trop faible risquerait de provoquer une insuffisance
d’oxygène.
• Lorsque vous utilisez le climatiseur dans une pièce fermée, veillez à ce
que cette pièce soit bien aérée. Une ventilation trop faible risquerait de
provoquer une insuffisance d’oxygène.
• Ne manipulez pas les touches si vous avez les mains humides sous
peine de vous électrocuter.
• Ne placez aucun appareil à combustion dans un endroit exposé
directement au souffle du climatiseur, faute de quoi la combustion sera
imparfaite.
• Lorsque vous envisagez de ne pas utiliser l’appareil pendant une
période prolongée, coupez l’alimentation principale à l’aide de
l’interrupteur ou du disjoncteur par mesure de sécurité. Le fait de
débrancher l’unité du secteur écarte tout risque de dommage lié à une
surtension ou à la foudre.
• Ne placez pas un récipient rempli d’eau, un vase par exemple, sur
l’unité. Si l’eau venait à couler sur l’unité, cela pourrait entraîner une
électrocution suite à une détérioration de l’isolation électrique.
• Ne lavez pas l’unité avec de l’eau, sous peine de vous exposer à un
risque d’électrocution.
• Ne nettoyez pas l’unité à l’aide d’alcool, de benzène, de diluant, de
lave-vitre, de cire, etc. Ces produits endommageraient le climatisateur.
• Avant de nettoyer l’unité, coupez l’alimentation à l’aide de
l’l’interrupteur ou du disjoncteur pour éviter de vous blesser avec le
ventilateur électrique.
Pour plus de renseignements sur le nettoyage, consultez la section
« Entretien ».
• Pour que le climatiseur conserve toute sa puissance, conformez-vous
à la gamme des températures de fonctionnement précisée dans les
instructions.
Dans le cas contraire, un dysfonctionnement, une panne ou une fuite
d’eau pourrait se produire.
Owner’s Manual
3-FR
–27–
Page 29

SMMS High-Wall Type
2 ACCESSOIRES
Owner’s Manual
Télécommande Support de la
télécommande
3 NOM DES PIÈCES
Unité intérieure
11
10
3
4
Piles (deux)
2
FR
TIMER SET
FAN
TIME
FILTER
SET
TEST
RESET
MODE
SAVE
VENT
CL
SWING/FIX
UNIT LOUVER
1 Capteur de température ambiante
2 Panneau avant
3 Grille de l’entrée d’air
4 Filtre à air
5 Sortie d’air
5
6
7
8, 9
6 Volet de flux d’air horizontal
7 Volet de flux d’air horizontal vertical
8 Panneau d’affichage
9 Capteur de signal infrarouge
10 Télécommande (sans fil)
11 Télécommande (avec fil, vendu
séparément)
1
–28–
4-FR
Page 30

SMMS High-Wall Type
Owner’s Manual
Noms et fonctions des
indicateurs et des commandes
de l’unité intérieure
Panneau d’affichage
123
4
Les conditions de fonctionnement sont décrites
ci-dessous.
1 FONCTIONNEMENT (vert)
Ce témoin s’allume pendant le fonctionnement du
climatiseur.
2 MINUTERIE (vert)
Ce témoin s’allume lorsque la minuterie est
programmée.
ATTENTION
• Commandes contradictoires en mode de
fonctionnement
Si vous sélectionnez FONCTIONNEMENT
AUTOMATIQUE sur un modèle sans
commutation automatique (refroidissement/
chauffage) ou si vous sélectionnez le mode
CHAUFFAGE dans un modèle ne produisant
que du froid, le climatisateur émet un signal
d’alarme (bip, bip). Choisissez un autre mode
de fonctionnement à l’aide de la touche MODE
de la télécommande sans fil. Vous ne pouvez
pas annuler la commande erronée à l’aide de la
télécommande filaire.
• Lorsqu’une interdiction locale est définie au
moyen de la commande centralisée depuis un
autre équipement, aucun signal n’est reçu
même si une touche de la télécommande est
actionnée. Toutefois, le signal de la touche
MARCHE/ARRÊT est accepté (un
avertissement sonore « pi » est émis par
intermittence à cinq reprises).
4 Fonctionnement TEMPORAIRE
Si vous égarez la télécommande sans fil ou si les
piles sont épuisées, appuyez sur le bouton .
• Appuyez sur le bouton pour déclencher le
climatisateur.
Appuyez de nouveau sur le bouton pour l’arrêter.
REMARQUE
En cas de réglage de la minuterie à l’aide de la
télécommande filaire, le témoin MINUTERIE ne
s’allume pas.
En cas de combinaison groupée, le témoin
MINUTERIE s’allume uniquement sur l’unité
principale (voir « 6 FONCTIONNEMENT LIMITÉ
PAR LA COMMANDE DE GROUPE »)
3 Préchauffage/Dégivrage (Orange)
Ce témoin s’allume à la mise sous tension ou
pendant le chauffage ou le dégivrage.
5-FR
–29–
Page 31

SMMS High-Wall Type
0
Owner’s Manual
4 NOM DES FONCTIONS DE LA TÉLÉCOMMANDE
Télécommande sans fil et
fonctions
1
PRESET
13
TEMP
MOD
F
AN
E
2
OMFORT
C
SLEEP
Hi-
POWE
R
16
Q
U
IET
FIX
SWI
N
G
6
7
14
TIME
SLEEP
R
O
N
FILTE
CHK
CLR
OFF
SET
R
CLOCK
9
1 Émetteur de signal infrarouge
Transmet un signal à l’unité intérieure.
2 Touche MARCHE/ARRÊT
Appuyez sur la touche pour mettre en marche l’unité.
(Un signal de réception est émis.)
Appuyez de nouveau sur la touche pour arrêter l’unité.
(Un signal de réception est émis.)
Si l’unité intérieure n’émet aucun signal de réception,
appuyez deux fois sur la touche.
3 Touche de sélection du mode (MODE)
Appuyez sur cette touche pour sélectionner un mode.
Chaque fois que vous appuyez sur la touche, un
mode est sélectionné selon la boucle suivante A :
Commande du commutateur automatique,
: Refroidissement, : Déshumidification,
: Chauffage, : Ventilation uniquement, et
revenir à A. (Un signal de réception est émis.)
4 Touche de la température ( )
............ Il est possible de régler la température
TEMP
TEMP
jusqu’à 30 °C.
............ Elle peut être abaissée jusqu’à 17 °C.
(Un signal de réception est émis.)
5 Touche de la vitesse du ventilateur (FAN)
Appuyez sur cette touche pour sélectionner la vitesse
du ventilateur. Si vous sélectionnez AUTO, la vitesse
du ventilateur dépend de la température ambiante.
TEMP
4
5
3
15
12
11
1
8
Vous pouvez également choisir un des cinq réglages
manuels de la vitesse du ventilateur.
(FAIBLE , FAIBLE
+
MOYEN
(Un signal de réception est émis.)
+
, MOYEN ,
, ÉLEVÉ )
6 Touche du balayage automatique du volet
(SWING)
Appuyez sur la touche pour déclencher l’oscillation le
volet. (Un signal de réception est émis.)
Appuyez sur la touche SWING pour arrêter
l’oscillation du volet. (Un signal de réception est
émis.)
7 Touche de réglage du volet (FIX)
Appuyez sur la touche pour régler la direction du flux
d’air. (Un signal de réception est émis.) Si cette
touche est relâchée, une tonalité de réception retentit
en continu.
8 Touche d’arrêt de la minuterie (OFF)
Appuyez sur cette touche pour fixer l’heure d’arrêt de
la minuterie.
9
Touche de mise en marche de la minuterie
(ON)
Appuyez sur cette touche pour fixer l’heure de la mise
en marche de la minuterie.
10 Touche mémoire (SET)
Appuyez sur la touche pour programmer les réglages
de l’heure. (Un signal de réception est émis.)
11 Touche d’annulation (CLR)
Appuyez sur cette touche pour annuler l’heure de
début ou d’arrêt de la minuterie. (Un signal de
réception est émis.)
12 Touche puissance élevée (Hi POWER)
Appuyez sur cette touche pour faire fonctionner le
climatiseur de manière automatique.
Cette fonction est incompatible avec la commande
de groupe.
13 Touche PRESET
Appuyez sur cette touche pour sélectionner le mode
de fonctionnement favori préalablement mémorisé.
Pour mémoriser ce mode, appuyez sur la touche
pendant au moins 3 secondes lorsque le mode de
fonctionnement qui vous intéresse est activé.
s’affiche et le mode est mémorisé.
14 Touche SLEEP
Appuyez sur cette touche pour désactiver la minuterie,
ce qui permet au climatisateur d’ajuster automatique la
température et la vitesse du ventilateur.
Vous pouvez sélectionner 4 plages de minuterie
désactivée (1, 3, 5 ou 9 heures).
15 Touche COMFORT SLEEP
Appuyez sur cette touche pour désactiver la minuterie,
ce qui permet au climatisateur d’ajuster automatique la
température et la vitesse du ventilateur.
Vous pouvez sélectionner 4 plages de minuterie
désactivée (1, 3, 5 ou 9 heures).
En mode de fonctionnement par commande de groupe,
la température et la vitesse du ventilateur définie ne sont
pas automatiquement ajustées. Seule la fonction de
désactivation de la minuterie est activée.
16 Touche QUIET
Appuyez sur cette touche pour lancer le
fonctionnement en mode silencieux.
Appuyez à nouveau sur cette touche pour rétablir le
fonctionnement normal.
FR
–30–
6-FR
Page 32

SMMS High-Wall Type
0
Owner’s Manual
Noms et fonctions des
indicateurs de la télécommande
sans fil
Affichage
Toutes les indications, sauf celle de l’heure de
l’horloge, s’affichent en appuyant sur la touche
MARCHE/ARRÊT .
3
12
1
8
9
6
• L’illustration présente toutes les indications à
des fins d’explication.
En fonctionnement normal, seules les
indications appropriées figurent sur la
télécommande.
1 Indicateur de transmission
Ce symbole ( ) indique que la télécommande
transmet des signaux à l’unité intérieure.
2 Indicateur du mode
Précise le mode de fonctionnement actuel.
(A : Commande du commutateur automatique,
: Refroidissement, : Déshumidification,
: Chauffage, : Ventilation seule)
3 Indicateur de température
Indique le réglage de la température (entre 17 °C à
30 °C).
Lorsque vous avez choisi le mode de fonctionnement
sur : Ventilation seule, aucune indication de
température ne s’affiche.
4 Indicateur de la vitesse du mode FAN
Spécifie la vitesse de ventilation sélectionnée. AUTO
ou un des cinq niveaux (FAIBLE , FAIBLE
MOYEN , MOYEN
ÉLEVÉ ) s’affiche.
L’écran affiche si le mode de fonctionnement
est : Déshumidification.
5 Indicateur TIMER et indicateur de l’heure
L’heure ou l’heure à laquelle la minuterie est
programmée s’affiche.
L’heure actuelle est toujours précisée sauf si la
minuterie est en cours de fonctionnement.
6 Indicateur Hi POWER
S’affiche lorsque le mode puissance élevée est activé.
Appuyez sur la touche Hi POWER pour activer ce
mode et appuyez à nouveau sur la touche pour
l’interrompre.
7 Indicateur (PRESET)
S’affiche lors de la mémorisation de votre mode de
fonctionnement favori ou indique, le cas échéant, le
mode de fonctionnement favori mémorisé.
Cette icône apparaît également lorsque le
fonctionnement favori mémorisé s’affiche.
+
7
5
4
+
,
8 Indicateur (COMFORT SLEEP)
S’affiche au cours du fonctionnement avec la
minuterie désactivée, ce qui permet d’ajuster
automatique la température et la vitesse du
ventilateur. À chaque fois que vous appuyez sur la
touche COMFORT SLEEP, l’affichage présente les
valeurs suivantes, à tour de rôle : 1 h, 3 h, 5 h et 9 h.
9 Indicateur (QUIET)
S’affiche en cours de fonctionnement silencieux.
10 Oscillation
S’affiche lors de l’oscillation, c’est-à-dire pendant le
déplacement du volet vers le haut et vers le bas.
REMARQUE
Lorsque la télécommande filaire et la
télécommande sans fil sont utilisées, il peut parfois
se produire un léger décalage au niveau de
l’affichage de la télécommande sans fil par rapport
au fonctionnement réel.
Préparation et vérification avant
la mise en marche
1. Mise en place des piles
• Faites glisser le
couvercle du
compartiment des
piles.
• Insérez 2 piles
neuves (R03 [AAA])
en respectant les
polarités (+) et (–).
2. Retrait des piles
• Faites glisser le
couvercle du compartiment des piles.
• Retirez les 2 piles usagées.
Piles
• Pour remplacer les piles, utilisez deux piles
,
neuves (R03 [AAA]) .
• Dans des conditions normales d’utilisation, les
piles durent environ un an.
• Changez les piles si l’unité intérieure n’émet
aucun signal de réception ou si la télécommande
ne permet pas de faire fonctionner le
climatisateur.
• Pour éviter tout dysfonctionnement dû à une
fuite des piles, retirez les piles si vous envisagez
de ne pas utiliser la télécommande pendant plus
d’un mois.
• Veuillez recycler les piles usagées
conformément aux dispositions prévues par la
réglementation de votre pays.
A
C
L
2
1
7-FR
–31–
Page 33

SMMS High-Wall Type
2
3
2
Owner’s Manual
5 RÉGLAGE DE
L’HORLOGE
Réglage de l’heure
Avant de mettre en route le climatisateur, réglez
l’horloge de la télécommande selon la procédure
décrite dans cette section. L’horloge de la
télécommande indiquera l’heure que le
climatisateur soit en marche ou pas.
Réglage initial
Après avoir introduit des piles dans la
télécommande, AM 0:00 apparaît sur l’affichage de
la télécommande et clignote.
PRESET
Q
U
IET
FIX
SWI
N
G
TIME
R
O
SLEEP
CHK
OFF
1 Touches et en mode TIMER
ON
Appuyez sur la touche ou de la fonction TIMER
pour mettre l’horloge à l’heure.
Chaque pression sur la touche TIMER incrémente
l’heure d’une minute.
En maintenant enfoncé la touche TIMER, l’heure
augmente par tranche de dix minutes.
2 Touche SET
SET
Appuyez sur la touche SET .
L’heure actuelle s’affiche et l’horloge se met en
marche.
N
TEMP
FILTE
F
AN
MOD
E
OMFORT
C
SLEEP
Hi-
POWE
R
CLR
OFF
SET
R
CLOCK
ON
OFF
SET
1
Réglage de l’horloge
PRESET
QUIET
SWING
TIMER
SLEEP
FIX Hi-POWER
ON
CHK
TEMP
FILTER
OFF
MODE
COMFORT
CLOCK
FAN
SLEEP
CLR
SET
1
1 Touche CLOCK
Appuyez sur la touche CLOCK avec la pointe d’un
crayon.
L’affichage de l’heure se met à clignoter.
OFF
2 Touches et en mode TIMER
Appuyez sur la touche ou de la fonction TIMER
pour mettre l’horloge à l’heure.
Chaque pression sur la touche TIMER incrémente
l’heure d’une minute.
En maintenant enfoncé la touche TIMER, l’heure
augmente par tranche de dix minutes.
3 Touche SET
Appuyez sur la touche SET .
L’heure actuelle s’affiche et l’horloge se met en
marche.
ON
ON
OFF
SET
SET
FR
–32–
8-FR
Page 34

SMMS High-Wall Type
Owner’s Manual
6 FONCTIONNEMENT LIMITÉ PAR LA COMMANDE DE
GROUPE
REMARQUE
Commande de groupe : permet de commander plusieurs climatisateurs à la fois.
Unité intérieure principale : unité de référence de l’ensemble des unités en mode de fonctionnement par
commande de groupe. Elle reçoit les instructions de la télécommande et les transmet aux unités
secondaires.
(L’unité intérieure principale est la seule unité intérieure qui reçoit le signal MARCHE/ARRÊT envoyé par
la télécommande sans fil.)
Unité intérieure secondaire : toute unité intérieure autre que l’unité principale.
Un télécommande filaire (vendue séparément) est nécessaire pour la commande de groupe.
▼ Exemple de combinaison groupée
Intérieure Intérieure Intérieure
Télécommande filaire
Ligne de commande
Extérieure
Extérieure
Extérieure
Autre ligne de raccordement
ATTENTION
Si vous utilisez l’unité intérieure en mode de commande de groupe,
1. Le mode Hi POWER ne fonctionne pas.
Si vous appuyez sur la touche Hi POWER de la télécommande sans fil, l’unité intérieure émet un signal de
réception et l’écran de la télécommande change. Toutefois, le mode Hi POWER n’est pas déclenché.
Rétablissez l’affichage de la télécommande sans fil en appuyant sur la touche Hi POWER.
2. COMFORT SLEEP
Si vous appuyez sur la touche COMFORT SLEEP de la télécommande sans fil, l’unité intérieure émet un
signal de réception et l’indication sur la télécommande change comme pour la commande Hi POWER.
Toutefois, l’ajustement automatique de la température et de la vitesse du ventilateur n’est pas effectué.
Seule la fonction d’arrêt de la minuterie est activée.
3. Les unités autres que l’unité principale ne répondent pas à la télécommande et n’autorisent
pas le mode de fonctionnement TEMPORAIRE.
Lorsque vous commandez le climatiseur à partir de la télécommande sans fil, le signal doit être transmis à
l’unité principale.
C’est la définition des adresses, au moment de l’installation, qui détermine l’unité principale et l’unité
secondaire. Cette dernière ne reçoit aucun signal de la télécommande.
Le climatiseur ne fonctionne pas, même si la touche de l’unité secondaire est actionnée.
(Certaines unités secondaires peuvent recevoir les signaux SWING et FIX, mais ces opérations ne sont
exécutées que sur l’unité qui reçoit le signal.)
(Si vous utilisez la télécommande sans fil, seule l’unité principale reçoit le signal SWING. Si le signal SWING
est transmis à l’unité secondaire, la tonalité de refus de signal (3 bips) retentit et l’unité secondaire ne reçoit
pas le signal.
En cas d’utilisation de la touche FIX, l’unité principale et l’unité secondaire peuvent être commandées de
manière autonome.
Si vous utilisez la télécommande filaire, vous pouvez modifier la direction du flux d’air de chaque unité en
sélectionnant l’unité intérieure.)
4. Seul le témoin TIMER de l’unité principale s’allume.
Lorsque la minuterie est réglée à l’aide de la télécommande filaire, même le témoin TIMER de l’unité
principale ne s’allume pas.
9-FR
–33–
Page 35

SMMS High-Wall Type
7 MANIPULATION DE LA TÉLÉCOMMANDE
Owner’s Manual
ATTENTION
• Le climatisateur ne fonctionnera pas si des
rideaux, des portes ou d’autres obstacles
bloquant la transmission des signaux entre la
télécommande et l’unité intérieure.
• Évitez de faire tomber un liquide dans la
télécommande.
Veillez à ne pas exposer la télécommande à la
lumière directe du soleil ou à une source de
chaleur.
• Si le récepteur infrarouge de l’unité intérieure
est exposée à la lumière directe du soleil, le
climatisateur risque de ne pas fonctionner
correctement.
Utilisez des rideaux pour éviter que le
récepteur ne soit exposé directement au soleil.
• Si la pièce accueillant le climatiseur est
pourvue d’un éclairage fluorescent à
déclenchement électronique, les signaux
pourraient ne pas être reçus correctement. Si
vous envisagez d’utiliser un tel éclairage,
contactez votre revendeur local.
• Si d’autres appareils électriques réagissent à la
télécommande, éloignez-les ou contactez votre
revendeur local.
Support de la télécommande
Installation du support de la
télécommande
• Avant de procéder à l’installation du support de
la télécommande sur un mur ou un pilier, vérifiez
si l’unité intérieure capte les signaux de la
télécommande depuis l’emplacement prévu.
Insertion et extraction de la
télécommande
• Pour mettre la télécommande en place, placezla parallèlement au support et enfoncez-la
dedans. Pour retirer la télécommande, faites
glisser la télécommande vers le haut pour la
dégager du support.
Emplacement de la
télécommande
• Placez la télécommande dans un endroit où ses
signaux peuvent atteindre le capteur de l’unité
intérieure (à une distance de 7 m, au maximum).
• Lorsque vous activez le fonctionnement de la
minuterie, la télécommande transmet
automatiquement un signal à l’unité intérieure à
l’heure fixée.
Si la télécommande se trouve dans une position
gênant la bonne transmission du signal, le
déclenchement de la minuterie peut être différé
de 15 minutes.
7 m
FR
–34–
10-FR
Page 36

SMMS High-Wall Type
2
4
3
2
3
8 UTILISATION DE LA TÉLÉCOMMANDE
Owner’s Manual
Fonctionnement du mode de
refroidissement, de chauffage ou
de ventilation uniquement
Marche
PRESET
TEMP
FAN
MODE
1
1 Bouton MARCHE/ARRÊT ( )
Appuyez sur ce bouton pour mettre en marche le
climatisateur.
2 Touche de sélection du mode (MODE)
Sélectionnez la fonction Refroidissement ,
Chauffage ou Ventilation seule .
3 Touche de la température ( )
Fixez la température désirée.
Lorsque le climatisateur est en mode VENTILATION
SEULE, la température ne s’affiche pas.
TEMP
4 Touche de la vitesse du ventilateur (FAN)
Sélectionnez FAIBLE , FAIBLE
MOYEN , MOYEN
ÉLEVÉ .
• Le témoin de FONCTIONNEMENT (vert)
sur le panneau d’affichage de l’unité intérieure
s’allume. L’unité se met en route au bout de
3 minutes environ.
(Si vous sélectionnez le mode VENTILATION
SEULE, l’unité démarre immédiatement.)
• Le mode Ventilation seule ne permet pas de
contrôler la température.
• La vitesse du ventilateur en mode
correspond au réglage ÉLEVÉ .
En conséquence, il suffit de procéder selon les
étapes 1, 2 et 4 pour sélectionner ce mode.
+
+
,
,
Déshumidification
Marche
PRESET
TEMP
FAN
MODE
1
1 Bouton MARCHE/ARRÊT ( )
Appuyez sur ce bouton pour mettre en marche le
climatisateur.
2 Touche de sélection du mode (MODE)
Sélectionnez DÉSHUMIDIFICATION .
3 Touche de la température ( )
Fixez la température désirée.
• La vitesse du ventilateur signale .
• Le témoin de FONCTIONNEMENT (vert)
sur le panneau d’affichage de l’unité intérieure
s’allume et le climatisateur se met en marche au
bout de 3 minutes uniquement.
Arrêt
Bouton MARCHE/ARRÊT ( )
Appuyez sur ce bouton pour arrêter le
climatisateur.
TEMP
Arrêt
Bouton MARCHE/ARRÊT ( )
Appuyez sur ce bouton pour arrêter le
climatisateur.
REMARQUE
Lorsque l’unité intérieure fonctionne avec une unité
extérieure de refroidissement uniquement,
apparaît sur l’affichage de la télécommande, mais
la fonction de chauffage est désactivée.
11-FR
–35–
Page 37

SMMS High-Wall Type
2
4
2
3
Owner’s Manual
Fonctionnement automatique
(commutateur automatique)
Cette fonction ne peut être utilisée qu’avec une
unité extérieure de récupération de chaleur. Si
cette fonction est utilisée avec un autre modèle
d’unité extérieure, « A » (Auto) apparaît au niveau
de la télécommande, mais la fonction automatique
est désactivée.
Marche
PRESET
FAN
TEMP
MODE
3
1
1 Bouton MARCHE/ARRÊT ( )
Appuyez sur ce bouton pour mettre en marche le
climatisateur.
2 Touche de sélection du mode (MODE)
Sélectionnez A.
3 Touche de la température ( )
Fixez la température désirée.
TEMP
4 Touche de la vitesse du ventilateur (FAN)
Sélectionnez FAIBLE , FAIBLE
MOYEN , MOYEN
ÉLEVÉ .
+
• Le témoin de FONCTIONNEMENT (vert) sur
le panneau d’affichage de l’unité intérieure
s’allume.
Le mode de fonctionnement est sélectionné en
fonction de la température ambiante et se met en
marche au bout de 3 minutes environ.
• Si le mode automatique « A » n’apporte pas le
confort attendu, vous pouvez sélectionner
manuellement le mode de fonctionnement
souhaité.
Arrêt
Bouton MARCHE/ARRÊT ( )
Appuyez sur ce bouton pour arrêter le
climatisateur.
+
,
,
Fonctionnement de la minuterie
Servez-vous de la télécommande filaire pour régler
la minuterie, si ce n’est pas déjà fait.
Démarrage et arrêt de la minuterie
PRESET
QUIET
SWING
FIX Hi-POWER
TEMP
FAN
MODE
COMFORT
SLEEP
1
TIMER
ON
SLEEP
FILTER
CHK
Réglage de la minuterie (TIMER)
1 Touches ON et OFF TIMER ( et )
Appuyez sur la touche ON ou la touche OFF TIMER
selon le cas.
• Le réglage de la minuterie précédent apparaît à
l’écran et clignote ainsi que ON/OFF.
Définissez l’horaire souhaité.
Chaque pression sur la touche TIMER incrémente
l’heure de dix minutes.
En maintenant enfoncé la touche TIMER, l’heure
augmente par tranche d’une heure.
2 Touche SET
Appuyez sur la touche SET pour régler la
minuterie.
Le créneau horaire de la minuterie s’affiche et la
minuterie se met en marche.
Annulation du mode TIMER
3 Touche CLR
Appuyez sur la touche CLR pour annuler la
programmation de la minuterie.
• Lorsque vous activez le fonctionnement de la
minuterie, la télécommande transmet
automatiquement le signal de la minuterie à
l’unité intérieure à l’heure spécifiée Par
conséquent, vérifiez si l’endroit où vous placez
la télécommande lui permet d’envoyer
correctement le signal. Dans le cas contraire,
cette opération peut être différée de 15 minutes
(au maximum).
• Si vous n’appuyez pas sur la touche SET
dans les 30 secondes après le réglage de
l’heure, celui-ci est annulé.
SET
CLR
ATTENTION
OFF
CLOCK
CLR
SET
OFF
ON
SET
CLR
SET
FR
–36–
12-FR
Page 38

SMMS High-Wall Type
Owner’s Manual
Lorsque vous avez programmé le fonctionnement
de la minuterie, les réglages sont enregistrés au
niveau de la télécommande.
Par la suite, le climatisateur se met en route dans
les conditions définies en appuyant simplement sur
la touche ON/OFF de la télécommande.
Si l’heure affichée par l’horloge clignote, vous ne
pouvez pas utiliser la minuterie.
Conformez-vous aux instructions de la section
« RÉGLAGE DE L’HEURE », puis programmez la
minuterie.
Programmation combinée de la
minuterie (définition du début et de
l’arrêt de la minuterie)
Arrêt de la minuterie —> Départ de la
minuterie
(Fonctionnement —> Arrêt —>
Fonctionnement)
Cette fonction est pratique pour arrêter le
climatisateur après vous êtes couché et le
redémarrer à votre réveil ou lorsque vous rentrez
chez vous.
Exemple :
Pour arrêter le climatisateur et le remettre en route
le lendemain matin.
Fonctionnement
Remise en route
Arrêt
Départ de la minuterie —> Arrêt de la
minuterie
(Arrêt —> Fonctionnement —> Arrêt)
Cette procédure permet de déclencher le
climatisateur à votre réveil et de l’arrêter lorsque
vous quittez la maison.
Exemple :
Pour mettre en route le climatisateur le lendemain
matin et l’arrêter.
Fonctionnement
Arrêt Arrêt
▼ Réglage de la minuterie combinée (TIMER)
1. Appuyez sur la touche ON TIMER pour fixer l’heure
de démarrage de la minuterie.
2. Appuyez sur la touche OFF TIMER pour fixer
l’heure d’arrêt de la minuterie.
3. Appuyez sur la touche SET .
ON
OFF
SET
• La fonction de démarrage (ON) ou d’arrêt (OFF)
de la minuterie la plus proche de l’heure actuelle
est activée en premier.
• Si le même horaire est défini pour les deux
fonctions de la minuterie, aucune n’est
appliquée.
Il est possible aussi que le climatisateur cesse de
fonctionner.
Minuterie combinée quotidienne
(définition du début et de l’arrêt de la
minuterie et activation quotidienne)
Cette fonctionnalité est utile lorsque vous souhaitez
utiliser la minuterie combinée chaque jour à la
même heure.
▼ Réglage de la minuterie combinée (TIMER)
1. Appuyez sur la touche OFF TIMER pour fixer
l’heure d’arrêt de la minuterie.
2. Appuyez sur la touche ON TIMER pour fixer l’heure
de démarrage de la minuterie.
3. Appuyez sur la touche SET .
13-FR
OFF
ON
SET
▼ Réglage de la minuterie combinée (TIMER)
1. Appuyez sur la touche ON TIMER pour fixer l’heure
de démarrage de la minuterie.
2. Appuyez sur la touche OFF TIMER pour fixer
l’heure d’arrêt de la minuterie.
3. Appuyez sur la touche SET .
4. Après l’étape 3, une flèche ( ou ) clignote
pendant 3 secondes environ. Pendant qu’elle
clignote, appuyez sur la touche SET .
ON
OFF
SET
SET
• Lorsque le programme quotidien de la minuterie
est en cours, les deux flèches ( , ) sont
affichées.
Annulation du fonctionnement de la
minuterie
Appuyez sur la touche CLR .
CLR
Horloge
Au cours du fonctionnement de la minuterie (ONOFF, OFF-ON ou OFF), l’heure n’est plus affichée et
est remplacée par l’heure programmée. Pour
afficher l’heure, appuyez brièvement sur la touche
SET ; l’heure s’affiche pendant 3 secondes environ.
–37–
Page 39

SMMS High-Wall Type
Owner’s Manual
Fonctionnement en mode de
puissance élevée
Puissance élevée (Hi POWER)
• Le mode Hi POWER ajuste automatiquement la
température ambiante, la direction du flux d’air et
le mode de fonctionnement de sorte que la pièce
soit rapidement rafraîchie en été et réchauffée
en hiver.
PRESET
QUIET
SWING
FIX Hi-POWER
TEMP
FAN
MODE
COMFORT
SLEEP
1
Réglage du mode Hi POWER
1 Touche Hi POWER
Appuyez sur le bouton Hi POWER après le
démarrage d’un mode de fonctionnement.
L’indication « Hi POWER » s’affiche simultanément
sur la télécommande.
Annulation du mode Hi POWER
Fonctionnement silencieux
• Le mode QUIET permet un fonctionnement
silencieux du climatisateur en choisissant
automatiquement la vitesse de ventilation la plus
faible.
PRESET
QUIET
SWING
FIX Hi-POWER
TEMP
FAN
MODE
COMFORT
SLEEP
1
Réglage du mode QUIET
1 Touche QUIET
Appuyez sur le bouton QUIET après le démarrage
d’un mode de fonctionnement. L’indication
s’affiche simultanément.
Annulation du mode QUIET
1 Touche QUIET
Appuyez à nouveau sur la touche QUIET.
Le symbole cesse de s’afficher sur la
télécommande.
FR
1 Touche Hi POWER
Appuyez à nouveau sur la touche Hi POWER.
L’indication « Hi POWER » cesse de s’afficher sur la
télécommande.
ATTENTION
• Le mode Hi POWER ne peut pas être activé en
mode
VENTILATION SEULE, ni lorsque le
démarrage de la minuterie (ON TIMER) est
programmé.
• Le mode Hi POWER est incompatible avec la
commande de groupe.
Lorsque le signal Hi POWER est transmis à
l’unité intérieure principale, une tonalité de
réception retentit sans que le mode Hi POWER
soit appliqué. Veuillez annuler le mode Hi
POWER.
DÉSHUMIDIFICATION et
ATTENTION
Le mode QUIET ne peut pas être activé si la
fonction
sélectionnée.
REMARQUE
Dans certains cas, du fait de ses caractéristiques
spécifiques, le fonctionnement silencieux n’assure
pas un rafraîchissement ou un chauffage suffisant
de la pièce.
–38–
DÉSHUMIDIFICATION est
14-FR
Page 40

SMMS High-Wall Type
Owner’s Manual
Fonctionnement prédéfini
Définissez le fonctionnement de votre choix pour
pouvoir l’appliquer ultérieurement.
Les réglages sont mémorisés par l’unité (hormis la
direction du flux d’air).
PRESET
1
FAN
TEMP
Sélectionnez le fonctionnement qui vous convient.
1 Appuyez sur le bouton PRESET pendant
3 secondes pour mémoriser les réglages.
L’indicateur s’affiche.
Par la suite, le mode de fonctionnement mémorisé
sera appliqué par simple pression de ce bouton.
Fonctionnement du mode
Confort nocturne
ATTENTION
Le mode COMFORT SLEEP ne permet pas
l’utilisation des modes
VENTILATION SEULE.
ou
DÉSHUMIDIFICATION
REMARQUE
• En mode de refroidissement, la température de
réglage s’élève d’un 1 degré/heure pendant
2 heures (augmentation de 2 degrés).
En mode de chauffage, la température de
réglage est abaissée.
• En cas de commande de groupe, le
climatisateur n’ajuste pas automatiquement
température et la vitesse du ventilateur selon
les paramètres définis. Seule la fonction d’arrêt
de la minuterie est activée.
Fonctionnement de la mise en
veille de la minuterie
Pour activer le fonctionnement avec mise en veille
de la minuterie (OFF timer).
Le mode COMFORT SLEEP est un mode sans
fonctionnement de la minuterie (OFF) avec réglage
automatique de la température et de la vitesse du
ventilateur.
PRESET
QUIET
TEMP
FAN
MODE
COMFORT
SLEEP
1 Appuyez sur la touche COMFORT SLEEP.
Vous avez le choix entre quatre réglages (1, 3, 5 ou
9 heures) pour définir la mise en veille de la
minuterie.
15-FR
1
PRESET
QUIET
FIX Hi-POWER
SWING
TIMER
ON
1
SLEEP
CHK
1 Appuyez sur la touche SLEEP.
Vous avez le choix entre quatre réglages (1, 3, 5 ou
9 heures) pour définir la mise en veille de la
minuterie.
–39–
TEMP
FILTER
OFF
MODE
COMFORT
CLOCK
FAN
SLEEP
CLR
SET
Page 41

SMMS High-Wall Type
Owner’s Manual
Réglage de la direction du flux
d’air
• Réglez correctement la direction du flux d’air.
Autrement, vous ne serez pas à l’aise et la
température de la pièce sera inégale.
• Réglez le flux d’air vertical à l’aide de la
télécommande.
• Réglez le flux d’air horizontal manuellement.
Réglage du flux d’air vertical
Le climatiseur règle automatiquement la direction
du flux d’air vertical conformément aux conditions
de fonctionnement lorsque le mode AUTO ou A est
sélectionné.
Pour régler la direction du flux d’air que
vous désirez
Cette opération s’effectue avec le climatiseur d’air
en marche.
REMARQUE
L’angle de la grille de flux d’air vertical est différent
en mode de refroidissement, de déshumidification
et de chauffage.
Pour déclencher l’oscillation
automatique du flux d’air
Cette opération s’effectue avec le climatiseur d’air
en marche.
PRESET
QUIET
SWING
FIX Hi-POWER
TEMP
FAN
MODE
COMFORT
SLEEP
1
1 Touche FIX
Maintenez la touche FIX de la télécommande
enfoncée ou appuyez brièvement dessus pour
déplacer le volet dans la direction souhaitée.
• Par la suite, le flux d’air vertical est
automatiquement diffusé dans la direction
d’inclinaison du volet que vous avez sélectionnée
à l’aide de la touche FIX.
PRESET
QUIET
SWING
FIX Hi-POWER
TEMP
FAN
MODE
COMFORT
SLEEP
1
1 Touche SWING
Appuyez sur la touche SWING de la télécommande.
• Pour arrêter la fonction, appuyez sur la touche
SWING.
FR
–40–
16-FR
Page 42

SMMS High-Wall Type
ATTENTION
• Les touches FIX et SWING ne sont pas
disponibles lorsque le climatiseur n’est pas en
marche (ni si l’heure de début de la minuterie
est programmée).
• Le climatiseur ne doit pas fonctionner pendant
plusieurs heures avec le flux d’air dirigé vers le
bas en cours de refroidissement ou de
déshumidification.
En effet, de la condensation peut apparaître à
la surface du volet de flux d’air vertical et
provoquer la chute de gouttes d’eau.
• Ne déplacez pas manuellement le volet de flux
d’air vertical. Utilisez toujours la touche FIX.
Si vous déplacez un volet manuellement, il
risque de ne plus fonctionner correctement.
Si tel est le cas, arrêtez immédiatement le
climatiseur, puis redémarrez-le.
• Si vous arrêtez et redémarrez immédiatement
le climatiseur, le volet de flux d’air vertical
risque de demeurer immobile pendant
10 secondes.
• Le réglage du volet est limité en cas de
commande de groupe. (voir page 33)
Owner’s Manual
Réglage du flux d’air horizontal
Préparation
• Saisissez le levier du volet de flux d’air horizontal
et déplacez-le pour régler le flux dans la direction
souhaitée.
• Vous pouvez régler le flux d’air sur la gauche, le
centre ou la droite du volet.
17-FR
–41–
Page 43

SMMS High-Wall Type
Owner’s Manual
9 SUGGESTIONS POUR UN FONCTIONNEMENT
ÉCONOMIQUE
Maintenez la température ambiante à un niveau agréable
Nettoyez les filtres à air
Un filtre à air encrassé peut nuire au bon
fonctionnement du climatiseur.
Nettoyez-les tous les 15 jours.
N’ouvrez pas les portes et les fenêtres
plus que nécessaire
Pour conserver l’air frais ou chaud dans la pièce,
n’ouvrez pas les portes et les fenêtres plus qu’il
ne le faut.
Rideaux des fenêtres
Lors du refroidissement, fermez les rideaux pour
éviter la lumière directe du soleil.
Pendant le chauffage, fermez les rideaux pour
conserver la chaleur.
Utilisez la minuterie à bon escient
Programmez la minuterie pour le temps désiré de
fonctionnement.
Faites en sorte que l’air circule
uniformément dans la pièce
Réglez la direction du flux d’air pour obtenir une
circulation d’air uniforme dans la pièce.
Nettoyage, s’il vous plaît
Fermez les fenêtres
Utilisez la minuterie
à bon escient
TIMER
Souffle vers le haut
Air
frais
et
sec
Air
chaud
Souffle vers le bas
Réglage du flux d’air
Brr, il fait froid
Commandez
FR
–42–
18-FR
Page 44

SMMS High-Wall Type
Owner’s Manual
10 FONCTIONNEMENT TEMPORAIRE
Fonctionnement TEMPORAIRE
Cette fonction est utilisée pour faire fonctionner l’appareil de façon temporaire si vous égarez la
télécommande ou la positionnez de manière incorrecte ou encore si ses piles sont déchargées.
• Appuyez une fois sur la touche (moins de 3 secondes) pour démarrer le climatiseur.
• La dernière opération réalisée par la télécommande sans fil sera répétée. (Si vous n’avez pas utilisé la
télécommande sans fil, les modèles avec commutation automatique (refroidissement/chauffage)
déclenchent le fonctionnement « A » et ceux qui en sont dépourvus démarrent le refroidissement
(réglage de la température : 24 °C, vitesse du ventilateur : ÉLEVÉ).)
Impossible de trouver
la télécommande
Le climatiseur est
doté d’une fonction
temporaire !
ATTENTION
Si vous maintenez la touche enfoncée pendant 10 secondes ou davantage, vous forcez le passage
en mode de refroidissement. (Cela augmente la charge du climatiseur. N’effectuez cette opération qu’à
titre de d’essai uniquement.) Tous les témoins de l’unité intérieure s’allument alors.
19-FR
–43–
Page 45

SMMS High-Wall Type
Owner’s Manual
11 ENTRETIEN
AVERTISSEMENT
Avant de nettoyer le climatiseur, prenez garde de couper l’alimentation principale ou d’actionner le
disjoncteur.
Nettoyage de l’unité interne et de la télécommande
ATTENTION
• Utilisez un chiffon sec pour nettoyer ces éléments.
• Vous pouvez également utiliser un chiffon imbibé d’eau froide pour
nettoyer l’unité intérieure si elle est très sale.
• N’utilisez jamais un chiffon humide pour nettoyer la télécommande.
• Evitez d’utiliser des dépoussiérants chimiques et de les laisser trop
longtemps sur l’unité. Sa surface pourrait se détériorer ou se
décolorer.
• N’utilisez ni benzène, ni diluant, ni cire, ni détergents similaires pour
le nettoyage.
La surface plastique pourrait se craqueler ou se déformer.
Essuyez avec un chiffon sec
Si vous pensez ne pas utiliser l’unité pendant au
moins 1 mois
1. Faites fonctionner le climatiseur en mode VENTILATION SEULE
pendant une demi-journée pour faire sécher l’intérieur de l’unité.
2. Arrêtez le climatiseur et coupez l’alimentation principale.
3. Retirez les piles de la télécommande.
Vérifications avant la mise en marche
ATTENTION
• Vérifiez que les filtres à air sont installés.
• Vérifiez que la sortie ou l’entrée d’air n’est pas bloquée.
Bouton réglé
sur MODE
VENTILATION
SEULE.
Diluant
FR
–44–
20-FR
Page 46

SMMS High-Wall Type
Owner’s Manual
Nettoyage des filtres à air
Nettoyez les filtres à air tous les 15 jours.
Si les filtres à air sont couverts de poussière, les
performances du climatiseur diminuent.
Nettoyez les filtres à air aussi souvent que
possible.
1. Ouvrez la grille d’entrée d’air.
Soulevez la grille d’entrée d’air pour la placer à
l’horizontale.
2. Appuyez sur les deux leviers gauche et droit du filtre
à air et soulevez ce dernier légèrement, puis
poussez-le vers le bas pour l’extraire du support de
filtre.
Filtre à air
Support du filtre
3. Utilisez un aspirateur pour retirer la poussière des
filtres ou lavez-les à l’eau.
Si vous lavez les filtres à air, faites-les sécher à
l’ombre.
4. Insérez la partie supérieure du filtre à air et alignez les
bords droit et gauche avec ceux de l’unité intérieure.
Support du filtre
5. Fermez la grille d’entrée d’air.
Nettoyage de la grille d’entrée
d’air
1. Retirez la grille d’entrée d’air.
Exercez une pression sur les deux côtés de la grille et
ouvrez-la vers le haut.
Déplacez le bras central vers la gauche et retirez la
grille.
21-FR
2. Nettoyez-la avec une éponge douce ou une serviette.
(N’utilisez jamais de brosse métallique ou de brosse
dure.)
• L’utilisation de brosses abrasives risque de griffer
la surface de la grille et d’abîmer sa couverture
métallique.
• Si la grille est très sale, utilisez un détergent neutre
d’usage domestique et rincez-le.
–45–
Page 47

SMMS High-Wall Type
3. Essuyez la grille pour la sécher complètement.
4. Placez les ergots droit et gauche de la grille d’entrée
d’air dans les fentes situées de part et d’autre du
climatisateur et poussez la grille à fond, puis faites
glisser le bras central.
5. Vérifiez que l’ergot central est complètement inséré,
puis fermez la grille.
• Exercez une pression au niveau des flèches (4)
figurant sur le bas de la grille d’entrée d’air pour
vérifier sa fermeture complète.
Owner’s Manual
FR
–46–
22-FR
Page 48

SMMS High-Wall Type
Owner’s Manual
12 PROBLÈMES ET CAUSES
Pour en savoir plus sur le contenu de l’unité extérieure, les combinaisons possibles, etc., consultez le
manuel du proprietaire accompagnant l’unité extérieure.
ATTENTION
Dans l’une des situations suivantes, arrêtez immédiatement le climatiseur, coupez l’alimentation à l’aide
de l’interrupteur et contactez votre revendeur :
• L’interrupteur ne fonctionne pas correctement.
• Le fusible principal grille souvent ou le disjoncteur est souvent actionné.
• Un corps étranger ou de l’eau est tombé à l’intérieur du climatiseur.
• Toute autre situation inhabituelle.
• Une indication anormale s’affiche sur la télécommande en cas d’utilisation de la télécommande filaire.
Avant de solliciter une intervention, vérifiez les points suivants.
▼ Nouvelle vérification
Absence de fonctionnement
• L’interrupteur d’alimentation principale est hors tension. (Intérieur)
• Le disjoncteur est activé pour couper l’alimentation.
• Le fusible principal a sauté.
• Interruption de l’alimentation électrique.
• Les piles de la télécommande sont déchargées.
• La fonction ON de la minuterie (touche TIMER) est activée.
• Le signal est envoyé à l’unité secondaire à partir de la télécommande.
(voir page 34)
• L’utilisation de l’unité intérieure est limitée par la télécommande filaire qui
contrôle d’autres unités.
(La transmission d’un signal s’accompagne d’un avertissement sonore
(5 bips).)
• Commandes contradictoires en mode de fonctionnement.
(Lorsque le mode de fonctionnement n’autorise pas la commande, le
témoin de « FONCTIONNEMENT » s’allume et les témoins de la
« MINUTERIE » et de « Préchauffage/Dégivrage » clignotent en alternance ; un avertissement
sonore retentit également.) (voir page 29)
Ne refroidit ou ne chauffe pas correctement
• Des portes ou fenêtres sont ouvertes.
• Le filtre à air est sale.
• Le volet est mal positionné.
• La vitesse du ventilateur est trop basse.
• Le climatiseur est en mode QUIET ou en mode DÉSHUMIDIFICATION.
• La température de réglage est trop élevée. (en mode de refroidissement)
• La température de réglage est trop basse. (en mode de chauffage)
• (Seulement lorsque l’air ne refroidit pas, même en mode de
refroidissement)
Lorsque qu’une autre unité intérieure du système diffuse de l’air chaud.
23-FR
–47–
Page 49

SMMS High-Wall Type
▼ Il ne s’agit pas de pannes
L’arrière de l’unité intérieure est mouillée.
• Les gouttelettes à l’arrière de l’unité intérieure sont automatiquement recueillies
et évacuées.
L’unité intérieure ou extérieure émet un bruit étrange.
• Lors d’un changement brutal de température, il arrive que l’unité intérieure ou
extérieure émette un bruit étrange dû à l’expansion ou à la contraction de
pièces, ou au changement du sens d’écoulement du réfrigérant.
L’air de la pièce est malodorant.
Une mauvaise odeur se dégage du climatiseur.
• Les odeurs imprégnées dans les murs, la moquette ou les tapis, les meubles,
les vêtements ou les fourrures se dégagent.
Le volet ne fonctionne pas en mode FIX ou SWING.
• Les touches FIX et SWING ne sont pas disponibles en cas de commande
de groupe. (voir page 33)
Owner’s Manual
La ventilation et le volet de l’unité intérieure change de position alors que l’unité ne fonctionne pas.
• Lorsque d’autres unités intérieures sont en marche, le ventilateur d’une unité intérieure arrêtée peut se
mettre en marche temporairement.
FR
–48–
24-FR
Page 50

1111050401
 Loading...