

Page 1
TOSHIBA
Instruction Manual
TIME LAPSE VCR
KV-5024A
Page 2

CAUTION
RISK OF ELECTRIC SHOCK
DO NOT OPEN
CAUTION: TO REDUCE THE RISK OF
ELECTRIC SHOCK. DO NOT REMOVE
COVER (OR BACK), NO USER SERVICE
ABLE PARTS INSIDE REFER SERVICING
TO QUALIFIED SERVICE PERSONNEL.
WARNING: TO REDUCE THE RISK OF FIRE OR ELECTRIC SHOCK, DO NOT EXPOSE THIS APPLIANCE
TO RAIN OR MOISTURE. DANGEROUS HIGH VOLTAGES ARE PRESENT INSIDE THE
ENCLOSURE. DO NOT OPEN THE CABINET. REFER SERVICING TO QUALIFIED PERSON
NEL ONLY.
NOTE: This equipment has been tested and found to comply with the limits for a Ciass A digital device,
pursuant to Part 15 of the FCC Ruies. These limits are designed to provide reasonable protec
tion against harmfui interference when the equipment is operated in a commerciai environment.
This equipment generates, uses, and can radiate radio frequency energy and, if not instalied
and used in accordance with the instruction manuai, may cause harmfui interference to radio
communications.
Operation of this equipment in a residentiai area is iikeiy to cause harmful interference in which
case the user wiil be required to correct the interference at his own expense.
In the spaces provided below, record the Model and Serial No. located at the rear of your video cassette
recorder.
The lightning flash with arrowhead symbol, within an
equilateral triangle, is intended to alert the user to the
A
presence of uninsulated "dangerous voltage" within the
product's enclosure that may be of sufficient magnitude to
constitute a risk of electric shock to persons.
The exclamation point within an equilateral triangle is intended to alert the user to the presence of important operating
and maintenance (servicing) instructions in the literature ac
companying the appliance.
Model No. Serial No.
Retain this information for future reference.
Important Precautions
Only cassettes marked fVUS can be used with the VCR. This VCR is not compatible with ordinary IVijSI VCRs.
-----------------------------------------------------------Save Original Packing Materials-------------------------------------------------------------------
The original shipping carton and packing materials will come in handy if you ever have to ship your VCR. For maximum
protection, repack the set as it was originally packed at the factory.
This VCR is covered with a clear plastic, to protect the top cover surface during shipping and handling. Daily wear may
result in dents or cracks in the plastic which appear as white marks or other kinds of apparent surface damage. This does
not mean that your VCR itself is damaged. If damage to this coating is extensive, simply peel it off.
Never operate this unit immediately after moving it from a cold location to a warm location. When the VCR is exposed to
such a change in temperature, moisture may condense on the cylinder inside it, one of its most crucial internal parts, The
unit is equipped with an automatic moisture condensation prevention circuit designed to cope with this problem. It takes
about TWO HOURS for this circuit to work with the power cord plugged in. Please do not use the VCR during this time.
Surface Damage
Moisture Condensation
Daily Maintenance
Before beginning the day's operation, rewind the cassette tape recorded on the previous day a few counts and play it back
to check for proper recording.
Copyright
To record video tapes and other material only in the event that third party copyrights and other rights are not violated.
Page 3

Features
This VCR Time Lapse Recorder features recording for 2, 12, 24 hours with audio using T-1 20 cassette. This recorder employs
2 heads which have the same azimuth to allow slow playback and still playback, it also features various playback functions,
such as picture search, and reverse picture search.
• REAL TIME MODE
Recordings may be made in the 2 hour real time mode.
• TIME LAPSE MODE
Recordings may be made in speeds of 1 2, 24 hours using
a T-120 cassette.
• NOISE FREE STILL PLAYBACK
The use of a 2-head having the same azimuth mechanism
provides clear, noise free still playback. However, if a tape
recorded in 2-hour record mode is played back, noise may
appear slightly in the upper and lower part of the screen.
• TIME DATE GENERATOR
The built-in time date generator superimposes the Month,
Day, Year, Day of Week, Hour, Minute, Second, Mode, and
Alarm input time on the picture. It may be positioned to avoid
interfering with critical areas of the picture. A battery backup
protects the program memory against power failures for up
to 7 days.
• ALARM RECORDING
An alarm input may be set to activate the 2-hour record
mode for 15 seconds, 30 seconds, or 3 minutes.
• ALARM MEMORY
The starting position of alarm recordings may be
automatically located by using the ALARM MEMORY mode.
Once the position is located, this VCR enters the PLAY mode
in PAUSE for immediate viewing.
• RECORD MODE LOCK
A REC LOCK/RESTART switch is provided to prevent
unauthorized use of the recorder.
POWER FAILURE RESTART
With the REC LOCK/RESTART switch in the ON position this
VCR will automatically return to the record mode selected
prior to a power failure.
SELECTIBLE AUTO REPEAT RECORDING
This VCR may be placed into a repeat recording mode so
that when the tape reaches the end it will be rewound
automatically and recording resumed.
PROGRAMMABLE TIMER RECORDING
This VCR can be programmed for 15 programs in total for
timer recording; two programs per day plus one for a
specified time of a day throughout the week. It is also
provided with a skip function that can skip programmed
contents where no recording is wanted.
ELECTRONIC BUZZER
An electronic buzzer is provided to indicate various
conditions such as the end of tape; the start of alarm
recording; excessive moisture (dew); or invalid entries.
DISPLAY PANEL
All modes of operation and conditions are displayed on the
display panel.
10000 HOUR METER
A 10000 hour meter is provided which indicates the total
time this VCR has been in operation.
Table of Contents
Important Precuations
......................................
Accessories ........................................................ 2
Features ............................................................. 2
Table of Contents .............................................. 2
Location of Controls .......................................... 3
Front panel ........................................................................... 3
Rear panel............................................................................ 5
Mode display......................................................................... 6
Time Date Generator
Setting to the current time..................................................... 9
How to program the timer
How to Select a Time Mode
.........................................
...................................................
..............................
Loading and Unloading a Video
Cassette ............................................................. ii
Page
i
10
Accessories
• Dew Caution Sheet
• Safety Instruction
Page
Basic Manual Recording ................................. 12
Recording in Various Ways.................................................13
Alarm Recording
Basic Playback
Playback in various ways....................................................15
Playback adjustment procedure......................................... 16
Playback of alarm recording
...............................................................
................................................
...............................................
14
15
16
Maintenance .................................................... 17
7
Before Catling Service Personnel ...................is
Specifications ...................................................21
ii
Page 4
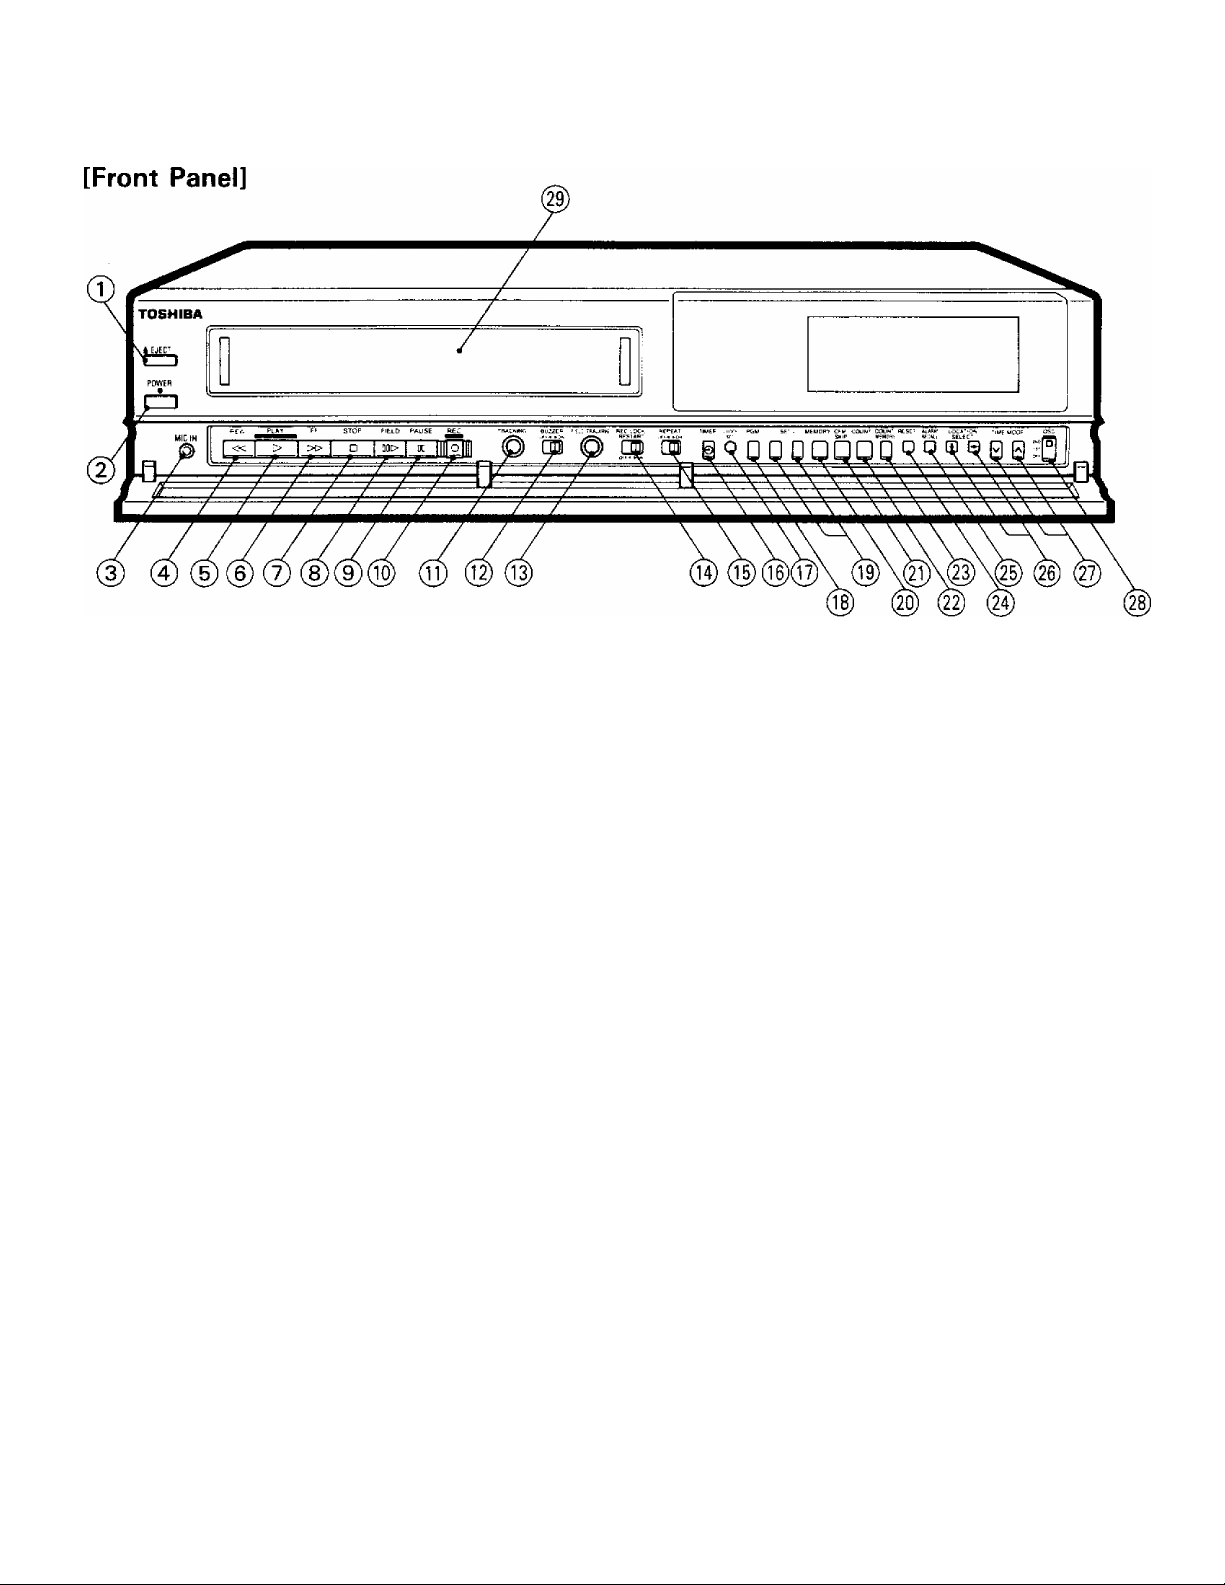
Location of Controls
(T) EJECT button
When pressed, the cassette is automatically ejected from
the cassette compartment.
(2) POWER button
Turns this VCR's power on and off. When off, the display
panel will show "OFF". The POWER button is disabled
while in the record look mode or in the alarm record mode.
@ MIC IN jack
When using this microphone jack as an audio input, the
RCA jack input will be switched off.
@ REW/REVERSE PICTURE SEARCH button
Pressing the REW button with the tape stopped causes
the tape to be rewound. Pressing the REW button during
playback causes the picture to be played back at 5 times
the normal speed in the reverse direction.
@ PLAY button
Pressing the PLAY button starts the playback mode.
@ FF/FORWARD PICTURE SEARCH button
Pressing the fiF button with the tape stopped causes the
tape to be fast-forwarded. Pressing the FF button during
playback causes the picture to be played back at 5 times
the normal speed in the forward direction.
STOP button
@
Pressing the STOP button while in the playback or record
will cancel the mode.
FIELD button
While in the playback mode, single frames may be viewed
by field pressing the PAUSE/STtLL button and then
advancing field by pressing the FIELD button. Keep the
button pressed to play back at about 1/30 of the normal
speed.
@ PAUSE button
Pressing the PAUSE button while in the record mode stops
tape movement and recording. Pressing the PAUSE button
while in the playback mode stops the tape and displays
a still picture. Pressing the PAUSE button twice cancels
this mode.
REC button
Pressing the REC button will begin recording in the mode
selected.
(JT) TRACKING control
Rotating this control while in the 2-hour playback mode
will eliminate tracking noise from the picture.
@ BUZZER switch
This switch is the on/off switch for the buzzer. The buzzer
will sound in different ways depending on that condition.
If there is moisture in the heads (DEW) the buzzer will
sound continuously. When the tape reaches its end in the
record mode, the buzzer will sound continuously. The
buzzer may be cancelled by pressing this button. The
buzzer will beep five times if recording is attempted with
the record protect tab removed or when the timer button
is pressed.
(@ FIELD TRACKING control
Rotating this control while in any field advance mode will
eliminate tracking noise from the picture.
@ REC LOCK/RESTART switch
Setting the REC LOCK/RESTART switch to the "ON"
position will disable all controls while in the record mode,
thereby protecting against unauthorized or accidental
termination. In the event of a power failure this VCR will
automatically resume recording when power is restored.
Setting the
position cancels these functions.
See page 13,
(J5) REPEAT switch
The record mode may be set so that when the the tape
reaches the end it will be rewound and resume recording.
This is accomplished by setting the REPEA Tswitch to the
"ON" position.
REC LOCK/RESTART switch to the "OFF"
@ TIMER button
This button is used to begin timer recording after they have
been programmed.
Page 5

Head cleaner and power fails display
• A head cleaning unit is provided to prevent the head from being clogged. The head cleaner automatically starts cleaning
the head when the tape end is detected for about 40 seconds. During cleaning the cassette mark blinks several times. Rest
assured this is not a defect.
• When the tape end is detected, an electric buzzer sounds and the counter display blinks. To stop the blinking, press any button.
• When power fails, the "PW.FAIL" mark blinks on the display. Press any button to erase the mark.
(Tt) clock set button
This button is used to program the time. (Refer to detailed
programming instructions.)
PGM button
This button is used program the timer. (Refer to detailed
programming instructions.)
(J9) SET (-)/( + ) button
These buttons are used to program the time or timer. (Refer
to detailed programming instructions.)
@ MEMORY button
This button is used to program the time or timer. (Refer
to detailed programming instructions.)
@ CFM/SKIP button
Pressing the CFM (confirm) button while in the stop mode
causes the contents of the timer memory to be shown on
the on-screen display. Press this button in timer setting
mode. "SKIP" is displayed where programmed times were,
and the program will be skipped for recording. Press it again
to display the programmed times.
@ COUNT, button
Pressing the COUNT, button displays the tape counter or
the alarm counter on the MODE DISPLAY.
@ COUNT. MEMORY button
Pressing the COUNT. MEMORY button causes the
"COUNT. M" (counter memory) to appear on the MODE
DISPLAY. If the tape is fast-forwarded or rewound while
in this mode the tape will stop automatically at a count
of "0000". Pressing this button twice causes the "ALARM
M" (alarm memory) to be displayed. If the tape is fastforwarded or rewound while in this mode the tape will stop
automatically at the beginning of an alarm and enter the
STILL, PLAYBACK mode. Pressing the button three times
cancels this function.
RESET button
• Pressing the RESET button while in the tape counter
mode resets the tape counter to "0000". Pressing the
/ffSfT button while in the alarm counter mode resets
the alarm counter to "A-00".
• Press this button to release the alarm recall that has been
recorded, (max 5 programs)
(25) ALARM RECALL button
Pressing the ALARM RECALL button while in the stop
mode will begin an on-screen review of all alarms which
have been recorded. Each alarm will be displayed along
with the time and date associated with that alarm of 5 se
conds. During this sequential display period the SET (-I-)
and SET (—) buttons may be used to advance or recall the
alarms displays.
(g) LOCATION SELECT buttons
Pressing these buttons will position the on-screen display.
The display will move in the direction of the arrows marked
on the buttons. When the display reaches the border of
the picture it will "wrap around" to the other side.
TIME MODE buttons
These buttons are used to select recording speed. Press
ing the button marked with the up or down arrow will
increase or decrease the record speed which will be shown
on the display panel.
ON-SCREEN DISPLAY switch
This switch allows you to select how much information
appears in the on-screen display. In the "OFF" position
the entire display is off. In the "1ST" position only one
line containing time and alarm information will be dis
played. In the "2ND" position a second tine containing date
information will be displayed.
CASSETTE COMPARTMENT
When a cassette is inserted into the cassette compartment,
the mechanism will automatically load the tape into this
VCR.
Page 6
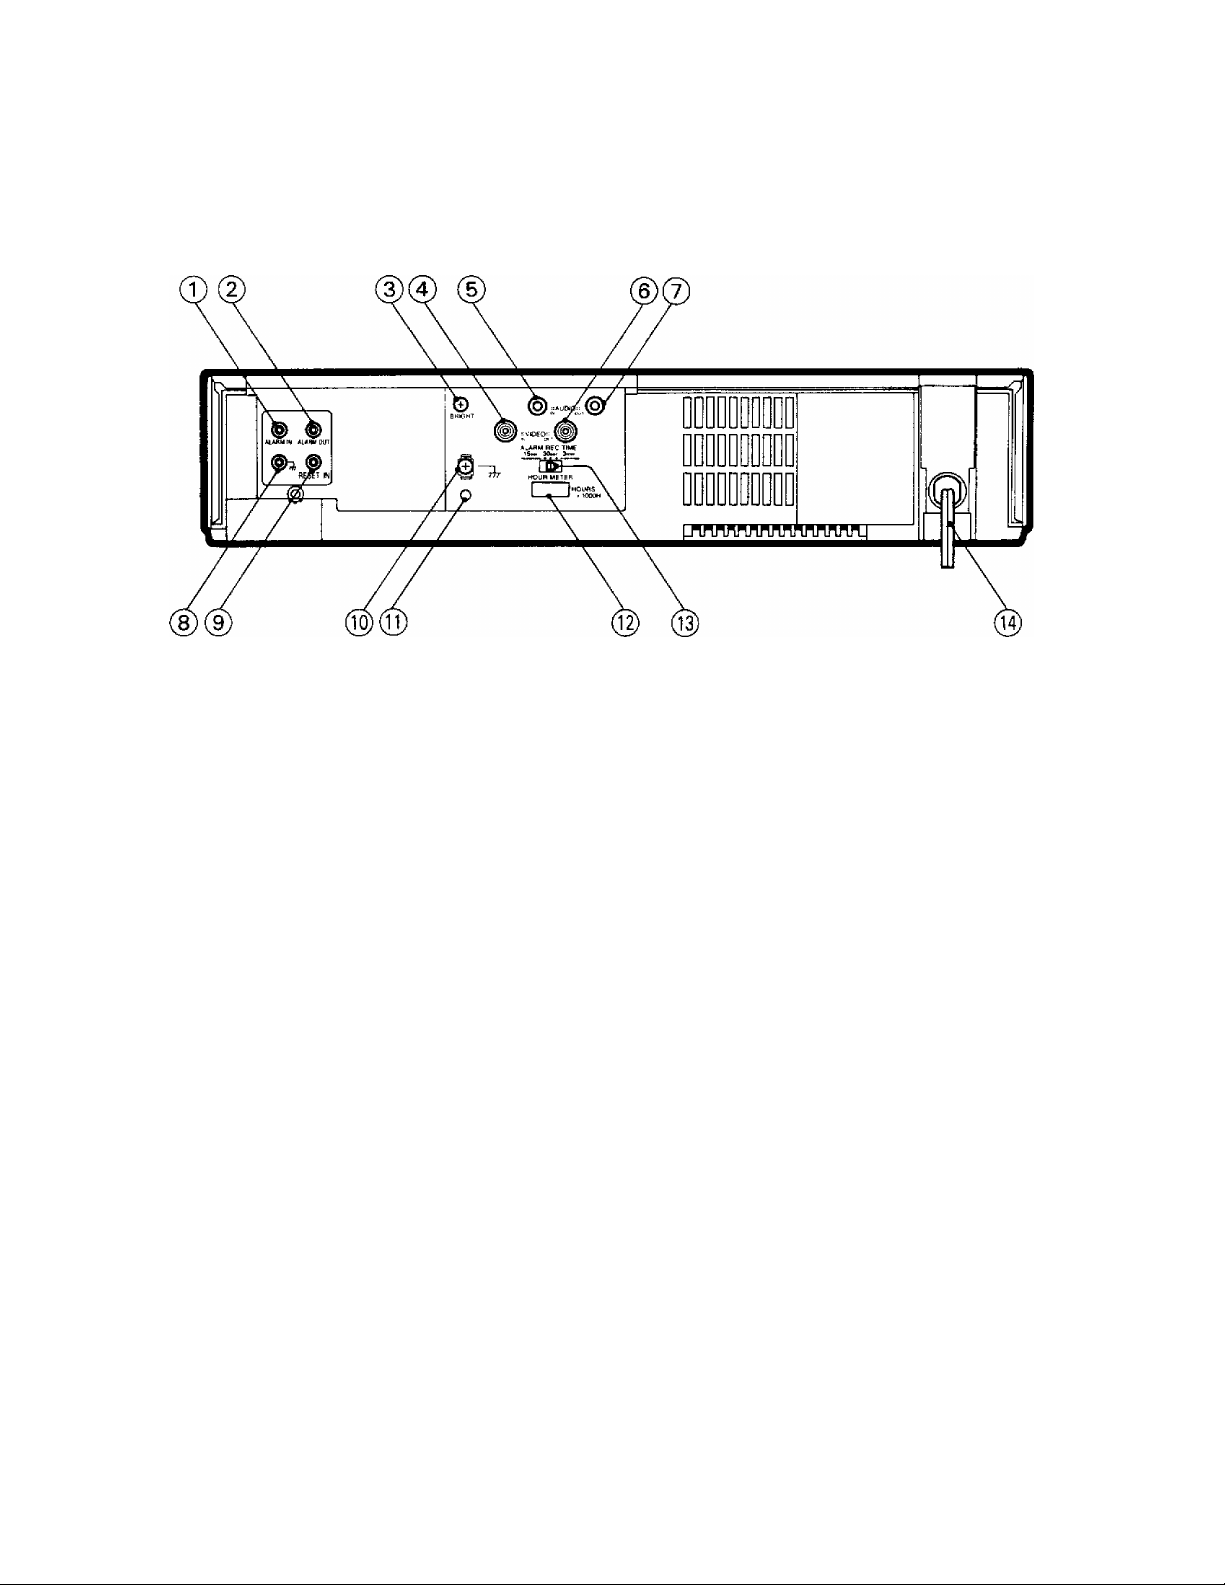
Location of Controls
[Rear Panel]
ALARM IN terminal
An alarm to ground at this terminal begins the alarm mode
recording sequence.
ALARM OUT terminal
This terminal outputs alarm signals.
BRIGHT control
@
The on-screen display brightness may be set by rotating
the BRIGHT control.
VIDEO IN jack
®
This BNC jack is a terminated video input.
AUDIO IN jack
This RCA jack is an audio line input.
VIDEO OUT jack
This BNC jack is a video output used to drive a monitor,
switcher, or other equipment.
AUDIO OUT jack
@
This RCA jack is an audio line output used to drive other
audio equipment.
GROUND terminal
This is the ground terminal for the alarm input.
(9) RESET IN terminal
Ground at this terminal will cancel an existing alarm
recording sequence.
GROUND terminal
This terminal is used to connect other equipment.
@ ALL CLEAR button
• Pressing this button will clear the entire time/date, and
timer program memory. The power will be turned off at
the same time. Pressing the POW£/i button will restore
power.
• Press this button if the VCR malfunctions.
@ 10000 HOUR meter
The 10000 HOUR meter displays the total number of hours
this VCR has been in service.
@ ALARM REC TIME switch
The ALARM REC TIME switch is used to set the alarm
recording time to 1 5 seconds, 30 seconds, or 3 minutes.
(U) POWER CORD
Page 7

[Mode Display]
Cassette Display
This indicator lights when a cassette is loaded.
Counter Memory Display
This display lights when the counter memory is in use.
Alarm Memory Display
This display lights when the alarm memory is in use.
(4) Alarm Display
This display lights when an alarm recording occurs.
Power Failure Display
This display lights when power failure occurs.
Recording/Playback Time Display
Recording/playback time mode is displayed,
(7) Timer Display
This display lights when the TIMER button is pressed.
Condensation Display
This display flashes if moisture condenses inside the unit.
Counter/Alarm Counter Display
Either the counter display or the alarm counter display can
be given by use of the counter/alarm counter selector
button.
(i^ Mode Display
The display will be given as follows depending on the con
trol mode.
►
11
!!►
Recording . . .
Pause
............
Time Lapse.
Fast-
Rewind ....
Abnormality
detected . . .
1REC1 ►
IRECI II
[Bi£J !►
\ 1 / indicator
1 REC 1 fiflRhpR
/ t '
Playback . .
Still
...........
Field
Advance . .
Forward Forward . . . .
Picture FastSearch. . . 1 PLAY 1
Reverse
Picture
Search. . . 1 PLAY 1
i PLAY [
! PLAY [
1 PLAY 1
Page 8

Time Date Generator
Time and date display will not appear without a video input.
[Front Panel]
REC LOCK/
RESTART
\
CLOCK SET button
PGM button W SKIP button
SET (-)/( + ) buttons ,
Control
OSD Selector button Set the switch to 2ND.
LOCATION SELECT buttons
CFM (confirmation)/
MEMORY button
Operation
[Rear Panel]
Brightness Adjust
OSD Selector button
EXAMPLE
MONTH-DAY-YEAR-Day of the Week
Hour-Minute-Second-Recording time
Function
Date and time will appear on 2 lines on a TV screen.
d- 8-9 I FRI
Ip
■ nn • nn p
tC ■ uu
'
uu C
LOCATION SELECT
buttons
Brightness Adjustment
control
Set the switch to 1 ST.
OSD
Set the switch to OFF.
OSD
0
0
To set brighter, turn the control
clockwise, and to set darker,
turn it counterclockwise. Use a
small screwdriver to adjust.
Time will appear on one line. For alarm recording, time
setting or timer programming, 2 lines will appear.
ip ■ nn ■ nn
iC
•
uu • uu
No display will appear.
For alarm recording, time setting or timer
programming, display will be on 2 lines.
Press the buttons to move the display location. The
moving direction coincides with the arrow heads on
the buttons. This function is enabled only when 2
lines are displayed.
Brightness of the background is adjusted for easy
reading of characters displayed on the TV screen.
Page 9

Control
Operation
Function
CLOCK SET buttons Press the button to set the
PGM (Program) button
SET — button
SET + button
MEMORY button
time.
Press the button to program the
timer.
Press the button to set the time
and program the timer.
Press the button to set the time
and program the timer.
Press the button to store the
display to be set.
When the button is pressed, the position indicating
the day will blink on the TV screen.
Using the SET button and MEMORY button, set the
calendar and time.
• When the button is pressed, calendar display will
change to the program display on the TV screen.
Using the
recording day, start and stop time.
• Two reservations can be programmed for each day
of the week, from Monday to Sunday.
• Daily programming is available.
• When the button is pressed, the display will
advance in the reverse direction.
• When the button is held down, the display will
change continuously.
• When the button is pressed, the display will
advance in the normal direction.
• When the button is held down, the display will
change continuously.
When the button is pressed, the figures displayed on
the TV screen will be stored in the memory. Then, the
display will move to the next character to be set, and
blink.
SET button and MEMORY button, set the
CFM (Confirmation)/
SKIP button
To confirm the timer
programming, stop the VCR
and press this button.
To clear the timer
programming, press PGM
(program) button to display
PGM mode, and press this
button
Pressing this button displays the programmed
contents on the TV screen. Pressing the SET button
enables the programmed contents to be changed.
Press the CFM/SKIP button to return to the calendar
display on the screen.
Press the SET button to display the unwanted
program for recording. Press the CFM/SKIP button.
The "SKIP” indicator replaces the recording start and
end times. The program will not be recorded. Press
the button again to return to display the programmed
recording start and end times.
8
Page 10

Setting to the Current Time
Setting outline: Press the S£T (-)/( + ) button to the desired alphanumeric characters at the blinking position, and then press
the MEMORY button to store these characters in memory.
For example, setting to 17:35 (5:35 PM), February 8 (Fri), 1991 from 12:00, January 28 (Mon), 1991.
Press the CLOCK Sf 7" button.
©
DISPLAY ON TV
SET
o
Press the SET button to set the 2 MONTH.
-SET +
□ D
When the + button is pressed...
[-* 1-^2->3->4^
When the — button is pressed, the direction is reversed.
Press the MEMORY button.
MEMORY
□
Press the SET button to set the 8 DAY,
а^гз-з 1
ID ■ nn ■ nn
iC • uu ■ и и
DISPLAY ON TV
:■(?> гз-з 1 MON
ib■nn•nn OCT
IC ■ u u • и и ос /
..............
12
I]
DISPLAY ON TV
3 -:33:~- 3 1 MON
1 D ■ nn ■ nn OCT
fC ■ uu ■ uu OC t
MON
SET
(2) Press the SET button to set the FFtIDAY.
-SET +
□ D
When the + button is pressed...
pMON->TUE^WED->THU^FRl->SAT-»-SUN-|
When the - button is pressed, the direction is reversed.
Press the MEMORY
MEMORY
DISPLAY ON TV
3- 3-3 1
tp • nn • nn
It * и и • и и
DISPLAY ON TV
г- 3-3 1
□
Similarly, set the hour and the minute. Seconds cannot
be set.
After setting the minute, press the MEMORY button so
that the month blinks as shown below.
'}C-uu- и и
nn ■ nn
FRI
SET
FRI
SET
-SET-h
D D
Press the MEMORY button.
MEMORY
The year remains unchanged, so press the MEMORY
button to store it in memory.
(Note) To change the setting of the year, press the SET
button to obtain the desired number, and then press the
MEMORY button to store this number in memory.
MEMORY
DISPLAY ON TV
3 - is;- 3 1 MON
1 D ■ nh■ nn OCT
It • uu ■ uu oc /
DISPLAY ON TV
3- 3-'-3. MON
iD•nn■ nh OCT
It ■ и и ■ и и ос /
DISPLAY ON TV
3- 3-3 1-MON:
□
t D • n n ‘ nn OCT
It • UU - UU OC /
:3':- 3-3 1
ID-DC■nn
1 1 ■ J D■ UU
Press the CLOCK SET button to end this procedure.
SET
o
Pressing "CLOCK SET" starts the clock.
This may be done to set the clock to the exact time.
The generator will automatically determine correct dates and
leap years.
1D ■ DC ■ n 1 D
1 t■DD■и 1 c
FRI
SET
DISPLAY ON TV
г- 3-3 1 FRI
Page 11

How to Program the Timer
(Before programming the timer, check to see if the current time is correct. If not, adjust the time according to the descriptions
given on the preceding page.)
Setting outline: Press the Sfrbutton to the desired alphanumeric characters at the blinking position, and then press the MEMORY
button to store these characters in memory.
For example, to record in 24-hour mode from 18:30 (6:30 PM) to 8:30 (8:30 AM) the next day, M01 (Monday Program 1)
Press the PGM button.
PGM
DISPLAY ON TV
MÓ /-' ----- ON
□
Press the SET{ -)/(+) buttons to set it to the programmed
day of the week.
-SET +
□ D
When the + button is pressed...
■M01”* *M02^TU1^
C
When the - button is pressed, the direction is reversed.
M01
M02
DAY
One setting allowed in each of these 15 groups.
Monday 1 Program
Monday 2 Program
Daily
" ¿ - OF
DISPLAY ON TV
-MÓ i- ON
•SU2-^DAY-
¿ - OF
Press the TIME MODE buttons to set the TIME MODE
“24".
MOI
¿"V
DISPLAY ON TV
18: 38
8:38
ON
OF
TIME MODE
0 0
Notes
•To program a reservation for another day, press the
MEMORY button to blink the position indicating the day of
the week, then press the SET button to the desired
alphanumeric characters.
Then repeat the procedures from (2) through (|).
• To cancel a reservation, press the CFM/SKIP button. Press
the button again to return to display the programmed
recording start and end times.
DISPLAY ON TV
SAI
SKIP
SKIP
The current time will be displayed if the PGM button is
pressed.
ON
OF
Press the MEMO/?/button.
MEMORY
□
¡2) Similarly, set the starting hour and minute as well as the
ending hour and minute using the SET button and
MEMORY button.
-SET+ MEMORY
□ □□
DISPLAY ON TV
MO 1 y.i; - - ON
(? - - : - - OF
DISPLAY ON TV
:M0 /: 18 •• 38 ON
" ¿ 8:30 OF
Notes
IF A POWER FAILURE SHOULD HAPPEN
• During power failure, "PW.FAIL" appears on the mode
display area.
Press any button to turn off the display.
DISPLAY ON TV
г- 8-3 1
FRI
11: S3: 13 <?w
(T) Press the TIMER button.
The power source is switched off, and "TIMER" flashes on
the mode display.
Recording starts when the programmed day and time of week
is reached.
If the power failure lasts less than 7 days, all programmed
memory will be retained.
This VCR should be plugged into a 120 volt outlet for at least
20 hours to fully charge the internal battery backup.
10
Page 12

How to Select a Time Mode
The following table shows the record and playback capability using a T*120 cassette.
Video Record Modes
Mode Display
2
12
24 26 hour
Record/Playback
Available Time
2 hour
14 hour
Recording Interval
(about)
1/60 second Possible Continuous
0.12 second Possible
0.22 second
Notes
• 1 2 and 24 hours are in time lapse mode.
• All recordings may be played back in any of the time lapse
speeds.
• Playing back must be performed in the mode that has been
used for recording, otherwise the sound is reproduced
abnormally.
Loading and Unloading a Video Cassette
Safety Tab
Preventing tape from erasure of recorded programs
If the safety tab is removed from the tape, the R£C button is
disabled when the tape is loaded on the VCR. Since recording
is not operable, pre-recorded programs cannot be erased by
mistake.
Sound Record Tape Running
Continuous
Possible Continuous
Loading a Cassette
Insert a cassette into the cassette compartment with the
Ф
window side facing upward. Push until the cassette is
automatically pulled into place. The power is turned on
automatically when the cassette is inserted. (Auto power
function)
NG
Unloading a Cassette
In the power ON mode, press the EJBCT button. The
cassette tape will be ejected automatically and the cassete
indicator " ICTOI " will go out.
Notes
Do not insert your hand or a foreign object into the
compartment. This may result in injury or damage. Pay
special care of children to avoid accidents.
When a cassette is inside the compartment, the
compartment lid does not open.
Remove the safety tab using a screwdriver or another
implement with a flat edge.
Safety tab
Recording on tape without the safety tab
Cover the hole where the safety tab was with adhesive tape
and recording is operable on the tape. To make sure, cover the
hole with a double layer of adhesive tape.
Adhesive Tape
The cassette indicator remains on whenever a cassette is
inside, even after the power is turned off.
The cassette indicator flashes when a cassette is being
loaded or removed.
11
Page 13

Basic Manual Recording
(T) Turn the power ON.
Obtain a picture on the monitor.
Confirm that time/date is displayed correctly.
Set the REPEA T and REC LOCK/RESTART switches as
required for recording.
Insert a cassette.
Select the recording time mode.
Notes
If the Pj4£/S£ button is pressed during video recording, the
machine will pause. To release it, press the fl4t/S£ button
again or press the REC button. If the pause state continues
for longer than 10 minutes, the machine will stop to pre
vent excessive wear of the tape.
The functions for auto repeat record, alarm record, etc.
should be set prior to video recording.
Even if a power failure occurs during recording with the REC
LOCK/RESTART switch set to "ON", recording can be
carried out in the same time mode after the power failure
is recovered within about one week.
Press the REC button.
@
To prevent accidental termination, the REC button cannot be
controlled with a light touch. Press the button firmly and be
sure to confirm that I REC I is lit.
For repeat video recording, attention must be paid to the
following:
Alarm recording is unavailable during automatic rewind.
No buzzer sound is given even if the tape has reached its
end.
The repeat function is unavailable if the STOP button has
been pressed during automatic rewind. The recording state
must be restored.
Do not forget to check the setting of the time/date generator
before repeat recording or timer recording.
12
Page 14

Recording in Various Ways
This unit employs a multi-function recording system so that it can be widely used for various recording functions. Carefully read
the description given here and become familiar with the operation of this unit.
Function Selection
Record Mode Lock/
Recording after Power
Failure
REC LOCK/RESTART
switch ON
REC LOCK/
RESTART
m
OFF^ ►ON
REC LOCK/RESTART
switch center position
REC LOCK/
RESTART
cm
OFF^ ►ON
REC LOCK/RESTART
switch OFF
REC LOCK/
RESTART
m
OFF< ►ON
Operation
• The record mode is
locked during
recording so that
other buttons and
switches cannot
operate.
* Control enters the
recording mode
automatically on
recovery from a
power failure.
***The record mode is
unlocked so that other
buttons and switches
can operate.
• For recovery from a
power failure, take the
same procedure as in *.
• Use the same record
mode as in ***.
• Controls does not
enter the recording
mode automatically on
recovery from a
power failure.
Remarks
• To clear the recording mode,
press the STOP button after
setting the REC LOCK/RESTART
switch to "OFF".
** If the power failure lasts less
than 7 days, then the date, time
and recording time mode will be
stored in the memory, and
recording will be resumed
automatically after power is
restored.
• Take the same procedure as
in ** if recovery from a power
failure is within 7 days.
Auto Repeat Recording
Sounding at end of tape
Timer Recording
Recording on the same
cassette repeatedly.
To ensure changing of
the cassette
To record at a specific
time by setting weekday
and time.
Notes
Under the following conditions, the recording mode will not
be resumed even if the power is restored.
- A mode other than recording is set with both the REPEA T
and REC LOCK/RESTART switches ON.
Set the REPEAT switch
to "ON".
Set the BUZZER switch
to "ON".
Set the timer recording
start and stop time, and
weekday. Then press the
TIMER button.
If an alarm signal is entered in AUTO Repeat mode. Repeat
Recording is disabled. In this case, pressthe AiARAf fffCAii.
button and then press the /iESfy button to reset the alarm
counter display.
• When the tape end is detected,
recording is started again from
the beginning of the tape, at the
same speed mode that was set
originally.
• If the power fails during
recording, recording mode will be
automatically resumed when the
power is restored.
• When the end of the tape is
detected, an electronic buzzer
sounds continuously, and the
counter display blinks.
• Press any one of CONTROL
buttons to stop the buzzer and
blinking of the counter display.
• Timer recording can be performed
for 15 programs in total; two
programs for everyday from
Monday through Sunday and one
program for a specified time of
day through the week.
13
Page 15

Alarm Recording
This unit is capable of "Alarm Recording". If the alarm input is connected to a door switch, this VCR will automatically switch
from the time lapse mode to continuous recording in the 2-hour mode.
Time Lapse Recording
1 2 or 24H Mode
Start of Record 3
• REC PAUSE mode
• STOP mode
^ Alarm Signal Input^
Connection Operation
The alarm switch
shown below.
Alarm signal input: short circuit *
Alarm reset input; short circuit *
* The short circuit should last at least
0,5 seconds.
is connected as Set the alarm recording time
Alarm Recording
2H Mode
selector switch to the desired
recording time length (15 sec, 30
sec. and 3 min.} when receiving an
alarm signal.
ALARM REC TIME
15s8c. 3min.
» <
Time Lapse Recording
12 or 24H Mode
• REC PAUSE mode
• STOP mode
[m
Alarm Recording
2H Mode
Alarm "signal Input ^
Function
When set to 15 sec., recording will
take place in 2-hour mode for 15 sec.,
and return to the previous time mode.
When set to 30 sec., recording will
take place in 2-hour mode for 30 sec.
When set to 3 min., recording will take
place in 2-hour mode for 3 min.
When alarm recording is completed,
the alarm display will blink.
If the ALARM RESET and GROUND
terminals are short-circuited, alarm
recording will be cancelled.
A voltage of 5 V is fed from the
ALARM OUT terminal during an alarm.
When an alarm signal is input with the
buzzer switch set to ON, the buzzer
sounds continuously.
Notes
If the alarm input terminals short-circuit for more than the
specified time, alarm recording continues during that time.
During alarm recording, on-screen display appears in two
lines.
14
Page 16

Basic Playback
Before attempting playback, turn off the REC LOCK/RESTART switch.
Notes
(T) Switch on the power.
(2) Insert the cassette tape.
Press the PLAY button.
(J) Select the playback time mode.
If a power failure occurs with the REC LOCK/RESTART
switch on, this VCR will enter record mode automatically.
If the PAUSE button is pressed during playback, this machine
will pause. To release it, press the PLAY button or PAUSE
button again. If pause is continued for longer than about 10
minutes, this machine will return to the playback state.
Some tapes may not be played back because of the recording
mode in which they were recorded.
Recorded Time Modes
2, 1 2, 24 hours
Playback in Various Ways
This VCR is designed to quickly review the contents of recorded tape.
Carefully read the following description, and become familiar with the operation, during playback.
Selection Operation
To playback a tape recorded in time
lapse mode.
To quickly check the contents of a
tape recorded in time lapse mode.
To playback a tape recorded in time
lapse mode.
To analyze a certain scene during
playback.
To take a single field.
Set to any one of time modes (12
or 24 hours!.
Select 2 hour mode or press the FF
button.
Press the REW button. Tape can be played back in reverse quick
Press the PAUSE button, then FIELD
button.
Press the PAUSE button.
Tape can be played in slow mode.
Tape can be played back in quick motion;
normal speed or 5 times normal speed.
motion: 5 times normal speed.
Fields of the picture can be fed one by
one in playback. Keep the FIELD button
pressed to slow the playback speed to
about 1/30 of the normal speed.
Field still pictures can be obtained.
Reproducible Time Modes
2, 12 24 hours
Function
15
Page 17

Playback Adjustment Procedure
Carefully read the following descriptions to obtain optimum performance.
----------------------------------------------------------- TRACKING
TRACKING
Noise appears in the picture during 2 hour playback.
• Adjust TRACKING to get a clearer picture.
FIELD TRACKING
• Adjust FIELD TRACKING to get a clearer picture when
noise appears on the screen in FIELD mode.
Note: Noise appears when a tape recorded in 2-hour
mode is played back.
In the case of 12 or 24 hour modes, noise cannot be elimi
nated by adjusting 'TRACKING", "FIELD TRACKING".
TRACKING FIELD TRACKING
Playback of Alarm Recordings
This VCR is designed for quick review of the contents of the alarm recordings. Carefully read the following descriptions, and
become familiar with each operation,
Selection Operation Function
To play back a tape immediately after
alarm recording or repeatedly play
back a certain segment of a tape.
Clear the counter to "0000" by
pressing the counter reset button at
the point on the tape which you want
to check.
Press the COUNT. MEMORY button.
The counter memory lamp on the
mode display will light. In this
condition, fast-forward or rewind the
tape.
The tape will automatically stop at
around "0000".
To quickly review the tape recorded in
alarm record mode.
To quickly find alarm recording date
(weekdays)
To check the number of alarm
recordings
Press the COUNT. MEMORY button to
turn on the alarm memory lamp, in
this condition, fast-forward or rewind
the tape.
Press the ALARM RECALL button in
stop mode.
Press the COUNT, button to show the
alarm counter on the display panel.
Still field mode will automatically start
at the point of the tape where the
alarm signal is recorded. Press the
PAUSE button or PLAY button to start
replay.
Alarm information on AL1 to AL5
(year, month, date, day of the week,
hour, minute, second) will automatically
appear in sequence on TV display,
starting with latest one (AL1) at 5
seconds intervals. After ALB is
displayed, this function is released.
The number of alarm recordings will
appear up to "99".
16
Page 18

Maintenance
This VCR is designed for long service, but periodic maintenance is recommended to keep it in top condition.
Procedure
Make sure that the RBC LOCK/RESTART switch is "OFF",
and then turn ON the power switches of this VCR, and
equipment such as video camera and monitor TV that are
connected to the monitoring system.
Make sure that correct pictures can be seen on the moni
tor TV.
Check the date and time displayed on the monitor TV.
1 A
REW
REW
<k: I
FF
1 и>
t>
FF
I x>
£
STOP
STOP
□
FIELD
w> DO
□ :
FIELD PAUSE
no>
pause
ITf
E,
REC
IPI
Rewind the cassette tape recorded on the previous day
by a few counts.
Press the PLAY button.
Check the picture played back.
Check the accuracy of the date and time of recording.
Notes
If any abnormality is found, turn OFF the power switch and
disconnect the power plug from the wall receptacle.
The I RECHlamo also blinks when there is an abnormality in
the VCR. The lamp will not go off even if one of the opera
tion buttons is pressed.
Operating Precautions
About Dewing
In case of dew detection (excessive moisture in the unit}, the safety device will operate to protect the cassette tape and video
head from damage.
In case of dew detection
The "DEW" message blinks, and buzzer sounds continuously
(when BUZZER switch is ON.) To stop the buzzer, turn the
BUZZER switch off.
Take out the video cassette
Wait until the "DEW" message goes out with the POWER
switch turned "ON". It may take a few hours, although it
depends upon conditions.
•
• Dew accumulation is similar to the phenomenon that occurs
when water gathers on a window glass of a heated room
during the winter season.
17
If the VCR operates in dewing condition, the tape and video
head will be damaged.
Dewing is likely to occur;
• When the VCR is rapidly moved from a cold place to warm
place.
• In rooms immediately after being heated or in places sub
jected directly to cold air from an air-conditioner.
• In summer, when the VCR is rapidly moved from a cooled
room or car to a hot, humid place.
• In very humid rooms.
Page 19

Before Calling Service Personnel
Check the following points once again.
Installation
Power is not supplied.
E.E pictures do not appear.
No operation with button pressed.
Dew lamp is blinking.
Date and time display data are not memorised,
in case of power failure.
Playback, fast forward and rewind are possible,
but recording is not possible.
Recording is discontinued.
Power failure is over, but recording is not
resumed.
Repeat recording is not possible.
Buzzer does not sound.
Timer recording is not possible.
Alarm recording is not possible.
Pictures played back include noise.
Pictures played back flicker {snow}.
Date and time are not displayed in the pictures
recorded tape.
When the power cord of the recorder is
plugged in the outlet, recording begins but
playback operation is not possible.
• Check that power cord plug is properly connected to an AC outlet.
• Check the connection of this unit to TV and video camera.
• Check for defective cable.
Function/Operation
• Check if the video cassette is loaded correctly.
• Check if REC LOCK/RESTART switch is "OFF".
• Check for blinking of Dew lamp.
• The unit does not operate because a safety device is actuated. Wait
until the lamp goes out.
• Check if the power cord plug of this unit is disconnected from the
outlet for a tong period of time.
Connect the power cord plug of this unit to an AC outlet to charge it
for at least 20 hours consecutively.
Recording
• Check that the video cassette safety tab is not broken.
• Check if video cassette tape is at the end.
• Check if more than 10 minutes has passed after pressing PAUSE
button during recording.
• Check if the REC LOCK/RESTART swlch is "OFF".
• Check that power failure period exceeds 7 days.
• Check that REPEAT switch is "ON".
• Check if
• Check if STOP button was pressed during auto rewind mode.
• Check if the BUZZER switch is "OFF".
• Check if the present time is correct.
• Check if the Timer is programmed correctly.
• Check if the TIMER button is pressed.
• After timer recording time setting:
• Power failure took place?
• Power switch turned "OFF"?
• Power cord plug disconnected?
♦ Check that alarm sensor is correctly connected to ALARM IN
terminal.
• Check if alarm reset input and ground terminal is inadvertently
connected.
Playback
• Adjust by Tracking Control.
• Clogging, deterioration or life of video head is exceeded.
• Check for dirt on the video head.
♦ Check if the OSD switch was "OFF" in recording mode.
• Check if the REC LOCK/RESTART s\N\tch is "ON".
1
ALARM 1 is disoiaved.
18
Page 20

Specifications
Power supply 120V, AC 60 Hz
Power consumption
External dimensions
Weight 6.8 kg (15 lbs)
Signal system Standard NTSC color television system
Recording system
Cassette in use IViiSl marked, 1/2 inch cassette tape
Tape speed
Video record time
Playback time 2, 12, 24 hours (when T-120 is used)
Fast forward/rewind time
Video input
Video output
Horizontal resolution
Video S/N
Audio inputs Line input: - 10 dBs (245mVrms), 47 k-ohm, pin jack —
Audio output -7 dBs (346mVrms), less than 10 k-ohm, pin jack
No. of audio tracks 1 track
Audio frequency characteristics
Audio S/N
Permissible operating temperature
Permissible operating humidity Less than 80%
Permissible storage temperature ~4°F to 140®F {-20°C to 60°C)
Time date generator
Display Month, day, year, day of the week, hour, minute, second, recording mode,
Display position Adjustable
Character size 14 X 10H
Power failure backup
Display panel
Display Tape, counter memory, recording, alarm memory,
Alarm
Alarm input
Alarm reset input
Alarm recording time
Alarm output
20 W
430 mm x 88 mm x 354 mm (16-1 5/16 x 3-7/1 5 x 13-15/16 inch) (WxH x D)
Rotary 2-head azimuth
33.4 mm/sec (at 2 hours record/playback time)
2, 12, 24 hours (when T-120 is used)
Within 6 minutes (when T-120 is used)
1 Vp-p, 75 ohm, unbalanced, negative sync. BNC
1 Vp-p, 75 ohm, unbalanced, negative sync. BNC
350 lines (monochrome mode). 300 lines (color mode)
More than 45 dB
Microphone input: - 70 dBs, less than 5 k-ohm, mini jack
100 Hz to 10 kHz
More than 43 dB
41 °F to 104*’F (5°C to 40°C)
alarm recall, alarm display, timer programming.
About 7 days
alarm, power failure, time, playback, mode, counter, alarm counter, dewing,
timer. Detection of abnormality
Shortcircuit
Shortcircuit
15 sec., 30 sec., 3 min.
5V, impedance 1.3 kQ
Designs and specifications are subject to change without notice.
TOSHIBA AMERICA CONSUMER RROOUCTS, INC.
Printed in Japan 70971344
 Loading...