

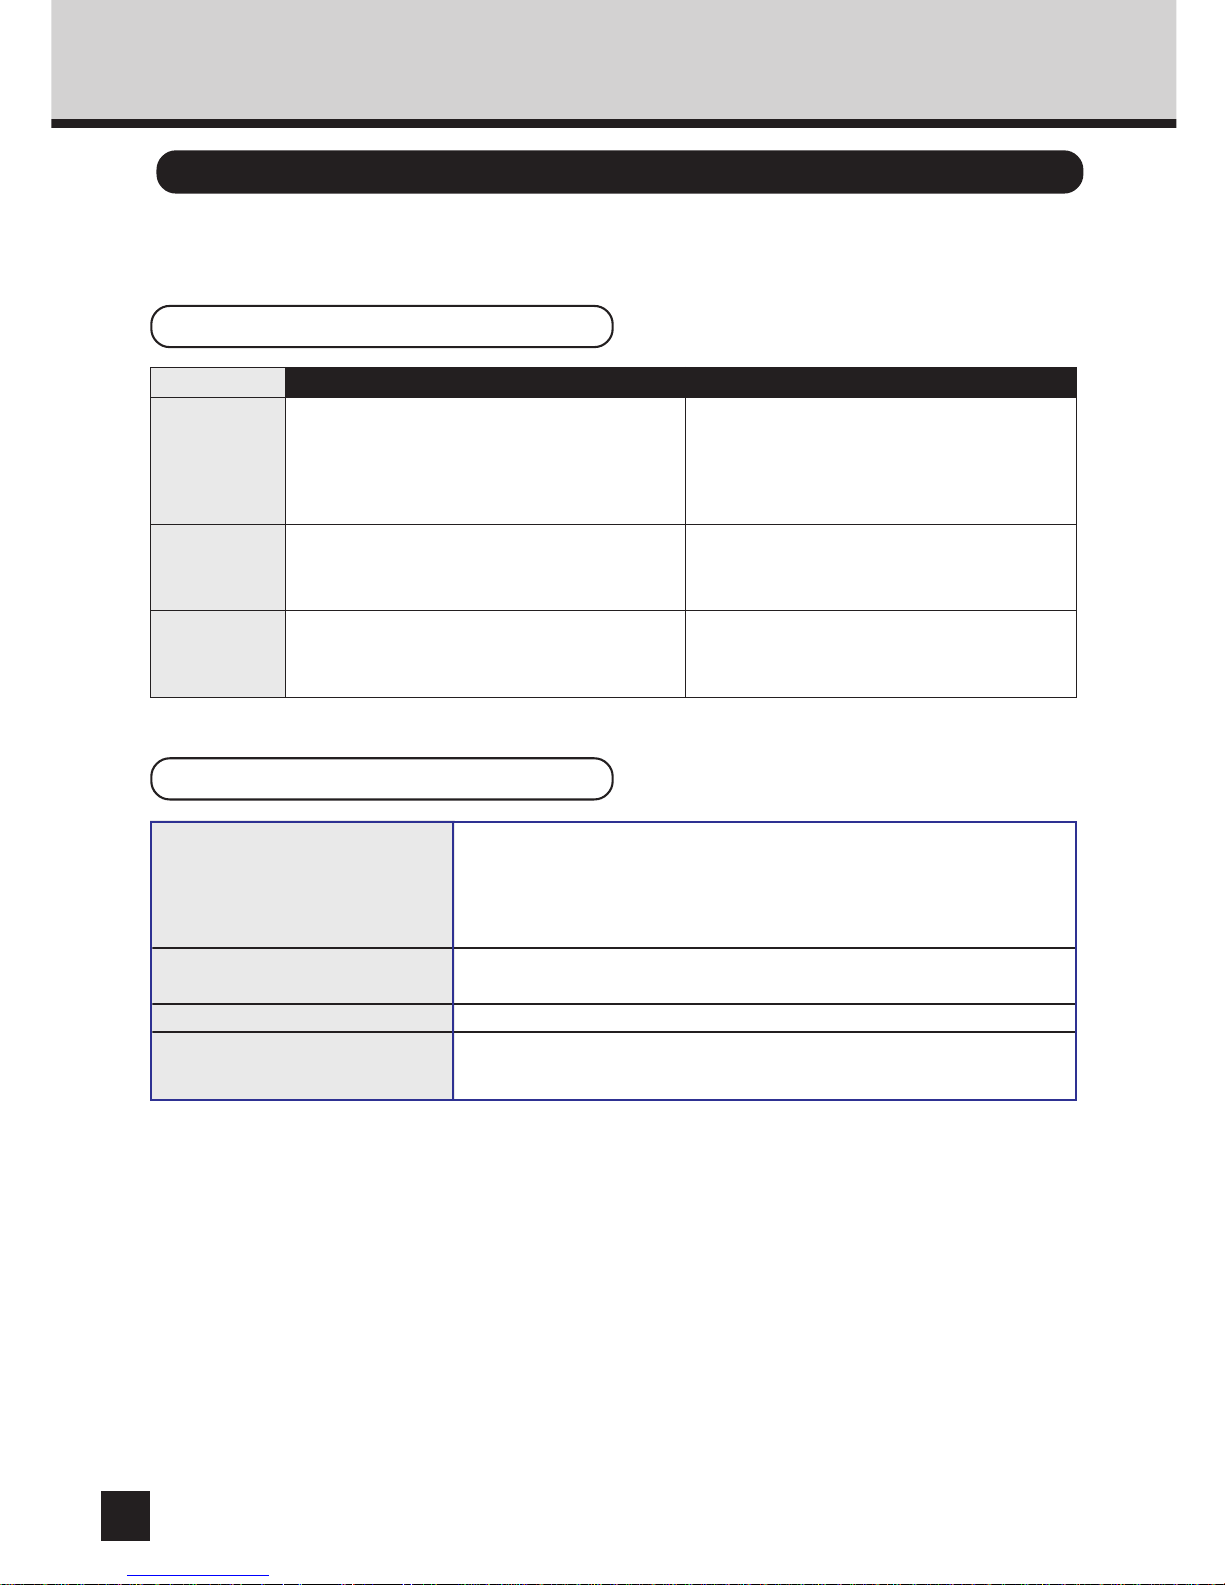
No part of this manual may be copied in whole or part without permission.
The contents of this manual may change without notification.
WARNING:
Changes or modification made to this equipment, not expressly approved by Toshiba Tec or parties
authorized by Toshiba Tec could void the user’s authority to operate the equipment.
For European models only:
FCC NOTICE
This equipment has been tested and found to comply with the limits for a Class A digital device, pursuant to Part 15
of the FCC Rules. These limits are designed to provide reasonable protection against harmful interference when the
equipment is operated in a commercial environment. This equipment generates, uses, and can radiate radio
frequency energy and, if not installed and used in accordance with the instruction manual, may cause harmful
interference to radio communications. Operation of this equipment in a residential area is likely to cause harmful
interference in which case the user will be required to correct the interference at his own expense.
WARNING:
This product complies with Class A for network connection. In a domestic environment this product
may cause radio interference in which case the user may be required to take adequate measures.
1. Do not touch the connector terminal when disconnecting the cables of peripheral equipment.
2. Before opening any covers or removing any units from the copier, discharge the static electricity
from your body by touching a metal part of the copier.
This product is carrying the CE-Mark in accordance with the related European Directives. Responsible
for CE-marking is TOSHIBA TEC GERMANY IMAGING SYSTEMS GmbH, Carl-Schurz-Str. 7, 41460
Neuss, Germany. email: customerservice@toshibatec-tgis.com
Trademarks described in this manual:
● Ethernet is a registered trademark of US Xerox Corporation.
● The official name of Windows 95 is Microsoft Windows 95 Operating System.
● The official name of Windows 98 is Microsoft Windows 98 Operating System.
● The official name of Windows Me is Microsoft Windows Millennium Edition Operating System.
● The official name of Windows 2000 is Microsoft Windows 2000 Operating System.
● The official name of Windows XP is Microsoft Windows XP Operating System.
● Microsoft, Windows, Windows NT, Microsoft Internet Explorer, and the brand names and product names of other Microsoft products
are trademarks or registered trademarks of US Microsoft Corporation in the US and other countries.
● Apple, AppleTalk, Macintosh, Mac OS, and LaserWriter are trademarks of US Apple Computer Inc. in the US and other countries.
● Postscript and Postscript Logo are trademarks of Adobe Systems Incorporated.
● IBM PC/AT is a registered trademark of US International Business Machine Corporation.
● Destiny™ is a registered trademark of Destiny Technology Corporation.
● WinPanel™ is a registered trademark of Destiny Technology Corporation.
● NetPanel™ is a registered trademark of Destiny Technology Corporation.
● TrueType is a trademark of US Apple Computer Inc.
● Other company names and product names in this manual are the trademarks or registered trademarks of their respective companies.
Intellectual Property Rights for softwares
● Destiny®, LaserAct®, PageStyler®, DPOS®, are the registered trademark of Destiny Technology Corporation.
● WinPanel™, NetPanel™, are the registered trademark of Destiny Technology Corporation.
● LaserAct® 6 Copyright ©1992-2001, Destiny Technology Corp. Ver.2.0 All Rights Reserved.
● PageStyler®II Copyright ©1995-2001, Destiny Technology Corp. Ver.2.0 All Rights Reserved.
● WinPanel™ Copyright ©1995-2001, Destiny Technology Corp. Ver.1.0 All Rights Reserved.
● NetPanel™ Copyright ©1995-2001, Destiny Technology Corp. Ver.1.0 All Rights Reserved.
● Copyright © TOSHIBA TEC Corp. 2001 All Rights Reserved.
● Copyright © Agfa Monotype Corp. 1997-2001 All Rights Reserved.
● Copyright © 1999-2001 Netsilicon, Inc. All Rights Reserved.
This Class A digital apparatus complies with Canadian ICES-003.
Cet appareil numérique de la classe A est conforme à la norme NMB-003 du Canada.

1
Thank you for purchasing the Toshiba e-STUDIO16/20/25 GA-1031 Printer Kit. This Operator’s
Manual outlines the network print functions, procedures for set-up, and trouble shooting for the
GA-1031 Printer Board and GF-1110 Network Interface Card. Please thoroughly read this
Operator’s Manual prior to installation and use. This manual should be used for reference to
ensure cusp, clean printed output and optimal networking functionality.

2
TABLE OF CONTENTS
■■
■■
■ INTRODUCTION ........................................................................... 7
REQUIREMENTS ........................................................................................... 8
EXAMPLES OF CONNECTING THE PRINTER ........................................... 10
Example of connection on a client-server type network .............................. 10
Example of connection on a peer-to-peer type network .............................. 10
SETUP FLOW............................................................................................... 11
Setup for Client Server Network for Windows.............................................. 11
Setup for the Peer-to-Peer Type Network .................................................... 12
■■
■■
■ NETWORK SETUP ..................................................................... 13
ASSIGNING THE IP ADDRESS ................................................................... 14
Assigning the IP Address from the Control Panel ....................................... 15
Assigning the IP Address using MAP .......................................................... 19
NOVELL SETTINGS ..................................................................................... 23
APPLETALK SETTING ................................................................................. 26
■■
■■
■ USING WITH PEER-TO-PEER UTILITY ..................................... 29
PEER-TO-PEER UTILITIES ......................................................................... 30
Required Environment................................................................................. 30
INSTALLING THE PEER-TO-PEER UTILITY FOR TCP/IP ........................... 31
Installation ................................................................................................... 31
INSTALLING THE PEER-TO-PEER UTILITY FOR IPX/SPX ........................ 36
Installation ................................................................................................... 36
UNINSTALLING THE PEER-TO-PEER UTILITY.......................................... 40
Uninstalling the Peer-to-Peer Utility for TCP/IP........................................... 40
Uninstalling the Peer-to-Peer Utility for IPX/SPX ........................................ 41
■■
■■
■ SETUP THE PRINT SERVER WITH NetWare 3.x ...................... 43
NetWare 3.x SETUP ..................................................................................... 44
Set-up Example ........................................................................................... 44
Setting up with PCONSOLE ........................................................................ 45
Select File Server ..................................................................................... 45
Creating a print queue .............................................................................. 45
Creating the print server ........................................................................... 46
Creating the printer ................................................................................... 47
Assigning a print queue ............................................................................ 49
SET UP THE PCONSOLE UTILITY OPTIONS............................................. 52
Setting Up Notify Options for the Printer ..................................................... 52
Primary File Server ..................................................................................... 53
Preferred File Servers ................................................................................. 53

3
INTRODUCTION
NETWORK
SETUP
USING WITH
PEER-TO-PEER
UTILITY
SETUP THE
PRINT SERVER
WITH NetWare 3.x
SETUP THE
PRINT SERVER
WITH NetWare 4.x
SETUP THE PRINT
SERVER WITH
Windows NT 4.0
INSTALLING THE
PRINTER DRIVER
for Macintosh
NETPANEL
FUNCTION
MAP
TROUBLE-
SHOOTING
SETUP THE
PRINT SERVER
WITH NetWare 5.x
INSTALLING THE
PRINTER DRIVER
for Windows
SPECIFICATIONS
AND OTHER
INFORMATION
■■
■■
■ SETUP THE PRINT SERVER WITH NetWare 4.x ..................... 55
SETUP IN NDS MODE ................................................................................. 56
Set-up Example........................................................................................... 56
Setting up NetWare Administrator ............................................................... 57
Starting NetWare Administrator ................................................................ 57
Creating a print queue .............................................................................. 58
Creating the printer ................................................................................... 60
Assigning the print queue ......................................................................... 61
Creating the print server ........................................................................... 63
Allocating the printer ................................................................................. 64
SETUP IN BINDERY MODE ......................................................................... 66
Confirmation before setting up .................................................................... 66
Confirm Bindery Context........................................................................... 66
Set-up Example ........................................................................................... 67
Setting up with PCONSOLE ........................................................................ 68
Starting PCONSOLE ................................................................................ 68
Creating a print queue .............................................................................. 68
Creating the print server ........................................................................... 69
Creating the printer ................................................................................... 70
Assigning the print queue ......................................................................... 71
SET UP THE PCONSOLE UTILITY OPTIONS............................................. 73
Setting Up Notify Options for the Printer ..................................................... 73
■■
■■
■ SETUP THE PRINT SERVER WITH NetWare 5.x ...................... 75
SETUP IN NDS MODE ................................................................................. 76
Set-up Example........................................................................................... 76
Setting up NetWare Administrator ............................................................... 77
Starting NetWare Administrator ................................................................ 77
Creating a print queue .............................................................................. 78
Creating the printer ................................................................................... 80
Assigning the print queue ......................................................................... 81
Creating the print server ........................................................................... 83
Allocating the printer ................................................................................. 84
■■
■■
■ SETUP THE PRINT SERVER WITH Windows NT4.0/2000........ 87
Windows NT PRINT SERVER SETUP ......................................................... 88
Preparation for Setting up............................................................................ 88
Confirming the TCP/IP Print Services ....................................................... 88
Creating a Shared Printer............................................................................ 89
Windows 2000 PRINT SERVER SETUP ...................................................... 95
Creating a Shared Printer............................................................................ 95
Install the Printer Drivers for Different Versions of Windows ...................... 105

4
■■
■■
■ INSTALLING THE PRINTER DRIVER for Windows ............... 109
INSTALLING THE PRINTER DRIVER ........................................................ 110
Features of Each Printer Driver ................................................................. 110
Installation from the CD-ROM ................................................................... 112
Installation by Adding Printer..................................................................... 118
Windows 95/98/Me ................................................................................. 118
Windows NT4.0 ...................................................................................... 122
Windows 2000/XP .................................................................................. 126
Copying the PageMaker PPD File ............................................................. 130
Setting the Options Configuration ............................................................. 131
UNINSTALLING THE PRINTER DRIVERS ................................................ 133
INSTALLING THE AGFA FONT MANAGER............................................... 134
Install AGFA Font Manager ....................................................................... 134
Uninstall AGFA Font Manager................................................................... 137
Description of Screen ................................................................................ 138
Getting Started with AGFA Font Manager ................................................. 139
■■
■■
■ INSTALLING THE PRINTER DRIVER for Macintosh ............. 141
INSTALLING THE PRINTER DRIVER ........................................................ 142
System Requirements ............................................................................... 142
Copying the PPD File ................................................................................ 143
Select the Driver ........................................................................................ 144
Option Setup ............................................................................................. 145
Printer Specific Options ............................................................................. 147
■■
■■
■ NETPANEL FUNCTION ............................................................ 151
INSTALLING NETPANEL............................................................................ 152
Required Environments ............................................................................. 152
Installing .................................................................................................... 153
Uninstalling ................................................................................................ 157
STARTING NETPANEL .............................................................................. 159
Required Environments ............................................................................. 159
Browsing with NetPanel ............................................................................ 160
Log in......................................................................................................... 161
DESCRIPTION OF SCREEN ..................................................................... 162
Using Help ................................................................................................. 163
OPERATING FLOW.................................................................................... 164
For the Normal User .................................................................................. 164
For the Administrator ................................................................................. 164
PRINTER DISCOVERY .............................................................................. 168
Printer Discovery Main Page ..................................................................... 168
Searching Result Display .......................................................................... 169

5
INTRODUCTION
NETWORK
SETUP
USING WITH
PEER-TO-PEER
UTILITY
SETUP THE
PRINT SERVER
WITH NetWare 3.x
SETUP THE
PRINT SERVER
WITH NetWare 4.x
SETUP THE PRINT
SERVER WITH
Windows NT 4.0
INSTALLING THE
PRINTER DRIVER
for Macintosh
NETPANEL
FUNCTION
MAP
TROUBLE-
SHOOTING
SETUP THE
PRINT SERVER
WITH NetWare 5.x
INSTALLING THE
PRINTER DRIVER
for Windows
SPECIFICATIONS
AND OTHER
INFORMATION
PRINTER MANAGEMENT.......................................................................... 171
Printer Management Search Page ........................................................... 171
Printer Management Main Page................................................................ 172
Reset Printer and Test Print Page ............................................................. 175
Reset a Printer and NIC.......................................................................... 176
Print a Test Page .................................................................................... 177
Printer Configure ....................................................................................... 178
General Properties.................................................................................. 178
Input Tray Properties............................................................................... 179
Output Bin Properties ............................................................................. 180
Paper Properties ..................................................................................... 181
Printer Setting Properties........................................................................ 182
PCL Font Properties ............................................................................... 185
Group Management ................................................................................ 186
NIC Configure............................................................................................ 187
Protocols Configuration .......................................................................... 187
IP Configuration ...................................................................................... 188
Apple Talk Configuration ......................................................................... 189
System Configuration ............................................................................. 190
Novell Configure ........................................................................................ 192
Novell Configuration ............................................................................... 192
Device Password....................................................................................... 193
Device Password .................................................................................... 193
SERVER MANAGEMENT........................................................................... 194
Server Management Main Page............................................................... 194
Server Management Main Page of Windows NT Server.......................... 195
Install a Printer to a File Server .............................................................. 196
Remove a Printer from a File Server ...................................................... 198
Deleting Print Jobs.................................................................................. 200
GROUP MANAGEMENT ............................................................................ 202
Group Management Main Page ............................................................... 202
Create a Group ....................................................................................... 203
Delete a Group ....................................................................................... 204
View Group and Printer .......................................................................... 205
Add a Printer to a Group ......................................................................... 207
Remove a Printer from a Group .............................................................. 208
NETPANEL SETTING................................................................................. 210
NetPanel Setting Main Page .................................................................... 210
Administrator Setting ................................................................................. 211
Change the Administrator Password ...................................................... 211
WNP Setting.............................................................................................. 212
Discovery Setting ...................................................................................... 213
1

6
■■
■■
■ MAP........................................................................................... 215
MAP ............................................................................................................ 216
Password for MAP..................................................................................... 216
USING THE MAP in Windows .................................................................... 217
Required Environments ............................................................................. 217
Install MAP ................................................................................................ 217
Start MAP .................................................................................................. 220
USING THE MAP in Macintosh .................................................................. 222
Required Environments ............................................................................. 222
Start MAP .................................................................................................. 222
SETUP NetWare at MAP ............................................................................ 223
SETUP AppleTalk at MAP........................................................................... 225
RESTORE FACTORY DEFAULTS.............................................................. 226
■■
■■
■ TROUBLESHOOTING .............................................................. 227
NETPANEL ERROR ................................................................................... 228
WHEN PRINTING CANNOT BE PERFORMED... ...................................... 231
■■
■■
■ SPECIFICATIONS AND OTHER INFORMATION..................... 233
SPECIFICATIONS OF THE UNITS ............................................................ 234
Specification of the Printer Unit ................................................................. 234
Specification of the Network Interface Card .............................................. 234
TEST PRINT SAMPLE ............................................................................... 235
Demo Page ............................................................................................... 235
Configuration Page.................................................................................... 236
NIC Status Page........................................................................................ 237
PCL Font List............................................................................................. 238
PS Font List ............................................................................................... 241
Status Log ................................................................................................. 243
Group Management List Page .................................................................. 244
LIST OF INTERNAL PCL FONTS .............................................................. 245
LIST OF INTERNAL PS FONTS................................................................. 247

7
INTRODUCTION
INTRODUCTION

8
REQUIREMENTS
Hardware
The following hardware and software requirements are necessary to function with the Network
Interface Card.
Be sure to use the correct type of cable and networking device for your network interface card
(NIC).
• 10BASE-T
UTP cable with a Category 3 or 5 RJ-45 connector.
• 100BASE-TX
STP cable with a Category 5 RJ-45 connector.
The following requirements must be met in order for the machine to operate on each network.
• IPX/SPX Network (NetWare)
Server : Novell NetWare 3. x, 4. x, 5.x.
Either PCONSOLE included with NetWare or NetWare
Administrator must be available.
Client : A computer that can be used as a NetWare client.
Protocol : IPX/SPX
• Microsoft Network
Server : Windows NT Server 4.0, Windows 2000 Server
Client : Windows 95, Windows 98, Windows Me,
Windows NT Workstation 4.0, Windows 2000 Professional,
Windows XP Home Edition, and Windows XP Professional
Protocol : TCP/IP, IPX/SPX
• AppleTalk (Ethernet)
Host : Mac OS 8.0, 8.5, 8.6, 9.0
Protocol : AppleTalk
Network Requirements

9
INTRODUCTION
To use the network utility included with this machine, the following requirements must be met.
z NetPanel
• Requirements for the Server that NetPanel will be installed on:
OS: Windows NT 4.0, Windows 2000, and Windows XP
The computer that can be connected to this machine via TCP/IP.
The following services are requried:
For Windows NT workstation 4.0: Microsoft Personal Web Server
For Windows NT Server 4.0: Microsoft Internet Information Server 4.0 or later
For Windows 2000 Professional: Microsoft Internet Information Server 5.0 or later
For Windows 2000 Server: Microsoft Internet Information Server 5.0 or later
For Windows XP Home Edition: Microsoft Internet Information Server 5.0 or later.
For Windows XP Professional: Microsoft Internet Information Server 5.0 or later
Netscape Navigator 3.0, or later, or Internet Explorer 3.0, or later
• Client machine to use NetPanel:
The computer that can be connected to this machine and the server machine for NetPanel
via TCP/IP.
Netscape Navigator 3.0, or later, or Internet Explorer 3.0, or later
z MAP
A computer that can be connected to this machine via IPX/SPX, and where TCP/IP is installed.
Netscape Navigator 3.0 , or later, or Internet Explorer 3.0, or later
Others
10
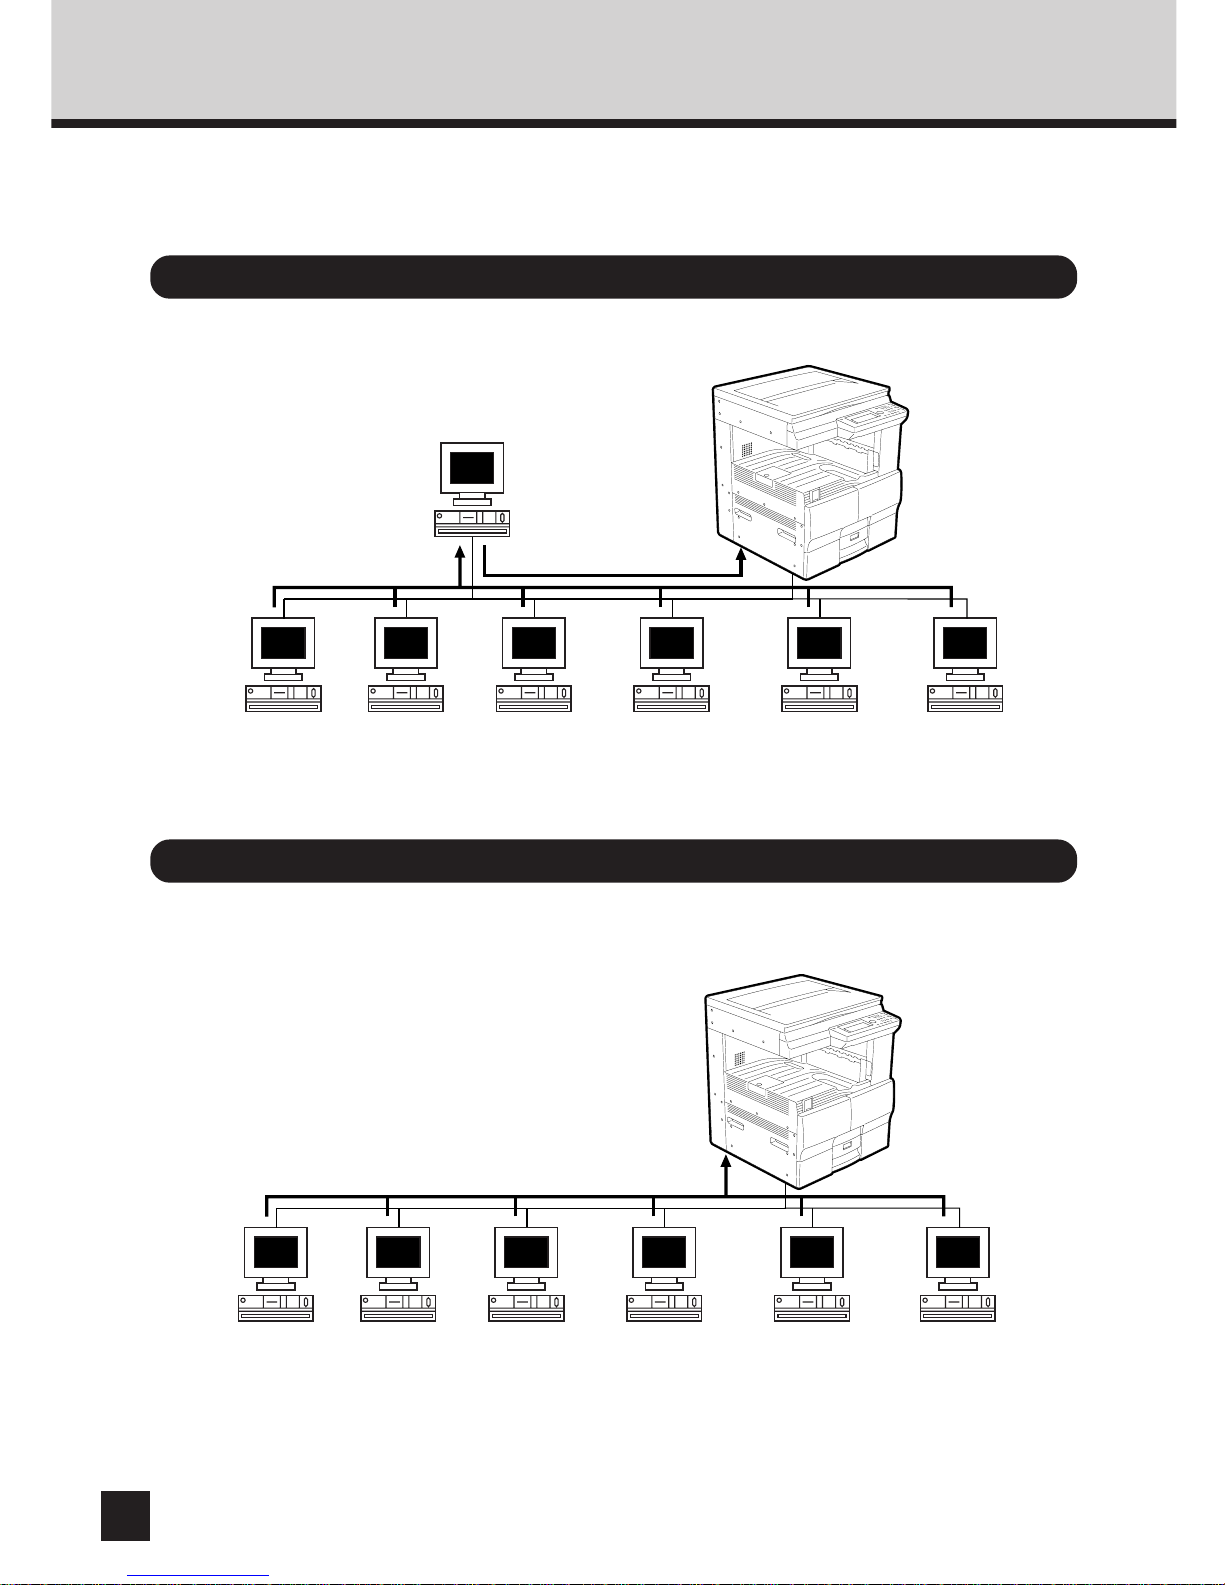
EXAMPLES OF CONNECTING THE PRINTER
The following network configurations are available to connect the e-STUDIO16/20/25 network
printer:
Example of connection on a client-server type network
Example of connection on a peer-to-peer type network
Print job transfer
e-STUIDIO16/20/25
Windows 95
client
NetWare Server
Windows NT Server
Windows 2000 Server
Windows 98
client
Windows Me
client
Windows NT4.0
client
Windows 2000
client
Windows XP
client
Print job spool
Print job transfer
e-STUIDO16/20/25
Windows 95
client
Windows 98
client
Windows Me
client
Windows NT4.0
client
Windows 2000
client
Windows XP
client
11
INTRODUCTION
SETUP FLOW
Instructions for set-up on a Windows NT Server, Windows 2000 Server, NetWare with TCP/IP,
or NetWare without TCP/IP network.
Setup for Client Server Network for Windows
Windows NT/2000 Server
• Assign the IP address,
Subnet Mask, and Gateway
address. (See “
NETWORK
SETUP - ASSIGNING IP
ADDRESS
”.)
NetWare with TCP/IP
• Assign the IP address,
Subnet Mask, and Gateway
address. (See “
NETWORK
SETUP - ASSIGNING IP
ADDRESS
”.)
• Configure the Novell
Settings. (See
“NETWORK SETUP NOVELL SETTINGS”)
NetWare without TCP/IP
Control Panel
Setup
Print Server
Setup
NetWare Setup
Install Printer
Driver
• Setup Windows NT Server.
(See “SETUP THE PRINT
SERVER WITH Windows
NT 4.0/2000 -Windows NT
PRINT SERVER SETUP”.)
• Setup Windows 2000
Server. (See “SETUP
THE PRINT SERVER
WITH Windows NT/2000 Windows 2000 PRINT
SERVER SETUP”.)
• Setup NetWare 3.x. (See
“SETUP THE PRINT
SERVER WITH NetWare
3.x - NetWare 3.x Setup”.)
• Setup NetWare 4.x in
bindery mode. (See
“SETUP THE PRINT
SERVER WITH NetWare
4.x - Setup in Bindery
Mode”.)
• Setup NetWare 4.x in NDS
mode. (See “SETUP THE
PRINT SERVER WITH
NetWare 4.x - Setup in
NDS Mode”.)
• Setup NetWare 5.x in NDS
mode. (See “SETUP THE
PRINT SERVER WITH
NetWare 5.x - Setup in
NDS Mode”.)
Setup NetWare using MAP.
(See “MAP - SETUP
NetWare at MAP”.)
Setup NetWare using MAP.
(See “MAP - SETUP
NetWare at MAP”.)
Install the appropriate
Printer Driver for the
Operating System used and
configure options.
(See “INSTALLING THE
PRINTER DRIVER for
Windows”.)
Install the appropriate
Printer Driver for the
Operating System used and
configure options.
(See “INSTALLING THE
PRINTER DRIVER for
Windows”.)
Install the appropriate
Printer Driver for the
Operating System used
and configure options.
(See “INSTALLING THE
PRINTER DRIVER for
Windows”.)
• Configure the Novell
Settings. (See
“NETWORK SETUP NOVELL SETTINGS”)
12
Setup for the Peer-to-Peer Type Network
Instructions for set-up on a Peer-To-Peer TCP/IP, IPX/SPX, and the AppleTalk (Ethernet)
Network.
TCP/IP IPX/SPX
• Assign the IP address, Subnet Mask, and
Gateway address. (See “
NETWORK SETUP -
ASSIGNING IP ADDRESS
”.)
• Configure the Novell Settings. (See
“NETWORK SETUP - NOVELL SETTINGS”)
Control Panel
Setup
Install the
Printer Driver
Install the
Peer-to-Peer
Utility
For Windows
For Macintosh
Assign the IP address, Subnet Mask, and
Gateway address. (See “NETWORK SETUP
- ASSIGNING IP ADDRESS”.)
Install the Peer-To-Peer Utility for TCP/IP.
(See “
USING WITH PEER-TO-PEER UTILITY
- Peer-to-Peer Utility for TCP/IP Setup
”.)
Install the Peer-To-Peer Utility for IPX/SPX.
(See “
USING WITH PEER-TO-PEER UTILITY
- Peer-to-Peer Utility for IPX/SPX Setup
”.)
Install the appropriate Printer Driver for the
Operating System used and configure options.
(See “INSTALLING THE PRINTER DRIVER for
Windows”.)
Install the appropriate Printer Driver for the
Operating System used and configure options.
(See “INSTALLING THE PRINTER DRIVER for
Windows”.)
Control Panel Setup • Assign the IP address, Subnet Mask, and Gateway address. (See
“ASSIGNING IP ADDRESS”.)
• Enable the AppleTalk. (See “NETWORK SETUP - APPLETALK
SETTING”)
Install Printer Driver Copy the PPD file and select the printer. (See “INSTALLING THE
PRINTER DRIVER for Macintosh” .)
AppleTalk Setup Setup AppleTalk using MAP. (See “MAP - AppleTalk Setup”.)
Printer Specific Options Setup Configure the Printer Specific Options. (See “INSTALLING THE
PRINTER DRIVER for Macintosh - Printer Specific Options”.)

13
NETWORK
SETUP
NETWORK SETUP

14
ASSIGNING THE IP ADDRESS
Assign the IP address, the Subnet Mask, and the Gateway address of this machine. This
address is required when using the TCP/IP protocol.
The steps for assigning the IP address are described in the following section:
● Assigning an IP Address from the Control Panel (➔P.15)
To assign the IP address, the Subnet Mask, and the Gateway address without having to
configure any other TCP/IP settings (such as WINS name), use this method.
● Assigning an IP Address using MAP (➔P.19)
The IP address can be assigned from a remote computer while also configuring various TCP/
IP settings (such as WINS name).
SUPPLEMENT:
You can use the TOSHIBA Status Display to assign an IP address as well as configure
other protocol settings. However, the e-STUDIO16/20/25 must be connected locally via the
LPT port in order for the TOSHIBA Status Display to assign an IP address. If any
problems occur, when assigning the IP address and MAP is not available, use the
TOSHIBA Status Display to re-assign the IP address. See “TOSHIBA STATUS DISPLAY
FUNCTION - PRINTER SETTING - [NIC Configuration] Tab” in the “OPERATOR’S
MANUAL FOR PRINTER FUNCTION - Local Setup”.
15
ASSIGNING
IP ADDRESS
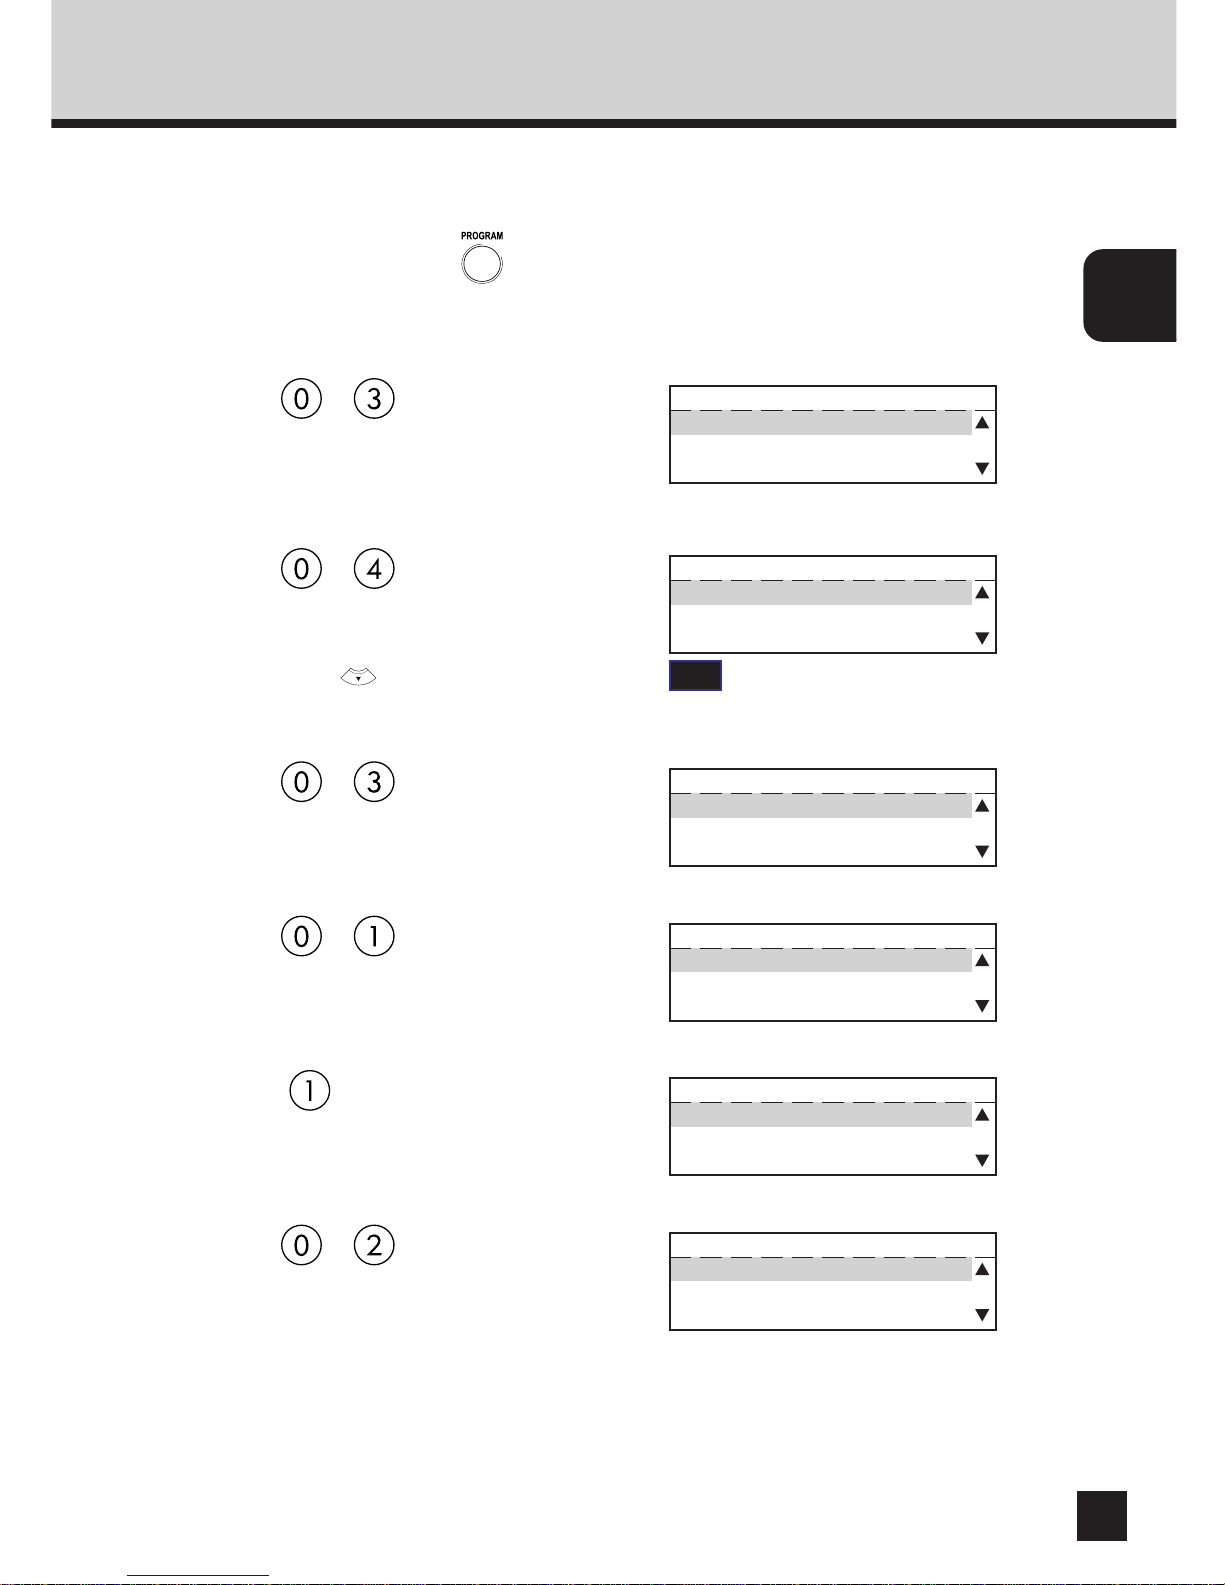
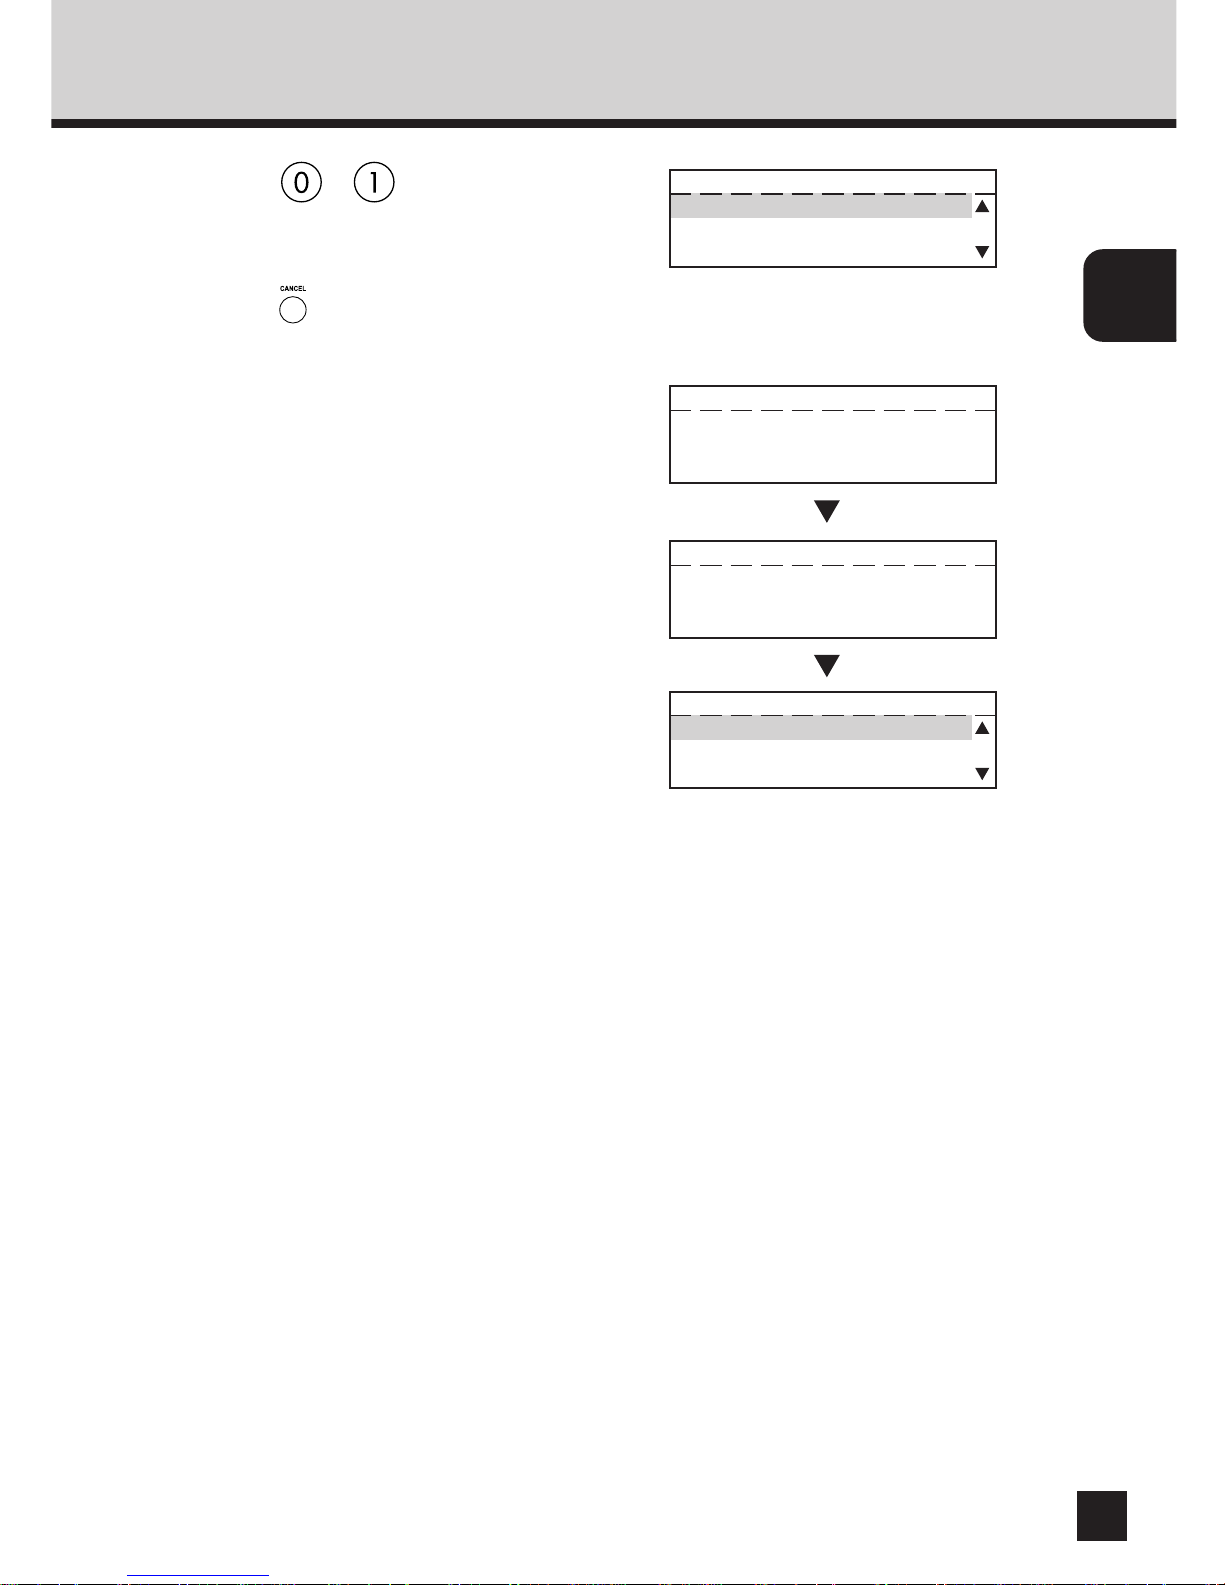
Assigning the IP Address from the Control Panel
1
In Standby Mode, press key.
● The PROGRAM menu is displayed.
2
Press + on the Dial Keypad
to select INITIAL SETUP.
PROGRAM
01.DEFAULT SETTING
02.LISTS
03.INITIAL SETUP
3
Press + on the Dial Keypad
to select NETWORK.
● NETWORK is outside of the Message Display
Panel. Press to display the desired item.
INITIAL SETUP
02.LANGUAGE
03.TERMINAL ID
04.NETWORK
4
Press + on the Dial Keypad
to select TCP/IP.
NETWORK
01.COMPLETE
02.TCP/IP
03.NETWARE
5
When the IP address can be obtained
from the DHCP server, continue to
“Use DHCP Server”.
When the IP address is assigned
manually, continue to “Assign IP
Address Manually”.
TCP/IP
01.BOOTP/DHCP
02.IP ADDRESS
03.SUBNET MASK
SUPPLEMENTS:
● When the IP address is obtained from the DHCP server, TCP/IP printing cannot be
performed because the IP address changes each time the printer is powered on.
● If there is a WINS server and you want to use a WINS name for the NIC, see “Assigning
IP Address using MAP”. By configuring the port with a WINS name instead of an IP
address, TCP/IP printing can be performed.
Use DHCP Server
TIP
“03. TERMINAL ID” appears on the menu only
when the FAX option is installed.
16
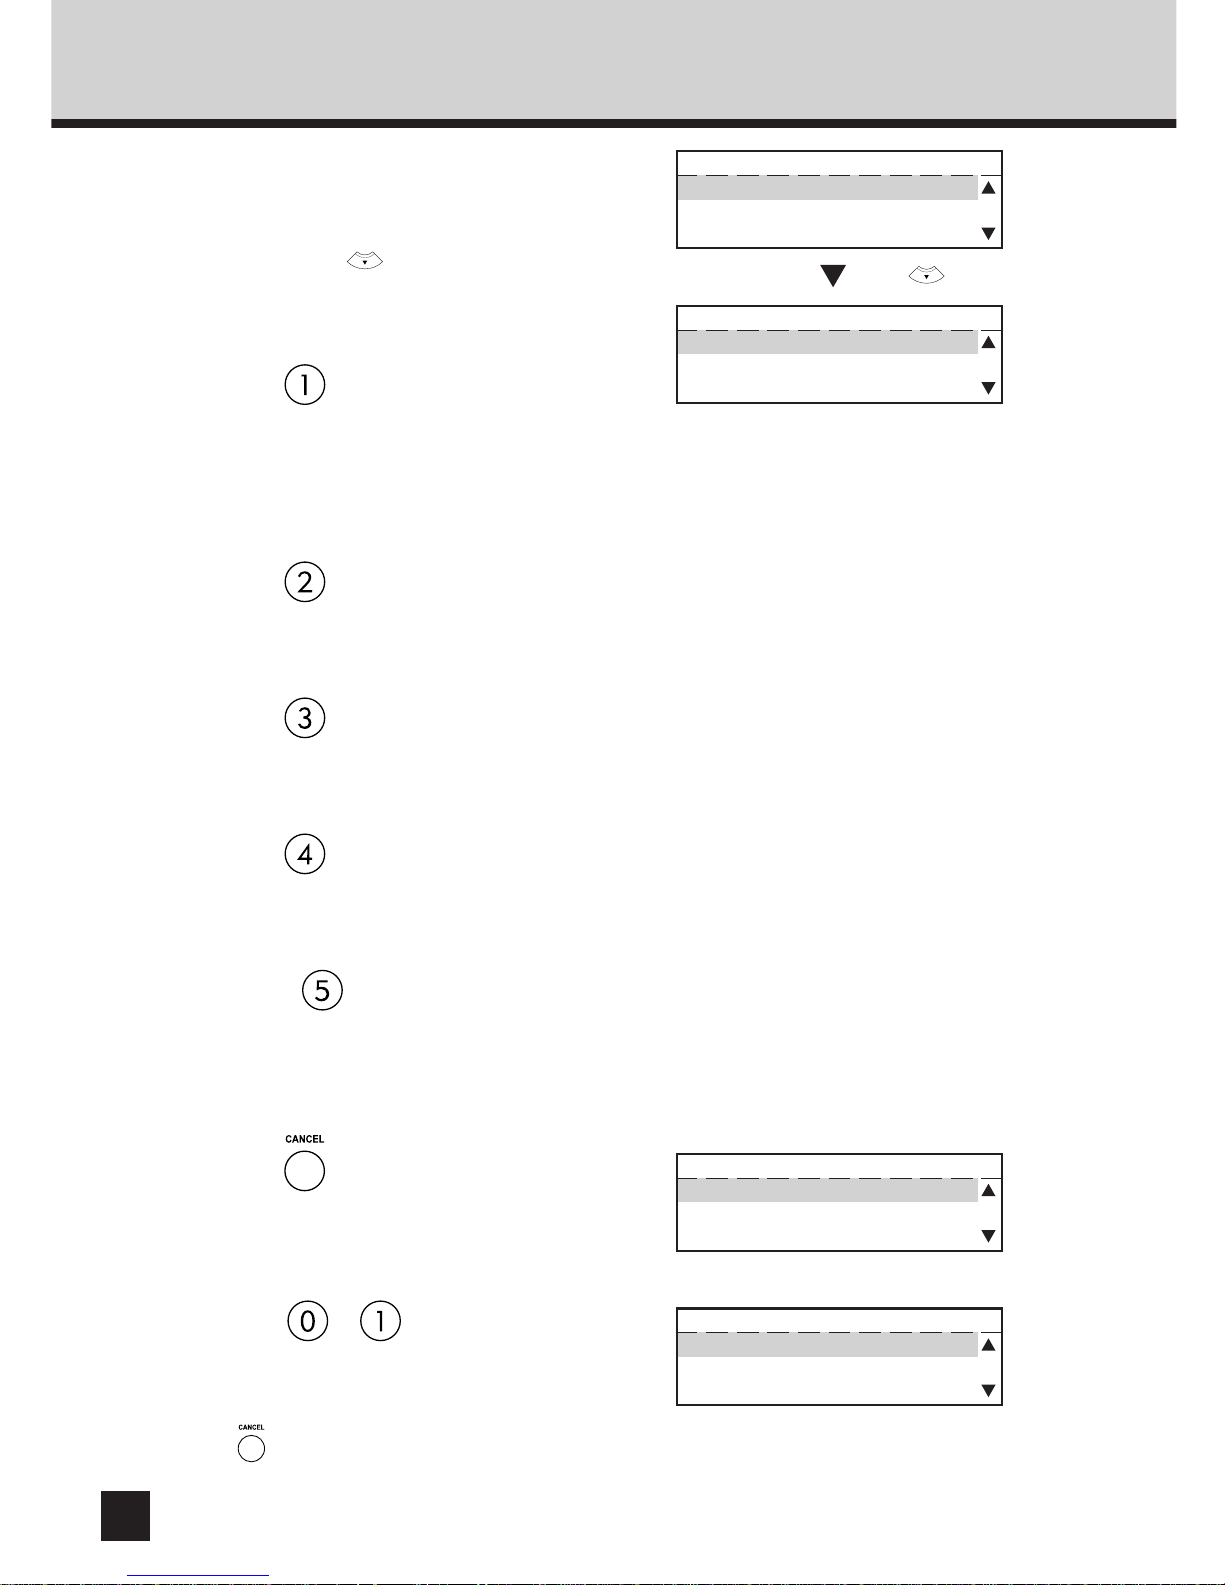
1
Press + on the Dial Keypad
to select BOOTP/DHCP.
TCP/IP
01.BOOTP/DHCP
02.IP ADDRESS
03.SUBNET MASK
2
Press on the Dial Keypad to
select ENABLE.
● If there is a DHCP server on your network and
you do not want use DHCP, press to select
DISABLE.
● The display returns to TCP/IP menu.
BOOTP/DHCP
1.ENABLE
2.DISABLE
3
Press .
● The display returns to NETWORK menu.
TCP/IP
01.BOOTP/DHCP
02.IP ADDRESS
03.SUBNET MASK
4
Press + on the Dial Keypad
to select COMPLETE.
● If you want to cancel the TCP/IP setting, press
.
NETWORK
01.COMPLETE
02.TCP/IP
03.NETWARE
After 2 sec.
NETWORK
Operation Completed
INITIAL SETUP
01.DATE & TIME
02.LANGUAGE
03.TERMINAL ID
After 2 sec.
NETWORK
Initializing
5
The network setting is executing.
● The Initializing message appears. After 2 sec.,
the Operation Completed message appears.
Then, the display returns to the INITIAL SETUP
menu.
● The Network Interface Card begins to initialize.
17
ASSIGNING
IP ADDRESS
2
Enter the IP Address using the Dial
Keypad.
IP ADDRESS
000.000.000.000
Assign the IP Address Manually
1
Press + on the Dial Keypad
to select IP ADDRESS.
TCP/IP
01.BOOTP/DHCP
02.IP ADDRESS
03.SUBNET MASK
3
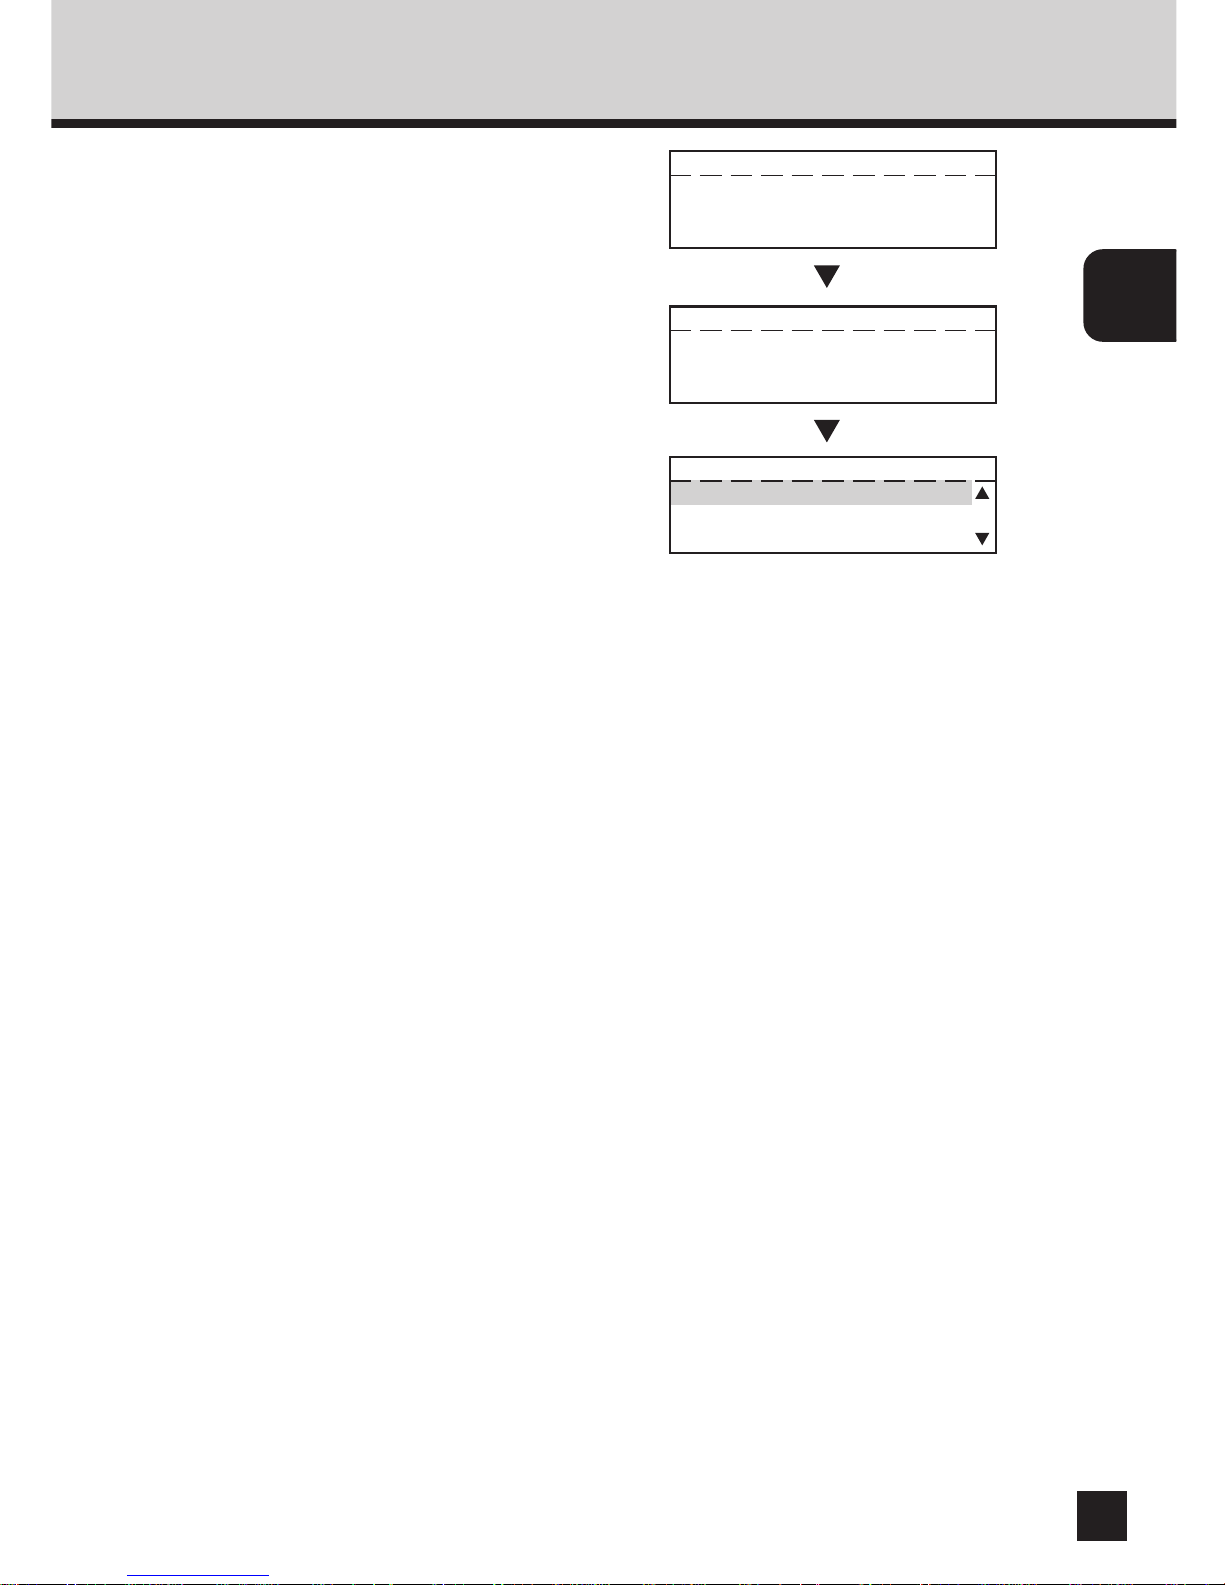
Press .
● The display returns to the TCP/IP menu.
IP ADDRESS
172.016.110.115
4
Press .
● The display returns to the NETWORK menu.
TCP/IP
01.BOOTP/DHCP
02.IP ADDRESS
03.SUBNET MASK
5
Press + on the Dial Keypad
to select COMPLETE.
● If you want to cancel the TCP/IP setting, press
.
NETWORK
01.COMPLETE
02.TCP/IP
03.NETWARE
SUPPLEMENT:
When you want to assign the Subnet Mask and Gateway address, continue the operation
after the display returns to the TCP/IP menu. The set-up is the same as the IP address.
● To assign the Subnet Mask, press + to select SUBNET MASK.
● To assign the Gateway address, press + to select DEFAULT GATEWAY.
18
After 2 sec.
NETWORK
Operation Completed
NETWORK
Initializing
6
The network setting is executing.
● The Initializing message appears. After 2 sec.,
the Operation Completed message appears.
Then, the display returns to the INITIAL SETUP
menu.
● The Network Interface Card begins to initialize.
INITIAL SETUP
01.DATE & TIME
02.LANGUAGE
03.TERMINAL ID
After 2 sec.

19
ASSIGNING
IP ADDRESS
NOTES:
● When there is a DHCP server, the TCP/IP Protocol must be installed on your computer.
● When there is a NetWare server, the IPX/SPX-compatible Protocol must be installed on
your computer.
● A web browser, Netscape Navigator3.0 and up, or Internet Explorer3.0 and up, must be
installed on your computer.
● If there is a Web Server on the local area network, shut down the Web Server.
● Assign the Gateway address for the network printer through a router. Enter the router’s
address for the Gateway address.
1
Select Programs from the Start menu
and click on MAP Setup in the Map
folder.
● The MAP Setup screen appears.
2
Check on either Search for IPX based
printers or Search for IP based
printers, depending on your network
environment.
● Check "Search for IPX based printers" if your
network includes NetWare servers.
● Check "Search for IP based printers" if your
network includes DHCP servers.
Use MAP to assign the machine a static IP address or configure the TCP/IP settings to obtain an
IP address from a DHCP server. Prior to this operation, MAP must be installed. For the details
of MAP installation, see “MAP - Install MAP.”
3
Click [OK].
Assigning the IP Address using MAP
20
6
Click on Setup TCP/IP.
● The TCP/IP Configuration Menu page is
displayed.
● When you want to assign a unique IP address,
go to step 7.
● When you want to obtain an IP address from a
DHCP server, go to step 8.
4
Select Programs from the Start menu
and click on MAP in the Map folder.
● Start searching network printers.
● Display the search results with your default
browser.
5
Click on your printer unit.
● When you search for printers based on the IPX/
SPX protocol, the printer unit name is displayed
as "MFP_XXXXXX", where the X's correspond
to the NIC serial number.
● When you search for printers based on the
TCP/IP protocol, the printer's IP address is
displayed.
21
ASSIGNING
IP ADDRESS
7
Check on Enable TCP/IP and enter the
IP Address.
● Enter the Subnet Mask and Default Gateway
address if necessary.
● Go to step 9.
8
Check off IP Address in NVRAM.
● “Enable DHCP” should be checked as a default
setting. Ensure that it is enabled.
SUPPLEMENTS:
● When the "IP Address in NVRAM" option is enabled, the IP address that was previously
obtained from the DHCP is stored in NVRAM. The NIC uses the IP address stored in
NVRAM the next time the printer is powered on, instead of obtaining an IP address from
the DHCP server. In order to avoid any network address conflicts, it is recommended
that you do not use the "IP Address in NVRAM" option when using the "Enable DHCP"
option.
● If there is a WINS server and you want to use a WINS name for the NIC, enter the
NetBIOS Name and the IP address of the Primary NetBIOS Name Server. When using
a DHCP server to obtain an IP address, TCP/IP printing cannot be performed because
the IP address changes each time the printer is powered on. By configuring the port with
a WINS name instead of an IP address, TCP/IP printing can be performed.
22
11
Complete the IP Address setting.
● The NIC will automatically restart. Please wait a
few minutes until the NIC status sheet is
printed. See the NIC status sheet to confirm the
IP address is assigned correctly.
● If the NIC status sheet is not printed, use the
ping command to confirm the IP address is
assigned correctly. Start the MS-DOS Prompt,
and at the command prompt enter “ping
xxx.xxx.xxx.xxx” (“xxx.xxx.xxx.xxx” is the IP
address that you assigned to the NIC). Repeat
this until the NIC replies.
9
Scroll down to the bottom of the
page.
10
Enter a password and click on
[Accept Settings].
● The default password is “sysadm”. The entered
password is described with asterisks “ * ”.
23
ASSIGNING
IP ADDRESS
NOVELL SETTINGS
When using the NetWare server for printing, the Novell Settings must be configured to enable
connection to the printer via the IPX/SPX protocol.
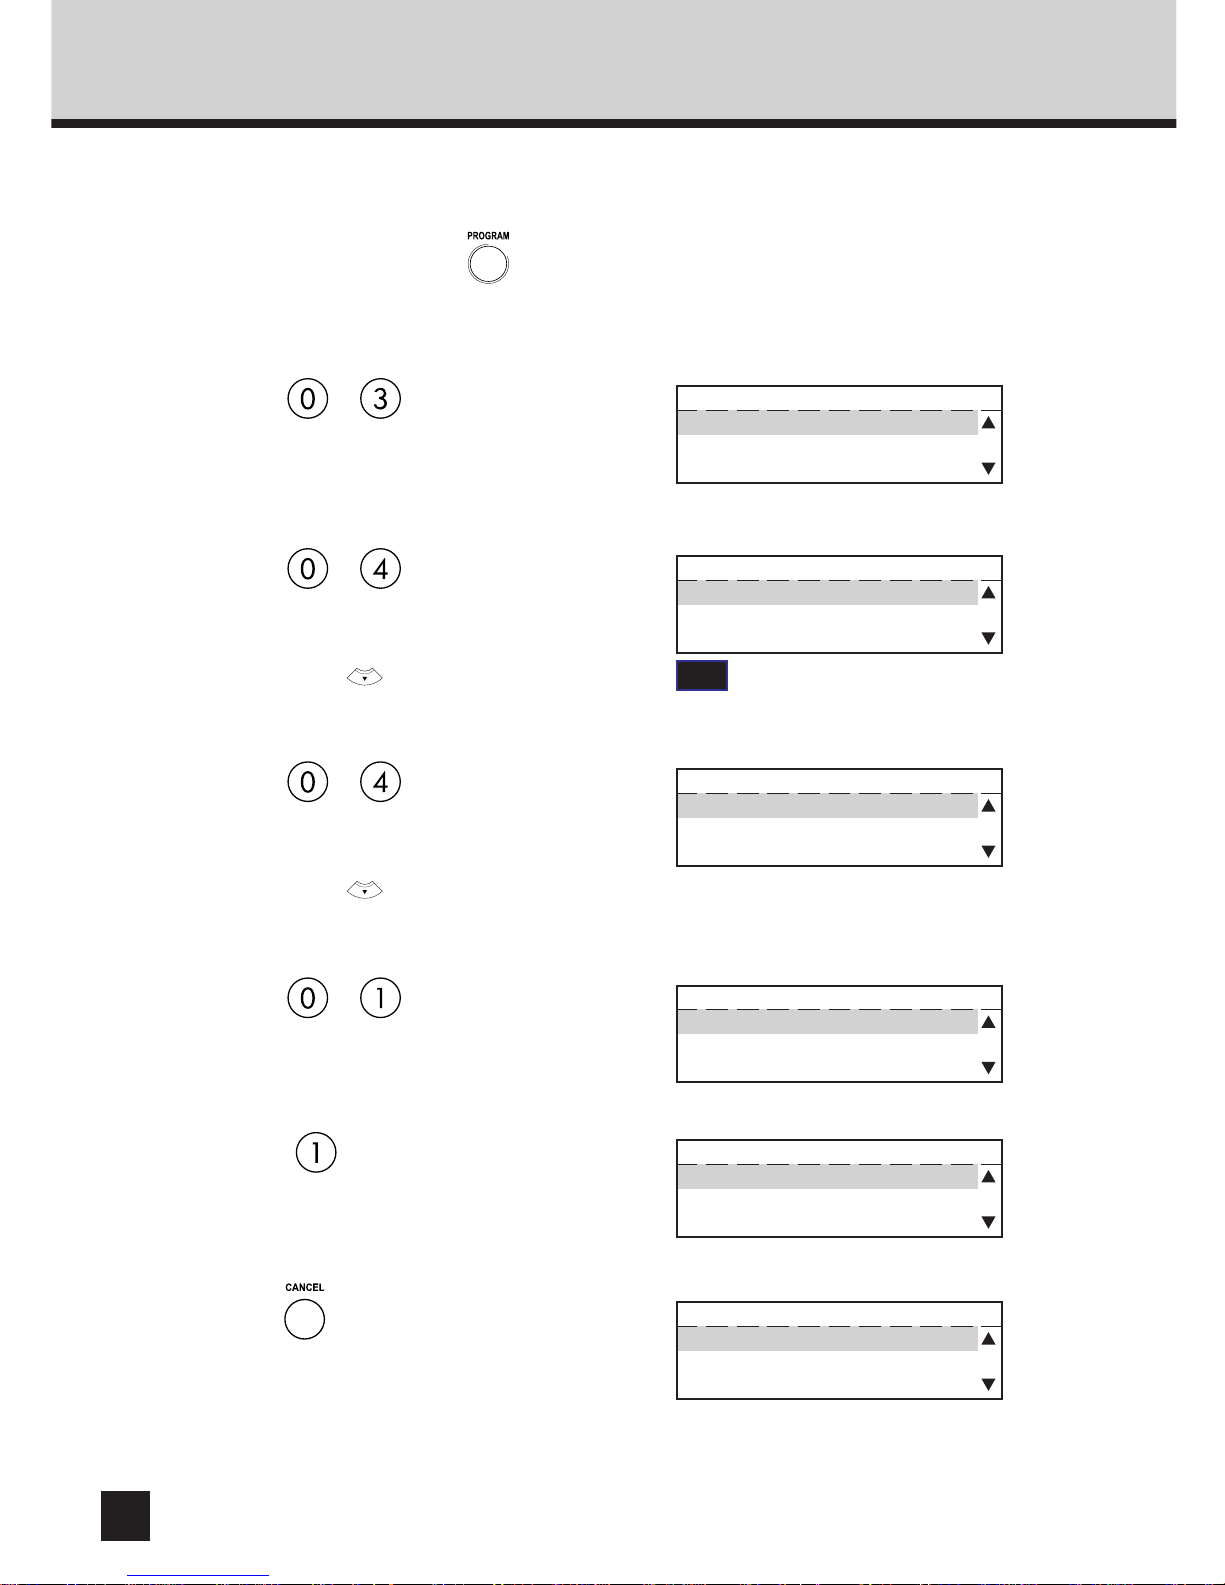
1
In Standby Mode, press key.
● The PROGRAM menu is displayed.
2
Press + on the Dial Keypad
to select INITIAL SETUP.
PROGRAM
01.DEFAULT SETTING
02.LISTS
03.INITIAL SETUP
3
Press + on the Dial Keypad
to select NETWORK.
● NETWORK is outside of the Message Display
Panel. Press to display the desired item.
INITIAL SETUP
02.LANGUAGE
03.TERMINAL ID
04.NETWORK
4
Press + on the Dial Keypad
to select NETWARE.
NETWORK
01.COMPLETE
02.TCP/IP
03.NETWARE
NETWARE
01.IPX/SPX
02.FRAME TYPE
5
Press + on the Dial Keypad
to select IPX/SPX.
IPX/SPX
1.ENABLE
2.DISABLE
6
Press on the Dial Keypad to
select ENABLE.
● The display returns to the TCP/IP menu.
NETWARE
01.IPX/SPX
02.FRAME TYPE
7
Press + on the Dial Keypad
to select the FRAME TYPE.
● If you do not have to change the frame type of
the NIC, skip to Step 9.
TIP
“03. TERMINAL ID” appears on the menu only
when the FAX option is installed.
24
8
Press the numeric key of the desired
frame type on the Dial Keypad.
● Some items are outside of the Message Display
Panel. Press to display the desired item.
● The display returns to NETWARE menu after
selecting the frame type.
Press to select AUTO.
● AUTO: The printer selects the
appropriate frame type
automatically. This is the factory
default.
Press to select 802.2.
● 802.3: The network uses 802.2 frame
type.
Press to select 802.3.
●
ETHERNET II
: The network uses 802.3 frame
type.
Press to select ETHERNET II.
● 802.3 SNAP: The network uses ETHERNET II
frame type.
Press to select ETHERNET
SNAP.
● 802.2: The network uses ETHERNET
SNAP frame type.
FRAME TYPE
1.AUTO
2.802.2
3.802.3
FRAME TYPE
3.802.3
4.ETHERNET II
5.ETHERNET SNAP
Press two times.
9
Press .
● The display returns to the NETWORK menu.
NETWARE
01.IPX/SPX
02.FRAME TYPE
10
Press + on the Dial Keypad
to select COMPLETE.
● If you want to cancel the Novell setting, press
.
NETWORK
01.COMPLETE
02.TCP/IP
03.NETWARE
25
ASSIGNING
IP ADDRESS
After 2 sec.
NETWORK
Operation Completed
INITIAL SETUP
01.DATE & TIME
02.LANGUAGE
03.TERMINAL ID
After 2 sec.
NETWORK
Initializing
11
The network setting is executing.
● The Initializing message appears. After 2 sec.,
the Operation Completed message appears.
Then, the display returns to the INITIAL SETUP
menu.
● The Network Interface Card begins to initialize.
26
APPLETALK SETTING
When printing with Macintosh computers, the AppleTalk Setting must be configured to enable
connecting to the machine via the AppleTalk protocol.
1
In Standby Mode, press key.
● The PROGRAM menu is displayed.
2
Press + on the Dial Keypad
to select INITIAL SETUP.
PROGRAM
01.DEFAULT SETTING
02.LISTS
03.INITIAL SETUP
3
Press + on the Dial Keypad
to select NETWORK.
● NETWORK is outside of the Message Display
Panel. Press to display the desired item.
INITIAL SETUP
02.LANGUAGE
03.TERMINAL ID
04.NETWORK
4
Press + on the Dial Keypad
to select APPLE TALK.
● APPLE TALK is outside of the Message Display
Panel. Press to display the desired item.
NETWORK
02.TCP/IP
03.NETWARE
04.APPLE TALK
ETHER TALK
1.ENABLE
2.DISABLE
6
Press on the Dial Keypad to
select ENABLE.
● The display returns to the ETHER TALK menu.
APPLE TALK
01.ETHER TALK
5
Press + on the Dial Keypad
to select ETHER TALK PROTOCOL.
7
Press .
● The display returns to the NETWORK menu.
APPLE TALK
01.ETHER TALK
TIP
“03. TERMINAL ID” appears on the menu only
when the FAX option is installed.
27
ASSIGNING
IP ADDRESS
8
Press + on the Dial Keypad
to select COMPLETE.
● If you want to cancel the AppleTalk setting,
press .
NETWORK
01.COMPLETE
02.TCP/IP
03.NETWARE
After 2 sec.
NETWORK
Operation Completed
INITIAL SETUP
01.DATE & TIME
02.LANGUAGE
03.TERMINAL ID
After 2 sec.
NETWORK
Initializing
9
The network setting is executing.
● The Initializing message appears. After 2 sec.,
the Operation Completed message appears.
Then, the display returns to INITIAL SETUP
menu.
● The Network Interface Card begins to initialize.

28

29
USING WITH
PEER-TO-PEER
UTILITY
USING WITH PEER-TO-PEER UTILITY

30
PEER-TO-PEER UTILITIES
The peer-to-peer utility allows this machine to be used as a network printer on a peer-to-peer
network via TCP/IP or IPX/SPX. Installing the peer-to-peer utility allows print data from a
computer to be sent directly to the e-STUDIO16/20/25. Install the peer-to-peer utility on each
computer from which you would like to print from.
There are two types of the peer-to-peer utility: One for the TCP/IP protocol and one for the IPX/
SPX protocol. Choose either one according to the network protocol used.
● Operating system (OS)
Windows 95, Windows 98, Windows Me, Windows NT 4.0, Windows 2000, Windows XP
● Network protocol
TCP/IP protocol
● Operating system (OS)
Windows 95, Windows 98, Windows Me, Windows NT 4.0, Windows 2000, Windows XP
● Network protocol
IPX/SPX protocol
Required Environment
For TCP/IP Protocol
For IPX/SPX Protocol
SUPPLEMENTS:
● The network setup should be completed on your computer.
● If you are not sure which protocol to use, please contact your system administrator.
● Complete the printer's network setup first, as necessary. This e-STUDIO16/20/25 must
be set up by a system administrator.

31
USING WITH
PEER-TO-PEER
UTILITY
The following shows the procedure to install the peer-to-peer utility for TCP/IP:
31
INSTALLING THE PEER-TO-PEER UTILITY FOR TCP/IP
PREPARATIONS:
● Connect both the e-STUDIO16/20/25 and your computer to the network.
● Turn ON the power to the machine.
● Establish an IP address for the machine.
● Check to see if the “TCP/IP” protocol has been activated on the computer. If not, install
it. To install the protocol, see the Windows HELP menu on the computer.
3
Click on [Setup utilities].
Installation
1
Insert the CD-ROM into the CD-ROM
drive.
● The menu screen appears.
● If the menu screen is not automatically
displayed, or when the Peer-to-Peer Utility for
TCP/IP is installed via the network, double-click
on “TOSHIBA_e-STUDIO16_20_25.exe” in the
Menu folder of the CD-ROM, that may be found
in Windows Explorer.
2
Click on a language of your Operating
System.

32
8
If necessary, change the folder for the
files to be installed, then click on
[Next].
7
Click on [Yes].
● The Choose Destination Directory screen
appears.
6
Installation Notes are displayed.
5
Click on [Next].
4
Click on [IP P2P setup].
● The welcome screen appears.

33
USING WITH
PEER-TO-PEER
UTILITY
9
10
Click on [Next].
The files are installed.
● The IP-PeerToPeer Setup screen appears.
11
In the field of “Max Hops for,” input a
value of 0 to 15, to specify the range
for the printer to be searched.
● 0:
Searches only the local area network where the
workstation is directly connected.
● 2 to 14:
Searches the local area network on which the
workstation is directly connected and the
networks which are accessible within the
specified number of routers.
● 15:
Searches all the networks that are connected.
12
In most cases, leave the “IP Port” as it
is shown. It is the default port
number of the print server.

34
13
In the “Printer Names” box, select the
port name required to be displayed.
● [based on Serial Numbers]
To display the serial number of the network
interface.
● [based on IP Address]
To be displayed with the IP address of the eSTUDIO16/20/25. (This is the default
selection.)
● [based on DNS Name]
To display the domain name assigned to this
machine when the Domain Server is activated.
● [based on unit name]
To display the unit name (printer name).
14
Click on [Printers...].
● The Printers... screen appears.
Make sure the printer is displayed
under the “Available Printers”
section. Check if “s” is displayed in
the Flag column. If it is not displayed,
click on [Select].
● When the machine is displayed under “Available
Printers”, go to Step 20.
● When the machine is not displayed under
“Available Printers”, go to the next step.
15
Click on [Find Printers].
● The system begins searching for printers on
your network.
● When the system finds the printer and displays
the machine under “Available Printers”, go to
Step 20.
● When the system does not find the machine, go
to the next step.
16

35
USING WITH
PEER-TO-PEER
UTILITY
Complete the field of each required
item.
● [IP Address]
Input the IP address of the printer.
● [Name]
Input the printer name you desire. The port
name is name input here.
● [Port]
In most cases, this does not need to be set.
Input the value obtained by adding 1 (one) to
the “Base Port Number” in the NetPanel “NIC
Configure - IP Configuration.”
● [Description]
If necessary, input a comment about the printer.
17
Click on [Add].
● If an addition has been made by mistake, click
on the added printer then click on [Delete].
18
The printer is added to the [Available
Printers] list.
19
Click on [OK].
20
21
Click on [OK].
● The completion message is displayed.
22
Click on the [OK].
SUPPLEMENTS:
● After the peer-to-peer utility for TCP/IP is installed, please continue the operation for
installing the printer driver.
● The “IP-P2P” program group and icon are added to the Start Menu. You can re-
configure using the program.
● If you make a change in the "Print Names" section, upon closing the program, it
prompts you to reboot the computer. Click on [OK] and restart your computer.
23
Next, installing the printer driver:
● For installing the printer driver, see
“INSTALLING THE PRINTER DRIVER for
Windows” on later pages.

36
INSTALLING THE PEER-TO-PEER UTILITY FOR IPX/SPX
PREPARATIONS:
● The printer must be enabled to use NetWare. Ask your administrator for more details.
● Connect both the printer and your computer to the network.
● Turn ON the power to the machine.
● Check if any “IPX/SPX compatible protocol” has been installed on your Windows OS
computer. If not, install it.
1
Insert the CD-ROM into the CD-ROM
drive.
● The menu screen appears.
● If the menu screen is not automatically
displayed, or when the Peer-to-Peer Utility for
IPX/SPX is installed via the network, double-click
on “TOSHIBA_e-STUDIO16_20_25.exe” in the
Menu folder of the CD-ROM, which may be
found in Windows Explorer.
3
Click on [Setup utilities].
NOTE:
When using the peer-to-peer utility for IPX/SPX where no NetWare server is on the
network, it is recommended that you change the frame type of the IPX/SPX-compatible
protocol installed on your computer. Open the properties dialog for the IPX/SPXcompatible protocol and change the frame type to “Ethernet 802.3.”
Installation
The following shows the procedure to install the peer-to-peer utility for IPX/SPX.
2
Click on a language of your Operating
System.

37
USING WITH
PEER-TO-PEER
UTILITY
5
Click on [Next].
● The Installation Notes screen appears.
4
Click on [IPX P2P setup].
● The welcome screen appears.
6
Click on [Yes].
● The Installation Notes screen appears.
7
If necessary, change the folder for the
files to be installed, then click on
[Next].

38
10
Make sure the printer is displayed
under “Available Printers”.
● When the machine is displayed under “Available
Printers”, go to Step 12.
● When the machine is not displayed under
“Available Printers”, go to the next step.
11
Click on [Find Printers].
● The system begins searching for printers on
your network and displays the printer(s) found
on the network.
NOTE:
If the printer is not found on the network, make sure that the network conditions are
satisfied.
12
Make sure the printer displayed under
“Available Printers” shows “S” flag in
the “Flags” column.
● The system begins searching for printers on
your network and displays the printer(s) found
on the network.
13
Click on [OK].
● The Information screen appears.
8
Click on [Next].
9
The files are installed.
● After completing copying files, the IPX Setup
screen appears.

39
USING WITH
PEER-TO-PEER
UTILITY
14
Click on [OK].
● The Installation is completed.
SUPPLEMENTS:
● After the peer-to-peer utility for IPX/SPX is installed, please continue the operation for
installing the printer driver.
● The “IPX-P2P” program group and icon are added to the Start Menu. You can re-
configure using the program.

40
4
Select [IP-P2P], then select [Add/
Remove...].
● See the illustration on the right.
To uninstall the Peer-to-Peer Utility, follow the procedure below.
UNINSTALLING THE PEER-TO-PEER UTILITY
Click on [Start], then select [Settings].
1
3
Select the [Control Panel].
Double-click on [Add/Remove
Programs].
2
5
Click on [Yes].
● The peer-to-peer utility for TCP/IP is uninstalled.
NOTE:
Before uninstalling, delete the printer driver or change the port of the printer driver. If you
uninstall the Peer-to-Peer utility before deleting the printer driver or changing the port, the
Peer-to-Peer utility may not be uninstalled completely.
To uninstall the printer driver, see “INSTALLING THE PRINTER DRIVER for Windows UNINSTALLING THE PRINTER DRIVER.”
Uninstalling the Peer-to-Peer Utility for TCP/IP

41
USING WITH
PEER-TO-PEER
UTILITY
6
7
Click on [OK].
Restart the computer.
Uninstalling the Peer-to-Peer Utility for IPX/SPX
4
Select [IPX-P2P], then select [Add/
Remove...].
● See the illustration on the right.
Click on [Start], then select [Settings].
1
3
Select the [Control Panel].
Double-click on [Add/Remove
Programs].
2

42
6
Click on [Yes].
● The peer-to-peer utility for TCP/IP is uninstalled.
7
8
Click on [OK].
Restart the computer.
5
Click on [OK].

43
SETUP THE
PRINT SERVER
WITH NetWare 3.x
SETUP THE PRINT SERVER
WITH NetWare 3.x

44
NetWare 3.x SETUP
When using with NetWare 3.x this machine is set up by using PCONSOLE.
Set-up Example
NOTES:
Set up in the print server mode. The Remote Printer Set-up cannot be used.
The following example is performed under the conditions stated below. Check the conditions of
the environment you are using.
<Server>
• NetWare server name : NWSRV (They must correspond with the names to be set for the
printer using MAP.)
<Contents to be set>
Name the following as desired.
• Print queue name : TOS_QUE
• Printer name : TOS_PRN
• Print server name : TOS_SRV (They must correspond with the names to be set for
the printer using MAP.)

45
SETUP THE
PRINT SERVER
WITH NetWare 3.x
Setting up with PCONSOLE
Select File Server
Creating a print queue
Type “PCONSOLE” and press the Enter key.
Log into the NetWare server as the Supervisor.
Choose Change Current File Server from the Available Options menu.
● If you don’t have to change the File Server, skip to “Creating a print queue.”
A list of file servers is displayed.
Select the file server on which you want to install the print server and press the
Enter key.
● If the name of the file server you want is not displayed, press the Insert key to get a list of file servers.
Log in to the file server.
To be performed on the workstaiton.
Press the Esc key to return to the Available Options menu.
Print Queues appear.
Choose Print Queue Information from
the Available Options menu and press
the Enter key.
Press the Insert key.
1
2
3
4
5
6
7
1
2
3

46
Creating the print server
Print Server appears.
Enter the name of the print server at
New Print Server Name and press the
Enter key.
Press the Insert key.
Choose Print Server Information from
the Available Options menu and press
the Enter key.
Enter the name of the print queue at
New Print Queue Name and press the
Enter key.
Press the Esc key.
The display returns to showing the
Available Options menu.
4
5
6
1
2
3
4

47
SETUP THE
PRINT SERVER
WITH NetWare 3.x
Creating the printer
The Print Server Information menu
appears.
Choose the Print Server Configuration
from the Print Server Information
menu and press the Enter key.
Choose the newly created print server
and press the Enter key.
Choose the Printer Configuration from
the Printer Server Configuration Menu
and press the Enter key.
Select a printer number, where Not
installed is displayed from the
Configured Printers box and press the
Enter key.
Configured Printers appears.
The Print Server Configuration Menu
appears.
Enter the printer name and press the
Enter key.
“Printer X Configuration” appears.
(X is the printer number selected.)
Confirm that the Type field is
highlighted, and press the Enter key.
1
2
3
4
5
6
7
8
9
10

48
Press the Esc key.
Press the Esc key.
The printer is added to the Configured
Printers list.
The display returns to showing the
Print Server Configuration menu.
Choose Remote Other/Unknown and
press the Enter key.
Choose Yes and press the Enter key.
11
12
13
14
15
16

49
SETUP THE
PRINT SERVER
WITH NetWare 3.x
Assigning a print queue
Defined Printers appears.
Select a created printer from Defined
Printers and press the Enter key.
Choose Queues Serviced by Printer
from the “Print Server Configuration”
menu.
The queue assigning screen appears.
Press the Insert key.
1
2
3
4
5

50
Available Queues appears.
Select a created queue.
● Up to 10 queues can be selected. When more
than one queue is to be selected, the priority
must be decided in advance.
Enter the priority and press the Enter
key.
The queue is assigned.
● When assigning more than one queue, repeat
steps 5 through 9.
Press the Esc key six times.
When Exit PConsole appears, choose
Yes and press the Enter key.
6
7
8
9
10
11
SUPPLEMENTS:
● Please set up the printer configuration for NetWare using MAP. See “MAP-Setup
NetWare at MAP”.

51
SETUP THE
PRINT SERVER
WITH NetWare 3.x
Cautions:
● To install the print server on more than one file server, perform the procedures of NetWare 3.x Set up:
Creating the print queue, Creating the print server, Creating the printer, and Assigning a print queue for
each file server. You must use the same name and password (if required) for the print server on all file
servers. If you use a password, specify it on each file server using the Change Password option on the
Print Server Information menu of the PCONSOLE utility.
● When the Print Server Card comes up, it automatically searches for and attaches to the file servers that are
no more than four hops and have no more than eight ticks propagation delay. For extremely large or
complex networks, this allows a bounded search time on start-up. If the print server must attach to file
servers beyond this range, or if you wish to accelerate start-up by eliminating the need to search all servers
in the four hops/eight ticks radius, the file servers with which the print server is to operate may be entered
into the Print Server Configuration of a primary file server. The primary file server can be any file server
within the four hops/eight ticks propagation time limits, but ideally is as close as possible to the print server.
Once the print server locates the primary file server and the list of file servers to be serviced, the automatic
search is dropped and the print server will go to those file servers listed (and to no others).

52
SET UP THE PCONSOLE UTILITY OPTIONS
Setting Up Notify Options for the Printer
To enable the print server to notify users or user groups if a problem occurs with the printer, set
up the Notify options. The print server supports the enhanced NOTIFY options for printers,
including informing users when the printer is:
● Jammed, opened, or out of paper
● Requires a manual paper feed or a form change
● Has had an engine failure
Select Print Server Information from the Available Options menu.
Select the print server you want to set up the NOTIFY options from the Print
Server menu.
Select Configuration from the Print Server Information.
Choose Notify List for Printer on the Print Server Configuration menu.
Select the printer from the Defined Printers list.
The screen appears (which is blank for an initial installation).
Press the Insert key.
View a list of Notify Candidates.
Select the user or group from the list.
Press the Esc key and then after asked to Save Changes choose Yes. Press the
Esc key at each screen until you reach the Print Server Configuration menu. If you
have finished the configuration, press the Esc key and then save the changes.
Set the First and Next intervals in the Notify Intervals screen.
● It is recommended that you use the defaults. The First interval is the number of seconds the network waits
before it notifies candidates about a print job problem. The Next interval specifies how often in seconds
candidates are notified. Enter a number for each interval and press the Enter key.
1
2
3
4
5
6
7
8
9
10
11

53
SETUP THE
PRINT SERVER
WITH NetWare 3.x
Primary File Server
Preferred File Servers
To use the primary file server option, use the following procedure on a file server close to the
printer:
Select File Server To Be Serviced from the Print Server Configuration menu.
The list of the file servers to be serviced by the primary file server is displayed.
Press the Insert key.
The Available File Servers list is displayed.
Select the name of the file server to be serviced and press the Enter key.
The selected file server is added to the File Servers To Be Serviced list.
Press the Esc key to return to the menu.
Install the Print Server Card on each of the primary file servers.
The Preferred File Server can be identified within the Network Interface Card itself. The
registration of the preferred file server is offered at MAP. If a preferred file server is listed, the
Network Interface Card will attach to this identified file server instead of initiating the automatic
search for file servers. If the preferred file server is also a primary file server (for example, has
file servers listed under file servers to be serviced), the Network Interface Card will connect
directly to these file servers.
The Preferred File Server is only applicable to bindery-based queues. Entering it has no affect
on NDS queues. For registering the preferred file server to the NIC, see “MAP - NetWare
Setup.”
1
2
3
4
5
6
7
8

54

55
SETUP THE
PRINT SERVER
WITH NetWare 4.x
SETUP THE PRINT SERVER
WITH NetWare 4.x

56
SETUP IN NDS MODE
Set-up Example
When using NetWare 4.x and Windows 95/98/Me/NT/2000/XP, this machine is set up using the
NetWare Administrator. When setting up from MS-DOS, use PCONSOLE.
The following example is performed under the conditions stated below. Check the conditions of
the environment you are using.
<Server>
• NetWare server name : NWSRV
• Directory tree name : ORG (They must correspond with the names to be set
for the printer using MAP or NetPanel.)
• Print Server Context : ORG (They must correspond with the names to be set
for the printer using MAP or NetPanel.)
<Contents to be set>
Name the following as desired.
• Print queue name : TOS_QUE
• Printer name : TOS_PRN
• Print server name : TOS_SRV (They must correspond with the names to be
set for the printer using MAP or NetPanel.)
NOTE:
Set up in the print server mode. The Remote Printer Mode cannot be used.

57
SETUP THE
PRINT SERVER
WITH NetWare 4.x
Setting up NetWare Administrator
Starting NetWare Administrator
Start NetWare Administrator.
● NetWare Administrator is found in the Public
directory of the SYS volume. Open the Public
directory with Explorer and start Nwadmn3x.exe.
● If you are using Intranet Ware on Windows 95,
Windows 98, or Windows Me, start
Nwadmin95.exe found in the Win95 directory of
the Public directory.
Log-in to the NetWare server as an
Administrator.
Perform this on the workstation.
1
2

58
Creating a print queue
Choose Create in the Object menu.
Click on the container object to create
the printer.
Choose Print Queues and click on
[OK].
The Class of New Object window
appears.
1
2
3
4

59
SETUP THE
PRINT SERVER
WITH NetWare 4.x
Enter the name of the print queue at
Print Queue Name.
The Select Object window appears.
Click on Browse of Print Queue
Volume (indicated by “A” in the figure
at right).
Create Print Queues appears.
Click on [Create].
Select a volume to create a print
queue from the Available Object list
and click on [OK].
The print queue is created.
A
5
6
7
8
9
10
11

60
Creating the printer
The Create Printer window appears.
Enter the name of the printer under
Printer Name.
Choose Printer and click on [OK].
Choose Create in the Object menu.
The Class of New Object window
appears.
Click on the container object to create
the printer.
Turn on the check box for Define
additional properties and click on
[Create].
The details of the created printer are
displayed.
1
2
3
4
5
6
7
8

61
SETUP THE
PRINT SERVER
WITH NetWare 4.x
Assigning the print queue
The screen switches to Assignments.
Click on [Add].
Click on [Assignments].
The Select Object window appears.
Select a created queue from Object
and click on [OK].
The screen switches to Configuration.
Click on “
▼▼
▼▼
▼” of Printer Type and
choose Other/Unknown.
Click on [Configuration].
1
2
3
4
5
6
7
8

62
Click on [OK].
The printer is created.
9
10

63
SETUP THE
PRINT SERVER
WITH NetWare 4.x
Creating the print server
Click on the container object to create
the printer.
Choose Create in the Object menu.
The Class of New Object window
appears.
Choose Print Server and click on
[OK].
The Create Print Server window
appears.
Enter the name of the print server
under Print Server Name.
Turn on the check box for Define
additional properties and click on
[Create].
The details of the created print server
are displayed.
1
2
3
4
5
6
7

64
Allocating the printer
The Select Object window appears.
The screen switches to Assignments.
Click on [Add].
Click on [Assignments].
The printer name is displayed under
Printer.
Click on [OK].
Select a created printer from the
Available Object list and click on [OK].
1
2
3
4
5
6
7

65
SETUP THE
PRINT SERVER
WITH NetWare 4.x
The print server is created.
8
SUPPLEMENTS:
● Please set up the printer configuration for NetWare NDS mode using MAP. See “MAP-
Setup NetWare at MAP”.
● You can also set up the printer configuration for NetWare NDS mode using NetPanel.
See “NETPANEL-Printer Management-Novell Configure”.

66
SETUP IN BINDERY MODE
Confirmation before setting up
Confirm Bindery Context
The print server is set up in the bindery mode of NetWare 4.x. It is set in the bindery mode when
you want to preserve the environment of the existing NetWare 3.x or to allow clients of NetWare
3.x to use the print server.
Before using the print server in the bindery mode, bindery context must be stored in the
NetWare 4.x server. Check if bindery context exists there. For the bindery mode, refer to the
Operator’s Manual for NetWare.
To confirm that the server has a Bindery Context, perform the following steps by through the
console prompt at the NetWare server.
Type load install and press Enter key.
Select NCF Files Options from the menu.
Select Edit AUTOEXEC.NCF from the menu.
View the screen to Edit AUTOEXEC.NCF file.
Search the file to see if you have a statement similar to the following included:
SET BINDERY CONTEXT=0U=ENG
● If the Bindery Context is “SET BINDERY CONTEXT=0U=ENG,” that means the server has a Bindery.
● When you do not have such a statement, add the statement and save it by pressing F10.
Press Alt+F10 to complete the confirmation.
● If the new statement is added, the definition in the file takes effect when the server is shut down and then
restarted. If you want the Bindery Context applied frequently, type the new statement by the console
prompt and press Enter.
1
2
3
4
5
6

67
SETUP THE
PRINT SERVER
WITH NetWare 4.x
Set-up Example
The following example is performed under the conditions stated below. Check the conditions of
the environment you are using.
<Server>
• NetWare server name : NWSRV (They must correspond with the names to be set for the
printer using MAP.)
• Directory tree name : ORG
<Contents to be set>
Name the following as desired.
• Print queue name : TOS_QUE
• Printer name : TOS_PRN
• Print server name : TOS_SRV (They must correspond with the names to be set for
the printer using MAP.)

68
Setting up with PCONSOLE
Starting PCONSOLE
Creating a print queue
Type “PCONSOLE” at the DOS
prompt and press the Enter key.
● When you have logged into the NDS mode,
press the F4 key to switch to the bindery mode.
Log in to the NetWare server as an
Administrator.
● To use the bindery service, log in through
bindery connection.
Perform this on the workstation.
Print Queues appears.
Choose Print Queues and press the
Enter key.
Enter the print queue name at New
Print Queue Name and press the Enter
key.
Press the Insert key.
The display returns to showing the
Available Options menu.
Press the Esc key.
1
2
1
2
3
4
5
6

69
SETUP THE
PRINT SERVER
WITH NetWare 4.x
Creating the print server
Press the Insert key.
Enter the print server name at New
Print Server Name and press the Enter
key.
Print Server appears.
The message as shown in the figure
at right appears.
Press the Enter key.
Choose Print Server from the
Available Options menu and press the
Enter key.
1
2
3
4
5
6

70
Creating the printer
Press the Insert key.
Enter the printer name at Printer and
press the Enter key.
Defined Printers appears.
The Print Server Information menu
appears.
Choose Printer from the Print Server
Information menu and press the Enter
key.
Choose the created print server and
press the Enter key.
1
2
3
4
5
6

71
SETUP THE
PRINT SERVER
WITH NetWare 4.x
Assigning the print queue
Printer XXXXX configuration (XXXXX
is the name of the printer created)
appears.
Enter printer number at Printer No.
Select the created printer and press
the Enter key.
Highlight the Parallel at Printer Type
and press the Enter key.
Choose Other/Unknown from Printer
Type and press the Enter key.
NetWare Server\Print Queue appears.
Press the Insert key.
Choose See list of Assign Print
Queues and press the Enter key.
Select the created queue from
Available Print Queues and press the
Enter key.
● Up to 10 queues can be selected. When more
than one queue is to be selected, the priority
must be decided in advance.
1
2
3
4
5
6
7
8
9

72
Enter the priority and press the Enter
key.
The queue is assigned.
● When assigning more than one queue, repeat
steps 5 through 9.
Press the Esc key twice.
When Save Changes? appears,
choose Yes and press the Enter key.
Press the Esc key four times.
When Exit? appears, choose Yes and
press the Enter key.
10
11
12
13
14
15
SUPPLEMENTS:
● Please set up the printer configuration for NetWare Bindery mode using MAP. See
“MAP-Setup NetWare at MAP”.

73
SETUP THE
PRINT SERVER
WITH NetWare 4.x
SET UP THE PCONSOLE UTILITY OPTIONS
Setting Up Notify Options for the Printer
You can specify users or groups of users that are notified if a problem occurs when a print job is
sent to the printer. If the print server is servicing queues on multiple file servers, you must set up
a NOTIFY list for each file server. To set up NOTIFY, use the following procedures:
Start the PCONSOLE utility.
Select “Print Servers” in the “Available Option” menu.
When a message appears, press the [Enter] key.
Select print server in the “Print Server” menu.
Select “Printers” in the “Print Server Information” menu.
Select printer in the “Defined Printers” menu.
Enter a number for the First and Next intervals for notifying users about printer
problems and press Enter key.
● The First interval is the number of seconds the network waits before it notifies users about a print job
problem.
● The Next interval specifies how often in seconds users are notified.
Select the user or user group from the Notify Candidates screen.
The Notify Intervals screen displays.
Press the Esc key and save all changes.
Press the Esc key until you see the prompt to exit PCONSOLE. Select Yes and
then press the Enter key.
Select “Notification” in the “Printer XXXX Configuration” menu ( XXXXX the name
of the printer ).
Select server in “NetWare Server/Object to be Notified/Object Type/First/Next/
State”, and then press the [Enter] key.
The Notify Intervals screen displays.
1
2
3
4
5
6
7
8
9
10
11
12
13
14

74

75
SETUP THE
PRINT SERVER
WITH NetWare 5.x
SETUP THE PRINT SERVER
WITH NetWare 5.x

76
SETUP IN NDS MODE
Set-up Example
When using NetWare 5.x and Windows 95/98/Me/NT/2000/XP, set up the e-STUDIO16/20/25
using NetWare Administrator.
The following example is performed under the conditions stated below. Check the conditions of
the environment you are using.
<Server>
• NetWare server name : NWSRV
• Directory tree name : ORG (They must correspond with the names to be set
for the printer using MAP or NetPanel.)
• Print Server Context : ORG (They must correspond with the names to be set
for the printer using MAP or NetPanel.)
<Contents to be set>
Name the following as desired.
• Print queue name : TOS_QUE
• Printer name : TOS_PRN
• Print server name : TOS_SRV (They must correspond with the names to be
set for the printer using MAP or NetPanel.)
NOTES:
● Set up in the print server mode. The remote printer mode cannot be used.
● The PCONSOLE is not available for NetWare 5.x. Therefore, the print queue cannot be
created in the bindery mode.
● The e-STUDIO16/20/25 does not support the NDPS mode of NetWare 5.x.

77
SETUP THE
PRINT SERVER
WITH NetWare 5.x
Setting up NetWare Administrator
Starting NetWare Administrator
Start NetWare Administrator.
● NetWare Administrator is found in the
Public\Win32 directory of the SYS volume. Open
the Win32 directory with Explorer and start
Nwadmn3x.exe.
● If you are using Intranet Ware on Windows 95,
Windows 98, or Windows Me, start
Nwadmin95.exe found in the Win95 directory of
the Public directory.
Log in to the NetWare server as an
Administrator.
This is performed on the workstation.
1
2

78
Creating a print queue
Choose Create in the Object menu.
Click on the container object to create
the printer.
Choose Print Queues and click on
[OK].
The Class of New Object window
appears.
1
2
3
4

79
SETUP THE
PRINT SERVER
WITH NetWare 5.x
Enter the name of the print queue
under Print Queue Name.
The Select Object window appears.
Click on Browse Print Queue Volume
(indicated by “A” in the figure at
right).
Create Print Queues appears.
Click on [Create].
Select a volume to create a print
queue from the Available Object list
and click on [OK].
The print queue is created.
A
5
6
7
8
9
10
11

80
Creating the printer
The Create Printer window appears.
Enter the name of the printer under
Printer Name.
Choose Printer and click on [OK].
Choose Create in the Object menu.
The Class of New Object window
appears.
Click on the container object to create
the printer.
Turn on the check box for Define
additional properties and click on
[Create].
The details of the created printer are
displayed.
1
2
3
4
5
6
7
8

81
SETUP THE
PRINT SERVER
WITH NetWare 5.x
Assigning the print queue
The screen switches to Assignments.
Click on [Add].
Click on [Assignments].
The Select Object window appears.
Select a created queue from Object
and click on [OK].
The screen switches to Configuration.
Click on “
▼▼
▼▼
▼” of Printer Type and
choose Other/Unknown.
Click on [Configuration].
1
2
3
4
5
6
7
8

82
Click on [OK].
The printer is created.
9
10

83
SETUP THE
PRINT SERVER
WITH NetWare 5.x
Creating the print server
Click on the container object to create
the printer.
Choose Create in the Object menu.
The Class of New Object window
appears.
Choose Print Server and click on
[OK].
The Create Print Server window
appears.
Enter the name of the print server
under Print Server Name.
Turn on the check box for Define
additional properties and click on
[Create].
The details of the created print server
are displayed.
1
2
3
4
5
6
7

84
Allocating the printer
The Select Object window appears.
The screen switches to Assignments.
Click on [Add].
Click on [Assignments].
The printer name is displayed under
Printer.
Click on [OK].
Select a created printer from the
Available Object list and click on [OK].
1
2
3
4
5
6
7

85
SETUP THE
PRINT SERVER
WITH NetWare 5.x
The print server is created.
8
SUPPLEMENTS:
● Please set up the printer configuration for NetWare NDS mode using MAP. See “MAP-
Setup NetWare at MAP”.
● You can also set up the printer configuration for NetWare NDS mode using NetPanel.
See “NETPANEL-Printer Management-Novell Configure”.

86

87
SETUP THE PRINT
SERVER WITH
Windows NT 4.0/2000
SETUP THE PRINT SERVER
WITH Windows NT4.0/2000

88
Windows NT PRINT SERVER SETUP
Preparation for Setting up
Confirming the TCP/IP Print Services
Create a shared printer on the Windows NT server so that clients can install the printer driver
from Windows NT server and print a document through the Windows NT server.
When using Windows NT as the print server, utilize the Microsoft TCP/IP Printing services.
Check the following before set up:
• The e-STUDIO16/20/25 and the computer are connected to the network.
• The printer is powered up.
• The printer has been configured with an IP address.
• The TCP/IP protocol and Microsoft TCP/IP Printing Service are installed on Windows NT.
Choose [Control Panel].
Click on [Start] and choose [Settings].
Click on the Services tab.
Double-click on [Network].
Check that “Microsoft TCP/IP
Printing” is displayed on Network
Services. If not, install it.
● For installation procedures, refer to the
Operator’s Manual for Windows NT and Help.
1
2
3
4
5

89
SETUP THE PRINT
SERVER WITH
Windows NT 4.0
Creating a Shared Printer
Click on [Start] and choose [Settings].
Log on to Windows NT as a user with
"Administrator" or "Power User"
group privileges.
Choose [Printers] to open the Printer
Folder.
Double-click on [Add Printer] to start
the Printer Wizard.
Check that “My computer” is selected
and click on [Next].
1
2
3
4
5
The printer created on the Windows NT server serves as a print server.

90
Click on [New Port...].
Choose “LPR Port” from Available
Printer Ports.
Type “PORT1” at Name of printer or
print queue on that server.
● “PORT1” must be entered in capital letters.
Enter the IP address for the printer at
“Name or address of server providing
lpd”.
Click on [Close].
Click on [OK].
Click on [Add Port...].
6
7
9
10
11
12
8

91
SETUP THE PRINT
SERVER WITH
Windows NT 4.0
Insert the printer driver CD-ROM.
Click on [OK].
Specify the folder that contains
drivers for Windows NT4.0 at “Copy
manufacturer’s files from”.
● When the PCL6 driver is installed, enter
“D:\ENGLISH\ESTUDIO\WINNT\PCL6” (Where
the CD-ROM drive is the D drive.)
● When the PS driver is installed, enter
“D:\ENGLISH\ESTUDIO\WINNT\PS” (Where the
CD-ROM drive is the D drive.)
Click on [Have Disk...].
Verify that the check box for the
added port (IP address of the printer)
is turned on, then click on [Next].
The IP address of the printer is added
to the list of “Available ports” in the
Add Printer Wizard.
13
14
15
16
17
18

92
Check on “Shared”.
● Rename the “Share Name” if required.
Change Printer name if necessary,
and click on [Next].
● When any other printer drivers have been
already installed, select whether or not this
printer will be used as the default printer. If
[Yes], this printer will be displayed first when
printing applications.
21
22
Click on [Next].
Select the printer driver to be
installed.
19
20
Select “Windows 95” from the list.
23
Click on [Next].
24

93
SETUP THE PRINT
SERVER WITH
Windows NT 4.0
Click on [OK].
Choose Yes or No as necessary, and
click on [Finish].
● The Insert Disk screen appears.
25
28
Click on [OK].
● The Printer Driver for Windows 95 screen
appears.
26
Specify the folder that contains
drivers for Windows 95/98/Me at
“Copy files from”.
● When the PCL6 driver is installed, enter
“D:\ENGLISH\ESTUDIO\WIN95_98\PCL6”
(Where the CD-ROM drive is the D drive.)
● When the PS driver is installed, enter
“D:\ENGLISH\ESTUDIO\WIN95_98\ESTUDIO\PS”
(Where the CD-ROM drive is the D drive.)
27
SUPPLEMENT:
Windows NT can save the printer drivers for Windows 95/98/Me, so that the Windows 95/
98/Me clients can install the printer driver from the Windows NT server without the CDROM.

94
The printer is created.
29
SUPPLEMENT:
To install the printer driver to the client computer, see “INSTALLING THE PRINTER
DRIVER for Windows - INSTALLATION BY ADDING A PRINTER.”

95
SETUP THE PRINT
SERVER WITH
Windows NT 4.0
Windows 2000 PRINT SERVER SETUP
Create a shared printer on the Windows 2000 server so that the clients can print a document
through the Windows 2000 server.
Creating a Shared Printer
Click on [Start] and choose [Settings].
Log on to Windows 2000 as a user
with "Administrator" or "Power User"
group privileges.
Choose [Printers] to open the Printer
Folder.
Double-click on [Add Printer] to start
the Printer Wizard.
Click on [Next].
1
2
3
4
5
The printer created on the Windows 2000 server serves as a print server.
SUPPLEMENT:
You can also set up the print server on Windows XP by following descriptions.

96
Select “Local printer”.
● Check off “Automatically detect and install my
Plug and Play printer”.
6
Select “Create a new port” and select
“Standard TCP/IP Port” at “Type”,
then click on [Next].
● The Add Standard TCP/IP Printer Port Wizard
appears.
7
Select “Local printer” or “Network
printer” according to the type of
printing mode.
● When the machine is connected in the local
area network with the TCP/IP protocol, select
“Local printer”. Printing can be performed using
the TCP/IP Printing. See “When Using the
TCP/IP Printing” and continue the installation.
● When the machine is connected to the Internet
or Intranet, select “Network printer”. Printing
can be performed using the IPP,
Internet
Printing Protocol
. See “When Using the IPP”
and continue the installation.
5
When Using the TCP/IP Printing
When the printer is connected to the local area network with TCP/IP, printing can be performed
by designating the TCP/IP port.

97
SETUP THE PRINT
SERVER WITH
Windows NT 4.0
Click on [Next].
8
Enter the IP address of this machine
at “Printer Name or IP Address”.
● The port name is automatically entered at “Port
Name”. If required, rename the port name.
9
Click on [Next].
10
Select “Custom” and click on
[Settings...].
● The Configure Standard TCP/IP Port Monitor
screen appears.
11

98
Enter “10001” at “Port Number” and
check on “SNMP Status Enabled”.
● “public” is automatically entered for the
“Community Name”, and “1” is entered at the
“SNMP Device Index”. Do not change them.
● Go to Step 15.
13
Select “Raw” or “LPR” under
“Protocol”.
● Raw: The default data type for clients other
than Windows 2000. When printing in
the Raw type, the entire process of
preparing the print job is done on the
client computer.
● LPR: Printing is done through the LPD service.
When printing in the LPR type, the
process of preparing the print job is done
on the print server.
● When “Raw” is selected, go to Step 13.
● When “LPR” is selected, go to Step 14.
12
Enter “PORT1” for the “Queue Name”
and check on “SNMP Status
Enabled”.
● “public” is automatically entered for the
“Community Name”, and “1” is entered at the
“SNMP Device Index”. Do not change them.
14
 Loading...