

Page 1

DIGITAL PLAIN PAPER COPIER
OPERATOR'S MANUAL
FOR PRINTER FUNCTION
NETWORK PRINTER BOARD GA-1140
ADMINISTRATOR'S GUIDE
Page 2

FCC NOTICE
This equipment has been tested and found to comply with the limits for a Class A digital device, pursuant to Part 15 of the FCC Rules. These
limits are designed to provide reasonable protection against harmful interference when the equipment is operated in a commercial environment.
This equipment generates, uses, and can radiate radio frequency energy and, if not installed and used in accordance with the instruction
manual, may cause harmful interference to radio communications. Operation of this equipment in a residential area is likely to cause harmful
interference in which case the user will be required to correct the interference at his own expense.
WARNING:
Changes or modification made to this equipment, not expressly approved by Toshiba Tec or parties authorized by Toshiba Tec could
void the user’s authority to operate the equipment.
This Class A digital apparatus complies with Canadian ICES-003.
Cet appareil numérique de la classe A est conformé à la norme NMB-003 du Canada.
For European models only:
WARNING:
This product complies with Class A for network connection. In a domestic environment this product may cause radio interference in
which case the user may be required to take adequate measures.
1. Do not touch the connector terminal when disconnecting the cables of peripheral equipment.
2. Before opening any covers or removing any units from the copier, discharge the static electricity from your body by touching a
metal part of the copier.
This product is carrying the CE-Mark in accordance with the related European Directives. Responsible for CE-marking is TOSHIBA
TEC GERMANY IMAGING SYSTEMS GmbH Carl-Schurz-Str. 7, 41460 Neuss, Germany.
e-mail: customerservice@toshibatec-tgis.com
The software described in this publication is furnished under license and may only be used or copied in accordance with the terms of such license.
This product may be covered by one of more of the following U.S. Patents: 4,500,919, 4,837,722, 5,212,546, 5,343,311, 5,424,754, 5,467,446, 5,506,946,
5,517,334, 5,537,516, 5,543,940, 5,553,200, 5,615,314, 5,619,624, 5,625,712, 5,666,436, 5,760,913, 5,818,645, 5,835,788, 5,867,179, 5,959,867, 5,970,174,
5,982,937, 5,995,724, 6,002,795, 6,025,922, 6,041,200, 6,065,041, 6,112,665, 6,122,407, 6,134,018, 6,141,120, 6,166,821, 6,185,335, 6,201,614, 6,215,562,
6,219,659, 6,222,641, 6,224,048, 6,225,974, 6,226,419, 6,238,105, 6,239,895, 6,256,108, 6,269,190, 6,289,122, 6,292,270, 6,310,697, 6,327,047, 6,327,050,
6,327,052, RE36,947, D406,117, D416,550, D417,864, D419,185, D426,206, D439,851, D444,793
Trademarks
EFI, Fiery, the Fiery logo, Fiery Driven and RIP-While-Print are registered trademarks of Electronics For Imaging, Inc. in the U.S. Patent and Trademark Office and/
or certain other foreign jurisdictions.
The Electronics For Imaging logo, the Fiery Driven logo, Command WorkStation, DocBuilder, DocBuilder Pro, Fiery X3e, Fiery FreeForm, Fiery Scan, Fiery
ScanBuilder, Fiery WebInstaller, Fiery WebScan, Fiery WebSpooler, Fiery WebStatus, Fiery WebTools, NetWise, Velocity, Velocity Balance, Velocity Build, Velocity
Design, Velocity Estimate, and Velocity Scan are trademarks of Electronics For Imaging, Inc.
All other terms and product names may be trademarks or registered trademarks of their respective owners, and are hereby acknowledged.
Legal Notices
APPLE COMPUTER, INC. (“APPLE”) MAKES NO WARRANTIES, EXPRESS OR IMPLIED, INCLUDING WITHOUT LIMITATION THE IMPLIED WARRANTIES OF
MERCHANTABILITY AND FITNESS FOR A PARTICULAR PURPOSE, REGARDING THE APPLE SOFTWARE. APPLE DOES NOT WARRANT, GUARANTEE, OR
MAKE ANY REPRESENTATIONS REGARDING THE USE OR THE RESULTS OF THE USE OF THE APPLE SOFTWARE IN TERMS OF ITS CORRECTNESS,
ACCURACY, RELIABILITY, CURRENTNESS, OR OTHERWISE. THE ENTIRE RISK AS TO THE RESULTS AND PERFORMANCE OF THE APPLE SOFTWARE IS
ASSUMED BY YOU. THE EXCLUSION OF IMPLIED WARRANTIES IS NOT PERMITTED BY SOME STATES. THE ABOVE EXCLUSION MAY NOT APPLY TO
YOU.
IN NO EVENT WILL APPLE, ITS DIRECTORS, OFFICERS, EMPLOYEES OR AGENTS BE LIABLE TO YOU FOR ANY CONSEQUENTIAL, INCIDENTAL OR
INDIRECT DAMAGES (INCLUDING DAMAGES FOR LOSS OF BUSINESS PROFITS, BUSINESS INTERRUPTION, LOSS OF BUSINESS INFORMATION, AND
THE LIKE) ARISING OUT OF THE USE OR INABILITY TO USE THE APPLE SOFTWARE EVEN IF APPLE HAS BEEN ADVISED OF THE POSSIBILITY OF SUCH
DAMAGES. BECAUSE SOME STATES DO NOT ALLOW THE EXCLUSION OR LIMITATION OF LIABILITY FOR CONSEQUENTIAL OR INCIDENTAL DAMAGES,
THE ABOVE LIMITATIONS MAY NOT APPLY TO YOU.
Apple’s liability to you for actual damages from any cause whatsoever, and regardless of the form of the action (whether in contract, tort [including negligence],
product liability or otherwise), will be limited to $50.
Copyright © TOSHIBA TEC Corp. 2002 All Rights Reserved.
Under the copyright laws, this manual cannot be reproduced in any form without prior written permission of TOSHIBA TEC. No patent liability
is assumed, with respect to the use of the information contained herein.
No part of this manual may be copied in whole or part without permission.
The contents of this manual may change without notification.
Page 3

SOFTWARE LICENSE AGREEMENT
YOU SHOULD CAREFULLY READ THE FOLLOWING TERMS AND CONDITIONS BEFORE USING THIS SOFTWARE. IF YOU DO NOT AGREE TO
THE TERMS AND CONDITIONS OF THIS AGREEMENT, DO NOT USE THE SOFTWARE. INSTALLING OR USING THE SOFTWARE INDICATES
THAT YOU AGREE TO AND ACCEPT THE TERMS OF THIS AGREEMENT. IF YOU DO NOT AGREE TO ACCEPT THE TERMS OF THIS
AGREEMENT YOU MAY RETURN THE UNUSED SOFTWARE FOR A FULL REFUND TO THE PLACE OF PURCHASE.
LICENSE
Electronics For Imaging, Inc. grants you a non-exclusive, non-transferable license to use the software and accompanying documentation (“Software”) included with the
controller GA-1140 for TOSHIBA e-STUDIO550/650/810 Series printer you have purchased, including without limitation PostScript® software provided by Adobe
Systems Incorporated.
You may:
a. use the Software solely for your own customary business purposes and solely with the controller GA-1140 for TOSHIBA e-STUDIO550/650/810 Series;
b. use the digitally-encoded machine-readable outline and bitmap programs (“Font Programs”) provided with the controller GA-1140 for TOSHIBA e-
STUDIO550/650/810 Series in a special encrypted format (“Coded Font Programs”) to reproduce and display designs, styles, weights, and versions of letters,
numerals, characters and symbols (“Typefaces”) solely for your own customary business purposes on a monitor used with the controller GA-1140 for TOSHIBA e-
STUDIO550/650/810 Series;
c. use the trademarks used by Electronics For Imaging to identify the Coded Font Programs and Typefaces reproduced therefrom (“Trademarks”); and
d. assign your rights under this Agreement to a transferee of all of your right, title and interest in and to the controller GA-1140 for TOSHIBA e-STUDIO550/650/
810 Series provided the transferee agrees to be bound by all of the terms and conditions of this Agreement.
You may not:
a. make use of the Software, directly or indirectly, to print bitmap images with print resolutions of greater than 600 dots per inch, or to generate fonts or typefaces
for use other than with the controller GA-1140 for TOSHIBA e-STUDIO550/650/810 Series;
b. make or have made, or permit to be made, any copies of the Software, Coded Font Programs, accompanying documentation or portions thereof, except as
necessary for use with the controller GA-1140 for TOSHIBA e-STUDIO550/650/810 Series purchased by you; provided, however, that under no circumstances
may you make or have made, or permit to be made, any copies of that certain portion of the Software which has been included on the controller GA-1140 for
TOSHIBA e-STUDIO550/650/810 Series hard disk drive or ROM. You may not copy the documentation;
c. attempt to alter, disassemble, decrypt or reverse engineer the Software, Coded Font Programs.
d. rent or lease the Software.
PROPRIETARY RIGHTS
You acknowledge that the Software, Coded Font Programs, Typefaces, and Trademarks are proprietary to Electronics For Imaging and its suppliers and that title and
other intellectual property rights therein remain with Electronics For Imaging and its suppliers. Except as stated above, this Agreement does not grant you any right to
patents, copyrights, trade secrets, trademarks (whether registered or unregistered), or any other rights, franchises or licenses in respect of the Software, Coded Font
Programs, Typefaces, or Trademarks. You may not adapt or use any trademark or trade name which is likely to be similar to or confusing with that of Electronics For
Imaging or any of its suppliers or take any other action which impairs or reduces the trademark rights of Electronics For Imaging or its suppliers. The trademarks may
only be used to identify printed output produced by the Coded Font Programs. At the reasonable request of Electronics For Imaging, you must supply samples of any
Typeface identified with a trademark.
CONFIDENTIALITY
You agree to hold the Software and Coded Font Programs in confidence, disclosing the Software and Coded Font Programs only to authorized users having a need to
use the Software and Coded Font Programs as permitted by this Agreement and to take all reasonable precautions to prevent disclosure to other parties.
REMEDIES
Unauthorized use, copying or disclosure of the Software, Coded Font Programs, Typefaces, or Trademarks will result in automatic termination of this license and will
make available to Electronics For Imaging other legal remedies.
LIMITED WARRANTY AND DISCLAIMER
Electronics For Imaging warrants that, for a period of ninety (90) days from the date of delivery to you, the Software under normal use will perform without significant
errors that make it unusable. Electronics For Imaging’s entire liability and your exclusive remedy under this warranty (which is subject to you returning the controller
GA-1140 for TOSHIBA e-STUDIO550/650/810 Series to Electronics For Imaging or an authorized dealer) will be, at Electronics For Imaging’s option, to use
reasonable commercial efforts to attempt to correct or work around errors, to replace the Software with functionally equivalent software, or to refund the purchase price
and terminate this Agreement. Some states/jurisdictions do not allow limitations on duration of implied warranty, so the above limitation may not apply to you.
For warranty service, please contact your authorized service/support center.
EXCEPT FOR THE ABOVE EXPRESS LIMITED WARRANTY, ELECTRONICS FOR IMAGING MAKES AND YOU RECEIVE NO WARRANTIES OR
CONDITIONS ON THE SOFTWARE OR CODED FONT PROGRAMS, EXPRESS, IMPLIED, STATUTORY, OR IN ANY OTHER PROVISION OF THIS
AGREEMENT OR COMMUNICATION WITH YOU, AND ELECTRONICS FOR IMAGING SPECIFICALLY DISCLAIMS ANY IMPLIED WARRANTY
OR CONDITION OF MERCHANTABILITY OR FITNESS FOR A PARTICULAR PURPOSE. Electronics For Imaging does not warrant that the operation of the
software will be uninterrupted or error free or that the Software will meet your specific requirements.
1
Page 4

LIMITATION OF LIABILITY
IN NO EVENT WILL ELECTRONICS FOR IMAGING OR ITS SUPPLIERS BE LIABLE FOR ANY DAMAGES, INCLUDING LOSS OF DATA, LOST
PROFITS, COST OF COVER OR OTHER SPECIAL, INCIDENTAL, CONSEQUENTIAL OR INDIRECT DAMAGES ARISING FROM THE USE OF THE
SOFTWARE, OR CODED FONT PROGRAMS, HOWEVER CAUSED AND ON ANY THEORY OF LIABILITY. THIS LIMITATION WILL APPLY EVEN
IF ELECTRONICS FOR IMAGING OR ANY AUTHORIZED DEALER HAS BEEN ADVISED OF THE POSSIBILITY OF SUCH DAMAGE. YOU
ACKNOWLEDGE THAT THE PRICE OF THE CONTROLLER GA-1140 FOR TOSHIBA e-STUDIO550/650/810 Series REFLECTS THIS ALLOCATION
OF RISK. BECAUSE SOME STATES/JURISDICTIONS DO NOT ALLOW THE EXCLUSION OR LIMITATION OF LIABILITY FOR CONSEQUENTIAL
OR INCIDENTAL DAMAGES, THE ABOVE LIMITATION MAY NOT APPLY TO YOU.
EXPORT CONTROLS
You agree that you will not export or re-export the Software or Coded Font Programs in any form without the appropriate United States and foreign government
licenses. Your failure to comply with this provision is a material breach of this Agreement.
GOVERNMENT USE
Use, duplication or disclosure of the Software by the United States Government is subject to restrictions as set forth in subdivision (c) (1) (ii) of the Rights in Technical
Data and Computer Software clause at DFARS 252.227-7013 or in subparagraphs (c) (1) and (2) of the Commercial Computer Software-Restricted Right Clause at 48
CFR 52.227-19, as applicable.
THIRD PARTY BENEFICIARY
You are hereby notified that Adobe Systems Incorporated, a California corporation located at 345 Park Avenue, San Jose, CA 95110-2704 (“Adobe”) is a third-party
beneficiary to this Agreement to the extent that this Agreement contains provisions which relate to your use of the Fonts, the Coded Font Programs, the Typefaces and
the Trademarks licensed hereby. Such provisions are made expressly for the benefit of Adobe and are enforceable by Adobe in addition to Electronics for Imaging.
GENERAL
This Agreement will be governed by the laws of the State of California.
This Agreement is the entire agreement held between us and supersedes any other communications or advertising with respect to the Software and Coded Font
Programs.
If any provision of this Agreement is held invalid, the remainder of this Agreement shall continue in full force and effect.
If you have any questions concerning this Agreement, please see Electronics For Imaging’s web site at www.efi.com.
Electronics For Imaging
303 Velocity Way
Foster City, CA 94404
2
Page 5

Preface
Thank you for purchasing Toshiba Tec’s GA-1140 Network Printer Controller. This
ADMINISTRATOR’S GUIDE explains the instructions for administrators to set up and manage the GA1140 printer. Read this guide before setting up and printing to your e-STUDIO550/650/810 with the
GA-1140 Network Printer Board. Keep this guide within easy reach, and use it to configure quality
printing environment and make the best of your printer’s functions.
NOTE:
This guide only explains about administering the GA-1140 Printer Function. For information
about administering using the job management tools and the GA-1140 scan and e-mail service
function, which are provided with the HDD option, please refer to
& E-mail Guide
.
Fiery Utilities Guide
and
Scan
3
Page 6

Table of Contents
■■
■ Introduction .................................................................................. 9
■■
About the Documentation ............................................................................. 10
About this Guide ........................................................................................ 10
About Other Manuals ................................................................................. 10
■■
■ Preparing for GA-1140 Setup.................................................... 11
■■
About Setup and Administration ................................................................... 12
Easy Setup Flow ........................................................................................... 13
Setup Flow for Windows Environments...................................................... 13
For Parallel Printing ................................................................................ 13
For SMB Printing .................................................................................... 13
For LPR Printing ..................................................................................... 13
For IPP Printing ...................................................................................... 14
For Novell Printing .................................................................................. 14
Setup Flow for Mac OS Environments ....................................................... 15
How to Setup from Touch Panel Display ....................................................... 16
Accessing Setting Menu ............................................................................ 18
Switching On-line/Off-line .......................................................................... 20
How to Setup from TopAccess ...................................................................... 21
Accessing TopAccess for Administrator ..................................................... 23
Connecting to the Parallel Port...................................................................... 24
Connecting to the Network ............................................................................ 25
■■
■ Setting up the Network Servers ............................................... 27
■■
About Network Servers Setup ....................................................................... 28
Windows NT 4.0/2000 Server Setup ............................................................. 29
Configuring a Windows NT 4.0/2000 Server.............................................. 30
Adding the GA-1140 to the TCP/IP Network .......................................... 30
Installing the GA-1140 as a Shared Printer ............................................ 31
Configuring Clients of a Windows NT 4.0 Server ................................... 32
NetWare Server Setup .................................................................................. 33
NetWare 5.x Server Setup with NDPS....................................................... 33
Configuring a NetWare 5.x Server with NDPS ....................................... 34
NetWare 3.x or 4.x Server Setup ............................................................... 35
Configuring a NetWare 4.x Server with NDS .......................................... 36
Configuring a NetWare 4.x with Bindery Emulation ................................ 37
Configuring a NetWare 3.x with Bindery Emulation ................................ 39
4
Page 7

■■
■ Setting up the Network Setup Options .................................... 41
■■
Setting up the Port Options ........................................................................... 42
Setting up the Ethernet Options ................................................................ 42
Setting up from Touch Panel Display ...................................................... 42
Setting up from TopAccess ..................................................................... 43
Setting up the Parallel Port Options ........................................................... 44
Setting up from Touch Panel Display ...................................................... 44
Setting up from TopAccess ..................................................................... 45
Setting up the Protocols ................................................................................ 46
Setting up the TCP/IP Options ................................................................... 46
Setting up from Touch Panel Display ...................................................... 47
Setting up from TopAccess ..................................................................... 49
Setting up the IPX/SPX Options ................................................................ 50
Setting up from Touch Panel Display ...................................................... 50
Setting up from TopAccess ..................................................................... 51
Setting up the AppleTalk Options ............................................................... 52
Setting up from Touch Panel Display ...................................................... 52
Setting up from TopAccess ..................................................................... 53
Setting up the Print Services ........................................................................ 54
Setting up the NetWare Options ................................................................ 54
Setting up from Touch Panel Display ...................................................... 54
Setting up from TopAccess ..................................................................... 57
Setting up the Windows Printing Service ................................................... 59
Setting up from Touch Panel Display ...................................................... 59
Setting up from TopAccess ..................................................................... 61
Setting up the LPD Printing Service .......................................................... 63
Setting up from Touch Panel Display ...................................................... 63
Setting up from TopAccess ..................................................................... 64
Introduction
Preparing for
GA-1140 Setup
Setting up the
Network Servers
Setting up the
Network Setup
Options
Setting up the
Printer Setup
Options
Setting up the
TopAccess Setup
Options
Administrative
Functions
Troubleshooting Appendix
■■
■ Setting up the Printer Setup Options ...................................... 67
■■
Setting up the Printer Setup Options ............................................................ 68
Setting up the Printer Default Options ....................................................... 68
Setting up from Touch Panel Display ...................................................... 68
Setting up from TopAccess ..................................................................... 76
Setting up the Emulation Options .............................................................. 79
Setting up from Touch Panel Display ...................................................... 79
Setting up from TopAccess ..................................................................... 80
5
Page 8

Setting up the PCL Options ....................................................................... 82
Setting up from Touch Panel Display ...................................................... 82
Setting up from TopAccess ..................................................................... 85
Setting up the PS Options ......................................................................... 87
Setting up from Touch Panel Display ...................................................... 87
Setting up from TopAccess ..................................................................... 88
Setting up the Queue Options ................................................................... 90
Setting up from TopAccess ..................................................................... 90
■■
■ Setting up the TopAccess Setup Options ................................ 93
■■
Setting up the TopAccess Setup Options ...................................................... 94
Setting up the TopAccess Options ............................................................. 94
Setting up from Touch Panel Display ...................................................... 94
Setting up from TopAccess ..................................................................... 95
Setting up the Job Log Options ................................................................. 98
Setting up from TopAccess ..................................................................... 98
Setting up the Language Options ............................................................ 100
Setting up from TopAccess ................................................................... 100
■■
■ Administrative Functions ....................................................... 101
■■
Administrative Functions on Touch Panel Display ....................................... 102
Printing Test Pages .................................................................................. 103
Printing a Current Job Forcibly ................................................................ 105
Deleting a Current Job Forcibly ............................................................... 107
Resetting the GA-1140 ............................................................................ 109
Restarting the GA-1140 ........................................................................... 111
Clearing the Server.................................................................................. 113
Setting Administrator Password ............................................................... 115
Administrative Functions on TopAccess ...................................................... 117
Displaying the Print Log ........................................................................... 118
Printing Test Pages .................................................................................. 119
Setting Administrator Password ............................................................... 121
Changing the TOSHIBA MFP Logo Web Link.......................................... 123
Restoring the Factory Defaults ................................................................ 124
Resetting the GA-1140 ............................................................................ 125
Restarting the GA-1140 ........................................................................... 126
Clearing the Server.................................................................................. 127
6
Page 9

Displaying and Managing the Counter..................................................... 128
Displaying the Drawer Counter ............................................................. 128
■■
■ Troubleshooting ....................................................................... 129
■■
Maintaining Optimal Performance ............................................................... 130
Troubleshooting during Setup ..................................................................... 131
Runtime Error Messages ............................................................................ 132
Touch Panel Display Messages ............................................................... 132
TopAccess Messages .............................................................................. 132
■■
■ Appendix .................................................................................. 135
■■
PrintMe Activation Guide............................................................................. 136
DNS Setup Options ................................................................................. 136
PrintMe Setup Options ............................................................................ 137
Activating PrintMe Services ..................................................................... 138
Default Setting List ...................................................................................... 140
Default Setting List for Printer Function ................................................... 140
TopAccess Setting ................................................................................ 140
Printer Setting ....................................................................................... 141
Default Setting List for Network Function ................................................. 142
Port Setting ........................................................................................... 142
TCP/IP Setting ...................................................................................... 142
IPX/SPX Setting ................................................................................... 142
NetWare Setting ................................................................................... 143
AppleTalk Setting .................................................................................. 144
Other Setting ........................................................................................ 144
Introduction
Preparing for
GA-1140 Setup
Setting up the
Network Servers
Setting up the
Network Setup
Options
Setting up the
Printer Setup
Options
Setting up the
TopAccess Setup
Options
Administrative
Functions
7
Troubleshooting Appendix
Page 10

8
Page 11

Introduction
Introduction
9
Page 12

About the Documentation
About this Guide
The TOSHIBA GA-1140 Network Printer BoardTM is a special-purpose controller built into the copier.
This manual is intended for anyone who is responsible for integrating the TOSHIBA GA-1140 Network
Printer Board into a business environment that includes networked personal computers. After you set
up the TOSHIBA GA-1140 Network Printer Board and client workstations as described in
individual users can print to the TOSHIBA GA-1140 Network Printer Board as a high-performance
printer.
The term “GA-1140” is used in this manual to refer to the TOSHIBA GA-1140 Network Printer Board.
Convention
indicates features that require the PS3 Upgrade option.
indicates features and functionality for which PS3 Scan & HDD Upgrade option is required.
About Other Manuals
There are also following manuals which are included in the User Documentation CD-ROM:
User’s Guide
,
User’s Guide
describes installation of printer drivers, printer description files, and other user software provided on the
User Software CD-ROM. It is also explains the printing features of the GA-1140 for users.
:
- explains how to install software to enable users to print to the GA-1140. Specifically, it
Fiery Utilities Guide
Upgrade (GE-1060+GE-1110).
Fiery Utilities Guide
available with the PS3 Scan & HDD Upgrade kit such as the Fiery WebTools, Command
WorkStation, and the DocBuilder Pro.
Scan & E-mail Guide
mail service function which are available with the PS3 Scan & HDD Upgrade kit.
and
Scan & E-mail Guide
- explains how to use optional software for the GA-1140 which are
- explains basic configuration and operation of the GA-1140 scan and e-
are also included in the PS3 Scan & HDD
10
Page 13

Preparing for GA-1140 Setup
Preparing for
GA-1140 Setup
11
Page 14

About Setup and Administration
The GA-1140 provides following tools to configure the GA-1140 network and printer settings:
Touch Panel Display
You can configure the GA-1140 from the Touch Panel Display on the copier. Since TopAccess, which
is another tool to set up the GA-1140, is enabled only on the TCP/IP network, setup operation from the
Touch Panel Display is useful when you setting up the GA-1140 for the first time, or when the GA-1140
is connected to your computer directly using the printer cable.
TopAccess
You can also configure the GA-1140 network and printer settings from TopAccess, a web-based utility.
TopAccess is functionally superior to setting up from Touch Panel Display in some setup. In addition to
that TopAccess provides the setup options for GA-1140 same as the Touch Panel Display, TopAccess
provides setting options that cannot be set up from the Touch Panel Display.
: You can also configure the GA-1140 network and printer settings from Command WorkStation
which is an optional software for the PS3 Scan & HDD Upgrade (GE-1060+GE-1110). For
further details about Command WorkStation, see
PS3 Scan & HDD Upgrade (GE-1060+GE-1110).
Fiery Utilities Guide
which is included in the
Administrators can perform following GA-1140 setup from the Touch Panel Display and TopAccess:
• Port Setup to specify Ethernet and parallel port settings.
P42 “Setting up the Port Options”
• Protocol Setup to specify the network protocols and print services for the active network systems
that will transmit print jobs to the GA-1140.
P46 “Setting up the Protocols”
• Printer Setup to specify default settings for printing, finishing options, emulation of the printer, PCL
options, and PostScript options.
P68 “Setting up the Printer Setup Options”
• TopAccess Setup to specify system options.
P94 “Setting up the TopAccess Setup Options”
12
Page 15

Easy Setup Flow
This chapter describes the minimum setup flow to configure the GA-1140 to use for printing.
Setup Flow for Windows Environments
For Parallel Printing
Step 1: Connecting the GA-1140 to the parallel port.
P24 “Connecting to the Parallel Port”
Step 2: Installing the printer driver for parallel printing.
Refer to
Step 1: Connecting the GA-1140 to the network.
Step 2: Setting up the TCP/IP to enable TopAccess.
User’s Guide
.
For SMB Printing
P25 “Connecting to the Network”
P46 “Setting up the TCP/IP Options”
Preparing for
GA-1140 Setup
Step 3: Setting up the Windows Printing Service.
P59 “Setting up the Windows Printing Service”
Step 4: Installing the printer driver for SMB printing.
Refer to
User’s Guide
.
For LPR Printing
Step 1: Connecting the GA-1140 to the network.
P25 “Connecting to the Network”
Step 2: Setting up the TCP/IP to enable TopAccess.
P46 “Setting up the TCP/IP Options”
Step 3: Setting up the LPD Printing Service.
P63 “Setting up the LPD Printing Service”
Step 4: Installing the printer driver for LPR printing.
Refer to
User’s Guide
.
13
Page 16

For IPP Printing
Step 1: Connecting the GA-1140 to the network.
P25 “Connecting to the Network”
Step 2: Setting up the TCP/IP to enable TopAccess.
P46 “Setting up the TCP/IP Options”
Step 3: Installing the printer driver for IPP printing.
Refer to
User’s Guide
.
For Novell Printing
Step 1: Connecting the GA-1140 to the network.
P25 “Connecting to the Network”
Step 2: Configuring NetWare server for GA-1140 printing.
P33 “NetWare Servers Setup”
Step 3: Setting up the TCP/IP to enable TopAccess.
P46 “Setting up the TCP/IP Options”
Step 4: Setting up the IPX/SPX protocol (if the NetWare server is connected to the IPX/SPX network).
P50 “Setting up the IPX/SPX Options”
Step 5: Setting up the NetWare Printing Service.
P54 “Setting up the NetWare Options”
Step 6: Installing the printer driver for Novell printing.
Refer to
14
User’s Guide
.
Page 17

Setup Flow for Mac OS Environments
: The PS3 Upgrade (GE-1020) or PS3 Scan & HDD Upgrade (GE-1060+GE-1110) is required
for printing from a Mac OS computer.
Step 1: Connecting the GA-1140 to the network.
P25 “Connecting to the Network”
Step 2: Setting up the TCP/IP to enable TopAccess.
P46 “Setting up the TCP/IP Options”
Step 3: Setting up the AppleTalk protocol.
P52 “Setting up the AppleTalk Options”
Step 4: Installing the printer driver for Novell printing.
Refer to
User’s Guide
.
Preparing for
GA-1140 Setup
15
Page 18

How to Setup from Touch Panel Display
The Touch Panel Display (on the Control Panel on the front of the copier) enables you to set options
and view information about jobs printed to the GA-1140. The Touch Panel Display also displays status
information and Setup options.
Copier Control Panel and Touch Panel Display
[PRINTER/NETWORK] key
Digital keysTouch Panel Display
To access the GA-1140 functions, press the [PRINTER/NETWORK] key on the Control Panel. You
can access to various functions from the Index keys on the Touch Panel Display.
Index keys
Entry Field
Select Button
16
Page 19

Index keys
Index keys are used to access to specific function stage on the Touch Panel Display. The displayed
Index keys vary the GA-1140 is currently On-line or Off-line. When it is On-line, only the [PRINT] key
([PRINT/SCAN] key when the PS3 Scan & HDD Upgrade is installed) and [ON/OFF] key are displayed.
When it is Off-line, the [SETTING] key and [UTILITY] key are additionally displayed.
[PRINT] key ([PRINT/SCAN] key when the PS3 Scan & HDD Upgrade is installed)
Press this index key to access the Private Jobs list and Stored Jobs list (also you can access
to the Scan Jobs list and Private Scan Jobs list when the HDD option is installed). You can
print, delete, modify jobs on each list.
[ON/OFF] key
Press this index key to switch the On-line or Off-line.
[SETTING] key
Press this index key to access the Setup Options menu to view or configure the GA-1140.
Users can display the current settings, and administrators can configure the GA-1140
settings.
[UTILITY] key
Press this index key to access the special functions, such as force-print and force-delete
function, and reset printer function.
Entry Field
You can enter the setting values in the entry field on the Touch Panel Display. When the entry field
accepts only numeric characters, you can enter the numbers using the Digital keys on the Control
Panel. When the entry field accepts alphanumeric characters, the display switches to the Character
Input screen and you can enter the characters by touching the character buttons on the display.
Preparing for
GA-1140 Setup
Select Button
You can select an option by pressing the button on the Touch Panel Display. When it is selected, the
button becomes a gray button. If the several button can be selected for an option, you can press a
gray button to clear the selection.
17
Page 20

Accessing Setting Menu
In order to operate the GA-1140 Setup from the Touch Panel Display, you should log into as an
administrator on the Touch Panel Display and access the Setting menu.
When you want to access to the Setting menu on the Touch Panel Display, follow the procedures
below.
Press the [PRINTER/NETWORK] key on the
Control Panel of the copier.
1
• The PRINT menu or PRINT/SCAN menu is displayed
on the Touch Panel Display.
Press the [ON/OFF] menu and press [OFF
LINE].
2
• The [SETTING] menu and [UTILITY] menu are
displayed next to the [ON/OFF] menu.
18
Press the [SETTING] menu.
3
Page 21

Press [ADMIN].
• The screen to enter an administrator password is
4
5
displayed if the administrator password has already
been set. If not, the Setup Options menu is
displayed.
SUPPLEMENT:
When you set up the GA-1140 for the first
time, an administrator password is not set.
If you want to set the administrator
password first, see “Setting Administrator
Password”. P115
Enter the password using the Digital keys and
press [SET].
Preparing for
GA-1140 Setup
The Setting menu is displayed. Proceed the
operation of a setup for desired settings.
6
19
Page 22

Switching On-line/Off-line
You can switch the connection status of the GA-1140. When the connection status is On-line, users
can print to the GA-1140. When the connection status is Off-line, users cannot print to the GA-1140.
When you configure the settings from the Touch Panel Display, the connection status is Off-line. After
you finish a setup, you should switch to On-line to enable printing.
Press the [PRINTER/NETWORK] key on the
Control Panel of the copier.
1
• The PRINT menu or PRINT/SCAN menu is displayed
on the Touch Panel Display.
Press the [ON/OFF] menu and press [ON LINE]
to enable for printing, or press [OFF LINE] to
2
disable for printing.
20
Page 23

How to Setup from TopAccess
The TopAccess, web-based utility which is available on the GA-1140 controller, allows you to manage
your GA-1140 remotely from the Internet or from your company’s intranet.
In order to operate TopAccess, the GA-1140 should be connected to the network and already
configured with the TCP/IP settings. After you complete the TCP/IP setup, you can access to
TopAccess home page to operate various functions from your computer using a Web browser such as
Netscape Navigator or Internet Explorer.
In order to use TopAccess, the following environments are required:
• Either the Netscape Communicator v4.5 or later and Java enabled, or Microsoft Internet Explorer
v4.0.1 and Service Pack 1, or later, with Java enabled, is installed on your computer.
• Monitor and video memory should supports 16-bit color at a minimum resolution of 800 x 600.
• Your computer and the GA-1140 are connected to a TCP/IP enabled network.
• The TCP/IP is correctly set up on the GA-1140.
TopAccess Interface
Status Display
Select Language
Menu
Function Tab
Operation Area
Preparing for
GA-1140 Setup
TOSHIBA MFP Logo
Select Language
Select the language in which TopAccess will be displayed.
Menu
Click the menu link to access to each function. When clicking on the menu, the page displayed in the
Operation Area will be changed.
21
Page 24

Status Display
Indicates the communication status and machine status.
Function Tab
Click the tab to access to each function among the page displayed in the Operation Area. When
clicking on the tab, the page displayed on the Operation Area will be changed.
Operation Area
Display the details of the page that you access by clicking on the menu and function tab.
TOSHIBA MFP Logo
Go to the TOSHIBA TEC Web site by clicking on this. The update information about TOSHIBA TEC
products is available on this Web site.
22
Page 25

Accessing TopAccess for Administrator
In order to operate the GA-1140 Setup from TopAccess, you should access to the TopAccess home
page for Administrator.
Start the Internet browser on your computer.
1
Enter “http://[IP address or DNS name]/adm” in
the Address entry field of the browser, and
2
press [Enter].
• Enter the IP address or DNS name assigned to the
GA-1140 instead of [IP address or DNS name].
Enter the password and click on [OK].
• If the administrator password has not been set, leave
3
the password field blank and click on [OK].
SUPPLEMENT:
When you set up the GA-1140 for the first
time, an administrator password is not set.
If you want to set the administrator
password first, see “Setting Administrator
Password”. P115
Preparing for
GA-1140 Setup
The TopAccess home page for administrator
appears.
4
23
Page 26

Connecting to the Parallel Port
The following describes how to connect the printer (PC/AT machine, or its equivalent) to a computer
using a printer cable (so-called “parallel connection”).
PREPARATION:
The IEEE 1284 compatible printer cable is an optional item. Please obtain one that is compatible
with your computer.
Turn OFF the power of the printer and the
power of the computer.
1
Remove the cover of connector portion
located on the right-rear side of the printer
2
body.
24
Insert the printer cable all the way to the deep
end of the parallel interface connector, and
3
secure it with the latches on both sides of the
connector.
Attach the removed cover as before.
4
Connect the other end of the printer cable to
the parallel port of your computer.
5
SUPPLEMENT:
The parallel port connector may vary depending on the model of the computer. If the printer
cable compatible with your computer is unknown, please ask the store where you purchased
your computer.
Page 27

Connecting to the Network
The following describes how to connect the printer to a network.
PREPARATION:
The 10BASE-T or 100BASE-TX cable is an optional item. Please obtain one that is compatible
with your computer.
Turn OFF the power of the printer.
1
Remove the cover of connector portion
located on the right-rear side of the printer
2
body.
Preparing for
GA-1140 Setup
Insert the 10BASE-T or 100BASE-TX cable in
the connector.
3
Attach the removed cover as before.
4
25
Page 28

26
Page 29

Setting up the Network Servers
Setting up the
Network Servers
27
Page 30

About Network Servers Setup
This chapter describes environments that typically include one or more network servers—Novell
NetWare servers and Windows NT 4.0 servers—that will share printing to the GA-1140. It describes
setting up servers that use IPX/SPX or TCP/IP protocols for communicating with the GA-1140. In
addition, it includes some guidelines for setting up direct communication from Windows NT 4.0
workstations, where a network server is optional.
The GA-1140 can accept jobs concurrently from NetWare, Windows NT 4.0, and AppleShare servers,
as well as jobs sent directly from Windows NT 4.0 workstations.
Because AppleShare servers require no special configuration, they are not discussed in this chapter,
except for use in a Windows NT 4.0 environment.
28
Page 31

Windows NT 4.0/2000 Server Setup
When a Windows NT 4.0/2000 computer is configured to connect to the GA-1140 using TCP/IP, it can
print directly to the GA-1140. If the computer shares the printer over the network, it is acting as a print
server to Windows NT 4.0/2000 clients. The client machines print to the GA-1140 by printing to the
Windows NT 4.0/2000 print server. Printing can then be monitored and controlled at the Windows NT
4.0/2000 server machine.
The Windows NT 4.0/2000 server can also use AppleTalk protocols for printing to the GA-1140 as an
alternative to TCP/IP. When creating a printer to share with AppleTalk users, do not “capture” the
printer. Capturing the printer forces all users to print to the server rather than directly to the printer. If
you capture the printer, GA-1140 print connections will not appear in the Mac OS Chooser.
Tips for experts—Windows NT 4.0/2000 with TCP/IP
When TCP/IP network connections are made from Windows NT 4.0/2000 computers, note the
following:
• Make sure you have a valid IP address for the GA-1140 and for any computers that will print to it.
• Make sure the Microsoft TCP/IP printing service is installed, and that the computer is using LPR printing.
• In GA-1140 Setup, enable TCP/IP and enter the IP address, Subnet mask, and Gateway address for the GA-1140.
You can enter these addresses manually or use DHCP, RARP, or BOOTP protocols to assign them dynamically.
Setting up the
Network Servers
• Make sure your GA-1140 name and address are listed in a domain name services (DNS) or a host name database
used by your system.
• Make sure your system host table includes the correct internal name for the GA-1140 as a remote printer.
• Install the appropriate printer driver files (PCL or PostScript) on the Windows NT 4.0/2000 server (see User’s Guide).
• Repeat the installation for everyone who prints to the GA-1140.
Each server and workstation running Fiery utilities with TCP/IP also needs the TCP/IP protocol and the utility software.
29
Page 32

Configuring a Windows NT 4.0/2000 Server
To configure a Windows NT 4.0/2000 server to communicate with the GA-1140, follow these general
steps. More detail is provided in subsequent sections.
• Load the TCP/IP network protocol on the server and configure it with an IP address, subnet mask,
and gateway.
• Make sure the Microsoft TCP/IP printing service is installed, and that the computer is using LPR
printing.
• Enter the host name of the GA-1140 in the host database used by your system.
P30 “Adding the GA-1140 to the TCP/IP Network”
• On the Windows NT 4.0/2000 server, create a printer for each GA-1140 print connection, install the
appropriate printer drivers (if necessary) and (optionally) share the printer on the network.
P31 “Installing the GA-1140 as a Shared Printer”
• Configure clients for printing to the printer shared by the Windows NT server.
P32 “Configuring Clients of a Windows NT 4.0/2000 Server”
Adding the GA-1140 to the TCP/IP Network
If your TCP/IP network consists of Windows NT 4.0/2000 servers and Windows NT 4.0/2000 clients,
use the directions in this section.
1. Register the IP address of the GA-1140 in the host name database used by your system.
• The hosts file maps remote devices to IP addresses. Users can then communicate with any device over TCP/IP by
using the host name rather than having to remember its IP address.
For installations that do not have a network administrator or a central host name database, add the GA-1140 to the
hosts file on the Windows NT 4.0/2000 server.
The Windows NT/2000 hosts file provides compatibility with the UNIX hosts file. The hosts file is used as a local
Domain Name Services (DNS) equivalent. It has the same format as the /etc/hosts file on UNIX servers.
The format of the hosts entry is: IP Address<TAB>host name<TAB>#comments
(where <TAB> indicates that you press the Tab key.)
To determine the IP Address and Server Name of your system, print a Setting List page from the GA-1140 Touch
Panel Display. P103 “Printing Test Pages”
NOTE:
If the GA-1140 has already been defined in an /etc/hosts file or equivalent host name database on a UNIX workstation on
your network, use the same host name here as you used for the name of the remote printer in the /etc/printcap file.
2. On the GA-1140 Touch Panel Display, perform Network Setup and Printer Setup to support TCP/
IP printing.
• Enter the options in Protocol Setup (IP address of the GA-1140, Subnet mask, and Gateway address).
30
Page 33

Installing the GA-1140 as a Shared Printer
The first step in creating a printer is installing the Windows NT printer drivers. The installation
instructions in
to the GA-1140. However, if you are an administrator running Windows NT 4.0/2000 Server, Windows
NT 4.0 Workstation, or Windows 2000 Professional, you can also create a printer and share it with
clients on the network. When a printer is shared, clients who are not able or are not given permission
to establish an independent network connection to the GA-1140 have to print through the server.
You can specify sharing of the printer during installation of the GA-1140 printer files. If you have not
yet installed the GA-1140 printer files on the Windows NT 4.0/2000 print server computer, do so now
following the instructions in
the GA-1140.
If you have already installed the GA-1140 printer files on the computer you are using as a Windows NT
4.0/2000 print server, see your Windows documentation for information about sharing the GA-1140.
If the HDD option is installed and more than one GA-1140 print connection is published (for example, if
both the Print queue and the Hold queue are published), you may wish to create a printer for each print
connection so that you and other users can print to each connection directly. When prompted to specify
the printer name, you may want to enter a name that indicates the GA-1140 print connection.
User’s Guide
can be used for every workstation that will print directly and independently
User’s Guide
. During installation, enter the information necessary to share
Setting up the
Network Servers
NOTES:
• When installing the driver to Windows NT 4.0 clients from the Windows NT 4.0 print server,
please check on the “Always spool RAW datatype” check box on the Print Processor dialog
box which can be displayed by clicking the [Print Processor...] button on the General tab of
printer properties dialog box of the shared printer on the Windows NT 4.0 print server.
• When installing the Windows 2000 PCL printer driver to the Windows 2000 server, you must
clear the “Enable advanced printing features” check box in the Advanced tab of the printer
properties dialog box.
31
Page 34

Configuring Clients of a Windows NT 4.0 Server
Each client of a Windows NT 4.0 server is already using a network protocol to communicate with the
server. Each client can print to the GA-1140 if it has been shared by a Windows NT 4.0 Server or
Windows NT 4.0 Workstation computer. In that case the client does not have to use the same network
protocol to connect to the Windows NT 4.0 server as the server uses to communicate with the GA-
1140.
1. For Windows NT 4.0 Workstation clients, before printing, connect to the print server computer and
select the GA-1140. Right mouse click and choose the Open command. When prompted, click
Yes to have Windows set up the printer.
• After clients have selected the printer, they can choose it from the Print Setup, Page Setup, or Print dialog box of their
application. Clients can change printing options for their own job, but printer properties are grayed and not available for
changing. When a client chooses Print, the job is transmitted to the Windows NT 4.0 print server, and from there to the
selected queue on the GA-1140. The job is listed in the Print Manager on the client workstation, and the administrator
can track it in the GA-1140 window in the Print Manager on the Windows NT 4.0 print server.
32
Page 35

NetWare Server Setup
NetWare 5.x Server Setup with NDPS
: To setting up the GA-1140 on a NetWare 5.x network with NDPS, the PS3 Scan & HDD
Upgrade (GE-1060+GE-1110) must be installed on the GA-1140.
The GA-1140 supports printing over a NetWare 5.x network running either the TCP/IP protocols or the
IPX protocol. For pure IP printing, the GA-1140 takes advantage of features in NDPS (Novell
Distributed Print Services), using the Novell Gateway version 2.0.3 or later and Support Pack version
3.0 or later. For IPX printing, the GA-1140 supports the PServer service in Bindery emulation or
through NDS (Novell Directory Services). For more information on IPX-based printing, see “NetWare
3.x or 4.x Server Setup”. P35
NOTE:
Setting up a NetWare environment correctly requires the presence and active cooperation of the
Novell network administrator. You must have administrator privileges on the network to create
new NDS or bindery objects.
Setting up the
Network Servers
NDPS is not like the earlier queue-based versions of NetWare printing. Instead, you use an NDPS
Manager and a Printer Agent, which control the tasks previously handled by a print queue, print server,
and spooler. You can also make the printer driver available for clients to download from Windows 95/
98/Me/2000 and Windows NT 4.0 computers.
The GA-1140 can receive print jobs from NetWare clients over Ethernet. During GA-1140 Setup, you
select the frame type or types that will be used for communication between the GA-1140 and network
servers. Frame type refers to the format of a communications packet; frame types are specified in a
startup file when the NetWare server (or any other workstation) loads its network drivers.
Tips for experts—NetWare 5.x networks
Setting up the GA-1140 in an NDPS environment is similar to setting up any other printer on the
network. The following information is useful for experienced network administrators:
• Make sure you have a valid IP address for the GA-1140 and for any workstations that will print to it.
• In GA-1140 Setup, enable TCP/IP and enter the IP address, Subnet mask, and Gateway address for the GA-1140. You
can enter these manually or use DHCP, RARP, or BOOTP protocols to assign the addresses dynamically.
• Bi-directional communication features in NDPS are not supported on the GA-1140.
33
Page 36

Configuring a NetWare 5.x Server with NDPS
The following procedure assumes NDPS has been installed during NetWare 5 installation and that a
Broker is running on the server. Unless you have manually unloaded the Broker, it loads and runs
when you install NDPS. Make sure you are using NetWare 5.x Service Pack version 3.0 or later, and
the Novell Gateway version 2.0.3 or later. Finally, create an NDPS Manager. For more information, see
your NetWare documentation.
Also In GA-1140 Setup, make sure you have enabled TCP/IP on the GA-1140.
Depending on the security needs at your organization, you can set up the GA-1140 as a Public Access
printer or a Controlled Access printer. The following procedure describes setting up a Public Access
printer. You can then convert this type of printer to Controlled Access if necessary. For more
information, see your NetWare documentation.
1. In NetWare Administrator, double-click the NDPS Manager object you have created.
2. In the Details window for the NDPS Manager object, click the Printer Agent List button.
• The list of Printer Agents appears.
3. Click New.
• The Create Printer Agent dialog box appears.
4. In the Printer Agent (PA) Name field, enter a name.
5. Under Gateway Types, select Novell Printer Gateway, and click OK.
6. In the Configure Novell PDS for Printer Agent dialog box, select “((NONE))”, and click OK.
7. In the Configure Port Handler dialog box, choose “Remote LPR on IP” as the connection type, and
click Next.
8. For Host Address, enter the IP address of the GA-1140.
9. For Printer Name, enter the name of the GA-1140 print connection you want users to print to, and
click Finish.
• This name must be print or hold.
10. In the Select Printer Drivers dialog box, select the printer driver for Windows 95/98/Me/2000 and
the driver for Windows NT 4.0.
11. Click Continue, and click OK.
34
Page 37
NetWare 3.x or 4.x Server Setup
The NetWise™ software built into the GA-1140 supports the following network operating environments:
• NetWare 4.x—Novell Directory Services (NDS)
• NetWare 3.x—Bindery services
• Servers running NetWare 4.x in bindery emulation mode
NOTE:
Setting up a NetWare environment correctly requires the presence and active cooperation of the
Novell network administrator. You must have administrator privileges on the network to create
new NDS or bindery objects.
The term “bindery server” is used to refer to a Novell file server running NetWare 3.x, or running
NetWare 4.x in bindery emulation mode. The term “NDS” is used to describe components of a NetWare
operating system running NetWare 4.x in native mode.
NetWare clients print to the GA-1140 through the Novell network server. Server setup and client
network setup are outlined here. Client printing setup and printing is described in
User’s Guide
.
The GA-1140 can receive print jobs from NetWare clients over Ethernet. During GA-1140 setup, you
select the frame type or types that will be used for communication between the GA-1140 and network
servers. Frame type refers to the format of a communications packet; frame types are specified in a
startup file when the NetWare server (or any other workstation) loads its network drivers.
Tips for experts—IPX networks
Setting up the GA-1140 is similar to setting up another printer on the network. The following
information is all that experienced network administrators need.
Setting up the
Network Servers
The GA-1140 with IPX connections has these characteristics:
• Both NetWare 3.x and NetWare 4.x are supported directly. NetWare 4.x is also supported through bindery emulation.
• A minimum connection to the GA-1140 consists of a NetWare file server, a NetWare print server, and a NetWare
queue.
• A single directory tree (for NetWare 4.x) and up to eight bindery servers can be configured simultaneously.
• The GA-1140 looks for print jobs on one NetWare print server per bindery server.
• Each print server can store jobs for any queue on the GA-1140.
35
Page 38

Configuring a NetWare 4.x Server with NDS
The following procedures explain how to set up a NetWare file server with NDS so that networked
users can print to the GA-1140 from their workstations, and the GA-1140 can obtain print jobs from the
NetWare server. More detail is provided in your NetWare documentation.
1. In NetWare Administrator, select the container object to create the printer and click the Object
menu and select the Create command.
• The New Object dialog box appears.
2. In the Class of new object list, select Print Queue and click OK.
• The Create Print Queue dialog box appears.
3. Select Directory Service Queue and enter the name of print queue in the Print Queue name field.
• The queues on the NetWare server must be named to match the Direct connection and the Print, and Hold queues on
the GA-1140. The NetWare queue names should be given an extension corresponding to the GA-1140 print
connection, as follows:
_print
_hold
_direct
NOTE:
More than one GA-1140 print connection is published (for example, if both the Print queue and the Hold queue are
published), you may wish to create a queue for each print connection so that you and other users can print to each
connection directly.
: The Hold queue and Print queue are only available when the PS3 Scan & HDD Upgrade (GE-1060+GE-1110) is
installed.
4. Click the browse button at the next to the Print Queue Volume field.
• The Select Object dialog box appears.
5. Select the volume to create a print queue and click OK.
6. Click Create.
7. Click the Object menu and select the Create command.
• The New Object dialog box appears.
8. In the Class of new object list, select Printer and click OK.
• The Create Printer dialog box appears.
9. Enter the printer name and check the Define additional properties option and click Create.
10. View the Assignments window and click Add.
• The Select Object dialog box appears.
11. Select a created queue and click OK.
12. View the Configuration window and select Other/Unknown at the Printer Type drop down box and
click OK.
13. Click the Object menu and select the Create command.
• The New Object dialog box appears.
36
Page 39

14. In the Class of new object list, select Print Server and click OK.
• The Create Print Server dialog box appears.
15. Enter the print server name and check the Define additional properties option and click Create.
16. View the Assignments window and click Add.
• The Select Object dialog box appears.
17. Select a created printer and click OK.
18. Click OK to close Assignments window for the print server.
Configuring a NetWare 4.x with Bindery Emulation
You can connect only one directory tree to the GA-1140. If you need to connect additional NetWare 4.x
servers, you can do so by using bindery emulation, which causes the 4.x server to behave like and be
accepted as a NetWare 3.x server.
NOTE:
The file server selected must not be in the same tree as that selected in NDS Setup.
Up to eight bindery servers, whether in native 3.x mode or in 4.x emulation, can connect to the GA-
1140.
In order to set up the NetWare 4.x server in bindery emulation mode for printing to the GA-1140, the
network administrator must do the following:
• Determine the Directory Services path to the container in which the print server and the print queue
for the GA-1140 will be created. The container defines the “bindery context” for your network
structure.
• Edit the network startup file to set the bindery context.
P37 “Editing the Network Startup File”
• Configure the print queues, print server, and printer on the file server.
P38 “Setting up the NetWare File Server”
Setting up the
Network Servers
Editing the Network Startup File
The following procedures explain how to edit the bindery contexts in the network startup file.
1. On NetWare file server, enter “load install” and press the Enter key.
2. Select NCF Files Options from the menu.
3. Select Edit AUTOEXEC.NCF from the menu.
37
Page 40

4. Search the file to see if you have a statement similar to the following included:
SET BINDERY CONTEXT=0U=ENG
• If the statement above can be found in the file, the server has a bindery. If this is not found, enter the statement
above and save the file.
5. Restart the NetWare file server.
Setting up the NetWare File Server
The following procedures explain how to set up a NetWare 4.x file server with bindery emulation so that
networked users can print to the GA-1140 from their workstations, and the GA-1140 can obtain print
jobs from the NetWare server.
For NetWare 4.x in emulation, the NetWare print server and print queue for GA-1140 are created and
configured from NetWare Print Console (PCONSOLE), a NetWare utility that is stored in NetWare’s
PUBLIC directory.
1. Start PCONSOLE at the DOS prompt on the workstation.
2. Select Print Queue from the Available Options menu and press the Enter key.
• The Print Queues window appears.
3. Press the Insert key and enter the print queue name and press the Enter key.
• The queues on the NetWare server must be named to match the Direct connection and the Print, and Hold queues on
the GA-1140. The NetWare queue names should be given an extension corresponding to the GA-1140 print
connection, as follows:
_print
_hold
_direct
NOTE:
More than one GA-1140 print connection is published (for example, if both the Print queue and the Hold queue are
published), you may wish to create a queue for each print connection so that you and other users can print to each
connection directly.
: The Hold queue and Print queue are only available when the PS3 Scan & HDD Upgrade (GE-1060+GE-1110) is
installed.
4. Press the Esc key to close the Print Queues window.
5. Select Print Server from the Available Options menu and press the Enter key.
6. When the message is displayed, press the Enter key.
• The Print Servers window appears.
7. Press the Insert key and enter a print server name and press the Enter key.
8. Select created print server name from the Print Servers window and press the Enter key.
• The Print Server Information menu appears.
9. Select Printers from the Print Server Information menu and press the Enter key.
• The Defined Printers window appears.
38
Page 41

10. Press the Insert key and enter a printer name and press the Enter key.
11. Select created printer name from the Defined Printers window and press the Enter key.
12. Highlight the Printer Type field and press the Enter key.
• The Printer Type menu appears.
13. Select Other/Unknown and press the Enter key.
• The NetWare Server\Print Queue window appears.
14. Press the Insert key and select the created queue from the Available Print Queues menu and
press the Enter key.
• Up to 10 queues can be selected. If you created several queues, repeat the operation to add all queues that are
required.
• When more than 1 queue is added, you must enter the priority value.
15. Press the Esc key until the Save Changes menu appears.
16. Select Yes and press the Enter key.
Configuring a NetWare 3.x with Bindery Emulation
The following procedures explain how to set up a NetWare 3.x file server with bindery emulation so that
networked users can print to the GA-1140 from their workstations, and the GA-1140 can obtain print
jobs from the NetWare server.
For NetWare 3.x in emulation, the NetWare print server and print queue for GA-1140 are created and
configured from NetWare Print Console (PCONSOLE), a NetWare utility that is stored in NetWare’s
PUBLIC directory.
Setting up the
Network Servers
1. Start PCONSOLE at the DOS prompt on the workstation.
2. If you are not selecting the file server which the print server is installed, change the current file
server.
3. Select Print Queue Information from the Available Options menu and press the Enter key.
• The Print Queues window appears.
4. Press the Insert key and enter the print queue name and press the Enter key.
• The queues on the NetWare server must be named to match the Direct connection and the Print, and Hold queues on
the GA-1140. The NetWare queue names should be given an extension corresponding to the GA-1140 print
connection, as follows:
_print
_hold
_direct
NOTE:
More than one GA-1140 print connection is published (for example, if both the Print queue and the Hold queue are
published), you may wish to create a queue for each print connection so that you and other users can print to each
connection directly.
39
Page 42

: The Hold queue and Print queue are only available when the PS3 Scan & HDD Upgrade (GE-1060+GE-1110) is
installed.
5. Press the Esc key to close the Print Queues window.
6. Select Print Server Information from the Available Options menu and press the Enter key.
• The Print Servers window appears.
7. Press the Insert key and enter a print server name and press the Enter key.
8. Select created print server name from the Print Servers window and press the Enter key.
• The Print Server Information menu appears.
9. Select Print Server Configuration from the Print Server Information menu and press the Enter key.
• The Print Server Configuration menu appears.
10. Select Printer Configuration from the Print Server Configuration menu and press the Enter key.
• The Configured Printers window appears.
11. Select a printer number and press the Enter key.
• The Printer Configuration window appears.
12. Select the Name field and enter a printer name.
13. Select the Type field and press the Enter key.
• The Printer types windows appears.
14. Select Remote Other/Unknown and press the Enter key.
15. Press the Esc key. In the Save changes window, select Yes and press the Enter key.
16. Confirm the created printer is added to the Configured Printers window and press the Esc key.
• The screen returns to the Print Server Configuration menu.
17. Select Queue Serviced by Printer from the Print Server Configuration menu.
• Defined Printers window appears.
18. Select the created printer from the Defined Printers window and press the Enter key.
19. Press the Insert key.
• The Available Queues window appears.
20. Select a queue and press the Enter key.
• Up to 10 queues can be selected. If you created several queues, repeat the operation to add all queues that are
required.
• When more than 1 queue is added, you must enter the priority value.
21. Press the Esc key until the Exit PConsole menu appears.
22. Select Yes and press the Enter key.
40
Page 43

Setting up the
Network Setup Options
Network Setup
Options
Setting up the
41
Page 44

Setting up the Port Options
Setting up the Ethernet Options
In the Ethernet options, you can specify the ethernet speed for the port if you know the ethernet speed
for your network.
You can set up the ethernet option from Touch Panel Display or TopAccess. There are no difference
between the setup from Touch Panel Display and setup from TopAccess for Ethernet options.
Setting up from Touch Panel Display
Accessing the Setting menu on the Touch Panel Display.
1
2
3
P18 “Accessing Setting Menu”
Accessing the Ethernet Setup screen.
1. Press [PORT SETUP] on the Setting menu.
2. Press [ETHERNET SETUP] on the Port Setup menu.
Press the desired option and press [SET].
• The screen returns to the Port Setup menu.
42
Ethernet Speed
This selects the ethernet speed of the ethernet port on the GA-1140. Select the speed that is
corresponding to your network specification.
AUTO - Press this button when you want to use a ethernet speed that the GA-1140
automatically selects.
10Mbps - Press this button to set 10Mbps for ethernet speed.
100Mbps - Press this button to set 100Mbps for ethernet speed.
Perform resetting the GA-1140.
4
P109 “Resetting the GA-1140”
• The setting changes on the Network options is applied after resetting the printer. If you want to set
other network options, you can also proceed the operation for setup before resetting the printer.
Page 45

Setting up from TopAccess
Accessing the TopAccess for Administrator.
1
2
3
4
P23 “Accessing TopAccess for Administrator”
Accessing the Port Setup page.
1. Click on the Network SETUP menu.
2. Click on the Port tab.
Select the ethernet speed at the Transmission
Speed drop down box and click on [SETUP].
The message “Reset the Printer Enable
Setting” is displayed on the top of a page.
Network Setup
Options
Setting up the
Perform resetting the GA-1140.
P125 “Resetting the GA-1140”
• The setting changes on the Network options is
applied after resetting the printer. If you want to set
other network options, you can also proceed the
operation for setup before resetting the printer.
43
Page 46

Setting up the Parallel Port Options
In the Parallel Port options, you can specify the time out interval and Ignore “End of File” option.
You can set up the Parallel Port option from Touch Panel Display or TopAccess. There are no
difference between the setup from Touch Panel Display and setup from TopAccess for Ethernet
options.
Setting up from Touch Panel Display
Accessing the Setting menu on the Touch Panel Display.
1
2
P18 “Accessing Setting Menu”
Accessing the Parallel Setup screen.
1. Press [PORT SETUP] on the Setting menu.
2. Press [PARALLEL SETUP] on the Port Setup menu.
Modify the options and press [SET].
3
44
Time Out
This option determines how long the GA-1140 waits without receiving data from the parallel
port before deciding that the current job is complete. Until the timeout, the GA-1140 cannot
receive new jobs through the parallel port, but it can continue to receive network print jobs.
Ignore EOF
This option specifies that the GA-1140 should ignore end-of-file (EOF) messages in a file. This
option must be set to Yes to print PostScript files in binary format (not ASCII); under normal
circumstances, it should be set to No. When this option is set to Yes, the GA-1140 uses the
parallel port timeout value to determine when the end of the file has been reached.
Perform resetting the GA-1140.
4
P109 “Resetting the GA-1140”
• The setting changes on the Network options is applied after resetting the printer. If you want to set
other network options, you can also proceed the operation for setup before resetting the printer.
Page 47

Setting up from TopAccess
Accessing the TopAccess for Administrator.
1
2
P23 “Accessing TopAccess for Administrator”
Accessing the Port Setup page.
1. Click on the Network SETUP menu.
2. Click on the Port tab.
Modify the options and press [SETUP].
3
Ignore EOF Character
This option specifies that the GA-1140 should ignore end-of-file (EOF) messages in a file. This
option must be enabled to print PostScript files in binary format (not ASCII); under normal
circumstances, it should be disabled. When this option is checked, the GA-1140 uses the
parallel port timeout value to determine when the end of the file has been reached.
Time out
This option determines how long the GA-1140 waits without receiving data from the parallel
port before deciding that the current job is complete. Until the timeout, the GA-1140 cannot
receive new jobs through the parallel port, but it can continue to receive network print jobs.
Network Setup
Options
Setting up the
The message “Reset the Printer Enable
Setting” is displayed on the top of a page.
4
Perform resetting the GA-1140.
P125 “Resetting the GA-1140”
• The setting changes on the Network options is
applied after resetting the printer. If you want to set
other network options, you can also proceed the
operation for setup before resetting the printer.
45
Page 48

Setting up the Protocols
Setting up the TCP/IP Options
In the TCP/IP options, you can assign the IP address, subnet mask, and gateway address of the GA-
1140.
You can set up the TCP/IP options from Touch Panel Display or TopAccess. There are no difference
between the setup from Touch Panel Display and setup from TopAccess for TCP/IP options.
NOTE:
When you configure the GA-1140 TCP/IP options for the first time, these options can only set
from the Touch Panel Display.
The TCP/IP settings vary depending on the network environment. The GA-1140 can be set up to
automatically obtain the TCP/IP settings using DHCP, RARP, or BOOTP server. Also you can assign
the TCP/IP settings manually entering the addresses. Before setting up the TCP/IP options, please
make sure the TCP/IP network system which built on your network.
Assigning the TCP/IP using the DHCP, RARP, or BOOTP server
Where either DHCP, RARP, or BOOTP server is in the network, the GA-1140 can be configured to get
TCP/IP settings automatically from the server.
NOTE:
When using the DHCP, RARP, BOOTP server to assign the IP address, the GA-1140 may
obtain different IP address every time after you reboot the printer. It may cause the failure of
printing for the LPR printing and IPP printing in case that you configured the port using the IP
address of the GA-1140. In this case, please use WINS server to solve the print server name of
GA-1140 instead of the IP address.
Assigning the TCP/IP manually
Where neither DHCP, RARP, nor BOOTP server is in the network, assign the static TCP/IP settings
manually.
46
Page 49

Setting up from Touch Panel Display
Accessing the Setting menu on the Touch Panel Display.
1
2
3
P18 “Accessing Setting Menu”
Accessing the TCP/IP Setup screen.
1. Press [PROTOCOL SETUP] on the Setting menu.
2. Press [TCP/IP] on the Protocol Setup menu.
Press [ETHERNET].
• Ethernet options screen is displayed.
Press [ENABLE] for “Enable TCP/IP”.
4
When you assign the IP address and subnet
mask automatically from DHCP, RARP, or
BOOTP server, proceed to step 5.
Network Setup
Options
Setting up the
When you assign the IP address and subnet
mask manually, select [DISABLE] for “Enable
Auto IP” and press [Next] and proceed to step
6.
Press [ENABLE] for “Enable Auto IP”, select
the protocol from “Select Protocol”, and then
5
press [SET].
• The screen returns to TCP/IP options menu. Proceed
to step 7.
47
Page 50

To assign the IP address, press [IP ADDRESS]
and enter the IP address of GA-1140 using the
6
Digital keys.
To assign the Subnet Mask, press [SUBNET
MASK] and enter the subnet mask using the
Digital keys.
Press [SET] to save settings.
• The screen returns to TCP/IP options menu. Proceed
to step 7.
Press [GATEWAY].
• The Gateway options screen is displayed.
7
• If you do not have to assign the gateway address,
proceed to the step 9.
48
When you assign the gateway address
automatically from DHCP, RARP, or BOOTP
8
server, press [ENABLE] for “Enable Auto IP”.
When you assign the gateway address
manually, select [DISABLE] for “Enable Auto
IP” and enter the gateway address using the
Digital keys.
Press [SET] to save settings.
• The screen returns to TCP/IP options menu.
Perform resetting the GA-1140.
9
P109 “Resetting the GA-1140”
• The setting changes on the Network options is applied after resetting the printer. If you want to set
other network options, you can also proceed the operation for setup before resetting the printer.
Page 51

Setting up from TopAccess
Accessing the TopAccess for Administrator.
1
2
P23 “Accessing TopAccess for Administrator”
Accessing the TCP/IP Setup page.
1. Click on the Network SETUP menu.
2. Click on the TCP/IP tab.
Check the box for “Enable Ethernet”.
3
When you assign the IP address and subnet
mask automatically, check the box for “Enable
Auto IP” and select the protocol from the
“Select Protocol” drop down menu.
To obtain the gateway address from the
network, check the box for “Enable Auto IP” at
the Gateway options group.
When you assign the IP address and subnet
mask manually, enter the IP address in the “IP
address” field, and enter the subnet mask in
the “Subnet mask” field. To assign the
gateway address manually, enter the gateway
address in the “Gateway Address” field under
the Gateway options group.
Network Setup
Options
Setting up the
Click on [SETUP] to save settings.
4
The message “Reset the Printer Enable
Setting” is displayed on the top of a page.
5
Perform resetting the GA-1140.
P125 “Resetting the GA-1140”
• The setting changes on the Network options is
applied after resetting the printer. If you want to set
other network options, you can also proceed the
operation for setup before resetting the printer.
49
Page 52

Setting up the IPX/SPX Options
When you use the GA-1140 in the NetWare IPX environment for the Novell printing, you can select the
frame type to be used on IPX network.
NOTE:
The frame type is set to “Auto” as a factory default setting. “Auto” frame type setting can work
on most of IPX network environment properly. Please use this option settings to select the
frame type manually only when the “Auto” frame type selection does not work properly.
You can set up the IPX/SPX options from Touch Panel Display or TopAccess. There are no difference
between the setup from Touch Panel Display and setup from TopAccess for IPX/SPX options.
Setting up from Touch Panel Display
Accessing the Setting menu on the Touch Panel Display.
1
2
P18 “Accessing Setting Menu”
Accessing the IPX/SPX Setup screen.
1. Press [PROTOCOL SETUP] on the Setting menu.
2. Press [IPX/SPX] on the Protocol Setup menu.
50
Select the frame type to be used and press
[SET].
3
• The screen returns to the Protocol Setup menu.
AUTO
Select this to use an appropriate frame type that the GA-1140 finds first.
EN_802.3,EN_802.2, EN_II, EN_SNAP
Instead of “AUTO”, select the frame types to be used from these options. The GA-1140 will
use all frame types selected here. These can be selected only when “AUTO” is not selected.
Page 53

Perform resetting the GA-1140.
4
P109 “Resetting the GA-1140”
• The setting changes on the Network options is applied after resetting the printer. If you want to set
other network options, you can also proceed the operation for setup before resetting the printer.
Setting up from TopAccess
Accessing the TopAccess for Administrator.
1
2
3
P23 “Accessing TopAccess for Administrator”
Accessing the IPX/SPX Setup page.
1. Click on the Network SETUP menu.
2. Click on the IPX/SPX tab.
Check the box for frame types to be used and
press [SETUP].
Network Setup
Options
Setting up the
Auto
Check this to use an appropriate frame type that the GA-1140 finds first.
Ethernet_802.3, Ethernet_802.2, Ethernet_II, Ethernet_SNAP
Instead of “Auto”, check the frame types to be used from these options. The GA-1140 will use
all frame types selected here. These can be checked only when “Auto” is checked off.
The message “Reset the Printer Enable
Setting” is displayed on the top of a page.
4
Perform resetting the GA-1140.
P125 “Resetting the GA-1140”
• The setting changes on the Network options is
applied after resetting the printer. If you want to set
other network options, you can also proceed the
operation for setup before resetting the printer.
51
Page 54

Setting up the AppleTalk Options
: The PS3 Upgrade (GE-1020) or PS3 Scan & HDD Upgrade (GE-1060+GE-1110) is required
for setting up the AppleTalk options.
When you use the GA-1140 in the AppleTalk environment for printing from a Mac OS computer, you
should enable the AppleTalk.
You can set up the AppleTalk options from Touch Panel Display or TopAccess. However, since setup
from the Touch Panel Display is only able to enable the AppleTalk, setup from TopAccess can
configure the sever name and AppleTalk zone that the GA-1140 should be connecting. Therefore, it is
recommended to configure the AppleTalk options from TopAccess rather than setting up from the
Touch Panel Display.
Setting up from Touch Panel Display
Accessing the Setting menu on the Touch Panel Display.
1
2
P18 “Accessing Setting Menu”
Accessing the AppleTalk Setup screen.
1. Press [PROTOCOL SETUP] on the Setting menu.
2. Press [APPLETALK] on the Protocol Setup menu.
52
To enable the AppleTalk, press [ENABLE] and
press [SET].
3
To disable the AppleTalk, press [DISABLE] and
press [SET].
• The screen returns to the Protocol Setup menu.
Perform resetting the GA-1140.
4
P109 “Resetting the GA-1140”
• The setting changes on the Network options is applied after resetting the printer. If you want to set
other network options, you can also proceed the operation for setup before resetting the printer.
Page 55

Setting up from TopAccess
Accessing the TopAccess for Administrator.
1
2
3
P23 “Accessing TopAccess for Administrator”
Accessing the IPX/SPX Setup page.
1. Click on the Network SETUP menu.
2. Click on the AppleTalk tab.
To enable the AppleTalk, check the box for
“Enable AppleTalk”, and select the zone where
the GA-1140 will connect at the “Zone Name”
drop down box.
• Select a zone if the AppleTalk network has a zone.
• In the “Server Name” option, the server name which
is set at the TopAccess options is displayed. If you
want to change the name, set the server name at the
TopAccess options.
To disable the AppleTalk, check off the box for
“Enable AppleTalk”.
Network Setup
Options
Setting up the
Click on [SETUP] to save settings.
The message “Reset the Printer Enable
Setting” is displayed on the top of a page.
4
Perform resetting the GA-1140.
P125 “Resetting the GA-1140”
• The setting changes on the Network options is
applied after resetting the printer. If you want to set
other network options, you can also proceed the
operation for setup before resetting the printer.
53
Page 56

Setting up the Print Services
Setting up the NetWare Options
NetWare Setup allows you to enter the names of the NetWare objects that are concerned with GA1140 print jobs. When you configured the NetWare server for Novell printing, you should set up NDS
(Novell Directory Services), Bindery Services, or both according to the NetWare configurations in order
to enable printing through the NetWare server.
Before setting up the NetWare options on GA-1140, prepare for following information which is required
for setup:
When the NetWare server is configured in NDS/NDPS mode:
• NDS Tree Name
• NDS Print Server Name
• Password (if it has been set)
• Search Root for Print Queues
When the NetWare server is configured in Bindery mode:
• File Server Name
• Bindery Print Server Name
• Password (if it has been set)
You can set up the NetWare options from Touch Panel Display or TopAccess. However, since setup
from the Touch Panel Display is only able to configure one bindery server, setup from TopAccess can
configure up to 8 bindery severs for Novell printing in bindery emulation. Therefore, it is recommended
to configure the NetWare options from TopAccess rather than setting up from the Touch Panel Display
when more than one bindery server is used for Novell printing.
Setting up from Touch Panel Display
Accessing the Setting menu on the Touch Panel Display.
1
2
54
P18 “Accessing Setting Menu”
Accessing the NetWare Setup screen.
1. Press [PROTOCOL SETUP] on the Setting menu.
2. Press [NETWARE] on the Protocol Setup menu.
• When using NetWare 4.x or NetWare 5.x in NDS/
NDPS mode, proceed to step 3.
• When using NetWare 3.x or NetWare 4.x in bindery
mode, proceed to step 5.
Page 57

Press [ENABLE] for “Enable NDS” and enter
the search root in the “Search Root” field.
3
Then press [Next].
• The Search Root option allows to set the root for the
print queues. To enter the search root, press the
entry field to display the keypad screen. Enter the
value using the keypad screen and press [SET] to
complete the entry.
Search Root
Enter the search root for the print queues. The GA-1140 always searches the queues only in
this root so that the GA-1140 can quickly find the queues.
Enter the value for each item explained below
and press [SET].
4
• To enter the value, press the entry field to display the
keypad screen. Enter the value using the keypad
screen and press [SET] to complete the entry.
• The screen returns to the Protocol Setup menu.
Proceed to step 7.
Network Setup
Options
Setting up the
NDS Tree
Enter the tree name of NDS.
NDS Print Server
Enter the name of the print server object to be created on the NetWare server. The name of
the print server must be entered with the NDS contexts.
(i.e. “CN=GA1140_SRV.OU=GA1140.O=ORG.”)
Password
Enter the password if it has been set to the print server.
55
Page 58

Press [ENABLE] for both “Enable NDS” and
“Enable Bindery Server” and press [Next]
5
twice.
NOTE:
You should also enable the “Enable NDS”
option to use the GA-1140 in bindery mode.
Enter the value for each item explained below
and press [SET].
6
• To enter the value, press the entry field to display the
keypad screen. Enter the value using the keypad
screen and press [SET] to complete the entry.
• The screen returns to the Protocol Setup menu.
56
File Server
Enter the name of a file server that the print server and print queues for the GA-1140 are
created.
Bindery Print Server
Enter the name of the print server that you have created for the GA-1140 on the file server.
Password
Enter the password if it has been set to the print server.
Perform resetting the GA-1140.
4
P109 “Resetting the GA-1140”
• The setting changes on the Network options is applied after resetting the printer. If you want to set
other network options, you can also proceed the operation for setup before resetting the printer.
Page 59

Setting up from TopAccess
Accessing the TopAccess for Administrator.
1
2
3
P23 “Accessing TopAccess for Administrator”
Accessing the NetWare Setup page.
1. Click on the Network SETUP menu.
2. Click on the NetWare tab.
• When using NetWare 4.x or NetWare 5.x in NDS/
NDPS mode, proceed to step 3.
• When using NetWare 3.x or NetWare 4.x in bindery
mode, proceed to step 4.
Check the box for “Enable NDS” and enter
each item explained below and click on
[SETUP].
• After clicking on [SETUP], proceed to step 5.
Network Setup
Options
Setting up the
Poll Interval
Enter the time interval in second for the print server to scan the print queues.
NDS Tree
Enter the tree name of NDS.
NDS Print Server
Enter the name of the print server object to be created on the NetWare server. The name of
the print server must be entered with the NDS contexts.
(i.e. “CN=GA1140_SRV.OU=GA1140.O=ORG.”)
Password
Enter the password if it has been set to the print server.
Search Root
Enter the search root for the print queues. The GA-1140 always searches the queues only in
this root so that the GA-1140 can quickly find the queues.
57
Page 60

Check the box for “Enable NDS” and “Enable
Bindery Server 1 (to 8)”. Then enter each item
4
explained below and click on [SETUP].
• The “Enable Bindery Server 1 (to 8)” option allows
you to set up to 8 bindery servers to be used for
printing. Check the box for this option from 1 to 8 as
you requires and you must enter the values for the
“File Server” and “Bindery Print Server” options where
you check the boxes.
NOTE:
You should also enable the “Enable NDS”
option to use the GA-1140 in bindery mode.
File Server
Enter the name of a file server that the print server and print queues for the GA-1140 are
created.
Bindery Print Server
Enter the name of the print server that you have created for the GA-1140 on the file server.
Password
Enter the password if it has been set to the print server.
58
The message “Reset the Printer Enable
Setting” is displayed on the top of a page.
5
Perform resetting the GA-1140.
P125 “Resetting the GA-1140”
• The setting changes on the Network options is
applied after resetting the printer. If you want to set
other network options, you can also proceed the
operation for setup before resetting the printer.
Page 61

Setting up the Windows Printing Service
Windows Printing Service Setup allows you to configure the Microsoft SMB protocol, the file and printer
sharing protocol built into Windows, which supports peer to peer printing, also known as Windows
printing.
Enabling Windows Printing Service allows the GA-1140 to be listed on the network so that Windows
clients can print to a particular connection on the GA-1140 without any other networking software.
Windows (SMB) printing runs over TCP/IP, so TCP/IP must be configured on all workstations that will
use Windows (SMB) printing and on the GA-1140 as well.
You can set up the Windows Printing Service options from Touch Panel Display or TopAccess. There
are no difference between the setup from Touch Panel Display and setup from TopAccess for Windows
Printing Service options.
Setting up from Touch Panel Display
Accessing the Setting menu on the Touch Panel Display.
1
2
P18 “Accessing Setting Menu”
Accessing the Windows Setup screen.
1. Press [PROTOCOL SETUP] on the Setting menu.
2. Press [Windows] on the Protocol Setup menu.
Network Setup
Options
Setting up the
Press [ENABLE] for “Enable Windows Printing
Service” and enter the value for each item
3
explained below and press [Next].
• To enter the value, press the entry field to display the
keypad screen. Enter the value using the keypad
screen and press [SET] to complete the entry.
Server Name
Enter the server name that will appear on the network for accessing the GA-1140 via SMB.
Comment
Enter comments about the printer. These comments are listed in the Properties of the GA1140 in Network Neighborhood.
59
Page 62

Domain or Workgroup
Enter the name of the workgroup or domain where you want the GA-1140 to appear.
Enter the value for each item explained below
and press [SET].
4
• The screen returns to the Protocol Setup menu.
Use WINS Server
Press [ENABLE] when you want to use WINS (Windows Internet Name Service) to name the
GA-1140 printer. In order to enable SMB for users who are located in different segment, use
a WINS name server.
Enable Auto IP
Press [ENABLE] to have the GA-1140 automatically obtain the WINS Name Server IP
address. If you do not enable this option, assign the IP address of the WINS name server
manually in the “IP Address” field.
IP Address
Enter the IP address of the WINS name server when you enable the “Use WINS Server”
option and disable the “Enable Auto IP” option.
60
Perform resetting the GA-1140.
5
P109 “Resetting the GA-1140”
• The setting changes on the Network options is applied after resetting the printer. If you want to set
other network options, you can also proceed the operation for setup before resetting the printer.
Page 63

Setting up from TopAccess
Accessing the TopAccess for Administrator.
1
2
3
Server Name
Comment
Domain or Workgroup
Use WINS Server
Enable Auto IP
IP Address
P23 “Accessing TopAccess for Administrator”
Accessing the Other Setup page.
1. Click on the Network SETUP menu.
2. Click on the Other tab.
Check the box for “Enable Windows Printing
Service” and enter each item explained below
and click on [SETUP].
Enter the server name that will appear on the network for accessing the GA-1140 via SMB.
Enter comments about the printer. These comments are listed in the Properties of the GA1140 in Network Neighborhood.
Enter the name of the workgroup or domain where you want the GA-1140 to appear.
Press [ENABLE] when you want to use WINS (Windows Internet Name Service) to name the
GA-1140 printer. In order to enable SMB for users who are located in different segment, use
a WINS name server.
Press [ENABLE] to have the GA-1140 automatically obtain the WINS Name Server IP
address. If you do not enable this option, assign the IP address of the WINS name server
manually in the “IP Address” field.
Enter the IP address of the WINS name server when you enable the “Use WINS Server”
option and disable the “Enable Auto IP” option.
Network Setup
Options
Setting up the
61
Page 64

SMB Printing
Select an emulation which is used for Point and Print of SMB printing. The selected emulation
is automatically used when a user install a printer driver by double-clicking a queue on the
GA-1140. This is available only when the HDD option is installed.
The message “Reset the Printer Enable
Setting” is displayed on the top of a page.
4
Perform resetting the GA-1140.
P125 “Resetting the GA-1140”
• The setting changes on the Network options is
applied after resetting the printer. If you want to set
other network options, you can also proceed the
operation for setup before resetting the printer.
62
Page 65

Setting up the LPD Printing Service
LPD Printing Service Setup enables LPR printing in the TCP/IP network.
In order to enable LPR printing, the GA-1140 should support the LPD protocol (Line Printer Daemon) to
receive LPR print jobs and print on the copier.
You can set up the LPD Printing Service options from Touch Panel Display or TopAccess. There are
no difference between the setup from Touch Panel Display and setup from TopAccess for LPD Printing
Service options.
Setting up from Touch Panel Display
Accessing the Setting menu on the Touch Panel Display.
1
2
3
P18 “Accessing Setting Menu”
Accessing the Windows Setup screen.
1. Press [PROTOCOL SETUP] on the Setting menu.
2. Press [Windows] on the Protocol Setup menu.
Press [Next] twice to display the LPD Printing
Service options.
Press [ENABLE] for “Enable LPD Printing
Service” and select options for each item
explained below and press [SET].
• The screen returns to the Protocol Setup menu.
Network Setup
Options
Setting up the
Enable Port 9100
Press [ENABLE] to enable downloading jobs to a GA-1140 queue from LPR printing using the
Port 9100. When you enable this option, select a queue at the Select Port 9100 Queue
option.
Select Port 9100 Queue
Specify the GA-1140 print queue for downloading jobs to Port 9100. You can only select the
direct queue for Port 9100 when the HDD option is not installed.
63
Page 66

: Also “Print” queue and “Hold” queue are available when the PS3 Scan & HDD Upgrade (GE-
1060+GE-1110) is installed. However, only the print queues you have enabled in the Queue
setup for the Printer Setup options are available.
P90 “Setting up the Queue Options”
Perform resetting the GA-1140.
4
P109 “Resetting the GA-1140”
• The setting changes on the Network options is applied after resetting the printer. If you want to set
other network options, you can also proceed the operation for setup before resetting the printer.
Setting up from TopAccess
Accessing the TopAccess for Administrator.
1
2
3
P23 “Accessing TopAccess for Administrator”
Accessing the Other Setup page.
1. Click on the Network SETUP menu.
2. Click on the Other tab.
Check the box for “Enable LPD Printing
Service” and enter each item explained below
and click on [SETUP].
64
Enable Port 9100
Check this option to enable downloading jobs to a GA-1140 queue from LPR printing using the
Port 9100. When you enable this option, select a queue at the Select Port 9100 Queue
option.
Select Port 9100 Queue
Specify the GA-1140 print queue for downloading jobs to Port 9100. You can only select the
direct queue for Port 9100 when the HDD option is not installed.
Page 67

The message “Reset the Printer Enable
Setting” is displayed on the top of a page.
4
Perform resetting the GA-1140.
P125 “Resetting the GA-1140”
• The setting changes on the Network options is
applied after resetting the printer. If you want to set
other network options, you can also proceed the
operation for setup before resetting the printer.
Network Setup
Options
Setting up the
65
Page 68

66
Page 69

Setting up the
Printer Setup Options
Printer Setup
Options
Setting up the
67
Page 70

Setting up the Printer Setup Options
Setting up the Printer Default Options
In the Printer Default options, you can specify the default printer settings such as number of copies,
paper size, paper source, finishing, destination, duplex, and orientation. These settings are used for
printing the job which does not include the print setting information. For example, when the print job is
sent from the MS-DOS prompt using the LPR command without specifying the paper size, orientation
and so on, the GA-1140 uses these settings for printing.
You can set up the Printer Default options from Touch Panel Display or TopAccess. There are no
difference between the setup from Touch Panel Display and setup from TopAccess for Ethernet
options.
Setting up from Touch Panel Display
Accessing the Setting menu on the Touch Panel Display.
1
2
P18 “Accessing Setting Menu”
Accessing the Printer Default Setup screen.
1. Press [PRINT DEFAULT] on the Setting menu.
68
Press [COPIES] to set the number of copies.
• The Copies option screen is displayed.
3
Page 71

Enter the number of copies in the using the
Digital keys and press [SET].
4
• The screen returns to the Printer Default options
menu.
Press [PAPER] to set the paper size.
• The Paper option screen is displayed.
5
Printer Setup
Options
Setting up the
Press the desired paper size and press [SET].
• The screen returns to the Printer Default options
6
menu.
69
Page 72
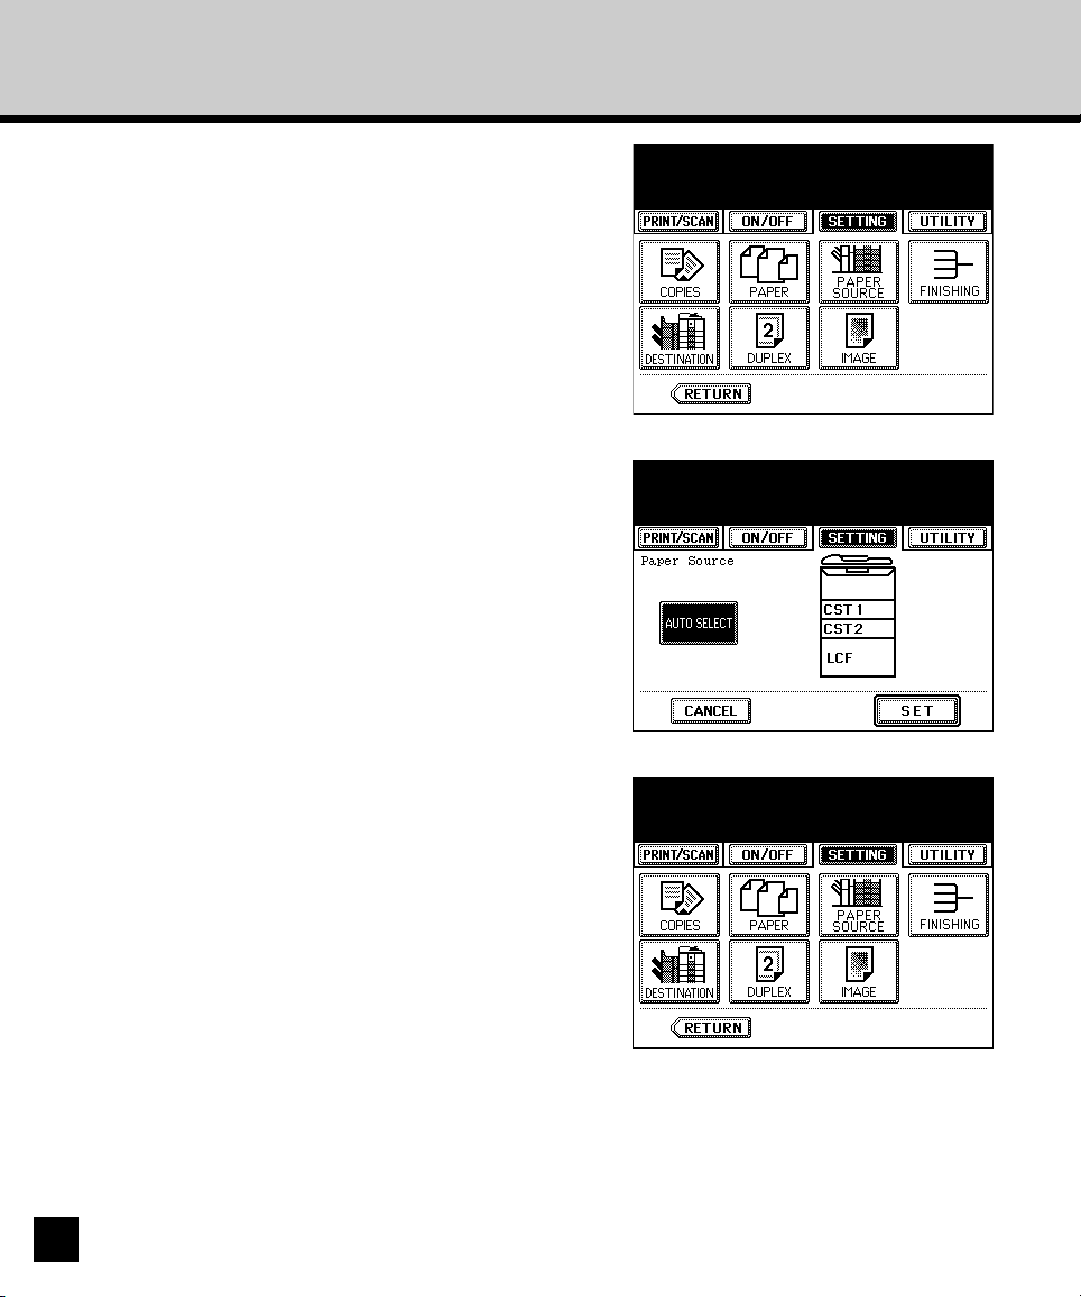
Press [PAPER SOURCE] to set the paper
source.
7
• The Paper Source option screen is displayed.
Press the desired paper source from the figure
on the screen, or press [AUTO SELECT], and
8
press [SET].
• [AUTO SELECT] allows the GA-1140 to automatically
select the appropriate paper source for a print job
according to the paper size of the print job.
• The screen returns to the Printer Default options
menu.
70
Press [FINISHING] to set the finishing option.
• The Finishing option screen is displayed.
9
Page 73

Press the desired Finishing option button and
10
press [SET], or press [Next] to display more
finishing options.
• When you press [SET], save the settings and the
screen returns to the Printer Default option menu.
Proceed to step 13.
• When you press [Next], the other finishing options
button will be displayed. Proceed to the next step.
SUPPLEMENT:
The [Next] button is available only when the Finisher or Saddle Stitch Finisher is installed on the
copier.
NOT-SORT NON-STAPLE
Select this button to print using no finishing features.
SORT
Select this button to print for sorting-printing when printing multiple copies.
GROUP
Select this button to print for group-printing when printing multiple copies.
Press the desired Finishing option button and
11
press [SET], or press [Next] to display more
finishing options.
• When you press [SET], save the settings and the
screen returns to the Printer Default option menu.
Proceed to step 13.
• When you press [Next], the other finishing options
button will be displayed. Proceed to the next step.
Printer Setup
Options
Setting up the
71
Page 74

SUPPLEMENT:
The [Next] button is available only when the Hole Punch Unit is installed on the copier.
SADDLE STITCH
Select this for booklet making with stapling on the center. The printer automatically performs
sorting of the pages and print two pages of reduced image on one page on the both side of
paper. The Saddle Stitch Finisher is required to enable this option.
NOTE: The Saddle Stitch option should be used only if the original job was sent as Magazine
Sort and you want to print this file to the Saddle Stitch bin.
LEFT-UPPER SINGLE
Select this to staple in the upper left and print. The Finisher or Saddle Stitch Finisher is
required to enable this option.
RIGHT-UPPER SINGLE
Select this to staple in the upper right and print. The Finisher or Saddle Stitch Finisher is
required to enable this option.
72
LEFT DOUBLE
Select this to staple double in the left and print. The Finisher or Saddle Stitch Finisher is
required to enable this option.
TOP DOUBLE
Select this to staple double in the upper side and print. The Finisher or Saddle Stitch Finisher
is required to enable this option.
Page 75

Press the desired Finishing option button and
12
press [SET].
• The screen returns to the Printer Default option
menu.
NONE
Select this button to print using no punching features.
LEFT
Select this to create holes on the left side and print. This can not be used in combination with
“SADDLE STITCH”, “LEFT DOUBLE”, and “TOP DOUBLE”. The Hole Punch unit is required
to enable this option.
TOP
Select this to create holes on the upper side and print. This can not be used in combination
with “SADDLE STITCH”, “LEFT DOUBLE”, and “TOP DOUBLE”. The Hole Punch unit is
required to enable this option.
Printer Setup
Options
Setting up the
13
Press [DESTINATION] to set the destination.
• The Destination option screen is displayed.
73
Page 76

14
15
Press the desired destination button and press
[SET].
• The screen returns to the Printer Default option
menu.
Press [DUPLEX] to set the Duplex option.
• The Duplex option screen is displayed.
74
Press the desired Duplex option button and
16
press [SET].
• The screen returns to the Printer Default option
menu.
SIMPLEX
Select this not to perform the Duplex printing.
Page 77

BOOK
Select this to print both side of paper in vertically the same direction to be bound along the
vertical side of paper that the pages can be turned over right and left.
Portrait
1
TABLET
Select this to print both side of paper a vertical reverse one to be bound along the horizontal
side of paper that the pages can be turned over up and down.
Portrait
1
Press [IMAGE] to set the orientation and
17
smoothing function.
• The Print Image option screen is displayed.
Landscape
2
1
2
Landscape
1
2
2
Printer Setup
Options
Setting up the
18
19
Press the desired orientation button, press
[YES] or [NO] to enable or disable the
smoothing function, and press [SET].
• The screen returns to the Printer Default option
menu.
Printer Default Setup is completed. Exit the
Setting menu and switch to On-line.
P20 “Switching to On-line/Off-line”
75
Page 78

Setting up from TopAccess
Accessing the TopAccess for Administrator.
1
2
3
Number of Copies
Paper Size
Paper Source
Finishing
P23 “Accessing TopAccess for Administrator”
Accessing the Printer Setup page.
1. Click on the Printer SETUP menu.
2. Click on the Printer tab.
Enter each item explained below and click on
[SETUP].
Enter the number of printed copies. You can set any integer from 1 to 9999.
Select the size of paper for printing.
This selects the source for feeding paper. Please select a paper source that correlates with
the printing size.
Auto Select - Automatically selects the paper set in the printer according to the printed
document size.
Upper Cassette - Paper is fed from the Upper Recording Paper Tray.
Lower Cassette - Paper is fed from the Lower Recording Paper Tray.
Large Capacity Feeder - Paper is fed from the Large Capacity Feeder. This cannot be
selected when the Large Capacity Feeder is not installed.
This sets how to sort the printed sheet when numerous copies are made for printing. Also you
can enable the output to be stapled, or made a hole on the paper.
Off - Select this button to print using no finishing features.
76
Page 79

Sort - Select this button to print for sorting-printing when printing multiple copies.
Group - Select this button to print for group-printing when printing multiple copies.
Sort + Staple Upper Left - Select this to staple in the upper left and print. The Finisher or
Saddle Stitch Finisher is required to enable this option.
Sort + Staple Upper Right - Select this to staple in the upper right and print. The Finisher
or Saddle Stitch Finisher is required to enable this option.
Sort + Staple Left (Double) - Select this to staple double in the left and print. The Finisher
or Saddle Stitch Finisher is required to enable this option.
Printer Setup
Options
Setting up the
Sort + Staple Top (Double) - Select this to staple double in the upper side and print. The
Finisher or Saddle Stitch Finisher is required to enable this option.
Saddle Stitch - Select this for booklet making with stapling on the center. The printer
automatically performs sorting of the pages and print two pages of reduced image on one
page on the both side of paper. The Saddle Stitch Finisher is required to enable this option.
Destination
This selects the destination tray to be outputted.
77
Page 80

Duplex
Enables duplex printing (printing on both sides of paper) according to the type of binding for
the duplex-printed pages.
Off - Select this not to perform the duplex printing.
Long Edge Binding - Select this to bind along the long edge side of paper. The direction
to be printed on the back side of the paper differs depending on the orientation.
Portrait Landscape
1
2
1
2
Short Edge Binding - Select this to bind along the short edge side of paper. The direction
to be printed on the back side of the paper differs depending on the orientation.
Portrait Landscape
1
1
2
2
Orientation
This sets the paper printing direction.
Smoothing
Check the box to print the texts and graphics smoothly.
Hole Punch
This selects whether or not to use the punching option. This can not be used in combination
with “Saddle Stitch”, “Sort + Staple Left (Double)”, and “Sort + Staple Top (Double)”. The Hole
Punch unit is required to enable this option.
Off - Select this not to use the punching option.
Left - Select this to create holes on the left side and print.
Top - Select this to create holes on the top side and print.
78
NOTE: For information about the Emulation Mode option on the Printer Setup page,
please see the next section.
The message “Request has been Received” is
displayed on the top of a page.
4
Page 81

Setting up the Emulation Options
In the Emulation options, you can specify the Emulation mode, PCL or PostScript, that the GA-1140 is
restricted for printing. When you select the Emulation mode either PCL or PS, Jobs sent to the GA1140 that does not match the Emulation mode are not printed.
It is configure to automatically select the Emulation mode as a factory default so that the GA-1140 will
print both PCL and PS jobs as switching to the appropriate page description language for each job. If
you do not need to restrict the Emulation mode for printing, do not change the Emulation options.
You can set up the Emulation options from Touch Panel Display or TopAccess. There are no
difference between the setup from Touch Panel Display and setup from TopAccess for Emulation
options.
Setting up from Touch Panel Display
Accessing the Setting menu on the Touch Panel Display.
1
2
P18 “Accessing Setting Menu”
Accessing the Emulation Setup screen.
1. Press [EMULATION] on the Setting menu.
Printer Setup
Options
Setting up the
Press desired Emulation option and press
[SET].
3
• The screen returns to the Setting menu.
Auto Select
Select this not to restrict to print. In Auto mod, the GA-1140 switches to the appropriated page
description language for each job.
PCL
Select this to allow the GA-1140 to print only PCL jobs.
79
Page 82

PS
Select this to allow the GA-1140 to print only PS jobs.
: “PS” emulation is available only when the PS3 Upgrade (GE-1020) or PS3 Scan & HDD
Upgrade (GE-1060+GE-1110) is installed.
Emulation Setup is completed. Exit the Setting
menu and switch to On-line.
4
P20 “Switching to On-line/Off-line”
Setting up from TopAccess
Accessing the TopAccess for Administrator.
1
2
3
P23 “Accessing TopAccess for Administrator”
Accessing the Printer Setup page.
1. Click on the Printer SETUP menu.
2. Click on the Printer tab.
Enter each item explained below and click on
[SETUP].
80
Emulation Mode
This option allows the GA-1140 to restrict to PCL or PostScript jobs, respectively. Jobs sent
to the GA-1140 that do not match the mode selected here are not printed.
Auto Select - Select this not to restrict to print. In Auto mod, the GA-1140 switches to the
appropriated page description language for each job.
PCL - Select this to allow the GA-1140 to print only PCL jobs.
PS - Select this to allow the GA-1140 to print only PS jobs.
Page 83

The message “Request has been Received” is
displayed on the top of a page.
4
Printer Setup
Options
Setting up the
81
Page 84

Setting up the PCL Options
In the PCL options, you can set the PCL (Printer Control Language) defaults to control printer output.
These settings are used for printing the PCL job which does not include the fonts for texts, line length,
and margin width. For example, when the PCL job is sent from the text editor that the fonts cannot be
specified, the GA-1140 uses these settings for printing.
You can set up the PCL options from Touch Panel Display or TopAccess. There are no difference
between the setup from Touch Panel Display and setup from TopAccess for PCL options.
Setting up from Touch Panel Display
Accessing the Setting menu on the Touch Panel Display.
1
2
3
P18 “Accessing Setting Menu”
Accessing the PCL Setup screen.
1. Press [PCL] on the Setting menu.
Press [Symbol Set] to set the symbol set.
• The Symbol Set options screen is displayed.
82
Select the symbol set that best matches the
needs of users printing to the GA-1140 and
4
press [SET].
• You can select a symbol set from 36 symbol sets. To
display more symbol sets, press [Next] to scroll the
screen.
• After pressing the [SET] button, the screen returns to
the PCL options menu.
Page 85

Press [FONT SETUP] to set default font and
size.
5
• The Font Setup options screen is displayed.
Enter each item explained below and press
[SET].
6
• The screen returns to the PCL options menu.
Printer Setup
Options
Setting up the
Font Number
Enter the font number of internal PCL font to be used as a default font for printing. You can
check the font numbers and internal PCL fonts in the Internal PCL Font List.
Font Pitch
Enter the font pitch when the selected font number represents a fixed pitch scalable font.
Pitch is measured by characters per inch, so 10-pitch type fits ten characters per inch.
Font Size
Enter the font size when the selected font number represents a proportionally spaced scalable
font. Font Size option allows you to determine the point size (height) of the default font.
83
Page 86

Press [PAGE LENGTH] to set the page length.
• The Page Length options screen is displayed.
7
Enter the number of lines to be printed per
page and press [SET].
8
• The screen returns to the PCL options menu.
84
Press [MARGIN] to set the margin.
• The Margin options screen is displayed.
9
Page 87

10
11
1
2
Enter the default margin width for each item
and press [SET].
• You can change the unit by pressing either [mm] or
[inch].
• The screen returns to the PCL options menu.
PCL Setup is completed. Exit the Setting
menu and switch to On-line.
P20 “Switching to On-line/Off-line”
Setting up from TopAccess
Accessing the TopAccess for Administrator.
P23 “Accessing TopAccess for Administrator”
Accessing the PCL Setup page.
1. Click on the Printer SETUP menu.
2. Click on the PCL tab.
Printer Setup
Options
Setting up the
Set each item explained below and click on
[SETUP].
3
Symbol Set
Select the symbol set that best matches the needs of users printing to the GA-1140.
Font Number
Enter the font number of internal PCL font to be used as a default font for printing. You can
check the font numbers and internal PCL fonts in the Internal PCL Font List.
Font Pitch
Enter the font pitch when the selected font number represents a fixed pitch scalable font.
Pitch is measured by characters per inch, so 10-pitch type fits ten characters per inch.
85
Page 88

Font Size
Enter the font size when the selected font number represents a proportionally spaced scalable
font. Font Size option allows you to determine the point size (height) of the default font.
Page Length
Enter the number of lines to be printed per page.
Margin - Unit
Select the unit of measurement from mm or inch. This unit is used to enter the left and top
margins.
Margin - Top
Enter the margin width set to the upper side of paper. The unit of measurement is depending
on the Unit option.
Margin - Left
Enter the margin width set to the left side of paper. The unit of measurement is depending on
the Unit option.
The message “Request has been Received” is
displayed on the top of a page.
4
86
Page 89

Setting up the PS Options
: PS Options is available only when the PS3 Upgrade (GE-1020) or PS3 Scan & HDD Upgrade
(GE-1060+GE-1110) is installed.
In the PS options, you can set the defaults for GA-1140 behavior for PostScript jobs. These settings
are used when the behaviors for PostScript jobs, such as printing PS error and converting paper size to
fit on paper, are not included in the PostScript file sent to the GA-1140.
You can set up the PS options from Touch Panel Display or TopAccess. However, since setup from
the Touch Panel Display is only able to enable or disable Print PS Error Page option and Convert
Paper Size option, setup from TopAccess can enable or disable the Allow Courier Substitution option,
which allows to substitute Courier for fonts that are unavailable on the GA-1140. Therefore, it is
recommended to configure the PS options from TopAccess rather than setting up from the Touch
Panel Display.
Setting up from Touch Panel Display
Accessing the Setting menu on the Touch Panel Display.
1
P18 “Accessing Setting Menu”
Printer Setup
Options
Setting up the
Accessing the PS Setup screen.
1. Press [PS] on the Setting menu.
2
Set each item explained below and press
[SET].
3
• The screen returns to the Setting menu.
Print PS Error Page
This option specify whether the GA-1140 should prints PS error page when it encounters a
PostScript error.
87
Page 90

Convert Paper Size
This option specify whether to convert paper sizes in documents automatically to the default
paper sizes specified.
PS Setup is completed. Exit the Setting menu
and switch to On-line.
4
P20 “Switching to On-line/Off-line”
Setting up from TopAccess
Accessing the TopAccess for Administrator.
1
2
3
P23 “Accessing TopAccess for Administrator”
Accessing the PS Setup page.
1. Click on the Printer SETUP menu.
2. Click on the PS tab.
Set each item explained below and click on
[SETUP].
88
Print PS Error Page
This option specify whether the GA-1140 should prints PS error page when it encounters a
PostScript error.
Convert Paper Size
This option specify whether to convert paper sizes in documents automatically to the default
paper sizes specified.
Allow Courier Substitution
This option specify whether to substitute Courier for fonts that are unavailable when you
download PostScript files to the GA-1140, or when you print a document for which you do not
have the corresponding printer font.
Page 91

The message “Request has been Received” is
displayed on the top of a page.
4
Printer Setup
Options
Setting up the
89
Page 92

Setting up the Queue Options
: Queue Options are available only when the PS3 Scan & HDD Upgrade (GE-1060+GE-1110) is
installed.
In the Queue options, you can enable or disable each queue for users. When the HDD option is
installed on the GA-1140, the Print queue and Hold queue will be available in addition to the Direct
queue. These queues can be enabled or disabled as you required. Also, you can specify the queue to
be used for parallel printing.
You can set up the Queue options only from TopAccess.
Setting up from TopAccess
Accessing the TopAccess for Administrator.
1
2
P23 “Accessing TopAccess for Administrator”
Accessing the Queue Setup page.
1. Click on the Printer SETUP menu.
2. Click on the Queue tab.
90
Set each item explained below and click on
[SETUP].
3
Publish Print Queue
Check this option to enable users to print jobs to the Print queue. Jobs printed to the Print
queue are spooled to the GA-1140 disk and printed on a first-in, first-out basis.
Publish Direct Connection
Check this option to enable users to print jobs to the GA-1140 without spooling. Jobs printed
to the Direct connection are not saved in the Printed queue. If you plan to download fonts to
the GA-1140, you must publish the Direct connection.
Page 93

Publish Hold Queue
Check this option to enable users to print jobs to the Hold queue. Jobs in the Hold queue can
be printed only by copying or moving them to the Print queue with the job management tools.
Parallel Connection
Select a queue where jobs printed to the parallel port are sent. Only the connections that you
published are displayed in the drop down list. This option is available only when you have
enabled the parallel port in the Port Setup options.
The message “Request has been Received” is
displayed on the top of a page.
4
Printer Setup
Options
Setting up the
91
Page 94

92
Page 95

Setting up the
TopAccess Setup Options
Setting up the
TopAccess Setup
Options
93
Page 96

Setting up the TopAccess Setup Options
Setting up the TopAccess Options
In the TopAccess options, you can specify system information that pertains to the GA-1140 itself and
all users.
You can set up the TopAccess options from Touch Panel Display or TopAccess. However, some
setting items are not available on the Touch Panel Display. To set up the TopAccess options in detail,
please perform a setup from TopAccess.
Setting up from Touch Panel Display
Accessing the Setting menu on the Touch Panel Display.
1
2
3
P18 “Accessing Setting Menu”
Accessing the TopAccess Setup screen.
1. Press [TopAccess] on the Setting menu.
Enter each item explained below and press
[Next] to proceed to the next setup screen.
• To enter the value for the Server Name option, press
the entry field to display the keypad screen. Enter
the value using the keypad screen and press [SET] to
complete the entry.
94
Server Name
Enter the name for the GA-1140.
Print Start Page
Specify whether the GA-1140 should print a start page when it is turned on or rebooted. The
start page displays information about the GA-1140, for example, the server name, the current
date and time, and print connections published.
Print Banner Page
Specify whether the AR-P15 should print a banner page after printing.
Page 97

Enter each item explained below and press
[SET].
4
• The screen returns to the Setting menu.
SUPPLEMENT:
When the HDD option is installed, the [Next]
button appears on this screen to proceed a
setup for the Scan option. For details about
the Scan option, please refer to
mail Guide
Use Character Set
Select the character set to be used for the Touch Panel Display, and optional job management
tools. This is important if a filename includes accented or composite characters (such as é or
æ). For mixed-platform network, select the setting that gives the best overall representation of
the special characters you use.
Delete Time for Private Job
Select how many days a Private job is stored on the GA-1140.
.
Scan & E-
Setting up the
TopAccess Setup
Options
TopAccess Setup is completed. Exit the
Setting menu and switch to On-line.
5
P20 “Switching to On-line/Off-line”
Setting up from TopAccess
Accessing the TopAccess for Administrator.
1
2
P23 “Accessing TopAccess for Administrator”
Accessing the TopAccess Setup page.
1. Click on the TopAccess SETUP menu.
2. Click on the TopAccess tab.
95
Page 98

Enter each item explained below and click on
[SETUP].
3
Installation Site
Enter the name of the department or site. This name is displayed on the Configurations page
on TopAccess which appears first when accessing TopAccess home page for users.
Administrator
Enter the name of the administrator. This name is displayed on the Configurations page on
TopAccess which appears first when accessing TopAccess home page for users.
Server Name
Enter the name for the GA-1140.
Refresh Rate
Specify how frequently the communication and copier status are updated.
Auto Refresh Job Status
Specify whether the Print Jobs and Print Log pages are refreshed automatically when a new
job is submitted.
Default Language
Specify the default language for TopAccess when a new web browser window is opened.
This is also sets the language of system pages.
Print Start Page
Specify whether the GA-1140 should print a start page when it is turned on or rebooted. The
start page displays information about the GA-1140, for example, the server name, the current
date and time, and print connections published.
Print Banner Page
Specify whether the GA-1140 should print a banner page after the printing is completed for
each job.
Job List Order
Specify the order in which jobs are displayed in the Job Status, Private, Stored Job, and Print
Jog page.
Delete Time for Private Job
Select how many days a Private job is stored on the GA-1140.
96
Page 99

Clear Each Scan Job
Select how many days a Scan job is stored on the GA-1140. This option is available only
when the HDD option is installed.
Use Character Set
Select the character set to be used for the Touch Panel Display, and optional job management
tools. This is important if a filename includes accented or composite characters (such as é or
æ). For mixed-platform network, select the setting that gives the best overall representation of
the special characters you use.
The message “Request has been Received” is
displayed on the top of a page.
4
Setting up the
TopAccess Setup
Options
97
Page 100

Setting up the Job Log Options
: Job Log Options are available only when the PS3 Scan & HDD Upgrade (GE-1060+GE-1110)
is installed.
In the Job Log options, you can specify whether the GA-1140 should store the jobs which were printed
from the Print queue. These options enable to access the jobs with the job management tools, which
are provided with the HDD option.
You can set up the Job Log options only from TopAccess.
Setting up from TopAccess
Accessing the TopAccess for Administrator.
1
2
3
P23 “Accessing TopAccess for Administrator”
Accessing the Job Log Setup page.
1. Click on the TopAccess SETUP menu.
2. Click on the Job Log tab.
Enter each item explained below and click on
[SETUP].
98
Enable Printed Queue
Check this option to enable the Printed queue, which creates a storage location on the GA1140 disk for recent jobs that were printed from the Print queue. Users with access to the job
management tools can reprint their own jobs from the Printed queue without sending them to
the GA-1140 again. If you checked off this option, jobs are deleted from the GA-1140 disk
immediately after they are printed.
 Loading...