

Page 1

G7 Adjustable Speed Drive
Quick Start Guide
Document Number: 51671-003
Date: March, 2005
Page 2

Introduction
Congratulations on the purch ase of your new G7 True Torque Control2 Adjustable Speed Drive (ASD).
The G7 True Torque Control
T o rque Control
provide compensation for motor slip, which results in smooth, quick starts and highly efficient operation.
The G7 uses digitally-controlled pulse width modulation. The programmable functions may be accessed
via the easy-to-use menu or via the Direct Access Numbers listed in the G7 ASD Operation Manual.
This feature, combined with Toshiba’s high-performance software, delivers unparalleled motor control
and reliability.
The G7 is a very powerful tool, yet surprisingly simple to operate. The user-friendly Electronic Operator
Interface (EOI) of the G7 has an easy-to-read 240 x 64 pixel graphical LCD screen. The EOI provides
easy access to the many monitoring and programming features of the G7.
The motor control software is menu-driven, which allows for easy access to the motor control parameters
and quick changes when required.
To maximize the abilities of your new G7, a working familiarity with this guide will be requir ed . This
guide has been prepared for the G7 ASD installer, user, and maintenance personnel. This guide may also
be used as a reference guide or for training. With this in mind, use this guide to develop a system
familiarity before attempting to install or operate the device.
2
. TIC’ s Vector Contro l Algorithm enables the motor to develop high starting torque and
2
Adjustable Speed Drive is a solid-state AC drive that features True
Important Notice
The instructions contained in this guide are not intended to cover all details or variations in equipment
types. Nor may it provide for every possible contingency concerning the installation, operation, or
maintenance of this equipment. Additional information pertaining to the G7 ASD is provided in the G7
Adjustable Speed Drive Operation Manual (P/N 51546) and can be found on the CD shipped with the
unit. A hardcopy of the manual is available through your Toshiba representative. Should additional
information be required contact your Toshiba representative.
The contents of this guide shall not become a part of or modify any prior or existing agreement,
commitment, or relationship. The sales contract contains the entire obligation of Toshiba International
Corporation. The warranty contained in the contract between the parties is the sole warranty of Toshiba
International Corporation and any statements contained herein do not create new warr anties or modif y the
existing warranty .
Any electrical or mechanical modifications to this equipment without prior written consent of
Toshiba International Corporation will void all warranties and may void the UL/CUL listing or
other safety certifications. Unauthorized modifications may also result in a safety hazard or
equipment damage.
Misuse of this equipment could result in injury and equipment damage. In no event will Toshiba
Corporation be responsible or liable for direct, indirect, special, or consequential damage or injury
that may result from the misuse of this equipment.
Page 3

Contacting Toshiba’s Customer Support
Center
T oshiba’s Customer Support Center can be contacted to obtain help in resolving any Adjustable Speed
Drive system problem that you may experience or to provide application information.
The center is open from 8 a.m. to 5 p.m. (CST), Monday throu gh F riday. The Support Cent er’s toll free
number is US (800) 231-1412/Fax (713) 466-8773 — Canada (800) 527-1204.
You may also contact Toshiba by writing to:
Toshiba Internationa l Corporation
13131 West Little York Road
Houston, Texas 77041-9990
Attn: ASD Product Manager.
For further information on Toshiba’s products and services, please visit our website at
www.TIC.TOSHIBA.com.
TOSHIBA INTERNATIONAL CORPORATION
G7 Adjustable Speed Drive
Please complete the Warranty Card supplied with the ASD and return it to Toshiba by prepaid m ail. This will
activate the 12 month warranty from the date of installation; but, shall not exceed 18 months from the shipping
date.
Complete the following information and retain for your records.
Model Number: ______________________________________________________________________
Serial Number:______________________________________________________________________
Project Number (if applicable):__________________________________________________________
Date of Installation:
Inspected By:______________________________________________________________________
Name of Application:_________________________________________________________________
__________________________________________________________________
Page 4

About This Guide
This guide was written by the Toshiba Technical Publications Group. This group is tasked with
providing technical documentat ion fo r th e G7 Adjustable Speed Drive. Every effort has been made to
provide accurate and concise information to you, our customer.
At Toshiba we’re continuously searching for better ways to meet the constantly changing needs of our
customers. Email your comments, questions, or concerns about this publication to Technical-
Publications-Dept@TIC.TOSHIBA.COM.
Guide’s Purpose and Scope
This document is a Quick Start Guide that provides information on how to safely install, operate,
maintain, and dispose of your G7
provided in this guide is applicable to the G7 True Torque Control
The complete G7 Adjustable Speed Drive Manual is included as a PDF file on the enclosed CD. The
complete printed manual may be ordered from your Toshiba Sales Representative, if required.
This Quick Start Guide provides information on the various features and functions of this powerful costsaving device, including
• Installation,
True Torque Control2 Adjustable Speed Drive. The information
2
Adjustable Speed Drive only.
• System operation,
• Configuration and menu options, and
• Mechanical and electrical specifications.
Included is a section on g eneral safet y ins truction s that des cribe the warni ng label s and symbols that ar e
used throughout the guide. Read the guide completely before installing, operating, performing
maintenance, or dispos ing of this equipment.
This guide and the accompanying drawings should be considered a permanent part of the equipment
and should be readily available for reference and review. Dimensions shown in the guide are in metric
and/or the English equivalent.
Because of our commitment to continuous improvemen t, T oshiba International Corporation reserves the
right, without prior notice, to update information, make product changes, or to discontinue any product
or service identified in this publication.
Toshiba International Corporation (TIC) shall not be liable for direct, indirect, special, or
consequential damages resulting from the use of the information contained wi th in t his g uide.
TOSHIBA is a registered trademark of the Toshiba Corporation. All other product or trade references
appearing in this guide are registered trademarks of their respective owners.
This guide is copyrighted. N o part o f thi s guide may be photocopied or reproduced in an y fo rm w it ho ut
the prior written consent of Toshiba International Corporation.
© Copyright 2005 Toshiba International Corporation.
All rights reserved.
Printed in the U.S.A.
Page 5

Table of Contents
Introduction .............................................................................................................................2
Important Notice .....................................................................................................................2
CE Compliance Requirements ...............................................................................................9
EMC Installation Guidelines ..............................................................................................9
Installation and Connections ................................................................................................ 12
Installation Notes ....................................... ...... .................................................. ............... 12
Mounting the ASD ...........................................................................................................13
Connecting the ASD .........................................................................................................14
I/O and Control .................................................................................................................17
Typical Connection Diagram ...........................................................................................19
Electronic Operator Interface ..............................................................................................20
EOI Features ...................................................................................................... ............... 20
EOI Operation ................................................................................... ...............................21
System Operation ..................................................................................................................22
Initial Setup ......................................................................................................................22
Operation (Local) ............................................................................................................. 22
Default Setting Changes ....................................... ...... ................................................... ...23
Startup Wizard Requirements .............................................................................................24
System Configuration and Menu Options ...........................................................................27
Root Menus ...................................................................................................................... 27
Enclosure Dimensions and Conduit Plate Information .....................................................43
Enclosure Dimensions/Weight ......................................................................................... 43
Conduit Plate Information ................................................................................................48
Conduit Extender Box (option) ........................................................................................50
Cable/Terminal Specifications .............................................................................................. 51
Dynamic Braking Resistor Wire/Cable Specifications ....................................................54
G7 ASD Quick Start Guide i
Page 6
General Safety Information
DO NOT attempt to install, operate, maintain or dispose of this equipment until you have read and
understood all of the product safety information and directions that are contained in this manual.
Safety Alert Symbol
The Safety Alert Symbol indicates that a potential personal injury hazard exists. The symbol is
comprised of an equilateral triangle enclosing an exclamation mark.
Signal Words
Listed below are the signal words that are used throughout this manual followed by their descriptions
and associated symbols. When the words DANGER, WARNING and CAUTION are used in this
manual they will be followed by important safety information that must be carefully adhered to.
The word DANGER preceded by the safety alert symbol indicates that an imminently hazardous
situation exists that, if not avoided, will result in death or serious injury to personnel.
DANGER
The word WARNING preceded by the safety alert symbol indicates that a potentially hazardous
situation exists that, if not avoided, could result in death or serious injury to personnel.
WARNING
The word CAUTION preceded by the safety alert symbol indicates that a potentially hazardous
situation exists which, if not avoided, may result in mino r or moderate injury.
CAUTION
The word CAUTION without the safety alert symbol indicates a potentially hazardous situation exists
which, if not avoided, may result in equipmen t and property damage.
CAUTION
G7 ASD Quick Start Guide 1
Page 7
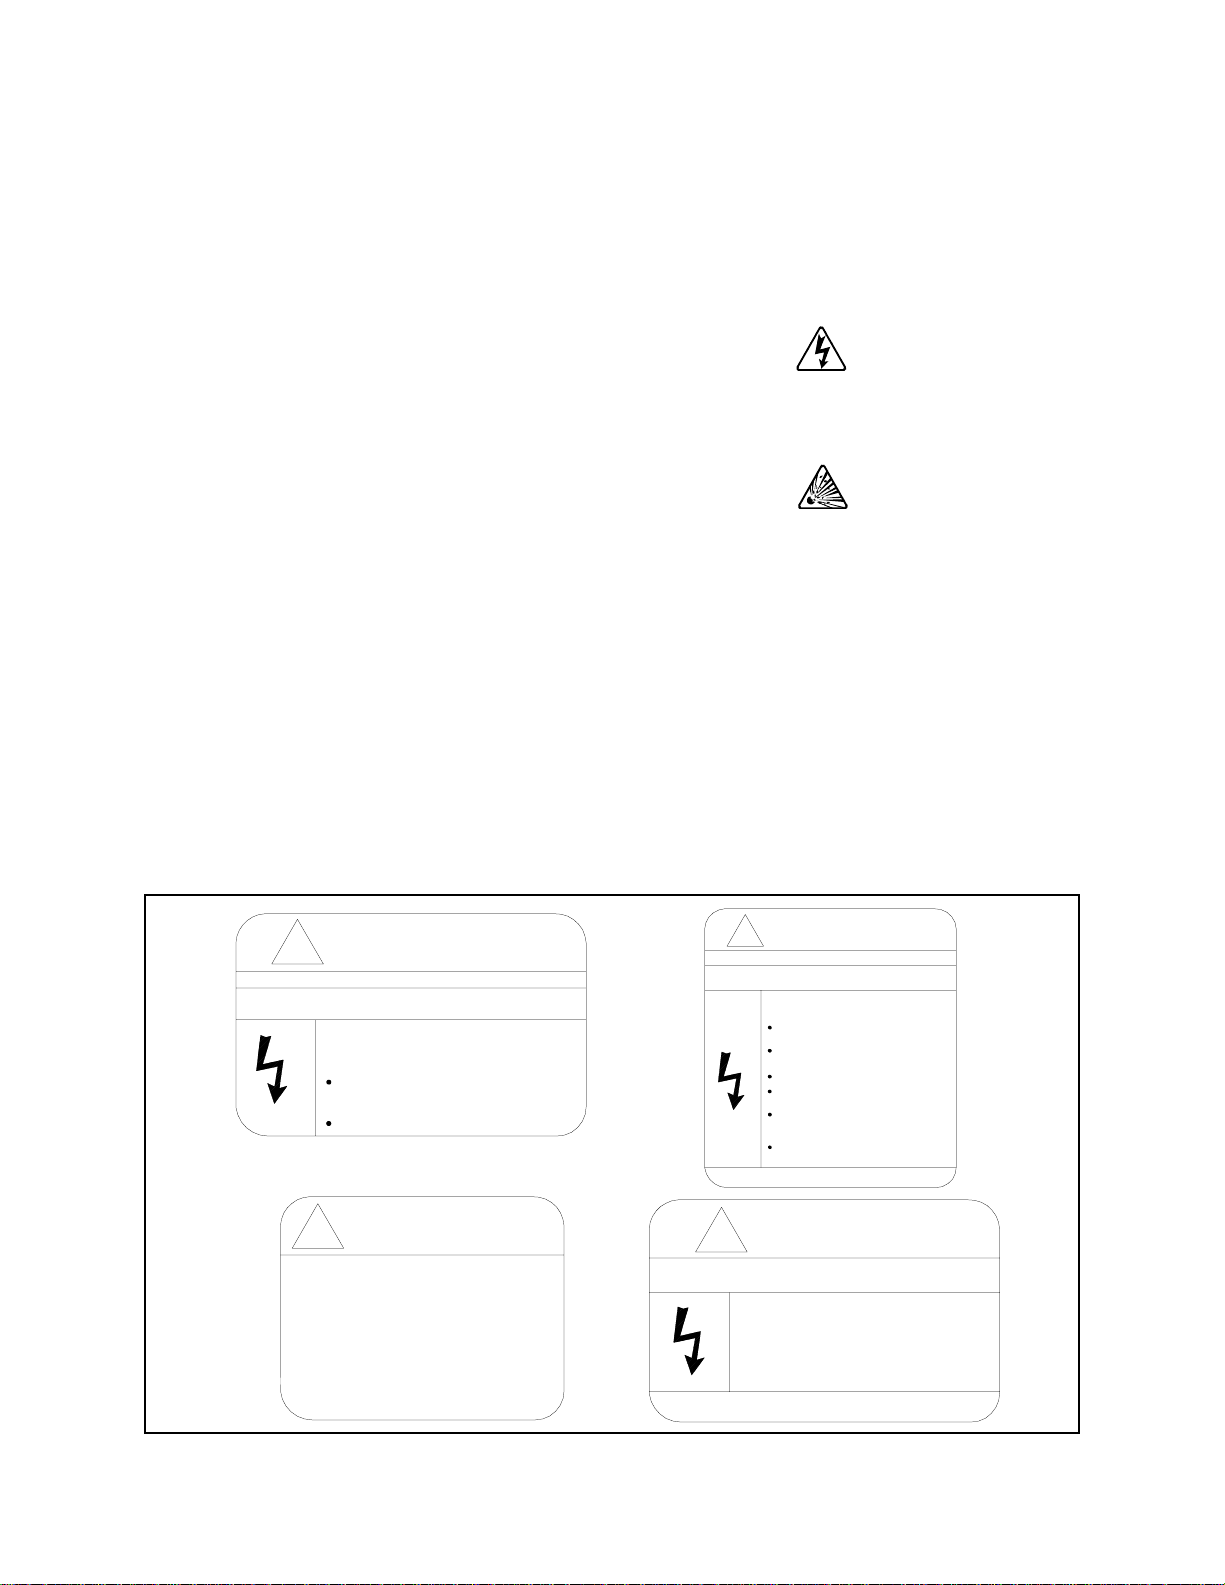
Special Symbols
T o identify special hazards, other symbols may appear in conjunction with the DANGER, WARNING
and CAUTION signal words. These symbols indicate areas that require special and/or strict adherence
to the procedures to prevent serious injury to personnel or death.
Electrical Hazard Symbol
A symbol which indicates a hazard of injury from electrical
shock or burn. It is comprised of an equilateral triangle
enclosing a lightning bolt.
Explosion Hazard Symbol
A symbol which indicates a hazard of injury from exploding
parts. It is comprised of an equilateral triangle enclosing an
explosion image.
Equipment Warning Labels
DO NOT attempt to install, operate, perform maintenance, or dispose of this equipment until you have
read and understood all of the product labels and user directions that are contained in this manual.
Shown below are examples of safety labels that may be found attached to the equipment. DO NOT
remove or cover any of the labels. If the labels are damaged or if additional labels are required, contact
your Toshiba sales representative for additional labels.
Labels attached to the equipment are there to provide useful information or to indicate an imminently
hazardous situation that may result in serious injury, severe property and equipment damage, or death if
the instructions are not followed.
Figure 1. Examples of labels that may be found on the equipment.
DANGER
DANGER
!
DO NOT REMOVE, DESTROY, OR COVER THIS LABEL.
READ THE INSTRUCTION MANUAL CAREFULLY BEFORE
ENTERING THIS COMPARTMENT.
HAZARDOUS VOLTAGE Behind These Panels.
Contact With Energi zed Main Bus Will Cause
Severe Injury, Death, Fire, Explosion, Or
Property Damage.
Turn Off And Lockout Primary And
Control Circuit Power Before Opening
These Panels.
Qualified Operators Only.
CAUTION
!
Excessive Loading of Operating Shaft
Can Prevent Contactor From Closing
Properly Resulting In Major Damage.
Do Not Use Contactor Shaft To Drive
Accessories Such As Mechanical Interlocks
Which Require More Than 5 Kgf-cm Of
Torque To Operate.
DO NOT OPEN THIS DOOR WHILE THE UNIT IS RUNNING.
THIS DOOR IS INTERLOCKED WITH ASD OPERAT ION.
!
DO NOT REMOVE, DESTROY, OR COVER THIS LABEL.
READ THE INSTRUCTION MANUAL CAREFULLY BEFORE
INSTALLING, OPERATING, OR SERVICING THIS EQUIPMENT.
HAZARDOUS VOLTAGE
Can Cause Severe Injury, Death, Explosion,
Fire, Or Property Damage.
Only Qualified Personnel Should Be Permitted
To Operarate or Service This Equipment.
Disconnect And Lockout Primary And Control
Circuit Power Before Servicing.
Keep All Panels And Covers Securely In Place.
Never Defeat, Modify, Or Bypass Safety
Interlocks.
Foreign Voltage May Be Present At Interface
Terminals. Isolate Before Performing Service
Or Repairs.
Unauthorized Modifications To This Equipment
Will Void The Warranty.
!
DANGER
HAZARDOUS VOLTAGE MAY BE PRESE NT.
Capacitors Are Charged. Wait
At Least 5 Minutes Before Entry.
Check For Charged Vol tage
To Dissipate To A Safe Level
Before Opening Th e Equipment.
2 G7 ASD Quick Start Guide
Page 8

Qualified Per sonnel
Installation, operation, and maintenance shall be performed by Qualified Personnel Only. A Qualified
Person is one that has the skills and knowledge relating to the construction, installation, operation, and
maintenance of the electrical equipment and has received safety training on the hazar ds involved (R efer
to the latest edition of NFPA 70E for additional safety requirements).
Qualified Personnel shall:
• Have carefully read the entire operation manual.
• Be familiar with the construction and function of the ASD, the equipment being driven, and the
hazards involved.
• Able to recognize and properly address hazards associated with the application of motor-driven
equipment.
• Be trained and authorized to safely energize, de-energize, ground, lockout/tagout circuits and
equipment, and clear faults in accordance with established safety practices.
• Be trained in the proper care and use of protective equipment such as safety shoes, rubber gloves,
hard hats, safety glasses, face shields, flash clothing, etc., in accordance with established safety
practices.
• Be trained in rendering first aid.
For further information on workplace safety visit www.osha.gov.
Equipment Inspection
• Upon receipt of the equipment inspect the packaging and equipment for shipping damage.
• Carefully unpack the equipment and check for parts that were damaged during shipping, missing
parts, or concealed damage. If any discrepancies are discovered, it should be noted with the carrier
prior to accepting the shipment, if possible. File a claim with the carrier if necessary and
immediately notify your Toshiba sales representative.
• DO NOT install or energize equipment that has been damaged. Damaged equipment may fail
during operation resulting in equipment damage or personal injury.
• Check to see that the rated capacity and the model number specified on the nameplate conform to
the order specifications.
• Modification of this equipment is dangerous and must not be performed except by factory trained
representatives. When modifications are required contact your Toshiba sales representative.
• Inspections may be required before and after moving installed equipment.
• Keep the equipment in an upright position.
• Contact your Toshiba sales representative to report discrepancies or for assistance if required.
G7 ASD Quick Start Guide 3
Page 9

Handling and Storage
• Use proper lifting techniqu es when moving the ASD; inclu ding pr operly si zing up th e load, getti ng
assistance, and using a forklift if required.
• Store in a well-ventilated covered location and preferably in the original carton if the equipment
will not be used upon receipt.
• Store in a cool, clean, and dry location. Avoid storage locations with extreme temperatures, rapid
temperature changes, high humidity, moisture, dust, corrosive gases, or metal particles.
• The storage temperature range of the G7 ASD is 14° to 104° F (-10 to 40° C).
• Do not store the unit in places that are exposed to outside weather conditions (i.e., wind, rain, snow,
etc.).
• Store in an upright position.
Disposal
Never dispose of electrical components via incineration. Contact your state environmental agency for
details on disposal of electrical components and packaging in your area.
Installation Precautions
Location and Ambient Requirements
• The Toshiba ASD is intended for permanent installations only.
• Installation shoul d conf orm to the 2005 National Electrical Code — Article 110 (NEC)
(Requirements For Electrical Installations), all regulations of the Occupational Safety and
Health Administration, and any other applicable national, regional, or industry codes and
standards.
• Select a mounting location that is easily accessible, has adequate personnel working space, and
adequate illumination for adjustment, inspection, and maintenance of the equipment (refer to 2005
NEC Article 110-13).
• A noncombustible insulating floor or mat should be provided in the area imm ediat ely s urr oun ding
the electrical system.
• Do Not mount the ASD in a location that would produce catastrophic results if it were to fall from
its mounting location (equipment damage or injury).
• Do Not mount the ASD in a location that would allow it to be exposed to flammable chemicals or
gases, water, solvents, or other fluids.
• Avoid installation in areas where vibration, heat, humidity, dust, fibers, steel particles, explosive/
corrosive mists or gases, or sources of electrical noise are present.
• The installation location shall not be exposed to direct sunlight.
• Allow proper clearance spaces for installation. Do not obstruct the ventilation openings. Refer to
the section titled
requirements.
Installation and Connections on pg. 12 for further information on ventilation
• The ambient operating temperature range of the G7 ASD is 14° to 104° F (-10 to 40° C).
• See the section titled Installation and Connections on pg. 12 for additional information on installing
the drive.
4 G7 ASD Quick Start Guide
Page 10

Mounting Requirements
•Only Qualified Personnel should install this equipment.
• Install the unit in a secure and upright position in a well-ventilated area.
• A noncombustible insulating floor or mat should be provided in the area imm ediat ely s urr oun ding
the electrical system at the place where maintenance operations are to be performed.
• As a minimum, the installation of the equipment should conform to the NEC Article 110
Requirements For Elect rical Install ations, OSHA , as well as any other applicable nat ional, r egional,
or industry codes and standards.
• Installation practices should conform to the latest revision of NFPA 70E Electrical Safety
Requirements for Employee Workplaces.
• It is the responsibility of the person installing the ASD or the electrical maintenance perso nne l to
ensure that the unit is installed into an enclosure that will protect personnel again st electric sh ock.
Conductor Routing an d Gr oun ding
WARNING
• Use separate metal conduits for routin g the input po wer , output power, and control circuits and each
shall have its own ground cable.
• A separate ground cable should be run inside the conduit with the input power, output power, and
and control circuits.
• DO NOT connect control terminal strip return marked CC to earth ground.
• Always ground the unit to prevent electrical shock and to help reduce electrical noise.
• It is the responsibility of the person installing the ASD or the electrical maintenance perso nne l to
provide proper grounding and branch circuit protection in accordance with the 2005 NEC and any
applicable local codes.
The Metal Of Conduit Is Not An Acceptable Ground.
Power Connections
DANGER
Contact With Energized Wiring Will Cause Severe Injury Or Death.
• Turn off, lockout, and tagout all power sources before proceeding to connect the power wiring to
the equipment.
• After ensuring that all power sources are turned off and isolated in accordance with established
lockout/tagout procedures, connect three-phase power source wiring of the correct voltage to the
correct input terminals and connect the output terminals to a motor of the correct voltage and type
for the application (refer to NEC Article 300 – Wiring Methods and Article 310 – Conductors For
General Wiring). Size the branch circuit conductors in accordance with NEC Table 310.16.
• If multiple conductors that are smaller than the recommend ed sizes are used in parallel fo r the input
or output power, each branch of the p arallel set shall have its own conduit and n ot share its conduit
with other parallel sets (i.e., place U1, V1, and W1 in one conduit and U2, V2, and W2 in another)
(refer to NEC Article 300.20 and Article 310.4). National and local electrical codes should be
G7 ASD Quick Start Guide 5
Page 11

referenced if three or more power conductors are run in the same conduit (refer to 2005 NEC
Article 310 adjustment factors on page 70-142).
• Ensure that the 3-phase input power is Not connected to the output of the ASD. This will damage
the ASD and may cause injury to personnel.
• Do not install the ASD if it is damaged or if it is missing any component(s).
• Do Not connect resistors across terminals PA – PC or PO – PC. This may cause a fire.
• Ensure the correct phase sequence and the desired direction of motor rotation in the Bypass mode
(if applicable).
• Turn the power on only after attaching and/or securing the front cover.
Protection
• Ensure that primary protection exists for the input wiring to the equipment. This protection must be
able to interrupt the available fault current from the power line. The equipment may or may not be
equipped with an input disconnect (op tio n).
• All cable entry openings must be sealed to reduce the risk of entry by vermin and to allow for
maximum cooling efficiency.
• Follow all warnings and precautions and do not exceed equipment ratings.
• If using multiple motors provide separate overload protection for each motor and use V/f control.
• External dynamic braking resistors must be thermally protected.
• It is the responsibility of the person installing the ASD or the electrical maintenance perso nne l to
setup the Emergency Off braking syst em of th e ASD. The funct ion of the E mergency Off braking
function is to remove output power from the drive in the event of an emergency. A supplemental
braking system may also be engaged in the event of an emergency. For further information on
braking systems, see the sections DC Injection Braking Start Frequ ency and Dynamic Braking
Enable in the G7 ASD Operation Manual.
Note: A supplemental emergency st o ppi ng s yst em s hou l d be used with the ASD. Emergency
stopping should not be a task of the ASD alone.
• Follow all warnings and precautions and do not exceed equipment ratings.
System Integration Precautions
The following precautions are provided as general guidelines for the setup of the ASD within the
system.
• The Toshiba ASD is a general-purpose product. It is a system component only and the system
design should take this into consideration. Please contact your Toshiba sales representative for
application-specific information or for traini ng support.
• The Toshiba ASD is part of a larger system and the safe operation of the ASD will depend on
observing certain precautions and performing proper system integration.
• A detailed system analysis and job safety analysis should be performed by the systems designer
and/or systems integrator before the installation of the ASD component. Contact your To shiba sales
representative for options availability and for application-specific system integration information if
required.
6 G7 ASD Quick Start Guide
Page 12

Personnel Protection
• Installation, operation, and maintenance shall be performed by Qualified Personnel Only.
• A thorough understanding of the ASD will be required before the installation, operation, or
maintenance of the ASD.
WARNING
• Rotating machinery and live conductors can be hazardous and shall not come into contact with
humans. Personnel should be protected from all rotating machinery and electrical hazards at all
times.
• Insulators, machine guards, and electrical safeguards may fail or be defeated by the purposeful or
inadvertent actions of workers. Insulators, machine guards, and electrical safeguards are to be
inspected (and tested where possible) at installation and periodically after installation for potential
hazardous conditions.
• Do not allow personnel near rotating machinery. Warning signs to this effect shall be posted at or
near the machinery.
• Do not allow personnel near electrical cond uctors. Human contact with electrical conductors can be
fatal. Warning signs to this effect shall be posted at or near the hazard.
• Personal protection equipment shall be provided and used to protect employees from any hazards
inherent to system operation.
• Follow all warnings and precautions and do not exceed equipment ratings.
System Setup Requirements
• When using the ASD as an integral part of a larger system, it is the responsibility of the ASD
installer or maintenance personnel to ensure that there is a fail-safe in place, i.e., an arrangement
designed to switch the system to a safe condition if there is a fault or failure.
• System safety features should be employed and designed into the integrated system in a manner
such that system operation, even in the event of system failure, will not cause harm or result in
personnel injury or system damage (i.e., E-Off, Auto-Restart settings, System Interlocks, etc.).
• The programming setup and system configuration of the ASD may allow it to start the motor
unexpectedly. A familiarity with the Auto-restart settings are a requirement to use this product.
• Improperly designed or imp rop erly in stalled sy stem in terlocks may r ender the motor u nable t o st art
or stop on command.
• The failure of external or ancillary components may cause intermittent system operation, i.e., the
system may start the motor without warning.
• There may be thermal or physical prope rties, or ancillary devices integ rated into t he overall sy stem
that may allow for the ASD to start the motor without warning. Signs at the equipment installation
must be posted to this effect.
• If a secondary magnetic contactor (MC) is used between the ASD and the load, it should be
interlocked to halt the ASD before the secondary contact opens. If the output contactor is used for
bypass operation, it must be interlocked such that commercial power is never ap pli ed to the AS D
output terminals (U, V, W).
• Power factor improvement capacitors or surge absorbers must not be installed on the output of the
ASD.
G7 ASD Quick Start Guide 7
Page 13

• Use of the built-in system protective features is highly recommended (i.e., E-Off, Overload
Protection, etc.).
• The operating controls and system status indicators should be clearly re adable and positioned
where the operator can see them without obstruction.
• Additional warnings and notifications shall be posted at the equipment installation location as
deemed required by Qualified Personnel.
• Follow all warnings and precautions and do not exceed equipment ratings.
Operational and Maintenance Precautions
WARNING
• Turn off, lockout, and tagout the main power, the control power, and instrumentation connections
before inspecting or servicing the drive, or opening the door of the enclosure.
• Turn off, lockout, and tagout the main power, the control power, and instrumentation connections
before proceeding to disconnect or connect the power wiring to the equipment.
• The capacitors of the ASD maintain a residual charge for a period of time after tur ning the ASD of f.
The required time for each ASD typeform is indicated with a cabinet label and a Charge LED.
Wait for at least the minimum time indicated on the enclosure-mounted label and ensure that the
Charge LED has gone out before opening the door of the ASD once the ASD power has been
turned off.
• Turn the power on only after attaching (or closing) the front cover and Do Not remove the front
cover of the ASD when the power is on.
• Do Not attempt to disassemble, modify, or repair the ASD. Call your Toshiba sales representative
for repair information.
• Do not place any objects inside of the ASD.
• If the ASD should emit smoke or an unusual odor or sound, turn the power off immediately.
• The heat sink and other com ponents may become extrem ely hot to the touch. Allow the unit to cool
before coming in contact with these items.
• Remove power from the ASD during extended periods of non-use.
• The system should be inspected periodically for damaged or improperly functioning parts,
cleanliness, and to ensure that the connectors are tightened securely.
• Ensure that the Run functions (F, R, Preset Speed, etc.) of the ASD are off before performing a
Reset. The post-reset settings may allow the ASD to start unexpectedly.
• Retry or Reset settings may allow the motor to start unexpectedly. Warnings to this effect should
be clearly posted near the ASD and motor.
• In the event of a power failure, the motor may restart after power is restored.
• Follow all warnings and precautions and do not exceed equipment ratings.
DO NOT install, operate, perform maintenance, or dispose of this equipment until you have read and
understood all of the product warnings and user directions. Failure to do so may result in equipment
damage, operator injury, or loss of life.
8 G7 ASD Quick Start Guide
Page 14
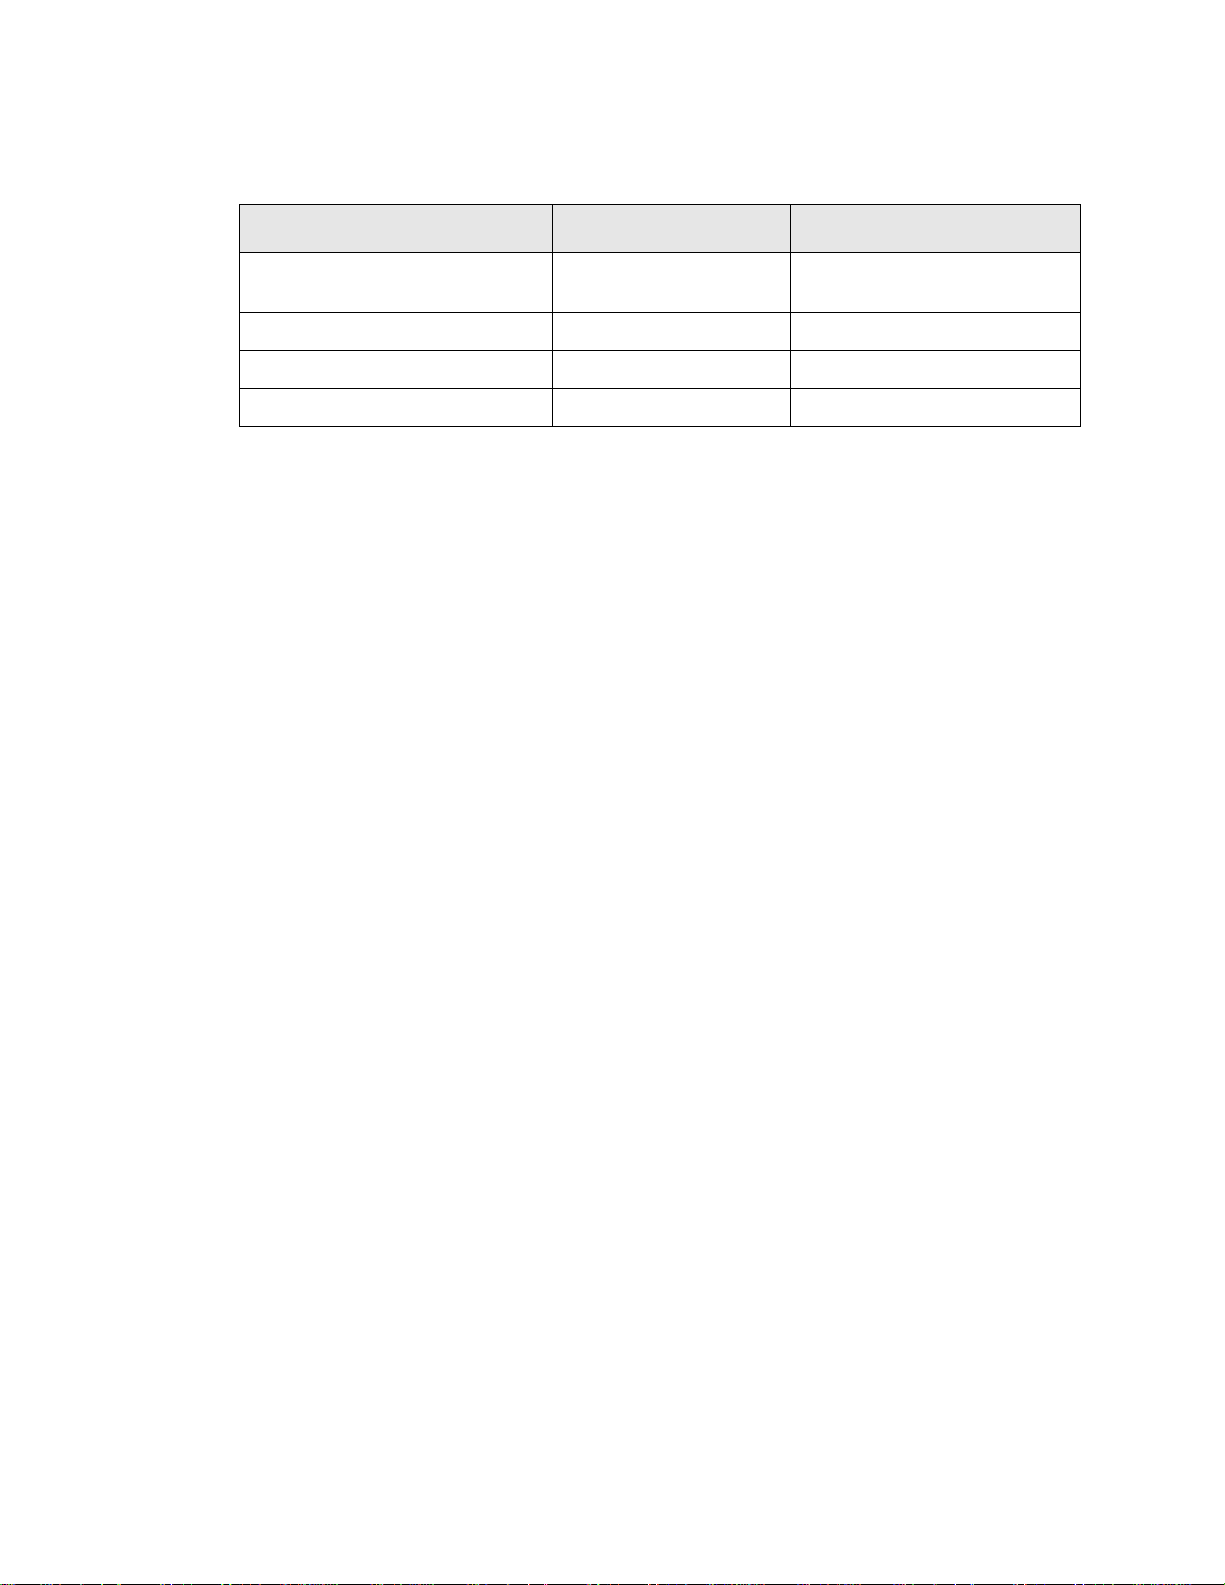
Service Life Information
Part Name Service Life Remarks
Large Capacity Electrolytic
Capacitor
Cooling Fan 26,000 Hours
CN Connectors 100 Connects/D i s c on ne c t s
On-board Relays 500,000 Actuatio ns
5 Years
CE Compliance Requirements
In addition to the local and regional safety requirements, this section describes additional criteria that
must be met to qualify for European Conformity (CE) certification. All relevant apparatus placed on
the European market is required to comply to the European Community directive on electromagnetic
compatibility (EMC). The following instructions provide a means of compliance for the 7-series o f
ASDs. A Technical Construction File (TFC) indicates the rationale used to declare compliance and is on
file at Toshiba International Corporation, Houston, Texas U.S.A.
EMC Installation Guidelines
All systems placed on the European market are required to comply with the European Community
directive regarding electromagnet compatibility (EMC). Toshiba ensures that all systems deployed in
the European market have been screened and are in 100% compliance with the following standards:
When not used for long periods,
charge semi-annually.
• Radiated Interference: EN 55011 Group 1 Class A
• Mains Interference: EN 55011 Group 1 Class A
• Radiated Susceptibility: IEC 801-3 1984
• Conducted RFI Susceptibility: prEN55101-4 (prIEC801-6) Doc 90/30270
• Electrostatic Discharge: IEC801-2 1991
• Electrical Fast Transient: IEC 801-4 1988
• Surge: IEC1000-4-5 1995 2 KV line-to-line, 4 KV line-to-earth
• Voltage Interruption: IEC 1000-4-11
General EMC Guidelines for Consideration
• Input filters of the appropriate rating shall be used.
• Proper grounding is a requirement.
• Grounds shall be kept to the minimum length to accomplish the connection.
• Grounds shall have low RF impedance.
• A central ground shall employed in a complex system.
• Paint or corrosion can hamper good grounding; remove as required.
G7 ASD Quick Start Guide 9
Page 15

• Keep control and power cabling separated. Minimize exposed (unscreened) cable.
• Use 3600 screened connections where possible.
CE Compliant Installation Guidelin es
ASDs should be installed in accordance with the following guidelines.
1. Filtering — An input filter shall be used with the ASD. A S chaffn er FN258 s eries inpu t filter of th e
appropriate rating shall be mounted next to the ASD.
2. Mechanical — The ASD and the associated equipment shall be mounted on a flat metallic
backplane. A minimum space of 5 cm (2 inches) shall be between the ASD and the filter to allow
for ventilation. The filter output cable is to be connected from the bottom of the filter to the ASD
power input and is to be the minimum le ngth required for a connection. See
filter selection assistance.
Units received as an Open Chassis shall not be placed into operation until being placed into an
approved enclosure that will protect personnel against electrical shock.
Opening and closing of enclosures or barriers should be possible only with the use of a key or a
tool.
3. Cabling — The power, filter, and motor cables shall be of the appropriate current rating. The
cables shall be connected in accordance with the guidelines of the manufacturer and the applicable
local and national agencies. A 4-core screened cable (such as RS 379-384) is to be used for the
power and earth connections to minimize RF emissions. Control cabling must be screened using
P/N RS 367-347 or a similar component.
4. Grounding — The mains (input) ground s hall be con nected at th e ground terminal pr ovid ed on t he
filter. The filter and motor shall be grounded at the ground terminals provided in the ASD.
Table 1 on page 11 for
5. Screening — The mains (input) screen is to be connected to the metallic back-plane at the filter;
remove any finish coating as required. The screen over the filter output cables, the motor cable
screen, and the control wire screens must be connected to the ASD case using glands or conduit
connectors. The motor cable screen shall be connected to the motor case. When using a braking
resistor, the cabling between the r esis tor an d ASD shall also be screen ed. Th is screen s hall connect
to both the ASD enclosure and the resistor enclosure.
6. Where residual-curr ent -o perat ed p rot ecti ve d evice (RCD) is used for protection in case of direct or
indirect contact, only RCD of type B is allowed on t he supply sid e of this Elect ronic Equipment
(EE). Otherwise, another protective meas ure shall b e applied, such as separation of the EE from the
environment by double or feinforced insulation, or isolation of the EE and the supply system by a
transformer.
10 G7 ASD Quick Start Guide
Page 16
See the G7 Filter Selection below for the recommended input filters for a given typeform.
Table 1.
G7 Filter Selection Table
230V
VT130G7U2010B FN258-7 VT130G7U4160B
VT130G7U2015B
VT130G7U2025B VT130G7U4270B
VT130G7U2035B VT130G7U4330B
VT130G7U2055B
VT130G7U2080B VT130G7U4500B
VT130G7U2110B FN258-42 VT130G7U4600B
VT130G7U2160B FN258-75 VT130G7U4750B FN258-130
VT130G7U2220B
VT130G7U2270B VT130G7U412KB
VT130G7U2330B FN258-130 VT130G7U415KB
FN258-16
FN258-30
FN258-100
460V
VT130G7U4015B
VT130G7U4025B VT130G7U430KB
VT130G7U4035B
VT130G7U4055B
VT130G7U4110B
VT130G7U4160B VT130G7U6055B
VT130G7U4270B
VT130G7U4330B VT130G7U6160B FN258-30
VT130G7U4400B FN258-75 VT130G7U6220B
VT130G7U4500B
VT130G7U4600B VT130G7U6330B
VT130G7U4750B FN258-130 VT130G7U6400B
VT130G7U410KB FN258-180 VT130G7U6500B FN258-75
VT130G7U412KB
VT130G7U415KB VT130G7U6750B
VT130G7U420KB
VT130G7U425KB VT130G7U612KB
VT130G7U430KB VT130G7U615KB
VT130G7U4015B
VT130G7U4025B VT130G7U625KB
VT130G7U4035B VT130G7U630KB
VT130G7U4055B
VT130G7U4080B
FN258-7
FN258-16
FN258-30
FN258-55
FN258-100
FS5236-300
FS5236-500
FN258-7
FN258-16
VT130G7U4110B
VT130G7U4220B FN258-42
VT130G7U4400B FN258-75
VT130G7U410KB FN258-180
VT130G7U420KB
VT130G7U425KB
FN258-30
FN258-55
FN258-100
FS5236-300
FS5236-500
600V
VT130G7U6015B
FN258-7VT130G7U4080B VT130G7U6025B
VT130G7U6035B
FN258-16VT130G7U4220B FN258-42 VT130G7U6080B
VT130G7U6110B
VT130G7U6270B
VT130G7U6600B
VT130G7U610KB FN258-130
VT130G7U620KB FS5236-300
FN258-42
FN258-55
FN258-100
FS5236-180
FS5236-500
G7 ASD Quick Start Guide 11
Page 17

Installation and Connections
The G7 True Torque Control2 Adjustable Speed Drive may be set up initially by performing a few
simple configuration settings. To operate properly , the ASD must be securely mounted and connected to
a power source (3-phase AC inpu t at the L1/R, L2/S, and L3/T terminals). The control terminals of the
ASD may be used by connecting the terminals of the Control Terminal Strip to the proper sensors or
signal input sources (see the section titled
Note: The optional ASD-Multicom boards may be used to expand the I/O functionality of
the ASD. See the section titled G7 Optional Devices in the G7 ASD Operation
Manual for further information on the availab le options.
The output terminals of the ASD (T1/U, T2/V, and T3/W) must be connected to the motor that is to be
controlled (see
As a minimum, the installation of the ASD shall conform to Article 110 of the 2005 NEC, the
Occupational Safety and Health Administration requirements, and to any other local and regional
industry codes and standards.
Figure 15 on pg. 19).
I/O and Control on pg. 17).
Upon initial system powerup, the Startup Wizard starts automatically . The Startup Wizard assists the
user with the initial configuration of the G7 True Torque Control
section titled
Initial Setup on pg. 22 for additional information on the Startup Wizard.
Installation Notes
When a brake-equipped motor is connected to the ASD, it is possible that the brake may not release at
startup because of insufficient voltage. To avoid this, Do Not connect the brake or the brake contactor to
the output of the ASD.
If an output contactor is u sed for bypass operation, it must be interlocked such that comm ercial power is
never applied to the output terminals of the ASD (T1/U, T2/V, or T3/W).
If a secondary magnetic contactor (MC) i s u sed bet ween the output of the ASD and the mot or, it should
be interlocked such that the ST – CC connection is disconnected before the output contactor is opened.
Do Not open and then close a secondary magnetic contactor between the ASD and the motor unless the
ASD is off and the motor is not rotating.
Note: Re-application of power via a secondary contact while the ASD is on or while the
motor is still turning may cause ASD damage.
On some devices the ST-to-CC connection i s f urther enhanced by the operation of the MS1 AUX relay
circuit. The MS1 AUX relay circuit is normally open and closes the ST-to-CC connection (via ST1)
only after normal system power is available. The MS1 AUX relay circuit prohibits the ST-to-CC
connection in the event that the MS1 contactor fails to close during start up or if MS1 opens while the
ASD is running. For the 230 volt ASD this feature is available on the 30 HP system, on the 460 volt
ASD this feature is available on the 75 HP and above systems, and on the 600 volt ASD it is available
on the 60 HP and above systems.
2
Adjustable Speed Drive. See the
Figure 2. ST activation using the MS1 AUX circuit configuration.
12 G7 ASD Quick Start Guide
Page 18
The ASD input voltage should remain within 10% of the specified input voltage range. Input voltag e s
Figure 3. Circuit breaker configuration.
approaching the upper or lower limit settings may require that the overvoltage and undervoltage stal l
protection level parameter be adjusted. Voltages outside of the permissible tolerance should be avoided.
The freque ncy of the in put power should be ±2 Hz of the specified input frequency.
Do not use an ASD with a motor that has a power rating that is higher than the rated output of the ASD.
The ASD is designed to operate NEMA B motors. Consult with your sales representative before using
the ASD for special applications such as with an explosion-proof motor or applications with a piston
load.
Do Not apply commercial power to the output terminals T1/U, T2/V, or T3/W.
Disconnect the ASD from the motor before megging or applying a bypass voltage to the motor.
Interface problems may occur when an ASD is used in conjunction with some types of process
controllers. Signal isolation may be required to prevent controller and/or ASD malfunction (contact
your Toshiba sales representative or the process contr oller manufacturer for additional information
about compatibility and signal isolation).
Use caution when setting the output frequency. Over speeding a motor decreases its ability to deliver
torque and may result in damage to the motor and/or the driven equipment.
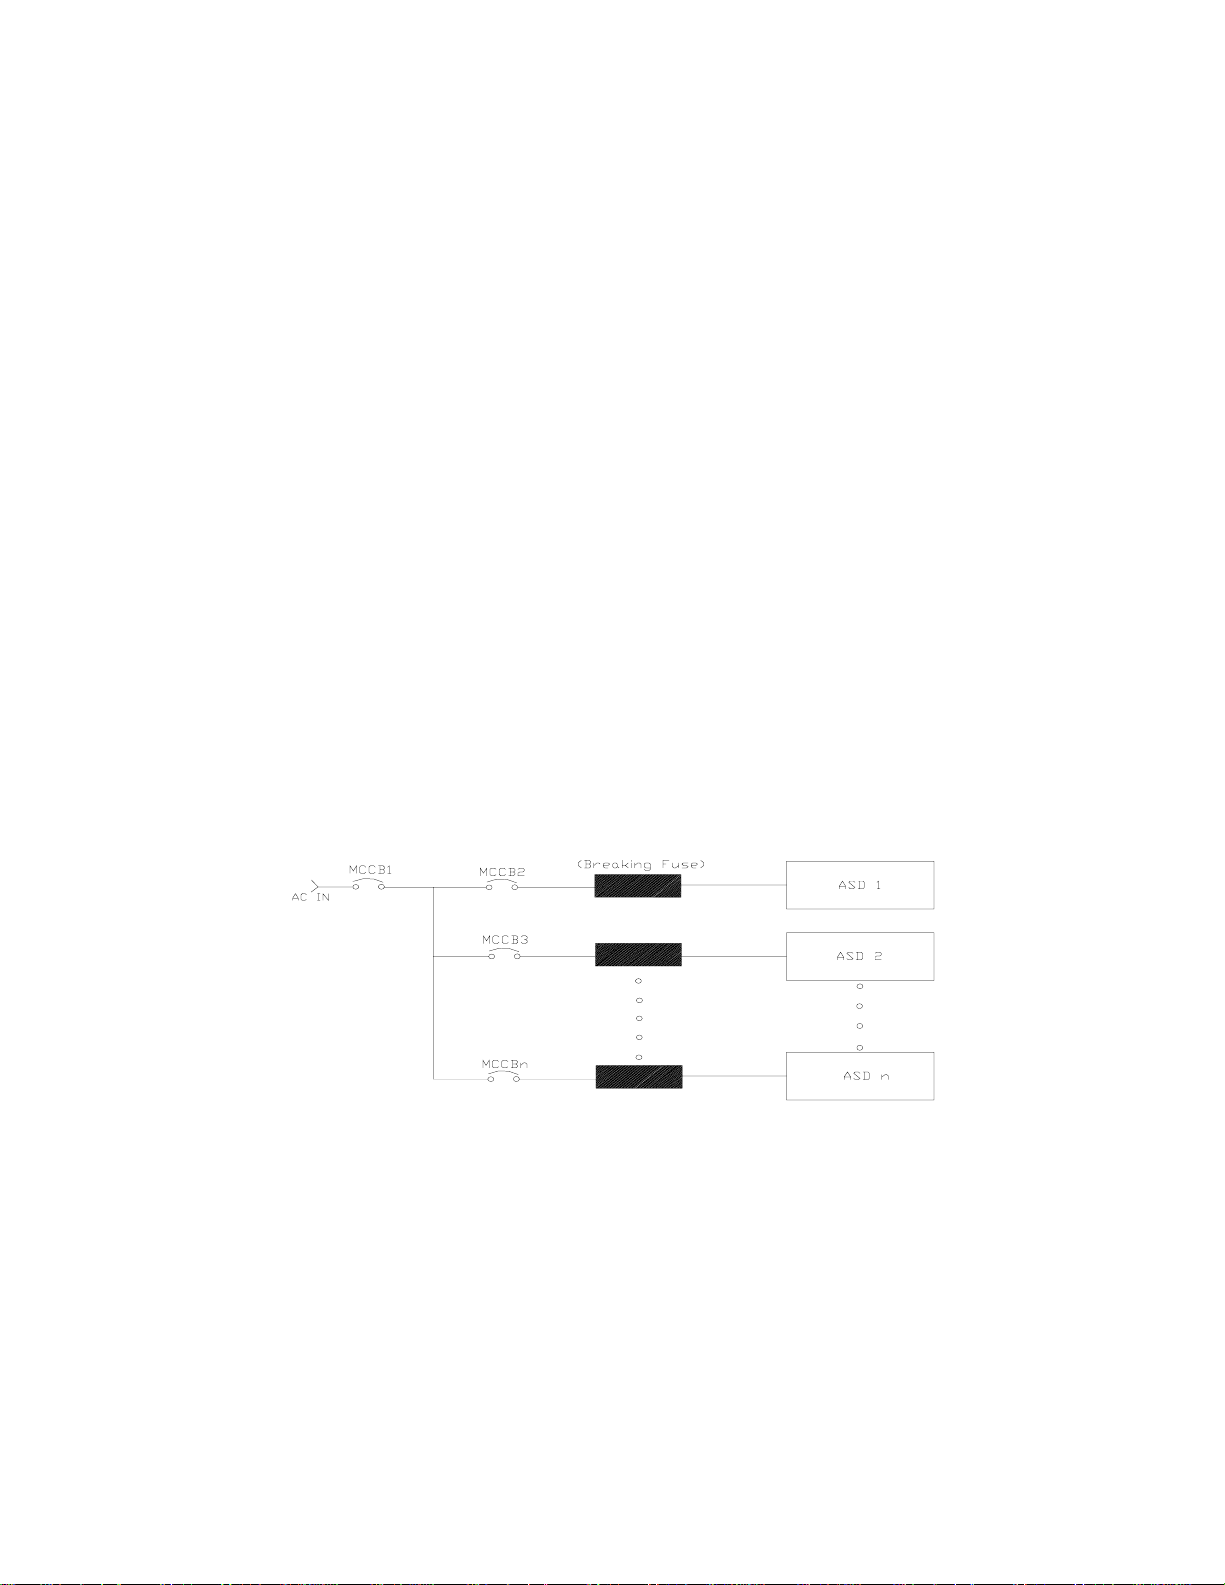
All G7 ASDs are equipped with internal DC bus fuses. However, not all G7 ASDs are equipped with
internal primary power input fuses (HP dependent). When connecting two or more drives that have no
internal fuse to the same power line as shown in
breaking configuration that will ensure that if a short circuit occurs in ASD 1, only MCCB2 trips, not
MCCB1. If it is not feasible to use this configuration, insert a fuse between MCCB2 and ASD 1.
Figure 3, it will be necessary to select a circuit-
Mounting the ASD
Install the unit securely in a well ventilated area that is out of direct sunlight using the mounting holes
on the rear of the ASD.
The ambient temperature rating for the G7 ASD is from 14 to 104° F (-10 to 40° C). The process of
converting AC to DC, and then back to AC produces heat. During normal ASD op eration, up to 5% of
the input energy to the ASD may be dissipated as heat. If installing the ASD in a cabinet, ensure that
there is adequate ventilation.
G7 ASD Quick Start Guide 13
CAUTION
Page 19
Do Not operate the ASD with the enclosure door open.
When installing multiple ASDs, ensure that there is a clearance space of at least 8 inches (20 cm) from
the top and the bottom of adjacent units. There should be at least 2 inches (5 cm) on either side of
adjacent units. For the models below 50 HP the top and bottom clearance specifications may be reduced
to 4 inches (10 cm). This space ensures that adequate ventilation is provided (see the G7 ASD
Operation Manual for additional information on mounting space requirements).
Note: Ensure that the ventilation openings are not obstructed.
ASDs produce high-frequency noise — steps must be taken during installation to avoid the negative
effects of noise. Listed below are some examples of measures that will help to combat noise problems.
• Separate the input and output power conductors of the main circuit. Do not install the input and
output wires in the same duct or in parallel with each other, and do not bind them together.
• Do not install the input or output power conductors of the main circuit and the wires of the control
circuit in the same duct or in parallel with each other, and do not bind them together.
• Use shielded wires or twisted wires for the control circuits.
• Ensure that the grounding terminals (G/E) of the ASD are securely connected to ground.
• Connect a surge suppressor to every electromagnetic contactor and every relay installed near the
ASD.
• Install noise filters as required.
Connecting the ASD
DANGER
Refer to the section titled Installation Precautions on pg. 4 and the section titled Lead Length
Specifications on pg. 16 before attempting to connect the ASD and the motor to electrical power.
System Grounding
Proper grounding helps to prevent electrical shock and to reduce electrical noise. The ASD is designed
to be grounded in accordance with Article 250 of the 2005 NEC or Section 10/Part One of the
Canadian Electrical Code (CEC).
The grounding conductor shall be sized in accordance with Article 250-122 of the NEC or Part One-
Table
6 of the CEC.
Note: The metal of conduit is not an acceptable ground.
The input, output, and control lines of the system shall be run in separate metal conduits and each shall
have its own ground conductor.
Power Connections
DANGER
L1/R, L2/S, and L3/T are the 3-phase input supply terminals for the ASD. The ASD may be operated
from a single-phase supply. When operating using a single-phase supply, use the L1 and L3 terminals.
14 G7 ASD Quick Start Guide
Page 20

T1/U, T2/V, and T3/W are the output terminals of the ASD that connect to the motor.
An inductor may be connected across terminals PA and PO to provide additional filtering. When not
used, a jumper is connected across these terminals (see
Connect the input and output power lines of the ASD as shown in Figure 4.
Note: In the event that the motor rotates in the wrong direction when powered up, reverse
any two of the three ASD output power leads connected to the motor.
Figure 4. ASD/Motor connection diagram.
Connect the 3-phase input power to the input terminals of the ASD at L1/R, L2/S, and L3/T. Connect
the output of the ASD to the motor from terminals T1/U, T2/V, and T3/W. The input and output
conductors and terminal lugs used shall be in accordance with the requirements listed in the section
titled
Cable/Terminal Specifications on pg. 51.
If conductors smaller than the recommended sizes are used in parallel for the input or output power,
each branch of the parallel set shall have its own conduit and not share its conduit with other parallel
sets (i.e., place U1, V1, and W1 in one conduit and U2, V2, and W2 in another).
Figure 15 on pg. 19).
Note: National and local codes should be referenced when running more than three
conductors in the same conduit.
Install a molded case circuit breaker (MCCB) or fuse between the 3-phase power source and the ASD in
accordance with the 2005 NEC Article 430.
CAUTION
For 600 volt ASDs, the 15 HP or less ASDs (P/N VT130G7U6015B – 6160B) require a class-J fuse
rated at 600 Volts/30 A.
A phase-shifting transformer (or other means) must be supplied by the user when configured for 12pulse operation.
External fuses are required on the below-listed ASDs when configured for 12-pulse operation.
VT130G7U2600B(DR)
VT130G7U2750B(DR)
VT130G7U412KB(DR)
VT130G7U415KB(DR)
VT130G7U610KB(DR)
VT130G7U612KB(DR)
VT130G7U615KB(DR)
Use either the Ferraz Shawmut Semiconductor fuse (P/N A70QS200) and fuse block P234C, or the
Toshiba ASD-FUSEKIT-12P. The Toshiba kit includes the required fuses and the mounting hardware
for the fuses.
G7 ASD Quick Start Guide 15
Page 21

Lead Length Specificat ion s
Adhere to the NEC and any local codes during the installation of ASD/Motor systems. Excessive le ad
lengths may adversely effect the performance of the motor. Special cables are not required. Lead lengths
from the ASD to the motor in excess of those listed in
of the ASD. Table 2 lis ts the suggested maximum lead lengths for the listed motor voltages.
Table 2.
Table 2 may require filters to be added to the output
Model
230 Volt All 1000 feet
460 Volt
600 Volt
Note: Contact Toshiba for application assistance when using lead lengths in excess of those
listed.
PWM Carrier
Frequency
< 5 kHz 600 feet
≥ 5 kHz 300 feet
< 5 kHz 200 feet
≥ 5 kHz 100 feet
NEMA MG-1-1998 Section IV Part 31
Compliant Motors
2
Exceeding the peak voltage rating or the allowable thermal rise time of the motor
insulation will reduce the life expectancy of the motor.
For proper operation, the carrier frequency must be 2.2 kHz or above except when
operating in the Constant Torque, Variable Torque, or the 5-Point Setting modes.
Startup and Test
Perform the following checks before turning on the unit:
• L1/R, L2/S, and L3/T are connected to the 3-phase input power.
• T1/U, T2/V, and T3/W are connected to the motor.
• The 3-phase input voltage is within the specified tolerance.
• There are no shorts and all grounds are secured.
16 G7 ASD Quick Start Guide
Page 22

I/O and Control
The ASD can be controlled by s everal input types and combinations thereof, as well as operate within a
wide range of output frequency and vo ltage leve ls. This sectio n disc usses t he ASD control met hods and
supported I/O functions.
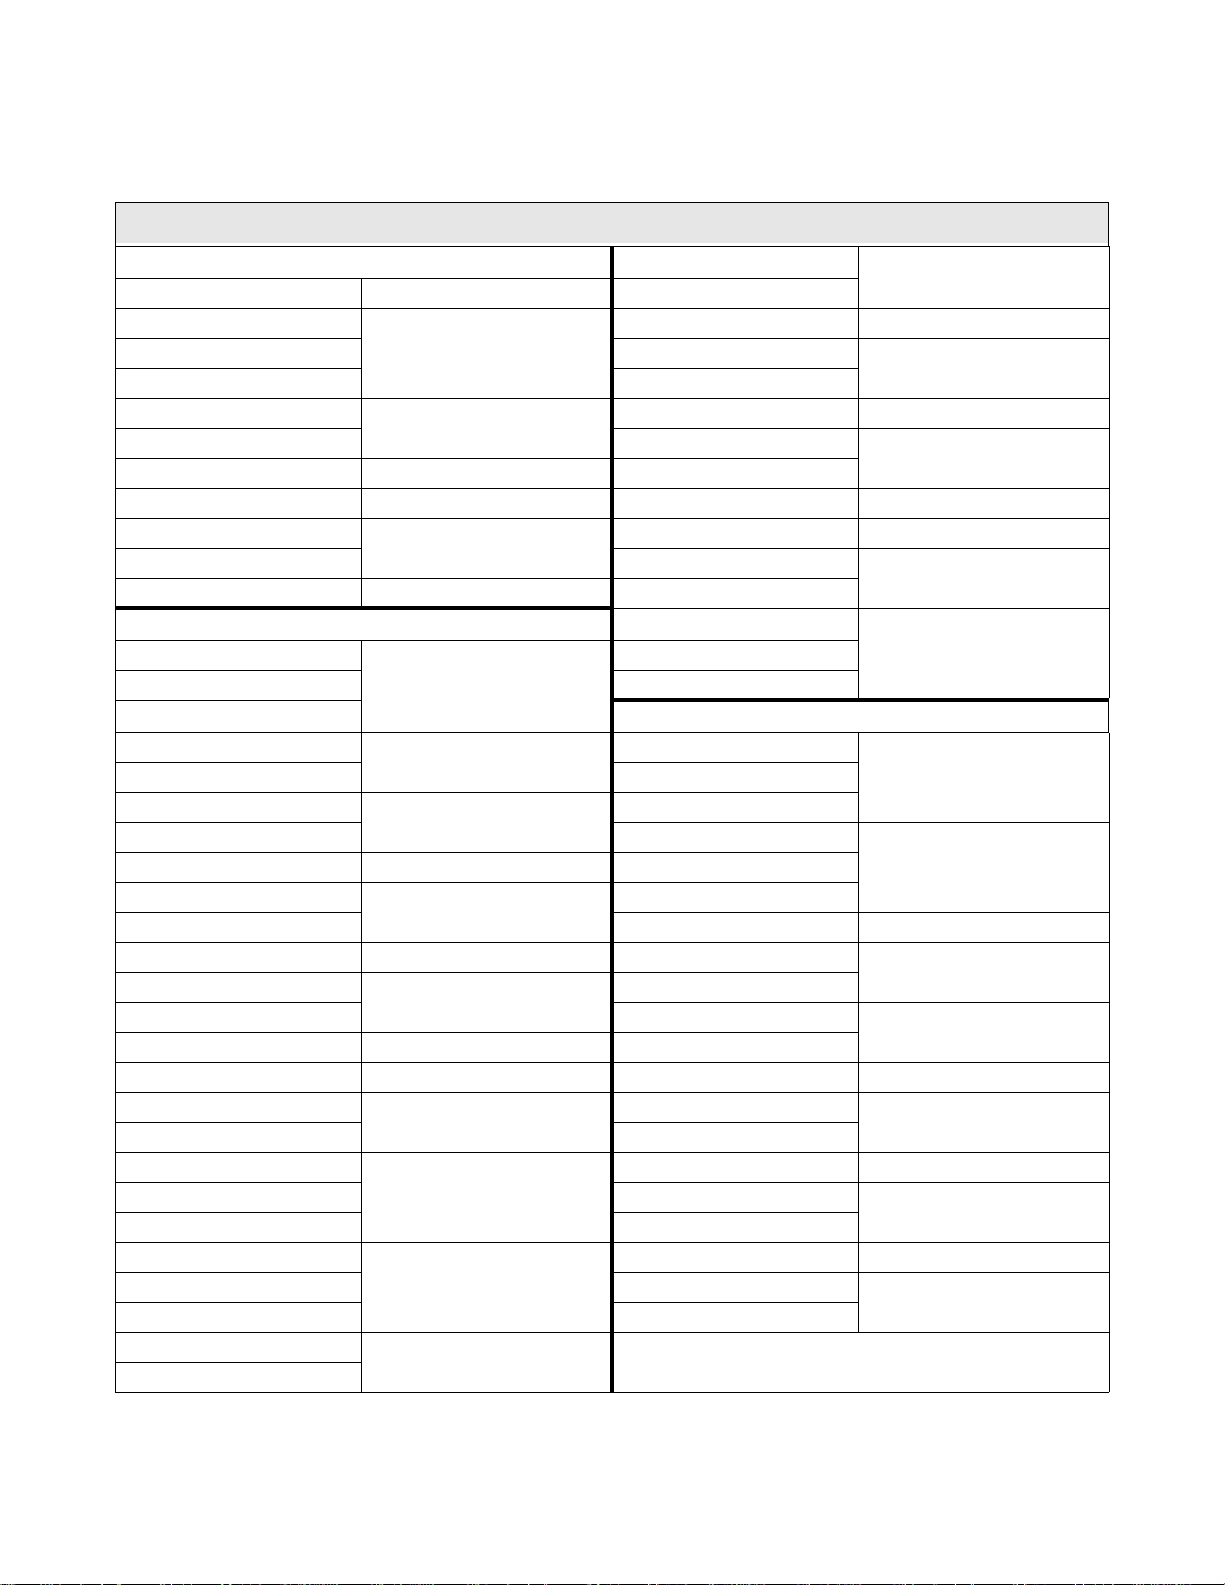
The Control Terminal S trip PCB (P/N 48570) sup ports discr ete and analog I/O functions and is shown
in the G7 ASD Operat ion Manual.
descriptions of the input and output terminals of the Control Terminal Strip PCB.
Note: To use the input control lines of the Control Terminal Strip the Command Mode
setting must be set to Use Control Terminal Strip (Program ⇒ Fundamental
Parameters ⇒ Standard Mode Selection ⇒ Command Mode ⇒ Use Control
Terminal Strip).
Figure 15 on pg. 19 shows the basic connection diagram for the G7 system.
Table 3.Control Terminal Strip default assignment terminal names and functions.
Default
Term. Setting
ST Discrete Input
RES Discrete Input Reset — Multifunctional programmable discrete input.
F Discrete Input Forward — Multifunctional programmable discrete input.
R Discrete Input Reverse — Multifunctional programmable discrete input.
S1 Discrete Input Preset Speed 1 — Multifunctional programmable discrete input.
S2 Discrete Input Preset Speed 2 — Multifunctional programmable discrete input.
S3 Discrete Input Preset Speed 3 — Multifunctional programmable discrete input.
S4 Discrete Input Emergency Off — Multifunctional programmable discrete input.
RR Analog Input
RX Analog Input
II Analog Input
VI Analog Input
P24 DC Output 24 VDC @ 50 mA output . Figure 9 on pg. 18.
PP DC Output PP — 10.0 VDC voltage source for the external potentiometer. Figure 10 on pg. 18.
OUT1 Discrete Output Low Frequency — Multifunctional programmable discrete output.
OUT2 Discrete Output Reach Frequency — Multifunctional programmable discrete output.
FP Output
AM Output
FM Output
FLC Output Fault relay (common).
FLA Output Fault relay (N.O.).
CC — Control common (Do Not connect to Earth Gnd).
Discrete Input Terminals ⇒ On = connected to CC.
Analog Input Terminals reference CC.
Input/Output Default Function (for programmable terminals) Circuit Config.
Standby (jumper to CC to operate the unit) — Multifunctional
programmable discrete input (see
information on this terminal).
RR — Multifunction programmable analog input
(0.0 to 10 volt input — 0 to 80 Hz output). Reference CC.
RX — Multifunctional programmable analog input
(-10 to +10 VDC input — -80 to +80 Hz output). Reference CC.
II — Multifunctional programmable analog input (4 [0] to 20 mADC
input — 0 to 80 Hz output). Reference CC.
VI — Multifunctional programmable analog inpu t
(0 to 10 VDC input — 0 to 80 Hz output). Reference CC.
Frequency Pulse — an output pulse train that has a frequency which is
based on the output frequency of the ASD.
Produces an output current that is proportional to the magnitude of the
function assigned to this terminal.
Table 3 on page 17 lists the names, the default settings, and the
Installation Notes on pg. 12 for further
Figure 5 on pg. 18.
Figure 6 on pg. 18.
Figure 7 on pg. 18.
Figure 8 on pg. 18.
Figure 11 on pg. 18.
Figure 12 on pg. 18.
Figure 13 on pg. 18
Figure 14 on pg. 18.FLB Output Fault relay (N.C.).
G7 ASD Quick Start Guide 17
Page 23

I/O Circuit Configurations
Figure 5. Discrete input. Figure 6 RR input.
Figure 7. RX input. Figure 8. VI/II input.
Figure 9. P24 Output. Figure 10. PP Output.
Figure 11. OUT1/OUT2 Output. Figure 12. FP Output.
Figure 13. AM/FM Output. Figure 14. Fault Relay (during fault).
18 G7 ASD Quick Start Guide
Page 24

Typical Connection Diagram
Figure 15. G7 typical connection diagram.
Note: When connecting multiple wires to the PA, PB, PC, or PO
terminals, do not connect a solid wi re and a stra nded wir e to the
same terminal.
Note: The AM, FM, VI, and II analog terminals are referenced to CC.
Note: See alternative ST-to-CC activation configu ra t ion on pg. 12.
G7 ASD Quick Start Guide 19
Page 25

Electronic Operator Interface
The G7 Electronic Operator Interface (EOI) is comprised of an LCD display, two LEDs, a rotary
encoder, and eight keys. These items are described below and their locations are provided in
Figure 16 on pg. 21.
The EOI can be mounted remotely from the ASD as described in the G7 ASD Operation Manual. The
dimensional requirements for remote mounting may also be found in this section. Using a screw length
that exceeds the specified dimensions may cause deformation of the outer surface of the bezel as shown
in
Figure 28 on pg. 55 and should be avoided.
The interface can operate up to distances of 15 feet from the ASD via the Common Serial (TTL) Port.
For distances beyond 15 feet, the RS-232/485 port is recommended.
EOI Features
LCD Disp lay — Displays configuration information, performance data (e.g., motor frequency, bus
voltage, torque, etc.), and diagnostic information.
Local|Remote Key — Toggles the system to and from the Local and Remote modes. The LED is on
when the system is in the Local Command mode. The Local mode allows the Command and
Frequency control functions to be carried out via the EOI.
The Remote mode enables the Command and Frequency control functions to be carried out via the
Control Terminal Strip, LED Keypad, RS232/485, Communication Card, or Pulse Input. The
selection may be made via
Command Mode.
Program ⇒ Fundamental Parameters ⇒ Standard Mode Settings ⇒
Note: The LED Keypad is under development and is unavailable at the time of the release
of this guide.
The availability of the Local mode of operation (Command and Frequency control) may be disabled
via Program
operation may be reinstated by changing this setting or performing a Reset (see 007).
Enter Key — Selects a menu item to be changed or accepts and records the changed data of the
selected field (same as pressing the Rotary Encoder).
Esc Key — Returns to the previou s leve l of th e men u tree, to ggles b e tween the Panel and the
Frequency Command screens, or cancels changes made to a field if pressed while still in the reverse
video mode (dark background/light text). The 3 functions are menu-specific.
Run Key — Issues the Run command while in the Local mode.
Run Key Status LED — Illuminates green while stopped or red while running.
Stop Key — Issues the Off command (decelerates to Stop at the programmed rate) if pressed once
while in the Local mode or initiates an Emergency Off (terminates the ASD output and applies the
brake if so configured) if pressed twice quickly from the Local or Remote modes.
Up Key — Increases the value of the selected parameter or scrolls up the menu lis ting ( continues d uring
press-and-hold).
Down Key — Decreases the value of the selected parameter or scrolls down the menu listing (continues
during press-and-hold).
⇒ EOI Option Setups ⇒ Local/Remote Key. The availability of the Local mode of
20 G7 ASD Quick Start Guide
Page 26

Rotary Encoder — Functions as the Up key, the Down key, and the Enter key. Turn the Rotary
Encoder either clockwise or counterclockwise to perform the Up or Down key functions. Press the
Rotary Encoder to perform the Enter function. Simultaneously pressing and turning the Rotary
Encoder performs a user-defined function (see Program ⇒ EOI Option Setup ⇒ Preferences ⇒
Encoder Action).
MON/PRG (Monitor/Program) — Provides a means to access the three root menus. Pressing the
MON/PRG key repeatedly loops the system through the three root menus (see
Figure 18 on pg. 27).
While looping through the root menus, the Program menu will display the last menu screen or sub-
menu item being accessed at the time that the MON/PRG key was pressed.
Figure 16. The G7 Electronic Operator Interface.
LCD Display
Enter Key
Local/Remote
Key (LED)
Monitor/Program
Key
Run Key
(LED)
Up/Down Arrow
Keys
Rotary Encoder
Esc Key
EOI Operation
The EOI is the primary input/output device for the user. The EOI may be used to monitor system
functions, input data into the system, or perform diagnostics.
Note: The Up/Down arrow keys and the Enter key may be used to perform the functions of
the Rotary Encoder. The Rotary Encoder will be used in this explanation and
throughout this guide for the Up, Down, and Enter key functions.
The software used with the G7 is menu driven; thus, making it a select and click environment. The
operating parameters of a motor may be selected and viewed or changed using the EOI.
To change a parameter setting, go to the Program mode by pressing the MON/PRG key unti l the
Program menu is displayed. Turn the Rotary Encoder until the desired parameter group is within the
cursor block. Press the Rotary Encoder (repeat if there is a submenu).
The selection will take on the reverse video format (dark background/light text). Turn the Rotary
Encoder to change the value of the parameter. Press the Esc key while the display is in the reverse
video mode to exit the menu without s avi ng the change or press the Rotary Encoder to accept the new
setting.
Repeated Esc key entries takes the menu back one level each time the Esc key is pressed until the root
level is reached. After reaching the root level, continued Esc entries will toggle the system to and from
the Frequency Command screen and the Panel menu.
Stop
|
Reset Key
Note: Panel menu changes entered here will affect EOI-controlled ASD operation only.
LED Keypad-controlled functions will not be affected. LED Keypad-controlled
operation settings may be viewed or changed at F008. See the section titled
Panel
Menu on pg. 28 for furthe r information on Panel Menu operations.
G7 ASD Quick Start Guide 21
Page 27

System Operation
Initial Setup
Upon initial system powerup, the Startup Wizard starts automatically . The Startup Wizard assists the
user with the initial configuration of the input power settings and the output parameters of the G7 ASD.
The ASD may also be setup by directly accessing each of the individual parameters (see the section
titled Direct Access Parameter Information in the G7 ASD Operation Manual.
The Startup Wizard may also be selected and run from the Program menu after the initial startup if
required.
The Startup Wizard querys the user for the following information:
1. Run now? (if selected continue on to step #2)/Run next time at power up? (if selected go to Program Mode) /Manually configure? (if selected go to Finish ⇒ Program Mode).
2. The Voltage and Frequency rating of the motor.
3. The Upper Limit frequency.
4. The Lower Limit frequency.
5. Adjust Accel/Decel times automatically? (if Yes, continue from step #8).
6. The Acceleration time.
7. The Deceleration Time.
8. The Volts/Hertz setting.
9. The motor Current rating.
10. The Command source.
11. The Frequency Reference source.
See the section titled Startup W izard Req uiremen ts on pg. 24 for additional information on the Startup
Wizard.
Operation (Local)
To turn the motor on, perform the following:
1. Press the MON/PRG key until the Frequency
Command screen is displayed.
2. Press the Local|Remote key to enter the Local
mode (green Local LED illuminates).
3. Turn the Rotary Encoder clockwise until the
Frequency Command value is at the desired
setting.
4. Press the Run key and the motor runs at the
Frequency Command value.
Note: The speed of the motor may be changed while the motor is running by using the Rotary
Encoder to change the Frequency Command value.
5. Press the Stop|Reset key to stop the motor.
22 G7 ASD Quick Start Guide
Frequency Command Screen
Page 28

Default Setting Changes
To change a default parameter setting, go to the root of the Program menu and turn the Rotary
Encoder until the desired parameter group is within the cursor block and press the Rotary Encoder
(repeat if there is a submenu).
Press the Rotary Encoder to select the default setting to be changed and the selection takes on the
reverse video format (dark b ackgroun d, ligh t text). Turn the Rotary Encoder to change the v alue of the
parameter. Press the ESC key before accepting the change to exit the menu without saving the change
or press the Rotary Encoder to accept the new setting.
For a complete listing of the Program mode menu options, see the section titled Program Mode on pg.
30. Menu items are listed and mapped for convenience. The Direct Access Numbers are listed where
applicable.
The default settings may also be changed by entering the Parameter Number of the setting to be
changed at the Direct Access menu (Program
listing of the Direct Access Numbers and a description of the associated parameter may be fou nd in the
section titled Direct Access Parameter Information in the G7 ASD Operation Manual.
A listing of all parameters that have been changed from the default setting may be viewed sequentially
by accessing the Changed From Default screen (Program
⇒ Direct Access ⇒ Applicable Parameter Number). A
⇒ Changed From Default).
Note: Parameter F201 was changed to create the example shown in Figure 17
The Changed From Default feature allows the user to view (or change) the parameters that are
different from the default or the post-reset settings. Once the Changed From Default screen is
displayed, the system automatically scrolls through all of the system parameters and halts once reaching
a changed parameter.
The Rotary Encoder may be clicked once clockwise to continue scrolling forward or clicked once
counterclockwise to begin scrolling in reverse. With each click of the Rotary Encoder from a stop, t he
system scrolls through all of the parameters and stops at the next parameter that has been changed.
Pressing the Rotary Encoder while a changed parameter is displayed accesses the settings of the
changed parameter for viewing or changing.
Pressing ESC while the system is performing a Changed From D efault search terminates the search.
Pressing ESC when done searching (or halted at a changed parameter) returns the system to the
Program menu.
Figure 17. Changed From Default screen.
G7 ASD Quick Start Guide 23
Page 29

Startup Wizard Requirements
The Startup Wizard queries the user for information on the input and output signa l param e ter s o f the
ASD. The ASD may also be setup by directly accessing each of the control settings via the Program
menu or the Direct Access Numbers (see the section titled Direct Access Parameter Information in
the G7 ASD Operation Manual.
Upon initial system powerup, the Startup Wizard starts automatically. It may also be run from the
Program menu after startup if required. The user is queried to eith er (1) run the Startup Wizard (Run
Now), (2) run the Startup Wizard at the next power up, or (3) perform a manual setting of user-
selected parameters.
If selection (2) is chosen, the system returns to the Program menu and defaults to the Startup Wi zard
on the next power up. If selection (3) is chosen, click t he su bs equen t Finish box and the system return s
to the Frequency Command screen. If selection (1) (Run Now) is selected, the Startup Wizard will
start and assist the user with the configuration of the G7 True Torque Control
Drive using the following user-input screens.
Voltage and Frequency Rating of the Motor
Motors are designed and manufactured for a specific
voltage and frequency range. The volta g e and freq uency
specifications for a given motor may be found on the
nameplate of the motor.
2
Adjustable Speed
Upper Limit Frequency
This parameter sets the highest frequency that the G7 will
accept as a frequency command or frequency setpoint.
The G7 may output frequencies higher than the Upper
Limit Frequency ( b ut, lower than th e Maximum
Frequency) when operating in the PID Control mode,
Torque Control mode, or the Vector Control modes
(sensorless or feedback).
Lower Limit Frequency
This parameter sets the lowest frequency that the G7 will
accept as a frequency command or frequency setpoint.
The G7 will output frequencies lower than the Lower
Limit Frequency when accelerating to the lower limit or
decelerating to a stop. Frequencies below the Lower
Limit may be output when operating in t h e P ID Co nt r o l
mode, Torque Control mode, or the Vector Control
modes (sensorless or feedback).
24 G7 ASD Quick Start Guide
Page 30

Adjust Accel/Decel Automatically?
When enabled, the G7 adjusts the acceleration and
deceleration rates according to the applied load. The
acceleration and deceleration times range from 12.5%
to 800% of the programmed values for the active
acceleration time [e.g., Acceleration Time #1 (F009)
and Deceleration Time #1 (F010)].
The motor and the load must be connected prior to
selecting Automatic Accel/Decel.
If Automatic Accel/Decel is not enabled, the Acceleration screen will appear followed by the
Deceleration screen as shown below.
Acceleration Time
Deceleration Time
Volts per Hertz Setting
This function establishes the relationship between
the output frequency and the output voltage.
Settings:
Constant Torque
Variable Torque
Automatic Torque Boost
Sensorless Vector Control (Speed)
Automatic Torque Boost + Automatic Energy Savings
Sensorless Vector Control (Speed) + Automatic Energy Savings
V/f 5-point Setting (Opens 5-point Setting Screen)
Sensorless Vector Control (Speed/Torque Switching)
PG Feedback Vector Control (Speed/Torque Switching)
PG Feedback Vector Control (Speed/Position Switching)
Motor Current Rating
This parameter allows the user to input the fullload amperage (FLA) of the motor. This value is
used by the ASD to determine the Thermal
Overload protection setting for the motor and
may be found on the nameplate of the motor.
G7 ASD Quick Start Guide 25
Page 31

Command Source
This selection allows the user to establish the
source of the Run commands (e.g., F, R, Stop,
etc.).
Settings:
Use Control Terminal Strip
Use LED Keypad Option
Use Common Serial (TTL) — (Use for LCD EOI Operation)
Use RS232/485
Use Communication Card
Frequency Reference
Source
This selection allows the user to establish the
source of the Frequency (speed) command.
Settings:
Use VI/II
Use RR
Use RX
Use Option Card RX2
Use LED Keypad Option
Use Binary/BCD Input
Use Common Serial (TTL) — (Use for LCD EOI Operation)
Use RS232/485
Use Communication Card
Use Motorized Pot Simulation
Use Pulse Input Option
Wizard: Finish
This screen is the final screen of the Startup
Wizard. The basic parameters of the ASD have
been set. Click Finish to return to the Program
mode. Additional application-specific
programming may be required.
26 G7 ASD Quick Start Guide
Page 32

System Configuration and Menu Options
Root Menus
The MON/PRG key accesses the three primary modes of the G7: the Frequency Command mode, the
Monitor mode, and the Program mode. From either mode, press the MON/PRG key to loop through
to the other two modes (see
key toggles the menu to and from the Panel menu and the Frequency Command mode.
Note: Panel menu changes made when accessing the Panel menu using the method sh own
Figure 18 is effective for Local LCD EOI control Only.
in
Figure 18. Root menu mapping.
Figure 18). While in the Frequency Command mode, pressing the ESC
Frequency Command Mode
Frequency Setting
While operating in the Local mode (Local LED is illuminated on the front panel), the running
frequency of the motor may be set from the Frequency Command screen. Using the Rotary Encoder,
enter the Frequency Command value and then press the Run key. The motor will run at the
Frequency Command speed and may be changed while running.
Scrolling Monitor
The Output Current and the ASD Load values are displayed (default setting) below the Frequency
Command parameter of the Frequency Command screen. Other user-selected parameters may be
displayed on this screen for quick-access monitoring while running. These parameters may be accessed
and enabled for display by placing a check in the box next to the item listed at Program ⇒ Monitor
Setup ⇒
When more than two items are selected for display the items are scrolled automatically. The display
time for each selected item may be set from 1 to 60 seconds. The parameters that may be displayed on
the Scrolling Monitor are listed in the section titled
G7 ASD Quick Start Guide 27
Scrolling Monitor Select. If no parameters are enabled for display, No Items is displayed.
Monitor Mode on pg. 46.
Page 33

Panel Menu
The Panel menu may be accessed in either of two ways: while operating using the LED Keypad
Option the Panel menu may be accessed via F008 or if operating in the Local mode using the LCD
EOI, press ESC from the Frequency Command screen.
The control settings of th e Panel menu ar e ef fective f or LED keypad control only if accessed via Direct
Access method F008 and are effective for the LCD EOI control only if accessed via the Frequency
Command screen. Changes made to either of the Panel menus are not carried over to the other Panel
menu.
Using either method provides quick access to the following Panel menu parameters:
Direction — Forward or Reverse (see F008 for further information on this setting).
Stop Pattern — The Decel Stop or Coast Stop settings determines the method used to stop the motor
when using the Stop|Reset key of the EOI. The Decel Stop setting enables the Dynamic Braking
system setup at F304 or the DC Injection Braking system setup at F250, F251, and F252. The Coast
Stop setting allows the motor to stop at the rate allowed by the inertia of the load.
Note: The Stop Pattern setting has no effect on the Emergency Off settings of F603.
V/f Group — 1 of 4 V/f profiles may be selected and run. Each V/f profile is comprised of 4 user
settings: Base Frequency, Base Frequency Voltage, Manual Tor que Boost, and Electronic
Thermal Protection. Expanded descriptions of these parameters may be found in the section titled
Direct Access Parameter Information in the G7 ASD Operation Manual.
Accel/Decel Group — 1 of 4 Accel/Decel profiles may be selected and run. Each of the Accel/Decel
profiles is comprised of 3 user settings: Acceleration, Deceleration, and Pattern. Expanded
descriptions of these parameters may be found in the section titled Direct Access Parameter
Information in the G7 ASD Operation Manual.
Feedback in Panel Mode — This feature enables or disables the PID feedback function.
Torque Limit Group — This parameter is used to select 1 of 4 preset positive torque limits to apply
to the active motor (of a multiple motor configuration). The settings of profiles 1 – 4 may be setup at
F441, F444, F446, and F448, respectively.
Monitor Mode
The Monitor mode allows the user to monitor motor performance variables, control settings, and
configuration data during motor operation. There are 46 items that may be monitored from this mode. The
items are listed and described below.
Note: The Monitor mode is a read-only mode. The settings cannot be changed from the
Monitor mode. For information on how to change the values, see the section titled
Default Setting Changes in the G7 ASD Operation Manual.
Running Frequency — Displays the G7 Output Frequency.
Frequency Reference — Displays the Frequency Setpoint.
Output Current — Displays the Output Current as a percentage of the rated capacity of the G7.
Bus Voltage — Displays the Bus Voltage as a percentage of the rated capacity of the G7.
Output Voltage — Displays the Output Voltage as a percentage of the rated capacity of the G7.
Input Signal Status — Displays the status of the discrete input lines of the Control Terminal Strip.
Out1 Out2 FL — Displays the status of the discrete output lines of the Control Terminal Strip.
Timer — Displays the Cumulative Run Time in hours.
28 G7 ASD Quick Start Guide
Page 34

Postcomp Frequency — Displays the Output Frequency after the application of the slip
compensation correction value.
Feedback (inst.) — Provides a status of the Real Time Feedback in Hz.
Feedback (1 second) — Provides a status of the 1-Second Averaging feedback in Hz.
Torque — Displays the Output Torque as a percentage of the rated capacity of the G7.
Torque Reference — Displays the Torque Reference as a percentage.
Torque Current — Displays the current being used to produce torque.
Excitation Current — Displays the current required to produce the excitation field.
PID Value — Displays the PID feedback value in Hz (Proportional-Integral-Derivative).
Motor Overload — Displays the Motor Overload value as a percentage of the rated capacity of the
motor.
ASD Overload — Displays the ASD Overload as a percentage of the rated capacity of the G7.
DBR Overload — Displays the DBR Overload value as a percentage of the Dynamic Braking
Resistor capacity.
Motor Load — Displays the Motor Load in real time as a percentage of the rated capacity of the
motor.
ASD Load — Displays the ASD Load as a percentage of the rated capacity of the G7.
DBR Load — Displays the DBR Load as a percentage of the Dynamic Braking Resistor capacity.
Input Power — Displays the Input Power in Kilowatts (Kw).
Output Power — Displays the Output Power in Kilowatts (Kw) .
Peak Current — Displays the Peak Current since the last start was initiated. The current is
displayed as a percentage of the rated capacity of the G7.
Peak Voltage — Displays the Peak V oltage since the last start was initiated. The voltage is displayed
as a percentage of the rated capacity of the G7.
PG Speed — Displays the PG Speed.
Direction — Displays the Direction command (forward/reverse).
PG Position — Displays the Pulse Generator Position.
RR — Displays the RR input value as a percentage of the full range of the RR value (potentiometer
input).
*VI/II — Displays the VI/II input setting as a percentage of the full range of the VI/II value.
Note: * The VI/II input represents two analog inputs (and terminals). The VI input
terminal is used for a 0 – 10 VDC an alog signal and the II input terminal is used
for current loop appli cat i ons, s uch as wi th a 4-20 mA signal. Either may be used
as a frequency or torque command source; however, the two cannot function
simultaneously. Throughout this manual they will be listed as VI/II.
RX — Displays the RX input setting as a percentage of the full range of the RX value (-10 to
+10 VDC input).
RX2 — Displays the RX2 input setting as a percentage of the full range of the RX2 value.
Note: The RX2 function is available on the ASD-Multicom option board only.
FM — Displays the output frequency value as a percentage of the full range of the FM value.
AM — Displays the output current as a percentage of the full range of the AM value.
Option Type — Displays the type form number of the installed ASD-Multicom opt ion board.
Option Term A — TBD.
Option Term B — TBD.
Option Term O — TBD.
Option Term P — TBD.
Max. Output — TBD.
Pattern Select — Active Group Number and Speed Number separated by a period (e.g., 2.3).
Repeats Left — Number of remaining Speed cycles in the active Group.
Pattern — Active Speed Number of the Group.
Pattern Time Left — Time remaining in the active Speed.
Fault Statu s — Displays the current fault or No Fault.
G7 ASD Quick Start Guide 29
Page 35

Program Mode
Table 4 lis ts the menu items of the Program mode and maps the flow of the menu selections. The
Parameter Numbers for the listed functions are provided where applicable. The functions listed may be
accessed (and changed) as mapped below or via the Direct Access method : Program ⇒ Direct Access ⇒
Applicable Parameter Number.
Table 4. Program mode mapping.
Program Menu Navigation
Primary Menu Sub Menu Parameter Name
FUNDAMENTAL
PARAMETERS
STARTUP WIZARD
Frequency Setting
Standard Mode Selectio n
Accel/Decel #1 Settings
Motor Set #1
(See section Startup Wizard Requirements in the G7 ASD Operation Manual.) N/A
Maximum Frequency F011
Upper Limit F012
Lower Limit F013
V/f Pattern F015
Command Mode F003
Frequency Mode #1 F004
Frequency Mode #2 F207
Reference Priority Selection F200
Mode #1/#2 Switching Frequency F208
Accel #1 F009
Decel #1 F010
Accel/Decel Pattern F502
Automatic Accel/Decel Enable/Disable F000
#1 Base Frequency F014
#1 Max Output Voltage F306
#1 Torque Boost F016
#1 Electronic Thermal Protection Level F600
Parameter
Number
CHANGED FROM
DEFAULT
DIRECT ACCESS
EOI OPTION SETUPS
30 G7 ASD Quick Start Guide
(See section Default Setting Changes in the G7 ASD Operation Manual.) N/A
(See section Direct Access Parameter Informati on in the G7 ASD Operation Manual.) N/A
Contrast (adjustment)
Local/Remote Key
Realtime Clock Setup
Preferences
Alarm Popups
Darker (highlight Darker and press Enter) N/A
Lighter (highlight Lighter and press Enter) N/A
Command N/A
Frequency N/A
Date and time setting (requires RTC option) N/A
Double Click Speed N/A
Arrow Speed N/A
Encoder Speed N/A
Encoder Action N/A
Overheat Alarm N/A
Undervoltage Alarm N/A
Page 36

Program Menu Navigation
Primary Menu Sub Menu Parameter Name
EOI OPTION SETUPS
Alarm Popups
Lockout
Review Startup Screen
UTILITY PARAMETERS
Versions (read only)
Display Units
T ype Reset
Over-current Alarm N/A
ASD Overload Alarm N/A
Motor Overload Alarm N/A
Timer N/A
Overtorque Alarm N/A
DBR Resistor Alarm N/A
Lockout Reset N/A
Lockout Monitor N/A
Lockout Run/Stop N/A
Lockout Parameter Access N/A
Lockout Parameter Wri te N/A
Lockout Frequenc y C ha n ge N/A
Lockout Options N/A
Lockout Local/Remote N/A
Password (Enable/Enter) N/A
(displays the Startup screen) N/A
Typeform N/A
CPU Version N/A
CPU Revision N/A
EEPROM #1 Version N/A
EEPROM #2 Version N/A
EOI Version N/A
User-defined Units Enable/Disable N/A
User-d ef ined Units N/A
Hz Per User-defined Unit F702
Frequency Display Resolution F703
Units for Voltage and Current F701
None
Auto Setu p for 50 Hz
Auto Setu p for 60 Hz
Restore Factory Defaults
Clear Trip
Clear Run Timer
New Base Drive Board
Save User Parameters
Restore User Parameters
Reload EOI Flash
Reset EOI Memory
Comm. Stops During Reset
Parameter
Number
F007
G7 ASD Quick Start Guide 31
Page 37

Program Menu Navigation
Primary Menu Sub Menu Parameter Name
TERMINAL SELECTION
PARAMETERS
Input Terminal Function
Output Terminal
Functions
Analog Input Functions
Reach Settings
FP Terminal Settings
Input Special Functions
Line Power Switching
F F111
R F112
ST F113
RES F114
S1 F115
S2 F116
S3 F117
S4 F118
S5 F119
S6 F120
S7 F121
12 F122
13 F123
14 F124
15 F125
16 F126
ON F110
Out 1 F130
Out 2 F131
FL F132
4 F133
5 F134
6 F135
7 F136
Acc/Dec Base Frequency Adjustment F650
Upper-limit Frequency Adjustment F651
Acceleration Time Adjustment F652
Deceleration Time Adjustment F653
Torque Boost Adjustment F654
Low Speed Signal Output Frequency F100
Speed Reach Setti ng Frequency F101
FP Terminal Meter Selection F676
FP Terminal Meter Adjustment F677
ST Signal Selection F103
F/R Priority Selection (w/both on) F105
Input Terminal Priority F106
Extended Terminal Function F107
(Commercial Power Switching) On Trip
Enable/Disable
Parameter
Number
F354
32 G7 ASD Quick Start Guide
Page 38

Program Menu Navigation
Primary Menu Sub Menu Parameter Name
TERMINAL SELECTION
PARAMETERS
FREQUENCY SETTING
PARAMETERS
Line Power Switching
Input Terminal Delays
Output Te rminal Delays
Analog Filter
Speed Ref. Setpoint
Jog Settings
Preset Speeds
Switching-Frequency Setting and Enable/
Disable
ASD-Output Switching Wait-Time F356
Commercial Input-Power Wait-Time F357
Commercial-Power Switching-Frequency
Hold-Time
F F140
R F141
ST F142
RES F143
S1-S4 F144
S5-S16 F145
Out1 On Delay F150
Out1 Off Delay F160
Out2 On Delay F151
Out2 Off Delay F161
FL On Delay F152
FL Off Delay F162
Out4 On Delay F153
Out4 Off Delay F163
Out5 On Delay F154
Out5 Off Delay F164
Out6 On Delay F155
Out6 Off Delay F165
Out7 On Delay F156
Out7 Off Delay F166
Analog Input Fi lter Selection F209
VI/II F201
RR F210
RX F216
RX2 F222
BIN F228
PG F234
Jog Run Frequency F260
Jog Stop Control F261
Jog Window Enable/Disable N/A
#1 Frequency & Characteristics F018
#2 Frequency & Characteristics F019
#3 Frequency & Characteristics F020
#4 Frequency & Characteristics F021
Parameter
Number
F355
F358
G7 ASD Quick Start Guide 33
Page 39

Program Menu Navigation
Primary Menu Sub Menu Parameter Name
FREQUENCY SETTING
PARAMETERS
PROTECTION
PARAMETERS
Preset Speeds
Preset Speed Mode
Fwd/Rev Disable
Motorized Pot Settings
Dynamic Braking
Stall
DC (Injection) Braking
Emergency Off Settings
Retry/Restart
Configuration
#5 Frequency & Characteristics F022
#6 Frequency & Characteristics F023
#7 Frequency & Characteristics F024
#8 Frequency & Characteristics F287
#9 Frequency & Characteristics F288
#10 Frequency & Charact eristics F289
#11 Frequency & Characteristics F290
#12 Frequency & Charact eristics F291
#13 Frequency & Charact eristics F292
#14 Frequency & Charact eristics F293
#15 Frequency & Charact eristics F294
Use Preset Speed Enable/Di sable F380
Disable Forward Run/Di sable Reverse Run F311
Motorized Pot Setting Disposition at Power
Down
Minimum Frequency N/A
Maximum Frequency N/A
Dynamic Braking Enable/Disable &
Configuration
Over-current Stall Level F601
Over-voltage Stall Enable/Disable F305
Over-voltage Stall Level Configuration N/A
Over-voltage Stall Level (Fast) F625
Continuing Stall Period (During Positive
Torque/Speed)
Stall Prevention During Regeneration F454
Start Fre quency F250
DC Braking Current F251
DC Braking Time F252
Motor Shaft Fixing Control F253
Motor Shaft Stationary Control Enable/Disable F254
Emergency Off Mode Configuration F603
DC Injection Braking Time F604
Emergency Off Activation of the FL Output
Enable/Disable
Number of Retries F303
Restart Conditions F301
Scan Rate F312
Lock-on Rate F313
Search Method F314
Search Inertia F315
Parameter
Number
F108
F304
F452
N/A
34 G7 ASD Quick Start Guide
Page 40

Program Menu Navigation
Primary Menu Sub Menu Parameter Name
PROTECTION
PARAMETERS
Undervoltage/Ridethrough
Overload
Trip Settings
Cooling Fan Control
Cumulative Run Timer
Phase Loss
Low Current Settings
Abnormal Speed Settings
Short Circuit Detect Pulse
Overtorque Settings
Brake Fault Timer
Base Frequency Voltage
Soft Start
TORQUE SETTING
PARAMETERS
Set Points
Torque Control
Ridethrough Mo de F302
Ridethroug h Time F310
Undervoltage Stall Level F629
Undervoltage Trip Enable/Disable F627
Undervoltage Detection Time F628
OL Reduction Starting Frequency F606
Motor 150% OL Time Limit F607
Soft Stall Enable/Disable F017
Motor Overload Trip Enable/Disable N/A
V/f Motor Enable/Disable N/A
Trip Save at Power Down Enable/Disable F602
Cooling Fan Control Mode F620
Cumulative Run Timer Alarm Setting F621
Output Phase Loss Detection Enable/Disable F605
Low Current Trip/Alarm Configuration F610
Abnormal Speed Detection Filter Time F622
Overspeed Detectio n Frequency Range F623
Speed Drop Detection Frequency Range F624
Short-Circuit-Pulse Run Command F613
Short-Circuit -Pu ls e Run Dur ation F614
Overtorque Trip Enable/Disable F615
Overtorque Trip/Alarm Level During Power
Operation
Overtorque Trip/Alarm Level During
Regeneration
Overtorque Detection Time F618
Braking Trouble Internal Timer F630
Release After Run Timer F632
Supply Voltage Compensation Enable/Disable F307
Output Voltage Limitation Enable/Disable
Suppression of Inrush-Current Timing F609
Interlock with ST
VI/II F205
RR F214
RX F220
RX2 F226
BIN F232
Torque Command Selection F420
Torque Command Filter F421
Synchronized Torque Bias Input Selection F422
Parameter
Number
F616
F617
G7 ASD Quick Start Guide 35
Page 41

Program Menu Navigation
Primary Menu Sub Menu Parameter Name
TORQUE SETTING
PARAMETERS
FEEDBACK
PARAMETERS
Torque Control
Torque Limit Settings
Manual Torque Limit
Settings
Torque Speed Limiting
Feedback Settings
PG Settings
Tension Torque Bias Inpu t Selection F423
Load Sharing Gain Input Selection F424
Positive T o rqu e Limit #1Se lec tio n F440
Negative T o rqu e Limit #1Se le ctio n F442
Manual Settings F441
Torque Limit Mode F450
Torque Limit Mode (speed dependent) F451
#1 Positive/Negative Torque Limit Settings F441
#2 Positive/Negative Torque Limit Settings F444
#3 Positive/Negative Torque Limit Settings F446
#4 Positive/Negative Torque Limit Settings F448
Torque Command Mode Selection F429
Forward Speed Limit Selection F425
Forward Speed Limit Level F426
Reverse Speed Limit Selection F427
Reverse Speed Limit Level F428
Speed Limit Torque Reference Selection F430
Speed Limit Torque Level F431
Speed Limit Torque Band F432
Speed Limit Torque Recovery Time F433
Input Selection F360
Proportional (P) Gain F362
Integral (I) Gain F363
Differential (D) Gain F366
Delay Filter F361
Deviation Limits F364
Position Difference Limit F631
Number of PG Input Pulses F367
PG Input Phases F368
PG Disconnection Detection Selection F369
Electronic Gear Setting F370
Position Loop Gain F371
Positioning Completion Range F372
Frequency Limit at Position F373
Current Control Proportional Gain F374
Current Control Integral Gain F375
Speed Loop Proportional Gain F376
Speed Loop Integral Gain F377
Motor Counter Data Selection F378
Speed Loop Parameter Ratio F379
Parameter
Number
36 G7 ASD Quick Start Guide
Page 42

Program Menu Navigation
Primary Menu Sub Menu Parameter Name
FEEDBACK
PARAMETERS
PATTERN RUN
CONTROL PARAMETERS
COMMUNICATION
SETTING PARAMETERS
Drooping Control
Override Control
Pattern Run
Speeds
Preset Speeds
Preset Speed Mode
Communication Settings
Drooping Gain 100% F320
Speed at Drooping Gain 0% F321
Speed at Drooping Gain 100% F322
Drooping Insensitive Torque Band F323
Drooping Output Filter F324
Drooping Reference F327
Load Inertia (Acc/Dec Torque) F325
Load Torque Filter F326
Adding Input Selection F660
Multiplying Input Selection F661
LED Option Override Multiplication Gain F729
Pattern Run Mode Enable/Disable and Restart
Configuration
Pattern #1 Speeds F530
Pattern #2 Speeds F540
Pattern #3 Speeds F550
Pattern #4 Speeds F560
#1 Frequency & Characteristics F018
#2 Frequency & Characteristics F019
#3 Frequency & Characteristics F020
#4 Frequency & Characteristics F021
#5 Frequency & Characteristics F022
#6 Frequency & Characteristics F023
#7 Frequency & Characteristics F024
#8 Frequency & Characteristics F287
#9 Frequency & Characteristics F288
#10 Frequency & Charact eristics F289
#11 Frequency & Characteristics F290
#12 Frequency & Charact eristics F291
#13 Frequency & Charact eristics F292
#14 Frequency & Charact eristics F293
#15 Frequency & Charact eristics F294
Use Preset Speed Enable/Di sable F380
ASD Number F802
Logic (TTL) Baud Rate F800
RS232/RS485 Baud Rate F820
Parity F801
RS232/RS485 Communication Time Out Time F803
Logic (TTL) Communication Time Out Action F804
RS232/RS485 Communication Time Out
Action
Parameter
Number
F520
N/A
G7 ASD Quick Start Guide 37
Page 43

Program Menu Navigation
Primary Menu Sub Menu Parameter Name
COMMUNICATION
SETTING PARAMETERS
Communication Settings
Communication
Reference Adjust
S20 Settings
Scan Receive Settings
Scan Transmit Settings
Communication Error
Optional Parameters
Communication Interval (logic) F805
RS232/RS485 Wire Count F821
RS232/RS485 Response Time F825
TTL Master Output Selection F806
RS232/RS485 Master Output Selection F826
LCD Port Connection Type N/A
Frequency Point Selection F810
Receive Address F860
Transmit Address F861
Speed Reference Station F862
Speed Reference Address F863
Torque Reference Station F865
Torque Reference Address F866
Fault Detect Station Number F868
Station Mode F869
S20 Reset F899
Error Mode F850
Error Detect Time F851
#1 Scan Receive F831
#2 Scan Receive F832
#3 Scan Receive F833
#4 Scan Receive F834
#5 Scan Receive F835
#6 Scan Receive F836
#1 Scan Transmit F841
#2 Scan Transmit F842
#3 Scan Transmit F843
#4 Scan Transmit F844
#5 Scan Transmit F845
#6 Scan Transmit F846
Command Request Disposition on Error F830
Optional Parameter #1 F890
Optional Parameter #2 F891
Optional Parameter #3 F892
Optional Parameter #4 F893
Optional Parameter #5 F894
Parameter
Number
38 G7 ASD Quick Start Guide
Page 44

Program Menu Navigation
Primary Menu Sub Menu Parameter Name
METER TERMINAL
ADJUSTMENT
PARAMETERS
MOTOR PARAMETERS
MONITOR SETUP
FM
AM
Analog1
Analog2
Vector Motor Model
Motor Settings
Motor Set #1
Motor Set #2
Motor Set #3
Motor Set #4
Trip History
Trip Monitor from ASD
FM Terminal Assignment F005
FM Terminal Adjustment F006
AM Terminal Assignment F670
AM Terminal Adjustment F671
Analog 1 Terminal Assignment F672
Analog 1 Terminal Adjustment F673
Analog 2 Terminal Assignment F674
Analog 2 Terminal Adjustment F675
AutoTune Enable/Disable and Reset Config. F400
AutoTune Enable/Disa bl e of Motor Con sta nt 3 F414
Slip Frequency Gain F401
Motor Constant 1 (primary resistance) F402
Motor Constant 2 (secon dary resistance) F403
Motor Constant 3 (exciting inductance) F404
Motor Constant 4 (load inertia) F405
Motor Constant 5 (leakage inductance) F410
Number of Motor Poles F411
Motor Capacity (kW) F412
Motor Type F413
#1 Base Frequency F014
#1 Max Output Voltage F306
#1 Torque Boost F016
#1 Electronic Thermal Protection Level F600
#2 Base Frequency F170
#2 Max Output Voltage F171
#2 Torque Boost F172
#2 Electronic Thermal Protection Level F173
#3 Base Frequency F174
#3 Max Output Voltage F175
#3 Torque Boost F176
#3 Electronic Thermal Protection Level F177
#4 Base Frequency F178
#4 Max Output Voltage F179
#4 Torque Boost F180
#4 Electronic Thermal Protection Level F181
Trip History Records N/A
Most Recent N/A
Second Most Recent N/A
Third Most Recent N/A
Parameter
Number
G7 ASD Quick Start Guide 39
Page 45

Program Menu Navigation
Primary Menu Sub Menu Parameter Name
MONITOR SETUP
SPECIAL CONTROL
PARAMETERS
Trip Monitor from ASD
Scrolling Monitor Select
Frequency Control
Jump Frequencies
Carrier Frequency
Accel/Decel #1 – #4
Settings
Accel/Decel Special
Crane/Hoist Load
Backlash Setup
Fourth Most Recent N/A
Scrolling Monitor Select N/A
Start Fre quency F240
End Frequency F243
Run Frequency F241
Run Frequency Hysteresis F242
Jump Frequency Bandwidth Settings F271
Jump Frequency Processing Selection F276
PWM Carrier Frequency Setting F300
Accel/Decel/Pattern #1 Configuration F009
Accel/Decel/Pattern #2 Configuration F500
Accel/Decel/Pattern #3 Configuration F510
Accel/Decel/Pattern #4 Configuration F514
S-Pattern Lower Limit Adjustment F506
S-Pattern Upper Limit Adjustment F507
Accel/Decel Time Lower Limit F508
Accel/Decel Switching Frequency #1 F505
Accel/Decel Switching Frequency #2 F513
Accel/Decel Switching Frequency #3 F517
Display Resolution F704
High-Speed Operation at Light Lo ad F330
Light-load High-speed Operation Switching
Lower Limit Frequency
Light-load High-speed Oper ation Lo ad Waiting
Time
Light-load High-speed Operation Load
Detection Time
Light-load High-speed Operation Heavy Load
Detection Time
Switching Load Torque During Forward Run F335
Heavy Load Torque During Acceleration in the
Forward Direction
Heavy Load Torque During Deceleration in the
Forward Direction
Switching Load Torque During Reverse Run F338
Heavy Load Torque During Acceleration in the
Reverse Direction
Heavy Load Torque During Deceleration in the
Reverse Direction
Frequency for A utomatic H igh-spee d Operati on
at Light Load
Not available at the time of this release. N/A
Parameter
Number
F331
F332
F333
F334
F336
F337
F339
F340
F341
40 G7 ASD Quick Start Guide
Page 46

Program Menu Navigation
Primary Menu Sub Menu Parameter Name
SPECIAL CONTROL
PARAMETERS
V/f Five Point Setting
Low Output Disable
Function
Earth Fault
Special Parameters
#1 Frequency Setting F190
#1 Voltage Setting F191
#2 Frequency Setting F192
#2 Voltage Setting F193
#3 Frequency Setting F194
#3 Voltage Setting F195
#4 Frequency Setting F196
#4 Voltage Setting F197
#5 Frequency Setting F198
#5 Voltage Setting F199
LOD Control and St opping Method F731
LOD Start Level F732
LOD Start Time F733
LOD Setpoint Boost F734
LOD Boost Time F735
LOD Feedback Level F736
LOD Restart Delay Time F737
Earth Fault Alarm Level F640
Earth Fault Alarm Time F641
Earth Fault Trip Level F642
Earth Fault Trip Time F643
V/f Adjustment Coefficient F183
0 Hz Dead Band Frequency Setting Signal F244
0 Hz Command Stop Function F255
Over Exciting Co operation F481
Stall Cooperation Gain at Field Weakening
Zone
Exciting Starting Rate N/A
Compensation Coefficient for Iron Loss F487
Voltage Compensation Coefficient for Dead
Time
Dead Time Compensation Enable/Disable F489
Dead Time Compensation Bias F490
Switching Frequency Between Current and
Voltage
Optional Analog Terminal Mark N/A
Current Differential Gain F454
Exciting Strengthening Coefficient F480
Enable/Disable User Parameter Initialization
During Typeform Initialization
Parameter
Number
F485
N/A
F491
F709
G7 ASD Quick Start Guide 41
Page 47

Program Menu Navigation
Primary Menu Sub Menu Parameter Name
SPECIAL CONTROL
PARAMETERS
Special Parameters
% Current Vector Control F482
% Voltage Vector Control F483
% Constant Vector C on tr ol F484
Parameter
Number
42 G7 ASD Quick Start Guide
Page 48

Enclosure Dimensions and Conduit Plate
Information
G7 Part Numbering Convention.
Note: The Type 1 enclosed versions of these drives meet or exceed the specification UL 1995,
the Standard for Heating and Cooling Equipment, and complies with the applicable
requirements for installation in a compartment h andling conditioned air. The
equipment listed in this manual meets or exceeds the criteria for CE certification and
carries the CE label.
Note: For CE compliance, all Toshiba ASD enclosures with hinged doors shall have a lock
placed on the standard door fastener or be fitted with the Toshiba lock kit (P/N 53730).
Note: All Toshiba ASD enclosures carry an IP20 rating.
Enclosure Dimensions/Weight
Table 5.
Conduit Plate
Model
Number
VT130G7U
2010B
2015B
2025B
2035B
2055B
2080B
2110B 14.22/361 12.16/309 11.23/285 14.22/361 13.05/331 11.46/291 0.55/14 0.28/7 49033 N/A 48
Fig.
19
A
(in/mm)B(in/mm)C (in/mm)D(in/mm)E(in/mm)F(in/mm)G(in/mm)H(in/mm)
8.47/215 7.28/185 7.33/186 8.47/215 7.95/202 6.74/171 0.53/13 0.23/6 49462 N/A 12
Number
(see
pg. 48 –
49)
Bottom Top
Shipping
Weight
(lbs.)
G7 ASD Quick Start Guide 43
Page 49

Model
Number
VT130G7U
Table 5. (Continued)
Fig.
A
(in/mm)B(in/mm)C (in/mm)D(in/mm)E(in/mm)F(in/mm)G(in/mm)H(in/mm)
Conduit Plate
Number
(see pg. 48 –
49)
Bottom Top
Shipping
Weight
(lbs.)
2160B
14.22/361
2220B 52
19
12.16/309 11.23/285 14.22/361 13.05/331 11.46/291 0.55/14 0.28/7
49033
N/A
50
2270B 15.72/399 49032 54
2330B
2400B
24.63/625
17.5/445 12.81/325 22.32/567 23.75/603 14.25/362 0.75/19 0.38/10
50097
N/A
111
157
26.47/672 49932
2500B 167
2600B
20
261
38.63/981 17.5/445 13.78/350 36.35/923 37.75/959 12.63/321 0.75/19 0.63/16 49900 49468
2750B 265
210KB
212KB 475
21 50.00/1270 24.15/613 20.00/508 46.15/1172 48.50/1232 12.00/305 0.75/19 0.69/18 54086 54086
466
215KB 496
4015B
4025B
4035B
13
8.47/215 7.28/185 7.33/186 8.47/215 7.95/202 6.74/171 0.53/13 0.23/6 49462 N/A
4055B
4080B
4110B 15
4160B
19
50
4220B 52
4270B 53
14.22/361 12.16/309 11.23/285 14.22/361 13.05/331 11.46/291 0.55/14 0.28/7 49033 N/A
4330B 54
4400B 58
4500B
4600B 147
24.63/625
17.5/445 12.81/325 22.32/567 23.75/603 14.25/362 0.75/19 0.38/10
4750B 157
20
50097
N/A
121
410KB 26.47/672 49932 167
412KB
261
38.63/981 17.5/445 13.78/350 36.35/923 37.75/959 12.63/321 0.75/19 0.63/16 49900 49468
415KB 265
44 G7 ASD Quick Start Guide
Page 50

Model
Number
VT130G7U
Table 5. (Continued)
Fig.
A
(in/mm)B(in/mm)C (in/mm)D(in/mm)E(in/mm)F(in/mm)G(in/mm)H(in/mm)
Conduit Plate
Number
(see pg. 48 –
49)
Bottom Top
Shipping
Weight
(lbs.)
420KB
425KB 475
50.00/1270 24.15/613 20.00/508 46.15/1172 48.50/1232 12.00/305 0.75/19 0.69/18 54086 54086
466
24
430KB 496
435KB 73.00/1854 24.00/610 20.00/508 68.00/1727 71.00/1803 16.00/406 0.75/19 0.69/18 51342 51342 665
6015B
6025B
6035B
6060B
8.47/215 7.28/185 7.33/186 8.47/215 7.95/202 6.74/171 0.53/13 0.23/6 49462 N/A 13
6080B
6120B
19
6160B
6220B
50
6270B 52
6330B 54
14.22/361 12.16/309 11.23/285 14.22/361 13.05/331 11.46/291 0.55/14 0.28/7 49033 N/A
6400B 56
6500B 58
6600B
155
24.63/625 17.5/445 12.81/325 22.32/567 23.75/603 14.25/362 0.75/19 0.38/10 50097 N/A
6750B 162
610KB
20
261
612KB
38.63/981 17.5/445 13.78/350 36.35/923 37.75/959 12.63/321 0.75/19 0.63/16 49900 49468
615KB 265
620KB
625KB 475
21 50.00/1270 24.15/613 20.00/508 46.15/1172 48.50/1232 12.00/305 0.75/19 0.69/18 54086 54086
466
630KB 490
G7 ASD Quick Start Guide 45
Page 51

Figure 19.
Figure 20.
46 G7 ASD Quick Start Guide
Page 52

Figure 21.
G7 ASD Quick Start Guide 47
Page 53

Conduit Plate Information
The conduit plate informatio n provided bel ow is for the 0. 75 to 350 HP G7 ASDs of t he 230, 460 , and 600
volt product lines. Each bottom or top conduit plate may be cross referenced to the applicable device using
the information in
Note: Unless otherwise specified, all dimensions are in inches .
Figure 22.
Table 5 on page 43.
48 G7 ASD Quick Start Guide
Page 54

Figure 23.
G7 ASD Quick Start Guide 49
Page 55

Conduit Extender Box (option)
The Conduit Extender Box (P/N ASD-Conduit-1) may be used when more room is required at the ASD
conduit connection point. This option makes adding and removing conduit easier and quicker.
Conduit Extender Box Installation
1. Remove the Conduit Plate (P/N 49462 of Figure 24).
2. Install the Conduit Extender Box (P/N 53354 of Figure 25) and secure using the 2 screws from the
conduit plate.
3. Complete the conduit and wiring connections.
4. Install the Conduit Extender Box cover (P/N 53355 of Figure 25).
Figure 24. Remove Conduit Plate.
Figure 25. Conduit Box/Cover.
50 G7 ASD Quick Start Guide
Page 56

Cable/Terminal Specifications
Installation should conform to the 2005 National Electrical Code Article 110 (NEC) (Requirements for
Electrical Installations), all regulations of the Occupational Safet y and Health Administration, and any
other applicable national, regional, or industry codes and standards.
Note: The following ratings are guidelines and shall not be the s ole de termining factor of the
lug or wire size used with the ASD. Application-specific applicables, wire insulation type,
conductor material, and local and regional regulations are but a few of the
considerations when selecting the actual lug and wire type to be used with the ASD.
Note: Cable/Terminal spe cifi cat i on s ar e based on the rated curr ent of the ASD and Do Not
include the 10% Service Factor.
For further installation information see the section titled Installation and Connections on pg. 12.
Table 6. 230-volt G7 ASD Cable/Terminal Specifications.
Model
VT130G7U
2010B 15 14 10
2015B 15 14 10
2025B 15 14 10
2035B 20 14 10
2055B 30 12 10
2080B 50 10 10
2110B 50 8 4
2220B 100 4 4
2270B 125 3 2 16 to 1
2330B 150 2 2
2400B 175 1/0 2/0
2500B 200 2/0 2/0 12 to 4/0
MCP
Rating
(Amps)
Recommended Maximum
Typical Wire/Cable Size (AWG or kcmil) Lug Size Range
Input/Output Power
AM, FM, and II
Terminals
20
(3-core shield)
Control Terminals
18
(2-core shield)
Wire-Size/Lug-Capacity for
Input/Output Power
10 to 1/0
24 to 8
18 to 42160B 75 6 4
2600B 250 *1/0 *4/0
2750B 300 *2/0 *4/0
210KB 400 *4/0 *500
215KB 600 *400 *500
*(6 to 250)
*(1/0 to 500)212KB 500 *300 *500
Note: Input and Output power wires require shielding for CE compliance.
Note: (*) Indicates that the item is one of a set of two parallel cables.
G7 ASD Quick Start Guide 51
Page 57

Table 7. 460-volt G7 ASD Cable/Terminal Specifications.
Model
VT130G7U
4015B 15 14 10
4025B 15 14 10
4035B 15 14 10
4055B 15 14 10
4080B 20 14 10
4110B 30 12 10
4160B 30 10 4
4220B 50 8 4
4270B 75 8 4
4330B 75 6 4
4400B 100 4 4
4500B 100 3 2 16 to 1
4600B 125 2 2
4750B 175 1 **2
MCP
Rating
(Amps)
Recommended Maximum
T y pical Wire/Cable Size (AWG or kcmil) Lug Size Range
Input/Output Power
AM, FM, and II
Terminals
20
(3-core shield)
Control Terminals
18
(2-core shield)
Wire-Size/Lug-Capacity for
Input/Output Power
24 to 8
18 to 4
10 to 1/0
410KB 200 2/0 2/0 12 to 4/0
412KB 250 *1/0 *4/0
415KB 300 *2/0 *4/0
420KB 400 *4/0 *500
425KB 500 *300 *500
430KB 600 *400 *500
435KB 700 *500 *500
*(6 to 250)
*(1/0 to 500)
Note: Input and Output power wires require shielding for CE compliance.
Note: (*) Indicates that the item is one of a set of two parallel cables.
Note: (**) Indicates that a 1.5” conduit orifice is required if using the recommended cable
size.
52 G7 ASD Quick Start Guide
Page 58

Table 8. 600-volt G7 ASD Cable/Terminal Specifications.
Model
VT130G7U
6015B 15 14 10
6025B 15 14 10
6035B 15 14 10
6060B 15 14 10
6080B 15 14 10
6120B 30 14 10
6160B 30 10 10
6220B 50 10 4
6270B 50 8 4
6330B 50 8 4
6400B 75 6 4
6500B 100 6 4
6600B 100 4 2
6750B 125 3 2
MCP
Rating
(Amps)
Recommended Maximum
Typical Wire/Cable Size (AWG or kcmil) Lug Size Range
Input/Output Power
AM, FM, and II
Terminals
20
(3-core shield)
Control Terminals
18
(2-core shield)
Wire-Size/Lug-Capacity for
Input/Output Power
24 to 8
18 to 4
16 to 1
610KB 150 1 *4/0
615KB 250 3/0 *4/0
620KB 300 *2/0 *500
630KB 500 *4/0 *500
Note: Input and Output power wire requires shielding for CE compliance.
Note: (*) Indicates that the item is one of a set of two parallel cables.
Note: (**) Indicates that a 1.5” conduit orifice is required if using the recommended cable
size.
*(6 to 250)612KB 200 2/0 *4/0
*(1/0 to 500)625KB 400 *3/0 *500
G7 ASD Quick Start Guide 53
Page 59

Dynamic Braking Resistor Wire/Cable
Specifications
When using a Dynamic Braking Resistor (DBR), use thermal protection and an input contactor that will
open the input 3-phase power circuit to the ASD in the event that a DBR over-temperature condition
occurs. In the event of a power source over-voltage condition or an ASD failure the input contactor will
prevent hazardous DBR temperatures.
Because the heat generated by the DBR will affect the cooling capacity of the heatsink, the resistor pack
should be mounted abov e or to t he side o f the ASD — Never below the ASD. Maintain a minimum of six
inches between the resistor pack and the ASD unit.
Heavy duty DBRs should be wired using the same gauge wire as the motor leads. Light duty DBRs may
use one wire size smaller (AWG) than the motor leads.
The total wire length from the ASD to the DBR should not exceed ten feet.
The wiring from the ASD to the DBR should be twisted approximately two twists per foot throughout the
length of the wire.
If EMI/RFI noise is of concern, the DBR wiring should be three-core screened cable. The screen should
connect to the ASD enclosure and the resistor enclosure.
54 G7 ASD Quick Start Guide
Page 60

Index
Numericals
12-pulse operation, 15
A
Abnormal Speed Settings, 35
Accel/Decel #1 – #4 Settings, 40
Accel/Decel #1 Settings, 30
Accel/Decel Settings, 40
Accel/Decel Special, 40
Adjust Accel/Decel Automatically, 25
Alarm Popups, 30
AM, 17, 39
Analog Filter, 33
Analog Input Functions, 32
Analog1, 39
Analog2, 39
ASD-FUSEKIT-12P, 15
B
Backlash Setup, 40
Base Frequency Volts, 35
Brake Fault Timer, 35
C
Cable/Terminal Specifications, 51
Carrier Frequency, 40
CC, 17
CE compliance, 43
CE Compliance Requirements, 9
Changed from Default, 30
Changed From D efault screen, 23
Circuit breaker configuration, 13
Command Sour ce, 26
Communication Error, 38
Communication Reference Adjust, 38
Communication Setting Parameters, 37
Communication Settings, 37
concerns about this publication, 4
Conduit Extender Box, 50
Conduit Extender Box Installation, 50
Conduit Plate Information, 43, 48
Configuration and Menu Options, 27
Connecting the ASD, 14
Connection Diagram, 19
Contrast (adjustment), 30
Control Terminal Strip, 17
Crane/Hoist Load, 40
Cumulative Run Timer, 35
D
Date and time setting, 30
DC Braking, 34
Dead Time Compensation, 41
Default Setting Changes, 23
Default Term. Setting, 17
Direct Access, 30
Discrete Input, 17
Discrete Output, 17
Display Units, 31
Disposal, 4
Down Key, 20
Drooping Control, 37
Dynamic Braking, 34
E
Electronic Operator Interface, 20
Emergency Off Setting, 34
Enclosure Dimensions/Weight, 43
Encoder Ac tion, 30
Enter Key, 20
EOI Features, 20
EOI Operation, 21
EOI Setup Options, 30
Equipment Inspection, 3
Escape Key, 20
F
F, 17
Fan Control, 35
Fault Status, 29
Feedback Parameters, 36, 37
Feedback Settings, 36
Ferraz Shawmut Semiconductor fuse, 15
Filter Selection Table, 11
FLA, 17
FLB, 17
FLC, 17
FM, 17, 39
FP, 17
FP Terminal Settings, 32
Frequency Control, 40
Frequency Mode #2, 30
Frequency Reference Source, 26
Frequency Set Mode, 27
Frequency Setting, 30
Frequency Setting Parameters, 33
Fundamental Parameters, 30
Fwd/Rev Disa ble, 34
G7 ASD Quick Start Guide 55
Page 61

G
G7 Part Numbering Convention, 43
General Safety Inf ormation , 1
H
Handling and Storage, 4
Motor Set #1, 30, 39
Motor Set #2, 39
Motor Set #3, 39
Motor Set #4, 39
Motor Settings, 39
Motorized Pot Settings, 34
Mounting the ASD, 13
MS1 AUX, 12
Review Startup Screen, 31
Root menu mapping, 27
Root Menus, 27
Rotary Encoder, 21
RR, 17
Run Key, 20
RX, 17
I
I/O and Control, 17
I/O Circuit Configurations, 18
II, 17
Initial Setup, 22
Input Special Functions, 32
Input Terminal Assignment, 32
Input Terminal Delays, 33
Installation and Connections , 12
Installation Notes, 12
Installation Precautions, 4
J
Jog Settings, 33
Jump Frequencies, 40
L
L1/R, 14
L2/S, 14
L3/T, 14
LCD Display, 20
LCD EOI Operation, 26
LCD Port Connection, 38
Lead Length Specifications, 16
Line Power Switching, 32, 33
Local Remote Key, 30
Local|Remote Key, 20
Lockout, 31
Low Current Settings, 35
Lower Limit Frequency, 24
M
Manual Torque Limit Settings, 36
Meter Terminal Adjustment
Parameters, 39
MON/PRG, 21
Monitor Mode, 28
Monitor Setup, 39
Motor connection diagram, 15
Motor Current Rating, 25
Motor Overload Trip, 35
Motor Parameters, 39
O
Operation (Local), 22
Operational and
Maintenance Precautions, 8
Option Type, 29
OUT1, 17
Out1 Out2 FL, 28
OUT2, 17
Output Terminal Delays, 33
Output Terminal Functions, 32
Overload, 35
Override Control, 37
Overtorque Settings, 35
P
P24, 17
PA, 15
Panel Menu, 28
Pattern Run, 37
Pattern Run Control Parameters, 37
PG Settings, 36
Phase Loss, 35
phase-shifting transformer, 15
PO, 15
Power Connections, 14
PP, 17
Preferences, 30
Preset Speed Mode, 34, 37
Preset Speeds, 33, 37
Program Menu Navigation, 30
Program Mode, 30
Protection Parameters, 34, 35
Q
Qualified Personnel, 3
R
R, 17
Reach Settings, 32
Realtime Clock Setup, 30
RES, 17
Retry/Restart Configuration, 34
S
S1, 17
S2, 17
S3, 17
S4, 17
Scrolling Monitor, 27
Scrolling Monitor Select, 40
Service Life Information, 9
Shipping Weight, 43
Shipping Weight (lbs.), 43
Short Circuit Detect Pulse, 35
Soft Stall Enable, 35
Soft Start, 35
Special Control Parameters, 40, 41
Special Parameters, 41
Speed Ref. Setpoint, 33
Speeds, 37
ST, 17
ST1, 12
Stall, 34
Standard Mode Settings, 30
Startup and Test, 16
Startup Wizard, 30
Startup Wizard Requirements, 24
Status LED, 20
Stop Key, 20
System Grounding, 14
System Integration Precautions, 6
System Operation, 22
T
T1/U, 15
T2/V, 15
T3/W, 15
Terminal Selection Parameters, 32
Torque Control, 35, 36
Torque Limit Settings, 36
Torque Setting Parameters, 35, 36
Torque Speed Limiting, 36
Trip History, 39
Trip Monitor from ASD, 39, 40
Trip Settings, 35
Type Reset, 31
56 G7 ASD Quick Start Guide
Page 62

U
UL 1995, 43
Undervoltage/Ridethrough, 35
Up Key, 20
Upper Limit Frequency, 24
Utility Parameters, 31
V
V/f Adjustment, 41
V/f Five Point Setting, 41
Vector Motor Model, 39
Versions, 31
VI, 17
Voltage and Frequency Rating
of the Motor, 24
Volts per Hertz Setting, 25
W
Warranty Card, 3
Wizard Finish, 26
G7 ASD Quick Start Guide 57
 Loading...