

Toshiba e-STUDIO 3515AC, e-STUDIO AC, e-STUDIO 4515AC, e-STUDIO 2010AC, e-STUDIO 2510AC Operator's Manual
...Page 1

MULTIFUNCTIONAL DIGITAL COLOR SYSTEMS /
MULTIFUNCTIONAL DIGITAL SYSTEMS
Operator’s Manual for
IP Fax Function
Page 2

© 2018 TOSHIBA TEC CORPORATION All rights reserved
Under the copyright laws, this manual cannot be reproduced in any form without prior written permission of TTEC.
Page 3

Preface
Thank you for purchasing TOSHIBA Multifunctional Digital Systems or Multifunctional Digital Color Systems.
This manual describes how to use the IP Fax function.
Read this manual before using the functions.
How to read this manual
Symbols in this manual
In this manual, some important items are described with the symbols shown below. Be sure to read these items
before using this equipment.
Indicates a potentially hazardous situation which, if not avoided, could result in death, serious
injury, or serious damage, or fire in the equipment or surrounding objects.
Indicates a potentially hazardous situation which, if not avoided, may result in minor or
moderate injury, partial damage to the equipment or surrounding objects, or loss of data.
Indicates information to which you should pay attention when operating the equipment.
Describes handy information that is useful to know when operating the equipment.
Pages describing items related to what you are currently doing. See these pages as required.
Target audience for this manual
This is a manual that is aimed at general users and administrators.
Description of original/paper direction
Paper or originals of A4, B5 or LT size can be placed either in a portrait direction or in a landscape direction. In this
manual, “-R” is added to this paper size when this size of paper or original is placed in a landscape direction.
Example: A4 size original on the original glass
Placed in a portrait direction: A4 Placed in a landscape direction: A4-R
Preface 3
Page 4

Model and series names in this manual
In this manual, each model name is replaced with the series name as shown below.
Model name Series name in this manual
e-STUDIO2010AC/2510AC e-STUDIO5015AC Series
e-STUDIO2515AC/3015AC/3515AC/4515AC/5015AC
e-STUDIO2018A/2518A/3018A/3518A/4518A/5018A e-STUDIO5018A Series
e-STUDIO5516AC/6516AC/7516AC e-STUDIO7516AC Series
e-STUDIO5518A/6518A/7518A/8518A e-STUDIO8518A Series
Optional equipment
For the available options, refer to the Quick Start Guide.
Screens in this manual
In this manual, Windows10 is taken for explanation purposes to describe the screens and operation procedures in
Windows.
The details on the screens may differ depending on your model and how the equipment is used, such as the status of
the installed options, the OS version and the applications.
Abbreviations in this manual
In this manual, “Dual Scan Document Feeder” (DSDF) and “Reversing Automatic Document Feeder” (RADF) are
collectively referred to as “Automatic Document Feeder” (ADF).
Trademarks
For trademarks, refer to the Safety Information.
4 Preface
Page 5

CONTENTS
Preface................................................................................................................................................. 3
Chapter 1 IP Fax Function Overviews
About IP Fax ......................................................................................................................................... 8
Chapter 2 Installing the license
Checking the license............................................................................................................................ 12
Installing the license ........................................................................................................................... 13
Chapter 3 Setting the IP Fax Function
Setting the IP Fax Function from TopAccess .......................................................................................... 16
Setting procedure ...................................................................................................................................................... 16
General settings ......................................................................................................................................................... 17
IP Fax Settings............................................................................................................................................................ 18
Address Book ............................................................................................................................................................. 30
Chapter 4 Using the IP Fax Function
Using the IP Fax Function from the Touch Panel..................................................................................... 36
Sending/Receiving ..................................................................................................................................................... 36
User Functions ........................................................................................................................................................... 47
Using the IP Fax Function from the N/W-Fax Driver ................................................................................ 56
Sending IP Faxes ........................................................................................................................................................ 56
Specifying Recipients of IP Faxes .............................................................................................................................. 60
Removing recipients .................................................................................................................................................. 68
Setting up the [Send] tab........................................................................................................................................... 69
Setting up the [Device Settings] tab ......................................................................................................................... 72
Using the IP Fax Function from TopAccess ............................................................................................. 74
Log .............................................................................................................................................................................. 74
Template .................................................................................................................................................................... 77
Inbound FAX routing .................................................................................................................................................. 79
Role Management ...................................................................................................................................................... 80
Notification Setting.................................................................................................................................................... 83
IP Fax Received Forward (Admin) ............................................................................................................................. 84
Chapter 5 Troubleshooting
Transmission/Reception Trouble .......................................................................................................... 98
Error Codes for IP Faxing...................................................................................................................... 99
Chapter 6 Appendix
Lists and Reports Functions for IP Faxing .............................................................................................102
FUNCTION LIST (Administrator).............................................................................................................................. 102
IP Fax Functions Displayed on Lists and Reports ................................................................................................... 103
Specification for IP Fax function ..........................................................................................................104
INDEX .........................................................................................................................................................105
CONTENTS 5
Page 6

6 CONTENTS
Page 7

1.IP Fax Function Overviews
About IP Fax.......................................................................................................................8
Page 8
0.About IP Fax
Oice A Oice B
IP Fax
Transmitter
IP Fax
Receiver
Inside the Intranet
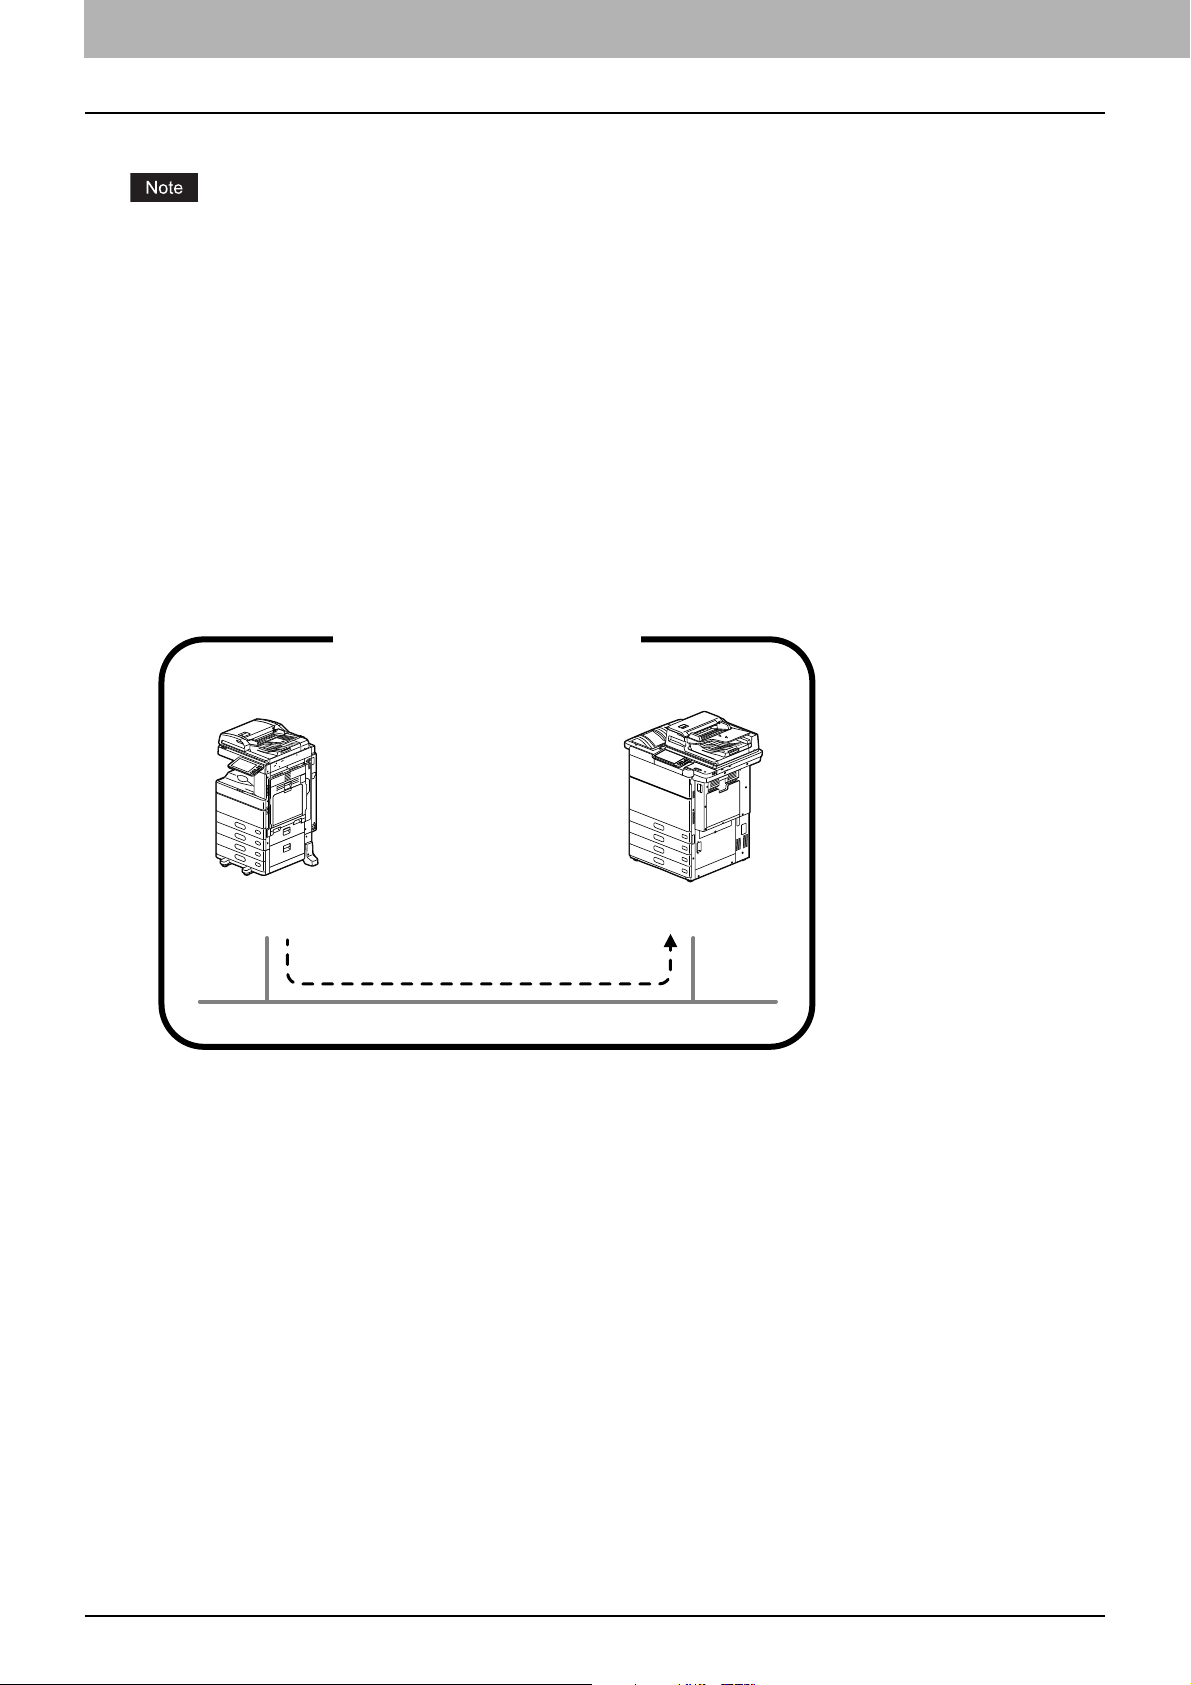
The IP Fax is a function for sending and receiving fax jobs on an IP network.
An IP Fax Enabler is required in order to use the IP Fax function. If you are using e-STUDIO2010AC/2510AC or
e-STUDIO2018A/2518A/3018A, Extended Memory (4GB) must be installed. For details, contact your service
technician or service representative.
Sending and receiving fax jobs by means of the IP Fax are guaranteed only for communication between Toshiba
MFPs.
When the IP Fax Enabler is installed, the available energy saving mode is Sleep mode.
The fax function of AirPrint does not support the IP Fax.
When security is required for sending/receiving fax jobs by the IP Fax, use an IPsec option.
When a wireless LAN is used, a communication error may occur.
Sending and receiving fax jobs by the IP Fax are not available under a network being connected by Wi-Fi Direct.
Within the IP Fax, the following sending and receiving operations are possible.
Sending/Receiving fax jobs between MFPs
Sending and receiving in an intranet is performed between MFPs which support IP Fax. An IP address, host name or
SIP URI is used for the destination. For details about SIP URI, see P.30 “Address Book”.
8 About IP Fax
Page 9

1.IP Fax Function Overviews
SIP Server
Oice A Oice B
IP Fax
Transmitter
IP Fax
Receiver
Inside the Intranet
T.38 Supporting
Gateway
Oice A Oice C
IP Fax
Transmitter
G3 Fax Machine
Inside the Intranet
Public
Network Line
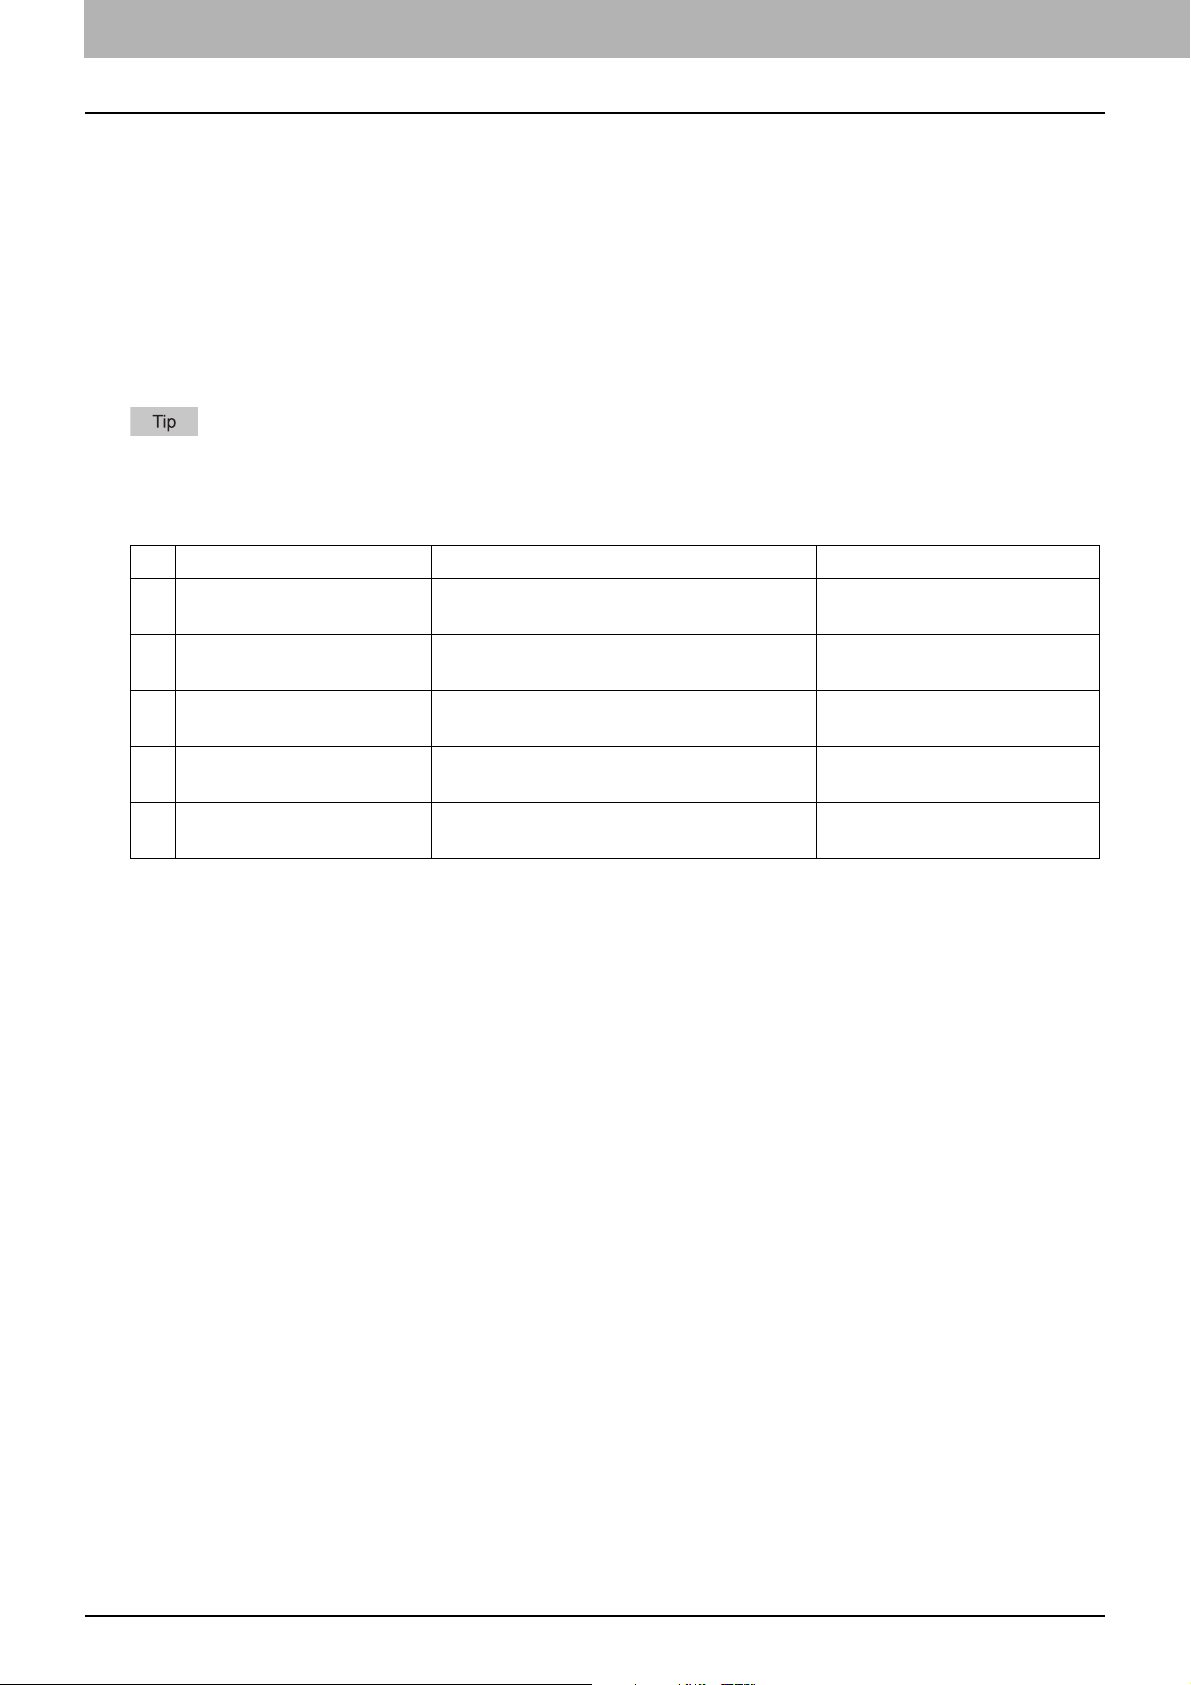
Sending/Receiving fax jobs via a SIP server
Sending and receiving is performed in an intranet between MFPs which support IP Fax via a SIP server. An IP Fax
number is used for the destination.
IP Fax Function Overviews
A SIP server manages and controls the IP telephone service using SIP (Session Initiation Protocol). We have
performed an operation test using Cisco Unified Communication Manager Express 14.0.
Sending/Receiving fax jobs from a G3 Fax machine via a T.38 supporting gateway
Sending/Receiving from a G3 Fax machine is performed from an IP Fax transmitter via a T.38 supporting gateway. A
telephone number is used for the destination.
A T.38 supporting gateway is a device for relaying the IP network and the public telephone line. We have performed
an operation test using Cisco C2911-CME-SRST/K9 + EM-HAD-6FXO.
About IP Fax 9
Page 10

1.IP Fax Function Overviews
10 About IP Fax
Page 11

2.Installing the license
Checking the license .........................................................................................................12
Installing the license.........................................................................................................13
Page 12

0.Checking the license
An IP Fax Enabler is required in order to use the IP Fax function. For details, contact your service technician or service
representative.
You can check whether or not the IP Fax Enabler is installed in the equipment as below.
Press [User Functions -User-] and the [Admin] tab. Select [General] and then [License Management]. If the license of
[IP Fax Enabler] or [IP Fax Enabler (license)] is registered, the IP Fax function is available.
MFP Management Guide”SETTING ITEMS (Admin)” - “Managing the option licenses” - “Viewing product
information”
12 Checking the license
Page 13

0.Installing the license
If the IP Fax Enabler is not installed in the equipment, install it by referring to the following manual.
MFP Management Guide”SETTING ITEMS (Admin)” - “Managing the option licenses” - “Installing an option” or
“Activating the license”
Installing the license
Installing the license 13
Page 14

2.Installing the license
14 Installing the license
Page 15

3.Setting the IP Fax Function
Setting the IP Fax Function from TopAccess........................................................................16
Setting procedure ................................................................................................................................................16
General settings ...................................................................................................................................................17
IP Fax Settings......................................................................................................................................................18
Address Book .......................................................................................................................................................30
Page 16
0.Setting the IP Fax Function from TopAccess
Perform the necessary settings from TopAccess in order to use the IP Fax function.
P.16 “Setting procedure”
P.17 “General settings”
P.18 “IP Fax Settings”
P.30 “Address Book”
For how to operate TopAccess, refer to the TopAccess Guide.
Setting procedure
This explains about the settings to use the IP Fax function.
For necessary information, such as telephone numbers, related to the setting and registration of each device (SIP
server, T.38 supporting gateway) used for receiving/sending an IP Fax, contact the administrator of each device.
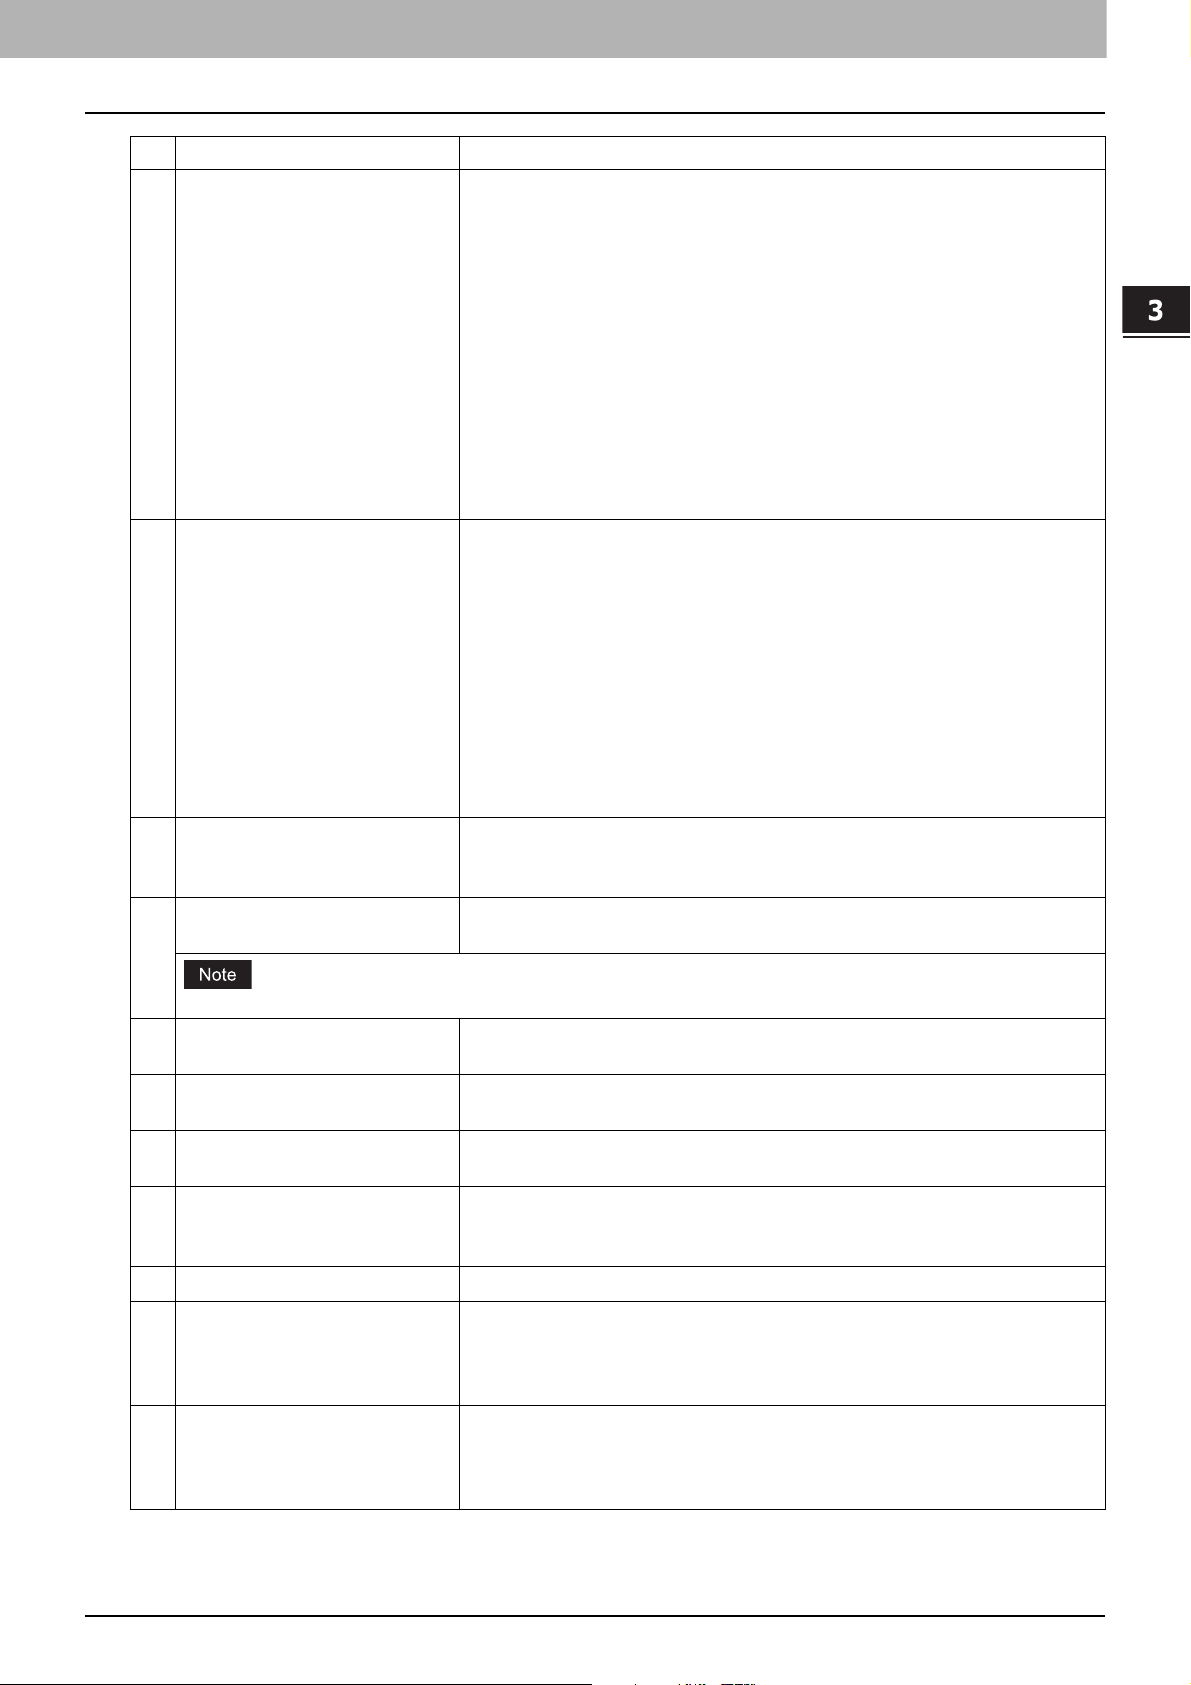
Setting
Operation Description Reference
1 IP Fax Send/IP Fax Receive
functions confirmation
2 General settings Specify the settings related to the IP Fax
3 SIP settings Set the necessary settings when a SIP server
4 Gateway settings Set the necessary settings when a T.38
5 Address book settings Set or edit the recipients of the address
Check that [Enable] is set for the IP Fax Send
and the IP Fax Receive functions.
operation from the touch panel.
is used.
supporting gateway is used.
book.
P.17 “Functions”
P.18 “General Setting”
P.22 “SIP Setting”
P.26 “Gateway Setting”
P.30 “Address Book”
16 Setting the IP Fax Function from TopAccess
Page 17

3.Setting the IP Fax Function
1
2
3
General settings
You can select whether to enable or disable the IP Fax Send function and the IP Fax Receive function.
Set the necessary settings from the [Administrator] tab displayed by logging into TopAccess by means of the
administrator privilege (access policy mode).
Click the [Administrator] tab and then [Setup] > [General Settings].
P.17 “Functions”
Functions
For details on items other than for IP Faxing, refer to the TopAccess Guide.
Item name Description
1 IP Fax Send Selects whether to enable or disable the IP Fax Send function.
2 IP Fax Receive Selects whether to enable or disable the IP Fax Receive function.
3 Network IP Fax Selects whether to enable or disable the network IP Fax function.
Setting the IP Fax Function
Setting the IP Fax Function from TopAccess 17
Page 18

3.Setting the IP Fax Function
1
2
3
4
5
6
7
8
9
10
11
12
13
14
15
16
17
18
IP Fax Settings
You can set up the IP Fax settings.
P.18 “General Setting”
P.22 “SIP Setting”
General Setting
On the General Setting menu, set the IP Fax operation setting performed from the touch panel.
Access TopAccess. Log into TopAccess in access policy mode as an administrator.
Click the [Administrator] tab and then [Setup] > [IP Fax].
Item name Description
18 Setting the IP Fax Function from TopAccess
1 Terminal ID Enters the terminal ID name (company name) to identify this equipment.
2 IP Fax Number Enters the IP Fax number of this equipment. This IP Fax number will be
Depending on the settings of this equipment, the IP Fax number is sometimes not printed.
When [ON] is set for [TTI for IP Fax], this name will be printed at the leading
edge of all documents transmitted.
printed at the leading edge of all documents transmitted.
Page 19
3.Setting the IP Fax Function
Item name Description
3 Resolution Selects the default resolution for sending IP Faxes.
4 Original Mode Selects the default image quality mode for sending IP Faxes.
5 Exposure Selects the default exposure for sending IP Faxes.
6 TTI Selects whether to print a transmission header (TTI) on received IP Faxes to
Standard — Select this to use the standard mode as the default
resolution.
This mode is suitable when you are frequently transmitting text
documents with normal size characters.
Fine — Select this to use the fine mode as the default resolution.
This mode is suitable when you are transmitting documents with small
size characters or fine drawings.
Ultra Fine — Select this to use the ultra fine mode as the default
resolution.
This mode is suitable when you are transmitting documents with very
small size characters or detailed drawings.
Text — Select this to set the Text mode as the default image quality mode.
This mode is suitable for sending text originals.
Text/Photo — Select this to set the Text/Photo mode as the default image
quality mode.
This mode is suitable for sending originals containing both text and
photos.
Photo — Select this to set the Photo mode as the default image quality
mode.
This mode is suitable for sending photo originals.
Select [Auto] to apply the ideal contrast automatically according to the
original or select the contrast manually in 11 stages.
identify their senders.
Setting the IP Fax Function
The printed time is the transmission time of each page.
7 RTI Selects whether to print a reception header (RTI) on received IP Faxes to
clearly identify their time, date, and page count.
8 Discard Selects whether to discard the lower portion of the received image if it is
larger than the recording paper.
9 Reduction Selects whether to reduce the received image if it is larger than the effective
printing area of the recording paper.
10 Duplex Print Selects whether to print the received images on both sides of the recording
paper.
Available only when the Automatic Duplexing Unit is installed.
11
Rotate Sort
*1
Selects whether to rotate the output direction in the tray for each reception.
12 Recovery Transmit Selects whether to retransmit an original stored in a memory by operating
on the touch panel after the initially specified number of redial attempts has
been failed.
When this is enabled, select the stored time length from 1 to 24 hours.
13 Journal Auto Print Selects whether to print a transmission and reception journal automatically
at every specified numbers of the communication. 40 or 120 can be set as
the numbers of the communication. For details, refer to the MFP
Management Guide.
Setting the IP Fax Function from TopAccess 19
Page 20

3.Setting the IP Fax Function
Item name Description
14 Memory Transmission Report Selects how to print a result report after a memory transmission.
OFF — Select this to not print a memory transmission report.
Always — Select this to print a memory transmission report with all page
images for each memory transmission completed.
ON ERROR — Select this to print a memory transmission report with all
page images only when the memory transmission is not successfully
completed.
Always (Print 1st Page Image) — Select this to print a memory
transmission report with the 1st page image for each memory
transmission completed.
ON ERROR (Print 1st Page Image) — Select this to print a memory
transmission report with the 1st page image only when the memory
transmission is not successful.
15 Multi Transmission Report Selects how to print a result report after a multi-address transmission.
OFF — Select this to not print a multi-address transmission report.
Always — Select this to print a multi-address transmission report with all
page images for each multi-address transmission completed.
ON ERROR — Select this to print a multi-address transmission report with
all page images only when the multi-address transmission is not
successfully completed.
Always — Select this to print a multi-address transmission report with the
1st page image for each multi-address transmission completed.
ON ERROR (Print 1st Page Image) — Select this to print a multi-address
transmission report with the 1st page image only when the multi-address
transmission is not successful.
16 RX End Tone Selects how to sound the RX end tone after the completion of reception.
OFF — The RX end tone does not sound.
Print End — The RX end tone sounds at the completion of printing.
Receive End — The RX end tone sounds at the completion of reception.
17 TX End Tone Selects how to sound the TX end tone after the completion of transmission.
OFF — The TX end tone does not sound.
Always — The TX end tone sounds at the completion of transmission.
ON ERROR — The TX end tone sounds in the case of a transmission failure.
Normal End — The TX end tone sounds at the normal completion of
transmission.
20 Setting the IP Fax Function from TopAccess
Page 21

3.Setting the IP Fax Function
Item name Description
18 Secure Receive You can set the Secure Receive function to store received IP Fax jobs in the
equipment without printing them.
With this function, you can prevent the leaking of confidential information
in an IP Fax received when no people are present in your office, such as
nighttime or holidays, or when an unspecified number of people visit your
office.
Enable — Select this to enable the Secure Receive function.
Disable — Select this to disable the Secure Receive function.
Weekly Schedule — Select this to set whether the Secure Receive
function is enabled or disabled for each day of the week.
You can set the time to enable and disable the Secure Receive function
(24-hour display).
- For a day on which you want to enable the Secure Receive function all
day, specify “00:00” for “Disable” and “00:00” for Enable.
- For a day on which you want to disable the Secure Receive function all
day, specify “00:00” for “Disable” and “24:00” for Enable.
To print the IP Fax jobs the Secure Receive function received, you must set
[Password] and [Retype Password]. For the password, you can enter up to
20 alphanumerical characters and symbols (! # ( ) * + , - . / : ; = ? @ $ ^ _ ` { | }
~ \).
*1 This function is not available for some models.
Setting the IP Fax Function
Setting the IP Fax Function from TopAccess 21
Page 22

3.Setting the IP Fax Function
1
2
3
4
5
6
7
8
9
10
11
12
13
14
15
16
17
SIP Setting
Set the necessary settings when a SIP server is used.
P.26 “Gateway Setting”
P.27 “[Add Gateway] screen”
P.28 “Report Setting”
It may take a while until the connection can be confirmed when SIP settings are changed.
22 Setting the IP Fax Function from TopAccess
Page 23

3.Setting the IP Fax Function
Item name Description
1 Enable SIP Selects whether to enable or disable the SIP settings. [Disable] is set as the
2 Transport Protocol Selects the transport protocol for sending a request from SIP.
3 Reception Port Number Enters the port number which receives SIP packets. You can enter a value in
4 User Name Enters the SIP user name registered in the SIP server. You can enter up to 64
5 Enable SIP Server Selects whether to enable or disable the SIP server. [Disable] is set as the
If there is no registration in [Server Address] of the registrar and the proxy server, [Enable] cannot be
selected and saving will fail.
When [Enable] is selected for [Enable SIP Server], set [Disable] in [Enable VoIP Gateway] in Gateway Setting.
When [Enable] is selected for [Enable VoIP Gateway], transmission not using a SIP server is also accepted.
6 Accept Transmission without
SIP Server
7 Address Mode Selects the address mode to receive an IP address manually or to obtain
default.
UDP — Select this to use UDP.
TCP — Select this to use TCP.
the range from 1 to 65535. Generally the default value “5060” is used.
alphanumerical characters and symbols ( &()=+$,;?/-_.!~*').
default.
Selects whether to enable or disable the direct transmission to an MFP
supporting the IP Fax function without using a SIP server. This setting is
applied when [Enable] is set for [Enable SIP Server]. [Disable] is set as the
default.
from a network automatically.
Manual — Select this to set the SIP server address manually.
Auto — Select this to obtain the SIP server address notified from a DHCP
server automatically.
Auto(DHCPv6) — Select this to obtain the SIP server address notified
from a DHCPv6 server automatically.
Setting the IP Fax Function
Auto(DHCPv6) — This can be selected regardless of whether the stateless or stateful if the [Use DHCPv6 Server
Option] check box is chosen in [IPv6] under [Basic Setting] of [Network].
Setting the IP Fax Function from TopAccess 23
Page 24

3.Setting the IP Fax Function
Item name Description
8 Registrar Server Setting -
Primary
9 Registrar Server Setting -
Secondary
When the settings are specified for both [Primary] and [Secondary] in
[Registrar Server Setting], those for [Primary] are used.
Connection Status — Displays the last connection status.
(Blank) — A server address is not specified.
Registered — The IP address or the host name of the SIP server has been
registered.
Available — The IP address or the host name of the SIP server to be used
can be registered; however, another server has been connected.
Failed — The registration of the IP address or the host name of the SIP
server to be used has failed.
Server IP Address * — Enters the host name or the IP address of a primary
registrar. You can enter up to 128 characters. This will not be displayed if
[Auto] or [Auto(DHCPv6)] has been selected in Address Mode.
Port Number — Enters the port number for sending packets to a primary
registrar. You can enter a value in the range from 1 to 65535. Generally the
default value “5060” is used.
User Name — Enters a user name to be authenticated in a primary registrar.
You can enter up to 64 characters.
Password — Enters a password to be authenticated in a primary registrar.
You can enter up to 64 characters.
Retype Password — Enters the same password again for a confirmation.
When a primary registrar cannot be used, a secondary one will be utilized.
Connection Status — Displays the last connection status.
(Blank) — A server address is not specified.
Registered — The IP address or the host name of the SIP server has been
registered.
Available — The IP address or the host name of the SIP server to be used
can be registered; however, another server has been connected.
Failed — The registration of the IP address or the host name of the SIP
server to be used has failed.
Server IP Address * — Enters the host name or the IP address of a
secondary registrar. You can enter up to 128 characters. This will not be
displayed if [Auto] or [Auto(DHCPv6)] has been selected in Address Mode.
Port Number — Enters the port number for sending packets to a secondary
registrar. You can enter a value in the range from 1 to 65535. Generally the
default value “5060” is used.
User Name — Enters a user name to be authenticated in a secondary
registrar. You can enter up to 64 characters.
Password — Enters a password to be authenticated in a secondary
registrar.
You can enter up to 64 characters.
Retype Password — Enters the same password again for a confirmation.
24 Setting the IP Fax Function from TopAccess
Page 25

3.Setting the IP Fax Function
Item name Description
10 Proxy Server Setting - Primary When the settings are specified for both [Primary] and [Secondary] in [Proxy
Server Setting], those for [Primary] are used.
Server IP Address * — Enters the host name or the IP address of a primary
proxy server. You can enter up to 128 characters. This will not be displayed if
[Auto(DHCP)] or [Auto(DHCPv6)] has been selected in Address Mode.
Port Number — Enters the port number for sending packets to a primary
registrar. You can enter a value in the range from 1 to 65535. Generally the
default value “5060” is used.
User Name — Enters a user name to be authenticated in a primary proxy
server. You can enter up to 64 characters.
Password — Enters a password to be authenticated in a primary proxy
server. You can enter up to 64 characters.
Retype Password — Enters the same password again for a confirmation.
11 Proxy Server Setting -
Secondary
When a primary proxy server cannot be used, a secondary one will be
utilized.
Server IP Address * — Enters the host name or the IP address of a
secondary proxy server. You can enter up to 128 characters. This will not be
displayed if [Auto] or [Auto(DHCPv6)] has been selected in Address Mode.
Port Number — Enters the port number for sending packets to a secondary
proxy server. You can enter a value in the range from 1 to 65535. Generally
the default value “5060” is used.
User Name — Enters a user name to be authenticated in a secondary proxy
server. You can enter up to 64 characters.
Password — Enters a password to be authenticated in a secondary proxy
server.
You can enter up to 64 characters.
Retype Password — Enters the same password again for a confirmation.
12 T.38 Transport Sets the transport protocol to be used preferentially in the T.38 session.
After the SIP session has been established, select the protocol for sending/
receiving data.
UDP — Select this to use UDP.
TCP — Select this to use TCP.
13 T.38 Media Type Sets the type of the media stream to be used in the T.38 session.
After the SIP session has been established, select the type of the media
stream for sending/receiving data.
Image — Select this to send or receive data in an image format.
Application — Select this to send or receive data in an application format.
14 T.38 Reception Port Number Enters the port number for receiving the T.38 session. You can enter a value
in the range from 1 to 65535. Generally the default value “5006” is used.
15 RTP Reception Port Number Enters the port number for receiving RTP (Real-time Transport Protocol).
You can enter a value in the range from 1 to 65535. Generally the default
value “5004” is used.
16 Incoming Reply Delay Time Enters the delay time until the reception operation has started after it has
been detected.
You can enter a value in the range from 0 to 32 sec. Generally the default
value “0” is used.
17 Maximum Use Bandwidth
(kbps)
Enters the maximum bandwidth for IP Fax communication. You can enter a
value in the range from 64 to 65535. Generally the default value “1000” is
used.
* If IPv6 is used for Server IP Address, put the value in brackets ([ ]). (Link Local Address is not available.)
Example: [2001:0db8::1234:5678:90ab:cdef]
Setting the IP Fax Function
Setting the IP Fax Function from TopAccess 25
Page 26
3.Setting the IP Fax Function
1
2
3
4
11
12
13
14
5
7
8
9
10
6
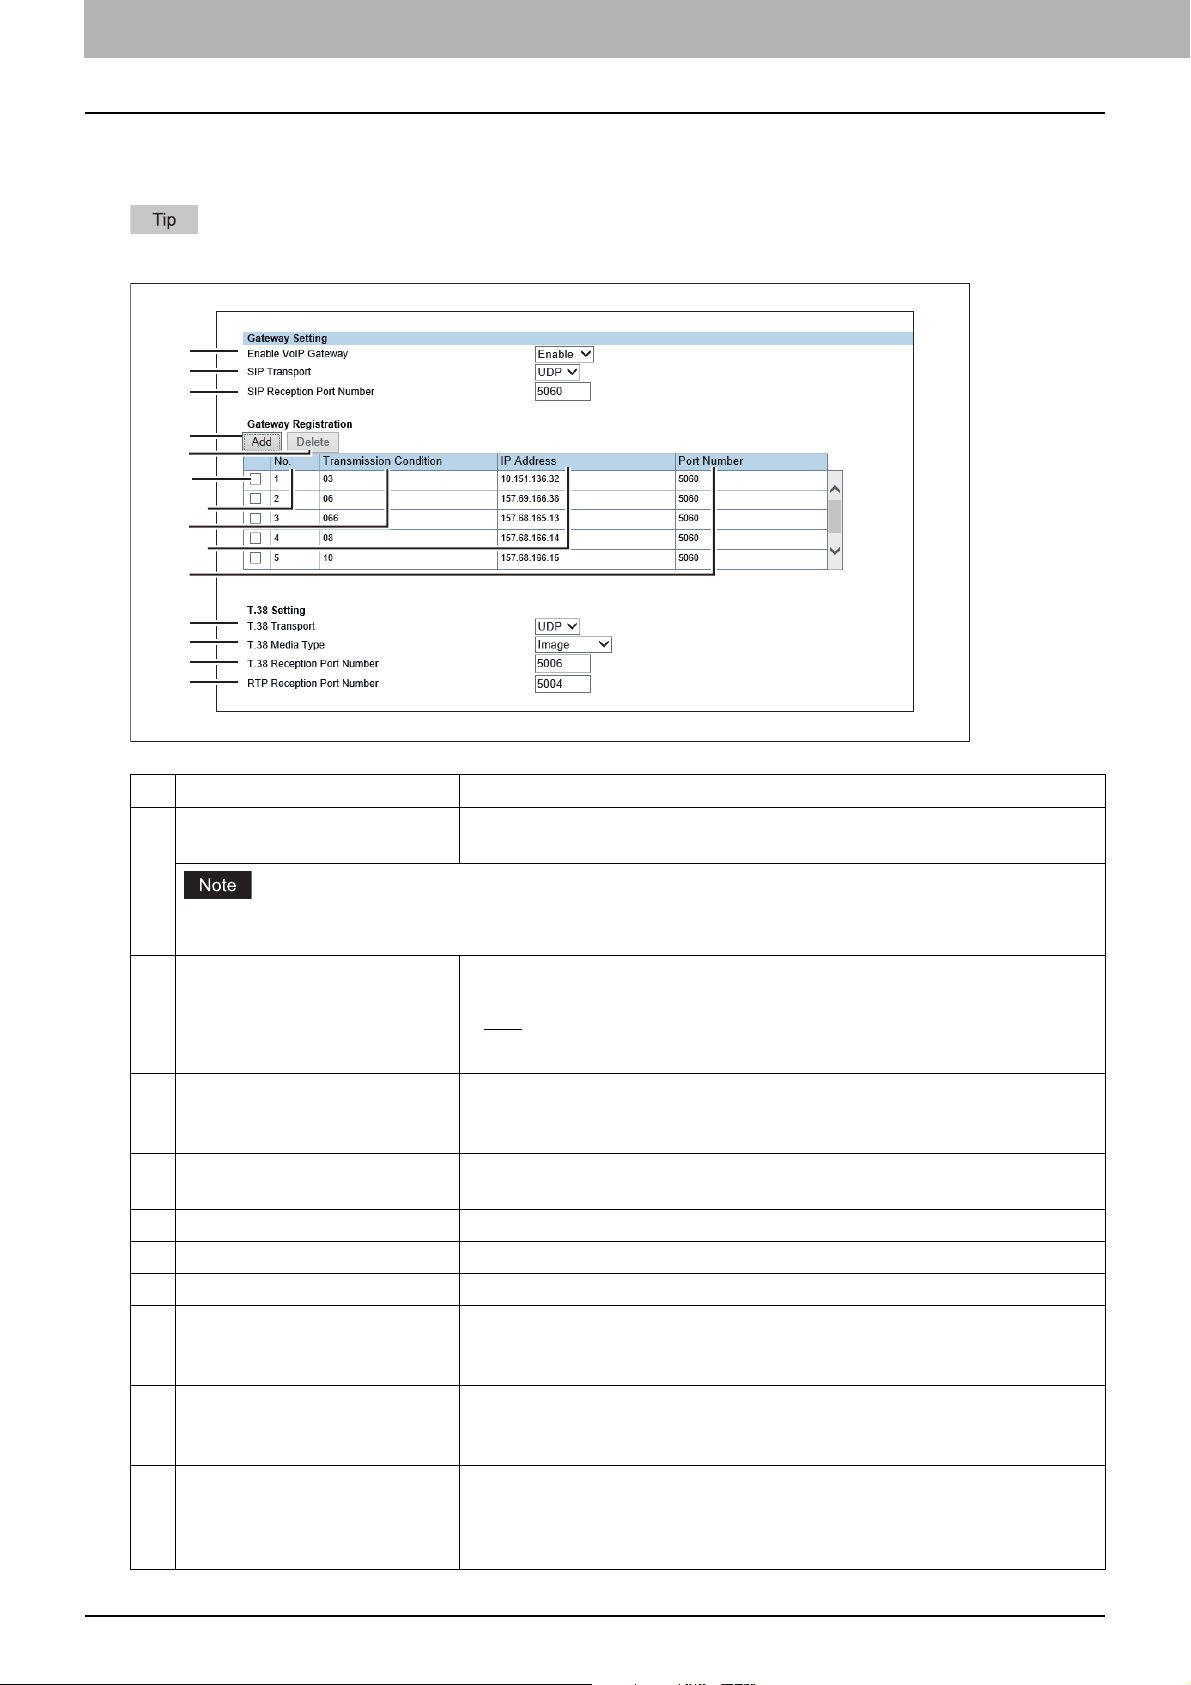
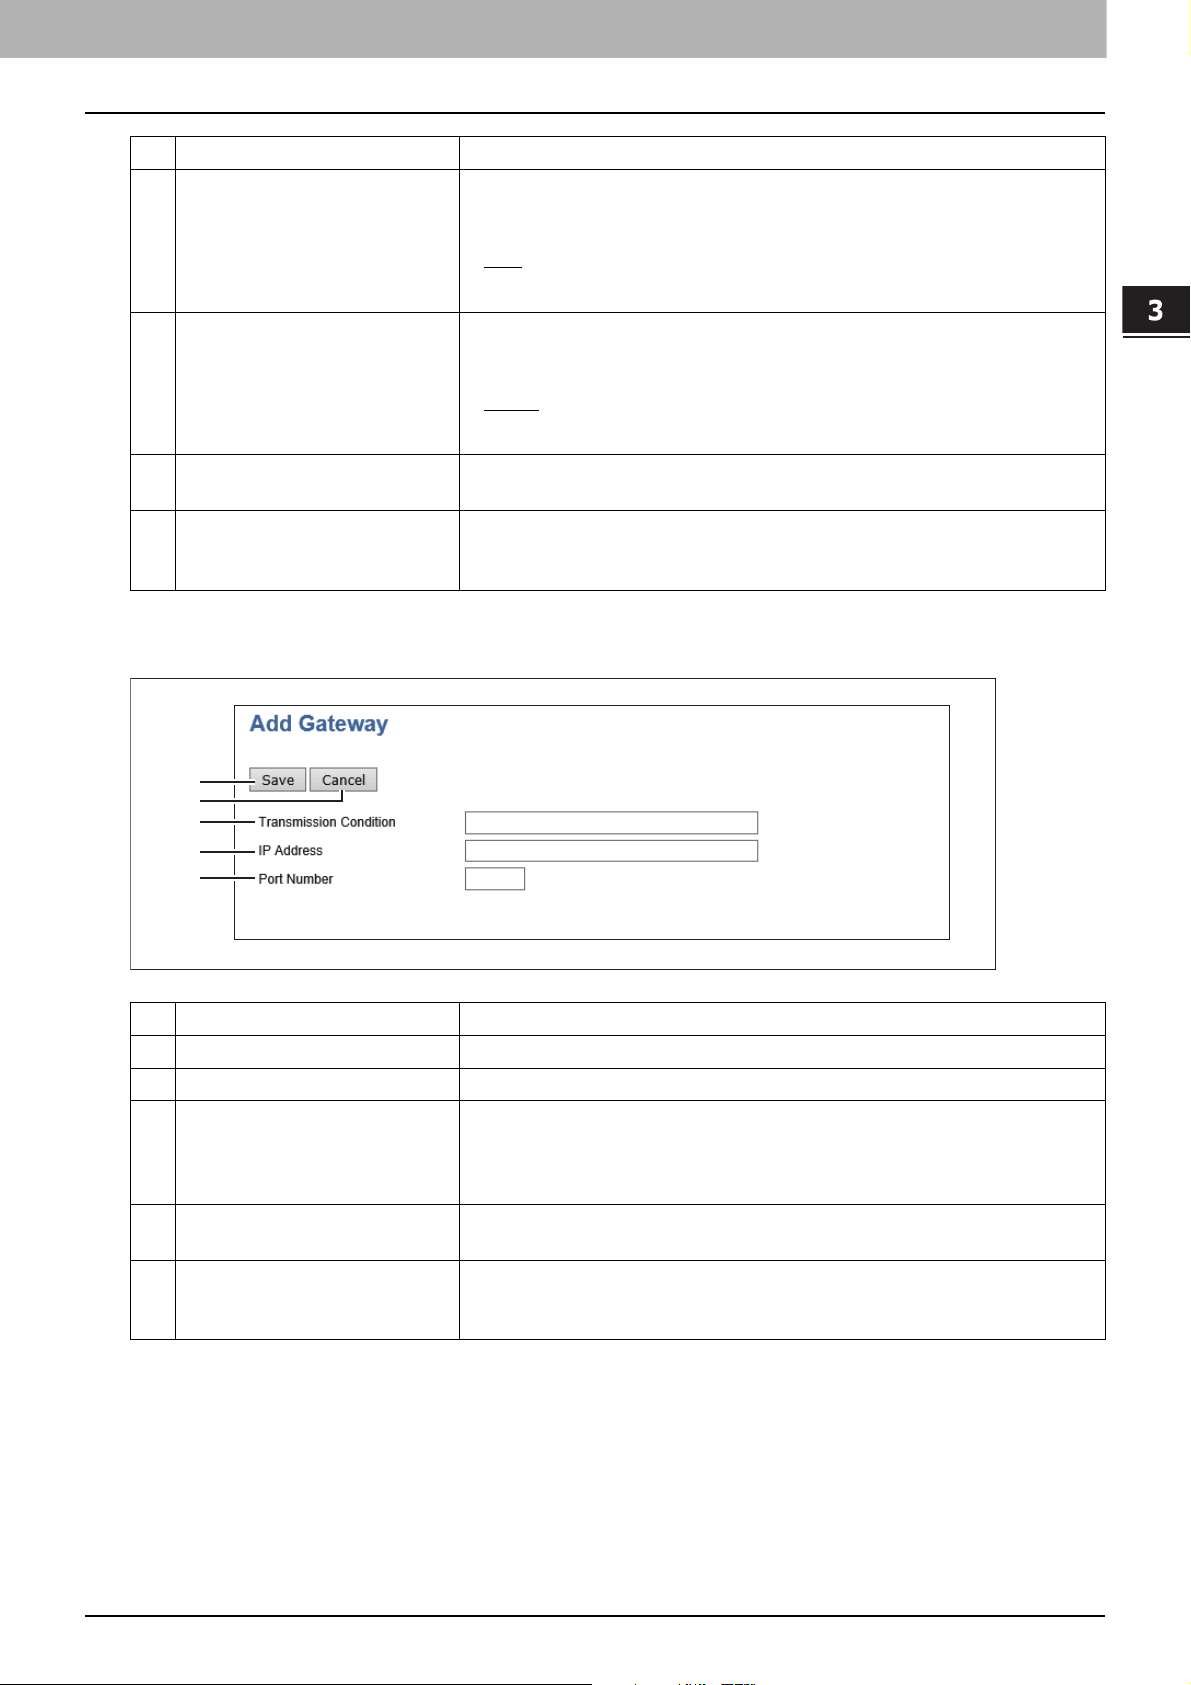
Gateway Setting
Set the necessary settings when a T.38 supporting gateway is used.
Up to 50 units of T.38 supporting gateway can be registered.
Item name Description
1 Enable VoIP Gateway Selects whether enable or disable a T.38 supporting gateway. [Disable] is set
When [Enable] is selected for [Enable SIP Server], set [Disable] in [Enable VoIP Gateway] in Gateway Setting.
When [Enable] is selected for [Enable VoIP Gateway], transmission not using a SIP server is also accepted.
2 SIP Transport Selects the transport protocol for sending a request from SIP to a T.38
3 SIP Reception Port Number Enters the port number which receives SIP packets for a T.38 supporting
4 Add Select this to add a new T.38 supporting gateway.
5 Delete Select this to delete the T.38 supporting gateway from the list.
6 Check box Selects the check box for the T.38 supporting gateways to be deleted.
7 No. The registration number of the T.38 supporting gateway is displayed.
8 Transmission Condition The number registered in [Transmission Condition] in the [Add Gateway]
9 IP Address The host name or the IP address of the T.38 supporting gateway registered
10 Port Number The number registered in [Port Number] in the [Add Gateway] screen is
26 Setting the IP Fax Function from TopAccess
as the default.
supporting gateway.
UDP — Select this to use UDP.
TCP — Select this to use TCP.
gateway. You can enter a value in the range from 1 to 65535. Generally the
default value “5060” is used.
P.27 “[Add Gateway] screen”
screen is displayed.
P.27 “[Add Gateway] screen”
in [IP Address] in the [Add Gateway] screen is displayed.
P.27 “[Add Gateway] screen”
displayed. You can enter the port number in the range from 1 to 65535 for
sending packets to the T.38 supporting gateway. Generally the default value
“5060” is used.
Page 27
3.Setting the IP Fax Function
3
4
5
1
2
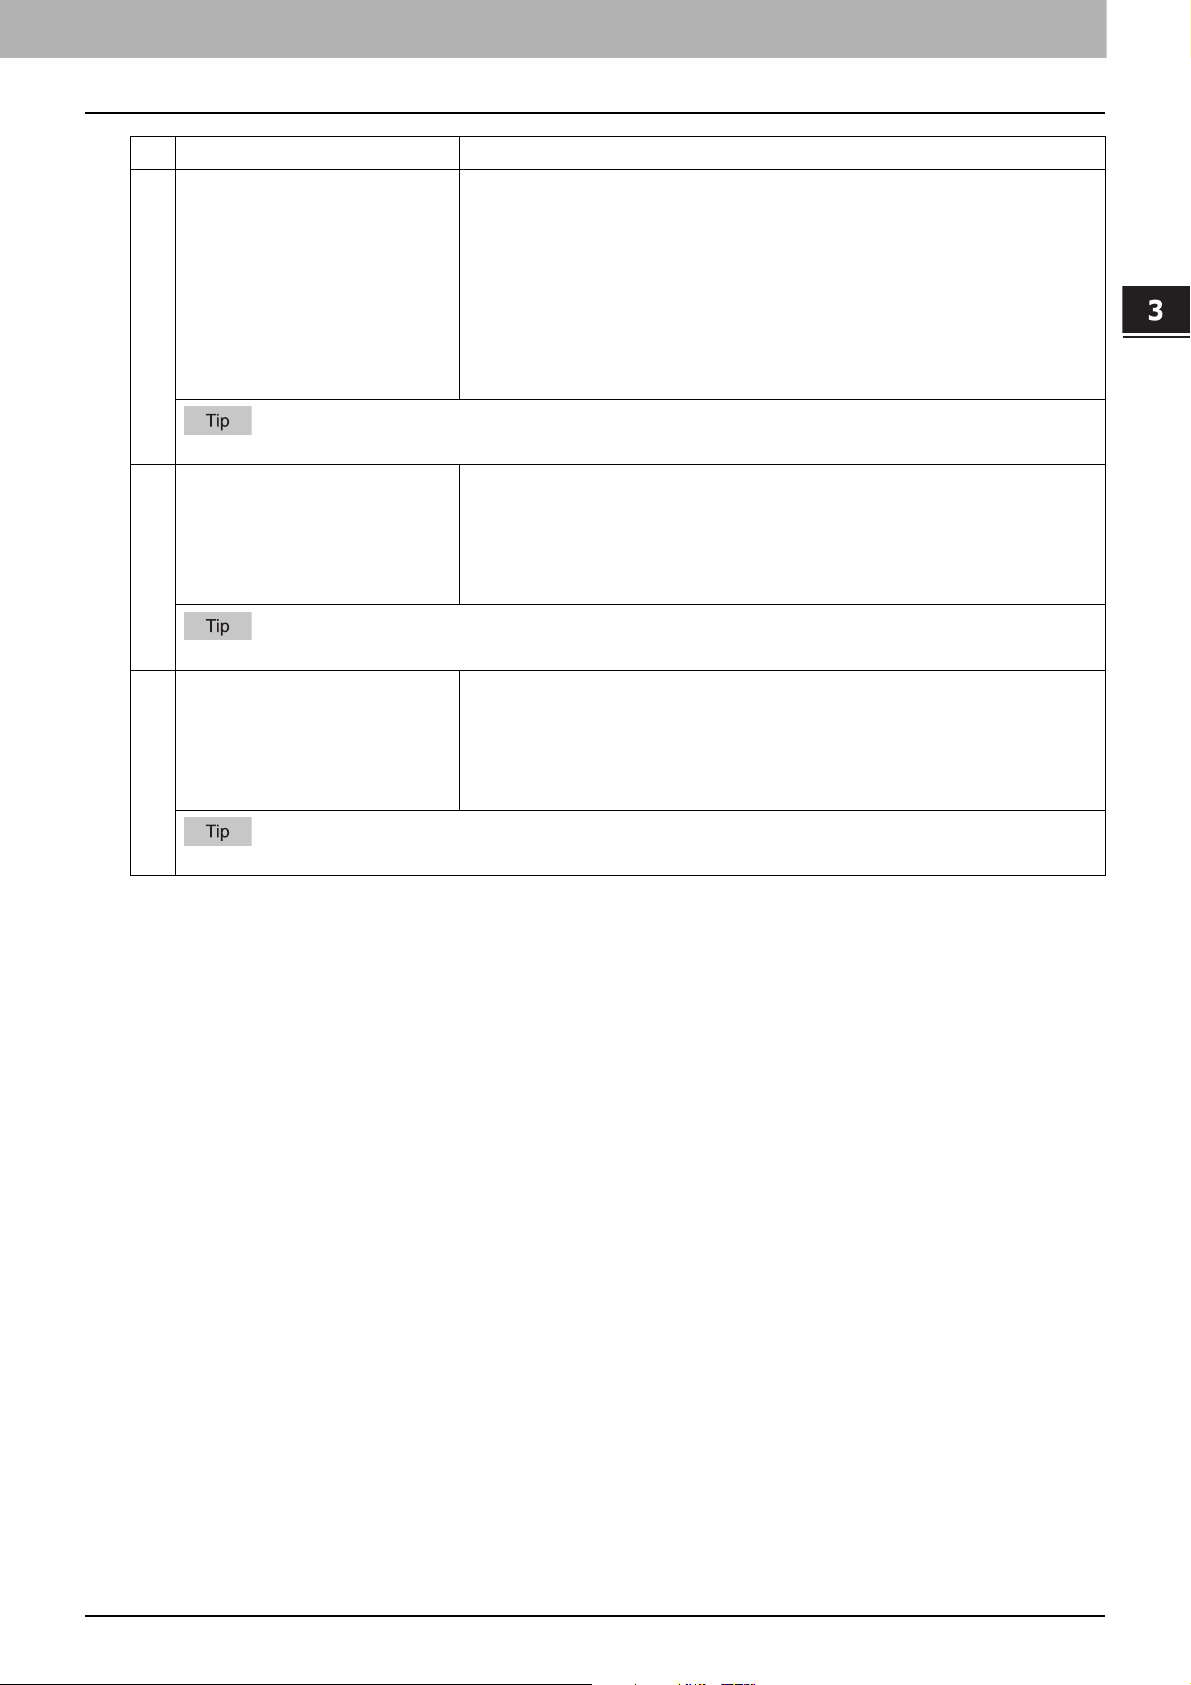
Item name Description
11 T.38 Transport Sets the transport protocol to be used preferentially in the T.38 session.
After the SIP session has been established, select the protocol to be used for
sending/receiving data.
UDP — Select this to use UDP.
TCP — Select this to use TCP.
12 T.38 Media Type Sets the type of the media stream to be used in the T.38 session.
After the SIP session has been established, select the type of the media
stream to be used for sending/receiving data.
Image — Select this to send or receive data in an image format.
Application — Select this to send or receive data in an application format.
13 T.38 Reception Port Number Enters the port number for receiving the T.38 session. You can enter a value
in the range from 1 to 65535. Generally the default value “5006” is used.
14 RTP Reception Port Number Enters the port number for receiving RTP (Real-time Transport Protocol).
You can enter a value in the range from 1 to 65535. Generally the default
value “5004” is used.
[Add Gateway] screen
You can register a new T.38 supporting gateway.
Setting the IP Fax Function
Item name Description
1[Save] button Select this to save the established T.38 supporting gateway.
2 [Cancel] button Select this to cancel the registration of the T.38 supporting gateway.
3 Transmission Condition The first few digits of the recipient’s fax number are displayed as the
transmission condition. You can enter up to 12 characters using numbers, #,
* and -. Only one unit of the T.38 supporting gateway can be registered
without the digits being entered in this field.
4 IP Address * Enters the host name or the IP address of the T.38 supporting gateway.
You can enter up to 128 alphanumerical characters and symbols.
5 Port Number Enters the port number for sending packets to the T.38 supporting gateway.
You can enter a value in the range from 1 to 65535. Generally the default
value “5060” is used.
* If IPv6 is used for Server IP Address, put the value in brackets ([ ]). (Link Local Address is not available.)
Example: [2001:0db8::1234:5678:90ab:cdef]
Setting the IP Fax Function from TopAccess 27
Page 28

3.Setting the IP Fax Function
1
2
3
4
5
6
3
Report Setting
You can set the result report of the IP Fax.
Item name Description
1 Select Agent You can make detailed settings by selecting one of the following items, and
then clicking [Select Agent].
Print — Select this to print. There are no settings available in [Select Agent].
Save as file — Select this to save as a file. Click [Select Agent] to make
settings for [Save as file Setting] and [Common Setting].
Email — Select this to send an E-mail. Click [Select Agent] to make address
settings, and settings for [Email Setting] and [Common Setting].
For details about [Email Setting], [Save as file Setting] and [Common Setting], refer to the TopAccess Guide.
2 Use login user address (User
Authentication)
Sets whether or not to use the E-mail address for a login user as the
destination for E-mail transmission during user authentication. You can set
the following items when you select this check box.
Use Email Address which was registered Local User — The E-mail address
for a user set in MFP Local Authentication is used as the destination for Email transmission.
Use Email Address which was LDAP registered — The E-mail address for a
server registered in LDAP Client is used as the destination for E-mail
transmission. Click [Server Assignment]. Up to 4 LDAP servers can be
For details about [LDAP Client settings], refer to the TopAccess Guide.
3 [1st Destination]/[2nd
Destination] button
assigned.
This is enabled when you select [Email] from Report Settings, and then click
the [Select Agent] button.
Click to display the address list where you can set addresses.
For details about the [1s Destination] and [2nd Destination] buttons, refer to the TopAccess Guide.
28 Setting the IP Fax Function from TopAccess
Page 29
3.Setting the IP Fax Function
Item name Description
4 [Email Setting] button This is enabled when you select [Email] from Report Settings, and then click
For details about [Email Setting], refer to the TopAccess Guide.
5 [Save as file Setting] button This is enabled when you select [Save as file] from Report Settings, and then
the [Select Agent] button.
You can set the following items on the agent settings page.
Subject
From Address
From Name
Body
File Name
click the [Select Agent] button.
You can set the following items on the agent settings page.
Destination
File Name
Setting the IP Fax Function
For details about [Save as file Setting], refer to the TopAccess Guide.
6 [Common Setting] button This is enabled when you select [Email] or [Save as file] from Report
Settings, and then click the [Select Agent] button.
You can set the following items on the agent settings page.
File Format
Encryption
For details about [Email Setting], [Save as file], and [Common Setting], refer to the TopAccess Guide.
Setting the IP Fax Function from TopAccess 29
Page 30

3.Setting the IP Fax Function
1
2
3
5
6
7
8
9
10
4
11
Address Book
You can manage a recipient list to be used in IP Fax transmission.
Access TopAccess. Click the [Registration] tab > [Address Book].
P.30 “[Address Book] screen”
P.31 “[Create Destination information]/[Edit Destination information] screen”
P.33 “[Search Address List] screen”
P.34 “[Create Group information]/[Edit Group information] screen”
For details about Address Book, refer to the TopAccess Guide.
Address Book can be also managed using the touch panel.
P.49 “Address (User)”
P.51 “Managing groups in address book (User)”
[Address Book] screen
Item name Description
1 [Add Address] button Select this to add a new recipient to the address book.
2 [Search] button Select this to search a recipient from the address book. For details about the
3 Group Select a group to display in the address list.
This is only available when [Shared Setting] - [Shared Address Book] is set to [Enable (Primary)] or [Enable
(Secondary)].
4 Select Page Selects a page when there are 101 items or more.
5 ID The registered ID of the recipient is displayed.
30 Setting the IP Fax Function from TopAccess
6 Name The name registered to the recipient is displayed.
7 Email Address The E-mail address registered to the recipient is displayed.
P.31 “[Create Destination information]/[Edit Destination information]
screen”
[Search Contact] screen, refer to the TopAccess Guide.
All Groups — Displays all the groups.
Local — Displays the local address book.
Shared — Displays the shared address book.
P.31 “[Create Destination information]/[Edit Destination information]
screen”
P.31 “[Create Destination information]/[Edit Destination information]
screen”
P.31 “[Create Destination information]/[Edit Destination information]
screen”
Page 31

3.Setting the IP Fax Function
1
2
6
8
9
10
5
7
3
4
11
13
14
15
16
12
Item name Description
8 Favorite A check mark is displayed when the E-mail address is set as Favorite.
9 Fax Number The telephone number or the IP Fax number registered to the recipient is
displayed.
P.31 “[Create Destination information]/[Edit Destination information]
screen”
10 Fax Type The fax type registered to the recipient is displayed.
P.31 “[Create Destination information]/[Edit Destination information]
screen”
11 Favorite A check mark is displayed when the fax number or the IP Fax number is set
as Favorite.
[Create Destination information]/[Edit Destination information] screen
Setting the IP Fax Function
Setting the IP Fax Function from TopAccess 31
Page 32

3.Setting the IP Fax Function
Item name Description
1 [Save] button Select this to save the entered information.
2 [Cancel] button Select this to cancel the adding or editing a recipient.
3 [Reset] button Select this to reset information entered in the given box.
4 [Delete] button Select this to delete the displayed recipient.
5 [Fax Setting] button Select this to register the recipient for fax/IP Fax transmission. For details
about the setting for the [Fax Setting] screen, refer to the TopAccess Guide.
6 Destination Selects Local Address Book or Shared Address Book as the registration
target for recipient information.
This is only available when [Shared Setting] - [Shared Address Book] is set to [Enable (Primary)] or [Enable
(Secondary)].
7 First Name Enters the first name of the recipient. You can enter up to 32 characters.
8 Last Name Enters the last name of the recipient. You can enter up to 32 characters.
9 Index Enters the characters to be used as the index. You can enter up to 64
characters.
10 Email Address Enters the E-mail address of the recipient. You can enter up to 192
characters. Select the [Favorite] check box to specify the recipient as
Favorite.
11 Fax Number / IPFax Enters the telephone number or the IP Fax number (host name, IP address,
IP Fax Number or SIP URI) of the recipient. You can enter up to 128
characters for the Fax Number and the IP Fax (Gateway, SIP). For the IP Fax
(Direct), you can enter up to 199 characters. Select the [Favorite] check box
to specify the recipient as Favorite.
The format for SIP URI should be any of the following.
[User Name]@[Host Name]
[User Name]@[IP Address]
[User Name]@[Host Name]:[Port Number]
[User Name]@[IP Address]:[Port Number]
If IPv6 is used for Server IP Address, put the value in brackets ([ ]). (Link Local Address is not available.)
Example:
User1@192.168.1.1
User1@host.local
User1@[2001:0db8::1234:5678:90ab:cdef]
User1@192.168.1.1:5060
User1@host.local:5060
User1@[2001:0db8::1234:5678:90ab:cdef]:5060
12 Fax Type Selects the fax type of the recipient.
G3 Fax — Select this to send a fax job via a public network line.
IPFax(Gateway) — Select this to send an IP Fax to a G3 Fax machine via a
T.38 supporting gateway.
IPFax(SIP) — Select this to send an IP Fax to an MFP supporting the IP Fax
function via a SIP server.
IPFax(Direct) — Select this to directly send an IP Fax to an MFP
supporting the IP Fax function without using a sever.
13 2nd Fax Number This cannot be used in the IP Fax function.
14 Company Enters the company name of the recipient. You can enter up to 64
characters.
32 Setting the IP Fax Function from TopAccess
Page 33

3.Setting the IP Fax Function
1
2
3
4
5
7
8
9
10
6
Item name Description
15 Department Enters the department name of the recipient. You can enter up to 64
characters.
16 Keyword Enters the comments on the recipient. You can enter up to 256 characters.
[First Name] or [Last Name], and [Email Address] or [Fax Number/IPFax] are mandatory items.
[Search Address List] screen
Select from the search address list and add to the address book.
Setting the IP Fax Function
Item name Description
1 [Add] button Select this to add the recipient specified in the search address list into the
address book.
2 [Cancel] button Select this to cancel the search address list display.
3 [Research] button Select this to return to the [Search Contact] screen. Change the search
criteria and execute the search again.
4 Fax Type This item is displayed when the LDAP server is selected in [Directly Service
Name] in the [Search Contact] screen.
Selects the fax type of the recipient.
G3 Fax — Select this to send a fax by a public network line.
IP Fax (Gateway) — Select this to send an IP Fax to a G3 Fax machine via a
T.38 supporting gateway.
IP Fax (SIP) — Select this to send an IP Fax to an MFP which supports the
IP Fax function via an SIP server.
IP Fax (Direct) — Select this to send an IP Fax directly to an MFP which
supports the IP Fax function, without going through a server.
For details about [LDAP Client settings], refer to the TopAccess Guide.
5 Number of Search Result The number of found recipient is displayed.
6 Check box Selects the check box of recipient to be registered to the address book.
7 Name Search results are displayed.
8Email Address
9Fax Number
10 Fax Type
Setting the IP Fax Function from TopAccess 33
Page 34

3.Setting the IP Fax Function
1
2
6
9
10
5
8
3
4
11
12
13
7
14
[Create Group information]/[Edit Group information] screen
You can create groups that contain multiple recipients.
This enables you to specify a group as the destination when sending an IP Fax to multiple recipients.
Item name Description
1 [OK] button Select this to register the selected recipients as a group.
2 [Cancel] button Select this to cancel the group registration.
3 [Reset] button Select this to reset the contents.
4 [Delete] button Select this to delete the displayed group.
5 Group Name Enters the group name. You can enter up to 20 characters.
6 Destination Selects Local Address Book or Shared Address Book as the registration
target for Group information.
This is only available when [Shared Setting] - [Shared Address Book] is set to [Enable (Primary)] or [Enable
(Secondary)].
7 Favorite Selects the [Favorite] check box to specify the group as Favorite.
8 ID The registered ID of the recipient is displayed.
9 Email Selects the check box to register E-mail address into the group when the
10 Fax Selects the check box to register fax number into the group when the
11 Name The name registered to the recipient is displayed.
12 Email Address The E-mail address registered to the recipient is displayed.
13 Fax Number The telephone number or the IP Fax number registered to the recipient is
14 Fax Type The fax type registered to the recipient is displayed.
34 Setting the IP Fax Function from TopAccess
recipient has E-mail information.
recipient has fax number information.
displayed.
Page 35

4.Using the IP Fax Function
Using the IP Fax Function from the Touch Panel.................................................................. 36
Sending/Receiving ...............................................................................................................................................36
User Functions .....................................................................................................................................................47
Using the IP Fax Function from the N/W-Fax Driver..............................................................56
Sending IP Faxes ..................................................................................................................................................56
Specifying Recipients of IP Faxes ........................................................................................................................60
Removing recipients ............................................................................................................................................68
Setting up the [Send] tab.....................................................................................................................................69
Setting up the [Device Settings] tab ...................................................................................................................72
Using the IP Fax Function from TopAccess ..........................................................................74
Log ........................................................................................................................................................................74
Template ..............................................................................................................................................................77
Inbound FAX routing ............................................................................................................................................79
Role Management ................................................................................................................................................80
Notification Setting..............................................................................................................................................83
IP Fax Received Forward (Admin) .......................................................................................................................84
Page 36

0.Using the IP Fax Function from the Touch Panel
P.36 “Sending/Receiving”
P.47 “User Functions”
Sending/Receiving
This chapter describes the basic sending/receiving operations of IP Fax.
P.36 “Sending an IP Fax”
P.38 “Specifying the recipient”
P.44 “Reception mode”
P.46 “Checking communication status / Checking reserved transmissions”
P.47 “Canceling the transmission”
For details on functions other than for IP Faxing, refer to the Fax Guide.
Sending an IP Fax
This section describes the basic procedures to send an IP Fax. For details of in-depth operations, see the page under
each procedure as required.
Place the original(s).
1
Check the original size and scanning range, etc. Place the original(s) in the correct direction on the original glass
or ADF.
For details about the operation, refer to the Fax Guide.
Press [Fax] on the Home screen.
2
The fax screen is displayed. If you leave the screen unattended for the period of the auto clear setting time (45
sec. by default), the screen returns to the default one automatically.
Set the original size, resolution and other necessary conditions.
3
For details about the transmission condition setting screen, refer to the Fax Guide.
36 Using the IP Fax Function from the Touch Panel
Page 37

4.Using the IP Fax Function
Specify the IP Fax recipient.
4
Using the IP Fax Function
Icon Fax Type
G3 Fax
IP Fax gateway
IP Fax SIP
IP Fax direct
Email
There are multiple methods to specify the recipients. For details, see the following page.
P.38 “Specifying the recipient”
You can check the contents from the touch panel before sending an IP Fax. For details about the operation of
[Preview], refer to the Fax Guide.
Press [Send].
5
The IP Fax is sent or reserved.
Alternatively, you can press the [START] button on the control panel to send a fax.
[Direct Tx] on the [Fax Setting] screen accessing from [Option] > [Fax Setting] is not available for IP Fax.
[Memory Tx] is selected if IP Fax recipients are registered in the address list.
In the IP Fax transmission mode, the original is scanned into the memory. Once a connection has been made,
this equipment automatically starts sending the scanned document. (Transmission conditions can be set in
the transmission condition setting screen.)
If the memory becomes full during scanning, that original will not be stored in the memory. When that
happens, reduce the number of originals you are sending.
You can check the status of the current sending. You can also cancel the transmission (deletes the job).
Refer to “Checking reserved transmissions” or “Canceling reserved transmissions” in the Fax Guide.
For details about [Redial function] and [Sending the next original], refer to the Fax Guide.
Using the IP Fax Function from the Touch Panel 37
Page 38

4.Using the IP Fax Function
Specifying the recipient
Specify the IP Fax recipient. There are various ways to specify the recipient, such as direct entry with the control panel
and address book entry.
P.38 “Entering directly with digital keys”
P.39 “Specifying the recipient in the address book”
P.40 “Searching from the address book or LDAP server”
P.43 “Specifying the group in the address book”
To use the address book, you need to register recipients’ IP Fax numbers to the book in advance.
For details about the operation, see the following pages.
P.30 “Address Book”
P.49 “Address (User)”
P.51 “Managing groups in address book (User)”
To send to multiple addresses
In the memory transmission mode, you can send the same document to multiple recipients (up to 400 recipients) at
once. When [Multi] is pressed after the fax number has been entered, it will be added to the recipient list displayed
on the left-hand side of the screen. Repeat this operation until you specify all recipients. You can also specify up to
a total of 400 recipients’ fax numbers by combining with other entry methods.
Entering directly with digital keys
You can specify the recipient by entering its IP Fax number on the touch panel.
Press .
1
Selects the destination type.
2
[Gateway] — Select this to send an IP Fax to a G3 Fax machine via a T.38 supporting gateway.
[SIP] — Select this to send an IP Fax to an MFP supporting the IP Fax function via a SIP server.
IP Fax direct transmission is not possible.
[G3] is a G3 Fax machine using a public network line. [Internet Fax] is used to send an Email by directly entering
an internet fax destination (Email address).
38 Using the IP Fax Function from the Touch Panel
Page 39

4.Using the IP Fax Function
Key in the recipient’s IP Fax number and press [Send].
3
Specifying the recipient in the address book
In the address book, you can specify the recipient.
Press the desired recipient on the tab.
1
Using the IP Fax Function
To cancel the selected recipient, press it again.
To confirm the selected recipient or delete an unnecessary recipient, press it in the recipient list displayed on
the left-hand side of the screen.
For details about how to confirm and delete recipients, refer to the Fax Guide.
To refine your search only for items including specified characters, press .
P.40 “Searching from the address book or LDAP server”
When you set your favorite or index items in the address book in the registration, the corresponding recipients
appear on the (favorite) tab or index tab.
Using the IP Fax Function from the Touch Panel 39
Page 40

4.Using the IP Fax Function
Searching from the address book or LDAP server
You can search for the recipient’s fax number from the address book or LDAP server.
To search for the recipient’s fax number from the LDAP (Lightweight Directory Access Protocol) server, the name of
the LDAP server to be connected is required to be registered to the MFP in advance. For details on the LDAP server, ask
your network administrator.
Select the or tab and press .
1
To display the recipient search menu, press while the address list is displayed. Perform this operation
when the LDAP server needs to be searched.
To display the group search menu, press while the group list is displayed.
Enter the keyword in the category which you want to use for searching. Press [Search].
2
You can search for the desired recipient’s fax number by specifying multiple keywords.
You can search for recipients even if you enter the partial strings. If you enter multiple search conditions, only the
recipients which meet all the entered conditions are displayed as the search results.
Location
Selects a location where the address book to be searched is stored. By selecting “MFP Local”, you can search
the address book of this equipment and a shared address book.
40 Using the IP Fax Function from the Touch Panel
Page 41

4.Using the IP Fax Function
Know ID
Use this when you want to search with the Known IDs registered in the address book. You can specify the range
of the ID numbers.
Index
Use this when you want to search with the index registered in the address book.
First Name
Use this when you want to search with the first name registered in the address book.
Last Name
Use this when you want to search with the last name registered in the address book.
Corp.
Use this when you want to search with the corporate name registered in the address book.
Dept.
Use this when you want to search with the department name registered in the address book.
Keyword
Use this when you want to search with the characters written in the Keyword which are registered in the
address book.
Fax No.
Use this when you want to search with the fax/IP Fax number registered in the address book.
E-mail
Use this when you want to search with the E-mail address registered in the address book.
Send Type
Use this when you want to search either fax/IP Fax number or E-mail address.
Selecting the LDAP server
To search for the recipient’s number in the LDAP server, select the one you want to search in the
pull-down menu of Location on the Search screen.
Using the IP Fax Function
Using the IP Fax Function from the Touch Panel 41
Page 42

4.Using the IP Fax Function
The search result is displayed. Select the desired recipient.
3
To cancel the selected recipient, press it again.
If you want to change the results of the search, press [Research]. You will be returned to the screen in step 2.
Specify the search string again.
You can switch the screen by selecting [Known ID Sort] or [Index Sort].
When the recipient’s number in the LDAP server is searched, the [Destination Type] screen is displayed. Select
the destination type and press [OK].
[G3] — Select this to send a G3 fax job via a public network line.
[Gateway] — Select this to send an IP Fax to a G3 Fax machine via a T.38 supporting gateway.
[SIP] — Select this to send an IP Fax to an MFP supporting the IP Fax function via a SIP server.
[Direct] — Select this to directly send an IP Fax to an MFP supporting the IP Fax function.
Under the following use condition, the [Destination Type] screen does not appear even if the recipient’s
number in the LDAP server is searched. All the jobs will be sent in a G3 format.
- When “Direct Tx” is selected in Tx Type on the [Fax] screen from [User Functions] of the Home screen.
P.47 “User Functions”
- When “Direct Tx” is selected in Tx Type on the [Fax] screen which is displayed by pressing [Option] on the
Fax screen.
- When [Monitor] is being pressed.
Press [Send].
4
42 Using the IP Fax Function from the Touch Panel
Page 43

4.Using the IP Fax Function
Specifying the group in the address book
In the address book, you can specify the group to which you want to send a fax.
Press the tab to select the group to send a fax to.
1
To cancel the selected group, press it again.
To confirm either fax/IP Fax number or E-mail address registered in the group, press [Contents].
To confirm the selected recipient or delete an unnecessary recipient, press it in the recipient list displayed on
the left-hand side of the screen.
For details about how to confirm and delete recipients, refer to the Fax Guide.
Using the IP Fax Function
To refine your search only for items including specified characters, press .
P.40 “Searching from the address book or LDAP server”
Using the IP Fax Function from the Touch Panel 43
Page 44

4.Using the IP Fax Function
Reception mode
This section describes how to receive IP Fax. Refer to the appropriate section for your current reception mode. The
reception mode can be set on the Admin menu. For details of the current setting, ask your administrator.
P.44 “Auto reception”
P.44 “Memory reception”
P.44 “Displaying the preview of a received IP Fax”
For details about the originals and paper, refer to the Fax Guide.
Fax reception settings can be changed from TopAccess.
P.18 “IP Fax Settings”
Auto reception
IP Faxes are automatically received during an incoming call. Users do not have to do anything when receiving IP Fax.
Memory reception
The received IP Fax data are stored in the memory, IP Faxes are automatically printed as soon as the equipment
becomes ready. As the memory reception function is always enabled, you do not need to make any setting.
Displaying the preview of a received IP Fax
You can confirm the contents on the touch panel before carrying out the printing of the IP Fax received by means of
the [Secure Rx (IP Fax)] or [Hold (Fax)] option.
Press [Print] on the Home screen.
1
The print screen is displayed. If you leave the screen unattended for the auto clear setting time (45 sec. by
default), the screen returns to the default one automatically.
Select [Secure Rx (IP Fax)] or [Hold (Fax)] for Job Type.
2
When is pressed, received IP Fax jobs are displayed in the list.
To delete a received IP Fax from the list, select the received file subject to delete and press [Delete].
When is pressed, received IP Fax jobs are displayed in thumbnail images.
To delete a received IP Fax from the thumbnail, select the thumbnail image subject to delete and press
[Delete].
The entry of the password is required at the first operation of any of [Delete], [Print], [Display Image] or the
thumbnail images.
Press [Display Image].
3
44 Using the IP Fax Function from the Touch Panel
Page 45

4.Using the IP Fax Function
Select [IP Fax] for [Line Select]. When [Secure Rx (IP Fax)] is selected, enter the password for
4
printing secure received fax jobs.
After [IP Fax] is selected, the password is entered and the [OK] is pressed, mark in the unchecked field
disappears. When the screen is shifted to another one and then is returned to this one, the entry of the password
is required when preview or printing is carried out.
When the preview is displayed, confirm the IP Fax image and the number of pages. To print a
5
received IP Fax as it is, press [Print]. Printing starts.
Using the IP Fax Function
When a page to confirm is selected, it is enlarged and the preview operation, such as the enlargement/
reduction of the display or the rotation of the page, becomes possible.
Press on the page to be rotated. The page is rotated by 90 degrees by each one time is pressed.
Uncheck of the pages which will not be printed.
Using the IP Fax Function from the Touch Panel 45
Page 46

4.Using the IP Fax Function
Checking communication status / Checking reserved transmissions
You can check reserved IP Fax transmissions.
Press [Job Status].
1
Press [Fax].
2
Reserved transmission jobs are listed up to 100 transmissions in the chronological order from top to bottom.
To print the list of the reserved transmissions jobs, press [Reservation List].
In the “Status” column, the status of each job is indicated as follows:
- IP: Sending IP Fax.
- Delayed: Reserved with the time to send specified.
- Wait: Communication is in the standby queue.
- Invalid: Under standby due to an invalid department code (Network IP Fax). Check the department code.
Delete any unnecessary reserved transmissions in the standby queue. For details about each operation,
refer to the Fax Guide.
46 Using the IP Fax Function from the Touch Panel
Page 47

4.Using the IP Fax Function
Checking communication log
For details about how to check the communication (send/receive) log, refer to the Fax Guide.
In the “Status” column in the list, the status is indicated as follows:
OK: Transmission or reception succeeded.
4-digit error code: Transmission or reception failed.
For details about the error codes, see the following page.
P.99 “Error Codes for IP Faxing”
Canceling the transmission
For details about the operations to cancel the memory transmission during scanning, to stop a transmission during
scanning and to cancel the reserved transmissions that are in the queue or in progress by displaying the list, refer to
the Fax Guide.
User Functions
This section describes about the settings and registrations of IP Fax performed from the touch panel.
P.47 “Fax (User)”
P.49 “List (User)”
P.49 “Address (User)”
P.51 “Managing groups in address book (User)”
P.52 “Network (Admin)”
P.54 “FAX(Admin)”
Using the IP Fax Function
Fax (User)
You can change the initial settings (defaults) for the IP Fax functions on the [Fax] screen.
For details how to display the [Fax] screen, refer to the MFP Management Guide.
Item name Description
Resolution Selects the resolution based on the fineness of the original. [Standard] is set as the
default.
Standard — This option is suitable for an original with regular size text.
Fine — This option is suitable for an original with small size text and fine illustrations.
U-Fine — This option is suitable for an original with small size text and detailed
illustrations.
If the recipient’s fax machine is not capable of receiving originals at the same
resolution, the resolution is automatically converted before being sent it to the
recipient. The higher the resolution is, the longer it takes to send an original.
Original Mode Selects the scanning mode based on the type of the original. [Text] is set as the default.
Text — This option is suitable for an original with text and line drawings.
Text/Photo — This option is suitable for an original with a mixture of text and
photos.
Photo — This option is suitable for an original with photos.
In the Text/Photo mode or Photo mode, transmission time may be longer than in the
TEXT mode.
Using the IP Fax Function from the Touch Panel 47
Page 48

4.Using the IP Fax Function
Item name Description
Tx Type Sets the fax transmission mode. [Memory Tx] is set as the default.
Exposure Selects the desired exposure for the original.
Default destination
type for LDAP search
result
Secure Receive
Forced Setting
Memory Tx — Select this to the original after the scanned data are saved in the
memory. Up to 100 transmissions of up to 1000 pages per 1 transmission can be
reserved. For IP Fax transmission, select [Memory Tx]. Direct transmission is not
possible in the IF Fax function.
Direct Tx — Select this to send the original directly as it is being scanned. Once a
page has been scanned and sent, the next page is scanned and sent. Therefore, it
takes longer to scan and send all pages. However, you can confirm on the fly that
each page is sent to the recipient.
When setting the contrast manually, press or to set the desired contrast.
When setting the contrast automatically in accordance with the original, press [Auto].
Sets the initial display of the destination type which is displayed by pressing the search
result of the LDAP server.
You can enable or disable the Secure Receive function.
This is available only when the Weekly Schedule function is set.
ON — This enables the Secure Receive function. ON -> Enable
It becomes disabled at the time set by Weekly Schedule.
OFF — This disables the Secure Receive function. OFF -> Disable
It becomes enabled at the time set by Weekly Schedule.
An administrator password is required.
RTI for IP Fax Switch the RTI recording On or Off. To enable this feature, the Terminal ID must be
registered to this equipment in advance.
TTI for IP Fax Switch the TTI recording On or Off. To enable this feature, the Terminal ID must be
registered to this equipment in advance.
Preview Setting Enabling the Preview function allows you to preview the scanned image before
transmitting the IP Fax job.
ON — Press this button to enable the function.
OFF — Press this button to disable the function.
Multidest.
Confirmation
Selects whether to display the confirmation screen when multiple destinations are
specified.
Default Address Book Selects the default tab displayed in the address book.
Default View for
Selects the default display format for the single tab of the address book.
Single
Default View for
Select the default display format for the group tab of the address book.
Group
Default destination
type for direct entry
Sets the initial display of the destination type which is displayed by pressing the tenkey tab.
48 Using the IP Fax Function from the Touch Panel
Page 49

4.Using the IP Fax Function
List (User)
You can print the lists below.
For details how to display the [List] screen, refer to the MFP Management Guide.
The list is printed on paper that is fed from the drawer in which LT-R or A4-R paper is set and exits to the receiving
tray.
Item name Description
Address Book Press this button to print the Address Book Information that shows all registered
recipients in the equipment.
ID Sort — Press this button to print the Address Book Information sorted by ID
number.
Name Sort — Press this button to print the Address Book Information sorted by last
name.
Group Numbers Press this button to print the Group Number Information that shows all registered
groups and members in the equipment.
Function Press this button to print the FUNCTION LIST (User).
ITU Mailbox Press this button to print a list of the current status of the mailboxes registered to this
equipment.
Using the IP Fax Function
When the Department Management feature is enabled, the screen to input the department code is displayed. Enter
the department code and press [OK] to print each list. However, when the No Limit Black function is enabled, each list
is printed without displaying the screen for inputting the department code.
For details about the No Limit Black function, refer to the MFP Management Guide.
Address (User)
Recipients registered in the address book can be listed from the screen displayed when [Fax] on the Home screen is
pressed, for example. When transmitting an IP Fax, you can easily specify the recipients by selecting from the address
book list.
In the address book, you can register up to 3000 recipients.
For details how to display the [Address] screen, refer to the MFP Management Guide.
On the [Single] tab of the Address Book menu, you can perform the following operations to manage recipients.
P.50 “Creating new recipient”
P.50 “Editing or deleting recipients”
P.50 “Searching for recipients”
P.50 “Setting the display order of the searching results for recipients”
You can import and export address book data in the TopAccess administrator mode. For details, refer to the
TopAccess Guide “Chapter 8: [Administration] Tab Page”.
The data of Address Book, ITU Mailbox and Template created in the equipment with the IP Fax function enabled
cannot be imported to one which does not support the IP Fax function.
Using the IP Fax Function from the Touch Panel 49
Page 50

4.Using the IP Fax Function
Creating new recipient
You can create new recipients in the address book from the [User Functions] screen.
On the Address Book screen, press an undefined line, then press [Entry], and then register a new
1
recipient.
Item name Description
First Name Press this button to enter the first name of the recipient. This name will appear in the
address book list on the touch panel. You can enter up to 32 characters.
Last Name Press this button to enter the last name of the recipient. This name will appear in the
address book list on the touch panel. You can enter up to 32 characters.
Index Press this button to enter the index of the recipient. You can enter up to 64 characters.
Corp. Press this button to enter the department name of the recipient. You can enter up to 64
characters.
Dept. Press this button to enter the department name of the recipient. You can enter up to 64
characters.
Keyword Press this button to enter a keyword for the recipient. This keyword can be used to
search for this recipient. You can enter up to 256 characters.
Fax/IPFax
2nd Fax This cannot be used in the IP Fax function.
E-mail Enter the E-mail address of the recipient. You can enter up to 192 characters. When
Type — Selects any of [G3], [Gateway], [SIP] or [Direct] as the destination type.
Destination — Enters the Fax number or the IP Fax number of the recipient. You can
enter up to 128 characters for the Fax Number and the IP Fax (Gateway, SIP). For the IP
Fax (Direct), you can enter up to 199 characters. When [Favorite] is pressed, the
registered address appears on the favorite tab of the address book.
[Favorite] is pressed, the registered address appears on the favorite tab of the address
book.
[First Name] or [Last Name], and [Fax/IPFax] or [E-mail] are mandatory items.
[Option] is available only when the destination is G3 fax.
For details about the Option function, refer to the Fax Guide.
Press [OK] to register the recipient.
2
Editing or deleting recipients
To edit recipients, press the recipient on the Address Book screen, then press [Edit]. To delete recipients, press the
recipient on the Address Book screen, the press [Delete].
Searching for recipients
When you press the search icon on the Address Book screen, the search screen is displayed. You can search for
recipients by entering the search items.
Setting the display order of the searching results for recipients
When you press [Setting] on the Address Book screen, you can set [Known ID Sort] or [Index Sort] as the display order
of the results of the above searching for recipients.
50 Using the IP Fax Function from the Touch Panel
Page 51

4.Using the IP Fax Function
Managing groups in address book (User)
You can create groups that contain multiple recipients. This enables you to specify groups instead of each recipient
separately when operating IP Fax transmission.
In the address book, you can register up to 200 groups. You can register up to 400 members in a group.
Both the fax number and the IP Fax number cannot be registered in one address together. Two destinations, the fax
number or IP Fax number and the E-mail address, can be registered in one address.
On the Group tab of the Address Book menu, you can perform the following operations to manage recipients.
P.51 “Creating new groups”
P.51 “Editing or deleting groups”
P.51 “Searching for groups”
P.51 “Confirming the members of a group”
Creating new groups
On the Address Book screen, select the Group tab, then press an undefined line, then press [Entry], and then create a
group.
Enter the group name and index, and then select the recipients included in the group. You can also search for
recipients by pressing the search icon.
Using the IP Fax Function
Editing or deleting groups
To edit groups, select the Group tab on the Address Book screen, then press the group, and then press [Edit]. You can
add or delete recipients included in the group. To delete groups, press the group, and then press [Delete].
Deleting a group does not delete the recipients from the [Single] tab. However, deleting a recipient in the [Single] tab
deletes the recipient from the group it is registered in.
To add/remove all the Fax Number/IP Fax Number and E-mail Address of a recipient to/from the group, press the
recipient name.
To add/remove only the fax number of a recipient to/from the group, select in the recipient information.
To add/remove only the E-mail address of a recipient to/from the group, select in the recipient information.
To add/remove only IP Fax (gateway) of a recipient to/from the group, select in the recipient information.
To add/remove only IP Fax (SIP) of a recipient to/from the group, select in the recipient information.
To add/remove only IP Fax (direct) of a recipient to/from the group, select in the recipient information.
Searching for groups
When you press the search icon on the Address Book screen, the search screen is displayed. You can search for groups
by entering the search items.
Confirming the members of a group
You can confirm the recipients registered in a group by pressing [Contents] of the group on the Address Book screen.
Using the IP Fax Function from the Touch Panel 51
Page 52

4.Using the IP Fax Function
1
2345
6
11
78910
Network (Admin)
Enter into the Admin menu in the User Functions screen and set various settings of the network on the Network
screen.
For details on functions other than for IP Faxing, refer to the MFP Management Guide.
For details how to display the [Network] screen, refer to the MFP Management Guide.
Item name Description
IPv4 For details on functions, refer to the MFP Management Guide.
1
IPv6
2
IPX/SPX
3
NetWare
4
SMB
5
AppleTalk
6
HTTP
7
Ethernet
8
Other
9
IPsec
10
Network Check P.53 “Checking the network”
11
When performing network settings, you are required to press [Apply Now] after changing the settings to initialize
the Network. Pressing [Apply Now] displays the message “Network Initializing” at the lower left of the screen in a
few seconds. The time for this message to appear differs depending on the setting. This message disappears when
the setting is complete.
While “Network Initializing” is being displayed, the [Network], [Security], [Wireless Setting], [802.1X Settings],
[Factory Default], [Clock] and [Cloning] buttons cannot be pressed. The operations with these buttons after the
message disappears.
52 Using the IP Fax Function from the Touch Panel
Page 53

4.Using the IP Fax Function
Checking the network
Two functions are available for checking the network status: ping and traceroute.
Item name Description
Server Select the server you want to check.
PING Press this button to check the connection status between this equipment and the
servers on the network.
TRACEROUTE Press this button to view and check the network path to the desired server.
There are two ways to select the server you want to check.
To select the desired server from the server list displayed on the touch panel:
Checkable servers and supported protocols are as follows.
Primary DNS server (IPv4/IPv6)
Secondary DNS server (IPv4/IPv6)
Primary WINS server (IPv4)
Secondary WINS server (IPv4)
SMTP server (IPv4/IPv6)
POP3 server (IPv4/IPv6)
Primary SNTP server (IPv4/IPv6)
Secondary SNTP server (IPv4/IPv6)
LDAP server 1
LDAP server 2
LDAP server 3
LDAP server 4
LDAP server 5
Remote server 1
Remote server 2
Primary registrar SIP server
Secondary registrar SIP server
Primary proxy SIP server
Secondary Proxy SIP server
Using the IP Fax Function
To designate the desired server manually:
Enter the server name, IPv4 address, or IPv6 address manually.
When you have entered a WINS name for the network path of the remote server 1/2 in TopAccess “Save as file
Setting”, you will not be able to perform network check on those servers by selecting them from the server list. In
this case, designate the IP address of the remote server 1/2 manually to perform the network check.
When the ping/traceroute command can reach a server, the IP address is displayed for the check result for the
server. If the command cannot reach it for some reason, the host name is displayed instead of the IP address.
Using the IP Fax Function from the Touch Panel 53
Page 54

4.Using the IP Fax Function
05-10-’19 1 5 : 0 8 F R O M- Aaabbb 1234567890 T-069 P0001/0001 F-049
Date sent
(automatically attached)
Sender’s ID name
Number of pages
Pages sent/Total pages
Communication number
File number
Sender’s ID (IP Fax) number
FAX(Admin)
You can register the terminal ID of IP Fax and set the password for printing secure received IP Fax jobs.
For details on functions other than for IP Faxing, refer to the MFP Management Guide.
For details how to display the [Fax] screen, refer to the MFP Management Guide“Chapter 2: Accessing the Admin
Menu”.
Registering the terminal ID
This section describes how to register the terminal ID of this equipment. If the terminal ID is registered in advance,
sender information can be printed on the leading edge on the transmitted original, and receiver information on the
trailing edge on the received fax.
You can enter up to 20 characters in the ID Name, but whether they can all be displayed or not depends on their
size.
When you add an international code, press [+]. To enter a pause “ - ”, press [Pause].
Example of how sender information is printed on paper
Sender information is printed about 5 mm (0.2 inch) from the top edge of the transmitted copy of the original.
54 Using the IP Fax Function from the Touch Panel
Page 55

4.Using the IP Fax Function
RECEIVED 05
-10-
’19 15:08 FROM- Cccddd TO
-
Aaabbb P0001/0001
Date received
(automatically attached)
Remote IP Fax ID information
Receiver’s
ID name
Number of pages
Pages sent
Example of how receiver information is printed on originals you receive
Receiver information is printed about 5 mm (0.2 inch) from the bottom edge of the received copy of the original.
Setting the password for printing the secure receive function
The Secure Receive function allows you to store received IP Fax jobs in the equipment without printing them.
For details about the Secure Receive function, refer to the MFP Management Guide.
You can set a password for printing a received Secure Receive IP Fax jobs.
Using the IP Fax Function
Select [IP Fax].
1
Enter the password in [New Password] and [Retype New Password], and then press [OK].
2
Up to 20 alphanumeric characters (including the following symbols) can be entered for the password.
You can use alphanumerics and the following symbols.
# $ ( ) * + , - . / : ; = ? @ \ ^ _ ` { | } ~
Press [OK].
3
Using the IP Fax Function from the Touch Panel 55
Page 56

0.Using the IP Fax Function from the N/W-Fax Driver
The required settings for receiving/sending by an IP Fax and the basic procedure for sending are as follows.
P.56 “Sending IP Faxes”
P.60 “Specifying Recipients of IP Faxes”
P.68 “Removing recipients”
P.69 “Setting up the [Send] tab”
P.72 “Setting up the [Device Settings] tab”
There are three types of sending methods.
IP Fax Direct — Sends an IP Fax directly to the MFP supporting the IP Fax function.
IP Fax Gateway — Select this to send an IP Fax to a G3 Fax machine via a T.38 supporting gateway.
IP Fax SIP — Sends an IP Fax to the MFP supporting the IP Fax function via a SIP server.
The IP Fax function requires an IP Fax options. For details, contact your service technician or service representative.
To send a fax by an IP Fax, enable [IP Fax Function] in the [Device Settings] tab.
P.72 “Setting up the [Device Settings] tab”
IP Fax direct transmission is possible only when a recipient is selected from the address book of the AddressBook
Viewer.
P.61 “Selecting recipients from the address book”
Sending IP Faxes
This section describes the basic procedures to send an IP Fax.
P.58 “When password entry is required”
P.59 “When LDAP authentication is enabled”
Start the application software and prepare the document to be sent.
1
Select [Print] from the [File] menu in the application software.
2
The procedure for displaying the [Print] dialog box may differ from the above depending on the application
software.
Select [TOSHIBA e-STUDIO Fax] for the printer and click [Preferences].
3
The dialog box of the N/W-Fax driver properties appears.
Note that the command name to open the driver properties may differ from [Preferences] depending on the
application software.
56 Using the IP Fax Function from the N/W-Fax Driver
Page 57

4.Using the IP Fax Function
Click the [Send] tab and specify the recipients.
4
Using the IP Fax Function
To specify recipients, enter them with the keyboard or select them from the address book.
P.60 “Specifying Recipients of IP Faxes”
On the [Send] tab, you can set the resolution of a fax cover sheet, etc. as well as specifying the recipients.
P.69 “Setting up the [Send] tab”
Confirm the recipients and click [OK].
5
The transmission settings are determined and the N/W-Fax driver properties dialog box is closed.
Using the IP Fax Function from the N/W-Fax Driver 57
Page 58

4.Using the IP Fax Function
Click [Print] in the [Print] dialog box.
6
The IP Fax is sent.
Note that the command name to print a document (send an IP Fax) may differ from [Print] depending on the
application software.
A waiting IP Fax job can be checked or deleted through the managing jobs function in TopAccess.
A sent IP Fax job can also be checked through the displaying job logs function in TopAccess. For details about
the operation, refer to the TopAccess Guide.
When password entry is required
When the [Enter the user credentials manually] option is enabled on this equipment, you are prompted to enter your
user name and password before sending an IP Fax.
When the dialog box appears, enter your user name and password, and then click [OK].
Up to 128 characters can be entered in the [User Name] box. Up to 64 characters in the [Password] box.
The user name and password entered in the above boxes are not stored. Therefore, you must enter your user name
and password every time you send an IP Fax.
If you want to change the settings of this option, carry it out on the [Device Settings] tab.
P.72 “Setting up the [Device Settings] tab”
58 Using the IP Fax Function from the N/W-Fax Driver
Page 59

4.Using the IP Fax Function
When LDAP authentication is enabled
When LDAP authentication is enabled on this equipment, you must specify an LDAP server in the [Server Name] box on
the [Send] tab before sending an IP Fax.
Using the IP Fax Function
If you attempt to send an IP Fax without specifying an LDAP server, the [Specify LDAP Server] dialog box will appear to
ask you to do so.
In this case, specify the desired LDAP server in the [Server Name] box and click [OK] to send the IP Fax.
If you want to change the settings of an LDAP authentication, carry it out on the [Device Settings] tab.
For details about the setting, refer to the Fax Guide.
Using the IP Fax Function from the N/W-Fax Driver 59
Page 60

4.Using the IP Fax Function
Specifying Recipients of IP Faxes
Up to 400 recipients can be specified in a single operation.
Specify recipients by the following methods.
P.60 “Entering recipients from the keyboard”
P.61 “Selecting recipients from the address book”
P.63 “Selecting recipients from the address book (Search option)”
If more than one recipient is specified in a single transmission, and a cover sheet is set in the N/W-Fax driver or a
header page is set to be printed on the recipient’s device, all the recipient information may be printed. If you want to
secure the recipient information, avoid sending an IP Fax to multiple recipients at the same time.
To use the address book, you need to register recipients in the address book of the AddressBook Viewer in advance.
Entering recipients from the keyboard
You can enter a recipient with the keyboard.
For IP Fax direct transmission, a recipient cannot be entered with the keyboard. Select the IP Fax number of a
recipient from the address book.
Select the entry method of a recipient to enter its IP Fax number.
1
To send an IP Fax to a G3 Fax machine via a T.38 supporting gateway, click [IP Fax Gateway] and enter the IP
Fax number in the right-hand box.
To send an IP Fax to an MFP via a SIP server, click [IP Fax SIP] and enter the SIP user name in the right-hand
box.
60 Using the IP Fax Function from the N/W-Fax Driver
Page 61

4.Using the IP Fax Function
Click .
2
Using the IP Fax Function
The recipients selected for “To” are listed.
To send faxes to several recipients, repeat steps 1 and 2 to add the necessary IP Fax numbers to the list.
When the fax transmission is completed, the recipients are automatically removed from the “To” list.
Selecting recipients from the address book
Select recipients from the address book in the AddressBook Viewer.
Select this when performing IP Fax direct transmission.
Click [Address Book].
1
The AddressBook Viewer runs.
Using the IP Fax Function from the N/W-Fax Driver 61
Page 62

4.Using the IP Fax Function
Select [Select-IP Fax] from the address book and add it to the list below.
2
To send faxes to several recipients, repeat the above steps to add the necessary IP Fax numbers to the lists.
You can select a recipient by the following operations:
Selecting a recipient by dragging and dropping
Drag a recipient in the address book and drop it to [Selected Contacts] and then select [IP Fax Number] from
[Select].
Selecting a recipient by double-clicking on it
Double-click on a recipient in the address book.
To change the setting of the recipient to be selected upon double-clicking, select the [View] menu, [Default
Configuration] and [Type Selection]. Then select [IP Fax Number] or [IP Fax and E-mail].
Selecting a recipient from a shortcut menu
Right-click on the recipient in the address book select [Select] from the shortcut menu and then [IP Fax
Number].
Removing a recipient
Select the recipient to be removed in “Selected Contacts” and click [Remove].
Confirm the recipients and click [OK].
3
The AddressBook Viewer is closed and the recipients selected for “To” are listed.
When the IP Fax transmission is completed, the recipients are automatically removed from the “To” list.
62 Using the IP Fax Function from the N/W-Fax Driver
Page 63

4.Using the IP Fax Function
Selecting recipients from the address book (Search option)
You can find and select a recipient from the address book in the AddressBook Viewer.
Click [Address Book].
1
Using the IP Fax Function
The AddressBook Viewer runs.
Select [Find] from the [Edit] menu.
2
The [Find Contact] dialog box appears.
The [Find Contact] dialog box can be made to appear by selecting the [Find] menu.
Using the IP Fax Function from the N/W-Fax Driver 63
Page 64

4.Using the IP Fax Function
Select an address book in [Data Source].
3
The address book which has been set as the default display appears in the [Data Source] box. To change the
setting of the default address book in the [Data Source] box, select [View] - [Default Configuration] - [Data Source]
and then choose an address book.
64 Using the IP Fax Function from the N/W-Fax Driver
Page 65

4.Using the IP Fax Function
Display the [Person] tab and enter search strings in the following boxes.
4
Using the IP Fax Function
Display Name — Enters a search string of the display names.
Fax Number — Enters the fax numbers.
Email — Enters a search string of the Email address.
IP Fax Number — Enters the IP Fax numbers.
If you perform searching in the above conditions, proceed to step 6. If you want to set more detailed search
conditions, proceed to step 5 and set them in the [Detail Setting] tab. However, note that even if you enter the
search conditions in both the [Person] and [Detail Setting] tabs, you cannot perform searching in this
combination in one time.
In the [Person] tab, you do not have to fill in all the boxes and the string does not need to completely correspond
to the target of the search. Entering one or more characters in one or more boxes causes a search to be made for
recipients which correspond to the particular conditions.
Using the IP Fax Function from the N/W-Fax Driver 65
Page 66

4.Using the IP Fax Function
Display the [Detail Setting] tab, set the search conditions, and then click [Add].
5
Field Select — Selects an item to be searched.
Condition of search string — Selects condition in the left-hand box, and then enters a search string in the
right-hand box.
The search condition is displayed in the “Condition list”.
To set more than one search condition, repeat this operation as many times as needed.
To delete the search conditions, select one and click [Remove].
Click [Search].
6
The search starts in the selected address book. When the search is complete, the recipients matching the search
conditions are listed.
To stop searching, click [Stop].
Even if you enter the search conditions in both the [Person] and [Detail Setting] tabs, only the search conditions
in the tab currently displayed is used. You cannot perform searching in the combined conditions on both tabs.
66 Using the IP Fax Function from the N/W-Fax Driver
Page 67

4.Using the IP Fax Function
Drag and drop the recipients to “Selected Contacts” from the list of the search results.
7
Using the IP Fax Function
Select [IP Fax] from [Select].
8
The recipients selected are listed in “Selected Contacts”.
To send faxes to several recipients, repeat steps 1 and 8 to add the necessary IP Fax numbers to the list.
You can select a recipient by the following operations:
Selecting a recipient by double-clicking on it
Double-click on a recipient in the list of the search results.
To change the setting of the recipient to be selected upon double-clicking, select the [View] menu, [Default
Configuration] and [Type Selection]. Then select [IP Fax Number] or [IP Fax and E-mail].
Selecting a recipient from a shortcut menu
Right-click on the recipient in the list of the search results, select [Select] from the shortcut menu and then [IP
Fax Number].
Removing a recipient
Select the recipient to be removed in “Selected Contacts” and click [Remove].
Confirm the recipients and click [OK].
9
The AddressBook Viewer is closed and the recipients selected for “To” are listed.
When the IP Fax transmission is completed, the recipients are automatically removed from the “To” list.
Using the IP Fax Function from the N/W-Fax Driver 67
Page 68

4.Using the IP Fax Function
Removing recipients
You can remove a recipient from the “To” list in the N/W-Fax driver properties.
Select a recipient and click [Remove].
1
The selected recipient is removed.
68 Using the IP Fax Function from the N/W-Fax Driver
Page 69

4.Using the IP Fax Function
21
19
5
3
10
12
18
1
2
4
6
7
11
9
14
15
13
16
8
17
20
Setting up the [Send] tab
In the [Send] tab, you can specify the recipients and how the IP Fax will be sent.
Setting the N/W-Fax driver options by displaying the printer properties from the [Print] dialog box within an
application will establish the settings for the current N/W-Fax job. The N/W-Fax driver option settings specific to each
N/W-Fax job set using this method will become disabled when the application is closed.
Click the [File] menu and select [Print] on an application.
1
Select [TOSHIBA e-STUDIO Fax] and click [Properties] or [Preferences].
2
Using the IP Fax Function
1. [Address Book]
Runs AddressBook Viewer to select the recipients from the address book.
P.61 “Selecting recipients from the address book”
2. To
This displays the specified recipients list.
For details about the setting, refer to the Fax Guide.
The Display Name in [To] can be changed by double-clicking it.
3. [Delete]
Deletes the selected recipients from the list.
P.68 “Removing recipients”
4. Fax Number
Enters the recipient’s fax number directly.
P.60 “Entering recipients from the keyboard”
5. [SUB/PWD]
Click this to display the [SUB/PWD] dialog box. You can add a sub address and a password to the entered fax
number.
P.60 “Entering recipients from the keyboard”
6. IP Fax gateway
Enters the recipient’s fax number directly to send an IP Fax to a G3 Fax machine via a T.38 supporting gateway.
P.60 “Entering recipients from the keyboard”
Using the IP Fax Function from the N/W-Fax Driver 69
Page 70

4.Using the IP Fax Function
7. IP Fax SIP
Enters the SIP user name directly to send an IP Fax to an MFP via an SIP server.
P.60 “Entering recipients from the keyboard”
8. Internet Fax Address
Enters the recipient’s internet fax number directly.
P.60 “Entering recipients from the keyboard”
9. Resolution
Selects the resolution for the fax.
- Standard (200 x 100 dpi) — Select this to send a document in Standard mode (200 x 100 dpi).
- Fine (200 x 200 dpi) — Select this to send a document in Fine mode (200 x 200 dpi).
- Super Fine (200 x 400 dpi) — Select this to send a document in Super Fine mode (200 x 400 dpi).
- Ultra Fine (400 x 400 dpi) — Select this to send a document in Ultra Fine mode (400 x 400 dpi).
10. Department Code
Enters a department code of 1 to 63 characters if required. When the department code is enabled on the MFP, you
must enter it to send an IP Fax.
- If you do not enter a department code when it is enabled on the MFP and the [Invalid Department Code Print
Job] is set to “Store to invalid job list” in TopAccess, the job will be stored in the Invalid job list without being
transmitted. You can print or delete a stored job from the [Job Status] on the touch panel.
- If you do not enter the department code when the department code is enabled on the MFP and the [Invalid
Department Code Print Job] is set to PRINT in TopAccess, the job will be sent.
- If you do not enter the department code when the department code is enabled on the MFP and the [Invalid
Department Code Print Job] is set to DELETE in TopAccess, the job will be deleted automatically.
11. Hide Department Code
Select this check box to display a department code in the blank symbols.
12. Cover Sheet
Selects the type of a cover sheet if you want to attach it to the first page of the document. The types of the cover
sheet are [Standard Cover Page], [Business Cover Page], [Professional Cover Page] and [My Cover Page].
For details about the setting, refer to the Fax Guide.
13. [Edit]
Click this to edit the contents of the cover sheet specified in the Cover Sheet option.
The [Cover Sheet Settings] dialog box appears and you can enter information such as a subject or a message.
Moreover, the type or size of the fonts can be changed.
For details about the setting, refer to the Fax Guide.
14. Server Name
Selects the desired LDAP server in the [Server Name] box if needed.
The settings for the LDAP server can be made on the [Device Settings] tab.
P.72 “Setting up the [Device Settings] tab”
15. [SNMP Settings]
Click this to check or change the SNMP settings.
For details about the setting, refer to the Fax Guide.
16. Delayed Fax
Selects this to send a document at a specified date and time. When this is selected, click [Edit] to display the
[Scheduled Time] dialog box and specify date and time the job will be transmitted. The job sent to the MFP will be
stored in the Fax queue until the specified date and time.
For details about the setting, refer to the Fax Guide.
70 Using the IP Fax Function from the N/W-Fax Driver
Page 71

4.Using the IP Fax Function
17. Save as File
Select this to save up to 10 GB of documents in the “file_share” folder in the MFP as well as to send the document
as a fax, Internet Fax or IP Fax. You can refer to the documents saved in the “file_share” folder in the MFP from
the Windows explorer.
For details about the setting, refer to the Fax Guide.
The cover sheet and the original will be stored in the “file_share” folder when the Cover Sheet option is set.
18. File Format
Selects the file format of the document that will be saved. This option is available only when the [Save as File]
check box is selected.
19. OCR
Select this check box to enable the OCR function. This option is available only when the [Save as File] check box is
selected. The OCR option is necessary to use the OCR function.
20. [Restore Defaults]
Click this to restore the settings to make the equipment as it was at the time of factory shipment.
21. [Help]
Click this to browse Help for the N/W-Fax driver.
Using the IP Fax Function
Using the IP Fax Function from the N/W-Fax Driver 71
Page 72

4.Using the IP Fax Function
1
2
3
4
5
6
7
8
9
10
Setting up the [Device Settings] tab
On the [Device Settings] tab, you can change a setting for N/W-Fax driver update or display the software version of the
driver.
Setting the N/W-Fax options by displaying the N/W-Fax driver properties from the Printers folder on the Windows
[Start] menu will establish the initial settings of the options.
Ask the administrator for details on the settings configured for your MFP.
Right-click [Start], then click [Control Panel] > [View devices and printers].
1
When using Windows 7, click [Start] and select [Devices and Printers].
When using Windows Server 2008, click [Start] and select [Control Panel] > [Hardware and Sound] > [Printers].
When using Windows 8.1 or Windows Server 2012, right-click in the lower left of the screen, and select [Control
Panel] > [Devices and Printers].
Right-click [TOSHIBA e-STUDIO Fax], and then select [Printing preferences] or [Printer
2
properties] from a shortcut menu.
When using Windows Server 2008, select [TOSHIBA e-STUDIO Fax], click the [File] menu and then select
[Printing Preferences] or [Properties].
If the [File] menu is not displayed, press [Alt].
1. Update Automatically
Select whether or not the setting information of each item on the [Device Settings] tab of the N/WFax driver is
to be obtained by automatically communicating with your MFP every time this tab is opened.
- On — Select this to obtain the setting information automatically.
- Off — Select this not to obtain the setting information automatically. Set each item manually.
72 Using the IP Fax Function from the N/W-Fax Driver
This function is not available when your computer and MFP are connected with a USB cable.
2. User Authentication
Selects the authentication method which is to be used. Set it to correspond to that of your MFP.
- Off — Select this not to perform user authentication.
- MFP Local Authentication — Select this to perform MFP Local Authentication.
- Windows Domain Authentication — Select this to perform Windows Domain Authentication.
- LDAP Authentication — Select this to perform LDAP Authentication.
Page 73

4.Using the IP Fax Function
If the user authentication and project code are enabled in the MFP, you need to enter the project code when
sending the IP Fax.
3. Details
The [LDAP Server Settings] dialog box will appear. This option can be selected only when [LDAP
Authentication] is selected in the [User Authentication] box.
For details about the setting, refer to the Fax Guide.
4. Enter the user credentials manually
When this check box is selected, you are prompted to enter your user name and password every time you send
an IP Fax. This option is available when any of MFP Local Authentication, Windows Domain Authentication, or
LDAP Authentication is selected in the [User Authentication] box.
To configure this option, select [Off] in the [Update Automatically] box.
This option can be used together with any of the user authentication functions (MFP Local Authentication,
Windows Domain Authentication, LDAP Authentication).
5. Fax Function
Selects whether or not the fax function is enabled. Set it to correspond to that of your MFP.
- Enabled — Select this to enable the fax function.
Using the IP Fax Function
- Disabled — Select this to disable the fax function.
6. Internet Fax Function
Selects whether or not the Internet Fax function is enabled. Set it to correspond to that of your MFP.
- Enabled — Select this to enable the Internet Fax function.
- Disabled — Select this to disable the Internet Fax function.
7. IP Fax Function
Selects whether or not the IP Fax function is enabled. Set it to correspond to that of your MFP.
- Enabled — Select this to enable the IP Fax function.
- Disabled — Select this to disable the IP Fax function.
8. Cover Sheet Confirmation
Select whether or not to display a message indicating a precaution that a cover sheet is being selected when a
job is sent.
- Enabled — Select this to display the message.
- Disabled — Select this not to display the message.
9. Customization
The [Customization] dialog box is displayed.
For details about the setting, refer to the Fax Guide.
10.Version Information
Click this to display the software version information of the N/W-Fax driver.
Using the IP Fax Function from the N/W-Fax Driver 73
Page 74

0.Using the IP Fax Function from TopAccess
34 56789101112 13 142
1
P.74 “Log”
P.77 “Template”
P.79 “Inbound FAX routing”
P.80 “Role Management”
P.83 “Notification Setting”
P.84 “IP Fax Received Forward (Admin)”
Log
You can check the job history on the [Log] tab of TopAccess.
P.74 “[View Logs] Item list”
For details about “[Export Logs] Items list <access policy mode>”, “[Log Settings] Item list <access policy mode> and
“[Logs] How to Set and to Operate” refer to the TopAccess Guide.
[View Logs] Item list
For details about “Print Log”, “Scan Log”, “Application Log” and “Message Log <access policy mode>” refer to the
TopAccess Guide.
Transmission Journal
The Transmission Journal page displays the following information for each transmission journal.
Item name Description
Select Page Selects a page when there are 101 items or more.
1
No. This displays the serial number of the journals.
2
File No. This displays the file number to identify the received job.
3
Duration This displays the time length taken for the transmissions. If it takes more
4
than 1 hour, “59:59” is indicated.
TO (Name) This displays the recipient name set for the transmission job.
5
TO (Fax No./Email) This displays the fax number or E-mail address of the recipient for the
6
transmission job.
Dept This displays the department code if department management is enabled.
7
Line This displays the line used.
8
Mode This displays the transmission mode*.
9
Pages This displays the number of pages of the transmission job.
10
Date Time This displays the date and time the transmission job was performed.
11
Status This displays the result of the transmission.
12
User Name This displays the user account name of the owner of the transmission job.
13
74 Using the IP Fax Function from TopAccess
Page 75

4.Using the IP Fax Function
34 56789101112 13 142
1
Item name Description
Domain Name/LDAP Server This displays the domain name or LDAP server of the user account who was
14
the owner of the transmission job.
* The transmission mode is displayed by a combination of a 2-digit letter code, a 3-digit numeric code, and up to a 4-digit supplemental code.
Example: EC 603
2-digit letter
code
Communication
Mode
EC: ECM
G3: G3
ML: E-mail
IE: IP Fax (ECM)
IG: IP Fax (G3)
Click a table heading item to refresh the page and reorder the transmission journal list in the specified order.
1st numeric
code
(bps)
0: 2400
1: 4800
2: 7200
3: 9600
4: 12000
5: 14400
6: V.34
7: T.38 (IP Fax)
2nd numeric code
(Resolution)
0: 8x3.85
1: 8x7.7
2: 8x15.4
4: 16x15.4
8: 300dpi
A: 400dpi
B: 600dpi
C: 100dpi
D: 150dpi
3rd
numeric
code
(Mode)
0: MH
1: MR
2: MMR
3: JBIG
Up to 4 digit
supplemental code
P: Polling
SB: Mailbox
SR/R: Relay mailbox
SF/F: Forward mailbox
ML: Internet Fax
I: N/W-Fax
O: Offramp Gateway
Reception Journal
The Reception Journal page displays the following information for each reception journal.
Using the IP Fax Function
Item name Description
Select Page Selects a page when there are 101 items or more.
1
No. This displays the serial number of the journals.
2
File No. This displays the file number to identify the received job.
3
Duration This displays the time taken for the receptions. If it takes more than 1 hour,
4
“59:59” is indicated.
From (Name) This displays the sender’s name of the received job.
5
From (Fax No./Email) This displays the fax number or E-mail address of the sender for the received
6
job.
Dept This displays the department code if department management is enabled.
7
Line This displays the line used.
8
Mode This displays the reception mode*.
9
Pages This displays the number of pages of the received job.
10
Date Time This displays the start date and time of the job reception.
11
Using the IP Fax Function from TopAccess 75
Page 76

4.Using the IP Fax Function
Item name Description
Status This displays the result of the reception.
12
User Name This displays the user account name of the owner of the received job.
13
Domain Name/LDAP Server This displays the domain name or LDAP server of the user account who was
14
the owner of the received job.
* The reception mode is displayed by a combination of a 2-digit letter code, a 3-digit numeric code, and up to a 4-digit supplemental code.
Example: EC 603
2-digit letter
code
Communication
Mode
EC: ECM
G3: G3
ML: E-mail
IE: IP Fax (ECM)
IG: IP Fax (G3)
Click a table heading item to refresh the page and reorder the reception journal list in the specified order.
1st numeric
code
(bps)
0: 2400
1: 4800
2: 7200
3: 9600
4: 12000
5: 14400
6: V.34
7: T.38 (IP Fax)
2nd numeric code
(Resolution)
0: 8x3.85
1: 8x7.7
2: 8x15.4
4: 16x15.4
8: 300dpi
A: 400dpi
B: 600dpi
C: 100dpi
D: 150dpi
3rd
numeric
code
(Mode)
0: MH
1: MR
2: MMR
3: JBIG
Up to 4 digit
supplemental code
P: Polling
SB: Mailbox
SR/R: Relay mailbox
SF/F: Forward mailbox
ML: Internet Fax
I: N/W-Fax
O: Onramp Gateway
76 Using the IP Fax Function from TopAccess
Page 77

4.Using the IP Fax Function
Template
You can register a template on the [Template] menu in the [Registration] tab of TopAccess.
P.77 “Destination Setting”
For details about the following operations, refer to the TopAccess Guide.
“Panel Setting”
“InternetFax Setting”
“Fax Setting”
“Email Setting”
“Save as file Setting”
“Box Setting”
“Store to USB Device Setting”
“Scan Setting”
“Extended Field settings”
“Extended Field Properties”
“Password Setting”
Destination Setting
In the Recipient List page, you can specify the destinations to which the IP Fax will be sent.
When you are setting up the destinations for the Scan to Email agent, you can only specify the E-mail addresses for
them.
When you are setting up the destinations for the Fax/InternetFax agent, you can specify fax numbers, E-mail
addresses and IP Fax numbers for them.
When Creating a Fax/Internet Fax agent:
Using the IP Fax Function
When Creating a Scan to Email agent:
You can specify the destinations by entering their E-mail addresses, fax numbers or IP Fax numbers manually or by
selecting them from destinations or destination groups from the address book. You can also specify the destinations
by searching in the LDAP server.
For details about the following operations, refer to the TopAccess Guide.
“Selecting the destination from the address book”
“Selecting the group from the address book”
“Searching for destinations in the LDAP server”
“Removing the contacts from Recipients List”
Using the IP Fax Function from TopAccess 77
Page 78

4.Using the IP Fax Function
Entering the destinations manually
You can add a destination manually to the Recipient List.
You cannot enter destinations if [Restriction of Destination Selection Method]-[Prohibit Direct Entry] is enabled.
For details about the operation of “Restriction of Destination Method”, refer to the TopAccess Guide.
For details about the [Recipient List] screen and the [Contact Property] screen, refer to the TopAccess Guide.
P.84 “IP Fax Received Forward (Admin)”
Click [Destination Setting] (when creating a Fax/Internet Fax agent) or [TO: Destination Setting] /
1
[CC: Destination Setting] / [BCC: Destination Setting] (when creating an Email agent) to open the
Recipient List page.
Click [New].
2
The Contact Property page is displayed.
Enter the E-mail address or IP Fax number of the destination in the [Destination] box and select
3
the destination’s fax type in the [Fax Type] box.
Click [OK].
4
The destination is added to the Recipient List page.
Repeat steps 2 to 4 to add all additional destinations that you require.
5
You can remove the destinations you added to the Recipient List before saving the destination settings.
For details, refer to the TopAccess Guide.
Click [Save].
6
The recipients are added as destinations.
78 Using the IP Fax Function from TopAccess
Page 79

4.Using the IP Fax Function
1
2
6
3
4
5
Inbound FAX routing
ITU-T communications function between fax devices with ITU-T support and enable fax transmission to and retrieval
from mailboxes.
The IP Fax function does not support [Inbound FAX routing]. However, you can specify the IP Fax destination to
[Destination Setting] and [Relay End Terminal Report] when an agent is set by selecting [Forward] for [Internet/
Fax(Relay)] in the [MailBox Setting] screen.
The type of mailboxes for ITU-T communications must be set in advance to either confidential, bulletin board, or
forward. You can specify a password on any mailbox to secure confidentiality.
P.79 “Relay End Terminal Report (Mailbox)”
For details about the following operations, refer to the TopAccess Guide.
“[Inbound FAX routing] screen”
“[MailBoxes Properties] screen”
“MailBox Setting (Mailbox)”
“Destination Setting (Mailbox)”
“InternetFax Setting (Mailbox)”
“Save as file Setting (Mailbox)”
“Email Setting (Mailbox)”
“Box Setting (Mailbox)”
Using the IP Fax Function
Mailboxes can be managed using the touch panel.
For details, refer to the Fax Guide.
Relay End Terminal Report (Mailbox)
On the Relay End Terminal Report page, you can specify a destination to which the transmission result list will be sent.
Using the IP Fax Function from TopAccess 79
Page 80

4.Using the IP Fax Function
1
2
3
Item name Description
[Add] button Adds settings to transmit the relay end terminal report.
1
[Cancel] button Cancels the settings.
2
[Reset] button Resets the settings.
3
Destination Enters the Email address or the IP Fax number of the recipient.
4
Fax Type Selects the fax type of the recipient.
5
Recipient list This displays the registered recipients. Select the E-mail address or IP Fax
6
number of the recipient.
You cannot specify more than 1 recipient for the destination of the Relay End Terminal Report.
Role Management
On the [Role Management] scree of TopAccess, you can manage and register roles if you are logged in with the access
policy mode.
P.81 “Default roles and privileges”
P.82 “[Create New Role] screen”
For details about the access policy mode, refer to the TopAccess Guide.
Item name Description
80 Using the IP Fax Function from TopAccess
[New] button Press this to add a new role.
1
[Delete] button Press this to delete the role selected in the role list.
2
Role Name This displays the role name.
3
P.82 “[Create New Role] screen”
You cannot delete the default roles.
For more information about default roles, see the following:
P.81 “Default roles and privileges”
You can check role information by clicking the role name.
For details, refer to the TopAccess Guide.
Page 81

4.Using the IP Fax Function
Default roles and privileges
The following table describes privileges granted to default roles related to the IP Fax functions.
For details of other privileges of default roles, refer to the TopAccess Guide.
The functions listed in “Privileges” and “Permitted operations (functions)” below are displayed in “6 Function list” on
the [Create Role Information] screen.
P.82 “[Create New Role] screen”
Default roles names Privileges Permitted operations (functions)
FaxOperator
User
Fax
* Part of operations (functions) is permitted.
Fax/iFax/IP Fax Function
Fax/iFax/IP Fax Function
Fax/iFax/IP Fax Function
*
Internet Fax Transmission
Fax Transmission
IP Fax Transmission
Fax Received Print
IP Fax Received Print
*
Internet Fax Transmission
Fax Transmission
IP Fax Transmission
Store to Local File Share
Store to Remote Server
*
Internet Fax Transmission
Fax Transmission
IP Fax Transmission
Using the IP Fax Function
Using the IP Fax Function from TopAccess 81
Page 82

4.Using the IP Fax Function
1
[Create New Role] screen
You can register a new role.
You can confirm and edit registered roles on the [Edit Role] screen.
However, you cannot edit the defaults roles.
For details about the [Role Edit] screen, refer to the TopAccess Guide.
The following table describes the registration of roles related to the IP Fax functions.
For details other privileges of default roles, refer to the TopAccess Guide.
Item name Description
MFP Function You can select the privileges to be assigned to the role.
1
Fax/iFax Function Select this to assign all fax, ifax and IP Fax functions.
Internet Fax
Transmission
Fax Transmission Select this to assign the fax transmission function.
IP Fax Transmission Select this to assign the IP Fax transmission function.
Fax Received Print Select this to assign the fax, Internet Fax and IP Fax received print function.
Select this to assign the Internet Fax transmission function.
82 Using the IP Fax Function from TopAccess
Page 83

4.Using the IP Fax Function
1
Notification Setting
You can receive information on your equipment by E-mail.
Access TopAccess. Run the access policy mode and click the [Administration] tab > [Maintenance] > [Notification].
P.83 “Setting up System Message Notification Events”
P.84 “Setting up Job Notification Events”
For details about the access policy mode, refer to the TopAccess Guide.
For details about “Setting up Email Setting”, “Setting up Application” and “Setting up License”, refer to the TopAccess
Guide.
Setting up System Message Notification Events
For details on items other than for IP Faxing, refer to the TopAccess Guide.
Using the IP Fax Function
Item name Description
Received Fax/InternetFax/
1
IPFax
Error — Select this to be notified of fax, Internet Fax or IP Fax reception errors.
Warning — Select this to be notified of fax, Internet Fax and IP Fax reception
warnings.
Information — Select this to be notified of fax, Internet Fax or IP Fax reception
information.
Using the IP Fax Function from TopAccess 83
Page 84

4.Using the IP Fax Function
1
2
1
Setting up Job Notification Events
You can select jobs to be notified.
Item name Description
Received Fax/InternetFax/
1
IPFax
IPFax Received Forward Selects to send Email when an error occurs or when job is completed.
2
Selects to send Email when an error occurs or when job is completed.
IP Fax Received Forward (Admin)
You can forward received IP Faxes to a specified destination.
Access TopAccess. Run the access policy mode and click the [Administration] tab > [Registration] menu > [IPFax
Received Forward] submenu.
For details, see the TopAccess Guide.
P.84 “Setting up Document Print (IP Fax Received Forward)”
P.85 “Setting up Destination Setting (IP Fax Received Forward)”
P.86 “Setting up InternetFax Setting (IP Fax Received Forward)”
P.87 “Setting up Save as file Setting (IP Fax Received Forward)”
P.92 “Setting up Email Setting (IP Fax Received Forward)”
P.96 “Setting up Box Setting (IP Fax Received Forward)”
Setting up Document Print (IP Fax Received Forward)
You can configure printing of forwarded documents.
Item name Description
1 Document Print
Always — Select this to always print forwarded document.
ON ERROR — Select this to print the received document when an error
occurred on all forwarding destinations. (For example, the document is not
printed when the E-mail transmission only failed in a combined setting of
Save as File and E-mail.)
84 Using the IP Fax Function from TopAccess
Page 85

4.Using the IP Fax Function
1
2 3 4 5 6 7
8 9
1
2
3
4
Setting up Destination Setting (IP Fax Received Forward)
You can specify the destinations to which the received IP Faxes will be transmitted. You can only specify an E-mail
address as the destination.
This function is available when [InternetFax] is selected as the forwarding agent.
Recipient List
Item name Description
[Save] button Click this to save recipient settings.
1
[Cancel] button Click this to cancel the settings.
2
[New] button Click this to display a screen where you can register an E-mail address as the
3
recipient.
P.85 “[Contact Property] screen”
[Address Book] button Click this to select a recipient from the address book.
4
[Address Group] button Click this to select an address book group as a recipient.
5
[Search] button Click this to search a recipient from the address book.
6
For details, refer to the TopAccess Guide.
[Delete] button Click this to delete the selected recipient.
7
Name This displays the names registered in the address book.
8
Destination This displays the E-mail addresses.
9
Using the IP Fax Function
[Contact Property] screen
You can specify an E-mail address as the recipient.
Item name Description
[OK] button Click this to save the recipient.
1
[Cancel] button Click this to cancel the settings.
2
[Reset] button Click this to deletes the entered E-mail address.
3
Destination Enters the Email address.
4
Using the IP Fax Function from TopAccess 85
Page 86

4.Using the IP Fax Function
1
2
3
4
5
6
Setting up InternetFax Setting (IP Fax Received Forward)
In the InternetFax Setting page, you can specify the content of the Internet Fax to be sent.
You can specify the destination when you have selected [InternetFax] as the forwarding agent.
Item name Description
1 Subject This sets the subject of the Internet Faxes. Select [Scanned from (Device
Name) [(Template Name)] (Date) (Time)] to automatically apply the subject,
or enter the desired subject in the box. If you manually enter the subject, the
subject will be “(Subject) (Date)” by automatically adding the date.
2 From Address Enter the E-mail address of the sender. When the recipient replies to a
received document, the message will be sent to this E-mail address.
3 From Name Enter the sender name of the Internet Fax.
4 Body Enter the body message of the Internet Fax. You can enter up to 1000
characters (including spaces).
5 File Format Select the file format of the scanned image. Only [TIFF-S] (TIFF-FX (Profile S))
format can be selected.
6 Fragment Page Size Select the size of the message fragmentation.
86 Using the IP Fax Function from TopAccess
Page 87

4.Using the IP Fax Function
1
2
3
4
5
6
Setting up Save as file Setting (IP Fax Received Forward)
In the Save as file Setting page, you can specify how and where a received document will be stored.
You can specify the destination when you have selected [InternetFax] as the forwarding agent.
Using the IP Fax Function
Using the IP Fax Function from TopAccess 87
Page 88

4.Using the IP Fax Function
Item name Description
1 File Format Select the file format to which the received document will be saved.
TIFF (Multi) — Select this to save scanned images as a Multi-page TIFF file.
TIFF (Single) — Select this to save scanned images separately as Single-
page TIFF files.
PDF (Multi) — Select this to save scanned images as a Multi-page PDF file.
PDF (Single) — Select this to save scanned images separately as Single-
page PDF files.
XPS (Multi) — Select this to save scanned images as a Multi-page XPS file.
XPS (Single) — Select this to save scanned images separately as Single-
page XPS files.
You can select whether to enable OCR by [Enable OCR].
If the Forced Encryption setting is enabled, only PDF (Multi) and PDF (Single) are selectable for a file format.
For the Forced Encryption function, refer to the MFP Management Guide.
Files saved in an XPS format can be used in Windows 7 Service Pack 1 or later versions with Net Framework
3.0 installed.
OCR processing is available only when the OCR Enabler is installed.
2 Encryption Set this to encrypt PDF files if you have selected [PDF (Multi)] or [PDF (Single)]
in the File Format setting.
Encryption
Select this if you want to encrypt PDF files.
User Password
Enter a password for opening encrypted PDF files.
Master Password
Enter a password for changing the Encrypt PDF setting.
Encryption Level
Select the desired encryption level.
40-bit RC4 — Select this to set an encryption level to one compatible with
Acrobat 3.0, PDF V1.1.
128-bit RC4 — Select this to set an encryption level to one compatible with
Acrobat 5.0, PDF V1.4.
128-bit AES — Select this to set an encryption level to one compatible with
Acrobat 7.0, PDF V1.6.
Authority
Select the desired types of authority for Encrypt PDF.
Printing — Select this to authorize users to print documents.
Change of Documents — Select this to authorize users to change
documents.
Content Copying or Extraction — Select this to authorize users to copy and
extract the contents of documents.
Content Extraction for accessibility — Select this to enable the
accessibility feature.
88 Using the IP Fax Function from TopAccess
Page 89

4.Using the IP Fax Function
Item name Description
If the Forced Encryption setting is enabled, you cannot clear the [Encryption] check box. For the Forced
Encryption function, refer to the MFP Management Guide.
The user password and the master password are not set at the factory shipment.
Passwords must be from 1 to 32 one-byte alphanumerical characters.
The user password must differ from the master password.
These passwords can be re-entered only by an authorized user. Users cannot change the settings of the
[Encryption Level] box and the [Authority] box if they are not authorized to change the master password. The
setting of the encryption will become available when either the user password or the master password is
entered. For the details of the encryption setting, refer to the MFP Management Guide. Ask the administrator
for resetting these passwords.
3 Destination — Use local folder Select this to save a received document to the “FILE_SHARE” folder.
4 Destination — Remote 1 Select this check box to save a received document to Remote 1. How you can
set this item depends on how you have set Remote 1 up in the [Save as file]
submenu under the [Setup] menu.
If you have selected [Allow the following network folder to be used as a
destination], you can only select [Use Administrator Setting]. The protocol
and the network path are displayed below this item.
If you have selected [Allow user to select network folder to be used as a
destination], select [Use User Setting] and enter the following items to
configure the destination to save files.
Protocol
Select the protocol to be used for uploading a received document to the
network folder.
SMB — Select this to send a received document to the network folder using
the SMB protocol.
FTP — Select this to send a received document to the FTP server.
FTPS — Select this to send a scanned file to the FTP server using FTP over
SSL/TLS.
NetWare IPX/SPX — Select this to send a scanned file to the NetWare file
server using the IPX/SPX protocol.
NetWare TCP/IP — Select this to send a scanned file to the NetWare file
server using the TCP/IP protocol.
Server Name
When you select [FTP] as the protocol, enter the FTP server name or IP
address to which a received document will be sent. For example, to send a
received document to the “ftp://192.168.1.1/user/scanned” FTP folder in the
FTP server, enter “192.168.1.1” in this box.
When you select [NetWare IPX/SPX] as the protocol, enter the NetWare file
server name or Tree/Context name (when NDS is available).
When you select [NetWare TCP/IP] as the protocol, enter the IP address of the
NetWare file server.
Port Number(Command)
Enter the port number to be used for controls if you select [FTP] as the
protocol. Generally “-” is entered for the control port. When “-” is entered, the
default port number, that is set for FTP Client by an administrator, will be
used. If you do not know the default port number for FTP Client, ask your
administrator and change this option if you want to use another port number.
Using the IP Fax Function
Using the IP Fax Function from TopAccess 89
Page 90

4.Using the IP Fax Function
Item name Description
4 Destination — Remote 1 Network Path
When you select [SMB] as the protocol, enter the network path to the network
folder. For example, to specify the “users/scanned” folder in the computer
named “Client01”, enter “\\Client01\users\scanned”.
When you select [FTP] as the protocol, enter the directory in the specified FTP
server. For example, to specify the “ftp://192.168.1.1/user/scanned” FTP
folder in the FTP server, enter “user/scanned”.
When you select [NetWare IPX/SPX] or [NetWare TCP/IP] as the protocol, enter
the folder path in the NetWare file server. For example, to specify the
“sys\scan” folder in the NetWare file server, enter “\sys\scan”.
Login User Name
Enter the login user name to access an SMB server, an FTP server, or a
NetWare server, if required. When you select [FTP] as the protocol, an
anonymous login is assumed if you leave this box blank. You can enter up to
32 alphanumerical characters and symbols other than <, >, “ (double
quotation), : (colon) and ; (semicolon). A user name with only a single space is
not possible.
Password
Enter the password to access an SMB server, an FTP server, or a NetWare
server, if required.
Retype Password
Enter the same password again for a confirmation.
[Execute] button
Tests the connection using the specified network settings to check if the
communications can be established.
5 Destination — Remote 2 Select this check box to save a received document to Remote 2. How you can
set this item depends on how the 2nd Folder has been set up in the [Save as
file] submenu in the [Setup] menu. If Remote 2 does not allow you to specify a
network folder, you can only select [Use Administrator Setting]. The protocol
and the network path are displayed below this item. If the Remote 2 allows
you to specify a network folder, you can specify the network folder settings.
See the description of the Remote 1 option for each item.
90 Using the IP Fax Function from TopAccess
Page 91

4.Using the IP Fax Function
Item name Description
6 File Name Format
Select the format of the file name. Information such as file name, date and
time or page number is added according to the selected format.
[FileName]-[Date]-[Page]
[FileName]-[Page]-[Date]
[Date]-[FileName]-[Page]
[Date]-[Page]-[Filename]
[Page]-[FileName]-[Date]
[Page]-[Date]-[FileName]
[FileName]_[Date]-[Page]
Comment
Enter the comment on the file.
Date
Select how you add “date and time” of the file name selected in [Format].
[YYYY][MM][DD][HH][mm][SS] — Year (4 digits), month, day, hour, minute
and second are added.
[YY][MM][DD][HH][mm][SS] — Year (2 digits), month, day, hour, minute
and second are added.
[YYYY][MM][DD] — Year (4 digits), month, and day are added.
[YY][MM][DD] — Year (2 digits), month, and day are added.
[HH][mm][SS] — Hour, minute and second are added.
[YYYY][MM][DD][HH][mm][SS][mm0] — Year (4 digits), month, day, hour,
minute, second and random number (2 digits and “0”) are added.
[None] — Date is not added.
Page
Select the number of digits of a page number applied to “Page” of the file
name selected in [Format] from 3 to 6. [4digits] is set as the default.
Sub ID
This equipment automatically adds a sub ID (identification number) to the
name of a file that you are saving the same file name exists. You can select the
number of digits of this sub ID from 4 to 6 or [Auto]. [Auto] is selected by
default. If [Auto] is selected, a sub ID (4 to 6 digits, selected randomly) is added
according to the status of the file name.
Add line information to File Name
Select this check box to add the incoming line information (IP Fax) to the file
name. The “Add line information to File Name” check box is [ON] as the
default.
Using the IP Fax Function
Up to 999 files that are sent from the same sender can be stored in the same destination. If 999 files that are sent from
the same sender have already been stored in the specified destination, this equipment will print the received
document from the same sender instead of storing them as files.
Using the IP Fax Function from TopAccess 91
Page 92

4.Using the IP Fax Function
1
2
3
4
5
6
7
8
Setting up Email Setting (IP Fax Received Forward)
In the Email Setting page, you can specify the content of the E-mail document to be sent.
You can specify the destination when you have selected [InternetFax] as the forwarding agent.
Item name Description
1 Subject This sets the subject of the E-mail documents. Select [Scanned from (Device
Name) [(Template Name)](Date)(Time)] to automatically apply the subject, or
enter the desired subject in the box. If you manually enter the subject, the
subject will be “(Subject) (Date)” by automatically adding the date.
2 From Address Enter the E-mail address of the sender. When the recipient replies, the
message will be sent to this E-mail address.
3 From Name Enter the sender name of the E-mail document.
4 Body Enter the body message of the E-mail document. You can enter up to 1000
characters (including spaces).
92 Using the IP Fax Function from TopAccess
Page 93

4.Using the IP Fax Function
Item name Description
5 File Format Select the file format to which the received document will be converted.
TIFF (Multi) — Select this to save scanned images as a Multi-page TIFF file.
TIFF (Single) — Select this to save scanned images separately as Single-
page TIFF files.
PDF (Multi) — Select this to save scanned images as a Multi-page PDF file.
PDF (Single) — Select this to save scanned images separately as Single-
page PDF files.
XPS (Multi) — Select this to save scanned images as a Multi-page XPS file.
XPS (Single) — Select this to save scanned images separately as Single-
page XPS files.
Comment
Enter the comment on the file.
Date
Select how you add “date and time” of the file name selected in [Format].
[YYYY][MM][DD][HH][mm][SS] — Year (4 digits), month, day, hour, minute
and second are added.
[YY][MM][DD][HH][mm][SS] — Year (2 digits), month, day, hour, minute
and second are added.
[YYYY][MM][DD] — Year (4 digits), month, and day are added.
[YY][MM][DD] — Year (2 digits), month, and day are added.
[HH][mm][SS] — Hour, minute and second are added.
[YYYY][MM][DD][HH][mm][SS][mm0] — Year (4 digits), month, day, hour,
minute, second and random number (2 digits and “0”) are added.
[None] — Date is not added.
Page
Select the number of digits of a page number applied to “Page” of the file
name selected in [Format] from 3 to 6. [4digits] is set as the default.
Sub ID
This equipment automatically adds a sub ID (identification number) to the
name of a file that you are saving the same file name exists. You can select the
number of digits of this sub ID from 4 to 6 or [Auto]. [Auto] is selected by
default. If [Auto] is selected, a sub ID (4 to 6 digits, selected randomly) is added
according to the status of the file name.
Using the IP Fax Function
You can select whether to enable OCR by [Enable OCR].
If the Forced Encryption setting is enabled, only the PDF (Multi) and the PDF (Single) are selectable for a file
format. For the Forced Encryption function, refer to the MFP Management Guide.
Files saved in an XPS format can be used in Windows 7 Service Pack 1 or later versions with Net Framework
3.0 installed.
OCR processing is available only when the OCR Enabler is installed.
Using the IP Fax Function from TopAccess 93
Page 94

4.Using the IP Fax Function
Item name Description
6 Encryption Set this to encrypt PDF files if you have selected [PDF (Multi)] or [PDF (Single)]
in the File Format setting.
Encryption
Select this if you want to encrypt PDF files.
User Password
Enter a password for opening encrypted PDF files.
Master Password
Enter a password for changing the Encrypt PDF setting.
Encryption Level
Select the desired encryption level.
40-bit RC4 — Select this to set an encryption level to one compatible with
Acrobat 3.0, PDF V1.1.
128-bit RC4 — Select this to set an encryption level to one compatible with
Acrobat 5.0, PDF V1.4.
128-bit AES — Select this to set an encryption level to one compatible with
Acrobat 7.0, PDF V1.6.
Authority
Select the desired types of authority for Encrypt PDF.
Printing — Select this to authorize users to print documents.
Change of Documents — Select this to authorize users to change
documents.
Content Copying or Extraction — Select this to authorize users to copy and
extract the contents of documents.
Content Extraction for accessibility — Select this to enable the
accessibility feature.
If the Forced Encryption setting is enabled, you cannot clear the [Encryption] check box. For the Forced
Encryption function, refer to the MFP Management Guide.
The user password and the master password are not set at the factory shipment.
Passwords must be from 1 to 32 one-byte alphanumerical characters.
The user password must differ from the master password.
These passwords can be re-entered only by an authorized user. Users cannot change the settings of the
[Encryption Level] box and the [Authority] box if they are not authorized to change the master password. The
setting of the encryption will become available when either the user password or the master password is
entered. For the details of the encryption setting, refer to the MFP Management Guide. Ask the administrator
for resetting these passwords.
94 Using the IP Fax Function from TopAccess
Page 95

4.Using the IP Fax Function
Item name Description
7 File Name Format
Select the format of the file name. Information such as file name, date and
time or page number is added according to the selected format.
[FileName]-[Date]-[Page]
[FileName]-[Page]-[Date]
[Date]-[FileName]-[Page]
[Date]-[Page]-[Filename]
[Page]-[FileName]-[Date]
[Page]-[Date]-[FileName]
[FileName]_[Date]-[Page]
Comment
Enter the comment on the file.
Date
Select how you add “date and time” of the file name selected in [Format].
[YYYY][MM][DD][HH][mm][SS] — Year (4 digits), month, day, hour, minute
and second are added.
[YY][MM][DD][HH][mm][SS] — Year (2 digits), month, day, hour, minute
and second are added.
[YYYY][MM][DD] — Year (4 digits), month, and day are added.
[YY][MM][DD] — Year (2 digits), month, and day are added.
[HH][mm][SS] — Hour, minute and second are added.
[YYYY][MM][DD][HH][mm][SS][mm0] — Year (4 digits), month, day, hour,
minute, second and random number (2 digits and “0”) are added.
[None] — Date is not added.
Page
Select the number of digits of a page number applied to “Page” of the file
name selected in [Format] from 3 to 6. [4digits] is set as the default.
Sub ID
This equipment automatically adds a sub ID (identification number) to the
name of a file that you are saving the same file name exists. You can select the
number of digits of this sub ID from 4 to 6 or [Auto]. [Auto] is selected by
default. If [Auto] is selected, a sub ID (4 to 6 digits, selected randomly) is added
according to the status of the file name.
Add line information to File Name
Select this check box to add the incoming line information (IP Fax) to the file
name. The “Add line information to File Name” check box is [ON] as the
default.
Using the IP Fax Function
8 Fragment Message Size Select the size of the message fragmentation.
Using the IP Fax Function from TopAccess 95
Page 96

4.Using the IP Fax Function
1
2
3
Setting up Box Setting (IP Fax Received Forward)
In the Box Setting page, you can specify how a received document will be stored in the Box.
You can specify the destination when you have selected [InternetFax] as the forwarding agent.
Item name Description
1 Destination Specify the destination box number for e-Filing.
Box Number
Enter the Box number where a received document will be stored.
Password
Enter the password if the specified Box number requires a password.
Retype Password
Enter the same password again for a confirmation.
2 Folder Name Enter the name of the folder where a received document will be stored.
3 Document Name Display how the received document will be named. You cannot change the
document name.
96 Using the IP Fax Function from TopAccess
Page 97

5.Troubleshooting
Transmission/Reception Trouble .......................................................................................98
Error Codes for IP Faxing...................................................................................................99
Page 98

0.Transmission/Reception Trouble
When IP Fax sending or receiving fails, perform the following checks.
Check the error code by any of the following ways.
- Press the [Logs] tab in TopAccess.
- Press [Job Status] and then the [Log] tab.
- Output the transmission journal.
- Output the reception journal.
Perform measures by checking “Corrective Action” in the error codes table ( P.99).
If the problem cannot be solved, contact your service representative.
98 Transmission/Reception Trouble
Page 99

0.Error Codes for IP Faxing
TopAccess has the page for the job list and the following error codes for IP Faxing are shown on the page in the [Logs]
tab. These codes help you specify the cause of an error you might encounter. It is recommended that you take a memo
of the displayed error code when you contact your service technician or service representative.
The error codes are also shown on the [Log] screen of the touch panel. See the following table when you find an error
code on the touch panel. If the error code displayed is not in the following table, refer to the Software
Troubleshooting Guide. If the error code displayed is not listed in the Software Troubleshooting Guide, contact your
service technician or service representative.
Error Code Problem Description Corrective Action
00C8 Communication error Retry communications.
0101, 0103-0130, 0132-
SIP server registration failure Check the setting of the network or a SIP server.
013D
0102 Time-out error Check the setting of the network or a SIP server.
0131 SIP server registration failure Long time taking for server registration Wait for a
while.
013E IP Fax communication error Retry sending.
0140 IP Fax start-up failure Turn the power OFF and then back ON.
0141 Job interrupted due to setting
Wait for a while and retry sending.
change
0142 IP Fax communication error Check the destination.
0143, 0300-0380, 04940502, 0504-0606
0144, 0400-0423, 0480-
IP Fax communication error Check the setting of the network or the SIP
server.
IP Fax communication error Wait for a while and retry sending.
0493, 0503
0150 IP Fax communication error Wait for a while and retry sending or receiving.
0433 IP Fax communication error Reception has been rejected since the sender ID
is anonymous.
4214 IP Fax function disabled Enable the IP Fax function.
4246 IP Fax license not installed Install the license of the IP Fax Enabler.
4314 There is no privilege to send an IP Fax
job.
For details about the privilege to send an IP Fax
job, contact your administrator.
Troubleshooting
Error Codes for IP Faxing 99
Page 100

5.Troubleshooting
100 Error Codes for IP Faxing
 Loading...