

Toshiba E-STUDIO2802AM, E-STUDIO2309A, E-STUDIO2802A, E-STUDIO2809A, E-STUDIO2802AF User Manual
Page 1

MULTIFUNCTIONAL DIGITAL SYSTEMS
Software Installation Guide
Page 2

©2015, 2017 TOSHIBA TEC CORPORATION All rights reserved
Under the copyright laws, this manual cannot be reproduced in any form without prior written permission of TTEC.
Page 3

Preface
Thank you for purchasing TOSHIBA Multifunctional Digital Systems. This manual explains how to install client
software. Read this manual before use. Keep this manual within easy reach, and use it to configure an
environment that makes best use of the e-STUDIO’s functions.
How to read this manual
Symbols in this manual
To ensure correct and safe use of this equipment, this manual describes safety precautions according to the
three levels shown below.
You should fully understand the meaning and importance of these items before reading this manual.
Indicates a potentially hazardous situation which, if not avoided, could result in death,
serious
injury, or serious damage, or fire in the equipment or surrounding objects.
Indicates a potentially hazardous situation which, if not avoided, may result in minor or
moderate
injury, partial damage to the equipment or surrounding objects, or loss of data.
Indicates information to which you should pay attention when operating the equipment.
Other than the above, this manual also describes information that may be useful for the operation of this
equipment with the following signage:
Describes handy information that is useful to know when operating the equipment.
Pages describing items related to what you are currently doing. See these pages as
required.
Screens and Operation Procedures
In this manual, the screens and the operation procedures in Windows are described for Windows 7.
The details on the screens may differ depending on how the equipment is used, such as the status of the
installed options, the OS version and the applications.
Trademarks
For trademarks, refer to the Safety Information.
Preface 1
Page 4

END USER SOFTWARE LICENSE AGREEMENT
INSTALLING OR OTHERWISE USING THIS SOFTWARE PRODUCT CONSTITUTES YOUR
ACCEPTANCE OF THE FOLLOWING TERMS AND CONDITIONS (UNLESS A SEPARATE LICENSE IS
PROVIDED BY THE SUPPLIER OF APPLICABLE SOFTWARE IN WHICH CASE SUCH SEPARATE
LICENSE SHALL APPLY). IF YOU DO NOT ACCEPT THESE TERMS, YOU MAY NOT INSTALL OR USE
THIS SOFTWARE, AND YOU MUST PROMPTLY RETURN THE SOFTWARE TO THE LOCATION WHERE
YOU OBTAINED IT.
GRANT OF LICENSE:
This is a legal agreement between you, the end-user (“You”), and TOSHIBA TEC Corporation (“TTEC”). This
software, fonts (including their typefaces) and related documentation (“Software”) is licensed for use with
TTEC MFP on which it was installed to the designated device you use (“System”) in accordance with the
terms contained in this License Agreement. The copyright and other intellectual property rights, title and
ownership of Software is proprietary and belonging to TTEC and its suppliers
the installation and/or use of Software, and for the results obtained by using Software. You may use one copy
of Software as installed on a single System, and may not copy Software for any reason except as necessary
to use Software on a single System. Any copies of Software shall be subject to the conditions of this License
Agreement. You may not, nor cause or permit any third party to, modify, adapt, merge, translate, reverse
compile, reverse assemble, or reverse engineer Software. You may not use Software, except in accordance
with this license. No title to the intellectual property in Software is transferred to you and full ownership is
retained by TTEC and its suppliers
modification, deletion, etc to the copyright notice of Software (including in duplicate).You will be held legally
responsible for any copyright infringement, unauthorized transfer, reproduction or use of Software.
. Source code of Software is not licensed to you. You may not perform
. TTEC disclaim responsibility for
TERM:
This license is effective until terminated by TTEC or upon your failure to comply with any term of this License
Agreement. Upon termination, you agree to destroy all copies of Software. You may terminate this license at
any time by destroying Software and all copies.
DISCLAIMER OF WARRANTY:
Software is provided "AS IS" without warranty of any kind, either express or implied, including, but not limited
to, the implied warranties of merchantability, fitness for a particular purpose, title, and non-infringement. TTEC
disclaims any warranty relating to the quality and performance of Software. If Software proves defective, You
(and not TTEC) shall be responsible for the entire cost of all necessary servicing, repair or correction. TTEC
does not warrant that the functions contained in Software will meet your requirements or that the operation of
Software will be uninterrupted or error free.
UPDATE AND DISCONTINUE:
TTEC may update, upgrade and discontinue Software without any restriction.
THIRD PARTY SOFTWARE:
There are cases in which third party software is contained in Software (including future updated and upgraded
versions). Such third party software is provided to you on different terms from those of this License
Agreement, in the form of term stated in the License Agreement with the suppliers or the readme files (or files
similar to readme files) separately from this License Agreement (“Separate Agreements, etc.”). When you use
the third party software, you must comply with the term of the third party software stated in the Separate
Agreements, etc. Except the term of the third party software, you must comply with the term stated in this
License Agreement.
LIMITATION OF LIABILITY:
IN NO EVENT WILL TTEC BE LIABLE TO YOU FOR ANY DAMAGES, WHETHER IN CONTRACT, TORT,
OR OTHERWISE (except personal injury or death resulting from negligence on the part of TTEC),
INCLUDING WITHOUT LIMITATION ANY LOST PROFITS, LOST DATA, LOST SAVINGS OR OTHER
INCIDENTAL, SPECIAL OR CONSEQUENTIAL DAMAGES ARISING OUT OF THE USE OR INABILITY TO
USE SOFTWARE, EVEN IF TTEC OR ITS SUPPLIERS HAVE BEEN ADVISED OF THE POSSIBILITY OF
SUCH DAMAGES, NOR FOR THIRD PARTY CLAIMS.
U.S. GOVERNMENT RESTRICTED RIGHTS:
The Software is provided with RESTRICTED RIGHTS. Use, duplication or disclosure by the U.S. Government
is subject to restrictions set forth in subdivision (b)(3)(ii) or (c)(i)(ii)of the Rights in Technical Data and
Computer Software Clause set forth in 252.227-7013, or 52.227-19 (c)(2) of the DOD FAR, as appropriate.
2 END USER SOFTWARE LICENSE AGREEMENT
Page 5

GENERAL:
You may not sublicense, lease, rent, assign or transfer this license or Software. Any attempt to sublicense,
lease, rent, assign or transfer any of the rights, duties or obligations hereunder is void. You agree that you do
not intend to, and will not ship, transmit, export or re-export (directly or indirectly) Software, including any
copies of Software, or any technical information contained in Software or its media, or any direct product
thereof, to any country or destination prohibited by government of Japan, the United States and the relevant
country. This license shall be governed by the laws of Japan or, at the election of a Supplier of TTEC
concerned with a dispute arising from or relating to this Agreement, the laws of the Country designated from
time to time by the relevant Supplier of TTEC. If any provision or portion of this License Agreement shall be
found to be illegal, invalid or unenforceable, the remaining provisions or portions shall remain in full force and
effect.
YOU ACKNOWLEDGE THAT YOU HAVE READ THIS LICENSE AGREEMENT AND THAT YOU
UNDERSTAND ITS PROVISIONS. YOU AGREE TO BE BOUND BY ITS TERMS AND CONDITIONS. YOU
FURTHER AGREE THAT THIS LICENSE AGREEMENT CONTAINS THE COMPLETE AND EXCLUSIVE
AGREEMENT BETWEEN YOU AND TTEC AND ITS SUPPLIERS AND SUPERSEDES ANY PROPOSAL
OR PRIOR AGREEMENT, ORAL OR WRITTEN, OR ANY OTHER COMMUNICATION RELATING TO THE
SUBJECT MATTER OF THIS LICENSE AGREEMENT.
Contractor/Manufacturer is TOSHIBA TEC Corporation, 1-11-1, Osaki, Shinagawa-ku, Tokyo, 141-8562,
Japan
END USER SOFTWARE LICENSE AGREEMENT 3
Page 6

Page 7

CONTENTS
Preface....................................................................................................................................... 1
END USER SOFTWARE LICENSE AGREEMENT ................................................................... 2
Chapter 1 BEFORE INSTALLATION
Before Installing the Software in Windows............................................................................ 8
Software on the Client Utilities/User Documentation DVD*................................................... 8
System requirements.............................................................................................................8
Before Installing the Software in Mac OS X ........................................................................... 9
About the PPD file ................................................................................................................. 9
System requirements.............................................................................................................9
Before Installing the Software in UNIX/Linux ...................................................................... 10
About CUPS ........................................................................................................................ 10
System requirements........................................................................................................... 10
Connection Environment....................................................................................................... 11
USB connection................................................................................................................... 11
Network connection ............................................................................................................. 12
Chapter 2 INSTALLATION IN WINDOWS
Installing the Drivers in Windows ......................................................................................... 14
Installing the drivers using the installer................................................................................ 14
Installing the drivers using Plug and Play............................................................................ 17
Uninstalling the Drivers from Windows ............................................................................... 20
Uninstalling the printer/scanner driver ................................................................................. 20
Uninstalling e-STUDIO Scan Editor..................................................................................... 21
Uninstalling the N/W-Fax driver........................................................................................... 23
Chapter 3 INSTALLATION IN MAC OS X
Installing the Printer in Mac OS X ......................................................................................... 26
Installing the PPD file .......................................................................................................... 26
Configuring the printer.........................................................................................................29
Uninstalling the Printer from Mac OS X ............................................................................... 34
Chapter 4 INSTALLATION IN UNIX/Linux
Configuring the Printer Using CUPS .................................................................................... 36
Configuring the printer for LPR printing ............................................................................... 36
Configuring the printer for IPP printing ................................................................................ 37
Configuring the printer for USB printing............................................................................... 38
Configuring the print options................................................................................................ 39
Uninstalling the Printer from UNIX/Linux ............................................................................. 41
INDEX ..................................................................................................................................................................... 43
CONTENTS 5
Page 8

6 CONTENTS
Page 9

1.BEFORE INSTALLATION
Before you start the installation, refer to the following pages according to the operating system that you use.
Before Installing the Software in Windows ............................................................................ 8
Software on the Client Utilities/User Documentation DVD*....................................................................................8
System requirements.............................................................................................................................................. 8
Before Installing the Software in Mac OS X ........................................................................... 9
About the PPD file ..................................................................................................................................................9
System requirements.............................................................................................................................................. 9
Before Installing the Software in UNIX/Linux ...................................................................... 10
About CUPS .........................................................................................................................................................10
System requirements............................................................................................................................................10
Connection Environment....................................................................................................... 11
USB connection....................................................................................................................................................11
Network connection..............................................................................................................................................12
Page 10

1 BEFORE INSTALLATION
Before Installing the Software in Windows
Refer to the following pages to install the software in Windows:
P.8 “Software on the Client Utilities/User Documentation DVD*”
P.8 “System requirements”
P.11 “Connection Environment”
P.14 “Installing the Drivers in Windows”
Software on the Client Utilities/User Documentation DVD*
* The Client Utilities DVD is available for e-STUDIO2802A/2802AM/2802AF.
Printer driver
Allows you to use this equipment as a printer when it is connected to a Windows computer.
- PCL6 Printer 2 driver - You can use this depending on the purposes of the applications in various
usages.
- PS3 printer driver* - This printer driver is suitable for printing from a general application, such as a DTP
application supporting PostScript.
- XPS printer driver - This printer driver is suitable for printing from a Windows Presentation Foundation
(WPF) application.
* To use the PS3 printer driver, the PostScript Kit option needs to be installed in the equipment.
Scanner driver
Allows you to scan the originals set in this equipment remotely from your Windows computer and send the
image to a TWAIN-compliant application.
e-STUDIO Scan Editor
Allows you to scan the original set in this equipment from your Windows computer and edit the scanned
images simply.
N/W Fax driver
Allows you to send electronic documents from your Windows computer to one or more destinations.
The N/W-Fax driver is not available for e-STUDIO2802A and e-STUDIO2802AM.
System requirements
CPU
1 GHz minimum (1 GHz or faster recommended)
Memory
32-bit processor
- 1 GB (2 GB recommended)
64-bit processor
- 2 GB (4 GB recommended)
Interface
USB 2.0 (Hi-Speed)
OS
Windows Vista SP2
Windows 7 SP1
Windows 8.1
Windows 10
Windows Server 2008 SP2
Windows Server 2008 R2 SP1
Windows Server 2012
Windows Server 2012 R2
Windows Server 2016
8 Before Installing the Software in Windows
Page 11

1 BEFORE INSTALLATION
Before Installing the Software in Mac OS X
Refer to following pages to install the software and configure the printer in Mac OS X:
P.9 “About the PPD file”
P.9 “System requirements”
P.11 “Connection Environment”
P.26 “Installing the Printer in Mac OS X”
About the PPD file
You need to install an exclusive PPD file (PostScript Printer Description file) in Mac OS X to print with the
equipment. This file contains information about controller-specific features of the equipment.
System requirements
To install the PPD file in Mac OS X and print with the equipment, the following environment is required.
CPU
1 GHz minimum (1 GHz or faster recommended)
Memory
32-bit processor
-2 GB
64-bit processor
- 2 GB (4 GB recommended)
Display resolution
1028 x 768 dots or more
OS
Mac OS X 10.6.x to Mac OS X 10.12.x
Protocol
TCP/IP
Before Installing the Software in Mac OS X 9
Page 12

1 BEFORE INSTALLATION
Before Installing the Software in UNIX/Linux
Refer to following pages to install the software and configure the printer in UNIX/Linux:
P.10 “About CUPS”
P.10 “System requirements”
P.11 “Connection Environment”
P.36 “Configuring the Printer Using CUPS”
About CUPS
When you configure the printer in UNIX/Linux using CUPS, you can use LPR printing or IPP printing. This
guide describes the behavior, options, and installation method of the CUPS printer driver for the equipment.
The behavior of the printer driver presented in this manual is consistent with CUPS v1.2.4. The driver may
appear and/or operate slightly differently in different versions. In the CUPS environment, you use a PostScript
Printer Description (PPD) file, not a printer driver to configure the printing. The PPD file is included in this
package.
System requirements
Development Environment
The supported UNIX/Linux environment is as follows.
OS:
Redhat Enterprise 5.10.x, 6.5.x
Fedora Ver.19
Open SuSE Ver.11.3
Bharat Operating System 5.x
CUPS:
1.2.4
Implementation Method
This driver consists of a PPD file that works in conjunction with an interface like XPP, KPrinter, etc. It can also
be used on OSX in the same way that it is used on Linux, but this is not recommended.
10 Before Installing the Software in UNIX/Linux
Page 13
1 BEFORE INSTALLATION
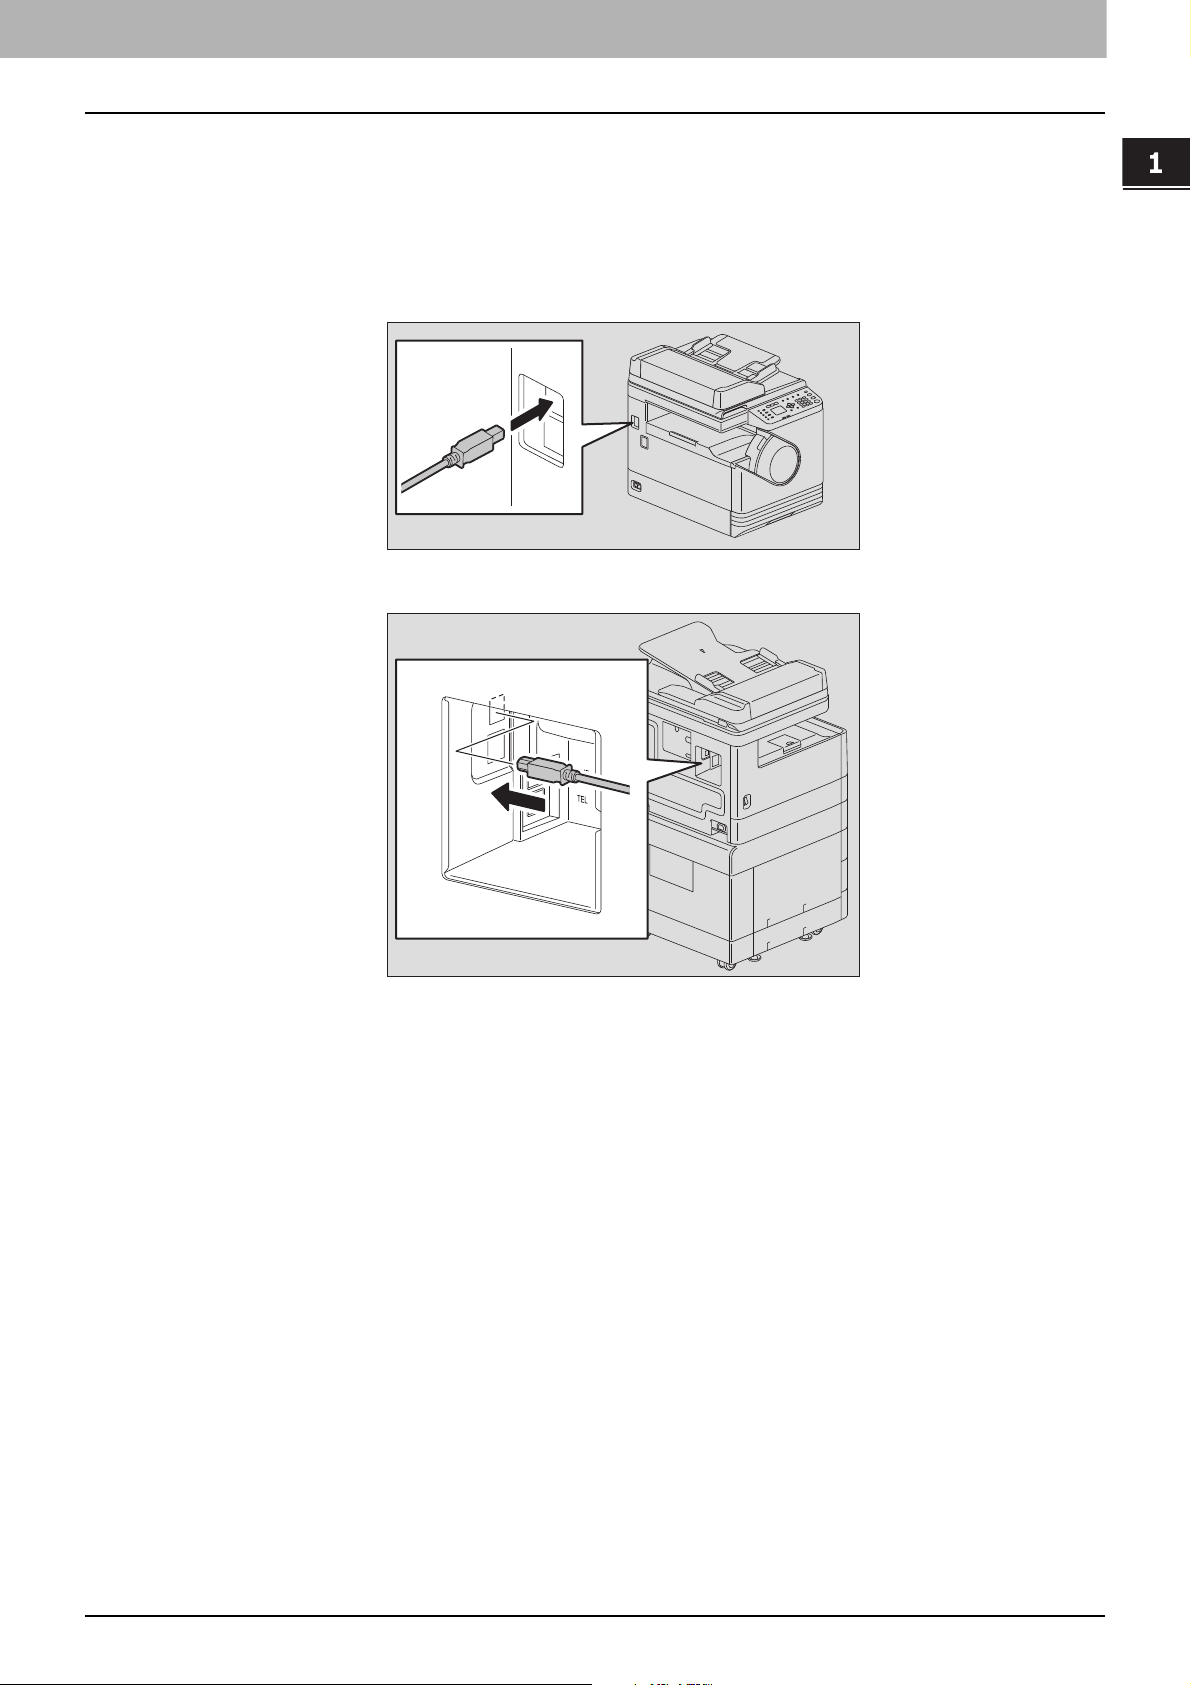
Connection Environment
A USB connection or network connection is available.
USB connection
Before installing the drivers, connect the equipment and the computer with a USB cable, and turn on the
equipment.
USB
LAN
Connection Environment 11
Page 14

1 BEFORE INSTALLATION
Network connection
Before installing the drivers, connect the equipment to the network, and then turn on the equipment.
USB
LAN
12 Connection Environment
Page 15

2.INSTALLATION IN WINDOWS
This chapter explains the installation in Windows.
Installing the Drivers in Windows......................................................................................... 14
Installing the drivers using the installer.................................................................................................................14
Installing the drivers using Plug and Play.............................................................................................................17
Uninstalling the Drivers from Windows ............................................................................... 20
Uninstalling the printer/scanner driver..................................................................................................................20
Uninstalling e-STUDIO Scan Editor......................................................................................................................21
Uninstalling the N/W-Fax driver............................................................................................................................23
Page 16

2 INSTALLATION IN WINDOWS
Installing the Drivers in Windows
This section describes how to install the printer, scanner, and N/W Fax drivers in Windows. Installing the
drivers requires the administrator authority.
Install the drivers using the installer or the Windows Plug and Play function.
P.14 “Installing the drivers using the installer”
P.17 “Installing the drivers using Plug and Play”
Close any running software, such as an antivirus program, before installing the drivers.
For Windows 7, Windows 8.1, Windows 10, Windows Server 2008 R2, Windows Server 2012, or
Windows Server 2016, use the installer to install the drivers. The Windows Plug and Play function
cannot install them.
P.14 “Installing the drivers using the installer”
When you are using Windows Server 2008 or Windows Server 2012, install [Desktop Experience] from
[Server Manager] of [Administrative Tools] before you install the scanner driver.
Installing the drivers using the installer
Make sure that the equipment is turned on.
1
Insert the Client Utilities/User Documentation DVD* into your computer.
2
* The Client Utilities DVD is available for e-STUDIO2802A/2802AM/2802AF.
The installer automatically starts and opens the installation dialog box.
If the installer does not automatically start, open the “Drivers” folder and double-click “Setup.exe” in
the DVD.
Select “I accept the terms of the license agreement” and click [Next].
3
Select [USB Connection] or [Network Connection], and then click [Next].
4
Make sure that the equipment has been connected to the computer or the network and
5
click [Next].
If you have selected [USB Connection] at the previous step, proceed to step 7.
14 Installing the Drivers in Windows
Page 17

2.INSTALLATION IN WINDOWS
Check the detected printer, select the model and click [Next].
6
If the equipment is not discovered over the network, specify the IP address manually following the
steps below. For the IP address of the equipment, refer to User's Guide “Chapter 6: VARIOUS
FUNCTIONS - Network Menu List - Setting the TCP/IP protocol”.
1. Click [Back].
2 INSTALLATION IN WINDOWS
2. Select [Select if you want to set the printer’s IP Address manually.], and then click [Next].
Installing the Drivers in Windows 15
Page 18

2 INSTALLATION IN WINDOWS
3. Enter the IP address of the equipment under [Specify a network printer by host name of IP
address.], then click [Next].
Check the model and the software to install and click [Next].
7
The option to select the model name is not displayed depending on the model used.
Click [Finish] when the installation is complete.
8
To install e-STUDIO Scan Editor, open the [Application] - [e-STUDIO Scan Editor] folders, double-click
“eSScanSetup.exe”, and follow the instructions that appear on the screen. After the installation, remove
the DVD from the computer.
The Installer may ask you to restart your computer. If it does, select “Yes, I want to restart my
computer now.” to restart your computer.
16 Installing the Drivers in Windows
Page 19

2 INSTALLATION IN WINDOWS
2.INSTALLATION IN WINDOWS
Installing the drivers using Plug and Play
You can use the Windows Plug and Play function to install the drivers in Windows Vista / Windows Server
2008. When using Plug and Play, first the scanner driver is installed, and then the printer driver.
For Windows 7, Windows 8.1, Windows 10, Windows Server 2008 R2, Windows Server 2012, or Windows
Server 2016, use the installer to install the drivers. The Windows Plug and Play function cannot install
them.
P.14 “Installing the drivers using the installer”
An additional printer wizard can also be used to install the printer driver. To use the additional printer
wizard, select the USB port or the network port that the equipment is connected to using “Choose a Printer
Port”.
Connect this equipment to the computer using a USB cable, and then start the
1
computer.
Do not connect or disconnect the USB cable when starting up the computer.
Turn on the equipment.
2
The Found New Hardware dialog box appears.
If it does not appear, turn off this equipment, and then wait approximately 10 seconds before turning it
on again. If you turn this equipment on immediately after turning it off, it may not function correctly.
Click “Locate and install driver software (recommended)”.
3
The dialog box requesting the disk (Client Utilities/User Documentation DVD*) appears.
* The Client Utilities DVD is available for e-STUDIO2802A/2802AM/2802AF.
If the User Account Control dialog box appears, click [Allow] or [Continue].
Installing the Drivers in Windows 17
Page 20

2 INSTALLATION IN WINDOWS
Click “I don't have the disc. Show me other options”.
4
Insert the Client Utilities/User Documentation DVD* into the computer.
5
* The Client Utilities DVD is available for e-STUDIO2802A/2802AM/2802AF.
Click “Browse my computer for driver software (advanced)”.
6
Select the folder on the DVD that contains the drivers, and then click [OK].
7
Select the folder according to the language and operating system you are using.
For example, for a 32-bit English OS, select “Drive name:\Drivers\e-STUDIOXXXXX\Driver\English\
i386”.
Click [Next].
8
If the Windows Security dialog box appears, click [Install this driver software anyway].
If a message prompting you to confirm the device software installation appears, select the option of
trusting the publisher such as [Install] or [Continue Anyway] to proceed with the installation.
18 Installing the Drivers in Windows
Page 21

2.INSTALLATION IN WINDOWS
When the installation completes, click [Close].
9
2 INSTALLATION IN WINDOWS
The Found New Hardware dialog box appears again and the installation of the printer driver begins.
Repeat steps 4 through 9 to install the printer driver.
10
After installation, make sure the icon for the installed printer appears in the Printers
11
window.
Remove the DVD from the computer.
12
Installing the Drivers in Windows 19
Page 22

2 INSTALLATION IN WINDOWS
Uninstalling the Drivers from Windows
This section explains how to uninstall the printer, scanner, e-STUDIO Scan Editor, and N/W Fax drivers.
Uninstalling the drivers requires the administrator authority.
Uninstalling the printer/scanner driver
The following instructions describe how to uninstall a printer driver or a scanner driver.
To perform uninstallation, you must log onto Windows with the “Administrator” account. However, even
if you have logged on with a user account other than “Administrator”, entering an administrator
password upon display of the [User Account Control] dialog box enables you to perform the
uninstallation by temporarily changing the user account.
Even when you have logged on Windows with the “Administrator” account, the [User Account Control]
dialog box may appear. In this case, click a button for allowing the operation, such as [Continue], and
then continue.
Click the Start button, select [Control Panel] and click [Uninstall a program].
1
For Windows 8.1 / Windows 10 / Windows Server 2012 R2 / Windows Server 2016, right-click on
the [Start], then click [Control Panel] > [Uninstall a program].
For instructions on how to access the [Uninstall or change a program] screen on Windows Server
2012, see the following instructions.
P.22 “Accessing the [Uninstall or change a program] screen on Windows Server 2012”
From the list, select you want to uninstall, and click [Uninstall].
2
Click [Yes].
3
20 Uninstalling the Drivers from Windows
Page 23

2 INSTALLATION IN WINDOWS
2.INSTALLATION IN WINDOWS
Uninstalling e-STUDIO Scan Editor
The following describes how to uninstall e-STUDIO Scan Editor from Windows Vista / Windows 7 / Windows
8.1 / Windows 10 / Windows Server 2008 / Windows Server 2012 / Windows Server 2016.
To perform uninstallation, you must log onto Windows with the “Administrator” account; this enables the
installation and uninstallation of client software. However, if you have logged onto Windows Vista /
Windows 7 / Windows 8.1 / Windows 10 / Windows Server 2008 / Windows Server 2012 / Windows Server
2016 with a user account other than “Administrator”, entering an administrator password upon display of
the [User Account Control] dialog box enables you to perform the uninstallation by temporarily changing
the user account.
Click the Start button, select [Control Panel] and click [Uninstall a program].
1
The [Uninstall or change a program] dialog box appears.
For Windows 8.1 / Windows 10 / Windows Server 2012 R2 / Windows Server 2016, right-click on
the [Start], then click [Control Panel] > [Uninstall a program].
For instructions on how to access the [Uninstall or change a program] screen on Windows Server
2012, see the following instructions.
P.22 “Accessing the [Uninstall or change a program] screen on Windows Server 2012”
From the list, select [e-STUDIO Scan Editor] and click [Uninstall].
2
Click [Yes].
3
Click [Yes] to delete the setting files.
4
Deleting files starts.
If you want to reinstall the client software later, click [No] to have the setting files remain. You can
restore the data and settings when you reinstall the client software.
Uninstalling the Drivers from Windows 21
Page 24

2 INSTALLATION IN WINDOWS
Accessing the [Uninstall or change a program] screen on Windows Server
2012
Follow the steps below to access the [Uninstall or change a program] screen on Windows Server 2012.
When you uninstall the printer driver or the N/W-Fax driver, open [Devices and Printers] at step 4.
Move the cursor to the upper right corner or lower right corner of the computer screen,
1
and then select [Start] in the menu that appears.
The [Start] screen appears.
Right-click in the blank area in the [Start] screen, and then click [All apps] that appears.
2
The [Apps] screen appears.
22 Uninstalling the Drivers from Windows
Page 25

2.INSTALLATION IN WINDOWS
Click [Control Panel].
3
2 INSTALLATION IN WINDOWS
The [All Control Panel Items] screen appears.
Click [Programs and Features].
4
The [Uninstall or change a program] screen appears.
Uninstalling the N/W-Fax driver
When you use e-STUDIO2309A/2809A with the optiional fax unit installed or e-STUDIO2802AF with the
standard fax unit installed, you can uninstall the N/W-Fax driver. Since the uninstallation procedure is the
same as for printer drivers, it is omitted. When performing uninstallation, see the following page:
P.20 “Uninstalling the printer/scanner driver”
Uninstalling the Drivers from Windows 23
Page 26

Page 27

3.INSTALLATION IN MAC OS X
This chapter explains the installation in Mac OS X.
Installing the Printer in Mac OS X......................................................................................... 26
Installing the PPD file ...........................................................................................................................................26
Configuring the printer..........................................................................................................................................29
Uninstalling the Printer from Mac OS X ............................................................................... 34
Page 28

3 INSTALLATION IN MAC OS X
Installing the Printer in Mac OS X
Refer to the following pages to install the PPD file and configure the printer in Mac OS X:
P.26 “Installing the PPD file”
P.29 “Configuring the printer”
Installing the PPD file
The following procedure explains the PPD file installation by example of the screens in Mac OS X 10.10.x.
The steps and screens may differ depending on the version of Mac OS X. When you use Mac OS X 10.6.x
- 10.9.x, 10.11.x, 10.12.x, refer to the following steps for Mac OS X 10.10.x to carry out the installation.
Insert the Install Disc into the disc drive.
1
Open the [MacPPD] folder, and then copy the ZIP file to the desktop.
2
Double-click the ZIP file on the desktop.
3
Double-click the Disk Image file.
4
Double-click the icon in the installer window.
5
When you start up the installer, be sure that Mac OS X Printer Setup Utility is not operating. If a PPD
file is installed while the Mac OS X Printer Setup Utility is operating, the printer may not be normally
recognized.
Click [Continue].
6
The [Software License Agreement] window is displayed.
26 Installing the Printer in Mac OS X
Page 29

3.INSTALLATION IN MAC OS X
Click [Continue].
7
Click [Agree].
8
3 INSTALLATION IN MAC OS X
The [Standard Install] window is displayed.
The subsequent steps may differ depending on the Mac OS version.
Click [Install] (or [Upgrade]).
9
The Select a Destination dialog box appears by clicking [Change Install Location]. Select the boot
disk for Mac OS X and click [Continue].
Installing the Printer in Mac OS X 27
Page 30

3 INSTALLATION IN MAC OS X
Enter the name and password, and click [OK].
10
Click [Close] to close the installer window.
11
Delete the ZIP files and Installer files created on the desktop.
12
Continue the procedure for configuring the printer.
13
P.29 “Configuring the printer”
28 Installing the Printer in Mac OS X
Page 31

3 INSTALLATION IN MAC OS X
3.INSTALLATION IN MAC OS X
Configuring the printer
After you copy the PPD file to the library folder in the System Folder, you can configure the printer.
The equipment supports the following Mac OS X print services:
LPR printing
P.29 “Configuring LPR printing”
IPP printing
P.31 “Configuring IPP printing”
USB printing
P.33 “Configuring USB printing”
LPR printing and IPP printing are available when the equipment and your computer are connected over
TCP/IP network.
Configuring LPR printing
The screens for Mac OS 10.10.x are used in this section.
When you use Mac OS X 10.7.x - 10.9.x, 10.11.x, 10.12.x, configure the printer in the same way as you
do in Mac OS X 10.10.x.
When you use Mac OS X 10.6.x, open [Print & Fax] from [System Preferences] and configure the
printer referring to the procedure below.
Open System Preferences and click [Print & Scan] (for Mac OS X 10.7.x or 10.8.x) or
1
[Printers & Scanners] (for Mac OS X 10.9.x, 10.10.x, 10.11.x or 10.12.x).
Click [+].
2
Installing the Printer in Mac OS X 29
Page 32

3 INSTALLATION IN MAC OS X
Click [IP] and specify the items as described below.
3
Address: <IP address or DNS name of this equipment>
Protocol: Line Printer Daemon - LPD
Queue:print
Name:<Any Name>
Location:<Any Name>
Use: TOSHIBA e-STUDIO2309A for e-STUDIO2309A
TOSHIBA e-STUDIO2809A for e-STUDIO2809A
TOSHIBA e-STUDIO2802A for e-STUDIO2802A
TOSHIBA e-STUDIO2802AM for e-STUDIO2802AM
TOSHIBA e-STUDIO2802AF for e-STUDIO2802AF
In the [Name] box, the name that is entered in the [Address] box is automatically displayed.
Even when you enter the IP address or DNS name of this equipment in the [Address] box, the
correct name might not be selected in the [Use] box. Select [Other] in the [Use] box and select
the correct PPD file for the equipment from the [/Library/Printers/PPDs/Contents/Resources/
en.lproj] folder.
- EST2309A.ppd for e-STUDIO2309A
- EST2809A.ppd for e-STUDIO2809A
- EST2802A.ppd for e-STUDIO2802A
- EST2802AM.ppd for e-STUDIO2802AM
- EST2802AF.ppd for e-STUDIO2802AF
Click [Add].
4
The [Installable Options] window appears.
If the screen below appears, click [Continue] to continue the printer setup.
Set the following options.
5
For e-STUDIO2309A/2809A:
Drawer 2 — Select this when the drawer 2 is installed.
Drawer 2 and 3 — Select this when the drawer 2 and 3 are installed.
Drawer 2, 3 and 4 — Select this when the drawer 2, 3 and 4 are installed.
ADU — Select the check box to use the Automatic Duplexing Unit.
For e-STUDIO2802A/2802AM/2802AF:
ADU — Select the check box to use the Automatic Duplexing Unit.
30 Installing the Printer in Mac OS X
Page 33

3.INSTALLATION IN MAC OS X
Click [OK].
6
The printer is added to the Printer List.
Configuring IPP printing
The screens for Mac OS 10.10.x are used in this section.
When you use Mac OS X 10.7.x - 10.9.x, 10.11.x, 10.12.x, configure the printer in the same way as you
do in Mac OS X 10.10.x.
When you use Mac OS X 10.6.x, open [Print & Fax] from [System Preferences] and configure the
printer referring to the procedure below.
Open System Preferences and click [Print & Scan] (for Mac OS X 10.7.x or 10.8.x) or
1
[Printers & Scanners] (for Mac OS X 10.9.x, 10.10.x, 10.11.x or 10.12.x).
3 INSTALLATION IN MAC OS X
Click [+].
2
Installing the Printer in Mac OS X 31
Page 34

3 INSTALLATION IN MAC OS X
Click [IP] and specify the items as described below.
3
Address: <IP address or DNS name of this equipment>
Protocol: Internet Printing Protocol - IPP
Queue:Print
Name:<Any Name>
Location:<Any Name>
Use: TOSHIBA e-STUDIO2309A for e-STUDIO2309A
TOSHIBA e-STUDIO2809A for e-STUDIO2809A
TOSHIBA e-STUDIO2802A for e-STUDIO2802A
TOSHIBA e-STUDIO2802AM for e-STUDIO2802AM
TOSHIBA e-STUDIO2802AF for e-STUDIO2802AF
In the [Name] box, the name that is entered in the [Address] box is automatically displayed.
Even when you enter the IP address or DNS name of this equipment in the [Address] box, the
correct name might not be selected in the [Use] box. Select [Other] in the [Use] box and select
the correct PPD file for the equipment from the [/Library/Printers/PPDs/Contents/Resources/
en.lproj] folder.
- EST2309A.ppd for e-STUDIO2309A
- EST2809A.ppd for e-STUDIO2809A
- EST2802A.ppd for e-STUDIO2802A
- EST2802AM.ppd for e-STUDIO2802AM
- EST2802AF.ppd for e-STUDIO2802AF
Click [Add].
4
The Installable Options window appears.
If the screen below appears, click [Continue] to continue the printer setup.
Set the following options.
5
For e-STUDIO2309A/2809A:
Drawer 2 — Select this when the drawer 2 is installed.
Drawer 2 and 3 — Select this when the drawer 2 and 3 are installed.
Drawer 2, 3 and 4 — Select this when the drawer 2, 3 and 4 are installed.
ADU — Select the check box to use the Automatic Duplexing Unit.
For e-STUDIO2802A/2802AM/2802AF:
ADU — Select the check box to use the Automatic Duplexing Unit.
32 Installing the Printer in Mac OS X
Page 35

3.INSTALLATION IN MAC OS X
Click [OK].
6
The printer is added to the Printer List.
Configuring USB printing
Connect to your PC using a USB cable.
1
Open System Preferences and click [Print & Scan] (for Mac OS X 10.7.x or 10.8.x) or
2
[Printers & Scanners] (for Mac OS X 10.9.x, 10.10.x, 10.11.x or 10.12.x).
Set the following options.
3
Drawer 2 — Select this when the drawer 2 is installed.
Drawer 2 and 3 — Select this when the drawer 2 and 3 are installed.
Drawer 2, 3 and 4 — Select this when the drawer 2, 3 and 4 are installed.
ADU — Select the check box to use the Automatic Duplexing Unit.
Click [OK].
4
3 INSTALLATION IN MAC OS X
Installing the Printer in Mac OS X 33
Page 36

3 INSTALLATION IN MAC OS X
Uninstalling the Printer from Mac OS X
In order to uninstall the printer from Mac OS X, delete the PPD file and other files in the following folders.
For e-STUDIO2309A:
Library/Printers/PPDs/Contents/Resources/en.lproj/EST2309A.ppd
For e-STUDIO2809A:
Library/Printers/PPDs/Contents/Resources/en.lproj/EST2809A.ppd
For e-STUDIO2802A:
Library/Printers/PPDs/Contents/Resources/en.lproj/EST2802A.ppd
For e-STUDIO2802AM:
Library/Printers/PPDs/Contents/Resources/en.lproj/EST2802AM.ppd
For e-STUDIO2802AF:
Library/Printers/PPDs/Contents/Resources/en.lproj/EST2802AF.ppd
For e-STUDIO2309A/2809A:
Library/Printers/toshiba/ES2809ASeries
For e-STUDIO2802A/2802AM/2802AF:
Library/Printers/toshiba/ES2802ASeries
34 Uninstalling the Printer from Mac OS X
Page 37

4.INSTALLATION IN UNIX/Linux
This chapter explains the installation in UNIX/Linux.
Configuring the Printer Using CUPS .................................................................................... 36
Configuring the printer for LPR printing ................................................................................................................36
Configuring the printer for IPP printing .................................................................................................................37
Configuring the print options ................................................................................................................................39
Uninstalling the Printer from UNIX/Linux.............................................................................41
Page 38

4 INSTALLATION IN UNIX/Linux
Configuring the Printer Using CUPS
Refer to the following pages to install the PPD file and configure the printer in UNIX/Linux for LPR printing,
IPP printing or USB printing.
P.36 “Configuring the printer for LPR printing”
P.37 “Configuring the printer for IPP printing”
P.38 “Configuring the printer for USB printing”
Configuring the printer for LPR printing
To set up CUPS, copy the PPD file onto the UNIX/Linux workstation, install the printer, and then configure
PPD. You can use a browser to install the printer and configure PPD.
After extracting the PPD file, restart the CUPS daemon.
Insert the Install Disc into the disc drive.
1
Log on to the root account.
2
Install the RPM package with the rpm command.
3
Enter the following command:
4
service cups start
If the CUPS has already been started, stop the CUPS service once by entering “service cups stop”
command, and then enter the above command to restart the CUPS service.
Open the browser and locate CUPS by typing “http://localhost:631/” in the address
5
box.
When you use Red Hat Linux, access CUPS with the following command:
/usr/bin/cupsconfig
Click [Add Printer] on the [Administration] tab.
6
Select [LPD/LPR Host or Printer] and click [Continue].
7
Enter “lpd://<IP address>/Print” in the [Connection] box and click [Continue].
8
Make sure to capitalize the “P” in “Print” for the device URI.
Enter the printer name, description, and location of the printer in each box, and click
9
[Continue].
If a new printer name is a duplicate of a name already in the printer list, the new printer will replace
the original printer.
Select [Toshiba] in the [Make] box and click [Continue].
10
If you do not see [TOSHIBA] in the [Make] list, restart CUPS.
Select the model name in the [Model] list and click [Add Printer].
11
Go to the following page for configuring the print options:
12
P.39 “Configuring the print options”
36 Configuring the Printer Using CUPS
Page 39

4.INSTALLATION IN UNIX/Linux
Configuring the printer for IPP printing
When you want to set up an IPP print queue in the Linux OS, follow the procedures here.
Insert the Install Disc into the disc drive.
1
Log on to the root account.
2
Install the RPM package with the rpm command.
3
Enter the following command:
4
5
service cups start
If the CUPS has already been started, stop the CUPS service once by entering “service cups stop”
command, and then enter the above command to restart the CUPS service.
Open the browser and locate CUPS by typing “http://localhost:631/” in the address
box.
4 INSTALLATION IN UNIX/Linux
When you use Red Had Linux, enter the following command to access “Common UNIX Printing
System” page.
/usr/bin/cupsconfig
Click [Add Printer] on the [Administration] tab.
6
Select “Internet Printing Protocol (http)” and click [Continue].
7
Enter “http://<IP address>:631/Print” in the [Connection] box and click [Continue].
8
Enter the printer name, description, and location of the printer in each box, and click
9
[Continue].
If a new printer name is a duplicate of a name already in the printer list, the new printer will replace
the original printer.
Select [Toshiba] in the [Make] box and click [Continue].
10
Select the model name in the [Model] box and click [Add Printer].
11
Confirm that the message notifying that the new printer has been properly added
12
appears.
Go to the following page for configuring the print options:
13
P.39 “Configuring the print options”
Configuring the Printer Using CUPS 37
Page 40

4 INSTALLATION IN UNIX/Linux
Configuring the printer for USB printing
When you want to set up an USB print queue in the Linux OS, follow the procedures here.
Insert the Install Disc into the disc drive.
1
Log on to the root account.
2
Install the RPM package with the rpm command.
3
Enter the following command:
4
5
6
service cups start
Connect to your PC using a USB cable..
Go to the following page for configuring the print options:
P.39 “Configuring the print options”
38 Configuring the Printer Using CUPS
Page 41

4.INSTALLATION IN UNIX/Linux
Configuring the print options
You can set the print options that are applied to the print jobs using CUPS.
Click the [Manage Printers] link on the [Administration] tab.
1
Select this equipment and then click [Set Default Options].
2
Configure the print options on the displayed page.
3
The underscored items are set by default.
Installed Options
Option Value Alternative Value Description
Drawers Not Installed
Drawer 2
Drawer 2 and 3
Drawer 2,3 and 4
ADU Installed
Not Installed
[Set Default
Options] button
Determines the selected items.
Select an optional drawer.
Select the Automatic Duplexing Unit option.
4 INSTALLATION IN UNIX/Linux
General
Option Value Alternative Value Description
Media Size A3, A4, A5, J Post Card, B4, B5,
Folio, Letter
Statement, Computer, 13" LG, 8.5"
SQ, 8K, 16K, Env DL, Env Cho-3,
Env You-4, Env-Com10, EnvMonarch, Env-C4, Env-C5
Media Source Auto
Media Type Printer's Default
Duplex Off
[Set Default
Options] button
(Default)
Drawer 1
Drawer 2
Drawer 3
Drawer 4
Bypass Tray
Plain Paper
Thick
Thick 1
Thick 2
Transparency
Thin
Envelope
Long Edge (Standard) 2-sided printing (Long-edge binding)
Short Edge (Flip) 2-sided printing (Short-edge binding)
Determines the selected items.
, Ledger, Legal,
Select the paper size.
Select the paper source.
Select the paper source.
1-sided printing
Configuring the Printer Using CUPS 39
Page 42

4 INSTALLATION IN UNIX/Linux
Printing Modes
Option Value Alternative Value Description
Department Code Disabled
Distinguish Thin
Lines
Do not Print Blank
Pages
[Set Default
Options] button
Printing Modes DC
Option Value Alternative Value Description
Department Code
(DC) - Digit 1 to
Digit 5
[Set Default
Options] button
Select whether or not to use the department codes
Enabled
for printing.
When this equipment is managed under the
department codes, this option should be enabled.
Off
, On Select the function to distinguish thin lines.
Off
, On Select the function to print blank pages.
Determines the selected items.
0
to 9 Specify the 5-digit department code when
“Department Code” of “Printing Modes” is enabled.
For the appropriate department code, ask your
system administrator.
Determines the selected items.
Quality
Option Value Alternative Value Description
Halftone Detail
Select how halftone images are printed.
Smooth
Smoothing On, Off
Select whether text and graphics are printed
smoothly.
Toner Save On, Off
[Set Default
Determines the selected items.
Select whether toner is saved for printing.
Options] button
40 Configuring the Printer Using CUPS
Page 43

Uninstalling the Printer from UNIX/Linux
To uninstall a printer that you have created, carry out the following procedure.
Click the [Manage Printers] link on the startup page.
1
Select the model, and then select [Delete Printer].
2
Click [Delete Printer].
3
Uninstall the installed RPM package with the rpm command.
4
4 INSTALLATION IN UNIX/Linux
Uninstalling the Printer from UNIX/Linux 41
Page 44

Page 45

INDEX
C
Client Utilities/User Documentation DVD
Windows ..................................................................8
CUPS
UNIX/Linux .............................................................10
E
e-STUDIO Scan Editor .................................................8
I
Install
Mac OS X
UNIX/Linux .............................................................36
Windows ................................................................14
Installer
Windows ................................................................14
IPP printing
Mac OS X
UNIX/Linux .............................................................37
L
LPR printing
Mac OS X ..............................................................29
UNIX/Linux .............................................................36
..............................................................26
..............................................................31
N
N/W Fax driver
Windows
Network connection ....................................................12
..................................................................8
P
Plug and Play
Windows ................................................................17
PostScript Printer Description file
Mac OS X
PPD file
Mac OS X ................................................................9
UNIX/Linux .............................................................10
Print options
UNIX/Linux .............................................................39
Printer driver
Windows ..................................................................8
................................................................9
S
Scanner driver
Windows ..................................................................8
System requirements
Mac OS X
UNIX/Linux .............................................................10
Windows ..................................................................8
................................................................9
U
Uninstall
Mac OS X ..............................................................34
UNIX/Linux .............................................................41
Windows ................................................................20
Uninstalling ...............................................................20
USB connection .........................................................11
USB printing
Mac OS X ..............................................................33
UNIX/Linux .............................................................38
INDEX 43
Page 46

44 INDEX
Page 47

DP-2802A/2802AM/2802AF
DP-2309A/2809A
OME150016C0
Page 48

1-11-1, OSAKI, SHINAGAWA-KU, TOKYO, 141-8562, JAPAN
MULTIFUNCTIONAL DIGITAL SYSTEMS
Software Installation Guide
©2015, 2017 TOSHIBA TEC CORPORATION All rights reserved
Patent; http://www.toshibatec.com/en/patent/
R150120P7503-TTEC
Ver03 F 2017-08
 Loading...