

Page 1
MULTIFUNCTIONAL DIGITAL COLOUR SYSTEMS
Operator's Manual
for Basic Functions
Page 2

EPA ENERGY STAR ® (MFD)
The United States Environmental Protection Agency (EPA) has introduced a voluntary programme, the ENERGY
STAR programme, to encourage the widespread and voluntary use of energy-efficient technologies that enhance
the workplace, improve product performance and prevent pollution. As an
TEC CORPORATION has determined that this copier model meets the
efficiency.
ENERGY STAR guidelines for this class of copier require ENERGY STAR copiers to have a ‘Sleep Mode’
feature that automatically makes the copier enter the sleep mode after a period of inactivity. The copier must also
automatically change to a ‘Low Power Mode’ (Automatic Energy Save) after a period of time since the last usage.
Specifically, this copier complies with the following requirements.
e-STUDIO2500c/3500c/3510c
‘Automatic Energy Save’-
The copier consumes less than 184 W (e-STUDIO2500c/3500c)/223 W (e-STUDIO3510c) during Energy
Save.
‘Automatic Energy Save’ Default Time-
The default time for the ‘Automatic Energy Save’ is 15 minutes.
‘Sleep Mode’
The copier consumes less than 80 W (e-STUDIO2500c/3500c)/95 W (e-STUDIO3510c) in the ‘Sleep
Mode’.
‘Sleep Mode’ Default Time-
The default time for the ‘Sleep Mode’ is 60 minutes (e-STUDIO2500c/3500c)/90 minutes
(e-STUDIO3510c).
Note1- The default setting for the ‘Sleep Mode’ and ‘Automatic Energy Save’ can be changed. Contact your
service representative to change the default settings noted above.
Note2- If the Fax or printer data is received in the sleep mode, the copier starts warming itself up and prints out
the data when it becomes ready. Also, when the start button or the energy saver button on the control
panel is pressed, the copier starts warming itself up.
ENERGY STAR Partner, the TOSHIBA
ENERGY STAR guidelines for energy
In accordance with EPA
paper.
Great White MultiUse 20 paper
If you have any questions regarding the use of recycled paper or some recommended types of recycled paper,
please contact your authorized Toshiba dealer.
ENERGY STAR programme guidelines, Toshiba recommends the following recycled
ENERGY STAR is a U.S. registered mark.
Page 3

Notice to Users
After a suitable place has been selected for the installation of the e-STUDIO2500c/3500c/3510c, please
do not change it. Avoid excessive heat, dust, vibration and direct sunlight. Also, provide proper ventilation as the copier emits a small amount of ozone.
The unit is classified as Class 1 Laser Product according to IEC 60825-1:1993/EN 60825-1.1994
including amendments.
The unit uses laser diode of output 25 mW, wave length 790 nm, continuous pulse.
For EU only
Warning:
This is a Class A product. In a domestic environment this product may cause radio interference in which
case the user may be required to take adequate measures.
Working environment
From EMC (Electromagnetic Compatibility) point of view, the operation of this product is being restricted
in following environments:
y Medical Environments: This product is not certified as a medical product according to the Medical
Product Directive 93/42/EEC.
y Domestic environments (e.g. a private living room with TV / Radio sets in the nearby surrounding
area) because this is a so called EMC class A product. In a domestic environment this product may
cause radio interference in which case the user may be required to take adequate measures!
Any consequences resulting from the use of this product in restricted working environments are not the
responsibility of TOSHIBA TEC.
The consequences of the use of this product in restricted working environments may be an electromagnetic interference with other devices or machines in the nearby surrounding area. This can result into
malfunction including data loss / data error pertaining to this product or the other devices / machines
involved in the electromagnetic interference.
Furthermore, for general safety reasons, the use of this product in environments with explosive atmospheres is not permitted.
CE compliance
This product is labelled with the CE mark in accordance with the provisions of the applicable European
Directives, notably the Low Voltage Directive 73/23/EEC and the Electromagnetic Compatibility Directive 2004/108/EEC for this product and the electric accessories, the Radio Equipment and Telecommunications Terminal Equipment Directive 99/5/EEC for the telecommunication accessories.
CE marking is the responsibility of TOSHIBA TEC GERMANY IMAGING SYSTEMS GmbH, CarlSchurz-Str. 7, 41460 Neuss, Germany, phone +49-(0)-2131-1245-0.
For a copy of the related CE Declaration of Conformity please contact your dealer or TOSHIBA TEC.
For Germany only
Machine Noise Information
Ordinance 3. GPSGV: The maximum sound pressure level is equal or less than 70 dB(A) according to
EN ISO 7779
Notice to Users 1
Page 4

Following information is for EU-member states only:
This product is marked according to the requirement in EU-Directive 2002/96/EC.
(Directive on Waste electrical and electronic equipment - WEEE)
The use of the symbol indicates that this product may not be disposed as unsorted municipal waste and
has to be collected separately. By ensuring this product is disposed of correctly, you will help prevent
potential negative consequences for the environment and human health, which could otherwise be
caused by inappropriate waste handling of this product.
For more detailed information about the take-back and recycling of this product please contact your supplier where you purchased the product.
2 Notice to Users
Page 5
Lineup of Our Manuals
Thank you for purchasing the TOSHIBA multifunctional digital colour systems e-STUDIO2500c/
3500c/3510c.
We have provided you with these manuals for the operation of this equipment. Select and read
the manual best suited to your needs.
Quick Start Guide
This Quick Start Guide describes the initial setup method of this equipment and accessories of this product such as operator’s manuals and
CD-ROMs.
Operator’s Manual for Basic Functions
This Operator’s Manual Basic Functions describes how to use the basic
functions of this equipment mainly focusing on the copying function.
Also this manual contains safety precautions for users to be observed.
Be sure to read it first carefully.
User Functions Guide
This User Functions Guide describes the functions and settings under
the [USER FUNCTIONS] button on the control panel of this equipment.
Colour Guide
This colour Guide simply explains the functions such as “copy density
adjustment”, “colour adjustment”, “copy editing”, "image editing” and
“image processing” in colour. This guide also includes the basic knowledge of colour.
Other guides are provided by the User Documentation CD-ROM in PDF files:
TopAccess Guide
This TopAccess Guide explains how to operate and set up the network
functions such as the network scanning function and job management,
using the TopAccess (Web-based utility) from client computers.
Lineup of Our Manuals 3
Page 6
Network Administration Guide
This Network Administration Guide explains the guidelines for setting up
network servers to provide various network services, and troubleshooting for network administrators.
Printing Guide
This Printing Guide explains how to install the client software for printing
from Microsoft Windows, Apple Mac OS, and UNIX computers, and print
to the equipment.
Scanning Guide
This Scanning Guide explains how to operate the scanning function of
this equipment.
e-Filing Guide
This e-Filing Guide explains how to operate the e-Filing function using
the TWAIN driver, File Downloader and e-Filing web utility.
Network Fax Guide
This Network Fax Guide explains how to use the network fax function
that enable users to operate fax and internet fax sending from a client
computer via network.
4 Lineup of Our Manuals
Page 7

User Management Guide
This User Management Guide describes how to manage this equipment
using the functions of “Department Management”, “User Management
Setting” and “User Authentication for Scan to E-mail”.
To read manuals in PDF (Portable Document Format) files
Viewing and printing this operator’s manual in PDF files require that you install Adobe Reader or
Adobe Acrobat Reader on your PC. If Adobe Reader or Adobe Acrobat Reader is not installed
on your PC, download and install it from the website of Adobe Systems Incorporated.
Lineup of Our Manuals 5
Page 8

Before Reading This Manual
This operator’s manual describes the following:
y How to use this equipment
y How to inspect and carry out maintenance on this equipment
y How to remedy mechanical and copying problems
Precautions in this manual
To ensure correct and safe use of this equipment, this operator’s manual describes safety precautions according to the three levels shown below.
You should fully understand the meaning and importance of these items before reading this
manual.
Indicates a potentially hazardous situation which, if not avoided, could result
in death, serious injury, or serious damage, or fire in the equipment or surrounding assets.
Indicates a potentially hazardous situation which, if not avoided, may result in
minor or moderate injury, partial damage of the equipment or surrounding
assets, or loss of data.
Indicates a procedure you should follow to ensure the optimal performance of
the equipment and problem-free copying.
Other than the above, this manual also describes information that may be useful for the operation of this equipment with the following signage:
Describes handy information that is useful to know when operating the equipment.
Pages describing items related to what you are currently doing. See these
pages as required.
6 Before Reading This Manual
Page 9
Description of original/paper direction
Paper or originals of A4 and B5 size can be placed either in a portrait direction or in a landscape
direction. In this manual, “-R” is added to this paper size when this size of paper or original is
placed in a landscape direction.
e.g.) A4 size original on the original glass
Placed in a portrait direction: A4 Placed in a landscape direction: A4-R
Paper or originals of A3 or B4 size can only be placed in a landscape direction, therefore “-R” is
not added to these sizes.
Trademarks
y Microsoft and Windows are the trademarks of Microsoft Corporation in the US and other
countries.
y Adobe, Adobe Acrobat, Adobe Reader and Adobe Acrobat Reader are the trademarks of
Adobe Systems Incorporated.
y Other company or product names shown in this manual may be a brand name or a trade-
mark of each company.
©2006 TOSHIBA TEC CORPORATION All rights reserved
Under the copyright laws, this manual cannot be reproduced in any form without prior written
permission of TOSHIBA TEC CORPORATION. No patent liability is assumed, however, with
respect to the use of the information contained herein.
Before Reading This Manual 7
Page 10

8 Before Reading This Manual
Page 11

CONTENTS
Notice to Users .............................................................................................1
Lineup of Our Manuals.................................................................................3
Before Reading This Manual ....................................................................... 6
TOSHIBA Quality is Second to None........................................................17
Features of the e-STUDIO2500c/3500c/3510c ..........................................19
General Precautions...................................................................................21
Disclaimer Notice ....................................................................................... 27
Forgery Prevention Function/Storage of Colour Copies ........................28
Chapter 1 BEFORE USING EQUIPMENT
Description of Each Component............................................................... 30
Main components .................................................................................... 30
Configuration of options........................................................................... 34
Control panel ........................................................................................... 37
Adjustment of the angle of the control panel ........................................... 39
Touch panel............................................................................................. 41
Preparation 1- Turning Power On/Off ......................................................45
Turning power on..................................................................................... 45
When department or user management is used .....................................46
Preparation 2- Turning power off (Shutdown) ........................................ 50
Turning power off (Shutdown) .................................................................50
Preparation 3- Setting Copy Paper ..........................................................54
Acceptable copy paper ............................................................................54
Setting copy paper (size change) ............................................................ 56
Changing the setting of paper size .......................................................... 61
Drawer for special uses ...........................................................................62
Placing paper in the Large Capacity Feeder (optional) ...........................65
Chapter 2 HOW TO MAKE COPIES
Setting Originals.........................................................................................68
Acceptable originals ................................................................................68
Placing originals on the glass.................................................................. 70
Using the Reversing Automatic Document Feeder (optional) .................72
Making Copies ............................................................................................ 76
Initial (Default) settings ............................................................................76
Copying procedure ..................................................................................77
Scanning the next originals during copying (Auto job start) ....................82
Interrupt copying in progress and make other copies
(Interrupt copying) ...................................................................................84
CONTENTS 9
Page 12

Bypass Copying ......................................................................................... 85
Bypass copying .......................................................................................85
Bypass copying on standard size paper.................................................. 86
Bypass copying on non-standard size paper...........................................91
Proof Copy ..................................................................................................95
Chapter 3 SETTING OF BASIC COPY MODES
Paper Selection........................................................................................... 98
Automatic Paper Selection (APS)............................................................98
Manual paper selection ......................................................................... 100
Copying mixed-sized originals in one operation (mixed original size) .. 101
Switching Colour Mode............................................................................103
Enlargement and Reduction Copying ....................................................104
Automatic Magnification Selection (AMS) ............................................. 104
Specifying both original size and copy size separately .........................106
Using the zoom buttons or the one-touch zoom buttons .......................108
Selecting Finishing Modes ...................................................................... 110
Type of finishing mode ..........................................................................110
Name of each part in the Finisher (optional) ......................................... 111
Sort/Group copying................................................................................ 112
Rotate sort mode ...................................................................................114
Staple sort mode ...................................................................................116
Magazine sort & saddle stitch mode (booklet mode).............................118
Hole punch mode (optional) .................................................................. 121
Manual stapling (MJ-1101 only) ............................................................ 123
Duplex Copying ........................................................................................ 125
1-sided original -> 1-sided copy (default setting at installation).............126
1-sided original -> 2-sided copy ............................................................127
2-sided original -> 2-sided copy ............................................................128
2-sided original -> 1-sided copy ............................................................129
Book-type original -> 2-sided copy ........................................................ 130
Original Mode............................................................................................ 134
Copy Density Adjustment........................................................................ 136
Automatic copy density mode................................................................ 136
Manual copy density mode....................................................................137
Chapter 4 IMAGE ADJUSTMENT
Colour Balance (YMCK Adjustment) ......................................................140
RGB Adjustment.......................................................................................142
One-Touch Adjustment............................................................................143
10 CONTENTS
Page 13

Background Adjustment..........................................................................144
Sharpness .................................................................................................145
Twin Colour (2-Colour) Copy...................................................................146
TWIN COLOUR SELECTABLE.............................................................146
RED & BLACK....................................................................................... 149
Monocolour copying ................................................................................ 152
Hue ............................................................................................................ 153
Saturation ................................................................................................154
Chapter 5 USING THE EDITING FUNCTIONS
IMAGE SHIFT ............................................................................................ 157
Creating a right or left margin ................................................................157
Creating a top or bottom margin............................................................159
Creating a bookbinding margin.............................................................. 161
EDGE ERASE ............................................................................................ 163
BOOK CENTRE ERASE............................................................................ 164
DUAL PAGE ..............................................................................................166
2IN1 / 4IN1 .................................................................................................168
MAGAZINE SORT ..................................................................................... 171
EDITING ..................................................................................................... 173
Trimming / Masking ...............................................................................173
Mirror image ..........................................................................................176
Negative/Positive reversal .....................................................................177
XY ZOOM ...................................................................................................178
COVER SHEET..........................................................................................180
SHEET INSERTION ...................................................................................183
TIME STAMP ............................................................................................. 186
PAGE NUMBER......................................................................................... 187
JOB BUILD ................................................................................................189
IMAGE DIRECTION ...................................................................................193
BOOK - TABLET .......................................................................................195
ADF / SADF ...............................................................................................196
Continuous feed mode ..........................................................................196
Single feed mode .................................................................................. 197
FULL IMAGE ............................................................................................. 199
CONTENTS 11
Page 14

Chapter 6 e-FILING
e-Filing....................................................................................................... 202
Creating User Boxes ................................................................................ 204
Changing Data of User Boxes ................................................................. 206
Deleting User Boxes.................................................................................209
Storing Documents in e-Filing ................................................................ 211
Printing Stored Documents .....................................................................216
Printing the whole document ................................................................. 216
Test printing........................................................................................... 218
Printing the stored document after changing the settings .....................219
Deleting Folders or Documents ..............................................................221
Appendix ...................................................................................................223
Storing documents in the shared folder................................................. 223
Chapter 7 TEMPLATE
Template....................................................................................................228
Template in “Useful Template” ..............................................................228
Registering User Groups and Templates...............................................230
Registering a template in the public template group .............................230
Registering the new user group.............................................................235
Registering a template in the user group...............................................238
Changing Data of User Groups and Templates.....................................243
Changing the data of a user group ........................................................ 243
Changing the data of a template ........................................................... 246
Recalling Templates.................................................................................251
When recalling a template in a public group..........................................251
When recalling a template in a user group............................................253
Deleting User Groups or Templates .......................................................256
Deleting a user group ............................................................................256
Deleting a template................................................................................ 258
Chapter 8 JOB STATUS
Job Status .................................................................................................262
Confirming Print Job Status.................................................................... 263
Print jobs ...............................................................................................263
Proof print jobs ......................................................................................267
Private print jobs.................................................................................... 270
12 CONTENTS
Page 15

When using department codes..............................................................275
Confirming Scan Job Status ...................................................................278
Log List...................................................................................................... 279
Confirming job history in log list.............................................................280
Registering into address book from log lists..........................................284
Printing journals (send/receive log list)..................................................286
Print Status Display..................................................................................287
Releasing print job errors ......................................................................287
Error Code.................................................................................................290
Chapter 9 BLINKING GRAPHIC SYMBOLS
Blinking Graphic Symbols....................................................................... 300
Drawer Display on the Touch Panel ....................................................... 301
Replace Toner Cartridge Symbol............................................................ 302
Recommendation for original toner ....................................................... 303
Replacing the toner cartridge ................................................................ 304
Cleaning the slit glasses........................................................................305
Cleaning the chargers ...........................................................................308
Replace Toner Bag Symbol ..................................................................... 309
Jam Symbols ............................................................................................ 311
Misfeed in the Reversing Automatic Document Feeder (optional) ........311
Misfeed in drawer feeding area .............................................................314
Misfeed in the Large Capacity Feeder (optional)...................................315
Misfeed in the Paper Feed Pedestal (optional) ..................................... 316
Misfeed on the bypass tray.................................................................... 316
Misfeed in the automatic duplexing unit ................................................ 317
Misfeed in the jam releasing cover ........................................................ 318
Misfeed in the fuser unit ........................................................................319
Misfeed in the Bridge Unit (optional) ..................................................... 322
Misfeed in the Finisher and the Hole Punch Unit
(optional: MJ-1101, MJ-6101)................................................................323
Misfeed in the Saddle Stitch Finisher and the Hole Punch Unit
(optional: MJ-1030, MJ-6004)................................................................328
Misfeed in the Saddle Stitch Unit (optional)...........................................330
Call Service Symbol ................................................................................. 333
Chapter 10 WHEN THIS MESSAGE APPEARS
“Toner near Empty” ............................................................................... 337
“Time for Slit glass and Main charger cleaning”...................................340
CONTENTS 13
Page 16

Cleaning the slit glass............................................................................ 340
Cleaning the chargers ...........................................................................343
“Check staple cartridge” ......................................................................... 344
Finisher (optional: MJ-1101)..................................................................344
Finisher (optional: MJ-1030)..................................................................346
“Check staple cartridge in the Saddle Stitch Unit” ...............................348
“Examine stapler” .................................................................................... 350
Finisher (optional: MJ-1101)..................................................................350
Finisher (optional: MJ-1030)..................................................................352
“READY (CHECK STAPLER)” ................................................................. 354
“Examine stapler in the Saddle Stitch Unit” .........................................355
“READY (CHECK SADDLE STITCH STAPLER)”....................................358
“READY (HOLE PUNCH DUST BIN IS FULL)”........................................ 359
Hole Punch Unit (optional: MJ-6101, MJ-6004).....................................359
“POWER FAILURE”..................................................................................360
“Time for periodic maintenance”............................................................ 361
“Check paper size setting on control panel for drawer N”...................362
During copying (using a drawer)............................................................362
During copying (using the bypass tray) ................................................. 365
During printing from the FAX or Printer (using a drawer) ......................366
During printing from the Printer (using the bypass tray) ........................368
“Cannot print this paper size Select the other drawer”....................... 370
“Cannot print this paper type Set the other paper type”..................... 371
“Reboot the machine”..............................................................................372
Chapter 11 MAINTENANCE
Daily Inspection ........................................................................................374
Simple Troubleshooting ..........................................................................375
Equipment does not start.......................................................................375
Paper jamming occurs frequently .......................................................... 375
Display does not change when buttons or icons are pressed ...............375
Functions cannot be set ........................................................................376
Image density is too low ........................................................................376
Image density is too high....................................................................... 376
Image trouble ........................................................................................376
Chapter 12 SPECIFICATIONS & OPTIONS
e-STUDIO2500c/3500c/3510c Specifications .........................................380
14 CONTENTS
Page 17

Specifications of Options ........................................................................ 384
Packing List .............................................................................................. 388
Copying Function Combination Matrix ..................................................389
Combination Matrix 1/2.......................................................................... 389
Combination Matrix 2/2.......................................................................... 390
Image Quality Adjustment Combination Matrix..................................... 391
Combination Matrix 1/2.......................................................................... 391
Combination Matrix 2/2.......................................................................... 392
INDEX ....................................................................................................................................... 393
CONTENTS 15
Page 18

16 CONTENTS
Page 19
TOSHIBA Quality is Second to None
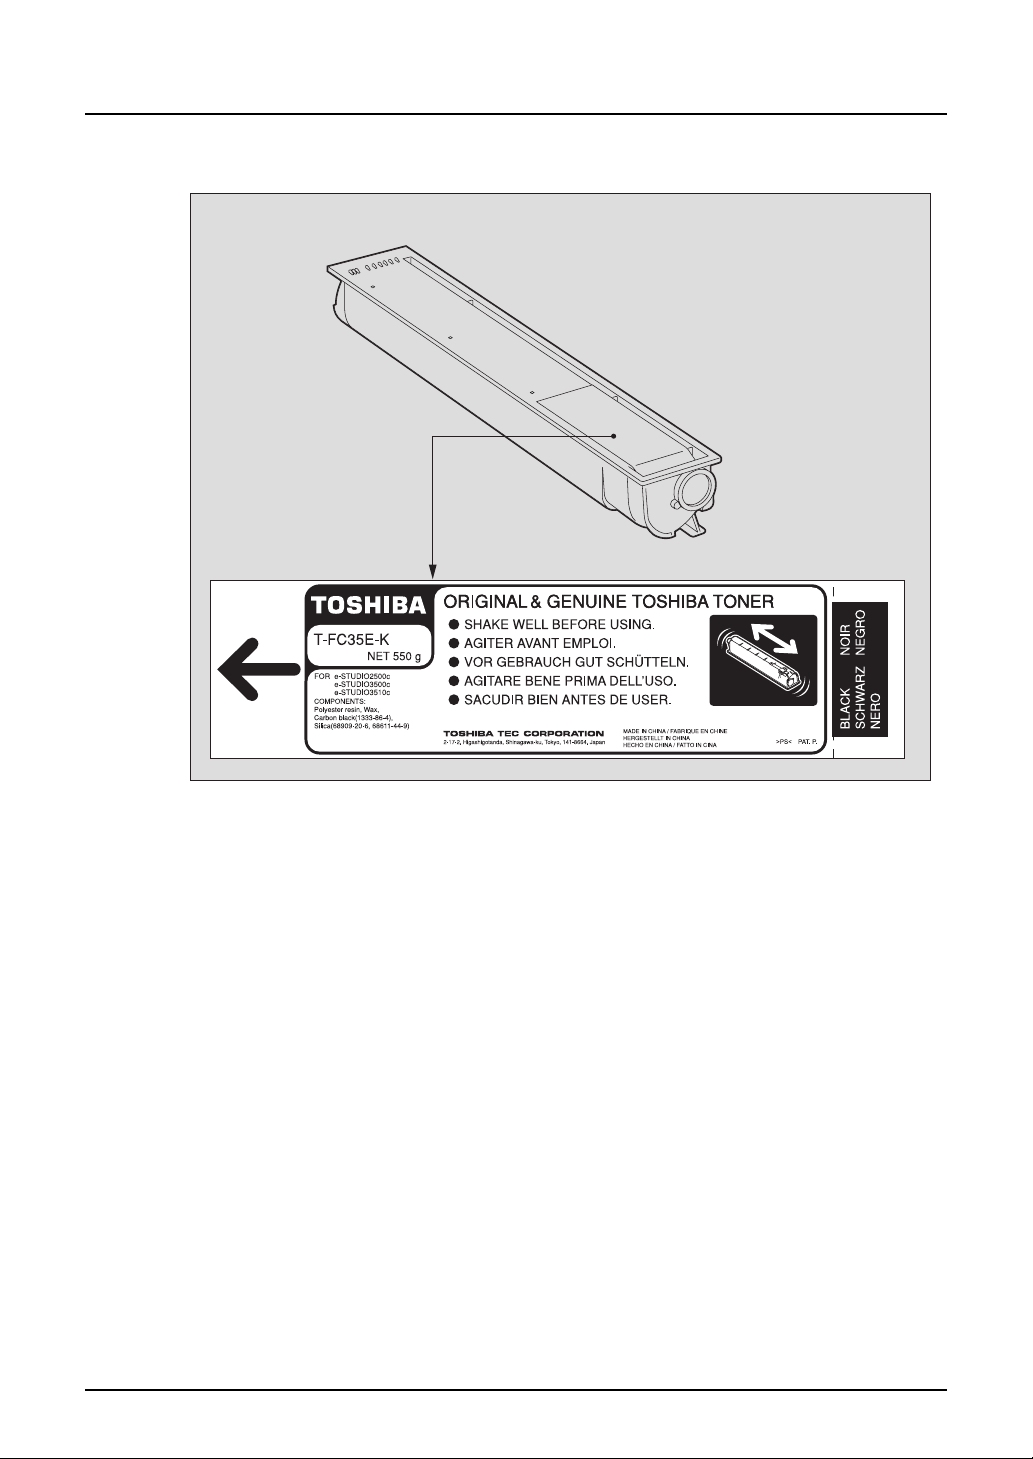
e-STUDIO2500c/3500c/3510c Toner Cartridges.
It is recommended that genuine TOSHIBA supplies and parts be used to obtain optimum results.
TOSHIBA Quality is Second to None 17
Page 20

Supplies / Parts
y Dependability
Genuine Toshiba supplies are subjected to the strictest of inspections so that every supply
you receive will perform at optimal levels.
y High Productivity
Genuine Toshiba supplies are created to meet the demands of our competitive world and
provide highspeed reliable copies when you need them.
y Stable Image Quality
Genuine Toshiba supplies are designed to provide consistently stable image output.
y Copier Kind
Genuine Toshiba supplies are designed to keep the copier and all its parts in trouble-free
working order.
Reduction of machine wear is due to Toshiba’s intimate knowledge of the copier’s characteristics ensuring the highest standard of care.
y Machine Balance
From the beginning Toshiba supplies and machines were made for each other. Whenever
Toshiba designs a new machine, it also designs a new toner that is made just for that
machine. By using Genuine Toshiba supplies with Toshiba copiers, you are guaranteed optimum performance.
Toner
y Optimum Image Quality
Toshiba toner is manufactured using ultra-fine quality materials under precisely controlled
conditions to ensure that your Toshiba copiers will continually generate sharp high-quality
images.
y Cost Advantage
Genuine Toshiba toner provides value. Only the proper amount of toner is used during the
reproduction process thereby enabling the machine to continue to operate until all the toner
has been used. In this way you get the full value from each cartridge used.
y Environmental Harmony
Genuine Toshiba toner is manufactured with the environment in mind. To care for Mother
Earth, we use embossed or plastic labels making our toner cartridge fully recyclable. In addition, dust and ozone levels have been reduced to improve the working environment.
y User Friendly
Before approving our toners for sale, we test them to be sure that they pass the strictest of
health standards. This takes the worry out of handling the toner.
General
y Service and Support Benefits
Toshiba’s Service technicians are certified to keep your copier performing at optimum levels.To ensure continuous image quality, utilize an authorized Toshiba Service provider to
care for and perform periodical maintenance on your copier.
18 TOSHIBA Quality is Second to None
Page 21

Features of the e-STUDIO2500c/3500c/3510c
The e-STUDIO2500c/3500c/3510c is a Multifunctional Digital Colour System with high speed
and high image quality. The e-STUDIO2500c/3500c/3510c is equipped with the network function
such as the printing and scanning one for comprehensive use to meet the needs of your office.
The e-STUDIO2500c/3500c/3510c also provides superior cost performance for black-and-white
copying and high colour reproduction and fine colour adjustment for colour copying so that you
can make copies as expected.
The e-STUDIO2500c/3500c/3510c offers the following convenient features, functions and
options.
y The copying speed is as follows.
- e-STUDIO2500c
- e-STUDIO3500c
- e-STUDIO3510c
y Warm-up time has been drastically shortened to approximately 99 seconds
y An all-in-one controller, as standard equipment, is installed to perform the effective network
functions.
y A 1/2 VGA wide panel improves operability and efficiency, and makes the viewing easier.
y A universal design is adopted for the control panel whose angle can be changed.
y Frequently used document styles can be stored in e-Filing in this equipment. You can easily
print the file in a specified style by recalling the saved style using the touch panel, or reorder
pages in the file as desired using TopAccess. Namely, one file saved in the e-Filing can be
repeatedly utilized and thus your workload is reduced.
y Received Fax documents can be stored in e-Filing without printing them.
y Scanned originals can be sent via Fax (optional) and E-mail simultaneously.
y Electronic sorting improves both colour and black-and-white copying productivity.
y Comes with rich editing functions such as trimming, masking and mirror.
y Supporting High-compression PDF makes data handling smoother.
y Loading the page memory and hard disc as standard equipment enables 2in1 / 4in1, Elec-
tronic sorting and magazine sorting, etc.
y A fixing system that uses less oil reduces the amount adhering to the paper.
y By simply replacing the cartridge, you can add toner without dirtying your hands.
y A wide variety of media from thick paper (up to 256 g/m
encies, waterproof paper, etc. is acceptable.
y The image quality technology offers successive stable copy images.
y Installing an optional finisher offers quick automatic sorting, stapling and hole punching
(optional) of copies.
y Installing a finisher with an optional saddle stitching function attached allows you to select
the saddle stitching mode which will automatically staple the centre of the documents just
like a book.
y Two energy-saving features are available: 1. ENERGY SAVER MODE: Unnecessary elec-
tricity at READY status is cut off, 2. SLEEP MODE: The minimum power consumption is kept
if the equipment is not used for a specified period.
y Improved security-related features
ment.
y The built-in wireless LAN unit and Bluetooth-compliant options are introduced to respond to
users’ wide-ranging needs.
*1
colour
colour
colour
: 25 copies per minute, Black-and-white: 35 copies per minute
*1
: 35 copies per minute, Black-and-white: 35 copies per minute
*1
: 35 copies per minute, Black-and-white: 45 copies per minute
(when 1-sided LT landscape continuous copying is performed in the non-sort mode without the Reversing Automatic Document Feeder being used)
2
*3
ensure users of a safe and pleasant working environ-
*2
.
), sticker labels, overhead transpar-
*1 Copying speed of "Full colour”, “Auto colour”, “Twin colour” and “Mono colour”
*2 Options not installed
Features of the e-STUDIO2500c/3500c/3510c 19
Page 22
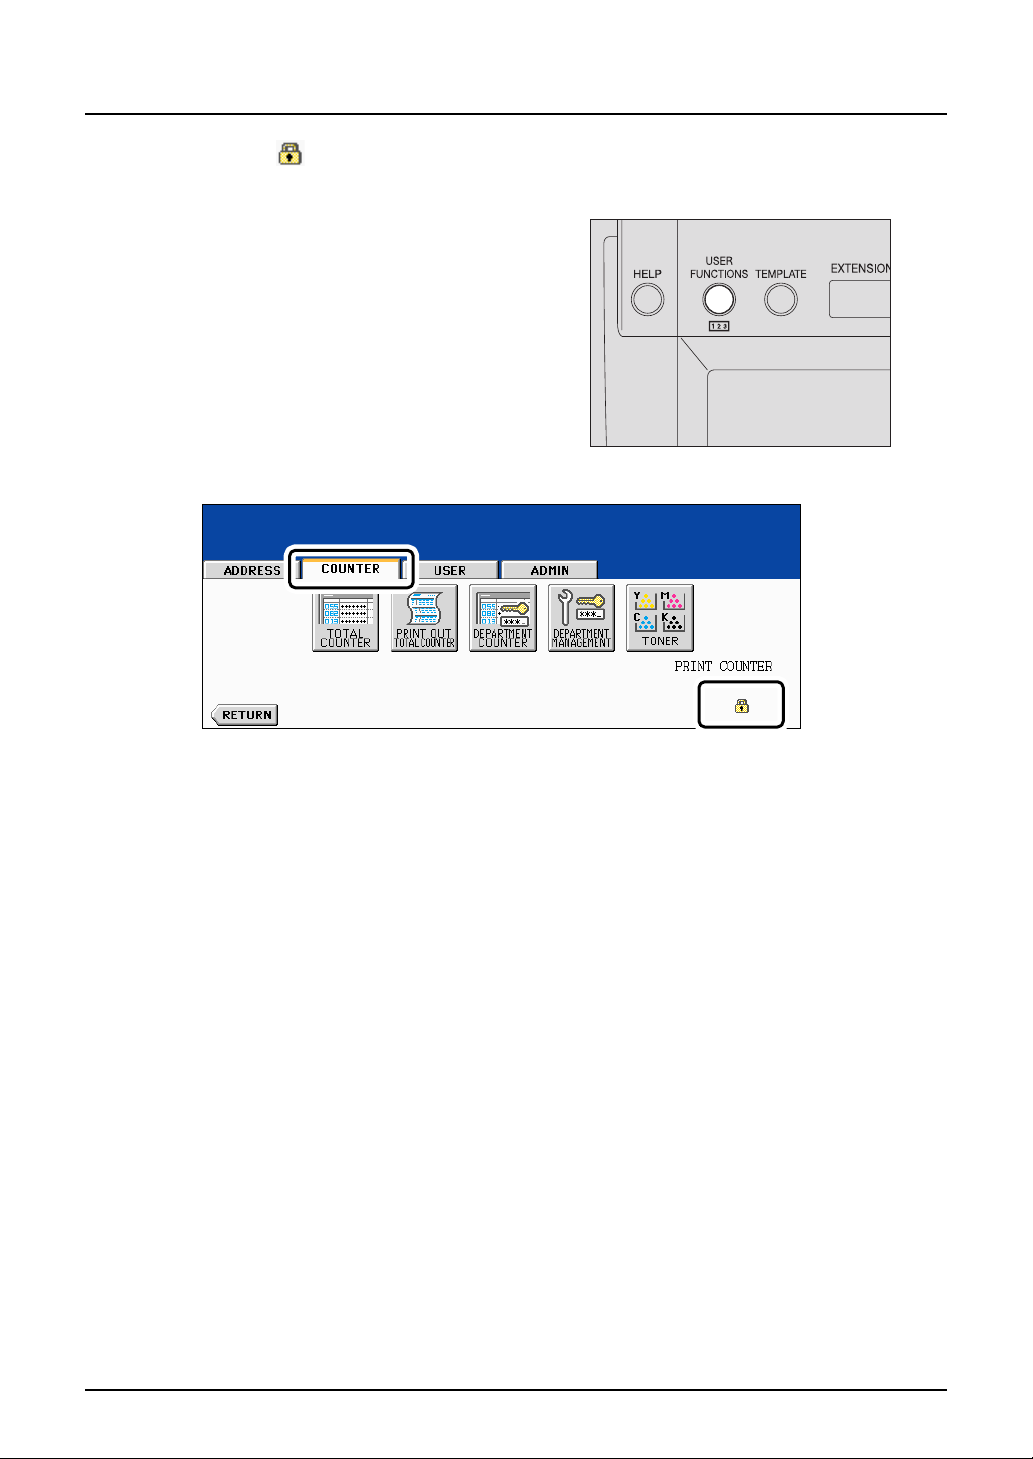
*3 An icon appears on the touch panel when the encryption function is enabled on this equipment.
< How to check active status of encryption function >
Press the [USER FUNCTIONS] button on the
control panel, and then click the [COUNTER]
tab on the touch panel. This icon appears at
the right bottom of the touch panel if the
encryption function is enabled.
Contact your service technician for the use of
the encryption function.
20 Features of the e-STUDIO2500c/3500c/3510c
Page 23

General Precautions
When installing or moving
Warning
y This Multifunctional Digital Colour Systems requires 220 to 240 V AC, 8 A 50/60 Hz electric
power.
Do not use a power supply with a voltage other than that specified.
Avoid multiple connections in the same outlet. This could cause a fire or give you an electric
shock. If you are considering increasing the number of outlets, contact an electrician.
y Always connect this Multifunctional Digital Colour Systems to an outlet with an earth connec-
tion to avoid the danger of fire or electric shock in case of short-circuiting. Contact your service representative for the details. Be sure to use a 3-conductor, grounded wall outlet.
In areas, except U.S. and Canada, where a 2-pin plug is used, the Multifunctional Digital
Colour Systems must be grounded for safety. Never ground it to a gas pipe, a water pipe, or
any other object not suitable for grounding.
y Plug the power cord securely into the outlet. If it is not plugged in properly, it could heat up
and cause a fire or give you an electric shock.
y Do not damage, break or attempt to repair the power cord.
The following things should not be done to the power cord.
- Twisting it
- Bending it
- Pulling it
- Placing anything on it
- Making it hot
- Situating it near radiators or other heat sources
This could cause a fire or give you an electric shock. If the power cord is damaged, contact
your service representative.
y When removing the plug from the outlet, do not pull the power cord. Always hold the plug
when removing it from the outlet. If the power cord is pulled, the wires may become broken
and this could cause a fire or give you an electric shock.
y Make sure that the ventilation holes are not blocked up.
If the temperature within the Multifunctional Digital Colour Systems becomes too high, a fire
could result.
y Do not move the Multifunctional Digital Colour Systems to another building, up and down the
stairs or for any great distance.
This could cause an injury or give you and electric shock. When lifting or moving the Multifunctional Digital Colour Systems, contact your service representative.
y Do not move the Multifunctional Digital Colour Systems with optional equipment, such as the
finisher, attached.
This could cause a fire or give you an electric shock. When lifting or moving the Multifunctional Digital Colour Systems, contact your service representative.
y When moving the Multifunctional Digital Colour Systems, be sure to shut down the power
prior to pulling out the plug from the outlet. If the power cord is damaged, this could cause a
fire or give you an electric shock.
y The socket outlet shall be near the equipment and be easily accessible.
y Pull out the plug from the outlet more than once a year to clean around the prongs. Accumu-
lating dust and dirt could cause a fire due to the heat released by electric leakage.
General Precautions 21
Page 24
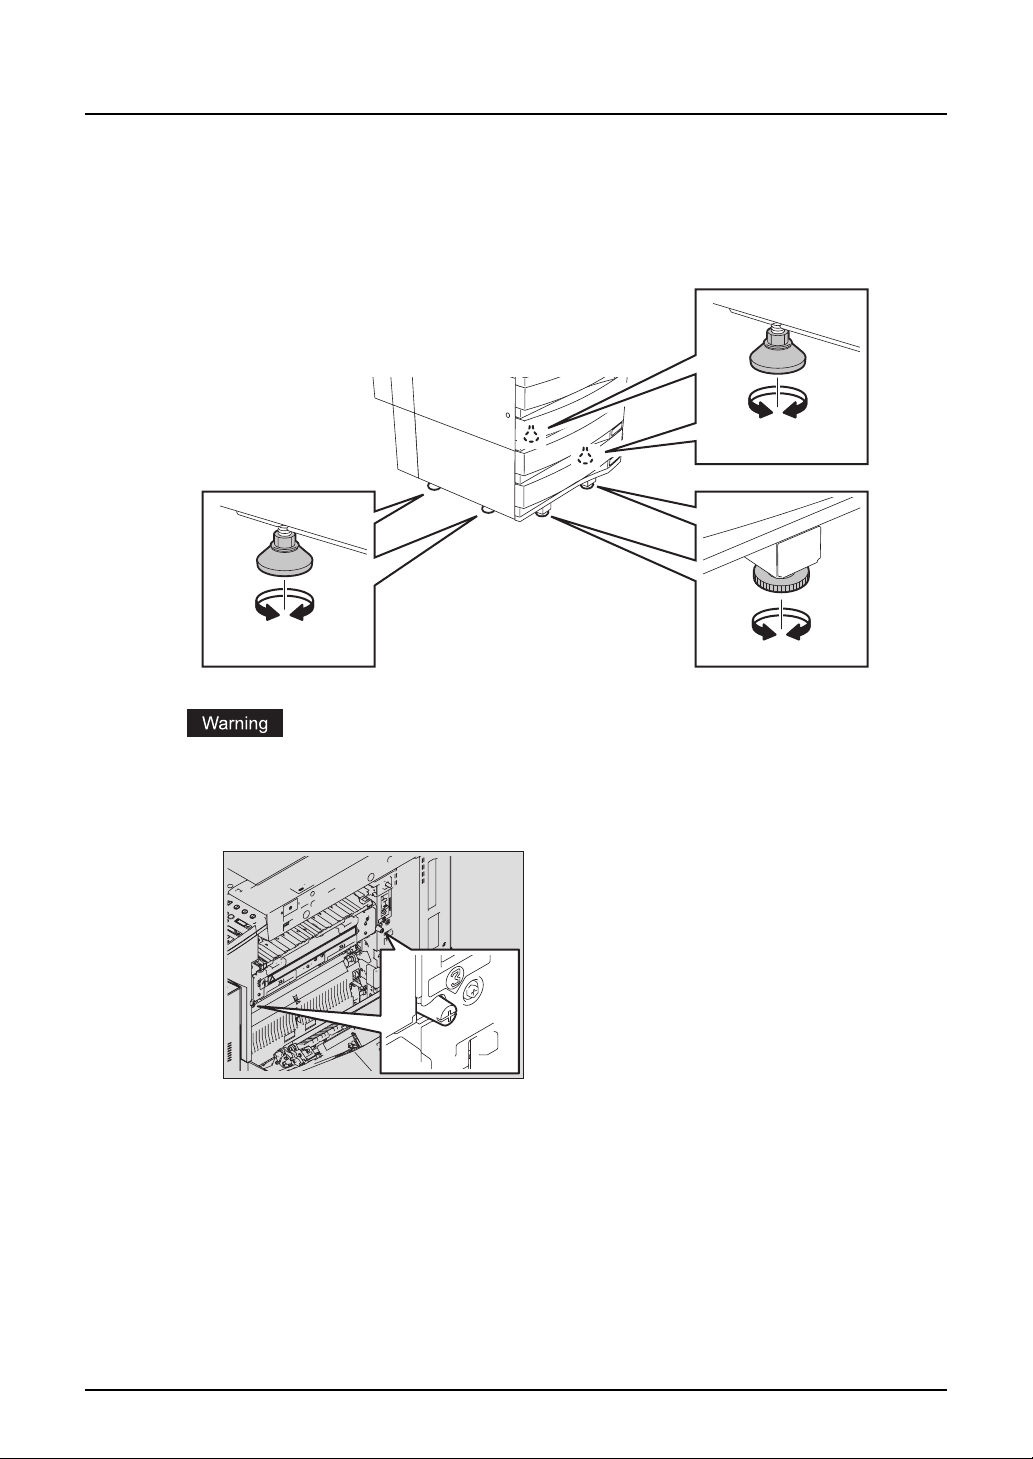
Caution
The Paper Feed Pedestal (optional) has 4 antiskid devices and 2 fall-preventing stoppers under
its bottom. When moving this equipment, turn them in the direction of arrows (see figures below)
and raise them to unfix the equipment. After it has been moved, be sure to turn them in the
opposite direction and lower them to fix it.
y Do not install the equipment by yourself or try to move it once it has been installed. This
could result in an injury or damage to the device. Contact your service representative if the
equipment needs to be installed or moved.
y Do not remove these screws. The fuser unit could fall over and injure someone.
22 General Precautions
Page 25
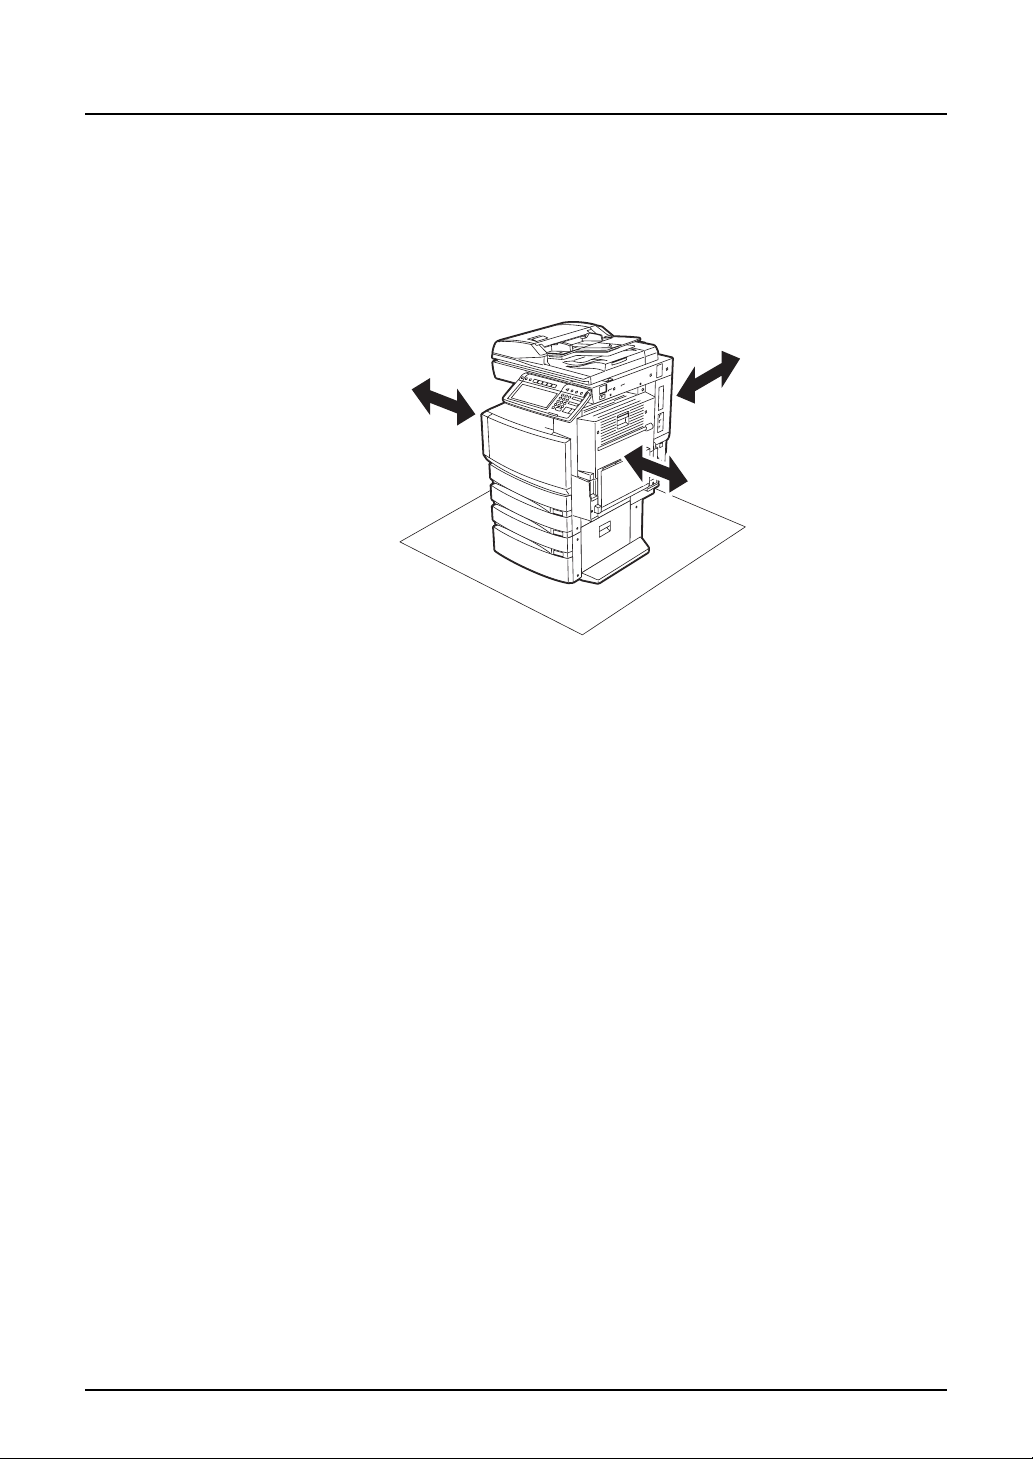
Other points
y Make sure that there is enough space around the system to facilitate changing of parts,
maintenance and clearing paper jam.
If there is insufficient space, some operations, such as bypass feeding, will become difficult
and the Multifunctional Digital Colour Systems could even break down.
To insure optimal operation, allow clearances of at least 80 cm on the right, and 10 cm on the
left and behind.
10cm
10cm
80cm
y Be sure to fix the power cable securely so that no one trips over it.
y Adverse environmental conditions may affect the safe operation and performance of the Mul-
tifunctional Digital Colour Systems, and the Multifunctional Digital Colour Systems could
break down.
- Avoid locations near windows or with exposure to direct sunlight.
- Avoid locations with drastic temperature fluctuations.
- Avoid too much dust.
- Avoid location that suffer from vibration.
y Allow the air to flow freely and make sure there is a ventilator.
With inadequate ventilation, the unpleasant odor released by ozone will begin to dominate
the atmosphere.
When using the Multifunctional Digital Colour Systems
Warning
y Do not place metallic objects or containers with water (flower vases, coffee cups, etc.) on or
near the Multifunctional Digital Colour Systems. And keep paper clips and staples away from
the air vent. This could cause a fire or give you an electric shock.
y If the Multifunctional Digital Colour Systems becomes excessively hot, smoke comes out of it
or there is an odd smell or noise, proceed as follows.
Turn the main switch OFF and remove the plug from the outlet, then contact your service
representative.
y If the Multifunctional Digital Colour Systems will not be used for more than one month,
remove the plug from the outlet for safety purposes during that time.
This could cause a fire or give you an electric shock if an insulation failure occurs.
General Precautions 23
Page 26

Caution
y Do not place heavy objects (4 kg or more) on the original glass and do not press on it with
force.
Breaking the glass could cause personal injury.
y Do not place heavy objects (4 kg or more) on the Multifunctional Digital Colour Systems. If
the objects fall off, this could cause injury.
y Do not remove or connect the plug with wet hands, as this could give you an electric shock.
y Do not touch the fuser unit or the metal area around it. Since they are very hot, you could be
burned or the shock could cause you to get your hand injured in the machine.
y When changing the angle of the control panel, be careful not to catch your hands in the gap
between the equipment and the control panel. This could cause personal injury.
y Be careful not to let your fingers be caught when closing the drawer. This could injure you.
y Be careful not to let your fingers be caught between the equipment and the automatic
duplexing unit. This could injure you.
y Do not place 3.3 kg or more of objects on an optional work table. Breaking the work table
could cause personal injury.
y Do not touch the metal portion of the guide plate in the automatic duplexing unit as it could
burn you.
24 General Precautions
Page 27
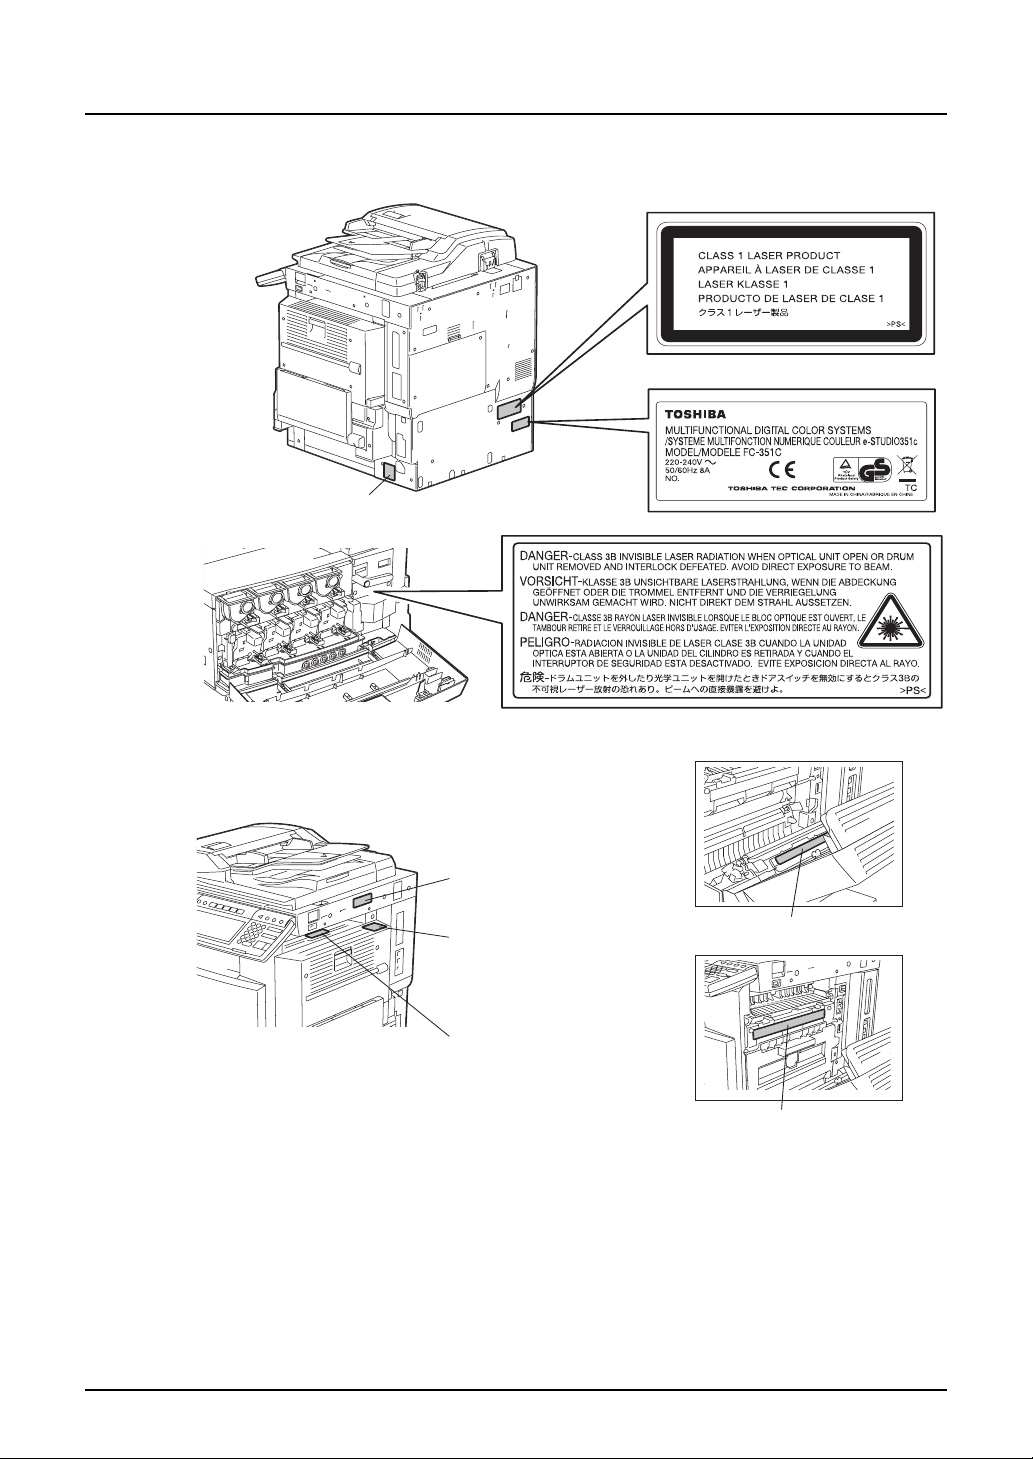
Position of Certification label, etc.
Explanatory label
Identification label
Warning for grounding wire
Warning label
Warning for
high temperature area
(
fuser unit
Warning for
high temperature area
(
ventilation holes
Warning for
high temperature area
(
fuser unit
)
)
)
Warning for handling transfer belt
Warning for high temperature area
General Precautions 25
Page 28

Other points
y Be very careful to treat the touch panel gently and never hit it. Breaking the surface could
cause malfunctions.
y Do not turn the power OFF with jammed paper left inside the Multifunctional Digital Colour
Systems.
This could cause malfunctions when the main switch is turned ON next time.
To turn the power OFF, see P.50 “Turning power off (Shutdown)”.
y Be sure to turn the power OFF when leaving the office or if there is a power outage. How-
ever, Do not turn the power OFF if the weekly timer is in use.
To turn the power OFF, see P.50 “Turning power off (Shutdown)”.
y Be careful because the paper exit area and paper just after exiting are hot.
During maintenance or inspection
Warning
y Never attempt to repair, disassemble or modify the Multifunctional Digital Colour Systems by
yourself. You could cause a fire or get an electric shock.
Always contact your Service representative for maintenance or repair of the internal parts of
the Multifunctional Digital Colour Systems.
y Always keep the plug and outlet clean. Prevent them from accumulating dust and dirt. This
could cause a fire and give you an electric shock due to the heat released by electric leakage.
y Do not let liquids such as water and oil get into the system when cleaning the floor. This
could cause a fire and give you an electric shock.
Caution
y Do not touch the stapling area. The actual needle point could cause you personal injury.
Saddle Stitch Finisher (optional) P.355
Finisher (optional) P.350
Other points
y Do not use such solvents as thinner or alcohol when cleaning the surface of the Multifunc-
tional Digital Colour Systems.
- This could warp the shape of the surface or leave it discoloured.
- When using a chemical cleaning pad to clean it, pay attention to any cautionary points.
When handling supplies
Caution
y Never attempt to incinerate toner cartridges and toner bags. Dispose of used toner car-
tridges and toner bags in accordance with local regulations. ( P.302 “Replace Toner Cartridge Symbol”, P.309 “Replace Toner Bag Symbol”)
26 General Precautions
Page 29

Disclaimer Notice
The following notice sets out the exclusions and limitations of liability of TOSHIBA TEC CORPORATION (including its employees, agents and sub-contractors) to any purchaser or user (‘User’)
of the e-STUDIO2500c/3500c/3510c, including its accessories, options and bundled software
(‘Product’).
1. The exclusion and limitations of liability referred to in this notice shall be effective to the fullest extent permissible at law. For the avoidance of doubt, nothing in this notice shall be taken
to exclude or limit TOSHIBA TEC CORPORATION’s liability for death or personal injury
caused by TOSHIBA TEC CORPORATION’s negligence or TOSHIBA TEC CORPORATION’s fraudulent misrepresentation.
2. All warranties, conditions and other terms implied by law are, to the fullest extent permitted
by law, excluded and no such implied warranties are given or apply in relation to the Products.
3. TOSHIBA TEC CORPORATION shall not be liable for any loss, cost, expense, claim or damage whatsoever caused by any of the following:
(a) use or handling of the Product otherwise than in accordance with the manuals, including
but not limited to Operator’s Manual, User’s Guide, and/or incorrect or careless handling or
use of the Product;
(b) any cause which prevents the Product from operating or functioning correctly which
arises from or is attributable to either acts, omissions, events or accidents beyond the reasonable control of TOSHIBA TEC CORPORATION including without limitation acts of God,
war, riot, civil commotion, malicious or deliberate damage, fire, flood, or storm, natural
calamity, earthquakes, abnormal voltage or other disasters;
(c) additions, modifications, disassembly, transportation, or repairs by any person other
than service technicians authorized by TOSHIBA TEC CORPORATION; or
(d) use of paper, supplies or parts other than those recommended by TOSHIBA TEC CORPORATION.
4. Subject to paragraph 1, TOSHIBA TEC CORPORATION shall not be liable to Customer for:
(a) loss of profits; loss of sales or turnover; loss of or damage to reputation; loss of production; loss of anticipated savings; loss of goodwill or business opportunities; loss of customers; loss of, or loss of use of, any software or data; loss under or in relation to any contract;
or
(b) any special, incidental, consequential or indirect loss or damage, costs, expenses,
financial loss or claims for consequential compensation;
whatsoever and howsoever caused which arise out of or in connection with the Product or
the use or handling of the Product even if TOSHIBA TEC CORPORATION is advised of the
possibility of such damages.
TOSHIBA TEC CORPORATION shall not be liable for any loss, cost, expense, claim or damage caused by any inability to use (including, but not limited to failure, malfunction, hang-up,
virus infection or other problems) which arises from use of the Product with hardware, goods
or software which TOSHIBA TEC CORPORATION has not directly or indirectly supplied
Disclaimer Notice 27
Page 30

Forgery Prevention Function/Storage of Colour Copies
Forgery prevention function
This copier has a forgery prevention function. Please ensure that your digital full-colour copier is
not used for making copies of prohibited items.
Storage of colour copies
y The copies should be kept in a place which is not exposed to light to prevent fading when
they are stored for a long time.
y If copies are kept pressed between plastics made of chloroethylene for a long time, the toner
may melt and stick to the plastic due to high pressure and high temperature. Keep them in
polyethylene binders.
y When a colour copy is folded, the toner at the fold can become separated.
y The toner on the copies may melt if it touches solvent. If the ink on the copies has not com-
pletely dried, the toner may also melt. Keep copies away from solvent.
y When copies are kept near an extremely high temperature such as a heater, the toner may
melt. Keep them at room temperature and do not allow this to vary very much.
28 Forgery Prevention Function/Storage of Colour Copies
Page 31

1.BEFORE USING EQUIPMENT
This chapter describes what you need to know before using this equipment, such as how to turn the power
ON or how to set copy paper.
Description of Each Component ...........................................................................30
Main components..............................................................................................................................30
Configuration of options ....................................................................................................................34
Control panel.....................................................................................................................................37
Adjustment of the angle of the control panel.....................................................................................39
Touch panel.......................................................................................................................................41
Preparation 1- Turning Power On/Off....................................................................45
Turning power on ..............................................................................................................................45
When department or user management is used ...............................................................................46
Preparation 2- Turning power off (Shutdown)......................................................50
Turning power off (Shutdown) ...........................................................................................................50
Preparation 3- Setting Copy Paper........................................................................54
Acceptable copy paper......................................................................................................................54
Setting copy paper (size change)......................................................................................................56
Changing the setting of paper size....................................................................................................61
Drawer for special uses.....................................................................................................................62
Placing paper in the Large Capacity Feeder (optional) .....................................................................65
Page 32

1 BEFORE USING EQUIPMENT
Description of Each Component
Main components
1
2
10
3
9
4
8
5
13
7
6
14
1. Reversing Automatic Document Feeder (Optional, MR-3018)
A stack of originals placed on this are scanned one sheet by one. Both sides of original can
be scanned. Maximum 100 sheets (80 g/m
originals can be placed in one go.
(The maximum number of sheets may vary depending on the media type of the originals.)
P.72 “Using the Reversing Automatic Document Feeder (optional)”
P.311 “Misfeed in the Reversing Automatic Document Feeder (optional)”
2
), 80 sheets (90 g/m2) (or stack height 16 mm) of
11
12
2. Operator’s Manual pocket (Back side)
Keep the Operator’s Manual in this.
3. Automatic duplexing unit
This is a unit to make copies on both sides of paper. Open it when paper jams occur.
P.317 “Misfeed in the automatic duplexing unit”
4. Bypass tray
Use this to make copies on special media types such as overhead transparencies, waterproof paper.
P.85 “Bypass copying”
P.316 “Misfeed on the bypass tray”
5. Paper feed cover
Open this cover when releasing a paper misfeed in the drawer feeding area.
P.314 “Misfeed in drawer feeding area”
30 Description of Each Component
Page 33

6. Paper feed cover (optional)
Open this cover when releasing a paper misfeed in the Paper Feed Pedestal (optional) or
Large Capacity Feeder (optional).
P.315 “Misfeed in the Large Capacity Feeder (optional)”
P.316 “Misfeed in the Paper Feed Pedestal (optional)”
7. Paper size indicator
8. Paper Feed Pedestal (optional, KD-1018) and Additional Drawer Module (optional,
MY-1031) or Large Capacity Feeder (optional, KD-1019)
9. Drawers
2
Maximum 550 sheets (80 g/m
), 450 sheets (90 g/m2) of plain paper can be placed in one
go.
10. Front cover
Open this cover when you replace the toner cartridge and clean the charger.
P.302 “Replace Toner Cartridge Symbol”
P.309 “Replace Toner Bag Symbol”
P.340 ““Time for Slit glass and Main charger cleaning””
11. Power switch
Turn the power of the equipment ON or OFF with this.
P.45 “Turning power on”
12. Connector for USB storage device
Use this connector when retrieving scanning data to USB storage device.
See the Scan Guide for details.
13. Network interface connector
Use this connector when connecting this equipment with network.
14. USB terminal (4-pin)
With this terminal, the equipment can be connected to your PC using a commercially available USB cable.
Description of Each Component 31
Page 34

1 BEFORE USING EQUIPMENT
1
11
10
9
8
2
3
16 15 14 13
4
5
6
(12)
7
1. Platen sheet
P.374 “Daily Inspection”
2. Original glass
Use this to copy three-dimensional originals, book-type originals and special paper such as
overhead transparencies or tracing paper, as well as plain paper.
P.68 “Setting Originals”
3. Touch panel
Use this to set copying density, colour adjustment, finishing mode and various types of other
functions.
P.41 “Touch panel”
4. Control panel
Use this to make copies, enter the number of copy sets, and perform and set various types
of other functions.
P.37 “Control panel”
32 Description of Each Component
Page 35

5. Charger cleaner
P.340 ““Time for Slit glass and Main charger cleaning””
6. Toner bag
P.309 “Replace Toner Bag Symbol”
7. Slit glass cleaner
Use this if the copied or printed paper is stained.
P.340 ““Time for Slit glass and Main charger cleaning””
8. Paper exit stopper
Use this to prevent the exiting paper from falling. Open this when you make a large amount
of copies on a larger size of paper (e.g.A3, A4).
9. Receiving tray
10. Scanning area
The data of originals transported from the Reversing Automatic Document Feeder (optional,
MR-3018) are scanned here.
P.374 “Daily Inspection”
11. Original scale
Use this to check the size of an original placed on the original glass.
12. Touch panel contrast adjustment volume
Use this when it is difficult to see the display on the touch panel.
13. Black toner cartridge
14. Cyan toner cartridge
15. Magenta toner cartridge
16. Yellow toner cartridge
P.302 “Replace Toner Cartridge Symbol”
Description of Each Component 33
Page 36

1 BEFORE USING EQUIPMENT
Configuration of options
8
10 9
1 2
7
3
4 5 6
1. Original Cover (KA-3511PC)
Holds an original.
2. Reversing Automatic Document Feeder (MR-3018)
Automatically feeds a placed stack of originals one by one to have them copied.
3. Bridge Unit (KN-3500)
Acts as a relay for the finisher and this equipment.
4. Large Capacity Feeder (KD-1019)
2
This feeder enables you to feed up to 2500 sheets (80 g/m
), 2000 sheets (90 g/m2) of A4
paper.
5. Paper Feed Pedestal (KD-1018)
Adds one drawer to the equipment.
6. Additional Drawer Module (MY-1031)
Enables one drawer to be added to the Paper Feed Pedestal.
7. Finisher (MJ-1101)
This finisher enables sort/group finishing and stapling. The Hole Punch Unit (optional,
MJ-6101) can be installed to this finisher. The Bridge Unit (optional, KN-3500) is required for
the installation of this finisher.
34 Description of Each Component
Page 37

8. Saddle Stitch Finisher (MJ-1030)
This finisher enables saddle stitching, in addition to sort/group finishing and stapling. The
Hole Punch Unit (optional, MJ-6004) can be installed to this finisher. The Bridge Unit
(optional, KN-3500) is required for the installation of this finisher.
9. Hole Punch Unit (MJ-6101)
This unit enables you to punch holes on printouts. It can be used by installing it on the Finisher (MJ-1101).
10. Hole Punch Unit (MJ-6004)
This unit enables you to punch holes on printouts. It can be used by installing it on the Finisher (MJ-1030).
Other options available are as follows. Contact your service technician or Toshiba product distributors for details.
Work Table (KK-3511)
This is a small table for placing originals while the equipment is operated.
y Installed on the right-hand side of the equipment
y Cannot be installed with e-BRIDGE ID Gate at the same time
FAX Unit (GD-1210)
This is a unit for using the equipment as a Fax.
y Installed inside of the equipment
2nd Line for Fax Unit (GD-1160)
This unit enables to add a line to the Fax to make it 2nd line.
y Installed inside of the equipment
y The Fax Unit (GD-1210) is necessary.
Data Overwrite Kit (GP-1060)
This is a kit to delete the temporarily stored data when copy, print, scan, Fax, internet Fax and
network Fax are performed.
y Installed inside of the equipment
512 MB Expansion Memory (GC-1250)
This memory enables the B4, A3 and FOLIO (LD, LG, 13" LG, COMP) size originals to be
scanned with the slim PDF format.
y Installed inside of the equipment
256 MB Expansion Memory (GC-1260)
This memory enables scanning in the full colour, auto colour and image smoothing mode with
600 dpi.
y Installed inside of the equipment
Wireless LAN Module (GN-1041)
This module enables the equipment to be used in a wireless LAN environment.
y Installed inside of the equipment
y The Antenna (GN-3010) is necessary.
y The equipment cannot be connected to the wireless and wired LAN at the same time.
Bluetooth Module (GN-2010)
This module enables the Bluetooth printing.
y Installed inside of the equipment
y The Antenna (GN-3010) is necessary.
Description of Each Component 35
Page 38

1 BEFORE USING EQUIPMENT
Antenna (GN-3010)
This is used when the Wireless LAN module and Bluetooth Module are installed.
y When the Wireless LAN module (GN-1041) is installed, it is placed on the back right side of
the equipment.
y When the Bluetooth Module (GN-2010) is installed, it is placed on the back left side of the
equipment.
36 Description of Each Component
Page 39

Control panel
Use the buttons on the control panel for various operations and settings through the equipment.
1. [HELP] button
Use this button to display a desired operation procedure.
2. [USER FUNCTIONS] button
Use this button for paper size or media type setting of drawers, and registration of the copy,
scan and FAX settings (including a default setting change.) See the User Functions Guide
for the functions enabled by this button.
3. [TEMPLATE] button
Use this button to store and recall frequently used copy, scan, and FAX settings.
4. [EXTENSION] button
Any operation with this button is invalid at present. This button is to extend functions in the
future.
5. [e-FILING] button
Use this button to access saved image data.
6. [SCAN] button
Use this button to use the scanning function.
7. [COPY] button
Use this button to use the copier function.
8. [FAX] button
Use this button to use the FAX / Internet FAX function.
9. PRINT DATA / MEMORY RX / FAX communication lamps
These lamps show the status of FAX data reception and FAX communication.
Description of Each Component 37
Page 40

1 BEFORE USING EQUIPMENT
10. [INTERRUPT] button
Use this button to interrupt the copy job in process and perform another one. The interrupted
job is resumed by your pressing this button again.
11. [JOB STATUS] button
Use this button to confirm each job status, printing status, and FAX transmission/reception
status of a print job, scan job and FAX job. ( P.262 “Job Status”)
12. [ACCESS] button
Use this button when the department code or user information has been set. If this button is
pressed after copying, the next user cannot use functions such as copying without keying in
the department code or user information. See the User Functions Guide for the department
and user management.
13. [ENERGY SAVER] button
Use this button when you want to shut down the equipment or when you want the equipment
enter into the energy saving mode. When you press this button, the menu for the energy
saving mode appears. Press the [SLEEP] button on this menu to enter into the energy saving mode and press the [SHUTDOWN] button to shut down the equipment.
14. [FUNCTION CLEAR] button
When this button is pressed, all selected functions are cleared and returned to the default
settings.
15. [STOP] button
Use this button to stop any scanning and copying operations in progress.
16. [START] button
Use this button to start copying, scanning and FAX operations.
17. [CLEAR] button
Use this button to correct numbers keyed in, such as the copy quantity.
18. ERROR lamp
This lamp lights when an error occurs and the equipment needs some actions to be taken.
19. [MONITOR/PAUSE] button
Use this button only when a FAX Unit (optional) is installed. (See the Operator’s Manual for
Facsimile Function for details.)
20. Digital keys
Use these keys to enter any numbers such as the copy quantity.
21. Touch panel
Use this panel for the various settings of each function of the copier, scanner and FAX. This
panel also indicates the status of the equipment, such as when you run out of paper or there
is a paper jam.
38 Description of Each Component
Page 41

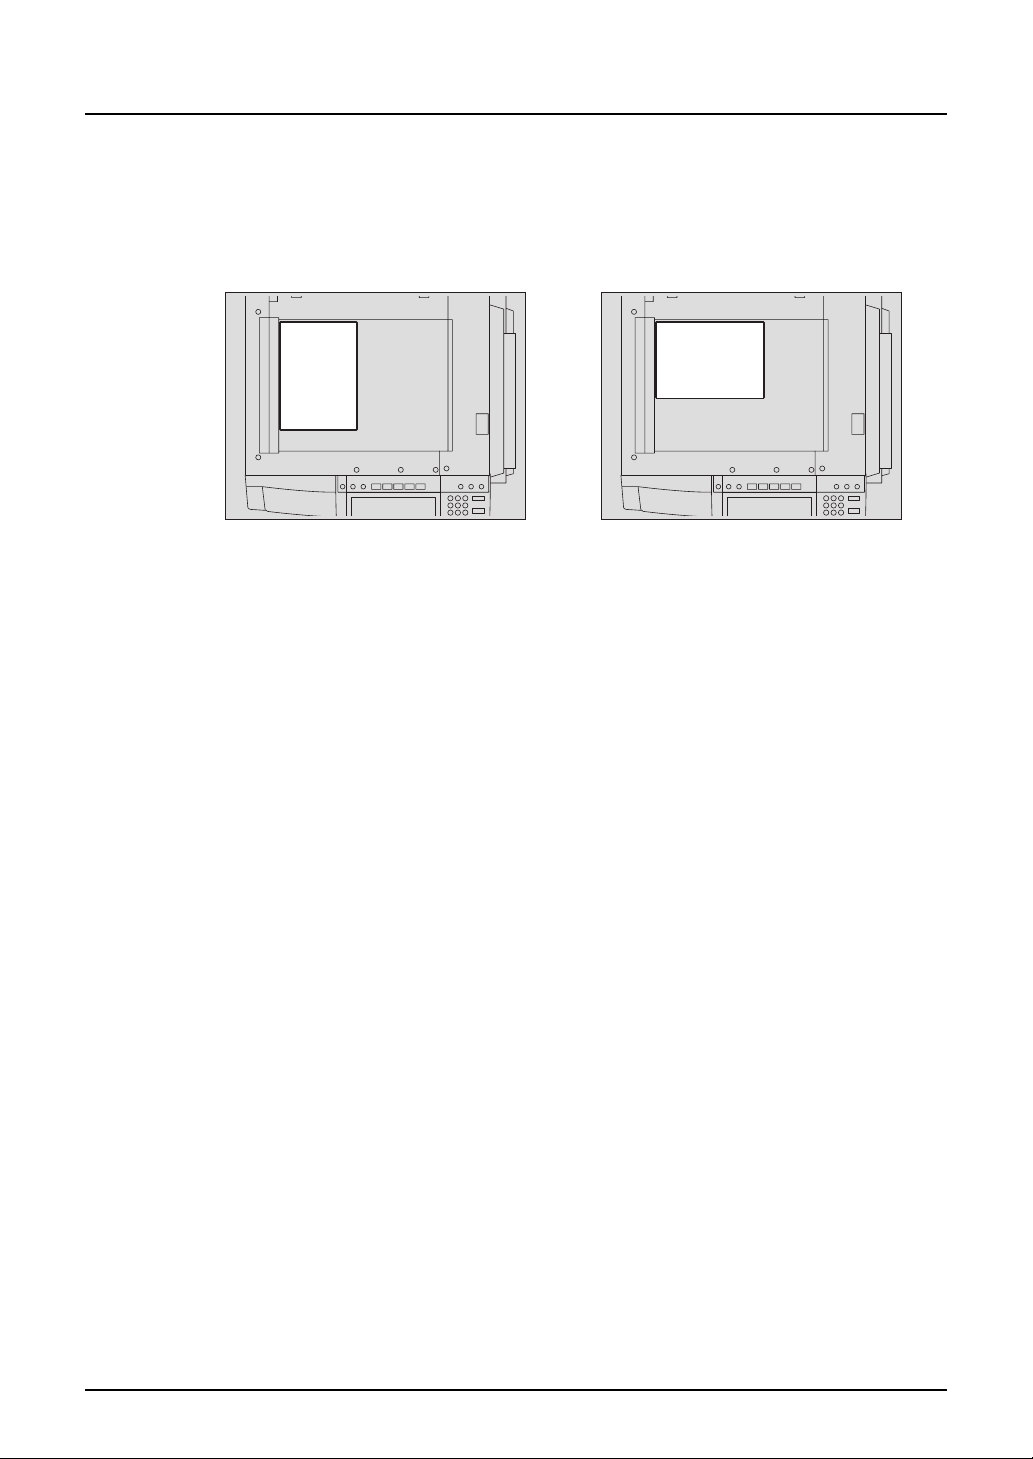
Adjustment of the angle of the control panel
When adjusting the angle of the control panel
The angle of the control panel is adjustable at any angle between 7 and 45 degrees from the
horizontal position.
When changing the angle of the control panel, be careful not to catch your hands in the gap
between the equipment and the control panel. This could injure you.
When fixing the angle of the control panel
The angle of the control panel can be fixed by using the stopper on the backside of the control
panel (at 7 degrees from the horizontal position). The stopper is located on A when the equipment is set up. Move it from the position A to B before fixing it.
A: The position where the angle is adjustable.
B: The position where the angle is fixed.
A
B
Description of Each Component 39
Page 42

1 BEFORE USING EQUIPMENT
Slide the stopper (in the posi-
1
tion A) slightly to the right, and
then pull it out.
Fit the latches of the stopper in
2
the hole of the position B and
insert them turning the stopper itself.
Shift the stopper to the left
3
until it clicks.
The angle of the control panel is fixed at
7 degrees.
40 Description of Each Component
Page 43

Touch panel
When the power is turned on, the basic menu for the copier function appears on this touch
panel. The status of the equipment is also displayed on the touch panel with messages and illustrations.
1. Message 10. Original mode button
2. Reproduction ratio 11. [PROOF COPY] button
3. Number of copy sets 12. Density adjustment buttons
4. APS/AMS* or currently selected paper size 13. Simplex / duplex button
5. Remaining paper level 14. Colour mode button
6. Date and time 15. Paper source selection buttons
7. [SETTINGS] button 16. Equipment status indication area
8. Finisher button 17. Function setting area
9. Enlargement/Reduction ([Zoom...]) button 18. Index buttons
* APS: Automatic paper selection, AMS: Automatic magnification selection
2 3 654
YYYY.MM.DD
7
8
9
10
11
12
18
17
1
13
1416 15
Message display
The following information appears at the top of the touch panel:
Equipment status, operational instructions, cautionary messages, reproduction ratios, number of
copy sets, paper size of a selected drawer, amount of paper in a selected drawer and date and
time.
Touch-buttons
Press these buttons on the touch panel lightly to set various functions.
Index buttons
Press these buttons to switch menus. The type and number of the index buttons vary depending
on the function of the copier, scanner and e-Filing.
Function setting area
This area includes buttons for selecting and setting each function.
[SETTINGS] button
Press this button to confirm currently set functions.
Description of Each Component 41
Page 44

1 BEFORE USING EQUIPMENT
(An example is shown below.)
Buttons appearing on the various menus are as follows (some buttons may not appear on the
menu):
42 Description of Each Component
Page 45

Clearing functions selected
When you press the selected button, the function which has been selected is cleared. Or the
selected setting is cleared automatically by the automatic function clear* when the equipment
has been left inactive for a specified period of time.
* Automatic function clear:
This function works when a specified period of time has passed since the last paper exit or the
last entry of any button. This function returns all the function settings to default without the need
to press the [FUNCTION CLEAR] button. When the department or user management function is
being used, the display returns to the department code or user information input menu. When
these functions are not being used, the display returns to the basic menu of the copier function.
The period for the automatic function clear is set at 45 seconds by default at the time of installation of the equipment. See the User Functions Guide for change of this setting.
Adjusting the contrast of the touch panel
Turn this adjustment volume on the left side of the control panel to adjust the contrast of the
touch panel.
Description of Each Component 43
Page 46

1 BEFORE USING EQUIPMENT
Setting letters
The following menu appears when any letter entry is required for the operations of scanning, eFiling, template and Internet FAX.
Use the buttons on the touch panel for letter entry and use the digital keys on the control panel
for number entry.
The following buttons are used for letter entry.
[Space]: Press this to enter a space.
[CANCEL]: Press this to cancel the entry of letters.
[ENTER]: Press this to fix all entered letters.
[Back Space]: Press this to delete the letter before the cursor.
: Press them to move the cursor.
[Shift]: Press this to enter capital letters.
[Caps Lock]: Press this to switch capital letters and small letters.
[Next]: Press this to access the special keys.
44 Description of Each Component
Page 47

Preparation 1- Turning Power On/Off
Turning power on
Open the switch cover, and then turn the power switch on.
y The equipment starts warming-up. “Wait Warming Up” appears during warming-up.
y While the equipment is warming up, you can use the auto job start function.
( P.82 “Scanning the next originals during copying (Auto job start)”)
The equipment will be ready for copying after about 99 seconds and “READY” appears.
When you turn the power of the equipment OFF, do not simply turn the power switch to turn it off
but be sure to shut it down.
P.50 “Turning power off (Shutdown)”
When the use of the equipment is managed under department management or user management function, you need to enter the department code or user information before making a copy.
For details, see P.46 “When department or user management is used”.
Preparation 1- Turning Power On/Off 45
Page 48

1 BEFORE USING EQUIPMENT
When department or user management is used
When the use of the equipment is managed under department management or user management function, each user needs to enter the department code or user information.
Department management
You can restrict users or manage copy volumes made by an individual group or department in
your company using the department codes. When the copy volume is controlled under the
department code, enter the code after turning the power on. See the User Functions Guide for
setting and registration of the department codes.
When the power is turned on, the following menu appears.
This menu also appears when the [ACCESS] button is pressed or the automatic function clear
has worked.
Key in a department code (5 digits) previously registered and press the [ENTER] button. The
menu will switch and the equipment will be ready to be used.
If the department code keyed in is incorrect, the menu does not change. In this case, press the
[FUNCTION CLEAR] button and then key in the correct code.
When copying is finished
When you finish all operations, press the [ACCESS] button to prevent unauthorized use of the
equipment. The display returns to the department code input menu.
46 Preparation 1- Turning Power On/Off
Page 49

User management
Users of the equipment can be limited and the available functions and past record of each user
can be controlled by using the user management function. When the equipment is managed
under this function, turn the power of the equipment ON and enter the information required (e.g.
user name, password) to use the equipment. The menu for entering user information also
appears when you pressed the [ACCESS] button on the control panel or automatic function
clear has worked. Enter the information following the procedure below.
The menu for user authentication appears.
1
MFP local authentication, LDAP authentication
Windows Domain Authentication
The domain name previously set by the network administrator is displayed in [DOMAIN].
If the domain name belonging to your organization is not displayed, press the [DOMAIN]
button and select it.
Preparation 1- Turning Power On/Off 47
Page 50

1 BEFORE USING EQUIPMENT
Press the [USER NAME] button.
2
Enter the user name (maximum 128 letters) and then press the
3
[ENTER] button.
Press the [PASSWORD] button.
4
48 Preparation 1- Turning Power On/Off
Page 51

Enter the password (maximum 64 letters) and then press the
5
[ENTER] button.
Press the [ENTER] button.
6
The menu will switch and the equipment will be ready to be used.
If the user information is incorrectly entered, the menu will not switch. In this case, press
the [FUNCTION CLEAR] button and then enter it again.
Displaying the available number of copies
The amount is determined by how many copies the user ( ) or the department ( ) has
remaining and the smaller of the two numbers is displayed.
The number appears for 5 seconds on the upper right of the screen.
COLOUR: Available number of copies for colour copying
BLACK: Available number of copies for black-and-white copying
The display differs depending on the management setting of this equipment.
When copying is finished
When you finish all operations, press the [ACCESS] button to prevent unauthorized use
of the equipment. The display returns to the one for entering user information.
Preparation 1- Turning Power On/Off 49
Page 52

1 BEFORE USING EQUIPMENT
Preparation 2- Turning power off (Shutdown)
Turning power off (Shutdown)
When turning OFF the power of the equipment, be sure to shut it down following the procedure
below. Make sure to check the following three points before shutdown. Be sure to confirm the
following three points before shutdown.
y No jobs should be left in the print job list. ( P.262 “Job Status”)
y None of the PRINT DATA, MEMORY RX and FAX communication lamps should be blinking.
(If the equipment is shut down while any of the above lamps is blinking, jobs in progress
such as FAX reception will be aborted.)
y No PC should access the equipment via the network.
y Do not press the power switch to turn the power OFF, otherwise the stored data may be lost
or the hard disk may be damaged.
y When the equipment is shut down, the job in progress is cleared.
Press the [ENERGY SAVER/
1
SHUT DOWN] button on the
control panel.
Press the [SHUTDOWN] button on the touch panel.
2
To cancel the shutdown operation, press the [CANCEL] button.
50 Preparation 2- Turning power off (Shutdown)
Page 53

“Shutdown in progress” appears on the menu. After a while, the
3
equipment is shut down and the power is turned OFF.
The power switch automatically returns to the OFF position.
Turning the power off (Shutting down) with the [USER
FUNCTIONS] button
The equipment can also be shut down by following the procedure below.
Press the [USER FUNCTIONS]
1
button on the control panel.
Press the [USER] button on the touch panel to enter the user set-
2
ting menu, and then press the [SHUTDOWN] button.
Preparation 2- Turning power off (Shutdown) 51
Page 54

1 BEFORE USING EQUIPMENT
“Processing job will be deleted. Are you sure you want to shut-
3
down?” appears on the menu. Press the [YES] button.
To cancel the shutdown operation, press the [NO] button.
“Shutdown in progress” appears on the menu. After a while, the
4
equipment is shut down and the power is turned OFF.
The power switch automatically returns to the OFF position.
Energy Saving Mode
This equipment supports two energy saving modes; the Automatic Energy Save mode and the
Sleep Mode.
Automatic Energy Save
The equipment enters the Automatic Energy Save mode automatically after a specified period of
time*1 since its last use. During this mode, “Saving energy – Press START button” appears on
the touch panel.
Sleep Mode
The equipment enters the Sleep Mode automatically after a specified period of time*2 since its
last use. During this mode, the message of the Automatic Energy Save mode disappears and
the [ENERGY SAVER / SHUTDOWN] button lights in green.
These modes are automatically cleared upon the reception of print data, Fax data, Internet Fax
data or E-mails. They are also cleared by pressing the [START] button.
Note 1: This period is set at 15 minutes by factory default.
Note 2: This period is set at 60 minutes for the e-STUDIO2500c/3500c and 90 minutes for the e-
STUDIO3510c by factory default.
Contact your service representative to change the default settings noted above.
52 Preparation 2- Turning power off (Shutdown)
Page 55

Press the [ENERGY SAVER/
1
SHUT DOWN] button on the
control panel.
Press the [SLEEP] button on the touch panel.
2
The equipment enters into the sleep mode. During this mode, the display on the touch
panel disappears and the [ENERGY SAVER/SHUT DOWN] button lights in green.
To cancel the energy saving mode
Press the [START] button on the control panel. The sleep mode is cleared and the equipment
will be ready for copying.
The sleep mode is also cleared by pressing any button of [ENERGY SAVER], [COPY], [SCAN],
[FAX] and [e-FILING].
Preparation 2- Turning power off (Shutdown) 53
Page 56

1 BEFORE USING EQUIPMENT
Preparation 3- Setting Copy Paper
Acceptable copy paper
Feeder Paper type Paper size Maximum sheet capacity
Drawers (Including
optional drawers)
Plain paper
(64 - 105 g/m
Recycled paper
(64 - 105 g/m
Thick 1
(106 - 163 g/m
Large Capacity
Feeder (optional)
Plain paper
(64 - 105 g/m
Bypass tray Plain paper
(64 - 105 g/m
Thick 1
(106 - 163 g/m
Thick 2
(164 - 209 g/m
Thick 3
(210 - 256 g/m
Sticker labels
Water proof paper 30 sheets
OHP film (Standard size)
*1 Automatic duplex copying is not available.
*2 Use Thick 2 mode for sticker labels.
(Standard size)
2
A/B format:
)
A3, A4, A4-R, A5-R, B4,
B5, B5-R, FOLIO
LT format:
2
)
LD, LG, LT, LT-R, ST-R,
COMP, 13"LG, 8.5"SQ
K format:
8K, 16K, 16K-R
2
)
(Standard size)
2
A4, LT
)
(Standard size)
2
A/B format:
)
A3, A4, A4-R, A5-R, A6-R,
B4, B5, B5-R, FOLIO,
2
305 x 457 WIDE
)
LT format:
LD, LG, LT, LT-R, ST-R,
2
)
COMP, 13"LG, 8.5"SQ,
12" x 18" FULL
2
K format:
)
8K, 16K, 16K-R
(Non-Standard size)
Length: 100 - 297 mm,
Width: 148 - 432 mm
A4 only
600 sheets (64 g/m
550 sheets (80 g/m
2
)
2
)
450 sheets (81 - 105 g/m
300 sheets
3000 sheets (64 g/m
2500 sheets (80 g/m
2
)
2
)
2000 sheets (81 - 105 g/m
100 sheets (64 - 80 g/m
80 sheets (81 - 105 g/m
2
2
40 sheets
40 sheets *
30 sheets *
*1, *2
30 sheets
1
1
*1
2
)
2
)
)
)
y Multiple paper sizes cannot be set in one drawer.
y “Maximum sheet capacity” refers to the maximum number of sheets when Toshiba-recom-
mended paper is set.
y Be sure that the paper height does not exceed the line indicated inside of the guide.
y “LT format” is the standard size for only use in North America.
y “K format” is a Chinese standard size.
Abbreviations for paper sizes:
LT: Letter, LD: Ledger, LG: Legal, ST: Statement, COMP: Computer, SQ: Square
54 Preparation 3- Setting Copy Paper
Page 57

Recommended paper
To make copies with a fine colour image, the following types of paper are recommended.
If you wish to use copy paper other than the recommended types, consult your service technician.
Paper type Toshiba recommendations/Manufacturer Mode
Plain paper ColourCopy/mondi
Thick
Sticker labels 3478/Zweckform-Avery - THICK2
*1
Transparencies
Water proof paper Water Proof Paper Duplex/
*1 Only Toshiba-recommended OHP film should be used. Using any other film may cause a malfunction.
BG72/FOLEX - TRANSPARENCY
TOMOEGAWA PAPER
AquaAce/Verbatim
90 g/m
100 g/m
120 g/m
160 g/m
200 g/m
220 g/m
250 g/m
230 g/m
230 g/m
2
2
2
2
2
2
2
2
2
PLAIN
THICK1
THICK2
THICK3
SPECIAL1
SPECIAL2
Handling and storing paper
Pay attention to the following points:
y Avoid using paper that is specially treated or previously printed on another machine, and
also avoid performing double copying on the same side of the paper, since this may cause a
malfunction.
y Do not use paper with creases, wrinkles or curls, paper prone to curling, smooth or rough
paper; this may cause paper misfeeds.
y Paper should be wrapped in its wrapping and stored in a damp-free place.
y To prevent paper from being folded or bent, store it evenly on a flat surface.
Preparation 3- Setting Copy Paper 55
Page 58

1 BEFORE USING EQUIPMENT
Setting copy paper (size change)
When you set or add copy paper in the drawer, follow the procedure below.
Placing paper in the drawer
Turn the power on.
1
Pull out the drawer carefully
2
until it comes to a stop.
Push the lower part of the end
3
guide in the direction of the
arrow to remove it, then reinstall it at the desired paper size
(indicated on the bottom inner
surface on the drawer).
Push the arrow part (right side)
4
of the side guide to unlock it.
56 Preparation 3- Setting Copy Paper
Page 59

While pushing the green lever
5
of the side guide in the direction of the arrow, set the side
guide to the desired paper
size.
Adjust the side guides with both hands.
Push the arrow part (left side)
6
to lock the side guide.
Preparation 3- Setting Copy Paper 57
Page 60

1 BEFORE USING EQUIPMENT
Place paper in the drawer(s).
7
y Place paper with its copy side up. (The copy side may be described on the wrapping
paper.)
y For the maximum number of sheets that can be set, see P.54 “Acceptable copy
paper”.
y Fan the paper well before placing it in the drawer.
y Be sure that the paper height does not exceed the line indicated inside of the guide.
y Do not use creased, folded, wrinkled or damp sheets of paper.
Make sure that a gap of 0.5 mm (1.0 mm or less
in total) is left between the paper and the side
guide for plain paper, and approx. 0.5 mm to 1.0
mm (approx. 1.0 mm to 2.0 mm in total) for thick
paper. If the gap is insufficient, it could cause
paper misfeeding.
A
58 Preparation 3- Setting Copy Paper
Page 61

Push the drawer straight into the equipment until it comes to a
8
stop.
Be sure to close the drawer securely and carefully.
Be careful not to let your fingers be caught when closing the drawer. This could injure
you.
When the paper size is differ-
9
ent from the one in the drawer,
change the paper size indicator to match with the size of
paper which has been set.
When the paper size is different from the one in the drawer, press
10
the [YES] button. When the paper is the same size as the one in the
drawer, press the [NO] button. (When you press the [NO] button,
you do not need to continue with step 11 and subsequent steps.)
Press the paper size button corresponding to the paper that has
11
been set in the drawer.
Preparation 3- Setting Copy Paper 59
Page 62

1 BEFORE USING EQUIPMENT
When you want to change the setting of the drawer for special uses
12
( P.62), press the paper type button.
Press the [ENTER] button.
13
60 Preparation 3- Setting Copy Paper
Page 63

Changing the setting of paper size
If the setting of the paper size registered in the equipment does not correspond to the one in the
drawer, it could cause a paper jam. In this case, change the setting of the paper size according
to the following procedure.
Press the [USER FUNCTIONS]
1
button on the control panel.
Press the [USER] button on the touch panel to enter the user set-
2
ting menu and then press the [DRAWER] button.
Press the drawer on the touch panel corresponding to the one in
3
which the paper size has been set, and then press the button indicating the new one.
Preparation 3- Setting Copy Paper 61
Page 64

1 BEFORE USING EQUIPMENT
Drawer for special uses
When you set paper for special uses other than normal copying (e.g. sheets for cover copying)
in the drawer, you need to set this drawer for the special use in advance. If the drawer has been
set for a special use, its indication will change on the touch panel. A drawer with this setting will
not be used for normal copying.
The following paper types are selectable according to each purpose.
Paper type Purpose Indication Reference
Cover sheet Sheet used in the cover copying mode P.180 “COVER
Insertion sheet Sheet used in the sheet insertion mode
(Up to 2 drawers can be set for this mode.
First, set Insert source 1, then press the
drawer for the paper type of Insert source
2, and then press the [INSERT] button.)
FAX paper Fax paper (Fax Unit (optional) is required
for the Fax function.)
Special paper Special types of paper
(e.g. Paper with a watermark)
Thick 1 Sheet used when its weight is between
106g/m
other paper types.
Recycled paper It can be set with other paper types.
2
and 163g/m2. It can be set with
(or
SHEET”
P.183 “SHEET
INSERTION”
)
(See the manual of each
option.)
-
P.54 “Acceptable copy
paper”
Setting the drawer for special uses
Place paper in the drawer(s).
1
y Place paper with its copy side up.
y Set the paper size as required. ( P.61 “Changing the setting of paper size”)
Press the [USER FUNCTIONS]
2
button on the control panel.
62 Preparation 3- Setting Copy Paper
Page 65

Press the [USER] button on the touch panel to enter the user set-
3
ting menu, then press the [DRAWER] button.
Press the desired drawer and [MEDIA TYPE] button on the touch
4
panel.
Press the paper type button.
5
E.g.: When Thick paper 1 is set in the 1st drawer and used as a cover sheet
Press the [RETURN] button three times or the [COPY] button on the control panel to
return to the basic menu.
Preparation 3- Setting Copy Paper 63
Page 66

1 BEFORE USING EQUIPMENT
Clearing the drawer for special uses
Follow steps 1 to 3 of “Setting the drawer for special uses”
1
( P. 6 2) .
Press the drawer on the touch panel corresponding to the one
2
whose setting you want to clear, and then press the [MEDIA TYPE]
button.
Press the paper type button corresponding to the one placed in the
3
drawer you selected in step 1.
The paper type setting is cleared and the indication of drawer returns to the original state.
y When both Insertion sheet 1 and 2 have been set and only the setting of Insertion
sheet 1 is cleared, the drawer for Insertion sheet 2 changes to the one for Insertion
sheet 1.
y The paper type set in the drawer can be checked with the icons on the basic menu.
64 Preparation 3- Setting Copy Paper
Page 67

Placing paper in the Large Capacity Feeder (optional)
Pull out the Large Capacity
1
Feeder carefully.
Pull out the drawer until it comes to a
stop.
Place paper in A and B.
2
A
B
y Place paper with its copy side up. (The copy side may be described on the wrapping
paper.)
y For the maximum number of sheets that can be set, see P.54 “Acceptable copy
paper”.
y Be sure that the paper height does not exceed the line indicated on the side guide.
y Fan and jog the paper well before placing it on the drawer. Set the paper for A to the
right side, and set that for B to the left side. (The paper can be set neatly if you pile it
up gradually and alternately in A and B.) Be sure that the centre lever is not open
(see the labels attached in the Large Capacity Feeder).
y Paper starts being fed out of the elevator tray (A) at first. When the paper on A has
run out, the paper on B moves to the position of A and starts being fed.
y Do not use wrinkled, folded or damp sheets of paper.
Push the drawer of the Large Capacity Feeder straight into the
3
equipment until it comes to a stop.
Close the drawer completely. The elevator tray automatically moves up to the paper
feeding position.
Be careful not to let your fingers be caught when closing the drawer. This could injure
you.
To change the paper type, see P.61 “Changing the setting of
4
paper size”.
Preparation 3- Setting Copy Paper 65
Page 68

1 BEFORE USING EQUIPMENT
66 Preparation 3- Setting Copy Paper
Page 69

2.HOW TO MAKE COPIES
This chapter explains the basic copying procedures.
Setting Originals .....................................................................................................68
Acceptable originals ..........................................................................................................................68
Placing originals on the glass............................................................................................................70
Using the Reversing Automatic Document Feeder (optional) ...........................................................72
Making Copies.........................................................................................................76
Initial (Default) settings......................................................................................................................76
Copying procedure............................................................................................................................77
Scanning the next originals during copying (Auto job start)..............................................................82
Interrupt copying in progress and make other copies (Interrupt copying) .........................................84
Bypass Copying......................................................................................................85
Bypass copying.................................................................................................................................85
Bypass copying on standard size paper............................................................................................86
Bypass copying on non-standard size paper ....................................................................................91
Proof Copy...............................................................................................................95
Page 70

2 HOW TO MAKE COPIES
Setting Originals
Acceptable originals
Acceptable originals are as follows.
Setting position Type of original
Original glass
Reversing Automatic
Document Feeder
(optional)
*2 *3
*1 Do not place any heavy objects (4 kg or over) on the glass.
*2 Some originals cannot be used depending on their paper quality.
*3 Be sure to place A5-size originals in the landscape direction.
Automatic size detection does not work properly when LT or K format paper is used for printing.
(LT format is a standard paper size for North America.) (K format is a standard paper size for
China.)
*1
Sheets
3-dimensional
object
Books
Plain paper
Recycled paper
1-sided originals:
35 - 157 g/m
2-sided originals:
50 - 157 g/m
2
2
Maximum
size
Length: 297 mm
Width: 432 mm
Length: 297 mm
Width: 432 mm
Acceptable sizes for automatic
size detection
(Standard size)
A3, A4, A4-R, A5-R, B4, B5, B5-R
(Standard size)
A3, A4, A4-R, A5-R, B4, B5, B5-R,
FOLIO
y Originals up to 100 sheets (80 g/m2), 80 sheets (90 g/m2) or 16 mm in height can be placed
on the Reversing Automatic Document Feeder (optional), regardless of their sizes.
y When you copy a large number of landscape originals using the Reversing Automatic Docu-
ment Feeder (optional), use the original stopper to prevent them from being scattered.
68 Setting Originals
Page 71

Maximum number of sheets for scanning
A maximum of 1000 A4 sheets, or up until the memory becomes full can be accepted per 1 copy
job.
When the number of scanned sheets has exceeded the above limit, a message “The number of
originals exceeds the limits. Will you copy stored originals?” appears. If you want to print out the
data of originals stored (scanned) up till then, press the [YES] button on the touch panel. If you
want to delete the stored data, press the [NO] button.
Setting Originals 69
Page 72

2 HOW TO MAKE COPIES
Placing originals on the glass
Sheet originals
Do not place heavy objects (4 kg or more) on the original glass and do not press on it with force.
Breaking the glass could injure you.
Raise the original cover or Reversing Automatic Document Feeder
1
(optional).
Raise it 60 degrees or more for detecting the original.
Place the original with its face
2
down on the original glass and
align it against the left rear corner of the glass.
A: Original
A
Lower the original cover or
3
Reversing Automatic Document Feeder (optional) carefully.
y When you want to copy originals with
high transparency such as OHP films
or tracing paper, place a blank sheet
of paper, the same size as the origi-
nal or larger, over the original.
A: Original
B: Blank sheet
B
A
70 Setting Originals
Page 73

Book-type originals
Do not place heavy objects (4 kg or more) on the original glass and do not press on it with force.
Breaking the glass could injure you.
Raise the original cover or Reversing Automatic Document Feeder
1
(optional).
Open the desired page of the
2
original and place it face down.
Align it against the left rear
corner of the glass.
y When you want to use the 2-sided
copying function or the dual-page
function on the book-type originals,
align the centre of the original on the
yellow indicator line of the glass.
( P.130 “Book-type original -> 2-
sided copy”)
( P.166 “DUAL PAGE”)
Lower the original cover or Reversing Automatic Document Feeder
3
(optional) carefully.
y Do not lower the Reversing Automatic Document Feeder forcibly when the original is
very thick. There will be no problem in copying even if the Reversing Automatic Doc-
ument Feeder is not fully lowered.
y Do not look fully at the original glass because intensive light may leak out during
copying.
Setting Originals 71
Page 74

2 HOW TO MAKE COPIES
Using the Reversing Automatic Document Feeder (optional)
Precautions
Do not use the types of original 1 to 8 shown below because such types may
cause misfeeding or damage to the equipment.
1. Badly wrinkled, folded or curled originals
2. Original with carbon paper
3. Taped, pasted or cut-out originals
4. Clipped or stapled originals
5. Originals with holes or tears
6. Damp originals
7. OHP films or tracing paper
8. Coating paper (coated with wax, etc.)
Use types of original 9 and 10 shown below with extra care.
9. Originals which cannot be moved with the fingers, or surface-treated originals
(The sheets of such originals may not be able to be separated.)
10. Folded or curled originals should be smoothed out before being used.
132
5
7849
If the scanning area or the guide area is dirty, image trouble such as black streaks may occur in
the printout. Weekly cleaning of these areas is recommended. ( P.374 “Daily Inspection”)
6
10
72 Setting Originals
Page 75

Continuous feed mode
Align all the originals. Then
1
place them face up and align
the side guides to the original
length.
y Place the originals straight along the
side guides.
y Collate the originals in the order that
you want them to be copied. The top
sheet of the originals will be fed first.
y This mode is also available for one-
sheet originals.
y Regardless of their sizes, originals
are acceptable up to 100 sheets (50
to 80 g/m
y For mixed-size originals, see
P.101 “Copying mixed-sized originals
in one operation (mixed original
size)”.
y Use the original stopper as required.
y To replace the original stopper, lift it
slightly and push it in.
2
) or 16 mm in height.
When the number of originals is too large to be set at one time, you can previously divide
the originals into several sets to copy them continuously. To do so, place the first set of
the originals and press the [CONTINUE] button on the touch panel while the data of this
set are being scanned. When this scanning has finished, set the next set of the originals
and press the [START] button on the control panel.
Setting Originals 73
Page 76

2 HOW TO MAKE COPIES
Single feed mode
To switch over between the continuous feed mode and the single feed mode, see P.196
“ADF / SADF”.
Align the side guides to the
1
original width.
Insert the original with its face
2
up and straight along the side
guides.
The menu of step 3 will be displayed.
The original will be pulled in automatically. Be sure to let go of it when it starts being
pulled.
If there are more originals, set them in the same way.
3
The same operation is performed whether or not you press the [YES] button.
74 Setting Originals
Page 77

After all originals have finished being fed, press the [FINISHED]
4
button.
If the [FINISHED] button is not pressed, copying is started when the automatic function
clear is operated.
P.43 “Clearing functions selected”
Setting Originals 75
Page 78

2 HOW TO MAKE COPIES
Making Copies
Initial (Default) settings
When the power is turned on, when the energy saving mode is cleared, and when the [FUNCTION CLEAR] button on the control panel is pressed, various setting items are automatically set.
These items are called the initial (default) settings. Set originals after placing paper or confirming
that there is paper in the drawers. When the [START] button on the control panel is pressed with
any of the settings unchanged, copies are made in the initial (default) settings. You can make
copies as desired by setting various copy modes.
The table below lists the various items of the initial settings at the time of installation of this
equipment.
Reproduction ratio 100%
Copy quantity 1
Paper selection Automatic Paper Selection (APS)
Original -> Copy 1-Sided -> 1-Sided
Density adjustment Manual copy density adjustment
Colour mode FULL COLOUR
Original mode TEXT/PHOTO
Finishing mode Placing originals on the original glass: Non-sort/
Feeding mode when originals are placed on the
Reversing Automatic Document Feeder (optional)
These initial settings can be changed as desired. See the User Functions Guide for details.
Item Initial (Default) setting
Non-staple mode
Placing originals on the Reversing Automatic Document Feeder (optional): Sort mode
Continuous feed mode
76 Making Copies
Page 79

Copying procedure
Placing originals on the Reversing Automatic Document
Feeder (optional)
Place paper in the drawer(s).
1
For the types and sizes of paper selectable, see P.54 “Acceptable copy paper”.
When the desired size or type of paper is not in any of the drawers or the Large Capacity
Feeder, see the following pages.
P.56 “Setting copy paper (size change)”
P.65 “Placing paper in the Large Capacity Feeder (optional)”
P.85 “Bypass Copying”
Place the original(s).
2
See the following pages to set the
originals.
P.68 “Acceptable originals”
P.72 “Using the Reversing Automatic
Document Feeder (optional)”
The originals are copied in the order of
being scanned.
Making Copies 77
Page 80

2 HOW TO MAKE COPIES
Select the copy modes as required. When you want to copy more
3
than one set, key in the desired number of copies.
y Press the [CLEAR] button on the control panel to correct the number keyed in.
y Note that some combinations of copy modes are restricted. ( P.389 “Copying Func-
tion Combination Matrix”, P.391 “Image Quality Adjustment Combination Matrix”)
y Once the [START] button on the control panel is pressed, any change in copy modes
(including setting of the previously divided sets of originals) cannot be applied afterward.
Press the [START] button.
4
y Copying starts. The paper exits with
its copied side down.
y When the drawer runs out of paper
during copying, the corresponding
drawer on the touch panel and the
[JOB STATUS] button on the control
panel blink. Add paper to this drawer
or select another one with the same
paper size.
y Be careful because the paper exit
area and paper just after exiting are
hot.
78 Making Copies
Page 81

Placing an original on the original glass
Place paper in the drawer(s).
1
For the types and sizes of paper selectable, see P.54 “Acceptable copy paper”.
When the desired size or type of paper is not in any of the drawers or the Large Capacity
Feeder, see the following pages.
P.56 “Setting copy paper (size change)”
P.72 “Using the Reversing Automatic Document Feeder (optional)”
P.85 “Bypass Copying”
Place the original(s).
2
See the following pages to set the originals.
P.68 “Acceptable originals”
P.72 “Using the Reversing Automatic Document Feeder (optional)”
The originals are copied in the order of being scanned.
Select the copy modes as required. When you want to copy more
3
than one set, key in the desired number of copies.
y Press the [CLEAR] button on the control panel to correct the number keyed in.
y Note that some combinations of copy modes are restricted. ( P.389 “Copying Func-
tion Combination Matrix”, P.391 “Image Quality Adjustment Combination Matrix”)
y Once the [START] button on the control panel is pressed, any change in copy modes
(including setting of the previously divided sets of originals) cannot be applied afterward.
Making Copies 79
Page 82

2 HOW TO MAKE COPIES
Press the [START] button.
4
Copying starts.
When you copy by placing originals on the original glass (e.g. using the sort mode, or
making 1-sided original 2-sided copies), the data of these originals are scanned into the
memory. In this case, proceed to steps 5 and 6.
Place the next original, and press the [START] button.
5
y Data scanning of this original starts.
y The next original will also be scanned in the same manner when you press the [YES]
button on the touch panel, and then press the [START] button on the control panel.
y Repeat the above procedure until the scanning of the last page of the original fin-
ishes.
When scanning of all pages has finished, press the [FINISHED] but-
6
ton on the touch panel.
Copying starts. The paper exits with its copied side down.
80 Making Copies
y When the drawer runs out of paper during copying, the corresponding drawer on the
touch panel and the [JOB STATUS] button on the control panel blink. Add paper to
this drawer or select another one with the same paper size.
y Be careful because the paper exit area and paper just after exiting are hot.
Page 83

Stopping the copying operation
Press the [STOP] button on the control panel to stop scanning or continuous copying.
Press the [STOP] button on the
1
control panel during scanning
(or continuous copying).
When the following menu is displayed, press the [MEMORY
2
CLEAR] button on the touch panel.
y If there is any copy job waiting, this job will start.
y During scanning: The data scanned up to then are deleted.
y During continuous copying: Copying stops and the data scanned up to then are
deleted.
Making Copies 81
Page 84

2 HOW TO MAKE COPIES
Scanning the next originals during copying (Auto job start)
You can reserve a copy job by scanning the original during continuous copying or while “READY
(WARMING UP)” appears.
Place the original(s).
1
Select the copy mode and set the number of copies.
2
Note that the job starts in the copy modes of the previous job unless you set new ones
particularly for this job.
Press the [START] button on
3
the control panel.
y Up to 10 jobs can be stored in the memory. When an 11th job is placed on the original
glass or the Reversing Automatic Document Feeder (optional) and the [START] button is pressed, “Auto Start” appears on the touch panel.
y A maximum of 1000 LT sheets, or up until the memory becomes full can be accepted
per 1 copy job. ( P.69 “Maximum number of sheets for scanning”)
82 Making Copies
Page 85

Confirming and cancelling auto job
Confirming auto job and cancelling job in waiting
Press the [JOB STATUS] button on the control panel to display the job list for confirming the set
auto job and cancelling a job waiting to be copied. To cancel auto jobs, see P.264 “Deleting
print jobs”.
Cancelling auto job
Press the [STOP] button on the control panel to stop a job while originals are being scanned. To
restart the job, press the [START] button. To clear the job, press the [FUNCTION CLEAR] button. (However, the originals which have been scanned before the job is stopped are copied even
though the [FUNCTION CLEAR] button is pressed.)
To cancel the 11th auto job, press the [STOP] button.
Making Copies 83
Page 86

2 HOW TO MAKE COPIES
Interrupt copying in progress and make other copies (Interrupt copying)
While continuous copying is in progress, you can interrupt this job with another copy job. The following features cannot be used together with interrupt copying:
y Cover sheet copying
y Sheet insertion copying
y Store to e-Filing / Copy & File
y Job build
Press the [INTERRUPT] but-
1
ton on the control panel.
The [INTERRUPT] button blinks first,
then lights after “Job interrupted job 1
saved” appears.
When the [INTERRUPT] button is pressed while originals are being scanned, the
[INTERRUPT] button blinks first. Then the button lights after “Job interrupted job 1 saved”
appears when the scanning is finished.
Replace the original with a new one.
2
Set other copy modes as required.
Press the [START] button on the control panel.
3
After you have finished the interrupt copying, press the [INTER-
4
RUPT] button again.
The message “READY to resume job 1” appears and the interrupted job resumes.
Interrupt copying is automatically cancelled after a certain period by automatic function
clearing without the need to press the [INTERRUPT] button again. The interrupted job (=
Job 1) resumes after this automatic function clearing.
84 Making Copies
Page 87

Bypass Copying
Bypass copying
When you want to make copies on OHP film, sticker labels, or non-standard size paper, place
the sheets of paper on the bypass tray. Bypass copying is also recommended for copying on
standard size paper which is not in any of the drawers.
If you select the paper size, you can utilize various functions such as the automatic paper selection (APS) or the automatic magnification selection (AMS). For the details, see P.389 “Copying Function Combination Matrix”.
To carry out bypass copying, open the bypass tray.
The operating procedure of bypass copying differs depending on the paper size used. See the
corresponding page for the operating procedure of each size. The table below shows these
pages.
Paper size Procedure
Standard size
Others (Non-standard size) P. 9 1
y Bypass copying stops when the paper placed on the bypass tray runs out during copying,
even if the same size paper is in any of the drawers. Copying is resumed when paper is supplied to the bypass tray.
y When bypass copying has completed, the [FUNCTION CLEAR] button on the control panel
blinks. Press this button to switch it to default copying using the drawers. (Bypass copying is
automatically cancelled after a certain period by automatic function clearing without the need
to press the [FUNCTION CLEAR] button. The bypass copying returns to default copying
using the drawers after this automatic function clearing.)
A3, A4, B4, B5 P. 8 6
Other than the above P. 8 9
Bypass Copying 85
Page 88

2 HOW TO MAKE COPIES
Bypass copying on standard size paper
Copying on A3, A4, B4 and B5 size paper
Place some sheets of paper
1
with their copy side down on
the bypass tray. Align the side
guides to the paper length
while holding A.
The message “Ready for bypass
feeding” appears.
A
B
y Rear side of the side guides of the bypass tray has an indicator for paper height. The
height of the sheets must not exceed this indicator.
y When you use more than one sheet, fan the sheets well before setting them on the
tray.
y Do not push the sheets into the entrance of the bypass feeder; this may cause a
paper jam.
y When the paper size is larger, draw out the three-stage paper holder. Raise B when
you use A3 or a larger size of paper.
Place the original(s).
2
86 Bypass Copying
Page 89

Press the button of the same size as the one of the paper you have
3
set on the tray.
If the paper size is not specified here, some operations may slow down the copying.
Press the [MEDIA TYPE] button on the touch panel if the media type
4
of the paper you have set on the tray is other than plain paper.
Press the button of the same media type as the one of the paper
5
you have set on the tray, and then press the [ENTER] button on the
touch panel.
y Set other copy modes as required.
y If a media type which is not same as the one you have set is selected here, this may
cause a paper jam or significant image trouble.
Bypass Copying 87
Page 90

2 HOW TO MAKE COPIES
y When you want to make 1-sided copies on THICK2, THICK3, SPECIAL1 or
SPECIAL2 paper, select (FRONT) for the paper. Select (BACK) for making 2-sided
copies on that paper.
e.g.: When making a 2-sided copy on a THICK3 paper
1. Place a sheet of THICK3 paper on the bypass tray.
2. Select THICK3 (FRONT) and make a 1-sided copy.
3. Place the paper copied at step 2 on the bypass tray again with its blank side
4. Select THICK3 (BACK) and make a copy.
y The paper type which has been set can be confirmed with the touch panel.
face down.
If you place the paper on the bypass tray with its top to bottom direction
unchanged, the original is copied in 'open to left', and if you place it with its top
to bottom direction changed, the original is copied in 'open to top'.
- When you want to make 2-sided copies on PLAIN, RECYCLED PAPER or
THICK1, use the Automatic Duplexing Unit of the equipment.
- OHP films cannot be copied 2-sided.
PLAIN -- TRANSPARENCY
THICK1 RECYCLED PAPER
THICK2 (FRONT) SPECIAL1 (FRONT)
THICK2 (BACK) SPECIAL1 (BACK)
THICK3 (FRONT) SPECIAL2 (FRONT)
THICK3 (BACK) SPECIAL2 (BACK)
Press the [START] button on the control panel.
6
When you copy on OHP films, remove the copied OHP films, which have exited on to the
receiving tray one by one. When the films pile up, they may become curled and may not
be projected properly.
88 Bypass Copying
Page 91

Copying on standard size paper other than A3, A4, B4
and B5
Place paper and original(s) by following step 1 and 2 in “Copying
1
on A3, A4, B4 and B5 size paper” ( P.86).
Press the [OTHER SIZE] button on the touch panel.
2
Press the button of the same size as the one of the paper you have
3
set on the tray.
Press the [OTHER] button for the copy size.
4
If the paper size is not specified here, some operations may slow down the copying.
Bypass Copying 89
Page 92

2 HOW TO MAKE COPIES
Press the [MEDIA TYPE] button on the touch panel if the media type
5
of the paper you have set on the tray is other than plain paper.
Press the button of the same media type as the one of the paper
6
you have set on the tray, and then press the [ENTER] button on the
touch panel.
E.g.: When Thick paper 1 is set
Set other copy modes as required.
y If a media type which is not same as the one you have set is selected here, this may
y If the paper size is not specified here, some operations such as cleaning may slow
The paper type which has been set can be confirmed with the touch panel. See the table
in P.86 “Bypass copying on standard size paper”.
Press the [START] button on the control panel.
7
When you copy on OHP films, remove the copied OHP films, which have exited on to the
receiving tray one by one. When the films pile up, they may become curled and may not
be projected properly.
90 Bypass Copying
cause a paper jam or significant image trouble.
down the copying.
Page 93

Bypass copying on non-standard size paper
Non-standard size paper should be within the following ranges: A (Length): 100 to 297 mm, B
(Width): 148 to 432 mm
B
Place some sheets of paper
1
with their copy side down on
A
the bypass tray. Align the side
guides to the paper length
while holding A.
The message “Ready for bypass
feeding” appears.
A
B
y Rear side of the side guides of the bypass tray has an indicator for paper height. The
height of the sheets must not exceed this indicator.
y When you use more than one sheet, fan the sheets well before setting them on the
tray.
y Do not push the sheets into the entrance of the bypass feeder; it may cause a paper
jam.
y When the paper size is larger, draw out the three-stage paper holder. Raise B when
you use A3 or a larger size of paper.
Place the original on the original glass.
2
Bypass Copying 91
Page 94

2 HOW TO MAKE COPIES
Press the [NON STANDARD] button on the touch panel.
3
Set each dimension following
4
the procedure below.
The [Length] and [Width] are indicated
as follows:
A: [Length]
B: [Width]
A
B
Using the digital keys
Key in the value in [Length] and press the [SET] button on the touch panel. Set the
width in the same way and press the [ENTER] button.
92 Bypass Copying
Page 95

Recalling dimensions registered in the memory
Press the desired memory number button from [MEMORY 1] to [MEMORY 4] to recall
the dimension data registered previously, and then press the [ENTER] button.
y Set other copy modes as required.
y Paper size that can be set is as follows:
Length: 100 mm to 297 mm
Width: 148 mm to 432 mm
y To register the dimension data in the memory, see P.94 “Registering non-stan-
dard size in the memory”.
Press the [START] button on the control panel.
5
Bypass Copying 93
Page 96

2 HOW TO MAKE COPIES
Registering non-standard size in the memory
Follow steps 1 to 3 on “Bypass copying on non-standard size
1
paper” ( P.9 1) .
Press the memory number button (from [MEMORY 1] to [MEMORY
2
4]) you want to register the dimension.
Key in each dimension, and press the [MEMORY] button on the
3
touch panel.
y Key in its length in [Length] and press the [SET] button on the touch panel. Set its
width in the same manner.
y Paper size that can be set is as follows:
Length: 100 mm to 297 mm
Width: 148 mm to 432 mm
94 Bypass Copying
Page 97

Proof Copy
This function allows you to check that the copy density, zoom and margin width, etc. are properly
set by making only one set of copies.
You can prevent miscopying by using this function before committing yourself to mass-copying.
y The setting of the number of copy sets, time stamp and stapling (when the optional Finisher
has been installed) can be changed after having made the proof copy.
y Press the [MEMORY CLEAR] button to clear the proof copy before changing the setting of
the zoom or copy density, etc. When you make copies again after changing the settings, the
data of the originals need to be scanned.
1
2
3
4
Place paper in the drawer(s).
Place the original(s).
Select the copy modes as required.
Press the [PROOF COPY] button.
y "PROOF COPY is set Press START button to copy" appears. (for approx. 2 sec.)
y Copy modes except for some such as sort/group can be set.
Press the [START] button.
5
The data scanning of the originals is
started and one set of copies is made.
Proof Copy 95
Page 98

2 HOW TO MAKE COPIES
Change the settings as required.
6
y The setting of the number of copy sets, time stamp, stapling (when the optional Fin-
isher has been installed) and sort can be changed.
y If you want to change the setting of the copy density, original mode, zoom or simplex/
duplex, press the [MEMORY CLEAR] button to clear the proof copy. After the change,
perform the instructions from step 1 again.
Press the [START] button.
7
If the number of copy sets is not changed in step 6, one less than the previously specified
number is copied. However, if "1" is specified for the number of copy sets, one set of
copies is made.
96 Proof Copy
Page 99

3.SETTING OF BASIC COPY MODES
This chapter describes the basic useful copying functions including Enlargement and Reduction Copying,
Selecting Finishing Modes, Duplex Copying and such.
Paper Selection.......................................................................................................98
Automatic Paper Selection (APS) .....................................................................................................98
Manual paper selection...................................................................................................................100
Copying mixed-sized originals in one operation (mixed original size).............................................101
Switching Colour Mode ........................................................................................103
Enlargement and Reduction Copying.................................................................104
Automatic Magnification Selection (AMS).......................................................................................104
Specifying both original size and copy size separately ...................................................................106
Using the zoom buttons or the one-touch zoom buttons.................................................................108
Selecting Finishing Modes...................................................................................110
Type of finishing mode .................................................................................................................... 110
Name of each part in the Finisher (optional) ................................................................................... 111
Sort/Group copying ......................................................................................................................... 112
Rotate sort mode.............................................................................................................................114
Staple sort mode ............................................................................................................................. 116
Magazine sort & saddle stitch mode (booklet mode) ...................................................................... 118
Hole punch mode (optional) ............................................................................................................121
Manual stapling (MJ-1101 only) ......................................................................................................123
Duplex Copying.....................................................................................................125
1-sided original -> 1-sided copy (default setting at installation) ......................................................126
1-sided original -> 2-sided copy ......................................................................................................127
2-sided original -> 2-sided copy ......................................................................................................128
2-sided original -> 1-sided copy ......................................................................................................129
Book-type original -> 2-sided copy..................................................................................................130
Original Mode ........................................................................................................134
Copy Density Adjustment ....................................................................................136
Automatic copy density mode .........................................................................................................136
Manual copy density mode .............................................................................................................137
Page 100

3 SETTING OF BASIC COPY MODES
Paper Selection
Automatic Paper Selection (APS)
When you place standard size originals on the original glass or the Reversing Automatic Document Feeder (optional), the size of the originals is automatically detected, which helps the equipment select paper that is the same size as the originals.
y The automatic paper selection may not work correctly depending on the type of the originals.
In that case, select the paper size manually.( P.100 “Manual paper selection”)
y For original sizes available for automatic paper selection, see P.68 “Acceptable originals”.
Place paper in the drawer(s).
1
Place the original(s).
2
Confirm that automatic paper selection has been selected on the
3
basic menu.
y Automatic paper selection is selected by default at the installation of the equipment.
y If “Change direction of original” or “CHANGE DRAWER TO CORRECT PAPER SIZE”
y Set other copy modes as required.
Even if the direction of the paper set in the selected drawer differs from that of the original, the equipment rotates the data of the original by 90 degrees to make copies as long
as their sizes are the same. (This works on A4 paper only.) For example, when an A4
original is set vertically and A4-R paper is placed in the drawer, the data of A4 original will
be rotated and copied correctly on A4-R paper.
98 Paper Selection
appears, perform the action accordingly.
 Loading...