

Page 1

Page 2

WARNING: Changes or modification made to this equipment, not expressly approved by
TOSHIBA TEC or parties authorized by TOSHIBA TEC could void the user's
authority to operate the equipment.
Page 3

ENERGY STAR ® (MFD)
EPA
The United States Environment Protection Agency (EPA) has introduced a voluntary ENERGY STA R
Program to encourage the widespread and voluntary use of energy-efficient technologies that enhance
the workplace, improve product performance and prevent pollution. As an
TOSHIBA TEC CORPORATION has determined that this copier model meets the ENERGY STA R
guidelines for energy efficiency.
ENERGY STAR Partner, the
ENERGY STAR guidelines for this class of copier require ENERGY STAR copiers to have an ‘Super
Power Save Mode’ (Off Mode) feature that automatically turns the copier off after a period of inactivity,
ensuring night and weekend shut-off. The copier must also automatically change to a ‘Low Power Mode’
(Automatic Energy Save) after a period of time since the last usage.
For Copier+Printer or FAX models,
copiers to have a ‘Sleep Mode’ feature that automatically makes the copier enter the sleep mode after a
period of inactivity. The copier must also automatically change to a ‘Low Power Mode’ (Automatic Energy
Save) after a period of time since the last usage.
Specifically, this copier complies with the following requirements:
e-STUDIO16/20/25 Copier + Printer model (Base model)
‘Super Power Save Mode’-
The copier consumes less than 5 watts in the ‘Super Power Save Mode’.
‘Super Power Save Mode’ Default Time-
The default time for the ‘Super Power Save Mode’ is 30 minutes (e-STUDIO16/20)/60 minutes
(e-STUDIO25).
‘Low Power Mode’-
The copier consumes less than 111.6 watts (e-STUDIO16)/127.0 watts (e-STUDIO20)/146.25
watts (e-STUDIO25) during Energy Save.
‘Low Power Mode’ Default Time-
The default time for the ‘Low Power Mode’ is 15 minutes.
e-STUDIO16/20/25 Copier + Printer or FAX models (Multifunction model)
‘Sleep Mode’-
The copier consumes less than 70 watts (e-STUDIO16/20)/80 watts (e-STUDIO25) in the ‘Sleep
Mode’.
‘Sleep Mode’ Default Time-
The default time for the ‘Sleep Mode’ is 30 minutes (e-STUDIO16/20)/60minutes (e-STUDIO25).
‘Low Power Mode’-
The copier consumes less than 111.6 watts (e-STUDIO16)/127.0 watts (e-STUDIO20)/146.25
watts (e-STUDIO25) during Energy Save.
‘Low Power Mode’ Default Time-
The default time for the ‘Low Power Mode’ is 15 minutes.
Note 1- The default setting for the ‘Super Power Save Mode’ or ‘Sleep Mode’ and ‘Low Power Mode’ can
be changed. If you want to increase the default setting, contact your authorized Toshiba dealer.
Note 2- For Copier model (Base model), to restart the copier after an automatic shut-off, press the
SUPER ENERGY SAVER key.
Note 3- For Copier model (Base model), after an automatic shut-off, the weekly timer feature cannot be
activated. If you prefer to activate this feature, contact your authorized Toshiba dealer.
ENERGY STAR guidelines require ENERGY STAR Multifunction
In accordance with the EPA
recycled copier paper (with up to 100% post consumer content) meeting the requirements as specified
in ENV 12281 (paper-printing and business paper-Requirements for copy paper for dry toner imaging
processes).
If you have questions regarding the use of recycled paper or some recommended types of recycled
paper, please contact your authorized Toshiba dealer.
ENERGY STAR Program guidelines, this copier is suitable for the use of
ENERGY STAR is a U.S. registered mark.
Page 4
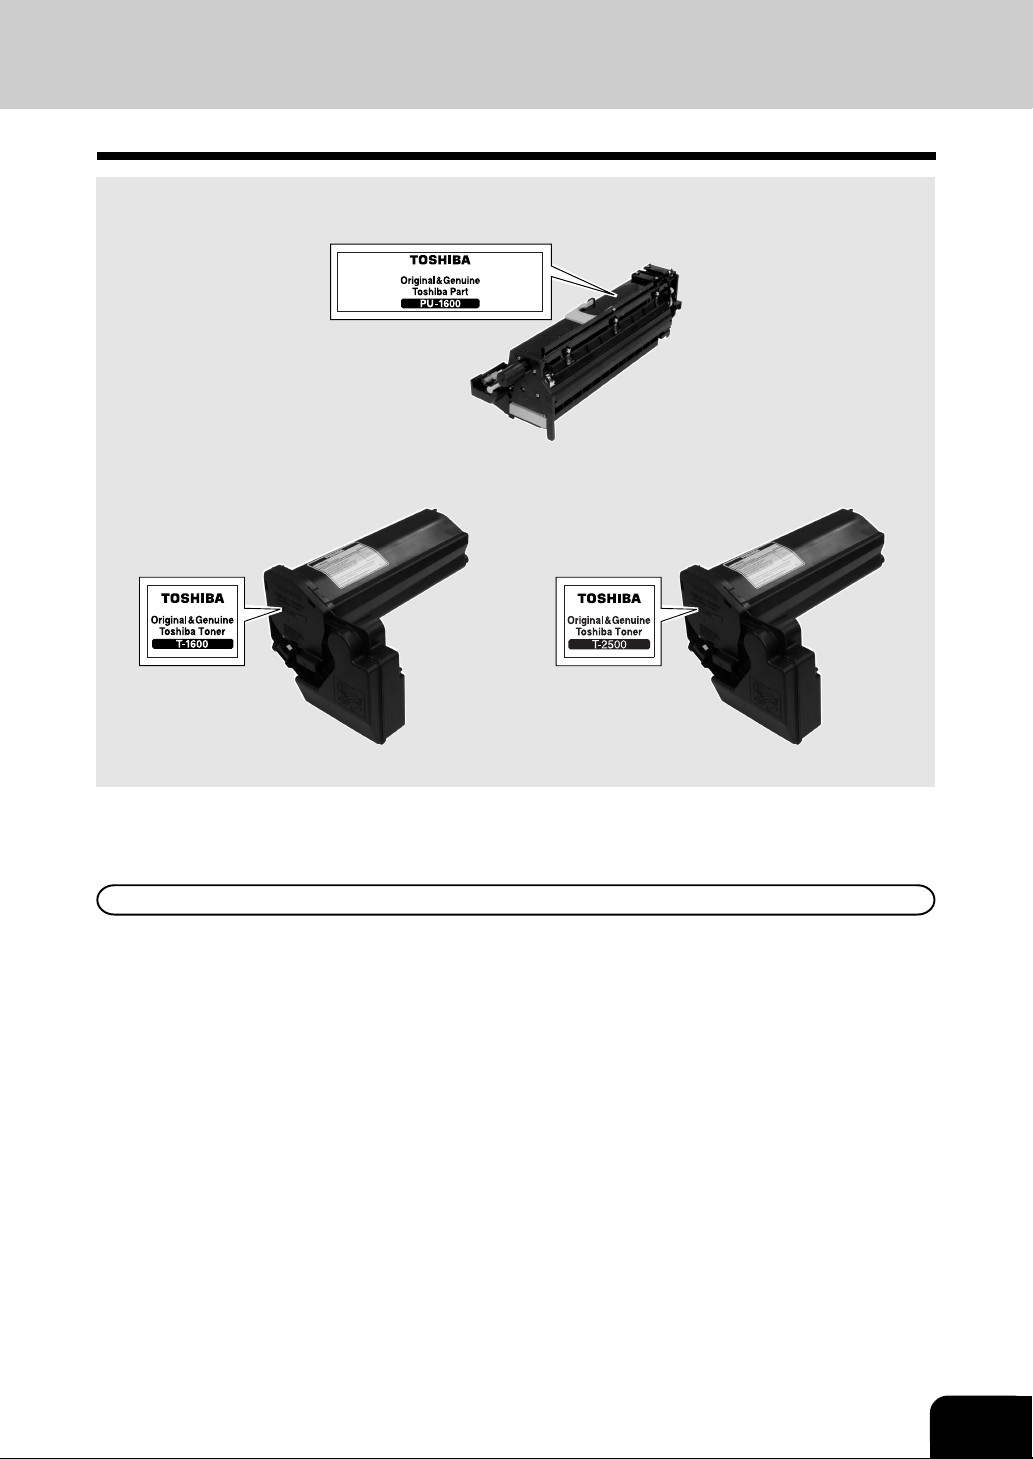
1. TOSHIBA QUALITY IS SECOND TO NONE
e-STUDIO16/20/25 Process Unit
The following information is embossed at the position indicated.
e-STUDIO16/20/25 Toner Cartridge
The following information is embossed at the position indicated.
1
2
3
4
5
e-STUDIO16 e-STUDIO20/25
It is recommended that genuine Toshiba Supplies and parts be used in order to obtain optimum results.
Supplies / Parts
Dependability
Genuine Toshiba supplies are subjected to the strictest of inspections so that all supply you receive will
perform at optimal levels.
High Productivity
Genuine Toshiba supplies are created to meet the demands of our competitive world and provide highspeed reliable trouble-free copies when you need them.
Stable Image Quality
Genuine Toshiba supplies are designed to provide consistently stable image output day after day.
Copier Kind
Genuine Toshiba supplies are designed to keep the copier and all its parts in trouble-free working order.
Reduction of machine wear is due to Toshiba’s intimate knowledge of the copier’s characteristics ensuring
the highest standard of care.
Machine Balance
From the beginning Toshiba supplies and machines were made for each other. Whenever Toshiba designs
a new machine, it also designs a new toner that is made just for that machine. By using Genuine Toshiba
supplies with Toshiba copiers you guarantee optimum performance.
6
7
8
9
10
11
12
1
Page 5

1
1. TOSHIBA QUALITY IS SECOND TO NONE (Cont.)
Toners
Optimum Image Quality
Genuine Toshiba toners use ultra-fine quality materials and precisely controlled parameters so that
Toshiba copiers can continually generate sharp, high-quality image output.
2
3
4
5
6
7
8
Cost Advantage
Genuine Toshiba toners mean value. They are designed to use only the proper amount of toner enabling
the machine to continue to operate until all the toner has been used. In this way you get the full value of
the toner.
Environmental Harmony
Genuine Toshiba toners are designed with the environment in mind. To care for Mother Earth, we use
embossed or plastic labels making our toners fully recyclable. In addition, harmful dust and ozone levels
have been reduced to improve the working environment.
Human Friendly
Genuine Toshiba toners are people-friendly. Before approving our toners for sale, we test them to be
sure they pass the strictest of health standards. This takes the worry out of handling the toner.
General
ISO 9000 and ISO 14000
Toshiba toner plants are ISO 9001 or ISO 9002 and ISO 14001 certified.
Therefore quality of craftsmanship and environmental friendly production are guaranteed from the factory.
Service and Support Benefits
Toshiba’s service engineers are certified to keep your copier performing at optimum levels. To ensure
continuous image quality, it is highly recommended to utilize a authorized Toshiba service provider to
care for and perform periodical maintenance so that you can get full benefit from your copier.
9
10
11
12
2
Page 6
2. PREFACE
Thank you for purchasing the Toshiba Digital e-STUDIO16/20/25 Copier. This Operator’s Manual describes
the following:
• how to use the digital copier
• how to make copies
• how to inspect and carry out maintenance on the digital copier
• how to remedy mechanical and copying problems.
Before using your e-STUDIO16/20/25 digital copier, thoroughly read and understand this Operator’s Manual.
To ensure that clean copies are made at all times and to make sure that the digital copier is in optimum
working order, keep this Operator’s Manual handy for future reference.
To ensure correct and safe use of the Toshiba Digital e-STUDIO16/20/25 Copier, this Operator’s Manual
describes safety precautions according to the following three levels of warning:
Before reading this Operator’s Manual, you should fully understand the meaning and importance of
these alert words.
1
2
3
4
Warning ..... Indicates a potentially hazardous situation which, if not avoided, could result in death, serious
injury, or serious damage, or fire in the equipment or surrounding assets.
Caution ...... Indicates a potentially hazardous situation which, if not avoided, may result in minor or
moderate injury, partial damage of the equipment or surrounding assets, or loss of data.
Note ........... Indicates a procedure you should follow to ensure the optimal performance of the digital
copier and problem-free copying.
Tip .............. Describes information useful to know when operating the digital copier.
Advice ........ Describes an operation you should follow to maintain the digital copier in good working
order.
Warning: This is a Class A product. In a domestic environment this product may cause radio interference in
which case the user may be required to take adequate measures.
1.Do not touch the connector terminal when disconnecting the cables of peripheral equipment.
2.Before opening any covers or removing any units from the copier, discharge the static electricity from
your body by touching a metal part of the copier.
This product is carrying the CE-Mark in accordance with the related European Directives.
Responsible for CE-Marking is Toshiba Europe GmbH Hammfelddamm 8,41460 Neuss, Germany.
Phone +49-2131 -158-01
5
6
7
8
9
10
COPYRIGHT 2000
TOSHIBA TEC CORPORATION
11
12
3
Page 7

1
2
3
4
5
6
7
8
9
2. PREFACE (Cont.)
1. Features of the e-STUDIO16/20/25
The e-STUDIO16/20/25 is a plain paper digital copier.
The e-STUDIO16/20/25 scans originals and stores the resulting data in its memory as digital images.
The e-STUDIO16/20/25 allows you not only to process and edit this digital image data, but also enables
copies to be sorted and non-sorted quietly, quickly, and easily. The e-STUDIO16/20/25 incorporates an
LCD display and menu selection keys that graphically represent copier functions. As a result, anybody
can make clear-looking copies quickly and easily.
The e-STUDIO16/20/25 also has the following convenient features which allow the digital copier to be
used in many applications.
• Copying speed is 16 (A4) copies per minute on the e-STUDIO16, 20 (A4) copies on the e-STUDIO20
and 25 (A4) copies on the e-STUDIO25.
• The automatic original density function automatically reads the density of the original to set the ideal
copy density.
• The size of the original is automatically read, and appropriate paper size and reproduction ratio are
automatically selected when using the Automatic Document Feeder or Reversing Automatic Document
Feeder (optional).
• Wide enlargement/reduction range (e-STUDIO16: 50% to 200%, e-STUDIO20/25: 25% to 400%) 50%
to 200% when the optional Reversing Automatic Document Feeder or optional Automatic Document
Feeder is used.
• Duplex copies can be made automatically from two-sided originals. (Optional Reversing Automatic
Document Feeder and Automatic Duplexing Unit are required.)
Single-sided copies can be made automatically from two-sided originals. (Optional Reversing Automatic
Document Feeder is required.)
Duplex copies can be made automatically from one-sided originals. (Optional Automatic Document
Feeder or Reversing Automatic Document Feeder and Automatic Duplexing Unit are required.)
• Comes with the following digital editing functions:
Negative/positive reversal, X-Y zoom, mirror image, etc.
2-in-1 and 4-in-1 (Available for the Standard Model)
Book copying and magazine sort (Optional Automatic Duplexing Unit is required.)
• With the electric sort function, you can also sort at a high speed without damaging the original.
• Copy sizes from Statement up to Ledger are acceptable.
• Comes with a weekly timer. This timer allows automatic sleep mode at the specified startup and
shutdown times, respectively.
• Upon installing the optional printer board, the copier can serve as a printer, allowing you to print out
data from your computer. In addition, with the optional network interface card installed, the copier can
serve as a network printer.
10
11
12
4
Page 8

3. TABLE OF CONTENTS
1. TOSHIBA QUALITY IS SECOND TO NONE ................................................................................. 1
2. PREFACE ......................................................................................................................................3
1. Features of the e-STUDIO16/20/25 .......................................................................................... 4
3. TABLE OF CONTENTS .................................................................................................................5
4. PRECAUTIONS .............................................................................................................................8
1. Installation ................................................................................................................................. 8
2. General Precautions .................................................................................................................9
1.BEFORE MAKING COPIES ........................................................................................................... 1-1
1. DESCRIPTION OF THE OPTIONAL EQUIPMENT.................................................................... 1-2
2. DESCRIPTION OF THE DIGITAL COPIER ................................................................................ 1-3
Main Components ..................................................................................................................... 1-3
Control Panel ............................................................................................................................ 1-4
Message Display Panel ............................................................................................................ 1-6
3. PAPER ....................................................................................................................................... 1-7
Acceptable Paper Types and Sizes / Handling and Storing Paper .......................................... 1-7
Changing the Paper Size of the Cassette ................................................................................ 1-8
Turning ON the Power Switch / Auto Job Start ........................................................................ 1-10
Cassette Size Setting .............................................................................................................. 1-11
4. DEPARTMENT CODES .......................................................................................................... 1-13
2.HOW TO MAKE COPIES................................................................................................................. 2-1
1. GENERAL COPYING PROCEDURE ........................................................................................ 2-2
2. SETTING ORIGINALS ............................................................................................................... 2-4
Originals .................................................................................................................................... 2-4
Placing the Original on the Glass ............................................................................................. 2-5
Using the Automatic Document Feeder (optional)
or the Reversing Automatic Document Feeder (optional) ........................................................ 2-6
3. INTERRUPT COPYING ............................................................................................................. 2-8
1
2
3
4
5
6
7
3.BASIC MENU ................................................................................................................................. 3-1
1. PAPER SELECTION ................................................................................................................. 3-2
Automatic Paper Selection (APS) ............................................................................................. 3-2
Manual Paper Selection ........................................................................................................... 3-4
Bypass Copying ........................................................................................................................ 3-5
Bypass Copying by Specifying the Copy Size .......................................................................... 3-7
2. REDUCTION AND ENLARGEMENT COPYING ....................................................................... 3-8
3. COPYING WITH COPY DENSITY SELECTION ..................................................................... 3-13
4. ORIGINAL IMAGE QUALITY SELECTION .............................................................................. 3-15
8
9
10
11
12
5
Page 9
3. TABLE OF CONTENTS (Cont.)
1
2
3
4
5
6
7
8
9
10
4.EDIT MENU ..................................................................................................................................... 4-1
1. DUPLEX COPYING ................................................................................................................... 4-2
1-Sided Originals > 1-Sided Copies (default setting) .......................................................... 4-3
1-Sided Originals > 2-Sided Copies .................................................................................... 4-4
2-Sided Originals > 2-Sided Copies .................................................................................... 4-8
2-Sided Originals > 1-Sided Copies .................................................................................... 4-9
Book-Type Originals > 2-Sided Copies .............................................................................. 4-10
2. DUAL PAGE COPYING ........................................................................................................... 4-12
3. IMAGE SHIFT COPYING ......................................................................................................... 4-13
4. EDGE ERASE COPYING ........................................................................................................ 4-14
5. 2-IN-1/4-IN-1 ........................................................................................................................... 4-15
6. MAGAZINE SORT ................................................................................................................... 4-18
7. ANNOTATION .......................................................................................................................... 4-21
8. EDITING .................................................................................................................................. 4-23
Mirror Image ............................................................................................................................ 4-23
Negative/Positive Reversal ..................................................................................................... 4-24
9. JOB BUILD .............................................................................................................................. 4-25
10. COPYING MIXED SIZE ORIGINALS ....................................................................................... 4-26
11. JOB MEMORY ......................................................................................................................... 4-27
12. PAPER TYPE ........................................................................................................................... 4-29
13. MENU LIST.............................................................................................................................. 4-30
5.PROGRAM MENU .......................................................................................................................... 5-1
1. WALKUP SCREEN.................................................................................................................... 5-2
2. TIMERS ..................................................................................................................................... 5-3
Auto Clear ................................................................................................................................. 5-3
Auto Low Power ........................................................................................................................ 5-4
Automatic Sleep ........................................................................................................................ 5-5
3. WEEKLY TIMER ......................................................................................................................... 5-7
4. SPEAKER VOLUME ................................................................................................................ 5-10
5. DEPARTMENT CODE ............................................................................................................. 5-11
Department Code Setting ....................................................................................................... 5-11
Clearing Department Code Counters ..................................................................................... 5-13
Deleting Department Code ..................................................................................................... 5-14
Change Department Code Setting ......................................................................................... 5-15
Report Printing ........................................................................................................................ 5-17
Canceling/Resuming Department Management .................................................................... 5-18
6. COPY SETUP .......................................................................................................................... 5-19
7. DATE AND TIME ...................................................................................................................... 5-23
8. CHANGE DISPLAY PANEL LANGUAGE ................................................................................ 5-26
9. FUNCTION LIST ...................................................................................................................... 5-27
10. TOTAL COUNTER ................................................................................................................... 5-28
11
12
6.FINISHING MODE SELECTION ..................................................................................................... 6-1
1. FINISHING MODE SELECTION ................................................................................................ 6-2
2. NON-SORT COPYING .............................................................................................................. 6-3
3. SORT COPYING ....................................................................................................................... 6-4
4. OFFSET COPYING .................................................................................................................... 6-6
5. ALTERNATION .......................................................................................................................... 6-7
6
Page 10
6. STAPLING ............................................................................................................................... 6-10
When the optional finisher is installed .................................................................................... 6-10
When the optional Stapler kit is installed ................................................................................ 6-13
1
7.WHEN THE GRAPHIC SYMBOL FLASHES .................................................................................. 7-1
1. DESCRIPTION OF THE GRAPHIC SYMBOLS ......................................................................... 7-2
2. LOADING PAPER ...................................................................................................................... 7-3
Adding Paper to the Cassettes ................................................................................................. 7-3
Adding Paper to the Large-Capacity Feeder (optional) ........................................................... 7-4
3. REPLACING TONER CARTRIDGE .......................................................................................... 7-5
4. REPLACING PROCESS UNIT .................................................................................................. 7-8
Replacing Process Unit ............................................................................................................ 7-8
Replacing Ozone Filter ........................................................................................................... 7-11
5. CLEARING PAPER JAM ......................................................................................................... 7-12
6. ADDING STAPLES .................................................................................................................. 7-24
7. REMOVING JAMMED STAPLES ............................................................................................. 7-28
8. CALLING FOR SERVICE ........................................................................................................ 7-31
9. PERIODIC MAINTENANCE .................................................................................................... 7-32
8. USER TEST MODE ......................................................................................................................... 8-1
1. AUTOMATIC TEST MODE ......................................................................................................... 8-2
AUTO TEST ................................................................................................................................ 8-2
2. INDIVIDUAL TEST MODE ......................................................................................................... 8-3
INDIVIDUAL TEST Summary .................................................................................................... 8-3
3. ADF TEST .................................................................................................................................. 8-4
4. KEY TEST .................................................................................................................................. 8-6
5. LED TEST .................................................................................................................................. 8-7
6. LCD TEST .................................................................................................................................. 8-8
7. SPEAKER TEST ........................................................................................................................ 8-9
8. SWITCH TEST ......................................................................................................................... 8-10
9. TEST PRINT ............................................................................................................................ 8-11
10. PRINTING A TEST RESULT.................................................................................................... 8-12
2
3
4
5
6
7
8
9.MAINTENANCE ............................................................................................................................. 9-1
1. DAILY INSPECTION .................................................................................................................. 9-2
2. CLEANING THE WIRE .............................................................................................................. 9-3
3. SIMPLE TROUBLESHOOTING ................................................................................................. 9-5
10.SPECIFICATIONS & OPTIONS ................................................................................................... 10-1
1. e-STUDIO16/20/25 SPECIFICATIONS ................................................................................... 10-2
2. SPECIFICATION OF OPTIONS ............................................................................................... 10-3
3. PACKING LIST ........................................................................................................................ 10-8
4. COPY FUNCTION COMBINATION MATRIX ........................................................................... 10-9
9
10
11
12
7
Page 11
1
4. PRECAUTIONS
1. Installation
The e-STUDIO16/20/25 should be installed by an authorized TOSHIBA service technician.
1
Note
The packing material should be disposed of properly.
2
3
4
5
6
7
8
To obtain the best possible results, this machine should be used in conjunction with a
dedicated AC power line at the following ratings:
2
220 - 240 VAC, 50/60 Hz, 1.4 kW or less (e-STUIDO16)
220 - 240 VAC, 50/60 Hz, 1.7 kW or less (e-STUIDO20/25)
110 - 127 VAC, 50/60 Hz, 1.4 kW or less (for Saudi Arabia 100V version only)
Note
1. The use of other appliances or other equipment on the same line as this machine may adversely
affect performance and copy quality.
2. Be sure to use a 3-conductor, grounded wall outlet.
3. In areas where a 2-pin plug is used, the copier must be grounded for safety.
Never ground it to a gas pipe, a water pipe, or any other object not suitable for grounding.
After a suitable place has been selected for installation of the e-STUDIO16/20/25, please
avoid frequent movement. Avoid excessive heat, dust, vibration and direct sunlight.
3
Also, provide proper ventilation as the copier emits a small amount of ozone.
Note
1. The recommended environmental range for use is as follows:
• Temperature: 10~30°C/50~86°F
• Humidity: 20~85% RH
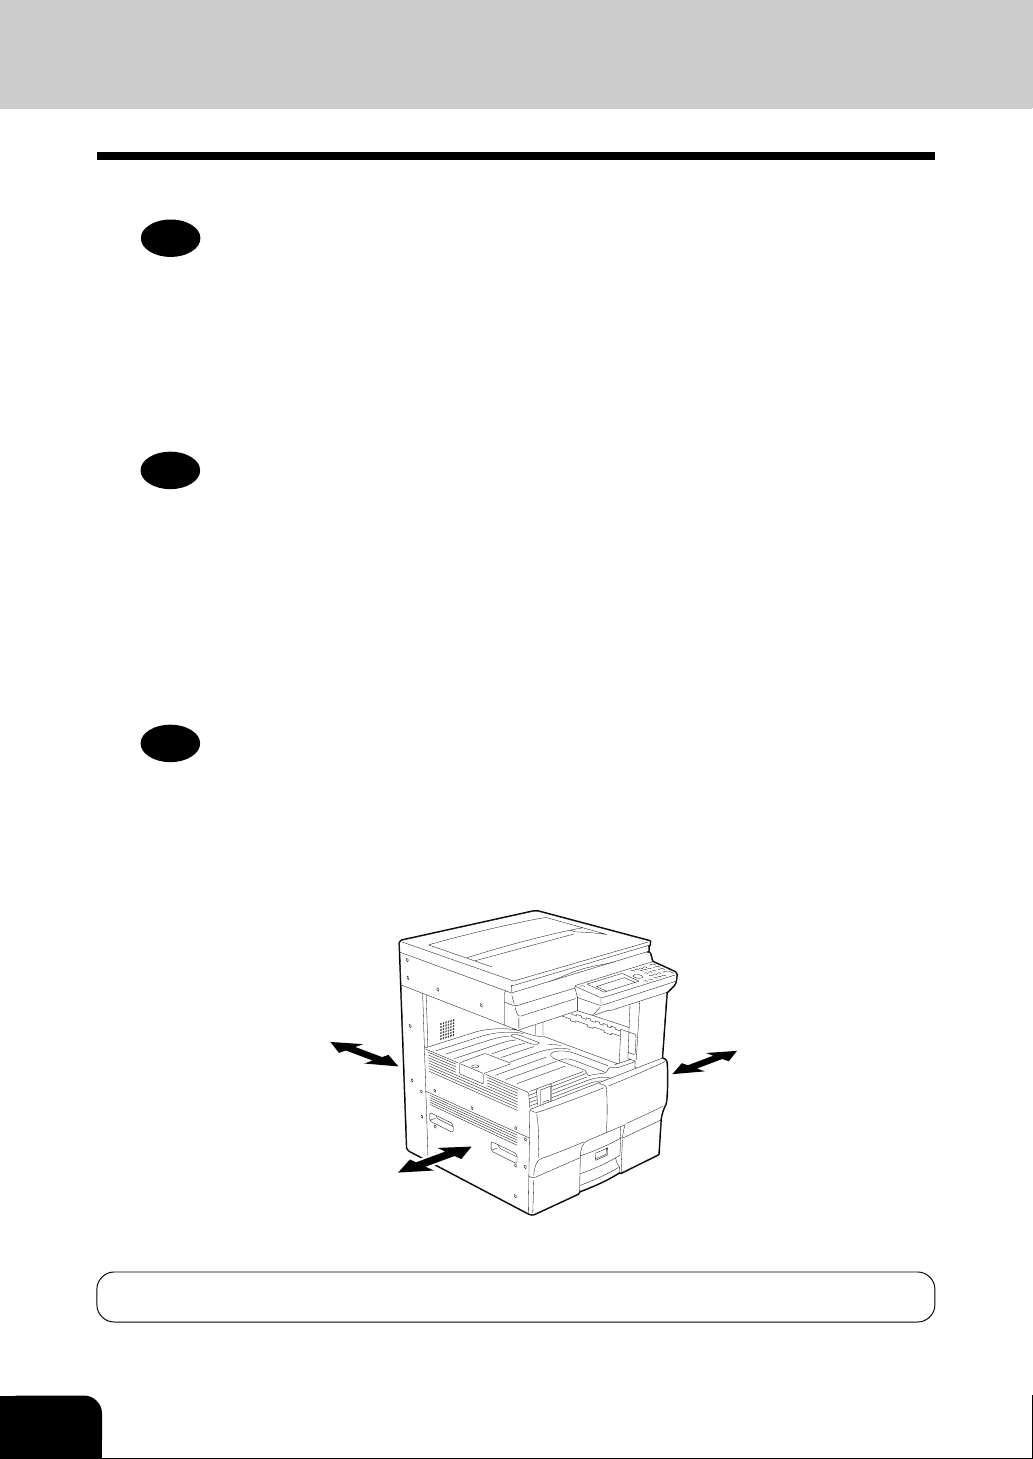
2. To ensure optimal operation, allow clearances of at least 80 cm on the left, 80 cm on the right and
10 cm in the rear (refer to the illustration below).
9
10
11
12
10 cm
80 cm
The e-STUDIO should be placed near an outlet that is easily accessible.
8
PRECAUTIONS
80 cm
Page 12
2. General Precautions
Handle and use the machine gently and carefully.
• Do not place anything on the paper cassettes or original feed tray.
1
• Never allow the power cable to be trampled on or pinched between hard objects, otherwise an
accident or electrical trouble might occur.
• Do not allow any metal items such as paper clips to fall into the copier.
Be sure to turn OFF the power switch (unless using auto timer mode):
• When you leave your office at night.
2
• If a power failure occurs.
Caution
When turning OFF the power switch, be sure to do so only after the machine cycling has
come to a complete stop.
Be sure to disconnect the power-cord plug:
• When you do not intend to use the machine for an extended period of time.
1
2
3
4
Be sure to turn OFF the power switch immediately and call for service:
• If an unusual noise is heard from the copier.
• If the outside of the copier becomes unusually hot.
• If any part of the copier is damaged, or it has been dropped.
• If the copier has been exposed to rain or liquid.
It is recommended that only supplies made or designated by Toshiba be used for the
e-STUDIO16/20/25 in order to optimize copy quality. All supplies should be stored in a
3
cool, dry area.
For optimum performance, it is recommended that high quality 80 g/m2. Xerographic bond paper be
used.
Paper of lower quality may contain inherent properties such as excess paper dust and may lead to
premature servicing.
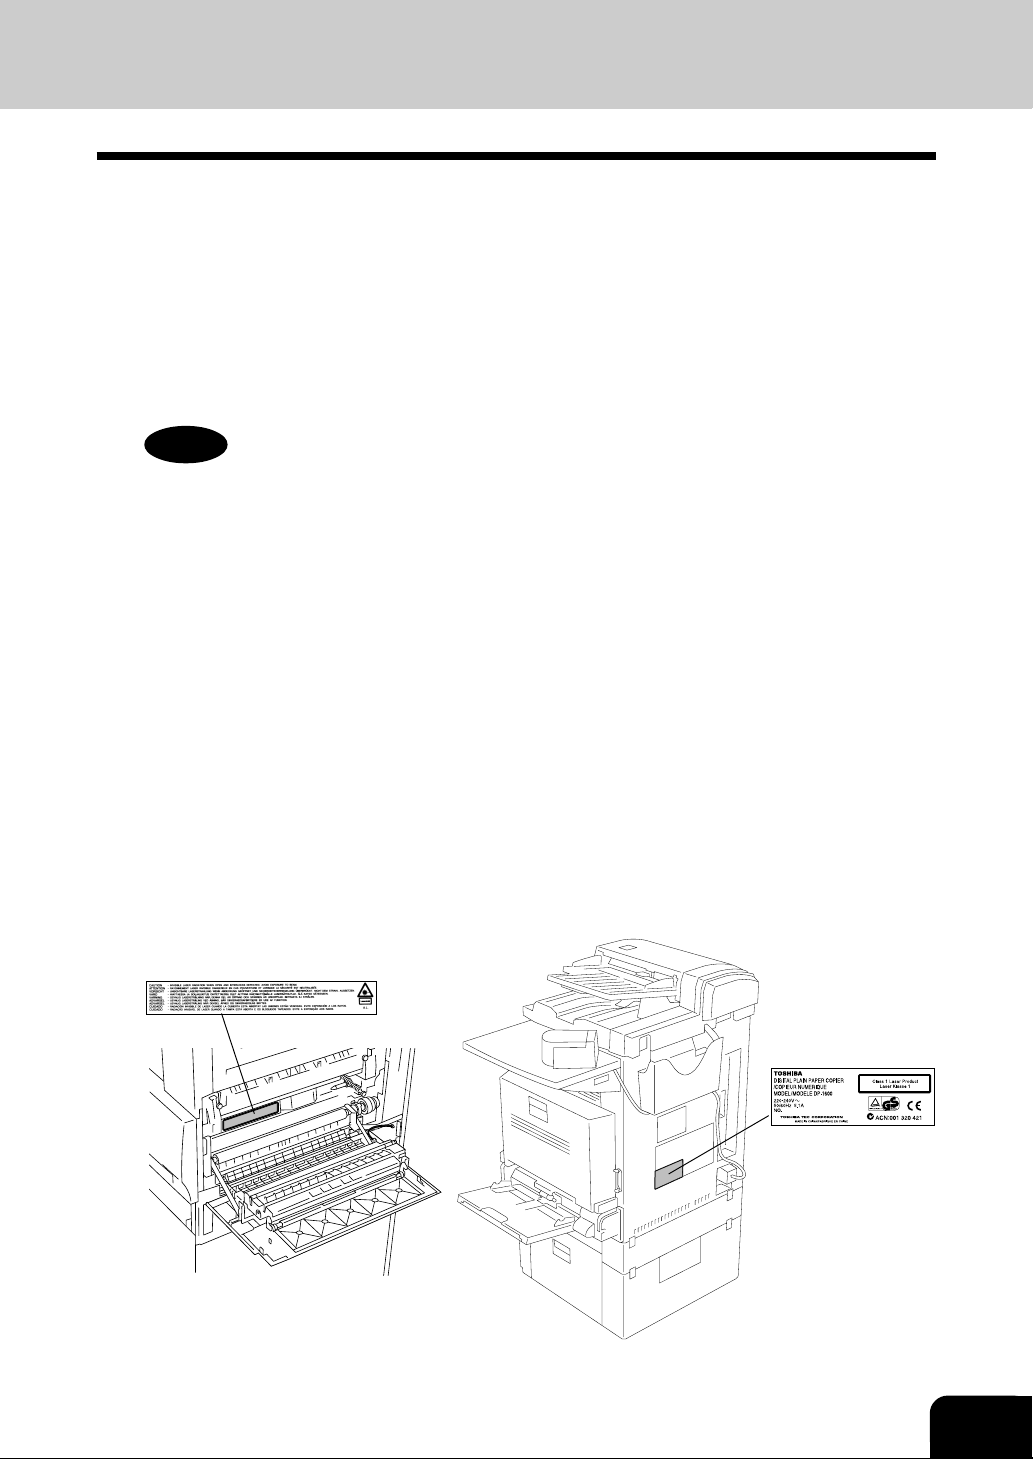
Warning label
Identification label
5
6
7
8
9
10
11
12
9
Page 13

1
2
3
4
5
6
7
8
9
10
11
12
10
Page 14

1. BEFORE MAKING COPIES
1. DESCRIPTION OF THE OPTIONAL EQUIPMENT ....................................................... 1-2
1
2
2. DESCRIPTION OF THE DIGITAL COPIER .................................................................... 1-3
Main Components .......................................................................................................... 1-3
Control Panel.................................................................................................................. 1-4
Message Display Panel .................................................................................................. 1-6
3. PAPER ............................................................................................................................ 1-7
Acceptable Paper Types and Sizes / Handling and Storing Paper................................. 1-7
Changing the Paper Size of the Cassette ...................................................................... 1-8
Turning ON the Power Switch / Auto Job Start............................................................. 1-10
Cassette Size Setting ................................................................................................... 1-11
4. DEPARTMENT CODES ................................................................................................ 1-13
3
4
5
6
7
8
10
11
12
1-1
9
Page 15
1
1. DESCRIPTION OF THE OPTIONAL EQUIPMENT
e-STUDIO16
Automatic document feeder (MR-2012)
Reversing automatic document feeder (MR-3011)
2
3
4
5
6
7
Stapler (KK-1600)
Automatic duplexing unit (MD-0101)
Job separator (MJ-5001)
Offset tray (MJ-5002)
Stack feed bypass (MY-1016)
Paper feed unit (MY-1015)
Paper feed pedestal (KD-1009)
e-STUDIO20/25
Automatic document feeder (MR-2012)
Reversing automatic document feeder (MR-3011)
8
9
10
11
12
1-2
Stapler (KK-1600)
Automatic duplexing unit
(MD-0101)
Finisher including Transportation
bridge (MJ-1011)*
(e-STUDIO20/25 only)
Paper feed unit (MY-1015)
Large Capacity Feeder
(KD-1010)**
(e-STUDIO20/25 only)
* The Job separator (MJ-5001) or Offset tray (MJ-5002) can be installed in place of the Finisher.
** The Paper feed pedestal (KD-1009) can be installed in place of the Large capacity feeder (KD-1010).
Furthermore, the Cassette module (MY-1017) (option for e-STUDIO20/25) can be installed in KD-
1009.
BEFORE MAKING COPIES
Stack feed bypass
(MY-1016)
Page 16
2. DESCRIPTION OF THE DIGITAL COPIER
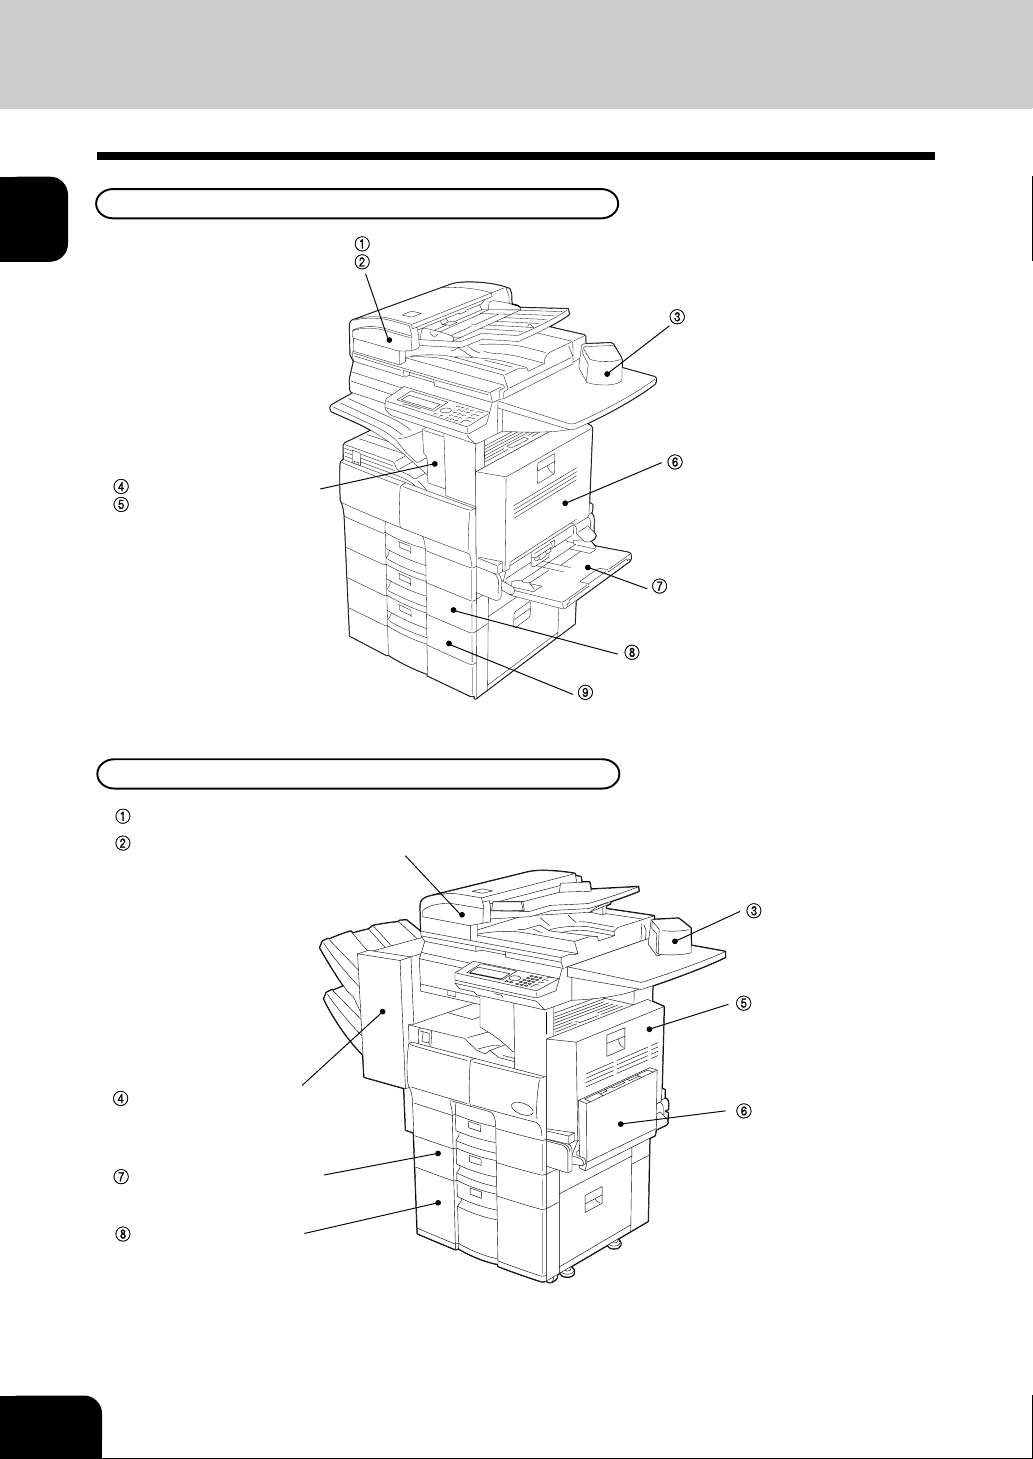
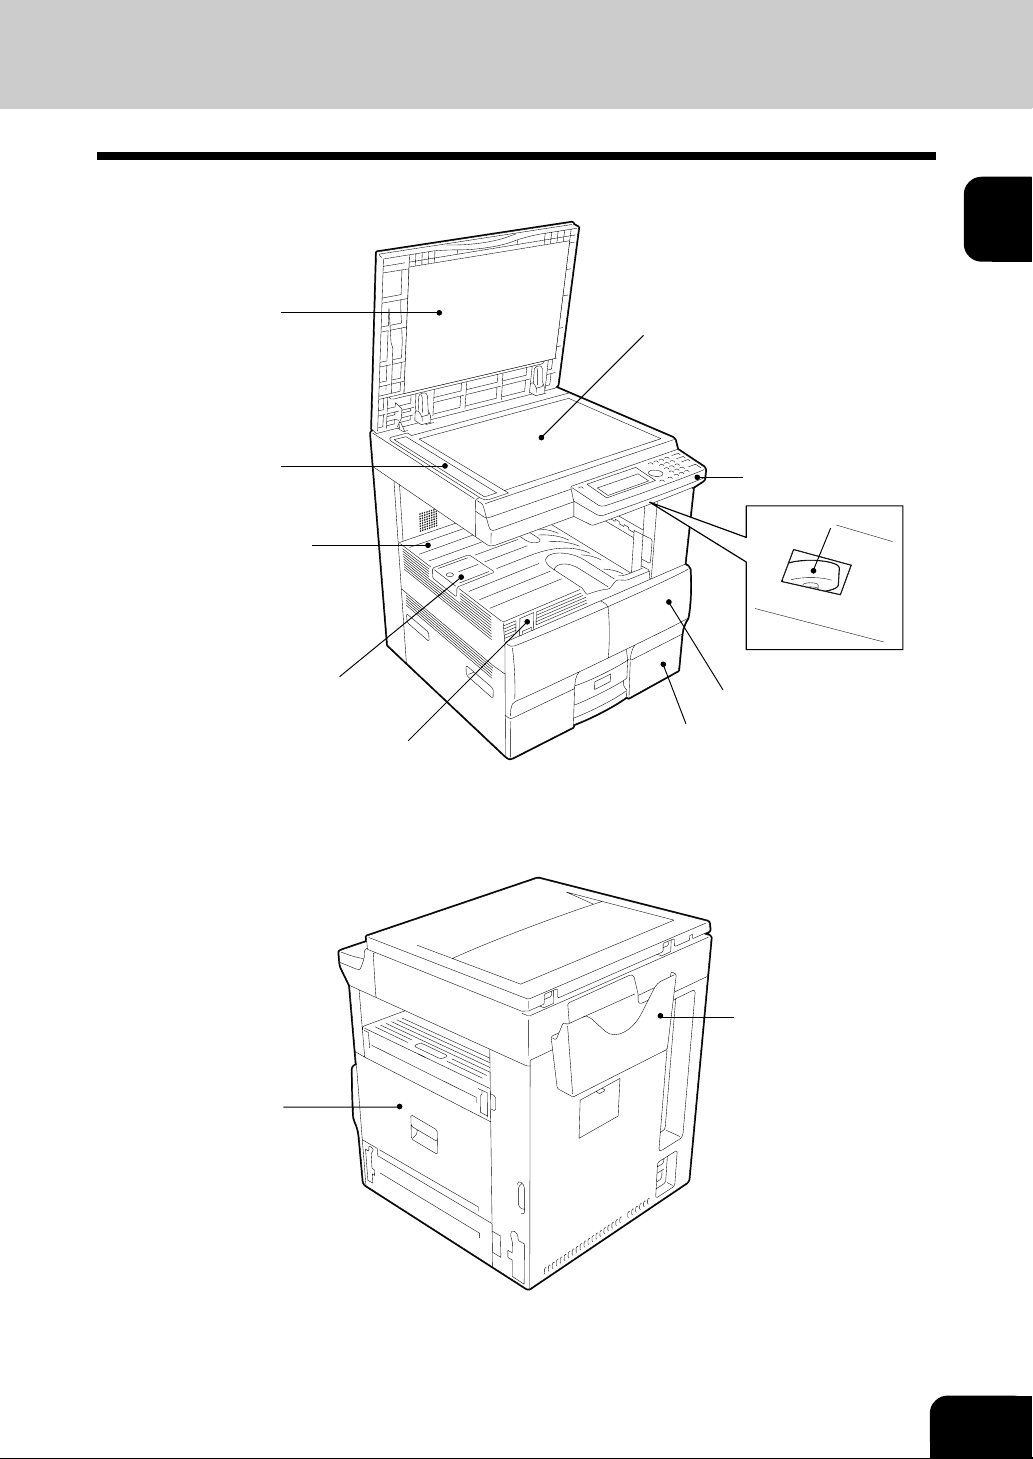
Main Components
1
Original cover
Original scale
Copy receiving tray
Paper stopper
Power switch
Original glass
Front cover
Cassette
Control panel
Brightness control*
2
3
4
5
6
7
Side cover
* Brightness control
Used to adjust the brightness of the message display panel.
8
9
Manual pocket
10
11
12
1-3
Page 17
1
2
3
4
5
6
7
8
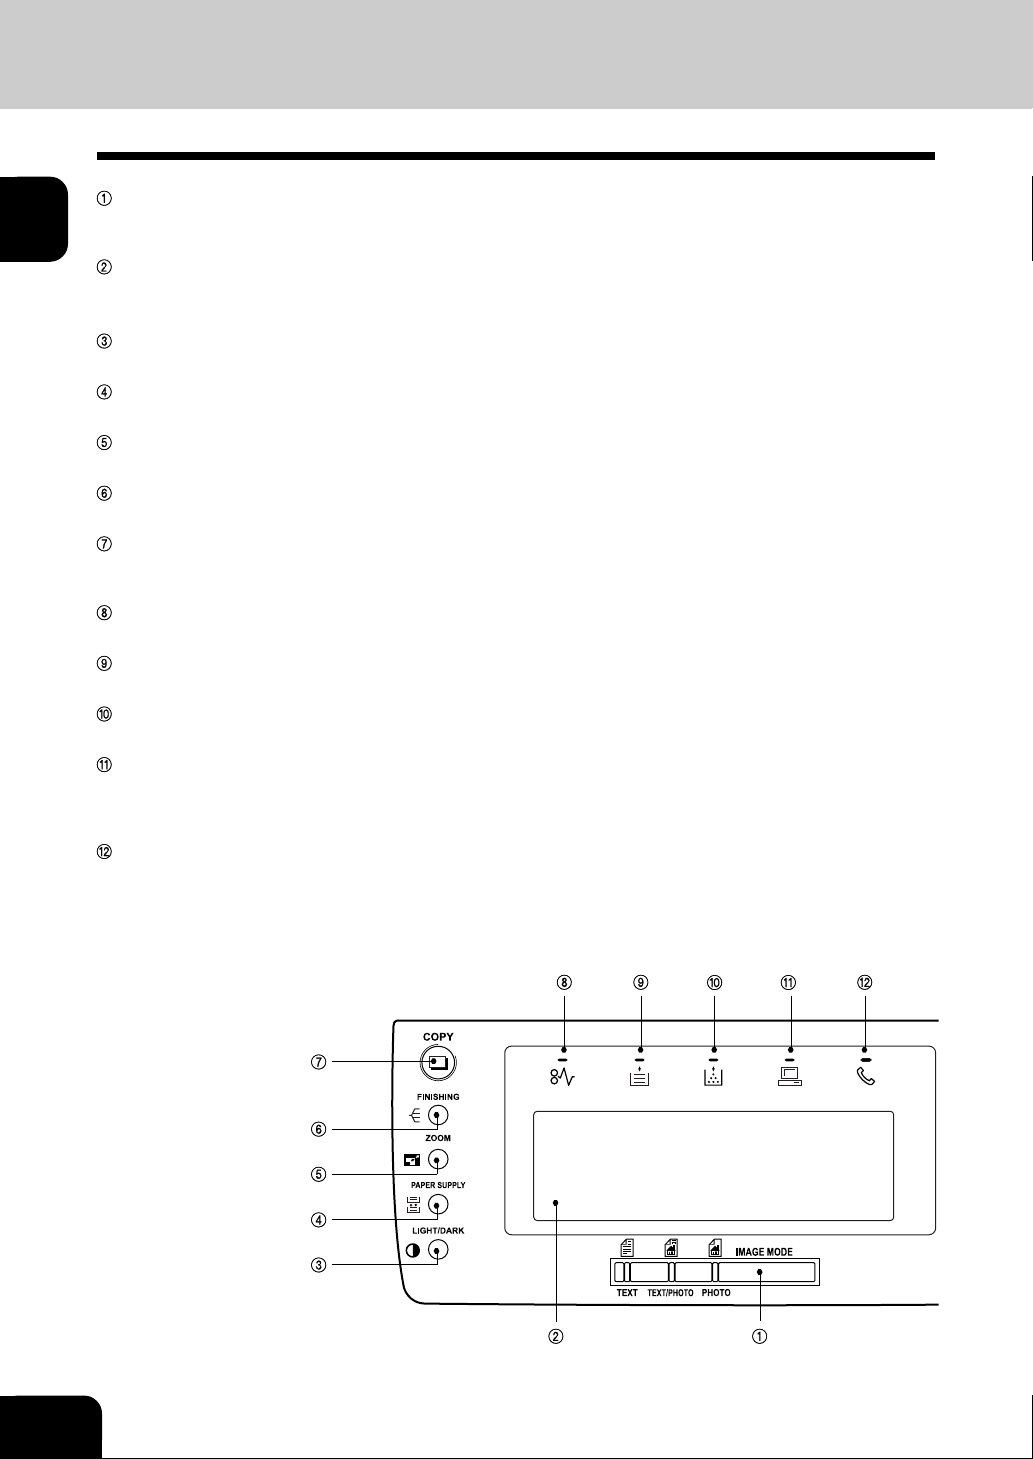
2. DESCRIPTION OF THE DIGITAL COPIER (Cont.)
Control Panel
IMAGE MODE
You can switch between the image modes (Text, Text/Photo and Photo) for copying. The lamp of the currently
selected image mode illuminates.
Message Display Panel
Displays the copier conditions, operating procedures, and various instructions and information to the user in text and
graphics.
LIGHT/DARK
Use this key when making a copy to specify the copy density.
PAPER SUPPLY
You can specify from which paper cassette you would like to feed paper for making a copy.
ZOOM
You can specify the scaling factor for copying.
FINISHING
You can specify how you would like to output copies (including Sort and Offset).
COPY
Press this key to switch from the other modes to the COPY mode. This manual describes the settings and operation
in the COPY mode in detail.
Paper Jam Lamp
This lamp blinks when an original or copy paper is jammed.
Recording Paper Lamp
This lamp blinks in the COPY mode when no paper is loaded in the selected paper cassette.
Toner Lamp
This lamp illuminates when the toner is about to run out or runs out completely.
PC Communication Lamp
This lamp is not used in the COPY mode.
This lamp blinks while the copier is serving as a printer and communicating with your computer, while it is printing out
in the PRINTER mode, or while it is communicating as a local scanner.
FAX Communication Lamp
This lamp is not used in the COPY mode.
This lamp blinks while the copier is communicating in the FAX mode.
9
10
11
12
1-4
BEFORE MAKING COPIES
Page 18
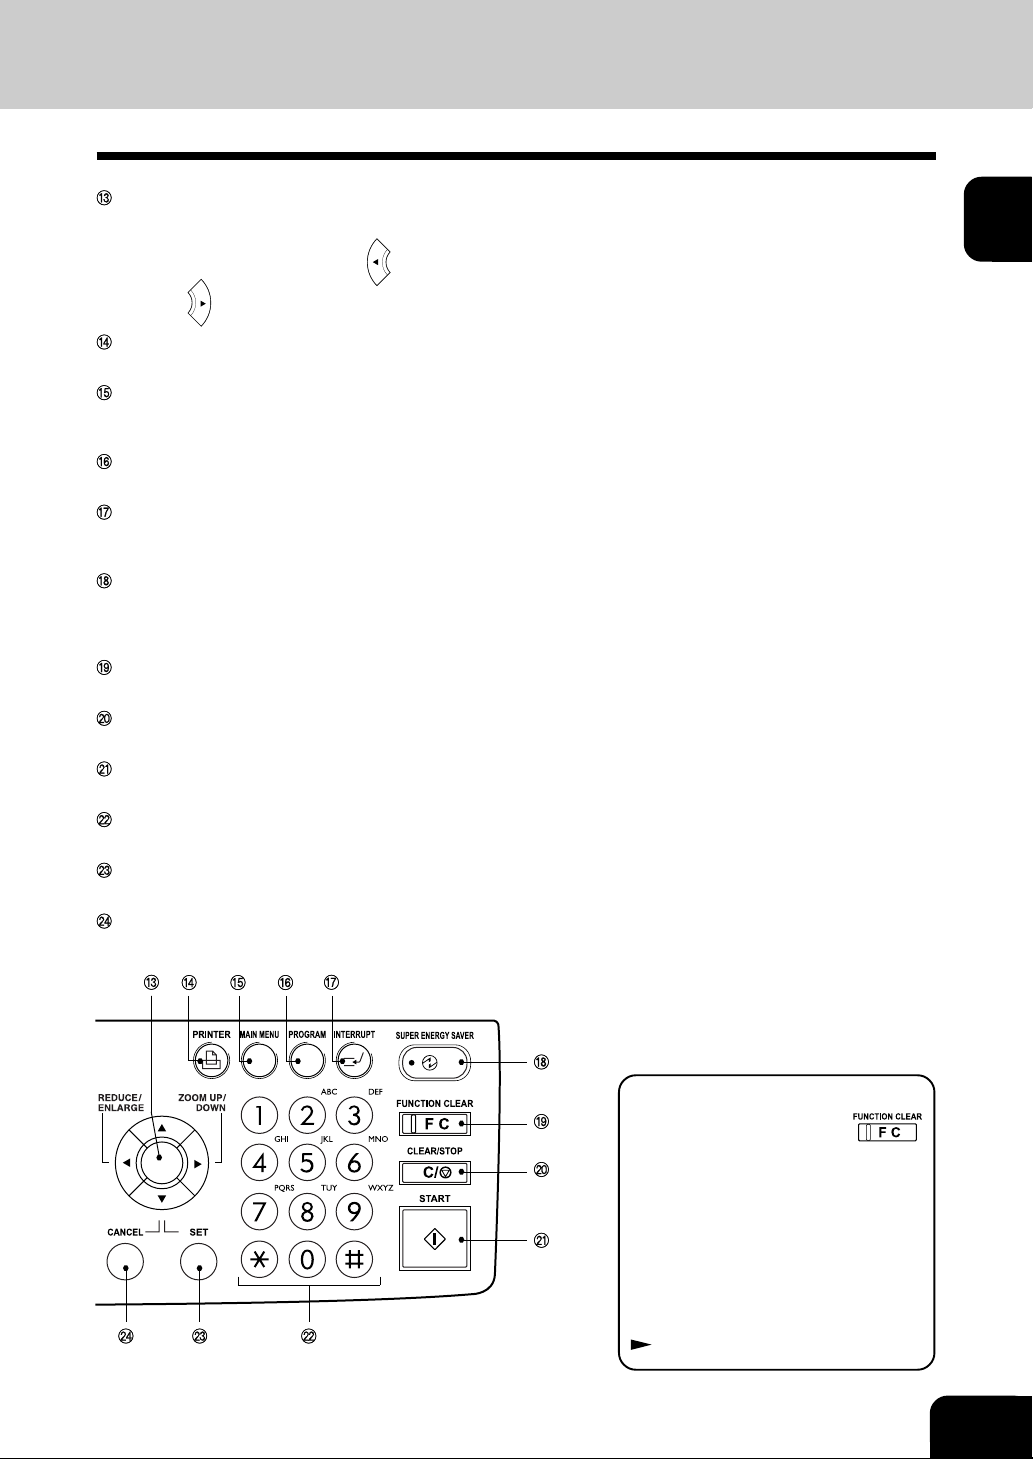
Arrow Keys
Use these keys to select a desired setting option or to enter a desired name or value in the PROGRAM mode or
EDIT MENU.
Also, in the COPY mode, use the key to enter the “REDUCE/ENLARGE” selection menu.
1
Use the key to enter the “ZOOM UP/DOWN” selection menu.
PRINTER Key
Use this key to adjust the printer settings or perform printing automatically.
MAIN MENU Key
Press this key to switch from the PROGRAM mode to the COPY mode.
You can select the jobs that you would like to perform in COPY, FAX or PRINTER mode.
PROGRAM Key
Use this key to reset the settings of the copier or adjust the default settings.
INTERRUPT Key
Use this key to interrupt the copying job in process and to perform another copying job. You can resume the
interrupted copying job by pressing this key again.
SUPER ENERGY SAVER Key
Press this key if the copier is unused for a long time and the copier goes into the Super Energy Save Mode. Only the
lamp located to the left of the key illuminates. The Message Display and the other lamps turn off. Press this key
again to resume copying. After warming up, the copier becomes ready to copy.
FUNCTION CLEAR Key
You can clear all modes that you have selected and reset the settings to the defaults.
CLEAR/STOP Key
Press this key to clear the number of copies to make or to stop copying.
START Key
Press this key to start copying.
Numeric Keys
Use these keys to enter the number of copies that you would like to make.
SET Key
Use this key to accept the data that you have entered in the PROGRAM mode or EDIT MENU.
CANCEL Key
Use this key to return to a previous menu in the PROGRAM mode or EDIT MENU.
2
3
4
5
6
7
8
Automatic Function Clear Mode
Even if you do not press the
key, the automatic function clear mode
will clear all settings to defaults and
the basic screen will be displayed, 45
seconds after copying is finished or
after the last key is pressed. While the
department management function is
being operated, the display returns to
the department code input screen.
Page 5-3.
9
10
11
12
1-5
Page 19
1
2
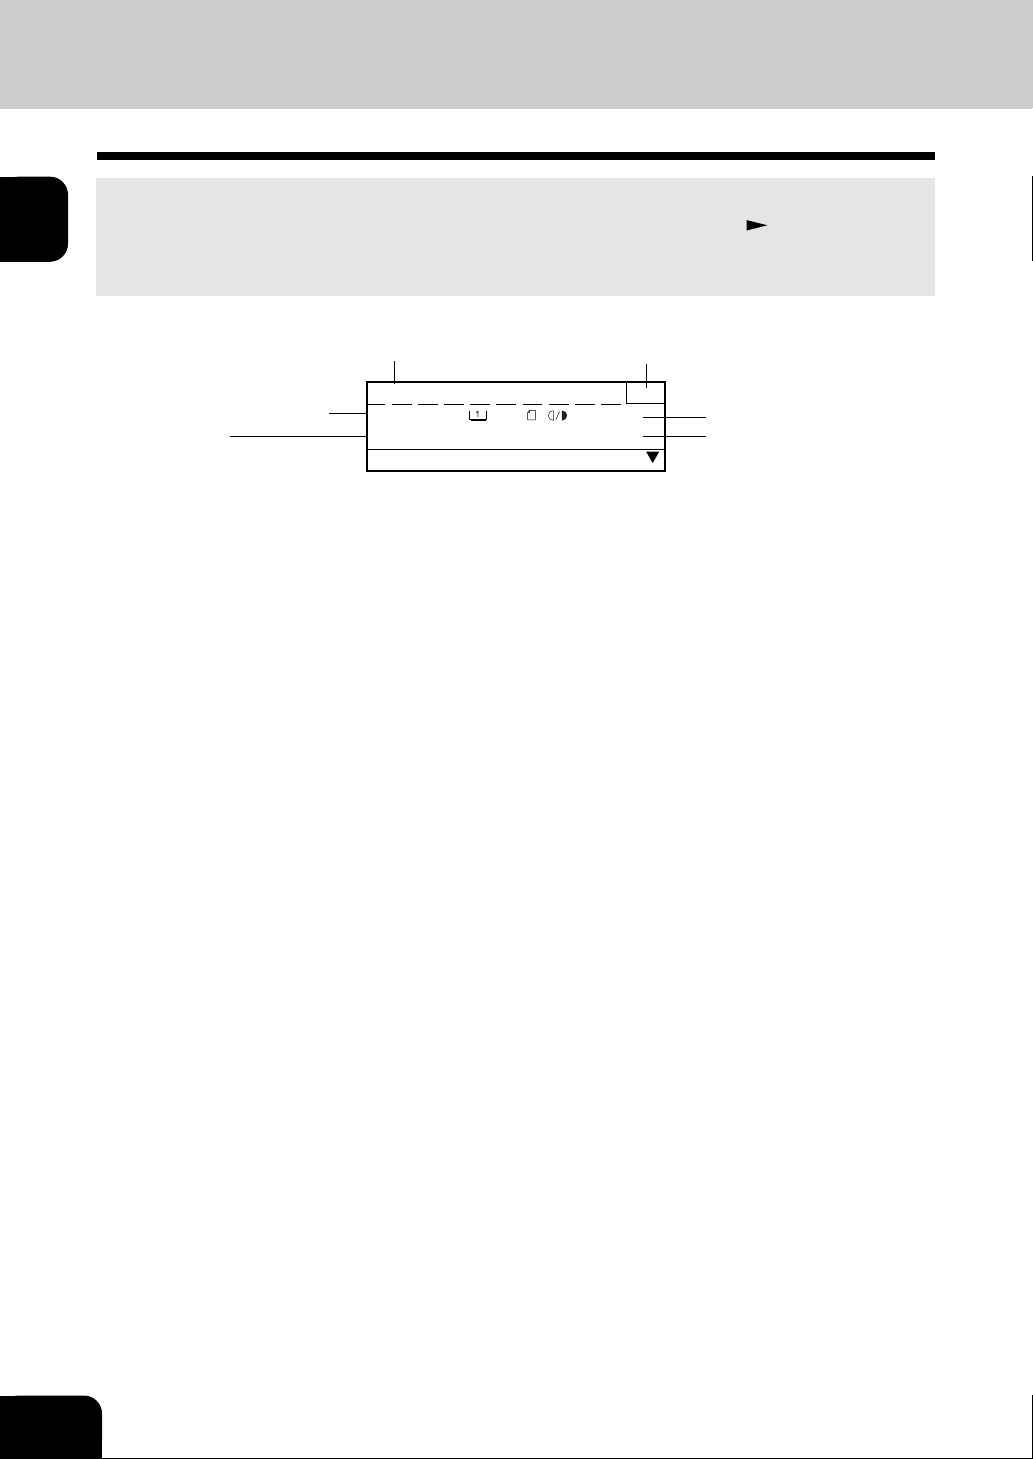
2. DESCRIPTION OF THE DIGITAL COPIER (Cont.)
Message Display Panel
When the power is turned on, the following basic screen is shown on the Message Display Panel. (When
the copier is controlled using the department code, a different screen is display.
The Message Display Panel indicates the copier’s status. It also illustrates operational procedures or
settings using brief sentences or icons.
Message Copy quantity
Page 1-13)
3
4
5
6
7
8
Paper size of the currently
selected paper source
Finishing
READY 1
PAPER :
FINISHING :SORT ZOOM :100%
A4 :AUTO
EDIT
Light/Dark
Zoom
9
10
11
12
1-6
BEFORE MAKING COPIES
Page 20
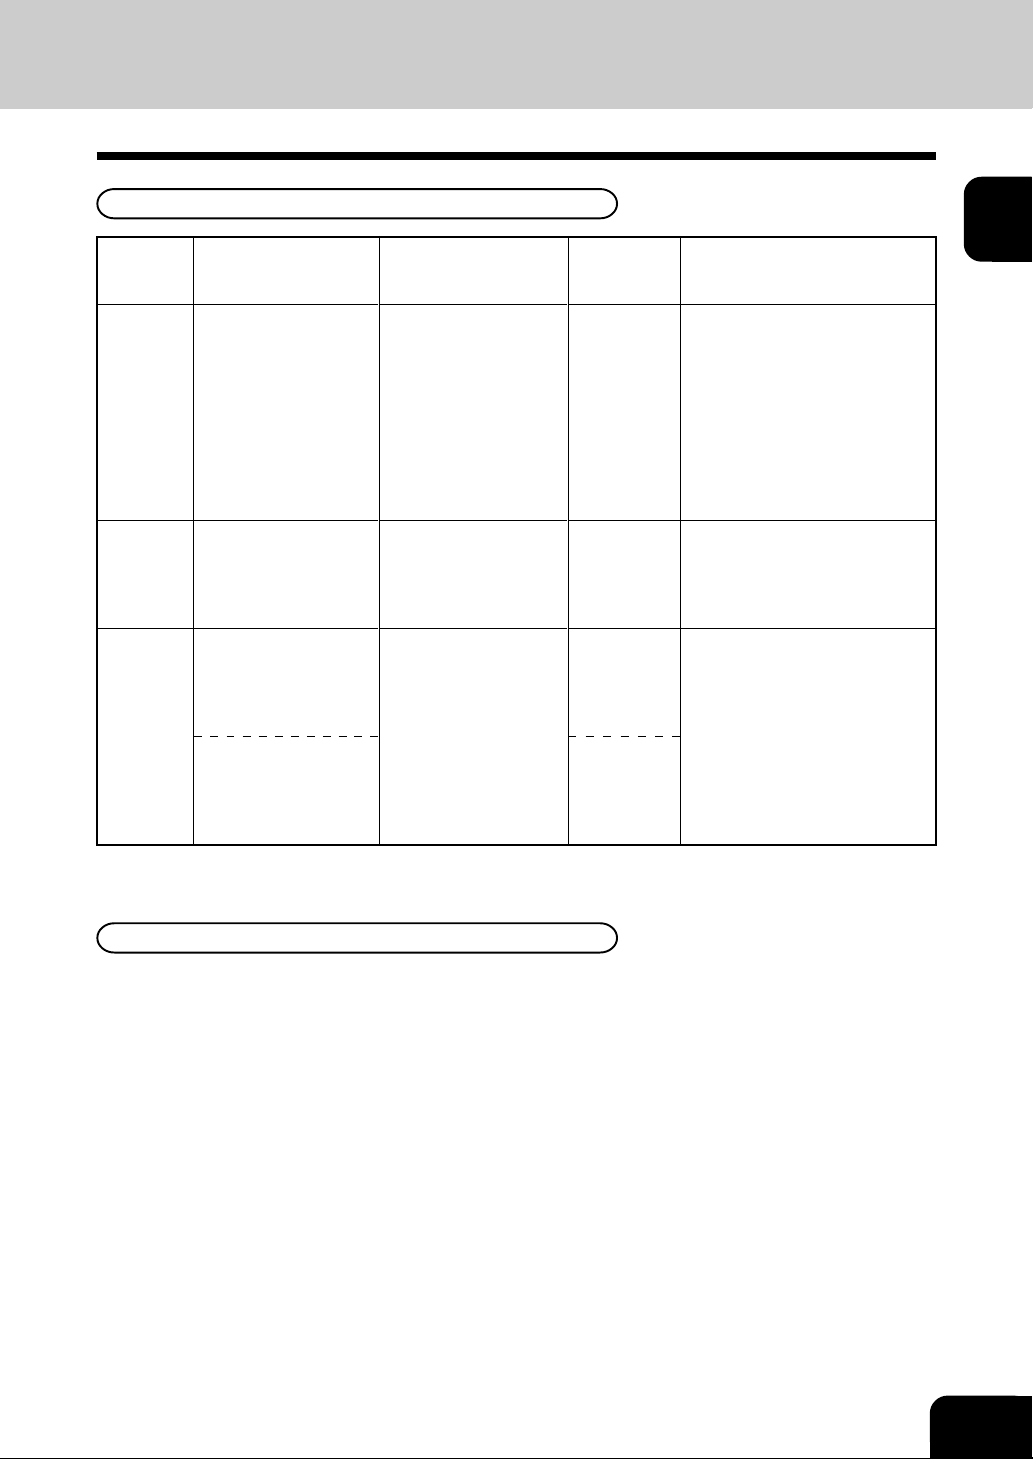
3. PAPER
Acceptable Paper Types and Sizes / Handling and Storing Paper
Acceptable Paper Types and Sizes
Feeder
Type of paper
Paper size
Maximum
capacity
Remarks
1
• Cassette
• Paper
feed unit
(option)
• Paper
feed
pedestal
(option)
• Large-
capacity
feeder
(option)
• Sheet
feed
bypass
(option)
“Maximum capacity” refers to the number of sheets when the paper recommended by Toshiba is set.
Plain paper
(64~80 g/m
Plain paper
(64~80 g/m
Multi-sheet feeding:
Plain paper (64~80
g/m2) only
1-sheet feeding:
Plain paper (80~163
g/m2), tracing paper,
OHP film, labels
2
) only
2
) only
Regular size
A/B format:
A3, A4, A4-R, A5-R,
FOLIO, B4
LT format :
LT, LT- R
Regular size
A/B format: A4 only
Regular size
A/B format:
A3, A4, A4-R, A5-R,
FOLIO, B4
LT format :
LT, LT- R
550 sheets
(Height:
approx. 60
mm)
2500 sheets
100 sheets
(Height:
apporx. 11
mm)
1 sheet
Plain paper with holes for filing
cannot be used.
Plain paper with holes for filing
cannot be used.
(for e-STUDIO20/25 only)
Plain paper with holes for filing
cannot be used.
Also, some of paper on the left
may not be used depending on
type or thickness.
(For details, consult your
service technician.)
2
3
4
5
6
7
8
Handling and Storing Paper
Pay attention to the following points:
• Avoid using paper that is specially treated or paper that has been printed on another machine, and
also avoid performing double copying on the same side of paper; this may cause a malfunction.
• Do not use paper with creases, wrinkles or that is prone to curling, slick paper, or rough paper; this
may cause paper misfeeds.
• Once opened, paper should be kept in its wrapping paper and stored in a damp-free place.
• To prevent paper being folded or bent, store it evenly on a flat surface.
9
10
11
12
1-7
Page 21
1
3. PAPER (Cont.)
Changing the Paper Size of the Cassette
The paper size of the copier’s cassettes can be changed to appropriate paper sizes using the following
procedure.
2
3
4
5
6
7
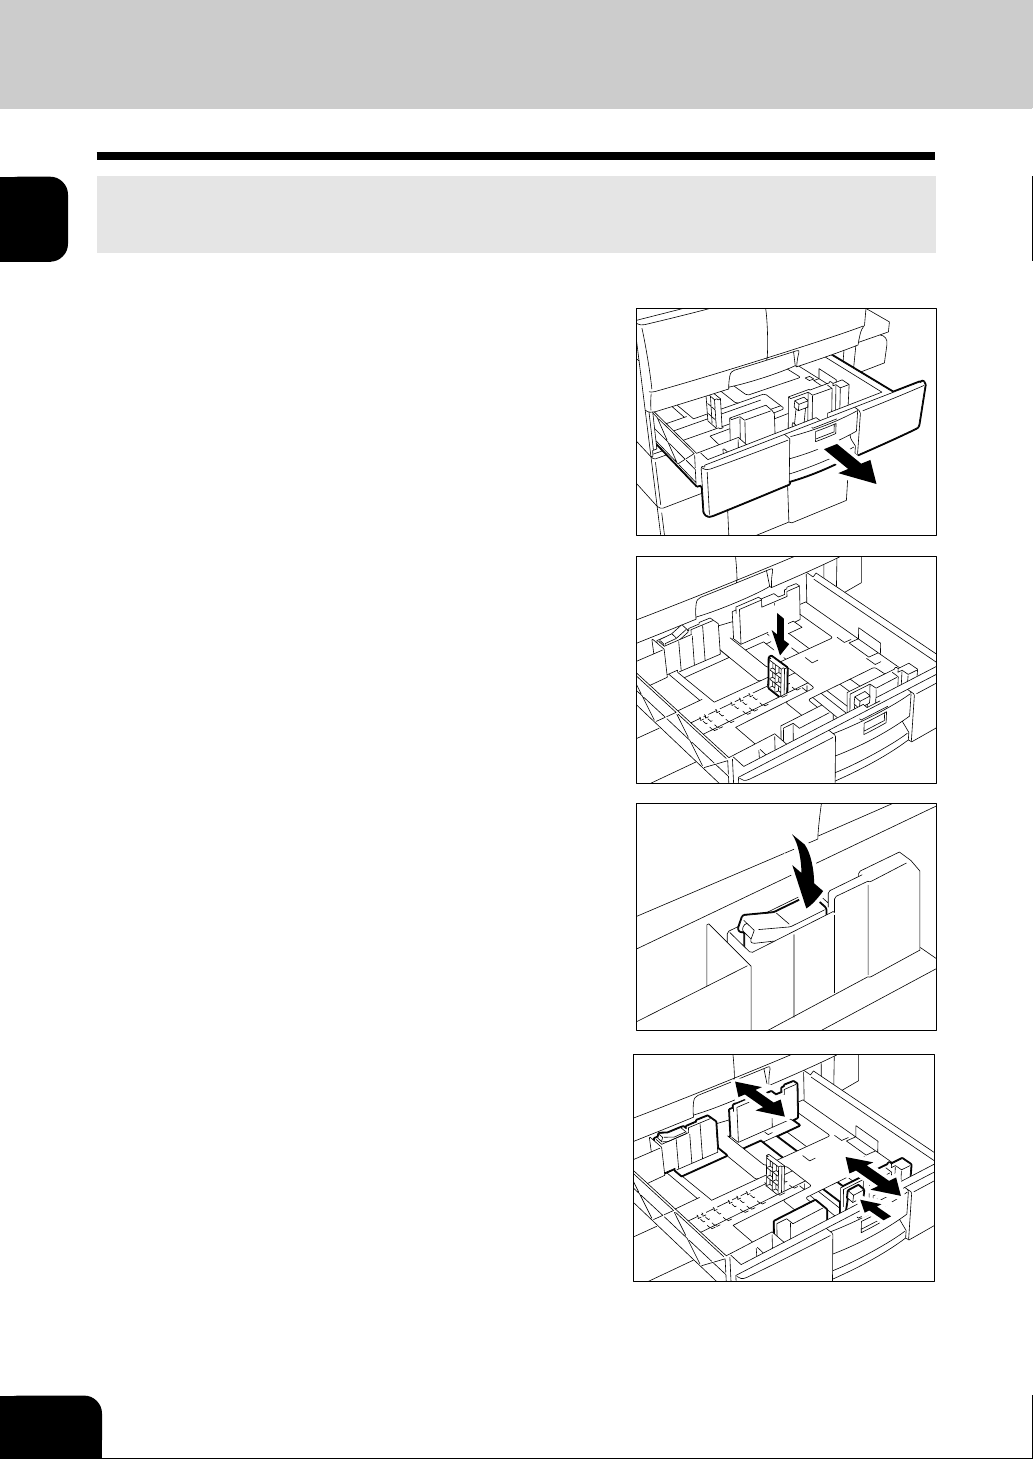
Pull the cassette out until it stops.
1
Move the width guide to the desired paper size
position (as indicated on the bottom surface of the
2
cassette).
Push the right (unlock) side of the size selection
lever to unlock it.
3
8
9
10
11
12
1-8
While pushing the size selection lever in the direction
of the arrow, set the side guide to the desired paper
4
width (as indicated on the bottom surface of the
cassette).
BEFORE MAKING COPIES
Page 22
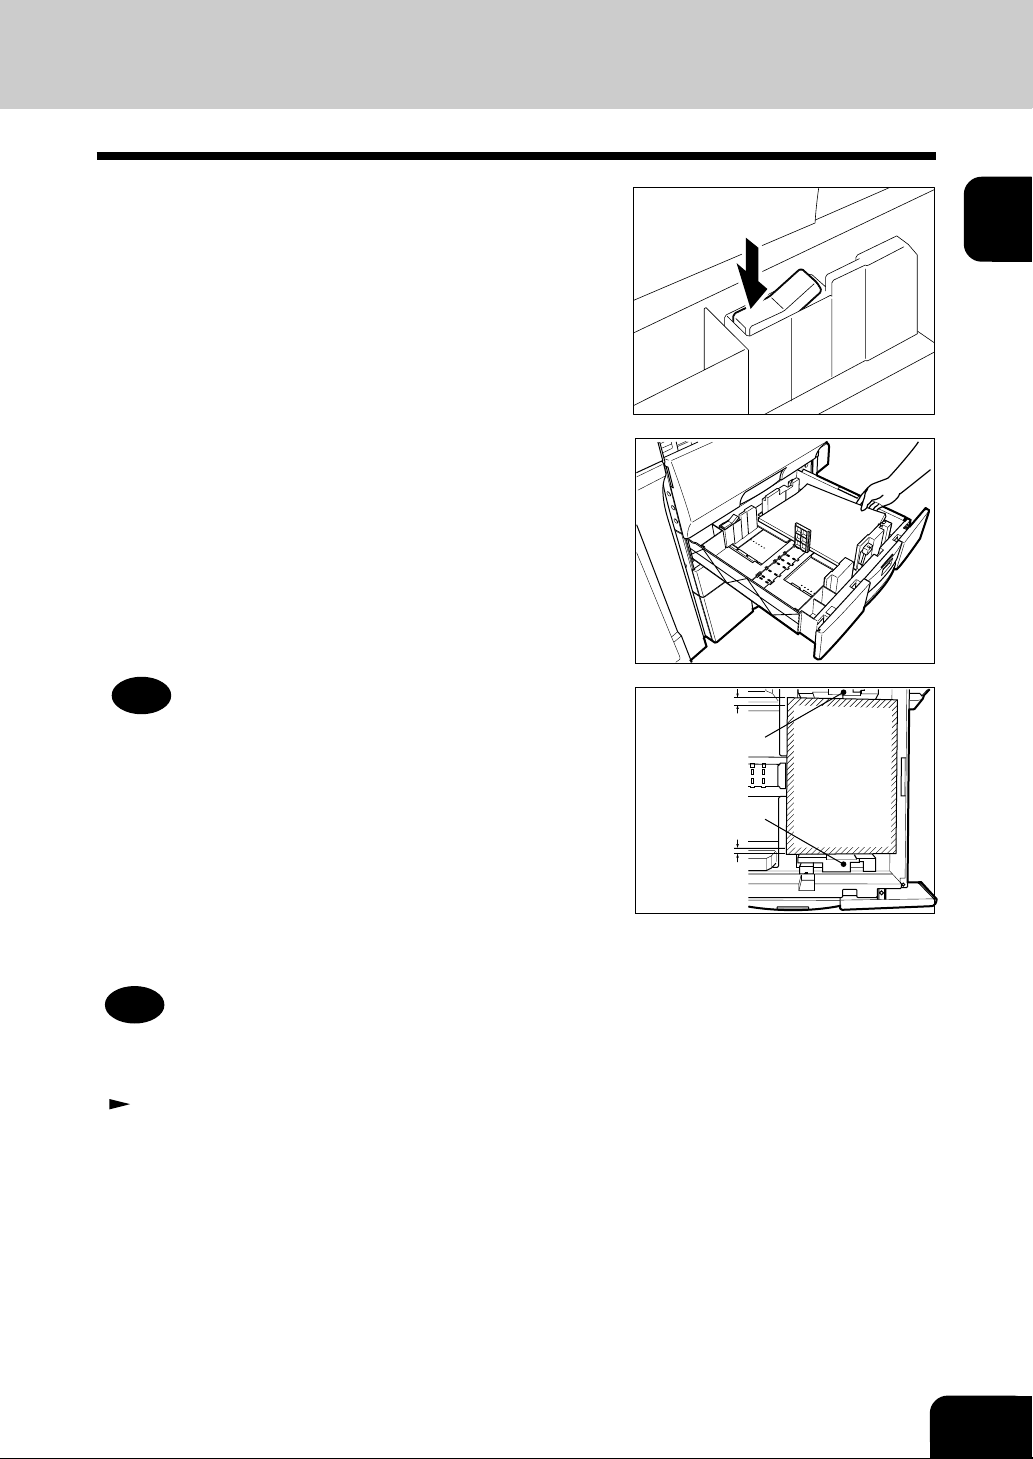
Push the left (lock) side to lock the size selection
lever.
5
Place paper in the cassette.
• Up to 550 sheets of paper (60 mm) (recommended by
6
Toshiba) can be set.
• Do not add paper above the line indicated on the guide.
• Do not use creased, folded, wrinkled or damp sheets of
paper.
1
2
3
4
5
Note
Make sure that a gap of approx. 0.5 mm (less than 1 mm in
total) is left between the paper and the side guide. If there is
no gap, this would causes paper misfeeding.
Install the cassette into the copier.
7
Tip
Changing the paper size of the cassette alone does not change
the cassette size indication on the display. To change the cassette
size, perform cassette size setting on the Message Display Panel.
Page 1-11
Approx. 0.5 mm
Side guide
Side guide
Approx. 0.5 mm
6
7
8
9
10
11
12
1-9
Page 23
1
2
3
3. PAPER (Cont.)
Turning ON the Power Switch / Auto Job Start
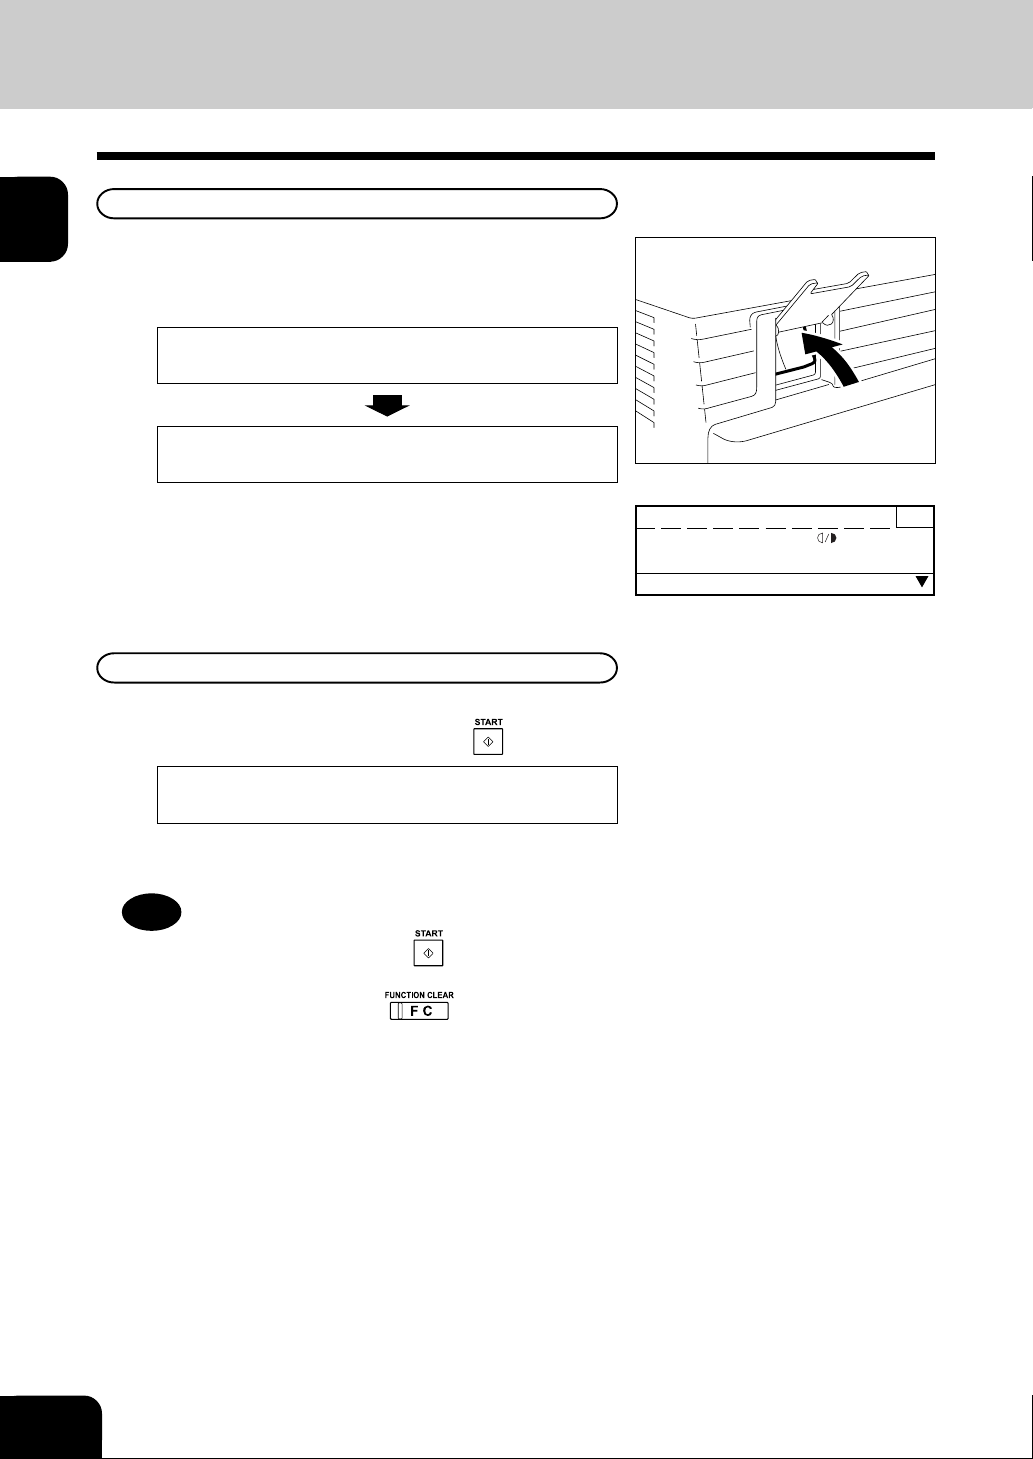
Turning On the Power Switch
Open the power switch cover and turn ON the switch.
1
• This message appears on the message display panel of
the basic screen :
Please wait
Wait warming up
4
5
6
7
8
9
The “Ready” message appears.
• This message indicates that the copier is ready for operation.
2
Auto Job Start
While the copier is warming up, place the original on the glass,
select the desired copy modes and press the key.
Wait warming up:Auto Start
When the machine reaches its proper operating temperature,
copying will automatically start.
Tip
Even after you have pressed the
the copy modes if copying has not yet started. To cancel the
auto job start mode, press the
key, you can change
key.
READY 1
PAPER :APS
FINISHING :NONSORT ZOOM :100%
:AUTO
EDIT
10
11
12
1-10
BEFORE MAKING COPIES
Page 24
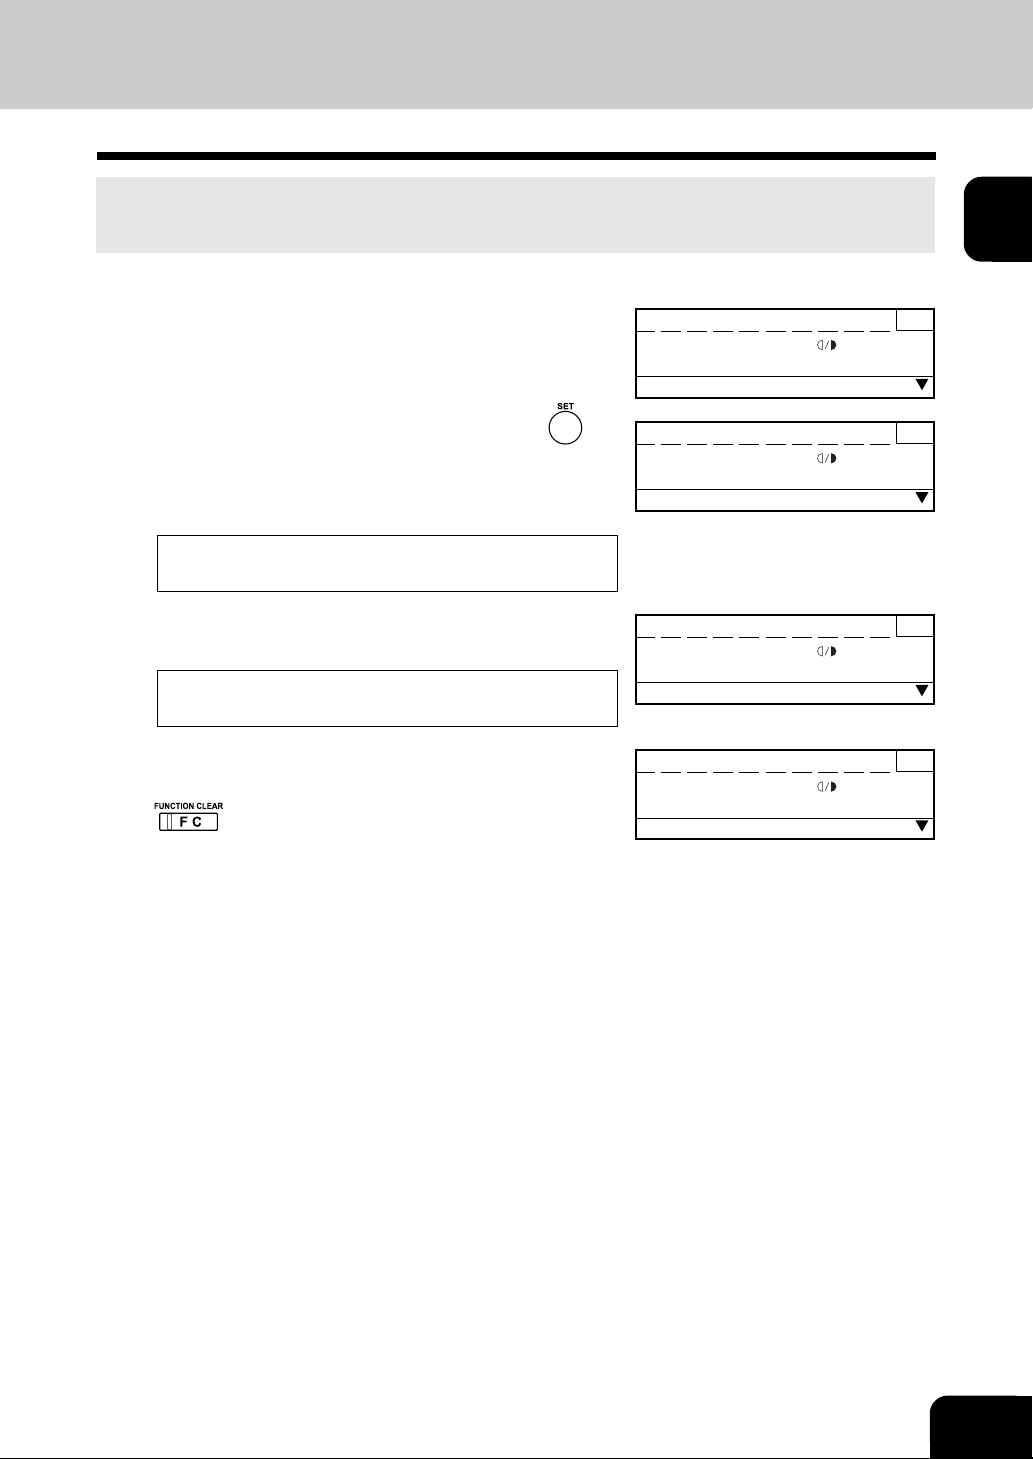
Cassette Size Setting
Enter the paper size loaded in each paper cassette in the copier. When the size of the paper loaded in
a cassette is changed (
indication may result if the wrong paper size is selected.
Page 1-8), please reset the cassette size before making a copy. A paper jam
1
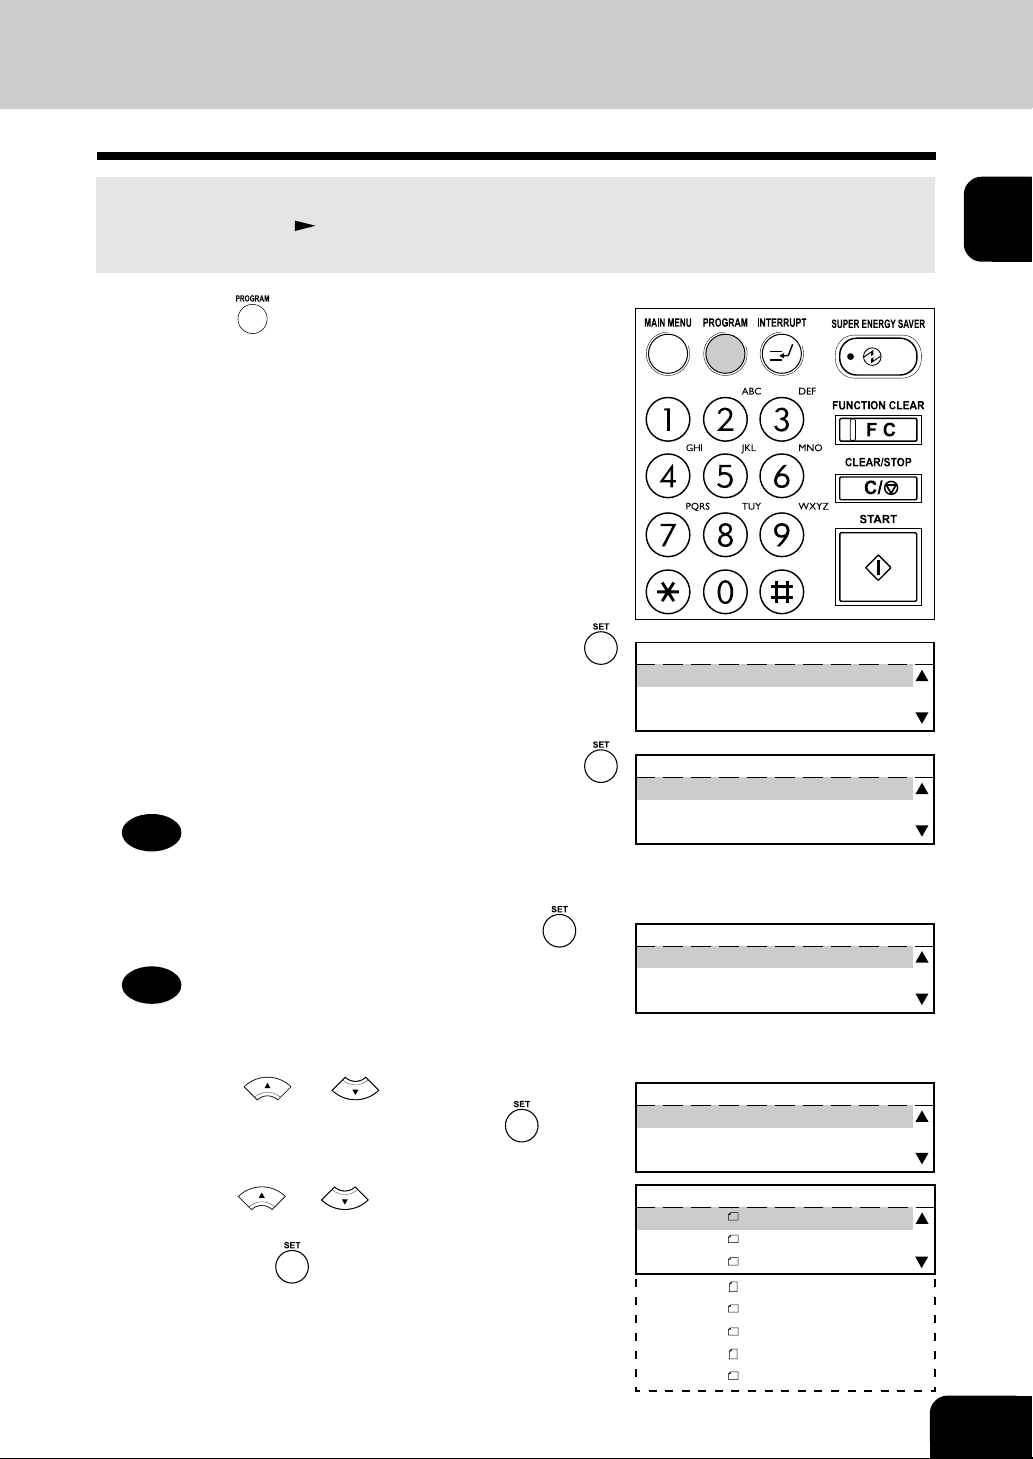
Press the key to enter the program menu.
1
Select "01.DEFAULT SETTINGS" and press the
2
key.
Select "01.MACHINE DEFAULTS" and press the
key.
3
Tip
"03. FAX SETUP" appears on the menu only when the FAX
option is installed.
Select "01.CASSETTE SIZE" and press the key.
4
Tip
"02. WALKUP SCREEN" appears on the menu only when the
FAX option is installed.
PROGRAM
01.DEFAULT SETTINGS
02.LISTS
03.INITIAL SETUP
DEFAULT SETTINGS
01.MACHINE DEFAULTS
02.COPY SETUP
03.FAX SETUP
MACHINE DEFAULTS
01.CASSETTE SIZE
02.WALKUP SCREEN
03.TIMERS
2
3
4
5
6
7
8
9
Press the or key to select the paper
5
cassette to be specified and press the key.
Press the or key to select the
6
size of paper loaded in the paper cassette
and press the key.
• The paper size in the paper cassette is specified.
Then the screen returns to MACHINE DEFAULT
selection.
CASSETTE SIZE
01.CASSETTE 1
02.CASSETTE 2
03.CASSETTE 3
Select paper size
01.A3
02.FOLIO
03.B4
04.A4
05.A4-R
06.A5-R
07.LT
08.LT-R
10
11
12
1-11
Page 25

1
2
3
4
5
3. PAPER (Cont.)
Repeat steps 4 to 6 to specify the paper size for other
paper cassettes, as necessary.
7
Press the key to return to the initial screen for
copying.
8
6
7
8
9
10
11
12
1-12
BEFORE MAKING COPIES
Page 26
4. DEPARTMENT CODES
If the copier is set up so that department codes can be used, you can make copies only after entering a
pre-assigned department code.
1
When the department control function is in use, the
screen shown on the right appears immediately after
1
the power switch is turned on.
Enter the 5-digit department code, and press key.
2
• The department code is shown with asterisks (*****). When
a correct department code is entered, the following message
appears.
READY
• When a wrong department code is entered, the following
message appears. Enter the correct department code.
Invalid DEPARTMENT CODE
Make copies, as you would normally.
3
• When you have finished making copies, either press the
key twice, or wait 45 seconds.
Enter DEPARTMENT CODE 1
PAPER :APS
FINISHING :SORT ZOOM :100%
READY 1
PAPER :APS
FINISHING :SORT ZOOM :100%
Invalid DEPARTMENT CODE 1
PAPER :APS
FINISHING :SORT ZOOM :100%
Enter DEPARTMENT CODE 1
PAPER :APS
FINISHING :SORT ZOOM :100%
:AUTO
EDIT
:AUTO
EDIT
:AUTO
EDIT
:AUTO
EDIT
2
3
4
5
6
7
8
9
10
11
12
1-13
Page 27

1
2
3
4
5
6
7
8
9
10
11
12
1-14
BEFORE MAKING COPIES
Page 28

2. HOW TO MAKE COPIES
1. GENERAL COPYING PROCEDURE ............................................................................. 2-2
1
2
2. SETTING ORIGINALS ................................................................................................... 2-4
Originals ......................................................................................................................... 2-4
Placing the Original on the Glass ................................................................................... 2-5
Using the Automatic Document Feeder (optional) or
Reversing Automatic Document Feeder (optional) ..................................................... 2-6
3. INTERRUPT COPYING.................................................................................................. 2-8
3
4
5
6
7
8
10
11
12
2-1
9
Page 29
1
2
3
4
5
1. GENERAL COPYING PROCEDURE
When originals are set and the key is pressed with all settings unchanged, copies are made using
the initial (default) settings (*1). By selecting various copy modes, you can alter the number and type of
copies to be made.
The initial (default) settings of the copier at the time of installation
are as shown on the right. You can change these initial settings.
Page 5-18
*1 The copy modes that are automatically set when the power
is turned on or when the key is pressed on the
control panel are called the initial (default) settings.
Initial settings
Reproduction ratio ........... 100%
Copy quantity ................... 1
Automatic paper selection
1-side copies from 1-side originals
Automatic image density
Text/photo mode
Non-sort mode
6
7
8
9
10
11
Copying Procedure
Place originals.
• When placing an original on the glass: Page 2-5
1
• When placing originals facing up in the automatic document
feeder (optional) or the reversing automatic document feeder
(optional):
Page 2-6
Automatic
document
feeder
Original
Original scale
Slide
12
2-2
HOW TO MAKE COPIES
Page 30

Set the desired copy modes.
• The automatic paper selection (APS) mode, automatic image
2
density mode and copying of one original are the default
settings.
1
2
3
Press the key.
• The message “COPYING” appears. The copier starts
3
copying. After completion of the copying, the message
“READY” appears again.
• For the e-STUDIO16, when an original is scanned from
the glass, a message appears prompting you to specify
the size of the original that you would like to copy.
Use the
original. Then press the
copying.
or key to specify the size of the
key. The machine will start
COPYING 1
PAPER :
FINISHING :SORT :100%
Select original size 1
A4
A3
A4-R
A5-R
B4
A4-R :AUTO
4
5
6
7
8
9
10
11
12
2-3
Page 31

1
2. SETTING ORIGINALS
Originals
The following specifications apply to originals that can be used with this copier:
2
3
4
5
6
7
8
9
Setting
place
Glass
Automatic
document
feeder
(optional)
Reversing
automatic
document
feeder
(optional)
Types of original
Sheets
Three-dimensional
objects Books
Plain paper, thermal
paper (for word
processor or fax), long
originals, originals with
filing holes (2-, 3- and
4- holes):
50 to 105 g/m
(Multi-sheet feeding)
50 to 127 g/m
(1-sheet feeding)
Plain paper, thermal
paper (for word
processor or fax), long
originals, originals with
filing holes (2-, 3- and
4- holes):
50 to 127 g/m
(1-sided original)
50 to 105 g/m
(2-sided original)
2
2
2
2
Maximum
size
Width
: 302 mm
Length
: 432 mm
Width
: 297 mm
Length
: 432 mm
Width
: 297 mm
Length
: 432 mm
Size capable of
automatic
detection
Regular size
A/B format:
A3, A4, A4-R,
A5-R, FOLIO, B4
(for e-STUDIO20/
25 only)
Regular size
A/B format:
A3, A4, A4-R,
A5-R, FOLIO, B4
Regular size
A/B format:
A3, A4, A4-R,
A5-R, FOLIO, B4
Maximum
number that
can be set
50 originals
2
(50 to 80 g/m
stacked height of
originals 8 mm
or less
100 originals
(50 to 80 g/m
or stacked
height of
originals 16 mm
or less
) or
2
)
Remarks
Do not place any
heavy object (4 kg
or over) on the
glass.
Some of the
originals on the
left may not be
used depending
on type or
thickness.
(For details,
consult your
service
technician.)
Some of the
originals on the
left may not be
used depending
on paper quality.
10
11
12
2-4
HOW TO MAKE COPIES
Page 32

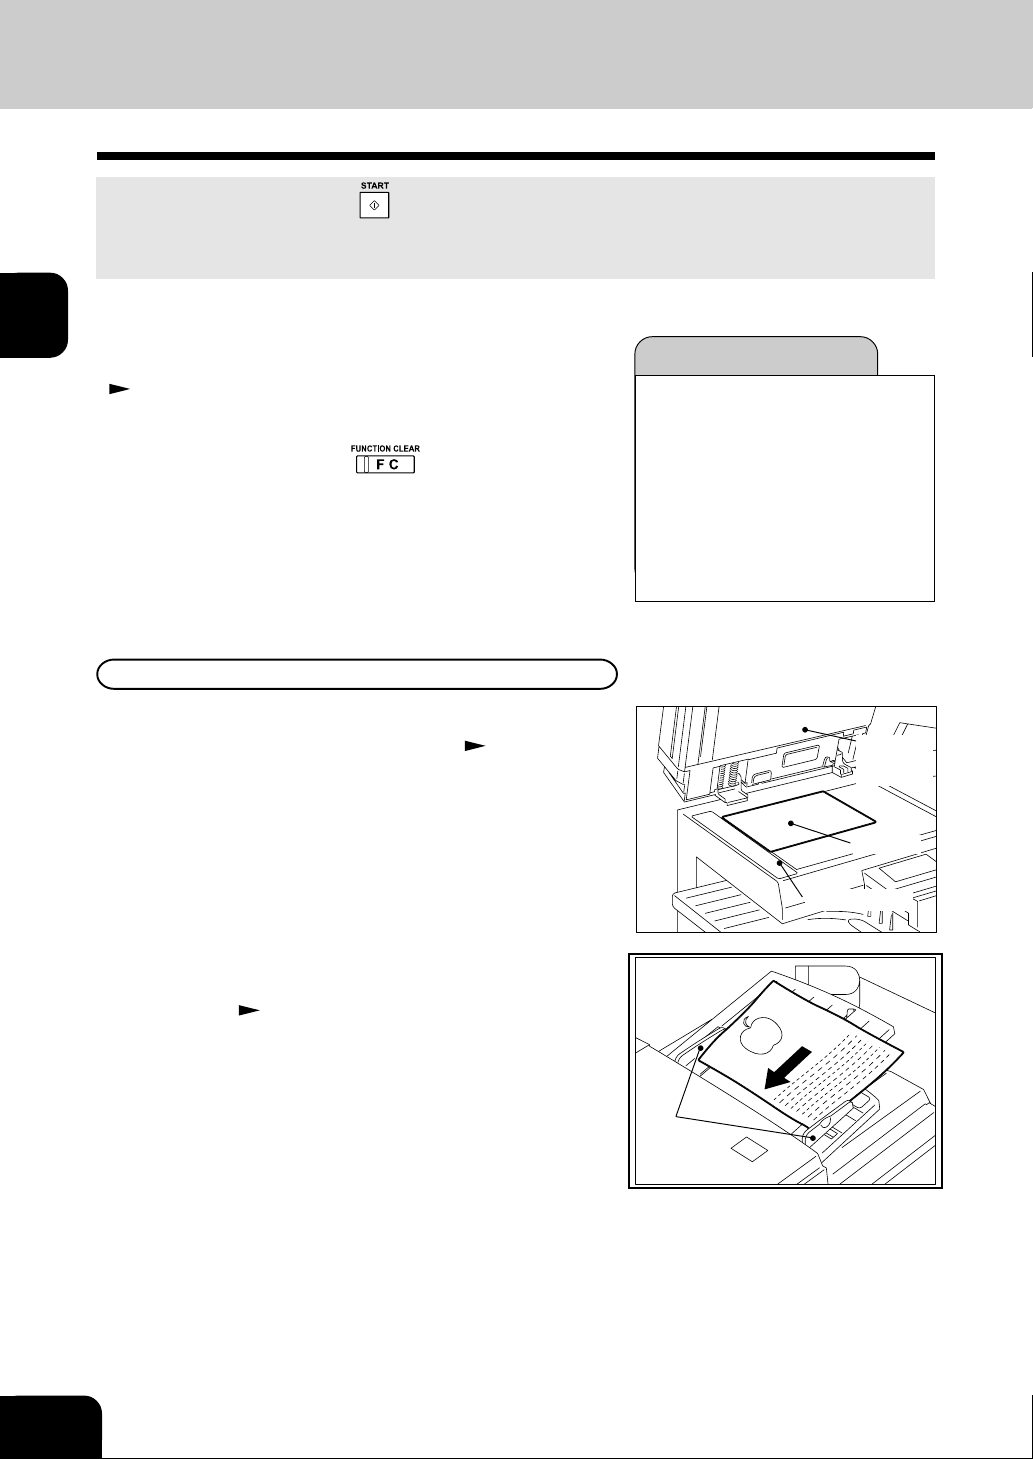
Placing the Original on the Glass
Sheet Originals
Raise the original cover or the automatic document
feeder (optional) and place the original on the glass
1
facing down.
Align the original against the left inner corner of the
glass.
2
Lower the original cover or the automatic document
feeder (optional) slowly.
3
Original scale
1
Automatic
document
feeder
2
Original
3
Tip
When copying originals with high transparency, such as an
OHP film and tracing paper, place a blank sheet of paper the
same size as the original or larger over the original.
Book-type Originals
Raise the original cover or the automatic document
feeder (optional) and set the original in the direction
1
shown in the figure.
• If the original is not set in the correct direction, copies will
not be delivered in the correct page order.
Lower the original cover or the automatic document
feeder (optional) slowly.
2
• Do not try to force the original cover or reversing automatic
document feeder (optional) to fully close over a very thick
original, such as a large book. Copies can be made if the
cover or feeder does not close fully.
• During copying, an intense light may leak out. Do not look
at the original glass surface.
Blank sheet
Original
4
5
6
7
8
9
10
11
12
2-5
Page 33

1
2
3
4
5
2. SETTING ORIGINALS (Cont.)
Using the Automatic Document Feeder (optional) or the Reversing Automatic Document Feeder (option)
After aligning the edges of the originals well, place
them on the original feed tray facing up and align
1
the slides to the width of the originals.
Slide
6
7
8
9
10
11
12
2-6
HOW TO MAKE COPIES
Page 34

Precautions for Using the Automatic Document Feeder (optional) or the Reversing Automatic Document Feeder (optional)
Do not use the following types of originals as they tend to be misfeed or become damaged:
1
(1) Badly wrinkled or folded originals. In particular,
originals whose leading edge is curled may fail
to be fed.
(2) Originals with carbon paper (5) Originals with holes or torn originals
(3) Taped, pasted or clipped (cut out) originals (6) Damp originals
(4) Clipped or stapled originals
(7) OHP film originals
2
3
4
5
6
7
Also, the following originals should be handled carefully:
(1) Folded or curled originals
should be smoothed out
before being used.
(3) Originals sticking to each other, or originals that are surface-treated
may fail to separate properly.
(2) Originals with the same
width can be set at a time.
(Do not mix originals with
different widths.)
8
9
10
11
12
2-7
Page 35

1
2
3
3. INTERRUPT COPYING
The interrupt copy is a convenient feature that allows the user to pause a job that is currently in progress.
Press the key.
1
• This message appears:
Job interrupted
• The
key illuminates during the INTERRUPT copying.
4
5
6
7
8
9
Note
One interrupt copy can be made from multiple originals by
placing them on the glass one at a time.
Place the original.
• If the previous original remains on the glass, open the original
2
cover or automatic document feeder (optional) or the
reversing automatic document feeder (optional) and replace
it with the original to be interrupt-copied.
Press the key.
3
• Repeat steps 2 to 4 if you need to interrupt copying again.
After interrupt copying is finished, press the
key again.
4
• When the following is shown on the Message Display, press
the
key and perform the interrupted jobs.
Ready to resume job.
Ready to resume job 3
PAPER :APS :AUTO
FINISHING :SORT ZOOM :100%
EDIT
10
11
12
2-8
HOW TO MAKE COPIES
Page 36

3. BASIC MENU
1. PAPER SELECTION ...................................................................................................... 3-2
Automatic Paper Selection (APS) .................................................................................. 3-2
Manual Paper Selection ................................................................................................. 3-4
Bypass Copying ............................................................................................................. 3-5
Bypass Copying by Specifying the Copy Size ............................................................... 3-7
1
2
3
2. REDUCTION AND ENLARGEMENT COPYING ............................................................ 3-8
3. COPYING WITH COPY DENSITY SELECTION .......................................................... 3-13
4. ORIGINAL IMAGE QUALITY SELECTION .................................................................. 3-15
4
5
6
7
8
9
10
11
12
3-1
Page 37

1
2
3
4
5
1. PAPER SELECTION
Automatic Paper Selection (APS)
When the power switch is turned ON, the Automatic Paper Selection (APS) mode is selected as the
default mode.
In this mode, when a regular-sized original is loaded for copying, the copier detects the original size
automatically and selects a same paper size as the original size. For the e-STUDIO16, when the original
is placed on the glass for copying, the copier cannot detect its size automatically. A message appears
prompting the user to specify the size of the original.
* This mode can only be used for actual-size (100%) copying.
* For automatically selectable original sizes:
Check that APS mode is selected in the upper left
portion of the Message Display.
1
Place the original(s) on the original feed tray or on
the glass.
2
Select desired copy mode.
Page 2-4
READY 1
PAPER :APS
FINISHING :SORT ZOOM :100%
:AUTO
EDIT
3
6
7
8
9
10
11
Enter the desired copy quantity using numeric keys.
• A copy quantity up to 999 can be keyed in.
4
• The copy quantity default is set at one.
• When an incorrect quantity is set, press the
and key in the correct number.
• If you press the key, all current copier settings will
be cleared, and returned to the default settings.
Press the key.
• If the following messages are shown;
5
Change the direction of original(s).
Change direction of original.
Load the cassette containing paper in the same size as
the original.
Set correct cassette
Add paper in the cassette.
Add Paper
key
12
3-2
BASIC MENU
Page 38

• For the e-STUDIO16, when an original is placed on the glass
for copying, the following message appears.
Select original size
1
Press the or key to select the original size
and press the key.
Select original size 1
A4
A3
A4-R
A5-R
B4
2
3
4
5
6
7
8
10
11
12
3-3
9
Page 39

1
1. PAPER SELECTION (Cont.)
Manual Paper Selection
Highly transparent originals such as OHP films and tracing paper, very dark originals, originals with dark
borders, or non-regular sized originals such as newspaper and magazines, may be incapable of automatic
paper selection. For these types of originals, use the manual paper selection.
2
3
4
5
6
7
8
Press the key with the initial screen shown in
the COPY mode.
1
Use the or keys and select the paper
cassette that you would like to feed paper from.
2
• Please note that the cassettes must be pre-defined with the
size of paper loaded.
Page 1-8
Place the original(s) on the original feed tray or on
the glass.
3
(“Setting Original”. Page 2-4)
Select desired copy mode and quantity as required.
4
READY 1
PAPER APS
SUPPLY:
:A4
:B4
9
10
11
12
3-4
Press the key.
5
BASIC MENU
Page 40

Bypass Copying
Bypass copying is convenient in the following instances:
• When the size of the paper you require is not installed in the copier’s paper cassettes.
• When you want to use a special type of paper such as OHP film.
* The optional stack feed bypass is required for any of the above.
Place the original(s) on the original feed tray or on
the glass.
1
(Setting Original Page 2-4)
Select desired copy mode.
2
Align the slide of the stack feed bypass to the width
of the paper to be loaded.
3
1
2
3
4
5
6
• Extend the paper holder when the size of paper is large.
Place sheets of copy paper on the stack feed bypass.
The following message appears:
4
Set paper size of bypass
• Place the sheets on the bypass guide and align the slides
to the paper size.
• For type of paper that can be used in bypass copying:
Page 1-7
7
8
9
10
11
12
3-5
Page 41

1
2
3
4
5
1. PAPER SELECTION (Cont.)
Enter the desired copy quantity using the numeric
keys.
5
Press the key.
6
Tip
• If the paper misfeeds in the bypass and the Paper Jam Lamp
flashes, remove the sheets from the bypass and replace
them.
Page 7-14.
• If the size of paper to be loaded is not identical to one
specified in the default setting, the default settings must be
reset.
Page 1-11.
6
7
8
9
10
11
12
3-6
BASIC MENU
Page 42

Bypass Copying by Specifying the Copy Size
By specifying the copy size in bypass copying, you can select the following copying modes:
• Duplex copying • Dual-page copying • Sort copying • Offset
• Magazine sort • 2-in-1/4-in-1 • Alternation
Place sheets of copy paper on the stack feed bypass.
1
1
2
3
4
Select the desired copy size.
2
• Use the or key to select the copy size.
Make sure that the desired copy size and its direction
are displayed. Then press the
Select the desired duplex printing mode, dual-page
copying, sort copying, offset, magazine sort, 2-in-1/
3
4-in-1 or alternation as well as the image density
and the reproduction ratio.
Please note that the reversing automatic document
feeder (optional) and the automatic duplexing unit
(optional) are required for duplex printing and
magazine sort.
Key in the desired copy quantity using the numeric
keys.
4
Place the original(s) on the original feed tray or on
the glass.
5
(Setting Original. Page 2-4)
key.
Select paper size
01.A3
02.FOLIO
03.B4
04.A4
05.A4-R
06.A5-R
07.LT
08.LT-R
5
6
7
8
9
10
11
Press the key.
6
12
3-7
Page 43

1
2
3
2. REDUCTION AND ENLARGEMENT COPYING
There are four methods available for enlargement and reduction copying.
• Using Automatic Magnification Selection (AMS):
After selecting the AMS mode and copy size, the copier automatically detects the size of the original
and calculates the appropriate reproduction ratio. For the e-STUDIO16, when the original is scanned
on the glass, the user must to manually specify the size of the original.
• REDUCE/ENLARGE:
When a regular-sized original and copy paper are used, select a ratio corresponding to the paper size.
Selectable Ratio:
4
5
6
7
8
9
Ratio
50%
71%
82%
141%
200%
• ZOOM UP/DOWN:
The Down and Up arrow keys select the desired reproduction ratio at 1% increments.
• XY ZOOM:
This function allows you to alter the reproduction ratio in the X and Y directions of your copies.
* Highly transparent originals such as OHP films and tracing paper, very dark originals, originals with
dark borders, or non-regular sized originals such as newspaper and magazines, may be incapable of
automatic magnification selection. For these types of originals, use the reduction/enlargement modes.
Using Automatic Magnification Selection (AMS)
Press the key.
A3/A5-R
A3/A4-R, A4-R/A5-R, B4/B5-R
B4/A4-R, B5-R/A5-R
A4-R/A3, A5-R/A4-R, A5/A4, B5-R/B4
A5-R/A3
Original/Copy
1
10
11
12
3-8
BASIC MENU
Page 44

Select “AMS” by using the key.
2
READY 1
ZOOM: 100%
AMS
REDUCE/ENLARGE
1
Press the key to accept the “AMS”.
3
Then select the paper cassette.
4
( Manual Paper Selection Page 3-3).
Place the original(s) on the original feed tray or the
glass.
5
Select the desired image density and copy quantity.
6
Press the key.
• If the following messages are shown;
7
Change the direction of original(s).
Change direction of org.
• Select the cassette of the correct paper size and orientation,
e.g. A4-R.
Use reduction cassette
READY 1
PAPER :
FINISHING :SORT ZOOM :AMS
A4 :AUTO
EDIT
2
3
4
5
6
7
8
• For the e-STUDIO16, when an original is placed on the glass
for copying, the following message appears.
Select original size
Press the or key to select the original size
and press the
key.
Select original size 1
A4
A3
A4-R
A5-R
B4
9
10
11
12
3-9
Page 45

1
2
2. REDUCTION AND ENLARGEMENT COPYING (Cont.)
Reduce/Enlarge
When a regular-sized original and copy paper are used, select a ratio corresponding to them.
Select the appropriate paper cassette.
(Manual Paper Selection Page 3-3.)
1
3
4
5
6
7
8
9
10
Press the key or key.
2
• Press the key and go to step 3,
or press the
Use the or keys and select “REDUCE/
3
ENLARGE.” Press the key.
Select the desired reproduction ratio using the
4
5
or key. Press the key.
• You must to manually specify the size of the original.
Place the original to be copied in the feeder or on
the glass, key in the copy quantity, and press the
key.
key and go to step 4.
READY 1
ZOOM: 100%
AMS
REDUCE/ENLARGE
ZOOM 1
REDUCE 50% A3 > A5
/ENLARGE: 71% A3 > A4
82% B4 > A4
141% A4 > A3
200% A5 > A3
READY 1
PAPER :
FINISHING :SORT ZOOM :65%
A4 :AUTO
EDIT
11
12
3-10
BASIC MENU
Page 46

Zoom Up/Down
Select the paper cassette.
(Manual Paper Selection Page 3-3.)
1
1
Press the key or key.
2
• Press the key and go to step 3,
or press the
Use the or keys and select “ZOOM UP/
3
DOWN.” Press the key.
Select the desired reproduction ratio using the
4
or key. Then press the key.
• For enlargement, use key. For reduction, use
key.
• Each time you press or key, the reproduction
ratio changes by 1%. Holding down the key changes the
reproduction ratio continuously. Further holding down the
key changes the reproduction ratio by 10 %.
• When the original is scanned on the original glass, the
reproduction ratio can be specified to 50 % to 200 % for the
e-STUDIO16, and 25 % to 400 % for the e-STUDIO20/25.
• When the original is scanned in the automatic document
feeder (optional) or reversing automatic document feeder
(optional), the reproduction ratio of 50 % to 200 % can be
specified.
key and go to step 4.
READY 1
ZOOM: AMS
REDUCE/ENLARGE
ZOOM UP/DOWN
ZOOM 1
ZOOM UP 200%
/DOWN: 101%
50%
2
3
4
5
6
7
8
9
10
Place the original to be copied in the feeder or on
5
the glass key in the copy quantity, and press .
• you need to manually specify the size of the original.
READY 1
PAPER :
FINISHING :SORT ZOOM :101%
A4 :AUTO
EDIT
11
12
3-11
Page 47

1
2. REDUCTION AND ENLARGEMENT COPYING (Cont.)
X-Y Zoom
2
3
4
5
6
7
8
This function allows you to alter the reproduction ratio in the X and Y directions of your copies.
Press the key on the control panel.
100%
100%
200%
200%
1
Press the key to display “XY ZOOM.” Then
2
press the key.
Specify the X and Y reproduction ratios.
3
• Select the X or Y direction using the or key and specify
the reproduction ratio using the
press the
• When the original is scanned on the original glass, the
reproduction ratio can be specified to 50 % to 200 % for the
e-STUDIO16, and 25 % to 400 % for the e-STUDIO20/25.
• When the original is scanned in the automatic document
feeder (optional) or reversing automatic document feeder
(optional), the reproduction ratio of 50 % to 200 % can be
specified.
key to accept the reproduction ratio.
or key. Then
READY 1
ZOOM: REDUCE/ENLARGE
ZOOM UP/DOWN
XY ZOOM
ZOOM 1
XY ZOOM: 200%
X 100 % - Y 99 %
50%
9
10
11
12
3-12
“Xxxx-Yxxx%” appears next to zoom on the display.
4
Select the desired paper cassette, image density and
copy quantity.
5
Place the original on the glass or the feed tray and
6
press the key.
BASIC MENU
READY 1
PAPER :
FINISHING :SORT ZOOM :X100-Y99%
A4 :AUTO
EDIT
Page 48

3. COPYING WITH COPY DENSITY SELECTION
There are two types of image density: automatic mode and manual mode.
In the automatic mode, the copier automatically detects the density of the original and selects the optimum
image density for it.
In the manual mode, the user can produce lighter or darker copies.
Copying in the Automatic Mode
1
2
Make sure that “ : AUTO” is displayed in the
message display.
1
• If “ , ” “NORMAL” or “ ” is displayed, press the key
and select “AUTO”.
Place the original and press key.
• The copier automatically detects the density of the original,
2
and makes copies at the optimum exposure.
Copying in the Manual Mode
Press the key.
1
READY 1
PAPER :
FINISHING :SORT ZOOM :100%
A4 :AUTO
EDIT
3
4
5
6
7
8
Select “MANUAL” by pressing the key.
2
Then press the key
9
READY 1
LIGHT AUTO
/DARK: MANUAL
10
11
12
3-13
Page 49

3. COPYING WITH COPY DENSITY SELECTION (Cont.)
1
2
3
4
5
6
7
Press the or key to select the desired image
density.
3
• To produce lighter copies, press the key. Each time you
press the key, the density-indicating mark moves one
step to the left and your copies are produced proportionally
lighter.
• To produce darker copies, press the
press the key, the density-indicating mark moves one
step to the right and your copies are produced proportionally
darker.
When the key is pressed after density is set, the
screen returns to the initial screen for copying.
4
• The specified copying density appears on the message
display.
Place the original to be copied in the feeder or glass
5
and press the key.
• Copies are made in the selected image density.
key. Each time you
LIGHT/DARK 1
MANUAL:
-3-2-10+1+2+3
READY 1
PAPER :
FINISHING :SORT ZOOM :100%
A4 : 2
EDIT
8
9
10
11
12
3-14
BASIC MENU
Page 50

4. ORIGINAL IMAGE QUALITY SELECTION
You can select the copy mode (Text, Text/Photo, and Photo) and produce clear copies matched to the
type of original. The text mode is suitable for making copies of originals containing text, or text and line
artwork. The Photo mode is suitable for making copies of originals containing black-and-white photos,
color photos or halftone photos. The Text/Photo mode is selected as the default mode. This mode is used
for making copies of regular originals.
Place the original(s) on the feed tray or on the glass.
1
Each time you press the key, the image mode
2
switches. Press the key repeatedly until the
lamp located above left of the desired image mode
illuminates.
1
2
3
4
Tip
Image mode selection may not be allowed depending on the
messages displayed. For example, when "Copying" is
displayed, the image mode selection is disabled.
If necessary, adjust the image density.
3
Select the desired paper cassette, reproduction ratio
and copy quantity.
4
Press the key.
5
5
6
7
8
9
10
11
12
3-15
Page 51

1
2
3
4
5
6
7
8
9
10
11
12
3-16
BASIC MENU
Page 52

4. EDIT MENU
1. DUPLEX COPYING ........................................................................................................ 4-2
1-Sided Originals > 1-Sided Copies (default setting) ................................................ 4-3
1-Sided Originals > 2-Sided Copies .......................................................................... 4-4
2-Sided Originals > 2-Sided Copies .......................................................................... 4-8
2-Sided Originals > 1-Sided Copies .......................................................................... 4-9
Book-Type Originals > 2-Sided Copies ................................................................... 4-10
2. DUAL PAGE COPYING................................................................................................ 4-12
1
2
3
4
3. IMAGE SHIFT COPYING ............................................................................................. 4-13
4. EDGE ERASE COPYING ............................................................................................. 4-14
5. 2-IN-1/4-IN-1 ................................................................................................................ 4-15
6. MAGAZINE SORT ........................................................................................................ 4-18
7. ANNOTATION ............................................................................................................... 4-21
8. EDITING ....................................................................................................................... 4-23
Mirror Image ................................................................................................................. 4-23
Negative/Positive Reversal .......................................................................................... 4-24
9. JOB BUILD ................................................................................................................... 4-25
10. COPYING MIXED SIZE ORIGINALS ........................................................................... 4-26
11. JOB MEMORY .............................................................................................................. 4-27
12. PAPER TYPE ............................................................................................................... 4-29
13. MENU LIST .................................................................................................................. 4-30
5
6
7
8
9
10
11
12
4-1
Page 53

1
2
3
4
5
1. DUPLEX COPYING
This function allows you to set the type of originals (1-sided, 2-sided or book-type) and the desired type
of copying (1-sided or 2-sided).
Original Copy
6
7
8
9
10
11
12
* , , and require the optional automatic duplexing unit to be
installed.
*
and require the optional reversing automatic document feeder
to be installed.
4-2
EDIT MENU
Page 54

1-Sided Originals > 1-Sided Copies (default setting)
This copy mode is selected as the default setting when the copier is turned on. To change use the
following procedures.
1
Press the key on the control panel while in the
initial screen for copying.
1
• The “EDIT MENU” screen appears.
Confirm that “DUPLEX” is highlighted on the screen.
2
Press the key.
Select “1>1” by pressing the key.
3
Then press the key. Press the key to return
to the initial screen for copying.
Tip
The menu that appears here varies depending on whether
the auto-duplexer unit (optional) and the reversing automatic
document feeder (optional) are installed or not.
Select the desired paper cassette, reproduction ratio,
image density and copy quantity.
4
Place the original(s) on the feed tray or on the glass.
5
Press the key.
6
READY 1
DUPLEX :1 > 1
DUAL PAGE :OFF
IMAGE SHIFT :OFF
DUPLEX 1
Original > Copy
1 > 1
1 > 2
2
3
4
5
6
7
8
10
11
12
4-3
9
Page 55

1
2
3
4
5
6
7
1. DUPLEX COPYING (Cont.)
1-Sided Originals > 2-Sided Copies
There are two methods of making duplexed copies from single-sided originals:
• Using the automatic document feeder (optional) or reversing automatic document feeder (optional)
- For duplex-copying from sheet originals of the specified sizes and weights.
• Setting originals on the glass - For duplex-copying from originals that cannot be handled by the automatic
document feeder (optional) or the reversing automatic document feeder (optional).
Note
This copying mode requires the automatic duplexing unit (optional) to be installed.
When using the Automatic Document Feeder (optional) or
the Reversing Automatic Document Feeder (optional)
Press the key on the control panel while in the
initial screen for copying. The “EDIT MENU” screen
1
appears.
Confirm that “DUPLEX” is highlighted on the screen.
2
Then press the key.
Select “1 > 2” by pressing the key.
3
Then press the key. Press the key to return
to the initial screen for copying.
READY 1
DUPLEX :1 > 1
DUAL TYPE :OFF
IMAGE SHIFT :OFF
DUPLEX 1
Original > Copy
1 > 1
1 > 2
8
9
10
11
12
4-4
Select the desired paper cassette, image density,
reproduction ratio and copy quantity.
4
Place the originals on the feed tray.
5
Press the key.
6
EDIT MENU
Page 56

How to place originals
5
4
3
2
1
• When placing originals vertically:
Align the edges of the originals and set them all in the same
direction (top to bottom).
• When placing originals horizontally:
Arrange the originals so that the odd and even pages are
placed alternately in opposite directions, and then set them in
the automatic document feeder (optional) or the reversing automatic document feeder (optional).
TOP
TOP
1
TOP
TOP
TOP
TOP
2
3
TOP
4
TOP
2
TOP
5
TOP
3
4
5
1
6
7
8
9
10
11
12
4-5
Page 57

1
2
3
4
1. DUPLEX COPYING (Cont.)
When Placing the Original on the Glass
Press the key on the control panel while in the
initial screen for copying. The “EDIT MENU” screen
1
appears.
Confirm that “DUPLEX” is highlighted on the screen.
2
Then press the key.
Select “1 > 2” by pressing the key.
3
Then press the key. Press the key to return
to the initial screen for copying.
Select the desired paper cassette, image density,
reproduction ratio and copy quantity.
4
READY 1
DUPLEX :1 > 1
DUAL TYPE :OFF
IMAGE SHIFT :OFF
DUPLEX 1
Original > Copy
1 > 1
1 > 2
5
6
7
8
9
10
11
Place the first page of the originals (first side) on
the glass.
5
Press the key.
• For the e-STUDIO16, when the automatic paper selection
6
(APS) mode or automatic magnification selection (AMS) is
selected, a message appears prompting you to specify the
size of the original that you would like to copy.
Use the
Then press the
original.
Place the next original (second side) on the glass.
or key to specify the size of the original.
key. The copier will start scanning the
7
Select original size 1
A4
A3
A4-R
A5-R
B4
Next original? 1
YES
NO
12
4-6
Press the key.
8
EDIT MENU
Page 58

Repeat steps 5 to 8 until all the originals are copied.
9
After the last original is scanned, select “NO” with
10
the key and then press the key.
How to place originals on the glass
• When setting originals vertically:
The first side and second side should be placed in the same
direction (top to bottom).
• When setting originals horizontally:
The first side and second side should be placed in the opposite direction (top to bottom).
Ver tical placement
(First side) (Second side)
Horizontal placement
1
2
3
4
5
6
(First side) (Second side)
7
8
9
10
11
12
4-7
Page 59

1
2
3
1. DUPLEX COPYING (Cont.)
2-Sided Originals > 2-Sided Copies
Placing two sided originals on the reversing automatic document feeder (optional) and pressing the
key feeds the original and scans the first side of the original into memory.
The original and the sheet are then turned over automatically and the second side of the original is
scanned into memory. Once both sides of all originals are scanned, the desired copies are printed.
You can set up to 100 A4 size (64 to 80 g/m
Note
This copying mode requires the reversing automatic document feeder (optional) and the automatic
duplexing unit (optional) to be installed.
2
) originals at a time.
4
5
6
7
8
9
Press the key on the control panel while in the
initial screen for copying. The “EDIT MENU” screen
1
appears.
Confirm that “DUPLEX” is highlighted on the screen.
2
Then press the key.
Select “2 > 2” by pressing the key.
3
Then press the key. Press the key to return
to the initial screen for copying.
Select the desired paper cassette, reproduction ratio,
image density and copy quantity.
4
• The automatic paper selection mode is selected as the
default mode.
Place the originals on the feed tray.
5
READY 1
DUPLEX :1 > 1
DUAL TYPE :OFF
IMAGE SHIFT :OFF
DUPLEX 1
Original > Copy
1 > 2
2 > 2
10
11
12
4-8
Press the key.
6
EDIT MENU
Page 60

2-Sided Originals > 1-Sided Copies
Note
This copying mode requires the reversing automatic document feeder (optional) to be installed.
1
Press the key on the control panel while in the
initial screen for copying. The “EDIT MENU” screen
1
appears.
Confirm that “DUPLEX” is highlighted on the screen.
2
Then press the key.
Select “2 > 1” by pressing the key.
3
Then press the key. Press the key to return
to the initial screen for copying.
Select the desired paper cassette, reproduction ratio,
image density and copy quantity.
4
• The automatic paper selection mode is selected as the
default mode.
Place the originals on the feed tray.
5
READY 1
DUPLEX :1 > 1
DUAL TYPE :OFF
IMAGE SHIFT :OFF
DUPLEX 1
Original > Copy
2 > 2
2 > 1
2
3
4
5
6
7
8
Press the key.
6
How to place originals
Always set originals vertically. If originals are set horizontally,
the copies will be output upside down alternately.
1
3
5
7
9
9
10
9
7
5
3
1
11
12
4-9
Page 61

1
1. DUPLEX COPYING (Cont.)
Book-Type Originals > 2-Sided Copies
This copying mode requires the automatic duplexing unit (optional) to be installed.
2
3
4
5
6
7
8
9
Press the key on the control panel while in the
initial screen for copying. The “EDIT MENU” screen
1
appears.
Confirm that “DUPLEX” is highlighted on the screen.
2
Then press the key.
Select “BOOK > 2” by pressing the key.
3
Press the key.
4
Select the start and end page.
• Select the desired copy mode using the or
5
key.
• RIGHT > RIGHT
Copying is started from a right page of the book and it ends
on a right page.
• RIGHT > LEFT
Copying is started from a right page of the book and it ends
on a left page.
• LEFT > LEFT
Copying is started from a left page of the book and it ends
on a left page.
• LEFT > RIGHT
Copying is started from a left page of the book and it ends
on a right page.
READY 1
DUPLEX :1 > 1
DUAL TYPE :OFF
IMAGE SHIFT :OFF
DUPLEX 1
Original > Copy
2 > 1
BOOK > 2
BOOK > 2 1
RIGHT > RIGHT
RIGHT > LEFT
LEFT > LEFT
10
11
12
4-10
Press the key.
6
Specify the Book Margin then press the key, as
necessary.
7
• Press the or key to specify the Book Margin.
Each time either of the keys is pressed, a value is
incremented or decremented by 1mm.
• Press the
decrement the value.
• Specify the value within a range of 8 mm to 30 mm.
Press the key.
key to increment, or key to
8
EDIT MENU
BOOK MARGIN 1
30mm
15mm
8mm
Page 62

Press the key to select the desired paper
9
cassette. Press the key when finished.
• Select Letter or A4 size.
Select Edge Erase, if necessary.
10
11
12
Page 4-14
Select the desired image density, reproduction ratio
and copy quantity.
Place the original on the glass and press the
key.
• The copy of page 1 will be ejected with its reverse side blank.
The copies of page 2 and subsequent pages will temporarily
be stacked inside the copier.
• Place page 1 of the original first.
1
2
3
4
5
Set the next original.
13
• Turn the page of the book and set it in the same way as
previously.
• Select “YES” when you need to copy both left and right
pages.
• Select “YES (SINGLE)” when you need to copy the one page
only.
Press the key.
14
Repeat steps 12 and 13 until you finish copying the
book.
15
Next Original?
YES
YES (SINGLE)
NO
6
7
8
9
10
11
12
4-11
Page 63

1
2
3
4
2. DUAL PAGE COPYING
The facing pages of a book or magazine are copied one at a time onto two separate sheets of paper. You
need not move the original on the glass. Two A4 size originals placed side by side on the glass can also
be copied onto two separate sheets of paper.
Example of Dual Page Copying
Press the key on the control panel while in the
initial screen for copying. The “EDIT MENU” screen
1
appears.
5
6
7
8
9
10
Press the key to display the “DUAL PAGE” in
2
reverse. Then press the key.
Press the key and select “ON.” Then press the
3
4
key
• Upon selecting “ON”, you are given an opportunity to select
the appropriate book margin. Any value ranging from 8 mm
to 30 mm is acceptable.
• When 20 mm is entered, a line that appears at the center of
the copy is masked in a range of 20 mm. When a copy is
made, a 10 mm margin is established on both sides of the
line.
• When both the Edge Erase width and the Book Margin are
specified, a bigger value would be specified for the margin.
“DUAL PAGE: XXmm” appears. Press the key
to return to the initial screen for copying.
Select the A4 paper cassette.
5
READY 1
DUPLEX :1>1
DUAL PAGE :OFF
IMAGE SHIFT :OFF
DUAL PAGE 1
OFF
ON
BOOK MARGIN 1
30mm
8 mm
8mm
READY 1
DUPLEX :1>1
DUAL PAGE :8mm
IMAGE SHIFT :OFF
11
12
4-12
Place the original on the glass.
6
Select the desired image density, etc. as required.
• Only 100 % of reproduction ratio is acceptable.
7
Press the key.
8
EDIT MENU
Page 64

3. IMAGE SHIFT COPYING
You can create margins on the copy and specify the position of these margins on either the right or the
left side of the copy. You can also create margins on copies of book originals using DUAL PAGE mode.
Page 4-12.
The default margins is approximately 7 mm, but you can select any margin between 4 and 15 mm.
Example of Image Shift Copying
Margin on left side Copy Margin on the right side Copy
Press the key on the control panel while in the
initial screen for copying. The “EDIT MENU” screen
1
appears.
1
2
3
4
5
Press the key to display “IMAGE SHIFT.” Then
2
press the key.
Select on which side the margin is to be created.
3
Then press the key.
• Select either “LEFT MARGIN” or “RIGHT MARGIN” to be
set.
Specify the margin by using the or key.
4
Press the key.
• The default margin is 7 mm.
• Any value ranging from 4 mm to 15 mm is acceptable.
Upon pressing the key, the programmed margin
5
appears on the screen. Press the key to return
to the initial screen for copying.
Place the originals on the feed tray or on the glass.
6
Select the desired paper cassette, image density,
reproduction ratio and copy quantity.
7
Press the key.
8
READY 1
DUPLEX :1>1
DUAL PAGE :OFF
IMAGE SHIFT :OFF
IMAGE SHIFT 1
OFF
LEFT MARGIN
RIGHT MARGIN
LEFT MARGIN 1
15mm
7mm
4mm
READY 1
DUPLEX :1>1
DUAL PAGE :OFF
IMAGE SHIFT :L- 7mm
6
7
8
9
10
11
12
4-13
Page 65

1
2
3
4
5
4. EDGE ERASE COPYING
If the edges of an original are torn or dirty, they are reproduced as black stains on the copy.
Using the edge erase mode, a white border will be created along the outside edges of the copy eliminating
the marks. The default edge erase margin is 10 mm, but you can select any margin within the range of 4
to 20 mm.
Example of Edge Erase Copying
Press the key on the control panel while in the
initial screen for copying. The “EDIT MENU” screen
1
appears.
6
7
8
9
10
11
Press the key to display “Edge Erase.” Then
2
press the key.
Press the key and select the “ON.”
3
Then press the key.
The current edge erase margin appears on the
4
screen. To change the edge erase margin, select
the desired margin by using the or key.
Then press the key.
• The edge erase margin changes at increments of 1 mm.
The selected edge erase margin appears on the
5
screen. Press the key to return to the initial
screen for copying.
Place the original(s) on the feed tray or on the glass.
6
READY 1
DUAL PAGE :OFF
IMAGE SHIFT :OFF
EDGE ERASE :OFF
EDGE ERASE 1
OFF
ON
EDGE ERASE 1
20mm
10mm
4mm
READY 1
DUAL PAGE :OFF
IMAGE SHIFT :OFF
EDGE ERASE :10mm
12
4-14
Select the desired paper cassette, image density,
reproduction ratio and copy quantity.
7
Press the key.
8
EDIT MENU
Page 66

5. 2-IN-1/4-IN-1
34
12
87
65
This function allows you to reduce and copy two or more originals onto a single sheet. Reducing four
sheets at a time onto a single sheet is called “4-in-1” copying.
Duplex copying of 4-in-1 allows 8 pages to be copied on one sheet.
* The reversing automatic document feeder (optional) is required to scan a double-sided original.
* The automatic duplexing unit (optional) is required for duplex copying.
* Reduction/enlargement copying is not available with this function.
1-sided originals 2-IN-1
1-sided copys
1 2 3 4
12 34 56 78
1
2
3
5 6 7 8
2-sided originals
1357
2 4 6 8
2-sided copys
12
43
4-IN-1
1-sided copys 2-sided copys
12 56
When Using the Automatic Document Feeder (optional) or
the Reversing Automatic Document Feeder (optional)
Place the original on the original feed tray.
1
Press the key. The “EDIT MENU” screen
appears.
2
Press the key to display “2IN1/4IN1.”
3
Then press the key.
56
87
7834
READY 1
IMAGE SHIFT :OFF
EDGE ERASE :OFF
2IN1/4IN1 :OFF
4
5
6
7
8
9
10
4
Press the key and select “2IN1” or “4IN1.”
Then press the key.
2IN1/4IN1 1
OFF
2IN1
4IN1
11
12
4-15
Page 67

5. 2-IN-1/4-IN-1 (Cont.)
1
2
3
4
5
6
Select the type of original and copy.
5
Press the key.
6
What is selected appears on the screen.
7
Press the key to return to the initial screen for
copying.
Select the desired paper cassette, image density, and
copy quantity.
8
Note
To select the paper cassette, press the
and then select the desired paper cassette.
Press the key.
key, select AMS
9
2IN1 1
Original > Copy
2 > 2
2 > 1
READY 1
IMAGE SHIFT :OFF
EDGE ERASE :OFF
2IN1/4IN1 :2IN1(2>1)
7
8
9
10
11
12
4-16
EDIT MENU
Page 68

When Placing the Original on the Glass
Follow step 2 to 8 of “When Using The Automatic
Document Feeder.” Page 4-15
1
1
Place the original on the glass and press the
key.
2
• For the e-STUDIO16, a message appears prompting you to
specify the size of the original that you would like to copy.
Use the or key to specify the size of the original.
Then press the
document.
• When the first original has been scanned, the “Next
Original?” screen appears.
Select “YES,” set the next original and press the
key.
3
• While the “Next Original?” screen is being shown, if the
key is pressed, the scanned data is deleted and 2-
in-1/4-in-1 copying is terminated. Select “YES” or “NO” and
press the
For the next and subsequent originals, repeat step
3 above.
4
When scanning of the last original has finished,
select “NO.”
5
key. The copier will start scanning the
key.
Select original size 1
A4
A3
A4-R
A5-R
B4
Next Original? 3
YES
NO
Memory clear? 3
YES
NO
Next Original? 3
YES
NO
2
3
4
5
6
7
8
Press the key.
6
9
10
11
12
4-17
Page 69

1
6. MAGAZINE SORT
The magazine sort mode allows you to copy and sort originals so that the copies can be folded in half
along the inside as if you were making a magazine.
Note
2
3
4
5
6
7
This copying mode requires the optional automatic duplexing unit (optional) to be installed.
Example of magazine sort
1
2
3
4
5
6
7
8
Press the key on the control panel while in the
initial screen for copying. The “EDIT MENU” screen
1
appears.
Press the key to display “MAGAZINE SORT.”
2
Then press the key.
Press the key to display “ON.” Then press the
3
key.
36
4 5
18
2 7
READY 1
EDGE ERASE :OFF
2IN1/4IN1 :OFF
MAGAZINE SORT:OFF
MAGAZINE SORT 1
OFF
ON
8
9
10
11
12
4-18
Press the key and specify whether the originals
4
are single-side or duplex. Then press the key.
“MAGAZINE SORT: X>2” appears. Press the
key to return to the initial screen for copying.
5
Select the desired image density and copy quantity.
6
EDIT MENU
MAGAZINE SORT 1
Original > Copy
1 > 2
2 > 2
READY 1
EDGE ERASE :OFF
2IN1/4IN1 :OFF
MAGAZINE SORT:1>2
Page 70

When Using the Automatic Document Feeder (optional) or
the Reversing Automatic Document Feeder (optional)
Place the originals on the feed tray and press the
7
key.
When Placing the Original on the Glass
1
2
3
4
Place the original on the glass and press the
key.
7
• For the e-STUDIO16, a message appears prompting you to
specify the size of the original that you would like to copy.
Use the
Then press the
document.
• When the first original has been scanned, the “Next
Original?” screen appears.
Select “YES,” set the next original and press the
key.
8
or key to specify the size of the original.
key. The copier will start scanning the
Select original size 1
A4
A3
A4-R
A5-R
B4
Next Original? 3
YES
NO
5
6
7
8
9
10
• While the “Next Original?” screen is being shown, if the
key is pressed, the scanned data is deleted and
MAGAZINE SORT is terminated. Select “YES” or “NO” and
press the
key.
Memory clear? 3
YES
NO
11
12
4-19
Page 71

1
6. MAGAZINE SORT (Cont.)
For the subsequent originals, repeat step 8 above.
9
2
3
4
5
6
7
When scanning of the last original has finished,
select “NO.”
10
Press the key.
11
Next Original? 3
YES
NO
8
9
10
11
12
4-20
EDIT MENU
Page 72

7. ANNOTATION
This function allows you to print the page number or page number and date & time on the lead-edge of
the copy.
The annotation area is located on the leading edge of the output paper. In the example shown, the
annotation will be printed along the top of the copy.
Example of annotation:
When placing the original on the glass using A4-R (on landscape) orientation.
1
2
3
4
Press the key on the initial screen for copying.
The “EDIT MENU” screen appears.
1
Press the key to display “ANNOTATION.” Then
2
press the key while “ANNOTATION” is displayed.
Press the key and select the desired
3
annotation type. Then press the key.
Press the key to return to the initial screen for
copying.
4
• Date and time are automatically printed according to the
format which is preset in the copier. Page 5-21
Select the desired paper cassette, image density,
reproduction ratio and copy quantity.
5
Note
Density of page number and date & time added by annotation
does not change even if the image density is changed.
READY 1
2IN1/4IN1 :OFF
MAGAZINE SORT:OFF
ANNOTATION :OFF
ANNOTATION 1
OFF
PAGE NUMBER
PAGE NO.+DATE&TIME
READY 1
2IN1/4IN1 :OFF
MAGAZINE SORT:OFF
ANNOTATION :PAGE NO.+D&T
5
6
7
8
9
10
11
12
4-21
Page 73

1
2
3
7. ANNOTATION (Cont.)
When Placing the Original on the Glass
Place the original on the glass and press the
key.
6
4
5
6
7
8
9
• For the e-STUDIO16, when the automatic paper selection
(APS) mode or automatic magnification selection (AMS) is
selected, a message appears prompting you to specify the
size of the original that you would like to copy.
Use the
Then press the key. The copier will start scanning the
document.
• When the first original has been scanned, the “Next
Original?” screen appears.
Select “YES,” set the next original and press the
key.
7
• While the “Next Original?” screen is being shown, if the
the ANNOTAION is terminated. Select “YES” or “NO,” and
press the key.
For the next and subsequent originals, repeat step
7 above.
8
or key to specify the size of the original.
key is pressed, the scanned data is deleted, and
Select original size 1
A4
A3
A4-R
A5-R
B4
Next Original? 3
YES
NO
Memory clear? 3
YES
NO
10
11
12
4-22
When the last original is finished being scanned,
select “NO.”
9
Press the key.
10
Tip
In the annotation function, printing is performed along the leadedge of the paper selected. This may be the top or the side of
copy depending upon the orientation of the copy paper.
Therefore, place the original with its top facing the paper output
side of the machine.
EDIT MENU
Next Original? 3
YES
NO
Page 74

8. EDITING
Mirror Image
This function allows you to make mirror-image copies.
* This mode is not available together with Image Shift, Sort, Alternation, Duplex copying, Srot/Offset,
Dual Page, 2-in-1/4-in-1 and Book > 2.
Example of Mirror Image
Press the key on the control panel while in the
initial screen for copying. The “EDIT MENU” screen
1
appears.
1
2
3
4
5
Press the key to display “EDITING.” Then press
2
the key.
Press the key to display “MIRROR.” Then press
3
the key.
“EDITING: MIRROR” appears. Press the key to
return to the initial screen for copying.
4
Select the desired paper cassette, image density,
reproduction ratio and copy quantity.
5
Place the original on the glass or the feed tray and
6
press the key.
READY 1
MAGAZINE SORT:OFF
ANNOTATION :OFF
EDITING :OFF
EDITING 1
OFF
MIRROR
NEG/POS
READY 1
MAGAZINE SORT:OFF
ANNOTATION :OFF
EDITING :MIRROR
6
7
8
9
10
11
12
4-23
Page 75

1
2
3
8. EDITING (Cont.)
Negative/Positive Reversal
This function allows you to reverse the black areas on the original as white areas, or vice versa.
* This function is not available with Edge Erase, Sort, Alternation, Duplex copying, Srot/Offset, Dual
Page, 2-in-1/4-in-1, Magazine Sort and Book > 2.
Example of negative/positive reversal
4
5
6
7
8
9
10
Press the key on the control panel while in
the initial screen for copying. The “EDIT MENU”
1
screen appears.
Press the key to display “EDITING.” Then press
2
the key.
Press the key and select “NEG/POS.” Then
3
press the key.
“EDITING: NEG/POS” appears. Press the key
to return to the initial screen for copying.
4
Select the desired paper cassette, image density,
reproduction ratio and copy quantity.
5
Place the original on the glass or the feeder tray and
6
press the key.
READY 1
MAGAZINE SORT:OFF
ANNOTATION :OFF
EDITING :OFF
EDITING 1
OFF
MIRROR
NEG/POS
READY 1
MAGAZINE SORT:OFF
ANNOTATION :OFF
EDITING :NEG/POS
11
12
4-24
EDIT MENU
Page 76

9. JOB BUILD
This function allows up to five sets of originals to be scanned and stored separately and then to be
copied and output all at once.
1
Press the key on the control panel while in the
initial screen for copying. The "EDIT MENU" screen
1
appears.
Press the key to display the "JOB BUILD."
2
Then press the key.
Press the key to display the "ON." Then press
3
the key.
The "JOB BUILD: ON" screen appears. Press the
4
5
6
key to return to the initial screen for copying.
Select the desired paper cassette, image density,
reproduction ratio and copy quantity.
Note
To select the paper cassette, press the key, select AMS
and then select the desired paper cassette.
Place the original on the glass or feed tray and press
the key.
READY 1
ANNOTATION :OFF
EDITING :OFF
JOB BUILD :OFF
JOB BUILD 1
OFF
ON
READY 1
ANNOTATION :OFF
EDITING :OFF
JOB BUILD :ON
Scanning in memory 1
Scanning Page :XXX
2
3
4
5
6
7
8
9
After the original is scanned, the screen on the right
appears.
7
• When scanning the next original without changing any
settings, place it on the glass or feed tray and select "Scan
next page." Then press the
• In scanning the next original, if the scan density and Edge
Erase settings are changed, select "Change current
settings" to change the settings. Then press the
• When all originals have been scanned, select "End job build"
to start copying automatically. Then press the key.
key.
key.
JOB BUILD 1
Scan next page
End job build
Change current setting
10
11
12
4-25
Page 77

1
10. COPYING MIXED SIZE ORIGINALS
A set of originals with different paper sizes can be copied together in the same operation, as long as the
originals all have the same width.
Note
2
3
4
5
6
7
This copy function requires the optional reversing automatic document feeder (RADF) be installed.
Press the key on the control panel while in
the initial screen for copying.
1
Press the key to display the “MIX SIZE”.
2
Then press the key.
Press the key to display the “ON”.
3
Then press the key.
Select the Automatic paper Selection (APS) mode
4
or Automatic Magnification Selection (AMS) mode.
Then select the desired paper cassette, reproduction
ratio, image density and copy quantity as required.
Note
READY 1
EDITING :OFF
BUILD JOB :OFF
MIX SIZE :OFF
MIXED SIZE ORIGINAL 1
OFF
ON
Put original in doc. feeder 1
EDITING :OFF
BUILD JOB :OFF
MIX SIZE :ON
8
9
10
11
12
4-26
When the “MIX SIZE” is selected, the “APS” is automatically
selected.
Place the originals on the original feed tray.
5
Press the key.
6
EDIT MENU
Page 78

11. JOB MEMORY
You can store and recall a combination of frequently used copy modes at any time.
In addition to reproduction ratios, image density, copy quantities, editing modes, duplex copying modes
and image shift modes can be stored. Storage is available for up to four combinations.
Storing a New Combination of Copy Modes
Select desired copy modes.
Examples:
1
Reproduction ratio ........ 85%
Copy quantity ................ 30
Image density ............... Automatic
Copy size ...................... A4
• Check that each mode is correctly set.
Press the key on the control panel while in the
initial screen for copying. The “EDIT MENU” screen
2
appears.
1
2
3
4
5
Press the key to display “JOB MEMORY.” Then
3
press the key.
Select “MEMORY” by pressing the key.
4
Then press the key.
Select the job number to be saved from “MEMORY1”
5
to “MEMORY4.” Then press the key.
Tip
When a memory location (with a copy job programmed) is
selected, the Job Memory icon is highlighted.
The stored copy mode is not erased when the copier is turned
off. When a job number with a copy mode already stored is
selected, the stored copy mode is deleted and replaced by a
new copy mode.
Press the key to return to the initial screen for
copying.
6
READY 1
EDITING :OFF
JOB BUILD :OFF
JOB MEMORY
JOB MEMORY 1
RECALL
MEMORY
MEMORY 1
MEMORY1
MEMORY2
MEMORY3
MEMORY4
6
7
8
9
10
11
12
4-27
Page 79

1
2
3
11. JOB MEMORY (Cont.)
Recalling a Stored Combination of Copy Modes
Press the key on the control panel while in the
initial screen for copying. The “EDIT MENU” screen
1
appears.
Press the key to display “JOB MEMORY” in
2
reverse. Then press the key.
READY 1
EDITING :OFF
JOB BUILD :OFF
JOB MEMORY
4
5
6
7
8
9
Press the key while “RECALL” is selected.
3
Select the desired Job number from “MEMORY1”
4
to “MEMORY4”. Then press the key. Press the
key to return to the initial screen for copying.
Tip
When the selected memory location contains a preprogrammed job, the Job Memory icon is highlighted with a
box.
Place the original on the glass or the feed tray and
5
press the key. The original is copied in the
combination of modes you have recalled.
JOB MEMORY 1
RECALL
MEMORY
MEMORY 1
MEMORY1
MEMORY2
MEMORY3
MEMORY4
10
11
12
4-28
EDIT MENU
Page 80

12. PAPER TYPE
You can select special paper for copying. This special paper is fed from the stack feed bypass.
Note
Place only one sheet of this special paper on the bypass at one time.
How to Select Special Sheets
1
2
Press the key on the control panel while in the
initial screen for copying. The “EDIT MENU” screen
1
appears.
Press the key to display the “PAPER TYPE. ”
2
Press the key.
3
Use the or key and select “THICK
4
PAPER” or “TRANSPARENCY.” The selected sheet
is displayed. Press the key to accept the sheet.
The selected paper type appears. Press the key
to return to the initial screen for copying.
5
Refer to the procedures described in “Bypass
Copying ( Page 3-4)” or “Bypass Copying by
6
Specifying the Copy Size ( Page 3-6).” Then make
a copy.
READY 1
JOB BUILD :OFF
JOB MEMORY
PAPER TYPE :OFF
PAPER TYPE 1
OFF
TRANSPARENCY
THICK PAPER
PAPER TYPE 1
OFF
TRANSPARENCY
THICK PAPER
READY 1
MIX SIZE :OFF
JOB MEMORY
PAPER TYPE :TRANSPARENCY
3
4
5
6
7
8
9
Selection of Thick paper or Transparency mentioned above applies only to the preceeding copying jobs.
10
11
12
4-29
Page 81

1
2
13. MENU LIST
Print out the copier’s menu list.
Press the key on the control panel while in the
initial screen for copying. The “EDIT MENU” screen
1
appears.
3
4
5
6
7
8
Press the key to display “MENU LIST.” Then
2
press the key.
• The menu list will be printed out.
READY 1
JOB MEMORY
PAPER TYPE :OFF
MENU LIST
MENU LIST
Printing accepted
9
10
11
12
4-30
EDIT MENU
Page 82

5. PROGRAM MENU
1. WALKUP SCREEN......................................................................................................... 5-2
1
2
2. TIMERS .......................................................................................................................... 5-3
Auto Clear ...................................................................................................................... 5-3
Auto Low Power .............................................................................................................. 5-4
Automatic Sleep ............................................................................................................. 5-5
3. WEEKLY TIMER ............................................................................................................. 5-7
4. SPEAKER VOLUME ..................................................................................................... 5-10
5. DEPARTMENT CODE .................................................................................................. 5-11
Department Code Setting ............................................................................................ 5-11
Clearing Department Code Counters .......................................................................... 5-13
Deleting Department Code .......................................................................................... 5-14
Change Department Code Setting ............................................................................... 5-15
Report Printing ............................................................................................................. 5-17
Canceling/Resuming Department Management .......................................................... 5-18
6. COPY SETUP .............................................................................................................. 5-19
7. DATE AND TIME........................................................................................................... 5-23
8. CHANGE DISPLAY PANEL LANGUAGE ..................................................................... 5-26
9. FUNCTION LIST .......................................................................................................... 5-27
10. TOTAL COUNTER ........................................................................................................ 5-28
3
4
5
6
7
8
10
11
12
5-1
9
Page 83

1
1. WALKUP SCREEN
Specify the initial screen that appears when the copier is turned on. A frequently used function can be
specified to display on the initial screen.
*The optional FAX kit and Printer kit need to be installed on the copier.
2
3
4
5
6
7
8
Press the key to enter the program menu.
1
Select “01.DEFAULT SETTINGS” and press the
key.
2
Select “01.MACHINE DEFAULTS” and press the
key.
3
Tip
"03. FAX SETUP" can be selected only when the FAX option
is installed.
Select “02.WALKUP SCREEN” and press the key.
4
Tip
"02. WALKUP SCREEN" can be selected only when the FAX
option is installed.
Select the desired function to display on the initial
5
screen and press the key.
Tip
PROGRAM
01.DEFAULT SETTINGS
02.LISTS
03.INITIAL SETUP
DEFAULT SETTINGS
01.MACHINE DEFAULTS
02.COPY SETUP
03.FAX SETUP
MACHINE DEFAULTS
01.CASSETTE SIZE
02.WALKUP SCREEN
03.TIMERS
WALKUP SCREEN
01.COPY
02.FAX
03.SCAN
9
10
11
12
5-2
"03. SCAN" can be selected only when the printer option is
installed.
PROGRAM MENU
Page 84

2. TIMERS
Auto Clear
Auto Clear occurs if no machine operation is performed within a certain period of time (Default: 45
seconds). Specify a waiting time for Auto Clear.
1
Press the key to enter the program menu.
1
Select “01.DEFAULT SETTINGS” and press the
key.
2
Select “01.MACHINE DEFAULTS” and press the
key.
3
Tip
"03. FAX SETUP" can be selected only when the FAX option
is installed.
Select “02.TIMERS” and press the key.
4
Tip
"02. WALKUP SCREEN" can be selected only when the FAX
option is installed.
Select “1.AUTO CLEAR” and press the key.
5
Press the or key to specify a waiting time
for “1.AUTO CLEAR.”
6
• Select the waiting time from the following:
15, 30, 45, 60, 75, 90, 105, 120, 135, 150, 180, 210, 240,
270, or 300 seconds.
PROGRAM
01.DEFAULT SETTINGS
02.LISTS
03.INITIAL SETUP
DEFAULT SETTINGS
01.MACHINE DEFAULTS
02.COPY SETUP
03.FAX SETUP
MACHINE DEFAULTS
01.CASSETTE SIZE
02.WALKUP SCREEN
03.TIMERS
TIMERS
1.AUTO CLEAR
2.AUTO LOW POWER
3.AUTO SLEEP
TIMERS
AUTO 300SEC
CLEAR: 45
15SEC
2
3
4
5
6
7
8
9
Press the key.
7
Press the key when finished with the program
menu.
8
10
11
12
5-3
Page 85

1
2
3
2. TIMERS (Cont.)
Auto Low Power
After the copier has been inactive for a set period of time (Default: 15 minutes), the copier shifts to the
Automatic Low Power mode automatically. “Saving Energy” appears on the message display of the
copier and the machine switches to a low power consumption mode.
How to change the Automatic Low Power Time
Press the key to enter the program menu.
1
4
5
6
7
8
9
10
Select “01. DEFAULT SETTINGS” and press the
key.
2
Select “01. MACHINE DEFAULTS” and press the
key.
3
Tip
"03. FAX SETUP" can be selected only when the FAX option
is installed.
Select “03. TIMERS” and press the key.
4
Tip
"02. WALKUP SCREEN" can be selected only when the FAX
option is installed.
Select “2. AUTO LOW POWER” and press the
key.
5
Select the desired Automatic Low Power Time by
6
using the or key. Then press the key.
• Select the waiting time from the following:
1, 2, 3, 4, 5, 10, 15, 20, 25, 30, 35, 40, 45, 50, 55, 60, 70,
80, 90, 100, 110, 120, 150, 180, 210 or 240 minutes.
PROGRAM
01.DEFAULT SETTINGS
02.LISTS
03.INITIAL SETUP
PROGRAM
01.MACHINE DEFAULTS
02.COPY SETUP
03.FAX SETUP
MACHINE DEFAULTS
01.CASSETTE SIZE
02.WALKUP SCREEN
03.TIMERS
TIMERS
1.AUTO CLEAR
2.AUTO LOW POWER
3.AUTO SLEEP
TIMERS 1
AUTO LOW 240MIN
POWER: 15
1MIN
11
12
5-4
Press the key when finished.
7
Clearing the Automatic Low Power Mode
Press any key except for the key and key.
PROGRAM MENU
Page 86

Automatic Sleep
If the copier remains idle (Default: 15 minutes with the e-STUDIO16 and 45 minutes with the e-STUDIO20/25)
after entering Automatic Low Power mode as explained on the previous page, the copier shifts to the Super
Energy Saver mode. The
power than the Auto Lower Power mode. If there are documents in the automatic document feeder, the original
cover is open or the FAX option is installed; the machine enters the Sleep mode and “Sleep mode” appears on
the message display.
How to Change the Sleep Time
Press the key to enter the program menu.
LED turns on and the message display goes blank. This mode saves more
1
Select “01. DEFAULT SETTINGS” and press the
key.
2
Select “01. MACHINE DEFAULTS” and press the
key.
3
Tip
"03. FAX SETUP" can be selected only when the FAX option
is installed.
PROGRAM
01.DEFAULT SETTINGS
02.LISTS
03.INITIAL SETUP
PROGRAM
01.MACHINE DEFAULTS
02.COPY SETUP
03.FAX SETUP
1
2
3
4
5
6
7
Select “03. TIMERS” and press the key.
4
Tip
"02. WALKUP SCREEN" can be selected only when the FAX
option is installed.
Select “3. AUTO SLEEP” and press the key.
5
Select the desired Automatic Sleep Time by using
6
the or key.
• Select the waiting time from the following:
3, 5, 10, 15, 20, 25, 30, 35, 40, 45, 50, 55, 60, 70, 80, 90,
100, 110, 120, 150, 180, 210 or 240 minutes.
MACHINE DEFAULTS
01.CASSETTE SIZE
02.WALKUP SCREEN
03.TIMERS
TIMER
1.AUTO CLEAR
2.AUTO LOW POWER
3.AUTO SLEEP
TIMERS
AUTO 240MIN
SLEEP: 45
3MIN
8
9
10
11
12
5-5
Page 87

1
2
2. TIMERS (Cont.)
Press the key.
7
Press the key when finished.
8
Clearing the Super Energy Saver mode
3
4
5
6
7
8
Press the key.
Clearing the Automatic Sleep mode
Press any key except for the key and key.
9
10
11
12
5-6
PROGRAM MENU
Page 88

3. WEEKLY TIMER
The weekly timer is a feature for turning the copier ON and OFF automatically at the times specified. If
you set the weekly timer for a start time in the morning and an end time in the evening for Sunday
through Saturday, the copier will automatically turn itself ON every morning and OFF every evening at
the specified times to meet the schedule of your office.
* To allow the weekly timer to work properly, the power switch should be always left ON.
How to Set the Weekly Timer
Press the key to enter the program menu.
1
1
2
3
4
5
Select “01.DEFAULT SETTINGS” and press the
key.
2
Select “01. MACHINE DEFAULTS” and press the
key.
3
Tip
"03. FAX SETUP" can be selected only when the FAX option
is installed.
Select the “04. WEEKLY TIMER” and press the
key.
4
Tip
"02. WALKUP SCREEN" can be selected only when the FAX
option is installed.
Select “2.ON” and press the key.
5
PROGRAM
01.DEFAULT SETTINGS
02.LISTS
03.INITIAL SETUP
PROGRAM
01.MACHINE DEFAULTS
02.COPY SETUP
03.FAX SETUP
MACHINE DEFAULTS
02.WALKUP SCREEN
03.TIMERS
04.WEEKLY TIMER
WEEKLY TIMER
1.OFF
2.ON
6
7
8
9
10
11
12
5-7
Page 89

3. WEEKLY TIMER (Cont.)
1
2
3
4
5
6
7
Select the day to be specified for WEEKLY TIMER
6
operation and press the key.
Enter a turn on time for the copier and press the
7
8
9
key.
• When the TIME FORMAT is at 12 HOUR, be sure to select
“AM/PM.”
Enter a turn off time for the copier and press the
key.
Repeat steps 6 to 8 to make a WEEKLY TIMER setting
for each day of the week.
Select “8.Done” and press the key.
10
Press the key to return to the initial screen for
copying.
11
WEEKLY TIMER
1.SUNDAY
2.MONDAY
3.TUESDAY
SUNDAY
ON TIME: HH:MM
08:45
SUNDAY
ON TIME: HH:MM
12:34 AM
SUNDAY
OFF TIME: HH:MM
17:30
WEEKRY TIMER
6.FRIDAY
7.SATURDAY
8.COMPLETE
8
9
10
11
12
5-8
PROGRAM MENU
Page 90

Canceling Weekly Timer
Press the key to enter the program menu.
1
1
Select “01.DEFAULT SETTINGS” and press the
key.
2
Select “01. MACHINE DEFAULTS” and press the
key.
3
Tip
"03. FAX SETUP" can be selected only when the FAX option
is installed.
Select “04. WEEKLY TIMER” and press the key.
4
Tip
"02. WALKUP SCREEN" can be selected only when the FAX
option is installed.
Select “1.OFF,” and press the key.
5
• When the Weekly Timer is turned off, any existing times
settings are still stored. When the weekly timer is resumed,
the settings made for the Weekly Timer are available.
Press the key to return to the initial screen for
copying.
6
PROGRAM
01.DEFAULT SETTINGS
02.LISTS
03.INITIAL SETUP
DEFAULT SETTINGS
01.MACHINE DEFAULTS
02.COPY SETUP
03.FAX SETUP
MACHINE DEFAULTS
02.WALKUP SCREEN
03.TIMERS
04.WEEKLY TIMER
WEEKLY TIMER
1.OFF
2.ON
2
3
4
5
6
7
8
10
11
12
5-9
9
Page 91

1
2
4. SPEAKER VOLUME
Adjust the volume of the alarm and key touch tones.
Press the key to enter the program menu.
1
3
4
5
6
7
8
Select “01.DEFAULT SETTINGS” and press the
key.
2
Select “01.MACHINE DEFAULTS” and press the
key.
3
Select “05.SPEAKER VOLUME” and press the
key.
4
Select the desired volume control and press the
5
key.
Tip
"3. RINGER VOLUME" and "4. MONITOR VOLUME" can be
selected only when the optional FAX board is installed.
Press the or key to adjust the volume of
the beep tone.
6
• Adjust the volume of the beep tone in eight levels: 0 to 7.
PROGRAM
01.DEFAULT SETTINGS
02.LISTS
03.INITIAL SETUP
DEFAULT SETTINGS
01.MACHINE DEFAULTS
02.COPY SETUP
03.FAX SETUP
MACHINE DEFAULTS
03.TIMERS
04.WEEKLY TIMER
05.SPEAKER VOLUME
SPEAKER VOLUME
1.ALARM VOLUME
2.KEY TOUCH VOLUME
3.RINGER VOLUME
ALARM VOLUME
VOLUME: 7
0
0
9
10
11
12
5-10
Press the key.
7
• The screen returns to SPEAKER VOLUME Selection.
Repeat steps 5 to 7 to adjust the volume of other
tones, as necessary.
8
Press the key to return to the initial screen for
copying.
9
PROGRAM MENU
Page 92

5. DEPARTMENT CODE
Department Code Setting
If the copier is set up so that department codes can be used, you can make copies only after entering the
department code.
When making copies using department codes, the copy quantity is stored for each individual department
code.
The department code is a 5-digit number, up to 99 codes can be set.
When the department code is registered for the first time, the master code needs to be registered. The
master code is used to register, change, or delete the other department codes and clear the department
code counters.
Department Code Setting
1
2
3
Tip
The menu that appears here varies depending on whether
the optional FAX board is installed or not.
Press the key to enter the program menu.
1
Select “01.DEFAULT SETTINGS” and press the
key.
2
Select “01.MACHINE DEFAULTS” and press the
key.
3
Select “06.DEPARTMENT CODE” and press the
key.
4
Select “1.YES” or “2.NO” and press the key.
5
• Select “1.YES” when registering the department code for
the first time.
• To register the department code for the second time and
thereafter, select “1.YES” to enable the department
management, or “2.NO” to disable the department
management function.
Select “2.NEW” and press the key.
6
• Select “1.RECOVER OLD DATA” if you are restoring the
department code function after it had been disable and you
wish to use the previous codes. (The original master code
is required.)
• Select “2.NEW” if you wish to program a totally new
department management system.
PROGRAM
01.DEFAULT SETTINGS
02.LISTS
03.INITIAL SETUP
DEFAULT SETTINGS
01.MACHINE DEFAULTS
02.COPY SETUP
03.FAX SETUP
MACHINE DEFAULTS
04.WEEKLY TIMER
05.SPEAKER VOLUME
06.DEPARTMENT CODE
DEPARTMENT CODE
1.YES
2.NO
DEPARTMENT CODE
1.RECOVER OLD DATA
2.NEW
4
5
6
7
8
9
10
11
12
5-11
Page 93

1
2
5. DEPARTMENT CODE (Cont.)
Master Code Entry
Enter a department name for department management
7
and press the key.
• Up to 20 characters can be entered for the department name.
• The department name for the master code does not have to
be entered.
• Department number 01 is assigned as the master code for
management functions.
MASTER CODE
MASTER CODE NUMBER: 01
ENTER MASTER CODE NAME (MAX20):
3
4
5
6
7
8
9
Important
The optional FAX board is required to enter characters. Thus
entry of the department name is not allowed without the
optional FAX board.
Enter the desired master code and press the
key.
8
• Enter a 5-digit number for the master code.
• The master code is a PIN number for management functions.
The master code is required to register or delete all other
department codes. So please remember the entered master
code.
Department Code Entry
Enter a department number and press the key.
9
• Enter a value within a range of 2 to 99.
Enter a department name and press the key.
10
• Up to 20 characters can be entered for the department name.
Important
The optional FAX board is required to enter characters. Thus
entry of the department name is not allowed without the
optional FAX board.
MASTER CODE
MASTER CODE NUMBER: 01
ENTER MASTER CODE:
12345
DEPARTMENT CODE
ENTER DEPARTMENT NUMBER(1-99):
06
DEPARTMENT CODE
DEPARTMENT NUMBER: 06
ENTER DEPARTMENT NAME (MAX20):
SOFTWARE GROUP
10
11
12
5-12
Enter a department code and press the key.
11
• Enter a 5-digit number for the department code.
• The same department code cannot be registered for another
department.
Repeat steps 9 to 11 to enter other departments,
as necessary.
12
Press the key to return to the initial screen for
copying.
13
PROGRAM MENU
DEPARTMENT CODE
DEPARTMENT NUMBER: 06
ENTER DEPARTMENT CODE:
87432
Page 94

Clearing Department Code Counters
You can clear the counter of each department code.
This procedure can only be performed by a supervisor who possesses the master department password.
Enter this password before proceeding.
Press the key to enter the program menu.
1
1
2
Select “01.DEFAULT SETTINGS” and press the
key.
2
Select “01.MACHINE DEFAULTS” and press the
key.
3
Select “06.DEPARTMENT CODE” and press the
key.
4
Select “YES” and press the key.
5
Enter the department number to be counter cleared
6
and press the key.
• When 1 is entered, the counters of all department codes
will be cleared.
• When other value (2 to 99) is entered, the counter of the
entered department code will be cleared.
PROGRAM
01.DEFAULT SETTINGS
02.LISTS
03.INITIAL SETUP
DEFAULT SETTINGS
01.MACHINE DEFAULTS
02.COPY SETUP
03.FAX SETUP
MACHINE DEFAULTS
04.WEEKLY TIMER
05.SPEAKER VOLUME
06.DEPARTMENT CODE
DEPARTMENT CODE
1.YES
2.NO
DEPARTMENT CODE
ENTER DEPARTMENT NUMBER(1-99):
3
4
5
6
7
8
03
9
Select “4.COUNT CLEAR” and press the key.
7
• The department number counter is cleared, and the screen
returns to the department number entry screen.
Counter clear for other departments, as necessary.
8
Press the key to return to the initial screen for
copying.
9
DEPARTMENT CODE
1.DELETE
2.MODIFY
3.RETAIN
4.COUNT CLEAR
DEPARTMENT CODE
DEPARTMENT NUMBER: XX
CLEARED
DEPARTMENT CODE
ENTER DEPARTMENT NUMBER(1-99):
10
11
12
5-13
Page 95

1
5. DEPARTMENT CODE (Cont.)
Deleting Department Code
The department code delete is used to remove an individual department code.
This procedure can only be performed by a supervisor who possesses the master department password.
Enter this password before proceeding.
2
3
4
5
6
7
8
Press the key to enter the program menu.
1
Select “01.DEFAULT SETTINGS” and press the
key.
2
Select “01.MACHINE DEFAULTS” and press the
key.
3
Select “06.DEPARTMENT CODE” and press the
key.
4
Select “YES” and press the key.
5
Enter the department number to be deleted and
6
press the key.
• Enter a value within a range of 2 to 99.
PROGRAM
01.DEFAULT SETTINGS
02.LISTS
03.INITIAL SETUP
DEFAULT SETTINGS
01.MACHINE DEFAULTS
02.COPY SETUP
03.FAX SETUP
MACHINE DEFAULTS
04.WEEKLY TIMER
05.SPEAKER VOLUME
06.DEPARTMENT CODE
DEPARTMENT CODE
1.YES
2.NO
DEPARTMENT CODE
ENTER DEPARTMENT NUMBER(1-99):
03
9
10
11
12
5-14
Select “1.DELETE” and press the key.
7
• The selected department number is deleted, and the screen
returns to the department number entry screen.
Change or delete a setting for other departments,
as necessary.
8
Press the key to return to the initial screen for
copying.
9
PROGRAM MENU
DEPARTMENT CODE
1.DELETE
2.MODIFY
3.RETAIN
DEPARTMENT CODE
DEPARTMENT NUMBER: 03
DELETED
DEPARTMENT CODE
ENTER DEPARTMENT NUMBER(1-99):
Page 96

Change Department Code Setting
The department code change is used to alter the master or individual department codes.
This procedure can only be performed by a supervisor who possesses the master department password.
Enter this password before proceeding.
1
Press the key to enter the program menu.
1
Select “01.DEFAULT SETTINGS” and press the
key.
2
Select “01.MACHINE DEFAULTS” and press the
key.
3
Select “06.DEPARTMENT CODE” and press the
key.
4
Select “1.YES” and press the key.
5
Enter the department number to change a setting,
6
and press the key.
PROGRAM
01.DEFAULT SETTINGS
02.LISTS
03.INITIAL SETUP
DEFAULT SETTINGS
01.MACHINE DEFAULTS
02.COPY SETUP
03.FAX SETUP
MACHINE DEFAULTS
04.WEEKLY TIMER
05.SPEAKER VOLUME
06.DEPARTMENT CODE
DEPARTMENT CODE
1.YES
2.NO
DEPARTMENT CODE
ENTER DEPARTMENT NUMBER(1-99):
07
2
3
4
5
6
7
8
Select “2.MODIFY” and press the key.
7
Enter the department name and press the key.
8
Tip
The optional FAX board is required to enter characters. Thus
entry of the department name is not allowed without the
optional FAX board.
DEPARTMENT CODE
1.DELETE
2.MODIFY
3.RETAIN
DEPARTMENT CODE
DEPARTMENT NUMBER: 07
HARDWARE GROUP
D
9
10
11
12
5-15
Page 97

5. DEPARTMENT CODE (Cont.)
1
2
3
4
5
6
Enter a department code and press the key.
9
• The same department code cannot be entered for other
departments:
Already assigned
Change or delete a setting for other departments
as necessary.
10
Press the key to return to the initial screen for
copying.
11
DEPARTMENT CODE
DEPARTMENT NUMBER: 07
ENTER DEPARTMENT CODE:
04096
7
8
9
10
11
12
5-16
PROGRAM MENU
Page 98

Report Printing
Print a copy count report for each department by inputting the code number for the desired department
and then following this procedure.
A list of all department codes is printed out if the master code is used.
1
Press the key to enter the program menu.
1
Select “02.LISTS” and press the key.
2
Select “1.DEPARTMENT CODE” and press the
key.
3
• The DEPARTMENT CODE list is printed out as the following
message appears:
Printing accepted
• The copy count report is printed out for the department code
used to initiate this print procedure or all department codes
if the master code was used.
Tip
"3. SUPPLY ORDER" can be selected only when the optional
FAX board kit is installed.
PROGRAM
01.DEFAULT SETTINGS
02.LISTS
03.INITIAL SETUP
LISTS
1.DEPARTMENT CODE
2.FUNCTION
3.SUPPLY ORDER
2
3
4
5
6
7
8
9
10
11
12
5-17
Page 99

1
2
5. DEPARTMENT CODE (Cont.)
Canceling/Resuming Department Management
Enable or disable the department management function.
Press the key to enter the program menu.
1
3
4
5
6
7
8
Select “01.DEFAULT SETTINGS” and press the
key.
2
Select “01.MACHINE DEFAULTS” and press the
key.
3
Tip
"03. FAX SETUP" can be selected only when the FAX option
is installed.
Select “06.DEPARTMENT CODE” and press the
key.
4
Select “1.YES” or “2.NO” and press the key.
5
• Select “1.YES” to enable or “2.NO” to disable the department
management function.
Press the key to return to the initial screen for
copying.
6
PROGRAM
01.DEFAULT SETTINGS
02.LISTS
03.INITIAL SETUP
DEFAULT SETTINGS
01.MACHINE DEFAULTS
02.COPY SETUP
03.FAX SETUP
MACHINE DEFAULTS
04.WEEKLY TIMER
05.SPEAKER VOLUME
06.DEPARTMENT CODE
DEPARTMENT CODE
1.YES
2.NO
9
10
11
12
5-18
PROGRAM MENU
Page 100

6. COPY SETUP
Specify the defaults for the copy functions. The defaults specified here are selected when the copier is
turned on or when Function Clear is performed.
1
APS/AMS
Select Automatic Paper Selection (APS) ( Page 3-2) or Automatic Magnification Selection (AMS)
page 3-7) as the default.
(
Press the key to enter the program menu.
1
Select “01.DEFAULT SETTINGS” and press the
key.
2
Select “02.COPY SETUP” and press the key.
3
Tip
"03. FAX SETUP" can be selected only when the optional
FAX board kit is installed.
Select “01.APS/AMS” and press the key.
4
Select “1.APS” or “2.AMS” as the default.
• Select “3.NO” if neither Automatic Paper Selection (APS)
5
nor Automatic Magnification Selection (AMS) is required for
the initial value.
Press the key.
6
• The screen returns to the COPY SETUP screen.
PROGRAM
01.DEFAULT SETTINGS
02.LISTS
03.INITIAL SETUP
DEFAULT SETTINGS
01.MACHINE DEFAULT
02.COPY SETUP
03.FAX SETUP
COPY SETUP
01.APS/AMS
02.IMAGE MODE
03.LIGHT/DARK
APS/AMS
1.APS
2.AMS
3.NO
2
3
4
5
6
7
8
9
Press the key to return to the initial screen for
copying.
7
10
11
12
5-19
 Loading...