


ER-GD400HKER-GD400SGER-GD400MS
ER-GD400C

2
1
STEP
2
STEP
3
STEP
4
STEP
5
STEP
START !
START !
1
5
REHEAT Rice or dish ……… Page 25~27
REHEAT
Milk
……………………
Page 30~31
DEFROST
Meat
……………… Page 30 , 32
BOIL Vegetable………………Page 30 , 33
REHEAT Fried food ………Page 34 , 37
REHEAT Sake ……………… Page 30~31
Read “SAFETY PRECATION” (Page 6~12)
Instruction to be strictly followed.
GETTING START !
EARTH CONNECTOR (Page 8)
To prevent electric shock that may occur during failure or
short circuit
INSERT THE PLUG
CLOSE THE DOOR (Page 12)
The power will turn on when the door is closed
WARMING THE EMTRY OWEN • DEODORIZE
(Page 24)
To burn away oil or grease in the oven , operate it empty.
Since the oven will become hot, use after it cools down.
When are done
~
Let’
The commonly used operation are listed above.
For other details , refer to the “Contents”
s start cooking !
Please read pages 20-23 before starting.
MICROWAVE HEATING
Place the food directly in the oven , do not use
square trays or gridiron
Place directly without
any accessories
Square Tray Gridiron

3
Preparation and Identification
Operation
steps
Changed condition
after operation
Heating with steam
Display
illuminate flash
Microwave Microwave
Notice
How to cook
COOKING INSTRUCTION 66
HOW TO USE COOKING BOOK 67
COOKING BOOK CONTENTS 68~69
Cooking Book 70~186

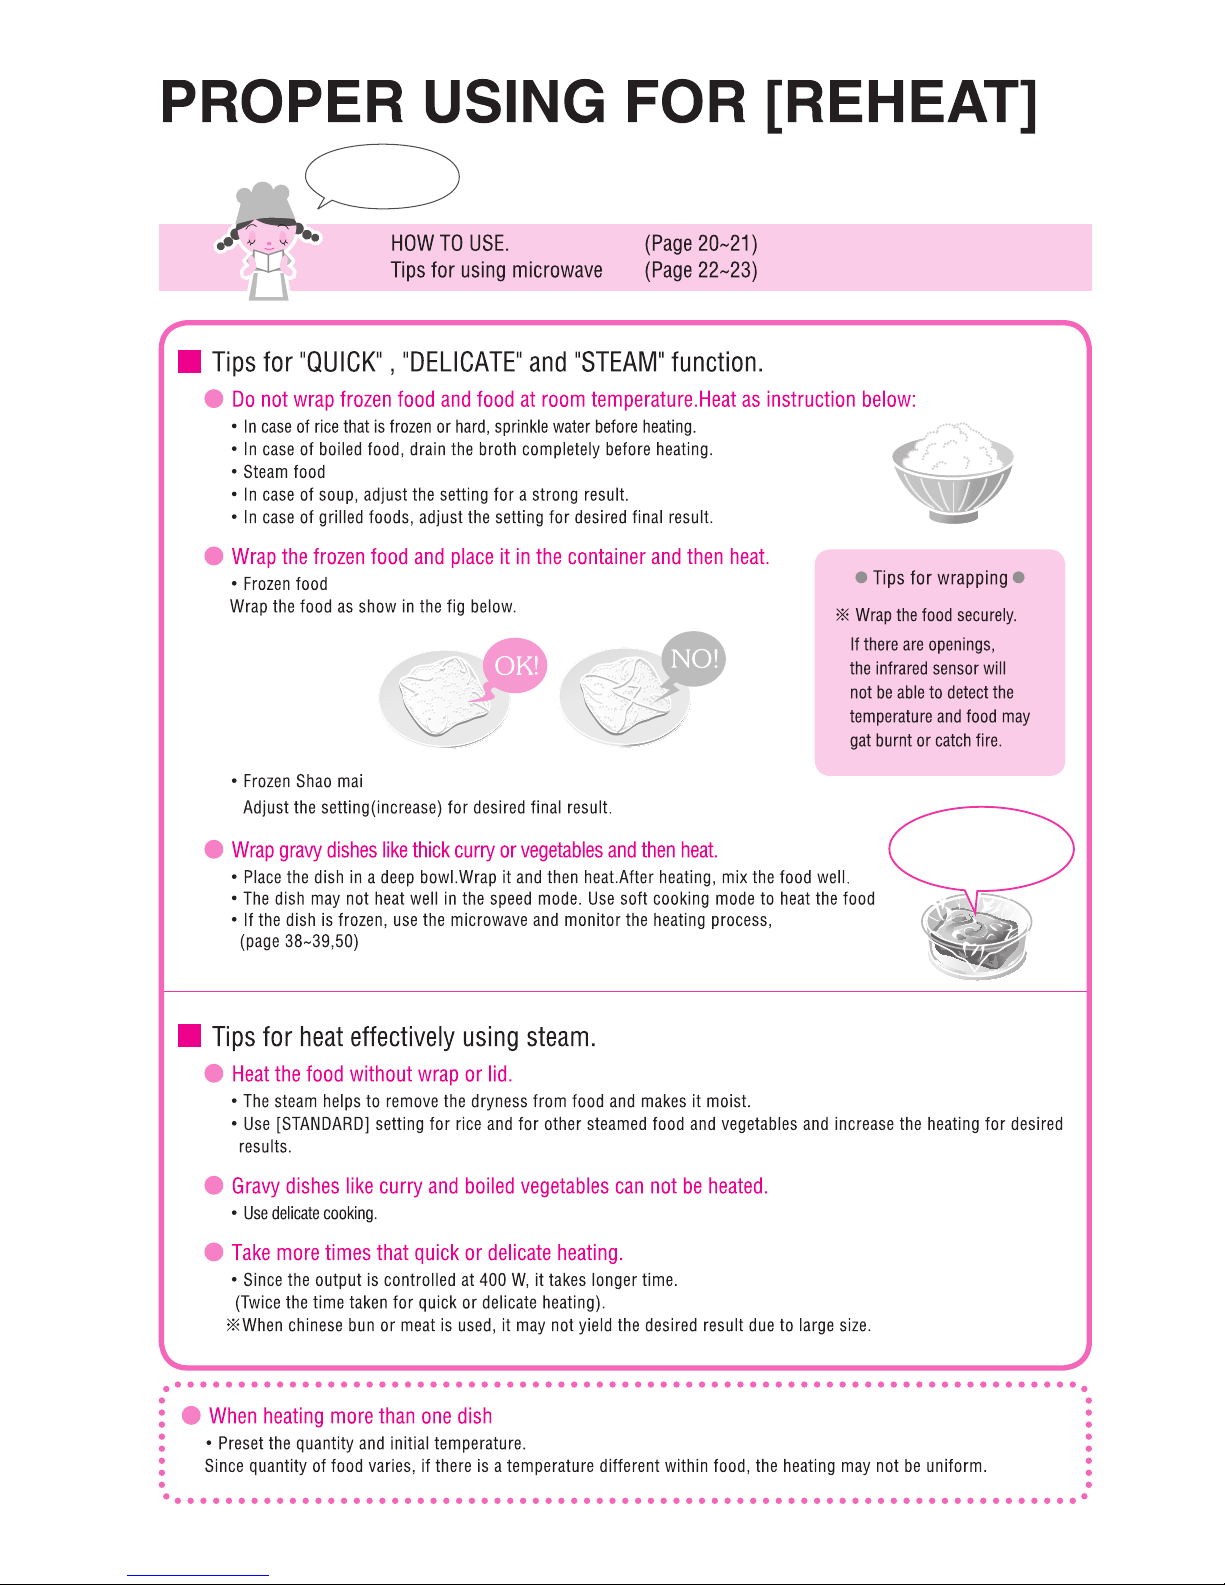
REHEATINGCONVECTION AND GRILLSTEAM
What can you do?
SPEEDY HEAT
Once for speed heat.
1 Press Start heat
REHEAT
Healthy Cooking
−10℃
90℃
★
Soften Ice-Cream
★
Soften butter
ONE TOUCH START !
REHEAT
START
Other…
The heating procedure in the oven is illustrated with images
GRILL
350 C
High Temp.High Temp.
200W
500W600W900W
★
Fish skin will not crack or burst easily.
P25〜P25〜
P38
〜P38〜
P44
〜P44〜
P49
P49
P42
P42
P43
P43
2 Press Start heat
Twice for delicate heat.
DELICATED HEAT
AUTO-SENSOR
HEATING
MANUAL
HEATING
MICROWAVE FUNCTION
Adjust Desirable Temperature
Rotate the knob.
Simple and easy to use.
MICROWAVE
4 Microwave level selection.
+
plusplus
o
CONVECTION
For speedy grill at high heat.
Hot wind in
the oven roasts
the outer part and
inner part is juicy.
High temperature from top heater make grilling effect.
Recommended
for fish and chicken
Becareful while cooking.Becareful while cooking.
400 C
High Temp.High Temp.
o
SUPERHEATED STEAM
Steam at high temperature
effectively surplus oil from
food.
oil
oil
STEAM
Sufficient steam is used steaming food
Food is steamed
in a basket steamer
for excellent
results.
For cooking with low
temperature
SUPERHEATED STEAM
Retains the freshness of ingredients
using low temperature to cook.
?
+
plusplus
4
OPEN THE WINDOW
SWITCH ON THE FAN
COOKING WITH HEA TER
! Breaking the egg in a container
and beat it well before heating it
! Don't make boiled eggs.
! Don't reheat boiled eggs.
COOKING WITH MICRO W A VE

STEAM
STEAM
SPEEDY HEAT
Once for speed heat.
1 Press Start heat
REHEAT
MORE !
MORE !
Healthy Cooking
−10℃
90℃
★
Soften Ice-Cream
★
Soften butter
ONE TOUCH START !
REHEAT
START
Other…
The heating procedure in the oven is illustrated with images
GRILL
350 C
High Temp.High Temp.
200W
500W600W900W
★
Fish skin will not crack or burst easily.
P25〜P25〜
P38
〜P38〜
P44
〜P44〜
P46
〜P46〜
P46
〜P46〜
P49
P49
P42
P42
P43
P43
2 Press Start heat
Twice for delicate heat.
DELICATED HEAT
AUTO-SENSOR
HEATING
3 Press Start heat
Third for moisten.
LASTING STEAM
MANUAL
HEATING
MICROWAVE FUNCTION
Adjust Desirable Temperature
Rotate the knob.
Simple and easy to use.
MICROWAVE
4 Microwave level selection.
STEAM
STEAM
+
plusplus
Easily moisten.
STEAM MICROWAVE
o
CONVECTION
For speedy grill at high heat.
Hot wind in
the oven roasts
the outer part and
inner part is juicy.
High temperature from top heater make grilling effect.
Recommended
for fish and chicken
Becareful while cooking.Becareful while cooking.
400 C
High Temp.High Temp.
o
SUPERHEATED STEAM
Steam at high temperature
effectively surplus oil from
food.
oil
oil
HYBRID CONVECTION
CONVECTION
SUPERHEATED
STEAM
plus
Operation with infrared
sensor for convection to
give reduced calories and
tasty foods.
STEAM
Sufficient steam is used steaming food
Food is steamed
in a basket steamer
for excellent
results.
For cooking with low
temperature
SUPERHEATED STEAM
Retains the freshness of ingredients
using low temperature to cook.
Ideal for
making
steamed egg
custard and
pudding.
Try it now !
+
plusplus
5
Preparation and Identification

6
*1
DANGER
BEFORE USE
DANGER
WARNING
CAUTION
*1
*2
*3
WARNING

7
Preparation and Identification
WARNING
CAUTION
WARNING
SAFETY PRECAUTION
BEFORE USE (Continued)
INSTALLATION

8
WARNING
CAUTION
At least 20 cm
away from the top
No safety
distance
required
from the rear
At least 4.5 cm
away from the left.
At least 4.5 cm
away from the Right.
Side
top
left
right
front
rear
bottom
Distance
(cm.)
20
4.5
4.5
open
not required
not required
INSTALLATION (Continued)

9
Preparation and Identification
WARNING
CAUTION
SAFETY PRECAUTION
DURING OPERATION

10
CAUTION
WARNING
MICROWAVE HEATING

11
Preparation and Identification
CAUTION
OPEN THE WINDOW
SWITCH ON THE FAN
This position
is also hot.
HEATER AND STEAM HEAATING

CONTROL PANEL
・Time and temperature selection can be
adjusted depending on the menu.
(page 38~50)
(Dial Menu /Time/Temperature/Adjusting the finish)
Auto menu is adjusted by rotated the knob to preset the time , temperature , finish etc. and the select can be confirmed by pressing
the key.
DIAL MENU
・By rotates the knob , It show at menu list 11~40
・is used when selecting on door menu (11~37) and cleaning (38~40)
TIME
・For setting the manual cooking time as well as increase or decrease the time during cooking.Increases on turning right and
decreases on turning left.
TEMPERATURE
・For setting the temperature for manual cooking (Superheated Steam/Convection/Proper Temperature Steam).
・For changing the temperature during manual cooking (Superheated Steam/Convection/Proper Temperature Steam).
ADJUSTING THE FINISH
・For adjusting the finish during auto menu. [Increases] in strength on turning right and [decreases] in strength on turnung left.
・On pressing this button, menu list 1~3 will appear
・For reheating rice and dish.
(Page 25~27)
※Cooking will start when the button is pressed.
・Used for confirm to Start/Restart process in
Button menu (4~10), Dial Menu (11~40).
Navigation Knob and Illumination Guide
・The display shows the auto menu number, cooking mode,
temperature and time.
CONTROL PANEL & DISPLAY
・Show the Auto menu list. When the symbol [0] displays on the
control panel, the menu lights up for 1 min after the door
closes. It also lights up when [AUTO MENU] is selected.
(The back of KNOB and START key is illuminated.)
Notified the cooking mode, status and completion by illumination.
●When the KNOB is
Rotated : Blue
Pressed : Red
●The START button : In the end setting.
・When pressing the key, auto menu list 4~10
will appear.
・Time and temperature selection is uncertain.
(page 30~33)
※1
※2
The auto menu consists of Button menu※1 and Dial
menu
※2
.
As the menu number are displayed on the control
panel, the oven may be used for cooking by pressing the appropriate menu number.
AUTO MENU LIST
BUTTON MENU
MANUAL COOKING BUTTON
MENU & SETTING KNOB
12
WARNING
CAUTION
CLEANING AND MAINTENANCE

・Time and temperature selection can be
adjusted depending on the menu.
(page 38~50)
(Dial Menu /Time/Temperature/Adjusting the finish)
Auto menu is adjusted by rotated the knob to preset the time , temperature , finish etc. and the select can be confirmed by pressing
the key.
DIAL MENU
・By rotates the knob , It show at menu list 11~40
・is used when selecting on door menu (11~37) and cleaning (38~40)
TIME
・For setting the manual cooking time as well as increase or decrease the time during cooking.Increases on turning right and
decreases on turning left.
TEMPERATURE
・For setting the temperature for manual cooking (Superheated Steam/Convection/Proper Temperature Steam).
・For changing the temperature during manual cooking (Superheated Steam/Convection/Proper Temperature Steam).
ADJUSTING THE FINISH
・For adjusting the finish during auto menu. [Increases] in strength on turning right and [decreases] in strength on turnung left.
・On pressing this button, menu list 1~3 will appear
・For reheating rice and dish.
(Page 25~27)
※Cooking will start when the button is pressed.
・Used for confirm to Start/Restart process in
Button menu (4~10), Dial Menu (11~40).
Navigation Knob and Illumination Guide
・For cancel or stop cooking program.
(The back of KNOB and START key is illuminated.)
Notified the cooking mode, status and completion by illumination.
●When the KNOB is
Rotated : Blue
Pressed : Red
●The START button : In the end setting.
・When pressing the key, auto menu list 4~10
will appear.
・Time and temperature selection is uncertain.
(page 30~33)
※1
※2
BUTTON MENU
MANUAL COOKING BUTTON
MENU & SETTING KNOB
CANCEL BUTTON
START HEATING BUTTON
13
Preparation and Identification

14

15
Preparation and Identification
Draining Water
cap
till here
[FRONT]
Front panel
Power plug
Handle
Power cord
Control panel / Display
For steam cooking,open the cap and pour water until
brim.
・Ensure that the cap and tank cover is closed properly.
・Push th water tank inside till it latches perfectly.
・If it is connect wrongly, it may cause leakage and a shortage
of steam.
■Inserting and removing
・As it holds water accumulated during steam cooking, care
should be taken when puling out the tray.
・Before cooking, it is importance to ensure that the tray is
fitted properly.
A container that stores water droplet from steam cooking
and condensed water accumulated in the oven.
Available as an additional accessories even if cooking is not use.
■Inserting and removing
A container for stores water required for steam cooking.
Available as an accessories even if steam cooking is not used.
At a capacity of approx 450 cc, approx 25 mins of steam
cooking and approx 60 mins of superheated steam cooking is
possible
.
■How to add water.
Tank cover
Water tank Drain Tray

16

17
Preparation and Identification

18

19
Preparation and Identification

20
Display the symbol
STEAM
Blink up during heating process.
center of
the circle
Note
!
Door menu lights up.
Next, the area around the knob
lights up and start blinking.
Blue:Turn the knob button.
Red :Press the DIAL button(confirm)
Show page number of the cook book.
P
Page symbol

21
Preparation and Identification
Note
!
This position
is also hot.
Note
!
Drain tray
Be careful
Hot steam!
Be careful
Hot steam!
Flashes.

22
Tips for using the microwave
Cool
Wipe off
Reheat
Beverage
Defrost
Boiled Vegetable

23
Preparation and Identification
CAUTION
1 dish 2 dishes 3 dishes 4 dishes
heating 1 dish. Heating 2 dishes
SQUARE TRAY
GRIDIRON
WARNING

24
庫内のカラ焼き・脱臭をする
START !START !
Open the window
Switch on the fan
Cleaning
Cleaning
Deodorize] , in order to burn away any odor due to oil or grease.(Color Burning)

Preparation and Identification /
How to cook
25
decrease increase
For quick heating press REHEAT once.
1 QUICK
2 DELICATE
3 STEAM
Press Once
Place the food at the
center without wrap.
REHEAT
START !
REHEAT
START !
Depend on the food or menu selected,
the remaining time is displayed.
STEAM
Accessories can not be used
26
Have you finished reading ?
When deep container is used,
there is a possibility of the wrap
sticking to food.

27
How to cook
●
To heat rice/frozen rice quickly.
→
[ 1 Quick ]
●
To heat food that may crack or burst easily/gravy/soups/frozen dishes
→
[ 2 Delicate ]
For example
・
Food that can crack or pop easily : grilled fish, croquette.
・
Food that can become dry or hard : Deep fried food, grilled meat.
・
Soupy food : Soups, Miso soup.
・
Gravy : Curried, Stew, boiled vegetable.
●
To heat Steam food
→
[ 3 Steam ]
For example
Shaomai, meat dumplings etc.
●
Milk
→
Use Automenu [Beverage] to
select [ 4 Milk ]
●
Sake
→
Use Automenu [Beverage] to
select [ 5 Alcohol Beverage ]
●
Coffee, Water
→
Set time and output power in
the [MICROWAVE].
●
Defrost meat and fish.
→
Use Automenu to select
[ Defrost ]
●
Bread
→
Set time and output power in
the [MICROWAVE].
●
Grilled, Deep fried food.
→
Use Automenu to select
[ 27 Crispy Reheating ]
Frozen Boiled Vegetable.
→
Set time and output power in the [MICROWAVE].
*
Sprinkle water for heating corn and mixed
vegetable.use microwave safe container for heating.
●
Commercially processed frozen food.
→
Set time and output power in the [MICROWAVE].
*
Refer to the instructions on the packet for heating and
monitor the food while heating.

28
Mode
Pages
Menu List
Position of dish Water Tank Accessories usege
Reference page
4 Milk
Accessories can not
be used
Page 31
5 Alcohol Beverage
Page 31
6 Meat・ Partial
Page 32
7 Meat・Whole[Steam]
Page 32
8 Sashimi
Page 32
9 Leaf
Page 33
10 Root
Page 33
■
Baking Choice
11 Hamburger
※
Page 72
12 Grilled chicken
※
Page 74
13 Fried Chicken
※
Page 84
■
Bread Chamber
14 French Bread
Page 99~103
15 Melon Buns
Page 104
16 Begel
Page 105
■
Grill
17 Grilled fish
Page 75
18 Gratin
Page 81~82
19 Dried Food
Page 75
■
Oven・ Superheated Steam
20 Grilled Vegetable
Page 78~79
21 Pizza
Page 93~94
Fill
N/A
N/A
N/A
N/A
N/A
N/A
N/A
N/A
N/A
N/A
N/A
N/A
Fill
Fill
Fill
Fill
Fill
page
30
page
30
page
30
page
34
page
35
page
34
page
34
page
34
page
35
Automenu number
Cooking (1~37), Cleaning (38~40)
Automenu List・Pages・Accessories for Cooking

29
How to cook
Mode
Pages
Menu List
Position of dish Water Tank Accessories usege
Reference page
■
Oven・ Superheated Steam
22 Baked Potato
Page 83
23 Cookies
Page 135~136
24 Profiterole
Page 130~131
25 Sponge Cake
Page 126~127
26 Stir-Fried Noodles
Page 86
27 Crispy Reheating
Page 37
28 Pastry
Page 123
■
Proper Temp・ Steam Function
29 Steamed Egg
Accessories can not
be used
Page 156
30 Crème Carame
l
Page 158
31 Healthy Vegetable
Page 161~168
32 Okowa Rice
Accessories can not
be used
Page 154~155
33 Steamed fish
Page 149~150
34 Shao Mai
Page 152
■
Microwave
35
Curry・ Stew
Accessories can not
be used
Page 170~172
36 Simmered Meat
Page 173
37 Tofu
Page 182~183
N/A
N/A
Menu List
Water tank preparation and accessories
Reference Page
■
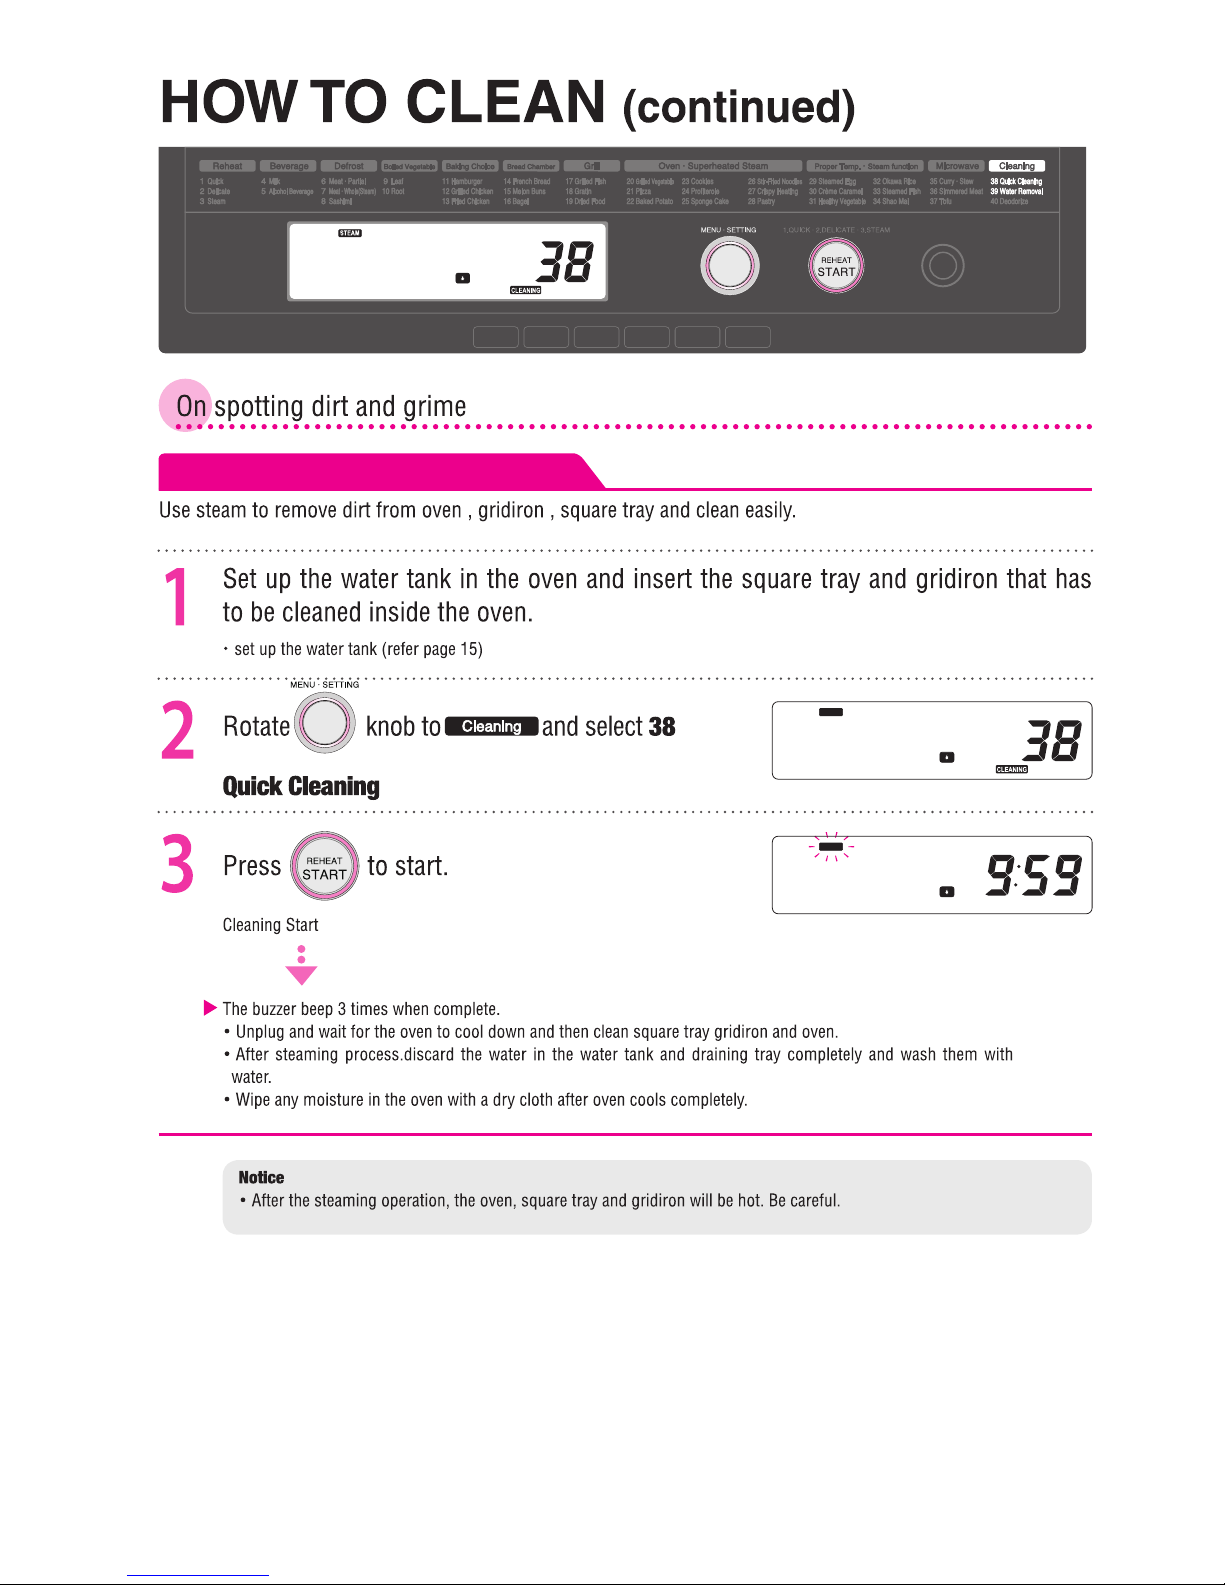
Cleaning
38 Quick Cleaning
Fill water tank.Insert the accessories to be cleaned
Page 54
39 Water Removal
Remove the water tank.
Page 55
40 Deodorize
Empty the water tank . Do not use oven
accessories.
Page 24
Fermentation
Fill
Fill
Fill
Fill
Fill
Fill
Fill
Fill
Fill
Fill
Fill
N/A
N/A
N/A
N/A
N/A
page
34
page
35
page
34
page
36
page
34
page
34
Automenu List・Pages・Accessories For Cleaning

30
How to use
HEATING
START !
HEATING
START !
Depending on menu selected,
the remaining time is displayed
Accessories can not be used
decrease increase

31
How to cook
Have you finished reading ?
Approx. width 8 cm.
Approx.
quantity 260 cc.
Approx.
height 8.5 cm.
Fig1 : 1 cup Fig 2 : 2 cups
Stir well with
a spoon
before heating.
sake bottle
1 dish 2 dishes 3 dishes 4 dishes
How to use
Page 30

32
Have you finished reading ?
How to use
Page 30
6 Meat・Partial
8 Sashimi
7 Meat・Whole(Steam)

33
How to cook
Boiled
Vegetable
Have you finished reading ?
A little quantity
is not good
!
How to use
Page 30

34
Remaining time
SUPERHEATED STEAM
LOWER
SHELF
START !START !

35
How to cook
START !START !
RemainingTime
CONVECTION
LOWER
SHELF
The buzzer will beep 3 times when finish.
LCD displays [High temp]
Open the door and take the food out.
●
If you forgot to take the food out, the buzzer will beep 5 times in an interval of
one minute.The beep will stop on press [Cancel] and open the door.
Becareful as the square tray will be hot.
Becareful as hot steam escape after cooking is
complete.

36
Remaining time.
MICROWAVE FERMENTATION
CONVECTION
Baking
Start !
Baking
Start !
Remaining time.
(Total time displayed includes fermentation
and baking time)
MICROWAVE FERMENTATION
CONVECTION
Accesories can not be used
Accesories can not be used
decrease increase

37
How to cook
Baking Choice
Oven Accessories
Oven Accessories
SUPERHEATED STEAM
P
P
P
CONVECTION
Crispy Reheating
How to use
Page 34
How to use
Page 34
Gridiron+Square Tray
At Upper Shelf
Convection
Hybrid Convection
Superheated Steam
Changing the baking method
Display : Hamburger

38
Remaining Time
Accessories can not be used
900W600W 500W 200W
Stew
DESIRED
TEMP

39
How to cook
A little quantity
is not good
!
increase decrease

40
Remainingtime
DESIRED TEMP
Accessories can not be used
900W600W 500W 200W
Stew
DESIRED
TEMP

41
How to cook
Have you finished reading ?

42
STEAM PROPER TEMP
MICROWAVE STEAM (400W)

43
How to cook
0 5 min 10 min 25 min
10 sec interval 30 sec interval 10 min interval
Beware hot steam
when taking the
food out.
Proper Temperature Steam
Accessories can not be used
STEAM PROPER TEMP
MICROWAVE STEAM (400W)

44
Remaining time
CONVECTION
・
During preheat the oven lamp switches off.
・
Since the square tray will be hot,care should be taken
when food is extracted out.
・
Preheat will last for 20 min. If no action is done
during this time, the cooking process will stop.
ADJUSTMENT OF TIME AND TEMPERATURE
CONVECTION
COOKING
With Preheat
Without Preheat

45
How to cook
0 15 min
30 sec interval
40 min 90 min
1min interval 5min interval
Convection refers to ...
Heating method by blowing hot wind that heats the food effectively at high
temperature providing a grilled effect.
Convection(with preheat) Convection(without preheat)
Superheated steam
(with preheat)
Superheated steam
(without preheat)
Hybrid Convection(with preheat)
Hybrid Convection(without preheat)
Grill

46
Beware hot steam
when taking the
food out.
Remaining time
Superheated steam
(With preheat)
Press 3 times
Press 5 times
ADJUSTMENT OF TIME AND TEMPERATURE
SUPERHEATED STEAM/HYBRID CONVECTION
COOKING
With Preheat
Without Preheat

47
How to cook
0 15 min
30 sec interval
40 min 60 min
1min interval 5min interval
Superheated steam is ..
Steam is heated to produce a high temperature greater than 100 ℃.The high heat is used to cook the food quickly and effectively.
※This cooking method is effective for removing the surplus oil in the food and delivers a healthy food.
Hybrid Convection is ...
It uses the superheated steam as well as high heat from heater to produce grilled effect.This method also removes the surplus oil in the food and tasty food.
Refer to Cooking Book for combination
Accessories usege
※
On pressing , it is the cycle change to
Convection(with preheat) Convection(without preheat)
Superheated steam
(with preheat)
Superheated steam
(without preheat)
Hybrid Convection(with preheat)
Hybrid Convection(without preheat)
Grill
Superheated steam
(Without preheat)
Press 4 times
Press 6 times

48
Remaining Time.
0 15min
30sec interval
90min40min
1min interval 5min interval
Convection(with preheat) Convection(without preheat)
Superheated steam
(with preheat)
Superheated steam
(without preheat)
Hybrid Convection(without preheat)

49
How to cook
0 5min
10sec interval
30min10min
1min interval30sec interval
Remaining time
UPPER
SHELF
Convection(with preheat) Convection(without preheat)
Superheated steam
(with preheat)
Superheated steam
(without preheat)
Hybrid Convection(with preheat)
Hybrid Convection(without preheat)
Grill

50

51
How to cook / Notice

52
WARNING
CAUTION
Blow Exit for steam
Make clean by using dried dish cloth.
There might be a white mark (dissolve in water) left at the
location nearby blow exit for steam af ter finishing steam
process. Please take care by removing it with dried dish
cloth.

53
Notice
Sponge Brush
Abrasive Nylon Sponge
Do not use the abrasive side.
Use the soft sponge side for cleaning.
Use non abrasive sponges for cleaning.
Do not use for cleaning.
54
How to clean with steam system
STEAM
STEAM

55
Notice
About Cleaning

56
Question Answers
Refer
Page
Should the oven be placed
from the wall and furniture at
a distance?
Yes. The furniture and the wall may overheat and cause
damage and fire.
・
Ensure there is a gap of 20 cm. above,and 4.5 cm. at
the sides.
・
No space require at back or at the bottom.
・
Ensure there is sufficient space to open the door fully
and take the food out.
Page 8
Should the appliance be
earthed?
Yes, Earth the appliance correctly.
Page 8
Is it necessary to operate the
oven empty and deodorize?
Yes, It is necessary.
When using the oven for the first time, operate the oven
empty and deodorize to burn away any oil or grease.
There may be smoke or smell.But it does not denote
malfunction.
Page 24
How can dirt or grease be
removed?
Refer to [HOW TO CLEAN] instruction for clean up
operation.
Page 52
Page 55
What kind of container may
be used?
Refer to [USABLE AND UNUSABLE CONTAINERS] guide.
Page 18
Page 19
What is the method to drain
the any excess water?
Refer to [How to draining water from pipe] instruction
guide.
Page 55
What is the method to shift
the product?
When moving the appliance raise at [Carry slot] the
bottom left and right of the product.
Page 14
Q. A.

57
Notice
Items Condition How to
The operation time is too short.
The food is not reheated after
pressing "Start" button.
●
If the temperature inside the cavity, especially the flat table) is
still high,the sensor cannot function properly. Cool the cavity
before reheating.
Food is not reheated.
●
Is the food in a metal container or wrap with aluminium foil?
●
Are you using oven accesorries like square tray?Do not use
square tray when heating.
Food is overheated by the
reheating function.
●
Are you using ceramic or glass lid? Do not use lid or cover.
→
Infrared sensor may not work properly
●
Is the food placed properly? Place the food in the center of the
oven chamber.
●
Is the quantity to small? The food quantity should be greater
than 100 g.
●
For the infrared sensor to detect the temperature of the food ,
use a container which is shorter and that has wide mouth.
Rice dried out.
●
Sprinkle water on the food before cooking to moisten it.
●
Use [MICROWAVE STEAM] to heat for moist results.
Water splashes when boiling
food or fish.
●
Remove excess water and place the food in a deep container.
●
Use delicate heating and monitor the process.
A curry or a stews is not
reheated.
●
Use delicate heating for heating gravy food like curry and stew
and moniter the process.
Frozen rice is not reheated.
●
If a new wrap is used,or the wrap overlaps or melts, the infrared
sensor may not work properly. Heat the food immediately after it
is taken out from the refrigerator.
Frozen food is not reheat.
●
If a new wrap is used,or the wrap overlaps or melts, the infrared
sensor may not work properly. Heat the food immediately after it
is taken out from the refrigerator. Also ensure that the wrap is in
contact with the food.
Food dried out.
●
Use [MICROWAVE STEAM] to heat for moist results.
Fried food or Tempura becomes
greasy.
●
Use[Crispy Reheating] for crispy result.

58
Items Condition How to
The food is defrosted
improperly.
●
Place the food on top of a paper towel and place it on a shallow
tray.
→
If a deep vessel is used, the edge of food prevents the
temperature to be measured accurately and defrost cannot
happen properly.
●
For the best results, the food must be about 3cm. thick.The
thickness should be uniform and thin portions such as fish tail
should be covered with aluminium foil.
●
To defrost more than two pieces at the same time,ensure that
the pieces are of the same size and thickness.
●
Depending on the size,the last result may vary.
The food is defrosted
unevenly.
●
Selec
t portion of the food may reheat faster resulting in
insufficient defrost due to the movement of infrared ray sensor.
→
Thin portion of food will reheat faster. So arrange the food
such that they are of uniform thickness.
→
For portions that has not been defrosted properly, use
[MICROWAVE 200W] and monitor the process during
defrosting.
→
If a new wrap overlaps or melts, the infrared sensor may not
work properly.Defrost the food once it is taken out of the
refrigerator.
The operation time is too short.
The beverage temperature is
still low.
●
If the temperature inside the oven,especially the bottom plate is
still high, the sensor cannot function properly.Cool the chamber
before heating.
Milk is too hot.
●
Did you select [Milk]? If you select[REHEAT]instead of milk,then
the milk will be hot.
●
Did you fill the right quantity? Fill 80% of the container with
milk.If the quantity to be heated is too small,the liquid will start
boiling
.
●
Refer page 31 for guidelines on container.
Alcohol is too hot.
●
Did you select [Alcohol Beverage]? If you select[REHEAT]instead
of Alcohol beverage ,then the beverage will be hot.
●
Did you fill the right quantity? Fill 80% of the container with
milk.If the quantity to be heated is too small,the liquid will start
boiling.
The temperature of alcohol in
the bottle is different.
●
After heating, mix the liquid well.
●
If Sake bottle is used, then shield the neck with an aluminium
foil to reduce the temperature difference.

59
Notice
Items Condition How to
Food does not get fully cooked
●
Have you covered the ceramic, glass or plastic ware with lid?
Remove the lid and then heat.
Place leafly vegetable on a flat plate and wrap them alone
without the container.
Wrap root vegetable with the container.
●
If the quantity is less than 100 g., use [MICROWAVE 600W] and
heat.
Vegetables are dried.
●
Wash the vegetable and sprinkle some water and then cook.
Food is boiled unevenly.
●
Arrange vegetable such as squash, potato etc. based on their
size. For uniform cooking, ensure that the size is uniform.
●
After cooking, remove from oven and leave it for 5 min. Repeat
the process again until done.
●
To cook more than 1 pieces at the same time, arrange the
vegetable according to the size for uniform cooking.
The operation time is too short.
The food temperature is still
low.
●
The oven, especially the bottom chamber is too hot and the
infrared sensor may not work properly.Open the door and wait
for cool down completely and then heat.
Heating time is too long.
●
Steam cooking takes longer time than microwave.If faster
cooking is desired, rather than moist finish, use [STEAM
REHEAT]
It is not well done.
●
Are you using right quantity? If the quantity differs from that
mentioned in the Cooking Book ,cooking may not yield desirable.
●
Is the water tank empty? If the water is less, the steam may not
be formed and cooking will not yield best result.
●
Ensure that the water tank is fitted inside properly.
It is not well done.
●
Is the water tank empty? If the water is less, the steam may not
be formed and cooking will not yield best result.
●
Ensure that the water tank is fitted inside properly.

60
Items Condition How to
The cake is not light
and fluffy.
●
Are the egg beaten well? Beat them until smooth and uniform.
●
Are the eggs frequently stirred after they are mixed with flore?
The ingredients are not
beaten well.
●
If the container contains moisture or oil, the mixture cannot be
beaten well.
●
Use container that does not contain oil or moisture.
The flour is still lumpy.
●
Did you sieve the flour?
Sieving removes the coarse particles and aerates the flour.
●
Did you blend the flour uniformly?
The center of the cake dents
●
Did you beaten the egg for too long?
The crust is too dark.
●
If the ingredient and size differs from in the cook book, the crust
color may change.Monitor the process and check the color.
The cake does not rise
enough.
●
Beat the white egg well,so that the mixture is thick and not free
flowing even when the bowl is turned.It is easy to beat white egg if
it is chilled.
There
are some holes
in the cake.
●
When the dough is poured into the mold, it get aerared.Ensure that the
dough is poured from a considerable height and immediately.
It does not rise enough.
●
Did you measure the quantity properly?
●
When baking ,Was the microwave set at the right temperature?
The cookies are burned
unevenly.
●
Is the size and thickness of the mould the same?
The roll is hard and has
not risen.
●
Was the dough fermented enough? Insufficient fermentation may
cause the temperature of the dough to be low and may not rise well.
●
Did you manipulate the bread during baking? Tempering with the
bread during baking will make it hard.
●
Handle it with care.Refer page 89 for
[Tips on Making Bread].
The color is not
uniform.
●
Were the bread pirces arranged properlu according to their size?
Ensure that the pieces are arranged properly and the same size.
Bread is
not thoroughly
cooked.
●
Refer page 99 for [
Tips on Making French Bread].
The color is irregular.
●
The color of the food may vary depending on the quality of cheese.
Monitor the process while cooking.

61
Notice

62
Effect Reason (Measure)
There is no display after the electric plug is
connected to the power supply.
There are some noises during cooking
Continuous noise during heater operation
Continuous noise (ji....) during microwave
cooking.
On and off fan sound during and post
cooking cooling.
No display occurs when key is pressed.
If the door is opened, the control panel
displays [0].
Hissing sound during steam cooking.
Condensed water drips into the oven cavity.
Steam leaks from oven door.
Wate collects inside the oven.
PipPip Buzzer sound occurs one minute after
cooking is over.
Steam leaks from the gap between the door
and the oven.
There is some smoke and smell
during the operation.
Steam does not come out.
・
If the plug is connected to the power supply with the door closed, the power supply
will be cut off. Open the door once to ON the power supply.
・ Sound due to fan operation that takes place during oven Does not denote malfunction.
・
After cooking, the oven fan operates to cool the oven.
When the fan works,the display [COOLING]
Spark occurs during cooking.
・
Did you use the square tray? Do not use square tray inside microwave.
・
Did you use metal container or grill for microwave recipes?
・
Metal skewers, containers or metal objects etc may cause spark.
・
Is the oven dirty? Radio waves tend to converge on the dirt and cause spark.
・
Water droplets may condense depending on the menu and little amount of steam
may leak. It does not have a damaging effect on the oven.
Wipe the moisture with a dry cloth.
・
Depending on the volume of steam generated and the room temperature, some
steam may leak but it does not have any effect on the cooking process.
There is no radio wave leakage when microwave is used.
During oven cooking, the LCD display is not
visible.
・The LCD display turns dark at high temperature and may not be visible. This is due to
the property of LCD and does not signif y malfunction. When the oven temperature
decreases, the LCD display is visible.
The temperature in the oven is not the same
as set temperature.
・
The oven temperature setting is standardized for empty oven. If the temperature is
set after adding the food or oven accessories, the setting may change. When
cooking, refer to recipe guide for recommended temperature settings.
・
Noise occurs due to steam conversion. Does not denote malfunction
・
Occurs due to heat contraction against oven walls. Does not denote malfunction
・
Noise is due to microwavecooking operation. Does not denote malfunction
・
If the door is opened for more mode than 5 min, the energy saving may be in
operation. (Open the door, place the food inside and start.)
・
When the door is opened, the power supply is connected.
・
If the food is not taken out after cooking is over, the buzzer will start ringing. It
does not denote malfunction.
・
Check if the water tank is fitted properly and add water to it.
・
When the oven gets heated, the steam may not be visible.
・
Noise occurs when water gets converted to steam upon heating by steam heater.
The noise may be loud when used initially.
・
When using the oven for the first time, smoke or smell may occur due to oil or
grease burning off. It does not indicate malfunction.
・
Did you warming the empty oven · deodorize?
・
Is the oven or the door dirty?
Oven door becomes foggy
・
During or after cooking, the glass door turns foggy or cloudy. It does not denote
malfunction. The effect subsides after 2 hours.When the oven is Warming the
empty oven · deodorize, the effect subsides in 30 min. (Refer to page 24).

63
Notice
Effect Reason (Measure)
Microwave does not work.
・ Is the power supply ON?
・ Is the power plug disconnected?
・ Check if the circuit breaker or fuse power is off.
・
Did you open or close the door during cooking and forgot to press [START] Button?
・ Did you perform any key operation while the power supply is off?
(The power supply switches on when the oven door is opened.)
Oven does not heat up on pressing
[REHEAT] button.
Oven does not heat up on pressing
[REHEAT] button.
If [START] is pressed after selecting [DEFROST]
or [BEVERAGE],heating does not begin.
・Is the [DOOR] display ON?
If the start key is pressed 1 min after the oven closes, heating will not take place.
(Open and close the door again and press the key.)
・ Is the [HIGH TEMP] display ON?
(If the oven temperature is pressing the high, heating may not start in start key certain menu
operation. Open the door, allow the oven to cool, wait for [HIGH TEMP] disappear and press the key.)
・ Check if demo mode is ON?
Refer page 61 for [demo] display instructions.
The buzzer does not sound.
・ Check if the buzzer is set to off?
Refer Buzzer sound settings in (page 51)to change the buzzer settings.
The status light does not work
・ Check if the status light function is set to cancel mode?
Refer the status light settings in (page 51)to change the status light settings.
Cooking does yield desirable results.
・ Did you follow the instructions properly?
(Check instruction guidelines for the usage of lid, wrap and oven accessories)
・ Did you start cooking when the oven was hot?
(Wait for the oven to cool.)
・ Did you use the appropriate food quantity?
・ Is the top part or bottom part of the oven dirty?
・ Did you select the right menu before cooking?
・ IF FOOD IS NOT AS DESIRED, refer (page 57~61) for guidelines.
[Start] button does not operate sometimes.
・ Close the oven door, wait for sometime and then start.
(Sometimes the oven does not start immediately after door close to prevent any malfunction.)

4MW5850104
ER-GD400C
ER-GD400HK
ER-GD400MSER-GD400SG
-
 Loading...