

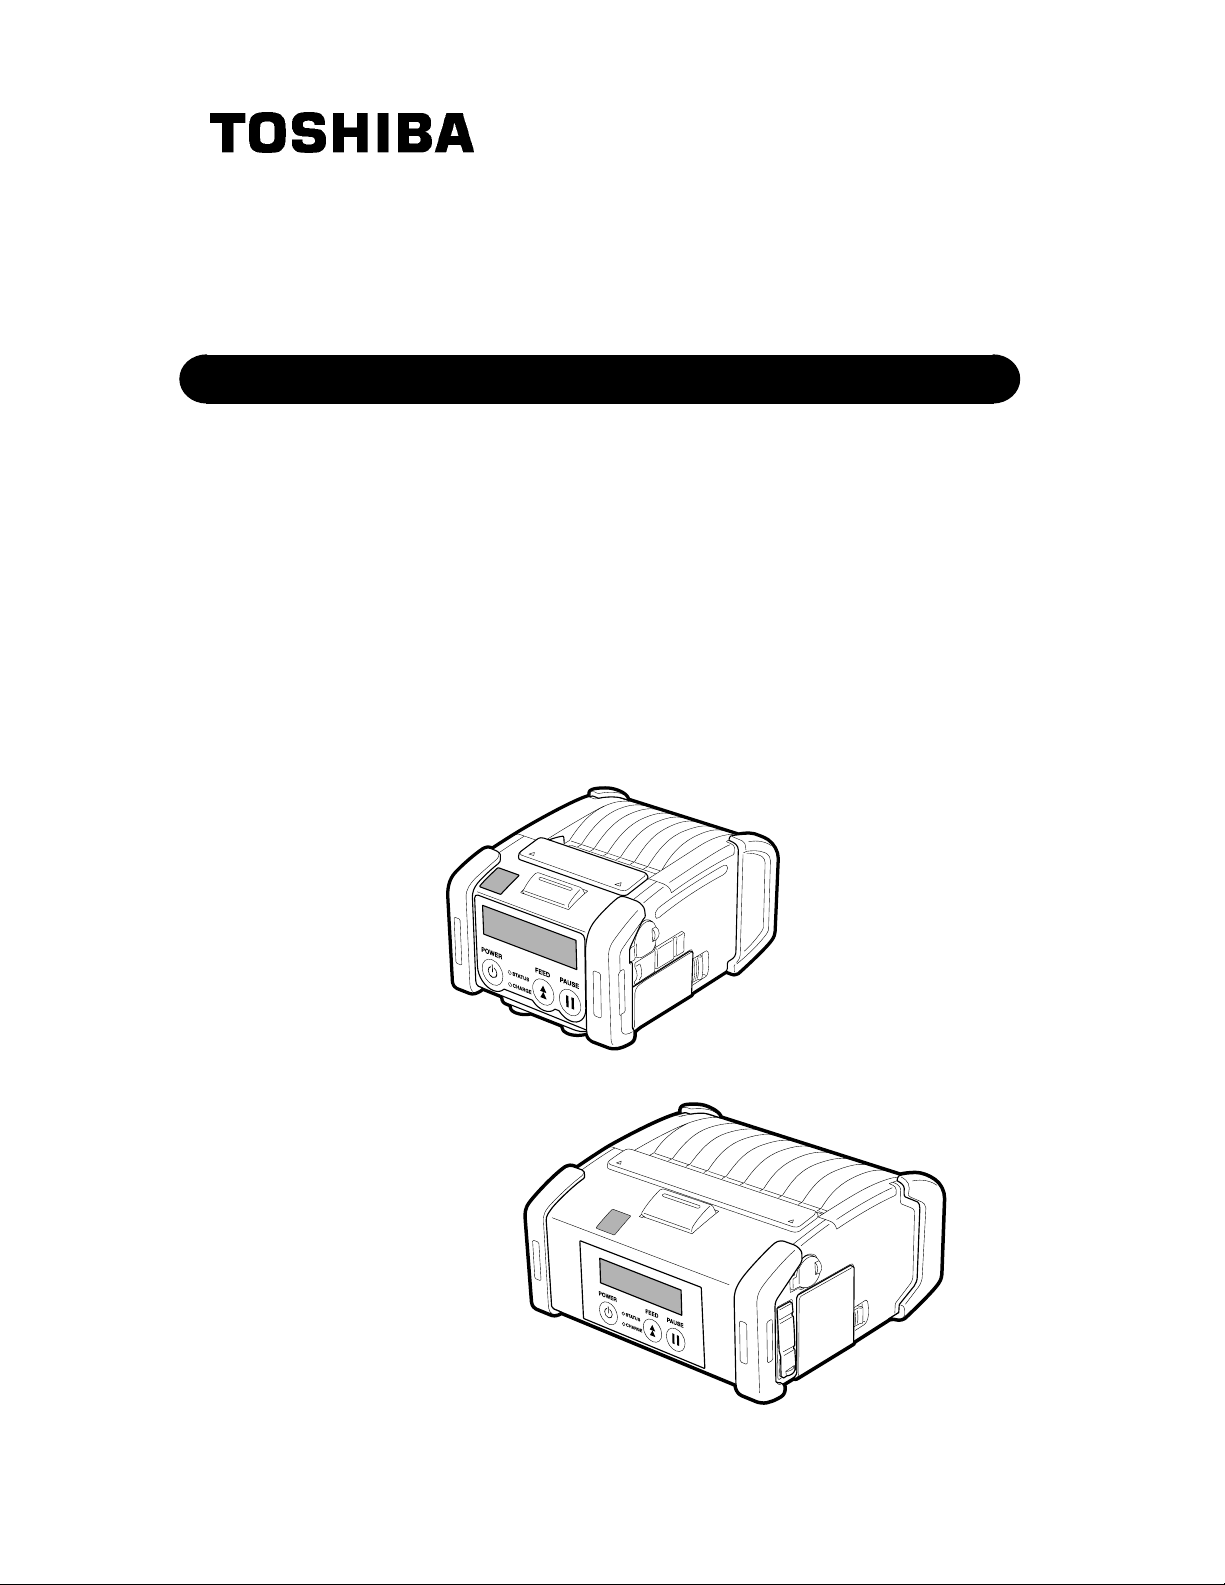
TOSHIBA Portable Printer
B-EP2DL/EP4DL SERIES
Owner's Manual
[B-EP2DL]
[B-EP4DL]
CE Compliance (for EU only)
r
This product complies with the requirements of EMC and R&TTE Directives including their amendments.
FCC Notice
This equipment has been tested and found to comply with the limits for a Class B digital device, pursuant to
Part 15 of the FCC Rules. These limits are designed to provide reasonable protection against harmful
interference in a residential installation. This equipment generates, uses, and can radiate radio frequency
energy and, if not installed and used in accordance with the instructions, may cause harmful interference to
radio communications. However, there is no guarantee that interference will not occur in a particular
installation. If this equipment does cause harmful interference to radio or television reception, which can be
determined by turning the equipment off and on, the user is encouraged to try to correct the interference by one
or more of the following measures:
• Reorient or relocate the receiving antenna.
• Increase the separation between the equipment and receiver.
• Connect the equipment into an outlet on a circuit different from that to which the receiver is connected.
• Consult the dealer or an experienced radio/TV technician for help.
Changes or modification not expressly approved by manufacturer for compliance could void the user’s authority
to operate the equipment.
“This Class B digital apparatus meets all requirements of the Canadian Interference-Causing Equipment
Regulations. ”
“Cet appareil numérique de la classe B respecte toutes les exigences du Règlement sur lematériel brouilleur
du Canada.” (for CANADA only)
VORSICHT:
Maschinenlärminformations-Verordnung 3. GPSGV, der höchste Schalldruckpegel beträgt 70 dB(A) oder
weniger gemäß EN ISO 7779.
Some types of this product are equipped with a wireless communication device, such as, TEC-BTM-R and SDLink 11g. Please be sure to read the enclosed Precautions for Handling of Wireless Communication Devices
before using this product.
Note:
When you purchase interface cables on the market, shielded cables must be chosen and used.
N258
The following information is for EU-member states only:
Disposal of batteries and/or accumulators
(based on EU-Directive 2006/66/EC,
Directive on batteries and accumulators and waste batteries and accumulators)
The use of the symbol indicates that batteries and/or accumulators may not be disposed as
unsorted municipal waste and has to be collected separately.
By ensuring that batteries and/or accumulators are disposed of correctly, you will help preven
potential negative consequences for the environmental and human health, which could
otherwise be caused by inappropriate waste handling of this product.
For more detailed information about the take-back and recycling of batteries and/o
accumulators, please contact your supplier where you purchased this product.
t
< For EU Only >
TOSHIBA TEC Europe Retail Information Systems S.A.
Rue de la Célidée 33 BE-1080 Brussels
1
Copyright © 2008
by TOSHIBA TEC CORPORATION
All Rights Reserved
570 Ohito, Izunokuni-shi, Shizuoka-ken, JAPAN
PRINTED IN INDONESIA
E
EO1-33079
7FM03281000
<English>
p
r
p
p
p
CAUTION!
1. Only use TOSHIBA TEC battery packs designed and manufactured for use with the specific printer model. There is a
risk of explosion if the battery is replaced by an incorrect type. Dispose of used batteries according to the instructions.
B-EP2DL-GH20-QM-R B-EP4DL-GH20-QM-R
B-EP2DL-GH30-QM-R B-EP802-BT-QM-R B-EP4DL-GH30-QM-R B-EP804-BT-QM-R
B-EP2DL-GH40-QM-R B-EP4DL-GH40-QM-R
2. When an external power source such as an AC adapter is connected to the printer, DO NOT use any device other than
an exclusive one.
AC adapter: B-EP800-AC-QM-R (Model: 0225A1950)
Cigarette lighter adapter: B-EP802-DC12-QM-R
DC ada
<Franaçis>
PRÉCAUTIONS!
1. N’utilisez que les packs batteries Toshiba Tec conçus et fabriqués pour être utilisés avec ce modèle spécifique. Il y a un
risque d’explosion si la batterie est remplacée par un modèle non adapté. Veuillez vous débarrasser des batteries
usagées en respectant la réglementation.
B-EP2DL-GH20-QM-R B-EP4DL-GH20-QM-R
B-EP2DL-GH30-QM-R B-EP802-BT-QM-R B-EP4DL-GH30-QM-R B-EP804-BT-QM-R
B-EP2DL-GH40-QM-R B-EP4DL-GH40-QM-R
2. Lorsque vous connectez l’imprimante sur un adaptateur secteur externe, N’UTILISEZ PAS d’adaptateur différent de
celui préconisé
Adaptateur secteur: B-EP800-AC-QM-R (Model: 0225A1950)
Adaptateur allume cigare: B-EP802-DC12-QM-R
Convertisseur continu: B-EP800-DC48-QM-R
<Deutsch>
Achtung!
1. Benutzen Sie nur den für Ihr Druckmodell bestimmten Akku. Bei Verwendung eines falschen Akkus besteht die Gefah
einer Explosion. Entsorgen Sie den alten Akku gemäß den Vorschriften!
B-EP2DL-GH20-QM-R B-EP4DL-GH20-QM-R
B-EP2DL-GH30-QM-R B-EP802-BT-QM-R B-EP4DL-GH30-QM-R B-EP804-BT-QM-R
B-EP2DL-GH40-QM-R B-EP4DL-GH40-QM-R
2. Sofern der Drucker den Strom durch eine externe Quelle bezieht, z.B. mit Hilfe eines AC Adapters, benutzen Sie nur
den vorgegebenen Adapter.
AC Adapter: B-EP800-AC-QM-R (Model: 0225A1950)
Batterie-Ladekabel für Zigarettenanzünder: B-EP802-DC12-QM-R
DC Ada
ter: B-EP800-DC48-QM-R㩷
ter: B-EP800-DC48-QM-R
<Español>
ATENCIÓN!
1. Utilice baterías diseñadas y fabricadas por Toshiba Tec específicamente para este modelo. Existe riesgo de explosión si
se usa un tipo de batería incorrecto. Deshágase de las baterías usadas según las instrucciones.
B-EP2DL-GH20-QM-R B-EP4DL-GH20-QM-R
B-EP2DL-GH30-QM-R B-EP802-BT-QM-R B-EP4DL-GH30-QM-R B-EP804-BT-QM-R
B-EP2DL-GH40-QM-R B-EP4DL-GH40-QM-R
2. Cuando conecte un alimentador externo a la impresora, como por ejemplo un adaptador AC, NO USE ningún
dispositivo diferente al modelo exclusivo de cada impresora.
Adaptador AC: B-EP800-AC-QM-R (Model: 0225A1950)
Adaptador para mechero: B-EP802-DC12-QM-R
Ada
<Nederlands>
WAARSCHUWING!
1. Gebruik enkel de batterijeenheid die overeenstemt met de desbetreffende printer. Vervanging door een verkeerd type
batterij kan een ontploffing veroorzaken. Dank uw batterijen af zoals voorgeschreven.
B-EP2DL-GH20-QM-R B-EP4DL-GH20-QM-R
2. Gebruik uitsluitend onderstaande wisselstroomadapter om de printer aan te sluiten met een externe voeding:
AC adapter: B-EP800-AC-QM-R (Model: 0225A1950)
Sigarettenaansteker adapter: B-EP802-DC12-QM-R
DC ada
tador DC: B-EP800-DC48-QM-R㩷
B-EP2DL-GH30-QM-R B-EP802-BT-QM-R B-EP4DL-GH30-QM-R B-EP804-BT-QM-R
B-EP2DL-GH40-QM-R B-EP4DL-GH40-QM-R
ter: B-EP800-DC48-QM-R㩷
2

<Italiano>
㭒㦮HG
㠊╧䎆
ᵈᗧ
A
p
ATTENZIONE!
1. Utilizzare il pacco batterie corretto per ogni modello di stampante. Esiste il rischio di esplosine se utilizzate le batterie
sbagliate. Smaltite le batterie secondo le istruzioni.
B-EP2DL-GH20-QM-R B-EP4DL-GH20-QM-R
B-EP2DL-GH30-QM-R B-EP802-BT-QM-R B-EP4DL-GH30-QM-R B-EP804-BT-QM-R
B-EP2DL-GH40-QM-R B-EP4DL-GH40-QM-R
2. Qualora la stampante sia collegata ad una alimentazione esterna, esempio la presa in corrente alternata, utilizzate
esclusivamente l’adattatore corretto:.
Adattatore AC: B-EP800-AC-QM-R (Model: 0225A1950)
Adattatore per accendisigaro per automezzi: B-EP802-DC12-QM-R
Adattatore DC: B-EP800-DC48-QM-R㩷
< Português >
TENÇÃO!
1. Utilize as baterias desenhadas e fabricadas pela Toshiba Tec especificamente para este modelo. Existe risco de
explosão se for utilizado um tipo de bateria incorrecta. Desfaça-se das baterias usadas de acordo com as instruções.
B-EP2DL-GH20-QM-R B-EP4DL-GH20-QM-R
B-EP2DL-GH30-QM-R B-EP802-BT-QM-R B-EP4DL-GH30-QM-R B-EP804-BT-QM-R
B-EP2DL-GH40-QM-R B-EP4DL-GH40-QM-R
2. Ao conectar uma impressora à alimentação externa, como por exemplo a um adaptador AC, NÃO UTILIZE nenhum
dispositivo diferente do modelo exclusivo para cada impressora.
Adaptador AC: B-EP800-AC-QM-R (Model: 0225A1950)
Adaptador para isqueiro: B-EP802-DC12-QM-R
Ada
<Polski>
UWAGA!
1. NaleĪy uĪywaü wyáącznie zastawów baterii zaprojektowanych i wyprodukowanych dla konkretnego modelu drukarki.
Wymiana baterii na bateriĊ innego typu grozi wybuchem. NaleĪy utylizowaü baterie zgodnie z podanymi instrukcjami.
B-EP2DL-GH20-QM-R B-EP4DL-GH20-QM-R
2. W przypadku uĪywania zewnĊtrznego Ĩródáa zasilania drukarki np. zasilacza AC, NIE NALEĩY uĪywaü innego
urządzenia poza wyspecyfikowanym.
Zasilacz AC: B-EP800-AC-QM-R (Model: 0225A1950)
Zasilacz samochodowy: B-EP802-DC12-QM-R
Zasilacz DC: B-EP800-DC48-QM-R㩷
tador DC: B-EP800-DC48-QM-R
B-EP2DL-GH30-QM-R B-EP802-BT-QM-R B-EP4DL-GH30-QM-R B-EP804-BT-QM-R
B-EP2DL-GH40-QM-R B-EP4DL-GH40-QM-R
c䞲ῃ㠊e
1. ⺆䎆ⰂG 䕿㦖G ⽎₆₆㦮G 㩚㣿䛞㦚G ㌂㣿G 䟊G 㭒㕃㔲㡺UG ┺⯎G ⺆䎆Ⰲ⯒G ㌂㣿䞮ⳊG 䙃㦮G 㥚䠮㧊G 㧞㔋┞┺UG ㌂㣿㧊G ⊳⋲
⺆䎆Ⰲ⓪G㍺ⳛ㍲㠦G➆⧒G㻮Ⰲ䟊G㭒㕃㔲㡺UG
B-EP2DL-GH20-QM-R B-EP4DL-GH20-QM-R
B-EP2DL-GH30-QM-R B-EP802-BT-QM-R B-EP4DL-GH30-QM-R B-EP804-BT-QM-R
B-EP2DL-GH40-QM-R B-EP4DL-GH40-QM-R
2. ⽎₆₆㠦GhjG㠊╧䎆G❇㦮G㣎G㩚㤦㦚G㩧㏣䞮⓪Gἓ㤆SG✲㔲G⽎₆₆G㩚㣿䛞㦚G㌂㣿G䟊G㭒㕃㔲㡺UG⽎₆₆G㩚㣿䛞G
㧊㣎⓪G㩧㏣G䞮㰖GⰦ㞚G㭒㕃㔲㡺GGGG
G hjG㠊╧䎆aGG B-EP800-AC-QM-R (Model: 0225A1950)G
G 㔲ṖG⧒㧊䎆G㠊╧䎆aG B-EP802-DC12-QM-RG
GkjG
ᢥ㧔❥㜚ሼ㧕
1. ᅃⵝల㔚ᳰดㆡ↪ᧄᯏኾ↪ຠޕᦝ឵ㆡ⇧ᒻᑼ⊛㔚ᳰᤨ㧘ᜬ⊔⊛ෂ㒾ᕈޕ↪ㆊᓟ⊛㔚ᳰ㧘⺧ᜲᾖ⺑ᦠ⯪ℂޕ
B-EP2DL-GH20-QM-R B-EP4DL-GH20-QM-R
B-EP2DL-GH30-QM-R B-EP802-BT-QM-R B-EP4DL-GH30-QM-R B-EP804-BT-QM-R
B-EP2DL-GH40-QM-R B-EP4DL-GH40-QM-R
2. ⡧ធᧄᯏ⊛#%㔚Ḯଏᙥེ╬ᄖㇱ㔚Ḯᤨ㧘ดㆡ↪ᧄᯏ⊛ኾ↪ຠޕ⺧൩⡧ធᧄᯏኾ↪ຠᄖછ↥ຠޕ
#% 㔚Ḯଏᙥེ B-EP800-AC-QM-R (Model: 0225A1950)
㤭ὠᯏ㔚Ḯଏᙥེ B-EP802-DC12-QM-R
&% 㔚Ḯଏᙥེ B-EP800-DC48-QM-R
aG B-EP800-DC48-QM-RG
3
English
quip
)
r
g
r
r
–
p
quip
)
A
p
The following information is for EU-member states only:
Disposal of products
(based on EU-Directive 2002/96/EC,
Directive on Waste electrical and electronic e
The use of the symbol indicates that this product may not be disposed as unsorted municipal waste and
has to be collected separately. Integrated batteries and accumulators can be disposed of with the
product. They will be separated at the recycling centers.
The black bar indicates that the product was placed on the market after August 13, 2005.
By ensuring this product is disposed of correctly, you will help prevent potential negative consequences
for the environmental and human health, which could otherwise be caused by inappropriate waste
handling of this product.
For more detailed information about the take-back and recycling of this product, please contact you
li
r wh
r
Franaçis
Les informations suivantes ne concernent que les utilisateurs des pays membres de l’union Européenne :
Recyclage des produits
(Basé sur la directive Européenne 2002/96/EC,
Directive sur le recyclage des équipements électriques et électroniques
L’utilisation de ce symbole indique que ce produit ne doit pas être jeté sans tri préalable, comme un
déchet classique, mais doit être collecté séparément. Les batteries et accumulateurs intégrés peuvent
être laissés en place, ils seront récupérés par le centre de recyclage.
La barre noire indique que ce produit a été mis sur le marché après le 13 Août 2005.
En vous assurant que ce produit est correctement mis au rebut, vous participerez à prévenir les
éventuelles conséquences néfastes sur l’environnement et la santé publique qui pourraient autrement
être causés par une gestion inappropriée des déchets contenus dans ce produit.
Pour obtenir des informations complémentaires sur la récupération et le recyclage de ce produit, veuillez
contacter le fournisseur au
Deutsch
Wiederververtungsinformationen für Verbraucher:
(gemäß EU-Directive 2002/96/EC,
Gesetz über das Inverkehrbringen, die Rücknahme und die umweltverträgliche Entsorgung von Elektro- und
Elektronik
eräten [ElektroG]"– WEEE).
Die folgenden Informationen gelten nur für EU-Mitgliedsstaaten.
Das durchgestrichene Mülltonnensymbol weist darauf hin, dass dieses Produkt nicht wie allgemeine
Hausmüll behandelt werden darf. Verbaute Batterien oder Akkus müssen vorher entnommen und separat
entsorgt werden.
Der schwarze Balken unter dem Symbol besagt, das das Produkt nach dem 13. August 2005 in Verkeh
gebracht wurde.
Indem Sie aktiv mit helfen, dieses Produkt ordnungsgemäß zu entsorgen, helfen Sie mit mögliche
negativen Auswirkungen auf die Umwelt sowie die menschliche Gesundheit zu vermeiden.
Für nähere Informationen zur Rücknahme und Wiederverwertung dieses Produktes wenden Sie sich bitte
an Ihren Lieferanten.
r
h
ment– WEEE
hi
r
.
REEE– WEEE)
rès duquel vous en avez fait l’acquisition.
Español
La siguiente información solo concierne a los Estados Miembros de la UE:
Desechado de los productos
(basado en la Directiva Europea 2002/96/EC,
Directiva sobre Residuos de e
El uso de este símbolo indica que el producto no puede ser desechado como basura común doméstica
por lo que debe ser recogido de forma separada. Sus baterías y acumuladores integrados pueden
eliminarse junto con el aparato. Estos elementos serán separados en los centros de reciclado.
La barra negra indica que el producto fue puesto en el Mercado después del 13 de Agosto de 2005.
segurando que nos deshacemos del producto de forma correcta, ayudaremos a evitar potenciales
consecuencias negativas tanto para el medio ambiente como para la salud pública, que podrían
producirse debido a un tratamiento inapropiado.
Para obtener información más detallada sobre la recogida y reciclaje de su producto, por favor, póngase
en contacto con el
os eléctricos y electrónicos – REEE – WEEE
roveedorque se lo suministró.
4
Nederlands
A
j
)
w
r
A
A
Onderstaande informatie geldt enkel in EU lidstaten:
Het afdanken van producten (volgens EU-richtlijn 2002/96/EC,
n betreffende afgedankte elektrische en elektronische apparatuur – WEEE
Richtli
Dit symbool geeft aan dat dit product niet mag afgedankt worden als algemeen huishoudelijk afval. Het
dient afzonderlijk gecollecteerd te worden. Geïntegreerde batterijen of laders kunnen samen met dit
product afgedankt worden. Zij worden in het recyclagecentrum gescheiden. De zwarte balk geeft aan dat
dit product na 13 augustus 2005 verhandeld werd.
Door een aangepaste afdanking van dit product beschermt u het milieu en de volksgezondheid tegen
mogelijke schadelijke gevolgen, die anders zouden kunnen voortvloeien uit het onjuist verwerken van de
resten van dit product. Vraag inlichtingen over de terugname en recyclage van dit product aan u
leverancier.
Italiano
Le seguenti informazioni sono solo gli stati membri della UE:
Smaltimento del prodotto
(basato sulla direttiva EU-Directive 2002/96/EC,
Direttiva sullo smaltimento per il Riciclaggio delle Apparecchiature Elettriche od Elettroniche – RAEE – WEEE)
Questo simbolo indica che i prodotti non possono essere smaltiti come rifiuti urbani non differenziati ma
devono essere raccolti separatamente. Eventuali batterie o accumulatori possono essere smaltiti con il
prodotto. Verranno separati dai centri di riciclaggio
La barra near indica che il prodotto è stato inserito nel mercato dopo il 13 Agosto 2005
ssicuratevi che questo prodotto sia smaltito correttamente, contribuirete a prevenire potenziali
conseguenze negative per l'ambiente e la salute umana, che potrebbero essere altrimenti causate da uno
smaltimento improprio di questo prodotto.
Per maggiori dettagli sul riciclo, o su come rendere il prodotto, contattate il vostro fornitore.
Português
A informação que se segue é apenas dirigida a países membros da UE:
Reciclagem de produtos (baseado na directive-UE 2002/96/EC,
Directiva sobre a reciclagem de resíduos de equipamentos eléctricos e electrónicos – REEE – WEEE)
O uso deste símbolo indica que este produto não pode ser colocado nos pontos de recolha de lixo
comum e deve ser recolhido separadamente. As baterias integradas e acumuladores podem se
entregues juntamente com o produto. Serão depois separados nos centros de reciclagem.
barra negra indica que o equipamento foi colocado no mercado após 13 de Agosto de 2005.
o assegurar-se que este produto é tratado correctamente está a ajudar a prevenir potenciais
consequências negativas para o ambiente e para a saúde humana, que poderiam ser causadas pelo
inapropriado tratamento deste produto.
Para mais informação sobre a reciclagem e tratamento deste produto, contacte o seu fornecedor.
Polski
Informacje dla PaĔstw czáonkowskich Unii Europejskiej:
Utylizacja urządzeĔ
(na podstawie dyrektywy Unii Europejskiej 2002/96/EC,
Dyrektywa dotycząca odpadów elektrycznych i elektronicznych – WEEE)
UĪycie symbolu oznacza, Īe urządzenie nie moĪe byü traktowane jako niesegregowane odpady i musi
byü zebrane oddzielnie. Zintegrowane baterie i akumulatory mogą byü utylizowane razem z urządzeniem.
Zostaną one posegregowane w centrach utylizacji.
Czarny prostokąt oznacza, Īe urządzenie zostaáo wprowadzone na rynek po 13 sierpnia 2005.
Poprzez zastosowanie siĊ do prawidáowych procedur utylizacji tego urządzenia, pomoĪecie PaĔstwo
ograniczyü potencjalne negatywne skutki dla Ğrodowiska i zdrowia ludzkiego, które mogáyby zaistnieü na
skutek niewáaĞciwej utylizacji tego urządzenia.
W celu uzyskania dodatkowych informacji odnoĞnie zwrotu i utylizacji tego urządzenia prosimy o kontakt
z punktem zakupu tego urządzenia.
5
Precautions for Handling of Wireless Communication Devices
Bluetooth® Module: TEC-BTM-R (GH30 model)
Wireless LAN Module: SD-Link 11g (GH40 model)
Trade Mark
Bluetooth is a registered trademark owned by Bluetooth SIG, Inc. and used byTOSHIBA TEC CORPORATION
under license.
Cautions
General
For all countries and areas
This product is a wireless communication device, and the use of thisproduct is restricted to the following
countries or areas. If the product isused in the countries or areas other than the following, you may bepunished
according to the laws of those countries or areas.
Japan, USA, Canada, Austria, Belgium, Bulgaria, Cyprus, Czech Republic, Denmark, Estonia, Finland, France,
Germany, Greece, Hungary, Ireland, Italy, Latvia, Lithuania, Luxembourg, Malta, Netherlands, Poland,
Portugal, Romania, Slovakia, Slovenia, Spain, Sweden, United Kingdom, Switzerland, Norway, Iceland,
Liechtenstein,
Australia, New Zealand, Mexico, China, Republic of Korea, Taiwan
For Europe
for Bluetooth for wireless LAN
Hereby, TOSHIBA TEC CORPORATION, declares that the TEC-BTM-R and SD-Link11g are in compliance
with the essential requirements and other relevant provisions of Directive 1999/5/EC. This equipment uses a
radio frequency band that has not been harmonized throughout all EU and EFTA countries, and can be used
EU and EFTA countries.
For USA
This device complies with Part 15 of the FCC Rules.Operation is subject to the following two conditions:
(1) this device may not cause harmful interference, and
(2) this device must accept any interference received, includinginterference that may cause undesired
operation.
Changes or modification not expressly approved by manufacturer forcompliance could void the user’s authority
to operate the equipment.
For Canada
Operation is subject to the following two conditions:
(1) this device may not cause interference, and
(2) this device must accept any interference, including interference that may cause undesired operation of the
device.
To prevent radio interference to the licensed service, this device is intended to be operated indoors and away
from windows to provide maximum shielding. Equipment that is installed outdoors is subject to licensing.
For safety
Do not use this product in locations where use may be forbidden, for example,in an aeroplane or a hospital. If
you do not know the forbidden areas, please referto and follow the airline company or medical institution
guidelines.
Flight instrument or medical equipment may be affected, causing a serious accident.
Since this product uses extremely low power compared with mobile phones, itcannot possibly interfere the
pacemakers and defibrillators. However, if the useof this product should be likely to have affected the
pacemaker or defibrillator,immediately stop using the product and contact your TOSHIBA TEC sales agent.
Do not disassemble, modify, or repair the product. Doing so may cause injury. Also, modification is against the
Laws and Regulations for Radio Equipment. Please ask your TOSHIBA TEC sales agent for repair.
Precaution in use
This product communicates with other devices by radio. Depending on the installation location, orientation,
environment, etc., its communication performance may deteriorate or devices installed near by may be
affected.
6
y
!
Keep away from a microwave.
Communication performance may deteriorate or a communication error may occur due to the radio emitted
from a microwave.
Since the Bluetooth and wireless LAN use the same radio frequency band, each radio wave may interfere with
each other when they are used at the same time, causing a deterioration of communication performance or a
disconnection of network. If there is any problem with connection, please stop using either Bluetooth or
wireless LAN.
Do not use the product on a metal table or near a metal object.
Communication performance may be deteriorated.
TEC-BTM-R Specification
• Bluetooth class 2
• Built-in protocol stack activated by Bluetooth V1.2 serial port profile
• Operating temperature: -5 to 50°C 25% to 85%RH (No condensation)
• Dimensions: 38.1 mm (W) x 25.4 mm (H) x 7 mm (D)
SD-Link 11g Specification
• Built-in IEEE802 Part 11b/g (802.11b/g)
• Operating temperature: 0 to 50°C 25% to 85%RH (No condensation)
• Dimensions: 47.0 mm (W) x 24.0 mm (H) x 4.7 mm (D)
CAUTION!
1.To avoid injury, be careful not to catch or jam your fingers while opening or closing the cover.
2.Do not touch moving parts. To reduce the risk that fingers, jewellery, clothing, etc., be drawn into the moving
parts, turn off the power switch to stop movement.
Safety Summar
Personal safety in handling or maintaining the equipment is extremely important. Warnings and Cautions
necessary for safe handling are included in this manual. All warnings and cautions contained in this manual
and written inside or outside of the printer should be read and understood before handling or maintaining the
equipment.
Do not attempt to effect repairs to this equipment. If a fault occurs that cannot be rectified using the
procedures described in this manual, turn off the power, then contact your authorised TOSHIBA TEC
representative for assistance.
Safety Precautions
This Owner's Manual and the products (machines) which you have purchased contain indications which should
be observed in order to use the machines safely and prevent harm to yourself and others and damage to
property. The meanings of these indications and symbols are given below.
Read these indications and become familiar with their contents before reading this Owner's Manual.
Precautions
The following precautions will help to ensure that this machine will continue to function correctly.
(1) Try to avoid locations that have the following adverse conditions:
*Temperatures out of the specification
*High Humidity
*Direct sunlight
*Excessive vibration
(2) The cover should be cleaned by wiping with a dry cloth or a cloth slightly dampened with a mild detergent
solution. NEVER USETHINNER OR ANY OTHER VOLATILE SOLVENT on the plastic covers.
(3) USE ONLY TOSHIBA TEC SPECIFIED media.
(4) DO NOT STORE the media where it might be exposed to direct sunlight, high temperatures, high humidity,
dust, or gas.
(5) Any data stored in the memory of the printer could be lost during a printer fault.
(6) DO NOT open the top cover and battery cover during operation. Doing so will stop printer operation.
(7) DO NOT scratch the surface of printed labels or receipt with a sharp object.
(8) Be sure to use a shielded interface cable.
CAUTION
1.This manual may not be copied in whole or in part without the prior written permission of TOSHIBA TEC.
2.The contents of this manual may be changed without notification.
3.Please refer to your local Authorised Service representative with regard to any queries you may have in this
manual.
7
WARNING
This indicates that there is the risk of death or serious injury if the machines are handled
improperly or contrary to this indication.
• If water or any other liquid enters the machine, turn off the power. Continuous use of the machine under such
conditions may cause fire or electric shock.
• If the enclosure is damaged when dropped or subject to shock, turn off the power. Continuous use of the
machine under such conditions may cause fire or electric shock.
• Avoid continuous exposure to direct sunlight or high temperature as this may cause fire.
• Do not remove covers or modify the machine by yourself. Doing so may cause fire or electric shock.
• Avoid water, operation with wet hands or cleaning with a moistened cloth. Failure to do this may cause fire or
electric shock.
• Do not wipe the machine with a cloth moistened with thinner or other volatile solvent as this may cause fire or
electric shock.
• Use the specified battery only. Failure to do this may cause fire or electric shock.
• Danger of explosion if the battery is incorrectly replaced. Replace the battery only with TOSHIBA TEC
Corporation, Battery Pack Model B-EP802-BT-QM-R 7.4V 2600mAh Li-ion or B-EP804-BT-QM-R 14.8V
2600mAh Li-ion. Discard used batteries according to the manufacturer's instruction.
• Do not disassemble and modify the battery because it has a protection unit in it. Doing so may break the
protection unit, causing the battery to heat up, burst or burn.
• If the battery gets wet, dry it completely. Using a wet battery may cause fire or electric shock.
• Be aware of the following precautions when using batteries. Otherwise they could heat up, burst or burn.
Do not throw the battery into fire or heat it with a microwave or oven, etc.
Do not load the battery with the electrodes reversed.
Do not connect the electrodes with metal objects like wire. Do not carry or store the battery along with
metal objects such as necklaces, hairpins, etc.
Do not stick a needle into, hammer, step on, or drop the battery.
Do not solder the battery.
Do not leave the battery where the temperature is more than 50°centigrade, such as inside a car or in
direct sunlight.
CAUTION
This indicates that there is the risk of personal injury or damage to objects if the machines are
improperly handled contrary to this indication.
• Keep away from flame or other sources of heat. Failure to do this may cause fire or machine failure.
• Do not drop or shock the machine as this may cause machine failure.
• During lightning, turn off and keep away from the machine because of danger of electric shock and machine
failure.
• Avoid locations subject to rapid change in temperature as this causes condensation, causing electric shock
or machine failure.
• Do not damage the print head, platen or strip roller with a sharp object. Doing so may cause machine failure.
• Do not touch or contact the print head element with a hard object. Doing so may cause machine failure.
• Use the specified media only. Failure to do this may cause machine failure.
• Be sure to turn off the machine before replacing the battery, or machine failure may occur.
• Do not charge the battery near flame or under direct sunlight. High temperature may activate or damage the
protection unit of the battery, disabling the electric charge or causing it to overheat, burst, or burn.
• Unload the battery when the machine will not be used for a longtime. Failure to do this may cause machine
failure.
• Keep the battery away from flame, a heat source or other locations subject to high temperature.
Failure to do this may cause it to over heat or burn.
• Do not force the battery into the machine or battery charger. Doing so may cause the battery to overheat,
burst or burn. Check for the correct electrode.
• Do not connect the battery to a power outlet or a car cigarette lighter jack as this may cause the battery to
overheat, burst or burn.
• Because the B-EP802-BT-QM-R and the B-EP804-BT-QM-R Series battery is exclusively for the B-EP2DL
and the B-EP4DL Series printer, respectively, do not use the battery in other machines. Doing so may
damage the battery or affect the performance and life of the battery.
8
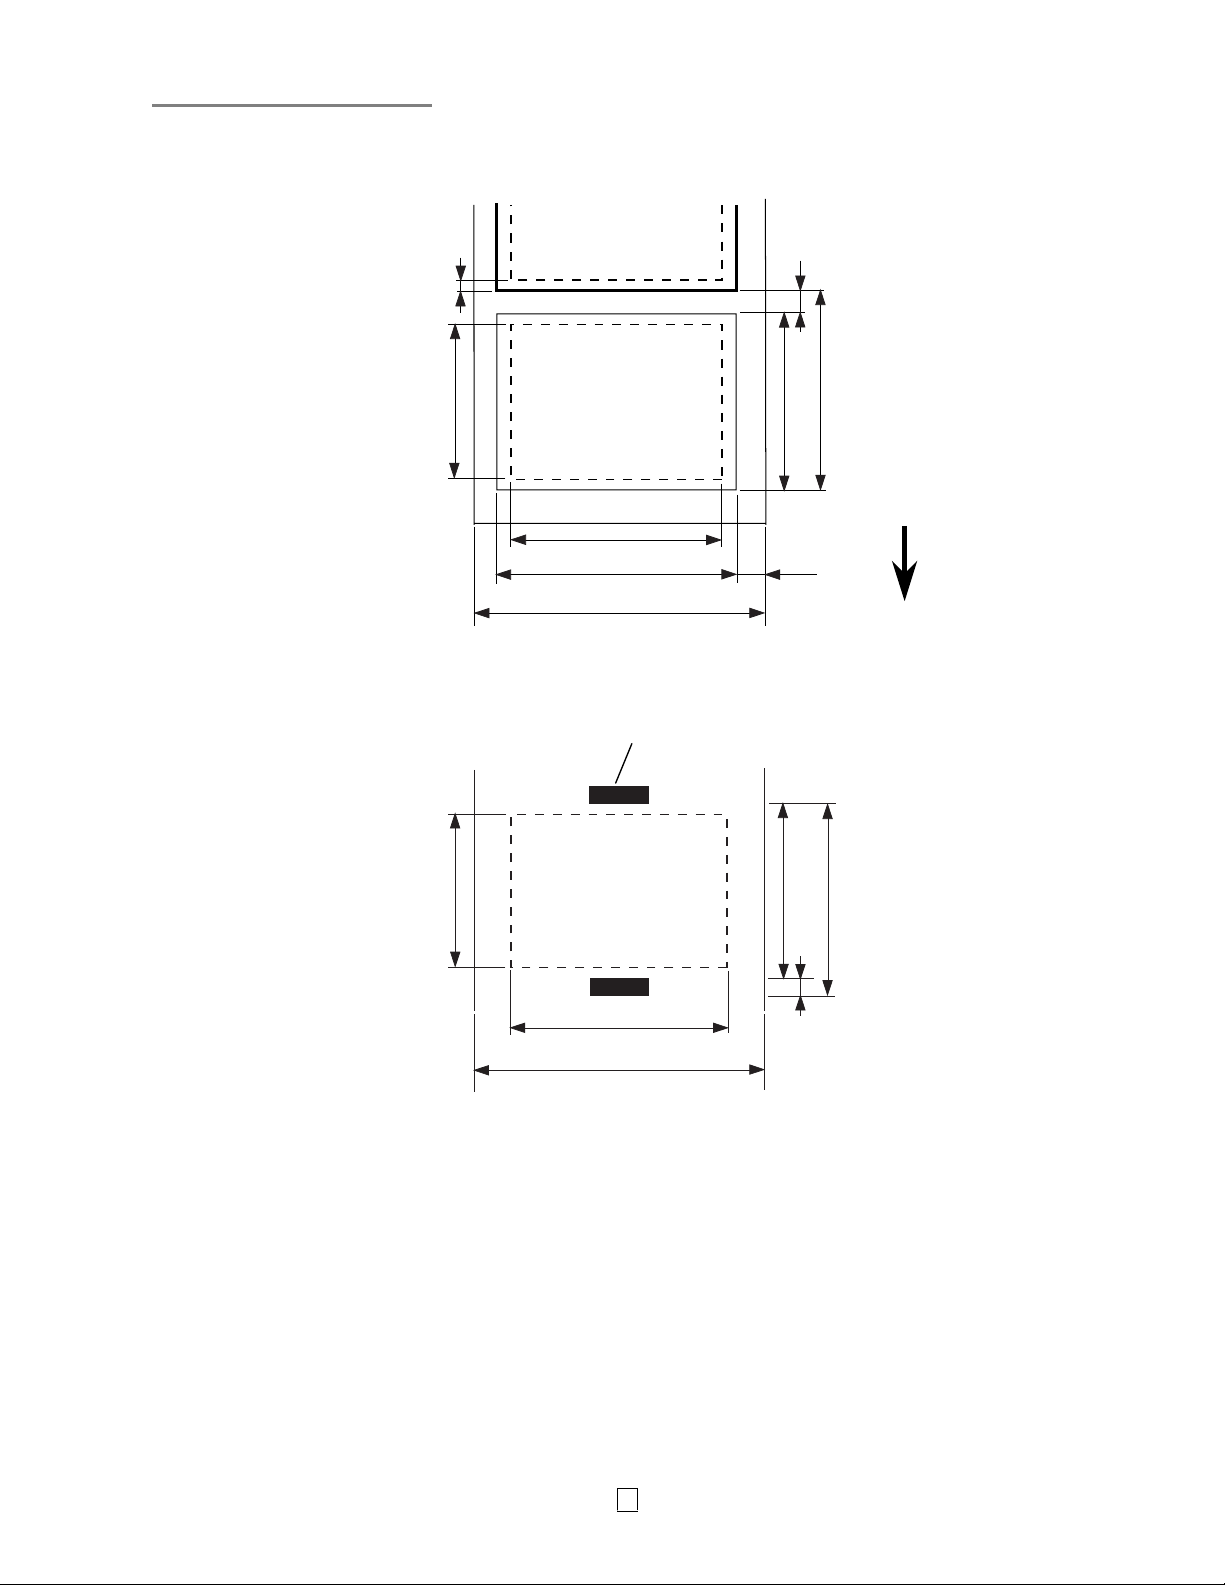
Media Specification
㩷
Label㩷
㩷
㩷
㩷
㩷
㩷
㩷
㩷
㩷
㩷
㩷
㩷
㩷
㩷
㩷
㩷
㩷
㩷
㩷
㩷
㩷
㩷
㩷
㩷
㩷
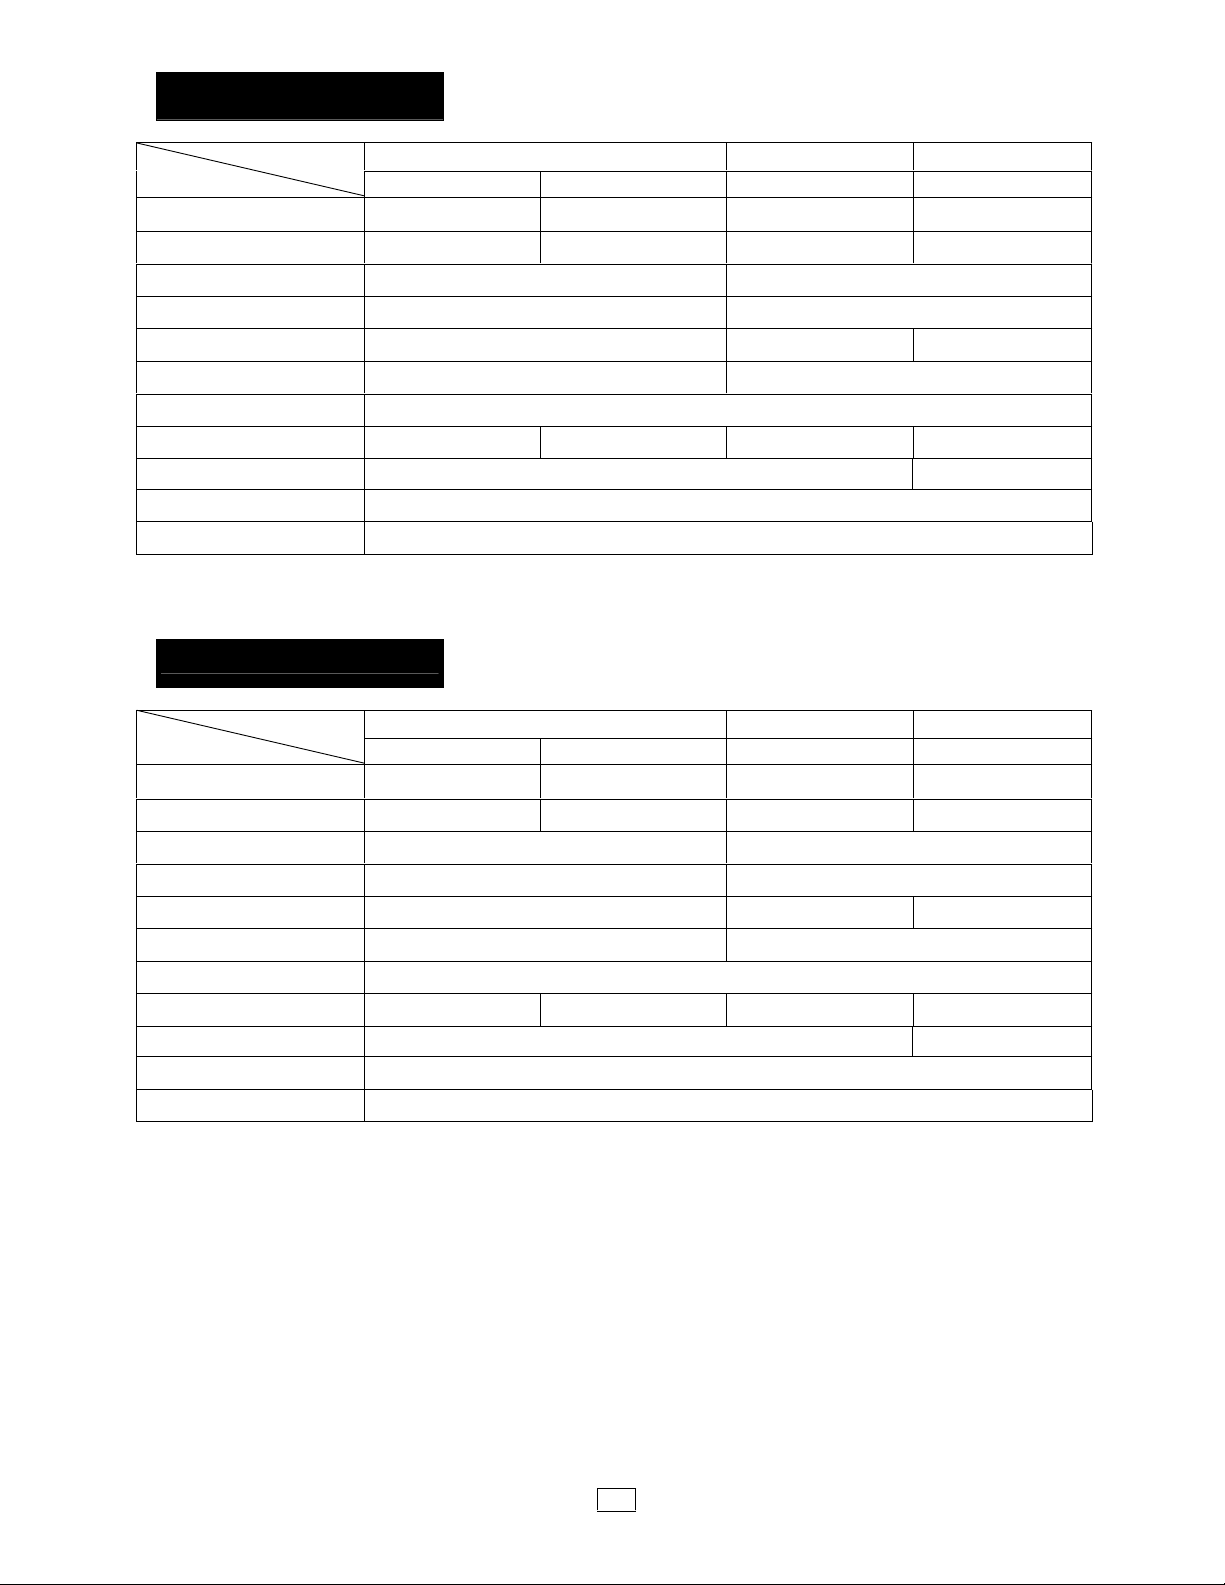
Tag/Receipt㩷
㩷
㩷
㩷
㩷
㩷
㩷
㩷
㩷
㩷
㩷
㩷
㩷
㩷
㩷
㩷
㩷
㩷
㩷
㩷
㩷
㩷
㩷
㩷
(H)
(I)
(H)
(G)
(D)
(C)
Black Mark
(G)
(D)
(B)
(F)
(B)
(E)
(A)
Feed direction
(A)
(E)
9
B-EP2DL Series
(Unit: mm)
Item Media
(A) Label/Receipt pitch 10.0 - 999.9 13.0 - 67.0 10.0 – 999.9 ---
(B) Label/Receipt length 7.0 - 997.0 10.0 - 60.0 7.0 - 997.0 --(C) Backing paper width 26.0 – 58.0 --(D) Media width 24.0 – 56.0 24.0 – 58.0
(E) Gap/black mark length 3.0 - 7.0 3.0 - 7.0 --(F) Vertical gap 1.0 - 7.0 --(G) Effective print width 48.0
(H) Effective print length 7.0 - 995.0 8.0 - 58.0 7.0 - 995.0 --(I) Top and bottom margin Min. 1.0 ---
Outer roll diameter ĭ60 (max.)
Roll direction Outside
Batch mode Strip mode With black mark No black mark
Label Tag/Receipt Receipt
NOTE:
Do not use the media other than the above to ensure print quality and print head life.
B-EP4DL Series
(Unit: mm)㩷
Item Media
(A) Label/Receipt pitch 10.0 - 999.9 13.0 - 67.0 10.0 – 999.9 ---
(B) Label/Receipt length 7.0 - 997.0 10.0 - 60.0 7.0 - 997.0 --(C) Backing paper width 50.0 – 115.0 --(D) Media width 48.0 – 113.0 50.0 – 115.0
(E) Gap/black mark length 3.0 - 7.0 3.0 - 7.0 --(F) Vertical gap 1.0 – 7.0 --(G) Effective print width 104.0
(H) Effective print length 7.0 - 995.0 8.0 - 58.0 7.0 - 995.0 --(I) Top and bottom margin Min. 1.0 ---
Outer roll diameter ĭ68 (max.)
Roll direction Outside
Batch mode Strip mode With black mark No black mark
Label Tag/Receipt Receipt
NOTE:
Do not use the media other than the above to ensure print quality and print head life.
10

CARE/HANDLING OF THE MEDIA
CAUTION!
Be sure to read carefully and understand the Supply Manual. Use only media that meets specified
requirements. Use of non-specified media may shorten the head life and result in problems with bar code
readability or print quality. All media should be handled with care to avoid any damage to the media or
printer. Read the following guideline carefully.
• Do not store the media for longer than the manufactures recommended shelf life.
• Store media rolls on the flat end, do not store them on the curved sidesas this might flatten that side
causing erratic media advance and poorprint quality.
• Store the media in plastic bags and always reseal after opening. Unprotected media can get dirty and the
extra abrasion from the dustand dirt particles will shorten the print head life.
• Store the media in a cool, dry place. Avoid areas where they would beexposed to direct sunlight, high
temperature, high humidity, dust or gas.
• The thermal paper used for direct thermal printing must not have specifications which exceed Ca++ 800
ppm, Na+ 800 ppm, K+ 800 ppmand Cl– 600 ppm.
• Some ink used on pre-printed labels may contain components which shorten the print head's product life.
Do not use labels pre-printed with ink which contains hard substances such as carbonic calcium
(CaCO3)and kaolin (Al2O3, 2SiO2, 2H2O).
For further information please contact your local distributor or your media manufacturer.
11

Printer Specification
㩷
B-EP2DL Series
㩷
Model B-EP2DL-GH20-QM-R B-EP2DL-GH30-QM-R B-EP2DL-GH40-QM-R
Driving power source
Printable count
Life cycle 300 cycles
Print method Direct thermal
Resolution 8 dots/mm䋨203 dpi䋩
Print speed
Issue mode Peel-off/Batch
Effective print width Max. 48.0mm
Font
Bar code
2-dimensional code QR code, Data Matrix, PDF417, Maxicode, MicroPDF417
Media detection sensor Transmissive/Reflective/Peel-off
Interface
IrDA (IrDA V1.2 Low
Power)
USB (V2.0) {{ {
Serial (RS-232C) { --- --Bluetooth(V1.2) --- { --Wireless LAN
(IEEE802.11b/g)
Operating temperature
Operating humidity 10%RH to 90%RH (No condensation)
Storage temperature -25ºC to 60ºC
Storage humidity 10%RH to 90%RH (No condensation)
Dimensions (Unit: mm) 88.0 (W) x 119.0 (L) x 65.0 (D) (Excluding the projecting parts.)
Weight Approx. 480 g (Battery pack included, media and other accessories excluded.)
Accessories
Option
Lithium ion battery 7.4䌖 2600mAh䋨Nominal value䋩
䋨Battery pack model name: B-EP802-BT-QM-R䋩
Approx.100m/Full charge
䋨It depends on the operating environment, print conditions, battery condition, etc.䋩
Max. 105.0 mm/sec.
䋨It depends on the operating environment, print conditions, battery condition, etc.䋩
[Bitmap Font]
Times Roman, Helvetica, Presentation, Letter Gothic, Prestige Elite,
Courier, OCR-A, OCR-B, GOTHIC725Black, Standard character, Bold character,
Price font1, Price font 2䇮Chinese character, Writable character
[Outline font]
Helvetica (w/wo Proportional), Price font 1, Price font 3, Price font 3
JAN8/EAN8, JAN13/EAN13, UPC-A/E, CODE39, CODE93, CODE128/EAN128, MSI,
NW-7, ITF, Customer bar code,
GS1 Databar (Omnidirectional/Truncated/Stacked/Stacked Omnidirectional/Limited/
Expanded/Expanded Stacked)
{{ {
--- --- {
-15ºC to 50ºC -5ºC to 50ºC 0ºC to 50ºC
(During battery charge: 0ºC to 40ºC/LCD display: 0ºC to 50ºC)
Battery pack x 1, Print head cleaner x 1, Belt clip x 1, Belt clip mounting screw x 2,
Ferrite Core x 1, Owner’s Manual x 1
BD Address Label x 2 (GH30 only)
Single-slot battery charger (B-EP800-CHG-QM-R), 6-slot battery charger (B-EP800CHG6-QM -R), AC adapter (B-EP800-AC-QM-R), Cigarette lighter adapter (B-EP802DC12-QM-R), DC adapter (B-EP800-DC48-QM-R), Battery pack (B-EP802-BT-QMR), Linerless Label kit (B-EP902-LL-QM-R), Shoulder strap (B-EP900-SS-QM-R),
Carry case (B-EP902-CC-QM-R)
Supplement
Specification of this printer may be changed without prior notice.
㩷
12

B-EP4DL Series
㩷
Model B-EP4DL-GH20-QM-R B-EP4DL-GH30-QM-R B-EP4DL-GH40-QM-R
Driving power source
Printable count
Life cycle 300 cycles
Print method Direct thermal
Resolution 8 dots/mm (203 dpi)
Print speed
Issue mode Peel-off/Batch
Effective print width Max. 104.0 mm
Font
Bar code
2-dimensional code QR code, Data Matrix, PDF417, Maxicode, MicroPDF417
Media detection sensor Transmissive/Reflective/Peel-off
Interface
IrDA (IrDA V1.2 Low
power)
USB (V2.0) {{ {
RS-232C { --- --Bluetooth (V1.2) --- { --Wireless LAN
(IEEE802.11b/g)
Operating temperature
Operating humidity 10%RH to 90%RH (No condensation)
Storage temperature -25ºC to 60ºC
Storage humidity 10%RH to 90%RH (No condensation)
Dimensions (Unit: mm) 150.0 (W) x 145.0 (L) x 75.0 (D) (Excluding the projecting parts.)
Weight Approx. 860 g (Battery pack included, media and other accessories excluded.)
Accessories
Option
㩷
Supplement
Specification of this printer may be changed without prior notice.
Lithium ion battery 14.8V, 2600mAh䋨Nominal value䋩
䋨Batter pack model name: B-EP804-BT-QM-R䋩
Approx.100m/Full charge
(It depends on the operating environment, print conditions, battery condition, etc.)
Max. 105.0 mm/sec.
(It depends on the operating environment, print conditions, battery condition, etc.)
[Bitmap Font]
Times Roman, Helvetica, Presentation, Letter Gothic, Prestige Elite,
Courier, OCR-A, OCR-B, GOTHIC725 Black, Standard character, Bold character,
Price font 䋱, Price font 2, Chinese character, Writable character
[Outline font]
Helvetica (w/wo proportional), Price font 1, Price font 2, Price font 3
JAN8/EAN8, JAN13/EAN13, UPC-A/E, CODE39, CODE93, CODE128/EAN128,
MSI, NW-7, ITF, Customer bar code,
GS1 Databar (Omnidirectional/Truncated/Stacked/Stacked Omnidirectional/Limited/
Expanded/Expanded Stacked)
{{ {
--- --- {
-15ºC to 50ºC -5ºC to 50ºC 0ºC to 50ºC
(During battery charge: 0ºC to 40ºC/LCD display: 0ºC to 50ºC)
Battery pack x1, Print head cleaner x 1, Belt clip x1, Belt clip mounting screw x 2,
Ferrite Core x 1, Owner’s Manual x 1
BD Address Label x 2 (GH30 only)
Single-slot battery charger (B-EP800-CHG-QM-R), 6-slot battery charger (B-EP800CHG6-QM-R), AC adapter (B-EP800-AC-QM-R), DC adapter (B-EP800-DC48-QMR), Battery pack (B-EP804-BT-QM-R), Linerless label kit (B-EP904-LL-QM-R),
Shoulder strap (B-EP900-SS-QM-R), Carry case (B-EP904-CC-QM-R)
13

Daily maintenance
㩷
To help retain the high quality and performance of your printer, it should be cleaned regularly cleaned.
㩷
CAUTION!
㩷
x
DO NOT USE a sharp object to clean the print head or various rollers, as this may cause a print failure or
㩷
breakdown of the printer.
㩷
x
NEVER USE any volatile solvent including thinner and benzene, as this may cause a print failure or
㩷
㩷
breakdown of the printer.
㩷
x
Do not touch the print head element with bare hands, as static may damage the print head.
㩷
㩷
Print head
Wipe the print head element with a supplied print
head cleaner pen.
Peel-off Roller
Wipe clean the Peel-off Roller with a soft cloth slightly
moistened with absolute ethyl alcohol while rotating
the rollers.
㩷
㩷
㩷
㩷
㩷
㩷
㩷
㩷
㩷
㩷
㩷
㩷
㩷
㩷
㩷
㩷
㩷
㩷
Print Head Element
Print Head Cleaner Pen
Peel-off Roller
㩷
㩷
Platen
Wipe clean the platen with a soft cloth slightly
moistened with absolute ethyl alcohol, while rotating
the platen.
Clean the platen of the linerless label kit in the same
way. Cleaning should be performed each time one or
two media rolls are used up.
㩷
Platen
14

Media Guide Roller and Strip Shaft
Wipe clean the Media Guide Rollers with a soft cloth
moistened with absolute ethyl alcohol while rotating
the rollers.
Wipe clean the strip shaft with a soft cloth slightly
moistened with absolute ethyl alcohol.
Clean the strip shaft of the linerless label kit in the
same way. Cleaning should be performed each time
one or two media rolls are used up
Media Sensor Window and Media Path
Remove dust or dirt from the Media Sensor Window
with a commercially available soft, dry brush.
Media Guide Roller
Strip Shaft
Wipe clean the Media Path with a soft dry cloth.
When linerless labels are used, wipe off dirt of
residual glues from the Media Guides each time one
or two media rolls are used up.
Top Cover, Operation panel, and IrDA Window
Wipe clean the cover, operation panel, and IrDA
window with a soft dry cloth slightly moistened with
absolute ethyl alcohol.
Remove any dirt or residual glues from the media
outlet with a cotton swab slightly moistened with
absolute ethyl alcohol.
When linerless labels are used, wipe off dirt of
residual glues from the Top Cover or Media Outlet
each time one or two media rolls are used up.
Media Sensor Window
Media Path
Media Outlet
Top Cover
IrDA Window
15
Operation Panel

Part Names
㩷
B-EP2DL Series
㩷
㩷㩷
㩷㩷
㩷
Peel-off Roller Cover
Peel-off Roller
Print Head
Media Guide Roller
Media Sensor
Platen
Top Cover
IrDA Window
Top Cover Open Button
㩷
㩷
㩷
Belt Clip
Operation Panel
Strap Slot
DCIN Connector
Print Head Cleaner
RS-232C Port
(GH20 only)
USB Port
Battery Lever
Battery Pack
Ferrite Core
M-3x8 Screws
BD Address Label (2 pcs.)
(GH30 model only)
16

B-EP4DL Series
㩷
㩷㩷
㩷
Peel-off Roller
Print Head
Media Guide Roller
Media Sensor
Platen
Top Cover
Peel-off Roller Cover
IrDA Window
RS-232C Port
(GH20 only)
Top Cover Open Button
Belt Clip
Operation Panel
M-3x8 Screws
Strap Slot
Print Head Cleaner
USB Port
Battery Lever
Battery Pack
DCIN Connector
Ferrite Core
BD Address Label (2 pcs.)
(GH30 model only)
17

Operation Panel Functions
㩷
㩷
㩷
㩷
㩷
㩷
㩷
㩷
㩷
㩷
㩷
㩷
㩷
㩷
㩷
㩷
㩷
㩷
㩷
㩷
㩷
㩷
㩷
㩷
㩷
(1)
(9)
No. Name/Icon Function/Usage
Liquid Crystal Display
(16 lines x 2 lines)
(1)
LCD Message
(2) Radio intensity Indicates the radio intensity in 4 levels䋨GH40 only䋩
(3) Connection Indicates an access point connection status䋨GH40 only䋩
(4) Sleep Displayed while the printer is in the power save mode.
(5) Transmission Indicates data transmission status.
(6) Error Displayed when an error occurred on the printer.
(7) External power source Displayed when the printer is charged with an optional device.
(8) Battery level Indicates the battery level in 5 levels.
(9) STATUS lamp
(2) (3) (4) (6) (5) (7) (8)
(11)
(10) (12) (13)
Upper line: Icons indicating the printer statuses, such as the radio
intensity, battery level, etc. are displayed.
Lower line: Printer status is indicated in alphanumerals or symbols.
ON LINE
The printer is ready for an issue command from
the host.
The printer is in pause state. When the printer
PAUSE
is paused during printing, the number of
unprinted labels is displayed.
COVER OPEN
LBL PRESENT ****
The top cover is open.
The printer is waiting for the printed label to be
removed from the media outlet. “****” indicates
the number of unprinted labels.
WAITING(XXXX)
The printer is waiting for a recovery of the
battery voltage or temperature decrease of the
print head or motor.
Lights or blinks in green, red, or orange to indicate the printer
status.
x Lights up in green: Normal state
x Lights up in orange: Near a low-battery state (Operable)
x Lights up in red: Low-battery state
x Blinks in green or orange: Communicating or internal processing
is in progress or a printed label is waiting to be removed.
x Blinks in red: Error state
NOTE:
Do not touch the
Operation panel with a
sharp object, as the
surface of the Operation
panel is easily damaged.
18

No. Name/Icon Function/Usage
(10) CHARGE lamp
Lights up in orange while the battery pack is charged and goes out
when the battery charge is completed.
Turns on or off the printer.
How to turn on the printer
While the printer is off, hold down the POWER button for a few
(11) 䌛POWER䌝 button
seconds. When “ONLINE” is displayed on the LCD, the printer is
ready.
How to turn off the printer
Hold down the POWER button until the LCD goes off.
(12) [FEED䌝 button
(13) [PAUSE䌝 button
㩷
㩷
Feeds media or reprints a previously printed data.
Function of the [FEED] button differs depending on the issue mode.
Temporarily stops media issue or restarts printing.
Used to recover the printer after clearing an error.
19

Loading a battery pack
㩷
㩷
㩷
㩷
1.If the battery pack leaks liquid or gives out smoke or bad smell, immediately stop using it and keep it
㩷
away from fire. Failure to do this may cause explosion or combustion.
㩷
2.In the United States, used lithium ion batteries should be returned to the store where you bought the
㩷
㩷
machine. (USA only)
㩷
3.LITHIUM ION BATTERY DISPOSE OF PROPERLY
㩷
Caution: Do not handle damaged or leaking lithium ion battery.
㩷
4. To avoid injury, be careful not to drop the battery pack on your foot.
㩷
㩷
Pushing aside the Battery Lever with the Battery
Pack, insert the Battery Pack into the printer to the
bottom. The Battery Pack is locked by the Battery
Lever.
Be careful of the orientation of the Battery Pack.
NOTE:
x
Be sure to use a battery pack designed and
manufactured for use with the specific model.
B-EP2DL series: B-EP802-BT-QM-R
B-EP4DL series: B-EP804-BT-QM-R
WARNING!
㩷
㩷
㩷
㩷
㩷
㩷
㩷
㩷
㩷
㩷
㩷
Battery Lever
Battery Pack
[B-EP2DL Series]
x
When unpacked, the battery level of the supplied
Battery Pack is not full. Please charge the Battery
Pack with an optional Battery Charger or load the
Battery Pack in the printer and connect an optional
adapter before using it.
iSingle-slot Battery charger: B-EP800-CHG-QM-R
i6-slot Battery Charger: B-EP800-CHG6-QM-R
iAC Adapter: B-EP800-AC-QM-R
iCigarette lighter adapter: B-EP802-DC12-QM-R
iDC adapter: B-EP800-DC48-QM-R
CAUTION!
DO NOT CONNECT any device other than the
above to the printer.
㩷㩷
㩷
Battery Lever
Battery Pack
[B-EP4DL Series]㩷
20

Removing a battery pack
㩷
Slide the Battery Lever in the direction of the arrow,
and remove the Battery Pack from the printer.
㩷
Battery Lever
Battery Pack
[B-EP2DL Series]
Battery Lever
Battery Pack
[B-EP4DL Series]
㩷
㩷
Charging the Battery Pack with an Optional Adapter
㩷
When charging the battery pack in the printer using
an optional AC Adapter, cigarette lighter adapter, or
DC adapter, insert the plug of the adapter into DCIN
Connector of the printer.
NOTE:
For details, please refer to the Owner’s Manual of
respective optional adapters.
When using an optional battery charger to charge the
battery packs, please refer to the Owner’s Manual of
respective models of battery charger. 㩷
㩷
㩷
DCIN Connector
Plug of the Optional
Adapter
㩷
21

Loading the Media
r
㩷
1.㩷Press the Top Cover Open Button to open the Top
Cover.
Top Cover
Top Cover
Open Button
[B-EP2DL Series]
Top Cover
Top Cover
Open Button
4.㩷Adjust the Paper Guides to the media roll width.
5.㩷Push back the Paper Guide Lever to lock the Paper
Guides.
Lock
Paper Guide
Lever
Paper Guide
6.㩷Pull the top edge of the media toward the Operation
Panel, and close the Top Cover removing slack of
the media.
[B-EP4DL Series]
2. 㩷Move the Paper Guide Lever toward the Operation
Panel and the Paper Guides outward.
NOTE:
Do not move the Paper Guides without unlocking
the Paper Guide Lever. Doing this may break the
Paper Guide.
3.㩷Place a media roll in the printer. Only outside
wound media is acceptable.
Media Roll
Release
Paper Guide
Lever
Top Cover
Media
NOTE:
x
Please use TOSHIBA TEC approved media only.
We are not responsible for any print result caused
by use of other media
x
When you order media, please contact the nearest
TOSHIBA TEC representative.
Pape
Guide
㩷
㩷
22

Before using a peel-off unit
㩷
When issuing labels in the peel-off mode, pull out the
peel-off roller before loading a label roll.
1. Open the Top cover, and push the Peel-off Cover
by the Ÿ marks with your thumbs in the direction
of the arrow.
Peel-off Roller Cover
How to put back the Peel-off Roller
1. Slightly hold down the Peel-off Roller Cover, and
insert the Peel-off Roller under the Peel-off Roller
Cover.
Peel-off Roller
Peel-off Roller Cover
2. Pull out the Peel-off Roller until the both edges
completely come out with a click
Refer to “Loading the Media” on the previous page
and set a label roll.
Peel-off Roller
Peel-off Roller Cover
NOTES:
1. For the B-EP4DL series, DO NOT PULL the center
of the Peel-off roller hard. Doing so may break the
Peel-off roller.
2. Do not forcibly pull out the Peel-off roller or push it
into the printer, otherwise the Peel-off roller may
break.
2. Hold down the Peel-off Roller Cover, push it into
the printer in the direction indicated by the arrow
until it clicks.
Peel-off Roller Cover
23

How to attach the accessories
!
㩷
㩷
CAUTION
㩷
1. Care should be taken not to drop the printer when securing it to your waist or slinging it over your shoulder.
㩷
2. For fixing the printer to your belt, the belt width should be 40 mm or less
㩷
printer to drop
㩷
.
Belt Clip
When you use the printer fixing to your belt, secure
the supplied Belt Clip to the printer back.
1. Secure the Belt Clip to the printer back with the
two screws.
NOTE:
Only use the supplied screw to secure the Belt Clip.
Use of other screw may damage the printer inside.
Use of the other belts may cause the
M-3x8 Screw
Belt Clip
2. Fasten the Belt Clip to your belt.
Shoulder Strap (Option)
Use the following procedure to fasten an optional
shoulder strap (B-EP900-SS-QM-R) to the printer.
1. 㩷Pass either end of the Shoulder Strap through the
Strap Slot of the printer, as shown in the figure
below.
Belt Clip
Belt
Shoulder Strap
Strap Slot
2. 㩷Pass the end of the Shoulder Strap through the
buckle. Slide the buckle to adjust the Shoulder
Strap length.
3. 㩷Do the same to the other end of the Shoulder
Strap.
㩷
㩷
㩷
24
Buckle

㩷
Carry case (Option)
A carry case exclusively for the printer is available as
an option.
B-EP2DL Series: B-EP902-CC-QM-R
B-EP4DL Series: B-EP904-CC-QM-R
Put the printer into the Carry Case using the following
procedure.
1. Turn off the printer.
2. Put the printer into the Carry Case in the
orientation indicated by the illustration on the right.
NOTE:
Before putting the printer into the Carry Case,
remove the Belt Clip, if it has been attached.
3. Close the Media Outlet Flap and the Top Flap of
the Carry Case.
㩷
㩷
㩷
㩷
㩷
㩷
㩷
㩷
㩷
㩷
㩷
Carry Case
㩷
㩷
㩷
㩷
㩷
㩷
㩷
㩷
Media Outlet Flap
d
c
Top Flap
NOTE:
When issuing the media, please be sure to open the
Media Outlet Flap. Failure to do this may cause a
paper jam.
4. Pass either end of the Shoulder Strap supplied
with the Carry Case through the ring of the Carry
Case.
5. Pass the end of the Shoulder Strap through the
buckle. Slide the buckle to adjust the Shoulder
Strap length.
6. Do the same to the other end of the Shoulder
Strap.
㩷
㩷
Ring
Buckle
Shoulder Strap
25

Data Transmission
When connecting a USB cable or an RS232C cable to the printer, put the ferrite core supplied with the
printer on the cable, as shown below.
Approx. 20 mm
Wind the cable around
the ferrite core one time.
Printer
Ferrite Core
IrDA
1.㩷Place the printer close to the host so that their IrDA
windows face each other within 20 cm distance.
2.㩷Turn on the printer and the host, and send data
from the host to the printer.
NOTE:
While communicating, avoid location where the IrDA
window is subjected to direct sunlight. A
communication failure may occur.
x To communicate with the host via IrDA, it is
required to configure the printer settings on the
host.
x Communicable distance and angle is shown in the
figure on the right. Note that this performance is
obtained under 1000 lux or less of fluorescent
lamp light.
Host
PC
Handy Terminal
Host
Max. 20cm
USB
1. Turn on the host and start the system.
2. Turn on the printer and connect a USB cable to the
printer.
3. Connect the USB cable to the host.
4. Send data from the host to the printer.
NOTE:
x
For details of the interface cable, please consult
the nearest TOSHIBA TEC representative.
x
When disconnecting the USB cable, please follow
the instruction of the system on the host.
㩷
26
Printer
USB Port
USB Cable

㩷
Serial (RS-232C) (GH20 model only)
1. 㩷 Connect the serial interface cable to the RS-232C
port on the printer.
2. 㩷 Connect the other end of the serial interface
cable to the host.
3. 㩷 Turn on the printer and the host, and send data
from the host to the printer.
NOTE:
For details of the interface cable, please consult the
nearest TOSHIBA TEC representative.
Wireless (GH30/GH40 model only)
1. 㩷 In the case of Bluetooth, place the printer within 3
m from the host.
In the case of wireless LAN, place the printer
within a wireless coverage area.
2. 㩷 Turn on the printer and the host, and send data
from the host to the printer.
NOTE:
x
Please be sure to read “Precautions for Handling
of Wireless Communication Devices” before
operating the printer.
RS-232C Port
Interface Cable
PC
Handy Terminal
[Bluetooth]
x
Confirm that there is no obstacles between the
printer and the host. Obstacles may cause a
communication failure.
The radio connectivity is affected by the operating
environment. Especially, metal obstacles, metal
powder, or locations enclosed by metal walls may
prevent proper communication.
For the installation location of access points, please
consult the nearest TOSHIBA TEC representative.
PC
Access Point
Handy Terminal
[Wireless LAN]
27

Troubleshooting
When a problem occurs during operation, please check the following troubleshooting guide and take
corrective action.
If you cannot solve a problem with the following solutions, do not attempt to repair it by yourself. Turn off the
printer, remove the battery pack, then contact a TOSHIBA TEC service representative for assistance.
If an error message is displayed.
When an error message is displayed, follow the respective instruction, then press the [PAUSE] button.
The error will be cleared.㩷㩷
Error Message Cause Solution
Turn off the [POWER] button, then back
COMMS ERROR
A parity error or framing error has
occurred during communication by RS232C.
The media is not loaded properly. Load the media properly.
The media is jammed in the printer.
to on. Send data from the host to the
printer again. If the problem recurs,
please turn off the power and contact
TOSHIBA TEC service representative.
Remove the jammed media, and load the
media properly. Press the [PAUSE]
button.
PAPER JAM ****
The media is not fed properly.
The reflective sensor does not detect
black marks .
The transmissive sensor does not detect
gaps between labels.
NO PAPER **** The printer ran out of media.
Load the media properly and press the
[PAUSE] button.
Load the media properly.
Load the media properly. If the problem
recurs, set a threshold again.
Load a new media roll and press the
[PAUSE] button.
COVER OPEN **** The top cover is opened. Close the top cover.
HEAD ERROR
A part of the print head element is
broken.
FLASH WRITE ERR. A flash memory write error occurred.
FORMAT ERROR A flash memory format error occurred.
Turn off the printer and contact TOSHIBA
TEC service representative for
replacement of the print head.
Turn off the [POWER] button, then back
to on. Send data from the host to the
printer again. If the problem recurs,
please turn off the power and contact
TOSHIBA TEC service representative.
Turn off the [POWER] button, then back
to on. Send data from the host to the
printer again. If the problem recurs,
please turn off the power and contact
TOSHIBA TEC service representative.
28

Error Message Cause Solution
Turn off the [POWER] button, then back
FLASH MEM FULL
The flash memory has insufficient area
for storing data.
LOW BATTERY Remaining battery capacity is low.
㩷EXCESS HEAD TEMP㩷
㩷AMBIENT TEMP ERR㩷
The print head temperature reached the
upper limit of the operating temperature.
The ambient temperature reached the
upper limit of the operating temperature.
㩷BATT. TEMP ERROR㩷 The battery is extremely hot.
㩷HIGH VOLT. ERROR㩷 The battery voltage is abnormal.
㩷CHARGE ERROR㩷
Command error
example
PC001;0A00,0300,
An error was detected while charging
the battery.
When a command error occurs, up to 16
digits of alphanumeric or symbol are
displayed on the upper line of the LCD.
Other error messages A hardware or software failure occurs.
to on. Send data from the host to the
printer again. If the problem recurs,
please turn off the power and contact
TOSHIBA TEC service representative.
Turn off the printer, and replace the
battery pack with a fully charged one.
Stop printing and wait until the printer
automatically restores. If the problem
recurs, please turn off the power and
contact TOSHIBA TEC service
representative.
Stop printing until the ambient
temperature falls within the printer’s
operating temperature range.
Turn off the printer, disconnect the power
adapter if connected, and wait until the
battery temperature falls within the
printer’s operating temperature range.
Turn off the printer, remove the battery,
reload it, and turn on the printer again
If the problem recurs, please turn off the
power and contact TOSHIBA TEC
service representative.
It could be the end of battery life.
Replace the battery pack with a new one.
Turn off the [POWER] button, then back
to on. Send data from the host to the
printer again. If the problem recurs,
please turn off the power and contact
TOSHIBA TEC service representative.㩷
Turn off the [POWER] button, then back
to on. If the problem recurs, please turn
off the power and contact TOSHIBA TEC
service representative.㩷
****: The number of unprinted labels 1 to 9999 (in units of label)㩷
㩷
㩷
When the printer does not operate properly
In the case of the following symptoms, please check the respective points and take corrective action.
Symptom Point to check (Cause) Solution
The printer does not turn on
by pressing the POWER
switch.
Fully charged battery is
loaded but the operating
time is short.
The printer cannot
communicate via IrDA.
The battery pack is not loaded correctly.
The battery life is expired.
The printer is not turned on. Turn on the printer.
Distance to the host is too far. .
Angle of the IrDA window is not proper.
Direct sunlight is coming into the IrDA
window
IrDA window is dirty. Clean the IrDA window.
Serial interface cable is connected.
(GH20 only)
Load a fully charged battery pack
correctly.
Load a fully charged new battery pack
correctly.
Bring the printer close to the host so that
their IrDA windows face each other within
10cm.
Move the printer so that the IrDA window
face that of the host.
Avoid direct sunlight.
Disconnect the RS-232C cable from the
printer.
29

Symptom Point to check (Cause) Solution
The printer cannot
communicate via IrDA.
The printer cannot
communicate via USB.
The printer cannot
communicate via serial
interface (GH20 only)
The printer cannot
communicate via Bluetooth.
(GH30 only)
The printer is communicating via
wireless communication. (GH30/GH40
only)
Communication conditions are incorrect. Set the communication conditions correctly
Issue mode is incorrect. Select a correct issue mode.
Transmission speed is incorrect. Send data at correct transmission speed.
The printer is not turned on. Turn on the printer.
Serial interface cable is connected.
(GH20 only)
The printer is communicating via
wireless communication. (GH30/GH40
only)
Issue mode is incorrect. Select a correct issue mode.
The printer is not turned on. Turn on the printer.
The interface cable is not connected
properly.
Issue mode is incorrect. Select a correct issue mode.
Communication conditions are improper.
The printer is not turned on. Turn on the printer.
Distance to the host is too far.
The printer is used in a location where it
is subjected to noise or interference.
The printer address is not correctly set
on the host.
Terminate the wireless communication.
Disconnect the RS-232C cable from the
printer.
Terminate the wireless communication
Completely connect the interface cable.
Set the communication conditions
properly.
Bring the printer close to the host within 3
m.
Avoid such location.
Correctly set the print address on the host.
The printer cannot
communicate via wireless
LAN.
(GH40 only)
Printout is too light.
The printer received print
data but does not print.
Issue mode is incorrect. Select a correct issue mode.
The printer is not turned on. Turn on the printer.
Distance to the host is too far.
Obstacles block the radio wave.
The printer is used in a location where it
is subjected to noise or interference.
The printer address is not correctly set
on the host.
Channel setting for the access point or
host is incorrect.
Issue mode is incorrect. Select a correct issue mode.
The print head is dirty. Clean the print head.
The media is not loaded properly. Load the media properly.
Deteriorated media is used. Load a new media roll.
The media is not a TOSHIBA TEC
approved one
The STATUS lamp is lit or blinking. Clear the error
The media is not loaded properly. Load the media properly.
Bring the printer within a wireless
coverage area.
Use the printer in a location with no
obstacles.
Avoid such location.
Correctly set the print address on the host
Avoid using a channel which interferes
with adjacent access points.
Use TOSHIBA TEC approved media.
30


PRINTED IN INDONESIA
E
EO1-33079
7FM03281000
 Loading...